


Junior Miss 67B
Instructions
Junior Miss *
Sewing Machine
BY SINGER
Table of Contents |
| Next Page |
Table of Contents
The Machine Cover The Table Clamp
The Main Parts of your Machine A Job for Everything
How to Wind the Bobbin How to Replace the Bobbin How to thread the Needle How to change the Needle
The Tension Dial How to sew a seam
How to place your fabric How to start stitching The Adapter
How to make an apron Apron for Grandmother Nightie for Carolyn Scarf for Barbara Contact Singer
Junior Miss 67B
Junior Miss *
Sewing Machine
BY SINGER
* A Trademark of THE SINGER COMPANY Copyright (c) 1973 The Singer Company All Rights Reserved Throughout the World
Previous Page | Next Page
Junior Miss 67B
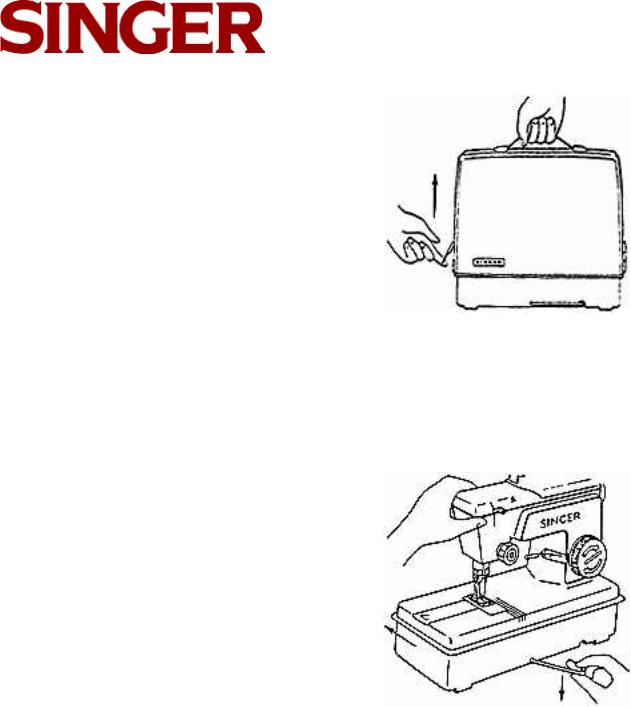
The Machine Cover
The machine cover protects your machine from dirt and dust when you are not sewing. Replace the cover when you finish sewing.
How to remove machine cover
1.Put your right hand on the handle and your left hand under the left
2.Pull the left tab away from the case and lift the cover up and off the machine.
How to replace machine cover
1.Remove the hand crank.
2.Carefully put the cover over the machine with the SINGER label in front.
3.Push down a little until the tabs snap in place.
The Table Clamp
The table clamp helps to hold the machine in place. Always remember to fasten the table clamp before you start to sew.
How to fasten machine to table
1.Pull down the table clamp from underneath the machine.
2.Hold clamp down and slide machine onto top of table.
3.Let the clamp hook under the edge of the table.
Table of Contents |
Previous Page | Next Page |
3

Junior Miss 67B
The Main Parts
of Your SINGER Sewing Machine
Table of Contents |
Previous Page | Next Page |
4
Junior Miss 67B
Main Parts continued...
Table of Contents |
Previous Page | Next Page |
5

Junior Miss 67B
A Job For Everything
See how fast you can learn what every part does.
1.SPOOL PIN holds the spool of thread.
2.SPOOL PIN THREAD GUIDE guides thread from the spool.
3.TAKE-UP LEVER pulls the thread from the spool to the needle.
4.PRESSER-FOOT LIFTER raises and lowers the presser foot.
5.NEEDLE carries the thread through the fabric when you sew.
6.PRESSER FOOT holds the fabric against the feed.
(Note: Always put fabric under the presser foot when you sew.)
7.FEED moves the fabric as you sew.
8.SLIDE PLATE opens so you can take the bobbin out. Slide it to the left to open. Slide it to the right to close.
9.NEEDLE PLATE is the working place for your fabric. The numbered guidelines help you sew straight seams.
10.TENSION DIAL decides how hard the needle should pull the thread.
11.TABLE CLAMP holds the machine tightly to your table.
12.BOBBIN WINDER holds the bobbin when you wind it. Never leave a bobbin on the winder while you are sewing.
13.FOOT PEDAL starts the machine when you press your foot on it. The machine stops when you remove your foot from the pedal. The ON-OFF Switch is located underneath the pedal. (See Number 16).
14.HAND WHEEL moves the take-up lever and needle at the same time. Always follow the arrows when you turn the hand wheel.
15.HAND CRANK fits into the slot of the hand wheel so that you can work your machine by hand. You must turn the power switch to OFF before you use the hand crank. Take the hand crank out of the hand wheel if you run your machine by battery or electric power.
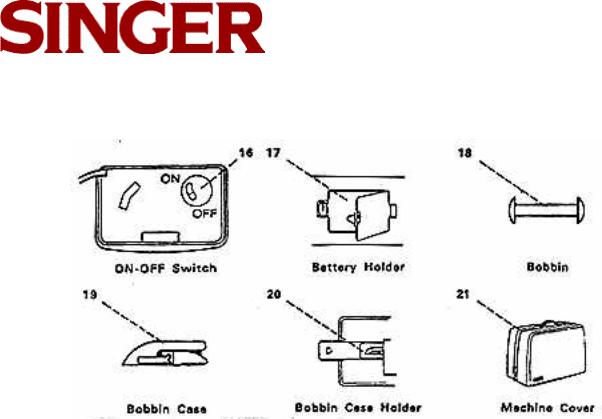
16.ON-OFF SWITCH is found under the foot pedal. It turns the battery or the electric power ON or OFF.
17.BATTERY HOLDER holds the batteries in the bottom of your machine. Open the latch by turning it with your fingers or a coin. Place four "D" batteries in the holder with the head of each battery
toward the hand wheel. Remove the batteries if you are not going to sew for more than two weeks.
18.BOBBIN is the little spool that you wind with thread.
19.BOBBIN CASE holds the bobbin while you wer.
20.BOBBIN CASE HOLDER holds the bobbin case while you sew. It moves back and forth to
help the needle form each stitch.
21.MACHINE COVER fits over your machine to protect it. Be sure you remove the hand crank and wrap the cord around the foot pedal before you put on the cover.
Table of Contents |
Previous Page | Next Page |
6
 Loading...