


Stand Dock
User Guide
www.samsung.com
Contents |
|
............................................................................................. |
3 |
English............................................................................................ |
6 |
Français.......................................................................................... |
9 |
Deutsch........................................................................................ |
12 |
Español......................................................................................... |
15 |
Italiano......................................................................................... |
18 |
Русский........................................................................................ |
21 |
....................................................................................... |
25 |
....................................................................................... |
29 |
العربية....................................................................................... |
36 |
2
StandDock .StandDock .
..
|
|
|
|
|
|
|
|
|
|
|
|
|
|
|
|
|
|
|
|
|
|||
|
|
|
|
|
|||
|
|
|
|
|
|
|
|
|
|
|
|
|
|
|
USB 2.0 |
|
|
|
|
|
|
|
|
|
|
|
|
|
|
||
|
|
||||||
|
|
|
|||||
1 |
|
stand dock . |
|||||
|
|
|
|||||
2 |
|
stand dock |
|||||
|
|
|
. |
||||
3
 AC
AC
.
4
.
5 USB 2.0 |
USB . |
|
|
3
•• .
•• Stand Dock / .
1 Stand Dock Stand Dock .
2Stand Dock.
Stand Dock .
•• 2.5 Pi(Φ) ATIV Smart PC ATIV Smart PC Pro.
•• Stand Dock .
•• . .
4
Stand Dock ,.
••Windows 8 ,.
••.
|
|
|
|
|
( ): -5 ~40 , ( ): 10 ~32 |
|
( ): 5%~90%, ( ): 20%~80% |
|
|
|
100~240VAC |
|
|
|
50~60Hz |
|
|
|
40W |
|
|
|
12.0VDC |
|
|
..
..
(Class B)
(B ), .
5
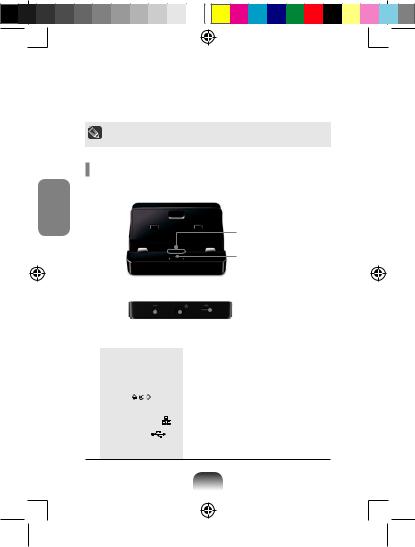
You can stand your Samsung computer by connecting the stand dock.You can also use various types of ports by connecting the stand dock to a compatible Samsung computer.
Use the adapter supplied with the computer.
Alternatively, you can purchase a separate adapter.
Overview
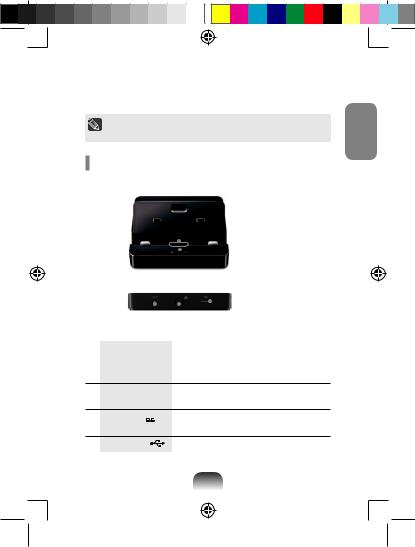
Front
English
Computer connector
Release button
Rear
|
|
|
|
|
USB 2.0 port |
|
|
|
|
|
|
|
|
|
|
|
|
|
DC jack Wired LAN port |
||||
|
|
|
|||
1 |
Computer connector |
You can connect the computer and the |
|||
|
|
|
stand dock with this connector. |
||
2 |
Release button |
Press this button to release the computer |
|||
|
|
|
from the stand dock. |
||
3 |
DC jack |
A jack to connect the AC adapter that |
|||
|
|
|
supplies power to the computer. |
||
4 |
Wired LAN port |
Connect the Ethernet cable to this port. |
|||
|
|
|
|
||
5 |
USB 2.0 port |
You can connect USB devices to the USB |
|||
|
|
|
port such as a keyboard/mouse, digital |
||
camera, etc.
6
the computer
•Before installing a computer to the docking station, make sure to disconnect all the cables connected to the computer.
•Installing and separating the stand dock after turning the computer off is recommended.
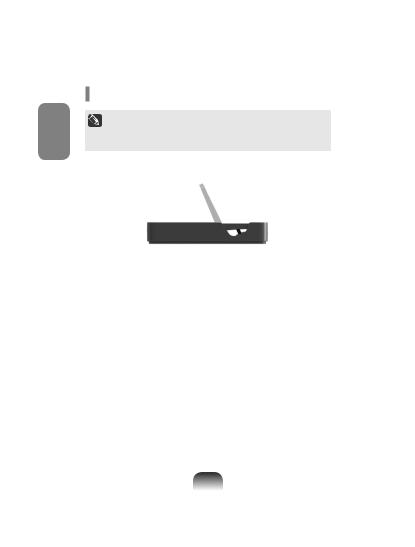
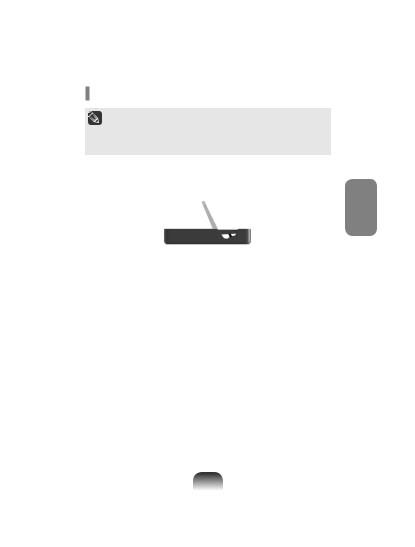
1Insert your finger into the groove on the side of the stand dock to open the top cover of the stand dock.
English
2Align the computer connector and the stand dock port at the bottom of the computer and connect them.
the computer’s AC adapter to the stand dock.
•Make sure that you should use the 2.5 Pi(Φ) ATIV Smart PC or ATIV Smart PC Pro adapter.
•You can also use the stand dock using only the battery power of the computer.
•If the computer doesn't work after being connected with the docking station, this may be due to poor contact caused by a foreign substance. Check and remove any substance on the connection.
7
English
Separating the computer
the release button, pull the computer upward with the
other hand.
•Since the descriptions in this manual are based on Windows 8, some of the descriptions may differ depending on the operating system or the device.
•The content and images in this manual are subject to change for the purpose of performance enhancement.
Specification
Items |
Specifications |
Operating |
Temperature: (Waiting) -5°~40°, (Operation) 10°~32° |
Environment |
Humidity: (Waiting) 5%~90%, (Operation) 20%~80% |
|
|
Operating |
100~240VAC |
Voltage |
|
Frequency |
50~60Hz |
|
|
Input Power |
40W |
|
|
Input Voltage |
12.0VDC |
WEEE SYMBOL INFORMATION
Correct disposal of this product (Waste Electrical & Electronic Equipment)
(Applicable in the European Union and other European countries with separate collection systems.)
This marking on the product, accessories or literature indicates that the product and its electronic accessories (e.g. charger, headset, USB cable) should not be disposed of with other household waste at the end of their working life. To prevent possible harm to the environment or human health from uncontrolled waste disposal, please separate these items from other types of waste and recycle them responsibly to promote the sustainable reuse of material resources.
Household users should contact either the retailer where they purchased this product, or their local government office, for details of where and how they can take these items for environmentally safe recycling.
Business users should contact their supplier and check the terms and conditions of the purchase contract. This product and its electronic accessories should not be mixed with other commercial wastes for disposal.
8
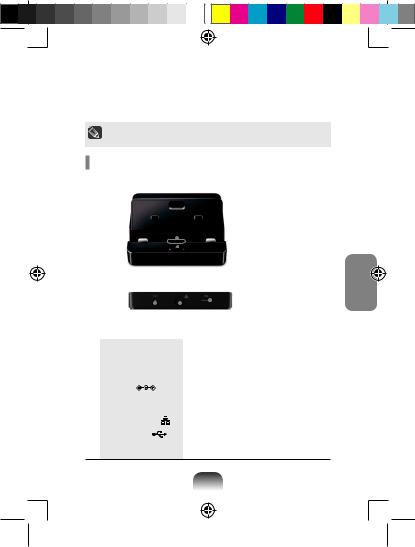
Vous pouvez poser votre ordinateur Samsung à la verticale en le connectant au support d'accueil.Vous pouvez également utiliser divers types de ports en connectant le support d'accueil à un ordinateur Samsung compatible.
Utilisez l'adaptateur fourni avec l'ordinateur.
Vous pouvez également acheter un adaptateur séparé.
Aperçu
Face
|
|
|
|
|
|
|
Connecteur pour |
|
|
|
|
|
|
|
|
ordinateur |
|
|
|
|
|
|
|
|
Bouton de |
|
|
|
|
|
|
|
|
||
|
|
|
|
|
|
|
libération |
|
Arrière |
|
|
|
|
|
|
||
|
|
|
|
|
|
|
|
Port USB 2.0 |
|
|
|
|
|
|
|
|
|
|
|
|
|
|
|
|
||
|
Prise DC |
Port LAN câblé |
||||||
|
|
|
|
|
||||
1 |
Connecteur pour |
|
|
Vous pouvez connecter l'ordinateur et le |
||||
|
ordinateur |
|
|
support d'accueil grâce à ce connecteur. |
||||
2 |
Bouton de libération Appuyez sur ce bouton pour libérer |
|||||||
|
|
|
|
|
l'ordinateur du support d'accueil. |
|||
3 |
Prise DC |
|
|
Prise utilisée pour connecter l’adaptateur |
||||
|
|
|
|
|
secteur fournissant le courant à |
|||
|
|
|
|
|
l’ordinateur. |
|||
4 |
Port LAN câblé |
|
|
Branchez le câble Ethernet à ce port. |
||||
|
|
|
|
|
|
|
||
5 |
Port USB 2.0 |
|
|
Vous pouvez brancher des périphériques |
||||
|
|
|
|
|
USB aux ports USB (un clavier/une souris, |
|||
un appareil photo numérique, etc.).
Français
9

de l’ordinateur
•Avant d'associer un ordinateur à la station d'accueil, assurezvous de déconnecter tous les câbles de l'ordinateur.
•Associez et séparez la station d'accueil pour clavier après avoir éteint l'ordinateur.
1Introduisez votre doigt dans la rainure située sur le côté du support d'accueil pour ouvrir le couvercle supérieur du support.
Français |
2 Alignez le connecteur pour ordinateur et le port d'accueil du support |
|
avec la partie inférieure de l'ordinateur et connectez-les. |
||
|
l'adaptateur secteur de l'ordinateur au support d'accueil.
•Assurez-vous d'utiliser l'adaptateur ATIV Smart PC ou ATIV Smart PC Pro 2,5 Pi (Φ).
•Vous pouvez également employer le support d'accueil en n'utilisant que l'alimentation sur batterie de l'ordinateur.
•Si l'ordinateur ne fonctionne pas après avoir été connecté à la station d'accueil, ceci peut s'expliquer par un mauvais contact engendré par un corps étranger. Vérifiez et enlevez toute substance empêchant une bonne connexion.
10
Séparation de l'ordinateur
appuyant sur le bouton de libération, tirez l'ordinateur vers le l'autre main.
•Comme les descriptions de ce manuel sont basées sur Windows 8, certaines descriptions peuvent différer selon le système d'exploitation ou l'appareil.
•Le contenu et les images de ce manuel sont susceptibles d'être modifiés à des fins d'amélioration des performances.
Spécifications
Eléments |
Spécifications |
|
Température : (Veille) -5° ~ 40°, |
Environnement |
(Fonctionnement) 10° ~ 32° |
d'utilisation |
Humidité : (Veille) 5 % ~ 90 %, |
|
(Fonctionnement) 20 % ~ 80 % |
Tension de fonctionnement |
100~240VAC |
Fréquence |
50~60Hz |
Puissance d'entrée |
40W |
Tension d'entrée |
12.0VDC |
Information du Symbole WEEE
Les bons gestes de mise au rebut de ce produit (Déchets d’équipements électriques et électroniques)
(Applicable aux pays disposant de systèmes de collecte séparés)
Ce symbole sur le produit, ses accessoires ou sa documentation indique que ni le produit, ni ses accessoires électroniques usagés (chargeur,
casque audio, câble USB, etc.) ne peuvent être jetés avec les autres déchets ménagers. La mise au rebut incontrôlée des déchets présentant des risques environnementaux et de santé publique, veuillez séparer vos produits et accessoires usagés des autres déchets. Vous favoriserez ainsi le recyclage de la matière qui les compose dans le cadre d’un développement durable.
Les particuliers sont invités à contacter le magasin leur ayant vendu le produit ou à se renseigner auprès des autorités locales pour connaître les procédures et les points de collecte de ces produits en vue de leur recyclage.
Les entreprises et professionnels sont invités à contacter leurs fournisseurs et à consulter les conditions de leur contrat de vente. Ce produit et ses accessoires ne peuvent être jetés avec les autres déchets professionnels et commerciaux.
Français
11
 Loading...