


1

Thank you for purchasing a Minolta camera.
A valuable tool for photographers, the Maxxum/Dynax 7 has been designed with precision in mind to help you capture your photographic vision. As you use the Maxxum/Dynax 7, you will find that its performance and reliability compliment your own photographic expertise and raise your skills to a higher level.
The Maxxum/Dynax 7 features a newly developed 9-point AF system with center dual cross-hair sensors to give great flexibility when composing photographs, and the ability to switch between AF and MF, using the AF/MF control button, without changing holding positions.
This is the first camera ever to incorporate a Navigation display which gives easy to understand information on camera operation and Custom functions, available in 5 languages. Combined with the conventional lever and dial controls, the Navigation display provides flexible and clear operation.
This manual has been designed to help you understand the operation of your camera and its functions. Please familiarize yourself with the names of the controls and their locations on the camera, then read the Basic Operation section. Once you’ve mastered basic operation, move on to the Detailed Operation section to expand your expertise.
This camera is designed to work specifically with lenses and accessories manufactured and distributed by Minolta. Using incompatible accessories with this camera may result in unsatisfactory performance or damage the camera and accessories.
FOR PROPER AND SAFE USE
Read and understand all warnings and cautions before using this product.
WARNING
Batteries may become hot or explode due to improper use.
•Use only the batteries specified in this instruction manual.
•Do not install the batteries with the polarity (+/–) reversed.
•Do not subject batteries to fire or high temperatures.
•Do not attempt to recharge, short, or disassemble.
•Do not mix batteries of different types, brands, or ages.
•Tape over lithium battery contacts to avoid short-circuit when disposing of batteries, and follow local regulations for battery disposal.
Keep batteries and other things that could be swallowed away from young children. Contact a doctor immediately if an object is swallowed.
Immediately remove the batteries and discontinue use if…
•the camera is dropped or subjected to an impact in which the interior is exposed.
•the camera emits a strange smell, heat, or smoke.
Do not disassemble. Electric shock may occur if a high voltage circuit inside the camera is touched. Take your camera to a Minolta Service Facility when repairs are required.
Do not look directly at the sun through the viewfinder.
CAUTION
Do not allow a camera lens to point directly at the sun. Fire may occur if sunlight comes to focus on a flammable surface. Replace the lens cap when the product is not being used.
2 |
3 |

TABLE OF CONTENTS |
|
Table of Contents .............................................................................. |
4 |
Name of Parts ................................................................................... |
8 |
Quick Operation .............................................................................. |
14 |
BASIC OPERATION |
|
Batteries .......................................................................................... |
17 |
Loading Film.................................................................................... |
20 |
Handling the Camera ...................................................................... |
23 |
Taking Pictures in Full-Auto ............................................................ |
24 |
Focusing.......................................................................................... |
28 |
Using the Built-in Flash ................................................................... |
31 |
Rewinding the Film.......................................................................... |
33 |
DETAILED OPERATION |
|
Navigation Display .......................................................................... |
36 |
Display Selection ................................................................. |
37 |
When Upper Part Turns Black ............................................. |
43 |
Display Brightness/Contrast ................................................ |
44 |
Focusing |
|
Focus Mode ......................................................................... |
46 |
AF/MF Control Button .......................................................... |
50 |
Focus Area........................................................................... |
53 |
AF Illuminator....................................................................... |
59 |
Exposure |
|
P Mode................................................................................. |
61 |
A Mode................................................................................. |
63 |
S Mode ................................................................................ |
66 |
M Mode ................................................................................ |
69 |
Metering |
|
Selectable Metering ............................................................. |
74 |
Exposure Compensation ..................................................... |
77 |
Automatic Exposure Lock (AEL).......................................... |
81 |
Setting the ISO Manually..................................................... |
86 |
Drive |
|
Continuous .......................................................................... |
88 |
Self-Timer............................................................................. |
90 |
Exposure Bracketing............................................................ |
92 |
Multiple Exposure ............................................................... |
96 |
Flash |
|
Flash Mode Switch .............................................................. |
99 |
Red-eye Reduction ............................................................ |
100 |
Rear flash Sync ................................................................. |
101 |
Slow-shutter Sync .............................................................. |
102 |
Flash Compensation .......................................................... |
103 |
Flash Bracketing ................................................................ |
104 |
Accessory Flash ................................................................ |
107 |
Flash Metering ................................................................... |
108 |
High Speed Sync ............................................................... |
110 |
Wireless/Remote Off-camera Flash ................................... |
112 |
PC Terminal........................................................................ |
118 |
Additional Features |
|
Date/Time Imprinting.......................................................... |
120 |
Eye-Start ............................................................................ |
125 |
Time Exposures (Bulb) ...................................................... |
126 |
Depth-of Field Preview ...................................................... |
128 |
Diopter Adjustment ............................................................ |
130 |
Setting/Cancelling the Audio.............................................. |
131 |
4 |
5 |

TABLE OF CONTENTS
Memory |
|
|
18 |
Exposure compensation control with rear control dial |
|
Storing memory ................................................................. |
135 |
|
in P, A, and S mode |
|
|
Recalling settings in memory............................................. |
137 |
19 |
Control dial - exchanged control |
|
|
Data memory |
|
|
20 |
Flash-metering |
|
Storing the data ................................................................. |
141 |
21 |
AF illuminator |
|
|
Film area and data number ............................................... |
143 |
22 |
Tasking on the focus-mode switch - AF-A position |
||
Data recall.......................................................................... |
146 |
23 |
AF using shutter-release button |
|
|
Deleting stored data........................................................... |
151 |
24 |
Full-auto mode of the exposure-mode dial |
|
|
Custom Functions |
|
25 |
Tasking on exposure mode dial - position “3” |
|
|
1 |
AF priority/Shutter-release priority |
|
26 |
Flash burst with exposure compensation |
|
2 |
Film rewind start |
|
27 |
Detailed display |
|
3 |
Film tip |
|
28 |
Operation display |
|
4 |
DX memory |
|
29 |
Large icon display |
|
5 |
Release lock (film) |
|
30 |
Meter index display |
|
6 |
Lens focus-hold button |
|
31 |
Exposure-history display |
|
7 |
Eyepiece sensor activation |
|
32 |
Vertical display |
|
8 |
Frame counter |
|
33 |
Imprint intensity |
|
9 |
AF/MF control button |
|
34 |
Camera’s ID number |
|
10 |
AE-lock button |
|
35 |
Language on navigation display |
|
11 |
Exposure bracketing/Flash bracketing sequence |
|
|
|
|
12 |
Film rewind speed |
|
APPENDIX |
|
|
13 |
Meter display duration |
|
Accessory information ....................................................... |
189 |
|
14 |
AF area display |
|
Trouble shooting ................................................................ |
192 |
|
15 |
Front and rear control dial Lock |
|
Care and Storage .............................................................. |
196 |
|
16 |
Release lock (lens) |
|
Specifications..................................................................... |
198 |
|
17 |
AF drive speed |
|
Index |
.................................................................................. |
202 |
6 |
7 |
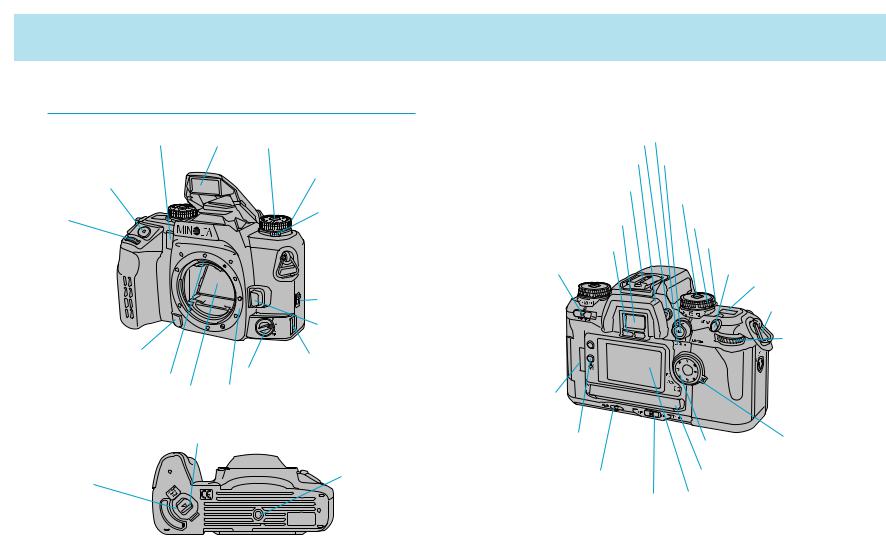
NAMES OF PARTS
For information on specific parts, refer to the page numbers shown in parenthesis.
Camera Body
AF illuminator (59)/Self- |
Built-in |
Exposure-compensation dial |
|
flash* (31) |
lock-release button (77) |
||
timer lamp (90) |
|||
|
|
||
|
|
Exposure-compensation |
|
Shutter-release |
|
dial (77) |
|
|
|
||
button |
|
|
Front control dial
Grip sensor (125) 
Depth-of-field preview button (128)
Lens contacts*
Mirror*
Battery-chamber release (17)
Battery-chamber door
Vertical-control-grip contacts (189)* 
Flash-compensa- tion dial (103)
 PC terminal
(118)
 Strap eyelet (16)
Back-cover release (20)
Lens release (19)
Remote-control terminal (191)
Focus-mode switch (46)
Lens mount
Tripod socket
* Do not touch
Diopter-adjustment dial (130)
Eyepiece cup (15)
Accessory shoe (107)
Viewfinder* (12)
Eyepiece sensor* (125)
Main switch (13)
Metering-mode switch (75)
AE-lock button (81)
Exposure-mode dial lockrelease button (24)
Exposure-mode dial (60)
Drive-mode lever (87)
AF/MF control button (50)
Top data panel (10)
Display-  selection

button (37)
Strap eyelet (16)
Rear control |
dial |

 Flash-mode
  switch (99)
Film window (20)
Navigation-display illuminator (44)
Manual-rewind button (34)
Eye-start switch (125)
|
Spot-AF but- |
|
ton (52) |
Focus-area |
Wide/Local |
focus-area |
|
selector (55) |
switch (54) |
Control-panel door (120)
Navigation display (36)
8 |
9 |
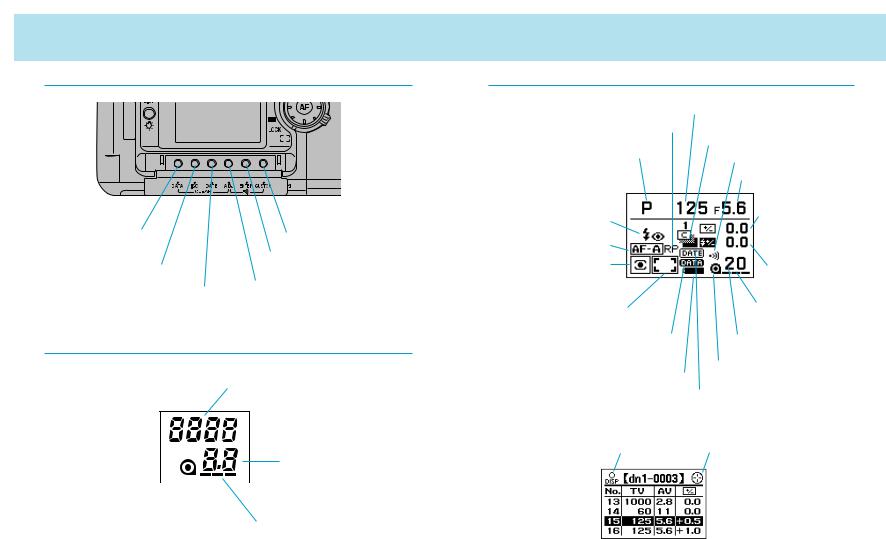
NAMES OF PARTS
Control Panel
Data-memory button |
Custom button (154) |
(141) |
Enter button (135) |
|
|
ISO button (86) |
Adjust button |
|
|
Date button (120) |
|
Top Data Panel
Shutter-speed display
Frame counter/
Aperture display
Cartridge mark 
Film-transport signals
Navigation Display
Shutter-speed display
Release-priority indicator (158)
Exposure-mode indicator (60)
Flash-mode indicators (99)
AF-mode indicator (46)
Metering-mode indicator (74)
Drive-mode indicators (87)
Audio-on indicator (131)
Aperture display
Exposure-com- pensation display (77)
Flash-compen- sation display (103)
Focus-area indicator (46) |
|
Film-transport signals |
Data-memory-on indicator (141) |
|
Frame counter |
Battery-condition indicator (18) |
Cartridge mark |
|
Imprint indicator (120) |
||
Display-selection indicator (147) |
Focus-area-selector indicator (142) |
|
10 |
11 |

NAMES OF PARTS
Viewfinder
Spot-metering area (75)
Local focus area (56)
Spot-focus area (55, 56)
Wide focus frame
Flash-compensation indicator (103)
Wireless/Remote flash indicator (114)
Manual-focus indicator (48)
AEL indicator (81, 102)
Exposure-mode indicator
Frames-remaining counter (26)
Aperture display
Shutter-speed display
Focus signals (28) Metering-mode indicator (75) High-speed-sync indicator(110)
Flash indicator (31)
QUICK OPERATION
1. Insert the batteries.
• The camera uses two CR123A batteries.
2. Attach a lens.
• Align the red marks, then turn it gently clockwise until it clicks.
3. Turn the camera on.
• Turn the main switch to ON.
4. Load the film
• Align the film-tip with the red mark, then close the back cover.
12 |
13 |
QUICK OPERATION
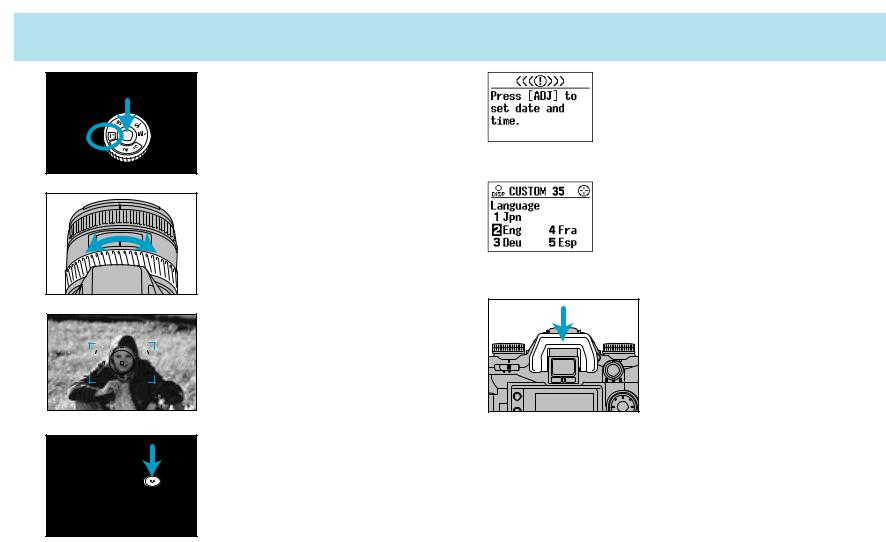
5. Set the camera for automatic operation.
• While pressing the exposure-mode dial lock-release button, set the exposure-mode dial to  .
.
6.If using a zoom lens, rotate the zooming ring to frame your
subject as desired.
Center your subject in the focus frame, then press the shutter-release button partway down.
Focus is set automatically.
8. Take the picture.
•Gently press the shutter release button all the way down.
If the camera is turned on and the date and time have not been set, this message appears. See page 121 for instructions for setting the date and time.
The navigation display panel can provide information in any one of five languages (Japanese, English, German, French, or Spanish). To select the language you wish to use, see Custom 35 (p. 187).
Attach the eyepiece cup for comfortable viewing.
14 |
15 |
BASIC
OPERATION
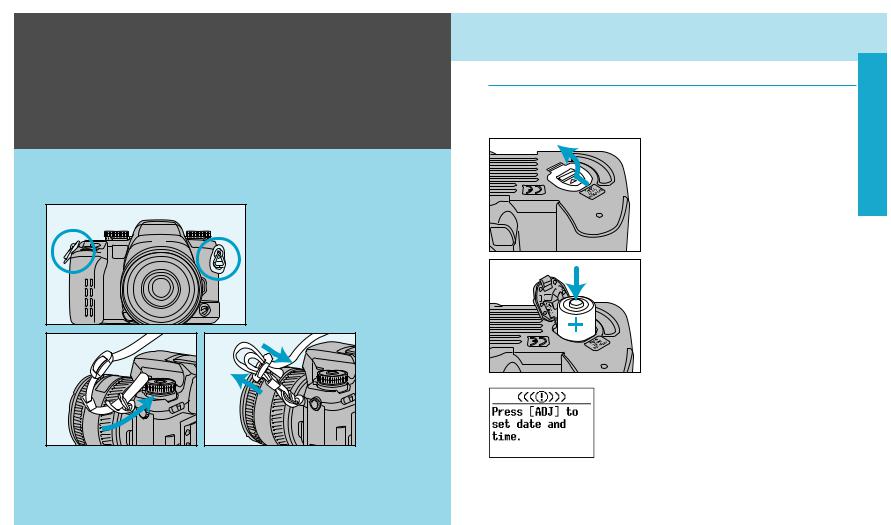
Attach the strap as shown.
•If you have Remote Cord RC-1000S or RC 1000L, you can use the cord holder on the strap. Attach the strap so that the holder comes to the side of the remote-control terminal (p. 191).
BATTERIES
Installing the Batteries
Your camera uses two 3V CR123A lithium batteries to supply power for all camera operations.
1.Turn the main switch off. Then slide the battery chamber release as shown, and open
the door.
2. Insert the batteries as indicated by the + and - marks.
3. Close the battery-chamber door.
If the camera’s batteries are removed for a long period of time, the date and time settings will be lost. When this happens, this message appears, and the date/time information will not be imprinted. See page 121 for instructions for setting the date and time.
BASIC OPERATION
16 |
17 |
BATTERIES
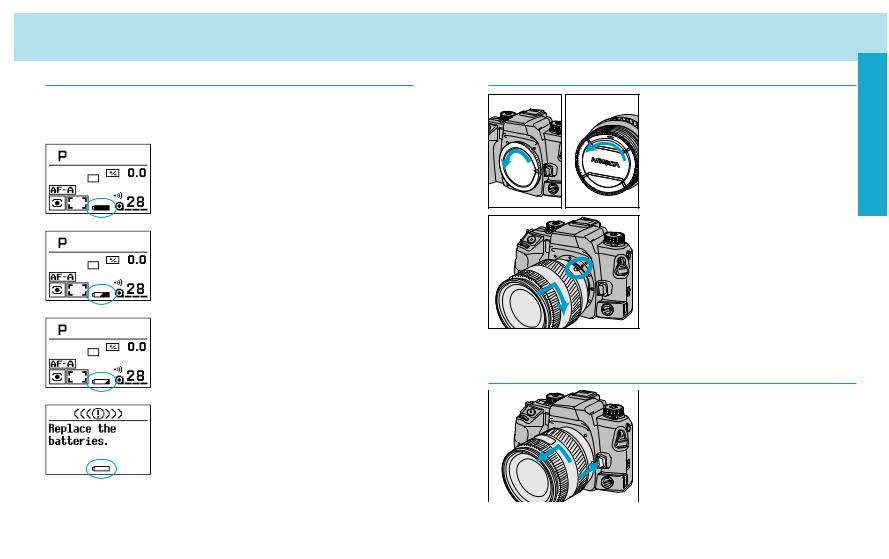
Battery Condition Indicators
The battery condition indicator displays the power status of the batteries when the main switch is set to ON.
Full-battery indicator
Power is sufficient for all camera operations.
Half-battery indicator
Power is low, but all functions are operational.
Keep a fresh battery handy.
Low-battery indicator
Power is extremely low. The batteries will need to be replaced soon. Flash recycling time may be slow.
Batteries are exhausted
Power is insufficient for camera operation.
Replace the batteries.
•If no display appears, power is too low for the camera to operate. Replace the batteries or make sure they have been inserted correctly.
LENS
Attaching the Lens
1. Remove the body and rear lens caps.
2. Align the red bead on the lens with the red dot on the camera’s lens mount. Press the lens against the lens mount, and turn the lens clockwise until it clicks in the locked position.
• Do not press the lens release when mounting the lens. The lens will not couple properly.
Removing the Lens
1. While pressing the lens release, turn the lens counterclockwise until it stops.
2. Remove the lens and replace the caps, or attach another lens.
Caution
•Do not force the lens if it does not turn smoothly.
•Do not touch the inside of the camera, especially the lens contacts and mirror.
BASIC OPERATION
18 |
19 |
LOADING FILM
Remove and discard the protective cover on the film gate before loading film for the first time.
Check the film window before loading film. If film is already loaded, refer to Manual Rewind on page 34 to remove a partially exposed roll.
• Load film in the shade to reduce the chances of fogging the film.
1. Slide the back-cover release and open the back cover.
2. Insert film cartridge into the film chamber.
• Refer to page 159 to reload a partially exposed roll.
3. Extend the leader between the guide rails to the index mark.
• If the film tip extends beyond the index mark, push the excess film back into the cartridge.
4. Close the back cover.
•The camera automatically advances the film to the first frame. 1 will appear in the frame counter.
•The ISO is shown in the navigation display for 5 seconds after loading.
•If loading was unsuccessful, this message appears in the navigation display. Repeat steps 1-4.
The shutter curtain’s precision design makes it extremely sensitive to pressure. Never touch it with your fingers or the film tip.

 shutter curtain
BASIC OPERATION
20 |
21 |
LOADING FILM
•Once the film is loaded, the back cover will lock until film rewinding is complete, preventing accidental opening.
•ISO is set automatically if DX-coded film is loaded. See page 86 for changing ISO manually.
•Non-DX-coded film is automatically rewound at the end of the roll or after 36 exposures.
•Non-DX-coded film is set to the ISO from the previous roll. Refer to page 86 to set the film speed manually.
•Do not use Polaroid Instant 35mm film. Winding problems may occur.
•Do not use infrared film in this camera. The camera’s frame counter sensor will fog infrared film.
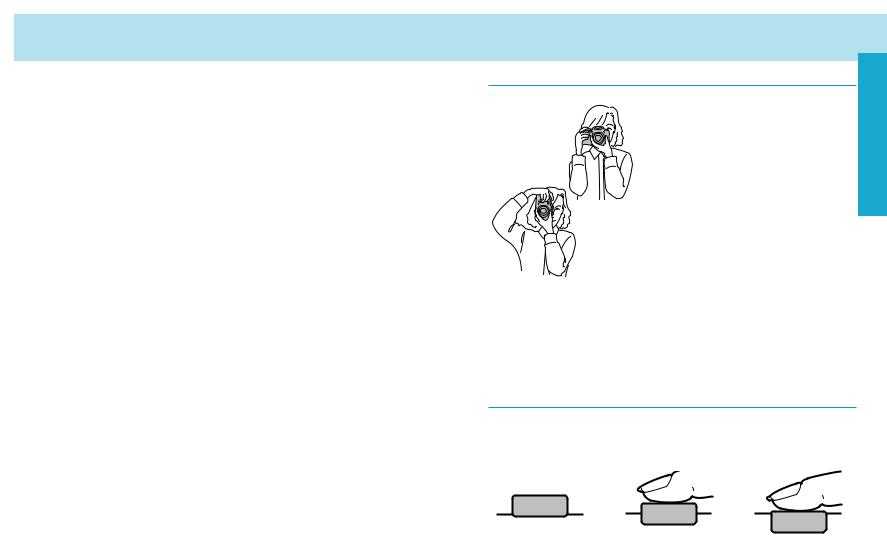
HANDLING THE CAMERA
Holding the Camera |
|
OPERATION |
|
|
|
|
Grip the camera firmly with your right |
|
|
hand, while supporting the lens with |
|
|
your left. Keep your elbows at your |
|
|
side and your feet shoulder-width |
|
|
apart to hold the camera steady. Keep |
BASIC |
|
|
the camera strap around your neck or wrist in the event you accidentally drop the camera.
• Do not touch the end of the lens barrel while taking a picture.
•Do not block the AF illuminator.
•Use a tripod when using slow shutter speeds or a telephoto lens.
•When taking vertically aligned photographs, the use of the vertical control grip, allows for easy access to all camera functions.
Pressing the Shutter-Release Button
Press the shutter-release button partway down to activate the camera’s autofocus and auto-exposure systems. Gently press the shut- ter-release button all the way down to take the picture.
22 |
23 |
 TAKING PICTURES IN FULL-AUTO
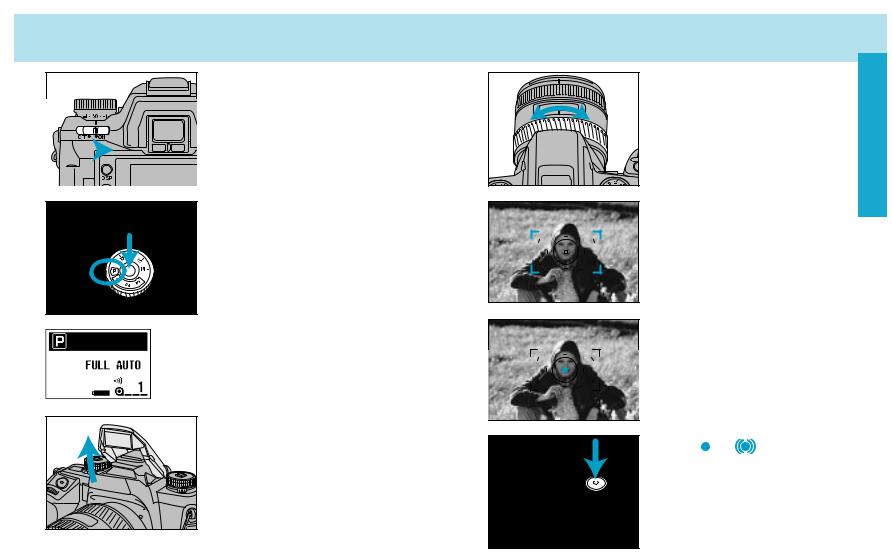
1. Turn the main switch to ON.
2. While pressing the exposuremode dial lock-release button, set the exposure-mode dial to  full-auto.
Full-auto is shown in the display. When the upper part is black, as shown, the position of the dials and levers may not match the actual camera control.
3. Raise the built-in flash.
• If the flash is raised, it will automatically fire when needed.
• For details on using the built-in flash, see page 31.
4.If using a zoom lens, rotate the zooming ring to frame your subject as desired.
Center your subject in the focus frame.
Press the shutter-release button partway down.
Focus will be set automatically. Audio sounds and the local focus area LED appears briefly indicating the focus area selected by the camera.
7. When or appears in the viewfinder, press the shutterrelease button all the way down to take the picture.
•Use focus lock (p.29) if your subject is outside the focus frame.
BASIC OPERATION
24 |
25 |
 TAKING PICTURES IN FULL-AUTO
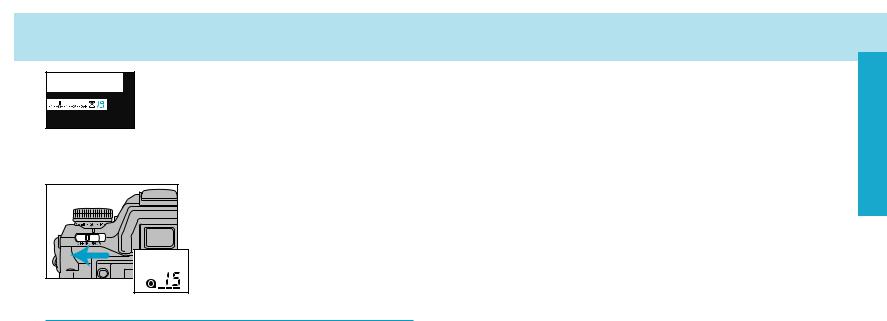
•The number of frames remaining is displayed in the viewfinder for the last 19 frames on the roll. This
countdown does not appear for non-DX-coded film.
•You can not take more pictures on a roll than what is stated on the film cartridge.
•Audio sound can be canceled (p 131).
• After taking picture, turn the camera off.
• After the camera is turned off, the frame counter remains displayed in the top data panel, but not in the rear navigation display.
• The frame counter in the top data panel disappears when the main switch is turned on.
Full-Auto Basic Settings
When the exposure-mode dial is set to  , the functions in the table below are reset to the full-auto mode, and locked in order not to be changed.
Function |
Full-Auto Settings |
Page No. |
|
|
|
|
|
Exposure mode |
Program (P) |
61 |
|
|
|
|
|
Metering mode |
14-segment honeycomb-pattern |
74 |
|
|
|
|
|
|
Autoflash, if the built-in flash is up. |
|
|
Flash mode |
(Pre-flash for red-eye reduction fires in |
99 |
|
accordance with the position of the |
|||
|
|
||
|
flash-mode switch). |
|
|
|
|
|
|
Focus mode |
AF-A, Autofocus priority |
46 |
|
|
|
|
|
AF area |
Wide focus area |
54 |
|
|
|
|
|
Drive mode |
Single frame advance |
87 |
|
|
|
|
Function |
Full-Auto Settings |
Page No. |
|
|
|
|
|
Exposure |
+/- 0.0EV |
77 |
|
compensation |
|||
|
|
||
|
|
|
|
Flash |
+/- 0.0EV |
103 |
|
compensation |
|||
|
|
||
|
|
|
|
PA/PS creative |
Cleared |
62 |
|
program mode |
|||
|
|
||
|
|
|
|
Flash-metering |
ADI (Advanced Distance Integration) |
108 |
|
method |
4-segment metering |
||
|
|||
|
|
|
•When the exposure-mode dial is set to  , the functions in the table above are reset to full-auto mode, and locked in order not to be changed. However, if Custom 24-2 (p. 178) is selected, these settings can be changed after the dial is set to
  .
.
•The following items will not be reset when the exposure-mode dial is set to  . Additional changes to these can be made after selecting
-Whether built-in flash fires or not
-Red-eye reduction
-Date and time imprinting
-Data memory
-Eye-start
-ISO setting
-Audio sound setting
-Custom function settings, except for custom functions 1, 20, 21, 22 and 23.
BASIC OPERATION
.
26 |
27 |
FOCUSING
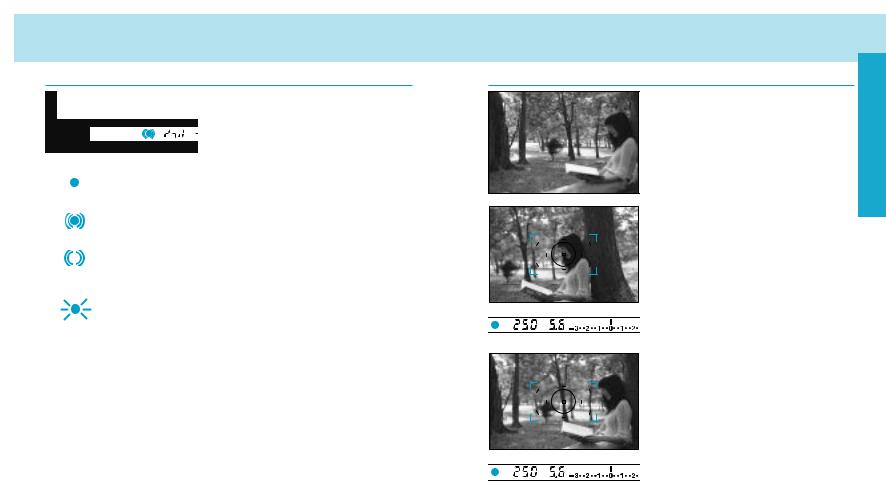
Focus Signals
The following signals appear in the viewfinder to indicate the focus status


 when the shutter-release button is

 pressed partway down.
Focus is confirmed.
Continuous autofocus – Focus is confirmed.
Continuous autofocus – Lens focusing. Shutter is locked.
(Blinks) Focus cannot be confirmed – Shutter is locked.
Subject is too close or is one of the special focus situations described on page 30.
•In the above chart, the shutter is locked when the lens is focusing or when focus cannot be confirmed. To change so that the shutter can be released, even if focus has not been confirmed, select Custom1- 2.
•If eye-start is on, it is possible to activate focus by bringing the camera to your eye. See eye-start for more information (p. 125).
Focus Lock
Use focus lock when your subject is outside the focus frame or when autofocus is difficult to confirm.
•The focus lock method described on this page, is used for stationary subjects. For moving subjects, see page 47 .
1. Center your subject in the focus frame, then press the shutter-release button partway down.
• appears in the viewfinder when focus is confirmed.
•Focus lock also locks the exposure settings when 14 segment honey-
comb-pattern metering is selected (p. 74).
2. Continue to hold the shutterrelease button partway down while you compose your picture.
3. Press the shutter-release button the rest of the way down to take the picture.
•If the shutter-release button is raised partway up, focus lock will not be cancelled. If you want the camera to refocus, remove your finger from the shutter-release button.
•Focus lock is not possible unless appears in the viewfinder.
BASIC OPERATION
28 |
29 |
FOCUSING
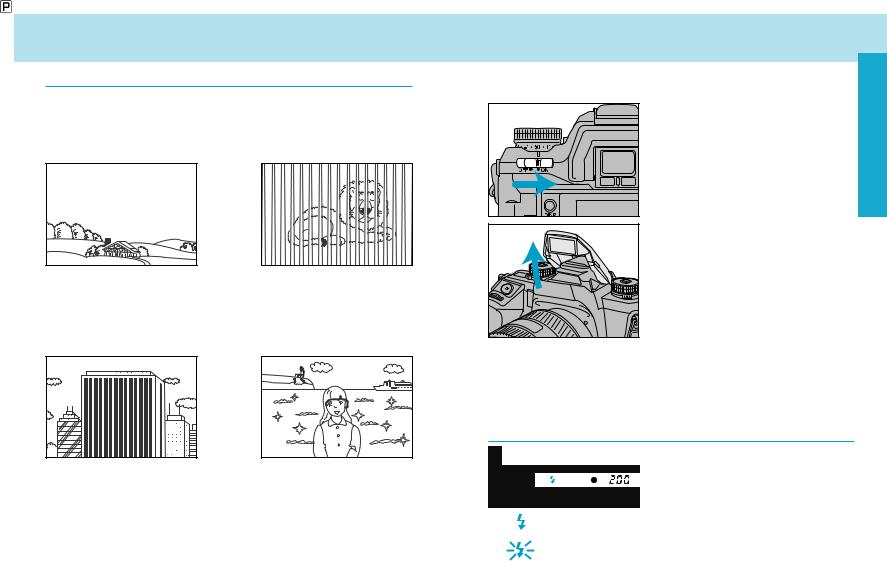
Special Focus Situations
The camera may not be able to focus in situations like those described below. When the focus signal blinks, use focus lock
(p. 29) or manual focus (p. 48). See page 28 for an explanation of the focus signals.
If the subject within the focus frame is very bright, or low in contrast.
If two subjects at different distances overlap in the focus frame.
If a subject composed of alternating light and dark lines completely fills the focus frame.
If your subject is near a very bright object or area.
USING THE BUILT-IN FLASH
The built-in flash provides coverage for focal lengths as wide as OPERATION 24mm.
1. Turn the main switch to ON and set the exposure-mode dial to . BASIC
2. Raise the built-in flash.
3. Press the shutter-release button to take the picture.
•When the exposure mode dial is set to  , the built-in flash will fire only when necessary.
•For red-eye reduction, turn the flash-mode switch to the red-eye reduction position.
•To cancel the flash, push the flash down.
Flash Signals
The following signals appear in the viewfinder to indicate the flash status when the shutter-release button is pressed partway down.
Flash is charged.
(Blinks) Previous exposure was correct.
30 |
31 |
USING THE BUILT-IN FLASH
Flash Range
The range of the built-in flash depends on the speed of the film and the selected aperture. Make sure your subject is within the flash range specified in the table below.
Aperture |
ISO 100 |
ISO 200 |
ISO 400 |
|
f/2.8 |
1.0 ~ 4.3m |
1.0 ~ 6.1m |
1.0 ~ 8.6m |
|
(3.3 ~ 14.1 ft.) |
(3.3 ~ 20.0 ft.) |
(3.3 ~ 28.2 ft.) |
||
|
||||
|
|
|
|
|
f/3.5 |
1.0 ~ 3.4m |
1.0 ~ 4.8m |
1.0 ~ 6.8m |
|
(3.3 ~ 11.2 ft.) |
(3.3 ~ 15.7 ft.) |
(3.3 ~ 22.3 ft.) |
||
|
||||
|
|
|
|
|
f/4 |
1.0 ~ 3.0m |
1.0 ~ 4.2m |
1.0 ~ 6.0m |
|
(3.3 ~ 9.8 ft.) |
(3.3 ~ 13.8 ft.) |
(3.3 ~ 19.7 ft.) |
||
|
||||
|
|
|
|
|
f/5.6 |
1.0 ~ 2.1m |
1.0 ~ 3.0m |
1.0 ~ 4.3m |
|
(3.3 ~ 6.9 ft.) |
(3.3 ~ 9.8 ft.) |
(3.3 ~ 14.1 ft.) |
||
|
||||
|
|
|
|
Lens Shadowing
Lens shadowing occurs when the lens or lens hood blocks part of the output from the built-in flash. Lens shadowing appears as semicircular shaded area at the bottom (horizontal) or side (vertical) of your image.
•Make sure you are at least 1m (3.3 ft.) from your subject when using the built-in flash.
•Remove the lens hood before using the built-in flash.
•Lens shadowing may occur with the following lenses at shorter focal lengths.
AF Zoom 17-35mm f/3.5G |
AF Zoom 28-70mm f/2.8G |
AF Zoom 28-85mm f/3.5-4.5 |
AF Zoom 28-135mm f/4-4.5 |
• The built-in flash can not be used with the following lenses: AF 300mm f/2.8 (APO tele) AF 600mm f/4 (APO tele) AF 300mm f/4 (APO tele)
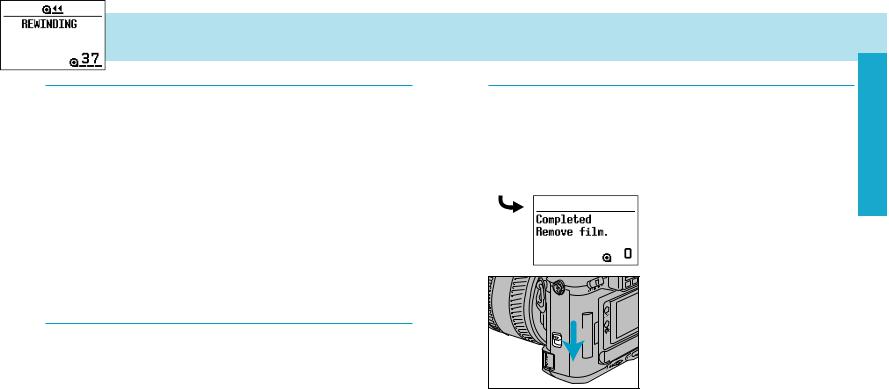
REWINDING THE FILM
The film is automatically rewound after the last frame is exposed.
Automatic Rewind OPERATION
1. Wait until the film is completely rewound.
BASIC
•Do not open the back cover until this message appears in the navigation display. Never use force.
2. When the film is completely rewound, open the back cover and remove the film.
•If the manual rewind button is pressed while the film is rewinding, the rewind speed will change.
32 |
33 |
REWINDING THE FILM
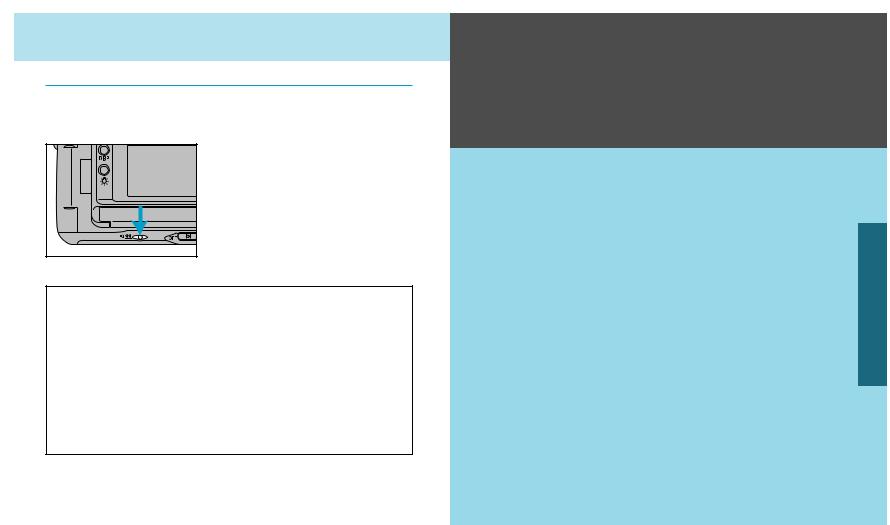
Manual Rewind
Use manual rewind to rewind the film before the roll is finished.
Gently press the manual-rewind button.
• Use a blunt object. A sharp object may cause damage.
Custom Function Notes
Custom 2, 3 and 12 refer to the rewinding of film.
Custom 2 - Automatic (1) or manually initiated (2) rewind start.
Custom 3 - Rewind the leader into the cartridge (1) or leave the leader out (2).
Custom 12 - Fast (1) or slow/silent (2) rewind.
DETAILED OPERATION
Once you have mastered the basic operation, you can move on to the Detailed Operation section to expand your expertise. Read those pages pertaining to the areas of your interest and need.
DETAILED OPERATION |
|
Navigation Display ................................ |
36 |
Focusing................................................ |
45 |
Exposure ............................................... |
60 |
Metering ................................................ |
73 |
Drive ...................................................... |
87 |
Flash...................................................... |
98 |
Additional Features.............................. |
119 |
Memory Functions............................... |
132 |
Data Memory....................................... |
140 |
Custom Functions ............................... |
153 |
DETAILED OPERATION
34 |
35 |
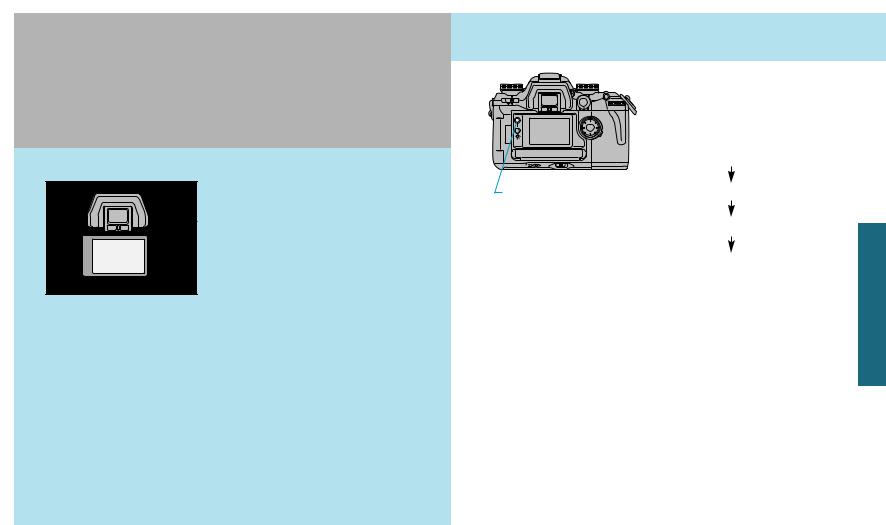
NAVIGATION
DISPLAY
Your camera uses the navigation display (a dot-matrix presentation in the large LCD panel on the back of the camera) to provide you with useful photographic information.
•Only general information is included in this section. Please refer to each specific section for more detailed information.
•Display will be slow in cold weather, but it normalizes when it warms up.
•If the camera is not operated for more than 1 hour, with the main switch on, the display will disappear. Press the shutter-release button partway down, or turn the main switch off and then back on, for the display to re-appear.
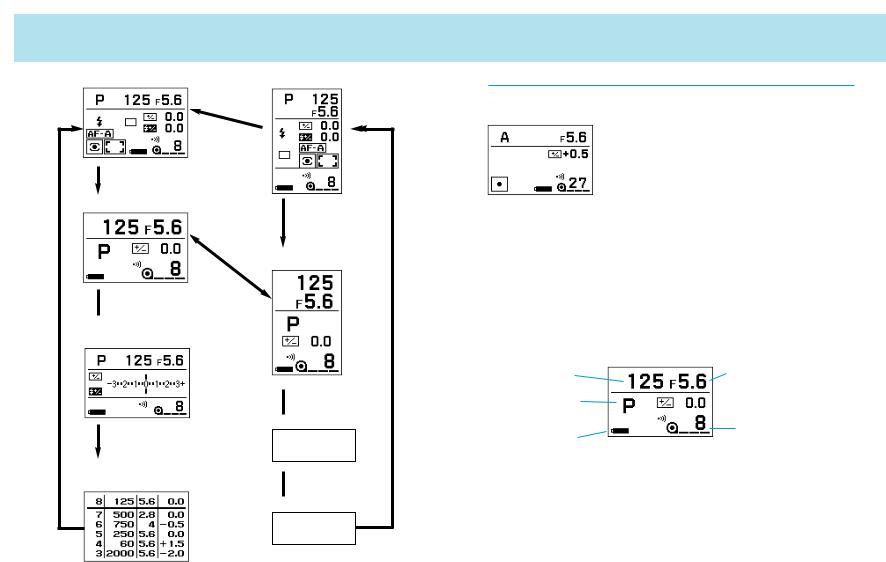
DISPLAY SELECTION
|
When the camera is first turned on, |
|
|
the detailed display is shown. |
|
|
Pressing the display-selection button |
|
|
causes the displays to change as fol- |
|
|
lows: |
|
|
Detailed display |
|
Display-selection button |
Large icon display |
|
|
Meter-index display |
DISPLAY |
|
Exposure-history display |
|
• The horizontal detailed display is used for explanations throughout this |
||
manual. |
|
NAVIGATION |
|
|
|
36 |
37 |
DISPLAY SELECTION
Detailed display |
Detailed display |
Display-selection button
Display selection button
Large icon display
Display-selec-  tion button
Meter-index display
Display-selec- tion button
Exposure-history display
Switch  horizontal/ vertical
Display selection button
Large icon display
Switch horizontal/ vertical
Display-selec-  tion button
Meter-index display
Display-selection
 button
Exposurehistory display
Display-selection button
Detailed Display
The detailed display shows all the settings.
•By selecting Custom 27-2 (p. 182), you can show only those settings which differ from the standard settings.
Large Icon Display |
|
|
|
DISPLAY |
||
|
|
|
NAVIGATION |
|||
For easier viewing of only a few items, select the large-icon display |
|
|||||
|
|
|||||
option. |
|
|
|
|
||
Shutter speed |
|
Aperture |
|
|
||
Exposure mode |
|
Exposure compensation |
|
|
||
|
|
|
||||
|
|
|
||||
Audio-on indicator |
|
|
|
|
|
|
|
|
|
|
|
||
Frame counter
Battery condition indicator
• To cancel this display, select Custom 29-2 (p. 184).
38 |
39 |
 Loading...