


Manual
UFS 902/910
Application of external USB storage media for recording and playback
UFS 902/910
GENERAL NOTICE
KATHREIN cannot be held liable for damage, loss of data or consequential loss of any kind (e.g. loss of profit, interruption of production, loss of data and information, or other detriment to assets) resulting from the use or non-usability of this KATHREIN product, even where KATHREIN has pointed out the possibility of such loss occurring.
REQUIRED FIRMWARE UFS 902/910
The firmware used on the UFS 902 must be version “V1.02“. The firmware used on the UFS 910 must be version “V1.04“.
If this firmware has not been installed on your UFS 902/910, you can either update the firmware via satellite as described in your UFS 902/910 manual, or download it from the following Internet website: “http://www.kathrein.de“. Firmware can be found under “Service” →“Software and Downloads” →“Receivers” → “UFS 902”/”UFS 910“ → “Software and Firmware”. For instructions on how to upload the software to your receiver, please see the Update Guide link on our Internet website (ufs910_update_guide.pdf).
EXTERNAL USB STORAGE MEDIA
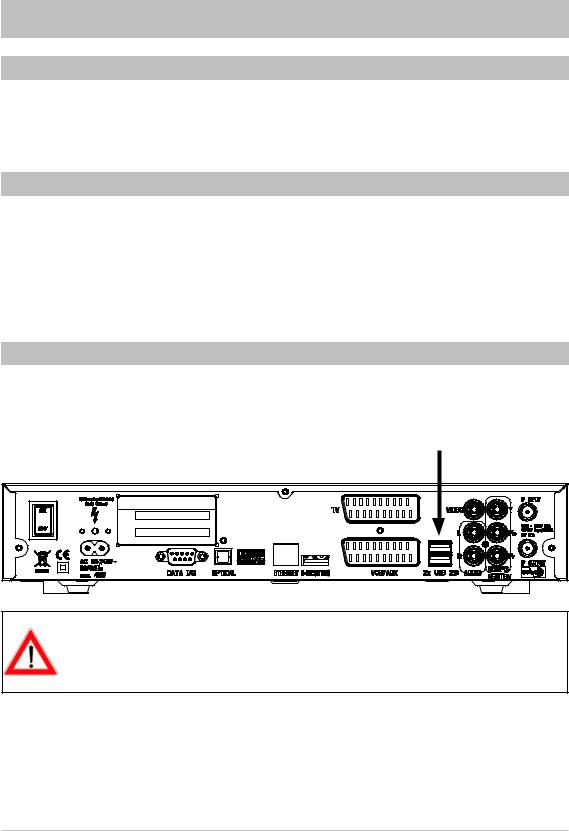
To record programmes with the UFS 902/910, an external USB storage medium is required (e.g. external hard disk drive with USB connection). The device can be connected on one of the two USB 2.0 interfaces on the receiver rear panel (see image below). The USB interface on the receiver front panel has not been designed for connection of USB storage media, it is only intended for firmware uploads.
Please note that the USB 2.0 socket on the receiver only has an output current of 500 mA. For some hard disk drives, this current is insufficient for smooth operation. To guarantee optimal supply to the hard disk, you can either use a hard disk drive with a built-in power supply or you can insert a USB 2.0 hub with its own power supply unit.
After connecting the external storage medium to one of the two USB 2.0 interfaces, the symbol USB will appear on your receiver‘s display (only at UFS 910). Subsequently, the registration procedure will follow.
As soon as registration has been successfully concluded, the symbol HDD will also be displayed. The external storage medium can now be used to make recordings through the UFS 910.
Press the button to check if the UFS 902 initialised successfully. If the screenshot “Recording Archive” appears, initialisation was successful.
2
FORMATTING AND SCANNING AN
EXTERNAL USB STORAGE MEDIUM
Connect the USB storage device to one of the two USB 2.0 interfaces on the receiver rear panel. Press the
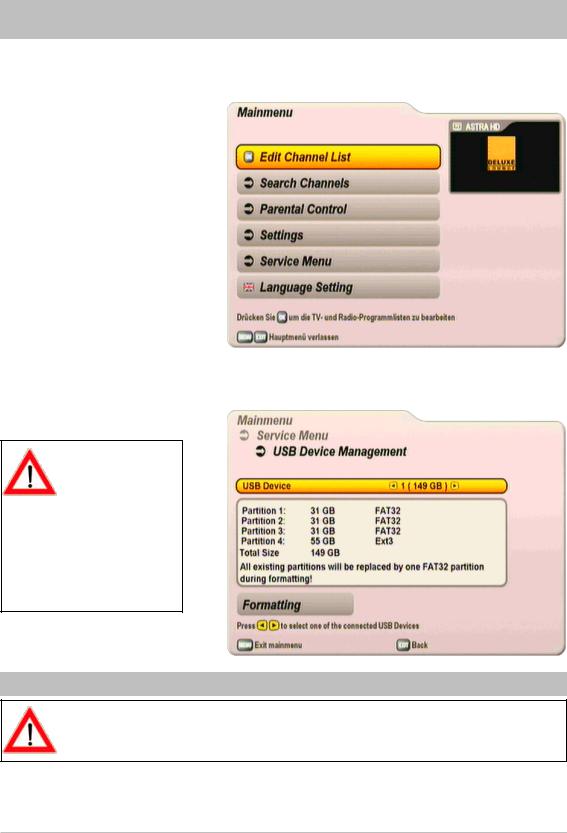
button to access the receiver’ s main menu. The following display will appear:
Select the “Service menu” with the buttons and confirm by pressing . Next, use the but-
tons to select “USB Device Management” and confirm with the button. The following display will appear (Example):
Your external storage medium must be formatted to “FAT32”. If your storage medium does not have this
format, you must first format it in the receiver menu: “USB Device Management” (see Messages/Error Messages at the top of page 15).
FORMATTING AN EXTERNAL USB STORAGE MEDIUM
If a partitioned USB storage medium is formatted, all partitions are deleted and the entire hard disk is formatted with a “FAT32” partition.
If more than one external storage device is connected to the receiver, use the buttons to select the storage device to be formatted.
3
FORMATTING AND SCANNING AN
EXTERNAL USB STORAGE MEDIUM
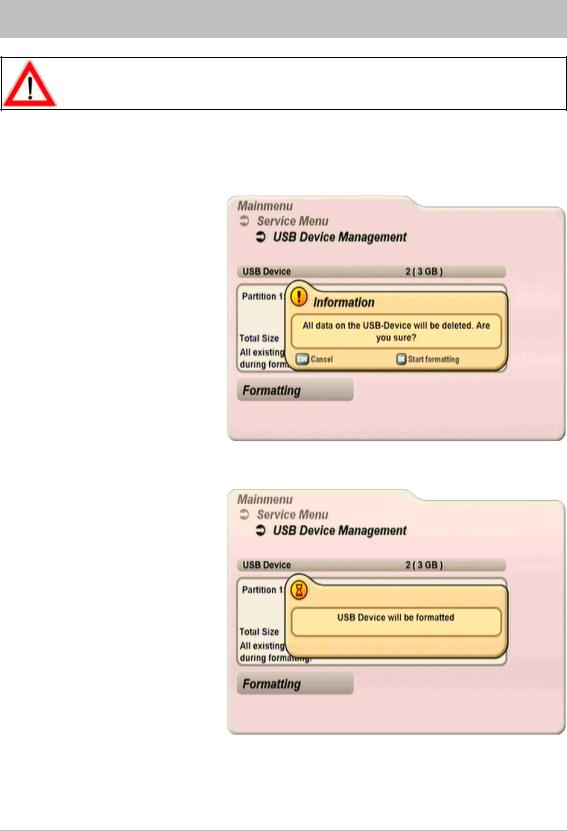
Formatting leads to permanent deletion of all data saved on the storage medium!
Use the buttons to choose the selection field “Formatting” and confirm the launch of the formatting procedure with the button. The following display will appear:
Confirm message with the button. The following display will appear:
Please Wait
Once formatting has been completed, the receiver returns to the TV picture.
4

FORMATTING AND SCANNING AN
EXTERNAL USB STORAGE MEDIUM
SCANNING EXTERNAL USB STORAGE MEDIA
During scanning, the connected USB storage medium is scanned for errors, which are automatically corrected by the receiver. Loss of recordings is likely!
If more than one external storage medium is connected to the receiver, use the to select the storage medium that is to be scanned.
Use the buttons to choose the selection field “Scan” and confirm scanning by pressing the button. The following display appears:
Confirm by pressing the button. The following display will appear:
After scanning has been completed, the receiver automatically switches back to the menu “USB Device Management”.
5
 Loading...