


® |
13 PRO |
Operating Instructions |
2 |
|||
|
||||||
|
Manuel d’Utilisation |
3 |
||||
|
|
|||||
|
|
Manual de Utilización . . . . . . |
. 5. . . |
|||
|
|
|
|
|
|
|
|
|
|
|
|
|
|
|
|
|
|
|
|
|
|
|
|
|
|
|
|
® |
General Binding Corporation |
|
Northbrook, IL 60062-4195 |
||
|
Operating Instructions |
13 Pro |
IMPORTANT SAFETY INSTRUCTIONS
YOUR SAFETY AS WELL AS THE SAFETY OF OTHERS IS IMPORTANT TO US. IN THIS INSTRUCTION MANUAL AND ON THE PRODUCT ARE IMPORTANT SAFETY MESSAGES. READ THESE MESSAGES CAREFULLY.
THE SAFETY ALERT SYMBOL PRECEDES EACH SAFETY MESSAGE IN THIS INSTRUCTION MANUAL.THIS SYMBOL
INDICATES A POTENTIAL PERSONAL SAFETY HAZARD THAT COULD HURT YOU OR OTHERS, AS WELL AS CAUSE PRODUCT DAMAGE OR PROPERTY DAMAGE.
THE FOLLOWING WARNING IS FOUND ON THE BOTTOM OF THE PRODUCT.

 WARNING
Electrical shock hazard. Do not open. No user servicable parts inside. Refer servicing to qualified service personnel.
This safety message means that you could be seriously hurt or killed if you open the product and expose yourself to hazardous voltage.
IMPORTANT SAFEGUARDS
WARNING: FOR YOUR PROTECTION DO NOT CONNECT THE POUCH
LAMINATOR TO ELECTRICAL POWER UNTIL YOU READ THESE INSTRUCTIONS COMPLETELY. KEEP THESE INSTRUCTIONS IN A CONVENIENT LOCATION FOR FUTURE REFERENCE. TO GUARD AGAINST INJURY, THE FOLLOWING BASIC SAFETY PRECAUTIONS MUST BE OBSERVED IN THE SET-UP AND USE OF THIS PRODUCT.
GENERAL SAFEGUARDS
•Use the pouch laminator only for its intended purpose of laminating documents according to the indicated specifications.
•Do not place anything in the throat opening of the machine other than carriers with pouches/documents.
•Place unit on a secure, stable work area to prevent the machine falling and possibly causing personal injury and damage to the unit.
•Turn unit off when not in use for an extended period of time.
•Follow all warnings and instructions marked on the product.
ELECTRICAL SAFEGUARDS
•The pouch laminator must be connected to a supply voltage corresponding to the electrical rating of the machine as indicated.
•Unplug the pouch laminator before moving it, or when it is not in use for an extended period of time.
•Do not operate with a damaged supply cord or plug, after it malfunctions, or after it has been damaged in any manner.
•Do not overload electrical outlets beyond their capacity as this can result in fire or electrical shock.
•Do not alter attachment plug. Plug is configured for the appropriate electrical supply.
•The unit is intended for indoor use only.
•Never push objects into this product through cabinet slots. Do not spill liquid of any kind on this product.
SERVICE
•Do not attempt to service or repair the pouch laminator yourself. Unplug the unit and contact an authorized service representative for any required repairs.
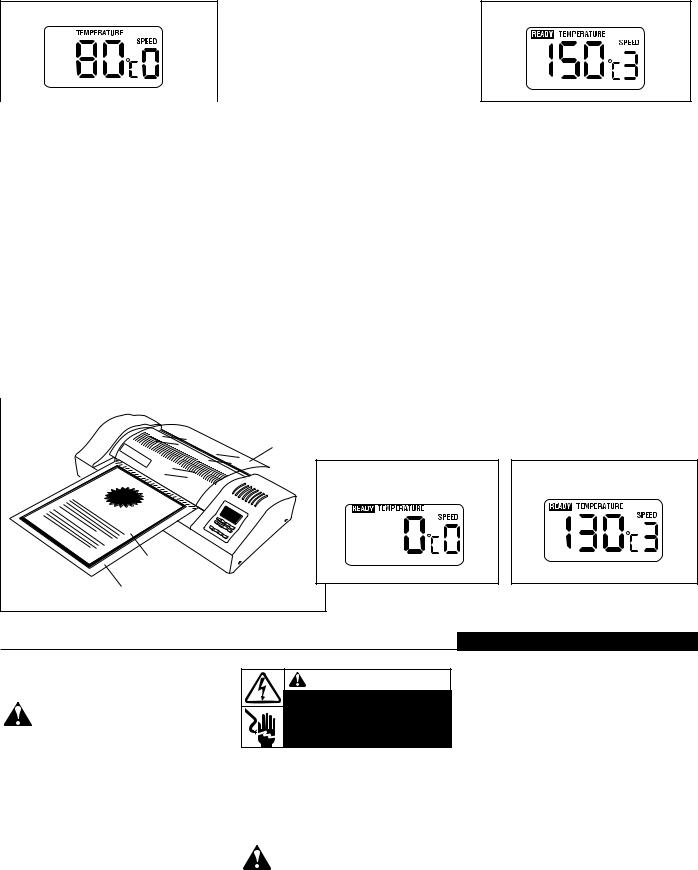
COLD - This is the setting that is automatically selected when the machine is first turned on. Sets the machine to 0, no temperature and no speed. If the temperature of the heater platen is above 90˚ C (194˚ F), then speed “2” is automatically set to protect the rollers.
TEMPERATURE -These keys are used to
 increase or decrease temperature by 1˚F. Temperature can be adjusted up
  to 160˚ C or 320˚ F.
SPEED - Adjust the speed of the rollers. 
 Speed 6 is the fastest speed.
CLEANING |
|
|
STOP - Stops the revolution of the rollers. To |
|||
|
|
CAUTION: Unplug this product before |
protect the rollers, the machine should not be |
|||
|
|
stopped for long periods of time when the |
||||
|
! cleaning. |
|
|
|||
|
|
|
temperature is above 90˚ C (194˚ F). |
|||
• Wipe exterior only with a damp cloth. Do |
||||||
REV - Reverses the revolution of the |
||||||
|
not use detergents or solvents. |
|||||
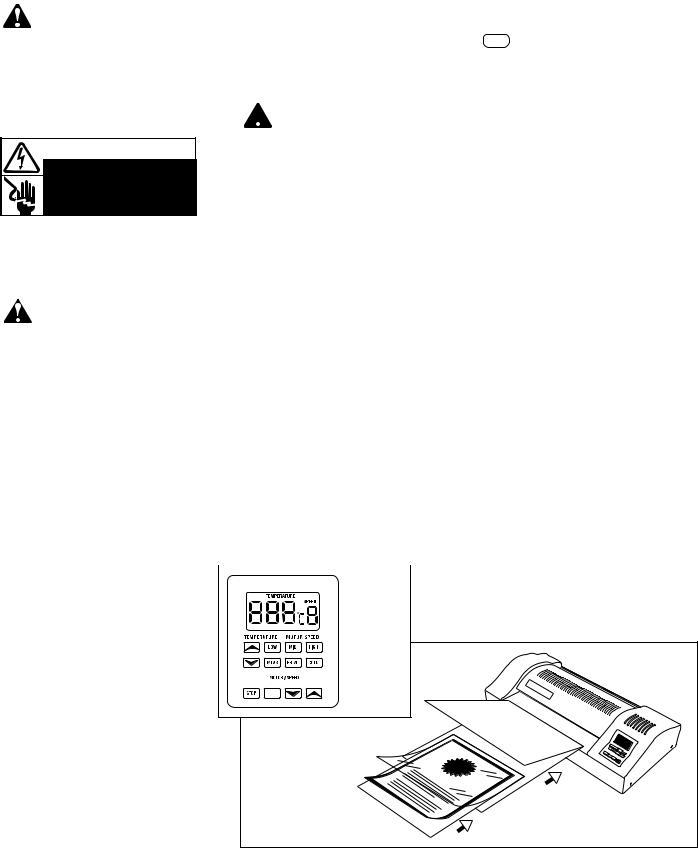
OPERATION |
|
|
rollers to correct misfeeds. |
|||
|
|
SET-UP |
||||
Control Panel LCD. The following |
||||||
information is displayed on the LCD: |
1. Connect power cord to appropriate power |
|||||
READY - Indicates that the machine is at the |
source. |
|||||
2. Push the power switch located on the back |
||||||
requested laminating temperature. |
||||||
TEMPERATURE - The numbers directly |
of the machine to the “on” position. |
|||||
|
||||||
below the word TEMPERATURE indicate the |
HOT LAMINATION |
|||||
user requested temperature setting. |
After the laminator has been turned on using |
|||||
SPEED - The numbers directly below the |
||||||
the power switch located on the back of the |
||||||
word SPEED indicate the speed setting. |
machine, the Cold mode is automatically set. |
|||||
Selecting Functions. Pressing keys |
“Ready,” temperature setting “0” and speed |
|||||
setting “0” should be displayed on the LCD. |
||||||
performs functions as follows: |
||||||
|
||||||
Low - Sets the machine to 230°F (110°C), |
1. Select either “LOW, MID, or HIGH” |
|||||
function key. The LCD will indicate the |
||||||
speed 5 |
|
|
||||
|
|
temperature and speed selected. “Ready” |
||||
Mid - Sets the machine to 266°F (130°C), |
||||||
will not be indicated until the laminator |
||||||
speed 3. |
|
|
||||
|
|
has reached the set temperature. |
||||
|
|
|
|
|
||
High - Sets the machine to 302°F (150°C) |
2. Use the Laminating Guide included with |
|||||
speed 3. |
|
|
the machine to select the proper tempera- |
|||
Note: Use of a carrier is recommended with |
ture and speed for the material to be |
|||||
laminated. |
||||||
all films for better quality output and |
||||||
3. Center the item to be laminated into a |
||||||
protection of rollers. |
|
|
||||
PRE/H - Sets the machine to 176˚ F (80˚ C), |
laminating pouch, so that the borders are |
|||||
even on all sides. |
||||||
Speed 2, stand-by. |
|
|
||||
|
|
4. Insert the pouch with the item sealed-edge |
||||
MEAS - Measures the current machine |
||||||
first into the paper CARRIER that is includ- |
||||||
temperature. |
|
|
ed with each carton of pouches. Position |
|||
|
|
|
|
|
the sealed edge of the pouch against the |
|
|
|
|
|
|
inside folded edge of the carrier. |
|
} |
|
|
||||
|
|
5. Insert the carrier and its contents straight |
||||
Control |
into the machine, leading with the folded |
|||||
|
|
|
||||
|
|
|
edge. handle carriers carefully so that |
|||
|
|
|
Panel |
|||
|
|
|
they can be reused. |
|||
|
|
|
LCD |
|||
|
} |
Selecting |
REV |
Functions |
2
13 Pro |
Operating Instructions |
PRE/H Stand-by |
10.Turn off the power switch. |
||
11. Unplug the power cord if the machine will |
|||
|
|
||
|
|
not be used for a long period of time. |
|
|
|
||
|
OPERATION, COLD LAMINATION |
||
|
After the laminator has been turned on using |
||
|
the power switch located on the back of the |
||
|
machine, the Cold mode is automatically set. |
||
|
|||
6 The laminated item will automatically exit |
“Ready,” temperature setting “0” and speed |
||
setting “0” should be displayed on the LCD. |
|||
the rear of the pouch laminator. After the |
|||
If the machine has just recently been used |
|||
pouch has stopped moving, place the |
|||
for Hot Lamination, then the machine must |
|||
carrier on a flat surface to cool briefly |
|||
reach a temperature of no hotter than 30˚ C |
|||
before removing the finished pouch. |
|||
(86˚ F) before starting Cold Lamination. |
|||
7. If the laminated product looks hazy, then |
|||
1. Select a GBC No-Heat Laminate that is |
|||
the temperature may need to be |
|||
increased or the speed decreased. If the |
slightly larger than the document to be |
||
laminated product looks wavy, then the |
laminated. |
||
temperature may need to be decreased |
2. Run the film, film-side faced up, for about |
||
or the speed increased. |
3-6mm (1/8 - 1/4”) into the laminator, and |
||
8. Select PRE/H to keep the machine on |
then press STOP to stop the rollers. |
||
stand-by at 80˚C (176˚ F). |
3. Carefully separate the backing release |
||
9. If finished laminating, press the “COLD” |
paper from the film, and drape the clear |
||
key. Temperature 0 and Speed 2 will be |
film over the top of the laminator. |
||
displayed. When the temperature |
4. Place the document between the |
||
reaches 85˚ C (186˚ F) the rollers will |
separated film and backing, and select |
||
stop automatically. Cooling down the |
Speed 1. |
||
machine before turning off the power |
5. After the laminated document exits the |
||
switch protects and extends the life of the |
|||
rear of the laminator, then either cut off |
|||
rollers. |
|||
the excess pouch edge for a flush-cut |
|||
|
|
appearance, or leave the |
|
Cold |
|
edge as an adhesive |
|
|
border for signage. |
||
Lamination |
film draped |
||
|
|||
|
over laminator |
|
|
|
|
|
|
GBC Creative Foils™
OTHER APPLICATIONS
GBC CREATIVE FOILS™
1.Select 150˚ C (302˚ F) and speed 3, and wait for the READY indicator.
2.Place GBC Creative Foil color-side-out over output from a toner-based laser printer or photocopier. When printing various colors on the same original piece, arrange the different colors and secure with the stickers included with the Creative Foils.
3.Insert the document and foil into a carrier and laminate.
4.When the item exits the rear of the laminator, then remove the document from the carrier and remove the excess foil.
GBC SOFT TOUCH POUCHES™
1.Select 130˚ C (266˚ F) and speed 3, and wait for the READY indicator.
2.Start laminating.
3.When the pouch exits the rear of the laminator, carefully rub a finger against a front corner to remove the protective carrier film.
Cold Lamination with |
GBC Soft Touch Pouches™ |
GBC No-Heat Laminate™
document
backing release paper
Manuel d’Utilisation
INSTRUCTIONS CONCERNANT LA SECURITE
VOTRE SÉCURITÉ, COMME CELLE
DES AUTRES, EST IMPORTANTE POUR NOUS. CES INSTRUCTIONS CONTIENNENT D'IMPORTANTS MESSAGES RELATIFS À LA SÉCURITÉ. MERCI DE LES LIRE TRÈS ATTENTIVEMENT.
CE SYMBOLE “ATTENTION SÉCURITÉ” PRÉCÈDE, DANS CE MANUEL D'UTILISATION, CHAQUE MESSAGE CONCERNANT LA SÉCURITÉ. CE SYMBOLE INDIQUE UN RISQUE POTENTIEL DE BLESSURE POUR VOUS OU D'AUTRES PERSONNES, OU UN RISQUE DE DOMMAGE POUR LA MACHINE OU VOS BIENS PERSONNELS.
L’AVERTISSEMENT SUIVANT EST NOTIFIÉ SUR LA PARTIE INFÉRIEURE DE L’APPAREIL.
ATTENTION
Risque de secousse électrique. Ne pas ouvrir. Aucune piéce réparable par l'utilisateur. Entretien par personnel qualifié.
Ce message signifie que vous pourriez être très sérieusement blessé si vous tentiez d’ouvrir l'appareil en vous exposant ainsià un risque de choc électrique.
INSTRUCTIONS CONCERNANT LA SECURITE
ATTENTION: PAR MESURE DE SÉCURITÉ, NE BRANCHEZ PAS LA
PLASTIFIEUSE À POCHETTES AVANT D'AVOIR LU EN TOTALITÉ CES INSTRUCTIONS. CONSERVEZ LES DANS UN ENDROIT APPROPRIÉ AFIN DE POUVOIR VOUS Y RÉFÉRER SI NÉCESSAIRE. AFIN
D'ÉVITER TOUTE BLESSURE, LES PRÉCAUTIONS DE BASE SUIVANTES DOIVENT ÊTRE OBSERVÉES À L'INSTALLATION ET LORS DE L'UTILISATION DE CET APPAREIL.
MESURES DE SECURITE GENERALES
•N’utilisez la plastifieuse à pochettes que pour la plastification de documents en vous conformant aux spécifications indiquées.
•N’introduisez pas dans la fente d'alimentation de la machine autre chose que des transporteurs, des pochettes et des documents.
•Installez la machine en sécurité sur un emplacement stable pour éviter qu’elle ne tombe; cela pourrait l'endommager et causer d'éventuelles blessures corporelles aux utilisateurs.
3
 Loading...