

Page 1

OPERATION MANUAL
© ZOOM Corporation
Reproduction of this manual, in whole or in part, by any means, is prohibited.
Page 2
1
Usage and safety precautions
Usage and safety precautions
SAFETY PRECAUTIONS
In this manual, symbols are used to highlight warnings and
cautions for you to read so that accidents can be prevented.
The meanings of these symbols are as follows:
This symbol indicates explanations about extremely
dangerous matters. If users ignore this symbol and
handle the device the wrong way, serious injury or
death could result.
This symbol indicates explanations about dangerous
matters. If users ignore this symbol and handle the
device the wrong way, bodily injury and damage to
the equipment could result.
Please observe the following safety tips and precautions to ensure
hazard-free use of the R16.
Power requirements
Since power consumption of this unit is fairly high, we
recommend the use of an AC adapter whenever possible.
If you use batteries, use either alkaline or nickel-metal
hydride batteries.
AC adapter operation
• Be sure to use only a DC5V /1A/center plus AC adapter
(ZOOM AD-14). Use of an adapter other than that
specified could damage the unit and pose a safety hazard.
• Connect the AC adapter only to an AC outlet that
supplies the rated voltage required by the adapter.
• When disconnecting the AC adapter from the AC outlet,
always grasp the adapter itself and do not pull on the
cable.
• During lightning or when not using the unit for an
extended period, disconnect the AC adapter from the
AC outlet.
Battery operation
• Use six conventional size AA-1.5 volt batteries.
• The R16 cannot be used for recharging. Pay close
attention to the labeling of the batteries to make sure
you choose the correct ones.
• When not using the unit for an extended period, remove
the batteries from the unit.
• If battery leakage has occurred, wipe the battery
compartment and the battery terminals carefully to remove
all remnants of battery fluid.
• While using the unit, the battery compartment cover
should be closed.
About grounding
Depending on installation conditions, a slight electrical
charge may be felt when touching a metal part of the
R16. If you w ish to avoid this, ground the unit by connecting
the ground screw on the rear panel to a good external
ground.
• To prevent the risk of accidents, never use any of the
following for grounding:
• Water pipes (risk of electric shock)
• Gas pipe (risk of explosion)
• Telephone wiring ground or lightning arrestor
(risk of lightning strike)
Environment
Avoid using your R16 where it will be exposed to:
• Extreme temperature
• High humidity, moisture, or splashing water
• Excessive dust or sand
• Excessive vibration or shock
Handling
Never place objects filled with liquids, such as vases, on
the R16 since this can cause electric shock.
The R16 is a precision instrument. Do not exert undue
pressure on the keys and other controls. Also take care
not to drop the unit, and do not subject it to shock or
excessive pressure.
Connecting cables and input and output jacks
You should always turn off the power to the R16 and all
other equipment before connecting or disconnecting
any cables. Also make sure to disconnect all connection
cables and the power cord before moving the R16.
Alterations
Never open the R16 case or attempt to modify the product
in any way since this can result in damage to the unit.
Volume
Do not use the R16 at a loud volume for a long time since
this could cause hearing impairment.
Usage Precautions
Electrical interference
For safety considerations, the R16 has been designed to provide
maximum protection against the emission of elec tromagnetic
radiation from inside the device, and protection from external
interference. However, equipment that is very susceptible to
interference or that emits powerful electromagnetic waves should
not be placed near the R16, as the possibility of interference
cannot be ruled out entirely.
With any type of digital control device, the R16 included,
electromagnetic interference could cause malfunction and could
corrupt or destroy data. Care should be taken to minimize the risk
of damage.
Cleaning
Use a soft, dry cloth to clean the R16. If necessary, slightly
moisten the cloth. Do not use abrasive cleanser, wax, or solvents
(such as paint thinner or cleaning alcohol), since these may dull
the finish or damage the surface.
Back up
The data on the R16 could be lost because of malfunction or
incorrect operation. Back-up your data.
Copyrights
Except for personal use, unauthorized recording from
copyrighted sources (CDs, records, tapes, video clips,
broadcast material and so on) is prohibited.
ZOOM Corporation does not bear any liability for injunctions
regarding copyright law infringement.
The SD symbol and SDHC symbol are trademarks.
Windows®/Windows Vista® are trademarks or registered
trademarks of Microsoft®.
trademarks or registered trademarks of Apple Inc.
Cubase are trademarks or registered trademarks of Steinberg Media
Technologies GmbH Inc.
registered trademarks of Intel® Corporation.
trademark or registered trademark of Advanced Micro Devices, Inc.
All other trademarks, product names, and company names mentioned
in this documentation are the property of their respective owners. All
trademarks and registered trademarks mentioned in this manual are
for identification purposes only and are not intended to infringe on the
copyrighted properties of their respective owners.
Macintosh® and Mac OS® are
Steinberg and
Intel® and Pentium® are trademarks or
AMD Athlon™ is a
Page 3

2
Introduction
Thank you very much for purchasing the ZOOM R16 Recorder/Interface/Controller. In this manual, we will call
it the R16. The R16 has the following features.
Introduction
Multitrack recorder that can use up to 32
GB SDHC cards
The R16 can record up to 8 tracks
simultaneously. For example, recording a
full band on individual tracks or multiple
microphones placed around a drum kit. After
making linear PCM recordings (WAV type) at
16/24-bit and 44.1-kHz sampling rate, you can
transfer the recorded files to your computer to
make use of them in your DAW software. You
can even connect two R16s together with a
USB cable, allowing you to record a maximum
of 16 tracks.
Hi-Speed USB (USB 2.0) audio interface
You can use the R16 as a Hi-speed USB (USB
2.0) audio interface that has abundant input
and output jacks. The R16 can handle 8 inputs
and 2 outputs at a maximum of 24-bit and 96
kHz, and its effects can even be used at 44.1
kHz sampling rate. The unit can also operate
using only USB bus power.
Usable as a control surface for DAW software
The R16 is equipped with functions that enable
you to control DAW software in a computer via a
USB cable. You can operate the transport of the
DAW software, such as play, record and stop,
and you can physically control fader operations.
You can also assign various DAW functions to
the R16’s F1–F5 function keys. (The assignable
functions depend on the DAW software.)
Various effects
The R16 has 2 main built-in effects—an insert
effect that can be applied to specific channel
signals and a send-return effect that can be
used like the send-return bus of a mixer. You
can use these effect in a wide variety of ways,
including during recording, by applying them
to already recorded tracks, and in mastering
operations like mixing down and bouncing.
Handles various input sources including
guitars, microphones and line-level
equipment
The R16 is equipped with 8 input jacks that
accept both XLR and phone connectors,
including one that can handle high impedance
signals and two that can supply 48V phantom
power. The R16 can handle high impedance
guitars and basses, dynamic and condenser
microphones, and various line level
instruments like synthesizers. It also has
two built-in high performance microphones
that are very convenient for recording
acoustic guitar and vocals.
Comprehensive built-in mixer features
The R16 is equipped with a digital mixer that
allows you to mix the playback of recorded
and imported audio tracks. You can adjust the
volume, pan, EQ and effects for each track
and mix them into a stereo output.
Multiple tuner modes and a metronome for
guide rhythms
The R16 not only has a standard chromatic
tuning function, it also has functions for
unusual tunings, including 7-string guitars and
5-string basses. The metronome can be used
as a guide rhythm while recording. You can
play the metronome sound through the mixer
OUTPUT jacks or you can send it only through
the headphones if you want. For example, in
a live situation you could send the click just to
the drummer via the headphone output.
Exchange files with computers and USB
memory devices
The R16 has a USB 2.0 jack that allows
high speed data transfer. You can transfer WAV
audio files recorded on the R16 to a computer
just by dragging and dropping. You can
also exchange files with a conn ected USB
memory device without using a computer.
Please read through this manual caref ully in order to understand the R16 functions effec tively.
After reading it, please keep t he manual along w ith the warranty in a safe place.
*Specifications are subject to change for improvement without notice.
Page 4
3
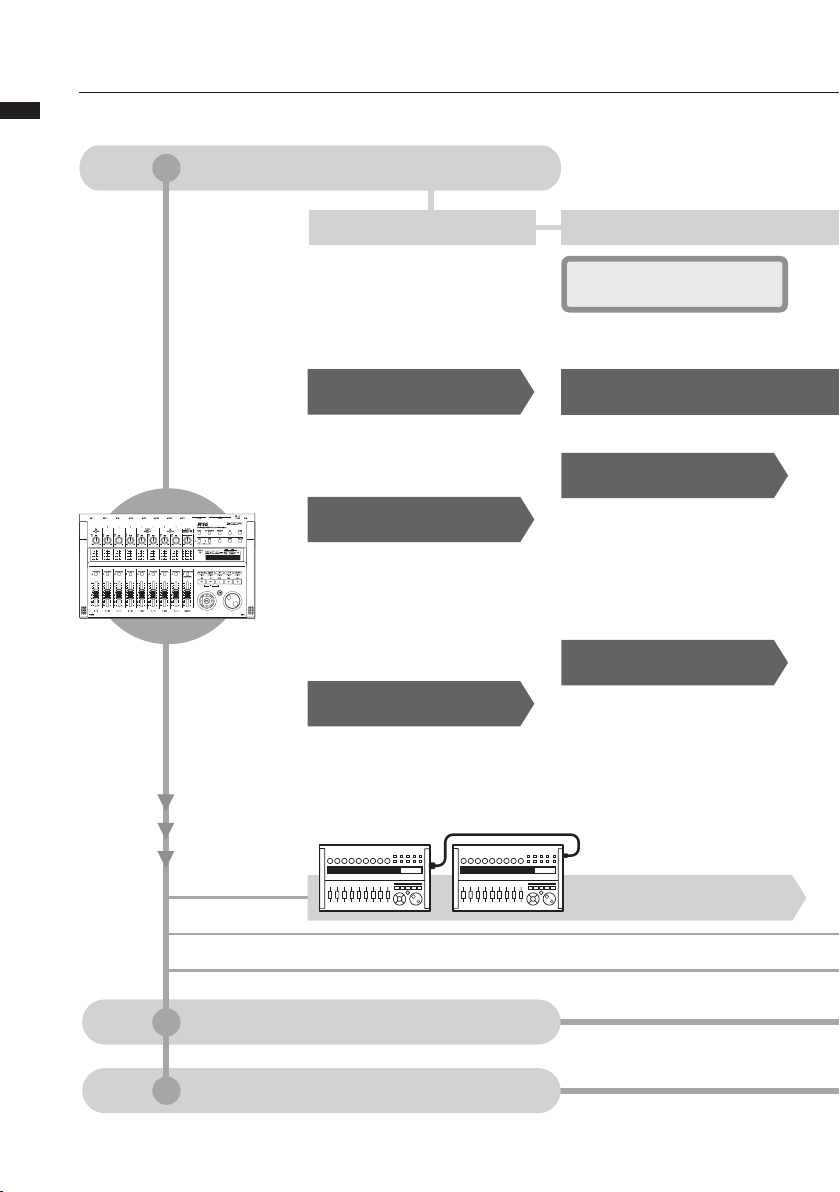
R16 operation flow
R16 operation flow
Multitrack Recorder
Preparation Recording
Make various settings for built-in
microphones, connected musical
instruments, other input sources,
signals and tracks. Use the tuner and
the metronome to prepare for a new
project or a live performance.
Effects P.45
• Patch editing, etc. P.51~
USB connection
Project creation P.17
Prepare a new project to save and
mix recordings.
• New project
Connecting external
equipment P.18, 19
The R16 can handle various types
of instruments and equipment.
• Built-in microphones P.19
• Hi-Z P.18
• Phantom power P.18
• Stereo link P.20
Performance settings
• TUNER P.33
• METRONOME P.34
Insert effects P.49
1. After the input jack
Track recording P.21
Record the input signals from
connected input sources to tracks.
• Undo/Redo P.16
Playback P.29
Play up to 16 tracks of monaural and
stereo audio simultaneously.
• A-B repeat P.30
• Setting marks P.43
Linking two units:
Sync recording P.33
Audio Interface
Control Surface
Page 5
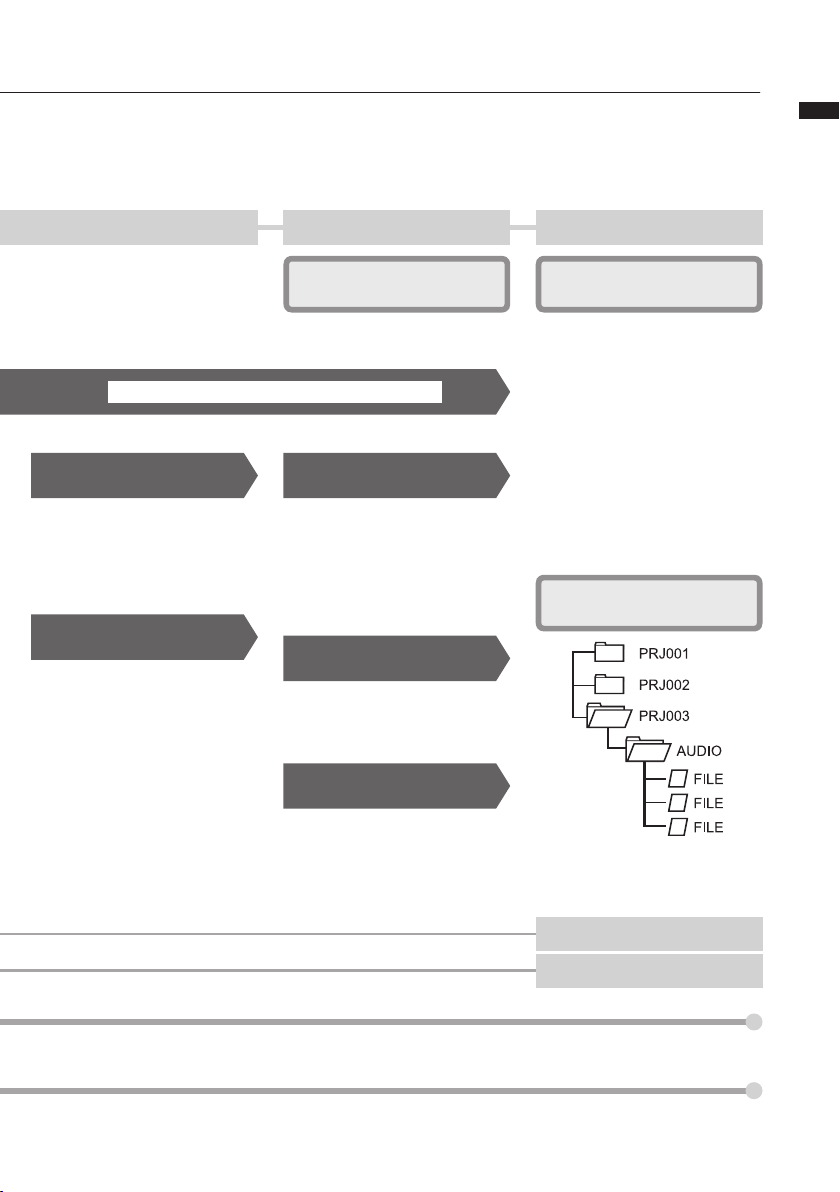
Record 8 tracks of mono and stereo audio simultaneously.
4
Select up to 330 effects.
Mixing & Mixdown Edit & Output
Use the various effects to process
signals as they are input, during
track playback and when outputting
a mix.
Effects used on specific track signals
Overdubbing P.25
Record new tracks while playing
back previously recorded tracks.
• Track assignment P.23
Mixer P.34 Project P.56
Adjust the recorded track using the
track mixer.
3. Before the master fader2. On mixer tracks as desired
Send/return effect
There are two i nter nal send/return
effects i n the built-in mixer—a
chorus/delay effect and a reverb
effect. Adjust the send levels of
both effects separately for each
mixer track.
Starting over
Mixing P.34
Pick and re-record just part of a file.
• Punch in/out P.27
Adjust parameters for each track.
• EQ • Volume • Pan P.37
R16 operation flow
Recorded music files and settings for a
song can be managed and stored as a
project and then edited in various ways.
• PROJECT/FILE P.56
• INFORMATION P.59
• IMPORT P.64
• DIVIDE P.63
• COPY P.60
• DELETE P.62
• RENAME P.61
• PROTECT P.56
SD cards P.71
Mixdown
Combine multiple tracks into one
stereo pair.
• Bounce P.39
• Record on the master track P.42
Exchange signals between DAW software and audio equipment
Operate DAW software with the R16
SD card reader P.73
USB memory P.73
P.77 (PDF version)
P.77 (PDF version)
Page 6
Basic recording guide
5
Here we explain how to record in stereo with the built-in microphones on the left and right side of the R16
Basic recording guide
and how to make a monaural recording of an electric guitar using the high impedance function.
Let’s make a quick recording with the R16!
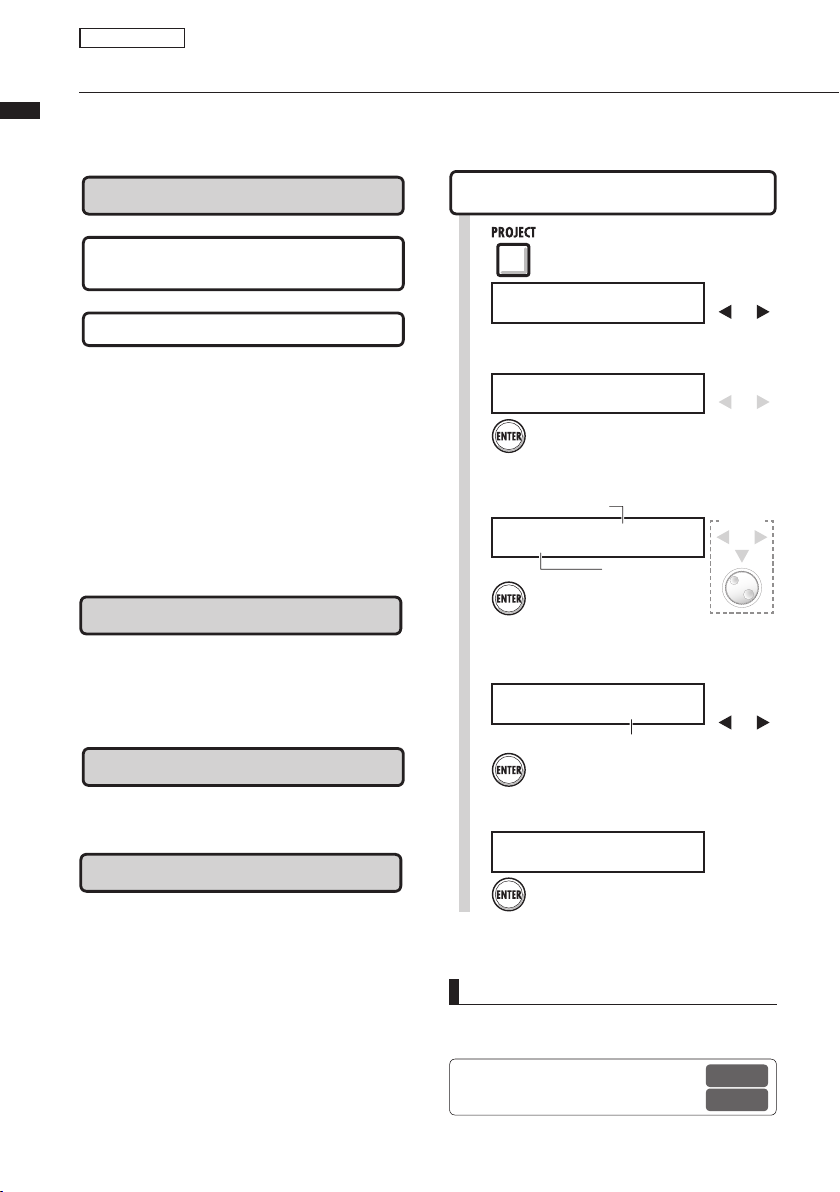
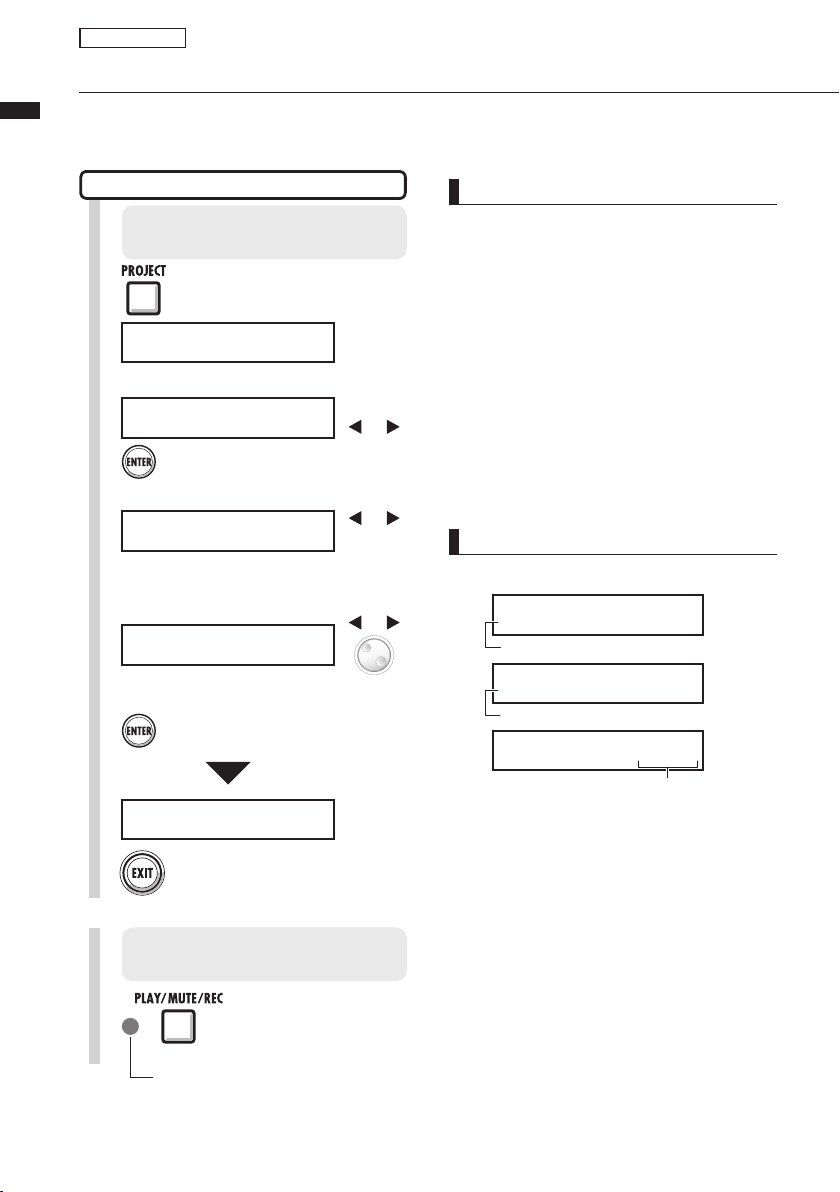
STEP 1
STEP 2
1
2
3
4
5
6
Insert an SD card and turn
the power on.
Create a new project.
Press and hold until you return to the main
screen.
Press [PROJECT].
PROJECT
>SELECT
>NEW
.
Select
PROJECT
>NEW [SD]003:22:52]
Search the menu with the
cursor and press [ENTER].
Name the new project.
PROJECT No.003
PRJ003
Confirm the name
and press [ENTER].
Select [CONTINUE].
SETTING?
[CONTINUE] RESET
Select the item with the
cursor, and press [ENTER].
Execute.
No.003:PRJ003
Create?
Confirm the creation of your new
project and press [ENTER].
Return to the main screen.
PRJ 003
00 00:00:00:000
This screen shows your new
project name and number.
Ref: Project
Cursor keys
Press the
right and left
cursor keys
to change the
selection.
The new project number
The new project name
Cursor keys
P.5 6
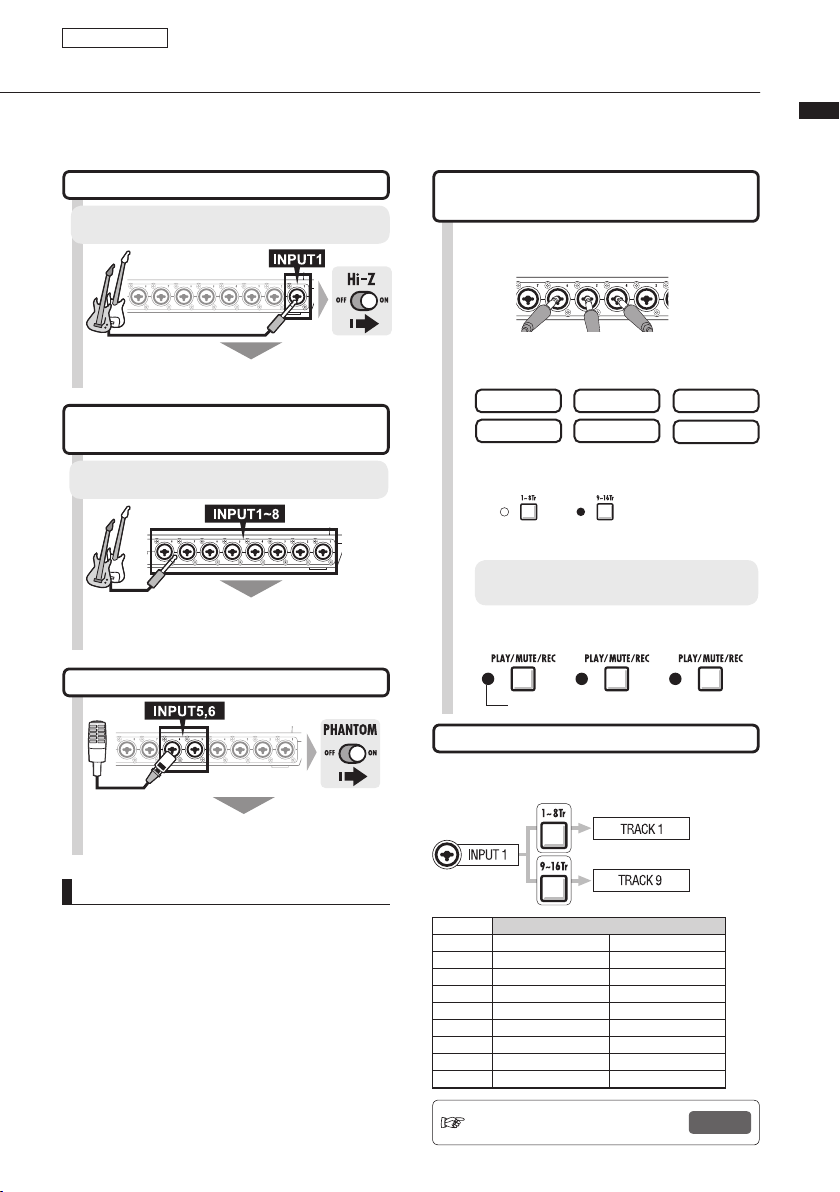
STEP 3
Turn input source
switches on.
Using the built-in microphones
(Stereo recording)
1
Press the status keys of INPUT 7 & 8
2
until their indicators light red.
When lit red, you can
start recording.
Turn the [MIC] switch on
for INPUT 7 & 8.
Press the [PLAY/
MUTE/REC] key one
or two times.
or
To record an electric guitar
(High impedance/monaural input)
Connect the guitar to INPUT 1.
1
2
Press the status key of INPUT 1 until the
3
indicators lights red.
When lit red, you can
start recording.
NOTE
Hi-Z is only on INPUT 1, and the built-in stereo
microphones function only on tracks 7 & 8.
Tracks 7 & 8 correspond to INPUT 7 & 8 and are
set up as 2 mono tracks by default. When you
are using the built-in mics for a stereo recording,
make a stereo link to create one stereo track.
Ref: Stereo link
Instrument connection
Turn the [Hi-Z] switch on
for INPUT 1.
Press the [PLAY/
MUTE/REC] key one
or two times.
P.2 0
P.19 , 2 0
Page 7
6
STEP 4
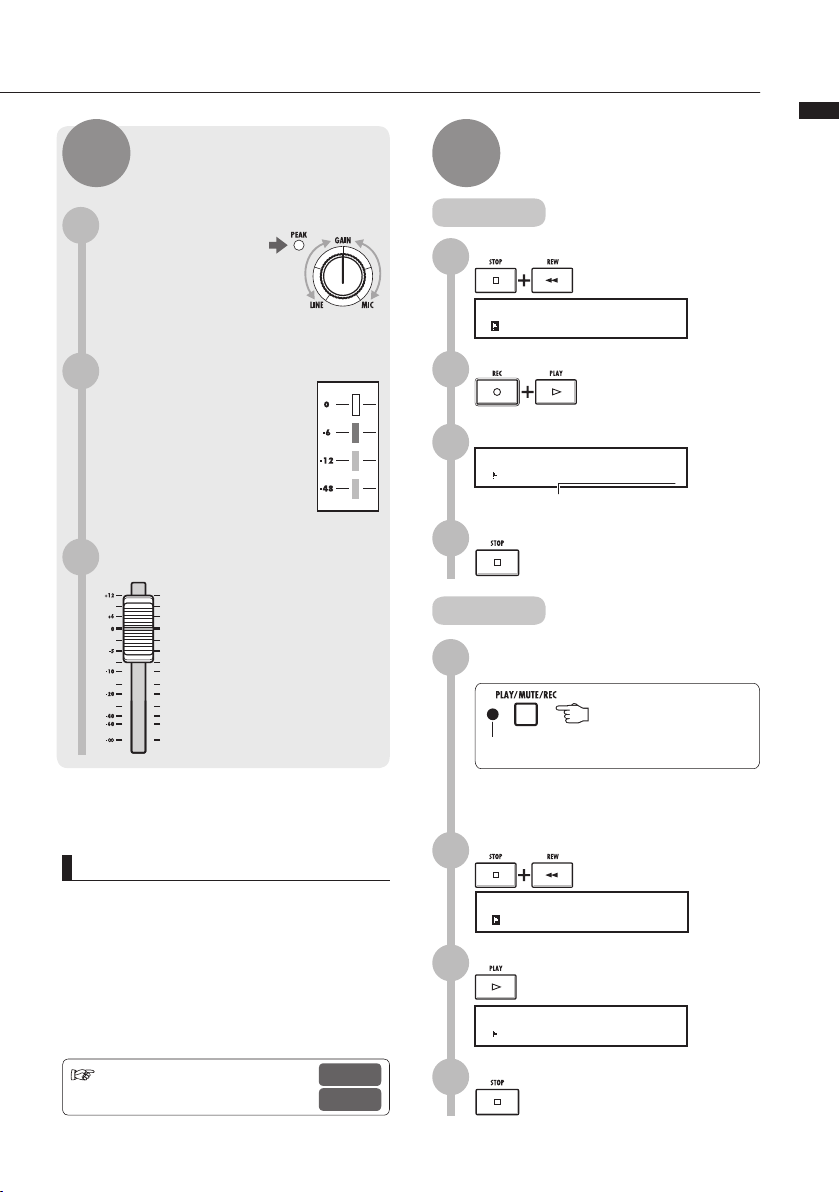
Adjust the input
sensitivity, monitoring
level and output
Adjust the INPUT sensitivity with
1
the [GAIN] knob.
You should adjust the
[GAIN] of each INPUT so
that the PEAK indicator
blinks occasionally.
STEP 5
Record—Complete—Play
Record
Move to the beginning.
1
PRJ 003 PRJ003
00 00:00:00:000
Press [STOP] & [REW]
at the same time.
Basic recording guide
Adjust the recording level.
2
The red (0 dB) indicator
of the level meter should
not light when you apply
an insert effect to an
INPUT. You should adjust
the PATCH LEVEL, for
example, if necessary.
Adjust the monitoring level.
3
You can adjust the
monitoring level of an
instrument with the fader
of the track it is being
recorded on. (INPUT 1, for
example, would be TRACK
1 or 9).
NOTE
If the input signals distort during recording, adjust the
input sensitivity or recording level, referring to
Step 4.
After recording has completed, the “wait” bar will
be displayed. Do not turn the power off or take
the SD card out until the “wait” bar disappears. If
you do not follow this procedure, you may damage the data or cause other problems.
Start recording.
2
Start performing.
3
PRJ 003 PRJ003
00 00:00:10:152
The counter starts to run.
Stop recording.
4
Press [REC] & [PLAY]
at the same time.
Press [STOP].
Playback
Exit record standby mode.
1
Press the STATUS KEY to turn the green light on.
Press the [PLAY/
When lit green, you
can play the track.
When the light changes from red to green,
the track status changes from “record
standby” to “playback standby.”
Return to the top.
2
PRJ 003 PRJ003
00 00:00:00:000
Start playback.
3
Press the [PLAY] key.
PRJ 003 PRJ003
00 00:00:10:152
MUTE/REC] key one
or two times.
Press [STOP] & [REW]
at the same time.
Ref: Recording methods in detail
:
How to use the INSERT EFFECT
P.17 —
P.4 9
Stop playback.
4
Press the [STOP] key.
Page 8

Table of contents
7
Table of contents
Usage and safety precautions ➞P. 1
Introduction ➞P. 2
R16 operation flow ➞P. 3
Basic recording guide ➞P.5
Names of parts ➞P. 9
Connections ➞P.11
SD card insertion ➞P.12
Preparing the power ➞P.13
Turning the power on/off ➞P.14
Date & time setting ➞P.14
Switch and key operation ➞P.15
Display information ➞P.16
Track recording
R16 recording flow ➞P.17
Creating a new project ➞P.17
Connecting instruments and
making monaural settings ➞P.18
Instrument connections:
stereo settings and status keys ➞P.19
Stereo link ➞P.20
Recording the first track ➞P.21
Track assignment ➞P.23
Overdubbing
Recording additional tracks ➞P.25
Playback
Playback of a project ➞P.29
Repeat playback of a
specific section (A-B repeat) ➞P.30
Using the counter and
markers to move (locate) ➞P.31
Tool
Tuner ➞P.33
Metronome ➞P.34
16-track synchronized recording ➞P.35
Mixing
R16 mixing procedure flow ➞P.36
Track settings for EQ, pan
and send-return level ➞P.37
Track parameters ➞P.38
Mix down/Bounce
Combining multiple tracks to 1-2 tracks ➞P.39
Using a mastering effect ➞P.41
Recording to the master track ➞P.42
Entering names ➞P.43
Error list: what to do when these
messages appear on the screen ➞P.44
Punching in and out
Automatic punch-in/punch-out ➞P.27
Manual punch-in/punch-out ➞P.28
Page 9

Table of contents
8
Effect
Effect patch overview ➞P.45
Input/output of the insert
and send return effects ➞P.47
Insert effect insertion position ➞P.49
Patch editing ➞P.52
Patch save ➞P.53
Patch import ➞P.54
Using the insert effect
only for monitoring ➞P.55
Project
Project overview & project protection ➞P.56
Selecting projects and files ➞P.58
Project and file information ➞P.59
Copying projects and files ➞P.60
Renaming files and projects ➞P.61
Deleting files and projects ➞P.62
Dividing files ➞P.63
Import files from other projects ➞P.64
Sequential playback of projects ➞P.65
USB
Computer connection ➞P.72
Card reader ➞P.73
Using USB memory to
save and import data ➞P.74
Audio interface/control surface ➞P.75
R16 Effect types and parameters ➞P.79
Effect patch list ➞P.89
Specifications ➞P.95
Troubleshooting ➞P.96
Index ➞P.97
System/SD card
Recording format bit rate setting ➞P.67
Adjusting the display ➞P.68
Changing the SD card
while the power is on ➞P.69
Formatting SD cards and
verifying card capacities ➞P.70
Confirming the version &
setting the battery type ➞P.71
Page 10
9
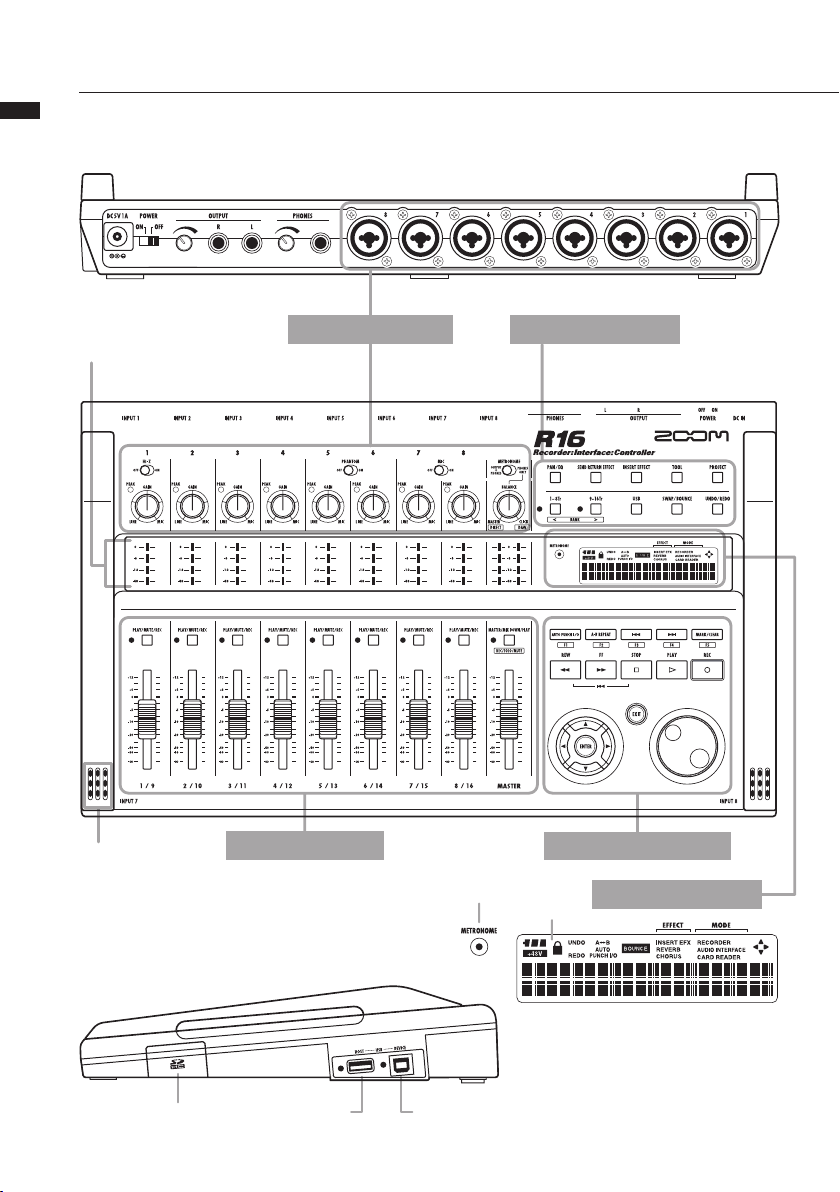
Panel Layout and functions
Panel Layout and functions
Rear panel
Level meters
(1/9~8/16, MASTER)
Built-in mic
Fader section
METRONOME indicator
Control sectionInput section
Transport section
Display
Display section
Right side panel
Bottom panel (not shown)
Battery compartment
SD card slot USB HOST jack USB DEVICE jack
Page 11

10
Input section
[PHANTOM] switch[Hi-Z] switch
PEAK indicators GAIN controls (1~8) BALANCE control
[MIC] switch
[METRONOME]
switch
Panel Layout and functions
Fader section
Status keys
(1/9~8/16, [MASTER])
Track indicator
Master indicator
Faders
(1/9~8/16, [MASTER])
Rear panel
POWER switch
Control section
PAN/EQ key
9-16Tr key
1-8Tr key
Transport section
[AUTO PUNCH IN/OUT] key
[ENTER] key
Cursor keys
[SEND RETURN EFFECT] key
[A-B REPEAT] key
[REW] key
OUTPUT jacks
[INSERT EFFECT] key
MARKER [
PHONES jack
[USB] key
[EXIT] key
[TOOL] key
[SWAP/BOUNCE] key
MARKER [
] key
DIAL
[PROJECT] key
[UNDO/REDO] key
] key
[MARK/CLEAR] key
[REC] key[PLAY] key[STOP] key[FF] key
DC5V1A jack OUTPUT control PHONES control INPUT jacks
Page 12
11
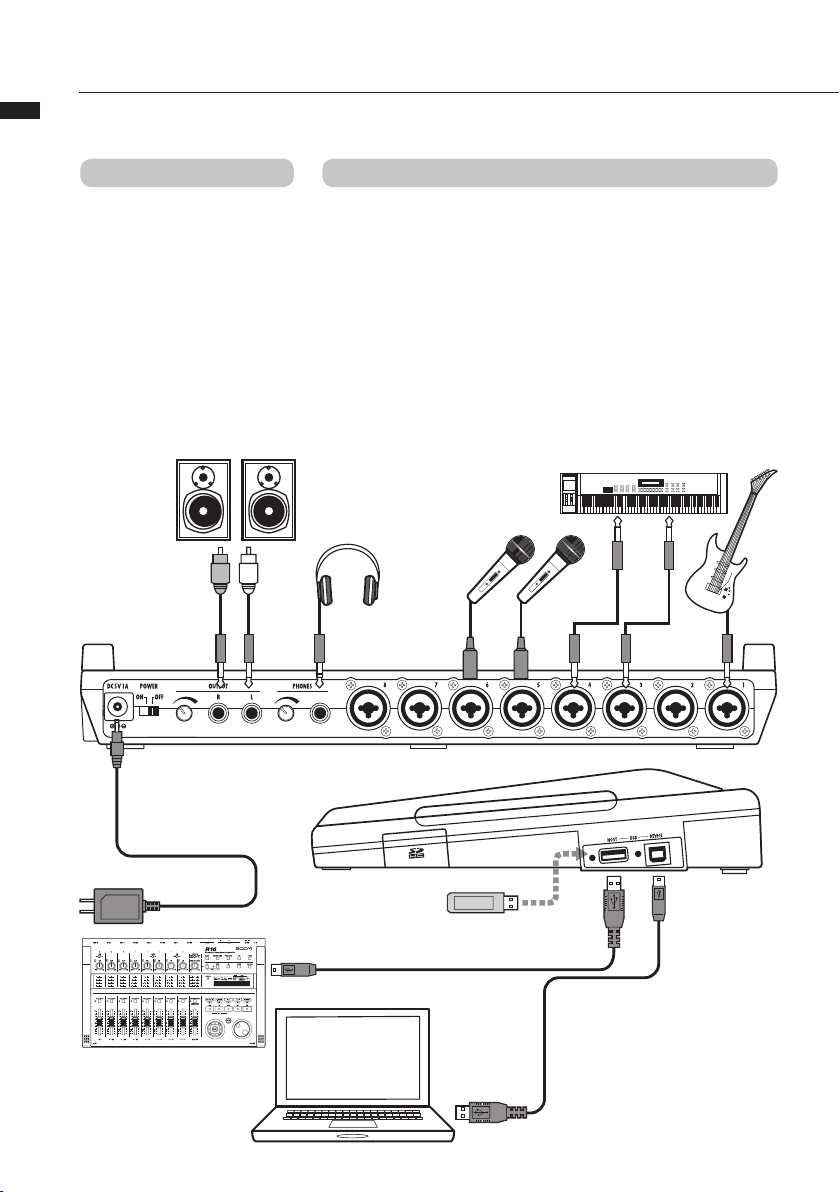
Connections
Refer to the instructions on this page when you connect instruments, microphones, audio equipment or
Connections
a computer to the R16.
OUTPUTS INPUTS
Use the [METRONOME] switch to set
whether the metronome is output to
only the [PHONES] jack or also to the
[OUTPUT] jacks.
1) Stereo system, speakers with
built-in amplifiers, etc.
When connecting speakers, be
sure to turn off the system’s power
beforehand.
Connecting them with the power on
could cause damage.
You can connect cables with XLR and monaural phone plugs (balanced or
unbalanced) to the INPUT jacks.
2) Microphones
In order to supply phantom power
to a condenser microphone, first
connect the microphone to [INPUT
5/6] and then turn the [PHANTOM]
switch ON.
3) Other equipment with stereo
outputs
When using a synthesizer or a
CD player with stereo outputs, for
example, be sure to connect its left
output jack to an odd number [INPUT]
jack on the R16 and its right output
jack to an even number [INPUT] jack
on the R16.
4) Guitar/Bass
Use [INPUT 1], which can handle
high impedance, when you directly
connect a passive-type electric guitar
or bass, and turn the [Hi-Z] switch
ON.
5) Built-in microphones
These microphones are useful for
recording drums indirectly and
recording a band. When you turn the
[MIC] switch ON, the sounds will be
input into INPUT 7 and 8.
Rear panel
8) AC adapter
Make sure to use a
ZOOM AD-14 adapter
designed for this unit.
7) Connecting two R16s
By connecting two R16s
together, you can record
16 tracks simultaneously.
21
3 4
R L
8
Right side
7
USB memory
6) Connecting a computer by USB
Connecting to a computer, you can
send audio files and projects directly to
and from the R16. You can also use the
6
R16 as an audio interface and a control
surface for DAW software.
panel
Page 13
12
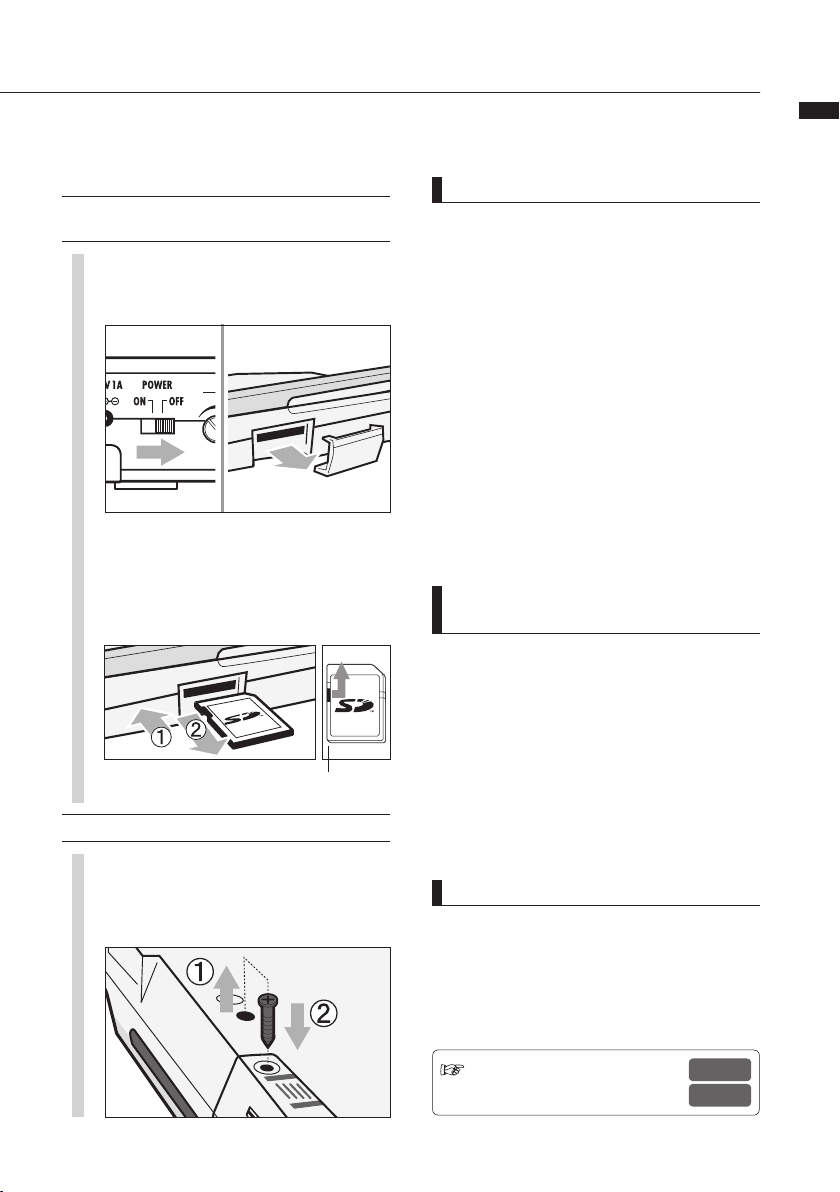
SD card installation
The R16 saves recording data and settings on SD cards.
To protect your data, turn the [POWER] switch OFF when inserting or ejecting a card.
An SD card is necessary for recording.
Always turn the [POWER] switch OFF first
(ordinary use)
1) Turn the [POWER] switch
1
OFF and detach the cover of
the SD card slot.
2) Insert an SD card
2
(write-protect unlocked)
into the slot.
To eject: Push the card in
first to eject it.
Unlock the SD card
write-protection.
Prevent unwanted removal of an SD card
NOTE
• If you must change an SD card while the power
is on, please follow the specific procedures
described on page 69.
• When inser ting or ejecting an SD card make sure
the [POWER] switch is OFF. If you insert with the
[POWER] switch ON, your data might be lost.
• If you cannot insert a card into the slot, you
may be trying to insert it in the wrong direction
or upsidedown. Try again with the correct card
orientation. If you force it in, you might break the
card.
• If an SD card was previously used with a
computer or a digital camera, you must format it
in the R16 before using it.
• If no SD card is inser ted, [REC] and [UNDO/REDO]
keys will not function in RECORDER MODE.
If these messages about
SD cards are shown
• “No Card”: No SD card is detected. Make sure an
SD card is inserted properly.
• “Card Protected”: The SD card write-protection
lock is closed, preventing rewriting. To release it,
slide the switch away from the lock position.
• “SD Card Format?”: The inserted card is not
formatted for the R16. Press the [ENTER] key to
format it. (Ref. P.70)
SD card installation
First remove the screw beside
1
the slot, and then screw it into
the screw-hole in the SD card
cover.
HINT
• The R16 can use 16 MB – 2 GB SD cards and
4–32 GB SDHC cards.
• You can get up-to-date information about
compatible SD cards on the Zoom site.
Zoom site: http://www.zoom.co.jp
Ref: SD CARD >EXCHANGE
SD CARD >FORMAT
P.6 9
P.7 0
Page 14
13
Powering the R16
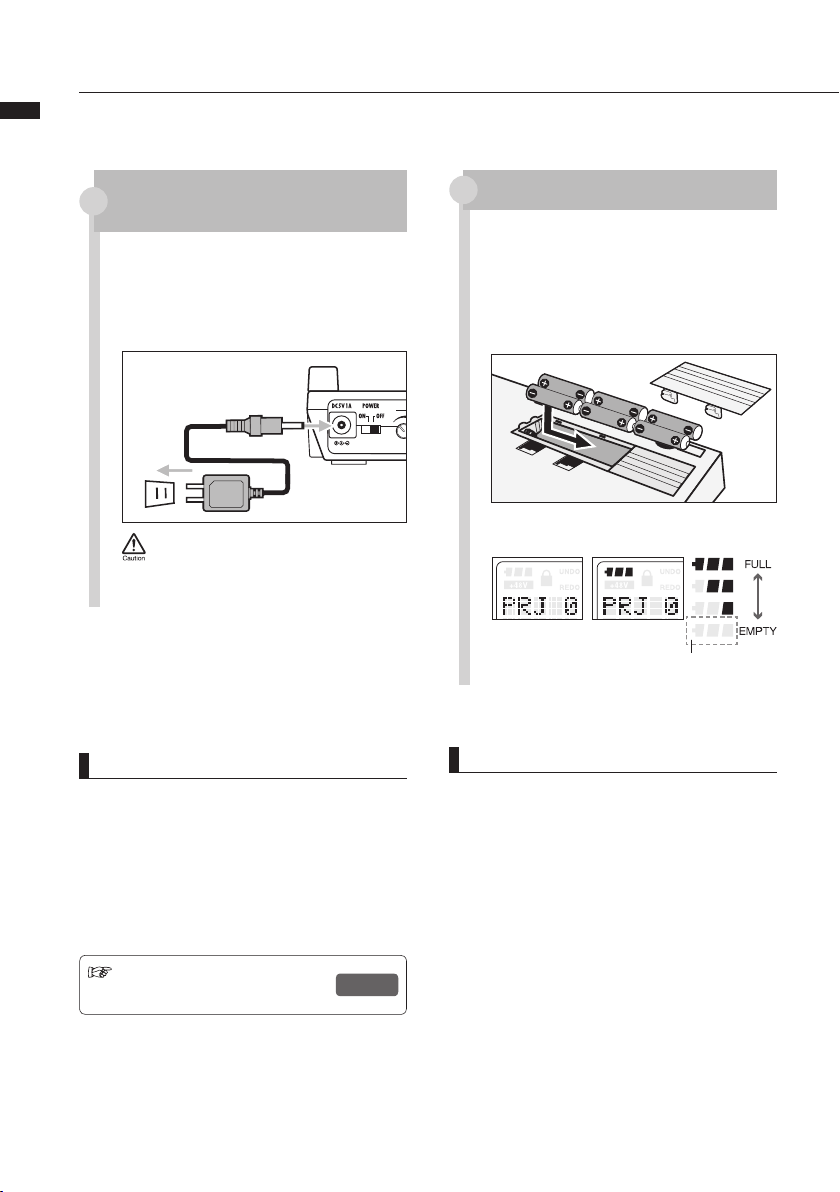
Please use the included AC ADAPTER that is designed for the R16 or six AA batteries (sold separately).
Powering the R16
Using the included AC ADAPTER with
an ordinary electricity supply
Make sure that [POWER]
1
is OFF, and then plug the
included AC ADAPTER into
the back of the unit.
You must use the included ZOOM AD-14
AC ADAPTER, which is designed for the
R16. Using any adapter other than the
AS-14 may damage the unit and void the
w ar r an t y.
HINT
Power supply from USB
With the [POWER] switch OFF, connecting a
computer to a USB cable makes the R16 start-up
automatically with power supplied by USB.
In this status, functions are different from when the
[POWER] switch is ON. The R16 can be used only
as an SD Card Reader or as an audio interface.
Ref.: R16 Battery type settings
BATTERY TYPE
P.6 9
Using batteries
Turn the [POWER] switch OFF
1
and open the battery case cover
on the bottom of the unit.
Install six AA batteries and
2
close the cover.
Power indicator on screen
No Indicator Indicator On
Using the AC
adapter
Using batteries
Battery power
status
Turn the [POWER]
switch OFF and
replace the
batteries.
NOTE
• Make sure that the [POWER] switch is OFF
when you open/close the battery cover or plug/
unplug the AC adapter. Removing batteries or
unplugging the AC adapter when the [POWER]
switch is ON, might cause lost recording data.
• The R16 can only use Alkali and NiMH batteries.
The approximate lifetime for Alkali batteries is
about 4.5 hours.
• Replace the batteries when you notice “Low
Battery” or the empty battery icon on the display,.
Turn the [POWER] switch OFF immediately
and install new batteries, or connect the included
AC adapter.
• Be sure to set the correct BATTERY TYPE setting
for accurate battery metering.
Page 15
14
Powering the R16 · Date & time setting
Precautions for starting-up and shutting down and how to set the date and time for files and data
Turning the power on and off
1) Make sure the power is off on all
equipment.
2) Insert an SD card into the R16. Confirm that
the connections for the power, instruments,
and monitoring system (or stereo
headphones) are correct.
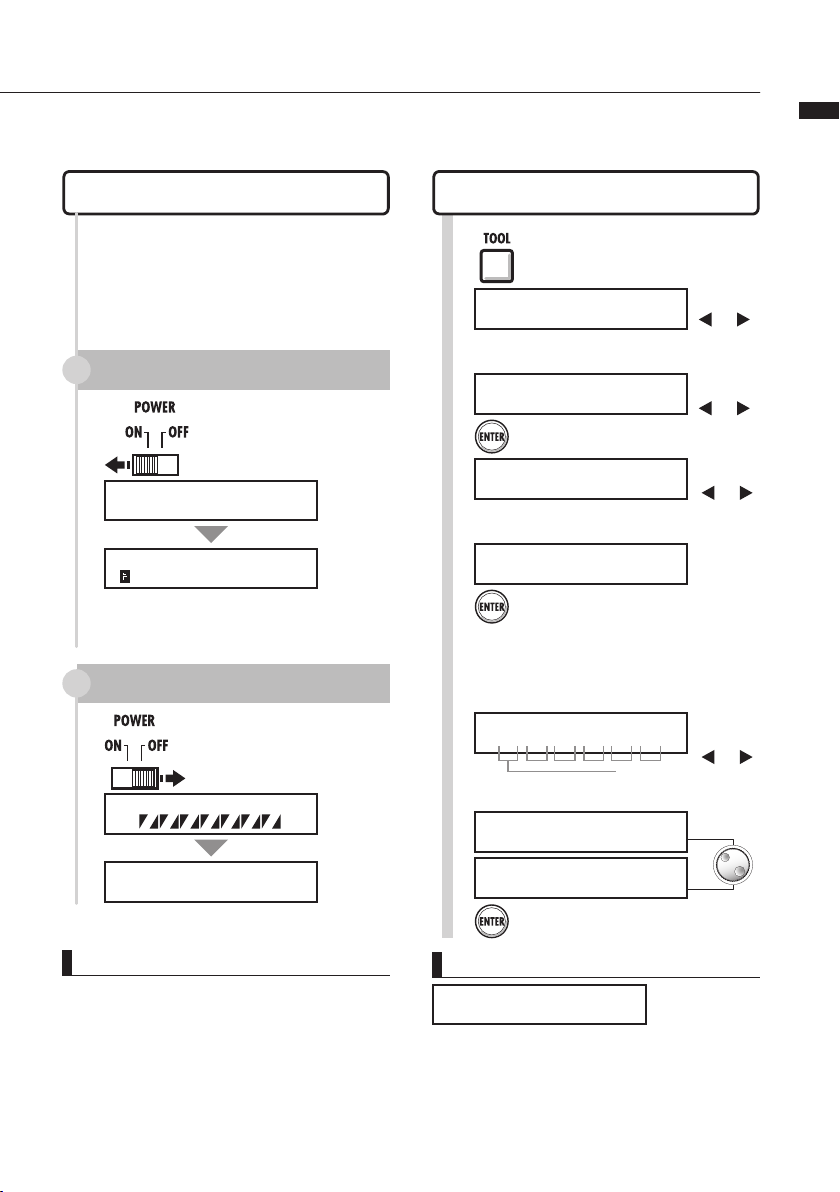
Turn [POWER] switch ON: Start-up
1
Turn the [POWER]
Setting the date and time
TOOL>SYSTEM>DATE/TIME
TOOL
>TUNER
Select
TOOL
>SYSTEM
Press [ENTER].
Press [TOOL].
>SYSTEM
1
2
cursor keys
.
switch ON.
SYSTEM
ZOOM R16
Ver:1.00
PRJ 000 PRJ000
00 00:00:00:000
Turn power on for connected instruments
2
and then for the monitoring system.
.
Turn [POWER] switch OFF: Shut-down
1
Turn the [POWER]
switch OFF.
Project Saving...
Goodbye See you!
>LCD
Select
3
4
>DATE/TIME
SYSTEM
>DATE/TIME
Press [ENTER].
Select items under
Make setting for the year, month, day and
time (hour: minute: second).
DATE TIME
2009/01/01 00:00:00
>DATE/TIME
Selected figure blinks
Change the time
5
DATE TIME
2009/03/01 00:00:00
DATE TIME
2009/03/10 10:15:03
Press [ENTER].
.
Rotate the DIAL
Use the
to move in
the Menu
Move with
the cursor
keys
Move with
the cursor
keys
Move with
the cursor
keys
to change the
numbers.
Powering the R16 · Date & time setting
.
NOTE
• Before turning the [POWER] switch ON, turn
the volume down on all instruments and the
monitoring system connected to the R16.
• If no power is supplied to the R16 for more than 1
minute, the DATE/TIME setting will be reset to its
initial value.
If this is displayed:
Reset
DATE TIME
• The DATE/TIME setting has been set to its initial
value. Reset the DATE/TIME settings.
Page 16
15
Switch and key operation overview
Here we explain how to use the keys of the R16 and their functions. Please look at the display for keys
Switch and key operation overview
that have icons shown on the screen.
Transport section
[REC] key
Functions only when tracks are in recording standby.
This key puts the R16 in recording standby mode.
When in recording standby this key stops recording standby.
[PLAY] key
This key starts playback.
When in recording standby this key starts the recording.
[STOP] key
When recording this key will stop the recording.
This key stops playback.
[REW] key
Rewind.
Fast forward.
Press [REC] and [REW] keys at the same time
to return to the top of the song.
[FF] key
[ENTER] key
Confirms selections
Control section
[PAN/EQ] key
[TOOL] key
[PROJECT]
key
[1-8Tr] & [9-16Tr] keys
[USB] key
[SWAP/BOUNCE]
key
Fader section
TRACK 1~8
(9~16) status
keys
MASTER
status key
Press to access track
mixer settings
→ P.41
Opens TOOL menu
(TUNER, METRONOME,
SYSTEM and SD CARD)
Opens PROJECT menu
Select tracks 1-8 or
9-16 with light showing
selected tracks
Opens USB menu
Opens SWAP/BOUNCE
menu
Change track ready status
Green: PLAY (playback)
No light: MUTE (mute)
Red: REC (record)
Change MASTER track
status
Green: PLAY (playback)
No light: MASTER (not
playback/recording ready)
Red: MIX DOWN
(recording)
A quick press returns to the
[EXIT] key
[DIAL]
previous step, and a long press
returns to the top screen.
Use to change and move among
menus and numbers.
Ref.: Mark-related keys see P.27.
Cursor:
Appearance and indication
The display shows cursor directions
Movable in all directions
Display
Use the cursor to move up, down, left and right to choose different function items.
The appearance of the display and its notation in the manual is shown above.
Manual notation
Movement in
the menu
Black: direction explained
Gray: movable directions
No color: not effective
Display
Appearance
Various switches & controls
[POWER] switch
[Hi-Z] switch
[MIC] switch
[METRONOME] switch
[GAIN] controls
[PEAK] indicators
[BALANCE]
Level meters
[METRONOME]
indicator
During audio interface use, control surface functions (shown in boxes below
keys) are provided by the row of keys starting with AUTO PUNCH I/O (F-1 to
F-5), as well as the [1-8Tr] and [9-16Tr] keys (<BANK>) and the [MASTER/
MIX DOWN/PLAY] (REC/SOLO/MUTE) key.
Turns power ON & OFF
Turns Hi-Z connection on/off (only for
INPUT 1).
Turn built-in microphones on/off
(signals to INPUT 7 & 8).
Set metronome output.
Adjust input sensitivity
Light at the moment of maximum input
When [METRONOME] is set to
“PHONES ONLY” during recording,
this adjusts the balance of the preMASTER fader and metronome signals
Show recording/playback levels
Flashes in time with the count
Page 17
16
Display information
On the R16’s display you can see project data, recorder connection and operation status, computer
audio-interface connection and status, available functions and the R16 menus.
Display and indications
The TOP screen shows the current projects.
Top line: project number and project name
Bottom line: icon mark/number and counter (time)
MENU screens show operation menus
PROJECT 1/7
>SELECT
Top line: current menu
Bottom line: menu &
items available
Page in menu/total
number of pages
Effect & Mode
Send return effects → P.48
REVERB/CHORUS icons
INSERT EFX icon P.48
Shown when insert effects on, set by key operation
INSERT
EFFECT
Key operation: Open effect menus
MODE
Displays current R16 operation mode
Recorder → P.17Audio Interface → P.75Card reader → P.73
Shown when on, set
by key operation
key
SEND
RETURN
EFFECT
key
Icon display area: active settings shown
Information
display area
Shown means active
Not shown means inactive
Usable directions
Icon display and setting keys
PHANTOM icon
Display on: 48V phantom power is supplied to mics connected to INPUT 5 & 6
Setting: [PHANTOM] switch ON
BATTERY icon → P.13
Display on: Batteries in use and their remaining charge
No display: AC adapter or USB power in use (no display while
powering with batteries means the batteries need to be replaced)
PROTECT icon → P.56
Display on: project cannot be overwritten
No display: project not protected
Set using menu
A-B REPEAT icon
→ P.30
[A-B REPEAT] key
Display on: A-B points are set
Set by key operation
BOUNCE icon
→ P.37
Display on: active
AUTO PUNCH IN/OUT icon
→ P.27
[AUTO PUNCH IN/OUT] key
Display on: active
Set by key operation
Display information
[UNDO/REDO]
UNDO icon REDO icon
UNDO: You can return to the previous recording operation
Valid UNDO operations: PUNCH IN/OUT, BOUNCE, MIX
DOWN (to MASTER TRACK)
REDO: Reverse the UNDO operation
[UNDO / REDO] key
Icon shown/not shown
After certain operations, “UNDO” is displayed, meaning an
UNDO operation is possible
After pressing the [UNDO/REDO] key, “REDO” is displayed,
meaning a REDO operation is possible.
Set by key operation.
NOTE
• UNDO is only valid for audio data recorded on tracks.
• You can only UNDO and REDO one operation.
Page 18
17
Track recording
R16 recording ow • Creating a new project
With multitrack recording you can create a complete work of music using the R16.
R16 recording ow • Creating a new project
To begin, create a new project for each piece.
Recording preparation
Connect instruments to the
appropriate INPUT jacks
Make project and track settings
Create a new project
Select the INPUTS and the recording tracks
Set stereo links
Change track status (recording, play, mute)
Adjust input sensitivity using the [GAIN] controls
Performance preparation
Set PRE-COUNT/METRONOME
Set and use TUNER
Record the first tracks
Create a new project
PROJECT>NEW
1
2
Press [PROJECT].
PROJECT
>SELECT
Select
PROJECT
>NEW [SD]003:22:52]
Press [ENTER].
>NEW
.
Confirm the PROJECT name.
New project number
3
Project No.003
PRJ003
New project name
Press [ENTER].
Select whether to use the settings of
4
the last project.
SETTING?
[CONTINUE] RESET
Select this to restore the default values
Press [ENTER].
Change
menu
Change
letters
Change
menu
Record standby—Record—Stop
Record more tracks
Overdubbing
Playback of already recorded tracks
Overdubbing
Record standby—Record—Stop
Execute.
5
No.003:PRJ003
Create?
Press [ENTER].
HINT
You can change the new project name at Step 3.
Ref: Name change
Using the previous settings
P.4 3
P.5 7
Page 19
18
Track recording
Connecting instruments and making monaural settings
You will need to adjust settings for musical instruments such as high impedance guitars, line input
synthesizers, the built-in microphones and microphones that use phantom power, as well as stereo and
monaural inputs, for example.
Connecting passive-type guitars
Connect high impedance (Hi-Z) instruments to
INPUT 1, and the turn the [Hi-Z] switch ON.
Assign INPUT 1–8 connections to
tracks 1–16
Connect instruments and microphones
to jacks
1
INPUT 1 – 8
Make settings for specific instruments,
built-in microphones and stereo tracks.
Signal to INPUT 1
Connecting low-impedance
instruments (monaural connection)
Connect low impedance instruments to any of the
INPUTS.
Signals to any INPUT between 1~8
2
PHANTOM
STEREO
Select the Track switches
3
TRACKS 1~8
Change the status of the connected
INPUTS
4
Press the status key of a track one or two
MONAURAL×2
TRACKS 9~16
Enable the faders
either for tracks
1–8 or 9–16
MICHi-Z
MONAURAL
times to turn the red light on.
Using phantom power
Red light on: recording enabled (REC)
Connecting instruments and making monaural settings
Supply phantom power to INPUT
5 and 6 jacks
NOTE
*Turn the [PHANTOM] switch on to provide +48V
power to INPUT 5 and 6. You can use either
INPUT 5 or 6 or both when the switch is ON.
*Use the fader that corresponds to the INPUT jack.
The signal from INPUT 1 goes to track 1/9.
*To use Track 9~16, switch the fader assignment by
pushing the [9 –16Tr] key.
*Depending on the INSERT EFFECT selection, the
output flow will change.
*Creating one stereo file from two faders requires
the use of the STEREO LINK setting.
Set tracks to receive INPUTS
Press the [1-8Tr] or [9-16Tr] key to set which tracks
will record the INPUTS.
INPUT TRACK
[1~8Tr] active [9~16Tr] active
1 1 9
2 2 10
3 3 11
4 4 12
5 5 13
6 6 14
7 7 15
8 8 16
Ref: STEREO setting
P.19
Page 20

19
Track recording
Instrument connections: stereo settings and status keys
To make a stereo recording, you can create one stereo file by recording on the neighboring
Instrument connections: stereo settings and status keys
odd/even-numbered tracks and by setting a stereo link.
The status key must be pushed to transfer the signal from an INPUT to a recording track.
Files corresponding to INPUTSUsing the built-in microphones
Turn the [MIC] switch ON.
Signals to INPUT 7/8
Connecting line input instruments
(stereo connection)
Choose INPUT 1, 3, 5 or 7 and connect the musical instrument.
Use INPUT 1/2, 3/4, 5/6 and 7/8 as pairs. Input
left signals to odd-numbered tracks and right
signals to even numbered tracks.
Assign INPUTS 1–8 to tracks 1–8
or tracks 9–16.
Connect instruments and
1
microphones to the jacks.
INPUT1~8
Recording INPUTS 1–8 results in file names
that correspond with the track numbers.
When STEREO LINK has been used
Stereo-linked tracks result in stereo files.
Lch = odd-numbered input signal recorded
Rch = even-numbered input signal recorded
Make stereo settings for the specific
2
instruments and built-in microphones.
STEREO
Select the tracks.
3
TRACKS
1~8
Set the status of the connected INPUTS.
4
Press the STATUS KEY of the
paired tracks one or two times
each to turn both lights on.
Red lights on: record ready (REC )
MONAURAL×2
TRACKS
9~16
Assign faders to
either tracks 1–8
or 9–16
MONAURAL
NOTE
* Use the fader that corresponds to the INPUT
jack. Signals from INPUT 1 go into Track 1/9.
* To use tracks 9-16, press the [9-16tr] key to
switch the fader assignments.
* The input and output flow change depending on
the INSERT EFFECT setting.
Page 21
20
Track recording
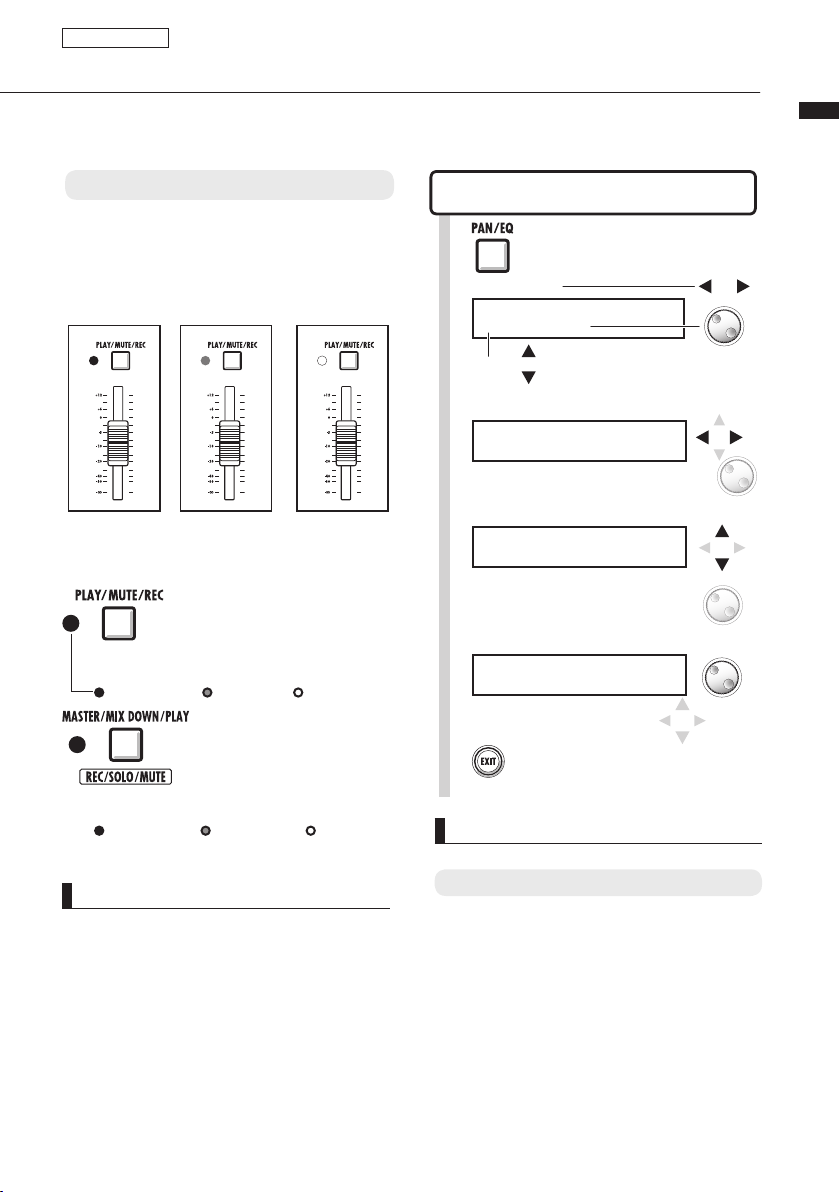
Stereo link
Set STEREO LINK for tracks for recording in advance to create a stereo file of the recording.
You can also assign stereo files.
STATUS KEYS and TRACK INDICATORS
Press a STATUS KEY to change the color of the
TRACK INDICATOR light and set the role of the
track fader.
The three TRACK INDICATOR colors show the
track status.
Stereo link
PAN/EQ>STEREO LINK
1
Press [PAN/EQ].
Switch tracks.
Track1
EQ HI G=0db
Change type
Select a track.
2
Track3
EQ HI G=0db
[REC]
Record ready
[PLAY]
Playing back
[MUTE]
Sound
disabled
Track indicators (1~16)
Press
REC
Red light on
Press
MASTER
Red light on
Press
→
→
Green light on→ No light on
→
Track indicator (MASTER)
→
→
Green light on
→
PLAY
Press
PLAY
→
→
→
→
→
Press
MUTE
Press
MIX DOWN
No light on
HINT
* In order to send the signals from an INPUT to a
recording track, press its STATUS KEY 1–2 times
until the track indicator lights red.
* For use of two INPUTS press both STATUS KEYS
to connect both INPUTS to tracks.
* Creating one stereo file from 2 tracks requires
STEREO LINK to be set.
* If the MASTER track is set to PLAY, all other
tracks will be set to MUTE (no sound).
Select
3
Tu r n
4
5
HINT
* The STEREO LINK track pairs are
Track 1/2, Track 3/4, Track 5/6, Track 7/8,
Track 9/10, Track 11/12, Track 13/14 and Track 15/16.
* STEREO LINK changes the setting from two
monaural tracks to one stereo track.
* At Step 4, whatever track number you choose,
the neighboring number track will be linked. You
cannot change these combinations.
* To adjust the volume of a pair of tracks set to
STEREO LINK you must operate the odd number
fader. The even number fader has no effect.
* The PAN parameter of a pair of tracks set to
STEREO LINK can be used to adjust their relative
volume balance.
* Even when STEREO LINK is active you can select
files and make phase settings for each track.
STEREO LINK.
Track3
STEREO LINK Off
STEREO LINK On.
Track3/4
STEREO LINK On
Press [EXIT] to complete
the setting.
Change
parameter values
Change setting
On/Off
Stereo link
Page 22
21
Track recording
Recording the first track
After connecting instruments and completing all recording preparation, we can prepare the recorder and
Recording the first track
start recording the first track.
Starting from the top screen of
the new project
Return to the top screen.
1
2
Press and hold [EXIT] for more than 2
seconds.
Return the counter to its head.
Press [REW] & [Stop] at
the same time to return the
counter to its head.
The top screen should look like this.
PRJ 001 PRJ001
ト00 00:00:00:000
The counter is at the head position (mark 00).
HINT
The top screen display of the new project
Counter at the head position (mark 00)
Batteries and phantom power active
After setting the input (Step 5 and after), you
can process input signals with the INSERT
EFFECT.
Adjusting the input level
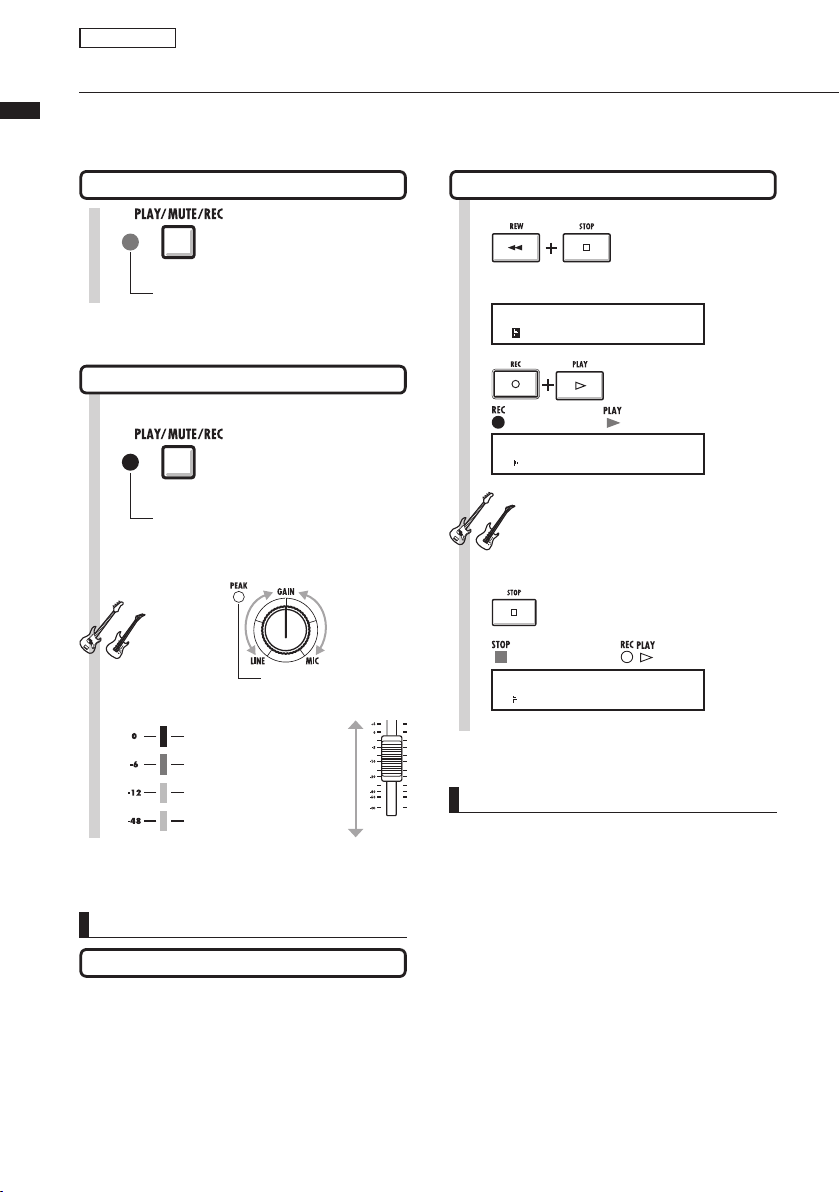
Arm the track for recording.
3
Red light on: recording enabled (REC).
Adjust the input sensitivity (GAIN).
Press 1-2 times until the
track light turns red.
4
Sounds
start.
Adjust the recording level.
5
If an INSERT EFFECT is
applied to an INPUT, make
adjustments to the patch
level, for example, to prevent
the LEVEL METER red light
(0dB) from turning on.
Adjust the monitoring system
6
Should light occasionally when
the volume reaches maximum
Using the recording track fader,
adjust the monitoring level of
the instrument being recorded.
(INPUT 1 is track 1 or 9).
Adjust the
recording level
and monitor.
Ref. : New project creation
Insert effect
P.17
P.4 8
NOTE
Red lights on PEAK indicators and Level meters
• A PEAK indicator turns red when the input
signal exceeds the maximum detectable level
of 0 dB, resulting in input clipping. The red light
on a Level meter means that the signal being
recorded (signal after passing through the insert
effect) is clipping. If clipping happens, the
recorded sound will be distorted. You should
reduce the recording level.
Page 23

Recording the first track
22
Recording the first track
Start record standby.
7
Press [REC].
Start recording.
8
Press [PLAY].
Red light on
PRJ 001 PRJ001
00 00:00:00:123
The counter starts to move.
Stop recording.
9
Press [STOP].
Green light on
PRJ 001 PRJ001
00 00:02:04:247
The counter stops moving, but does not return to 0.
Red light on
Green light on
Lights off
HINT
• Press [UNDO/REDO] to cancel the recording.
Recording again
• If you record on the same track again, the
previous recording will be overwritten.
• The three ways to record a new le or re-record
are:
• Press the [UNDO/REDO] key to execute the
undo-action (cancel the recording).
• Through PROJECT>FILE, set the recorded
track assignment to “NOT ASSIGN.” (Ref.: P.23)
• Through PROJECT>FILE>EDIT>DELETE,
delete the FILE (AUDIO DATA). (Ref. : P.62)
Playing back the first track
10
11
12
13
14
Stop.
Press [STOP].
Green light on
PRJ 001 PRJ001
00 00:04:31:153
Play the track.
Press the [PLAY/MUTE/
REC] key of the TRACK to
playback 1–2 times until
Green light on: playback
enabled [PLAY]
Return the counter to its head.
PRJ 001 PRJ001
ト00 00:00:00:000
Play.
Stop.
the green light is on.
Press [REW] & [Stop] at
the same time to return the
counter to its head.
Press [PLAY].
Press [STOP].
Lights off
The counter
stops moving.
Green light on
Green light on
NOTE
• Recorded audio les in a track will be recorded
over. If you rewind the counter back to the head,
a new recording will overwrite the previous one.
During playback the files stored on the tracks will
be played.
If you want to record a new file, do not assign a file
to the track.
Ref. : Assigning files to tracks
Mark
P.2 3
P. 31
Page 24
23
Track recording
Track assignment
Here, after completing the first track recording, we record the next track while playing back the already
Track assignment
recorded audio file. The preparation is almost identical to the first one, but we will conduct playback on
a different track.
Playback track preparation
Assign the playback file to a
1
different tracks.
Press [PROJECT].
PROJECT
>SELECT
Select
2
>FILE
PROJECT
>FILE
Press [ENTER].
.
Select the track for playback.
3
TRACK1
NOT ASSIGN
Select a different track from the one for
the next recording.
Select the file for the track.
4
TRACK5
MONO-000 [TR 5
Assign it.
5
6
7
Press [ENTER].
TRACK5
MONO-000 [TR 5]
Press and hold [EXIT] to
return to the top screen.
Prepare the already recorded
track for playback.
Press the [PLAY/MUTE/
REC] of the track to be
played back 1–2 times until
the green light turns on.
Menu
change
Track
change
File change
NOTE
• Recorded audio files on tracks will be overwritten
by new recording. If you rewind the counter to
the top and begin recording again, be aware that
the overwritten previous recording will be lost.
• During playback the file assigned to the track is
played.
• If you want to record to a new file, do not assign
any file to a track.
• When you move a file on a track, confirm that no
files are assigned to the track to be recorded
(“NOT ASSIGN”). If there is any assigned file, that
recording will be overwritten by new recording.
• Files exclusively for reading (read only) are shown
with <R.0> on the display, and you cannot record
over them if they are assigned to tracks.
• Files marked with an asterisk (*) cannot be
assigned to the selected track.
HINT
• File track assignment status
TRACK 5
NOT ASSIGN
Display of a track with no file
TRACK 5
MONO-000
Display of track with no assigned files
TRACK 5
MONO-000
Display of a track with assigned file
• If the first and second recordings are on different
tracks, you can skip to Step 7, because you
only need to change the track status and start
recording.
• You can select tracks using the status key. The
indicators of selectable tracks will light orange.
• You can assign files imported from a computer or
USB memory.
• Stereo files can only be assigned to the tracks set
to stereo link or the master track.
[TR 3]
Green light on: playback enabled [PLAY].
Page 25
24
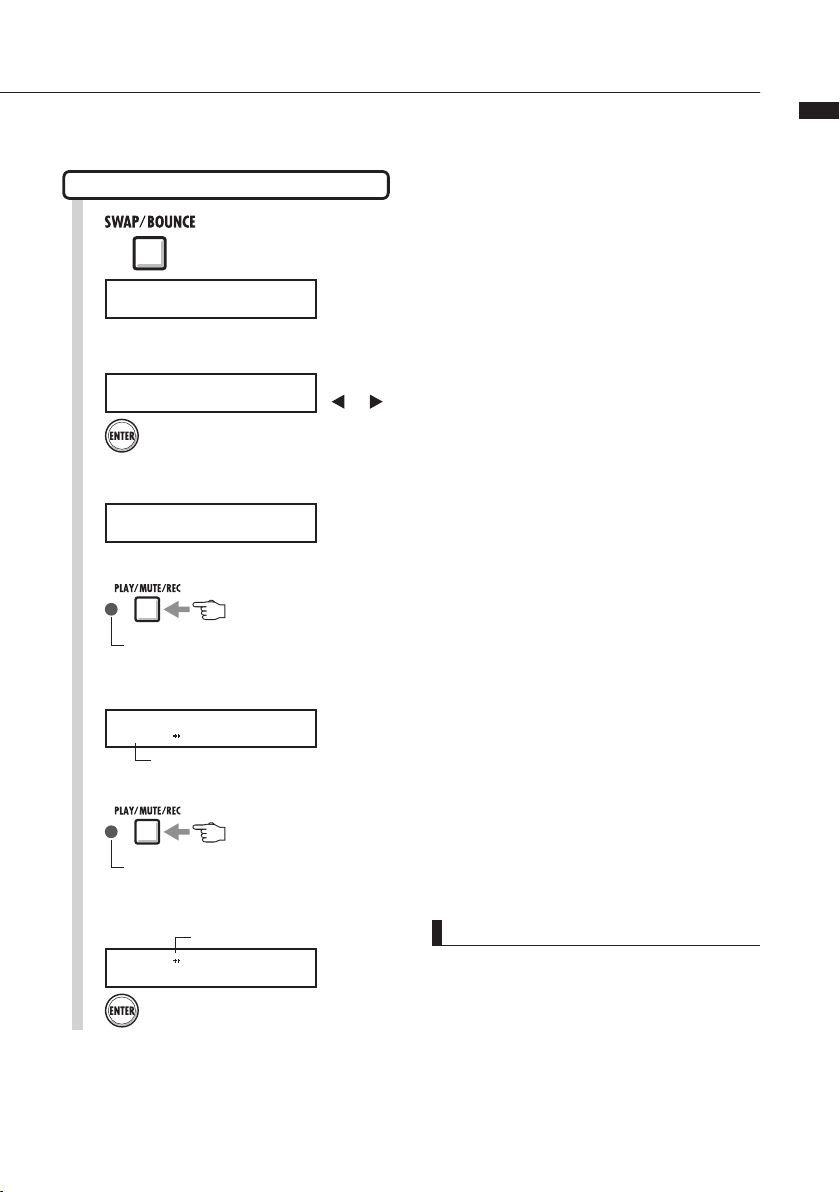
Switch two tracks (SWAP)
Track assignment
1
Select
2
SWAP/BOUNCE
>SWAP
SWAP/BOUNCE
>SWAP
Press [SWAP/BOUNCE].
>SWAP
Press [ENTER].
.
Select the first track to swap.
3
SELECT TRACK
Indicators blink orange on tracks that can be selected.
Press the track status key to select a track.
Selectable: blinking orange
Selected: lit orange
Select the second track to swap.
4
SELECT TRACK
TRACK1
Already selected track
Indicators blink orange on tracks that can be selected.
Press the track status key to select a track.
Menu
change
Selectable: blinking orange
Selected: lit orange
Swap the tracks.
5
TRACK1 TRACK2
Swap?
Tracks to be swapped
Press [ENTER] to confirm.
NOTE
• The swap function switches two tracks, including
the assigned files and all track parameter
information.
• Stereo tracks cannot be swapped.
Page 26
25
Overdubbing
Recording the second and later tracks
After completing the first track recording, you can record the next track in turn while playing back
Recording the second and later tracks
recorded audio files. The preparation for recording is the same as for the first track, and you can
playback on a different track.
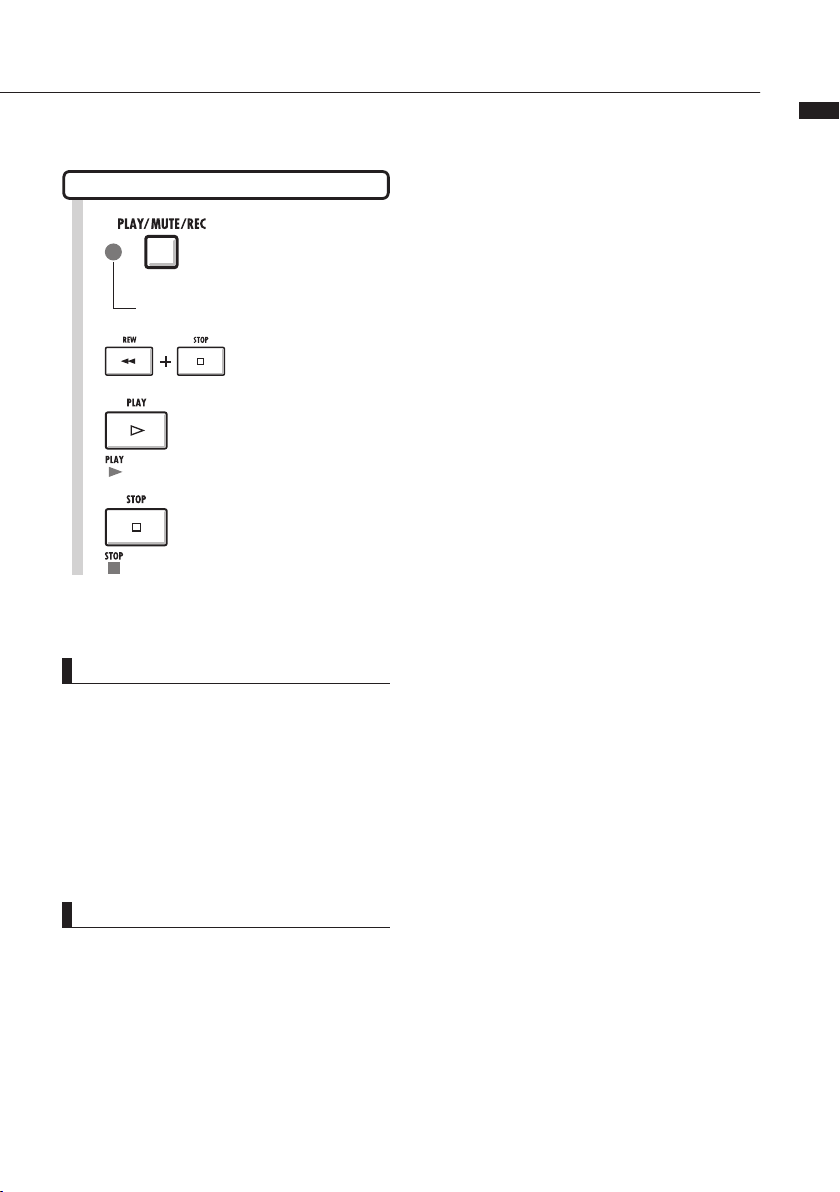
Playing back the already recorded track
]
1
Green light on: playback enabled [PLAY]
Press the [PLAY/MUTE/
REC] of the TRACK for
playback 1-2 times until the
green light turns on.
Recording~Stop
4
PRJ 001 PRJ001
ト00 00:00:00:000
Press [REW] & [Stop]
at the same time to
return the counter to
the head.
Recording preparation for the second track
2
Red light on: recording enabled [REC]
Press the [PLAY/MUTE/
REC] of the recording track
1-2 times until the red light
turns on.
Adjust the [GAIN].
3
Instrument starts
sounding
Red
Orange
Green
Green
HINT
Other Uses
• If you want to use the same track as you recorded
before for the second track recording, you
should transfer the file to another track, and
make the target track empty. Refer to “Preparation
of playback tracks” on P.24.
• You can also swap recorded tracks with
unrecorded tracks.
• This method is useful for creating a second guitar
track using Hi-Z.
Briefly lights when the sound
volume reaches maximum.
The level should
cause no red light
(0dB) even at the
maximum sound.
Press [REC] and then
5
PRJ 001 PRJ001
ト00 00:00:00:123
[PLAY] to star t recording.
Green light onRed light on
The counter starts moving.
Perform.
6
Press [STOP] to stop recording.
Green light on The lights off
PRJ 001 PRJ001
00 00:02:04:247
The counter stops moving, but does not return to 0.
NOTE
• If the first and second recordings are on different
tracks, you can skip to Step 7, because you
only need to change the track status and start
recording.
• When you move file tracks, make sure there is
no file assigned to the track where you plan to
record (display says “NOT ASSIGN”). If there are
assigned files, old files will be overwritten and
cannot be retrieved.
• Select tracks using the STATUS KEYS. Orange
lights indicate selectable tracks.
• Read-only files are displayed as <R.0> and
cannot be recorded over if assigned.
Page 27
26
Playback all the tracks
Recording the second and later tracks
1
Green light on: playback enabled [PLAY]
2
3
Green light on
4
Green light on
Press the [PLAY/MUTE/
REC] keys 1-2 times on all
TRACKS to be played until
the green lights are on.
Press [REW] & [Stop] at
the same time to return
the counter to the head.
Press [PLAY] to star t playback.
Press [STOP] to stop playback.
NOTE
• When you move a file on a track, confirm that no
files are assigned to the track to be recorded
(“NOT ASSIGN”). If there is an assigned file, that
recording will be overwritten by new recording.
• Recorded audio files on tracks will be overwritten
by new recording. If you rewind the counter to
the top and begin recording again, be aware that
the overwritten previous recording will be lost.
• During playback the file assigned to the track is
played.
HINT
• If you want to record a new file, do not assign any
file to a track.
Page 28
27
Recording again
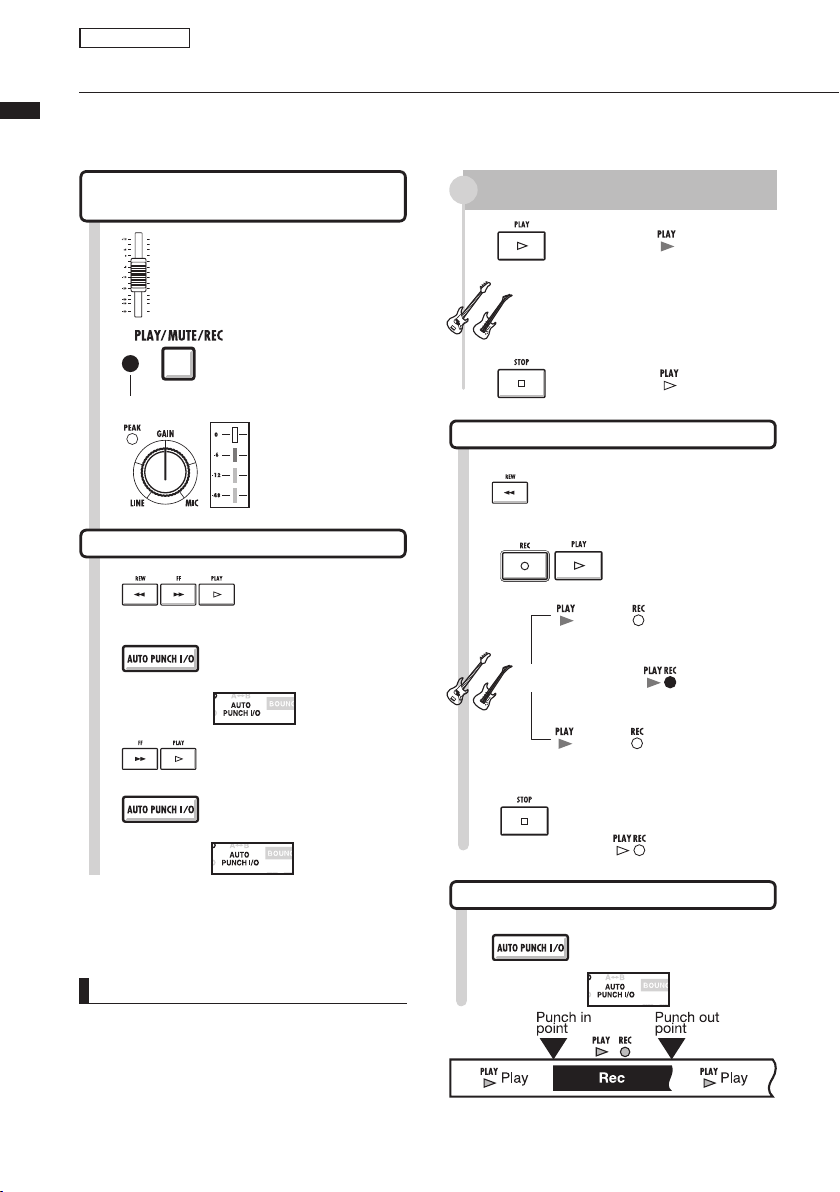
Automatic punch-in/punch-out
The punch-in and punch-out functions enable you to pick already recorded portions of a recorded file
Automatic punch-in/punch-out
and re-record them. You can set the beginning and ending points of the portion in advance and record
automatically with punch-in at the beginning and punch-out at the ending.
Prepare the track you want to
re-record with punch-in/punch-out
Re-recording a track
1
2
3
Raise the fader.
Press [PLAY/MUTE/REC]
1-2 times until the red light
is on.
Red light on: recording enabled
Adjust the recording
level and the GAIN to
be the same as the
already recorded part.
Rehearse
Press [PLAY]
1
2
Re-recording: punch-in/punch-out
8
to start playing.
When the punch-in point is passed, the [MUTE]
function of the track automatically starts.
Perform (not recording)
When the punch-out point is passed, the [MUTE]
function is released.
Press [STOP]
to stop.
Move to before the
PUNCH IN point.
Light on
Light off.
Make punch-in and punch-out settings
Using [REW], [FF] and [PLAY]
4
5
6
7
locate the point just before
the re-recording (PUNCH IN).
Press [AUTO
PUNCH I/O]
Pressing [FF] & [PLAY], locate
the punch-out point.
Press [AUTO
PUNCH I/O]
Set the punchin point.
Icon blinks
Set the punchout point.
Icon lights
NOTE
•
Once you make auto punch-in/out settings, you
cannot change the points. To change the points you
must cancel and reset them.
•
Press the [AUTO PUNCH IN/OUT] key again to
cancel the points set.
9
Light on Light off
Pass the punch-in point
Performance Recording.
Pass the punch-out point
Light on Light off
Press [STOP]
10
Release PUNCH IN/OUT
11
to stop.
Press [AUTO PUNCH I/O].
Re-recorded portion.
Press [REC] and then
[PLAY] to star t playback.
Not
recording.
Lights on
Not
recording.
The recorder stops.
Light off
Icon off
Page 29
28
Recording again
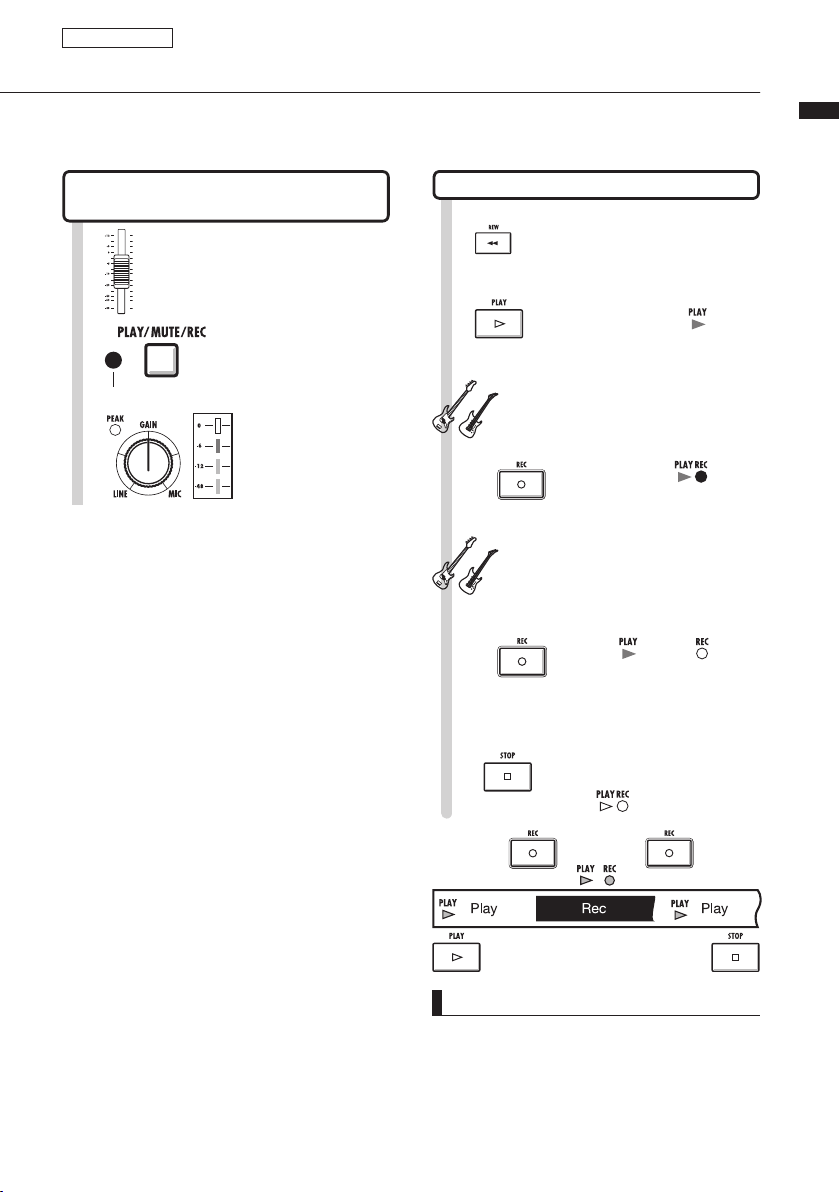
Manual punch-in/punch-out
You can punch in and out manually. Press the [REC] key during playback to start re-recording from that
point.
Prepare the track for punch-in/
punch-out
Re-recording track
1
2
3
Raise the fader
Press [PLAY/MUTE/REC]
1-2 times until the red light
turns on.
Red light on: recording enabled
Adjust the recording
level and the GAIN to
be the same as the
already recorded part.
Re-recording: punch-in/punch-out
4
5
6
7
Using [REW], locate the point just
before where you want to re-record.
Press [PLAY] to star t
playback.
Start performance,
not yet recording
Press [REC]
to start recording,
(punch-in)
Perform and record.
Press [REC]
recording/start playback
(punch out).
Light on Light off
to stop
Light on
Lights
on
Manual punch-in/punch-out
8
Press [STOP]
to stop.
Start
Re-recorded portion
The recorder stops.
Lights off
Stop
NOTE
• Punch-in/punch-out recording overwrites the
existing recording. A previously recorded file
should be assigned to the track.
• You can use the [UNDO/REDO] function.
Page 30
29
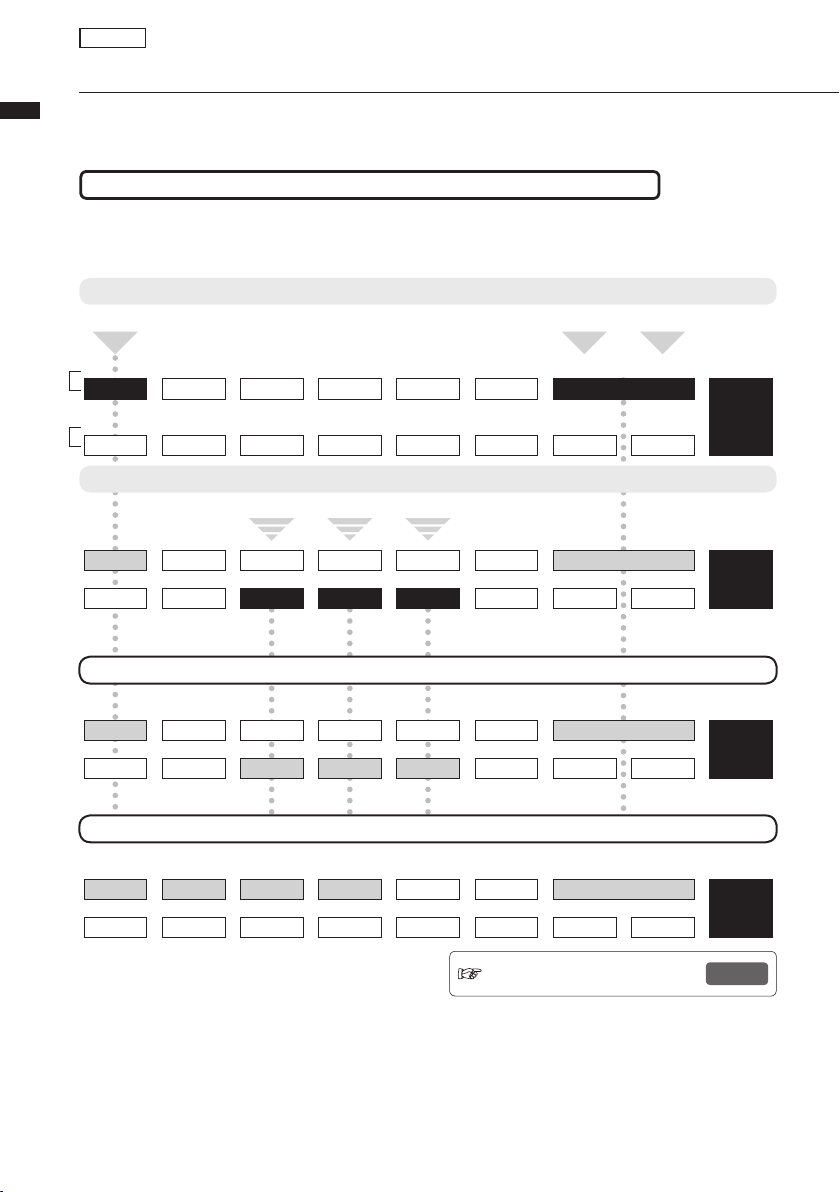
Playback
Playback of a project
Recorded audio files are assigned to tracks for storage. During playback, all the tracks that you have
Playback of a project
enabled for playback with their status keys (green lights on) will be played.
Overview of recording and playback process in a project
TRACK
1/9
TRACK
2/10
TRACK
3/11
TRACK
4/12
TRACK
5/13
TRACK
6/14
TRACK
7/15
TRACK
8/16
Recording the first track
Track 1: monaural recording Track 7 & 8: stereo recording
1-8 TRACK
REC NOT ASSIGN
NOT ASSIGN NOT ASSIGN
MONO-000.WAV
9-16 TRACK
NOT ASSIGN NOT ASSIGN NOT ASSIGN NOT ASSIGN NOT ASSIGN NOT ASSIGN NOT ASSIGN NOT ASSIGN
NOT ASSIGN NOT ASSIGN
REC
STE-000.WAV
Recording more tracks/Playback of the previously recorded tracks
Track 1: monaural playback
PLAY
NOT ASSIGN NOT ASSIGN NOT ASSIGN NOT ASSIGN NOT ASSIGN
MONO-000.WAV
NOT ASSIGN NOT ASSIGN NOT ASSIGN NOT ASSIGN NOT ASSIGN
Monaural recording on tracks 11, 12 and 13
PLAY
STE-000.WAV
REC REC REC
MONO-001.WAV MONO-002.WAV MONO-003.WAV
Playback
Track 1, 11, 12 and 13: monaural playback Track 7 & 8: stereo playback
PLAY
NOT ASSIGN NOT ASSIGN NOT ASSIGN NOT ASSIGN NOT ASSIGN
MONO-000.WAV
NOT ASSIGN NOT ASSIGN NOT ASSIGN NOT ASSIGN NOT ASSIGN
PLAY PLAY PLAY
MONO-001.WAV MONO-002.WAV MONO-003.WAV
PLAY
STE-000.WAV
MASTER
TRACK
Assigning tracks and playback
Track 1, 2, 3 & 4: monaural playback Track 7 & 8: stereo playback
PLAY PLAY PLAY PLAY
VOCAL2.WAV VOCAL.WAV BASS.WAV GUITAR.WAV
NOT ASSIGN NOT ASSIGN NOT ASSIGN
NOT ASSIGN NOT ASSIGN NOT ASSIGN
NOT ASSIGN
NOT ASSIGN
STE-000.WAV
NOT ASSIGN NOT ASSIGN
Ref. : Assigning files to tracks.
PLAY
P.2 3
Page 31

30
#$ࡇ࠻⸳ቯㇱಽ
ߊࠅߒౣ↢
Playback
Repeat playback of a specific section (A-B repeat)
You can set and repeat playback between a beginning point (A) and an ending point (B) in a project.
Setting A-B points
Locate the
1
2
A↔ blinks.
3
4
A↔B icon
A-B repeat: playback repeatedly
Press [PLAY] to star t repeat
5
playback.
beginning point.
Press [A-B REPEAT] .
Locate the end point.
Press [A-B REPEAT] .
HINT
• When playback reaches point B, it automatically
goes back to point A and continues playback.
• While the A↔B icon is on, playback repeats
continuously.
• You can make these settings both during playback
and when stopped.
• If you set point B at a time before point A, repeat
playback will start from point B.
• If you want to make new settings, cancel the
previous ones by pressing the [A-B REPEAT] key
again and then make the new ones.
A-B Repeat section
Plays again and again
A-B repeat
6
Cancel A-B repeat and the points
7
Press [STOP] to stop playback.
Press [A-B REPEAT] again
to cancel.
A↔B icon off
Page 32

31
Using the counter and markers to move (locate)
The counter indicates recording time and elapsed time in minute/second/millisecond and bar/beat/tick
Using the counter and markers to move (locate)
(1/48beat). Use it to set marks that you can then quickly move (locate) to in your project.
Locate a time or position using
the counter
Preparation: Stop the recorder.
Select the project.
Start from the top screen.
Select hour: minute: second or
1
bar-beat-tick.
PRJ01 PRJ001
00 00:00:00:000
Hour: minute: second: millisecond
PRJ01 PRJ001
00 00 - 00 - 000
Bar- beat- tick (1/48 beat)
Choose the desired unit.
(Hour: minute: second: millisecond
2
or bar-beat-tick.)
PRJ01 PRJ001
00 00:00:00:000
Move between units, the
selected item blinks
Change the values.
3
PRJ01 PRJ001
00 00:15:00:000
Switch
Switch
Move between
items
Place a mark
Place a mark using the counter
Start from the top screen.
Set the counter to the
desired mark position.
PRJ01 PRJ001
00 00:01:12:037
1
PRJ01 PRJ001
01 00:01:12:037
Marker icon
Place a mark during recording/playback
Press [MARK/CLEAR].
Mark number
In the middle of recording/playback
PRJ01 PRJ001
00 00:06:19:004
1
PRJ01 PRJ001
01 00:06:19:004
Press [MARK/CLEAR].
Move between
items
NOTE
• You cannot use these procedures during recording/
playback.
HINT
• After Step 3 you can start playback from the set
counter value.
HINT
Mark icon display
ト03 000:10:08:015
Mark number 3 is located at 10 minutes, 8 seconds, 15
milliseconds.
Counter is at the indicated mark
No mark registered at this counter position
Mark Numbers
Mark 0 = Counter 0. This is the head of the
project. You cannot change this par ticular mark.
• If you place a new mark ahead of a registered
mark, all the following marks will be automatically
renumbered in order.
• You can place a maximum of 100 marks in one
project.
Page 33

32
Locate to the position of a mark Delete a mark
Using the counter and markers to move (locate)
With key operations you can move
between marks
1
Press the forward or backward
mark key until you reached the
desired mark.
PRJ01 PRJ001
03 00:12:00:037
Project
Move to mark numbers in
counter sequence
Choose a mark.
1
PRJ01 PRJ001
00 00:00:00:000
Blinks
2
Choose the mark number.
PRJ01 PRJ001
03 00:12:00:037
Move between
items
1
Press the forward and backward
mark keys until you reach the
desired mark.
PRJ01 PRJ001
03 00:12:00:037
2
PRJ01 PRJ001
02 00:12:00:037
The selected (highlighted) mark is erased and the
preceding mark is shown (the counter does not move).
Press [MARK/CLEAR].
NOTE
• Once you delete a mark, you cannot retrieve it.
• You cannot delete the top mark
00.
HINT
• If you press the [MARK/CLEAR] key at a place
where a mark exists (mark icon highlighted), that
mark is deleted. If there is no mark at a location
(icon not highlighted), a new mark is placed there.
To delete a mark, you must move to it first (mark
icon highlighted).
• When placing and deleting marks, numbers are
automatically given in order from the beginning.
New mark is added
Mark is deleted
Not possible
to change
Page 34

33
Tool
Tuner
The R16 has a multifunctional tuner that includes, for example, chromatic tuning that detects note
Tool>Tuner
names by semitones, standard guitar/bass tuning and half-step-down tuning.
1
Press [TOOL].
2
Select
TOOL
>TUNER
Press [ENTER].
>TUNER
3
Select the type of tuner.
4
CHROMATIC 440Hz
Tuner type
GUITAR 440Hz
<E> String6
String note name
Standard pitch
Chromatic tuner
TOOL>TUNER>CHROMATIC
CHROMATIC 440Hz
5
Change the standard pitch (if
necessary) and begin tuning.
.
Press [PLAY/
MUTE/REC] 1-2
times until the red
light turns on.
Red light on:
recording enabled
Menu select
Tuner type
Change the
standard pitch
Tuner type
Change the
standard pitch
select
select
Other tuner types
TOOL>TUNER>GUITER/BASS, etc.
Select the tuner type.
5
GUITAR 440Hz
E String6
Change string
number
6
GUITAR 440Hz
<E> String6
Note name: play the open string of the indicated note
and adjust the pitch
Set the standard pitch and
string number.
Start tuning.
→
Tuner type
Change
standard pitch
select
HINT
Pitch indicator
Low Standard
Standard High
• The pitch indicator responds to sources input on
tracks with red status lights.
• The standard pitch setting is between 435 Hz and
445 Hz in 1 Hz units. The initial setting is 440 Hz.
• Using the other tuners you can use common half-
step and whole-step down tunings, for example.
• The standard pitch value setting will be stored
separately for each project.
CHROMATIC 440Hz
>>A
The note closest to the input signal is indicated.
This display indicates if the pitch is higher
or lower compared to the note indicated.
Tuner type GUITAR BASS OPEN A OPEN D OPEN E OPEN G DADGAD
String/
note
String1 E G E D E D D
String2 B D C# A B B A
String3 G A A F# G# G G
String4 D E E D E D D
String5 A B A A B G A
String6 E E D E D D
String7 B
Page 35

34
Tool
Metronome
This metronome, which includes a pre-count function, allows you to change its volume, tone and
pattern. You can also choose to output the metronome sound only through the headphones.
1
2
Press [TOOL].
TOOL
>TUNER
Select
>METRONOME
TOOL
>METRONOME
Press [ENTER].
These are the standard metronome settings (common).
Change menu
.
Select each setting MENU.
3
METRONOME
>ON/OFF
METRONOME
>TEMPO
Change menu
Select the settings and setting values.
4
METRONOME ON/OFF
Play&REC
Press [ENTER].
Change item
HINT
Tapping the tempo
• On the TEMPO screen, press the (TOOL) key
several times at the tempo you desire, and the
tempo will be set to the detected median value.
Changing and adjusting the metronome output
[METRONOME] switch: Sets the output
OUTPUT + PHONES
The METRONOME sound is output
through both the OUTPUT and
PHONES jack.
PHONES ONLY
The metronome sound is output
through only the PHONES jack.
Use the BALANCE knob to adjust the
relative volumes of the [MASTER] fader
signal and the metronome sound.
MASTER CLICK
• These settings are stored for each project.
• You can use the metronome even during MASTER
TRACK playback.
(metronome)
MENU settings and setting values
ON/OFF: Set when active
Settings
Play Only During playback only
REC Only During recording only
Play&REC During both playback & recording
Off (default) No metronome sound
TEMPO: Set manually or by number
Manual input
Setting range
40.0~250.0 Initial value: 120.0
LEVEL: Change metronome volume
Setting range
0–100 Initial value: 50
Setting range
L100–R100 Initial value: C (center)
Settings
BELL (default)
CLICK Click sound only
STICK Drum stick sound
COWBELL Cowbell tone
HIGH-Q Synthesized click sound
Settings
0/4 (no accent)
1/4~8/4, 6/8
Settings
Off No sound
1~8
SPECIAL Special (rhythm shown below)
Input the tempo by tapping the
[TOOL] key repeatedly
PAN: Stereo position
SOUND: Change tone
Metronome sound with a bell on the
accent
PATTERN: Change rhythm
Initial value: 4/4
PRE-COUNT: Pre-count setting
Enable sound during pre-count for 1
to 8 beats. Initial: 4 beats
NOTE
Be aware that the metronome starts sounding
from the instant that recording/playback begins.
Therefore, if you begin in the middle of a song, the
metronome sound and the pulse of the music might
be out of sync. Moreover, if you turn the metronome
volume up high, the accented beat of some sounds
might become difficult to distinguish.
Metronome indicator
During metronome use the metronome
indicator lights in time with the tempo.
Tool>Metronome
Page 36

35
Tool
16-track synchronized recording by connecting two R16s
If you want to record more then 8 tracks at the same time for a band performance, for example, you can
Tool>System>Sync rec
increase the number of tracks by connecting two R16s with a USB cable.
Make sender settings.
Set the R16 that will be used for key control as the Master.
1
2
3
4
Press [TOOL].
Select
>SYSTEM
PROJECT
>SYSTEM
Press [ENTER].
Select
>SYNC REC
SYSTEM
>SYNC REC
Press [ENTER].
Select
>Master
SYNC REC
>Master
Press [ENTER].
USB Indicator: [HOST] light on
.
. .
.
Master/Slave
Change
menus
Change
menus
Make receiver settings.
Set the R16 that receives commands as the Slave.
1
2
3
4
Press [TOOL].
Select
>SYSTEM
PROJECT
>SYSTEM
Press [ENTER].
Select
>SYNC REC
SYSTEM
>SYNC REC
Press [ENTER].
Select.
>Slave
SYNC REC
>Slave
Press [ENTER].
USB Indicator: [DEVICE] light on.
.
.
Change
menus
Change
menus
Master/Slave
Connect two R16 with a USB cable.
5
Plug a USB 2.0 (AB-type) cable into the
socket that has a lit indicator.
NOTE
• Perfect synchronization of the start timing in
recording by two R16s is not guaranteed.
• There will be a gap of approximately 1-2 ms.
HINT
Command keys that effect both sender and receiver.
[REC] key [FF] key
[PLAY] key [REW] key
[STOP] key
Page 37

36
Mixing
R16 mixing procedure flow
Use the track mixer to make stereo link settings, to adjust sound volume, EQ and PAN (balance), and to
adjust the send signal strength, which affects the depth of send return effects.
NOTE
Adjust volume, EQ and
PAN of sounds
• When you are using a stereo track, except for the
phase setting, parameter values are shared by
both L and R channels.
HINT
Select the SEND-
RETURN EFFECT patch
Adjust the
SEND-RETURN EFFECT
Apply the insert effect
to tracks
What is the track mixer?
• This mixer can mix audio tracks from the recorder
into stereo.
• You can adjust the sound volume and PAN and
EQ parameters of each track using its fader.
The recorder (recording)
The track mixer
R16 mixing procedure flow
Mix down
Mix down
Master track (recording)
Page 38

37
Mixing
Track settings for EQ, pan and send-return level
This track mixer uses track parameters to adjust PAN (stereo position), EQ (equalizer) and SEND-
Pan/EQ/Send-return effect
RETURN EFFECT of the recorder's audio tracks.
1
Press [PAN/EQ].
Track
Track1
EQ HI G=0dB
Type (EQ is on)
Select a track.
2
Change track number
Track1
EQ HI G=0dB
Turn ON/OFF and select
types and values.
3
Track3
EQ HI G=0dB
EQ is ON
Track3
EQ HI Off
EQ is OFF.
Track3
EQ HI G=0dB
Tur n setting off.
Change the parameter type.
Parameter
Press [ENTER].
Parameter ON/
OFF.
HINT
• Using the track mixer, you can adjust each track
element (track parameter), including PAN and
the SEND-RETURN EFFECT settings to change
the signal processing track by track.
• At step 2, tracks can be selected using track
status keys. Track indicators light orange when
the track is selected.
NOTE
• The parameters of the L/R channels in stereo
tracks are the same except the phase setting
(INVERT).
• The settings are stored with the project.
• The MASTER TRACK does not have any settings
except for volume control with its fader.
Track3 PAN=R2
Adjust the value of the parameter.
Track3
EQ HI G=0dB
4
Press [ENTER] to confirm settings.
Change the
parameter type.
Adjust the value
of the parameter.
Page 39

38
Mixing
Track parameters
Parameters available to each track
Display Parameter
PAN
PAN
EQ HI EQ boost for high pitch/frequency range
EQ HI G
EQ HI F
EQ MID EQ boost for middle pitch/frequency range
EQ MID G
EQ MID F
EQ MID Q
EQ LOW EQ boost for low pitch/frequency range
EQ LO G
EQ LO F
SEND-RETURN EFFECT levels
REVERB
SEND
CHORUS
SEND
EQ HI GAIN*
EQ HI
FREQUENCY*
EQ MID GAIN*
EQ MID
FREQUENCY*
EQ MID
Q-FACTOR*
EQ LOW GAIN*
EQ LOW
FREQUENCY*
REVERB
SEND LEVEL*
CHORUS/
DELAY SEND
LEVEL*
Setting range:
Initial value
L100~
R100
−12~
+12dB
:0dB
500(Hz)~
18(kHz)
:8.0(kHz)
−12~
+12dB
:0dB
40(Hz)~
18(kHz)
:1..0(kHz)
0.1~1.0
:0.5
−12~
+12dB
:0dB
40(Hz)~
1.6(kHz)
:125(Hz)
0~100
:0
0~100
:0
Explanation
Adjusts a track’s PAN. In case of a stereo track
adjusts the volume balance between the left and
right tracks.
Adjust amount of boost/cut of high frequencies by
-12 ~ +12 dB. This parameter is shown only when
EQ HI is on.
Adjust EQ boost/cut frequency of high frequencies.
This parameter is shown only when EQ HI is on.
Adjust amount of boost/cut of medium frequencies
by -12 ~ +12 dB. This parameter is shown only
when EQ MID is on.
Adjust EQ boost/cut frequency of medium
frequencies. This parameter is shown only when
EQ MID is on.
Adjust the Q value (width of the frequency band
affected) of medium frequencies. This parameter is
shown only when EQ MID is on.
Adjust amount of boost/cut of low frequencies by
-12 ~+12dB. This parameter is shown only when
EQ LO is on.
Adjust EQ boost/cut frequency of low frequencies .
This parameter is shown only when EQ LO is on.
Adjust the signal level sent from tracks to the
Reverb effect.
Adjust the signal level sent from tracks to the
Chorus/Delay effect.
Monaural tracks: 1 ~16
Stereo tracks: 1/2 ~ 15/16
Stereo
Monaural
tracks
tracks
Master
track
Pan/EQ/Send-return effect
FADER
ST LINK
INVERT
FADER
STEREO LINK
INVERT
0~127
:0
On/Off
:Off
On/Off
:Off
Adjust the sound volume.
Switch on/off to set the stereo link function that
connects 2 monaural tracks together. (→P.20)
Set whether the phase of a track is inverted or not.
Off: normal phase, ON: inverted phase.
*Switch parameters with asterisks (*) On/Off using the ENTER key.
Page 40

39
Mix down/Bounce
Combine multiple tracks into 1~2 tracks
Combine multiple tracks into one monaural or stereo file.
Bounce/Project>Rec setting>Bounce
Using BOUNCE, this creates a new file in the same project.
Settings for the bounced tracks
PROJECT>REC SETTING>BOUNCE
Start from the top screen.
1
2
3
Press [PROJECT].
Select
>REC SETTING
PROJECT
>REC SETTING
Press [ENTER].
Select
>BOUNCE
REC SETTING
>BOUNCE
Press [ENTER].
.
Set whether the track that is
overwritten by the bounce
recording is muted or not.
Select
4
>REC TRACK: Play
BOUNCE
REC TRACK: Play
.
Change
menus
Change
menus
Bounce (preparation)
Set tracks that you want to bounce
1
to playback.
Press the [PLAY/MUTE/
REC] 1-2 times until the
green light turns on.
Green light on: playback enabled (PLAY)
Select destination track(s) for the
2
bounce.
Press [PLAY/MUTE/REC]
1-2 times until the red light
turns on.
Red light on: record enabled [REC]
HINT
• “Bounce” means combining audio data from
several tracks and files together into one stereo
or monaural file. This is also called “ping-pong
recording.”
.
5
Press [ENTER].
Mute: Set the bounce destination track to
be silent (initial setting).
Play: Set the bounce destination track to
play and be included in the bounce.
NOTE
• You can cancel a bounce using the [UNDO/
REDO] key.
• If you bounce 2 monaural tracks to stereo, set the
PAN of the odd number track to L 100 and the
even number track to R 100.
Ref: Mix down
P. 41, 4 4
• To also record the signal of the track(s) that the
bounce is being recorded to, set “REC TRACK”
to “Play” in the BOUNCE Menu as described at
Step 4.
• Once the bounce is executed, a new le will be
created in the same project.
• If you set the bounce destination to a monaural
track, the recorded signals are mixed to
monaural. If set to a stereo link track pair, the
recorded signals are mixed to stereo.
Page 41

Bounce/Project>Rec setting>Bounce
40
Bounce (recording)
3
4
5
6
7
Press [SWAP/BOUNCE].
Select
>BOUNCE
SWAP/BOUNCE
> BOUNCE
Press [ENTER].
Select On.
BOUNCE
On
Press [ENTER].
BOUNCE icon
appears on display
Proceed to the next step or cancel
Select OFF to exit bounce mode.
Press and hold [EXIT] to
return to the top.
.
Press [REW] & [Stop] at
the same time to return the
counter to the head.
Change
menus
Set On/Off
Adjust the mix balance (audition)
1
Adjust the mix balance including
REC LEVEL, volume, PAN and EQ
2
for each track.
3
Playback the track after bouncing
Press [PLAY/MUTE/REC] of the bounce
destination track.
1
Press [PLAY] to star t playback.
Make sure that the red
(0 dB) signal does not
light on the MASTER
level meter.
Press [STOP] to stop playback.
Press it 1-2 times until the
green light turns on.
Green light on: playback enabled (PLAY)
8
9
Press [REC] and then
[PLAY] to star t recording.
Green light onRed light on
Press [STOP] to end the bounce.
Press [PLAY/MUTE/REC] on the tracks
bounced.
2
Press 1-2 times each until
the light turns off.
Light off: MUTE (no sound)
Press [REW] & [Stop] at
3
4
the same time to return the
counter to the head.
Press [PLAY] to star t playback.
Page 42

41
Mix down/Bounce
Using a mastering effect
Use a mastering algorithm as an insert effect on the master track that affects just the mix down.
Using a mastering effect
Insert an INSERT EFFECT before
the [MASTER] fader.
1
Press [INSERT EFFECT].
Effect ON/OFF switch
If “INSERT EFFECT Off” is displayed,
press [ENTER].
Change algorithms
CLEAN <IN1>
No.00:Standard
Select
2
3
4
5
MASTERING
MASTERING <IN1/2>
No.00:PlusAlfa
Press[ ].
No.00:Plus Alfa
>EDIT
Select
>INPUT SOURCE
No.00:Plus Alfa
>INPUT SOURCE
Press [ENTER].
Input Source
INPUT1
Select
MASTER.
Input Source
MASTER
Press [ENTER].
.
Change menus
Change menus
Change input
Select the patch.
7
MASTERING <MASTER>
No.03:DiscoMst
Audition the patches while
listening to the tracks playback,
and then select one.
8
Press [EXIT].
PRJ001 <MASTER>
00 000:00:000
Change patch
NOTE
• If the INSERT EFFECT is applied to the [MASTER]
fader, you cannot also use the INSERT EFFECT
on track inputs.
• At step 7, if you notice any distortion of the signals
because of the MASTERING EFFECT, check
the sound of playback on the track and adjust
it by lowering all the faders. (If a track sound is
distorted, adjust that track.)
• You can select STEREO, DUAL, MIC or MASTER
algorithms. If you set another algorithm, the insert
.
position changes to the inputs.
HINT
• When you choose a MASTERING algorithm, you
can use the MASTERING EFFECT processing on
the stereo mix.
Recording signal flow to the master track
No.00:Plus Alfa
>EDIT
6
MASTERING <MASTER>
No.00:PlusAlfa
Press[ ].
Change menus
Page 43

42
Mix down/Bounce
Recording to the master track
Record a "final" stereo mix as a mix down on the [MASTER] track. Signals are recorded to the [MASTER]
track after passing through the [MASTER] fader.
Recording to the [MASTER] track.
Preparation: Adjust the signal levels.
1
Play the tracks, and adjust the
mix balance of the tracks.
Press [REW] + [STOP]
at the same time and
then [PLAY] to star t
playback from the top.
Adjust the level of the signal that
passes through the master fader.
2
Red
Carefully control
Orange
the level so as
not to light the
Green
red indicator
(clip=0dB).
Green
3
Recording to the master track
4
5
6
Press [STOP].
Press [MASTER/MIX
DOWN/PLAY] 1-2
times until the red light
turns on.
Red light on: recording enabled
Press [REW] & [Stop] at
the same time to return
the counter to the head.
Press [REC] and [PLAY]
in turn to start recording.
Play the master track
Press [MASTER/MIX
1
Green light on: playback enabled
Doing this mutes the other tracks and
disables all effects.
2
Press [PLAY] to star t
playback.
3
Disable master track playback.
Press [STOP] to stop playback.
4
Light off: muted
DOWN/PLAY] 1-2 times
until the green light
turns on.
Press [REW] & [Stop] at
the same time to return
the counter to the head.
Press [MASTER/MIX
DOWN/PLAY] 1-2
times until the light
turns off.
Muting of the other tracks
is canceled and their status
lights become as they were
before enabling master track
playback.
HINT
• Each project can have one master track.
• The master track will have a le assigned.
•
You can even mix down from the middle of a song,
overwriting the data of the recorded section.
• During recording you can confirm the playback
levels of each track and the recording levels of
the master track.
• The signals sent from the OUTPUT jacks are
the same signals that have passed through the
[MASTER] fader.
• You can use the [UNDO/REDO] key.
• You can use the metronome during playback.
Recording to the master track
Press [STOP] to stop
7
recording.
NOTE
The settings of the pan/balance, insert and send/
return effects of each track affect the signals sent to
the master track and are reflected in its sound.
Consecutive playback of
multiple master tracks.
No.65
Page 44

43
Entering names
You can change names when you create new data, use RENAME menu functions or edit patches.
Entering names
Whatever name change method you use, the handling of letter positions and letters is the same.
Keys used for name changes
Move letter position Letter deletion Insert and select
letter
Select a letter.
1
P RJ001
When a letter in a name is highlighted,
you can change it.
Change the initial letter.
2
0 PRJ001
Insert and select
letter
Choose the second
3
letter to be changed.
0 PRJ001
Move letter position
Change the second letter.
4
0 5PRJ001
Insert and select
letter
Delete the third letter.
5
05P RJ001
Letter deletion
05R J001
Choose the last letter and change.
6
0518_01
7
Proceed to the next action
or
exit without saving the change.
Names and rules
Project number
PRJ xxx: PRJ (space, 3 numerals)
The project number is given
automatically starting with the lowest
and is not changeable.
Project name
PRJxxx: PRJ, 3 numerals, Maximum
of 8 characters
Monaural files
MONO-xxx.WAV
MONO-, 3 numerals (x), extension (.WAV)
Stereo files
STE-xxx.WAV
STE-, 3 numerals, extension (.WAV)
Mix Down (Master)
“MASTRxxx.WAV"
MASTR, 3 numerals, extension (.WAV)
Insert effect/Send-Return effect Usable characters
Patch number: 2 numerals.
The patch number is given
automatically starting with the
lowest and is not changeable.
Patch name: 8 characters.
Project Usable characters
None
Numerals: 0-9
Alphabet: A-Z, a-z
Symbols: (space) ! "
# $ % & ' ( ) *+ , - . /: ;
<> = ?@ [ ] ^ _ ` { }|
File (recorded)
None
Numerals: 0-9
Alphabet: A-Z
Symbols: (space) ! " # $
% & ' ( ) *+ , - . /: ; <
> = ?@ [ ] ^ _ ` { }|
Usable
characters
Maximum of 8
characters +
.WAV
(extension)
Numerals: 0-9,
Alphabet: A –Z,
Symbol: _
(under score)
NOTE
• When a name is displayed and the initial letter is
highlighted during operation, you can change the
name.
• If the same name exists, a
attached to the top of the name. You have to
change the name to save it.
• Deleted letters cannot be retrieved. You can restart
the procedure with the EXIT key.
• If you have mistakenly changed a patch name,
move to the next patch without saving.
• The numbers “xxx” of a name are automatically
assigned at naming time.
symbol will be
Page 45

44
Error list: what to do when these messages appear
on the screen
Push the [EXIT] key when you see a message like “---Error” or “Please push the EXIT key.”
When other errors and messages occur, the displayed screen will automatically close within three seconds.
Message Meaning Response
Message when something is missing.
No Card There is no card inserted. Make sure that an SD card is inserted correctly.
No Project There is no project at all.
No File There is no file in the project.
No USB Device There is no USB connection.
Messages shown frequently
Reset DATE/TIME Setting lost because of low battery. Set the [DATE/TIME] again. →P.14
Low Battery! Time to change the batteries. Change batteries or connect the adapter.
Stop Recorder
Messages that objects (projects, files, etc) are protected
Card Protected SD card is protected.
Project Protected The project is protected.
File Protected
USB Device Protected USB device connection is protected. Disable the protection of the equipment.
Over capacity or over limit messages
Card Full The card is full. Change to a new card or delete unneeded data.
Project Full
File Full File is full. Delete unneeded files.
USB Device Full The connected USB device is full. Change the connected USB device or delete data.
Cannot be accessed during playback/
recording.
This is a read-only file, you cannot write to
it.
No more projects can be saved on the
card.
Check that the project has not been deleted or
changed to a different place.
Check that the file has not been deleted or stored in
a different place.
The connection may have been canceled or there
may be problems with the cable.
Stop the recorder first, and then try again.
Eject the SD card and unlock the write protection.
Insert the card again. →P.12
Disable project protection using the [PROTECT]
menu. →P.56
Disable the read-only status of the file using a
computer.
Delete unneeded projects.
Error list: what to do when these messages appear on the screen
No access messages
Card Access Error Unable to read or write the card. Press EXIT and try the operation again.
Project Access Error Unable to read or write the project. Press EXIT and try the operation again.
File Access Error Unable to read and write the file. Press EXIT and try the operation again.
USB Device Access Error
Card Format Error This is a card format the R16 cannot use. Change the card format to one that the R16 can use.
File Format Error This is the file format the R16 cannot use. Change the file format to one that the R16 can use.
USB Device Format Error This is a USB format the R16 cannot use Change the USB format to one that the R16 can use.
Other errors
Card Error
Project Error
File Error
USB Device Error
Unable to read or write to the connected
USB device.
There is an error occurring. Press EXIT and try the operation again.
Press EXIT and try the operation again.
Page 46

45
Effect
Effect patch overview
You can select patches in the R16, use effects easily, make fine adjustments to suit the music, and then
Effect patch overview
edit and save patches.
Effect patch use process
Use effects
→INSERT EFFECT P.49
→SEND RETURN P.49
Edit a patch
→EDIT P.53
You can make subtle
adjustments to effect
module parameters to
achieve sounds you
like.
Patch
selection
→PATCH SELECT P.50
You can select and
use algorithms,
pre-set patches
and their combinations.
Import patches
→IMPORT P.55
You can use patches
imported from other
projects.
Set insertion
position
→INPUT SOURCE P.51
Use only for
monitoring
→REC SIGNAL P.57
Patch initialization
→PATCH INITIAL (PDF)
Algorithms and patches
One effect is called an “effect module”
and it consists of 2 elements.
Effect types, which are different types,
and effect parameters, which control the
depth of the effect.
A patch is the result of adjusting the effect
type and parameters of each module.
An algorithm is the orderly arrangement of
the initial patches arranged for recording
targets or methods.
Adjust the parameters
Algorithms
CLEAN
ACO/BASS SIM
Patch
COMP/
LIMITER
Module
Effect types
Parameters
EFX
Adjust the
effect send level
→REV/DLY SEND P.41
Edit the modules
Select the types
Edit the patch level
All patches
One patch
INPUT 1-8
Track 1-16
MASTERING
3BAND
PRE
EQ
AMP
MODULATION/
DELAY
CHORUS
Depth
Rate
Tone
Mix
Adjust the
effect send level
→REV SEND P.41
Save patches
→SAVE P.55
Guide
: Only “AI” uses “SEND E”
: “R” and “AI” both use
“SEND E”
: Only “AI” uses “INSERT E”
: “R” and “AI” share INSERT
: All shared
R/AI shared:
INSERT E/SEND E shared
R = Recorder
AI = Audio Interface
SEND E. =
SEND RETURN EFFECT
INSERT E. = INSERT EFFECT
DISTORTION
BASS
MODULATION/
ZNR
ENSEMBLE FLANGER
Depth
Rate
Tone
Mix
DELAY
Depth
Rate
Resonance
Manual
PAT CH
LEVEL
~
Page 47

46
Insert effects and
send return effects
The insert effects in one project include 330
patches classified into 9 algorithms. You can
select the algorithms and patches according
to your application and choose where to insert
those patches.
Arrangement
Effect patch overview
The send/return effect is internally connected
in the SEND/RETURN at the MIXER section.
There are 2 types of effects adjustable by their
mixer SEND LEVELS (signal volumes sent to
the effect) and they can be used together.
Display
Arrangement
Display
Arrangement
Display
Arrangement
Display
Arrangement
Display
Arrangement
Display
Monaural
Monaural
Monaural
×2
Monaural
×2
Stereo
Stereo
Monaural
×8
Monaural
×8
Stereo
Stereo
Page 48

47
Effect
Input/output of the insert and send return effects
There are 2 types of effects processors built in to the R16—insert effects and send return effects. You
Insert effect/send return effect
can use them at the same time.
INPUT 1-8 TRACK 1-16
INSERT EFFECT
You can use insert effects on
specific channels.
SEND RETURN EFFECT
The built-in effects in the send return
effect of the mixer.
Insert effect points
CHORUS/DELAY
Input
You can select inputs to apply effects to
signals before recording them to recorder
tracks.
Tr ac k
Apply processing to the playback sound of
any audio tracks in the track mixer.
Master
Process the final stereo mix just before
the [MASTER] fader (signals recorded
to the master track).
The recorder (recording)
The track mixer
Mix down
The master track (recording)
REVERB
Send level
(Signal volume sent to
the effect)
Mix (return) with the original sounds of
the sent track.
Insert effect signal flow Send return effect signal flow
Put the insert effect on a monaural input and
output in monaural.
Ref.: Insert effect position
P.52
Page 49

48
Uses of effects and patches Select effect & patch
Insert effects and send return effects are selected and
adjusted the same way.
You can select the most appropriate modules from the
algorithms, edit types and parameters and use saved
patches.
There are a few major differences between the two
types of effects when making settings. For an INSERT
EFFECT, you select a patch and set the insertion
point. For a SEND RETURN EFFECT, you adjust the
send level of the signals using the mixer.
Other functions are “IMPORT” to get patches from
another project and “REC SIGNAL” to apply the effect
only to monitoring.
The use procedures of effects are the same when
using the R16 as an audio interface and control
surface, but the patches are initialized when the unit is
not used as a recorder.
INSERT EFFECT
Algorithm name
on display
Algorithm suitable for guitar/bass recording
CLEAN
DISTORTION
ACO/B ASS SIM
BASS
For microphone recording, such as vocals
MIC
For 2 independent channels (2 mono inputs/outputs)
DUAL MIC
For recording synthesizers, electric pianos and other lineoutput instruments
STEREO
Algorithm with 8 independent channels of input/output
8×COMP EQ
Processing for final stereo mixes
MASTERING
Number of patches
(programmed patches)
30(22)
50(40)
20(10)
30(20)
50(30)
50(30)
50(40)
20(10)
30(21)
SEND RETURN EFFECT
Algorithm name
on display
Process final stereo mix signals
CHORUS/DELAY
Process final stereo mix signals
REVERB
Number of patches
(programmed patches)
30(18)
30(22)
Effect
1
2
3
4
<INSERT EFFECT>
<SEND EFFECT>
Press until the red light turns on.
Red light on.
or
Press [INSERT EFFECT] or [SEND RETURN EFFECT ].
Press [ENTER] to turn on/off.
Select the algorithm.
Algorithm name
Patch number: Patch name
Insert effect example
CLEAN <IN1>
No.00:Standard E
CLEAN, DISTORTION,
ACO/BASS
BASS, MIC,
DUAL MIC, STEREO,
8x
MASTERING
CHORUS/DELAY
REVERB
Send return effect example
SEND CHORUS/DELAY
No.00:ShortDLY
Select the patch.
CLEAN <IN1>
No.15:Standard E
EDIT
IMPORT
INPUT SOURCE
REC SIGNAL
SIM,
COMP EQ,
Press [ ].
Press [PLAY/
MUTE/REC].
Insert effect
insertion point
Change
algorithm
E (edit mark): items
are already edited
Change patch
P.53
P.55
P.51
P.5 7
Insert effect/send return effect
Page 50

49
Effect
Insert effect insertion position
You can change the insert position of the Insert Effect.
Insert effect>Patch sel>Input source
This menu is only for Insert Effect.
1
Press [INSERT EFFECT].
Effect on/off switch.
If “INSERT EFFECT Off” is displayed,
press [ENTER].
Select .
4
>INPUT SOURCE
No.00:Standard
>INPUT SOURCE
Press [ENTER].
Input Source
INPUT1
Change
menu
Change
input place
Select the algorithm/patch.
2
3
Current insert position
CLEAN <IN1>
No.00:Standard
IN**
IN**/**
TR**
TR**/**
IN*~**
TR*~**
MASTER
Inserted in INPUT **
Inserted in INPUTS ** and **
Inserted in TRACK **
Inserted in TRACKS ** and **
Inserted in INPUTS * to **
Inserted in TRACKS * to **
Inserted in the master track
Press[ ].
Change
algorithm
Change
patch
NOTE
• You can select a single INPUT (1~8) only when
you have chosen the CLEAN, DISTORTION,
ACO/BASS SIM, BASS or MIC algorithm.
• You can select Track 1-8 or Track 9-16 only when
the 8 x COMP EQ is chosen as the algorithm.
• INPUT 1-8 can be selected only when the 8 x
COMP EQ algorithm has been chosen.
• After you select an insertion place, if you change
the algorithm to 8 x COMP EQ, the insertion place
will be changed to Input 1-8, Track 1-8 or Track
9-16 (depending on the previous setting).
• To insert into a single monaural track output, you
must select TRACK 1 ~ TRACK 8. To insert into
a two monaural tracks or a stereo track, you must
select TRACK 1/2 ~ TRACK 15/16. If you want
to inser t before the MASTER FADER, you must
select MASTER.
Set source of input into effect.
5
Input Source
INPUT8
Input Source
TRACK8
Press [ENTER].
On display Insert place
Input
Input1~Input8
Track1,Track2
Track1/2,
Track3/4
Master
With 8 x Comp EQ setting case
Track1-8
Track9-16
6
CLEAN <TR8>
No.00:Standard
Mixer input
Single mixer input
Output from either monaural track
1 or 2
Output from either stereo track or 2
monaural tracks
Just before the [MASTER] fader
All track 1–8 outputs
All track 9–16 outputs
Press[ ].
Current insert position
HINT
Change the insertion place of the insert effect.
When a project is at the default status, the insert
effect is inserted on INPUT 1.
To change this place, select an INPUT SOURCE at
Step 4:
Change
input place
Page 51

50
Odd-
numbered
Track
インサートエフェクトの挿入位置
Odd-
numbered
INPUT
or
Track
Even-
numbered
INPUT
or
Track
INSERT
EFFECT
L
INSERT
EFFECT
R
Even-
numbered
Track
Odd-
numbered
INPUT
or
Track
or
MasterL
Even-
numbered
INPUT
or
Track
or
MasterR
INSERT
EFFECT
Odd-
numbered
Track
or
MasterTrack
(L)
Even-
numbered
Track
or
MasterTrack
(R)
INPUT1
or
Track1/9
INPUT2
or
Track2/10
INSERT
EFFECT
1
INSERT
EFFECT
2
Track1/9
Track2/10
INPUT2
or
Track2/10
INSERT
EFFECT
8
Track2/10
Insert position of insert effect
Inserting the INSERT EFFECT into 2 monaural inputs
(DUAL algorithm)
Insert effect>Patch sel>Input source
Inserting an INSERT EFFECT into a stereo input
(Stereo Master algorithm)
Inserting an INSERT EFFECT on 8 inputs
(8 x COMP EQ algorithm)
Page 52

51
Effect
Insert effect
Send return effect
You can create patches that combine effects together, change effect types in patches, or change
Insert effect/send return effect>Patch sel>Edit
processing however you like by adjusting the depth of effects using their parameters.
: Patch editing
or
1
Select the algorithm/patch.
2
Effect on/off switch.
If “INSERT EFFECT Off ” is
displayed, press [ENTER].
CLEAN <IN1>
No.15:Standard E
Press [ ].
3
Select .
4
>EDIT
No.15:Standard
>EDIT E
Press [ENTER].
Press [INSERT
EFFECT] or
[SEND RETURN
EFFECT].
Change
algorithm
Change
patch
Change
item
Edit effect modules
Turn the effect types on/off.
5
Effect module off
Compressor
Off
Press [ENTER] to switch.
Type (effect module) ON
COMP/LIMITER E
Compressor
E: Edit mark
Effect type Shown after you edit or change
Set the effect module
Select the effect module.
6
COMP/LIMITER E
Compressor
MOD/DELAY E
Chorus
Effect type
Change module
HINT
• Some patches say “Empty,” because no modules
in the patch have been set yet.
• When you want to edit the ZNR module, go to the
page with “TOTAL” in the first row.
• You can individually edit the modules arranged in
the L/R Channels of the DUAL MIC ALGORITHM.
Your selection is the left channel when the first
row displays “L” and the right channel when the
first row displays “R.”
• In the 8 x COMP EQ ALGORITHM, each channel
has its own HPF, COMPRESSOR and EQ
modules and you can turn each effect module on/
off on each channel independently. You can check
the current channel by looking at the number in
the first row of the display.
Edit the patch level
(final patch sound volume)
Set the patch level.
7
TOTAL
Patch Level=25
8
Press [EXIT] to return.
Change module
Change
value
Page 53

Insert effect/send return effect>Patch sel>Edit
52
Adjust the effect parameters
Select a parameter.
1
Ensemble E
Depth=2
Change
parameters
Set the value.
2
Ensemble E
Depth=2
Change
value
3
Press [EXIT] to return.
NOTE
• You cannot edit an algorithm itself, including
the combination and arrangement of the effect
modules.
• If you turn “off” an effect module, all the settings
after the effect module, such as the type and
parameters will also be turned off.
• When you are using 8 x COMP EQ, you cannot
turn an effect on or off for all channels at once.
But if you press [ENTER] when an effect setting
value is displayed for the desired channel, you
can switch it off for that channel.
• You cannot turn off the “TOTAL” modules.
• There is no ZNR module in the 8 x COMP EQ
algorithm.
• If you change to another patch without saving a
patch that shows the ‘E’ mark, your edits will be
lost completely. Please refer to the next page for
patch saving.
Change INSERT EFFECT name
Select .
1
2
3
TOTAL
TOTAL
Patch Leve1=25
Press [ ] until you see
PATCH NAME.
Press[ ].
Patch Name
S tandard
Blinks
Change name
Press [EXIT] to finish.
Change module
Change SEND RETURN EFFECT name
Press [ ] until you see
1
PATCH NAME.
Press[ ].
Patch Name
S tandard
Blinks
Change name
2
Press [EXIT] to finish.
Change
value
Page 54

53
Effect
Insert effect
Send return effect
Once you have edited a patch, use “SAVE” to save it. You can save a patch at any place within
Insert effect/send return effect>Patch sel>Save
the same algorithm.
1
: Patch save
or
Press [INSERT
EFFECT] or
[SEND RETURN
EFFECT].
Effect ON/OFF switch
When “INSERT EFFECT Off” is displayed,
press [ENTER].
Select the algorithm/patch.
2
CLEAN <IN1>
No.15:Standard E
Patch has been edited
3
Select .
4
No.00:Standard
>SAVE
Press [ ].
>SAVE
Press [ENTER].
Select the place to save.
5
Save to
NO.29:Empty
Save location number: patch name
Press [ENTER].
Execute [SAVE] action.
6
NO.29:Empty
Save?
Press [ENTER].
Change
algorithm
Change
patch
Change
menu
Change place to
save
NOTE
• These procedures are the same for both insert
and send return effects.
• If you switch to another patch without saving
an edited patch, you will lose all the edits.
Remember to always save your edited patches.
• The import source and the import destination are
different projects when using PATCH IMPORT.
HINT
• You can save your edited patch at any place within
the same algorithm.
• You can make a patch copy by saving an existing
patch to a different area.
Page 55

54
Effect
Insert effect
Send return effect
: Patch import
Import one or all patches that have been created in another project to use in the current project.
See steps 1~3 on the previous
page.
Select .
4
>IMPORT
No.00:Standard
>IMPORT
Press [ENTER].
Change
menu
Import one patch.
IMPORT>PATCH
Select .
1
>PATCH
PATCH IMPORT
>PATCH
Press [ENTER].
Change menu. Select import method.
5
PATCH IMPORT
>ALL
Change menu>ALL: impor t all patches from the
target project
Change menu>PATCH: select one patch and
import it from the target project
Import all patches.
IMPORT>ALL
Select .
1
>ALL
PATCH IMPORT
>ALL
Press [ENTER].
Change
menu/item
Change item
Select the project to import from.
2
PATCH IMPORT
No.001:PRJ001
Source project number and name
Press [ENTER].
Select the patch to import.
3
Import
No.00:Standard
Source patch number
Press [ENTER].
Change item
Change
project
Change
patch
Insert effect/send return effect>Patch sel>Import
Select the project to import from.
2
ALL PATCH IMPORT
No.001:PRJ001
Source project number and name
Press [ENTER].
Confirm the project to import from
3
and press [IMPORT].
No.001 : PRJ001
All Patch Import?
Press [ENTER].
Change
project
Select the patch to import.
4
Import to
No.00:Standard
Destination patch number
(save location)
Press [ENTER].
Import the patch.
5
NO.01:Ensemble
Import?
Press [ENTER].
Change
place to save
Page 56

55
Effect
Using the insert effect only for monitoring
By applying an insert effect only to monitoring, unaffected input signals can be recorded to tracks.
Insert effect> Patch sel >Rec signal
1
Press [INSERT EFFECT].
Effect ON/OFF switch
When “INSERT EFFECT Off” is displayed,
press [ENTER].
Select the Algorithm/Patch.
2
CLEAN
No.15:Standard E
3
Press [ ].
Using the insert effect only
for monitoring
By default, when an insert effect is
applied to an input signal, the signal
with the effect is recorded to the track.
However, when desired, you can apply
the insert effect only to the monitoring
outputs and record the non-processed
input signal on the track.
For example, you can apply an insert
effect to a microphone, to make a vocalist
feel more comfortable singing, but still
record the vocal without the effect.
Change
algorithm
Change patch
Select
4
5
>REC SIGNAL
No.00:Standard
>REC SIGNAL
Press [ENTER].
Select
DRY
REC SIGNAL
Dry
Press [ENTER].
WET
(Default value)
DRY
.
.
The input signal will be recorded
to the track after it passes through
the insert effect.
The input signal will be recorded
to the track before passing
through the insert effect. However,
the input signal monitored from the
OUTPUT and PHONES jacks will
pass through the insert effect first.
Change setting
HINT
• The settings made here will be stored project by
project.
• If necessary, restore the initial “Wet” setting before
recording other parts.
Page 57

56
Project
Project overview & project protection
A project stores data and elements necessary for music playback. The “PROTECT” function allows you
to prevent the alteration of a completed project.
All elements of a piece of music are stored
in a project as one unit, including audio files,
information about track assignments, and
mixer, effect, metronome and tuner settings.
The unit can handle a maximum of 1000
projects on a single card. Create a new project
for each new piece of music.
Data saved in a project:
* Audio data for every track including the
MASTER track
* Folder settings selected by tracks
* Mixer settings
* Patch numbers and patch contents set for
insert and send return effects
* Contents of play lists
* All other necessary files
Protecting a project
PROJECT>EDIT>PROTECT
1
2
3
4
Press [PROJECT].
Select
>EDIT
PROJECT
>EDIT
Press [ENTER].
Select
>PROTECT
PROJECT EDIT
>PROTECT
Press [ENTER].
Select
PROJECT PROTECT
On
.
>ON
Press [ENTER].
.
.
Change
menu
Change
menu
Turn ON/OFF
Project/Project>edit>Protect
NOTE
• You can play back a project when it is protected,
but you cannot change it. If you want to record in
it or edit it again, set “PROTECT” to “Off.”
• Projects that are not protected will be automatically
saved to the SD card when you turn the POWER
switch OFF or when you open another project.
• We strongly recommend setting “PROTECT” to
“On” once you complete a piece of music to avoid
saving a mistaken operation later.
HINT
• The lock icon appears on
the screen when a project
is protected.
Page 58

57
Project
Create a new project
With the R16 you can create up to 1000 projects on a single card. You can also transfer the settings of
Project>New
the previous project to a new project.
1
2
Press [PROJECT].
PROJECT
>SELECT
>NEW
.
Select
PROJECT
>NEW [SD]003:22:52]
Press [ENTER].
Confirm the project name.
New project number
3
Project No.003
P RJ003
Blinks
Press [ENTER].
New project name
Change the
name to be
saved
Select whether to use the settings
4
from the last project.
SETTING?
[CONTINUE] RESET
Select to use default settings
Press [ENTER].
Change menu
Change menu
Change menu
NOTE
You can use the settings and values of the last
project in the new one or use the R16 default
settings.
Settings carried over with CONTINUE
• BIT LENGTH setting
• INSERT EFFECT settings
• SEND RETURN EFFECT settings
• Track status (PLAY/MUTE/REC) settings
• BOUNCE settings
• REC TRACK settings
• Track parameter settings
• METRONOME settings
[RESET]
Use default setting values for every item
Create the project.
5
No.003:PRJ003
Create?
Press [ENTER].
HINT
At Step 3, you can change the name of the new
project.
Ref.: Changing names
P.43
Page 59

58
Project
Selecting projects and files
You can select a project for recording, playback and editing from the top screen.
You can also select files for playback and assign them to tracks.
Select a project
PROJECT>SELECT
1
2
Press [PROJECT].
Select
PROJECT
>SELECT
Press [ENTER].
>SELECT
Select the project.
3
PROJECT SELECT
No.002:PRJ002
Press [ENTER].
Load the project.
4
No.002:PRJ002
Load?
Press [ENTER].
.
Change menu
Change
project
Select a file
PROJECT>FILE
Select
PROJECT
>FILE
Press [ENTER].
Press [PROJECT].
>FILE
1
2
Select the file.
3
TRACK15
M15TR000 [TR1]
Select file.
*If you want to listen to a file for confirmation,
you can use the following keys.
Playback: [PLAY] key
Stop: [STOP] key
Project>Select/Project>File
.
Change menu
Change track
or use
[1 - 8] and
[MASTER]
status keys
NOTE
You can only playback and record to the project
that is currently loaded. You cannot load and use
multiple projects at the same time.
HINT
When the R16 [POWER] switch is turned ON, the
project loaded the last time the unit was used will
be loaded automatically. (If you have changed SD
cards, then the last project used on the inserted
card will be loaded.)
Fast forward: [FF] key
Rewind: [REW] key
Zero return:
+
[STOP] and [REW] keys
Moving to a marker:
[>>|] and [|<<] MARKER keys
Ref.: Track assignment
P.23
Page 60

59
Project
Project and file information
You can display information about the currently loaded project and files including creation dates and
Project>Information/Project>File>Information
times, capacities, recording lengths and file formats.
Project information
PROJECT>INFORMATION
1
2
Press [PROJECT].
Select
>INFORMATION
PROJECT
>INFORMATION
Press [ENTER].
.
Change menu
Select the type of information.
3
PROJECT INFORMATION
NAME
NAME:PRJ001
Project name
PROJECT INFORMATION
DAT E
DATE:09/10/10 15:00
Year/month/day/time
of creation
PROJECT INFORMATION
SIZE
SIZE378.5MB
PROJECT INFORMATION
TIME
TIME:00:09:13
Length of project recording
HINT
• Project and le INFORMATION pages can only be
viewed. Their contents cannot be edited directly.
Change item
Size
File information
PROJECT>FILE>INFORMATION
1
2
Press [PROJECT].
Select
PROJECT
>FILE
Press [ENTER].
>FILE
.
Select track number (1–16,
3
MASTER) and file name.
TRACK 15
MONO-000 [TR1]
Track number
File name
Select
4
MONO-000.WAV
>INFORMATION
Press[ ].
>INFORMATION
Press [ENTER].
Select the types of information.
5
F OR M AT
FILE INFORMATION
NAME
NAME:MONO-000.WAV
FILE INFORMATION
DAT E
DATE:2009/03/03
Year/month/day of the creation
FILE INFORMATION
TIME
TIME:12:47:47
Time of creation
FILE INFORMATION
FORMAT:WAV44.1/16 MN
Format, sampling frequency/bit
rate, ST (stereo), MN (monaural)
Change menu
Change track
Change file
.
Change menu
File name
Change item
SIZE
LENGTH
FILE INFORMATION
SIZE:24384.0KB
FILE INFORMATION
LENGTH:00:04:42
File recording length
Size
Page 61

60
Project
Copying projects and files
You can copy a saved project and use it as a new project.
You can make copies of files in the same project by changing the file names.
Project copy
PROJECT>EDIT>COPY
1
2
3
4
5
Press [PROJECT].
Select
>EDIT
PROJECT
>EDIT
Press [ENTER].
Select
>COPY
PROJECT
>COPY
Press [ENTER].
Select the project to copy.
PROJECT COPY
No.002:PRJ002
Press [ENTER].
The new project number of
the copy is shown.
Copy to
No.011
.
Change menu
.
Change menu
Change project
File copy
PROJECT>FILE>EDIT>COPY
1
2
3
4
5
Press [PROJECT].
Select
>FILE
PROJECT
>FILE
Press [ENTER].
Select the file to copy.
TRACK 1
VOCAL.WAV
Press[ ].
Select
>EDIT
VOCAL.WAV
>EDIT
Press [ENTER].
Select
>COPY
VOCAL.WAV
>COPY
Press [ENTER].
Project>Edit>Copy/Project>File>Edit>Copy
.
Change menu
Change
track
Change file
.
Change menu
.
Change menu
Press [ENTER].
Copy the project.
6
No.002->No.011
Copy?
Press [ENTER].
Old->new project
numbers
NOTE
• When there is a project with the same name, a *
will be added to the top. Change the name and
save.
Change the name of the
copied file.
6
FILE COPY
V OCAL.WAV
Copy the file.
7
XOCAL.WAV
Copy?
Blinks
Change saved
Press [ENTER].
Press [ENTER].
file name of
the copy
Page 62

61
Project
Renaming files and projects
Change the name of the currently loaded project and files.
Project>Edit>Rename/Project>File>Edit>Rename
Project name change
PROJECT>EDIT>RENAME
1
2
3
4
Press [PROJECT].
Select
PROJECT
>EDIT
Press [ENTER].
Select
PROJECT
>RENAME
Press [PROJECT].
>EDIT
>RENAME
.
.
Change characters.
PROJECT RENAME
PRJ002
Selected character highlighted and blinking
PROJECT RENAME
SONG2009
Press [ENTER].
Change menu
Delete
character
Delete
character
Change
position
Change
character
NOTE
• If there is a project with the same name, a * mark
will be added to the top. Change the name and
save.
HINT
Project names
Characters that can be used: 8 maximum
Numerals: 0-9
Alphabet: A-Z, a-z
Symbols: (space) ! ” # $ % & ‘ ………..etc.
File names
Characters that can be used: 12 including extension
Numerals: 0-9
Alphabet: A-Z (capital letters)
Symbol: _ (underscore)
File name change
PROJECT>FILE>EDIT>RENAME
Select
PROJECT
>FILE
Press [ENTER].
Press [PROJECT].
>FILE
.
1
2
Select the file name.
3
TRACK 1
S07TR000
Press[ ]
Select
4
5
6
Ref.: Name changing
>EDIT
PROJECT
>EDIT
Press [ENTER].
Select
>RENAME
PROJECT
>RENAME
Press [ENTER].
Select
>RENAME
PROJECT RENAME
P RJ002.WAV
Selected character highlighted and blinking
PROJECT RENAME
QRJ002.WAV
Press [ENTER].
.
Change menu
Change
track
Change file
Change menu
.
Change menu
.
Delete
character
Change
position
Change
character
P.43
Page 63

62
Project
Deleting files and projects
Delete selected files and projects.
Delete a project
PROJECT>EDIT>DELETE
1
2
3
4
5
Press [PROJECT].
Select
>EDIT
PROJECT
>EDIT
Press [ENTER].
Select
>DELETE
PROJECT
>DELETE
Press [ENTER].
Select the project to delete.
PROJECT DELETE
No.001:PRJ001
Press [ENTER].
Delete the project.
No.001:PRJ001
Delete?
Press [ENTER].
.
.
Change menu
Change menu
Change
project
Delete a file
PROJECT>FILE>EDIT>DELETE
1
2
3
4
5
6
Press [PROJECT].
Select
>FILE
PROJECT
>FILE
Press [ENTER].
Select the file name.
TRACK1
MONO-000 [TR7]
Press[ ]
Select
>EDIT
MONO-000.WAV
>EDIT
Press [ENTER].
Select
>DELETE
MONO-000.WAV
>DELETE
Press [ENTER].
Delete.
MONO-000.WAV
Delete?
Project>Edit>Delete/Project>File>Edit>Delete
.
Change menu
Change
track
.
.
Change file
Change menu
Change menu
NOTE
• Once deleted, projects and files cannot be
retrieved. Please be careful when deleting.
• You cannot delete projects or files that have
PROTECT set to ON.
• If you delete the currently loaded project, the
project with the lowest number will be loaded.
Press [ENTER].
NOTE
• When you delete les, the tracks they are assigned
to become empty.
Page 64

63
Project
Dividing files
You can divide a file at any point to make two files. Do this to delete unnecessary portions of recordings
Project>File>Edit>Divide
or to divide long recordings.
1
Select
2
PROJECT
>FILE
Select a file.
3
TRACK15
MONO-000.WAV
4
Select
5
MONO-000.WAV
>EDIT
Select
6
MONO-000.WAV
>DIVIDE
Press [PROJECT].
>FILE
.
Press [ENTER].
Select file
Press [ ].
>EDIT
.
Press [ENTER].
>DIVIDE
.
Change menu
Change
track
or use [1-8]
and [MASTER]
status keys
Change
track
Change
track
Divide.
8
MONO-000.WAV
Divide?
Press [ENTER].
When you set the dividing point, you can use the
following keys to listen to the file.
Playback: [PLAY] key
Stop: [STOP] key
Fast forward: [FF] key
Rewind: [REW] key
Zero return:
[STOP] and [REW] keys
Move to markers:
[>>|] and [|<<] MARKER k eys
Press [ENTER].
Set the divide point.
7
DIVIDE POINT
ト00 00:00:00:000
DIVIDE POINT
ト00 00:01:25:086
Press [ENTER].
Use markers or change time
Change
numbers
HINT
• When a le is divided, les with new names will be
created automatically in the same folder.
"A" is added to the end of the name of the file
created from the part before the dividing point.
"B" is added to the end of the name of the file
created from the part after the dividing point.
If the original file name already had 8 characters,
the last character will be replaced with "A" and
"B" in the new file names.
• The original divided le is deleted.
Ref.: LOCATE/MARKER
P.2 7
Page 65

64
Project
Import files from other projects
Import files from projects other than the current project.
1
2
3
4
5
Press [PROJECT].
Select
>FILE
PROJECT
>FILE
Press [ENTER].
Select a file.
TRACK15
MONO-000.WAV
Select file
Press [ ].
Select.
>IMPORT.
MONO-000.wav
>IMPORT
Press [ENTER].
.
Change menu
Change
track
or use [1-8]
and [MASTER]
status keys
Change menu
Confirm the file.
6
FILE IMPORT
L EADGTR.WAV
Change the name to be saved.
Cursor blinks
Import the file.
7
ACOGTR.WAV
Import?
Project>File>Import
Press [ENTER].
Press [ENTER].
Select the project that has
6
the file to be imported.
FILE IMPORT
No.000:PRJ001
Press [ENTER].
Select the file to import.
7
FILE IMPORT
LEADGTR.WAV
Press [ENTER].
Change
project
NOTE
• If there is a le with the same name in the project,
a * mark will be added to the top. Change the
name and save.
HINT
Characters that can be used: 12 maximum
Numerals: 0-9
Alphabet: A-Z (Capital letters)
Signs: _ (underscore)
Ref.: Name changing
P.30
Page 66

65
Project
Sequential playback of projects
The playback order of multiple projects can be registered and managed in playlists. This is useful for
Project >Sequence play
playing back several songs consecutively, live play accompaniment and output to an external recorder.
Play a playlist
1
2
Press [PROJECT].
PROJECT
>SELECT
Select .
>SEQUENCE PLAY
PROJECT
>SEQUENCE PLAY
Press [ENTER].
Select the playlist.
3
“Empty”: no songs in list
List1:Empty
Total 00:00:00:000
Number of registered projects shown
List1:2Songs
Total 00:03:16:186
Number of projectsPlaylist number
Total playback time of list
4
Display during playback
NO.003:PRJ003
00 02:18:017
Playlist number Elapsed playback time
Playback stops at the end of the final project.
Press [PLAY].
Change
menu
Project name
Select
list
Edit a playlist
PROJECT>SEQUENCE PLAY>EDIT
Press [
4
Select .
5
Register, edit and change projects
6
7
>EDIT
List1:2Songs
>EDIT
Press [ENTER].
Select the first project
(or the project to change).
The end of the project list
or no projects registered
Track1
End of List
Register project to be played.
Project number you want to register
No.001:PRJ001
003:00:047 1/1
Project: playback length
].
End of list display
Project name you want to register.
Selected track number
Change menu
Change
project
Total number of tracks
HINT
Audio tracks assigned to the current list play back.
Button operation during playback
Playback from the top of the current project
Stop playback and return to the top of the
present project
Start playback from the top of the first project in
the list
Stop playback and start playback from the top
of the next project in the list
Stop playback and start playback from the top
of the previous project in the list
Select and register more projects.
8
Track2
End of List
No.002:PRJ002
004:00:01 2/2
9
Press [EXIT].
Change track
Page 67

Remove a project from a list
66
Select a project to remove.
6
No.002 : PRJ002
004:00:01 3/5
Press [
No.002:PRJ002
7
INSERT [DELETE]
Select .
DELETE
Press [ENTER].
No.002:PRJ002
004:00:01 3/4
Insert a project into a list
Project >Sequence play
Delete a Playlist
PROJECT>SEQUENCE PLAY>DELETE
Press [
4
List1:2Songs
>EDIT
Change track
].
Change
project
Change item
Select .
5
>DELETE
List1:2Songs
>DELETE
Press [ENTER].
].
Change menu
Change menu
Delete.
6
List1:2Songs
Delete?
Press [ENTER].
Select the track to insert to.
6
No010:PRJ010
002:14:58 4/5
Press [
Select .
7
INSERT
Track5
[INSERT] DELETE
Press [ENTER].
No.010:PRJ010
002:14:58 4/6
Selected project is inserted
Change track
].
Change
project
Change item
NOTE
• If a master track or the le assigned to the master
track is deleted, the playlist will become empty.
• Set the master track to the recording that you
want to hear when you register a project in a
playlist.
• To change the les of registered projects, change
the master tracks and edit the playlist.
• The maximum number of playlists is 10, and each
playlist can have a maximum of 99 registered
projects.
• To register a project, the master track must have a
recorded file with a length of at least 4 seconds.
Ref. : Master Track setting
P.4 6
Page 68

67
System
Recording format bit rate setting
Usually CDs are recorded in 16-bit, 44.1 kHz format, but with the R16 you can also use higher
Project>Rec setting>Bit length
quality 24-bit recording.
Setting and changing the bit rate
PROJECT>REC SETTING>BIT RATE
1
2
3
4
Press [PROJECT].
Select .
>REC SETTING
PROJECT
>REC SETTING
Press [ENTER].
Select
>BIT LENGTH
REC SETTING
>BIT LENGTH
Press [ENTER].
Select bit number.
BIT LENGTH
16bit
Press [ENTER].
.
Change
menu
Change
menu
16bit – 24bit
HINT
• If you are overwriting a recording, you cannot
change this.
• This setting is stored for each project.
• The initial setting is 16bit.
• If you use 44.1 kHz/24-bit, you will have to convert
to 16-bit to create an audio CD.
Page 69

68
System
Adjusting the display
You can adjust the backlight and contrast.
Turning the backlight On/Off
TOOL>SYSTEM>LCD>LIGHT
1
2
3
4
Press [TOOL].
TOOL
>TUNER
Select .
>SYSTEM
TOOL
>SYSTEM
Press [ENTER].
Select .
>LCD
SYSTEM
>LCD
Press [ENTER].
Select .
>LIGHT
LCD
>LIGHT
Change
menu
Change
menu
Change
menu
Adjusting the contrast
TOOL>SYSTEM>LCD>CONTRAST
1
2
3
4
Press [TOOL].
TOOL
>TUNER
Select .
>SYSTEM
TOOL
>SYSTEM
Press [ENTER].
Select .
>LCD
SYSTEM
>LCD
Press [ENTER].
Select .
>CONTRAST
LCD
>CONTRAST
Change
menu
Change
menu
Change
menu
Tool>System>LCD>Light/Contrast
Press [ENTER].
Select .
5
ON/OFF
LIGHT
On
Press [ENTER].
On
Backlight on (default setting)
Off
Backlight off
Tur n On/Off
HINT
Turn the back light off to conserve the batteries.
Select a number.
5
CONTRAST:3
Press [ENTER].
Change number
Press [ENTER].
Page 70

69
SD card
Changing the SD card while the power is on
You can change the SD card with the power on. You might need to change an SD card when using the
Tool>SD card>Exchange
R16 if the remaining capacity of the inserted card becomes low, or when you need to import data from a
previously recorded SD card.
1
Press [TOOL].
Load the SD card to use in the R16
SD CARD DATA>LOAD
Select .
2
3
>SD CARD
TOOL
>SD CARD
Press [ENTER].
Select .
>EXCHANGE
SD CARD
>EXCHANGE
Press [ENTER].
Remove SD CARD
Eject SD card.
4
Insert SD CARD
Insert another SD card.
5
SD CARD
Format?
SD card is new and not formatted for the R16.
SD CARD DATA
[LOAD] SAVE
SD card formatted for R16.
Format the SD card for use.
6
SD CARD
Format?
Press [ENTER].
Change
menu
Card removal
possible
SD card formatted for the R16
Select .
6
7
Save current R16 project to the SD card
SD CARD DATA>SAVE
SD card formatted for the R16
6
7
8
[LOAD]
SD CARD DATA
[LOAD] SAVE
Press [ENTER].
Load a project on the card.
SD CARD
Load?
Press [ENTER].
The lowest-numbered project on the inserted
SD card is loaded.
Select .
[SAVE]
SD CARD DATA
LOAD [SAVE]
Press [ENTER].
Select the project to save to.
Save to
No.011:PRJ011
Save destination project number: name
Press [ENTER].
Save the current project.
Save to No.011
Save?
Press [ENTER].
Change
Change
menu
menu
Page 71

70
SD card
Formatting SD cards and verifying card capacities
You can format SD cards for use with the R16, deleting all the data on it, and check SD card
capacity (remaining space).
Tool>SD card>Format/Remain
Format SD card and delete all data
TOOL>SD CARD>FORMAT
1
2
3
Press [TOOL].
Select .
>SD CARD
TOOL
>SD CARD
Press [ENTER].
Select .
>FORMAT
SD CARD
>FORMAT
Press [ENTER].
Change
menu
Change
menu
Execute.
4
SD CARD
Format?
Press [ENTER].
NOTE
• If you insert an SD card that has not been
formatted for use with the R16, the “FORMAT”
menu opens automatically.
• If you format an SD card, all its data will be
permanently erased.
• When you format an SD card, all data on the card
will be deleted, and folders and files exclusively
for R16 use will be created.
Data structure of R16 SD cards
PROJ000
PRJDATA.ZID
EFXDATA.ZID
AUDIO
SYS
ZOOM.ZDT
Verify SD card remaining capacity
TOOL>SD CARD>REMAIN
1
2
3
Press [TOOL].
Select .
>SD CARD
TOOL
>SD CARD
Press [ENTER].
Select .
>REMAIN
SD CARD
>REMAIN
Press [ENTER].
SD CARD REMAIN
054:06:00/15317.7MB
Remaining recording
time for the current
recording format
Remaining
capacity of
the card
Change
menu
Change
menu
NOTE
• If the remaining capacity of an SD card is less
than the amount of recording data, recording will
fail. Change the card before you run out of space.
Ref. : Importing data from USB
memory to an SD card
: Saving data from an SD card
to USB memory
: Operation without an SD card
P.76
P.12
NOTE
• Release the write-protection lock of the SD card
before inserting it.
• [SAVE] includes various data for the project in
use, but no audio data is saved.
HINT
• Insert an unformatted SD card and execute when
“Format?” appears. Then options to [SAVE] and
[LOAD] the present project will follow.
Page 72

71
System
Confirming the version & setting the battery type
You can confirm the current version of the system software. If you set the battery type, the remaining
Tool>System>System version/Battery type
battery charge will be displayed more accurately.
Confirming the system version
TOOL>SYSTEM>SYSTEM VERSION
1
2
3
Press [TOOL].
TOOL
>TUNER
Select .
>SYSTEM
TOOL
>SYSTEM
Press [ENTER].
SYSTEM
>LCD
Select .
>VERSION
SYSTEM
>VERSION
Press [ENTER].
Select the type of information.
4
SYSTEM
SYSTEM
ZOOM R16
SYSTEM Ver:1.00
Ver
SUB
ZOOM R16
SUB SYSTEM Ver:1.00
Ver
Current system version
Current sub-system version
Change
menu
Change
menu
Change
menu
Set the type of batteries
TOOL>SYSTEM>BATTERY TYPE
1
2
3
4
Press [TOOL].
TOOL
>TUNER
Select .
>SYSTEM
TOOL
>SYSTEM
Press [ENTER].
SYSTEM
>LCD
Select .
>BATTERY TYPE
SYSTEM
>BATTERY TYPE
Press [ENTER].
BATTERY TYPE
ALKALINE
Type of battery set
Press [ENTER].
ALKALINE
Ni-MH
Default value: ALKALINE
Alkaline batteries
Nickel-metal hydride batteries
Change
menu
Change
menu
Change
menu
Change type
BOOT
SYSTEM
ZOOM R16
BOOT SYSTEM Ver:1.00
Ver
Current boot system version
HINT
You can check for up-to-date system software
information at the ZOOM WEB site:
www.zoom.co.jp.
NOTE
Please use only either alkaline or nickel-metal
hydride batteries.
Page 73

72
USB
Computer connection
Use USB to connect an R16 to a computer (Windows or Macintosh OS) .
By connecting this unit to a computer, you can
use it as an SD card reader, an audio interface
for sound input and output and a control surface
to control DAW software.
NOTE
• To import an audio file into the R16, its format must
be WAV with a sampling frequency of 44.1 kHz and
a bit rate of 16 or 24.
• File names should use only capital letters, numbers
and the "_" (underscore). They should be 8 or fewer
characters plus the “.WAV” extension.
• You can connect the R16 and a computer by USB
when the power is on. If you connect the R16 by
USB when its [POWER] switch is OFF, you can start
it up with power supplied over USB.
• When you are using the R16 as a card reader
or as an audio interface, you cannot use it as a
recorder.
Computer connection
HINT
• Card reader OS compatibility
Windows: Windows XP and later
Macintosh: Mac OS x 10.2 and later
• Project data is saved to the ROOT DIRECTORY of
the SD card as PROJxxx (xxx is the project number)
and audio data is saved as “WAV” files inside
“AUDIO” in the project directory.
• The MASTER track and stereo tracks are stereo
WAV files.
For details about use with a computer, refer to the detailed
manual (PDF) on the CD-ROM included with the R16.
Page 74

73
USB
Card reader
You can access the R16 SD card through a computer to backup, read and import various data, projects and files.
USB>Card reader
Using as an SD card reader
USB>CARD READER
Connect the R16 with a computer
1
by USB (DEVICE JACK).
2
3
Press [USB].
Select .
>CARD READER
USB
>CARD READER
Press [ENTER].
Change
menu
Execute.
4
CARD READER
Enter?
Press [ENTER].
Operating the R16 from a computer.
To computer
Back up project data on an SD card to a computer.
From computer
Import to an SD card from a backup of audio and
computer data.
Disconnecting
To properly disconnect the R16
1
from your computer, follow your
operating system's procedure for
removing hardware.
2
or
Press to disconnect the R16
as a card reader.
NOTE
• To import an audio file into the R16, its format
must be WAV with a sampling frequency of 44.1
kHz and a bit rate of 16 or 24.
•
File names should use only capital letters, numbers
and the "_" (underscore). They should be 8 or fewer
characters plus the “.WAV” extension.
HINT
• Card reader OS compatibility
Windows: Windows XP and later
Macintosh: Mac OS x 10.2 and later
• Project data is saved to the ROOT DIRECTORY of
the SD card as PROJxxx (xxx is the project number)
and audio data is saved as “WAV” files inside
“AUDIO” in the project directory.
• The MASTER track and stereo tracks are stereo
WAV files.
• To import WAV les from a computer, copy them
to the “AUDIO” folder in the “PROxxx” project
folder (xxx=project number) where you want
to use them. Use the R16 to assign the files to
tracks.
•
You can connect the R16 to a computer by USB
when the power is on.
• If you connect the R16 by USB when its [POWER]
switch is OFF, you can start it up with power
supplied over USB.
Ref. : Assign to tracks
P.2 3
For details about use with a computer, refer to the detailed
manual (PDF) on the CD-ROM included with the R16.
Page 75

74
USB
Using USB memory to save and import data
By connecting USB memory directly to the R16, you can save and import files.
This is convenient for exchanging files with band members.
Saving to USB memory
USB>USB STRAGE>SAVE
Connect the USB memory to the
1
USB Host Jack of the R16.
2
3
4
5
6
7
8
Press [USB].
Select .
>USB STRAGE
USB
>USB STRAGE
Press [ENTER].
Select .
>SAVE
USB STRAGE
>SAVE
Press [ENTER].
Select project with data to save.
DATA SAVE
No.001:PRJ001
Press [ENTER].
Select a file.
Select File
LEADGTR.WAV
Press [ENTER].
Select the data to save.
DATA SAVE
LEADGTR.WAV
Press [ENTER].
Change the name of
the file to be saved.
Save the file.
ACOGTR.WAV
Save?
Press [ENTER].
Change
menu
Change
menu
Change
project
Change
project
Change file
Importing from USB MEMORY
USB>USB STRAGE>LOAD
Connect USB MEMORY to the
1
USB Host Jack of the R16.
2
3
4
5
6
7
8
Press [USB].
Select .
>USB STRAGE
USB
>USB STRAGE
Press [ENTER].
Select .
>LOAD
USB STRAGE
>LOAD
Press [ENTER].
Select the folder.
Select File
Folder:WAVFILES
Appears if there is a folder.
Press [ENTER].
Select a file.
Select File
DR_LOOP.WAV
Press [ENTER].
Select a file.
Save to
No.001:PRJ001
Press [ENTER].
Load the file.
DR_LOOP.WAV
Load?
Press [ENTER].
Change
menu
Change
menu
Change folders
and files
Change folders
and files
Change file
USB>USB strage
NOTE
•
Never remove the USB memory when sending and receiving data. Disconnect after the “Saving” or “Loading” display is gone.
• During USB storage use, no recording is possible.
• When saving on USB memory, the saved data is stored at the top level of the le structure.
Page 76

75
USB
Audio interface/control surface
Connect the R16 by USB to a computer to use it as a controller and as an audio interface with DAW
Interface/controller
software.
Connecting the R16 as an audio
interface/control surface
1. Audio interface mode
By using the R16 as an interface between a
computer and other audio equipment and
instruments, you can record and edit audio signals
with DAW software.
You can also connect instruments that require Hi-Z
or phantom power.
2. Control surface mode
Using the faders and keys on the R16, you can
control transport and mixer operations in your DAW
software.
1 2
Install DAW software
Install driver
ZOOM R16 audio driver
Connecting the R16 with a
computer for the first time
Install ZOOM R16 USB Audio
1
drivers on the computer.
Connect the R16 to the computer.
2
Set and connect the R16
Set DAW software.
3
Device settings
Control surface settings
Connect R16 to computer
AUDIO INTERFACE
Set DAW software
Set device
ZOOM R16 audio driver
Control surface settings
Mackie Control
NOTE
• To use the R16 as an audio interface for DAW
software (for example, Cubase LE 4) it is
necessary to install the ZOOM R16 USB audio
driver. Install it correctly according the included
installation guide.
• Please download the latest version of the ZOOM
R16 USB audio driver from our home page, http://
www.zoom.co.jp.
Page 77

76
Connecting and setting the R16
Follow these procedures from the second time connecting
1
Press [USB].
Disconnecting
1
Press [USB].
Interface/controller
Select .
2
>AUDIO INTERFACE
USB
>AUDIO INTERFACE
Press [ENTER].
Confirm.
3
AUDIO INTERFACE
Enter?
Press [ENTER].
Select whether to use previous settings.
4
SETTING?
[CONTINUE] RESET
Press [ENTER].
Connect USB cable to R16.
5
Sample Rate=48.0kHz
s :Solo
[DEVICE] USB indicator lights
AUDIO INTERFACE
icon blinks.
Connect USB cable to the
6
computer.
AUDIO INTERFACE icon lights after connection
Change
menu
Change
menu
Change
menu
Disconnect.
2
AUDIO INTERFACE
Terminate?
Press [ENTER].
Unplug the USB cable.
3
NOTE
You can use the settings and values of the last
project in a new one or reset them to the defaults
Data transferred with CONTINUE
• INSERT EFFECT settings
• SEND RETURN EFFECT settings
• Track parameter settings
• TUNER settings
RESET
Default settings for each item
NOTE
• Before you unplug the USB cable when
disconnecting from a computer, follow the proper
procedures for the computer OS to disconnect
the device first.
• After step 2 of "Disconnecting" above, unplug
the USB cable only after “AUDIO INTERFACE”
disappears from the R16 display.
• Even without power from the R16 (adapter or
batteries), you can start-up with just USB bus
power when using the audio interface/control
surface functions.
• We strongly recommend that you always keep
the R16 system software up-to-date. If you use
an R16 running an old system, a computer might
not recognize it.
Connection complete
Page 78

77
Page 79

78
Page 80

79
R16 effect types and parameters 1
R16 effect types and parameters
Effect parameters
Insert effect
CLEAN, DISTORTION, ACO/BASS SIM algorithms
COMP/LIMITER module
Type Parameters/Descriptions
Compressor
Rack Comp
Limiter
Parameter descriptions
Parameter
name
Sense 0~10
Attack
Tone 0~10
Level 2~100
Threshold 0~50
Ratio 1~10
Release 1~10
EFX module
Type Parameters/Descriptions
Auto Wah
Tremolo
Phaser
Ring
Modulator
Slow Attack
Fix-Wah
Parameter descriptions
Parameter
name
Position
Sense
Resonance
Level
Depth
Rate
Wave
Color
Frequency
Balance
Time
Curve
Dry Mix
RTM Mode
RTM Wave
RTM Sync
Sense Attack Tone Level
MXR Dynacomp type compressor.
Threshold Ratio Attack Level
Compressor with more detailed adjustments.
Threshold Ratio Release Level
Limiter for suppressing signal peaks above a certain level.
Setting range Description
Compressor: Fast, Slow
Rack Comp: 1~10
Position Sense Resonance Level
Auto wah dependent on dynamics of input signal.
Depth Rate Wa ve Level
Periodically varies the volume level.
Position Rate Color Level
Produces a swooshing sound.
Position Frequency Balance Level
Produces a metallic ringing sound. Adjusting the Frequency parameter results in a drastic change of sound character.
Position Time Curve Level
Slows down the attack rate of the sound.
Position Frequency Dry Mix Level RTM Mode RTM Wave RTM Sync
Changes the wah frequency according to rhythm tempo.
Setting range Description
Before, After Sets connection position of EFX module to “before” or “after” preamp.
−10~−1, 1~10 Adjusts auto wah sensitivity.
0~10 Adjusts resonance intensity.
2~100 Adjusts signal level after passing module.
0~100 Adjusts modulation depth.
0~50
(P86 Table1) Adjusts modulation rate. Can be set in rhythm tempo note units.
Up 0~9, Down 0~9, Tri 0~9
4Stage, 8State, Invert4, Invert8 Selects sound type.
Ring Modulator: 1~50 Adjusts frequency used for modulation.
Fix-Wah: 1~50 Adjusts wah center frequency.
0~100 Adjusts balance between original sound and effect sound.
1~50 Adjusts rise time for sound.
0~10 Adjusts volume rise curve.
0~10 Adjusts original sound mix ratio.
P86 Table 2 Adjusts change range and direction.
P86 Table 3 Selects control waveform.
(P86 Table 4) Adjusts control frequency.
Adjusts compressor sensitivity.
Selects compressor response speed.
Adjusts compressor response speed.
Adjusts tonal quality.
Adjusts signal level after passing module.
Adjusts threshold for compressor/limiter action.
Adjusts compressor/limiter compression ratio.
Adjusts delay until compressor/limiter release from point where signal
level falls below threshold level.
Sets modulation waveform to “Up” (rising sawtooth), “Down” (falling
sawtooth), or “Tri” (triangular). Higher values result in stronger clipping,
emphasizing the effect.
Page 81

80
R16 effect types and parameters 2
PREAMP module
Type Parameters/Descriptions
FD Clean
VX Clean
JC Clean
HW Clean
UK Blues
US Blues
TweedBass
BG Crunch
MS #1959
MS Drive
Rect Vnt
HK Drive
DZ Drive
ENGL Drive
PV Drive
TS+FD CMB
SD+MS STK
FZ+MS STK
Acoustic Sim
Aco_Ere Pre
Bass Sim
Parameter description
Parameter
name
Cabinet
Level
Body
Color
3Band EQ module
3Band EQ
Parameter description
Parameter
name
Middle
Treble
Level
MOD/DELAY module
Chorus
Ensemble
Flanger
Pitch
Clean sound of Fender Twin Reverb ('65 model) favored by guitarists of many music styles.
Clean sound of combo amp VOX AC-30 operating in class A.
Clean sound of Roland JC series with built-in chorus which gives a broad, clear tone.
Clean sound of legendary all-tube Hiwatt Custom 100 from Britain.
Crunch sound of 30-watt combo amp Marshall 1962 Bluesbreaker.
Crunch sound of Fender Tweed Deluxe '53.
Crunch sound of Fender Bassman, a bass amp with a strong presence.
Crunch sound of Mesa Boogie MkIII combo amp.
Crunch sound of legendary Marshall 1959.
High gain sound of Marshall JCM2000 stack amp.
High gain sound of Mesa Boogie Dual Rectifier red channel (vintage mode).
High gain sound of Hughes & Kettner flagship model Triamp MKII.
High gain sound of the Diezel Herbert hand-made German guitar amp with three separately controllable channels.
Drive sound of ENGL Ritchie Blackmore Signature 100.
High gain sound of Peavey 5150 developed in cooperation with a world-famous hard rock guitarist.
Combination of Fender combo amp and Ibanez TS-9 sound.
Combination of Marshall stack amp and Boss SD-1 sound.
Combination of Fuzz Face and Marshall stack amp sound.
Gain Tone Cabinet Level
FD Clean - FZ+MS STK have the same parameters.
This effect makes an electric guitar sound like an acoustic guitar.
This is a dedicated preamp for electroacoustic guitar.
This effect makes an electric guitar sound like a bass guitar.
Gain
Tone
Top
Type Parameter/Description
This is a 3-band equalizer.
Bass
Type Parameters/Descriptions
Mixes a variable pitch-shifted component with the original signal, resulting in a full-bodied resonating sound.
Chorus ensemble with three-dimensional movement.
Produces a resonating and strongly undulating sound.
Shifts the pitch up or down.
Top Body Level
Color Tone Level
Tone Level
Setting range Description
0~100 Adjusts preamp gain (distortion intensity).
0~30 Adjusts tonal quality.
0~2 Adjusts speaker cabinet sound intensity.
1~100 Adjusts signal level after passing module.
0~10 Adjusts characteristic acoustic guitar string resonance.
0~10 Adjusts characteristic acoustic guitar body resonance.
1~4 Adjusts characteristics of dedicated electroacoustic guitar preamp.
Bass Middle Treble Level
Setting range Description
−12dB~12dB Adjusts low frequency boost/cut.
−12dB~12dB Adjusts mid frequency boost/cut.
−12dB~12dB Adjusts high frequency boost/cut.
2~100 Adjusts signal level after passing module.
Depth Rate Tone Mix
Depth Rate Tone Mix
Depth Rate Resonance Manual
Shift Tone Fine Balance
R16 effect types and parameters
Page 82

81
R16 effect types and parameters 3
R16 effect types and parameters
Vibe
Step
Cry
Exciter
Air
Delay
Analog Delay
Reverse Delay
ARRM Pitch
Parameter descriptions
Parameter
name
Depth
Rate
Tone
Mix
Resonance
Manual
Shift
Fine
Balance
Shape
Range
Sense
Frequency
Low Boost
Size
Reflex
Time
Wet Level
Dry Level
Feedback
Hi Damp
Type
RTM Wave
RTM Sync
Depth Rate Tone Balance
Effect with automatic vibrato.
Depth Rate Resonance Shape
Special effect that changes the sound in a staircase pattern.
Range Resonance Sense Balance
Varies the sound like a talking modulator.
Frequency Depth Low Boost
Enhances the sound outline, making it more prominent.
Recreates the airy ambience of a room, with a feeling of depth.
Delay effect with a maximum setting of 2000 ms.
Delay effect with a maximum setting of 2000 ms. Simulates the warm sound of an analog delay.
Reverse delay effect with a maximum setting of 1000 ms.
Changes the pitch of the original sound in time with the tempo of a rhythm.
Size Reflex Tone Mix
Time Feedback Hi Damp Mix
Time Feedback Hi Damp Mix
Time Feedback Hi Damp Balance
Type Tone RTM Wave RTM Sync
Setting range Description
Exciter: 0~30 Adjusts effect depth.
All others: 0~100 Adjusts modulation depth.
Chorus, Ensemble: 1~50 Adjusts modulation rate.
Flanger, Vibe, Step: 0~50 (P.86 Table1)
0~10 Adjusts tonal quality.
0~100 Adjusts mix ratio of effect sound to original sound.
Flanger: −10~10
Step, Cry: 0~10 Adjusts effect intensity.
0~100 Adjusts frequency range of effect.
−12~12, 24 Adjusts pitch shift amount in semitone units.
−25~25 Adjusts pitch shift amount in cent (1/100 semitone) units.
0~100 Adjusts balance between original sound and effect sound.
0~10 Adjusts effect sound envelope.
1~10 Adjusts frequency range of effect.
−10~−1, 1~10 Adjusts effect sensitivity.
1~5 Adjusts frequency of effect.
0~10 Adjusts low frequency boost.
1~100 Adjusts size of simulated space.
0~10 Adjusts amount of wall reflections.
Wide: 1~64
Delay, Analog Delay:1~2000ms (P.86 Table1)
Reverse Delay: 10~1000ms (P.86 Table1)
0~30 Adjusts effect sound level.
0~30 Adjusts original sound level.
0~100 Adjusts feedback amount.
0~10 Adjusts intensity of delay sound high range damping.
P.86 Table 5 Selects pitch change type.
P.86 Table 3 Selects control waveform.
P.86 Table 4 Selects control waveform cycle.
Adjusts modulation rate. Using a rhythm tempo as reference, setting
in note units is also possible.
Adjusts resonance intensity. Negative values result in reversed phase
of effect sound.
Adjusts delay time.
ZNR module
Parameter description
Type Parameter/Description
ZNR
Parameter
name
Threshold
Threshold
ZOOM original noise reduction for reducing noise during playing pauses without affecting the overall tone.
Setting range Description
Off, 1~30
Adjusts ZNR sensitivity. For maximum noise reduction, set value as
high as possible without causing the sound to decay unnaturally.
Page 83

82
R16 effect types and parameters 4
BASS algorithm
COMP/LIMITER module
Type Parameters/Descriptions
Rack Comp
Limiter
EFX module
Auto Wah
Tremolo
Phaser
Modulator
Slow Attack
Fix-Wah
Parameter descriptions
Parameter
name
Position
Sense
Resonance
Dry Mix
Level
PREAMP module
Bassman
Hartke
Super Bass
SANSAMP
Tube Preamp
Parameter descriptions
Parameter
name
Cabinet
Balance
Level
3Band EQ module
3Band EQ
MOD/DELAY module
Chorus
Ensemble
Flanger
Pitch
Vibe
Step
Cry
Exciter
Air
Delay
Analog Delay
Reverse Delay
ARRM Pitch
ZNR module
For an explanation of types and parameters, see CLEAN, DISTORTION, ACO/BASS SIM algorithms.
Type Parameters/Descriptions
Ring
Type Parameters/Descriptions
SVT
Gain
Tone
Type Parameters/Descriptions
Type Parameters/Descriptions
Type Parameters/Descriptions
ZNR
Position Sense Resonance Dry Mix Level
This effect varies the wah action according to the intensity of the input signal.
For an explanation of types and parameters, see CLEAN, DISTORTION, ACO/BASS SIM algorithms.
Setting range Description
Before, After
−10~−1.1~10 Adjusts auto wah sensitivity.
0~10 Adjusts resonance intensity.
0~10 Adjusts original sound mix ratio.
2~100 Adjusts signal level after passing module.
Simulation of Ampeg SVT sound.
Simulation of Fender Bassman sound.
Simulation of Hartke HA3500 sound.
Simulation of Marshall Super Bass sound.
Simulation of Sansamp Bass Driver DI sound.
ZOOM original tube preamplifier sound.
Gain Tone Cabinet Balance Level
All PREAMP modules have the same parameters.
Setting range Description
0~100 Adjusts preamp gain (distortion depth).
0~30 Adjusts tonal quality.
0~2 Adjusts intensity of speaker cabinet sound.
0~100 Adjusts mix balance of signal before and after module.
1~100 Adjusts signal level after passing module.
For an explanation of types and parameters, see CLEAN, DISTORTION, ACO/BASS SIM algorithms.
For an explanation of types and parameters, see CLEAN, DISTORTION, ACO/BASS SIM algorithms.
For an explanation of types and parameters, see CLEAN, DISTORTION, ACO/BASS SIM algorithms.
Sets insert position of EFX module to “Before” (before PREAMP) or
“After” (after PREAMP).
R16 effect types and parameters
Page 84

83
R16 effect types and parameters 5
R16 effect types and parameters
MIC algorithm
COMP/LIMITER module
Type Parameters/Descriptions
Rack Comp
Limiter
EFX module
Tremolo
Phaser
Ring Modulator
Slow Attack
Fix-Wah
MIC PRE module
Mic Pre
Parameter descriptions
Parameter
De-Esser
Low Cut
3BAND EQ module
3Band EQ
MOD/DELAY module
Chorus
Ensemble
Flanger
Pitch
Vibe
Step
Cry
Exciter
Air
Delay
Analog Delay
Reverse Delay
ARRM Pitch
ZNR module
For an explanation of types and parameters, see CLEAN, DISTORTION, ACO/BASS SIM algorithms.
Type Parameters/Descriptions
For an explanation of types and parameters, see CLEAN, DISTORTION, ACO/BASS SIM algorithms.
Type Parameters/Description
name
Type
Tone
Level
Type Parameters/Description
Type Parameters/Descriptions
Type Parameters/Description
ZNR
Type Tone Level De-Esser Low Cut
This is a preamplifier for using an external microphone.
Setting range Description
Vocal, AcousticGt, Flat Selects preamp characteristics.
0~10 Adjusts tonal quality.
1~100 Adjusts signal level after passing module.
Off, 1~10 Controls the de-esser setting.
Off, 80~240Hz
For an explanation of types and parameters, see CLEAN, DISTORTION, ACO/BASS SIM algorithm
For an explanation of types and parameters, see CLEAN, DISTORTION, ACO/BASS SIM algorithms.
For an explanation of types and parameters, see CLEAN, DISTORTION, ACO/BASS SIM algorithms.
Controls a filter for reducing low frequency noise often picked up
during mic recording.
DUAL MIC algorithm
COMP/LIMITER L module
Compressor L
Limiter L
Parameter descriptions
Parameter
name
Threshold
Ratio
Type Parameters/Descriptions
Threshold Ratio Attack Level
Compressor for attenuating high-level signals and boosting low-level signals.
Threshold Ratio Release Level
Limiter for attenuating high-level signals that exceed a certain threshold.
Setting range Description
−24~0 Adjusts threshold level of compressor/limiter.
Compressor: 1~26
Limiter: 1~54, ∞
Adjusts compression ratio of compressor/limiter.
Page 85

84
R16 effect types and parameters 6
Attack
Level
Release
MIC PREAMP L module
Type Parameters/Description
Mic Pre L
3BAND EQ L module
3Band EQ L
DELAY L module
Delay L
Echo L
Doubling L
Parameter descriptions
Parameter
name
Feedback
COMP/LIMITER R module
Compressor R
Limiter R
MIC PREAMP R module
Mic Pre R
3BAND EQ R module
3Band EQ R
DELAY R module
Delay R
Echo R
Doubling R
ZNR module
For an explanation of types and parameters, see MIC algorithm.
Type Parameters/Description
For an explanation of types and parameters, see CLEAN, DISTORTION, ACO/BASS SIM algorithms.
Type Parameters/Description
Delay effect with a maximum setting of 2000 ms.
Warm delay effect with a maximum setting of 2000 ms.
Doubling effect which creates body by adding a short delay.
Time
Tone
Mix
Type Parameters/Description
Type Parameters/Description
Type Parameters/Description
Type Parameters/Descriptions
Type Parameters/Description
ZNR
Delay L, Echo L: 1~2000ms (P.89 Table 1)
For an explanation of types and parameters, see COMP LIMITER L module.
For an explanation of types and parameters, see MIC algorithm.
For an explanation of types and parameters, see CLEAN, DISTORTION, ACO/BASS SIM algorithms.
For an explanation of types and parameters, see DELAY L module.
For an explanation of types and parameters, see CLEAN, DISTORTION, ACO/BASS SIM algorithms.
0~10 Adjusts attack rate of compressor.
2~100 Adjusts module output level.
0~10
Time Feedback Mix
Time Feedback Mix
Time Tone Mix
Setting range Description
Doubling L: 1~100ms
0~100 Adjusts feedback amount.
0~10 Adjusts tonal quality.
0~100 Adjusts mix ratio of effect sound to original sound.
Adjusts speed of limiter release after signal falls below threshold
level.
Adjusts delay time.
R16 effect types and parameters
STEREO algorithm
COMP/LIMITER module
Type Parameters/Descriptions
Compressor
Limiter
Lo-Fi
Parameter description
Parameter
name
Character
Color
Distortion
For an explanation of types and parameters, see DUAL MIC algorithm.
Character Color Distortion Tone EFX Level Dry Level
Lo-fi effect purposely degrades sound quality.
Setting range Description
0~10 Adjusts filter characteristics.
1~10 Adjusts sound color.
0~10 Adjusts distortion.
Page 86

85
R16 effect types and parameters 7
R16 effect types and parameters
Tone
EFX Level
Dry Level
ISO/MIC MODEL module
Type Parameters/Descriptions
Isolator
Mic Modeling
Parameter descriptions
Parameter
name
Xover Lo
Xover Hi
Mix High
Mix Mid
Mix Low
Mic Type
3BAND EQ module
Type Parameters/Description
3Band EQ
MOD/DELAY module
Type Parameters/Descriptions
Chorus
Flanger
Phaser
Tremolo
Auto Pan
Pitch
Ring
Modulator
Delay
Echo
Doubling
Dimension
Resonance
Parameter descriptions
Parameter
name
Depth
Resonance
Color
LFO Shift
Width
Xover Lo Xover Hi Mix High Mix Mid Mix Low
Divides the signal into three frequency bands and allows individual adjustment of the mixing ratio for each band.
Mic Type
Changes the character of the built-in microphones.
For an explanation of types and parameters, see CLEAN, DISTORTION, ACO/BASS SIM algorithms.
Mixes a variable pitch-shifted component with the original sound, resulting in full-bodied resonating tone.
Produces a resonating and strongly undulating sound.
Produces a swooshing sound.
Periodically varies the volume level.
Shifts the panning position of the sound between left and right.
This effect shifts the pitch up or down.
For an explanation of types and parameters, see CLEAN, DISTORTION, ACO/BASS SIM algorithms.
Delay effect with a maximum setting of 2000 ms.
Warm delay effect with a maximum setting of 2000 ms.
Doubling effect which creates body by adding a short delay.
Effect producing spatial expansion.
Depth Freq Offset Rate Filter Type Resonance EFX Level Dry Level
Resonance filter with LFO.
4Stage ,8Stage, Invert4, Invert8 Selects sound type.
0~10 Adjusts tonal quality.
0~100 Adjusts effect sound level.
0~100 Adjusts original sound level.
Setting range Description
50Hz~16kHz Adjusts low-to-mid crossover frequency.
50Hz~16kHz Adjusts mid-to-high crossover frequency.
Off, −24~6 Adjusts high range mix level.
Off, −24~6 Adjusts mid range mix level.
Off, −24~6 Adjusts low range mix level.
SM57
MD421
U87
C414
Depth Rate Mix
Depth Rate Resonance
Rate Color LFO Shift
Depth Rate Clip
Width Rate Clip
Shift Tone Fine Balance
Time Feedback Mix
Time Feedback Mix
Time Tone Mix
Rise1 Rise2
Setting range Description
0~100 Adjusts modulation depth.
−10~10
0~180 Adjusts left/right phase shift.
0~10 Adjusts auto pan width.
Simulation of SM57 mic suitable for recording of various analog
instruments as well as guitars.
Simulation of MD421 professional standard mic indispensable for
broadcasting, recording and live applications
Simulation of U87, a standard condenser type microphone used in
studios worldwide.
Simulation of C414, a famous microphone highly trusted in recording
situations.
Adjusts resonance intensity. Negative values result in reversed phase
for the effect sound.
Page 87

86
R16 effect types and parameters 8
Rate
Clip
Shift
Time
Feedback
Mix
Tone
Fine
Balance
Rise1
Rise2
Freq Offset
Filter Type
Resonance
EFX Level
Dry Level
ZNR module
Type Parameters/Description
ZNR
Parameters marked with
Table 1
The note durations for the setting values are shown below.
Thirty-second note
Sixteenth note
Quarter triplet note
NOTE
• The note range actually available depends on the parameter.
• Depending on the combination of tempo setting and selected note symbol, the parameter setting range could be exceeded. In such a
case, the value is automatically halved (or set to 1/4 if the range is still exceeded).
Table 2
Setting value Description
Off
Frequency does not change.
Up
Down
Table 3
Setting
value
Up Saw
Up Fin
DownSaw
DownFin
Table 5
Setting
value
Frequency changes from minimum to maximum according to the controlling waveform.
Frequency changes from maximum to minimum according to the controlling waveform.
Hi
Frequency changes from patch setting to maximum according to the controlling waveform.
Lo
Frequency changes from minimum to patch setting according to the controlling waveform.
Description
Rising sawtooth wave
Rising fin wave
Falling sawtooth wave
Falling fin wave
1
1 semitone lower — original sound
2
Original sound — 1 semitone lower
3
Doubling — detune + original sound
4
Detune + original sound — doubling
5
Original sound — 1 octave higher
6
1 octave higher — original sound
7
Original sound — 2 octaves lower
8
2 octaves lower — original sound
9
1 octave lower + original sound — 1 octave higher + original sound
0~50
(P.86 Table 1)
0~10 Adds emphasis by clipping the modulation waveform.
−12~12,24
Delay, Echo: 1~2000ms
Doubling: 1~100ms
HPF, LPF, BPF Selects filter type.
For an explanation of types and parameters, see CLEAN, DISTORTION, ACO/BASS SIM algorithms.
Setting
value
TrixTri
Square
Description
(P.86 Table 1)
0~100 Adjusts feedback amount.
0~100 Adjusts mix ratio of effect sound to original sound.
0~10 Adjusts tonal quality.
−25~25 Adjust pitch shift amount in cent (1/100 semitone) units.
0~100 Adjust balance between original sound and effect sound.
0~30 Adjusts stereo component intensity.
0~30 Adjusts mono component intensity.
1~30 Adjusts LFO offset.
1~30 Adjusts resonance intensity.
0~100 Adjusts effect sound level.
0~100 Adjusts original sound level.
allow selection of a setting value in note units, using the song/pattern tempo as reference.
Dotted sixteenth note
Eighth note
Half triplet note
Description
Tri
Triangular wave
Squared triangular wave
Sine
Sine wave
Square wave
Adjusts modulation rate. Using the rhythm tempo as reference,
setting in note units is also possible.
For an explanation of types and parameters, see CLEAN, DISTORTION, ACO/BASS SIM algorithms.
Adjusts delay time.
Dotted eighth note Quarter note x 2
Quarter note
Dotted quarter note Quarter note x 20
Table 4
Setting
value
Setting
value
10
11
12
13
14
15
16
Description
Eighth note
Quarter note
Half note
Dotted half note
1 octave higher + original sound — 1 octave lower + original sound
Complete fifth down + original sound — complete
fourth up + original sound
Complete fourth up + original sound — complete fifth
down + original sound
0 Hz + original sound — 1 octave up
1 octave up — 0 Hz + original sound
0 Hz + original sound — 1 octave up + original sound
1 octave up + original sound — 0 Hz + original sound
: :
Setting
value
1 bar
2 bars
3 bars
4 bars
Description
Description
1 measure
2 measures
3 measures
4 measures
R16 effect types and parameters
Page 88

87
R16 effect types and parameters 9
R16 effect types and parameters
8x Comp EQ algorithm
Modules 1~8
Unit Type Parameter
HPF 1-8 HPF
COMP/LIMITER
1-8
3BAND EQ 1-8 3Band EQ
Parameter description
Parameter
name
Frequency
MASTERING algorithm
COMP/Lo-Fi module
Type Parameter
3Band Comp
Lo-Fi
Parameter descriptions
Parameter
name
Xover Lo
Xover Hi
Sense Hi
Sense Mid
Sense Low
Mix High
Mix Mid
Mix Low
NORMALIZER module
Type Parameter
Normalizer
Parameter description
Parameter
name
Gain
Xover Lo Xover Hi Sense Hi Sense Mid Sense Low Mix High Mix Mid Mix Low
Compressor that divides the signal into three frequency bands and allows individual adjustment of compressor sensitivity and
mixing ratio for each band.
For an explanation of types and parameters, see STEREO algorithms.
Adjusts COMP/Lo-Fi module input level.
Rack Comp
Limiter
Setting range Description
80~240Hz Adjusts cutoff frequency.
Setting range Description
50Hz~16kHz Adjusts low-to-mid crossover frequency.
50Hz~16kHz Adjusts mid-to-high crossover frequency.
0~24 Adjusts high range compressor sensitivity.
0~24 Adjusts mid range compressor sensitivity.
0~24 Adjusts low range compressor sensitivity.
Off, −24~6 Adjusts high range mixing ratio.
Off, −24~6 Adjusts mid range mixing ratio.
Off, −24~6 Adjusts low range mixing ratio.
Gain
Setting range Description
−12~12 Adjusts level.
High-pass filter blocks the low range and passes high frequencies.
For an explanation of types and parameters, see CLEAN,
DISTORTION, ACO/BASS SIM algorithms.
Frequency
3BAND EQ module
Type Parameters/Description
3Band EQ
DIMENSION/RESO module
Type Parameters/Descriptions
Dimension
Resonance
ZNR module
Type Parameters/Description
ZNR
For an explanation of types and parameters, see CLEAN, DISTORTION, ACO/BASS SIM algorithms.
For an explanation of types and parameters, see STEREO algorithms.
For an explanation of types and parameters, see CLEAN, DISTORTION, ACO/BASS SIM algorithms.
Page 89

88
R16 effect types and parameters 10
Send/return effect
CHORUS/DELAY module
Type Parameters/Descriptions
Chorus
Delay
Parameter descriptions
Parameter
name
LFO Type
Depth
Rate
Pre Delay
EFX Level
Rev Send
Time
Feedback
Hi Damp
Pan
REVERB module
Hall
Room
Spring
Plate
Parameter description
Parameter
name
Pre Delay
Decay
EQ High
EQ Low
E.R.Mix
EFX Level
LFO Type Depth Rate Pre Delay EFX Level
Mixes a variable pitch-shifted component with the original sound, resulting in full-bodied resonating tone.
Time Feedback Hi Damp Pan EFX Level Rev Send
Delay effect with a maximum setting of 2000 ms.
Setting range Description
Mono, Stereo
0~100 Adjusts effect depth.
1~50 Adjusts modulation rate.
1~30 Adjusts pre-delay time.
0~100 Adjusts effect sound level.
0~30 Adjusts delay sound reverb send level.
1~2000ms (P.86 Table 1) Adjusts delay time.
0~100 Adjusts feedback amount.
Left10~Left1, Center, Right1~Right10 Adjusts delay sound panning.
Simulates the acoustics of a concert hall.
Simulates the acoustics of a room.
Pre Delay Decay EQ High EQ Low E.R.Mix EFX Level
Hall and Room have the same parameters.
Simulates a spring reverb.
Simulates a plate reverb.
Pre Delay Decay EQ High EQ Low EFX Level
Spring and Plate have the same parameters.
0~10 Adjusts intensity of delay sound high range damping.
Setting range Description
1~100 Adjusts pre-delay time.
1~30 Adjusts reverb time.
−12~6 Adjusts high range effect sound.
−12~6 Adjusts low range effect sound.
0~30 Adjusts mix ratio of initial reflections.
0~100 Adjusts effect sound level.
Sets LFO phase to mono or stereo.
Parameters/Descriptions
R16 effect types and parameters
Page 90

89
Effect patch list 1
R16 effect patch list
Effect Patch List
Insert effect
CLEAN algorithm
No. Patch name Description
0 Standard
1 Ensemble
2 CompPlus
3 R&Roll
4 CutPhase
5 Hi-WT
6 DlyLead
7 Blues
8 MultiFLG
9 DaDaFunk
10 Tremolo
11 BeatRock
12 Rockably
13 WarmCho
14 Unison
15 Crunch
16 CleanArp
17 CompLead
18 FastRate
19 ClubJazz
20 SlowVibe
21 Ethnic
22 Insect
23-29 Empty
DISTORTION algorithm
No. Patch name Description
0 5-1-5-0
1 MS#1959
2 AnyOD
3 RectiDRV
4 MultiLD
5 Detune
6 UK Blues
7 Fusion
8 AutoWah
9 JB Style
10 Hvy Riff
11 BlueLine
12 Melody
13 TalkTime
14 ArpenCho
15 HK Drive
16 MS Drive
17 Crunch
18 NuanceOD
19 Tremolo
20 ShortDLY
21 Half Wah
22 Jet Riff
23 SmoothLD
24 HR Core
25 ENGL 650
Standard clean sound optimized for line-level equipment.
Transparent sound with ensemble effect.
Universal compressor with a wide range of uses.
Sound tailored for vintage genres such as rock’n’roll.
Phase effect for that great cutting style.
Hiwatt amp tone gets natural distortion from the picking dynamics.
Clean lead patch, characterized by long delays with solid presence.
Choose this for an orthodox blues feel.
Flanger suitable for many uses including arpeggio, cutting, and lead guitar.
Auto wah brings out picking nuances.
Twin reverb with added tremolo for color.
Get into the Merseybeat for rock bands.
Rockabilly sound with effective use of short delay.
Combination of warm tone with deep chorus.
Unison sound with added bass (-12 shift), good for low range phrasing.
Light crunch for rock and pop backing.
Wide ensemble sound that works well with arpeggios and obligato.
Streamlined lead sound with effective compressor action.
Fast phaser turns full chords into a unique lead sound.
Simulates the ambience in a jazz club or a similar live venue.
Slow attack sound for imaginative chord work.
ARRM effect effectively emphasizes open-string phrasing.
Special effect sound of a small insect buzzing.
5150 simulation, great for hard riffs.
British rock sound with airy distortion that comes alive at high volumes.
Overdrive suitable for both lead and backing.
Sound modeled on the Boogie Rectifier.
Versatile lead tone for many applications.
Solid sound with detune effect.
Bluesbreaker with added delay gives fat and smooth sound.
Fusion type sound with a surging deep chorus.
Versatile auto wah for lead or backing.
Octaver sound made famous by Jeff Beck.
Choose this for heavy riffs.
Bluesy sound with a dry character.
Sustain sound for melodious solos.
Talk sound featuring a cry effect. A sense of persistence makes it easy to play.
Chorus effect great for arpeggios.
The full-bodied sound of AMP3 high-gain distortion with added delay.
JCM2000 lead channel simulation. Air effect adds the cabinet touch.
Crunch sound optimized for cutting.
Overdrive sound brings out those fine amp details.
Tremolo sound for arpeggio.
Rock lead sound with short delay.
Midrange-oriented sound with half open wah.
Flanger jet sound.
Smooth and glossy distortion sound.
Punchy hard rock sound.
Simulation of the ENGL E650 favored by Ritchie Blackmore.
Page 91

90
Effect patch list 2
26 5thPitch
27 375 DLY
28 PsycheVB
29 D’live
30 NicePick
31 X’over
32 Combo
33 MildTone
34 Bright
35 OLD DLY
36 Tweed
37 BoxBody
38 Big Wave
39 Bottom
40-49 Empty
ACO/BASS SIM algorithm
No. Patch name Description
0 Ensemble
1 Delay LD
2 Chorus
3 FineTune
4 Air Aco
5 Standard
6 CompBass
7 WarmBass
8 Flanging
9 Auto Wah
10-19 Empty
BASS algorithm
No. Patch name Description
0 SVT
1 BASSMAN
2 HARTKE
3 SUPER-B
4 SANS-A
5 TUBE PRE
6 Attack
7 Wah-Solo
8 Talk&Cry
9 Melody
10 SlapJazz
11 Destroy
12 Tremolo
13 SoftSlow
14 Limiter
15 X’over
16 CleanWah
17 Exciter
18 ClubBass
19 DriveWah
20-29 Empty
Synthesizer-like pitch sound with fifth-down for ad-libbing.
Dotted eighth delay at 120 bpm creates a gimmicky sound for solo play.
Psychedelic vibe sound of the sixties as personied by Jimi Hendrix.
Crunch sound with intense live feeling.
Crunch sound controlled by picking.
Slick semi-acoustic sound with overdrive.
Crunch sound in the boogie combo style.
Mild tone emphasizes the low range.
Bright and airy sound.
Lead tone flavored with analog delay.
Tweed amp sound with a clear edge.
Old-style semi-acoustic fusion sound.
Special effect sound using ARRM creates a wave that rolls back to you.
Twang those lower strings with this sound.
Gorgeous sound with deep ensemble effect.
Lively acoustic guitar sound for lead playing.
Chorus sound suitable for everything from rhythm guitar to lead guitar.
Delicate detune creates sonic depth.
Air sound creates a micing effect.
Standard bass sound with many uses.
Bass sound comes alive with compressor and exciter.
Bass sound with warm and round feeling.
Flanging sound covers a lot of ground from 16-beat phrases to melody playing.
Funky bass sound that makes good use of auto wah.
Walk the high road of rock. Great for finger picking or flatpicking.
Vintage rock sound for any occasion.
Hartke simulation with all the glitz and glitter.
Choose this for guitar unison play and solo play.
Edgy sound with a strong core is a good match for flatpicking.
All-rounder tube sound always comes in handy.
Compression sound effective for slap and flatpick playing.
Solo sound with distortion and a touch of wah. Pitch shift is the secret ingredient.
Typical special effect that makes a cry sound like a talking modulator.
Chorus sound for melody, solo, chord playing and harmonics.
Basic slap sound in the jazz bass style.
Smashing sound mixing distortion, pitch shifting and ring modulator.
A great match for a moody bass line and chord playing.
Melody or solo play tone that is ideal for a fretless bass.
Limiter evens out the sound when using a pick.
Flanger sound for picking, typical of the crossover genre.
Auto wah sound that has a million uses.
Universal sound with a fresh and transparent character.
Play those walking phrases with this sound that simulates the ambience of a small club.
Auto wah sound with variable drive that follows picking dynamics.
R16 effect patch list
MIC algorithm
No. Patch name Description
0 Rec Comp
1 RoomAmbi
2 VocalDly
3 Rock
Conventional preamp + compression sound for recording.
Simulates the acoustics of a radio station broadcast studio.
Delay effect that works best with wet vocals.
Massive compression sound for rock vocals.
Page 92

91
Effect patch list 3
R16 effect patch list
4 Long DLY
5 InTheBOX
6 Limiter
7 AG MIC
8 AG Dub
9 12st Cho
10 AG-Jumbo
11 AG-Small
12 AG Lead
13 Live AMB
14 Tunnel
15 Filter
16 BrethCmp
17 Vib MOD
18 Duet Cho
19 Ensemble
20 VocalDub
21 Sweep
22 VoiceFlg
23 PH Voice
24 VibVoice
25 FutureVo
26 M to F
27 F to M
28 WaReWaRe
29 Hangul
30-49 Empty
DUAL MIC algorithm
No. Name Comment Recommended L/R input
0 Vo/Vo 1
1 Vo/Vo 2
2 Vo/Vo 3
3 AG/Vo 1
4 AG/Vo 2
5 AG/Vo 3
6 ShortDLY
7 FatDrum
8 BothTone
9 Condnser
10 DuoAtack
11 Warmth
12 AM Radio
13 Pavilion
14 TV News
15 F-Vo/Pf1
16 JazzDuo1
17 Cntmprry
18 JazzDuo2
19 Ensemble
20 Enhanced
21 Warmy
22 Strum+Vo
23 FatPlus
24 Arp+Vo
25 ClubDuo
26 BigShape
27 FolkDuo
28 GtrDuo
29 Bright
30-49 Empty
For duets Vocals
Chorus for main vocal Vocals
For harmony Vocals
Creates a story-like character Acoustic guitar/Vocal
Similar to AG/Vo 1 but vocal character different Acoustic guitar/Vocal
Aggressively modifies vocal character Acoustic guitar/Vocal
Short delay sound with effective doubling Microphones
For drum recording with single point stereo mic Microphones
Tuned for male on L channel and female on R channel Vocals
Simulates condenser mic sound with dynamic mic input Vocals
Chorus for lead vocals with emphasized attack Vocals
Warm sound with prominent midrange Vocals
Simulates AM monaural radio Vocals
Narration sound at expo booths Vocals
TV newscaster sound Vocals
For female vocal piano ballads Vocal/Piano
Simulates jazz session LP with lo-fi sound Vocal/Piano
All-round clear sound Vocal/Piano
JazzDuo 1 for male vocal Vocal/Piano
For guitar with strong attack and mellow piano Acoustic guitar/Piano
Enhances clear, strong outline for ballads Acoustic guitar/Vocal
Moderates overbright ambience Acoustic guitar/Vocal
Smooth fat sound with midrange compensation Acoustic guitar/Vocal
Spruces up a thin midrange Acoustic guitar/Vocal
Overall solid sound Acoustic guitar/Vocal
Simulates live sound in small club Acoustic guitars
Enhances overall clarity Acoustic guitars
Fresh and clean sound Acoustic guitars
Suitable for guitar duos Acoustic guitars
Bright and sharp global feeling Acoustic guitars
Long delay sound for vocals (2-beat at 120 bpm)
This effect seems to put the entire sound into a small box
Limiter effect that is very useful for recording
Preamp tone that is great for recording acoustic guitar
Doubling sound that gives a stroke more of a pick feeling
Chorus sound for 12-string guitar
Increases the apparent body size of an acoustic guitar
Reduces the apparent body size of an acoustic guitar
Delay sound for acoustic guitar leads
Bright reverb sound for acoustic guitar increases the live feeling
Simulation of tunnel reverb
Filter effect lets you change the sound character during a song
Fairly strong compressor sound emphasizes breathiness
Crafty vocal sound combines phaser and vibrato
Detune sound creates an instant duet
Fresh ensemble sound great for chorus
Conventional doubling sound
Voice sound with slow phase sweep
Flanging chorus sound with strong modulation
Gimmicky phase sound seasoned with delay
Clearcut vibrato sound
A message from the aliens
Transforms male vocals into a female sound
Transforms female vocals into a male sound
Special effect sound speaks to you from the cosmos
Special effect sound that turns Japanese into Korean
Page 93

92
Effect patch list 4
STEREO algorithm
No. Name Comment
0 Syn-Lead
1 OrganPha
2 OrgaRock
3 EP-Chor
4 ClavFlg
5 Concer t
6 Honkey
7 PowerBD
8 DrumFlng
9 LiveDrum
10 JetDrum
11 AsianKit
12 BassBost
13 Mono->St
14 AM Radio
15 WideDrum
16 DanceDrm
17 Octaver
18 Percushn
19 MoreTone
20 SnrSmack
21 Shudder!
22 SwpPhase
23 Dir tyBiz
24 Doubler
25 SFXlab
26 SynLead2
27 Tekepiko
28 Soliner
29 HevyDrum
30 SM57Sim
31 MD421Sim
32 U87Sim
33 C414Sim
34 Doubling
35 Shor tDLY
36 Lo-Fi
37 Limiter
38 BoostPls
39 All Comp
40-59 Empty
For synthesizer single note lead
Phaser for synthesizer/organ
Boomy distortion for rock organ
Beautiful chorus for electric piano
Wah for clavinet
Concert hall effect for piano
Honky-tonk piano simulation
Gives a bass drum more power
Conventional flanger for drum
Simulates outdoor live doubling
Phaser for 16-beat hi-hat
Changes a standard kit to an Asian kit
Emphasizes low range
Gives spaciousness to a monaural source
AM radio simulation
Wide stereo effect for drum machine track
Reinforces bass for dance rhythms
Adds one-octave lower sound
Gives air, presence, and stereo spread to percussion
Distortion with emphasized midrange body
Emphasizes snappy snare sound
Sliced sound for techno tracks
Phaser with powerful resonance
Lo-fi distortion using ring modulator
Doubling for vocal track
Forces special effect sound on synthesizer
Old-style jet sound for synthesizer lead
For sequenced phrases or single note muted guitar
Simulates analog strings ensemble
For hard rock drums
Simulation of SM57 mic suitable for recording of various analog instruments as well as guitars
Simulation of MD421 professional standard mic indispensable for broadcasting, recording and live applications
Simulation of U87, a standard condenser type microphone used in studios worldwide
Simulation of C414, a famous microphone highly trusted in recording situations
Creates doubled sounds as if the entire sound body became thicker
Delay sound suitable for vocals and field recordings, and also for creating a gimmicky effect
Create Lo-Fi sounds with a nostalgic atmosphere as if the sound is coming from a radio
A limiter very effective on band rehearsals and live recording
Boosts sound by adding sound pressure during recording
Compressor adjusts volume differences of instruments in a band performance, for example, and evens them out
R16 effect patch list
8x COMP EQ algorithm
No. Name Comment Recommended input 1 - 8
0 VoclBand
1 Inst
2 AcoBand
For vocal band
For jazz or fusion band
For acoustic band
1
2
3
4
5-6
7-8
1-2
3
4
5-6
7-8
1
2
3
4
5-6
7-8
Guitar amp
Bass amp
Vocal
Chorus
Drums
Keyboard
Guitar amp
Bass amp
Piano
Drums
Keyboard
Acoustic bass
Piano
Vocal
Chorus
Acoustic guitar
Percussion
Page 94

93
Effect patch list 5
R16 effect patch list
3 1ManBand
4 StdDrum
5 VtgDrum
6 EhcdDrum
7 Percus
8 CompLtr
9 A Capla
10-19 Empty
MASTERING algorithm
No. Name Comment
0 PlusAlfa
1 All-Pops
2 StWide
3 DiscoMst
4 Boost
5 Power
6 Live
7 WarmMst
8 TightUp
9 1930Mst
10 LoFi Mst
11 BGM
12 RockShow
13 Exciter
14 Clarify
15 VocalMax
16 RaveRez
17 FullComp
18 ClearPWR
19 ClearDMS
20 Maximizr
21-29 Empty
For private recording studio
Standard sound for recording each sound of a drum kit
1970s drum sound with enhanced hi-hat
Punchy compressed drum sound
Suitable for recording individual percussion sounds
Versatile, mellow sound
For a cappella group
Enhances the overall power
Conventional mastering
Wide-range mastering
For club sound
For hi-fi finish
Powerful low range
Adds a live feel
Adds a warm feeling
Adds a hard feeling
Mastering with 1930's sound
Lo-fi mastering
Mastering for background music
Gives a rock style mix a live feel
Lo-fi mastering with slight distortion in mid and upper range
Emphasizes high-end range
Brings vocals to the foreground
Special sweep effect using sharp filter
Strong compression over full frequency range
Power tuning with emphasized midrange
Enhances clarity and spaciousness
Boosts overall sound pressure level
1-2
Guitar
3
Bass
4
Keyboard
5
Vocal
6
Chorus
7-8
Sequencer
1
Bass drum
2
Snare drum
3
Hi-hat
4
High tom
5
Mid tom
6
Low tom
7-8
Overhead mics
1-2
Various percussion
3-4
Cymbal/bell
5-6
Drums
7-8
All percussion together
1-8
1-2
Female vocals
3-4
Male vocals
5-6
Vocal duo
7-8
All vocals together
Page 95

94
Effect patch list 6
Send/return effect
CHORUS/DELAY
No. Name Comment
0 Vocal
1 GtChorus
2 Doubling
3 Echo
4 Delay3/4
5 Delay3/2
6 FastCho
7 DeepCho
8 ShortDLY
9 DeepDBL
10 SoloLead
11 WarmyDly
12 EnhanCho
13 Detune
14 Natural
15 Whole
16 Delay2/3
17 Delay1/4
18-29 Empty
REVERB
No. Name Comment
0 TightHal
1 BrgtRoom
2 SoftHall
3 LargeHal
4 SmallHal
5 LiveHous
6 TrStudio
7 DarkRoom
8 VcxRev
9 Tunnel
10 BigRoom
11 PowerSt.
12 BritHall
13 BudoKan
14 Ballade
15 SecBrass
16 ShortPla
17 RealPlat
18 Dome
19 VinSprin
20 ClearSpr
21 Dokan
22-29 Empty
Chorus for adding color to vocals
Chorus to enhance weak guitar sound
Versatile doubling
Showy analog-style delay
Dotted-8th-note delay in sync with rhythm tempo
Dotted-quarter-note delay in sync with rhythm tempo
Fast-rate chorus
Versatile deep chorus
Versatile short delay
Deep doubling
Keeps fast phrases tight
Simulates warm analog delay
Enhancer using phase shift doubling
For instruments with strong harmonics such as an electronic piano or synthesizer
Chorus with low modulation for backing
Whole-note delay in sync with rhythm tempo
Half-triplet-note delay in sync with rhythm tempo
16th-note delay in sync with rhythm tempo
Hall reverb with a hard tonal quality
Room reverb with a hard tonal quality
Hall reverb with a mild tonal quality
Simulates the reverberation of a large hall
Simulates the reverberation of a small hall
Simulates the reverberation of a club
Simulates the reverberation of a rehearsal studio
Room reverb with a mild tonal quality
Tuned to enhance vocals
Simulates the reverberation of a tunnel
Simulates the reverberation of a gym
Gate reverb
Simulates the bright reverb of a concert hall
Simulates the reverberation at the Budokan in Tokyo
For slow ballads
Reverb for brass section
Short reverb
Spring reverb simulation
Reverb of a domed-stadium
Simulates analog spring reverb
Clear reverb with short reverb time
Simulates the reverberation of a clay pipe
R16 effect patch list
Page 96

95
Specifications
Specifications
Recorder
Audio interface
Mixer
Effects
Metronome
Others Other functions Sequential playback, synchronized recording
Hardware
Section R16
Track count 16 (monaural)
Maximum number of
simultaneous recording tracks
Maximum number of
simultaneous playback tracks
Recording data format 44.1kHz, 16/24bit
Maximum recording time 200 minutes/1GB (of mono tracks)
Projects 1000 maximum per SD Card
Markers 100/project
Locator Minute/second/millisecond or bar/beat/tick
File editing Divide
Other functions Punch-in/out (manual, automatic), Bounce, A-B repeat, UNDO/REDO
Number of input channels 8
Number of output channels 2
Quantization 24-bit
Sampling frequency 44.1, 48, 88.2, 96 kHz
Faders 9 (monaural x 8, master x 1)
Level meters 4-segment display
Track parameters 3-band equalizer, pan (balance), effect send x 2, invert
Stereo linking Track pairs 1/2 – 15/16 selectable
Algorithms
Patches 330 insert, 60 send return
Effect modules 7 insert, 2 send return
Tuner Chromatic, guitar, bass, open A/D/E/G, D modal
Tones 5
Beat No accent, 1/4 - 8/4, 6/8
Tempo 40.0~250.0 BPM
Recording media SD card (16MB-2GB), SDHC card (4-32GB)
Analog-digital conversion 96kHz 24bit delta-sigma ADC
Digital-analog conversion 96kHz 24bit delta-sigma DAC
Display 20-digit 2-line custom LCD (with backlight)
Inputs
Phantom power supply 48V
Output
USB
Power supply
Dimension 376mm (W) × 237.1mm (D) × 52.2mm (H)
Weight 1.3kg
INPUT 1-8
Built-in
microphones
OUTPUT TRS phone type (balanced)
PHONES Standard stereo phone jack 20mW x 2 (32
8
16 audio + metronome
9 (CLEAN, DISTORTION, ACO/BASS SIM, BASS, MIC, DUAL MIC, STEREO,
8× COMP EQ, MASTERING)
XLR/standard phone combo jack x8
Input impedance:
(Balanced input) 1K
(Unbalanced input) 50K
1 equipped with Hi-Z switch, input impedance 470k
2 equipped with phantom power switches
Input level: –50dBm < continuous < +4dBm
Omnidirectional condenser microphones
Gain: -50dBm < continuous < +4dBm
USB 2.0 High Speed (operation as audio interface/control surface or card
reader)
DC 5V 1A AC adaptor (ZOOM AD-14)
Six AA batteries (4.5-hour continuous operation time with backlight on and
phantom power off)
balanced, 2 hot
unbalanced
(Hi-Z on)
load)
Page 97

96
Troubleshooting
If you have any problems during operation of the R16, check the following points first.
Problems during playback •••••••••••••••••
No sound, or sound is very weak.
• Check the connections to your monitoring system
and the volume settings of the system.
• Make sure that status keys in the mixer section are
lit green (except the [MASTER] status key) and
that faders are raised. If a key is not green, press it
repea tedly until it lights green.
• Make sure that the [MASTER] status key is not lit and
that the [MASTER] fader is raised.
Moving the fader does not affect the volume.
• On channels for which stereo link is turned on,
the fader of the even-numbered channel will have
no effect. Either turn stereo link off (→P.20), or
use the fader of the odd-numbered channel in
the pair.
No sound from input signal, or sound is very weak.
• Make sure that the [GAIN] control for the
respective input is increased.
• Check that the status light is green (playback
enabled) and that the fader of the track is raised.
An operation does not work and the message “Stop
Recorder” is shown on the display.
• Some operations are not possible while the
recorder is operating. Press the [STOP] key
to stop the recorder and then conduct the
operation.
Problems during recording ••••••••••••••••
Cannot record on a track.
• Make sure that you have selected and enabled a
recordable track.
• Check whether you have run out of free space on
the SD card (→P.70).
• Recording is not possible if the project is
protected. Either set “PROTECT” to “OFF”
(→P.54), or use a different project.
The recorded sound is distorted.
• Make sure that the [GAIN] (input sensitivity) and
recording level are not set too high.
• Lower the fader so that the 0 (dB) indicator of the
level meter does not light.
• If the EQ gain of the track mixer is set extremely
high, the sound may be audibly distorted even if
the fader is lowered. Set the EQ gain to a lower
value.
• When an insert effect is applied to an input,
check whether the effect output level (patch
level) setting is appropriate.
Problems with effects ••••••••••••••••••••
Insert effect cannot be inserted.
• When using the 8x COMP EQ algorithm, the
selection of insert points is limited (→P.49).
Insert effect does not work.
• Check that the “INSERT EFFECT” icon is shown
on the display. If it is not shown, press the [INSERT
EFFECT] key and then press [ENTER] to enable
it.
• Make sure that the insert effect is inserted in the
desired location (→P.49).
Send/return effect does not work.
• Check that the “CHORUS/DELAY” icon is shown
on the display. If it is not shown, press the SEND
RETURN EFFECT key and then press [ENTER] to
enable it.
• Make sure that the send level for the track is
raised (→P.37, 48).
Other problems •••••••••••••••••••••••••
Cannot save a project.
• The project cannot be saved if the project is
protected. Set “PROTECT” to “OFF” (→P.56).
Cannot create a new project or copy a project.
• If “Project Full” appears on the display, all the
memory available on the card has been used.
Delete unneeded projects to free up memory.
An error message is shown when attempting to
execute a command.
• Please check the error message list (→P.44).
Troubleshooting
Page 98

Index
97
A
Index
A-B repeat function ➞P.30
Point A ➞P.30
Point B ➞P.30
Algorithm ➞P.45
Audio interface ➞P.75
Auto punch in/out ➞P.27
B
Bit rate ➞P.67
Bounce ➞P.39
Built-in microphone ➞P.11, 19
C
Changing names ➞P.43, 61
Chromatic tuner ➞P.33
Connections ➞P.11
Contrast ➞P.68
Control surface ➞P.75
D
Date setting ➞P.14
Deletion
Deleting files ➞P.62
Delete letters ➞P.43
Deleting marks ➞P.32
Deleting projects ➞P.62
Display ➞P.16
Backlight ➞P.68
Contrast ➞P.68
E
Effects
Effect modules ➞P.51-52, 79-88
Effect parameters ➞P.52, 79-88
Effect types ➞P.47, 51, 79-88
Insert effect ➞P.41, 45-55
Mastering effect ➞P.41
Send return effect ➞P.45-48, 51-54
EQ ➞P.37-38, 80
F
File
Change files names ➞P.61
Copy files ➞P.60
Delete files ➞P.62
File information ➞P.59
Import files ➞P.64
Select files ➞P.58
Formatting an SD card ➞P.70
G
GAIN ➞P.21
H
Hi-Z ➞P.18
I
Import
File import ➞P.64
Patch import ➞P.54
Project import ➞P.64
USB memory import ➞P.74
Using the card reader ➞P.73
Input sensitivity (gain) ➞P.21
Insert effect ➞P.41, 45-55
Before the master fader ➞P.41
Insertion position ➞P.49
Using only for monitoring ➞P.55
L
Level
Track level ➞P.21
Send level ➞P. 37
Locating ➞P.31
M
Manual punch-in/out ➞P.28
Marks ➞P.31
Master track ➞P.42
Mastering effect ➞P.41
Metronome ➞P.34
Mixer & Mixing ➞P.36
Mix Down ➞P.42
Stereo link ➞P.20
Track parameters ➞P.38
Track mixer settings ➞P.37
O
Out point for punch recording ➞P.27
Overdubbing ➞P.25
Page 99

P
98
Pan ➞P.37
Patches
Change patch names ➞P.51
Edit patches ➞P.51
Format patches ➞PDF
Import patches ➞P.53
Patch list ➞P.89-94
Save and change patches ➞P.53
Select patches ➞P.51
Power
Power On/Off ➞P.13-14
Installing batteries ➞P.13
Battery type setting ➞P.71
Punch-in/out
Automatic punch-in/out ➞P.27
Manual punch-in/out ➞P.28
Punch-in/out points ➞P.27
Playlist ➞P.65-66
Project
Basic operations ➞P.56
Creating a new project ➞P.17, 57
Changing projects names ➞P.61
Copying projects ➞P.60
Deleting projects ➞P.62
Protecting projects ➞P.56
Selecting projects ➞P.58
Sequential playback ➞P.65
R
Recording
Overdubbing ➞P.25
Preparation before recording ➞P.17
Recording the first track ➞P.21
Recording second and later times ➞P.25
Recording on a master track ➞P.42
Recording format ➞P.67
Tracks assignment ➞P.23
S
SD card
Card capacity confirmation ➞P.70
Card reader ➞P.73
Changing card with power on ➞P.69
Formatting a card ➞P.70
Insertion ➞P.12
Selecting and using jacks ➞P.11, 18, 19
Send return effect
Patches ➞P.51-54
Track send level setting ➞P.37
Sequential project playback ➞P.65
Shutdown ➞P.13
Specifications ➞P.95
Stereo link ➞P.20
Stereo settings ➞P.19
Switches and keys ➞P.15, 18-19
System version ➞P.71
T
Tracks ➞P.20-26, 29, 35, 37-40
Track assignment ➞P.23
Track mixer settings ➞P.37
Track parameters ➞P.38
Tuner functions ➞P.33
Tuner types ➞P.33
U
USB ➞P.72-76
DAW software operation ➞PDF
Exchanging files with a computer ➞P.73
Using USB memory ➞P.74
Index
Page 100

FCC regulation warning (for U.S.A.)
This equipment has been tested and found to comply with the limits for a Class B digital device, pursuant
to Part 15 of the FCC Rules. These limits are designed to provide reasonable protection against harmful
interference in a residential installation. This equipment generates, uses, and can radiate radio frequency
energy and, if not installed and used in accordance with the instructions, may cause harmful interference
to radio communications. However, there is no guarantee that interference will not occur in a particular
installation. If this equipment does cause harmful interference to radio or television reception, which can be
determined by turning the equipment off and on, the user is encouraged to try to correct the interference by
one or more of the following measures:
• Reorient or relocate the receiving antenna.
• Increase the separation between the equipment and receiver.
• Connect the equipment to an outlet on a circuit different from that to which the receiver is connected.
• Consult the dealer or an experienced radio/TV technician for help.
For EU Countries
Declaration of Conformity:
This product complies with the requirements of
EMC Directive 2004/108/EG and
Low Voltage Directive 2006/95/EC
Disposal of Old Electrical & Electronic Equipment
(Applicable in European countries with separate collection systems)
This symbol on the product or on its packaging indicates that this product
shall not be treated as household waste. Instead it shall be handed over to
the applicable collection point for the recycling of electrical and electronic
equipment. By ensuring this product is disposed of correctly, you will help
prevent potential negative consequences for the environment and human
health, which could otherwise be caused by inappropriate waste handling of this
product. The recycling of materials will help to conserve natural resources. For
more detailed information about recycling of this product, please contact your
local city office, your household waste disposal service or the shop where you
purchased the product.
ITOHPIA Iwamotocho 2-chome Bldg. 2F
2-11-2 Iwamoto-cho, Chiyoda-ku, Tokyo 101-0032 Japan
Web site: http://www.zoom.co.jp
R16-5000-1
 Loading...