

Page 1
Quick Guide
You must read the Usage and Safety Precautions before use.
The Operation Manual can be downloaded from the ZOOM website (https://www.zoom.jp/docs/
q2n-4k). This page has les in PDF and ePub formats.
The PDF le format is suitable for printing on paper and reading on a computer.
The ePub format can be read with electronic document readers and is designed for reading on
smartphones and tablets.
© 2018 ZOOM CORPORATION
Copying or reprinting this manual in part or in whole without permission is prohibited.
Product names, registered trademarks and company names in this document are the property of their respective companies.
You might need this manual in the future. Always keep it in a place where you can access it easily.
The contents of this manual and the specifications of the product could be changed without notice.
Page 2
Preparations
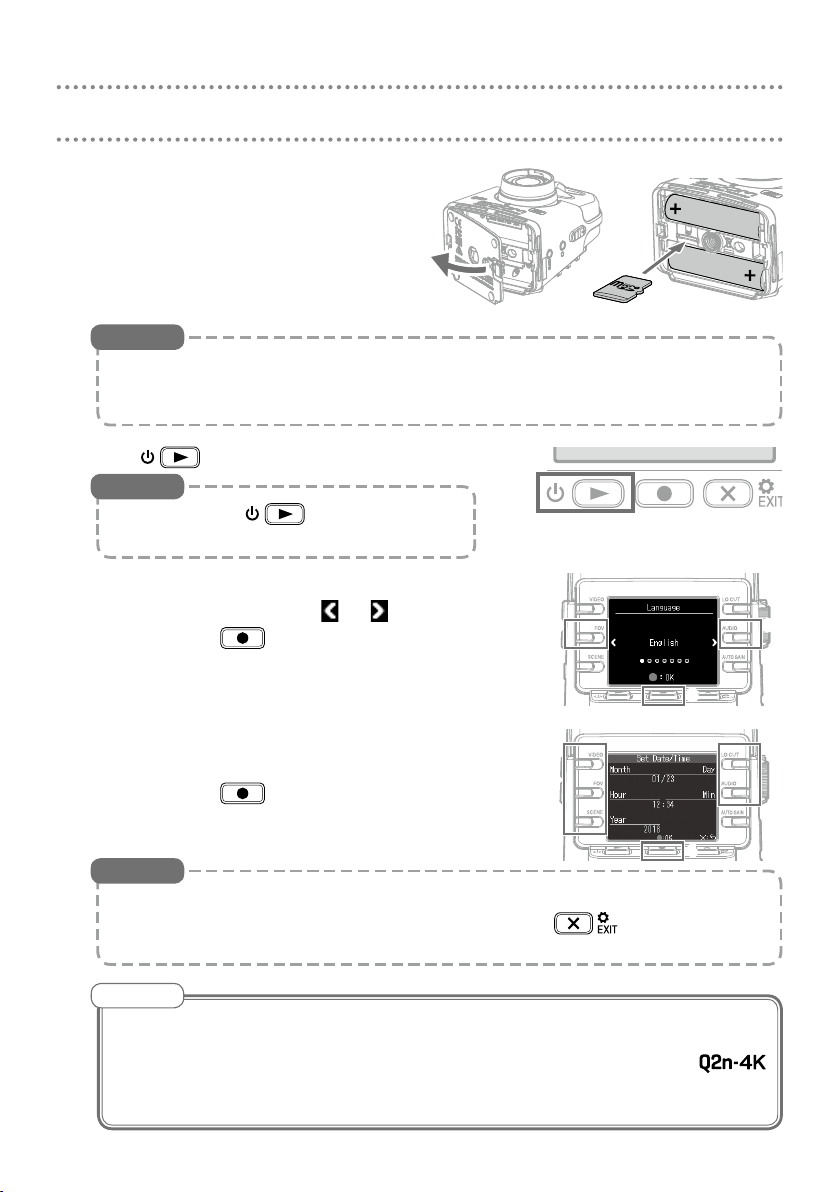
Remove the battery/SD card compart-
1.
ment cover and install batteries and a
microSD card.
microSD card
HINT
• The dedicated AC adapter (ZOOM AD-17) can also be connected to the
USB port to use AC power.
• When connected to a computer, power can be supplied by USB.
Press to turn the power on.
2.
HINT
Press and hold to turn the power
off.
Set the language shown.
3.
Select the language: Press
Confirm: Press
or
2
3
3
3
Set the date and time.
4.
Change values: Press corresponding buttons
Confirm: Press
HINT
Language display and date and time settings can be changed later on the
Setting Screen. From the Recording Screen, press
ting Screen.
NOTE
• Set the Battery Type on the Setting Screen to the type of batteries installed
so that the remaining battery power can be shown correctly.
• After purchasing a new microSD card, always format it using the
to maximize performance. Select “SD Format” on the Setting Screen to
format a microSD card.
4
to open the Set-
2
4
4
Page 3
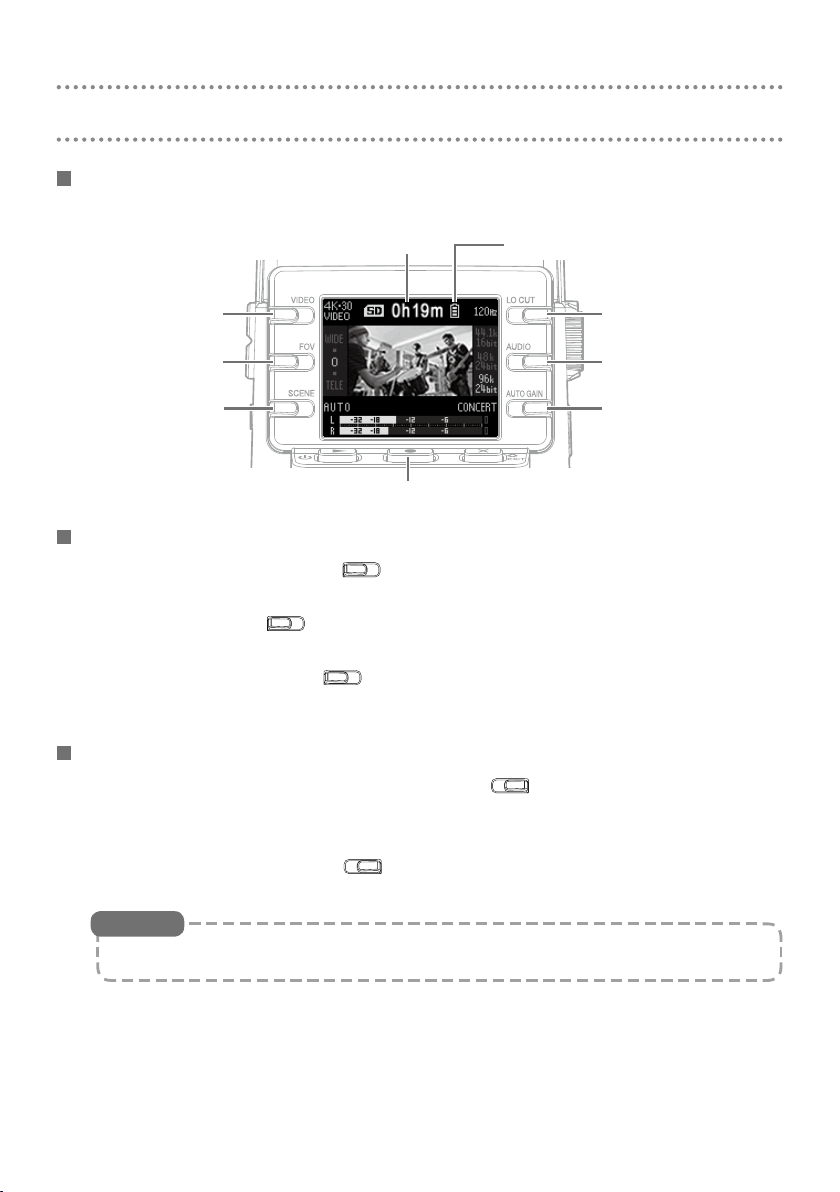
VIDEO
FOV
SCENE
LO CUT
AUDIO
Recording
Using the Recording Screen
The Recording Screen opens when the power is turned on.
When recording: recording time
In recording standby: available recording time
Remaining battery charge
VIDEO setting
FOV setting
SCENE setting
Start recording
Stop recording (press when recording)
LO CUT setting
AUDIO setting
AUTO GAIN
setting
Making video recording settings
• Setting video quality: Press
This sets the video resolution and frame rate per second.
• Setting FOV: Press
This sets the field of view (FOV).
• Setting scene type: Press
This sets the camera settings for the recording conditions (scene).
Making audio recording settings
• Setting low-frequency noise reduction: Press
The low-cut filter can be set to reduce the sound of wind, vocal pops and other
noise.
• Setting audio quality: Press
This sets the sampling frequency (kHz) and bit rate.
HINT
See the Operation Manual for details about each setting item.
3
Page 4

Adjusting the audio recording level
AUTO GAIN
• Adjusting manually: Turn
Adjust so that the level meters are around
−12 dB with the loudest sounds.
HighLow
• Adjusting automatically: Turn
Setting Explanation
This disables automatic level ad-
OFF
CONCERT
SOLO
MEETING Use for meetings and field recordings.
justment. Adjust the recording level
manually.
Use for recording band performances,
concerts and other loud situations.
Use for solo performances and other
quiet sounds.
Peak indicators Level meters
HINT
• To clear the peak indicator, press to open the Setting Screen once.
• If a mic or audio device is connected to the external input jack, the
can capture that audio and record it with video.
• If a mic that uses plug-in power is connected, use the Setting Screen to set
“Plug-in Power” to “On”.
Recording video
Press .
1.
Press again to stop video recording.
2.
HINT
When recording for long periods of time with a microSDHC card, recording
files will be split after 4 GB.
When using a microSDXC card, recording will continue in one file even if the
file size exceeds 4 GB.
NOTE
If the internal temperature of the rises during use, a warning message will appear and it will turn off automatically. Wait for the temperature to
decrease before using it again.
4
1,2
Page 5

Playing recordings
Playing back videos
Press on the Recording Screen.
1.
The recorded file will start playing.
Press to stop playback and re-
2.
open the Recording Screen.
Playback operations
Function Operation
Pause/resume
Search forward
Search backward
Move to next file
Move to previous order
Check file information
Delete file
Press
Press and hold
Press and hold
Press
Press
Press
Open Deletion Screen: Press
Select file: Press
Delete file: Press
Cancel: Press
Status indicator
Playing :
Paused :
Stopped :
Remaining playback time
1 2
Remaining
battery charge
Using headphones Watching on an HDMI-compatible TV
Connect an HD-
MI-compatible TV or
Connect headphones
to the headphones
jack, and use
to
adjust the volume.
other device to the
Micro HDMI connec
tor, which will output
video and audio.
5
Page 6

Setting item list
From the Recording Screen, press to open the Setting Screen where you can
use the following functions and settings.
Page 1
Item Explanation
NTSC/PAL This sets the standard recording frame rate used according to the re-
gional video format. [NTSC (30 FPS)/PAL (25 FPS)]
Beep Set the volume of the sound made when turned on or operated.
Play Mode Set whether files are played continuously or playback stops after one
Plug-in Power Set when using a mic that supports plug-in power. [On/Off]
SD Format Format an SD card.
Page 2
Item Explanation
WEBCAM Use as a web camera.
CARD READER Use as a card reader when connected to a computer.
CARD READER for
iOS
USB MIC Use as a USB mic when connected to a computer.
USB MIC for iOS Use as a USB mic when connected to an iOS device.
/ / ]
[
file. [Play One/Play All]
Use as a card reader when connected to an iOS device.
Page 3
Item Explanation
Date/time Set the date and time. [Year, Month, Day, Hour and Min]
Page 4
Item Explanation
Battery Type This sets the type of batteries used. [Alkaline/Ni-MH/Lithium]
Power Save Set to dim the display automatically if not used for a certain amount of
time. This is disabled during playback. [Off/1 min/3 min/5 min]
Auto Power Off Set the amount of time until it turns off automatically when not being
used. This function is disabled during recording and playback as well as
when it is powered through its USB port. [Off/1 min/3 min/5 min]
Language Set the language shown on the display.
Setting Reset Restore the recorder to its factory default settings.
6
Page 7

Connecting by USB
When the Recording Screen is open, press
1.
to open the Setting Screen.
3
3
Press to open the USB Connection Setting
2.
Screen.
Press the button for the function to use.
3.
Press on the Confirmation Screen to select “Yes ”.
4.
Use a USB cable to connect a computer or iOS device.
5.
To end a USB connection, press on any function screen.
6.
4 1,6
Specications
Image sensor 1/2.3" 16 M-pixel CMOS sensor
Lens F 2.8, 150° FOV
Video format MPEG-4 AVC/H.264 (MOV)
Video resolutions 4K: 30 p, 25 p, 24 p 1080: 60 p, 50 p, 30 p, 25 p, 24 p 720: 30 p, 25 p
Audio formats WAV: 96 kHz/24-bit, 48 kHz/24-bit, 44.1 kHz/16-bit
Audio functions • LO CUT: OFF, 80 Hz, 120 Hz, 160 Hz • AUTO GAIN: OFF, CONCERT, SOLO, MEETING
Image functions • FOV: WIDE • 0 • TELE (5 steps)
Display 1.77" full-color LCD (160 × 128)
Audio inputs
Output connectors Combined headphone/line stereo mini jack, HDMI micro Type D
Built-in speaker 300 mW 8 Ω mono speak er
Recording media microSD / microSDHC / microSDXC (256 GB maximum)
USB microUSB
Power 2 AA batteries : alkaline LR6 (1.5 V), nickel metal hydride HR6 (1.2 V) or lithium FR6 (1.5 V)
Estimated continuous
video recording time using
batteries
External dimensions Main unit (maximum dimensions): 58.7 mm (D) × 68.5 mm (W) × 83.0 mm (H)
Weight (main unit only) 124 g
• DELAY: 0.0 F, 0.5 F–10.0 F (only during WEBCAM use)
• DIRECT MONITOR: ON, OFF (only during USB MIC use)
• SCENE: AUTO, OUTDOOR, SUNSET, NIGHT, CONCERT LIGHT, JAZZ CLUB, DANCE CLUB, MONOCHROME, SEPIA, FILM, X-PROCESS, FLAT
Mic 120° fixed XY stereo, 120 dBSPL maximum input sound pressure, -∞ dB – +39 dB input gain
Line Input connector: stereo mini jack, −∞ dB – +39 dB input gain
2 kΩ or higher input impedance, plug-in power (2.5 V) supported
WEBCAM Class: UVC 1.0 + UAC 1.0, Formats: 720 p WVGA video, 48 kHz/16-bit audio
CARD READER Class: USB Mass Storage
USB MIC Class: UAC 1.0, Format: 44.1 kHz/16-bit
Note: card reader and USB mic functions support iOS devices
AC adapter (ZOOM AD-17): DC 5 V/1 A
Note: USB bus power supported
Video resolution Alkaline LR6 (1.5 V) Ni-MH HR6 (1.2 V) Lithium FR6 (1.5 V)
720/30 p 2.0 hours 3.0 hours 6.0 hours
1080/30 p 1.2 hours 2.0 hours 4.0 hours
4K/30 p 0.5 hours 1.0 hours 2.0 hour s
48 kHz/24-bit audio
• The above values are approximate.
• Continuous battery operation times were determined using in-house testing methods. They will
vary greatly according to use conditions.
2
7
Page 8

ZOOM CORPORATION
4-4-3 Kanda-surugadai, Chiyoda-ku, Tokyo 101-0062 Japan
http://www.zoom.co.jp
Z2I-3395-02
 Loading...