

Page 1

Thank you for purchasing the ZOOM MultiTrak Recording
Studio MRS-4
(subsequently referred to as "the MRS-4").
The MRS-4 offers the following attractive features.
◆ Simultaneous 4-track playback/2-track recording
8 virtual takes per track add up to a total of 32 takes available
for recording.
◆ Flexible track parameter settings
Hi/Lo EQ, effect send, and other parameters can be set
individually for each track.
◆ Bounce feature supports recording from 4 tracks of
simultaneous playback
Even when there are no empty tracks, the MRS-4 allows you
to bounce existing material onto 2 tracks, while performing
simultaneous playback of 4 tracks.
◆ Versatile effects
The MRS-4 incorporates an insert effect for processing the
input signal, a send/return effect for use in a mixer loop, and a
mixdown effect for use on the master bus.
◆ Other sophisticated features
Metronome, MIDI output, AUX input, long-stroke faders, and
other exciting features make the MRS-4 a great all-round
package.
In order to take full advantage of the MRS-4's versatile
functionality and to ensure trouble-free enjoyment, please
read this manual carefully. Keep this manual in a safe
place together with the warranty card.
Operation Manual
Page 2
Safety Precautions
In this manual, symbols are used to highlight warnings
and cautions for you to read so that accidents can be
prevented. The meanings of these symbols are as
follows:
This symbol indicates explanations
about extremely dangerous matters. If
users ignore this symbol and handle the
device the wrong way, serious injury or
death could result.
This symbol indicates explanations
about dangerous matters. If users ignore
this symbol and handle the device the
wrong way, bodily injury and damage to
the equipment could result.
Please observe the following safety tips and precautions
to ensure hazard-free use of the MRS-4.
About power
Since power consumption of this unit is fairly high, we
recommend the use of an AC adapter whenever
possible. When powering the unit from the batteries, use
only an alkaline type.
AC adapter operation
• Be sure to use only an AC adapter which supplies 9 V DC,
300 mA and is equipped with a "center minus" plug (Zoom
AD-0006).
The use of an adapter other than the specified type may
damage the unit and pose a safety hazard.
• Connect the AC adapter only to an AC outlet that supplies
the rated voltage required by the adapter.
• When disconnecting the AC adapter from the AC outlet,
always grasp the adapter itself and do not pull at the cable.
• If the unit is not to be used for a long time, disconnect the
AC adapter from the outlet.
Battery operation
•
Use four IEC R6 (size AA) batteries (alkaline or manganese).
• The MRS-4 cannot be used for recharging.
Pay close attention to the labelling of the battery to make
sure you choose the correct type.
• If the MRS-4 is not to be used for an extended period of
time, remove the battery from the unit.
• If batteries leakage has occurred, wipe the battery
compartment and the battery terminals carefully to remove
all remnants of battery fluid.
• While using the unit, the battery compartment cover should
be closed.
Environment
Avoid using your MRS-4 in environments where it will
be exposed to:
• Extreme temperature
• High humidity or moisture
• Excessive dust or sand
• Excessive vibration or shock
Handling
• Since the MRS-4 is a precision electronic device,
avoid applying excessive force to the controls. Do not
operate the keys or controls with your foot.
• Take care that no foreign objects (coins or pins etc.)
or liquids can enter the unit.
• Be sure to turn the power to all equipment off before
making connections.
• Before moving the unit, turn the power off, and
disconnect all cables and the AC adapter.
Alterations
Never open the case of the MRS-4 or attempt to
modify the product in any way since this can
result in damage to the unit.
In Case of Trouble
If there seems to be a defect or a problem with
the unit, immediately disconnect the AC adapter
or remove the batteries to shut off the power.
Then disconnect any other cables connected to
the unit.
Usage Precautions
• Electrical interference
For safety considerations, the MRS-4 has been designed
to provide maximum protection against the emission of
electromagnetic radiation from inside the device, and
protection from external interference. However,
equipment that is very susceptible to interference or that
emits powerful electromagnetic waves should not be
placed near the MRS-4, as the possibility of interference
cannot be ruled out entirely.
With any type of digital control device, the MRS-4
included, electromagnetic interference can cause
malfunctioning and can corrupt or destroy data. Care
should be taken to minimize the risk of damage.
• Cleaning
Use a soft, dry cloth to clean the MRS-4. If necessary,
slightly moisten the cloth. Do not use abrasive cleanser,
wax, or solvents (such as paint thinner or cleaning
alcohol), since these may dull the finish or damage the
surface.
Please keep this manual at hand for future
reference.
USAGE AND SAFETY PRECAUTIONS
••••••••
2
Introduction
•••••••••••••••••••••••••••••••••••••••••
4
Internal configuration
•••••••••••••••••••••••••••••••••
4
Recorder section
••••••••••••••••••••••••••••••••••••••
4
Effect section
•••••••••••••••••••••••••••••••••••••••••
5
Mixer section
•••••••••••••••••••••••••••••••••••••••••
5
SmartMedia
•••••••••••••••••••••••••••••••••••••••••••
5
Parts of the MRS-4
•••••••••••••••••••••••••••••••
6
Top panel
••••••••••••••••••••••••••••••••••••••••••••••
6
Rear panel
••••••••••••••••••••••••••••••••••••••••••••
7
Front panel
••••••••••••••••••••••••••••••••••••••••••••
7
Connections
•••••••••••••••••••••••••••••••••••••••••
8
Power on/off switching
•••••••••••••••••••••••••••••••
9
Turning power on
••••••••••••••••••••••••••••••••••••
9
Turning power off
••••••••••••••••••••••••••••••••••••
9
Operating the unit on batteries
•••••••••••••••••••••••
9
Basic Operation
•••••••••••••••••••••••••••••••••••
10
Step 1 Preparations for recording
••••••••••••••••••••
10
1-1 Creating a new song
••••••••••••••••••••••••••••••
10
Step 2 Recording the first track
•••••••••••••••••••••
12
2-1 Adjusting input sensitivity
••••••••••••••••••••••••
12
2-2 Using the insert effect
••••••••••••••••••••••••••••
13
2-3 Selecting a track and recording on it
•••••••••••••••
15
Step 3 Overdubbing
•••••••••••••••••••••••••••••••••
17
3-1 Adjusting input sensitivity and
setting the insert effect
••••••••••••••••••••••••••••
17
3-2 Selecting and recording to a track
•••••••••••••••••
17
Step 4 Mixdown
••••••••••••••••••••••••••••••••••••••
18
4-1 Preparations for mixdown
••••••••••••••••••••••••
18
4-2 Adjusting volume/pan/EQ
••••••••••••••••••••••••
19
4-3 Using the send/return effect
•••••••••••••••••••••••
21
4-4 Using the mixdown effect
••••••••••••••••••••••••
25
4-5 Recording on the master recorder
•••••••••••••••••
27
Reference [Recorder]
•••••••••••••••••••••••••••
28
Using V-takes
•••••••••••••••••••••••••••••••••••••••
28
Combining multiple tracks (Bounce function)
•••••••
29
Re-recording only a specified region
(Punch-in/out function)
••••••••••••••••••••••••••••
30
Using manual punch-in/out
•••••••••••••••••••••••••••
31
Using auto punch-in/out
••••••••••••••••••••••••••••••
31
Reference [Locating a Point]
•••••••••••••••••
33
Moving to a desired point in a song
(Locate function)
•••••••••••••••••••••••••••••••••••
33
Switching between time and measure indication
••••
33
Marking a point in a song (marker function)
••••••••
34
Assigning a mark
••••••••••••••••••••••••••••••••••••
34
Moving to a mark location
•••••••••••••••••••••••••••
34
Clearing a mark
•••••••••••••••••••••••••••••••••••••
35
Playing back the same passage repeatedly
(A-B Repeat)
••••••••••••••••••••••••••••••••••••••••
36
Reference [Mixing]
•••••••••••••••••••••••••••••••
37
Assigning two inputs to a track
••••••••••••••••••••••
37
Adding the input signal to the mixdown
••••••••••••••
38
Linking two tracks (stereo link function)
••••••••••••••
39
Reference [Track Editing]
••••••••••••••••••••••
40
Copying a specified region of data to another
location
•••••••••••••••••••••••••••••••••••••••••••••
40
Copying the data of an entire track
••••••••••••••••••
41
Erasing a specified segment
•••••••••••••••••••••••••
42
Erasing an entire track
•••••••••••••••••••••••••••••••
43
Exchanging the data of entire tracks
•••••••••••••••••
44
Reference [Song Functions]
•••••••••••••••••••
46
Song menu basic functions
••••••••••••••••••••••••••
46
Song menu items
••••••••••••••••••••••••••••••••••••
47
Creating a new song (SONG NEW)
•••••••••••••••••••
47
Reading in an existing song (SONG SELECT)
•••••••••
47
Checking the remaining recording time
(SONG CAPACITY)
••••••••••••••••••••••••••••••••
47
Copying a song (SONG COPY)
••••••••••••••••••••••
48
Deleting a song (SONG DELETE)
••••••••••••••••••••
48
Protecting a song (SONG PROTECT)
•••••••••••••••••
49
Selecting the recording grade (SONG GRADE)
•••••••
49
Reference [Metronome/MIDI]
•••••••••••••••••
50
Basic metronome settings
•••••••••••••••••••••••••••
50
Functions available with MIDI
••••••••••••••••••••••••
51
Synchronizing an external device to the MRS-4
•••••
51
Reference [Other Functions]
••••••••••••••••••
52
Using the tuner
•••••••••••••••••••••••••••••••••••••••
52
Formatting a SmartMedia card
•••••••••••••••••••••••
53
Display adjustments
••••••••••••••••••••••••••••••••••
54
Using the AUX IN jacks to save tracks
•••••••••••••••
55
Specifications
•••••••••••••••••••••••••••••••••••••
56
MRS-4 file configuration
•••••••••••••••••••••••••••••
57
File compatibility with PS-02
•••••••••••••••••••••••••
57
MRS-4 Card Manager Software
••••••••••••••••••••••
57
Troubleshooting
••••••••••••••••••••••••••••••••••
58
Playback problems
••••••••••••••••••••••••••••••••••
58
Problems with recording
•••••••••••••••••••••••••••••
58
Problems with effects
••••••••••••••••••••••••••••••••
59
Problems with MIDI
••••••••••••••••••••••••••••••••
59
Other problems
••••••••••••••••••••••••••••••••••••••
59
MIDI Implementation
••••••••••••••••••••••••••••
60
MIDI implementation
••••••••••••••••••••••••••••••••
60
MIDI implementation chart
•••••••••••••••••••••••••••
61
Index
•••••••••••••••••••••••••••••••••••••••••••••••••
62
Contents
ZOOM MRS-4
3
ZOOM MRS-4
USAGE AND SAFETY PRECAUTIONS
2
USAGE AND SAFETY PRECAUTIONS
Contents
Warning
Caution
Caution
Caution
Caution
Warning
Caution
Page 3
The MRS-4 provides three types of effects:
insert effect, mixdown effect, and send/return
effect. These effects have different
characteristics, as described below.
■ Insert effect
This effect operates directly after the input
mixer. It is used to modify the input signal
before it is recorded.
■ Mixdown effect
This effect operates directly before the
MASTER faders of the track mixer. It is used
to modify the signal mixed from tracks 1 – 4.
■ Send/return effect
This effect is internally connected to the
send/return loop of the mixer section. The
effect can be adjusted individually for each
track by using the send level control. The
higher the setting, the stronger the effect.
The MRS-4 has two types of mixers.
■ Input mixer
Serves to adjust the instrument or mic signal
input to the MRS-4 and to assign the signal
to the desired track.
■ Track mixer
Serves to mix the playback signal of the
recorder before sending it to the stereo output
jacks. The signal from each of tracks 1 – 4 is
sent to the mixer channels 1 – 4 for
individual adjustment of EQ, effect send
level, panning (left/right playback position),
etc. These items are called track parameters.
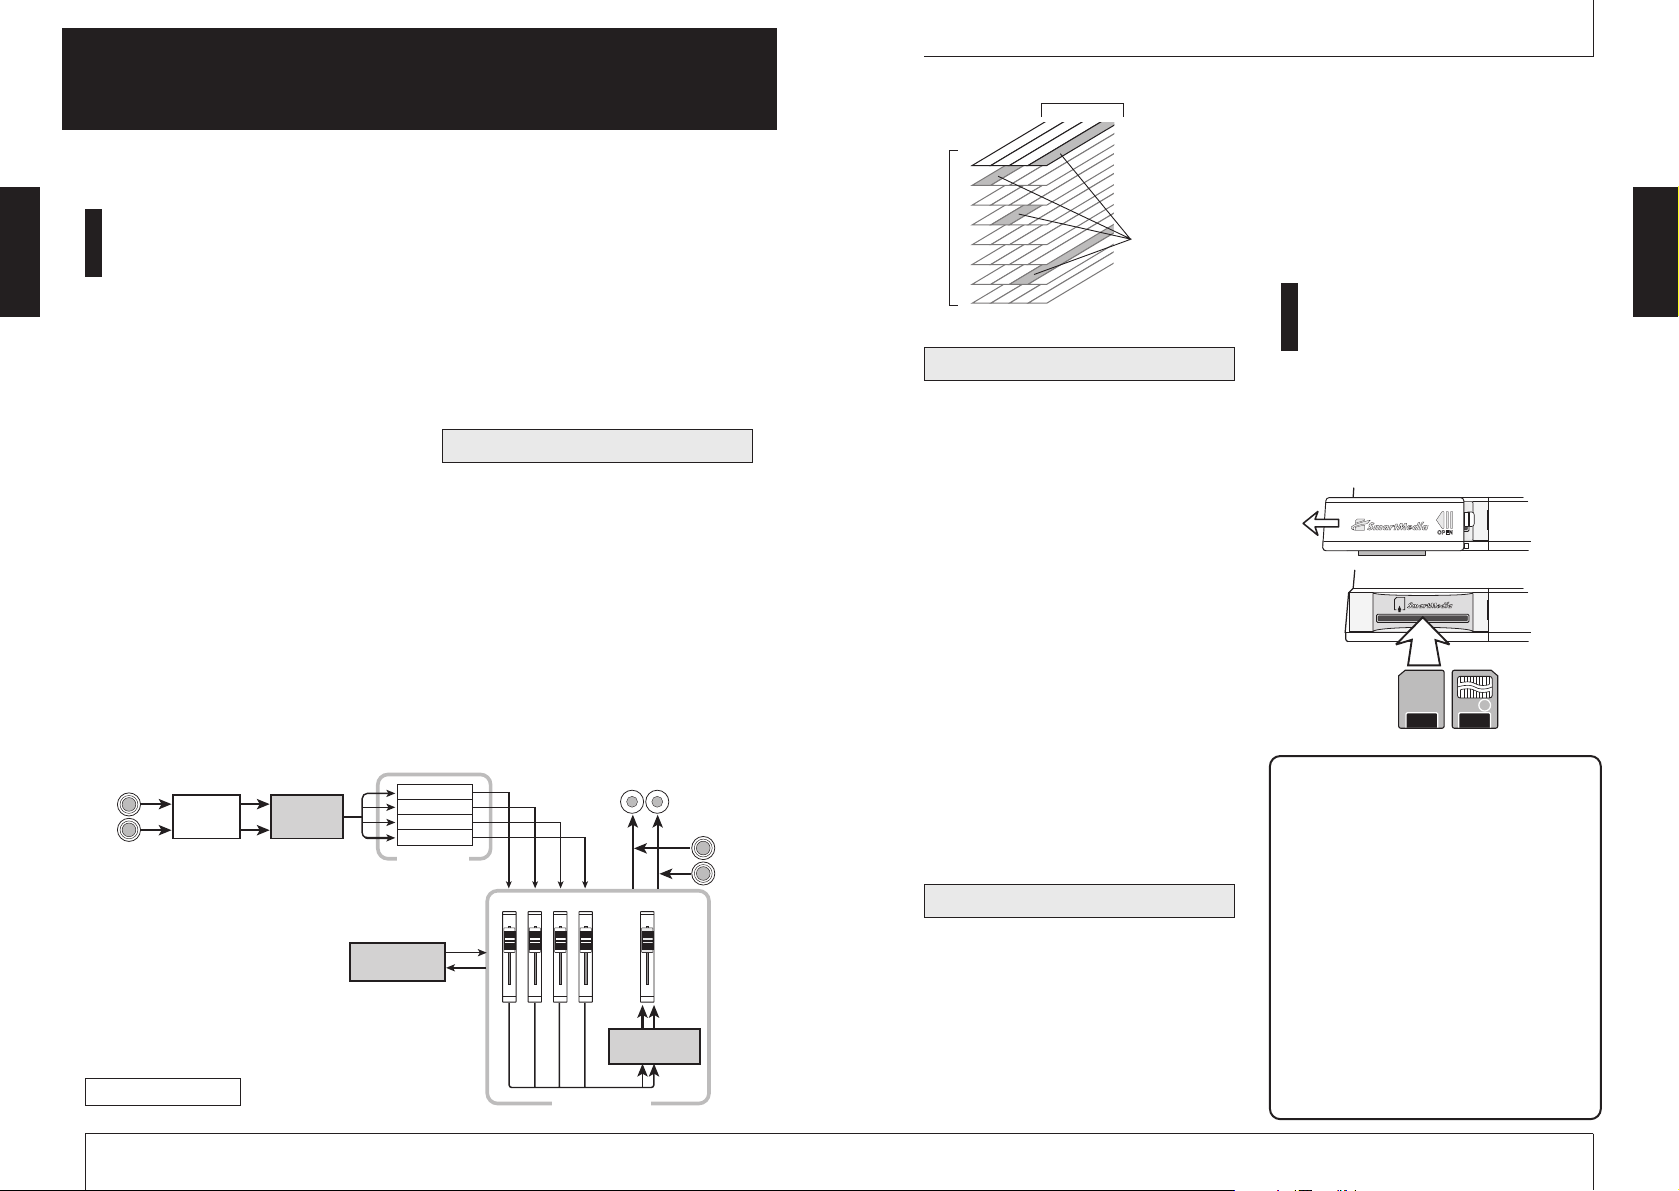
SmartMedia
To use the MRS-4, a SmartMedia card is
required. Before turning the MRS-4 on, insert
the card into the front panel slot, as shown in
the illustration below.
◆ Caution ◆
●
If the card is inserted upside down or
with wrong orientation, it does not go all
the way in. Do not try to force the card
in, because this will damage the card.
●
Never insert or remove the SmartMedia
card while power to the unit is turned on.
Otherwise data may be lost.
●
Standard SmartMedia cards (designed
for 3.3V) with a capacity from 16 – 128
MB can be used.
●
When wishing to use a SmartMedia card
that has been formatted in other
equipment such as a computer or digital
camera, you must format the card again
in the MRS-4, as described on page 53.
SmartMedia
Correct Wrong
Mixer section
Effect section
V
Introduction
ZOOM MRS-4
5
Internal configuration
The MRS-4 is divided internally into the
following three sections.
■ Recorder section
The MRS-4 is a 4-track recorder that uses
SmartMedia cards for storing data. This
allows audio recording/playback on four
tracks.
■ Effect section
The audio signal can be processed in various
ways by the effect section. The MRS-4 offers
an insert effect for the input signal as well as
a send/return effect and mixdown effect for
use on the recorderd signal.
■ Mixer section
This section is used for mixing the various
signals and supplying them to the other
sections. There is an input mixer for
assigning the input signal to various tracks,
and a track mixer that adjusts level and sound
quality for each track before sending the
result to the left and right MASTER jacks.
The illustration below shows the signal flow
and how the sections fit together.
Now let's take a closer look at each section.
The recorder section of the MRS-4 has four
tracks (separate segments for recording audio
data). Up to two tracks can be recorded
simultaneously, and up to four tracks can be
played back simultaneously. Each of the
tracks 1 – 4 has eight virtual tracks (called
"V-takes"). In each track, one V-take can be
selected for recording/playback. For
example, you can record guitar solos onto
multiple V-takes, and then compare them
later to select the best take.
Recorder section
ZOOM MRS-4
Introduction
4
Introduction
This section shows the various sections of the unit and explains some important concepts of the
MRS-4.
Internal configuration
INPUT
Input
mixer
Insert
effect
Send/return
effect
Tra ck 1
Tra ck 2
Tra ck 3
Tra ck 4
Recorder
1234
MASTER [L]/[R]
MASTER
Mixdown
effect
Track mixer
AUX IN
Track
3
1
2
4
-take
1
2
3
4
5
6
7
8
Currently
selected
V-takes
Page 4
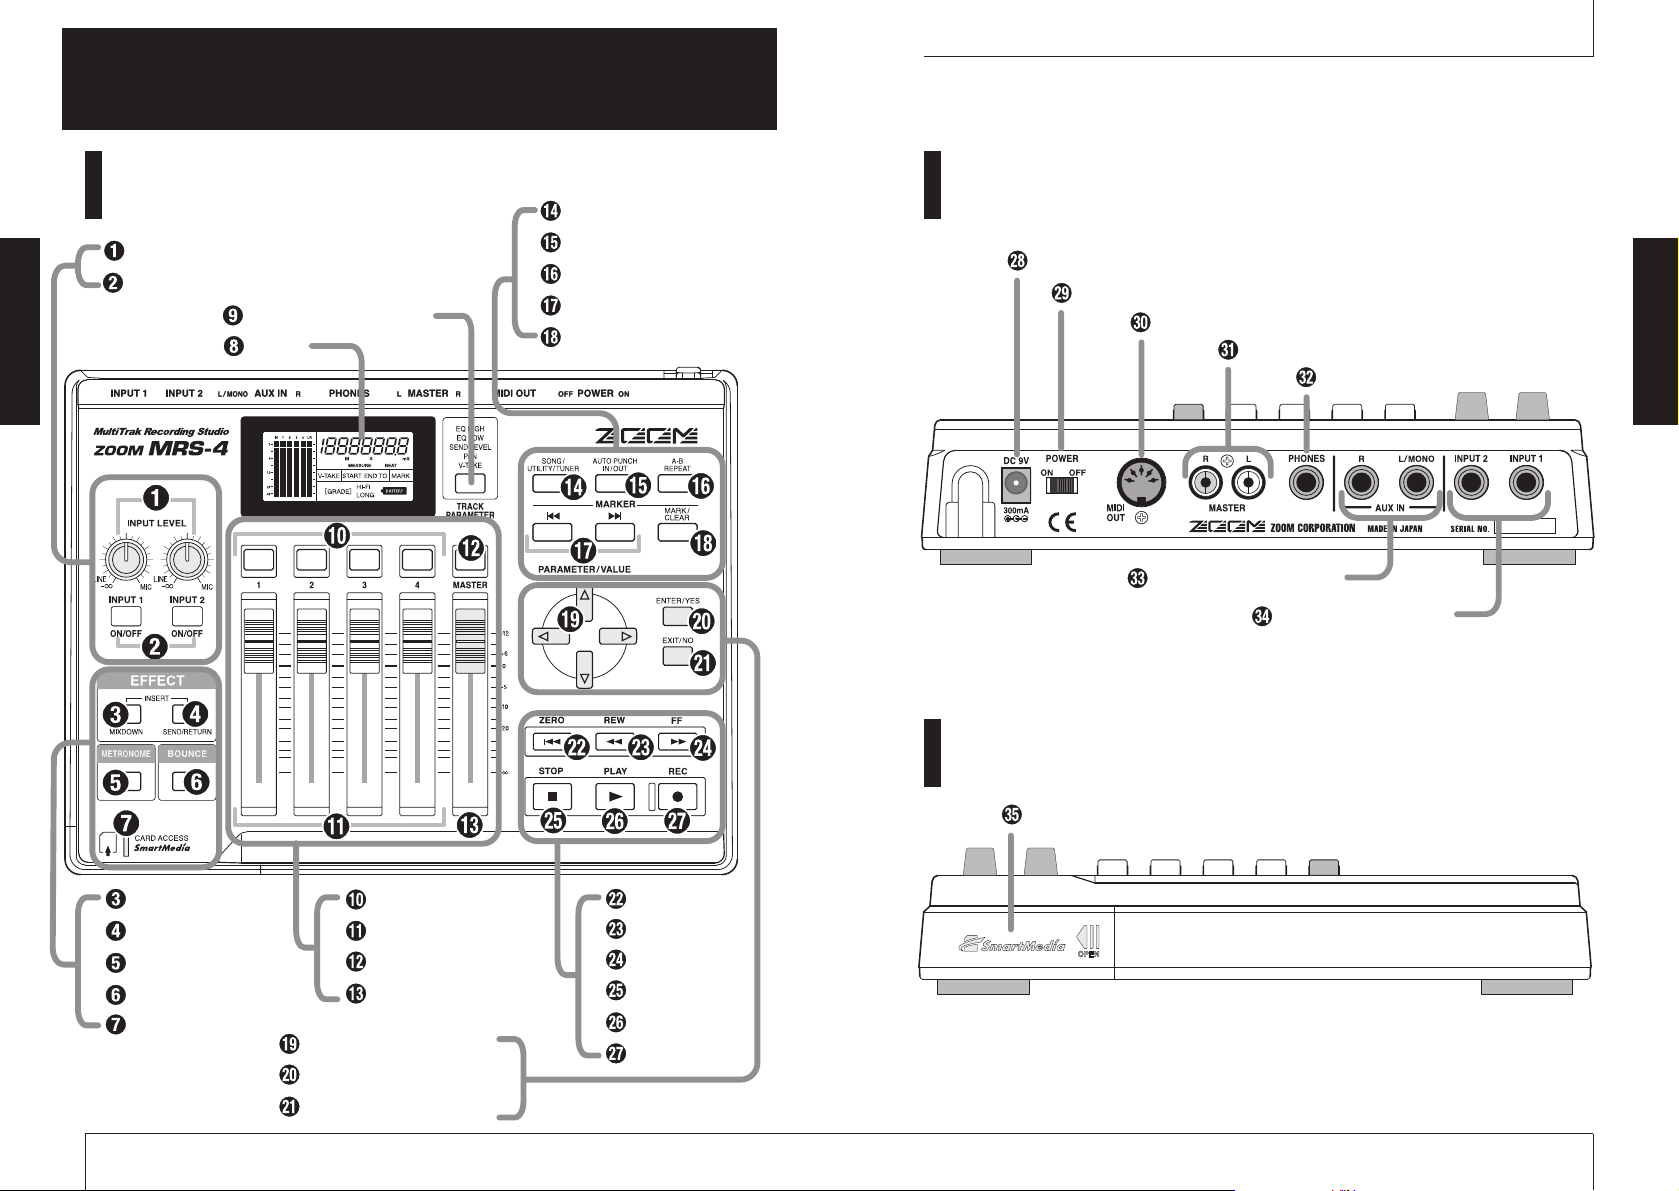
Parts of the MRS-4
ZOOM MRS-4
7
ZOOM MRS-4
Parts of the MRS-4
6
Parts of the MRS-4
Top panel Rear panel
Front panel
[INPUT LEVEL] controls 1/2
[ON/OFF] keys 1/2
[TRACK PARAMETER] key
Display
[SONG/UTILITY/TUNER] key
[AUTO PUNCH IN/OUT] key
[A-B REPEAT] key
MARKER [U]/MARKER [I] keys
[MARK/CLEAR] key
[DC 9V] jack
[POWER] switch
[MIDI OUT] connector
MASTER [L]/[R] jacks
[PHONES] jack
AUX IN [L/MONO]/[R] jacks
[INPUT 1]/[INPUT 2] jacks
[MIXDOWN] key
[SEND/RETURN] key
[METRONOME] key
[BOUNCE] key
Card access indicator
Track status keys 1 – 4
Track faders 1 – 4
MASTER status key
MASTER fader
[PARAMETER/VALUE] keys
[ENTER/YES] key
[EXIT/NO] key
ZERO [U] key
REW [T] key
FF [Y] key
STOP [P] key
PLAY [R] key
REC [O] key
SmartMedia card slot
Page 5
Power on/off switching
To turn the MRS-4 on or off, proceed as
follows.
1.
Make sure that the MRS-4 and all
other devices are turned off.
Turn down the volume at the source
equipment, MRS-4, and monitor system.
2.
Insert the SmartMedia card into
the SmartMedia card slot on the
front panel of the MRS-4, as
described on page 5.
3.
Set the [POWER] switch of the
MRS-4 to ON.
The MRS-4 starts up.
4.
Turn the monitor system on.
1.
Turn the monitor system off.
2.
Set the [POWER] switch of the
MRS-4 to OFF.
The indication "POWEROF" (power off)
appears on the display, and the MRS-4 shuts
down.
Always follow the above procedure, and do not
remove the SmartMedia card without first turning
off the power. Otherwise data may be destroyed.
◆ Caution ◆
When operating the unit with the AC
adapter, always use the [POWER]
switch of the MRS-4 to turn the unit
on and off. Never disconnect the AC
adapter while the card access
indicator is lit. Otherwise data may be
destroyed.
Operating the unit on
batteries
The MRS-4 can be powered from batteries
(not supplied). Follow the steps below to
insert the batteries.
1.
Turn the unit over and open the
battery compartment cover.
2.
Insert four fresh IEC R6 (size AA)
batteries into the battery
compartment. The use of alkaline
batteries is recommended.
3.
Close the battery compartment
cover.
If the indication "[ ]" flashes while the unit
is powered from batteries, the batteries are
exhausted. Replace the batteries as soon as
possible.
NOTE
Four IEC R6 (size AA) batteries
MRS-4 underside
Tur ning power off
Tur ning power on
Connections
ZOOM MRS-4
9
ZOOM MRS-4
Connections
8
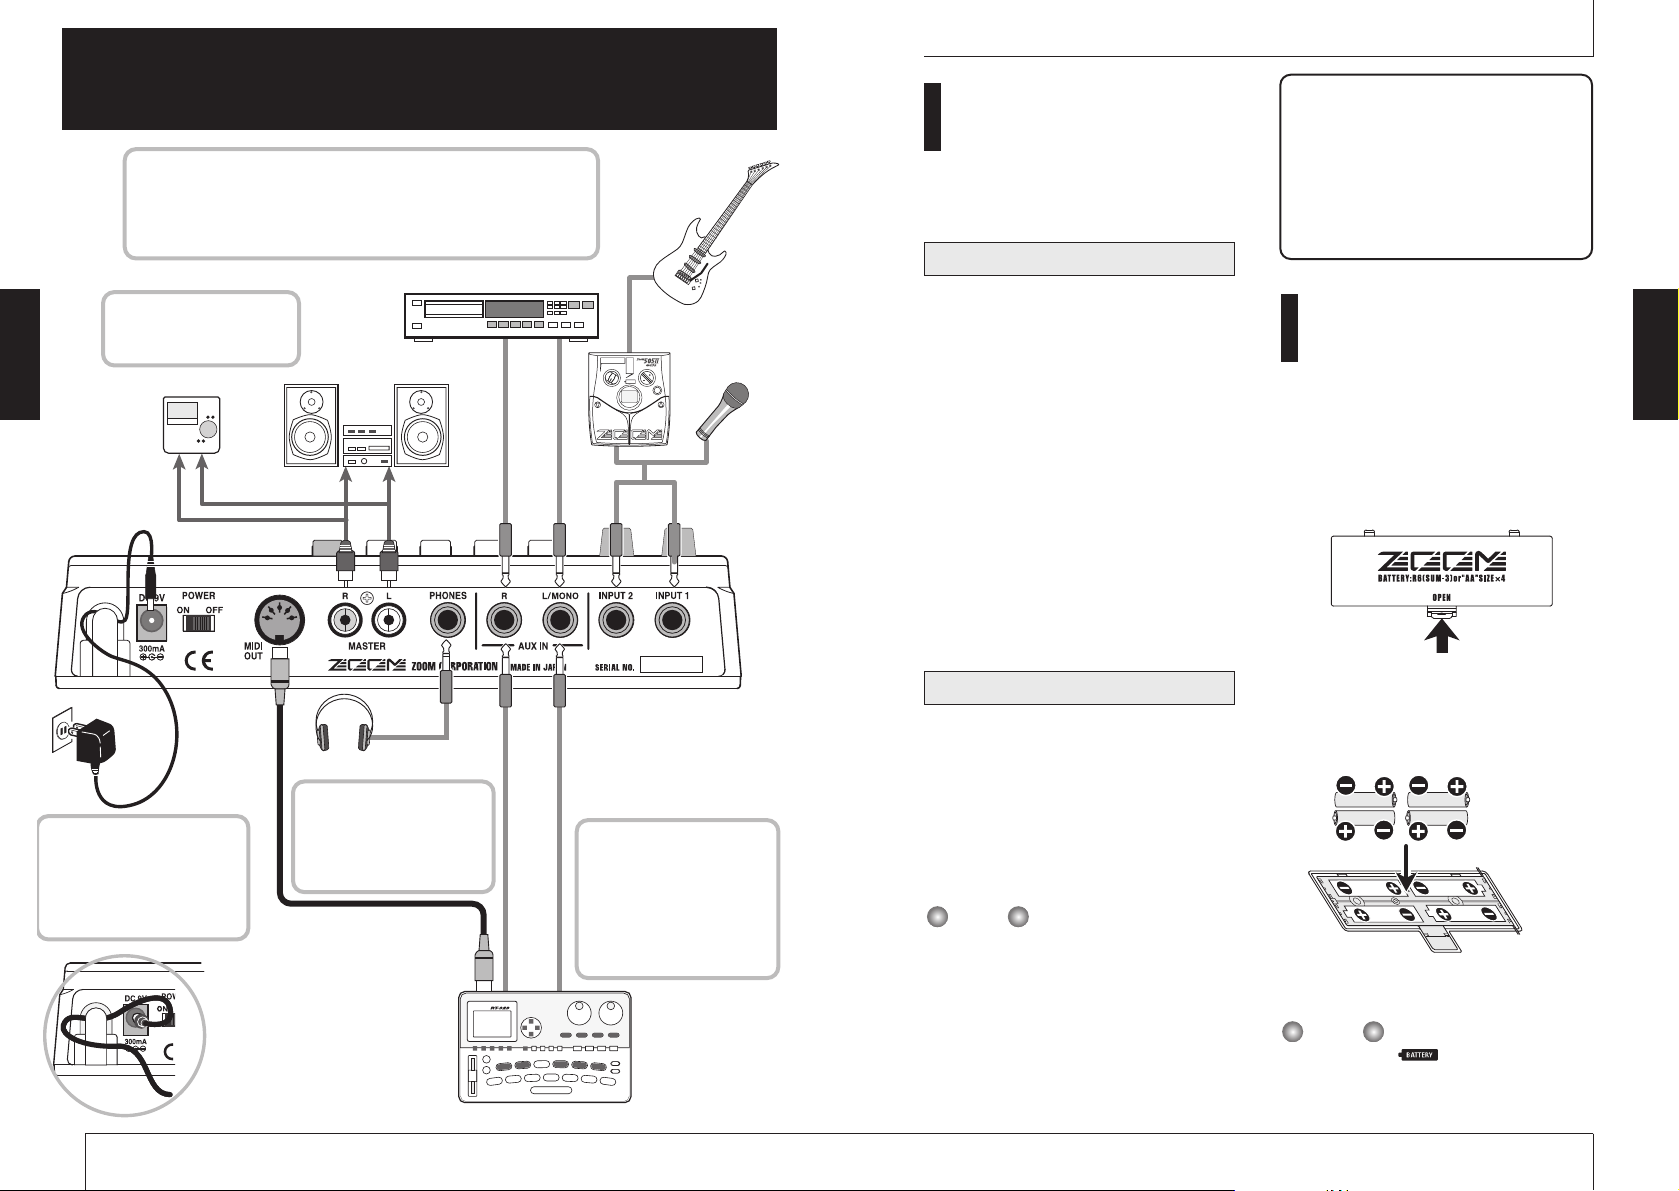
Connections
When a line level signal such as that from a CD player or rhythm machine
is connected to the AUX IN [L/MONO]/[R] jacks, it will be output from
the MASTER [L]/[R] jacks together with the mixed playback signal from
the tracks of the MRS-4. For a stereo device, use both the [L/MONO] and
[R] jacks. For a mono device, use only the [L/MONO] jack.
Connect the monitor system
or master recorder to the
MASTER [L]/[R] jacks.
To power the MRS-4 from an
AC outlet, be sure to use only
the AC adapter ZOOM AD0006 (available separately).
Using another kind of AC
adapter may result in damage.
To synchronize operation of
the recorder section of the
MRS-4 with another MIDI
device, connect the [MIDI
OUT] connector of the MRS4 to the MIDI IN connector
of the other device
To monitor with headphones,
plug them into the [PHONES]
jack. This jack carries the
same signal as the MASTER
[L]/[R] jacks
Headphones
Multi-effect such
as 505II
Mic
Guitar
Monitor system
Master recorder
Rhythm machine,
MIDI sequencer or
other MIDI device
AC adapter
CD player or other external source component
Loop the cable of the AC
adapter around the hook as
shown in the diagram before
connecting it to the [DC 9V]
jack. This will prevent the plug
from being pulled out if the
cable is accidentally pulled.
NOTE
Page 6
When you start to use the MRS-4 for recording, you must choose whether to create a new song or
open an existing song for modification.
1.
Connect the monitor system to the MASTER [L]/[R] jacks.
To use headphones for monitoring, connect them to the [PHONES] jack.
2.
Make sure that a SmartMedia card is inserted in the SmartMedia card slot. Then
turn power on in the order MRS-4
➜ monitor system.
When the MRS-4 is turned on, it automatically checks whether the inserted SmartMedia
card already contains any songs.
●
When there are no songs on the SmartMedia card
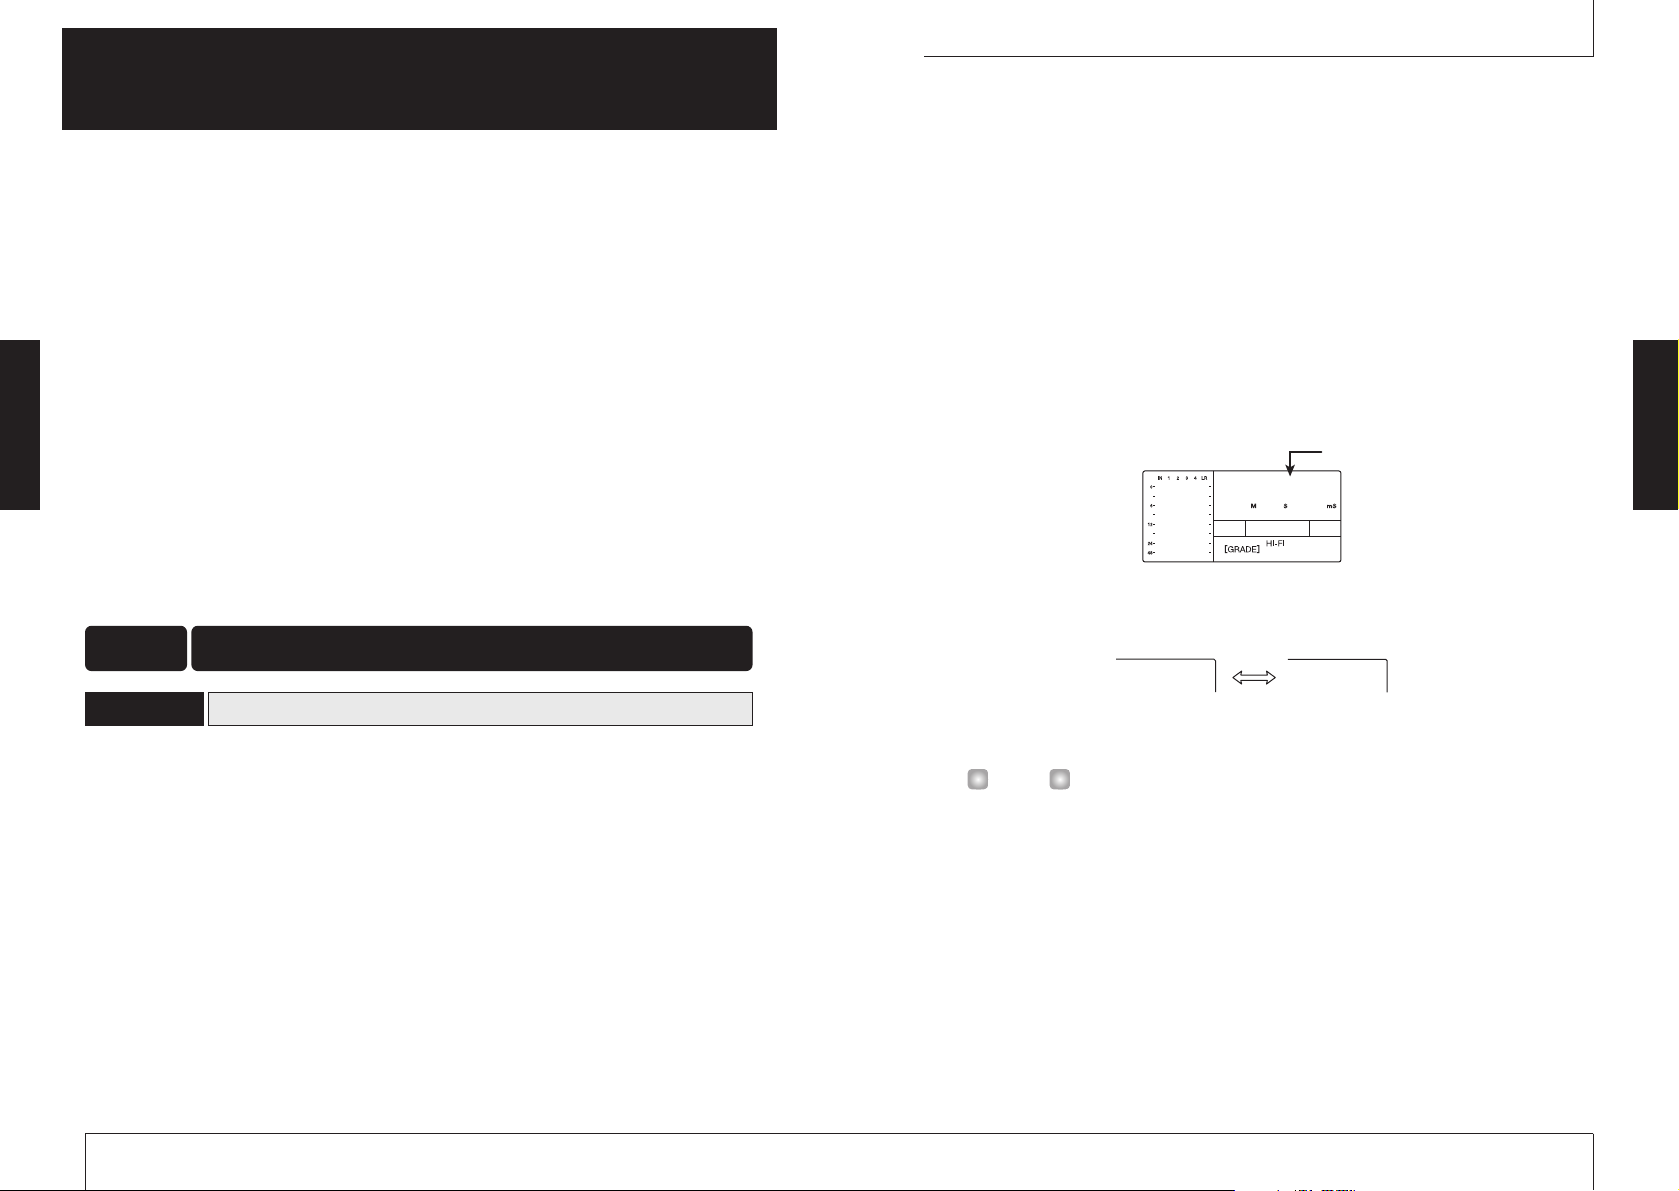
A new song is automatically created, and the display shows the following information. This
display condition is called the "main screen". The main screen is the starting point for all
operations.
●
When there are songs on the SmartMedia card
The following two indications appear alternately on the display.
When you press the [ENTER/YES] key in this condition, a new song is created, and the
main screen appears. The recording will be automatically set to HiFi.
• If you press the [EXIT/NO] key at the above screen, or if no key is operated for 5
seconds, the most recent song is automatically read into the unit. (For information on
how to create a new song after a song has been read in, see page 47.)
• If required, change the recording grade setting (➝ p. 49).
HINT
Basic Operation
ZOOM MRS-4
11
Operation is divided into four major steps.
●
Step 1: Preparations for recording
Make the necessary connections and prepare to record a song.
●
Step 2: Recording the first track
Use the insert effect on the input signal if necessary and record the first track.
●
Step 3: Overdubbing
While listening to the recorded track, record the second and subsequent tracks
(overdubbing).
●
Step 4: Mixdown
Adjust the level, panning, and EQ for each recorded track, and apply the send/return
effect to create a stereo mix. Apply the mixdown effect to the signal, and then send the
result to the master recorder.
In the MRS-4, all data required to play a piece you have created is collectively referred to as a
"song".
A song contains the following information.
●
All recording data from the recorder section
●
All settings of the mixer section
●
All settings of the effect section
●
Other settings such as for metronome and tuner functions
Up to 15 songs can be stored on one SmartMedia card, provided that there is enough capacity. By
reading a song stored on a card back into the MRS-4, all previous settings are recreated (except
for fader setting positions).
Creating a new song
1-1
Preparations for recordingStep 1
ZOOM MRS-4
Basic Operation
10
Basic Operation
This section describes basic operation steps of the MRS-4, starting with preparations for
recording and continuing through the final mixdown process.
Current position within the song
000000
NEWSONG
YES NO
Page 7
The insert effect processes the signal from input 1/2 before it is sent to the tracks for recording. In
this example, you apply the insert effect on the guitar signal supplied to the INPUT 1 jack. If you
do not wish to use the insert effect, proceed to section 2-3 on page 15.
1.
Press the [MIXDOWN] key and the [SEND/RETURN] key simultaneously.
The [MIXDOWN] key and [SEND/RETURN] key serve to select the effect to be used.
Pressing both keys simultaneously causes the keys to flash in red. This indicates that the
insert effect has been activated.
While the [MIXDOWN] key and [SEND/RETURN] key are both flashing simultaneously,
the mixdown effect and send/return effect cannot be used.
The display shows the currently selected algorithm (effect type).
The following algorithms are available for the insert effect.
2.
Use the [PARAMETER/VALUE] keys to select the algorithm and the setting value.
NOTE
Using the insert effect
2-2
ZOOM MRS-4
13
This section describes how to record an electric guitar connected to the [INPUT 1] jack on track 1
to create the first track of a recording.
Connect the instrument to the input of the MRS-4 and adjust input sensitivity.
1.
Connect the instrument to the [INPUT 1] jack on the MRS-4 (➜p. 8).
2.
Press the [ON/OFF] key 1 so that the key lights up.
The [ON/OFF] keys 1/2 serve to activate their respective inputs. When the key is lit, the
input is active.
To record from an instrument with stereo output such as a synthesizer, connect the L/R
output of the device to the [INPUT 1]/[INPUT 2] jacks and set both [ON/OFF] keys 1/2 to
ON.
The MRS-4 can accept up to two simultaneous input signals.
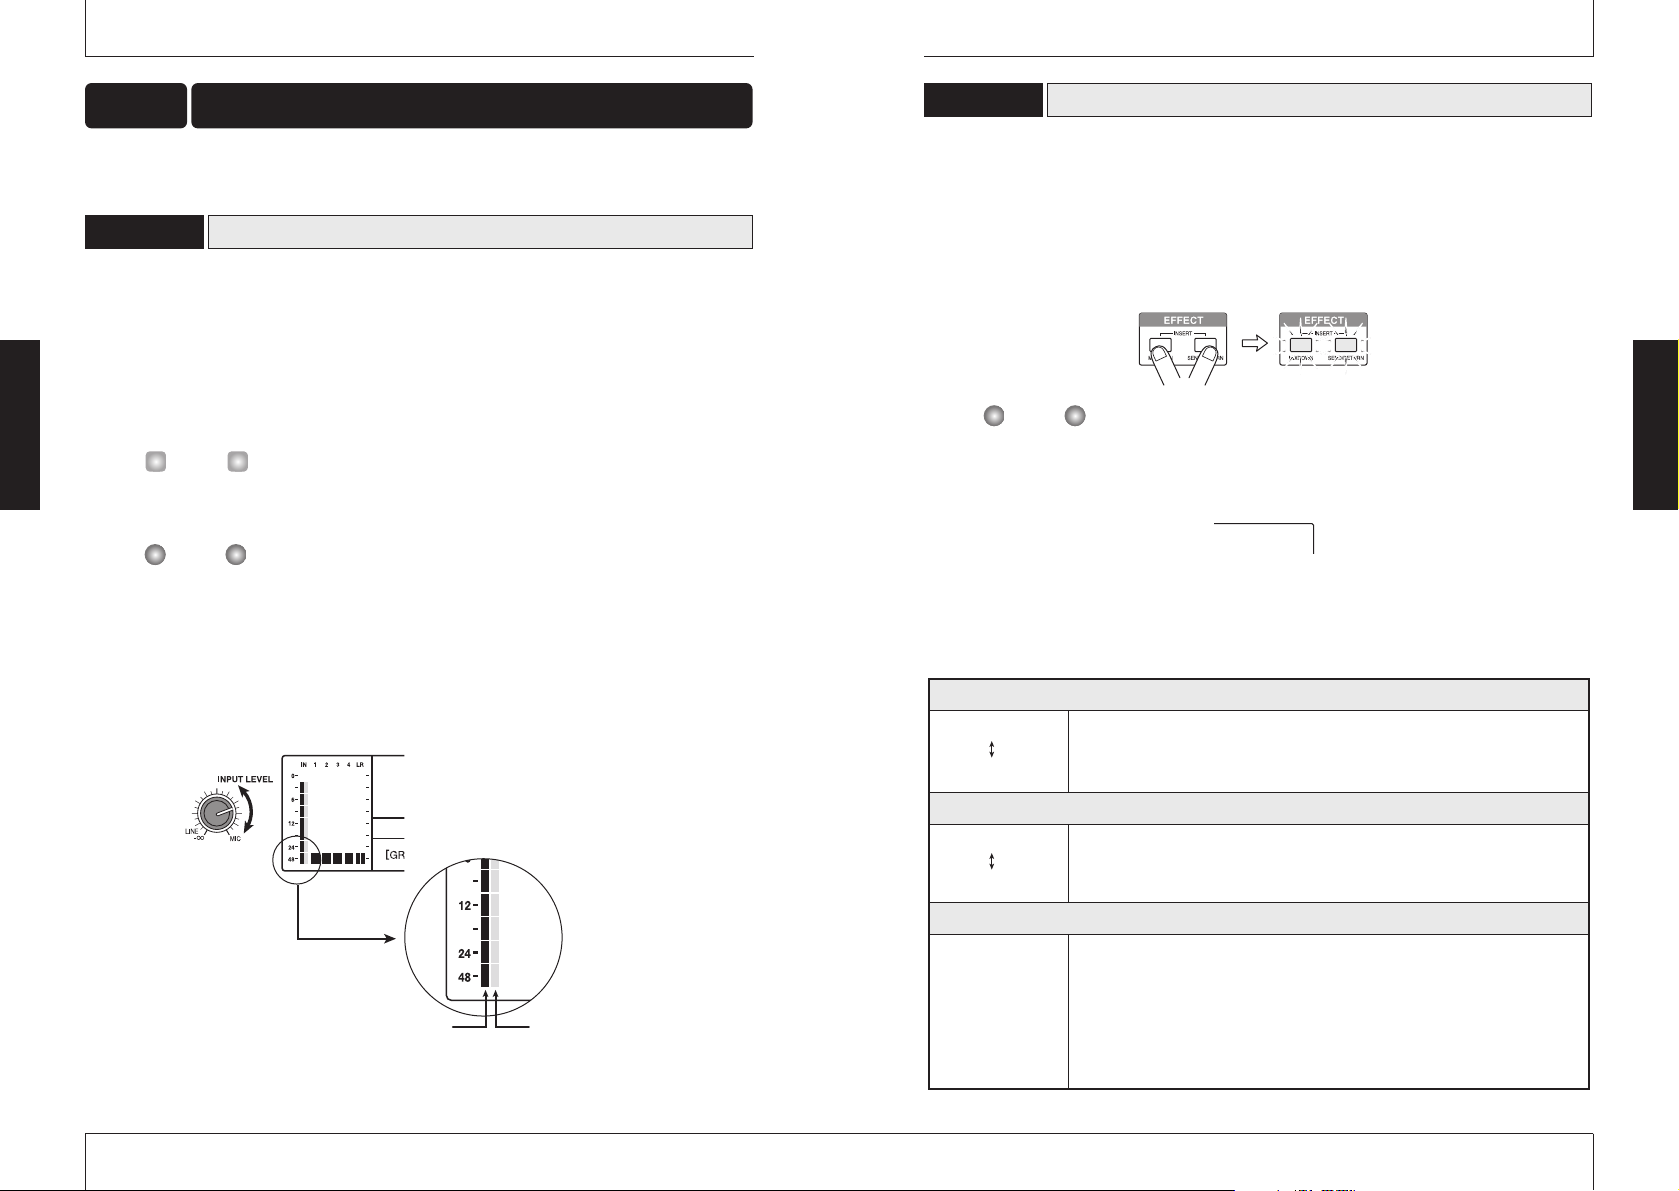
3.
While playing the instrument, use the [INPUT LEVEL] control 1 to adjust the input
sensitivity.
The signal input level appears on the level meter (IN) in the left part of the display. Adjust
the control so that the 0 dB indicator does not light when you play the instrument at the
loudest level.
0
INPUT 1 level
INPUT 2 level
NOTE
HINT
Adjusting input sensitivity
2-1
Recording the first track Step 2
ZOOM MRS-4
12
LIMIT 0
LIMIT 9
This effect suppresses signal peaks to keep the input signal below a certain
level. During stereo recording, the effect monitors both inputs. Higher setting
values produce stronger limiter action.
Algorithm 1
( LIMIT 0 – LIMIT 9 )
Algorithm 2
( COMP 0 – COMP 9 )
Algorithm 3
( CAB CO, CAB BC, CAB ST )
COMP 0
COMP 9
This effect compresses the signal when the input signal exceeds a certain
level. During stereo recording, the effect monitors both inputs. Higher setting
values produce stronger compressor action.
CAB CO
CO
BC
ST
CAB BC
CAB ST
This is a cabinet simulator that duplicates the sound of a guitar amplifier. It is
useful when a distortion effect is connected between the guitar and the input
of the MRS-4. The abbreviation on the right indicates the amp type.
Combo amp
Bright combo amp
Stack amp
Insert effect algorithms
Basic Operation
Basic Operation
LIMIT 0
Page 8
Record the guitar sound with insert effect on track 1, as follows.
1.
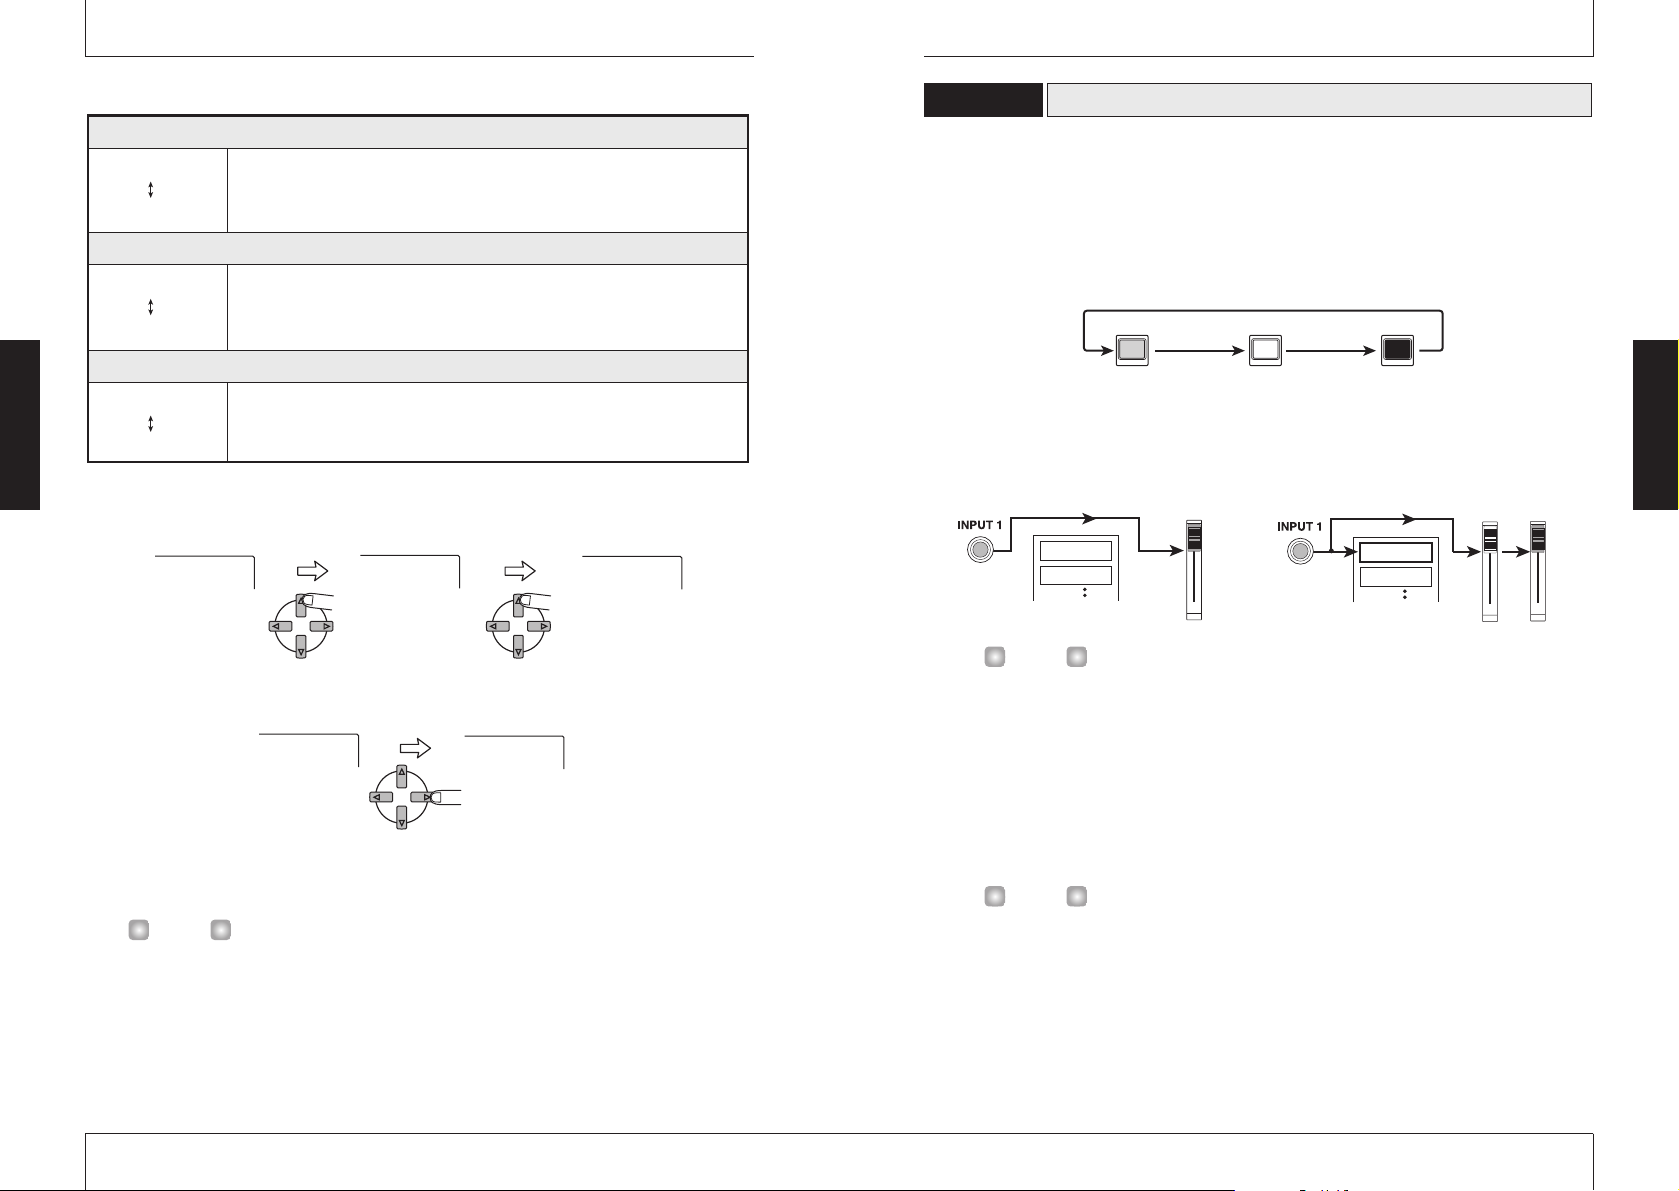
Press the status key 1 repeatedly, until the key is lit in red.
The status keys 1 – 4 serve for selecting the recording track, and for controlling the mute
on/off condition for the track. With each push of the status key, the setting changes as
follows.
When the status key 1 changes from green to red, track 1 is in the recording standby
condition. The input signal routing in this condition is as follows.
Up to two tracks (tracks 1/2 or tracks 3/4) can be selected for recording simultaneously.
2.
While playing your instrument, operate fader 1 of the MRS-4 or the volume
control of the monitor system to adjust the monitoring level.
The setting of fader 1 has no effect on the recording level.
3.
To use the metronome function, press the [METRONOME] key so that the key
lights up.
When the [METRONOME] key is lit, the internal metronome operates.
In the default condition of the song, the metronome is set to a 4/4 beat, tempo of 120
BPM, and a precount of 4 beats. These settings can be changed if desired. For details,
see page 50.
4.
To start recording, use the ZERO [U] key to return to the beginning of the song,
and then press the PLAY [
R
] key while holding down the REC [O] key.
The precount clicks are heard, and then recording on track 1 starts. The REC [O] key and
PLAY [
R
] key are lit. Play your guitar while using the metronome sounds as a guide.
HINT
HINT
k
Selecting and recording to a track
2-3
ZOOM MRS-4
15
The up/down [PARAMETER/VALUE] keys change the right-hand setting value. When the
highest or lowest setting is reached, the unit switches to the next algorithm.
Pressing the left/right [PARAMETER/VALUE] keys changes directly to the next algorithm.
3.
Press the [EXIT/NO] key.
The main screen returns.
Pressing the [MIXDOWN] and [SEND/RETURN] keys together turns the insert effect off.
Pressing both keys once more together turns the insert effect on again, with the most
recent setting in use.
HINT
LIMIT 5
COMP 0
LIMIT 8
LIMIT 9
COMP 0
ZOOM MRS-4
14
Algorithm 4
( MICEF 10 – MICEF 19 )
Algorithm 5
( MICEF 20 – MICEF 29 )
Algorithm 6
( MICEF 30 – MICEF 39 )
MICEF10
MICEF19
This is a mic input limiter. Unlike the LIMIT 0 - LIMIT 9 effect, the effect
operates independently for input 1 and 2. Higher setting values produce
stronger limiter action.
MICEF20
MICEF29
This is a mic input limiter optimized for vocals. The effect operates
independently for input 1 and 2. Higher setting values produce stronger
limiter action.
MICEF30
MICEF39
This is a mic input limiter optimized for acoustic guitar. The effect operates
independently for input 1 and 2. Higher setting values produce stronger
limiter action.
Insert effect algorithms (continued)
Basic Operation
Basic Operation
Lit in green Out Lit in red
Status key
Muting off Muting on Selected as recording trac
If no recording track is selected
Track 1
Track 2
MASTER
If a recording track (track 1) is selected
Tra ck 1
Tra ck 2
MASTER
1
Page 9

ZOOM MRS-4
17
5.
When your guitar play is finished, press the STOP [P] key.
The REC [O] key and PLAY [R] key go out, and the recorder section stops. The display
briefly shows "WAIT", and then the main screen reappears.
The length of the "WAIT" interval differs, depending on recording conditions.
6.
To listen to the recording, use the ZERO [U] key to return to the beginning of the
song, and then press the PLAY [
R
] key.
The recorded track is played back.
•To turn the metronome off while checking the recording, press the [METRONOME] key
so that the key is no longer lit.
• While the recorder is stopped, you can use the REW [
T
] key and FF [Y] key to move
the current position in 0.1 second units. If you then press the PLAY [
R
] key, playback
starts from that position.
• The basic functions of the transport keys are explained below.
Basic functions of transport keys
7.
To stop playback, press the STOP [P] key.
To redo the recording, repeat steps 4 – 5.
8.
Press the status key 1 so that the key is lit in green.
The recording condition of track 1 is turned off.
HINT
NOTE
Click ClickClick Click Ding Tick Tick Tick Ding Tick Tick Tick
Record
〜
Precount
ZOOM MRS-4
16
This section describes how to record another instrument on track 2 while listening to the guitar
recorded in step 2 (track 1).
1.
Connect the instrument or mic to the [INPUT 1] jack.
2.
Press the [ON/OFF] key 1 so that the key lights up.
3.
While playing the instrument, use the [INPUT LEVEL] control 1 to adjust the input
sensitivity.
4.
Press the [MIXDOWN] key and the [SEND/RETURN] key simultaneously, so that
the keys are flashing in red.
5.
Select the algorithm and set the value as was done in step 2.
6.
Press the [EXIT/NO] key to return to the main screen.
Record the sound of the second instrument on track 2.
1.
Press the status key 2 repeatedly, until the key is lit in red. Make sure that status
key 1 is lit in green.
This places track 2 into the recording standby condition.
2.
Operate fader 2 to adjust the monitor level.
If necessary, perform playback and adjust faders 1 and 2 for optimum balance between track
playback sound and input signal.
3.
To use the metronome function, press the [METRONOME] key so that the key
lights up.
4.
To start recording, use the ZERO [U] key to return to the beginning of the song,
and then press the PLAY [
R
] key while holding down the REC [O] key.
The precount clicks are heard, and then recording starts. The REC [O] key and PLAY [R]
key are lit. Play your guitar while listening to the playback sound of track 1 and the
metronome.
5.
When recording is finished, press the STOP [P] key.
The display briefly shows "WAIT", and then the main screen reappears.
Selecting a track and recording on it
3-2
Adjusting input sensitivity and setting the insert effect
3-1
Overdubbing Step 3
Basic Operation
Basic Operation
REW [T] key
Moves backwards from the current position
in 0.1 second steps. Keeping the key
ZERO [U] key
Moves to the start
of the song (counter
zero position).
STOP [P] key
Stops the song.
depressed moves back quickly. Pressing the
FF [Y] key while holding down the REW
[T] key moves backwards in 1 second steps.
PLAY [R] key
Starts playback from the current position.
FF [Y] key
Moves forward from the current
position in 0.1 second steps. Keeping
the key depressed moves forward
quickly. Pressing the REW [T] key
while holding down the FF [Y] key
moves forward in 1 second steps.
REC [O] key
When this key is held down while
pressing the PLAY [R] key, the
recorder starts to record. Pressing this
key during playback causes punch-in,
and pressing the key during recording
causes punch-out.
Page 10
ZOOM MRS-4
19
The length of the "WAIT" interval depends on setting conditions.
6.
To listen to the recording, use the ZERO [U] key to return to the beginning of the
song, and then press the PLAY [
R
] key.
The recorded tracks 1 and 2 are played back. If necessary, adjust faders 1 and 2 for optimum
balance.
7.
To stop playback, press the STOP [P] key.
8.
Press the status key 2 so that the key is lit in green.
You can record more tracks in the same way.
When recording of tracks 1 – 4 is completed, you can adjust the level, EQ, and panning of each
track to create the final stereo mix. This process is called mixdown.
When performing mixdown on the MRS-4, you can either record the completed song on an
external master recorder, or on unused V-takes in the MRS-4. The example in this section explains
how to record on an external master recorder.
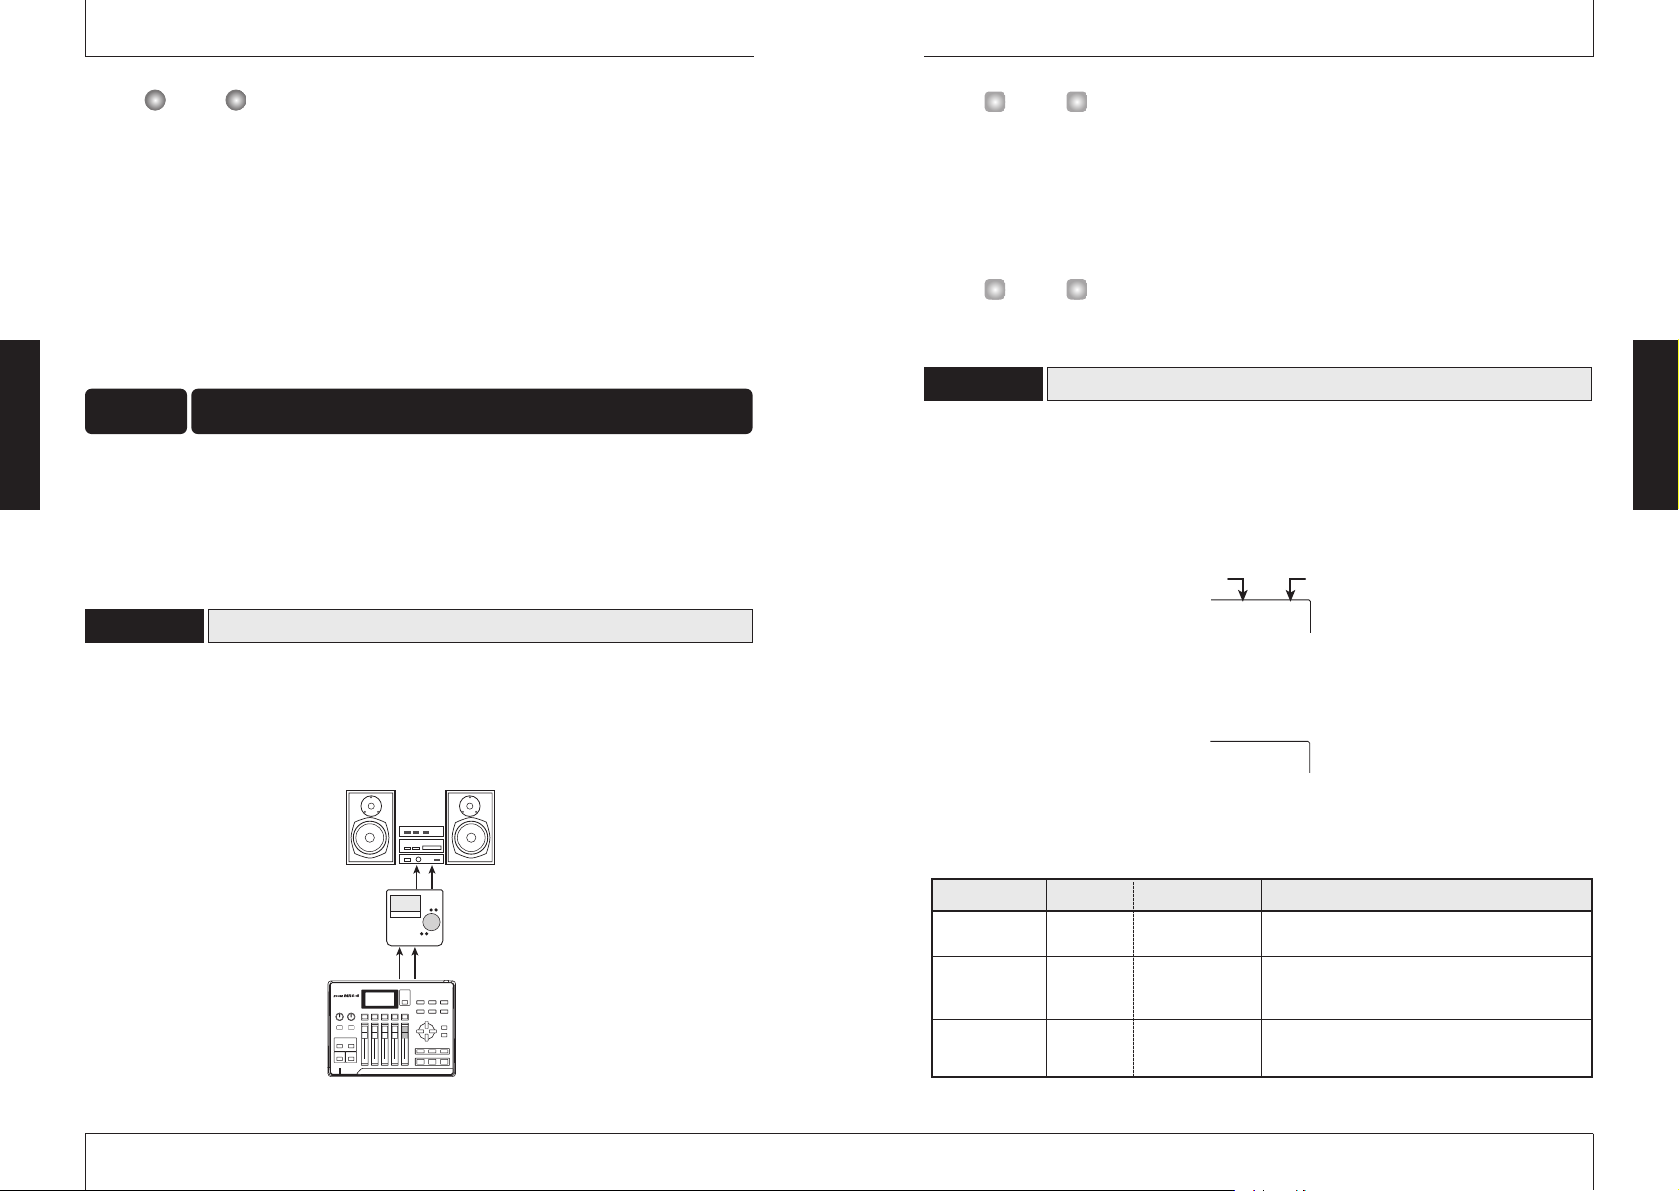
Connect the master recorder and make other preparations as follows.
1.
Connect a master recorder (MD or DAT or similar) to the MASTER [L]/[R] jacks.
The connection principle for an external master recorder is shown below.
Preparations for mixdown
4-1
MixdownStep 4
NOTE
ZOOM MRS-4
18
To listen to the final mix on the monitor system during mixdown, set the master recorder
to monitor the input source. (For details, refer to the documentation of the master
recorder.)
2.
Make sure that all status keys are lit in green.
3.
Set the [ON/OFF] keys 1/2 and the [METRONOME] key to OFF.
It is also possible to add the input signal from inputs 1/2 to the mix. In this case, set the
desired [ON/OFF] key to ON (
➝ P. 38).
1.
Set the [MASTER] fader to 0 dB.
2.
While the main screen is shown, press the [TRACK PARAMETER] key.
The track parameter menu appears. With this menu, you can change the settings for
individual tracks.
3.
Use the status keys 1 – 4 to select the track.
While the track parameter menu is shown, the status keys 1 – 4 serve for selecting a track.
The status key for the currently selected track is lit in orange.
Selectable track parameters and settings are listed in the table below.
HIEQ ON
Adjusting volume/pan/EQ
4-2
HINT
HINT
HIEQ
Switches high EQ on or off
HIG
Adjusts high EQ boost/cut from -12 (dB) to +12
(dB). This parameter is only shown when HI EQ is
set to ON.
Display
Parameter
Settingrange Description
HIF
Selects the frequency for high EQ boost/cut. This
parameter is only shown when HI EQ is set to ON.
Track parameters and settings
ON/OFF
-12 – 12
500 – 8000(Hz)
HI EQ
ON/OFF
HI EQ
GAIN
HI EQ
FREQUENCY
Basic Operation
Basic Operation
SettingTrack parameter
Monitor system
LINE OUT
Master recorder
LINE IN
MASTER[L]/[R]
MRS-4
FADE100
Page 11

The track mixer incorporates a send/return effect with reverb/delay/chorus. The signal flow when
using the send/return effect is as follows.
The intensity of the send/return effect can be adjusted for each track individually by adjusting the
send level. Raising the level causes the effect to be more pronounced for that track. This example
shows how to select the algorithm for the send/return effect and how to adjust the send level.
Setting the algorithm and parameter for the send/return effect
1.
While the main screen is shown, press the [SEND/RETURN] key.
The [SEND/RETURN] key lights up and the send/return effect is activated. The menu for
selecting the algorithm for the send/return effect appears on the display.
For the send/return effect, you can select a reverb, delay, or chorus type algorithm. Each type has
one parameter (an element for adjusting the action of the effect) that allows a more finely graded
adjustment than the send level. Available algorithms and parameters are listed in the table on page
22 – 23.
A
Using the send/return effect
4-3
ZOOM MRS-4
21
4.
Use the [PARAMETER/VALUE] keys to set the track parameters.
The left/right [PARAMETER/VALUE] keys select the parameter, and the up/down
[PARAMETER/VALUE] keys change the setting value.
When STL (stereo link) is ON, all parameters for tracks 1 and 2, and tracks 3 and 4 are
linked, except for the V-take selection.
The FADER parameter is only for display and cannot be changed. (When the respective
fader is moved, the indication changes.)
NOTE
HINT
ZOOM MRS-4
20
LOEQ
Switches low EQ on or off
LOG
Adjusts low EQ boost/cut from -12 (dB) to +12
(dB). This parameter is only shown when LO EQ is
set to ON.
LOF
Selects the frequency for low EQ boost/cut. This
parameter is only shown when LO EQ is set to ON.
Controls the stereo link function for using tracks 1/2
and 3/4 in a stereo configuration. (For details, see
page 39.)
Track parameters and settings (continued)
ON/OFF
FADE
Shows the current fader position numerically
(display only).
0 – 127
-12 – 12
63 – 2000(Hz)
SEND
Determines whether the signal from the respective
channel (track) is sent to the send/return effect.
ON/OFF
SLVL
Adjusts the level of the signal sent to the send/return
effect. This parameter is only shown when SEND is
set to ON.
0 – 100
STL
T
x-y
ON/OFF
Selects the V-take to be used for the respective
track.
*
x is the track number and y is the V-take number.
(For details, see page 28.)
x=1 – 4
y=1 – 8
PAN
LO EQ
ON/OFF
LO EQ
GAIN
LO EQ
FREQUENCY
FADER
SEND
ON/OFF
SEND
LEVEL
STEREO
LINK
V TAKE
PAN
Adjusts panning (left/right position) of the signal
from the respective track. When STL (stereo link) is
set to ON, this adjusts the left/right volume balance
of the stereo tracks.
L50 – 0 – R50
Basic Operation
Basic Operation
HIEQ ON
HIG 0
HIG 0 HIG 1
SEND
LEVEL
312 4
MASTER
Send/return
effect
lgorithm
Setting value
HALL 0
Page 12

2.
Use the [PARAMETER/VALUE] keys to select the algorithm and the setting value.
The up/down [PARAMETER/VALUE] keys change the setting value. When the highest or
lowest setting is reached, the unit switches to the next algorithm.
Pressing the left/right [PARAMETER/VALUE] keys changes directly to the next algorithm.
3.
To change the parameter of the currently selected algorithm, press the
[ENTER/YES] key.
While the algorithm is displayed, pressing the [ENTER/YES] key calls up the parameter for
that algorithm.
ZOOM MRS-4
23
ZOOM MRS-4
22
Basic Operation
Basic Operation
Send/return effect algorithms and parameters
Algorithm 1
( HALL 0 – HALL 9 )
This is a stereo effect that adds hall type reverberation. Higher settings
produce longer reverb time.
HALL 0
HALL 9
Algorithm 2
Parameter
TONE 0
TONE 10
( TONE 0 – TONE 10 )
Adjusts the reverb tone. Higher settings produce stronger
treble boost. (5 is the flat setting.)
( ROOM 0 – ROOM 9 )
This is a stereo effect that adds room type reverberation. Higher settings
ROOM 0
ROOM 9
produce longer reverb time.
Parameter
TONE 0
TONE 10
( TONE 0 – TONE 10 )
Adjusts the reverb tone. Higher settings produce stronger
treble boost. (5 is the flat setting.)
Algorithm 6
CHO MN
Algorithm 7
CHO ST
( CHO MN )
This is a mono chorus effect. A component whose pitch shifts cyclically up
and down is added to the original sound, resulting in a wavering, expansive
sound.
Parameter
RATE 1
RATE 50
( RATE 1 – RATE 50 )
Adjusts the fluctuation rate. Higher values produce faster
fluctuation.
( CHO ST )
This is a stereo chorus effect. The pitch of left and right components are
shifted upside down, resulting in a unique, expansive sound.
Parameter
RATE 1
RATE 50
( RATE 1 – RATE 50 )
Adjusts the fluctuation rate. Higher values produce faster
fluctuation.
Algorithm 3
DOBLE 0
DOBLE 9
Algorithm 4
SHORT 0
SHORT 9
Algorithm 5
LONG 0
LONG 9
( DOUBLE0 – DOUBLE9 )
This is a mono doubling delay which adds a slightly delayed component to
the original sound, giving the sound more body. Higher settings produce
more delayed components.
Parameter
TIME 2
TIME 50
( TIME 2 – TIME 50 )
Adjusts the delay time in the range from 2 – 50 ms.
( SHORT 0 – SHORT 9 )
This is a mono short delay. Higher settings produce more delayed
components.
Parameter
TIME 50
TIME250
( TIME 50 – TIME 250 )
Adjusts the delay time in the range from 50 – 250 ms.
( LONG 0 – LONG 9 )
This is a mono long delay. Higher settings produce more delayed
components.
Parameter
TIME 25
TIME100
( TIME 25 – TIME 100 )
Adjusts the delay time in the range from 250 ms (setting
value 25) – 1000 ms (setting value 100).
HALL 8
HALL 9
ROOM 0
ROOM 5
DOBLE 0
DOBLE 0
TIME 2
Page 13

10.
While playing the song, use the up/down [PARAMETER/VALUE] keys to adjust the
send level for that track.
11.
Perform the same steps for other tracks.
The mixdown effect serves to process the stereo signal produced by the track mixer. This effect
can be used simultaneously with the send/return effect. The signal flow is shown below.
Proceed as follows to select the algorithm for the mixdown effect and adjust the effect intensity.
Selecting the algorithm for the mixdown effect
1.
While the main screen is shown, press the [MIXDOWN] key.
The [MIXDOWN] key lights up and the mixdown effect is activated. The menu for
selecting the algorithm for the mixdown effect appears on the display.
Available algorithms for the mixdown effect are listed in the table on the next page.
Using the mixdown effect
4-4
ZOOM MRS-4
25
4.
To change the setting, use the up/down [PARAMETER/VALUE] keys.
5.
To return to the algorithm display, press the [EXIT/NO] key.
6.
When the algorithm and parameter setting for the send/return effect has been
made, press the [EXIT/NO] key several times to return to the main screen.
The send/return effect setting is stored for each song separately.
Adjusting the send/return effect intensity for each track
7.
While the main screen is shown, press the [TRACK PARAMETER] key and then
use the status keys 1 – 4 to select the track for which you want to make the
setting.
8.
Use the left/right [PARAMETER/VALUE] keys to call up the SEND (send/return
effect) parameter, and set it to ON.
9.
Press the right [PARAMETER/VALUE] key once to call up the indication "SLVL"
(send level).
SEND ON
HINT
TIME 2
DOBLE 0
ZOOM MRS-4
24
Basic Operation
Basic Operation
TIME 2
TIME 4
MASTER [L]/[R]
1234
MASTER
Mixdown
effect
SLVL 0
POWER 0
Page 14

When the mixdown effect setting is completed, you are ready to record the final mix on the
master recorder.
1.
Use the ZERO [U] key to return to the beginning of the song.
2.
Set the master recorder to the recording condition.
3.
Press the PLAY [R] key.
4.
When the song has been completely recorded, stop the master recorder and the
MRS-4.
5.
To check the recording, rewind the master recorder and play the recording from
the beginning.
Whenever you make any changes to a song on the MRS-4, the song is automatically
saved on the SmartMedia card.
HINT
Recording on the master recorder
4-5
ZOOM MRS-4
27
2.
While playing the song, use the [PARAMETER/VALUE] keys to adjust the
algorithm.
The up/down [PARAMETER/VALUE] keys change the setting value. When the highest or
lowest setting is reached, the unit switches to the next algorithm.
Pressing the left/right [PARAMETER/VALUE] keys changes directly to the next algorithm.
3.
Press the [EXIT/NO] key.
The main screen returns.
ZOOM MRS-4
26
Basic Operation
Basic Operation
Mixdown effect algorithms
Algorithm 1
POWER 0
POWER 9
Algorithm 2
BOOST 0
BOOST 9
Algorithm 3
VOCAL 0
VOCAL 9
( POWER 0 – POWER 9 )
This effect adds fat bass and more power to the sound. Higher values
produce more bass emphasis.
( BOOST 0 – BOOST 9 )
This effect produces a tight low end and crisp high end. Higher values
produce more bass and treble boost.
( VOCAL 0 – VOCAL 9 )
This effect emphasizes the midrange, lending warmth and suppleness to
vocals. Higher values produce more midrange emphasis.
POWER 8
BOOST 5
POWER 9
BOOST 0
VOCAL 0
Page 15

Combining multiple
tracks (Bounce function)
"Bounce" is a function that mixes the
recorded content of several tracks and records
them on one or two tracks. This is sometimes
also called "ping-pong recording". Even
when all 4 tracks are recorded, the MRS-4
allows you to play them back simultaneously
and bounce them onto currently unused Vtakes.
For example, after bouncing 4 tracks onto 1
or 2 V-takes, switching the V-takes of the
tracks allows you to listen to the bounce
target tracks while overdubbing another
instrument on the remaining tracks. Instead
of using an external master recorder, it is also
possible to perform mixdown onto two
internal V-takes.
This section describes how to bounce the Vtakes 1 of tracks 1 – 4 onto V-takes 8 of
tracks 1 and 2.
Specifying the bounce target V-take
1.
While the main screen is shown,
press the [SONG/UTILITY/TUNER]
key, and then use the left/right
[PARAMETER/VALUE] keys to
bring the indication "BOUNCE"
onto the display.
2.
Press the [ENTER/YES] key.
The display changes as follows.
At this screen, you can select the V-take of
the bounce target track you plan to record to.
3.
Use the up/down [PARAMETER/
VALUE] keys to select the V-take
as follows.
●
CR (Current)
Record on currently selected V-take.
●
1 – 8 (V-take 1 – 8)
Record on the specified V-take.
In this example, let's select V-take 8.
4.
Press the [EXIT/NO] key several
times to return to the main screen.
1
1
2
3
4
5
6
7
8
234
Track
Bounce
V-take
Reference [Recorder]
ZOOM MRS-4
29
Using V-takes
Each track 1 – 4 of the recorder contains
eight virtual tracks called "V-takes". For each
track, you can select one take, which will be
used for recording and playback. For
example, you can switch V-takes and record
important passages such as vocal or guitar
solos several times on the same track. Later
you can compare them and select the best Vtake.
To switch the V-take for a track, proceed as
follows.
1.
While the main screen is shown,
press the [TRACK PARAMETER]
key.
The track parameter menu appears.
2.
Use the status keys 1 – 4 to select
the track you wish to switch.
3.
Use the left/right [PARAMETER/
VALUE] keys to bring the V-take
indicator onto the display.
The track number and V-take number are
shown at the top right of the display.
4.
Use the up/down [PARAMETER/
VALUE] keys to select the V-take
number.
5.
Repeat steps 2 – 4 as required to
switch V-takes for other tracks.
6.
Press the [EXIT/NO] key to return
to the main screen.
1
2
3
4
5
6
7
8
Flashing:
Currently selected
V-take
Out:
Unrecorded V-take
Lit:
Recorded V-take
V-take
Track
T1-2
ZOOM MRS-4
Reference [Recorder]
28
Reference [Recorder]
This section describes various advanced functions and operations of the recorder section of the
MRS-4.
BOUNCE
REC CR
REC 8
Track number
E T1-1
Indicator
Indicates an empty V-take.
V-take number
Page 16

This section describes how to use manual
punch-in/out to re-record a region of a
previously recorded track.
1.
Repeatedly press the status key of
the track on which you want to
punch-in/out, until the key is lit in red.
2.
Raise the fader of the corresponding
channel to a suitable position.
3.
While playing the instrument
connected to the input, adjust the
input sensitivity.
If necessary, play back the recorder and use
the faders of the mixer section to adjust the
mix balance of your instrument and the
playback of the tracks.
4.
Move to a point several measures
earlier than where you want to
punch-in, and press the PLAY [
R
]
key to begin playback.
When the metronome is on and playback is
started from a point midway in a song, no
precount clicks are heard. Depending on the
start position, the metronome sound may start
within a beat.
5.
When you come to the punch-in
location, press the REC [
O
] key.
The REC [O] key lights, and track recording
begins from that location (punch-in).
6.
When you come to the punch-out
location, press the REC [
O
] once
more.
The REC [O] key goes out, and the unit switches
from recording to playback (punch-out).
7.
To stop the recorder, press the
STOP [
P
] key.
The display briefly shows "WAIT".
The length of the "WAIT" interval depends on
setting conditions.
8.
To check the newly recorded
content, move to the point of step
4, and press the PLAY [
R
] key.
To redo punch-in/punch-out, repeat steps 4 – 7.
9.
When the results are as desired,
press the status key for that track
so that the key lights in green.
Auto punch-in/out is a function that lets you
specify beforehand the region to be rerecorded. Punch-in will occur automatically
when you reach the starting location (In
point), and punch-out will occur automatically
when you reach the ending location (Out
point).
The procedure is as follows.
Setting the In/Out points
1.
Repeatedly press the status key of
the track on which you want to
punch-in/out, until the key is lit in red.
2.
Raise the fader of the corresponding
channel to a suitable position.
3.
While playing the instrument
connected to the input, adjust the
input sensitivity.
4.
Move to the point at which you
want to punch-in, and press the
[AUTO PUNCH IN/OUT] key.
The [AUTO PUNCH IN/OUT] key flashes.
This sets the "In point" at which recording
will begin.
Using auto punch-in/out
NOTE
Using manual punch-in/out
Reference [Recorder]
ZOOM MRS-4
31
Carrying out the bounce function
5.
Adjust the level balance, pan, and
EQ of tracks 1 – 4.
6.
Press the [BOUNCE] key.
The [BOUNCE] key lights up and the bounce
function is activated.
If desired, you can also use the send/return effect
and mixdown effect during bounce. (For details,
see page 21, 25.)
7.
On the main screen, press the
status keys 1/2 for the bounce
target tracks 1/2, so that the keys
are lit in red.
Make sure that [ON/OFF] keys 1/2 and the
[METRONOME] key are out.
8.
Return to the beginning of the
song, and then press the PLAY [
R
]
key while holding down the REC
[
O
] key.
The mixed signal of tracks 1 – 4 is routed
through the MASTER fader and recorded on
the bounce target (V-takes 8 of tracks 1 and
2). The level meter L/R indication allows
checking the level.
• When bouncing in stereo, the odd-numbered
track of the bounce destination is
automatically recorded as the left channel and
the even-numbered track as the right channel.
•By setting the ON/OFF keys 1/2 to ON, it is
possible to add the input signal from inputs
1/2 to the bounced signal.
• The input signal from the AUX IN jacks and
from the internal metronome is not recorded.
9.
When recording is completed, stop
the recorder.
The display briefly shows "WAIT".
The length of the "WAIT" interval depends on
setting conditions.
10.
On the target track, select the Vtakes that were used as bounce
targets, return to the beginning of
the song, and check the recording.
At this time, the status keys of tracks 3/4
should be out, so that the tracks are muted.
To redo the bounce process, repeat steps 5 – 9.
When playing back bounce target V-takes, the
parameters previously set for that track will be
active. Panning, EQ, and effect depth therefore
may be different from the actual recording. To
accurately monitor the content of the bounce
target, reset the track parameter settings.
11.
When the results are as desired,
press the [BOUNCE] key so that
the key goes out.
The bounce function is turned off.
Re-recording only a
specified region (Punchin/out function)
Punch-in/out is a function that lets you rerecord just a specified region of a previously
recorded track. The action of switching a
track that is in play mode to record mode is
called "punch-in", and the action of switching
back from recording to playback is called
"punch-out".
The MRS-4 provides two ways to do this.
You can use the panel keys to punch-in/out
manually ("manual punch-in/out"), or cause
punch-in/out to occur automatically at
previously specified points ("auto punchin/out").
ZOOM MRS-4
Reference [Recorder]
30
HINT
HINT
NOTE
NOTE
Page 17

Moving to a desired
point in a song (Locate
function)
You can specify a location within the song in
time units (minutes/seconds/milliseconds),
and move to that location.
1.
While the main screen is shown,
press the right [PARAMETER/
VALUE] key once.
The indication "M" flashes on the display.
2.
Use the left/right [PARAMETER/
VALUE] keys to move the flashing
indication.
To show the current position in minutes, "M"
should be flashing. For indication in seconds,
"S" should be flashing. For indication in
milliseconds, "mS" should be flashing.
3.
Use the up/down [PARAMETER/
VALUE] keys to change the
numerical indication for the
currently selected unit.
While holding down the key for one
direction, pressing the key for the other
direction will cause a rapid change.
When the numbers have been changed, the
unit is at the corresponding song position.
Pressing the PLAY [
R
] key will start
playback from that point.
4.
To return to the main screen,
repeatedly press the left
[PARAMETER/VALUE] key until the
flashing stops.
Switching between time
and measure indication
The current point can be shown on the
display either as time or in measures.
1.
While the main screen is shown,
press the left/right [PARAMETER/
VALUE] keys repeatedly until the
measure and beat indication is
shown on the display.
The display switches to measure indication
(measure number/beat count). When the
transport keys are used in this condition to
move in the song, the measure number/beat
count indication changes accordingly.
• The measure number and beat count shown
here have been converted using the
NOTE
Measure
Beat
If the measure indication and time indication
do not match, this symbol is shown.
5-1O
Reference [Locating a Point]
ZOOM MRS-4
33
5.
Move to the point at which you want
to punch-out, and press the [AUTO
PUNCH IN/OUT] button once more.
This sets the "Out point" at which recording will
end. The [AUTO PUNCH IN/OUT] button
changes from flashing to constantly lit.
The In/Out points can also be set while the
recorder is operating.
Carrying out auto punch-in/out
6.
Move to a point several measures
earlier than the In point.
7.
Repeatedly press the status key of
the track on which you want to
punch-in/out, until the key is
flashing in red.
8.
If you want to rehearse the auto
punch-in/out, press only the PLAY
[
R
] key. To actually carry out auto
punch-in/out, hold down the REC
[
O
] key while pressing the PLAY
[
R
] key.
●
If only PLAY [R] key was pushed
(rehearsal)
When the In point is reached, the track on
which you are punching-in/out will be muted.
When you reach the Out point, muting will
be defeated. (You will always be able to
monitor the input signal during this time.)
Performing this action will not record
anything on the track.
●
If REC [O] key + PLAY [R] key were
pushed (actual operation)
When the In point is reached, recording will
begin automatically (punch-in). When the
Out point is reached, recording will end
automatically, and playback will resume
(punch-out).
9.
When punch-in/out is complete,
press the STOP [
P
] key.
The display briefly shows "WAIT".
The length of the "WAIT" interval depends on
setting conditions.
10.
To listen to the recorded result,
press the status key for the track
on which you performed punchin/out until the key is lit in green.
Then move to a location earlier
than the In point and press the
PLAY [
R
] key.
If you want to re-do the recording, repeat
steps 6 – 9.
11.
When the results are as desired,
press the [AUTO PUNCH IN/OUT]
key so that the key goes out.
The auto punch-in/out function is turned off,
and the In point and Out point settings are
discarded.
NOTE
Track
Playback Playback
Record
In point Out point
Track
Playback Playback
Mute
In point Out point
HINT
ZOOM MRS-4
Reference [Recorder]
32
Reference [Locating a Point]
This section describes how to quickly move to any desired point in a song.
0145965
0145965 0145965 0145965
Flashing
0145966
0146966
Page 18

Specifying a mark directly
1.
While the main screen is shown,
press the left [PARAMETER/
VALUE] key once.
The indication "MARK" flashes on the
display, and the number of the nearest mark
before the current location is shown.
2.
Use the up/down [PARAMETER/
VALUE] keys to select the desired
mark number.
As the mark number is changed, the unit also
moves to that location.
You can clear (delete) an existing mark as
follows.
1.
While the main screen is shown,
press the left [PARAMETER/
VALUE] key once. Then use the
up/down [PARAMETER/VALUE]
keys to select the desired mark
number.
If the mark position and the current position do
not match, the mark cannot be deleted. If no dot
is shown at the bottom right of the mark number,
use the MARKER [
U
]/MARKER [Y] keys to
bring the marker position and the current position
to match.
2.
Press the [MARK/CLEAR] key.
The selected mark is deleted, and the
subsequent marks are renumbered.
•Once deleted, a mark cannot be restored.
• The mark number 00 that corresponds to the
beginning of a song cannot be deleted.
NOTE
NOTE
Clearing a mark
Reference [Locating a Point]
ZOOM MRS-4
35
metronome beat as reference. (For information
on how to change the metronome beat and
tempo, see page 50.)
• This indication is for information only. The
measure indication cannot be used to move to
a point in the song.
2.
To r eturn to time indication, press
the left [PARAMETER/VALUE] key
once.
Marking a point in a
song (marker function)
You can assign up to 50 marks in a song at
any desired location, allowing you to quickly
move to that point later. This is convenient
when you want to play back repeatedly from
a specific location.
To assign a mark at a location in a song,
proceed as follows.
1.
Move to the point at which you
want to assign a mark.
If necessary, you can specify the current
point in minutes/seconds/milliseconds.
A mark can be assigned either during playback or
when stopped.
2.
Press the [MARK/CLEAR] key.
A mark will be assigned to the current
location, and the mark number is shown.
The mark number is assigned automatically
in ascending order from 01 to 50. (The
beginning of the song always corresponds to
the mark number 00.) If you add a new mark
between two existing marks, the subsequent
marks will be renumbered.
Here's how to move to the location of a mark.
This can be done in two ways: you can use
key operations, or specify the mark number
directly.
Using keys to move to a mark
1.
While the main screen is shown,
press either the MARKER [
U
] or
the MARKER [
I
] key.
Each time you press the key, the unit moves
to the next mark before or after the current
location.
Moving to a mark location
HINT
Assigning a mark
ZOOM MRS-4
Reference [Locating a Point]
34
Mark added
00 01 02 03
Mark
number
Song
00 01 0302 04
Mark
number
Song
Mark
Current location
01
When the mark is the
closest to the current
location, a dot appears
here.
02
Mark to be
deleted
00 01 0302 04
Mark
number
Song
00 01 02 03
Mark
number
Song
Marknumber
SET 02
Song
Page 19

Assigning two inputs to
a track
In the "Basic Operation" section, we learned
how to record the signal from one input on
one track. By using the input mixer, it is also
possible to combine the signal from two
inputs onto one track, or to record it on two
tracks separately. The procedure is described
below.
1.
Connect the instrument or
microphone to be recorded to the
[INPUT 1]/[INPUT 2] jacks.
2.
Set [ON/OFF] keys 1/2 to ON.
3.
While listening to the sound,
operate the [INPUT LEVEL]
controls 1/2 to adjust the input
sensitivity.
The input level for each input can be checked
separately on the display.
4.
Repeatedly press the status key for
the track on which you want to
record, until the key is lit in red.
The track is now in the recording
standby condition.
The maximum number of tracks you can
record to simultaneously is two. Only the
combination of tracks 1/2 or tracks 3/4 is
allowed.
The signal flow from the input mixer to the
tracks depends on the track selection and the
status of the [ON/OFF] keys 1/2, as shown in
the illustrations.
●
When only one recording track is
selected
●
When two recording tracks are
selected (tracks 1/2 or tracks 3/4)
Recorder
Recorder
INPUT 1 or INPUT 2
INPUT 1
INPUT 2
Track
Track
Reference [Mixing]
ZOOM MRS-4
37
Reference [Mixing]
This section describes advanced mixing techniques using the input mixer and track mixer.
Playing back the same
passage repeatedly (AB Repeat)
A-B Repeat is a function that repeatedly
plays back a desired region of the song. This
is useful when you want to listen to the same
region repeatedly.
1.
Move to the point at which you
want to begin repeat playback, and
press the [A-B REPEAT] key.
The [A-B REPEAT] key flashes, and the
repeat start location (point A) is specified.
2.
Move to the point at which you
want to end repeat playback, and
press the [A-B REPEAT] key.
The [A-B REPEAT] key will change from
flashing to constantly lit, and the repeat end
location (point B) will be specified.
• If you specify a point B that is located earlier
than point A, the region from points B
➝ A will
be played repeatedly.
• If you want to redo the point A/B settings,
press the [A-B REPEAT] key several times to
make it go out, and then repeat steps 1 – 2.
• Point A/B setting can be done when the
recorder is either stopped or playing.
3.
To begin repeat playback, press
the PLAY [
R
] key.
Repeat playback will begin when you press
the PLAY [
R
] key while the [A-B REPEAT]
key is lit. When the end point (normally point
B) is reached, the recorder jumps to the start
point (normally point A), and playback
continues.
4.
To stop repeat playback, press the
STOP [
P
] key.
Even after pressing the STOP [P] key to
stop playback, you can perform repeat
playback again as many times as desired, as
long as the [A-B REPEAT] key is lit.
5.
To turn off repeat playback, press
the [A-B REPEAT] key.
The [A-B REPEAT] key goes out, and repeat
playback will be turned off.
You can use repeat playback together with the
auto punch-in/out function. By setting points A
and B outside the punch-in/out points, you can
automatically have the recorder return to point A
after punch-out and play back the recorded
section for checking.
HINT
HINT
ZOOM MRS-4
Reference [Locating a Point]
36
Playback
A B
INPUT 1 or INPUT 2
INPUT 1
INPUT 2
Recorder
Recorder
Track
Track
Track
Track
Page 20

7.
Use the [PARAMETER/VALUE]
keys to adjust the parameter.
The left/right [PARAMETER/VALUE] keys
serve for selecting the parameter and the
up/down [PARAMETER/VALUE] keys for
setting the value.
• When wishing to use the send/return effect,
press the [SEND/RETURN] key to set it to ON,
and then select the algorithm and parameter
(
➝ p. 21).
• When a signal is sent from the input mixer to
the send/return effect, only the signal output
from the MASTER [L]/[R] jacks reflects the
effect. The effect has no influence on the signal
recorded on the track.
8.
When preparations are complete,
play the instrument and perform
mixdown.
The input 1/2 signal is mixed to the track 1 –
4 signal and sent to the master recorder. It is
also possible to apply the mixdown effect to
the mixed signal.
When bouncing the signal onto internal V-takes,
the input signal can also be mixed in as
described above.
Linking two tracks
(stereo link function)
This function allows you to link two tracks in
the track mixer, so that their parameters
(except the V-take selection) are adjusted in
sync. This is convenient to control stereo
material that was recorded on two tracks.
1.
While the main screen is shown,
press the [TRACK PARAMETER]
key.
The track parameter menu appears.
2.
Use the status keys 1 – 4 to select
one of the two tracks you want to
link.
3.
Use the left/right [PARAMETER/
VALUE] keys to call up the STL
(stereo link) parameter.
4.
Use the up/down [PARAMETER/
VALUE] keys to set the STL
parameter to ON.
When status key 1 or 2 was pressed in step 2,
tracks 1 and 2 are linked. When status key 3
or 4 was pressed, tracks 3 and 4 are linked.
When two tracks are linked, the following
applies.
●
When the stereo link is activated, the PAN
parameter is set to 0 for both tracks. The
values for all other track parameters
(except V-take selection) are copied from
the odd-numbered track to the evennumbered track.
●
When the parameter in one track is
changed, the parameter of the other track
also changes accordingly (except V-take
selection).
●
When the fader for the odd-numbered
track is operated, the level in both tracks
changes. (The fader of the even-numbered
track is inactive.)
●
The PAN parameter operates as a
BALANCE parameter that adjusts the
level balance between the two (left and
right) channels.
5.
To cancel the stereo link, set the
STL parameter to OFF.
Reference [Mixing]
ZOOM MRS-4
39
●
When no recording track is selected
• When when the insert effect is used, the basic
signal flow for inputs 1/2 remains same.
• Depending on the selected insert effect
algorithm, the level at input 1 and 2 may be
watched simultaneously for operation in both
channels, or inputs 1 and 2 may operate
independently.
Adding the input signal
to the mixdown
When performing mixdown, the input mixer
can be used to add the signal from inputs 1/2.
1.
Connect the master recorder to the
MASTER [L]/[R] jacks and make
the necessary preparations for
mixdown (
➜
p. 18).
2.
Connect the instrument or
microphone to add to the mix to
the [INPUT 1]/[INPUT 2] jacks.
3.
Set the [ON/OFF] keys 1/2 to ON.
4.
While listening to the sound, adjust
the input sensitivity with the
[INPUT LEVEL] controls 1/2.
5.
While the main screen is shown,
press the [TRACK PARAMETER]
key.
The track parameter menu for changing the
settings for individual tracks appears.
6.
Press the [ON/OFF] key 1 or 2 to
select the input on which to operate.
Available parameters and their setting range
are shown in the table below.
ZOOM MRS-4
Reference [Mixing]
38
INPUT 1 or INPUT 2
MASTER
fader
OUTPUT
Track
mixer
INPUT 1
MASTER
fader
INPUT 2
Track
mixer
HINT
L
R
OUTPUT
L
R
Input setting parameters and setting range
Parameter
SEND/
RETURN
SEND LEVEL
PAN
Display
SEND
SLVL
PAN
Setting range Description
ON/OFF
0〜100
L50〜0〜R50
Determines whether input signal is routed to
send/return effect.
Adjusts signal level sent from input to send/return
effect. Appears only if SEND parameter is set to
ON.
Adjusts panning (if only one input is active) or
balance (if two inputs are active) for signal sent from
input mixer to track and output.
NOTE
HINT
STL OF
STL ON
Page 21

8.
Specify the end point in the same
way as described in step 6.
9.
When you have specified the end
point, press the [ENTER/YES] key.
The screen for specifying the copy
destination track and V-take appears.
10.
Specify the copy destination track
and V-take in the same way as
described in step 4.
11.
Specify the copy destination start
point in the same way as described
in step 6.
The display changes as follows.
12.
To execute the copy, press the
[ENTER/YES] key.
While the copy is in progress, the remaining
time is shown on the display as a percentage,
such as "doinG90". When the copy is
complete, the "tr Edit" screen returns.
The length of the processing interval depends on
setting conditions.
By pressing the [EXIT/NO] key instead of
the [ENTER/YES] key, you can return to the
display of the preceding step and make
changes.
Copying the data of an
entire track
The recorded data of an entire track can be
copied to another track. The recorded data at
the copy destination will be erased, and
overwritten by the copy source data.
1.
While the main screen is shown,
press the [TRACK PARAMETER]
key.
The track parameter menu appears.
2.
Use the status keys 1 – 4 to select
the copy source track. Then use
the left/right [PARAMETER/VALUE]
keys to call up the screen for
selecting the V-take.
The track number and V-take number are
shown.
3.
Press the [ENTER/YES] key.
The display changes as follows.
4.
Press the right [PARAMETER/
VALUE] key once to bring up the
indication "CoPy" on the display.
Then press the [ENTER/YES] key.
The copy source track number and V-take
number are shown. (In the initial condition,
this is the V-take currently set for the track
selected in step 2.)
T1-1
Track number
V-take number
Reference [Track Editing]
ZOOM MRS-4
41
Copying a specified
region of data to another
location
A specified region of recorded data can be
copied to any location in any track. The data
that was previously at the copy destination
will be erased and overwritten by the copy
source data.
1.
While the main screen is shown,
press the [SONG/UTILITY/TUNER]
key.
The display will show the song number.
2.
Press the right [PARAMETER/VALUE]
key once to bring up the indication
"tr Edit" (track edit) on the display.
Then press the [ENTER/YES] key.
The first item of the track edit menu appears.
3.
Make sure that the display indicates
"tr COPY" and press the [ENTER/
YES] key.
The screen for specifying the copy source
track and V-take appears.
4.
Use the [PARAMETER/VALUE] keys
to specify the copy source track
and V-take.
In "Src x-y", "x" is the copy source track
number and "y" is the V-take number. Use the
left/right [PARAMETER/VALUE] keys to
move the flashing section, and use the
up/down [PARAMETER/VALUE] keys to
change the number.
5.
Press the [ENTER/YES] key.
The screen for specifying the start point of
the copy source appears.
6.
Use the [PARAMETER/VALUE]
keys to specify the copy source
start point.
The start location can be specified in two ways.
●
Specifying the start point using time
units
Press the right [PARAMETER/VALUE] key
until the desired time unit indication ("M" =
minutes, "S" = seconds, "MS" = milliseconds)
is flashing at the bottom of the display. Then
use the up/down [PARAMETER/VALUE]
keys to change the numeric value. You can
also use the ZERO
[U] key, REW [T] key,
and FF [
Y
] key to move the position (but
playback is not possible).
●
Specifying the start point using a
preset mark
Press the left [PARAMETER/VALUE] key
once to bring up the mark number display
(MARK indicator flashes). Then use the
up/down [PARAMETER/VALUE] keys to
specify the mark number. You can also use
the MARKER [
U
]/MARKER [I] keys.
7.
When you have specified the start
point, press the [ENTER/YES] key.
The screen for specifying the end point of the
copy source appears.
SRC 1-1
Copy source track number Copy source
V-take
ZOOM MRS-4
Reference [Track Editing]
40
Reference [Track Editing]
The audio data recorded on the tracks of the recorder can be edited in a variety of ways, including
erasing portions or copying. This section explains the track editing functions.
105560
TR COPY
103560
Copy destination track
number
Copy destination
V-take number
DST 1-1
YES NO
NOTE
ERASE
Page 22

Use the left/right [PARAMETER/VALUE]
keys to move the flashing section, and use the
up/down [PARAMETER/VALUE] keys to
change the number.
5.
Press the [ENTER/YES] key.
A screen will appear that allows you to set a
start point for the erase action.
6.
Use the [PARAMETER/VALUE]
keys to specify the start point for
the segment to be erased.
The start location can be specified in two
ways.
For information on how to specify the
position, see page 40.
7.
When you have specified the start
point, press the [ENTER/YES] key.
A screen will appear that allows you to set
the end point for the erase action.
8.
Specify the end point in the same
way as described in step 6.
9.
When you have specified the end
point, press the [ENTER/YES] key.
The display changes as follows.
10.
To execute the erase process,
press the [ENTER/YES] key.
While erasing is in progress, the remaining
time is shown on the display as a percentage,
such as "doinG90". When the copy is
complete, the "tr Edit" screen returns.
The length of the processing interval depends on
setting conditions.
By pressing the [EXIT/NO] key instead of
the [ENTER/YES] key, you can return to the
display of the preceding step and make
changes.
Erasing an entire track
This operation erases all recorded data from
the specified track/V-take.
1.
While the main screen is shown,
press the [TRACK PARAMETER]
key.
The track parameter menu appears.
2.
Use the status keys 1 – 4 to select
the track to be erased. Then use
the left/right [PARAMETER/VALUE]
keys to call up the screen for
selecting the V-take.
The track number and V-take number are
shown.
3.
Press the [ENTER/YES] key.
The display changes as follows.
4.
Press the [ENTER/YES] key.
The track number and V-take number to be
erased are shown. (In the initial condition,
this is the V-take currently set for the track
selected in step 2.)
ER T1-1
Track number
V-take number
Reference [Track Editing]
ZOOM MRS-4
43
5.
If necessary, specify the track
number and V-take number, and
press the [ENTER/YES] key.
Use the left/right [PARAMETER/VALUE]
keys to move the flashing section, and use the
up/down [PARAMETER/VALUE] keys to
change the number. You can also specify a Vtake that is currently not selected for the
track.
When you press the [ENTER/YES] key, the
copy destination track number and V-take
number are shown.
6.
Specify the copy destination track
and V-take in the same way as
described in step 5.
7.
Press the [ENTER/YES] key.
The display changes as follows.
8.
To execute the copy, press the
[ENTER/YES] key.
While the copy is in progress, the remaining
time is shown on the display as a percentage,
such as "doinG90". When the copy is
complete, the V-take selection screen returns.
The length of the processing interval depends on
setting conditions.
By pressing the [EXIT/NO] key instead of
the [ENTER/YES] key, you can return to the
display of the preceding step and make
changes.
Erasing a specified
segment
This operation erases the recorded data from
the specified segment of a track, returning it
to a silent (blank) state.
1.
While the main screen is shown,
press the [SONG/UTILITY/TUNER]
key.
The display will show the song number.
2.
Press the right [PARAMETER/
VALUE] key once to bring up the
indication "tr Edit" (track edit) on
the display. Then press the
[ENTER/YES] key.
The first item of the track edit menu appears.
3.
Press the right [PARAMETER/
VALUE] key once to bring up the
indication "tr Ers" (track erase) on
the display. Then press the
[ENTER/YES] key.
The screen for specifying the track and Vtake to erase appears.
4.
Use the [PARAMETER/VALUE]
keys to specify the track and Vtake to erase.
SRC 1-1
TR ERS
Track number V-take number
ZOOM MRS-4
Reference [Track Editing]
42
COPY
Copy source
track number
Copy source
V-take number
CP T1-1
Copy destination
track number
Copy destination
V-take number
CP T1-1
YES NO
TR COPY
103560
105560
YES NO
T1-1
ERASE
NOTE
NOTE
Page 23

5.
If necessary, specify the track
number and V-take number, and
press the [ENTER/YES] key.
Use the left/right [PARAMETER/VALUE]
keys to move the flashing section, and use the
up/down [PARAMETER/VALUE] keys to
change the number. You can also specify a Vtake that is currently not selected for the
track.
When you press the [ENTER/YES] key, the
exchange destination track number/V-take
number are shown.
6.
Use the [PARAMETER/VALUE]
keys to specify the exchange
destination track and V-take.
7.
Press the [ENTER/YES] key.
The display changes as follows.
8.
To execute the exchange process,
press the [ENTER/YES] key.
While exchange is in progress, the remaining
time is shown on the display as a percentage,
such as "doinG90". When the copy is
complete, the V-take selection screen is
shown.
By pressing the [EXIT/NO] key instead of
the [ENTER/YES] key, you can return to the
display of the preceding step and make
changes.
Reference [Track Editing]
ZOOM MRS-4
45
5.
If necessary, specify the track
number and V-take number, and
press the [ENTER/YES] key.
Use the left/right [PARAMETER/VALUE]
keys to move the flashing section, and use the
up/down [PARAMETER/VALUE] keys to
change the number. You can also specify a Vtake that is currently not selected for the
track.
When you press the [ENTER/YES] key, the
display changes as follows.
6.
To execute the erase process,
press the [ENTER/YES] key.
While erasing is in progress, the remaining
time is shown on the display as a percentage,
such as "doinG90". When the copy is
complete, the "tr Edit" screen returns.
The length of the processing interval depends on
setting conditions.
By pressing the [EXIT/NO] key instead of
the [ENTER/YES] key, you can return to the
display of the preceding step and make
changes.
Exchanging the data of
entire tracks
You can exchange the recorded data of two
specified tracks.
1.
While the main screen is shown,
press the [TRACK PARAMETER]
key.
The track parameter menu appears.
2.
Use the status keys 1 – 4 to select
the exchange source track. Then
use the left/right [PARAMETER/
VALUE] keys to call up the screen
for selecting the V-take.
The track number and V-take number are
shown.
3.
Press the [ENTER/YES] key.
The display changes as follows.
4.
Press the right [PARAMETER/
VALUE] key two times to bring up
the indication "CHAnGE" on the
display. Then press the [ENTER/
YES] key.
The track number and V-take number to be
used as exchange source are shown. (In the
initial condition, this is the V-take currently
set for the track selected in step 2.)
ZOOM MRS-4
Reference [Track Editing]
44
YES NO
NOTE
T1-1
ERASE
CHANGE
Exchange source
track number
Exchange source
V-take number
CH T1-1
Exchange destination
track number
Exchange destination
V-take number
CH T1-1
YES NO
Page 24

4.
Press the [ENTER/YES] key.
The screen for the item selected in step 3
appears.
The subsequent steps differ for each item. For
details, see the following section.
Song menu items
Operation steps for the various song items are
described here.
To create a new song on the SmartMedia
card, proceed as follows.
1.
Select "SnG nEW" on the song
menu, and press the [ENTER/YES]
key.
The indication "YES NO" appears on the
display.
The maximum number of songs that can be
stored on one SmartMedia card is 15 (song
numbers 01 – 15), provided that there is enough
capacity. If there are no more empty song
numbers, the indication "SnG FUL" is shown on
the display, and this item cannot be selected.
2.
Press the [ENTER/YES] key.
A new song is created, and the main screen
returns. The lowest available song number is
automatically assigned to the song.
To read in an existing song from the
SmartMedia card, proceed as follows.
1.
Select "SnG SEL" on the song menu,
and press the [ENTER/YES] key.
The display changes as follows.
2.
Use the up/down [PARAMETER/
VALUE] keys to select the song
number.
Only songs with recorded data can be
selected.
3.
Press the [ENTER/YES] key.
The song is read into the memory of the
MRS-4, and the main screen returns.
To check the remaining recording time for
the currently selected song, proceed as
follows.
1.
Select "CAPACity" on the song menu,
and press the [ENTER/YES] key.
The remaining recording capacity of the song
(calculated for monaural tracks) is shown on
the display.
• This display is for reference only. It cannot be
changed.
• The capacity depends on the selected
recording grade.
2.
To r eturn to the song menu, press
the [EXIT/NO] key.
NOTE
Checking the remaining
recording time (SONG CAPACITY)
Song number
SEL 01
Reading in an existing song
(SONG SELECT)
NOTE
Creating a new song
(SONG NEW)
Reference [Song Functions]
ZOOM MRS-4
47
Song menu basic functions
The song menu that appears when you press
the [SONG/UTILITY/TUNER] key lets you
perform various song related functions. The
basic operation principles described below
are similar for most items.
1.
While the main screen is shown,
press the [SONG/UTILITY/TUNER]
key.
The number of the currently selected song
(01 – 15) appears on the display. This is the
top screen of the song menu.
2.
Press the [ENTER/YES] key.
The first item of the song menu appears.
3.
Use the left/right [PARAMETER/
VALUE] keys to call up the desired
item.
The song menu has the following items.
SNG NEW
ZOOM MRS-4
Reference [Song Functions]
46
Reference [Song Functions]
This section describes how to create a new song, how to read in an existing song, and how to
perform other song related operations.
Song number
SONG01
Song menu items
Item
SONG NEW
SONG SELECT
SONG CAPACITY
SONG COPY
SONG DELETE
SONG PROTECT
SONG GRADE
Display
SNG NEW
SNG SEL
CAPCITY
SNGCOPY
SNG DEL
PROTECT
GRADE
Description
Create a new song
Read in an existing song.
Show the remaining recording capacity based on the
currently selected recording grade setting.
Copy the contents of an entire song to an empty song.
Delete an existing song.
* This item does not appear if the currently selected
song is protected.
Protect a song from accidental deletion or overwriting.
Set the recording grade (sound quality).
* This item does not appear for songs that are already
recorded.
YES NO
802000
Page 25

You can protect the currently selected song,
so that no further recording or editing is
possible. When a song is protected, you can
still change effects or parameters, but you
cannot store the results on the SmartMedia
card.
1.
From the song menu, select
"ProtECt" and press the [ENTER/
YES] key.
The current protection on/off status is shown
on the display.
2.
Use the up/down [PARAMETER/
VALUE] keys to switch the
protection status between on and
off.
By pressing the [EXIT/NO] key you can
return to the preceding screen.
Before starting to record a song, you can
select the recording grade from the following
two choices.
●
HiFi: High-quality recording for best
sound
●
LONG: Slightly lower quality recording
for longer recording time
The default setting when you start a new song is
HiFi. If you have not started to record yet, you
can switch to LONG.
1.
From the song menu, select
"GrAdE".
An indicator on the display shows the
currently selected grade (HiFi or LONG).
It is not possible to change the grade setting for a
song after you have recorded anything. Therefore
this item does not appear for recorded songs.
2.
Use the up/down [PARAMETER/
VALUE] keys to select the grade
setting.
3.
Press the [ENTER/YES] key.
The indication "YES NO" appears on the
display.
4.
To carry out the grade setting,
press the [ENTER/YES] key.
When the setting is completed, the song
menu appears again. By pressing the
[EXIT/NO] key instead of the [ENTER/YES]
key, you can return to the display of the
preceding step and make changes.
NOTE
HINT
Selecting the recording
grade (SONG GRADE)
Protecting a song
(SONG PROTECT)
Reference [Song Functions]
ZOOM MRS-4
49
To copy the entire contents of the currently
selected song into an empty song number,
proceed as follows.
1.
Select "SnGCopy" on the song
menu, and press the [ENTER/YES]
key.
2.
Use the up/down [PARAMETER/
VALUE] keys to select the
destination song number.
Only empty song numbers can be selected.
3.
Press the [ENTER/YES] key.
The indication "YES NO" appears on the
display.
4.
To carry out the copy, press the
[ENTER/YES] key.
When copying is completed, the song menu
appears again. By pressing the [EXIT/NO]
key instead of the [ENTER/YES] key, you
can return to the display of the preceding step
and make changes.
To delete the entire contents of a song on the
SmartMedia card, proceed as follows.
1.
Select "SnG dEL" on the song
menu, and press the [ENTER/YES]
key.
The number of the signal that will be deleted
appears on the display.
If the currently selected song is protected, the
"SnG dEL" menu item does not appear. Turn
protection off first (
➝ p. 49).
2.
Use the left/right [PARAMETER/
VALUE] keys to select the number
of the song you want to delete.
Numbers of protected songs or songs with no
data do not appear.
3.
Press the [ENTER/YES] key.
The indication "YES NO" appears on the
display.
4.
To carry out the deletion, press the
[ENTER/YES] key.
When deletion is completed, the song menu
appears again. (If the current song was
deleted, the song with the lowest number is
read in.) By pressing the [EXIT/NO] key
instead of the [ENTER/YES] key, you can
return to the display of the preceding step and
make changes.
NOTE
Deleting a song
(SONG DELETE)
Copying a song
(SONG COPY)
ZOOM MRS-4
Reference [Song Functions]
48
YES NO
DEL 01
PRT OFF
PRT ON
GRADE
Grade
GRADE
GRADE
YES NO
Page 26

When the metronome is on and playback is
started from a point midway in a song, no
precount clicks are heard. Depending on the start
position, the metronome sound may start partly
through a beat.
Functions available
with MIDI
MIDI (Musical Instrument Digital Interface) is
a standard that allows various types of messages
such as playing and timing information to be
exchanged between devices such as electronic
musical instruments and computers.
The MRS-4 supports MIDI, and can transfer
the following messages to another MIDIcompatible device via the [MIDI OUT]
connector located on the rear panel.
●
Timing clock
Timing information used for synchronization
of MIDI devices such as rhythm machines
and MIDI sequencers. The internal
metronome of the MRS-4 divides a quarter
note into 24 ticks and sends this as a timing
signal.
●
Song position pointer
A message that specifies the current location
in measures and beats, counted from the start
of the song. The measure and beat count uses
the time signature of the internal metronome
as a reference.
●
Start/Stop/Continue
Message that controls transport movements
of a device.
By sending the above kinds of messages for
example to a rhythm machine or MIDI
sequencer, the external device can be
synchronized to the song of the MRS-4.
The MRS-4 supplies the above MIDI messages at
all times. When not wishing to receive these at an
external device, disconnect the MIDI cable.
Synchronizing an
external device to the
MRS-4
You can synchronize operation of an external
MIDI device such as a rhythm machine or
MIDI sequencer to the song of the MRS-4.
1.
Connect the MIDI IN connector of
the other device to the [MIDI OUT]
connector of the MRS-4. (For
information on connections, see
page 8.)
2.
Set the rhythm machine, MIDI
sequencer, or other MIDI device to
synchronize with an external MIDI
clock.
For details, refer to the documentation of the
rhythm machine, MIDI sequencer, or other
MIDI device.
3.
Set the metronome tempo and
time signature setting of the MRS4 as required for the music piece
that you want to synchronize.
When synchronizing an external device to the
MRS-4, the measure/beat position
information is referenced to the internal
metronome of the MRS-4. Therefore a
matching setting should be used. (For
information on how to make metronome
settings, see page 50.)
4.
Return to the start position of the
MRS-4 song, and start playback.
When the precount is finished, a start
message is sent to the external device, and
the device operates in sync with the MRS-4.
When the song is stopped at the MRS-4, the
external device is also stopped.
When the song is stopped midway, a song
position pointer indicating the current position is
sent. Consequently, provided that the metronome
time signature setting matches, the external
device will start playback from the same position
even if playback of the song at the MRS-4 is
started midway.
HINT
Reference [Metronome/MIDI]
ZOOM MRS-4
51
Basic metronome settings
You can set the metronome tempo, time
signature, volume, and precount.
1.
While the main screen is shown,
press the [SONG/UTILITY/TUNER]
key.
The number of the currently selected song
appears on the display.
2.
Use the left/right [PARAMETER/
VALUE] keys to bring the indication
"MEtro" (metronome menu) onto
the display.
3.
Press the [ENTER/YES] key.
The first item of the metronome menu is
shown.
4.
Use the left/right [PARAMETER/
VALUE] keys to select the item,
and use the up/down
[PARAMETER/ VALUE] keys to
change the setting value.
Available items and their setting range are
shown in the table below.
5.
When the setting is complete,
press the [EXIT/NO] key several
times to return to the main screen.
The metronome time signature and tempo
settings serve as reference for the measure/time
signature information shown on the display of the
MRS-4, as well as for the position information
and clock information provided to external MIDI
devices.
When you press the PLAY [R] key at the
metronome menu, the metronome sound only
is heard. This is convenient for checking the
tempo and level.
HINT
LVL 10
METRO
SONG01
ZOOM MRS-4
Reference [Metronome/MIDI]
50
Reference [Metronome/MIDI]
This section describes how to make metronome settings and how to synchronize operation of the
MRS-4 with other MIDI devices.
Metronome items and setting range
LEVEL
BPM
(Tempo)
SIGNATURE
(Time signature)
PRECOUNT
Item
Display
LVL
BPM
SIG
PRCNT
Setting range
0 – 15
40.0 – 250.0
0-4 – 8-4
oF, 2 – 8
Adjusts the metronome level.
Adjusts the metronome tempo.
Sets the metronome time signature. The
setting range is 0/4 to 8/4.
Sets the number of beats for the precount.
Available settings are oF (no precount) and 2
– 8 beats.
Description
HINT
NOTE
Page 27

7.
When tuning is complete, press the
[EXIT/NO] key several times to
return to the main screen.
Formatting a SmartMedia
card
Before starting to use an off-the-shelf
SmartMedia card (designed for 3.3V,
capacity 16 – 128 MB), you must first format
it in the MRS-4 as follows.
1.
While the MRS-4 is turned off,
insert the unformatted SmartMedia
card into the card slot on the front
panel (
➜
P. 5).
2.
Turn power to the MRS-4 on.
The MRS-4 starts up.
Also when an unformatted SmartMedia card is
inserted, the MRS-4 is operative, but when you
try to activate a transport function, the indication
"noCARD" appears.
3.
While the main screen is shown,
press the [SONG/UTILITY/TUNER]
key, and then use the left/right
[PARAMETER/VALUE] keys to
bring the indication "CArd" (card
menu) onto the display.
4.
Press the [ENTER/YES] key two
times.
The display changes as follows.
5.
To execute the formatting process,
press the [ENTER/YES] key.
Formatting starts. When formatting is
completed, the card menu appears again.
Press the [EXIT/NO] key several times to
return to the main screen.
By pressing the [EXIT/NO] key instead of
the [ENTER/YES] key, you can return to the
display of the preceding step and make
changes.
NOTE
Reference [Other Functions]
ZOOM MRS-4
53
Using the tuner
The MRS-4 has a built-in chromatic tuner
that can be used when tuning an instrument
connected to the [INPUT 1]/[INPUT 2]
jacks. To use the tuner, proceed as follows.
1.
Connect the instrument to the
[INPUT 1]/[INPUT 2] jack and set
the appropriate [ON/OFF] key 1/2
to ON.
2.
While the main screen is shown,
press the [SONG/UTILITY/TUNER]
key.
The number of the currently selected song is
shown.
3.
Use the left/right [PARAMETER/
VALUE] keys to call up the
indication "tunEr" on the display,
and then press the [ENTER/YES]
key.
The tuner function is turned on, and the tuner
reference pitch value is shown on the display.
In this condition, all effects are bypassed
(temporarily turned off).
During playback of a song, the tuner function
cannot be used.
4.
Play a single note on the instrument.
The nearest note to the one you played is
shown on the display. An indicator to the
right of the pitch shows by how much the
pitch is off.
5.
Tune your instrument until the note
indication shows that the note is
matched.
6.
To change the reference pitch of
the tuner, use the up/down
[PARAMETER/VALUE] keys.
The default setting is A = 440 Hz. The
adjustment range is 435 – 445 Hz.
NOTE
ZOOM MRS-4
Reference [Other Functions]
52
Reference [Other Functions]
This section describes other convenient functions of the MRS-4.
Note names
A
A#
B
C
C#
D
D#
E
F
F#
G
G#
A#8
Pitch is sharp
The more the pitch is off, the faster the
indicator rotates.
Correct pitch
Pitch is flat
CARD
FORMAT
YES NO
TUNER
Reference value
440 **
442
CARD
Page 28

Using the AUX IN jacks
to save tracks
AUX IN is an input that accepts an external
signal which is then mixed with the internal
signal of the MRS-4 and output as is at the
MASTER [L]/[R] jacks.
This can serve several purposes. For example,
during track recording or overdubbing, you
could connect a rhythm machine
synchronized to the MRS-4 to the [AUX IN]
jacks and reproduce this with the overall
sound. This eliminates the need to record the
rhythm machine on its own track, thereby
freeing up tracks for other purposes. The
procedure for doing this is described below.
Track recording/overdubbing
During track recording/overdubbing, connect
the output of a rhythm machine to the [AUX
IN] jacks. Synchronize playback of the
rhythm machine to operation of the MRS-4,
use tracks 1 – 4 for recording parts such as
guitar, bass, vocal etc. while listening to the
sound of the rhythm machine.
The output at the MASTER [L]/[R] jacks
allows you to monitor the sound from the
instrument currently being recorded, the
playback sound of MRS-4 tracks, and the
rhythm machine sound input via the [AUX
IN] jacks. However, the rhythm machine
sound cannot be recorded on a track.
Bounce/mixdown
During bounce/mixdown, change the rhythm
machine connection over to the [INPUT
1]/[INPUT 2] jacks. If you synchronize
operation of the MRS-4 and the rhythm
machine, you can mix the rhythm machine
sound with the playback sound from tracks 1
– 4 for bounce/mixdown. The rhythm
machine mix ratio can be adjusted with the
[INPUT LEVEL] control 1/2.
You can also apply the send/return effect and
mixdown effect to the rhythm machine sound
(
➝ p. 21, 25).
Rhythm
machine
MRS-4
MIDI OUT MIDI IN
LINE OUT
INPUT 1/2
MRS-4
MIDI OUT MIDI IN
LINE OUT
AUX IN
Rhythm
machine
Reference [Other Functions]
ZOOM MRS-4
55
Display adjustments
You can adjust the display contrast and
control the backlight as follows.
1.
While the main screen is shown,
press the [SONG/UTILITY/TUNER]
key, and then use the left/right
[PARAMETER/VALUE] keys to
bring the indication "Lcd" onto the
display.
2.
Press the [ENTER/YES] key.
The first item of the LCD menu is shown.
3.
Use the left/right [PARAMETER/
VALUE] keys to select the item, and
use the up/down [PARAMETER/
VALUE] keys to adjust the setting
value.
Available items and their setting range are
shown in the table below.
When operating the MRS-4 on battery power,
switching the backlight off will result in longer
battery life.
4.
When the setting is complete,
press the [EXIT/NO] key several
times to return to the main screen.
HINT
ZOOM MRS-4
Reference [Other Functions]
54
CONT 1
Display items and setting range
Item
CONTRAST
BACK LIGHT
Display
CONT
LIT
Setting range
0, 1, 2
ON, OF
Description
Adjust the display contrast.
Switch the display backlight on and off.
Page 29

Specifications
ZOOM MRS-4
57
Recorder
Physical tracks: 4
Virtual takes: 32 (8 V-takes per track)
Maximum number of simultaneous recording tracks:
2
Maximum number of simultaneous playback tracks:
4
Recording media: SmartMedia card 16 – 128 MB (3.3V)
Recording grade: 32 kHz (HiFi) / 16 kHz (Long)
Maximum recording time (converted to single monaural track):
16 MB = 8 min. or more (HiFi), 16 min. or more (Long)
32 MB = 16 min. or more (HiFi), 33 min. or more (Long)
64 MB = 33 min. or more (HiFi), 67 min. or more (Long)
128 MB = 67 min. or more (HiFi), 135 min. or more (Long)
Marker function: 50 points (per song)
Locate function: min/sec/ms or measure/beat
Track editing functions: Copy & paste, erase, exchange
Punch-in/out function: Manual/auto
Other functions: Bounce, A-B repeat
Mixer
Faders: 45 mm x 5 (Track 1 – 4, Master)
Level meter indicator bars: 8 (Input 1/2, Track 1 – 4, Master L/R)
Track parameters: Equalizer, Effect Send, Pan (Stereo operation: balance)
Equalizer: High (f:500 – 8000 Hz, Gain: ±12 dB)
Low (f:63 – 2000 Hz, Gain: ±12 dB)
Stereo Link: Tracks 1 + 2 or 3 + 4, selectable
Effects
Mixdown effect: Power, Boost, Vocal
Send/return effect: Hall, Room, Doubling, Delay, Chorus
Insert effect: Compressor, Limiter, Cabinet Simulator, Mic Pre)
Tuner function: Chromatic auto tuner
Metronome
Tempo: 40.0 – 250.0
Time signature: 0/4-8/4
Precount: Off, 2 – 8
Maximum number of songs: 15
A/D converter: 20-bit, 64x oversampling
D/A converter: 20-bit, 8x oversampling
Sampling frequency: 32 kHz
Display: MRS-4 original LCD (with backlight)
Inputs
Inputs: 2 standard mono phone jacks
Input level: - -50 to +4 dBm, continuously variable
Input impedance: 1 to 500 kilohms, continuously variable
AUX input (L/MONO, R): 2 standard mono phone jacks
Input impedance 10 kilohms (mono), 20 kilohms (stereo)
Outputs
Master out: RCA type phono jacks (L/R)
Rated output level: -10 dBm (into load impedance 10 kilohms or higher)
Output impedance: 1 kilohm max.
Headphone output: standard stereo phone jack, 50 mW (into 32 ohms load)
MIDI OUT
Dimensions:
220 (W) x 165 (D) x 56.3 (H) mm
Weight:
700 g (without batteries)
Power requirements:
DC 9V, 300 mA from AC adapter Zoom AD-0006
4 batteries IEC R6 (size AA); battery life 5 hours or more (with alkaline batteries)
Supplied accessory:
SmartMedia card (32 MB)
0 dB = 0.775 Vrms
Design and specifications subject to change without notice.
ZOOM MRS-4
Specifications
56
Specifications
MRS-4 file configuration
The MRS-4 stores the following file types on
the SmartMedia card.
●
xx-yz.aud
This file contains the audio data recorded on
a V-take. The number of such files on the
SmartMedia card corresponds to the number
of recorded V-takes. When a song is deleted,
the V-take files belonging to that song are
deleted.
xx = song number (0 – 14)
y = track number (0 – 3)
z = V-take number (0 – 7)
●
Songno.mr4
This file contains information about the
currently used song number, global parameter
values, and mount information for the MRS-4
Card Manager (see below).
●
UtyprmXX.mr4
This file contains the default settings for all
items and song parameters. The number of
such files on the SmartMedia card
corresponds to the number of songs that were
created. When a song is deleted, this file is
also deleted.
xx = song number (0 – 14)
File compatibility with
PS-02
Setting file
Setting files for the ZOOM PS-02 and the
MRS-4 are not compatible. If a PS-02
SmartMedia card is inserted in the MRS-4,
the various setting files are disregarded.
Audio file
Audio files for the ZOOM PS-02 and the
MRS-4 are theoretically not compatible. If a
PS-02 SmartMedia card is inserted in the
MRS-4, some audio files may be readable,
but playback pitch will be different from the
original. Depending on the settings, some
audio files may not be readable at all.
Zoom Corporation assumes no responsibility for
any consequences of using PS-02 SmartMedia in
the MRS-4.
MRS-4 Card Manager
Software
If you have Internet access, you can
download the MRS-4 Card Manager software
from the Zoom Corporation web site free of
charge (Windows/Macintosh versions). It
allows a computer equipped with a
SmartMedia card reader to manage MRS-4
data. The software provides the following
functions.
●
Convert MRS-4 audio data into WAV
files
●
Convert WAV/AIFF format audio files
into MRS-4 audio data
●
Back up the SmartMedia card
contents onto the hard disk of the
computer
Web site of Zoom Corporation:
http://www.zoom.co.jp/
Recording times are
approximate. Actual
times may be
somewhat shorter,
depending on setting
conditions.
NOTE
Page 30

ZOOM MRS-4
59
ZOOM MRS-4
58
The recorded sound is distorted
• Check whether the input sensitivity
setting ([INPUT LEVEL] controls 1/2)
was appropriate.
•Lower the track faders or MASTER fader
so that the 0 (dB) dot of the level meter
does not light.
• If the EQ gain of the track mixer is set
extremely high, the sound may be audibly
distorted even if the fader is lowered. Set
the EQ to an appropriate value.
Insert effect does not operate
• Make sure that the [SEND/RETURN] key
and [MIXDOWN] key are flashing or lit
in red.
• Check that the limiter and compressor
settings are not too low for the input level.
Send/return effect does not operate
• Make sure that the [SEND/RETURN] key
is flashing or lit in green. If the key is not
lit, press the key to make it light in green.
•Make sure that the SEND parameter for
each mixer track is on and that the SLVL
parameter is set to a suitable value.
Mixdown effect does not operate
• Make sure that the [SEND/RETURN] key
is flashing or lit in green. If the key is not
lit, press the key to make it light in green.
Cannot synchronize with external
MIDI device
• Make sure that the [MIDI OUT]
connector on the MRS-4 is properly
connected to the MIDI IN connector on
the external MIDI device with a MIDI
cable.
• Make sure that the external MIDI device
is set up to receive a timing clock signal
for synchronized operation.
• Make sure that the external MIDI device
is set to the playback condition.
• Make sure that the metronome tempo and
time signature settings match the song on
the external MIDI device.
Cannot use tuner function
• The tuner cannot be used during song
playback. Stop the song before using the
tuner.
• Make sure that the [ON/OFF] key of the
respective input is on, and the [INPUT
LEVEL] control 1/2 is raised.
One of the following messages
appears on the display
• PLYSTOP
This operation cannot be carried out during
recorder operation. Stop the recorder first.
Other problems
Problems with MIDI
Problems with effects
No sound, or very low volume
• Check the connections to your monitor
system, and the volume of your monitor
system.
• Make sure that the status keys 1 – 4 are lit
in green. If a key is not lit, press the key
to make it light in green.
• Make sure that the track faders 1 – 4 and
the MASTER fader are raised.
• Make sure that a SmartMedia card is
inserted in the card slot.
Operating the fader does not affect
the volume
• On channels for which stereo link is
turned on, the fader of the even-numbered
channel will have no effect. Either turn
stereo link off (
➝ p. 39), or operate the
fader of the odd-numbered channel.
Recorder stops midway during play
•When performing playback with a status
key lit in red, a temporary file is created
internally by the MRS-4. If the remaining
capacity of the SmartMedia card then
becomes low, playback is stopped midway
through the song. In such a case, press the
status key so that it goes out or is lit in
green.
Noise occurs during mixdown
• Make sure that the [ON/OFF] keys 1/2 are
out.
• Check whether the mixdown effect is set
to an extreme setting.
Input signal is not heard, or very low
volume
• Make sure that the [ON/OFF] keys 1/2 are
lit.
• Make sure that the [INPUT LEVEL]
controls 1/2 are turned up.
Can't record on a track
• Make sure that the status key of the track
selected for recording is lit in red.
• Recording is not possible if the song is
protected. Either turn protect off
(
➝ p. 49), or use another song.
• Make sure that a SmartMedia card is
inserted in the card slot.
• The signal from the [AUX IN] jacks
cannot be recorded on a track. Connect
the sound source for recording to the
[INPUT 1]/[INPUT 2] jacks.
Cannot perform bounce
• Make sure that the [BOUNCE] key is on.
• Make sure that the status key of the track
selected as bounce destination is lit in red.
• Make sure that the track faders 1 – 4 and
the MASTER fader are raised.
Problems with recording
Playback problems
Troubleshooting
If the MRS-4 does not seem to function normally, check the following points first.
Tro ubleshooting
Tro ubleshooting
Page 31

MIDI implementation chart
MIDI implementation
ZOOM MRS-4
61
ZOOM MRS-4
MIDI implementation
60
MIDI implementation
1. Recognized Messages
None.
2. Transmitted Messages
Status 1st 2nd Description
------------------------------------------------------------------
F2H sl sh Song Position Pointer shsl: song position
F8H Timing Clock
FAH Start
FBH Continue
FCH Stop
MIDI Implementation
• SNG FUL
The SmartMedia card already contains 15
songs. Therefore a new song cannot be
created. Erase unneeded songs.
• NOCARD
• NOCARD1
No SmartMedia card is inserted, otherwise
the card you inserted is not supported.
• CDFMTER
The SmartMedia card is not formatted
properly. Format the card in the MRS-4 first.
• CARDERR
Cannot read SmartMedia card. Wipe the
metal side of the card with a soft cloth and
try again.
• CDPRTCT
A write protect seal is attached to the
SmartMedia card. Remove the seal and try
again.
• RECFULL
There is no more free capacity, and
recording cannot proceed. Erase unneeded
tracks or songs.
• REC ERR
There is not enough free capacity on the card
for the selected conditions, and recording
data cannot be created. Erase unneeded
tracks or songs.
[Smartmedia Digital Recorder ] Date : 06.Jan.,2002
Model MRS-4 MIDI Implementation Chart Version :1.00
Transmitted Recognized Remarks
Function ...
Basic Default x
Channel Changed x
Default 3
Mode Messages x
Altered ******************
Note x
Number True voice ******************
Velocity Note ON x
Note OFF x
After Key's x
Touch Ch's x
Pitch Bend x
x
Control
Change
Prog x
Change True # ******************
System Exclusive x
System Song Pos o
Song Sel x
Common Tune x
System Clock o
Real Time Commands o
Aux Local ON/OFF x
All Notes OFF x
Mes- Active Sense x
sages Reset x
Notes No recognized messages.
Mode 1 : OMNI ON, POLY Mode 2 : OMNI ON, MONO o : Yes
Mode 3 : OMNI OFF, POLY Mode 4 : OMNI OFF, MONO x : No
Page 32

Insert effect
•••••••••••••••••••••••••••••••••••••••••••••
5, 13
Algorithm
••••••••••••••••••••••••••••••••••••••••
13
◆ L
Level meter
•••••••••••••••••••••••••••••••••••••••••••••••••
12
Locate
••••••••••••••••••••••••••••••••••••••••••••••••••••••
33
Low EQ
•••••••••••••••••••••••••••••••••••••••••••••••••••••
20
◆ M
Main screen
••••••••••••••••••••••••••••••••••••••••••••••••
11
Manual punch-in/out
•••••••••••••••••••••••••••••••••••••
31
Mark
••••••••••••••••••••••••••••••••••••••••••••••••••••••
34
[MARK/CLEAR] key
•••••••••••••••••••••••••••••••••••
34
Deleting
•••••••••••••••••••••••••••••••••••••••••••
35
Locating
••••••••••••••••••••••••••••••••••••••••••
34
Setting
•••••••••••••••••••••••••••••••••••••••••••••
34
MARK indicator
••••••••••••••••••••••••••••••••••••••••••
35
Marker
••••••••••••••••••••••••••••••••••••••••••••••••••••••
34
MARKER [U]/MARKER [Y] key
••••••••••••••••
34
MASTER [L]/[R] jack
••••••••••••••••••••••••••••••••••••
8
Measure display
•••••••••••••••••••••••••••••••••••••••••••
33
BEAT indicator
•••••••••••••••••••••••••••••••••
33
Metronome
•••••••••••••••••••••••••••••••••••••••••••••••••
50
[METRONOME] key
••••••••••••••••••••••••••••••••••••
15
MIDI
••••••••••••••••••••••••••••••••••••••••••••••••••••••
51
MIDI implementation
•••••••••••••••••••••••••••••••••••
60
MIDI implementation chart
••••••••••••••••••••••••••••
61
[MIDI OUT] jack
••••••••••••••••••••••••••••••••••••••••••
8
Mixdown
••••••••••••••••••••••••••••••••••••••••••••••••••••
18
Adding an input signal
••••••••••••••••••••••••
38
Mixdown effect
••••••••••••••••••••••••••••••••••••••••
5, 25
Algorithm
••••••••••••••••••••••••••••••••••••••••
26
Mixer
••••••••••••••••••••••••••••••••••••••••••••••••••••••••
5
MRS-4 Card Manager
•••••••••••••••••••••••••••••••••••
57
[MIXDOWN] key
•••••••••••••••••••••••••••••••••••
13, 25
◆ O
[ON/OFF] key
••••••••••••••••••••••••••••••••••••••••
12, 37
Overdubbing
•••••••••••••••••••••••••••••••••••••••••••••••
17
◆ P
Panning
••••••••••••••••••••••••••••••••••••••••••••••••••••••
20
Parameter
•••••••••••••••••••••••••••••••••••••••••••••••••••
21
[PARAMETER/VALUE] key
•••••••••••••••••••••••••
14
[PHONES] jack
•••••••••••••••••••••••••••••••••••••••••••••
8
PLAY [R] key
••••••••••••••••••••••••••••••••••••••••••••
16
Point A
••••••••••••••••••••••••••••••••••••••••••••••••••••••
36
Point B
••••••••••••••••••••••••••••••••••••••••••••••••••••••
36
Power on/off
•••••••••••••••••••••••••••••••••••••••••••••••••
9
Precount
•••••••••••••••••••••••••••••••••••••••••••••••••••••
15
PS-02 file compatibility
•••••••••••••••••••••••••••••••••
57
Punch-in/out
•••••••••••••••••••••••••••••••••••••••••••••••
30
In point
••••••••••••••••••••••••••••••••••••••••••••
31
Out point
•••••••••••••••••••••••••••••••••••••••••
31
◆ R
Rear panel
••••••••••••••••••••••••••••••••••••••••••••••••••••
7
Recorder
••••••••••••••••••••••••••••••••••••••••••••••••••••••
4
REC [O] key
••••••••••••••••••••••••••••••••••••••••••••••
16
REW [T] key
•••••••••••••••••••••••••••••••••••••••••••••
16
◆ S
Send/return effect
•••••••••••••••••••••••••••••••••••••
5, 21
Algorithm
••••••••••••••••••••••••••••••••••••••••
22
Parameters
•••••••••••••••••••••••••••••••••••••••
22
[SEND/RETURN] key
•••••••••••••••••••••••••••••
13, 21
SmartMedia card
•••••••••••••••••••••••••••••••••••••••••••
5
Formatting
•••••••••••••••••••••••••••••••••••••••
53
Inserting
••••••••••••••••••••••••••••••••••••••••••••
5
Song
•••••••••••••••••••••••••••••••••••••••••••••••••
10, 46
Copying
•••••••••••••••••••••••••••••••••••••••••••
48
Creating
••••••••••••••••••••••••••••••••••••••
10, 47
Deleting
•••••••••••••••••••••••••••••••••••••••••••
48
Protecting
••••••••••••••••••••••••••••••••••••••••
49
Reading in
••••••••••••••••••••••••••••••••••••••••
47
Remaining time indication
•••••••••••••••••••
47
Selecting a recording grade
••••••••••••••••••
49
Song menu
•••••••••••••••••••••••••••••••••••••••••••••••••
46
Song position pointer
••••••••••••••••••••••••••••••••••••
51
Specifications
••••••••••••••••••••••••••••••••••••••••••••••
56
Start/Stop/Continue
••••••••••••••••••••••••••••••••••••••
51
Status key
•••••••••••••••••••••••••••••••••••••••••••••••••••
15
Stereo link
•••••••••••••••••••••••••••••••••••••••••••••
20, 39
STOP [P] key
•••••••••••••••••••••••••••••••••••••••••••••
16
Synchronization
•••••••••••••••••••••••••••••••••••••••••••
51
◆ T
Time display
•••••••••••••••••••••••••••••••••••••••••••••••
33
MEASURE indicator
••••••••••••••••••••••••••
33
Timing clock
•••••••••••••••••••••••••••••••••••••••••••••••
51
Top panel
•••••••••••••••••••••••••••••••••••••••••••••••••••••
6
Track
••••••••••••••••••••••••••••••••••••••••••••••••••••••
40
Copying
••••••••••••••••••••••••••••••••••••••••••
40
Copying all data
••••••••••••••••••••••••••••••••
41
Erasing all data
••••••••••••••••••••••••••••••••••
43
Erasing specified data segment
•••••••••••••
42
Exchanging
•••••••••••••••••••••••••••••••••••••••
44
Track mixer
••••••••••••••••••••••••••••••••••••••••••••••••••
5
Track number
••••••••••••••••••••••••••••••••••••••••••••••
28
Track parameters
••••••••••••••••••••••••••••••••••••••
5, 19
[TRACK PARAMETER] key
•••••••••••••••••••••••••
19
Transport keys
•••••••••••••••••••••••••••••••••••••••••••••
16
Tuner
••••••••••••••••••••••••••••••••••••••••••••••••••••••
52
◆ V
V-take
••••••••••••••••••••••••••••••••••••••••••••••
4, 20, 28
V- TAKE indicator
••••••••••••••••••••••••••••••••••••••••
28
V-take number
•••••••••••••••••••••••••••••••••••••••••••••
28
◆ Z
ZERO [U] key
•••••••••••••••••••••••••••••••••••••••••••
16
Index
ZOOM MRS-4
63
◆ DISPLAY
BOOST BOOST
•••••••••••••••••••••••••••
26
BOUNCE BOUNCE
••••••••••••••••••••••••
29
CAB BC CAB BC
••••••••••••••••••••••••••
13
CAB CO CAB CO
••••••••••••••••••••••••••
13
CAB ST CAB ST
••••••••••••••••••••••••••
13
CAPCITY CAPCITY
••••••••••••••••••••••••
47
CARD CARD
•••••••••••••••••••••••••••••
53
CHANGE CHANGE
••••••••••••••••••••••••
44
CHO MN CHO MN
•••••••••••••••••••••••••
23
CHO ST CHO ST
••••••••••••••••••••••••••
23
COMP COMP
•••••••••••••••••••••••••••••
13
COPY COPY
•••••••••••••••••••••••••••••
41
DOBLE DOUBLE
•••••••••••••••••••••••••
22
ERASE ERASE
•••••••••••••••••••••••••••
43
FADE FADE
••••••••••••••••••••••••••••••
20
FORMAT FORMAT
•••••••••••••••••••••••••
53
GRADE GRADE
•••••••••••••••••••••••••••
49
HALL HALL
•••••••••••••••••••••••••••••
22
HIEQ HI EQ
•••••••••••••••••••••••••••••
19
LCD LCD
•••••••••••••••••••••••••••••••
54
LIMIT LIMIT
•••••••••••••••••••••••••••••
13
LOEQ LO EQ
••••••••••••••••••••••••••••
20
LONG LONG
•••••••••••••••••••••••••••••
22
METRO METRO
••••••••••••••••••••••••••
50
MICEF MICEF
••••••••••••••••••••••••••••
14
NEWSONG NEWSONG
•••••••••••••••••••••
11
PAN PAN
•••••••••••••••••••••••••••
20, 38
POWER POWER
••••••••••••••••••••••••••
26
PROTECT PROTECT
••••••••••••••••••••••••
49
ROOM ROOM
••••••••••••••••••••••••••••
22
SEND SEND
••••••••••••••••••••••••
24, 38
SHORT SHORT
•••••••••••••••••••••••••••
22
SLVL SLVL
•••••••••••••••••••••••••
24, 38
SNG DEL SNG DEL
••••••••••••••••••••••••
48
SNG NEW SNG NEW
•••••••••••••••••••••••
47
SNG SEL SNG SEL
•••••••••••••••••••••••••
47
SNGCOPY SNGCOPY
•••••••••••••••••••••••
48
STL STL
••••••••••••••••••••••••••••••••
39
TR COPY TR COPY
••••••••••••••••••••••••
40
TR EDIT TR EDIT
•••••••••••••••••••••••••
40
TR ERS TR ERS
•••••••••••••••••••••••••••
42
TUNER TUNER
•••••••••••••••••••••••••••
52
VOCAL VOCAL
•••••••••••••••••••••••••••
26
WAIT WA I T
••••••••••••••••••••••••••••••
16
◆ A
A-B Repeat
•••••••••••••••••••••••••••••••••••••••••••••••••
36
[A-B REPEAT] key
••••••••••••••••••••••••••••••••••••••
36
Algorithm
•••••••••••••••••••••••••••••••••••••••••••••••••••
13
Auto punch-in/out
••••••••••••••••••••••••••••••••••••••••
31
Operation
•••••••••••••••••••••••••••••••••••••••••
32
Rehearsal
•••••••••••••••••••••••••••••••••••••••••
32
[AUX IN] jack
•••••••••••••••••••••••••••••••••••••••••
8, 55
◆ B
Batteries
••••••••••••••••••••••••••••••••••••••••••••••••••••••
9
Bounce
••••••••••••••••••••••••••••••••••••••••••••••••••••••
29
[BOUNCE] key
•••••••••••••••••••••••••••••••••••••••••••
30
◆ C
Connections
•••••••••••••••••••••••••••••••••••••••••••••••••
8
◆ E
Editing a track
•••••••••••••••••••••••••••••••••••••••••••••
40
Effects
••••••••••••••••••••••••••••••••••••••••••••••••••••••••
5
Bypass
••••••••••••••••••••••••••••••••••••••••••••
52
Error messages
••••••••••••••••••••••••••••••••••••••••••••
59
◆ F
Fader
••••••••••••••••••••••••••••••••••••••••••••••••••••••
20
FF [Y] key
••••••••••••••••••••••••••••••••••••••••••••••••
16
File configuration
•••••••••••••••••••••••••••••••••••••••••
57
Front panel
•••••••••••••••••••••••••••••••••••••••••••••••••••
7
◆ H
Hi EQ
••••••••••••••••••••••••••••••••••••••••••••••••••••••
19
◆ I
Input
••••••••••••••••••••••••••••••••••••••••••••••••••••••
38
Parameter
•••••••••••••••••••••••••••••••••••••••••
38
[INPUT LEVEL] control
••••••••••••••••••••••••••
12, 37
Input mixer
••••••••••••••••••••••••••••••••••••••••••••••
5, 37
Input sensitivity
•••••••••••••••••••••••••••••••••••••••••••
12
ZOOM MRS-4
Index
62
Index
Page 33

ZOOM CORPORATION
NOAH Bldg., 2-10-2, Miyanishi-cho, Fuchu-shi, Tokyo 183-0022, Japan
PHONE: +81-42-369-7116 FAX: +81-42-369-7115
Web Site: http://www.zoom.co.jp
Printed in Japan MRS-4 - 5000-2
 Loading...