


SM2571BT
Zenith SM2571BT, SR2501EC6, SR2549S6, SMS2500RK6, SMS9551S Operating Manual & Warranty
...
THE QUALITY GOES IN BEFORE THE NAME GOES ON@
iAviso para nuestros
clientes de habla hispana:
consulte la informacion que
aparece al final de este manual!
5EN'r'RY
Direct-View Color TV
J
recycled paper
50 percent
Return the Product Registration
Card, and your TV could be free!

WARNING:
TO REDUCE THE RISK .)F ELECTRIC SHOCK DO NOT
REMOVE COVER (OR BACK). NO USER SERVICEABLE
PARTS INSIDE. REFER TO QUALIFIED SERVICE
PERSONNEL.
TO PREVENT FIRE OR SHOCK HAZARDS, DO NOT EXPOSE
THIS PRODUCT TO RAIN OR MOISTURE.
The lightning flash with arrowhead symbol, within an equilateral
triangle, is intended to alert the user to the presence of uninsulated
"dangerous voltage" within the product's enclosure that may be of
sufficient magnitude to constitute a risk of electric shock to persons.
The exclamation point within an equilateral triangle is intended to
alert the user to the presence of important operating and maintenance
(servicing) instructions in the literature accompanying the appliance.
Safety Tips
Refer to the "Safety Tips" booklet that came with your
product for important safety considerations.
Note to Cable TV System Installer
This reminder is provided to call the cable TV system
installer's attention to Article 820-40 of the NEC that
provides guidelines for proper grounding and, in particular,
specifies that the cable ground shall be connected to the
grounding system of the building, as close to the point of
the cable entry as practical.
Power-Cord Polarization
This product is equipped with a polarized alternating-
current line plug (a plug having one blade wider than the
other.) This plug will fit into the power outlet only one
way. This is a safety feature. If you are unable to insert the
plug fully into the outlet, try reversing the plug. If the plug
should still fail to fit, contact your electrician to replace
your obsolete outlet. Do not defeat the safety purpose of
the polarized plug.
CAUTION
To prevent electric shock, match wide blade of plug to
wide slot, fully insert.
ATTENTION
Pour _viter les chocs _lectriques, introduire la lame la plus
large de la fiche dans la borne correspondante de la prise et
pousser jusqu'au fond.
Copyright © Zenith Electronics Corporation 1994 r_V_N2

CONTENTS
INTRODUCTION
Welcome ........................................... ii
Installation Considerations ........................... ii
CONNECTIONS FOR YOUR TV
Connection Center on Back of TV .................... 1- l
Make Basic Connection to TV ....................... 1-2
THE FIRST TIME YOU OPERATE YOUR TV
Step 1. Connect the Power........................... 2- l
Step 2. Use Auto Program ........................... 2-1
Step 3. Set the Clock ............................... 2-1
Step 4. Use Other Options ........................... 2-1
GETTING TO KNOW YOUR TV
Typical Control Panel .............................. 3-1
Sleep Timer ...................................... 3-1
REMOTE CONTROL MODEL SC2400
Operation ........................................ 4- I
Installing Batteries ................................. 4-1
REMOTE CONTROL MODEL SC3390
OPERATION ..................................... 5-1
Preparation for Use ................................ 5-2
Installing Batteries ................................. 5-2
REMOTE CONTROL MODEL MBR3420
Introduction ...................................... 6-1
Choosing Operating Mode .......................... 6-1
TV Operations .................................... 6-2
VCR Operations .................................. 6-3
Cable-TV Operations ............................... 6-4
Preparation for Use ................................ 6-5
Installing Batteries ................................. 6-5
Programming Brand Codes .......................... 6-6
TV, VCR and Cable-TV Brand Codes ................. 6-7
QUICK REFERENCE TO ON-SCREEN MENUS
Available Menus .................................. 7-1
Basic Menu Operation ............................. 7- I
Menu Operation Example ........................... 7-2
SETUP MENU
Auto Program .................................... 8-1
Ch. (Channel) AddiDel ............................. 8-1
Tuning Band ..................................... 8-2
Auto Tuning ..................................... 8-2
Clock Set ........................................ 8-2
Captions ......................................... 8-3
VIDEO MENU
Contrast ......................................... 9-1
Brightness ....................................... 9- l
Color ........................................... 9-
Tint ............................................. Q-
Sharpness ........................................ 9-
Picture Pref. (Preference) ........................... 0-
MAINTENANCE AND TROUBLESHOOTING
Caring Ibr Your T'v'. .............................. 10-
Extended Absence ................................ !0-
TV Picture Interference ............................ 10-l
Before Calling for Service .......................... 10-2
Product Registration Card
Recommended Accessories for Your Television
Aviso para nuestros clientes de habla hispana
Your Zenith Warranty
HOW TO USE YOUR OPERATING GUIDE
This operating guide describes a family of TV models. Some models have features that are not provided
on other models. Different control panels and remote controls may be used from model-to-model. Refer to
the applicable sections of this operating guide for the features and items provided with your TV.
2734-0 i

INTRODUCTION
WELCOME
Welcome into the family of Zenith Color Television owners.
This guide provides instructions on how to operate your new
TV. It is supplemented by a booklet containing Safety Tips.
We urge you to read these publications carefully so that you
will receive full enjoyment from your new Zenith TV for
many years to come.
Your new TV has been designed and built to give you the very
best in quality, features and performance. There are thousands
of Zenith authorized service centers throughout the U.S.,
,Canada and Mexico who can attend promptly and effectively
1:oordinary service needs.
]!fyou should have an unusual performance or service problem
that cannot be satisfactorily resolved by your Zenith dealer or
;Zenith authorized service center, contact us at:
Zenith Electronics Corporation
Customer Service Department
1000 Milwaukee Avenue
Glenview, IL 60025-2493
Telephone: (708) 391-8752
Mon-Fri, 8:00 a.m. - 4:30 p.m. Central Time
Provide the model number, serial number, and date of pur-
chase or original installation, with a full explanation of the
problem and the service history. We will welcome the opportu-
nity to look into your specific question or problem and to be
of assistance in resolving it promptly.
The model and serial numbers of your new TV are located on the
back of the TV cabinet. For your future convenience and protec-
tion, we suggest that you record these numbers here:
Model No.
Serial No.
INSTALLATION CONSIDERATIONS
Before you install your TV...
Ventilation -- Proper ventilation keeps your TV
running cool. Air circulates through perforations
in the back and bottom of the cabinet. Do not
block these vents or you will shorten the life of
your TV.
Power Source -- Your TV is designed to operate
on normal household current, 120 volt 60 Hertz
AC. Do not attempt to operate it on DC current.
Power Cord -- Your power cord has a polarized
plug as required by Underwriters' Laboratories. It
has one regular blade and one wide blade and fits
only one way into a standard electrical outlet. If
the blades will not enter either way, your outlet is
very old and non-standard. A new outlet should be
installed by a qualified electrician.
Please read and observe each safety point in the "Safety
Tips" folder when installing and using your TV.
VIDEO GAMES AND OTHER FIXED
PATTERN DISPLAY CAUTION -- If you use your TV tbr
video games, teletext or other fixed displays, avoid setting the
BRIGHTNESS control for an excessively bright picture. A
bright, fixed pattern, if used for long periods of time, can re-
sult in a permanent imprint on the TV picture tube. You can re-
duce this possibility by alternating the use of the fixed pattern
display with normal TV picture viewing, by turning down the
CONTRAST control for sustained fixed pattern use, and by
turning off the fixed pattern display when not in use.
PLUGGING IN YOUR TV -- Be sure to plug your TV into
an "unswitched" AC power source. The "switched" AC out-
lets found on some video equipment will not continue supply-
ing power to the TV once the equipment is turned off. If the
power to the TV is interrupted, you will have to reset the clock
in the TV to the current time.
Safe Operation -- Your TV is manufactured and
tested with your safety in mind. However, unusual
stress caused by dropping or mishandling, expo-
sure to flood, fire, rain or moisture, or accidental
spilling of liquids into the TV, can result in poten-
tial electrical shock or fire hazards. If this hap-
pens, have your TV checked by a service techni-
cian before using it again.
TVWEI_IaZ ii

CONNECTIONS FOR YOUR TV
CONNECTION CENTER ON BACK OF TV
Refer to the illustration below and the connection-diagrams on
the following pages when connecting your new TV.
VHF-UHF/CABLE
j
VHF-UHF/CABLE
Jacks for 75-ohm antenna-type
connections to your TV. Attach
your antenna, cable-TV line or
VCR to this jack.
Connection Center On Back Of TV
,73,vo 1 -- 1

CONNECTIONS FOR YOUR TV
MAKE BASIC CONNECTION TO TV
Select the hook up that best fits .,,'ourneeds, " ....
Antenna
Flat Wire
300/75 ohm
Adaptor
300 ohm
i
|
OR
i
Round Wire
75 ohm
Antenna Direct to l'\'
Antenna
_danne I 3/4VCR
_U_T ANTENNA
VHF UHF/CABLE
Antenna Through VCR to TV
DECODER/
CONVERTER
Video
I _ (_ i Channel3/4
,Cable TV In '_'_
I •
, I "_
OR !
L ............. 4_
Direct Connection To TV
VHF-UHF/CABLE _J
DECODER/
CONVERTER VCR
_Cable_TVln I _
! I
OR !
!
DirectConnection To VCR
ANTENNA
Iv,deo ...=_l_,%_2--1
m _nel 3/4
Cable Direct to TV
Cable Through VCR to TV
2,3*0 1 -- 2
THE FIRST TIME YOU OPERATE YOUR TV
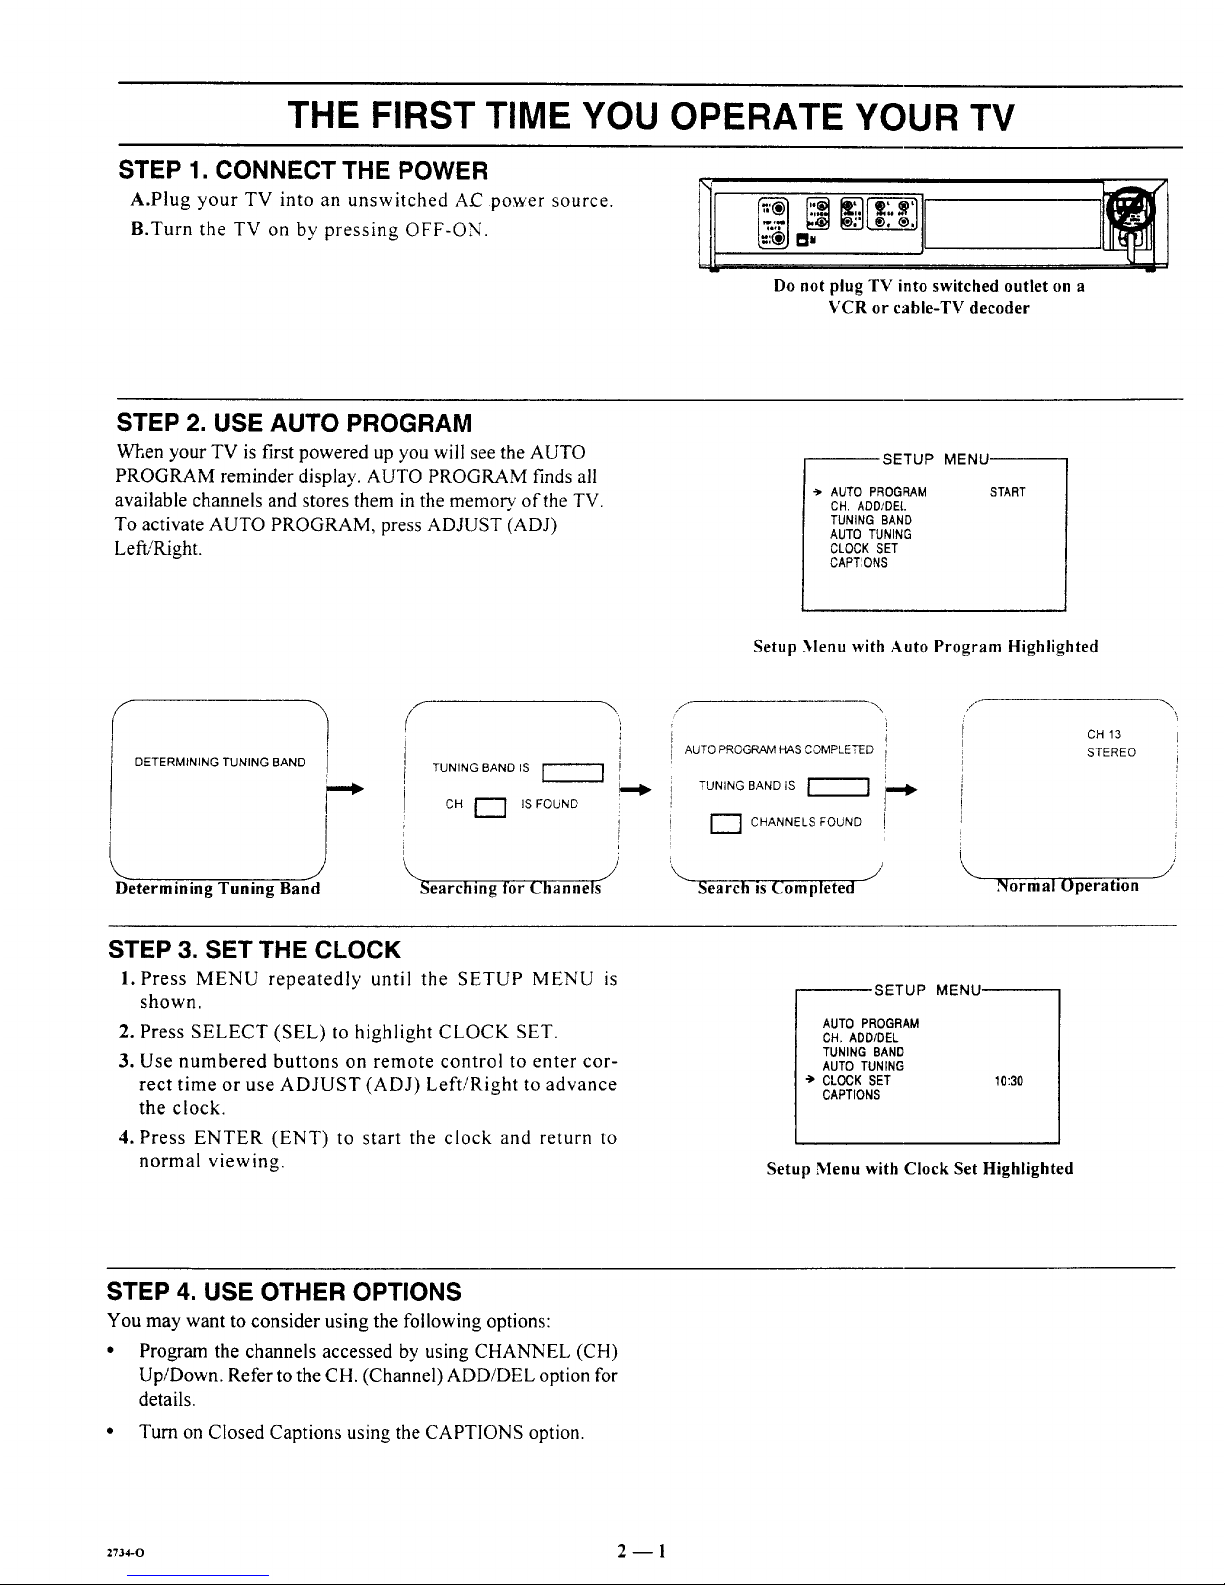
STEP 1. CONNECT THE POWER
A.Plug your TV into an unswitched AC power source.
B.Turn the TV on by pressing OFF-ON.
m=
Do not plug TV into switched outlet on a
VCR or cable-TV decoder
STEP 2. USE AUTO PROGRAM
When your TV is first powered up you will see the AUTO
PROGRAM reminder display. AUTO PROGRAM finds all
available channels and stores them in the memo_' of the TV.
To activate AUTO PROGRAM, press ADJUST (ADJ)
Left/Right.
SETUP MENU
AUTO PROGRAM
CH. ADD/DEL
TUNING BAND
AUTO TUNING
CLOCK SET
CAPTIONS
START
Setup Menu with Auto Program Highlighted
DETERMINING TUNING BAND _']
J
Determining Tuning Band
I i
i
[ TUNINGBANO,S_ ;
i
I CH E_] ISFOUND
r
i
\ /
Searching for Channels
I
AUTO PROGRAM HAS COMPLETED i
TU,INGBANO,SI-------'1 j.._
r_ CHANNELS FOUND !
Search is Completed
\
CH 13
STEREO
Normal Operation
J
STEP 3. SET THE CLOCK
l. Press MENU repeatedly until the SETUP MENU is
shown.
2. Press SELECT (SEL) to highlight CLOCK SET.
3. Use numbered buttons on remote control to enter cor-
rect time or use ADJUST (ADJ) Left/Right to advance
the clock.
4. Press ENTER (ENT) to start the clock and return to
normal viewing.
SETUP MENU
AUTO PROGRAM
CH. ADD/DEL
TUNING BAND
AUTO TUNING
-> CLOCK SET
CAPTIONS
10:30
Setup Menu with Clock Set Highlighted
STEP 4. USE OTHER OPTIONS
You may want to consider using the following options:
• Program the channels accessed by using CHANNEL (CH)
Up/Down. Refer to the CH. (Channel) ADD/DEL option for
details.
• Turn on Closed Captions using the CAPTIONS option.
2734-o 2 -- 1
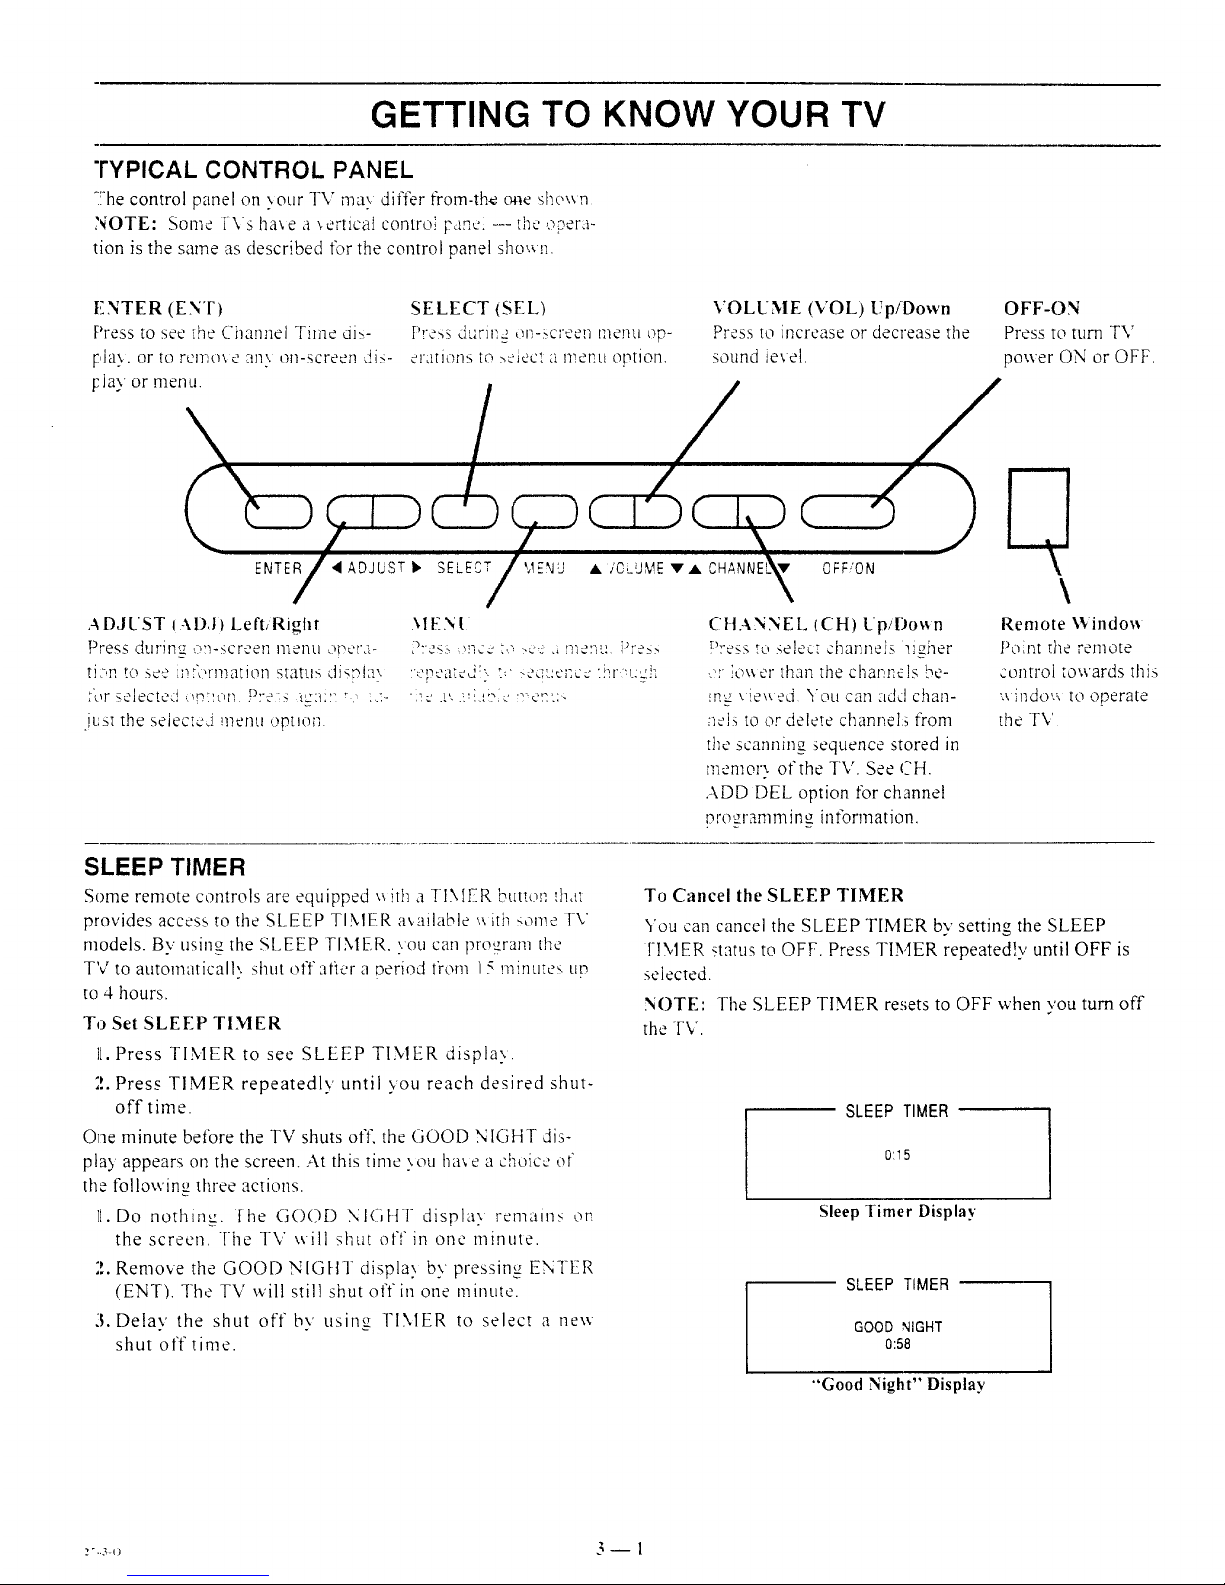
GETTING TO KNOW YOUR TV
TYPICAL CONTROL PANEL
The control panel on xour TV ma_ differ from.th_ o_e she\_n
NOTE: Some TVsha_ea_erticatcontrolp4n_':---thcopera-
tion is the same as described t\_rthe control panel sho,a n.
F.NTER (EN'F} SELECT (SEL) VOLUME (VOL) Up/Down OFF-ON
Pressto see_heCilannel Time dis- Pressdurn_.a,m-screent,a_.._,l
_ _ _,, op- Press to increase or decrease the Press to turn TV
F,ia.,,, or to remox e an,. on-screen dis- orations to .,eiec: a mer.u option, sound ie',el, power ON or OFF.
FJay or menu._ __T C _ _/ _
ADJL'ST !-\!),l) Left, Right
Press dtlrJll_. ,._T!-SCree[l nlenl.i OD.::F_i--
ti>n to see ;nformation sT.attl,_dis_ia',
:br selected (}DPx,l;P:-os i_:!1: r, :.>
.just the selected menu opt_o_
CttANNEL (CH) Up/l)ov, n
Press ru select dqarmeJs l_giler
,; '.ox_erthanthe channels be-
_n__ie_ed You can ..tddchan-
;_eisto or delete channels from
the scanning sequence stored in
memop, of the TV. See CH.
ADD DEL option t-brchannel
Dro_rammin_ information.
Remote V,'indo_
Point the remote
control towards this
•Aindov, to operate
the TV
SLEEP TIMER
Some remote controls are equipped ;_ilh a TIXIER butt _,_.!hat
provides access to the SLEEP TINIER a',ailable _ith some I-V
models. Bv usino the SI,EEP FIMER. you can program the
TV to automaticall,, shut off after a period from 15 minutes up
to 4 hours.
To Set SLEEP TIMER
]L.Press TIMER to see SLEEP TINIER display.
2. Press TIMER repeatedly' until you reach desired shut-
off time.
One minute before the TV shuts off, the GOOD NIGHT dis-
play appears on the screen. At this time ',ou ha_ea choice of
the following three actions.
l{.Do nothing. [he GOOD NIGHT displa,, remains on
the screen. The I-V \rill shut oft" in one minute.
2. Remove the GOOD NIGttT display by pressing ENTER
(ENT). The TV will still shut off in one minute.
3. Delay the shut off by using TIMER to select a nexv
shut off time.
To Cancel the SLEEP TIMER
You can cancel the SLEEP TIMER by' setting the SLEEP
FIMER status to OFF. Press TIMER repeatedly' until OFF is
selected.
NOTE: The SLEEP TIMER resets to OFF when you turn off
the TV.
SLEEP TIMER
0:15
Sleep Timer Display
SLEEP TIMER
GOOD NIGHT
0:58
"'Good Night" Display

REMOTE CONTROL MODEL SC2400
OPERATION
MUTE
Used to turn off sound while the picture
remains. Press again to restore the sound.
VOLUME Up/Down
Used to adjust the volume level of the TV.
t
Point towardyour TV.
OFF-ON
MUTE DISPLAY
O©
CHAN
VOL @ VOk
CHAN
I
OFF/ON
Used to turn TV ON or OFF.
DISPLAY
Used to see Channel/Time display for TV
having on-screen displays. Press again to re-
move display.
CHANNEL Up/Down
Used to select a TV channel by going up or
down through channels.
SC2400
INSTALLING BATTERIES
When the effective range of the remote becomes noticeably
shorter, replace the batteries with two (2) high quality, size
AAA, alkaline batteries.
Zenith is not responsible for damage caused by battery leak-
age.
I
REMOVE TWO SCREWS TO REPLACE BATTERIES
® [ ®
AAA -
AAA +_ _
z736-o 4_ 1
 Loading...