

Page 1

ACTIVA SERIES ROOF TOP Air
Conditioners
Installation manual
Ref.: N-40XXX
Page 2

Page 3

Index
1 Installation manual.................................................................................................................. 1
1.1 Safety instructions.................................................................................................................. 2
1.2 Icons used in this document................................................................................................... 2
1.3 Instructions for storage, transport, loading and unloading of the unit.................................... 3
1.3.1 Disposal of packaging............................................................................................................ 3
1.3.2 Lifting points........................................................................................................................... 3
1.4 Technical data........................................................................................................................ 4
1.4.1 Technical and physical data for ARC (cool only) and ARG (cool only + gas heat)................ 4
1.4.2 ARH technical and physical data (heat pump) and ARD (heat pump + gas heat)................. 5
1.4.3 Weight options and accessories............................................................................................. 7
1.5 ARC units with electric heater................................................................................................ 7
1.6 ARH units with electric heater................................................................................................ 7
1.7 Limits of use........................................................................................................................... 8
1.8 Power and application data for gas ARG / ARD.................................................................... 8
1.9 Hot water coil, optional in ARC/ARH...................................................................................... 9
1.10 Measurements, clearances and accesses........................................................................... 10
1.10.1 Connections for supply and return side ducts...................................................................... 10
1.10.2 General dimensions and accesses (models 045/060)......................................................... 11
1.10.3 General dimensions and accesses (models 075/090)......................................................... 12
1.11 ARC/ARG Performance....................................................................................................... 13
1.11.1 ARC/ARG 045 Cooling capacities........................................................................................ 13
1.11.2 ARC/ARG 060 Cooling capacities........................................................................................ 13
1.11.3 ARC/ARG 075 Cooling capacities........................................................................................ 14
1.11.4 ARC/ARG 090 Cooling capacities........................................................................................ 14
1.12 ARH/ARD Output................................................................................................................. 15
1.12.1 ARH/ARD 045 Cooling capacities........................................................................................ 15
1.12.2 ARH/ARD 060 Cooling capacities........................................................................................ 15
1.12.3 ARH/ARD 075 Cooling capacities........................................................................................ 16
1.12.4 ARH/ARD 090 Cooling capacities........................................................................................ 16
1.12.5 ARH/ARD 045 Thermodynamic heat capacity..................................................................... 16
1.12.6 ARH/ARD 060 Thermodynamic heat capacity..................................................................... 17
1.12.7 ARH/ARD 075 Thermodynamic heat capacity..................................................................... 17
1.12.8 ARH/ARD 090 Thermodynamic heat capacity..................................................................... 18
1.13 Indoor fan............................................................................................................................. 18
1.13.1 Features table...................................................................................................................... 18
1.13.2 Considerations when consulting the output tables............................................................... 18
1.13.3 Output table for indoor fan, model ARC-045, applications with side ducts, standard drive motor
3 kW..................................................................................................................................... 19
1.13.4 Performance table for inside fan, model ARC-045, applications with side ducts, optional
operation HPD motor 4 kW.................................................................................................. 19
1.13.5 Output table for indoor fan, model ARC-060, applications with side ducts, standard drive motor
4 kW..................................................................................................................................... 19
Index
i
Page 4

1.13.6 Output table for indoor fan, model ARC-060, applications with side ducts, optional HPD drive
motor 5.5 kW........................................................................................................................ 20
1.13.7 Output table for indoor fan, model ARC-075, applications with side ducts, standard drive motor
5.5 kW.................................................................................................................................. 20
1.13.8 Performance table for inside fan, model ARC/ARH-075, applications with side ducts, optional
operation HPD motor 7.5 kW............................................................................................... 20
1.13.9 Output table for indoor fan, model ARC/ARH-090, applications with side ducts, standard drive
motor 7.5 kW and optional HPD motor 9.2 kW.................................................................... 21
1.13.10 Output table for indoor fan, model ARC/ARH-090, applications with side ducts, optional HPD
drive motor 11 kW................................................................................................................ 21
1.14 Pressure drop of options/accessories, gas heating and vertical ducts................................ 21
1.15 Instructions for installation and connection of the unit......................................................... 22
1.15.1 Characteristics of the placement.......................................................................................... 22
1.15.2 Characteristics of the facility where the unit will be installed................................................ 22
1.15.3 Specifications for the foundation or anchoring of the unit.................................................... 23
1.15.4 Characteristics of utility provider connections...................................................................... 23
1.15.5 Preparation and connecting to the various utilities............................................................... 23
1.16 Instructions for starting up the unit....................................................................................... 29
1.16.1 Electrical checks................................................................................................................... 29
1.16.2 Starting the gas heating, ARG/ARD..................................................................................... 30
1.17 Unblocking the unit safely in case of breakdown................................................................. 33
1.18 Regular maintenance tasks performed by specialised personnel........................................ 34
1.18.1 Planned Maintenance Schedule........................................................................................... 34
1.18.2 Maintenance tasks performed by specialised personnel...................................................... 35
1.18.3 Gas heating (ARG/ARD Models).......................................................................................... 38
1.19 Unit sound pressure data..................................................................................................... 40
2 Unit installation data.............................................................................................................. 43
2.1 List of tests for unit start-up.................................................................................................. 44
2.2 Start-up Data........................................................................................................................ 45
Index
ii
Page 5

1
Installation manual
Page 6
1.1 Safety instructions
This document contains the necessary information for the safe and efficient transportation, assembly
and installation of the air conditioning unit. This guarantees the condition of the unit and its operating
safety.
Only an authorised company may assemble the air conditioning unit.
A T T E N T I O N
Only authorised companies with the appropriate technical resources and suitably trained personnel may
install the air conditioning unit.
C A U T I O N
The specialists responsible for installing the air conditioning unit must make sure they have all of the
information and knowledge required to correctly install, test and deliver the unit. Johnson Controls Inc.
shall not be considered responsible for any damage caused by installation of the unit that is no consistent
with that described in this document or others specifically provided with the unit.
During regular unit installations, the fitter must pay special attention to certain situations in order to pre‐
vent injuries or damage to the unit.
Situations that could jeopardise the safety of the fitter or that of others nearby or that could put the unit
itself at risk are clearly indicated in this manual.
A series of special symbols are used to clearly identify these situations.
Pay careful attention to these symbols and to the messages following them, as your safety and the safety
of others depends on it.
1.2 Icons used in this document
D A N G E R
• The text following this symbol contains information and instructions relating directly to your safety
and physical wellbeing.
• Not taking these instructions into account could lead to serious, very serious or even fatal injuries to
you and others in the proximities of the unit.
Information can also be found on safe procedures during unit handling. This will help reduce the risk of
accidents.
C AU T I O N
• The text following this symbol contains information and instructions relating directly to your safety
and physical wellbeing.
• Not taking these instructions into account could lead to minor injuries to you and others in the prox‐
imities of the unit.
• Not taking these instructions into account could lead to unit damage.
Information can also be found on safe procedures during unit handling. This will help reduce the risk of
accidents.
N OT E
• The text following this symbol contains information or instructions that may be of use or that is worthy
of a more thorough explanation.
• Instructions regarding inspections to be made on unit parts or systems may also be included.
1
Installation manual
1.1 Safety instructions
2
Page 7
1.3 Instructions for storage, transport, loading and unloading of
the unit
Delivery inspection
The unit should be carefully inspected for visible damage or abnormalities as soon as it is received.
Any abnormalities or damage to the unit should be communicated to both the transportation and insur‐
ance company in writing.
Storage instructions
The unit should be stored in a place suitable to the purpose (warehouse or similar), protected from the
weather, water, humidity and dust.
Cover the unit with a canvas of a suitable size.
The unit should be appropriately protected from knocks and dust, ensuring the protective parts it was
supplied with remain in place. Where these are not in place, establish the necessary protection and
barriers to keep vehicles or fork-lift trucks away.
Transport, loading and unloading of the unit
The units should only be handled by personnel from the company responsible for their installation.
Transport of the unit should be in such a manner that no damage is caused by faulty or inadequate
mooring to the bed or body of the vehicle.
Where necessary, protect all of the edges of the unit against knocks and scratches and moor it to the
bed or body of the vehicle using suitable textile belts or slings to keep it perfectly still.
Loading and unloading the unit from a truck or trailer should be on flat, solid ground using an appropriate
crane with sufficient capacity.
C AU T I O N
It is strictly prohibited to use fork lifts to load, unload, or handle the unit.
1.3.1 Disposal of packaging
The packaging is recyclable. Dispose of it in the appropriate place or take it to an appropriate collection
centre. Respect the regulations in force for this type of waste in the country where the unit is being
installed.
Packaging remains must be correctly disposed of. Improper disposal of packaging generates environ‐
mental problems that affect human life.
1.3.2 Lifting points
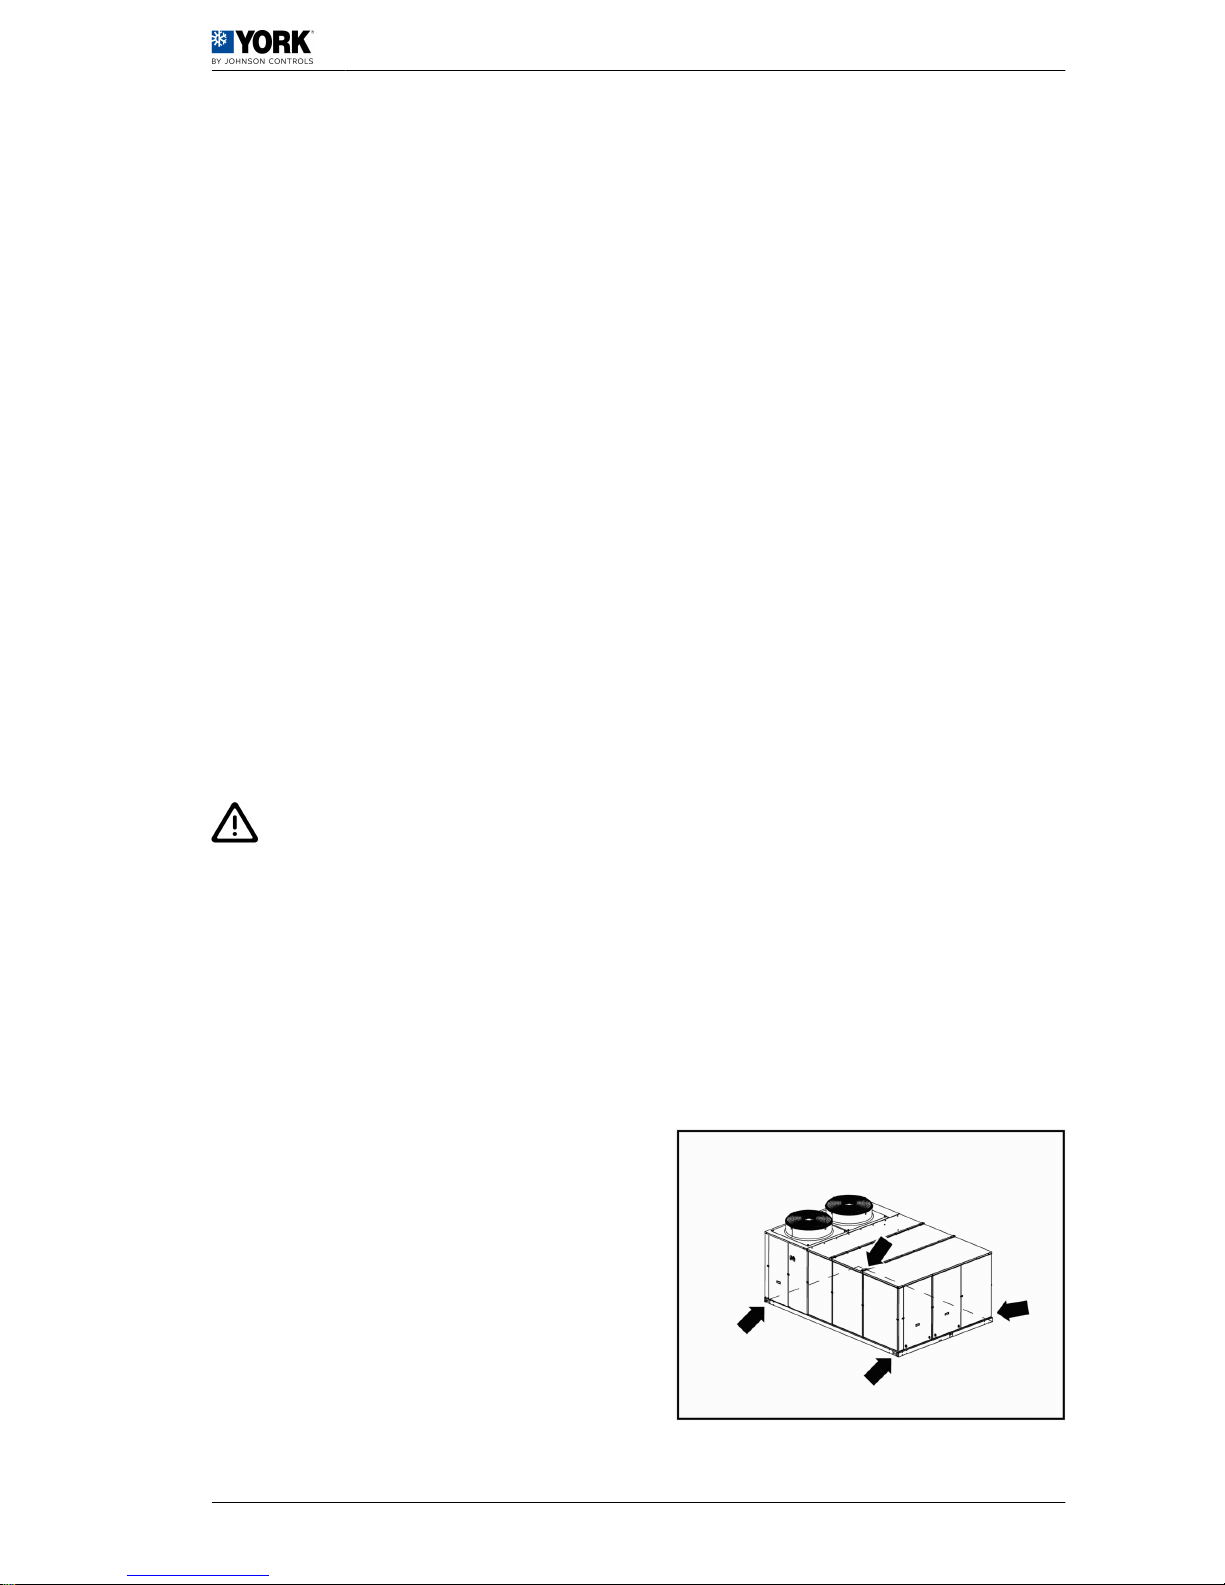
The points designed for lifting the unit are situated in
the beams at its base. -arrows-.
Before hoisting the unit, check that the cables or
slings are firmly hooked to these points and make
sure the crane and the cables or slings are capable of
lifting the weight.
Installation manual 1
Instructions for storage, transport, loading and unloading of the unit 1.3
3
Page 8

Place separators -1- above the unit to prevent the ca‐
bles or slings from touching it.
Attach guide ropes so that that the unit does not rotate
freely.
The cables or slings should be long enough to form
an angle of over 45º to the horizontal plane. Hoist the
unit keeping it in a horizontal position.
D AN G E R
There should not be onlookers within a radius of 10
m of the unit when it is being hoisted.
Centre of gravity of the unit
Models 045 060 075 090
A 1180 1180 1135 1080
B 1390 1425 1480 1540
C 3180 3180 3495 3495
D 2337 2337 2337 2337
All measurements in mm.
1. Centre of gravity
2. End of the outdoor coil
1.4 Technical data
1.4.1 Technical and physical data for ARC (cool only) and ARG (cool only
+ gas heat)
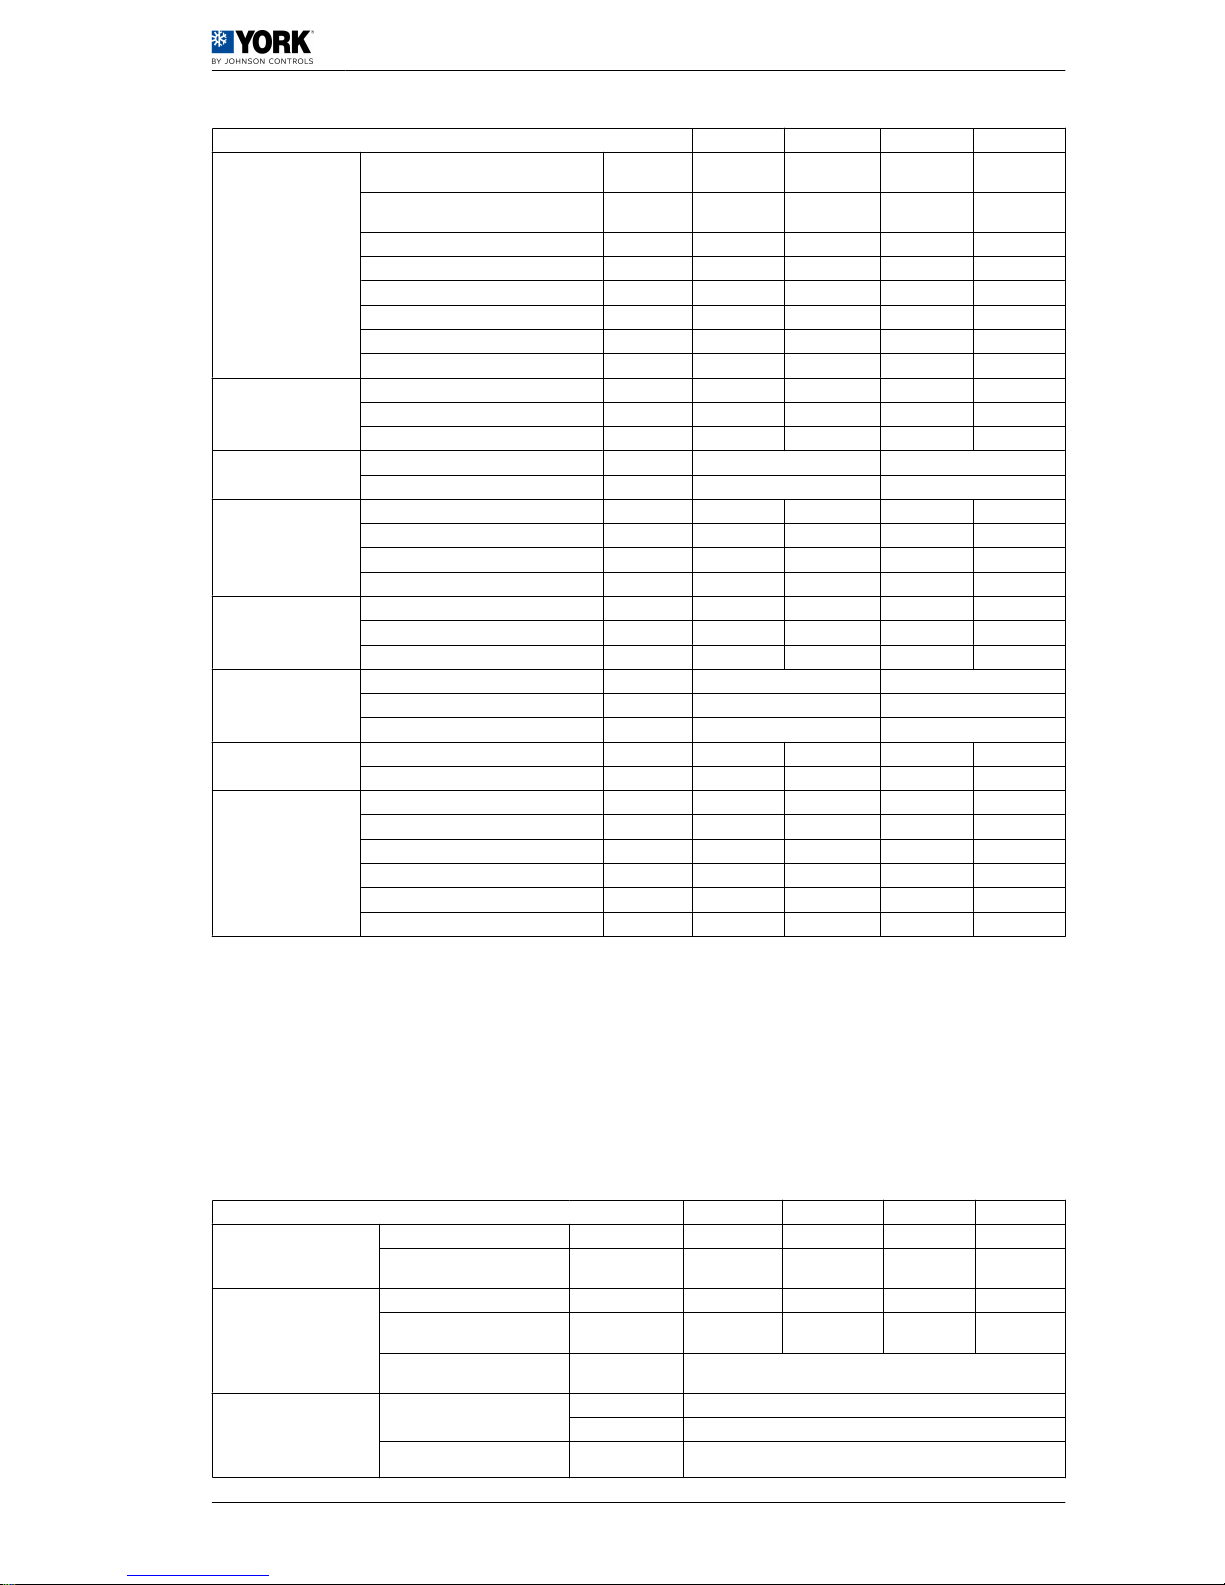
Models ARC/ARG 045 060 075 090
Cooling capacity(1)
Net cooling capacity kW 45,1 61 71,5 84
Rated absorbed power in cool mode kW 16 23 30 36
Heating (ARC)
Optional electric heating capacity (400
V) (2)
kW 12-25-37-50
Gas Heating (ARG)
Heat capacity at 100% power (standard)
(LHV) Total
kW
85
Net (2) kW 76
Heat capacity at 100% power, high ca‐
pacity (optional)
Total kW 100
Net (2) kW 90
100% gas consumption (2ND-H natural
gas, G20 at 20 mbar and 15ºC) (stand‐
ard)
m3/h 8,6
100% gas consumption (2ND-H natural
gas, G20 at 20 mbar and 15ºC) high ca‐
pacity (optional)
m3/h 9,8
Stages No. 2
Compressors
Rated/start-up current A 2x12/95 2x15/118 2x20/140 2x25/198
Type and quantity SCROLL, 1 (TANDEM 50% + 50%)
Degree of protection IP21
Refrigerant (R-410A) kg 10,5 18,2 20,5 29
Electric power supply V / ph / Hz 400/3+N/50
Indoor fan (3)
Rated air flow m3/h 8500 11500 13500 16000
1 Installation manual
1.4 Technical data
4
Page 9
Models ARC/ARG 045 060 075 090
Maximum static pressure with rated flow
(standard)
Pa 182 270 240 368
Maximum static pressure with rated flow
(optional HPD drive)
Pa 368 430 >500 >500
Maximum flow m3/h 10000 13500 16000 18000
Minimum flow m3/h 7000 9500 11500 13000
IP55 Motor (standard) kW 3 4 5,5 7,5
Rated current A 5,5 5,7 7,6 11,7
IP55 Motor (HPD optional) kW 4 5,5 7,5 9,2/11
Rated current A 5,7 7,6 11,7 14/17,4
Indoor coil (evaporator)
Number of elements No. 2 3 3 4
Distance between fins mm 1,81 1,81 1,81 1,81
Front surface m
2
1,44 1,58 1,95 1,06 (x 2)
Air filters (G4)
Quantity per unit No. 6 6
Dimensions mm 470x550x48 565x594x48
Outdoor fan
Diameter / number mm 800/1 800/2 800/2 800/2
Total rated flow m3/h 15000 23000 27000 27000
Motor (IP54) kW 1,9 1,9 1,9 1,9
Rated current A 3,5 2x3,5 2x3,5 2x3,5
Outdoor coil (condens‐
er)
Number of elements No. 2 3 2 3
Distance between fins mm 1,81 1,81 1,81 1,81
Front area m
2
2,27 2,49 2.31 (x2) 2.31 (x2)
Net dimensions (4)
Height mm 1316 1367
Length mm 3180 3495
Width mm 2337 2337
Net weight (basic unit
without accessories) (4)
ARC kg 900 945 1118 1142
ARG kg 1010 1055 1228 1252
Electrical features of
the unit
Total rated power kW 16 23 30 36
Total rated current A 32 42 54 70
Total maximum power kW 23 31 38 45
Total maximum current A 42 56 70 83
Circuit breaker (K Curve (5) A 50 63 80 100
Minimum cable section (6) mm
2
10 16 25 35
(1) Data comply with Eurovent conditions, summer: indoor 27 °C TS / 19 °C TH - outdoor TS 35 °C (TS Dry-bulb Thermometer; TH Wet-bulb thermometer).
(2) Add the inside motor consumption to find the total calorific capacity.
(3) See
Indoor fan , see on page 18
.
(4) Consider the additional weight of options and accessories. To do so, see
Weight options and accessories , see on page 7
.
LHV: Lower heating value.
(5) and (6) Circuit breaker with K curve, according to DIN, VDE 0660-104. Section of cables for the power supply line based on copper conductors, 105 ºC. The indicated
circuit breaker and the section of power supply cables are guidelines. They should be adjusted based on the requirements of each installation, distance between units, fall
in planned voltage and on the application of the current regulations with respect to the country where the unit is being installed.
1.4.2 ARH technical and physical data (heat pump) and ARD (heat pump
+ gas heat)
Models ARH/ARD 045 060 075 090
Cooling capacity(1)
Net cooling capacity kW 47,6 61,9 71,4 83,4
Rated absorbed power in cool
mode
kW 17 20 28 36
Heat capacity
Heating capacity (2) kW 45,2 58 71,7 86,5
Rated power absorbed in heat
mode
kW 16 19 27 33
Optional electric heating ca‐
pacity (400 V) (ARH) (2)
kW 12-25-37-50
Gas Heating (ARG)
Heat capacity at 100% power
(standard)
(LHV) Total kW 85
Net (2) kW 76
Heat capacity at 100% power,
high capacity (optional)
Total kW 100
Installation manual 1
Technical data 1.4
5
Page 10

Models ARH/ARD 045 060 075 090
Net (2) kW 90
100% gas consumption (2NDH natural gas, G20 at 20 mbar
and 15ºC) (standard)
m3/h 8,6
100% gas consumption (2NDH natural gas, G20 at 20 mbar
and 15ºC) high capacity (op‐
tional)
m3/h 9,8
Stages No. 2
Compressors
Rated/start-up current A 2x12/95 2x15/118 2x20/140 2x25/198
Type and quantity SCROLL, 1 (TANDEM 50 % + 50 %)
Degree of protection IP21
Refrigerant
(R-410A)
kg 14,5 19 20,5 29
Electric power supply V / ph / Hz 400/3+N/50
Indoor fan (3)
Rated air flow m3/h 8500 11500 13500 16000
Maximum static pressure with
rated flow (standard drive)
Pa 168 242 240 368
Maximum static pressure with
rated flow (optional HPD drive)
Pa 335 402 >500 >500
Maximum flow m3/h 10000 13500 16000 18000
Minimum flow m3/h 7000 9500 11500 13000
IP55 Motor (standard) kW 3 4 5,5 7,5
Rated current A 5,5 5,7 7,6 11,7
IP55 Motor (HPD optional) kW 4 5,5 7,5 9,2/11
Rated current A 5,7 7,6 11,7 14/17,4
Indoor coil (evaporator)
Number of elements No. 3 4 3 4
Distance between fins mm 2,11 2,11 1,81 1,81
Front surface m
2
1,44 1,58 1,95 1,06 (x 2)
Air filters (G4)
Quantity per unit No. 6 6
Dimensions mm 470x550x48 565x594x48
Outdoor fan
Diameter / number mm 800/1 800/2 800/2 800/2
Total rated flow m3/h 15000 23000 27000 27000
Motor (IP54) kW 1,9 1,9 1,9 1,9
Rated current A 3,5 2x3,5 2x3,5 2x3,5
Outdoor coil (condenser)
Number of elements No. 3 4 2 3
Distance between fins mm 2,11 2,54 1,81 1,81
Front area m
2
2,27 2,49 2.31 (x2) 2.31 (x2)
Net dimensions (4)
Height mm 1316 1367
Length mm 3180 3495
Width mm 2337 2337
Net weight (basic unit with‐
out accessories) (4)
ARH kg 930 985 1145 1220
ARD kg 1040 1095 1255 1330
Electrical features of the
unit
Total rated power kW 17 22 28 36
Total rated current A 32 42 54 70
Total maximum power kW 23 31 38 45
Total maximum current A 42 56 70 83
Circuit breaker (K Curve (5) A 50 63 80 100
Minimum cable section (6) mm
2
10 16 25 35
(1) Data comply with Eurovent conditions, summer: indoor 27 °C TS / 19 °C TH - outdoor TS 35 °C. Winter: Indoor TS 20 °C, outdoor TS 7 °C / TH 6 °C (TS Dry-bulb
thermometer; TH Wet-bulb thermometer).
(2) Add the inside motor consumption to find the total calorific capacity.
(3) See
Indoor fan , see on page 18
(4) Consider the additional weight of options and accessories. To do so, see
Weight options and accessories , see on page 7
.
LHV: Lower heating value.
(5) and (6) Circuit breaker with K curve, according to DIN, VDE 0660-104. Section of cables for the power supply line based on copper conductors, 105 ºC. The indicated
circuit breaker and the section of power supply cables are guidelines. They should be adjusted based on the requirements of each installation, distance between units, fall
in planned voltage and on the application of the current regulations with respect to the country where the unit is being installed.
1 Installation manual
1.4 Technical data
6
Page 11
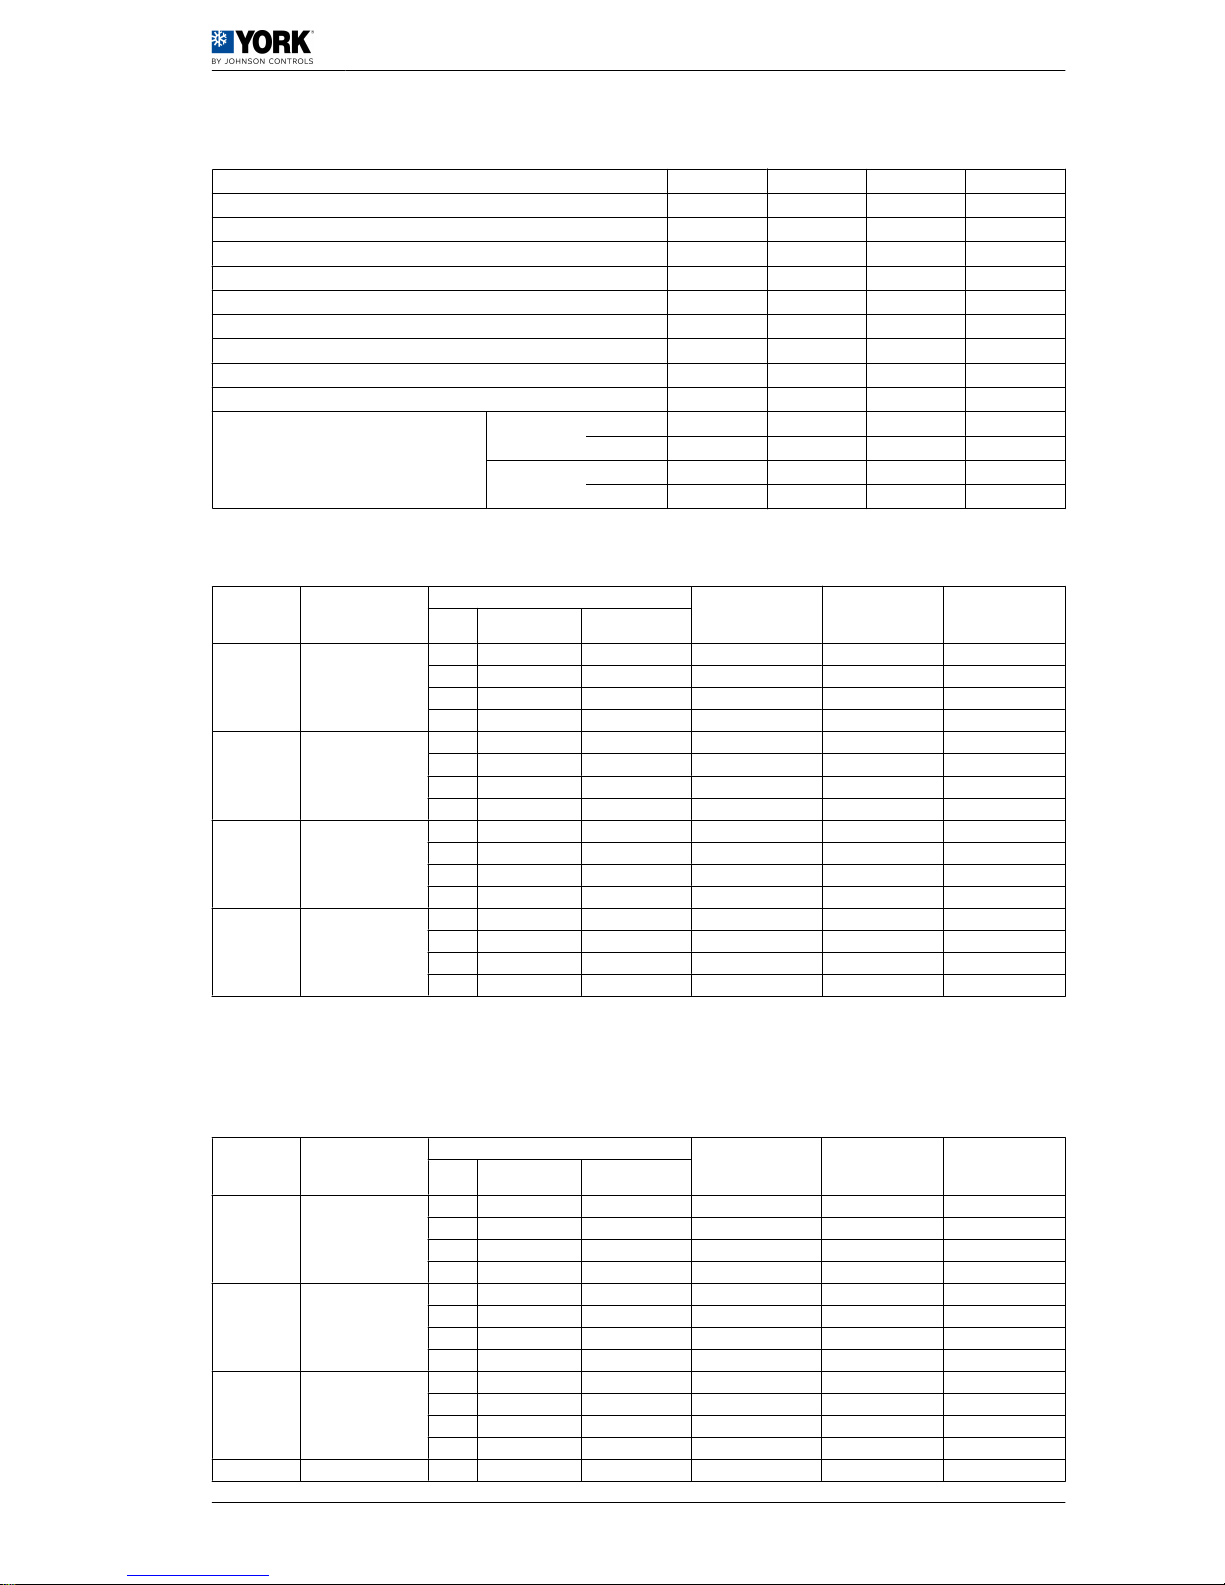
1.4.3 Weight options and accessories
Models 045 060 075 090
Economiser kg 65 65 73 73
Extraction fan (axial) kg 54 54 63 63
Return fan (centrifuge) kg
Roof-curb mounting base (fixed/adjustable) kg 81/157 81/157 85/165 85/165
ERP adaptor for Roof Curb kg 177 177 190 190
Electric resistor kg 20 20 20 20
Hot water coil kg 60 60 60 60
Fixed outdoor air intake kg 9 9 9 9
Barometric damper kg 20 20 20 20
Copper fin coil
ARC/ARG
indoor 19 31 44 64
outdoor 30 49 70 104
ARH/ARD
indoor 29 48 44 64
outdoor 44 64 70 104
1.5 ARC units with electric heater
ARC Model
Electric power sup‐
ply V/Ph/Hz
Electric resistor
Maximum total current
of the unit (A)
Maximum circuit
breaker (K Curve) (1)
Minimum cable cross-
section (mm2) (2)
Power
(kW)
Stages (No.) Current (A)
045 400/3/50
12 1 18 32 50 10
25 2 36 38 50 10
37 2 54 60 80 25
50 2 72 78 100 35
060 400/3/50
12 1 18 42 50 10
25 2 36 42 50 10
37 2 54 60 80 25
50 2 72 78 100 35
075 400/3/50
12 1 18 54 63 16
25 2 36 54 63 16
37 2 54 62 80 25
50 2 72 80 100 35
090 400/3/50
12 1 18 70 80 25
25 2 36 70 80 25
37 2 54 70 80 25
50 2 72 84 100 35
(1) K Curve (DIN, VDE 0660-104).
(2) Based on copper conductors 105 °C.
1.6 ARH units with electric heater
ARC Model
Electric power sup‐
ply V/Ph/Hz
Electric resistor
Maximum total current
of the unit (A)
Maximum circuit
breaker (K Curve) (1)
Minimum cable cross-
section (mm2) (2)
Power
(kW)
Stages (No.) Current (A)
045 400/3/50
12 1 18 50 63 16
25 2 36 68 80 25
37 2 54 86 100 35
50 2 72 104 125 50
060 400/3/50
12 1 18 60 80 25
25 2 36 78 100 35
37 2 54 96 125 50
50 2 72 114 125 50
075 400/3/50
12 1 18 72 80 25
25 2 36 90 100 35
37 2 54 108 125 50
50 2 72 126 160 70
090 400/3/50
12 1 18 88 100 35
Installation manual 1
ARC units with electric heater 1.5
7
Page 12

ARC Model
Electric power sup‐
ply V/Ph/Hz
Electric resistor
Maximum total current
of the unit (A)
Maximum circuit
breaker (K Curve) (1)
Minimum cable cross-
section (mm2) (2)
Power
(kW)
Stages (No.) Current (A)
25 2 36 106 125 50
37 2 54 124 160 70
50 2 72 142 160 70
(1) K Curve (DIN, VDE 0660-104).
(2) Based on copper conductors 105 °C.
1.7 Limits of use
Model 045 060 075 090
Voltage limits Min./Max V 342/457
ARC/ARG
Temperature of air input in indoor coil
TH °C Min./Max. 15/23 15/23 15/23 15/23
DB °C Min./Max. 20/32 20/32 20/32 20/32
Outdoor temperature (without condensa‐
tion control)
TS °C Min. 7 7 7 7
Maximum outdoor tempera‐
ture (1)
At full
load
TS °C 46 46 46 46
At partial
load
TS °C 52 52 52 52
ARH/ARD
Summer cycle
Temperature of air input in indoor coil
WB °C Min./Max. 15/23 15/23 15/23 14/23
DB °C Min./Max. 20/32 20/32 20/32 20/32
Outdoor temperature (without condensa‐
tion control)
TS °C Min. 7 7 7 7
Maximum outdoor tempera‐
ture (1)
At full
load
TS °C 46 46 46 46
At partial
load
TS °C 52 52 52 52
Winter cycle
Temperature of air input in indoor coil DB °C Min./Max. 10/25 10/25 10/25 10/25
Outdoor temperature DB °C Min./Max. -10/20 -10/20 -10/20 -10/20
ARG/ARD (2) Gas heating
Indoor temperature TS °C Max 30 30 30 30
Outdoor temperature DB °C Min./Max. -15/25 -15/25 -15/25 -15/25
1. Direct sunlight on the unit should be prevented when temperatures are higher than 43ºC. If placed under some kind of protective cover, the cover should not interfere
with the flow of outdoor ventilation.
2. The gas heating units (ARG/ARD) are only appropriate for use with gas. In LPG (Liquefied Petroleum Gas, propane) installations, it must be ensured that in no case
should gasoline in liquid form reach the gas group.
DB: Dry-bulb Thermometer; TH: Wet-bulb thermometer.
1.8 Power and application data for gas ARG / ARD
Model
Heat capacity Gas consumption m3/h
Temperature rise in ºC at full
power (4)
Total (LHV) (1) kW Net kW
Natural gas (2) L.P.G. pro‐
pane (3)
Standard High power Standard High power Standard High power
Optional (on‐
ly standard)
Min. Max.
045 85 100 76 90 8,6 9,8 3,6 17 33
060 85 100 76 90 8,6 9,8 3,6 17 33
075 85 100 76 90 8,6 9,8 3,6 17 33
090 85 100 76 90 8,6 9,8 3,6 17 33
(1) LHV: Lower heating value.
(2) Natural gas 2ND-H, G20, at 20 mbar and 15 ºC
(3) Propane gas, G31, at 37 mbar and 15 ºC.
(4) The air flow should be regulated so as to increase temperature within the specified limits. Units with optional high power burners should have a minimum air flow of
10000 m3/h.
Note: The gas units are shipped ready to operate with natural gas. A conversion kit can be used to convert them to propane gas (L.P.G.).
1 Installation manual
1.7 Limits of use
8
Page 13

1.9 Hot water coil, optional in ARC/ARH
ARC/ARH
Data with water, without glycol
090
075
060
045
Water temperature ºC 90 ÷ 70
Air flow m37000 8500 10000 11500 13500 15000 16000 17000 18000
Heat capacity kW 71,1 79,5 87,0 93,7 101,7 107,3 111 114,2 117,4
Water flow m3/h 3 3,3 3,7 4 4,3 4,5 4,7 4,8 5
Pressure drop kPa 9,5 11 14 16 19 21 22 23 25
Air temperature rise K 30 27 25 24 22 21 20 19 18
Water temperature ºC 80 ÷ 60
Air flow m37000 8500 10000 11500 13500 15000 16000 17000 18000
Heat capacity kW 58,6 65,4 71,5 77 83,5 88,1 90,8 93,7 96,3
Water flow m3/h 2,5 2,8 3 3,3 3,5 3,7 3,9 4 4,1
Pressure drop kPa 7,5 9 9,5 11 13 14 16 16 18
Air temperature rise K 24 22 21 20 18 17 17 16 15
Water temperature ºC 70 ÷ 50
Air flow m37000 8500 10000 11500 13500 15000 16000 17000 18000
Heat capacity kW 46,0 51,2 55,8 61,1 65,1 68,7 71 73 75
Water flow m3/h 1,9 2,2 2,4 2,6 2,8 2,9 3 3,1 3,2
Pressure drop kPa 4,5 6 6,5 7,5 9 9,5 10,5 11 11
Air temperature rise K 19 18 16 15 14 13 13 12 12
- Pressure drop of coil + 3-way valve.
- Coil input air: 18 ℃.
- Total volume of water in circuit 10 l.
- See air pressure drop,
Pressure drop of options/accessories, gas heating and vertical ducts. , see on page 21
.
ARC/ARH
Data with a mix of water and 35% glycol
090
075
060
045
Water temperature ºC 90 ÷ 70
Air flow m37000 8500 10000 11500 13500 15000 16000 17000 18000
Heat capacity kW 68,5 76,3 83,6 89,8 97,5 102,8 106,3 109,4 112,4
Water flow m3/h 3,2 3,6 4 4,2 4,6 4,8 5 5,1 5,3
Pressure drop kPa 12 15 17 20 23 25 27 28 30
Air temperature rise K 28 26 24 22 21 20 19 18 17
Water temperature ºC 80 ÷ 60
Air flow m37000 8500 10000 11500 13500 15000 16000 17000 18000
Heat capacity kW 55,6 62 67,7 72,8 79 83,3 85,9 88,5 91
Water flow m3/h 2,6 2,9 3,2 3,5 3,7 4 4,1 4,2 4,3
Pressure drop kPa 9 10 12 14 16 18 19 20 21
Air temperature rise K 23 21 20 18 17 16 16 15 14
Water temperature ºC 70 ÷ 50
Air flow m37000 8500 10000 11500 13500 15000 16000 1700 18000
Heat capacity kW 41,4 46 50,7 54,8 59,6 63,1 65,3 67,3 69,2
Water flow m3/h 2 2,2 2,4 2,6 2,8 3 3,1 3,2 3,3
Pressure drop kPa 6 6,5 7 8,5 10 11 12 13 14
Air temperature rise K 17 16 15 14 13 12 12 11 11
- Pressure drop of coil + 3-way valve.
- Coil input air: 18 ℃.
- Total volume of water in circuit 10 l.
- See air pressure drop,
Pressure drop of options/accessories, gas heating and vertical ducts. , see on page 21
.
Installation manual 1
Hot water coil, optional in ARC/ARH 1.9
9
Page 14

1.10 Measurements, clearances and accesses
1.10.1 Connections for supply and re‐
turn side ducts
Minimum clearance
A. Minimum clearance: 900 mm
B. Minimum clearance: 600 mm (without economiser), 1,200 mm (with economiser)
C. Minimum clearance: 600 mm (without economiser), 1245 mm (with economiser)
D. Outdoor coil
1. Return air
2. Supply air
Units are shipped with the lower duct openings covered.
For applications with downward airflow ducts:
1 In order to access the covers of the lower supply and return air ducts, remove the side panels of the
supply and return air compartments.
2 Remove and discard the lower duct covers.
3 Replace the side panels of the supply and return air compartments. Make sure that the seal is com‐
pletely air-tight and check that the screws that fasten the panel have their corresponding o-rings.
For applications with sideways airflow ducts:
Flanges for connecting the side ducts are included in an accessory kit.
1 Replace the side panels of the supply and return air compartments with the set of accessory panels.
Make sure that the seal is air-tight.
1 Installation manual
1.10 Measurements, clearances and accesses
10
Page 15

2 Connect the duct system to the panel flanges.
Minimum clearance above the unit
The unit is designed to be installed outdoors.
In ground level installations, the building eaves should be at a vertical distance of at least 1830 mm from
the top of the unit and should not overhang the unit more than 915 mm.
There are no restrictions regarding the overhang if the eaves are 3000 mm or more above the unit.
1.10.2 General dimensions and ac‐
cesses (models 045/060)
A. Combustion exhaust hood
B. Combustion air input hood
C. Access to gas heating system
D. Gas supply intake (∅ 58 mm), with rubber grommet
E. RAG/RAD unit details
F. Access to motor, fan and pulleys
G. Access to heating options
H. Access to control system
I. Control cable intake (∅ 23 mm) (side)
J. Power cable intake (∅ 38 + 29 mm) (side)
K. Opening for connection of lower supply and return air ducts.
L. Control cable intake (PG 21 mm) (lower)
M. Power cable intake (PG 48 mm) (lower)
Installation manual 1
Measurements, clearances and accesses 1.10
11
Page 16

N. Close-up of the base, shown separately to be more easily seen
O. Access to filters and indoor coil
P. Condensate drain connection (1” BSP Female)
Q. Access to the outdoor air compartment
R.
Supply and return air compartment side panels See
Connections for supply and return side
ducts , ver pág. 10
S. Compressor access
T. Pressure reading connection
1. Return air
2. Supply air
3. Condensate air
1.10.3 General dimensions and ac‐
cesses (models 075/090)
A. Combustion exhaust hood
B. Combustion air input hood
C. Access to gas heating system
D. Gas supply intake (∅ 58 mm), with rubber grommet
E. RAG/RAD unit details
F. Access to motor, fan and pulleys
G. Access to heating options
H. Access to control system
I. Control cable intake (∅ 23 mm) (side)
1 Installation manual
1.10 Measurements, clearances and accesses
12
Page 17

J. Power cable intake (∅ 38 + 29 mm) (side)
K. Opening for connection of lower supply and return air ducts.
L. Control cable intake (PG 21 mm) (lower)
M. Power cable intake (PG 48 mm) (lower)
N. Close-up of the base, shown separately to be more easily seen
O. Access to filters and indoor coil
P. Condensate drain connection (1” BSP Female)
Q. Access to the outdoor air compartment
R.
Supply and return air compartment side panels See
Connections for supply and return side
ducts , ver pág. 10
S. Compressor access
T. Pressure reading connection
1. Return air
2. Supply air
3. Condensate air
1.11 ARC/ARG Performance
1.11.1 ARC/ARG 045 Cooling capacities
Return air Outdoor coil air temperature (TS)
Flow
m3/h
TH
ºC
27 ºC 35 ºC 46 ºC
PTKWPC
kW
Sensible power kW
PTkWPC
kW
Sensible power kW
PTkWPC
kW
Sensible power kW
Input temp. TS in indoor coil Input temp. TS in indoor coil Input temp. TS in indoor coil
30 27 24 22 30 27 24 22 30 27 24 22
(Mini‐
mum)
7000
23 50.9 10.9 29.4 23.5 17.6 - 48.3 12 28.5 22.6 16.7 - 43.5 13.2 26.9 21 15.1 -
19 46.1 10.6 38.3 32.5 26.6 22.7 43.5 11.5 37.3 31.4 25.5 21.6 39.1 12.4 35.6 29.8 23.9 19.9
17 43.5 10.4 42.7 36.8 30.9 35.6 40 11.4 40 35.1 29.2 30.4 35.7 12.3 35.7 33.4 27.5 23.5
15 39.1 10.2 39.1 39.1 34.1 30.1 37.4 11.2 37.4 37.4 33.1 29.2 33.5 12.2 33.5 33.5 31.5 27.5
(Nominal)
8500
23 52.8 11.1 32 25.1 18.2 - 50.1 12.2 31.1 24.2 17.3 - 45.1 13.5 29.5 22.6 15.7 -
19 47.8 10.8 42.4 35.5 28.6 24 45.1* 11.7* 41.3 34.4* 27.5 22.9 40.6 12.6 39.7 32.7 25.8 21.2
17 45.1 10.5 45.1 40.5 33.6 41.3 41.5 11.6 41.5 38.9 31.9 34 37 12.5 37 37 30.2 25.6
15 40.6 10.4 40.6 40.6 37.5 32.9 38.8 11.3 38.8 38.8 36.5 31.9 34.7 12.4 34.7 34.7 34.7 30.2
(Maxi‐
mum)
10000
23 54.1 11.3 34.5 26.6 18.7 - 51.4 12.4 33.5 25.7 17.8 - 46.3 13.7 32 24.1 16.2 -
19 49.1 10.9 46.2 38.3 30.4 25.2 46.3 11.9 45.1 37.2 29.3 24.1 41.7 12.9 41.7 35.6 27.7 22.4
17 46.3 10.7 46.3 44 36.2 46.3 42.6 11.8 42.6 42.3 34.4 37.4 38 12.7 38 38 38 27.4
15 41.7 10.6 41.7 41.6 40.7 35.4 39.8 11.5 39.8 39.8 39.7 34.5 35.7 12.6 35.7 35.7 35.7 32.8
* Data in accordance with Eurovent Rooftop program certification conditions
PT: Total Power; PC: Power absorbed by the compressor
WB: Wet-bulb temperature; TS: Dry bulb temperature.
1.11.2 ARC/ARG 060 Cooling capacities
Return air Outdoor coil air temperature (TS)
Flow
m3/h
TH
ºC
27 ºC 35 ºC 46 ºC
PTkWPC
kW
Sensible power kW
PTkWPC
kW
Sensible power kW
PTkWPC
kW
Sensible power kW
Input temp. TS in indoor coil Input temp. TS in indoor coil Input temp. TS in indoor coil
30 27 24 22 30 27 24 22 30 27 24 22
(Mini‐
mum)
9500
23 68.8 14.6 41.3 32.5 23.8 - 65.3 16 40 31.3 22.5 - 58.8 17.7 38 29.2 20.5 -
19 62.3 14.2 54.5 45.7 36.9 31.1 58.8 15.4 53 44.3 35.5 29.7 52.9 16.6 50.1 42.1 33.3 27.5
17 58.8 13.9 58.8 52.1 43.3 43.7 54.1 15.2 54.1 49.8 41.1 38.7 48.2 16.5 48.2 47.5 38.8 32.9
15 52.9 13.7 52.9 52.9 48.2 42.3 50.6 14.9 50.6 50.6 46.9 41.1 45.3 16.3 45.3 45.3 44.7 38.9
(Nominal)
11500
23 71.4 14.9 45.4 35 24.7 - 67.7 16.3 44.2 33.8 23.4 - 61 18.1 42.1 31.7 21.3 -
19 64.6 14.4 60.8 50.5 40.1 33.1 61* 15.7* 59.4 49* 38.6 31.7 54.9 17 54.9 45.8 36.4 29.5
Installation manual 1
ARC/ARG Performance 1.11
13
Page 18

Return air Outdoor coil air temperature (TS)
Flow
m3/h
TH
ºC
27 ºC 35 ºC 46 ºC
PTkWPC
kW
Sensible power kW
PTkWPC
kW
Sensible power kW
PTkWPC
kW
Sensible power kW
Input temp. TS in indoor coil Input temp. TS in indoor coil Input temp. TS in indoor coil
30 27 24 22 30 27 24 22 30 27 24 22
17 61 14.1 61 58 47.6 49.8 56.1 15.5 56.1 55.7 45.3 43 50 16.8 50 50 43 36.1
15 54.9 14 54.9 54.9 53.5 46.6 52.5 15.2 52.5 52.5 52.3 45.3 47 16.6 47 47 47 43.1
(Maxi‐
mum)
13500
23 73.2 15.1 49.3 37.3 25.4 - 69.5 16.5 48.1 36.1 24.1 - 62.6 18.3 46 34 22.1 -
19 66.4 14.6 66.4 55 43 35 62.6 15.9 62.6 53.5 41.6 33.6 56.3 17.2 56.3 51.4 39.4 31.4
17 62.6 14.3 62.6 62.6 51.6 56 57.8 15.7 57.8 57.6 49.4 47.2 51.3 17 51.3 51.3 47 39
15 56.3 14.2 56.3 56.3 56.3 50.7 53.8 15.4 53.8 53.8 53.8 49.4 48.2 16.9 48.2 48.2 48.2 47.2
* Data in accordance with Eurovent Rooftop program certification conditions
PT: Total Power; PC: Power absorbed by the compressor
WB: Wet-bulb temperature; TS: Dry bulb temperature.
1.11.3 ARC/ARG 075 Cooling capacities
Return air Outdoor coil air temperature (TS)
Flow
m3/h
TH
ºC
27 ºC 35 ºC 46 ºC
PTkWPC
kW
Sensible power kW
PTkWPC
kW
Sensible power kW
PTkWPC
kW
Sensible power kW
Input temp. TS in indoor coil Input temp. TS in indoor coil Input temp. TS in indoor coil
30 27 24 22 30 27 24 22 30 27 24 22
(Mini‐
mum)
11500
23 81.2 19.5 49.3 38.7 28 - 77 21.3 47.8 37.2 26.6 - 69.4 23.6 45.4 34.8 24.2 -
19 73.6 18.9 65.2 54.6 44 36.9 69.4 20.5 63.5 52.9 42.3 35.2 62.5 22.1 61 50.4 39.7 32.7
17 69.4 18.5 69.4 62.6 51.7 52 63.8 20.3 63.8 59.8 49.1 46 56.9 21.9 56.9 56.9 46.4 39.3
15 62.5 18.2 62.5 62.5 57.6 50.6 59.7 19.9 59.7 59.7 56.1 49.1 53.4 21.7 53.4 53.4 53.4 46.5
(Nominal)
13500
23 83.7 19.9 53.4 41.1 28.9 - 79.4 21.7 51.9 39.7 27.4 - 71.5 24 49.5 37.3 25 -
19 75.8 19.2 71.6 59.3 47.1 38.9 71.5* 20.9* 70 57.7* 45.4 37.2 64.3 22.6 64.3 55.1 42.8 34.7
17 71.5 18.8 71.5 68.2 56 58.1 65.8 20.7 65.8 65.6 53.3 50.3 58.6 22.4 58.6 58.6 50.6 42.4
15 64.3 18.6 64.3 64.3 63 54.9 61.5 20.3 61.5 61.5 61.5 53.4 55 22.2 55 55 55 50.8
(Maxi‐
mum)
16000
23 86 20.1 58.3 44.1 29.8 - 81.6 22 56.9 42.6 28.3 - 73.5 24.4 63.2 40.2 25.9 -
19 78 19.5 78 65 50.8 41.3 73.5 21.2 73.5 63.3 49.1 39.6 66.2 22.9 54.4 60.8 46.5 37
17 73.5 19.1 73.5 73.5 61 65.6 67.6 21 67.6 67.6 58.4 55.5 60.3 22.7 66.2 60.3 55.6 46.1
15 66.2 18.9 66.2 66.2 66.2 60 63.2 20.6 63.2 63.2 63.2 58.5 56.6 22.5 60.3 56.6 56.6 55.8
* Data in accordance with Eurovent Rooftop program certification conditions
PT: Total Power; PC: Power absorbed by the compressor
WB: Wet-bulb temperature; TS: Dry bulb temperature.
1.11.4 ARC/ARG 090 Cooling capacities
Return air Outdoor coil air temperature (TS)
Flow
m3/h
TH
ºC
27 ºC 35 ºC 46 ºC
PTkWPC
kW
Sensible power kW
PTkWPC
kW
Sensible power kW
PTkWPC
kW
Sensible power kW
Input temp. TS in indoor coil Input temp. TS in indoor coil Input temp. TS in indoor coil
30 27 24 22 30 27 24 22 30 27 24 22
(Mini‐
mum)
13000
23 94.5 19.5 57.8 45.2 32.6 - 89.7 21.3 56.2 43.6 31 - 80.8 23.6 53.4 40.8 28.2 -
19 85.6 18.9 76.7 64.1 51.5 43.1 80.8 20.5 74.8 62.2 49.6 41.1 72.7 22.1 71.8 59.2 46.6 38.2
17 80.8 18.5 80.8 73.3 60.7 56.2 74.3 20.3 74.3 70.3 57.7 51.4 66.3 21.9 66.3 66.3 54.5 46.1
15 72.7 18.2 72.7 72.7 67.8 59.4 69.5 19.9 69.5 69.5 66.1 57.7 62.2 21.7 62.2 62.2 62.2 54.7
(Nominal)
16000
23 98.2 22.8 64.6 49.3 34 - 93.2 25 62.9 47.6 32.3 - 84 27.6 60.1 44.8 29.5 -
19 89 22.1 87.3 71.9 56.6 46.4 84* 24* 84 70* 54.7 44.5 75.6 25.9 75.6 67 51.7 41.5
17 84 21.6 84 83 67.7 63.8 77.3 23.8 77.3 77.3 64.6 57.5 68.9 25.7 68.9 68.9 61.4 51.2
15 75.6 21.4 75.6 75.6 75.6 66.4 72.2 23.3 72.2 72.2 72.2 64.7 64.7 25.4 64.7 64.7 64.7 61.7
(Maxi‐
mum)
18000
23 100 23.1 68.9 51.8 34.7 - 95 25.3 67.3 50.2 33.1 - 85.6 27.9 64.5 47.4 30.3 -
19 90.7 22.4 90.7 77 60 48.5 85.6 24.3 85.6 75 57.9 46.5 77 26.2 77 72 54.9 43.5
17 85.6 21.9 85.6 85.6 72.2 68.9 78.8 24.1 78.8 78.7 69.1 61.4 70.2 26 70.2 70.2 65.9 54.5
15 77 21.6 77 77 77 71 73.6 23.6 73.6 73.6 73.6 69.2 66 25.8 66 66 66 66
1 Installation manual
1.11 ARC/ARG Performance
14
Page 19

* Data in accordance with Eurovent Rooftop program certification conditions
PT: Total Power; PC: Power absorbed by the compressor
WB: Wet-bulb temperature; TS: Dry bulb temperature.
1.12 ARH/ARD Output
1.12.1 ARH/ARD 045 Cooling capacities
Return air Outdoor coil air temperature (TS)
Flow
m3/h
TH
ºC
27 ºC 35 ºC 46 ºC
PTkWPC
kW
Sensible power kW
PTkWPC
kW
Sensible power kW
PTkWPC
kW
Sensible power kW
Input temp. TS in indoor coil Input temp. TS in indoor coil Input temp. TS in indoor coil
30 27 24 22 30 27 24 22 30 27 24 22
(Mini‐
mum)
7000
23 53.7 11.1 31.8 25.2 18.6 - 50.9 12.2 30.8 41.3 17.6 - 45.9 13.5 29.2 22.6 16 -
19 48.6 10.8 41.7 35.1 28.5 24.1 45.9 11.7 40.6 24.2 27.4 23 41.3 12.6 39 32.3 25.7 21.3
17 45.9 10.5 45.9 40 33.3 32.5 42.2 11.6 42.2 34 31.6 29.2 37.6 12.5 37.6 36.3 29.8 25.4
15 41.3 10.4 41.3 41.3 36.9 32.5 39.5 11.3 39.5 38.2 36 31.6 35.3 12.4 35.3 35.3 34.2 29.8
(Nominal)
8500
23 55.7 11.3 34.9 27.1 19.2 - 52.8 12.4 33.9 26.1 18.3 - 47.6 13.7 32.3 24.5 16.6 -
19 50.5 10.9 46.6 38.8 30.9 25.7 47.6* 11.9* 45.5 37.6* 29.8 24.6 42.8 12.9 42.8 35.9 28.1 22.9
17 47.6 10.7 47.6 44.5 36.6 36.8 43.8 11.8 43.8 42.7 34.9 32.4 39 12.7 39 39 33 27.8
15 42.8 10.6 42.8 42.8 41.1 35.9 40.9 11.5 40.9 40.9 40.1 34.9 36.7 12.6 36.7 36.7 36.7 33.1
(Maxi‐
mum)
10000
23 57.25 11.5 37.9 28.9 19.8 - 54.3 12.6 37 27.9 18.8 - 48.9 213.9 35.3 26.3 17.2 -
19 51.8 11.1 51.3 42.2 33.2 27.2 48.9 12.1 48.9 41.1 32.1 26 44 13.1 44 39.4 30.3 24.3
17 48.9 10.9 48.9 48.8 39.7 41.3 45 12 45 45 37.9 35.6 40.1 12.9 40.1 40.1 36.1 30
15 44 10.8 44 44 44 39 42.1 11.7 42.1 42.1 42.1 38 37.6 12.8 37.6 37.6 37.6 36.2
* Data in accordance with Eurovent Rooftop program certification conditions
PT: Total Power; PC: Power absorbed by the compressor
WB: Wet-bulb temperature; TS: Dry bulb temperature.
1.12.2 ARH/ARD 060 Cooling capacities
Return air Outdoor coil air temperature (TS)
Flow
m3/h
TH
ºC
27 ºC 35 ºC 46 ºC
PTkWPC
kW
Sensible power kW
PTkWPC
kW
Sensible power kW
PTkWPC
kW
Sensible power kW
Input temp. TS in indoor coil Input temp. TS in indoor coil Input temp. TS in indoor coil
30 27 24 22 30 27 24 22 30 27 24 22
(Mini‐
mum)
9500
23 69.8 14.2 42.2 33.1 24.1 - 66.3 15.5 40.9 31.9 22.8 - 59.7 17.1 38.8 29.8 20.7 -
19 63.2 13.7 55.7 46.7 37.7 31.6 59.7 14.9 54.3 45.2 36.3 30.2 53.7 16.1 52.1 43 34 28
17 59.7 13.4 59.7 53.3 44.3 42.5 54.9 14.8 54.9 51 42 38.3 48.9 15.9 49 48.7 36.7 33.6
15 53.7 13.3 53.7 53.7 49.3 43.3 51.3 14.5 51.3 51.3 48 42 46 15.8 46 46 45.8 39.8
(Nomi‐
nal)
11500
23 72.4 14.4 46.5 35.8 25 - 68.7 15.8 45.2 34.5 23.8 - 61.9 17.5 43.2 32.4 21.7 -
19 65.6 14 62.4 51.7 41 33.8 61.9* 15.2* 61 50.3* 39.5 32.4 55.7 16.4 55.7 48 37.3 30.1
17 61.9 13.7 61.9 59.5 48.7 48.1 56.9 15 56.9 56.9 46.5 42.5 50.8 16.3 50.8 50.8 44.1 36.9
15 55.7 13.5 55.7 55.7 55 47.8 53.2 14.7 53.2 53.2 53.2 46.5 47.7 16.1 47.7 47.7 47.7 44.2
(Maxi‐
mum)
13500
23 74.4 14.6 50.7 38.2 25.8 - 70.6 16 49.4 37 24.6 - 63.6 17.7 47.3 34.9 22.5 -
19 67.4 14.2 67.4 56.5 44.1 35.8 63.6 15.4 63.6 55.1 42.6 34.3 57.2 16.6 57.2 52.8 40.2 32.1
17 63.6 13.9 63.6 63.6 53 53 58.5 15.2 58.5 58.5 50.8 46.6 52.1 16.5 52.1 52.1 48.3 40
15 57.2 13.7 57.2 57.2 57.2 52.1 54.7 14.9 54.7 54.7 54.7 50.8 49 16.3 49 49 49 48.6
* Data in accordance with Eurovent Rooftop program certification conditions
PT: Total Power; PC: Power absorbed by the compressor
WB: Wet-bulb temperature; TS: Dry bulb temperature.
Installation manual 1
ARH/ARD Output 1.12
15
Page 20
1.12.3 ARH/ARD 075 Cooling capacities
Return air Outdoor coil air temperature (TS)
Flow
m3/h
TH
ºC
27 ºC 35 ºC 46 ºC
PTkWPC
kW
Sensible power kW
PTkWPC
kW
Sensible power kW
PTkWPC
kW
Sensible power kW
Input temp. TS in indoor coil Input temp. TS in indoor coil Input temp. TS in indoor coil
30 27 24 22 30 27 24 22 30 27 24 22
(Mini‐
mum)
11500
23 81.1 19.6 49.2 38.6 28 - 76.9 21.4 47.8 37.2 26.6 - 69.3 23.7 45.4 34.8 24.1 -
19 73.5 19 65.2 54.6 43.9 36.8 69.3 20.6 63.5 52.9 42.3 35.2 62.4 22.2 61 50.3 39.7 32.6
17 69.3 18.5 69.3 62.2 51.7 52 63.8 20.4 63.8 59.7 49.1 46 56.8 22 56.8 56.8 46.3 39.3
15 62.4 18.3 62.4 62.4 57.6 50.5 59.6 20 59.6 59.6 53.1 49.1 53.3 21.8 53.3 53.3 53.3 46.5
(Nomi‐
nal)
13500
23 83.5 19.9 53.3 41.1 28.9 - 79.3 21.7 51.9 39.6 27.4 - 71.4 24 49.5 37.2 25 -
19 75.7 19.2 71.6 59.3 47.1 38.9 71.4* 20.9* 69.9 57.6* 45.4 37.2 64.3 22.6 64.3 55.1 42.8 34.7
17 71.4 18.8 71.4 68.2 55.9 58 65.7 20.7 65.7 65.5 53.3 50.3 58.5 22.4 58.5 58.5 50.6 42.4
15 64.2 18.6 64.2 64.2 63 54.8 61.4 20.3 61.4 61.4 61.4 53.3 55 22.2 55 55 55 50.7
(Maxi‐
mum)
16000
23 85.9 20.1 58.3 44 29.8 - 81.5 22 56.8 42.6 28.3 - 73.4 24.4 54.4 40.2 25.9 -
19 77.8 19.5 77.8 65 50.7 41.3 73.4 21.2 73.4 63.3 49 39.6 66.1 22.9 66.1 60.7 46.5 37
17 73.4 19.1 73.4 73.4 61 60.6 67.5 21 67.5 67.5 58.4 55.5 60.2 22.7 60.2 60.2 55.6 46.1
15 66.1 18.9 66.1 66.1 66.1 60 63.1 20.6 63.1 63.1 63.1 58.4 56.5 22.5 56.5 56.5 56.5 55.8
* Data in accordance with Eurovent Rooftop program certification conditions
PT: Total Power; PC: Power absorbed by the compressor
WB: Wet-bulb temperature; TS: Dry bulb temperature.
1.12.4 ARH/ARD 090 Cooling capacities
Return air Outdoor coil air temperature (TS)
Flow
m3/h
TH
ºC
27 ºC 35 ºC 46 ºC
PTkWPC
kW
Sensible power kW
PTkWPC
kW
Sensible power kW
PTkWPC
kW
Sensible power kW
Input temp. TS in indoor coil Input temp. TS in indoor coil Input temp. TS in indoor coil
30 27 24 22 30 27 24 22 30 27 24 22
(Mini‐
mum)
13000
23 93.8 22.9 57.6 45 32.4 - 89 25.1 55.9 43.3 30.7 - 80.2 27.7 53.2 40.5 28 -
19 85 22.2 76.5 63.9 51.3 42.9 80.2 24.1 74.5 61.9 49.4 41 72.2 26 71.6 59 46.4 38
17 80.2 21.7 80.2 73 60.4 56 73.8 23.9 73.8 70 57.4 51.1 65.8 25.8 65.8 65.8 54.3 46
15 72.2 21.4 72.2 72.2 67.5 59.1 69 23.4 69 69 65.8 57.4 61.7 25.5 61.7 61.7 61.7 54.5
(Nomi‐
nal)
16000
23 97.6 23.4 64.4 49.1 33.8 - 92.6 25.6 62.7 47.4 32.1 - 83.4 28.3 60 44.6 29.3 -
19 88.4 22.6 87 71.7 56.4 46.2 83.4* 24.6* 83.4 69.7* 54.5 44.2 75.1 26.6 75.1 66.8 51.5 41.3
17 83.4 22.1 83.4 82.7 67.4 63.6 76.7 24.4 76.7 76.7 64.4 57.3 68.4 26.3 68.4 68.4 61.2 51
15 75.1 21.9 75.1 75.1 75.1 66.2 71.7 23.9 71.7 71.7 71.7 64.5 64.2 26.1 64.2 64.2 64.2 61.5
(Maxi‐
mum)
18000
23 99.5 23.7 68.7 51.6 34.5 - 94.3 25.9 67 50 32.9 - 85 28.6 64.2 47.2 30.1 -
19 90.1 22.9 90.1 76.7 59.6 48.2 85 24.9 85 74.8 57.7 46.3 76.5 26.9 76.5 71.8 54.7 43.3
17 85 22.4 85 85 71.9 68.6 78.2 24.7 78.2 78.2 68.9 61.2 69.7 26.6 69.7 69.7 65.7 54.3
15 76.5 22.2 76.5 76.5 76.5 70.7 73.1 24.2 73.1 73.1 73.1 68.8 65.5 26.4 65.5 65.5 65.5 65.5
* Data in accordance with Eurovent Rooftop program certification conditions
PT: Total Power; PC: Power absorbed by the compressor
WB: Wet-bulb temperature; TS: Dry bulb temperature.
1.12.5 ARH/ARD 045 Thermodynamic heat capacity
Flow
m3/h
Return
air TS
ºC
Outdoor air temperature TS ºC
-10 -5 0 5 7 10 15 20
PT PC PT PC PT PC PT PC PT PC PT PC PT PC PT PC
(Minimum)
7000
14 30.2 10.2 34.1 10.7 38.6 11.1 43.5 11.4 45.6 11.9 48.9 12.3 54.8 13.2 61.1 13.7
17 29.8 11.1 33.7 11.6 38.1 12.1 43 12.3 45.1 12.9 48.3 13.4 54.2 14.3 60.4 14,9
20 29.5 11.4 33.3 11.8 37.7 12.3 42.5 12.6 44.6 13.2 47.8 13.7 53.6 14.7 59.7 15.2
23 29.1 12.1 32.9 12.6 37.2 13.2 42 13.5 44 14.1 47.2 14.6 52.9 15.7 59 16.2
25 28.9 12.5 32.7 13 37 13.6 41.7 13.9 43.7 14.5 46.9 15 52.6 16.1 58.6 16.7
(Nominal)
8500
14 30.6 9.9 34.6 10.3 39.2 10.8 44.2 11 46.3 11.6 49.6 12 55.6 12.8 62 13.3
17 30.2 10.8 34.2 11.2 38.7 11.7 43.6 12 45.7 12.5 49 13 55 13.9 61.3 14.4
1 Installation manual
1.12 ARH/ARD Output
16
Page 21
Flow
m3/h
Return
air TS
ºC
Outdoor air temperature TS ºC
-10 -5 0 5 7 10 15 20
PT PC PT PC PT PC PT PC PT PC PT PC PT PC PT PC
20 29.9 11 33.8 11.5 38.2 12 43.1 12.2 45.2* 12.8* 48.4 13.2 54.3 14.21 60.6 14.7
23 29.5 11.8 33.3 12.3 37.7 12.8 42.6 13.1 44.6 13.7 47.8 14.2 53.6 15.2 59.8 15.8
25 29.3 12.1 33.1 12.6 37.5 13.2 42.3 13.4 44.3 14.1 47.5 14.6 53.3 15.6 59.4 16.2
(Maximum)
10000
14 30.9 9.7 34.9 10.1 39.5 10.5 44.6 10.7 46.7 11.3 50.1 11.6 56.2 12.5 62.6 12.9
17 30.5 10.5 34.5 10.9 39.1 11.4 44.1 11.6 46.2 12.2 49.5 12.6 55.5 13.5 61.9 14
20 30.2 10.7 34.1 11.2 38.6 11.7 43.5 11.9 45.6 12.5 49 12.9 54.9 13.8 61.2 14.3
23 29.8 11.5 33.7 11.9 38.1 12.5 43 12.7 45.1 13.3 48.3 13.8 54.2 14.8 60.3 15.3
25 29.6 11.8 33.4 12.3 37.9 12.8 42.7 13.1 44.8 13.7 48 14.2 53.8 15.2 60 15.8
* Data in accordance with Eurovent Rooftop program certification conditions
PT: Total Power; PC: Power absorbed by the compressor
WB: Wet-bulb temperature; TS: Dry bulb temperature.
1.12.6 ARH/ARD 060 Thermodynamic heat capacity
Flow
m3/h
Return
air TS
ºC
Outdoor air temperature TS ºC
-10 -5 0 5 7 10 15 20
PT PC PT PC PT PC PT PC PT PC PT PC PT PC PT PC
(Minimum)
9500
14 38.7 11.4 43.7 11.8 49.5 12.4 55.9 12.6 58.6 13.2 62.8 13.7 70.4 14.7 78.5 15.2
17 38.2 12.3 43.2 12.8 49 13.4 55.25 13.7 57.9 14.3 62 14.8 69.6 15.9 77.6 16.5
20 37.8 12.6 42.7 13.1 48.4 13.7 54.6 14 57.2 14.7 61.3 15.2 68.7 16.3 76.6 16.9
23 37.3 13.5 42.2 14 47.8 14.7 53.8 15 56.4 15.7 60.5 16.2 67.8 17.4 75.6 18
25 37.1 13.9 41.9 14.4 47.5 15.1 53.5 15.4 56.1 16.1 60.1 16.7 67.4 17.9 75.2 18.5
(Nominal)
11500
14 39.3 11 44.4 11.5 50.2 12 56.7 12.2 59.4 12.8 63.7 13.3 71.4 14.2 79.6 14.7
17 38.8 11.9 43.8 12.4 49.7 13 56 13.3 58.7 13.9 63 14.4 70.6 15.4 78.7 16
20 38.3 12.2 43.2 12.7 49.1 13.3 55.3 13.6 58* 14.2* 62.2 14.7 69.7 15.8 77.7 16.3
23 37.8 13.1 42.8 13.6 48.4 14.2 54.6 14.5 57.2 15.2 61.4 15.7 68.8 16.9 76.7 17.5
25 37.6 13.4 42.5 14 48.1 14.6 54.3 14.9 56.9 15.6 61 16.2 68.4 17.3 76.2 18
(Maximum)
13500
14 39.7 10.7 44.8 11.2 50.7 11.7 57.2 11.9 60 12.5 64.3 12.9 72.1 13.9 80.4 14.4
17 39.2 11.6 44.3 12.1 50.2 12.6 56.6 12.9 59.3 13.5 63.6 14 71.3 15 79.4 15.6
20 38.7 11.9 43.8 12.4 49.6 12.9 55.9 13.2 58.6 13.8 62.8 14.3 70.4 15.3 78.5 15.9
23 38.2 12.7 43.2 13.2 48.9 13.8 55.2 14.1 57.8 14.8 62 15.3 69.5 16.4 77.5 17
25 38 13.1 43 13.6 48.6 14.2 54.8 14.5 57.5 15.2 61.6 15.7 69.1 16.9 77 17.5
* Data in accordance with Eurovent Rooftop program certification conditions
PT: Total Power; PC: Power absorbed by the compressor
WB: Wet-bulb temperature; TS: Dry bulb temperature.
1.12.7 ARH/ARD 075 Thermodynamic heat capacity
Flow
m3/h
Return
air TS
ºC
Outdoor air temperature TS ºC
-10 -5 0 5 7 10 15 20
PT PC PT PC PT PC PT PC PT PC PT PC PT PC PT PC
(Minimum)
11500
14 47.9 15.9 54.1 16.5 61.2 17.2 69.1 17.6 72.4 18.4 77.6 19.1 87 20.5 97 21.2
17 47.3 17.2 53.4 17.9 60.5 18.7 68.3 19.1 71.5 20 76.7 20.7 86 22.2 95.9 23
20 46.7 17.5 52.8 18.3 59.8 19.1 67.4 19.5 70.7 20.4 75.8 21.1 85 22.7 94.7 23.5
23 46.1 18.8 52.1 19.6 59 20.4 66.6 20.9 69.8 21.8 74.8 22.6 83.9 24.3 93.5 25.1
25 45.8 19.3 51.8 20.1 58.7 21 66.2 21.5 69.3 22.5 74.3 23.3 83.4 24.9 93 25.8
(Nominal)
13500
14 48.5 15.4 54.8 16 62.1 16.7 70 17.1 73.4 17.9 78.7 18.5 88.3 19.8 98.4 20.6
17 48 16.6 54.2 17.3 61.4 18.1 69.2 18.5 72.6 19.4 77.8 20 87.2 21.5 97.2 22.2
20 47.4 17 53.6 17.7 60.6 18.5 68.4 18.9 71.7* 19.8* 76.9 20.5 86.25 22 96.1 22.8
23 46.8 18.2 52.9 19 60 19.8 67.5 20.2 70.8 21.2 75.9 21.9 85.1 23.5 95 24.4
25 46.5 18.7 52.5 19.5 59.5 20.4 67.1 20.8 70.3 21.8 75.4 22.5 84.5 24.1 94.2 25
(Maximum)
16000
14 49 15 55.4 15.6 62.7 16.3 70.7 16.6 74.2 17.4 79.5 18 89.1 19.3 99.4 20
17 48.4 16.2 54.7 16.9 62 17.6 69.9 18 73.3 18.9 78.6 19.5 88.1 20.9 98.2 21.7
20 47.9 16.6 54.1 17.3 62.3 18 69.1 18.4 72.4 19.3 77.6 20 87 21.4 97 22.2
23 47.2 17.7 53.4 18.5 60.5 19.3 68.2 19.7 71.5 20.6 76.6 21.4 85.9 22.9 95.8 23.7
Installation manual 1
ARH/ARD Output 1.12
17
Page 22

Flow
m3/h
Return
air TS
ºC
Outdoor air temperature TS ºC
-10 -5 0 5 7 10 15 20
PT PC PT PC PT PC PT PC PT PC PT PC PT PC PT PC
25 47 18.2 53.1 19 60.1 19.8 67.8 20.3 71 21.2 76.2 22 85.4 23.5 95.2 24.4
* Data in accordance with Eurovent Rooftop program certification conditions
PT: Total Power; PC: Power absorbed by the compressor
WB: Wet-bulb temperature; TS: Dry bulb temperature.
1.12.8 ARH/ARD 090 Thermodynamic heat capacity
Flow
m3/h
Return
air TS
ºC
Outdoor air temperature TS ºC
-10 -5 0 5 7 10 15 20
PT PC PT PC PT PC PT PC PT PC PT PC PT PC PT PC
(Minimum)
13000
14 57.7 18.4 65.2 19.2 73.9 20 83.3 20.5 87.3 21.4 93.6 22.2 105 23.8 117 24.6
17 57.1 20 64.5 20.8 73 21.7 82.3 22.2 86.3 23.2 92.5 24 103.7 25.8 115.7 27
20 56.4 20.4 63.7 21.2 72.1 22.2 81.4 22.7 85.3 23.7 91.4 24.6 102.5 26.3 114.3 27.3
23 55.6 21.8 62.9 22.7 71.2 23.7 80.3 24.3 84.2 25.4 90.2 26.3 101.2 28.2 112.8 29.2
25 55.3 22.5 62.5 23.4 70.8 24.4 79.8 24.9 83.7 26.1 89.7 27 100.6 29 112.1 30
(Nominal)
16000
14 58.5 17.9 66.2 18.6 74.9 19.4 84.5 19.8 88.6 20.8 95 21.5 106.5 23 118.7 23.9
17 57.9 19.3 65.4 20.1 74 21 83.5 21.5 87.5 22.5 93.8 23.3 105.2 25 117.3 25.9
20 57.2 19.8 64.6 20.6 73.2 21.5 82.5 22 86.5* 23* 92.7 23.8 104 25.5 116 26.4
23 56.4 21.2 63.8 22 72.2 23 81.4 23.5 85.4 24.6 91.5 25.5 102.6 27.3 114.4 28.3
25 56.1 21.8 63.4 22.6 71.8 23.7 81 24.2 84.9 25.3 91 26.2 102 28.1 113.7 29.1
(Maximum)
18000
14 59.1 17.4 66.8 18.1 75.7 18.9 85.3 19.3 89.5 20.2 96 20.9 107.5 22.4 119.9 23.3
17 58.4 18.8 66 19.6 74.8 20.5 88.4 20.9 88.4 21.9 94.8 22.7 106.3 24.3 118.5 25.2
20 57.7 19.3 65.3 20 73.9 20.9 83.3 21.4 87.4 22.4 93.7 23.2 105 24.8 117 25.8
23 57 20.6 64.4 21.4 73 22.4 82.3 22.9 86.2 24 92.4 24.8 103.6 26.6 115.5 27.6
25 56.7 21.2 64 22 72.5 23 81.8 23.5 85.7 24.6 91.9 25.5 103 27.3 114.8 28.3
* Data in accordance with Eurovent Rooftop program certification conditions
PT: Total Power; PC: Power absorbed by the compressor
WB: Wet-bulb temperature; TS: Dry bulb temperature.
1.13 Indoor fan
1.13.1 Features table
Model Fan kit
Motor (1) Motor pulley (adjustable) Fan pulley (fixed) Belt
kW
Type of cas‐
ing
∅ pulley (mm)
∅ shaft
(mm)
∅ pulley
(mm)
∅ shaft
(mm)
Length (mm) Ref. Qty.
045
Standard 3 100 LB 109-135 28 236 25 1840 BX71 1
Option HPD 4 kW 4 100 LC 109-135 28 190 25 1740 BX67 1
060
Standard 4 100 LC 124-150 28 236 25 2040 BX79 1
Option HPD 5.5 kW 5,5 112 MB 147-178 28 236 25 2040 BX79 1
075
Standard 5,5 112 MB 124-150 28 236 25 2040 BX79 1
Option HPD 7.5 kW 7,5 132 M 147-178 38 236 25 2123 BX82 1
090
Standard 7,5 132 M 139-173 38 250 35 2040 BX79 2
Option HPD 9.2 kW 9,2 132 MBA 139-173 38 250 35 2040 BX79 2
Option HPD 11 kW 11 132 MB 152-190 38 250 35 2040 BX79 2
(1) All motors are totally closed, cooled by fans at 1450 r/min, with a solid base and a service factor of 1.15.
Inside fan output tables for determining the motor pulley adjustment and the type of drive needed for the installation.
1.13.2 Considerations when consulting the output tables
Indoor fan output tables
For units with 0% outdoor air and 100% return air, dry indoor coil, and standard G4 filters.
1 Installation manual
1.13 Indoor fan
18
Page 23
C AU T I O N
Before consulting the tables, add secure drops to the pressure required for the installation due to:
• heat pump (models ARH/ARD-045 and 060)
• Gas heating (ARG/ARD Models)
• vertical supply and return and
• accessories included in the unit, when appropriate. See Pressure drop of options/accessories, gas
heating and vertical ducts. , see on page 21 .
The motor pulleys come adjusted to an opening of 4 turns. See
Maintenance tasks performed by spe‐
cialised personnel
, see on page 35
for the belt adjustment and tightening procedure.
C AU T I O N
• Before commissioning the installation, but after balancing the air distribution in the building, the supply
air flow should be checked.
• With clean filters the indoor fan should not exceed a -200 Pa drop in intake.
1.13.3 Output table for indoor fan, model ARC-045, applications with side
ducts, standard drive motor 3 kW
Motor pulley open‐
ing adjustment
(no. of turns)
Air flow m3/h
7000 8000 8500 9000 10000
SPA kW SPA kW SPA kW SPA kW SPA kW
0 244 1,9 203 2,1 182 2,2 160 2,4 114 2,7
1 220 1,8 185 2,0 155 2,1 134 2,3 85 2,6
2 194 1,7 167 1,9 130 2 106 2,1 53 2,4
3 174 1,6 138 1,8 106 1,9 80 2 - -
4 152 1,4 108 1,6 82 1,8 54 1,9 - -
5 122 1,3 80 1,5 52 1,6 - - - -
6 94 1,1 52 1,4 - - - - - -
SPA: Static pressure available (Pa).
1.13.4 Performance table for inside fan, model ARC-045, applications with
side ducts, optional operation HPD motor 4 kW
Motor pulley opening
adjustment (no. of
turns)
Air flow m3/h
7000 8000 8500 9000 10000
PED kW PED kW PED kW PED kW PED kW
0 425 2,8 392 3,2 368 3,3 346 3,5 298 3,9
1 380 2,8 342 3,1 320 3,3 297 3,5 244 3,8
2 338 2,7 294 3,0 268 3,2 247 3,4 187 3,7
3 310 2,6 270 2,9 246 3,0 225 3,2 168 3,5
4 280 2,4 248 2,7 224 2,8 202 3,0 147 3,3
5 245 2,3 212 2,6 188 2,7 165 2,9 110 3,2
6 212 2,2 175 2,5 150 2,6 126 2,7 70 3,0
PED: Static pressure available (Pa).
1.13.5 Output table for indoor fan, model ARC-060, applications with side
ducts, standard drive motor 4 kW
Motor pulley open‐
ing adjustment
(no. of turns)
Air flow m3/h
9500 10500 11500 12500 13500
PED kW PED kW PED kW PED kW PED kW
0 340 3,2 308 3,5 270 3,9 230* 4,3* 176* 4,5*
1 310 3,1 277 3,4 240 3,7 197* 4,1* 146* 4,4*
2 280 2,9 248 3,2 210 3,5 163 3,9 115* 4,3*
3 250 2,7 220 3,0 180 3,3 147 3,7 88* 4,1*
4 218 2,5 188 2,8 152 3,1 130 3,5 60 3,9
Installation manual 1
Indoor fan 1.13
19
Page 24
Motor pulley open‐
ing adjustment
(no. of turns)
Air flow m3/h
9500 10500 11500 12500 13500
PED kW PED kW PED kW PED kW PED kW
5 190 2,3 162 2,6 123 3,0 90 3,4 30 3,7
6 160 2,1 134 2,4 92 2,8 50 3,2 - -
PED: Static pressure available (Pa).
* Zone outside of range
1.13.6 Output table for indoor fan, model ARC-060, applications with side
ducts, optional HPD drive motor 5.5 kW
Motor pulley opening
adjustment (no. of
turns)
Air flow m3/h
9500 10500 11500 12500 13500
PED kW PED kW PED kW PED kW PED kW
0 505 3,7 472 4,1 430 4,6 390 5,0 347* 5,7*
1 475 3,5 440 3,9 400 4,3 357 4,8 310 5,5
2 447 3,4 410 3,5 370 4,2 323 4,6 273 5,2
3 418 3,2 380 3,4 340 3,9 292 4,4 245 4,9
4 387 3,0 350 3,2 307 3,7 260 4,1 215 4,5
5 340 2,9 306 3,1 267 3,5 223 3,9 178 4,3
6 295 2,7 262 3,0 227 3,3 185 3,7 140 4,1
PED: Static pressure available (Pa).
* Zone outside of range
1.13.7 Output table for indoor fan, model ARC-075, applications with side
ducts, standard drive motor 5.5 kW
Motor pulley open‐
ing adjustment
(no. of turns)
Air flow m3/h
11500 12500 13500 14500 15000 16000
PED kW PED kW PED kW PED kW PED kW PED kW
0 335 3,9 294 4,3 240 4,7 195 5,1 143 5,4 105* 5,8*
1 280 3,6 240 4,0 190 4,4 140 4,8 108 5,1 45 5,5
2 226 3,3 187 3,8 140 4,1 85 4,5 50 4,8 - -
3 190 3,1 148 3,5 104 3,8 25 4,2 - - - -
4 155 2,9 116 3,2 43 3,6 - - - - - -
5 124 2,8 78 3,1 - - - - - - - -
6 97 2,7 40 3,0 - - - - - - - -
PED: Static pressure available (Pa).
* Zone outside of range
1.13.8 Performance table for inside fan, model ARC/ARH-075, applications
with side ducts, optional operation HPD motor 7.5 kW
Motor pulley open‐
ing adjustment
(no. of turns)
Air flow m3/h
11500 12500 13500 14500 15000 16000
PED kW PED kW PED kW PED kW PED kW PED kW
0 -* -* -* -* -* -* -* -* 625* 8,2* 540* 8,8*
1 -* -* -* -* -* -* 595 7,4 564* 8,0* 508* 8,6*
2 660 5,1 630 5,9 588 6,5 540 7,2 512* 7,7* 460* 8,4*
3 610 4,9 565 5,5 524 6,1 478 6,8 450 7,3 400* 7,9*
4 550 4,7 510 5,2 465 5,8 420 6,5 394 6,9 338 7,5
5 495 4,5 450 5,0 408 5,5 362 6,1 330 6,5 277 7,0
6 440 4,3 400 4,8 352 5,3 305 5,8 273 6,1 220 6,6
* Zone outside of range
1 Installation manual
1.13 Indoor fan
20
Page 25
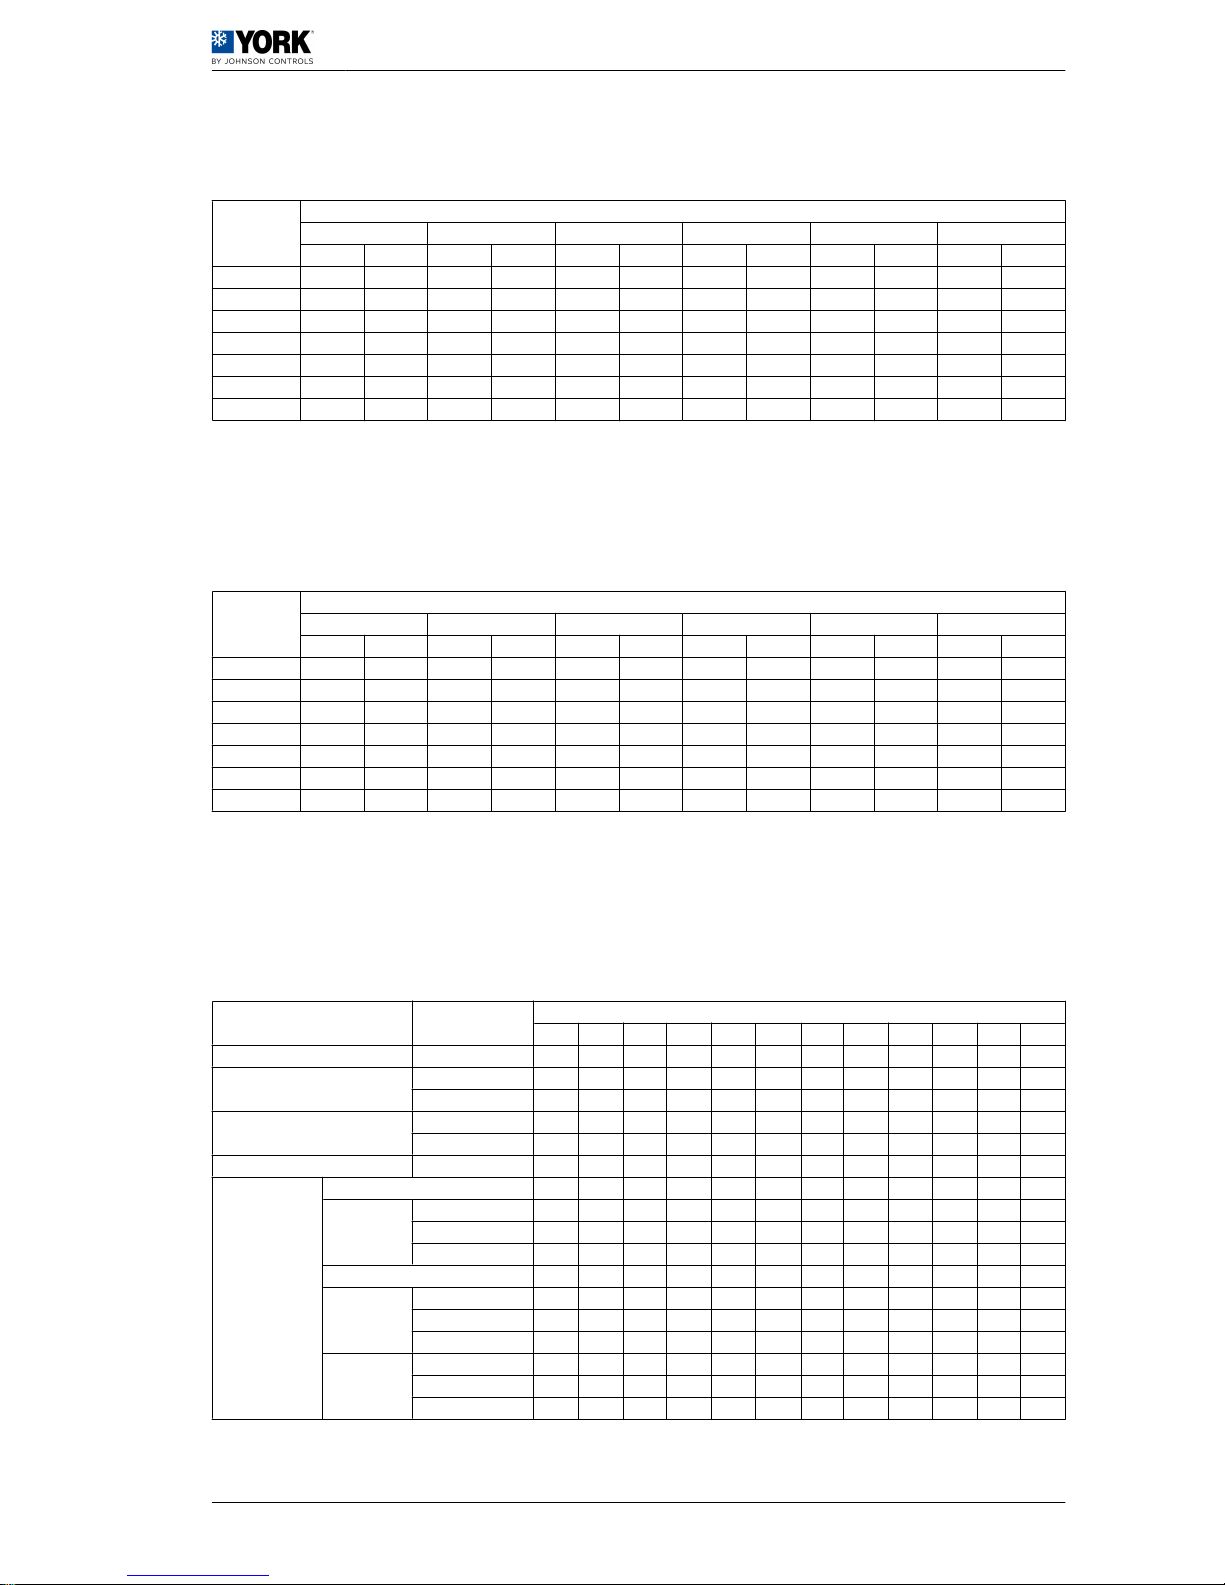
1.13.9 Output table for indoor fan, model ARC/ARH-090, applications with
side ducts, standard drive motor 7.5 kW and optional HPD motor 9.2 kW.
Motor pulley
opening adjust‐
ment (no. of
turns)
Air flow m3/h
13000 14000 15000 16000 17000 18000
PED kW PED kW PED kW PED kW PED kW PED kW
0 480 6,9 420 7,5 368 7,9 314* 8,3* 250* 9,1* 180* 9,8*
1 435 6,5 380 7,1 322 7,5 265* 8,0* 205* 8,7* 136* 9,5*
2 390 6,1 335 6,6 276 7,0 218* 7,7* 160* 8,3* 93** 9,1**
3 352 5,6 298 6,1 245 6,5 184 7,1 120* 7,8* 55** 8,5**
4 316 5,1 262 5,5 212 6,0 150 6,6 78 7,3 - -
5 270 4,9 215 5,3 167 5,8 105 6,4 35 7,0 - -
6 225 4,7 172 5,1 120 5,7 60 6,2 - - - -
PED: Static pressure available (Pa).
* Optional Zone HPD motor 9,2 kW
** Zone outside of range
1.13.10 Output table for indoor fan, model ARC/ARH-090, applications with
side ducts, optional HPD drive motor 11 kW
Motor pulley
opening adjust‐
ment (no. of
turns)
Air flow m3/h
13000 14000 15000 16000 17000 18000
SPA kW SPA kW SPA kW SPA kW SPA kW SPA kW
0 -* -* -* -* 535 8,4 465 9,0 398 9,7 330 10,5
1 610 7,5 550 7,9 472 8,3 408 8,9 343 9,6 275 10,4
2 540 7,3 474 7,7 412 8,1 352 8,7 288 9,4 220 10,2
3 494 6,9 434 7,4 375 7,9 315 8,4 254 9,1 185 9,9
4 447 6,5 395 7,0 338 7,6 278 8,1 220 8,8 150 9,6
5 396 6,2 344 6,7 285 7,2 227 7,8 168 8,4 98 9,2
6 345 5,9 292 6,3 236 6,8 176 7,4 115 8,0 45 8,7
SPA: Static pressure available (Pa).
* Zone outside of range
1.14 Pressure drop of options/accessories, gas heating and ver‐
tical ducts.
Model m3/h (x 1000)
Pressure drop (Pa)
7 8 9 10 11 12 13 14 15 16 17 18
Gas heating ARG/ARD 18 20 24 30 37 45 53 60 70 80 90 100
Heat pump
ARH/ARD 045 8 13 14 17
ARH/ARD 060 18 22 26 30 34 36
Vertical supply
045/060 28 32 38 45 56 70 82 93
075/090 28 30 35 45 57 85 125 165
Vertical return 12 12 12 12 12 12 12 12 12 12 12 12
Option or accessory
Economiser / Motorised damper
7 9 11 13 16 19 22 25 29 33 37 43
Electric resistor
kW
12-25 20 28 36 44 56 68 80 92 110 125 144 170
37 28 37 46 56 70 85 100 114 130 150 172 194
50 45 60 75 92 110 130 155 180 210 240 274 310
Water coil 35 43 52 63 76 90 104 119 133 147 163 190
Air filters (F6)
045/060 50 55 65 70 75 87 100 114
075 55 65 68 70 82 87
090 78 80 92 97 110 118
Air filters (F7)
045/060 67 75 85 95 105 115 125 135
075 75 85 90 95 107 115
090 100 105 117 125 135 145
Installation manual 1
Pressure drop of options/accessories, gas heating and vertical ducts. 1.14
21
Page 26

1.15 Instructions for installation and connection of the unit
1.15.1 Characteristics of the placement
The location of the unit must be studied to ensure a completely satisfactory installation. To do so, the
environmental conditions of the area where the unit is to be installed must be taken into account.
Furthermore, the normal weather conditions should be instrumental in determining the best position of
the unit and the hoods, screens or covers required to ensure its correct working order.
If possible, in warm zones like the southern Europe, the unit should be located on the north or east side
of the building or property.
The location chosen for the unit must provide the condenser with an unlimited air supply.
As well as the technical data given in this document and any others that are applicable, please bear in
mind that the unit has been designed for outdoors installation only.
Where the unit is to be installed at ground level, refer to section
Specifications for the foundation or
anchoring of the unit , see on page 23
.
Where the unit is to be installed on the roof of a building or property, make sure that the roof structure
can support the weight of the unit plus that of any optional equipment and/or accessories to be fitted.
The unit must be installed on a specific mounting base or on a frame of appropriate steel angles. There
are optional mounting bases available (Roof-curb).
Regardless, keep the level tolerance at maximum 10 mm all along the length and width of the unit.
If the unit is to be installed on a base or on a special angle frame that is not the standard Roof-curb,
gaskets should be applied to all surfaces that are touching the bottom of the unit.
If it is preferred to place the unit on shock absorbers, this should be done as described in
Connections
for supply and return side ducts , see on page 10
.
Special instructions for locations where there is regular snowfall or with ambient temperatures of close
to 0ºC or less
In areas where there is regular or sporadic snow, the unit should be elevated above the ground or roof
where it is installed. The height should be enough to prevent the unit, the condenser and evaporator air
inlets and the access to the unit panels from becoming blocked by accumulated snow.
Protection against ice
In areas where the temperature can be 0ºC or less, there should be some kind of additional protection
to prevent the water contained in the condensate drain pipe from freezing.
Use an electric cord resistor in the drain trap as well as in the drain, where applicable.
In heat pumps, also use cord resistors in the outdoor coil tray to prevent any ice from accumulating.
Special instruction for locations with high ambient temperatures
In areas where the ambient temperature is over 43ºC, the unit must not be located in direct sunlight and,
therefore a specific sunshade will be required.
The installation of a special sunshade over the unit must not effect the air flow required by the unit to
work correctly. Check the minimum clearance required
Connections for supply and return side ducts ,
see on page 10
.
1.15.2
Characteristics of the facility where the unit will be installed
The air duct installation where the unit is to be installed must be formed by a closed return duct system.
The additional installation of economisers or outdoor air intakes is not excluded.
To reduce operating noise, the supply and return air duct connections on the unit must be made using
flexible joints.
1 Installation manual
1.15 Instructions for installation and connection of the unit
22
Page 27

The supply and return air duct systems must be designed for the air flow requirements of the installation.
The ducts should not be sized based on the supply and return air connection sizes of the unit.
Duct covers
Units are shipped with side and lower duct openings covered. See section
Connections for supply and
return side ducts , see on page 10
.
1.15.3 Specifications for the foundation or anchoring of the unit
Where the unit is to be installed at ground level, the characteristics of the ground it will sit on must be
taken into account.
Characteristics, such as acceptable surface firmness, must be suitable for the foundation the unit re‐
quires.
The unit should be placed on a level concrete slab at least 100 mm thick.
The length and width of the slab must be at least 150 mm more than the base rails on the unit.
C AU T I O N
Do not attach the unit to the foundations of the building.
1.15.4 Characteristics of utility provider connections
In general, the different connections required by the unit are made following the shortest route possible.
Under no circumstances may any local or national regulations be contravened when performing the
preparatory work for service connections.
N OT E
For further information on this subject, always keep the current regulations for the country where the unit
is being installed at hand.
C AU T I O N
• Before the connection work, possible losses of flow, temperature and voltage drops, etc. that might
affect the distances between planned connection points and the unit must be taken into account.
• As a result, each connection must be sized accordingly.
Additional specifications for the gas connection (for ARG/ARD models only)
To correctly size the gas supply pipe, keep in mind the flow required, the specific density of the gas and
the length of the stretch.
The fact that the heating value of the gas can vary from town to town should also be kept in mind. The
heating value of the gas should be checked with the utility company.
1.15.5 Preparation and connecting to the various utilities
Gas. Insulation and/or duct protection.
A specific line should be used for gas supply. Its installation must comply with country and local safety
regulations.
N OT E
For further information on this subject, always keep the current regulations for the country where the unit
is being installed at hand.
Installation manual 1
Instructions for installation and connection of the unit 1.15
23
Page 28

Access for the gas supply pipe connection
Access for the gas supply pipe connection is through
the opening on the front panel of the unit. -1-.
A special grommet, kept in fan compartment, is pro‐
vided for the gas supply pipe, This grommet should
be placed in the panel at the front of the unit at the
time the gas supply pipe is installed.
Important recommendations for the installation of the gas supply pipe
1 If the supply line needs to carry gas when there is condensation, then a device for its collection and
discharge should be installed. -2-.
2 Install a manual gas supply shut-off valve -3- if required by the current regulations in the country the
unit is being installed in.
3 Install a ground in the gas supply line.
4 Use a wrought iron or steel pipe for the installation of the gas supply line.
5 Before installing the pipe hit the outside with a hammer to get rid of any dirt or scale it might have
inside. Use compressed air to expel any residue and particles that might be there.
6 Apply a moderate amount of sealing paste to the threads of the male part of the joint.
D AN G E R
• Natural gas may contain a small quantity of propane, which is an efficient solvent of lead carbonate
and most common commercial compounds.
• In installations involving wrought iron or steel, a specialised putty should be used to seal them.
• Sealing material that complies with the BS6956 standards, part 5 or equivalent may be used.
7 Purge the air from the gas supply line before using it.
8 Open the unit's main gas supply valve.
9 Apply a soapy water solution to all joints to test for any leaks.
D AN G E R
• DANGER OF EXPLOSION. Never use a flame to verify the absence of leaks in the installation
joints.
• During gas supply line pressure tests with pressures greater than 0,5 PSI (3,5 kPa), the burner
and its manual shut-off valve must be disconnected from the system of gas supply pipes.
Gas. Modification for service with LPG (Liquefied Petroleum Gas, propane gas)
All units with gas heating are specially manufactured to operate with natural gas. The unit can be modified
to operate with LPG (Liquefied Petroleum Gas, propane gas) if necessary. This involves a conversion
kit that is assembled during the installation work.
A specific line should be used for gas supply. Its installation must comply with country and local safety
regulations.
The LPG propane pressure must be at 37 mbar with the unit at full load for it to operate correctly.
Three main factors must be taken into consideration in order to keep the gas pressure values correct:
1 Speed of gas evaporation, which depends on:
a. the temperature of the liquid and
b. the size of the "wet surface" of the container or containers.
1
Installation manual
1.15 Instructions for installation and connection of the unit
24
Page 29

2 Correct pressure regulation.
3 Pressure drop in the supply lines between the regulators and the unit. The diameter of the pipe
depends on its length and the total load of all units.
N OT E
LPG propane gas tank and component manufacturers, as well as their suppliers, can provide complete
information about the sizing of the tank in regards to evaporation, pipes, and recommended regulator
adjustments.
Important recommendations for the installation of the gas supply pipe:
Gas. Insulation and/or duct pro‐
tection. , see on page 23
.
Electricity. Power and control
POWER LINE
Power must be supplied to the unit through a specific
electricity supply line with an exclusive power control
and differential breaker, installed in line with national
and local regulations.
N OT E
For further information on this subject, always keep
the current regulations for the country where the unit
is being installed at hand.
Make sure that the electricity supply line has enough
capacity to power the unit. Its length, the cable diam‐
eter and their protection (cover or jacket) should be
appropriate for the unit.
Use a multimeter to check that the supply voltage
stays within the accepted limits.
Technical and phys‐
ical data for ARC (cool only) and ARG (cool only + gas
heat) , see on page 4
or
ARH technical and physical
data (heat pump) and ARD (heat pump + gas heat) ,
see on page 5
.
To install the power cable, loosen the closures by 1/4
turn -1- and remove the panel covering the electrical
panel.
Installation manual 1
Instructions for installation and connection of the unit 1.15
25
Page 30

Bringing the power and control cables directly from
the Roof-curb
Remove the protective plate -1-.
Pull the cables through the gland at the base of the
unit. -1- and -5-.
Pull the cables through the grommet to the electrical
panel. -2- and -4-.
Seal the glands with silicone to ensure they are leakproof.
Replace the protective plate.
Passing the power and control cables through the
front of the unit.
Exchange the position of the side cover -3- and the
plate that has the grommet. -2- and -4-.
Press the the appropriate openings on the edge of the
unit -6- until they are released.
Place gland that fits the cable and pull the cable
through the grommet to the electrical panel. -2-.
Connect the cable to the input connections indicated
and firmly tighten the set screws. Also consult the
Wiring Diagrams.
N OT E
The complete wiring diagram for the unit is attached
to the inside of the electrical panel.
The electrical panel is fitted with a phase detector to
ensure the electrical connection follows the sequence
of phases R-S-T. Where the connection does not re‐
spect this sequence, the electronic control circuit re‐
mains disconnected and the unit will not start.
To correct the phase sequence, change the position
of two of the three unit power cables on the input ter‐
minals.
CONTROL LINE
1
Installation manual
1.15 Instructions for installation and connection of the unit
26
Page 31

Bringing the power and control cables directly from
the Roof-curb
Remove the protective plate -1-.
Pull the cables through the gland at the base of the
unit. -1- and -5-.
Pull the cables through the grommet to the electrical
panel. -2- and -4-.
Seal the glands with silicone to ensure they are leakproof.
Replace the protective plate.
Passing the power and control cables through the
front of the unit.
Exchange the position of the side cover -3- and the
plate that has the grommet. -2- and -4-.
Press the the appropriate openings on the edge of the
unit -6- until they are released.
Place gland that fits the cable and pull the cable
through the grommet to the electrical panel. -2-.
Connect the cable to the terminals indicated and firm‐
ly tighten the set screws. Also consult the Wiring Di‐
agrams.
N OT E
The complete wiring diagram for the unit is attached
to the inside of the electrical panel.
Condensates. Insulation and/or protec‐
tion of ducts
Condensates should be released by means of a spe‐
cific installation in line with local or national regula‐
tions.
N OT E
For further information on this subject, always keep
the current regulations for the country where the unit
is being installed at hand.
Installation manual
1
Instructions for installation and connection of the unit 1.15
27
Page 32

Condensate drain pipes are connected using a fe‐
male thread 1” BSP connection -1- situated on the
bottom of the unit.
Install a drain trap on the exhaust outlet of the unit.
The drain trap should be fitted with an access hatch
-1- for easier draining and cleaning where required.
Apply a moderate amount of sealing paste to the
threads of the male part of the joint.
Lay the condensate drain pipe from the female con‐
nection on the bottom of the unit to a nearby drain.
N OT E
The condensate drain pipe should be at a minimum
gradient of 2% (2 cm of drop for each metre in length).
Protection against ice
In areas where the temperature can be 0ºC or less, there should be some kind of additional protection
to prevent the water contained in the condensate drain pipe from freezing.
An electric heater (wire heater) should be installed in the drain trap and in the condensate drain pipe.
For units with heat pumps, electric heaters must also be installed in the outdoor coil tray to prevent
possible ice accumulation.
1 Installation manual
1.15 Instructions for installation and connection of the unit
28
Page 33

1.16 Instructions for starting up the unit
1.16.1 Electrical checks
Remove the transport fastening from the compres‐
sors
The compressors have a fastening system to prevent
them from moving during transport.
Once the unit is installed and before making its initial
connection, these fastenings must be removed. To do
so:
1 Loosen the central screws in the supports (painted
yellow) of the tandem compressors without re‐
moving them.
2 Remove the two fasteners -1-.
3 Tighten the central screws until the are completely
screwed in.
4 Check that the tandem compressors are resting
on their antivibration supports.
D AN G E R
• All side panels except for that of the electrical box,
must be fitted, closed and secured with their cor‐
responding locks before turning the general switch
on the unit.
• The unit has a remote control, which means that
the fan turbine may start unexpectedly.
C AU T I O N
Loose connection terminals produce overheating of
cables and terminals. The unit is working incorrectly
and there is a risk of fire.
Check that the cables are firmly secured to their con‐
nection terminals.
C AU T I O N
Do not turn on the general switch on the unit or start
the unit until all installation work has been completed.
Initial connection of the unit
Once all of the planned accessories are installed, and
before starting the unit, its general switch must be
turned on. -Q3-.
Press the "Test" button for two seconds so that the
unit recognises the installed accessories. When the
recognition process is complete, the red pilot light
switches off.
Rotating direction of the scroll compressors
Installation manual 1
Instructions for starting up the unit 1.16
29
Page 34

The scroll compressors and the fans only operate correctly if they rotate in the correct direction. All of
the motors and compressors in the unit are connected so that they rotate correctly.
If the compressors are not connected correctly and are rotating in the wrong direction:
• The compressor will not compress.
• Operating noise will be abnormal.
• Electricity consumption (A) will be low.
• They overheat.
1.16.2 Starting the gas heating, ARG/ARD
D AN G E R
• In order to prevent damage to the gas valves, the burner group should be disconnected form the gas
pipe system during the pressure test.
• Only an Authorised Technical Assistance Service for Johnson Controls Inc. with the appropriate
technical resources and adequately trained personnel may perform the start up tasks for gas heating
on the unit.
Prior checks
1. Check that the type of gas to be used is the same as that specified on the ticket situated to the left of
the gas section access panel.
2. Check that the covers for the gas outlets and the combustion air intake have been correctly installed.
See
General dimensions and accesses (models 045/060) , see on page 11
or
General dimensions and
accesses (models 075/090) , see on page 12
.
3. Check that the combustion air intake is free of obstruction from dirt, snow, branches, dry leaves, residue
or other objects.
4. Make sure the the gas supply line complies with safety regulations, that it is able to supply an adequate
flow and pressure of gas, and that it has been purged of air. See
Gas. Insulation and/or duct protec‐
tion. , see on page 23
or
Gas. Modification for service with LPG (Liquefied Petroleum Gas, propane
gas) , see on page 24
.
Lighting
The burner is equipped with an automatic lighting system.
D AN G E R
Do not try to start the burner manually.
Start up without the portable YKTOOL test device (accessory)
1. Connect the electrical supply to the unit.
2. Open the unit's gas supply valve.
3. Place the ambient thermostat in the maximum heat.
4. The burner group should light (it might take a few minutes depending on the mode established in the
thermostat)
Post start up checks
Once the entire control circuit is activated and the heating section is operating, the following checks
should be made:
1. Make sure there are no gas leaks either in the unit's pipes or in the supply pipes.
D AN G E R
Never use a flame to verify the absence of leaks in the installation joints. DANGER OF EXPLOSION.
1 Installation manual
1.16 Instructions for starting up the unit
30
Page 35

2. Check that the pressure of the supply gas is within the limits designated on the rating plate.
3. The supply pressure at full output should be checked for all gas appliances in the building.
4. Pressure in the gas supply line should never exceed 25 mbar In units powered by natural gas, the
operating pressure should never fall below 12.5 mbar.
N OT E
If the gas supply is outside these limits, contact the gas utility company or your local representative for
corrective measures.
5. Check that gas pressure in the manifold is correct. See
Pulley adjustment (models 045/060/075: 1
groove; models 090: 2 grooves) , see on page 31
.
6. Check that the flame in the burners is completely
blue.
A. Burner
B. Heat exchanger tube
C. Burner flame
D. Pilot tube
E. Supply manifold
7. After 15 minutes operating and using a combustion
gas analyser, test the CO, CO2 and Nox content, if
possible, in the discharge of the flue passage. With
both stages of heat operating, the carbon monoxide
(CO) content should be less than 0.1 % (1000 ppm).
The CO/CO2 ratio should be less than 0.02.
Pulley adjustment (models 045/060/075:
1 groove; models 090: 2 grooves)
Loosen the nuts -A-. Never loosen nuts -C-.
Loosen the belts by turning the screw -B-.
Loosen the set screws -D- to release the mobile rim E-.
To increase or decrease the opening of the pulley,
turn the mobile rim -E- on the thread of the fixed core
of the pulley in the appropriate direction.
Apply sealant to the threads of the set screws. -D- and
fully tighten, checking that they match up to their
housing in the fixed core of the pulley.
1.
Pulley completely closed (maximum diame‐
ter). Maximum air flow.
2.
Pulley completely open (minimum diameter).
Minimum air flow.
DP Pulley diameter
Installation manual 1
Instructions for starting up the unit 1.16
31
Page 36

C AU T I O N
In the case of model 090, both of the pulley grooves
should be at the same distance from the fixed core of
the pulley (same number of open or close turns).
1.
Pulley completely closed (maximum diame‐
ter). Maximum air flow.
2.
Pulley completely open (minimum diameter).
Minimum air flow.
DP Pulley diameter
Gas pressure regulation in the burner
supply manifold
The units are manufactured and regulated for the
2ND-H (G-20) natural gas family .
Gas is regulated depending on the type of gas used,
follow the steps below and adjust the two valves ac‐
cording the values specified in
Pulley adjustment
(models 045/060/075: 1 groove; models 090: 2
grooves) , see on page 31
.
C AU T I O N
The gas valve in units converted to LPG (Liquid Pe‐
troleum Gas, propane) should be regulated according
to the technical instructions included in the conversion
kit.
1. Tasks to do first:
– Regulation of the inside pilot -Pe-. The regulator
screw is under the plastic cap. Starting at the “com‐
pletely closed (-)” position, make -V1- five complete
anti-clockwise turns using a flat tipped screw driver
– Regulating using quick partial opening -Vstart-. The
regulator screw is under the plastic cap. Starting at
the “completely closed (-)” position, make -Vstart- one
turn in anti-clockwise direction using the the cap itself
C AU T I O N
• Do not use a screwdriver to make a quick partial
opening regulation. -Vstart-.
• Never move the screw resealed in red.
1
Installation manual
1.16 Instructions for starting up the unit
32
Page 37

2. Regulating the GV1 valve with a heat stage oper‐
ating.
– Adjust the main regulator (reading pressure Pa).
– Adjust the gas stage regulation fly wheel -Vmax-. To
do so, loosen the first cylindrical head screw. -T- next
to the symbol -.
– Check the pressure reading in the manifold valve
outlet -Pc-.
– Once adjusted, tighten the screw -T-.
C AU T I O N
Never move the resealed blue screw next to the (+)
symbol.
3. Regulating the GV2 valve with two heat stages op‐
erating.
– Adjust the main regulator and the gas stage follow‐
ing the same procedures as described for valve GV1.
– After fifteen minutes operating with the 2 heat
stages, check the content of CO and CO2, according
to
Post start up checks , see on page 30
.
Temperature rise regulation
The temperature rise (or difference in temperature between the return air and the hot supply air) should
be within the specified limits.
Power and application data for gas ARG / ARD , see on page 8
.
Once the temperature rise has been determined, the flow may be calculated as follows:
m3/s =
0.9 x kW gas input (*)
1.2072 x °C Temperature rise
(*) Based on 90% rated output and on the net heating value of the gas.
Find the temperature rise after 15 minutes operating. So as not to be affected by radiant heat from the
exchanger, the reading for hot air should be taken in the supply duct at a minimum of 2 metres from the
unit connection .
Increase the air flow of the fan to reduce the temperature rise; reduce the air flow of the fan to in‐
crease the temperature rise.
1.17 Unblocking the unit safely in case of breakdown
D AN G E R
• All side panels except for that of the electrical box,
must be fitted, closed and secured with their cor‐
responding locks before turning the general switch
on the unit.
• The unit has a remote control, which means that
the fan turbine may start unexpectedly.
To unlock the unit, see "Restarting the air conditioning
unit in the case of damage" in the User Manual.
Installation manual
1
Unblocking the unit safely in case of breakdown 1.17
33
Page 38
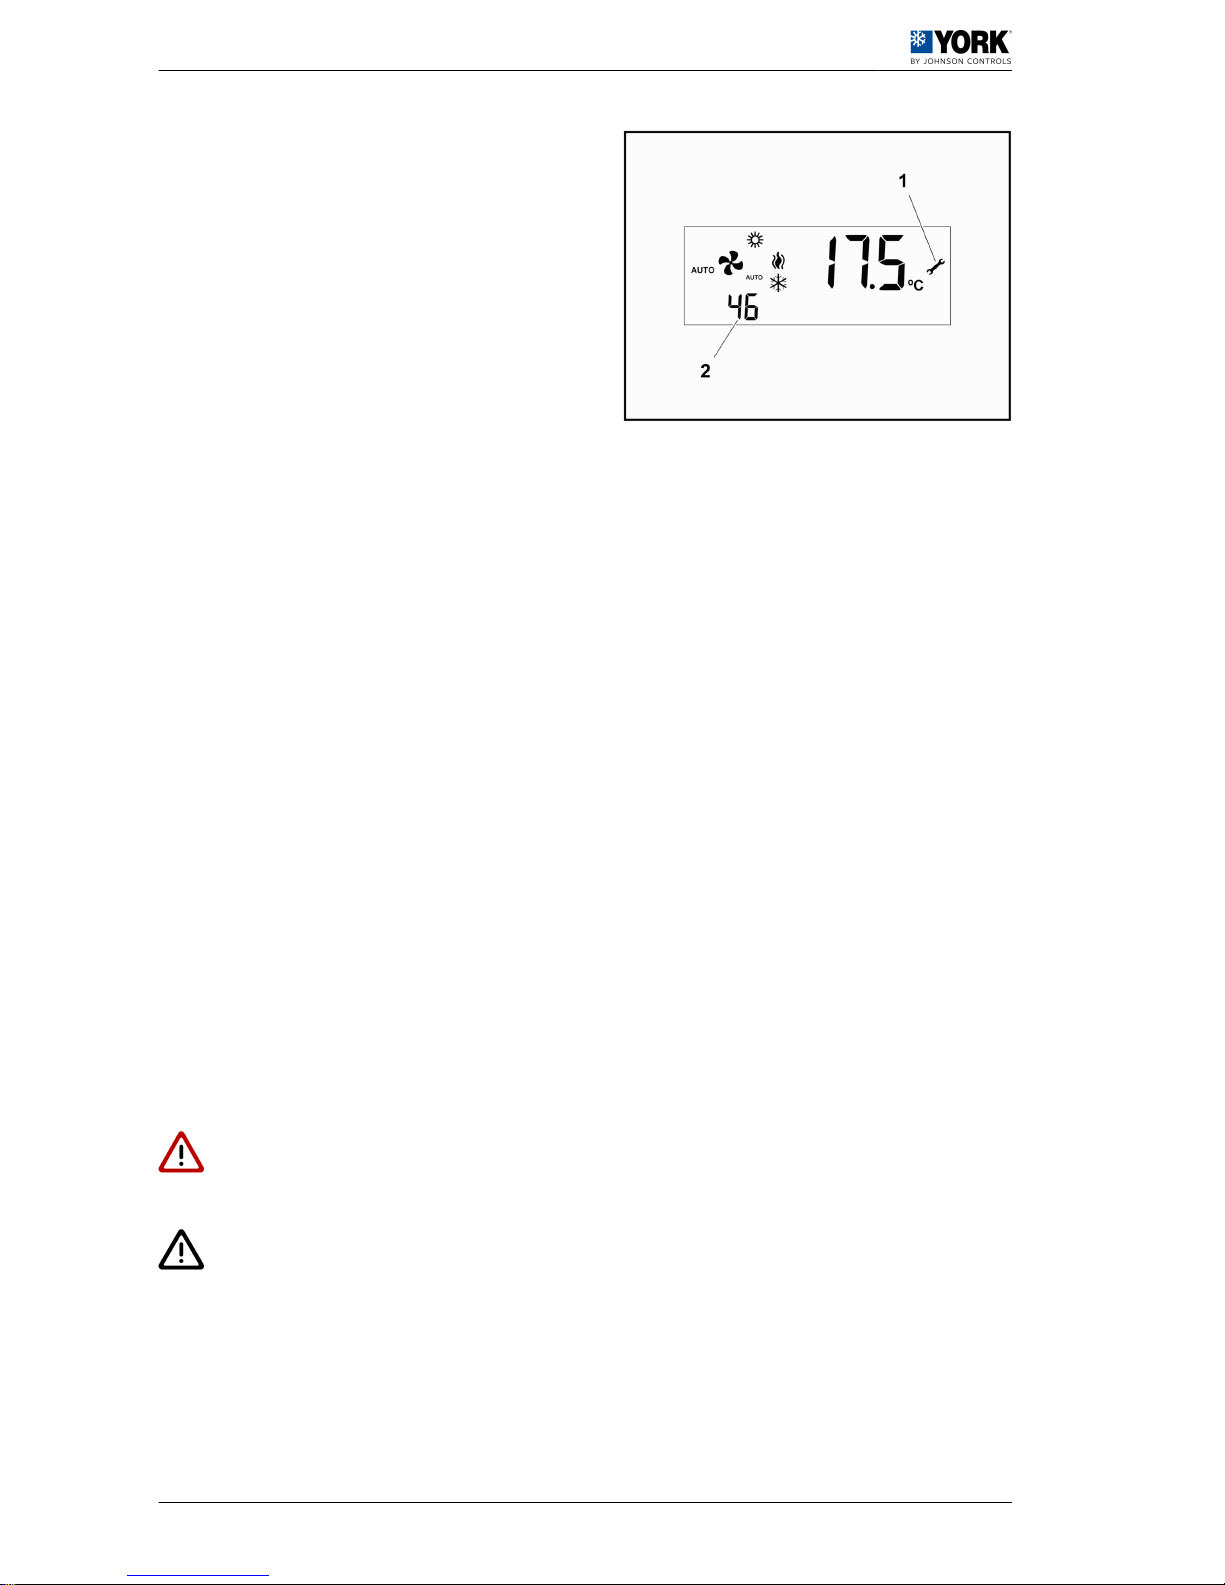
If the thermostat display keeps showing the pilot light
-1- and any fault code or if the air conditioner does not
start, contact a Johnson Controls Inc. Authorised
Technical Assistance Service.
1.18 Regular maintenance tasks performed by specialised per‐
sonnel
Like any other machine, the unit requires regular maintenance, as the wear to which some of its parts
are subjected can effect its mechanical reliability, electrical consumption and working life.
In order to keep the unit in similar working order to when it was installed and commissioned, a series of
maintenance tasks must be performed every so often.
Furthermore, all maintenance and servicing tasks required by local and national regulations must be
carried out.
D AN G E R
Only a Johnson Controls Inc. Authorised Technical Assistance Service with the appropriate technical
resources and suitably trained personnel may perform the unit maintenance tasks.
C AU T I O N
Johnson Controls Inc. shall not be considered responsible for any damage caused by inappropriate use
or maintenance of the unit that is in any way inconsistent with that described in this document or others
specifically provided with the platform.
1.18.1 Planned Maintenance Schedule
The following table shows the recommended frequency for regular maintenance tasks. Depending on
the environmental and working conditions where the unit is installed, maintenance tasks may be carried
out more or less frequently. The units must undergo all planned maintenance, without exception.
1 Installation manual
1.18 Regular maintenance tasks performed by specialised personnel
34
Page 39
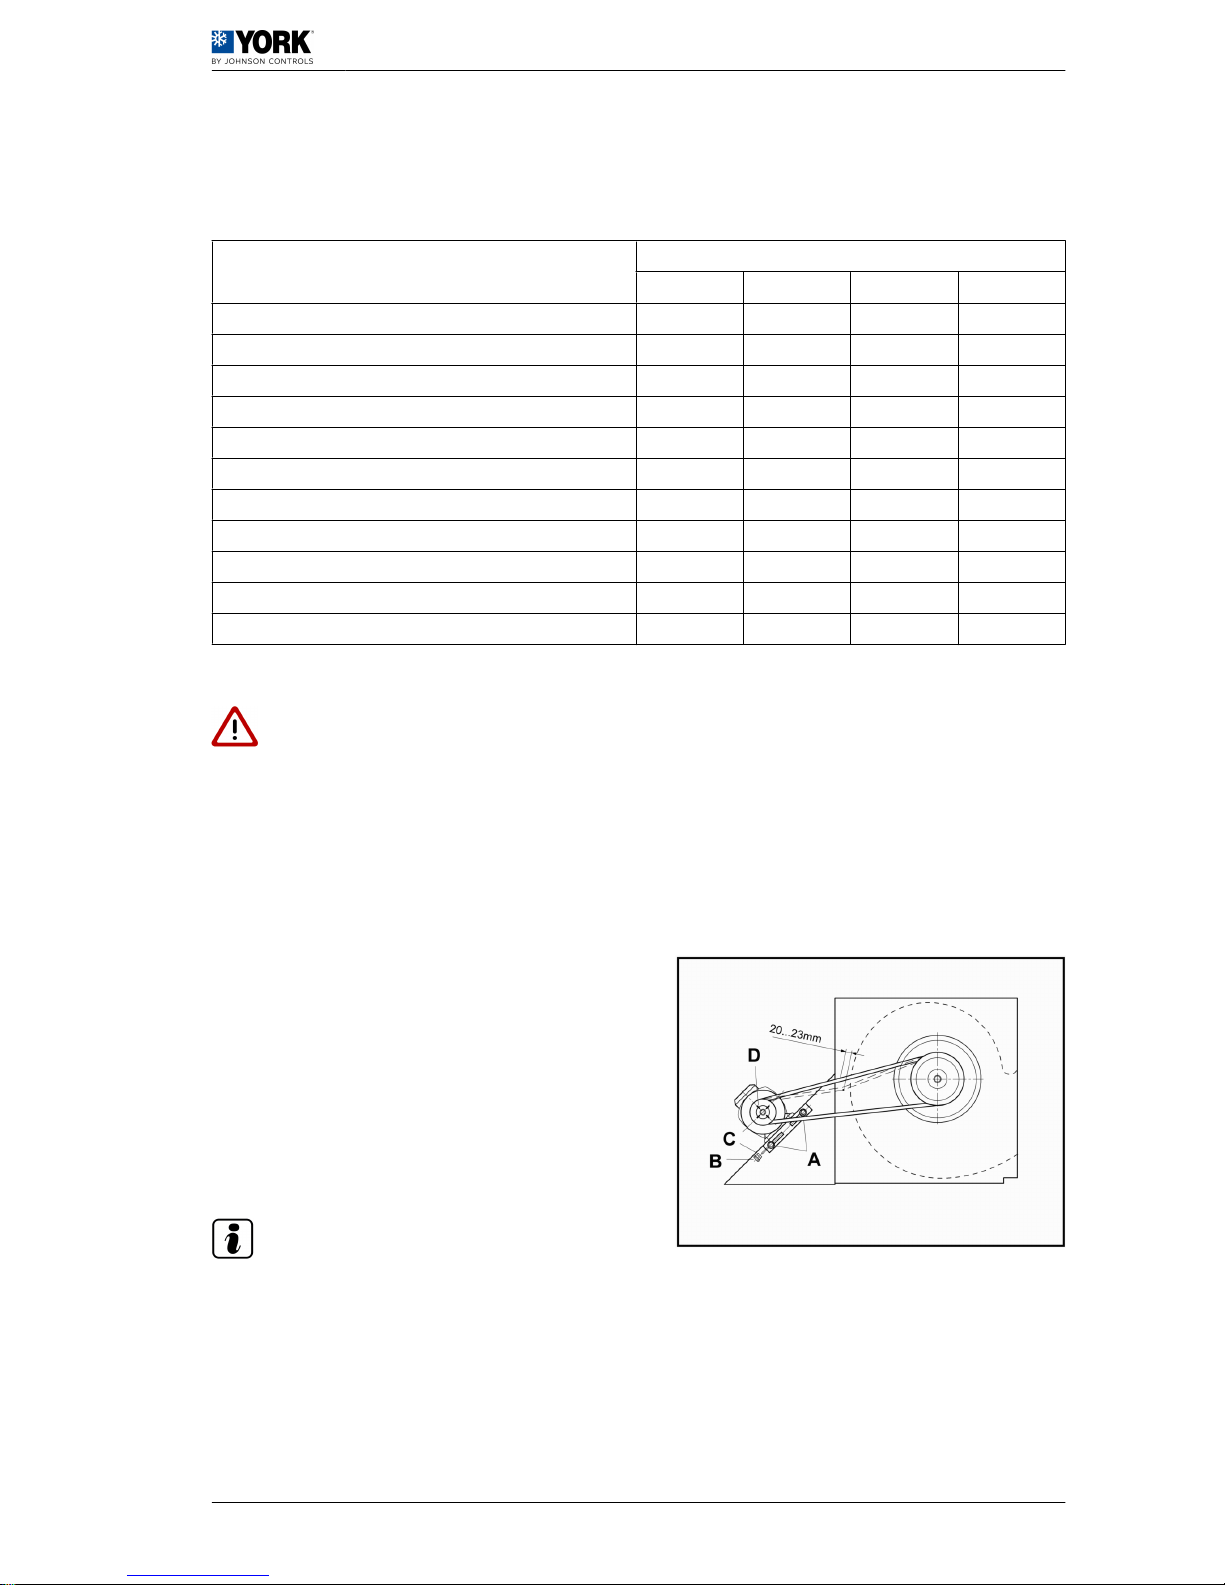
The person responsible for the building or property where the unit is installed must ensure that these
inspections are performed at the appropriate time. Likewise, this person should keep and maintain a log
book reflecting both planned and unplanned work by the Johnson Controls Inc. Authorised Technical
Assistance Service.
Task
Frequency
1 month 2 months 6 months Annual
Belts (indoor fan) X
Air filters X
Indoor coil (evaporator) X
Condensate tray and drain trap X
Outdoor coil (condenser) X
Outdoor air intake (accessory) X
Refrigerant circuit X
Electrical and mechanical operation X
Integrity of the unit structure and components X
Hot water coil (accessory) X
Gas heating (ARG/ARD Models) X
1.18.2 Maintenance tasks performed by specialised personnel
D AN G E R
• The unit has a remote control, which means that the fan turbine may start unexpectedly.
• Disconnect the general switch on the unit before removing any of its side panels.
Belts (indoor fan)
Check their condition and correct tensioning.
If it is necessary to replace the belts, they should be
the same type and size as the originals.
Tensioning of the belts and adjusting the pulley
All units incorporate single speed motors with belt
transmission for indoor ventilation.
1 Loosen the nuts -A-. Never loosen nuts -C-.
2 Tighten the belts by turning the screw -B- until the
belt moves: 20...23 mm.
3 Tighten the nuts -A-.
4 Check the tension of the belts twice during the first
24 hours of unit operations.
N OT E
The fan motor variable diameter pulley can be regu‐
lated in order to obtain the supply air flow desired.
Pulley adjustment (models 045/060/075:
1 groove; models 090: 2 grooves)
Loosen the nuts -A-. Never loosen the nuts -C-.
Loosen the belts by turning the screw -B-.
Installation manual 1
Regular maintenance tasks performed by specialised personnel 1.18
35
Page 40

Loosen the set screws -D- to release the mobile rim E-.
To increase or decrease the opening of the pulley,
turn the mobile rim -E- on the thread of the fixed core
of the pulley in the appropriate direction.
Apply sealer to the threads of the set screws. -D- and
attach them to the bottom, checking that they match
up to their housing in the fixed core of the pulley.
1.
Pulley completely closed (maximum diame‐
ter) Maximum air flow
2.
Pulley completely open (minimum diameter)
Minimum air flow
DP Pulley diameter
C AU T I O N
In the case of model 090, both of the pulley grooves
should be at the same distance from the fixed core of
the pulley (same number of open or close turns).
1.
Pulley completely closed (maximum diame‐
ter) Maximum air flow
2.
Pulley completely open (minimum diameter)
Minimum air flow
DP Pulley diameter
Air filters
The air filters should be replaced by new ones of the same type and size, as required.
Slide the unit filters out on their guides to replace them.
I NF O R M AT I O N
If the unit has an energy recovery system (accessory), it is important to follow the planned maintenance
frequency for air filters.
Indoor coil
Visually inspect the indoor coil when performing air filter maintenance.
The complete surface of the fins must be kept clean. If they need to be cleaned, use a soft brush or a
vacuum cleaner, taking special care not to damage the fins.
D AN G E R
Never use a water hose to clean the indoor coil compartment.
Condensate tray and drain trap
Remove all dirt and residue accumulated in the condensate tray.
Check that neither the condensation outlet nor the drain trap is blocked.
Check that the condensate (water) has been correctly released to the outside.
Fill the drain trap with water if required (prime it).
1 Installation manual
1.18 Regular maintenance tasks performed by specialised personnel
36
Page 41

Outdoor coils
The complete surface of the fins must be kept clean. If they need to be cleaned, use a soft brush or a
vacuum cleaner, taking special care not to damage the fins.
Given that they are exposed to the outdoors, the fins can accumulate a lot of dirt and grime (dust, soot,
sand, etc.). To clean the fins more thoroughly, use water with a neutral detergent (e.g. washing-up liquid).
Clean from the inside out and from top to bottom.
Outdoor air intake (accessory)
If the system has an economiser, motorised damper or energy recuperation system, maintenance work
should be performed for the air filters included on the inside of the rain hood.
Check that the aluminium mesh and the filter frames are in good condition.
If necessary, clean the filters more completely using water with a neutral detergent (for example house‐
hold dish soap).
C AU T I O N
The filters have an arrow indicating airflow direction stamped on the frame, the arrow should point to the
inside of the unit.
Cooling Circuit
Before the start of each season when the unit is in use, a thorough check of the refrigerant circuit must
be made, including operating pressures, controls and temperature rises, etc.
Electrical and mechanical operation
Before the start of each season when the unit is in use, check the consumption (in amps) of all motors,
the condition of the electrical connections and the correct working order of the safety and protection
systems.
The motor bearings for both the indoor and outdoor fans are permanently lubricated and do not need
additional lubricant during maintenance.
If the unit has an economiser, motorised damper or barometric relief damper
(accessory):
Check that the air dampers and their drive motors work correctly.
If the unit has an axial exhaust fan (accessory):
Check the condition of the fan and the operating control.
Condition of the unit structure and components
Check the correct condition of the unit structure and outdoor components for knocks, dents, scratched
paint or rust. Check that screws are properly secured and the condition of leak-proof seals and panel
locks and make sure they close properly.
Hot water coil (accessory)
Before the start of each season of operation, check the level of water in the system, that air has been
purged from the coils, and the operation of control components.
Depending on the climate where the unit is installed, the mix of anti-freeze and water must be checked.
Installation manual 1
Regular maintenance tasks performed by specialised personnel 1.18
37
Page 42
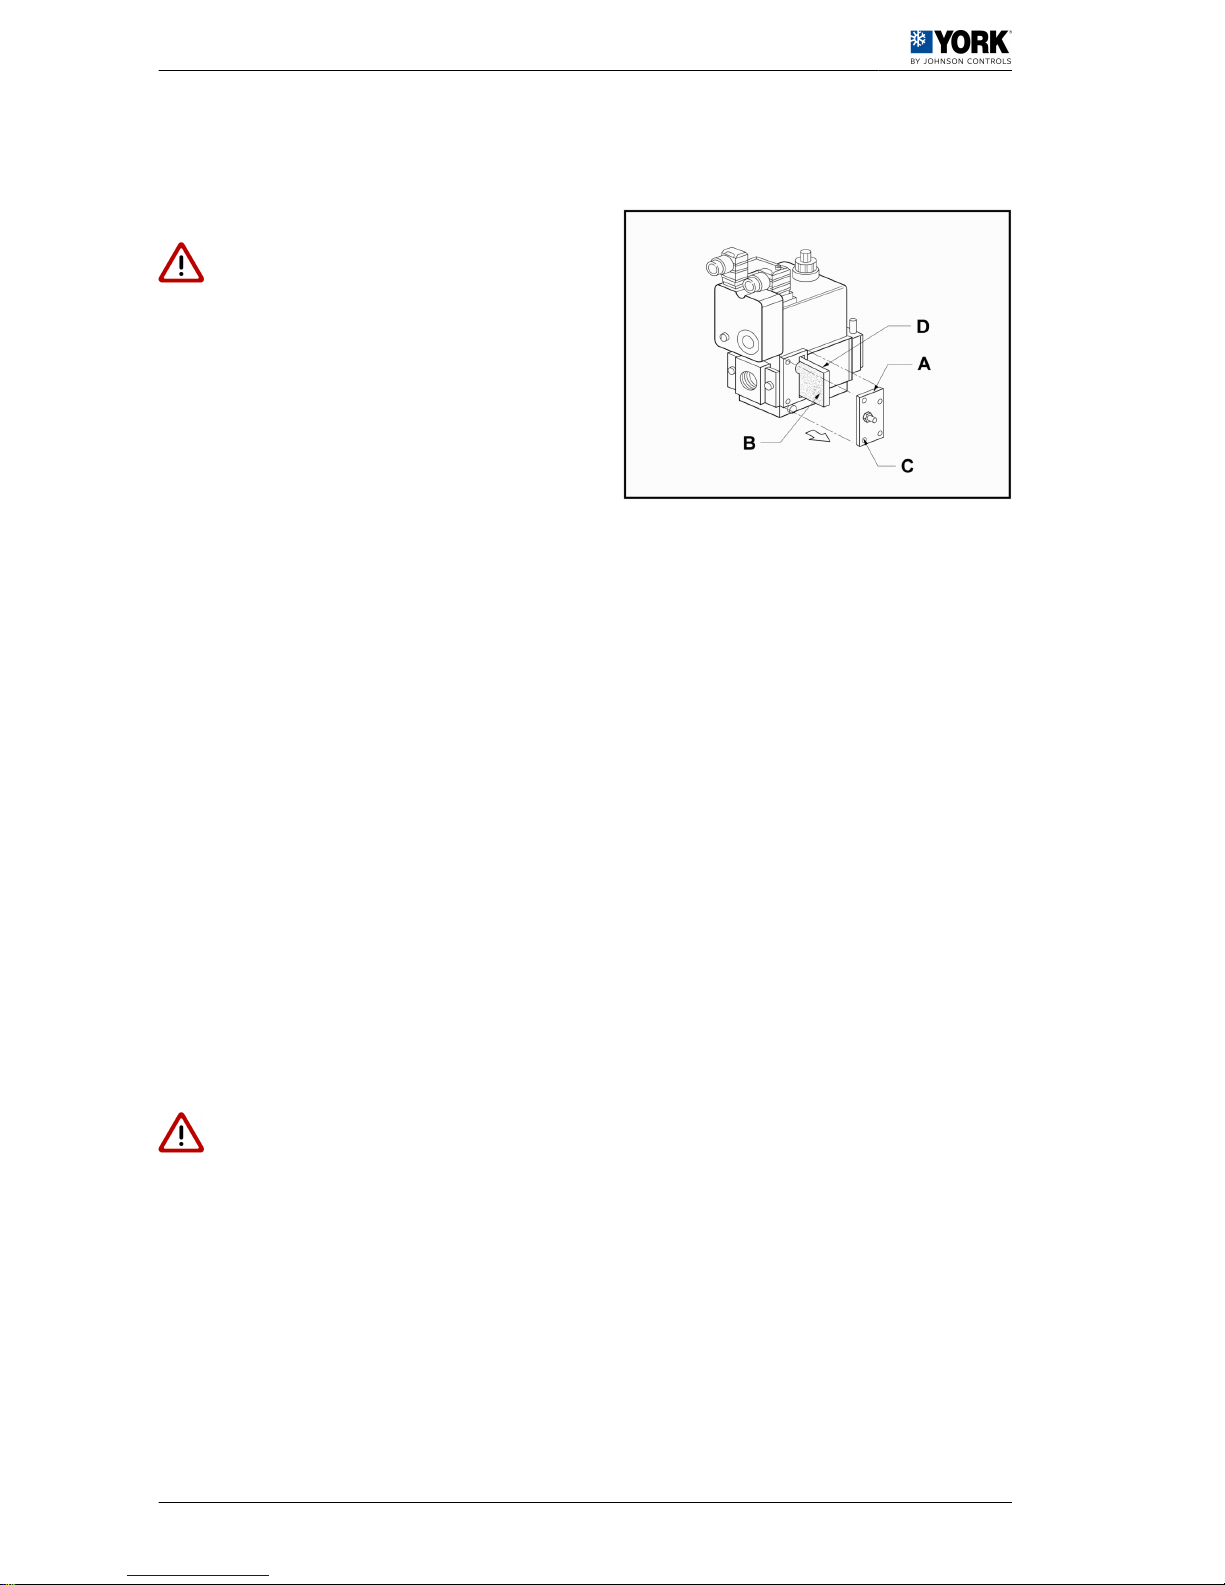
1.18.3 Gas heating (ARG/ARD Mod‐
els)
Gas valve filter
D AN G E R
Close the unit's gas supply valve before accessing the
valve filter.
Gas filter -B- of the valve is found under a cover -A-,
on the side of the valve.
Check the condition of the gas filter in both valves.
Clean and replace it if necessary.
To install a filter, position it correctly -D- and put the
cover in place pressing the four fastening screws C- uniformly in order to assure it is air tight.
Burners
Check how the flame in the burners looks.
If it does not look right, the burners may need cleaning. To do so, remove the burner group as specified
in
Instructions for burner and injector inspection , see on page 38
.
Gas injectors
Visually check that the injector calibrated holes are not partially obstructed. Clean them if necessary as
described in
Instructions for burner and injector inspection , see on page 38
.
Combustion air intake
Check that the combustion air intake is free of obstruction from dirt, snow, branches, dry leaves, residue
or other objects.
Discharge of combustion gases
Check that the combustion gasses discharge is free of obstruction from dirt, snow, branches, dry leaves,
residue or other objects.
Check that that there is no accumulation of soot on the panels around the exhaust tubes. If there is soot
accumulated, it could be that combustion is incomplete. If that is the case, make the checks indicated
in
Post start up checks , see on page 30
.
Instructions for burner and injector in‐
spection
D AN G E R
Close the gas supply valve and shut off the electrical
power to the unit before inspecting the burners and
injectors.
1 Installation manual
1.18 Regular maintenance tasks performed by specialised personnel
38
Page 43

1. Disconnect the gas supply pipe from the unit.
2. Remove the upper panel -A- and the lower panel -
B-to access the gas selection.
3. Disconnect the gas valves, the ignition electrodes,
the flame sensors, and the the temperature sensors.
4. Loosen and remove the 4 screws -T- that fasten the
burner group to its support.
5. Remove the burner group, pulling it up and out.
Now the burners and injectors can be accessed for
inspection and cleaning.
6. Before returning the burner group to its place,
check that the separation between the ignition elec‐
trode and the far burner is between 2 and 3 mm.
A. Gas flow
B. Burners
C. Connector
D. Teflon support
E. Electrode
Installation manual 1
Regular maintenance tasks performed by specialised personnel 1.18
39
Page 44

Cleaning the flue passages and heat ex‐
changer
As long as combustion regulation is adequate, it is
rare that the heat exchanger needs to be cleaned. If
the heat exchanger becomes sooty, it may be cleaned
in the following manner:
1 Remove the burner group according to
Instruc‐
tions for burner and injector inspection , see on
page 38
.
2 Remove the screws from the upper part of the
casing and from the top turbine of the combustion
gas draft blower.
3 Remove the screws that hold the upper part of the
flue box without tearing the insulation beside it.
Afterwards, remove the central plate dividing the
upper and lower flue boxes.
4 Take out the flue baffles from inside the flue box -
C- from inside the heat exchanger pipes -B-. No‐
tice that the last curve in the baffle fits tightly in the
pipe -A-, requiring the end of the baffle to be well
secured to the tube collar -D-. To take it out, move
the end of the baffle towards the centre of the tube,
freeing it from the tube collar and then pulling out
in a straight line.
5 Using a metal brush with a flexible rod, brush the
interior of each of the tubes, brushing to the out‐
side and getting to the very end in the flue box as
well as at the beginning at the burners.
6 Also brush all of the inside of the flue box and the
baffles.
7 Run the brush over the the exhaust hoods, from
the side of the flue box downward.
8 If there is a large accumulation of soot, take the
draft blower out and clean the turbine and casing.
9 Once the brushing is finished, carefully clean the
residue using compressed air. If necessary us a
vacuum cleaner.
10 Put the parts back in the reverse order from which
they were removed.
11 When remounting the central and upper parts of
the flue box, be careful not to tear the insulation
beside it.
12 Make sure that all of the joints on the side with the
combustion system ventilation are air tight. Apply
high temperature (260 °C) sealing putty to do it.
1.19
Unit sound pressure data
Octave band sound spectrum dB(A), outdoor
Models 045 060 075 090
125 Hz
250 Hz
500 Hz
1,000 Hz
1 Installation manual
1.19 Unit sound pressure data
40
Page 45

2,000 Hz
4,000 Hz
8000 Hz
Sound power level dB (A)
Sound pressure level at 5 m dB (A)
Octave band sound spectrum dB(A), indoor
Models
045 060 075 090
125 Hz
250 Hz
500 Hz
1,000 Hz
2,000 Hz
4,000 Hz
8000 Hz
Sound power level dB (A)
Installation manual 1
Unit sound pressure data 1.19
41
Page 46

Page 47

2
Unit installation data
Page 48

Please complete the following data to register the full details of the installation and the commissioning
inspection.
Complete the blank fields or mark the appropriate box, as applicable.
2.1 List of tests for unit start-up
Please complete the following forms to register the full details of the installation and the start-up inspec‐
tion.
Complete the blank fields or mark the appropriate box, as applicable.
Company performing installation:
Installing technician:
Name / project number:
Location of the unit:
Address of the unit location:
Person in charge of the building or
property where the unit is installed:
Installation work start date:
Unit model number:
Unit serial number:
Plate and version:
Thermostat, model and version:
General inspection of the unit
Visual appearance
Levelling of the unit
Check the unit for transport, loading and unloading damage
Unit installed with sufficient clearance
Check the circuit for the presence of oil (significant refrigerant leaks).
Terminals and connections correctly secured in the control panel and accessories
Air filters installed
Condensate drain pipe and drain trap installed correctly
Thermostat and connection cabling installed correctly
Air duct installation complete and correct
Accessories and planned options installed (if applicable)
Inspection of the air supply fan
Drive belt and pulleys aligned and correctly fastened
Drive belt tension correctly adjusted
Verification of direction of rotation
Inspection of the gas heating section (models ARG/ARD)
Verification of the kind of gas supplied to the unit
Combustion air input hood installed
2 Unit installation data
2.1 List of tests for unit start-up
44
Page 49
Inspection of the gas heating section (models ARG/ARD)
Exhaust hoods installed
Inspection of compressors
Verification that direction of rotation is correct
2.2 Start-up Data
Electrical data
Rating plate Actual
Power supply
Check specifica‐
tions in the Installa‐
tion Manual
Control voltage
Fan consumption (A)
Consumption of condenser fan 1 (A)
Consumption of condenser fan 2 (A)
Consumption of compressor 1 (A)
Consumption of compressor 2 (A)
Consumption of supply fan (A)
Electric resistor 1 (Optional)
Electric resistor 2 (Optional)
Cool and heat modes
Refrigerant circuit. Compressor 1
Mode Value
Subcooling (min. 8 K, max. 18 K) ºC
Liquid pressure: _____ bar
Liquid temperature: _____ ºC
Superheat (min. 4 K, max. 10 K) ºC
Suction pressure: _____ bar
Suction temperature: _____ ºC
Complete liquid line checked in sight glass
Correct oil level checked in sight glass
Refrigerant circuit. Compressor 2
Mode Value
Subcooling (min. 8 K, max. 18 K) ºC
Liquid pressure: _____ bar
Liquid temperature: _____ ºC
Superheat (min. 4 K, max. 10 K) ºC
Suction pressure: _____ bar
Suction temperature: _____ ºC
Complete liquid line checked in sight glass
Correct oil level checked in sight glass
Air flow values
m3/h
Design
Measured
Unit installation data 2
Start-up Data 2.2
45
Page 50

Air temperature
Mode (cool or heat): Temperature (ºC)
Outdoor air:
Supply air:
Return air:
Indoor air mix (if economiser is fitted):
OPTIONS
Heating mode (hot water coil)
Air temperature
Capacity: _____ (kW) Temperature (ºC)
Supply air (at 100 %)
Return air
Hydraulic circuit
Temperature (ºC) Pressure (bar)
Water inlet
Water outlet
Heating mode (gas burner) (ARG/ARD models)
Air temperature
Capacity: _____ (kW) Temperature (ºC)
Supply air (at 100 %)
Return air
Gas circuit (Natural gas)
Gas family G20
Pressure (mbar)
G25
Supply line Min. 12.5 / Max. 25 mbar
Gas valve adjustments
Main regulator (PBr)
Stage regulator (V
max
)
Gas consumption m3/h
Propane gas conversion, G31, if applicable
Supply line 37 mbar
Pressure mbar
Gas valve adjustments
Main regulator
Stage regulator
Gas consumption m3/h
Combustion analyser
Outdoor ambient temperature ___ ºC
Smoke temperature ___ ºC
Carbon monoxide CO content ____ ppm or ___ %
Carbon dioxide content CO
2
___ %
Nitrogen oxide content NO ____ ppm
2 Unit installation data
2.2 Start-up Data
46
Page 51

Others
Outdoor fan 1
Type or model
Surge protection adjusted
Outdoor fan 2
Type or model
Surge protection adjusted
Indoor fan
Type or model
Surge protection adjusted
Belts Type or model
Economiser Minimum outdoor air setting
Notes and observations:
____________________________________________________________________________________
____________________________________________________________________________________
____________________________________________________________________________________
____________________________________________________________________________________
____________________________________________________________________________________
____________________________________________________________________________________
____________________________________________________________________________________
____________________________________________________________________________________
____________________________________________________________________________________
____________________________________________________________________________________
____________________________________________________________________________________
____________________________________________________________________________________
____________________________________________________________________________________
Installed by: Name
Date and signature
Unit installation data 2
Start-up Data 2.2
47
Page 52

 Loading...