


 Loading...
RIVAGE PM StageMix
User Guide
EN

Introduction |
|
|
CONTENTS |
|
|
||
|
|
||
|
|
|
|
Introduction
Thank you for downloading the RIVAGE PM StageMix app (hereinafter referred to as “StageMix”) for iPad. StageMix enables you to use your iPad to wirelessly control the parameters of your Yamaha RIVAGE PM series digital mixing console.
StageMix offers the sound engineer (who is away from the system) the freedom to control parameters remotely, while listening to the results from the vantage point of the performers. The simple, intuitive touch interface on the iPad allows you to interact with the console in a direct and understandable manner. This attribute will help you set up faster and more dynamically than ever before.
Note
•The software and this document are the exclusive copyrights of Yamaha Corporation.
•Copying or modifying the software or reproduction of this document, by any means, whether in whole or in part, is expressly forbidden without the written consent of Yamaha Corporation.
•Yamaha Corporation makes no representations or warranties with regard to the use of the software and documentation and cannot be held responsible for the results of the use of the software and this document.
•Copying of commercially available music sequence data and/or digital audio files is strictly prohibited except for your personal use. If you plan to use such data or files, consult a copyright specialist.
•Illustrations of product screens that appear in this document are for instructional purposes only, and may appear somewhat different from the screens that are displayed on your computer.
•Information about system software and changes to certain product functions or specification due to updates to the software can be found in the related documentation.
•Apple, the Apple logo, and iPad are trademarks of Apple Inc., registered in the U.S. and other countries.
•IOS is a trademark or registered trademark of Cisco Systems, Inc. in the U.S. and other countries, and used under license.
•The company names and product names in this document are the trademarks or registered trademarks of their respective companies.
2 |
RIVAGE PM StageMix User Guide |

Contents |
|
|
CONTENTS |
|
|
||
|
|
||
|
|
|
|
Contents
Introduction . . . . . . . . . . . . . . . . . . . . . . . . . . . . . . . . . 2 Software requirements. . . . . . . . . . . . . . . . . . . . . . . . . 4 Setup. . . . . . . . . . . . . . . . . . . . . . . . . . . . . . . . . . . . . . . 4
Wi-Fi setup . . . . . . . . . . . . . . . . . . . . . . . . . . . . . . . . . . . . . . . . . . . 4 Network setting for the RIVAGE PM system. . . . . . . . . . . . . . . . . 4 Wi-Fi setting on your iPad . . . . . . . . . . . . . . . . . . . . . . . . . . . . . . . 5
Using DHCP . . . . . . . . . . . . . . . . . . . . . . . . . . . . . . . . . . . . . . 5 Using a fixed IP address. . . . . . . . . . . . . . . . . . . . . . . . . . . . . . 5
Configuring StageMix . . . . . . . . . . . . . . . . . . . . . . . . . . . . . . . . . . 6
Offline Demo mode. . . . . . . . . . . . . . . . . . . . . . . . . . . . . . . . . 6 Selecting a console and starting the operation . . . . . . . . . . . . 6
Part names & functions . . . . . . . . . . . . . . . . . . . . . . . . 7
HOME screen . . . . . . . . . . . . . . . . . . . . . . . . . . . . . . . . . . . . . . . . . 7
Meter area. . . . . . . . . . . . . . . . . . . . . . . . . . . . . . . . . . . . . . . . 7 Main area . . . . . . . . . . . . . . . . . . . . . . . . . . . . . . . . . . . . . . . . 8 Toolbar area . . . . . . . . . . . . . . . . . . . . . . . . . . . . . . . . . . . . . . 8 SCENE screen . . . . . . . . . . . . . . . . . . . . . . . . . . . . . . . . . . . . 13 UTILITY screen. . . . . . . . . . . . . . . . . . . . . . . . . . . . . . . . . . . . 14 SELECTED CH indicator . . . . . . . . . . . . . . . . . . . . . . . . . . . . . 19 EQ screen . . . . . . . . . . . . . . . . . . . . . . . . . . . . . . . . . . . . . . . 20 DYN screen . . . . . . . . . . . . . . . . . . . . . . . . . . . . . . . . . . . . . . 21 GEQ/PEQ screen . . . . . . . . . . . . . . . . . . . . . . . . . . . . . . . . . . 24 CH NAME screen. . . . . . . . . . . . . . . . . . . . . . . . . . . . . . . . . . 26
Troubleshooting . . . . . . . . . . . . . . . . . . . . . . . . . . . . . 27
3 |
RIVAGE PM StageMix User Guide |

Software requirements |
|
|
CONTENTS |
|
|
||
|
|
||
|
|
|
|
Software requirements
•Apple iPad4 or later
•Supported OS: iOS10 or later
•Yamaha RIVAGE PM Series Digital Mixing System V2.0 or later
•Wi-Fi access point
•Ethernet cable (used to connect the RIVAGE PM system to the Wi-Fi access point)
Setup
Wi-Fi setup
Refer to the instruction manual for your device to set up the Wi-Fi access point. Although no special settings are required, we recommend that you configure security settings, such as WPA, to prevent any outside intrusion into the network.
Network setting for the RIVAGE PM system
1. Use an Ethernet cable to connect the network port of the RIVAGE PM system to the Wi-Fi access point.
If you plan to connect it to a legacy access point that does not feature the AUTO-MDIX function, you will need to use a cross cable. Since many newer device models support the AUTO-MDIX function, you will be able to use either a straight cable or a cross cable.
2.
3.
4.
5.
Make sure that the Ethernet cable is connected to the LAN port of the Wi-Fi device.
(Do not connect the cable to the WAN port.)
Open the SETUP screen on the RIVAGE PM system.
Touch the NETWORK popup button in the CONSOLE STATUS field to open the NETWORK screen.
On the FOR STAGEMIX tab, set the STAGEMIX CONNECTIVITY to ENABLE, and then specify the IP address in the IP address segment for the Wi-Fi access point.
6. On the MISC tab in the NETWORK screen, select “EDITOR/STAGEMIX” or “STAGEMIX ONLY” for the COMMUNICATION QUALITY of the NETWORK connector for StageMix.
When using the RIVAGE PM Editor and StageMix in the same NETWORK connector, select “EDITOR/STAGEMIX.”
NOTE
When using only StageMix, select the “STAGEMIX ONLY” option to reduce the communication load.
When selecting the “EDITOR/STAGEMIX” option, which results in greater communication load and slower performance of StageMix, enable IGMP Snooping on the Wi-Fi device.
Network switching
You can connect to a network using a wired connection in addition to a wireless connection. A Lightning to USB 3 Camera Adapter and an USB Ethernet Adapter are required to use a wired connection. You can switch between a wireless and wired connection when offline.
4 |
RIVAGE PM StageMix User Guide |

Setup |
|
|
CONTENTS |
|
|
||
|
|
||
|
|
|
|
Wi-Fi setting on your iPad
Use DHCP or a fixed IP address to set up your iPad.
Using DHCP
DHCP (Dynamic Host Configuration Protocol) is a network protocol that enables the server to automatically assign an IP address to the devices. Follow the steps below to set up the iPad using DHCP.
1.
2.
3.
4.
5.
6.
Open the Settings menu on the iPad.
Select Wi-Fi, and then select the proper network.
Tap the blue icon located to the right of the currently-selected network name to display a screen that enables you to edit the IP address.
Select DHCP, and then make sure that the iPad has received IP Address, Subnet Mask, Router, and DNS data.
If the data is not displayed, select Renew Lease (to update DHCP lease).
Once the setting is complete, press the Home button on the iPad to exit the Settings menu.
NOTE
•Make sure that the IP address uses the subnet for the RIVAGE PM system.
•If the DHCP setting is not enabled after Step 5, check your DHCP server settings. Alternatively, use a fixed IP address to set up your iPad.
Using a fixed IP address
1.
2.
3.
4.
5.
Open the Settings menu on the iPad.
Select Wi-Fi, and then select the proper network.
Tap the blue icon located to the right of the currently-selected network name to display a screen that enables you to edit the IP address.
Select Static.
IP Address: Enter the IP address that is identical to the one for the RIVAGE PM system, but with a modified fourth octet.
(Example: If the IP address for the RIVAGE PM system is “192.168.0.128”, enter “192.168.0.127” for the iPad.)
6.
7.
8.
9.
Subnet Mask: Enter “255.255.255.0”.
Router: Enter the IP address for the Wi-Fi access point.
This IP address is usually labeled on the bottom of the Wi-Fi device, or printed in the instruction manual.
DNS: Enter the IP address for the Wi-Fi access point. (Same as explained in Step 7.)
Press the Home button on the iPad to exit the Settings menu.
5 |
RIVAGE PM StageMix User Guide |
Setup |
|
|
CONTENTS |
|
|
||
|
|
||
|
|
|
|
Configuring StageMix
Launch StageMix.
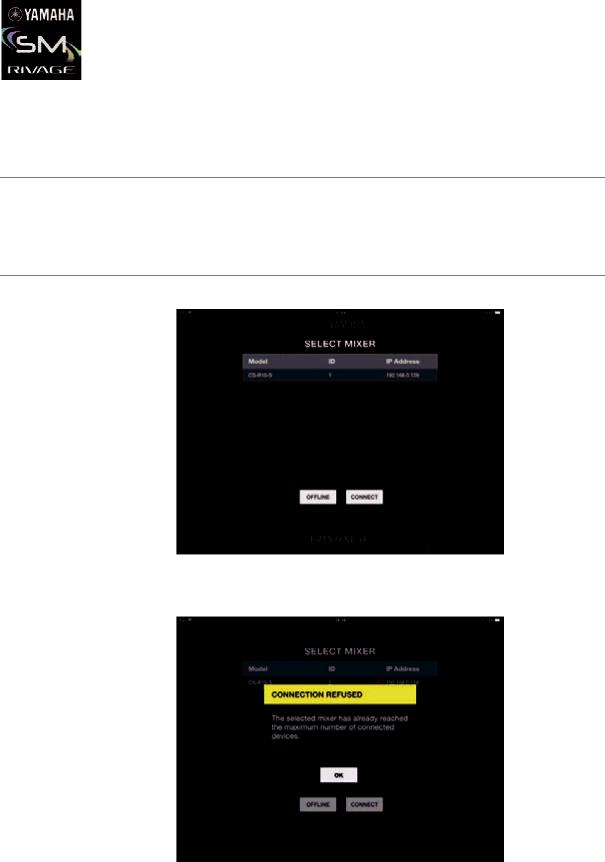
The SELECT MIXER screen appears. This screen enables you to do the following:
•Engage Offline Demo mode, use the StageMix features, and navigate the user interface.
•Select the RIVAGE PM system on the network and start using StageMix.
Offline Demo mode
Press the OFFLINE button in the SELECT MIXER screen to engage Offline Demo mode to navigate the StageMix application while the RIVAGE PM system is offline (that is, not connected to StageMix). Please note that the level meters and most scene memory features will be disabled in this mode.
Selecting a console and starting the operation
Once the iPad is set up to link to the RIVAGE PM system, select the system from the list, and then press the CONNECT button.
If the maximum number per control surface/console (two instances) of StageMix installations have already been connected to the RIVAGE PM system, a prohibiting icon will appear to the left of the IP Address. If you select the RIVAGE PM system with the prohibiting icon in StageMix, and then press the CONNECT button, a message will appear indicating that the connection was not made.
Once StageMix receives parameter data from the RIVAGE PM system, the StageMix setup process is complete.
If a connection between StageMix and the RIVAGE PM system cannot be established, refer to the Troubleshooting section at the end of this User Guide.
6 |
RIVAGE PM StageMix User Guide |

Part names & functions |
|
|
CONTENTS |
|
|
||
|
|
||
|
|
|
|
Part names & functions
HOME screen
The HOME screen is the main screen of StageMix. It is displayed each time you start StageMix.
You can return to this screen by tapping [HOME] in the Toolbar area.
Meter area
Main area
Toolbar area
Meter area
This area displays input level, output level, and fader levels. In SENDS ON FADER mode, it displays send levels.
The Meter area offers INPUT mode and OUTPUT mode. To toggle between these two modes, swipe the Meter area upward. The Meter area is in INPUT mode when you start StageMix for the first time. The next time you start StageMix, the area will be in the mode that was used most recently.
INPUT mode
OUTPUT mode
The screen in each mode is divided into 12 channel blocks.
In either mode, STEREO OUT, CUE A, and CUE B meters will be displayed on the right end of the screen.
The CUE A/B meters will appear only if CUE is turned on. Tap CUE A/B to clear CUE and hide the CUE A/B meters.
Meters are displayed in green for up to –18 dB, yellow for up to 0 dB, and in red for levels higher than 0 dB.
7 |
RIVAGE PM StageMix User Guide |
Part names & functions |
|
|
CONTENTS |
|
|
||
|
|
||
|
|
|
|
You can change the metering point using “Meter Point” in the PREFERENCE screen (page 17). Note that the metering point for DCA is fixed at Post On.
The fader level for each channel is indicated by a white line. A thick white line appears when the fader is at the nominal (0 dB) level.
If a channel is turned off, the background of the meter turns black and the meter itself appears in gray.
The channels displayed in the Main area are surrounded by a white box in the Meter area. You can drag this box left or right, or tap it to select other channels to be displayed in the Main area. Tapping it repeatedly will switch the Main area between displaying each 12-channel group.
While the SELECTED CH screen is displayed, only the selected channel will be surrounded by a white box. If you switch to another channel, the white box will move accordingly.
In SENDS ON FADER mode, each channel’s send level is displayed here. In this case, the fader level bar is displayed in the color assigned to the destination channel.
Main area
The Main area displays details of the content selected in the Toolbar area. Each screen you can access from the Main area is explained in the section that describes the Toolbar buttons.
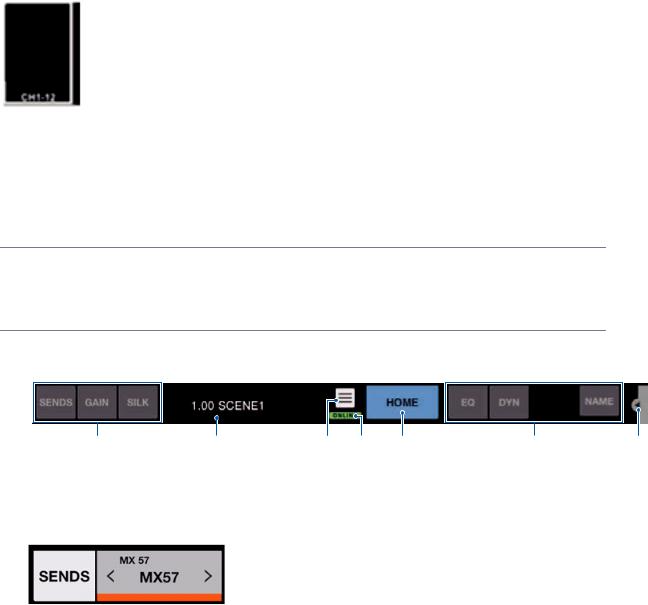
Toolbar area
This area is always displayed near the bottom of the HOME screen.
|
|
|
2 |
3 |
4 |
5 |
|
|
|
7 |
1 |
6 |
|||||||||
1Fader mode switch buttons
These buttons enable you to select the Fader display mode in the Main area of the HOME screen. If none of the options is selected, NORMAL mode will be used.
If you select SENDS, the channel ID, name, icon, and color of the send destination will appear to the right of the SENDS button.
Tap this send destination indicator to display the send destination list (page 11), which enables you to change the send destination.
Press and hold down the SENDS button to switch the control target between the send level and send pan. Press and hold down the GAIN button to switch the control target between analog gain and digital gain.
2Scene indicator
This area displays the number and name of the scene that is currently selected. If a scene other than the currently-applied scene is selected, the scene number will flash. Tap this area to display the SCENE screen. While the SCENE screen is open, tap this area again to close the SCENE screen.
If you change a parameter of the recalled scene, an Edit indicator will appear in the upper-right corner of the area.
3Utility button
Tap this button to display the UTILITY screen.
4ONLINE indicator
This indicator lights up while the system is online.
5HOME button
Tap this button to return to the HOME screen.
If you have changed the Fader mode, the HOME screen will open in the selected Fader mode.
8 |
RIVAGE PM StageMix User Guide |
Part names & functions |
|
|
CONTENTS |
|
|
||
|
|
||
|
|
|
|
6Tool buttons
Tap each button to switch the display in the Main area. The tapped button will light up steadily.
If you tap the GEQ button, the Main area will display the details on the lowest-numbered GEQ/PEQ that has been inserted to an input or output channel. If nothing is inserted, this button will not appear.
7Menu button
Tap this button to open the context menu that is applicable to the current screen. For more information on the menu, refer to the section on each screen.
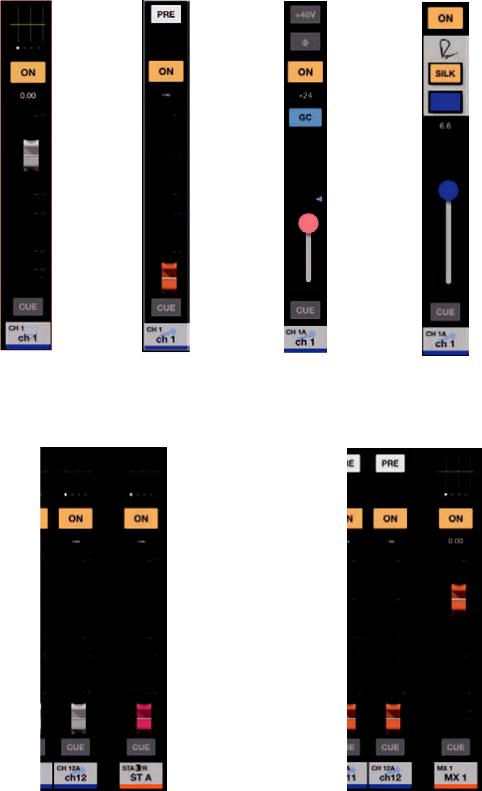
■Fader mode
You can select the fader indication mode from NORMAL, SENDS (SENDS ON FADER), GAIN, and SILK by using the Fader mode buttons. NORMAL is the default setting at the time of the application startup.
NORMAL |
SENDS |
GAIN |
SILK |
When the fader indication mode is set to NORMAL, GAIN, or SILK, a stereo channel is shown at the right edge of the main area. By swiping this area to the left or right, you can switch the indication between ST A and ST B.
When the fader indication mode is set to SENDS, the send-destination output channel is shown at the right edge of the main area.
When NORMAL, GAIN, |
When SENDS is |
or SILK is selected |
selected |
9 |
RIVAGE PM StageMix User Guide |
Loading...