

Page 1

YAMAHA
Owner’s Guide
Page 2

Congratulations J
You are the proud owner of a Yamaha PSR-400/PSR-500. Your PSR400/PSR-500 is a high-quality musical instrument that incorporates ad
vanced Yamaha digital technology and many versatile features. In order to
obtain maximum performance and enjoyment from your PSR-400/PSR500, we urge you to read this Owner’s Guide thoroughly while trying out
the various features described. Keep the Owner’s Guide in a safe place for
later reference.
CONTENTS
HOW TO USE THE MANUAL...................................1
NOMENCLATURE.....................................................2
PREPARATION 4
Power Supply........................................................4
Using Headphones Or
An External Sound System
The Foot Pedal
The Music Stand...................................................5
.....................................................
...................................
QUICK OPERATION GUIDE 6
Select & Play Voices.............................................6
Add Reverb (PSR-500 only)
The Split Mode —
Play Different Left- And Right Hand Voices
The Dual Voice Mode —
Play Two Voices Across The Entire Keyboard
Play With Auto Accompaniment
Play With Auto Harmony.......................................9
.................................
...........
......
...........................
FEATURE REFERENCE io
OVERALL CONTROL........................................10
POWER Button
MODE
...........................................................
DSP (Digital Sound Processing —
PSR-500 only)
MASTER VOLUME
ACCOMPANIMENT VOLUME......................11
PITCH BEND................................................11
TRANSPOSE ...............................................12
TUNING
TEMPO
SPLIT POINT CHANGE................................13
PAGE MEMORY...........................................13
.........................................................
.............................................
..............................................
......................................
........................................................
10
10
11
11
12
12
AUTO ACCOMPANIMENT................................16
STYLE SELECT...........................................16
ACCOMPANIMENT CONTROL
THE SINGLE FINGER MODE......................18
THE FINGERED MODE...............................18
ORCHESTRATION
5
5
6
7
7
8
CUSTOM STYLE
VOICE
...............................................................
VOICE SELECT...........................................21
THE SPLIT MODE........................................23
REVERB DEPTH (PSR-500 only)................23
VOLUME
OCTAVE.......................................................24
PAN..............................................................24
MIDI CHANNEL
DUAL VOICE................................................24
AUTO HARMONY
VOICE MEMORY
SONG MEMORY
RECORDING A MELODY
RECORDING A CHORD SEQUENCE
MELODY AND CHORD PLAYBACK
THE CONDUCTOR......................................30
THE MULTI PADS (PSR-500)...........................31
THE DRUM PADS (PSR-400)
MIDI
...................................................................
RECEIVE CHANNEL/CLOCK......................33
MODE
System Exclusive Reception........................34
Transmitted Data..........................................35
DEMO................................................................36
APPENDIX A: MIDI BASICS....................................37
APPENDIX B: POLYPHONY...................................38
APPENDIX C: TROUBLESHOOTING
APPENDIX D: MAINTENANCE...............................39
APPENDIX E; SYSTEM RESET..............................40
SPECIFICATIONS...................................................40
INDEX
.....................................................................
......................................................
..........................................................
......................................
.........................................
...........................................
........................................
.........................................
...............................................
...................
............................
..........
...........
...........................
.....................
16
19
19
21
23
24
25
25
26
26
28
29
32
33
33
39
41
Page 3

HOW TO USE THE MANUAL
This operation manual is divided into three main sections:
PREPARATION [page 4]
This section outlines the first things you must do before playing the PSR-400A^SR-
500. Including power supply setup and external connections.
QUICK OPERATION GUIDE [page 6]
The QUICK OPERATION GUIDE provides simplified operation procedures for sev
eral of the PSR-400A^SR-500’s main features. Each step includes a page number in the
^‘FEATURE REFERENCE” section on which you can ftnd full details about the corre
sponding control or feature.
FEATURE REFERENCE [page io]
This section provides full details on all PSR-400/PSR-500 features and controls. The
features are organized in the same way as they are on the PSR-400/PSR-500 panel — in
functional groups such as “OVERALL CONTROL,” “AUTO ACCOMPANIMENT,”
“VOICE,” etc.
Start with the “PREPARATION” section to ensure that you set up your PSR-400/PSR500 properly. Then try out the basic features outlined in the “QUICK OPERATION
GUIDE,” referring to the page numbers given if you need more information. Refer to the
“FEATURE REFERENCE” section whenever you need detailed information about a
control or feature. The manual has an INDEX at the back which you can use to quickly
locate information about specific features. The “NOMENCLATURE section which fol
lows also provides page numbers on which details about each control can be found.
The Appendices
In addition to the three main sections described above, the manual has five appendices
containing general information about MIDI, PSR-400/PSR-500 polyphony, troubleshoot
ing, maintenance, and system reset.
Page 4
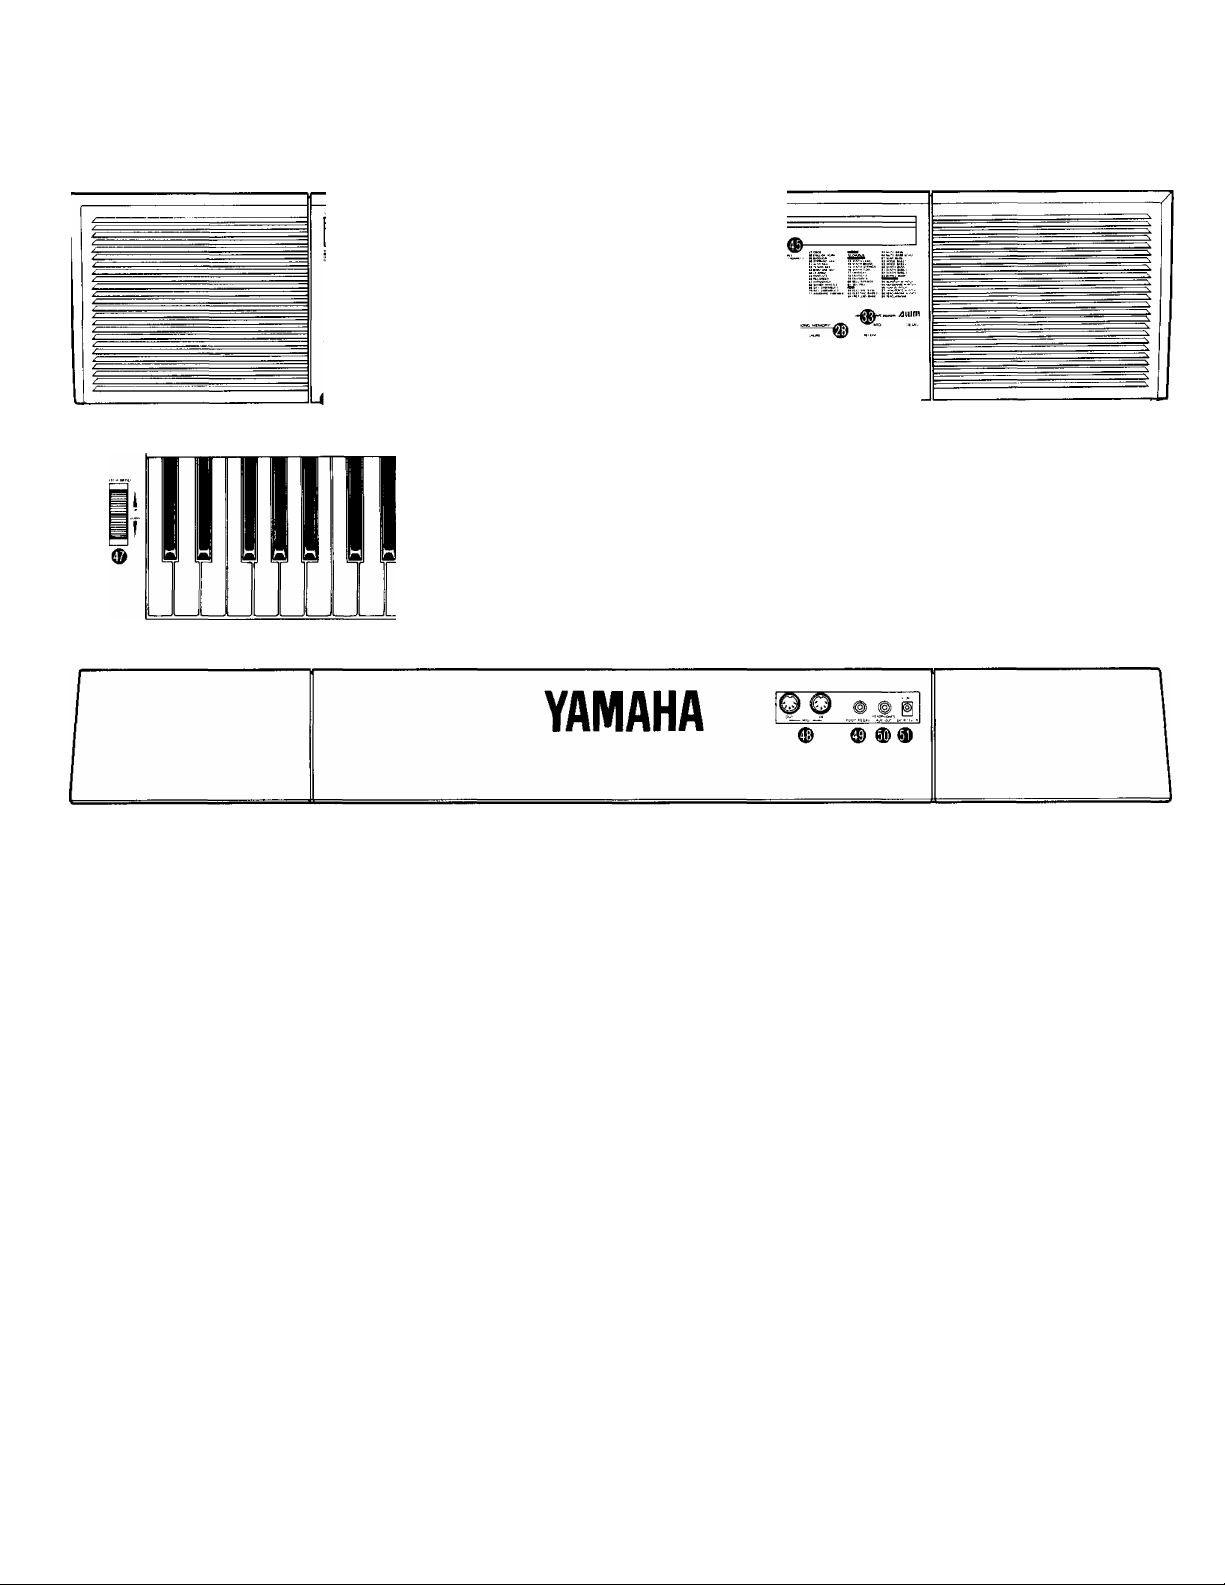
NOMENCUTURE
PSR-400
B " ' E® W W“H
YAMAHA^sR-aDD ^
“5 S. ©’? ®’o © © ®o © © ''Ki, "»ler □ s, o
n'n |^¿AAa O®©® ® O00© A'™AAAA °
U U o©®® S □ 00®© ^ "tZ3 S '9 □
a - (^^ ► * •■ i •■ •- ‘a P' )f
!l!ll!l!!!l!!l!!!l!!l!!
* iiiss sr^rF'
•n
®c>
-1 ». At:
Top Panel Controls
■ OVERALL CONTROL
© [POWER] Button......................................................page 10
@ [MODE] Button........................................................page 10
@ [DSP] Button (PSR-500)..................................page 11
© [MASTER VOLUME] Control
® [ACCOMP. VOLUME/PITCH BEND RANGE]
Buttons......................................................page 11,12
® [TRANSPOSE] Buttons
© [TUNING] Buttons....................................................page 12
® [TEMPO] Buttons.....................................................page 12
® [SPLIT POINT CHANGE] Button
■ PAGE MEMORY
@ [RECORD] Button
® [PAGE 1] and [PAGE 2] Buttons (PSR-400).
[PAGE 1] through [PAGE 4] Buttons (PSR-500)
..........................................................................page 13
...................................................
® [MIDI BULK DUMP] Button
■ AUTO ACCOMPANIMENT
® Numeric STYLE SELECT Buttons....................page 16
® ORCHESTRATION Buttons: [RHYTHM],
[BASS], (ORCHESTRA 1]. [ORCHESTRA 2],
and [ORCHESTRA 3].............................................page 19
...........................
...........................................
.............................
.....................................
page 11
page 12
page 13
page 13
page 15
® CUSTOM [RECORD/END] and [CLEAR]
Buttons
ACCOMPANIMENT CONTROL
® [INTRO] Button..................................................page 17
® [FILL IN 1] and [FILL IN 2] Button
® [NORMAL] Button
® [BRIDGE] Button.....................................................page 17
® [ENDING] Buttons...................................................page 17
.................................................................
...................
...........................................
page
page 19
page 17
® [SYNC-START ON/OFF —RHYTHM
STOP] Button........................................................page 16
® [START/STOP] Button............................................page 16
VOICE
® Numeric VOICE SELECT Buttons
@ AUTO HARMONY [ON/OFF] and [TYPE]
Buttons
® [DUAL VOICE] Button
.................................................................
............................................
© [REVERB DEPTH] Buttons (PSR-500)
...................
............
page 21
page 25
page 24
page 23
® [VOLUME] Buttons.................................................page 23
@ [OCTAVE] Buttons.................................................page 24
@ [PAN] Buttons
@ [MIDI CH.] Buttons.................................................page 24
........................................................
page 24
Page 5
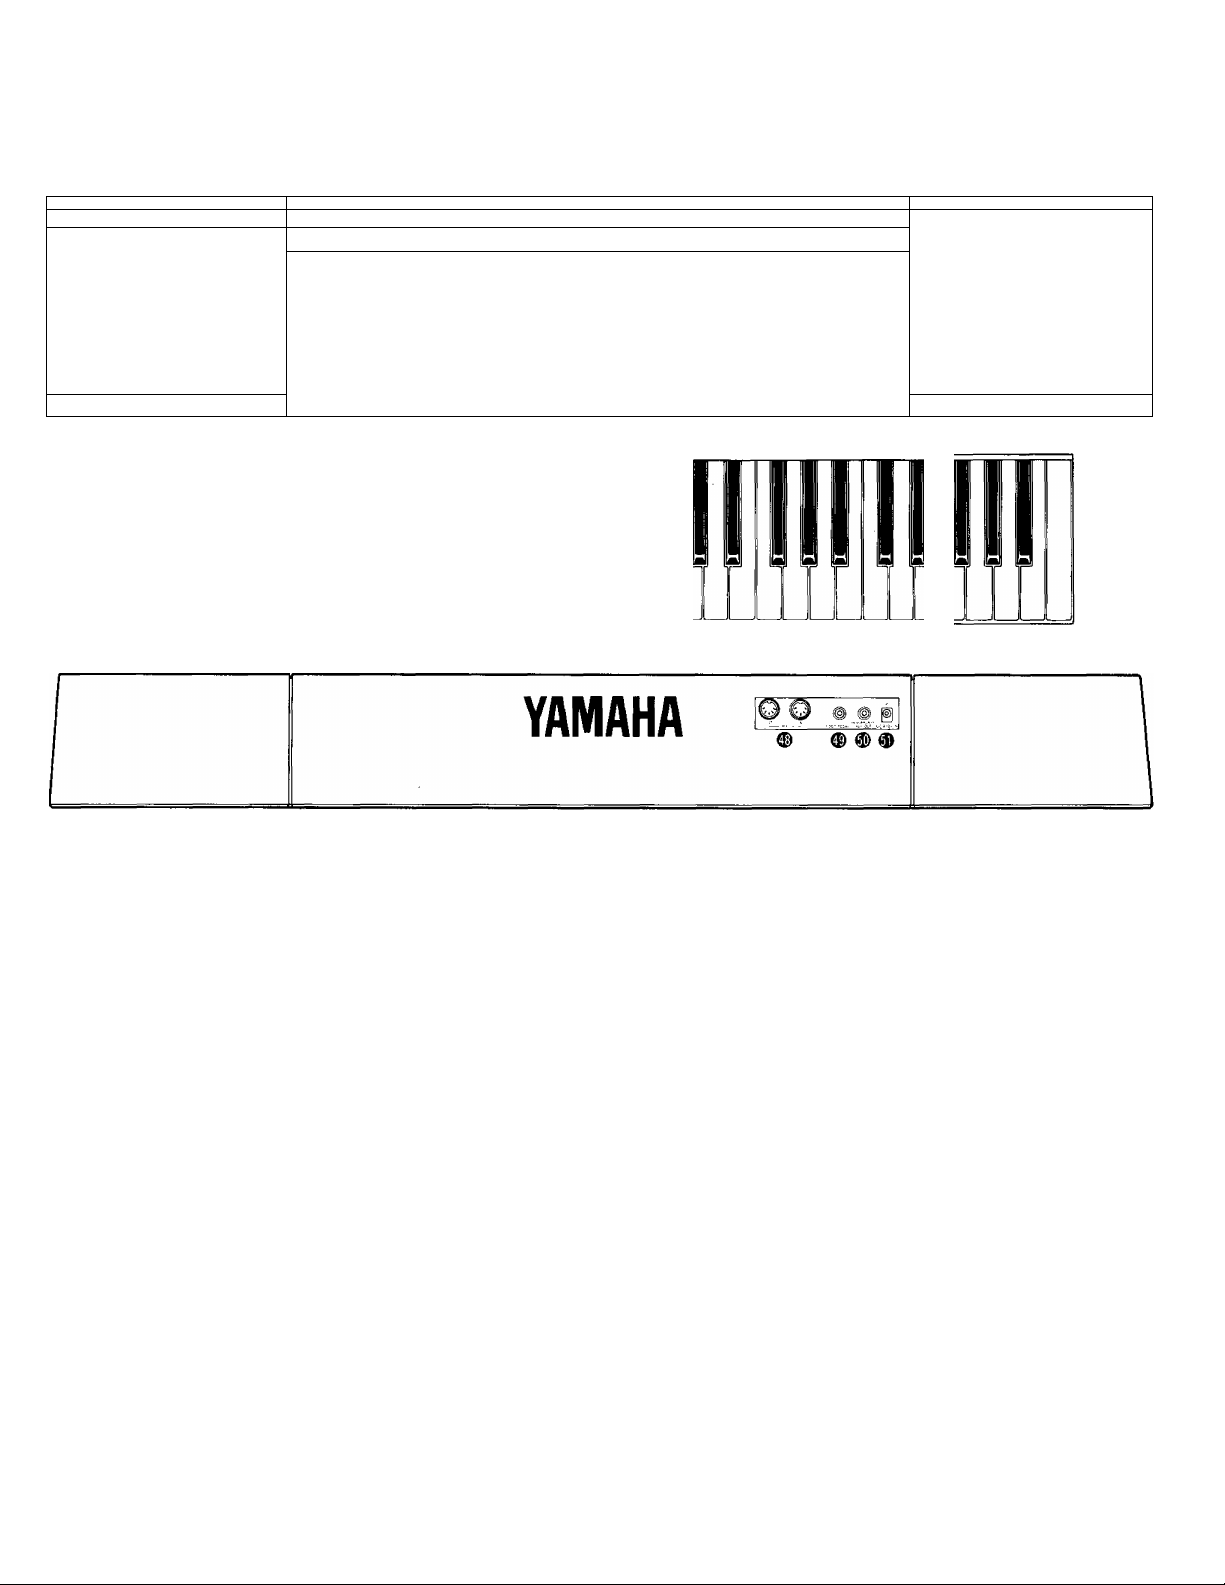
PSR-500
^„
.....
— ■■ - -■
---------------------------------------------------------------------------------------
7
11 ~~
□□□□ f>
Ш- Ш
■■
.................. _________________________ _____
YAMAHA r^resna ^ —^iijtn
' ® ° о о о © © о @ © □
П п п Щ; й й АА OQ©® Ф.. о©0© Л^,АЛАЛ □
UULI^'Xf^VV со ©о cz5 czb ОО0© V <7'i7 V V V □ 'v □
.
^
.......................................................... ^
. ж ж ЖЖЖЖ J
____
Siibi'*'
................................................
.............................
............
....
.........
^ s..,
_________________
■; - ■ ™ ^ W ;
lb □ □ □ аф D® □ □ □ (Bv■'■
» *?■ г- ^ Ф- -Ф^ Ф .< 1-: - - - •“ •- ^ ^ J.- s;^ -i
VOICE MEMORY
® [RECORD] Button
@ [1] through [4] Buttons
.............................................
....................................
page 25
page 25
SONG MEMORY
@ [CHORD 1] through [CHORD 5] Buttons....page 28
® [MELODY 1] through [MELODY 5] Buttons
..........................................................................page 26
® [CONDUCTOR] Button
0) [RECORD/EDIT] Button
® [PLAY/STOP] Button
............................................
......................................
...............................................
page 30
page 26
page 27
MIDI
® [RECEIVE ON/OFF] Button
.....................................
page 33
® [RECEIVE CH7CLOCK] Buttons.............................page 33
® [MODE] Button.........................................................page 33
DEMO
® DEMO Buttons [1] through [3]
DRUM PAD (PSR-400)
@ [PAD ASSIGN ON/OFF] Button
@ [1] through [4] Buttons
MULTI PAD (PSR-500)
® [RECORD/END (TERMINATE)] Button
@ [1] through [4] Buttons
.........................
.......................
....................................
.............
....................................
page 35
page 32
page 32
page 31
page 31
■ OTHERS
@ MULTI DISPLAY
® VOICE LIST.............................................................page 21
® STYLE LIST
® PITCH BEND WHEEL
................................................
.............................................................
......................................
page 4
page 11
Rear Panel Connectors
® MIDI IN and OUT Connectors
® FOOT PEDAL Jack..............................................page 5
® HEADPHONES/AUX. OUT Jack
(S) DC IN Jack........................................................page 4
..........................
.........................
page 37
page 5
page 16
Page 6
PREPARATION
This section contains information about setting up your PSR400/PSR-500 and preparing to piay. Be sure to go through this
section carefuiiy before using your PSR-400/PSR-500.
POWER SUPPLY
Your PSR-400 or PSR-500 will run either from batteries* or an optional power
adaptor. Follow the instructions below according to the power source you intend to
use.
* When batteries are used the sound of tiie PSR-400/PSR-500 may be distorted at high vol
ume levels. This is because tiie power of the amplifier is reduced when batteries are used.
CAUTION!
Never interrupt the power supply (e.g. remove the batteries or unplug the AC adaptor) dur
ing any PSR-400/PSR-500 record operation! Doing so can result in a loss of data.
Using Batteries
style'S.P'.!TVQIC£
bdtt
sme sMTvofCE beat
____
yW6
The PSR-400/PSR-5CX) is initially supplied with a set of batteries. Depending on
storage conditions, the supplied batteries may not last as long as a fresh set.
When the batteries need to be replaced, “batt” will appear on the MULTI DIS
PLAY. When this display appears the PSR-400/PSR-500 will not operate, and the
power must be turned off while either the batteries are replaced or an AC adaptor is
connected.* Internal data will be retained for up to about 10 minutes while the
batteries are changed or an AC adaptor is connected.
When the batteries fail, replace them with six 1.5 V SUM-1, “D” size, R-20 or
equivalent batteries, as follows:
©'□tZJOOOO©
“1 r”
+ ^ -
PA-5
1. Open the battery compartment cover located on the instrument’s bottom panel
and remove the old batteries.
□
2. Insert the six new batteries, being careful to follow the polarity markings on the
inside of the compartment.
3. Replace the compartment cover, making sure that it locks firmly in place. ^
* If fresh batteries or an AC adaptor are not immediately available, it may be possible to use
the PSR-400/PSR-500 for a little while longer by turning the power off and then on again,
and playing at a low volume setting.
Caution:
1. When the batteries run down, replace them with a complete set of six new batteries.
NEVER mix old and new batteries.
2. Do not use different kinds of batteries at the same time.
3. To prevent possible damage due to battery leakage, remove the batteries from the instru
ment if it is not to be used for an extended period of time.
Using An Optional AC Power Adaptor
■o
Plug the DC output cable from an optional Yamaha PA-5 AC Power Adaptor
into the DC IN jack on the rear panel of the PSR-400/PSR-500, then plug the AC
cable of the Power Adaptor into a convenient wall AC power socket.
The internal batteries are automatically disconnected when an AC Power Adap
tor is used.
* Use ONLY a Yamaha PA-5 AC Power Adaptor to power your instrument from the AC mains.
Other adaptors may be damaged by use with the PSR-400/PSR-500, and they may even
cause serious damage to your PSR-400/PSR-500.
Page 7
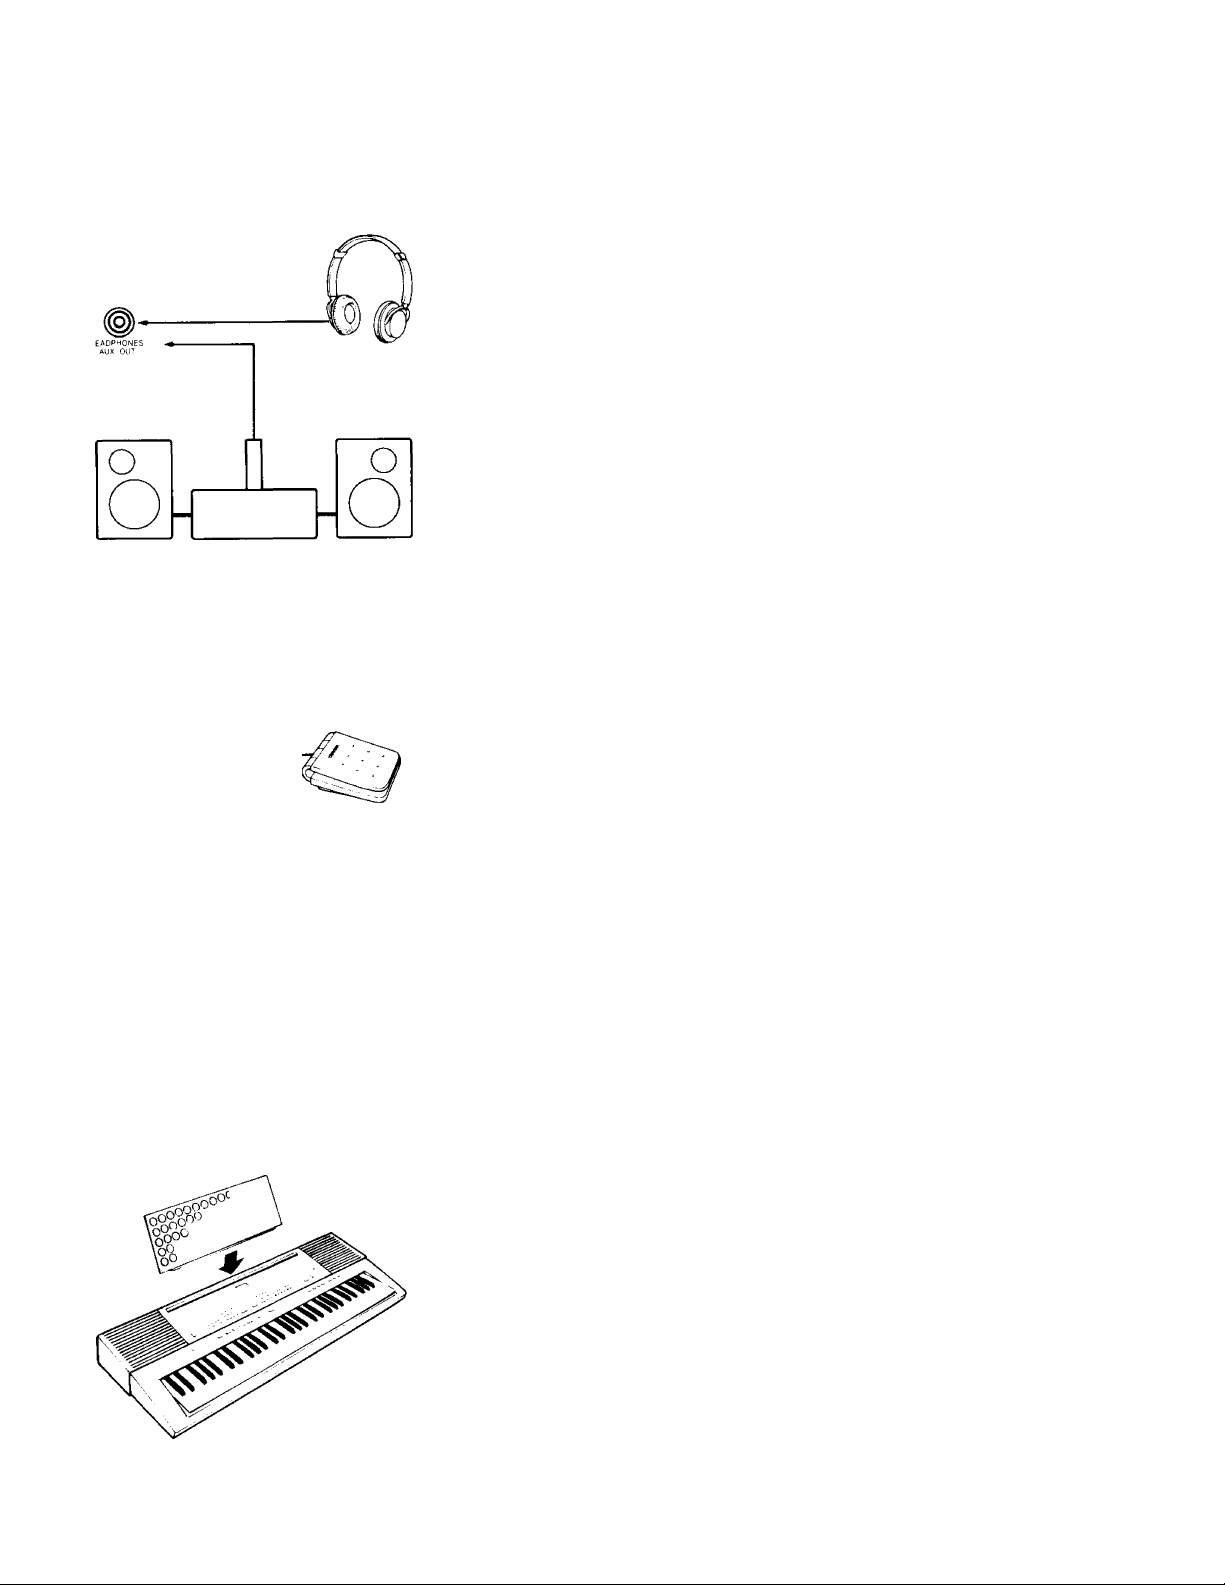
USING HEADPHONES OR AN EXTERNAL SOUND SYSTEM
A Standard pair of stereo headphones can be plugged into the rear-panel HEAD
PHONES/AUX. OUT jack for private practice or late-night playing. The internal
speaker system is automatically shut off when a pair of headphones is plugged into
the HEADPHONES jack. The HEADPHONES/AUX. OUT jack can also be used
to deliver the output of the PSR-400/PSR-500 to a keyboard amplifier, stereo sound
system, mixing console or tape recorder.
Stereo sound system
THE FOOT PEDAL
Plug the supplied foot pedal into the rear-panel FOOT PEDAL jack. The foot
pedal functions as a damper pedal, controlling sustain. Press the pedal to sustain
notes after the keys are released.
• Be sure that you do not press the pedal while inserting the plug into the FOOT
PEDAL jack or while turning the power on. If you do, the ON/OFF status of the
footswitch will be reversed. This function has been implemented to allow either
press-to-make or press-to-break contact type footswitches to be used with the
PSR-400/PSR-500.
• Sustain cannot be applied to voices in which releasing the key played does not
stop the sound: e.g. MUTE GUITAR (26), MARIMBA (41), PERCUSSIONS
(99), etc.
•
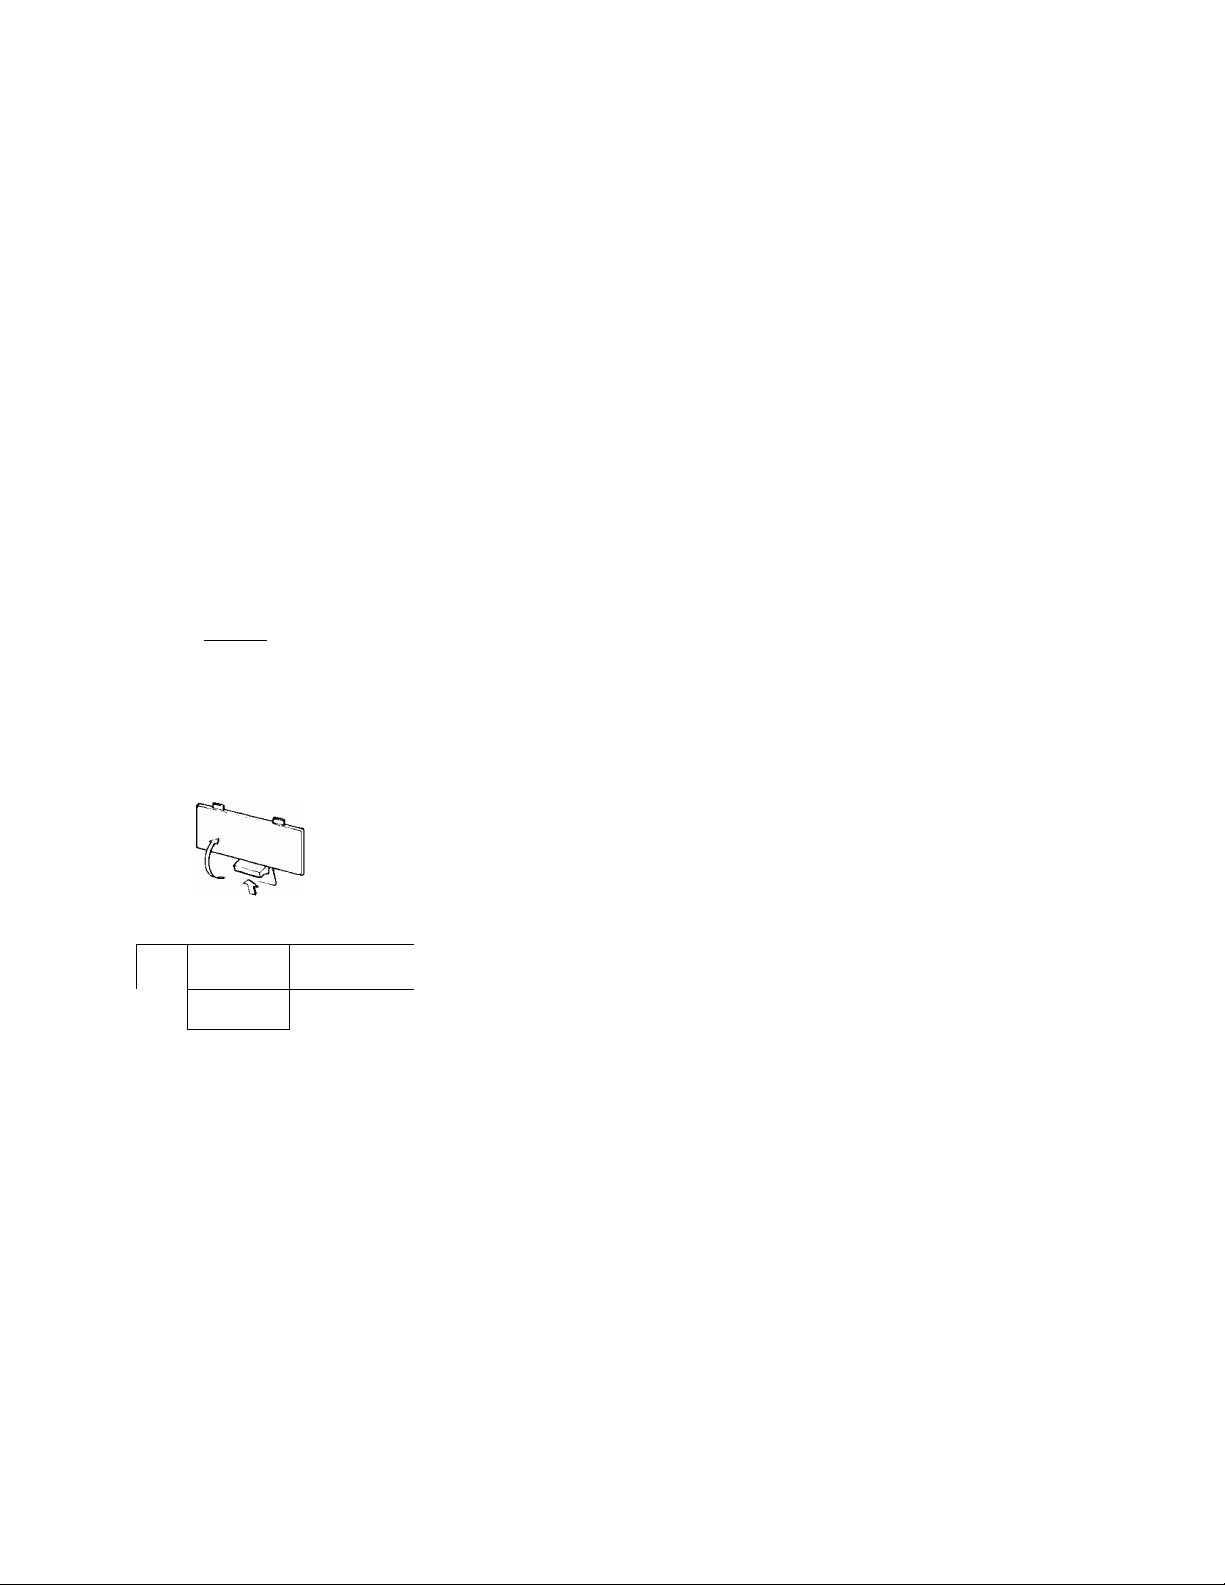
THE MUSIC STAND
Insert the bottom edge of the music stand into the slot located at the rear of the
PSR-400/PSR-500 control panel.
Page 8

QUICK OPERATION GUIDE
This section provides brief outlines of the procedures for operating several of the most basic PSR-400/PSR-500 features. Refer to the page numbers listed for details about each feature and more advanced capabilities.
SELECT & PLAY VOICES
VOfCfc SELECT
o
G 0 © ©
1. Use the VOICE SELECT buttons to select a voice [page 21].
STYLE ^SPLfT VOICE VQlQE
STYLE SPLfTVCHCE BEAT
/г
2. Use the MASTER VOLUME control to set the overall vol
ume [page 11].
3- Play.
ADD REVERB (PSR-500 only)
OOFF
»ROOM
OHALL
D
/\ /\ /\ /\ /\
TYPE VOLUME OCTAVE PAN MIDI CH
^ ^ ^ ^
1. Use the [DSP] button to select the HALL or ROOM reverb
type [page 11].
2. Use the [REVERB DEPTH] button to set the depth of the
selected reverb effect for the current voice [page 23].
Page 9
QUICK OPERATION GUIDE
THE SPLIT MODE
PLAY DIFFERENT LEFT- ÄND RIGHT- HAND VOICES
MODE
O NORMAL
• SPLIT
□
1. Use the [MODE] button to select the SPLIT mode [page 10],
2. Use the [SPLIT POINT CHANGE] button to change the split
point, if necessary [page 13].
3. Use the VOICE SELECT buttons to select the left-hand and
right-hand voices [page 23].
Press a left-hand key before selecting the left-hand voice
and a right-hand key before selecting the right-hand voice.
II
VOICE SELECT
I
IE
SPLIT POINT
▼
® O © ©
Q® © ©
Gl\-) © ©
THE DUAL VOICE MODE
PLAY TWO VOICES ACROSS THE ENTIRE KEYBOARD
1. Use the VOICE SELECT buttons to select a voice [page 21].
dual voice
ON/OFF
2. Press the [DUAL VOICE] button to engage the DUAL
VOICE mode [page 24].
VOICE SELECT
© O © ©
Q© © ©
©r\) © ©
3. Use the VOICE SELECT buttons to select the second “dual’
voice ]page 24].
4. Play.
Page 10
QUICK OPERATION GUIDE
PLAY WITH AUTO ACCOMPANIMENT
style select
MODE
oNORMAL
OSPLIT
ST YL E / S PL IT voice VQlGi.
pn
C. I
STVLE SPU^ VOiCr QELAT
1. Use the [MODE] button to select the SINGLE FINGER or
FINGERED mode [page 10].
2. If necessary, use the [SPLIT POINT CHANGE] button to set
the split point [page 13].
3. Use the STYLE SELECT buttons to select the desired accom
paniment style [page 16]. You can also select a melody (up
per keyboard) voice via the VOICE SELECT buttons [page
21].
-PITCH BLNO RANGE
A A A A
it ! HM b I L
□
ACCOMPANIMENT CONTROL
o o
fill in 2 BniDGE
START/STOP
4. Use the ACCOMPANIMENT CONTROL buttons to deter
mine how the accompaniment will be started [page 16], then
press the [SYNC-START ON/OFF] button to engage the syn
chronized start mode [page 16].
START/STOP
5. Press any key or play a chord to the left of the split point to
start the automatic accompaniment — play using either SIN
GLE FINGER or FINGERED type fingering according to the
selected mode [page 10].
6. Use the [ACCOMP, VOLUME] buttons to adjust the volume
of the accompaniment sound [page 11].
1. Use the ACCOMPANIMENT CONTROL section [START/
STOP] or [ENDING] button to stop the accompaniment
Ipage 17].
Page 11
PlÀYVm« Atno HARMONY
QUICK OPERATION GUIDE
MODE
Onormal
O SPLIT
* SINGLE
•finger
OriwriERfO
n
AUTO HARMONY
1t duet
2 TRIO
'3 BLOCK
A COUNTRY
5 octave
6 STRUM
AUTO HARMONY
ON/OFF
1. Use the [MODE] buttons to select the SPLIT, SINGLE FIN
GER, or FINGERED mode [page 10],
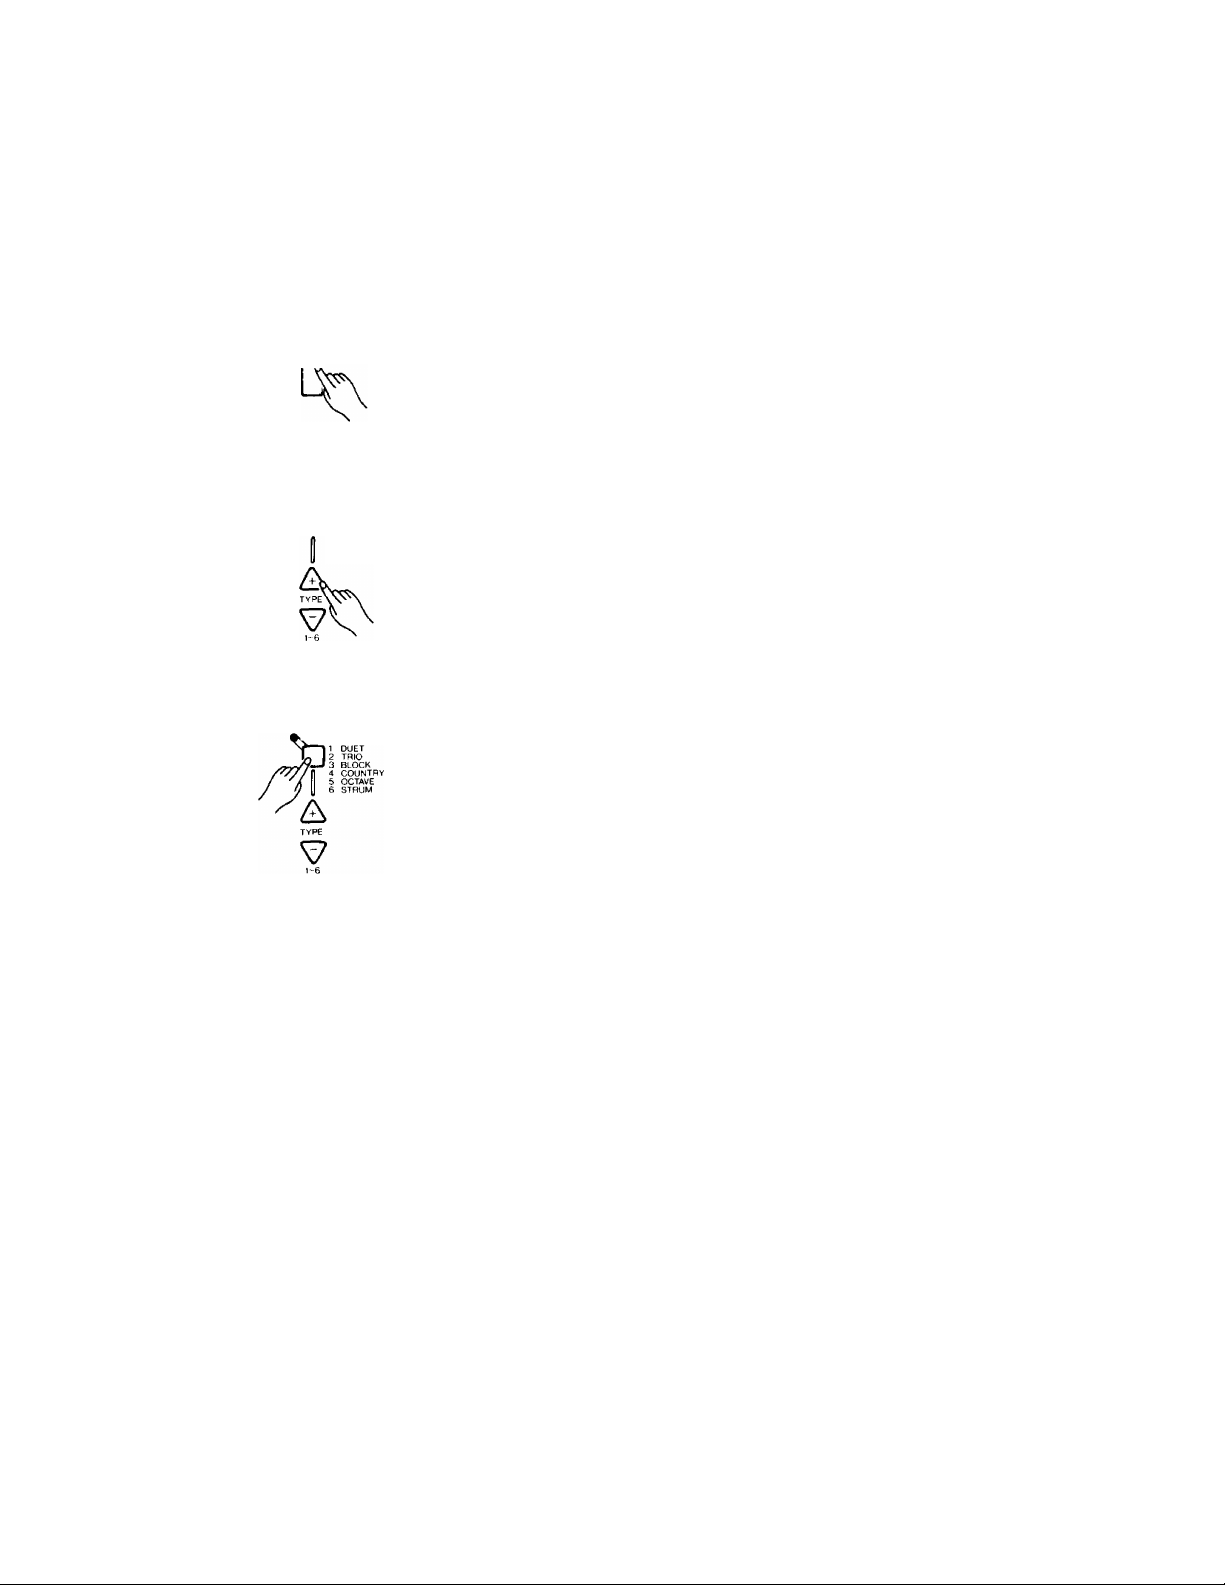
2. Use the AUTO HARMONY TYPE buttons to select a har
mony type between **1” and “6” [page 25],
3. Press the [AUTO HARMONY ON/OFF] button so that its
indicator lights [page 25],
4- Play chords on the left-hand section of the keyboard while
playing a melody on the right-hand section of the keyboard
[page 25].
Page 12

FEATURE REFERENCE
The “FEATURE REFERENCE" provides full details on each of the PSR-400/PSR500 features. The features are presented as they appear on the PSR-400/PSR-500
panel, organized into functional groups such as “OVERALL CONTROL,” “AUTO AC
COMPANIMENT,” and “VOICE.” To find information about a particular control or fea
ture, either go directly to the section in which that control or feature is found, or look up
the name of the control or feature in the index at the end of the manual.
OVERALL CONTROL
PSR-400
POWER MODE
ON'Of-F
o normal
DD B
PAGE MEMORY
o o
page 1 PAGE ?
OVERALL CONTROL
■— ACCOMP TRANS tijwimg TPMPQ
— VOLUME POSE itr^
" y V y
MIDI RULK DUMP
-PITCH 8FND RANGE
- ¿is ^ ^
P □□ t>
POWER Button
Press the [POWER] button to turn the power on or off.
□
PSR-500
onohmal
O SPLIT OOFF
° FINGER
OfiNGEHEDOHALL
dddI
PAGE MEMORY
RECORD PAGE 1 PAGE 2 PAGES PAGE ■! MIDI BULK DUMP
o o o o
OVERALL CONTROL
'ITCH LSLNL) RANCE
- ¿is ^ ^ ^
kCCOMP trans ti iMiMr’ TciuiDj^
VOLUME POSE TUNING TEMPO
y y y y
P□□□□O
MODE
The [MODE] button determines the operational mode
of the PSR-400/PSR-500. Press the [MODE] button as
many times as necessary until the indicator corresponding
to the desired mode lights:
MODE
• NORMAL
OSPLIT
-SINGLE
“finger
OFINGEREU
□
Auto Power OFF
To prevent unnecessary battery drainage, the PSR-400/
PSR-500 features an Auto Power OFF function that auto
matically turns the power OFF if the instrument is not
used — i.e. no buttons or keys are pressed or no automatic
features are operating — for approximately 10 minutes.
The Auto Power OFF function does not operate when
the PSR-400/PSR-500 is powered from an optional AC
Power Adaptor.
10
n
NORMAL
This is the normal mode of operation in which you can
select and play a single voice (or two voices if the DUAL
VOICE function is used), and select styles for rhythmonly accompaniment.
SPLIT
In this mode different voices can be selected for the leftand right-hand sections of the keyboard. See page 23 for
details.
Page 13
FEATURE REFERENCE (overall control)
SINGLE FINGER
This mode provides automatic rhythm, bass, and orchestra
accompaniment that you can control by playing just one,
two, or three keys in the left-hand section of the keyboard.
See page 18 for details.
FINGERED
The FINGERED mode provides automatic rhythm, bass,
and orchestra accompaniment based on chords you play in
the left-hand section of the keyboard. See page 18 for
details.
• DSP (Digital Sound Processing — PSR-500 only)
The [DSP] button provides two digital effects that you
can use for extra depth and expressive power. This button
determines the type of effect to be used, while the
REVERB DEPTH controls in the VOICE section allow
the depth of the effect to be individually set for each voice
— including the left- and right-hand split voices, and the
main and sub dual voices.
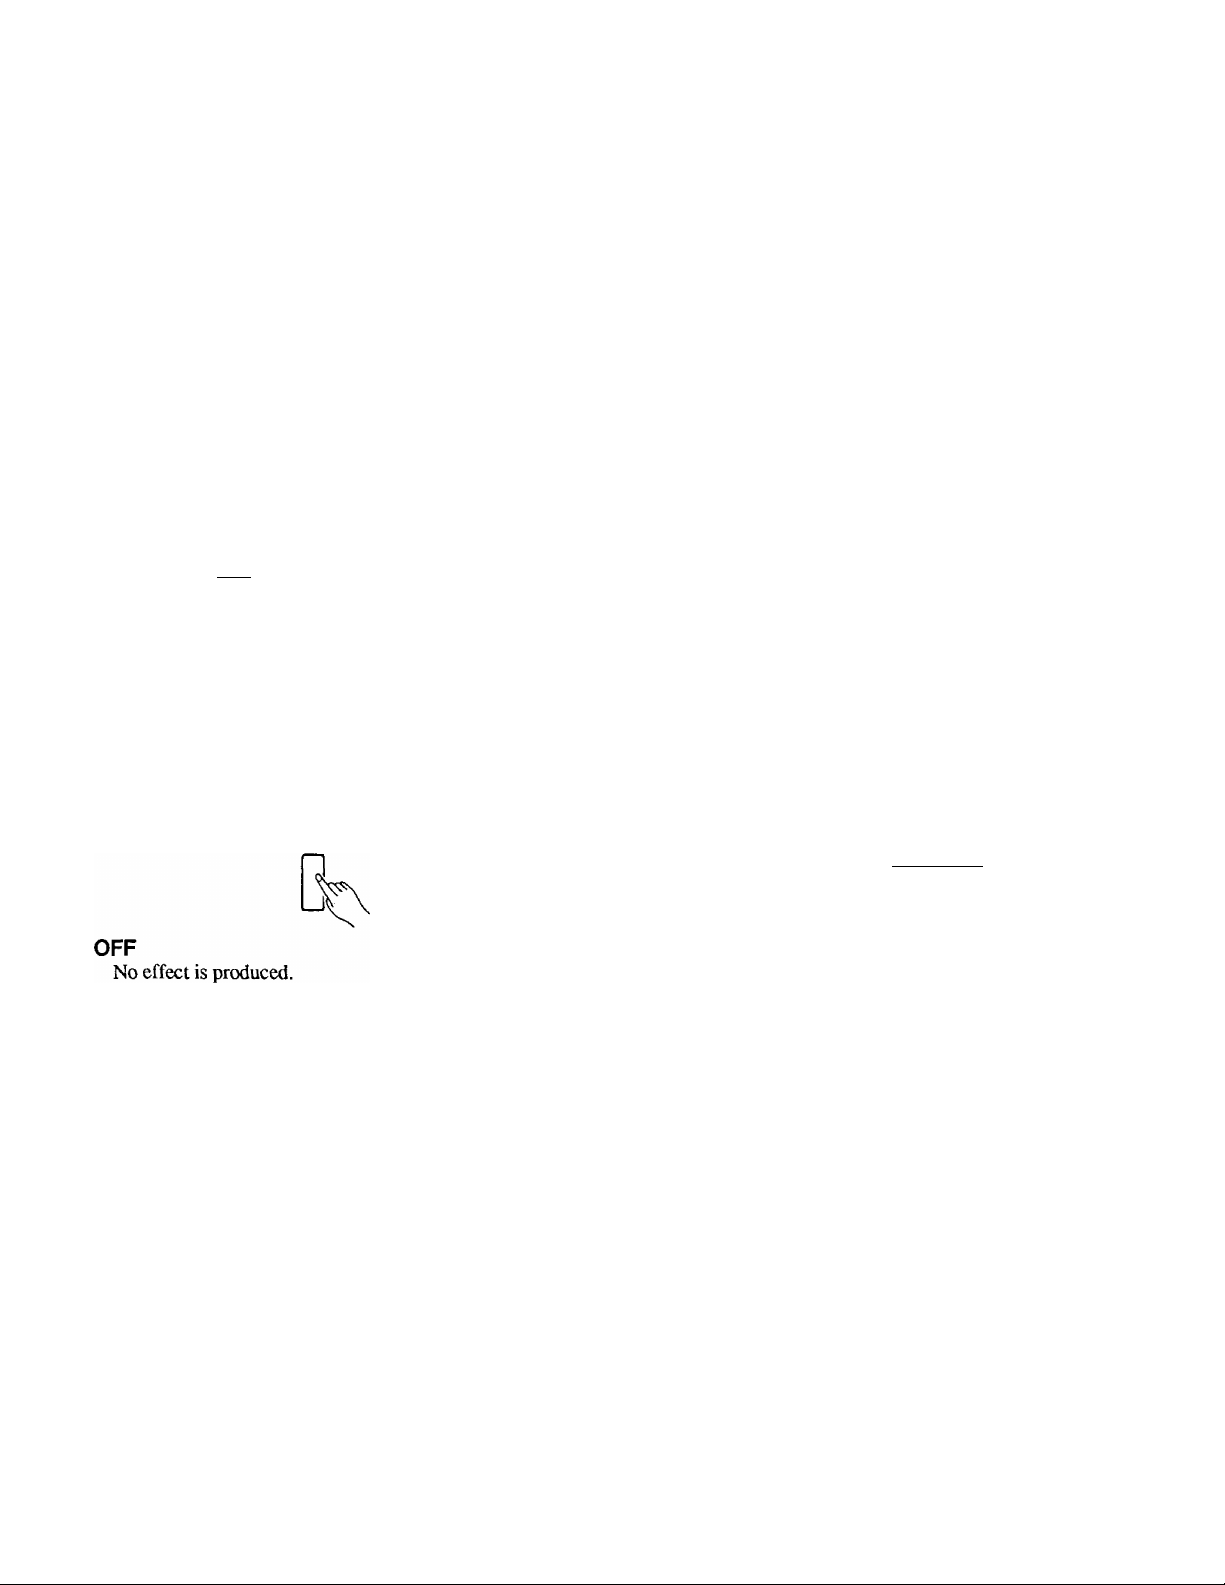
Each time the [DSP] button is pressed the next effect is
selected and the corresponding indicator will light. No
effect is selected when the OFF indicator is lit.
OOFF
•ROOM
OHALL
MASTER VOLUME
Use the MASTER VOLUME control to adjust the over
all volume of the PSR-400/PSR-500 — including the
sound of the voices being played, auto accompaniment,
song memory playback, etc.
VOLUM
ll
ACCOMPANIMENT VOLUME
Although the MASTER VOLUME control can be used
to set the overall volume level, the ACCOMPANIMENT
VOLUME [A] and [T] buttons can be used to adjust the
volume of the selected accompaniment in relation to the
right-hand melody voice. Press the [A] button to increase
the volume, or the [T] button to decrease the volume. The
selected volume level will be displayed on the MULTI
DISPLAY while the volume is being adjusted, and for
approximately 2 seconds after either VOLUME button is
released.
A
ACCOMP
VOLUME
y
STYLE/SPLIT VOICE vOlCt
_» I
C I
SPLIT voice:
ROOM
This setting adds a reverb effect to the sound that is
similar to the type of acoustic reverberation you would
hear in a room.
HALL
For a spacious reverb sound, use the HALL setting.
This effect simulates the natural reverberation of a concert
•
hall.
• Almost all of the auto accompaniment styles are programmed to
use the DSP effects, but no effect will be produced If DSP is set
to OFF.
The volume range is from 0 to 24. A setting of 0 pro
duces no sound while 24 is the highest volume level. The
default accompaniment volume value (21) can be recalled
at any time by pressing both the ACCOMPANIMENT
VOLUME [A] and [T] buttons at the same time,
• When this parameter has been changed, be sure to store the
new data to a PAGE MEMORY (see page 13). If this is not done
the newly selected data will be lost when a different PAGE
MEMORY is selected.
PITCH BEND
The PITCH BEND wheel to the left of the keyboard
allows the pitch notes to be bent up or down — roll the
wheel away from you to bend up, and toward you to bend
down (this situation can be reversed, as described below).
When the PITCH BEND wheel is moved almost all the
way in either direction, the current pitch bend range value
will appear on the MULTI DISPLAY (see below).
11
Page 14

FEATURE REFERENCE (overall control)
Setting the Pitch Bend Range
The maximum amount of pitch bend produced by the
PITCH BEND wheel can be set anywhere from ±1 semi
tone to ±12 semitones (i.e. plus or minus one octave).
1. To set the pitch bend range, roll the PITCH BEND
wheel all the way in either direction so that the current
range value appears on the MULTI DISPLAY.
PITCH BEND
STYLE ! SPLIT VOICE VÇHÇ^
tl‘
■ . CJOW
c
STYLE SPLIT VOICE B£>T
■ I
2. Use the ACCOMP. VOLUME (PITCH BEND
RANGE) [A] and [T] buttons to set the desired range
— the pitch bend range value is displayed in semitones
(-12 through 12). If a minus setting is selected pitch
bend wheel operation is reversed — i.e. roll the wheel
away from you to lower pitch.
PITCH BEND MANGE
r
¿hi
ftCCOMF
VOLUME
y
The transposition range is from -12 to +12, with -12
corresponding to downward transposition by 12 semitones
(one octave, and +12 corresponding to upward transposi
tion by 12 semitones. 0 is the “normal” keyboard pitch
value. The normal transpose value (0) can be recalled at
any lime by pressing both the TRANSPOSE [A] and [T]
buttons at the same time.
• The TFIANSPOSE function will not work while any keys are held.
• TRANSPOSE does not affect the percussion voices (numbers
94 through 99).
• When this parameter has been changed, be sure to store the
new data to a PAGE MEMORY (see page 13). If this is not done
the newly selected data will be lost when a diUerent PAGE
MEMORY is selected.
TUNING
The PSR-400/PSR-500 [TUNING] buttons makes it
possible to tune the pitch of the PSR-400/PSR-500 to
match other instruments. Tuning can be accomplished
over a ±50-cent range (that’s 100 cents total, or one semi
tone) in 16 steps.
STYLE / SPLIT VOtCE
TUNING
u u TÌ n
T tu.u
style split voce
3. Release the PITCH BEND wheel.
When this parameter has been changed, be sure to store the
new data to a PAGE MEMORY (see page 13). If this is not done
the newly selected data will be lost when a different PAGE
MEMORY Is selected.
TRANSPOSE
The PSR-400/PSR-500 [TRANSPOSE] buttons makes
it possible to shift the pitch of the PSR-4(X)/PSR-500 up or
down in semitone intervals up to a maximum of 12 semi
tones (one octave). Transposing the pitch of the PSR-4(X)/
PSR-500 keyboard makes it easier to play in difficult key
signatures, and you can simply match the pitch of the
keyboard to the range of a singer or other instrumentalist.
A
TRANS
POSE
The TRANSPOSE [A] and [T] buttons are used for
transposition. Press the [A] button to increase the pitch of
the keyboard, or the [T] button to lower the pitch. The
selected degree of transposition will be displayed on the
center two digits of the MULTI DISPLAY while the
TRANSPOSE [A] or [▼] button is pressed, and for ap
proximately 2 seconds after either TRANSPOSE button is
released.
STYLE/SPLIT VOICE
style split VÛJCE
n
u
The TUNING [A] and [T] buttons are used for tuning.
Press the [A] button to raise the pitch of the instrument, or
the [T] button to lower the pitch. The selected degree of
tuning will be shown on the MULTI DISPLAY in Hertz
while the TUNING [A] or [T] button is pressed, and for
approximately 2 seconds after either TUNING button is
released.
The tuning range is from 427.5 Hertz (-50 cents) to ^
452.9 Hz (+50 cents). 440.0 Hertz (±0 cents) is the “nor
mal” tuning value. The normal tuning value (440,0) can
be recalled at any time by pressing both the TUNING [A]
and [T] buttons at the same time.
• TUNING does not affect the percussion voices (numbers 94
through 99).
• When this parameter has been changed, be sure to store the
new data to a PAGE MEMORY (see page 13). If this is not done
the newly selected data will be lost when a different PAGE
MEMORY is selected.
TEMPO
The TEMPO buttons control the tempo of the AUTO
ACCOMPANIMENT, the SONG MEMORY, DEMO
playback, and the MULTI PADs on the PSR-5CX).
¿h
TEMPO
STYLE/SPUT VOICE VOCE
f pn
IC
style split voce beat
U
12
Page 15
FEATURE REFERENCE (overall control)
Press the TEMPO [A] button to increase the tempo, or
the TEMPO [▼] button to decrease the tempo. The se
lected tempo will be displayed on the MULTI DISPLAY
(in quarter-note beats per minute) while the TEMPO [A]
or [T] button is pressed, and for approximately 2 seconds
after either TEMPO button is released.
The available tempo range is from 40 to 240 beats per
minute. Each accompaniment style has a different “de
fault” tempo which is automatically set whenever a new
style is selected (but not when a new style is selected
while the accompaniment is playing). The default tempo
for the currently selected accompaniment style can be
recalled at any time by pressing both the TEMPO [A] and
[▼] buttons at the same time.
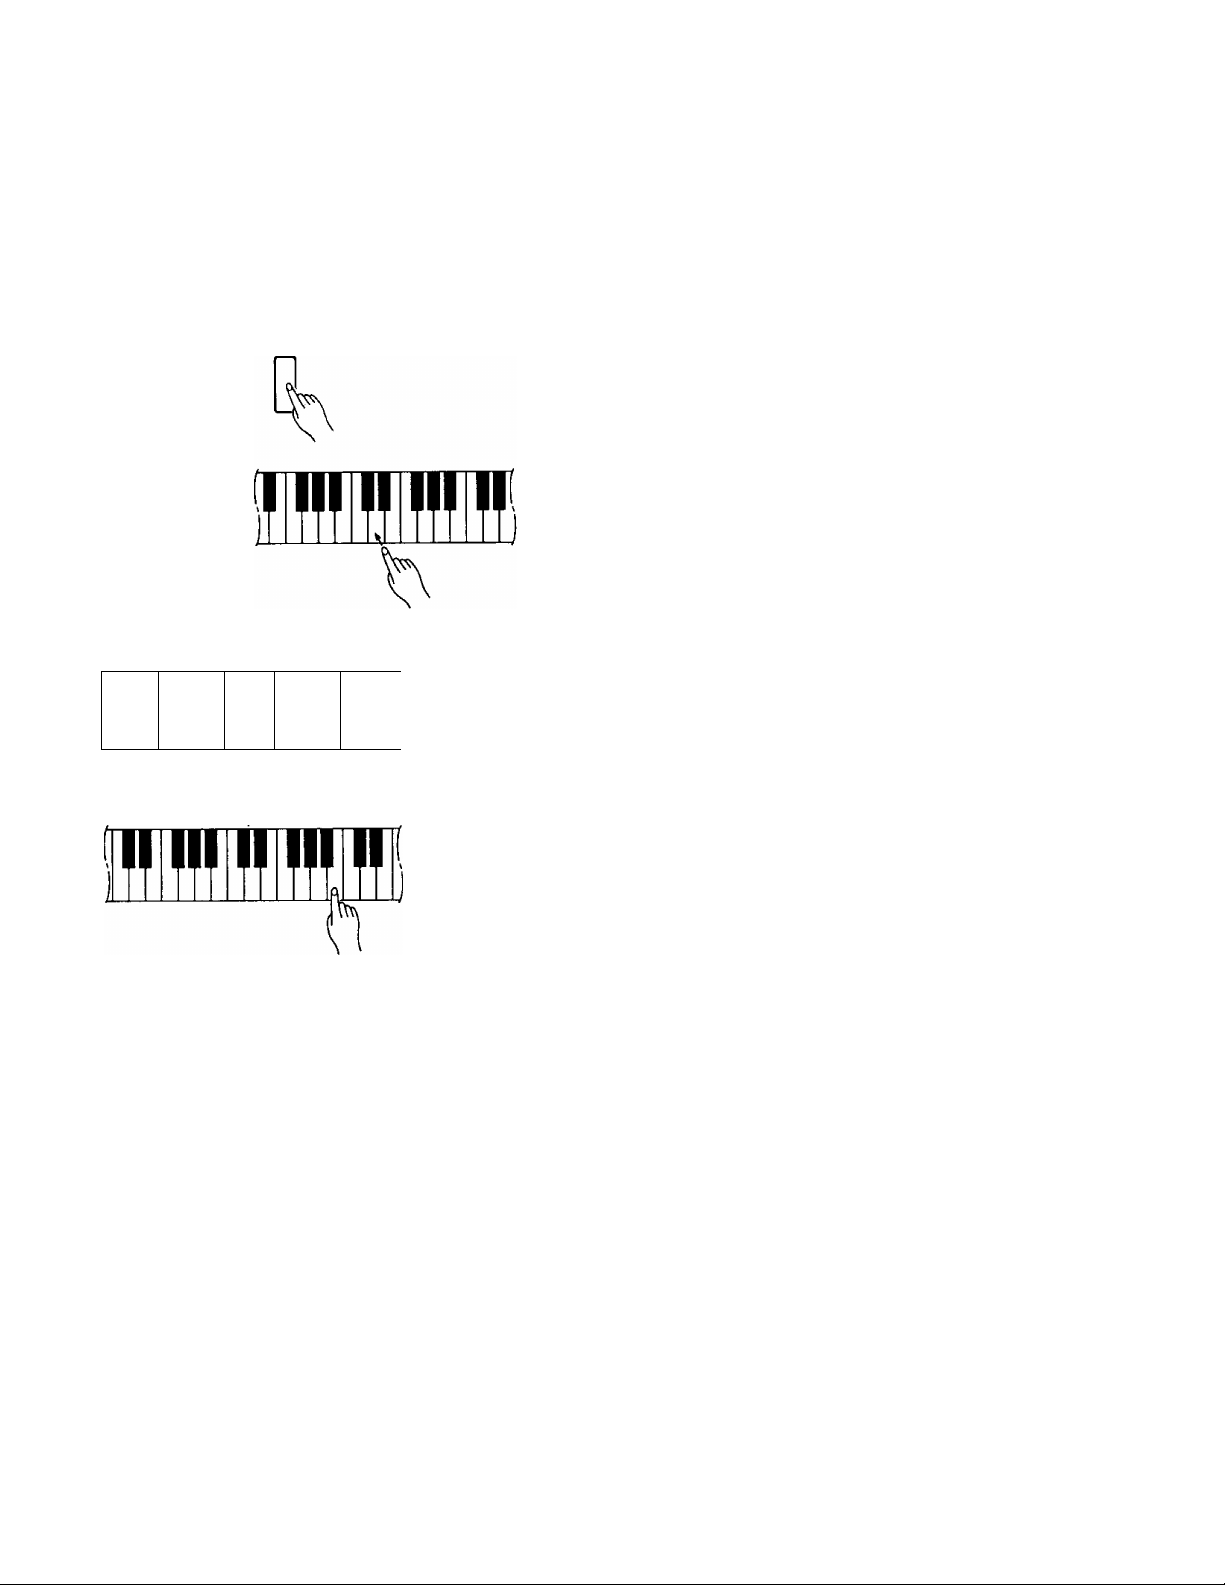
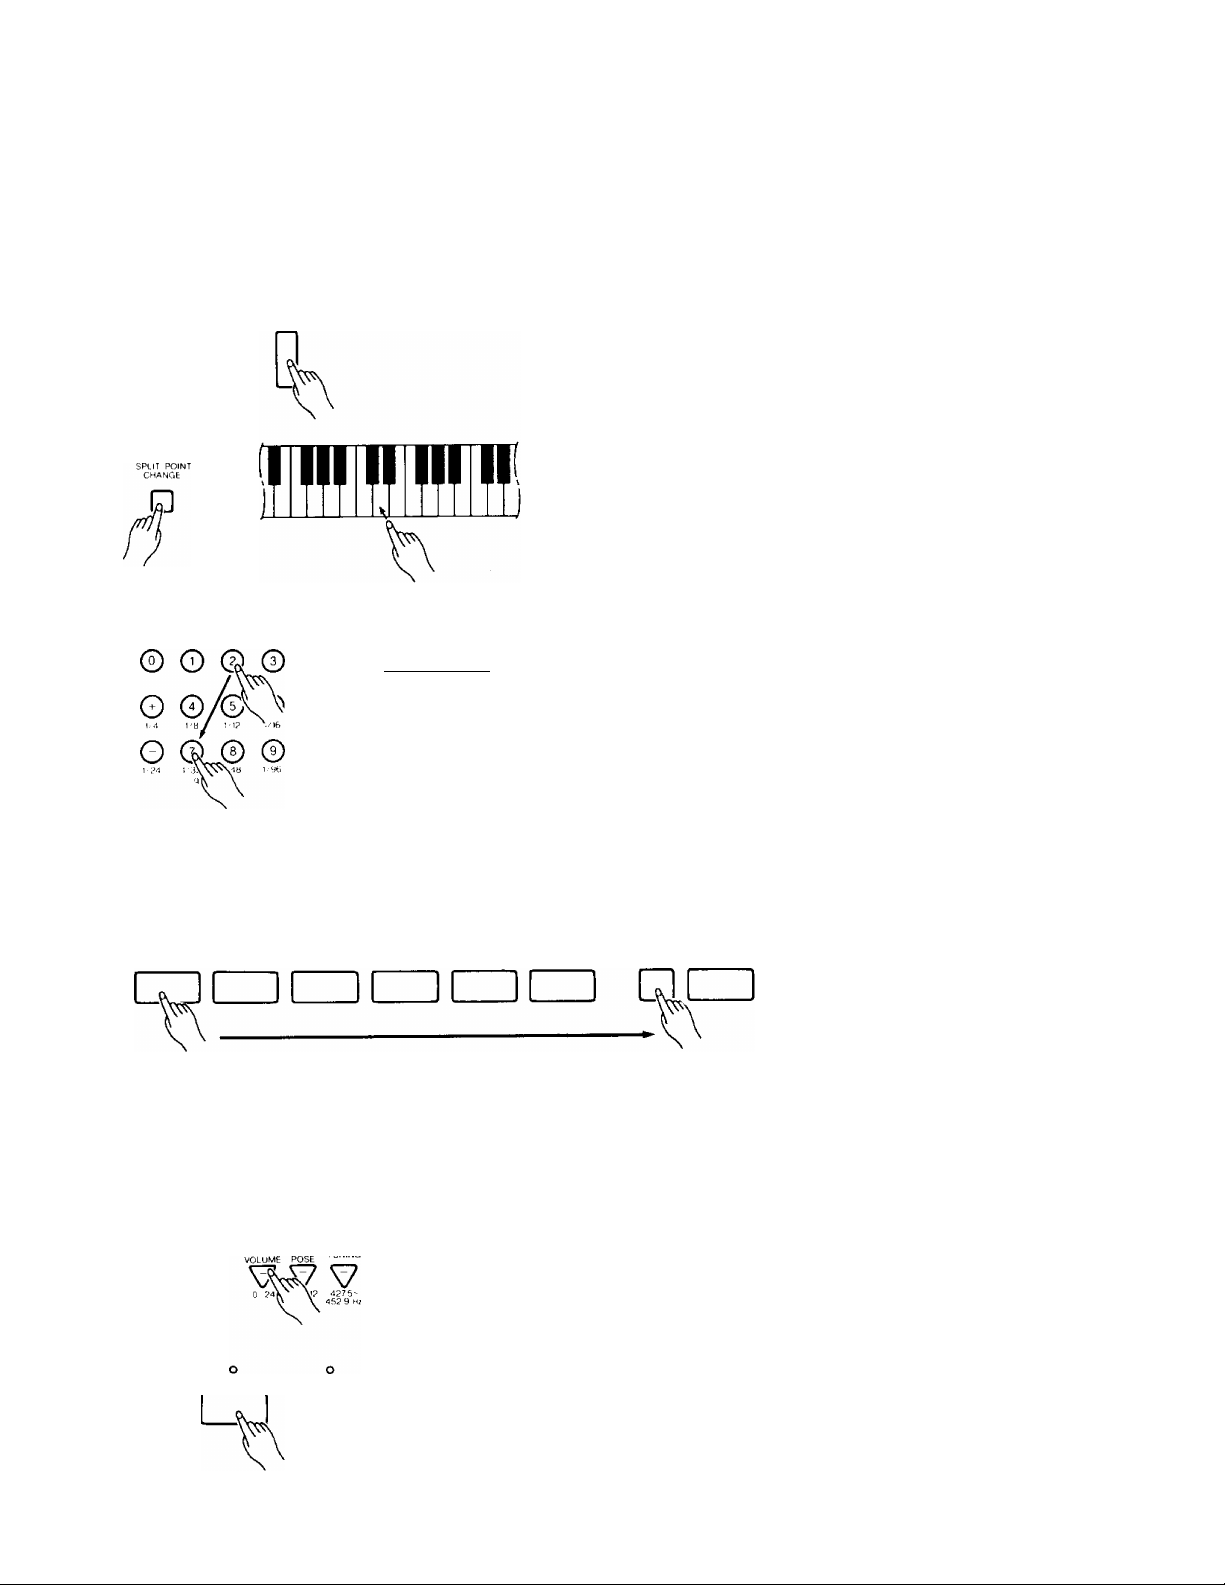
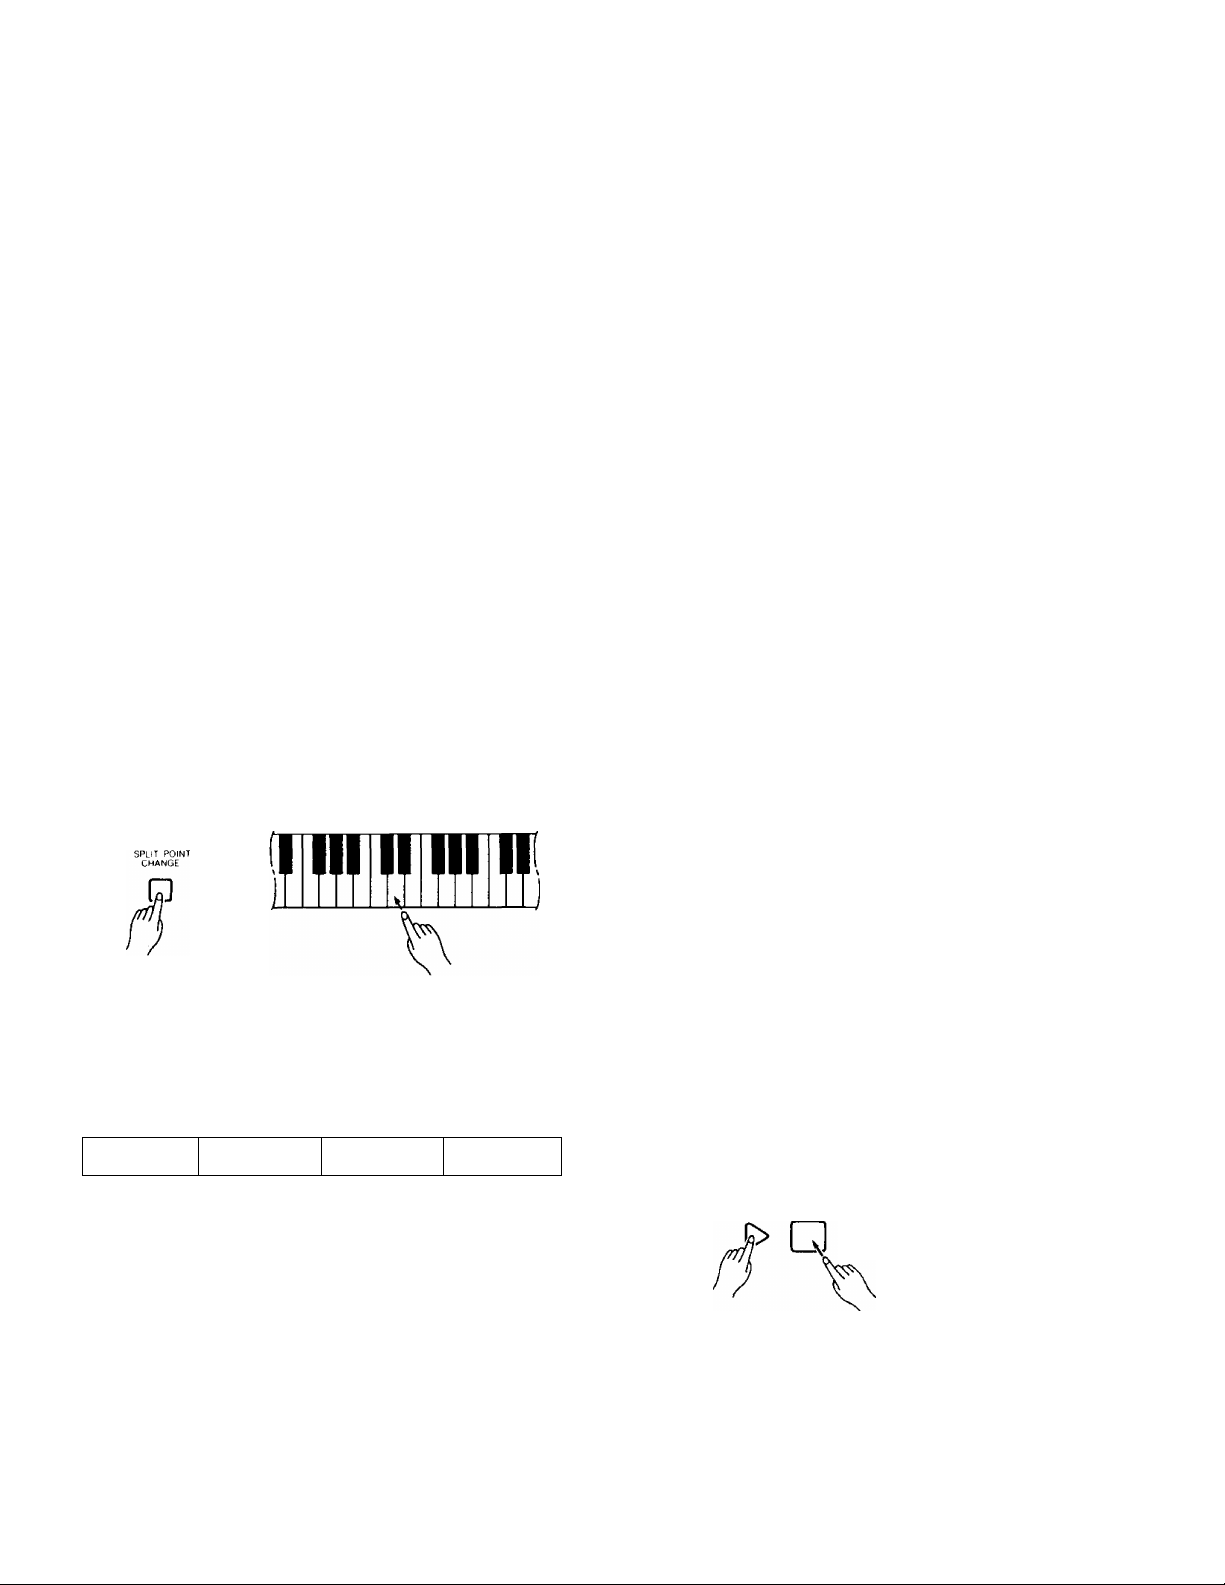
# SPLIT POINT CHANGE
Separate split points can be set for the SPLIT, FIN
GERED, and SINGLE FINGER modes. The default split
point settings are as follows:
• SPLIT mode: Ctt3
• SINGLE FINGER mode: D2
• FINGERED mode: G2
The split point for each mode can be set to any other
key while that mode is selected by pressing the desired
split-point key while holding the [SPLIT POINT
CHANGE] button.
PAGE MEMORY
The PAGE MEMORY can be used to store 4 complete
sets of panel settings (including the contents of the SONG
MEMORY and MULTI PAD features) in the PSR-500
and 2 in the PSR-400 that can then be recalled simply by
pressing a single button.
When the power is initially turned on the previously
selected “PAGE” is automatically selected and its indica
tor will light. If any changes are then made to the panel
settings the PAGE indicator will flash, indicating that
changes have been made. If the same PAGE button is then
pressed the original PAGE settings will be recalled and
the indicator will light continuously again.
The following panel settings are stored by the PAGE
MEMORY:
• Currently selected voice(s).
• MULTI PAD (PSR-500)/DRUM PAD (PSR-400) contents.
•SONG MEMORY contents.
• VOICE MEMORY contents.
• VOICE section parameter settings (Auto Harmony, Reverb
Depth (PSR-500), Volume, Octave, Pan, MIDI Out Channel,
Dual).
• CUSTOM ACCOMPANIMENT contents.
• Currently selected STYLE.
• Currently selected chord voice when accompaniment stopped.
• ORCHESTRATION settings.
• ACCOMPANIMENT CONTROL status.
• MODE.
• ACCOMP. VOLUME.
•TUNE.
• TRANSPOSE.
• TEMPO.
• PITCH BEND RANGE.
• DSP (PSR-500)
• MIDI RECEIVE CHANNELCLOCK.
• The MIDI MODE setting is not recorded by the PAGE MEMORY.
MIDI MODE is reset to "00" whenever the power is turned on or
a different PAGE is selected.
The split point is shown on the MULTI DISPLAY for
as long as the [SPLIT POINT CHANGE] button is held.
The C3 key, for example, would be displayed as “c 3”.
Ftt2 would be displayed as “F"2”. The sharp is indicated
by the lit bar between the “F” and the “2.”
c d
SfYlf SRuTViXet- BEM
C3
d d
smv. St*L'rvO*CE BEAT
styee st^iTvOiCt
D2
s h d
T 1 ■
sm F SPLIT VOiCl BEAT
G2
The SPLIT, SINGLE FINGER, and FINGERED mode
split points are retained in memory and will be recalled
whenever the corresponding mode is selected.
Note that the split-point key is included in the righthand section of the keyboard.
• When this parameter has been changed, be sure to store the
new data to a PAGE MEMORY (see next paragraph). If this is
not done the newly selected data will be lost when a different
PAGE MEMORY is selected.
Recording
Make the desired panel settings, then press one of the
PAGE MEMORY buttons while holding the [RECORD]
button. The corresponding indicator will light indicating
that the data has been memorized. All previous data in the
selected PAGE will be erased.
PAGE MEMORY
RECOflD PAGE 1 PAGE 2 PAGE 3 PAGE 4 MIDI BULK DUMP
o o o o
□ □□ o
The PAGE MEMORY cannot be recorded while any automatic
playback feature or any recording function is running (AUTO
ACCOMPANIMENT play; SONG MEMORY record/p!ay/play
ready; PSR-500 MULTI PAD record/play; CUSTOM ACCOMPA
NIMENT record/play, DEMO play, PSR-400 DRUM PAD pad
assign).
13
Page 16

FEATURE REFERENCE (OVERALL CONTROL)
Recall
To recall a PAGE MEMORY setting
simply press the appropriate PAGE
MEMORY button. The corresponding
indicator will light and the required
panel settings will be recalled.
• If the panel settings are changed
but not recorded (including such
operations as completing a SONG
MEMORY recording), those
changes will be lost if a PAGE
MEMORY is recalled.
• A different PAGE MEMORY cannot be
selected while any automatic playback
feature or any recording function Is running
(AUTO ACCOMPANIMENT play; SONG
MEMORY record/play/play ready; PSR-500
MULTI PAD record/play: CUSTOM AC
COMPANIMENT record/play. DEMO play,
PSR-400 DRUM PAD pad assign).
■ If the panel settings have been changed but
not recorded and the power is turned off,
those panel settings will be memorized
separately from the page memory.
• PAGE MEMORY data will be retained in
memory even when the PSR-400/PSR-500
power is turned off as long as a full set of
good batteries is present or an AC power
adaptor remains connected.
• If no batteries are installed and no AC
power adaptor is connected for more than
about 10 minutes, the PAGE memory is
automatically initialized when the power is
turned on. Individual PAGE MEMORY
banks can be initialized by holding the
corresponding PAGE MEMORY button
while turning the power on. All PAGE
MEMORY banks can be initialized at once
by holding both the CUSTOM [RECORD/
END] and [CLEAR] buttons while UJrning
the power on. In either case, “clr" appears
on the MULTI DISPLAY when the memory
is initialized.
STviEr SPLIT voce
c ir
STYLE SPLIT VOICE
The initialized settings are as follows:
14
List of initial PAGE memory settings
* Settings in parentheses apply to the PSFT-500 only.
MODE
(DSP)
PITCH BEND PIANGE
OVERALL
CONTROL
AUTO
ACCOMPANI
MENT
VOICE
ACCOMP. VOL
TFTANSPOSE
TUNING
SPLIT POINT
STYLE No.
ORCHESTRATION
CUSTOM STYLE
ACCOMP. CONTROL
SYNCHRO START
Chord Voice When
Accompaniment
Stopped
LEFT
Current
RIGHT
HARMONY ON/OFF
LEFT
VOICE
MEMORY 1
RIGHT
HARMONY ON/OFF
SINGLE FINGER
ORCHESTFIA 1
ORCHESTRA 2
ORCHESTFIA 3
(REVERB DEPTH)
NORMAL/DUAL
(REVERB DEPTH)
(REVERB DEPTH)
HARMONY TYPE
(REVERB DEPTH)
(REVERB DEPTH)
HARMONY TYPE
SPLIT
FINGERED
RHYTHM
BASS
VOICE No.
VOLUME
OCTAVE
PAN
VOICE No.
VOLUME
OCTAVE
PAN
MIDI CH
DUAL VOICE
VOICE No.
VOLUME
OCTAVE
PAN
MIDI CH
DUAL VOICE
VOICE No.
VOLUME
OCTAVE
PAN
MIDI CH
DUAL VOICE
VOICE No.
VOLUME
OCTAVE
PAN
MIDI CH
DUAL VOICE
PAGE 1 ~ 2 [PSR-400]
PAGE 1 ~ 4 [PSR-500]
NORMAL
(ROOM)
2
21
0
440
CII3
D2
G2
00
ON
ON
ON
ON
ON
PAGE 1: Style for DEMO 1
PAGE 2: Style for DEMO 2
(PAGES: Style for DEMO 3)
(PAGE 4: LAMBADA)
NORMAL
OFF
35
(6)
12
2
0
NORMAL
89
(6)
21
1
0
DUAL
35
(6)
16
-1
0
2
OFF
00
(6)
21
0
0
3
1
OFF
OFF
86
(6)
21
1
0
35
(6)
16
0
0
95
(6)
21
0
0
2
OFF
03
(6)
21
0
0
2
1
ON
OFF
00
(6)
10
0
0
Page 17

FEATURE REFERENCE (overall control)
VOICE
SONG
MEMORY
MIDI
MULTI 1
PAD
[PSR-500]
DRUM
PAD
[PSR-400]
NORMAUDUAL
VOICE No. 35
(REVERB DEPTH)
VOLUME 21
LEFT
VOICE VOICE No. 35
MEMORY 2
RIGHT
HARMONY ON/OFF
LEFT
VOICE
MEMORY3 (REVERB DEPTH)
RIGHT
HARMONY ON/OFF
LEFT
VOICE VOICE No. 67
MEMORY4
RIGHT
HARMONY ON/OFF
VOICE MEMORY 1 - 4
CHORD 1~!
MELODY 1 - 5
CONDUCTOR
RECEIVE CH 1-16
CLOCK
2 4 banks X 4 pages
3
4
1
2
3
4
(REVERB DEPTH)
HARMONY TYPE 5
(REVERB DEPTH)
HARMONY TYPE
(REVERB DEPTH)
(REVERB DEPTH)
HARMONY TYPE
OCTAVE
PAN 0
MIDI CH
DUAL VOICE ON
VOLUME 21
OCTAVE 0
PAN -4
MIDI CH
DUAL VOICE ON
VOICE No. 56
VOLUME 24
OCTAVE
PAN 0
MIDI CH 2
DUAL VOICE OFF
VOICE No. 71
VOLUME 21
OCTAVE
PAN 0
MIDI CH
DUAL VOICE ON
VOICE No. 30
VOLUME 24
OCTAVE 2
PAN 0
MIDI CH
DUAL VOICE
VOLUME 24
OCTAVE 0
PAN
MIDI CH
DUAL VOICE ON
NORMAL DUAL
93
(6)
0
2
(6)
1
OFF
(6)
1
(6)
0
1
1
OFF
(8)
2
ON
(9)
0
1
1
OFF
All OFF
No Data
No Data
No Data
All Enable
Disable
= 16 patterns
4 banks X 2 pages
= 8 voices
(14)
22
1
0
49
(9)
20
0
0
59
(9)
21
1
0
53
(9)
24
0
0
36
(13)
18
1
0
60
(9)
18
0
0
Page Memory MIDI Bulk Dump
The contents of each PAGE
MEMORY can be bulk dumped via the
MIDI OUT connector as a system ex
clusive message and received by a sec
ond PSR-400/PSR-500 or a MIDI data
recorder.
Press the [MIDI BULK DUMP]
1.
button. All PAGE MEMORY indi
cators will flash and “bdp” will
flash on the MULTI DISPLAY.
MIDI BULK DUMP
Press the button of the PAGE
2.
MEMORY you want to transmit.
The corresponding indicator will
flash while the data is being trans
mitted. The bulk dump can be
aborted at any time by pressing the
[MIDI BULK DUMP] button a
second time. No other operations
can be performed during a bulk
transmission.
When the transmission has finished
3.
the PAGE MEMORY indicators
and MULTI DISPLAY will return
to their previous states.
STYLE > SPLIT voce VOf.F
bdP
S7VLE SPLIT VOICE BEAT
15
Page 18

FEATURE REFERENCE (AUTO ACCOMPANIMENT)
AUTO ACCOMPANIMENT
AUTO ACCOMPANIMENT
STYLE SELECT
© o © ©
ORCHESTRATION
,BASS£V 1 Ov ? (X 3
0 0©©
1/4 1/8 ^'1? 1/16
O © © ®
ACCOMPANIMENT CONTROL
INTRO
o
TILL IN
o
o o o
NORMAL TILL IN 2 BRIDGE
][
STYLE SELECT
Select any of the PSR-400/PSR-500’s 100 accompani
ment styles by using one of the two following methods:
1: Choose one of the 100 accompaniment styles — num
bered “00” through “99” — shown on the STYLE LIST
then enter its number using the numeric STYLE SELECT
buttons. To select BAROQUE (number 27), for example,
first press “2” and then “7,” The number “27” should then
be displayed on the left two digits of the MULTI DISPLAY.
;tyl e SELECT
STYLE-SPLIT MOICt
Jl t
C. I
style split voice 0LAT
2: The [+] and [-] buttons in the STYLE SELECT group
can be used to increment (increase by one) or decrement
(decrease by one) the current accompaniment style number.
Press the W button briefly to select the accompaniment
style one number higher than the current accompaniment
style, or the [-] button to select the accompaniment style one
number lower than the current accompaniment style. If you
hold the [+] or [-] button down, the accompaniment style
number will increment or decrement continuously — simply
release the button when the desired accompaniment style
number has been reached.
u yll select
© o © ©
STVLL ^SPLIT VQ'Cl
_
RECORD/END CLEAR
CUSTOM
I 1 f I
o
ENDING
][
ACCOMPANIMENT CONTROL
Starting the Accompaniment
Press the [START/STOP] button to start the selected
accompaniment immediately. The rhythm sound will be
gin playing and, if the FINGERED or SINGLE FINGER
mode is selected via the OVERALL CONTROL section
MODE button, the bass and chord parts will also begin
playing as soon as the first note or chord is played on the
keyboard.
Press the [SYNC-START ON/OFF] button if you want
the accompaniment to start when you play the first note on
the keyboard. In this case the accompaniment is started by
playing in the left-hand section of the keyboard if the
RNGERED, SINGLE FINGER or SPLIT mode is
selected, or by playing anywhere on the keyboard if the
NORMAL mode is selected. If you press the [SYNC-
START ON/OFF — RHYTHM STOP] button, the right
two dots in the MULTI DISPLAY and the [SYNCSTART ON/OFF — RHYTHM STOP] button indicator
will flash at the current tempo. The synchro start mode
can be re-engaged by pressing the [SYNC-START ON/
OFF — RHYTHM STOP] button again so that its
indicator goes out.
• The right two dots in the MULTI DISPLAY will con
tinue to flash while the rhythm plays to provide a visual
indication of the current tempo.
style SfT-IT VOIC^ 8t>T ■
SYNC START ON-OFF
iN.-J'rtni cJii-'srJr r eTAOT/CTnP
RHYTHM STOP
□ [
1
1
c.u.
1st. Beat
2nd. Beat
3rd. Beat
4th. Beat
16
Q© © ©
1 /4 ' • t'48 i'96
1.12 MS
© ©
¿'1
STYI.f SPI :T VOICE BEAT
Page 19

FEATURE REFERENCE (AUTO ACCOMPANIMENT)
A different accompaniment style can be selected at any time
while the accompaniment is playing. The style number display
will change as soon as the selection is made, but the new style
will begin playback from the top of the next measure. The tempo
will not change when the new style begins playing.
The NORMAL and BRIDGE Variations
Each style has two main variations — NORMAL and
BRIDGE. If the [NORMAL] or [BRIDGE] button is
pressed while the rhythm is playing, the corresponding
variation will begin from the top of the next measure. You
can also select [NORMAL] or [BRIDGE] before starting
the accompaniment.
o
normal
O
BRIDGE
Starting the Accompaniment with an Introduction
Any of the PSR-400/PSR-500 accompaniment patterns
can be started with an appropriate introduction by pressing
the [INTRO] button and then the [START/STOP] button.
□
[!□
Adding Fill-ins
The PSR-400 and PSR-500 provide two types of fill-ins
(rhythmic variations) — one which leads to the NORMAL
variation and one which leads to the BRIDGE variation.
Press the [FILL IN 1] button at any time while the accom
paniment is playing to add a short fill-in and go to (or
return to) the NORMAL variation, or press the [FILL IN
2] button to add a short fill-in and go to (or return to) the
BRIDGE variation.
The [NORMAL] indicator will flash while FILL IN 1
plays, and the [BRIDGE] indicator will flash while FILL
IN 2 plays. You can change the variation that will begin
playing after the fill-in by pressing the desired variation
button while the indicator is still flashing.
□ LIJ
BRIDGE
□ CD
If you hold the [FILL IN 1] or [HLL IN 2] button, the
fill-in pattern will repeat until the button is released, then
the NORMAL or BRIDGE variation will begin from the
beginning of the next measure.
Once the [INTRO] button is pressed, the [INTRO] indi
cator will be lit continuously and the [NORMAL] or
[BRIDGE] indicator will flash to indicate which variation
will play when the introduction has finished. You can
change the “destination” variation by pressing the [NOR
MAL] or [BRIDGE] button while its indicator is flashing.
When the introduction ends, the [INTRO] indicator will
go out and the [NORMAL] or [BRIIXjE] indicator will
light continuously.
• It is possible to start the accompaniment from any variation —
even the ending — by pressing the corresponding button prior to
pressing the [START/STOP] button. The destination [NORMAL]
or [BRIDGE] variation can be selected in the normal way.
• If the [INTRO], [FILL IN, >]. [FILL IN 2], or [ENDING] pattern is
selected prior to pressing the [START/STOP] button and then
the same button is pressed again or the currently flashing [NOR
MAL] or [BRIDGE] button is pressed, Its indicator will go out and
the destination [NORMAL] or [BRIDGE] pattern indicator will light
continuously. Once started the accompaniment will then begin
directly from the NORMAL or BRIDGE pattern.
• The [INTRO] button can be used to select the introduction
pattern even while the accompaniment is playing.
•
• If the [FILL IN 1] or [FILL IN 2] button is pressed during the last
1/4-note of a measure, the fill in will begin from the first beat of
the next measure. If pressed at any other time the fill-in will
begin immediately.
• It is also possible to start the accompaniment with a fill-in by
pressing the desired FILL IN button prior to pressing the
[START/STOP] button. The destination [NORMAL] or [BRIDGE]
variation can be selected in the normal way.
Stopping the Accompaniment
An accompaniment in progress can be stopped immedi
ately by pressing the [START/STOP] button or the
[SYNC-START ON/OFF — RHYTHM STOP] button. In
the latter case the synchro start mode will be engaged
when the accompaniment stops. The accompaniment can
also be stopped with an appropriate ending by pressing the
[ENDING] button.
□ [
The ending will begin from the first beat of the next measure.
If the [FILL IN 1] or [FILL IN 2] button is pressed while the ending
pattern is playing, a fill-in will be played, followed by a return to
the normal or bridge pattern.
17
Page 20

FEATURE REFERENCE (AUTO ACCOMPANIMENT)
THE SINGLE FINGER MODE
The SINGLE FINGER mode is selected via the
[MODE] button in the OVERALL CONTROL section
(see page 10).
MODE
OWORMAL
O SPLIT
1
SINGLE FINGER accompaniment makes it simple to
produce beautifully orchestrated accompaniment using
major, seventh, minor and minor-seventh chords by press
ing a minimum number of keys in the left-hand section of
the keyboard. The accompaniment produced is perfectly
matched to the currently selected accompaniment style.
If you press a “C” key in the left-hand section of the
keyboard, for example, a C-maJor accompaniment will be
played. Press another key in the left-hand section of the
keyboard to select a new chord. The key you press will
always determine the “root” of the chord played (i.e. “C”
for a C chord).
THE FINGERED MODE
The FINGERED mode is ideal if you already know
how to play chords on a keyboard, since it allows you to
supply your own chords for the Auto Accompaniment
feature.
MODE
ONORMAL
O SPLIT
R
The PSR-400/PSR-500 will accept the following chord
types:
Chord Abbreviation
Major M
Minor
Major seventh
Suspended fourth
Minor sixth m6
Minor seventh m7
Minor seventh flatted fifth
Minor major seventh
Seventh
Seventh flatted fifth
Seventh suspended fourth 7sus4
Augmented (seventh)
Diminished (seventh)
m 1-k3-5
M7
sus4
m7-5
mM7
7 1-3-(5)-l>7
7-5
aug
dim
Normal Voicii
1-3-5
1-3-(5)-7
1-4-5
1-l>3-5-6
1-l>3-(5)-k7
1-k3-t5-l>7
1-t3-(5)-7
1-3-L5-t7
1-4-5-t7
1-3-lt5-(l>7)
1-l»3-k5-(6)
Playing Minor, Seventh, and Minor-seventh
Chords In the Single-finger Mode
Cm
C7
Cm 7
¡■EfflEEI
I For a minor chord, press the root key and a black key to
its left.
I For a seventh chord, press the root key and a white key
to its left.
I For a minor-seventh chord, press the root key and both
a white and black key to its left.
The automatic accompaniment will continue playing even if you
lift your fingers from the Auto Accompaniment keys. You only
need to press the Auto Accompaniment keys when changing
chords.
If the SINGLE FINGER mode is used while the accompaniment
is stopped, the appropriate bass and chord sound will be pro
duced when any left-hand keys are pressed. The bass voice is
the same as the accompaniment bass voice. The chord voice
can be selected using the VOICE SELECT buttons after a key in
the left-hand section of the keyboard has been pressed.
REVERB DEPTH (PSR-500 only), VOLUME, OCTAVE, and
PAN settings will affect the chord voice, but the DUAL VOICE
mode cannot be used.
* Notes in parentheses may be omitted.
Minor sixth chords will only be properly detected if
they are played in “root position.” Seventh flatted fifth
chords will be recognized as long as either the root or ^
flatted seventh is the lowest note. For diminished and
augmented chords, the lowest key pressed is assumed to
be the root.
• If you play two notes one octave apart on the left-hand section of
the keyboard, that note will be taken as the root and the accom
paniment will use only that note, tf you play the root and fifth the
accompaniment will use only the root and fifth.
If you play three adjacent keys at once (semitone intervals). All
accompaniment parts except for rhythm will be muted.
If the FINGERED mode is used while the accompaniment is
stopped, the appropriate bass note will be produced when a lefthand chord is detected, and the chord will sound as played. The
chord voice can be selected using the VOICE SELECT buttons
after a key in the left-hand section of the keyboard has been
pressed. REVERB DEPTH (PSR-500 only). VOLUME, OC
TAVE, and PAN settings will affect tfie chord voice, but the
DUAL VOICE mode cannot be used.
18
Page 21

FEATURE REFERENCE (AUTO ACCOMPANIMENT)
ORCHESTRATION
Accompaniment parts can be turned on or off by press
ing the corresponding ORCHESTRA button. When a part
is turned off the corresponding indicator will go out. To
silence the bass part, for example, press the ORCHES
TRATION [BASS] button so that its indicator goes out.
Press the button again to turn that part back on.
orchestration
Depending on the selected style, all ORCHESTFIATION buttons
may not always contain data (the indicators will light even if the
corresponding ORCHESTRATION button does not contain
data).
• CUSTOM STYLE
The PSR-400/PSR-500 CUSTOM STYLE feature lets
you create original accompaniment styles — one for each
PAGE MEMORY — which are stored as style number 99
(PROGRAMMABLE). You can program separate pat
terns for the INTRO, NORMAL, BRIDGE, FILL IN 1,
FILL IN 2, and ENDING variations.
1. Select one of the preset or custom styles on which you
want to base your new custom style prior to activating
the CUSTOM STYLE feature.
2. Press the CUSTOM [RECORD/END] button. Style
number 99 will automatically be selected and the AC
COMPANIMENT CONTROL variation LEDs will
flash in sequence. If you press the [RECORD/END]
button again at this point recording will be cancelled
and the previous style will be re-selected.
RECORD/END CLEAR
CUSTOM
I I
As soon as an ACCOMPANIMENT CONTROL
variation button is pressed, the selected pattern will
begin playing repeatedly (along with a metronome
“click” sound which will not be recorded), based on a
C chord.
* If you cancel recording at this point by pressing the
[RECORD/END] button, any previously recorded CUSTOM
STYLE data will be erased and the current style will be
recorded in the CUSTOM STYLE memory.
4. The ORCHESTRATION buttons will be flashing in
sequence. Select the part you want to program by
pressing the corresponding ORCHESTRATION but
ton. When an ORCHESTRATION button is pressed
its indicator will light and the sound of that track will
be emphasized. At this point you can press any other
ORCHESTRATION button to select a different record
track, as required. Further, by turning the selected
track off, the ORCHESTRATION indicators will
resume flashing in sequence and you can hear the
overall volume balance of the accompaniment.
ORCHESTRATION
-ORCHESTRA*
• The ORCHESTRATION [2] and [31 buttons each contain 2
tracks of data. Press either of these buttons once to select
track A, and a second time to select track B. When the button
is pressed a third time the part is turned off.
5. You can now add new material to the selected part by
playing on the keyboard. You can completely clear a
part if you want to record new material from scratch:
press the ORCHESTRATION button corresponding to
the part you want to clear while holding the [CLEAR]
button. Individual notes can be cleared by pressing the
appropriate key while holding the [CLEAR] button.
This technique is particularly useful when recording
drum parts.
ORCHESTRATION
.BASSÍ
3. Select the variation you want to program by pressing
the corresponding ACCOMPANIMENT CONTROL
button.
ACCOMPANIMENT CONTROL
o o
FILL IN ?
o
ENDING
(NTRO
o
fill in I
o
□□ □ CD IZZI □ □□
RECORD/END
19
Page 22

FEATURE REFERENCE (AUTO ACCOMPANIMENT)
When recording the RHYTHM track only a percus
sion voice (numbers 94 through 99) can be selected.
Any voice can be selected when recording any of the
other tracks. Note, however, that a special transpose
function is applied to the BASS track, so we recom
mend that you record a bass voice on the BASS track.
• Be sure to record your CUSTOM ACCOMPANIMENT based
on a C chord. The parts will be automatically transposed to
match the chord played when the CUSTOM ACCOMPANI
MENT is played back.
The percussion voices (numbers 94 through 99) and the
SYNTH TOM voice (number 76) differ in operation from the
other voices in the following ways:
1. During automatic playback they are not transposed to
match the current chord.
2. They can be played during rhythm-only auto accompani
ment playback in the NORMAL mode.
* If the DUAL function is engaged the above only apply if the
percussion or SYNTH TOM voice is the main voice.
• The voice(s) assigned to the selected part can be changed
by using the VOICE select keys in the normal way,
• The length of NORMAL. BRIDGE. INTRO. FILL, and END
ING variations is determined by the selected style.
6. Continue selecting and recording parts until the cur
rently selected variation of your custom style is com
plete.
7. Press the CUSTOM [RECORD/END] button to stop
recording. Your custom style will be automatically
stored as style number 99, and can be selected and
used in the same way as the preset styles.
RFCORD END
СП
• To record a different variation of the CUSTOM
STYLE, repeat steps 2 through 7, above.
• The following data can be changed during CUSTOM
STYLE recording:
• NOTE ON/OFF including velocity.
• TEMPO (the tempo setting that is active when recording is
stopped is used).
• All VOICE section parameters except MIDI Channel (Auto
Harmony, Reverb Depth (PSR-500 only), Volume. Octave,
Pan, Dual Voice) can be set independently for each track.
• VOICE (including VOICE MEMORY) can be set independ
ently for each track.
• One set of voice parameters, including the voice number,
are memorized at the beginning of each track. This means
that 7 sets of voice parameters are memorized for each
custom style variation — RHYTHM. BASS, ORCHESTRA
1,2A, 2B. 3A. and 3B.
• PITCH BEND (changes memorized in real time).
• SUSTAIN (changes memorized in real time).
• Custom styles have a somewhat simpler format than
the preset styles, so some of the preset style data is
changed when used in a custom style. In other words,
the preset style may not sound exactly the same when
used in a custom style.
Quantization
It is possible to set a quantize value before recording a
part by pressing the appropriate STYLE SELECT key.
The available quantize values are: 1/4, 1/6,1/8,1/12,1/16,
1/24,1/32,1/48, 1/96. The selected quantize value forces
all notes you play to fall on the nearest specified beat. If
you select 1/8, for example, all notes you play will be
aligned to the nearest eighth note. The selected quantize
value will be shown on the display for approximately 2
seconds after the button is released.
One measure of 8th notes before quantization
After quantization
The default quantize value is 1/96, This value is automatically
selected whenever the CUSTOM STYLE record mode is en
gaged.
Material that has already been recorded on a track will not be
quantized. Only notes played after the quantization value has
been changed wilt be quantized to that value.
Quantization is applied to both note-on and note-off timing. In
some cases the length of a quantized note may reduced to an
extremely short value of botii the note-on and note-off timing of
the same note are quantized to the same beat.
Before quantize
Note-on Note-off
After quantize
* •
(i)
u
Note-on and note-off are almost the same.
• When a CUSTOM STYLE has been recorded, be sure
to store the new data to a PAGE MEMORY (see page
13), If this is not diftne the newly recorded CUSTOM
STYLE data will be lost when a different PAGE
MEMORY is selected.
• If the CUSTOM STYLE memory becomes full during
recording, “End” will appear on the MULTI DISPLAY
and recording will end. Up to approximately 1,600
notes (including INTRO, FILL and other variations)
can be recorded in each CUSTOM STYLE.
A A
fP-
20
Page 23

VOICE
FEATURE REFERENCE (voice)
VOICE SELECT
® O © ©
© © © ©
© © © ©
PSR-400
AUTO harmony
ON/OFF
1 DUET
2 TRIO
T]
3 BLOCK
4 COUNTRY
5 OCTAVE
6 STRUM
A A A A A
TYPE VOLUME OCTAVE PAN MIDI CH
^ y
VOICE MEMORY
D □□□□
DUAL VOICE
ON/OFFQ^QN/C
VOICE SELECT
Select any of the PSR-400/PSR-500’s 100 voices by
using oneof the following methods:
Voice Selection Method 1:
Choose one of the 100 voices — numbered “00”
through “99” — shown on the panel VOICE LIST then
enter its number using the numeric VOICE SELECT but
tons. To select “ELECTRONIC ORGAN 1” (number 12),
for example, first press “1” and then “2.” The number
“12” should then appear on the right two digits of the
MULTI DISPLAY.
VOICE SELECT
STYLfc^Sf'LrTVOICt^ VQICt
! Jl
STYLE SPl.JTVOiCF BtAl
I L
© © © ©
Voice Selection Method 2:
The [+] and [-] buttons in the numeric VOICE SELECT
button group can be used to increment (increase by one)
or decrement (decrease by one) the current voice number.
Press the [+] button briefly to select the voice one number
higher than the current voice, or the [-] button to select the
voice one number lower than the current voice. If you
hold the [+] or [-] button down, the voice number will
increment or decrement continuously — simply release
the button when the desired voice number has been
reached.
VOICE SELECT
© © © ©
© © © ©
AUTO HARMONY
, ON/OFF
Qi^ON/j
1 DUET
2 TRIO
3 : BLOCK
4 COUNTRY
5 OCTAVE
6 STRUM
/\ /\ /\ /\ /\ /\
TYPE VOLUME OCTAVE PAN MIDI CH
DUAL VOICE
ON/OFF
QS^ON/C
ü
© © ® ©
VOICE MEMORY
o o o o
PSR-500 (>□□□□
VOICE select
© o © ©
STYif ; SPI IT voce VOu-
I _»
Q© © ©
I L
cr\) © ©
• Note that the PSR-400/PSR-5(X) keyboard has “touch
response” — that is, you can control the loudness of the
sound to a certain degree according to how hard you
play the keys. The degree of touch sensitivity is differ
ent for each voice. For example, the piano and percus
sion voices are very responsive to keyboard touch,
while the organ voices have no touch response at all.
Keyboard Percussion
When any of the percussion voices is selected (voice
numbers 94 through 99), you can play a range of drum
and percussion instruments on the keyboard.
The percussion instruments played by the various keys
when voice 98 PERCUSSIONS W/GATE or 99
PERCUSSIONS are selected are marked by symbols
above the keys.
• The TRANSPOSE. TUNING, and OCTAVE functions desaibed
on pages 12 and 24 do not affect the percussion sounds. The
percussion sounds ais affected, however, by the PITCH BEND,
PAN, and VOICE section VOLUME. REVERB DEPTH, MIDI
CHANNEL, and HARMONY controls.
21
Page 24

FEATURE REFERENCE (voice)
DRUM & PERCUSSION INSTRUMENT KEY ASSIGNMENTS
94 SCRATCH W/PITCH
Key
C1~C6
95 KICK & SNARE W/PITCH
Key
C1-B1 Bass Drum Heavy
C2-B2
C3-B3 Snare Low
C4-B4 Snare High
C5-C6
96 TOM W/PITCH
Key
C1-B2
C3-C6
97 LATIN PERCS W/PITCH
Key
C1-B1
C2-B2
C3-B3
C4-B4
C5-C6
Instrument
Scratch
Instrument
Bass Drum Light
Synth Snare
Instrument
Acoustic Tom
Synth Tom
Instrument
Conga
Bongo
Timbale
Agogo
Cuica
98 PERCUSSIONS W/GATE
99 PERCUSSIONS
Key
C1
C#1
D1
DUI
El
F1
F#1
G1
Gth
A1
AIM
B1
C2
Ctt2
D2
Dft2
E2
F2
FI2
G2
Glt2
A2
Ait 2
B2
C3
Cll3
D3
Dtt3
E3
F3
Fits
Instrument
Bass Drum Low
El
Triangle Mute Gtl3
E]
Synth Snare
Triangle Open
Synth Tom Bass
Synth Tom Low
m
Synth Tom Middle
S
Synth Tom High D4
s
Bass Drum High Dlt4
E
Bass Drum Middle
E
Closed Rim Shot
B
Tom Bass FII4
m
Tom Low
[E
Snare High
m
Tom Middle
(E
Open Rim Shot
a
Snare Low B4
m
Tom High
E
Handclaps
[s
Cowbell
m
Cabasa
K
Hi-Hat Closed
m
Brush Hit
0
Hi-Hat Open
B
Crash Cymbal
H
Splash Cymbal
H
Ride Cymbal 1 A5
e
Ride Cymbal 2
H
Conga Low
E
Conga High
E
Conga Mute
Key Instrument
G3
A3
Att3 Timbale High
B3 Tambourine
C4 Claves Low
Ctt4
E4
F4
G4 Brush Squeeze
GH4
A4
Att4
C5
CH5
D5 Scratch Low
Dits
E5
F5 Maracas ^
Ftt5
G5
Gtt5
Att5
B5 House Tom High
C6 House Hi-Hat
— —
Bongo Low
IE
Bongo High
m
Timbale Low
B
Claves High
Agogo Low
\Æ
Agogo High f
Cuica Low
m
Cuica High
e
Whistle
iffl
Hi-Hat Foot
m
Snare Low with Gate Reverb
E
Voice 'One'
H
Voice 'Two’
H
[three]
Voice ‘Three’
Q
Voice ‘Four’
Scratch High
B]
Bongo Mute
m
House Bass Drum
ffl
House Snare Drum
S3
House Tom Bass
S3
House Tom Low
S3
House Tom Middle
S3
22
Page 25

FEATURE REFERENCE (voice)
THE SPLIT MODE
The PSR-400/PSR-500 SPLIT mode — selected via the
[MODE] button — allows you to play two voices at once:
one with the left hand and one with the right. The lefthand voice can be played to the left of the “split point,”
set as described in “SPLIT POINT CHANGE” on page
13, and the right-hand voice can be played to the right of
the split point.
When the SPLIT mode is first selected the current voice
is assigned to the right-hand keys. The right-hand voice
number will be shown on the right two digits of the
MULTI DISPLAY, and the left-hand voice number will
appear on the left two digits of the MULTI DISPLAY
when a key to the left of the split point is pressed for
about 2 seconds (the “SPLIT VOICE” dot in the display
also will light).
MODE
ONOftMAL
• SPLIT
rt SINGLE
^FINGER
OFINGEREO
n
style/SPLIT VQiCE
O D n n
D.U U
style split voice
REVERB DEPTH (psr -500 only)
The depth of the selected DSP effect can be increased
or decreased for the selected voice by using the REVERB
DEPTH [A] or [T] button. The reverb depth range is
from 0 (no effect) to 15 (maximum reverb depth). The
reverb depth is shown on the MULTI DISPLAY while the
REVERB DEPTH
proximately 2 seconds after either REVERB DEPTH
button is released. Pressing both the REVERB DEPTH
[A] and [T] buttons simultaneously immediately selects
reverb depth value 6.
No effect is produced when the reverb depth is set to 0. From
settings 1 to 8 the original sound is maintained at the same level
while the level of the effect sound is increased. From settings 9
to 15 the effect level is maintained while the level of the original
sound is reduced.
In the SPLIT mode the left-hand voice reverb depth can be
adjusted after playing a left-hand key and the right-hand voice
reverb depth can be adjusted after playing a right-hand key.
[A] or [T] button is held, and for ap
A
REVERB
DEPTH
STYLE I SPLIT VOICE VOICE
style SPLIT voce
o
O
Changing the Right and Left-hand Voices
To change the right-hand voice press a key to the right
of the split point, then select the new right-hand voice in
the normal way.
To change the left-hand voice press a key to the left of
the split point, then select the new left-hand voice in the
normal way.
SPLIT POINT
T
WICE SELECT
© O © ©
Q_0 © ©
©O') © ©
When the SPLIT MODE is used with the DUAL VOICE function
(see page 23) different dual voices can be assigned to the leftand right-hand sections of the keyboard. Press a key to the right
of the split point to select the right-hand voice, then turn DUAL
VOICE on and select the right-hand dual voice. Press a key to
the left of the split point to select the left-hand voice, then turn
DUAL VOICE on and select the left-hand dual voice.
VOLUME
Although the MASTER VOLUME control can be used
to set the overall volume level, the VOLUME [A] and
[▼] buttons can be used to adjust the volume of the se
lected voice in relation to all other sound produced by the
PSR-400/PSR-500 — i.e. accompaniment, song memory,
etc. Press the [A] button to increase the volume, or the
[▼] button to decrease the volume. The selected volume
level will be displayed on the MULTI DISPLAY while
the volume is being adjusted, and for approximately 2
seconds after either VOLUME button is released.
A
/GLUME
The volume range is from 0 to 24, with 0 producing no
sound while 24 is die highest volume. The default volume
value (21) can be recalled at any time by pressing both the
VOLUME [A] and [T] buttons at the same time,
• In the SPLIT mode the left-hand voice volume can be adjusted
after playing a left-hand key and the right-hand voice volume can
be adjusted after playing a right-hand key.
STYLE/SPLfT voce VOICE
^ /
STYLE SPLIT VOCE SEAT
23
Page 26

FEATURE REFERENCE (VOICE)
OCTAVE
The OCTAVE [▲] and [T] buttons can be used to shift
the pitch of the selected voice up or down by one or two
octaves. Press the [▲] button to shift the pitch up, or the
[T] button to shift the pitch down. The selected octave (-
2, -1,0,1, or 2) will be displayed on the MULTI DIS
PLAY while the octave value is being adjusted, and for
approximately 2 seconds after either OCTAVE button is
released. A setting of 0 produces the normal pitch for the
voice. The normal octave (0) can be recalled at any time
by pressing both the CXTTAVE [▲] and [T] buttons at the
same time.
A
OCTAVE
In the SPLIT mode the left-hand voice octave can be shifted
after playing a left-hand key and the right-hand voice octave can
be shifted after playing a right-hand key.
The OCTAVE cannot be changed while the keyboard is being
played.
SmE/SPLUVOtGE VOICE
STVLF SPLIT WOCF
n
u
MIDI CHANNEL
The MIDI transmit channel for the selected voice is set
via the MIDI CH. [A] and [T] buttons in the VOICE
section. The [A] button increments the uansmit channel
number and the [▼] button decrements the channel
number. The current channel number is shown on the
MULTI DISPLAY while selection is in progress and for
approximately 2 seconds after both MIDI CH. buttons are
released. The MIDI transmit channel range is from 1 to
16.
A
MIDI CH
Different transmit channels can be set for the left- and right-hand^
voices in the split mode — press a left-hand key prior to setting
the left-hand transmit channel, and a right-hand key prior to
setting the right-hand transmit channel.
The MIDI CHANNEL cannot be changed while the keyboard is
being played.
SiVLfc^ SPLIT VOICE VOICE
style shlit voice
PAN
The PAN [A] and [T] buttons can be used to pan the
sound of the selected voice to any of 15 positions between
full left and right in the stereo sound field. Press the [A]
button to pan the voice to the right, or the [▼] button to
pan the voice to the left. The selected pan position will be
displayed on the MULTI DISPLAY while the pan value is
being adjusted, and for approximately 2 seconds after
either PAN button is released.
A
PAN
The PAN range is from -7 (full left) through 0 (center)
to 7 (full right). The center position (0) can be recalled at
any time by pressing both the PAN [A] and [T] buttons
at the same time. The new PAN value will take effect as
soon as the next key is played.
• In the SPLIT mode the left-hand voice can be panned after
playing a left-hand key and the right-hand voice can be panned
after playing a right-hand key.
S^LE/SPlIt VOICE_____V<?IQE
n
u
DUAL VOICE
The DUAL VOICE feature makes it possible to select
and play two different voices simultaneously.
To activate the DUAL VOICE feature press the [DUAL
VOICE ON/OFF] button (the indicator will light). When
ON, the voice selected prior to turning the DUAL VOICE
feature ON will sound simultaneously with a second
“dual” voice. Any voice can be selected as the dual voice
while the DUAL feature is ON, and its number will be
shown on the right two digits of the MULTI DISPLAY.
The DUAL VOICE feature can be turned OFF by presi^
ing the [DUAL VOICE ON/OFF] button a second time.
The AUTO HARMONY function (see page 25) applies only to
the main voice in the DUAL VOICE mode.
Only main voice data is transmitted via the MIDI OUT connector
on the specified MIDI channel for that voice (see above) in the
DUAL VOICE mode.
REVERB DEPTH (PSR-500), VOLUME, OCTAVE, and PAN can
be set independently for the main and sub voices in the DUAL
VOICE mode.
In the SPLIT mode the left-hand dual voice can be selected after
playing a left-hand key and the right-hand dual voice can be
selected after playing a right-hand key.
dual voice
^ON/OFF
u
STVLE/SPUTvaJCE VOCF
35
STYLt SPLIT voice SEAT
24
Page 27

FEATURE REFERENCE (VOICE)
AUTO HARMONY
Auto Harmony can be used in the SPLIT. SINGLE
FINGER, and FINGERED modes. It automatically adds
appropriate harmony notes to a melody you play on the
keyboard. You can choose from 6 different types of har
mony.
AUrO HAF^MO^IY
^ON,OrF
-----
1 1 DUET
I 1 2 TFtIO
^ -I :i BLOCK STYLLiSPUTMOICfc VOICE
A COUNTRY
5 OCTAVE
n
6 STRUM
TYPE
Use the AUTO HARMONY TYPE [A] and [T] but
tons to select a harmony type between “I” and “6.”
The selected harmony type number will be shown on
the rightmost digit of the MULTI DISPLAY while the
AUTO HARMONY TYPE [A] or [T] button is pressed.
Once the desired harmony type has been selected, press
the [AUTO HARMONY ON/OFF] button so that its indi
cator lights to engage the AUTO HARMONY feature.
PSR-400/PSR-500 Harmony Types
DUET
TRIO
BLOCK
COUNTRY
OCTAVE
STRUM
The harmony produced is based on the chord played on the left-
hand section of the keyboard in the FINGERED, SINGLE
FINGER, or SPLIT modes. If no chord is detected, no harmony
is produced.
Only a single note can be played at a time on the keyboard (or
the right-hand section of the keyboard) when the AUTO
HARMONY feature is used.
The harmony can be muted by playing any three consecutive
notes on the left-hand section of the keyboard.
Although a single note or an interval of a fifth can be used to
produce FINGERED mode auto accompaniment, these are not
recognized in the SPLIT mode.
If AUTO HARMONY is used at the same time as the DUAL
feature (see page 24). harmony will not be applied to the second
"dual” voice.
If AUTO HARMONY is used at the same time as the SPLIT
feature (see page 23). harmony will be not be applied to the left-
hand voice.
STYi.L spu-voice:
VOICE MEMORY
The PSR-400/PSR-500 VOICE MEMORY can be used
to store 4 different sets of voice combinations — i.e.
main, dual, and split voices — that can then be recalled
simply by pressing a single button.
Recording
Make the desired voice settings in the normal, dual, and
split modes, then press one of the VOICE MEMORY
buttons — [1] through [4] — while holding the
[RECORD] button. The corresponding indicator will light
indicating that the data has been memorized.
VOICE MEMORY
o o o o
□□□□
Recall
To recall a VOICE MEMORY setting simply press the
appropriate VOICE MEMORY button. The corresponding
indicator will light and the required voice settings will be
recalled. If you press the same VOICE MEMORY button
a second time, its indicator will go out and the previous
voice settings will be recalled.
• VOICE MEMORY recall operations can be recorded using the
Custom Accompaniment, Song Memory (Melody), and Multi Pad
(PSR-500) features. If the contents of the voice memory are
changed while any of these are being played back, the new
voices will take effect from the next time playback is started.
VOICE MEMORY data will be retained in memory
even when the PSR-400/PSR-500 power is turned off
as long as a full set of good batteries is present or an
AC power adaptor remains connected (see “PAGE
MEMORY” on page 13 for more details).
When a VOICE MEMORY has been recorded, be sure
to store the new data to a PAGE MEMORY (see page
13). If this is not done the newly recorded VOICE
MEMORY data will be lost when a different PAGE
MEMORY is selected.
25
Page 28

FEATURE REFERENCE (SONG MEMORY)
SONG MEMORY
SONG MEMORY
melody
(V CONDUCTOR
The PSR-400/PSR-500 SONG MEMORY allows you to
“record” and play back chord sequences created using the
Auto Accompaniment feature and melody lines you play on
the keyboard.
The SONG MEMORY also has five separate CHORD
“banks” that can be used to record different accompaniments,
and five MELODY banks that can be used to record different
melodies or parts of a song. A “CONDUCTOR” function is
also provided which allows the various banks can be
“chained” — i.e. they will play back in any specified order.
This allows you to record verses and choruses in different
banks, for example, then “chain” them in the desired order for
playback.
• Material recorded using the SONG MEMORY is re
tained in memory even when the POWER switch is
turned OFF if batteries are present or an AC adaptor is
connected (see “PAGE MEMORY” on page 13 for
more details).
• Chord or melody parts recorded in the SONG
MEMORY can be selected and played at any time while
auto accompaniment is playing. Simply press a chord or
melody memory button to play the corresponding part,
then press the same button again to exit.
RECOflD/EDIT
lf=l
SONG MEMORY
PLAY/STOP
□
RECORDING A MELODY
1. Press one of the MELODY buttons — [1] through [5]
— while holding the [RECORD] button. The corre
sponding MELODY indicator will flash, indicating
that the SONG MEMORY is now in the record ready
mode. The metronome will also begin to sound at the
currently selected tempo, while the [SYNC-START
ON/OFF] button indicator and the right two dots in the
MULTI DISPLAY flash at the current tempo.
MELODY
RECORD/EDIT
mj
If you have already recorded other MELODY or CHORD
banks that you want to hear while recording the new melody
bank, press the corresponding MELODY or CHORD buttons.
The indicators of banks selected for playback will flash slowly.
• When a SONG MEMORY recording has been finished,
be sure to store the new data to a PAGE MEMORY (see
page 13). If this is not done the newly recorded SONG
MEMORY data will be lost when a different PAGE
MEMORY is selected.
26
Page 29

FEATURE REFERENCE (song memory)
2. Recording will begin as soon as you play a note on the
keyboard or press the SONG MEMORY [PLAY/
STOP] button or the ACCOMPANIMENT CON
TROL [START/STOP] button.
3. Play the melody using the entire keyboard if the NOR
MAL mode is selected, or the keys to the right of the
split point if the SPLIT, FINGERED, or SINGLE
FINGER mode is selected.
• The rhythm part of the currently selected style will play
automatically during recording. If you want to turn it off,
press the ORCHESTFIATION RHYTHM button.
* Some of the preset styles (and custom styles based on
those presets) use percussion voices in parts other than the
rhythm part. Use the corresponding ORCHESTFIATION
button if you want to turn the percussion voices off.
T
4. Stop recording by pressing the ACCOMPANIMENT
CONTROL [START/STOP] or [ENDING] button, or
the SONG MEMORY [PLAY/STOP] button.
o
ENDING
SONG MEMORY
PLAY/STOP
□
Data Edit Mode
It is possible to change any of the above parameters for
a specific track by pressing the appropriate MELODY
track button twice while holding the [RECORD] button.
The indicator of the selected track will flash slowly indi
cating that the track is in the edit ready mode. Press a key
or the [PLAY/STOP] button and the track will play. You
can now change the parameters while listening to the
result. Changes affect that last occurrence of the corre
sponding parameter in the track, as shown in the exam
ples below. The last parameter change takes priority.
Press the [PLAY/STOP] button to exit when youYe fin
ished editing.
• It is also possible to listen to other recorded tracks while editing
the selected track.
Example 1
In addition to notes played on the keyboard, changes
in the following data can be recorded by the SONG
MEMORY MELODY banks:
• Pitch Bend
• Sustain on/off
• Voice Number (including VOICE MEMORY bank number)
• Auto Harmony (TYPE, ON/OFF)
• Octave
• Voice Volume
• Reverb Depth
• Pan
• Multi Pad PI ay/Terminate
• Dual Voice (Voice number. ON/OFF)
Melody
J > J PAl / J J f] f] o
▲
Voice “00”
Example 2
Melody
▲
Voice “01 "
If you switch to voice number "02" here...
L
this voice number will be changed to "02"
If you change the volume setting to "21 ’’ here...
the last volume change will be altered, like this.
27
Page 30

FEATURE REFERENCE (SONG MEMORY)
RECORDING A CHORD
SEQUENCE
1. Select an accompaniment style that is appropriate for
the type of music you want to record.
2. Press one of the CHORD buttons — [1] through [5] —
while holding the [RECORD] button. This engages the
record ready mode for the selected bank. The selected
CHORD bank indicator will flash, the metronome will
sound, and the [SYNC-START ON/OFF] indicator
and right two dots in the MULTI DISPLAY will flash
at the currently selected tempo.
CHORD
/^^7/ melody
RECORD/ED1T
If the NORMAL or SPLIT mode is selected, the FINGERED
mode is automatically selected when the record ready mode
is engaged If the FINGERED or SINGLE FINGER mode is
selected, no change occurs.
If you have already recorded one or more MELODY banks
that you want to hear while recording the CHORD bank,
press the corresponding MELODY buttons as well. The
indicators of MELODY banks selected for playback will flash
slowly. MELODY banks that were turned on during CHORD
bank playback will also be played back.
It is also possible to record a MELODY bank at the same
time as you record a CHORD bank — press the MELODY
bank button to be recorded while holding the [RECORD]
button before beginning recording of the CHORD bank.
MELODY
4, Play the required chords (FINGERED or SINGLE
FINGER) in the left-hand section of the keyboard. If
you’ve also selected a MELODY bank to be recorded,
play the melody on the right-hand section of the key
board.
You can also turn previously-recorded MELODY
banks on and off while recording the CHORD bank,
and these changes will be recorded along with the
chord data.
5. Stop recording by pressing the ACCOMPANIMENT
CONTROL [START/STOP] or [ENDING] button, or
the SONG MEMORY [PLAY/STOP] button.
• In addition to chord changes, changes in the follow
ing data can be recorded by the SONG MEMORY
CHORD banks:
• Normal, Bridge, and Ending Variations
• Fill-Ins
• MELODY Bank Switching
• Orchestration
• Style Number
• Accompaniment Volume (one setting only at the beginning
of each bank)
• Tempo (one setting only at the beginning of each bank)
• The following data can be changed by using the Data
Edit Mode.
• Accompaniment Volume
• Tempo
Data Edit Mode
It is possible to change any of the above parameters for
a specific track by pressing the appropriate CHORD track
button twice while holding the [RECORD] button. The
indicator of the selected track will flash slowly indicating
that the track is in the edit ready mode. Press a key or the
[PLAY/STOP] button and the track will play. You can
now change the parameters as many times as required
while listening to the result. The last parameter change
takes priority. Press the [PLAY/STOP] button to exit
when you’re finished editing.
RECORD/EDIT
3. Recording will begin as soon as you play a chord or
note on the left-hand section of the keyboard. If you’ve
selected a MELODY bank to record with the CHORD
bank, a right-hand note will also start the recording
process.
Recording can also be started by pressing the AC
COMPANIMENT CONTROL [START/STOP] button
or the SONG MEMORY [PLAY/STOP] button. In
this case only the rhythm will begin without bass and
chord accompaniment until you play the first chord or
note on the left-hand section of the keyboard.
28
Q MELOOY
RECORD/EDIT
It is also possible to listen to other recorded melody tracks while
editing the selected track.
Page 31

FEATURE REFERENCE (SONG MEMORY)
• Whenever you record using the SONG MEMORY, any
previously recorded material in the same bank will be
erased,
• If the power is turned off while recording, material
recorded up to the point at which the power was dis
connected will be retained in memory (the last event,
however, may be lost). All data will be lost, however, if
the power is not restored within approximately 10 min
utes after disconnection if a good set of batteries is not
installed (see **PAGE MEMORY” on page 14 for more
details).
• If the SONG MEMORY becomes full while recording,
“End” will appear on the MULTI DISPLAY and re
cording will stop. Up to approximately 700 notes can
be recorded in each PSR-500 MELODY bank, and up
to approximately 500 notes in each PSR-400
MELODY bank. Up to approximately 150 chords can
be recorded in each PSR-400/PSR-500 CHORD bank.
ST>i.£/SPllTVO*CE
End
smE SPLIT VO»CE
• If you press a MELODY or CHORD bank button while an
accompaniment style is already playing, the selected melody
or chord sequence will begin playing from the beginning of
the next measure. You can return to the accompaniment by
pressing the same CHORD bank button a second time. The
accompaniment will resume playing from the beginning of
the next measure. A melody that is playing can be stopped
by pressing the same MELODY button a second time.
• If you select a CHORD bank during auto accompaniment,
the NORMAL mode will be automatically selected. The
FINGERED or SINGLE FINGER mode will be automatically
re-selected when you return to the auto accompaniment.
• When a CHORD bank is selected during auto accompani
ment, the style, tempo, accompaniment volume,
orchestration, and accompaniment control settings recorded
in the selected CHORD bank will be used even after you
return to the auto accompaniment.
3. Play along on the keyboard if you like. You can also
change the tempo during playback.
4. Individual MELODY banks can be stopped during
playback by pressing their buttons. If you press a
CHORD bank button while it is playing, that bank will
stop playing at the top of the next measure and auto
accompaniment will begin (the last chord will remain
active until a new chord is played). The mode that was
engaged immediately prior to activating CHORD play
back will be automatically recalled.
MELODY AND CHORD
PLAYBACK
1. Any number of MELODY banks and/or one CHORD
bank can be played back at the same time. Press the
buttons corresponding to the MELODY and/or
CHORD banks you want to play back — the indicators
of the selected banks will flash.
MELOOY
Playback will begin as soon as a key on the keyboard,
the SONG MEMORY [PLAY/STOP] button, or the
ACCOMPANIMENT CONTROL [START/STOP]
button is pressed. If you press a different bank button
during playback, playback of the newly selected bank
will begin from the top of the next measure.
SONG MEMORY
liTART /STOP
Pi AY/SfOP
□
5. MELODY playback will stop automatically when all
recorded data has been played back. CHORD banks
that were not recorded with a complete ending will
repeat until stopped (if you pressed the [PLAY/STOP]
button before the ending finished the bank will play
repeatedly). You can also stop playback at any time by
pressing the SONG MEMORY [PLAY/STOP] button
or the ACCOMPANIMENT CONTROL [START/
STOP] button.
• If memory playback is stopped by pressing a MELODY or
CHORD button, that track will be tijrned off but the rhythm
will not stop. Use the [PLAY/STOP] if you want to stop the
rhythm at the same time.
29
Page 32

FEATURE REFERENCE (SONG MEMORY)
THE CONDUCTOR
The SONG MEMORY CONDUCTOR function allows
CHORD and MEMORY banks to be “chained” and auto
matically played back in any order.
Recording
1. Press the [CONDUCTOR] button while holding the
[RECORD] button to engage the CONDUCTOR
record ready mode. The [CONDUCTOR] button indi
cator will flash. The indicators of all CHORD and
MELODY banks that contain recorded data will also
flash.
CONDUCTOR
1
r/-
• The CONDUCTOR record ready mode can not be engaged
if none of the CHORD and MELODY banks contain data.
2. Press the CHORD and/or MELODY bank buttons that
you want to begin playback with — the selected bank
indicators will light continuously.
RECORO/EDIT
CZ3
Playback
1. To playback the CONDUCTOR sequence simply
press the [CONDUCTOR] button so that its indicator
flashes, and then press the SONG MEMORY [PLAY/
STOP] button.
SONG MEMORY
.-^[-CONDUCTOR
PLAY/STOP
□
2. CONDUCTOR playback will stop automatically when
the end of the sequence is reached. You can also stop
playback at any time by pressing the SONG
MEMORY [PLAY/STOP] button.
3. Press the SONG MEMORY [PLAY/STOP] button to
begin recording.
SONG MEMORY
PLAY/STOP
4. Press the CHORD and MELODY bank buttons at the
appropriate times in the order that you want them to
play (playback will actually begin from the beginning
of the next measure). Any MELODY bank on/off
events recorded in a chord bank remain active in a
CONDUCTOR chain,
5. Recording will end when a complete ending in the data
is encountered, or when the SONG MEMORY
[PLAY/STOP] button is pressed.
• If the memory becomes full during CONDUCTOR recording,
“End" will appear on the MULTI DISPLAY and recording will
stop. The CONDUCTOR memory capacity is approximately
200 "events" — each button press (on or off) is an event.
•
30
Page 33

FEATURE REFERENCE (THE MULTI PADS/PSR-500)
THE MULÎI PADS (PSR-^)
o
RËCORD/FND
1 terminate; t
o
The PSR-500 MULTI PADS can be used to record short
rhythmic or melodic sequences, percussion fill-ins, or single
"percussion sounds that can be played at any time simply by
pressing the appropriate pad.
Recording
1. Select the voice you want to use, then press one of the
MULTI PAD buttons — [1] through [4] — while holding
the MULTI PAD [RECORD/END] button. The
[RECORD/END] button indicator will flash to indicate
that the record ready mode is engaged, and the metronome
will begin to sound.
o
RECORD/END
I TERMINATE!
MULTI PAD
2 a
The following data is recorded in the MULTI PAD
memory:
• Note on/off and velocity.
• Auto Harmony on/off and type.
• Reverb depth.
• Volume.
• Octave.
• Pan.
• Dual.
• Voice Number (including VOICE MEMORY bank number).
Playback
Simply tap any of the MULTI PADS at any time to play
back the data they contain. MULTI PAD playback begins as
soon as the button is pressed.
MULTI PAD playback can be terminated by pressing the
[RECORD/END (TERMINATE)] button.
^ • The NORMAL mode is automatically selected when recording is
started.
2. Play a short sequence.
3. Press the MULTI PAD [RECORD/END] button to stop
recording. Recording will also stop automatically and
“End” will appear on the MULTI DISPl.AY when the pad
memory becomes full.
• Each MULTI PAD can record up to approximately 70 consecu
tive quarter notes. Pitch bend, program change, and other op
erations reduce the number of notes that can be recorded.
• MULTI PAD playback speed is determined by the current TEMPO
setting.
• The contents of the MULTI PAD memory are retained in
memory even when the power is turned off (see “PAGE
MEMORY” on page 13 for details).
• When a MULTI PAD has been recorded, be sure to store
the new data to a PAGE MEMORY (see page 13). If this
is not done the newly recorded MULTI PAD data will be
lost when a different PAGE MEMORY is selected.
31
Page 34

FEATURE REFERENCE (THE DRUM PADS/PSR-400)
THE DRUM PADS (PSR-400)
Ô
PAO ASSfGN
ON/OFF
0 □□□□
The PSR-400 DRUM PADS can be used to record single
drum and percussion notes that can be played at any time sim
ply by pressing the appropriate pad.
Recording
1. Press the [PAD ASSIGN ON/OFF] button — the indicator
will light and the last selected PERCUSSION voice (94
through 99) will automatically be selected (any of the other
percussion voices — 94 through 99 — can also be selected
at this point).
PAO ASSIGN
ON/OFF
Cft LJUJIIDi
DRUM PAD
Playback
Simply tap any of the DRUM PADS at any time to play
back the data they contain.
• The contents of the DRUM PAD memory are retained in
memory even when the power is turned off (see “PAGE
MEMORY” on page 13 for details),
# When a DRUM PAD has been recorded, be sure to store
the new data to a PAGE MEMORY (see page 13). If this
is not done the newly recorded DRUM PAD data will be
lost when a different PAGE MEMORY is selected.
2. Press one of the PAD buttons — [1] through [4] — while
holding the key corresponding to the percussion sound you
want to record. This records the selected percussion sound
in the selected PAD button. The velocity with which the
key is played is also recorded. Continue and record all four
PAD buttons, changing voices (94 — 99) as required.
□□□a
3. Press the [PAD ASSIGN ON/OFF] button to exit from the
pad assign mode.
32
Page 35

MIDI
RECEIVE
ON/OFF MODE
□ □
A
CEiVE O
CLOCK
FEATURE REFERENCE (MIDI)
RECEIVE CHANNEL/CLOCK
The enable/disable status of all MIDI receive channels
is set via the MIDI section RECEIVE CH./CLOCK [A]
and [▼] buttons. The [A] button increments the receive
channel number shown on the display and the [T] button
decrements the receive channel number. The receive chan
nel number is shown on the right two digits of the MULTI
DISPLAY while the status — “E” for enabled or “d” for
disabled — appears on the leftmost digit. The MIDI chan
nel and status display appears while selection is in
progress and for approximately 2 seconds after both MIDI
CH. buttons are released. A *‘C” in place of the channel
number (1 through 16) stands for **CLC1CK/’ and allows
reception of the MIDI clock to turned on or off. If the
[RECEIVE ON/OFF] button is used while the MIDI re
ceive channel or clock display is showing, the status of the
channel or clock can be switched between “E” and “d.”
|STVL£/SP^ITVQ.CE _
RtCEIVE
ON/OFF
□
A
CEIVE a
CLOCK
Receive channel/clock settings apply to both the Remote Control
and Multi Voice receive modes.
Separate receive channel/clock settings are retained in each
PAGE MEMORY even when the power is turned off (see “PAGE
MEMORY" on page 14 for details).
E “
style split voice
style; SPLIT VOCE VOICE
P -
c
style split voice
style; SPLIT voice VOICE
P -
p
STVLE SPLIT VOtCe
-V2£i
______
1
1 f
1
ip
to
^ BEAT '
r
L
MODE
The [MODE] button is used to select the MIDI receive
mode in which the PSR-400/PSR-500 is to operate —
Remote Control or Multi Voice.
Press the [MODE] button to call the mode display, then
use the same button to select “00” (Remote Control) or
“99” (Multi Voice).
□
The MIDI MODE is automatically reset to “00" whenever the
power is turned on, when a different PAGE MEMORY is se
lected, or when the DEMO function is used.
■ The Remote Control Mode (Mode 00)
The Remote Control mode should be used when the
PSR-400/PSR-500 is to be connected to a second key
board by which it is to be controlled. In this mode playing
the external keyboard has exactly the same effect as play
ing the PSR-400/PSR-5(X)’s own keyboard. Further the
PSR-400/PSR-5(X) panel controls can be used as normal.
This mode is automatically selected whenever the PSR-
400/PSR-500 is turned on, when a different PAGE
MEMORY is selected, or when the DEMO function is
used.
Data Received In the Remote Control Mode
The PSR-400/PSR-500 receives and responds to the
following data received via the MIDI IN connector when
the Remote Control mode is selected:
• In addition to note and velocity data, the PSR-400/PSR-
500 responds to program change, sustain ON/OFF, vi
brato, volume, pan, reverb (PSR-500 only), start, stop,
and MIDI clock messages.
• Program change messages 00 through 99 correspond to
voices 00 through 99.
33
Page 36

FEATURE REFERENCE (MIDI)
See page 35 for details on control change messages.
Program change and control change data only affects the
main voice in the NORMAL mode (the right-hand voice
when the SPLIT mode is selected) when the DUAL func
tion is engaged.
MIDI start messages control PSR-500 auto accompani
ment, song memory play or record start, and conductor
play or record start in the same way as the panel
[START/STOP] button.
MIDI stop messages have the same effect as pressing
the panel [START/STOP] button when a function is run
ning.
When a single receive channel is selected, reception only
occurs on the specified channel.
Transpose settings affect received MIDI note numbers.
Pitch bend data from ООН ООН to 7FH 7FH is received,
with ООН ООН corresponding to minimum and 7FH 7FH to
maximum pitch bend wheel position. The panel pitch
bend range setting affects the received pitch bend data.
External synchronization is automatically selected when
MIDI clock is received if clock reception is turned on. If
the external MIDI clock data is not received, internal
clock operation is automatically resumed.
If the TEMPO [A] or [T] button is pressed during external
sync mode is engaged, "EC” (External Clock) will appear
on the display. In this state the TEMPO value cannot be
changed.
■ The Multi Voice Mode (Mode 99)
The Multi mode should be used when the PSR-400/
PSR-500 is to be used as a multi-timbral tone generator,
for example, receiving data from a second MIDI device
(such as a sequencer). In this mode the PSR-400/PSR-500
can receive on multiple MIDI channels, each channel
corresponding to a different voice. In this mode local key
board performance and the VOICE section settings func
tion normally regardless of received MIDI data. Since the
PSR-400/PSR-500 employs the Yamaha Dynamic Voice
Allocation system, it is not necessary to specify the
number of notes that can be played via each channel.
• When the Multi Voice mode is selected, the following
panel features can not be used:
• SONG MEMORY
•MULTI PAD (PSR-500)
• AUTO ACCOMPANIMENT & ACCOMPANIMENT CONTROL
• CUSTOM ACCOMPANIMENT
• TEMPO & ACCOMPANIMENT VOLUME
Data Received In the Multi Voice Mode
In the Multi mode the PSR-400/PSR-500 functions as a
multi-timbre tone generator, allowing different voices to
be played on all 16 MIDI channels.
MIDI note, velocity, and other channel messages re
ceived on a MIDI channel will affect only the voice se
lected for that channel.
Velocity sensitivity for each voice is the same as when
the voices are played via the PSR-400/PSR-500 key
board.
The pane! TRANSPOSE setting does not affect the re
ceived MIDI data.
The tuning and DSP settings affect the received note
data.
Pitch bend data is received independently for each chan
nel. The panel PITCH BEND RANGE setting applies to
all channels.
Sustain on/off, reverb depth, volume, vibrato, and pan
messages are accepted for each channel. See page 35
for details.
MIDI start, stop, and clock data will be ignored. ^
The program change, control change, and pitch bend
status of each channel are reset whenever the power is
turned on or the mode is switched from “00” to “99.” The
default program change value is “00” (PIANO), the de
fault pitch bend value is "center.” See page 35 for default
control change values.
System Exclusive Reception
System exclusive data can be received from an external
device via a bulk dump operation when the MIDI receive
mode is set to “(Ю.”
• All panel controls are locked during reception, and all
panel settings will be replaced by the received data.
Once received, the new panel settings must be recorded
to a PAGE MEMORY or they will be lost.
• The data formats of the system exclusive messages are;
PSR-400: FOH -> 43H -> 76H -> 09H -> BULK DATA
F7H
PSR-500: FOH -> 43H -> 76H -> OAH -> BULK DATA ->
F7H
• If an error is detected during reception "Err" will appear
on the MULTI DISPLAY. If this occurs, try receiving the
data again.
SmEJ SPLIT VOICE VQgE
Ь r r
style split voice
See “Page Memory MIDI Bulk Dump” on page 15 for
details on bulk dump transmission.
• Program change messages 00 through 99 correspond to
voices 00 through 99.
34
Page 37

FEATURE REFERENCE (MIDI)
• Transmitted Data
The following data is transmitted via the MIDI OUT
connector when either the Remote Control or Multi Voice
mode is selected:
• The transmit channel for each voice is set using the
MIDI CHANNEL button described on page 24.
• All notes played on the keyboard, including velocity data.
In the SPLIT mode the left- and right-hand voices are
transmitted on their respective transmit channels.
• In the FINGERED or SINGLE FINGER mode, only data
corresponding to notes played on the right-hand section
of the keyboard is transmitted.
• Transmitted note numbers are affected by the Trans
pose setting.
— • Transmitted note numbers are affected by the octave
setting.
• Program change and control change data will not be
transmitted if the DUAL function is engaged. Turn DUAL
off if you want this data to be transmitted.
• Pitch bend data. The actual pitch bend data range is
determined by the pitch bend range setting. If the pitch
bend range is set to 12, for example, data from ООН ООН
to 7FH 7FH will be transmitted. If the pitch bend range is
set to 1, data from 3CH 3AH to 20H 45H will be transmit
ted.
• The MIDI program change number corresponding to the
number of the selected voice is transmitted when a voice
is selected.
• MIDI control change messages corresponding to reverb
(PSR-500 only), pan, volume, and sustain are transmitted
when these functions are operated. For details refer to *
below.
• A MIDI START message is transmitted whenever the
rhythm or accompaniment is started, and a MIDI STOP
^ message is transmitted whenever the rhythm or accom
paniment is stopped. The same applies to demo and
song memory start/stop operations.
• Style, custom style, demo, multi pad (PSR-500), drum
pad (PSR-400), notes added by the auto harmony func
tion, and song memory playback are not transmitted.
• When a VOICE MEMORY button is pressed, the program
change and control change data corresponding to that
voice is transmitted. The previous panel data is
transmitted when a VOICE MEMORY is turned off.
Control Change Data Value Specifica
tions (receive and transmit, both modes)
Data Format: BnH -> cc -> vv
BnH: Control Event (n=channel number)
cc : Control Number
w : Control Value
vibratocc=0lH
vv= ООН
Each voice has its own default value that is used when the
voice is initially selected.
cc=:07H ; volume
vv= 7FH
The default value when no data is being transmitted is 6F
(panel value; 21).
cc=0AH ; pan
vv= ООН
The default value is “center" when no data is being trans
mitted.
cc=40H : sustain
vv= ООН - 3FH : off
Default is off.
:5BH : reverb
vv= ООН - 07Н : 0 (Off)
cc=7BH : all note off
vv= ООН (fixed)
0FH : о (off)
ЮН
- 1FH ; 1 (min)
20H
- 2FH ;2
ЗОН
-3FH : 3
-4FH;4
40H
50H
- 5FH ; 5
- 6FH : 6
бон
70 Н
- 7FH : 7 (max)
24 (Panel Value ; max)
01H
01 (-24dB)
00 (no sound)
ООН
-07H :-7 (Left Most)
08H
- OFH ; -6
ЮН
- 17H :-5
18H
- 1FH : -4
20H
- 27H : -3
28H
- 2FH : -2
ЗОН
- 37H : -1
- 47H : 0 (Center)
38H
48H
-4FH : 1
50 Н
-57H ; 2
58Н
-5FH:3
бон
- 67H : 4
- 6FH : 5
68Н
-77H :6
70Н
78Н
- 7FH : 7 (Right Most)
40H - 7FH : on
i(PSH1-500 only)
OFH :1
08H -
ЮН - 17Н ; 2
18H - 1FH : 3
20H - 27Н : 4
2FH:
28H -
ЗОН - 37Н : 6 (Default)
38H - 3FH: 7
40H 48H - 4FH: 9
50H 58H - 5FH; 11
бон -
68Н - 6FH: 13
70Н - 77Н : 14
78Н - 7FH ;
5
47Н : 8
57Н : 10
67 Н: 12
15 (max)
35
Page 38

FEATURE REFERENCE (DEMO)
DEMO
□
2
□
3
□
To give you an idea of the PSR-400/PSR-500’s sophisti
cated capabilities, it is programmed with 3 demonstration
songs that you can select and play.
1. Press the DEMO [1], [2], or [3] button to start playback of
the corresponding demo.
3
□
2. Press the same DEMO button a second time or the
[START/STOP] button to stop demo playback.
The demonstration will play continuously until the
DEMO button is pressed.
* If the MIDI MODE is set to “99," it will be reset to “00" when DEMO
playback is started.
36
Page 39

APPENDIX A: MIDI BASICS
MIDI, the Musical Instrument Digital Interface, is a worldstandard communication interface that allows MIDI-compatible musical instruments and equipment to share musical infor
mation and control one another. This makes it possible to cre
ate “systems” of MIDI instruments and equipment that offer
far greater versatility and control than is available with iso
lated instruments.
The PSR-400/PSR-500 MIDI Connectors
The PSR-400/PSR-500 MIDI IN connector receives MIDI
data from an external MIDI device which can be used to con
trol the PSR-400/PSR-500. The MIDI OUT connector trans
mits MIDI data generated by the PSR-400/PSR-500 (e.g. note
and velocity data produced by playing the keyboard).
Simple MIDI Control
The PSR-400/PSR-500 is capable of receiving the same
MIDI data, so a second MIDI keyboard connected to the PSR400/PSR-500 MIDI IN connector can be used to remotely play
the PSR-400/PSR-500 and select voices as required.
MIDI Keyboard
MIDI
OUT
MIDI
IN
PSR-400/PSR-500
MIDI Sequence Recording
The same type of musical information transfer described
above is used for MIDI sequence recording. A MIDI sequence
recorder can be used to “record” MIDI data received from a
PSR-4(X)/PSR-500, for example. When the recorded data is
played back, the PSR-400/PSR-500 automatically “plays” the
recorded performance in precise detail.
PLAYBACK
MIDI OUT
PSR-400/PSR-500
RECORD
MIDI IN '
MIDI sequencer
MIDI OUT
Most MIDI keyboards (including the PSR-400 and PSR500, of course) transmit note and velocity (touch response)
information via the MIDI OUT connector whenever a note is
played on the keyboard. If the MIDI OUT connector is con
nected to the MIDI IN connector of a second keyboard (syn
thesizer, etc.) or a tone generator (essentially a synthesizer
with no keyboard), the second keyboard or tone generator will
respond precisely to notes played on the original transmitting
keyboard. The result is that you can effectively play two in
struments at once, providing thick multi-instrument sounds,
'^'he PSR-400/PSR-500 also transmits “program change” data
when one of its voices is selected. Depending on how the re
ceiving device is set up, the corresponding voice will be auto
matically selected on the receiving keyboard or tone generator
whenever a voice is selected on the PSR-400/PSR-500.
MIDI keyboard
PSR-400/PSR-500
MIDI
OUT
MIDI
IN
or
tone generator
Note: Never use MIDI cables longer than about 15 meters, since
cables longer than this can pick up noise which can cause data
errors.
MIDI Bulk Dump
MIDI bulk dump operations allow large amounts of MIDI
data to be transmitted from one device to another. The entire
contents of the PSR-400/PSR-500 PAGE MEMORY, for ex
ample, can be dumped to a second PSR-400/PSR-500 or to a
bulk storage device such as a MIDI data recorder or MIDI
computer.
MIDI IN ^rMIDI OUT
PSR-400/PSR-500
MIDI IN^
MIDI data recorder
37
Page 40

APPENDIX В: POLYPHONY
The PSR-4CX) and PSR-500 feature a maximum polyphony
of 28-notes, so up to 28 notes can be played on simultane
ously. This 28-note maximum applies to all PSR-400/PSR-500
features, including automatic accompaniment, song memory,
the multi pads, etc. If more than 28 notes are played at any one
time, the extra notes will not sound and '‘CFull” will appear on
the MULTI DISPLAY to indicate that the maximum po
lyphony has been exceeded.
STYLES SPLtT VOICE
r r II
L Г Uf I
STYLE SPLIT VOtCE
VOICE/POLYPHONY LIST
Voice Name
00 PIANO..
06 HARPSICHORD 1
07 HARPSICHORD 2
08 CLAVI
09 CELESTA
19 ELECTRIC GUITAR 2
20 ELECTRIC GUITAR 3,
24 JAZZ GUITAR...
25 JAZZ GUITAR O
26 MUTE GUITAR.
27 MUTE GUITAR E
28 STEEL GUITAR
29 FOLK GUITAR..
30 12STRINGGU1T
31 GUT GUITAR....
32 VIOLIN 1
33 VIOLIN 2
...................
.............
...........
............
»s
.1 34 CELLO..........................
.2 35 STRINGS 1
.2 36
.2 37
.2 38 HARP
.2
.1
.2 41
.1 42
.1 43
.2 44
.2
.2
.2
.2
.2
.2
.2
.2
.1
.1 54 FLUTE
.2
.2 56
.2
.1
.2
.1
.2
.1
.1
.2
.1
.1
.1
Voice Name
STRINGS 2
ORCHESTRA HIT
............................
39 BANJO
40
45 MUTE TRUMPET 2
46
47 TROMBONE
48
49 HORN
50 TUBA
51
52 BRASS ENSEMBLE 2 .
53 PICCOLO
55 CLARINET....................
57 OBOE
58
59
60
61 ALTO SAX
62 TENOR SAX.................
63
64 OCARINA
65
66
67 HARMONICA
.........................
VIBRAPHONE
MARIMBA.....................
STEEL DRUM
TRUMPET
MUTE TRUMPET 1
MUTE TRUMPET 3
FLUGELHORN
...........................
............................
BRASS ENSEMBLE 1 .
..........................
BASS CLARINET
...........................
ENGLISH HORN
BASSOON ...................
SOPRANO SAX
BARITONE SAX
PANFLUTE
RECORDER
..................
...................
.........
..............
..............
....................
......
......
......
................
.............
.....................
.........
..........
...........
....................
...........
.....................
..................
.................
...............
Some of the PSR-400/PSR-500’s voices are actually combi
nations of two or more voices. These voices therefore only
allow half (or less) the normal 28-note maximum. The follow
ing is a list of the number of voices used by each of the PSR400/PSR-500 voices.
Used Voices
.....................
.....................
.....................
.....................
.....................
.....................
.....................
.....................
.....................
.....................
.....................
.....................
.....................
.....................
.....................
.....................
.....................
.....................
.....................
.....................
.....................
.....................
.....................
.....................
.....................
.....................
.....................
.....................
.....................
.....................
.....................
.....................
.....................
.....................
SAMBA WHISTLE
1
2 69
2 70
1 71
1 72
1 73
2 74
1 75
1 76
1 77 FANTASY 1
2
1
1 80
1 81 SEO PAD...................................
1 82
1
1
3
3 86
1
1 88
1
1 90
1
1 92
1 93
1 94
1
1
1
1
1 99
1
1
68
SAX ENSEMBLE 1
SAX ENSEMBLE 2
WOODWIND ENSEMBLE
CHORUS
SYNTH LEAD
SYNTH BRASS
SYNTH STRINGS
SYNTH TOM..............................
78 FANTASY 2
79 FANTASY 3
BELL STRINGS.........................
ELECTRIC BASS 1
83 ELECTRIC BASS 2
FRETLESS BASS
84
85 MUTE BASS
MUTE BASS ECHO
87 SLAP BASS...............................
WOOD BASS 1
89 WOOD BASS 2
SYNTH BASS 1 ........................
91 SYNTH BASS 2.........................
SYNTH BASS 3.........................
BOWED BASS
SCRATCH W/PITCH
KICKaSNARE W/PITCH
95
96 TOM W/PITCH
LATIN PERCS W/PITCH
97
PERCUSSIONS W/GATE.........
98
PERCUSSIONS
Voice Name Used Voices
.....................
...................
....................
.........
...................................
............................
.........................
.....................
...............................
...............................
...............................
...................
...................
.....................
.............................
..................
.........................
.........................
..........................
.................
...............
..........................
..........
........................
........
........
........
........
........
........
........
........
........
.........4
.........2
.........4
........
.........3
.........
.........
.........
........
.........
.........
.........
.........
.........
.........
.........
.........
.........
.........
.........
.........
.........
.........
1
2
3
3
2
2
2
2
1
4
1
1
1
1
2
1
1
1
1
1
1
1
1
1
1
1
1
1
38
Page 41

APPENDIX C: TROUBLESHOOTING
Something not working as it should? In many cases what ap
pears to be a malfunction can be traced to a simple error that can
be remedied immediately. Before assuming that your PSR-400/
PSR-500 is faulty, please check the following points.
1. PROBLEM
• The PSR-400/PSR-500 speakers produce a “pop” sound
whenever the power is turned ON or OFF.
CHECK
• This is normal and is no cause for alarm.
2. PROBLEM
• No sound.
CHECK
• Is the MASTER VOLUME control turned up high enough?
• Is the power turned on? The Auto Power Off function auto
matically turns off the power if no buttons or keys are
pressed for more than about 10 minutes when running the
^ PSR-400/PSR-500 from batteries.
• Are a pair of headphones plugged into the PHONES jack?
Have you accidentally plugged the foot pedal into the
phones jack?
3. PROBLEM
• Rhythm won’t start or no rhythm sound.
CHECK
• Is the accompaniment volume turned up high enough?
• Is the ORCHESTRATION RHYTHM button turned on?
• Are you sure you pressed the START button?
• Perhaps the PSR-400/PSR-500 is in the SYNCHRO
START mode, so all you have to do is start playing.
4. PROBLEM
• Auto accompaniment won’t function. No lower keyboard
sound.
CHECK
• Auto accompaniment won’t sound right if the FINGERED
mode is selected and you’re using SINGLE FINGER type
fingering or improper chord fingering.
• Are you sure you’re playing in the left-hand section of the
keyboard when the FINGERED or SINGLE FINGER
mode is selected?
• Are all ORCHESTRATION buttons on?
5. PROBLEM
• Auto accompaniment chords don’t seem to change prop
erly.
CHECK
• Are you playing chords that the PSR-400/PSR-500 can
recognize (see chord types on page 18)?
6. PROBLEM
• Abnormal operation not listed above. Complete lack of
control.
CHECK
• The internal microprocessor may have been “locked up”
due to static electricity or other causes. Turn the instrument
OFF for a moment, then turn it ON again. If the lock-up
makes it impossible to turn the power off, remove the bat
teries or unplug the AC adaptor. If you turn the power back
on within about 10 minute the previous contents of the
memory will be safely retained.
7. PROBLEM
■ Sustain pedal operation is reversed (press-OFF, release-
ON).
CHECK
■ You probably held the pedal pressed while turning the
power on or inserting the pedal plug into the FOOT
PEDAL jack. Turn the power off and then on again with
the pedal released.
APPENDIX D: MAINTENANCE
Location
Avoid exposure to direct sunlight or other sources of heat.
Never leave it inside a car where it can get very hot. It may
cause discoloration or deformation. Vibration, excessive
dust, cold, low or high humidity can also cause malfunction.
Handling
Avoid rough handling. Don’t drop or jolt the PSR-4(X)/
PSR-500 as this can damage the internal circuitry. Pressing
too hard on keys or controls may lead to malfunctions.
When cords are plugged into the rear panel jacks, pay par
ticular attention not to apply excessive force to them since
this may damage the terminals or internal circuitry.
Cleaning
Clean the exterior with a soft, dry cloth. Using chemical
solvents may damage the finish.
* Interference Through Electromagnetic Fields
Do not use your PSR-400/PSR-500 close to television
sets or other equipment receiving electromagnetic signals as
this could cause interference noise in the other appliance.
• Service and Modifications
Your PSR-400/PSR-5(X) contains no user serviceable
parts. Opening it or tampering with it in any way can lead to
electrical shock as well as damage. Refer all servicing to
qualified YAMAHA personnel.
YAMAHA is NOT responsible for damage caused by improper use.
39
Page 42

APPENDIX E: SYSTEM RESET -
SPECIFICATIONS
Abnormal operation procedures and other problems can
cause the PSR-400/PSR-500 system to “lock up” or malfunc
tion. Normally, simply turning the power off and then on again
will solve the problem. If turning the power off and on docs
not restore normal operation, use the SYSTEM RESET proce
dure described below (all PAGE MEMORY data is initialized
when a SYSTEM RESET is executed: see page 14).
1. Turn the power off.
2. Turn the power on while holding both the CUSTOM
[RECORD/END] and [CLEAR] buttons.
3. The MULTI DISPLAY should appear as shown below,
indicating that the SYSTEM RESET has been successful.
STYLE: ^ SPLIT VOCE
I.
11
c
SPL IT VCUCt
If the [POWER] button is locked up and cannot be used to turn the
power off, unplug and then re-insert the AC adaptor if one is being
used, or remove and then replace the batteries.
If none of the above restores operation, unplug the AC adaptor or
remove the batteries for several hours, then try again.
Keyboard:
61 keys (C1-C6) with Touch Response
Voices:
100 voices
Polyphony; 28
Accompaniment Styles:
PSR-500; 103 styles
PSR-400; 101 styles
Demonstrations:
3 songs
Other Controls:
OVERALL CONTROL; POWER (ON/OFF), MODE (NORMAL/
SPLIT/SINGLE FINGER/ FINGERED). DSP (OFF/ROOM/HALL,
PSR-500 only) MASTER VOLUME. ACCOMP. VOLUME (PITCH
BEND RANGE, +/-), TRANSPOSE (+/-), TUNING (+/-), TEMPO
(+/-), SPLIT POINT CHANGE
PAGE MEMORY; RECORD. PAGE (1~4 = PSR-500,
1 -2 = PSR-400). MIDI BULK DUMP
PITCH BEND
AUTO ACCOMPANIMENT; STYLE SELECT (O-O, +, quantize
1/4-1/96), ORCHESTRATION (RHYTHM. BASS. ORCHES- ^
TRA1-3), CUSTOM (RECORD/END. CLEAR)
ACCOMPANIMENT CONTROL; INTRO. FILL IN 1. NORMAL,
FILL IN 2, BRIDGE, ENDING, SYNC-START ON/OFF (RHYTHM
STOP), START/STOP
VOICE; VOICE SELECT (0-9, +, -). AUTO HARMONY (ON/OFF.
+/-), REVERB DEPTH (+/-, PSR-500 only). VOLUME (+/-),
OCTAVE (+/-), PAN (+/-). MIDI CH (+/-). DUAL VOICE (ON/OFF)
VOICE MEMORY; RECORD. 1-4
SONG MEMORY; CHORD (1-5), MELODY (1-5), CONDUCTOR,
RECORD/EDIT
SONG MEMORY; PLAY/STOP
MULTI PAD (PSR-500 only); RECORD/END (TERMINATE), 1-4
DRUM PAD (PSR-400 only); PAD ASSIGN (ON/OFF), 1-4
MIDI; RECEIVE (ON/OFF). RECEIVE CH/CLOCK (+/-), MODE
DEMO; 1-3
Auxiliary Jacks:
HEADPHONES/AUX. OUT. DC (9-12V) IN. FOOT PEDAL. MIDI
IN/OUT
Main Amplifiers:
8W X 2 (when using AC power adaptor)
4W X 2 (when using batteries)
Speakers: A
12cm (4-3/4”) X 2
Rated Voltage:
DC 9-12V
Batteries:
Six SUM-1, “D" size, R-20 or equivalent batteries
AC Power Adaptor:
PA-5
Dimensions (W x d x H):
968mm X 405mm x 136mm (38-1/8" x 15-15/16" x 5-3/8")
Weight:
6.3kg (13.9lbs.) excluding batteries
Supplied Accessories:
• Music Stand
• Six SUM-1 Batteries
• Foot Pedal
• Owner's Guide
* Specifications subject to change without notice.
40
• The “Demo Tunes" and “default data of MULTI PAD (PSR-500)" of
this keyboard are “Demonstration" purposes only. It may not be
possible to reproduce the “Demo Tunes" and “default data of MULTI
PAD (PSR-500)" 100% manually.
Page 43

----------
INDEX-------------
A
AC power.............................................4
Auto accompaniment
volume..........................................11
adding fill-ins
bridge variation.............................17
normal variation
starting..........................................16
starting with an introduction
stopping
Auto harmony
Auto power off...................................10
........................................
.........................
...............................
...........................
..........
...................................
16
17
17
17
25
B
Batteries...............................................4
«r
Chord
data edit
playback........................................29
sequence recording
Chords
fingered mode...............................18
single-finger mode........................18
Conductor
Custom style
........................................
.......................
..........................................
......................................
28
28
30
19
D
Demo..................................................36
Drum/percussion key assignments
Drum pads..........................................32
^SP.......................................................11
aal voice
..........................................
......
24
F
Fingered mode...............................18,11
Foot pedal
............................................
H
Hall effect
Headphones
Headphones/Aux Out jack
..........................................
.........................................
...................
11
K
Keyboard percussion
.........................
21
17
22
5
5
5
M
Maintenance.......................................39
Manual, how to use..............................1
Master volume control.......................11
Melody
data edit
playback
recording
MIDI
bulk dump
channel
clock
connectors
control change data
control, description.......................37
multi voice mode..........................34
receive channel.............................33
remote control mode
sequence recording.......................37
system exclusive data reception.... 34
transmit data
Mode
Multi pads
Music stand
........................................
.......................................
......................................
................................
.........................................
.............................................
....................................
......................
....................
.................................
..................................................
..........................................
..........................................
15, 37
27
29
26
24
33
37
35
33
35
10
31
N
Normal mode
O
Octave
Orchestration......................................19
.....................................
................................................
10
24
P
Page memory
data
...............................................
initial settings
recall.............................................14
recording
Pan......................................................24
Pitch bend
range
.............................................
Polyphony
Power button.....................................
PSR-400 nomenclature
PSR-500 nomenclature
...............................
......................................
..........................................
..........................................
........................
........................
13
14
13
11
12
38
10
Q
Quantization.......................................20
R
Reverb depth......................................23
Room effect
.......................................
11
S
Single finger mode
Song memory.....................................26
Specifications
Split mode
changing voices............................23
Split point change
Style select........................................
System reset.......................................40
.....................................
.......................
....................................
..............................
18,11
23,10
40
13
16
T
Tempo................................................12
Transpose...........................................12
Troubleshooting.................................39
Tuning................................................12
5
2
3
V
Voice
list with polyphony
memory
select
Volume
accompaniment............................11
master
voice.............................................23
........................................
...........................................
..........................................
......................
38
25
21
11
41
Page 44

[Portable Keyboard]
Model PSR-400/PSR-500
MIDI Implementation Chart
Date : 05/19,1991
Version: 1.0
Function
Basic Default
Channel Changed
Default
Mode Messages
Altered
Note
Number : True voice
Velocity Note ON
Note OFF
After Key’s
Touch Ch’s
Pitch Bender
Control 10
Change 64
01
07
91
Transmitted
Remote Control Mode
1-16 (*1) 1-16 (*2)
1-16
3
X
0-127
ife 9)e ^ 4c 4c
О 9nH,v= 1-127
X 9nH, V = 0
X X
X X
0(*5)
X О
о 9nH,v= 1-127
X 9nH,v = 0or8nH
о
о
о
о
Recognized
Multi Voice Mode
1-16 (*2)
1-16 (*2)
(*2)
X
X
0-127 0-127
0-127 (*4) 0-127 (*4)
0(*6)
о
о
о
о
1-16 (*2)
(*2) (*3)
X
X
о 9nH,v= 1-127
X 9nH,v = Oor8nH
X
X
0(*6)
О
о Volume
о
о
о
Remarks
7 bit resolution
Vibrato
Pan
Sustain
Reverb Depth
(PSR-500 only)
Program
Change
: True#
System Exclusive
System : Song Pos
: SongSel
Common : Tune
System : Clock
Real Time : Commands
Aux : Local ON/OFF
: All Notes OFF
Messages : Active Sense
: Reset
Notes : *1: Memorized
*2: Each Channel can be set ON or OFF individually.
*3: Multi Timbre. Dynamic Voice Allocation
*4: Some voice is replaced by sine wave above a certain pitch.
*5: Data range is altered by the pitch bend range of panel setting.
i.e. Pitch bend range: 12
Pitch bend range: 1
Pitch bend range of panel setting is applied.
*6
0-99 = voice number
*1
Page memory bulk dump
*8
Possible to set ON/OFF manually.
*9
Mode 1 : OMNI ON, POLY
Mode 3 : OMNI OFF, POLY
42
о
0-99,124-127 (*7)
4с 4е 4с 4с 4с 4с 4с 4= 4с 4е
0(*8)
X
X
X
0-99 (*7)
о
о
X
X О
о
X
......
ООН, ООН, to 7FH, 7FH
......
3CH, 3AH, to 20H, 45H
__________
Mode 2 : OMNI ON, MONO
Mode 4 : OMNI OFF, MONO
о
0-99
0(*8)
X
X
X
(*9)
о
X
о
X
о
0-99
0-99 (*7)
X
X
X
X
X
X START, STOP
X
о
о
X
О: Yes
X :No
Page 45

FCC INFORMATION (U.S.A.)
1. IMPORTANT NOTICE: DO NOT MODIFY THIS UNIT!
This product, when installed as indicated in the instructions contained in this manual, meets FCC require
ments. Modifications not expressly approved by Yamaha may void your authority, granted by the FCC, to use
the product.
2. IMPORTANT: When connecting this product to accessories and/or another product use only high quality
shielded cables. Cable/s supplied with this product MUST be used. Follow all installation instructions. Failure
to follow instructions could void your FCC authorization to use this product in the USA.
3. NOTE: This product has been tested and found to comply with the requirements listed in FCC Regulations, Part
15 for Class “B” digital devices. Compliance with these requirements provides a reasonable level of assurance
that your use of this product in a residential environment will not result in harmful interference with other elec
tronic devices. This equipment generates/uses radio frequencies and, if not installed and used according to
the instructions found in the users manual, may cause interference harmful to the operation of other elec
tronic devices. Compliance with FCC regulations does not guarantee that interference will not occur in all
installations. If this product is found to be the source of interference, which can be determined by turning the
unit “OFF" and “ON", please try to eliminate the problem by using one of the following measures:
Relocate either this product or the device that is being affected by the interference.
Utilize power outlets that are on different branch (circuit breaker or fuse) circuits or install AC line fiiter/s.
In the case of radio or TV interference, relocate/reorient the antenna. If the antenna lead-in is 300 ohm ribbon
lead, change the lead-in to co-axial type cable.
If these corrective measures do not produce satisfactory results, please contact the local retailer authorized
to distribute this type of product. If you can not locate the appropriate retailer, please contact Yamaha Corpo
ration of America, Electronic Service Division, 6600 Orangethorpe Ave, Buena Park, CA90620
The above statements apply ONLY to those products distributed by Yamaha Corporation of America or its
subsidiaries.
WARNING: CHEMICAL CONTENT NOTICE!
The solder used in the manufacture of this product contains LEAD. In addition, the electrical/electronic and/or plastic (where
applicable) components may also contain traces of chemicals found by the California Health and Welfare Agency (and possi
bly other entities) to cause cancer and/or birth defects or other reproductive harm.
DO NOT REMOVE ANY ENCLOSURE COMPONENTS! There are no user service^le parts inside. All service
should be performed by a service representative authorized by Yamaha to perform such service.
IMPORTANT MESSAGE: Yamaha strives to produce products that are both user safe and environmentally “friendly". We
sincerely believe that our products meet these goals. However, in keeping with both the spirit and the letter of various statutes
we have included the messages shown above and others in various locations in this manual.
Page 46

For details of products, please contact our nearest subsidiary/
or the authorized distributor listed below.
Die Einzelheiten zu Produkten sind bei unseren unten aufge
führten Niederlassungen und Vertragshändlern in den jeweiligen
Bestimmungsländern erhältlich.
Pour plus de détails sur les produits, veuillez-vous adresser
au concessionnaire/distributeur pris dans la liste suivante le plus
proche de chez vous.
NORTH AMERICA
CANADA
Yamaha Canada Music Ltd.
135 Milner Avenue, Scarborough, Ontario,
MIS 3R1, Canada
Tel: 416-298-1311
U.S.A.
Yamaha Corporation of America
6600 Orangeihorpe Ave., Buena Park, Calif. 90620,
U.S.A.
Tel: 714-522-9011
MIDDLE & SOUTH AMERICA
MEXICO
Yamaha De Mexico S.A. De C.V.,
Departamento de ventas
Javier Rojo Gomez No. 1149, Col. Gpe Del
Moral, Deleg. Iztapalapa, 09300 Mexico, D.F.
Tel: 686-00-33
BRASIL
Yamaha Musical Do Brasil LTDA.
Ave. Reboucas 2636, Sao Paulo, Brasil
Tel: 55-1 1 853-1377
PANAMA
Yamaha De Panama S.A.
Edificio Interseco, Calle Elvira Mendez no.10, Piso
3, Oficina # 105, Ciudad de Panama, Panama
Tel: 507-69-5311
OTHER LATIN AMERICAN COUNTRIES
AND CARIBBEAN COUNTRIES
Yamaha Music Latin America Corp.
6101 Blue Lagoon Drive, Miami, Elorida 33126,
U.S.A.
Tel: 305-261-4111
EUROPE
THE UNITED KINGDOM/IRELAND
Yamaha-Kemble Music(U.K.) Ltd.
Sherbourne Drive, Tilbrook, Milton Keynes,
MK7 8BL England
Tel: 0908-366700
GERMANY/SWITZERLAND
Yamaha Europa GmbH.
Siemensstralîe 22-34, D-2084 Rellingen, E.R. of
Germany
Tel: 04101-3030
AUSTRIA/HUNGARY
Yamaha Music Austria GmbH.
Schleiergasse 20, A-llOO Wien Austria
Tel: 0222-60203900
ITALY
Yamaha Musica Italia S.P.A.,
Home Keyboard Division
Viale Italia 88, 20020 LainatefMilano), Italy
Tel: 02-937-4081
SPAIN
Yamaha-Hazen Electronica Musical, S.A.
Jorge Juan 30, 28001, Madrid, Spain
Tel: 91-577-7270
PORTUGAL
Valentim de Carvalho Cl SA
Estrada de Porto Salvo, Paço de Arcos 2780 Oeiras,
Portugal
Tel: 01-443-3398/4030/1823
GREECE
Philippe Nakas S.A,
Navarinou Street 13, P.Code 10680, Athens, Greece
Tel: 01-364-7111
SWEDEN
Yamaha Scandinavia AB
J. A. Wettergrens gaia 1, Box 30053, 400 43
Göteborg, Sweden
Tel: 031-496090
DENMARK
Yamaha Scandinavia Filial Danmark
Finsensvej 86, DK-2000 Frederiksberg, Denmark
Tel: 31-87 30 88
FINLAND
Fazer Music Inc.
Lânsituulentie lA, SF-02100 Espoo, Finland
Tel: 90-435 011
NORWAY
Narud Yamaha AS
Osterndalen 29, 1345 Osteräs
Tel: 02-24 47 90
ICELAND
Pall H. Pälsson
P.O. Box 85, Reykjavik, Iceland
Tel: 01-19440
EAST EUROPEAN COUNTRIES
(Except HUNGARY)
Yamaha Europa GmbH.
Siemensstraße 22-34, D-2084 Rellingen, E.R. of
Germany
Tel: 04101-3030
UNION OF SOVIET SOCIALIST
REPUBLICS
Yamaha Corporation, Asia Oceania Group
Nakazawa-cho 10-1, Hamamatsu, Japan 430
Tel: 81(Country Code)-53-460-2311
THE NETHERLAND
Yamaha Music Benelux B.V.,
Verkoop Administratie
Kanaalweg 18G, 3526 KI. Utrecht, The Netherland
Tel: 030-828411
BELGIUM/LUXEMBOURG
Yamaha Music Benelux B.V.,
Administration des Ventes
Rue de Bosnie 22, 1060 Brusseles, Belgium
Tel: 02-5374480
FRANCE
Yamaha Mu.si()ue France, Division Claviers
BP 70-77312 Marne-la-Valée Cedex 2, Erance
Tel: 01-64-61-4000
MOROCCO
Yamaha-Hazen Electrónica Musical, S.A.
Jorge Juan 30, 28001, Madrid, Spain
Tel: 91-577-7270
OTHER COUNTRIES
Yamaha Musique France, Division Export
BP 70-77312 Marne-la-Valée Cedex 2, France
Tel: 01-64-61-4000
MIDDLE EAST ASIA
ISRAEL
R.B.X. International Co., Ltd.
P.O. Box 111 36, Tel-Aviv 61111, Israel
Tel: 3-298-251
AFRICA
Para detalles sobre los productos, póngase en contacto con
nuestra subsidiaria o distribuidor autorizado enumerados a
continuación.
OTHER COUNTRIES
Yamaha Musique France, Division Export
BP 70-77312 Marne-la-Valée Cedex 2, France
Tel: 01-64-61-4000
ASIA
HONG KONG
Tom Lee Music Co., Ltd.
15/F., World Shipping Centre, Harbour City,
7 Canton Road, Kowloon, Hong Kong
Tel: 3-722-1098
INDONESIA
PT. Nusantik
Gedung Yamaha Music Center, Jalan Jend. Gatot
Subroto Kav. 4, Jakarta 12930, Indonesia
Tel: 21-520-2577
KOREA
Inkel Corporation Ltd.
41-4 2-Ka Myungryoon-dong, Chongro-ku, Seoul,
Korea
Tel: 2-764-3377
MALAYSIA
Yamaha Music Malaysia Sdn., Bhd.
16-28, Jalan SS 2/72, Petaling Jaya, Selangor,
Malaysia
Tel: 3-717-8977
PHILIPPINES
Yupangco Music Corporation
339 Gil J. Puyat Avenue, Makati, Metro Manila
1200, Philippines
Tel: 2-85-7070
SINGAPORE
Yamaha Music Asia Pte., Ltd.
80 Tannery Lane, Singapore 1334, Singapore
Tel: 747-4374
TAIWAN
Kung Hsue She Trading Co., Ltd.
KHS Fu Hsing Building, 322, Section 1, Fu-Hsing
S. Road, Taipei 10640, Taiwan. R.O.C.
Tel: 2-709-1266
THAILAND
Siam Music Yamaha Co., Ltd.
933/1-7 Rama I Road, Patumwan, Bangkok,
Thailand
Tel: 2-215-0030
THE PEOPLE’S REPUBLIC OF CHINA
AND OTHER ASIAN COUNTRIES
Yamaha Corporation, Asia Oceania Group
Nakazawa-cho 10-1, Hamamatsu, Japan 430
Tel: 81(Country Code)-53-460-2311
OCEANIA
AUSTRALIA
Yamaha Music Australia Pty. Ltd.
17-33 Market Street, South Melbourne, Vic. 3205,
Australia
Tel: 3-699-2388
NEW ZEALAND
Music Houses of N.Z. Ltd,
146/148 Captain Springs Road, Te Papapa,
Auckland New Zealand
Tel: 9-640-099
COUNTRIES AND TRUST
TERRITORIES IN PACIFIC OCEAN
Yamaha Corporation, Asia Oceania Group
Nakazawa-cho 10-1, Hamamatsu, Japan 430
Tel: 81{Country Code)-53-460-2311
HEAD OFFICE Yamaha Corporation, Electronic Musical Instrument Division
Nakazawa-cho 10-1, Hamamatsu, Japan 430
Tel: SKCountry Code)-53-460-3273
Page 47

YAMAHA
IMPORTANT
PLEASE RECORD THE SERIAL NUMBER OF YOUR UNIT IN THE
SPACE BELOW.
MODEL: PSR-400
MODEL: PSR 500
SERIAL NO:
THE SERIAL NUMBER IS LOCATED ON THE BOTTOM OF THE UNIT.
RETAIN THIS OWNER'S GUIDE IN A SAFE PLACE FOR FUTURE REFER
ENCE.
YAMAHA CORPORATION
PO. Box 1, Hamamatsu, Japan
' IWl 'i AMAHA i ORPORATION
^ III VM49260 Printed in Japan
 Loading...