

Page 1

Wireless DCP
Wireless DCP
Owner’s Manual
Introduction
Thank you for downloading the Wireless DCP app for Yamaha Matrix Processor MTX-series.
Wireless DCP allows these processors to be controlled remotely using smart devices such as the
iPhone. In specific terms, it has been designed to allow users to control volumes and presets on
MTX processors via a simple, intuitive graphical interface from anywhere within wireless
range.
The latest version of the firmware for MTX-series products can be downloaded from the follow-
ing web site.
http://www.yamahaproaudio.com/
Notices
• The Wireless DCP application and this manual are copyright of Yamaha Corporation.
• Copying of the Wireless DCP application or reproduction of this manual in whole or in part by any means
is expressly forbidden without the written consent of Yamaha Corporation.
• Yamaha Corporation makes no representations or warranties with regard to the use of the Wireless DCP
application and this manual and cannot be held responsible for the results of usage thereof.
• Screen displays as illustrated in this manual are for instructional purposes and may appear somewhat
different from those on your smart device.
• Apple, the Apple Logo, iPhone, iPod touch, iPad, and iOS are trademarks of Apple Inc., registered in the
U.S. and other countries.
• Company and product names used in this manual are trademarks or registered trademarks of their
respective companies.
• Future upgrades of the Wireless DCP application and any changes in specifications and functions will be
announced separately.
Wireless DCP Owner’s Manual
EN
1
Page 2

Contents
1. System Requirements .......................................................................3
2. Getting Started................................................................................ 3
3. Configuration .................................................................................4
3.1 MTX Processor Network..........................................................................................4
3.2 iOS Device ............................................................................................................... 5
3.3 Wireless DCP...........................................................................................................9
3.3.1 Offline Demo Mode ....................................................................................10
3.3.2 Making Connections...................................................................................12
3.3.3 Entering a Password ..................................................................................13
4. Controller Screen........................................................................... 17
5. Settings Screen............................................................................. 20
5.1 Overview................................................................................................................20
5.2 Selecting a Device .................................................................................................21
5.3 Changing Passwords.............................................................................................22
5.4 Editing Staff Pages ................................................................................................23
5.5 Displaying App Information ...................................................................................24
6. Troubleshooting ............................................................................ 25
Wireless DCP Owner’s Manual
2
Page 3

1. System Requirements
• Smart device
The following Apple devices (running iOS5 or later)
• iPhone (iPhone 3GS or later)
•iPad
• iPod touch (3
• Yamaha Matrix Processor MTX-series
• Wi-Fi access point (preferably with 802.11n, 5-GHz capability)
• Cat 5e cable (for connecting MTX processor and Wi-Fi access point)
rd
generation or later)
2. Getting Started
Set up your Wi-Fi access point as described in the manual that came with it. While no special settings
are needed, we do recommend using WPA security or the like in order to prevent unwanted devices
from joining the network. Less experienced Wi-Fi users may benefit from the following suggestions.
1. Assign a name to your wireless network.
2. Activate a security mode (such as WPA2) and set a password.
3. Select a wireless mode such as 802.11n or 802.11g.
4. If available, enable Auto Channel Selection so that the wireless channel with the lowest level
of interference will be automatically selected.
We recommend using 802.11n networks as they support faster communication between smart devices
and Wi-Fi access points. We also recommend using Wi-Fi access points with multiple external antennae as this makes it easier to connect to the network. For increased security, meanwhile, we recommend using a stealth mode or MAC address filtering.
Wireless DCP Owner’s Manual
3
Page 4

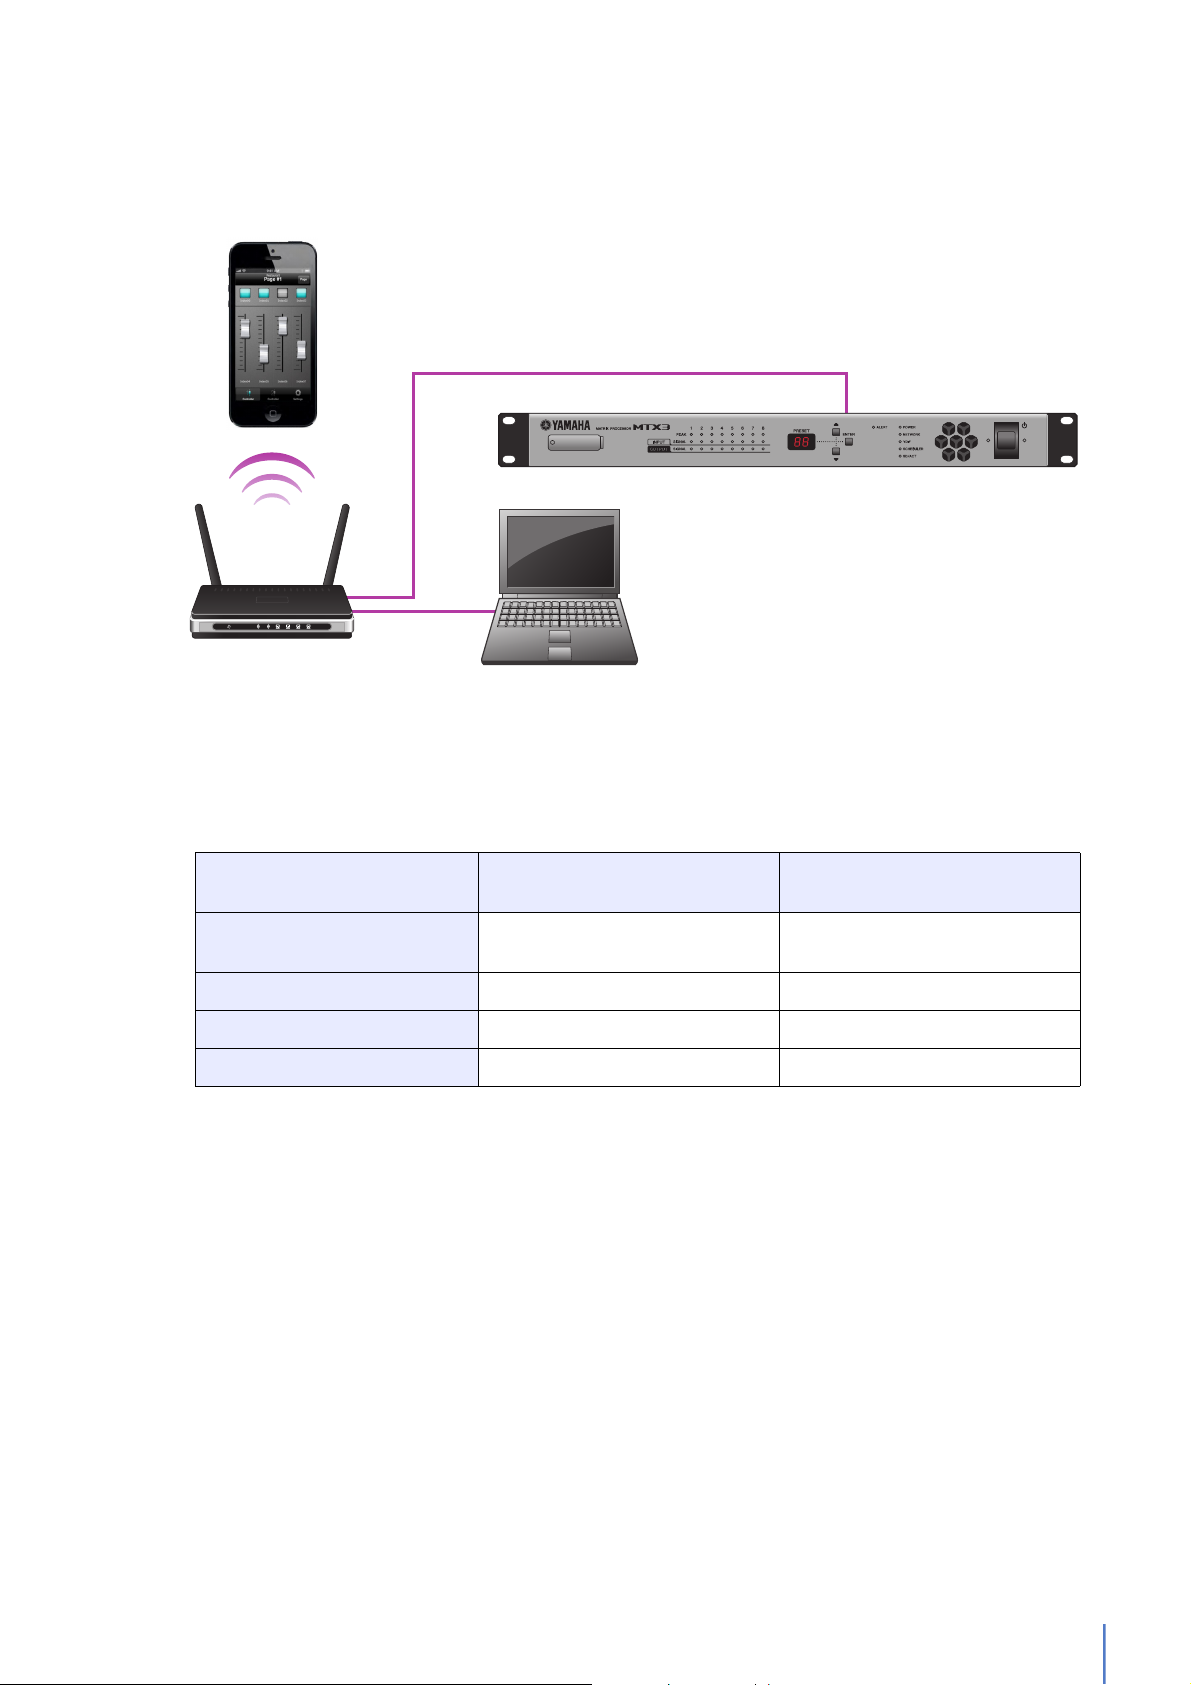
3. Configuration
Smart device
Wi-Fi access point
Computer
MTX processor
Ethernet
Switch
3.1 MTX Processor Network
Using a Cat 5e cable, connect your Wi-Fi access point to the Network port on the MTX processor.
Insert an Ethernet Switch as necessary.
Wireless DCP Owner’s Manual
4
Page 5

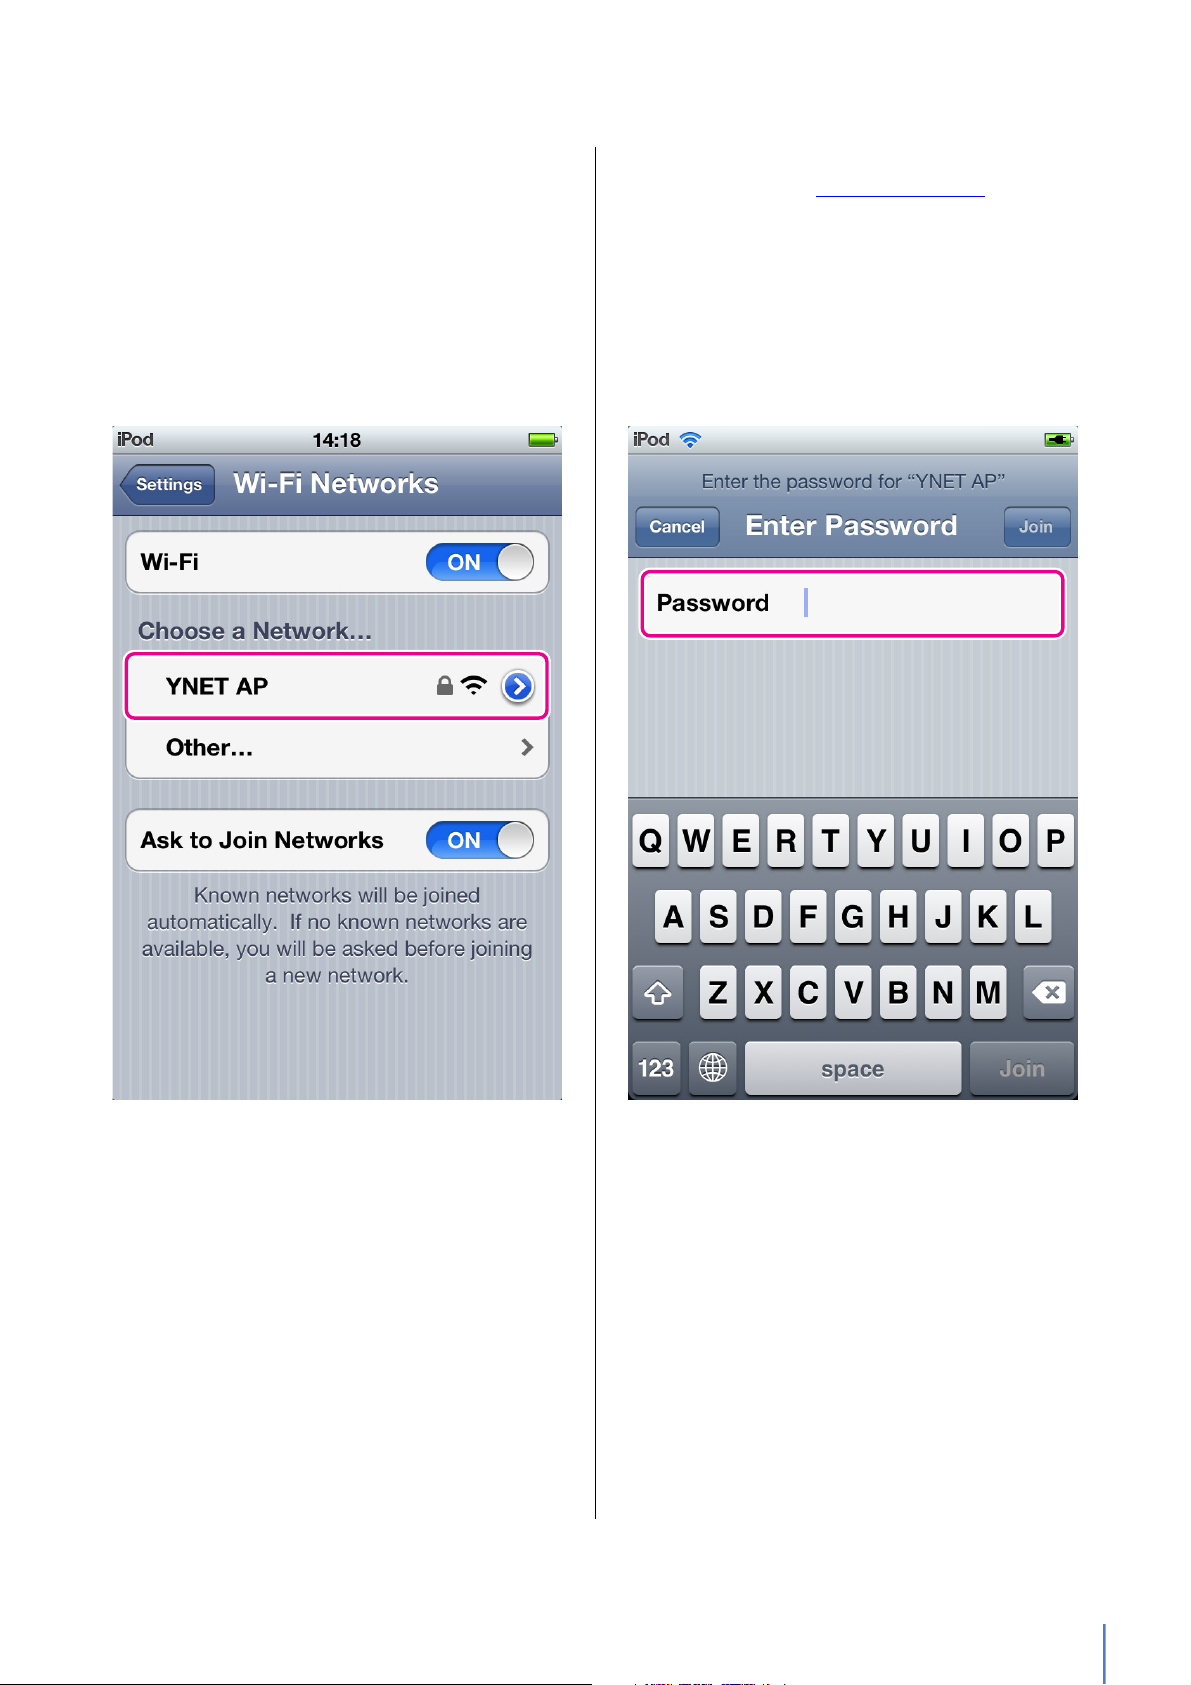
3.2 iOS Device
1. Go to Settings. Tap Wi-Fi. 2. Turn on Wi-Fi.
3. Configuration
Wireless DCP Owner’s Manual
5
Page 6
3. Configuration
3. Under Choose a Network…, select the WiFi access point to which the MTX processor
is connected.
4. Enter the Wi-Fi access point’s password.
Refer to Section 2. Getting Started for more
details.
Wireless DCP Owner’s Manual
6
Page 7
3. Configuration
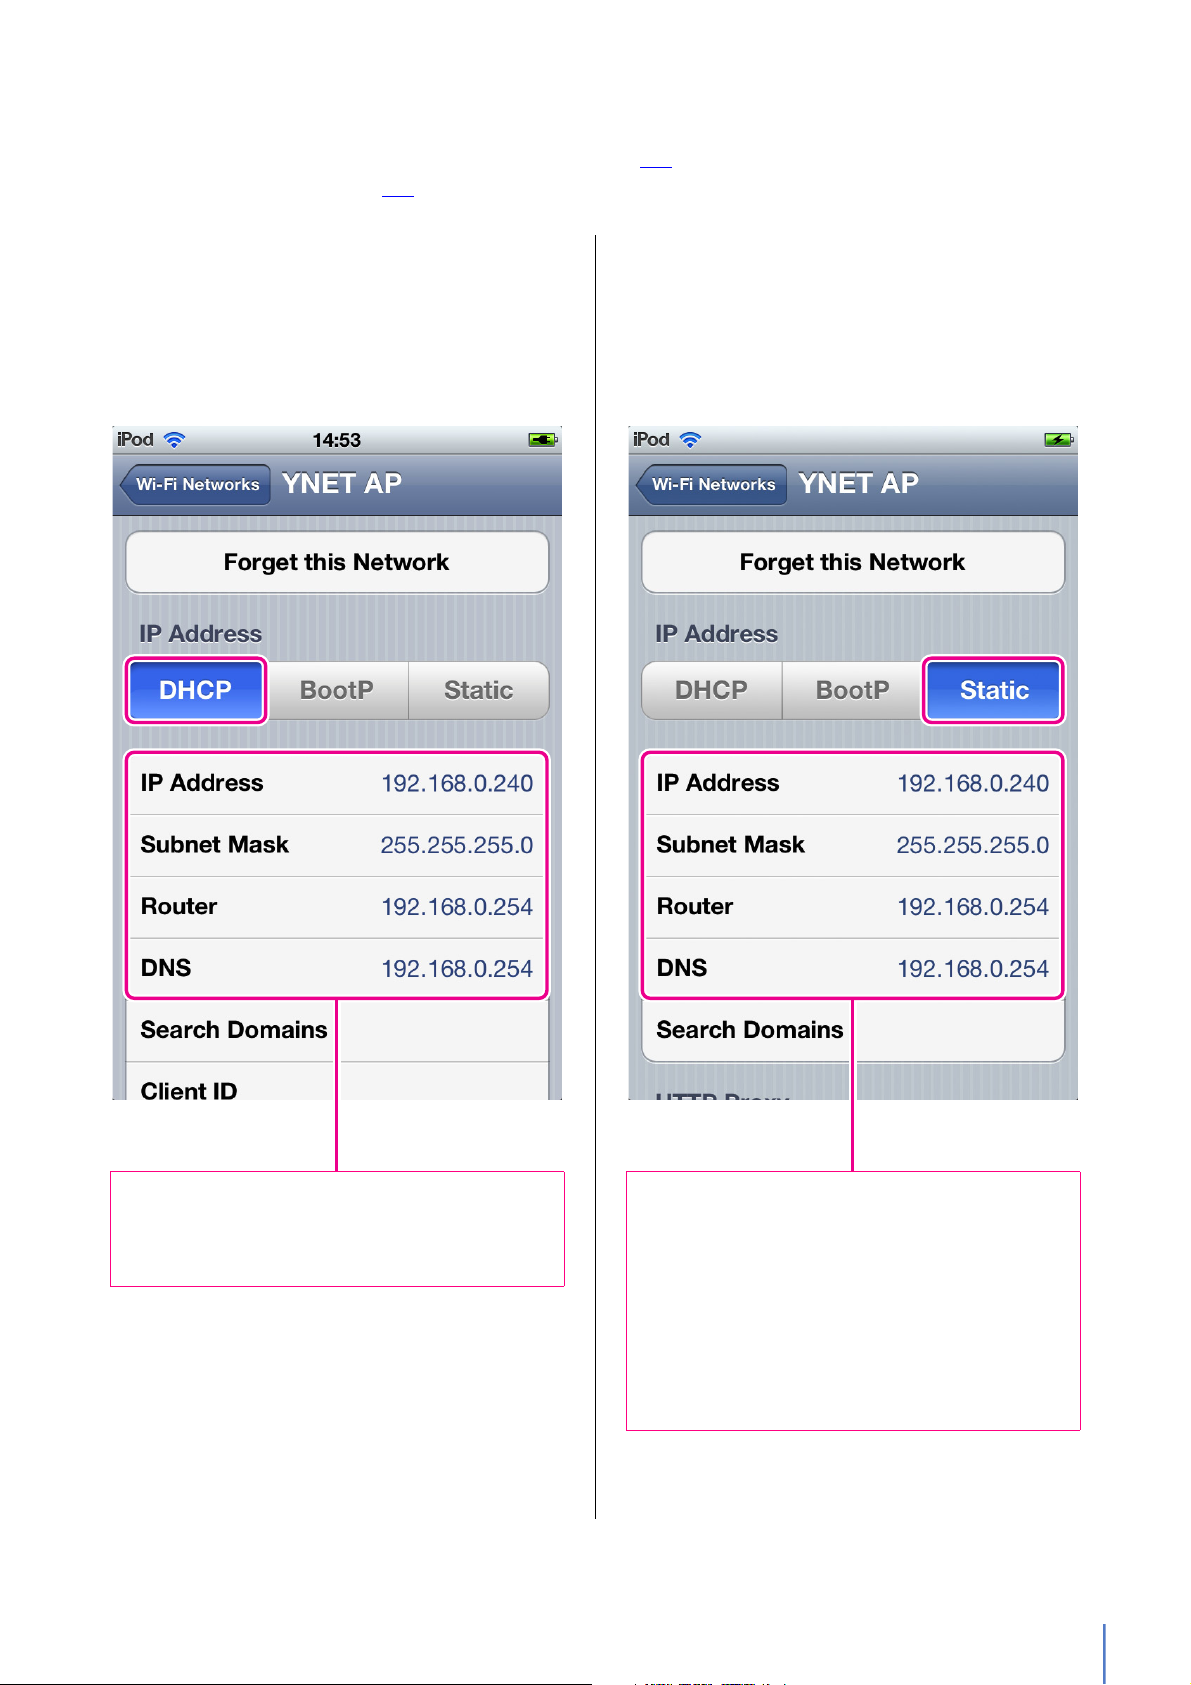
1. Verify that settings have been made for IP
Address, Subnet Mask, Router, and DNS.
2. Press the Home button to complete the network
setting process.
1. IP Address: For the first three numbers, use those
from the MTX processor’s IP address. Set a different value for the fourth number.
2. Subnet Mask: Enter “255.255.255.0”.
3. Router: Enter the IP address of the router or Wi-Fi
access point to be used.
4. Enter the IP address of the DNS or Wi-Fi access
point to be used.
5. Press the Home button to complete the network
setting process.
5. Configure your network as follows. (Use Procedure 5-1 if the network assigns IP addresses automatically; use Procedure 5-2 if not.)
5-1. Select DHCP if the network’s DHCP
server automatically determines IP
addresses.
5-2. Select Static if you need to manually
set an IP address.
Wireless DCP Owner’s Manual
7
Page 8
Key points for network configuration
Smart device
Wi-Fi access point
Computer
MTX processor
3. Configuration
1. All of the devices to be connected—that is, the MTX processor, the Wi-Fi access point, the smart device, and
the computer running MTX Editor—must have IP addresses from the same network (or subnet). If, for example, the subnet mask is 255.255.255.0 and the MTX processor’s IP address is 192.168.0.1, the smart device
should have an IP address in the form of 192.168.0.xx.
Good combination of settings
Router with integrated Wi-Fi*
and DNS
MTX processor 192.168.0.1 192.168.0.1
Smart device 192.168.0.101 192.168.11.50
Computer 192.168.0.253 192.168.0.253
*: If using a Wi-Fi access point that is not also a router, set the IP address for accessing it.
2. If the Wi-Fi access point’s DHCP server automatically assigns IP addresses, be sure that any IP addresses set
statically for other devices are not duplicated. We recommend that you check the setting for the range of IP
192.168.0.100 192.168.11.1
Incorrect combination of
settings
addresses that can be assigned automatically.
Meanwhile, if the Wi-Fi access point’s default IP subnet is not the same as that of the MTX processor, an incorrect combination of settings (similar to that shown in 1. above) will result and normal operation will not be possible. Because the IP subnet automatically assigned to the smart device in such a case will also differ from that
of the MTX processor, it will not be possible to connect.
3. Two smart devices running Wireless DCP can be connected to each MTX processor. (However, only one
device can be logged into by an administrator password.)
4. Connect the MTX processor to the LAN connector of the Wi-Fi access point.
If you connect to a WAN (Internet) connector, the smart device will not be able to communicate properly with
the MTX processor.
Wireless DCP Owner’s Manual
8
Page 9
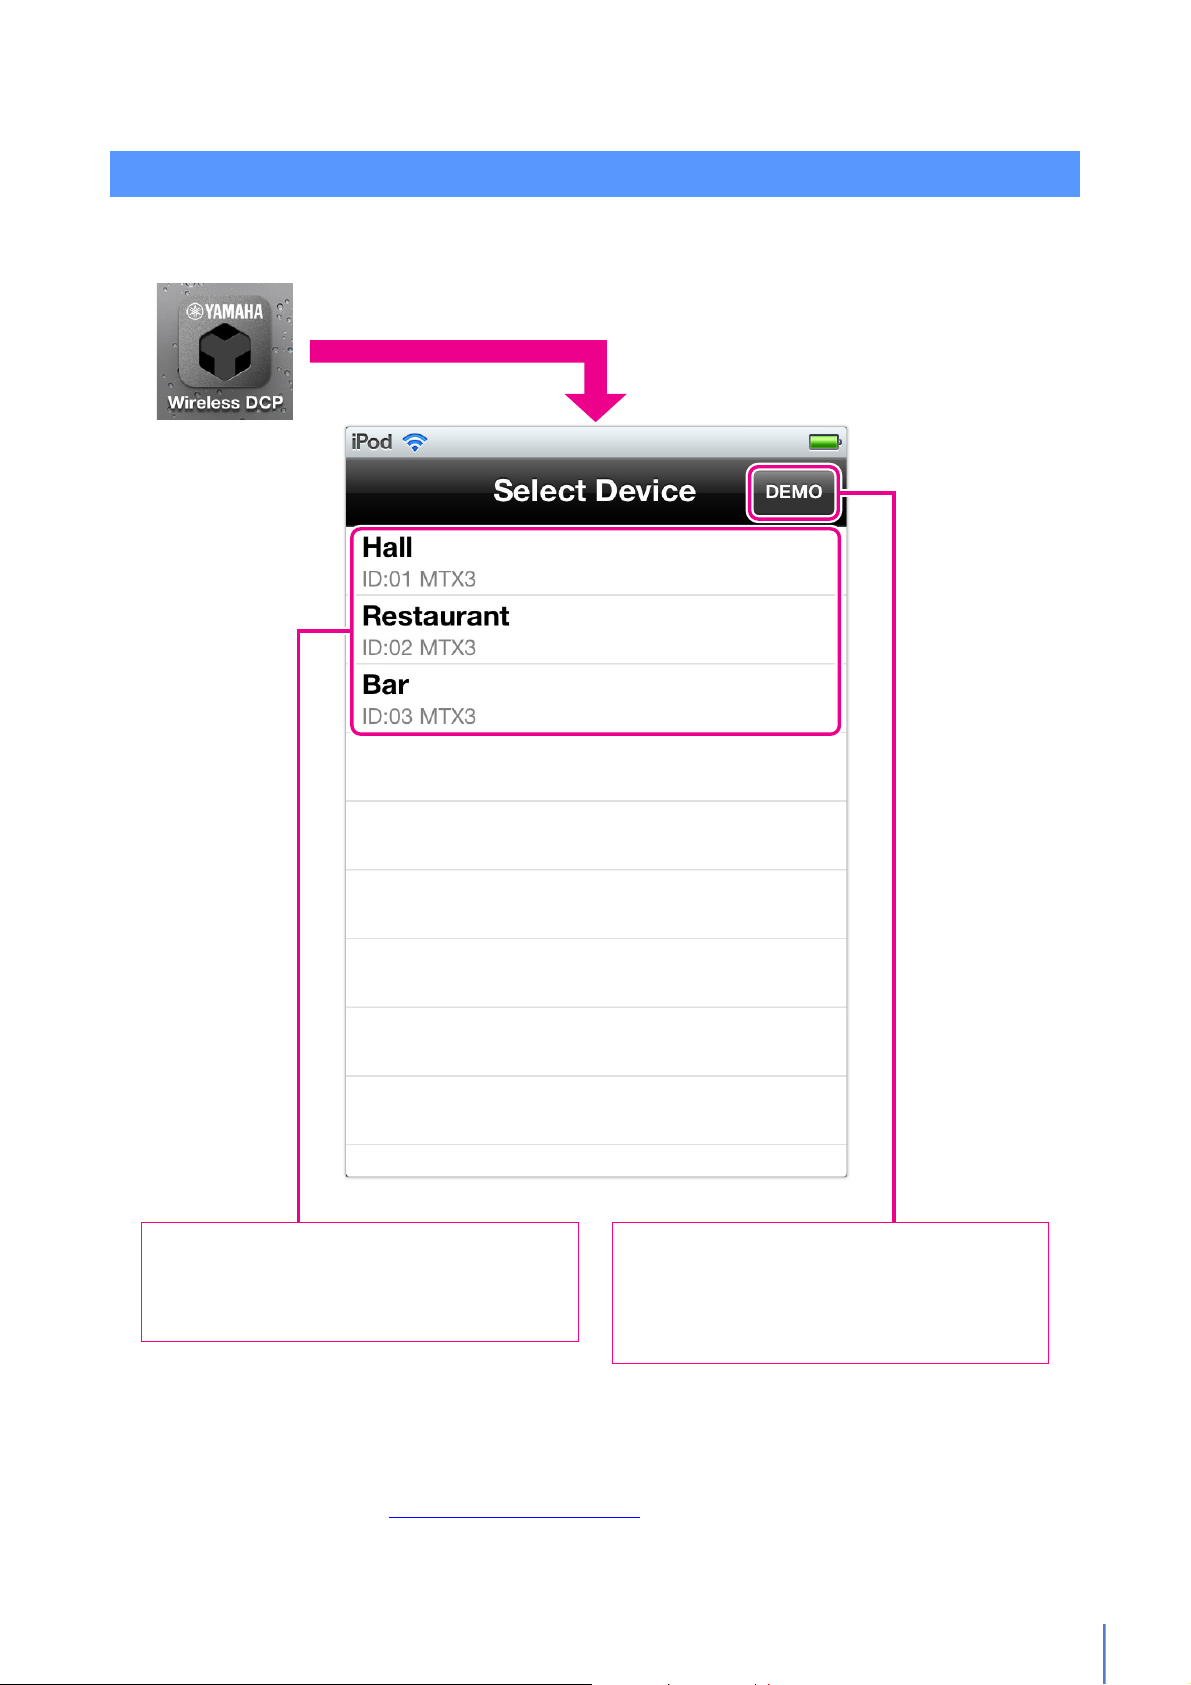
3.3 Wireless DCP
Device list
MTX processors available for connection are displayed here. When you select one, the Enter
Password screen will be displayed.
DEMO button
Tap DEMO on this screen to activate Offline Demo
mode. In this mode, you can try out Wireless DCP
functions and the user interface without performing any actual operations on the MTX processor.
Tap the Wireless DCP app to launch it. The Select Device screen will be displayed.
3. Configuration
If you launch Wireless DCP with Auto-connect mode active, the app will automatically reconnect to
the MTX processor it was most recently used with. You can use the Auto-connect switch to modify
this setting. Refer to Section 3.3.3 Entering a Password for details.
Wireless DCP Owner’s Manual
9
Page 10

3.3.1 Offline Demo Mode
Controller pane
Use this pane to try out the faders and buttons.
Page button
Tap to display the Select Page screen.
Controller 1 and Controller 2 buttons
Tap to switch the Controller pane’s display.
Settings button
Tap to display the Settings screen.
In Offline Demo mode, Wireless DCP disconnects from the MTX processor so you can try out the
app’s functions and user interface without performing any actual operations. To activate this
mode, tap DEMO on the Select Device screen.
3. Configuration
Wireless DCP Owner’s Manual
10
Page 11

3. Configuration
From Demo mode to Normal mode
On the Settings screen, tap Select Device... to display the Select Device screen. Here, you can
select the MTX processor to be controlled. When you do so, the Enter Password screen will be
displayed.
Wireless DCP Owner’s Manual
11
Page 12

3.3.2 Making Connections
When you select a processor, the Enter Password screen will be displayed.
Information displayed
Upper line: Device name (configured using MTX Editor)
Lower line: Unit ID and model name
On the Select Device screen, tap the MTX processor to be controlled.
3. Configuration
Wireless DCP Owner’s Manual
12
Page 13

3.3.3 Entering a Password
1
2
Reset button
Tap to display the Reset Password
screen.
Cancel button
Tap to return to the Select Device
screen without entering a password.
Auto-connect switch
Turn this switch on to connect automatically whenever the app is
launched.
To enter a password
1. Tap the password field to display the onscreen keyboard.
2. Enter your password using the keyboard.
3. Tap Join to connect to the MTX processor. Upon connection, the Controller 1 pane will be displayed.
NOTE
Passwords take the form of a four-digit number, and none are set when the app is first launched. In this condition, it is possible to log into Wireless DCP without entering a password by simply tapping Join. It is important,
therefore, to set passwords. Refer to Section 5.3 Changing Passwords
for details.
Enter a valid password to connect to the selected MTX processor.
3. Configuration
Wireless DCP Owner’s Manual
13
Page 14

3. Configuration
There are two different types of password—one for administrator, one for staff. As shown below,
certain functions are available only when logged into the MTX processor using an administrator
password.
Administrator Staff
Select Page
Change Password
Edit Staff Pages
×
×
(but restricted by administrator)
NOTE
You can restrict the functions for staff use by assigning different passwords for administrator and staff.
Wireless DCP Owner’s Manual
14
Page 15

3. Configuration
To reset a password
1. Tap Reset to display the Reset Password screen. If, for example, you forget a password, you
can use this screen to reset (or remove) it. Note that both administrator and staff passwords
are reset by this action.
2. Tap the MAC address field to display the onscreen keyboard. Enter the MAC address of the
MTX processor to connect using the keyboard.
You can check the MAC address from the MTX Editor.
Wireless DCP Owner’s Manual
15
Page 16

3. You will be asked to confirm that you wish to reset the passwords. Tap Yes to do so.
3. Configuration
Wireless DCP Owner’s Manual
16
Page 17

4. Controller Screen
Controller pane
This pane contains switches and
faders configured and arranged
using MTX Editor.
Information displayed
Upper line: Name of connected device
Lower line: Page name
Page button
Tap to display the Select
Page screen.
Controller 1 and Controller 2 buttons
Tap to switch the Controller pane’s display.
Settings button
Tap to display the Settings screen. Refer to Section
5. Settings Screen for details.
The Controller screen is used to remotely control the connected MTX processor.
The Controller screen displays controllers configured using MTX Editor. The positions of the faders
and switches can be edited using that application and saved as a preset. These presets can then be
recalled from the MTX processor’s main panel, a digital control panel (DCP), or this app. For more
details regarding controller settings, please refer to the MTX Editor Owner’s Manual.
Wireless DCP Owner’s Manual
17
Page 18

Page buttons
On the Select Page screen, you can select the pages to be displayed in the Controller 1 and Controller 2
panes. Administrators can restrict the pages available for selection by staff. Refer to Section 5.4 Editing
Staff Pages for details.
Using MTX Editor, four controller screens can be registered as pages.
4. Controller Screen
Wireless DCP Owner’s Manual
18
Page 19

4. Controller Screen
NOTE
The following message is shown whenever a preset is being recalled from an MTX processor. In such a case,
please wait until synchronization is complete.
Wireless DCP Owner’s Manual
19
Page 20

5. Settings Screen
NOTE
Parameters on the Change Password and Edit Staff Pages screens
can be set only when logged into the MTX processor using an
administrator password.
5.1 Overview
The Settings screen is used to set various Wireless DCP parameters.
Wireless DCP Owner’s Manual
20
Page 21

5. Settings Screen
Device name, unit ID, and model name are displayed here.
To connect to a different
device
1. Tap Select Device... .
2. You will be asked to confirm that
you wish to disconnect from the
current MTX processor. Tap Yes to
do so.
3. The Select Device screen will be
displayed. Refer to Section 3.3.2
Making Connections for details on
how to proceed.
5.2 Selecting a Device
Information on the currently connected MTX processor is shown in the Select Device field. In addition, you can tap Select Device... to connect to a different MTX processor from this page.
Wireless DCP Owner’s Manual
21
Page 22

5. Settings Screen
2
1
3
4
6
To change a password
1. Select the type of password to be
changed (i.e., administrator or
staff).
2. Enter the current password.
3. Enter the new password.
4. Re-enter the new password for
confirmation.
5. A message will be displayed to
indicate that the password has
been successfully changed. Tap
OK to continue.
6. Tap Settings to return to the top
level of the Settings screen.
NOTE
Passwords can be changed only
when logged into the MTX processor using an administrator password.
5.3 Changing Passwords
Tap Change Password to modify the passwords set for Wireless DCP on the currently connected
MTX processor.
Wireless DCP Owner’s Manual
22
Page 23

5. Settings Screen
1
2
To edit staff pages
1. Tap individual pages to select them.
2. Tap Settings to return to the top level of the Settings screen.
NOTE
• Staff pages can be selected only when logged into the MTX processor using an
administrator password.
• This setting is saved by each smart device. Also, you can change the settings connected for each MTX processor.
5.4 Editing Staff Pages
Using the Edit Staff Pages screen, you can select the pages that will be available for selection by staff
on the Select Page screen.
Wireless DCP Owner’s Manual
23
Page 24

5. Settings Screen
Settings button
Tap to return to the top level of the Settings screen.
Version
Displays the current Wireless DCP version.
Legal
Displays open source licenses and other library-related information.
5.5 Displaying App Information
Tap About to display the current version number, copyright details, and other information about the
Wireless DCP app.
Wireless DCP Owner’s Manual
24
Page 25

6. Troubleshooting
No Wi-Fi available
The error message on the left is displayed when the smart device is
not connected to a Wi-Fi access point or Wi-Fi is turned off. For
details regarding Wi-Fi settings, refer to Section 2. Getting Started
and Section 3.2 iOS Device
addresses of the router and DNS have been set as connection will
be periodically lost if it is not.
. You should also ensure that the IP
Failed to establish connection
The error message on the left may be displayed as a result of incorrect network settings on the smart device. Ensure that the MTX processor’s network settings match those in Wireless DCP. For details
regarding these settings, refer to Section 3.1 MTX Processor Net-
work and Section 3.2 iOS Device. This error message may also be
displayed if the selected MTX processor is not turned on or is
already connected to a different smart device.
Wireless DCP Owner’s Manual
25
Page 26

Connection has been lost
6. Troubleshooting
The error message on the left will be displayed if the selected MTX
processor is turned off or the smart device is moved out of Wi-Fi
range. If connection is lost when the iOS device is locked, this message will be displayed when it is unlocked. In such a case, tap Reconnect to reconnect to the MTX processor, and continue controlling it.
If this message occurs frequently, we recommend that you set the
iOS device’s auto-lock time to 5 Minutes or Never as follows.
1. Go to Settings on your iOS device.
2. Tap General.
3. Tap Auto-Lock and select 5 Minutes or Never.
Preset has no setting
The error message on the left will be displayed if Wireless DCP settings have not been associated with an MTX processor preset. For
details on how to make the corresponding settings, refer to the MTX
Editor Owner’s Manual.
Wireless DCP Owner’s Manual
26
Page 27

Not connected
6. Troubleshooting
The message on the left will be displayed when another smart
device is already connected to the selected MTX processor. Two
smart devices running Wireless DCP can be connected to each
MTX processor. Meanwhile, the same message is displayed when
the smart device becomes disconnected from the Wi-Fi access
point due to a weak signal or the use of invalid network settings.
Login Failed
The message on the left will be displayed when you log in by an
administrator password to an MTX processor that another smart
device for an administrator is already connected.
One smart device can be connected for an administrator, and
another one can be connected for a staff member.
Wireless DCP Owner’s Manual
27
Page 28

6. Troubleshooting
Failed Internet connection
To disable automatic connection
No MTX processor in the device list
The message “Failed Internet connection” may be displayed when
attempting access to the Internet via the Wi-Fi access point (or
router), depending on the settings.
Not required for an Internet connection between the Wireless DCP
and the MTX processor.
Make sure the Wi-Fi device is set properly, for example, with no
redirect setting. For details, contact the device's dealer.
1. Tap Settings in Wireless DCP.
2. On the Settings screen, tap Select Device... .
3. As described in To connect to a different device (page 21)
, select
the MTX processor being controlled.
4. Automatic connection will be disabled when the Enter Password
screen is displayed.
In addition, automatic connection is also disabled if Cancel is
tapped to return to the Select Device screen from the Enter
Password screen.
If no Wireless DCP settings have been registered in any MTX processor presets, the device list will not contain any devices. For
details on how to make the corresponding settings, refer to the MTX
Editor Owner’s Manual.
Difficulty moving multiple faders
Difficulty operating multiple
switches
If Multitasking Gestures is turned on, it may not be possible to move
more than three faders simultaneously in Wireless DCP. When
using this app, therefore, we recommend that you turn Multitasking
Gestures off as follows.
1. Go to Settings on your iPad.
2. Tap General.
3. Tap the Multitasking Gestures switch to turn it off.
If Zoom is turned on, it may not be possible to operate more than
three switches simultaneously in Wireless DCP. When using this
app, therefore, we recommend that you turn Zoom off as follows.
1. Go to Settings on your iOS device.
2. Tap General.
3. Tap Accessibility.
4. Tap the Zoom switch to turn it off.
C.S.G., Pro Audio Division
© 2013 Yamaha Corporation
Wireless DCP Owner’s Manual
303PO-A1
28
 Loading...