

Page 1
OPERATING MANUAL
ba75953e03 05/2017
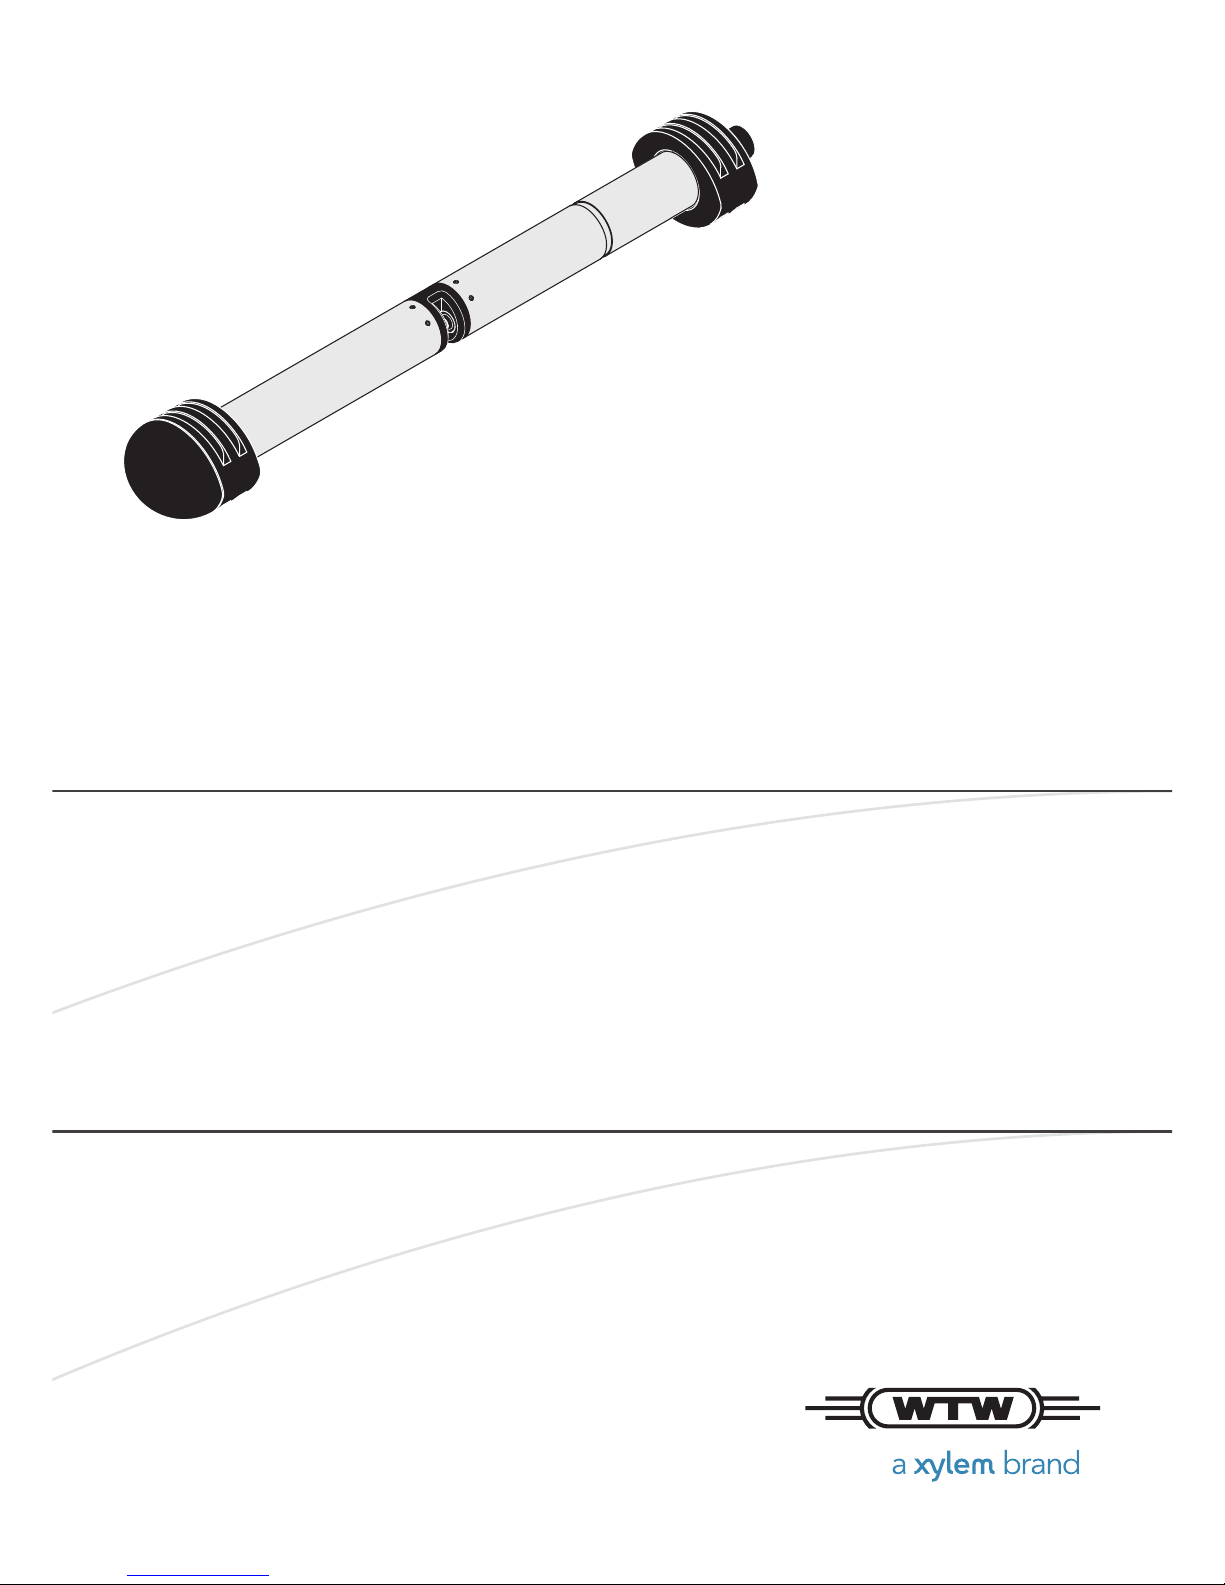
NiCaVis 705 IQ
OPTICAL SENSOR FOR NITRATE AND CARBON SUM PARAMETERS
Page 2

2 ba75953e03 05/2017
NiCaVis 705 IQ
Copyright © 2017 Xylem Analytics Germany GmbH
Printed in Germany.
Page 3

NiCaVis 705 IQ Contents
3
ba75953e03 05/2017
Contents
1 Overview . . . . . . . . . . . . . . . . . . . . . . . . . . . . . . . . . . . . . . . . . . 5
1.1 How to use this component operating manual . . . . . . . . . . . . . 5
1.2 Field of application . . . . . . . . . . . . . . . . . . . . . . . . . . . . . . . . . . 6
1.3 Measuring principle of the sensor NiCaVis 705 IQ . . . . . . . . . . 6
1.4 Structure of the sensor NiCaVis 705 IQ . . . . . . . . . . . . . . . . . . 7
2 Safety . . . . . . . . . . . . . . . . . . . . . . . . . . . . . . . . . . . . . . . . . . . . 8
2.1 Safety information . . . . . . . . . . . . . . . . . . . . . . . . . . . . . . . . . . . 8
2.1.1 Safety information in the operating manual . . . . . . . . . 8
2.1.2 Safety signs on the product . . . . . . . . . . . . . . . . . . . . . 8
2.1.3 Further documents providing safety information . . . 8
2.2 Safe operation . . . . . . . . . . . . . . . . . . . . . . . . . . . . . . . . . . . . . . 9
2.2.1 Authorized use . . . . . . . . . . . . . . . . . . . . . . . . . . . . . . . 9
2.2.2 Requirements for safe operation . . . . . . . . . . . . . . . . . 9
2.2.3 Unauthorized use . . . . . . . . . . . . . . . . . . . . . . . . . . . . . 9
3 Commissioning . . . . . . . . . . . . . . . . . . . . . . . . . . . . . . . . . . . . 10
3.1 IQ SENSOR NET system requirements . . . . . . . . . . . . . . . . . . . 10
3.2 Scope of delivery of the NiCaVis 705 IQ . . . . . . . . . . . . . . . . . 10
3.3 Installation . . . . . . . . . . . . . . . . . . . . . . . . . . . . . . . . . . . . . . . . 11
3.3.1 Mounting the sensor . . . . . . . . . . . . . . . . . . . . . . . . . . 11
3.3.2 Mounting the shock protectors . . . . . . . . . . . . . . . . . . 13
3.3.3 Connecting the sensor to the IQ S
ENSOR NET . . . . . . 14
3.4 Initial commissioning . . . . . . . . . . . . . . . . . . . . . . . . . . . . . . . . 16
3.4.1 General information . . . . . . . . . . . . . . . . . . . . . . . . . . 16
3.4.2 Sensor structure . . . . . . . . . . . . . . . . . . . . . . . . . . . . . 17
3.4.3 Settings for the main sensor . . . . . . . . . . . . . . . . . . . . 18
3.4.4 Settings for virtual sensors . . . . . . . . . . . . . . . . . . . . . 21
4 Measurement / Operation . . . . . . . . . . . . . . . . . . . . . . . . . . . . 23
4.1 Determination of measured values . . . . . . . . . . . . . . . . . . . . . 23
4.2 Measurement operation . . . . . . . . . . . . . . . . . . . . . . . . . . . . . 24
4.3 Calibration . . . . . . . . . . . . . . . . . . . . . . . . . . . . . . . . . . . . . . . . 24
4.3.1 Overview . . . . . . . . . . . . . . . . . . . . . . . . . . . . . . . . . . 24
4.3.2 User calibration . . . . . . . . . . . . . . . . . . . . . . . . . . . . . 27
4.3.3 Sensor check/
Zero adjustment
. . . . . . . . . . . . . . . . . . 31
Page 4

NiCaVis 705 IQ
4
ba75953e03 05/2017
5 Maintenance and cleaning . . . . . . . . . . . . . . . . . . . . . . . . . . . 37
5.1 Maintenance . . . . . . . . . . . . . . . . . . . . . . . . . . . . . . . . . . . . . . .37
5.2 Sensor cleaning . . . . . . . . . . . . . . . . . . . . . . . . . . . . . . . . . . . . 37
5.2.1 Cleaning agents and accessories . . . . . . . . . . . . . . . . 37
5.2.2 General steps to be taken . . . . . . . . . . . . . . . . . . . . . . 38
5.2.3 Basic cleaning . . . . . . . . . . . . . . . . . . . . . . . . . . . . . . .39
5.2.4 Cleaning the measuring gap . . . . . . . . . . . . . . . . . . . . 40
6 Spare parts, maintenance equipment, accessories . . . . . . . . 41
7 What to do if... . . . . . . . . . . . . . . . . . . . . . . . . . . . . . . . . . . . . . 43
8 Technical data . . . . . . . . . . . . . . . . . . . . . . . . . . . . . . . . . . . . . 46
8.1 Measurement characteristics . . . . . . . . . . . . . . . . . . . . . . . . . . 46
8.2 Application characteristics . . . . . . . . . . . . . . . . . . . . . . . . . . . . 47
8.3 General data . . . . . . . . . . . . . . . . . . . . . . . . . . . . . . . . . . . . . . . 48
8.4 Electrical data . . . . . . . . . . . . . . . . . . . . . . . . . . . . . . . . . . . . . . 49
9 Indexes . . . . . . . . . . . . . . . . . . . . . . . . . . . . . . . . . . . . . . . . . . 50
9.1 Explanation of the messages . . . . . . . . . . . . . . . . . . . . . . . . . .50
9.1.1 Error messages . . . . . . . . . . . . . . . . . . . . . . . . . . . . . . 51
9.1.2 Informative messages . . . . . . . . . . . . . . . . . . . . . . . . . 53
9.2 Status info . . . . . . . . . . . . . . . . . . . . . . . . . . . . . . . . . . . . . . . . . 54
10 Appendix: Glossary . . . . . . . . . . . . . . . . . . . . . . . . . . . . . . . . . 55
Page 5
NiCaVis 705 IQ Overview
5
ba75953e03 05/2017
1 Overview
1.1 How to use this component operating manual
Structure of the
IQ SENSOR NET
operating manual
Fig. 1-1 Structure of the
IQ SENSOR NET operating manual
The IQ SENSOR NET operating manual has a modular structure like the IQ SENSOR NET
itself. It consists of a system operating manual and the operating manuals of all
the components used.
Please file this component operating manual into the ring binder of the system
operating manual.
IQ Sensor Net Operating Manual
System
Operating
Manual
(Ring Binder)
IQ Sensor
Operating
Manual
MIQ Module
Operating
Manual
MIQ Terminal
Operating
Manual
Component Operating Manuals
Page 6

Overview NiCaVis 705 IQ
6
ba75953e03 05/2017
1.2 Field of application
The NiCaVis 705 IQ is an online sensor for the on-site determination of nitrate
and carbon sum parameters in waste water treatment plants.
The range of application comprises control, feedback control and monitoring.
Measuring location
Ultrasound cleaning
system
The ultrasound cleaning system ensures low maintenance and long-term reliable measurement operation.
The ultrasound source integrated in the sensor excites the measurement
windows to produce vibrations in the ultrasound range. The
movement of the surface as a result of this prevents the growth of
pollution in almost all cases and, thus, ensures reliable measured
values during continuous operation.
Compressed air
cleaning (option)
The sensor is designed to be equipped with an additional compressed air-driven
cleaning system, which supports the ultrasound cleaning system as necessary.
1.3 Measuring principle of the sensor NiCaVis 705 IQ
The sensor operates according to the measuring principle of UV-VIS- spectrometry.
Any substance present in a measuring solution attenuates a light beam that
penetrates the measuring solution. The attenuation (absorbance) of the light
beam is measured for individual wavelengths.The wavelength dependent distribution produces the absorbance spectrum.
The wavelength range where an absorbance occurs is characteristic of the
substance.The extent of the absorbance depends on the amount of the
substance.
The influence of typical interference matrix variants occurring at municipal waste
water treatment plants can be eliminated by including the entire absorbance
spectrum.
With this measuring principle, measuring does not take place continuously but
at intervals.
NiCaVis 705 IQ Outlet
Page 7

NiCaVis 705 IQ Overview
7
ba75953e03 05/2017
1.4 Structure of the sensor NiCaVis 705 IQ
The sensor has a light source (1), a measuring gap (3) to enable the contact of
light with the measuring solution, and a detector (5) to measure the attenuated
light beam.
The sender of the optical system (2) directs a light beam, the measuring beam
(6), through the measuring solution and a second light beam, the reference
beam (8), over a distance without measuring solution. The test sample is
between both measurement windows (3) in the measuring gap.
The receiver of the optical system (4) directs the measuring beam and reference
beam to the detector. In the detector, the light is received by fixed photo diodes.
Fig. 1-2 Structure of the sensor
1 Light source
2 Sender of the optical system
3 Measuring gap between the measurement windows
4 Receiver of the optical system
5 Detector
6 Measuring beam
7 Reference beam
8 Connection for the optional compressed air cleaning system
7
6
34
8
21 5
Page 8
Safety NiCaVis 705 IQ
8
ba75953e03 05/2017
2 Safety
2.1 Safety information
2.1.1 Safety information in the operating manual
This operating manual provides important information on the safe operation of
the product. Read this operating manual thoroughly and make yourself familiar
with the product before putting it into operation or working with it. The operating
manual must be kept in the vicinity of the sensor so you can always find the information you need.
Important safety instructions are highlighted in this operating manual. They are
indicated by the warning symbol (triangle) in the left column. The signal word
(e.g. "CAUTION") indicates the level of danger:
NOTE
indicates a situation where goods might be damaged if the actions mentioned
are not taken.
2.1.2 Safety signs on the product
Note all labels, information signs and safety symbols on the product. A warning
symbol (triangle) without text refers to safety information in this operating
manual.
2.1.3 Further documents providing safety information
The following documents provide additional information, which you should
observe for your safety when working with the measuring system:
Operating manuals of other components of the IQ S
ENSOR NET system
(power packs, controller, accessories)
Safety datasheets of calibration and maintenance equipment (e.g. cleaning
solutions).
WARNING
indicates a possibly dangerous situation that can lead to serious (irreversible) injury or death if the safety instruction is not
followed.
CAUTION
indicates a possibly dangerous situation that can lead to slight
(reversible) injury if the safety instruction is not followed.
Page 9

NiCaVis 705 IQ Safety
9
ba75953e03 05/2017
2.2 Safe operation
2.2.1 Authorized use
The authorized use of the NiCaVis 705 IQ consists of its use as a sensor in the
IQ S
ENSOR NET. Only the operation and running of the sensor according to the
instructions and technical specifications given in this operating manual is authorized (see chapter 8 T
ECHNICAL DATA). Any other use is considered unauthor-
ized.
2.2.2 Requirements for safe operation
Note the following points for safe operation:
The product may only be operated according to the authorized use specified
above.
The product may only be supplied with power by the energy sources men-
tioned in this operating manual.
The product may only be operated under the environmental conditions men-
tioned in this operating manual.
The product may not be opened.
2.2.3 Unauthorized use
The product must not be put into operation if:
it is visibly damaged (e.g. after being transported)
it was stored under adverse conditions for a lengthy period of time (storing
conditions, see chapter 8 T
ECHNICAL DATA).
Page 10

Commissioning NiCaVis 705 IQ
10
ba75953e03 05/2017
3 Commissioning
3.1 IQ SENSOR NET system requirements
Software versions of
the controller and
terminal
components
The operation of the NiCaVis 705 IQ requires the following software versions in
the IQ S
ENSOR NET:
For cleaning with
compressed air via
a relay
3.2 Scope of delivery of the NiCaVis 705 IQ
The following parts are included in the scope of delivery:
SensorNiCaVis 705 IQ
Sensor sleeve
Shock protectors
Operating manual
DIQ/S 28X Controller software: Version 3.72 or higher
DIQ/S 182 Controller software: Version 3.45 or higher
MIQ/MC3 Controller software: Version 3.72 or higher
MIQ/MC2 Controller software: Version 3.72 or higher
MIQ TC 2020 XT Controller software: Version 3.72 or higher
DIQ/S 28X Controller software: Version 3.72 or higher
DIQ/S 182 Software version: Version 3.45 or higher
MIQ/CR3 Software version: Version 2.90 or higher
MIQ/R6 Software version: Version 2.90 or higher
MIQ/CHV PLUS Software version: Version 2.90 or higher
Page 11

NiCaVis 705 IQ Commissioning
11
ba75953e03 05/2017
3.3 Installation
3.3.1 Mounting the sensor
NOTE
The sensor is an optical precision instrument that should be protected against
shocks. Make sure that the distances to the wall, bottom and other installation
surroundings are sufficient. If necessary, protect the sensor from hitting with the
protective ring provided. Mount any fixing elements only on the stable metal
shaft.
NOTE
Always make sure the surface of the enclosure is not damaged by sharp-edged
objects. The enclosure of the sensor may not touch any metallic objects in order
to prevent contact corrosion.
NOTE
Do not suspend the sensor on the sensor connection cable. Risk of cable break
and water penetration at the cable gland.
A wide range of mounting accessories is available for the installation of the
NiCaVis 705 IQ (see chapter 6 S
PARE PARTS, MAINTENANCE EQUIPMENT, ACCES-
SORIES). Thus, all prevalent ways of mounting are possible.
Generally, observe the following general rules
when mounting the sensor at the
measuring location:
Horizontal
installation
When mounting the sensor horizontally, the measuring gap opening should be
on the side. Thus, any air bubbles can escape upward after cleaning and no sediment can collect in the measuring gap. The sensor should be aligned in parallel
with the flow direction.
Fig. 3-1 Horizontal installation
Measuring gap opening
Flow direction
Page 12
Commissioning NiCaVis 705 IQ
12
ba75953e03 05/2017
Vertical installation For vertical installation, mount the sensor in a position that allows interfering ele-
ments in the measuring gap to escape with the current. In the case of vertical
installation, the minimum flow rate is 0.2 m/s so the measuring gap is kept clean
optimally.
Fig. 3-2 Vertical installation
Protection against
shocks
When installing the sensor, always make sure it cannot knock against a wall or
another obstacle. Make sure the safety margins are sufficient (e. g. with suspended mounting).
Mount the enclosed shock protectors (see section 3.3.2). Their soft rubber compound absorbs hard impacts.
Fig. 3-3 Sensor with mounted shock protectors
Flow direction
Measuring gap opening
Page 13

NiCaVis 705 IQ Commissioning
13
ba75953e03 05/2017
3.3.2 Mounting the shock protectors
The shock protectors consist of two rings, a cap and four cable ties. To mount
the shock protectors, proceed as follows:
Fig. 3-4 Mounting the shock protectors
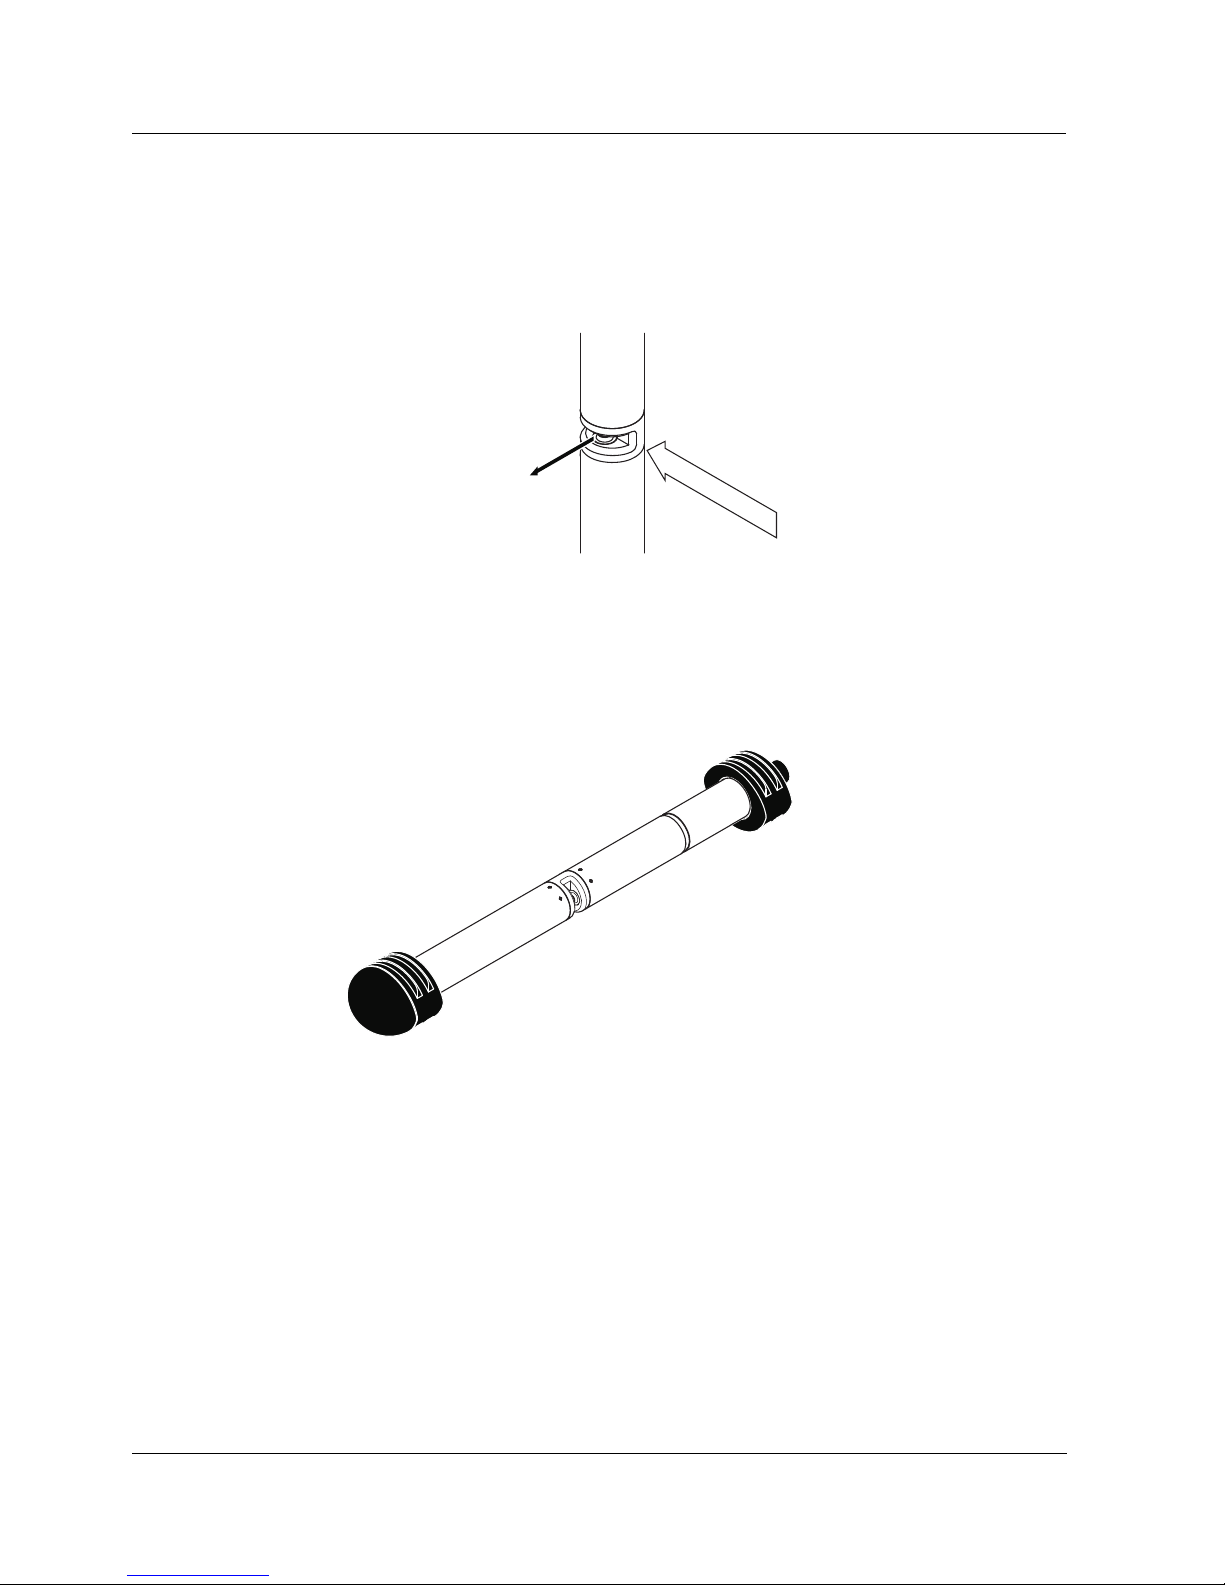
1. Plug the cap (pos. 2 in Fig. 3-4) on one of the two rings (pos.1).
2. Put the assembled unit on the sensor end and fix it with 2 cable
ties (pos. 3) as shown in Fig. 3-4.
3. Put the second ring on the cable end of the sensor and fix it
with the remaining two cable ties in the same way.
1
3
2
Sensor with mounted
shock protectors
Page 14

Commissioning NiCaVis 705 IQ
14
ba75953e03 05/2017
3.3.3 Connecting the sensor to the IQ SENSOR NET
Connection cable A sensor connection cable of the SACIQ or SACIQ SW type is required to
connect the sensor. The cable is available in different lengths. Compared to the
standard model SACIQ, the SACIQ SW sensor connection cable is optimized
regarding its corrosion resistance in seawater and brackish water and adapted
for use in conjunction with the NiCaVis 705 IQ. Information on this and other
IQ S
ENSOR NET accessories is given in the WTW catalog and on the Internet.
Are the plug
connections dry?
Before connecting the sensor and sensor connection cable, please make sure
the plug connections are dry. If moisture gets into the plug connections, first dry
the plug connections (dab them dry or blow them dry using compressed air).
NOTE
Do not suspend the sensor on the sensor connection cable but use the suitable
mounting equipment. Information on this and other IQ S
ENSORNET
accessories
is given in the WTW
catalog and on the Internet.
How to connect the SACIQ (SW) sensor connection cable to the terminal strip of an MIQ module is described in chapter 3 I
NSTALLATION
of the IQ S
ENSOR NET system operating manual.
Page 15
NiCaVis 705 IQ Commissioning
15
ba75953e03 05/2017
Connecting the
sensor to the sensor
connection cable
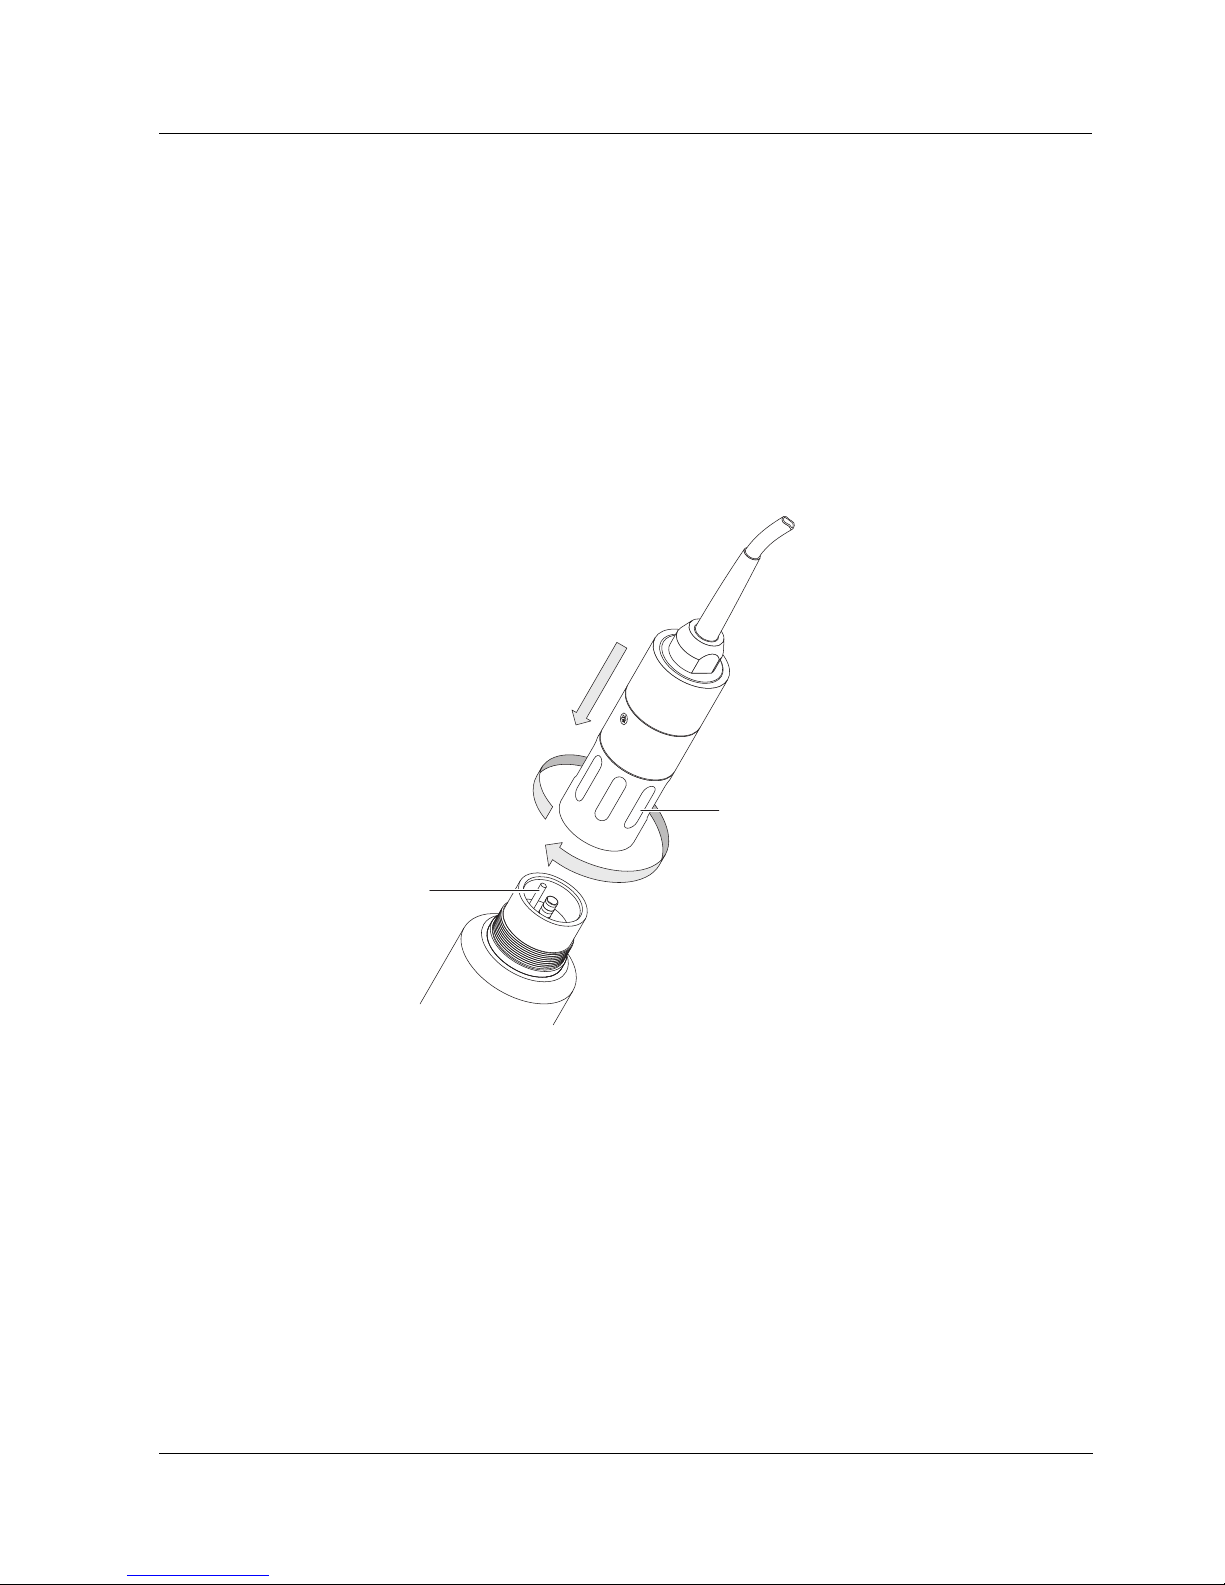
Fig. 3-5 Connect the sensor
1. Take the protective caps off the plug connections of the sensor and the
SACIQ (SW) sensor connection cable and keep them safe.
2. Plug the socket of the SACIQ (SW) sensor connection cable onto the
plug head connector of the sensor. At the same time, rotate the socket
so that the pin in the plug head connector (1) clicks into one of the two
holes in the socket.
3. Then screw the coupling ring (2) of the sensor connection cable onto
the sensor up to the stop.
SACIQ (SW)
1
2
Page 16
Commissioning NiCaVis 705 IQ
16
ba75953e03 05/2017
3.4 Initial commissioning
3.4.1 General information
Measuring location The sensor is prepared for operation in the outlet of the waste water treatment
plant and calibrated in the factory.
The sensor is immediately ready to measure.
Use calibration after
initial ommissioning
On the basis of a reference measurement ("laboratory value"), check whether
the default settings deliver sufficiently accurate measured values or whether you
want to carry out a user calibration (see section 4.3 C
ALIBRATION).
CAUTION
Never look into the measuring window or put objects into the
measuring window during operation! The emitted UV radiation
can damage the eyes!
In the case of authorized use, inadvertent eye contact with the
light beam is not possible.
How to adjust the settings is described in the following section (section 3.4.3).
Page 17

NiCaVis 705 IQ Commissioning
17
ba75953e03 05/2017
3.4.2 Sensor structure
The physical sensor is the sensor with the instrument or model designation,
NiCaVis 705 IQ. The physical sensor processes the measurement signal
(absorbance spectrum) and supplies up to 5 measurement results to the
IQ S
ENSOR NET. The measurement results are administrated like 5 sensors that
differ in hierarchy as follows:
Main sensor The sensor for nitrate measurement is the main sensor.
It registers on the system under the designation, NiCaVis 705 IQ and the series
number of the physical sensor.
Virtual sensors All other sensors for carbon measurement are virtual sensors.
You register on the system under the designation, NiCaVis 705 IQ and the
series number of the physical sensor.
Sensor overlapping
settings and
functions
Some settings and functions are sensor overlapping. Sensor overlapping settings are generally edited in the setting menu of the main sensor.
These are the most important sensor overlapping settings and functions:
Measuring location
Times of the measuring cycle
(
Meas. interval, Cleaning duration Air, Adjustment phase
etc.)
Signal smoothing
Page 18
Commissioning NiCaVis 705 IQ
18
ba75953e03 05/2017
3.4.3 Settings for the main sensor
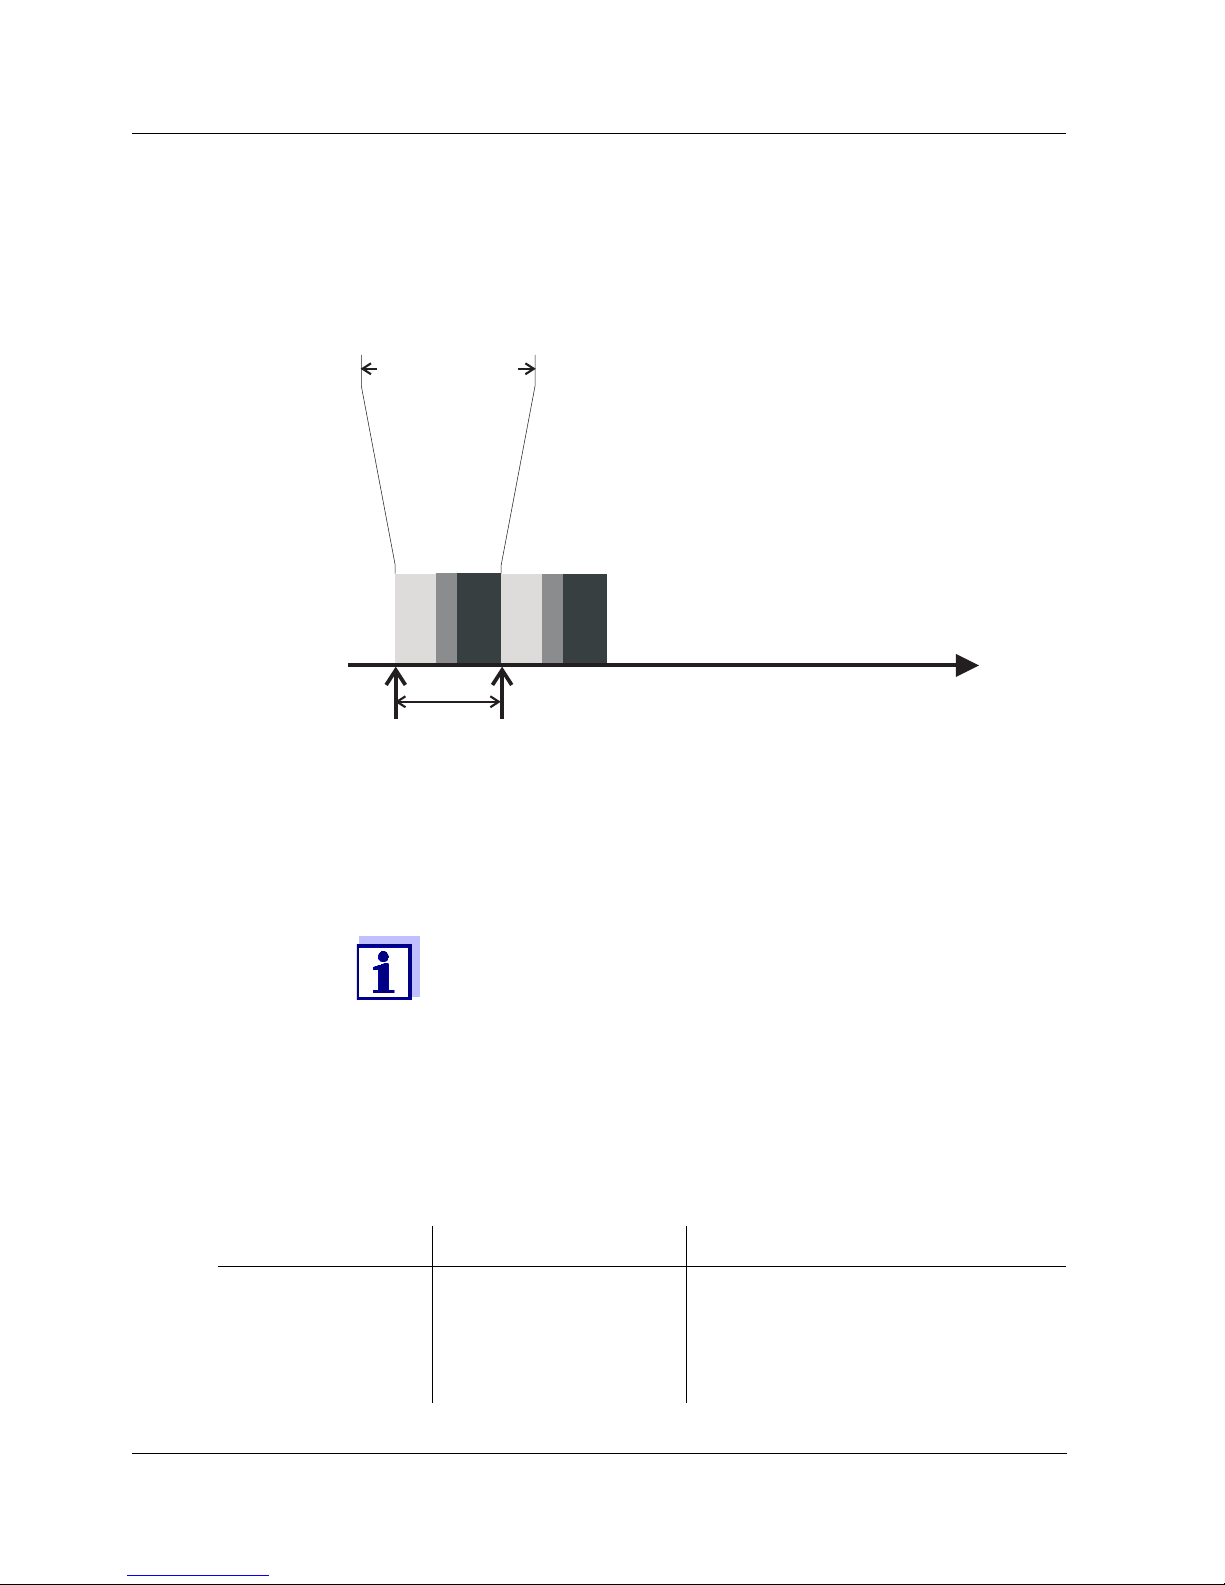
Measuring cycle A measuring cycle consists of the cleaning procedure, the adjustment time for
the measuring system and the determination of the measured value. The following graphic demonstrates the relevant settings:
Fig. 3-6 Measuring cycle of the sensor
Carrying out
settings
Using <S>, switch from the measured value display to the main menu of the
settings. Then navigate to the setting menu (setting table) of the sensor. The
procedure is described in detail in your IQ S
ENSOR NET system operating
manual.
Default values are marked in bold.
Time
Adjustment time
Measurement
Measuring
cycle
Measuring interval
Cleaning
A change of the following settings will take some time (up to a few
minutes) until it can be seen in the measured value display:
Measuring mode
Measuring location
Number of N-sensors
Number of C-sensors
Further changes can only be made when the last changes are visible in the measured value display.
Menu item Settings Explanations
Measuring mode
NO3-N
NO3
The measured parameter is displayed
in the selected citation form.
When changing the
Measuring mode
setting, always check the
Measuring
location
setting.
Page 19

NiCaVis 705 IQ Commissioning
19
ba75953e03 05/2017
Measuring location Outlet
(permanently set)
Measurement location or application of
the sensor.
The possible measurement loca-
tions are displayed depending on the
currently set measuring mode.
The sample matrix on which the cal-
culation of the measured value is
based changes with the location of
the sensor.
Measuring range
- Display of the measuring range
(see chapter 8 T
ECHNICAL DATA).
Cal - # raw value 1
Value pairs of the user calibration (see section 4.3.2).
Note
: Leave those values unchanged during the initial commission-
ing.
Cal - ref. value 1
Cal - # raw value 2
Cal - ref. value 2
Number of C-sensors
1 ... 4 Apart from the main sensor, up to 4
more sensors can be displayed.
The settings for the additional sensors
are done in the menus for the respective sensors.
Zero adjustment Factory
User
Setting of which zero adjustment is
used in the sensor.
Factory zero adjustment or
Zero adjustment carried out last
Signal smoothing
On
Off
Switching on/off the signal smoothing.
For details, see
Response time t90
.
Menu item Settings Explanations
Page 20

Commissioning NiCaVis 705 IQ
20
ba75953e03 05/2017
Response time t90
3 ... 60 min Response time of the signal smoothing.
Depending on the sample matrix, measured values can vary more or less
strongly (e.g. due to foreign bodies or
air bubbles).
The signal filter (here, the
Response
time t90
) reduces the limits of variation
of the measured values.
The
Response time t90
specifies the
time after which 90 % of a signal
change are displayed.
This menu item is only available with:
Signal smoothing
=
On
The specified time is used as a guide
value for low (10 min) to high (60 min)
signal smoothing and can deviate from
the value that was set.
Cleaning mode
On
Off
Switching on/off the automatic, timecontrolled cleaning function.
Cleaning type
Ultrasound
Air
Ultrasound+air
Cleaning methods / adjustment time
This menu item is only available with:
Cleaning mode
=
On
The duration of the cleaning procedure
with a ir is set in the m e nu item
Cleaning
duration Air
.
Cleaning duration Air
0,5 ...10 ... 300 s This menu item is only available with:
Cleaning type
=
Air
and
Cleaning type
=
Ultrasound+air
For this setting to come into effect, the
setting
Settings of outputs and links
/
Relay function
/
Sensor controlled
/
Puls duration /Automatic
has to be
selected for the linked relay.
Please note the software requirements
for the components with relay outputs,
MIQ/CR3, MIQ/R6, MIQ/CHVPlus,
DIQ/S 182, DIQ/S 28X (see section
3.1).
Save and quit
- The system confirms the saving of the
settings and the display switches to the
next higher level.
Menu item Settings Explanations
Page 21

NiCaVis 705 IQ Commissioning
21
ba75953e03 05/2017
3.4.4 Settings for virtual sensors
Carrying out
settings
Using <S>, switch from the measured value display to the main menu of the
settings. Then navigate to the setting menu (setting table) of the sensor. The
procedure is described in detail in your IQ S
ENSOR NET system operating
manual.
Default values are marked in bold.
Quit
- The display switches to the next higher
level without storing the new settings.
Menu item Settings Explanations
Menu item Settings Explanations
Measuring mode
(NitraVis 705 IQ)
NO3-N
NO3
The measured parameter is displayed
in the selected citation form.
Measuring mode
(CarboVis 705 IQ)
COD spectr., total
COD spectr., dissolv
TOC spectr., correl.
BOD spectr., correl.
DOC spectr., correl.
SAC 254, total
SAC 254, dissolved
UVT 254, total
*
UVT 254, dissolved
*
The measured parameter is displayed
in the selected citation form.
Measuring location Outlet
(permanently set)
Measurement location or application of
the sensor.
The setting is done in the setting menu
of the relevant main sensor.
Measuring range
- Display of the measuring range
(see chapter 8 T
ECHNICAL DATA).
Cal - # raw value 1
Value pairs of the user calibration (see section 4.3.2).
Note:
Leave those values unchanged during the initial commission-
ing.
Cal - ref. value 1
Cal - # raw value 2
Cal - ref. value 2
Page 22

Commissioning NiCaVis 705 IQ
22
ba75953e03 05/2017
Main sensor
Information that there are further sensor overlapping settings in the setting
menu of the relevant main sensor
(
Meas. interval, Cleaning duration Air
,
Signal smoothing
etc.).
Save and quit
- The system confirms the saving of the
settings and the display switches to the
next higher level.
Quit
- The display switches to the next higher
level without storing the new settings.
* The UVT-254 value is standardized to 10 mm gap width.
Menu item Settings Explanations
Page 23

NiCaVis 705 IQ Measurement / Operation
23
ba75953e03 05/2017
4 Measurement / Operation
4.1 Determination of measured values
Fig. 4-1 Determination of measured values
During a measurement, the absorbance spectrum of the test sample is recorded
and set against the stored absorbance spectrum of a zero adjustment (measurement in ultrapure water). The algorithm for the calculation depends on the
selected application and/or the measuring location. The resulting raw value can
be adjusted to an independent reference measurement with the aid of a socalled user calibration.
Absorbance spectrum
of zero adjustment
Absorbance spectrum
of measurement
Physical sensor, series number xxx
Main
sensor
software
Virtual
sensor
software
Main sensor meas. mode
(algorithm)
User calibration data
of main sensor
Main sensor raw value
Meas. value of main sensor
Virtual sensor raw value
Meas. value of virtual sensor
Virtual sensor meas. mode
(algorithm)
User calibration data
of virtual sensor
IQ Sensor Net
Page 24

Measurement / Operation NiCaVis 705 IQ
24
ba75953e03 05/2017
4.2 Measurement operation
Measured value
display
Fig. 4-2
Factors affecting the
measured values
The following factors can adversely affect the measurement quality:
The measuring gap is not sufficiently filled and flowed through by the test
sample
Foreign bodies and air bubbles are in the measuring gap
Extraordinary changes (interferences) of the sample matrix
Contaminated measurement windows due to difficult sample matrix
Damaged measuring windows
Lacking quality of the zero adjustment, e. g. due to contaminated ultrapure
water
The user calibration is not representative (or erroneous)
4.3 Calibration
4.3.1 Overview
In the delivery condition, the sensor is precalibrated and ready to measure (see
section 3.4.1).
There are two types of calibration that are included into the calculation of the
CAUTION
Never look into the measuring window or put objects into the
measuring window during operation! The emitted UV radiation
can damage the eyes!
In the case of authorized use, inadvertent eye contact with the
light beam is not possible.
Raw value,
identifiable by #
Measured value
Page 25

NiCaVis 705 IQ Measurement / Operation
25
ba75953e03 05/2017
measured value at different points (see section 4.1):
User calibration (see section 4.3.2)
Sensor check/
Zero adjustment
(see section 4.3.3).
An overview diagram of the calibration procedures can be found on page 4 - 32.
User calibration With a user calibration you compensate for the influence of the test sample. The
user calibration requires a successful
Sensor check (H2O dest.)
and a valid
Zero adjustment
.
We recommend to check the current user calibration against independent
comparison measurements if you suspect a basic change of the characteristics
of the test sample. If the comparison measurements show clear deviations,
these can be compensated by a user calibration.
Recalibration after a
change of the
measuring location
Sensor check (H2O
dest.)
The characteristics of a sensor and thus the measured values provided by it
change in the course of time.
The reasons for this can be the aging of the sensor, or contamination or
mechanical damage of the sensor. Contamination or mechanical damage in the
area of the measuring chamber or on the measurement windows affect the
measured values.
A
Sensor check (H2O dest.)
determines the condition of the sensor. By checking
the sensor with the aid of the
Sensor check (H2O dest.)
you can rapidly see any
changes of the sensor and whether it needs to be cleaned or if any other actions
have to be taken.
A
Sensor check (H2O dest.)
should be carried out twice per year at regular inter-
vals. An extraordinary
Sensor check (H2O dest.)
should be carried out if you
suspect that the sensor has been damaged such as by mechanical shock, or if
the measured values do not seem plausible.
Each time after the application or measurement location was
changed, we recommend to carry out a
Zero adjustment
(and, if the
Sensor check (H2O dest.)
was not successful, also a
Zero adjust
-
ment
with user calibration if necessary) (With a change of the
Measuring location
setting).
The data of the user calibration are stored in the IQ S
ENSOR NET
controller and thus assigned to the measuring location (not to the
sensor). The calibration data of the
Zero adjustment
are stored in
the sensor.
In spectroscopy, even very small contamination that is not visible to
the eye can considerably affect the measured value.
The proper and thorough cleaning of the sensor is the basis for reliable measurement data.
Page 26

Measurement / Operation NiCaVis 705 IQ
26
ba75953e03 05/2017
Zero adjustment
While the
Sensor check (H2O dest.)
just determines the current state of the
sensor, a
Zero adjustment
can be used to compensate for changes of the
sensor. A zero adjustment can be required if, for example, the
Sensor check
(H2O dest.)
is not successful even after the sensor was thoroughly cleaned.
If the
Zero adjustment
is not successful, the sensor is blocked for measurement.
A successful
Zero adjustment
is required for the determination of measured val-
ues.
Sensor check
(standard)
Use the
Sensor check (standard)
to check the sensor with a standard solution
(see chapter 6 S
PARE PARTS, MAINTENANCE EQUIPMENT, ACCESSORIES). During
the check, the recorded spectrum is compared to a reference spectrum of the
standard solution stored in the sensor.
The sensor should always be very thoroughly cleaned prior to a zero
adjustment.
Page 27

NiCaVis 705 IQ Measurement / Operation
27
ba75953e03 05/2017
4.3.2 User calibration
Calibration points
and value pairs
The adjustment is carried out at one or two points within the measuring range.
A value pair is determined at each point. Each value pair consists of the raw
value of the NiCaVis 705 IQ sensor and the corresponding reference value.
Each value pair has to be determined at the same time and place as the test
sample as possible. At the time of the calibration, the test sample should be in
a condition that is typical of the application.
Selection of
calibration points
If the required accuracy is low, the default setting of the first value pair can be
adopted unchanged. The first value pair is equivalent to the zero point in this
case. The second value pair should be close to the working point of the application. This method results in a single-point calibration.
If the application has to cover a wide value range with high measuring accuracy,
both value pairs should be used for calibration. When doing so, the calibration
value pairs should be determined and input at the limits of the application range
as possible.
You obtain samples of different concentrations e. g. by taking two samples
during clearly different conditions of the plant (dry period and rain period).
Storage location of
user calibration data
The calibration data of the user calibration are stored in the IQ S
ENSOR NET
controller. They are loaded into the sensor during operation and automatically
assigned to the replacement sensor if the sensor is exchanged.
The measurement results will be ever more accurate the closer the
composition of the test sample corresponds to the status at the time
of the calibration. If there is a fundamental change of the characteristics of the sample, a new calibration may be necessary.
Page 28

Measurement / Operation NiCaVis 705 IQ
28
ba75953e03 05/2017
Performing a user
calibration
Proceed as follows if you want to perform a user calibration:
1. Bring the sensor into the measuring position.
2. Switch to the measured value display with <M>.
3. Use <> to select the NiCaVis 705 IQ sensor.
4. Call up calibration with <C>. The
Maintenance condition:
Linked outputs are frozen.
window appears.
By activating the maintenance condition, linked outputs remain in
their present state. The cleaning and the determination of measured
values are switched off. The measured value display shows a flashing, invalid measured value ("----").
5. Confirm the maintenance condition with <OK>.
6. Select the menu item,
Single measurement
.
The measurement is started. After measuring, read the raw value (without dimension) and note it down. In the case of fluctuating values, carry
out several measurements and average the individual raw values.
7. Take a sample at the same time as the measurement and as close to
the sensor as possible.
8. Determine the reference value and note it down as a value pair together
with the raw value.
9. For a two-point calibration:
Determine the second value pair (step 6 to step 8).
At least one value pair and a maximum of two value pairs can be
entered for a valid calibration. The values must be in ascending
order. If they are not in ascending order, a calibration error will occur.
10. NiCaVis 705 IQ Switch off the maintenance condition (use <>
to select the sensor, press <OK> and make the setting in the
Anzeige/
Optionen
menu).
11. Switch to the measured value display with <M>. The measured value
stops flashing.
12. Sort the values pairs in ascending order.
13. In the
Settings of sensors and diff. sensors
menu, enter the value pair
or pairs (see the following table).
Page 29

NiCaVis 705 IQ Measurement / Operation
29
ba75953e03 05/2017
Default values are marked in bold.
Calibration
evaluation
The entered calibration data are checked for plausibility by the system. The
check can have the following results:
The entry of calibration values outside the measuring range leads
to a calibration error.
Menu item Settings Explanations
Cal - # raw value 1
CarboVis:
-10000,00 ... 0,00 ... 20000,00
NitraVis
:
-10000,00 ... 0,00 ... 5000,00
Raw value of the first value pair
(lower concentration).
For single-point calibration, enter 0.
Cal - ref. value 1
CarboVis:
0,00 ... 20000,00
NitraVis
:
0,00 ... 5000,00
Reference value of the first value pair
(lower concentration).
For single-point calibration, enter 0.
Cal - # raw value 2
CarboVis:
-10000,00 ... 0,00 ... 20000,00
NitraVis
:
-10000,00 ... 0,00 ... 5000,00
Raw value of the second value pair
(higher concentration) or raw value of the
single-point calibration.
Cal - ref. value 2
CarboVis:
0,00 ... 20000,00
NitraVis
:
0,00 ... 5000,00
Reference value of the second value pair
(higher concentration) or reference value
of the single-point calibration.
Display Meaning/actions
Measured
value display
Successful new valid calibration value pairs were entered for
the sensor.
"----" Calibration value pairs not accepted. Sensor is blocked for
measurement. A log book message is generated.
Causes:
Ascending order not observed.
At least one value is outside the measuring range.
Page 30

Measurement / Operation NiCaVis 705 IQ
30
ba75953e03 05/2017
Information on the contents and structure of the log book and how
you can call it up is given in the L
OG BOOK chapter of the
IQ S
ENSOR NET system operating manual.
The user calibration is not recorded in the calibration history. You
can, however, view the current value pairs in the
Settings of sen
-
sors and diff. sensors
menu at any time.
Page 31

NiCaVis 705 IQ Measurement / Operation
31
ba75953e03 05/2017
4.3.3 Sensor check/
Zero adjustment
NOTE
The sensor check or Zero adjustment must be carried out under absolutely
clean conditions. If you do not work carefully enough the Zero adjustment can
deteriorate the measuring quality.
Ultrapure water
(H2O dist.)
As ultrapure water exclusively use distilled or deionized water that is suitable for
analysis purposes.
Storage location of
the
Zero adjustment
data
The data of the sensor checks are not stored.
The data of the user zero adjustment are stored in the sensor.
Outlet A successful
Sensor check (H2O dest.)
is the prerequisite for a valid user cali-
bration. After each
Sensor check (H2O dest.)
the sensor is evaluated.
A changed sensor evaluation proves that the cleaning was effective.
The steps of the sensor check or
Zero adjustment
are identical except for the
used check solutions (ultrapure water or standard solution) and are described
together below. The sensor check and
Zero adjustment
are carried out with the
aid of the sensor sleeve.
Page 32

Measurement / Operation NiCaVis 705 IQ
32
ba75953e03 05/2017
Flowchart
Fig. 4-3
Overview of
Sensortest/Zero adjustment and user calibration.
After cleaning several times
without significant change of
the sensor assesssment:
Carry out zero adjustment
Main sensor:
Check user calibration
Virtual sensor:
Check user calibration
Sensor OK
Operating error or defective sensor
(Sensor blocked for measurement)
Sensor check
(Standard)
OK Error
-40 ... +40 < -40 or
> +40
Operating error or defective sensor
Zero adjustment
Error
OK
After several zero adjustments:
Reset to:
Factory zero adjustment or
last valid user zero adjustment
After several sensor checks:
Cleaning the sensor
Sensor check
(H2O dist.)
Assessment number
Rinse the measuring chamber
with ultrapure water several times
Clean the measurement windows
Carry out a sensor check (H2O)
TEST: MEASUREMENT WINDOWS
TEST: ELECTRONICS AND OPTICS
Page 33

NiCaVis 705 IQ Measurement / Operation
33
ba75953e03 05/2017
Preparing the
sensor check or
Zero adjustment
Prepare the sensor check or
Zero adjustment
as follows:
1. Switch to the measured value display with <M>.
2. Use <> to select the NiCaVis 705 IQ sensor.
3. Call up calibration with <C>. The
Maintenance condition:
Linked outputs are frozen.
window appears.
By activating the maintenance condition, linked outputs remain in
their present state. The cleaning and the determination of measured
values are switched off. The measured value display shows a flashing, invalid measured value ("----").
4. Confirm the maintenance condition with <OK>.
5. Take the sensor out of the test sample.
6. Remove the blind plug or unscrew the compressed air connection from
the sensor.
7. Thoroughly clean the sensor enclosure, sensor sleeve and the compressed air channels (see section 5.1 M
AINTENANCE).
To finish the cleaning procedure, thoroughly rinse the entire sensor with
ultrapure water.
8. Mount the cleaned sensor sleeve:
Loosen both coupling rings on the sensor sleeve.
Put the sensor sleeve on the sensor and align it:
– The measuring gap is in the center of the sensor sleeve
– The filling opening of the sensor sleeve and the measuring gap
opening of the sensor are offset by 90°.
Tighten both coupling rings on the sensor sleeve by hand.
Page 34

Measurement / Operation NiCaVis 705 IQ
34
ba75953e03 05/2017
Fig. 4-4 Putting the sensor sleeve on the sensor
Carrying out the
sensor check or
Zero adjustment
9. Put the sensor in a horizontal position on a firm and vibration-free surface. Turn the filling opening of the sensor sleeve upward (Fig. 4-4).
10. Rinse the measuring chamber with ultrapure water at least 3 times.
11. For
Sensor check (H2O dest.)
or
Zero adjustment
:
Fill the measuring chamber with ultrapure water.
or
For
Sensor check (standard)
:
Fill the measuring chamber with standard solution (see section 6).
12. If there are any air bubbles on the measuring windows remove them by
gently knocking on the sensor sleeve with a bar.
Carry out the intended sensor check or
Zero adjustment
directly
after filling the sensor sleeve. If you wait longer, the result of the
Sensor check/
Zero adjustment
will be affected.
Measuring
chamber
Sensor
sleeve
13. Select the required option with <> and <OK>:
Sensor check (H2O dest.)
Zero adjustment
Sensor check (standard)
14. Confirm with <OK>.
A multipart checklist appears. Use it to check once more whether all
preparations have been completed.
Page 35

NiCaVis 705 IQ Measurement / Operation
35
ba75953e03 05/2017
Result
after
Sensor
check (H2O dest.)
If the rating number is not in the zero range:
Repeat the cleaning procedure and the
Sensor check (H2O dest.)
until the rating
number no longer changes significantly.
If the rating number is still outside the zero range, a new zero adjustment is necessary.
Result
after
Zero
adjustment
If the result is erroneous, clean the sensor and all equipment once again. Then
carry out a new
Zero adjustment
and when doing so make sure the conditions
are absolutely clean.
15. Confirm each checklist with <OK> until the
Start measurement
display
appears.
Up to this point, you can break off the calibration procedure at any
time with the <ESC> key. The system continues to work with the old
calibration data. The maintenance condition, however, has to be
switched off again in any case.
After starting the calibration with the <OK> key (step 16.) you can no
longer cancel the calibration procedure.
16. Confirm with <OK>.
The measurement is started. After the end of the measurement the
result appears. With the
Zero adjustment
, the result is entered in the
calibration history at the same time.
Rating number Meaning
Zero range
(-40 ... +40)
Sensor check (H2O dest.)
successful (OK)
(0 = no deviation)
Positive number
(+40 ... +1000)
Measured values were too low.
Possible cause:
The measurement windows are contaminated.
Negative number
(-40 ...-1000)
Measured values were too high.
Possible cause:
During the last zero adjustment, the measurement
windows were contaminated more than during the
current sensor check.
Result
Meaning Sensor released for
measurement
OK Zero adjustment
successful. yes
Error Zero adjustment
not success-
ful.
No ("----")
Page 36

Measurement / Operation NiCaVis 705 IQ
36
ba75953e03 05/2017
Result
after
Sensor
check (standard)
Completing the
sensor check or
Zero adjustment
After a successful sensor check or
Zero adjustment
, return to measurement as
follows:
If no valid zero adjustment is possible under the current conditions,
you can restore the readiness for measurement by measuring with
an older valid zero adjustment.
To do so, select the
Zero adjustment
setting in the sensor settings
Factory
(factory zero adjustment) or
User
(last valid user zero
adjustment).
Then check the measurement results with a
Sensor check (stan
-
dard)
. Suitable standards (check equipment) for your sensor are
available as accessories (see chapter 6).
Result
Meaning
OK Sensor check (standard)
successful.
Error Sensor check (standard)
not successful.
Possible cause
: wrong or expired standard
17. Confirm the calibration result with <OK>.
18. Confirm the message,
"After successful cal ..."
with <OK>.
The display returns to the measured value display. The measured val ue
flashes because the sensor is still in the maintenance condition.
19. Pour away the ultrapure water or standard solution and remove the
sensor sleeve.
20. Screw in the blind plug or compressed air connector and install the sensor at the measuring site.
21. After the
Sensor check (standard)
:
Thoroughly rinse the sensor and sensor sleeve with ultrapure water.
22. NiCaVis 705 IQ Switch off the maintenance condition (use <>
to select the sensor, press <OK> and make the setting in the
Display/
Options
menu).
23. Switch to the measured value display with <M>. The measured value
stops flashing.
Store the sensor sleeve in a clean environment, e. g. in a plastic
bag, until the next sensor check or
Zero adjustment
.
Page 37

NiCaVis 705 IQ Maintenance and cleaning
37
ba75953e03 05/2017
5 Maintenance and cleaning
5.1 Maintenance
The UV-VIS- NiCaVis 705 IQ sensor operates maintenance-free.
5.2 Sensor cleaning
5.2.1 Cleaning agents and accessories
Cleaning agents To clean the sensor, use the following cleaning agents only:
* For the final cleaning prior to a
Sensor check
or
Zero adjustment
, only use
cleaning agents with purity grade "for analysis". Finally, thoroughly rinse the
sensor with ultrapure water.
Accessories Sponge
Plastic-bristled brushes of different sizes.
Interdental brushes are suitable for the cleaning of the compressed air channels.
Flocked cleaning cards (see accessories)
Lens tissues
Wash bottle
NOTE
Never use any pressure washer, steam blaster, abrasives or metal brushes to
clean the sensor. Risk of damaging the sensor.
Contamination Cleaning agents
Water-soluble substances – Primary cleaning: Tapwater, warm if
possible
(30 - 50 °C)
– Precision cleaning: Household wash-
ing-up liquid + ultrapure water.
Lime deposits 5 % hydrochloric acid *
Grease deposits Mixture of isopropanol and water (approx.
70 % isopropanol) *
Page 38

Maintenance and cleaning NiCaVis 705 IQ
38
ba75953e03 05/2017
5.2.2 General steps to be taken
Depending on the application site and the level of contamination of the sensor
as well as the coming job, the cleaning procedure includes the following parts:
Every cleaning procedure starts with a basic cleaning. It removes tough
grime such as incrustation of fouling matter, algae and biological deposits. If
the sensor surface might be contaminated with pathogenic germs it should
also be disinfected.
Cleaning the measuring gap: Removal of lime deposits.
Cleaning the measuring gap: Removal of grease deposits.
Example 1 A heavily contaminated sensor, for which a
Sensor check
or
Zero adjustment
should be carried out, must run through all cleaning steps properly. During the
cleaning process always keep all surfaces moist to prevent already dissolved
contamination and detergents from drying ("working wet-on-wet"). Finally, thoroughly rinse off all remaining cleaning agents with ultrapure water.
Example 2 If the sensor from example 1 should be cleaned on site during a routine visual
inspection and should then continue measuring, a basic cleaning might possibly
be sufficient.
The quoted examples and the following descriptions are intended to
give a general guideline. Due to the sensor's wide range of application, the type and level of contamination can considerably vary.
Therefore, the cleaning procedure has to be individually composed.
If necessary, individual cleaning steps have to be changed or
repeated several times until the result meets the requirements.
Page 39

NiCaVis 705 IQ Maintenance and cleaning
39
ba75953e03 05/2017
5.2.3 Basic cleaning
Steps of the basic
cleaning
After completing the cleaning procedure, screw in the blind plug or compressed
air connection.
1. Take the sensor out of the test sample and remove any solid matter
deposits and incrustation of fouling matter manually with a brush or
sponge.
2. Wash the sensor down with warm tapwater (30 - 50 °C).
Note:
Do not use a pressure washer or steam blaster.
3. If the sensor might be contaminated with pathogenic germs it should be
disinfected with a surface disinfectant. This also applies to the cable and
mounting parts.
Note:
Follow the instruction manual of the disinfectant (reaction time!).
4. Remove the blind plug or unscrew the compressed air connection from
the sensor.
5. Clean the sensor with soapy water. When doing so, clean the area of
the measuring gap and the compressed air channels very thoroughly.
The compressed air channels can be cleaned with the aid of interdental
brushes and rinsed with soapy water from a wash bottle.
6. Soak the flocked cleaning cards with soapy water and use them to clean
the measuring gap as shown in the following figure. Cut suitable strips
off the cleaning card to clean the bottom of the measuring gap.
Then rinse the sensor with running warm tapwater and finally with a lot
of ultrapure water.
7. Finally wipe the measurement window with a lens tissue.
Page 40

Maintenance and cleaning NiCaVis 705 IQ
40
ba75953e03 05/2017
5.2.4 Cleaning the measuring gap
To remove lime or grease deposits, use the flocked cleaning cards together with
the following detergents:
Proceeding Start by removing any lime deposits.
Soak a flocked cleaning card with the relevant detergent and use it to clean
the measuring windows according to step 6. in section 5.2.3 B
ASIC CLEANING.
If necessary, leave the cleaning card in the measuring gap for a few minutes
so the detergent can take effect.
Thoroughly rinse with ultrapure water the measuring gap and the surrounding
areas moistened with detergent.
Then wipe the measurement window with a lens tissue. The surface of the
measurement windows must be free of streaks.
Protect the cleaned sensor against new contamination.
Contamination Cleaning agents
Lime deposits Hydrochloric acid 5 % for analysis
Grease deposits Mixture of isopropanol and water (approx. 70 % iso-
propanol), made of 7 volume parts isopropanol for
analysis and 3 volume parts ultrapure water
Page 41

NiCaVis 705 IQ Spare parts, maintenance equipment, accessories
41
ba75953e03 05/2017
6 Spare parts, maintenance equipment,
accessories
General
accessories,
replacement parts
Test equipment
Components for the
optional
compressed air
cleaning system
Description Model Order no.
Calibration sleeve VIS/CV 481 074
20 flocked cleaning cards for cleaning the
measuring gap
VIS/CT 481 071
Cleaning set:
– 20 flocked cleaning cards
– Cleaning solutions
VIS C/SET 481 079
Description Model Order no.
Standard 1
with low concentration
for 5 mm UVVIS/SAC/NOx sensors
ST-1 481 077
Standard 2
with high concentration
for 1 mm UVVIS/SAC/NOx sensors
ST-2 481 078
Description Model Order no.
Compressed air cleaning set with 15 m
compressed-air hose, to be connected to a
valve module or Cleaning Air Box
SET/AP 481 075
Active valve module (does not require a
free relay output in the IQ S
ENSOR NET
system)
MIQ/CHV PLUS 480 018
Valve module for the IQ S
ENSOR NET sys-
tem 182 (external relay and compressed
air supply)
DIQ/CHV 472 007
Air compressor to be triggered by relay,
power supply 115 V AC
Cleaning Air Box
- 115 VAC
480 017
Air compressor to be triggered by relay,
power supply 230 V AC
Cleaning Air Box
- 230 VAC
480 019
Page 42

Spare parts, maintenance equipment, accessories NiCaVis 705 IQ
42
ba75953e03 05/2017
Mounting
accessories
Description Model Order no.
Mounting set for horizontal installation with
EH/F 170 swing mounting assembly
VIS Set/EH 481 073
Set for the mounting of UVVIS/SAC/NOx
sensors to the S 200 electrode floater
VIS Set/F 481 080
Flow-through armature VIS FT-1 480 080
Information on other IQ SENSOR NET accessories is given in the
WTW catalog and on the Internet.
Page 43

NiCaVis 705 IQ What to do if...
43
ba75953e03 05/2017
7 What to do if...
"----" display
(invalid measured
value)
Implausible
measured values
Cause Remedy
– User calibration values entered
incorrectly
– *
Sensor check (H2O dest.)
or
*
Zero adjustment
or
*
Sensor check (standard)
defective
– Correct the entry and enter once
again (section 4.3.2)
– Repeat
*
Sensor check (H2O dest.)
or
*
Zero adjustment
or
*
Sensor check (standard)
.
Check conditions, especially cleanliness (section 4.3.3)
–
Zero adjustment
still erroneous
after several trials
–Contact service
– Unknown – See log book
Cause Remedy
– Erroneous user calibration – Repeat user calibration. Make sure
the samples for comparison are representative.
– Substantial change of test sample
(sample matrix)
– Carry out new user calibration
– Measurement windows dirty – Clean the measurement windows
– Sensor setting wrong – Check and, if necessary, correct the
Measuring mode, Measuring loca
-
tion
sensor settings
– Carry out new user calibration
– Optical system maladjusted, e. g.
due to inadmissible mechanical
shock
– Carry out
*
Sensor check (H2O dest.)
or
*
Zero adjustment
or
*
Sensor check (standard)
Page 44

What to do if... NiCaVis 705 IQ
44
ba75953e03 05/2017
Drifting measured
values
Display of
OFL
Measured values
fluctuating heavily
Measured values
too low or too high
Cause Remedy
– Cleaning efficiency too low - mea-
surement windows becoming
more and more contaminated
– Clean the measurement windows
(section 5.2.4)
– Use other cleaning method
– Select different measurement loca-
tion
– Set longer cleaning duration
– Set more frequent cleaning proce-
dures
– Install optional compressed air
cleaning device
– Failure of the optional com-
pressed air cleaning system
– Clean the measurement windows
(section 5.2.4)
– Check all components of the com-
pressed air cleaning system (compressor, compressed air line,
sensor, rinsing openings)
– Substantial change of test sample
(sample matrix)
– Carry out new user calibration
Cause Remedy
– Measuring range exceeded – Check process
– Foreign matter in the measuring
gap
– Clean the measuring gap (section
5.2.3)
– Erroneous user calibration – Repeat user calibration. Make sure
the samples for comparison are representative.
Cause Remedy
– Gas bubbles in front of the mea-
surement windows
– Check the position within the pro-
cess and the installation position
Cause Remedy
– Gas bubbles in front of the mea-
surement windows
– Check the installation position of the
sensor
Page 45

NiCaVis 705 IQ What to do if...
45
ba75953e03 05/2017
Display of
ERROR
– Measurement windows dirty – Clean the measurement windows
Cause Remedy
Cause Remedy
– Sensor not correctly connected – Check the assignment of the termi-
nal connections
– Load at a power supply module
too high
– Install another power supply module
in the vicinity of the sensor
–IQS
ENSOR NET cable towards the
NiCaVis 705 IQ too long (voltage
drop too great)
– Install another power supply module
in the vicinity of the sensor
– Electrical connection between
power supply module and
NiCaVis 705 IQ is interrupted
– Check the cable connection step-
by-step starting with the power supply module, and replace any defective cable sections.
– Check the contacts on the MIQ
modules (stack mounting). Clean
any dirty contacts. Carefully bend
back contact springs that have been
pressed flat or bent (pay attention to
sufficient spring tension)
Page 46

Technical data NiCaVis 705 IQ
46
ba75953e03 05/2017
8 Technical data
8.1 Measurement characteristics
Measuring principle Spectrophotometric Absorption measurement; integrated microprocessor elec-
tronics, shielded 2-wire connection for power and data transmission.
Light source
Detector
Wavelengths range 200 - 720 nm
Measuring gap
(optical layer
thickness)
Nitrate
measurement,
5 mm gap width
Carbon
measurement,
5 mm gap width
Lamp type Xenon flashlamp
Photo diodes 256
NiCaVis 705 IQ 5 mm
Measuring location Measuring mode Measuring range Resolution
NO3
0.0 ... 250.0 mg/L 0.1 mg/L
NO3-N
0.00 ... 50.00 mg/L 0.01 mg/L
Measuring location Measuring mode Measuring range Resolution
Outlet COD spectr., total
0.0 ... 800.0 mg/L 0.1 mg/L
COD spectr., dissolv
0.0 ... 800.0 mg/L 0.1 mg/L
TOC spectr., correl.
0.0 ... 500.0 mg/L 0.1 mg/L
DOC spectr., correl.
0.0 ... 500.0 mg/L 0.1 mg/L
BOD spectr., correl.
0.0 ... 500.0 mg/L 0.1 mg/L
SAC 254, total
0.0 ... 600.0 1/m 0.1 1/m
SAC 254, dissolved
0.0 ... 600.0 1/m 0.1 1/m
UVT 254, total
*
* The UVT-254 value is standardized to 10 mm gap width.
0.0 ... 100.0 % 0.1 %
UVT 254, dissolved
* 0.0 ... 100.0 % 0.1 %
Page 47

NiCaVis 705 IQ Technical data
47
ba75953e03 05/2017
8.2 Application characteristics
Suitability and areas
of application
Measuring medium
Pressure resistance Sensor with connected SACIQ (SW) sensor connection cable:
The sensor meets all requirements according to article 3(3) of 97/23/EC ("pressure equipment directive").
Type of protection Sensor with connected SACIQ (SW) sensor connection cable:
IP X8, 1 bar (10
5
Pa)
Immersion depth
Operating position Any
The quoted measuring ranges are nominal measuring ranges that
are theoretically possible. In practice, real measuring ranges exist
that are given by the limits of photometric determination. The limits
are significantly influenced by the light scattering due to solids and
the absorption of accompanying substances (sample matrix).
Therefore, no fixed measuring range can be determined beforehand.
Municipal wastewater with a low proportion of industrial wastewater
pH value 4 - 12
Flow rate < 3 m/s
Temperature 0 °C ... + 45 °C
(32 °F ... + 113 °F)
Max. admissible overpressure 105 Pa (1 bar)
min The measuring gap must be
filled with test sample.
max 10 m depth
Page 48

Technical data NiCaVis 705 IQ
48
ba75953e03 05/2017
8.3 General data
Dimensions
(in mm)
Weight
Connection
technique
Connection via SACIQ (SW) sensor connection cable
Materials
Storage
temperature
Ø 96
891
Ø 60
Ø 96
891
120
Socket SACIQ...
With shock protection:
774
865
381
Approx. 3.8 kg (without shock protectors and without sensor connection cable)
Approx. 4.8 kg (with shock protectors but without sensor connection
cable)
Sensor shaft Titan Grade 2
Center piece PEEK
End cap PEEK
Measurement window Sapphire
Plug head connector housing POM
Plug, 3-pole ETFE (blue) Tefzel
®
Protection ring POM
- 10 °C ... + 50 °C (14 ... 122 °F)
Page 49

NiCaVis 705 IQ Technical data
49
ba75953e03 05/2017
Meter safety
Test certificates
8.4 Electrical data
Applicable norms – EN 61010-1
– UL 61010-1
– CAN/CSA C22.2#61010-1
– IEC 62471
cETLus, CE
2001759
Conforms to ANSI/UL 61010-1
Certified to CAN/CSA C22.2#61010-1"
Nominal voltage Max. 24VDC
via the IQ S
ENSOR NET (for more details,
see chapter T
ECHNICAL DATA of the
IQ S
ENSOR NET system operating manual)
Power consumption
8W
(maximum power consumption)
3.5 W
(medium power consumption)
If the system is supplied with power via a
MIQ/WL PS o DIQ/S 28X, only the
medium power consumption has to be
taken into account.
Protective class III
Page 50

Indexes NiCaVis 705 IQ
50
ba75953e03 05/2017
9 Indexes
9.1 Explanation of the messages
This chapter contains a list of all the message codes and related message texts
that can occur in the log book of the IQ S
ENSOR NET system for the
NiCaVis 705 IQ sensor.
Some error messages contain an internal error code, starting with "#".
Information on the contents and structure of the log book and the
structure of the message code is given in the L
OG BOOK chapter of
the IQ S
ENSOR NET system operating manual.
The last three digits of the message code form the component code.
It identifies the component (active component) that caused the message:
Module code Component
3A2 NitraVis 705 IQ
3AW CarboVis 705 IQ - virtual
3AX CarboVis 705 IQ - virtual
3AY CarboVis 705 IQ - virtual
3AZ CarboVis 705 IQ - virtual
541 BasicVis IQ
Page 51

NiCaVis 705 IQ Indexes
51
ba75953e03 05/2017
9.1.1 Error messages
Message code Message text
EA2541
Sensor temperature too high!
* Check process and application
EA3541
Sensor temperature too low!
* Check process and application
EAF541
Optical measuring range exceeded
* Check process (TSS or measured value too high)
* Select measuring location free of air bubbles
* Remove foreign matter from measuring gap
* Clean sensor
* Optimize cleaning settings
* Switch on signal smoothing, increase response time
EAI541
Zero adjustment erroneous
* Clean the sensor and sensor sleeve repeatedly
* Position the sensor sleeve according to operating manual
* Rinse the measuring chamber with ultrapure water several times
* Fill the measuring chamber with ultrapure water
* Repeat the zero adjustment
EAM3Ax
Meas. range exceeded or undercut
* Check process
EC33Ax
User calibration erroneous,
Check raw value / reference value pairs:
* Set all values within the measuring range
(see operating manual)
* Enter value pairs in ascending order
EI1541
Operational voltage too low
* Check installation and cable lengths, Follow installation instructions
* Power supply module(s) overloaded, add power supply module(s)
* Check terminal and module connections
* Defective components, replace components
EI2541
Operational voltage too low, no operation possible
* Check installation and cable lengths, Follow installation instructions
* Power supply module(s) overloaded, add power supply module(s)
* Check terminal and module connections
* Defective components,
replace components
ES2541
Humidity to high in sensor
* Contact service
ES3541
Failure optical measurement: deviation in reference channel too high
* Execute zero ajustment
Page 52

Indexes NiCaVis 705 IQ
52
ba75953e03 05/2017
ES4541
Overflow optical measurement
* Execute zero ajustment
ES5541
Failure optical measurement: hardware
* Contact service
ES6541
Failure optical measurement: software
* Contact service
ES7541
Failure optical measurement: software BIOS
* Contact service
Message code Message text
Page 53

NiCaVis 705 IQ Indexes
53
ba75953e03 05/2017
9.1.2 Informative messages
Message code Message text
IA23Ax
Calculation of negative concentrations
* Perform user calibration or check user calibration
IAC541
Zero adjustment was successfully carried out
* Carry out sensor check
* If required, carry out new user calibration
IC3541
Factory calibration has been activated. Make sure the sensor operates
correctly.
IC4541
The last valid user zero adjustment was activated. Make sure the sen
-
sor operates correctly.
IC5541
Invalid user zero adjustment was replaced by last valid user calibration.
Caution! Wrong measured values possible. Carry out a new successful
zero adjustment to make sure the sensor operates correctly.
IC6541
The invalid user zero adjustment was replaced by the factory zero
adjustment. Caution! Wrong measured values possible. Check
whether the sensor operates correctly or carry out a new successful
user zero adjustment.
Page 54

Indexes NiCaVis 705 IQ
54
ba75953e03 05/2017
9.2 Status info
The status info is a coded piece of information on the current status of a sensor.
Each sensor sends this status info to the controller. The status info of sensors
consists of 32 bits, each of which can have the value 0 or 1.
Status info,
general structure
The bits 0 - 15 are reserved for general information.
The bits 16 - 21 are reserved for internal service information.
You obtain the status info:
via a manual query in the
Einstellungen/Settings/Service/List of all compo
-
nents
menu (see system operating manual)
by an automated query
– from a superordinate process control (e. g. when connected to the Profi-
bus)
– of the IQ Data Server (see operating manual of the IQ S
ENSOR NET soft-
ware pack)
Status-Info
NiCaVis 705 IQ
0 1 2 3 4 5 6 7 8 9 10 11 12 13 14 15
1 0 0 0 0 0 0 0 0 0 0 0 0 0 0 0 (general)
0 0 0 0 0 0 0 0 0 0 0 0 0 0 0 0 (internal)
16 17 18 19 20 21 22 23 24 25 26 27 28 29 30 31
The evaluation of the status info, e.g. in the case of an automated
query, has to be made individually for each bit.
Status bit Explanation
Bit 0
Component hardware defective
Bit 1
Component hardware defective
xxx
Bit 2
Optical measuring range exceeded
Bit 3-31 -
Page 55

NiCaVis 705 IQ Appendix: Glossary
55
ba75953e03 05/2017
10 Appendix: Glossary
Absorbance (Absorption)
Attenuation of the light beam when it penetrates the sample.
Adjusting To manipulate a measuring system so that the relevant value (e.g. the
displayed value) differs as little as possible from the correct value or
a value that is regarded as correct, or that the difference remains
within the tolerance.
BSB, BOD Abbreviation for the "Biochemical Oxygen Demand". The biochemical
oxygen demand of the amount of oxygen required by microorganisms
in order to aerobically decompose organic substances in an aqueous
solution.
Calibration Comparing the value from a measuring system (e. g. the displayed
value) to the correct value or a value that is regarded as correct.
Often, this expression is also used when the measuring system is
adjusted at the same time (see adjusting).
Calibration value pair Value pair consisting of the raw value measured by the
NiCaVis 705 IQ sensor, and a reference value measured e.g. by a
laboratory determination. The calibration value pairs are the result of
the user calibration.
Concentration Mass or amount of a dissolved substance per volume, e. g. in g/L or
mol/L.
CSB, COD Abbreviation for the "Chemical Oxygen Demand". The chemical oxy-
gen demand is the equivalent amount of oxygen that is required for
the complete oxidation of the organic (major part) and anorganic
(minor part) substances in an aqueous solution.
DOC Abbreviation for dissolved organic carbon. Concentration of
dissolved, organically bound carbon in water.
Measured parameter The measured parameter is the physical dimension determined by
measuring, e.g. pH, conductivity or D.O. concentration.
Measured parameter
(correlated)
With the measuring method used, a correlated measured parameter
is not determined directly. A correlated measured parameter can,
however, be derived from a determinable measured parameter. The
precondition for this is that there is a reproducible interrelationship
(correlation) between the determinable and correlated measured
parameter.
Measured value The measured value is the special value of a measured parameter to
be determined. It is given as a combination of the numerical value and
unit (e. g. 3 m; 0.5 s; 5.2 A; 373.15 K).
The measured value is determined from the raw value taking into
account the data from a user calibration. The measured value is
displayed together with the raw value in the measured value display.
Page 56

Appendix: Glossary NiCaVis 705 IQ
56
ba75953e03 05/2017
Measuring gap The measuring gap is between the two measurement windows. In the
measuring gap, the light beam penetrates the test sample.
Measuring system The measuring system comprises all the devices used for measuring,
e. g. measuring instrument and sensor. In addition, there is the cable
and possibly an amplifier, terminal box and armature.
NO2-N The proportion of nitrogen coming from nitrite.
NO3-N The proportion of nitrogen coming from nitrate.
Raw value The raw value is determined from the spectrum while taking into
account the data from the zero adjustment. The raw value is displayed
on the right side of the measured value in the measured value display.
Reference sample Random sample of the test sample for comparative chemical-analyt-
ical laboratory analyses intended for user calibration.
Resolution Smallest difference between two measured values that can be
displayed by a meter.
Sample matrix Composition of the test sample of different individual substances.
Test sample Designation of the test sample ready to be measured.
Ultrapure water (H2O
dist.)
Ultrapure water is distilled or deionized water suitable for analysis
purposes.
Zero adjustment Measuring and saving the absorbance spectrum of ultrapure water.
Defines the zero points in the spectrum for all wavelengths. The light
beam is not alleviated at the zero point. The zero point influences the
calculation of the raw value.
TOC Abbreviation for total organic carbon. Total amount of organically
bound carbon in water.
UVT (dissolved) Transmission measurement after turbidity correction
(reference measurement at 550 nm).
UVT (total) Transmission measurement at a certain wavelength.
The UVT-254 value is standardized to 10 mm gap width.
Page 57

Page 58

What can Xylem do for you?
We're a global team unified in a common purpose: creating innovative solutions to
meet our world's water needs. Developing new technologies that will improve the way
water is used, conserved, and re-used in the future is central to our work. We move,
treat, analyze, and return water to the environment, and we help people use water
efficiently, in their homes, buildings, factories and farms. In more than 150 countries, we
have strong, long-standing relationships with customers who know us for our powerful
combination of leading product brands and applications expertise, backed by a legacy
of innovation.
Xylem Analytics Germany GmbH
Dr.-Karl-Slevogt-Str. 1
82362 Weilheim
Germany
Xylem Analytics Germany
Sales GmbH & Co. KG
WTW
Dr.-Karl-Slevogt-Str. 1
82362 Weilheim
Germany
Tel.:
Fax:
E-Mail
Internet:
+49 881 183-325
+49 881 183-414
wtw.rma@xyleminc.com
www.WTW.com
Service address:
®
For more information on how Xylem can help you, go to xyleminc.com.
 Loading...