


ROOM AIR CONDITIONER
Use and Care Guide
For questions about features, operation/performance, parts, or service, call: 1-800-207-1156. In Canada, for assistance, installation, or service, call: 1-800-207-1156.
Models:
WHHW182AW WHHW242AW
®/™ ©2020 Whirlpool. All rights reserved. Manufactured under license by XLS Products, Pennsylvania. Limited warranty provided by XLS Products. Whirlpool. Tous droits réservés. Fabriqué sous licence par XLS Products, Pennsylvanie. Garantie limitée fournie par XLS Poducts.
Whirlpool. Todos los derechos reservados. Fabricado bajo licencia por XLS Products, Pennsylvania.

INTRODUCTION |
|
IMPORTANT SAFETY INSTRUCTION ............................................................................................. |
1 |
ELECTRICAL REQUIREMENTS........................................................................................................ |
2 |
PACKING LIST ................................................................................................................................... |
3 |
INSTALLATION & ASSEMBLY INSTRUCTIONS ............................................................................. |
4 |
USING YOUR AIR CONDITIONER .................................................................................................... |
13 |
OPERATING YOUR AIR CONDITIONER........................................................................................... |
15 |
CARE AND CLEANING ...................................................................................................................... |
16 |
TROUBLESHOOTING ........................................................................................................................ |
17 |
XLS PRODUCTS WARRANTY FOR WHIRLPOOL® AIR CONDITIONERS....................................... |
19 |
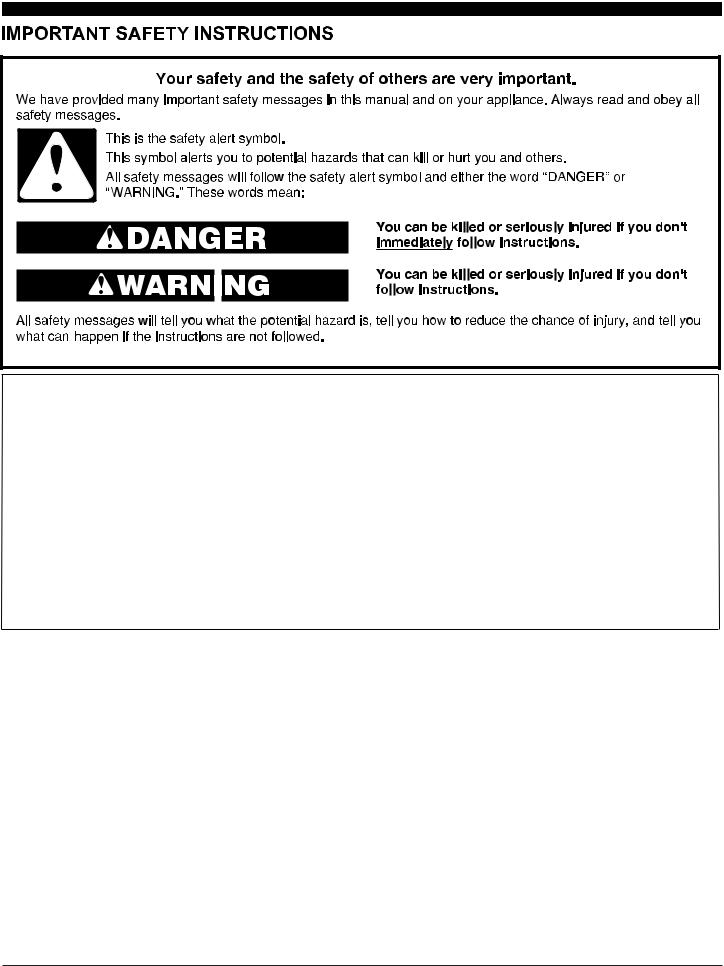
IMPORTANT SAFETY INSTRUCTIONS
WARNING: To reduce the risk of fire, electric shock, or injury when using your air conditioner, follow these basic precautions:
■Plug into a grounded 3 prong outlet.
■Do not remove ground prong.
■Do not use an adapter.
■This appliance is not intended for use by people (including children) whose physical, sensory or mental capacities are different or impaired or who lack the necessary experience or knowledge/expertise to do so, unless such persons are supervised or are trained to operate the appliance by a person who accepts responsibility for their safety.
■Do not use an extension cord.
■Unplug air conditioner before servicing.
■Use two or more people to move and install air conditioner.
■Do not drink water collected in the water bucket.
■Children should be supervised to ensure that they do not play with the appliance.
SAVE THESE INSTRUCTIONS
1

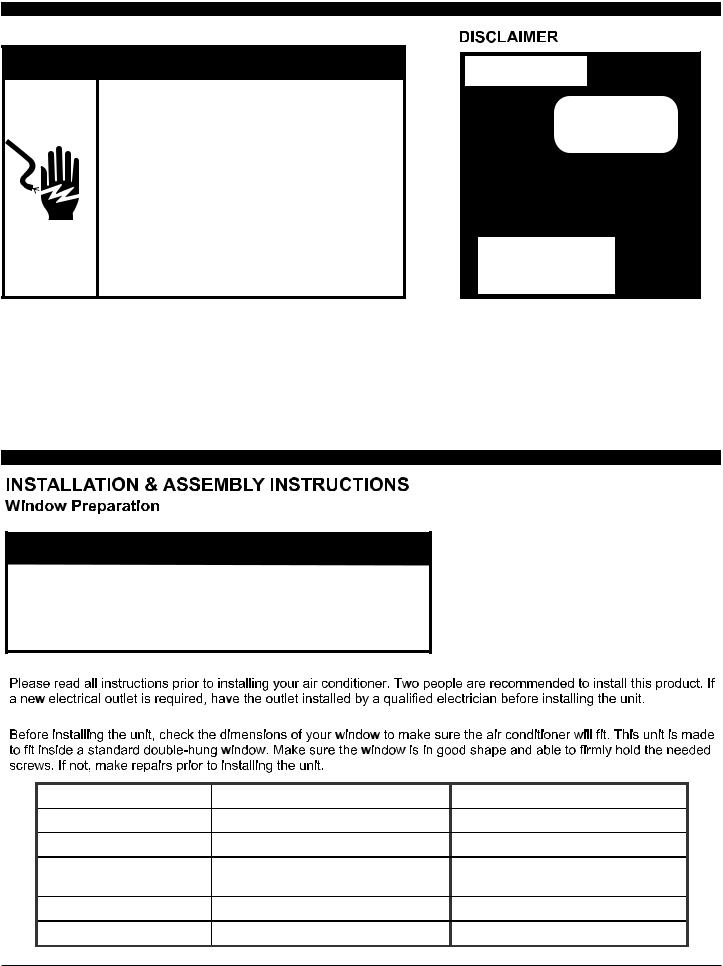
ELECTRICAL REQUIREMENTS—ALL MODELS

 WARNING
Electrical Shock Hazard
Plug into a grounded 3 prong outlet. Do not remove ground prong.
Do not use an adapter.
Do not use an extension cord.
Failure to follow these instructions can result in death, fire, or electrical shock.
NOTE: 


18K/22K/24K
A.Reset button B.Test button
2
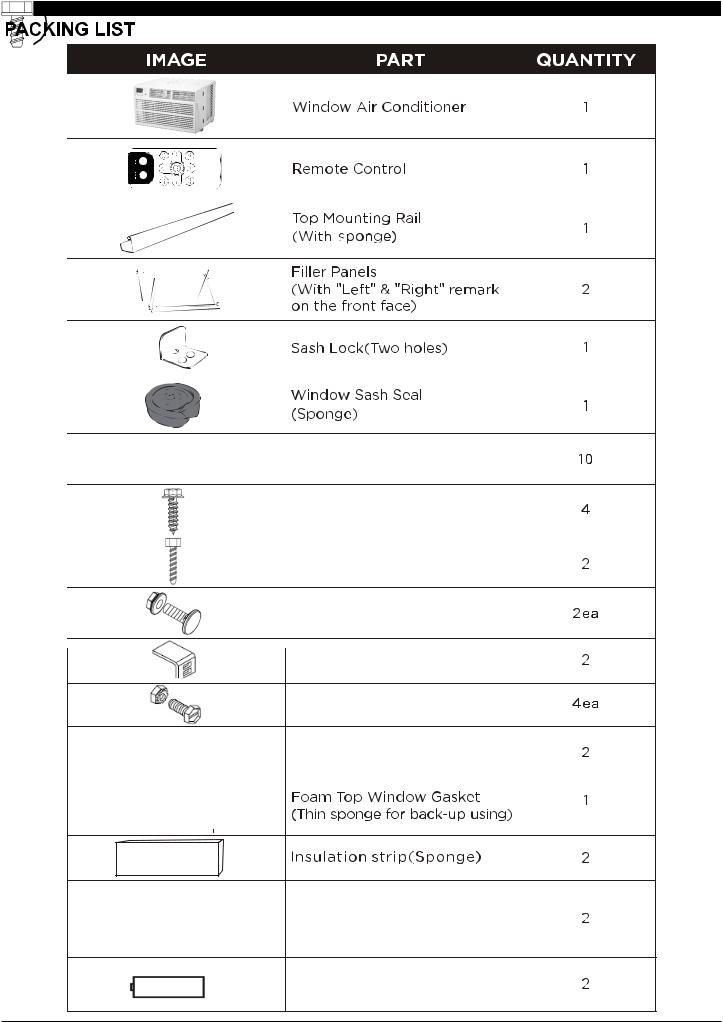
5/16" Long Hex-head Screw
5/8" Long Hex-head Screw
1/2" Long Hex-head Screw
5/8" Long Flat Head Bolt and
Locknut
Sill Angel Bracket
1/2" Long Flat Head Bolt and
Locknut
Gasket
Support Bracket(with R and L remark)
Ba ery(AAA)
3

 WARNING
Electrical Shock Hazard
Plug into a grounded 3 prong outlet. Do not remove ground prong.
Do not use an adapter.
Do not use an extension cord.
Failure to follow these instructions can result in death, fire, or electrical shock.
Grounding type wall receptacle
Do not, under any circumstances, cut, remove, or bypass the grounding prong.
Power supply cord with 3-prong grounding plug and current detection device
ALL INFORMATION AND THE TECHNICAL SPECIFICATIONS PRESENTED IN THIS USER'S MANUAL ARE THE PRESENTATION OF THE MANUFACTURER.
 WARNING
Excessive Weight Hazard
Use two or more people to move and install air conditioner.
Failure to do so can result in back or other injury.
Model |
15K/18K |
22K/24K |
|
Unit Height(inches) |
17.91 |
18.625 |
|
Unit Width(inches) |
23.625 |
26.50 |
|
Min. Window Opening |
19.00 |
19.50 |
|
(See FIG 1)(inches) |
|||
|
|
||
Min. Window Width(inches) |
28.00 |
30.00 |
|
Max Window Width(inches) |
41.00 |
41.00 |
4

STORM WINDOW REQUIREMENTS


 (15K/18K See FIG.1/FIG.2 ; 22K/24K See FIG.3/FIG.4).
FIG.1 |
FIG.2 |
|
|
|
|
|||
|
|
SASH |
|
|
SASH |
|||
|
|
|
|
|
||||
|
|
|
|
|
|
|
||
|
|
|
|
|
|
|
19 MIN |
|
|
|
|
|
|
|
|
||
|
|
|
|
|
|
|
||
|
|
19 MIN |
1/2 MIN |
1/2 MIN |
||||
|
|
|
|
|||||
|
|
|
|
|
|
|
||
1/2 MIN |
|
|
|
|
|
|||
|
|
|
|
Storm Window Frame |
||||
|
|
|
|
|||||
Storm Window Frame or Obstruction |
or Obstruction |
|
|
|||||
|
|
|
|
|
||||
FIG.3 |
FIG.4 |
|
|
|
|
|||
|
|
SASH |
|
|
SASH |
|||
|
|
|
|
|
||||
|
|
|
|
|
|
|
||
|
|
|
|
|
|
|
19 1/2 MIN |
|
|
|
|
|
|
|
|
||
|
|
|
|
|
|
|
||
|
|
19 1/2 MIN |
1/2 MIN |
1/2 MIN |
||||
|
|
|
|
|||||
|
|
|
|
|
|
|
||
1/2 MIN |
|
|
|
|
|
|||
|
|
|
|
Storm Window Frame |
||||
|
|
|
|
|||||
Storm Window Frame or Obstruction |
or Obstruction |
|
|
|||||
5
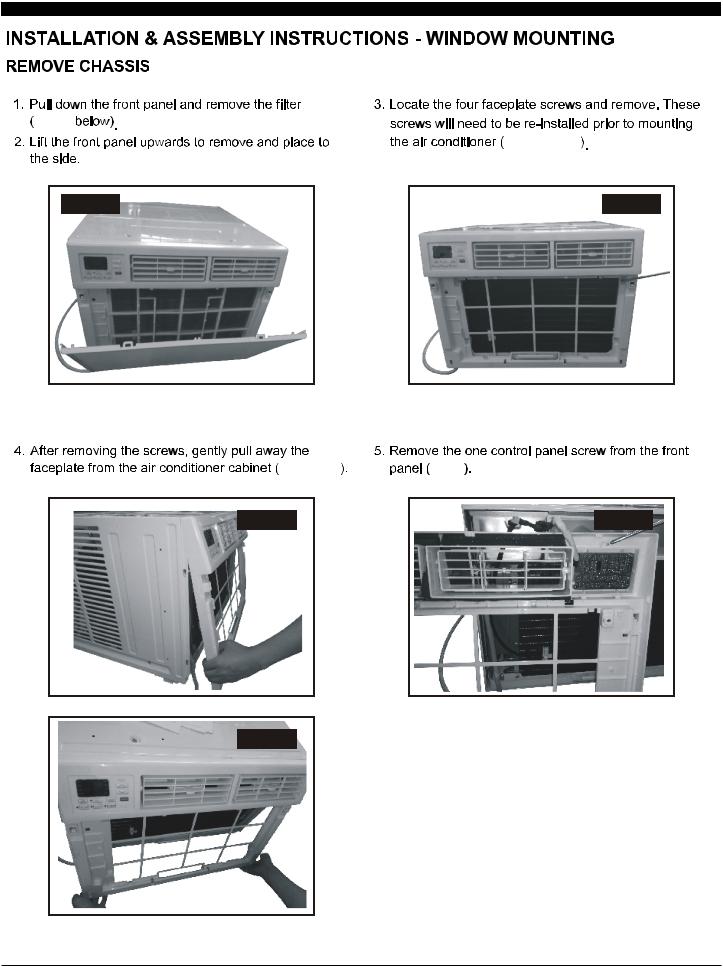
FIG.5
FIG.6 below
FIG.5 |
FIG.6 |
FIG.7 & 8
FIG.7 |
FIG.9 |
FIG.8
6

7

 Suggest to keep a downward tilt.


 FIG.13a


|
|
FIG.13a |
SIDE RETAINER |
|
5/16 |
WINDOW FILLER PANEL |
Long
Hex-head
Screw
SIDE RETAINER
WINDOW FILLER
PANEL


 FIG.13b-
14.
PLASTIC
FRAME |
FIG.13b |
|
SIDE RETAINER 
FIG.a
WINDOW FILLER
5/16" Long PANEL
Hex-head Screw
Foam Gasket and Top
Angle Rail
AIR CONDITIONER
FIG.14 CABINET PLASTIC
FRAME
LOCKING
"I" SECTION SCREW WINDOW HOLE
FILLER
PANEL
FIG.B
NOTE: 

(Suggest to keep a downward tilt, to let accumulated rain water to drain out, from back side of the unit
bottom.)
8
 1/2" Long Flat head
 Bolt and Locknut
5/8" Long Flat Head Bolt 


 5/8"
5/8" 


(It should set on the gasket for 22K/24K)
|
Bottom |
|
|
|
|
Rail Seal |
|
1/2" Long |
|
|
|
|
|
|
|
|
|
|
Flat head Bolt |
|
|
|
|
and Locknut |
|
5/8" Long |
|
||
|
Hex-head Screw |
|
||
|
|
|
Gasket |
|
|
|
|
|
|
|
|
|
|
|
5/8" Long
Hex-head Screw
1/2" Long
Hex-head Screw
9

WINDOW SASH SEAL


 sash lock
 Sash Lock
5/8" Long
Hex-head Screw
Using two people, lift the conditioner 


 gently


IMPORTANT:


FIG.15
10
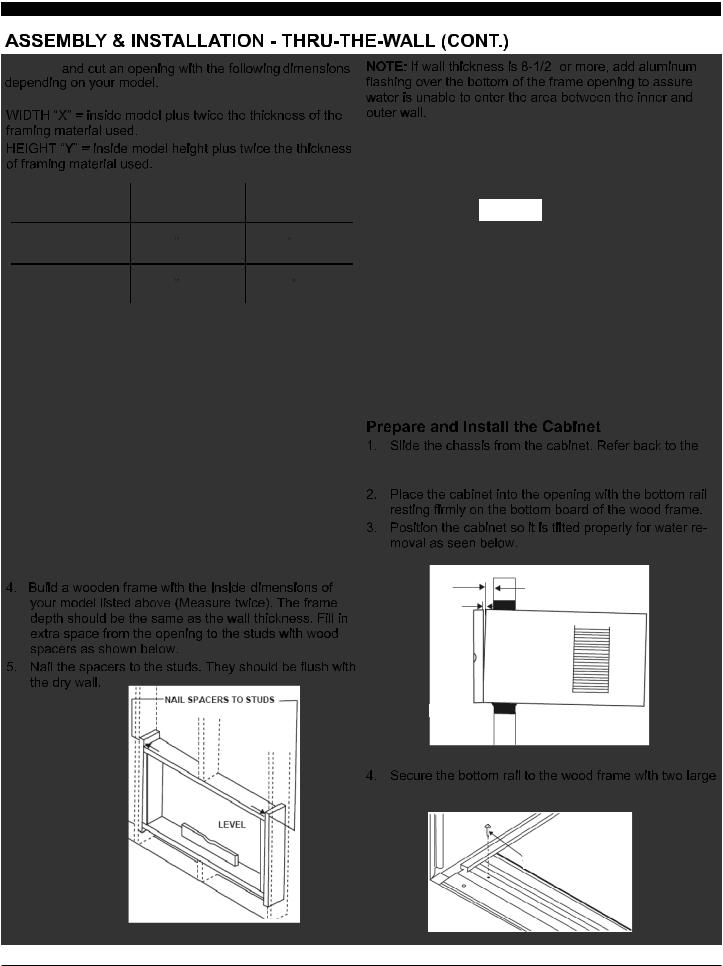
Measure |
" |
Model |
15K/18K |
22K/24K |
||
Inside Franme Height |
18 1/4 |
(46.4 cm) |
19 1/2 |
(49.5 cm) |
Inside Franme Width |
23 7/8 |
(60.6 cm) |
26 9/10 |
(68.3 cm) |
CAULK AS REQUIRED
|
|
|
|
|
|
|
|
|
|
|
ALUMINUM FLASHING |
||
|
|
|
FIG.16 |
OVER BOTTOM OF FRAME |
|
|
|
|
|
|
|
|
|
|
|
|
|
|
|
|
|
|
|
|
|
|
OVER |
|
|
|
|
|
|
8-1/2" |
Inside |
|
|
|
|||
|
|
|
|
|
|
|
Frame |
|
|
|
|
|
|
Height |
|
Inside |
|
|
|
|
|
|
Frame |
|
|
|
|
|
|
Width |
|
|
|
|
remove chassis 


 (Page 6 and 7)
  window mounting section.
3/4" PLUS
TRIM THICKNESS 5/16" SEE PARA 5
TO 3/8"
LEVEL
FIG.17
 "
" 


FIG.18
1" LONG WOOD SCREW
11


 support bracket assembly

 window mounting


 thru-the-wall


 "
"
FIG.19 


 thru-the-wall


 support bracket installation


 thru-the-wall


FIG.20
12
NOTE:
For Cooling model |
1 |
|
|
2
AUTO |
|
|
AUTO |
|||
SPEED |
|
|
MODE |
|||
|
|
|
|
|
|
|
|
|
|
|
|
|
|
3
9 8 7 6 5 4
For Heating model |
1 |
|
|
2
AUTO |
|
|
AUTO |
|||
SPEED |
|
|
MODE |
|||
|
|
|
HEAT |
|||
|
|
|
|
|
|
|
3
9 8 7 6 5 4
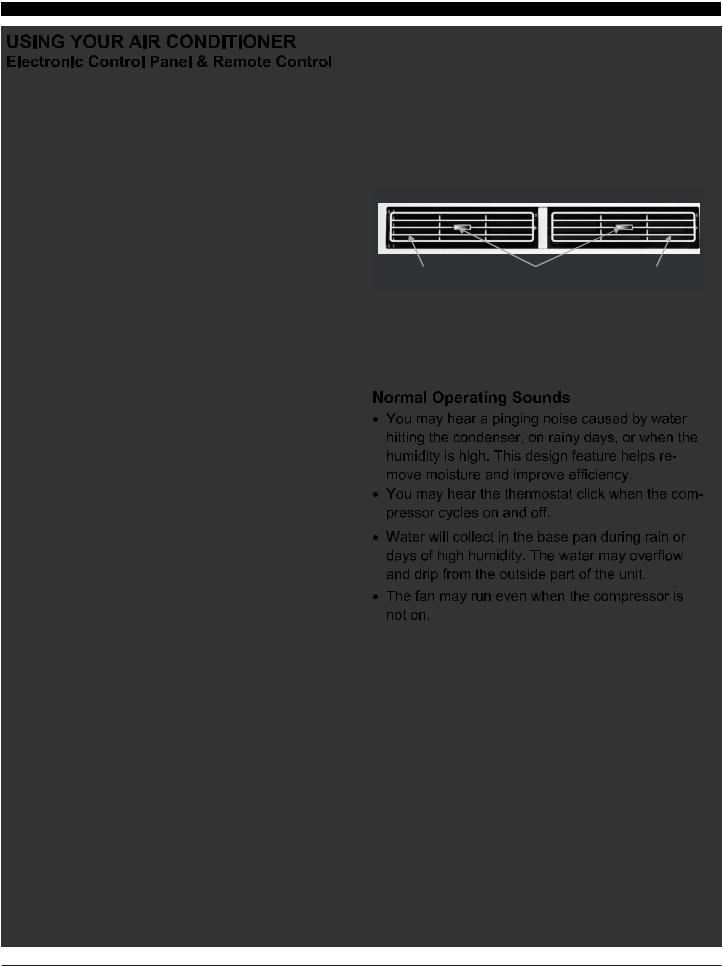
Normal Operating Sounds
•You may hear a pinging noise caused by water hitting the condenser, on rainy days, or when the humidity is high. This design features helps remove moisture and improve efficiency.
•You may hear the thermostat click when the compressor cycles on and off.
•Water will collect in the base pan during rain or days of high humidity. The water may overflow and drip of the outside part off the unit.
•The fan may run even when the compressor is not on
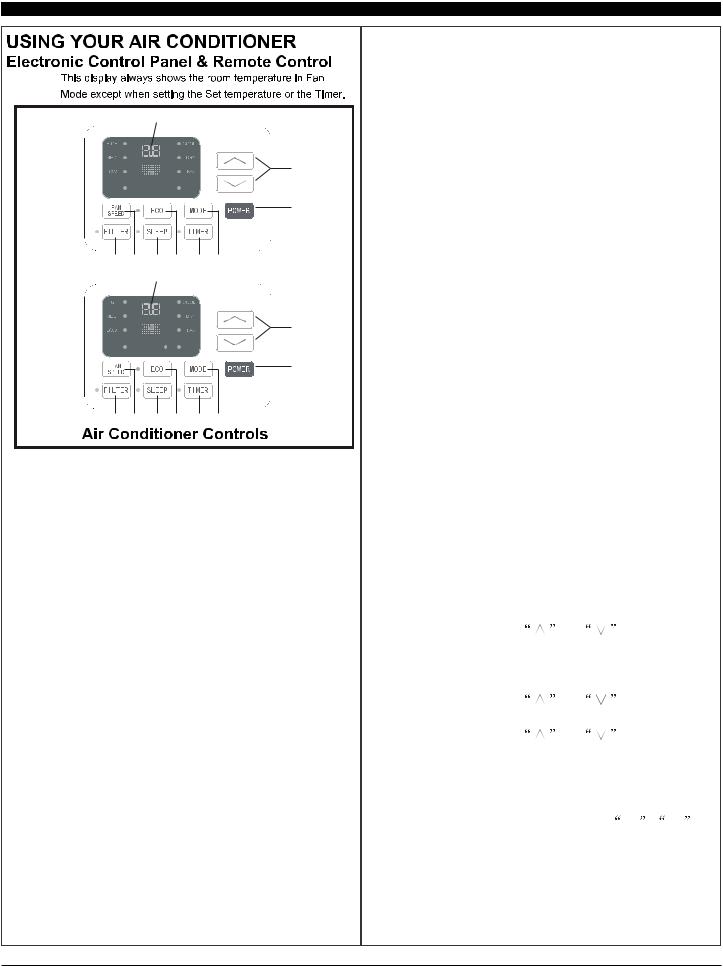
1.Digital Display: Without timer setting, the operation mode is Cooling, Dry, Fan, Heat and Auto, and the set temperature will be displayed. Time will be displayed under timer setting.
2. and
and  Button: Use these buttons on the control panel and remote to increase or decrease
the Set Temperature or Timer.
Temperature range: 61 ~88
~88 or 16
or 16 ~31
~31 .
.
3.Power Button: Turn the air conditioner on and off.
4.Mode Button: Press the mode button to cycle through the various modes: Cool, Dry, Fan and Auto, or Heat.
Cool Mode: The cooling function allows the air conditioner to cool the room and at the same time reduces Air humidify. Press the MODE button to activate the cooling function. To optimize the function of the air conditioner, adjust the temperature and the speed by pressing the button indicated.
Dry Mode: This function reduces the humidity of the air to make the room more comfortable. Press MODE button to set the DRY mode. An automatic function of alternating cooling cycles and air fan is activated.
Fan Mode: The conditioner works in only ventilation. Press MODE button to set the FAN mode. With pressing FAN SPEED button the speed changes in the following sequence: Hi, Med and Lo in FAN mode. The remote control also stores the speed that was set in the previous mode of operation.
Auto Mode: In AUTO mode the unit automatically chooses the fan speed and the mode of operation (COOL, DRY, Heat or FAN).In this mode the fan speed and the temperature are set automatically according to the room temperature (tested by the temperature sensor which is incorporated in the indoor unit.).
Heat Mode: The heating function allows the air conditioner to heat the room. Press the MODE button to activate the cooling function. To optimize the function of the air conditioner, adjust the temperature and the speed by pressing the button indicated.
5.Timer Button: Use these buttons on the control panel and remote to set the Timer.
Timer Off: The timed stop is programmed by pressing TIMER button. Set the rest time by
pressing the button |
or |
until the |
desired rest time is displayed. |
|
|
Timer On: When the unit is off, press TIMER button at the first time, set the temperature with
pressing the button |
or |
. Press TIMER |
button at the second time, set the rest time with |
||
pressing the button |
or |
. Press TIMER |
button at the third time, confirm the setting, then the rest time to next automatical switching-on
could be read on the display of the machine.
N27(: It can be set to automatically turn off or on in 0.5-24 hours. Each press of the 
 buttons will increase or decrease the timer. The
Timer can be set in 0.5 hour increments below 10 hours, and 1 hour increments above 10 hours.
The SET light will turn on while setting.
To cancel the set function, press the TIMER button again.
13
6.Eco Button: When the unit is in ECO mode, the light will turn on. In ECO mode, the unit will turn-off once the room is cooled to the user set temperature. The unit will turn back on when the room temperature rises above the user set temperature.
Before the compressor stars, the fan motor will run for a while, then it will stop for a while-and will repeat to provide a much more comfortablefeeling and save energy.
7.Sleep Button:: Press the SLEEP button, the Sleep Light will be on, and all the left lights will be off after a while. In SLEEP mode, the airconditioner will automatically adjust the temperature and fan speed to make the room more comfortable during the night. For cooling mode, the set temperature will automatically raise every 30-60 minutes and at most change six times until the set temperature is 81or 82°F. For heating mode, the set temperature will automatically decrease every 30-60 minutes and at most change six times until the set temperature is 75 or 76°F. And every running time depends on the set temperature.
8. Fan Speed Button: Press the FAN SPEED button to choose the fan speed options. You can choose Hi, Med, Lo or auto speed in COOL or Heat mode and choose Hi, Med, Lo in FAN mode.
9.Filter Button: When the fan motor has worked for 500 total hours, the Filter Check light will turn on to remind the user to clean the filter. The light can then be turned off by pressing the Filter Check button.
10. Directional Louvers: To direct airflow, use the horizontal wheel to control the horizontal direction, and the air deflector to control the vertical direction.
air deflector |
horizontal wheel air deflector |
14

1 |
|
2 |
|
3 |
|
7 |
|
|
|||
4 |
|
||
5 |
|
8 |
|
6 |
|
9 |
|
|
10 |
||
3 |
|
|
|
|
|
||
|
|
|
|
|
|
|
|
HEAT |
|
||
*For mark 6 button, it is AUTO MODE for cooling only, and it is HEAT for heating model.
1.Power: Turn the air conditioner on and off.
2.Cool: Press the COOL button to COOL mode.
3. and
and  : Use these buttons on the control panel and remote to increase or decrease the
Set Temperature or Timer. Temperature range: 61 ~88
~88 or 16
or 16 ~31
~31 .
.
4.Sleep: Press the SLEEP button, all
of the display lights will turn off after a while, but the Sleep light is always on. In SLEEP mode, the air conditioner will automatically adjust the temperature and fan speed to make the room more comfortable during the night. The set temperature will automatically raise every 30-60
minutes, and at most change sixtimes until the set temperature is 81 or 82 .
.


 NOTE:
NOTE: 


5.Timer: Use these buttons on the control panel and remote to set the Timer.
Timer Off: The timed stop is programmed by pressing TIMER button. Set the rest time by
pressing the button

 or
or 

 until the rest time displayed is to your demand then press TIMER button again.
Timer On: When the unit is off, press TIMER button at the first time, set the temperature with
pressing the button

 or
or 

 . Press TIMER button at the second time, set the rest time with
pressing the button

 or
or 

 . Press TIMER button at the third time, confirm the setting, then
the rest time to next automatical switching-on could be read on the display of the machine. NOTE: It can be set to automatically turn off or on in 0.5-24 hours. Each press of the 


 buttons will increase or decrease the timer. The Timer can be set in 0.5 hours increment below 10 hours and 1 hour increment for 10 hours or above. The SET light will turn on while setting. To cancel the setted function, press the TIMER button again.
6. a.Auto Mode: In AUTO mode the unit automatically
chooses the fan speed and the mode of operation
(COOL,DRY or FAN). In this mode the temperature
is set automatically according to the room
temperature (tested by the temperature sensor
which is incorporated in the indoor unit.).
It is for cooling only model.
b.HEAT: Press the HEAT button to HEAT mode.
It is for heating model.
7.Fan Speed: Press the FAN SPEED button to choose the fan speed options. You can choose
Hi, Med, Lo or auto speed in COOL mode and choose Hi, Med, Low in FAN mode.
8.Display: To press the DISPLAY button, it can switch off/on all lights or LED display.
9.Eco: When the unit is in ECO mode, the light will turn on. In ECO mode, the unit will turn-off once the room is cooled to the user set temperature.
The unit will turn back on when the room temperature rises above the user set temperature. Before the compressor stars, the fan motor will run for a while, then it will stop for a while-and will repeat to provide a much more comfortable-feeling and save energy.
10.Fan Only: Press the Fan Only button to FAN ONLY mode.
15
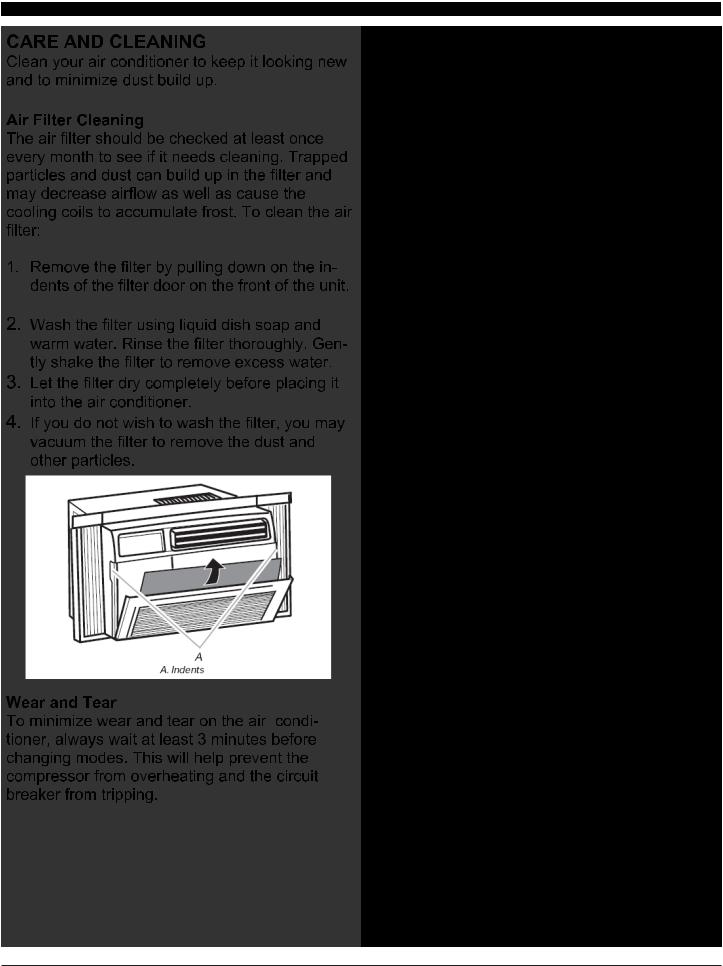
Cabinet Cleaning
 WARNING
Electrical Shock Hazard
Disconnect Power Before Cleaning.
Replace all parts and panels before operating. Failure to do so can result in death or electrical shock.

 FIG.21
FIG.21
16


 WARNING
Electrical Shock Hazard
Plug into a grounded 3 prong outlet. Do not remove ground prong.
Do not use an adapter.
Do not use an extension cord.
Failure to follow these instructions can result in death, fire, or electrical shock.
17

ASSISTANCE OR SERVICE
Before calling for assistance or service, please check the "Troubleshooting" section. It may save you the cost of a service call. If you still need help, follow the instructions below.
When calling, please know the purchase date and the complete model and serial numbers of the appliance. This information will help us to better respond to the request.
In the USA
Call XLS Products Customer Service toll free:
1-800-207-1156.
Our consultants provide assistance with:
■■Features and specifications on our full line of appliances.
■■Installation information.
■■Use and maintenance procedures.
For further assistance:
If you need further assistance, you can write to XLS Products with any questions or concerns at:
XLS Products, Inc.
Customer Service P.O. Box 16262
Philadelphia, PA 19114-0262
■■ Accessory and repair parts. |
Please include a daytime phone number in your correspondence. |
|
■■Specialized customer assistance.
■■Referrals to local dealers, repair parts distributors, and service companies. XLS Products-designated service technicians
are trained to fulfill the product warranty and provide afterwarranty service, anywhere in the United States.
In Canada
Call XLS Products Customer Service toll free:
1-800-207-1156.
Our consultants provide assistance with:
■■Features and specifications on our full line of appliances.
■■Use and maintenance procedures.
■■Accessory and repair parts.
■■Referrals to local dealers, repair parts distributors, and service companies. XLS Products-designated service technicians
are trained to fulfill the product warranty and provide afterwarranty service, anywhere in Canada.
For further assistance:
If you need further assistance, you can write to XLS Products with any questions or concerns at:
XLS Products, Inc.
Customer Service P.O. Box 16262
Philadelphia, PA 19114-0262
Please include a daytime phone number in your correspondence.
18
 Loading...