

Page 1

User Guide
IP VIDEO PHONE
Video Phone User Guide
1
Page 2

Video Phone User Guide
Contents
Chapter 1: Introduction 1
Welcome 1
The Concept of VoIP 2
What is SIP 3
Chapter 2: Installing 4
Package Contents 4
Assembling the Phone 5
Connecting to the Network 6
Power on the Phone 7
Chapter 3: Using the Phone 8
Knowing Your IP Video Phone 8
Keys/Buttons Layout 9
Making Telephone Calls 10
Receiving a Call 11
Muting a Call 11
Ending a Call 11
Chapter 4: Setting Up the Phone 12
Phonebook 13
Call Records 17
System Settings 19
SIP Services 26
Call Services 28
Appendix A: Regulatory Information 31
1
Page 3

Chapter 1 : Introduction
Welcome
Thank you for choosing the IP Video Phone. This product provides many extraordinary features:
z Streaming Video and Voice over IP networks (VoIP).
z Support SIP (Session Initiation Protocol) telephony services.
z Friendly graphical user interface with four interactive soft buttons provide most easy-to-use operations.
z Integrated 5 inches LCD panel and camera provide outstanding video quality.
z Ergonomically adjustable camera and screen
position.
z Multi-function keypad for telephony operations and
configurations.
z Handset and speaker-phone modes.
Video Phone User Guide
z Web User Inter face for online con figuration from w eb
browser on your computer
Please read this user guide carefully before taking any
installation action. Please contact your dealers or system
integrators if you have questions.
1
Page 4

The Concept of VoIP
The initial of Voice/Video over Internet Protocol, is the advanced technologies
that provide digital voice/video conversations over the Internet or through any
other IP-based network.
Few significant benefits of VoIP are:
z Cost saving. By utilizing a single network to carry voice/video and data
where
z users have existing network capacity that can carry VoIP at no extra
cost.
z Able to transmit multiple telephone calls down the existing IP network. It
makes
z VoIP a simple way to add an extra services to home or office.
Video Phone User Guide
z Receiving incoming calls anywhere you are connected to IP network or
Internet. User can work from anywhere with a sufficiently fast and stable
Internet connection.
The diagram on right side provides an example of a VoIP network structure.
Figure 1 : VoIP Network Structures
2
Page 5

What is SIP
SIP is the initial of Session-Initiation-Protocol; it is an applica t ion-layer control
(signaling) protocol for creating, modifying, and terminating sessions with one
or more participants. These sessions include Internet telephone calls,
multimedia distribution, and multimedia conferences. Simply say, SIP is a most
commonly used protocol that used to interconnect SIP Enabled PBXes and/or
SIP User Agents to each other to establish voice and video sessions between
each other over an IP Network.
This IP Video Phone implemented with advanced SIP technologies that is able
to provide outstanding voice and video quality over the IP network.
The diagram on right side provides an example of a SIP infrastructures.
Video Phone User Guide
Figure 2 : SIP Infrastructures
3
Page 6
Chapter 2 : Installing
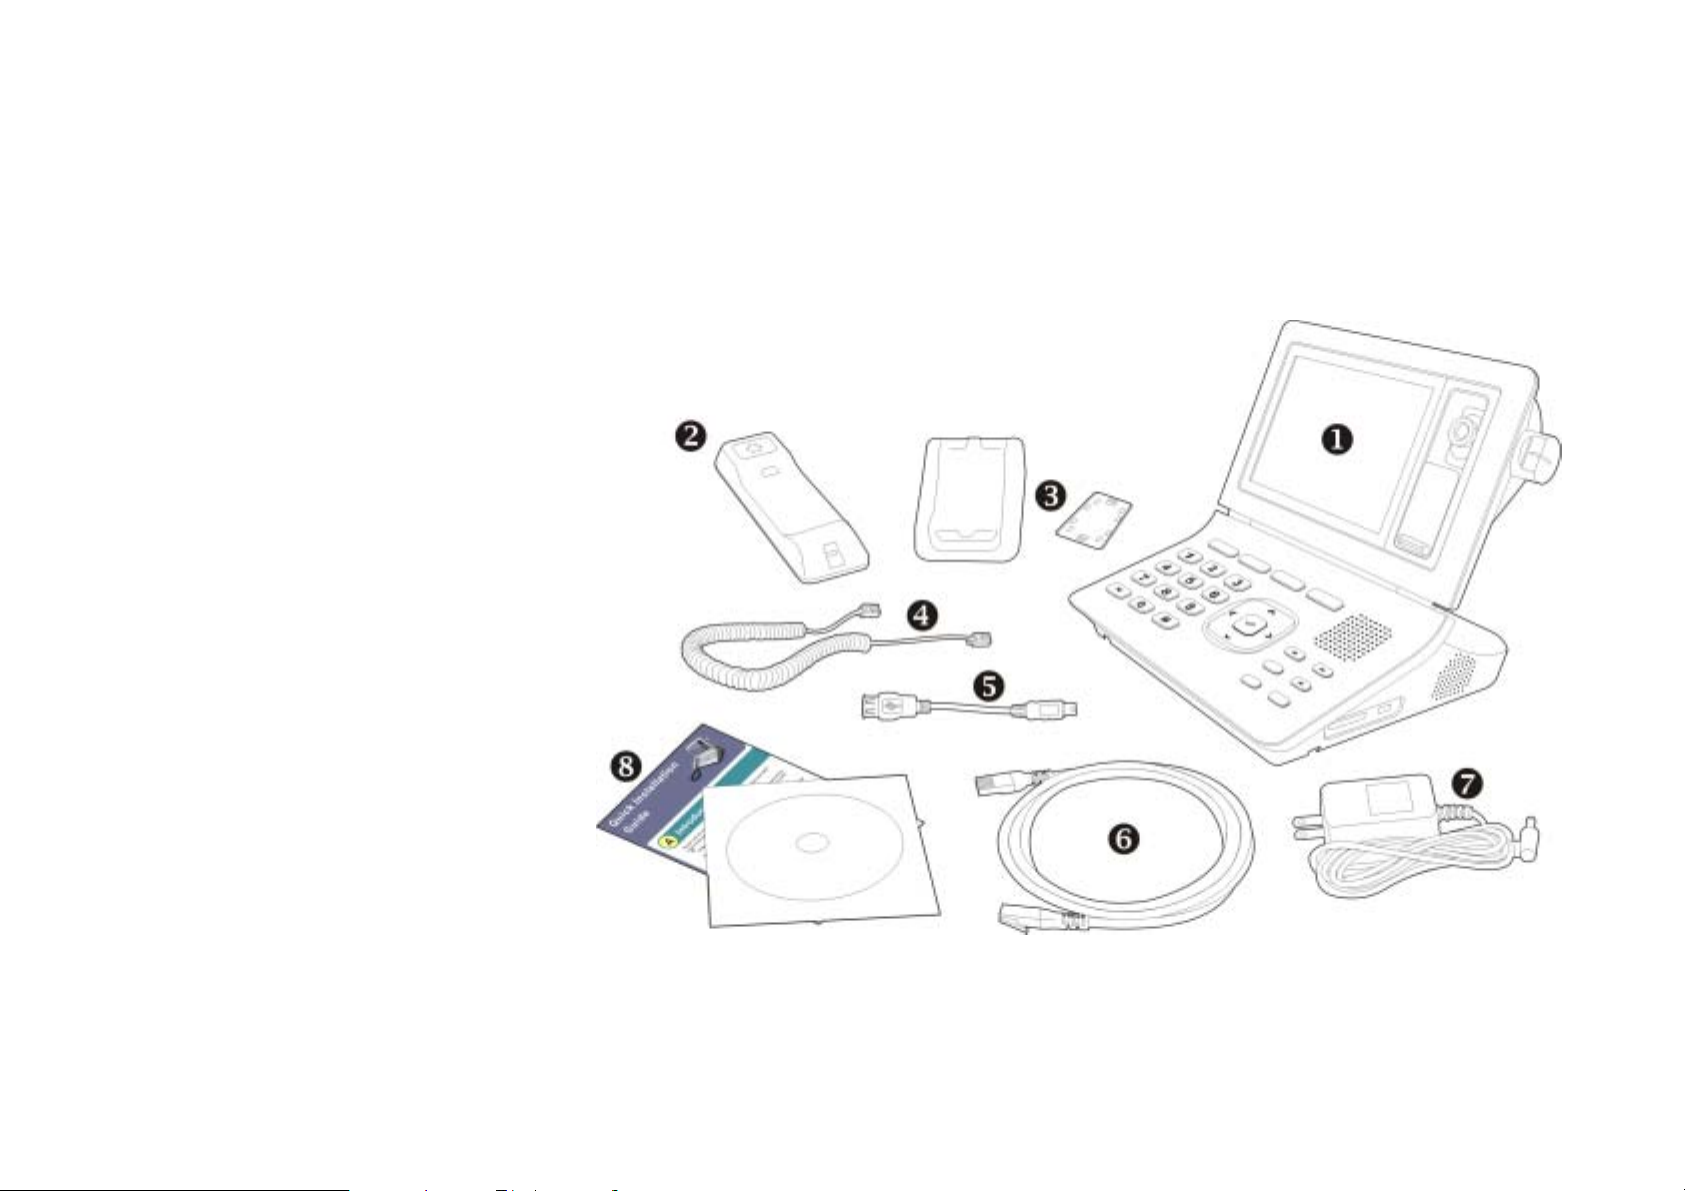
Package Contents
The following items are included in your
IP Video Phone package. Check this list
before installation to ensure that you
have received all items.
n Phone Base Unit
o Handset
p Handset Cradle and Fixing Plate
q Handset Cord
r USB Cable
Video Phone User Guide
s Ethernet Cable
t Power Adapter
u Quick-Installation-Guide and CD
Please contact your dealer immediately
in case you are missing items.
4
Figure 3 : Package Contents
Page 7

Assembling the Phone
z Locate the longer strai ghtened end o f the han dset cord , and plug
this end into the back of the phone base unit.
z Plug in short straightened end of the handset cord into the jack
at the bottom of the handset. Please refer to Figure 3.
Video Phone User Guide
Figure 4 : Assembling the Handset
z You may fix the Handset Cradle with Phone Unit by using the
bundled Fixing Plate. Please follow this procedure. Please refer
to Figure 4.
5
Figure 5 : Mounting the Fixing Plate
Page 8

Connecting to the Network
Please identify which IP Video Phone model you have before
installation. Standard model comes with only Power and LAN
connectors on the back panel. Advanced model comes with
extra WAN and four video/ audio ports. Please follow these
steps to connect your IP Video phone:
z To connect to Ethernet network, plug in one end of Ethernet
cable into LAN port of the phone base unit, and then plug in
the other end to a Ethernet switch or Hub.
z Plug audio and video cables to proper ports to connect to
external A/V devices such as:
Video Outpu – TV, VCR, etc.
Audio Output – peakers, Audio Recorder, etc.
Audio Input – Microphone, CD Player, etc.
Video Phone User Guide
Video Input – Camcorder, CCTV Camera,
DVD Player, etc.
(For advanced model)
z Connect the power cord of the power adapter at last. After you have
Figure 6 : Cabling Diagram
made the correct connections, then plug in the AC power adapter to an
electrical outlet. Use only the adapter that came with the phone.
6
Page 9
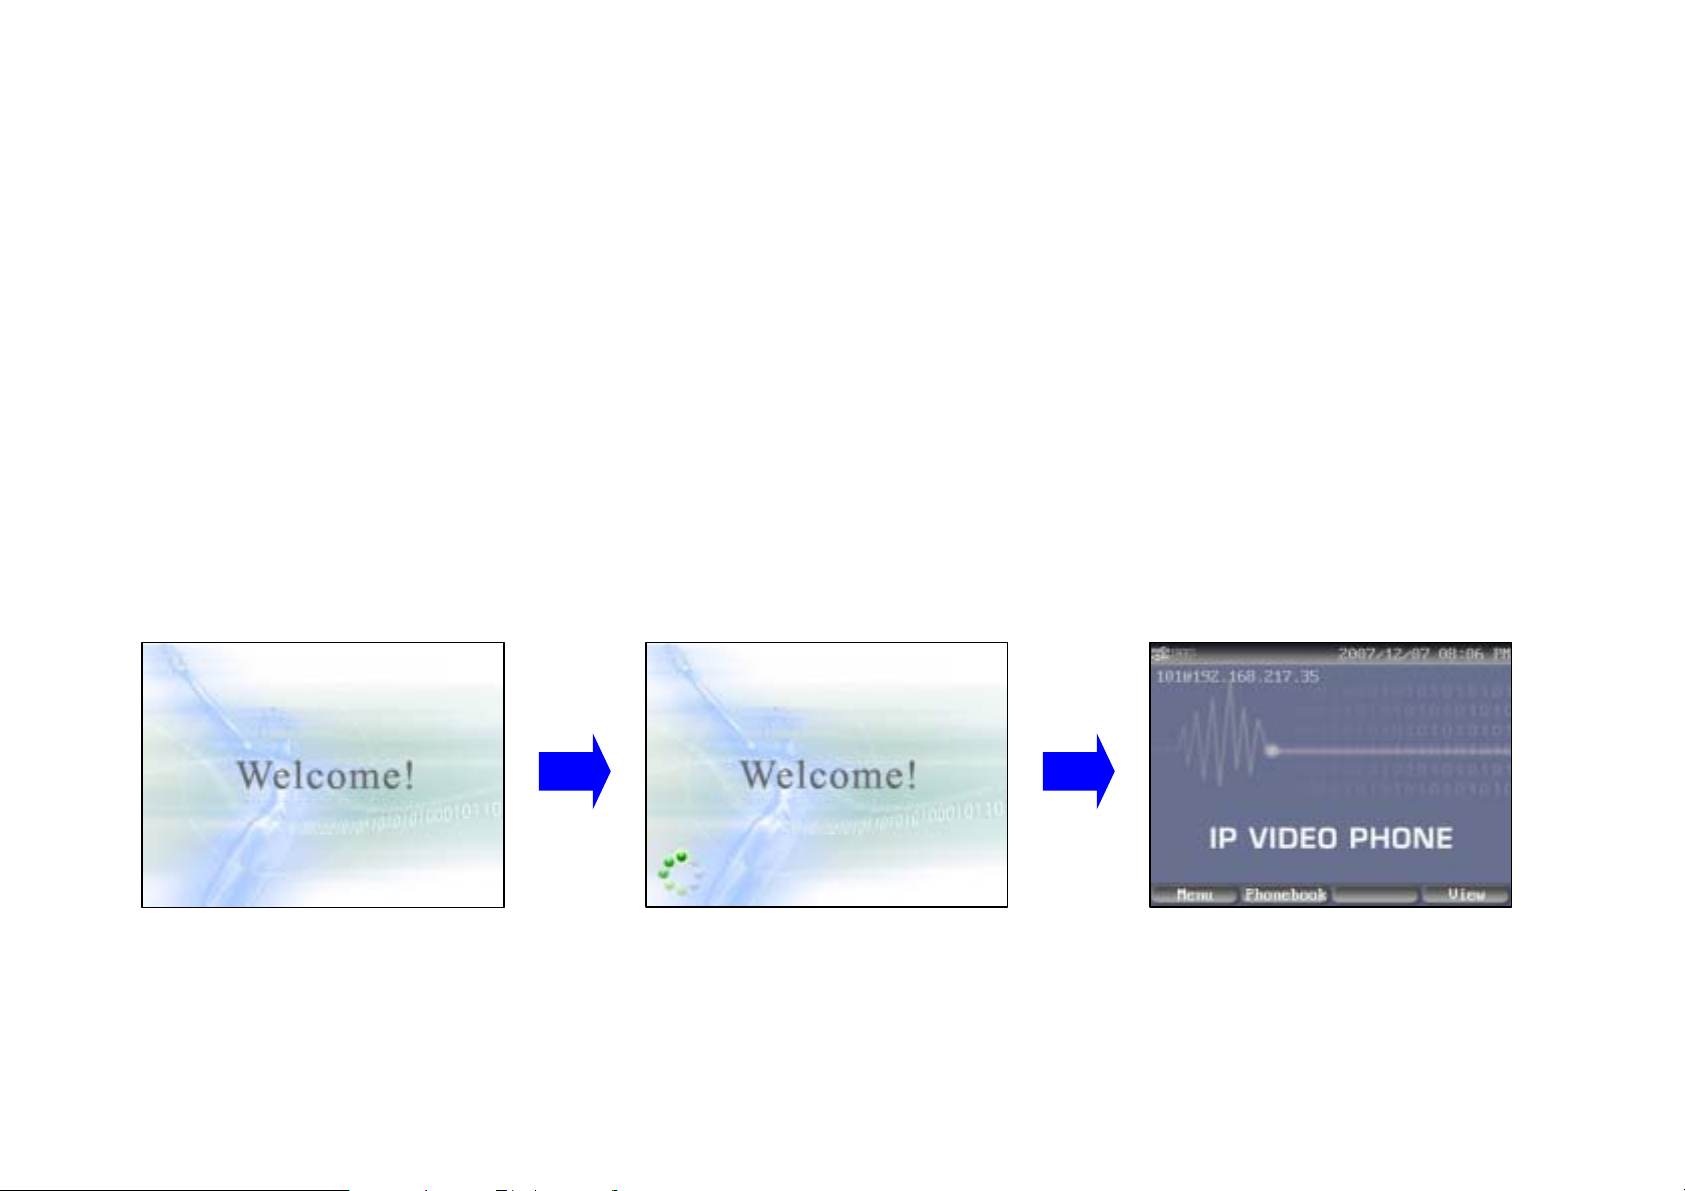
Power on the Phone
After this phone is properly installed, you may power on it by plug in the power adapter
connector. Following boot-up sequences will take place:
z A Welcome message will show on the LCD first. This screen will last for about 5
seconds. Please refer to the first picture from the left below.
z Then you will see a System Loadi ng messag e on th e LCD scr een. A vivid color ring is
circling during this stage, please refer to second picture from the left below. This
screen will last for about 25 seconds.
After boot up sequences are completed, the main page will show on the LCD screen,
please refer to the third picture from the left. Now this Phone is ready to use.
Video Phone User Guide
Figure 7 : Booting Up Screens
7
Page 10

Chapter 3 : Using the Phone
Knowing Your IP Video Phone
Video Phone User Guide
Handset
5 Inches LCD Screen
Camera Lens
Camera Knob
Sliding Lens Cover
Soft-Function Key
Indicators
Speaker
USB Port
SD Card Slot
Microphone
Fixing Plate
Handset Cradle
8
Page 11

Keys/Buttons Layout
y
Video Phone User Guide
-
Soft-Function Ke
Dedicated Function Keys
FUNCTION (LED Indicator)
MUTE (LED Indicator)
FLASH
SPEAKER (LED Indicator)
: Volume Up
: Volume Down
Dial Key Pad
9
Navigation Key Pad
Page 12
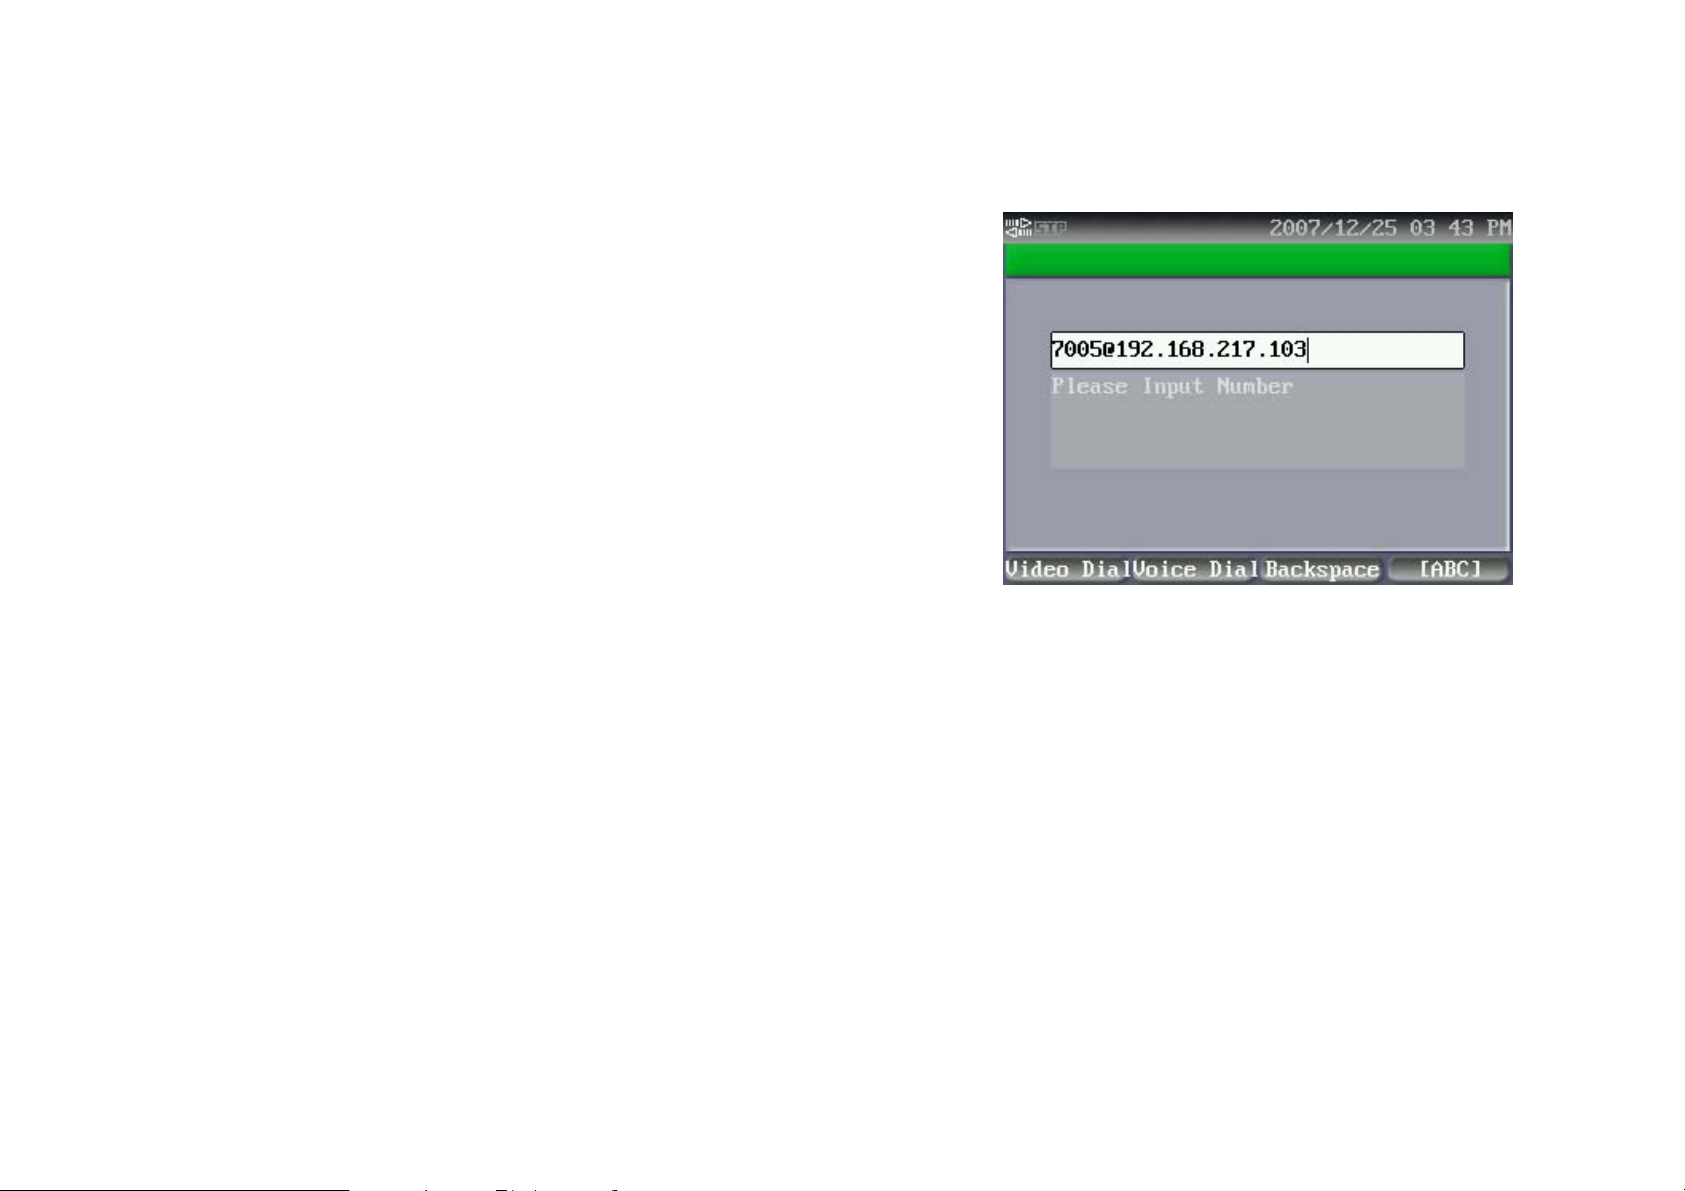
Making Telephone Calls
After this phone has booted up, you may place a call by following
ways:
z Lift the handset and key in the preferred phone number on the
dialing field, then press Dial button to make a call.
z Press the SPEAKER button and key in the preferred phone
number on the dialing field, then pr ess Dial bu tton to make a call.
This phone is able to remember your last called phone number. So if
you have made a call before, you will see last called phone number on
the dialing field w hen y ou li fti ng the handse t or pressing the SPE AK ER
Video Phone User Guide
button. You can press the Dial button to call same number again, or
press the numeric keys to cancel pervious number.
Figure 8 : Making Calls
You may also make a call from several other locations of the User
Interface:
z To dial from the Phonebook. Enter the Phonebook and find the
preferred number, then press the Dial button o r Enter key ( R) of th e
Navigation Keypad to make a call.
z To dial from the Call Records. Find the preferred phone number in
the Call Records, then press the Dial button or Enter key (R) of the
Navigation Keypad to make a call.
10
Page 13
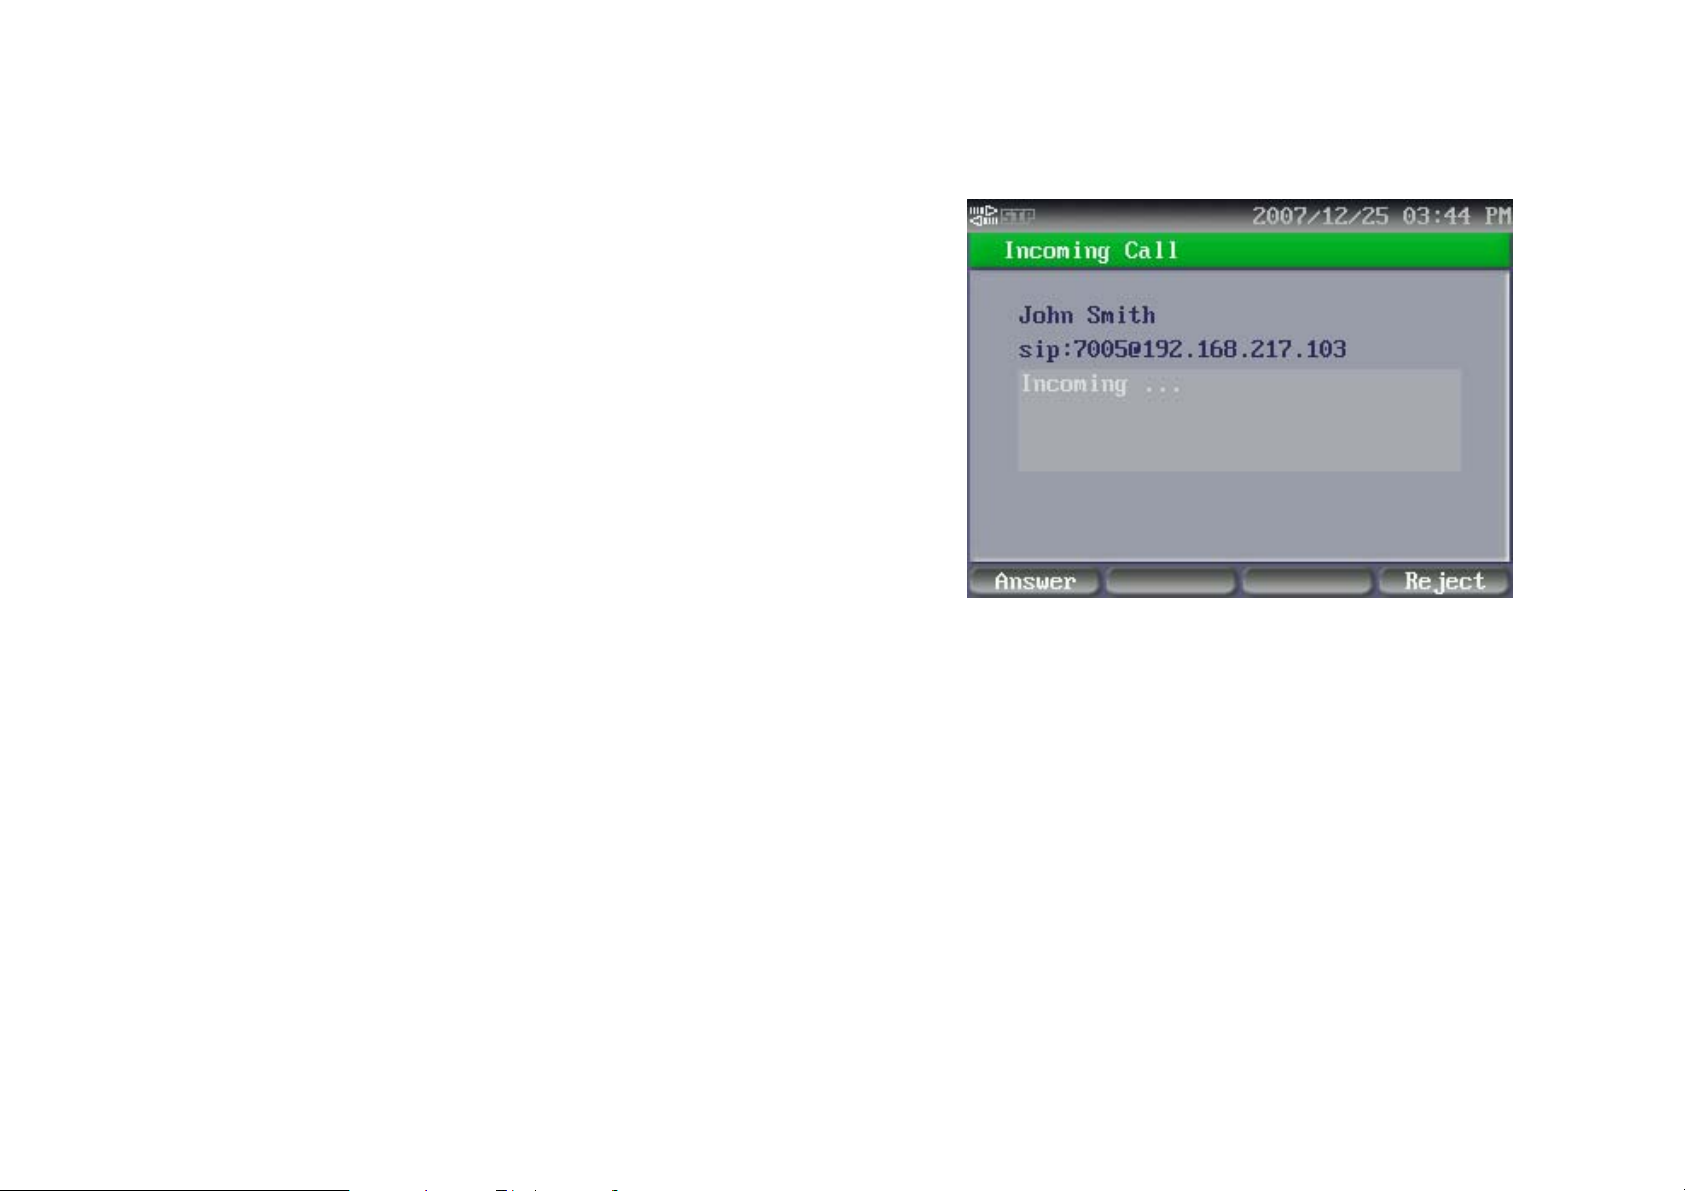
Receiving a Call
When a call is come in, the phone will ring, and you will see the screen
on the right side appeared. You may receive this call by following ways:
z Pick up the handset.
z Press the SPEAKER button.
Muting a Call
You may press the MUTE button to cut the outgoing video and voice
when using handset or speaker-phone. This feature allows you to
prevent the persons on the other end from hearing what you or
someone else at this end is saying.
Video Phone User Guide
You can cancel the mute function by pressing the MUTE button again.
Figure 9 : Receiving Calls
Ending a Call
You may end the call by following ways:
z Hang up the handset if you are using the handset.
z Press the SPEAKER button if your are using the speaker phone.
11
Page 14

Chapter 4 : Setting up the Phone
This chapter describes how to use and setup your IP Video Phone. You may press the Menu
soft-function key to enter this mode. T here are 5 major sections in this mode:
z Phonebook
z Call Records
z System Settings
z SIP Services
z Call Services
z Photo Album
You may use [ Å ] and [ Æ ] keys to select preferred
section, then press Enter key [ 9 ] to enter the sub
pages. Then use [ Ç ] and [ È ] keys to select
Video Phone User Guide
preferred item, and then press Enter key [ 9 ] to take
further actions.
Figure 10 : Phonebook
12
Page 15

Phonebook
Phonebook main page includes five options: Search, List, Add New Contact,
Import and Export.
Search
This is a smart searching feature, it will show all related co ntacts while you
are keying f irst few characters. When you s ee the preferred contact, you may
use [ Ç ] and [ È ] keys to highlight the target contact, and then press Enter
key [ 9 ] to view details.
There are 4 soft-function keys in this page:
Video Phone User Guide
Figure 11 : Search Mode
Edit
Backspace
[ABC]/[123]
Exit
Press this button to edit the details of selected person.
There are 5 items in this page: Group, Name, PSTN,
Mobile and IP-URI (Uniform Resource Identifier). You
may update person or object data here.
Press this button to cancel last inputted character.
Press this button to switch key pad between input
characters or numbers.
Press this button to back to last screen.
13
Page 16

List
You will see all contacts list in this page by alphabetical sequence. You may
use [ Ç ] and [ È ] keys to hi ghli ght pre ferre d t arg et, and t hen press [ Group ] ,
[ Edit ], [ Delete ] and [Exit ] to proceed further actions.
There are 4 soft-function keys in this page:
You may switch the group to show phone list of selected
Video Phone User Guide
Group
Edit
Delete
Exit
group by pressing this button. There are total 10 groups
and “All Numbers”.
Press this button to edit the details of selected person.
There are 5 items in this page: Group, Name, PSTN,
Mobile and IP-URI (Uniform Resource Identifier). You
may update person or object data here.
You may delete selected person or o bject by pr essing thi s
button.
Press this button to back to last screen.
Add New Contact
You may add new contact phone number in this pag e. You will see five items:
Group
Name
- Select preferred group for this new contact by using [ Å ]
and [ Æ ] keys.
- You may input name of new contact here.
Figure 12 : List Mode
PSTN No
Mobile No
14
- You may input PSTN phone number of new contact here.
- You may input mobile phone number of new contact here.
Figure 13 : Add New Contact
Page 17

IP-URI
There are 3 soft-function keys in this page:
- You may input Domain Name or IP address of of new
contact here. The format usually like this:
<Domain>@xxx.xxx.xxx.xxx.
Video Phone User Guide
Backspace
[ABC]/[123]
Exit
Press this button to cancel last inputted character.
Press this button to switch key pad between input
characters or numbers.
Press this button to back to last screen.
Edit Group
You may rename group in this page. You will see a list of groups when you
enter this page. There are total 10 groups, from Group 1 to Group 10. Use
[ Ç ] and [ È ] keys to select preferred group, and then go to right side to
change the name.
There are 3 soft-function keys in this page:
Backspace
[ABC]/[123]
Press this button to cancel last inputted character.
Press this button to switch key pad between input
characters or numbers.
Figure 14 : Edit Group Mode
Exit
Press this button to back to last screen.
15
Page 18

Import & Export
You may import and export the phone book in thi s p ag e. Expor ted p hone book
is you stored in text file format. You can use WordPad to edit the phonebook,
and then import it back to IP Video Phone. Phonebook is able to store
maximum 200 records.
You have to attach a USB disk before you take Import or Export actions. You
will see 2 selections when you enter this page: Import and Export. Use [ Å ]
and [ Æ ] keys to select preferred item, then press [ 9 ] to execute selected
action.
There is 1 soft-function key in this page:
Video Phone User Guide
Export
Import
Clear
Exit
Press this button to export Phonebook to USB Disk.
Press this button to import Phonebook from USB Disk.
Press this button to delete all records on the Phoneb ook. This
feature is able to prevent duplication data on Phonebook.
Press this button to back to last screen.
Figure 16 : Import and Export Mode
Phonebook File Format
Exported Phonebook data is stored in “CSV” format. CSV format is common
used file format for Internet and networ k appli c ations. You may Notepad to
edit this file. There are 4 columns in this file: Name, IP-URI, PSTN, and
Mobile. Please note, DO NOT delete the comma “,” between columns.
16
Page 19

Call Records
Find Call Records by using [ Å ] and [ Æ ] keys. There are 3 options:
Missed Calls, Dialed Calls and Answered Calls.
Missed Calls
In this page, you will see a list of all missed calls. This phone keeps maximum
20 missed call records.
You may use [ Ç ] and [ È ] keys to select preferred record, then you may
press [ 9 ] to dial out this number. There are 4 soft-function keys in this page:
Video Phone User Guide
Enter
Clear
Delete
Exit
Press this button to dial out selected number.
Press this button to delete all missed call records.
Press this button to delete this missed call.
Press this button to back to last screen.
Figure 17 : Call Records
Dialed Calls
In this page, you will see a list of all dialed calls, this phone keeps maximum
20 dialed call records.
You may use [ Ç ] and [ È ] keys to select preferred record, then you may
press [ 9 ] to dial out this number. There are 4 soft-function keys in this page:
Enter
Clear
17
Press this button to dial out selected number.
Press this button to delete all dialed call recor ds.
Figure 18 : Missed Calls
Page 20

Delete
Video Phone User Guide
Press this button to delete this dialed call.
Exit
Press this button to back to last screen.
Answered Calls
In this page, you will see a list of all missed calls, this phone keeps maximum
20 answered call records.
Use [ Ç ] and [ È ] keys to select preferred item, then you may press [ 9 ] to
dial selected number or you may user one of 4 soft-function keys in this
mode:
Enter
Clear
Delete
Exit
Press this button to dial out selected number.
Press this button to delete all answered call recor ds.
Press this button to delete this answered call.
Press this button to back to last screen.
Figure 19 : Answered Calls
18
Page 21

System Settings
Find System Settings by using [ Å ] and [ Æ] keys. There are 5 options:
Phone Settings, Network Settings, Video Settings, Audio Settings and
Upgrade.
Basic Settings
This mode contains basic settings of this phone. There are 11 items in this
page:
Video Phone User Guide
Device ID
Device Name
Date & Time
Date Format
Time Format
- This ID is a unique number giving by manufacturer to
identify this device on networks. it is fixed and not
revisable.
- This item allows user to give a name to this device.
You can use this name to identify this particular device if
you have more than one IP Video Phone on
the same network. You can input up to 30 characters in
this field.
- You can input your local date and time in this field.
- You can select preferred date format at this field. There
are 3 formats available: YYYY/MM/DD, MM/DD/YYYY and
DD/MM/YYYY. Use Ñ and Ò keys to select preferred one,
then press OK to confirm selection.
- You can select preferred ti me format at this fi eld. There ar e
2 formats available: 12 hours and 24 hours system. You
may use [ Å ] and [ Æ] keys to select preferred format.
Figure 20 : System Settings
Figure 21 : Basic Settings - 1
19
Page 22

Time Zone
Video Phone User Guide
- You may select preferred time zone in this field. This Time
Zone is based on GMT (Greenwich Mean Time) system.
There are total 25 selections, from GM T-12 to GMT+12.
You may use [ Å ] and [ Æ] keys to select preferred
format.
NTP Server1
- You may enable or disable the NTP service here.
- This field allows you to set the main
Network-Time-Protocol server address.
NTP Server2
- You may input an alternate NTP server address here. In
case the main NTP server is not available, system will
calibrate time according to second server.
Web UI
- This item allows user to enable or disable the Web User
Interface. You can manage this product from a computer
with Web User Interface if it is enabled. You may disable
this feature for security reasons.
Soft-function keys may different in each page. Following function keys are
using in these pages:
Edit
SyncTime
Press this button to select preferred items.
Press this button to synchronize time with NTP server.
Press this button to sa ve changes temporarily. You will be
Figure 22 : Basic Settings - 2
OK
asked to save changes permanently when you press Exit
to leave this page
Backspace
Exit
Press this button to cancel last inputted character.
Press this button to back to last screen.
20
Page 23

Network Settings
t
This page allows you to setup the important parameters of network
connection. There are 8 items in this mode.
Video Phone User Guide
IP Type
- This item allows you to select type of IP address of this
device. There are 3 options: DHCP Client, Fixed IP and
PPPoE:
DHCP Client - If you wish to connect this device to a
exist network and get dynamic IP address from the
DHCP server, please select this one. You will see all
other items in this mode are grayed out. In most of
cases, DHCP Client is used for connecting LAN
(Local-Area-Network).
Figure 23 : DHCP Client Settings
Fixed IP - If you wish to use fixed IP address to connec
to network, you may select this one. You may get Fixed
IP when you applying SIP service from carriers or
operators. You will see last 2 items for PPPoE are
grayed out. Please follow instructions below to setup
other parameters for Fixed IP.
PPPoE - This selection is for connecting ADSL modem
directly. Your phone will trigger ADSL model to connect
to Internet automatically when you are dialing phone
number. Normally in this case, this device is
disconnected with LAN or you do not have exist
network.
IP Address
21
- You may fill in IP address here if Fixed IP is selected.
Figure 24 : Fixed IP Settings
Page 24

Sub Netmask
Video Phone User Guide
- You may fill in Subnet Mask address here if Fixed IP is
selected.
Def. Gateway
- You may fill in default gateway address here if Fixed IP is
selected.
DNS1
- You may fill in primary DNS server address here if Fixed IP is
selected.
DNS2
- You may fill in secondary DNS server address here if Fixed IP
is selected.
PPPoE ID
- You may f ill in PPPoE account ID or name here if PPPoE is
selected in IP type selection.
PPPoE PSWD
- You may fill in PPPoE account password here if PPPoE is
selected in IP type selection.
Soft-function keys may different in each page. Following function keys are
using in these pages :
Edit
Press this button to select preferred items.
Press this button to sa ve changes temporarily. You will be
OK
asked to save changes permanently when you press Exit
Figure 25 : PPPoE Settings
to leave this page
Backspace
Exit
Press this button to cancel last inputted character.
Press this button to back to last screen.
22
Page 25

Video Settings
This page contai ns 7 parameters of video streaming and quality.
Video Phone User Guide
Video Def.
Bandwidth
Quality
Scene Color
- You may disable video streaming here. Select “Off” to make
audio only phone calls.
- This item allows you to select preferred bandwidth of video
streaming. There are 6 options: 768Kbps, 512Kbps, 384Kbps,
256Kbps and 128Kbps. You shall select suitable bandwidth to
meet Internet condition. You may have to check available
bandwidth with your service provider. Default setting is 384Kbps.
- This item allows you to select pr eferr ed v ideo q uali ty. There are 5
options: Excellent, Good, Average, Acceptable and Worst.
Please note that better quality creates higher bit-rate and
requires larger bandwidth. You may see broken video if you
select better quality but with not enough bandwidth. Default
setting is Average.
- This item allows you to adjust color balance of the camera
module. There are 3 options: Yellow Lamps, Orange Lamps and
Fluorescent Light. Please select a suitable one to meet your
room lighting environment. Default setting is Yellow Lamps.
Figure 26 : Video Settings
Brightness
- This item allows you to adjust brightness of the camera module.
There are 10 levels, from 0 to 9. Higher number gives brighter
image. Default setting is 5.
Lightness
- This item allows you to adjust lightness of LCD panel. There are
10 levels, from 0 to 9. Default setting is 5.
Video Fmt.
23
- This item allows you to select the video format of LCD Display or
Page 26
TV-OUT port (specified models). There are 2 options: NTSC and
PAL.
Soft-function keys may different in each page. Following function keys are
using in these pages:
Video Phone User Guide
Edit
Press this button to select preferred items.
Press this button to sa ve changes temporarily. You will be
OK
asked to save changes permanently when you press Exit
to leave this page
Exit
Press this button to back to last screen.
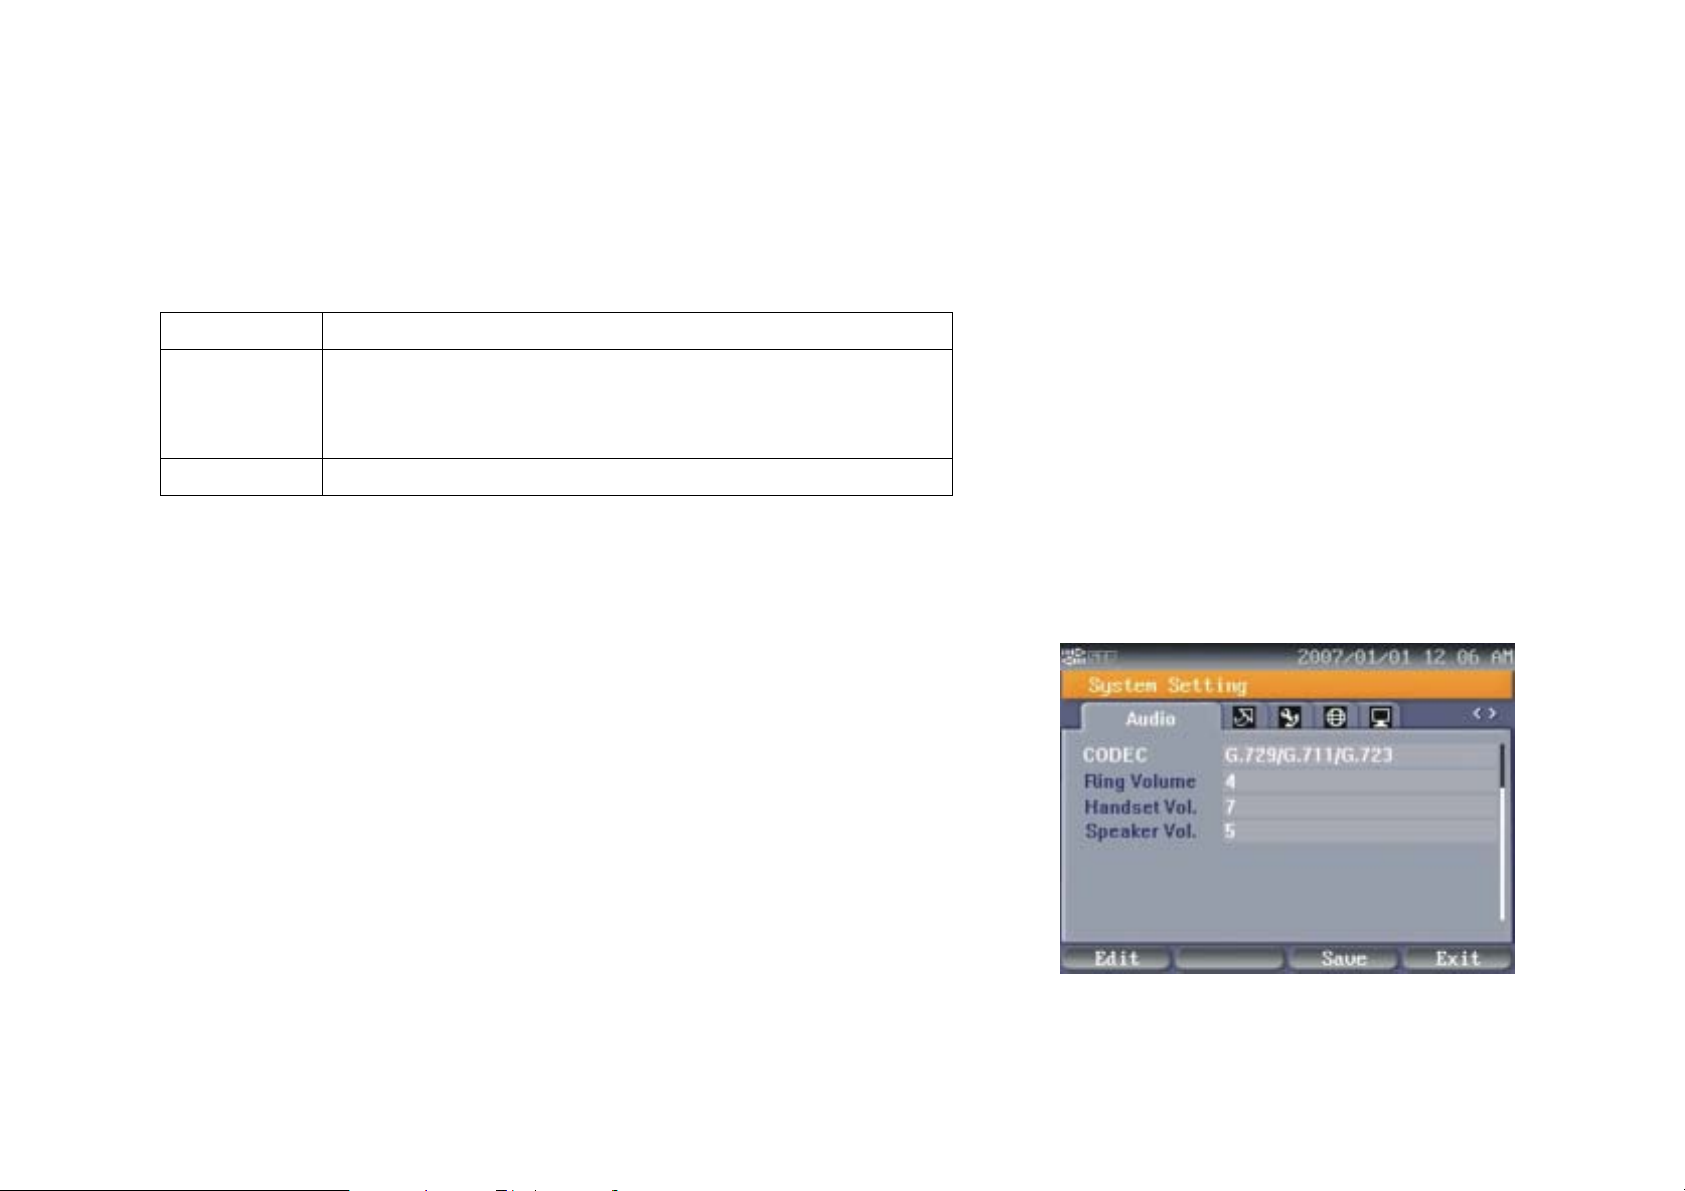
Audio Settings
This page contains 4 parameters for adjusting audio qualities.
CODEC
Ring Volume
Handset Vol.
- This item allows y ou to select the pr iority of audio CODEC . This
phone will associate caller's IP phone according to this priority.
This phone supports 2 audio CODECs: G.711 and G . 7 29.
There are 2 options: <G.711/G.729> and <G.729/G.711>.
Default setting is <G.711/G.729>.
- T his item allows you to set volume of ring tone. There are 10
levels, 0 ~ 9. Default setting is 4.
- T his item allows you to set volume of handset. There are 10
levels: 0 ~ 9. Default setting is 9. You have to pick up the
handset when you are setting the volume.
Speaker Vol.
24
- This item allows you to set volume of speaker. There are 10
Figure 27 : Audio Settings
Page 27

levels, 0 ~ 9. Default setting is 4.
Soft-function keys may different in each page. Following function keys are
using in these pages:
Video Phone User Guide
Edit
OK
Exit
Press this button to select preferred items.
Press this button to sa ve changes temporarily. You will be
asked to save changes permanently when you press Exit
to leave this page
Press this button to back to last screen.
Upgrade
This page allows you to upgrade firmware of this phone. This upgrade goes
through the USB Mass Storage (USB Memory Disk). There are 2 options:
SW Version
AutoUpgarde
Please follow these steps to take upgrade:
- Shows current firmware version.
- You may enable this feature if it is available from service
provider.
1. Download the new firmware into a USB disk.
2. Connect the USB Disk to USB port of this phone. Use USB cable that
comes with the package if the connector format is not match.
3. Press “Upgrade” to start, you will see screen like Figure 29 appeared.
Figure 28 : Upgrade Page
25
Page 28
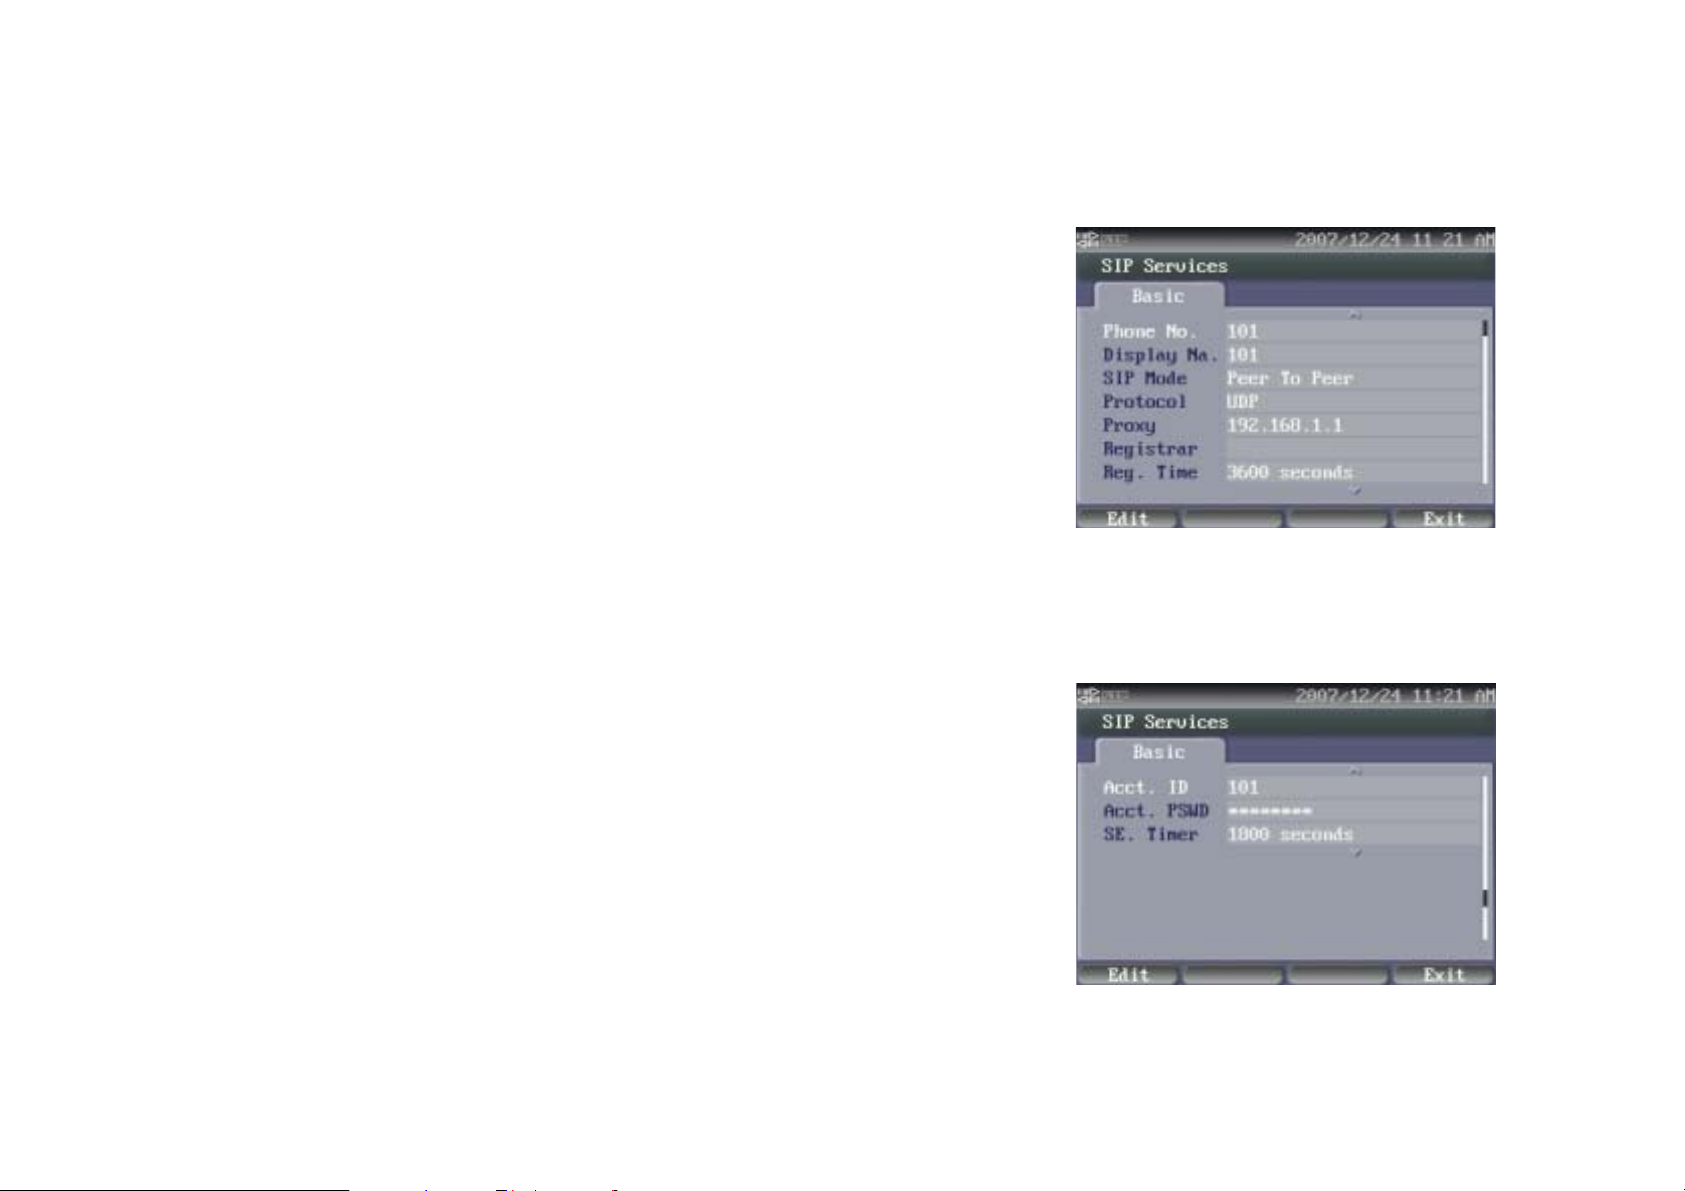
SIP Services
This section allows you to setup necessary parameters of SIP services.
There is only 1 option: Add New Service.
Add New Service
There are 10 parameters for setting the SIP service:
Video Phone User Guide
Phone No.
Display Na.
SIP Mode
Protocol
Proxy
Registrar
- You have to fill in the phone number here. Normally it is
provided by service provider. It also can be an extension
number if this phone is connected to a IP PBX.
- Initial of Display Name. This name will show on the IP phone
of called parties. You may fill in the preferred name here .
- This item allows you to select the working model of SIP
service. Select “Serv er” mode i f this phon e is conn ect to a SIP
server or IP PBX. Default setting is Peer-TO-Peer.
- You may select the correct low level communication protocol
here. There are 2 options: UDP and TCP. You have to confirm
which one the service is using from your service provider.
Default setting is UDP.
- You may fill in IP address or domain name of the SIP Proxy
Server here.
- You may fill in IP address or domain name of SIP Registrar
Server here.
Figure 30 : SIP Setting Page 1
26
Figure 31 : SIP Setting Page 2
Page 29

Reg. Time
Video Phone User Guide
- Initial of Registration Time. This item is a parameter of SIP
service. You may fill in the effective registration period of SIP
service here. You have to contact your service provider to get
correct setting. Default setting is 3600 seconds.
Acct. ID
Acct. PSWD
SE Timer -
Soft-function keys may different in each page. Following function keys are
using in these pages:
Edit
OK
Backspace
Exit
- You may fill in your account name of SIP service here.
- You may fill in the password of your SIP service account here.
Initial of Session Timer. This is a parameter of SIP service.
You may fill in the Session Timer period of SIP service. You
have to contact your service provider to get correct setting.
Default setting is 1800 seconds.
Press this button to select preferred items.
Press this button to sa ve changes temporarily. You will be
asked to save changes permanently when you press Exit
to leave this page
Press this button to cancel last inputted character.
Press this button to back to last screen.
27
Page 30
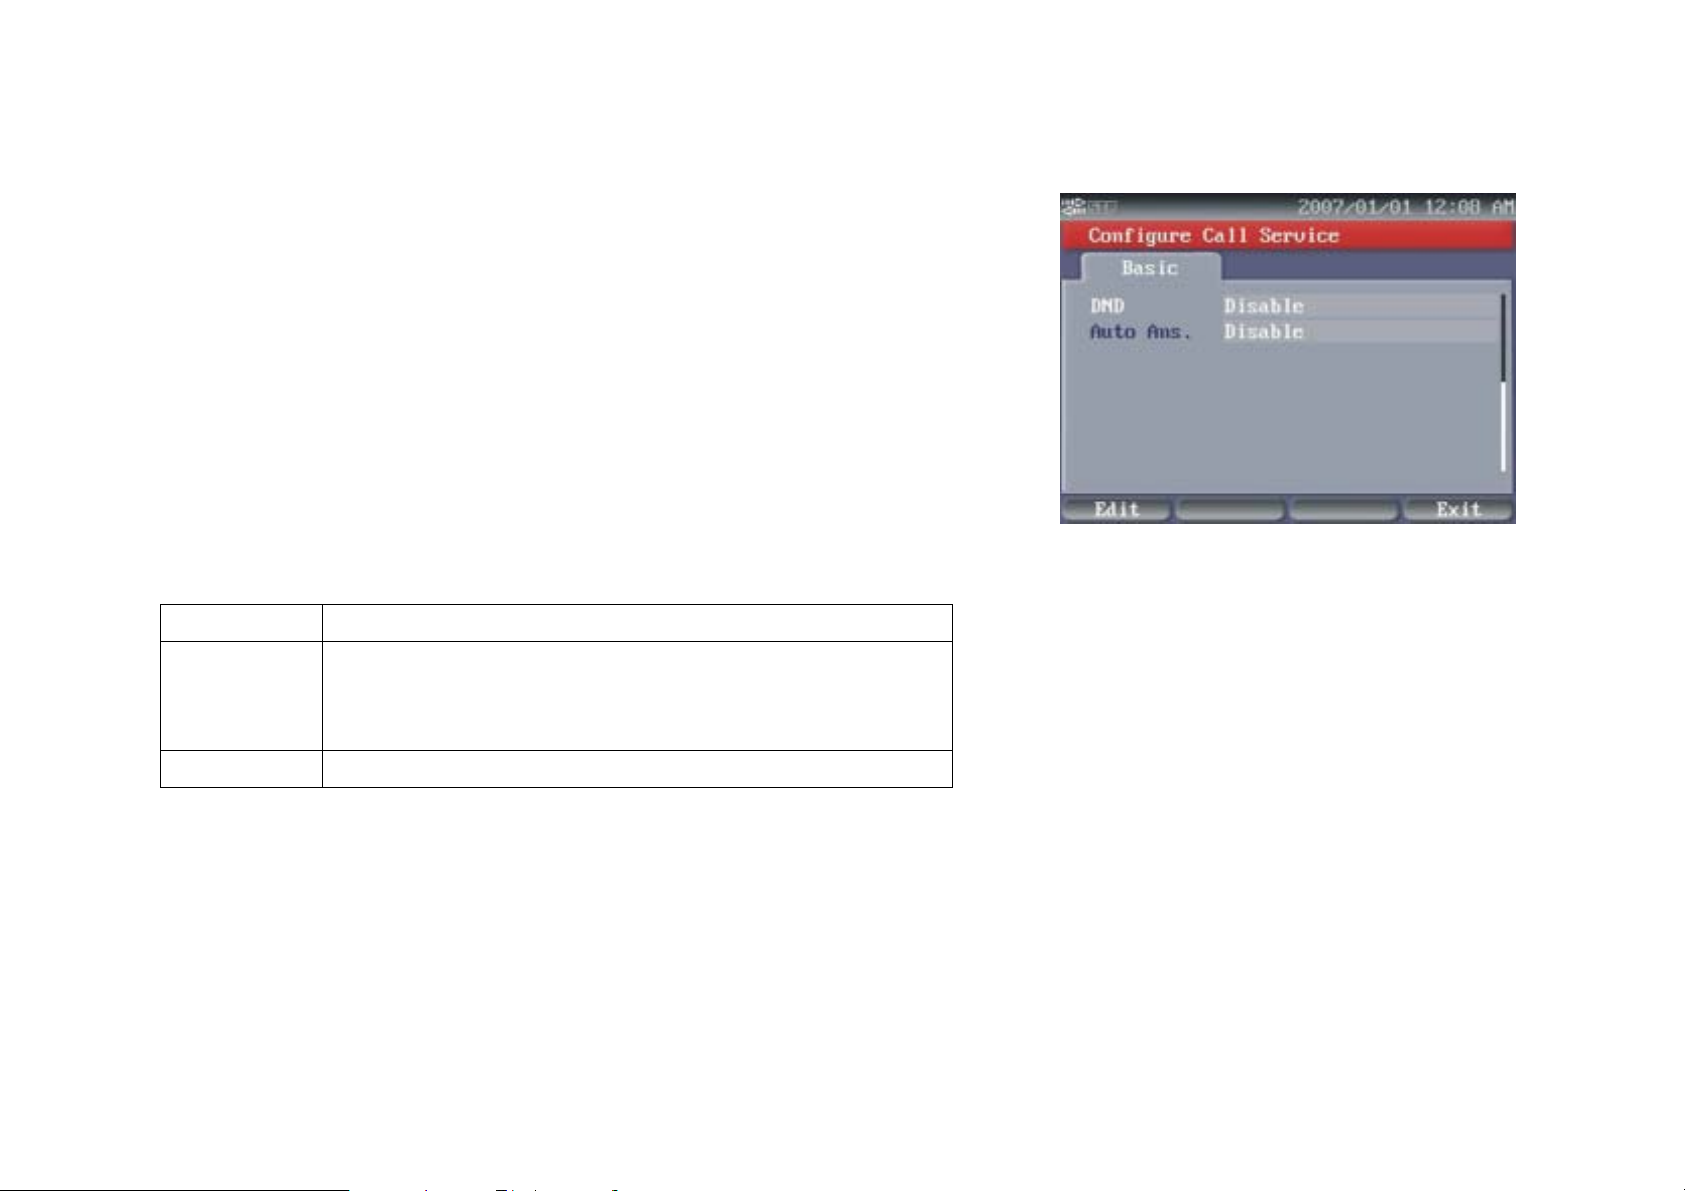
Call Services
You can setup call services of this phone here. There are 2 services
available:
Video Phone User Guide
DND
Auto Answer
Soft-function keys may different in each page. Following function keys are
using in these pages:
Edit
OK
Exit
- Initials of "Do Not Disturb". All phone calls will be rejected
if this service is enabled. Caller will here busy tone when
call this number.
- This feature allows this phone to answer incoming call
automatically. There are 2 options: Disable and
Immediately.
Press this button to select preferred items.
Press this button to sa ve changes temporarily. You will be
asked to save changes permanently when you press Exit
to leave this page
Press this button to back to last screen.
Figure 32 : Call Services
28
Page 31
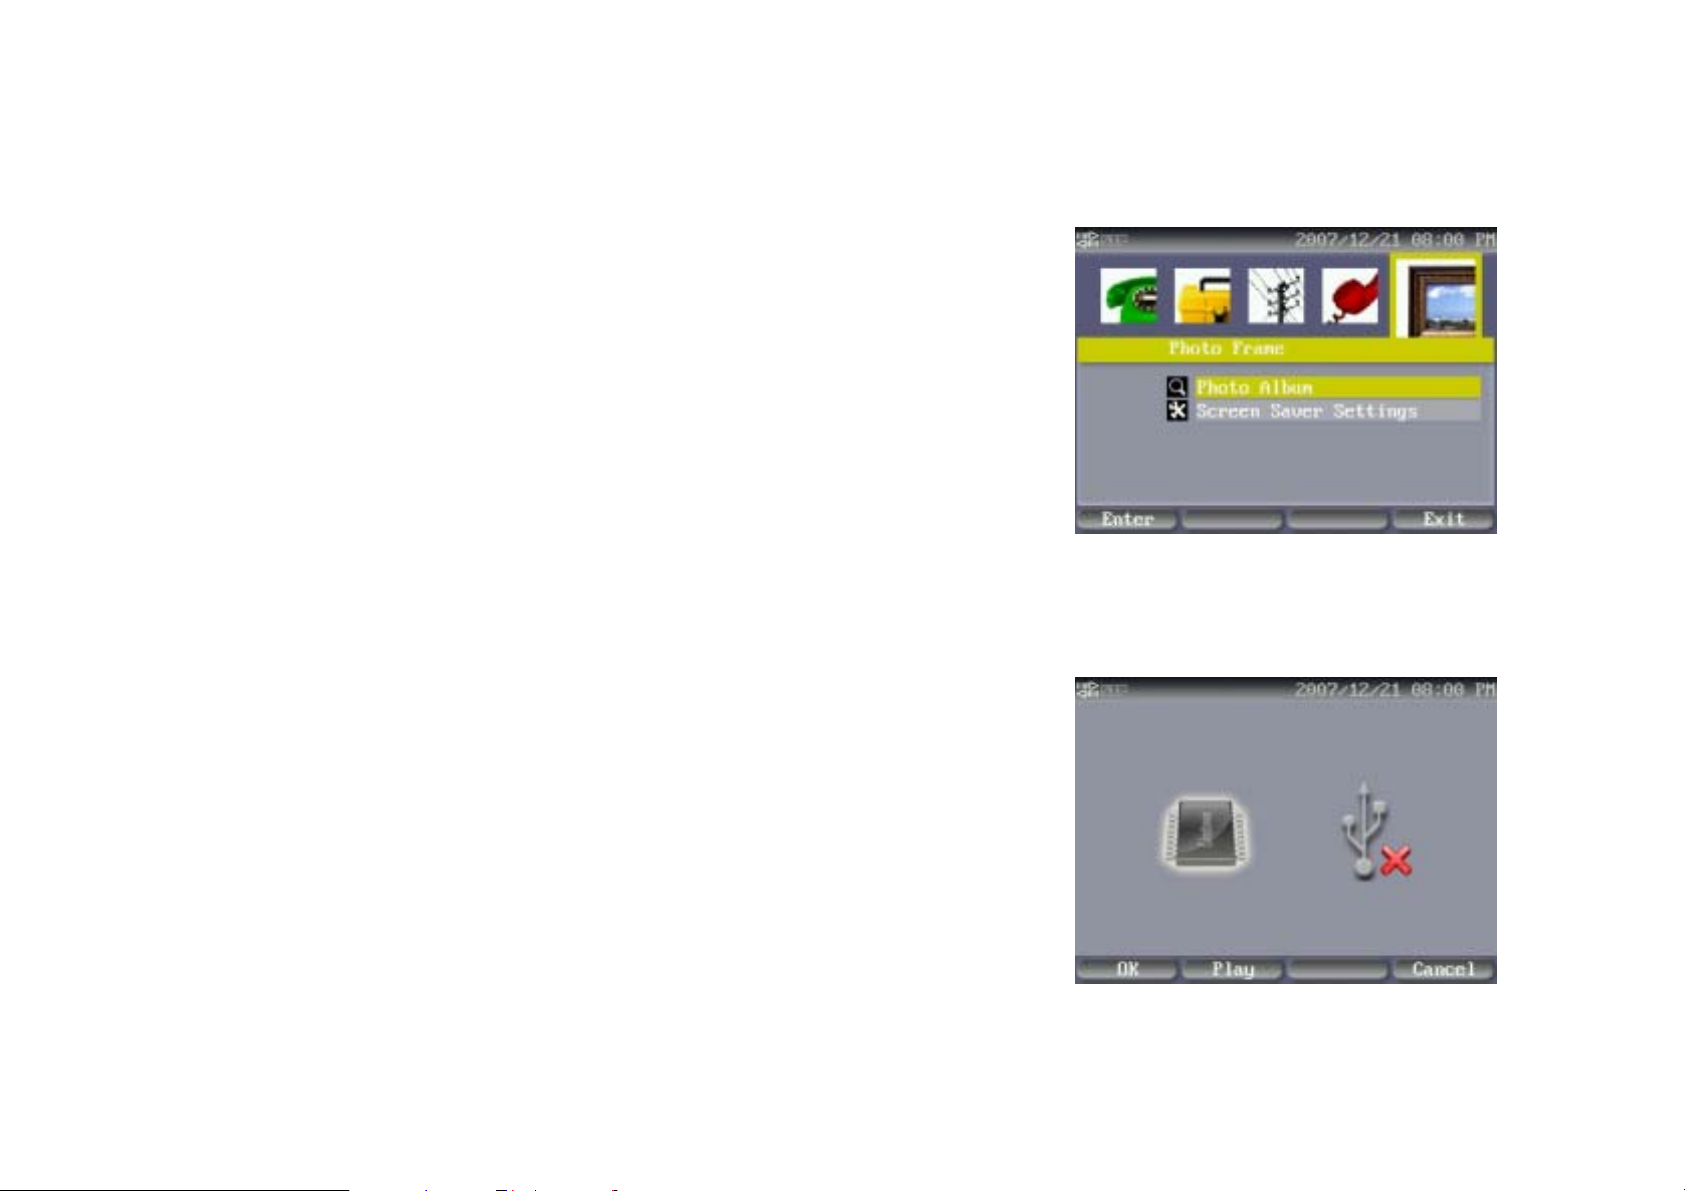
Photo Frame
This phone comes with Photo Frame and Screen Saver features.
Video Phone User Guide
Photo Frame
You may store JPEG photos in embedded Flash Disk, and then playback the
photos on LCD display. The photos in embedded Flash Disk are only for
playing on this phone, not for other purpose for they will be resized to a
proprietary size.
Please follow these steps to import photos:
1. Select Photo Frame, and the press Enter [ 9 ].
2. Select source, from Local Memory or USB Disk.
3. This Phone will locate i mage and create thumbnails. It may t ake minutes i f
the photo size is too lar ge. The larg est photo s ize that this phone is a ble to
convert is 4 Mega-Bytes (2048x2048).
4. If you select USB Disk, then you may press “Import” button to upload
images into embedded Flash Disk.
5. If you select embedded Flash Disk, then you may use [Å], [Æ], [ Ç ] and
[ È ] keys to select photo, then press Delete button to erase photo from
Figure 33 : Photo Frame Main Page
embedded Flash Disk, or press View button to view photo at full screen.
Screen Saver
There are 2 options in this page:
29
Figure 34 : Photo Frame – Select Source
Page 32

Saver Type
Video Phone User Guide
- You may select “Photo Slideshow” or Clock” here.
Active Time
- You may select active time here. There are 3 options: 1
minute, 3 minutes and 5 minutes .
Beside Photo Slideshow or Screen Saver will activate in selected period, in
order to extend the life time of LCD display, the screen will turn off after 10
minutes from the last pressing button action.
Soft-function keys may different in each page. Following function keys are
using in these pages:
Enter
Play
Press this button to dial selected preferred item.
Press this button to playback the photos is selected
memory disk.
View
Delete
Cancel
Edit
Press to view selected photo in full screen.
Press to erase photo from selected memory disk.
Press to back to last level.
Press this button to select preferred items.
Figure 35 : Photo Frame – Thumbnails
Press this button to sa ve changes temporarily. You will be
OK
asked to save changes permanently when you press Exit
to leave this page
Backspace
Exit
Press this button to cancel last inputted character.
Press this button to back to last screen.
30
Page 33

Video Phone User Guide
Appendix A : Regulartory Information
FCC STATEMENT
This product has been tested and complies with the specifications for a Class B digital device, pursuant to Part 15 of the FCC Rules.
These limits are designed to provide reasonable protection against harmful interference in a residential installation. This equipment
generates, uses, and can radiate radio frequency energy and, if not installed and used according to the instructions, may cause
harmful interference to radio communicat ions. However, there is no guarantee that interference will not occur in a particular
installation. I f this eq uipme nt does caus e har mful int erferenc e to r adio or tel evi sion rec epti o n, whi ch is found by tur ning th e equipm ent
off and on, the user is encouraged to try to correct the interference by one or more of the following measures:
z Reorient or relocate the receiving antenna
z Increase the separation between the equipment or devices
z Connect the equipment to an outlet other than the receiver's
z Consult a dealer or an experienced radio/TV techni ci an for assist a nce
FCC Radiation Exposure Statement
This equipment complies with FCC radiation exposure limits set forth for an uncontrolled environment. This equipment should be
installed and operated with minimum distance 20cm between the radiator and your body.
31
Page 34

Video Phone User Guide
EC DECLARATION OF CONFORMITY (EUROPE)
Manufacturer declares that this product conforms to the specifications listed below, following the provisions of the European R&TTE
directive 1999/5/EC:
z EN 301 489-1, 301 489-17 General EMC requirements for Radio equipment.
z EN 609 50 Safety
z EN 300-328-1, EN 300-328-2 Technical requirements for Radio equipment.
Caution: This equipment is intended to be used in all EU and EFTA countries. Outdoor use may be restricted to certain frequencies
and/or may require a license for operation. Contact local Authority for procedure to follow.
Note: Combinations of power levels and antennas resulting in a radiated power level of above 100 mW equivalent isotropic radiated
power (EIRP) are considered as not compliant with the above mentioned directive and are not allowed for use within the European
community and countries that have adopted the European R&TTE directive 1999/5/EC.
32
 Loading...