


Welltech ATA-171P, ATA-171 V1.5 Manual
ATA-171/172/171P (ATA-S1/S2/P)
User’s Guide
ATA-171/172/17 1P (ATA-S1/S2/P) User’s Guide
V.1.5
2006/7/17
0
|
|
ATA-171/172/171P (ATA-S1/S2/P) |
|
|
|
|
User’s Guide |
1 |
Introduction ....................................................................................................................................... |
2 |
|
|
1.1 |
Hardware Overview............................................................................................................... |
2 |
|
1.2 |
Software Overview ................................................................................................................ |
2 |
2 |
Keypad Interface for The ATA........................................................................................................... |
3 |
|
3 |
Setup the ATA by Web Browser........................................................................................................ |
4 |
|
|
3.1 |
Login...................................................................................................................................... |
4 |
|
3.2 |
System Information for the ATA............................................................................................. |
5 |
|
3.3 |
Phone Book........................................................................................................................... |
5 |
|
3.4 |
Phone Setting........................................................................................................................ |
6 |
|
3.5 |
Network ............................................................................................................................... |
12 |
|
3.6 |
IP Settings ........................................................................................................................... |
16 |
|
3.7 |
NAT Trans. .......................................................................................................................... |
22 |
|
3.8 |
Others.................................................................................................................................. |
23 |
|
3.9 |
System Auth. ....................................................................................................................... |
25 |
|
3.10 |
Save Change ...................................................................................................................... |
25 |
|
3.11 |
Update................................................................................................................................. |
26 |
|
3.12 |
Reboot................................................................................................................................. |
27 |
4 |
Setup the ATA by using Console (Hyper Terminal)......................................................................... |
28 |
|
|
4.1 |
Configure the COM port ...................................................................................................... |
28 |
|
4.2 |
Login into the ATA ............................................................................................................... |
29 |
|
4.3 |
Using CLI command to configure the ATA .......................................................................... |
30 |
5 |
How to make a phone call .............................................................................................................. |
36 |
|
1
ATA-171/172/171P (ATA-S1/S2/P)
User’s Guide
1Introduction
This user’s manual is for 1-port FXS VoIP terminal adapter (ATA). This user’s manual will explain the IVR instruction, web configuration, and command line configuration for the ATA. Before using the ATA, some setup processes are required to make the ATA work properly. Please refer to the Setup Menu for further information.
1.1Hardware Overview
The ATA has the following interfaces for Networking, telephone interface, LED indication, and power connector.
1.1.1Two RJ-45 Networking interface, these two interfaces support 10/100Mps Fast Ethernet. you can connect one RJ-45 Fast Ethernet port to the ADSL or Switch, and connect the other one to your computer.
1.1.2One RJ-11 Type analog telephone jack interfaces. You can connect one analog telephone to the terminal adapter.
1.1.3LED Indication: There are three LED indicators in the ATA to show the Power, Register, and Off-Hook indication.
1.2Software Overview
|
Network Protocol |
Tone |
|
|
|
|
|
|
|
|
• |
SIP v1 (RFC2543), v2 (RFC3261) |
• |
Ring Tone |
|
• |
IP/TCP/UDP/RTP/RTCP |
• |
Ring Back Tone |
|
• |
IP/ICMP/ARP/RARP/SNTP |
• |
Dial Tone |
|
• |
TFTP Client/DHCP Client/ PPPoE Client |
• |
Busy Tone |
|
• |
Telnet/HTTP Server |
• |
Programming Tone |
|
• |
DNS Client |
|
|
|
|
|
||
|
• |
NAT/DHCP Server |
Phone Function |
|
|
|
|
||
|
|
|
|
|
|
Codec |
• |
Volume Adjustment |
|
|
|
Speed dial key |
||
|
|
|
• |
|
|
• |
G.711: 64k bit/s (PCM) |
• |
Phone book |
|
||||
|
• |
G.726: 16k / 24k / 32k / 40k bit/s (ADPCM) |
• |
Flash |
|
• G.729A: 8k bit/s (CS-ACELP) |
IP Assignment |
||
|
|
|
||
•G.729B: adds VAD & CNG to G.729
|
|
|
• |
Static IP |
|
|
|
• |
DHCP |
|
Voice Quality |
• |
PPPoE |
|
|
|
|
||
|
• VAD: Voice activity detection |
Security |
||
|
• CNG: Comfortable noise generator |
|
|
|
|
|
HTTP 1.1 basic/digest authentication for Web setup |
||
|
• LEC: Line echo canceller |
• |
||
|
• |
Packet Loss Compensation |
• |
MD5 for SIP authentication (RFC2069/ RFC 2617) |
|
• |
Adaptive Jitter Buffer |
|
|
|
QoS |
|||
|
|
|
||
|
|
|
|
|
|
Call Function |
• |
ToS field |
|
|
|
|
|
|
|
• |
Call Hold |
NAT Traversal |
|
|
|
|
||
•Call Waiting
|
• |
Call Forward |
|
• |
STUN |
|
|
|
Caller ID |
|
|
||
|
• |
|
|
|
|
|
|
|
|
|
|
||
|
• |
3-way conference |
|
Configuration |
|
|
|
|
|
|
|
|
|
|
DTMF Function |
|
• |
Web Browser |
|
|
|
• In-Band DTMF |
|
• |
Console/Telnet |
|
|
|
|
|
IVR/Keypad |
|
||
|
• Out-of Band DTMF |
|
• |
|
||
|
|
|
|
|
||
|
• |
SIP Info |
|
|
|
|
|
|
Firmware Upgrade |
|
|||
|
|
|
|
|
||
|
SIP Server |
|
|
|
|
|
|
|
|
|
|
||
|
|
|
|
|
|
|
|
• |
Registrar Server (three SIP account) |
|
• |
TFTP |
|
|
• |
Outbound Proxy |
|
• |
Console |
|
|
|
|
|
• |
HTTP |
|
|
|
|
|
|
|
|
2

ATA-171/172/171P (ATA-S1/S2/P)
User’s Guide
2Keypad Interface for The ATA
You can use the PSTN phone keypad to operate the ATA. Please follow the instruction to configure your terminal adapter.
Group |
IVR Action |
IVR Menu Choice |
|
Parameter(s) |
|
|
|
|
|
Notes: |
|
|
|
|
|
Dial out from |
|
|
|
|
|
|
Press O# can pass relay to PSTN |
||||||
Funcrion |
0 |
None |
|
|
|
|
Line, user can dial out from PSTN |
|||||||
PSTN Line |
|
|
|
|
||||||||||
|
|
|
|
|
|
|
Line. (For 171P only) |
|
|
|
||||
|
|
|
|
|
|
|
|
|
|
|
||||
Function |
Unlock keypad |
#190# |
None |
|
|
|
|
After |
you |
unlock keypad |
setting, |
|||
setting |
|
|
|
|
then you may configure the ATA. |
|||||||||
|
|
|
|
|
|
|
||||||||
|
|
|
|
|
|
|
|
After you hear “Option Successful,” |
||||||
Function |
Reboot |
#195# |
None |
|
|
|
|
hang-up. The system will reboot |
||||||
|
|
|
|
|
|
|
|
automatically. |
|
|
|
|||
|
|
|
|
|
|
|
|
System will automatically |
Reboot. |
|||||
|
|
|
|
|
|
|
|
WARNING: ALL “User-Changeable” |
||||||
Function |
Factory Reset |
#198# |
None |
|
|
|
|
NONDEFAULT SETTINGS WILL |
||||||
|
|
|
|
|
|
|
|
BE LOST! This will include network |
||||||
|
|
|
|
|
|
|
|
and service provider data. |
|
|
||||
Info |
Check WAN IP |
#126# |
None |
|
|
|
|
IVR will announce the current WAN |
||||||
Address |
|
|
|
|
IP address of the ATA |
|
|
|
||||||
|
|
|
|
|
|
|
|
|
|
|||||
Info |
Check LAN IP |
#120# |
None |
|
|
|
|
IVR will announce the current LAN |
||||||
Address |
|
|
|
|
IP address of the ATA |
|
|
|
||||||
|
|
|
|
|
|
|
|
|
|
|||||
Info |
Check IP Type |
#121# |
None |
|
|
|
|
IVR |
will |
announce |
if DHCP |
in |
||
|
|
|
|
enabled or disabled. |
|
|
|
|||||||
|
|
|
|
|
|
|
|
|
|
|
||||
Info |
Check the Phone |
#122# |
None |
|
|
|
|
IVR |
will announce current |
in |
use |
|||
Number |
|
|
|
|
VoIP number |
|
|
|
||||||
|
|
|
|
|
|
|
|
|
|
|||||
Info |
Check Network |
#123# |
None |
|
|
|
|
IVR |
will |
announce |
the |
current |
||
Mask |
|
|
|
|
network mask of the ATA. |
|
|
|||||||
|
|
|
|
|
|
|
|
|
||||||
Info |
Check Gateway |
#124# |
None |
|
|
|
|
IVR |
will |
announce |
the |
current |
||
IP Address |
|
|
|
|
gateway IP address of the ATA. |
|
||||||||
|
|
|
|
|
|
|
|
|||||||
|
Check Primary |
|
|
|
|
|
|
IVR |
will |
announce |
the |
current |
||
Info |
DNS Server |
#125# |
None |
|
|
|
|
|||||||
|
|
|
|
setting in the Primary DNS field. |
|
|||||||||
|
Setting |
|
|
|
|
|
|
|
||||||
|
|
|
|
|
|
|
|
|
|
|
|
|
||
Info |
Check Firmware |
#128# |
None |
|
|
|
|
IVR will announce the version of the |
||||||
Version |
|
|
|
|
firmware running on the ATA. |
|
||||||||
|
|
|
|
|
|
|
|
|||||||
Setting |
Set DHCP client |
#111# |
None |
|
|
|
|
The system will change to DHCP |
||||||
|
|
|
|
Client type |
|
|
|
|
||||||
|
|
|
|
|
|
|
|
|
|
|
|
|||
|
|
|
Enter IP address using numbers on |
|
|
|
|
|
|
|||||
Setting |
Set Static IP |
#112xxx*xxx*xxx*xxx# |
the telephone keypad. |
Use the |
* |
DHCP will be disabled and system |
||||||||
Address |
(star) |
key when entering |
a |
decimal |
will change to the Static IP type. |
|
||||||||
|
|
|
||||||||||||
|
|
|
point. |
|
|
|
|
|
|
|
|
|
|
|
|
Set Network |
|
Enter |
value-using numbers |
on the |
|
|
|
|
|
|
|||
Setting |
#113xxx*xxx*xxx*xxx# |
telephone keypad. Use the * (star) key |
Must set Static IP first. |
|
|
|
||||||||
Mask |
|
|
|
|||||||||||
|
|
when entering a decimal point. |
|
|
|
|
|
|
|
|||||
|
|
|
|
|
|
|
|
|
|
|||||
|
|
|
Enter IP address using numbers on |
|
|
|
|
|
|
|||||
Setting |
Set Gateway IP |
#114xxx*xxx*xxx*xxx# |
the telephone keypad. |
Use the |
* |
Must set Static IP first. |
|
|
|
|||||
Address |
(star) key when entering a decimal |
|
|
|
||||||||||
|
|
|
|
|
|
|
|
|||||||
|
|
|
point. |
|
|
|
|
|
|
|
|
|
|
|
|
|
|
Enter IP address using numbers on |
|
|
|
|
|
|
|||||
Setting |
Set Primary DNS |
#115xxx*xxx*xxx*xxx# |
the telephone keypad. |
Use the |
* |
Must set Static IP first. |
|
|
|
|||||
Server |
(star) key when entering a decimal |
|
|
|
||||||||||
|
|
|
|
|
|
|
|
|||||||
|
|
|
point. |
|
|
|
|
|
|
|
|
|
|
|
|
|
|
1:G.711 u-Law, 2: G.711 a-Law, |
4: |
You can set the codec you want to |
|||||||||
Setting |
Set Codec |
#130+[1-8]# |
G.729a, 5: G.726 16K, 6: G.726 24K, |
|||||||||||
the first priority. |
|
|
|
|||||||||||
|
|
|
7: G.726 32K, 8: G.726 40K, |
|
|
|
|
|
||||||
|
|
|
|
|
|
|
|
|
|
|
||||
Setting |
Set Handset |
#131+[00~15]# |
Handset Gain from 0~15 |
|
|
|
You |
can set the Handset |
gain to |
|||||
Gain |
|
|
|
proper value, default is 6 |
|
|
||||||||
|
|
|
|
|
|
|
|
|
||||||
Setting |
Set Handset |
#132+[00~12]# |
Handset Volume from 0~12 |
|
|
You can set the Handset volume to |
||||||||
Volume |
|
|
proper value, default is 10 |
|
|
|||||||||
|
|
|
|
|
|
|
|
|
||||||
3
ATA-171/172/171P (ATA-S1/S2/P)
User’s Guide
3Setup the ATA by Web Browser
The ATA provides a built-in web server. You can use Web browser to configure the ATA. First please input the IP address in the Web page. In the end of IP address, please add the port number “:9999”. Ex: http://192.168.1.100:9999
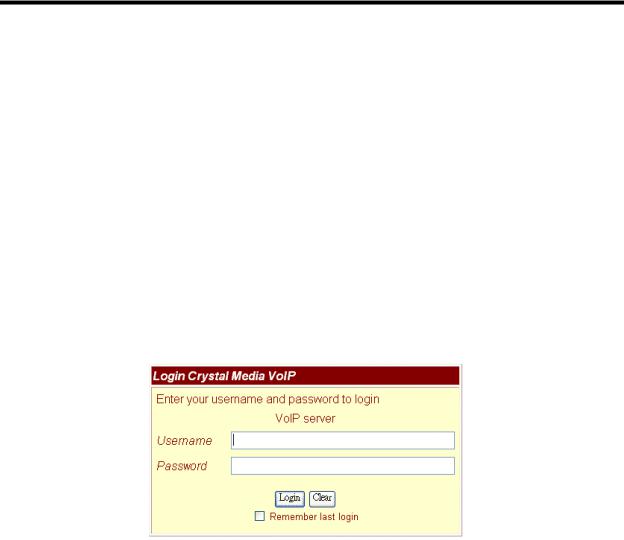
3.1Login.
3.1.1Please input the username and password into the blank field. The default setting is:
1.For Administrator, the username is: root; and the password is: null. If you use the account login, you can configure all the setting.
2.For normal user, the username is: user; and the password is: test. If you use the account login,
but you cannot configure the SIP setting.
3.WAN port IP address is DHCP mode, please use #126# to hear WAN port get IP address.
3.1.2Click the “Login” button will move into the ATA web based management information page.
3.1.3If you change the setting in the Web Management interface, please do remember to click the “Submit” button in that page. After you finished the change of the setting, click the “Save” function in the left side, and click the Save Button. When you finished the setting, please click the Reboot function in the left side, and click the Reboot button in that page. After the system restart, all the setting can work properly.
Figure 1. Login
4
ATA-171/172/171P (ATA-S1/S2/P)
User’s Guide
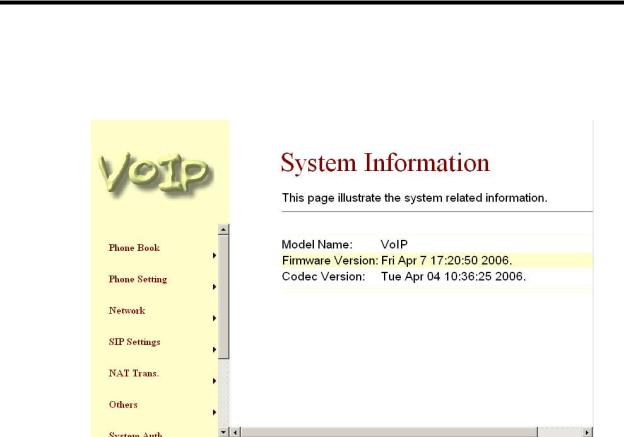
3.2System Information for the ATA.
3.2.1When you login the web page, you can see the ATA current system information like firmware version, company… etc in this page.
3.2.2Also you can see the function lists in the left side. You can use mouse to click the function you want to set up.
Figure 2. System Information
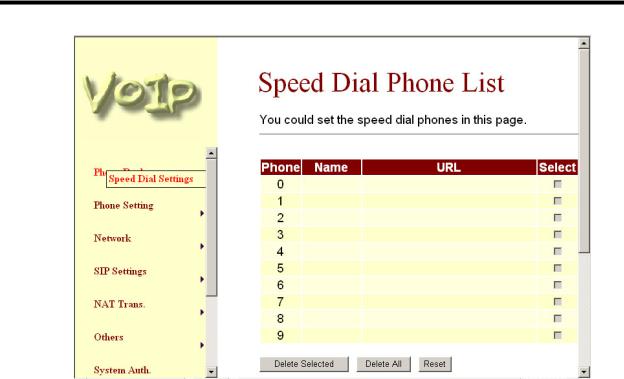
3.3Phone Book
3.3.1In Phone Book contains Speed Dial Settings. You can setup the Speed Dial number. If you want to use Speed Dial you just dial the speed dial number (from 0~9) then press “#”.
3.3.2In Speed Dial setting function you can add/delete Speed Dial number. You can input maximum 10 entries speed dial list.
-1- If you need to add a phone number into the Speed Dial list, you need to input the position, the name, and the phone number (by URL type). When you finished a new phone list, just click the “Add Phone” button.
-2- If you want to delete a phone number, you can select the phone number you want to delete then click “Delete Selected” button.
-3- If you want to delete all phone numbers, you can click “Delete All” button.
5
ATA-171/172/171P (ATA-S1/S2/P)
User’s Guide
Figure 3. Speed Dial
3.4Phone Setting
3.4.1In Phone Setting contains Call Forward, SNTP Settings, Volume Settings, Block Setting, Caller ID, Auto Dial Setting, Flash Time Setting, Call Waiting, and T.38(FAX) Setting functions.
3.4.2Call Forward function: you can setup the phone number you want to forward in this page. There are three type of Forward mode. You can choose All Forward, Busy Forward, and No
Answer Forward by click the icon. You can also select forward path to forward incomig call to IP or PSTN side.
-1- All Forward: All incoming call will forward to the number you choosed. You can input the name(description) and the phone number in URL field. If you select this function, then all the incoming call will direct forward to the speed dial number you choose.
-2- Busy Forward: If you are on the phone, the new incoming call will forward to the number you choosed. You can input the name(description) and the phone number in URL field.
-3- No Answer Forward: : If you can not answer the phone, the incoming call will forward to the number you choosed. You can input the name(description) and the phone number in URL field. Also you have to set the Time Out time for system to start to forward the call to the number you choosed.
-4- When you finished the setting, please click the Submit button.
-5- If there is nothing need to change, please click the Save Change Item in the left side, then click the Save button. The change you made will save into the system and the system will Reboot automatically.
6

ATA-171/172/171P (ATA-S1/S2/P)
User’s Guide
Figure 4. Forward Setting
3.4.3SNTP Setting function: you can setup the primary and second SNTP Server IP Address, to get the date/time information. Also you can base on your location to set the Time Zone, and how long need to synchronize again. When you finished the setting, please click the Submit button.
Figure 5. SNTP Setting
7

ATA-171/172/171P (ATA-S1/S2/P)
User’s Guide
3.4.4Volume Setting function: you can setup the Handset Volume, Ringer Volume, and the
Handset Gain. When you finished the setting, please click the Submit button. -1- Handset Volume is to set the volume for you can hear from the handset. -2- Ringer Volume is to set the ringer volume for you can hear.
-3- PSTN-Out Volume is is to set the volume for you can hear from the PSTN side. -4- Handset Gain is to set the volume send out to the other side’s handset.
-5- PSTN-In Gain is to set the volume send out to the other side. -6- When you finished the setting, please click the Submit button.
-7- If there is nothing need to change, please click the Save Change Item in the left side, then click the Save button. The change you made will save into the system and the system will Reboot automatically.
Figure 6. Volume Setting
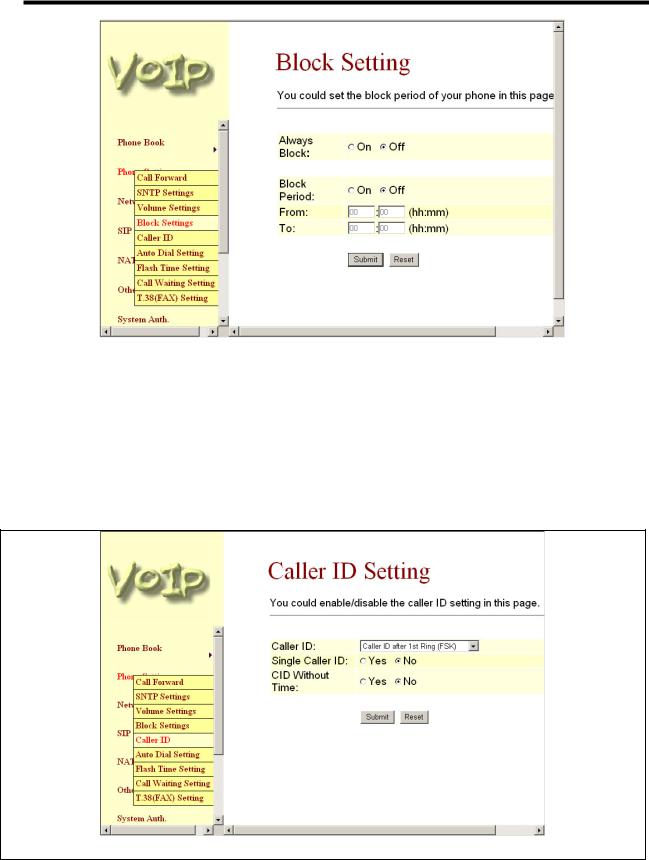
3.4.5Block Setting function: you can setup the Block Setting to keep the phone slience. You can choose Always Block or Block a period.
-1- Always Block: All incoming call will be blocked until disable this feature.
-2- Block Period: Set a time period and the phone will be blocked during the time period. If the “From” time is large than the “To” time, the Block time will from Day 1 to Day 2.
-3- When you finished the setting, please click the Submit button.
-4- If there is nothing need to change, please click the Save Change Item in the left side, then click the Save button. The change you made will save into the system and the system will Reboot automatically.
8
ATA-171/172/171P (ATA-S1/S2/P)
User’s Guide
Figure 7. Block Setting
3.4.6 Caller ID function: you can set the device to show Caller ID in your PSTN Phone or IP Phone. -1- There are four selection of Caller ID. You need to base on your environment to set the Caller ID function for FSK or DTMF. When you change the setting, please also double check the PTT seting in Others. You need to choose the correct country code then the
Caller ID will be effect.
-2- When you finished the setting, please click the Submit button. If there is nothing need to change, please click the Save Change Item in the left side, then click the Save button. The change you made will save into the system and the system will Reboot automatically.
Figure 8. Caller ID Setting
9
ATA-171/172/171P (ATA-S1/S2/P)
User’s Guide
3.4.7Auto Dial Setting function: This function is when you input the phone number by the keypad but you don’t need to press “#”. After time out the system will dial directly. When you finished the setting, please click the Submit button. If there is nothing need to change, please click the Save Change Item in the left side, then click the Save button. The change you made will save into the system and the system will Reboot automatically.
Figure 9. Auto Dial Setting
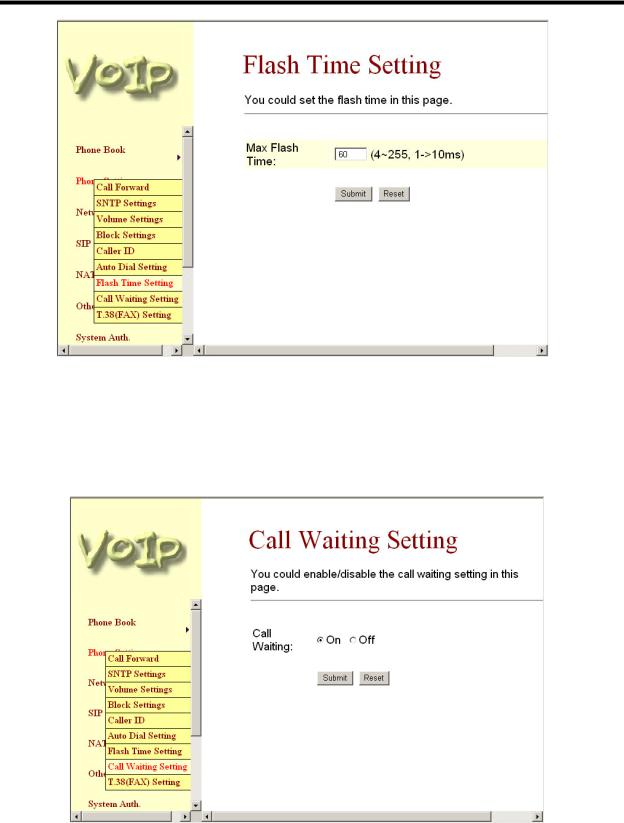
3.4.8Flash Time Setting function: When you use the PSTN Phone and you need to press the Hook to do the Flash (Switch to the other phone line or HOLD), this function is for you to set the time you press the Hook to represent the Flash function. When you finished the setting, please click the Submit button. If there is nothing need to change, please click the Save Change Item in the left side, then click the Save button. The change you made will save into the system and the system will Reboot automatically.
10
ATA-171/172/171P (ATA-S1/S2/P)
User’s Guide
Figure 10. Flash Time Setting
3.4.9Call Waiting Setting function: You can Enable/Disable the Call Waiting function, When you are talking with someone, there is a new incoming call, you will hear the call waiting tone. When you finished the setting, please click the Submit button. If there is nothing need to change, please click the Save Change Item in the left side, then click the Save button. The change you made will save into the system and the system will Reboot automatically.
Figure 11. Call Waiting Setting
3.4.10T.38 Setting function: You can Enable/Disable the T.38 function. When you finished the setting, please click the Submit button. If there is nothing need to change, please click the
11
 Loading...