


GRILL OWNER’S GUIDE
E-210™ ORIGINAL · E-310™ ORIGINAL · E-320™ ORIGINAL |
LPG |
Thank you for purchasing a Weber® grill.
Take a few minutes and protect it by registering your product online at www.weber.com.
YOU MUST READ THIS OWNER’S GUIDE BEFORE
OPERATING YOUR GAS GRILL.
m DANGER
If you smell gas:
1)Shut off gas to the appliance.
2)Extinguish any open flames.
3)Open lid.
4)If odour continues, keep away from the appliance and immediately call your gas supplier or your fire service.
Leaking gas may cause a fire or explosion which can cause serious bodily injury, death, or damage to property.
mWARNING
1)Do not store or use petrol or other flammable liquids or vapours in the vicinity of this or any other appliance.
2)A gas supply cylinder not connected for use shall not be stored in the vicinity of this or any other appliance.
mWARNING: Carefully follow all leak-check procedures in this Owner’s Guide prior to grill operation. Do this even if the grill was dealerassembled.
mWARNING: Do not ignite this appliance without first reading the BURNER IGNITION sections of this Owner’s Guide.
OUTDOOR USE ONLY.
NOTICE TO INSTALLER: These instructions must be left with the owner, who should keep them for future use.
845CN-0003 |
48660 |
|
|
0845 |
EN - INTERNATIONAL ENGLISH |
|
07/01/14 |

m DANGER
Failure to follow the DANGERS, WARNINGS and CAUTIONS contained in this Owner’s Guide may result in serious bodily injury or death, or may result in a fire or an explosion causing damage to property.
WARNINGS
WARNINGS:
mImproper assembly of grill may be dangerous. Please follow the assembly instructions carefully.
mDo not use this grill unless all parts are in place. The grill must be properly assembled according to the assembly instructions.
mYour Weber® gas grill should never be used by children. Accessible parts of the grill may be very hot. Keep young children, elderly and pets away while grill is in use.
mExercise caution when using your Weber® gas grill. It will be hot during cooking or cleaning, and should never be left unattended, or moved while in operation.
mDo not use charcoal, briquettes or lava rock in your Weber® gas grill.
mWhile igniting the grill or cooking, never lean over open grill.
mNever place hands or fingers on the front edge of the cookbox when the grill is hot or the lid is open.
mThe entire cookbox gets hot when in use. Do not touch.
mUnder no circumstances should you attempt to disconnect the gas regulator or any gas fitting while your grill is in operation.
mUse heat-resistant barbecue mitts or oven gloves when operating grill.
mFollow regulator connection instructions for your type of gas grill.
mShould the burners go out while grill is in operation, turn all gas valves off.
Open the lid and wait five minutes before attempting to relight grill, using the igniting instructions.
mFlammable materials should not be present within approximately 60 cm of the grill. This includes the top, bottom, back or sides of the grill.
mDo not build this model of grill in any built-in or slide-in construction. Ignoring this WARNING could cause a fire or an explosion that can damage property and cause serious bodily injury or death.
mDo not store an extra (spare) or disconnected gas supply cylinder under or near this grill.
mAfter a period of storage and/or non-use, the Weber® gas grill should be checked for gas leaks and burner obstructions before use. See instructions in this Owner’s Guide for correct procedures.
mDo not operate your Weber® gas grill if there are any leaking gas connections.
mDo not use a flame to check for gas leaks.
mDo not put a grill cover or anything flammable on or in the storage area under the grill while grill is in operation or is hot.
mLiquid propane gas is not natural gas. The conversion or attempted use of natural gas in a liquid propane gas unit or liquid propane gas in a natural gas unit is dangerous and will void your warranty.
mKeep electrical mains lead and the fuel supply hose away from heated surfaces.
mDo not enlarge valve orifices or burner ports when cleaning the valves or burners.
mThe Weber® gas grill should be thoroughly cleaned on a regular basis.
mA dented or rusty gas supply cylinder may be hazardous and should be checked by your gas supplier. Do not use a gas supply cylinder with a damaged valve.
mAlthough your gas supply cylinder may appear to be empty, gas may still be present, and the cylinder should be transported and stored accordingly.
mShould a grease fire occur, turn off all burners and leave lid closed until fire is out.
mShould an uncontrolled flare-up occur, move food away from the flames until flaring subsides.
2 WWW.WEBER.COM®

WARRANTY |
TABLE OF CONTENTS |
Thank you for purchasing a WEBER® product. Weber-Stephen Products LLC, 200 East Daniels Road, Palatine, Illinois 60067-6266 (“Weber”) prides itself on delivering a safe, durable, and reliable product.
This is Weber’s Voluntary Warranty provided to you at no extra charge. It contains the information you will need to have your WEBER® product repaired in the unlikely event of a failure or defect.
Pursuant to applicable laws, the customer has several rights in case the product is defective. Those rights include supplementary performance or replacement, abatement of the purchasing price and compensation. In the European Union, for example, this would be a two-year statutory warranty starting on the date of the handover of the product.
These and other statutory rights remain unaffected by this warranty provision. In fact, this warranty grants additional rights to the Owner that are independent from statutory warranty provisions.
WEBER’S VOLUNTARY WARRANTY
Weber warrants, to the purchaser of the WEBER® product (or in the case of a gift or promotional situation, the person for whom it was purchased as a gift or promotional item), that the WEBER® product is free from defects in material and workmanship for the period(s) of time specified below when assembled and operated in accordance with the accompanying Owner’s Guide. (Note: If you lose or misplace your WEBER® Owner’s Guide, a replacement is available online at www.weber.com, or such country-specific
website to which Owner may be redirected.) Under normal, private single family home or apartment use and maintenance, Weber agrees within the framework of this warranty to repair or replace defective parts within the applicable time periods, limitations, and exclusions listed below. TO THE EXTENT ALLOWABLE BY APPLICABLE LAW, THIS WARRANTY IS EXTENDED ONLY TO
THE ORIGINAL PURCHASER AND IS NOT TRANSFERABLE TO SUBSEQUENT OWNERS, EXCEPT IN THE CASE OF GIFTS AND PROMOTIONAL ITEMS AS NOTED ABOVE.
OWNER’S RESPONSIBILITIES UNDER THIS WARRANTY
To ensure trouble-free warranty coverage, it is important (but it is not required) that you register your WEBER® product online at www. weber.com, or such country-specific website to which Owner may be redirected). Please also retain your original sales receipt and/or invoice. Registering your WEBER® product confirms your warranty coverage and provides a direct link between you and Weber in case we need to contact you.
The above warranty only applies if the Owner takes reasonable care of the WEBER® product by following all assembly instructions, usage instructions, and preventative maintenance as outlined in the accompanying Owner’s Guide, unless the Owner can prove that the defect or failure is independent of non-compliance with the above mentioned obligations. If you live in a coastal area, or have your product located near a pool, maintenance includes regular washing and rinsing of the exterior surfaces as outlined in the accompanying Owner’s Guide.
WARRANTY HANDLING / EXCLUSION OF WARRANTY
If you believe that you have a part which is covered by this Warranty, please contact Weber Customer Service using the contact information on our website (www.weber.com, or such countryspecific website to which Owner may be redirected). Weber will, upon investigation, repair or replace (at its option) a defective
part that is covered by this Warranty. In the event that repair or replacement are not possible, Weber may chose (at its option) to replace the grill in question with a new grill of equal or greater value. Weber may ask you to return parts for inspection, shipping charges to be pre-paid.
This WARRANTY lapses if there are damages, deteriorations, discolorations and/or rust for which Weber is not responsible caused by:
•Abuse, misuse, alteration, modification, misapplication, vandalism, neglect, improper assembly or installation, and failure to properly perform normal and routine maintenance;
•Insects (such as spiders) and rodents (such as squirrels), including but not limited to damage to burner tubes and/or gas hoses;
•Exposure to salt air and/or chlorine sources such as swimming pools and hot tubs/spas;
•Severe weather conditions such as hail, hurricanes, earthquakes, tsunamis or surges, tornadoes or severe storms.
The use and/or installation of parts on your WEBER® product that are not genuine Weber parts will void this Warranty, and any damages that result hereby are not covered by this Warranty. Any
conversion of a gas grill not authorized by Weber and performed by a Weber authorized service technician will void this Warranty.
The grills illustrated in this Owner’s Guide may vary slightly from the model purchased.
PRODUCT WARRANTY PERIODS
Cookbox: 10 years, no rust through/burn through
(2 years paint excluding fading or discoloration)
Lid assembly: 10 years, no rust through/burn through
Stainless steel
burner tubes: 10 years, no rust through/burn through
Stainless steel
cooking grates: 5 years, no rust through/burn through
Stainless steel
Flavorizer® bars: 5 years, no rust through/burn through
Porcelain-enameled
cast iron cooking grates: 5 years, no rust through/burn through
All remaining parts: 2 years
DISCLAIMERS
APART FROM THE WARRANTY AND DISCLAIMERS AS DESCRIBED IN THIS WARRANTY STATEMENT, THERE ARE EXPLICITLY NO FURTHER WARRANTY OR VOLUNTARY DECLARATIONS OF LIABILITY GIVEN HERE WHICH GO BEYOND THE STATUTORY LIABILITY APPLYING TO WEBER. THE PRESENT WARRANTY STATEMENT ALSO DOES NOT LIMIT OR EXCLUDE SITUATIONS OR CLAIMS WHERE WEBER HAS MANDATORY LIABILITY AS PRESCRIBED BY STATUTE.
NO WARRANTIES SHALL APPLY AFTER THE APPLICABLE PERIODS OF THIS WARRANTY. NO OTHER WARRANTIES GIVEN BY ANY PERSON, INCLUDING A DEALER OR RETAILER, WITH RESPECT TO ANY PRODUCT (SUCH AS ANY “EXTENDED
WARRANTIES”), SHALL BIND WEBER. THE EXCLUSIVE REMEDY OF THIS WARRANTY IS REPAIR OR REPLACEMENT OF THE PART OR PRODUCT.
IN NO EVENT UNDER THIS VOLUNTARY WARRANTY SHALL RECOVERY OF ANY KIND BE GREATER THAN THE AMOUNT OF THE PURCHASE PRICE OF THE WEBER PRODUCT SOLD.
YOU ASSUME THE RISK AND LIABILITY FOR LOSS, DAMAGE, OR INJURY TO YOU AND YOUR PROPERTY AND/OR TO OTHERS AND THEIR PROPERTY ARISING OUT OF THE MISUSE OR ABUSE OF THE PRODUCT OR FAILURE TO FOLLOW INSTRUCTIONS PROVIDED BY WEBER IN THE ACCOMPANYING OWNER’S GUIDE.
PARTS AND ACCESSORIES REPLACED UNDER THIS WARRANTY ARE WARRANTED ONLY FOR THE BALANCE OF THE ABOVE MENTIONED ORIGINAL WARRANTY PERIOD(S).
THIS WARRANTY APPLIES TO PRIVATE SINGLE FAMILY HOME OR APARTMENT USE ONLY AND DOES NOT APPLY TO WEBER GRILLS USED IN COMMERCIAL, COMMUNAL OR MULTI-UNIT SETTINGS SUCH AS RESTAURANTS, HOTELS, RESORTS, OR RENTAL PROPERTIES.
WEBER MAY FROM TIME TO TIME CHANGE THE DESIGN OF ITS PRODUCTS. NOTHING CONTAINED IN THIS WARRANTY SHALL BE CONSTRUED AS OBLIGATING WEBER TO INCORPORATE SUCH DESIGN CHANGES INTO PREVIOUSLY MANUFACTURED PRODUCTS, NOR SHALL SUCH CHANGES BE CONSTRUED AS AN ADMISSION THAT PREVIOUS DESIGNS WERE DEFECTIVE.
Refer to International Business Units list at the end of this Owner’s Guide for additional contact information.
WARNINGS . . . . . . . . . . . . . . . . 2 WARRANTY . . . . . . . . . . . . . . . . 3 TABLE OF CONTENTS. . . . . . . . . . . . 3 E-210™ ORIGINAL EXPLODED VIEW. . . . . . 4 E-310™ ORIGINAL EXPLODED VIEW. . . . . . 6 E-320™ ORIGINAL EXPLODED VIEW. . . . . . 8
IMPORTANT INFORMATION ABOUT LPG GAS
& GAS CONNECTIONS . . . . . . . . . . . 10
WHAT IS LIQUID PROPANE GAS? . . . . . . . . . . . . . . 10
SAFE HANDLING TIPS FOR
LIQUID PROPANE GAS CYLINDERS. . . . . . . . . . . . . . 10 STORAGE . . . . . . . . . . . . . . . . . . . . . . . . 10 LPG CYLINDER REQUIREMENTS. . . . . . . . . . . . . . . 10 REGULATOR CONNECTIONS & REQUIREMENTS . . . . . . . 10
LPG CYLINDER INSTALLATION
INSIDE CABINET. . . . . . . . . . . . . . 12
WHERE DOES THE LPG CYLINDER GO?. . . . . . . . . . . . 12 INSIDE CABINET REQUIREMENTS . . . . . . . . . . . . . . 12 INSIDE CABINET INSTALLATION. . . . . . . . . . . . . . . 13
LPG CYLINDER INSTALLATION
OUTSIDE CABINET . . . . . . . . . . . . . 14
OUTSIDE CABINET REQUIREMENTS.. . . . . . . . . . . . 14 GROUND PLACEMENT INSTALLATION. . . . . . . . . . . . 14
CONNECTING THE REGULATOR . . |
. . . . . |
15 |
|
WHAT IS A REGULATOR? |
. . . . . . . . . . |
. . . . . . |
. . 15 |
CONNECTING THE REGULATOR TO THE CYLINDER. . . . . . |
. 15 |
||
PREPARING TO USE YOUR GRILL. . |
. . . . |
. 16 |
|
WHAT IS A LEAK CHECK?. . . . . . . . . . . |
. . . . . . |
. 16 |
|
PARTIAL DISASSEMBLY OF YOUR GRILL |
|
16 |
|
FOR A LEAK CHECK . . . |
. . . . . . . . . . |
. . . . . . |
|
CHECKING FOR GAS LEAKS.. . . . . . . . . . . . . . . |
. 17 |
||
DISCONNECTING THE REGULATOR . . . . . . |
. . . . . . |
. 19 |
|
REFILLING THE LPG CYLINDER. . . . . . . . . . . . . . . |
. . . . . . . . . . . . |
. . 19 |
|
RECONNECT THE LPG CYLINDER. . . . . . . |
. . . . . . |
. 19 |
|
GRILLING TIPS & HELPFUL HINTS. . . . . . |
20 |
||
TIPS & HINTS.. . . . . . . . . . . . . . . . . . . . . . 20 |
|||
COVERED COOKING. . . . . |
. . . . . . . . . . . . . . |
|
20 |
FLAVORIZER® SYSTEM. . |
. . . . . . . . . . |
. . . . . . |
. 20 |
DRIPPINGS AND GREASE . . . . . . . . . . |
. . . . . . |
. 20 |
|
SAFETY CHECKS BEFORE USING YOUR GRILL. 21 |
|||
SAFETY FIRST . . . . . |
. . . . . . . . . . |
. . . . . . |
. 21 |
SLIDE-OUT GREASE TRAY . . . . . . . . . . |
. . . . . . |
. 21 |
|
CATCH PAN AND DISPOSABLE DRIP PAN . . . . |
. . . . . . |
. 21 |
|
HOSE INSPECTION . . . |
. . . . . . . . . . |
. . . . . . |
. 21 |
MAIN BURNER IGNITION & USAGE. . . . . . |
22 |
||
METHODS OF BURNER IGNITION. . . . . . . |
. . . . . . |
. 22 |
|
MAIN BURNER IGNITION . . . . . . . . . . |
. . . . . . |
. 22 |
|
TO EXTINGUISH BURNER. . . . . . . . . . . |
. . . . . . |
. 22 |
|
SIDE BURNER IGNITION & USAGE |
|
. 24 |
|
(320 MODELS). . |
. . . . . . . . . . . . |
||
ON THE SIDE... . . . . . . . . |
. . . . . . . . . . . . . |
|
24 |
SIDE BURNER IGNITION |
. . . . . . . . . . . |
. . . . . . |
. 24 |
TO EXTINGUISH SIDE BURNER. . . . . . . . |
. . . . . . |
. 24 |
|
TROUBLESHOOTING. . . . . . . . . . . . |
26 |
||
GENERAL TROUBLESHOOTING . . . . . . . . |
. . . . . . |
. 26 |
|
SIDE BURNER TROUBLESHOOTING (320 MODEL) . . . . . . . |
26 |
||
ANNUAL MAINTENANCE. . . . . . . . . . |
27 |
||
KEEPING YOUR WEBER® GAS GRILL IN TIP-TOP SHAPE. . . . |
. 27 |
||
BURNER FLAME PATTERN . . . . . . . . . . . . . . . . |
|
27 |
|
WEBER® SPIDER/INSECT SCREENS. . . . . . |
. . . . . . |
. 27 |
|
BURNER TUBE PORTS. . |
. . . . . . . . . . |
. . . . . . |
. 27 |
BURNER TUBE CLEANING OR REPLACEMENT. . |
. . . . . . |
. 28 |
|
STORAGE . . . . . . . |
. . . . . . . . . . |
. . . . . . |
. 32 |
ROUTINE MAINTENANCE . . . . . . . . . |
33 |
||
BEAUTIFUL—INSIDE AND OUT. . . . . . . . |
. . . . . . |
. 33 |
|
CLEANING THE OUTSIDE OF THE GRILL . . . . |
. . . . . . |
. 33 |
|
CLEANING THE INSIDE OF THE GRILL. . . . . |
. . . . . . |
. 33 |
|
HOSE INSPECTION . . . |
. . . . . . . . . . |
. . . . . . |
. 33 |
MAINTAINING THE ELECTRONIC |
|
34 |
|
CROSSOVER® IGNITION SYSTEM. . . . . . . . |
. . . . . . |
||
CLEANING SIDE BURNER TUBE (320 MODEL) . . . |
. . . . . |
35 |
|
SIDE BURNER MAINTENANCE . . . . . . . . |
. . . . . . |
. 35 |
|
WWW.WEBER.COM® 3
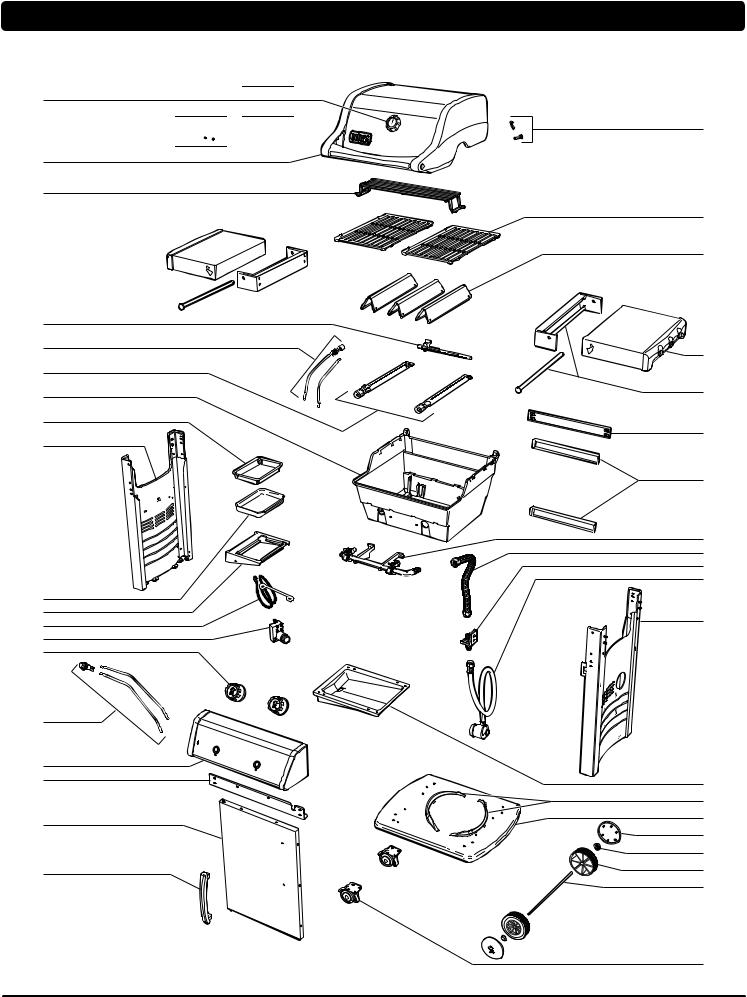
SPIRIT® E-210™ ORIGINAL EXPLODED VIEW
1 


 2
2
3 4
5
6
7
8
9
10
11
12
13
14
15
16
17
18
19
20
Spirit® E-210™_Original_LPG_EU_070114
21
22
23
24
25
26
27
28
29
30
31
32
33
34
35
36
37
38
39
40
4 WWW.WEBER.COM®

SPIRIT® E-210™ ORIGINAL EXPLODED VIEW
SPIRIT® E-210™ ORIGINAL LPG
EXPLODED VIEW LIST
1.Thermometer and Bezel
2.Logo Plate
3.Shroud Assembly
4.Warming Rack
5.Crossover® Burner Tube
6.Igniter Electrode
7.Burner Tube
8.Cookbox
9.Disposable Drip Pan
10.Left Frame Panel
11.Catch Pan
12.Catch Pan Holder
13.Matchstick Holder
14.Igniter Module
15.Control Knob
16.Igniter Button
17.Control Panel
18.Front Cross Brace
19.Door
20.Door Handle
21.Shroud Hardware
22.Cooking Grate*
23.Flavorizer® Bar
24.Fold-Down Table
25.Fold-Down Assembly
26.Rear Cross Brace
27.Rear Frame Support
28.Manifold
29.Manifold Hose
30.Bulkhead
31.Hose & Regulator
32.Right Frame Panel
33.Slide-Out Grease Tray
34.Cylinder Bracket
35.Bottom Panel
36.Wheel Cover
37.Hub Cap
38.Wheel
39.Axle
40.Locking Caster
*Cooking Grate may vary depending on the model purchased.
WWW.WEBER.COM® 5
1
2
3
4
5
6
7
8
9
10
11
12
13
14
15
16
17
18
19
20
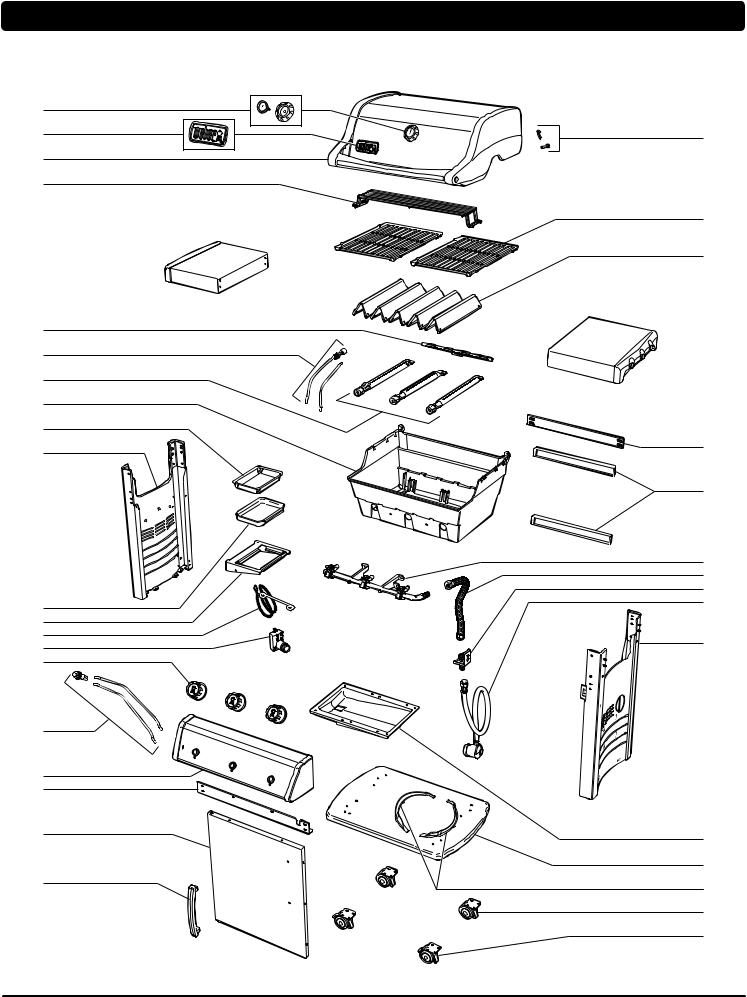
SPIRIT® E-310™ ORIGINAL EXPLODED VIEW
Spirit® E-310™_Original_LPG_EU_070114
21
22
23
 24
24
25
26
27
28
29
30
31
32
33
34
35
36
6 WWW.WEBER.COM®

SPIRIT® E-310™ ORIGINAL EXPLODED VIEW
SPIRIT® E-310™ORIGINAL LPG
EXPLODED VIEW LIST
1.Thermometer and Bezel
2.Logo Plate
3.Shroud Assembly
4.Warming Rack
5.Crossover® Burner Tube
6.Igniter Electrode
7.Burner Tube
8.Cookbox
9.Disposable Drip Pan
10.Left Frame Panel
11.Catch Pan
12.Catch Pan Holder
13.Matchstick Holder
14.Igniter Module
15.Control Knob
16.Igniter Button
17.Control Panel
18.Front Cross Brace
19.Door
20.Door Handle
21.Shroud Hardware
22.Cooking Grate*
23.Flavorizer® Bar
24.Side Table
25.Rear Cross Brace
26.Rear Frame Support
27.Manifold
28.Manifold Hose
29.Bulkhead
30.Hose & Regulator
31.Right Frame Panel
32.Slide-Out Grease Tray
33.Bottom Panel
34.Cylinder Bracket
35.Caster
36.Locking Caster
*Cooking Grate may vary depending on the model purchased.
WWW.WEBER.COM® 7

1
2
3
4
5
6
7
8
9
10
11
12
13
14
15
16
17
18
19
20
21
22
23
24
25
SPIRIT® E-320™ ORIGINAL EXPLODED VIEW
Spirit® E-320™_Original_LPG_EU_070114
26
27
28
29
30
31
32
33
34
35
36
37
38
39
40
41
42
8 WWW.WEBER.COM®

SPIRIT® E-320™ ORIGINAL EXPLODED VIEW
SPIRIT® E-320™ ORIGINAL LPG
EXPLODED VIEW LIST
1.Thermometer and Bezel
2.Logo Plate
3.Shroud Assembly
4.Warming Rack
5.Side Burner Lid
6.Side Burner Table
7.Side Burner Assembly
8.Side Burner Valve Plate
9.Side Burner Control Knob
10.Crossover® Burner Tube
11.Igniter Electrode
12.Burner Tube
13.Cookbox
14.Disposable Drip Pan
15.Left Frame Panel
16.Catch Pan
17.Catch Pan Holder
18.Matchstick Holder
19.Igniter Module
20.Control Knob
21.Igniter Button
22.Control Panel
23.Front Cross Brace
24.Door
25.Door Handle
26.Shroud Hardware
27.Cooking Grate*
28.Flavorizer® Bar
29.Side Table
30.Rear Cross Brace
31.Rear Frame Support
32.Side Burner Gas Line Assembly
33.Manifold
34.Manifold Hose
35.Bulkhead
36.Hose & Regulator
37.Right Frame Panel
38.Slide-Out Grease Tray
39.Bottom Panel
40.Cylinder Bracket
41.Caster
42.Locking Caster
*Cooking Grate may vary depending on the model purchased.
WWW.WEBER.COM® 9

IMPORTANT INFORMATION ABOUT LPG GAS & GAS CONNECTIONS
WHAT IS LIQUID
PROPANE GAS?
Liquid propane gas (LPG) is the flammable, petroleum-based product used to fuel your
grill. It is a gas at moderate temperatures and pressure when it is not contained. But at moderate pressure inside a container, such as a cylinder, LPG is a liquid. As pressure is released from the cylinder, the liquid readily vapourises and becomes liquid propane gas.
•LPG has an odour similar to natural gas. You should be aware of this odour.
•LPG is heavier than air. Leaking liquid propane gas may collect in low areas and resist dispersion.
SAFE HANDLING TIPS FOR LIQUID PROPANE GAS CYLINDERS
There are various guidelines and safety factors that you need to keep in mind when using liquid propane gas (LPG). Carefully follow these instructions before using your Weber® gas grill.
•Always close the cylinder valve before disconnecting regulator.
•Do not use a damaged LPG cylinder. A dented or rusty LPG cylinder or an LPG cylinder with a damaged valve may be hazardous and should be replaced with a new cylinder immediately.
•Treat “empty” LPG cylinders with the same care as you treat full cylinders. Even when an LPG cylinder is empty of liquid, there may still be gas pressure inside the cylinder.
•LPG cylinders must be installed, transported, and stored in an upright position. LPG cylinders should not be dropped or handled roughly.
•Never store or transport the LPG cylinder where temperatures can reach 51° C (the cylinder will become too hot to hold by hand). For example: do not leave the LPG cylinder in a car on a hot day.
•Leak-test the joint where the regulator connects to the LPG cylinder each time a reconnection occurs. For example: test each time the LPG cylinder is refilled and reinstalled.
•LPG cylinders must be kept out of reach of children.
•Do not connect to natural gas supply (city gas). The valves and orifices are designed exclusively for liquid propane gas.
•The areas around the LPG cylinder must be free and clear from debris.
•The LPG cylinder should not be changed in the proximity of an ignition source.
STORAGE
For grills that have been stored for a while, it is important to follow these guidelines:
•The gas must be turned off at the LPG cylinder when the Weber® gas grill is not in use.
mWARNING: Make sure that the LPG cylinder valve is closed when the grill is
not in use.
•If storing the Weber® gas grill indoors, first DISCONNECT the gas supply and store the LPG cylinder outdoors in a well-ventilated space.
•Do not store a disconnected LPG cylinder in a building, garage, or any other enclosed area.
•If you do not disconnect the LPG cylinder from the Weber® gas grill, be sure to keep both the grill and the cylinder outdoors in a well-ventilated area.
•Check that the areas under the control panel and the slide-out grease tray are free from debris that might obstruct the flow of combustion or ventilation air.
LPG CYLINDER REQUIREMENTS
•Use only a 3kg-13kg LPG cylinder.
REGULATOR CONNECTIONS &
REQUIREMENTS
•In the United Kingdom, this appliance must be fitted with a regulator complying with BS 3016, having a nominal output of 37 millibars. (Supplied with grill.)
•The length of hose must not exceed 1.5 metres.
•Avoid kinking the hose.
•We recommend that you replace the gas hose on your Weber® gas grill every five years. Some countries may have requirements that the gas hose be replaced within less than five years, in which case that country’s requirement would take precedence.
•Any parts sealed by the manufacturer must not be altered by the user.
•Any modification of the appliance may be dangerous.
•Only a nationally approved low-pressure hose and regulator must be used.
•Replacement pressure regulators and hose assemblies must be those specified by the outdoor cooking gas appliance manufacturer.
•Be sure the regulator is mounted with the small vent hole pointed downward so that it will not collect water. This vent should be free of dirt, grease, bugs, etc.
10 WWW.WEBER.COM®
IMPORTANT INFORMATION ABOUT LPG GAS & GAS CONNECTIONS
COUNTRY |
GAS TYPE & PRESSURE |
|
|
Bulgaria, Cyprus, Czech Republic, Denmark, Estonia, Finland, |
I3B/P - 30 mbar |
Hungary, Iceland, Latvia, Lithuania, Malta, Netherlands, Norway, |
|
Romania, Slovak Republic, Slovenia, Sweden, Turkey |
|
|
|
Belgium, France, Greece, Ireland, Italy, Luxembourg, Portugal, Spain, |
I3+ - 28-30 / 37 mbar |
Switzerland, United Kingdom |
|
Poland |
I3P - 37 mbar |
Austria, Germany |
I3B/P - 50 mbar |
CONSUMPTION DATA
|
|
Propane kW |
Butane kW |
Propane g/h |
Butane g/h |
|
|
|
|
|
|
Spirit® 210 Classic |
7,8 |
8,8 |
558 |
640 |
|
Spirit® 220 Classic |
11,3 |
12,9 |
808 |
939 |
|
Spirit® 310 Classic |
9,4 |
10,6 |
672 |
771 |
|
Spirit® 320 |
Classic |
12,9 |
14,7 |
922 |
1070 |
Spirit® 210 |
Original |
7,8 |
8,8 |
558 |
640 |
Spirit® 310 |
Original |
9,4 |
10,6 |
672 |
771 |
Spirit® 320 |
Original |
12,9 |
14,7 |
922 |
1070 |
Spirit® 210 Premium |
7,8 |
8,8 |
558 |
640 |
|
Spirit® 310 Premium |
9,4 |
10,6 |
672 |
771 |
|
Spirit® 320 Premium |
12,9 |
14,7 |
922 |
1070 |
|
VALVE ORIFICE SIZE
MAIN BURNER VALVES
|
|
|
LPG Gas |
|
Methane Gas |
|
|
|
|
|
|
|
|
|
I3B/P - 30 mbar |
|
I3+ - 28-30 / 37 mbar |
I3B/P - 50 mbar |
G (20) |
G (25) |
Spirit® 2 Burner |
0.99 mm |
|
0.97 mm |
0.90 mm |
1.40 |
1.50 |
|
mm |
mm |
||||
|
|
|
|
|
||
|
|
|
|
|
|
|
Spirit® 3 Burner |
0.90 mm |
|
0.86 mm |
0.79 mm |
1.25 |
1.35 |
|
mm |
mm |
||||
|
|
|
|
|
||
|
|
|
|
|
|
|
|
|
SIDE BURNER VALVE |
|
|
|
|
|
|
|
|
|
|
|
|
|
|
LPG Gas |
|
Methane Gas |
|
|
|
|
|
|
|
|
Spirit® 220 |
0.98 mm |
|
0.90 mm |
0.84 mm |
1.39 |
1.50 |
|
mm |
mm |
||||
|
|
|
|
|
||
|
|
|
|
|
|
|
Spirit® 320 |
0.98 mm |
|
0.90 mm |
0.84 mm |
1.39 |
1.50 |
|
mm |
mm |
||||
|
|
|
|
|
||
|
|
|
|
|
|
|
REPLACEMENT HOSE,
REGULATOR AND VALVE ASSEMBLY
mIMPORTANT NOTICE:
We recommend that you replace the gas hose assembly on your Weber® gas grill every five years. Some countries may have requirements that the gas hose be replaced within less than five years, in which case that country’s requirement would take precedence.
For replacement hose, regulator, and valve assemblies, contact the Customer Service Representative in your area using the contact information on our web site.
Log on to www.weber.com.
WWW.WEBER.COM® 11
 Loading...