


GAS GRILL
Built-In NG Gas Grill Installation Guide
Assembly - Pg. 10
 Guía de Instalación de la Barbacoa de Gas Natural Empotrada - Pg. 29
  Guide pour l’Installation du Grill à Gaz Naturel Intégré - Pg. 41
460 - NG
660 - NG
#56584
56584 08/01/13 NG US - ENGLISH

WARNINGS
WARNINGS
Do not store a spare or disconnected liquid propane cylinder under or near this barbecue.
Improper assembly may be dangerous. Please follow the assembly instructions carefully.
After a period of storage, and/or nonuse, the Weber® gas barbecue should be checked for gas leaks and burner obstructions before use. See instructions in this manual for correct procedures.
Do not operate the Weber® gas barbecue if there is a gas leak present.
Do not use a flame to check for gas leaks.
Combustible materials should never be within 24 inches (61 cm) of the back or sides of your Weber® gas barbecue.
Do not put a barbecue cover or anything flammable on, or in the storage area under the barbecue.
Your Weber® gas barbecue should never be used by children. Accessible parts of the barbecue may be very hot. Keep young children away while it is in use.
You should exercise reasonable care when operating your Weber® gas barbecue. It will be hot during cooking or cleaning and should never be left unattended, or moved while in operation.
Should the burners go out while in operation, turn all gas valves off. Open the lid and wait five minutes before attempting to relight, using the igniting instructions.
Do not use charcoal or lava rock in your Weber® gas barbecue.
Never lean over open grill or place hands or fingers on the front edge of the cookbox.
Should a grease fire occur, turn off all burners and leave lid closed until fire is out.
Do not enlarge valve orifices or burner ports when cleaning the valves or burners.
The Weber® gas barbecue should be thoroughly cleaned on a regular basis.
Liquid propane gas is not natural gas. The conversion or attempted use of natural gas in a liquid propane unit or liquid propane gas in a natural gas unit is dangerous and will void your warranty.
Do not attempt to disconnect any gas fitting while your barbecue is in operation.
Use heat-resistant barbecue mitts or gloves when operating barbecue.
Keep any electrical supply cord and the fuel supply hose away from any heated surfaces.
Combustion byproducts produced when using this product contain chemicals known to the state of California to cause cancer, birth defects, or other reproductive harm.
Do not use this barbecue unless all parts are in place. The unit must be properly assembled according to the assembly instructions.
Proposition 65 Warning: Handling the brass material on this product exposes you to lead, a chemical known to the state of California to cause cancer, birth defects or other reproductive harm.
(Wash hands after handling this product.)
LIQUID PROPANE GAS UNITS ONLY
Use the pressure regulator and hose assembly that is supplied with your Weber® gas barbecue.
Do not attempt to disconnect the gas regulator and hose assembly or any gas fitting while your barbecue is in operation.
A dented or rusty liquid propane cylinder may be hazardous and should be checked by your liquid propane supplier. Do not use a liquid propane cylinder with a damaged valve.
Although your liquid propane cylinder may appear to be empty, gas may still be present, and the cylinder should be transported and stored accordingly.
If you see, smell or hear the hiss of escaping gas from the liquid propane cylinder
1.Move away from liquid propane cylinder.
2.Do not attempt to correct the problem yourself.
3.Call your fire department.
2
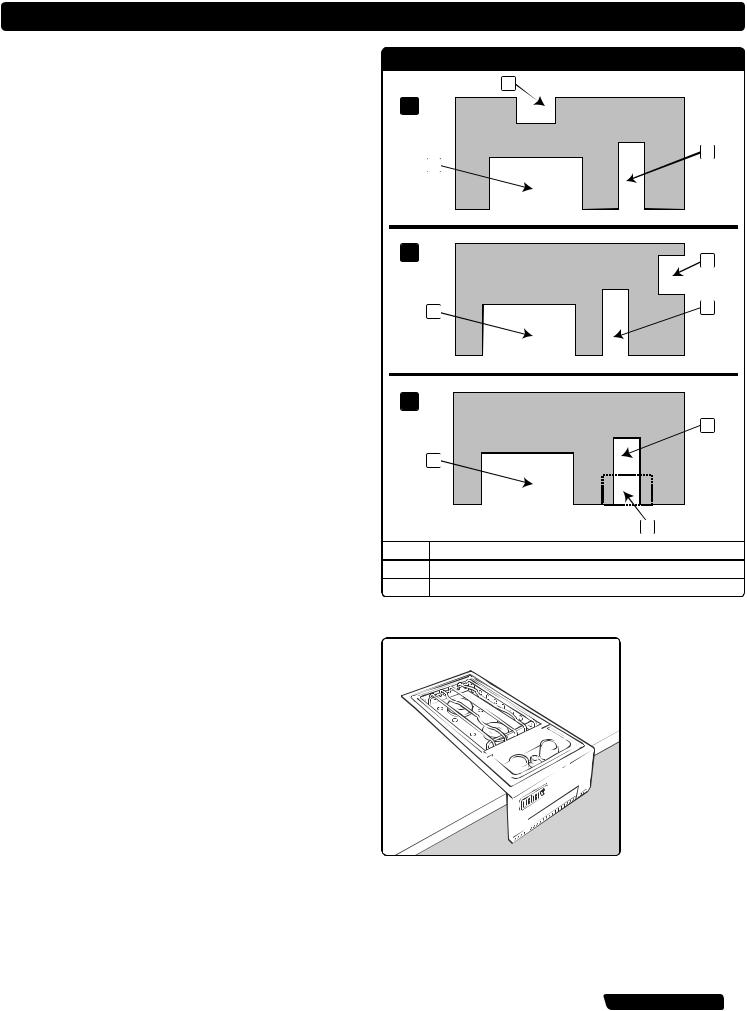
BUILT-IN CUTOUT DIMENSIONS
“ISLAND” STRUCTURE CONFIGURATION OPTIONS
There are many available options for positioning the major components of your “island” structure. The major components are:
1)The Built-In Grill
2)Gas supply enclosure
3)Optional side burner accessory
The three common options (A, B, C) are illustrated in the “ ‘Island’ Structure Configuration Options” table.
Note: Gas line limitation
The gas supply hose from grill manifold to gas supply bulkhead must not exceed 58" (147 cm).The 3⁄8" (9.52 mm) side burner accessory hose (not included) must not exceed 58" (147 cm).
NOTE: IF YOU HAVE PURCHASED A SIDE BURNER
If you have purchased a side burner accessory with your Summit® Gas Grill, Weber® recommends that you read the SUMMIT® BUILT-IN SIDE BURNER INSTALLATION/ OWNER’S GUIDE before designing your “island” structure.
“ISLAND” STRUCTURE CONFIGURATION OPTIONS
2
A
3
|
1 |
C |
|
|
1 |
|
2 |
1 |
Summit® Built-In Grill |
2 |
Gas supply |
3 |
Optional side burner accessory |
B |
2 |
1 |
|
3 |
|
|
|
|
|
|
|
3 |
|
|
|
|
|
|
|
|
|
|
|
|
|
|
|
|
|
 WWW.WEBER.COM® 3
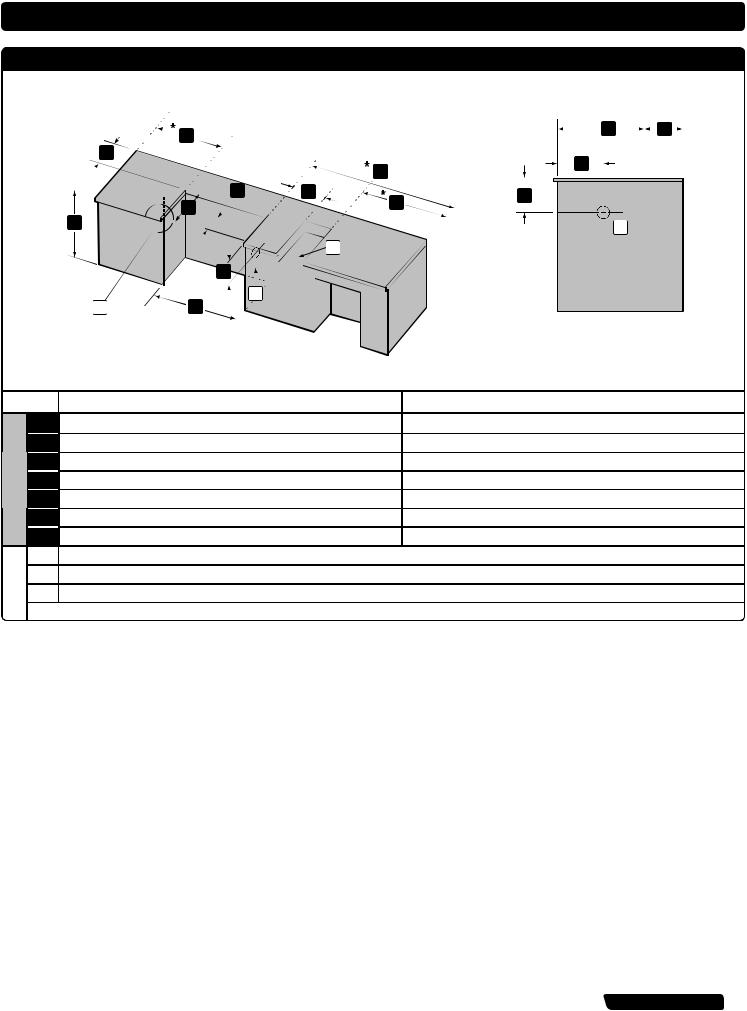
BUILT-IN CUTOUT DIMENSIONS
GENERAL CONSTRUCTION DETAILS
Summit® Built-In Unit and all other accessory units should be on site before construction begins.
For ease of installation, the grill will be pushed on its casters into the built-in structure.
The installation of this grill requires a level floor pad surface (1) and countertop surface. The floor pad surface must be constructed from solid materials and must be level
and smooth. Proper subgrade materials must be used under the floor pad to prevent materials from settling and heaving.
Rotisserie Outlet
If the supporting structure is going to have an electrical outlet for a rotisserie, it should be on the left side of the structure.
Grill and enclosure illustrations are for reference only.
BUILT-IN CUTOUT GENERAL DIMENSIONS
All dimensions are to finished surfaces.
WARNING: All countertop finished surfaces must be constructed of a noncombustible material.
BUILT-IN CUTOUT GENERAL DIMENSIONS
1
|
460 |
660 |
TOLERANCES |
1 |
34" (864 mm) |
42" (1067 mm) |
±1⁄4" (6 mm) |
2 |
36" (914 mm) |
36" (914 mm) |
max |
3 |
24 5⁄16" (618 mm) |
24 5⁄16" (618 mm) |
±1⁄4" (6 mm) |
4
BUILT-IN CUTOUT DIMENSIONS
POSITIONING YOUR GRILL
When determining a suitable location for your Summit® Gas Grill installation, give thought to concerns such as exposure to wind, proximity to traffic paths, and keeping any gas supply lines as short as possible. Never locate the Summit® Gas Grill in a garage, breezeway, or shed, under an unprotected overhang, or in any other enclosed area. Position the grill and structure so there is enough room to safely evacuate the area in case of a fire.
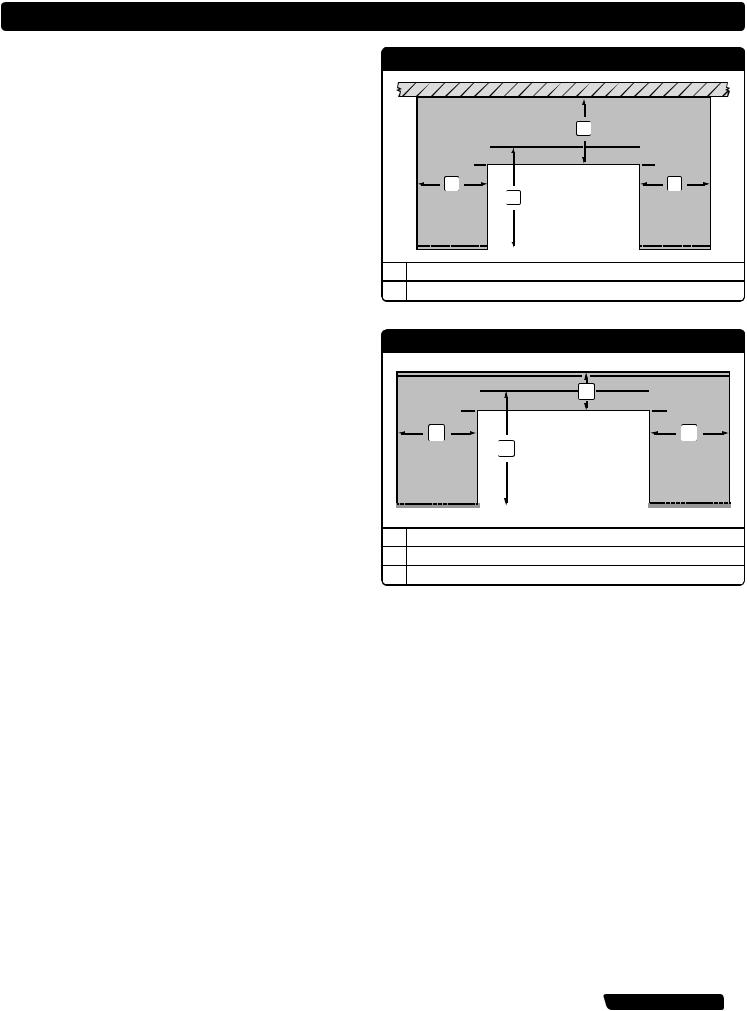
CLEARANCE FROM SURFACES OR STRUCTURES
WARNING: The structure, “island,” countertops, and adjacent work areas for the Built-In Grill installation must be built from noncombustible materials only.
NOTE: If you have questions on which materials are considered noncombustible, contact your local building materials supplier or fire department.
CLEARANCES - INSTALLATION ADJACENT TO A STRUCTURE
|
|
1 |
|
1 |
1 |
||
|
|
2 |
|
1 |
|
|
|
|
|
|
|
|
24" (610 mm) any surface |
||
2 |
|
27" (686 mm) minimum for lid clearance |
|
CLEARANCES - "ISLAND" INSTALLATION
3
1 |
1 |
2
1 |
24" (610 mm) any surface |
2 |
27" (686 mm) minimum for lid clearance |
3 |
10 1⁄2" (267 mm) minimum |
 WWW.WEBER.COM® 5
BUILT-IN CUTOUT DIMENSIONS
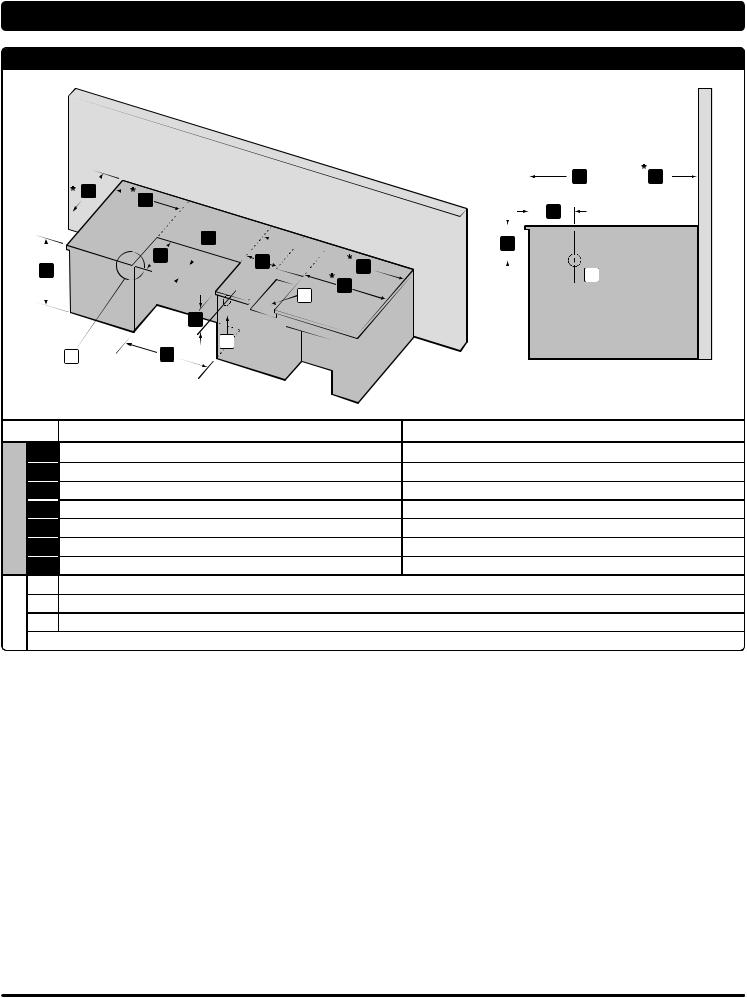
BUILT-IN CUTOUT DETAILED DIMENSIONS - INSTALLATION ADJACENT TO A STRUCTURE
1
6
a
*1
| <![if ! IE]> <![endif]>DIMENSIONS |
2 |
|
3 |
||
|
||
|
4 |
|
|
5 |
|
|
6 |
7 a b c
5 
 1
1
1
2
2
5
3
b
7
460 |
660 |
24" minimum* (610 mm) |
24" minimum* (610 mm) |
16 1⁄2" (419 mm) |
16 1⁄2" (419 mm) |
11 1⁄8" (283 mm) |
11 1⁄8" (283 mm) |
10 1⁄2" (267 mm) minimum |
10 1⁄2" (267 mm) minimum |
24 5⁄16" (618 mm) |
24 5⁄16" (618 mm) |
36" (914 mm) maximum |
36" (914 mm) maximum |
34" (864 mm) built-in frame |
42" (1067 mm) built-in frame |
For a countertop treatment: recommended 3⁄4" (19 mm) overhang
Gas inlet
Side burner opening
*Clearance from any surface or structure is at least 24" (610 mm) from the back and sides of the grill or side burner.
6
BUILT-IN CUTOUT DIMENSIONS
BUILT-IN CUTOUT DETAILED DIMENSIONS - "ISLAND" INSTALLATION
|
1 |
|
|
|
5 |
4 |
|
|
|
|
|
|
|
4 |
|
|
|
|
2 |
|
|
|
|
1 |
|
|
|
|
|
|
|
|
|
|
|
2 |
4 |
|
1 |
3 |
|
|
5 |
|
|
|
|
|
6 |
|
|
|
|
|
|
|
|
|
|
|
b |
|
|
|
|
|
|
|
|
|
|
|
c |
|
|
|
|
3 |
|
|
|
|
|
a |
7 |
b |
|
|
|
|
|
|
|
|
|
<![endif]> DIMENSIONS
*1
2
3
4
5
6
7
a
b
c
460 |
660 |
24" minimum* (610 mm) |
24" minimum* (610 mm) |
16 1⁄2" (419 mm) |
16 1⁄2" (419 mm) |
11 1⁄8" (283 mm) |
11 1⁄8" (283 mm) |
10 1⁄2" (267 mm) minimum |
10 1⁄2" (267 mm) minimum |
24 5⁄16" (618 mm) |
24 5⁄16" (618 mm) |
36" (914 mm) maximum |
36" (914 mm) maximum |
34" (864 mm) built-in frame |
42" (1067 mm) built-in frame |
For a countertop treatment: recommended 3⁄4" (19 mm) overhang
Gas inlet
Side burner opening
*Clearance from any surface or structure is at least 24" (610 mm) from the back and sides of the grill or side burner.
 WWW.WEBER.COM® 7

VENTILATION
VENTILATION
WARNING: Ventilation holes must be provided in the structure at the top and bottom to provide ventilation in the event of a gas leak.
Ventilation holes can be located in a low visibility area and should be protected by screening material to prevent rodents and insects from entering the structure. Air holes will also help dry moisture.
Note: These drawings are only a reference.
• Cross ventilation must be incorporated in the supporting structure. We recommend a minimum of 100 square inches (254 square cm) of venting per side.
• Vents should be on two sides of the structure.
• The drawings are for reference only.
•Position of the vents should be from the center, outward.
•Position the vents at both the bottom of the structure and at the top of the structure.
•The bottom vents should be as close to ground level as possible. Make sure the vent
area is not blocked by interior supports of the structure.
• We recommend vents with screens.
•Access doors to the structure are not considered vents.
•Clean the vents periodically.
8
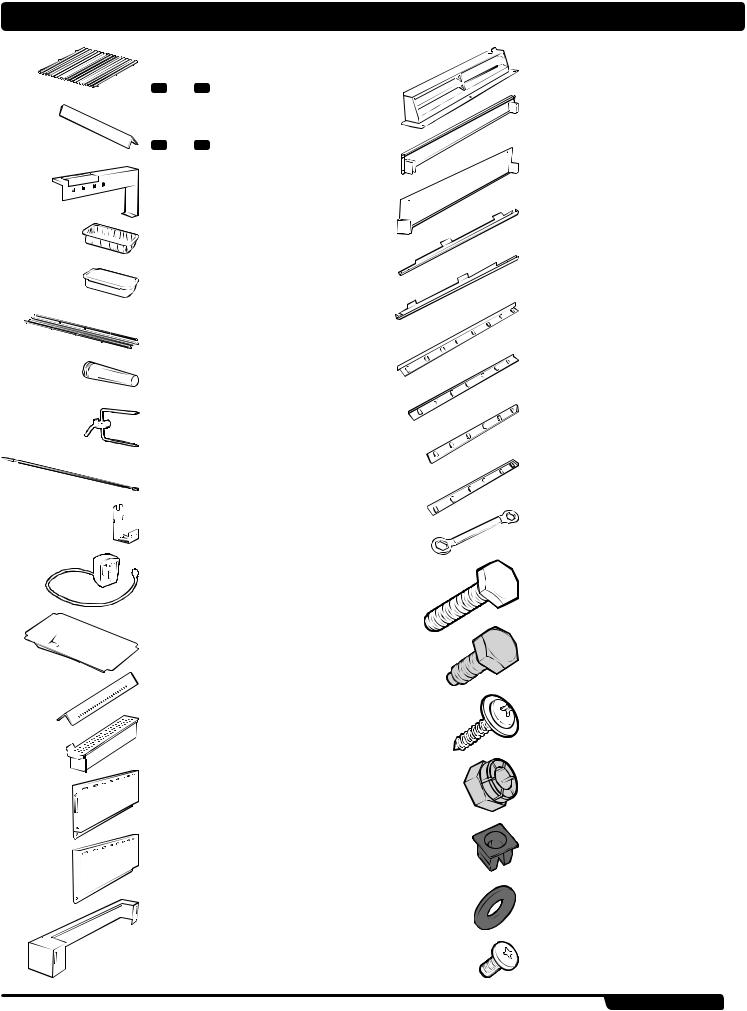
PARTS LIST • LISTA DE PIEZAS • LISTE DES PIECES
Stainless Steel Cooking Grate |
Rear Vent - 1 |
Parrilla de Cocción de Acero Inoxidable |
Respiradero Posterior - 1 |
Grille de Cuisson en Acier Inoxydable |
Aération Arrière - 1 |
460 - 2 660 - 3
Flavorizer® Bar
Barra Flavorizer®
Barre Flavorizer®
460 - 8 660 - 12
Catch Pan Holder - 1
Soporte del Plato Recolector - 1 Support pour Égouttoir - 1
Front Wheel Alignment Panel - 1
Panel de Alineación de las Ruedas Delanteras - 1 Panneau d’Alignement de la Roue Avant - 1
Rear Wheel Alignment Panel - 1
Panel de Alineación de las Ruedas Traseras - 1 Panneau d’Alignement de la Roue Arrière - 1
Left Trim Piece - 1
Disposable Drip Pan - 1 |
Pieza de Guarnición Izquierda - 1 |
|
Bandeja de Goteo Desechable - 1 |
Pièce à Rogner de Gauche - 1 |
|
|
|
|
Egouttoir Jetable - 1 |
Right Trim Piece - 1 |
|
|
|
|
Catch Pan - 1 |
Pieza de Guarnición Derecha - 1 |
|
Plato Recolector - 1 |
Pièce à Rogner de Droite - 1 |
|
Egouttoir - 1 |
Rear Filler Strip - 1 |
|
|
|
|
Warming Rack - 1 |
Tira de Relleno Posterior - 1 |
|
Rejilla para Calentar - 1 |
Bande de Remplissage Arrière - 1 |
|
Grille de Maintien au Chaud - 1 |
|
|
Battery Housing - 1 |
Front Filler Strip - 2 |
|
Tira de Relleno Delantera - 2 |
|
|
Compartimiento de la Batería - 1 |
|
|
Bande de Remplissage Avant - 2 |
|
|
Logement des Piles - 1 |
|
|
|
|
|
Rotisserie Fork - 4 |
Left Top Filler Strip - 1 |
|
Tira de Relleno Izquierda Superior - 1 |
|
|
Horquilla del Asador Giratorio - 4 |
|
|
Bande de Remplissage Supérieure Gauche - 1 |
|
|
Fourche de la Rôtissoire - 4 |
|
|
|
|
|
Rotisserie Spit - 1 |
Right Top Filler Strip - 1 |
|
Espetón del Asador Giratorio - 1 |
Tira de Relleno Derecha Superior - 1 |
|
Broche de la Rôtissoire - 1 |
Bande de Remplissage Supérieure Droite - 1 |
|
Rotisserie Bracket - 1 |
Wrench - 1 |
|
Soporte del Asador Giratorio - 1 |
|
|
Llave - 1 |
|
|
Support de la Rôtissoire - 1 |
|
|
Clé - 1 |
|
|
|
|
|
Rotisserie Motor - 1 |
1-Inch Bolt (1⁄4 - 20 x 1") - 2 |
|
Motor del Asador Giratorio - 1 |
|
|
Perno de 1 Pulgada (1⁄4 - 20 x 1") - 2 |
|
|
Moteur de la Rôtissoire - 1 |
|
|
Boulon de 1 Pouce (1⁄4 - 20 x 1") - 2 |
|
|
|
|
|
Slide-Out Grease Tray - 1 |
|
|
Bandeja Corrediza Recolectora de Grasa - 1 |
Silver Hex Bolt (1⁄4 - 20 x 5⁄8") - 4 |
|
Plateau de Récupération des Graisses Amovible - 1 |
Perno Hexagonal Plateado (1⁄4 - 20 x 5⁄8") - 4 |
|
|
Boulon Hexagonal en Argent (1⁄4 - 20 x 5⁄8") - 4 |
|
Smoker Bar - 1 |
|
|
Barra del Ahumador - 1 |
Screw - 3 |
|
Barre du Fumoir - 1 |
|
|
Smoker Box - 1 |
Tornillo - 3 |
|
Vis - 3 |
|
|
Caja del Ahumador - 1 |
|
|
|
|
|
Boîtier du Fumoir - 1 |
|
|
|
Nut (1⁄4 - 20) - 2 |
|
Left Side Vent - 1 |
Tuerca (1⁄4 - 20) - 2 |
|
Respiradero del Lado Izquierdo - 1 |
Ecrou (1⁄4 - 20) - 2 |
|
Aération Latérale Gauche - 1 |
|
|
Right Side Vent - 1 |
Plastic Plug - 3 |
|
Tapon de Plástico - 3 |
|
|
Respiradero del Lado Derecho - 1 |
Bouchon de Plastique - 3 |
|
Aération Latérale Droite - 1 |
|
|
|
Washer - 4 |
|
Rear Vent Bracket - 1 |
Arandela - 4 |
|
Soporte del Respiradero Posterior - 1 |
Rondelle - 4 |
|
Support de l’Aération Arrière - 1 |
|
|
|
Silver Screw (10 - 32 x 3⁄8") - 11 |
|
|
Tornillo Plateado (10 - 32 x 3⁄8") - 11 |
|
|
Vis en Argent (10 - 32 x 3⁄8") - 11 |
|
|
WWW.WEBER.COM® |
9 |
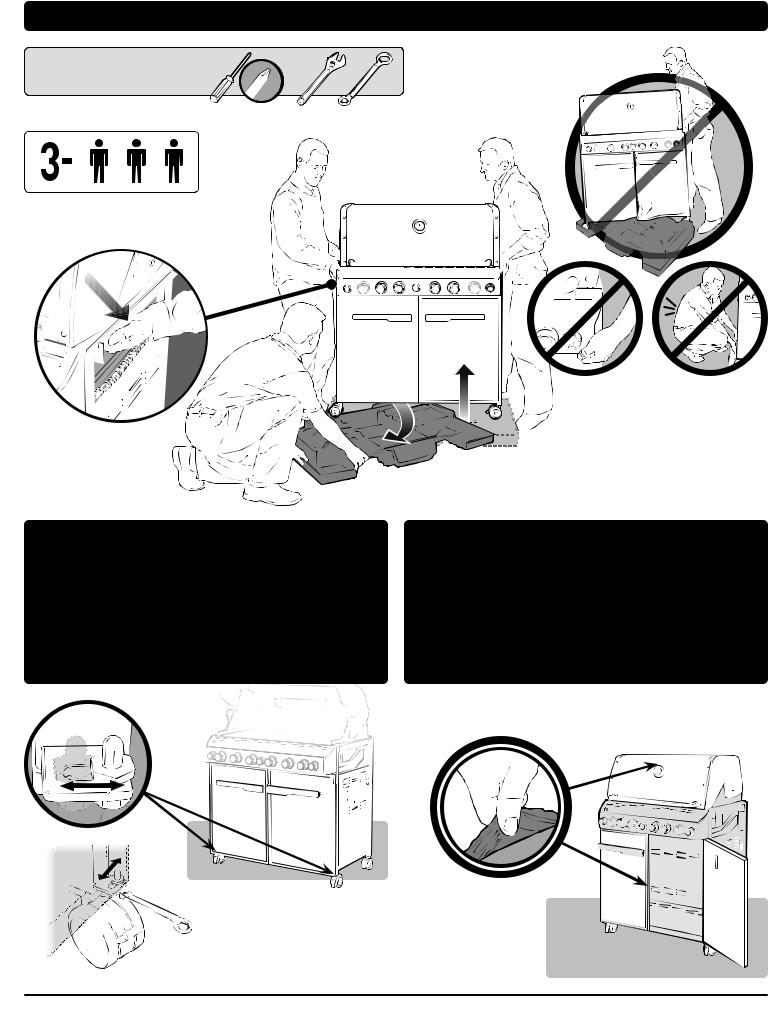
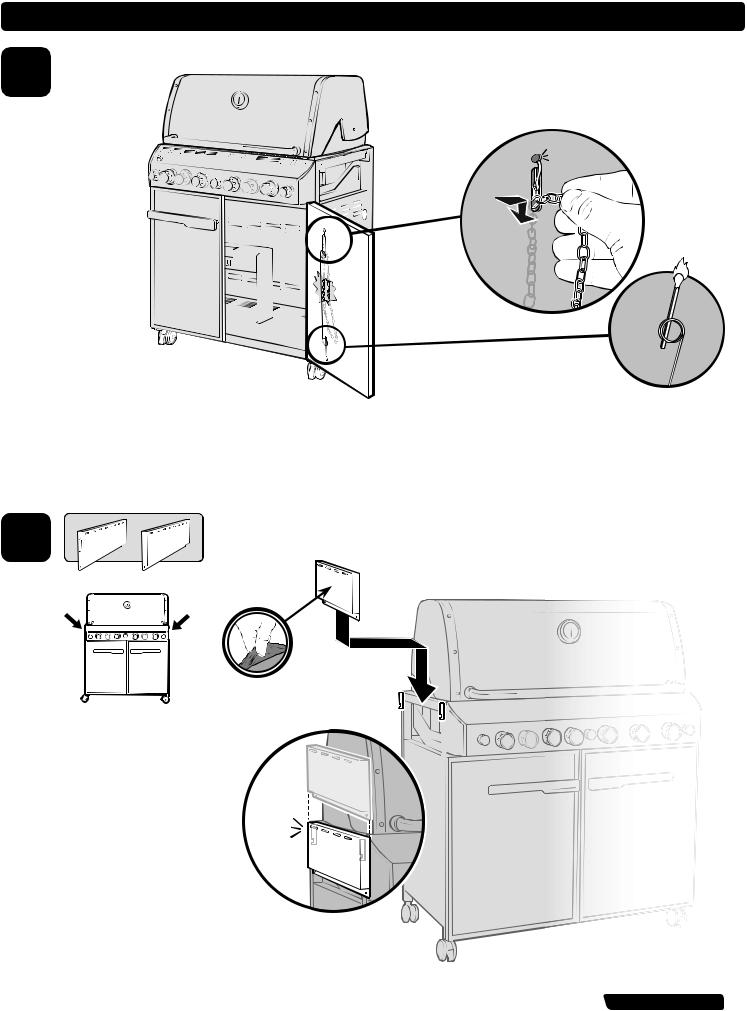
ASSEMBLY • ENSAMBLAJE • ASSEMBLAGE
TOOLS NEEDED:
HERRAMIENTAS REQUERIDAS:
OUTILS NECESSAIRES :
IMPORTANT: TO PROPERLY ALIGN FRAME AND DOORS, ASSEMBLE GRILL ON A FLAT AND LEVEL SURFACE.
IMPORTANTE: PARA ALINEAR CORRECTAMENTE EL BASTIDOR Y LAS PUERTAS, ARME LA BARBACOA SOBRE UNA SUPERFICIE PLANA Y HORIZONTAL.
IMPORTANT : POUR ALIGNER CORRECTEMENT LE CADRE ET LES PORTES, ASSEMBLEZ LE GRILL SUR UNE SURFACE PLANE ET REGULIERE.
• Adjust doors, if necessary.
•Si fuese necesario, ajuste las puertas.
•Ajustez les portes, si nécessaire.
The grill illustrated may have slight differences than the model purchased.
La barbacoa ilustrada puede tener ligeras diferencias con respecto al modelo comprado.
Il est possible que le grill de l’illustration présente de légères différences par rapport au modèle acheté.
Remove protective film from stainless surface before using grill.
Retire la película protectora de la superficie de acero inoxidable antes de utilizar la barbacoa.
Retirez la pellicule de protection de la surface inoxydable avant d’utiliser le grill.
10

|
|
ASSEMBLY • ENSAMBLAJE • ASSEMBLAGE |
||
1 |
460 |
660 |
||
|
|
|
|
|
|
|
|
|
|
2 |
 WWW.WEBER.COM® 11
ASSEMBLY • ENSAMBLAJE • ASSEMBLAGE
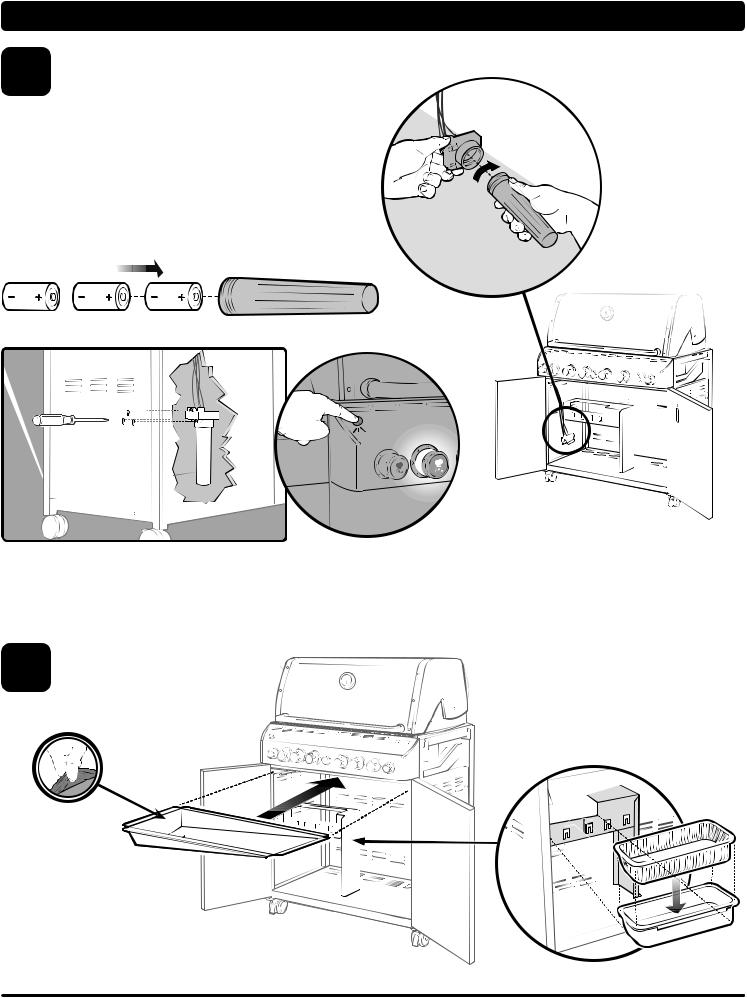
3 |
Requires three “D” alkaline batteries (included). Use |
alkaline |
batteries only. Do not mix old and new batteries or different |
|
|
types of batteries (standard, alkaline, or rechargeable). |
|
Requiere tres baterías alcalinas “D” (incluidas). Use solamente baterías alcalinas. No mezcle baterías nuevas con viejas o diferentes tipos de baterías entre sí (normales, alcalinas, o recargables).
Nécessite trois piles alcalines “D” (fournies). Utilisez des piles alcalines uniquement. Ne mélangez pas des piles usagées avec des piles neuves ou différents types de piles (standard, alcalines, ou rechargeables).
4
12
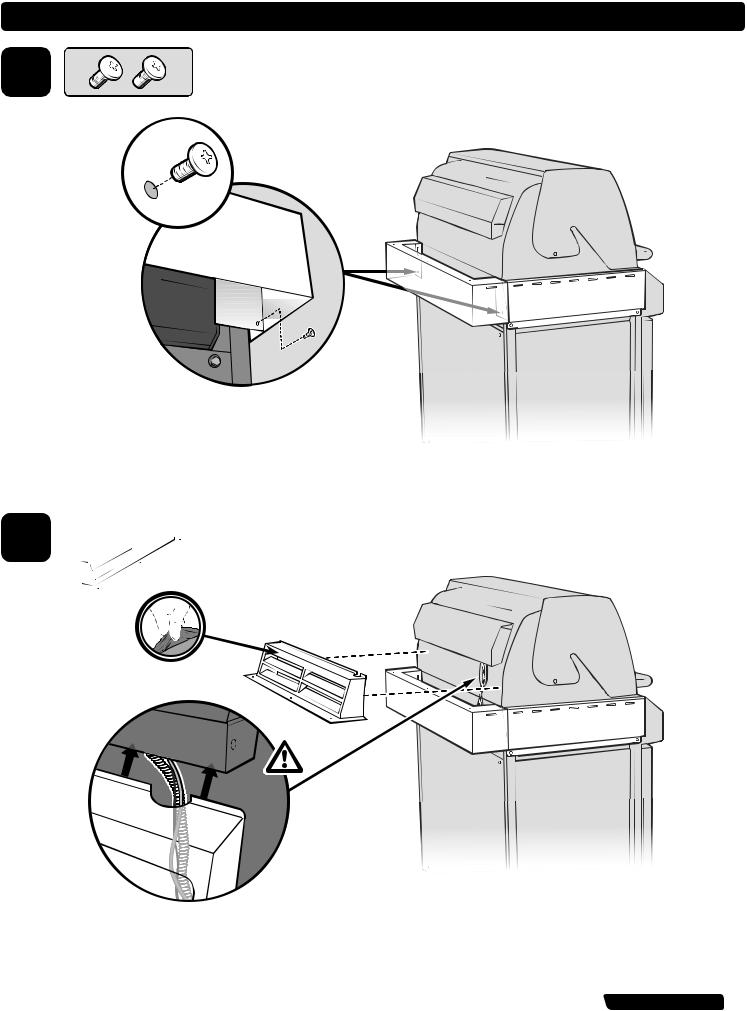
ASSEMBLY • ENSAMBLAJE • ASSEMBLAGE
5
6
 WWW.WEBER.COM® 13

ASSEMBLY • ENSAMBLAJE • ASSEMBLAGE
7
8
14
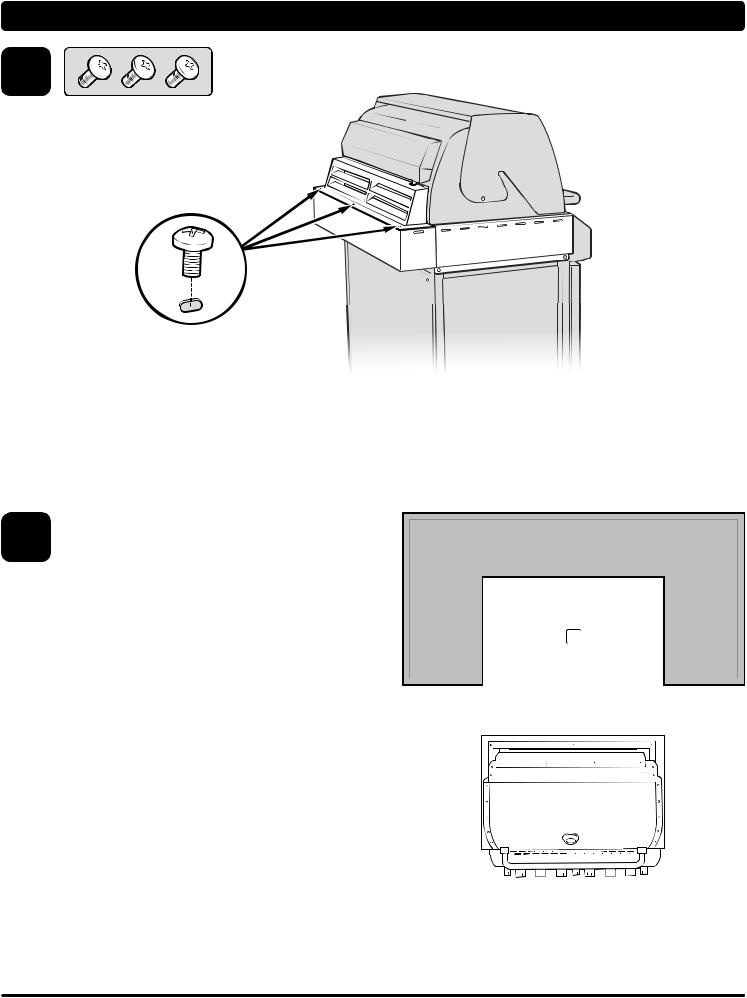
ASSEMBLY • ENSAMBLAJE • ASSEMBLAGE
9
10 
 WWW.WEBER.COM® 15
ASSEMBLY • ENSAMBLAJE • ASSEMBLAGE
11
Now that the side vents are installed, the grill should be placed
12 directly in front of the cut-out opening (a) of the built-in structure. The grill will be pushed straight into the structure once the wheel alignment panels are installed in the following steps.
Align grill with enclosure, but do not roll grill into enclosure at this time.
Ahora que los respiraderos laterales están instalados, la barbacoa deberá colocarse directamente en frente de la abertura del corte (a) en la estructura empotrada. Una vez que
los paneles de alineación de las ruedas estén instalados en los a siguientes pasos, la barbacoa se empujará directamente dentro
de la estructura. Alinee la barbacoa con el compartimiento, pero no la ruede aún dentro del mismo.
Maintenant que les aérations latérales sont installées, le grill devrait être placé directement en face de l’ouverture découpée (a) de la structure encastrée. Le grill sera enfoncé directement à l’intérieur de la structure une fois que les panneaux d’alignement des roues seront installés selon les
étapes suivantes. Alignez le grill avec le meuble, mais ne faites pas rouler le grill à l’intérieur du meuble pour l’instant.
16
 Loading...