


E-210 • S-210 • E-310 • S-310
<![endif]>Manual Owner’s LP
REGISTER today
Unlock grilling happiness: Register your SPIRIT II gas grill and receive special content to make you the ultimate backyard hero.
Registration is easy and we only ask a few quick questions. In less than two minutes, activate your unique Weber-ID, and unlock a lifetime of Weber knowledge and guidance. Stay inspired along the way.
PHONE |
MOBILE |
ONLINE |
|
800-446-1071 |
weber.com |
support@weberstephen.com |
weber.com |
Keep this Owner’s Manual for future reference, thoroughly read through it, and if you have any questions please contact us today.
59502_Spt_II_LP_enUS_esMX_frCA_working.indd 1 |
|
|
11/13/17 11:24 AM |
|
|
<![endif]>Welcome to Weber
welcome to the family
We are so glad that you have joined us on the journey to backyard happiness. Please take some time to read through this Owner’s Manual to ensure that you are up and grilling quickly and easily. We want to be with you for the life of your grill, so please take just a couple of minutes to register your grill. We promise that we will never sell your information or spam you with unnecessary emails. What we do promise is to be by your side, every step of the way. By signing up for your Weber-ID, as part of your registration, we will deliver special content just for you and your grill to enjoy.
So, come along and join us online, on the phone, or however else you'd like to stay in touch.
Thank you for choosing Weber. We are happy you are here.
2
Important
Safety Information
DANGER, WARNING, and CAUTION statements are used throughout this Owner's Manual to emphasize critical and important information. Read and follow these statements to help ensure safety and prevent property damage. The statements are defined below.
m DANGER: Indicates a hazardous situation which, if not avoided,
will result in death or serious injury.
m WARNING: Indicates a hazardous situation which, if not avoided,
could result in death or serious injury.
m CAUTION: Indicates a hazardous situation which, if not avoided,
could result in minor or moderate injury.
m DANGER If you smell gas:
•Shut off gas to the appliance (grill).
•Extinguish any open flame.
•Open lid.
•If odor continues, keep away from the appliance (grill) and immediately call your gas supplier or your fire department.
mWARNING
•Do not store or use gasoline or other flammable liquids or vapors in the vicinity
of this (grill) or any other appliance.
•An LP cylinder (tank) not connected for use shall not be stored in the vicinity of this (grill) or any other appliance.
USE OUTDOORS ONLY.
READ THE INSTRUCTIONS BEFORE USING THE APPLIANCE (GRILL).
NOTICE TO INSTALLER: These instructions must be left with the consumer.
NOTICE TO CONSUMER: Retain these instructions for future reference.
59502_Spt_II_LP_enUS_esMX_frCA_working.indd 2 |
|
|
11/13/17 11:24 AM |
|
|

Installation and Assembly
m DANGER: This grill is not intended to be installed in or on recreational vehicles or boats.
m WARNING: Do not use this grill unless all parts are in place and the grill was properly assembled according to the assembly instructions.
m WARNING: Do not build this model of grill in any built-in or slide-in construction.
m WARNING: Do not modify the appliance (grill). Liquid propane gas is not natural gas. The conversion or attempted use of natural gas in a liquid propane gas unit or liquid propane gas in a natural gas unit is unsafe and will void your warranty.
•In the United States, installation must conform with local codes or, in the absence of local codes, with either the National Fuel Gas Code, ANSI Z223.1/ NFPA 54, Natural Gas and Propane Installation Code, CSA B149.1; or Propane Storage and Handling Code, B149.2; or the Standard for Recreational Vehicles, ANSI A119.2/NFPA 1192, and CSA Z240 RV Series, Recreational Vehicle Code, as applicable.
•In Canada, the installation of this grill must comply with local codes and/or the latest edition of Standard CAN/CSA-B149.2 (Propane Storage and Handling Code). These instructions, while generally acceptable, do not necessarily comply with the Canadian installation codes, particularly with piping above and below ground.
•In Mexico, if there are local codes that apply to portable gas appliances, you must comply with the latest edition of Official Mexican Standard (NOM).
•If an external electrical source is utilized (such as a rotisserie) it must be electrically grounded in
accordance with local codes or, in the absence of local codes, with the National Electrical Code, ANSI/NFPA 70, or the Canadian Electrical Code, Part 1, CSA C22.1.
Operation
m DANGER: Only use the grill outdoors in a wellventilated area. Do not use in a garage, building, breezeway, tent, any other enclosed area, or beneath overhead combustible construction.
m DANGER: Do not use the grill in any vehicle or in any storage or cargo area of any vehicle. This includes, but is not limited to, cars, trucks, station wagons, mini-vans, sport utility vehicles, recreational vehicles, and boats.
m DANGER: Do not use the grill within 24 inches
(61 cm) of combustible materials. This includes the top, bottom, back and sides of the grill.
m DANGER: Keep the cooking area clear of flammable vapors and liquids such as gasoline, alcohol, etc., and combustible materials.
m DANGER: This appliance (grill) must be kept away from flammable materials during use.
m DANGER: Do not put a grill cover or anything flammable on, or in the storage area under the grill while it is in operation or is hot.
m DANGER: Should a grease fire occur, turn off all burners and leave lid closed until fire is out.
m WARNING: Accessible parts may be very hot. Keep young children away.
m WARNING: The use of alcohol, prescription drugs, non-prescription drugs, or illegal drugs may impair the consumer’s ability to properly and safely assemble, move, store, or operate the grill.
m WARNING: Never leave the grill unattended during pre-heating or use. Exercise caution when using this grill. The entire cookbox gets hot when in use.
m WARNING: Do not move the appliance (grill) during use.
m WARNING: Keep any electrical supply cord and the fuel supply hose away from any heated surfaces.
m CAUTION: This product has been safety-tested and is only certified for use in a specific country. Refer to country designation located on outside of box.
• Do not use charcoal or lava rock in the grill.
Storage and/or Nonuse
m WARNING: Turn off the gas supply at the gas cylinder (tank) after use.
m WARNING: LP tanks must be stored outdoors out of the reach of children and must not be stored in a building, garage, or any other enclosed space.
m WARNING: After a period of storage and/or nonuse, the grill should be checked for gas leaks and burner obstructions before use.
•Storage of the grill indoors is permissible only if the LP tank is disconnected and removed from the grill.
California Proposition 65
m WARNING: Combustion byproducts produced when using this product contain chemicals known to the state of California to cause cancer, birth defects, or other reproductive harm.
m WARNING: Handling the brass material on this product exposes you to lead, a chemical known to the state of California to cause cancer, birth defects, or other reproductive harm. Wash hands after handling this product.
TABLE OF CONTENTS |
<![if ! IE]> <![endif]>Welcome |
||
|
|||
2 |
Welcome to Weber |
|
|
|
Important Safety Information |
|
|
4 |
The Weber Promise |
<![if ! IE]> <![endif]>to |
|
|
Warranty |
||
|
<![if ! IE]> <![endif]>Weber |
||
5 |
Product Features |
||
|
|||
|
SPIRIT II Features |
|
|
|
GS4 Grilling System |
|
|
6 |
Tips and Hints |
|
|
|
The Flame - Direct or Indirect |
|
|
|
Grilling Do's and Don'ts |
|
|
8 |
Getting Started |
|
|
|
Important Information about |
|
|
|
LP Gas & Gas Connections |
|
|
|
LP Tank Installation & Leak Checking |
|
|
|
Refilling or Replacing an LP Tank |
|
|
12 |
Operation |
|
|
|
The Very First Time You Grill |
|
|
|
Every Time You Grill |
|
|
|
Igniting the Grill |
|
|
14 |
Product Care |
|
|
|
Cleaning and Maintenance |
|
|
16 |
Troubleshooting |
|
|
18 |
Grilling Guide |
|
|
55 |
Replacement Parts |
|
|
esMX |
frCA |
19 37
ALWAYS
HAVE THE
LATEST AND
GREATEST
The most recent version of this Owner’s Manual can be
found online.
3
59502_Spt_II_LP_enUS_esMX_frCA_working.indd 3 |
|
|
11/13/17 11:24 AM |
|
|
<![endif]>The Weber Promise
4
The Weber Promise
At Weber, we pride ourselves on two things: making grills that last and providing a lifetime of excellent customer service.
Warranty
Thank you for purchasing a Weber product. WeberStephen Products LLC, 1415 S. Roselle Road, Palatine, Illinois 60067 and its Americas Business units (“Weber”) pride ourselves on delivering a safe, durable, and reliable product.
This is Weber’s Voluntary Warranty provided to you at no extra charge. It contains the information you will need to have your Weber product repaired or replaced in the unlikely event of a failure or defect.
Pursuant to applicable laws, the Owner has several rights in case the product is defective. Those rights include supplementary performance or replacement, abatement of the purchasing price,
and compensation. These and other statutory rights remain unaffected by this Warranty provision. In fact, this Warranty grants additional rights to the Owner that are independent from statutory Warranty provisions.
Weber’s Voluntary Warranty
Weber warrants, to the purchaser of the Weber product (or in the case of a gift or promotional situation, the person for whom it was purchased as a gift or promotional item) (“Owner”), that the Weber product is free from defects in material and workmanship for ten (10) years from the date of purchase when assembled and operated in
accordance with the accompanying Owner’s Manual, normal wear and tear excluded. (Note: If you lose or misplace your Weber Owner’s Manual, a replacement is available online at www.weber.com.) Weber agrees within the framework of this warranty to repair
or replace the part that is defective in material or workmanship subject to the limitations, and exclusions listed below. TO THE EXTENT ALLOWABLE BY APPLICABLE LAW, THIS WARRANTY IS EXTENDED ONLY TO THE ORIGINAL PURCHASER AND IS NOT TRANSFERABLE TO SUBSEQUENT OWNERS, EXCEPT IN THE CASE OF GIFTS AND PROMOTIONAL ITEMS AS NOTED ABOVE.
Weber stands by its products and is happy to provide you with the Warranty described for material defects in the grill or its relevant components, normal wear and tear excepted.
•‘Normal wear and tear’ includes cosmetic and other immaterial deterioration that may come with
ownership of your grill over time, such as surface rust, dents / scratches, etc.
However, Weber will honor this Warranty for the grill or its relevant components where damage or dysfunction results from a material defect.
•‘Material defect’ includes rust through or burn through of certain parts, or other damage or failure inhibiting your ability to safely / properly use your grill.
Owner’s Responsibilities Under this Warranty / Exclusion of Warranty
To ensure trouble-free Warranty coverage, it is important (but not required) that you register your Weber product online at www.weber.com. Please also retain your original sales receipt and/or invoice. Registering your Weber product confirms your warranty coverage, will expedite any Warranty claims you may need to make, and provides a direct link between you and Weber in case we need to contact you. If you have not had time to register your grill before calling for Warranty service, please have the following information available when you do call: Name – Address – Phone Number – Email – Serial Number – Purchase Date – Purchase Dealer – Model – Color – Primary Issue
The above warranty only applies if the Owner takes reasonable care of the Weber product by following all assembly instructions, usage instructions,
and preventative maintenance as outlined in the accompanying Owner’s Manual, unless the Owner can prove that the defect or failure is independent of noncompliance with the above mentioned obligations. If you live in a coastal area, or have your product located near a pool, maintenance includes regular washing and rinsing of the exterior surfaces as outlined in the accompanying Owner’s Manual.
This WARRANTY lapses if there are damages, deteriorations, discolorations, and/or rust for which Weber is not responsible caused by:
•Abuse, misuse, alteration, modification, misapplication, vandalism, neglect, improper assembly or installation, and failure to properly perform normal and routine maintenance;
•Insects (such as spiders) and rodents (such as squirrels), including but not limited to damage to burners and/or gas hoses;
•Exposure to salt air and/or chlorine sources such as swimming pools and hot tubs/spas;
•Severe weather conditions such as hail, hurricanes, earthquakes, tsunamis or surges, tornadoes or severe storms.
•Acid rain and other environmental factors
The use and/or installation of parts on your Weber product that are not genuine Weber parts will void this Warranty, and any damages that result hereby are not covered by this Warranty. Any conversion of a gas grill not authorized by Weber and performed by a Weber authorized service technician will void this Warranty.
Warranty Processing
If you believe that you have a part which is covered by this Warranty, please contact Weber Customer Service using the contact information on our website (www.weber.com). Weber will, upon investigation, repair or replace (at its option) a defective part that is covered by this Warranty. In the event that repair or replacement are not possible, Weber may choose (at its option) to replace the grill in question with a new grill of equal or greater value. Weber may ask you to return parts for inspection, shipping charges to be pre-paid by Owner.
When you contact Customer Service, please have the following information available:
Name – Address – Phone Number – Email – Serial Number – Purchase Date – Purchase Dealer – Model – Color – Primary Issue
REGISTRATION = WARRANTY
Disclaimers
APART FROM THE WARRANTY AND DISCLAIMERS AS DESCRIBED IN THIS WARRANTY STATEMENT, THERE ARE EXPLICITLY NO FURTHER WARRANTY OR VOLUNTARY DECLARATIONS OF LIABILITY GIVEN HERE WHICH GO BEYOND THE STATUTORY LIABILITY APPLYING TO WEBER. THE PRESENT WARRANTY STATEMENT ALSO DOES NOT LIMIT OR EXCLUDE SITUATIONS OR CLAIMS WHERE WEBER HAS
MANDATORY LIABILITY AS PRESCRIBED BY STATUTE.
NO WARRANTIES SHALL APPLY AFTER THE TEN (10) YEAR PERIOD OF THIS WARRANTY. NO OTHER WARRANTIES GIVEN BY ANY PERSON, INCLUDING A DEALER OR RETAILER, WITH RESPECT TO ANY
PRODUCT (SUCH AS ANY “EXTENDED WARRANTIES”), SHALL BIND WEBER. THE EXCLUSIVE REMEDY OF THIS WARRANTY IS REPAIR OR REPLACEMENT OF THE PART OR PRODUCT.
IN NO EVENT UNDER THIS VOLUNTARY WARRANTY SHALL RECOVERY OF ANY KIND BE GREATER THAN THE AMOUNT OF THE PURCHASE PRICE OF THE WEBER PRODUCT SOLD.
YOU ASSUME THE RISK AND LIABILITY FOR LOSS, DAMAGE, OR INJURY TO YOU AND YOUR PROPERTY AND/OR TO OTHERS AND THEIR PROPERTY ARISING OUT OF THE MISUSE OR ABUSE OF THE PRODUCT OR FAILURE TO FOLLOW INSTRUCTIONS PROVIDED BY WEBER IN THE ACCOMPANYING OWNER’S MANUAL.
PARTS AND ACCESSORIES REPLACED UNDER THIS WARRANTY ARE WARRANTED ONLY FOR THE
BALANCE OF THE ABOVE MENTIONED ORIGINAL TEN (10) YEAR WARRANTY PERIOD.
THIS WARRANTY APPLIES TO PRIVATE SINGLE FAMILY HOME OR APARTMENT USE ONLY AND DOES NOT APPLY TO WEBER® GRILLS USED IN
COMMERCIAL, COMMUNAL OR MULTI-UNIT SETTINGS SUCH AS RESTAURANTS, HOTELS, RESORTS, OR RENTAL PROPERTIES.
WEBER MAY FROM TIME TO TIME CHANGE THE DESIGN OF ITS PRODUCTS. NOTHING CONTAINED IN THIS WARRANTY SHALL BE CONSTRUED AS
OBLIGATING WEBER TO INCORPORATE SUCH DESIGN CHANGES INTO PREVIOUSLY MANUFACTURED PRODUCTS, NOR SHALL SUCH CHANGES BE CONSTRUED AS AN ADMISSION THAT PREVIOUS DESIGNS WERE DEFECTIVE.
WEBER-STEPHEN PRODUCTS LLC Customer Service Center
1415 S. Roselle Road Palatine, IL 60067 U.S.A.
For replacement parts, call:
1-800-446-1071
PROTECT
YOUR
INVESTMENT
Shield your grill from the elements with a heavy-duty premium grill cover.
59502_Spt_II_LP_enUS_esMX_frCA_working.indd 4 |
|
|
11/13/17 11:24 AM |
|
|

SPIRIT II F E AT UR E S
A
B
C
D E
F
G
H 
A Built-In Thermometer
Being aware of the temperature inside of your grill allows you to adjust the heat when needed.
B Warming Rack
The warming rack keeps food warm or toasts burger buns, as the main meal grills below.
C Porcelain-Enameled, Cast Iron Cooking Grates
The reversible cooking grates empower you to be even more creative with your dish. The thin side of the cooking grate is ideal for delicate food such as fish and shrimp, while the wider side creates a thick sear mark enhancing the flavor of your food.
D iGRILL 3 Ready
The iGrill 3 app-connected thermometer monitors food from beginning to end, displaying the real-time core food temperature on your mobile device. Once you’ve downloaded the Weber iGrill app, connect your devices to Bluetooth, and run up to four thermometer probes from your grill to the food. (Sold separately.)
E Side Tables with Integrated Tool Hooks
Use the side tables to keep platters, seasonings, and tools within arm’s reach. Hang your essential grilling tools on the hooks for easy access and organization of your backyard workspace. The left side table folds down to fit in smaller spaces.
F Fuel Gauge
Always know where you stand. The easy-to-read fuel gauge located next to the gas tank lets you see how much fuel is left in your tank at all times. Rest assured knowing that you will not run out of gas halfway through your next grilling experience.
G Easy Access Gas Tank Storage
Mounting the gas tank to the outside of the grill makes the tank easy to access and remove; while also increasing storage space in the cart.
H Open Cart Design
The sleek open-cart design provides additional room and accessibility of your grilling tools.
The grills illustrated in this Owner’s Manual may vary slightly from the model purchased.
GS4 GRILLING SYSTEM
The GS4 Grilling System sets a new standard in the world of backyard cuisine. This innovative grilling system is based on over 30 years of grilling experience, culinary expertise, and most importantly, avidly considering the wants and needs of the people who matter most – the grilling community.
Each component of GS4 was uniquely designed for ease-of-use and to provide an unequaled satisfaction to your backyard grilling experience. Promising burners that are ensured to ignite every time, smoke infused food that grills evenly
and consistently regardless of where it’s placed on the cooking grate, and hassle free cleanup; you are able to focus on what it is all about – bringing people together around the grill.
The GS4 grilling system is composed of four key components: The INFINITY
Crossover Ignition, Burners, FLAVORIZER Bars, and Grease Management System. These components ensure that every aspect of your grilling experience is easy and reliable; from the moment the burners are lit to the general maintenance of your grill. And together, create a strong grilling engine within every Spirit II grill.
1 INFINITY Crossover Ignition
The INFINITY Crossover Ignition is ensured to ignite every time. Backed by a generous warranty, you can rest assured that
you’ll be up-and-grilling the first time, every time.
2 Burners
The heavy duty, stainless steel burners were built to last and provide even heat distribution to your cooking grates.
3 FLAVORIZER Bars
The classic Weber FLAVORIZER bars are angled just right to catch drippings that smoke and sizzle, adding that irresistible smoky flavor we all know and love to your food. Any drippings not vaporized follow the slope and are funneled away from the burners, down into the grease management system.
4 Grease Management System
The grease management system helps with the removal of grease while reducing the risk of flare-ups. Drippings that are not vaporized by the FLAVORIZER bars are funneled away from the burners into the disposable drip tray, located within the catch pan under the cookbox. Simply remove the catch pan and replace the drip tray as needed.
<![endif]>Features Product
5
59502_Spt_II_LP_enUS_esMX_frCA_working.indd 5 |
|
|
11/13/17 11:24 AM |
|
|

<![endif]>Tips and Hints
The Flame - Direct or Indirect
HIGH
|
BURNER |
BURNER |
BURNER |
1 |
2 |
3 |
|
|
|
|
|
|
|
|
|
|
|
|
|
|
|
|
|
HIGH
BURNER |
BURNER |
1 |
2 |
DIRECT HEAT
S E T U P
Use the direct method for small, tender pieces of food that take less than 20 minutes to cook, such as: hamburgers, steaks, chops, kabobs, boneless chicken pieces, fish fillets, shellfish, and sliced vegetables.
With direct heat, the fire is right below the food. It sears the surfaces of the food, developing flavors, texture, and delicious caramelization while cooking the food all the way to the center.
OFF
MEDIUM
BURNER |
BURNER |
BURNER |
1 |
2 |
3 |
OFF
MEDIUM
BURNER |
BURNER |
1 |
2 |
INDIRECT HEAT
S E T U P
Use the indirect method for larger cuts of meat that require 20 minutes or more of grilling time, or for foods so delicate that direct exposure to the heat would dry them out or scorch them, such
as: roasts, bone-in poultry pieces, whole fish, delicate fish fillets, whole chickens, turkeys, and ribs. Indirect heat can also be used for finishing thicker foods or bone-in cuts that have been seared or browned first over direct heat.
With indirect heat, the heat is on both sides of the grill, or off to one side of the grill. The food sits over the unlit part on the cooking grate.
OFF
START/HIGH |
LOW |
MEDIUM
6 |
REGISTRATION IS IMPORTANT |
59502_Spt_II_LP_enUS_esMX_frCA_working.indd 6 |
|
|
11/13/17 11:24 AM |
|
|
Grilling Do’s and Don’ts
Preheat each and every time.
If the cooking grates aren’t hot enough, food will stick, and you will likely never have a chance of searing properly or developing those handsome grill marks. Even if a recipe calls for medium or low heat, always preheat the grill on the highest setting first. Open the lid, turn up the heat, close the lid, and then let the cooking grate heat up for about ten minutes or until the lid thermometer reads 500° F (260° C).
Don't grill on dirty grates.
Tossing food onto the cooking grates before they have been cleaned is never a good idea. Leftover “stuff” on the grates acts like glue, binding it to the grates and your new food. To avoid tasting last night’s dinner on today’s lunch, make sure you are grilling on a clean
cooking grate. Once the grates are preheated, use a stainless steel bristle grill brush to make a clean, smooth surface.
Create a little elbow room.
Packing too much food onto the cooking grates restricts your flexibility. Leave at least one-quarter of the cooking grates clear, with plenty of space between each food item, in order to get your tongs in there and easily move the food around. Sometimes grilling involves split-second decisions and the ability to jockey food from one area to another.
So give yourself enough room to operate.
Try not to peek.
The lid on your grill is for more than just keeping the rain out. Most importantly, it’s for preventing too much air from getting in, and too much heat and smoke from getting out. When the lid is closed, the cooking grates are hotter, the grilling times are faster, the smoky tastes are stronger, and the flare-ups are fewer. So put a lid on it!
Only flip once.
Know when to tame the flame.
When grilling, sometimes the most important thing to know is when to stop. The most reliable way to test doneness of your food
is to invest in an instant-read thermometer. This slim little gem will help you pinpoint that critical moment when your food is at its best.
Don’t be afraid to experiment.
Back in the 1950s, grilling meant one thing: meat (and only meat) charred over open flames. The modern day backyard chef doesn’t need a kitchen in order to prepare a full course meal. Use your grill to make chargrilled appetizers, sides, and even desserts. Register your grill to receive special content that will inspire you along the way. We’d love to join you on your grilling adventures.
<![endif]>Hints and Tips
Be present in the process.
Before firing up your grill, make sure that everything you need is within arm’s reach. Don’t forget your essential grilling tools, already oiled and seasoned food, glazes or sauces, and clean cooking platters for cooked food. Having to run back to your kitchen not only means missing out on the fun, but could also result in burning your food. French chefs call this “mise en place” (meaning, “put in place”). We call it “being present”.
What’s better than a juicy steak with a deep sear and plenty of beautifully caramelized bits? The key to accomplishing these results
is to keep your food in place. Sometimes we |
|
|
|
|
|
|
|
|
|
|
|
|
|
|
|
|
H |
|
|
|
|
|
|
|
|
|
|
|
|
|
|
|
|
|
|
|
G |
|
|
|
|
|
|
|||||||||||||
|
|
|
|
|
|
|
|
|
|
|
|
|
|
|
- |
|
|
|
|
|
|
|
|
|
|
|
|
|
|
|
|
|
|
|
|
|
|
|
|
|
||||||||||||||||
|
|
|
|
|
|
|
|
|
|
|
|
|
|
|
|
|
|
|
|
|
|
|
|
|
|
|
T |
|
|
|
|
|
|
|
|
|
|
|
|
|
|
|
|
|
|
|
|
R |
|
|
|
|
|
|||
have the tendency to flip our food before it |
|
|
|
|
|
|
|
|
|
|
|
|
|
U |
S |
|
|
|
|
|
|
|
|
|
|
|
|
|
|
|
|
|
|
|
|
|
|
I |
|
|
|
|
|
|||||||||||||
|
|
|
|
|
|
|
|
|
|
|
|
M |
|
|
|
|
|
|
|
|
|
|
|
|
|
|
|
|
|
|
|
|
|
|
L |
|
|
|
||||||||||||||||||
|
|
|
|
|
|
|
|
|
|
|
|
|
|
|
|
|
|
|
|
|
|
|
|
|
|
|
|
|
|
|
|
|
|
|
|
L |
|
|
||||||||||||||||||
reaches the desirable level of color and flavor. |
|
|
|
|
|
|
|
|
|
|
• |
|
|
|
|
|
|
|
|
|
|
|
|
|
|
|
|
|
|
|
|
|
|
|
|
|
|
I |
|
|||||||||||||||||
|
|
|
|
|
|
|
|
S |
|
|
|
|
|
|
|
|
|
|
|
|
|
|
|
|
|
|
|
|
|
|
|
|
|
|
N |
|||||||||||||||||||||
|
|
|
|
|
|
|
|
|
|
|
|
|
|
|
|
|
|
|
|
|
|
|
|
|
|
|
|
|
|
|
|
|
|
|
|
|
G |
|||||||||||||||||||
In nearly all cases, you should turn food just |
|
|
|
|
|
|
|
|
|
|
|
|
|
|
|
|
|
|
|
|
|
|
|
|
|
|
|
|
|
|
|
|
|
|
|
|
|
|
|
|
T |
|||||||||||||||
|
|
|
|
|
|
|
|
L |
|
|
|
|
|
|
|
|
|
|
|
|
|
|
|
|
|
|
|
|
|
|
|
|
|
|
|
|
|
|
|
|
|
O |
||||||||||||||
|
|
|
|
|
|
|
|
|
|
|
|
|
|
|
|
|
|
|
|
O |
|
|
|
|
|
|
|
|
|
|
BARBECUE |
|
|
|
|
|
|
|
|
O |
||||||||||||||||
once. If fiddling with it more than that, you are |
|
|
|
|
|
|
|
O |
|
|
|
|
|
|
|
|
|
|
|
|
|
|
|
|
|
|
|
|||||||||||||||||||||||||||||
|
|
|
|
|
|
|
|
|
|
|
|
|
|
|
|
|
|
|
|
|
|
|
|
|
|
L |
||||||||||||||||||||||||||||||
|
|
|
|
|
|
|
T |
|
|
|
|
|
|
|
|
|
|
|
|
|
|
|
|
|
|
|
||||||||||||||||||||||||||||||
probably also opening the lid too much, which |
|
|
|
|
|
|
|
G |
|
|
|
|
|
|
|
|
|
|
|
|
|
|
|
|
|
|
|
S |
||||||||||||||||||||||||||||
|
|
|
|
|
|
|
|
|
|
|
|
|
|
|
|
|
|
|
|
|
|
|
|
|
|
• |
||||||||||||||||||||||||||||||
|
|
|
|
|
|
|
N |
|
|
|
|
|
|
|
|
|
|
|
|
|
|
|
|
|
|
|
||||||||||||||||||||||||||||||
|
|
|
|
|
|
|
|
|
|
|
|
|
|
|
|
|
|
|
|
I |
|
|
|
|
|
|
|
|
|
|
|
|
|
|
|
|
|
|
|
|
||||||||||||||||
causes its own set of problems. So step back |
|
|
|
|
|
|
|
L |
|
|
|
|
|
|
|
|
|
|
|
|
|
|
MITTS |
|
|
|
|
|
|
|
|
|
|
|
|
|
M |
|||||||||||||||||||
|
|
|
|
|
|
|
L |
|
|
|
|
|
|
|
|
|
|
|
|
|
|
|
|
|
|
|
|
|
|
|
|
|
|
|
||||||||||||||||||||||
|
|
|
|
|
|
|
|
|
|
|
|
|
|
|
|
|
|
|
|
|
|
|
|
|
|
|
|
|
|
|
|
|
|
|
|
|
|
|
|
|
|
|
|
|
|
|
U |
|||||||||
and trust the grill. |
|
|
|
|
|
|
|
|
|
|
|
|
|
|
|
|
|
|
|
I |
|
|
|
|
|
|
|
|
|
|
|
|
|
|
|
|
|
|
|
|
|
|
|
|
|
|
|
|||||||||
|
|
|
|
|
|
|
|
|
|
|
|
|
|
|
|
|
|
|
R |
|
|
|
|
|
|
|
|
|
|
|
|
|
|
|
|
|
|
|
|
|
|
|
|
|
|
|
S |
|||||||||
|
|
|
|
|
|
|
|
|
|
|
|
|
|
|
|
|
|
|
|
G |
|
|
|
|
|
|
|
|
|
|
|
|
|
|
|
|
|
|
|
|
|
|
|
|
|
|
|
T |
||||||||
|
|
|
|
|
|
|
|
|
|
|
|
|
|
|
|
|
|
|
|
E |
|
|
|
|
|
|
|
|
|
|
|
|
|
|
|
|
|
|
|
|
|
|
|
|
|
|
- |
|||||||||
|
|
|
|
|
|
|
|
|
|
|
|
|
|
|
|
|
|
|
|
|
|
|
|
|
|
|
|
|
|
|
|
|
|
|
|
|
|
|
|
|
|
|
|
|
|
|
|
|
|
|
|
|
|
H |
||
|
|
|
|
|
|
|
|
|
|
|
|
|
|
|
|
|
|
|
|
V |
|
|
|
|
|
|
|
|
|
|
|
|
|
|
|
|
|
|
|
|
|
|
|
|
|
|
|
|
|
|
|
|
|
|
||
|
|
|
|
|
|
|
|
|
|
|
|
|
|
|
|
|
|
|
|
|
|
|
|
|
|
|
|
|
|
|
|
|
|
|
|
|
|
|
|
|
|
|
|
|
|
|
|
|
|
|
|
|
|
A |
||
|
|
|
|
|
|
|
|
|
|
|
|
|
|
|
|
|
|
|
|
A |
|
|
|
|
|
|
|
|
|
|
|
|
|
|
|
|
|
|
|
|
|
|
|
|
|
|
|
|
|
|
|
|
|
|||
|
|
|
|
|
|
|
|
|
|
|
|
|
|
|
|
|
|
|
|
H When in doubt, wear them. The good |
|
|
|
|
V |
|||||||||||||||||||||||||||||||
|
|
|
|
|
|
|
|
|
|
|
|
|
|
|
|
|
|
|
|
- |
|
|
|
|
|
ones are insulated and protect |
|
|
|
|
|
G |
E |
|||||||||||||||||||||||
|
|
|
|
|
|
|
|
|
|
|
|
|
|
|
|
|
|
|
|
|
|
|
|
|
|
|
|
|
R |
|
||||||||||||||||||||||||||
|
|
|
|
|
|
|
|
|
|
|
|
|
|
|
|
|
|
|
|
|
T |
|
|
|
|
|
|
|
|
|||||||||||||||||||||||||||
|
|
|
|
|
|
|
|
|
|
|
|
|
|
|
|
|
|
|
|
|
|
S |
|
|
|
|
|
I |
|
|||||||||||||||||||||||||||
|
|
|
|
|
|
|
|
|
|
|
|
|
|
|
|
|
|
|
|
|
|
|
|
|
|
L |
|
|
||||||||||||||||||||||||||||
|
|
|
|
|
|
|
|
|
|
|
|
|
|
|
|
|
|
|
|
|
|
|
U |
|
|
L |
|
|
||||||||||||||||||||||||||||
|
|
|
|
|
|
|
|
|
|
|
|
|
O |
|
|
|
|
|
|
|
|
|
|
|
M |
|
|
|
both hand and forearm. |
|
|
|
|
|
|
|
|
|||||||||||||||||||
|
|
|
|
|
|
|
|
|
|
|
|
|
|
|
|
|
|
|
|
|
|
|
|
|
|
|
|
|
|
|
|
|
|
|
|
|||||||||||||||||||||
|
|
|
|
|
|
|
|
|
|
|
|
|
|
|
|
|
|
|
|
|
|
|
|
|
|
|
|
|
|
|
|
|
|
|
|
|
|
|
|
|||||||||||||||||
|
|
|
|
|
|
|
|
|
|
|
|
|
|
|
|
|
|
|
|
|
|
|
|
|
|
• |
|
|
|
|
|
|
I |
|
|
|
|
|
||||||||||||||||||
|
|
|
|
|
|
|
|
|
|
|
|
|
|
|
|
|
|
|
|
|
|
|
|
|
|
|
|
|
|
|
|
N |
|
|
|
|
|
|
||||||||||||||||||
|
|
|
|
|
|
|
|
|
|
|
|
|
|
|
|
|
|
|
|
|
|
|
|
|
|
|
|
S |
|
|
|
|
|
|
|
|
|
|
|
|
|
|
|
|
|
|
|
G |
|
|
|
|
|
|
|
|
|
|
|
|
|
|
|
|
|
|
|
|
|
|
|
|
|
|
|
|
|
|
|
|
|
|
|
|
|
L |
|
|
|
|
|
|
|
|
|
|
|
|
|
|
|
|
|
|
|
T |
|
|
|
|
|
|
|
|
|
|
|
|
|
|
|
|
|
|
|
|
|
|
|
|
|
|
|
|
|
|
|
|
|
|
|
|
O |
|
|
|
|
|
|
|
|
|
|
|
|
|
|
|
|
O |
|
|
|
|
|
|
|
|||
|
|
|
|
|
|
|
|
|
|
|
|
|
|
|
|
|
|
|
|
|
|
|
|
|
|
|
|
|
|
O |
|
|
|
|
|
|
|
|
|
|
|
|
|
|
O |
|
|
|
|
|
|
|
||||
|
|
|
|
|
|
|
|
|
|
|
|
|
|
|
|
|
|
|
|
|
|
|
|
|
|
|
|
|
|
|
|
T |
G |
|
|
|
|
|
|
|
|
|
|
|
|
L |
|
|
|
|
|
|
|
|
|
|
|
|
|
|
|
|
|
|
|
|
|
|
|
|
|
|
|
|
|
|
|
|
|
|
|
|
|
|
|
|
|
|
|
|
|
|
|
|
|
|
|
|
|
S |
|
|
|
|
|
|
|
|
|
|
|||
|
|
|
|
|
- |
|
|
|
|
|
|
|
|
|
|
|
|
|
|
|
|
|
|
|
|
|
|
|
|
|
|
|
|
|
|
|
|
|
|
|
• |
|
|
|
|
|
|
|
|
|
|
|
|
|||
|
|
|
|
|
|
|
|
|
|
|
|
|
|
|
|
|
|
|
|
|
|
|
|
|
|
|
|
|
|
|
NI |
LL |
|
|
|
|
|
|
|
|
|
|
|
|
|
|
|
|
|
|
||||||
|
|
|
|
T |
|
|
|
|
|
|
|
|
|
|
|
|
|
|
|
|
|
|
|
|
|
|
|
|
|
|
|
|
|
|
|
|
|
U |
|
|
|
|
|
|
|
|
|
|
|
|
|
|
||||
|
|
|
|
|
|
|
|
|
|
|
|
|
|
|
|
|
|
|
|
|
|
|
|
|
|
|
|
|
|
|
|
|
|
IR |
|
|
|
|
|
|
|
|
|
|
|
|
|
|
|
|
|
|
||||
|
|
|
|
S |
|
|
|
|
|
|
|
|
|
|
|
|
|
|
|
|
|
|
|
|
|
|
|
|
|
|
|
|
|
|
|
|
|
TS |
|
|
|
|
|
|
|
|
|
|
|
|
|
|
|
|||
|
|
M |
U |
|
|
|
|
|
|
|
|
|
|
|
|
|
|
|
|
|
|
|
|
|
|
|
|
|
|
|
|
|
|
|
|
|
G E VAH- |
|
|
|
|
|
|
|
|
|
|
|
|
|
|
|
|
|
||
|
• |
|
|
|
|
SPATULA |
|
|
|
|
|
I |
|
|
|
|
|
|
|
|
|
|
|
|
|
|
|
|
|
|
|
|
|
|
|
|
|
|
|
|
|
|
||||||||||||||
S |
|
|
|
|
|
|
|
|
|
|
N |
|
|
|
|
|
|
|
|
|
|
|
|
|
|
|
|
|
|
|
|
|
|
|
|
|
|
|
|
|
||||||||||||||||
|
|
|
|
|
|
|
|
|
|
|
|
G |
|
|
|
|
|
|
|
|
|
|
|
|
|
|
|
|
|
|
|
|
|
|
|
|
|
|
|
|
|
|||||||||||||||
|
|
|
|
|
|
|
|
|
|
|
|
|
|
|
T |
|
|
|
|
|
|
|
|
|
|
|
|
|
|
|
|
|
|
|
|
|
|
|
|
|
|
|
|
|||||||||||||
L |
|
|
|
|
|
|
|
|
|
|
|
|
|
|
|
O |
|
|
|
|
|
|
|
|
|
|
|
|
|
|
|
|
|
|
|
|
|
|
|
|
|
|
|
|||||||||||||
O |
|
|
|
|
|
|
|
|
|
|
|
|
|
|
|
|
|
|
|
|
|
|
|
|
|
|
|
|
|
|
|
|
|
|
|
|
|
|
|
|
|
|
||||||||||||||
|
|
|
|
|
|
|
|
|
|
|
|
|
|
|
|
|
|
|
|
|
|
|
|
|
|
|
|
|
|
|
|
|
|
|
|
|
|
|
|
|
|
|
|
|
|
|||||||||||
O |
|
|
|
|
|
|
|
|
|
|
|
|
|
|
|
|
O |
|
|
|
|
|
|
|
|
|
|
|
|
|
|
|
|
|
|
|
|
|
|
|
|
|
|
|
||||||||||||
T |
|
|
|
|
|
|
|
|
|
|
|
|
|
|
|
|
|
|
|
|
|
|
|
|
|
|
L |
|
|
|
|
|
|
|
|
|
|
|
|
|
|
|
|
|
|
|
|
|
|
|
|
|
|
|
||
G |
|
|
|
|
Look for a long-handled spatula |
|
|
|
|
|
|
S |
|
|
|
|
|
|
|
|
|
|
|
|
|
|
|
|
|
|
|
|
|
|
|
|
|
|
|
|||||||||||||||||
|
|
|
|
|
|
|
|
|
|
|
• |
|
|
|
|
|
|
|
|
|
|
|
|
|
|
|
|
|
|
|
|
|
|
|
|
|
|
|
||||||||||||||||||
N |
|
|
|
|
|
|
|
|
|
|
|
|
|
|
|
|
|
|
|
|
|
|
|
|
|
|
|
|
|
|
|
|
|
|
|
|
|
|
||||||||||||||||||
I |
|
|
|
|
|
|
|
|
|
|
|
|
|
|
|
|
|
|
|
|
|
|
|
|
|
|
|
|
|
|
|
|
|
|
|
|
|
|
|
|
||||||||||||||||
L |
|
|
|
designed with a bent (offset) neck |
|
|
|
|
|
|
|
M |
|
|
|
|
|
|
|
|
|
|
|
|
|
|
|
|
|
|
|
|
|
|
|
|
|
|
|
|||||||||||||||||
L |
|
|
|
|
|
|
|
|
|
|
|
|
|
|
|
|
|
|
|
|
|
|
|
|
|
|
|
|
|
|
|
|
|
|
|
|
|
|||||||||||||||||||
|
|
|
|
|
|
|
|
|
|
U |
|
|
|
|
|
|
|
|
|
|
|
|
|
|
|
|
|
|
|
|
|
|
|
|
|
|
|
|||||||||||||||||||
I |
|
|
|
|
|
|
|
|
|
|
|
|
|
|
|
|
|
|
|
|
|
|
|
|
|
|
|
|
|
|
|
|
|
|
|
|
|
|||||||||||||||||||
R |
|
|
|
|
|
|
|
|
|
|
S |
|
|
|
|
|
|
|
|
|
|
|
|
|
|
|
|
|
|
|
|
|
|
|
|
|
|
|
||||||||||||||||||
G |
|
|
|
|
|
|
|
|
|
|
|
|
|
|
|
|
|
|
|
|
|
|
|
|
|
|
|
T |
|
|
|
|
|
|
|
|
|
|
|
|
|
|
|
|
|
|
|
|
|
|
|
|
|
|
|
|
E |
|
|
|
|
|
so that the blade is set lower |
|
|
|
|
|
|
|
- |
|
|
|
|
|
|
|
|
|
|
|
|
|
|
|
|
|
|
|
|
|
|
|
|
|
|
|
|||||||||||||||
|
|
|
|
|
|
|
|
|
|
|
H |
|
|
|
|
|
|
|
|
|
|
|
|
|
|
|
|
|
|
|
|
|
|
|
|
|
|
|
||||||||||||||||||
V |
|
|
|
|
|
|
|
|
|
|
|
|
|
|
|
|
|
|
|
|
|
|
|
|
|
|
|
|
|
|
|
|
|
|
|
|
|
|
||||||||||||||||||
A |
|
|
|
|
|
|
|
|
|
|
|
|
|
|
|
|
|
|
|
|
|
|
|
|
|
|
A |
|
|
|
|
|
|
|
|
|
|
|
|
|
|
|
|
|
|
|
|
|
|
|
|
|
|
|
|
|
H |
|
|
|
|
|
|
|
|
|
|
|
|
|
|
|
|
|
|
|
|
|
|
|
|
|
V |
|
|
|
|
|
|
|
|
|
|
|
|
|
|
|
|
|
|
|
|
|
|
|
|
|
|
|
|
||
|
|
|
|
than the handle. This makes it |
|
|
|
|
|
G |
E |
|
|
|
|
|
|
|
|
|
|
|
|
|
|
|
|
|
|
|
|
|
|
|
|
|
|
|
|
|
||||||||||||||||
- |
|
|
|
|
|
|
|
|
|
|
|
|
|
|
|
|
|
|
|
G T |
O O |
|
|
|
|
|
|
|
|
|
|
|
|
|
|
|
|
|
||||||||||||||||||
T |
|
|
|
|
|
|
|
|
|
|
|
|
|
|
|
|
|
|
|
|
|
|
|
|
|
|
|
|
|
|
|
|
|
|
|
|
||||||||||||||||||||
|
|
|
|
|
|
|
|
|
|
|
|
|
|
|
|
|
|
|
|
|
|
|
|
|
R |
|
|
|
|
|
|
|
|
|
|
|
LS |
• |
|
|
|
|
|
|
|
|
|
|
|
|
|
|
|
|
||
S |
|
|
|
|
|
|
|
|
|
|
|
|
|
|
|
|
|
|
|
|
|
|
|
|
|
|
|
|
|
|
|
IN |
|
|
MU |
|
|
|
|
|
|
|
|
|
|
|
|
|
|
|||||||
|
|
|
|
|
|
|
|
|
|
|
|
|
|
|
|
|
|
|
|
|
|
|
|
|
|
|
|
|
|
L |
|
|
|
|
|
|
|
|
|
|
|
|
|
|
|
|
|
|
||||||||
|
U |
|
|
easier to lift food off the |
|
|
|
L |
I |
|
|
|
|
|
|
|
|
IL |
|
|
|
|
|
|
S |
|
|
|
|
|
|
|
|
|
|
|
|
|||||||||||||||||||
|
|
|
|
|
|
|
|
|
|
|
|
|
|
R |
|
|
|
|
|
|
|
|
|
|
|
|
|
|
|
|
|
|
|
|
||||||||||||||||||||||
|
|
|
|
|
|
|
|
|
|
|
|
|
|
|
|
|
|
G |
|
|
|
|
|
|
|
|
|
|
T |
|
|
|
|
|
|
|
|
|
|
|
||||||||||||||||
|
|
M |
|
|
L |
|
|
|
|
|
|
|
|
|
|
|
|
|
|
|
|
|
|
|
- |
|
|
|
|
|
|
|
|
|
|
|||||||||||||||||||||
|
|
|
|
|
|
|
|
|
|
|
|
E |
|
|
|
|
|
|
|
|
|
|
|
|
|
H |
|
|
|
|
|
|
|
|
|
|||||||||||||||||||||
|
|
|
|
|
|
|
|
|
|
|
|
|
|
|
V |
|
|
|
|
|
|
|
|
|
|
|
|
|
|
A |
|
|
|
|
|
|
|
|||||||||||||||||||
|
|
|
• |
|
|
|
|
|
|
|
|
|
|
|
|
|
|
I |
|
|
|
|
|
|
A |
|
|
|
|
|
|
|
|
|
|
|
|
|
|
|
|
|
V |
|
|
|
|
|
|
|
||||||
|
|
|
|
|
|
|
|
|
|
|
|
|
|
|
|
N |
|
|
|
|
|
|
|
|
|
|
|
|
|
|
|
|
|
|
|
|
|
|
|
|
|
|
|
|
|
|
|
|||||||||
|
|
|
|
|
S |
|
|
|
|
|
|
|
|
|
|
|
|
|
|
|
|
|
|
|
|
|
|
|
|
|
|
|
|
|
|
|
|
|
|
|
|
|
|
|
|
E |
|
|
|
|
|
|
|
|||
|
|
|
|
|
L |
|
|
|
cooking grates. |
|
|
|
|
T |
|
|
|
|
|
|
|
|
|
|
|
|
|
|
|
|
|
|
|
|
|
|
|
|
|
|
|
|
G |
|
|
|
|
|
|
|||||||
|
|
|
|
|
|
|
|
|
|
|
|
|
|
|
|
|
|
|
|
|
|
|
|
|
|
|
|
|
|
|
|
|
|
|
|
|
|
|
|
R |
|
|
|
|
|
|||||||||||
|
|
|
|
|
|
O |
|
|
|
|
|
|
|
O |
|
|
|
|
|
|
|
|
|
|
|
|
|
|
|
|
|
|
|
|
|
|
|
|
|
|
|
|
|
I |
|
|
|
|
|
|||||||
|
|
|
|
|
|
O |
|
|
|
|
|
|
|
|
|
|
|
O |
|
|
|
|
|
|
|
|
|
|
|
|
|
|
|
|
|
|
|
|
|
|
|
|
|
|
|
|
|
L |
|
|
|
|||||
|
|
|
|
|
|
|
T |
G |
|
|
|
|
|
|
|
|
|
L |
|
|
|
|
|
|
|
|
|
|
|
|
|
|
|
|
|
|
|
|
|
|
|
|
|
|
|
|
|
|
|
L |
|
|
||||
|
|
|
|
|
|
|
|
NI |
|
|
|
|
|
|
|
S |
|
|
|
|
|
|
|
|
|
|
|
|
|
|
|
|
|
|
|
|
|
|
|
|
|
|
|
|
|
|
|
|
I |
|
||||||
|
|
|
|
|
|
|
|
L |
|
|
|
|
|
• |
|
|
|
|
|
|
|
|
|
|
|
|
|
|
|
|
|
|
|
|
|
|
|
|
|
|
|
|
|
|
|
|
|
|
||||||||
|
|
|
|
|
|
|
|
|
|
|
|
|
|
|
|
|
|
|
|
|
|
|
|
|
|
|
|
|
|
|
|
|
|
|
|
|
|
|
|
|
|
|
|
|
|
|
N |
|||||||||
|
|
|
|
|
|
|
|
|
|
|
|
|
M |
|
|
|
|
|
|
|
|
|
|
|
|
|
|
|
|
|
|
|
|
|
|
|
|
|
|
|
|
|
|
|
|
|
|
|
|
|
|
|
|
|||
|
|
|
|
|
|
|
|
|
|
L |
IR |
|
|
U |
|
|
|
|
|
|
|
|
|
|
|
|
|
|
|
|
|
|
|
|
|
|
|
|
|
|
|
|
|
|
|
|
|
|
|
|
|
G |
||||
|
|
|
|
|
|
|
|
|
|
|
|
TS |
|
|
|
|
|
|
|
|
|
|
|
|
|
|
|
|
|
|
|
|
|
|
|
|
|
|
|
|
|
|
|
|
|
|
|
|
|
|
|
|
|
|
||
|
|
|
|
|
|
|
|
|
|
|
|
G EVAH- |
|
|
|
|
|
|
O |
|
|
|
|
|
|
|
|
|
|
|
|
|
|
|
|
|
|
|
|
|
|
|
|
|
|
|
|
|
|
|
|
|
T |
|||
|
|
|
|
|
|
|
|
|
|
|
|
|
|
|
|
|
|
|
|
|
|
|
|
|
|
|
|
|
|
|
|
|
|
|
|
|
|
|
|
|
|
|
|
|
|
|
|
|
|
|
|
|
O |
|||
|
|
|
|
|
|
|
|
|
|
|
|
|
|
|
|
|
|
|
|
|
|
|
|
|
|
|
|
|
|
|
|
|
|
|
|
|
|
|
|
|
|
|
|
|
|
|
|
|
|
|
|
|
|
O |
||
|
|
|
|
|
|
|
|
|
|
|
|
|
|
|
|
|
|
|
|
O |
|
|
|
|
|
|
|
|
|
|
|
|
|
|
TIMER |
|
|
|
|
|
|
|
|
|
|
|
|
|
||||||||
|
|
|
|
|
|
|
|
|
|
|
|
|
|
|
|
|
|
|
|
|
|
|
|
|
|
|
|
|
|
|
|
|
|
|
|
|
|
|
|
|
|
|
|
|
|
|
L |
|||||||||
|
|
|
|
|
|
|
|
|
|
|
|
|
|
|
|
|
|
|
|
T |
|
|
|
|
|
|
|
|
|
|
|
|
|
|
|
|
|
|
|
|
|
|
|
|
|
|
|
|||||||||
|
|
|
|
|
|
|
|
|
|
|
|
|
|
|
|
|
|
|
|
G |
|
|
|
|
|
|
|
|
|
|
|
|
|
|
|
|
|
|
|
|
|
|
|
|
|
|
|
S |
||||||||
|
|
|
|
|
|
|
|
|
|
|
|
|
|
|
|
|
|
|
|
|
|
|
|
|
|
|
|
|
|
|
|
|
|
|
|
|
|
|
|
|
|
|
|
|
|
|
|
|||||||||
|
|
|
|
|
|
|
|
|
|
|
|
|
|
|
|
|
|
|
|
N |
|
|
|
|
|
|
|
|
|
|
|
|
|
|
|
|
|
|
|
|
|
|
|
|
|
|
|
• |
||||||||
|
|
|
|
|
|
|
|
|
|
|
|
|
|
|
|
|
|
|
|
I |
|
|
|
|
|
|
|
|
|
|
|
|
|
|
|
|
|
|
|
|
|
|
|
|
|
|
|
M |
||||||||
|
|
|
|
|
|
|
|
|
|
|
|
|
|
|
|
|
|
|
|
L |
|
|
|
|
|
|
|
|
|
|
|
|
|
|
|
|
|
|
|
|
|
|
|
|
|
|
|
|||||||||
|
|
|
|
|
|
|
|
|
|
|
|
|
|
|
|
|
|
|
|
L |
|
|
|
|
|
Avoid the disappointment of torching |
|
|
|
|
U |
|||||||||||||||||||||||||
|
|
|
|
|
|
|
|
|
|
|
|
|
|
|
|
|
|
|
|
I |
|
|
|
|
|
|
|
|
|
|||||||||||||||||||||||||||
|
|
|
|
|
|
|
|
|
|
|
|
|
|
|
|
|
|
|
|
R |
|
|
|
|
|
|
|
|
|
S |
||||||||||||||||||||||||||
|
|
|
|
|
|
|
|
|
|
|
|
|
|
|
|
|
|
|
|
G |
|
|
|
|
|
|
|
|
|
T |
||||||||||||||||||||||||||
|
|
|
|
|
|
|
|
|
|
|
|
|
|
|
|
|
|
|
|
E |
|
|
|
|
|
|
|
|
|
|
|
|
|
|
|
|
|
|
|
|
|
|
|
|
|
|
|
|
|
|
|
|
|
|
- |
|
|
|
|
|
|
|
|
|
|
|
|
|
|
|
|
|
|
|
|
|
|
|
|
|
|
|
|
|
|
|
|
|
|
|
|
|
|
|
|
|
|
|
|
|
|
|
|
|
|
|
|
|
|
|
H |
||
|
|
|
|
|
|
|
|
|
|
|
|
|
|
|
|
|
|
|
|
V |
|
|
|
|
|
|
|
|
|
|
|
|
|
|
|
|
|
|
|
|
|
|
|
|
|
|
|
|
|
|
|
|
|
|
||
|
|
|
|
|
|
|
|
|
|
|
|
|
|
|
|
|
|
|
|
|
|
|
|
|
|
|
|
|
|
|
|
|
|
|
|
|
|
|
|
|
|
|
|
|
|
|
|
|
|
|
|
|
|
A |
||
|
|
|
|
|
|
|
|
|
|
|
|
|
|
|
|
|
|
|
|
A your dinner by simply setting a timer. |
|
|
|
|
||||||||||||||||||||||||||||||||
|
|
|
|
|
|
|
|
|
|
|
|
|
|
|
|
|
|
|
|
H |
|
|
|
|
|
|
|
|
|
|
|
|
|
|
|
|
|
|
|
|
|
|
|
|
|
|
|
|
|
|
|
|
V |
|||
|
|
|
|
|
|
|
|
|
|
|
|
|
|
|
|
|
|
|
|
|
|
|
|
Nothing fancy needed—just one |
|
|
|
|
|
G |
E |
|||||||||||||||||||||||||
|
|
|
|
|
|
|
|
|
|
|
|
|
|
|
|
|
|
|
|
- |
|
|
|
|
|
|
|
|
|
|||||||||||||||||||||||||||
|
|
|
|
|
|
|
|
|
|
|
|
|
|
|
|
|
|
|
|
|
T |
|
|
|
|
|
|
R |
|
|||||||||||||||||||||||||||
|
|
|
|
|
|
|
|
|
|
|
|
|
|
|
|
|
|
|
|
|
|
S |
|
|
|
L |
I |
|
||||||||||||||||||||||||||||
|
|
|
|
|
|
|
|
|
|
|
|
|
|
|
|
|
|
|
|
|
|
|
U |
|
|
|
|
that is reliable and easy |
|
|
|
L |
|
|
||||||||||||||||||||||
|
|
|
|
|
|
|
|
|
|
|
|
|
|
|
|
|
|
|
|
|
|
|
|
|
|
|
|
|
|
|
|
|
||||||||||||||||||||||||
|
|
|
|
|
|
|
|
|
|
|
|
|
|
|
|
|
|
|
|
|
|
|
|
|
M |
|
|
|
|
|
|
|
|
|
|
|||||||||||||||||||||
|
|
|
|
|
|
|
|
|
|
|
|
|
|
|
|
|
|
|
|
|
|
|
|
|
|
|
|
|
|
|
|
|
|
|
|
|||||||||||||||||||||
|
|
|
|
|
|
|
|
|
|
|
|
|
|
|
|
|
|
|
|
|
|
|
|
|
|
|
• |
|
|
|
|
|
|
|
|
|
|
|
||||||||||||||||||
|
|
|
|
|
|
|
|
|
|
|
|
|
|
|
|
|
|
|
|
|
|
|
|
|
|
|
|
|
|
|
NI |
|
|
|
|
|
||||||||||||||||||||
|
|
|
|
|
|
|
|
|
|
|
|
|
|
|
|
|
|
|
|
|
|
|
|
|
|
|
|
S |
|
|
|
|
|
|
|
|
to use. |
|
|
|
|
|
|
|
|
|
G |
|
|
|
|
|
|
|
||
|
|
|
|
|
|
|
|
|
|
|
|
|
|
|
|
|
|
|
|
|
|
|
|
|
|
|
|
|
L |
|
|
|
|
|
|
|
|
|
|
|
|
|
|
|
|
|
T |
|
|
|
|
|
|
|
||
|
|
|
|
|
|
|
|
|
|
|
|
|
|
|
|
|
|
|
|
|
|
|
|
|
|
|
|
|
O |
|
|
|
|
|
|
|
|
|
|
|
|
|
|
O |
|
|
|
|
|
|
|
|||||
|
|
|
|
|
|
|
|
|
|
|
|
|
|
|
|
|
|
|
|
|
|
|
|
|
|
|
|
|
|
O |
|
|
|
|
|
|
|
|
|
|
|
|
O |
|
|
|
|
|
|
|
||||||
|
|
|
|
|
|
|
|
|
|
|
|
|
|
|
|
|
|
|
|
|
|
|
|
|
|
|
|
|
|
|
|
T |
G |
|
|
|
|
|
|
|
|
|
|
|
|
L |
|
|
|
|
|
|
|
|
|
|
|
|
|
|
|
|
|
|
|
|
|
|
|
|
|
|
|
|
|
|
|
|
|
|
|
|
|
|
|
|
|
|
|
|
|
|
|
|
|
|
|
|
|
S |
|
|
|
|
|
|
|
|
|
|
|||
|
|
|
|
|
|
|
|
|
|
|
|
|
|
|
|
|
|
|
|
|
|
|
|
|
|
|
|
|
|
|
|
|
|
|
|
|
|
|
|
|
|
• |
|
|
|
|
|
|
|
|
|
|
|
|
||
|
|
|
|
|
|
|
|
|
|
|
|
|
|
|
|
|
|
|
|
|
|
|
|
|
|
|
|
|
|
|
|
|
NI |
L |
|
|
|
|
|
|
|
|
|
|
|
|
|
|
|
|
|
|
|
|||
|
|
|
|
|
|
|
|
|
|
|
|
|
|
|
|
|
|
|
|
|
|
|
|
|
|
|
|
|
|
|
|
|
|
|
|
|
|
|
M |
|
|
|
|
|
|
|
|
|
|
|
|
|
||||
|
|
|
|
|
|
|
|
|
|
|
|
|
|
|
|
|
|
|
|
|
|
|
|
|
|
|
|
|
|
|
|
|
|
|
|
|
|
|
|
U |
|
|
|
|
|
|
|
|
|
|
|
|
|
|
||
|
|
|
|
|
|
|
|
|
|
|
|
|
|
|
|
|
|
|
|
|
|
|
|
|
|
|
|
|
|
|
|
|
|
|
L |
IR |
|
|
|
|
|
|
|
|
|
|
|
|
|
|
|
|
|
|||
|
|
|
|
|
|
|
|
|
|
|
|
|
|
|
|
|
|
|
|
|
|
|
|
|
|
|
|
|
|
|
|
|
|
|
|
|
|
TS |
|
|
|
|
|
|
|
|
|
|
|
|
|
|
|
|||
|
|
|
|
|
|
|
|
|
|
|
|
|
|
|
|
|
|
|
|
|
|
|
|
|
|
|
|
|
|
|
|
|
|
|
|
|
|
G E VAH- |
|
|
|
|
|
|
|
|
|
|
|
|
|
|
|
|
|
|
59502_Spt_II_LP_enUS_esMX_frCA_working.indd 7 |
|
|
11/13/17 11:24 AM |
|
|
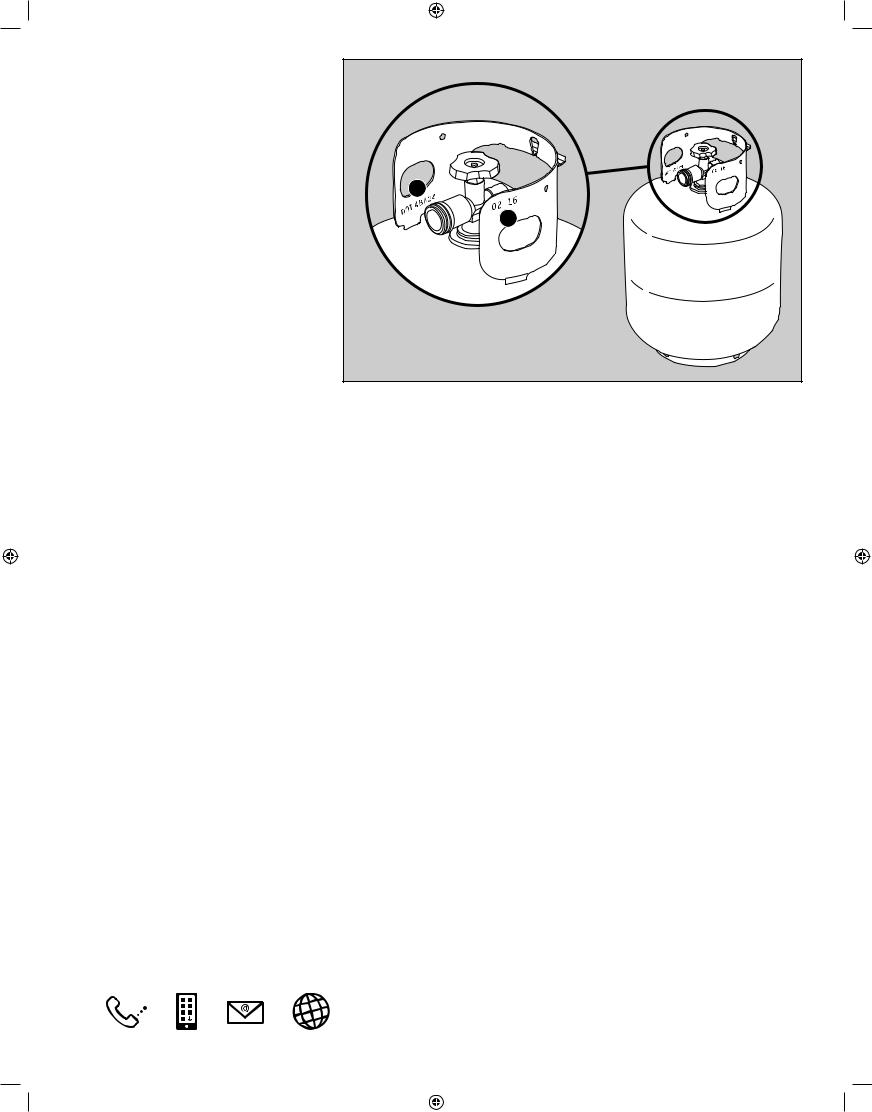
| <![if ! IE]> <![endif]>Started |
Important Information about |
|
LP Gas & Gas Connections |
||
|
||
|
What Is LP Gas? |
|
|
Liquefied petroleum gas, also called LP, LP gas, |
|
|
liquid propane, or simply propane or butane, is the |
|
| <![if ! IE]> <![endif]>Getting |
flammable, petroleum-based product used to fuel |
|
your grill. It is a gas at moderate temperatures and |
||
|
||
|
pressure when it is not contained. But at moderate |
|
|
pressure inside a container, such as a tank, LP is a |
|
|
liquid. As pressure is released from the tank, the liquid |
|
|
readily vaporizes and becomes gas. |
|
|
Safe Handling Tips For LP Tanks |
|
|
• A dented or rusty liquid propane tank may be |
|
|
hazardous and should be checked by your liquid |
|
|
propane supplier. Do not use a liquid propane tank with |
|
|
a damaged valve. |
|
|
• Although your liquid propane tank may appear to be |
|
|
empty, gas may still be present, and the tank should be |
|
|
transported and stored accordingly. |
|
|
• The LP tank must be installed, transported, and stored |
|
|
in an upright, secure position. LP tanks should not be |
|
|
dropped or handled roughly. |
|
|
• Never store or transport the LP tank where |
|
|
temperatures can reach 125° F (51.7° C) (the tank will |
|
|
become too hot to hold by hand). |
|
|
• Place dust cap on tank valve outlet whenever the tank |
|
|
is not in use. Only install the type of dust cap on the |
|
|
tank valve outlet that is provided with the tank valve. |
|
|
Other types of caps or plugs may result in leakage of |
|
|
propane. |
LP Tank Requirements
•The tank must be approximately 18¼ inches (46.35 cm) high and 12¼ inches (31.1 cm) in diameter with a marked 20 pound (9.07 kg) LPG capacity or 47.6 pound (21.6 kg) water capacity as stated by the manufacturer. Other tanks may be acceptable provided they are compatible with the grill retention means (tank scale).
•The tank used must be constructed and marked in accordance with the Specifications for LP gas Cylinders of the U.S. Department of Transportation (D.O.T.); or the Canadian Standard for Cylinders,
Spheres and Tubes for Transportation of Dangerous Goods and Commission, CAN/CSA-B339, as applicable.
•Tanks must be provided with a listed OPD (Overfilling Prevention Device) and a Type 1 (CGA 810) tank connection. The tank connection must be compatible with the grill connection.
•The tank must include a collar to protect the tank valve.
•Tanks must have a D.O.T. certification (A), and a testing date (B) that is within five years of current use.
What is a Regulator?
Your gas grill is equipped with a pressure regulator, which is a device to control and maintain uniform gas pressure as gas is released from the LP tank.
Regulator Requirements
•The regulator and hose assembly supplied with this grill must be used. This regulator has a flow limiting device built into the unit that will restrict the flow of gas in the event that a leak is detected.
•Replacement regulator and hose assemblies must be as specified by Weber-Stephen Products LLC (UL-listed Type 1 (CGA 810) tank connection device as described in the latest edition of ANSI Z21.81).
8 TAKES LESS THAN TWO MINUTES
A
B
59502_Spt_II_LP_enUS_esMX_frCA_working.indd 8 |
|
|
11/13/17 11:24 AM |
|
|

LP Tank Installation & Leak Checking
Installation Location
The tank is hung onto the tank scale which is located outside the cabinet base under the right side table. The shape of the collar assembly (the metal protective ring around the tank valve) determines one of two directions in which the tank will correctly hang on the tank scale (A).
Inspect the Tank
1)Confirm that the tank valve is fully closed. Close by turning valve clockwise.
2)Confirm that the tank valve is the proper mating type for the regulator (B).
3)Inspect the tank valve, including the internal rubber seal for damage or debris (C). If damaged, return tank to local retailer.
Install The Tank
1)Check that all burner control knobs are in the
off  position. Check by pushing in and turning knobs clockwise.
2)Loosen hand nut and rotate tank lock up (D).
3)Lift tank into position on the tank scale (E).
4)Rotate the tank lock down. Tighten the hand nut.
5)Screw the regulator coupling onto the tank valve, turning clockwise (F). Hand-tighten only. Using a wrench could damage the regulator coupling and could cause a leak. Proceed to “CHECKING FOR GAS LEAKS.”
A |
B |
C |
D |
E
F |
<![endif]>Started Getting
9
59502_Spt_II_LP_enUS_esMX_frCA_working.indd 9 |
|
|
11/13/17 11:24 AM |
|
|

<![endif]>Getting Started
10
What is a Leak Check?
Once the LP tank is properly installed, it is necessary to perform a leak check. A leak check is a reliable way to verify that gas is not escaping after you connect the tank. The fuel system in your grill features factorymade connections that have been thoroughly checked for gas leaks and the burners have been flame-tested. Weber recommends performing a thorough leak check after assembly, as well as annually. The following fittings should be tested:
•Where the regulator connects to the tank.
•Where the gas hose connects to the bulkhead.
•Where the bulkhead connects to the corrugated gas line.
Checking for Gas Leaks
1)Wet fittings (G) with a soap and water solution, using a spray bottle, brush, or rag. You can make your own soap and water solution by mixing 20% liquid soap with 80% water; or, you can purchase leak check solution in the plumbing section of any hardware store.
2)Slowly open gas supply by turning tank valve counterclockwise while checking for bubbles.
3)If bubbles appear there is a leak:
a)If the leak is at the cylinder (H), turn off the gas. DO NOT OPERATE THE GRILL. Disconnect the tank and return the tank to your local retailer.
b)If the leak is at the regulator (I), turn off the gas. DO NOT OPERATE THE GRILL. Contact the Customer Service Representative in your area using the contact information on our website.
c)If the leak is at any fittings indicated in illustration (J), re-tighten fitting with a wrench and recheck for leaks with soap and water solution. If leak persists, turn off the gas. DO NOT OPERATE THE GRILL.
G |
J |
H |
K |
d) If the leak is at any fittings indicated in |
I |
illustration (K), turn off the gas. DO NOT |
|
OPERATE THE GRILL. |
|
If a leak is present, contact the Customer Service |
|
Representative in your area using the contact |
|
information on our website. |
|
4) If bubbles do not appear, leak checking is complete: |
|
a) Turn gas supply off at the tank and rinse |
|
connections with water. |
|
NOTE: Since some leak test solutions, including soap and |
|
water, may be slightly corrosive, all connections should |
|
be rinsed with water after checking for leaks. |
|
m DANGER: Do not use a flame to check for gas leaks. Be sure there are no sparks or open flames in the area while you check for leaks.
m DANGER: Leaking gas may cause a fire or explosion.
m DANGER: Do not operate the grill if there is a gas leak present.
m DANGER: If you see, smell, or hear the hiss of gas escaping from the liquid propane tank: 1. Move away from liquid propane tank.
2. Do not attempt to correct the problem yourself.
3. Call your fire department.
m DANGER: Always close the tank valve before disconnecting the regulator. Do not attempt to disconnect the gas regulator and hose
assembly or any gas fitting while this grill is in operation.
m DANGER: Do not store a spare LP tank under or near this grill. Never fill the tank beyond 80% full. Failure to follow these statements exactly may result in a fire causing death or serious injury.
UNLOCK GRILLING HAPPINESS
59502_Spt_II_LP_enUS_esMX_frCA_working.indd 10 |
|
|
11/13/17 11:24 AM |
|
|
Refilling or Replacing an LP Tank
How Much Fuel is in the Tank?
The tank scale indicates the amount of fuel in a standard 20 pound (9.07 kg) tank once the tank is hung from the scale. The fuel level is checked by viewing the red level indicator line, located on scale. When the indicator line is at the top, the tank is full (L). When it is at the bottom, the tank is empty (M) and needs to be removed to replace or refill.
Removal of the LP Tank
1)Confirm that the tank valve is fully closed. Close by turning valve clockwise (N).
2)Unscrew regulator coupling by turning counterclockwise by hand (O).
3)Loosen tank hand nut and turn tank lock up out of the way.
4)Lift tank off tank scale.
Additional Leak Check Precautions
The following fittings should be tested for gas leaks each time a tank is refilled and reinstalled:
•Where the regulator connects to the tank (H) and at the regulator (I).
Follow the instructions for "Checking for Gas Leaks".
L |
<![if ! IE]> <![endif]>StartedGetting |
O |
|
M |
|
N |
|
|
|
|
|
|
|
|
|
|
|
|
|
|
|
|
|
|
|
|
|
|
|
|
|
|
|
|
|
|
|
|
U |
|
|
|
|
|
|
|
|
|
|
|
|
|
|
|
|
|
|
|
|
|
|
|
|
|
|
|
|
|
|
|
|
|
|
|
|
|
|
|
|
|
|
|
|
|
S |
|
|
|
|
|
|
|
|
|
|
|
|
|
|
|
|
|
|
|
|
|
|
|
|
|
|
|
|
|
|
|
|
|
|
|
|
|
|
|
|
|
|
|
|
|
T |
|
|
|
|
|
|
|
|
|
|
|
|
|
|
|
|
|
|
|
|
|
|
|
|
|
|
|
|
|
|
|
|
|
|
|
|
|
|
|
|
|
|
|
|
|
|
V |
|
|
|
|
|
|
|
|
|
|
|
|
|
|
|
|
|
|
|
|
|
|
|
|
|
|
|
|
|
|
|
|
H |
|
|
|
|
|
|
|
|
|
|
|
E |
|
|
|
|
|
|
|
|
|
|
|
|
|
|
|
|
|
|
|
|
|
|
|
|
|
|
|
|
|
|
|
|
|
|
|
|
|
|
|
|
|
|
|
G |
|
|
|
|
|
|
|||
|
|
|
|
|
|
|
|
|
|
|
|
|
|
|
|
|
|
|
|
|
|
|
|
- |
|
|
|
|
|
|
|
|
|
|
|
|
|
|
|
|
|
|||
|
|
|
|
|
|
|
|
|
|
|
|
|
|
|
|
|
|
|
|
|
|
|
T |
|
|
|
|
|
|
|
|
|
|
|
|
R |
|
|
|
|
|
|||
|
|
|
|
|
|
|
|
|
|
|
|
|
|
|
|
|
|
|
|
|
|
|
S |
|
|
|
|
|
|
|
|
|
|
|
|
|
|
L |
|
|
|
|||
|
|
|
|
|
|
|
|
|
|
|
|
|
|
|
|
|
|
|
|
M |
U |
|
|
|
|
|
|
|
|
|
|
|
|
|
|
|
I |
|
|
|
|
|||
|
|
|
|
|
|
|
|
|
|
|
|
|
|
|
|
|
|
|
|
|
|
|
|
|
|
|
|
|
|
|
|
|
|
|
|
L |
|
|
||||||
|
|
|
|
|
|
|
|
|
|
|
|
|
|
|
|
|
|
|
|
|
|
|
|
|
|
|
|
|
|
|
|
|
|
|
|
|
|
|
N |
|||||
|
|
|
|
|
|
|
|
|
|
|
|
|
|
|
|
|
|
|
• |
|
|
|
|
|
|
|
|
TONGS |
|
|
|
|
|
|
|
I |
|
|||||||
|
|
|
|
|
|
|
|
|
|
|
|
|
|
|
|
|
O |
|
|
|
|
|
|
|
|
|
|
|
|
|
|
|
|
|
G |
|||||||||
|
|
|
|
|
|
|
|
|
|
|
|
|
|
|
|
|
|
|
|
|
|
|
|
|
|
|
|
|
|
|
|
|
|
|
|
|
|
L |
||||||
|
|
|
|
|
|
|
|
|
|
|
|
|
|
|
|
|
S |
|
|
|
|
|
|
|
|
|
|
|
|
|
|
|
|
|
|
|
|
|
|
|
|
T |
||
|
|
|
|
|
|
|
|
|
|
|
|
|
|
|
|
|
L |
|
|
|
|
|
|
|
|
|
|
|
|
|
|
|
|
|
|
|
|
|
|
|
|
|
|
|
|
|
|
|
|
|
|
|
|
|
|
|
|
|
|
|
|
O |
|
|
|
|
|
|
|
|
|
|
|
|
|
|
|
|
|
|
|
|
|
|
|
|
|
O |
|
|
|
|
|
|
|
|
|
|
|
|
|
|
|
|
|
|
T |
|
|
|
|
|
|
|
|
|
|
|
|
|
|
|
|
|
|
|
|
|
|
|
|
|
|
O |
|
|
|
|
|
|
|
|
|
|
|
|
|
|
|
|
|
|
|
|
|
|
Consider these to be an extension |
|
|
|
|
|
|
||||||||||||||||
|
|
|
|
|
|
|
|
|
|
|
|
|
|
|
|
|
I |
|
|
|
|
|
|
|
|
|
|
|
||||||||||||||||
|
|
|
|
|
|
|
|
|
|
|
|
|
|
|
|
|
G |
|
|
|
|
|
|
|
|
|
|
|
|
|
|
|
|
|
|
|
|
|
|
|
|
|
|
S |
|
|
|
|
|
|
|
|
|
|
|
|
|
|
|
|
|
N |
|
|
|
|
|
|
|
|
|
|
|
|
|
|
|
|
|
|
|
|
|
|
|
|
|
|
• |
|
|
|
|
|
|
|
|
|
|
|
|
|
|
|
|
|
L |
|
|
|
|
|
|
of your hand. The best tongs |
|
|
|
|
|
|
|
M |
||||||||||||
|
|
|
|
|
|
|
|
|
|
|
|
|
|
|
|
|
R |
|
|
|
|
|
|
|
|
|
|
|
|
|
||||||||||||||
|
|
|
|
|
|
|
|
|
|
|
|
|
|
|
|
|
|
|
|
|
|
|
|
|
|
|
|
|
|
S |
||||||||||||||
|
|
|
|
|
|
|
|
|
|
|
|
|
|
|
|
|
L |
|
|
|
|
|
|
|
|
|
|
|
|
|
|
|
|
|
|
|
|
|
|
|
|
|
|
U |
|
|
|
|
|
|
|
|
|
|
|
|
|
|
|
|
|
I |
|
|
|
|
|
|
|
|
|
|
|
|
|
|
|
|
|
|
|
|
|
|
|
|
|
|
|
|
|
|
|
|
|
|
|
|
|
|
|
|
|
|
|
|
G |
|
|
|
|
|
should have an effortless tension |
|
|
|
|
|
|
T |
||||||||||||||
|
|
|
|
|
|
|
|
|
|
|
|
|
|
|
|
|
V |
|
|
|
|
|
|
|
|
|
|
|
- |
|||||||||||||||
|
|
|
|
|
|
|
|
|
|
|
|
|
|
|
|
|
E |
|
|
|
|
|
|
|
|
|
|
|
|
|
|
|
|
|
|
|
|
|
|
|
|
|
|
H |
|
|
|
|
|
|
|
|
|
|
|
|
|
|
|
|
|
A |
|
|
|
|
|
|
|
|
|
|
|
|
|
|
|
|
|
|
|
|
|
|
|
|
|
A |
|
|
|
|
|
|
|
|
|
|
|
|
|
|
|
|
|
|
T |
|
|
|
mechanism, comfortable hand |
|
|
|
|
|
|
G |
V |
|||||||||||||||
|
|
|
|
|
|
|
|
|
|
|
|
|
|
|
|
|
|
|
|
|
|
|
|
|
|
E |
||||||||||||||||||
|
|
|
|
|
|
|
|
|
|
|
|
|
|
|
|
|
H |
|
|
|
|
|
|
|
|
|
|
|
|
|
|
|
|
|
|
|
|
|
|
|
|
|
||
|
|
|
|
|
|
|
|
|
|
|
|
|
|
|
|
|
- |
|
|
|
|
|
|
|
|
|
|
|
|
|
|
|
|
|
|
|
|
|
|
R |
|
|
||
|
|
|
|
|
|
|
|
|
|
|
|
|
|
|
|
|
|
S |
|
|
|
grips, and a lock to keep |
|
|
L |
L |
I |
|
|
|||||||||||||||
|
|
|
|
|
|
|
|
|
|
|
|
|
|
|
|
|
|
|
|
|
|
|
|
|
|
|
|
|
|
|
|
|
|
|
|
|
|
I |
|
|
|
|
||
|
|
|
|
|
|
|
|
|
|
|
|
|
|
|
|
|
|
|
|
|
|
|
|
|
|
|
|
|
|
|
|
|
|
|
|
|
|
|
|
|
|
|
||
|
|
|
|
|
|
|
|
|
|
|
|
|
|
|
|
|
|
|
|
|
|
|
|
|
|
|
|
|
|
|
|
|
|
|
|
|
N |
|
|
|
|
|
|
|
|
|
|
|
|
|
|
|
|
|
|
|
|
|
|
|
|
|
|
|
|
|
|
|
O |
|
|
|
them compact. |
|
|
|
G |
|
|
|
|
|
|
|
|||||
|
|
|
|
|
|
|
|
|
|
|
|
|
|
|
|
|
|
|
|
|
|
|
|
|
|
|
|
|
|
O |
|
|
|
|
|
|
|
|
||||||
|
|
|
|
|
|
|
|
|
|
|
|
|
|
|
|
|
|
|
|
|
|
|
|
O |
|
|
|
|
|
|
|
|
|
|
T |
|
|
|
|
|
|
|
|
|
|
|
|
|
|
|
|
|
|
|
|
|
|
|
|
|
|
|
|
|
|
|
|
|
|
|
|
|
|
|
|
|
|
|
O |
|
|
|
|
|
|
|
|
||
|
|
|
|
|
|
|
|
|
|
|
|
|
|
|
|
|
|
|
|
|
|
|
|
|
T |
G |
|
|
|
|
|
|
|
|
L |
|
|
|
|
|
|
|
|
|
|
|
|
|
|
|
|
|
|
|
|
|
|
|
|
|
|
|
|
|
|
|
|
|
|
|
NI |
|
|
|
|
M |
S |
|
|
|
|
|
|
|
|
|
|||
|
|
|
|
|
|
|
|
|
|
|
|
|
|
|
|
|
|
|
|
|
|
|
|
|
|
|
|
|
|
|
|
|
|
|
|
|
|
|
|
|||||
|
|
|
|
|
|
|
|
|
|
|
|
|
|
|
|
|
|
|
|
|
|
|
|
|
|
|
|
L |
|
|
U |
• |
|
|
|
|
|
|
|
|
|
|
||
|
• |
|
|
|
|
|
|
|
BRUSH |
|
|
|
|
|
G |
|
|
|
|
L |
IR |
|
|
|
|
|
|
|
|
|
|
|
|
|
||||||||||
|
|
|
S |
|
|
|
|
|
|
|
|
|
|
|
|
|
|
TS |
|
|
|
|
|
|
|
|
|
|
|
|
|
|||||||||||||
|
|
M |
U |
|
|
|
|
|
|
|
|
|
|
|
|
|
|
|
|
|
|
|
|
|
|
|
|
|
G E VAH- |
|
|
|
|
|
|
|
|
|
|
|
|
|
|
|
|
|
|
|
|
|
|
|
|
|
|
|
|
|
|
|
|
|
N |
|
|
|
|
|
|
|
|
|
|
|
|
|
|
|
|
|
|
|
|
|
|||||
|
|
|
|
|
|
|
|
|
|
|
|
|
|
|
|
|
|
|
I |
|
|
|
|
|
|
|
|
|
|
|
|
|
|
|
|
|
|
|
|
|
|
|||
S |
|
|
|
|
|
|
AND MOP |
|
|
|
|
|
T |
|
|
|
|
|
|
|
|
|
|
|
|
|
|
|
|
|
|
|
|
|||||||||||
T |
|
|
|
|
|
|
|
|
|
|
|
|
|
S |
|
|
|
|
|
|
|
|
|
|
|
|
|
|
|
|
|
|
|
|
||||||||||
L |
|
|
|
|
|
|
|
|
|
|
|
|
|
|
|
|
|
|
|
|
|
|
|
|
|
|
|
|
|
|
|
|
|
|
|
|
|
|
|
|
|
|
|
|
O |
|
|
|
|
|
|
|
|
|
|
|
|
|
|
|
|
|
|
|
|
|
O |
|
|
|
|
|
|
|
|
|
|
|
|
|
|
|
|
|
|
|
|
||
O |
|
|
|
|
|
|
|
|
|
|
|
|
|
|
|
|
|
|
|
|
|
|
O |
|
|
|
|
|
|
|
|
|
|
|
|
|
|
|
|
|
|
|
|
|
G |
|
|
|
|
|
|
|
|
|
|
|
|
|
|
|
|
|
|
|
|
|
|
L |
|
|
|
|
|
|
|
|
|
|
|
|
|
|
|
|
|
|
|
|
|
|
|
|
|
|
|
|
|
|
|
|
|
|
|
|
|
|
|
|
|
|
|
|
|
|
|
|
|
|
|
|
|
|
|
|
|
|
|
|
|
|
|
|
|
|
N |
|
|
Look for a basting brush with heat- |
|
|
|
|
|
|
• |
|
|
|
|
|
|
|
|
|
|
|
|
|
|
|
|
|
|
|
|
||||||||||||||
L |
|
|
|
|
|
|
|
|
M |
|
|
|
|
|
|
|
|
|
|
|
|
|
|
|
|
|
|
|
|
|||||||||||||||
I |
|
|
|
|
|
|
|
|
|
|
|
|
|
|
|
|
|
|
|
|
|
|
|
|
|
|
|
|
|
|
|
|
|
|
|
|
|
|
|
|
|
|
|
|
L |
|
|
|
|
|
|
|
|
|
|
|
|
|
|
|
|
|
|
|
|
|
|
|
U |
|
|
|
|
|
|
|
|
|
|
|
|
|
|
|
|
|
|
|
|
I |
|
|
resistant silicone bristles and a long |
|
|
|
|
|
|
|
|
|
|
|
|
|
|
|
|
|
|
|
|
|
|
|
|
|
||||||||||||||||
R |
|
|
|
|
|
|
|
- |
|
|
|
|
|
|
|
|
|
|
|
|
|
|
|
|
|
|
|
|
||||||||||||||||
|
|
|
|
|
|
|
|
|
|
|
|
|
|
|
|
|
|
|
|
|
|
|
S |
|
|
|
|
|
|
|
|
|
|
|
|
|
|
|
|
|
|
|
|
|
G |
|
|
|
|
|
|
|
|
|
|
|
|
|
|
|
|
|
|
|
|
|
|
|
T |
|
|
|
|
|
|
|
|
|
|
|
|
|
|
|
|
|
|
|
|
E |
|
|
|
|
|
|
|
|
|
|
|
|
|
|
|
|
|
|
|
|
|
|
H |
|
|
|
|
|
|
|
|
|
|
|
|
|
|
|
|
|
|
|
|
|
H handle, and a mop with long, cotton |
|
|
|
|
V |
|
|
|
|
|
|
|
|
|
|
|
|
|
|
|
|
|
|
|
|
|||||||||||||||||||
A |
|
|
|
|
|
|
|
|
|
|
|
|
|
|
|
|
|
|
|
|
|
|
A |
|
|
|
|
|
|
|
|
|
|
|
|
|
|
|
|
|
|
|
|
|
V |
|
|
|
|
|
|
|
|
|
|
|
|
|
|
|
|
|
|
|
|
|
|
|
|
|
|
|
|
|
|
|
|
|
|
|
|
|
|
|
|
|
|
|
|
|
U threads that sop up the thinner, |
|
|
|
|
G |
E |
|
|
|
|
|
|
|
|
|
|
|
|
|
|
|
|
|
|
|
|
|
||||||||||||||||
|
|
|
I R |
|
|
|
|
|
|
|
|
|
|
|
|
|
|
|
|
|
|
|
|
|
|
|
||||||||||||||||||
- |
|
|
|
|
|
|
|
|
|
|
|
|
|
|
|
|
|
|
|
|
|
|
|
|
|
|
|
|
|
|
|
|
|
|
|
|
|
|
|
|
|
|
|
|
T |
|
|
|
|
|
|
|
|
|
|
|
|
|
|
|
|
|
|
|
|
|
|
|
|
|
|
|
|
|
|
|
|
|
|
|
|
|
|
|
|
|
|
||
S |
|
|
|
|
|
|
|
|
|
|
|
|
|
|
|
L |
|
|
|
|
|
|
|
|
|
|
|
|
|
|
|
|
|
|
|
|
|
|
|
|
|
|||
|
|
|
|
|
|
vinegar-based sauces. |
|
L |
|
|
|
|
E |
|
|
|
|
|
|
|
|
|
|
|
|
|
|
|
|
|
|
|
||||||||||||
|
|
|
|
S |
|
GN |
|
|
|
|
|
|
|
|
|
|
|
|
|
|
|
E |
|
|
|
|
|
|
|
|
||||||||||||||
|
|
M |
|
|
|
|
|
|
|
|
|
|
|
|
I |
|
|
|
|
|
V |
|
|
|
|
|
|
|
|
|
|
A |
|
|
|
|
|
|
|
|
||||
|
|
|
• |
|
|
|
|
|
|
|
|
|
|
|
|
|
|
|
|
|
|
|
|
|
|
|
|
|
|
|
|
|
V |
|
|
|
|
|
|
|
|
|||
|
|
|
|
L |
|
|
|
|
|
|
|
|
|
|
|
|
T |
|
|
|
|
|
|
|
|
|
|
|
|
|
|
|
|
|
|
G |
|
|
|
|
|
|
||
|
|
|
|
|
|
|
|
|
|
|
|
|
|
|
|
|
|
|
|
|
|
|
|
|
|
|
|
|
|
|
|
|
|
|
R |
|
|
|
|
|
||||
|
|
|
|
O |
|
|
|
|
|
|
|
|
|
|
|
O |
|
|
|
|
|
|
|
|
|
|
|
|
|
|
|
|
|
|
|
|
I |
|
|
|
|
|||
|
|
|
|
|
O |
|
|
|
|
|
|
|
|
|
|
O |
|
|
|
|
|
|
|
|
|
|
|
|
|
|
|
|
|
|
|
|
L |
|
|
|
||||
|
|
|
|
|
|
T |
G |
|
|
|
|
|
|
|
|
L |
|
|
|
|
|
|
|
|
|
|
|
|
|
|
|
|
|
|
|
|
|
L |
|
|
||||
|
|
|
|
|
|
|
NI |
|
|
|
|
|
|
S |
|
|
|
|
|
|
|
|
|
|
|
|
|
|
|
|
|
|
|
|
|
|
|
I |
|
|||||
|
|
|
|
|
|
|
|
|
|
|
|
|
M |
|
|
|
|
|
|
|
|
|
|
|
|
|
|
|
|
|
|
|
|
|
|
|
|
N |
||||||
|
|
|
|
|
|
|
|
|
L |
L |
IR |
|
U |
• |
|
|
|
|
|
|
|
|
GRILLING PAN |
|
|
|||||||||||||||||||
|
|
|
|
|
|
|
|
|
|
|
|
|
O |
|
|
|
|
|
|
|
|
|
|
|
|
O |
||||||||||||||||||
|
|
|
|
|
|
|
|
|
|
|
|
|
|
|
|
|
|
|
|
|
|
|
|
|
|
|
|
|
|
|
|
|
|
|
|
|
G |
|||||||
|
|
|
|
|
|
|
|
|
|
|
TS |
|
|
|
|
|
|
|
|
|
|
|
|
|
|
|
|
|
|
|
|
|
|
|
|
|
|
|
|
|
|
|
||
|
|
|
|
|
|
|
|
|
|
|
|
G EVAH- |
|
|
|
|
O |
|
|
|
|
|
|
|
|
|
|
|
|
|
|
|
|
|
|
|
|
|
|
|
|
|
T |
|
|
|
|
|
|
|
|
|
|
|
|
|
|
|
|
|
|
|
|
|
|
|
|
|
|
|
|
|
|
|
|
|
|
|
|
|
|
|
|
|
|
|
|
O |
|
|
|
|
|
|
|
|
|
|
|
|
|
|
|
|
|
|
T |
|
|
|
|
|
Designed for food that is either too |
|
|
|
|
|
L |
|||||||||||||||
|
|
|
|
|
|
|
|
|
|
|
|
|
|
|
|
|
I |
|
|
|
|
|
|
|
|
|
|
|
||||||||||||||||
|
|
|
|
|
|
|
|
|
|
|
|
|
|
|
|
|
G |
|
|
|
|
|
|
|
|
|
|
|
|
|
|
|
|
|
|
|
|
|
|
|
|
|
|
S |
|
|
|
|
|
|
|
|
|
|
|
|
|
|
|
|
|
N |
|
|
|
|
|
|
|
|
|
|
|
|
|
|
|
|
|
|
|
|
|
|
|
|
|
|
• |
|
|
|
|
|
|
|
|
|
|
|
|
|
|
|
|
|
L |
|
|
|
small or too delicate for the cooking |
|
|
|
|
M |
||||||||||||||||||
|
|
|
|
|
|
|
|
|
|
|
|
|
|
|
|
|
R |
|
|
|
|
|
|
|
S |
|||||||||||||||||||
|
|
|
|
|
|
|
|
|
|
|
|
|
|
|
|
|
L |
|
|
|
|
|
|
|
|
|
|
|
|
|
|
|
|
|
|
|
|
|
|
|
|
|
|
U |
|
|
|
|
|
|
|
|
|
|
|
|
|
|
|
|
|
I |
|
|
|
|
|
|
|
|
|
|
|
|
|
|
|
|
|
|
|
|
|
|
|
|
|
|
|
|
|
|
|
|
|
|
|
|
|
|
|
|
|
|
|
|
G |
|
|
|
|
|
|
grates, a perforated grilling pan |
|
|
|
|
|
|
T |
|||||||||||||
|
|
|
|
|
|
|
|
|
|
|
|
|
|
|
|
|
V |
|
|
|
|
|
|
|
|
|
|
|
|
H |
||||||||||||||
|
|
|
|
|
|
|
|
|
|
|
|
|
|
|
|
|
E |
|
|
|
|
|
|
|
|
|
|
|
|
|
|
|
|
|
|
|
|
|
|
|
|
|
|
- |
|
|
|
|
|
|
|
|
|
|
|
|
|
|
|
|
|
|
|
|
|
|
|
|
|
|
|
|
|
|
|
|
|
|
|
|
|
|
|
|
|
|
|
A |
|
|
|
|
|
|
|
|
|
|
|
|
|
|
|
|
|
|
A |
|
|
|
|
|
|
|
|
|
|
|
|
|
|
|
|
|
|
|
|
|
|
|
|
|
||
|
|
|
|
|
|
|
|
|
|
|
|
|
|
|
|
|
T |
|
|
|
keeps food right where it ought |
|
|
|
|
|
|
|
V |
|||||||||||||||
|
|
|
|
|
|
|
|
|
|
|
|
|
|
|
|
|
|
|
|
|
|
|
|
|
|
|
E |
|||||||||||||||||
|
|
|
|
|
|
|
|
|
|
|
|
|
|
|
|
|
H |
|
|
|
|
|
|
|
|
|
|
|
|
|
|
|
|
|
|
|
|
|
|
|
G |
|
||
|
|
|
|
|
|
|
|
|
|
|
|
|
|
|
|
|
- |
|
|
|
|
|
|
|
|
|
|
|
|
|
|
|
|
|
|
|
|
|
|
R |
|
|||
|
|
|
|
|
|
|
|
|
|
|
|
|
|
|
|
|
|
|
|
M |
|
|
to be—on the grill, |
|
|
|
|
|
L |
|
I |
|
|
|||||||||||
|
|
|
|
|
|
|
|
|
|
|
|
|
|
|
|
|
|
|
U |
|
|
|
|
|
|
|
|
|
|
|
|
|
|
|
|
|
|
|
|
|||||
|
|
|
|
|
|
|
|
|
|
|
|
|
|
|
|
|
|
S |
|
|
|
|
|
|
|
|
|
|
|
|
|
|
|
|
|
|
L |
|
|
|
|
|||
|
|
|
|
|
|
|
|
|
|
|
|
|
|
|
|
|
|
|
|
|
|
|
|
|
|
|
|
|
|
|
|
|
|
|
|
|
|
I |
|
|
|
|
||
|
|
|
|
|
|
|
|
|
|
|
|
|
|
|
|
|
|
|
|
|
|
|
|
|
|
|
|
|
|
|
|
|
|
|
|
|
|
|
|
|
|
|
||
|
|
|
|
|
|
|
|
|
|
|
|
|
|
|
|
|
|
|
|
|
|
• |
|
|
|
|
|
|
|
|
|
|
|
|
N |
|
|
|
|
|
|
|||
|
|
|
|
|
|
|
|
|
|
|
|
|
|
|
|
|
|
|
|
|
|
|
|
|
|
not in it. |
|
|
|
|
|
G |
|
|
|
|
|
|
|
|||||
|
|
|
|
|
|
|
|
|
|
|
|
|
|
|
|
|
|
|
|
|
|
|
|
S |
|
|
|
|
|
|
|
|
|
|
|
|
|
|
|
|
||||
|
|
|
|
|
|
|
|
|
|
|
|
|
|
|
|
|
|
|
|
|
|
|
|
O |
|
|
|
|
|
|
|
|
|
O |
|
|
|
|
|
|
|
|
||
|
|
|
|
|
|
|
|
|
|
|
|
|
|
|
|
|
|
|
|
|
|
|
|
L |
|
|
|
|
|
|
|
|
|
|
|
T |
|
|
|
|
|
|
|
|
|
|
|
|
|
|
|
|
|
|
|
|
|
|
|
|
|
|
|
|
|
|
|
|
O |
|
|
|
|
|
|
|
|
|
|
O |
|
|
|
|
|
|
|
|
|
|
|
|
|
|
|
|
|
|
|
|
|
|
|
|
|
|
|
|
|
|
|
|
|
|
T |
G |
|
|
|
|
|
|
|
|
L |
|
|
|
|
|
|
|
|
|
|
|
|
|
|
|
|
|
|
|
|
|
|
|
|
|
|
|
|
|
|
|
|
|
|
|
NI |
|
|
|
|
M |
S |
|
|
|
|
|
|
|
|
|
|||
|
|
|
|
|
|
|
|
|
|
|
|
|
|
|
|
|
|
|
|
|
|
|
|
|
|
|
|
|
|
|
|
|
|
|
|
|
|
|
|
|||||
|
|
|
|
|
|
|
|
|
|
|
|
|
|
|
|
|
|
|
|
|
|
|
|
|
|
|
|
L |
|
|
U |
• |
|
|
|
|
|
|
|
|
|
|
||
|
|
|
|
|
|
|
|
|
|
|
|
|
|
|
|
|
|
|
|
|
|
|
|
|
|
|
|
L |
IR |
|
|
|
|
|
|
|
|
|
|
|
|
|
||
|
|
|
|
|
|
|
|
|
|
|
|
|
|
|
|
|
|
|
|
|
|
|
|
|
|
|
|
|
TS |
|
|
|
|
|
|
|
|
|
|
|
|
|
||
|
|
|
|
|
|
|
|
|
|
|
|
|
|
|
|
|
|
|
|
|
|
|
|
|
|
|
|
|
|
G E VAH- |
|
|
|
|
|
|
|
|
|
|
|
|
|
|
59502_Spt_II_LP_enUS_esMX_frCA_working.indd 11 |
|
|
11/13/17 11:24 AM |
|
|
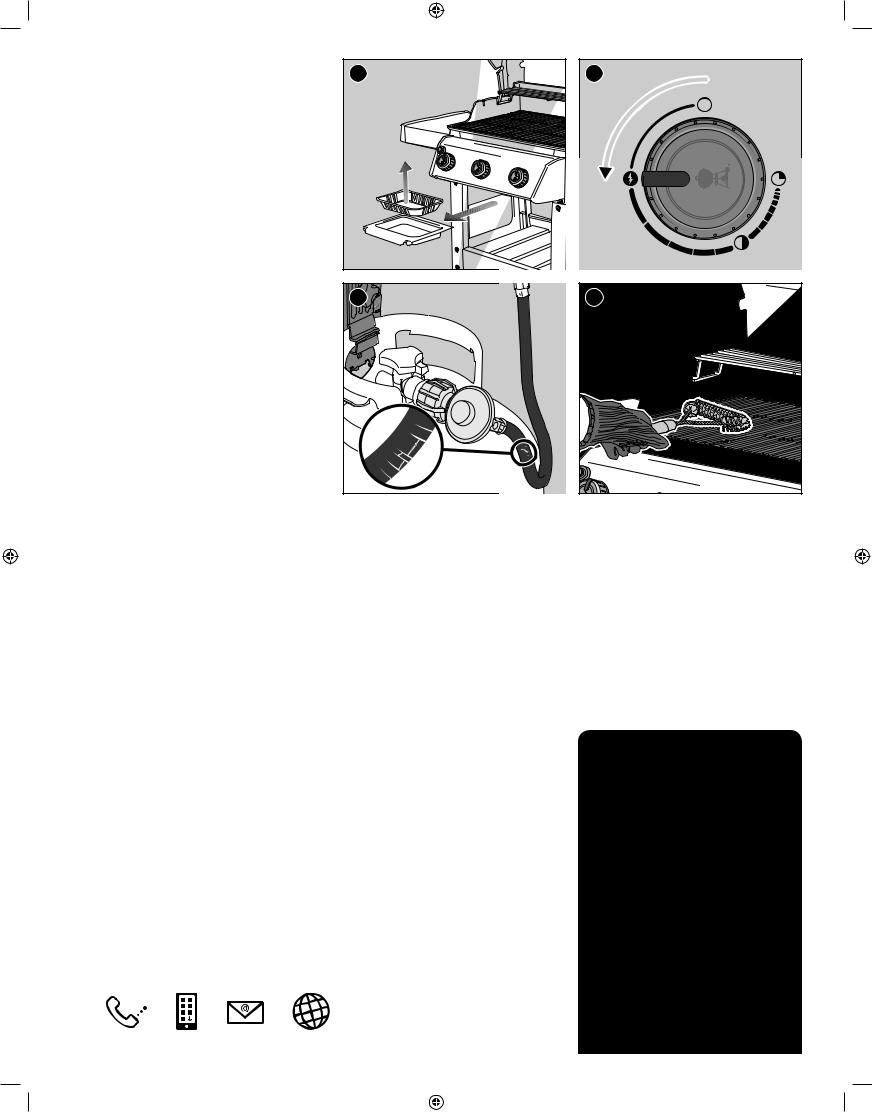
<![endif]>Operation
The Very First Time You Grill
Perform an Initial Burn-Off
Heat the grill on the highest setting, with the lid closed, for at least 20 minutes prior to grilling for the first time.
Every Time You Grill
Meal-to-Meal Maintenance
The Meal-To-Meal Maintenance plan includes the following simple, yet important, steps that should always be performed prior to grilling.
Check for Grease
Your grill was built with a grease management system that funnels grease away from food and into a
disposable container. As you cook, grease is channeled down to the slide-out catch pan and into a disposable drip tray that lines the slide-out catch pan. This system should be cleaned each and every time you grill to prevent fires.
1)Confirm that the grill is off and cool.
2)Remove the slide-out catch pan by pulling it forward (A).
3)Check for excessive amounts of grease in the disposable drip tray that lines the slide-out catch pan. Discard disposable drip tray when necessary and replace with a new one.
4)Reinstall all components.
Inspect the Hose
Routine inspection of the hose is necessary.
1)Confirm that the grill is off and cool.
2)Check hose for any signs of cracking, abrasions, or cuts (B). If the hose is found to be damaged in any way, do not use the grill.
Preheat the Grill
Preheating the grill is critical to successful grilling. Preheating helps to prevent food from sticking to the grate and gets the grate hot enough to sear properly. It also burns off residue of a previously cooked meal.
1)Open the grill lid.
2)Ignite your grill according to the ignition instructions in this Owner's Manual.
3)Close lid.
4)Preheat the grill with all burners on the start/
high position for 10 to 15 minutes or until thermometer registers 500° F (260° C) (C).
Clean the Cooking Grate
After preheating, any bits of food or debris left over from previous use will be easier to remove. Cleaned grates will also prevent your next meal from sticking.
1)Brush the grates with a stainless steel bristle grill brush immediately after preheating (D).
A |
C |
B |
D |
m DANGER: Do not line the slide-out catch pan or cookbox with aluminum foil.
m DANGER: Check the slide-out catch pan for grease build-up before each use. Remove excess grease to avoid a grease fire.
m WARNING: Use caution when removing slideout catch pan and disposing of hot grease.
m WARNING: Use heat-resistant barbecue mitts or gloves when operating grill.
m WARNING: Grill brushes should be checked for loose bristles and excessive wear on a regular basis. Replace brush if any loose bristles
are found on cooking grates or brush. Weber recommends purchasing a new stainless steel bristle grill brush at the beginning of every spring.
m WARNING: If the hose is found to be damaged in any way, do not use the grill. Replace using only Weber authorized replacement hose.
m WARNING: Keep ventilation openings around tank clear and free of debris.
12 |
GET FREE SPECIAL CONTENT |
59502_Spt_II_LP_enUS_esMX_frCA_working.indd 12 |
|
|
11/13/17 11:24 AM |
|
|
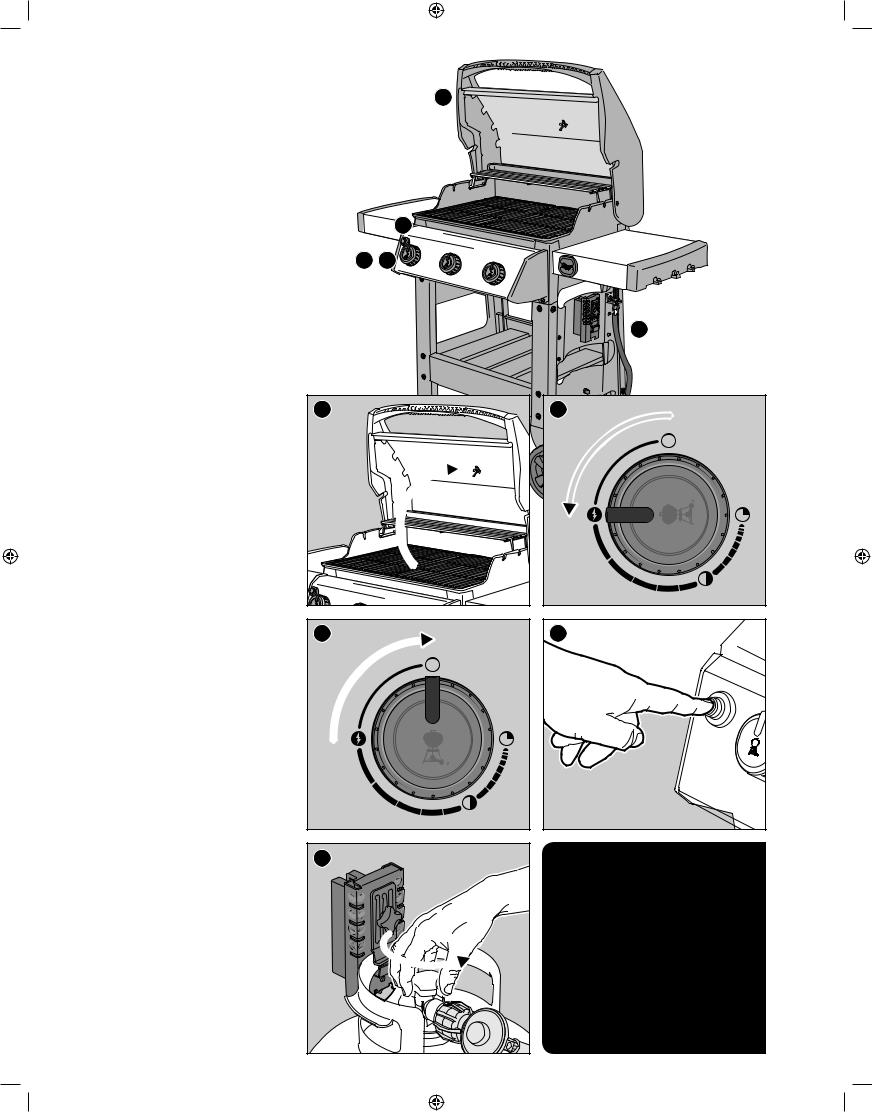
Igniting the Grill
Using the Crossover Ignition System to Ignite the Grill
The crossover ignition system ignites burner 1 furthest to the left with a spark from the igniter electrode. You generate the energy for the spark by pushing the igniter button. You will hear the igniter clicking. Burner(s) 2 (and 3) can be lit after burner 1 is lit. All burners should be lit for preheating, however, all burners do not have to be lit while grilling.
1)Open the grill lid (A).
2)Check that all burner control knobs are in the off
 position. Check by pushing in and turning knobs clockwise (B).
Note: It is important that all burner control knobs are
in the off position before turning on the LP tank. If they are not, the flow limiting device built into the regulator will activate, limiting the flow of gas from the LP tank.
3)Turn the LP tank on by slowly turning the tank valve counterclockwise; wait 60 seconds (C).
Note: It is important that the LP tank is turned on slowly. If it is opened too quickly, the flow limiting device built into the regulator will activate, limiting the flow of gas from the LP tank.
A
E
B D
C
<![endif]>Operation
4)Begin with burner 1 furthest to the left. Push the burner control knob in and turn it counterclockwise
to the start/high position (D).
IMPORTANT: Always ignite burner 1 first. The other burner(s) ignite from burner 1.
5)Push and hold the electronic ignition button (E). You will hear it ticking.
6)Check that burner 1 is lit by looking through the cooking grates and through the cutout in the FLAVORIZER BARS.
7)If the burner does not ignite, turn burner control knob to the off  position and wait five minutes to allow the gas to clear before attempting to light the burner again.
8)When burner 1 ignites, you can turn on burner 2 (and burner 3).
Should the burners fail to ignite using the electronic ignition, refer to the TROUBLESHOOTING section. There you will find instructions on igniting the grill with a match to help determine the exact problem.
To Extinguish Burners
1)Push each burner control knob in and then turn clockwise all the way to the off  position.
2)Turn gas supply off at the LP tank.
A |
B |
C |
D 
E
m WARNING: Open lid during ignition.
m WARNING: Do not lean over open grill while igniting or cooking.
m WARNING: If ignition does not occur within four seconds of attempting to light the first burner, turn the burner control knob to the off position. Wait five minutes to allow
accumulated gas to dissipate, and then repeat the lighting procedure.
13
59502_Spt_II_LP_enUS_esMX_frCA_working.indd 13 |
11/13/17 11:24 AM |
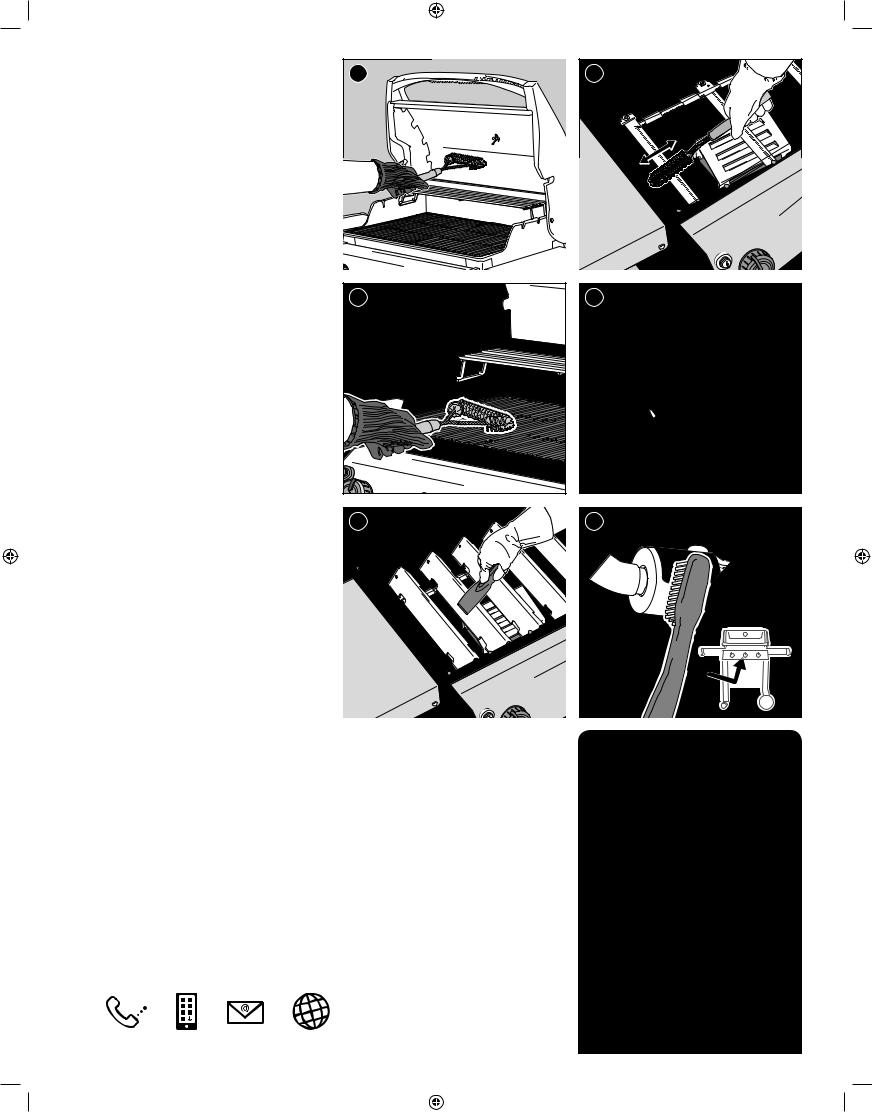
<![endif]>Product Care
Cleaning and Maintenance
Cleaning the Inside of the Grill
Over time, the performance of your grill can diminish if it has not been maintained properly. Low temperatures, uneven heat, and food sticking to cooking grates are all signs that cleaning and maintenance are overdue. When your grill is off and cool, start by cleaning the inside, from the top down.
A thorough cleaning is recommended at least twice a year. Consistent use may require quarterly cleanings.
Cleaning the Lid
From time to time you may notice “paint-like” flakes on the inside of the lid. During use, grease and smoke vapors slowly change into carbon and deposit on the inside of your lid. These deposits will eventually peel, and looks very similar to paint. These deposits are non-toxic, but the flakes could fall onto your food if you do not clean the lid regularly.
1)Brush the carbonized grease from the inside of the lid with a stainless steel bristle grill brush (A). To minimize further build-up, the inside of the lid can be wiped with a paper towel after grilling while the grill is still warm (not hot).
Cleaning the Cooking Grates
If you have been cleaning your cooking grates as recommended, the debris on your grates should be minimal.
1)With grates installed, brush the debris off your cooking grate with a stainless steel bristle grill brush (B).
2)Take the grates out and set aside.
Cleaning the FLAVORIZER BARS
FLAVORIZER BARS catch drippings that smoke and sizzle, adding flavor to your food. Any drippings that are not vaporized by the FLAVORIZER BARS are funneled away from the burners. This helps prevent flare-ups inside of your grill, and protects the burners from getting clogged.
1)Scrape the FLAVORIZER BARS with a plastic scraper (C).
2)If necessary, brush the FLAVORIZER BARS with a stainless steel bristle grill brush.
3)Remove FLAVORIZER BARS and set aside.
Cleaning the Burners
Two areas on the burners that are key to optimum performance are the ports (small openings running along the length of the burners) and the spider/insect screens on the ends of the burner. Keeping these areas clean is essential for safe operation.
Cleaning the Burner Ports
1)Use a clean stainless steel bristle grill brush to clean the outside of the burners by brushing
across the top of the burner ports (D). Do not brush lengthwise.along the tube, as this will only brush debris from one port to another.
2)When cleaning burner 1, avoid damaging the ignition electrode by carefully brushing around it (E).
Cleaning the Spider Screens
1)Locate the ends of the burners on the underside of the control panel where they meet the valves.
2)Clean the spider/insect screens on each of the burners using a soft bristle brush (F).
A 


 D
D
B |
E |
C |
F |
m WARNING: Turn your grill off and wait for it to cool before thoroughly cleaning.
m WARNING: Over time, the development of rough surfaces can form on the FLAVORIZER BARS. Wearing gloves is recommended when handling. Do not clean FLAVORIZER BARS or cooking grates in a sink, dishwasher, or selfcleaning oven.
m WARNING: When cleaning the burners, never use a brush that has already been used to clean the cooking grates. Never put sharp objects into the burner port holes.
m CAUTION: Do not place any grill components onto the side tables as they may scratch the paint or stainless steel surfaces.
m CAUTION: Do not use any of the following to clean your grill: abrasive stainless steel polishes or paints, cleaners that contain
acid, mineral spirits or xylene, oven cleaner, abrasive cleansers (kitchen cleansers), or abrasive cleaning pads.
14 UNLOCK A LIFETIME OF GUIDANCE
59502_Spt_II_LP_enUS_esMX_frCA_working.indd 14 |
|
|
11/13/17 11:24 AM |
|
|
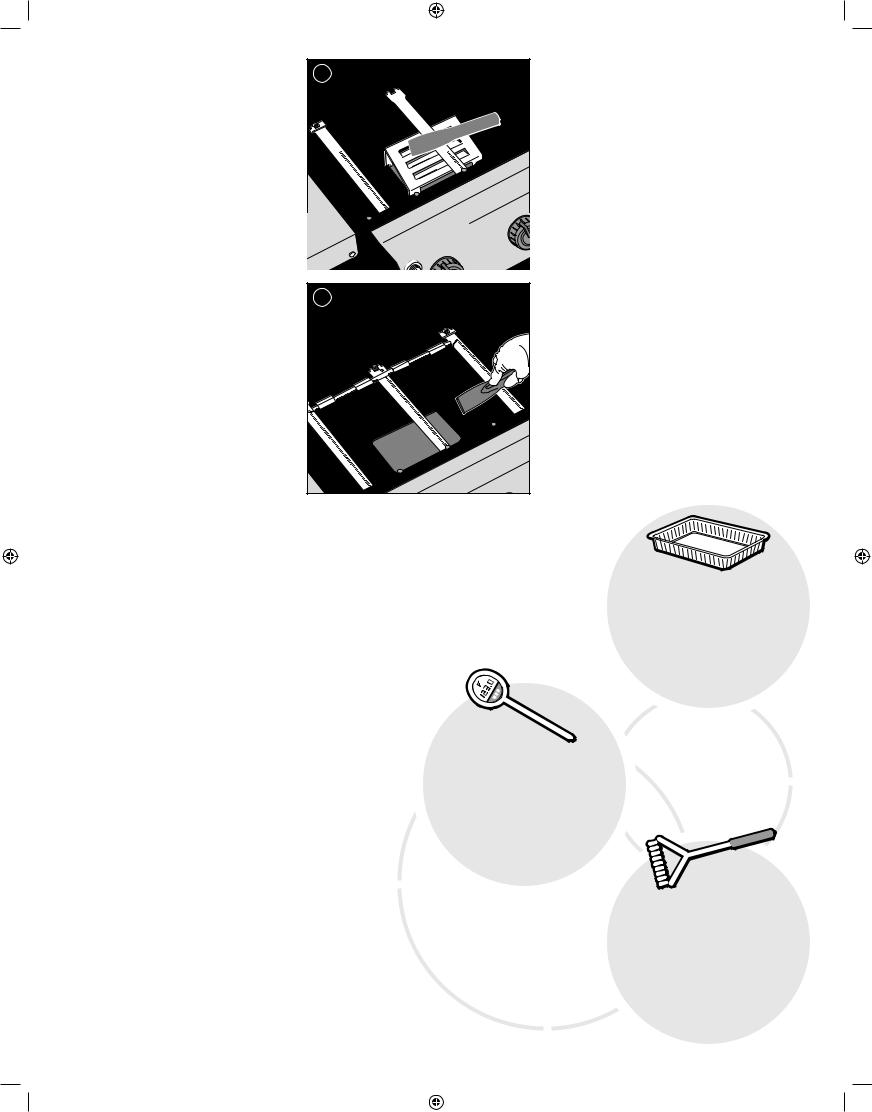
Cleaning the Heat Deflector
Located under the burners, the heat deflector distributes heat evenly throughout the cookbox while cooking. Keeping the heat deflector clean will enhance the cooking performance of your grill.
1)Scrape the heat deflector with a plastic scraper (G).
2)If necessary, brush the heat deflector with a stainless steel bristle grill brush.
3)Remove heat deflector and set aside.
Cleaning the Cookbox
Look inside the cookbox for any grease accumulation or leftover food particles. Excessive accumulation can cause a fire.
1)Use a plastic scraper to scrape debris off the sides and bottom of the grill into the opening in bottom of the cookbox (H). This opening leads debris into the slide-out catch pan.
Cleaning the Grease Management System
The grease management system consists of a slide-out catch pan and disposable drip tray. These components were designed to be easily removed, cleaned, and replaced; an essential step every time you prepare to grill. Instructions on inspecting the grease management system can be found in MEAL-TO- MEAL MAINTENANCE.
Cleaning the Outside of the Grill
The outside of your grill may include stainless steel, porcelain-enameled, and plastic surfaces. Weber recommends the following methods based on the surface type.
Cleaning Stainless Steel Surfaces
Clean stainless steel using a non-toxic, non-abrasive stainless steel cleaner or polish designed for use on outdoor products and grills. Use a microfiber cloth to clean in the direction of the grain of the stainless steel. Do not use paper towels.
Note: Do not risk scratching your stainless steel with abrasive pastes. Pastes do not clean or polish. They will change the color of the metal by removing the top chromium oxide film coating.
Cleaning Painted, Porcelain-Enameled Surfaces and Plastic Components
Clean painted, porcelain-enameled and plastic components with warm soapy water, and paper towels or cloth. After wiping down the surfaces, rinse and dry thoroughly.
Cleaning the Outside of Grills that are in Unique Environments
If your grill is subject to a particularly harsh environment, you will want to clean the outside more often. Acid rain, pool chemicals, and salt water can cause surface rusting to appear. Wipe down the outside of your grill with warm soapy water. Follow up with a rinse and thorough drying. Additionally, you may want to apply a stainless steel cleaner weekly to prevent surface rust.
G


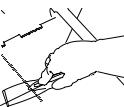


 Product
<![endif]>Care
H |
|
|
|
|
|
|
|
|
G T |
O O |
|
|
|
|
|
LS |
• |
|
|
|
|
IN |
|
M |
|
||
L |
|
|
|
U |
||
IL |
|
|
|
|
|
|
|
|
|
|
|
|
S |
|
|
|
|
|
|
|
|
|
|
|
|
|
|
|
|
|
|
|
|
|
|
|
|
|
|
H |
|
|
|
|
|
|
|
|
|
|
|
|
G |
|
|
|
|
|
||
|
|
|
|
|
|
|
|
|
|
|
|
|
|
|
|
|
|
|
|
|
|
|
|
|
|
- |
|
|
|
|
|
|
|
|
|
|
|
|
|
|
|
|
|
|||
|
|
|
|
|
|
|
|
|
|
|
|
|
|
|
|
|
|
|
|
|
|
|
|
|
T |
|
|
|
|
|
|
|
|
|
|
|
|
|
R |
|
|
|
|
|||
|
|
|
|
|
|
|
|
|
|
|
|
|
|
|
|
|
|
|
|
|
|
|
|
S |
|
|
|
|
|
|
|
|
|
|
|
|
|
|
|
L |
|
|
||||
|
|
|
|
|
|
|
|
|
|
|
|
|
|
|
|
|
|
|
|
|
|
M |
U |
|
|
|
|
|
|
|
|
|
|
|
|
|
|
|
|
|
I |
|
|
|
||
|
|
|
|
|
|
|
|
|
|
|
|
|
|
|
|
|
|
|
|
|
|
|
|
|
|
|
|
|
|
|
|
|
|
|
|
|
|
|
|
L |
|
|
||||
|
|
|
|
|
|
|
|
|
|
|
|
|
|
|
|
|
|
|
|
|
|
|
|
|
|
|
|
|
|
|
|
|
|
|
|
|
|
|
|
|
|
N |
||||
|
|
|
|
|
|
|
|
|
|
|
|
|
|
|
|
|
|
|
|
• |
|
|
|
|
|
|
|
|
|
|
|
|
|
|
|
|
|
|
|
|
|
|
I |
|
||
|
|
|
|
|
|
|
|
|
|
|
|
|
|
|
|
|
|
S |
|
|
|
|
|
|
|
|
|
|
|
|
|
|
|
|
|
|
|
|
|
|
|
G |
||||
|
|
|
|
|
|
|
|
|
|
|
|
|
|
|
|
|
|
|
|
|
|
|
|
|
|
|
|
|
|
|
|
|
|
|
|
|
|
|
|
|
|
|
T |
|||
|
|
|
|
|
|
|
|
|
|
|
|
|
|
|
|
|
|
L |
|
|
|
|
|
|
|
|
|
|
|
|
|
|
|
|
|
|
|
|
|
|
|
|
|
|
|
|
|
|
|
|
|
|
|
|
|
|
|
|
|
|
|
|
|
O |
|
|
|
|
|
|
|
|
|
|
|
|
|
|
|
|
|
|
|
|
|
|
|
|
|
|
O |
||
|
|
|
|
|
|
|
|
|
|
|
|
|
|
|
|
|
O |
|
|
|
|
|
|
|
|
|
|
FOIL PANS |
|
|
|
|
|
|
|
O |
||||||||||
|
|
|
|
|
|
|
|
|
|
|
|
|
|
|
|
|
L |
|
|
|
|
|
|
|
|
|
|
|
|
|
|
|
|
|
M |
|||||||||||
|
|
|
|
|
|
|
|
|
|
|
|
|
|
|
|
|
T |
|
|
|
|
|
|
|
|
|
|
|
|
|
|
|
|
|
|
|
|
|
|
|
|
|
|
|
|
L |
|
|
|
|
|
|
|
|
|
|
|
|
|
|
|
|
|
G |
|
|
|
|
|
|
|
|
|
|
|
|
|
|
|
|
|
|
|
|
|
|
|
|
|
|
|
|
S |
|
|
|
|
|
|
|
|
|
|
|
|
|
|
|
|
|
N |
|
|
|
|
|
|
|
|
|
|
|
|
|
|
|
|
|
|
|
|
|
|
|
|
|
|
|
|
• |
|
|
|
|
|
|
|
|
|
|
|
|
|
|
|
|
|
I |
|
|
|
|
|
|
|
|
|
|
|
|
|
|
|
|
|
|
|
|
|
|
|
|
|
|
|
|
|
|
|
|
|
|
|
|
|
|
|
|
|
|
|
|
|
|
L |
|
|
|
|
|
|
|
|
|
|
|
|
|
|
|
|
|
|
|
|
|
|
|
|
|
|
|
|
U |
|
|
|
|
|
|
|
|
|
|
|
|
|
|
|
|
|
I |
|
|
|
|
|
|
|
|
|
|
|
Perfect for lining the |
|
|
|
|
|
|
|
|
|||||||||
|
|
|
|
|
|
|
|
|
|
|
|
|
|
|
|
|
R |
|
|
|
|
|
|
|
|
|
|
|
|
|
|
|
|
|
|
|
- |
|||||||||
|
|
|
|
|
|
|
|
|
|
|
|
|
|
|
|
|
|
|
|
|
|
|
|
|
|
|
|
|
|
|
|
|
|
|
|
|
|
|
|
|
|
|
|
|
S |
|
|
|
|
|
|
|
|
|
|
|
|
|
|
|
|
|
|
G |
|
|
|
|
|
|
|
|
|
|
|
|
|
|
|
|
|
|
|
|
|
|
|
|
|
|
|
|
T |
|
|
|
|
|
|
|
|
|
|
|
|
|
|
|
|
|
E |
|
|
|
|
|
|
|
|
catch pan to make cleanup |
|
|
|
|
|
|
H |
|||||||||||||
|
|
|
|
|
|
|
|
|
|
|
|
|
|
|
|
|
H |
|
|
|
|
|
|
|
|
|
|
|
|
V |
||||||||||||||||
|
|
|
|
|
|
|
|
|
|
|
|
|
|
|
|
|
A |
|
|
|
|
|
|
|
|
|
|
|
|
|
|
|
|
|
|
|
|
|
|
|
|
|
|
A |
||
|
|
|
|
|
|
|
|
|
|
|
|
|
|
|
|
|
V |
|
|
|
|
|
|
|
|
|
|
|
|
|
|
|
|
|
|
|
|
|
|
|
|
|
|
|
|
|
|
|
|
|
|
|
|
|
|
|
|
|
|
|
|
|
|
|
|
|
|
|
|
|
|
|
|
|
|
convenient and easy. |
|
|
|
|
|
|
|
G |
E |
||||||||
|
|
|
|
|
|
|
|
|
|
|
|
|
|
|
|
|
|
|
|
U |
|
|
|
|
|
|
|
|
|
|
I R |
|
||||||||||||||
|
|
|
|
|
|
|
|
|
|
|
|
|
|
|
|
|
- |
|
|
|
|
|
|
|
|
|
|
|
|
|
|
|
|
|
|
|
|
|
|
|
|
|
|
|||
|
|
|
|
|
|
|
|
|
|
|
|
|
|
|
|
|
|
T |
|
|
|
|
|
|
|
|
|
|
|
|
|
|
|
|
|
|
|
|
|
|
|
|
||||
|
|
|
|
|
|
|
|
|
|
|
|
|
|
|
|
|
|
|
S |
|
|
|
|
|
|
|
|
|
|
|
|
|
|
|
|
|
|
|
L |
|
|
|
||||
|
|
|
|
|
|
|
|
|
|
|
|
|
|
|
|
|
|
|
|
|
|
M |
|
|
|
|
|
|
|
|
|
|
|
|
|
|
|
L |
|
|
|
|||||
|
|
|
|
|
|
|
|
|
|
|
|
|
|
|
|
|
|
|
|
|
|
|
|
|
|
|
|
|
|
|
|
|
|
|
|
I |
|
|
|
|
||||||
|
|
|
|
|
|
|
|
|
|
|
|
|
|
|
|
|
|
|
|
|
|
|
|
|
|
|
|
|
|
|
|
|
|
|
|
|
|
|
|
|
|
|
|
|
||
|
|
|
|
|
|
|
|
|
|
|
|
|
|
|
|
|
|
|
|
|
|
|
|
• |
|
|
|
|
|
|
|
|
|
|
|
|
|
N |
|
|
|
|
|
|||
|
|
|
|
|
|
|
|
|
|
|
|
|
|
|
|
|
|
|
|
|
|
|
|
|
|
|
|
|
|
|
|
|
|
|
|
|
G |
|
|
|
|
|
|
|||
|
|
|
|
|
|
|
|
|
|
|
|
|
|
|
|
|
|
|
|
|
|
|
|
|
|
S |
|
|
|
|
|
|
|
|
|
|
|
|
|
|
|
|
|
|
|
|
|
|
|
|
|
|
|
|
|
|
|
|
|
|
|
H |
|
|
|
|
|
|
|
|
|
L |
|
|
|
|
|
|
|
|
|
|
|
|
T |
|
|
|
|
|
|
||
|
|
|
|
|
|
|
|
|
|
|
|
|
|
|
|
|
|
|
|
|
|
|
|
O |
|
|
|
|
|
|
|
|
|
|
|
O |
|
|
|
|
|
|
|
|||
|
|
|
|
|
|
|
|
|
|
|
|
|
|
|
|
A |
|
|
|
|
|
|
|
|
|
O |
|
|
|
|
|
|
|
|
|
|
O |
|
|
|
|
|
|
|
||
|
|
|
|
|
|
|
|
|
|
|
|
|
|
|
|
|
V |
|
|
|
|
|
|
|
|
|
|
|
|
|
|
|
|
|
|
|
|
|
|
|
|
|
|
|||
|
|
|
|
|
|
|
|
|
|
|
|
|
|
|
|
|
|
|
|
|
|
|
|
|
|
|
T |
|
|
|
|
|
|
|
|
|
L |
|
|
|
|
|
|
|
||
|
|
|
|
|
H |
|
|
|
|
|
|
|
|
|
|
|
E |
|
|
|
|
|
|
|
|
|
|
|
G |
NI |
|
|
|
|
M |
S |
|
|
|
|
|
|
|
|
||
|
|
|
|
|
- |
|
|
|
|
|
|
|
|
|
|
|
G |
|
|
|
|
|
|
|
|
|
|
|
|
|
|
|
|
|
|
|
|
|
|
|
|
|
|
|||
|
|
|
|
T |
|
|
|
|
|
|
|
|
|
|
|
I |
|
|
|
|
|
|
|
|
|
|
LL |
IR |
|
U |
|
|
|
|
|
|
|
|
|
|
|
|||||
|
|
|
|
S |
|
|
|
|
|
|
|
|
|
|
|
|
|
|
|
|
|
|
|
|
|
|
|
TS |
|
|
|
|
|
|
|
|
|
|
|
|
||||||
|
|
M |
U |
|
|
|
|
|
|
|
|
|
|
|
|
L |
|
|
|
|
|
|
|
|
|
|
|
|
G E VAH- |
|
|
|
|
|
|
|
|
|
|
|
|
|
||||
|
|
|
|
|
|
|
|
|
|
|
|
|
|
|
|
L |
|
|
|
|
|
|
|
|
|
|
|
|
|
|
|
|
|
|
|
|
|
|
|
|
||||||
|
|
|
|
|
|
|
|
|
|
|
|
|
|
|
|
|
|
|
N |
|
|
|
|
|
|
|
|
|
|
|
|
|
|
|
|
|
|
|
|
|
|
|||||
|
• |
|
|
|
|
|
|
|
|
|
|
|
|
|
|
|
|
|
|
I |
|
|
|
|
|
|
|
|
|
|
|
|
|
|
|
|
|
|
|
|
|
|
|
|||
S |
|
|
|
|
|
|
|
|
|
|
|
|
|
|
|
|
|
|
|
G |
|
|
|
|
|
|
|
|
|
|
|
|
|
|
|
|
|
|
|
|
|
|||||
|
|
|
|
|
|
|
|
|
|
|
|
|
|
|
|
|
|
|
|
|
|
T |
|
|
|
|
|
|
|
|
|
|
|
|
|
|
|
|
|
|
|
|
||||
L |
|
|
|
|
|
|
|
|
|
|
|
|
|
|
|
|
|
|
|
|
|
|
|
|
|
|
|
|
|
|
|
|
|
|
|
|
|
|
|
|
|
|
|
|
|
|
O |
|
|
THERMOMETER |
|
|
|
O |
|
|
|
|
|
|
|
|
|
|
|
|
|
|
|
|
|
|
|
|
|||||||||||||||||||
L |
|
|
|
|
|
|
|
|
|
|
|
|
|
|
|
|
|
|
|
|
|
|
|
|
|
|
|
|
|
|||||||||||||||||
O |
|
|
|
|
|
|
|
|
|
|
|
|
|
|
|
|
|
|
|
|
|
|
|
O |
|
|
|
|
|
|
|
|
|
|
|
|
|
|
|
|
|
|
|
|
||
T |
|
|
|
|
|
|
|
|
|
|
|
|
|
|
|
|
|
|
|
|
|
|
|
|
L |
|
|
|
|
|
|
|
|
|
|
|
|
|
|
|
|
|
|
|
|
|
G |
|
|
|
|
|
|
|
|
|
|
|
|
|
|
|
|
|
|
|
|
|
|
|
|
S |
|
|
|
|
|
|
|
|
|
|
|
|
|
|
|
|
|
|
|
|
|
N |
|
|
|
|
|
|
|
|
|
|
|
|
|
|
|
|
|
|
|
|
|
|
|
|
|
• |
|
|
|
|
|
|
|
|
|
|
|
|
|
|
|
|
|
|
|
|
I |
|
|
|
|
|
|
|
|
|
|
|
|
|
|
|
|
|
|
|
|
|
|
|
|
|
M |
|
|
|
|
|
|
|
|
|
|
|
|
|
|
|
|
|
|
|
|
R |
|
|
|
|
Small and relatively inexpensive, |
|
|
|
|
|
|
|
|
|
|
|
|
|
|
|
|
|
|
|
|
|
|
|
|
|
|
|
|
|||||||||||||
|
|
|
|
|
|
|
|
|
|
|
|
S |
|
|
|
|
|
|
|
|
|
|
|
|
|
|
|
|
|
|
|
|
||||||||||||||
L |
|
|
|
|
|
|
|
|
|
|
|
|
|
|
|
|
|
|
|
|
|
|
|
|
|
U |
|
|
|
|
|
|
|
|
|
|
|
|
|
|
|
|
|
|
|
|
I |
|
|
|
|
|
|
|
|
|
|
|
|
|
|
|
|
|
|
|
|
|
|
|
|
|
|
|
|
|
|
|
|
|
|
|
|
|
|
|
|
|
|
|
|
|
|
G |
|
|
|
|
|
|
|
|
|
|
|
|
|
|
|
|
|
|
|
|
|
|
|
|
|
T |
|
|
|
|
|
|
|
|
|
|
|
|
|
|
|
|
|
|
|
|
|
|
|
|
this gadget is essential for quickly |
|
|
|
|
|
|
|
- |
|
|
|
|
|
|
|
|
|
|
|
|
|
|
|
|
|
|
|
|
||||||||||||||
A |
|
|
|
|
|
|
|
|
|
A |
|
|
|
|
|
|
|
|
|
|
|
|
|
|
|
|
|
|
|
|
||||||||||||||||
E |
|
|
|
|
|
|
|
|
|
|
|
|
|
|
|
|
|
|
|
|
|
|
|
|
H |
|
|
|
|
|
|
|
|
|
|
|
|
|
|
|
|
|
|
|
|
|
V |
|
|
|
|
|
|
|
|
|
|
|
|
|
|
|
|
|
|
|
|
|
|
|
|
V |
|
|
|
|
|
|
|
|
|
|
|
|
|
|
|
|
|
|
|
|
|
|
|
|
|
|
|
|
|
|
|
|
|
|
|
|
|
|
|
|
|
|
|
|
|
|
|
|
|
|
|
|
|
|
|
|
|
|
|
|
|
|
|
|
|
|
||
H |
|
|
|
gauging the internal temperature |
|
|
|
|
|
G |
E |
|
|
|
|
|
|
|
|
|
|
|
|
|
|
|
|
|
|
|
|
|
||||||||||||||
- |
|
|
|
|
|
|
|
|
|
|
|
|
|
|
|
|
|
|
|
|
R |
|
|
|
|
|
|
|
|
|
|
|
|
|
|
|
|
|
|
|
|
|
|
|
|
|
T |
|
|
|
|
|
|
|
|
|
|
|
|
|
|
|
|
|
|
I |
|
|
|
|
|
|
|
|
|
|
|
|
|
|
|
|
|
|
|
|
|
|
|
|
|||
|
U |
|
|
|
|
|
|
|
|
|
|
|
|
|
|
|
|
|
|
|
|
|
|
|
|
|
|
|
|
|
|
|
|
|
|
|
|
|
|
|
|
|
||||
S |
|
|
|
|
|
|
|
|
|
|
|
|
|
|
|
|
L |
|
|
|
|
|
|
|
|
|
|
|
|
|
|
|
|
|
|
|
|
|
|
|
|
|
|
|||
|
|
|
• of the meat when grilling. |
|
I |
|
|
|
|
|
|
|
|
|
|
|
|
|
|
|
|
|
|
|
|
|
|
|
|
|
|
|||||||||||||||
|
|
M |
|
|
|
|
|
|
|
|
|
|
|
N |
L |
|
|
|
|
|
|
|
|
|
|
|
|
|
|
|
|
|
|
|
|
|
|
|
|
|
|
|
||||
|
|
|
|
|
|
|
|
|
|
|
|
|
|
|
|
|
|
|
|
|
|
|
|
|
|
|
|
|
|
|
|
|
|
|
|
|
|
|
|
|
||||||
|
|
|
|
|
S |
|
|
|
|
|
|
|
|
|
|
|
|
|
|
|
|
|
|
|
|
|
|
|
|
|
|
|
|
|
|
|
|
|
|
|
|
|
|
|
||
|
|
|
|
|
|
|
|
|
|
|
|
|
|
|
|
G |
|
|
|
|
|
|
|
|
|
|
|
|
|
|
|
|
|
|
|
|
|
|
R |
|
|
|
|
|||
|
|
|
|
|
L |
|
|
|
|
|
|
|
|
|
|
|
T |
|
|
|
|
|
|
|
|
|
|
|
|
|
|
|
|
|
|
|
|
|
|
|
|
|
|
|||
|
|
|
|
|
O |
|
|
|
|
|
|
|
|
|
|
|
O |
|
|
|
|
|
|
|
|
|
|
|
|
|
|
|
|
|
|
|
|
|
|
|
I |
|
|
|
||
|
|
|
|
|
O |
|
|
|
|
|
|
|
|
|
O |
|
|
|
|
|
|
|
|
|
|
|
|
|
|
|
|
|
|
|
|
|
|
|
L |
|
|
|||||
|
|
|
|
|
|
T |
G |
|
|
|
|
|
|
|
L |
|
|
|
|
|
|
|
|
|
|
|
|
|
|
|
|
|
|
|
|
|
|
|
|
|
L |
|
|
|||
|
|
|
|
|
|
|
NI |
|
|
|
|
|
S |
|
|
|
|
|
|
|
|
|
|
|
|
|
|
|
|
|
|
|
|
|
|
|
|
|
|
|
I |
|
||||
|
|
|
|
|
|
|
|
|
|
|
|
M |
|
|
|
|
|
|
|
|
|
|
|
|
|
|
|
|
|
|
|
|
|
|
|
|
|
|
|
|
N |
|||||
|
|
|
|
|
|
|
|
|
L |
|
|
U |
• |
|
|
|
|
|
|
|
|
|
|
|
|
|
|
|
|
|
|
|
|
|
|
|
|
|
|
|
|
|||||
|
|
|
|
|
|
|
|
|
|
|
|
|
|
|
|
|
|
|
|
|
|
|
|
|
|
|
|
|
|
|
|
|
|
|
|
|
|
|
|
|
G |
|||||
|
|
|
|
|
|
|
|
|
L |
IR |
|
|
|
|
|
|
|
|
|
|
|
|
|
|
|
|
|
|
|
|
|
|
|
|
|
|
|
|
|
|
|
|||||
|
|
|
|
|
|
|
|
|
|
TS |
|
|
|
|
|
|
|
|
|
|
|
|
|
|
|
|
|
|
|
|
|
|
|
|
|
|
|
|
|
|
|
|
|
|
||
|
|
|
|
|
|
|
|
|
|
|
G EVAH- |
|
|
|
|
|
T |
|
|
|
|
|
|
|
|
GRILL BRUSH |
|
|
|
|
|
|
S |
|||||||||||||
|
|
|
|
|
|
|
|
|
|
|
|
|
|
|
|
|
O |
|
|
|
|
|
|
|
|
|
|
|
|
|
|
|
|
|
|
|
|
|
|
|
|
|
|
T |
||
|
|
|
|
|
|
|
|
|
|
|
|
|
|
|
|
|
|
|
|
|
|
|
|
|
|
|
|
|
|
|
|
|
|
|
|
|
|
|
|
|
|
|
|
|
||
|
|
|
|
|
|
|
|
|
|
|
|
|
|
|
|
|
O |
|
|
|
|
|
|
|
|
|
|
|
|
|
|
|
|
|
|
|
|
|
|
|
|
|
|
|
O |
|
|
|
|
|
|
|
|
|
|
|
|
|
|
|
|
|
|
|
|
|
|
|
|
|
|
|
|
|
|
|
|
|
|
|
|
|
|
|
|
|
|
|
|
|
|
O |
|
|
|
|
|
|
|
|
|
|
|
|
|
|
|
|
|
|
G |
|
|
|
|
|
|
|
|
|
|
|
|
|
|
|
|
|
|
|
|
|
|
|
|
|
|
|
|
L |
|
|
|
|
|
|
|
|
|
|
|
|
|
|
|
|
|
|
|
|
|
|
|
|
|
|
|
|
|
|
|
|
|
|
|
|
|
|
|
|
|
|
|
|
|
|
|
|
|
|
|
|
|
|
|
|
|
|
|
|
|
|
|
|
N |
|
|
|
|
|
|
A must-use before you even dream |
|
|
|
|
• |
|||||||||||||||||
|
|
|
|
|
|
|
|
|
|
|
|
|
|
|
|
|
L |
|
|
|
|
|
|
|
|
|
|
M |
||||||||||||||||||
|
|
|
|
|
|
|
|
|
|
|
|
|
|
|
|
|
I |
|
|
|
|
|
|
|
|
|
|
|
|
|
|
|
|
|
|
|
|
|
|
|
|
|
|
|
|
|
|
|
|
|
|
|
|
|
|
|
|
|
|
|
|
|
|
L |
|
|
|
|
|
|
|
|
|
|
|
|
|
|
|
|
|
|
|
|
|
|
|
|
|
|
|
|
U |
|
|
|
|
|
|
|
|
|
|
|
|
|
|
|
|
|
I |
|
|
|
|
|
of grilling. A quick once-over on hot |
|
|
|
||||||||||||||||||||
|
|
|
|
|
|
|
|
|
|
|
|
|
|
|
|
|
R |
|
|
|
|
|
|
|
|
- |
||||||||||||||||||||
|
|
|
|
|
|
|
|
|
|
|
|
|
|
|
|
|
|
|
|
|
|
|
|
|
|
|
|
|
|
|
|
|
|
|
|
|
|
|
|
|
|
|
|
|
S |
|
|
|
|
|
|
|
|
|
|
|
|
|
|
|
|
|
|
G |
|
|
|
|
|
|
|
|
|
|
|
|
|
|
|
|
|
|
|
|
|
|
|
|
|
|
|
|
T |
|
|
|
|
|
|
|
|
|
|
|
|
|
|
|
|
|
H grates prevents the charred remains |
|
|
|
H |
|||||||||||||||||||||||||
|
|
|
|
|
|
|
|
|
|
|
|
|
|
|
|
|
|
|
|
V |
||||||||||||||||||||||||||
|
|
|
|
|
|
|
|
|
|
|
|
|
|
|
|
|
E |
|
|
|
|
|
|
|
|
|
|
|
|
|
|
|
|
|
|
|
|
|
|
|
|
|
|
|
A |
|
|
|
|
|
|
|
|
|
|
|
|
|
|
|
|
|
|
A |
|
|
|
|
|
|
|
|
|
|
|
|
|
|
|
|
|
|
|
|
|
|
|
|
|
|
|||
|
|
|
|
|
|
|
|
|
|
|
|
|
|
|
|
|
V |
|
|
|
|
|
|
|
|
|
|
|
|
|
|
|
|
|
|
|
|
|
|
|
|
|
|
|
|
|
|
|
|
|
|
|
|
|
|
|
|
|
|
|
|
|
|
|
|
|
|
|
|
|
|
|
of meals past from sticking to |
|
|
|
|
|
G |
E |
|||||||||||||
|
|
|
|
|
|
|
|
|
|
|
|
|
|
|
|
|
|
|
|
U |
|
|
|
|
|
I R |
|
|||||||||||||||||||
|
|
|
|
|
|
|
|
|
|
|
|
|
|
|
|
|
- |
|
|
|
|
|
|
|
|
|
|
|
|
|
|
|
|
|
|
|
|
|
|
|
|
|
|
|||
|
|
|
|
|
|
|
|
|
|
|
|
|
|
|
|
|
|
T |
|
|
|
|
|
|
|
|
|
|
|
|
|
|
|
|
|
|
|
|
|
|
|
|
||||
|
|
|
|
|
|
|
|
|
|
|
|
|
|
|
|
|
|
|
S |
|
|
|
|
|
|
|
|
|
|
|
|
|
|
|
|
|
|
|
L |
|
|
|
||||
|
|
|
|
|
|
|
|
|
|
|
|
|
|
|
|
|
|
|
|
|
|
M |
|
|
your meals present. |
|
|
|
|
L |
|
|
|
|||||||||||||
|
|
|
|
|
|
|
|
|
|
|
|
|
|
|
|
|
|
|
|
|
|
|
|
|
|
N |
|
|
|
|
||||||||||||||||
|
|
|
|
|
|
|
|
|
|
|
|
|
|
|
|
|
|
|
|
|
|
|
|
• |
|
|
|
|
|
|
|
|
|
|
|
|
|
G |
I |
|
|
|
|
|||
|
|
|
|
|
|
|
|
|
|
|
|
|
|
|
|
|
|
|
|
|
|
|
|
|
|
S |
|
|
|
|
|
|
|
|
|
|
|
|
|
|
|
|
|
|
|
|
|
|
|
|
|
|
|
|
|
|
|
|
|
|
|
|
|
|
|
|
|
|
|
|
|
|
L |
|
|
|
|
|
|
|
|
|
|
|
|
T |
|
|
|
|
|
|
|
|
|
|
|
|
|
|
|
|
|
|
|
|
|
|
|
|
|
|
|
|
|
|
|
|
|
O |
|
|
|
|
|
|
|
|
|
|
|
O |
|
|
|
|
|
|
|
|
|
|
|
|
|
|
|
|
|
|
|
|
|
|
|
|
|
|
|
|
|
|
|
|
|
|
|
O |
|
|
|
|
|
|
|
|
|
|
O |
|
|
|
|
|
|
|
|
|
|
|
|
|
|
|
|
|
|
|
|
|
|
|
|
|
|
|
|
|
|
|
|
|
|
|
|
T |
G |
|
|
|
|
|
|
|
|
L |
|
|
|
|
|
|
|
|
|
|
|
|
|
|
|
|
|
|
|
|
|
|
|
|
|
|
|
|
|
|
|
|
|
|
|
|
|
NI |
|
|
|
|
M |
S |
|
|
|
|
|
|
|
|
|||
|
|
|
|
|
|
|
|
|
|
|
|
|
|
|
|
|
|
|
|
|
|
|
|
|
|
|
|
|
|
|
|
|
|
|
|
|
|
|
|
|
|
|||||
|
|
|
|
|
|
|
|
|
|
|
|
|
|
|
|
|
|
|
|
|
|
|
|
|
|
|
|
|
|
|
L |
|
|
U |
• |
|
|
|
|
|
|
|
|
|
||
|
|
|
|
|
|
|
|
|
|
|
|
|
|
|
|
|
|
|
|
|
|
|
|
|
|
|
|
|
|
|
L |
IR |
|
|
|
|
|
|
|
|
|
|
|
|
||
|
|
|
|
|
|
|
|
|
|
|
|
|
|
|
|
|
|
|
|
|
|
|
|
|
|
|
|
|
|
|
|
TS |
|
|
|
|
|
|
|
|
|
|
|
|
||
|
|
|
|
|
|
|
|
|
|
|
|
|
|
|
|
|
|
|
|
|
|
|
|
|
|
|
|
|
|
|
|
|
G E VAH- |
|
|
|
|
|
|
|
|
|
|
|
|
|
59502_Spt_II_LP_enUS_esMX_frCA_working.indd 15 |
|
|
11/13/17 11:24 AM |
|
|
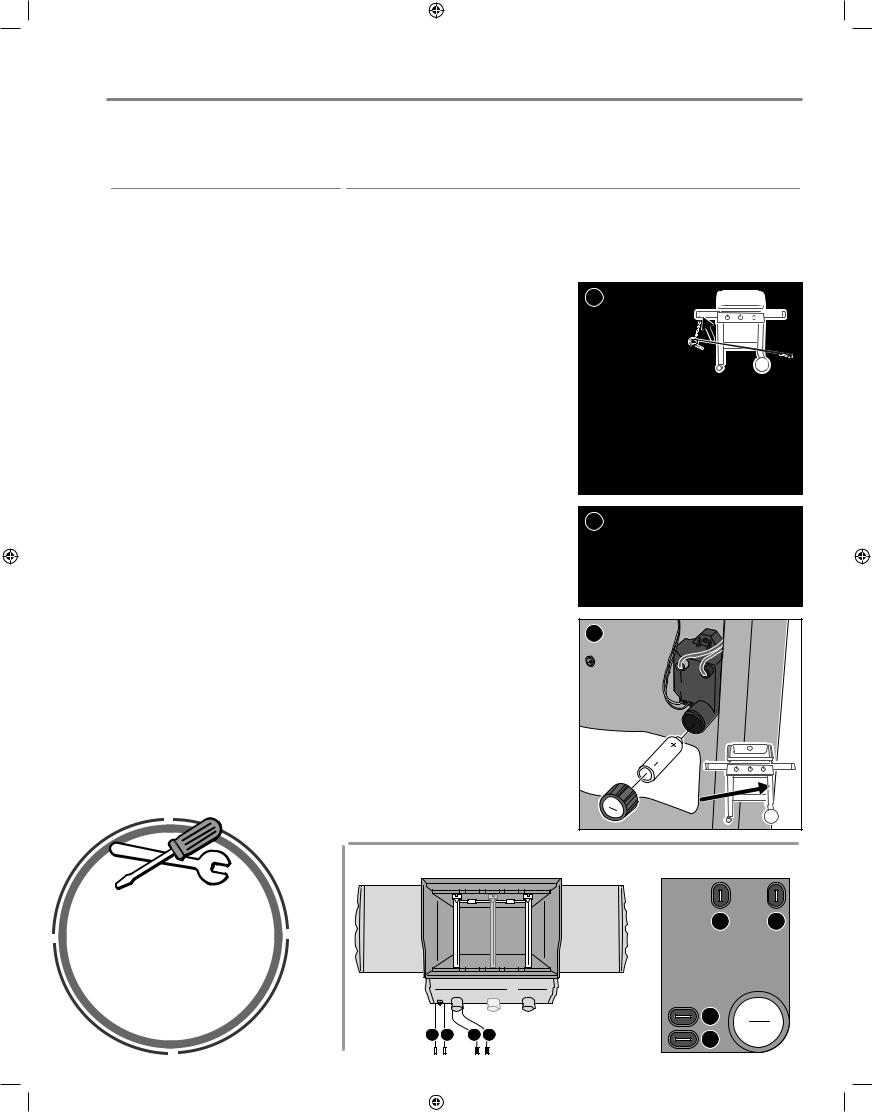
<![endif]>Troubleshooting
GRILL WILL NOT IGNITE
SYMPTOM
• Burner does not ignite when following the electronic ignition instructions in the “Operation” section of this Owner's Manual.
CAUSE |
SOLUTION |
|
|
There is a problem with gas flow. |
If the grill will not ignite, the first step is to determine if there is gas flowing to the burners. To check this, |
|
follow the instructions below for “Using a Match to Determine if there is Gas Flow to the Burners.” |
|
If match lighting IS NOT successful, follow the gas flow troubleshooting suggestions on the next page. |
There is a problem with the electronic ignition system. |
If the grill will not ignite, the first step is to determine if there is gas flowing to the burners. To check this, |
|
follow the instructions below for “Using a Match to Determine if there is Gas Flow to the Burners.” |
|
If match lighting IS successful, follow the instructions below for “Checking the Components of the Electronic |
|
Ignition System.” |
|
|
Using a Match to Determine if there is Gas Flow to the Burners
1)Open the grill lid.
2)Check that all burner control knobs are in the
off position. Check by pushing in and turning knobs clockwise.
Note: It is important that all burner control knobs be
in the off position before you turn on the LP tank. If they are not, the flow limiting device built into the regulator will activate, limiting the flow of gas from the LP tank.
3)Turn the LP tank on by slowly turning the tank valve counterclockwise; wait 60 seconds.
Note: It is important that the LP tank is turned on slowly. If it is opened too quickly, the flow limiting device built into the regulator will activate, limiting the flow of gas from the LP tank.
4)Begin with burner 1, furthest to the left. Put match in the matchstick holder and strike match. (Matchstick holder is located under left side table.) Insert lit match down through the cooking grates, past the FLAVORIZER BARS and next to the burner (A).
5)Push the burner control knob in and turn it counterclockwise to the start/high position.
6)Check that the burner is lit by looking through the cooking grates and through the cutout in the FLAVORIZER BARS.
7)If the burner does not ignite within 4 seconds, turn burner control knob to the off  position and wait five minutes to allow the gas to clear before attempting to light the burner again. If repeated attempts fail, follow the gas flow troubleshooting instructions on the next page.
8)If the burner ignites, the problem lies in the ignition system. Follow the instructions for “Checking the Components of the Electronic Ignition System.”
9)After burner 1 ignites, you can turn on burner 2 (and burner 3).
10)Replace the matchstick holder by hanging underneath left side table (B).
Checking the Components of the Electronic Ignition System
When pressing the ignition button you should hear a ticking sound. If you cannot hear the ticking sound, check the battery, then check the wires.
Checking the Battery
There are three potential issues with the battery that supplies the power to your ignition module that need to be checked:
1)Some batteries have a plastic protective wrap around them. (Do not confuse this plastic with the battery label.) Check that this plastic wrap is removed.
2)Confirm that the battery is installed correctly (C).
3)If the battery is old, replace it with a new battery.
Checking the Wires
There are two potential trouble spots that need to be checked:
1)Check that the ignition wires are connected securely to the terminals on the ignition button under the control panel.
2)Make sure the ignition wires are properly attached to the ignition module. The wire terminals are color coded to correspond with the terminals on the ignition module. The number of wires will vary per model.
A


B
C |
Igniter Module Wire Chart
REPLACEMENT |
|
|
|
2 |
1 |
PARTS |
|
|
|
|
|
To obtain replacement parts, |
|
|
|
|
|
contact the local retailer |
|
|
|
|
|
in your area or log onto |
|
|
|
|
|
weber.com. |
|
|
|
3 |
|
4 |
3 |
2 |
1 |
4 |
|
16 |
|
|
|
|
|
|
|
|
|
|
59502_Spt_II_LP_enUS_esMX_frCA_working.indd 16 |
|
|
11/13/17 11:24 AM |
|
|
GAS FLOW
SYMPTOM
•Grill does not reach desired temperature or heats unevenly.
•One or more of the burners fail to ignite.
•Flame is low when burner is on high position.
•Flames do not run the whole length of the burner.
•Burner flame pattern is erratic.
CAUSE |
SOLUTION |
|
|
The “flow limiting device” has been activated. |
Reset the “flow limiting device” by closing the LP |
This safety feature built into the regulator restricts |
tank valve and turning all the burner control knobs |
the gas flow in the event of a gas leak. You can |
to the off position. Wait five minutes to allow |
inadvertently activate this safety feature without |
accumulated gas to dissipate, then ignite the grill |
having a gas leak. This typically occurs when you |
again following the instructions in the “Operation” |
turn on the gas at the LP tank and one or more of the |
section. |
control knobs are not in the off position. It may also |
|
occur if you turn on the LP tank too quickly. |
|
The LP tank is low or empty. |
Refill LP tank. |
Fuel hose is bent or kinked. |
Straighten fuel hose. |
Burner ports are dirty. |
Clean burner ports. Refer to “Cleaning the |
|
Burner Ports.” |
|
|
SYMPTOM
• Gas is smelled in conjunction with burner flames that appear yellow and lazy.
CAUSE |
SOLUTION |
|
|
Spider screens on the burners are obstructed. |
Clean spider screens. Refer to “Cleaning the Spider |
|
Screens” in the Product Care section. Also refer to |
|
the illustrations and information in this section about |
|
proper flame pattern and spider screens. |
|
|
SYMPTOM
• The smell of gas and/or a light hissing sound.
CAUSE |
SOLUTION |
|
|
The internal rubber seal in the LP tank valve could be |
Inspect the rubber seal for damage. If damaged, |
damaged. |
return tank to local retailer. |
|
|
GREASY GRILL (Peeling Paint & Flare-Ups)
SYMPTOM
• Inside of lid appears to have the appearance of peeling paint.
CAUSE |
SOLUTION |
|
|
The flakes you see are accumulated cooking vapors |
This happens over time after repeated use of your |
that have turned into carbon. |
grill. This is not a defect. Clean the lid. Refer to the |
|
“Product Care” section. |
|
|
SYMPTOM
• Experiencing flare-ups when grilling or preheating.
CAUSE |
SOLUTION |
|
|
There is leftover food from the previous meal. |
Always preheat the grill on the highest setting for 10 |
|
to 15 minutes. |
The inside of the grill needs to be cleaned thoroughly. |
Follow the steps in the "Cleaning and Maintenance" |
|
section to clean the grill inside from the top down. |
|
|
m WARNING: Do not attempt to make any repair to gas carrying, gas burning, ignition components or structural components without contacting Weber-Stephen Products LLC, Customer Service Department.
m WARNING: Failure to use genuine Weber-Stephen parts for any repair or replacement will void all warranty protection.
m CAUTION: The burner tube openings must be positioned properly over the valve orifices.
B |
<![if ! IE]> <![endif]>Troubleshooting |
Proper Burner Flame Pattern |
|
The burners in your grill were factory set for the |
|
correct air and gas mixture. When the burners |
|
are performing correctly, you will see a specific |
|
flame pattern. The tips may occasionally flicker |
|
yellow (A), with a descending light blue (B) to |
|
dark blue flame (C). |
|
m WARNING: Blocked and dirty ports can |
|
restrict full gas flow, resulting in a fire (D) in |
|
and around the gas valves, causing serious |
|
damage to your grill. |
|
A |
|
C |
D
Spider Screens
The combustion air openings of the burners (E) are fitted with stainless steel screens to prevent spiders and other insects from spinning webs and building nests inside the burners. Additionally, dust and debris can accumulate on the outside of the spider/insect screen and obstruct the oxygen flow to the burners.
E
CALL
CUSTOMER
SERVICE
If you are still experiencing any problems, contact the Customer Service Representative in your area using
the contact information on weber.com.
59502_Spt_II_LP_enUS_esMX_frCA_working.indd 17 |
|
|
11/13/17 11:24 AM |
|
|

<![endif]>Grilling Guide
Grilling Guide
Type Thickness/Weight Approximate Total Grill Time
 RED MEAT
Steak: New York strip, porterhouse, rib-eye, T-bone, and filet mignon (tenderloin)
Flank Steak
Ground Beef Patty
Tenderloin
¾ inch (19 mm) thick 1 inch (25 mm) thick
2 inches (5 cm) thick
1½ to 2 pounds (0,68 - 0,91 kg), ¾ inch (19 mm) thick ¾ inch (19 mm) thick
3 to 4 pounds (1,36 -1,81 kg)
4 to 6 minutes direct high heat
6 to 8 minutes direct high heat
14 to 18 minutes sear 6 to 8 minutes direct high heat, then 8 to 10 minutes indirect high heat
8 to 10 minutes direct medium heat
8 to 10 minutes direct medium heat
45 to 60 minutes 15 minutes direct medium heat, then 30 to 45 minutes indirect medium heat
 PORK
PORK
Bratwurst: fresh |
3 ounce (85 g) link |
|
¾ inch (19 mm) thick |
Chop: boneless or bone in |
1¼ to 1½ inches (3,18 - 3,81 cm) thick |
|
|
Ribs: baby back, spareribs |
3 to 4 pounds (1,36 -1,81 kg) |
Ribs: country-style, bone in |
3 to 4 pounds (1,36 -1,81 kg) |
Tenderloin |
1 pound (0,45 kg) |
20 to 25 minutes direct low heat
6 to 8 minutes direct high heat
10 to 12 minutes sear 6 minutes direct high heat, then 4 to 6 minutes indirect high heat
1½ to 2 hours indirect medium heat
1½ to 2 hours indirect medium heat
30 minutes sear 5 minutes direct high heat, then 25 minutes indirect medium heat
POULTRY
Chicken Breast: boneless, skinless |
6 to 8 ounces (170-226 g) |
8 to 12 minutes direct medium heat |
|
Chicken Thigh: boneless, skinless |
4 ounces (113g) |
8 to 10 minutes direct medium heat |
|
Chicken Pieces: bone in, assorted |
3 to 6 ounces (85-170 g) |
36 to 40 minutes 6 to 10 minutes direct low heat, then |
|
30 minutes indirect medium heat |
|||
|
|
||
Chicken: whole |
4 to 5 pounds (1,81-2,27 kg) |
1 to 1¼ hours indirect medium heat |
|
Cornish Game Hen |
1½ to 2 pounds (0,68-0,91 kg) |
60 to 70 minutes indirect medium heat |
|
Turkey: whole, unstuffed |
10 to 12 pounds (4,54-5,44 kg) |
2 to 2½ hours indirect medium heat |
|
|
|
|
|
SEAFOOD |
|
|
|
Fish, Fillet, or Steak: halibut, |
¼ to ½ inch (6,35-12,7 mm) thick |
3 to 5 minutes direct medium heat |
|
red snapper, salmon, sea bass, |
1 to 1¼ inches (25-31 mm) thick |
10 to 12 minutes direct medium heat |
|
swordfish, and tuna |
|||
Fish: whole |
1 pound (0,45 kg) |
15 to 20 minutes indirect medium heat |
|
3 pounds (1,36 kg) |
30 to 45 minutes indirect medium heat |
||
|
|||
Shrimp |
1½ ounces (42,5 g) |
2 to 4 minutes direct high heat |
|
|
|
|
|
VEGETABLES |
|
|
|
Asparagus |
½ inch (12,7 mm) diameter |
6 to 8 minutes direct medium heat |
|
Corn |
in husk |
25 to 30 minutes direct medium heat |
|
husked |
10 to 15 minutes direct medium heat |
||
|
|||
Mushroom |
shiitake or button |
8 to 10 minutes direct medium heat |
|
portobello |
10 to 15 minutes direct medium heat |
||
|
|||
Onion |
halved |
35 to 40 minutes indirect medium heat |
|
½ inch (12,7 mm) slices |
8 to 12 minutes direct medium heat |
||
|
|||
|
whole |
45 to 60 minutes indirect medium heat |
|
Potato |
½ inch (12,7 mm) slices |
9 to 11 minutes parboil 3 minutes, then 6 to 8 minutes |
|
|
|||
|
direct medium heat |
||
|
|
||
|
|
|
The cuts, thicknesses, weights, and grilling times above are meant to be guidelines. Factors such as altitude, wind, and outside temperature can affect cooking times. Two rules of thumb: Grill steaks, fish fillets, boneless chicken pieces, and vegetables using the direct method for the time given on the chart (or to the desired doneness), turning food once halfway through grilling time. Grill roasts, whole poultry, bone-in poultry pieces, whole fish, and thicker cuts using the indirect method for the time given on the chart (or until an instant-read thermometer registers the desired internal temperature). Cooking times for beef and lamb use the USDA’s definition of medium doneness unless otherwise noted. Before carving, let roasts, larger cuts of meat, and thick chops and steaks rest for 5 to 10 minutes after cooking. The internal temperature of the meat will rise by 5 to 10 degrees during this time.
18 |
DON'T FORGET TO REGISTER |
59502_Spt_II_LP_enUS_esMX_frCA_working.indd 18 |
|
|
11/13/17 11:24 AM |
|
|
E-210 • S-210 • E-310 • S-310
<![endif]>(LP) propietario del Manual
REGÍSTRATE hoy
Únete al mundo de las parrilladas: registra tu asador de gas SPIRIT II y recibe contenidos especiales que te permitirán convertirte en el héroe definitivo de cualquier reunión.
Registrarse es muy sencillo y sólo hay que contestar un par de preguntas rápidas. En menos de dos minutos, habrás activado tu propio identificador Weber-ID y tendrás acceso a toda una vida de experiencia y conocimientos al estilo Weber. No volverás a quedarte sin ideas.
PHONE |
APP MÓVIL |
EN LÍNEA |
|
01 800 0093237 |
weber.com |
support@weberstephen.com |
weber.com |
Guarda este manual del propietario para poder consultarlo en el futuro, léelo íntegramente y, si tienes alguna duda, contacta hoy con nosotros.
59502_Spt_II_LP_enUS_esMX_frCA_working.indd 19 |
|
|
11/13/17 11:24 AM |
|
|
<![endif]>Bienvenido a Weber
20
bienvenido al mundo de Weber
Nos alegra que hayas decidido elegirnos para viajar al mundo de la felicidad en tu patio trasero. Tómate tu tiempo para leer este manual del propietario y no tardarás en estar preparado para cocinar fácilmente cualquier cosa en tu nuevo asador. Queremos estar contigo durante toda la vida de tu asador, para lo que te rogamos que dediques un par de minutos a registrarlo. Te prometemos que jamás venderemos
tus datos ni te enviaremos mensajes de correo electrónico con información
innecesaria. Puedes estar seguro de que te acompañaremos a cada paso del camino. Además, si activas tu identificador Weber-ID durante el registro, recibirás contenidos especialmente elegidos que podrás poner en práctica en tus parrilladas.
Visítanos y únete a nosotros en línea, por teléfono o como prefieras que estemos en contacto.
Gracias por elegir Weber. Nos alegra tenerte con nosotros.
Información importante sobre seguridad
Los avisos encabezados por las palabras
PELIGRO, ADVERTENCIA y PRECAUCIÓN se emplean a lo largo de este manual del propietario para poner de manifiesto información crítica e importante. Lea y respete tales avisos para garantizar la
seguridad durante el uso y evitar posibles daños materiales. Dichos avisos se describen a continuación.
PELIGRO: Indica una situación peligrosa que, de no evitarse, provocará muertes o lesiones graves.
ADVERTENCIA: Indica una situación peligrosa que, de no evitarse, puede provocar muertes o lesiones graves.
PRECAUCIÓN: Indica una situación peligrosa que, de no evitarse, puede provocar lesiones leves o moderadas.
PELIGRO Si percibe olor a gas:
•Interrumpa el suministro de gas al aparato (asador).
•Extinga las llamas prendidas.
•Abra la tapa.
•Si el olor no se disipa, manténgase alejado del aparato (asador) y avise inmediatamente a su proveedor de gas o el departamento de bomberos.
ADVERTENCIA
•No guarde ni use gasolina u otros líquidos o vapores inflamables cerca de este aparato (asador)
o cualquier otro.
•Evite guardar botellas (tanques) de LP no conectadas para su uso cerca de este aparato (asador) o cualquier otro.
SÓLO APTO PARA EL USO AL AIRE LIBRE.
LEA LAS INSTRUCCIONES ANTES DE USAR EL APARATO (ASADOR).
AVISO PARA EL INSTALADOR: Entregue estas instrucciones al consumidor.
AVISO PARA EL CONSUMIDOR: Guarde estas instrucciones para poder consultarlas en el futuro.
Instalación y montaje
PELIGRO: Este asador no ha sido diseñado para su instalación en el interior o encima de vehículos o embarcaciones recreativas.
ADVERTENCIA: Se prohíbe el uso de este asador a menos que estén instaladas todas las piezas y el asador se haya montado de acuerdo con las instrucciones de montaje.
ADVERTENCIA: No instale este modelo de asador en una estructura empotrada o móvil.
ADVERTENCIA: No modifique el aparato (asador). El gas propano líquido no es un gas natural. La conversión o el intento de uso de gas natural en un equipo de gas propano líquido, o gas propano
líquido en un equipo de gas natural, no es seguro y constituye un motivo de invalidación de la garantía.
•En Estados Unidos, la instalación debe tener lugar de acuerdo con los códigos locales en vigor o, en ausencia de códigos locales, de conformidad con las siguientes normas, según corresponda: “National Fuel Gas Code, ANSI Z223.1/NFPA 54, Natural Gas and Propane Installation Code, CSA B149.1”; “Propane Storage and Handling Code, B149.2”; o “Standard for Recreational Vehicles, ANSI A119.2/NFPA 1192, CSA Z240 RV Series, Recreational Vehicle Code”.
•En Canadá, la instalación de este asador debe cumplir los requisitos establecidos por los códigos locales y/o la edición más reciente de la norma “CAN/CSA-B149.2 (Propane Storage and Handling Code)”. En los casos en los que se considera generalmente aceptable, estas instrucciones no cumplen necesariamente los códigos de instalación canadienses, en particular en relación con la instalación de tuberías en tierra y bajo tierra.
•En México, si existen códigos locales en materia de aparatos portátiles de gas, deberán cumplirse los requisitos establecidos por la edición más reciente de la Norma Oficial Mexicana (NOM).
•Si se emplea una fuente eléctrica externa (por ejemplo, para alimentar un asador giratorio), esta deberá conectarse eléctricamente a tierra de acuerdo con los códigos locales o, en ausencia de códigos locales, de conformidad con los códigos “National Electrical Code, ANSI/NFPA 70” o “Canadian Electrical Code, Part 1, CSA C22.1”.
Operación
PELIGRO: El uso de este asador sólo debe tener lugar al aire libre, en áreas bien ventiladas.
Se prohíbe el uso en garajes, edificios, pasajes cubiertos, tiendas de campaña y otras áreas cerradas, así como bajo tejados combustibles.
PELIGRO: Se prohíbe el uso del asador en vehículos, así como en las áreas de almacenamiento o carga de los mismos. Lo anterior hace referencia a automóviles, camiones, camionetas, minivans, utilitarios deportivos, vehículos y embarcaciones recreativos, etc.
PELIGRO: Se prohíbe el uso del asador (incluidos sus extremos superior, inferior, posterior y laterales) a menos de 24 in (61 cm) de materiales combustibles.
PELIGRO: Mantenga el área destinada a la preparación de alimentos libre de vapores y líquidos inflamables, como gasolina, alcohol, etc., así como de materiales combustibles.
PELIGRO: Este aparato (asador) debe mantenerse alejado de materiales inflamables de todo tipo durante el uso.
PELIGRO: No coloque la funda del asador ni ningún otro objeto inflamable dentro o encima del espacio de almacenamiento situado bajo el mismo durante el uso del asador o mientras este se encuentre caliente.
PELIGRO: Si la grasa liberada por los alimentos provocase un incendio, apague todos los quemadores y mantenga la tapa cerrada hasta que las llamas se extingan.
ADVERTENCIA: Las piezas al alcance del usuario pueden estar muy calientes. Los niños deben permanecer alejados del aparato.
ADVERTENCIA: El consumo de alcohol, medicamentos (bajo supervisión médica o no) y drogas ilegales puede afectar a la capacidad
del usuario para montar, desplazar, guardar y usar el asador correctamente y con seguridad.
ADVERTENCIA: Debe prestarse atención al asador tanto durante el precalentamiento como durante el uso. El uso de este asador exige precaución.
El compartimento de asado alcanza temperaturas muy elevadas durante el uso.
ADVERTENCIA: No desplace el aparato (asador) durante el uso.
ADVERTENCIA: Mantenga los cables de alimentación eléctrica y las mangueras de suministro de
combustible alejados de las superficies calientes.
•Se prohíbe el uso de carbón o rocas de lava en este asador.
Almacenamiento y/o desuso
ADVERTENCIA: Interrumpa el suministro de gas cerrando la llave de la botella (tanque) de gas tras el uso.
ADVERTENCIA: Los tanques de LP deben almacenarse al aire libre, lejos del alcance de los niños, y no en edificios, garajes u otros espacios cerrados.
ADVERTENCIA: Tras un período de almacenamiento y/o desuso, debe comprobarse el asador para
determinar si sufre fugas de gas u obstrucciones en los quemadores antes del uso.
•El almacenamiento del asador en interiores sólo se permite si el tanque de LP se desconecta del asador y se extrae del mismo.
Propuesta 65 del estado de California
ADVERTENCIA: Los productos derivados de la combustión que tiene lugar durante el uso de este producto contienen sustancias químicas que, según el estado de California, provocan cáncer, defectos de nacimiento y otras lesiones reproductivas.
ADVERTENCIA: La manipulación de las piezas de bronce que contiene este producto expone al usuario al contacto con plomo, un elemento
químico que, según el estado de California, provoca cáncer, defectos de nacimiento y otras lesiones reproductivas. Lávese las manos tras manipular este producto.
59502_Spt_II_LP_enUS_esMX_frCA_working.indd 20 |
|
|
11/13/17 11:24 AM |
|
|
Aplica solo a los clientes en México:
Debe leer esta guía del propietario antes de poner a funcionar el asador de gas.
m PELIGRO: Si huele a gas:
1.Cierre el suministro de gas al artefacto.
2.Apague todas las flamas cerrando la válvula general de paso.
3.Abra la tapa.
4.No accione interruptores eléctricos.
5.Llame inmediatamente a la central de fugas o a su proveedor de gas.
6.Una fuga de gas puede provocar un incendio o explosión que puede resultar en lesiones corporales serias o la muerte, o daños a la propiedad.
m ADVERTENCIA:
•No almacene gasolina u otros fluidos flamables en la cercanía de su aparato.
•Ningún cilindro de gas que no esté conectado para su uso deberá almacenarse cerca de éste o cualquier otro artefacto doméstico.
•No obstruir la salida de los gases de combustión del asador.
•No debe utilizarse como calefactor de ambiente.
•Mantener los alrededores del aparato libres de materiales combustibles, gasolina y otros vapores o líquidos flamables.
m ADVERTENCIA:
Este aparato no debe ser utilizado como calentador de ambiente, sólo se debe utilizar para cocinar alimentos.
m ADVERTENCIA:
Estos productos trabajan a una presión de 2,75 kPa.
2 Quemadores Principales de: |
14 138 kJ/h |
3 Quemadores Principales de: |
10 287 kJ/h |
Puede que las parrillas que aparecen en las ilustraciones de este manual del propietario difieran ligeramente de las incluidas con el modelo adquirido.
ÍNDICE |
<![if ! IE]> <![endif]>Bienvenido |
|
|
||
20 |
Bienvenido a Weber |
|
|
Información importante sobre seguridad |
|
22 |
La promesa de Weber |
|
|
Garantía |
<![if ! IE]> <![endif]>a |
|
|
|
23 |
Características |
<![if ! IE]> <![endif]>Weber |
|
del producto |
|
|
|
|
|
SPIRIT II : Características |
|
|
Sistema de asado GS4 |
|
24 |
Consejos y sugerencias |
|
|
La llama: directa o indirecta |
|
|
Qué hacer y qué no hacer al cocinar |
|
|
a la parrilla |
|
26 |
Primeros pasos |
|
|
Información importante acerca del gas |
|
|
LP y las conexiones de gas |
|
|
Instalación de un tanque de LP y prueba |
|
|
de fugas |
|
|
Rellenar o sustituir un tanque de LP |
|
30 |
Operación |
|
|
La primera vez que uses el asador |
|
|
Cada vez que cocines a la parrilla |
|
|
Encendido del asador |
|
32 |
Mantenimiento |
|
|
del producto |
|
|
Limpieza y mantenimiento |
|
34 |
Resolución de problemas |
|
36 |
Guía de cocina |
|
|
a la parrilla |
|
55 |
Piezas de repuesto |
|
SIEMPRE LO ÚLTIMO Y MEJOR
La versión más reciente de este manual del propietario está disponible en línea.
59502_Spt_II_LP_enUS_esMX_frCA_working.indd 21 |
|
|
11/13/17 11:24 AM |
|
|

<![endif]>La promesa de Weber
22
La promesa de Weber
En Weber estamos orgullosos de dos cosas: fabricar asadores que duran y ofrecer toda una vida de excelente atención al cliente.
Garantía
Gracias por adquirir un producto Weber. WeberStephen Products LLC, 1415 S. Roselle Road, Palatine, Illinois 60067, y sus delegaciones comerciales
de Norteamérica y Sudamérica (en adelante y en conjunto, “Weber”) se enorgullecen de fabricar productos seguros, duraderos y confiables.
Weber ofrece esta Garantía Voluntaria sin costo adicional. Aquí encontrarás la información necesaria si tu producto Weber necesita reparación o reemplazo, en el caso poco probable de que sufra una falla o defecto.
Según la legislación vigente, el Propietario posee diversos derechos en caso de que el producto resulte defectuoso. Tales derechos incluyen desempeño complementario o reemplazo, rebaja del precio
de compra y compensación. Las cláusulas de esta Garantía no afectan a tales derechos legales ni a ningún otro. De hecho, esta Garantía proporciona al Propietario derechos que van más allá de los que le otorga la Garantía legal.
Garantía Voluntaria de Weber
Weber garantiza al comprador del producto Weber (o, en caso de que sea un regalo o promoción, la persona para quien haya sido adquirido como regalo o artículo promocional) (en adelante, el “Propietario”)
que este se encontrará libre de defectos de materiales y mano de obra durante diez (10) años a partir de la fecha de compra, siempre que el armado y uso del mismo tengan lugar de acuerdo con el manual del propietario que lo acompaña, quedando excluidos
el desgaste y deterioro normales del producto. (Nota: En caso de pérdida o extravío del manual del propietario del producto Weber, es posible descargar un reemplazo en www.weber.com). Weber acepta, en el marco de esta Garantía, reparar o sustituir las piezas defectuosas en cuanto a materiales o mano de obra, con las limitaciones y exclusiones descritas a continuación. EN LA MEDIDA EN QUE LO PERMITA LA LEGISLACIÓN APLICABLE, ESTA GARANTÍA SÓLO SERÁ VÁLIDA PARA EL COMPRADOR ORIGINAL
Y NO PODRÁ TRANSFERIRSE A POSTERIORES PROPIETARIOS, EXCEPTO EN CASO DE REGALO O ENTREGA COMO ARTÍCULO PROMOCIONAL, SEGÚN LO DESCRITO ANTERIORMENTE.
Weber respalda sus productos y ofrece con gusto la Garantía descrita frente a defectos de materiales en el asador o sus componentes, quedando excluidos el desgaste y deterioro normales del producto.
•Se entienden por “desgaste y deterioro normales” los deterioros estéticos e inmateriales que se deriven de la propiedad prolongada del asador, como la oxidación de superficies, las abolladuras/rayones, etc.
Weber, no obstante, cumplirá sus obligaciones según esta Garantía en relación con el asador y sus componentes en caso de daño o disfunción como consecuencia de defectos de materiales.
•Se entienden por “defectos de materiales” el agrietamiento por corrosión o quemadura de ciertas piezas, así como otros daños o fallas que impidan usar el asador con seguridad/de un modo apropiado.
REGISTRO = GARANTÍA
Responsabilidades del Propietario bajo esta Garantía/situaciones no cubiertas
A fin de asegurar la debida cobertura de la Garantía, es importante (aunque no obligatorio) registrar
el producto Weber en www.weber.com. Deben conservarse el recibo y/o la factura de compra originales. Al registrar el producto Weber, se confirma la cobertura de la Garantía, se acelera el procesamiento de las posibles reclamaciones en Garantía y se establece un vínculo directo con Weber que el fabricante puede usar si necesita contactar con el Propietario. Si no tuviste tiempo de registrar tu asador antes de solicitar asistencia en Garantía, recopila los siguientes datos antes de llamar: nombre, domicilio, número de teléfono, correo electrónico, número de serie, fecha de compra, distribuidor, modelo, color y principal problema.
La Garantía anterior sólo será válida si el Propietario cuida razonablemente del producto Weber de acuerdo con las instrucciones de armado, las instrucciones de uso y las indicaciones de mantenimiento preventivo descritas en el manual del propietario
que lo acompaña, a menos que el Propietario pueda demostrar que la falla o el defecto no tiene relación con el incumplimiento de tales obligaciones. Si el producto se instala en una zona costera o cerca de una alberca, el lavado y enjuague periódicos de las superficies exteriores se considerarán parte del mantenimiento, según lo descrito en el manual del propietario.
Esta GARANTÍA no cubre piezas dañadas, deterioradas, decoloradas y/u oxidadas por motivos de los que Weber no sea responsable y tengan su origen en:
•Abuso, mal uso, alteración, modificación, uso indebido, vandalismo, negligencia, armado o instalación incorrectos, u omisión al llevar a cabo las labores normales y rutinarias de mantenimiento.
•Insectos (como arañas) y roedores (como ardillas), incluidos, entre otros, los daños en quemadores y/o mangueras de gas.
•Exposición a atmósferas salinas y/o fuentes de cloro, como albercas o tinas calientes/spas.
•Condiciones meteorológicas severas, como granizo, huracanes, terremotos, tsunamis o temporales, tornados o grandes tormentas.
•Lluvia ácida y otros factores ambientales.
El uso y/o la instalación de piezas no fabricadas por Weber en el producto Weber es motivo de invalidación de esta Garantía, que no cubrirá los daños que resulten de tales acciones. Toda conversión de un asador de gas no autorizada por Weber y llevada a cabo por un técnico autorizado por Weber ocasionará la invalidación de esta Garantía.
Procesamiento de la Garantía
Si crees que tienes una pieza cubierta por esta Garantía, contacta con el servicio de atención al cliente de Weber usando la información de contacto disponible en nuestro sitio web (www.weber.com). Luego de llevar a cabo las investigaciones que correspondan, Weber reparará o sustituirá (a decisión propia) la pieza defectuosa cubierta por esta Garantía. En caso de que la reparación o sustitución no sea posible, Weber podrá (a decisión propia) reemplazar el asador en cuestión por otro nuevo de igual o mayor valor. Puede ser que Weber te pida que devuelvas las piezas afectadas para su inspección (deberás cubrir los gastos de envío).
Antes de contactar con el servicio de atención al cliente, recopila la siguiente información: nombre, domicilio, número de teléfono, correo electrónico, número de serie, fecha de compra, distribuidor, modelo, color y principal problema.
Exenciones de responsabilidad
APARTE DE LAS GARANTÍAS Y EXENCIONES DESCRITAS COMO PARTE DE ESTA DECLARACIÓN DE GARANTÍA, NO EXISTEN OTRAS GARANTÍAS O DECLARACIONES VOLUNTARIAS DE RESPONSABILIDAD EXPLÍCITAS, MÁS ALLÁ DE LA RESPONSABILIDAD LEGAL APLICABLE A WEBER. ASIMISMO, LA PRESENTE DECLARACIÓN DE GARANTÍA NO LIMITA NI EXCLUYE AQUELLAS SITUACIONES O RECLAMACIONES DE LAS QUE
WEBER DEBA HACERSE RESPONSABLE SEGÚN LO PREVISTO EN LA LEY.
NO SE CONSIDERARÁ VÁLIDA NINGUNA OTRA GARANTÍA UNA VEZ VENCIDA ESTA GARANTÍA DE DIEZ (10) AÑOS. WEBER NO ASUMIRÁ NINGUNA OTRA GARANTÍA (INCLUIDAS LAS “GARANTÍAS AMPLIADAS”) OFRECIDA POR NINGUNA PERSONA, DISTRIBUIDOR O AGENTE COMERCIAL, EN RELACIÓN CON NINGÚN PRODUCTO. EL ÚNICO OBJETO DE ESTA GARANTÍA ES LA REPARACIÓN O SUSTITUCIÓN DE LA PIEZA O EL PRODUCTO EN CUESTIÓN.
ESTA GARANTÍA VOLUNTARIA NO CUBRIRÁ EN NINGÚN CASO IMPORTES ECONÓMICOS SUPERIORES AL PRECIO DE COMPRA DEL PRODUCTO WEBER ADQUIRIDO.
EL USUARIO ASUME EL RIESGO Y LA RESPONSABILIDAD DERIVADOS DE AQUELLAS PÉRDIDAS, DAÑOS O LESIONES SUFRIDOS POR AQUEL Y SU PROPIEDAD Y/U OTRAS PERSONAS Y SUS PROPIEDADES, QUE SE DERIVEN DEL MAL USO O ABUSO DEL PRODUCTO, O DE NO RESPETAR LAS INSTRUCCIONES INCLUIDAS EN EL MANUAL DEL PROPIETARIO QUE LO ACOMPAÑA.
LAS PIEZAS Y ACCESORIOS SUSTITUIDOS EN EL MARCO DE ESTA GARANTÍA GOZARÁN DE UN
PERÍODO DE GARANTÍA EQUIVALENTE AL TIEMPO RESTANTE DEL PERÍODO DE GARANTÍA ORIGINAL, DE DIEZ (10) AÑOS.
ESTA GARANTÍA SÓLO ES VÁLIDA PARA EL USO EN VIVIENDAS O DEPARTAMENTOS UNIFAMILIARES PRIVADOS, NO ASÍ PARA ASADORES WEBER® DESTINADOS AL USO EN INSTALACIONES COMERCIALES, COMUNITARIAS O DE UNIDADES MÚLTIPLES, COMO RESTAURANTES, HOTELES, COMPLEJOS TURÍSTICOS O PROPIEDADES DE RENTA.
PUEDE SER QUE WEBER MODIFIQUE EL DISEÑO DE SUS PRODUCTOS CADA CIERTO TIEMPO. NINGUNA DE LAS ESTIPULACIONES QUE CONTIENE ESTA GARANTÍA DEBE CONSIDERARSE CONSTITUYENTE DE UNA OBLIGACIÓN POR PARTE DE WEBER
DE INCORPORAR TALES CAMBIOS DE DISEÑO A PRODUCTOS FABRICADOS ANTERIORMENTE; DEL MISMO MODO, LA APLICACIÓN DE TALES CAMBIOS NO CONSTITUIRÁ UNA ADMISIÓN DEL CARÁCTER DEFECTUOSO DE LOS DISEÑOS ANTERIORES.
WEBER-STEPHEN PRODUCTS LLC Centro de atención al cliente
1415 S. Roselle Road Palatine, IL 60067 EE. UU.
Para adquirir piezas de repuesto, llama al teléfono:
1-800-446-1071
Para compras hechas en México / Para garantía acudir / Importado por:
Weber-Stephen Products S.A. de C.V.
Anatole France 139-139A Colonia. Polanco III Seccion Del. Miguel Hidalgo
Ciudad de México C.P. 11540
RFC: WPR030919-ND4
Para partes de repuesto llame a:
01800-00-WEBER (93237)
Para hacer efectiva esta garantía es necesario llame por teléfono a los números indicados en este apartado o presentarse en los establecimientos autorizados por Weber. Para hacer efectiva esta garantía no pueden exigirse otros requisitos más que la presentación del producto, la garantía vigente y comprobante de venta.
59502_Spt_II_LP_enUS_esMX_frCA_working.indd 22 |
|
|
11/13/17 11:24 AM |
|
|

SPIRIT II :
C A R ACT E R Í ST I C A S
A
B
C 
D E
F
G
H
A Termómetro integrado |
E Mesas laterales con ganchos |
Conocer la temperatura en el interior del asador te |
portautensilios integrados |
permite ajustar el fuego cuando es necesario. |
Usa las mesas laterales para tener las bandejas, |
|
|
B Soporte para calentar |
condimentos y utensilios siempre al alcance de tu |
mano. Cuelga en los ganchos los utensilios que más |
|
El soporte para calentar mantiene los alimentos |
uses para acceder fácilmente a ellos y organizar tu |
calientes o tuesta los panes para tus hamburguesas |
espacio de trabajo. La mesa lateral izquierda se pliega |
mientras el plato principal se cocina debajo. |
para facilitar el almacenamiento del asador. |
C Parrillas de cocción de hierro fundido vitrificado
Las parrillas de cocción reversibles te permiten sacar el máximo provecho de tu creatividad. El lado con barras delgadas es ideal para alimentos delicados, como pescado o camarones; el lado con barras gruesas crea marcas profundas que realzan el sabor del alimento.
D iGRILL 3 Ready
El termómetro iGrill 3 se conecta a una app que te permite controlar la cocción de principio a fin desde tu dispositivo móvil, conociendo en todo momento la temperatura interior del alimento. Descarga la app Weber iGrill, activa la conexión Bluetooth en tus dispositivos e inserta hasta cuatro puntas de prueba en las piezas que quieras controlar.
(Se vende por separado).
F Indicador de combustible
Ahora siempre sabrás hasta dónde puedes llegar. El indicador de combustible, de fácil lectura, se encuentra junto al tanque de gas y te permite saber cuánto combustible queda en todo momento. Cocina
con tranquilidad, sabiendo que no te quedarás sin gas a la mitad de tu próxima parrillada.
G Fácil acceso al tanque de gas
Como está fuera del asador, es más fácil acceder al tanque de gas para sustituirlo y el carro proporciona más espacio de almacenamiento.
H Carro de diseño abierto
El elegante diseño abierto del carro ofrece más espacio y te permite acceder con facilidad a los utensilios.
SISTEMA DE ASADO GS4
El sistema de asado GS4 representa una auténtica revolución en el mundo de la cocina al aire libre. Este innovador sistema se basa en más de 30 años de experiencia, técnica de cocina y, aún más importante, un incansable interés por los deseos y necesidades de la gente que más importa: la comunidad de parrilleros.
Todos los componentes del sistema de asado GS4 están cuidadosamente diseñados para facilitar su uso y ofrecer un inigualable nivel de satisfacción en cuanto a la experiencia de asado al aire libre. Quemadores que siempre encienden, piezas cocinadas uniforme y consistentemente con un delicado toque ahumado sin importar el lugar de la parrilla de cocción en el que se coloquen
y máxima limpieza sin complicaciones; para que puedas concentrarte en lo que te hace realmente feliz: reunir a tus amigos y familiares alrededor de tu asador.
El sistema de asado GS4 está formado por cuatro componentes principales: el sistema de encendido INFINITY crossover, los quemadores, las barras FLAVORIZER y el sistema de gestión de grasa. Todos ellos garantizan la confiabilidad y sencillez de la experiencia al completo; desde el momento en que se encienden los quemadores hasta que llega la hora del mantenimiento. E integrados en un asador Spirit II, forman un potente motor de cocina a la parrilla.
1 Sistema de encendido INFINITY crossover
El sistema de encendido INFINITY crossover está diseñado para garantizar el correcto encendido de los quemadores. Respaldado por una generosa garantía, te permite comenzar a cocinar siempre a la primera. Sin excepción.
2 Quemadores
Los quemadores de alto desempeño, fabricados en acero inoxidable, están diseñados para durar y favorecen la distribución uniforme del calor en las parrillas de cocción.
3 Barras FLAVORIZER
Las clásicas barras FLAVORIZER de Weber forman el ángulo perfecto para capturar los jugos, que humean y crepitan al contacto con ellas para aportar ese irresistible sabor ahumado que todos conocen y adoran. Los jugos que no se evaporan recorren la pendiente y se alejan de los quemadores
hasta caer en el sistema de gestión de grasa.
4 Sistema de gestión de grasa
El sistema de gestión de grasa contribuye a eliminar la grasa, reduciendo al mismo
tiempo el riesgo de llamaradas. Los jugos que no se evaporan en las barras FLAVORIZER se recogen lejos de los quemadores, en la bandeja de goteo desechable que protege el colector, bajo el compartimento de asado. Sólo tienes que sacar el colector y sustituir la bandeja de goteo cuando sea necesario.
<![endif]>producto del Características
23
59502_Spt_II_LP_enUS_esMX_frCA_working.indd 23 |
|
|
11/13/17 11:24 AM |
|
|
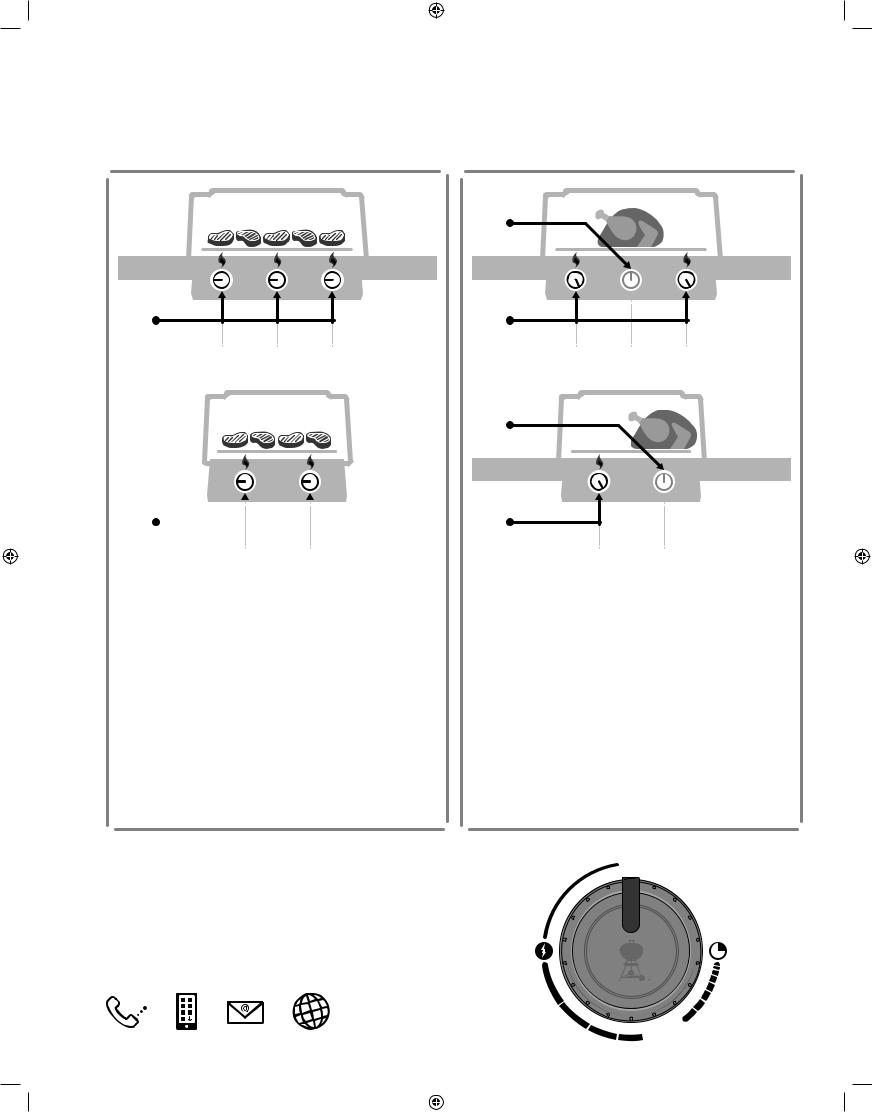
<![endif]>Consejos y sugerencias
La llama:
directa o indirecta
HIGH
|
BURNER |
BURNER |
BURNER |
1 |
2 |
3 |
|
|
|
|
|
|
|
|
|
|
|
|
|
|
|
|
|
HIGH
BURNER |
BURNER |
1 |
2 |
C ONF IGUR A C IÓN PA R A
CALOR DIRECTO
Usa el método directo para cocinar alimentos tiernos de pequeño tamaño que requieran menos de 20 minutos de cocción, como hamburguesas, filetes, chuletas, kebabs, piezas de pollo sin hueso, pescado en filetes, marisco y verduras en rodajas.
Con calor directo, el fuego se sitúa justo bajo el alimento.
La superficie se dora, se desarrollan los sabores y texturas, y tiene lugar una deliciosa caramelización, mientras que el alimento se cocina hasta el centro.
OFF
MEDIUM
BURNER |
BURNER |
BURNER |
1 |
2 |
3 |
OFF
MEDIUM
BURNER |
BURNER |
1 |
2 |
C ONF IGUR A C IÓN PA R A
CALOR INDIRECTO
Usa el método indirecto para cortes de carne más gruesos que requieran un tiempo de cocción superior a 20 minutos o alimentos tan delicados que la exposición directa al calor pudiera secarlos o quemarlos, como asados, piezas de pollo con hueso, pescados enteros, filetes de pescado delicados, pollos enteros, pavos o costillas. El calor indirecto se puede usar también para acabar
alimentos muy gruesos o cortes con hueso previamente dorados o tostados con calor directo.
El método indirecto permite repartir el calor por ambos lados de la parrilla o concentrarlo sólo en uno de ellos. Coloca el alimento en la parte de la parrilla de cocción que no esté encendida.
24 |
REGISTRARSE ES IMPORTANTE |
 APAGADO
ENCENDIDO/ALTO |
BAJO |
 MEDIO
MEDIO
59502_Spt_II_LP_enUS_esMX_frCA_working.indd 24 |
|
|
11/13/17 11:24 AM |
|
|
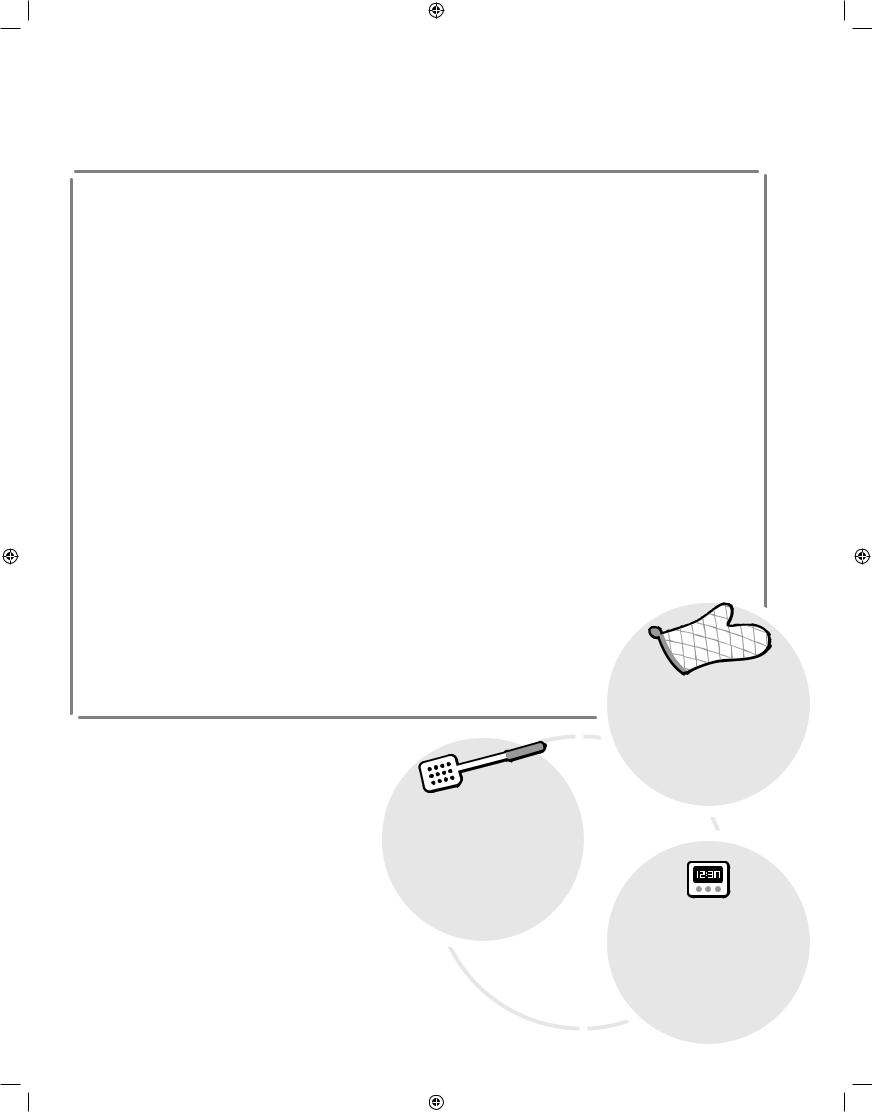
Qué hacer y qué no hacer al cocinar a la parrilla
Precalienta siempre el asador antes de cocinar.
Si las parrillas de cocción no están lo suficientemente calientes, los alimentos se pegarán y no podrás dorar tus piezas de carne ni disfrutar de esas atractivas marcas de parrilla. Incluso aunque la receta indique que debes cocinar a fuego medio o bajo, precalienta antes el asador a fuego máximo. Abre la tapa, sube el fuego, cierra
la tapa y deja que la parrilla de cocción se caliente durante unos diez minutos o hasta que el termómetro de la tapa indique 260 °C (500 °F).
No cocines en parrillas sucias.
Cocinar alimentos en una parrilla de cocción sucia nunca es una buena idea. Los restos de alimentos adheridos a las parrillas son como pegamento y acaban adhiriéndose también a los alimentos nuevos. Si no quieres saborear la cena de ayer en el almuerzo de hoy, asegúrate de borrar la pizarra antes de empezar. Cuando las parrillas estén calientes, usa un cepillo con cerdas de acero inoxidable para limpiar y suavizar la superficie.
Mantén a raya tu curiosidad.
La tapa del asador no sólo sirve para protegerlo de la lluvia. También, y más importante, impide que entre demasiado aire y que salga demasiado calor y humo. Cuando la tapa está cerrada, las parrillas de cocción están más calientes, los alimentos se asan en menos tiempo, los sabores ahumados son más intensos y se producen menos llamaradas. ¡Así que pon la tapa!
Voltea una sola vez.
¿Hay algo mejor que una jugosa pieza de carne con marcas profundas y preciosos bordes caramelizados? La clave para conseguir esos resultados es no tocar el alimento. A veces sentimos la tentación de voltear los alimentos antes de que alcancen el nivel deseado de color y sabor. En casi todos los casos, no hace falta voltear los alimentos más de una vez. Si lo haces más veces, probablemente también estés abriendo la tapa con demasiada frecuencia, dando lugar a otros problemas. Da un paso atrás y confía en tu asador.
<![endif]>sugerencias y Consejos
Mantente presente. |
|
|
|
|
|
|
Controla tu fuego interior. |
|
|
|
|
|
|
|
|
|
|
|
|
|
|
|
|
|
|
|
|
|
|
|
|
|
|
||||||||||||||||
Antes de encender el asador, asegúrate de tener todo lo que necesites |
|
A veces, lo más importante al cocinar a la parrilla es saber cuándo |
|
|
|
|
|
|
|
|
|
|
|
||||||||||||||||||||||||||||||||||||
al alcance del brazo. No olvides tus principales herramientas de |
|
|
|
|
|
|
parar. La forma más confiable de comprobar si un alimento está |
|
|
|
|
|
|
|
|
|
|
|
|
||||||||||||||||||||||||||||||
parrillada, los alimentos ya engrasados y sazonados, los glaseados |
|
|
|
hecho es consultar el termómetro. Esta pequeña joya te permitirá |
|
|
|
|
|
|
|
|
|
|
|
||||||||||||||||||||||||||||||||||
o salsas que quieras usar, así como bandejas limpias para la comida |
|
|
determinar el momento justo para servir. |
|
|
|
|
|
|
|
|
|
|
|
|
|
|
|
|
|
|
|
|
|
|
|
|
||||||||||||||||||||||
cocinada. Tener que volver a la cocina no sólo significa perderse |
|
|
|
|
|
|
No tengas miedo de experimentar. |
|
|
|
|
|
|
|
|
|
|
|
|
|
|
|
|
|
|
||||||||||||||||||||||||
parte de la diversión, sino que puede ser el principio de una comida |
|
|
|
|
|
|
|
|
|
|
|
|
|
|
|
|
|
|
|
|
|
||||||||||||||||||||||||||||
quemada. Los chefs franceses llaman a esto mise en place (algo así |
|
|
|
En la década de 1950, cocinar a la parrilla significaba una única cosa: |
|
|
|
|
|
|
|
|
|
|
|||||||||||||||||||||||||||||||||||
como “puesta en escena”). Nosotros lo llamamos estar presente. |
|
|
|
|
|
|
|
|
|
|
|
|
|
|
|
|
|||||||||||||||||||||||||||||||||
|
|
|
|
|
|
carne (y sólo carne) carbonizada sobre una llama abierta. |
|
|
|
|
|
|
|
|
|
|
|
|
|
||||||||||||||||||||||||||||||
|
|
|
|
|
|
|
|
|
|
|
|
|
|
|
|
|
|
|
|
||||||||||||||||||||||||||||||
No cocines demasiados alimentos a la vez. |
|
|
|
|
|
|
Los chefs modernos no necesitan una cocina para preparar una |
|
|
|
|
|
|
|
|
|
|
|
|
||||||||||||||||||||||||||||||
|
|
|
|
|
|
comida completa. Usa tu asador para cocinar aperitivos, guarniciones |
|
|
|
|
|
|
|
|
|
||||||||||||||||||||||||||||||||||
Poner demasiada comida en las parrillas de cocción limita tu |
|
|
|
|
|
|
e incluso postres. Registra tu asador y recibe contenidos especiales e |
|
|
|
|
|
|
|
|
|
|||||||||||||||||||||||||||||||||
flexibilidad. Mantén despejada, al menos, una cuarta parte de las |
|
|
|
|
|
|
ideas que seguro disfrutarás poniendo |
|
|
|
|
|
|
|
|
|
|
|
|
|
DA |
|
|
|
|
|
|
|
|
|
|
|
|
||||||||||||||||
parrillas de cocción, con espacio suficiente entre los alimentos para |
|
|
|
|
Nos encantará acompañarte en tus |
|
|
|
|
|
|
S |
|
|
|
|
|
|
|
|
|
|
|
|
|
|
|
|
|
|
|
||||||||||||||||||
introducir las pinzas y moverlos con libertad. A veces, cocinar a la |
|
|
|
|
|
|
aventuras a la parrilla. |
|
|
|
|
|
|
|
|
|
|
|
|
|
|
|
|
|
|
|
|
|
|
|
|
|
|
I |
|
|
|
|
|
||||||||||
|
|
|
|
|
|
|
|
|
|
|
|
|
|
|
|
|
|
U |
|
|
|
|
|
|
|
|
|
|
|
|
|
|
|
|
|
|
|||||||||||||
|
|
|
|
|
|
|
|
|
|
|
|
|
|
|
|
|
|
|
|
|
|
|
|
|
|
|
|
|
T |
|
|
|
|
|
|
|
|
|
|
|
|
|
|
E |
|
|
|
|
|
parrilla requiere tomar decisiones en pocos segundos, y para eso es |
|
|
|
|
|
|
|
|
|
|
|
|
|
|
|
|
|
|
|
|
|
|
|
|
A |
|
|
|
|
|
|
|
|
|
|
|
|
|
|
N |
|
|
|
|
|||||
|
|
|
|
|
|
|
|
|
|
|
|
|
|
|
|
|
|
|
|
|
|
|
R |
|
|
|
|
|
|
|
|
|
|
|
|
|
|
|
T |
|
|
|
|||||||
fundamental poder mover los alimentos de una zona a otra. Ofrécete |
|
|
|
|
|
|
|
|
|
|
|
|
|
|
|
|
|
|
|
|
|
|
A |
|
|
|
|
|
|
|
|
|
|
|
|
|
|
|
|
A |
|
||||||||
|
|
|
|
|
|
|
|
|
|
|
|
|
|
|
|
|
|
|
|
|
|
|
|
|
|
|
|
|
|
|
|
|
|
|
|
|
|
|
|
||||||||||
|
|
|
|
|
|
|
|
|
|
|
|
|
|
|
|
|
|
|
|
|
P |
|
|
|
|
|
|
|
|
|
|
|
|
|
|
|
|
|
|
S |
|||||||||
|
|
|
|
|
|
|
|
|
|
|
|
|
|
|
|
|
|
|
|
|
|
|
|
|
|
|
|
|
|
|
|
|
|
|
|
|
|
|
|
||||||||||
|
|
|
|
|
|
|
|
|
|
|
|
|
|
|
|
|
|
|
|
|
|
|
|
|
|
|
|
|
|
|
|
|
|
|
|
|
|
|
|
|
|
|
|
||||||
espacio suficiente para trabajar. |
|
|
|
|
|
|
|
|
|
|
|
|
|
|
|
|
|
|
|
|
|
|
|
|
|
|
|
|
|
|
|
|
|
|
|
|
|
|
|
|
|
|
|
|
|
I |
|||
|
|
|
|
|
|
|
|
|
|
|
|
|
|
|
|
|
|
|
|
|
|
S |
|
|
|
|
|
|
|
|
|
|
|
|
|
|
|
|
|
|
|
|
|
|
|||||
|
|
|
|
|
|
|
|
|
|
|
|
|
|
|
|
|
|
|
|
|
|
|
|
|
|
|
|
|
|
|
|
|
|
|
|
|
|
|
|
|
|
|
|
M |
|||||
|
|
|
|
|
|
|
|
|
|
|
|
|
|
|
|
|
|
|
|
|
|
|
|
|
|
|
|
|
|
|
|
|
|
|
|
|
|
|
|
|
|
|
|
|
|||||
|
|
|
|
|
|
|
|
|
|
|
|
|
|
|
|
|
|
|
|
|
|
|
|
|
|
|
|
|
|
|
|
|
|
|
|
|
|
|
|
|
|
|
|
|
|
|
P |
||
|
|
|
|
|
|
|
|
|
|
|
|
|
|
|
|
|
|
|
|
|
|
|
E |
|
|
|
|
|
|
|
|
|
|
|
|
|
|
|
|
|
|
|
|
|
|
|
|
|
|
|
|
|
|
|
|
|
|
|
|
|
|
|
|
|
|
|
|
|
|
|
|
|
|
|
|
|
|
|
|
|
|
|
|
|
|
|
|
|
|
|
|
|
|
|
|
|
|
R |
|
|
|
|
|
|
|
|
|
|
|
|
|
|
|
|
|
|
|
|
|
|
|
|
L |
|
|
|
|
|
|
|
|
|
|
|
|
|
|
|
|
|
|
|
|
|
|
|
|
|
|
|
|
|
|
|
|
|
|
|
|
|
|
|
|
|
|
|
|
|
|
|
|
|
|
|
|
|
|
|
|
|
|
|
|
|
|
|
|
|
|
|
|
|
|
|
|
|
|
|
|
|
|
|
|
|
|
|
|
|
|
|
|
|
|
|
|
|
|
|
|
|
|
|
B |
|
|
|
|
|
MANOPLAS DE |
|
|
|
|
E |
|||||||||||||||
|
|
|
|
|
|
|
|
|
|
|
|
|
|
|
|
|
|
|
|
|
|
|
I |
|
|
|
|
|
|
|
|
|
S |
||||||||||||||||
|
|
|
|
|
|
|
|
|
|
|
|
|
|
|
|
|
|
|
|
|
|
|
D |
|
|
|
|
|
|
|
|
|
|||||||||||||||||
|
|
|
|
|
|
|
|
|
|
|
|
|
|
|
|
|
|
|
|
|
|
|
|
|
|
|
|
|
|
|
|
C |
|||||||||||||||||
|
|
|
|
|
|
|
|
|
|
|
|
|
|
|
|
|
|
|
|
|
|
|
N |
|
|
|
|
|
|
|
|
|
|||||||||||||||||
|
|
|
|
|
|
|
|
|
|
|
|
|
|
|
|
|
|
|
|
|
|
|
I |
|
|
|
|
|
|
|
|
|
I |
||||||||||||||||
|
|
|
|
|
|
|
|
|
|
|
|
|
|
|
|
|
|
|
|
|
|
|
C |
|
|
|
|
|
|
|
|
|
|
|
|
|
|
|
|
|
|
|
|
|
|
|
|
|
N |
|
|
|
|
|
|
|
|
|
|
|
|
|
|
|
|
|
|
|
|
|
|
|
S |
|
|
|
|
|
|
|
|
|
|
|
|
|
|
|
|
|
|
|
|
|
|
|
|
|
D |
|
|
|
|
|
|
|
|
|
|
|
|
|
|
|
|
|
|
|
|
|
|
|
|
|
|
|
|
|
|
|
|
|
|
|
|
|
|
|
|
|
|
|
|
|
|
|
|
|
I |
|
|
|
|
|
|
|
|
|
|
|
|
|
|
|
|
|
|
|
|
|
|
|
E |
|
|
|
|
|
|
|
BARBACOA |
|
|
|
|
|
|
||||||||||||
|
|
|
|
|
|
|
|
|
|
|
LADAS • |
|
|
|
|
|
|
|
|
|
|
|
|
|
|
|
|
|
|
|
|
|
|
B |
|||||||||||||||
|
|
|
|
|
|
|
|
|
|
|
|
|
|
|
|
|
|
|
|
R |
|
|
|
|
|
|
|
|
|
|
|
|
|
||||||||||||||||
|
|
|
|
|
|
|
|
|
|
IL |
|
|
|
|
|
|
|
|
|
|
|
P |
|
|
|
|
|
|
|
|
|
|
|
|
|
|
|
|
|
|
|
|
|
|
|
|
L |
||
|
|
|
|
|
|
|
|
|
R |
|
|
|
|
|
|
|
|
|
|
|
|
|
|
|
|
|
|
|
|
|
|
|
|
|
|
|
|
|
|
|
|
|
|
|
|
||||
|
|
|
|
|
|
|
|
R |
|
|
|
|
|
|
|
|
|
|
|
|
|
|
|
|
|
|
|
En caso de duda, úsalas. Las mejores |
|
|
|
|
E |
||||||||||||||||
|
|
|
|
|
|
|
A |
|
|
|
|
|
|
|
|
|
|
|
|
|
|
M |
|
|
|
|
|
|
|
||||||||||||||||||||
|
|
|
|
|
|
P |
|
|
|
|
|
|
|
|
|
|
|
|
|
|
|
|
|
|
|
|
|
|
S |
||||||||||||||||||||
|
|
|
|
|
|
|
|
|
|
|
|
|
|
|
|
|
|
|
|
|
I |
|
|
|
|
|
|
P |
|||||||||||||||||||||
|
|
|
|
|
T |
|
|
|
|
|
|
|
|
|
|
|
E |
|
|
|
|
|
|
S |
|
|
|
están aisladas y protegen la |
|
|
|
|
A |
|
|||||||||||||||
|
|
|
|
A |
|
|
|
|
|
|
|
|
|
|
|
N |
|
|
|
|
|
|
A |
|
|
|
|
|
R |
|
|
||||||||||||||||||
|
|
|
R |
|
|
|
|
|
|
|
|
|
|
|
|
T |
|
|
|
|
|
|
|
T |
|
|
mano y el antebrazo. |
|
|
|
|
A |
|
|
|
||||||||||||||
|
|
|
|
|
|
|
|
|
|
|
|
|
|
|
|
A |
|
|
|
|
|
|
|
|
|
|
|
|
|
|
|||||||||||||||||||
|
|
A |
|
|
|
|
|
|
|
|
|
|
|
|
|
|
|
|
|
|
|
|
N |
|
|
|
|
|
T |
|
|
|
|
||||||||||||||||
|
|
|
|
|
|
|
|
|
|
|
|
|
|
|
|
|
S |
|
|
|
|
|
|
|
|
|
|
|
|
|
|||||||||||||||||||
|
P |
|
|
|
|
|
|
|
|
|
|
|
|
|
|
|
|
|
|
I |
|
|
|
|
|
E |
|
|
|
|
|
|
|
|
|
|
|
|
|
|
|
|
|
|
|||||
|
|
|
|
|
|
|
|
|
|
|
|
|
|
|
|
|
|
|
|
|
|
|
|
|
I |
|
|
|
|
|
|
|
|
|
|
|
|
|
U |
|
|
|
|
|
|||||
S |
|
|
|
|
|
|
|
|
|
|
|
|
|
|
|
|
|
|
|
M |
|
|
|
|
|
|
M |
|
|
|
|
|
|
|
|
|
|
|
|
S |
|
|
|
|
|
||||
|
|
|
|
|
|
|
|
|
|
|
|
|
|
|
|
|
|
|
|
|
|
|
|
|
|
|
|
|
A |
|
|
|
|
|
|
|
|
|
|
P |
|
|
|
|
|
|
|||
E |
|
|
|
|
|
|
ESPÁTULA |
|
|
|
|
P |
|
|
|
|
|
|
|
R |
R |
|
|
|
|
|
|
|
|
A |
|
|
|
|
|
|
|
||||||||||||
|
|
|
|
|
|
|
|
|
|
R |
|
|
|
|
|
|
|
|
E |
|
|
|
|
|
|
R |
|
|
|
|
|
|
|
|
|||||||||||||||
L |
|
|
|
|
|
|
|
|
|
|
|
|
|
|
|
|
|
|
|
H |
|
|
|
|
R |
|
|
|
|
|
|
|
|
|
|||||||||||||||
|
|
|
|
|
|
|
|
|
|
|
|
|
|
|
|
|
|
|
|
|
|
|
• |
|
LI |
|
|
|
|
|
|
|
|
|
|
||||||||||||||
B |
|
|
|
|
|
|
|
|
|
|
E |
|
|
|
|
|
|
|
|
|
|
|
|
SADAL |
|
|
|
|
|
|
|
|
|
|
|
||||||||||||||
I |
|
|
|
|
|
|
|
|
|
|
S |
|
|
|
|
|
|
|
|
|
|
|
|
|
|
|
|
|
|
|
|
|
|
|
|
|
|
||||||||||||
D |
|
|
|
|
|
|
|
|
|
|
|
|
|
|
|
|
|
|
|
|
|
C |
|
|
|
|
|
|
|
|
|
|
|
|
LADAS |
|
|
|
|
|
|
|
|
|
|
|
|
||
N |
|
|
|
|
Busca una espátula de mango largo |
|
|
|
|
|
|
|
|
|
|
|
|
|
|
|
|
• |
|
|
|
|
|
|
|
|
|
|
|
||||||||||||||||
|
|
|
|
|
|
|
|
I |
|
|
|
|
|
|
|
|
|
|
|
|
|
|
|
|
|
|
|
|
|
|
|
||||||||||||||||||
I |
|
|
|
|
|
|
|
|
|
|
|
|
|
|
|
|
|
|
|
L |
|
H |
|
|
|
|
|
|
|
|
|
|
|||||||||||||||||
|
|
|
|
|
|
|
|
|
|
|
|
|
|
|
|
|
|
|
RI |
|
|
|
E |
R |
|
|
|
|
|
|
|
|
|||||||||||||||||
C |
|
|
|
|
|
|
|
|
|
|
|
|
|
|
|
|
|
|
|
|
|
N |
|
|
|
|
|
|
|
|
R |
|
|
|
|
|
|
R |
|
|
|
|
|
|
|
||||
|
|
|
|
|
|
|
|
|
|
|
|
|
|
|
|
|
|
|
|
|
|
|
|
|
|
|
|
A |
|
|
|
|
|
|
|
|
|
|
|
|
|
|
|
||||||
S |
|
|
|
|
|
|
|
|
|
|
|
|
|
|
|
|
|
|
|
|
|
D |
|
|
|
|
|
|
P |
|
|
|
|
|
|
|
|
|
|
|
|
|
|
|
|
|
|||
|
|
|
|
y cuello arqueado (a distinta altura), |
|
|
|
|
|
|
|
|
|
|
S |
|
|
|
|
|
|
|
|
|
|
|
A |
|
|
|
|
|
|
||||||||||||||||
E |
|
|
|
|
|
|
|
|
I |
|
|
|
|
|
|
|
|
|
|
|
|
|
|
|
|
|
|
M |
|
|
|
|
|
||||||||||||||||
|
|
|
|
|
|
|
|
|
|
|
|
|
|
|
|
|
|
|
|
|
B |
|
|
|
|
|
U |
|
|
|
|
|
|
|
|
|
|
|
|
|
I |
|
|
|
|
|
|||
|
|
|
|
|
|
|
|
|
|
|
|
|
|
|
|
|
|
|
|
|
|
|
|
|
|
|
|
|
|
|
|
|
|
|
|
|
|
|
|
|
|
|
|
|
|||||
R |
|
|
|
que tenga la pala más baja que el mango. |
|
|
|
|
|
|
|
|
T |
|
|
|
|
|
|
|
|
|
|
|
|
|
|
E |
|
|
|
|
|
||||||||||||||||
|
|
|
|
|
|
L |
|
|
|
|
A |
|
|
|
|
|
|
|
|
|
|
|
|
|
|
N |
|
|
|
|
|||||||||||||||||||
P |
|
|
|
|
|
|
|
|
|
|
|
|
|
|
|
|
|
|
|
|
|
|
|
|
|
T |
|
|
|
||||||||||||||||||||
|
|
|
|
|
|
|
|
|
|
|
|
|
|
|
|
|
|
|
|
|
|
E |
|
|
|
R |
|
|
|
|
|
|
|
|
|
|
|
|
|
|
|
|
A |
|
|||||
M |
|
|
|
|
Así te resultará más fácil retirar |
|
|
|
|
S |
|
P |
A |
|
|
|
|
|
|
|
|
|
|
|
|
|
|
|
|
|
|
S |
|||||||||||||||||
I |
|
|
|
|
|
|
|
P |
|
|
|
|
|
|
|
|
|
|
|
|
|
|
|
|
|
|
|
||||||||||||||||||||||
|
|
|
|
|
|
A |
|
|
|
|
|
|
|
|
|
|
|
|
|
|
|
|
|
|
|
|
|||||||||||||||||||||||
S |
|
|
los alimentos de las parrillas |
|
|
|
|
|
|
|
|
|
|
|
|
|
|
|
|
|
|
|
|
|
|
|
|
|
|
|
I |
||||||||||||||||||
|
|
|
R |
|
|
|
|
|
|
|
|
|
|
|
|
|
|
|
|
|
|
|
|
|
|
|
|
|
M |
||||||||||||||||||||
|
A |
|
|
|
|
|
|
|
|
|
|
|
|
|
|
|
|
|
|
|
|
|
|
|
|
|
|
|
|
|
|||||||||||||||||||
|
|
A |
|
|
|
|
|
|
|
|
|
|
|
|
|
|
|
|
|
|
|
|
|
|
|
|
|
|
|
|
P |
||||||||||||||||||
|
|
|
T |
|
|
|
|
|
|
|
|
|
|
|
|
|
|
|
|
|
|
|
|
|
|
|
|
|
|
|
|
|
|||||||||||||||||
|
|
|
|
N |
|
|
|
|
|
de cocción. |
|
|
|
T |
|
|
|
|
|
|
|
|
|
TEMPORIZADOR |
|
|
|
R |
|||||||||||||||||||||
|
|
|
|
|
E |
|
|
|
|
|
|
|
|
|
|
|
|
|
|
|
|
|
|
|
|
|
E |
||||||||||||||||||||||
|
|
|
|
|
I |
|
|
|
|
|
|
|
|
|
|
|
U |
|
|
|
|
|
|
|
|
|
|
|
|
|
S |
||||||||||||||||||
|
|
|
|
|
M |
|
|
|
|
|
|
|
|
|
|
S |
|
|
|
|
|
|
|
|
|
|
|
|
|
||||||||||||||||||||
|
|
|
|
|
|
A |
|
|
|
|
|
|
|
|
|
P |
|
|
|
|
|
|
|
|
|
|
|
|
|
C |
|||||||||||||||||||
|
|
|
|
|
|
|
R |
|
|
|
|
|
|
|
|
|
|
|
|
|
|
|
|
|
|
|
|
|
|
||||||||||||||||||||
|
|
|
|
|
|
|
R |
|
|
|
|
|
|
|
A |
|
|
|
|
|
|
|
|
|
|
|
|
|
I |
||||||||||||||||||||
|
|
|
|
|
|
|
|
E |
|
|
|
|
|
R |
|
|
|
|
|
|
|
|
|
|
|
|
|
|
|
|
|
|
|
|
|
|
|
|
|
|
|
|
|
|
|
|
|
||
|
|
|
|
|
|
|
|
|
H |
|
|
|
|
R |
|
|
|
|
|
|
|
|
|
|
|
|
|
|
|
|
|
|
|
|
|
|
|
|
|
|
|
|
|
|
|
|
|
|
|
|
|
|
|
|
|
|
|
|
|
|
• |
SADA |
LL |
|
|
|
|
|
|
|
|
S |
|
|
|
|
|
|
Evita la decepción de una cena |
|
|
|
|
|
N |
||||||||||||||
|
|
|
|
|
|
|
|
|
|
|
|
|
|
|
|
|
|
|
|
|
|
|
|
|
|
|
|
|
|
|
|
|
D |
||||||||||||||||
|
|
|
|
|
|
|
|
|
|
|
|
|
|
|
|
|
|
|
|
|
|
|
E |
|
|
|
|
|
|
|
|
|
|
|
|
|
|
|
|
|
|
|
|
|
|
|
|
|
I |
|
|
|
|
|
|
|
|
|
|
|
|
|
|
|
|
|
|
|
|
|
|
|
|
|
|
|
|
|
quemada usando un sencillo |
|
|
|
|
|
|
B |
|||||||||||||
|
|
|
|
|
|
|
|
|
|
|
|
|
|
|
|
|
|
|
|
|
|
|
R |
|
|
|
|
|
|
|
|
|
|
|
|
||||||||||||||
|
|
|
|
|
|
|
|
|
|
|
|
|
|
|
|
|
|
|
|
|
|
|
P |
|
|
|
|
|
|
|
|
|
|
|
|
|
|
|
|
|
|
|
|
|
|
|
|
L |
|
|
|
|
|
|
|
|
|
|
|
|
|
|
|
|
|
|
|
|
|
|
|
|
M |
|
|
|
|
temporizador. No necesitas nada |
|
|
|
|
E |
||||||||||||||||
|
|
|
|
|
|
|
|
|
|
|
|
|
|
|
|
|
|
|
|
|
|
|
|
|
|
|
|
|
|
|
S |
||||||||||||||||||
|
|
|
|
|
|
|
|
|
|
|
|
|
|
|
|
|
|
|
|
|
|
|
I |
|
|
|
|
|
|
|
P |
||||||||||||||||||
|
|
|
|
|
|
|
|
|
|
|
|
|
|
|
|
|
|
|
|
|
|
|
|
S |
|
|
sofisticado, sólo uno que sea |
|
|
|
R |
A |
|
||||||||||||||||
|
|
|
|
|
|
|
|
|
|
|
|
|
|
|
|
|
|
|
|
|
|
|
|
|
A |
|
|
|
A |
|
|
||||||||||||||||||
|
|
|
|
|
|
|
|
|
|
|
|
|
|
|
|
|
|
|
|
|
|
|
|
|
|
|
T |
|
confiable y fácil de usar. |
|
|
|
|
|
|||||||||||||||
|
|
|
|
|
|
|
|
|
|
|
|
|
|
|
|
|
|
|
|
|
|
|
|
|
|
|
|
N |
|
|
T |
|
|
|
|
||||||||||||||
|
|
|
|
|
|
|
|
|
|
|
|
|
|
|
|
|
|
|
|
|
|
|
|
|
|
|
|
|
E |
|
|
|
|
|
|
|
|
|
|
|
|
|
|
|
|
|
|
||
|
|
|
|
|
|
|
|
|
|
|
|
|
|
|
|
|
|
|
|
|
|
|
|
|
|
|
|
|
I |
|
|
|
|
|
|
|
|
|
|
|
|
|
U |
|
|
|
|
|
|
|
|
|
|
|
|
|
|
|
|
|
|
|
|
|
|
|
|
|
|
|
|
|
|
|
|
|
|
|
|
M |
|
|
|
|
|
|
|
|
|
|
|
|
S |
|
|
|
|
|
|
|
|
|
|
|
|
|
|
|
|
|
|
|
|
|
|
|
|
|
|
|
|
|
|
|
|
|
|
|
|
A |
|
|
|
|
|
|
|
|
|
|
P |
|
|
|
|
|
|
||
|
|
|
|
|
|
|
|
|
|
|
|
|
|
|
|
|
|
|
|
|
|
|
|
|
|
|
|
|
|
|
R |
R |
|
|
|
|
|
|
|
|
A |
|
|
|
|
|
|
|
|
|
|
|
|
|
|
|
|
|
|
|
|
|
|
|
|
|
|
|
|
|
|
|
|
|
|
|
|
|
|
|
|
E |
|
|
|
|
|
|
R |
|
|
|
|
|
|
|
|
||
|
|
|
|
|
|
|
|
|
|
|
|
|
|
|
|
|
|
|
|
|
|
|
|
|
|
|
|
|
|
|
|
|
H |
|
|
|
|
R |
|
|
|
|
|
|
|
|
|
||
|
|
|
|
|
|
|
|
|
|
|
|
|
|
|
|
|
|
|
|
|
|
|
|
|
|
|
|
|
|
|
|
|
|
|
• |
|
LI |
|
|
|
|
|
|
|
|
|
|
||
|
|
|
|
|
|
|
|
|
|
|
|
|
|
|
|
|
|
|
|
|
|
|
|
|
|
|
|
|
|
|
|
|
|
|
|
SADAL |
|
|
|
|
|
|
|
|
|
|
|
||
59502_Spt_II_LP_enUS_esMX_frCA_working.indd 25 |
|
|
11/13/17 11:24 AM |
|
|
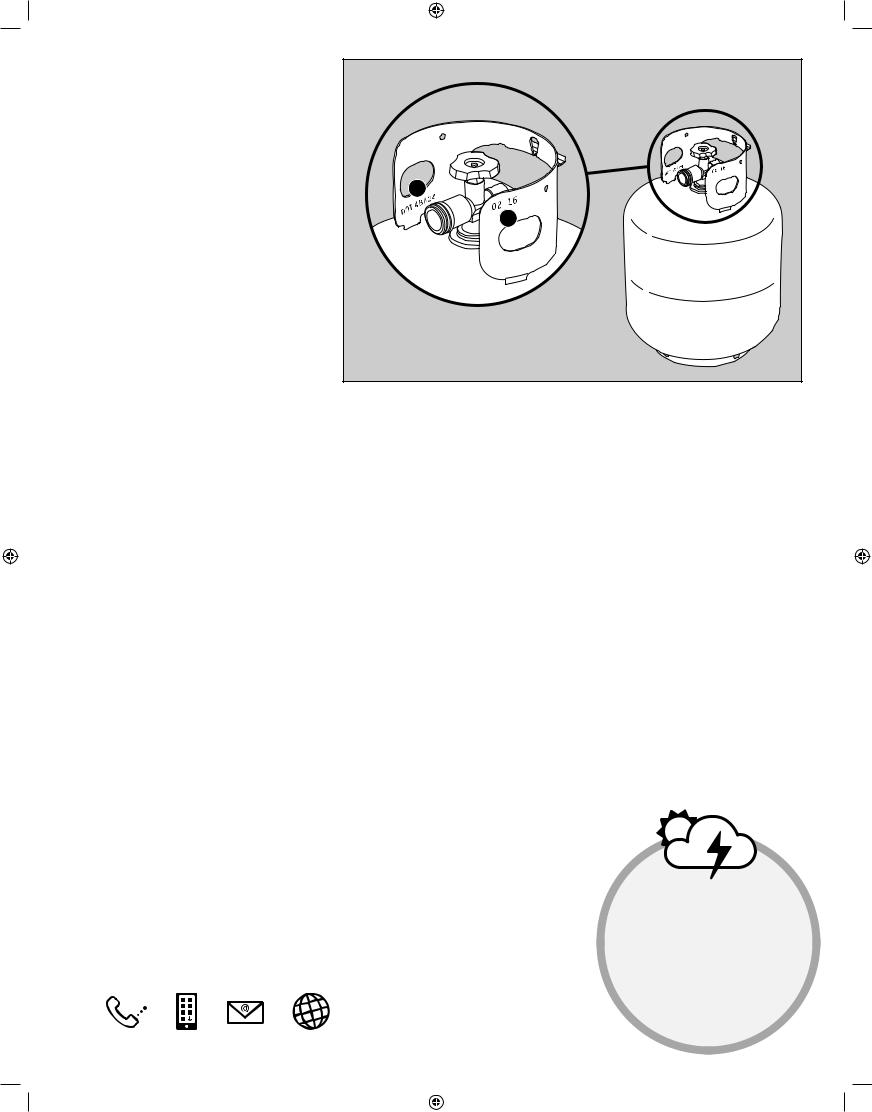
<![endif]>Primeros pasos
26
Información importante acerca del gas LP y las conexiones de gas
¿Qué es el gas LP?
El gas licuado de petróleo, también conocido como LP, gas LP, propano líquido o, simplemente, propano o butano, es un producto inflamable con base de petróleo que debes usar como combustible para
tu asador. A temperaturas y presiones moderadas, fuera de un contenedor, es un gas. Sin embargo, a presiones moderadas dentro de un contenedor (como un tanque), el LP es un líquido. Conforme se libera la presión del tanque, el líquido se evapora rápidamente, convirtiéndose en gas LP.
Consejos de seguridad para la manipulación de tanques de LP
•Los tanques de propano líquido abollados u oxidados pueden representar un riesgo y deben ser comprobados por tu proveedor de propano líquido. No uses tanques de propano líquido cuya válvula esté dañada.
•Aunque un tanque de propano líquido parezca estar vacío, puede que aún contenga gas, por lo que debe transportarse y almacenarse tomando las precauciones adecuadas.
•Los tanques de LP deben instalarse, transportarse y almacenarse en posición vertical y fija. Evita que puedan caerse y no los manipules con brusquedad.
•No almacenes ni transportes un tanque de LP en lugares en los que la temperatura pudiera alcanzar los 125 °F (51.7 °C) (el tanque se calentaría demasiado como para sujetarlo con la mano).
•Coloque una tapa antipolvo a la salida de la válvula del tanque cuando este no se encuentre en uso. En la salida de la válvula del tanque, solamente instale el tipo de tapa antipolvo que viene provisto con la válvula del tanque. Otros tipos de tapas o tapones podrían resultar en fugas de propano.
A
B
Requisitos que debe cumplir el regulador
•Usa el conjunto formado por el regulador y la manguera suministrados con el asador. Este regulador posee un dispositivo limitador de caudal integrado en la unidad que restringe el caudal de gas en caso de detección de una fuga de gas.
•La sustitución del conjunto formado por el regulador y la manguera debe realizarse según lo especificado por Weber-Stephen Products LLC (dispositivo de conexión a tanque de Tipo 1 con homologación UL (CGA 810), según lo descrito en la última edición de la norma ANSI Z21.81).
Requisitos que debe cumplir un tanque de LP
•El tanque debe medir, aproximadamente,
18¼ pulgadas (46,35 cm) de altura y 12¼ pulgadas (31,1 cm) de diámetro. Asimismo, debe poseer una capacidad de 20 libra (9,07 kg) de gas LP o 47.6 libra (21,6 kg) de agua, según lo indicado por el fabricante. Puede que sea aceptable también el uso de otros tanques, siempre que sean compatibles con los medios de retención del asador (báscula del tanque).
•El tanque debe haber sido fabricado y estar marcado de acuerdo con las especificaciones establecidas por las siguientes normas, según corresponda: “Specifications for LP gas Cylinders of the U.S. Department of Transportation (D.O.T.)”; o “Canadian Standard for Cylinders, Spheres and Tubes for Transportation of Dangerous Goods and Commission, CAN/CSA-B339”.
•Los tanques deben equiparse con un dispositivo homologado de protección de sobrellenado (OPD) y una conexión de tanque de Tipo 1 (CGA 810). La conexión de tanque debe ser compatible con la conexión del asador.
•El tanque debe incluir un collarín que proteja la válvula.
•Los tanques deben poseer certificación D.O.T. (A) y su fecha de ensayo (B) no debe ser anterior a cinco años desde la fecha de uso.
¿Qué es un regulador?
Tu asador está equipado con un regulador de presión, que es un dispositivo destinado a controlar y mantener uniforme la presión de gas mientras lo libera el tanque de LP.
EN MENOS DE DOS MINUTOS
PROTEGE TU
INVERSIÓN
Blinda tu asador frente a los elementos con una funda de alta calidad.
59502_Spt_II_LP_enUS_esMX_frCA_working.indd 26 |
|
|
11/13/17 11:24 AM |
|
|
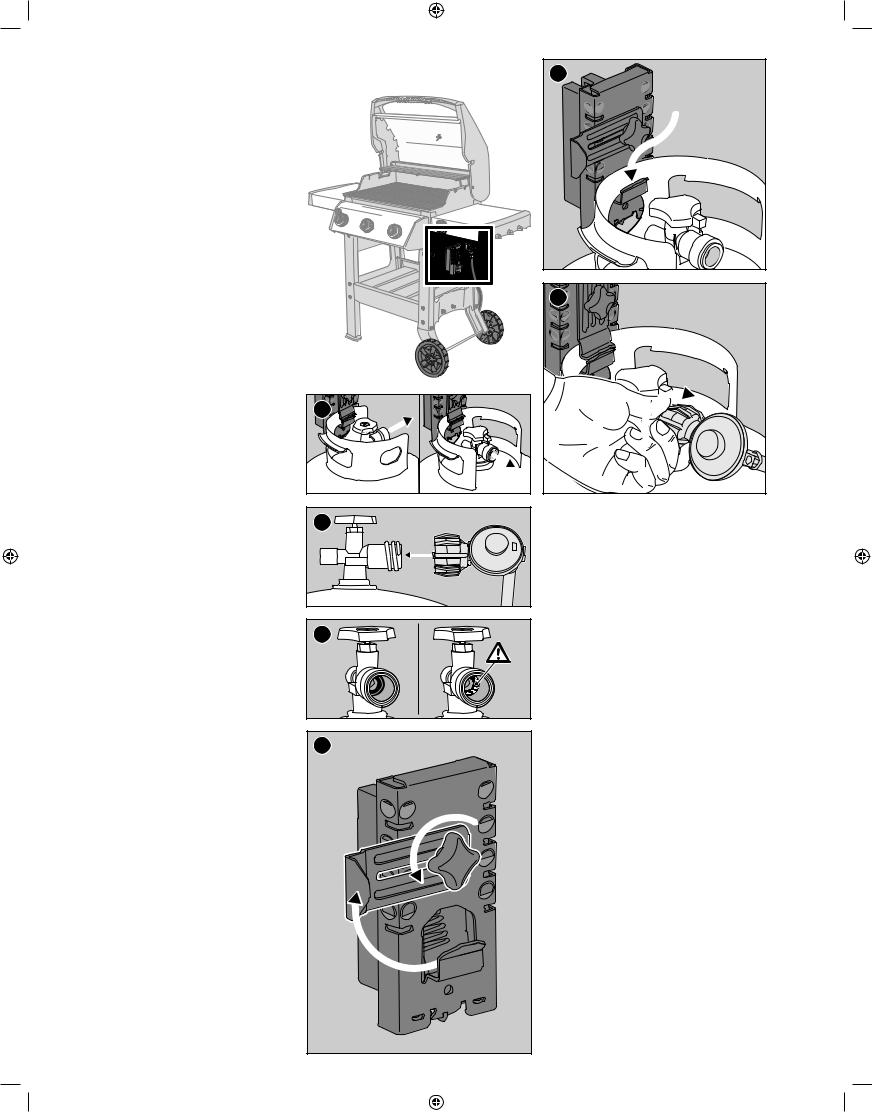
Instalación de un tanque de LP y prueba de fugas
Lugar de instalación
Cuelga el tanque de la báscula situada fuera de la base del gabinete, bajo la mesa lateral derecha. La forma del collarín (la placa circular que protege la válvula) determina las dos direcciones en las que se puede colgar el tanque de la báscula (A).
Inspección del tanque
1)Comprueba que la válvula del tanque se encuentre completamente cerrada. Ciérrala girándola en el sentido de las agujas del reloj.
2)Comprueba que la válvula del tanque sea compatible con el regulador (B).
3)Inspecciona la válvula del tanque, incluido el sello de caucho interno, en busca de daños o residuos (C). Si detectas algún daño en el tanque, devuélvelo a tu distribuidor local.
Instalación del tanque
1)Comprueba que los mandos de los quemadores
estén todos en la posición de cierre  . Asegúrate presionando los mandos y girándolos en el sentido de las agujas del reloj.
2)Afloja la tuerca manual y gira el seguro del tanque (D).
3)Cuelga el tanque de la báscula (E).
4)Gira de nuevo el seguro del tanque. Aprieta la tuerca manual.
5)Enrosca el acoplamiento del regulador en la válvula del tanque girándolo en el sentido de las agujas
del reloj (F). Hazlo sólo con la mano. Si usas una llave, podrías dañar el acoplamiento del regulador y provocar una fuga. Pasa a la sección PRUEBA DE FUGAS DE GAS.
A |
B |
C |
D |
E
F |
<![endif]>pasos Primeros
27
59502_Spt_II_LP_enUS_esMX_frCA_working.indd 27 |
|
|
11/13/17 11:24 AM |
|
|
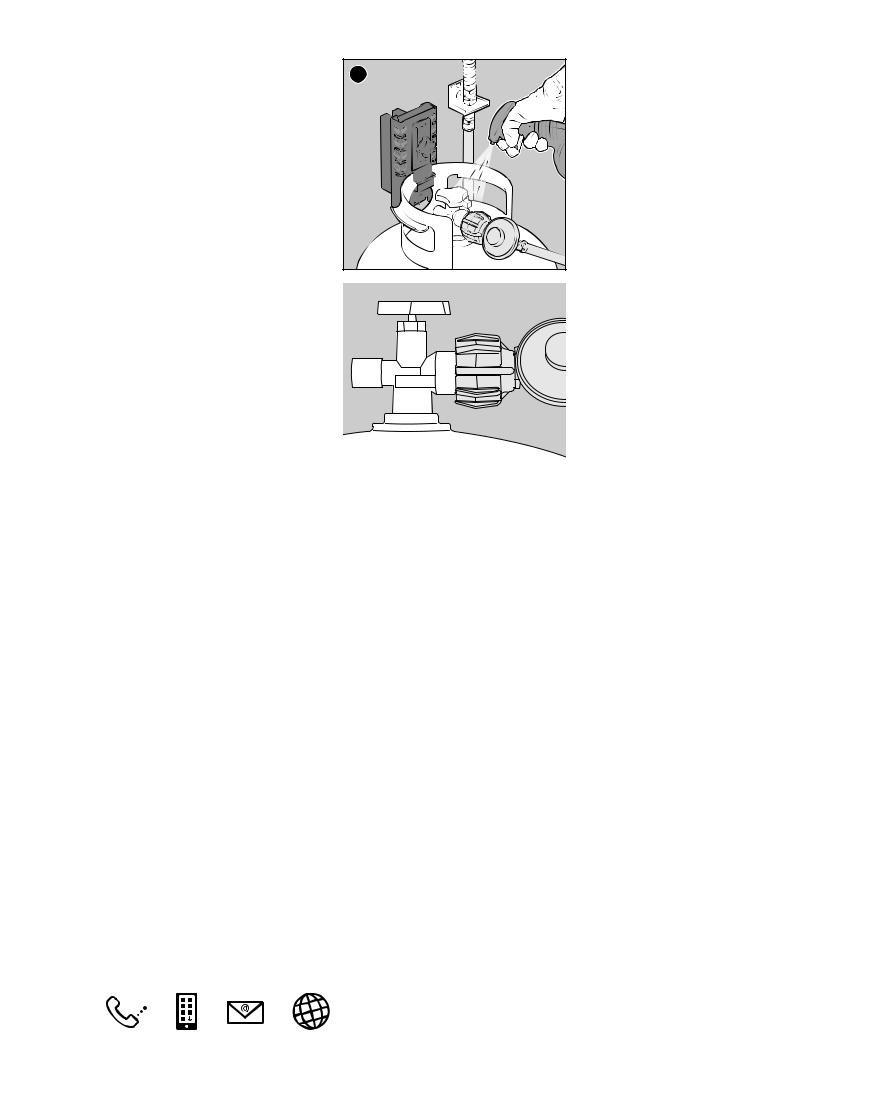
<![endif]>Primeros pasos
28
¿Qué es una prueba de fugas?
Una vez instalado correctamente el tanque de LP, es necesario realizar una prueba de fugas. Una prueba de fugas es una manera confiable de comprobar que no existen escapes de gas después de conectar el tanque. El sistema de combustible de tu asador cuenta con conexiones que se realizan en la fábrica
y superan estrictas pruebas de detección de fugas de gas; los quemadores, además, se someten a diferentes pruebas de encendido de llamas. Weber recomienda llevar a cabo una prueba de fugas a profundidad después de armar el asador, así como una vez al año. Deben revisarse las siguientes uniones:
•Conexión entre el regulador y el tanque.
•Conexión entre la manguera de gas y el conector pasante.
•Conexión entre el conector pasante y el tubo corrugado de gas.
Prueba de fugas de gas
1)Humedece las uniones (G) con una solución de agua y jabón empleando un pulverizador, una brocha o un trapo. Puedes hacer tu propia solución de agua y jabón mezclando un 20 % de jabón y un 80 %
de agua; también puedes adquirir una solución de prueba de fugas en la sección de plomería de cualquier tienda de bricolaje.
2)Lentamente, gira la válvula del tanque en sentido contrario a las agujas del reloj para iniciar el suministro de gas, comprobando al mismo tiempo si aparecen burbujas.
3)Si aparecen burbujas, existirá una fuga:
a)Si la fuga está en el tanque (H), cierra la válvula de gas. NO USES EL ASADOR. Desconecta el tanque y devuélvelo a tu distribuidor local.
b)Si la fuga está en el regulador (I), cierra la válvula de gas. NO USES EL ASADOR. Contacta con el representante de atención al cliente de tu zona usando la información de contacto disponible en nuestro sitio web.
c)Si la fuga se encuentra en cualquiera de las uniones indicadas en la ilustración (J), vuelve a apretar la unión correspondiente con una llave y realiza una nueva prueba de fugas con la solución de agua y jabón. Si la fuga no desaparece, cierra el suministro de gas. NO USES EL ASADOR.
d)Si la fuga se encuentra en cualquiera de las uniones indicadas en la ilustración (K), cierra el suministro de gas. NO USES EL ASADOR.
En caso de fuga, ponte en contacto con el representante de atención al cliente de tu zona usando la información de contacto disponible en nuestro sitio web.
4)Si no aparecen burbujas, la prueba de fugas habrá concluido.
a)Interrumpe el suministro de gas y enjuaga las conexiones con agua.
NOTA: Ciertas soluciones de prueba de fugas, incluidas las compuestas de agua y jabón, pueden resultar ligeramente corrosivas, por lo que es importante enjuagar bien todas las conexiones con agua después de la prueba.
G |
H |
I |
ÚNETE AL MUNDO DE LAS PARRILLADAS
J
K
m PELIGRO: No use llamas para comprobar la existencia de fugas. Asegúrese de que no se generen chispas ni llamaradas en la zona durante la prueba de fugas.
m PELIGRO: Las fugas de gas pueden causar un incendio o explosión.
m PELIGRO: No use el asador si presenta alguna fuga de gas.
m PELIGRO: Si observa, huele o escucha un escape de gas procedente del tanque de propano líquido:
1.Aléjese del tanque de propano líquido.
2.No intente corregir el problema personalmente.
3.Avise al departamento de bomberos.
m PELIGRO: Cierre siempre la válvula del tanque antes de desconectar el regulador. No intente desconectar el conjunto formado por el regulador de gas y la manguera ni otras conexiones de gas con el asador en operación.
m PELIGRO: No guarde un tanque de LP de repuesto bajo este asador o cerca del mismo. No llene el tanque más del 80 %. El no acatar estas advertencias al pie de la letra pudiera resultar en un fuego letal o causar lesiones serias.
59502_Spt_II_LP_enUS_esMX_frCA_working.indd 28 |
|
|
11/13/17 11:24 AM |
|
|
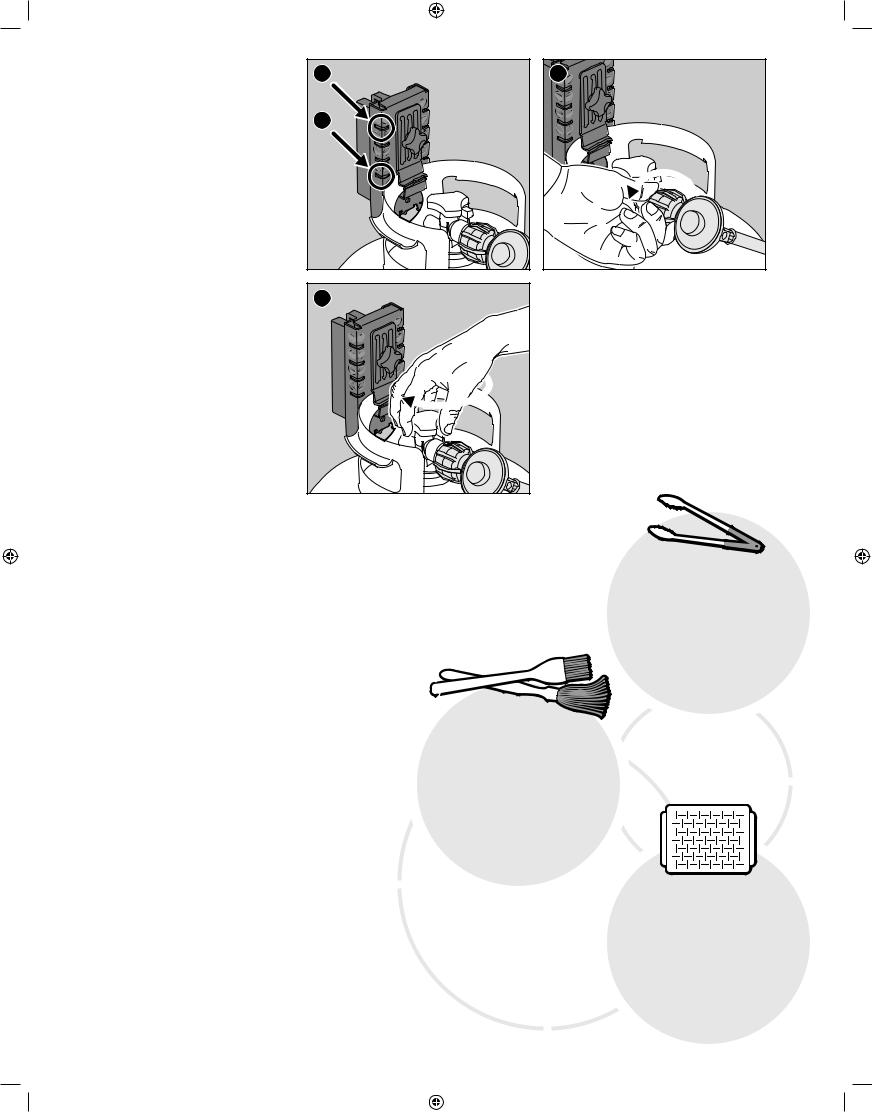
Rellenar o sustituir un tanque de LP
¿Cuánto combustible hay en el tanque?
La báscula indica la cantidad de combustible que contiene un tanque estándar de 20 libra (9,07 kg) una vez colgado de la misma. El nivel de combustible
se comprueba consultando la línea indicadora de nivel roja de la báscula. Cuando la línea indicadora se encuentra en el extremo superior, el tanque está
lleno (L). Cuando está en el extremo inferior, el tanque está vacío (M) y es preciso retirarlo para sustituirlo
o rellenarlo.
Retirada del tanque de LP
1)Comprueba que la válvula del tanque se encuentre completamente cerrada. Ciérrala girándola en el sentido de las agujas del reloj (N).
2)Desenrosca el acoplamiento del regulador girándolo con la mano en sentido contrario a las agujas del reloj (O).
3)Afloja la tuerca manual del seguro del tanque y aparta el seguro del tanque.
4)Retira el tanque de la báscula.
Otras pruebas de fugas
Debe comprobarse la existencia de fugas de gas en las siguientes uniones cada vez que se rellene y reinstale un tanque:
•Conexión entre el regulador y el tanque (H), y uniones del regulador (I) en sí.
Sigue las instrucciones descritas en la sección “Prueba de fugas de gas”.
L |
<![if ! IE]> <![endif]>pasosPrimeros |
O |
|
M |
|
N |
|
|
|
|
|
|
|
|
|
|
|
|
|
|
|
|
|
|
|
|
|
|
|
|
|
|
|
|
|
E |
|
|
|
|
|
|
|
|
|
|
|
|
|
|
|
|
|
|
|
|
|
|
|
|
|
|
|
|
|
|
|
|
|
|
|
|
|
|
R |
A |
|
|
|
|
|
|
|
|
|
|
|
|
|
|
|
|
|
|
|
|
|
|
|
|
|
|
U |
|
|
|
|
|
|
|
|
|
|
I |
|
|
|
|
|
|
|
|
|
|
|
|
|
|
|
|
|
|
|
|
|
|
|
|
|
|
|
|
|
|
|
|
|
|
|
|
|
|
|
|
|
|
||
|
|
|
|
|
|
|
|
|
|
|
|
|
|
|
|
|
|
|
|
T |
|
|
|
|
|
|
|
|
|
|
|
E |
|
|
|
|
|
|
|
|
|
|
|
|
|
|
|
|
|
|
|
|
|
|
|
|
A |
|
|
|
|
|
|
|
|
|
|
|
|
N |
|
|
|
|
|
|
|
|
|
|
|
|
|
|
|
|
|
|
|
|
|
|
|
R |
|
|
|
|
|
|
|
|
|
|
|
|
T |
|
|
|
|||
|
|
|
|
|
|
|
|
|
|
|
|
|
|
|
|
|
A |
|
|
|
|
|
|
|
|
|
|
|
|
|
|
A |
|
||||
|
|
|
|
|
|
|
|
|
|
|
|
|
|
|
|
P |
|
|
|
|
|
|
PINZAS |
|
|
|
|
S |
|||||||||
|
|
|
|
|
|
|
|
|
|
|
|
|
|
|
B |
|
|
|
|
|
|
|
|
|
|
|
|
|
|
|
E |
||||||
|
|
|
|
|
|
|
|
|
|
|
|
|
|
|
S |
|
|
|
|
|
|
|
|
|
|
|
|
|
|
|
|
|
|
|
|
I |
|
|
|
|
|
|
|
|
|
|
|
|
|
|
|
|
E |
|
|
|
|
|
|
|
|
|
|
|
|
|
|
|
|
|
|
|
|
M |
|
|
|
|
|
|
|
|
|
|
|
|
|
|
|
|
L |
|
|
|
|
|
|
|
|
|
|
|
|
|
|
|
|
|
|
|
|
|
P |
|
|
|
|
|
|
|
|
|
|
|
|
|
|
|
|
|
|
|
|
|
|
|
|
|
|
|
|
|
|
|
|
|
|
|
|
R |
|
|
|
|
|
|
|
|
|
|
|
|
|
|
|
|
I |
|
|
|
|
Considéralas una prolongación de tus |
|
|
|
|
C |
||||||||||||
|
|
|
|
|
|
|
|
|
|
|
|
|
|
|
N |
|
|
|
|
|
|
|
|
||||||||||||||
|
|
|
|
|
|
|
|
|
|
|
|
|
|
|
D |
|
|
|
|
|
|
|
|
|
|
|
|
|
|
|
|
|
|
|
|
|
S |
|
|
|
|
|
|
|
|
|
|
|
|
|
|
|
|
|
|
|
|
|
|
|
|
|
|
|
|
|
|
|
|
|
|
|
|
|
|
|
|
|
|
|
|
|
|
|
|
|
|
|
|
|
C |
|
|
|
manos. Las mejores pinzas deben contar |
|
|
|
I |
||||||||||||||
|
|
|
|
|
|
|
|
|
|
|
|
|
|
|
|
|
|
|
|
|
N |
||||||||||||||||
|
|
|
|
|
|
|
|
|
|
|
|
|
|
|
I |
|
|
|
|
|
|
|
|
|
|
|
|
|
|
|
|
|
|
|
|
|
|
|
|
|
|
|
|
|
|
|
|
|
|
|
|
|
S |
|
|
|
|
con un mecanismo de tensión que no |
|
|
|
|
D |
||||||||||||
|
|
|
|
|
|
|
|
|
|
|
|
|
|
|
R |
|
|
|
|
|
|
|
|
B |
|||||||||||||
|
|
|
|
|
|
|
|
|
|
|
|
|
|
|
E |
|
|
|
|
|
|
|
|
|
|
|
|
|
|
|
|
|
|
|
|
|
I |
|
|
|
|
|
|
|
|
|
|
|
|
|
|
|
|
|
|
|
|
|
|
|
|
|
|
|
|
|
|
|
|
|
|
|
|
L |
|
|
|
|
|
|
|
|
|
|
|
|
|
|
|
|
P |
|
|
|
|
|
cueste accionar, empuñaduras |
|
|
|
|
|
|||||||||||
|
|
|
|
|
|
|
|
|
|
|
|
|
|
|
M |
|
|
|
|
|
|
|
|
|
E |
||||||||||||
|
|
|
|
|
|
|
|
|
|
|
|
|
|
|
I |
|
|
|
|
confortables y un seguro que |
|
|
|
A |
P |
S |
|||||||||||
|
|
|
|
|
|
|
|
|
|
|
|
|
|
|
S |
|
|
|
|
R |
|
||||||||||||||||
|
|
|
|
|
|
|
|
|
|
|
|
|
|
|
|
A |
|
permita guardarlas cerradas. |
|
A |
|
|
|||||||||||||||
|
|
|
|
|
|
|
|
|
|
|
|
|
|
|
|
|
|
T |
|
|
|
|
|||||||||||||||
|
|
|
|
|
|
|
|
|
|
|
|
|
|
|
|
|
|
|
N |
T |
|
|
|
|
|||||||||||||
|
|
|
|
|
|
|
|
|
|
|
|
|
|
|
|
|
|
|
|
E |
|
|
|
|
|
|
|
|
|
|
|
|
|
|
|
|
|
|
|
|
|
|
|
|
|
|
|
|
|
|
|
|
|
|
|
|
|
I |
|
|
|
|
|
|
|
|
|
|
|
U |
|
|
|
|
|
|
|
|
|
|
|
|
|
|
|
|
|
|
|
|
|
|
|
|
|
M |
|
|
|
|
|
|
|
|
|
S |
|
|
|
|
|
||
|
|
|
|
|
|
|
|
|
|
|
|
|
|
|
|
|
|
|
|
|
A |
|
|
|
|
|
|
|
|
P |
|
|
|
|
|
|
|
|
|
|
|
A |
|
|
|
PINCEL |
|
|
|
|
|
|
|
|
|
R |
R |
|
|
|
|
|
|
A |
|
|
|
|
|
|
|||||
|
P |
|
|
|
|
|
|
|
I |
|
|
|
|
E |
|
|
|
|
R |
|
|
|
|
|
|
|
|||||||||||
|
|
R |
|
|
|
|
|
|
|
|
|
|
H |
|
|
R |
|
|
|
|
|
|
|
|
|||||||||||||
|
|
|
|
|
|
|
|
|
|
|
|
|
|
|
|
|
|
|
|
|
|
|
|
LI |
|
|
|
|
|
|
|
|
|
||||
|
|
A |
|
|
|
|
|
|
|
|
|
|
|
S |
|
|
|
|
|
|
|
• SADAL |
|
|
|
|
|
|
|
|
|
|
|
||||
I |
|
|
|
|
|
Y BROCHA |
|
|
|
|
|
|
|
|
|
|
|
|
|
|
|
|
|
|
|
|
|
|
|
||||||||
S |
|
|
|
|
|
|
|
|
|
|
|
|
|
|
|
M |
|
|
|
|
|
|
|
|
|
|
|
|
|
|
|
|
|
|
|||
E |
|
|
|
|
|
|
|
|
|
|
|
|
|
|
|
|
P |
|
|
|
|
|
|
|
|
|
|
|
|
|
|
|
|
|
|
||
L |
|
|
|
|
|
|
|
|
|
|
|
|
|
|
|
|
|
|
|
|
|
|
|
|
|
|
|
|
|
|
|
|
|
|
|||
|
|
|
|
|
|
|
|
|
|
|
|
|
|
|
|
|
R |
|
|
|
|
|
|
|
|
|
|
|
|
|
|
|
|
|
|||
B |
|
|
|
|
|
|
|
|
|
|
|
|
|
|
|
|
|
|
|
|
|
|
|
|
|
|
|
|
|
|
|
|
|
|
|||
|
|
|
|
|
|
|
|
|
|
|
|
|
|
|
|
|
E |
|
|
|
|
|
|
|
|
|
|
|
|
|
|
|
|
|
|||
D |
|
|
|
|
Consigue un pincel con cerdas de |
|
|
|
S |
|
|
|
|
|
|
|
|
|
|
|
|
|
|
|
|
|
|||||||||||
N |
|
|
|
|
|
|
|
|
I |
|
|
|
|
|
|
|
|
|
|
|
|
|
|
|
|
|
|||||||||||
|
|
|
|
|
|
|
|
|
|
|
|
|
|
|
|
|
|
|
C |
|
|
|
|
|
|
|
|
|
|
|
|
|
|
|
|
|
|
I |
|
|
|
silicona resistentes al calor y mango largo, |
|
|
|
D |
|
|
|
|
|
|
|
|
|
|
|
|
|
|
|
|
|
||||||||||||
S |
|
|
|
|
|
|
|
|
|
|
|
|
|
|
|
|
|
|
|
|
|
|
|
||||||||||||||
C |
|
|
|
|
|
|
|
|
|
|
|
|
|
|
|
|
|
|
N |
|
|
|
|
|
|
|
|
|
|
|
|
|
|
|
|
|
|
R |
|
|
|
y una brocha con cerdas largas de algodón |
|
|
|
I |
|
|
|
|
|
|
|
|
|
|
|
|
|
|
|
|
|
||||||||||||
|
|
|
|
|
|
B |
|
|
|
|
|
|
|
|
|
|
|
|
|
|
|
|
|
||||||||||||||
E |
|
|
|
|
|
|
|
|
|
|
|
|
|
|
|
|
|
L |
|
|
|
|
|
|
|
|
|
|
|
|
|
|
|
|
|
|
|
P |
|
|
|
|
|
|
|
|
|
|
|
|
|
|
|
|
|
|
|
|
|
|
|
|
|
|
|
|
|
|
|
|
|
|
|
||
I |
|
|
|
que absorban bien las salsas menos |
|
|
|
E |
|
|
|
|
|
|
|
|
|
|
|
|
|
|
|
|
|
|
|||||||||||
|
|
|
|
|
|
S |
|
|
|
|
|
|
|
|
|
|
|
|
|
|
|
|
|
|
|
||||||||||||
M |
|
|
|
|
densas con base de vinagre. |
|
|
|
|
|
|
|
|
|
|
|
|
|
|
|
|
|
|
|
|
|
|
|
|||||||||
S |
|
|
|
|
|
|
|
|
|
|
|
|
|
|
|
|
|
|
A |
|
|
|
|
|
|
||||||||||||
|
|
|
T |
|
|
|
|
|
|
|
|
|
|
|
|
|
|
|
|
|
|
|
|
|
|
|
|
|
|
|
|
|
|
|
|||
|
A |
|
|
|
|
|
|
|
|
|
|
|
|
|
|
|
|
|
|
|
|
|
|
|
|
|
|
M |
|
|
|
|
|
||||
|
|
|
|
|
|
|
|
|
|
|
|
|
|
|
|
|
|
|
|
S |
|
|
|
|
|
|
|
|
|
|
|
|
|
|
|||
|
|
|
|
N |
|
|
|
|
|
|
|
|
|
T |
|
|
|
|
U |
|
|
|
|
|
|
|
|
|
|
|
I |
|
|
|
|
|
|
|
|
|
|
|
E |
|
|
|
|
|
|
|
|
|
|
|
|
|
T |
|
|
|
|
|
|
|
|
|
|
|
E |
|
|
|
|
|
|
|
|
|
|
|
I |
|
|
|
|
|
|
|
|
U |
|
|
|
A |
|
|
|
|
|
|
|
|
|
|
|
|
N |
|
|
|
|
||
|
|
|
|
|
M |
|
|
|
|
|
|
|
|
S |
|
|
|
|
|
|
|
|
|
|
|
|
|
|
|
|
T |
|
|
|
|||
|
|
|
|
|
A |
|
|
|
|
|
|
|
P |
|
|
|
R |
|
|
|
|
|
|
|
|
|
|
|
|
|
|
|
|
|
|
|
|
|
|
|
|
|
|
R |
|
|
|
|
|
A |
|
|
|
|
|
|
|
|
|
|
|
|
|
|
|
|
|
|
S |
||||||
|
|
|
|
|
|
|
|
RE |
|
|
|
|
|
|
ES |
|
A |
|
|
|
|
BANDEJA |
|
|
A |
|
|||||||||||
|
|
|
|
|
|
|
|
|
|
R |
|
|
|
|
|
|
|
|
|
|
|
|
|
P |
|||||||||||||
|
|
|
|
|
|
|
|
|
H |
LI |
R |
|
|
P |
|
|
|
|
|
|
|
|
|
|
|
|
|
|
|
|
|
|
|
I |
|||
|
|
|
|
|
|
|
|
|
|
• SADAL |
|
|
|
|
D |
|
|
|
|
PARA ASAR |
|
|
|
|
M |
||||||||||||
|
|
|
|
|
|
|
|
|
|
|
|
|
|
|
|
|
|
|
|
|
|
|
|
|
C |
||||||||||||
|
|
|
|
|
|
|
|
|
|
|
|
|
|
|
L |
|
|
|
|
|
|
|
|
|
|
|
|
|
|
|
|
|
|
|
|
|
R |
|
|
|
|
|
|
|
|
|
|
|
|
|
|
|
B |
|
|
|
|
|
|
|
|
|
|
|
|
|
|
|
|
|
|
|
|
|
E |
|
|
|
|
|
|
|
|
|
|
|
|
|
|
|
I |
|
|
|
|
|
|
|
|
|
|
|
|
|
|
|
|
|
|
|
|
|
S |
|
|
|
|
|
|
|
|
|
|
|
|
|
|
|
N |
|
|
|
|
|
|
|
|
|
|
|
|
|
|
|
|
|
|
|
|
|
|
|
|
|
|
|
|
|
|
|
|
|
|
|
|
|
|
Diseñadas para alimentos demasiado pequeños |
|
|
N |
||||||||||||||||||
|
|
|
|
|
|
|
|
|
|
|
|
|
|
|
C |
|
|
|
|||||||||||||||||||
|
|
|
|
|
|
|
|
|
|
|
|
|
|
|
I |
|
|
|
|
|
|
|
|
|
|
|
|
|
|
|
|
|
|
|
|
|
I |
|
|
|
|
|
|
|
|
|
|
|
|
|
|
|
|
|
|
|
|
|
|
|
|
|
|
|
|
|
|
|
|
|
|
|
|
|
|
|
|
|
|
|
|
|
|
|
|
|
|
|
|
|
S |
|
|
|
|
o delicados para las parrillas de cocción, |
|
|
|
|
D |
||||||||||||
|
|
|
|
|
|
|
|
|
|
|
|
|
|
|
R |
|
|
|
|
|
|
|
|
B |
|||||||||||||
|
|
|
|
|
|
|
|
|
|
|
|
|
|
|
E |
|
|
|
|
|
|
|
|
|
|
|
|
|
|
|
|
|
|
|
|
|
I |
|
|
|
|
|
|
|
|
|
|
|
|
|
|
|
|
|
|
|
|
|
|
|
|
|
|
|
|
|
|
|
|
|
|
|
|
L |
|
|
|
|
|
|
|
|
|
|
|
|
|
|
|
|
P |
|
|
|
|
las bandejas para asar están perforadas |
|
|
|
|
|||||||||||||
|
|
|
|
|
|
|
|
|
|
|
|
|
|
|
M |
|
|
|
|
|
|
|
E |
||||||||||||||
|
|
|
|
|
|
|
|
|
|
|
|
|
|
|
I |
|
|
|
y mantienen los alimentos justo donde |
|
|
A |
P |
S |
|||||||||||||
|
|
|
|
|
|
|
|
|
|
|
|
|
|
|
S |
|
|
R |
|
||||||||||||||||||
|
|
|
|
|
|
|
|
|
|
|
|
|
|
|
|
A |
|
|
deben estar: sobre la parrilla, |
|
A |
|
|
||||||||||||||
|
|
|
|
|
|
|
|
|
|
|
|
|
|
|
|
|
|
T |
|
|
|
|
|
||||||||||||||
|
|
|
|
|
|
|
|
|
|
|
|
|
|
|
|
|
|
|
N |
|
T |
|
|
|
|
||||||||||||
|
|
|
|
|
|
|
|
|
|
|
|
|
|
|
|
|
|
|
|
E |
|
|
|
|
no dentro de ella. |
|
|
|
|
|
|
|
|
||||
|
|
|
|
|
|
|
|
|
|
|
|
|
|
|
|
|
|
|
|
M |
|
|
|
|
|
S |
|
|
|
|
|
||||||
|
|
|
|
|
|
|
|
|
|
|
|
|
|
|
|
|
|
|
|
I |
A |
|
|
|
|
|
|
|
|
|
U |
|
|
|
|
|
|
|
|
|
|
|
|
|
|
|
|
|
|
|
|
|
|
|
|
|
|
|
|
|
|
|
|
|
|
|
P |
|
|
|
|
|
|
||
|
|
|
|
|
|
|
|
|
|
|
|
|
|
|
|
|
|
|
|
|
|
R |
R |
|
|
|
|
|
|
A |
|
|
|
|
|
|
|
|
|
|
|
|
|
|
|
|
|
|
|
|
|
|
|
|
|
|
|
|
|
|
E |
|
• SADALL |
|
R |
|
|
|
|
|
|
29 |
|||
|
|
|
|
|
|
|
|
|
|
|
|
|
|
|
|
|
|
|
|
|
|
|
|
H |
R |
|
|
|
|
|
|
|
|||||
|
|
|
|
|
|
|
|
|
|
|
|
|
|
|
|
|
|
|
|
|
|
|
|
|
|
I |
|
|
|
|
|
|
|
|
|
||
59502_Spt_II_LP_enUS_esMX_frCA_working.indd 29 |
|
|
11/13/17 11:24 AM |
|
|
 Loading...