


S U M M I T |
® |
& |
|
|
Natural Gas Grill Owners Guide
YOU MUST READ THIS OWNERS GUIDE BEFORE OPERATING YOUR GAS GRILL
DANGER
If you smell gas:
1.Shut off gas to the appliance.
2.Extinguish any open flames.
3.Open lid
4.If odor continues, keep away from the appliance and immediately call your gas
supplier or your fire department. Leaking gas may cause a fire or explosion which can cause serious bodily injury or death, or damage to property.
WARNING
1.Do not store spare liquid propane cylinder within 10 feet (3m) of this appliance.
2.Do not store or use gasoline or other flammable liquids or vapors within 25 feet (8m) of this appliance.
WARNING: Follow all leak-check procedures carefully in this manual prior to barbecue operation. Do this even if the barbecue was dealer-assembled.
NOTICE TO INSTALLER: These instructions must be left with the owner and the owner should keep them for future use.
THIS GAS APPLIANCE IS DESIGNED FOR OUTDOOR USE ONLY.
WARNING: Do not try to light this appliance without reading the “Lighting” Instructions section of this manual
# |
43721 |
|
A405_NG.d
Ba402_NG.a
B405_NG.c
C405_NG.c
D405_NG.d 43721 US 01/29/03
E403.b
NG

Dangers & Warnings
DANGER
Failure to follow the Dangers, Warnings and Cautions contained in this Owner’s Manual may result in serious bodily injury or death, or in a fire or an explosion causing damage to property.
WARNINGS
Do not store a spare or disconnected liquid propane cylinder under or near this barbecue.
Improper assembly may be dangerous. Please carefully follow the assembly instructions in this manual.
After a period of storage, and/or nonuse, the Weber® gas barbecue should be checked for gas leaks and burner obstructions before use. See instructions in this manual for correct procedures.
Do not operate the Weber® gas barbecue if there is a gas leak present.
Do not use a flame to check for gas leaks.
Combustible materials should never be within 24 inches of the top, bottom, back or sides of your Weber® gas barbecue.
Do not put a barbecue cover or anything flammable on, or in the storage area under the barbecue.
Your Weber® gas barbecue should never be used by children. Accessible parts of the barbecue may be very hot. Keep young children away while it is in use.
You should exercise reasonable care when operating your Weber® gas barbecue. It will be hot during cooking or cleaning and should never be left unattended, or moved while in operation.
Should the burners go out while in operation, turn all gas valves off. Open the lid and wait five minutes before attempting to relight, using the lighting instructions.
Do not use charcoal or lava rock in your Weber® gas barbecue.
Never lean over open grill or place hands or fingers on the front edge of the cooking box.
Should a grease fire occur, turn off all burners and leave lid closed until fire is out.
Do not enlarge valve orifices or burner ports when cleaning the valves or burners.
The Weber® gas barbecue should be thoroughly cleaned on a regular basis.
Liquid propane gas is not natural gas. The conversion or attempted use of natural gas in a liquid propane unit or liquid propane gas in a natural gas unit is dangerous and will void your warranty.
Do not attempt to disconnect any gas fitting while your barbecue is in operation.
Use heat-resistant barbecue mitts or gloves when operating barbecue.
Keep any electrical supply cord and the fuel supply hose away from any heated surfaces.
Combustion byproducts produced when using this product contain chemicals known to the state of California to cause cancer, birth defects, or other reproductive harm.
Do not use this barbecue unless all parts are in place. The unit must be properly assembled according to the instructions outlined in the “Assembly Instruction” section of the Owner’s Guide.
LIQUID PROPANE GAS UNITS ONLY:
Use the regulator that is supplied with your Weber® gas barbecue.
Do not attempt to disconnect the gas regulator or any gas fitting while your barbecue is in operation.
A dented or rusty liquid propane cylinder may be hazardous and should be checked by your liquid propane supplier. Do not use a liquid propane cylinder with a damaged valve.
Although your liquid propane cylinder may appear to be empty, gas may still be present, and the cylinder should be transported and stored accordingly.
If you see, smell or hear the hiss of escaping gas from the liquid propane cylinder:
1.Move away from liquid propane cylinder.
2.Do not attempt to correct the problem yourself.
3.Call your fire department.
A-2
|
|
|
|
|
|
|
Contents |
|
|
|
|
|
|
|
|
|
|
|
|
|
|
|
|
|
Danger & Warnings .................................................................................. |
A-2 |
|
|
|
|
|
|
|
Warranty .................................................................................................. |
A-4 |
|
|
|
|
|
|
|
General Instructions ................................................................................. |
A-5 |
|
|
|
|
|
|
|
Grilling Methods |
A-6 |
|
|
|
|
|
|
|
||
|
|
|
|
|
|
|
Cleaning |
A-6 |
|
|
|
|
|
|
|
||
|
|
|
|
|
|
|
Exploded View |
A-7 |
|
|
|
|
|
|
|
||
|
|
|
|
|
|
|
Parts List |
A-11 |
|
|
|
|
|
|
|
||
|
|
|
|
|
|
|
Assembly Instructions |
B-a |
|
|
|
|
|
|
|
||
|
|
|
|
|
|
|
Gas Instructions |
C-1 |
|
|
|
|
|
|
|
||
|
|
|
|
|
|
|
Leak Checking ......................................................................................... |
C-4 |
|
|
|
|
|
|
|
Operating |
D-1 |
|
|
|
|
|
|
|||
|
|
|
|
|
|
|
Grilling Methods |
D-1 |
|
|
|
|
|
|
|||
|
|
|
|
|
|
|
Lighting |
D-3 |
|
|
|
|
|
|
|
||
|
|
|
|
|
|
|
.......................................................................................Manual Lighting |
D-4 |
|
|
|
|
|
|
|
Lighting the Side Burner ........................................................................... |
D-5 |
|
|
|
|
|
|
|||
|
|
|
|
|
|
|
Troubleshooting |
D-6 |
|
|
|
|
|
|
|
||
|
|
|
|
|
|
|
Side Burner Troubleshooting..................................................................... |
D-7 |
|
|
|
|
|
|
|
............................................................................................Maintenance |
E-1 |
|
|
|
|
|
|
|
Replacing Main Burners ........................................................................... |
E-2 |
|
|
|
|
|
|
|
Crossover® Ignition System Operations ..................................................... |
E-4 |
A-3

Warranty
Weber-Stephen Products Co. (Weber) hereby warrants to the ORIGINAL PURCHASER of this Weber® gas grill that it will be free of defects in material and workmanship from the date of purchase as follows:
Aluminum Castings, lifetime, 1 year paint Stainless Steel Hood Section, 25 years
Burners, 10 years Igniter, 3 years
Cooking Grates, 7 years Flavorizer® Bars, 5 year no rust
through Thermoplastic/Thermoset Parts, 10 years Excluding
fading All Remaining Parts, 5 years,
when assembled and operated in accordance with the printed instructions accompanying it.
Weber may require reasonable proof of your date of purchase. THEREFORE, YOU SHOULD RETAIN YOUR SALES SLIP OR INVOICE.
This Limited Warranty shall be limited to the repair or replacement of parts that prove defective under normal use and service and which on examination shall indicate, to Weber’s satisfaction, they are defective. Before returning any parts, contact the Customer service representative in your region using the contact information sheet provided with your manual. If Weber® confirms the defect and approves the claim, Weber® will elect to replace such parts without charge. If you are required to return defective parts, transportation charges must be prepaid. Weber® will return parts to the purchaser, freight or postage prepaid.
This Limited Warranty does not cover any failures or operating difficulties due to accident, abuse, misuse, alteration, misapplication, vandalism, improper installation or improper maintenance or service, or failure to perform normal and routine maintenance, including but not limited to damage caused by insects within the burner tubes, as set out in this owner’s manual.
Deterioration or damage due to severe weather conditions such as hail, hurricanes, earthquakes or tornadoes, discoloration due to exposure to chemicals either directly or in the atmosphere, is not covered by this Limited Warranty.
There are no other express warrants except as set forth herein and any applicable implied warranties of merchantability and fitness are limited in duration to the period of coverage of this express written Limited Warranty. Some regions do not allow limitation on how long an implied warranty lasts, so this limitation may not apply to you.
Weber® is not liable for any special, indirect or consequential damages. Some regions do not allow the exclusion or limitation of incidental or consequential damages, so this limitation or exclusion may not apply to you.
Weber® does not authorize any person or company to assume for it any other obligation or liability in connection with the sale, installation, use, removal, return, or replacement of its equipment; and no such representations are binding on Weber®.
This Warranty applies only to products sold at retail.
WEBER-STEPHEN PRODUCTS CO.
Customer Service Center
1890 Roselle Road, Suite 308
Schaumburg, IL 60195
USA
A-4
General Instructions
Your Weber® gas barbecue is a portable outdoor cooking appliance. With the Weber® gas barbecue you can grill, barbecue, roast and bake with results that are difficult to duplicate with indoor kitchen appliances. The closed lid and Flavorizer® bars produce that “outdoor” flavor in the food.
The Weber® gas barbecue is portable so you can easily change its location in your yard or on your patio. Portability means you can take your Weber® gas barbecue with you if you move.
The natural gas supply is easy to use and gives you more cooking control than charcoal fuel.
•These instructions will give you the minimum requirements for assembling your Weber® gas barbecue. Please read the instructions carefully before using your Weber® gas barbecue. Improper assembly can be dangerous.
•Not for use by children.
•If there are local codes that apply to portable gas grills, you will have to conform to them. If there are no local codes, you must conform to the latest edition of the National Fuel Gas Code: ANSI Z 223.1/NFPA54.
•This Weber® gas barbecue is designed for natural (piped in city) gas only. Do not use liquid propane (LP) bottled gas. The valves, orifices and hose are for natural gas only.
•Do not use with charcoal fuel.
•Check that the area under the control panel and the bottom tray are free from debris that might obstruct the flow of combustion or ventilation air.
For Installation in Canada
These instructions, while generally acceptable, do not necessarily comply with the Canadian Installation codes, particularly with piping above and below ground. In Canada the installation of this appliance must comply with local codes and/or Standards CAN/CGA-B149.1 Natural Gas and Propane Installation Code.
Storage
■The gas must be turned OFF at the natural gas supply when the Weber® gas barbecue is not in use.
■When the Weber® gas barbecue is stored indoors, the gas supply must be disconnected.
■The Weber® gas barbecue should be checked for gas leaks and any obstructions in the burner tubes before using. (See Sections: “General Maintenance and Annual Maintenance.”)
■Check that the areas under the control panel and the slide out bottom tray are free from debris that might obstruct the flow of combustion or ventilation air.
■The Spider /Insect Screens should also be checked for any obstructions. (See Section: “Annual Maintenance.”)
Operating
WARNING: Only use this barbecue outdoors in a well-ventilated area. Do not use in a garage, building, breezeway or any other enclosed area.
WARNING: Your Weber® gas barbecue shall not be used under an unprotected combustible roof or overhang.
WARNING: Your Weber® gas barbecue is not intended to be installed in or on recreational vehicles and/or boats.
WARNING: Do not use the barbecue within 24 inches of combustible materials, top, bottom, back or sides of the grill.
WARNING: The entire cooking box gets hot when in use. Do not leave unattended.
WARNING: Keep any electrical supply cord and the fuel supply hose away from any heated surface.
WARNING: Keep the cooking area clear of flammable vapors and liquids, such as gasoline, alcohol, etc., and combustible materials.
Gas Supply Testing
•Disconnect your Weber® gas barbecue when the gas supply is being tested at high pressures. This appliance and its individual shutoff valve must be disconnected from the gas supply piping system during any pressure testing of that system at test pressures in excess of 1/2 psig (3.5 kPa).
•Turn OFF your Weber® gas barbecue when the gas supply is being tested at low pressures. This appliance must be isolated from the gas supply piping system by closing its individual manual shutoff valve during any pressure testing of the gas supply piping system at the pressure equal to or less than 1/2 psig (3.5 kPa).
A-5

General Instructions
Grilling Methods
NOTE: If grill looses heat while cooking refer to the troubleshooting section of this manual.
WARNING: Do not move the Weber® gas barbecue when operating or while barbecue is hot.
You can adjust the Left and Right burners in each burner set as desired. The control settings are High (H), Medium (M), Low (L), or Off (O).
Note: The temperature inside your cooking box for the first few uses, while surfaces are still very reflective, may be hotter than those shown in your cookbook. Cooking conditions. Such as wind and weather, may require the adjustment of the burner controls to obtain the correct cooking temperatures.
If burners go out during cooking, open lid, turn off all burners and wait five minutes before relighting. Preheating - Your Weber® gas barbecue is an energyefficient appliance. It operates at an economical low BTU rate. To preheat: after lighting, close lid and turn all burners to high (HH). Preheating to between 500° and 550° F (260° and 290° C) will take 10 to 15 minutes depending on conditions such as air temperature and wind.
Drippings and grease - The Flavorizer® bars are designed to “smoke” the correct amount of drippings for flavorful cooking. Excess drippings and grease will accumulate in the catch pan under the slide out bottom tray. Disposable foil drip pans are available that fit the catch pan.
WARNING: Check the bottom tray for grease buildup before each use. Remove excess grease to avoid a grease fire in the slide out bottom tray.
Cleaning
WARNING: Turn your Weber® gas barbecue OFF and wait for it to cool before cleaning.
CAUTION: Do not clean your Flavorizer® bars or cooking grates in a self-cleaning oven.
For availability of replacement cooking grates and Flavorizer® bars contact the
Customer Service Representative in your region using the contact information sheet
provided with your manual.
Outside surfaces - Use a warm soapy water solution to clean, then rinse with water.
CAUTION: Do not use oven cleaner, abrasive cleansers (kitchen cleansers) cleaners that contain citrus products, or abrasive cleaning pads on barbecue or cart surfaces.
Slide out Bottom tray - Remove excess grease, then wash with warm soapy water, then rinse
Flavorizer® bars and Cooking grates - Clean with a suitable brass bristle brush. As needed, remove from grill and wash with warm soapy water, then rinse with water.
Catch pan - Disposable foil trays are available, or you can line the catch pan with aluminum foil. To clean the catch pan, wash with warm soapy water, then rinse.
Thermometer - Wipe with warm soapy water; clean with plastic scrub ball. Do not put in dishwasher or submerge in water.
Inside cooking module - Brush any debris off of burner tubes. DO NOT ENLARGE BURNER PORTS (OPENINGS). Wash inside of cooking box with warm soapy water and a water rinse.
Inside Lid - While lid is warm, wipe inside with paper towel to prevent grease build-up. Flaking built-up grease resembles paint flakes.
Stainless steel surfaces - Wash with a soft cloth and a soap and water solution. Be careful to scrub with the grain direction of the stainless steel.
Thermoset surfaces - Wash with a soft cloth and a soap and water solution.
Do not use cleaners that contain acid, mineral spirits or xylene. Rinse well after cleaning.
Thermoset work surfaces are not to be used as cutting boards.
A-6
|
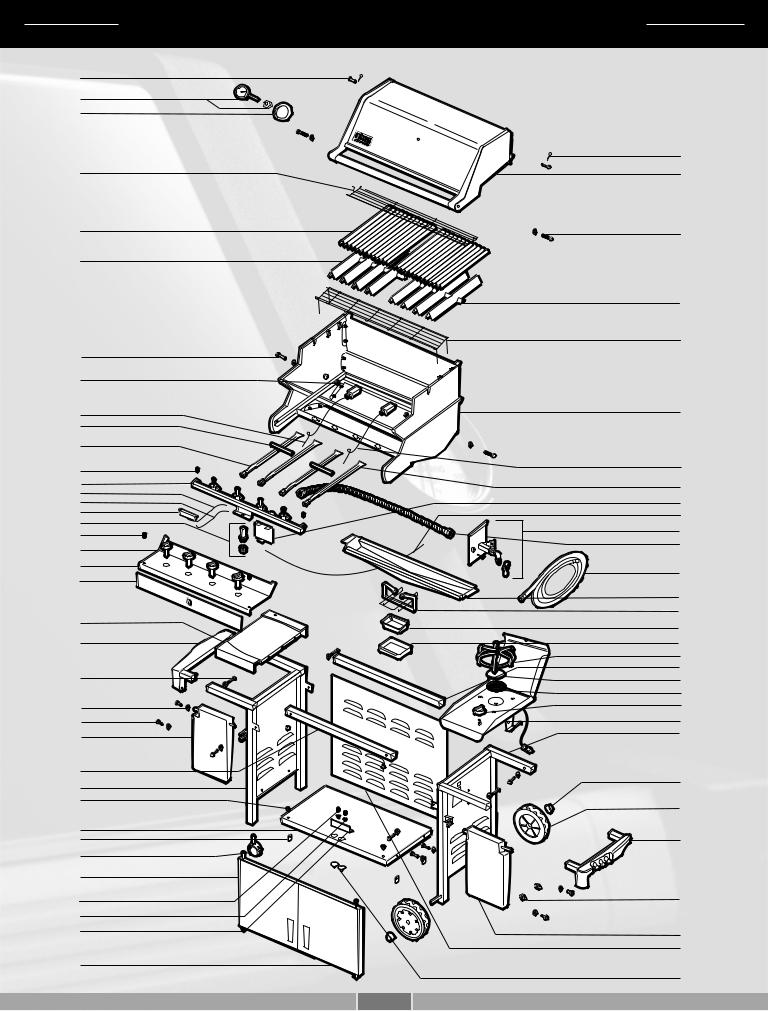
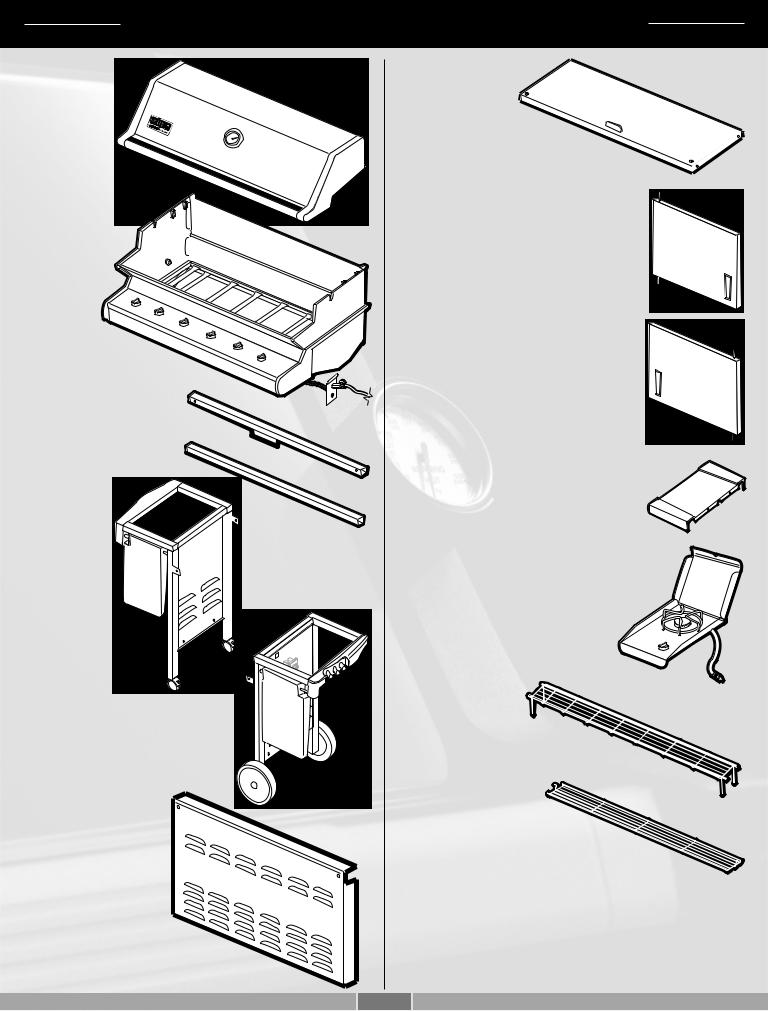
Summit® Silver B Exploded View |
1 |
Summit® Silver B NG 012903 |
2 |
|
3 |
|
|
39 |
4 |
40 |
5 |
41 |
|
|
6 |
|
|
42 |
|
43 |
7 |
|
8 |
|
9 |
44 |
|
10 |
|
|
11 |
|
|
12 |
45 |
|
13 |
46 |
|
14 |
||
47 |
||
15 |
||
16 |
48 |
|
17 |
49 |
|
18 |
||
50 |
||
19 |
||
|
||
20 |
51 |
|
21 |
||
|
||
|
52 |
|
22 |
53 |
|
54 |
||
|
||
23 |
55 |
|
|
56 |
|
24 |
57 |
|
58 |
||
|
59 |
|
25 |
60 |
|
26 |
61 |
|
27 |
62 |
|
|
||
28 |
63 |
|
29 |
||
|
||
30 |
64 |
|
|
||
31 |
|
|
32 |
65 |
|
33 |
|
|
34 |
|
|
35 |
66 |
|
36 |
|
|
37 |
67 |
|
|
||
|
68 |
|
38 |
|
|
|
69 |
|
|
A-7 |

Summit® Silver B Exploded View List
1. |
Hinge Pin |
39. |
Hair Pin Cotter |
2. |
Thermometer Hardware |
40. |
Lid Assembly |
3. |
Thermometer Bezel |
41. |
1/4 - 20 x 1 1/4 inch Bolt |
4. |
Warm-Up™ Basket |
42. |
Right Flavorizer® Bar Assembly |
5. |
12 inch Cooking Grate |
43. |
Warming Rack |
6. |
Left Flavorizer® Bar Assembly |
44. |
Cookbox Assembly |
7. |
Cookbox Assembly Hardware |
45. |
Electrode Assembly |
8. |
1/4 - 20 Hex Nut |
46. |
Right Burner Tube |
9. |
Electrode Assembly |
47. |
Battery Shield Assembly |
10. |
Crossover® Tube |
48. |
Side Burner Ignition Wire |
11. |
Left Burner Tube |
49. |
Manifold Assembly |
12. |
1/4 - 20 x 1/2 inch Screw |
50. |
Main Gas Line |
13. |
Manifold |
51. |
Hose |
14. |
Negative Ignition Switch Wire |
52. |
Bottom Tray |
15. |
Positiver Ignition Switch Wire |
53. |
Summit Catch Pan Holder |
16. |
Three Output Ignition Module |
54. |
Summit Catch Pan |
17. |
Ignition Switch Button Assembly |
55. |
Summit Drip Pan |
18. |
1/4 - 20 x 1/2 inch Black Screw |
56. |
Side Burner Grate |
19. |
Burner Control Knob |
57. |
Rear Frame Rail |
20. |
Control Panel |
58. |
Side Burner Cap |
21. |
Front Panel |
59. |
Side Burner Ring |
22. |
Left Work Surface |
60. |
Side Burner Control Knob |
23. |
Left Trim Piece |
61. |
Side Burner |
24. |
1/4 - 20 x 1 inch Black Bolt |
62. |
Wheel Frame Assembly |
25. |
Nylon Washer |
63. |
Hubcap |
26. |
1/4 - 20 x 1/2 inch Black Bolt |
64. |
Wheel |
27. |
Left Swing-Up Table |
65. |
Right Trim Piece |
28. |
Front Frame Rail |
66. |
Cylinder Glides |
29. |
Caster Frame Assembly |
67. |
Right Swing-Up Table |
30. |
Door Bushing |
68. |
Back Panel |
31. |
Bottom Shelf |
69. |
Door Plug |
32.Mounting Clip
33.Caster
34.Left Door
35.10 - 16 x 3/4 Screw w/ Washer
36.Plastic Plug
37.Door Stop
38.Right Door
A-8

Summit® Gold B Exploded View
1
2
3
4
5
6
7
8
9
10
11
12
13
14
15
16
17
18
19
20
21
22
23
24
25
26
27
28
29
30
31
32
33
34
35
36
37
38
39
Summit® Gold B NG 012903
40
41
42
43
44
45
46
47
48
49
50
51
52
53
54
55
56
57
58
59
60
61
62
63
64
65
66
67
68
69
70
A-9

Summit® Gold B Exploded View List
1. |
Hinge Pin |
40. |
Hair Pin Cotter |
2. |
Thermometer Hardware |
41. |
Lid Assembly |
3. |
Thermometer Bezel |
42. |
1/4 - 20 x 1 1/4 inch Bolt |
4. |
Warm-Up™ Basket |
43. |
Right Flavorizer Bar Assembly |
5. |
12 inch Cooking Grate |
44. |
Warming Rack |
6. |
Left Flavorizer® Bar Assembly |
45. |
Cookbox Assembly |
7. |
Cookbox Assembly Hardware |
46. |
Electrode Assembly |
8. |
1/4 - 20 inch Hex Nut |
47. |
Electrode Assembly |
9. |
Electrode Assembly |
48. |
Battery Shield Assembly |
10. |
Crossover® Tube |
49. |
Side Burner Ignition Wire |
11. |
Left Burner Tube |
50. |
Manifold Assembly |
12. |
Right Burner Tube |
51. |
Main Gas Line |
13. |
1/4 - 20 x 1/2 inch Phillips Screw |
52. |
Hose |
14. |
Manifold |
53. |
Bottom Tray |
15. |
Negative Ignition Switch Wire |
54. |
Summit Catch Pan Holder |
16. |
Positive Ignition Switch Wire |
55. |
Summit Catch Pan |
17. |
Three Output Ignition Module Assembly |
56. |
Summit Drip Pan |
18. |
Ignition Switch Button Assembly |
57. |
Rear Frame Rail |
19. |
10 - 24 x 1/2 inch Black Screw |
58. |
Side Burner Grate |
20. |
Control Knob |
59. |
Side Burner Cap |
21. |
Control Panel |
60. |
Side Burner Ring |
22. |
Front Panel |
61. |
Side Burner |
23. |
Left Work Surface |
62. |
Side Burner Control Knob |
24. |
Left Trim Piece |
63. |
Rear Panel |
25. |
1/4 - 20 x 1 inch Black Bolt |
64. |
Wheel Frame Assembly |
26. |
Nylon Washer |
65. |
Wheel |
27. |
1/4 x 20 x 1/2 inch Black Bolt |
66. |
Hubcap |
28. |
Left Swing-Up Table |
67. |
Right Trim Piece |
29. |
Front Frame Rail |
68. |
Right Swing-Up Table |
30. |
Caster Frame Assembly |
69. |
Cylinder Glides |
31. |
Door Bushing |
70. |
Door Plug |
32.Bottom Shelf
33.Mounting Clip
34.Caster Assembly
35.Left Door Assembly
36.10 - 16 x 3/4 w/ Washer
37.Plastic Plug
38.Door Stop
39.Right Door
A-10
Summit® Silver B Parts List
Lid - 1
Cookbox - 1
Front Frame Rail - 1
Rear Frame Rail - 1
Left Frame
Assembly - 1
Right Frame Assembly - 1
Rear Panel - 1
Bottom Shelf - 1
Left Door - 1
Right Door - 1
Side Table - 1
Side Burner - 1
Warming Rack - 1
Warm-Up™ Rack - 1
A-11
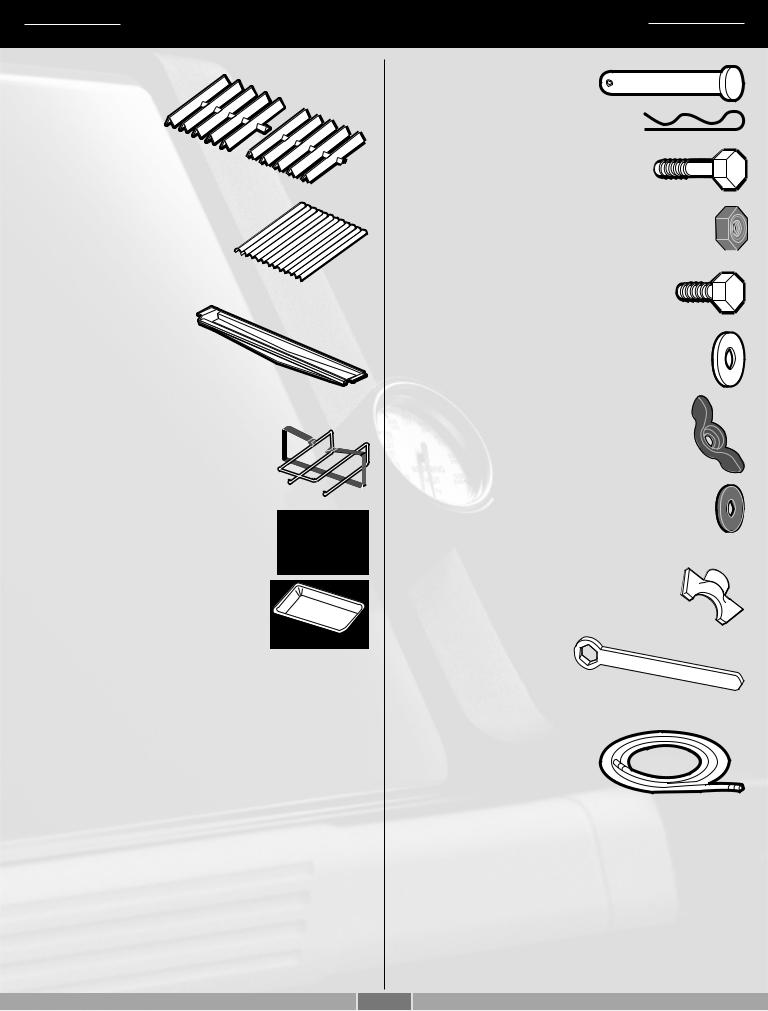
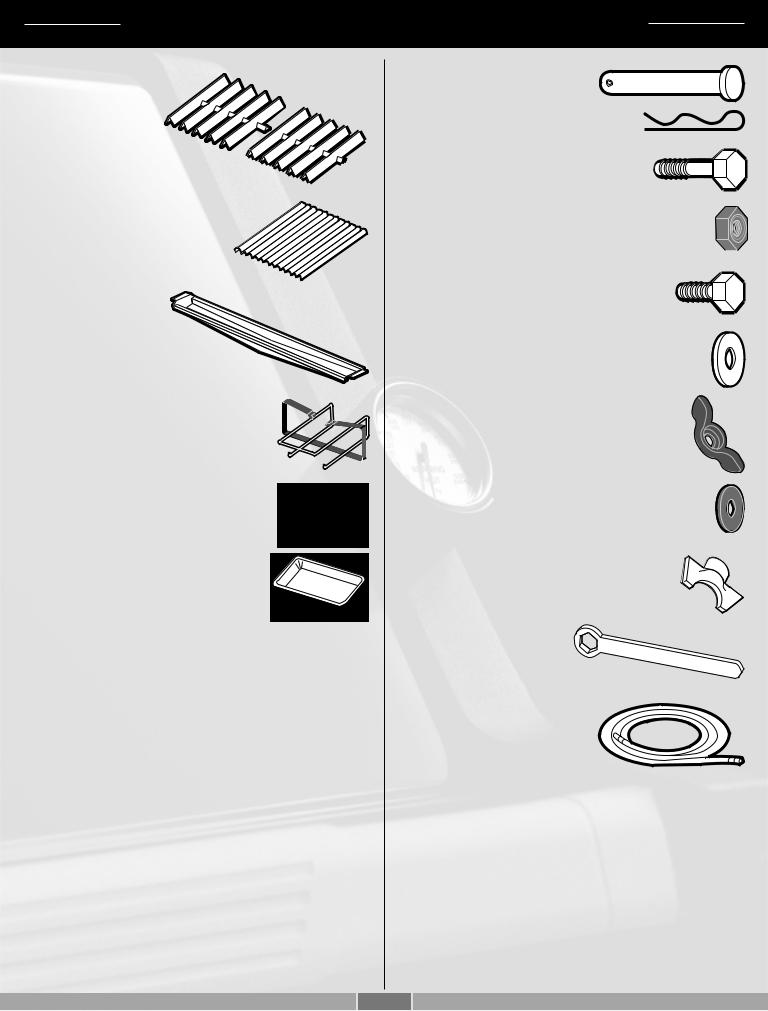
Summit® Silver B Parts List
Flavorizor® Bars - 2 Sets
Stainless Steel
Cooking Grates - 2
Bottom Tray - 1
Catch-Pan Holder - 1
Catch-Pan - 1
Disposable Drip Pans - 2
Hinge Pin- 2
Hair Pin Cotter- 2
1-1/4 inch Bolts
(1/4 x 20 x 1-1/4 inch Bolt) - 2
Nut Hex (1/4 x 20 Blk Zinc) - 2
1/2 inch Bolts
(1/4 x 20 x 1/2 inch Bolt) - 8
Nylon Washer - 10
Wing Nut (10-24) - 2
Plastic Washer - 1
Wrench - 1
7/16 inch Wrench - 1
Hose - 1
A-12
Summit® Gold B Parts List
Lid - 1
Cookbox - 1
Front Frame Rail - 1
Rear Frame Rail - 1
Left Frame
Assembly - 1
Right Frame Assembly - 1
Rear Panel - 1
Bottom Shelf - 1
Left Door - 1
Right Door - 1
Side Table - 1
Side Burner - 1
Warming Rack - 1
Warm-Up™ Rack - 1
A-13
Summit® Gold B Parts List
Flavorizor® Bars - 2 Sets
Stainless Steel
Cooking Grates - 3
Bottom Tray - 1
Catch-Pan Holder - 1
Catch-Pan - 1
Disposable Drip Pans - 2
Hinge Pin- 2
Hair Pin Cotter- 2
1-1/4 inch Bolts
(1/4 x 20 x 1-1/4 inch Bolt) - 2
Nut Hex (1/4 x 20 Blk Zinc) - 2
1/2 inch Bolts
(1/4 x 20 x 1/2 inch Bolt) - 8
Nylon Washer - 10
Wing Nut (10-24) - 2
Plastic Washer - 1
Wrench - 1
7/16 inch Wrench - 1
Hose - 1
A-14
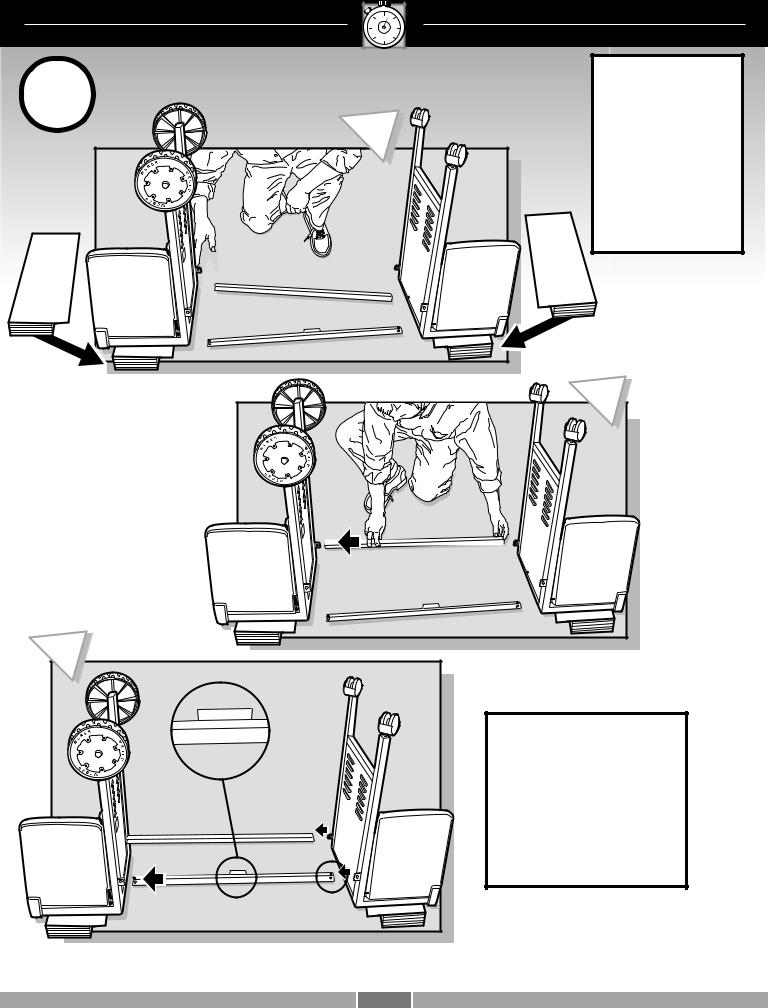
1 |
|
Place corregated |
a |
from each side of |
|
the Cookbox under |
||
|
the Caster and |
|
|
|
|
|
|
Wheel Frame |
|
|
Assembly to level |
|
|
the frames for |
|
|
Frame Rail |
|
|
Assembly. |
c |
|
|
|
|
|
|
|
CAUTION: Before |
|
|
|
|
proceeding to the next |
|
|
|
|
step check that frame rail |
|
|
|
|
(2) is on the side with the |
|
|
(1) |
|
swing tables (3). The tab |
|
|
|
on frame rail (2) must be |
||
|
|
(3) |
||
(3) |
(2) |
facing toward the wheels. |
||
|
||||
Ba402_NG.a |
|
|
|
|
|
|
B-a |
|
 Loading...