

Page 1

LCD TFT TV 7" with FM radio
MODEL VT5009 SR
4
15
26
37
www.vitekaus.com
INSTRUCTION MANUAL
5009.qxd 29.06.05 14:56 Page 1
Page 2

2
5009.qxd 29.06.05 14:56 Page 2
Page 3

3
5009.qxd 29.06.05 14:56 Page 3
Page 4

Dear consumer. Thank you for purchasing this TFTLCD colour television. To enjoy the feature of this unit to ensure
safety and years of troublefree operation, please read this manual and follow the instructions contained herein.
Keep it also handy for further future reference.
WARNINGS
TO REDUCE THE RISK OF FIRE OR ELECTRIC SHOCK, DO NOT EXPOSE THIS APPLIANCE TO RAIN OR MOISTURE.
CAUTION: TO REDUCE THE RISK OF ELECTRIC SHOCK, DO NOT REMOVE COVER (OR BACK). NO USERSERVICING TO
QUALIFIED SERVICE PERSONNEL.
The lightning flash with arrowhead symbol, within an equilateral triangle, is intended to alert the user to
the presence of uninsulated "dangerous voltage" within the product's enclosure that may be of suffi
cient magnitude to constitute a risk of electric shock to persons.
The exclamation point within an equilateral triangle is intended to alert the user to the presence of impor
tant operating and maintenance (servicing) instructions in the literature accompanying the appliance.
This unit operates on 12VDC/230V ~ 50Hz. If the unit is not used for a long period of time, remove the
plug from the AC mains.
This unit must not be exposed to moisture or rain. During heavy rains with lightings unplug TV from
mains.
The power switch in this unit is mounted on the secondary circuit and does not disconnect the whole unit
from the mains in OFF position.
Ensure all connections are properly made before operating the unit.
This unit should be positioned so that it is properly ventilated.
Avoid placing it, for example, close to curtains, on the carpet or in
a builtin installation such as a bookcase.
Do not expose this unit to direct sunlight or heat radiating sources.
ENGLISH
4
CAUTION
RISK OF ELECTRIC SHOCK
DO NOT OPEN
5009.qxd 29.06.05 14:56 Page 4
Page 5

IMPORTANT SAFETY INSTRUCTIONS
READ ALL INSTRUCTIONS BEFORE USING
1. READ INSTRUCTIONS
All the safety and operating instructions should be read before the appliance is operated.
2. RETAIN INSTRUCTIONS
The safety and operating instructions should be retained for future reference.
3. HEED WARNINGS
All warnings on the appliance and in the operating instructions should be adhered to.
4. FOLLOW INSTRUCTIONS
All operating and use instructions should be followed.
5. CARTS AND STANDS
The appliance should be used only with a cart or stand that is recommended by the manufacturer.
6. VENTILATION
The appliance should be situated so that its location or position does not interfere with its proper ventilation. For example,
the appliance should not be situated on a bed, sofa, rug or similar surface that may block the ventilation openings: or
placed in a builtin installation, such as a bookcase or cabinet that may impede the flow of air through the ventilation
openings.
7. POWER SOURCE
The appliance should be connected to a power supply only of the type described in the operating instructions or as
marked on the appliance.
8. MAINTENANCE
Do not open the cabinet and attempt to service the unit by yourself, please contact your agent for maintenance.
9. CLEAN
Do not use thinners or other chemical reagent. Wipe the TV off with a soft cloth if it gets dirty.
10. STORAGE & OPEARATION TEMPERATURE.
Do not storage and operation the unit in high or cold temperature places.
Permissible storage temperatures are within the range of 20°C to +60°C.
Permissible operation temperatures are within the range of 0°C to +40°C.
ENGLISH
5
For safety, the driver should not watch TV or operate the controls during driving. Watching and operating the TV
while driving are prohibited by local law.
Due to TFTLCD Technology some light or dark dots may appear on the LCD. This does not mean the unit is dam
aged.
5009.qxd 29.06.05 14:56 Page 5
Page 6

OPERATION BUTTONS AND PARTS
1. Main Unit (see page 2)
(1) Remote Sensor
(2) Volume Up/Down Control buttons
(3) Power/FM (power save mode) Indicator
(4) Program Up/Down Control buttons
(5) Menu Control button
(6) TV/AV/FM Control button
(7) Power Control button
(8) Right / Left Speaker
(9) TFT LCD Screen
(10) Earphone Jack
(11) Rod Antenna
(12) DC Power Supply Socket
(13) Audio Right Channel Socket of AV IN
(14) Audio Left Channel Socket of AV IN
(15) Video socket of AV IN
(16) Wall Mounting Bracket house
(17) Charge Battery Indicator
(18) Charge Battery Mode switch
(19) External Antenna Socket
(20) Unit Stand
2. Remote Control (see page 3)
(1) TV Sound System Control button
(2) Mute Control button
(3) Previous Program Control button
(4) Sleep Timer Control button
(5) Program Channel Control buttons
(6) Program Digit Control button
(7) View Mode Control button
(8) Power ON/OFF control button
(9) Volume Up Control button
(10) Volume Down Control button
(11) Menu Control button
(12) Program Up Control button
(13) Program Down Control button
(14) Picture Mirror Control button
(15) TV/AV/FM Mode Control button
ENGLISH
6
POWER SUPPLY
(1) AC Power:
The optional AC/DC adaptor allows the TV to be operated by household current, (Note: Please look over the symbol of the
AC/DC for correct voltage).
(2) Car Power (DC 12V):
The optional car adaptor (apply to the car with " " polarity connected to the ground) allows the TV to be powered by the car
battery through the vehicle 's cigarette lighter power.
(3) Battery operation:
The unit can be operated by 10 normal or rechargeable batteries (UM3, LR6 Size="AA").
The battery pack allows the rechargeable batteries to be charged for DC operation. Please check correct polarity before
using.
BASIC OPERA
TION
(A) Turning ON/OFF TV
• Press the [POWER ON/OFF] button to turn on the TV.
• Under the condition of being TV off mode, press [CH+] or [CH] button to turn on the TV automatically.
(B) Selecting the TV, AV or FM Mode
• Press [TV/AV/FM] button each to change the mode function from TV to AV and FM. During the mode transfer the audio
signal will be muting.
• For TV use the antenna input and connect to the household TV socket for best reception.
• When using the unit for the first time the TV/Radio stations should be set either by autosearch or manual search (For
details please function setting (3).
5009.qxd 29.06.05 14:56 Page 6
Page 7

(C) TV Menu Function Operation
(1) Picture setting:
• Press the [MENU] button Picture setting menu will appear.
• Press the [CH+] or [CH] button to select setting.
• Press the [V+] or [V] button to adjust your desired setting level.
BRIGHTNESS Setting:
Press the [V+] or [V] button to adjust your desired brightness level
setting.
COLOUR Setting:
Press the [V+] or [V] button to adjust your desired colour level setting.
CONTRAST Setting:
Press the [V+] or [V] button to adjust your desired contrast level setting.
SHARPNESS Setting:
Press the [V+] or [V] button to adjust your desired sharpness level setting.
TINT Setting:
Press the [V+] or [V] button to adjust your desired tint level setting. (The TINT function is used in NTSC system only)
(2) Audio Level Setting
• Press the [MENU] second times then Audio setting menu will be
shown on the screen. Press or on hold the [V+] or [V] button to
set your desired volume level.
• The volume can also be set with the remote control by pressing
[V+] or [V] button on the remote.
(3) Function Setting
• Press the [MENU] button three times then the Function setting
menu will be shown on the screen.
• Press the [CH+] or [CH] button to select your desired function
setting position.
• Press the [V+] or [V] button to change your desired setting
function shown on the screen:
LANGUAGE Setting:
Press the [V+] or [V] button to your desired language setting.
CALENDAR Setting:
Press the [V+] or [V] button to display your desired year, month and date of calendar.
GAME Playing:
• The Russia Square game is installed in the unit.
• To play game, press the [V+] button to move box right side, press the [V] button to move box left side, press the [CH+] to
change box direction up and down, press the [CH] button to accelerate box movement.
Screen Mirror Function:
• The position is selected on screen, press the [V+] or [V] button to change picture display left to right side and
pressed the button back to normal mode.
ENGLISH
7
5009.qxd 29.06.05 14:56 Page 7
Page 8

• Further, press MIRROR button of the remote to change the picture mirror mode directly.
Screen Up and Down Function:
• The position is selected on screen, press the [V+] or [V] button to change picture display up to down side and
pressed the button back to normal mode.
VIEW MODE Function:
• The position is selected on screen, press the [V+] or [V] button to change the screen view mode: Normal, 16:9,
Zoom or 4:3 of display format.
• Further, press VIEW MODE button of the remote handset to change the view mode of screen directly.
(4) Video and Audio System Setting:
• Press the [MENU] button four times continuously, then the
screen will show the System menu.
• Press the [CH+] or [CH] button to select your desired setting
item position.
• Press the [V+] or [V] button to change the setting functions and
shown on the screen:
C. SYS. Setting ( Colour System Setting):
The C. SYS setting position is selected on screen, press the [V+] or
[V] button to select your local colour system. The colour system
would be set as following: AUTO, PAL (P4.43), P3.58, N3.58, N4.43,
SECAM. The unit original colour system is set to AUTO system.
S. SYS. Setting (Sound System Setting):
• The S. SYS setting position is selected on screen, press the [V+] or [V] to select the TV sound system position. The TV
sound system can be set to M, B/G, I, D/K of TV audio system.
• Further, by pressing SYS button of the remote handset to change sound system directly.
SCREEN BLUE BACK Setting
The BLUE BACK position is selected on screen, press the [V+] or [V] button to select the BLUE BACK to ON/OFF. If "ON" is
set and the screen will change to blue colour background automatically.
SWAP Program Channel function:
• The SWAP setting position is selected on screen which allows the current program channel to swap to your desired other
program channel.
• Press the [V+] or [V] button to store your desired target program channel (it means the target channel has been selected
with the channel number will be changed to red colour automatically.). Then press the [CH] button to confirm the swap
ping program channel and press the [V+] or [V] to swap the program function.
COPY Function:
• The COPY setting position of screen function allows you to copy current channel number to your desired program channel
memory.
• Press the [V+] or [V] to select up or down the program memory. Then press [CH] to confirm channel number and press
[V+] or [V] to copy the program function.
WEAK SIGNAL Function:
• Normally, the weak signal function has been set to ON. Even the weak signal function would be receiving in best sensitivity.
• In the case of high strength TV signal area, the weak signal should be set to OFF to improve the picture of screen.
In the WEAK SIGNAL setting position of screen, press the [V+] or [V] to set function ON or OFF.
ENGLISH
8
5009.qxd 29.06.05 14:56 Page 8
Page 9

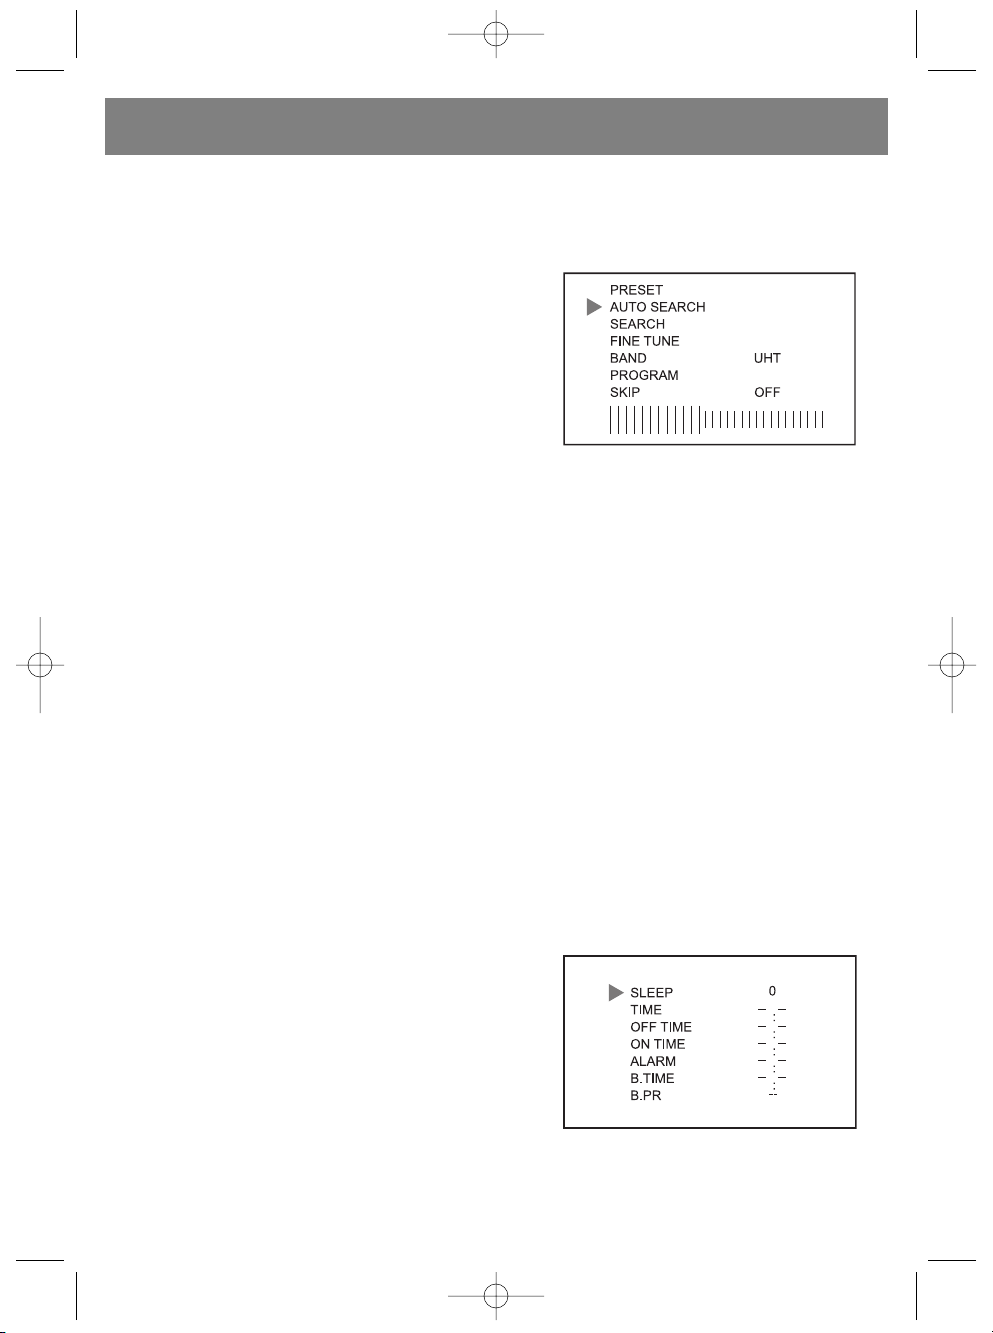
(5) PRESET TV Program function:
• Press the [MENU] button five times continuously then the preset
program setting menu will be shown on the screen.
• Press the [CH+] or [CH] to select your desired function. Then
pressed the [V+] or [V] button to set the item function as fol
lowing:
AUTO SEARCH Function:
AUTO SEARCH position is selected on screen, press [V+] or [V] to
search program with auto search processing. It will search all cur
rent TV program and store them automatically.
SEARCH Function (Manual Search):
SEARCH position is selected on screen, press the [V+] or [V] to search program and store it.
FINE TUNE Function:
The FINE TUNE position is selected on screen, press the [V+] or [V] button to adjust best receiving the program.
BAND Function:
The BAND position is selected on screen, press the [V+] or [V] button to your desired setting band for VHFL, VHFH or UHF
band.
PROGRAM Function:
The PROGRAM position is selected on screen, press the [V+] or [V] button to set up or down the program channel and select
your desired program memory from 0 to 255.
SKIP Function:
The SKIP position is selected on screen, press the [V+] or [V] button to set "ON" and the current program channel memory
will be deleted automatically.
(6) CLOCK Set function
Press the [MENU] button six times continuously then the Clock setting
menu will be shown on the screen.
Press the [CH+] or [CH] button to select your desired function.
Then press the [V+] or [V] button to set the item function.
NOTE: The all time setting will be canceled if the unit lose power supply.
SLEEP Function:
SLEEP position is selected on screen, press the [V+] or [V] button
once the sleep time will be counting up or down 10 minutes and the maximum sleep setting timer for 240 minutes.
Further, by pressing button of the remote handset to count up the sleep timer directly.
NOTE: When power off sleep timer setting would be reset.
TIME Function:
• TIME position is selected on screen, press the [V+] button to tune up the minute and pressed the [V] button to tune up
the hour to set real clock.
• In normal mode. When pressed the [V+] or [V] button clock will be display on the screen for 10 seconds automatically.
OFF TIME Function:
• OFF TIME position is selected on screen, press the [V+] button to tune up the minute and press the [V] button to tune up
the hour to set the off time.
• Then the unit will be counting down until the setting count to zero and the unit will be turned off automatically.
ENGLISH
9
5009.qxd 29.06.05 14:56 Page 9
Page 10

NOTE: If the clock is not set before, the time off function will not set. When power off all clock and timer setting would be
reset.
ON TIME Function:
• ON TIME position is selected on screen, press the [V+] button to tune up the minute and press the [V] button to tune up
the hour to set the on time.
• Then the unit will be counting up until the setting time to count real clock and the unit will be tune on automatically.
NOTE: If the clock is not set, then the on time function will not set.
ALARM Function:
• ALARM position is selected on screen, press the [V+] button to tune up the minute and press the [V] button to tune up
hour the alarm time will set.
• The unit will be counting up the setting until the setting time to count real clock and will display the "ALARM" symbol on
screen automatically. If no any key is pressed within10 minutes, it will jump out of this function and the symbol will disap
pear automatically.
NOTE: If the clock is not set, then the alarm timer function will not set. When power off the alarm timer setting would be
reset.
B. TIME (BOOKING TIME) Function:
• B. TIME position is selected on screen, press the [V+] button to tune up the minute and press the [V] button to tune up
the hour setting the booking time.
• Then unit will be counting up until the setting count real clock and the unit will jump to your booking program automatically
during tune on the TV.
B. PR. (BOOKING PROGRAM) Function:
B. PR position is selected on screen, press [V+] or [V] button to set your desired booking program setting.
NOTE: If the clock or booking time is not set, then the booking time and booking program function will not set.
(D) FM Function Operation
(1) PRESET FM Program of Radio Function:
• Press the [TV/AV/FM] button to show the FM logo on screen,
then press [MENU] button once and the FM Preset program set
ting menu will be shown on the screen.
• Press [CH+] or [CH] to select your desired recommend func
tion. Then press [V+] or [V] button to set the item function:
AUTO SEARCH Function:
AUTO SEARCH position is selected on screen, press the [V+] or [V]
button to search program with automatic search processing. It would search all the currently FM program and store them
automatically.
SEARCH Function:
SEARCH position is selected on screen, press the [V+] or [V] to search near program and store it automatically.
FINE TUNE Function:
FINE TUNE position is selected on screen, press the [CH+] or [CH] button, then press [V+] or [V] button to adjust and
improve the program reception.
ENGLISH
10
5009.qxd 29.06.05 14:56 Page 10
Page 11

PROGRAM Function:
PROGRAM position is selected on screen, press the [V+] or [V] button to set up or down the program channel and select
your desired program from 0 to 99.
STEREO Function:
STEREO position is selected on screen, press [V+] or [V] button to set stereo ON or OFF mode. Normally the stereo function
is set to "ON" state.
(2) SYSEM of FM Radio Mode Operation:
Refer to section (4) TV SYSTEM operation and detail about SWAP and COPY function. C. SYS., S. SYS., WEAK SIGNAL func
tions will disappear on the menu of screen.
(3) FUNCTION of FM Radio Mode Operation:
Refer to section (3) TV FUNCTION system operation about the detail.
(4) Clock Function Operation:
Refer to section (6) CLOCK system operation about the detail.
(E) AV Mode Operation
• When you want to watch other source device with AVIN and connect the source signal to the unit and yellow colour jack
connect to video signal, Red colour jack connect to Audio Right channel, White colour jack connect to audio left channel.
• Press the [TV/AV/FM] button to select AV channel on screen. Then you can watch the video picture
NOTE: In AV mode. The PRESERT, S. SYS., SWAP, COPY, WEAK SIGNAL setting menu will disappear on the screen.
(F) Remote Control
• In the remote handset, press the MUTE button to temporary silences audio output, and press button again back to normal
state.
• Press the button to alternate between previous and current program.
• Press the / button to set direct key digit number 1, 2 or 3.
• Press the digit button 0 9 it will tune your desired program directly.
(G) Listen Audio with The Headphone
Plug the earphone into the earphone socket and it will cut off speaker signal automatically.
(H) Charge Battery and Battery Operation Function:
• Insert the rechargeable batteries into battery case (UM3, LR6, size= "AA" x 10 pcs) and install the case to main unit, Then
plug AC/DC adaptor power or Car power source into the main unit.
• Switch the battery mode to "Charge" position then it will charge up battery automatically and charge indicator light will be
on.
• If used the battery power set the battery mode switch at "Power" position and release the plug of AC/DC adaptor or Car
power.
Warning: Do not use NONRECHARGEABLE Batteries to charge. The batteries will explode and damage the unit.
Caution: DO NOT charge continuously for over 24 hours, as it will deteriorate the performance of the rechargeable
batteries.
NOTE: If rechargeable batteries are being charged for the first time, it will take approximately 15 hours to be full charged.
If the operating time is reduced drastically even when the rechargeable batteries are properly recharged replace a
new set of rechargeable batteries.
ENGLISH
11
5009.qxd 29.06.05 14:56 Page 11
Page 12

(I) Using Outdoor Antenna
In the case when TV signal are too weak with the rod antenna, connect to outdoor antenna with 3.5mm jack to 75 OHM anten
na jack adaptor as figure shown:
ENGLISH
12
5009.qxd 29.06.05 14:56 Page 12
Page 13

TROUBLE SHOOTING
The following conditions do not necessary mean that the TV is broken. Please check the causes as indicated below request
ing that the TV be serviced.
ENGLISH
13
Condition Cause
No sound and picture
Dead batteries pack or is not properly connected.
AC adaptor is not properly connected.
Unauthorized power supply being used.
The TV/AV is not selected properly.
No picture
The program is not tuned properly.
Resetting the broadcast program.
The S. SYS is not selected or matched video system
properly.
No sound
The volume level is set to minimum.
The earphone is plugged in to the unit.
Poor signal reception due to sound is muting automatically.
The S. SYS. is not selected and audio system properly.
The audio signal is muting.
Poor reception
The antenna is not adjusted to best direction or not connect
ed to out door antenna properly.
The program channel is not tuned up properly.
The S. SYS. is not selected or matched to system properly.
Poor brightness of screen The brightness and contrast is not set to the best level.
The screen not good or clear reception
The broadcast signal may be too weak.
The antenna is not adjusted to best direction properly.
The weak signal is set off.
Snow on the screen
You may be receiving electronic interference from car train
engines, and High voltage wires or neon signs cross it.
Poor color
The colour system is not set to match video system.
The signal is too weak and color system is not working.
Remote controller doesn't work
The batteries lose power.
The sharp rays interference the remote reception.
5009.qxd 29.06.05 14:56 Page 13
Page 14

SPECIFICATIONS
Type: TFT LCD Color Television
Reception Frequencies: TV: 45.25MHz 863.25MHz
FM:87.5MHz 108MHz
Clock Accuracy: +/6 Seconds/Day
Video and Audio System: Please refer to the rating label
Display Element: Colour TFT LCD 1440 X 234 elements of pixel
Screen Size: 7 inches
Audio Output: 250mW(Max) X2 (16 OHM)
Speaker size: 20mm x 40mm square speaker
LCD Back Light: high luminance fluorescent light tube
Connection Terminals:
External antenna 3.5mm socket
Stereo earphone 3.5mm socket
External power socket (DC 12V)
AV (Audio/Video) input socket (RCA)
Power Supply: 3 ways power supply system
AC/DC Adaptor
Car batteries car adaptor
Batteries batteries pack
Power consumption: Approx. 10W
Main Unit Dimension: 190mm (W) x 160mm(H) x 48mm (D)
Main Unit Weight: Approx. 680g
ACCESSORY WITH TV
AC/DC Adaptor, D3.5mm to 75 OHM Antenna Adaptor cable,
Remote Control unit, Battery Case, Car Adaptor, Stereo Earphone,
AV set cable (RCA to RCA cable), Wall mounting Stand, Leather Case.
The manufacture reserves the right to change the product specifications without prior notice of the users.
Service life of the unit is not less then 5 years
Guarantee
Details regarding guarantee conditions can be obtained from the dealer from whom the appliance was pur
chased. The bill of sale or receipt must be produced when making any claim under the terms of this guaran
tee.
This product conforms to the EMCRequirements as laid down by the Council Directive
89/336/EEC and to the Low Voltage Regulation (23/73 EEC)
ENGLISH
14
5009.qxd 29.06.05 14:56 Page 14
Page 15

7” (17.8cm) TFT LCDFARBFERNSEHER/ MONITOR / FM RADIO FUNKTION/
Sehr geehrter Käufer! Wir bedanken uns herzlich für Ihre Wahl. Wir garantieren Ihnen Sicherheit und Qualität der
Produktion unter Folgen den Anforderungen der Bedienungsanleitung. Um richtigen Betrieb des Geräts zu gewähren,
lesen Sie bitte die Bedienungsanleitung gewissenhaft durch und bewahren Sie sie für weiteren Gebrauch auf.
WARNUNG
Um den Brand oder den Stromschlag zu vermeiden, lassen Sie bitte den Fernseher nie beim Regen oder bei erhöhter
Feuchtigkeit stehen.
Warnung: Um das Risiko des Stromschlags zu reduzieren, nehmen Sie den Deckel oder die Rückwand nie ab. Die Wartung
muss ausschliesslich vom geschulten Personal durchgeführt werden.
Das Symbol des Dreiecks mit Blitz warnt vor nicht isolierter „gefährlicher Spannung“. Es besteht das
Risiko des Stromschlags.
Das Ausrufzeichen im Dreieck bedeutet, dass es um wichtige Hinweise hinsichtlich der Bedienung in der
vorliegenden Bedienungsanleitung geht.
Für die Spannung des Fernsehers wird der Gleichstrom 12V DC oder der Wechselstrom 230V, 50 Hz ver
wendet. Sollte das Gerät eine längere Zeit nicht gebraucht werden, so schalten Sie den Fernseher vom
Netz ab, indem Sie den Stecker aus der Steckdose herausnehmen.
Es ist verboten, den Fernseher bei erhöhter Feuchtigkeit oder beim Regen zu betreiben. Beim Gewitter
schalten Sie den Fernseher vom Wechselstromnetz ab, indem Sie den Stecker aus der Steckdose her
ausnehmen.
Bei der Position des Netzschalters OFF wird der Fernseher nicht abgeschaltet und verbraucht die
Energie weiter!
Vor dem Einschalten des Ferhsehers vergewissern Sie sich, dass das Gerät korrekt ins Netz eingeschal
tet wurde.
Stellen Sie den Fernseher auf einem durchgelufteten Platz auf, verdichten Sie nicht die
Isolationsöffnungen am Gehäuse. Stellen Sie den Fernseher nicht in der Nähe der Vorhänge, auf dem
Teppich oder in der Blockmöbel auf.
Bewahren Sie den Fernseher vor direkten Sonnenstrahlen und schalten Sie ihn nicht bei erhöhter
Lufttemperatur ein.
DEUTSCH
15
CAUTION
RISK OF ELECTRIC SHOCK
DO NOT OPEN
5009.qxd 29.06.05 14:56 Page 15
Page 16

WICHTIGE SICHERHEITSMASSNAHMEN
LESEN SIE DIESE BEDIENUNGSANLEITUNG VOR DEM GEBRAUCH DES GERÄTS GEWISSENHAFT DURCH.
1. Um richtigen Betrieb des Geräts zu gewähren, lesen Sie bitte die Bedienungsanleitung gewissenhaft durch.
2. Bewahren Sie diese Bedienungsanleitung für weiteren Gebrauch auf.
3. Folgen sie allen Warnungen, die auf dem Gerät oder in der Bedienungsanleitung angegeben sind.
4. Folgen Sie allen Anforderungen der vorliegenden Bedienungsanleitung.
5. Diese Gerät darf nur mit dem Befestigungszubehör gebraucht werden, welches vom Hersteller empfohlen ist.
6. Stellen Sie den Fernseher auf einem durchgelufteten Platz auf, verdichten Sie nicht die Isolationsöffnungen am Gehäuse.
Stellen Sie den Fernseher nicht in der Nähe der Vorhänge, auf dem Teppich, auf dem Bett oder in der Blockmöbe auf. Bei
der Aufstellung des Fernseher in der Blockmöbel muss ein Abstand gewährt werden, nicht weniger als 15 cm von der
oberen, hinteren und den seitlichen Oberflächen des Gehäuses des Fernsehers.
7. Dieses Gerät funktioniert nur von der Speisungsquelle, die auf dem Gerät oder in der Bedienungsanleitung angegeben
ist.
8. Versuchen Sie nicht, den Fernseher bei dessen Störung selbstständig zu reparieren. Sollte beim Betrieb des Fernsehers
seltsame Sachen vorkommen, schalten Sie den Fernseher vom Netz ab und wenden Sie sich an qualifizierten Fachmann
des ServiceCenters.
9. Verwenden Sie keine flüssigen Mittel, Sprays und abrasiven Reinigungsmittel. Für das Reinigen des Fernsehers
gebrauchen Sie etwas feuchten weichen Stoff ohne Strich.
10. Es ist verboten, das Gerät bei zu hoher und zu niedriger Temperatur zu betreiben. Der Temperaturbereich für die
Aufbewahrung des Fernsehers ist von 20°C bis +60°C. Der Temperaturbereich des Betriebs des Fernsehers ist von 0°C
bis +40°C.
DEUTSCH
16
Zwecks seiner eigenen Sicherheit ist es dem Fahrer verboten, den Fernseher zu schauen oder seine
Funktionen zu steuern. In mehreren Ländern ist der Betrieb des Fernsehers beim Fahren verboten.
Die Technologie LCDTFT lässt das Erscheinen von einigen hellen oder dunklen Punkten auf dem Bildschirm
des Fernsehers zu. Solche Fernseher sind nicht defekt.
5009.qxd 29.06.05 14:56 Page 16
Page 17

STEUERUNGSEINHEITEN
1. Beschreibung des Fernsehers (seite 2)
1. Indikator der Fernbedienung
2. Tasten der Regulierung der Tonstärke
(reduzieren/erhöhen)
3. Indikator der Speisung /FM (im Energiesparregime)
4. Tasten der Steuerung von Kanälen (die Kanalnummer
vergrössern/die Kanalnummer reduzieren).
5. MenüTaste
6. Steuerungstaste TV / AV / FM.
7. Steuerungstaste der Speisung.
8. Lautsprecher des Fernsehers (linker und rechter).
9. TFT LCD Bildschirm.
10. Konnektor der Kopfhörer.
11. Antenne.
12. Konnektor für den Anschluss der Speisung des
Gleichstroms
13. Rechter Audioeingang AV IN.
14. Linker Audioeingang AV IN.
15. Videoeingang AV IN.
16. Zubehör für die Befestigung des Fernsehers an die
Wand.
17. Indikator der Ladung der Batterien.
18. Einschalten der Ladung der Batterien
19. Konnektor für den Anschluss der äusseren Antenne.
20. Gestell für den Fernseher.
2. Fernbedienung (seite 3)
1. Taste der Wahl des Tonsystems des Fernsehers.
2. Taste der Ausschaltung des Tons.
3. Taste der Rückkehr zu vorangehendem Programm.
4. Taste der Einstellung des Timers „Schlaf“.
5. Tasten der Wahl der Programmnummer.
6. Taste der direkten Wahl der ein, zwei oder dreistelligen
Programm nummer.
7. Taste der Wahl des Bildregimes.
8. Taste der Ein und Ausschaltung der Speisung.
9. Taste des Reduzierens des Tons.
10. Taste des Erhöhens des Tons.
11. MenüTaste
12. Taste der Umschaltung der Kanäle zunehmend.
13. Taste der Umschaltung der Kanäle abnehmend.
14. Taste der Spiegelumwandlung des Bilds.
15. Taste der Steuerung der TV / AV / FM Regime.
DEUTSCH
17
SPEISUNG
1. Speisung vom Wechselstromnetz:
Der im Lieferumfang vorhandene AC/DC Adapter ermöglicht, den Fernseher ans Hausnetz der Speisung anzuschliessen.
(Bemerkung: vor dem Einschalten vergewissern Sie sich, dass die Spannung der Speisung im Netz korrekt ist).
2. Speisung des Autos (12 V):
Zusätzlicher Wagenadapter (angeschlossen über das Kabel „“ an die Masse des Wagens) ermöglicht, die Speisung an den
Fernseher über den Wagenanraucher anzuschliessen.
3. Speisung mit der Hilfe der Batterien:
Für die Speisung des Fernsehers kann man 10 übliche oder wiederladende Batterien verwenden. (UM3, LR6 “AA”).
Für das Laden der wiederladenden Batterien wird ein spezielles Gerät verwendet. Vor dessen Betrieb überprüfen Sie bitte die
korrekte Polarisierung der Batterien.
HAUPT
OPERATIONEN
1. Einschalten / Ausschalten des Fernsehers
• Für das Einschalten des Fernsehers drücken Sie die Taste der Ein und Ausschaltung.
• Wenn der Fernseher im Warteregime ist, drücken sie die Taste POWER (Speisung) auf der Fernbedienung, die Taste #/ $,
TV / AV oder eine der Zifferntasten, um den Fernseher aus dem Warteregime ins Betriebsregime zu überführen.
2. Wahl des Regimes TV / AV oder FM
• Drücken Sie die Taste (TV / AV / FM) jedes Mal, wenn Sie die Funktion wechseln möchten: TV, AV und FM. Beim Drücken
der Taste wird der Tonsignal abgeschaltet.
5009.qxd 29.06.05 14:56 Page 17
Page 18

• Im Regime TV gebrauchen Sie den Eingang der Antenne. Schliessen Sie die äussere Antenne an den Konnektor des
Fernsehers an, um die Qualität des Empfangs besser zu machen.
• Beim Einschalten des Fernsehers zum ersten Mal müssen die TV/Radiosender auf die Autosuche oder manuelle Suche
umgeschaltet werden.
3. Steuerung der Funktionen des Menüs
Einstellung des Bilds
• Drücken Sie die Taste MENU, auf dem Bildschirm erscheint das
Menü der Einstellung des Bilds.
• Drücken Sie die Taste (CH+) oder (CH), um den ensprechen
den Punkt der Einstellung zu wählen.
• Drücken Sie die Taste (V+) oder (V), um die Einstellung des
gewählten Parameters des Menüs durchzuführen.
Regulierung der HELLIGKEIT
Drücken Sie die Taste (V+) oder (V), um alle Einstellungen der Helligkeit bis zu gewünschter Wert zu ändern.
Regulierung der FARBE
Drücken Sie die Taste (V+) oder (V), um alle Einstellungen der Farbe bis zu gewünschter Wert zu ändern.
Regulierung der SCHÄRFE
Drücken Sie die Taste (V+) oder (V), um alle Einstellungen der Schärfe bis zu gewünschter Wert zu ändern.
Regulierung der FARBSÄTTIGUNG
Drücken Sie die Taste (V+) oder (V), um alle Einstellungen der Farbsättigung bis zu gewünschter Wert zu ändern. (Diese
Funktion wird im System NTSC gebraucht).
Regulierung der Tonstärke
• Drücken Sie die Taste MENU (Menü) zweimal, um ins Menü der
Regulierung der Tonstärke einzugehen. Drücken Sie die Taste
V+ oder V, um die Tonstärke zu reduzieren oder höher zu
machen. Auf dem Bildschirm erscheint die Skala:
• Weiter können Sie die Tonstärke einfach durch das Drücken der
Tasten V+ oder V auf der Fernbedienung regulieren.
Menü FUNCTION (Funktionen)
• Drücken Sie die Taste MENU dreimal, um ins Menü Function
einzugehen.
• Das Umschalten zwischen den Menüpunkten erfolgt mit der
Hilfe der Tasten CH+ und CH.
• Mit der Hilfe der Tasten C V+ oder V erfolgt die Einstellung des
gewählten Parameters des Menüs.
Language (Sprache)
Um gewünschte Sprache zu wählen, drücken Sie die Taste V+ oder
V. Danach wird die ganze Information auf dem Bildschirm nur in
der von Ihnen gewählten Sprache abgebildet werden.
CALENDAR (Kalender)
Mit den Tasten CH+ und CH wählen Sie den Menüpunkt CALENDAR. Mit der Hilfe der Tasten V+ und V wählen Sie gewün
schten Monat und gewünschtes Jahr.
DEUTSCH
18
5009.qxd 29.06.05 14:56 Page 18
Page 19

DEUTSCH
19
GAME (Spiel)
• Mit den Tasten CH+ und CH wählen Sie den Menüpunkt GAME. Um das Spiel SQUARE anzufordern, drücken Sie die
Taste V+ oder V.
• Spielregeln. Die Taste V+ dient für die Bewegung nach rechts, die Taste V für die Bewegung nach links. Mit der Hilfe der
Taste CH+ erfolgt das Biegen der Figur, die Taste CH ist für die schnellere Bewegung der Figur nach unten zuständig.
Screen Mirror (Spiegelumwandlung)
Wählen sie mit den Tasten CH+ und CH den Menüpunkt . Mit der Hilfe der Tasten V+ oder V drehen Sie das Bild
spiegelhaft um: der linke Teil wird zum rechten Teil und umgekehrt.
Diese Funktion kann auch mit der Hilfe der Taste der Spiegelumwandlung erfüllt werden.
Screen Up and Down (Umwandlung des Bildes von oben nach unten)
Wählen sie mit den Tasten CH+ und CH den Menüpunkt . Mit der Hilfe der Tasten V+ oder V drehen Sie das Bild um: der
obere Teil wird zum unteren Teil und umgekehrt.
View Mode (Bildformat)
Wählen sie mit den Tasten CH+ und CH den Menüpunkt . Mit der Hilfe der Tasten V+ oder V wählen Sie ein gewünscht
es Bildformat:, 16:9, Zoom oder 4:3. Weiter kann die Einstellung dieser Funktion mit der Taste VIEW MODE auf der
Fernbedienung erfüllt werden.
Menü der Einstellungen Audio und Video System
(Einstellungen)
Drücken Sie MENU viermal, um ins Menü System einzugehen. Auf
dem Bildschirm erscheint folgendes Bild:
BILD
Das Umschalten zwischen den Menüpunkten erfolgt mit der Hilfe
der Tasten CH+ und CH. Mit der Hilfe der Tasten V+ oder V wird
die Wahl des gewählten Parameters des Menüs gemacht.
C.SYS (Wahl des Farbsystems)
Mit den Tasten V+ oder V wählen Sie das Farbsystem aus der folgenden Liste: AUTO, PAL (P4.43), P3.58, N3.58, N4.43,
SECAM. Vorerst ist im Fernsehr das System AUTO eingestellt.
S.SYS (Wahl des Tonsystems)
Mit den Tasten V+ oder V wählen Sie das Tonsystem aus der folgenden Liste: DK, I, M, BG. Weitere Einstellung dieser
Funktion ist mit der Hilfe der Taste SYS auf der Fernbedienung möglich.
BLUE BACK (blauer Farbhintergrund)
Mit den TAsten CH+ und CH wählen Sie den Menüpunkt BLUE BACK. Mit den Tasten V+ oder V wählen Sie den Stand ON
oder OFF. Wenn es auf “ON” steht, wird auf dem Bildschirm automatisch blauer Hintergrund erscheinen.
SWAP (Sortierung der Kanäle)
Mit den Tasten CH+ und CH wählen Sie den Menüpunkt SWAP. Die Funktion SWAP (Sortierung der Kanäle) ermöglicht die
gefundenen Kanäle unter für den Gebraucher bequemen Nummern zu speichern. Gehen Sie in dieses Menü mit der Hilfe der
Tasten CH+ und CH ein, wählen Sie einen Kanal, den Sie unter Ihrer eingenen Nummer speichern möchten (nach der Wahl
des Kanals wechselt die Farbe ihre Nummer auf Rot). Dann geben Sie mit den Tasten V+ oder V die zukünftige Nummer des
Kanals ein. Danach wählen Sie mit den Tasten CH+ und CH den Kanal, der unter dieser Nummer gespeichert ist. Das
Drücken der Taste V+ und V bestätigt die Änderung.
COPY (Kopieren der Signale)
Mit den Tasten CH+ und CH wählen Sie den Menüpunkt COPY. Die Funktion COPY (Kopieren der Signale) ermöglicht, den
5009.qxd 29.06.05 14:56 Page 19
Page 20

laufenden Kanal in nötigen Platz zu kopieren. Gehen Sie in dieses Menü mit der Hilfe der Tasten CH+ und CH ein, wählen Sie
einen Kanal, in welchen kopiert wird (nach der Wahl des Kanals wechselt die Farbe ihre Nummer auf Rot) . Weiter geben Sie
mit den Tasten V+ oder V die Nummer des Kanals, den Sie kopieren, ein. Danach wählen Sie mit den Tasten CH+ und CH
den Kanal, der unter dieser Nummer gespeichert ist. Das Drücken der Taste V+ und V bestätigt das Kopieren.
WEAK SIGNAL (System der Geräuschunterdrückung)
Wenn der Signal zu schwach ist, schalten Sie diese Funktion ein, um die Bildqualität besser zu machen. Wenn der Signal stark
ist, schalten Sie diese Funktion aus (Stand OFF). Im Regime AV schalten Sie diese Funktion ab, sonst wird das Bild schwarz
weiss sein.
Menü Preset (Einstellung)
Drücken Sie die Taste MENU fünfmal, um ins Menü Preset einzuge
hen. Auf dem Bildschirm erscheint folgendes Bild:
Das Umschalten zwischen den Menüpunkten wird mit der Hilfe der
Tasten CH+ und CH gemacht. Mit den Tasten V+ und V wird die
Einstellung des gewählten Parameters des Menüs gemacht.
AUTOSEARCH (Autosuche)
Drücken Sie für diese Funktion die Taste V+ und V. Der Fernseher
geht ins Regime der automatischen Suche und der Speicherung
gefundener Kanäle. Bei der automatischen Suche werden alle
gefangenen Sender nach deren Frequenz der Reihe nach gespeichert.
SEARCH (manuelle Suche)
Mit den Tasten CH+ und CH wählen sie den Menüpunkt SEARCH. Mit den Tasten V+ und V beginnen Sie die manuelle
Suche der Kanäle in nötiger Reihenfolge ab laufendem Kanal und dem Frequenzbereich. Die Eingabe aller Sender erfolgt
konsequent, ein Kanal nach dem anderen.
FINE TUNE (Präzise Einstellung)
Mit den Tasten CH+ und CH wählen sie den Menüpunkt FINE TUNE. Mit den Tasten V+ und V erreichen Sie den besten
Stand der Bild und Tonqualität.
BAND (Bereich)
Mit den Tasten CH+ und CH wählen sie den Menüpunkt BAND. Mit den Tasten V+ und V wählen Sie gewünschten
Suchbereich – VHFL / VHFH / UHF.
PROGRAM (Programm)
Mit den Tasten CH+ und CH wählen sie den Menüpunkt PROGRAM. Mit den Tasten V+ und V wählen Sie gewünschte
Nummer des Programms. Die Nummern der Kanäle können im Bereich 0255 geändert werden.
SKIP (Überspringen)
Mit den Tasten CH+ und CH wählen sie den Menüpunkt SKIP. Mit den Tasten V+ und V aktivieren Sie diese Funktion. Mit der
Hilfe dieser Funktion kann man jeden eingegebenen Kanal aus der Reihenfolge der durchzublätternden Kanäle weglassen.
Clockset (Uhr)
• Drücken Sie den Punkt MENU sechsmal, um ins Menü Clockset
einzugehen.
• Auf dem Bildschirm erscheint folgendes Bild:
• Das Umschalten zwischen den Menüpunkten wird mit der Hilfe der
Tasten CH+ und CH gemacht. Mit den Tasten V+ und V wird die
Einstellung des gewählten Parameters des Menüs gemacht.
ANMERKUNG: die Daten der eingestellten Uhr werden beim Auschalten
der Speisung des Fernsehers gelöscht.
DEUTSCH
20
5009.qxd 29.06.05 14:56 Page 20
Page 21

SLEEP (Timer der Abschaltung)
• Der Timer wird für die automatische Abschaltung des Fernsehers nach eingegebener Zeit eingestellt. Ändern Sie die
Uhrzeit mit den Tasten V+ und V, die bis zu der Abschaltung des Fernsehers blieb. Das wiederholte Drücken ändert die
bis zur Abschaltung bleibende Zeit mit einem Schritt von 10 Minuten. Die maximale Zeit beträgt 240 Minnuten.
• Um diese Funktion weiter anzufordern, gebrauchen Sie ein spezielle Taste auf der Fernbedienung .
TIME (Uhr)
Mit den Tasten CH+ und CH wählen sie den Menüpunkt TIME. Mit der Taste V+ werden Minuten eingegeben, von 0 bis 59.
Mit der Taste V werden Stunden eingegeben, von 0 bis 23.
Anmerkung: Beim Abschalten der Speisung des Fernsehers wird die Uhr auf Null gestellt.
OFF TIME (Timer der Abschaltung)
• Mit den Tasten CH+ und CH wählen sie den Menüpunkt OFF TIME. Mit der Taste V+ werden Minuten der Abschaltung
eingegeben, von 0 bis 59. Mit der Taste V wird die Stunde der Abschaltung eingegeben, von 0 bis 23.
• Mit der Hilfe dieser Funktion wird die Uhrzeit der automatischen Abschaltung in eingegebener Zeit eingegeben.
Anmerkung: Beim Abschalten der Speisung des Fernsehers werden die Uhr und der Timer auf Null gestellt..
ON TIME (Timer der Einschaltung)
• Mit den Tasten CH+ und CH wählen sie den Menüpunkt ON TIME. Mit der Taste V+ werden Minuten der Einschaltung
eingegeben, von 0 bis 59. Mit der Taste V wird die Stunde der Einschaltung eingegeben, von 0 bis 23.
• Mit der Hilfe dieser Funktion wird die Uhrzeit der automatischen Abschaltung in eingegebener Zeit eingegeben.
Anmerkung: Beim Abschalten der Speisung des Fernsehers werden die Uhr und der Timer auf Null gestellt.
ALARM (Signal)
• Wählen Sie mit der Taste CH den Menüpunkt ALARM. Mit der Taste V+ werden Minuten eingegeben, von 0 bis 59. Mit
der Taste V wird die Stunde eingegeben, von 0 bis 23.
• Sobald die Zeit, die in diesem Parameter eingegeben ist, kommt, beginnt der Bidschirm automatisch zu flimmern.
Anmerkung: Wenn die Uhr nicht eingestellt ist, funktioniert diese Funktion nicht. Beim Abschalten der Speisung des
Fernsehers werden die Uhrzeit des Signals auf Null gestellt.
B.TIME (Zeit des Programmierens)
Wählen Sie mit der Taste CH den Menüpunkt B.TIME. Mit der Taste V+ werden Minuten der Einschaltung eingegeben, von 0
bis 59. Mit der Taste V wird die Stunde eingegeben, von 0 bis 23. Sobald die Zeit, die in diesem Parameter eingegeben ist,
kommt, beginnt der Bidschirm automatisch zu flimmern.
B.PR (Kanal des Programmierens)
Mit den Tasten V und V+ wird ein Kanal gewählt, auf welchen sich der Fernseher umschaltet, sobald die Zeit, die im
Parameter B.TIME eingegeben ist, kommt. Die Nummern der Kanäle können im Bereich 0255 geändert werden.
Steuerungsfunktionen des FMEmpfängers
1. Menü Preset FM (Einstellung Radio):
• Drücken Sie die Taste (TV/ AV /FM) für die Anforderung des
Logos FM auf dem Bildschirm, dann drücken Sie die Taste
(MENU) einmal, auf dem Bildschirm erscheint das Menü Preset
(Einstellung Radio).
• Das Umschalten zwischen den Menüpunkten wird mit der Hilfe
der Tasten CH+ und CH gemacht. Mit den Tasten V+ und V wird
die Einstellung des gewählten Parameters des Menüs gemacht.
DEUTSCH
21
5009.qxd 29.06.05 14:56 Page 21
Page 22

AUTOSEARCH (AUTOSUCHE)
Für die Aktivierung dieser Funktion wählen Sie diesen Menüpunkt, drücken Sie die Taste V+ oder V. Der Fernseher geht ins
Regime der automatischen Suche und der Speicherung gefundener Kanäle ein. Bei der automatischen Suche werden alle
gefangenen Sender nach deren Frequenz der Reihe nach gespeichert.
SEARCH (SUCHE)
Mit den Tasten CH+ und CH wählen sie den Menüpunkt SEARCH. Mit den Tasten V+ oder V beginnen Sie die manuelle
Suche der Kanäle in nötiger Reihenfolge ab laufendem Kanal und dem Frequenzbereich. Die Eingabe aller Sender erfolgt
konsequent, ein Kanal nach dem anderen.
FINE TUNE (Präzise Einstellung)
Mit den Tasten CH+ und CH wählen sie den Menüpunkt FINE TUNE. Mit den Tasten V+ oder V erreichen Sie die beste
Empfangsqualität.
PROGRAM (Programm)
Mit den Tasten CH+ und CH wählen sie den Menüpunkt PROGRAM. Mit den Tasten V+ oder V wählen Sie gewünschte
Nummer des Programms. Die Nummern der Radiosender können im Bereich 099 geändert werden.
STEREO (Stereo)
Funktion Stereosystem
Mit den Tasten CH+ und CH wählen sie den Menüpunkt STEREO. Mit den Tasten V+ oder V schalten Sie diese Funktion ein
oder aus (ON\OFF). Normalerweise ist diese Funktion auf “ON” umgeschaltet.
Menü SYSTEM (Einstellungen) im Regime FMRadio:
Greifen Sie zum Punkt der Beschreibung des Einstelungsmenüs des Audio und Videosystems System (Einstellungen) im TV
Regime. In diesem Menü sind die Parameter SWAP und COPY zugänglich. Die Funktionen C.SYS, S. SYS, WEAK SIGNAL sind
nicht zugänglich.
Menü FUNCTION (Funktionen) im Regime FMRADIO:
Greifen Sie zum Punkt der Beschreibung des Einstelungsmenüs FUNCTION im TV Regime.
Menü CLOCK (Uhr) im Regime FMRADIO:
Greifen Sie zum Punkt der Beschreibung des Einstelungsmenüs CLOCKSet im TV Regime.
STEUERUNG DES REGIMES TV/AV
• Beim Anschliessen zusätzlicher Geräte an den Konnektor AV – IN stellen Sie entsprechenden Eingang Audio/Video kor
rekt fest: schliessen Sie das gelbe Kabel an den Konnektor des Videoeingangs, das rote Kabel – an den Konnektor des
rechten Toneingangs, das weisse Kabel – an den Konnektor des linken Toneingangs.
• Drücken Sie die Taste TV/AV, um zum Regime AV zu übergehen. Auf dem Bilsdschirm muss das Bild von der äusseren
Quelle erscheinen.
ANMERKUNG: Im Regime AV verschwinden die Menüpunkte PRESET (Einstellung): S.SYS, SWAP, COPY, WEAK SIGNAL vom
Bildschirm.
Fernbedienung
• Um das Ton auszuschalten, drücken sie die Taste MUTE auf der Fernbedienung, das wiederholte Drücken dieser Taste
bringt den Ton zurück.
• Drücken Sie die Taste , um den Fernseher von laufendem Programm auf vorangehendes Programm umzuschaten.
• Drücken Sie die Taste /, um eine ein, zwei oder dreistellige Nummer des Kanals direkt einzugeben. .
• Drücken Sie die Zifferntasten 09 , um den Fernseher auf eingegebenen Kanal umzuschalten.
Anhören des Tons über die Kopfhörer
Schliessen Sie den Stecker der Kopfhörer an den Konnektor der Kopfhörer am Fernseher. Der Ton der Lautsprecher des
Fernsehers wird dabei automatisch abgeschaltet.
DEUTSCH
22
5009.qxd 29.06.05 14:56 Page 22
Page 23

Gebrauch der äusseren Antenne
Wenn der Fernsehsignal mit bereits vorhandener Antenne zu schwach ist, schliessen Sie die äussere Antenne über das Über
gangskabel (3,5 mm, 75 Ohm) wie auf dem Bild dargestellt an:
Laden der Batterien und deren Gebrauch beim Betrieb des Geräts
• Setzen Sie wiederladende Batterien in die spezielle Zelle ein (UM3, LR6, “AA” 10 St.) und setzen Sie die Zelle in den
Fernseher ein. Danach schalten Sie die Speisung des Geräts ein.
• Schalten Sie den Schalter des Regimes der Batterien auf „Laden“ um. Danach beginnt das Laden der Batterien automa
tisch und der Indikator des Ladens geht an.
• Beim Gebauch der Batterien für die Speisung des Geräts muss man den Schalter des Regimes der Batterien auf
„Speisung“ umschalten und die äussere Speisung abschalten (den Stecker AC/DC des Adapters oder die Speisung des
Autos).
Warnung: laden Sie nie normale Batterien. Solche Batterien können explodieren und das Gerät beschädigen.
Warnung: laden Sie die Batterien nicht über 24 Stunden lang, dies verschlechtert ihren Betrieb.
Anmerkung: wenn wiederladende Batterien zum ersten Mal wieder geladen werden, bedarf man für ihr Laden ca. 15
Stunden.
Wenn die Betriebsdauer des Geräts durch den Gebrauch der Batterien wesentlich kürzer wurde, selbst wenn diese
korrekt wieder geladen wurden, braucht man sie gegen neue Batterien tauschen.
DEUTSCH
23
5009.qxd 29.06.05 14:56 Page 23
Page 24

BEHEBEN EINFACHER STÖRUNGEN
• Bevor Sie sich an das ServiceCenter wenden, schätzen Sie die Korrektheit des Betriebs Ihres Fernsehers selbstständig
ein. Folgende Hinweise helfen Ihnen dabei.
DEUTSCH
24
Stand Ursache
Keine Bild und Ton vorhanden
Überprüfen Sie die Qualität der Batterien und die Korrektheit deren
Anschlusses.
AC Adapter nicht ins Netz eingeschaltet.
Für die Speisung des Geräts wird keine entsprechende Spannung ver
wendet.
Regime TV/AV nicht korrekt gewählt.
Kein Bild vorhanden
Programm nicht entsprechend eingestellt.
Programm nicht eingestellt.
Die Wert S.SYS oder das Farbsystem falsch gewählt.
Kein Ton vorhanden
Lautstärke auf Minimum gestellt.
Kopfhörer sind angeschlossen.
Schwacher Signal, der zu automatischer Abschaltung des Tons führt.
Parameter S.SYS falsch gewählt.
Tonsignal ausgeschaltet (MUTE Taste).
Schlechte Empfangsqualität
Äussere Antenne falsch angeschlossen.
Position der Antenne nicht gut genug reguliert.
Kanal des Programms ist nicht entsprechend eingestellt.
Parameter S.SYS falsch gewählt.
Schwache Helligkeit des Bildschirms Helligkeit und Kontrast nicht eingestellt.
Bild mit Störungen
Zu schwacher Signal.
Position der Antenne nicht gut genug reguliert.
Funktion WEAK SIGNAL ausgeschaltet.
„Schnee“ auf dem Bildschirm
Wirkung äusserer Geräusche: von Automotoren, vom Zug; es gibt nicht
isolierte Hochspannung.
Schlechte Farbsättigung des Bildes
Farbsystem falsch eingestellt.
Zu schwacher Signal.
5009.qxd 29.06.05 14:56 Page 24
Page 25

SPEZIFIKATION
Typ des Bildschirms: aktive LCDTFT Matrix
Empfangsfrequenzen: TV: 45.25MHz863.25MHz
FM:87.5MHz108MHz
Genauigkeit der Uhr: =+6 sec./Tag
Bildschirmgrösse: 7”
Bildschirmauflösung: 1440 x 234
Ton: 250 mW (max.) x 2 (16 Ohm)
Lautsprecher: 20 mm x 40 mm
Aufhellung: Leuchtröhre von Hochleistung
Konnektoren des Antenneneingangs (3,5mm),
Eingang der Stereokopfhörer (3,5 mm),
Konnektor der Speisung (12V DC), AudioVideo Eingang RCA.
Speisung: Netzgerät AC/DC, Autoadapter, Batterienvorrichtung
Leistungsaufnahme: 10 W (ungefähr)
Abmessungen: 192 mm x 160 mm x 48 mm
Gewicht: 680 g (ungefähr)
ACCESSOIRES:
Netzgerät AC/DC, Übergangskabel 3.5 mm, 75 Ohm für die äussere Antenne, Fernbedienung, Batterienzelle, Autoadapter,
Stereokopfhörer, AV Kabel (RCA RCA), Zubehör für die Befestigung an die Wand, Lederetui.
Der Hersteller behält sich das Recht vor die Charakteristiken des Gerätes ohne Vorbescheid zu ändern.
Die Lebensdauer des Gerätes beträgt nichtweniger als 5 Jahre
Gewährleistung
Ausführliche Bedingungen der Gewährleistung kann man beim Dealer, der diese Geräte verkauft hat,
bekommen. Bei beliebiger Anspruchserhebung soll man während der Laufzeit der vorliegenden
Gewährleistung den Check oder die Quittung über den Ankauf vorzulegen.
Das vorliegende Produkt entspricht den Forderungen der elektromagnetischen Verträglichkeit,
die in 89/336/EWG >Richtlinie des Rates und den Vorschriften 23/73/EWG über die
Niederspannungsgeräte vorgesehen sind.
DEUTSCH
25
5009.qxd 29.06.05 14:56 Page 25
Page 26

ПОРТАТИВНЫЙ ЖК ТЕЛЕВИЗОР 7" С FM РАДИО
Уважаемый покупатель! Мы выражаем вам огромную признательность за ваш выбор и гарантируем
надежность и качество продукции при соблюдении требований инструкции по эксплуатации. Для
обеспечения правильного использования изделия внимательно изучите ‹‹Инструкцию по эксплуатации›› и
сохраните ее для дальнейшего использования.
ПРЕДУПРЕЖДЕНИЕ
Во избежание пожара или поражения электрическим током не оставляйте телевизор под дождем или в условиях
повышенной влажности.
Предостережение: чтобы уменьшить риск удара током, не снимайте крышку (или заднюю стенку). Сервисное
обслуживание должен осуществлять только квалифицированный персонал.
Треугольный символ с обозначением вспышки молнии со стрелкой предупреждает пользователя о
присутствии неизолированного "опасного напряжения". Риск удара электрическим током.
Восклицательный знак внутри треугольника сообщает о присутствии важной информации в
данной инструкции по эксплуатации.
Для питания телевизора используется постоянное напряжение 12В DC или переменное
напряжение 230 В, 50 Гц. Если устройство не используется в течение длительного периода
времени, отключите телевизор от электросети переменного тока, вынув вилку питания из розетки.
Запрещается использовать телевизор в условиях высокой влажности или под дождем. Во время
грозы отключите телевизор от электросети переменного тока, вынув вилку питания из розетки.
В положении сетевого выключателя OFF телевизор не отключается от электросети и продолжает
потреблять электроэнергию!
Перед включением телевизора проверьте, чтобы устройство было подключено к электросети
правильным образом.
Устанавливайте телевизор в проветриваемое место, не закрывайте вентиляционные отверстия на
корпусе. Не помещайте его близко к занавескам, на ковре или в мебельной стенке.
Берегите телевизор от попадания прямых солнечных лучей и старайтесь не включать его при
повышенной температуре воздуха.
РУССКИЙ
26
CAUTION
RISK OF ELECTRIC SHOCK
DO NOT OPEN
5009.qxd 29.06.05 14:56 Page 26
Page 27

ВАЖНЫЕ ИНСТРУКЦИИ ПО БЕЗОПАСНОСТИ
ВНИМАТЕЛЬНО ПРОЧИТАЙТЕ ДАННУЮ ИНСТРУКЦИЮ ПЕРЕД ИСПОЛЬЗОВАНИЕМ УСТРОЙСТВА.
1. Перед использованием телевизора внимательно изучите инструкцию по его эксплуатации.
2. Сохраните данную инструкцию для дальнейшего использования.
3. Соблюдайте все предупреждения, указанные на приборе и в инструкции по эксплуатации.
4. Тщательно выполняйте все правила, указанные в данной инструкции. Устройство должно использоваться только с
креплением, которое рекомендуется изготовителем.
5. Устанавливайте телевизор в проветриваемое место, не закрывайте вентиляционные отверстия на корпусе. Не
помещайте его близко к занавескам, не ставьте его на кровать, на ковер или в мебельную стенку. При размещении
телевизора в мебельной стенке необходимо обеспечивать зазоры не менее 15 см от верхней, задней и боковых
поверхностей корпуса телевизора.
6. Данное изделие работает только от источника питания, указанного в инструкции или на приборе.
7. Запрещается самостоятельно ремонтировать телевизор в случае его поломки. Не снимайте защитный корпус
телевизора. Если в работе устройства наблюдаются ненормальные явления, отключите проигрыватель от
питающей сети и обратитесь за помощью к квалифицированному специалисту сервисной службы.
8. Не применяйте жидкие, аэрозольные или абразивные чистящие средства. Используйте слегка влажную мягкую
безворсовую ткань для чистки телевизора.
9. Запрещается эксплуатировать устройство при слишком высокой или слишком низкой температуре. Диапазон
температур для хранения телевизора: от 20 до +60°С. Диапазон температур работы телевизора: от 0 до +40°С.
РУССКИЙ
27
Во время движения водителю (для собственной безопасности) запрещается смотреть телевизор или
управлять его функциями. Во многих странах законом запрещено использование телевизора во время
движения.
Технология LCDTFT допускает наличие на экране телевизора нескольких светлых или темных цветных
точек это не является браком.
5009.qxd 29.06.05 14:56 Page 27
Page 28

ОРГАНЫ УПРАВЛЕНИЯ
1. Описание телевизора (см. стр.2)
1. Датчик пульта
2. Кнопки регулирования громкости
(уменьшения/увеличения)
3. Индикатор питания/FM (в энергосберегающем
режиме питания)
4. Кнопки управления программ (увеличить номер
канала/уменьшить номер канала)
5. Кнопка меню
6. Кнопка управления TV/AV/FM
7. Кнопка управления питания
8. Динамики телевизора (правый и левый)
9. TFTLCDэкран
10. Гнездо для наушников
11. Антенна
12. Разъем для подключения питания постоянного тока
13. Правый аудиовход AV IN
14. Левый аудиовход AV IN
15. Видеовход AV IN
16. Крепление для установки ТВ на стену
17. Индикатор заряда батареек
18. Включатель заряда батареек
19. Разъем для подключения наружной антенны
20. Подставка для телевизора
2. Пульт управления (см. стр.3)
1. Кнопка выбора звуковой системы телевизора
2. Кнопка отключения звука
3. Кнопка возвращения к предыдущей программе
4. Кнопка установления таймера "Сон"
5. Кнопки выбора номера программы
6. Кнопка прямого выбора одно, двух, трехзначного
номера программы
7. Кнопка выбора режима изображения
8. Кнопка включения/выключения питания
9. Кнопка уменьшения звука
10. Кнопка увеличения звука
11. Кнопка меню
12. Кнопка переключения канала в порядке возрастания
номеров
13. Кнопка переключения канала в порядке убывания
номеров
14. Кнопка зеркального поворота картинки
15. Кнопка управления режимами TV/AV/FM
РУССКИЙ
28
ЭЛЕКТРОПИТАНИЕ
1. Питание от сети переменного тока
Имеющийся в поставке AC/DC адаптер позволяет включать телевизор в домашнюю сеть электропитания.
(Примечание: перед подключением убедитесь в правильности напряжения питания в электросети).
2. Автомобильное питание (12В)
Дополнительный автомобильный адаптер (подсоединяемый проводом "" к массе автомобиля) позволяет подключать
питание к телевизору через прикуриватель.
3. Питание с помощью батарей
Для питания телевизора можно использовать 10 обычных или перезаряжающихся батареек (UM3, LR6 "AA").
Для зарядки перезаряжающихся батареек используется специальное устройство. Перед его использованием
проверьте правильную полярность подключения батареек.
ОСНОВНЫЕ ОПЕР
АЦИИ
1. Включение/выключение телевизора
• Для включения телевизора нажмите кнопку включения/выключения питания.
• Если телевизор находится в режиме ожидания, нажмите кнопку POWER (питание) на ПДУ, кнопку #/$, TV/AV или
одну из кнопок с цифрами, чтобы перевести телевизор из режима ожидания в режим работы.
2. Выбор режима TV/AV или FM
• Нажимайте кнопку (TV/AV/FM) каждый раз, когда хотите изменить функцию: TV, AV и FM. Во время нажатия на
кнопку звуковой сигнал отключается.
5009.qxd 29.06.05 14:56 Page 28
Page 29

• В режиме TV используйте вход антенны. Подсоедините внешнюю антенну к гнезду телевизора для улучшения
качества приема.
• При включении телевизора в первый раз TV/радиоканалы должны быть установлены в режиме автопоиска или
ручного поиска (смотри меню FUNCTION).
3. Управление функциями меню
Настройка изображения
• Нажмите кнопку MENU на экране появится меню
настройки изображения.
• Нажмите кнопку (CH+) или (CH), чтобы выбрать
соответствующий пункт настройки.
• Нажмите кнопку (V+) или (V), чтобы осуществить настройку
выбранного параметра меню.
Регулировка ЯРКОСТИ
Нажмите кнопку (V+) или (V), чтобы изменить настройки яркости до нужного значения.
Регулировка ЦВЕТНОСТИ
Нажмите кнопку (V+) или (V), чтобы изменить настройки цветности до нужного значения.
Регулировка РЕЗКОСТИ
Нажмите кнопку (V+) или (V), чтобы изменить настройки резкости до нужного значения.
Регулировка НАСЫЩЕННОСТИ
Нажмите кнопку (V+) или (V), чтобы изменить настройки насыщенности изображения до нужного значения. (Эта
функция используется в системе NTSC).
Регулировка уровня громкости
• Нажмите кнопку MENU (Меню) два раза, чтобы перейти в меню регулировки громкости. Нажмите кнопку (V+) или
(V), чтобы повысить или понизить громкость на экране телевизора появится шкала.
• В дальнейшем вы можете регулировать громкость простым нажатием на кнопки (V+) или (V) пульта
дистанционного управления.
Меню FUNCTION (Функции)
• Нажмите кнопку MENU три раза, чтобы перейти в меню Function.
• Переключение между пунктами меню осуществляется с помощью кнопок (СН+) и (СН).
• С помощью кнопки (V+) или (V) осуществляется настройка выбранного параметра меню.
Language (язык)
Чтобы выбрать желаемый язык, нажмите кнопку (V+) или (V). После этого вся экранная информация будет
выводиться на экран телевизора только на выбранном вами языке.
CALENDAR (Календарь)
Кнопками (СН+) и (СН) выберите пункт меню CALENDAR. С помощью кнопки (V+) или (V) выберите требуемый месяц
и год.
GAME (Игра)
Кнопками (СН+) и (СН) выберите пункт меню GAME. Для вызова игры SQUARE нажмите кнопку (V+) или (V).
Правила игры: кнопка (V+) служит для движения вправо, кнопка (V) для движения влево. С помощью кнопки (СН+)
происходит поворот фигуры, кнопка (СН) ускоряет движение фигуры вниз.
РУССКИЙ
29
5009.qxd 29.06.05 14:56 Page 29
Page 30

Screen Mirror (Зеркальное преобразование)
• Кнопкой (СН+) или (СН) выберите пункт меню . С помощью кнопки (V+) или (V) зеркально переверните
изображение: левая часть становится правой, а правая левой.
• Данную функцию также можно выполнить с помощью кнопки зеркала на пульте.
Screen Up and Down (Преобразование изображения сверху вниз)
• Кнопками (СН+) и (СН) выберите пункт меню . С помощью кнопки (V+) или (V) преобразуйте изображение:
верхняя часть становится нижней, а нижняя верхней.
View Mode (Формат изображения)
• Кнопками (СН+) и (СН) выберите пункт меню . С помощью кнопки (V+) или (V) выберите требуемый формат
изображения: Normal, 16:9, Zoom или 4:3. В дальнейшем регулировку данной функции можно осуществлять
кнопкой VIEW MODE пульта дистанционного управления (ПДУ).
Меню установок аудио и видео System (Установки)
Нажмите кнопку MENU четыре раза, чтобы перейти в меню
System. На экране телевизора появится следующая картинка:
Переключение между пунктами меню осуществляется с
помощью кнопок (СН+) и (СН). С помощью кнопки (V+) или (V)
осуществляется настройка выбранного параметра меню.
C.SYS (Выбор системы цвета)
Кнопкой (V+) или (V) выберите систему цветности из
следующего списка: AUTO, PAL (Р4.43), P3.58, N3.58, N4.43,
SECAM. Первоначально в телевизоре установлена система AUTO.
S.SYS (Выбор системы звука)
Кнопкой (V+) или (V) выберите систему звука из следующего списка: DK, I, M, BG. В дальнейшем регулировку данной
функции можно осуществлять кнопкой SYS пульта дистанционного управления.
BLUE BACK (синий цветовой фон)
Кнопками (СН+) и (СН) выберите пункт меню BLUE BACK. Кнопкой (V+) или (V) выберите значение ON или OFF. Если
установлено значение ON, то на экране телевизора автоматически появится синий цветовой фон.
SWAP (Сортировка каналов)
Кнопками (СН+) и (СН) выберите пункт меню SWAP. Функция SWAP (Сортировка каналов) позволяет сохранить
найденные каналы под удобными пользователю порядковыми номерами. Войдите в данное меню и с помощью
кнопок (СН+) и (СН) выберите канал, который вы хотите сохранить под своим номером (после выбора канала цвет
его номера изменяется на красный). Далее кнопкой (V+) или (V) установите будущий номер канала. Затем кнопками
(СН+) и (СН) выберите канал, находящийся под этим номером. Нажатие на кнопку (V+) или (V) подтвердит
изменения.
COPY (Копирование каналов)
Кнопкой (СН+) или (СН) выберите пункт меню COPY. Функция COPY (Копирование каналов) позволяет скопировать
текущий канал в нужное место. Войдите в данное меню и с помощью кнопок (СН+) и (СН) выберите канал, в который
будет производиться копирование (после выбора канала цвет его номера изменяется на красный). Далее кнопкой
(V+) или (V) установите номер канала, подвергающегося копированию. Затем кнопками (СН+) и (СН) выберите
канал, находящийся под этим номером. Нажатие на кнопку (V+) или (V) подтвердит копирование.
РУССКИЙ
30
5009.qxd 29.06.05 14:56 Page 30
Page 31
WEAK SIGNAL (Система шумоподавления)
Когда сигнал очень слабый, включите эту функцию для улучшения качества изображения. В случае, когда сигнал
сильный, отключите данную функцию (положение OFF). В режиме AV отключите данную функцию, иначе изображение
будет чернобелым.
Меню Preset (Настройка)
Нажмите кнопку MENU пять раз, чтобы перейти в меню Preset.
На экране телевизора появится следующая картинка:
Переключение между пунктами меню осуществляется с
помощью кнопок (СН+) и (СН). С помощью кнопки (V+) или (V)
осуществляется настройка выбранного параметра меню.
AUTOSEARCH (Автопоиск)
Для выполнения данной функции нажмите кнопку (V+) или (V).
Телевизор войдет в режим автоматического поиска и запоминания найденных каналов. При автоматическом поиске
запоминаются все принимаемые телевизионные станции в порядке их расположения по частотам вещания.
SEARCH (Ручной поиск)
Кнопками (СН+) и (СН) выберите пункт меню SEARCH. Кнопкой (V+) или (V) начните ручной поиск каналов в нужном
направлении с текущего канала и диапазона частот. Настройка всех телеканалов осуществляется последовательно по
одному: канал за каналом.
FINE TUNE (Точная настройка)
Кнопками (СН+) и (СН) выберите пункт меню FINE TUNE. Кнопкой (V+) или (V) добейтесь наилучшего состояния
качества изображения и звука.
BAND (Диапазон)
Кнопками (СН+) и (СН) выберите пункт меню BAND. Кнопкой (V+) или (V) выберите желаемый диапазон поиска
VHFL/VHFH/UHF.
PROGRAM (Программа)
Кнопками (СН+) и (СН) выберите пункт меню PROGRAM. Кнопкой (V+) или (V) выберите желаемый номер
программы. Номера телеканалов могут изменяться в диапазоне 0255.
SKIP (Пропуск)
Кнопками (СН+) и (СН) выберите пункт меню SKIP. С помощью кнопки (V+) или (V) активизируйте данную функцию.
С помощью данной функции любой настроенный канал можно исключить из последовательно пролистываемых
каналов.
Меню Clockset (Часы)
Нажмите кнопку MENU шесть раз, чтобы перейти в меню Clockset.
На экране телевизора появится следующая картинка:
Переключение между пунктами меню осуществляется с помощью
кнопок (СН+) и (СН). С помощью кнопки (V+) или (V)
осуществляется настройка выбранного параметра меню.
ПРИМЕЧАНИЕ: установленные часы сбиваются при отключении
питания телевизора.
SLEEP (Таймер отключения)
Таймер устанавливается для автоматического отключения телевизора через заданное время. С помощью кнопки (V+)
РУССКИЙ
31
5009.qxd 29.06.05 14:56 Page 31
Page 32

или (V) измените время, оставшееся до отключения телевизора. Повторное нажатие изменяет время отключения с
шагом 10 мин. Максимальное время 240 мин.
В дальнейшем для вызова этой функции используйте специальную кнопку на пульте дистанционного управления .
TIME (Часы)
Кнопками (СН+) и (СН) выберите пункт меню TIME. С помощью кнопки (V+) устанавливаются минуты от 0 до 59. С
помощью кнопки (V) устанавливаются часы от 0 до 23.
Замечание: при отключении питания телевизора часы обнуляются.
OFF TIME (Таймер отключения)
Кнопками (СН+) и (СН) выберите пункт меню OFF TIME. С помощью кнопки (V+) устанавливаются минуты выключения
телевизора от 0 до 59. С помощью кнопки (V) устанавливается час выключения от 0 до 23. С помощью этой
функции устанавливается время автоматического выключения телевизора в заданное время.
Замечание: при отключении питания телевизора часы и таймеры обнуляются.
ON TIME (Таймер включения)
Кнопками (СН+) и (СН) выберите пункт меню ON TIME. С помощью кнопки (V+) устанавливаются минуты включения
телевизора от 0 до 59. С помощью кнопки (V) устанавливается час включения от 0 до 23. С помощью этой функции
устанавливается время автоматического включения телевизора в заданное время.
Замечание: при отключении питания телевизора часы и таймеры обнуляются.
ALARM (Сигнал)
Кнопкой (СН) выберите пункт меню ALARM. С помощью кнопки (V+) устанавливаются минуты от 0 до 59. С помощью
кнопки V устанавливается час включения, от 0 до 23. При наступлении времени, указанном в этом параметре, экран
телевизора начнет автоматически мерцать.
Замечание: если часы не установлены, то данная функция не работает. При отключении питания телевизора время
срабатывания сигнала обнуляется.
B.TIME (Время программирования)
Кнопкой (СН) выберите пункт меню B.TIME. С помощью кнопки (V+) устанавливаются минуты включения телевизора
от 0 до 59. С помощью кнопки (V) устанавливаются часы от 0 до 23. При наступлении времени срабатывания экран
телевизора начнет автоматически мерцать.
B.PR (Канал программирования)
С помощью кнопки (V) или (V+) выбирается канал, на который переключится телевизор при наступлении времени,
записанном в параметре B.TIME. Номера телеканалов могут изменяться в диапазоне 0255.
Функция управления FMрадиоприемником
1. Меню Preset FM (Настройка радио)
• Нажмите кнопку (TV/AV/FM) для вызова на экран телевизора
логотипа FM, далее нажмите кнопку (MENU) один раз на
экране появится меню Preset (Настройка радио).
• Переключение между пунктами меню осуществляется с
помощью кнопок (СН+) и (СН). С помощью кнопки (V+) или
(V) осуществляется настройка выбранного параметра
меню.
AUTOSEARCH (Автопоиск)
Для выполнения этой функции выберите данный пункт меню, нажмите кнопку (V+) или (V). Телевизор войдет в режим
РУССКИЙ
32
5009.qxd 29.06.05 14:56 Page 32
Page 33

автоматического поиска и запоминания найденных каналов. При автоматическом поиске запоминаются все
принимаемые радиостанции в порядке их расположения по частотам вещания.
SEARCH (Поиск)
Кнопками (СН+) и (СН) выберите пункт меню SEARCH. Кнопкой (V+) или (V) начните ручной поиск каналов в нужном
направлении с текущего канала. Настройка всех радиостанций осуществляется последовательно по одному: канал за
каналом.
FINE TUNE (Точная настройка)
Кнопками (СН+) и (СН) выберите пункт меню FINE TUNE. Кнопкой (V+) или (V) добейтесь наилучшего состояния
качества приема.
PROGRAM (Программа)
Кнопками (СН+) и (СН) выберите пункт меню PROGRAM. Кнопкой (V+) или (V) выберите желаемый номер
программы. Номера радиостанций могут изменяться в диапазоне 099.
STEREO (Стерео)
Функция "Стереосистема"
Кнопками (СН+) и (СН) выберите пункт меню STEREO. Кнопкой (V+) или (V) включите или отключите данную
функцию (ON\OFF). Обычно данная функция установлена в положение ON.
Меню SYSTEM (Установки) в режиме FMрадио
Обратитесь в раздел описания меню установок аудио и видеосистемы System (Установки) в режиме ТВ. В данном
меню доступны параметры SWAP и COPY. Функции C.SYS, S. SYS, WEAK SIGNAL недоступны.
Меню FUNCTION (Функции) в режиме FMрадио
Обратитесь в раздел описания меню FUNCTION в режиме ТВ.
Меню CLOCK (Часы) в режиме FMрадио
Обратитесь в раздел описания меню CLOCKSet в режиме ТВ.
Управление режимом TV/AV
• При подключении дополнительного оборудования к разъему AV IN правильно выберите соответствующий вход
видео/аудио: желтый кабель подсоедините к разъему видеовхода, красный кабель к разъему правого звукового
канала, белый кабель к разъему левого звукового канала.
• Нажмите кнопку TV/AV, чтобы перейти в режим AV. На экране должно появиться изображение с внешнего
источника.
ПРИМЕЧАНИЕ: в режиме AV пункты меню PRESET (Настройка) S.SYS, SWAP, COPY, WEAK SIGNAL исчезают с
экрана.
Пульт дистанционного управления
• Для отключения звука нажмите кнопку MUTE на дистанционном пульте управления, повторное нажатие на эту
кнопку снова вернет звук в исходное состояние.
• Нажмите кнопку , чтобы переключить телевизор с текущей программы на последнюю просмотренную.
• Нажмите кнопку /, чтобы установить напрямую одно, двух или трехзначный номер канала.
• Нажмите цифровые кнопки (09) , чтобы непосредственно переключить телевизор на заданный канал.
Прослушивание звука через наушники
Подключите разъем наушников к гнезду для наушников в телевизоре. Звук динамиков телевизора при этом
автоматически отключается.
РУССКИЙ
33
5009.qxd 29.06.05 14:56 Page 33
Page 34

Использование внешней антенны
Если телевизионный сигнал с имеющейся антенны слишком слаб, то подсоедините внешнюю антенну через
переходной кабель (3.5 мм разъем, 75 Ом), как показано в рисунке.
Зарядка батарей и их использование в работе устройства
• Вставьте перезаряжающиеся батареи (UM3, LR6, "AA" 10 шт.) в специальный отсек и вставьте его в телевизор.
После этого подключите питание к устройству.
• Переключите выключатель режима батарей в позицию "Заряд". После этого автоматически начнется заряд
батарей и включится индикатор заряда.
• При использовании батареек для питания устройства необходимо установить выключатель режима батарей в
позицию "Питание" и отключить внешнее питание (вилку AC/DCадаптера или автомобильное питание).
Предупреждение: никогда не заряжайте обычные батареи. Такие батареи могут взорваться и повредить
устройство.
Предостережение: не заряжайте батареи в течение более 24 часов, это ухудшит их работу.
Примечание: если перезаряжающиеся батареи заряжаются в первый раз, для полного заряда необходимо
приблизительно 15 часов.
Если время работы устройства от батарей резко уменьшилось (даже если они перезаряжаются правильно),
их следует заменить на новые.
РУССКИЙ
34
5009.qxd 29.06.05 14:56 Page 34
Page 35

УСТРАНЕНИЕ ПРОСТЫХ НЕИСПРАВНОСТЕЙ
• Прежде чем обратиться в сервисную службу, оцените самостоятельно исправность вашего телевизора.
Следующие рекомендации помогут вам в этом.
РУССКИЙ
35
Состояние Причина
Нет изображении и звука
Проверьте качество батарей и правильность их подключения.
АСадаптер не подключен к электросети.
Для питания устройства используется несоответствующее
напряжение.
Режим TV/AV выбран неправильно.
Нет изображения
Программа не настроена должным образом.
Программа не настроена.
Значение S.SYS или система цветности выбраны неправильно.
Нет звука
Уровень звука установлен на минимум.
К устройству подсоединены наушники.
Слабый уровень телевизионного сигнала, который приводит к
автоматическому отключению звука.
Параметр S.SYS выбран неправильно.
Звуковой сигнал выключен (кнопка MUTE).
Плохое качество приема
Внешняя антенна подсоединена неправильно.
Направление антенны не отрегулировано.
Канал программы не настроен должным образом.
Параметр S.SYS выбран неправильно.
Слабая яркость экрана Яркость и контраст изображения не настроены.
Изображение с помехами
Слишком слабый сигнал.
Направление антенны не отрегулировано.
Функция WEAK SIGNAL отключена.
"Снег" на экране
Влияние внешних шумов: от автомобильных двигателей, от поезда и
присутствие неизолированного высокого напряжения.
Плохая цветность изображения
Система цветности установлена неправильно.
Слишком слабый телевизионный сигнал.
5009.qxd 29.06.05 14:56 Page 35
Page 36

СПЕЦИФИКАЦИЯ
Тип экрана: активная LCDTFTматрица
Принимаемые частоты: TV: 45.25863.25 МГц
FM: 87.5108 МГц
Точность хода часов: = +6 (секунды/день)
Размер экрана: 7"
Разрешение экрана: 1440 х 234
Звуковая мощность: 250 мВт (максимальная) х 2 (16 Ом)
Динамики: 20 х 40 мм
Подсветка: люминесцентная лампа высокой мощности
Разъемы: антенный вход (3,5 мм), вход стереонаушников (3,5мм),
разъем подключения питания (12 В DC), аудио/видеовход RCA
Электропитание: блок питания AC/DC, автомобильный адаптер, батарейный источник питания
Мощность потребления: 10 В (приблизительно)
Размеры: 192х160х48 мм
Вес: 680 г (приблизительно)
АКСЕССУАРЫ
Блок питания AC/DC , переходной кабель 3.5 мм, 75 Ом для подсоединения внешней антенны, пульт дистанционного
управления, отсек для батарей, автомобильный адаптер, стереонаушники, AVкабель (RCARCA), настенное
крепление, кожаный футляр.
Производитель оставляет за собой право изменять характеристики приборов без предварительного
уведомления.
Срок службы прибора не менее 5ти лет
Данное изделие соответствует всем требуемым европейским и российским стандартам безо
пасности и гигиены.
Производитель: АНДЕР ПРОДАКТС ГмбХ, Австрия
Йеневайнгассе, 10/10, 1210, Вена, Австрия
РУССКИЙ
36
5009.qxd 29.06.05 14:56 Page 36
Page 37

7" (17.8 CM) КОЛЬОРОВИЙ TFT LCDТЕЛЕВІЗОР/ МОНІТОР / ФУНКЦІЯ FM РАДІО/
Шановний покупець! Ми виражаємо Вам величезну вдячність за Ваш вибір. Ми гарантуємо надійність і якість
продукції при дотриманні вимог інструкції з експлуатації. Для забезпечення правильного використання
виробу уважно вивчіть ‹‹інструкцію з експлуатації›› і збережіть її для подальшого використання.
ПОПЕРЕДЖЕННЯ
Щоб уникнути пожежі або поразки електричним струмом, не залишайте телевізор під дощем або в умовах підвищеної
вологості.
Застереження: Щоб зменшити ризик удару струмом, не знімайте кришку (або задню стінку). Сервісне обслуговування
повинен здійснювати тільки кваліфікований персонал.
Трикутний символ із позначенням спалаху блискавки зі стрілкою попереджає користувача про
присутність неізольованої " небезпечної напруги ". Ризик удару електричним струмом.
Знак оклику всередині трикутника повідомляє про присутність важливої інформації в даній інструкції
з експлуатації.
Для живлення телевізора використовується постійна напруга 12 В DC або змінна напруга 230V, 50 Гц.
Якщо пристрій не використовується протягом тривалого періоду часу, відключіть телевізор від
електромережі змінного струму, вийнявши вилку живлення з розетки.
Забороняється використовувати телевізор в умовах високої вологості або під дощем. Під час грози
відключіть телевізор від електромережі змінного струму, вийнявши вилку живлення з розетки.
У положенні мережного вимикача OFF телевізор не відключається від електромережі й продовжує
споживати електроенергію!
Перед включенням телевізора перевірте, щоб пристрій був підключений до електромережі
правильним образом.
Установлюйте телевізор у провітрюване місце, не закривайте вентиляційні отвори на корпусі. Не
поміщайте його близько до фіранок, на килимі або в меблевій стінці.
Бережіть телевізор від влучення прямих сонячних променів і намагайтеся не включати його при
підвищеній температурі повітря.
УКРАЇНЬСКИЙ
37
CAUTION
RISK OF ELECTRIC SHOCK
DO NOT OPEN
5009.qxd 29.06.05 14:56 Page 37
Page 38

ВАЖЛИВІ ІНСТРУКЦІЇ З БЕЗПЕКИ
УВАЖНО ПРОЧИТАЙТЕ ДАНУ ІНСТРУКЦІЮ ПЕРЕД ВИКОРИСТАННЯМ ПРИСТРОЮ.
1. Для забезпечення правильного використання виробу уважно вивчіть "Інструкцію з експлуатації" перед
використанням телевізора.
2. Збережіть дану інструкцію з експлуатації для подальшого використання.
3. Дотримуйте всіх попереджень, зазначених на приладі й в інструкції з експлуатації.
4. Ретельно виконуйте всі правила, зазначені в даній інструкції з експлуатації.
5. Даний пристрій повинен використовуватися тільки із кріпленням, що рекомендується виготовлювачем.
6. Установлюйте телевізор у провітрюване місце, не закривайте вентиляційні отвори на корпусі. Не поміщайте його
близько до фіранок, на ліжку, на килимі або в меблевій стінці. При розміщенні телевізора в меблевій стінці повинен
забезпечуватися зазор, не менш 15 см від верхньої, задньої й бічної поверхонь корпуса телевізора.
7. Даний виріб працює тільки від джерела живлення, зазначеного в інструкції або на приладі.
8. Не вживайте спроб самостійно відремонтувати телевізор у випадку його поломки, не знімайте захисний корпус
телевізора. Якщо в роботі пристрою спостерігаються ненормальні явища, відключіть програвач від живильної
мережі й зверніться по допомогу до кваліфікованого фахівця сервісної служби.
9. Не застосовуйте рідкі, аерозольні або абразивні засоби, що чистять. Використовуйте злегка вологу м'яку
безворсову тканину для чищення телевізора.
10. Забороняється експлуатувати пристрій при занадто високій і занадто низькій температурі. Діапазон температур для
зберігання телевізора: від 20°С до +60°С. Діапазон температур роботи телевізора: від 0°С до +40°С.
УКРАЇНЬСКИЙ
38
Для власної безпеки під час руху водієві забороняється дивитися телевізор або управляти його функціями.
У багатьох країнах законом заборонене використання телевізора під час руху.
Технологія LCDTFT допускає наявність на екрані телевізора декількох світлих або темних кольорових
крапок. Дані телевізори не являються браком.
5009.qxd 29.06.05 14:56 Page 38
Page 39

ОРГАНИ КЕРУВАННЯ
1. Опис телевізора (см. стр.2)
1. Датчик пульта
2. Кнопки регулювання голосності (зменшення /
збільшення)
3. Індикатор живлення / FM (в енергозберігаючому
режимі живлення)
4. Кнопки керування програм (збільшити номер каналу /
зменшити номер каналу).
5. Кнопка меню.
6. Кнопка керування TV / AV / FM.
7. Кнопка керування живлення.
8. Динаміки телевізора (правий і лівий).
9. TFT LCD екран.
10. Гніздо для навушників.
11. Антена.
12. Роз'єм для підключення живлення постійного струму.
13. Правий аудіовхід AV IN.
14. Лівий аудіовхід AV IN.
15. Відеовхід AV IN.
16. Кріплення для установки ТВ на стіну.
17. Індикатор заряду батарейок.
18. Вмикач заряду батарейок.
19. Роз'єм для підключення зовнішньої антени.
20. Підставка для телевізора.
2. Пульт керування (см. стр.3)
1. Кнопка вибору звукової системи телевізора.
2. Кнопка відключення звуку.
3. Кнопка повернення до попередньої програми.
4. Кнопка встановлення таймера "сон".
5. Кнопки вибору номера програми.
6. Кнопка прямого вибору однодвохтризначного
номера програми.
7. Кнопка вибору режиму зображення.
8. Кнопка включення/вимикання живлення.
9. Кнопка зменшення звуку.
10. Кнопка збільшення звуку.
11. Кнопка меню.
12. Кнопка переключення каналу в порядку зростання
номерів.
13. Кнопка переключення каналу в порядку убування
номерів.
14. Кнопка дзеркального повороту картинки.
15. Кнопка керування режимами TV / AV / FM .
УКРАЇНЬСКИЙ
39
ЕЛЕКТРОЖИВЛЕННЯ
1. Живлення від мережі змінного струму:
Наявний у поставці AC/DC адаптер дозволяє вмикати телевізор у домашню мережу електроживлення.
(Примітка: Перед підключенням переконайтеся в правильності напруги живлення в електромережі).
2. Автомобільне живлення (12 В):
Додатковий автомобільний адаптер (що приєднується проводом "" до маси автомобіля) дозволяє підключати
живлення до телевізора через прикурювач.
3. Живлення за допомогою батарей:
Для живлення телевізора можна використовувати 10 звичайних батарейок або батарейок, що
перезаряджаються (UM3, LR6 "AA").
Для зарядки батарейок, що перезаряджаються, використовується спеціальний пристрій. Перед його
використанням, будь ласка, перевірте правильну полярність підключення батарейок.
ОСНОВНІ ОПЕР
АЦІЇ
1. Включення / вимикання телевізора
• Для включення телевізора, натисніть кнопку включення/вимикання живлення.
• Якщо телевізор знаходиться в режимі чекання, натисніть кнопку POWER (живлення) на ПДК, кнопку #/ $,
TV / AV або одну із кнопок із цифрами, щоб перевести телевізор із режиму чекання в режим роботи.
2. Вибір режиму TV / AV або FM
• Натискайте кнопку (TV / AV / FM) щораз, щоб змінити функцію: TV, AV і FM. Під час натискання на кнопку
звуковий сигнал відключається.
5009.qxd 29.06.05 14:56 Page 39
Page 40

УКРАЇНЬСКИЙ
40
• У режимі TV використовуйте вхід антени. Приєднайте зовнішню антену до гнізда телевізора для поліпшення якості
прийому.
• При включенні телевізора в перший раз TV / радіоканали повинні бути встановлені в режимі автопошуку або
ручного пошуку (дивися меню FUNCTION).
3. Керування функціями меню
Настроювання зображення
• Натисніть кнопку MENU, і на екрані з'явиться меню
настроювання зображення.
• Натисніть кнопку (CH+) або (CH), щоб вибрати відповідний
пункт настроювання.
• Натисніть кнопку (V+) або (V), щоб здійснити настроювання
обраного параметра меню.
Регулювання ЯСКРАВОСТІ
Натисніть кнопку (V+) або (V), щоб змінити настроювання яскравості до потрібного значення.
Регулювання КОЛЬОРОВОСТІ
Натисніть кнопку (V+) або (V), щоб змінити настроювання кольоровості до потрібного значення.
Регулювання РІЗКОСТІ
Натисніть кнопку (V+) або (V), щоб змінити настроювання різкості до потрібного значення.
Регулювання НАСИЧЕНОСТІ
Натисніть кнопку (V+) або (V), щоб змінити настроювання насиченості зображення до потрібного значення. (Ця функція
використовується в системі NTSC).
Регулювання рівня голосності
• Натисніть кнопку MENU (Меню) два рази, щоб перейти в меню регулювання голосності. Натисніть кнопку V+ або V
щоб підвищити або понизити голосність. На екрані телевізора з'явиться шкала:
• Надалі, Ви можете регулювати голосність простим натисканням на кнопки V+ або V пульта дистанційного
керування.
Меню FUNCTION (Функції)
• Натисніть кнопку MENU три рази, щоб перейти в меню Function.
• Переключення між пунктами меню здійснюється за допомогою кнопок СН+ і СН.
• За допомогою кнопок V+ або V здійснюється настроювання обраного параметра меню.
Language (мова)
Щоб вибрати бажану мову, натисніть кнопку V+ або V. Після цього вся екранна інформація буде виводитися на екран
телевізора тільки на обраній вами мові.
CALENDAR (Календар)
Кнопками СН+ і СН виберіть пункт меню CALENDAR. За допомогою кнопок V+ і V виберіть необхідний місяць і рік
GAME (Гра)
Кнопками СН+ і СН виберіть пункт меню GAME. Для виклику гри SQUARE натисніть кнопку V+ або V.
Правила гри. Кнопка V+ служить для руху вправо, кнопка V для руху вліво. За допомогою кнопки СН+ відбувається
поворот фігури, кнопка СН прискорює рух фігури вниз.
5009.qxd 29.06.05 14:56 Page 40
Page 41

Screen Mirror (Дзеркальне перетворення)
Кнопками СН+ і СН виберіть пункт меню . За допомогою кнопок V+ або V дзеркально переверніть зображення:
ліва частина стає правою, а права лівою. Дану функцію також можна виконати за допомогою кнопки дзеркала на пульті.
Screen Up and Down (Перетворення зображення зверху вниз)
Кнопками СН+ і СН виберіть пункт меню . За допомогою кнопок V+ або V перетворіть зображення: верхня частина
стає нижньою, а нижня верхньою.
View Mode (Формат зображення)
Кнопками СН+ і СН виберіть пункт меню . За допомогою кнопок V+ або V виберіть необхідний формат
зображення: Normal, 16:9, Zoom або 4:3. Надалі регулювання даної функції можна здійснювати кнопкою VIEW MODE
пульта дистанційного керування (ПДК).
Меню установок аудіо й відео System (Установки)
Натисніть кнопку MENU чотири рази, щоб перейти в меню
System. На екрані телевізора з'явиться наступна картинка:
Переключення між пунктами меню здійснюється за допомогою
кнопок СН+ і СН. За допомогою кнопок V+ або V здійснюється
настроювання обраного параметра меню.
C.SYS (Вибір системи кольору)
Кнопками V+ або V виберіть систему кольоровості з наступного списку: AUTO, PAL (Р4.43), P3.58, N3.58, N4.43, SECAM.
Спочатку в телевізорі встановлена система AUTO.
S.SYS (Вибір системи звуку)
Кнопками V+ або V виберіть систему звуку з наступного списку: DK, I, M, BG. Надалі регулювання даної функції можна
здійснювати кнопкою SYS пульта дистанційного керування (ПДК).
BLUE BACK (синій колірний фон)
Кнопками СН+ і СН виберіть пункт меню BLUE BACK. Кнопками V+ або V виберіть значення ON або OFF. Якщо
встановлено "ON", на екрані телевізора автоматично з'явиться синій колірний фон.
SWAP (Сортування каналів)
Кнопками СН+ і СН виберіть пункт меню SWAP. Функція SWAP (Сортування каналів) дозволяє зберегти знайдені канали
під зручними користувачу порядковими номерами. Увійдіть у дане меню й за допомогою кнопок СН+ і СН виберіть
канал, що ви хочете зберегти під своїм номером (після вибору каналу колір його номера змінюється на червоний). Далі
кнопками V+ або V установіть майбутній номер каналу. Потім кнопками СН+ і СН виберіть канал, що знаходиться під
цим номером. Натискання на кнопку V+ або V підтвердить зміни.
COPY (Копіювання каналів)
Кнопками СН+ і СН виберіть пункт меню COPY. Функція COPY (Копіювання каналів) дозволяє скопіювати поточний канал
у потрібне місце. Увійдіть у дане меню й за допомогою кнопок СН+ і СН виберіть канал, у який буде вироблятися
копіювання (після вибору каналу колір його номера змінюється на червоний). Далі кнопками V+ або V установіть номер
каналу, що піддається копіюванню. Потім кнопками СН+ і СН виберіть канал, що знаходиться під цим номером.
Натискання на кнопку V+ або V підтвердить копіювання.
WEAK SIGNAL (Система шумозаглушення)
Коли сигнал дуже слабкий, включіть цю функцію для поліпшення якостей зображення. У випадку, коли сигнал сильний,
відключіть дану функцію (положення OFF). У режимі AV відключіть дану функцію, інакше зображення буде чорнобілим.
УКРАЇНЬСКИЙ
41
5009.qxd 29.06.05 14:56 Page 41
Page 42

Меню Preset (Настроювання)
Натисніть кнопку MENU п'ять разів, щоб перейти в меню Preset.
На екрані телевізора з'явиться наступна картинка:
Переключення між пунктами меню здійснюється за допомогою
кнопок СН+ і СН. За допомогою кнопок V+ або V здійснюється
настроювання обраного параметра меню.
AUTOSEARCH (Автопошук)
Для виконання даної функції натисніть кнопку V+ або V.
Телевізор увійде в режим автоматичного пошуку й
запам'ятовування знайдених каналів. При автоматичному пошуку запам'ятовуються всі прийняті телевізійні станції в
порядку їхнього розташування по частотах віщання.
SEARCH (Ручний пошук)
Кнопками СН+ і СН виберіть пункт меню SEARCH. Кнопками V+ або V почніть ручний пошук каналів у потрібному
напрямку з поточного каналу й діапазону частот. Настроювання всіх телеканалів здійснюється послідовно по одному:
канал за каналом.
FINE TUNE (Точне настроювання)
Кнопками СН+ і СН виберіть пункт меню FINE TUNE. Кнопками V+ або V доможіться найкращого стану якості
зображення й звуку.
BAND (Діапазон)
Кнопками СН+ і СН виберіть пункт меню BAND. Кнопками V+ або V виберіть бажаний діапазон пошуку VHFL / VHFH /
UHF.
PROGRAM (Програма)
Кнопками СН+ і СН виберіть пункт меню PROGRAM. Кнопками V+ або V виберіть бажаний номер програми. Номера
телеканалів можуть змінюватися в діапазоні 0255.
SKIP (Пропуск)
Кнопками СН+ і СН виберіть пункт меню SKIP. За допомогою кнопки V+ або V активізуйте дану функцію. За допомогою
даної функції будьякий настроєний канал можна виключити з каналів, що послідовно перегортаються.
Меню Clockset (Годинник)
Натисніть кнопку MENU шість разів, щоб перейти в меню Clockset.
На екрані телевізора з'явиться наступна картинка:
Переключення між пунктами меню здійснюється за допомогою
кнопок СН+ і СН. За допомогою кнопок V+ або V здійснюється
настроювання обраного параметра меню.
ПРИМІТКА: установлені години збиваються при відключенні
живлення телевізора.
SLEEP (Таймер відключення)
Таймер установлюється для автоматичного відключення телевізора через заданий час. За допомогою кнопок V+ або V
змініть час, що залишився до відключення телевізора. Повторне натискання змінює час відключення із кроком 10 хв.
Максимальний час 240 хв.
Надалі, для виклику цієї функції використовуйте спеціальну кнопку на пульті дистанційного керування (ПДК).
УКРАЇНЬСКИЙ
42
5009.qxd 29.06.05 14:56 Page 42
Page 43

TIME (Годинник)
Кнопками СН+ і СН виберіть пункт меню TIME. За допомогою кнопки V+ встановлюються хвилини, від 0 до 59. За
допомогою кнопки V установлюються години, від 0 до 23.
Зауваження: При відключенні живлення телевізора години обнуляються.
OFF TIME (Таймер відключення)
Кнопками СН+ і СН виберіть пункт меню OFF TIME. За допомогою кнопки V+ встановлюються хвилини вимикання
телевізора, від 0 до 59. За допомогою кнопки V установлюється година вимикання, від 0 до 23. За допомогою цієї
функції встановлюється час автоматичного вимикання телевізора в заданий час.
Зауваження: При відключенні живлення телевізора години й таймери обнуляються.
ON TIME (Таймер включення)
Кнопками СН+ і СН виберіть пункт меню ON TIME. За допомогою кнопки V+ встановлюються хвилини включення
телевізора, від 0 до 59. За допомогою кнопки V установлюється година включення, від 0 до 23. За допомогою цієї
функції встановлюється час автоматичного включення телевізора в заданий час.
Зауваження: При відключенні живлення телевізора години й таймери обнуляються.
ALARM (Сигнал)
Кнопкою СН виберіть пункт меню ALARM. За допомогою кнопки V+ встановлюються хвилини, від 0 до 59. За
допомогою кнопки V установлюється година включення, від 0 до 23. При настанні часу, зазначеного в цьому параметрі,
екран телевізора почне автоматично мерехтіти.
Зауваження: Якщо годинник не встановлений, то дана функція не працює. При відключенні живлення телевізора час
спрацьовування сигналу обнуляється.
B.TIME (Час програмування)
Кнопкою СН виберіть пункт меню B.TIME. За допомогою кнопки V+ встановлюються хвилини включення телевізора, від
0 до 59. За допомогою кнопки V установлюються години, від 0 до 23. При настанні часу спрацьовування екран
телевізора почне автоматично мерехтіти.
B.PR (Канал програмування)
За допомогою кнопок V або V+ вибирається канал, на який переключиться телевізор при настанні часу, записаного в
параметрі B.TIME. Номера телеканалів можуть змінюватися в діапазоні 0255.
Функція керування FMрадіоприймачем
1. Меню Preset FM (настроювання радіо):
• Натисніть кнопку (TV/ AV /FM) для виклику на екран
телевізора логотипа FM, далі натисніть кнопку (MENU) один
раз, і на екрані з'явитися меню Preset (настроювання радіо).
• Переключення між пунктами меню здійснюється за
допомогою кнопок СН+ і СН. За допомогою кнопок V+ або
V здійснюється настроювання обраного параметра меню.
AUTOSEARCH (АВТОПОШУК)
Для виконання даної функції виберіть даний пункт меню,
натисніть кнопку V+ або V. Телевізор увійде в режим автоматичного пошуку й запам'ятовування знайдених каналів. При
автоматичному пошуку запам'ятовуються всі прийняті радіостанції в порядку їхнього розташування по частотах віщання.
SEARCH (ПОШУК)
Кнопками СН+ і СН виберіть пункт меню SEARCH. Кнопками V+ або V почніть ручний пошук каналів у потрібному
напрямку з поточного каналу. Настроювання всіх радіостанцій здійснюється послідовно по одному: канал за каналом.
УКРАЇНЬСКИЙ
43
5009.qxd 29.06.05 14:56 Page 43
Page 44

FINE TUNE (Точне настроювання)
Кнопками СН+ і СН виберіть пункт меню FINE TUNE. Кнопками V+ або V доможіться найкращого стану якості прийому.
PROGRAM (Програма)
Кнопками СН+ і СН виберіть пункт меню PROGRAM. Кнопками V+ або V виберіть бажаний номер програми. Номера
радіостанцій можуть змінюватися в діапазоні 099.
STEREO (Стерео)
Функція стерео система
Кнопками СН+ і СН виберіть пункт меню STEREO. Кнопками V+ або V включіть або відключіть дану функцію (ON\OFF).
Звичайно дана функція встановлена в стан "ON".
Меню SYSTEM (Установки) у режимі FMрадіо:
Зверніться в розділ опису меню установок аудіо й відеосистеми System (Установки) у режимі ТВ. У даному меню
доступні параметри SWAP і COPY. Функції C.SYS, S. SYS, WEAK SIGNAL недоступні.
Меню FUNCTION (Функції) у режимі FMрадіо:
Звернутися в розділ опису меню FUNCTION у режимі ТВ
Меню CLOCK (Годинник) у режимі FMрадіо:
Звернутися в розділ опису меню CLOCKSet у режимі ТВ
Керування режимом TV/AV
• При підключенні додаткового обладнання до роз'єма AV IN правильно виберіть відповідний вхід відео\аудіо:
жовтий кабель приєднайте в роз'єм відеовходу, червоний кабель у роз'єм правого звукового каналу, білий кабель
у роз'єм лівого звукового каналу.
• Натисніть кнопку TV/AV, щоб перейти в режим AV. На екрані повинне з'явитися зображення із зовнішнього
джерела.
ПРИМІТКА: У режим AV пункти меню PRESET (Настроювання): S.SYS, SWAP, COPY, WEAK SIGNAL зникають із екрана.
Пульт дистанційного керування
• Для відключення звуку натисніть кнопку MUTE на дистанційному пульті керування, повторне натискання на цю
кнопку знову поверне звук у вихідний стан.
• Натисніть кнопку МАЛЮНОК, щоб переключити телевізор із поточної програми на останню переглянуту.
• Натисніть кнопку МАЛЮНОК, щоб установити прямо однодвох або тризначний номер каналу.
• Натисніть цифрові кнопки 09 , щоб безпосередньо переключити телевізор на заданий канал.
Прослуховування звуку через навушники
Підключіть роз'єм навушників до гнізда для навушників у телевізорі. Звук динаміків телевізора при цьому автоматично
відключається.
УКРАЇНЬСКИЙ
44
5009.qxd 29.06.05 14:56 Page 44
Page 45

Використання зовнішньої антени
У випадку, коли телевізійний сигнал занадто слабий із наявною антеною, приєднайте зовнішню антену через
перехідний кабель (3.5 мм роз'єм, 75 Ом), як показано в малюнку:
Зарядка батарей і їхнє використання в роботі пристрою
• Вставте батареї, що перезаряджаються, у спеціальний відсік (UM3, LR6, "AA" 10 шт) і встановіть його в телевізор.
Після цього підключіть живлення до пристрою.
• Переключіть вимикач режиму батарей у позицію "Заряд". Після цього автоматично почнеться заряд батарей і
включиться індикатор заряду.
• При використанні батарейок для живлення пристрою необхідно встановити вимикач режиму батарей у позицію
"Живлення" і відключити зовнішнє живлення (вилку AC/DC адаптера або автомобільне живлення).
Попередження: Ніколи не заряджайте звичайні батареї. Такі батареї можуть вибухнути й ушкодити пристрій.
Застереження: не заряджайте батареї протягом більше 24 годин, це погіршить їхню роботу.
Примітка: якщо батареї, що перезаряджаються, заряджаються в перший раз, для повного заряду необхідно приблизно
15 годин.
Якщо час роботи пристрою від батарей різко зменшився, навіть якщо вони перезаряджаються правильно, їх
варто замінити на нові.
УКРАЇНЬСКИЙ
45
5009.qxd 29.06.05 14:56 Page 45
Page 46

УСУНЕННЯ ПРОСТИХ НЕСПРАВНОСТЕЙ
• Перш ніж звернутися в сервісну службу, оцініть самостійно справність вашого телевізора. Наступні рекомендації
допоможуть Вам у цьому.
УКРАЇНЬСКИЙ
46
Стан Причина
Немає зображення й звуку
Перевірте якість батарей і правильність їхнього підключення.
АС адаптер не підключений до електромережі.
Для живлення пристрою використовується невідповідна напруга.
Режим TV/AV обраний неправильно.
Немає зображення
Програма не настроєна належним чином.
Програма не настроєна.
Значення S.SYS або система кольоровості обрані неправильно
Немає звуку
Рівень звуку встановлений на мінімум
До пристрою приєднані навушники
Слабкий рівень телевізійного сигналу, що приводить до
автоматичного відключення звуку
Параметр S.SYS обраний неправильно.
Звуковий сигнал виключений (кнопка MUTE)
Погана якість прийому
Зовнішня антена приєднана неправильно.
Напрямок антени не відрегульований.
Канал програми не настроєний належним чином
Параметр S.SYS обраний неправильно
Слабка яскравість екрана Яскравість і контраст зображення не настроєні
Зображення з перешкодами
Занадто слабкий сигнал
Напрямок антени не відрегульований
Функція WEAK SIGNAL відключена
Сніг на екрані
Вплив зовнішніх шумів: від автомобільних двигунів, від поїзда й
присутність неізольованої високої напруги.
Погана кольоровість зображення
Система кольоровості встановлена неправильно
Занадто слабкий телевізійний сигнал
5009.qxd 29.06.05 14:56 Page 46
Page 47

СПЕЦИФІКАЦІЯ
Тип екрана: Активна LCDTFT матриця
Прийняті частоти: TV: 45.25MHz863.25MHz
FM:87.5MHz108MHz
Точність ходу годинника: =+6 секунди/день
Розмір екрана: 7"
Розрішення екрана: 1440х234
Звукова потужність: 250 мВт (максимальна)х2 (16 Ом)
Динаміки: 20мм х 40мм
Підсвічування: люмінесцентна лампа високої потужності
Роз'єми: антенний вхід (3,5 мм), вхід стереонавушників (3,5 мм),
роз'єм підключення живлення (12 В DC), аудіовідео вхід RCA.
Електроживлення: блок живлення AC/DC, автомобільний адаптер, батарейне джерело живлення
Потужність споживання: 10 В (приблизно)
Розміри: 192мм х 160мм х 48мм
Вага: 680 гр (приблизно)
АКСЕСУАРИ:
Блок живлення AC/DC, перехідний кабель 3.5mm, 75 Ом для приєднання зовнішньої антени, пульт дистанційного
керування, відсік для батарей, автомобільний адаптер, стереонавушники, AV кабель (RCA RCA), настінне кріплення,
шкіряний футляр.
Виробник залишає за собою право змінювати характеристики приладу без попереднього
повідомлення.
Термін служби приладу не менш 5 років
Гарантія
Докладні умови гарантії можна отримати в дилера, що продав дану апаратуру.
При пред’явленні будьякої претензії протягом терміну дії даної гарантії варто пред’явити чек або кви
танцію про покупку.
Даний виріб відповідає вимогам до електромагнітної сумісності, що пред’являються дирек
тивою 89/336/ЄЕС Ради Європи й розпорядженням 23/73 ЄЕС по низьковольтних
апаратурах.
УКРАЇНЬСКИЙ
47
5009.qxd 29.06.05 14:56 Page 47
Page 48

5009.qxd 29.06.05 14:56 Page 48
 Loading...