

Page 1
EISWÜRFELBEREITER EDEL
Bedienungsanleitung
Instructions for use | Notice d´utilisation
Gebruiksaanwijzing | Istruzioni per l’uso
Instrucciones de uso | Návod k obsluze
Instrukcja obsługi
Modell 48955
Page 2

Impressum:
Bedienungsanleitung Modell 48955
Stand: November 2016 /nr
Copyright ©
Mannheimer Straße 4
68766 Hockenheim
Telefon +49 (0) 62 05/94 18-0
Telefax +49 (0) 62 05/94 18-12
E-Mail info@unold.de
Internet www.unold.de
Page 3
Weitere Informationen zu unserem Sortiment erhalten Sie unter www.unold.de
Page 4

INHALTSVERZEICHNIS
Bedienungsanleitung Modell 48955
Technische Daten ...................................8
Symbolerklärung .....................................8
Sicherheitshinweise ................................8
Vor dem ersten Benutzen .........................12
Display/Bedienelement ............................13
Uhrzeit einstellen ...................................14
Zeitvorwahl ............................................14
Hinweise zum Wasser ..............................15
Wasser ablaufen lassen ...........................15
Bedienen ...............................................16
Reinigen und Pflegen .............................18
Fehler beheben ......................................19
Garantiebestimmungen ...........................20
Entsorgung / Umweltschutz .....................20
Informationen für den Fachhandel ............20
Service-Adressen ....................................21
Instructions for use Model 48955
Technical Specifications .........................22
Explanation of symbols ............................22
Safety Information ..................................22
Before using the appliance for the
first time................................................26
Display ..................................................27
Setting the time .....................................28
Timer .....................................................28
Instructions concerning the water .............29
Draining water ........................................29
Making ice cubes ....................................30
Cleaning and care ...................................32
Troubleshooting ......................................33
Guarantee Conditions ..............................34
Waste Disposal /
Environmental Protection ........................34
Service ..................................................21
Notice d´utilisation Modèle 48955
Spécification technique ..........................35
Explication des symboles .........................35
Pour votre sécurité ..................................35
Avant la première utilisation ....................39
Écran ....................................................39
Régler l‘heure .........................................40
Présélection de la durée ..........................41
Remarques concernant l‘eau ....................42
Vider l’eau .............................................42
Fabriquer des glaçons .............................43
Nettoyage et entretien .............................45
Dépannage .............................................46
Conditions de Garantie ............................47
Traitement des déchets /
Protection de l’environnement ..................47
Service ..................................................21
Gebruiksaanwijzing Model 48955
Technische gegevens ..............................48
Verklaring van de symbolen ......................48
Voor uw veiligheid ...................................48
Vóór het eerste gebruik ............................52
Display ..................................................52
Tijd instellen ..........................................53
Tijdprogrammering ..................................54
Aanwijzingen bij het water .......................55
Water laten weglopen ..............................55
IJsblokjes maken ....................................56
Reinigen en onderhouden ........................58
Storingen verhelpen ................................59
Garantievoorwaarden ...............................60
Verwijderen van afval /
Milieubescherming .................................60
Service ..................................................21
Page 5

INHALTSVERZEICHNIS
Istruzioni per l‘uso Modello 48955
Dati tecnici ...........................................61
Significato dei simboli ............................61
Per la vostra sicurezza .............................61
Prima del primo utilizzo ..........................65
Display ..................................................66
Impostazione dell‘ora ..............................67
Temporizzazione .....................................67
Avvertenze sull‘acqua ..............................68
Scarico dell’acqua ..................................68
Preparazione dei cubetti di ghiaccio .........69
Pulizia e cura .........................................71
Risoluzione dei problemi .........................72
Norme die garanzia .................................73
Smaltimento / Tutela dell’ambiente ..........73
Service ..................................................21
Manual de instrucciones Modelo 48955
Datos técnicos .......................................74
Explicación de los símbolos .....................74
Para su seguridad ...................................74
Antes del primer uso ...............................78
Pantalla .................................................78
Ajustar hora ...........................................80
Preselección de tiempo ...........................80
Indicaciones sobre el agua .......................81
Vaciado del agua ....................................81
Fabricar cubitos de hielo .........................82
Limpieza y cuidado .................................84
Eliminación de fallos ..............................85
Condiciones de Garantia ..........................86
Disposición/Protección del
medio ambiente .....................................86
Service ..................................................21
Návod k obsluze Modelu 48955
Technické údaje ....................................87
Vysvětlení symbolů ..................................87
Pro Vaši bezpečnost ................................87
Před prvním použitím ..............................91
Displej ...................................................92
Nastavení času .......................................93
Předvolba času .......................................93
Pokyny k vodě ........................................94
Vypuštění vody .......................................94
Výroba kostek ledu ..................................95
Čištění a péče ........................................97
Odstraňování chyb ..................................98
Záruční podmínky ...................................99
Likvidace / Ochrana životného prostředí ...99
Service ..................................................21
Instrukcja obsługi Model 48955
Dane techniczne .....................................100
Objaśnienie symboli ................................100
Dla bezpieczeństwa użytkownika ..............100
Przed pierwszym użyciem ........................104
Wyświetlacz ...........................................105
Ustawianie godziny .................................106
Wybór wstępny czasu ..............................106
Wskazówki dotyczące wody ......................107
Spuszczanie wody ...................................107
Wytwarzanie kostek lodu ..........................108
Czyszczenie i pielęgnacja ........................110
Usuwanie błędów ....................................111
Warunki gwarancji...................................112
Utylizacja / ochrona środowiska ................112
Service ..................................................21
Page 6
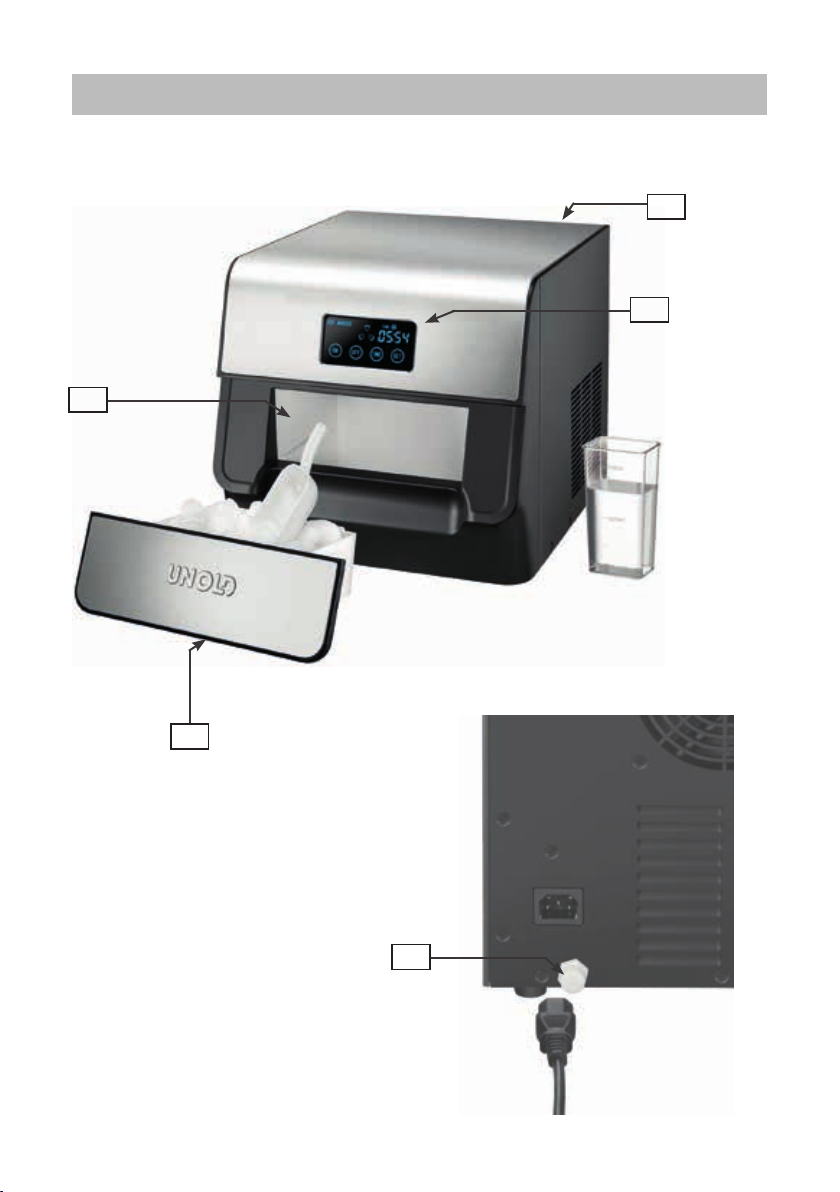
EINZELTEILE
3
1
2
4
5
Page 7

EINZELTEILE
D Ab Seite 8
1 Gehäuse
2 Display
3 Wassertank
4 Eisbehälter
5 Restwasserablauf (Geräterückseite)
GB Page 22
1 Housing
2 Display
3 Water tank
4 Ice container
5 Residual water drain
F Page 35
1 Carter
2 Affichage
3 Réservoir d‘eau
4 Réservoir à glaçons
5 Niveau d’eau restante
NL Pagina 48
1 Behuizing
2 Display
3 Watertank
4 IJsbak
5 Afloop voor restwater
I Pagina 61
1 Custodia
2 Display
3 Serbatoio dell’acqua
4 Contenitore del ghiaccio
5 Scarico dell’acqua residua
E Página 74
1 Carcasa
2 Pantalla
3 Recipiente de agua
4 Recipiente de hielo
5 Salida del agua residual
CZ Strany 87
1 Těleso
2 Displej
3 Nádrž na vodu
4 Zásobník ledu
5 Odtok zbytkové vody
PL Strony 100
Obudowa
1
Display
2
Zbiornik na wodę
3
Zbiornik na lód
4
Drenaż nadmiaru wody
5
Page 8
BEDIENUNGSANLEITUNG MODELL 48955
TECHNISCHE DATEN
Leistung: 150 W, 220–240 V~, 50 Hz
Maße: Ca. 29,5 x 35,0 x 29,0 cm (LxB/TxH)
Zuleitung: Ca. 120 cm
Gewicht: Ca. 9,8 kg
Gehäuse: Kunststoff, schwarz/Edelstahl gebürstet
Wassertank: 1,5 Liter Wasservolumen
Ausstattung: LCD-Display, Zeitvorwahl-Funktion, Uhrzeit-Anzeige, Signalton
bei vollem Eiswürfelbehälter sowie bei leerem Wassertank, bis zu
60 Eiswürfel in 1 Stunde, Fassungsvermögen Eiswürfelbehälter
ca. 600 g
Zubehör: Bedienungsanleitung, Eisschaufel, Messbecher
Änderungen und Irrtümer in Ausstattungsmerkmalen, Technik, Farben und Design
vorbehalten
SYMBOLERKLÄRUNG
Dieses Symbol kennzeichnet eventuelle Gefahren, die Verletzungen
nach sich ziehen können oder zu Schäden am Gerät führen.
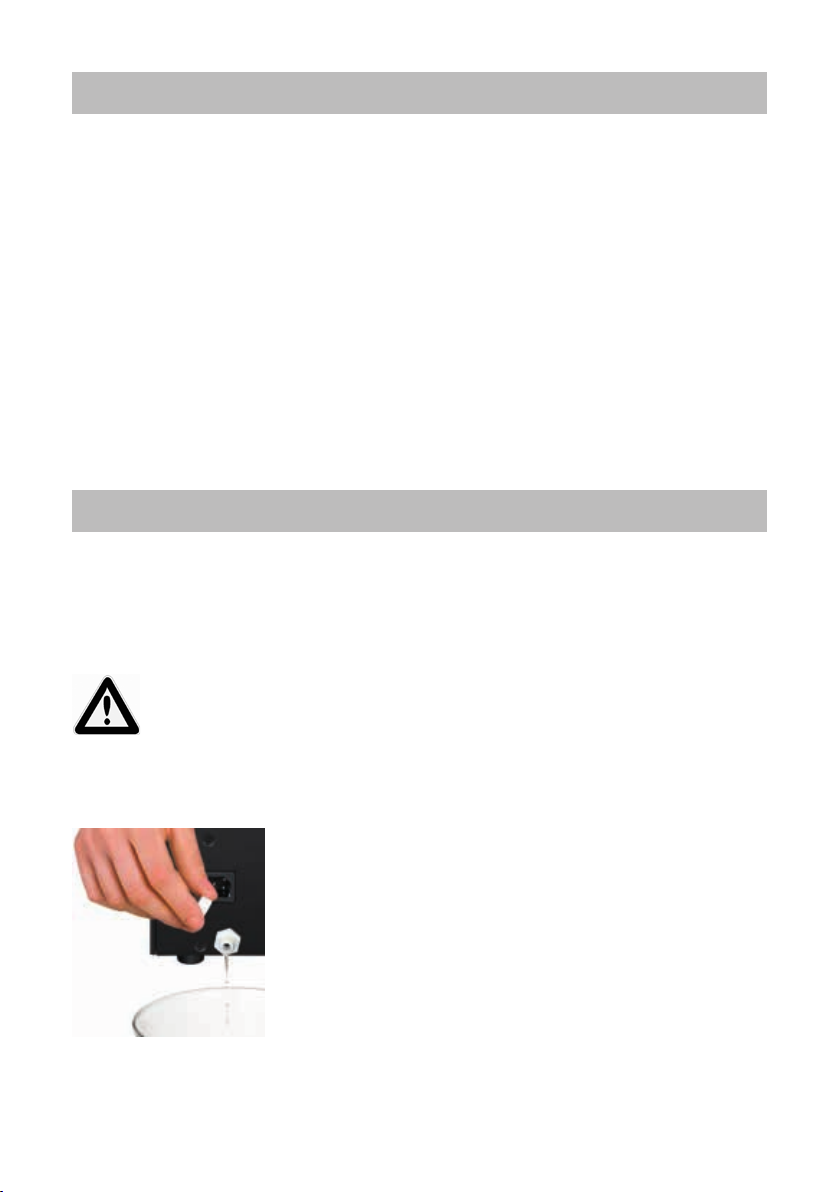
Dieses Symbol weist auf eine eventuelle Brandgefahr hin.
Dieses Symbol weist Sie auf eine eventuelle Verbrennungsgefahr hin.
Gehen Sie hier immer besonders achtsam vor.
SICHERHEITSHINWEISE
Bitte lesen Sie die folgenden
Anweisungen und bewahren Sie
diese auf.
Personen im Haushalt
1. Das Gerät kann von Kindern
ab 8 Jahren und von Perso
nen mit verringerten physischen, sensorischen oder
mentalen Fähigkeiten oder
8
Mangel an Erfahrung und/
oder Wissen benutzt wer
den, wenn sie beaufsichtigt werden oder bezüglich
des sicheren Gebrauchs des
Gerätes unterwiesen wurden
und die daraus resultieren
den Gefahren verstanden
haben. Das Gerät ist kein
Page 9

Spielzeug. Das Säubern und
die Wartung des Geräts dür
fen von Kindern nur unter
Aufsicht durchgeführt wer
den.
2. Kinder unter 3 Jahren soll
ten dem Gerät fernbleiben
oder durchgehend beauf
sichtigt werden.
3. Kinder zwischen 3 und 8
Jahren sollten das Gerät nur
dann ein- und ausschalten,
wenn es sich in seiner vor
gesehenen normalen Bedienungsposition befindet, sie
beaufsichtigt werden oder
bezüglich des sicheren
Gebrauchs unterwiesen wur
den und die daraus resultierenden Gefahren verstanden
haben. Kinder zwischen 3
und 8 Jahren sollten das
Gerät weder anschließen
noch bedienen, säubern
oder warten.
4. An einem für Kinder unzu
gänglichen Ort aufbewahren.
Anforderungen an den Aufstellort
und bei der Bedienung des Gerätes
5. Gerät nur an Wechselstrom
mit Spannung gemäß Typen
-
schild anschließen.
6. Dieses Gerät darf nicht mit
einer externen Zeitschaltuhr
oder einem Fernbedienungs
-
system betrieben werden.
7. Tauchen Sie das Gerät oder
die Zuleitung keinesfalls in
Wasser oder andere Flüssig
-
keiten ein.
8. Das Gerät und die Zuleitung
dürfen nicht in der Spülma
-
schine gereinigt werden.
9. Das Gerät ist ausschließlich
für den Haushaltsgebrauch
oder ähnliche Verwendungs
-
zwecke bestimmt, z. B.
Teeküchen in Geschäf
ten, Büros oder sonstigen
Arbeitsstätten,
Verwendung durch Gäste in
Hotels, Motels oder sonsti
gen Beherbergungsbetrieben,
in Privatpensionen oder
Ferienhäusern.
10. Das Gerät bzw. die Zuleitung
niemals mit nassen Händen
berühren.
11. Stellen Sie das Gerät aus
Sicherheitsgründen niemals
auf heiße Oberflächen, ein
Metalltablett oder einen nas
-
sen Untergrund.
12. Das Gerät oder die Zuleitung
dürfen nicht in der Nähe von
Flammen betrieben werden.
13. Benutzen Sie den Eiswür
felbereiter stets auf einer
freien, ebenen Oberfläche.
14. Halten Sie mindestens
15 cm Abstand zu ande
-
9
Page 10

ren Gegenständen, um eine
ausreichende Belüftung des
Gerätes zu gewährleisten.
15. Verwenden Sie keine elektri
schen Geräte im Inneren des
Gerätes, es sei denn, diese
wurden vom Hersteller emp
fohlen.
16. Achten Sie darauf, dass
die Zuleitung nicht über
den Rand der Arbeitsfläche
hängt, da dies zu Unfällen
führen kann, wenn z. B.
Kleinkinder daran ziehen.
17. Der Eiswürfelbereiter darf
nicht im Freien benutzt oder
gelagert werden.
18. Das Gerät darf nur nach ord
nungsgemäßem Zusammenbau benutzt werden.
19. Füllen Sie nur klares, kaltes
Wasser in den Wassertank.
20. Führen Sie keine Gegen
stände in das Innere des
Gerätes ein, um Verletzun
gen zu vermeiden.
21. Lassen Sie das Gerät nach
dem Auspacken mindestens
zwei Stunden stehen, bevor
Sie es in Betrieb nehmen,
um Schäden am Kompressor
zu vermeiden.
22. Schalten Sie das Gerät nicht
zu oft hintereinander ein und
aus, da dies dem Kompres
-
sor schaden kann. Das Gerät
sollte deshalb mindestens
drei Minuten lang in Betrieb
sein.
23. Schalten Sie das Gerät aus
und ziehen Sie den Netzste
cker, bevor Sie es bewegen,
um Schäden am Gerät zu
vermeiden.
24. Das Gerät darf nicht mit
Zubehör anderer Hersteller
oder Marken benutzt wer
den, um Schäden zu vermeiden.
25. Nach Gebrauch sowie vor
dem Reinigen den Netz
stecker aus der Steckdose
ziehen. Das Gerät niemals
unbeaufsichtigt lassen,
wenn der Netzstecker einge
steckt ist.
26. Reinigen Sie das Gerät nach
jedem Gebrauch.
27. Versuchen Sie nie, das Gerät
selbst zu reparieren, da
Gefahr durch Stromschlag
besteht.
28. Prüfen Sie regelmäßig
das Gerät, den Stecker
und die Zuleitung auf Ver
schleiß oder Beschädigungen. Bei Beschädigung des
Anschlusskabels oder ande
rer Teile senden Sie das
Gerät bitte zur Überprüfung
und Reparatur an unseren
Kundendienst. Unsachge
-
10
Page 11
mäße Reparaturen können
zu erheblichen Gefahren für
den Benutzer führen und
haben den Ausschluss der
Garantie zur Folge.
29. Wenn die Anschlussleitung
dieses Gerätes beschädigt
Öffnen Sie auf keinen Fall das Gehäuse des Gerätes. Es besteht
die Gefahr eines Stromschlages.
Lassen Sie das Gerät nach dem Auspacken bitte mindestens
zwei Stunden mit geöffnetem Eisbehälter stehen, bevor Sie es
in Betrieb nehmen. Das Kühlmittel im Gerät muss sich erst ab
senken, da sonst der Kompressor beschädigt werden kann.
Füllen Sie ausschließlich reines Trinkwasser in das Gerät. Ver
wenden Sie niemals Wasser mit Zusätzen oder anderen flüssigen Lebensmitteln. Diese verstopfen die Leitungen im Gerät und
können das Gerät beschädigen.
Warnung: Lagern Sie keine explosiven Stoffe wie Sprühdosen
mit entzündlichen Treibgasen in diesem Gerät.
wird, muss sie durch den
Hersteller oder seinen Kun
dendienst oder eine ähnlich
qualifizierte Person ersetzt
werden, um Gefährdungen
zu vermeiden.
-
-
Halten Sie Lüftungsöffnungen an der Geräteabdeckung und
innerhalb des Geräts frei von Hindernissen.
Benutzen Sie keine anderen mechanischen Vorrichtungen oder
Hilfsmittel zur Beschleunigung des Abtauvorgangs als die vom
Hersteller empfohlenen.
Beschädigen Sie nicht den Kältekreislauf.
Benutzen Sie keine elektrischen Geräte innerhalb des
Lebensmittelfaches des Geräts, sofern sie nicht vom Hersteller
empfohlen wurden.
Der Kompressor kann im Betrieb sehr heiß werden –
Verbrennungsgefahr!
Der Hersteller übernimmt keine Haftung bei fehlerhafter Montage, bei unsachgemäßer oder fehlerhafter
Verwendung oder nach Durchführung von Reparaturen durch nicht autorisierte Dritte.
11
Page 12

VOR DEM ERSTEN BENUTZEN
Achten Sie beim Auspacken und Entfernen der Verpackung darauf, dass
das Gerät nicht um mehr als 45 ° gekippt wird, da sonst der Kompressor im
Gerät beschädigt werden kann.
1. Entfernen Sie alle Verpackungsmaterialien und ggf. Transportsicherungen. Halten Sie Verpackungsteile von Kindern fern
- Erstickungsgefahr!
2. Prüfen Sie, ob alle aufgeführten
Zubehörteile vorhanden sind.
3. Reinigen Sie alle Teile mit einem
feuchten Tuch, wie im Kapitel
„Reinigen und Pflegen“ beschrieben.
4. Prüfen Sie, ob alle Teile ordnungsgemäß zusammengebaut
sind und das Gerät stabil und
waagrecht steht.
5. Prüfen Sie, ob der Restwasserablauf an der Geräterückseite durch
die Verschlusskappe geschlossen
ist.
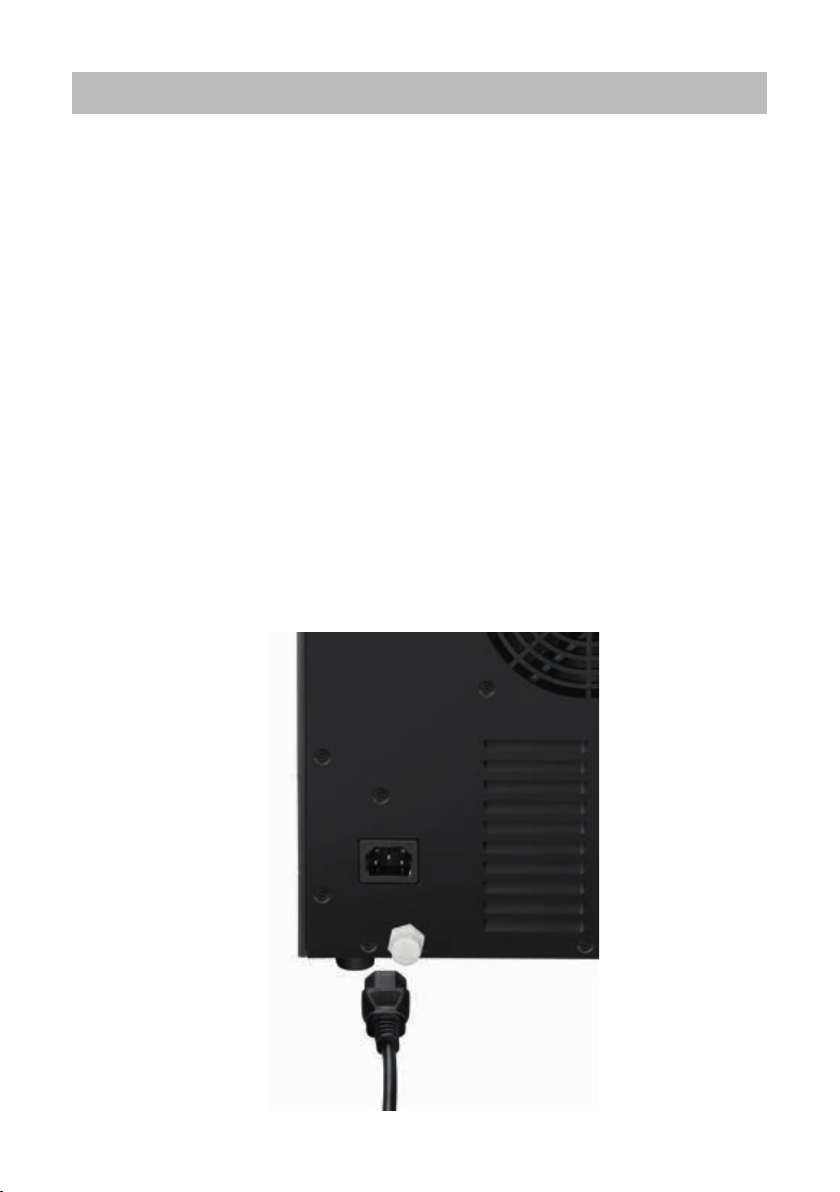
6. Schließen Sie die Zuleitung an
der Geräterückseite an.
7. Schließen Sie das Gerät mittels
der Zuleitung an das Stromnetz
(220–240 V~, 50 Hz) an.
12
Page 13
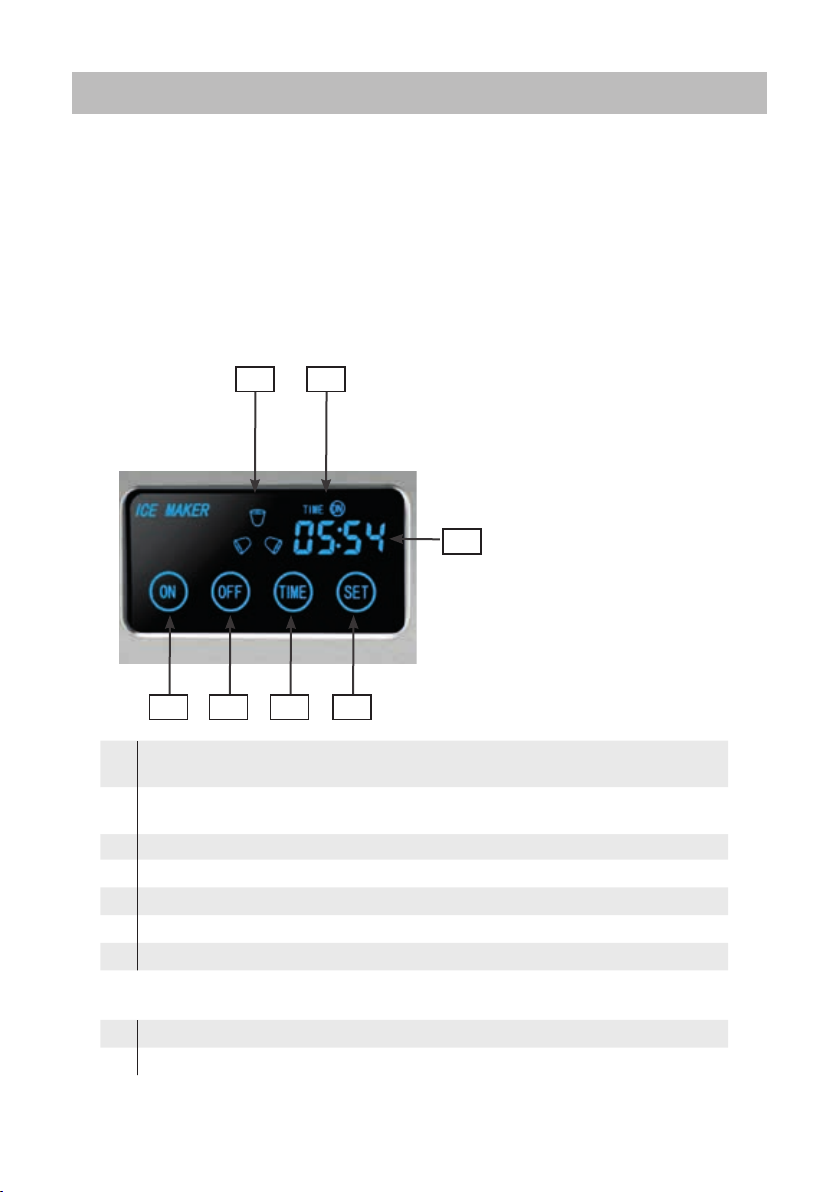
DISPLAY/BEDIENELEMENT
Ihr neuer Eiswürfelbereiter verfügt über ein „Touchscreen“-Bedienelement. Das
bedeutet, dass alle Einstellungen am Gerät direkt über das Display vorgenommen
werden. Tippen Sie hierfür leicht auf die gewünschte Taste. Beachten Sie
dabei, die Einstellungen über die Tasten zügig vorzunehmen. Wenn Sie länger
als 3 Sekunden mit einem Tastendruck warten, wird die aktuelle Eingabe
abgebrochen und das Gerät kehrt in den ursprünglichen Zustand zurück. Bis
dahin vorgenommene Einstellungen werden jedoch gespeichert.
1 2
3
7
6 5 4
1 Symbol dreht sich: Eiswürfel werden hergestellt
Symbol blinkt: Störung
2 TIME ON Eingestellte Startzeit
TIME OFF Eingestellte Ausschaltzeit
3 Zeitanzeige
4 SET Uhrzeit oder Zeitvorwahl ein- oder ausschalten
5 TIME Uhrzeit oder Zeitvorwahl anzeigen
6 OFF Eiswürfelherstellung beenden oder unterbrechen
7 ON Eiswürfelherstellung beginnen
Nicht abgebildet:
8 Symbol Behälter Eiswürfelbehälter voll
9 Symbol Wasserhahn Wassertank leer
13
Page 14

UHRZEIT EINSTELLEN
1. Drücken Sie einmal die Taste
„TIME“ auf dem Display, um die
Stunden einzustellen: Drücken
Sie hierfür nun so lange die
Taste „SET“, bis die gewünschte
Uhrzeit in Stunden erreicht ist.
2. Um die Minuten einzustellen,
drücken Sie zweimal die Taste
„TIME“ und anschließend so
ZEITVORWAHL
Zeitvorwahl einstellen
Einschaltzeit:
1. Drücken Sie die Taste „TIME“
dreimal, um die Stunden
mittels der Taste „SET“
einzustellen, bzw. viermal,
um die Minuten einzustellen.
Warten Sie anschließend fünf
Sekunden, bis das Display in der
Grundeinstellung ist. Drücken Sie
nun die Taste „SET“ dreimal. Im
Display wird oben rechts „TIME“,
„ON“ und „OFF“ angezeigt.
Abschaltzeit
2. Drücken Sie die Taste „TIME“
fünfmal, um die Stunden
mittels der Taste „SET“
einzustellen, bzw. sechsmal,
um die Minuten einzustellen.
Warten Sie anschließend fünf
Sekunden, bis das Display in der
Grundeinstellung ist. Drücken Sie
lange die Taste „SET“, bis die
gewünschte Uhrzeit in Minuten
erreicht ist.
3. Drücken Sie die Taste „TIME“,
um die eingestellte Uhrzeit zu
speichern.
nun die Taste „SET“ dreimal. Im
Display wird oben rechts „TIME“,
„ON“ und „OFF“ angezeigt.
Zeitvorwahl überprüfen
3. Drücken Sie die Taste „TIME“
mehrmals hintereinander. Die
jeweils eingestellten Zeiten
werden angezeigt.
Zeitvorwahl ein- oder ausschalten
4. Drücken Sie die Taste „SET“, um
die Zeitvorwahl einzuschalten.
Zum Ausschalten der Zeitvorwahl
müssen Sie erneut die Taste
„SET“ so lange drücken, bis die
Symbole „ON“ und „OFF“ oben
rechts im Display erlöschen.
14
Page 15
HINWEISE ZUM WASSER
1. Bitte verwenden Sie ausschließlich Trinkwasser, um Eiswürfel
herzustellen. Verwenden Sie
keine Zusätze, Aromastoffe oder
Ähnliches, diese können das
Gerät verunreinigen. Das verwendete Wasser sollte nicht kühler als
7 °C und nicht wärmer als 35 °C
sein. Zudem erzielen Sie die besten Resultate, wenn das Gerät in
einer Umgebungstemperatur von
15 °C bis maximal 38 °C arbeitet.
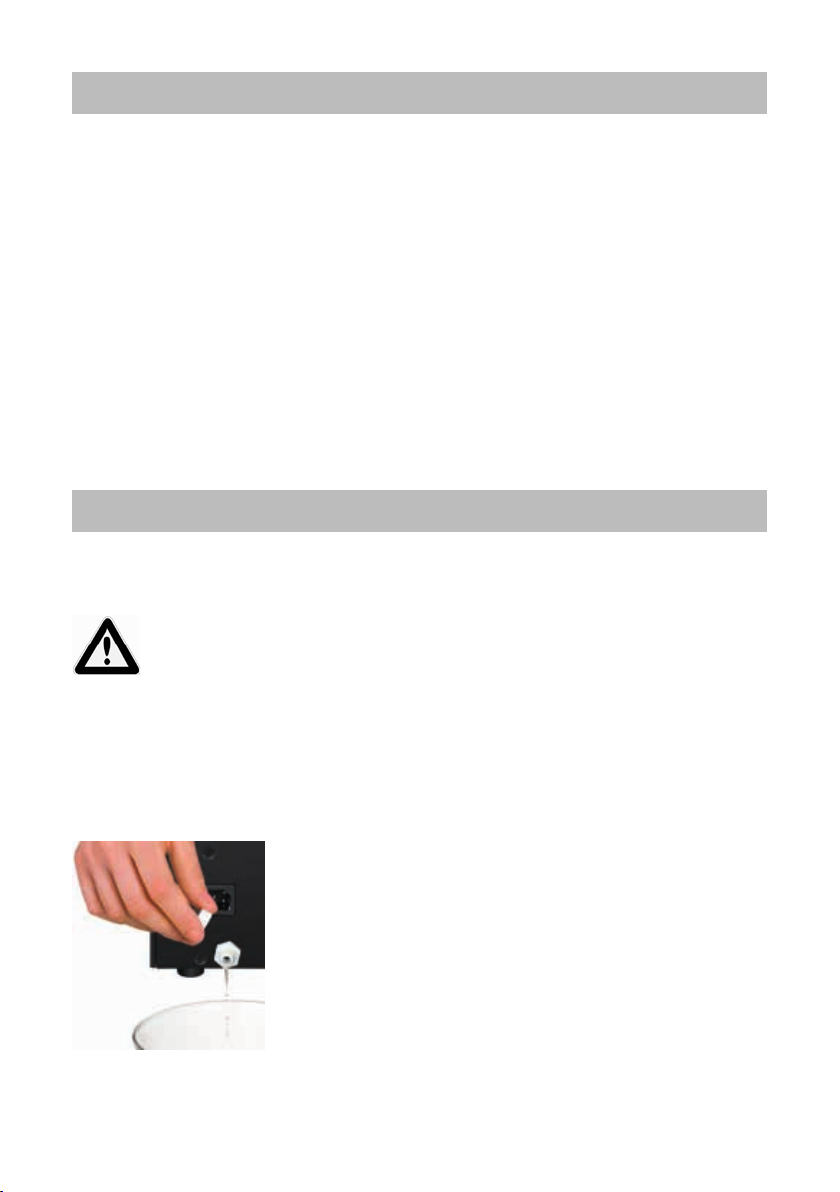
WASSER ABLAUFEN LASSEN
1. Möchten Sie das eingefüllte Wasser wieder aus dem Gerät herauslaufen lassen, gehen Sie bitte wie
folgt vor:
Schalten Sie das Gerät aus und
ziehen Sie den Stecker aus der
Steckdose.
2. Halten Sie das Gerät über eine
ausreichend große Schüssel oder
die Küchenspüle oder
stellen Sie es
an die Kante
der Arbeitsfläche.
3. Entfernen Sie den
Verschluss am
2. Tipp: Im Regelfall stellt das Gerät
leicht trübe Eiswürfel her, was
jedoch die Qualität der Eiswürfel
nicht beeinträchtigt. Dies liegt am
besonders schnellen Gefriervorgang. Um kristallklare Eiswürfel
zu erhalten, verwenden Sie Trinkwasser, welches zuvor abgekocht
und abgekühlt wurde.
Restwasserablauf (5) hinten am
Gerät gegen den Uhrzeigersinn.
4. Warten Sie, bis das Wasser ganz
aus dem Gerät gelaufen ist und
verschließen Sie dann den Wasserauslauf wieder.
5. Achten Sie hierbei darauf, das
Gerät nicht zu sehr zu kippen, um
Schäden am Kompressor zu vermeiden.
15
Page 16
BEDIENEN
1. Achtung: Die ersten mit dem Gerät
hergestellten Eiswürfel sollten
nicht verzehrt werden. Bitte
entsorgen Sie diese Eiswürfel,
da ggf. Produktionsrückstände
enthalten sein können.
2. Bereiten Sie das Gerät vor, wie
unter „Vor dem ersten Benutzen“
beschrieben.
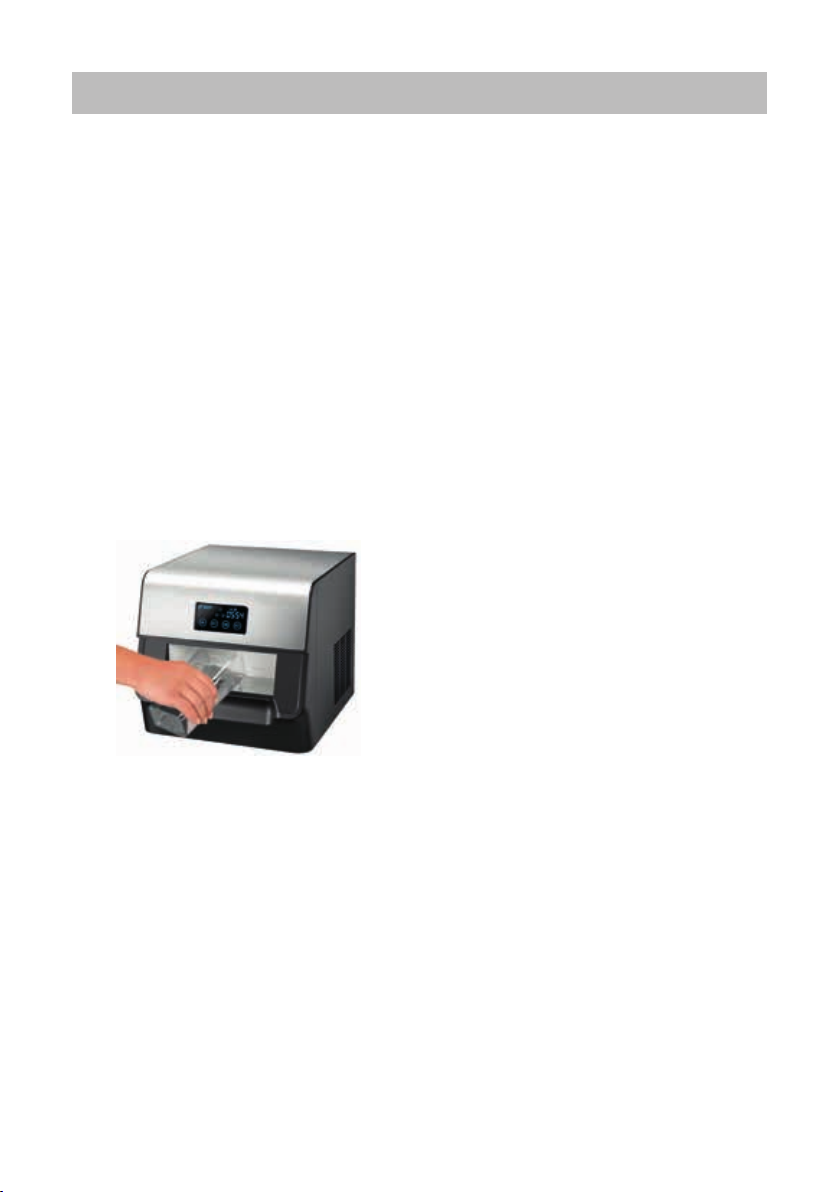
3. Entfernen Sie den Eisbehälter
(4), indem Sie diesen nach vorne
aus dem Gerät ziehen.
4. Füllen Sie frisches, klares Wasser
in den mitgelieferten Messbecher.
5. Gießen Sie das Wasser in den
Wassertank (siehe Abbildung).
Es dürfen maximal 1,5 l Wasser
eingefüllt werden. Bitte beachten
Sie die entsprechende Minimumund Maximum-Markierung an der
linken Seite im Wassertank.
6. Füllen Sie nicht mehr Wasser
als bis zur Max-Markierung ein,
um zu vermeiden, dass Wasser
herausläuft.
7. Schieben Sie den Eisbehälter
wieder in das Gerät.
8. Drücken Sie die Taste „ON“, um
die Eiswürfelherstellung sofort zu
starten. Wenn Sie die Zeitvorwahl
aktiviert haben, müssen Sie keine
Taste drücken, das Gerät startet
automatisch zur eingegebenen
Zeit.
9. Das Gerät beginnt, die
Eiswürfel herzustellen. Die
ersten hergestellten Eiswürfel
entsprechen noch nicht der
gewählten Eiswürfelgröße, da
es noch einige Minuten dauert,
bis das Gerät die entsprechende
Betriebstemperatur erreicht hat.
Daher sind die ersten Würfel noch
etwas kleiner.
10. Sollte die Pumpe im Gerät längere
Zeit kein Wasser transportieren,
schalten Sie das Gerät bitte aus
und lassen Sie einige Tropfen
Wasser über den Restwasserablauf
heraustropfen. Starten Sie den
Vorgang dann erneut.
11. Je nach Wasser- und
Umgebungstemperatur sind die
Eiswürfel in ca. 6 bis 18 Minuten
fertig. Hinweis: Zu Beginn der
Eiswürfelherstellung kommt es
aus technischen Gründen vor,
dass die Eiswürfel noch klein oder
unterschiedlich groß sind.
16
Page 17
12. Sie können jederzeit die
Eiswürfelherstellung unter- oder
abbrechen, indem Sie die Taste
„OFF“ drücken.
13. Wenn Sie das Gerät über die
Zeitvorwahl programmiert haben,
müssen Sie keine Taste drücken,
das Gerät beendet die Herstellung
von Eiswürfeln zur eingestellten
Zeit automatisch.
14. Achtung: Wenn Sie den
Vorgang unterbrechen, läuft das
überschüssige Wasser zurück in
den Wassertank. Die Eiswürfel,
die noch am Kühlgestänge
hängen, fallen nach einiger Zeit
in den Eisbehälter und können
dann entnommen werden.
15. Wenn der Eisbehälter voll ist,
leuchtet dieses Symbol (8)
auf und es ertönt ein Signalton.
16. Das Gerät stoppt automatisch die
Eiswürfelherstellung.
17. Entnehmen Sie den Eisbehälter
und leeren Sie diesen. Setzen
Sie den Eisbehälter wieder ein.
Bitte beachten Sie, dass Sie den
Eisbehälter beim Einsetzen in
das Gerät leicht schräg halten
müssen.
18. Fahren Sie dann mit der
Herstellung der Eiswürfel fort.
19. Der Eiswürfelbereiter prüft außerdem automatisch den Wasserstand im Wassertank. Wenn der
Wasserstand zu niedrig ist, leuchtet dieses Symbol (9) auf:
20. Das Gerät stoppt automatisch
die Eiswürfelherstellung. Füllen
Sie Wasser nach, wie oben
beschrieben, und beachten Sie
dabei die MAX-Markierung und
überfüllen Sie das Gerät nicht.
21. Schließen Sie den Eisbehälter
wieder und drücken Sie die Taste
„ON“.
22. Wenn dieses Symbol leuchtet
wird der Wassertank durch
zu große Eiswürfel blockiert.
Schalten Sie das Gerät aus und
warten Sie, bis die Eiswürfel etwas
schmelzen. Fahren Sie dann mit
der Herstellung der Eiswürfel fort
(warten Sie allerdings mindestens
3 Minuten, bevor Sie fortfahren,
um Schäden am Gerät zu
vermeiden).
23. Achten Sie bitte darauf, die
Eiswürfel nicht zu lange im
Eiswürfelbehälter zu lassen, da
diese sonst schmelzen. Wenn
Sie die Eiswürfel nicht gleich
verwenden möchten, lagern Sie
diese im Tiefkühlfach.
24. Lassen Sie den Eisbehälter nach
dem Gebrauch bitte geöffnet
stehen, um die Bildung von Pilzen
oder Bakterien zu vermeiden.
Nach spätestens 24 Stunden
muss das Wasser im Eiswürfelbereiter aus hygienischen
Gründen ausgewechselt werden.
17
Page 18
REINIGEN UND PFLEGEN
Vor dem Reinigen stets das
Gerät ausschalten und den
Stecker aus der Steckdose
ziehen.
1. Das Gerät und die Zuleitung dürfen nicht in Wasser oder eine
andere Flüssigkeit eingetaucht
werden oder in der Spülmaschine
gereinigt werden.
2. Wischen Sie den Eiswürfelbereiter innen und außen mit einem
feuchten Tuch ab. Verwenden Sie
hierfür am besten eine Mischung
aus Wasser, dem etwas haushaltsüblicher Essig zugefügt wurde.
3. Den Eisbehälter können Sie mit
etwas warmem Spülwasser reinigen. Der Eisbehälter ist nicht
spülmaschinengeeignet!
4. Den Wassertank bitte mit einem
feuchten Tuch gründlich reinigen
und anschließend mit einem fusselfreien Tuch trocknen.
5. Verwenden Sie keine scharfen
Scheuermittel, Stahlwolle, metallischen Gegenstände, heißen Reinigungsmittel oder Desinfektionsmittel.
6. Lassen Sie den Eisbehälter nach
dem Gebrauch offen stehen, um
die Bildung von Pilzen oder Bakterien zu vermeiden.
7. Gerät und Anschlussstecker müssen vollkommen trocken sein,
bevor das Gerät wieder benutzt
werden darf.
8. Bewahren Sie den vollständig
getrockneten Eiswürfelbereiter an
einem trockenen und sicheren Ort
auf, um ihn vor Staub, Stoß, Hitze
und Feuchtigkeit zu schützen.
18
Page 19

FEHLER BEHEBEN
Fehler Ursache Lösung
Der Kompressor brummt
sehr laut.
Es leuchtet keine Kontrollleuchte, wenn Sie
den Stecker in die
Steckdose stecken.
Eiswürfel kleben aneinander
Das Symbol
leuchtet
Voltzahl zu niedrig. Schalten Sie das Gerät
aus und prüfen Sie, ob
das Gerät an einer 220–
240 V~-Steckdose angeschlossen ist.
Das Gerät ist nicht richtig angeschlossen.
Prüfen Sie, ob der Stecker richtig in die Steckdose gesteckt wurde.
Ein Bauteil ist defekt. Nehmen Sie Kontakt zu
unserem Kundenservice
auf.
Zu kaltes Wasser
Zu kühle Umgebungstemperatur
Zu große Eiswürfel
blockieren den Wassertank
Füllen Sie lauwarmes
Wasser in den Wassertank.
Schalten Sie das Gerät aus und warten Sie,
bis die Eiswürfel etwas
schmelzen. Fahren Sie
dann mit der Herstellung
der Eiswürfel fort.
19
Page 20
GARANTIEBESTIMMUNGEN
Wir gewähren auf unsere Geräte eine Garantie von 24 Monaten, bei gewerblichem Gebrauch 12 Monate, ab dem Kaufda-
tum für Schäden, die bei bestimmungsgemäßem Gebrauch nachweislich auf Werksfehler zurückzuführen sind. Innerhalb
der Garantiezeit beheben wir Material- und Herstellungsfehler nach unserem Ermessen durch Reparatur oder Umtausch.
Unsere Garantieleistungen gelten ausschließlich für in Deutschland und Österreich verkaufte Geräte. Bei anderen Ländern
wenden Sie sich bitte an den zuständigen Importeur. Geräte, für die eine Mängelbeseitigung beansprucht wird, senden Sie
bitte zusammen mit einer Kopie des maschinell erstellten Kauf belegs, aus dem das Kaufdatum ersichtlich sein muss, sowie
einer Fehlerbeschreibung gut verpackt und freigemacht an unseren Kundendienst. Im Garantiefall werden dem Kunden in
Deutschland und Österreich entstandene Versandkosten zurückerstattet. Von der Garantie ausgeschlossen sind Schäden
durch Verschleiß, unsachgemäße Handhabung und Nichteinhaltung der Wartungs- und Pflegeanweisungen. Der Garantiean-
spruch erlischt, wenn Reparaturen oder Eingriffe am Gerät von dritter Stelle vorgenommen werden. Eventuelle Ansprüche des
Endverbrauchers gegenüber dem Verkäufer oder Händler werden durch diese Garantie nicht eingeschränkt.
ENTSORGUNG / UMWELTSCHUTZ
Unsere Geräte werden auf hohem Qualitätsniveau für eine lange Nutzungsdauer her ge stellt. Regelmäßige
Wartung und fachge rechte Reparaturen durch unseren Kunden dienst können die Nutzungsdauer des Gerätes
verlängern. Wenn ein Gerät defekt und nicht mehr zu reparieren ist, beachten Sie bitte: Dieses Produkt darf
nicht zusammen mit dem normalen Hausmüll entsorgt werden. Sie müssen dieses Produkt an einer aus-
gewiesenen Sammelstelle zum Recycling von elektrischen oder elektronischen Geräten ab liefern. Durch das
separate Sammeln und Recyceln von Abfallprodukten helfen Sie mit, die natürlichen Ressourcen zu schonen
und stellen sicher, dass das Produkt in gesundheits- und umweltverträglicher Weise entsorgt wird.
INFORMATIONEN FÜR DEN FACHHANDEL
Hiermit erklärt die UNOLD AG, dass sich der Eiswürfelbereiter 48955 in Übereinstimmung mit den
grundlegenden Anforderungen der europäischen Richtlinie für elektromagnetische Verträglichkeit
(2014/30/EU) und der Niederspannungsrichtlinie (2014/35/EC) bendet.
Die Übereinstimmung mit den Regularien bezieht sich auf den Tag der Erstellung dieser Erklärung.
Hockenheim, 18.1.2013
UNOLD AG, Mannheimer Straße 4, 68766 Hockenheim
Diese Anleitung kann im Internet unter www.unold.de als pdf-Datei heruntergeladen werden.
Verwendetes Kühlmittel: R600a
20
Page 21

SERVICE-ADRESSEN
DEUTSCHLAND
Kundendienst
Telefon +49 (0) 62 05/94 18-27
Mannheimer Straße 4
68766 Hockenheim
Sie möchten innerhalb der Garantiezeit ein Gerät zur Reparatur einsenden? Auf unserer
Internetseite www.unold.de/ruecksendung können Sie sich einen Rücksendeschein ausdrucken,
um damit das Paket kostenlos bei der Post abzugeben (nur für Einsendungen aus Deutschland
und Österreich).
SCHWEIZ ÖSTERREICH
Telefax +49 (0) 62 05/94 18-22
E-Mail service@unold.de
Internet www.unold.de
MENAGROS AG
Hauptstr. 23
CH 9517 Mettlen
Telefon +41 (0) 71 6346015
Telefax +41 (0) 71 6346011
E-Mail info@bamix.ch
Internet www.bamix.ch
DEC
Digital Electronic Center Service GmbH
Kelsenstraße 2
A-1030 Wien
Telefon +43 (0) 1/9616633-0
Telefax +43 (0) 1/9616633-22
E-Mail office@decservice.at
Internet www.decservice.at
POLEN TSCHECHIEN
Quadra-Net
Dziadoszanska 10
61-248 Poznań
Internet www.quadra-net.pl
befree.cz s.r.o.
Škroupova 150
537 01 Chrudim
Telefon +42 0 46 46 01 881
E-Mail obchod@befree.cz
21
Page 22
INSTRUCTIONS FOR USE MODEL 48955
TECHNICAL SPECIFICATIONS
Power: 150 W, 220–240 V~, 50 Hz
Dimensions: Approx. 29.5 x 35.0 x 29.0 cm (LxW/DxH)
Power cord: Approx. 120 cm
Weight: Approx. 9.8 kg
Housing: Plastic, black / stainless steel, brushed
Water tank: 1.5 litre water volume
Features: LCD display, timer function, time display, signal tone when ice cube
container is full, or water tank is empty, up to 60 ice cubes per hour,
ice cube container capacity approx. 600 g
Accessories: Operating instructions, ice scoop, measuring cup
Equipment features, technology, colours and design are subject to change without notice. Errors and
omissions excepted
EXPLANATION OF SYMBOLS
This symbol denotes a possible hazard which could cause injury or
damage to the appliance.
Caution: risk of fire. This symbol indicates a possible fire hazard.
This symbol indicates a potential burning hazard. Please be especially
careful at all times here.
SAFETY INFORMATION
Please read the following
instructions and keep them on
hand for later reference.
Instructions for persons in the
household
1. The appliance can be used
by children 8 years and older
and by persons with limited
physical, sensory or mental
abilities or with lack of expe
rience or limited knowledge,
if they are supervised by a
person who is responsible
22
for their safety or they have
been instructed with regard
to safe use of the appli
ance and have understood
the dangers that can result
from use of the appliance.
The appliance is not a toy.
Children should only clean
and maintain the appliance
under supervision.
2. Children under the age of 3
should stay away from the
Page 23

appliance or they must be
under constant supervision.
3. Children between the ages
of 3 and 8 should only
switch the appliance on and
off when it is in its normal
intended operating position,
they are supervised or have
been instructed relative to
safe use of the appliance
and have understood the
hazards that can result from
using the product. Children
between 3 and 8 years of
age should neither connect
or operate the appliance, nor
should they clean or main
-
tain the appliance.
4. Keep the appliance out of
the reach of children.
Requirements imposed on the setup location and for the operation
of the appliance
5. Only connect the appliance
to an AC power supply with
voltage corresponding to the
voltage specified on the rat
-
ing plate.
6. This appliance must not be
operated with an external
timer or a remote control
system.
7. Never immerse the appli
ance or the power cord in
water or other liquids.
8. Do not clean the appliance or
power cord in a dishwasher.
9. The appliance is intended
for household use only, or for
similar areas of use, such as,
kitchenettes in businesses,
offices or other workplaces,
Use by guests in hotels,
motels or other lodgings,
in private guest houses or
holiday homes.
10. Never touch the appliance or
power cord with wet hands.
11. For safety reasons, never
place the appliance on hot
surfaces, a metal tray or on
a wet surface.
12. Do not place the appliance
or power cord near open
flames during operation.
13. Always use the ice cube
maker on a level, unclut
-
tered surface.
14. Maintain a distance of at
least 15 cm from other
objects to ensure sufficient
ventilation of the appliance.
15. Do not use any electrical
devices in the interior of the
appliance, unless they have
been recommended by the
manufacturer.
16. Ensure that the power cord
does not hang over the edge
of the counter top or table,
since this can cause acci
dents, for example if small
children pull on the cord.
23
Page 24

17. Do not operate or store the
ice cube maker outdoors.
18. Use the appliance only after
it has been properly assem
-
bled.
19. Fill the water tank only with
clear, cold water.
20. Do not insert any objects in
the interior of the appliance,
to avoid injuries.
21. After unpacking, do not
operate the appliance for at
least two hours, to prevent
damage to the compressor.
22. Do not switch the appliance
on and off repeatedly, since
this can damage the com
pressor. Therefore, the appliance should be operated for
at least three minutes.
23. Switch off the appliance and
unplug it from the power
supply before moving it, to
prevent damage to the appli
-
ance.
24. To avoid damage, do not use
the appliance with accesso
ries of other manufacturers
or brands.
25. Unplug the mains plug from
the electrical outlet after use
and before cleaning. Never
leave the appliance unat
tended when the mains plug
is plugged in.
26. Clean the appliance after
every use.
27. Never attempt to repair the
appliance yourself, since
this can result in electric
shock.
28. Check the appliance, the
plug and the power cord reg
ularly for wear or damage.
In case of damage to the
power cord or other parts,
please send the appliance
for inspection and repair to
our customer service depart
ment. Unauthorised repairs
can result in serious hazards
for the user and void the
warranty.
29. If the power cord of this
appliance is damaged, it
must be replaced by the
manufacturer or by the man
ufacturer’s customer service
organisation, or by a person
with similar qualifications,
to prevent hazards.
30. Unplug the appliance from
the power supply after use
and prior to cleaning. Never
leave the appliance unat
tended when it is plugged in
to the power supply.
31. Clean the appliance after
every use.
32. Never attempt to repair the
appliance yourself, since this
can result in electric shock.
33. Check the appliance, the
plug and the power cord reg
-
24
Page 25
ularly for wear or damage. In
case of damage to the power
cord or other parts, please
send the appliance for
inspection and repair to our
after sales service. Unau
34. If the supply cord is dam
aged, it must be replaced
by the manufacturer or its
service agent or a similarly
qualified person in order to
-
avoid a hazard.
thorized repairs can result in
serious risks to the user and
void the warranty.
Never open the housing of the appliance. This can result in
electric shock.
After unpacking, please do not operate the appliance for at
least two hours and open the ice container. The coolant in the
appliance must first settle, otherwise the compressor could be
damaged. Only fill the appliance with clean drinking water. Never
use water with additives or other liquid food products. These
clog the lines in the appliance and can damage the appliance.
Warning: Do not store explosive substances such as aerosol
cans with a flammable propellant in this appliance.
Warning: Keep ventilation openings, in the appliance enclosure
or in the built-in structure, clear of obstruction
-
Warning: Do not use mechanical devices or other means to
accelerate the defrosting process, other than those recommended
by the manufacturer
Warning: Do not damage the refrigerant circuit.
Warning: Do not use electrical appliances inside the food
storage compartments of the appliance, unless they are of the
type recommended by the manufacturer.
The compressor can become extremely hot in operation – danger
of burn injuries!
The manufacturer will not be liable in the event of improper or incorrect use or if repairs are carried out
by unauthorized third parties.
25
Page 26
BEFORE USING THE APPLIANCE FOR THE FIRST TIME
When unpacking the appliance and removing the packaging material, make
sure not to tilt the appliance more than 45°, to prevent damage to the compressor inside the appliance.
1. Remove all packaging materials
and any transport safeguards.
Keep packaging materials away
from children – danger of suffocation!
2. Check whether all listed accessory parts are present.
3. Clean all parts with a damp
cloth, as described in the section
„Cleaning and care“.
4. Check to make sure that all parts
are assembled correctly and the
appliance is stable and level.
5. Check whether the residual water
drain on the rear of the appliance
is closed with the sealing cap.
6. Now connect the power cord to
the back of the appliance.
7. Connect the appliance to the
mains network (220–240 V~,
50 Hz).
8. Press the „On“ button to switch
the appliance on.
26
Page 27

DISPLAY
Your new ice cube maker has a touch screen operating element. This means that
all settings on the device are made directly via the display. To do this, lightly tap
the desired button. In this regard, note that the settings must be made promptly
via the buttons. If you wait for longer than 3 seconds between touching buttons
the current entry will be cancelled and the appliance will revert to its original
status. However, the settings made up to that point in time will be saved.
1 2
3
7
6 5 4
1 Symbol rotates: Ice cubes are being produced
Symbol flashes: Fault
2 TIME ON The currently set start time
TIME OFF The currently set switch-off time
3 Time display
4 SET Set time or timer
5 TIME Display time or timer
6 OFF Switch off the device/end or interrupt the making of ice cubes
7 ON Switch on appliance/start making ice cubes
Without picture:
8 Symbol – container Ice cube container full
9 Symbol – water tap Water tank empty
27
Page 28

SETTING THE TIME
1. Press the „TIME“ button on the
display once to set the hours:
To do this, now press the „SET“
button until the desired time in
hours is reached.
2. To set the minutes, press the
„TIME“ button twice, and then
press the „SET“ button until
TIMER
Setting the timer
Switch-on time:
1. Press the „TIME“ button three
times to set the hours via the
„SET“ button, or four times to set
the minutes via the „SET“ button.
Then wait five seconds until the
display is in home position. Now
press the „SET“ button three
times. In the display, top right,
„TIME“, „ON“ and „OFF“ are
displayed.
Switch-off time
2. Press the „TIME“ button five
times to set the hours via the
„SET“ button, or six times to set
the minutes via the „SET“ button.
Then wait five seconds until the
the desired time in minutes is
reached.
3. Press the „TIME“ button to save
the set time.
display is in home position. Now
press the „SET“ button three
times. In the display, top right,
„TIME“, „ON“ and „OFF“ are
displayed.
Checking the timer
3. Press the „TIME“ button several
times in succession. Each of the
set times will be displayed.
Switching the timer on or off
4. Press the „SET“ button to switch
on the timer. To switch off the
timer, you must again press the
„SET“ button“ until the symbols
„ON and „OFF“ in the top right of
the display go out.
28
Page 29
INSTRUCTIONS CONCERNING THE WATER
1. Please only use drinking water to
produce ice cubes. Do not use any
additives, flavourings or similar
items, such items can contaminate the appliance. The water
used should not be cooler than
7°C and it should not be warmer
than 35°C. In addition, you obtain
the best results when the appliance is working in an ambient
temperature of 15°C to maximum
38°C.
DRAINING WATER
1. To drain the water from the appliance, please proceed as follows:
Switch off the appliance and
unplug it from the electrical
outlet.
2. Hold the appliance over a sufficiently large bowl or the kitchen
sink or place it on the edge of the
countertop.
2. Tip: As a rule the appliance produces slightly opaque ice cubes,
which however does not impair
the quality of the ice cubes. This
is due to the especially fast freezing process. To get crystal clear
ice cubes, use drinking water,
which has been boiled and cooled
beforehand.
3. Remove the cap on the
residual water drain (5) on the
rear of the appliance by turning it
counter clockwise.
4. Wait until the water has drained
completely from the appliance
and then seal the water drain
again.
5. In this process make sure not to
tilt the appliance too far, to prevent damage to the compressor.
29
Page 30

MAKING ICE CUBES
1. Caution: Do not use the first ice
cubes that have been produced
with the appliance. Dispose of
these ice cubes; they may contain
production residues.
2. Prepare the appliance as
described in the section “Before
using the appliance the first
time”.
3. Remove the ice container (4)
from the appliance by pulling it
forward.
4. Fill the provided measuring cup
with fresh, clean water.
5. Pour the water into the water
tank (see illustration). At least a
maximum of 1.8 litres must be
filled into the appliance. Please
pay attention to the respective
minimum and maximum mark on
the left side of the water tank.
6. Do not fill water past the Max
marking to prevent water from
running out.
7. Slide the ice container back into
the appliance.
8. Press the On button to start
making ice cubes immediately.
If you have activated the timer,
you do not need to press any
button; the appliance will start
automatically at the specified
time.
9. The appliance starts to make ice
cubes. The first ice cubes that are
made do not have the selected
size, since it takes several minutes
before the appliance reaches
the right operating temperature.
Therefore, the first ice cubes are
somewhat smaller.
10. If the pump in the appliance
should not transport any water
for a longer period of time, switch
off the appliance, and allow a few
drops of water to drip out via the
residual drain. Then restart the
process.
11. Depending on water and ambient
temperature the ice cubes will be
ready in approx. 6 to 18 minutes.
Note: At the beginning of ice cube
making process, for technical
reasons the ice cubes are still
small and of different sizes.
12. You can interrupt the making of
ice cubes any time by pressing
the „OFF“ button.
13. If you have programmed the
appliance via the timer, you do
not need to press any button, the
30
Page 31

appliance stops making ice cubes
automatically at the set time.
14. Caution: If you interrupt the
process, the excess water runs
back into the water tank. The
ice cubes that are still attached
to the cooling linkage will drop
off into the ice container after a
while, and can then be taken out.
15. When the ice container is full this
symbol (8) lights up and a
signal tone sounds.
16. The appliance automatically stops
making ice cubes.
17. Remove the ice container and
empty it. Insert the ice container
back into the appliance. Please
note that you must hold the ice
container slightly slanted when
inserting it in the appliance.
18. Then proceed the ice cube making
process.
19. In addition, the ice cube maker
automatically checks the water
level in the water tank. If the
water level is too low, this symbol
(9) lights up:
20. The appliance automatically stops
making ice cubes. Top up water as
described above; in this process
pay attention to the MAX mark
and do not overfill the appliance.
21. Close the ice container and press
the „ON“ button.
22. When this symbol lights up
the water tank is blocked due to
overly-large ice cubes. Switch off
the appliance and wait until the ice
cubes have melted slightly. Then
proceed with production of the
ice cubes (however, wait at least
3 minutes before proceeding, to
prevent appliance damage).
23. Please remember not to leave the
ice cubes in the ice container too
long, since they will melt. If you
do not wish to use the ice cubes
right away, you can store them in
the freezer.
24. After use, please leave the ice
cube maker open to prevent the
formation of mould or bacteria.
The water must be changed after 24 hours at the latest, for
reasons of hygiene.
31
Page 32

CLEANING AND CARE
Before cleaning, always turn
off the appliance and unplug it
from the electrical outlet.
1. Do not immerse the appliance
and power cord in water or other
liquids or wash them in the dishwasher.
2. Wipe off the ice cube maker with
a damp cloth inside and out. To
do this, it is best to use a mixture
of water and a little household
vinegar.
3. You can clean the ice container
with a little warm dishwashing
water. The ice container is not
dishwasher-safe!
4. Please clean the water tank thoroughly with a damp cloth and
then dry it with a lint-free cloth.
5. Do not use any abrasive scouring agents, steel wool, metallic
objects, hot cleaning agents or
disinfectants.
6. After use, please leave the ice
cube maker open to prevent the
formation of mould or bacteria.
7. The appliance and power plug
must be completely dry before the
appliance can be operated again.
8. When completely dry, store the
completely dried ice cube maker
in a dry and safe place so that it is
protected from dust, impact, heat
and moisture.
32
Page 33

TROUBLESHOOTING
Problem Cause Solution
The compressor hums
very loudly.
No indicator lamp
lights up when you
plug the appliance into
the wall socket.
Ice cubes stick together
The symbol is illuminated.
The voltage is too low. Switch off the appliance
and check whether it
is connected to a 220240 V~ electrical outlet.
The appliance is not
connected correctly.
Check to make sure that
the plug was inserted
correctly into the wall
socket.
A component is defective.
The water is too cold
The ambient tempera-
Contact our customer
service department.
Fill the water tank with
lukewarm water.
ture is too cool
Ice cubes that are too
large are blocking the
water tank
Switch off the appliance and wait until the
ice cubes have melted
slightly. Then proceed
with the ice cube making
process.
33
Page 34

GUARANTEE CONDITIONS
We grant a 24 months guarantee, and in case of commercial use a 12 months guarantee, starting from the date of purchase
for any damage demonstrably due to manufacturing defects and when the appliance has been used according to its intended
use. Within the warranty period we will remedy defective materials or workmanship through repair or replacement, at our
option. Our warranty terms apply only to appliances sold in Germany and Austria. For other countries, please contact the re-
sponsible importer. In the event of a claim for remedy of defects, please send the appliance to our after sales service, properly
packaged and postage paid, together with a copy of the automatically generated sales receipt, which must show the date of
purchase, and a description of the defect. If the defect is covered by the warranty, the customer will be reimbursed for the
shipping costs only in Germany and Austria. The warranty does not cover damage from normal wear, improper handling and
failure to comply with the maintenance and care instructions. The warranty is void if repairs or modifications are made to the
appliance by third parties. Any claims of the end consumer vis-à-vis the retailer are not limited by this warranty.
WASTE DISPOSAL / ENVIRONMENTAL PROTECTION
Our appliances are produced on a high quality level for a long lifetime. Regular maintenance and expert
repairs by our after-sales service can extend the useful life of the appliance. If an appliance is defective
and repair is not possible we ask you to follow the following instructions for disposal. Do not dispose this
appliance together with your standard household waste. Please bring this product to an approved collection
point for recycling of electric and electronic products. By separate collection and disposal of waste products
you help to protect natural resources and ensure, that the product is disposed in an adequate way to protect
health and environment.
The instruction booklet is also available for download: www.unold.de
Coolant used: R600a
34
Page 35

NOTICE D´UTILISATION MODÈLE 48955
SPÉCIFICATION TECHNIQUE
Puissance : 150 W, 220-240 V~, 50 Hz
Dimensions : env. 29,5 x 35,0 x 29,0 cm (Lxl/pxH)
Câble d’alimentation : env. 120 cm
Poids : env. 9,8 kg
Boîtier : plastique, noir / inox brossé
Réservoir d‘eau : volume d‘eau de 1,5 l
Équipement : écran LCD, fonction de présélection de temps, affichage de l‘heure, signal
Accessoires : mode d‘emploi, pelle à glace, verre doseur
Sous réserve de modifications et d’erreurs concernant les caractéristiques d’équipement, la technique,
les couleurs et le design
EXPLICATION DES SYMBOLES
Ce symbole indique les dangers susceptibles de provoquer des blessures ou des
endommagements de l’appareil.
Ce symbole vous informe d‘un éventuel risque d‘incendie.
Ce symbole indique le risque d’être brûlé. Soyez prudent en utilisant l’appareil.
sonore lorsque le bac à glaçons est plein ou que le réservoir d‘eau est vide,
jusqu‘à 60 glaçons en une heure, contenance du bac à glaçons de 600 g env.
POUR VOTRE SÉCURITÉ
Veuillez lire les indications
suivantes et les conserver.
Personnes dans le foyer
1. L‘appareil peut être utilisé
par des enfants de plus de
8 ans et par des personnes
dont les capacités phy
siques, sensorielles ou intellectuelles sont limitées ou
dont l‘expérience et/ou les
connaissances sont insuffi
santes, si ceux-ci sont surveillés ou s‘ils ont été formés à une utilisation sûre
de l‘appareil et aux dangers
pouvant en résulter. L‘appa
reil n‘est pas un jouet. Le
nettoyage et la maintenance
de l‘appareil peuvent être
exécutés par des clients,
exclusivement sous surveil
lance.
2. Les enfants de moins de 3
ans doivent se tenir loin de
l‘appareil ou être surveillés
en permanence.
3. Les enfants de 3 à 8 ans ne
doivent allumer et éteindre
35
Page 36

l‘appareil que s‘il se trouve
dans sa position d‘utilisa
tion normale prévue, s‘ils
sont surveillés ou s‘ils ont
été informés concernant
la sécurité d‘utilisation et
qu‘ils ont compris les risques
potentiels en résultant. Les
enfants âgés de 3 à 8 ans ne
doivent ni brancher, ni utili
ser, ni nettoyer ou entretenir
-
10. Ne jamais toucher l’appareil
l‘appareil.
4. Conserver hors de portée des
enfants.
11. Pour des raisons de sécurité,
Exigences concernant le lieu
d‘installation et l‘utilisation de
l‘appareil
5. Raccorder exclusivement
l’appareil au courant alter
12. L’appareil ou le câble ne
natif à la tension se conformant au panneau signalétique.
13. Toujours utiliser la machine
6. Cet appareil ne doit pas être
utilisé avec un minuteur
externe ou un système de
14. Maintenir une distance d’au
commande à distance.
7. Ne plonger en aucun cas
l’appareil ou le câble d‘ali
mentation dans de l’eau ou
un autre liquide.
8. L‘appareil et le câble d‘ali
15. Ne pas utiliser de compo
mentation ne doivent pas
être nettoyés au lave-vais
selle.
9. L‘appareil est exclusivement
16. Veiller à ce que le câble ne
destiné à un usage ménager
ou à des fins similaires, par
ex.
une kitchenette dans des
boutiques, des bureaux ou
d‘autres lieux de travail,
à l‘usage des clients dans
des hôtels, motels ou autres
lieux d‘hébergement,
dans des pensions privées ou
des résidences de vacances.
ou son cordon d’alimentation
avec les mains mouillées.
ne mettez jamais l‘appareil
sur des surfaces chaudes, ni
sur une étagère métallique
ni sur un support humide.
doivent pas être utilisés à
proximité de flammes.
à glaçons sur une surface
dégagée et plane.
moins 15 cm avec les autres
objets afin de garantir une
ventilation suffisante de
l‘appareil.
sants électriques à l‘intérieur de l‘appareil, sauf s‘ils
ont été recommandés par le
fabricant.
pende pas par-dessus le
36
Page 37

bord du plan de travail, cela
pouvant provoquer des acci
dents si un enfant tire des-
-
25. Débrancher l’appareil du
sus, par exemple.
17. La machine à glaçons ne doit
pas être utilisée ou stockée à
l’air libre.
18. L‘appareil doit exclusive
ment être utilisé si son
-
26. Nettoyer l‘appareil après
assemblage est conforme.
19. Remplir le réservoir d’eau
27. Ne jamais essayer de réparer
exclusivement avec de l’eau
froide et claire.
20. N’introduire aucun objet
dans l’appareil afin d’éviter
28. Vérifier régulièrement l’usure
des blessures.
21. Une fois l’appareil déballé,
le laisser reposer au moins
deux heures avant de le
mettre en service afin d’évi
ter tout endommagement du
compresseur.
22. Ne pas allumer et éteindre
l’appareil de manière répétée
afin de ne pas endommager
le compresseur. L’appareil
doit donc fonctionner durant
au moins trois minutes d’af
29. Si le câble d‘alimentation de
-
filée.
23. Éteindre l’appareil et
débrancher la prise du sec
teur avant de le déplacer
afin d’éviter d’endommager
l’appareil.
24. L‘appareil ne doit pas être
utilisé avec des accessoires
d‘un autre fabricant ou
d‘une autre marque pour ne
pas risquer de l‘abîmer.
secteur après utilisation
et avant le nettoyage. Ne
jamais laisser l’appareil sans
surveillance lorsque la prise
est branchée.
chaque utilisation.
soi-même l’appareil, car des
risques de choc électrique
existent.
et la détérioration de l’appa
reil, de la prise et du câble.
Si le câble de raccordement
ou d’autres pièces sont abî
més, envoyer l’appareil pour
contrôle et réparation à notre
service après-vente. Toute
réparation non-conforme
peut provoquer des risques
importants pour l’utilisateur
et entraîner l’exclusion de la
garantie.
cet appareil est endommagé,
il doit être remplacé par le
fabricant, son service clien
tèle ou une personne qualifiée similaire, afin d‘éviter
tout danger.
37
Page 38

Ne pas ouvrir le boîtier de l‘appareil. Risque d‘électrocution.
Une fois l’appareil déballé, le laisser reposer au moins
deux heures avant de le mettre en service. Le liquide de
refroidissement contenu dans l’appareil doit d’abord diminuer,
sans quoi le compresseur pourrait être endommagé.
Remplir l‘appareil avec de l‘eau potable pure uniquement. Ne
jamais utiliser de l‘eau avec des additifs ou d‘autres denrées
alimentaires liquides. Cela obturerait les conduites et pourrait
endommager l‘appareil.
Avertissement : Ne stockez aucune substance explosive comme
les bombes aérosols avec gaz propulseur inflammable dans cet
appareil.
Avertissement : Tenez les orifices d‘aération sur le recouvrement
de l‘appareil et à l‘intérieur de celui-ci libres de tout objet.
Avertissement : N‘utilisez aucun autre dispositif mécanique ou
auxiliaire pour l‘accélération du dégel que ceux recommandés
par le fabricant.
Avertissement : N‘endommagez pas le circuit de refroidissement.
Avertissement : N‘utilisez aucun appareil électrique à l‘intérieur
du compartiment à denrées alimentaires de l‘appareil s‘ils n‘ont
pas été recommandés par le fabricant.
Le compresseur peut devenir très chaud en fonctionnement :
risque de brûlures !
Le fabricant n’est nullement responsable en cas d’utilisation irrégulière ou non conforme, ou suite à
l’exécution de réparations par des tiers non autorisés.
38
Page 39

AVANT LA PREMIÈRE UTILISATION
Lors du déballage, veiller à ne pas incliner l’appareil de plus de 45 ° afin
de ne pas endommager le compresseur situé dans l’appareil.
1. Retirer tous les matériaux d‘emballage et, le cas échéant, les
sécurités de transport. Tenir les
éléments d‘emballage hors de
portée des enfants : risque d‘asphyxie !
2. Vérifier si tous les accessoires
énumérés sont présents.
3. Nettoyer toutes les pièces à l’aide
d’un chiffon humide, comme
décrit dans le chapitre « Nettoyage et Entretien ».
4. Vérifier si toutes les pièces sont
unes aux autres et si l’appareil est
stable et horizontal.
5. Vérifier si l‘écoulement d‘eau résiduelle situé sur la face arrière de
l‘appareil est fermé à l‘aide du
capuchon.
6. Raccorder le câble d’alimentation
à la partie arrière de l’appareil.
7. Raccorder l’appareil au réseau
électrique à l’aide du câble d’alimentation (220–240 V~, 50 Hz).
8. Appuyer sur la touche « On » pour
allumer l‘appareil.
correctement assemblées les
ÉCRAN
Votre nouvelle machine à glaçons est dotée d‘un « écran tactile » faisant office
d‘élément de commande. Cela signifie que tous les réglages sur l‘appareil
peuvent être effectués directement sur l‘écran. Pour cela, tapoter légèrement
sur la touche souhaitée. Ce faisant, procéder rapidement aux réglages à l‘aide
des touches. Si vous patientez plus de 3 secondes avant de presser une touche,
la saisie actuelle est interrompue et l‘appareil bascule à nouveau dans son état
initial. Les réglages effectués jusque-là sont cependant sauvegardés.
39
Page 40

1 2
3
7
6 5 4
1 Le symbole tourne : glaçons en cours de préparation
Le symbole clignote : panne
2 TIME ON L‘heure de début actuellement paramétrée
TIME OFF L‘heure d‘arrêt actuellement paramétrée
3 Affichage de l‘heure
4 SET Régler l‘heure ou la présélection de temps
5 TIME Afficher l‘heure ou la présélection de temps
6 OFF Éteindre l‘appareil / Stopper ou interrompre la
production de glaçons
7 ON Allumer l‘appareil / Commencer la production de glaçons
Non illustré:
8 Symbole du réservoir Bac à glaçons plein
9 Symbole du robinet Réservoir d‘eau vide
RÉGLER L‘HEURE
1. Presser une fois la touche
« TIME » sur l‘écran pour régler
les heures : pour cela, presser
maintenant la touche « SET »
jusqu‘à ce que l‘heure souhaitée
ensuite la touche « SET » jusqu‘à
ce que l‘heure souhaitée (en
minutes) soit atteinte.
3. Presser la touche « TIME » pour
sauvegarder l‘heure réglée.
(en heures) soit atteinte.
2. Pour régler les minutes, presser
deux fois la touche « TIME », et
40
Page 41

PRÉSÉLECTION DE LA DURÉE
Régler la présélection de température
Temps de mise en marche :
1. Presser trois fois la touche
« TIME » pour régler les heures
à l‘aide de la touche « SET »
ou quatre fois pour régler les
minutes. Patienter ensuite cinq
secondes jusqu‘à ce que l‘écran
soit en réglage de base. Appuyer
maintenant trois fois sur la touche
« SET ». « TIME », « ON » et
« OFF » sont affichés en haut à
droite de l‘écran.
Temps d‘arrêt
2. Presser cinq fois la touche
« TIME » pour régler les heures
à l‘aide de la touche « SET » ou
six fois pour régler les minutes.
Patienter ensuite cinq secondes
jusqu‘à ce que l‘écran soit
en réglage de base. Appuyer
maintenant trois fois sur la
touche « SET ». « TIME », « ON »
et « OFF » sont affichés en haut à
droite de l‘écran.
Vérifier la présélection de temps
3. Presser la touche « TIME »
plusieurs fois d‘affilée. Les durées
réglées respectives sont affichées.
Allumer ou éteindre la présélection de
temps
4. Presser la touche « SET » pour
activer la présélection de temps.
Pour désactiver la présélection
de temps, vous devez presser une
nouvelle fois la touche « SET »
jusqu‘à ce que les symboles
« ON » et « OFF » en haut à droite
de l‘écran s‘éteignent.
41
Page 42

REMARQUES CONCERNANT L‘EAU
1. Veuillez utiliser exclusivement de
l‘eau potable pour produire des
glaçons. N‘utiliser aucun additif,
arôme ou ingrédient analogue. Ils
pourraient encrasser l‘appareil.
L‘eau utilisée ne doit pas être à
une température inférieure à 7°C
et supérieure à 35°C. De plus,
vous obtiendrez les meilleurs
résultats si l‘appareil fonctionne
à une température ambiante de
15°C à 38°C au maximum.
VIDER L’EAU
1. Si vous souhaitez vider l’eau
contenue dans l’appareil, procéder comme suit :
Éteindre l‘appareil et
débrancher la prise de courant.
2. Tenir l‘appareil au dessus d‘une
cuve suffisamment grande ou de
l‘évier, ou bien
le placer au
bord du plan
de travail.
3. Retirer le capuchon au niveau
de l‘écoulement d‘eau résiduelle (5) au dos
de l‘appareil en le tournant dans
2. Conseil : en règle générale, l‘appareil produit des glaçons légèrement troubles, ce qui n‘altère
cependant pas la qualité des glaçons. Cela s‘explique par le processus de congélation particulièrement rapide. Pour obtenir des
glaçons transparents, utilisez de
l‘eau potable portée à ébullition
puis refroidie au préalable.
le sens inverse des aiguilles d‘une
montre.
4. Attendre jusqu’à ce que toute
l’eau se soit écoulée de l’appareil
et refermer l’écoulement d’eau.
5. Veiller à ne pas pencher trop l‘appareil afin de ne pas endommager
le compresseur.
42
Page 43

FABRIQUER DES GLAÇONS
1. Attention : les premiers glaçons
produits avec l‘appareil ne doivent
pas être consommés. Veuillez les
jeter, car ils sont susceptibles
de contenir des résidus de
production.
2. Préparer l’appareil comme décrit
au chapitre « Avant la première
utilisation ».
3. Retirer le bac à glaçons (4) en
tirant celui-ci vers l’avant hors de
l’appareil.
4. Verser de l‘eau fraîche dans le
verre doseur fourni.
5. Verser de l‘eau dans le réservoir
d‘eau (cf. illustration). Il doit
contenir 1,8 l d‘eau au maximum.
Veuillez respecter le marquage
Minimum et Maximum sur le côté
gauche du réservoir d‘eau.
6. Ne pas verser plus d’eau que le
repère Max pour éviter que l’eau
déborde.
7. Remettre le bac à glaçons dans
l’appareil.
8. Presser la touche « ON » pour
démarrer immédiatement la
production de glaçons. Si vous
avez activé la présélection de
temps, vous ne devez presser
aucune touche ; l‘appareil
démarre automatiquement pour
la durée indiquée.
9. L‘appareil commence à produire
des glaçons. Les premiers glaçons
fabriqués ne correspondent pas
encore à la taille sélectionnée
car quelques minutes sont
nécessaires avant que l’appareil
atteigne la température de
fonctionnement appropriée. Les
premiers glaçons sont donc un
peu plus petits.
10. Si la pompe dans l‘appareil
ne doit pas transporter d‘eau
pendant une durée prolongée,
veuillez éteindre l‘appareil et
laisser quelques gouttes d‘eau
couler par l‘écoulement d‘eau
résiduelle. Recommencer ensuite
l‘opération.
11. Les glaçons sont prêts en 6 à 18
minutes env. selon la température
de l‘eau et la température
ambiante. Remarque : au début
de la fabrication des glaçons,
les glaçons peuvent être plus ou
moins petits pour des raisons
techniques.
43
Page 44

12. Vous pouvez interrompre ou arrêter
à tout moment la fabrication de
glaçons en pressant la touche
« OFF ».
13. Si vous avez programmé l‘appareil
avec la présélection de temps,
vous ne devez presser aucune
touche. L‘appareil termine
automatiquement la fabrication
de glaçons à l‘issue de la durée
paramétrée.
14. Attention : si vous interrompez
l‘opération, l‘eau excédentaire
reflue dans le réservoir d‘eau.
Les glaçons qui sont encore
suspendus à la barre réfrigérante
tombent dans le bac à glaçons
au bout d‘un certain temps et
peuvent ensuite être retirés.
15. Si le bac à glaçons est plein, ce
symbole (8) s‘allume et un
signal sonore retentit.
16. L’appareil arrête automatiquement
la fabrication de glaçons.
17. Retirer le bac à glaçons et le
vider. Remettre le bac à glaçons
en place. Veiller à incliner
légèrement le bac à glaçons pour
l’introduire dans l’appareil.
18. Poursuivre ensuite la fabrication
de glaçons.
19. En outre, la machine à glaçons
contrôle automatiquement le
niveau d’eau dans le réservoir.
Lorsque le niveau d’eau est trop
faible, ce symbole (9) s’allume
20. L’appareil arrête automatiquement
la fabrication de glaçons. Faire
l‘appoint d‘eau, comme décrit
plus haut, et respecter à cette
occasion le marquage MAX afin
de ne pas trop remplir le réservoir.
21. Refermer le bac à glaçons et
presser la touche « ON ».
22. Si ce symbole s‘allume,
le réservoir d‘eau est
bloqué par de trop gros glaçons.
Éteindre l‘appareil et attendre
que les glaçons fondent un peu.
Ensuite, poursuivre la fabrication
des glaçons (patienter au moins
3 minutes avant de poursuivre,
afin d‘éviter des dommages sur
l‘appareil).
23. Veiller à ne pas laisser les glaçons
trop longtemps dans le bac à
glaçons, sans quoi ils fondent.
Si vous ne souhaitez pas utiliser
les glaçons immédiatement, les
stocker dans le compartiment de
surgélation.
24. Après utilisation, laisser le bac
à glaçons ouvert afin d’éviter la
formation de champignons ou de
bactéries.
Au-delà de 24 heures, l’eau
contenue dans la machine à
glaçons doit être remplacée
pour des raisons d’hygiène.
44
Page 45

NETTOYAGE ET ENTRETIEN
Avant le nettoyage, éteindre
systématiquement l’appareil et
débrancher la prise.
1. L’appareil et le câble ne doivent
pas être immergés dans l’eau ou
un autre liquide, ni être nettoyés
au lave-vaisselle.
2. Essuyer l‘intérieur et l‘extérieur
de la machine à glaçons avec un
chiffon humide. Pour cela, utiliser idéalement un mélange à
base d‘eau additionné d‘un peu
de vinaigre ménager.
3. Vous pouvez laver le bac à glaçons
avec un peu d‘eau chaude. Le bac
à glaçons ne doit pas être lavé en
machine !
4. Veuillez nettoyer minutieusement
le réservoir d‘eau avec un chiffon
humide, puis le sécher avec un
chiffon non pelucheux.
5. N’utiliser aucun abrasif puissant,
pas de laine de verre, d’objets
métalliques, pas de détergent
chaud ou de désinfectant.
6. Après utilisation, laisser le bac
à glaçons ouvert afin d’éviter la
formation de champignons ou de
bactéries.
7. L’appareil et la prise doivent être
intégralement secs avant de pouvoir réutiliser l’appareil.
8. Conserver la machine à glaçons
totalement sèche dans un endroit
sec et sûr, à l’abri de la poussière,
des chocs, de la chaleur et de
l’humidité.
45
Page 46

DÉPANNAGE
Problème Cause Solution
Le compresseur est
très bruyant.
Aucun témoin lumineux ne s’allume
lorsque vous branchez
la prise sur le secteur.
Les glaçons collent
entre eux
Voltage trop faible. Débrancher l’appareil et
vérifier si il est raccordé
à une prise 220-240 V~.
L’appareil n’est pas
correctement raccordé.
Une pièce est défectueuse.
Eau trop froide
Température ambiante
Vérifier si la prise a bien
été enfoncée.
Veuillez contacter notre
service après-vente.
Remplir le réservoir
d‘eau tiède.
trop fraîche
Le symbole
est allumé.
46
De trop gros glaçons
bloquent le réservoir
d'eau
Éteindre l'appareil et
attendre que les glaçons
fondent un peu. Poursuivre ensuite la fabrication de glaçons.
Page 47

CONDITIONS DE GARANTIE
En cas d’utilisation conforme et lors de dégâts manifestement dus à des défauts de fabrication, nos appareils sont garantis
24 mois, lors d’utilisation professionnelles 12 mois, à dater de l’achat. Notre garantie n’est valide que pour les appareils
vendus en Allemagne et en Autriche. Dans tout autre pays veuillez contacter l’importateur. Veuillez envoyer à notre adresse
les appareils, pour lesquels vous réclamez une suppression de défauts, avec le bon d’achat montrant la date d’achat, port
payé et proprement emballé. Les coûts de transport seront remboursés en cas de garantie en Allemagne et en Autriche. Les
défauts causés par usure, utilisation incorrecte ou non-respect des instructions de maintenance sont exclus. Notre obligation
de garantie cesse, si de réparations ou des interventions sont accomplies par des tiers. Cette garantie n’affecte pas les droits
du consommateur contre le commerçant.
TRAITEMENT DES DÉCHETS / PROTECTION DE L’ENVIRONNEMENT
Nos appareils sont produits selon un standard élevé de qualité pour une longue durée d’utilisation. Un
entretien régulier et des réparations compétentes par notre service après-vente prolongent cette durée
d’utilisation. Si néanmoins l’appareil est endommagé et ne peut plus être réparé, veuillez suivre les in-
structions suivantes. Ne jamais disposer ce produit avec les dégâts de ménage. Apportez ce produit à une
station de collection pour récupération de produits électriques et électroniques. Par la collection séparée
vous aidez à protéger les ressources naturelles et prenez soin, que le produit est démonté sans risque pour
la santé et l’environnement.
Liquide de refroidissement utilisé : R600a
47
Page 48

GEBRUIKSAANWIJZING MODEL 48955
TECHNISCHE GEGEVENS
Vermogen: 150 W, 220-240 V~, 50 Hz
Afmetingen: Ca. 29,5 x 35,0 x 29,0 cm (lxb/dxh)
Aansluitkabel: Ca. 120 cm
Gewicht: Ca. 9,8 kg
Behuizing: Kunststof, zwart/roestvrij staal geborsteld
Watertank: 1,5 liter watervolume
Uitvoering: Lcd-display, tijdprogrammeringsfunctie, tijdweergave, signaaltoon bij volle ijsbak
Toebehoren: Bedieningshandleiding, ijsschep, maatbeker
Wijzigingen en vergissingen in de uitrustingskenmerken, techniek, kleuren en design voorbehouden
VERKLARING VAN DE SYMBOLEN
alsmede bij lege watertank, maximaal 60 ijsblokjes per uur, inhoud ijsbak ca. 600 g
Dit symbool wijst op eventuele gevaren die letsel tot gevolg kunnen hebben of tot schade
aan het apparaat leiden.
Dit symbool attendeert u op een eventueel brandgevaar.
Dit symbool wijst op een eventueel verbrandingsgevaar. Ga hier altijd zeer voorzichtig te
werk.
VOOR UW VEILIGHEID
Lees de volgende aanwijzingen
a.u.b. door en bewaar ze goed.
Personen in het huishouden
1. Het apparaat kan door kin
deren van 8 jaar en ouder
gebruikt worden en door per
sonen met beperkte fysieke,
sensorische of mentale vaar
digheden of met gebrek aan
ervaring en/of kennis, mits
zij onder toezicht staan of
instructies over het gebruik
van dit apparaat hebben
48
gekregen en de hieruit resul
terende gevaren begrepen
hebben. Het apparaat is
geen speelgoed. Het appa
raat mag uitsluitend door
kinderen gereinigd en onder
houden worden, indien deze
onder toezicht staan.
2. Kinderen onder 3 jaar moe
ten uit de buurt van het
apparaat blijven of voortdu
rend onder toezicht staan.
-
-
-
-
-
Page 49

3. Kinderen tussen de 3 en 8
jaar mogen het apparaat uit
sluitend in- en uitschakelen,
wanneer het apparaat zich
in zijn voorziene, normale
bedieningspositie bevindt,
de kinderen onder toezicht
staan of instructies over
het gebruik van dit appa
raat hebben gekregen en de
hieruit resulterende gevaren
begrepen hebben. Kinderen
tussen de 3 en 8 jaar mogen
het apparaat niet aansluiten,
bedienen, reinigen of onder
houden.
4. Bewaar het apparaat op een
plaats die ontoegankelijk is
voor kinderen.
Eisen aan de plaats van opstelling
en voor het bedienen van het ap
-
paraat
5. Sluit het apparaat uitslui
tend aan op wisselstroom
met spanning overeenkom
stig het typeplaatje.
6. Dit apparaat mag niet met
een externe tijdklok of met
een afstandsbediening bediend worden.
7. Dompel het apparaat nooit
in water of andere vloeistof
-
fen.
8. Het apparaat en de aansluit
kabel mogen niet in de vaatwasser gereinigd worden.
9. Het apparaat is uitsluitend
bestemd voor huishoudelijk
gebruik of voor soortgelijke
doeleinden, bijv.
theekeukens in bedrijven,
kantoren of overige
werklocaties,
gebruik door gasten in
hotels, motels of overige
logiesbedrijven,
in particuliere pensions of
vakantiehuizen.
10. Het apparaat c.q. het snoer
nooit met natte handen aan
-
raken.
11. Plaats het apparaat om vei
ligheidsredenen nooit op
hete oppervlakken, een
metalen dienblad of een
natte ondergrond.
12. Het apparaat of het snoer
mogen niet in de buurt van
vlammen worden gebruikt.
13. Gebruik de ijsblokjesmaker
steeds op een vrij en effen
oppervlak.
14. Houd een afstand van min
stens 15 cm t.o.v. andere
voorwerpen aan, zodat het
apparaat voldoende ventila
tie heeft.
15. Gebruik geen elektrische
apparaten binnenin het
apparaat, voor zover zij niet
door de fabrikant worden
geadviseerd.
49
Page 50

16. Let erop dat het snoer niet
over de rand van het werk
vlak heen hangt, omdat dit
tot ongevallen kan leiden,
als bv. kleine kinderen eraan
trekken.
17. De ijsblokjesmaker mag niet
in de open lucht gebruikt of
bewaard worden.
18. Het apparaat mag uitslui
tend gebruikt worden, nadat
het correct gemonteerd is.
19. Vul de watertank uitsluitend
met helder, koud water.
20. Steek geen voorwerpen in
het binnenste van het appa
raat, om verwondingen te
vermijden.
21. Laat het apparaat na het
uitpakken minstens twee
uur staan, voordat u het in
gebruik neemt, om schade
aan de compressor te vermij
-
den.
22. Schakel het apparaat niet te
vaak achter elkaar aan- en
uit, omdat de compressor
daardoor beschadigd kan
raken. Het apparaat moet
daarom minstens drie minu
-
ten lang in werking zijn.
23. Om schade aan het apparaat
te vermijden, schakelt u het
apparaat uit en trekt u de
stekker uit het stopcontact,
voordat u het beweegt.
24. Om schade te vermijden,
mag het apparaat niet met
toebehoren van andere fabri
kanten of andere merken
worden gebruikt.
25. Trek de netstekker uit het
stopcontact nadat u het
apparaat heeft gebruikt en
voordat u het gaat reinigen.
Laat het apparaat nooit zon
der toezicht achter, als de
netstekker in het stopcon
tact steekt.
26. Reinig het apparaat iedere
keer na gebruik.
27. Probeer nooit het apparaat
zelf te repareren, omdat
gevaar voor een elektrische
schok bestaat.
28. Controleer het apparaat, de
stekker en de aansluitka
bel regelmatig op slijtage of
beschadiging. Bij bescha
diging van de aansluitkabel
of van andere onderdelen
stuurt u het apparaat voor
controle en reparatie naar
onze klantenservice a.u.b.
Onvakkundige reparaties
kunnen leiden tot aanzien
lijke gevaren voor de gebruiker en hebben tot gevolg dat
de garantie vervalt.
29. Als de aansluitkabel van dit
apparaat wordt beschadigd,
moet deze, om risico te voor
-
50
Page 51

komen, door de fabrikant
of de klantenservice van de
met dezelfde competentie
worden vervangen.
fabrikant of door iemand
Open de behuizing van het apparaat in geen geval. Er bestaat
kans op een elektrische schok.
Laat het apparaat na het uitpakken minstens twee uur staan
voordat u het in gebruik neemt. Het koelmiddel in het apparaat
moet eerst bezinken, omdat de compressor anders beschadigd
kan worden.
Vul het apparaat uitsluitend met schoon drinkwater. Gebruik
nooit water met toevoegingen of andere vloeibare levensmid
delen. Deze verstoppen de leidingen in het apparaat en kunnen
het apparaat beschadigen.
Waarschuwing: Sla geen explosieve stoffen zoals spuitbussen
met ontplofbare drijfgassen in dit apparaat op.
Waarschuwing: Houd ventilatieopeningen bij de afdekking van
het apparaat en binnen het apparaat vrij van hindernissen.
Waarschuwing: Gebruik geen andere mechanische voorzieningen
of hulpmiddelen ter versnelling van het ontdooiproces dan die
door de fabrikant worden geadviseerd.
-
Waarschuwing: Beschadig het koelcircuit niet.
Waarschuwing: Gebruik geen elektrische apparaten binnen het
levensmiddelenvak van het apparaat, voor zover zij niet door de
fabrikant worden geadviseerd.
De compressor kan tijdens het gebruik zeer heet worden –
verbrandingsgevaar!
De fabrikant is niet aansprakelijk, indien het apparaat ondeskundig of foutief gebruikt of door niet
geautoriseerde derden gerepareerd werd.
51
Page 52

VÓÓR HET EERSTE GEBRUIK
Let er bij het uitpakken en verwijderen van de verpakking op dat het appa-
raat niet meer dan 45 ° gekanteld wordt, omdat de compressor in het apparaat anders beschadigd kan worden.
1. Verwijder alle verpakkingsmaterialen en eventuele transportbeveiligingen. Houd verpakkingsonderdelen verwijderd van kinderen – er
bestaat dan kans op verstikking!
2. Controleer of alle vermelde accessoire-onderdelen aanwezig zijn.
3. Reinig alle onderdelen met een
vochtige doek, zoals beschreven
staat in het hoofdstuk „Reinigen
en onderhouden“.
5. Controleer of de afloop voor restwater aan de achterkant van het
apparaat door de afsluitdop is
gesloten.
6. Sluit de aansluitkabel aan de achterkant van het apparaat aan.
7. Sluit het apparaat m.b.v. de aansluitkabel aan op het stroomnet
(220-240 V~, 50 Hz).
8. Druk op de knop „On“ om het
apparaat in te schakelen.
4. Controleer of alle delen correct
gemonteerd zijn en of het apparaat stabiel en horizontaal staat.
DISPLAY
Uw nieuwe ijsblokjesmaker beschikt over een „touchscreen“-bedieningselement.
Dat betekent dat alle instellingen aan het apparaat direct via het display worden
gedaan. Tik hiervoor zacht op de gewenste knop. Let er hierbij op dat u de
instellingen via de knoppen vlot uitvoert. Als u langer dan 3 seconden met het
drukken op een knop wacht, wordt de huidige invoer afgebroken en keert het
apparaat terug naar de oorspronkelijke toestand. Tot dan toe gedane instellingen
worden echter wel opgeslagen.
52
Page 53

1 2
3
7
6 5 4
1 Symbool draait: ijsblokjes worden gemaakt
Symbool knippert: Storing
2 TIME ON De op dat moment ingestelde starttijd
TIME OFF De op dat moment ingestelde uitschakeltijd
3 Tijdweergave
4 SET Tijd of tijdprogrammering instellen
5 TIME Tijd of tijdprogrammering weergeven
6 OFF Apparaat uitschakelen/het maken van ijsblokjes
beëindigen of onderbreken
7 ON Apparaat inschakelen/het maken van ijsblokjes beginnen
Niet weergegeven:
8 Symbool bak IJsbak vol
9 Symbool waterkraan Watertank leeg
TIJD INSTELLEN
1. Druk één keer op de knop „TIME“
op het display om de uren in te
stellen: Druk hiervoor nu zolang
op de knop „SET“ tot de gewenste
de knop „SET“ tot de gewenste
tijd in minuten is bereikt.
3. Druk op de knop „TIME“ om de
ingestelde tijd op te slaan.
tijd in uren is bereikt.
2. Om de minuten in te stellen,
drukt u twee keer op de knop
„TIME“ en vervolgens zolang op
53
Page 54

TIJDPROGRAMMERING
Tijdprogrammering instellen
Inschakeltijd:
1. Druk drie keer op de knop „TIME“
om de uren door middel van de
knop „SET“ in te stellen resp. druk
vier keer op de knop „TIME“ om
de minuten in te stellen. Wacht
vervolgens vijf seconden tot het
display is teruggekeerd naar de
basisinstelling. Druk nu drie keer
op de knop „SET“. In het display
wordt rechtsboven „TIME“, „ON“
en „OFF“ weergegeven.
Uitschakeltijd
2. Druk vijf keer op de knop „TIME“
om de uren door middel van de
knop „SET“ in te stellen resp.
druk zes keer op de knop „TIME“
om de minuten in te stellen. Wacht
vervolgens vijf seconden tot het
display is teruggekeerd naar de
basisinstelling. Druk nu drie keer
op de knop „SET“. In het display
wordt rechtsboven „TIME“, „ON“
en „OFF“ weergegeven.
Tijdprogrammering controleren
3. Druk meermaals achter elkaar
op de knop „TIME“. De telkens
ingestelde tijden worden
weergegeven.
Tijdprogrammering in- of uitschakelen
4. Druk op de knop „SET“ om de
tijdprogrammering in te schakelen.
Om de tijdprogrammering uit te
schakelen, drukt u opnieuw zolang
op de knop „SET“ tot de symbolen
„ON“ en „OFF“ rechtsboven in
het display verdwijnen.
54
Page 55

AANWIJZINGEN BIJ HET WATER
1. Gebruik uitsluitend drinkwater om
ijsblokjes te maken. Gebruik geen
toevoegingen, aromastoffen en
dergelijke, deze kunnen het apparaat verontreinigen. Het gebruikte
water dient niet kouder dan 7 °C
en niet warmer dan 35 °C te zijn.
Bovendien behaalt u de beste
resultaten als het apparaat in een
omgevingstemperatuur van 15 °C
tot maximaal 38 °C werkt.
WATER LATEN WEGLOPEN
1. Als u het water uit het apparaat
wilt laten aflopen, gaat u als volgt
te werk:
Schakel het apparaat uit
en trek de stekker uit het
stopcontact.
2. Houd het apparaat boven een kom
die groot genoeg is of boven het
aanrecht of
plaats het aan
de rand van
het werkvlak.
3. Verwijder de
afsluitdop van
de afloop voor
2. Tip: Over het algemeen maakt het
apparaat iets troebele ijsblokjes,
hetgeen echter de kwaliteit van de
ijsblokjes niet nadelig beïnvloedt.
Dit ligt aan het uiterst snelle
vriesproces. Om kristalheldere
ijsblokjes te verkrijgen, gebruikt
u drinkwater dat van tevoren is
gekookt en afgekoeld.
restwater (5) achter aan het apparaat tegen de klok in.
4. Wacht totdat het water helemaal
uit het apparaat gelopen is en
sluit de waterafloop dan weer.
5. Let er hierbij op dat u het apparaat
niet te veel kantelt om schade aan
de compressor te vermijden.
55
Page 56

IJSBLOKJES MAKEN
1. Let op: De eerste met het apparaat
gemaakte ijsblokjes dienen niet
te worden geconsumeerd. Gooi
deze ijsblokjes weg, omdat deze
evt. productierestanten kunnen
bevatten.
2. Bereid het apparaat voor, zoals
beschreven in het hoofdstuk „Vóór
het eerste gebruik.
3. Verwijder de ijsbak (4), door hem
naar voren toe uit het apparaat te
trekken.
4. Vul de meegeleverde maatbeker
met vers, helder water.
5. Giet het water in de watertank (zie
afbeelding). Deze moet maximaal
met 1,8 l water worden gevuld.
Let hierbij op de minimum- en
maximum-markering aan de linker
kant in de watertank.
6. Vul hoogstens tot de maxmarkering bij met water om te
voorkomen dat er water uitloopt.
7. Schuif de ijsbak weer in het
apparaat.
8. Druk op de knop „ON“ om het
maken van ijsblokjes direct te
starten. Als u de tijdprogrammering
hebt geactiveerd, hoeft u niet
op een knop te drukken. Het
apparaat start dan automatisch
op de geprogrammeerde tijd.
9. Het apparaat begint ijsblokjes
te maken. De eerste ijsblokjes
hebben nog niet de gekozen
grootte, omdat het een paar
minuten duurt tot het apparaat de
betreffende bedrijfstemperatuur
heeft bereikt. Daarom zijn de
eerste ijsblokjes nog iets kleiner.
10. Mocht de pomp in het apparaat
langere tijd geen water
transporteren, schakel dan het
apparaat uit en laat enkele
druppels water via de afloop voor
restwater eruit lopen. Start het
proces daarna opnieuw.
11. Afhankelijk van de water- en
omgevingstemperatuur zijn de
ijsblokjes in ca. 6 tot 18 minuten
klaar. Aanwijzing: Aan het begin
van het maken van ijsblokjes
komt het om technische redenen
voor dat de ijsblokjes nog klein of
verschillende in grootte zijn.
12. U kunt te allen tijde het maken
van ijsblokjes onder- of afbreken
door op de knop „OFF“ te drukken.
56
Page 57

13. Als u het apparaat via de
tijdprogrammering hebt
geprogrammeerd, hoeft u niet
op een knop te drukken. Het
apparaat beëindigt het maken
van ijsblokjes automatisch op de
ingestelde tijd.
14. Let op: Als u het proces
onderbreekt, loopt het overtollige
water terug naar de watertank.
De ijsblokjes, die nog aan de
koelstangen hangen, vallen na
enige tijd in de ijsbak en kunnen
dan worden uitgenomen.
15. Als de ijsbak vol is, gaat het
symbool (8) branden en
klinkt er een signaaltoon.
16. Het apparaat stopt automatisch
met het maken van ijsblokjes.
17. Neem de ijsbak uit het apparaat
en maak de bak leeg. Plaats de
ijsbak weer terug. Denk er a.u.b.
aan dat u de ijsbak iets scheef
moet houden als u hem in het
apparaat zet.
18. Ga daarna door met het maken
van ijsblokjes.
19. De ijsblokjesmaker controleert
automatisch het waterpeil in
de watertank. Als het waterpeil
te laag is, gaat dit symbool (9)
branden:
20. Het apparaat stopt automatisch
met het maken van ijsblokjes.
Vul water bij, zoals bovenstaand
beschreven, en let daarbij op
de MAX-markering, zodat het
apparaat niet overvuld wordt.
21. Sluit de ijsbak weer en druk op de
knop „ON“.
22. Als dit symbool brandt ,
wordt de watertank door te grote
ijsblokjes geblokkeerd. Schakel
het apparaat uit en wacht tot de
ijsblokjes een beetje smelten. Ga
daarna door met het maken van
ijsblokjes (wacht echter minimaal
3 minuten voordat u doorgaat
om schade aan het apparaat te
voorkomen).
23. Let er a.u.b. op dat u de ijsblokjes
niet te lang in de ijsbak laat, omdat
de ijsblokjes anders smelten. Als
u de ijsblokjes niet meteen wilt
gebruiken, leg deze dan zolang in
het diepvriesvak van de koelkast.
24. Laat de ijsbak na gebruik a.u.b.
geopend staan om te voorkomen
dat zich schimmels of bacteriën
vormen.
Om hygiënische redenen moet
het water in de ijsblokjesmaker uiterlijk na 24 uur ververst
worden.
57
Page 58

REINIGEN EN ONDERHOUDEN
Vóór het reinigen altijd het
apparaat uitschakelen en de
stekker uit de stekkerdoos
trekken.
1. Het apparaat en de aansluitkabel
mogen niet in water of een andere
vloeistof gedompeld of in de vaatwasser gereinigd worden.
2. Veeg de ijsblokjesmaker van binnen en buiten af met een vochtige
doek. Gebruik hiervoor liefst een
mengsel van water, waaraan een
beetje azijn is toegevoegd.
3. De ijsbak kunt u in een beetje
warm afwaswater reinigen. De ijsbak is niet geschikt voor de vaatwasser!
4. Reinig de watertank grondig met
een vochtige doek en droog deze
vervolgens met een pluisvrije
doek.
5. Gebruik geen scherpe schuurmiddelen, staalwol, metalen voorwerpen, hete schoonmaakmiddelen
of desinfecterende middelen.
6. Laat de ijsbak na gebruik geopend
staan om te voorkomen dat zich
schimmels of bacteriën vormen.
7. Het apparaat en de aansluitstekker moeten volkomen droog
zijn voordat het apparaat weer
gebruikt kan worden.
8. Berg de volledig droge ijsblokjesmaker op een droge en veilige
plaats op om het apparaat tegen
stof, stoten, hitte en vocht te
beschermen.
58
Page 59

STORINGEN VERHELPEN
Storing Oorzaak Oplossing
De compressor maakt
een heel hard brommend geluid.
Er brandt geen controlelampje, als u de stekker in het stopcontact
steekt.
IJsblokjes plakken aan
elkaar
Het symbool
brandt
Te weinig voltage Schakel het apparaat
uit en controleer of het
apparaat op een 220240 V~-stopcontact aangesloten is.
Het apparaat is correct
aangesloten.
Controleer of de stekker
goed in het stopcontact
is gestoken.
Er is een component
defect.
Te koud water
Te lage omgevingstem-
Neem contact op met
onze klantenservice.
Vul de watertank met
lauwwarm water.
peratuur
Te grote ijsblokjes
blokkeren de watertank
Schakel het apparaat uit
en wacht tot de ijsblokjes een beetje smelten.
Ga daarna door met het
maken van ijsblokjes.
59
Page 60

GARANTIEVOORWAARDEN
Wij geven op onze apparaten een garantietermijn van 24 maanden (12 maanden bij commerciële gebruik), gerekend vanaf de
dag van aanschaf. Deze garantie geldt voor schade, die bij correct gebruik aantoonbaar is veroorzaakt door een fout in de pro-
ductie. Binnen de garantietermijn verhelpen wij materiaal- en productiefouten door herstelling of vervanging naar onze keuze.
Onze garantie is slechts geldig voor in Duitsland en Oostenrijk verkopte apparaten. In andere landen a.u.b. de importeur
aanspreken. Apparaaten, waarvoor garantie in aanspraak wordt genomen, moeten ons samen met een kopie van de machineel
gegenereerde kassabon waaruit de koopdatum duidelijk wordt, alsmede een beschrijving van de fout goed verpakt aan onze
klantenservice worden toegezonden, porto betaald. Als er sprake van garantie is, worden de verzendingskosten in Duitsland
en Oostenrijk aan de klant vergoed. De garantie dekt geen schade veroorzaakt door slijtage, onbehoorlijk gebruik/foutieve han-
delingen en niet-naleving van de onderhouds- en reinigingsaanwijzingen. Het recht op garantie vervalt, wanneer reparaties
of manipulaties aan het apparaat door derden worden doorgevoerd. Eventuele rechten van de eindgebruiker t.o.v. de verkoper
of distributeur worden door deze garantie niet aangetast.
VERWIJDEREN VAN AFVAL / MILIEUBESCHERMING
Onze apparaten zijn geproduceerd met een hoge qualiteit voor een lange gebruik. Regelmatige onderhoud
en vakkundig reparaties door onze klantenservice verlengt de gebruiksduur. Wanneer het apparat defekt is
en kan niet meer gerepareerd worden, let op de volgende instructies. Dit product mag niet samen met het
normale huishoudelijke afval worden afgevoerd. U dient dit product bij een voor het recycleren van elek-
trische of elektronische apparaten aangewezen verzamelplaats in te leveren. Door het separaat inzamelen
en recycleren van afvalproducten helpt u mee bij het zuinig omgaan met de natuurlijke hulpbronnen en zorgt
u ervoor dat het product op een gezondheids- en milieuvriendelijke manier afgevoerd wordt.
Gebruikt koelmiddel: R600a
60
Page 61

ISTRUZIONI PER L‘USO MODELLO 48955
DATI TECNICI
Potenza: 150 W, 220-240 V~, 50 Hz
Misure: circa 29,5 x 35,0 x 29,0 cm
Cavo di alimentazione: circa 120 cm
Peso: circa 9,8 kg
Scocca: plastica nera/acciaio inox spazzolato
Serbatoio dell’acqua: volume d‘acqua 1,5 litri
Dotazioni: display LCD, funzione di temporizzazione, indicazione ora, segnale acustico
Accessori: istruzioni per l’uso, sessola per ghiaccio, misurino
Con riserva di modifiche ed errori relativi a caratteristiche delle dotazioni, tecnica, colore e design
SIGNIFICATO DEI SIMBOLI
Questo simbolo segnala possibili pericoli in grado di provocare lesioni a persone o danni
all‘apparecchio.
Questo simbolo segnala eventuali pericoli di incendio.
Questo simbolo indica un possibile pericolo di ustioni. In presenza di questo simbolo
agire sempre con la massima cautela.
di contenitore dei cubetti di ghiaccio pieno e di serbatoio dell‘acqua vuoto,
fino a 60 cubetti di ghiaccio all‘ora, capacità del contenitore dei cubetti di
ghiaccio circa 600 g
PER LA VOSTRA SICUREZZA
Si raccomanda di leggere e
conservare le presenti istruzioni.
Persone in ambito domestico
1. L‘apparecchio può essere
utilizzato da bambini a par
tire dagli 8 anni di età e
da persone che presentano
ridotte capacità fisiche, sen
soriali o mentali o che difettano della necessaria esperienza e/o conoscenze solo
se adeguatamente sorve
-
gliati o addestrati sull‘uso in
sicurezza dell‘apparecchio e
se a conoscenza dei rischi
correlati. L‘apparecchio non
è un giocattolo. La pulizia
e la manutenzione dell‘ap
parecchio possono essere
effettuate da bambini sol
tanto sotto sorveglianza.
2. L‘apparecchio deve essere
tenuto fuori dalla portata dei
bambini di età inferiore a 3
61
Page 62

anni oppure questi devono
essere costantemente sorve
-
gliati.
3. I bambini di età compresa tra
3 e 8 anni dovrebbero accen
dere e spegnere l‘apparecchio soltanto quando questo
si trova nella posizione di
comando normalmente pre
vista, se sono sorvegliati o se
sono stati istruiti in relazione
all‘uso sicuro e hanno com
preso i pericoli risultanti. I
bambini di età compresa tra
3 e 8 anni non dovrebbero
collegare, comandare, pulire
o sottoporre a manutenzione
l‘apparecchio.
4. Conservare fuori dalla por
tata dei bambini.
Requisiti relativi al luogo di instal
-
lazione e all‘uso dell‘apparecchio
5. Collegare l‘apparecchio sol
tanto a corrente alternata
con tensione conforme alle
indicazioni della targhetta.
6. Questo apparecchio non
deve essere comandato tra
mite timer esterni o sistemi
di telecomando.
7. Non immergere mai l‘appa
recchio o il cavo di alimentazione in acqua o altri liquidi.
8. L‘apparecchio e il cavo di
alimentazione non possono
essere lavati in lavastoviglie.
9. L‘apparecchio è progettato
esclusivamente per l’uso
domestico o per impieghi
similari, ad es.
in aree cucina di negozi,
uffici o altri luoghi di lavoro,
per l‘uso da parte degli
ospiti di hotel, motel o altre
strutture ricettive,
in pensioni private o case di
vacanza.
10. Non toccare mai né l‘appa
recchio né il cavo di alimentazione a mani bagnate.
11. Per motivi di sicurezza non
posizionare mai l‘apparec
chio su superfici calde, vassoi metallici o basi umide.
12. L‘apparecchio e il cavo di
alimentazione non devono
essere impiegati nei pressi
di fiamme.
13. Utilizzare la macchina del
ghiaccio sempre su una
superficie sgombra e piana.
14. Per assicurare una suffi
ciente ventilazione dell’apparecchio, mantenere una
distanza di almeno 15 cm
dagli altri oggetti.
15. Non usare alcun apparecchio
elettrico all‘interno dell‘ap
parecchio, a meno che ciò
non sia stato raccomandato
dal produttore.
16. Assicurarsi che il cavo di ali
mentazione non penda dal
62
Page 63

piano di lavoro, in quanto
potrebbe causare infortuni,
ad es. se un bambino pic
-
colo dovesse strattonarlo.
17. La macchina per ghiaccio
non deve essere usata o con
-
servata all’aperto.
18. L‘apparecchio deve essere
usato soltanto previo cor
-
retto assemblaggio.
19. Riempire il serbatoio dell’ac
qua soltanto con acqua
pulita fredda.
20. Per evitare lesioni non intro
durre alcun oggetto all’interno dell’apparecchio.
21. Per evitare danni al com
pressore, dopo il disimballo
lasciar fermo l’apparecchio
per almeno due ore prima di
metterlo in funzione.
22. Non accendere e spegnere
l’apparecchio in rapida suc
cessione, in quanto ciò può
danneggiare il compres
sore. Pertanto l’apparecchio
dovrebbe rimanere in fun
zione per almeno tre minuti.
23. Per evitare danni all’appa
recchio, prima di spostarlo,
spegnerlo e staccare la spina
dalla presa elettrica.
24. Per evitare danni, non usare
l‘apparecchio con accessori
di altri marchi o produttori.
25. Dopo l’utilizzo e prima della
pulizia, staccare la spina
dalla presa elettrica. Non
lasciare mai l‘apparecchio
incustodito quando la spina
è inserita.
26. Pulire l’apparecchio dopo
ogni utilizzo.
27. Non cercare mai di riparare
l’apparecchio da soli, in
quanto sussiste il pericolo di
scosse elettriche.
28. Controllare regolarmente che
l‘apparecchio, la spina e il
cavo di alimentazione non
presentino tracce di usura
o danni. Qualora il cavo di
collegamento o altri com
ponenti siano danneggiati
inviare l‘apparecchio alla
nostra assistenza clienti per
la verifica e la riparazione.
Riparazioni non idonee pos
sono infatti causare notevoli
pericoli per l‘utente e com
portano il decadere della
garanzia.
29. Se il cavo di collegamento di
questo apparecchio è dan
neggiato, al fine di evitare
pericolosità, deve essere
sostituito dal produttore, dal
servizio clienti o da una per
sona analogamente qualificata.
63
Page 64

Non aprire mai la scocca dell‘apparecchio. Sussiste il pericolo
di scosse elettriche.
Dopo il disimballo lasciar fermo l’apparecchio per almeno due
ore prima di metterlo in funzione. Il refrigerante dell’apparecchio
deve prima scendere, in quanto altrimenti il compressore può
subire danni.
Riempire l‘apparecchio esclusivamente con acqua potabile
pura. Non usare mai acqua con additivi o altri alimenti liquidi.
Questi ostruiscono infatti i tubicini dell‘apparecchio e lo possono
danneggiare.
Avvertimento: Non conservare in questo apparecchio sostanze
esplosive come flaconi spruzzatori con gas propellenti
infiammabili.
Avvertimento: Mantenere sempre sgombre da ostacoli le
aperture di ventilazione della copertura dell‘apparecchio e
all‘interno dell‘apparecchio.
Avvertimento: Per accelerare il processo di scongelamento non
utilizzare altri dispositivi o ausili meccanici rispetto a quelli
raccomandati dal produttore.
Avvertimento: Non danneggiare il circuito del refrigerante.
Avvertimento: Non usare apparecchi elettrici all‘interno dello
scomparto alimenti dell‘apparecchio, a meno che questi non
siano stati raccomandati dal produttore.
Durante l‘esercizio il compressore può diventare molto caldo –
Pericolo di ustioni!
Il produttore declina qualunque responsabilità in caso di utilizzi errati o non idonei o qualora le riparazioni
siano eseguite da terzi non autorizzati.
64
Page 65

PRIMA DEL PRIMO UTILIZZO
Al momento del disimballo e della rimozione della confezione assicurarsi
che la macchina non sia inclinata di oltre 45 ° in quanto altrimenti il compressore può subire danni.
1. Rimuovere tutti i materiali da
imballo e le eventuali protezioni
da trasporto. Tenere i componenti
dell‘imballo fuori dalla portata
dei bambini – pericolo di soffocamento!
2. Controllare che tutti gli accessori
menzionati siano disponibili.
3. Pulire tutte le parti con un panno
umido, come descritto nel capitolo “Pulizia e manutenzione“.
4. Controllare che tutti i pezzi siano
correttamente assemblati e che
la macchina sia posizionata in
maniera stabile e orizzontale.
5. Verificare che lo scarico dell‘acqua residua sul retro della macchina sia chiuso con l‘apposito
tappo.
6. Collegare il cavo di alimentazione
al retro dell’apparecchio.
7. Collegare l‘apparecchio alla rete
elettrica (220–240 V~, 50 Hz)
mediante il cavo di alimentazione.
8. Per accendere l‘apparecchio premere il tasto „On“.
65
Page 66

DISPLAY
La sua nuova macchina del ghiaccio è dotata di un elemento di comando
„touch-screen“. Ciò significa che tutte le impostazioni possono essere effettuate
direttamente tramite il display. Per procedere alle impostazioni toccare
leggermente il tasto desiderato facendo attenzione a effettuare le impostazioni
rapidamente. Se si attende più di 3 secondi per premere un tasto l‘immissione
attuale è interrotta e la macchina torna alla condizione originale. Sino ad allora
le impostazioni effettuate sono tuttavia memorizzate.
1 2
3
7
6 5 4
1 Il simbolo gira: I cubetti di ghiaccio sono in fase di produzione
Il simbolo lampeggia: Anomalia
2 TIME ON Ora di avvio attualmente impostata
TIME OFF Ora di spegnimento attualmente impostata
3 Visualizzazione del tempo
4 SET Impostazione dell‘ora o della temporizzazione
5 TIME Indicazione dell‘ora o della temporizzazione
6 OFF Spegnimento della macchina/fine o interruzione della
produzione dei cubetti di ghiaccio
7 ON Accensione della macchina/inizio della produzione dei
cubetti di ghiaccio
Senza immagine
8 Simbolo Contenitore Contenitore dei cubetti di ghiaccio pieno
9 Simbolo Rubinetto dell‘acqua Serbatoio dell‘acqua vuoto
66
Page 67

IMPOSTAZIONE DELL‘ORA
1. Per impostare l‘ora premere una
volta il tasto „TIME“ del display:
premere quindi il tasto „SET“ fino
a raggiungere l‘ora desiderata in
ore.
2. Per impostare i minuti premere
prima due volte il tasto „TIME“
e poi quello „SET“ fino a
TEMPORIZZAZIONE
Impostazione della temporizzazione
Ora di accensione:
1. Premere il tasto „TIME“ tre volte
per impostare l‘ora mediante
il tasto „SET“ e quattro volte
per impostare i minuti. Quindi
attendere cinque secondi che
il display sia nell‘impostazione
base. Premere poi tre volte il tasto
„SET“. Il display visualizza in alto
a destra „TIME“, „ON“ e „OFF“.
Ora di disattivazione
2. Premere il tasto „TIME“ cinque
volte per impostare l‘ora mediante
il tasto „SET“ e sei volte per
impostare i minuti. Quindi
attendere cinque secondi che
il display sia nell‘impostazione
raggiungere l‘ora desiderata in
minuti.
3. Per memorizzare l‘ora impostata
premere il tasto „TIME“.
base. Premere poi tre volte il tasto
„SET“. Il display visualizza in alto
a destra „TIME“, „ON“ e „OFF“.
Verifica della temporizzazione
3. Premere più volte in successione
il tasto „TIME“. Vengono
visualizzate le ore impostate.
Attivazione e disattivazione della
temporizzazione
4. Per attivare la temporizzazione
premere il tasto „SET“. Per
disattivare la temporizzazione
premere nuovamente il tasto
„SET“ finché i simboli „ON“ e
„OFF“ visualizzati a sinistra in
alto sul display si spengono.
67
Page 68

AVVERTENZE SULL‘ACQUA
1. Per preparare i cubetti di ghiaccio si raccomanda di usare esclusivamente acqua potabile. Non
utilizzare additivi, aromi o simili,
in quanto possono danneggiare
la macchina. L‘acqua impiegata
deve avere una temperatura non
inferiore a 7 °C e non superiore
a 35 °C. Inoltre i risultati migliori
si ottengono quando la macchina
lavora a una temperatura ambientale compresa tra 15 °C e massimo 38 °C.
SCARICO DELL’ACQUA
1. Per scaricare l’acqua presente
nella macchina, procedere come
segue:
Spegnere la macchina e
staccare la spina dalla presa
elettrica.
2. Tenere la macchina sopra a una
ciotola sufficientemente capiente
o sull‘acquaio oppure
appoggiarla
sul bordo
del piano di
lavoro.
2. Consiglio: Di norma la macchina
produce cubetti di ghiaccio leggermente torbidi, il che non ne
pregiudica assolutamente la qualità. Ciò dipende infatti dal processo di congelazione particolarmente rapido. Per ottenere cubetti
di ghiaccio trasparenti e cristallini
usare acqua potabile che sia stata
fatta precedentemente bollire e
raffreddare.
3. Rimuovere il tappo dello
scarico dell’acqua residua (5) presente sulla macchina girandolo in
senso antiorario.
4. Attendere che l’acqua sia completamente fuoriuscita dalla macchina e quindi richiudere lo scarico dell’acqua.
5. Per evitare danni al compressore,
fare attenzione a non inclinare
troppo la macchina.
68
Page 69

PREPARAZIONE DEI CUBETTI DI GHIACCIO
1. Attenzione: I primi cubetti di
ghiaccio preparati con la macchina non devono essere consumati. Si raccomanda di buttare questi cubetti di ghiaccio
in quanto possono contenere dei
residui della produzione.
2. Preparare la macchina come illustrato nella sezione „Prima del
primo utilizzo“.
3. Estrarre il contenitore del ghiaccio (4) dalla macchina tirandolo
in avanti.
4. Versare nel misurino fornito in
dotazione acqua fresca e pulita.
5. Riempire con questa il serbatoio
dell‘acqua (vedere la figura).
Il serbatoio deve essere riempito massimo 1,8 l litri d‘acqua.
Osservare le corrispondenti marcature del minimo e del massimo
sul lato sinistro del serbatoio.
6. Per evitare che l‘acqua trabocchi
non superare la tacca Max.
7. Riposizionare il contenitore del
ghiaccio nella macchina.
8. Premere il tasto „ON“ per avviare
immediatamente la produzione
dei cubetti di ghiaccio. Se la temporizzazione è attivata, non serve
premere nessun tasto, la macchina si avvia automaticamente
all‘ora inserita.
9. La macchina inizia a produrre
i cubetti di ghiaccio. Il primi
cubetti prodotti non corrispondono al formato scelto, in quanto
servono alcuni minuti affinché la
macchina raggiunga la temperatura di esercizio richiesta. Pertanto i primi cubetti sono un po’
piccoli.
10. Nel caso la pompa della macchina non trasporti acqua per
tanto tempo, spegnere la macchina e lasciare che alcune gocce
fuoriescano dallo scarico dell‘acqua residua. Quindi avviare nuovamente il processo.
11. I cubetti di ghiaccio sono pronti,
a seconda della temperatura
dell‘acqua e di quella ambientale,
dopo 6 - 18 minuti circa. Avvertenza: All‘inizio della produzione,
per motivi tecnici, i cubetti di
ghiaccio possono essere troppo
piccoli oppure possono essere di
dimensioni diverse.
12. E’ possibile interrompere la produzione dei cubetti in qualsi-
69
Page 70

asi momento premendo il tasto
„OFF“.
13. Se la macchina è stata programmata tramite temporizzazione
non serve premere alcun tasto.
Essa termina la preparazione dei
cubetti di ghiaccio automaticamente all‘ora impostata.
14. Attenzione: Se il procedimento
è interrotto, l‘acqua in eccesso
rifluisce nel serbatoio dell‘acqua.
Dopo qualche tempo i cubetti di
ghiaccio ancora appesi alle barre
di raffreddamento cadono nel
contenitore del ghiaccio e possono quindi essere prelevati.
15. Quando il contenitore del ghiaccio
è pieno questo simbolo (8)
si illumina ed è inviato un segnale
acustico.
16. La macchina arresta automaticamente la produzione dei cubetti
di ghiaccio.
17. Rimuovere e svuotare il contenitore del ghiaccio. Reinserire il
recipiente del ghiaccio. Si osservi
che quando il contenitore del
ghiaccio è inserito nella macchina
deve essere tenuto in obliquo.
18. Quindi proseguire con la preparazione dei cubetti di ghiaccio.
19. La macchina per ghiaccio verifica
inoltre automaticamente il livello
dell’acqua nel serbatoio. Quando
il livello dell’acqua è troppo
basso, si accende questo simbolo
(9):
20. La macchina arresta automaticamente la produzione dei cubetti
di ghiaccio. Reintegrare l‘acqua,
come descritto in precedenza,
tenendo presente la marcatura
MAX in modo da non riempire
eccessivamente la macchina.
21. Richiudere il contenitore del
ghiaccio e premere il tasto „ON“.
22. Quando questo simbolo si illumina il serbatoio dell‘acqua
è bloccato da cubetti del ghiaccio
troppo grandi. Spegnere la macchina e attendere che i cubetti
fondano leggermente. Quindi continuare la produzione dei cubetti
di ghiaccio (attendendo però
almeno 3 minuti prima di proseguire, in modo da evitare danni
alla macchina).
23. Accertarsi di non lasciare i cubetti
nel contenitore troppo a lungo, in
quanto altrimenti si sciolgono. Se
non si vuole consumare i cubetti
immediatamente, metterli nel freezer.
24. Per evitare la formazione di funghi e batteri, dopo l’uso lasciar
aperto il contenitore del ghiaccio.
Per ragioni igieniche, l’acqua
presente nella macchina del
ghiaccio deve essere sostituita
al più tardi dopo 24 ore.
70
Page 71

PULIZIA E CURA
Prima di procedere alla pulizia
spegnere sempre la macchina
e staccare la spina dalla presa
elettrica.
1. La macchina e il cavo di alimentazione non devono essere
immersi in acqua o altri liquidi e
non devono essere lavati in lavastoviglie.
2. Strofinare la macchina del ghiaccio, sia all‘interno che all‘esterno,
con un panno umido utilizzando
preferibilmente una miscela d‘acqua con l‘aggiunta di un po‘ di
aceto.
3. Il contenitore del ghiaccio può
essere pulito con acqua calda e
un po’ di detersivo per piatti. Il
contenitore del ghiaccio non è
lavabile in lavastoviglie!
4. Pulire accuratamente il serbatoio
dell‘acqua con un panno umido e
quindi asciugarlo con un panno
antipelucchi.
5. Non usare prodotti abrasivi, lana
d’acciaio, oggetti metallici, disinfettanti o detergenti caldi.
6. Per evitare la formazione di funghi e batteri, dopo l’uso lasciar
aperto il contenitore del ghiaccio.
7. La macchina e la spina di collegamento devono essere perfettamente asciutte prima di essere
riutilizzate.
8. Conservare la macchina per
ghiaccio perfettamente asciugata
in un luogo asciutto e sicuro, in
modo da proteggerla da polvere,
urti, calore e umidità.
71
Page 72

RISOLUZIONE DEI PROBLEMI
Problema Causa Rimedio
Il compressore produce
un rumore molto forte.
Quando la spina è
inserita nella presa
nessuna delle spie di
controllo si accende.
I cubetti di ghiaccio
si appiccicano uno
all‘altro
Il simbolo si
illumina
Voltaggio troppo basso. Spegnere la macchi-
na e controllare che sia
col-legata a una presa a
220–240 ~-.
La macchina non è correttamente collegata.
Controllare che la spina
sia stata correttamente
inserita nella presa.
Un componente è
difettoso.
Acqua troppo fredda
Temperatura ambientale troppo fredda
Cubetti troppo grossi
bloccano il serbatoio
dell'acqua
Contattare la nostra assistenza clienti.
Riempire il serbatoio
dell’acqua con acqua
tiepida.
Spegnere la macchina e
attendere che i cubetti
fondano leggermente.
Quindi proseguire la preparazione dei cubetti di
ghiaccio.
72
Page 73

NORME DIE GARANZIA
I nostri prodotti sono garantiti per 24 mesi, 12 mesi in caso di uso professionale, dalla data di acquisto per i guasti manife-
statisi durante un utilizzo conforme alle disposizioni e attribuibili in modo dimostrabile a difetti di fabbricazione. Nel periodo
di garanzia porremo rimedio ai difetti materiali e di produzione secondo la nostra valutazione, procedendo alla riparazione
o alla sostituzione dell’apparecchio. Le nostre prestazioni di garanzia valgono esclusivamente per gli apparecchi venduti
in Germania e Austria. In tutti gli altri casi rivolgersi all‘importatore. Gli apparecchi per i quali si richiede la riparazione di
guasti ci devono essere inviati con spedizione affrancata e debitamente imballati, unitamente a una copia del documento
di acquisto redatto a macchina dal quale risulti la data di vendita, nonché la descrizione del guasto. In caso di garanzia al
cliente verranno rimborsati i costi di spedizione sostenuti in Germania e Austria. Sono esclusi dalla garanzia i guasti dovuti
all’usura, all’uso inappropriato o al mancato rispetto delle regole di manutenzione. Il diritto di garanzia decade qualora siano
state effettuate riparazioni o interventi da parte di terzi. Eventuali diritti del consumatore finale verso il venditore o negoziante
non vengono limitati dalla presente garanzia.
SMALTIMENTO / TUTELA DELL’AMBIENTE
I nostri apparecchi vengono prodotti rispettando un elevato standard qualitativo per una lunga durata
di utilizzo. Una corretta manutenzione e riparazioni adeguate a cura dal nostro servizio clienti possono
prolungare la durata di utilizzo del prodotto. Se un apparecchio è difettoso e non più riparabile, per il suo
smaltimento si presti attenzione ai punti che seguono. Questo prodotto non deve essere smaltito unitamente
ai comuni rifiuti domestici. Consegnare il prodotto a un centro di raccolta per il riciclaggio dei rifiuti elettrici
o elettronici. Con la raccolta differenziata dei rifiuti e dei prodotti riciclabili è possibile contribuire alla tutela
delle risorse naturali e far smaltire il prodotto nel rispetto dell’ambiente e della salute.
Refrigerante utilizzato: R600a
73
Page 74

MANUAL DE INSTRUCCIONES MODELO 48955
DATOS TÉCNICOS
Potencia: 150 W, 220–240 V~, 50 Hz
Medidas: aprox. 29,5 x 35,0 x 29,0 cm (LxAn/PxAl)
Cable de alimentación: aprox. 120 cm
Peso: aprox. 9,8 kg
Carcasa: plástico, negro/acero fino cepillado
Depósito de agua: 1,5 litros de volumen de agua
Equipamiento: pantalla LCD, función de preselección de tiempo, indicación de hora,
Accesorios: instrucciones de servicio, pala de hielo, vaso medidor
Reservado el derecho de modificaciones y errores en características de equipamiento, técnica, colores
y diseño
EXPLICACIÓN DE LOS SÍMBOLOS
Este símbolo advierte de posibles riesgos que pueden traer consigo lesiones personales
o daños al aparato.
Este símbolo indica un posible peligro de incendio.
Este símbolo hace referencia a un eventual riesgo de quemaduras. Proceda siempre con
especial cuidado.
señal acústica con el recipiente de cubitos de hielo lleno, así como con
depósito de agua vacío, hasta 60 cubitos de hielo en una hora, capacidad
del recipiente de cubitos de hielo aprox. 600 g.
PARA SU SEGURIDAD
Lea y conserve las siguientes
instrucciones.
Personas en el hogar
1. Este aparato puede ser
manejado por niños a par
tir de 8 años y por personas
con una capacidad física,
mental o sensorial reducida
o carentes de experiencia y/o
conocimientos siempre que
estén supervisados o hayan
sido correspondientemente
instruidos en el manejo
74
seguro de dicho aparato y
comprendan los peligros que
conlleva. Este aparato no es
ningún juguete. Los niños
solo pueden llevar a cabo la
limpieza y el mantenimiento
del mismo si están supervi
-
sados por un adulto.
2. Mantener vigilados o aleja
dos del aparato a los niños
menores de 3 años.
3. Los niños de entre 3 y 8
años solo deben conectar y
Page 75

desconectar el aparato si se
encuentra en su posición
de manejo normal previsto,
si son supervisados o han
sido instruidos en el manejo
seguro del aparato y han
comprendido los peligros
resultantes del mismo. Los
niños de entre 3 y 8 años no
deberán conectar, manejar,
limpiar ni realizar el mante
-
nimiento del aparato.
4. Guarde el aparato fuera del
alcance de los niños.
Requisitos para el lugar de insta
lación y para el manejo del aparato
5. Conecte el aparato solo a
corriente alterna con una
tensión de acuerdo con la
placa de características.
6. Este aparato no debe utili
-
zarse con un reloj programador externo ni con un sistema de mando a distancia.
7. De ninguna manera sumerja
el aparato o el cable de ali
-
mentación en agua o en
otros líquidos.
8. El aparato y el cable de ali
-
mentación no deben lavarse
en el lavavajillas.
9. El aparato está destinado
exclusivamente al uso
doméstico o a fines de uso
similares, por ejemplo,
cocinas tipo office en
comercios, oficinas u otros
lugares de trabajo,
el uso por parte de clientes
en hoteles, moteles u
otros establecimientos de
alojamiento colectivo,
en pensiones privadas o en
casas vacacionales.
10. No toque nunca el aparato o
el cable de alimentación con
las manos húmedas.
11. Por razones de seguridad
jamás coloque el aparato
sobre superficies calientes,
sobre una bandeja metálica
o sobre una base mojada.
12. El aparato o el cable de ali
mentación no deben utilizarse cerca de llamas.
13. Use siempre la máquina de
cubitos de hielo sobre una
superficie libre y plana.
14. Mantenga como mínimo una
distancia de 15 cm a otros
objetos para garantizar una
ventilación suficiente del
aparato.
15. No utilice equipos eléctricos
dentro del aparato, a menos
que fueron recomendados
por el fabricante.
16. Preste atención a que el
cable de alimentación no
cuelgue sobre el borde de la
superficie de trabajo, dado
75
Page 76

que ello puede conducir a
accidentes, si p. ej. niños
pequeños tiran de él.
17. La máquina de cubitos de
hielo no debe ser usada ni
guardada a la intemperie.
18. El aparato solo debe utili
zarse una vez que se haya
montado correctamente.
19. Llene el depósito de agua
solo con agua fría y clara.
20. No introduzca ningún objeto
en el interior del aparato
para evitar lesiones.
21. Después del desembalaje
deje el aparato en reposo
durante dos horas como
mínimo antes de ponerlo en
funcionamiento para evitar
daños en el compresor.
22. No conecte y desconecte
el aparato con demasiada
frecuencia para no dañar el
compresor. El aparato debe
estar en funcionamiento
durante tres minutos como
mínimo.
23. Desconecte el aparato y des
enchúfelo antes de moverlo
para evitar daños en el
mismo.
24. Para evitar daños, no use el
aparato con accesorios de
otros fabricantes o marcas.
25. Después del uso así como
antes de la limpieza, des
-
enchufe el aparato. No deje
nunca el aparato sin vigilan
-
cia cuando esté enchufado.
26. Limpie el aparato después
de cada uso.
27. No intente reparar nunca el
aparato usted mismo dado
que existe peligro por des
-
carga eléctrica.
28. Controle periódicamente si
el aparato, el enchufe y el
cable de alimentación pre
sentan desgaste o daños. En
caso de daños en el cable de
alimentación o en otras pie
zas envíe el aparato para su
verificación y reparación a
nuestro servicio de atención
al cliente. Las reparaciones
inadecuadas pueden oca
sionar considerables peligros para el usuario y tienen
como consecuencia la exclu
sión de la garantía.
29. En caso de que la línea de
alimentación del aparato
esté dañada, para evitar
peligros la deberá cambiar el
fabricante, su Servicio Pos
tventa u otra persona igualmente cualificada.
76
Page 77

De ninguna manera abra la carcasa del aparato. Existe peligro
de descarga eléctrica.
Después del desembalaje deje el aparato en reposo durante
dos horas como mínimo antes de ponerlo en funcionamiento. El
refrigerante del aparato debe primero bajar de nivel dado que,
de lo contrario, se podría deteriorar el compresor.
Llene el aparato solo con agua potable limpia. No use nunca
agua con aditivos u otros alimentos líquidos. Obstruyen los
conductos en el aparato deteriorando el mismo.
Advertencia: No almacene en este equipo sustancias explosivas
tales como aerosoles en lata con gas propulsor inflamable.
Advertencia: Mantenga las aberturas de ventilación en la
cubierta del equipo y dentro del mismo libres de obstáculos.
Advertencia: No utilice otros dispositivos mecánicos o medios
auxiliares para la aceleración del proceso de descongelación
que los recomendados por el fabricante.
Advertencia: Evite dañar el circuito de refrigeración.
Advertencia: No utilice aparatos eléctricos en el compartimento
de alimentos del equipo, a no ser que sean del tipo recomendado
por el fabricante.
El compresor puede calentarse mucho durante el funcionamiento.
¡Peligro de quemaduras!
El fabricante no es responsable en caso de uso inapropiado o equivocado o después de haber sido
efectuadas reparaciones por terceros no autorizados.
77
Page 78

ANTES DEL PRIMER USO
Durante el desembalaje y la retirada del mismo preste atención a no incli-
nar el aparato más de 45 ° dado que, de lo contrario, se podría deteriorar
el compresor en el aparato.
1. Retire todos los materiales de
embalaje y, dado el caso, los
seguros de transporte. Mantenga
las piezas de embalaje alejado de
los niños. ¡Peligro de asfixia!
2. Compruebe si están todos los
accesorios especificados.
3. Limpie todas las piezas con un
paño húmedo como se describe
en el capítulo “Limpieza y cuidado”.
5. Compruebe si la salida de agua
residual en la parte posterior del
aparato está cerrada con el tapón
de cierre.
6. Conecte el cable de alimentación
a la parte posterior del aparato.
7. Conecte el aparato mediante el
cable de alimentación a la red
eléctrica (220–240 V~, 50 Hz).
8. Pulse la tecla „On“ para conectar
el aparato.
4. Compruebe si todas las piezas
han sido correctamente ensam-
bladas y si el aparato está estable
y en horizontal.
PANTALLA
Su nueva máquina de cubitos de hielo dispone de un elemento de mando de
pantalla táctil. Esto significa que todos los ajustes en el aparato se realizan
directamente a través de la pantalla. Para este fin, pulse brevemente la tecla
deseada. Al hacerlo, asegúrese de realizar los ajustes rápidamente a través de
las teclas. Si espera más de 3 segundos para pulsar una tecla, se interrumpe
la introducción actual y el aparato vuelve a su estado original. Sin embargo, se
guardan los ajustes realizados hasta entonces.
78
Page 79

1 2
3
7
6 5 4
1 El símbolo gira: Se fabrican cubitos de hielo
El símbolo parpadea: Fallo
2 TIME ON El tiempo de inicio actualmente ajustado
TIME OFF El tiempo de desconexión actualmente ajustado
3 Indicador de tiempo
4 SET Ajustar la hora o la preselección de tiempo
5 TIME Visualizar la hora o la preselección de tiempo
6 OFF Desconectar el aparato/finalizar o interrumpir la fabricación
de cubitos de hielo
7 ON Conectar el aparato/iniciar la fabricación de cubitos de
hielo
Sin imagen:
8 Símbolo Recipiente Recipiente de cubitos de hielo lleno
9 Símbolo Grifo de agua Depósito de agua vacío
79
Page 80

AJUSTAR HORA
1. Pulse una vez la tecla „TIME“ en
la pantalla para ajustar las horas:
Para ello, pulse la tecla „SET“
hasta obtener el tiempo deseado
en horas.
2. Para ajustar los minutos, pulse
la tecla „TIME“ dos veces y, a
continuación, la tecla „SET“
PRESELECCIÓN DE TIEMPO
Ajustar la preselección de tiempo
Tiempo de conexión:
1. Pulse la tecla „TIME“ tres veces
para ajustar las horas mediante
la tecla „SET“ o bien cuatro
veces para ajustar los minutos.
A continuación, espere cinco
segundos hasta que la pantalla
esté en el ajuste básico. Ahora,
pulse la tecla „SET“ tres veces.
En la pantalla se indica „TIME“,
„ON“ y „OFF“ en la parte superior
derecha.
Tiempo de desconexión
2. Pulse la tecla „TIME“ cinco veces
para ajustar las horas mediante
la tecla „SET“ o bien seis
veces para ajustar los minutos.
A continuación, espere cinco
segundos hasta que la pantalla
esté en el ajuste básico. Ahora,
pulse la tecla „SET“ tres veces.
hasta obtener el tiempo deseado
en minutos.
3. Pulse la tecla „TIME“ para
guardar la hora ajustada.
En la pantalla se indica „TIME“,
„ON“ y „OFF“ en la parte superior
derecha.
Comprobar la preselección de tiempo
3. Pulse la tecla „TIME“ varias
veces consecutivas. Se indican
los tiempos ajustados correspondientemente.
Conectar o desconectar la preselección
de tiempo
4. Pulse la tecla „SET“ para conectar
la preselección de tiempo. Para
desconectar la preselección de
tiempo debe pulsar de nuevo la
tecla „SET“ hasta que se apaguen
los símbolos „ON“ y „OFF“ en
la parte superior derecha de la
pantalla.
80
Page 81

INDICACIONES SOBRE EL AGUA
1. Utilice exclusivamente agua potable para fabricar cubitos de hielo.
No utilice aditivos, sustancias
aromáticas o similares. Podrían
ensuciar el aparato. El agua utilizada no debe tener una temperatura inferior a 7 °C y superior
a 35 °C. Además, obtendrá los
mejores resultados si el aparato
funciona en una temperatura
ambiente de 15 °C a máximo
38 °C.
VACIADO DEL AGUA
1. Si desea retirar el agua de la
máquina, proceda como se indica
a continuación:
Desconecte el aparato y
desenchufe la clavija.
2. Coloque el aparato
sobre un recipiente suficientemente
grande o en
el fregadero o
colóquelo en
el borde de la
encimera.
2. Consejo: Normalmente, el aparato
fabrica cubitos de hielo ligeramente turbios. Sin embargo, no
perjudica la calidad de los cubitos de hielo. Se debe al proceso
de congelación especialmente
rápido. Para obtener cubitos
de hielo cristalinos utilice agua
potable previamente hervida o
enfriada.
3. Retire el tapón de la
salida de agua residual (5) en
la parte posterior del aparato
girando en sentido contrario a las
agujas del reloj.
4. Espere a que salga toda el agua
del aparato y vuelva a cerrar la
salida del agua.
5. Asegúrese de no inclinar el aparato en exceso para evitar daños
en el compresor.
81
Page 82

FABRICAR CUBITOS DE HIELO
1. Atención: Los primeros cubitos de
hielo fabricados con el aparato no
se deberían consumir. Deseche
estos cubitos de hielo dado que
podrían contener residuos de
producción.
2. Prepare el aparato como descrito
en „Antes del primer uso“.
3. Retire el recipiente de hielo (4)
tirando de él hacia delante del
aparato.
4. Llene el vaso medidor
suministrado con agua fresca y
clara.
5. Vierta el agua en el depósito de
agua (véase ilustración). Se deben
llenar como máximo 1,8 l de
agua. Observe el marcado mínimo
y máximo correspondiente en el
lado izquierdo del depósito de
agua.
6. Llene el agua solo hasta el
marcado de máximo, para evitar
que se derrame el agua.
7. Vuelva a colocar el recipiente del
hielo en el aparato.
8. Pulse la tecla „ON“ para iniciar
de inmediato la fabricación de
cubitos de hielo. Si ha activado
la preselección de tiempo, ya no
debe pulsar ninguna tecla. El
aparato se inicia automáticamente
a la hora introducida.
9. El aparato empieza a fabricar
cubitos de hielo. Los primeros
cubitos fabricados no se
corresponden con el tamaño
seleccionado ya que tienen que
pasar unos minutos antes de que el
aparato alcance la temperatura de
funcionamiento correspondiente.
Por ello, los primeros cubitos son
un poco más pequeños.
10. Si la bomba en el aparato no
suministra agua durante un
tiempo prolongado, desconecte
el aparato y deje salir unas gotas
de agua a través de la salida de
agua residual. Después, reinicie
el proceso.
11. Según la temperatura del agua y la
temperatura ambiente los cubitos
de hielo estarán listos en aprox.
6 a 18 minutos. Indicación: Por
razones técnicas, puede suceder
al inicio de la fabricación de
cubitos de hielo que los cubitos
sean pequeños o de diferentes
tamaños.
12. Puede interrumpir o cancelar la
fabricación de cubitos de hielo en
82
Page 83

cualquier momento pulsando la
tecla „OFF“.
13. Si ha programado el aparato a
través de la preselección de tiempo
no debe pulsar ninguna tecla. El
aparato finaliza la fabricación de
cubitos de hielo automáticamente
a la hora ajustada.
14. Atención: Si interrumpe el
proceso, el agua excesiva vuelve
al depósito de agua. Los cubitos
de hielo que se queden colgando
de las varillas de enfriamiento
caerán en el recipiente del hielo
pasado un tiempo, desde donde
se podrán extraer.
15. Cuando el recipiente del hielo
está lleno, se ilumina este
símbolo (8) y se emite una
señal acústica.
16. El aparato detiene automáticamente la fabricación de cubitos
de hielo.
17. Retire el recipiente del hielo y
vacíelo. Coloque de nuevo el
recipiente de hielo. Asegúrese
de sujetar el recipiente del hielo
ligeramente inclinado durante la
colocación en el aparato.
18. Después, continúe con la
fabricación de los cubitos de
hielo.
19. Además, la máquina de
cubitos de hielo comprueba
automáticamente el nivel de agua
en el depósito de agua. Si el nivel
de agua es demasiado bajo se
ilumina este símbolo (9).
20. El aparato detiene automáticamente la fabricación de cubitos
de hielo. Rellene agua como se
describe arriba observando la
marca „MAX“ para no llenar el
aparato en exceso.
21. Cierre de nuevo el recipiente del
hielo y pulse la tecla „ON“.
22. Si se ilumina este símbolo
el depósito de agua estará
bloqueado por cubitos de hielo
demasiado grandes. Desconecte
el aparato y espere hasta que se
hayan fundido un poco los cubitos
de hielo. Después, siga con la
fabricación de los cubitos de
hielo (sin embargo, espere como
mínimo 3 minutos antes de seguir
para evitar daños en el aparato).
23. Asegúrese de no dejar los cubitos
de hielo demasiado tiempo en el
recipiente de cubitos dado que
podrían fundirse. Si no desea
utilizar los cubitos de hielo
directamente, guárdelos en el
congelador.
24. Después del uso, deje abierto el
recipiente del hielo para evitar la
formación de hongos y bacterias.
Después de máximo 24 horas
se debe cambiar el agua en
máquina de cubitos de hielo
por razones higiénicas.
83
Page 84

LIMPIEZA Y CUIDADO
Antes de la limpieza se debe
desconectar siempre el aparato
y retirar el enchufe de la toma
de corriente.
1. El aparato y el cable de alimentación no deben ser sumergidos
en agua ni en otro líquido ni ser
lavados en el lavavajillas.
2. Limpie la máquina de cubitos de
hielo en el interior y exterior con
un trapo húmedo. Al hacerlo, utilice preferentemente una mezcla
de agua con un poco de vinagre
convencional.
3. Puede limpiar el recipiente del
hielo con un poco de agua tibia
de fregar. ¡El recipiente del hielo
no es apto para lavavajillas!
4. Limpiar a fondo el depósito del
agua con un paño húmedo y,
a continuación, secarlo con un
paño sin pelusas.
5. No utilice productos de limpieza
agresivos, lana o estopa de acero,
objetos metálicos, productos de
limpieza calientes ni desinfectantes.
6. Después del uso, deje abierto el
recipiente del hielo para evitar la
formación de hongos y bacterias.
7. Tanto el aparato como el enchufe
de conexión deberán estar completamente secos antes de volver
a utilizar el aparato.
8. Guarde la máquina de cubitos de
hielo completamente seca en un
lugar seco y seguro, para protegerla contra polvo, golpes, calor y
humedad.
84
Page 85

ELIMINACIÓN DE FALLOS
Fallos Causa Solución
El compresor hace
Voltaje demasiado bajo. Desconecte el aparato
mucho ruido.
No se enciende ninguna luz indicadora
El aparato no está co-
rrectamente conectado.
cuando se conecta el
enchufe.
Un componente está
defectuoso.
Los cubitos de hielo
están pegados entre sí
Agua demasiado fría
Temperatura ambiente
demasiado fría
Se ilumina el símbolo Los cubitos de hielo
demasiado grandes
bloquean el depósito
de agua
y compruebe si está conectado a un enchufe de
220–240 V~.
Compruebe si el conec-
tor está correctamente
enchufado.
Contacte con nuestro
servicio de atención al
cliente.
Llene el depósito de agua
con agua tibia.
Desconecte el aparato y
espere hasta que se hayan fundido un poco los
cubitos de hielo. Después, continúe con la fabricación de los cubitos
de hielo.
85
Page 86

CONDICIONES DE GARANTIA
La garantía para nuestros equipos es de 24 meses, y de 12 meses en el caso de uso comercial, a partir de la fecha de
compra, cubriendo los daños que con un uso acorde a lo prescrito pueden atribuirse fehacientemente a defectos de fabri-
cación. Dentro del período de garantía, solucionamos errores de material y de fabricación a consideración nuestra mediante
reparación o cambio. Nuestros servicios de garantía son válidos únicamente para los aparatos que han sido vendidos en
Alemania y Austria. Para todos los demás casos diríjase por favor al importador correspondiente. Aquellos aparatos que se
presentan para eliminar errores, por favor enviarlos junto a una copia del comprobante de compra extendido a máquina, del
cual debe desprenderse la fecha de compra, así como una breve descripción de las deficiencias, apropiadamente embalado
y con los sellos correspondientes a nuestro servicio al cliente. En caso de garantía, los gastos de envío serán restituidos al
cliente solamente en Alemania y Austria. Aquellos daños causados por desgaste están excluidos de la garantía, así como
manipulación incorrecta, e incumplimiento de las condiciones de mantenimiento y cuidado. El derecho a garantía expira si las
reparaciones o mantenimiento son realizadas por terceros. Todo reclamo del consumidor final ante el vendedor, comerciante
no se ve afectado por esta garantía.
DISPOSICIÓN/PROTECCIÓN DEL MEDIO AMBIENTE
Nuestros aparatos se fabrican con un alto nivel de calidad por un largo período de uso. El mantenimiento
regular y las reparaciones de tipo técnico a través de nuestro servicio al cliente pueden prolongar la du-
ración del aparato. Cuando un aparato está defectuoso y ya no puede repararse, por favor considere en la
disposición final los siguientes puntos: Este producto no puede ser eliminado junto a la basura domiciliaria.
Usted debe entregar este producto a un lugar oficial para el reciclaje de aparatos eléctricos o electrónicos.
Mediante la clasificación por separado y el reciclaje de productos residuales, Usted contribuye a proteger
los recursos naturales y asegura que el producto sea eliminado de forma salubre y acorde con el medio
ambiente.
Refrigerante utilizado: R600a
86
Page 87

NÁVOD K OBSLUZE MODELU 48955
TECHNICKÉ ÚDAJE
Výkon: 150 W, 220-240 V~, 50 Hz
Rozměry: cca 29,5 x 35,0 x 29,0 cm (DxŠ/HxV)
Přívod: cca 120 cm
Hmotnost: cca 9,8 kg
Těleso: plast černý / nerez kartáčovaná
Nádrž na vodu: objem 1,5 litru
Vybavení: LCD displej, funkce předvolby času, zobrazení hodin, signální tón při plné nádobě
Příslušenství: návod k obsluze, lopatka na led, odměřovací nádoba
Je vyhrazeno právo na omyly a změny vybavení, techniky, barev a designu
VYSVĚTLENÍ SYMBOLŮ
na led i při prázdné nádrži na vodu, až 60 kostek ledu za hodinu, objem nádoby na
led cca 600 g
Tento symbol označuje případná ohrožení, která mohou způsobit poranění nebo poškození
přístroje.
Tento symbol Vás upozorňuje na případné nebezpečí požáru.
Tento symbol poukazuje na eventuální nebezpečí popálení. Postupujte tu vždy zvláště
opatrně.
PRO VAŠI BEZPEČNOST
Následující pokyny si přečtěte a
uložte.
Osoby v domácnosti
1. Přístroj může být používán
dětmi od 8 let a osobami se
sníženými fyzickými, smyslo
vými nebo duševními schopnostmi nebo s nedostatkem
zkušeností a/nebo nedostat
kem znalostí, pokud jsou
pod dohledem nebo pokud
byly poučeny o bezpečném
používání přístroje a porozu
měly z něj vyplývajícím rizikům. Přístroj není hračka.
Čištění a údržbu přístroje
smí provádět děti pouze pod
dohledem.
2. Děti do 3 let by se neměly k
-
přístroji přibližovat nebo být
pod trvalým dohledem.
3. Děti mezi 3 a 8 roky by
-
měly zapínat a vypínat pří
stroj pouze tehdy, když se
nachází ve své určené nor
-
mální pozici ovládání a když
-
-
87
Page 88

jsou pod dohledem nebo
pokud byly poučeny o bez
pečném používání přístroje
a porozuměly z něj vyplýva
jícím rizikům. Děti mezi 3 a
8 roky by neměly přístroj ani
připojovat ani ovládat, čistit
nebo provádět údržbu.
4. Uchovávejte na místě nepří
stupném dětem.
Požadavky na místo postavení a
při obsluze přístroje
5. Přístroj připojujte pouze na
střídavý proud s napětím
podle typového štítku.
6. Tento přístroj nesmí být pou
žíván s externími časovými
spínacími hodinami nebo se
systémem pro dálkové ovlá
dání.
7. V žádném případě přístroj
nebo jeho přívod nepono
řujte do vody nebo do jiné
kapaliny.
8. Přístroj a jeho přívod nesmí
být čištěny v myčce.
9. Přístroj je určen výhradně
pro domácí použití nebo
podobné účely, např.
pro kuchyňky v obchodech,
kancelářích nebo podob
ných pracovištích,
použití hosty v hotelu,
motelu nebo jiných ubytova
cích zařízeních,
v soukromých penziónech
nebo rekreačních objektech.
88
10. Nikdy se přístroje popř. jeho
-
přívodu nedotýkejte mok
rýma rukama.
11. Z bezpečnostních důvodů
-
přístroj nikdy nestavte na
horké povrchy, kovový pod
nos nebo mokrý podklad.
12. Přístroj ani přívodní kabel
-
nesmí být používány v blíz
kosti plamenů.
13. Výrobník ledu vždy použí
vejte na volném a rovném
podkladu.
14. Dodržujte vzdálenost mini
málně 15 cm od jiných
-
předmětů, aby bylo zaručeno
dostatečné větrání přístroje.
15. Nepoužívejte žádné elek
-
trické přístroje uvnitř přístroje, kromě případu, že by
byly výrobcem doporučeny.
16. Dbejte na to, aby přívodní
-
kabel nevisel přes okraj
pracovní plochy, protože to
může vést k nehodám, např.
za něj mohou zatáhnout
malé děti.
17. Výrobník ledu nesmí být pou
žíván nebo ukládán venku.
18. Přístroj smí být použit pouze
-
po správném sestavení.
19. Do nádrže na vodu lijte jen
čistou, studenou vodu.
20. Nestrkejte dovnitř přístroje
-
žádné předměty, abyste pře
dešli zranění.
-
-
-
-
-
-
-
-
Page 89

21. Nechte přístroj po vybalení
minimálně dvě hodiny stát,
než jej uvedete do provozu,
abyste předešli poškození
kompresoru.
22. Nezapínejte a nevypínejte
přístroj příliš často za sebou,
protože to kompresoru může
škodit. Přístroj by proto měl
být v provozu vždy nejméně
tři minuty.
23. Než budete přístrojem pohy
-
bovat, tak jej vypněte a
vytáhněte síťovou zástrčku,
abyste předešli jeho poško
-
zení.
24. Přístroj nesmí být použí
-
ván s příslušenstvím jiných
výrobců nebo značek, aby se
předešlo poškození.
25. Po použití i před čištěním
vyndejte síťovou zástrčku ze
zásuvky. Nikdy nenechávejte
přístroj bez dozoru, když je
připojen do sítě.
26. Po každém použití přístroj
vyčistěte.
27. Nikdy se nepokoušejte pří
stroj opravovat sami, protože
hrozí nebezpečí úderu elek
trickým proudem.
28. Pravidelně kontrolujte pří
stroj, zástrčku a přívodní
kabel, zda nejsou opotře
beny nebo poškozeny. Při
poškození přívodního kabelu
nebo jiných dílů pošlete pro
sím přístroj na kontrolu a
opravu do našeho servisu.
Neodborné opravy mohou
vést k značnému nebezpečí
pro uživatele a mají za násle
dek ztrátu záruky.
29. Je-li přívodní vedení tohoto
přístroje poškozeno, musí
být vyměněno výrobcem,
jeho servisem nebo podobně
kvalifikovanou osobou, aby
se předešlo ohrožení.
-
-
-
-
-
-
89
Page 90

V žádném případě těleso přístroje neotevírejte. Je nebezpečí
úderu elektrickým proudem.
Nechte přístroj po vybalení minimálně dvě hodiny stát, než jej
uvedete do provozu. Chladicí prostředek v přístroji se musí
nejprve usadit, protože jinak může dojít k poškození kompresoru.
Plňte přístroj výhradně čistou pitnou vodou. Nikdy nepoužívejte
vodu s přísadami nebo jinými tekutými potravinami. Ty ucpávají
vedení v přístroji a mohou jej poškodit.
Výstraha: V tomto přístroji neskladujte žádné výbušné látky jako
spreje se vznětlivými hnacími plyny.
Výstraha: Větrací otvory na krytu přístroje a uvnitř přístroje
udržujte volné.
Výstraha: Nepoužívejte jiné mechanické přípravky nebo
pomůcky pro urychlení tání než výrobcem doporučené.
Výstraha: Nepoškoďte chladicí okruh.
Výstraha: Nepoužívejte žádné elektrické přístroje uvnitř
přihrádky na potraviny, pokud nebyly doporučeny výrobcem.
Kompresor může být v provozu velmi horký – nebezpečí popálení!
Výrobce nepřebírá žádné ručení při neodborném nebo chybném použití nebo po provedení opravy
neautorizovanými třetími osobami.
90
Page 91

PŘED PRVNÍM POUŽITÍM
Při vybalování a odstraňování obalu dbejte na to, aby se přístroj nenaklonil
více než o 45 °, protože jinak se může poškodit jeho kompresor.
1. Odstraňte všechny části balení
a případné transportní pojistky.
Části balení udržujte mimo dosah
dětí – nebezpečí udušení!
2. Zkontrolujte, zda jsou všechny
uvedené části příslušenství
dodány.
3. Všechny díly vyčistěte vlhkou
utěrkou, jak je popsáno v kapitole
„Čištění a péče“.
4. Zkontrolujte, zda jsou všechny
části správně sestaveny a přístroj
stojí stabilně a vodorovně.
5. Zkontrolujte zda odtok zbytkové
vody na zadní straně přístroje je
uzavřen krytkou.
6. Připojte přívodní vedení na straně
přístroje.
7. Připojte přístroj pomocí přívodního kabelu do sítě (220–240 V~,
50 Hz).
8. Stiskněte tlačítko „ZAP“, abyste
přístroj zapnuli.
91
Page 92

DISPLEJ
Váš nový výrobník ledu disponuje ovládacím prvkem „dotyková obrazovka“. To
znamená, že všechna nastavení přístroje se provádějí přímo na displeji. K tomu
lehce stiskněte požadované tlačítko. Dbejte přitom, abyste nastavení pomocí
tlačítek prováděli svižně. Když budete se stisknutím tlačítka čekat déle než 3
vteřiny, aktuální zadávání se přeruší a přístroj se vrátí do výchozího stavu. Do té
doby provedená nastavení však budou uložena.
1 2
3
7
6 5 4
1 Symbol se otáčí: probíhá výroba kostek ledu
Symbol bliká: porucha
2 TIME ON Aktuálně nastavená doba startu
TIME OFF Aktuálně nastavená doba vypnutí
3 Zobrazení času
4 SET/ NAST Nastavení času nebo časové předvolby
5 TIME/ ČAS Zobrazení času nebo časové předvolby
6 OFF/ VYP Vypnutí přístroje/ukončení nebo přerušení výroby ledu
7 ON/ ZAP Zapnutí přístroje/zahájení výroby ledu
Bez obrázku:
8 Symbol nádoby Nádoba na led je plná
9 Symbol vodního kohoutku Nádrž na vodu je prázdná
92
Page 93

NASTAVENÍ ČASU
1. Jednou stiskněte tlačítko „ČAS“
na displeji pro nastavení hodin:
Nyní stiskněte tlačítko „NAST“
tak dlouho, až bude dosažen
požadovaný čas v hodinách.
2. Pro nastavení minut stiskněte
tlačítko „ČAS“ dvakrát a potom
tlačítko „NAST“ tak dlouho, až
PŘEDVOLBA ČASU
Nastavení předvolby času
Doba zapnutí:
1. Stiskněte tlačítko „ČAS“ třikrát,
abyste pomocí tlačítka „NAST“
nastavili hodiny, popř. čtyřikrát pro
nastavení minut. Potom počkejte
pět vteřin, než se displej vrátí do
základního nastavení. Stiskněte
nyní tlačítko „NAST“ třikrát. Na
displeji se nahoře vpravo zobrazí
„ČAS“, „ZAP“ a „VYP“.
Doba vypnutí
2. Stiskněte tlačítko „ČAS“ pětkrát,
abyste pomocí tlačítka „NAST“
nastavili hodiny, popř. šestkrát pro
nastavení minut. Potom počkejte
pět vteřin, než se displej vrátí do
základního nastavení. Stiskněte
nyní tlačítko „NAST“ třikrát. Na
displeji se nahoře vpravo zobrazí
„ČAS“, „ZAP“ a „VYP“.
bude dosažen požadovaný čas v
minutách.
3. Stiskněte tlačítko „ČAS“ pro
uložení nastaveného času.
Kontrola předvolby času
3. Několikrát za sebou stiskněte
tlačítko „ČAS“. Dané nastavené
časy se zobrazí.
Zapnutí nebo vypnutí předvolby času
4. Stiskněte tlačítko „NAST“ pro
zapnutí předvolby času. Pro
vypnutí předvolby času musíte
znovu mačkat tlačítko „NAST“
tak dlouho, až symboly „ZAP“ a
„VYP“ nahoře vpravo na displeji
zmizí.
93
Page 94

POKYNY K VODĚ
1. Pro výrobu kostek ledu používejte
výhradně pitnou vodu. Nepoužívejte žádné přísady, aromatické
látky ani podobné látky, ty mohou
přístroj znečistit. Použitá voda by
neměla být chladnější než 7 °C
a teplejší než 35 °C. Nejlepších
výsledků dosáhnete, když přístroj pracuje při okolní teplotě od
15 °C do maximálně 38 °C.
VYPUŠTĚNÍ VODY
1. Pokud chcete nechat naplněnou
vodu z přístroje odtéci, postupujte
následujícím způsobem:
Vypněte přístroj a vytáhněte
zástrčku ze zásuvky.
2. Podržte přístroj nad dostatečně
velkou miskou nebo kuchyňským
dřezem nebo
jej postavte na
hranu pracovní
plochy.
3. Oto-
čením proti
směru hodinových ručiček
odstraňte uzá-
2. Tip: Přístroj zpravidla vyrábí kostky
ledu s mírným zákalem, což však
jejich kvalitu neovlivňuje. Je to
dáno mimořádně rychlým procesem zmrazení. Pro získání křišťálově čirých kostek ledu použijte
pitnou vodu, která byla předem
převařena a vychlazena.
věr na odtoku zbytkové vody (5)
vzadu na přístroji.
4. Počkejte, dokud voda z přístroje
zcela nevyteče a potom odtok
vody opět uzavřete.
5. Dbejte přitom na to, abyste přístroj příliš nenaklonili, aby se pře-
dešlo poškození kompresoru.
94
Page 95

VÝROBA KOSTEK LEDU
1. Pozor: První přístrojem vyrobené
kostky ledu by se neměly
konzumovat. Tyto kostky ledu
vyhoďte, protože případně mohou
obsahovat zbytky z výroby.
2. Připravte přístroj tak, jak je
popsáno v části „Před prvním
použitím“.
3. Vyjměte nádobu na led (4) tím,
že ji vytáhnete směrem dopředu z
přístroje.
4. Dodanou odměřovací nádobu
naplňte čerstvou, čistou vodou.
5. Nalijte vodu do nádrže na vodu (viz
vyobrazení). Musí být naplněno
maximálně 1,8 l vody. Dbejte
na příslušné značky minima a
maxima na levé straně nádrže na
vodu.
6. Nedolévejte vodu více než ke
značce Max, abyste předešli
jejímu vytečení.
7. Nádobu na led opět zasuňte do
přístroje.
8. Stiskněte tlačítko „ZAP“ pro
okamžitý start výroby kostek
ledu. Pokud jste aktivovali
předvolbu času, musíte stisknout
malé tlačítko, přístroj se pak
automaticky zapne v zadanou
dobu.
9. Přístroj začíná vyrábět kostky ledu.
První vyrobené kostky ledu ještě
neodpovídají navolené velikosti,
protože několik minut trvá,
než přístroj dosáhne příslušné
provozní teploty. Proto jsou první
kostky poněkud menší.
10. Pokud čerpadlo v přístroji delší
dobu nečerpalo žádnou vodu,
přístroj vypněte a nechte několik
kapek vody vykapat z odtoku
zbytkové vody. Potom postup
znovu odstartuje.
11. Podle teploty vody a okolí jsou
kostky ledu hotové za cca 6 až 18
minut. Upozornění: Na začátku
výroby kostek ledu dochází z
technických důvodů k tomu, že
kostky ledu jsou malé nebo mají
různou velikost.
12. Výrobu kostek ledu můžete
kdykoli přerušit nebo vypnout,
když stisknete tlačítko „VYP“.
13. Když jste přístroj naprogramovali
pomocí předvolby času, nemusíte
stisknout žádné tlačítko, přístroj
výrobu kostek ledu ukončí
automaticky sám v nastavenou
dobu.
95
Page 96

14. Pozor: Když chcete postup
přerušit, přetéká přebytečná voda
zpět do nádrže na vodu. Kostky
ledu, které ještě drží na mrazicích
tyčkách, spadnou po určité době
do nádoby na led a mohou pak být
vyjmuty.
15. Když je nádoba na led plná,
rozsvítí se tento symbol (8)
a zazní signální tón.
16. Přístroj automaticky zastaví
výrobu kostek ledu.
17. Vyjměte nádobu na led a
vyprázdněte ji. Vložte nádobu
na led zpátky. Dbejte na to, že
nádobu na led musíte při vkládání
do přístroje držet mírně šikmo.
18. S výrobou kostek ledu pak
pokračujte.
19. Výrobník ledu kromě toho
automaticky kontroluje hladinu
vody v nádrži. Když je hladina
vody příliš nízká, rozsvítí se tento
symbol (9):
20. Přístroj automaticky zastaví
výrobu kostek ledu. Doplňte vodu
tak, jak bylo popsáno výše, dbejte
přitom na značku MAX a přístroj
nepřeplňujte.
21. Opět zavřete nádobu na led a
stiskněte tlačítko „ZAP“.
22. Když svítí tento symbol , je
nádrž na vodu blokována příliš
velkými kostkami ledu. Vypněte
přístroj a počkejte, než kostky
ledu trochu roztají. S výrobou
kostek ledu pak pokračujte
(počkejte však alespoň 3 minuty,
než budete pokračovat, abyste
předešli poškození přístroje).
23. Dbejte na to, abyste kostky
ledu nenechali v nádobě na
led příliš dlouho, protože by se
jinak roztekly. Když kostky ledu
nechcete hned použít, uložte je
do mrazáku.
24. Nádobu na led nechte po použití
stát otevřenou, aby se předešlo
vzniku plísní nebo bakterií.
Nejpozději po 24 hodinách
musí být voda ve výrobníku
ledu z hygienických důvodů
vyměněna.
96
Page 97

ČIŠTĚNÍ A PÉČE
Před čištěním přístroj vždy
vypněte a vyndejte zástrčku ze
zásuvky.
1. Přístroj a přívodní kabel nesmí
být ponořovány do vody nebo jiné
tekutiny ani čištěny v myčce.
2. Otřete výrobník ledu uvnitř a
zvenku vlhkou utěrkou. Použijte k
tomu nejlépe vodu, do které bylo
přidáno trochu běžného octa.
3. Nádobu na led můžete vyčistit
trochou teplé vody. Nádoba na led
není vhodná pro čištění v myčce!
4. Nádrž na vodu důkladně vyčistěte
vlhkou utěrkou a potom osušte
utěrkou, která nepouští vlákna.
5. Nepoužívejte abrazivní čisticí prostředky, drátěnku, kovové předměty, horké čisticí prostředky ani
dezinfekční prostředky.
6. Nádobu na led nechte po použití
stát otevřenou, aby se předešlo
vzniku plísní nebo bakterií.
7. Před opětným použitím pří-
stroje musí být přístroj i přívodní
zástrčka zcela suché.
8. Zcela usušený výrobník ledu
uložte na suché a bezpečné
místo, aby byl chráněn před prachem, nárazy, horkem a vlhkem.
97
Page 98

ODSTRAŇOVÁNÍ CHYB
Závada Příčina Řešení
Kompresor velmi hlasi-
Příliš nízké napětí. Vypněte přístroj a zkont-
tě bručí.
Nesvítí žádná kontrolka, když síťovou
Přístroj není správně
připojen.
zástrčku zastrčíte do
zásuvky.
Některý díl je vadný. Obraťte se na náš servis.
Kostky ledu se k sobě
lepí
Příliš chladná voda
Příliš nízká okolní
teplota
Symbol svítí Příliš velké kostky ledu
blokují nádrž na vodu
rolujte, zda je zapojen do
zásuvky 220–240 V~.
Zkontrolujte, zda zástrčka v zásuvce správně
sedí.
Naplňte nádrž na vodu
vlažnou vodou.
Vypněte přístroj a počkejte, než kostky ledu
trochu roztají. S výrobou
kostek ledu pak pokra-
čujte.
98
Page 99

ZÁRUČNÍ PODMÍNKY
Na naše přístroje poskytujeme záruku v trvání 24 měsíců (u průmyslového využití 12 měsíců) od data koupě výrobku, záruka
se vztahuje na poškození, která prokazatelne vznikla při správném použití v důsledku výrobních vad. Po dobu záruky budeme
odstraňovat materiální i výrobní vady opravou nebo výměnou podle našeho uvážení. Poskytnutí záruky výhradně platí pro
zařízení prodány v Německu i Rakousku. V jiných zemích se obrat’te prosím na kompetentní dovozce. Přístroje, na které
bylo uplatňováno odstranění vad, zašlete prosím smechanicky vyhotovenou kopií nákupního dokladu, ze kterého musí být
bezpodmínečně patrný datum nákupu i s popisem vad, přístroj musí být bezpečně zabalen a nafrankován na náš záruční
servis. V připadě opravněné záruky jsou kupujícím vraceny poštovní poplatky v Německu i Rakousku. Tato záruka se nevztahuje
na poškození způsobená opotřebením, nesprávným zacházením a nedodržováním návodů kúdržbě a obsluze. Záruční doba
zaniká, když opravy nebo manipulace s přístrojem byly provedeny třetí osobou. Eventuální nároky zákazníka vůči prodejci/
obchodníku nejsou touhle zárukou omezeny.
LIKVIDACE / OCHRANA ŽIVOTNÉHO PROSTŘEDÍ
Naše vyrobené přístroje mají vysoce kvalitní standard pro zajišt’ění jejich dlouhé životnosti. Pravidel-
né údržby i opravy odborně provedeny naším prodejním servisem mohou mít vliv na prodloužení provozní
životnosti přístroje. Když je přístroj vadný a už ho nelze opravit, neopomeňte prosím: Toto zařízení nepatří
do běžného domovního odpadku, ale musí být předáno do autorizované sběrny pro recyklování elektrických
nebo elektronických zařízení. Separátní sběr a recyklování odpadních produktů umožňuje šetření přírodních
zdrojů a zajišt’uje, aby byly odpady likvidovány způsobem, který je pro zdraví a kologii přijatelný.
Použité chladivo: R600a
99
Page 100

INSTRUKCJA OBSŁUGI MODEL 48955
DANE TECHNICZNE
Moc: 150 W, 220-240 V~, 50 Hz
Wymiary: ok. 29,5 x 35,0 x 29,0 cm (dł. x sz. / gł. x wys.)
Przewód zasilający: ok. 120 cm
Ciężar: ok. 9,8 kg
Obudowa: tworzywo sztuczne, czarny kolor / stal szlachetna, szczotkowana
Zbiornik na wodę: 1,5 l
Wyposażenie: wyświetlacz CD, wybór wstępny czasu, wskazanie godziny, sygnał dźwiękowy
Akcesoria: instrukcja obsługi, łopatka do lodu, kubek z podziałką
Zmiany i błędy w opisie wyposażenia, technice, kolorach i konstrukcji są zastrzeżone
OBJAŚNIENIE SYMBOLI
Symbol ten oznacza ewentualne niebezpieczeństwa, które mogą prowadzić do obrażeń
lub uszkodzenia urządzenia.
Ten symbol wskazuje na ewentualne niebezpieczeństwo pożaru.
Symbol ten wskazuje na ewentualne niebezpieczeństwo poparzenia. Zawsze postępować
tutaj ze szczególną ostrożnością.
pełnego pojemnika na kostki lodu oraz pustego zbiornika na wodę, do 60 kostek
lodu na godzinę, pojemność pojemnika na kostki lodu ok. 600 g
DLA BEZPIECZEŃSTWA UŻYTKOWNIKA
Prosimy przeczytać poniższe
instrukcje i zachować je do użytku
w przyszłości.
Wskazówki dotyczące osób w
gospodarstwie domowym
1. Urządzenie może być uży
wane przez dzieci w wieku
powyżej 8 lat oraz osoby
o ograniczonej sprawno
ści fizycznej, sensorycznej
lub umysłowej lub też nie
posiadające doświadczenia
i/lub wiedzy, jeśli są one
nadzorowane lub zostały
100
poinstruowane w zakresie
bezpiecznego użytkowania
i zrozumiały niebezpieczeń
stwa wynikające z użytkowania urządzenia. Urządze-
-
nie nie jest zabawką. Dzieci
mogą czyścić i konserwować
urządzenie tylko pod nadzo
-
rem.
2. Nie dopuszczać do urządze
nia dzieci w wieku poniżej 3
lat lub nadzorować je przez
cały czas.
-
-
-
 Loading...