


User Manual
Pure Cross R 4.1
USER MANUAL.............................. |
03-18 |
BETRIEBSANLEITUNG ................. |
19-37 |
MODE D'EMPLOI........................... |
38-57 |
HANDLEIDING............................... |
58-75 |
www.tunturi.com

Contents |
|
WELCOME........................................... |
3 |
SAFETY WARNINGS........................... |
3 |
Electrical safety .................................... |
4 |
ASSEMBLY........................................... |
5 |
Parts out of box..................................... |
5 |
Hardware kit.......................................... |
5 |
Assembly steps..................................... |
5 |
USE....................................................... |
8 |
Adjusting the support feet..................... |
8 |
WORKOUTS......................................... |
8 |
Pulse rate measurement....................... |
8 |
Heart rate measurement ...................... |
9 |
Maximum heart rate.............................. |
9 |
USER INTERFACE............................. |
10 |
Display functions................................. |
10 |
Key functions....................................... |
10 |
Extra functions.................................... |
10 |
PROGRAMS........................................ |
11 |
Manual mode....................................... |
11 |
Beginner mode..................................... |
11 |
Advance mode.................................... |
12 |
Sporty mode........................................ |
12 |
Cardio mode........................................ |
13 |
Watt mode........................................... |
13 |
Body fat............................................... |
13 |
Recovery............................................. |
14 |
I-CONSOLE APP................................ |
14 |
Start up................................................ |
15 |
User setting......................................... |
15 |
User data set....................................... |
15 |
Workout selection ............................... |
16 |
Manual program.................................. |
16 |
I-Route................................................ |
16 |
Program.............................................. |
17 |
Watt Control........................................ |
17 |
Cardio control...................................... |
17 |
Stop workout....................................... |
17 |
Workout summary............................... |
17 |
CLEANING AND MAINTENANCE..... |
18 |
TRANSPORT AND STORAGE.......... |
18 |
DISCLAIMER...................................... |
18 |
WARRANTY....................................... |
18 |
SPECIFICATIONS.............................. |
76 |
Parts list.............................................. |
76 |
Exploded view..................................... |
78 |
Owner’s manual • Pure 4.1 |
GB |
|
|
||
|
|
|
Welcome
Welcome to the world of Tunturi New
Fitness!
Thank you for purchasing this piece of Tunturi equipment. Tunturi offers a wide range of professional fitness equipment, including cross trainers, treadmills, exercise bikes, and rowers. The Tunturi equipment is suitable for the entire family, no matter what fitness level.
For more information, please visit our website www.tunturi.com
Safety warnings
WARNING
Read the safety warnings and the instructions. Failure to follow the safety warnings and the instructions can cause personal injury or damage to the equipment. Keep the safety warnings and the instructions for future reference.
WARNING
Heart rate monitoring systems may be inaccurate. Over exercise may result in serious injury or death. If you feel faint stop exercising immediately.
•The equipment is suitable for home use only. Max. usage is limited to 3 hrs a day. The equipment is not
suitable for full commercial use (e.g. large gyms).
•The use of this equipment by children or persons with a physical, sensory,
•mental or motorial disability, or lack of experience and knowledge can give cause to hazards. Persons responsible for their safety must give explicit instructions or supervise the use of the equipment.
•Before starting your workout, consult a physician to check your health.
•If you experience nausea, dizziness or other abnormal symptoms, immediately stop your workout and consult a physician.
3

•To avoid muscular pain and strain start each workout by warming up and finish each workout by cooling down. Remember to stretch at the end of the workout.
•The equipment is suitable for indoor use only. The equipment is not suitable for outdoor use.
•Only use the equipment in environments with adequate ventilation. Do not use the equipment in draughty environments in order not to catch a cold.
•Only use the equipment in environments with ambient temperatures between 10 °C and 35 °C. Only store the equipment in environments with ambient temperatures between 5 °C and
45 °C.
•Do not use or store the equipment in humid surroundings. The air humidity must never be more than 80%.
•Only use the equipment for its intended purpose. Do not use the equipment for other purposes than described in the manual.
•Do not use the equipment if any part is damaged or defective. If a part is damaged or defective, contact your dealer.
•Keep your hands, feet and other body parts away from the moving parts.
•Keep your hair away from the moving parts.
•Wear appropriate clothing and shoes.
•Keep clothing, jewellery and other objects away from the moving parts.
•Make sure that only one person uses the equipment at a time. The equipment must not be used by persons weighing more than 150kg (330 lbs).
•Do not open equipment without consulting your dealer.
Owner’s manual • Pure 4.1
Electrical safety
(only for equipment with electric power)
•Before use, always check that the mains voltage is the same as the voltage on the rating plate of the equipment.
•Do not use an extension cable.
•Keep the mains cable away from heat, oil and sharp edges.
•Do not alter or modify the mains cable or the mains plug.
•Do not use the equipment if the mains cable or the mains plug is damaged or defective. If the mains cable or the mains plug is damaged or defective, contact your dealer.
•Always fully unwind the mains cable.
•Do not run the mains cable underneath the equipment. Do not run the mains cable underneath a carpet. Do not place any objects on the mains cable.
•Make sure that the mains cable does not hang over the edge of a table. Make sure that the mains cable cannot be caught accidentally or tripped over.
•Do not leave the equipment unattended when the mains plug is inserted into the wall socket.
•Do not pull the mains cable to remove the mains plug from the wall socket.
•Remove the mains plug from the wall socket when the equipment is not in use, before assembly or
disassembly and before cleaning and maintenance.
4

Assembly
Parts out of box
The package contains the parts as shown in figure.
If a part is missing, contact your dealer.
Hardware kit
The package contains the fasteners as shown in figure.
If a part is missing, contact your dealer. General assembly information
Owner’s manual • Pure 4.1 |
GB |
|
|
||
|
|
|
WARNING
•Assemble the equipment in the given order.
•Carry and move the equipment with at least two persons.
CAUTION
•Place the equipment on a firm, level surface.
•Place the equipment on a protective base to prevent damage to the floor surface.
•Allow at least 100 cm of clearance around the equipment.
Refer to the illustrations for the correct assembly of the equipment.
Assembly steps
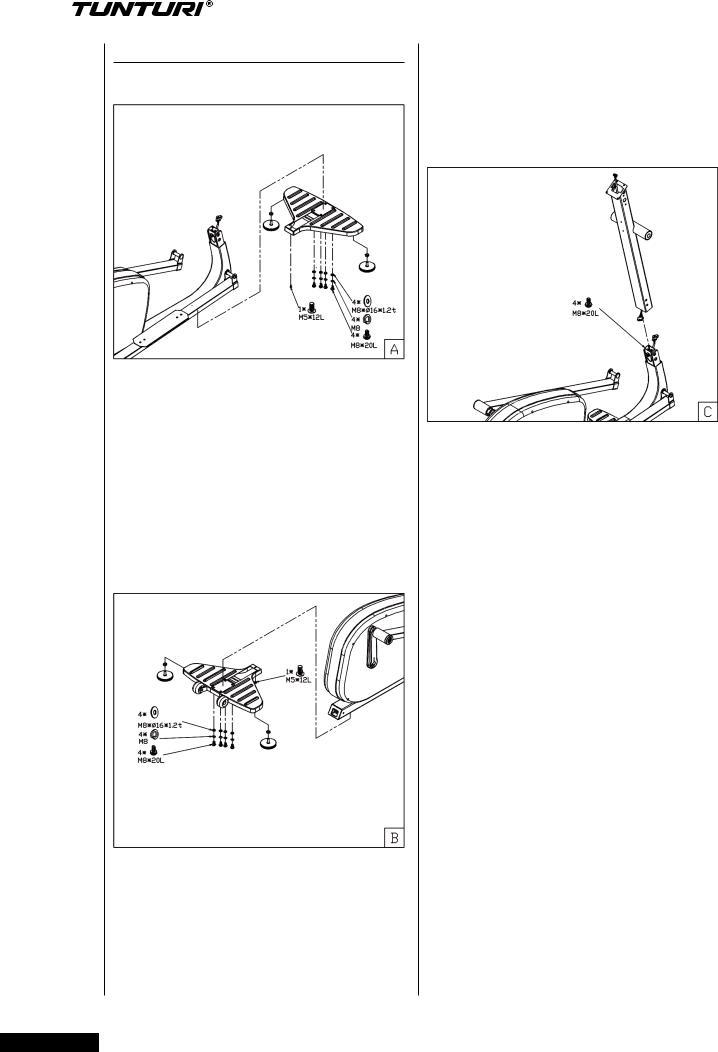
Assembly step A
•Fit height adjustment pads to the front stabilizer.
5
Owner’s manual • Pure 4.1
•Fit front stabilizer by using the shown
hardware.
Remark:
First put all screws/ bolts in correct place before tightening them fully.
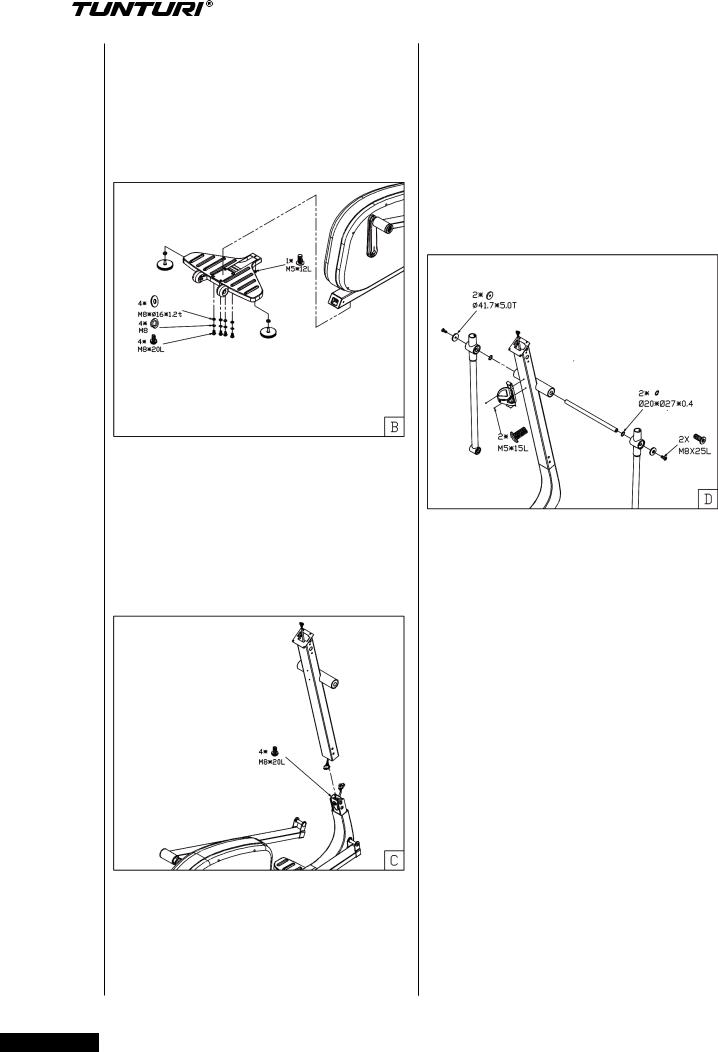
Assembly step B
•Fit height adjustment pads to the rear stabilizer.
•Fit rear stabilizer by using the shown hardware.
Remark:
First put all screws/ bolts in correct place before tightening them fully.
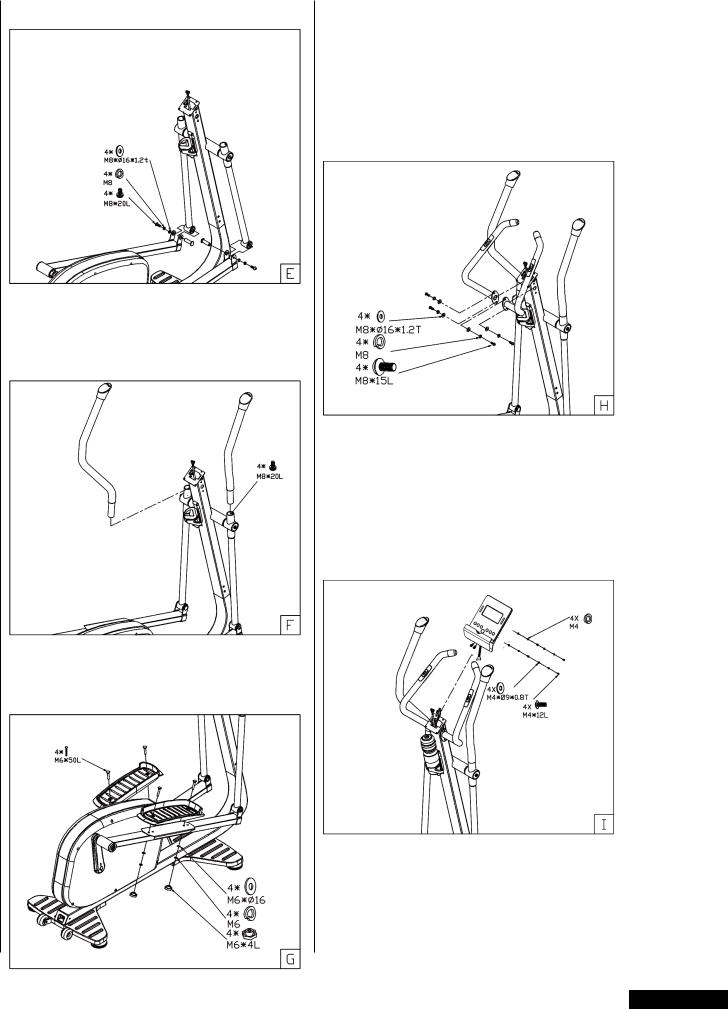
Assembly step C
•
•Connect the wires from upright tube and main frame before sliding the upright tube in position.
Remark:
Do not remove screws from the frame before siding the upright tube in position.
•Use the enclosed Allen key to tighten both fastening screws through the holes in the tube from inside out.
•Tighten the fastening screws by turning them counter-clockwise.
Remark:
First tighten all 6 bolts hand tight before tightening them fully. This to avoid miss alignment
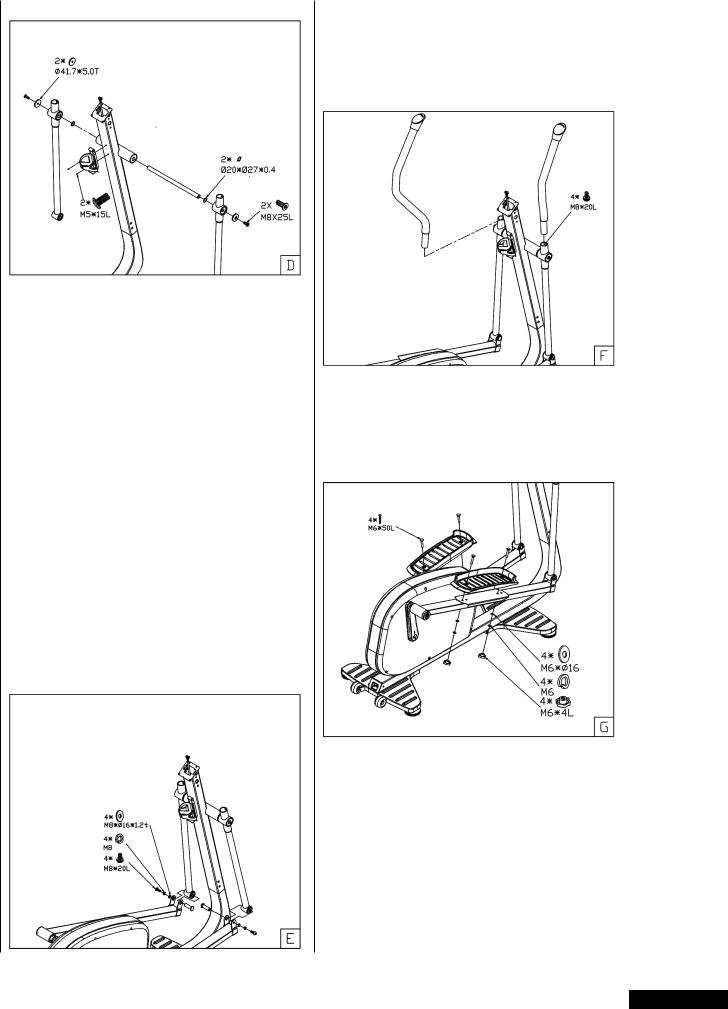
Assembly step D
•Push the metal shaft through the bracket housing of the left arm. Attach now the left arm to the front frame tube by pushing the metal shaft through the opening in the tube. Push the right arm on the shaft and lock it by tightening a large washer, and a screw to the both ends of the
shaft. Tighten the arms using two
Allen keys.
Remark:
A think shim washer is in between both swivel arms and front frame tube..
•Fix the bottle holder to the upright tube.
6
Assembly step E
•Fix pedal tube to lower arms as shown in picture.
Assembly step F
•Fix upper moving handle bars as shown in picture.
Assembly step G
Owner’s manual • Pure 4.1 |
GB |
|
|
||
|
|
|
•Fix both foot rests to the pedal tubes
as shown in picture.
Remark:
There are two horizontal positions you can fix the foot rests too. Make sure you use same fittings for left and right foot rest always.
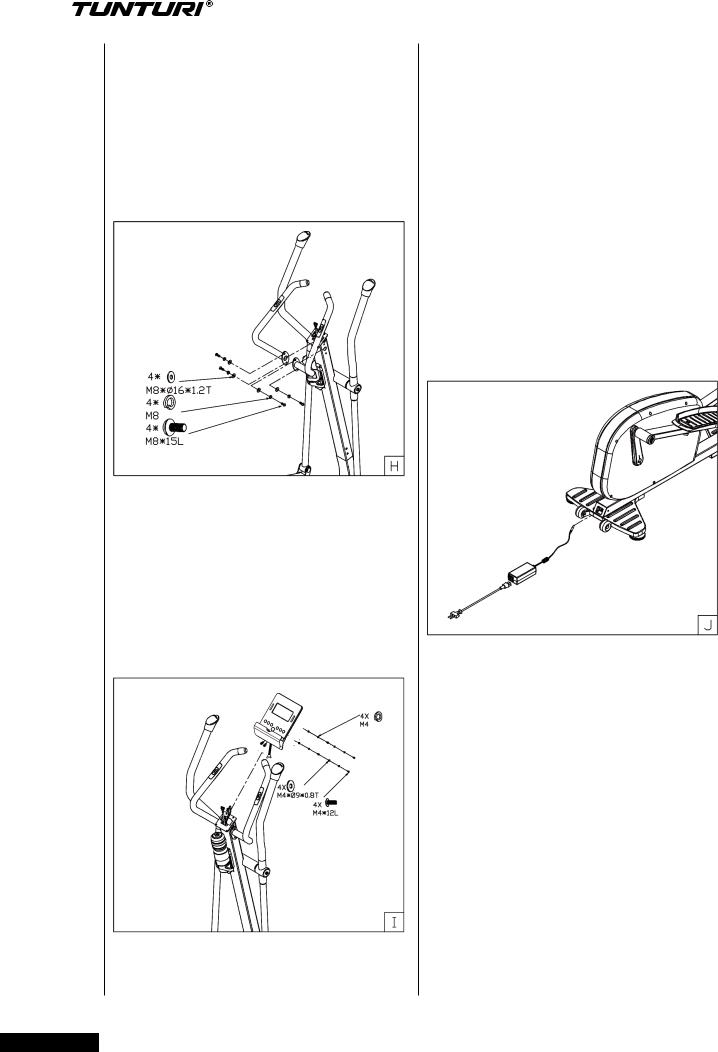
Assembly step H
•Fix both fixed handle bar tubes as shown in picture.
Remark:
First put all screws/ bolts in correct place before tightening them fully.
Assembly step I
•Fix the console bracket to the upright tube
•Guide the hand pulse wires coming from the handlebar and data cable coming form upright tube through the console bracket hole.
7
Owner’s manual • Pure 4.1
•remove the 4 assembly screws from the consoles rear cover.
•Connect the hand pulse wires and data cable with the console.
•Fix the console to the console
bracket.
Remark:
Avoid the wires to damage during assembly
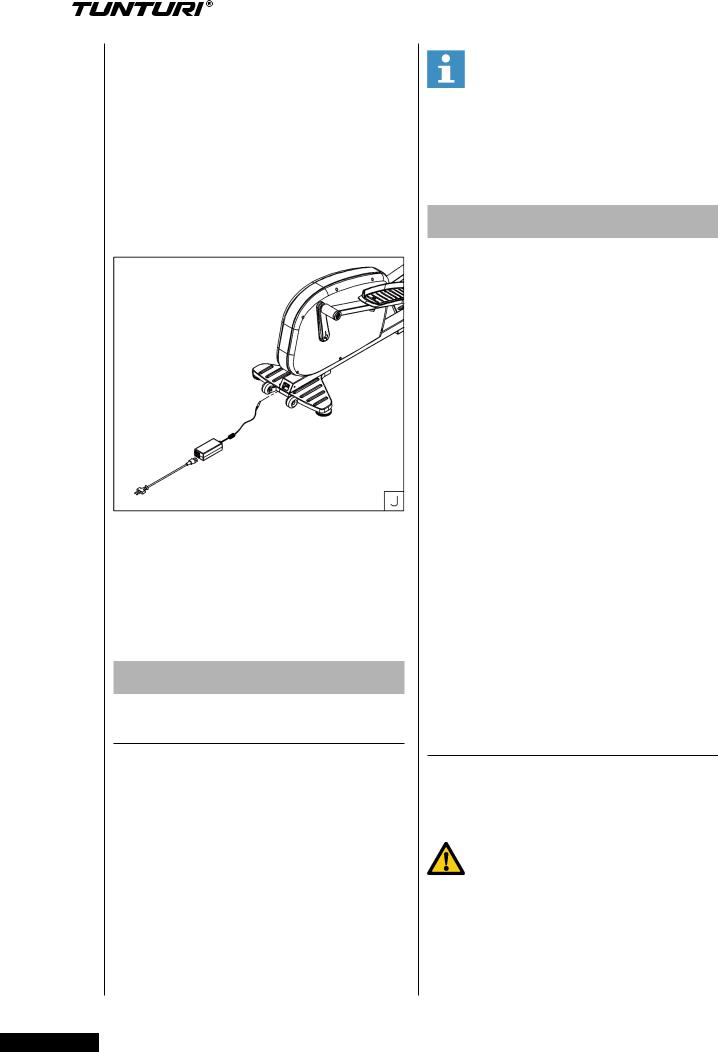
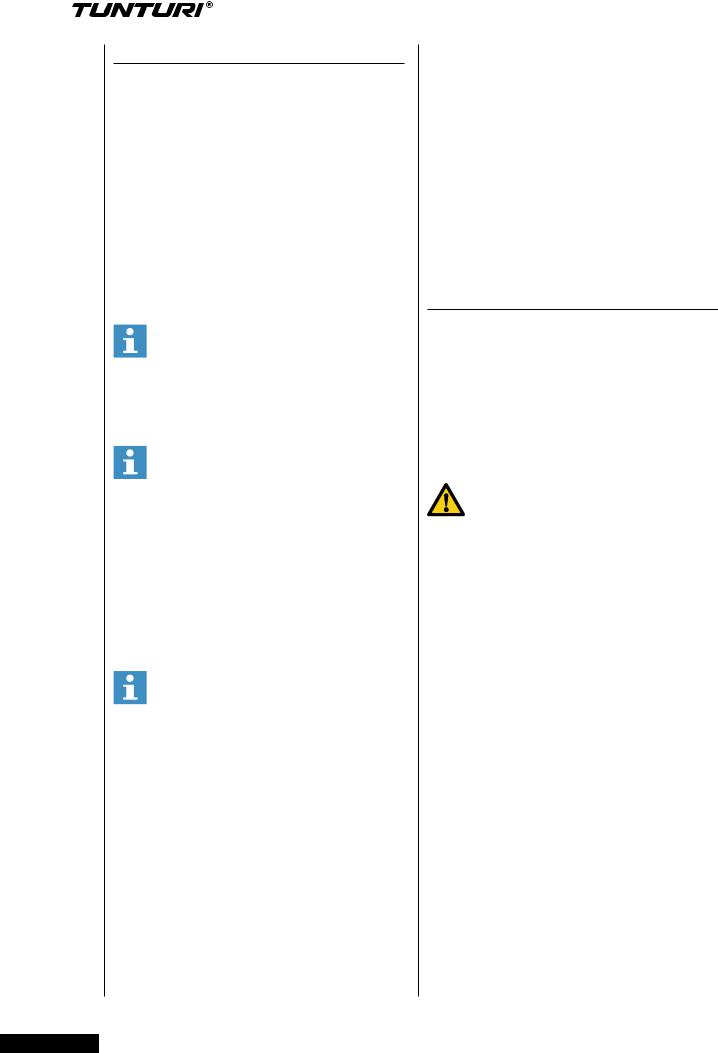
Assembly step J
•Attach the transformer to the cross trainer before connect it to the wall outlet.
Remark:
Always remove power cord when machine is not in use.
Use
Adjusting the support feet
The equipment is equipped with 4 support feet. If the equipment is not stable, the support feet can be adjusted.
1.Turn the support feet as required to put the equipment in a stable position.
2.Tighten the locknuts to lock the support feet.
NOTE
The machine is the most stable when all support feet are turned fully in. Therefore start to level the machine by turning all support feet fully in, before turning out the required support feet to stable the machine.
Workouts
The workout must be suitably light, but of long duration. Aerobic exercise is based on improving the body’s maximum oxygen uptake, which in turn improves endurance and fitness. You should perspire, but you should not get out of breath during the workout.
To reach and maintain a basic fitness level, exercise at least three times a week, 30 minutes at a time. Increase the number of exercise sessions to improve your fitness level. It is worthwhile to combine regular exercise with a healthy diet. A person committed to dieting should exercise daily, at first 30 minutes or less at a time, gradually increasing the daily workout time to one hour.
Start your workout at low speed and low resistance to prevent the cardiovascular system from being subjected to excessive strain. As the fitness level improves, speed and resistance can
be increased gradually. The efficiency of your exercise can be measured by monitoring your heart rate and your pulse rate.
Pulse rate measurement
(hand pulse sensors)
The pulse rate is measured by sensors in the handlebars when the user is touching both sensors at the same time.
WARNING
Heart rate monitoring systems may be inaccurate. Over exercise may result in serious injury or death. If you feel faint stop exercising immediately.
8

Most accurate pulse measurement is achieved when the skin is slightly moist and constantly touching the hand pulse sensors. If the skin is too dry or too moist, the pulse rate measurement might become less accurate.
NOTE
Do not use the hand pulse sensors in combination with a heart rate chest belt.
If you set a heart rate limit for your workout, an alarm will sound when it is exceeded.
Heart rate measurement
(heart rate chest belt)
The most accurate heart rate measurement is achieved with a heart rate chest belt. The heart rate is measured by a heart rate receiver in
combination with a heart rate transmitter belt. Accurate heart measurement requires that the electrodes on the transmitter belt are slight moist and constantly touching the skin. If the electrodes are too dry or too moist, the heart rate measurement might become less accurate.
WARNING
If you have a pacemaker, consult a physician before using a heart rate chest belt.
CAUTION
If there are several heart rate measurement devices next to each other, make sure that the distance between them is at least 2 meter.
If there is only one heart rate receiver and several heart rate transmitters, make sure that only one person with a transmitter is within transmission range.
NOTE
•Do not use a heart rate chest belt in combination with the hand pulse sensors.
Owner’s manual • Pure 4.1 |
GB |
|
|
||
|
|
|
•Always wear the heart rate chest belt under your clothes directly in contact with your skin. Do not wear the heart rate chest belt above your clothes.
If you wear the heart rate chest belt above your clothes, there will be no signal.
•If you set a heart rate limit for your workout, an alarm will sound when it is exceeded.
•The transmitter transmits the heart rate to the console up to a distance of 1,5 meter. If the electrodes are not moist, the heart rate will not appear on the display.
•Some fibres in clothes (e.g. polyester, polyamide) create static electricity which can prevent accurate heart rate measurement.
•Mobile phones, televisions and other electrical appliances create an electromagnetic field which can prevent accurate heart rate measurement.
Maximum heart rate
(during training)
The maximum heart rate is the highest heart rate a person can safely achieve through exercise stress. The following formula is used to calculate the average maximum heart rate: 220 - AGE. The maximum heart rate varies from person to person.
WARNING
Make sure that you do not exceed your maximum heart rate during your workout. If you belong to a risk group, consult a physician.
Beginner: (50-60% of max. heart rate)
Suitable for beginners, weight-watchers, convalescents and persons who have not exercised for a long time. Exercise at least three times a week, 30 minutes at a time.
Advance: (60-70% or max. heart rate)
Suitable for persons who want to improve and maintain fitness. Exercise
9
Owner’s manual • Pure 4.1
at least three times a week, 30 minutes at a time.
Expert: (70-80% or max. heart rate)
Suitable for the fittest of persons who are used to long-endurance workouts.
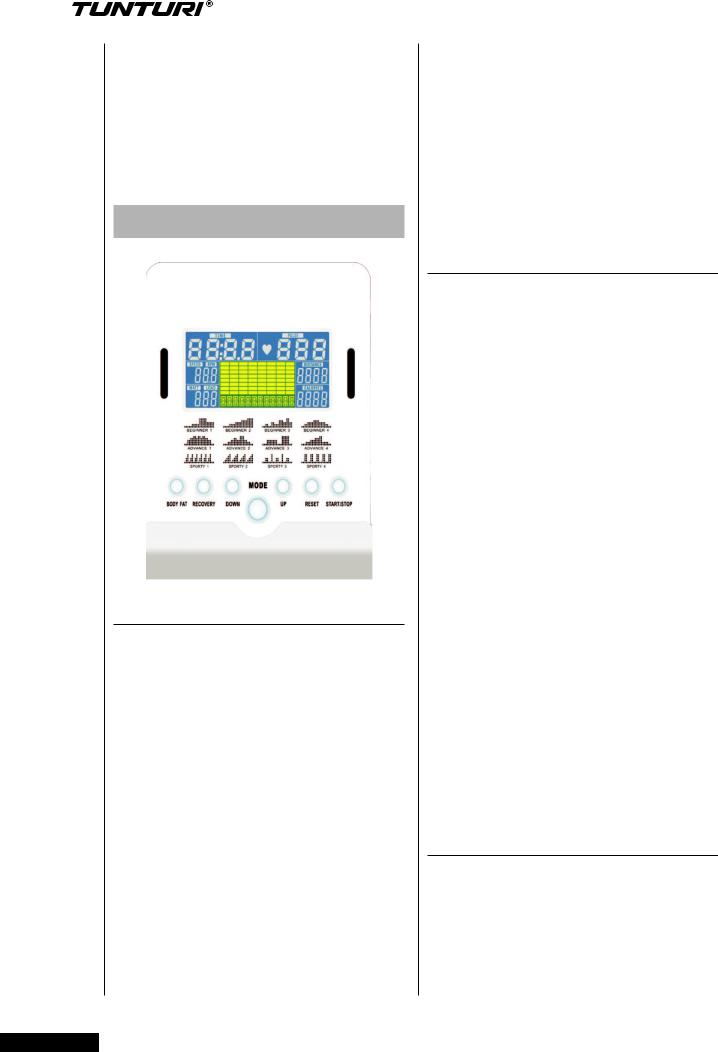
User interface
Display functions
Time window :
Shows workout time during exercise Range: 0:00 ~ 99:59
Speed window :
Shows actual speed during exercise Range: 0.0 ~ 99.9
RPM window :
Shows revolutions per minute during exercise
Range: 0 ~ 999
Watt window :
Shows workout watt power during exercise.
In watt program ode, console will show preset watt value.
Setting range: 0 ~ 350
Pulse window :
Shows pulse in bpm during exercise
Distance window :
Shows workout distance during exercise.
Range: 0.0 ~99.9
Calories window :
Shows burned calories during exercise
Range: 0 ~999
Key functions
Body fat key :
Test body fat in % and BMI.
Recovery key :
Test heart rate recovery status.
Down key :
Decrease resistance level during workout.
In setting selection lower value.
Mode key :
Confirm setting or selection
Up key :
Increase resistance level during workout. In setting selection upper value.
Reset key :
When press and hold for 2 seconds, display will reboot and start from main menu. (all shown data will be lost) Reverse to main menu during presetting workout value or stop mode
Start/ stop key :
Start workout when in idle mode. Stop/ pause workout when in active mode.
Extra functions
•Choose settings for units by using the Metric/ Imperial switch located on the back cover of the console
Console needs to reboot to apply the change.
•When setting one or more targets, the target value starts to count up when reached “0”
10
Programs
•Power on the display or use reset key function to go to main menu.
•Press Up key or Down Key to select workout program.
•Available programs are: Quick start, Manual, beginner, Advance, Sporty, Cardio and Watt program.
Manual mode
For Quick start you can
•Press Start/ stop key to start workout without any preset setting..
During workout you can press Up/ Down key to adjust resistance level.
Quick start mode stops when, no input for longer than 4 minutes or when Start/ stop key is pressed.
When settings in manual mode are required than you;
•Press Up/ Down key to select workout program, choose Manual mode and press mode key to enter next setting entry for manual mode program.
•Press Up/ Down key to preset training time, and press Mode key to confirm the setting.
•After confirm you can set also (also): distance, Calories, and Pulse.
Note:
When setting more than one goal, the training will end at first achieved goal. Leave a goal blank and it will not be seen as a preset limit.
•Press Start/ Stop key to start workout
•Press Up/ Down key to adjust resistance level
•Press Start/ stop key to pause workout.
•Press Reset key to return to main menu. (active training data will be lost)
Owner’s manual • Pure 4.1 |
GB |
|
|
||
|
|
|
Beginner mode
•Press Up/ Down key to select workout program, choose beginner mode and press Mode key to enter next setting menu for beginner mode.
•There can be 4 beginner modes selected: beginner 1, beginner 2, beginner 3, and beginner 4. Select one by using the Up/ Down key and confirm selected by pressing Mode key.
•Press Up/ Down key to preset training time, and press Mode key to confirm the setting.
•After confirm you can set also (also): distance, Calories, and Pulse.
Note:
When setting more than one goal, the training will end at first achieved goal. Leave a goal blank and it will not be seen as a preset limit.
•Press Start/ Stop key to start workout
•Press Up/ Down key to adjust resistance level
•Press Start/ stop key to pause workout.
•Press Reset key to return to main menu. (active training data will be lost)
11
Owner’s manual • Pure 4.1
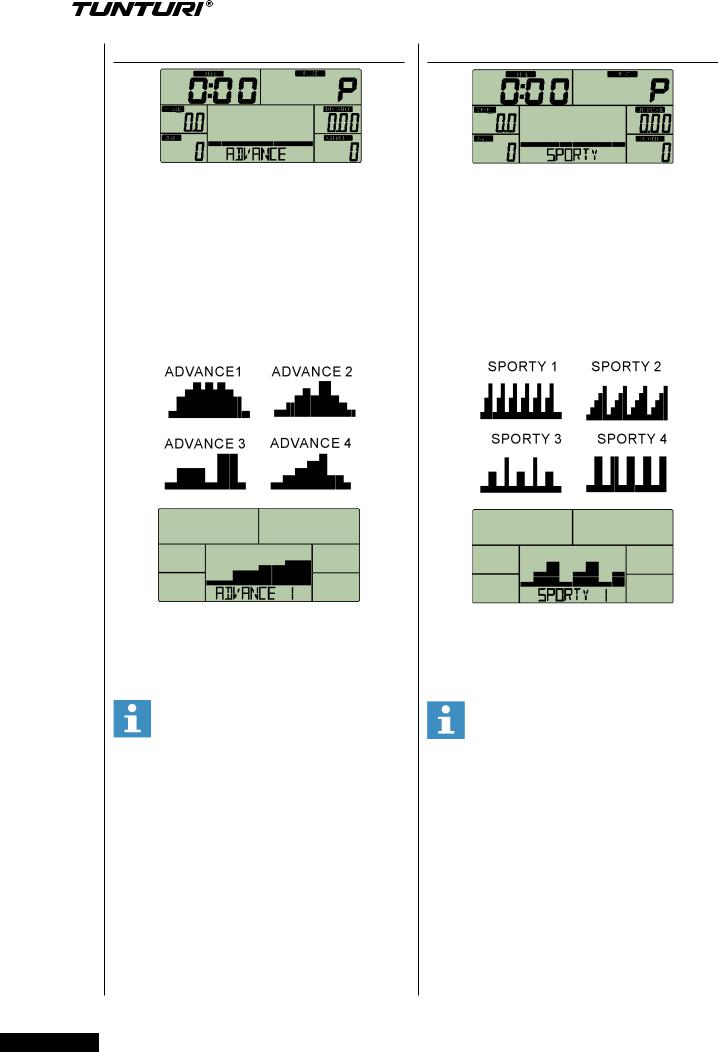
Advance mode
•Press Up/ Down key to select workout program, choose advance mode and press Mode key to enter next setting menu for advance mode.
•There can be 4 advance modes selected: advance 1, advance 2, advance 3, and advance 4. Select one by using the Up/ Down key and confirm selected by pressing Mode key.
•Press Up/ Down key to preset training time, and press Mode key to confirm the setting.
•After confirm you can set also (also): distance, Calories, and Pulse.
Note:
When setting more than one goal, the training will end at first achieved goal. Leave a goal blank and it will not be seen as a preset limit.
•Press Start/ Stop key to start workout
•Press Up/ Down key to adjust resistance level
•Press Start/ stop key to pause workout.
•Press Reset key to return to main menu. (active training data will be lost)
Sporty mode
•Press Up/ Down key to select workout program, choose sporty mode and press Mode key to enter next setting menu for sporty mode.
•There can be 4 Sporty modes selected: sporty 1, sporty 2, sporty 3, and sporty 4. Select one by using the Up key or Down key and confirm selected by pressing
Mode key.
•Press Up/ Down key to preset training time, and press Mode key to confirm the setting.
•After confirm you can set also (also): distance, Calories, and Pulse.
Note:
When setting more than one goal, the training will end at first achieved goal. Leave a goal blank and it will not be seen as a preset limit.
•Press Start/ Stop key to start workout
•Press Up/ Down key to adjust resistance level
•Press Start/ stop key to pause workout.
•Press Reset key to return to main menu. (active training data will be lost)
12

Cardio mode
•Press Up/ Down key to select workout program, choose cardio mode and press Mode key to enter next setting menu for advance mode.
•Press Up/ Down key to set your age and confirm by pressing mode key.
•There can be 4 cardio modes selected:55%, 75%,90%
or TAG (target heart rate) default set on 100 (us Up/ Down key to change, and confirm by pressing mode key). Select one by using the Up/ Down key and confirm selected by pressing
Mode key.
•Press Up/ Down key to preset training time, and press Mode key to confirm the setting.
•Press Start/ stop key to pause workout.
•Press Reset key to return to main menu. (active training data will be lost)
Note:
After 6 seconds without pulse input, LCD will show “Pulse Input” to notify the user.
Owner’s manual • Pure 4.1 |
GB |
|
|
||
|
|
|
Watt mode
•Press Up/ Down key to select workout program, choose watt mode and press Mode key to enter next setting menu for advance mode.
•Press Up/ Down key to set watt target
(default set on 120) and confirm by pressing mode key.
•Press Up/ Down key to preset training time, and press Mode key to confirm the setting.
•Console will adjust tension level by the watt target and workout status (rpm)
•User can use Up/ Down key to adjust watt target during workout.
•Press Start/ stop key to pause workout.
•Press Reset key to return to main menu. (active training data will be lost)
Body fat
In stop mode, press Body fat key to start this function.
•Set Gender by using Up/ Down key and confirm by Mode key.
•Set Age by using Up/ Down key and confirm by Mode key.
•Set Height by using Up/ Down key and confirm by Mode key.
•Set Weight by using Up/ Down key and confirm by Mode key.
After confirm user must grab and hold both hand pulse sensors.
13
Owner’s manual • Pure 4.1
Note:
If hand grips are grabbed incorrectly, display cannot read and show
“---- “ “ ----”. re grab hand pulse sensors again to see if improves.
When console can read the display will show a progress bar.
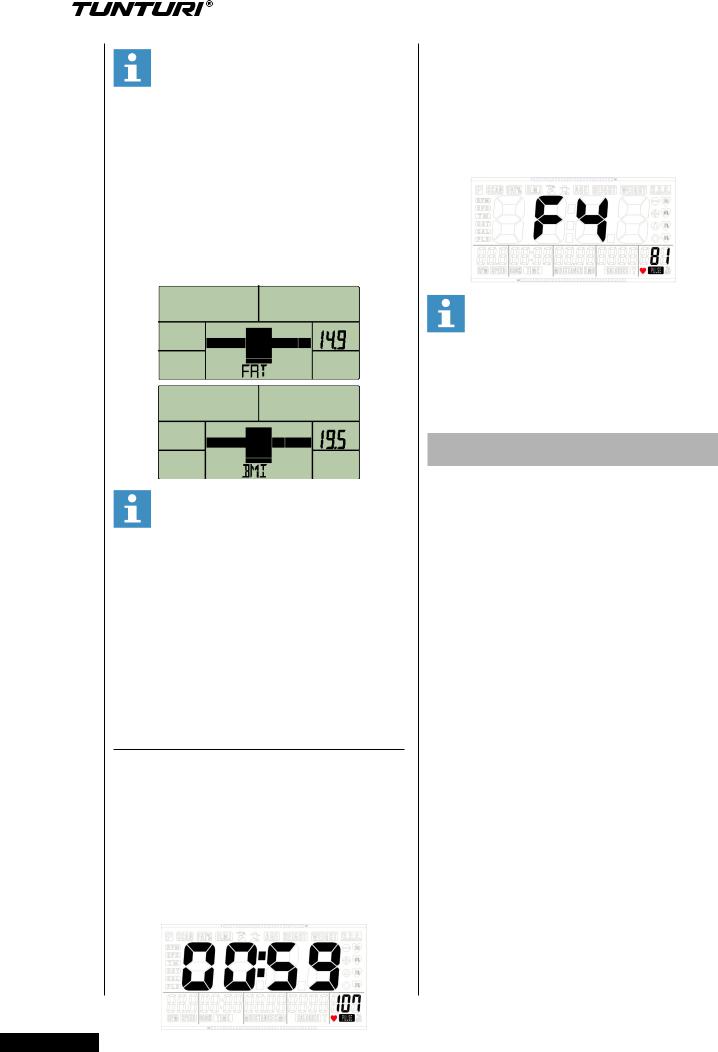
display will show after finished body fat in percentage and BMI as a
number by turns in every 3 seconds.
Note:
Error codes in body fat program are:
LCD show “---- “ “ ----”: hand grips search for reading
E1: There is no heart rate signal input detected for at least 5 seconds.
E4: Occurs when FAT% is below 5% or exceeds 50%. Occurs when BMI result is below 5 or exceeds 50.
Recovery
•After exercising for a period of time, keep holding on hand grips until display shows the actual pulse reading.
•Press Recovery key, and re grab hand grips
•All display functions will stop except “TIME” that will start counting down from 00:60 to 00:00.
•LCD will display your heart rate recovery status with the F1, F2….to
F6.
F1 is the best result and F6 is the worst.
Press the RECOVERY button again to return the main display.
Note:
During the recovery time, re-press “RECOVERY” and console will go back to previous page.
I-Console App
We have developed an App, wich you can download on your 10” tablet from the app store (iOS: iPad) or Google Play ( Android Market: Samsung, HTC, LG, etc.). You only have to type Tunturi and it will search and find the App. This gives you more possibilities to use our product in combination with your 10” tablet.
To start the App, you have to connect your tablet with bluetooth and search for device TUN-xxx (number)! The password you have to use to connect is
0000 ( 4 times zero ).
“Made for iPad” means that an electronic accessory has been designed to connect specially to the iPad and has been certified by the developer to meet Apple performance standards. Apple is not responsible for the operation of this device or its compliance with safety and regulatory standards. Please note that the user of this accessory with iPad may affect wireless performance.
iPad is a trademark of Apple Inc., registered in the U.S. and other countries.
14

Note:
Once the console is connected to the tablet with Bluetooth, the console will power off.
For iOs system, please exit the i-Console app and turn off the Bluetooth from IPad, then the console will power on again.
Start up
Connect:
•Press “Connect”, the i-Console
App will search for Bluetooth automatically.
•Select the corresponding Bluetooth signal and start workout.
Help:
Press “Help” will show help menu when available.
Exit:
Press “Exit” to close application.
Knowledge:
Press Knowledge to show extra information when available.
Setting:
•Before connect to Bluetooth, the user may change the settings in “system”. ( Unit/ Language/ Password )
Owner’s manual • Pure 4.1 |
GB |
|
|
||
|
|
|
Press “Back” button to go back to previous setting.
User setting
User data set:
Press “User data set” to preset/ edit/ delete or select a user.
Quick start:
Press “Quick start” to start workout in manual mode.
Guest:
Press “Guest” to start workout without preset user data.
Press “Back” button to go back to previous setting.
User data set
Select user by using the navigation buttons or press “Back” button to go back to previous setting.
15

Owner’s manual • Pure 4.1
Create/ change user settings: you can select:
•Avatar colour
•Age
•Height
•Weight
•Back ground colour.
Press “Next” to confirm change and go to workout selection menu, or press
“Exit” to go back to former menu without change.
Workout selection
After select user, the user may start workout with: Manual/ i-Route/ Program/ program suggest or Watt,
Manual program
Select “Manual”, preset: Time/ Distance/
Calories and press “Start” button to start workout, or press “Back” button to go back to previous setting.
I-Route
Select I-Route, the user may select country and press next to select corresponding route, or press “Back” button to o back to previous setting.
Press/ swipe road map to switch display.
16
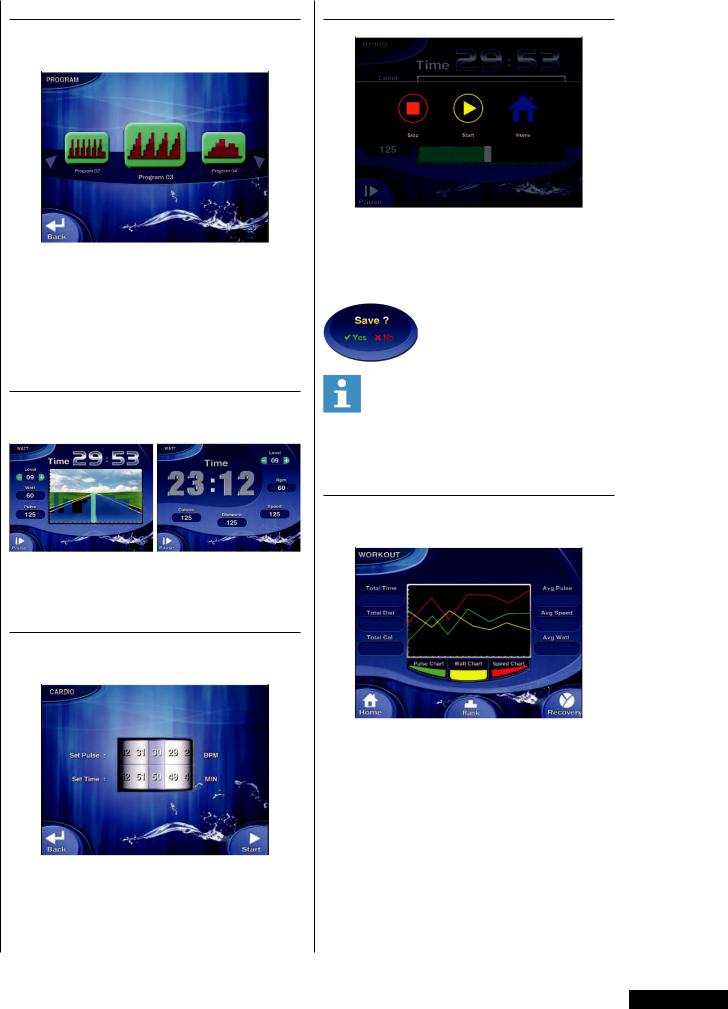
Program
Select program may select program
1~12 and user program.
preset: Time/ Distance/ Calories and press “Start” button to start workout, or press “Back” button to go back to previous setting.
Watt Control
select Watt and preset watt and time to start workout.
Press/ swipe road map to switch display.
Cardio control
select Cardio and preset pulse and time to start workout.
Owner’s manual • Pure 4.1 |
GB |
|
|
||
|
|
|
Stop workout
Press “Start” to resume workout.
Press “Home” to close application
Press “Stop” to save or stop the workout and go back to main window.
Select “yes” to save workout. Select “No” to go back to program mode without saving data.
Note:
Not able to save workout in Guest mode.
Workout summary
A workout summary is displayed at the end of a workout.
Press “Home” to go back to main window.
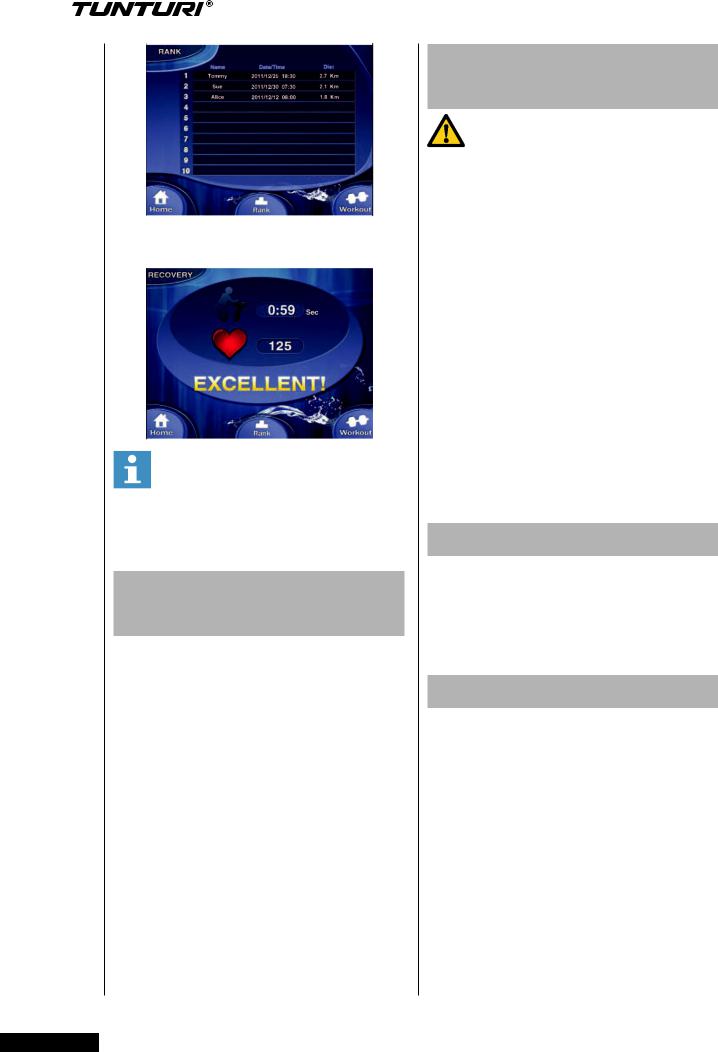
Press “Rank” to show ranking
•In rank mode, press “workout” to go back to workout window
17
Owner’s manual • Pure 4.1
Press “Recovery” to start recovery program.
Note:
Recovery mode requires heart rate reading
Cleaning and maintenance
Defects and malfunctions Despite continuous quality control, defects and malfunctions caused by individual parts can occur in the equipment. In most cases, it will be sufficient to replace the defective part.
•If the equipment does not function properly, immediately contact the dealer.
•Provide the model number and the serial number of the equipment to the dealer. State the nature of the problem, conditions of use and purchase date.
Transport and
storage
WARNING
Carry and move the equipment with at least two persons.
•Remain standing in front of the equipment on each side and take a sturdy grip at the handlebars. Lift the front of the equipment so as to lift the rear of the equipment on the wheels.
Move the equipment and carefully put the equipment down. Place the equipment on a protective base to prevent damage to the floor surface.
•Move the equipment carefully over uneven surfaces. Do not move the equipment upstairs using the wheels, but carry the equipment by the handlebars.
•Store the equipment in a dry place with as little temperature variation as possible.
Disclaimer
2014 Tunturi New Fitness BV. All rights reserved
The product and the manual are subject to change. Specifications can be changed without further notice
Warranty
The product has a warranty from the date of delivery (to be documented by invoice or delivery note).
Further information on warranty terms can be obtained from your local dealer. The warranty terms may vary from one country to another. Damages caused by normal wear, overloading or improper handling are excluded from the warranty. Damages caused by material or manufacturing faults are covered by the warranty and will repaired or replaced at no cost.
18

Index |
|
WILLKOMMEN................................... |
19 |
WARNHINWEISE ZUR SICHERHEIT.19 |
|
Elektrische Sicherheit ......................... |
20 |
ZUSAMMENBAU................................ |
21 |
Verpackungsinhalt............................... |
21 |
Hardware kit........................................ |
21 |
Allgemeine zusammenbau.................. |
21 |
Montageschritte................................... |
22 |
GEBRAUCH....................................... |
25 |
Einstellen der Stützfüße...................... |
25 |
TRAININGS........................................ |
25 |
Pulsfrequenzmessung......................... |
25 |
Herzfrequenzmessung........................ |
26 |
Maximale Herzfrequenz...................... |
26 |
USER INTERFACE............................. |
27 |
Display Funktionen.............................. |
27 |
Key Funktionen................................... |
27 |
Extra Funktionen................................. |
27 |
Einschalten.......................................... |
28 |
PROGRAMME.................................... |
28 |
Manueller modus................................. |
28 |
Beginner Modus ................................. |
29 |
Advance Modus ................................. |
29 |
Sporty Modus ..................................... |
30 |
Cardio Modus ..................................... |
30 |
Watt Modus ........................................ |
31 |
Recovery............................................. |
31 |
Body fat............................................... |
32 |
I-CONSOLE APP................................ |
33 |
Inbetriebnahme................................... |
33 |
Benutzerdatensatz.............................. |
34 |
Trainings Auswahl .............................. |
34 |
Manuelle Einstellung........................... |
34 |
I-Route................................................ |
35 |
Program.............................................. |
35 |
Watt-Einstellung.................................. |
35 |
Kardio-Einstellung............................... |
35 |
Stop Training....................................... |
35 |
Trainingszusammenfassun ................ |
36 |
REINIGUNG UND WARTUNG........... |
37 |
TRANSPORT UND LAGERUNG....... |
37 |
GARANTIE......................................... |
37 |
HAFTUNGSAUSSCHLUSS............... |
37 |
Deutsch |
|
Diese deutsche Bedienungsanleitung ist eine Übersetzung des englischen Textes.
Es können keine Rechte auf diese Übersetzung abgeleitet werden.
Betriebsanleitung • PURE 4.1 |
D |
|
|
||
|
|
|
Willkommen
Willkommen in der Welt von Tunturi New
Fitness!
Vielen Dank, dass Sie dieses Gerät von Tunturi erworben haben. Tunturi bietet eine breite Palette an professionellen
Fitnessgeräten wie beispielsweise
Crosstrainern, Laufbändern,
Trainingsfahrrädern, Rudergeräten und
Vibrationsplatten. Die Tunturi Geräte sind für die ganze Familie geeignet
- ganz egal, wie fit man ist. Weitere
Informationen finden Sie auf unserer
Website unter www.tunturi.com
Warnhinweise zur
Sicherheit
WARNUNG
Lesen Sie die Warnhinweise zur Sicherheit und die Anweisungen. Werden die Warnhinweise zur Sicherheit und die Anweisungen nicht befolgt, kann dies zu Personenverletzungen und Schäden am Gerät führen. Bewahren Sie die Warnhinweise zur Sicherheit und die Anweisungen zur künftigen Bezugnahme auf.
WARNUNG
Herzfrequenz-Überwachungssysteme können ungenau sein. Eine Überanstrengung kann zu schweren
Schädigungen oder zum Tod führen. Wenn Sie sich schwach oder ohnmächtig fühlen, stellen Sie die
Übungen unverzüglich ein.
•Das Gerät ist nur für den Heimund gewerblichen Gebrauch (z.B. Krankenhäuser, Feuerwachen, Hotels, Schulen, usw.) geeignet. Die maximale Verwendung ist auf
6 Stunden pro Tag beschränkt.
Das Gerät ist nicht für den ausschließlichen gewerblichen Einsatz (z.B. große Fitnessstudios) geeignet.
19

Betriebsanleitung • PURE 4.1
•Wenn dieses Gerät von Kindern oder Personen mit körperlicher, sensorischer, geistiger oder motorischer Behinderung verwendet wird, oder wenn nicht genügend
Erfahrung und Kenntnisse vorhanden sind, kann dies zu
Gefahrensituationen führen.
Personen, die für deren Sicherheit verantwortlich sind, müssen klare
Anweisungen geben oder den
Gebrauch des Geräts beaufsichtigen.
•Bevor Sie Ihr Training starten, nehmen Sie Kontakt mit einem Arzt auf, um Ihre Gesundheit kontrollieren zu lassen.
•Falls Sie Übelkeit, ein Schwindelgefühl oder andere anormale Symptome verspüren, hören Sie unverzüglich mit Ihrem
Training auf und wenden Sie sich an einen Arzt.
•Um einen Muskelkater zu vermeiden, starten Sie jedes Training mit Aufwärmen und beenden Sie es mit
Abkühlen. Denken Sie daran, sich am Ende des Trainings zu dehnen.
•Das Gerät ist nur für den Gebrauch in geschlossenen Räumen geeignet. Das Gerät ist nicht für den Gebrauch im Freien geeignet.
•Verwenden Sie das Gerät nur in Umgebungen mit ausreichender Belüftung. Verwenden Sie das Gerät nicht in zugiger Umgebung, damit Sie sich nicht erkälten.
•Verwenden Sie das Gerät nur in Umgebungen mit
Umgebungstemperaturen zwischen
10 °C und 35 °C. Lagern Sie das
Gerät nur in Umgebungen mit einer Umgebungstemperatur zwischen 5
°C und 45 °C.
•Verwenden und lagern Sie das Gerät nicht in feuchten Umgebungen. Die Luftfeuchtigkeit darf niemals 80%
überschreiten.
•Verwenden Sie das Gerät nur bestimmungsgemäß. Verwenden Sie das Gerät nicht für einen anderen als für den in diesem Handbuch beschriebenen Zweck.
•Verwenden Sie das Gerät nicht, falls Teile beschädigt oder defekt sind.
Ist ein Teil beschädigt oder defekt, wenden Sie sich an Ihren Händler.
•Halten Sie Ihre Hände, Füße und andere Körperteile von den beweglichen Teilen fern.
•Halten Sie Ihr Haar von den beweglichen Teilen fern.
•Tragen Sie entsprechende Kleidung und Schuhe.
•Halten Sie Kleidung, Schmuck und andere Gegenstände von den beweglichen Teilen fern.
•Vergewissern Sie sich, dass das Gerät nur von einer Person auf einmal verwendet wird. Das Gerät darf nicht von Personen verwendet werden, deren Gewicht 150 kg (330 lbs) überschreitet.
•Öffnen Sie das Gerät nicht, ohne vorher mit Ihrem Händler zu sprechen.
Elektrische Sicherheit
(betrifft nur elektrisch betriebene Geräte)
•Vergewissern Sie sich vor der
Verwendung stets, dass die Netzspannung mit der Spannung auf dem Typenschild des Geräts
übereinstimmt.
•Verwenden Sie kein Verlängerungskabel.
•Halten Sie das Netzkabel von Hitze, Öl und scharfen Kanten fern.
•Verändern Sie nichts am Netzkabel oder am Netzstecker
•Verwenden Sie das Gerät nicht, falls das Netzkabel oder der Netzstecker
•beschädigt oder defekt ist. Ist das Netzkabel oder der Netzstecker beschädigt oder defekt, wenden Sie sich an Ihren Händler.
•Wickeln Sie das Netzkabel immer vollständig ab.
•Lassen Sie das Netzkabel nicht unter dem Gerät entlanglaufen. Lassen
Sie das Netzkabel nicht unter einem Teppich entlanglaufen. Stellen
Sie keine Gegenstände auf das Netzkabel.
•Vergewissern Sie sich, dass das
Netzkabel nicht über der Kante eines Tisches hängt. Vergewissern Sie sich, dass niemand versehentlich über das Netzkabel stolpert.
20
•Lassen Sie das Gerät nicht unbeaufsichtigt, wenn der
Netzstecker in die Wandsteckdose eingesteckt ist.
•Ziehen Sie nicht am Netzkabel, um den Netzstecker aus der Wandsteckdose zu ziehen.
•Ziehen Sie den Netzstecker aus der Wandsteckdose, wenn das
Gerät nicht verwendet wird, bevor es zusammengebaut oder zerlegt wird sowie vor der Reinigung und
Wartung.
Zusammenbau
Verpackungsinhalt
Die Verpackung enthält die in Bild dargestellten Teile.
Fehlt ein Teil, wenden Sie sich an Ihren Händler
Betriebsanleitung • PURE 4.1 |
D |
|
|
||
|
|
|
Hardware kit
Die Verpackung enthält die
Befestigungsteile gemäß Bild. Siehe
Abschnitt “Beschreibung”.
Fehlt ein Teil, wenden Sie sich an Ihren
Händler.
Allgemeine zusammenbau
WARNUNG
•Bauen Sie das Gerät in der angegebenen Reihenfolge zusammen.
•Tragen und bewegen Sie das Gerät mit mindestens zwei Personen.
VORISCHT
•Stellen Sie das Gerät auf festen, ebenen Boden.
•Stellen Sie das Gerät auf eine schützende Unterlage, um Schäden am Bodenbelag zu vermeiden.
•Sorgen Sie rund um das Gerät für einen Freiraum von mindestens 100 cm.
Der richtige Zusammenbau des Geräts geht aus den Abbildungen hervor.
21
Betriebsanleitung • PURE 4.1
Montageschritte
Montageschritt A
•Montiere die Polster zur
Höhenanpassung des fordern
Stabilisator
•Montiere den fordere Stabilisator mithilfe der gezeigten Hardware
Bemerkung:
Platziere an erster Stelle alle Schrauben/ Bolzen an der richtigen Stelle bevor diese vollständig zu befestigen.
Montageschritt B
•Montiere die Polster zur
Höhenanpassung des fordern Stabilisator
•Montiere den hinteren Stabilisator mithilfe der gezeigten Hardware
Bemerkung:
Platziere an erster Stelle alle Schrauben/ Bolzen an der richtigen Stelle bevor diese vollständig zu befestigen.
Montageschritt C
•Verbinden Sie die Kabel vom Upright Tube und Main Frame bevor sie den Upright Tube in Position schieben..
Bemerkung:
Entfernen sie die Schauben nicht aus dem Frame bevor der Upright Tube in
Position geschoben ist..
•Verwenden Sie den beilegenden Inbus-Schlüssel um die Schrauben, durch die Löcher (von Innen nach Außen) zu befestigen.
•Ziehen Sie die Befestigungsschrauben an - drehen im Uhrzeigersinn.
Bemerkung:
Ziehe die 6 Bolzen erst handfest bevor diese Nachgezogen werden um Schiefstellung zu vermeiden
22
Montageschritt D
•Schieben Sie den Metall-Shaft durch das Innenlager-Gehäuse des linken Armes. Schließen Sie jetzt den linken Arm an am vorderen
Rahmenrohr durch den MetallShaft durch die Öffnung im Rohr zu drücken. Drücken Sie den rechten Arm auf den Shaft und befestige
diesen mit den Unterlegscheiben und Schraube an den beiden Enden der Shaft . Ziehen Sie die Arme mit zwei Inbus-Schlüssel
Remark:
Eine dicke shim-Unterlegscheibe ist zwischen den Swivel-Arm und den Front
Frame-Tube
•Befestige den Bottle Holder am
Upright Tube
Montageschritt E
Betriebsanleitung • PURE 4.1 |
D |
|
|
||
|
|
|
•Montiere den Pedal-Tube an den
Lower-Arm wie auf der Abbildung gezeigt wird.
Montageschritt F
•Montiere den Upper Moving handle bar wie auf der Abbildung gezeigt wird.
Montageschritt G
•Montiere beide Foot-rests auf den Pedal-Tubes wie auf der Abbildung gezeigt wird.
Bemerkung:
Die Foot-rests sind unterschiedlich, bitte beachten Sie das Sie Links und Rechts nicht vertauschen.
23
Betriebsanleitung • PURE 4.1
Bemerkung:
Die Foot Rests können in zwei horizontale Positionen befestigt werden. Die Foot Rests können auch fixiert werden. Stellen sie sicher das Sie beide Seiten in der gleichen Position befestigen.
Assembly step H
•Montiere beide fixed handle barTubes wie auf der Abbildung gezeigt wird.
Bemerkung:
Platziere an erster Stelle alle Schrauben/
Bolzen an der richtigen Stelle bevor diese vollständig zu befestigen.
Montageschritt I
•Befestige die Console Bracket am Upright Tube
•Ziehen sie die Hand-Pulse wires aus der Handle bar und da Date-Cable aus dem Upright-Tube vorsichtig durch die Öffnung im Konsole-
Bracket.
•Entferne die 4 Montage-Schrauben aus der Rückseite der Konsole.
•Schließe die Hand-Pulse wire und das Data-Cable an, an der Konsole.
•Befestige die Konsole am Konsole-
Bracket.
Remark:
Avoid the wires to damage during assembly
Montageschritt J
•Stecke den Transformator an am
Cross Trainer bevor sie diesen in der Wandkontaktdose stecken.
Bemerkung:
Bitte immer da Stromkabel entfernen wenn der Trainer nicht benutzt wird
24

Gebrauch
Einstellen der Stützfüße
Das Gerät hat 4 Stützfüße. Steht das
Gerät nicht stabil, kann es mit den
Stützfüßen eingestellt werden.
•Drehen Sie die Stützfüße wie erforderlich, um das Gerät in eine stabile Position zu bringen.
•Ziehen Sie die Sicherungsmuttern an, um die Stützfüße zu sichern.
HINWEIS
Die Maschine steht am stabilsten, wenn alle vier Stützfüße vollständig eingeschraubt sind. Nivellieren Sie die Maschine daher, indem Sie alle Stützfüße vollständig eindrehen, bevor Sie die entsprechenden Füße zur
Stabilisierung der Maschine wieder herausdrehen.
Trainings
Das Training muss leicht und geeignet, aber von langer Dauer sein. AerobicÜbungen basieren auf der Verbesserung der maximalen
Sauerstoffaufnahme des Körpers, was wiederum die Ausdauer und Fitness verbessert. Sie sollten während des Trainings zwar ins Schwitzen, aber nicht außer Atem kommen. Um eine Basisfitness zu erreichen und zu halten, üben Sie mindestens drei
mal pro Woche 30 Minuten lang an einem Stück. Erhöhen Sie die Anzahl der Übungssitzungen, um
Ihre Fitness zu verbessern. Es lohnt sich, die regelmäßigen Übungen mit einer gesunden Diät zu kombinieren. Personen, die Diät machen, sollten täglich zuerst 30 Minuten oder weniger an einem Stück üben und die tägliche Trainingszeit allmählich auf eine Stunde verlängern. Beginnen Sie Ihr Training mit niedriger Geschwindigkeit und geringem Widerstand, um zu vermeiden, dass das Herzkreislaufsystem einer
Betriebsanleitung • PURE 4.1 |
D |
|
|
||
|
|
|
übermäßigen Belastung ausgesetzt wird. Mit sich verbessernder Fitness können Geschwindigkeit und Widerstand allmählich erhöht werden. Die
Wirksamkeit Ihrer Übungen kann durch Überwachung der Herzfrequenz und Ihrer Pulsfrequenz gemessen werden.
Pulsfrequenzmessung
(Handpulssensoren)
Die Pulsfrequenz wird durch Sensoren in den Handgriffen gemessen, wenn der Benutzer beide Sensoren gleichzeitig anfasst.
WARNUNG
Herzfrequenz-Überwachungssysteme können ungenau sein. Eine Überanstrengung kann zu schweren Schädigungen oder zum Tod führen. Wenn Sie sich schwach oder ohnmächtig fühlen, stellen Sie die
Übungen unverzüglich ein.
Die genaueste Pulsmessung wird erzielt, wenn die Haut etwas feucht ist und die Handpulssensoren konstant berührt werden. Ist die Haut zu trocken oder zu feucht, kann die Pulsfrequenzmessung weniger genau ausfallen.
HINWEIS
Verwenden Sie die Handpulssensoren nicht in Kombination mit einem
Herzfrequenz-Brustgürtel.
Wenn Sie sich einen HerzfrequenzGrenzwert für Ihr Training setzen, ertönt beim Überschreiten ein Signal.
25
Betriebsanleitung • PURE 4.1
Herzfrequenzmessung
(Herzfrequenz-Brustgürtel)
Die genaueste Herzfrequenzmessung lässt sich mit einem Herzfrequenz-
Brustgürtel erzielen. Die Herzfrequenz wird mit einem Herzfrequenzempfänger in Kombination mit einem Herzfrequenz-
Sendegürtel gemessen. Für eine genaue Herzfrequenzmessung ist es erforderlich, dass die Elektroden am Sender etwas feucht sind und die Haut konstant berühren. Sind die Elektroden zu trocken oder zu feucht, kann die
Herzfrequenzmessung weniger genau ausfallen.
HINWEIS
Falls Sie einen Schrittmacher haben, wenden Sie sich zunächst an einen
Arzt, bevor Sie einen HerzfrequenzBrustgürtel verwenden
VORSICHT
•Falls sich mehrere HerzfrequenzMessgeräte in gegenseitiger Nähe befinden, vergewissern Sie sich, dass der Abstand zwischen ihnen mindestens 2 Meter beträgt.
•Falls nur ein Herzfrequenzempfänger und mehrere Herzfrequenzsender vorhanden sind, vergewissern Sie sich, dass nur eine Person mit einem Sender in Sendereichweite ist.
HINWEIS
•Verwenden Sie keinen HerzfrequenzBrustgürtel in Kombination mit den Handpulssensoren.
•Tragen Sie den HerzfrequenzBrustgürtel stets mit direktem
Hautkontakt unter Ihrer Kleidung. Tragen Sie den HerzfrequenzBrustgürtel nicht auf Ihrer Kleidung.
Falls Sie den HerzfrequenzBrustgürtel auf Ihrer Kleidung tragen, gibt es kein Signal.
•Wenn Sie sich einen Herzfrequenz-
Grenzwert für Ihr Training setzen, ertönt beim Überschreiten ein Signal.
•Der Sender überträgt die Herzfrequenz in einem Abstand bis zu 1,5 Meter zur Konsole. Sind die
Elektroden nicht feucht, erscheint die
Herzfrequenz nicht auf der Anzeige.
•Einige Fasern in der Kleidung (z.B. Polyester, Polyamid) erzeugen statische Elektrizität, die eine genaue
Herzfrequenzmessung verhindern kann.
•Mobiltelefone, Fernsehgeräte und andere Elektrogeräte erzeugen ein elektromagnetisches Feld, das
eine genaue Herzfrequenzmessung verhindern kann.
Maximale Herzfrequenz
(während des Trainings)
Die maximale Herzfrequenz ist die höchste Herzfrequenz, die eine
Person durch Übungsbelastung sicher erzielen kann. Folgende Formel wird zur Berechnung der durchschnittlichen
maximalen Herzfrequenz verwendet: 220 - ALTER. Die maximale Herzfrequenz variiert von Person zu Person.
WARNUNG
Stellen Sie sicher, dass Sie während des Trainings Ihre maximale Herzfrequenz nicht überschreiten. Falls Sie einer Risikogruppe angehören, wenden Sie sich an einen Arzt.
Anfänger: (50-60% der maximalen Herzfrequenz)
Geeignet für Anfänger, GewichtBeobachter, Genesende und Personen, die schon lange nicht mehr trainiert haben. Trainieren Sie mindestens dreimal pro Woche 30 Minuten an einem Stück.
Fortgeschritten: (60-70% der maximalen Herzfrequenz)
Geeignet für Personen, die ihre Fitness verbessern und halten wollen. Trainieren Sie mindestens dreimal pro Woche 30 Minuten an einem Stück.
Experte: (70-80% der maximalen Herzfrequenz)
Geeignet für die fittesten Personen, die sich an lange Ausdauertrainings gewöhnt haben.
26
 Loading...