

C35
OWNER'S MANUAL P. 2 -9
BETRIEBSANLEITUNG S. 10-17
MODE D'EMPLOI P. 18-26
HANDLEIDING P. 25-34
MANUALE D'USO P. 35- 42
MANUAL DEL USUARIO P. 4 3-50
BRUKSANVISNING S. 51-58
KÄYTTÖOHJE S. 59-65
SERIAL NUMBER
•
SERIENNUMMER
•
NUMERO DE SERIE
•
SERIENUMMER
•
NUMERO DI SERIE
•
NÚMERO DE SERIE
•
SERIENNUMMER
•
SARJANUMERO
•
www.tunturi.com

CONTENTS
ASSEMBLY ................................................................3
EXERCISING .............................................................6
TRANSPORT AND STORAGE .................................9
MAINTENANCE ........................................................9
TECHNICAL SPECIFICATIONS .................................9
IMPORTANT SAFETY
INSTRUCTIONS
protective base to avoid any damages to
the floor beneath the equipment.
• Make sure that the exercising
environment has adequate ventilation.
To avoid catching cold, do not exercise
in a draughty place.
• In training, the equipment tolerates
an environment measuring +10°C to
+35°C. The equipment can be stored
in temperatures ranging between -15°C
and +40°C. Air humidity in the training or
storage environment must never exceed
90 %.
C35
•
Read this guide through carefully
before assembling, using or servicing
your fitness equipment. Please keep
the guide somewhere safe; it will
provide you now and in the future with
the information you need to use and
maintain your equipment. Always follow
these instructions with care. Please
note that the warranty does not cover
damage due to shipping or negligence of
adjustment or maintenance instructions
described in this manual.
NOTE ABOUT YOUR
HEALTH
• Before you start any training, consult a
physician to check your state of health.
• If you experience nausea, dizziness
or other abnormal symptoms while
exercising, stop your workout at once
and consult a physician.
• To avoid muscular pain and strain,
begin each workout by warming up and
end it by cooling down (slow pedaling at
low resistance). Don’t forget to stretch at
the end of the workout.
NOTE ABOUT
THE EXERCISING
ENVIRONMENT
• The equipment is not to be used
outdoors.
• Place the equipment on a firm, level
surface. Place the equipment on a
NOTE ABOUT USING
THE EQUIPMENT
• If children are allowed to use the
equipment, they should be supervised
and taught to use the equipment
properly, keeping in mind the child’s
physical and mental development and
their personality.
• Before you start using the equipment,
make sure that it functions correctly
in every way. Do not use a faulty
equipment.
• Press the keys with the tip of the
finger; your nails may damage the key
membrane.
• Never lean on the meter.
• Never remove the side covers. Do not
step on the frame casing.
• Only one person may use the
equipment at a time.
• Hold the handlebar for support when
getting on or off the equipment.
• Wear appropriate clothing and shoes
when exercising.
• Protect the meter from sunlight and
always dry the surface of the meter if
there are any drops of sweat on it.
• The equipment must not be used by
persons weighing over 135 kg.
•
The equipment has been designed
•
for home use. The Tunturi warranty
applies only to faults and malfunctions
OWNER'S MANUAL
2
OWNER'S MANUAL • C35
GB
in home use (24 months). Further
information on warranty terms can be
found in the warranty booklet included
with the product.
• Make sure the equipment is unplugged
before carrying out any assembly or
maintenance procedures.
• Do not attempt any servicing or
adjustments other than those described
in this guide. Everything else must
be left to someone familiar with the
maintenance of electromechanical
equipments and authorised under the
laws of the country in question to carry
out maintenance and repair work.
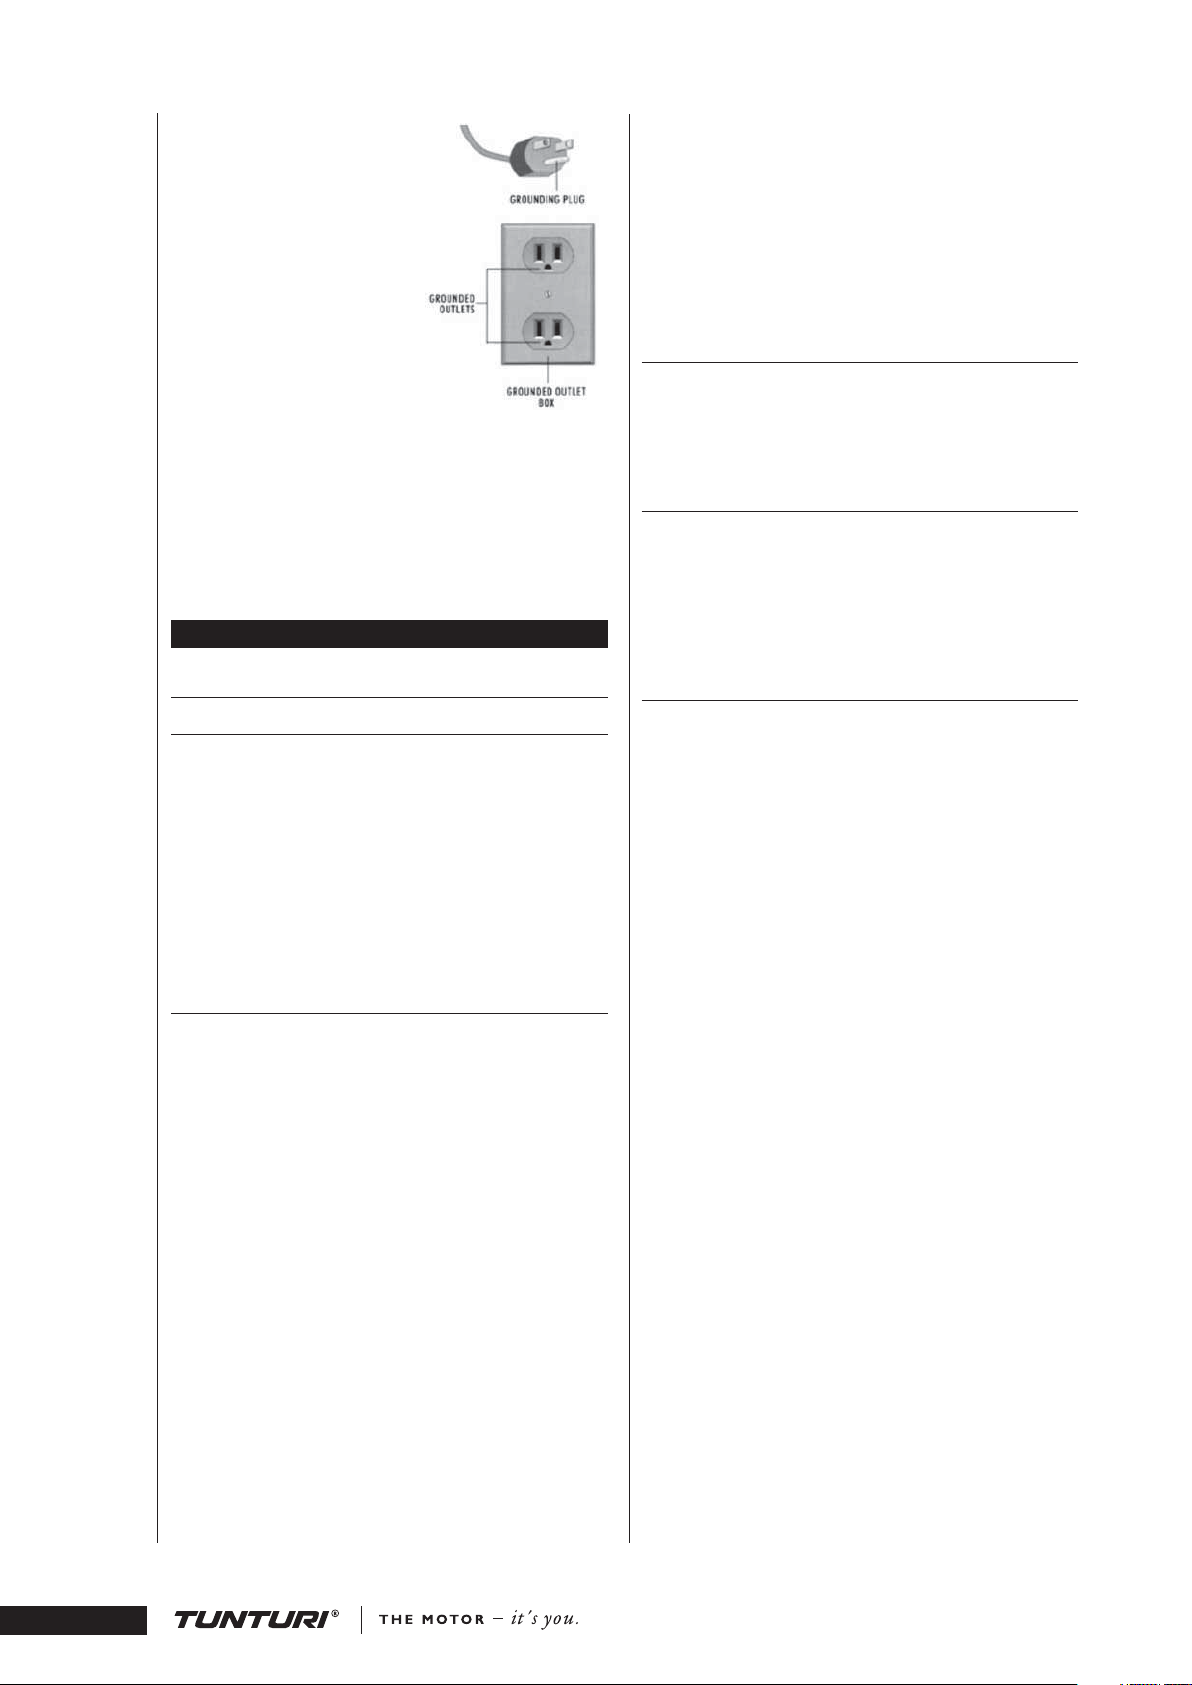
• This product must be grounded. If
it should malfunction or breakdown,
grounding provides a path of least
resistance for electric current to reduce
the risk of electric shock. This product
is equipped with a cord having an
equipment-grounding conductor and
a grounding plug. The plug must be
plugged into an appropriate outlet that
is properly installed and grounded in
accordance with all local codes and
ordinances.
ASSEMBLY
Start by unpacking the equipment. Two people are
needed for the assembly. Check that you have the
following parts:
1. Frame
2. Front support
3. Rear support
4. Front frame tube
5. Arms (2)
6. Footrests (2)
7. Meter
8. Handlebar
9. Shaft
10. Transformer
11. Assembly kit (contents marked with * in the spare
part list): keep the assembly tools, as you may need
them e.g. for adjusting the equipment
If necessary, please contact your dealer with the
model, equipment serial no. and spare part no. of the
missing part. You’ll find a spare part list at the back of
this guide. The packaging includes a silicate bag for
absorbing moisture during storage and transportation.
Please dispose of the bag once you have unpacked the
equipment. The directions left, right, front and back are
defined as seen from the exercising position. Allow at
least 100 cm of clearance around the equipment.
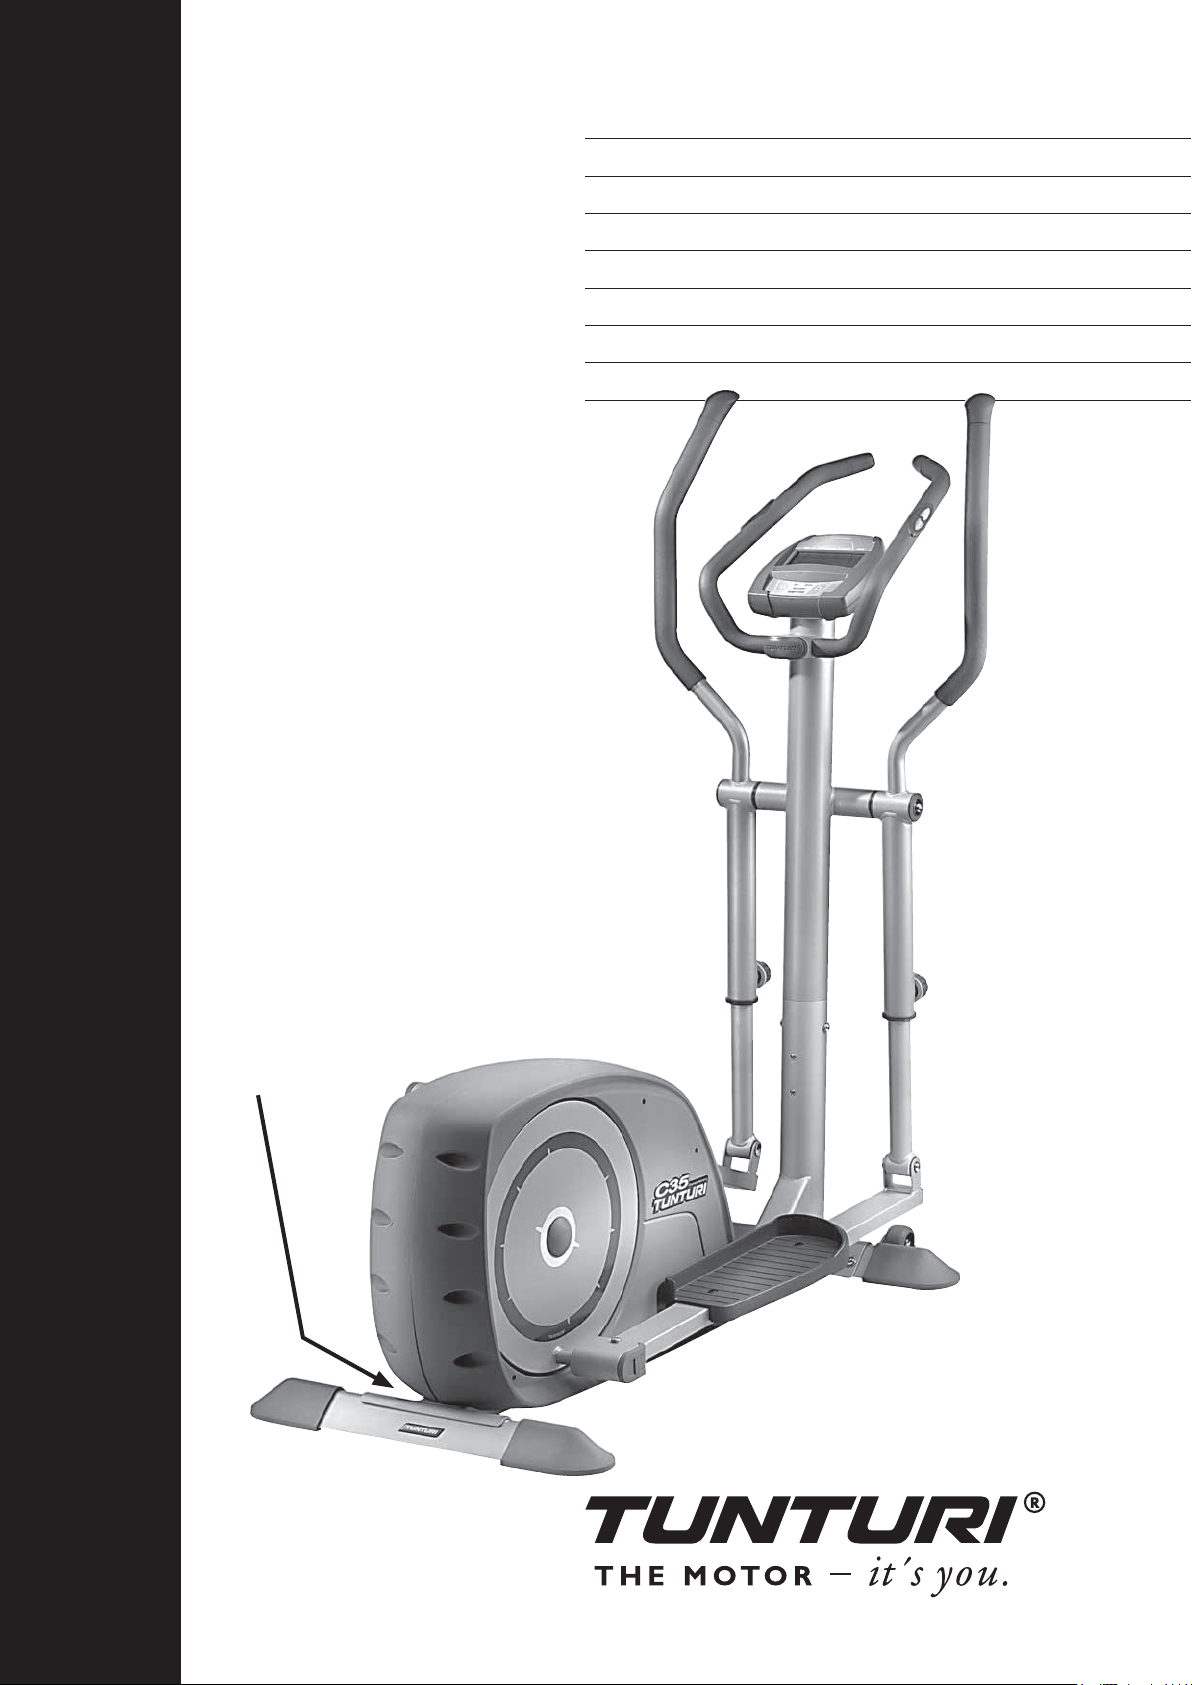
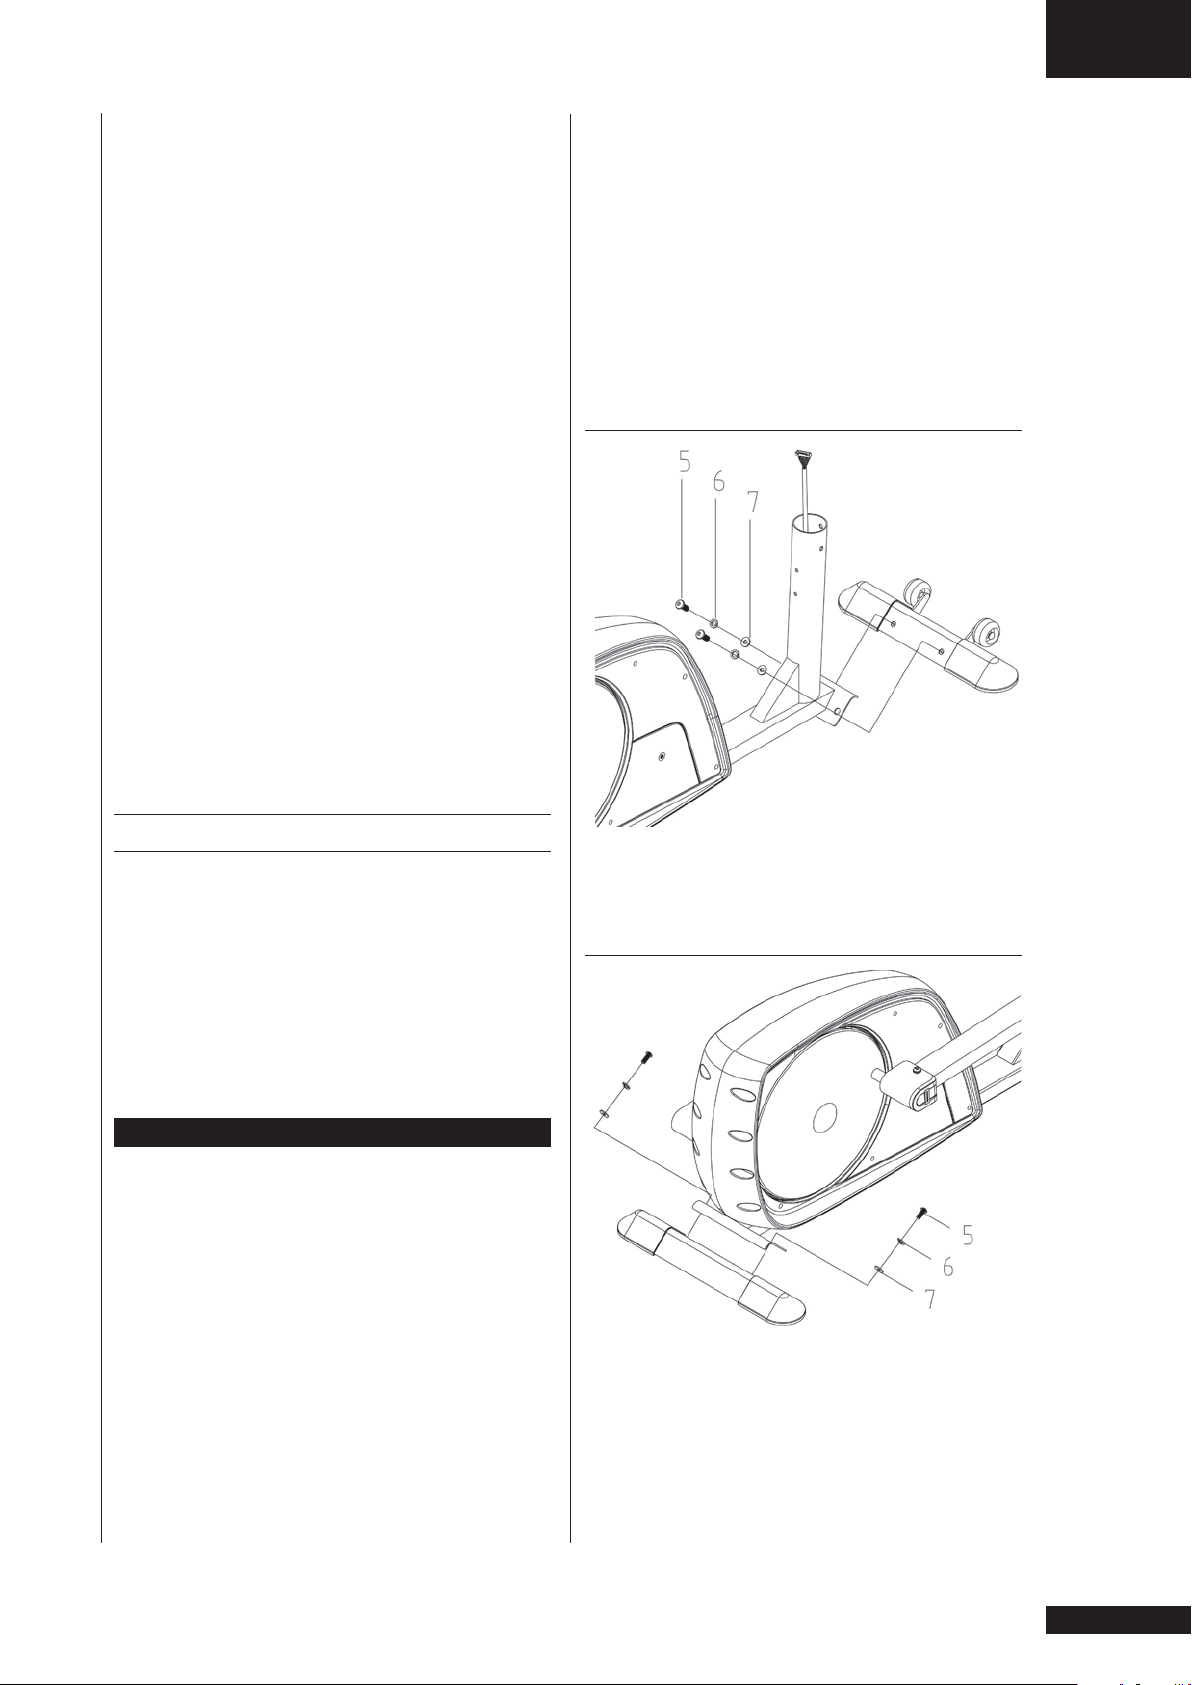
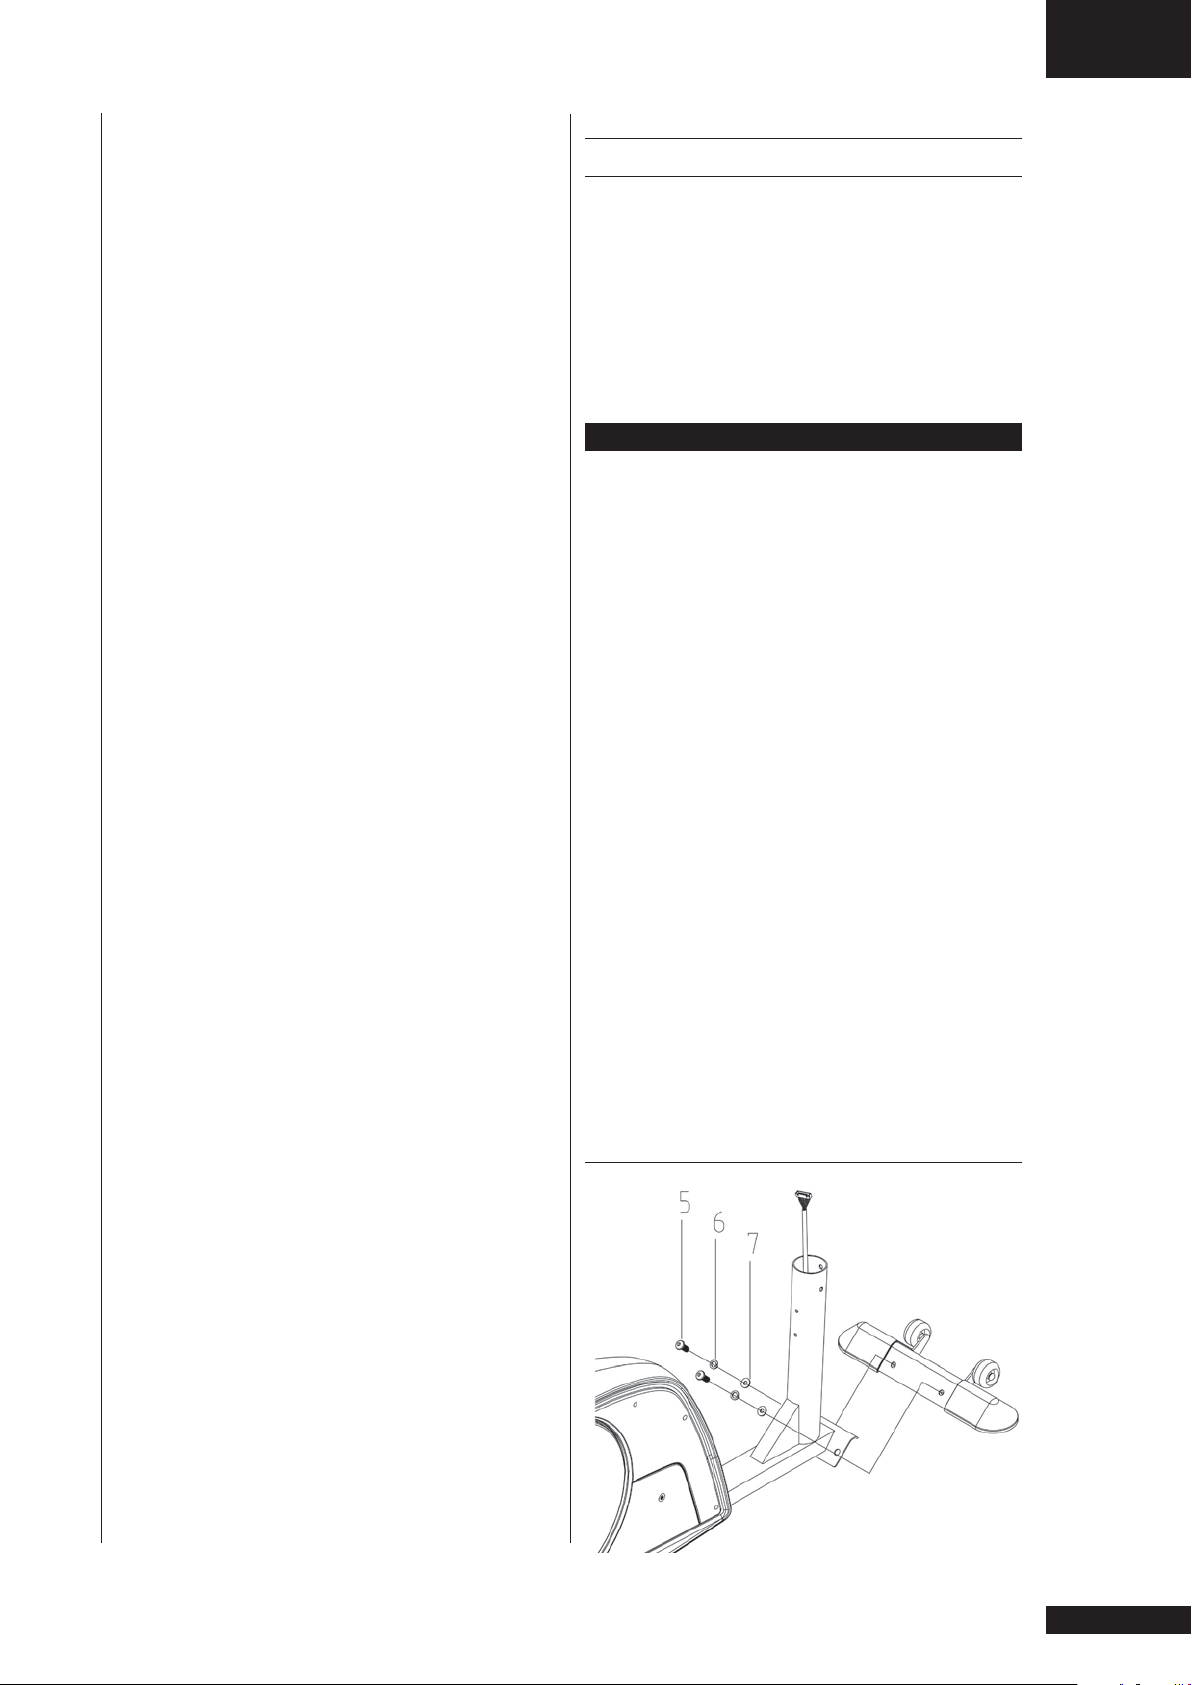
FRONT SUPPORT
DANGER:
Improper connection of the equipmentgrounding conductor can result in a risk
of electric shock. Check with a qualified
electrician or serviceman if you are
in doubt as to whether the product is
properly grounded. Do not modify the
plug provided with the product - if it will
not fit the outlet, have a proper outlet
installed by a qualified electrician.
SAVE THIS INSTRUCTION MANUAL
WELCOME TO THE WORLD
OF TUNTURI EXERCISING!
Your choice shows that you really want to invest in your
well being and condition; it also shows you really value
high quality and style. With Tunturi Fitness Equipment,
you’ve chosen a high quality, safe and motivating
product as your training partner. Whatever your goal in
training, we are certain this is the training equipment to
get you there. You’ll find information about using your
exercise equipment and what makes for efficient training
at Tunturi’s website at WWW.TUNTURI.COM.
Attach the front support with transportation wheels
to the main frame with two bolts, washers and locking
sleeves.
3
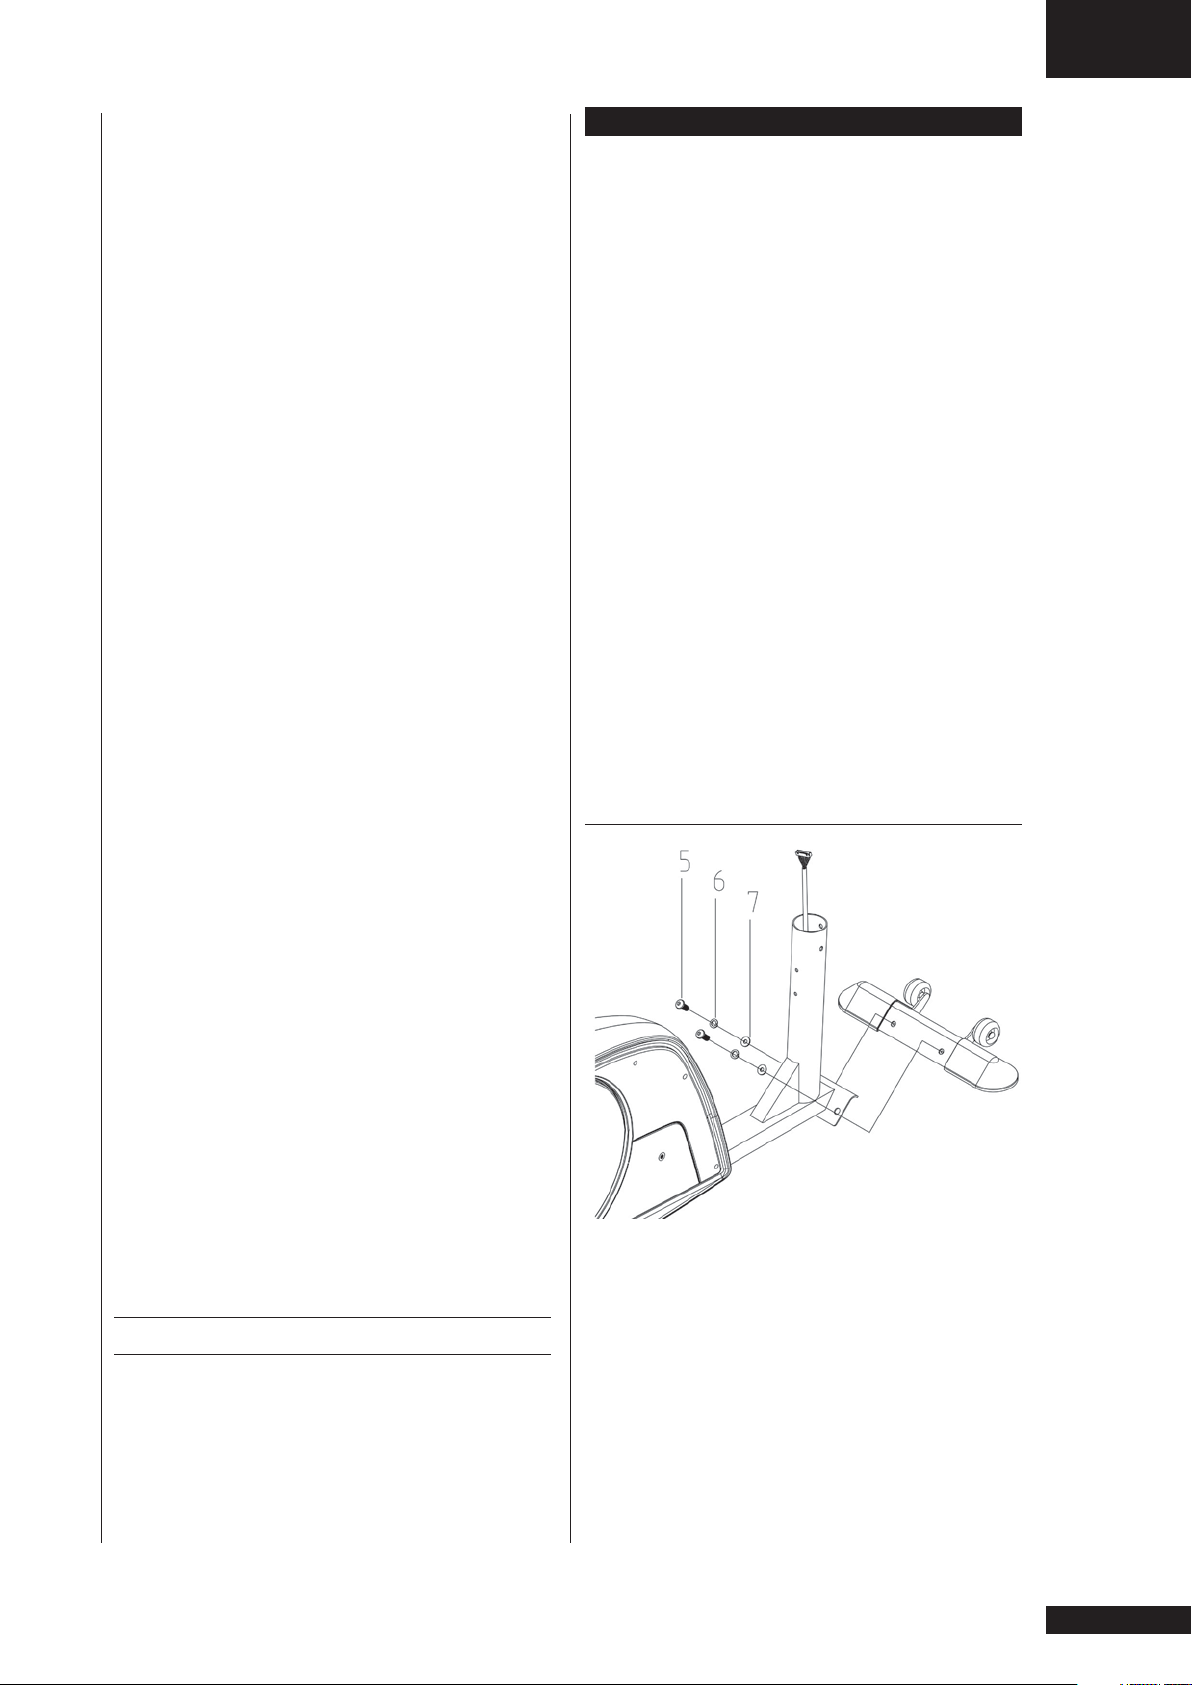
REAR SUPPORT
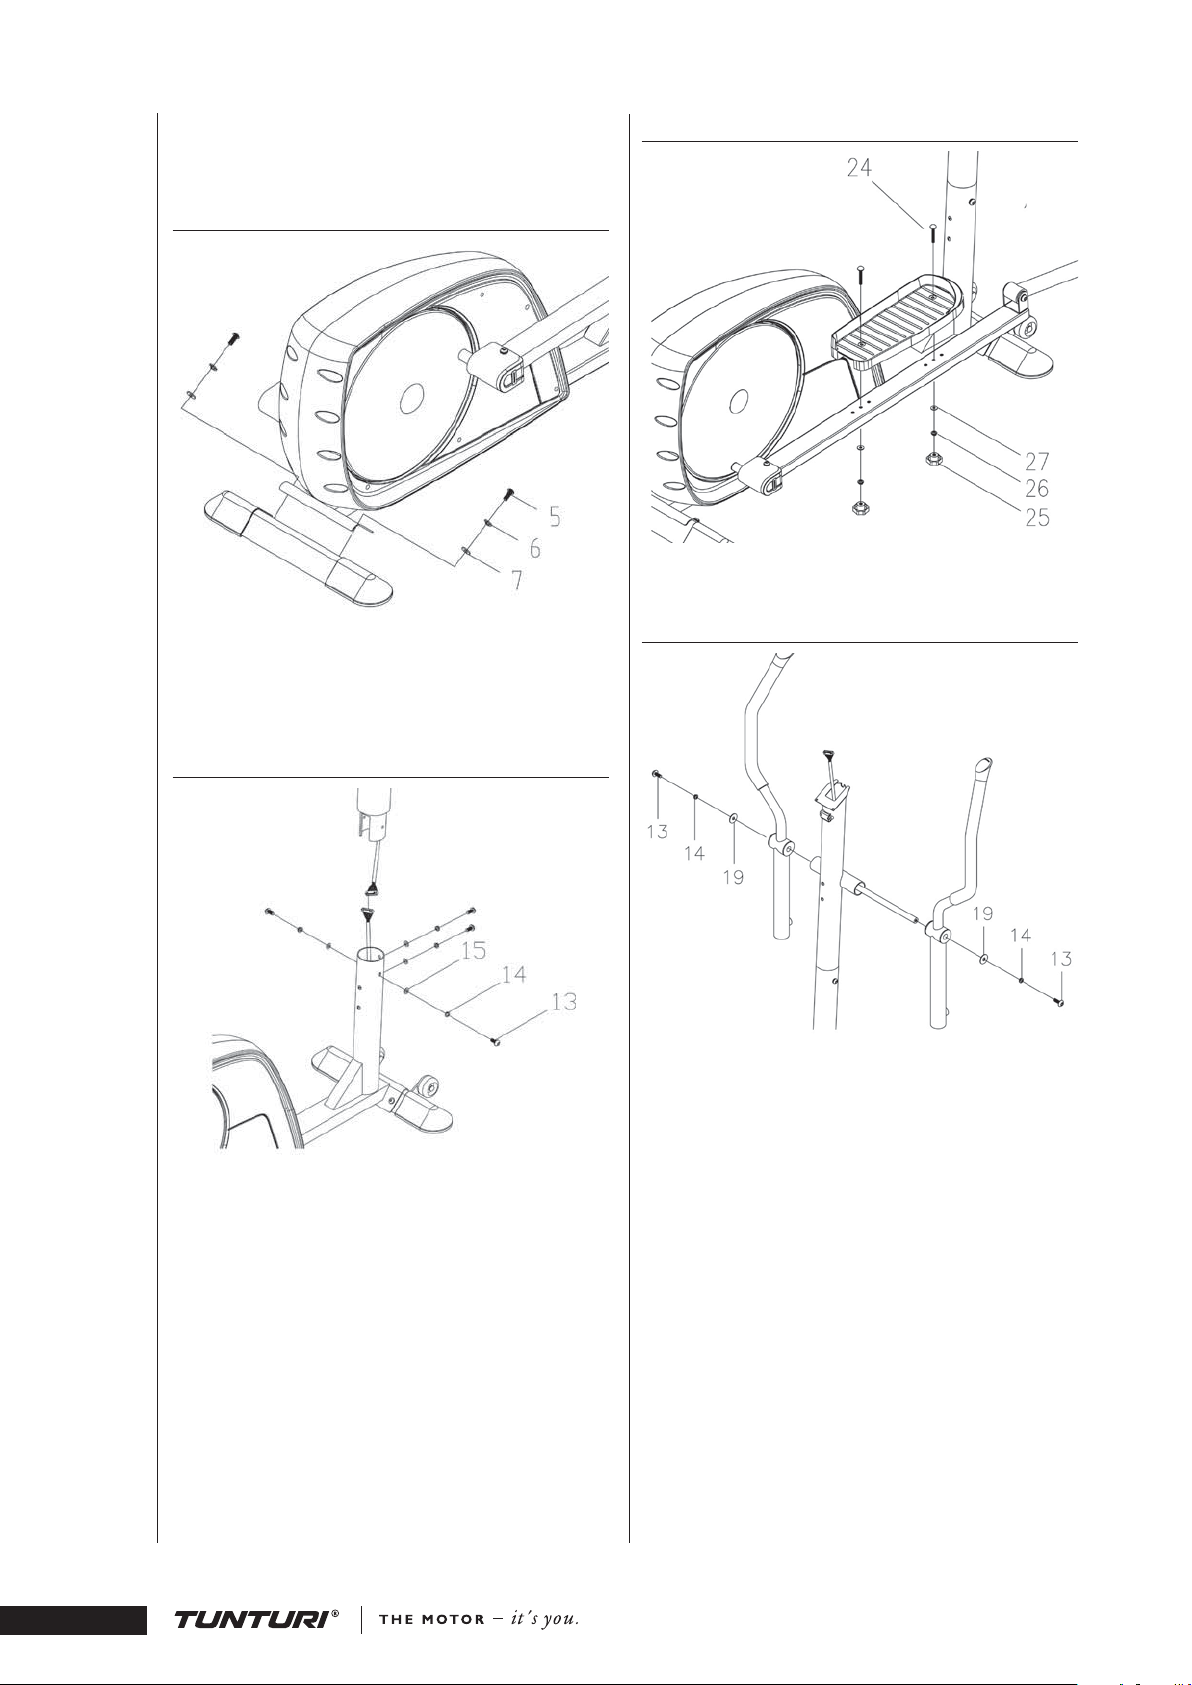
FOOTRESTS
Push the stand feet to the rear support ends and attach
the rear support to the main frame with two bolts,
washers and locking sleeves.
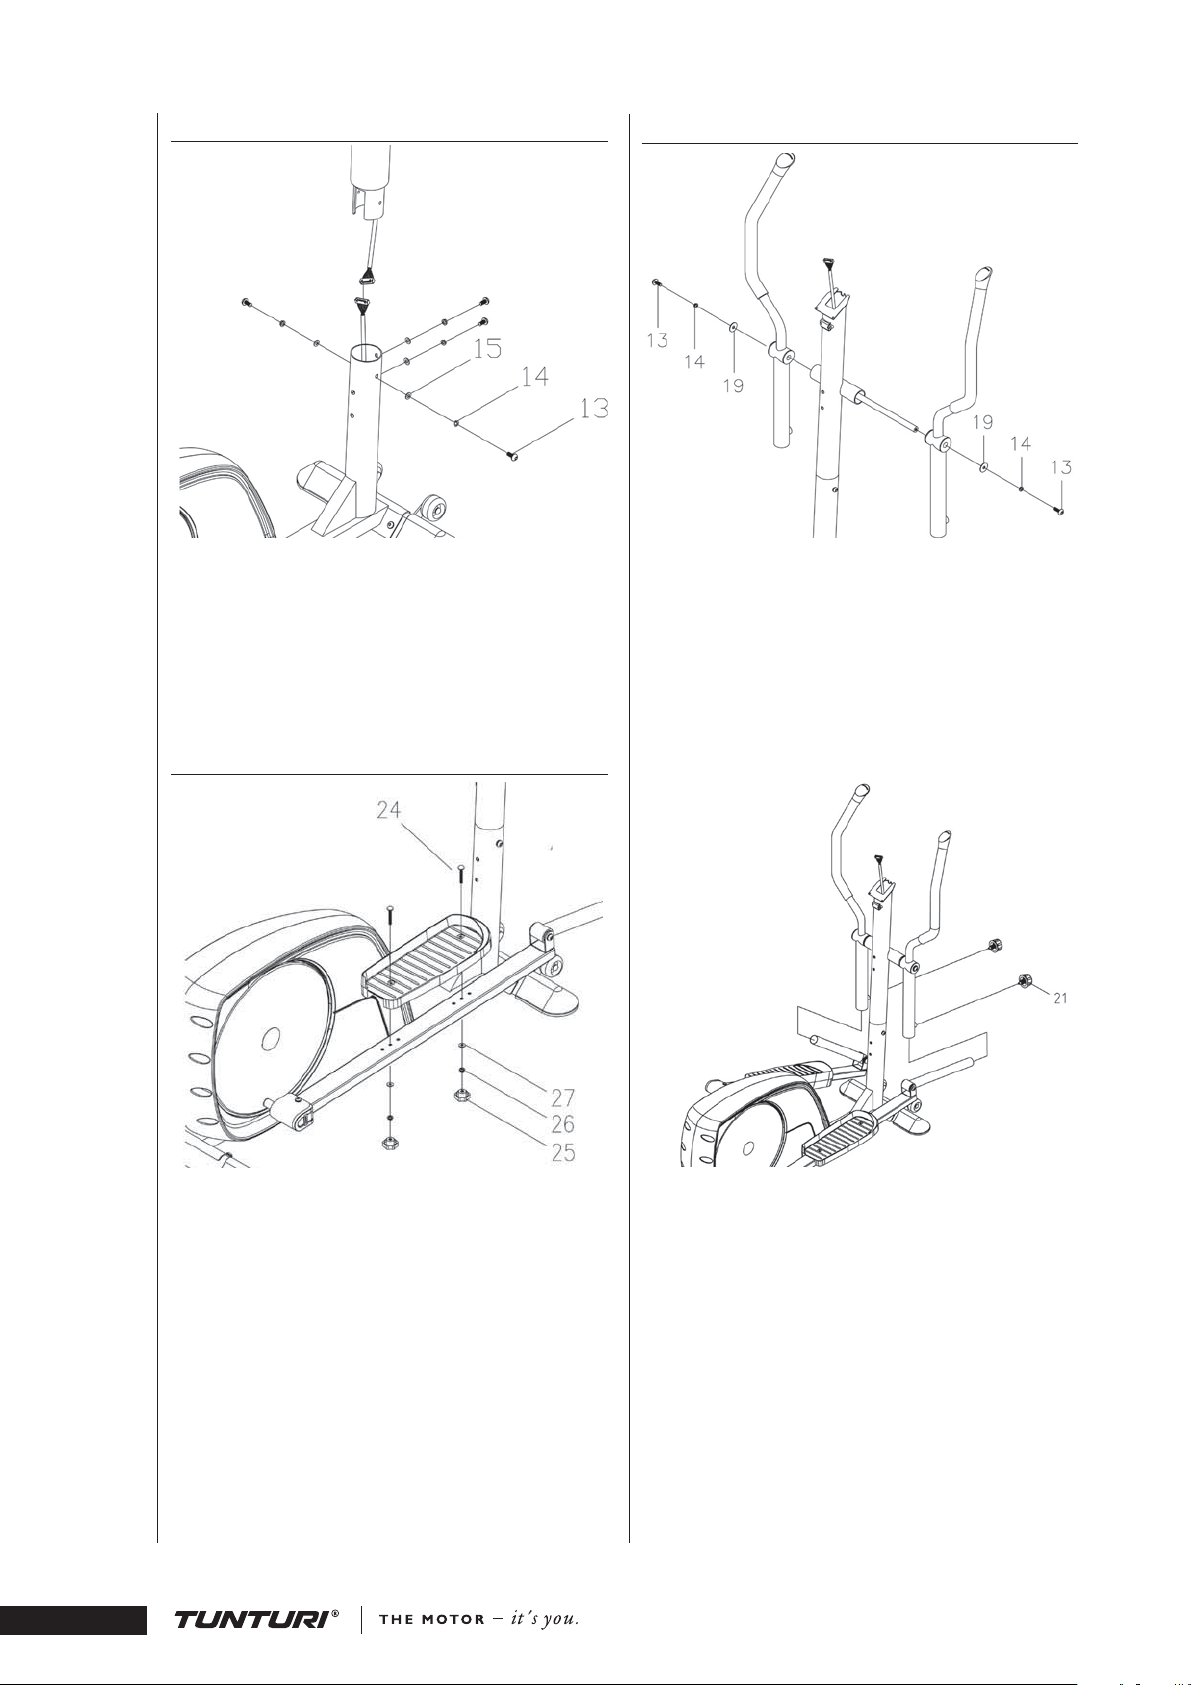
FRONT FRAME TUBE
Remove the rubber band from around meter cable
coming from the frame tube. Attach the meter cable
to the connector coming from the front frame tube.
Push the front frame tube inside the frame tube: do not
damage the meter cable! Attach the front frame tube
tight to the frame with the washers and attachment
screws.
Attach the footrests to the position of your choice on
the pedal shafts with two screws, two washers / screw
and locking nuts.
ARMS
Push the metal shaft through the bracket housing of
the left arm. Attach now the left arm to the front frame
tube by pushing the metal shaft through the opening in
the tube. Push the right arm on the shaft and lock it by
tightening a large washer, a locking sleeve and a screw to
the both ends of the shaft. Tighten the arms using two
Allen keys.
C35
•
OWNER'S MANUAL
4
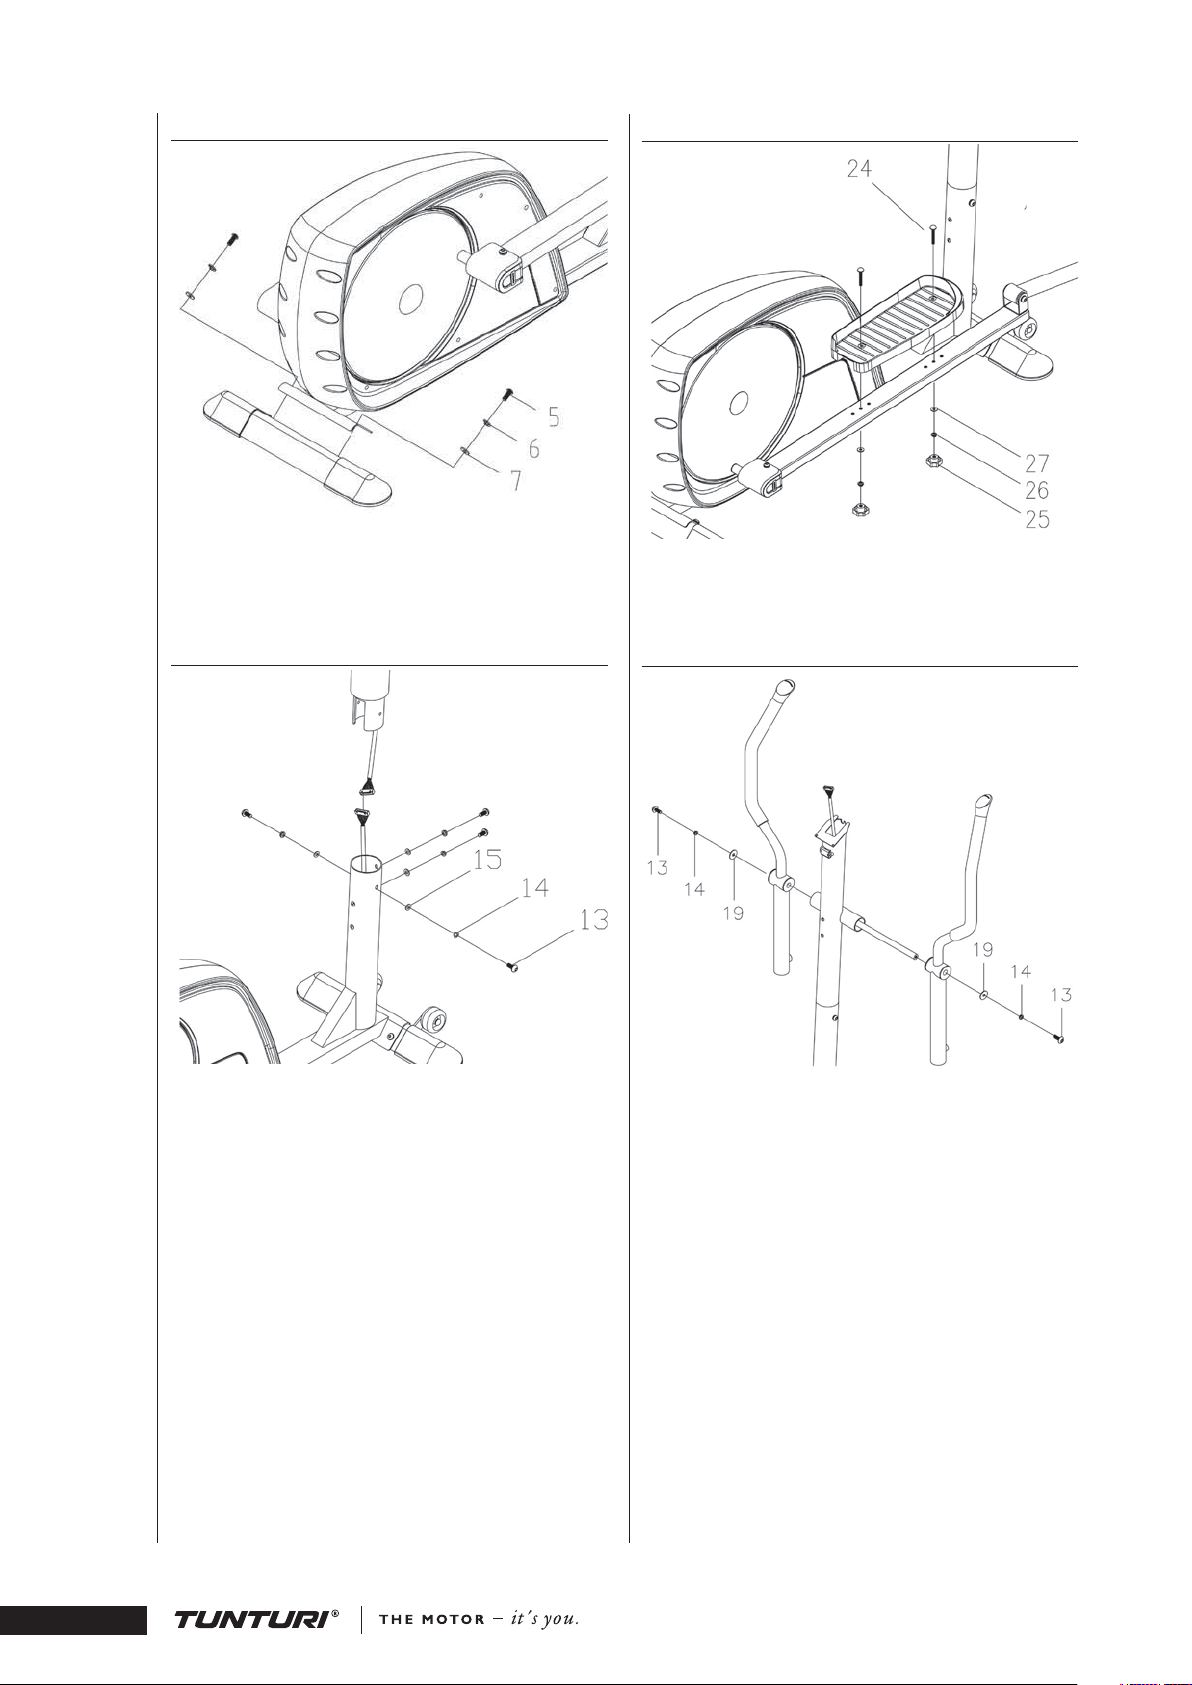
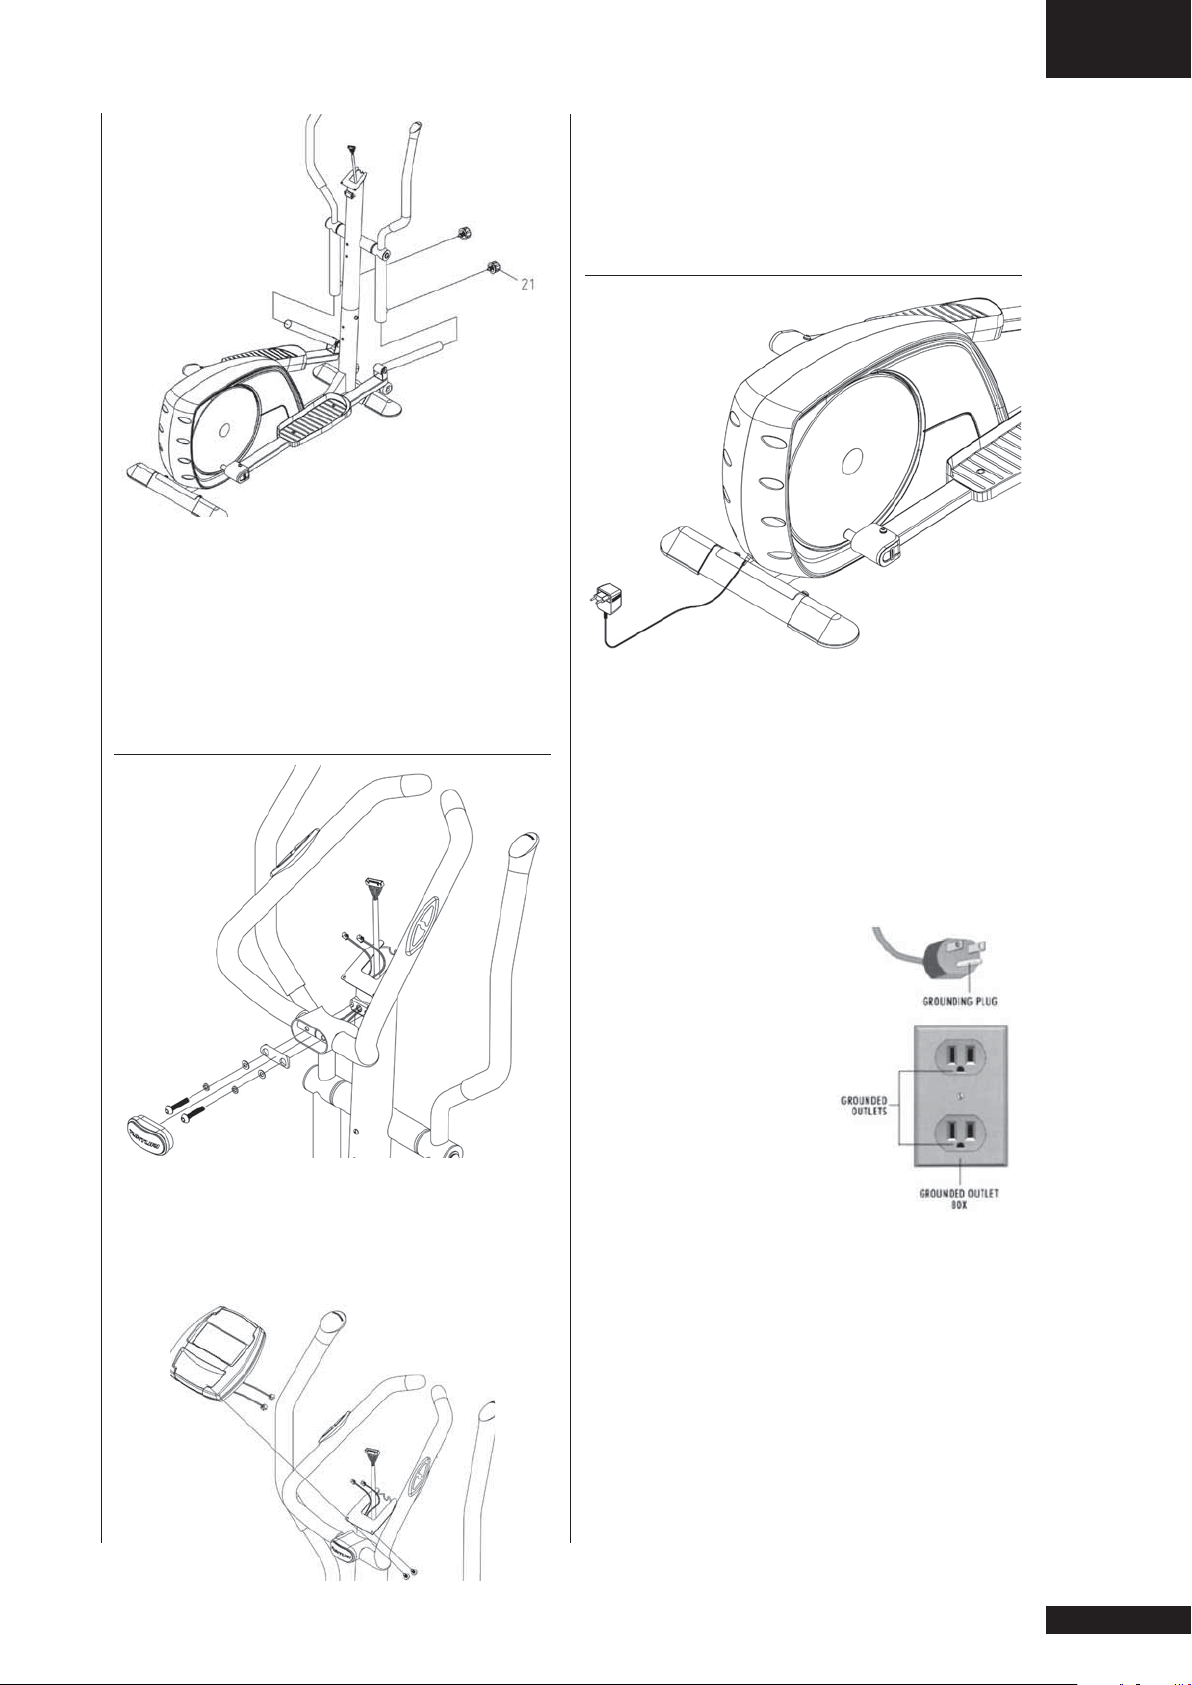
Push the left footrest support forward so that you can
push the adjustment tube in the front of the foot rest
support inside the arm tube. Lock the adjustment tube
with the locking screw. Repeat the procedure with the
right footrest support.
NOTE! The European model allows selecting
adjustment (see Adjusting the footrest supports).
GB
OWNER'S MANUAL • C35
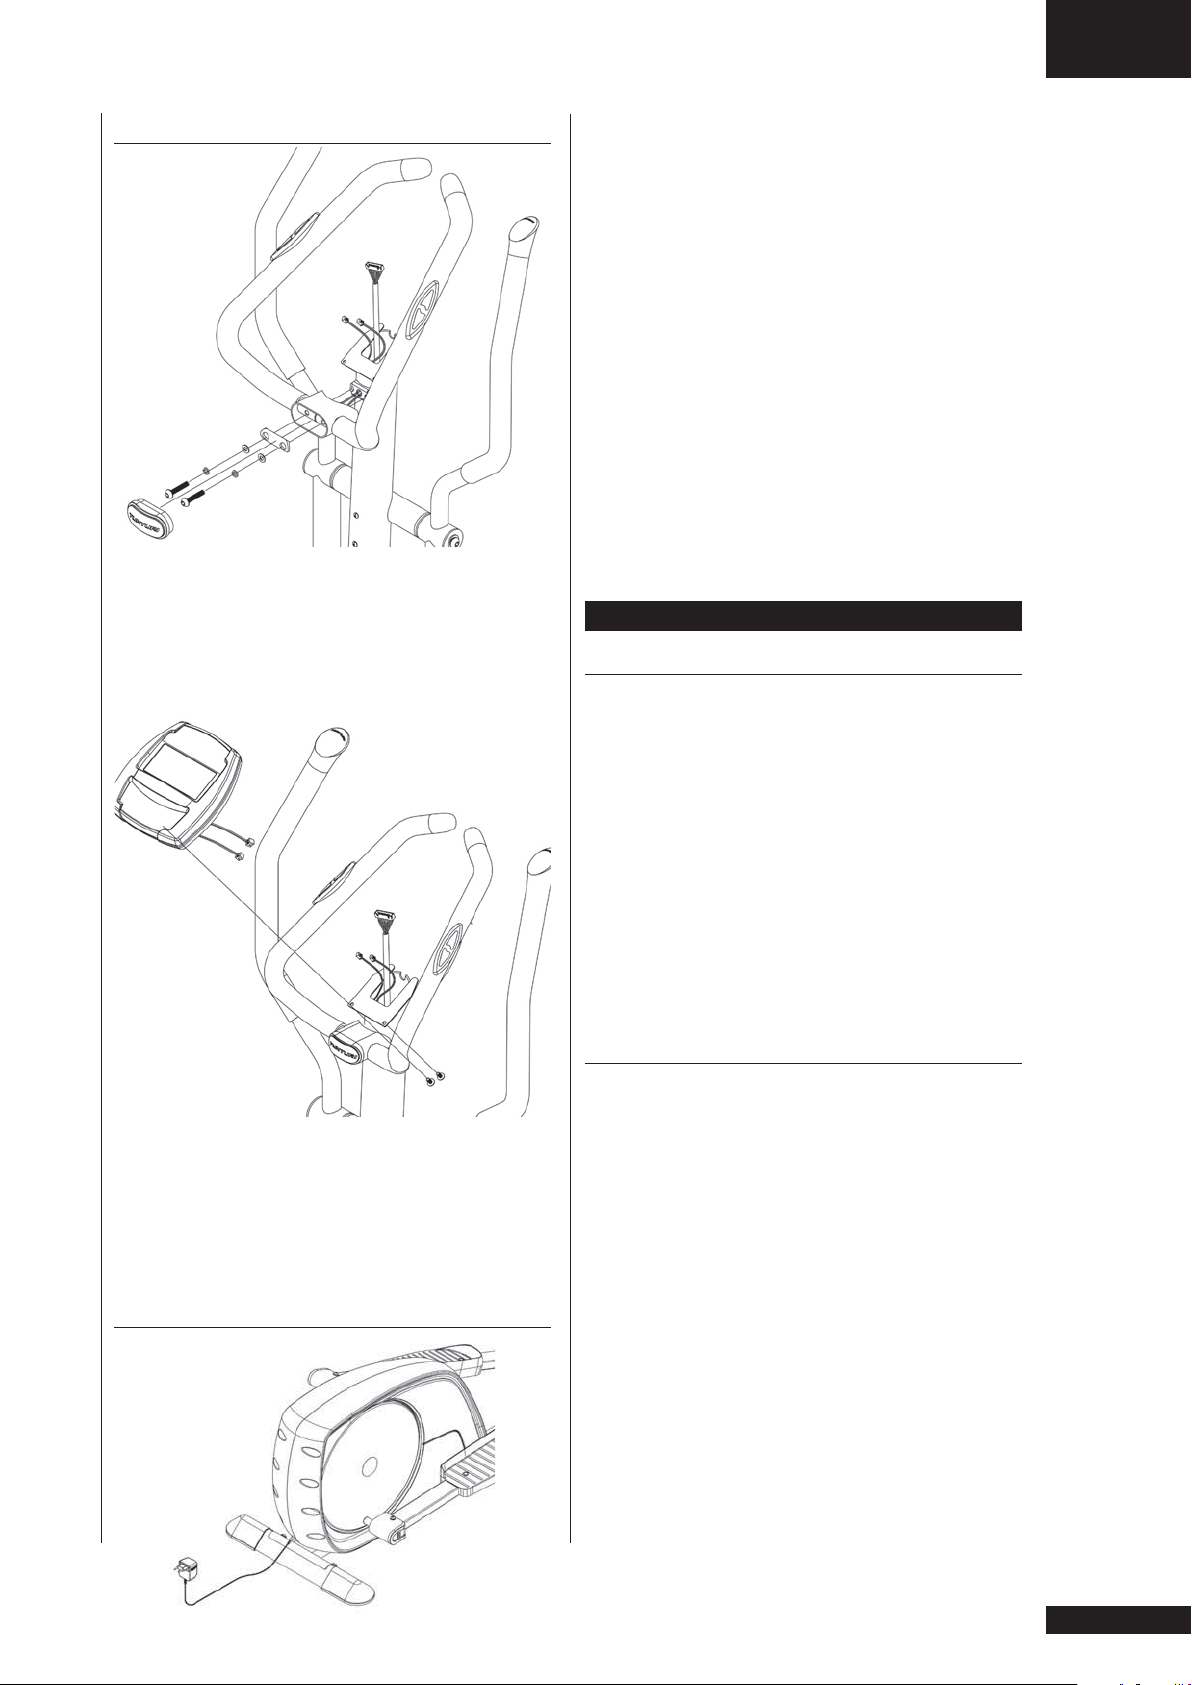
Unscrew the two screws in the bottom of the console.
Attach the cord from the front tube and the pulse cords
to the console outlets. Push the console onto the end of
the front tube and fasten the console with the fastening
screws. Be careful not to damage the cords!
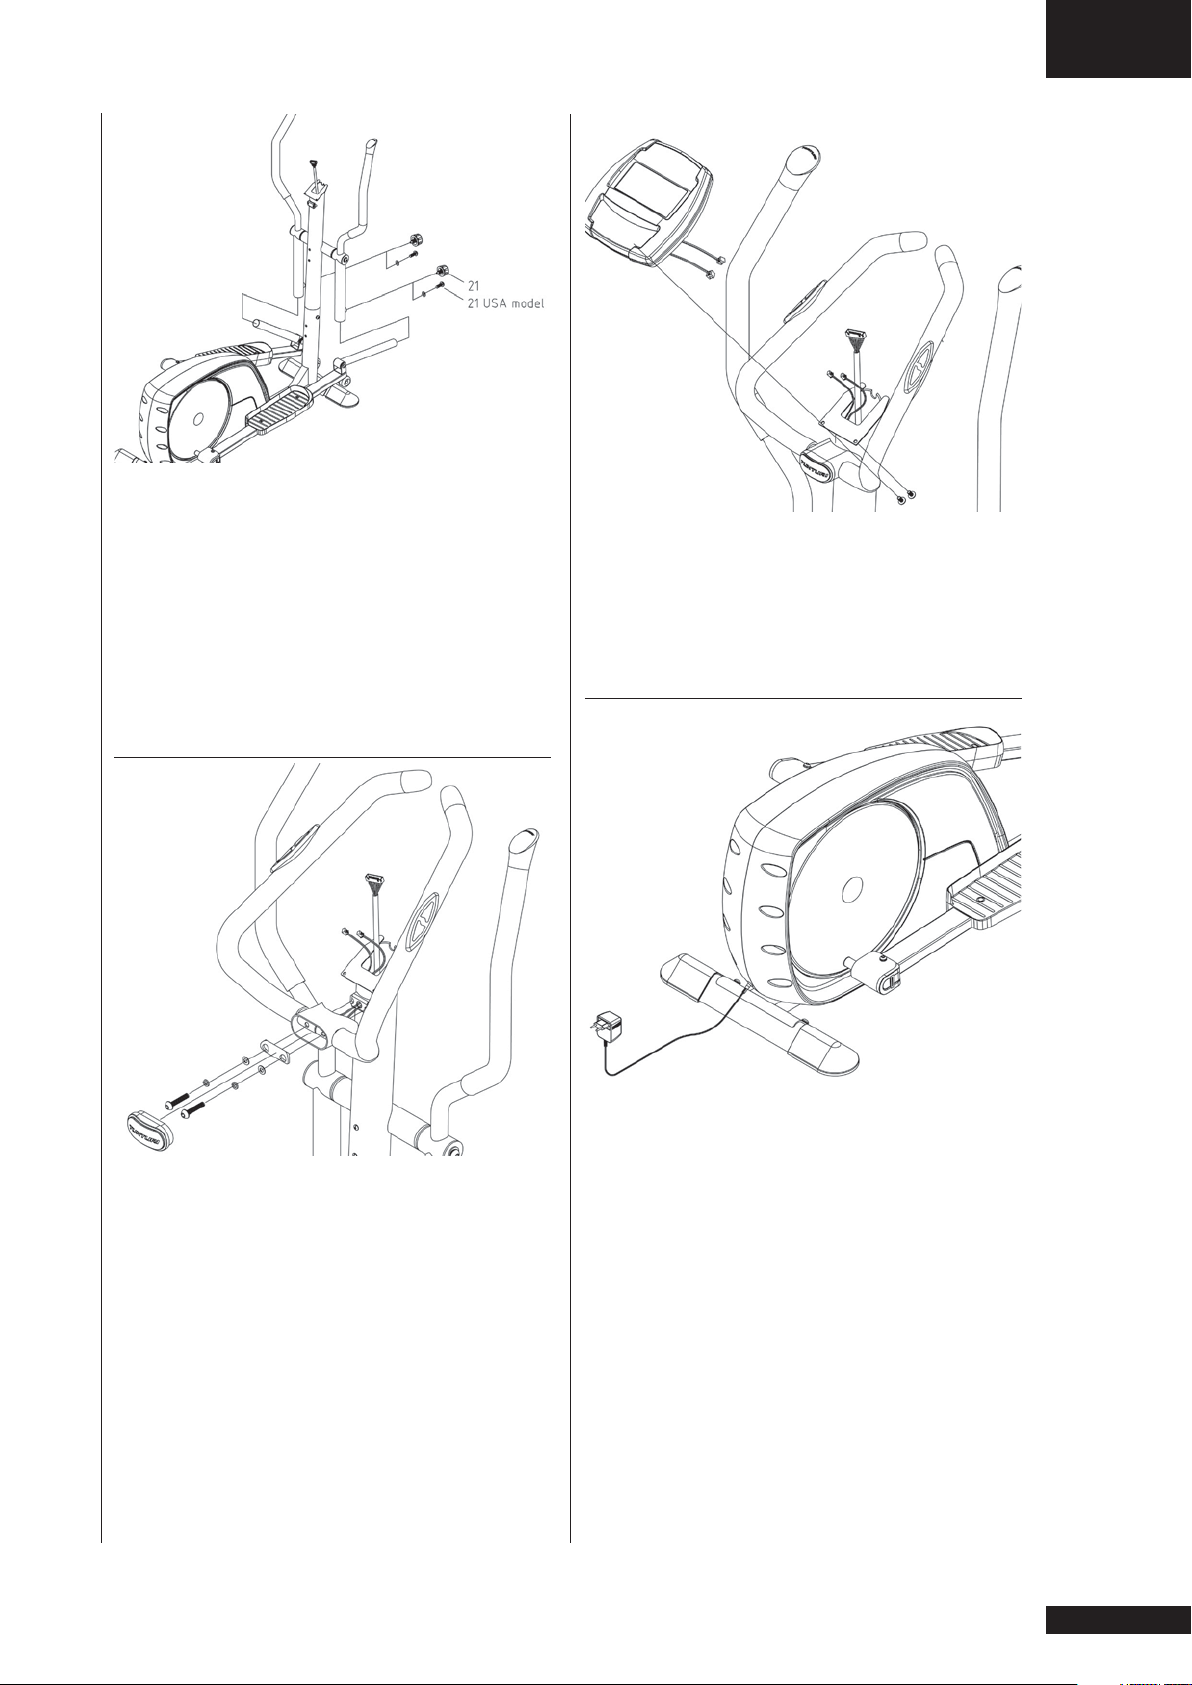
TRANSFORMER
METER AND HANDLEBAR
Attach the handle bar into the front frame
tube.Withdraw the plastic covers on the screws and
thread the hand pulse cords through the opening in
the front frame tube. Pull the screws tightly so that the
handlebar does not move during the training. Push the
plastic covers onto the screws.
Before connecting the equipment to a power source,
make sure that local voltage matches that indicated on
the type plate: the equipment operates at either 230 V
or 115 V (North American version). Plug the socket end
of the transformer cord into the connector, just above
the rear support in the center of the frame, and the
other end into the wall socket.
NOTE! The equipment must be connected to a
grounded wall socket. Do not use extension wires
when connecting the equipment to the power source.
Make sure the power cord does not run underneath the
equipment.
DANGER: Always switch off the power and unplug
this appliance from the electrical outlet immediately
after using.
WARNING: To reduce the risk of burns, fire, electric
shock, or injury to persons:
5
1) An appliance should never be
left unattended when plugged
in. Unplug from outlet when
not in use, and before carrying
out any maintenance or repair
procedures.
2) Do not operate under
blanket or other combustive
material. Excessive heating can
occur and cause fire, electric
shock, or injury to persons.
IMPORTANT! Behind the console
of the C35 there is a battery
case. The C35 can be used with batteries or with electric
current. If the device is used solely with batteries, please
note that the servo brake exhausts the batteries rather
quickly. Hence, we recommend the use of electricity
as the main power source. NOTE! The clock in the
console uses always batteries, even when the device is
not connected to any power source. Otherwise the clock
would reset to zero.
EXERCISING
You should start slowly at a low pedalling speed and low
resistance, because for an overweight person strenuous
exercise may subject the heart and circulatory system
to excessive strain. As fitness improves, resistance and
pedalling speed can be increased gradually. Exercise
efficiency can be measured by monitoring the pulse.
The pulse meter helps you monitor your pulse easily
during exercise, and thus to ensure that the exercise is
sufficiently effective but not over-strenuous.
HEART RATE
No matter what your goal, you’ll get the best results by
training at the right level of effort, and the best measure
is your own heart rate.
PULSE MEASUREMENT WITH HAND GRIP
PULSE
Pulse measurement is based on the monitoring of
peripheral circulation. The handgrip sensors in the
handlebars take a pulse measurement when the
user is touching both sensors simultaneously. Pulse
measurement requires that the skin is constantly
touching the sensors and that the skin is slightly moist.
C35
•
ADJUSTING THE FOOTREST SUPPORTS
(EUROPEAN MODEL)
Turn the locking knob counterclockwise and pull the
locking knob out so that the adjusting tube can be
moved freely up and down. When the height is right, let
go of the knob. The tube locks into place. Tighten the
locking knob clockwise.
NOTE! Always make sure that the locking knob is
fastened properly before starting to exercise. Adjust the
footrest support height so that the elliptic movement
does not strain your ankles.
EXERCISE LEVEL
Working out using an exercise cycle is excellent aerobic
exercise, the principle being that the exercise should be
suitably light, but of long duration. Aerobic exercise
is based on improving the body’s maximum oxygen
uptake, which in turn improves endurance and fitness.
The ability of the body to burn fat as a fuel is directly
dependent on its oxygen uptake capacity.
Aerobic exercise should above all be pleasant. You
should perspire, but you should not get out of breath
during the workout. You must, for example, be able to
speak and not just pant while pedalling. You should
exercise at least three times a week, 30 minutes at a
time, to reach a basic fitness level. Maintaining this level
requires a few exercise sessions each week. Once the
basic condition has been reached, it is easily improved,
simply by increasing the number of exercise sessions.
Exercise is always rewarding for weight loss, because it is
the only way of increasing the energy spent by the body.
This is why it is always worthwhile to combine regular
exercise with a healthy diet. A dieter should exercise
daily - at first 30 minutes or less at a time, gradually
increasing the daily workout time to one hour.
TELEMETRIC HEART RATE MEASUREMENT
The console has a heart rate receiver compatible with
equipment, so you can also use uncoded heart rate belts
for heart rate measurement. The most reliable heart rate
measurement is achieved with a telemetric device, in
which the electrodes of the transmitter fastened to the
chest transmit the pulses rom the heart to the console by
means of an electromagnetic field.
NOTE! If you are fitted with a pacemaker, please consult
a physician before using a wireless heart rate monitor.
If you want to measure your heart rate this way
during your workout, moisten the grooved electrodes
on the transmitter belt with saliva or water. Fasten
the transmitter just below the chest with the elastic
belt, firmly enough so that the electrodes remain in
contact with the skin while exercising, but not so tight
that normal breathing is prevented. If you wear the
transmitter and belt over a light shirt, moisten the shirt
slightly at the points where the electrodes touch the
shirt. The transmitter automatically transmits the heart
rate reading to the console up to a distance of about 1
m.
If the electrode surfaces are not moist, the heart-rate
reading will not appear on the display. If the electrodes
are dry, they must be moistened again. Allow the
electrodes warm up properly to ensure accurate heart
rate measurement. If there are several telemetric
heart rate measurement devices next to each other,
the distance between them should be at least 1.5 m.
Similarly, if there is only one receiver and several
transmitters in use, only one person with a transmitter
should be within transmission range. The transmitter is
switched to an active state only when it is being used for
measurement. Sweat and other moisture can, however,
keep the transmitter in an active state and waste battery
energy. Therefore it is important to dry the electrodes
carefully after use.
OWNER'S MANUAL
6

OWNER'S MANUAL • C35
GB
When selecting training attire, please note that some
fibers used in clothes (e.g. polyester, polyamide) create
static electricity, which may prevent reliable heart
rate measurement. Please note that a mobile phone,
television and other electrical appliances form an
electromagnetic field around them, which will cause
problems in heart rate measurement.
First find your maximum heart rate i.e. where the rate
doesn’t increase with added effort. If you don’t know
your maximum heart rate, please use the following
formula as a guide:
208 - 0,7 X AGE
These are average values and the maximum varies from
person to person. The maximum heart-rate diminishes
on average by one point per year. If you belong to a risk
group, ask a doctor to measure your maximum heart
rate for you.
We have defined three different heart-rate zones to help
you with targeted training.
BEGINNER
50-60 % of maximum heart-rate.
•
Also suitable for weight-watchers, convalescents
and those who haven’t exercised for a long time.
Three sessions a week of at least a half-hour each is
recommended. Regular exercise considerably improves
beginners’ respiratory and circulatory performance and
you will quickly feel your improvement.
TRAINER
60-70 % of maximum heart-rate.
•
Perfect for improving and maintaining fitness. Even
reasonable effort develops the heart and lungs effectively,
training for a minimum of 30 minutes at least three
times a week. To improve your condition still further,
increase either frequency or effort, but not both at the
same time!
ACTIVE TRAINER
70-80 % of maximum heart-rate.
•
Exercise at this level suits only the fittest and
presupposes long-endurance workouts.
DISPLAY
1. PERFORMANCE SPEED (/MIN)
Pedalling speed (RPM). The column underneath also
shows the pedalling speed.
2. EXERCISE DURATION
00:00-99:59; measuring at 1 second intervals, h1:40-h9:
59 measuring at 1 minute intervals.
3. HEART RATE DURING EXERCISE
The symbol of a heart blinks simultaneously with your
own heart rate during the exercise. The arrow signs show
if the heart rate exceeds or surpasses the set values.
4. EXERCISE TRIP LENGTH (KM/MILE)
O0.0 – 99.99 km / miles
5. EXERCISE SPEED (KMH/MPH)
00.0-99.9 kmh / mph
6. ENERGY CONSUMPTION (KCAL)
Estimated total energy consumption during the exercise,
0 –9999 kcal
7. CLOCK (CLOCK)
Real time clock
8. THERMOMETER (TEMP C / TEMP F)
Measures the room temperature either in Celsius or
Fahrenheit
9. HYGROMETER (HUMIDITY %)
Measures the room humidity, 0-100%.
10. DISPLAY OF THE CHOSEN FUNCTION
The console displays the chosen exercise mode (Program
= preprogrammed program; Manual = manually
programmed exercise; Recovery = measuring of recovery
heart rate, Target HR = heart rate exercise; Min Max =
upper and lower heart rate limits)
11. DISPLAY OF AN EXERCISE PROFILE
The profile of a preprogrammed exercise program.
CONSOLE
KEYS
1. SET
Selection of the goal values
2. RESET.
Zeroing the exercising values, ending the exercise and
return into main display
3. ”+ / -”
Setting the goal values, increasing the intensity (+),
decreasing the intensity (-)
4. RECOVERY
Measuring the recovery heart rate
5. START/STOP
Starting and interrupting the exercise.
12. DISPLAY OF THE CUMULATIVE HEART RATE
If the heart rate is measured during the exercise, the
display shows the profile of the heart rate formed during
the exercise.
13. CHANGE OF BATTERIES (BATTERY LOW)
A warning sign is displayed before the change of
batteries.
USING THE CONSOLE
The console is turned on by pressing any key. It
the device has not been used for five minuts, it
automatically switches itself to main display.
Select the desired measuring unit with the switch behind
the console. You can select either metric (km, km/h,
Celsius) or English (miles, mph, Fahrenheit) units.
Set the clock in the console (Clock) as follows: In main
display, press both of the arrow keys simultaneously for
three seconds. The clock is shown in the main number
7

display. Set the right time using the arrow keys; switch
from hours to minutes and back to main display by
pressing the SET key.
MANUAL EXERCISE
In a manual exercise you can adjust the resistance during
the exercise by the ”+/-” keys.
1. You can start exercising immediately by pressing the
START/STOP key. Adjust the resistance by pressing the
”+/-” keys.
2. You can start exercising by setting goal values. Press an
”+/-” key until under the main number display is shown
the text ”Manual”.
3. Press the SET key after which you can set the goal
values.
4. TIME = select the desired exercise duration by
pressing the ”+ / -” keys. Switch to the following step by
pressing the SET key.
5. DISTANCE = select the desired distance by pressing
the ”+ / -” keys. Switch to the following step by pressing
the SET key.
6. KCAL= select the goal value of energy consumption
by pressing the ”+ / -” keys. Switch to the following step
by pressing the SET key.
7. PULSE = set the heart rate an upper limit with ”+ /
-” keys: the display shows a heart symbol and an arrow
upwards. Press the SET key to switch to setting the
heart rate a lower limit. The display shows a heart and
an arrow downwards. Set the lower limit with ”+ / -”
keys. If your heart rate exceeds these limits, the limit
value in question blinks in the display. To switch back to
setting the exercise duration (TIME), press the SET key.
8. You can start exercising by pressing the START/
STOP key. Start pedalling and adjust the resistance if
necessary during the exercise.
9. You can interrupt the exercise by pressing START/
STOP (”Over” is shown in the display). The program
information stays in the console memory for five
minutes. If you resume with training whithin this time,
simply press the START/STOP key again to continue.
10. You can stop exercising by pressing RESET when the
console is in the pause mode.
11. If you have set a goal value, the console gives a signal
and the displayed value starts blinking after the goal has
been reached. Reset the display by first pressing START/
STOP and thereafter RESET.
TARGET HR EXERCISE
pressing the SET key.
4. DISTANCE = select the desired distance by pressing
the ”+ / -” keys. Switch to the following step by pressing
the SET key.
5. KCAL= select the goal value of energy consumption
by pressing the ”+ / -” keys. Switch back to setting the
exercise durationt by pressing the SET key.
6. You can start exercising by pressing the START/
STOP key. Start pedalling and adjust the heart rate level
if necessary during the exercise.
7. You can interrupt the exercise by pressing START/
STOP (”Over” is shown in the display). The program
information stays in the console memory for five
minutes. If you resume with training whithin this time,
simply press the START/STOP key again to continue.
8. You can stop exercising by pressing RESET when the
console is in the pause mode.
9. If you have set a goal value, the console gives a signal
and the displayed value starts blinking after the goal has
been reached. Reset the display by first pressing START/
STOP and thereafter RESET.
EXERCISE PROFILES
1. After the console is switched on, press ”+” or ”-”
key until the display shows a profile code (P1-P8)
and the profile form. All of the profiles are so called
constant crank moment profiles, i.e the faster you cycle
the faster you travel the exercise distance. All of the
preprogrammed profiles are 20 minutes in duration.
2. Select the desired profile by the ”+/-” keys. Press
SET to switch to setting the exercise profile duration;
with the ”+/-” keys you can set the time in five minutes
increments between 10 and 90 minutes.
3. Start exercising by pressing START/STOP. Start
pedalling. With the ”+/-” keys, you can change the
resistance level in the section of the profile you are
performing at the moment. ”+” key increases the
resistance; ”-” key decreases it.
4. You can interrupt the exercise by pressing START/
STOP (”Over” is shown in the display).The program
information stays in the console memory for five
minutes. If you resume with training whithin this time,
simply press the START/STOP key again to continue.
5. You can stop exercising by pressing RESET when the
console is in the pause mode.
6. If you complete the whole profile, the console gives a
signal tune and the displayed value starts blinking after
the goal has been reached. Reset the display by first
pressing START/STOP and thereafter RESET.
(CONSTANT HEART RATE)
In a Target HR –exercise you will set the desired heart
rate; during the exercise the device sees to that this heart
rate will be sustained independent of how fast you work.
C35
•
1. Press a ”+/-” key, until the text Target HR is shown
under the main number display.
2. Set the desired constant heart rate for the exercise by
pressing SET. The display shows the word PULSE and
the symbols of a heart and an arrow up / arrow down.
You can set the desired heart rate by pressing the ”+ / -”
keys. Switch to the following stepi by pressing SET.
3. TIME = select the desired exercise duration by
pressing the ”+ / -” keys. Switch to the following step by
OWNER'S MANUAL
8
RECOVERY –
MEASURING THE RECOVERY PULSE
Measure your recovery pulse rate at the end of the
workout.
1. To start the measuring of the recovery pulse rate,
press RECOVERY. The display also shows the word
”Recovery”.
2. The measuring starts automatically and takes two
minutes.
IMPORTANT! If any disturbances during the measuring
should occur, the display shows “Err” instead of the
measurement value.

OWNER'S MANUAL • C35
GB
3. Upon completion of the measurement, the display
shows the recovery rate as a percentage. The smaller the
rate, the fitter you are. Please note that your results are
in a relation to the pulse level in the beginning of the
measurement, and that your results are personal and
cannot directly be compared with any other person’s
results. In order to improve the reliability of recovery
pulse measurement, always try to standardize the
measurement situation as accurately as possible; start
measuring at the same heart rate level as precisely as
possible.
4. To switch back to the main display by pressing
RESET. The console will also automatically switch to
the main display one minute after the completion of the
measurement.
TRANSPORT AND STORAGE
Please follow these instructions when carrying and
moving the equipment about, because lifting it
incorrectly may strain your back or risk other accidents:
NOTE! Always switch the power off and unplug the
power cord before you start moving the equipment
around!
The device is easy to move by pushing along on the
integrated transport wheels. Tilt the device from the
front and push along the floor on the wheels at the front
support. We recommend that you use a protective base
when transporting the equipment.
To prevent the equipment malfunctioning, store in a dry
place with as little temperature variation as possible and
protected from dust.
MAINTENANCE
The equipment requires very little maintenance. Check,
however, from time-to-time that all screws and nuts are
tight.
After exercising, clean the equipment with a soft,
•
absorbent cloth. Do not use solvents. Sweat may cause
corrosion: we recommend therefore that you protect all
metal surfaces outside the plastic covers with teflon.
Never remove the equipment’s protective casing.
•
If the equipment is not used for a period of time, the
•
transmission belt may become temporarily distorted.
This can lead to a sensation of slightly uneven pedaling.
However, after a few minutes of use the effect disappears
as the belt returns to its original form.
the device for normal operation again. If after you have
reset the device by turning the power off and on again,
and the device is still not operational, contact your local
Tunturi dealer for service.
If you require spare parts, always give the model, serial
number of your equipment and the spare part number
for the part you need. The spare part list is at the back
of this manual. Use only spare parts mentioned in the
spare part list.
TECHNICAL SPECIFICATIONS
Length ..........................................135 cm
Width ..........................................66 cm
Height ..........................................157 cm
Weight .........................................63 kg
The C35 meets the requirements of the EU’s EMC
Directives on electromagnetic compatibility (89/336/
EEC) and electrical equipment designed for use within
certain voltage limits (73/23/EEC). This product
therefore carries the CE label.
The North American versions (115 V) comply with
FCC requirements on electromagnetic compatibility
and are accordingly marked with the FCC label. The
North American versions also comply with the following
safety standards: UL 1647 and CSA C 22.2 No. 68-92.
The C35 crosstrainer meets EN precision and safety
standards (EN-957).
Due to our continuous policy of product development,
Tunturi reserves the right to change specifications
without notice.
NOTE! The instructions must be followed carefully in
the assembly, use and maintenance of your equipment.
The warranty does not cover damage due to negligence
of the assembly, adjustment and maintenance
instructions described herein. Changes or modifications
not expressly approved by Tunturi Oy Ltd will void the
user’s authority to operate the equipment!
We wish you many enjoyable trainings with your
new Tunturi training partner!
MALFUNCTIONS
NOTE! Despite continuous quality control, defects and
malfunctions caused by individual components may
occur in the equipment. In most cases it’s unnecessary
to take the whole device in for repair, as it’s usually
sufficient to replace the defective part. Always give
the model, serial number of your equipment and in
case of malfunctions also conditions of use, nature of
malfunction and any error code.
When you encounter unusual behavior from the device,
simply turn the power off, wait 1 minute and turn the
power on. This should clear incidental errors and ready
9

INHALT
WICHTIGE SICHERHEITSHINWEISE .....................10
MONTAGE ................................................................ 11
TRANSPORT UND LAGERUNG ............................16
WARTUNG ..............................................................17
TECHNISCHE DATEN ............................................17
WICHTIGE
müssen Sie deshalb deren geistige und
körperliche Entwicklung und vor allem
deren Temperament berücksichtigen, sie
gegebenenfalls beaufsichtigen und sie
vor allem auf die richtige Benutzung des
Gerätes hinweisen.
Das Gerät sollte grundsätzlich nur von
•
einer Person benutzt werden.
Der Anwendungsbereich dieses
•
Trainingsgerätes ist der Heimbereich.
Das Gerät daft nur in Innenräumen
•
benutzt werden.
C35
•
SICHERHEITSHINWEISE
Dieses Handbuch ist ein wesentlicher
Bestandteil Ihrer Trainingsausrüstung.
Lesen Sie dieses Handbuch bitte
sorgfältig durch, bevor Sie Ihr
Trainingsgerät montieren, mit ihm
trainieren oder es warten. Bitte
bewahren Sie dieses Handbuch; es
wird Sie jetzt und zukünftig darüber
informieren, wie Sie Ihr Gerät benutzen
und warten. Befolgen Sie diese
Anweisungen immer sorgfältig. Für
Schäden, die durch Missachtung der
beschriebenen Einstellungs- und
Wartungsanweisungen entstehen,
besteht kein Garantie-Anspruch!
Vor Beginn eines
•
Trainingsprogrammes einen Arzt
konsultieren.
Bei Übelkeit, Schwindelgefühl oder
•
anderen anomalen Symptomen sollte
das Training sofort abgebrochen und
unverzüglich ein Arzt aufgesucht
werden.
Dieses Gerät hat ein geschwindigk
•
eitsabhängiges Bremssystem, d.h. je
schneller Sie schreiten, desto höher ist
die Belastung.
Aufgrund des natürlichen Spieltriebes
•
und der Experimentierfreudigkeit
der Kinder können Situationen und
Verhaltensweisen entstehen, für die
das Trainingsgerät weder gebaut
noch abgesichert ist und die eine
Verantwortung seitens des Herstellers
ausschliessen.Wenn Sie dennoch
Kinder an das Trainingsgerät lassen,
Das Gerät auf möglichst ebenen
•
Untergrund stellen.
Stützen Sie sich nie gegen das
•
Cockpit ab!
Bedienen Sie die Tasten mit der
•
Fingerkuppe. Ein Fingernagel kann die
Membrane der Tasten beschädigen.
Das Gerät nie ohne die seitlichen
•
Abdeckungen benutzen.
Dieses Gerät ist nicht für den Einsatz
•
in Feuchträumen (Sauna, Schwimmbad)
vorgesehen.
Beim Training muss die
•
Umgebungstemperatur zwischen +10°C
und +35°C liegen. Zur Aufbewahrung
kann das Gerät bei Temperaturen
zwischen -15°C und +40°C gelagert
werden. Die Luftfeuchtigkeit darf nie 90
% überschreiten.
Vor Beginn des Trainings
•
sicherstellen, dass das Gerät völlig
intakt ist. Auf keinen Fall mit einem
fehlerhaften Gerät trainieren.
Zum Auf-und Absteigen am Lenker
•
abstützen. Nicht auf das Gehäuse treten.
Zur Benutzung des Gerätes stets
•
angemessene Kleidung und Schuhwerk
tragen.
Nie die Hände in die Nähe von
•
beweglichen Teilen bringen.
Zur Vermeidung von Muskelkater Auf-
•
und Abwärmtraining nicht vergessen.
Keine anderen als die in dieser
•
BETRIEBSANLEITUNG
10
BETRIEBSANLEITUNG • C35
D
Betriebsanleitung beschriebenen
Wartungsmassnahmen und
Einstellungen vornehmen. Die
angegebenen Wartungsanweisungen
sind einzuhalten.
Das Gerät darf nicht von Personen
•
benutzt werden, deren Gewicht über 135
kg liegt.
Ihr neuer Heimtrainer von Tunturi
•
wurde für das Heimtraining entwickelt.
Die Garantie dieses Gerätes beträgt 24
Monate für das Heimtraining. Nähere
Informationen zur Garantie auf Ihr
Fitnessgerät finden Sie im dem Gerät
beiliegenden Garantieheft. Sowohl
Tunturi, als auch seine nationalen
Vertretungen übernehmen keine Haftung
für Verletzungen oder Geräteschäden,
die sich bei Dauereinsatz in
gewerblichen Fitnesscentern,
Sportvereinen und vergleichbaren
Einrichtungen ergeben.
Sollte Ihr Gerät unvollständig sein, wenden Sie sich
bitte unter Angabe des Modells, der Seriennummer
und Nummer des fehlenden Teiles an Ihren TunturiHändler. Die Ersatzteilnummer geht aus der Liste am
Ende dieser Betriebsanleitung hervor. Der beiliegende
Beutel mit Granulat dient als Klimaschutz während des
Transportes und soll nach Montage beseitigt werden.
Die Beschreibung der Lage von Teilen (rechts, links,
vorne, hinten) geht von der Blickrichtung beim Training
aus. Bitte beachten Sie beim Aufstellen des Gerätes,
dass in jede Richtung wenigstens 100 cm Freiraum
vorhanden ist.
VORDERES STÜTZBEIN
HERZLICH WILLKOMMEN IN DER WELT DES
TRAINIERENS MIT TUNTURI!
Durch Ihren Kauf haben Sie bewiesen, dass Ihnen Ihre
Gesundheit und Ihre Kondition viel wert sind; auch
haben Sie gezeigt, dass Sie Qualität zu schätzen wissen.
Mit einem Tunturi-Fitnessgerät haben Sie sich für ein
hochwertiges, sicheres und motivierendes Produkt als
Trainingspartner entschieden. Welches Ziel Sie auch
immer mit Ihrem Training verfolgen, wir sind sicher,
dass Sie es mit diesem Fitnessgerät erreichen. Hinweise
zu Ihrem Trainingsgerät und zum effektiven Training
damit finden Sie auf der Internetseite von Tunturi
WWW.TUNTURI.COM.
MONTAGE
Montieren Sie das Gerät mit einer weiteren Person.
Prüfen Sie, dass folgende Teile enthalten sind:
1. Rahmen
2. Vorderes Stützbein
3. Hinteres Stützbein
4. Vorderes Rahmenrohr
5. Handgriffe (2 Stück)
6. Fussbretter (2 Stück)
7. Messgerät
8. Armstütze
9. Stange
10. Netzanschluss
11. Beutel mit Montagezubehör (Inhalt mit * im
Ersatzteilverzeichnis gekennzeichnet): Bewahren Sie die
Montageteile sorgfältig auf, denn Sie können sie später
u.a. zur Justierung benötigen
Befestigen Sie das mit einem Transportrad versehen
vordere Stützbein mit zwei Schrauben, Unterlegscheiben
und Arretierungsscheiben am Rahmen.
HINTERES STÜTZBEIN
Drücken Sie die Kunststoffschutzkappen auf die Enden
der hinteren Stützbeine und befestigen Sie das hintere
Stützbein mit zwei Schrauben, Unterlegscheiben und
Arretierungsscheiben am Rahmen.
11
VORDERES RAHMENROHR
HANDGRIFFE
Entfernen Sie die Gummibandhalterung der aus dem
Rahmenrohr kommenden Messleitung. Schliessen Sie
die aus dem Rahmenrohr kommende Messleitung an
der Klemme am vorderen Rahmenrohr an. Schieben Sie
das vordere Rohr in das Rahmenrohr: Achten Sie darauf,
dass die Messleitung nicht beschädigt wird! Befestigen
Sie das vordere Rahmenrohr mit Unterlegscheiben und
Befestigungsschrauben.
FUSSBRETTER
Schieben Sie die Metallstange durch die Achsbuchse des
linken Handgriffs, positionieren Sie den Griff neben der
Befestigungsbohrung des vorderen Rohres und schieben
Sie die Stange auch durch die Achsbohrung. Schieben
Sie anschliessend den rechten Griff auf das Ende der
Metallstange und arretieren Sie die Stange, indem Sie
an Enden der Achsbuchse des rechten Griffs eine grosse
Unterlegschraube, eine Arretierungsscheibe und eine
Befestigungsschraube anbringen. Ziehen Sie die Griffe
mit zwei Inbusschrauben fest.
Befestigen Sie die Pedalbretter an der gewünschten
mit zwei Schrauben und zwei Unterlegscheiben pro
Schraube und Muttern an dem Pedalschaft.
C35
•
BETRIEBSANLEITUNG
12
Schieben Sie den linken Pedalschaft so nach vorn, dass
Sie das vorn am Pedalschaft befindliche Befestigungsrohr
in den Griff hineinschieben können. Wählen Sie den
gewünschten Befestigungspunkt (vgl. Einstellung des
Pedalschafts) und befestigen Sie den Griff mit einer
Justierschraube am Fussbrett. Wiederholen Sie diese
Schritte am rechtseitigen Griff.
BETRIEBSANLEITUNG • C35
D
MESSGERÄT UND ARMSTÜTZE
Die Handstütze an das vordere Rahmenrohr befestigen.
Die Kunststoffschütze an den Befestigungsschrauben
entfernen und die Handpulsekabel durch die Öffnung
in der Mitte des vorderen Rahmenrohres schieben. Die
Schrauben so fest einschrauben, dass die Handstütze
sich nicht während des Trainings bewegt. Die
Kunststoffschützen wieder auf Platz einstellen.
Schliessen Sie den Transformator an die Buchse
oberhalb des hinteren Standprofils an. Verbinden Sie
das Transformatorkabel mit einer Steckdose.
* Nach Beendigung Ihres Trainings trennen Sie das
Gerät bitte immer vom Netz.
* Vergewissern Sie sich, dass das Gerät nicht auf dem
Netzkabel steht!
BITTE BEACHTEN: Auf der Hinterseite des Cockpits am
C35 befindet sich ein Batterienfach. Somit kann das
Gerät entweder mit Netzstrom oder mit vier Stücke CBatterien betriebt werden. Falls das Gerät ausschliesslich
mit Batterien betriebt wird, bitte beachten, dass die
Servo-Bremse die Batterien ziemlich schnell ausnützt.
Deshalb empfehlen wir, dass das Gerät hauptsächlich
mit dem Netzstrom betriebt wird. Bitte beachten Sie
auch, dass die Uhr am Cockpit zwar die Batterien
benutzt, wenn das Gerät nicht an eine Stromquelle
angekoppelt ist; übrigens würde die Uhr sich auf Null
stellen.
TRAINIEREN MIT TUNTURI
EINSTELLUNG DES PEDALSCHAFTS
Stellen Sie die Höhe der Pedalschäfte auf folgende
Weise ein: Drehen Sie den Justierknopf eine Drehung
entgegen dem Uhrzeigersinn und ziehen Sie den Knopf
so nach aussen, dass sich das Befestigungsrohr des
Pedalschafts frei nach oben und unten bewegen kann.
Befestigen Sie den Pedalschaft, indem Sie den Knopf
bei richtiger Einstellhöhe loslassen. Der Einstellknopf
schnappt in die vorgesehen Position ein. Ziehen Sie
anschließend den Justierknopf im Uhrzeigersinn fest.
Die zwei Festigungsschrauben am Boden des Cockpits
herausschrauben. Den Kabel aus den Vorderrohr
und die Pulskabel an den Anschlüsse des Cockpits
anschliessen. Das Cockpit ans Ende des Vorderrohres
befestigen und es mit Befestigungsscrauben auf Platz
befestigen. Achten Sie darauf, die Kabel nicht zu
beschädigen!
NETZANSCHLUSS
BITTE BEACHTEN: Vergewissern Sie sich stets vor
dem Trainingsbeginn, dass der Justierknopf richtig
festgezogen ist. Stellen Sie die Höhe des Pedalschafts so
ein, dass die elliptische Bewegung des Geräts in Ihren
Knöcheln in jeder Phase angenehm zu spüren ist.
DAS TRAININGSNIVEAU
Treten ist eine ausgezeichnete aerobe Trainingsform,
d. h. das Training ist zwar leicht, erfordert aber eine
lange Trainingsdauer. Das aerobe Training basiert
auf einer Verbesserung der max. Sauerstoffaufnahm
efähigkeit, was zu einer Verbesserung der Kondition
und Ausdauer führt. Treten ist auch eine angenehme
Trainingsform. Man soll war schwitzen, aber nicht
ausser Atem kommen. So sollte man während des
Trainings normal sprechen können. Das Training
sollte aus mindestens drei 30-minütigen Einheiten
pro Woche bestehen. So wird eine Grundkondition
erreicht. Die Aufrechterhaltung der Kondition setzt
zirka zwei Trainingssätze pro Woche voraus. Ist die
Grundkondition erreicht, kann diese leicht durch
Erhöhen der Trainingsfrequenz verbessert werden.
Körperliche Betätigung ist ein wichtiges Hilfsmittel zur
Reduzierung des Körpergewichtes, denn Training ist
das einzige Mittel, den Energieverbrauch des Körpers
zu erhöhen. Dabei ist es neben einer kalorienarmen
Diät wichtig, regelmässig zu trainieren. Die tägliche
Trainingszeit sollte am Anfang 30 Minuten entweder auf
13

C35
•
einmal oder in kleineren Intervallen betragen und sollte
langsam auf 60 Minuten erhöht werden. Lassen Sie das
Training mit geringem Tretwiderstand beginnen. Eine
grosse Anstrengung bei einem hohen Körpergewicht
kann zu einer gefährlichen Belastung des Herzens
und des Kreislaufs führen. Die Trainingseffizienz
kann mit Hilfe der Pulsfrequenz geschätzt und die
Tretgeschwindigkeit der Kondition entsprechend
langsam erhöht werden. Mit der Anzeige Ihres Gerätes
können Sie ihre Pulsfrequenz während des Trainings
beobachten und sicherstellen, dass das Training effektiv
genug aber nicht zu anstrengend ist.
HERZFREQUENZ
Egal, welches Ziel Sie erreichen wollen, die besten
Resultate erzielen Sie mit einem Training auf dem
richtigen Leistungsniveau, und das beste Mass ist dabei
Ihre eigene Herzfrequenz.
PULSMESSUNG MIT DEN SENSOREN IN DEN
HANDSTÜTZEN
Die Pulsmessung beruht auf der Kontrolle Ihres
Kreislaufs in den äusseren Blutgefässen. Hierzu
werden die Sensoren in den Handstützen benutzt,
die die Pulsschläge immer dann messen, wenn
der Gerätebenutzer gleichzeitig die beiden in den
Handstützen angebrachten Sensoren berührt. Eine
verlässliche Pulsmessung setzt voraus, dass die Haut
etwas feucht und ständig in Kontakt mit den Sensoren
ist. Tunturi empfielt jedoch, immer wenn eine höchst
zuverlässige Herzfrequenzmessung wichtig ist, den
Sendergurt zu verwenden.
TELEMETRISCHE HERZFREQUENZMESSUNG
Das Cockpit hat einen Herzfrequenzempfänger, so
dass Sie zur Herzfrequenzmessung auch nicht kodierte
Messgurte verwenden können. Als zuverlässigste
Art der Herzfrequenzmessung hat sich die drahtlose
Herzfrequenzabnahme erwiesen, bei der die Herzschläge
mit einem Elektrodengurt von der Brust abgenommen
werden. Vom Gurt werden die Impulse danach über
ein elektromagnetisches Feld an den Empfänger in der
Elektronikanzeige übertragen.
BITTE BEACHTEN! Falls Sie einen Herzschrittmacher
tragen, lassen Sie sich von Ihrem Arzt bestätigen, dass
Sie die drahtlose Herzfrequenzmessung benutzen
können.
Zur drahtlosen Herzfrequenzmessung während des
Trainings die gegen die Haut kommenden Elektroden
am Elektrodengurt sorgfältig mit Wasser oder Speichel
anfeuchten. Wird der Elektrodengurt über einem
dünnen Hemd getragen, sind die gegen die Elektroden
gerichteten Flächen ebenfalls zu befeuchten. Den Sender
mit Hilfe des Gurtes fest unterhalb der Brustmuskulatur
befestigen und darauf achten, dass der Gurt beim
Training nicht verrutscht. Den Elektrodengurt
jedoch nicht so festziehen, dass z. B. die Atmung
erschwert wird. Der Sender kann den Pulswert bis zu
einer Entfernung von zirka 1 m an den Empfänger
übertragen.
Bei trockenen Elektroden wird kein Herzfrequenzwert
angezeigt. Ggf. Elektroden wieder anfeuchten. Für
eine zuverlässige Herzfrequenzmessung müssen die
Elektroden auf Körpertemperatur angewärmt sein. Sind
mehrere drahtlose Herzfrequenzmessgeräte gleichzeitig
eingesetzt, sollten sie mindestens 1,5 m voneinander
entfernt sein. Werden nur ein Herzfrequenzempfänger,
aber mehrere Sender eingesetzt, darf sich nur eine
Person, die einen Herzfrequenzsender trägt, während
der Herzfrequenz-messung innerhalb der Reichweite
des Senders befinden. Der Sender schaltet sich aus,
wenn der Elektrodengurt abgenommen wird. Er kann
jedoch durch Feuchtigkeit neu aktiviert werden, was
die Lebensdauer der Batterie verkürzt. Deswegen ist es
wichtig, den Sender nach dem Training sorgfältig zu
trocknen.
Achten Sie bei Ihrer Trainingskleidung darauf, dass
bestimmte für Kleidungsstücke verwendete Fasern (z.B.
Polyester, Polyamid) statische elektrische Ladungen
verursachen, die ein Hindernis für eine zuverlässige
Herzfrequenzmessung sein können. Beachten Sie
auch, dass durch Handys, Fernsehgeräte und andere
elektrische Geräte elektromagnetische Felder entstehen,
die Probleme bei der Herzfrequenzmessung verursachen
können.
Ermitteln Sie zuerst Ihre maximale Herzfrequenz. Wenn
Sie diese nicht kennen, orientieren Sie sich bitte an der
nachfolgenden Formel:
208 - 0,7 X ALTER
Das Maximum unterscheidet sich von Mensch zu
Mensch. Die maximale Herzfrequenz verringert sich
pro Jahr durchschnittlich um einen Punkt. Wenn Sie
zu einer Risikogruppe zählen, bitten Sie den Arzt, Ihre
maximale Herzfrequenz festzustellen.
Wir haben drei Herzfrequenzbereiche definiert, die Sie
bei Ihrem zielgerichteten Training unterstützen.
ANFÄNGER
Sie ist ausserdem für Übergewichtige und
Rekonvaleszenten geeignet sowie für diejenigen,
die seit langem nicht mehr trainiert haben. Drei
Trainingseinheiten pro Woche von jeweils einer halben
Stunde Dauer sind angemessen. Regelmässiges Training
verbessert die Leistungsfähigkeit der Atmungs- und
Kreislauforgane ganz entscheidend.
FORTGESCHRITTENE
Herzfrequenz.
Perfekt geeignet zur Verbesserung und Erhaltung der
Fitness. Damit stärken Sie Ihr Herz und Ihre Lungen
mehr, als auf dem Anfängerniveau. Wir empfehlen
mindestens 3 Trainingseinheiten pro Woche mit jeweils
mindestens 30 Minuten. Wenn Sie Ihr Fitnessniveau
noch weiter erhöhen möchten, trainieren Sie häufiger
oder intensiver, aber nicht beides zugleich.
AKTIVE SPORTLER
Herzfrequenz.
Das Training auf diesem Niveau ist nur für
durchtrainierte Sportler geeignet und setzt ein LangzeitAusdauertraining voraus.
50-60 % der maximalen Herzfrequenz.
•
60-70 % der maximalen
•
70-80 % der maximalen
•
BETRIEBSANLEITUNG
14

BETRIEBSANLEITUNG • C35
D
COCKPIT
BEDIENUNGSTASTEN
1. SET
Wahl der Zielwerte.
2. RESET
Nullen der Trainingswerte, Enden des Trainings und
Rückkehr zur Hauptanzeige.
3. + / -
Einstellung der Zielwerte, Erhöhung (+) oder
Verringerung (-) der Trainingsintensität.
4. RECOVERY
Messung der Erholungsherzfrequenz
5. START / STOP
Das Training starten und unterbrechen
ANZEIGEN
1. LEISTUNGSGESCHWINDIGKEIT (/MIN)
Tretgeschwindigkeit (RPM). Unter der Ablesung wird
ein Pfeiler mit Geschwindigkeitsinformation gezeigt.
2. TRAININGSDAUER
00:00 – 99:59, Messung nach jeder Sekunde, h1:40
– h9:59 Messung nach jeder Minute
3. HERZFREQUENZ WÄHREND DES TRAININGS
Herz-Symbol blinkt im Takt mit der gemessenen
Herzfrequenz.
4. TRAININGSSTRECKE (KM/MILE)
0.00-99.99 km / miles
5. TRAININGSGESCHWINDIGKEIT (KMH / MPH)
00.0 – 99.9 kmh / mph
6. ENERGIEVERBRAUCH (KCAL)
Der berechnete Gesamtenergieverbrauch während des
Trainings: 0-9999 kcal
7. UHR (CLOCK)
Realzeituhr
8. THERMOMETER (TEMP C / TEMP F)
Messung der Raumstemperatur (Celsius oder
Fahrenheit)
9. FEUCHTIGKEIT (HUMIDITY %)
Messung der Raumsfeuchtigkeit, 0-100%
10. ZEIGER DES GEWÄHLTEN FUNKTIONSMODUSES.
Das Cockpit zeigt das gewählte Funktionsmodus
(Program = Fertigprogramm; Manual =
Manuelles Training; Recovery = Messung
der Erholungsherzfrequenz; Target HR =
Herzfrequenztraining; Min Max = Ober- und
Untergrenzwerte für die Herzfrequenz)
11. PROFILANZEIGE DES TRAININGPROGRAMMS
Das Profil eines gewählten fertigen Trainingsprogramms.
12. KUMULATIVE HERZFREQUENZANZEIGE
Falls Herzfrequenz während des Trainings gemessen
wird, kann man das Profil der Herzfrequenz am Display
zu formen sehen.
13. BATTERIENWECHSEL
Das Cockpit warnt im voraus wenn die Batterien
gewechselt werden sollen.
BETRIEB DES COCKPITS
Das Cockpit wird durch Drücken irgendeiner Taste
gestartet. Wird das Gerät mehr als fünf Minuten nicht
betriebt schaltet sich das Cockpit automatisch aus.
Die gewünschte Messungseinheit mit der Taste auf der
Rückseite des Cockpits wählen. Sie können zwischen
metrische (km, km/h, Celsius) oder englische (miles,
mph, Fahrenheit) Messungseinheiten wählen.
Die Einstellung der Zeit (Clock) geschieht auf folgende
Weise: Bei der Hauptanzeige die beiden Pfeiltasten
gleichzeitig 3 Sekunden drücken. Die Uhr zeigt sich
jetzt in dem Display an. Die Zeit mit Pfeiltasten
einstellen. Durch drücken der SET-Taste können Sie
von den Stunden zu den Minuten und zurück zu der
Hauptanzeige kommen.
MANUAL TRAINING
In dem manuellen Training kann der Widerstand
während des Trainings justiert werden.
1. Sie können gleich mit dem Training anfangen durch
Drücken der START/STOP –Taste. Der Widerstand
kann mit den ”+/-”-Tasten geändert werden.
2. Sie können mit dem Training durch Wahl der
Zielwerte anfangen. Die ”+/-” -Tasten drücken bis am
Display das Wort “Manual” steht.
3. Die SET-Taste drücken um die Zielwerte einzustellen.
4. TIME = Trainingsdauer mit der Plus- und
Minustasten einstellen. Mit der SET-Taste kommen Sie
weiter an die nächste Einstellung.
5. DISTANCE = Trainingsstrecke mit der Plus- und
Minustasten einstellen. Mit SET-Taste kommen Sie
weiter an die nächste Einstellung.
6. KCAL = Zielwerte für Energieverbrauch mit der Plus-
und Minustasten einstellen. Mit SET-Taste kommen Sie
weiter an die nächste Einstellung.
7. PULSE = Obergrenze für Herzfrequenz mit den
Plus- und Minustasten einstellen: das Cockpit zeigt
ein Herz und einen ”+” an. Durch Drücken der SET
–Taste können Sie die Untergrenze für Herzfrequenz
mit der Plus- und Minustasten einstellen: das Display
zeigt jetzt ein Herz und einen “Pfeil unten” an. Wenn
der Herzfrequenzwert die Obergrenze überschreitet,
blinkt der betroffene Pfeil an dem Display. Rückkehr
zur Einstellung der Trainingsdauer ( = TIME) geschieht
durch Drücken der SET-Taste.
8. Sie können mit dem Training durch Drücken der
START/STOP –Taste anfangen. Starten Sie zu treten
und beim Bedarf den Widerstand während des Trainings
justieren.
9. Sie können das Training durch Drücken der START/
STOP –Taste unterbrechen (das Display zeigt “Over”
an. Die Programminformation wird fünf Minuten lang
gespeichert. Kehren Sie zurück zum Training während
15

C35
•
dieser Zeit brauchen Sie nur die START/STOP –Taste
aufs neue zu drücken.
10. Während der Pause können Sie das Training durch
Drücken der RESET-Taste enden.
11. Wenn Sie sich ein Zielwert eingestellt haben, gibt das
Cockpit ein Signallaut und das gezeigte Wert beginnt
zu blinken, welches bedeutet dass Sie das Ziel erreicht
haben. Die Anzeige mit der START/STOP –Taste
nullen und danach noch die RESET-Taste drücken.
TARGET HR – TRAINING (KONSTANTE
HERZFREQUENZ)
In dem Target HR –Training stellen Sie das
gewünschte Niveau der konstanten Herzfrequenz
ein; während des Trainings versorgt das Gerät dafür,
dass Sie das Herzfrequenzniveau unabhängig von der
Tretgeschwindigkeit erreichen.
1. Die Pfeiltaste drücken, bis das Display zeigt “Target
HR” an.
2. Das gewünschte Herzfrequenzniveau für das Training
durch Drücken der SET-Taste einstellen. Jetzt zeigt das
Display “PULSE”, ein Herz und ein Pfeil oben/unten
an. Das Zielniveau für die Herzfrequenz mit den Plusund Minustasten einstellen. Mit der SET-Taste kommen
Sie weiter an die nächste Einstellung.
3. TIME = Trainingsdauer mit den Plus- und
Minustasten einstellen. Mit der SET-Taste kommen Sie
weiter an die nächste Einstellung.
4. DISTANCE = Trainingsstrecke mit den Plus- und
Minustasten einstellen. Mit der SET-Taste kommen Sie
weiter an die nächste Einstellung.
5. KCAL = Zielwerte für Energieverbrauch mit den
Plus- und Minustasten einstellen. Mit der SETTaste kommen Sie weiter an die nächste Einstellung.
Rückkehr zur Einstellung der Trainingsdauer ( = TIME)
geschieht durch Drücken der SET-Taste.
6. Sie können mit dem Training durch Drücken der
START/STOP –Taste anfangen. Starten Sie zu treten
und beim Bedarf das Herzfrequenzniveau während des
Trainings justieren.
7. Sie können das Training durch Drücken der START/
STOP –Taste unterbrechen (das Display zeigt ”Over”
an. Die Programminformation wird für fünf Minuten
lang gespeichert. Kehren Sie zurück zum Training
während dieser Zeit Minuten brauchen Sie nur die
START/STOP –Taste aufs neue zu drücken.
8. Sie können das Training durch Drücken der RESET-
Taste enden während das Cockpit in dem Pausezustand
ist.
9. Wenn Sie sich ein Zielwert eingestellt haben, gibt das
Cockpit ein Signallaut und das gezeigte Wert beginnt
zu blinken, welches bedeutet, dass Sie das Ziel erreicht
haben. Das Display mit der START/STOP –Taste
nullen und danach noch die RESET-Taste drücken
TRAININGSPROFILE
1. Nachdem das Cockpit eingeschaltet ist, irgendeine
Pfeiltaste drücken bis auf dem Display ein Profilkod
(P1-P8) und ein Profilform angezeigt werden. Alle
Profile benutzen einen konstantem Widerstand; d.h.
je schneller Sie treten, desto schneller kommen Sie
weiter in der Strecke, die das Cockpit messt. Die
vorprogrammierte Dauer aller Profile beträgt 20
Minuten.
2. Das gewünschte Profil mit der Pfeiltasten wählen.
Durch Drücken der SET-Taste kann die Dauer des
Profils eingestellt werden: mit Pfeiltasten kann die Zeit
jede fünf Minuten zwischen 10:00 und 90:00 Minuten
eingestellt werden.
3. Das Training durch Drücken der START/STOP –
Taste beginnen. Beginnen Sie zu treten. Durch Drücken
der Pfeiltasten kann jenes Widerstandsniveau des Profils
geändert werden, das gerade im Gang ist. Mit Pfeil oben
nimmt der Widerstand zu; mit Pfeil unten nimmt er ab.
4. Sie können das Training durch Drücken der START/
STOP –Taste unterbrechen (am Cockpit zeigt das
Wort ”Over”. Die Programminformation wird für fünf
Minuten lang gespeichert. Kehren Sie zurück zum
Training während dieser Zeit brauchen Sie nur die
START/STOP –Taste aufs neue zu drücken.
5. Sie können das Training durch Drücken der RESET-
Taste beenden, wenn das Cockpit im Pausezustand
ist. Wenn Sie das ganze Profil durchgeführt haben,
gibt das Gerät ein Signallaut und blinkt den Zielwert,
welches bedeutet dass Sie die Zielwerte erreicht haben.
Das Display durch Drücken der START/STOP –Taste
nullen und danach die RESET-Taste drücken.
RECOVERY – MESSUNG DER
ERHOLUNGSHERZFREQUENZ
Messen Sie Ihre Erholungsherzfrequenz nach dem
Training.
1. Die Messung der Erholungsherzfrequenz wird durch
Drücken die “RECOVERY”-Taste gestartet. Auch das
Display zeigt “Recovery” an.
2. Die Messung startet automatisch und dauert zwei
Minuten.
BITTE ACHTEN: Wenn während der Messung Störungen
vorkommen, zeigt das Display statt Herzfrequenz “Err”.
3. Nach dem Ende der Messung zeigt das Display die
Erholungsbeziehung als ein Prozentzahl. Je kleiner dieser
Zahl ist, desto besser ist Ihre Kondition! Beachten Sie,
dass Ihre Ergebnisse in Beziehung mit dem Pulsniveau
vom Messungsanfang steht, und dass Ihre Ergebnisse
immer persönliche Ergebnisse sind, die nicht mit
Ergebnissen anderer Menschen direkt vergleichbar sind.
Zur Verbesserung der Zuverlässigkeit der Messung
sollten Sie stets versuchen, den Messvorgang möglichst
genau zu standardisieren; beginnen Sie die Messung
möglichst genau auf dem gleichen Herzfrequenzniveau.
4. Der Rückkehr zum Hauptdisplay geschieht durch
Drücken der RESET-Taste. Das Hauptdisplay stellt
auch automatisch auf die Normalanzeige nach einem
Minut um.
TRANSPORT UND LAGERUNG
Bitte befolgen Sie diese Hinweise, wenn Sie das Gerät
tragen oder bewegen, denn falsches Anheben kann zu
Rückenverletzungen oder anderen Unfällen führen:
BITTE BEACHTEN: Schalten Sie das Gerät immer
BETRIEBSANLEITUNG
16

BETRIEBSANLEITUNG • C35
D
aus und ziehen Sie immer erst den Netzstecker aus der
Wandsteckdose, bevor Sie das Gerät an einen anderen
Platz stellen!
Dank eingebauter Transportrollen ist der C35 leicht
zu bewegen. Dazu um das Gerät herumgehen, an
den Handstützen festhalten, leicht ankippen und
auf den Transportrollen im vorderen Fussrohr
fortbewegen. Ein Verschieben des Gerätes kann
manche Fussbodenmaterialien beschädigen, z.B.
Holzparkettböden. In diesem Fall müssen Sie den
Boden vorher schützen.
Lagern Sie das Gerät an einem trockenen, staubfreien
Ort mit möglichst geringen Temperaturschwankungen.
WARTUNG
Das Gerät braucht nur sehr wenig Wartung. Prüfen
Sie dennoch von Zeit zu Zeit, dass alle Schrauben und
Muttern fest sitzen.
Bitte trocknen Sie nach jedem Training alle Teile
•
des Gerätes mit einem weichen, saugfähigen Tuch.
Verwenden Sie keine Lösungsmittel. Da Schweiss
Korrosion verursachen kann, empfehlen wir, dass Sie
alle Metalloberflächen, die mit Schweiss in Berührung
kommen können, mit Teflon zu schützen.
Entfernen Sie niemals die Schutzverkleidung des
•
Gerätes.
Wenn das Gerät eine Zeit lang nicht benutzt
•
wurde, kann der Antriebsriemen vorübergehend
deformiert sein. Das kann zu einem leichten, unruhigen
Treten der Pedale führen. Aber schon nach wenigen
Trainingsminuten erlangt der Riemen wieder in seine
normale Form und der Effekt verschwindet vollständig.
TECHNISCHE DATEN
Länge ...........................................135 cm
Breite ...........................................66 cm
Höhe ............................................157 cm
Gewicht .......................................63 kg
Der C35 wurde nach den Richtlinien der EU für
elektromagnetische Einheitlichkeit, EMC (89/336/
EWG) und europäische Niederspannungsrichtlinie (72/
23/EWG) gestaltet und tragen das CE KonformitätsZeichen.
Der C35 erfüllt die EN-Präzisions- und
Sicherheitsstandards (EN-957).
Aufgrund unserer kontinuierlichen Produktentwicklung
behält sich Tunturi das Recht vor, Spezifikationen ohne
vorherige Ankündigung zu verändern.
BITTE BEACHTEN: Die Hinweise bezüglich der
Montage, der Benutzung und der Wartung Ihres Geräts
müssen sorgfältig beachtet werden. Die Garantie
schliesst keine Beschädigungen ein, die auf Fahrlässigkeit
bei der Montage, Einstellung und Wartung, wie sie in
diesem Handbuch beschrieben wurden, zurückzuführen
sind. Werden Modifizierungen ohne das Einverständnis
der Tunturi Oy Ltd vorgenommen, erlischt jeglicher
Garantieanspruch!
Wir wünschen Ihnen viele angenehme
Trainingsstunden mit Ihrem neuen Tunturi
Trainingspartner!
BETRIEBSSTÖRUNGEN
BITTE BEACHTEN: Trotz kontinuierlicher
Qualitätsüberwachung können vereinzelt an den
Geräten durch einzelne Komponenten verursachte
Funktionsstörungen auftreten. Dabei ist es nicht
angebracht, das ganze Gerät zur Reparatur zu bringen,
da der Fehler meistens durch Austauschen der defekten
Komponente behoben werden kann.
Falls Sie Funktionsstörungen an Ihrem Gerät feststellen,
schalten Sie es umgehend aus. Warten Sie 1 Minute
und schalten Sie das Gerät wieder ein. Normalerweise
werden Funktionsstörungen mit dieser Massnahme
behoben und das Gerät kann weiterverwendet werden.
Sollte die Funktionsstörung aber wieder auftreten, das
Gerät umgehend ausschalten und Kontakt mit Ihrer
nationalen Tunturi-Vertretung aufnehmen. Wenden
Sie sich an Ihre nationale Tunturi-Vertretung, wenn
Sie Ersatzteile benötigen oder Funktionsstörungen an
Ihrem Gerät feststellen. Beschreiben Sie das Problem
und die Einsatzbedingungen und teilen Sie das
Kaufdatum und die Seriennummer des Gerätes mit.
Die Ersatzteilnummern finden Sie in der Liste am Ende
dieser Anweisung. Nur Teile in der Ersatzteilliste dürfen
verwendet werden.
17

TABLE DES MATIERES
CONSEILS ET AVERTISSEMENTS .......................17
ASSEMBLAGE ........................................................19
S’ENTRAINER AVEC TUNTURI .............................22
TRANSPORT ET RANGEMENT ............................. 25
MAINTENANCE ......................................................25
CARACTERISTIQUES TECHNIQUES ...................26
CONSEILS ET
AVERTISSEMENTS
Lisez attentivement ce mode d’emploi
avant d’assembler, d’utiliser ou
d’effectuer l’entretien de votre appareil
sportif. Veuillez conserver ce guide, il
contient les renseignements dont vous
aurez besoin, maintenant et plus tard,
pour utiliser et entretenir votre appareil.
Suivez toujours les instructions très
rigoureusement. Veuillez noter que la
garantie ne couvre pas les dommages
causes par un manque de precaution
quant aux instructions de montage
et d’entretien decrites dans ce mode
d’emploi.
AVERTISSEMENTS LIES A VOTRE
SANTE
Consultez votre médecin avant de
•
commencer vos exercices.
Placez l’appareil sur une surface
•
aussi plane que possible. Placez une
protection sous l’appareil.
Assurez-vous d’une ventilation
•
suffisante, mais evitez toutefois les
courants d’air.
En entraînement, l’appareil supporte
•
des températures de 10°C à 35°C.
L’appareil peut aussi être rangée à
une température comprise entre 15°C et +40°C. L’hygrométrie du
local d’utilisation ou de rangement de
l’appareil ne doit jamais excéder 90 %.
AVERTISSEMENTS LIES A
L’UTILISATION DE L’APPAREIL
Si vous décidez de laisser un
•
enfant utiliser l’appareil, prenez
toujours en considération l’état de son
développement physique et mental ainsi
que son caractère. Donnez à l’enfant les
conseils nécessaires pour une bonne
utilisation de l’appareil et ne le laissez
jamais seul.
Commencez par vérifier que l’appareil
•
est en parfait état de marche. N’utilisez
jamais un appareil défectueux.
Ne vous accoudez jamais à l’unite des
•
compteurs!
Appuyez sur les touches du bout des
•
doigts: vos ongles risquent d’abîmer la
membrane des touches.
Si vous êtes pris de nausées ou de
•
vertiges ou sentez d’autres symptômes
anormaux pendant l’entraînement,
interrompez immédiatement la session
et consultez votre médecin.
Afin d’éviter toutes douleurs
•
musculaires, commencez et terminez
vos sessions par des mouvements d
‘échauffement (pédalage lent avec une
résistance faible). N’oubliez pas non plus
d’effectuer des mouvements d’étirement
C35
pour terminer votre session.
•
AVERTISSEMENTS LIES A VOTRE
MILIEU D’ENTRAINEMENT
L’appareil ne doit pas être utilisé à
•
l’exterieur.
MODE D'EMPLOI
18
N’utilisez jamais l’appareil avec les
•
protections latérales démontées.
Ne montez jamais à deux ou à
•
plusieurs sur l’appareil.
Prenez toujours appui avec vos mains
•
sur le guidon en montant sur l’appareil
ou en en descendant.
Portez des vêtements et chaussures
•
appropriés.
Protégez l’unite des compteurs d’une
•
exposition au soleil et séchez toujours la
surface de l’unite des compteurs si des
gouttes de sueur sont tombées dessus.
N’effectuez jamais d ‘autres
•
opérations de réglage et d ‘entretien que
MODE D'EMPLOI • C35
F
celles mentionnées dans ce guide et
suivez bien les conseils d’entretien qui y
sont donnés.
L’appareil ne doit pas être utlisé par
•
des personnes pesant plus de 135 kg.
Cet appareil peut être utilisé à la
•
maison. La garantie de la societe
Tunturi Ltd ne couvre que les defauts
ou imperfections s’etant manifestes
pendant l’utilisation à la maison (24
mois). Pour information complémentaire
sur la garantie de votre équipement de
fitness, veuillez consulter la brochure de
garantie livrée avec l’appareil.
N’essayez pas d’effectuer d’autres
•
entretiens ou réglages que ceux décrits
dans ce mode d’emploi. Les autres
opérations doivent être laissées aux
soins des personnes compétentes
dans l’entretien des dispositifs
électromagnétiques et autorisées, aux
regards des lois du pays concerné (ou
équivalent) à accomplir les travaux
de maintenance et de réparations.
Les instructions de maintenance de
ce mode d’emploi doivent être suivies
scrupuleusement.
BIENVENUE DANS LE MONDE DE
L’ENTRAÎNEMENT TUNTURI
Votre choix prouve que vous souhaitez réellement
investir dans votre bien-être et votre condition; il
révèle aussi que vous savez apprécier la haute qualité
et l’élégance. En choisissant un équipement sportif
Tunturi, vous adoptez un produit de premier choix
comme partenaire pour un entraînement motivant
en toute sécurité. Quel que soit votre objectif, nous
sommes persuadés que cet appareil est celui qui vous y
conduira. Adressez-vous à
pour plus d’informations.
WWW.TUNTURI.COM
ASSEMBLAGE
Pour l’assemblage, il faut deux personnes. Vérifier que
les pièces suivantes sont en votre possession :
1. Châssis
2. Tube d’appui avant
3. Tube d’appui arrière
4. Tube du châssis avant
5. Appuie-bras (2)
6. Repose-pieds (2)
7. Compteur
8. Barre d’appui
9. Barre métallique
10. Cordon d’alimentation
11. Kit d’assemblage (le contenu avec * dans la liste
des pièces détachées) : Conservez les outils de montage,
vous pourrez en avoir besoin pour régler l’appareil par
exemple
Ce produit doit être relié à la terre. S’il
•
fonctionnait mal ou tombait en panne,
le fait qu’il soit relié à la terre réduirait le
risque de choc électrique. Ce produit est
équipé d’un câble muni d’un équipement
conducteur relié à la terre et d’une prise
de terre. Le câble doit être branché
dans une prise de courant appropriée,
correctement installée et reliée à la terre
selon les réglementations locales et les
lois.
DANGER: une connexion incorrecte du
câble peut avoir pour résultat le risque
d’un choc électrique. Veuillez vérifier
avec un électricien qualifié si vous avez
un doute quant au bon branchement
du produit. Ne modifiez pas le câble
d’alimentation fourni avec l’appareil, s’il
ne convient pas à la prise de courant,
veuillez en faire installer une correcte
par un électrician confirmée.
Si vous remarquez qu’il manque une pièce à votre
appareil, veuillez prendre contact avec votre vendeur et
lui indiquer le modèle, le numéro de fabrication et le
numéro de la pièce manquante (voir derniere page de ce
manuel). En l’emballage il y a aussi un sachet destiné à
absorber l’humidité pendant le transport et le stockage.
Les termes gauche, droite, devant et derrière sont utilisés
comme si vous étiez en position d’exercice sur l’appareil.
Laissez au moins 100 cm d’espace libre devant, derrière
et sur les côtés.
TUBE D’APPUI AVANT
19
Fixez le tube d’appui avant équipé des roulettes de
transport au châssis avec deux vis, rondelles et plaques
de verrouillage.
TUBE D’APPUI ARRIÈRE
Placez les embouts de protection en plastique aux
extrémités du tube d’appui arrière et fixez le tube
d’appui arrière avec deux vis, rondelles et plaques de
verrouillage.
REPOSE-PIEDS
Fixez les repose-pieds à l’endroit souhaité à l’aide deux
vis, deux rondelles / vis ainsi que des écrous de blocage.
POIGNÉES
TUBE AVANT
Retirez l’attache en caoutchouc du fil du compteur
sortant du tube du châssis. Raccordez le fil du compteur
sortant du tube du châssis au raccord situé dans le tube
avant. Enfoncez le tube avant à l’intérieur du tube du
châssis: attention à ne pas abimer les fils du compteur!
Fixez le tube avant avec des rondelles et des vis de
fixation en serrant bien.
Enfoncez la barre métallique à travers le logement de
la poignée gauche, placez la poignée à côté du trou
de fixation et enfoncez la barre également à travers le
trou de l’axe. Appuyez ensuite la poignée droite sur
l’extrémité de la barre métallique et vérouillez la barre
en fixant une grosse rondelle, une plaque de verrouillage
et une vis de fixation aux l’extrémités du logement de
la poignée droite. Serrez la poignée en vous servant de
deux clés pour vis six pans.
C35
•
MODE D'EMPLOI
20
Poussez le bras de la pédale gauche en avant de manière
à pouvoir enfoncer la poignée du tube de fixation
située à l’intérieur du bras de pédale. Fixez la poignée
au repose-pied à l’aide des vis de réglage. Répétez
l’opération pour la poignée droite.
F
MODE D'EMPLOI • C35
Retirer les deux vis de fixation situées su fond du
compteur. Raccorder les fils du pulsomètre sortant
du tube avant au connecteur du compteur. Pousser le
compteur à l’extrémité du tube avant et le fixer avec les
vis de fixation : Attention à ne pas abîmer les fils.
CORDON D’ALIMENTATION
ATTENTION! Le modèle européen autorise choisir le
point de fixation désiré (voir Réglage du bras de pédale).
COMPTEUR ET BARRE D’APPUI
Fixer le tube avant du guidon.Retirer les protections en
caoutchouc des extrémités des vis de fixation et enfoncer
les fils du pulsomètre à travers le trou situé au milieu
du tube central. Bien serrer les vis afin que le guidon ne
bouge pas durant l’exercice. Remettre la protection en
caoutchouc en place sur les vis de fixation.
Avant de brancher l’appareil à une source
d’alimentation, assurez-vous que la tension locale
correspond à celle indiquée sur la plaque de type. Le
C35 fonctionne soit en 230 V soit en 115 V (modèles
américains). Branchez la prise femelle du cordon
d’alimentation dans le connecteur, juste audessus du
support arrière, au milieu du châssis et l’autre bout
du cordon à une prise secteur. Mettez l’appareil sous
tension à partir du commutateur se trouvant au-dessus
du connecteur.
ATTENTION !
• L’appareil doit être branché sur
une prise à la terre. N’utilisez
pas de rallonge.
• Assurez-vous que le cordon ne
passe pas pardessous l’appareil.
DANGER: il faut toujours couper
l’alimentation et débracher
l’appareil immédiatement apr’es
utilisation.
ATTENTION ! Pour réduire le
risque de brûlure, de feu, de
choc électrique ou de blessures sur les personnes:
1) Un appareil ne doit jamais être laissé sans surveillance
quand il est branché.
2) Ne faîtes pas fonctionner l’appareil sous une
couverture ou avec des matériaux combustibles. Une
chaleur excessive peut avour pour conséqunce un feu,
un choc électrique ou blesser quelqu’un.
21

C35
•
S’ENTRAINER AVEC TUNTURI
RÉGLAGE DU BRAS DE PÉDALE
(MODELE EUROPEEN)
Réglez la hauteur des bras de pédales de la manière
suivante: tournez le bouton de réglage d’un tour dans
le sens inverse des aiguilles d’une montre et tirez le
bouton vers le haut de sorte que le tube de fixation
puisse librement se déplacer de haut en bas. Fixez le
bras de pédale en relachant le bouton lorsque la hauteur
de réglage est convenable. Le bouton de réglage se
verrouille sur place. Pour terminer, serrez le bouton de
réglage dans le sens des aiguilles d’une montre.
ATTENTION ! Vérifiez toujours avant de commencer
l’exercice que le bouton de réglage est bien serré. Réglez
la hauteur du bras de pédale de sorte que le mouvement
elliptique soit ressenti dans la cheville de façon agréable
à tous les stades.
NIVEAU D’ENTRAINEMENT
Le pédalage est une excellente forme d’exercice aérobie
qui lie à la fois modération et durée dans les efforts. Un
tel exercice vise à améliorer votre capacité maximale
d’absorption d’oxygène, donc votre endurance et votre
condition physique. La capacité du corps à ”brûler” la
graisse est directement liée à sa capacité de transporter
l’oxygène. L’exercice aérobie est avant tout un exercice
agréable qui devra faire apparaître une légère sueur sur
votre peau mais ne devra en aucun cas vous essouffler.
Pour vous remettre en forme, il vous faut pratiquer
des exercices physiques au moins trois fois par semaine
pendant 30 minutes à chaque fois et pour vous
maintenir en bonne condition, au moins deux fois par
semaine. Une fois un bon niveau de condition atteint,
il est facile de l’améliorer en augmentant le nombre des
séances d’entraînement. L’exercice physique est le seul
moyen d’augmenter la quantité d’énergie consommée
par votre organisme. Voilà pourquoi une diète faible
en calories doit toujours être accompagnée d’exercices
physiques réguliers. Il est bon de pratiquer des exercices
tous les jours, au début pendant 30 minutes (avec ou
sans pauses) puis d’augmenter la dose quotidionne
progressivement à une heure. Débutez avec une vitesse
de pédalage et une résistance faibles. Si vous êtes obèse,
un effort excessif pourrait surcharger votre système
cardiovasculaire. Au fur et à mesure que votre condition
s’améliore, vous pourrez augmenter résistance et vitesse.
Pour mesurer l’intensité de l’exercice, vous pourrez
utiliser votre fréquence cardiaque. Ceci est possible avec
le compteur de pulsations qui vous permettra de suivre
facilement votre fréquence cardiaque pendant l’exercice
pour vous aider à choisir le niveau d’intensité qui vous
convient.
Quel que soit votre objectif, vous obtiendrez les
meilleurs résultats en vous entraînant à un niveau
d’effort approprié, le meilleur contrôle étant votre pouls.
MESURE DU POULS
Pour mesurer le pouls, en fonction du suivi de la
circulation sanguine aux extrémités, on utilise les
capteurs situés dans les reposes-mains. Ceux-ci mesurent
les impulsions de la circulation sanguine à chaque
fois que l’utilisateur touche simultanément avec les
deux mains les capteurs situés dans les reposes-mains.
Quand vous vous tenez fermement aux deux capteurs
de pulsations en même temps, l’écran affiche vos
pulsations.
ATTENTION ! Si vous effectuez un exercice avec
contrôle de la fréquence cardiaque ou si la précision des
informations sur votre rythme cardiaque est importante
pour vous, nous vous recommandons de réaliser cette
mesure avec la ceinture à la différence de la ceinture
cardiaque, la précision de la mesure du pouls peut varier
considérablement d’une personne à l’autre.
MESURE DU RYTHME CARDIAQUE SANS FIL
Les compteurs sont équipés d’un récepteur, vous pouvez
donc utiliser également des ceintures télémétriques
non codées. La façon la plus fiable de mesurer le pouls
est de le faire à l’aide d’un couple émetteur-récepteur
sans fil, dans lequel les électrodes de l’émetteur fixé au
niveau de la poitrine envoient les pulsations à l’unité des
compteurs à travers le champ électromagnétique existant
entre l’émetteur et le récepteur.
ATTENTION ! Si vous utilisez un stimulateur cardiaque,
vérifiez auprès de votre médecin que vous pouvez
utilisez un cardiofréquencemètre sans fil.
Si vous désirez mesurer votre pouls avec la méthode sans
fil, commencez par bien mouiller, avec de l’eau ou votre
salive, les électrodes de la ceinture de l’émetteur, qui
seront en contact avec la peau de votre poitrine. Si vous
fixez la ceinture sur votre T-shirt, mouillez le T-shirt aux
endroits où se posent les électrodes. Placez la ceinture
flexible sous les muscles pectoraux de façon à ce que les
électrodes de l’émetteur restent constamment en contact
avec votre peau tout au long de l’exercice. Ne serrez
cependant pas trop la ceinture: vous devez pouvoir
respirer normalement. L’émetteur peut transmettre votre
pouls à l’unité des compteurs sur une distance d’un
mètre au maximum.
Si les électrodes ne sont pas suffisamment mouillées,
l’écran n’affichera pas votre pouls. Donc si les électrodes
se sont asséchées en contact avec votre peau, il vous
faudra les mouiller à nouveau. Pour mesurer le pouls
avec un maximum de fiabilité, laisser les électrodes
s’échauffer, par contact sur votre peau, à la température
de votre corps. Dans le cas où plusieurs équipements
de mesure du pouls sans fils sont utilisés en même
temps, la distance entre eux doit être d’au moins 1,5 m.
D’autre part, si on ne dispose que d’un récepteur mais
de plusieurs émetteurs, une seule personne portant un
émetteur doit se trouver à l’intérieur de la zone de portée
du récepteur, lorsque la mesure du pouls est en cours.
MODE D'EMPLOI
22
ATTENTION! Prenez en compte dans vos vêtements
d’entraînement le fait que certaines fibres utilisées dans
les vêtements (ex. polyester, polyamide) génèrent de

MODE D'EMPLOI • C35
F
l’électricité statique, ce qui peut entraîner un manque
de fiabilité de la mesure du rythme cardiaque. Un
téléphone portable, une télévision et d’autres appareils
électriques créent un champ électromagnétique autour
d’eux, ce qui pose des problèmes dans la mesure du
rythme cardiaque.
Déterminez d’abord votre rythme cardiaque maximum
c’est à dire le rythme à partir duquel le pouls n’augmente
plus, même si l’effort est accru. Si vous ne connaissez pas
votre pouls maximum, utilisez ces formules indicatives :
208 - 0,7 X ÂGE
Notez bien que c’est une valeur moyenne et que les
maxima varient d’une personne à l’autre. Le pouls
maximum diminue, en moyenne, d’une pulsation par
année. Si vous faites partie d’un des groupes «à risque»,
consultez un médecin pour qu’il mesure votre pouls
maximum. Nous avons déterminé trois zones de pouls
pour vous aider dans vos entraînements soumis à un
objectif.
DÉBUTANT
50-60 % du pouls maximum
•
Ce niveau convient aussi aux personnes désirant perdre
du poids ou n’ayant pas pratiqué d’activité physique
depuis longtemps ainsi qu’aux convalescents. Il est
recommandé de s’entraîner au moins une demi-heure
trois fois par semaine. Un exercice régulier améliore,
de façon décisive, les performances respiratoires et
circulatoires du débutant et les effets d’une meilleure
forme sont très vite ressentis.
ENTRAÎNEMENT
60-70 % du pouls maximum
•
Ce niveau est parfait pour l’amélioration et le maintien
d’une bonne condition physique. Il permet de renforcer
le coeur et les poumons tout en respectant un effort
raisonnable. S’entraîner au moins trois fois par semaine
pendant une demi-heure minimum. Pour progresser
davantage, augmentez soit la fréquence soit la durée des
séances mais pas les deux en même temps !
ENTRAÎNEMENT ACTIF
70-80 % du pouls maximum
•
L’exercice à ce niveau ne convient qu’aux personnes
en excellente condition physique et suppose un
entraînement antérieur de longue date.
5. START / STOP
Démarrage et interruption de l’exercice
AFFICHAGES
1. VITESSE DE PERFORMANCE (/MIN)
Vitesse de tour de pédale (RPM), il y a également une
colonne sous la valeur affichée qui indique la vitesse de
pédale.
2. DURÉE D’ENTRAÎNEMENT
00:00- 99:59 : mesure à 1 seconde d’intervalle,h1:40h9:59, mesure à 1 minute d’intervalle.
3. RYTHME CARDIAQUE D’ENTRAÎNEMENT
Le symbole ”coeur” clignote au rythme du battement
cardiaque. Les symboles ”flèche” de l’écran indiquent
si le rythme cardiaque dépasse la limite supérieure ou
inférieure réglée.
4. DISTANCE DE L’EXERCICE (KM / MILE)
0.00-99,99 km / miles
5. VITESSE DE L’EXERCICE (KMH / MPH)
00.0-99.9 km/h / mph
6. DÉPENSE ÉNERGÉTIQUE (KCAL)
Évaluation de la dépense énergétique globale durant
l’exercice, 0-9999 kcal
7. HORLOGE (CLOCK)
Horloge en temps réel
8. THERMOMÈTRE (TEMP C / TEMP F)
Thermomètre de température ambiante, en degrés
Celsius ou Fahrenheit
9. HYGROMÈTRE (HUMIDITY %)
Pour mesurer l’humidité de la pièce 0-100 %
10. INDICATEUR DU MODE DE FONCTIONNEMENT
SÉLECTIONNÉ
Le compteur indique le mode d’entraînement
sélectionné (Program = profil pré-programmé, Manual
= exercice en mode manuel, Recovery = mesure du
rythme cardiaque de récupération, Target HR = exercice
avec contrôle par rythme cardiaque, Min Max = limites
inférieure et supérieure pour le rythme cardiaque
UNITE DES COMPTEURS
TOUCHES
1. RÉGLAGE
Sélection des valeurs souhaitées
2. MISE À ZÉRO
Mise à zéro des valeurs d’entraînement, fin de l’exercice
et retour en mode prêt au démarrage.
3. + / -
Réglage des valeurs souhaitées, réglage de l’intensité :
augmenter la résistance / le rythme cardiaque avec la
touche +, diminuer la résistance / le rythme cardiaque
avec la touche -.
4. RÉCUPÉRATION
Mesure du rythme cardiaque de récupération
11. AFFICHAGE DE PROFIL DU PROGRAMME
D’ENTRAÎNEMENT
Profil sélectionné de programme d’entraînement préprogrammé
12. AFFICHAGE CUMULATIF DU RYTHME CARDIAQUE
Si l’utilisateur utilise la mesure du rythme cardiaque
durant l’exercice, l’écran affiche le profil du rythme
cardiaque durant l’exercice
13. CHANGEMENT DES PILES (BATTERY LOW)
Un écran d’alarme indique le besoin de changer les piles
UTILISATION DU COMPTEUR
Le compteur se met en route en appuyant sur n’importe
quelle touche du compteur. Si l’équipement n’est pas
23

utilisé pendant 5 minutes, le compteur se débranche
automatiquement.
Choisir les unités du compteurs souhaitées à l’aide de
l’interrupteur situé au dos du compteur. Vous pouvez
choisur les unités métriques (km, km/h, Celsius) ou les
unités anglaises (miles, mph, Fahrenheit)
Régler l’heure de l’horloge (clock) de la manière suivante
: en mode démarrage, appuyer simultanément sur les
deux touches flèche pendant 3 secondes. L’horloge
s’affiche sur l’écran de chiffres principal. Procéder au
réglage de l’heure avec les touches flèche, les heures
puis les minutes et revenir en position démarrage en
appuyant sur la touche SET.
11. Si vous vous êtes fixé une valeur précise, le compteur
émet un signal sonore et l’affichage de la valeur se
met à clignoter une fois que vous avez atteint la valeur
souhaitée. Mettre l’affichage à zéro en appuyant
d’abbord sur la touche START / STOP, puis sur la
touche RESET.
EXERCICE TARGET HR (FRÉQUENCE
CARDIAQUE CONSTANTE)
Durant l’exercice Target HR, vous réglez le niveau
de fréquence cardiaque constante ; durant l’exercice,
l’équipement veille automatiquement à ce que le rythme
cardiaque reste inchangé indépendamment de la vitesse
de pédalage.
C35
•
ENTRAÎNEMENT EN MODE MANUEL
En mode manuel, il est possible de régler le niveau de
résistance pendant l’exercice à l’aide des touches flèche.
1. Vous pouvez également commencer immédiatement
en appuyant sur la touche START/STOP. Régler le
niveau de résistance durant l’exercice à l’aide des touches
flèche.
2. Vous pouvez commencer en paramétrant une valeur
précise pour l’exercice. Appuyer sur la touche flèche
jusqu’à ce que le texte Manual s’inscrive sous l’écran de
chiffres principal.
3. Appuyer sur la touche SET, ce qui vous permet
d’accéder aux réglages des valeurs que vous pouvez
déterminer.
4. TIME = régler la durée souhaitée de votre exercice
avec les touches +/-. La touche SET vous permet de
passer au réglage suivant.
5. DISTANCE = régler la distance souhaitée de votre
exercice avec les touches +/-. La touche SET vous
permet de passer au réglage suivant.
6. KCAL = régler la valeur souhaitée pour votre dépense
énergétique durant l’exercice avec les touches +/-, la
touche SET vous permet de passer au réglage suivant.
7. PULSE = régler la valeur de limite cardiaque
maximale pour la durée de l’exercice avec les touches
+/- : l’écran affiche les symboles coeur et flèche vers le
haut. Appuyer sur la touche SET, ce qui vous permet
d’accéder aux réglages de la limite cardiaque inférieure
: l’écran affiche les symboles coeur et flèche vers le bas.
Régler la limite cardiaque inférieure pour la durée de
l’exercice avec les touches +/-. Si votre tythme cardiaque
dépasse les limites fixées, le compteur l’indique en
faisant clignoter la flèche de la limite concernée sur
l’écran. Ensuite revenir au réglage de la durée de
l’exercice (TIME) en appuyant sur la touche SET.
8. Vous pouvez commencer immédiatement en
appuyant sur la touche START/STOP. Commencer à
pédaler et régler le niveau de résistance durant l’exercice
si nécessaire.
9. Vous pouvez interrompre votre exercice en appuyant
sur la touche START/STOP (le compteur affiche le
texte Over). Les informations du programme sont
conservées durant 5 minutes dans la mémoire du
compteur, vous pouvez donc continuer votre exercice en
appuyant de nouveau sur START/STOP.
10. Vous pouvez arrêter votre exercice en appuyant sur la
touche RESET lorsque le compteur est en mode pause.
1. Appuyer sur la touche flèche jusqu’à ce que le texte
Targer HR s’inscrive sous l’écran de chiffres principal.
2. Réglez le niveau de fréquence cardiaque constante
souhaité à l’aide de la touche SET. L’écran affiche le
texte PULSE, ainsi que les symboles coeur et flèche vers
le haut et flèche vers le bas. Vous pouvez régler votre
niveau de fréquence cardiaque constante avec les touches
+/-. La touche SET vous permet de passer au réglage
suivant.
3. TIME = régler la durée souhaitée de votre exercice
avec les touches +/-. La touche SET vous permet de
passer au réglage suivant.
4. DISTANCE = régler la distance souhaitée de votre
exercice avec les touches +/-. La touche SET vous
permet de passer au réglage suivant.
5. KCAL = régler la valeur souhaitée pour votre dépense
énergétique durant l’exercice avec les touches +/-, la
touche SET vous permet de revenir au réglage de la
durée (TIME) de l’exercice.
6. Commencez l’exercice en appuyant sur la touche
START/STOP. Commencer à pédaler et régler le niveau
de fréquence cardiaque constante durant l’exercice si
nécessaire.
7. Vous pouvez interrompre votre exercice en appuyant
sur la touche START/STOP (le compteur affiche le
texte Over). Les informations du programme sont
conservées durant 5 minutes dans la mémoire du
compteur, vous pouvez donc continuer votre exercice en
appuyant de nouveau sur START/STOP.
8. Arrêter l’exercice en appuyant sur la touche RESET
lorsque le compteur est en mode pause.
9. Si vous vous êtes fixé une valeur précise, le compteur
émet un signal sonore et l’affichage de la valeur se
met à clignoter une fois que vous avez atteint la valeur
souhaitée. Mettre l’affichage à zéro en appuyant
d’abbord sur la touche START / STOP, puis sur la
touche RESET.
PROFILS D’ENTRAÎNEMENT
1. Une fois le compteur en marche, appuyer sur une
touche flèche (vers le haut ou vers le bas) jusqu’à ce que
le compteur affiche le code du profil (P1-P8) ainsi que
le mode du profil. Tous les profils sont des profils dits
à moments de levier constants : plus vous pédalez vite,
plus rapidement est parcourue la distance au compteur.
La durée des tous les profils pré-programmées est de 20
minutes.
2. Sélectionner le profil souhaité avec les touches flèche.
MODE D'EMPLOI
24

MODE D'EMPLOI • C35
F
Appuyer sur la touche SET pour accéder aux réglages de
la durée du profil d’entraînement : les touches flèches
permettent de régler la durée de 10:00 à 90:00 minutes
par échelons de 5 minutes.
3. Commencez l’exercice en appuyant sur la touche
START/STOP. Commencer à pédaler. Durant l’exercice,
vous pouvez modifier le niveau de résistant de la partie
que profil que vous êtes en train d’effectuer en utilisant
les touches flèche : la flèche vers le haut augmente la
résistante, la flèche vers le bas la diminue.
4. Vous pouvez interrompre votre exercice en appuyant
sur la touche START/STOP (le compteur affiche le
texte Over). Les informations du programme sont
conservées durant 5 minutes dans la mémoire du
compteur, vous pouvez donc continuer votre exercice en
appuyant de nouveau sur START/STOP.
5. Vous pouvez arrêter votre exercice en appuyant sur la
touche RESET lorsque le compteur est en mode pause.
Si vous effectuez le profil complet, le compteur émet un
signal sonore et la valeur de l’écran se met à clignoter
une fois l’objectif atteint. Mettre l’affichage à zéro en
appuyant d’abbord sur la touche START / STOP, puis
sur la touche RESET.
RECOVERY – MESURE DU RYTHME
CARDIAQUE DE RÉCUPÉRATION
Mesurez votre rythme cardiaque de récupération à la fin
de l’exercice.
1. Appuyer sur la touche RECOVERY pour accéder à
la mesure du rythme cardiaque de récupération. L’écran
affiche le texte Recovery.
2. La mesure démarre automatiquement et dure deux
minutes. IMPORTANT ! Si une interférence se produit
durant la mesure du rythme cardiaque, l’écran affiche le
texte Err. à la place de la valeur.
3. À la fin de la période de mesure, l’écran affiche
le rapport de récupération du rythme cardiaque en
pourcentage. Plus ce chiffre est faible, meilleure est votre
forme physique. Notez que votre résultat est en rapport
avec votre niveau cardiaque à l’instant du démarrage
de la mesure et que votre résultat est personnel et donc
non comparable avec les éventuels résultats d’autres
personnes. Pour améliorer la fiabilité de la mesure du
pouls de récupération, essayez de toujours procéder de
manière pratiquement identique; commencez la mesure
à un niveau cardiaque similaire.
4. Pour quitter la fonction de mesure du rythme
cardiaque de récupération et revenir à l’écran général,
appuyer sur la touche RESET ; le compteur revient
automatiquement en mode d’affichage général une
minute après la fin de la mesure.
TRANSPORT ET RANGEMENT
L´appareil se déplace aisément grâce à ses roulettes de
transport. Pour ce faire, se mettre derrière l´appareil,
basculer l´appareil vers soi et le déplacer sur les roulettes
disposées au bas de la barre de soutien derrière. Le
déplacement de l’équipement peut abîmer certains
revêtements de sol, par ex. les parquets en bois. Dans ce
cas, veillez à protéger le sol.
Pour lui garantir un fonctionnement impeccable, rangez
et utilisez votre appareil dans un endroit sec, sans
variations de température importantes, et protégez-le
contre les poussières.
Le déplacement de l’équipement peut abîmer certains
revêtements de sol, par ex. les parquets en bois. Dans ce
cas, veillez à protéger le sol.
MAINTENANCE
Le C35 ne requièrent qu’un minimum de maintenance.
Vérifiez, de temps en temps, que tous les écrous et vis
sont serrés.
Après s’être exercé, séchez toujours l’appareil avec un
•
tissu mou et absorbant. N’utilisez pas de détergent. La
sueur cause la corrosion; nous recommandons donc que
vous protégez toutes les surfaces de metal en dehors des
couvertures en plastique avec de teflon.
N’enlevez jamais les capots protecteurs de l’appareil.
•
Si l’appareil d’appartement reste longtemps
•
inutilisé, la courroie de transmission peut se
déformer temporairement et provoquer une sensation
d’irrégularité dans le pédalage. Cependant, après
quelques minutes d’utilisation, cet effet disparaît, la
courroie reprenant sa forme initiale. Pour éviter les
problèmes de fonctionnement du vélo, rangez-le dans
un endroit sec où la température varie le moins possible
et protégez-le de la poussière.
DEFAUTS DE FONCTIONNEMENT
ATTENTION ! En dépit d’un contrôle continu de
la qualité, l’appareil peut présenter des défauts ou des
anomalies de fonctionnement provenant de certains
de ses composants. Dans ce cas, il n’est pas cependant
nécessaire d’aller faire réparer votre appareil, le problème
pouvant bien souvent être résolu par simple changement
de la pièce défectueuse.
Si votre appareil se comporte de façon anormale, retirez
le fil électrique et attendez environ 1 minute. Remettez
l’appareil en marche et vérifiez que l’anomalie a disparu.
Si l’anomalie a disparu, vous pouvez utiliser votre
appareil de façon normale. Si l’anomalie n’a pas disparu,
contacez votre vendeur.
Veuillez suivre ces instructions pour déplacer ou
transporter votre appareil: en le levant d’une façon
incorrecte, vous risquez un accident ou un problème de
dos.
ATTENTION ! Coupez toujours l’alimentation de votre
appareil et débranchez le cordon secteur avant de
déplacer votre appareil sportif !
Contactez votre distributeur au cas ou vous
remarqeuriez un défaut ou un mauvais fonctionnement
de votre l’appareil ou si vous avez besoin de pièces
de rechange. Indiquez-lui la nature du problème, les
conditions d’utilisation, la date d’achat, le modèle et
le numéro de série. Vous trouverez la liste des pièces
détachées à la fin de ce mode d’emploi. Seules des pièces
mentionnées dans la liste des pièces de rechange peuvent
être utilisées dans l’appareil.
25

CARACTERISTIQUES
TECHNIQUES
Longueur .....................................135 cm
Hauteur .......................................157 cm
Largeur .........................................66 cm
Poids ............................................63 kg
Tous les modèles Tunturi répond aux normes des
directives EMC de l’UE concernant la compatibilité
électromagnétique (89/336/CEE) et les appareils
électriques destinés à une utilisation dans certaines
limites de tensions (73/23/CEE). Ce produit porte, en
conséquence, la marque CE.
Tous les modèles Tunturi américains (115 V) satisfont
aux exigences posées par la FCC en matière de
compatibilité électromagnétique et sont revêtus en
conséquance du label FCC. Tous les modèles Tunturi
américains répond aux normes des directives UL 1647
et CSA C 2
Tous les appareils crosstrainer Tunturi répondent aux
normes de sécurité et de précision EN (EN-957).
Du fait de sa politique de développement continu des
produits, Tunturi se réserve le droit de modifier les
spécifications sans préavis.
2.2 No. 68-92.
ATTENTION ! La garantie ne couvre pas les dommages
dus à une négligence des instructions d’assemblage,
de réglages ou de maintenance données dans ce mode
d’emploi. Suivez les instructions scrupuleusement pour
l’assemblage, l’utilisation et la maintenance de votre
équipement. Des changements ou modifications non
expressément approuvés par Tunturi Oy Ltd rendront
nulle l’autorité de l’utilisateur sur l’equipement.
Nous vous souhaitons d’agréables et
nombreuses séances d’exercice avec votre
nouveau partenaire d’entraînement Tunturi !
C35
•
MODE D'EMPLOI
26

INHOUD
OPMERKINGEN EN ADVIEZEN .............................25
DE MONTAGE .......................................................... 28
FITNESS TRAINING MET TUNTURI ...................... 30
VERPLAATSEN ....................................................... 33
ONDERHOUD .........................................................34
TECHNISCHE GEGEVENS ....................................34
OPMERKINGEN EN
ADVIEZEN
Lees deze gids zorgvuldig door vóórdat
u begint met monteren, gebruiken of
onderhouden van uw Tunturi trainer.
Bewaar de gids op een handige plaats.
U kunt er, nu en in de toekomst, nuttige
informatie uithalen die u nodig heeft
voor het gebruik en het onderhoud van
de apparatuur. Volg de instructies altijd
met zorg op. De garantie vervalt bij
schade ontstaan tijdens de verzending
of door het niet volgen van de in
deze handleiding gegeven instructies
betreffende het monteren, afstellen en
onderhoud van het apparaat.
VEILIGHEID
Het doornemen en opvolgen van de
•
onderstaande voorzorgen is uitermate
belangrijk voor de veiligheid van de
gebruiker.
De trainer is geschikt voor personen
•
tot maximaal 135 kg lichaamsgewicht.
Laat uw conditie controleren bij uw
•
huisarts voordat u begint met trainen.
Bij misselijkheid, duizeligheid of een
•
ander lichamelijk ongemak gebruik dient
de gebruiker direct te stoppen en een
arts te raadplegen.
HANDLEIDING • C35
De trainer kan tijdens in het gebruik
•
stof en/of smeermiddelen verliezen. De
ondergrond dient hiertegen bestand te
zijn.
Zorg voor voldoende ventilatie tijdens
•
de training, maar zorg dat u niet op de
tocht zit.
Houd bij het op-en afstappen de
•
handgrepen vast.
Gebruik de trainer uitsluitend voor het
•
doel waarvoor deze is gemaakt en zoals
hierna beschreven wordt.
VERDER
De trainer mag uitsluitend door één
•
persoon tegelijk gebruikt worden.
Raak nooit bewegende delen aan.
•
Houd kinderen en huisdieren tijdens
•
de training buiten het bereik van de
trainer.
Houd toezicht bij gebruik door
•
kinderen of gehandicapte personen.
Draag tijdens de training de juiste
•
kleding en geschikte schoenen.
Stop in geval van een defect of storing
•
en neem contact op met uw dealer.
Houd hiervoor gevoelige apparatuur
•
of dingen buiten het bereik van
het magnetisch veld van het
weerstandsmechanisme.
Controleer voor de training of het
•
apparaat goed functioneert. Train nooit
op een defect apparaat.
Onderhoud en afstellingen anders dan
•
in deze handleiding beschreven dienen
uitsluitend uitgevoerd te worden door
deskundigen. Volg de instructies van de
handleiding nauwkeurig op.
NL
Om spierpijn te voorkomen, begint u
•
de training met een warming up en sluit
u die af met cooling-down (langzaam
trainen met geringe weerstand). U sluit
de training af met stretch oefeningen.
Plaats de trainer op een vlakke en
•
stevige ondergrond.
Tijdens de training is de ideale
•
gebruikstemperatuur tussen +10º
en +35°C; voor opslag gelden de
temperaturen tussen de -15° en +40°C.
De luchtvochtigheid in de trainings- of
opslagruimte mag nooit hoger dan 90 %
zijn.
Leun of steun nooit op de meter.
•
27
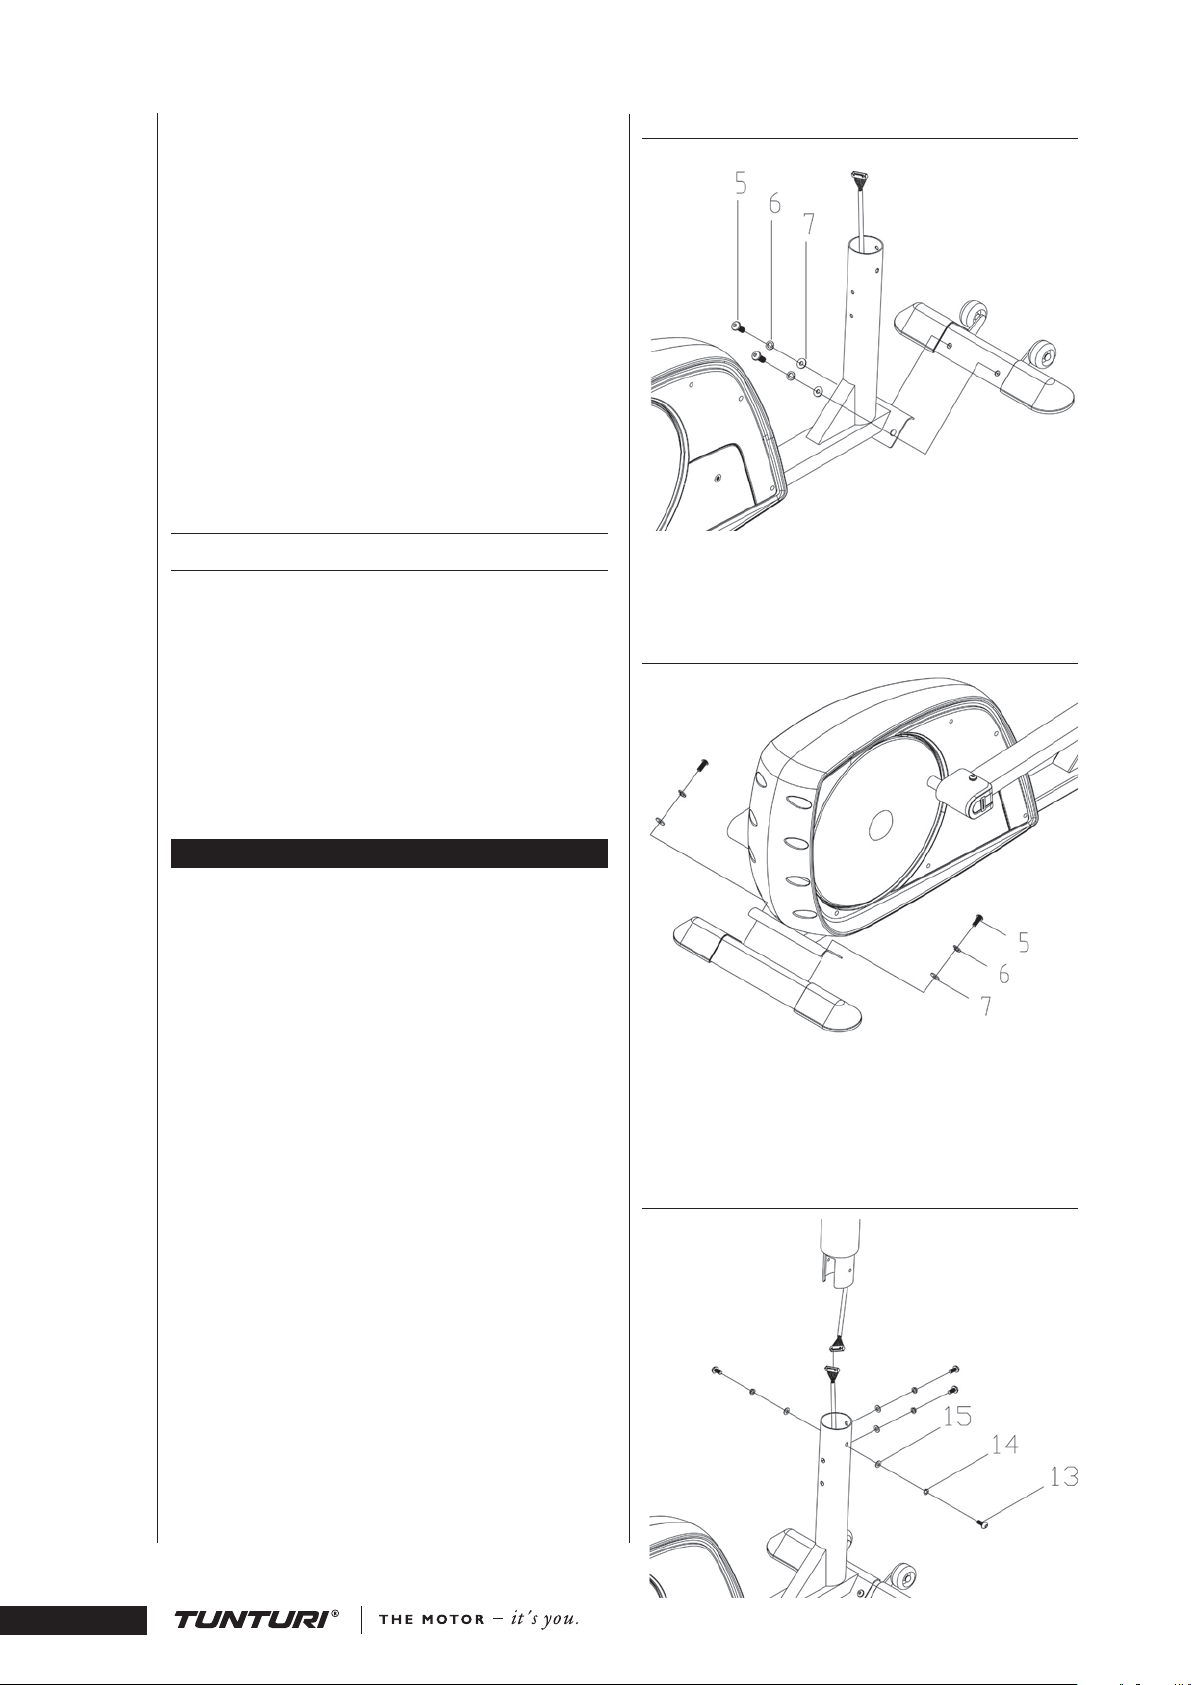
Druk op de toetsen met uw
•
vingertoppen; nagels kunnen de
toetsmembranen beschadigen.
Stap niet op de framekast.
•
Het apparaat is ontworpen voor
•
thuisgebruik. De Tunturi-garantie is
alleen van toepassing op defecten en
storingen ontstaan bij thuisgebruik (24
maanden). Nadere informatie over de
garantie op uw trainingstoestel vindt u in
het bijgesloten garantieboekje.
WELKOM IN DE WERELD VAN
DWARSSTEUN VOOR
TUNTURITRAINING!
Uw keuze toont aan, dat u echt in uw gezondheid
en conditie wilt investeren. Het bewijst ook, dat u
kwaliteit en stijl belangrijk vindt en dit waardeert. Met
deze Tunturi trainer heeft u een veilig, motiverend,
kwaliteitsproduct als trainingspartner gekozen. Wat
uw trainingsdoel ook is, wij zijn ervan overtuigd dat
de keuze van deze trainer de juiste is, om uw doel te
bereiken. Informatie betreffende het gebruik van Uw
trainingsapparatuur en een efficiënte training hiermede
kunt U in deze gids en Tunturi's website
TUNTURI.COM vinden.
WWW.
DE MONTAGE
Voor de monteren zijn twee personen nodig. De
instructies links, rechts, voor en achter, zijn bepaald
zittend op de fiets.
1. Frame
2. Dwarssteun voor
3. Dwartssteun achter
4. Voorbuis voor
5. Handgrepen (2 st.)
6. Voetsteunen (2 st.)
7. Meter
8. Handsteun
9. Stang
10. Transformator
11. Gereedschap set (onderdelen met * in de
onderdelenlijst: Bewaar de montagebenodigdheden,
omdat u die o.a. nog bij de bijstelling van de apparatuur
kunt gebruiken)
Bevestig de steunvoet voor, die van transportwielen ter
verplaatsing voorzien is, met de twee schroeven, ringen,
de veerring en de moer aan het frame.
DWARSSTEUN ACHTER
Druk de steundoppen op de uiteinden van de
dwarssteun achter vast en bevestig de steunvoet achter
met de twee schroeven, ringen, de veerring en de moer
aan het frame.
VOORBUIS
Mocht er een onderdeel missen, neem dan contact op
met uw Tunturi dealer onder vermelding van het model,
C35
•
HANDLEIDING
28
het serienummer van het apparaat en het nummer van
het missende onderdeel. Achter in deze gids vindt u
de onderdelenlijst. De verpakking bevat een zakje met
korrels die de apparatuur tijdens opslag en transport,
heeft beschermd tegen vocht. Dit zakje kan na het
uitpakken van de trainer, weggegooid worden. Plaats de
trainer op een zo vlak mogelijke ondergrond, met aan
de voorkant, de achterkant en aan de zijkanten minstens
100 cm vrije ruimte.
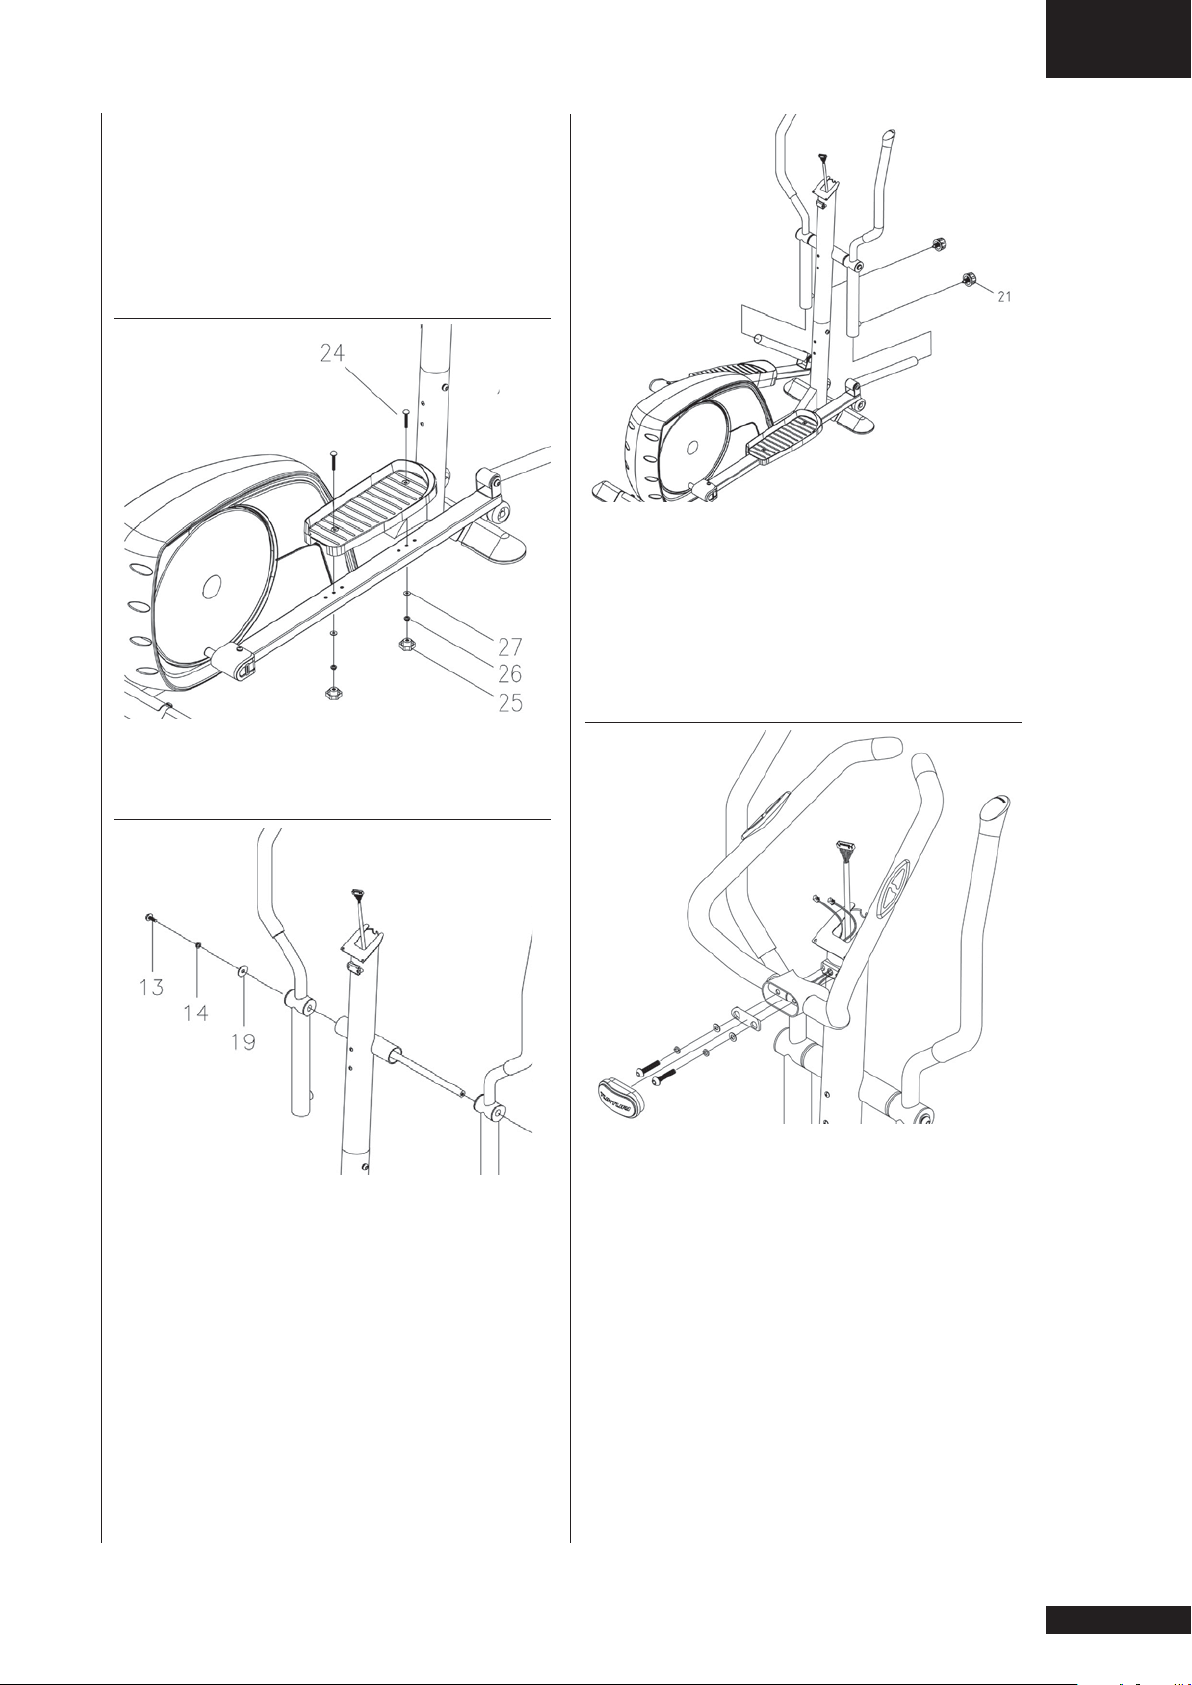
Verwijder de elastiekjes van de uit de framebuis
komende draad voor de monitor. Koppel de uit de
framebuis komende draad voor de monitor aan het zich
op de voorbuis bevindende stekkertje. Duw de voorbuis
in de framebuis naar binnen: let er daarbij op de draad
voor de meter niet beschadigt! Bevestig de voorbuis op
het frame met de 4 inbusbouten, ringen en veering.
VOETSTEUNEN
NL
HANDLEIDING • C35
Duw de linker treeplank zover naar voren dat de
bevestigingsbuis, die zich aan de voorkant van de
treeplank bevindt, in de handgreepbuis geplaatst kan
worden. Kies de gewenste hoogte instelling (zie verder
onder instelling van de voetsteunen) eb vergrendel de
handgreepbuis met de treeplank dmv de borgknop. Doe
hetzelfde met de rechterkant.
Maak de voetsteunen vast op de gewenste plaatsen van
de treeplank met twee schroeven, borgring en knop.
HANDGREPEN
Druk de metalen stang door de kunststof geleide bussen
in de voorbuis. Plaats vervolgens de linker en de rechter
handgreepbuis op de metalen stang. Bij het plaatsen van
de handgreepbuizen moet u erop letten dat de hoogte
vergrendelknoppen aan de voorzijde dienen te zitten.
Daarna de beide imbusbouten met de veerring en de
grote onderlegring plaatsen en vastzetten.
MONITOR EN HANDSTEUN
Bevestig het stuur aan de stuurkolom. Verwijder de
plastic beschermdopjes van de bevestigingsbouten
en duw de sensordraden door het gat midden in de
stuurkolom. Draai de bouten stevig vast, zodat het
stuur niet beweegt tijdens de training. Druk de plastic
beschermdopjes weer op hun plaats over de bouten.
29
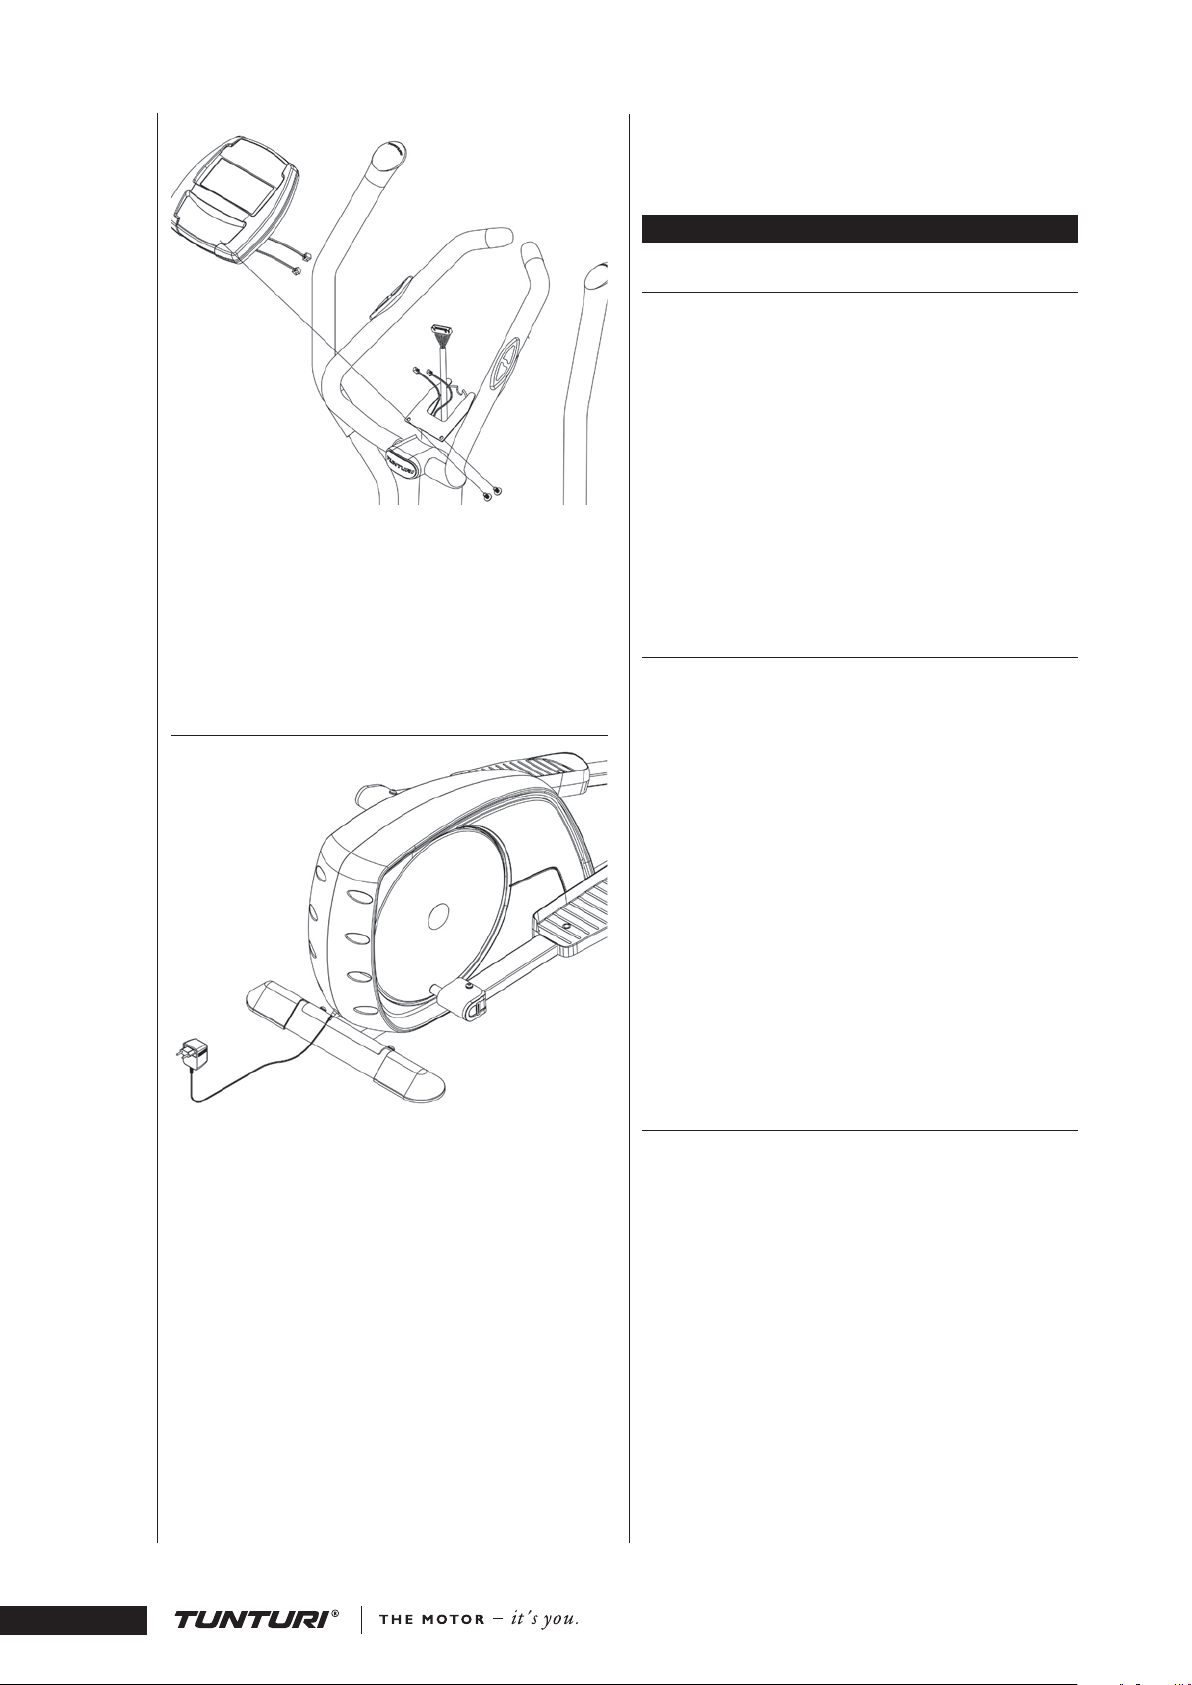
Maak de twee schroeven aan de onderkant van de
monitor los. Verbind de draad die uit de stuurkolom
komt en de sensordraden met de bijbehorende
aansluitingen van de monitor. Druk de monitor op
het uiteinde van de stuurkolom en bevestig de monitor
met behulp van de twee schroeven: Let er op, dat U de
draden niet beschadigt!
TRANSFORMATOR
LET OP! De klok van de meter gebruikt echter stroom
van de batterijen wanneer het apparaat niet op
netspanning is aangesloten, anders zou de klok op 0
komen te staan.
FITNESS TRAINING MET TUNTURI
AFSTELLING VAN DE VOETSTEUN
Stel de hoogte van de voetsteunen op de volgende
manier: draai de regelknop één slag terug naar links en
trek deze knop zo uit, dat de bevestigingsbuis van de
voetsteun zich vrij naar boven en beneden kan bewegen.
Als de hoogte passend is, borg dan de voetsteun door de
knop los te laten. De borgknop springt dan terug op z'n
plaats. Vergrendel de knop tenslotte door die met de
klok mee vast te draaien.
BELANGRIJK! Controleer altijd voor u met de
oefening gaat beginnen, of de borgknop stevig
aangedraaid is. Regel de hoogte van de voetsteun zo, dat
de elliptische beweging van het toestel bij iedere fase van
de beweging in de enkel prettig aanvoelt.
TRAININGS NIVEAU
Trainen op een fietstrainer is een uitstekende aërobe
oefening, die in principe licht maar langdurig
van aard is. Aërobe inspanning vergroot het
zuurstofopnamevermogen van het lichaam, waardoor
het uithoudingsvermogen en de conditie verbeteren.
Door de verbeterde zuurstofopname neemt ook het
vet verbrandingsvermogen van het lichaam toe. Een fit
lichaam verbrandt dus ook in rust meer vet.
C35
•
Steek de stekker van de transformator in het contact
in het achterframe. Steek dan pas de stekker in het
wandstopcontact.
* Haal na het trainen altijd de stekker van de
transformator uit het stopcontact.
* Het snoer mag niet onder het apparaat doorlopen of
op andere wijze afgeklemd worden.
BELANGRIJK! Op de achterkant van de meter van
de C35 bevindt zich tevens een batterijruimte. Het
apparaat kan dus op netspanning aangesloten worden
of batterijen gebruiken (4 stuks C-batterijen). Wanneer
als spanningsbron uitsluitend C-batterijen gebruikt
worden, dient men in aanmerking te nemen dat
de servorem veel stroom van de batterijen afneemt.
Wij bevelen aan om netspanning te gebruiken als
stroombron voor het apparaat.
Aërobe training is bovenal aangenaam. Transpireren
is uitstekend, maar het is niet de bedoeling dat u
buiten adem raakt. Tijdens de training kunt u nog
normaal spreken, u gaat dus niet hijgen. Om een goede
basisconditie op te bouwen moet u minstens drie keer
per week dertig minuten trainen. Om een bepaald
conditieniveau te handhaven zijn enkele trainingen per
week voldoende. De conditie kan eenvoudig verder
worden verbeterd door het aantal trainingen per week te
verhogen.
TRAINEN OM AF TE VALLEN
Omdat inspanning de enige manier is om het
energieverbruik (vetverbranding) van het lichaam
te verhogen, wordt u voor uw training beloond met
gewichtsverlies. Zeker als u de training combineert met
gezonde voeding. Wie wil afvallen kan het best beginnen
met een dagelijkse training van ongeveer dertig minuten
en dat geleidelijk opbouwen tot hooguit een uur. Zeker
bij overgewicht is het verstandig om altijd in een rustig
tempo en met weinig weerstand te beginnen om het
hart- en vaatsysteem niet te zwaar te belasten. Als de
conditie beter wordt, kunnen trapsnelheid en weerstand
geleidelijk worden verhoogd. De doelmatigheid van een
training is te controleren aan de hand van de hartslag.
Met de hartslagmeter kunt u de hartslag tijdens de
training eenvoudig meten en zo controleren of de
training voldoende effectief is zonder dat het lichaam te
zwaar wordt belast.
HANDLEIDING
30

HANDLEIDING • C35
NL
TRAININGS NIVEAU
Wat uw doel, uw streven ook met het trainen is, u
bereikt het beste resultaat door te trainen op een niveau
dat u aankunt. Daarvoor is, zoals gezegd, uw hartslag de
beste graadmeter.
HARTSLAGMETING MET HANDSENSOREN
De hartslagmeting gebeurt op basis van de perifere
bloedsomloop, met behulp van de sensors in het stuur;
deze meten de hartslag altijd wanneer u beide sensors in
het stuur tegelijk aanraakt.
Als u een hartslag gestuurde trainer gebruikt, of als de
hartslag meting voor u essentieel is, raden wij u aan
uw hartslag te registreren via een borstband; Ondanks
het gebruik van een borstband, kan het de waarde/
betrouwbaarheid van persoon tot persoon verschillen.
TELEMETRISCHE HARTSLAG METING
Hartslag kan telemetrisch worden gemeten. De C35
heeft een ingebouwde hartslagpuls ontvanger voor de
bijgeleverde borstband met ingebouwde telemetrische
hartslagzender. Dit is het meest betrouwbare systeem,
dat werkt met een borstband met meerdere elektrodes
waarvan de gemeten waarden draadloos doorgeseind
worden naar de monitor.
BELANGRIJK! Als u een pacemaker gebruikt, mag u
de borstband alleen met toestemming van een arts
gebruiken.
Wanneer u uw hartslag tijdens de training op deze
manier wilt controleren, moeten de geribbelde
elektroden aan de binnenzijde van de borstband vochtig
gemaakt worden (water). Plaats de zender juist onder
de borst met de elastische band strak genoeg om tijdens
het fietsen de elektroden contact te laten houden met
de huid, maar niet zo strak dat normaal ademen wordt
belemmerd.
De zender geeft de hartslag automatisch door aan de
monitor die zich niet verder dan één meter van de
borstband mag bevinden. Wanneer de zender verder
van de monitor verwijderd is, wordt het signaal te zwak
om te ontvangen. Let er ook op, dat er niet meerdere
personen met een borstband om binnen een straal van
één meter rond de monitor staan, want de monitor
ontvangt dan van elke elektrode een signaal en telt
deze dan bij elkaar op. Door vocht en transpiratie op
de elektrodes kan de zender aan blijven staan. Om
lege batterijen te voorkomen maakt u de elektrodes na
gebruik goed schoon en droog.
Denkt u eraan wat de trainingskleding betreft, dat
bepaalde in de kleding gebruikte vezels (zoals polyester
of polyamide) statische elektriciteit veroorzaken, wat bij
de hartslagmeting problemen veroorzaken kan. Denkt
u eraan dat mobiele telefoons, een teevee of andere
elektronische apparaten een elektromagnetisch veld om
zich heen vormen, wat bij de hartslagmeting problemen
veroorzaken kan.
Om te beginnen dient u te weten wat uw maximale
hartslag is: dit is de hartslag die bij meer inspanning niet
meer hoger wordt.
Als u niet weet wat uw maximale hartslag is, kunt u de
volgende formule als leidraad nemen:
208 – 0,7 X DE LEEFTIJD
Het maximum varieert van persoon tot persoon. De
maximale hartslag daalt per jaar met gemiddeld één
punt. Als u tot de risicogroepen behoort, vraag dan een
arts uw maximale hartslag te bepalen. Om u te helpen
met uw training, hebben wij drie verschillende hartslag
niveaus geselecteerd.
BEGINNER
Dit niveau is ook geschikt voor mensen die lijnen,
mensen die herstellende zijn van een ziekte en mensen
die lang niet getraind hebben.
Drie trainingen van tenminste een halfuur per week zijn
aan te bevelen. Regelmatig trainen stimuleert bij een
beginner de ademhaling en bloedsomloop in sterke mate
en zorgt al snel voor een merkbaar resultaat.
GEMIDDELDE SPORTER
maximale hartslag
Een perfect niveau om de conditie te verbeteren en op
peil te houden. Zelfs een redelijk normale inspanning minimaal 3 trainingen van 30 minuten per week - heeft
een positief effect op hart en longen. Om uw conditie
verder te verbeteren kunt u het aantal keren trainen per
week verhogen of de duur van uw training verlengen.
Verhoog echter nooit beide tegelijkertijd!
GETRAINDE SPORTER
hartslag
Trainen op dit niveau is alleen weggelegd voor wie
écht fit is en wie gewend is aan langdurige conditie
trainingen.
50 tot 60 % van de maximale hartslag
•
60 tot 70 % van de
•
70 tot 80 % van de maximale
•
MONITOR
DRUKKNOPPEN
1. SET
Instelling van de streefwaarden.
2. RESET
Op nul zetten van de trainingswaarden, beëindigen van
de training en terug naar de uitgangspositie.
3. + / -
Instelling van de streefwaarden, intensiteitinstelling:
weerstand / hartslag vermeerderen: met de + knop;
weerstand / hartslag verminderen: met de - knop.
4. RECOVERY
Meten van de conditiehartslag.
5. START / STOP
Begin en einde van de training.
DISPLAYS
1. TRAPSNELHEID (/ MIN)
Trapsnelheid (RPM), bovendien onder de numerieke
display nog een kolom, die de trapsnelheid weergeeft.
2. TRAININGSTIJD
31

C35
•
00:00 – 99:59 meting per seconde; h1:40 – h9:59
meting per minuut.
3. HARTSLAG GEDURENDE DE TRAINING
Het hartsymbool knippert met dezelfde snelheid als de
gemeten hartslag.
De pijlen in het display geven aan wanneer de hartslag
de van tevoren ingestelde boven- of ondergrens
overschrijdt.
4. TRAININGSAFSTAND (KM / MILE)
0.00 – 99.99 km / mijl
5. FIETSSNELHEID (KMH / MPH)
00.0 – 99.9 km/h / mph
6. ENERGIEVERBRUIK (KCAL)
Schatting van het totaal energieverbruik gedurende de
training, 0 – 9999 kcal
7. TIJD (CLOCK)
Werkelijke tijd
8. TEMPERATUURMETER (TEMP C / TEMP F)
Meting van de kamertemperatuur in Celsius of in
Fahrenheit.
9. VOCHTIGHEIDSMETER (HUMIDITY %)
Meting van de vochtigheidsgraad in de kamer, 0
– 100%
10. AANDUIDING VAN HET GEKOZEN PROGRAMMA
De monitor geeft het gekozen programma
aan (Program = basisprogramma, Manual =
keuzeprogramma, Recovery = weergave van de hartslag,
Target HR = training van de hartslag, Min Max =
waarden van de onderste- en de bovenste grens voor de
hartslag)
11. DISPLAY VAN HET TRAININGSPROFIEL
Trainingsprofiel van het gekozen voorkeuze programma
12. CUMULATIEVE HARTSLAGDISPLAY
Indien bij de training een hartslagprogramma gebruikt
wordt, geeft de display het profiel weer dat gedurende
de hartslag training gevormd wordt.
13. VERVANGING VAN DE BATTERIJEN (BATTERY LOW)
Een waarschuwingsdisplay geeft aan wanneer de
batterijen aan vervanging toe zijn.
GEBRUIK VAN DE MONITOR
De monitor gaat aan door het indrukken van een
willekeurige knop van de monitor. Indien het apparaat
langer dan 5 minuten niet gebruikt wordt, schakelt de
monitor automatisch uit.
Maak een keuze uit de betreffende meeteenheden
met behulp van de schakelaar op de achterkant van
de monitor. Maak een keuze uit metrische eenheden
(km, km/h, Celsius) of Engelse eenheden (mijlen, mph,
Fahrenheit).
Stel de tijd (clock) van de monitor als volgt in: druk bij
het aanzetten van de monitor 3 seconden tegelijkertijd
op beide pijlen.
Op de hoofddisplay komt nu een tijddisplay. Stel de
tijd in met behulp van de +/- -knoppen. Van uren naar
minuten en terug naar het opstart menu komt men met
behulp van de SET -knop.
MANUAL TRAINING
Bij handmatige instelling van het trainingsniveau kan
het weerstandsniveau bijgesteld worden gedurende de
training met behulp van de +/- -knoppen.
1. Er kan direct met de training begonnen worden
door op de START / STOP knop te drukken. Stel het
weerstandsniveau in tijdens de training door op de +/- knoppen te drukken.
2. De training kan ook begonnen worden met het
instellen van de streefwaarden voor de training.
Druk op de +/- -knoppen totdat onder het
hoofdnummerdisplay het woord Manual verschijnt.
3. Druk vervolgens op de SET –knop, waarna de
streefwaarden ingesteld kunnen worden.
4. TIME = instellen van de gewenste duur van de
training met behulp van de + / - -knoppen. Met de
SET –knop door naar de volgende instelling.
5. DISTANCE = instellen van de gewenste afstand voor
de training met behulp van de + / - -knoppen. Met de
SET –knop door naar de volgende instelling.
6. KCAL = instellen van het gewenste energieverbruik
voor de training met behulp van de + / - -knoppen.
Met de SET –knop door naar de volgende instelling.
7. PULSE = instellen van de bovenwaarde voor de
hartslag gedurende de training met behulp van de + /
- -knoppen: op de display ziet men dan een hart en een
pijl omhoog. Met de SET –knop door naar de instelling
van de onderwaarde voor de hartslag gedurende de
training: op de display ziet men dan een hart en een
pijl omlaag. Stel de waarde in voor de ondergrens van
de hartslag gedurende de training met behulp van de
+ / - -knoppen. Indien uw hartslagwaarde buiten de
gestelde grenzen komt, geeft de monitor dit aan door
een knipperende pijl behorende bij de overschreden
grens. Met de SET –knop terug naar de trainingstijd
(TIME) instelling.
8. U kunt de training ook beginnen door de START /
STOP –knop in te drukken. Begin met trainen en stel
indien nodig het weerstandsniveau in gedurende de
training.
9. U kunt de training onderbreken door de START
/ STOP –knop in te drukken (op de display van de
monitor verschijnt dan de tekst Over). De gegevens van
het programma blijven 5 minuten in het geheugen van
de monitor, zodat u met de onderbroken training verder
kunt gaan door nogmaals op de START / STOP –knop
te drukken.
10. U kunt ophouden met de training vanuit de
onderbrekingsfase door op de RESET –knop te
drukken.
11. Indien de vooraf ingestelde streefwaarden bereikt
worden, geeft de monitor een geluidssignaal en de
display begint te knipperen wanneer de streefwaarde
bereikt is. Stel de display op nul door het indrukken
HANDLEIDING
32

HANDLEIDING • C35
NL
van de START / STOP –knop en vervolgens de RESET
–knop.
STREEFWAARDE HR-TRAINING (CONSTANTE
HARTSLAG)
Bij de streefwaarde HR-training wordt de gewenste
constante hartslag van te voren ingesteld. Gedurende de
training zorgt het apparaat er dan automatisch voor dat
de door u ingestelde hartslagsnelheid behouden wordt,
onafhankelijk van de fietssnelheid.
1. Druk op de knoppen met pijltjes totdat onder het
hoofdnummerdisplay de tekst Target HR staat.
2. Stel het gewenste constante hartslagniveau voor de
training in door op de SET –knop te drukken. Op
het scherm komt dan de tekst PULSE en een hart
met een pijltje omhoog of omlaag. De gewenste
hartslagfrequentie kan ingesteld worden met de + /
- -knoppen. Door op de SET –knop te drukken gaat u
naar de volgende instelling.
3. TIME = instellen van de gewenste duur van de
training met behulp van de + / - -knoppen. Met de
SET –knop door naar de volgende instelling.
4. DISTANCE = instellen van de gewenste afstand voor
de training met behulp van de + / - -knoppen. Met de
SET –knop door naar de volgende instelling.
5. KCAL = instellen van het gewenste energieverbruik
voor de training met behulp van de + / - -knoppen. Met
de SET –knop gaat u daarna terug naar de tijdsduur
(TIME) instelling.
6. Begin de training door de START / STOP –knop
te drukken. Begin met trainen en stel indien nodig de
constante hartslagwaarde in gedurende de training met
behulp van de +/- -knoppen.
7. U kunt de training onderbreken door de START
/ STOP –knop in te drukken (op de display van de
monitor verschijnt dan de tekst Over). De gegevens
van het programma blijven gedurende 5 minuten in het
geheugen van de monitor, zodat u met de onderbroken
training verder kunt gaan door nogmaals op de START
/ STOP –knop te drukken.
8. Beëindig de training door op de RESET –knop
te drukken op het moment dat de monitor in de
onderbrekingsfase is.
9. Wanneer u een streefwaarde hebt ingesteld, geeft
de monitor een geluidssignaal en de display begint te
knipperen wanneer de streefwaarde bereikt is. Stel de
display op nul door eerst op de START / STOP –knop
te drukken en vervolgens op de RESET –knop.
TRAININGSPROFIELEN
1. Druk nadat de monitor is opgestart op de knoppen
met pijltjes (pijl omhoog of pijl omlaag) totdat op
de monitor het profielteken verschijnt (P1 – P8) en
de profielvorm. Alle profielen zijn zgn. standaard
krukmoment -profielen: hoe sneller men trapt, hoe
groter de afstand van de weg die men aflegt op de
monitor. De duur van alle profielen is van tevoren
ingesteld op 20 minuten.
2. Kies het gewenste profiel met behulp van de +/- -
knoppen. Door op de SET –knop te drukken komt
u op de tijdsinstelling van het trainingsprofiel: met de
+/- -knoppen kunt u de tijd in stappen van 5 minuten
instellen van 10:00 tot 90:00 minuten.
3. Begin de training door op de START / STOP –knop
te drukken. Begin met trainen en stel indien nodig het
weerstandsniveau van de profielvorm waarmee u traint
in door op de +/- -knoppen te drukken: de pijl omhoog
knop geeft een grotere weerstand, en de pijl omlaag
knop vermindert de weerstand.
4. U kunt de training onderbreken door de START
/ STOP –knop in te drukken (op de display van de
monitor verschijnt dan de tekst Over).
De gegevens van het programma blijven gedurende
5 minuten in het geheugen van de monitor, zodat u
met de onderbroken training verder kunt gaan door
nogmaals op de START / STOP –knop te drukken.
5. Beëindig de training door op de RESET –knop
te drukken op het moment dat de monitor in de
onderbrekingsfase is.
6. Wanneer u het profiel helemaal afwerkt, geeft de
monitor een geluidssignaal en begint de display te
knipperen bij het bereiken van de streefwaarde. Stel de
display op nul door eerst op de START / STOP –knop
te drukken en vervolgens op de RESET –knop.
RECOVERY – METEN VAN DE
CONDITIEHARTSLAG
Meet uw conditiehartslag bij het beëindigen van de
training.
1. U meet uw conditiehartslag door op de RECOVERY
–knop te drukken. Op de display verschijnt dan de
tekst Recovery.
2. De meting start automatisch en duurt twee minuten.
BELANGRIJK! Indien bij de hartslagmeting een storing
optreedt, verandert de hartslagwaarde op het scherm in
Err.
3. Aan het einde van de meettijd verschijnt het
herstelpercentage op het scherm. Hoe kleiner dit
percentage is, des te beter is uw conditie.
Denkt u er wel om, dat het resultaat afhankelijk is van
uw hartslagsnelheid bij het begin van de meting, en dat
het resultaat zeer persoonlijk is en in geen geval direct
vergelijkbaar met het resultaat van andere personen.
Om de betrouwbaarheid van de meting van de
hartslagreactie te verbeteren, moet u altijd proberen om
de meting zo nauwkeurig mogelijk en altijd op dezelfde
wijze uit te voeren; begin de meting zoveel mogelijk op
hetzelfde hartslagniveau.
VERPLAATSEN
Wilt u uw trainer verplaatsen, doe dat dan op de
hieronder omschreven manier. Het verkeerd optillen van
een zwaar apparaat, kan immers rugletsel veroorzaken.
BELANGRIJK! Schakel bij het verplaatsen van het
apparaat altijd eerst de elektriciteit uit en neem de
stekker uit het stopcontact!
Plaats de trainer in een droge, stofvrije ruimte met
minimale temperatuurverschillen. Met behulp van de
transportrollen aan de voorkant is de C35 eenvoudig te
33

verplaatsen. Ga voor de C35 staan en kantel het frame
naar u toe. Nu kan het apparaat verreden worden.
Pas op dat de vloer niet beschadigt wanneer u het
toestel verplaatst. Bescherm tere vloermaterialen zoals
parketvloeren enz.
Om schade aan het apparaat te voorkomen, is het
raadzaam de trainer op een droge plek met zo min
mogelijk stof en temperatuurwisselingen te plaatsen.
Alle Tunturi modellen voldoen aan de eisen van EUs
EMC Directieven betreffende elektromagnetische
compatibiliteit (89/336/EEC) en elektrische
apparatuur ontworpen voor gebruik binnen bepaalde
spanningslimieten (73/23/EEC). Daarom is dit product
met de CE label voorzien.
Alle Tunturi crosstrainers voldoen aan EN precisie- en
veiligheidsnormen (EN-957).
ONDERHOUD
De Tunturi apparaten hebben weinig onderhoud nodig.
Het is raadzaam om zo nu en dan te controleren of alle
bouten en moeren nog goed vast zitten. U kunt het
apparaat schoonhouden door het af te nemen met een
vochtige doek. Gebruik echter geen oplosmiddelen.
De metalen delen kunt u het beste tegen de
•
inwerking van transpiratievocht beschermen, om
regelmatig deze delen te behandelen met teflonolie.
Verwijder de kunststof behuizing van het apparaat
•
nooit!
Als het apparaat enige tijd niet wordt gebruikt, is het
•
mogelijk, dat de transmissieriem enigszins vervormt. U
ondervindt een onregelmatig gevoel bij het trainen, als u
weer opnieuw gaat trainen. Echter na een paar minuten
bewegen, krijgt de transmissieriem zijn oorspronkelijke
vorm weer terug en zal het onregelmatige gevoel weer
snel verdwijnen.
GEBRUIKSSTORINGEN
BELANGRIJK! Ondanks voortdurende
kwaliteitscontroles, kunnen er defecten of storingen
optreden die het gevolg zijn van het niet goed
functioneren van onderdelen die in de trainer zijn
gebruikt. In de meeste gevallen is het onnodig om het
gehele apparaat ter reparatie aan te bieden, aangezien de
storing meestal kan worden opgelost door het vervangen
van het defecte onderdeel. Mochten er storingen
optreden bij het gebruik van de trainer, neem dan
onmiddellijk contact op met uw Tunturi dealer.
Tunturi is gerechtigd om specificaties te veranderen
zonder daarover nader te berichten.
BELANGRIJK! De garantie vervalt bij schade als
gevolg van het niet volgen van de instructies in
deze gids betreffende het monteren, het instellen en
het onderhouden van de apparatuur. De instructies
dienen bij het in elkaar zetten, het onderhoud en het
gebruik, zo zorgvuldig mogelijk te worden gevolgd.
Veranderingen of modificaties, welke niet door Tunturi
Oy Ltd zijn goedgekeurd, laten de Tunturi Oy Ltd
product aansprakelijkheid geheel vervallen.
Wij wensen u veel plezierige trainingen met uw
nieuwe Tunturi trainingspartner!
Vermeldt daarbij altijd het model en het serienummer
van uw Tunturi trainer, de eventuele storingscode en
door wie de trainer is geïnstalleerd. Indien u merkt dat
er iets niet in orde is met de trainer, schakelt u direct de
trainer uit. Wacht vervolgens één minuut en schakel de
trainer weer aan. Op deze manier moeten incidentele
fouten hersteld zijn en kan de trainer opnieuw worden
gebruikt. Indien de trainer na het aan- en uitschakelen
nog steeds niet goed functioneert, neem dan contact op
met uw Tunturi dealer voor onderhoud.
Vermeldt bij het bestellen van onderdelen het model,
het serienummer van het apparaat en het nummer van
het onderdeel. Op de laatste pagina’s van deze gids vindt
u de onderdelenlijst.
C35
•
HANDLEIDING
34
TECHNISCHE GEGEVENS
Lengte ..........................................135 cm
Breedte .........................................66 cm
Hoogte .........................................157 cm
Gewicht .......................................63 kg

MANUALE D'USO • C35
I
INDICE
AVVERTENZE .......................................................... 32
MONTAGGIO ..........................................................36
IL TRAINING CON LA TUNTURI .............................38
TRASPORTO ED IMMAGAZZINAGGIO ................. 41
MANUTENZIONE .................................................... 42
DATI TECNICI .........................................................42
AVVERTENZE
Questo libretto di istruzioni è una parte
essenziale della tua attrezzatura da
ginnasica. Leggi con attenzione quanto
scritto in questa guida, prima del
montaggio dei pezzi e prima di fare uso
dell’attrezzo o di effettuarne qualunque
manutenzione. Ti raccomandiamo pure
di conservare la presente guida in un
luogo sicuro e a portata di mano; essa
ti fornirà, adesso e nel futuro, tutte
le istruzioni necessarie all’uso e alla
manutenzione della tua attrezzatura da
ginnastica. Tali istruzioni devi seguirle
sempre con molta attenzione! La
garanzia non copre danni derivati da
negligenze derivate nelle regolazioni
o nelle manutenzioni descritte i questo
libretto.
AVVERTENZE SULLA VOSTRA
SALUTE
Prima di iniziare l’allenamento
•
consultate un medico per controllare la
vostra condizione fisica.
Assicuratevi che l’ambiente dove vi
•
allenate abbia ventilazione adeguata e
non sia umido.
Consigliamo di conservare l’attrezzo,
•
quando in uso, a temperatura ambiente
da +10 a +35°C. L’attrezzo può essere
immagazzinato da -15 a + 40°C. Il tasso
d’umidità non deve mai superare il 90 %.
AVVERTENZE SULL’USO
DELL’ATTREZZO
Se si permette ai bambini di usare
•
l’attrezzo, si deve sempre tenere conto
del loro sviluppo fisico e mentale e del
loro temperamento. Devono essere
istruiti al corretto uso dell’attrezzo e
controllati.
Prima dell’uso assicuratevi che
•
l’attrezzo funzioni correttamente. Non
usate un attrezzo difettoso.
Non appoggiarsi mai sul pannello.
•
Premi i tasti con il polpastrello:
•
le unghie possono danneggiare la
membrana del display.
Non usate mai l’attrezzo con carter
•
smontati.
Per evitare danni consigliamo di
•
collocare l’attrezzo su una superficie
protettiva.
L’attrezzo può essere usato da una
•
persona sola alla volta.
Impugnate il manubrio per salire o
•
scendere dall’attrezzo.
Se avvertite disturbi, nausea o altri
•
sintomi anormali durante l’esercizio,
smettate immediatamente e consultate
un medico.
Onde evitare dolori muscolari, fate
•
alcuni esercizi di stiramento prima
dell’allenamento.
AVVERTENZE SULL’AMBIENTE
L’attrezzo non è stato progettato per
•
essere usato all’aperto.
Posizionare l’attrezzo su una
•
superficie la più piana possibile.
Proteggi il pannello dell’utente dalla
•
luce del sole. La superficie del pannello,
se bagnata dal sudore, deve sempre
essere asciugata.
Indossate abbigliamento appropriato
•
durante l’allenamento.
Non tentate riparazioni e manutenzioni
•
diverse da quelle descritte da questo
manuale.
L’attrezzo non puó essere usato da
•
persone, il cui peso superi i 135 kg.
Questo attrezzo é concepito per uso
•
domestico, per il quale vale la garanzia;
35

per uso domestico 24 mesi. Per maggiori
informazioni sulle condizioni di garanzia
dell’attrezzo, consultare il libretto di
garanzia allegato.
SEI BENVENUTO NEL MONDO DEGLI
ALLENAMENTI TUNTURI!
Hai fatto un’ottima scelta. Si vede che tieni alla tua
forma fisica. Indubbiamente sei una persona esigente
che richiede il meglio in quanto a qualità e stile. Nella
Tunturi troverai il tuo partner ideale. Alta tecnologia,
sicurezza e stimolo per sempre migliori prestazioni
sono le sue caratteristiche. Qualunque sia il tipo di
allenamento che intendi praticare, questo è lo strumento
fatto per te. Nel fascicolo unito al tuo attrezzo Tunturi
troverai le informazioni necessarie per un allenamento
efficace. Puoi anche consultare il sito internet della
Tunturi (WWW.TUNTURI.COM).
BASE APPOGGIO ANTERIORE
Fissa al telaio la base, provvista di rotelle, usando due
viti, rondelle e piattine di fissaggio.
MONTAGGIO
Per montaggio sono necessarie due persone. Iniziate
a controllare i seguenti componenti, contenuti nella
confezione:
1. Telaio
2. Base appoggio anteriore
3. Base appoggio posteriore
4. Tubo telaio anteriore
5. Maniglie (2 pezzi)
6. Basette appoggiapiedi (2 pezzi)
7. Contatore
8. Appoggiamani
9. Barra
10. Cavetto di alimentazione
11. Busta con ferramenta (contenuto indicato con
asterisco nell’elenco pezzi di ricambio): conserva tali
utensili con cura, in quanto ne puoi aver bisogno (per
esempio, in fase di regolazione dell’attrezzo).
La lista pezzi di ricambio, la trovi nel retro di questa
guida. Se avete bisogno di ricambi, contattate il
rivenditore indicando il modello, il numero di
serie dell’attrezzo e i codice del ricambio. L’imballo
comprende anche un sacchetto anti-umidità per
assobirla durante il transporto. Sinistra, destra, davanti e
dietro sono visti dalla posizione d’uso. Lasciate 100 cm
di spazio circa l’attrezzatura.
BASE APPOGGIO POSTERIORE
Premi le protezioni di plastica entro le estremità della
base e fissa quest’ultima al telaio, usando due viti,
rondelle e piattine di fissaggio.
TUBO ANTERIORE
C35
•
MANUALE D'USO
36

Rimuovi l’elastico che tiene fermo il cavetto contatore,
fuoriuscente dal tubo telaio. Collega il cavetto contatore
dal tubo telaio all’attacco che si trova nel tubo anteriore.
Spingi il tubo anteriore all’interno del tubo telaio,
facendo attenzione a non danneggiare il cavetto
contatore. Fissa quindi ben stretto il tubo anteriore, con
le rondelle e le viti.
BASETTE APPOGGIAPIEDI
I
MANUALE D'USO • C35
Spingi il braccio pedale di sinistra in avanti, in modo da
riuscire a spingerlo all’interno della maniglia del tubo
fissaggio, che si trova nella parte anteriore del braccio
pedale. Scegli il punto fissaggio da te desiderato (vedi
Regolazione Braccio Pedale) e fissa la maniglia alla
basetta appoggiapiedi, usando la vite diregolazione.
Ripeti quindi l’operazione per la maniglia di destra.
Fissa le basette nel punto desiderato del braccio pedale,
usando due viti, due rondelle per ogni vite e due dadi,
da stringere.
MANIGLIE
Spingi la barra metallica attraverso l’alloggio
dell’impugnatura di sinistra, colloca la maniglia in
prossimità del foro di fissaggio del tubo anteriore e
spingi quindi la barra anche attraverso il foro dell’asse.
Fatto ciò, premi la maniglia di destra entro l’estremità
della barra metallica e blocca la barra stessa, fissando
all’estremità dell’alloggio della maniglia una rondella
grande, una piattina di bloccaggio e una vite di fissaggio.
Stringi le maniglie con due chiavi a testa esagonale.
CONTATORE E APPOGGIAMANI
Stacca le due viti, collocate sul fondo del contatore.
Fissare il poggiamano alla barra anteriore. Rimuovere
i tappi di plastica che proteggono le viti di fissaggio.
Inserire il filo del cardiofrequenzimetro attraverso il
foro centrale che si trova sulla barra anteriore. Serrare
correttamente le viti di fissaggio. Riposizionare le
protezioni di plastica sopra le viti.
37

Rimuovere le due viti di fissaggio che si trovano sul
fondo del pannello. Collegare il filo che fuoriesce dalla
barra anteriore ed il folo del cardiofrequenzimetro alle
prese del pannello. Inserire il pannello nell’estremità
della barra anteriore e serrare le viti. Fare attenzione a
non danneggiare i cavi.
CAVETTO DI ALIMENTAZIONE
Assicuratevi sempre che questa manopola sia stretta
prima di salire in sella. Assicuratevi sempre che la vite di
fissaggio sotto la sella sono stretti prima di salire in sella.
IL TRAINING CON LA TUNTURI
REGOLAZIONE BRACCIO PEDALE
Regola l’altezza dei bracci pedale, procedendo come
segue: gira la manopola di regolazione per un giro
in senso antiorario e tira la manopola all’infuori, in
modo che il tubo di bloccaggio del braccio pedale
diventi libero di esser mosso in su e in giù. Fissa quindi
il braccio, quando questo si trova ad altezza giusta,
rilasciando la manopola di regolazione, che scatterà al
suo posto. Alla fine, stringi la manopola in senso orario.
ATTENZIONE: assicurati sempre, prima di iniziare
l’esercizio, che la manopola sia stretta a dovere.
Regola l’altezza del braccio pedale in modo tale, che il
movimento ellittico dell’attrezzo risulti piacevole per le
tue caviglie, qualunque sia il movimento stesso.
LIVELLO DEGLI ESERCIZI
Pedalare è un eccellente esercizio aerobico molto meglio
se di bassa intesità ma di lunga durata. L’allenamento
aerobico migliora la capacità polmonare, che migliora la
resistenza e la condizione fisica in generale. La capacità
del corpo di bruciare grasso è direttamente dipendente
alla capacità di immissione dell’ossigeno.
C35
•
Collegare il trasformatore alla presa che si trova sopra
il piede d’appoggio posteriore. Collegare il cavo di
alimentazione del trasformatore alla presa di corrente.
* Alla fi ne dell’allenamento, scollegare il cavetto di
alimentazione dalla presa di corrente.
* Assicurarsi che il cavetto di alimentazione non si trovi
sotto l’attrezzatura sportiva.
NOTA BENE! Anche il retro del pannello del C35 è
dotato di alloggiamento per le pile. Il pannello può
essere quindi alimentato tramite la corrente di rete o con
4 pile C. Se si utilizzano solo le pile, bisogna ricordare
che il servofreno è in grado di consumare la loro
carica rapidamente. Consigliamo di utilizzare sempre
l’alimentazione dalla rete. Bisogna inoltre ricordare
che l’orologio del pannello viene alimentato dalle pile
quando l’attrezzo non è collegato alla rete. Questa
funzione permette di non azzerare sempre l’orologio
dopo lo spegnimento dell’attrezzo.
L’esercizio aerobico deve sopratutto essere divertente.
Aumenta la respirazione ma non dovreste mai andare
in debito di ossigeno durante l’allenamento. Dovreste
ad esempio poter parlare senza problemi. Dovreste
allenare almeno tre volte la settimana per 30 minuti per
raggiungere un discreto livello che per essere migliorato
richiede solo l’incremento delle sessioni di allenamento.
L’allenamento aerobico si accompagna anche alle diete
perchè è l’unico modo per incrementare l’energia spese
dal corpo. Una persona chi si sottopone ad una dieta
dovrebbe accompagnarla ad un allenamento regolare.
Potete inziare a ritmo blando e bassa resistenza perchè
un esercizio troppo intenso può provocare in una
persona sovrapeso un affaticamento del cuore. Si
possono controllare i propri progressi misurando le
pulsazioni sotto sforzo grazie all’accessorio incluso.
Questo anche per controllare che l’allenamento sia
efficace ma non troppo pesante.
BATTITO CARDIACO
Il cardiofrequenzimetro, che permette di controllare
anche la circolazione superficiale, è integrato nel
corrimano. I sensori installati, rivelano la frequenza
cardiaca quando l’utente appoggia entrambe le mani
sul corrimano. Qualunque sia lo scopo che tu ti sia
prefissato, i risultati migliori saranno raggiunti col
suddetto training al giusto livello di sforzo, e la misura
migliore, per tale sforzo, è il ritmo del tuo stesso cuore.
MANUALE D'USO
38

MANUALE D'USO • C35
I
MISURAZIONE DELLE PULSAZIONI CON
SENSORI NEL MANUBRIO
Il monitoraggio delle pulsazioni si basa sui sensori che si
trovano nel manubrio. Il dispositivo inizia a rilevare la
frequenza quando l’utente tocca entrambe le manopole
del manubrio contemporaneamente. Per garantire un
monitoraggio affidabile, è importante che la pelle sia
costantemente a contatto con i sensori e che questa sia
leggermente umida.
MISURAZIONE DELLA FREQUENZA CARDIACA
CON LA CINTURA
Si possono misurare le pulsazioni in telemetria: la C35
ha inserito nel manubrio un ricevitore compatibile. La
cintura trasmettitore non-codice può essere comprata
come optional. La misurazione telemetrica è la più
affidabile, gli elettrodi rilevano e trasmettono le
pulsazioni dal cuore al pannello per mezzo di un campo
elettromagnetico.
ATTENZIONE! Coloro i quali sono portatori di
pacemaker devono consultare il proprio medico, che
indicherà o meno la possibilità di utilizzare l’attrezzo
con questo tipo di cardiofrequenzimetro.
Se volete misurare le pulsazioni in questo modo durante
l’allenamento, inumidite gli elettrodi in gomma posti
sulla cinghia elastica con saliva e acqua. Allacciate la
cintura sotto al petto abbastanza stretta in modo che
gli elettrodi rimangano a contatto con la pelle, ma non
cosi stretta da rendere difficile la respirazione. Il campo
di trasmissione massimo o è circa 1 m. nella portata di
trasmissione. Se allacciate le cintura sopra una maglietta,
inumiditela leggermente nei punti di contatto degli
elettrodi.
Se gli elettrodi non sono umidi, il vostro battito non
appare sullo schermo. Se gli elettrodi sono asciutti,
inumiditeli nuovamente. Se ci sono parecchi sistemi
i di rilevazione telemetrica vicini, è bene che la
distanza tra loro sia di almeno 1.5 m. Il trasmettitore
si accende da solo appena rileva i primi battiti. Sudore
o creme possono mantenerlo acceso anche dopo l’uso
consummando la batteria. Ecco perche’ è bene pulire gli
elettrodi dopo l’uso.
persona a persona. Il numero massimo di pulsazioni
cardiache diminuisce, in media, di un punto ogni anno.
Se appartieni ad uno gruppo a rischio, chiedi a un
medico di misurare il tuo livello massimo di pulsazioni
cardiache.
Abbiamo definito tre differenti aree di pulsazioni, per
aiutarti a stabilire il tuo livello di training.
PRINCIPIANTI
Questo livello è indicato anche per i weight-watchers,
per i convalescenti e per coloro che non hanno fatto
allenamento per lungo tempo. Si raccomandano tre
periodi di training ininterrotto alla settimana, ognuno
della durata di almeno mezz’ora. Un esercizio regolare
migliora notevolmente la performance respiratoria e
circolatoria del principiante, tanto da farti sentire presto
molto più in forma.
TRAINER
Questo livello è perfetto per chi voglia migliorare il
proprio fitness e mantenerlo in ottime condizioni. Uno
sforzo ragionevole e bilanciato migliora notevolmente
le funzioni cardiovascolari e respiratorie; il training
deve durare per almeno 30 minuti e deve essere fatto
come minimo tre volte alla settimana. Per migliorare
ulteriormente la tua condizione fisica, puoi aumentare
la frequenza o l’intensità dello sforzo, ma non entrambi
allo stesso tempo!
TRAINER ATTIVO
Le esercitazioni a questo livello vanno bene solo per
coloro che hanno raggiunto una forma quasi perfetta
e devono essere precedute da lunghi periodi di
allenamenti “endurance”.
50-60 % del massimo di pulsazioni
•
60-70 % del massimo di pulsazioni
•
70-80 % del massimo di pulsazioni
•
PANNELLO
TASTI
1. SET
Selezione dei valori di riferimento.
2. RESET
Azzeramento de ivalori di allenamento, conclusione
dell’esercizio e ritorno allo stato iniziale.
Prima di scegliere gli abiti da ginnastica, tieni presente
che alcune fibre tessili in essi usate (esempio poliesteri
e poliamidi) sono produttrici di elettrostaticità, e ciò
può inficiare l’affidabilità della misura pulsazioni.
Tieni anche presente che telefono cellulare, TV ed
altri apparati elettrici formano all’intorno un campo
elettromagnetico, con conseguenti problemi nella
misura del battito cardiaco.
Per prima cosa, quindi, devi sapere qual’è il livello
massimo di battiti cardiaci, ovverossia il livello, oltre il
quale le pulsazioni non aumentano, pur aggiungendo
sforzi. Se tu non conosci il numero massimo delle tue
pulsazioni, puoi usare la seguente formula indicativa:
208 - 0,7 X L’ETÀ
Naturalmente, il valore massimo effettivo varia da
3. + / -
Impostazione dei valori di riferimento, regolazione
dell’intensità: per incrementare l’intensità/frequenza
cardiaca, digitare il tasto +, per ridurre invece, digitare il
tasto -.
4. RECOVERY
Misurazione della frequenza cardiaca di recupero.
5. START / STOP
Inizio o conclusione dell’esercizio.
SCHERMATE
1. VELOCITÀ DI ESECUZIONE (/MIN)
Velocità di pedalata (RPM). Oltre alla visualizzazione
numerica, la schermata presenta anche una
rappresentazione grafica della velocità.
39

2. DURATA ESERCIZIO
00:00- 99:59: misurazione ogni 1 secondo, h1:40-h9:
59 misurazione ogni 1 minuto.
3. FREQUENZA CARDIACA
L’icona del cuore lampeggia in base al ritmo della
frequenza cardiaca. Le icone che raffigurano le frecce
indicano se la frequenza supera per eccesso o difetto il
valore di riferimento impostato.
3 secondi entrambi i tasti freccia. Sulla schermata
numerica principale comparirà l’orologio. Regolare l’ora
con i tasti freccia, prima le ore e poi i minuti. Presando
il tasto SET, la schermata tornerà nel suo stato iniziale.
ALLENAMENTO MANUAL
Con i tasti +/- è possibile regolare il livello di resistenza
durante il programma di allenamento Manual.
C35
•
4. DISTANZA D’ESERCIZIO (KM / MIGLIA)
0,00-99,99 km / miglia
5. VELOCITÀ DI ESERCIZIO (RPM / KM/H / MPH)
00.0-99.9 km/h / mph
6. CONSUMO D’ENERGIA (KCAL/KJ)
Consumo energetico calcolato durante l’esercizio, 09999 kcal.
7. OROLOGIO (CLOCK)
Orologio.
8. TERMOMETRO (TEMP C / TEMP F)
Termometro per la misurazione della temperatura
ambientale, gradi Celsius o Fahrenheit.
9. MISURAZIONE UMIDITÀ (HUMIDITY %)
Misurazione dell’umidità ambientale, 0-100%
10. INDICATORE DI MODALITÀ
Il pannello visualizza la modalità di allenamento
selezionata (Program = programma pronto, Manual =
programma manuale, Recovery = misurazione frequenza
cardiaca di recupero, Target HR = esercizio con
frequenza caricata costante, Min Max = valore massimo
e minimo della frequenza cardiaca)
11. SCHERMATA PROFILO PROGRAMMA DI
ALLENAMENTO
Profilo del programma di allenamento preimpostato e
selezionato.
12. SCHERMATA FREQUENZA CARDIACA CUMULATIVA
Se durante l’allenamento si utilizza il
cardiofrequenzimetro, sul display sarà visulizzato il
profilo della frquenza cardiaca registrata.
13. SOSTITUZIONE PILE (BATTERY LOW)
Questo messaggio avverte l’utente della necessità di
sostituire le pile.
UTILIZZO DEL PANNELLO
Per attivare il pannello basta digitare uno dei suoi tasti.
Se il pannello rimane inutilizzato per 5 minuti, si spegne
automaticamente.
Selezionare l’unità di misurazione, utilizzando il
selettore che si trova sul retro del pannello. È possibile
selezionare tra il sistema metrico (km, km/h, Celsius) o
quello britannico (miglia, mph, Fahrenheit).
Impostare l’orologio (clock) nel modo seguente: con
il pannello acceso, pressare contemporaneamente per
1. Per iniziare l’allenamento si può pressare direttamente
il tasto verde START/STOP. Regolare il livello di
resistenza durante l’esercizio, utilizzando i tasti +/-.
2. Si può iniziare l’esercizio, regolando un valore di
riferimento. Pressare i tasti +/- fino a visualizzare il testo
Manual nella schermata numerica principale.
3. Pressare il tasto SET per aprire la schermata di
impostazione dei valori di riferimento.
4. TIME = serve per impostare la durata dell’esercizio
+/-. Pressare il tasto SET per passare all’operazione di
impostazione successiva.
5. DISTANCE = serve per impostare la distanza di
allenamento desiderata con i tasti +/-. Pressare il
tasto SET per passare all’operazione di impostazione
successiva.
6. KCAL = serve per impostare il valore di consumo
neregetico desiderato con i asti +/-. Pressare il tasto SET
per passare all’operazione di impostazione successiva.
7. PULSE = serve per impostare la soglia massi di
frequenza cardiaca raggiungibile durante l’allenamento.
Utilizzare i tasti + / -: la schermata visualizza le icone
di un cuore e di una freccia rivolta verso l’alto. Pressare
il tasto SET per impostare la soglia minima della
frequenza cardiaca: la schermata visualizza le icone
di un cuore e di una freccia rivolta verso il basso.
Impostare la soglia minima di frequenza cardiaca
raggiungibile durante l’allenamento. Utilizzare i tasti
+ / -: Se la frequenza cardica dovesse superare i valori
di riferimento, allora il valore della soglia visualizzato,
inizierà a lampeggiare. Passare poi all’impostazione della
durata dell’esercizio (TIME), pressando il tasto SET.
8. Per iniziare l’allenamento si può pressare direttamente
il tasto START/STOP. Iniziare a pedalare e, se
necessarion, regolare il livello di resistenza.
9. È possibile interrompere l’esercizio, pressando il tasto
START/STOP (nella schermata viene visualizzato il
testo Over). I dati del programma rimangono nella
memoria del pannello per 5 minuti; ciò significa che
si può riprendere l’allenamento interrotto, pressando
nuovamente i tasti START/STOP.
10. Per finire l’allenamento basta pressare il tasto
RESET quando il pannello si trova in modalità stand-by
(allenamento interrotto).
11. Se è stato impostato un valore di riferimento, il
pannello emetterà un segnale acustico e la schermata
numerica ed il valore inizieranno a lampeggiare.
Azzerrare la schermata, pressando prima il tasto
START/STOP e poi il tasto RESET.
PROGRAMMA HR-TARGET (FREQUENZA
COSTANTE)
Con gli allenamenti legati al programma Target HR
è possibile impostare un livello di frequenza cardiaca
costante; durante l’allenamento l’attrezzo regola
MANUALE D'USO
40

MANUALE D'USO • C35
I
automaticamente la resistenza in modo che pur variando
la velocità di pedalata, la frequenza cardica rimarrà
costante.
1. Pressare i tasti freccia fino a visualizzare il testo Target
HR nella schermata numerica principale.
2. Impostare il livello di frequenza desiderato, pressando
il tasto SET. La schermata visualizza il testo PULSE e le
icone di un cuore e di una freccia rivolta verso il basso
/alto. Impostare la soglia di frequenza cardiaca con i
tasti + / -. Pressare il tasto SET per passare all’operazione
di impostazione successiva.
3. TIME = serve per impostare la durata dell’esercizio
+/-. Pressare il tasto SET per passare all’operazione di
impostazione successiva.
4. DISTANCE = serve per impostare la distanza di
allenamento desiderata con i tasti +/-. Pressare il
tasto SET per passare all’operazione di impostazione
successiva.
5. KCAL = serve per impostare il valore di consumo
neregetico desiderato con i asti +/-. Pressare il tasto SET
per passare all’operazione di impostazione della durata
(TIME).
6. Per iniziare l’allenamento si può pressare direttamente
il tasto START/STOP. Iniziare a pedalare e, se
necessarion, regolare il livello di frequenza caridca con i
tasti freccia.
7. È possibile interrompere l’esercizio, pressando il tasto
START/STOP (nella schermata viene visualizzato il
testo Over). I dati del programma rimangono nella
memoria del pannello per 5 minuti; ciò significa che
si può riprendere l’allenamento interrotto, pressando
nuovamente i tasti START/STOP.
8. Per finire l’allenamento basta pressare il tasto RESET
quando il pannello si trova in modalità stand-by
(allenamento interrotto).
9. Se è stato impostato un valore di riferimento, il
pannello emetterà un segnale acustico e la schermata
numerica ed il valore inizieranno a lampeggiare.
Azzerrare la schermata, pressando prima il tasto
START/STOP e poi il tasto RESET.
testo Over). I dati del programma rimangono nella
memoria del pannello per 5 minuti; ciò significa che
si può riprendere l’allenamento interrotto, pressando
nuovamente i tasti START/STOP.
5. Per finire l’allenamento basta pressare il tasto RESET
quando il pannello si trova in modalità stand-by
(allenamento interrotto). Se è stato impostato un valore
di riferimento, il pannello emetterà un segnale acustico
e la schermata numerica ed il valore inizieranno a
lampeggiare. Azzerrare la schermata, pressando prima il
tasto START/STOP e poi il tasto RESET.
RECOVERY – MISURAZIONE FREQUENZA DI
RECUPERO
Serve per misurare la frequenza cardiaca di recupero alla
fine dell’allenamento.
1. Per passare alla misurazione della frequenza cardiaca
di recupero, bisogna pressare il tasto RECOVERY. Il
pannello visualizza il testo RECOVERY.
2. La misurazione inizia automaticamente e dura due
minuti.
NOTA BENE! Se si rilevano degli inconvenienti nella
misurazione della frequenza cardiaca, la schermata
visualizzerà il testo Err.
3. Alla fine della misurazione, verrà visualizzato il
rapporto della frequenza cardiaca di recupero come
valore percentuale. Minore sarà questo valore, migliore
sarà la condizione fisica dell’utente. Ricordate che i
valori rilevati sono collegati con la frequenza cardiaca
iniziale e che i vostri risultati sono personali e non
confrontabili con quelli degli altri.
Al fine di migliorare l’attendibilità della misurazione
frequenza cardiaca di recupero, cerca sempre di
standardizzare l’atto collegato alla misurazione, il più
precisamente possibile; incomincia a misurare, con
estrema precisione, partendo da uno stesso livello
pulsazioni.
PROFILI DI ALLENAMENTO
1. Una volta acceso il pannello, pressare il tasto +/- fino
a quando no sarà visualizzata la schermata col codice
profili P1-P8. Tutti i profili sono di tipo a coppia
costante. Maggiore sarà la velocità di pedalata, più
rapido sarà l’avanzamento e quindi più lunga sarà
la distanza percorsa. Tutti i profili hanni una durata
preimpostata di 20 minuti.
2. Selezionare il codice profilo desiderato, utilizzando
i tasti freccia. Le impostazioni relative alla durata del
profilo sono visibili, pressando il tasto SET. Con il tasto
freccia è possibile prolungare o ridurre il profilo di 5
minuti per volta. La gamma di regolazione è 10:00-90:
00 minuti.
3. Per iniziare l’allenamento si può pressare direttamente
il tasto START/STOP. Iniziare a pedalare. Con i tasti
freccia è possibile regolare il livello di resistenza durante
il programma di allenamento: per incrementare la
resistenza, digitare il tasto freccia su, per ridurre invece,
digitare il tasto freccia giù.
4. È possibile interrompere l’esercizio, pressando il tasto
START/STOP (nella schermata viene visualizzato il
4. Dalla misurazione della frequenza cardica di recupero
si può passare alla schermata principale, pressando il
tasto RESET; il pannello tornerà automaticamente
alla shermata principale un minuto dopo la fine della
misurazione.
TRASPORTO ED
IMMAGAZZINAGGIO
Cerca di seguire le seguenti istruzioni, per il trasporto
e la rimozione dell´attrezzo, perchè un sollevamento
avvenuto nella maniera incorretta può provocarti danni
alla schiena o può farti incorrere in altri incidenti:
AVVERTENZA! Stacca sempre la corrente e togli il
cavo elettrico di collegamento, prima di incominciare a
spostare l’attrezzo!
E` facile sportare la C35 grazie alle ruote integrate.
Impugnate l’attrezzo dal davanti e spingetelo lungo il
pavimento sulle ruote. Per prevenire mal funzionamenti
lasciate l’attrezzo in un posto non umido e protetto dalla
41

polvere. Lo spostamento dell’attrezzo può danneggiare
alcuni tipi di pavimento, come per esempio il parquet.
Raccomandiamo quindi di proteggere adeguatamente il
pavimento.
Per prevenire eventuali difetti al funzionamento
dell’attezzo, devi conservarla, al riparo dalla polvere, in
un posto asciutto, dove la temperatura sia quanto più
possibile costante.
MANUTENZIONE
materiale elettrico destinato all’uso nell’ambito di
determinati limiti di tensione (73/23/CEE). Pertanto il
prodotto porta l’etichetta CE.
Tutti gli crosstrainer Tunturi sono in conformità con gli
standars EN per la precisione e la sicurezza (EN-957).
A causa di una politica volta a un continuo sviluppo
del prodotto, la Tunturi si riserva il diritto di effettuare
cambiamenti nelle caratteristiche degli attrezzi, senza
darne relativo preavviso.
La C35 richiedono pochissima manutenzione.
Comunque, di tanto in tanto, controlla che tutte le viti
e i dadi siano stretti a sufficienza.
Dopo ogni seduta di allenamento, asciugare sempre
•
tutte le parti dell’attrezzo con un panno soffice e
assorbente. Non fare uso di solventi. Il sudore causa
corrosione; suggeriamo quindi di proteggere tutte le
superfici metalliche fuori delle coperture di plastica con
del Teflon.
Non rimuovere mai l’involucro di protezione
•
dell’attrezzo.
Se l’attrezzo non è stata in uso per un certo periodo
•
di tempo, la cinghia di trasmissione può presentare delle
temporanee deformazioni. Queste possono provocare la
sensazione di una pedalata leggermente irregolare, non
uniforme. Comunque, l’effetto è destinato a scomparire,
dopo solo qualche minuto d’uso, non appena la cinghia
sia ritornata alla sua forma originale.
DISTURBI DURANTE L’USO
ATTENZIONE! Nonostante un un continuo controllo
della qualità, l’attrezzura potrebbe talvolta presentare
difetti e manfunzionamenti, causati da qualche signolo
componente. Nella maggior parte dei casi, non c’è
bisogno di mettersi a far riparare tutta l’attrezzura, ma
generalmente basta sostituire il pezzo o la parte difettosa.
ATTENZIONE! La garanzia non copre danni
derivanti da inosservanza, nel montaggio, regolazione
e manutenzione, delle istruzioni fornite nella presente
guida. Le istruzioni per montaggio, uso e manutenzione
C35
•
Se nel tuo l’attrezzo compaiono delle funzioni che siano
fuori dell’ordinario, togliere la spina di corrente aspetta
per circa un minuto. Poi rimetti in funzione l’attrezzo ed
assicurati che il fenomeno sia scomparso. Qualora non
si presenti più il suddetto problema, l’attrezzo può essere
usato come d’abitudine. Se però il problema non fosse
scomparso, contatta il rivenditore.
Se l’attrezzo non funziona bene durante l’uso o se si ha
bisogno dei pezzi di ricambio, contatta i tuo rivenditore
Tunturi indicando de che cosa di tratta, le condizioni in
cui la usi, la data di acquisto, il modello e il numero di
serie del tuo attrezzo. Si raccomanda di utilizzare sempre
pezzi di ricambio originali.
DATI TECNICI
Lunghezza ....................................135 cm
Altezza .........................................157 cm
Larghezza .....................................66 cm
Peso ..............................................63 kg
Tutti gli crosstrainer assolvono ai criteri stabiliti dalle
direttive EMC dell’Unione Europea, riguardanti
la compatibilità elettromagnetica (89/336/CEE) e
MANUALE D'USO
42

MANUAL DEL USARIO • C35
E
INDICE
INFORMACION Y PRECAUCIONES .......................40
MONTAJE ................................................................. 44
EJERCICIOS CON TUNTURI .................................46
TRANSPORTE Y ALMACENAMIENTO ..................50
MANTENIMIENTO ..................................................50
DATOS TECNICOS .................................................. 50
della tua attrezzatura, devono essere seguite con molta
cura. Non rispondiamo di cambi o modifiche non
expressamente approvate da Tunturi Oy Ltd.
Ti auguriamo di avere la gioia di fare tanti
allenamenti, insieme al tuo nuovo amico Tunturi!
INFORMACION Y
PRECAUCIONES
Lea atentamente esta guía antes del
montaje, uso o mantenimiento de su
equipo de ejercicio. Mantenga esta guía
en lugar seguro; le brindará hoy y en el
futuro la información que necesite para
usar y mantener su equipo. Siga siempre
atentamente sus instrucciones. Por favor
anótese que la garantía no cubre daños
debidos a transportes o negligencias
de ajuste o no seguir instrucciones
de mantenimiento descritas en este
manual.
OBSERVACIONES SOBRE SU SALUD
Antes de empezar a hacer cualquier
•
ejercicio, consulte con un médico y
hágase un chequeo.
Si durante el ejercicio experimenta
•
náuseas, mareos u otros síntomas
anormales, pare inmediatamente y
consulte con un médico.
La máquina no se debe usar a la
•
intemperie.
Coloque la máquina sobre una
•
superficie dura y horizontal.
Compruebe si el lugar donde hace el
•
ejercicio tiene buena ventilación. Para
evitar resfriados, evite las corrientes en
el lugar del ejercicio.
En entrenamiento, la máquina tolera
•
una temperatura ambiente de entre
+10°C y +35°C.
La máquina también puede almacenarse
a temperaturas de 15°C a +40°C. La
humedad
relativa ambiente nunca debe exceder el
90 %.
OBSERVACIONES SOBRE LA
MÁQUINA
Es una buena idea colocar la máquina
•
sobre una base protectora.
Si se deja a los niños usar la máquina,
•
primero se los debe enseñar a usarla
bien y después se les debe vigilar,
teniendo en cuenta el desarrollo físico y
mental del niño y su personalidad.
Antes de empezar a usar la máquina,
•
compruebe si todos sus mecanismos
funcionan bien. No use la máquina si
observa alguna anomalía.
Esta máquina sólo debe ser utilizada
•
por una persona cada vez.
Agarre el manillar al subir o bajar de
•
la máquina. No se ponga de pie sobre la
estructura.
Cuando haga ejercicio, lleve ropa y
•
calzado adecuados.
Para evitar agujetas y tirones
•
musculares empiece el ejercicio
calentando y termínelo poco a poco
(pedaleando lentamente a menos
resistencia). No olvide hacer ejercicios
de estiramiento después de usar la
máquina.
OBSERVACIONES SOBRE
ELEJERCICIO
No se apoye nunca sobre el contador
•
de usuario.
Pulse las teclas con la punta del dedo,
•
las uñas pueden dañar la membrana de
las teclas.
Mantenga las manos alejadas de las
•
partes móviles de la máquina.
Proteja el contador de la luz solar.
•
Seque siempre la superficie del contador
43
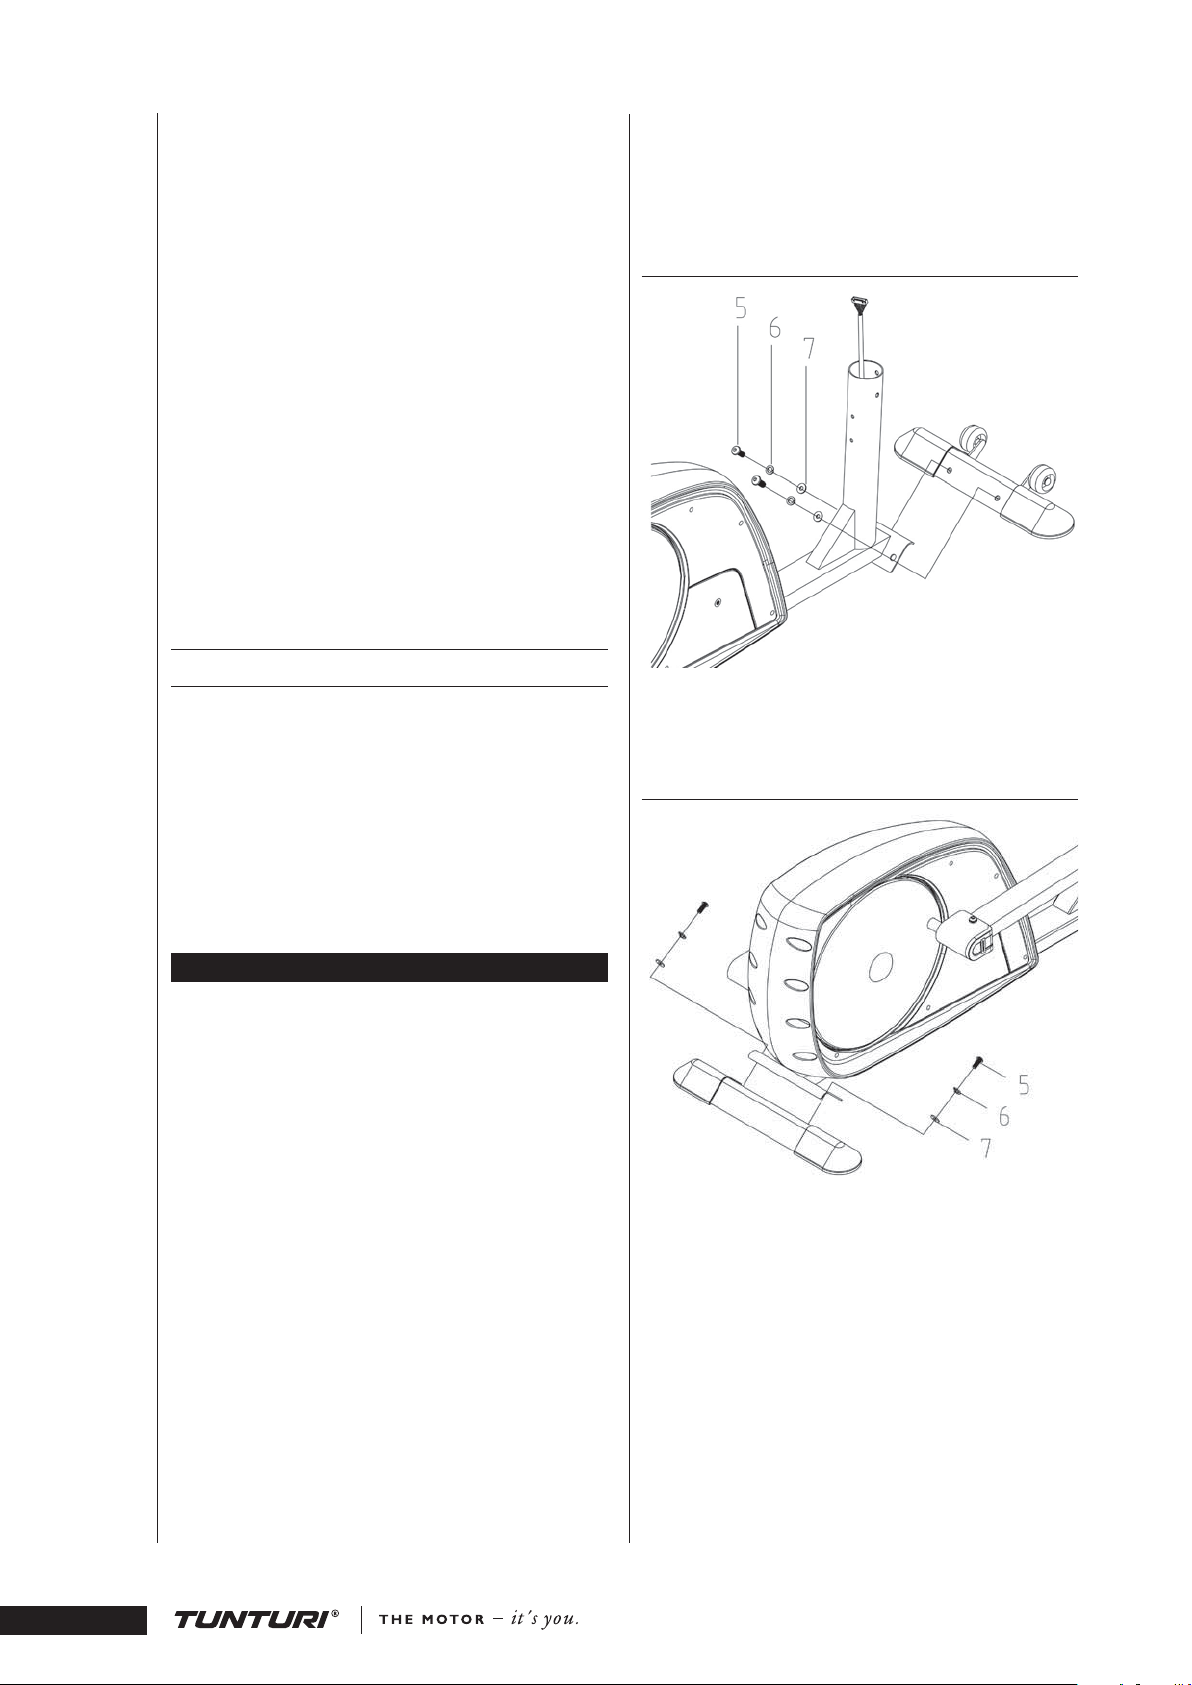
si caen unas gotas de transpiración
sobre el contador.
No intente hacer revisiones o ajustes
•
de la máquina que no estén descritos en
este Manual.
El peso máximo de un usuario de esta
•
máquina es de 135 kg.
El equipo ha sido diseñado
•
para un uso en casa. La garantía
Tunturi se aplica sólo a defectos o
malfuncionamiento en un uso en casa
(24 meses). Encontrará información más
detallada sobre la garantía de su equipo
de ejercicio en el libro de garantía
suministrado con el equipo.
BIENVENIDO AL MUNDO TUNTURI
DEL EJERCICIO
Su elección demuestra que Ud. realmente está dispuesto
a invertir en su bienestar y en su condición física, y
asimismo sabe apreciar la calidad y el estilo. Con el
equipamiento de ejercicio Tunturi, Ud. ha elegido
como compañero de entrenamiento un producto de alta
calidad, seguro y motivador. Cualquiera sea su meta,
puede estar seguro de que este equipo le acompañará
hasta cumplirla. Entcontrará información sobre el
uso de su equipo de ejercicios y todo lo inherente a
un entrenamiento eficiente en el sitio de Tunturi en
Internet (WWW.TUNTURI.COM).
transporte. Puede desecharlo una vez que haya abierto
el paquete. Las direcciones derecha, izquierda, adelante
y atrás se definen desde la posición de ejercicio. Deje
unos 100 cm de espacio detrás, delante y a cada lado de
la máquina.
SOPORTE DELANTERO DE APOYO
Ajuste el soporte delantero de apoyo equipado con las
ruedas de transporte en el armazón con dos tornillos,
arandelas y arandelas de cierre.
SOPORTE TRASERO DE APOYO
C35
•
MONTAJE
Para el montaje son necesarias dos personas. Compruebe
si en el embalaje están todas las piezas:
1. Armazón
2. Soporte delantero de apoyo
3. Soporte trasero de apoyo
4. Tubo central del armazón
5. Reposabrazos (2)
6. Reposapies (2)
7. Contador
8. Barra de apoyo
9. Barra metálica
10. Cable de conexión
11. Piezas de montaje (señalados con un asterisco (*) en
la lista de repuestos): se recomienda guardar las piezas de
kit, por ejemplo, para eventuales reajustes del equipo
Si advierte que en la entrega falta alguna pieza, tome
contacto con su proveedor informando el modelo, el
número de serie del equipo y el número de parte de la
pieza faltante. En el reverso de esta guía encontrará la
lista de piezas. El paquete incluye un saco de silicato
para absorber la humedad durante el almacenamiento y
Instale los protectores de plástico en los dos extremos del
soporte trasero de apoyo y coloque éste en el armazón
con dos tornillos, arandelas y arandelas de cierre.
MANUAL DEL USARIO
44
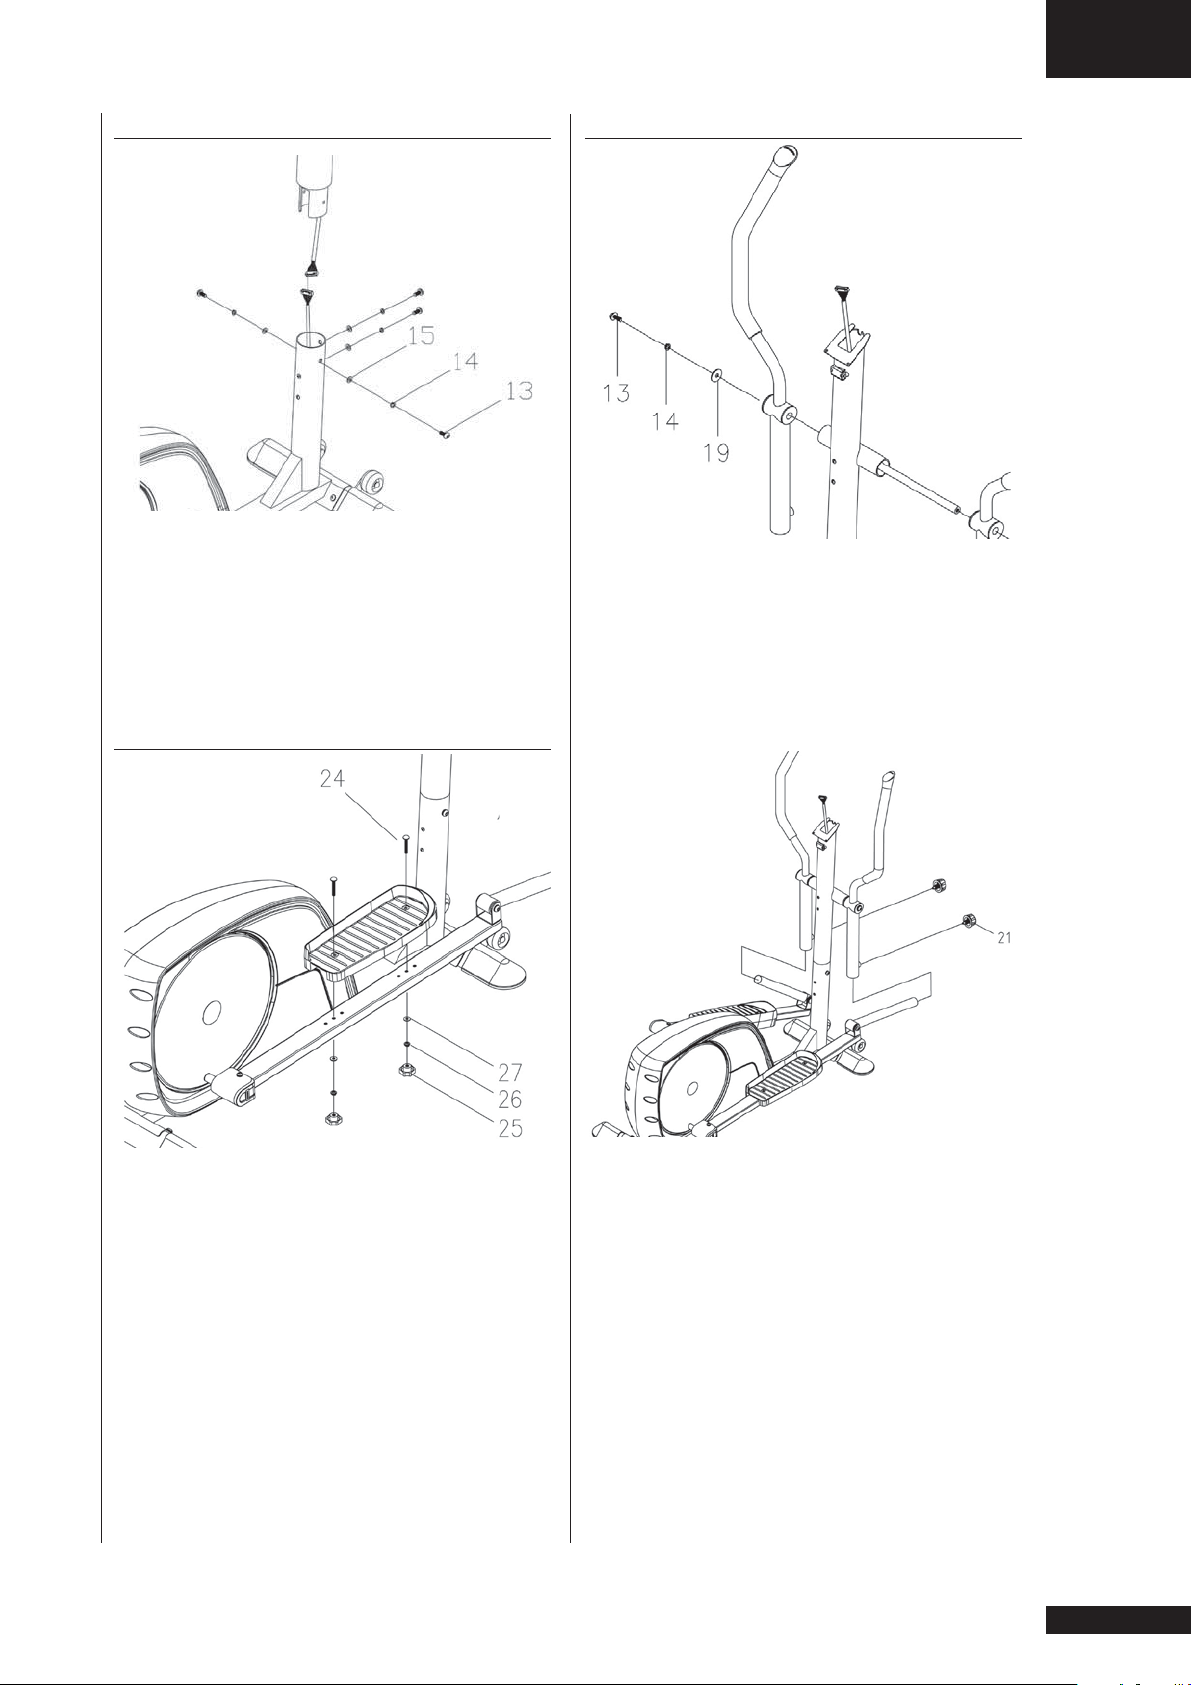
MANUAL DEL USARIO • C35
E
TUBO DELANTERO
Quite la cinta de goma del cable del contador que
sale del tubo de armazón. Ajuste el cable del contador
del tubo de armazón al conector del tubo delantero.
Introduzca el tubo delantero dentro del tubo de
armazón sin dañar en absoluto el cable de contador.
Apriete totalmente las arandelas y los tornillos del tubo
delantero.
REPOSAPIES
REPOSABRAZOS
Introduzca la barra metálica en el cojinete del
reposabrazos izquierdo e instale éste último cerca del
agujero de fijación del tubo delantero e introduzca
la barra, también, dentro del agujero del eje. Luego,
introduzca el reposabrazos derecho en el extremo de
la barra metálica y bloquee la barra colocando en el
extremo del cojinete del reposabrazos derecho una
arandela grande, una aradela de cierre y un tornillo de
fijación.
Coloque los reposapies en el lugar deseado del pedal
con dos tornillos, dos arandelas / tornillo y tuercas de
fijación.
Apriete el reposabrazos con dos llaves de seis. Empuje
la palanca pedal hacia delante hasta que se pueda
introducir el tubo de fijación (situado en la parte
delantera de la palanca) dentro del reposabrazos.
Coloque el reposabrazos en relación con el reposapie
ajustándolo con un tornillo regulador. Repita la
operación con el reposabrazos derecho.
NOTA: El modelo europeo permite elijar un lugar de
fijación deseado (ver Regulación del pedal).
45

CONTADOR Y BARRA DE APOYO
CABLE DE CONEXIÓN
C35
•
Ajuste el manillar al tubo delantero. Retire los
protectores de plástico de las cabezas de los tornillos
de ajuste y haga pasar los cables del pulso de la mano a
través del orificio central del tubo delantero. Apriete los
tornillos fuertemente para que el manillar no se mueva
durante la realización del ejercicio. Coloque el protector
de plástico en su lugar sobre el tornillo de ajuste.
Desatornille los dos tornillos de ajuste situados en la
parte inferior del contador. Acople el cable procedente
del tubo delantero así como los cables del pulso al
conector del contador.Introduzca el contador en la
cabeza del tubo delantero y afiance el contadoren su
lugar con los tornillos de ajuste: tenga cuidado de no
dañar los cables.
Conecte el transformador al conector que hay justo
sobre el soporte trasero. Conecte después el cable del
transformador a la corriente.
* Desenchufe siempre el aparato de ejercicio de la
corriente y quite el cable del aparato inmediatamente
después de usarlo.
* Asegúrese de que el cable no queda debajo del aparato.
¡IMPORTANTE! En el modelo C35 hay también un
compartimiento para pilas en la parte posterior del
contador. De este modo el aparato puede utilizar
como fuente de alimentación tanto la corriente de la
red como pilas (4 unidades de pilas tipo C). En caso
de que se utilice como fuente de alimentación sólo las
pilas, ha de tenerse en cuenta que el servofreno las agota
con bastante rapidez. Le recomendamos que utilice la
corriente de la red como fuente de alimentación del
aparato. Observe, no obstante, que el reloj del contador
toma la corriente de las pilas cuando el aparato no está
conectado a la fuente de alimentación, de no ser así el
reloj se pondría a cero.
EJERCICIOS CON TUNTURI
REGULACIÓN DEL PEDAL (MODELO EUROPEO)
Controle la altura de los pedales de la siguiente manera:
Gire la llave reguladora una vuelta en el sentido
contrario de reloj y tire de la misma de manera que el
tubo de fijación del pedal se mueva libremente hacia
arriba y hacia abajo. Coloque el pedal soltando la llave
una vez que ésta esté a la altura deseada. Se escuchará un
“clic” cuando el pedal esté bien colocado. Para terminar,
apriete la llave en el sentido de reloj. NOTA: Antes de
empezar el ejercicio, asegúrese siempre de que la llave
está bien apretada. Elija la altura del pedal de manera
que en todas las fases del ejercicio el movimiento elíptico
del equipo produzca una sensación agradable en los
tobillos.
MANUAL DEL USARIO
46
NIVEL DE EJERCICIO
El ejercicio con la bicicleta estática es un excelente
ejercicio aeróbico, siempre que se elija una resistencia
no muy alta pero se mantenga durante bastante tiempo.
El ejercicio aeróbico consiste en aumentar al máximo el

MANUAL DEL USARIO • C35
E
suministro de oxígeno al cuerpo, lo que mejora el estado
físico y la resistencia. La capacidad del cuerpo para
quemar grasas depende directamente de su capacidad de
oxigenación. El ejercicio aeróbico debe ser sobre todo
agradable. Puede usted sudar, pero no debe asfixiarse.
Por ejemplo, mientras pedalea debe usted poder hablar
sin llegar nunca a jadear. Para conseguir un nivel básico
de forma debe hacer ejercicio como mínimo tres veces
por semana, 30 minutos cada vez. Mantener ese nivel
básico requiere varias sesiones de ejercicio a la semana.
Una vez alcanzado, es fácil mejorarlo sin más que
aumentar las sesiones semanales.
El ejercicio siempre es bueno para perder peso, pues
es la única manera de aumentar la energía consumida
por el cuerpo. Por eso siempre vale la pena combinar
el ejercicio periódico con una dieta sana. Una persona
que quiera perder peso debe hacer ejercicio todos los
días (al principio unos 30 minutos o algo menos, pero
aumentando poco a poco la duración hasta llegar a una
hora diaria).
Empiece cada día pedaleando despacio y con baja
resistencia, pues una persona con exceso de peso que
haga ejercicio violento puede someter su sistema
cardiovascular a un esfuerzo excesivo. A medida que vaya
mejorando su estado de forma puede ir aumentando
poco a poco la resistencia y velocidad de la pedalada.
Para medir la eficacia del ejercicio, controle su pulso. El
contador de pulso le permite vigilar continuamente el
pulso durante el ejercicio para saber si es suficientemente
eficaz pero soportable.
transmisor y la correa encima de una camiseta ligera,
moje un poco la camiseta en los puntos donde los
electrodos tocan la piel. Colóquese el transmisor justo
debajo del pecho, con la correa elástica suficientemente
apretada para que los electrodos estén en contacto
con su piel, pero no tan fuerte que no pueda respirar
normalmente. El transmisor envía automáticamente la
lectura de las pulsaciones al contador hasta una distancia
aproximada de 1 m.
Si la superficie de los electrodos no está mojada, no
aparece en pantalla la medida del pulso. Si los electrodos
se secan, hay que volver a mojarlos. Para que la medida
del pulso sea más exacta, espere a que los electrodos
se calienten. Si hay varios medidores telemétricos del
pulso cerca unos de otros, la distancia mínima debe ser
de 1,5 m. Del mismo modo, si sólo se usa un receptor
con varios transmisores, sólo debe haber en el radio de
alcance del transmisor una persona. El transmisor sólo se
activa cuando se usa para medir. Sin embargo, el sudor
y otras humedades pueden hacer que se active y gaste
pila. Por tanto, es importante secar bien los electrodos
después de usarlo.
A la hora de elegir la ropa adecuada para realizar los
ejercicios tenga en cuenta que algunas fibras textiles
(por ejemplo el poliéster o la poliamida) producen
electricidad estática, lo que puede impedir una correcta
medición del pulso. Tenga en cuenta que el teléfono
móvil, el televisor y otros aparatos eléctricos forman
a su alrededor un campo electromagnético que puede
producir errores en la medición del pulso.
Sea cual sea su objetivo, obtendrá los mejores resultados
entrenando a un nivel de esfuerzo adecuado, para lo cual
el mejor indicador es su propio ritmo cardíaco.
MEDIDA DEL PULSO
La medición del pulso basada en el seguimiento de la
circulación periférica utiliza los sensores situados en los
manillares, que miden las pulsaciones de la circulación
sanguínea siempre que el usuario del equipo toque los
sensores en los manillares simultáneamente. Para que la
medida del pulso sea fiable, la piel de las manos tiene
que estar ligeramente húmeda y en contacto constante
con los sensores.
MEDIDA DEL RITMO CARDÍACO CON UN
CINTURÓN
El C35 se fabrica con función de medida del pulso.
Quiere decirse que la máquina lleva un receptor interno
compatible con los transmisores de pulso La medida del
pulso es más fiable si se hace con un sensor telemétrico
en el que los electrodos de un transmisor sujeto al pecho
transmiten las pulsaciones del corazón al contador
creando un campo electromagnético.
NOTA: Si Usted tiene incorporado un marcapasos,
consulte a su médico antes de utilizar un monitor
inalámbrico del ritmo cardiaco.
Si quiere medir su pulso de este modo durante su
ejercicio, moje las ranuras de los electrodos del
transmisor con saliva o agua. Si quiere ponerse el
Determine primero su ritmo cardíaco máximo, es decir,
el ritmo que ya no aumenta al incrementarse el esfuerzo.
Si Ud. no conoce su ritmo cardíaco máximo, use como
guía la siguiente fórmula:
208 – 0,7 X EDAD
El máximo varía según las personas. El ritmo cardíaco
máximo disminuye en promedio un punto por año. Si
Ud. pertenece a alguno grupo de riesgo, solicite a un
médico que le mida su ritmo cardíaco máximo. Hemos
definido tres zonas diferentes de ritmo cardíaco para
ayudarle en su entrenamiento dirigido.
PRINCIPIANTE
También recomendable para “vigilantes de peso”,
convalecientes y personas que no hayan hecho ejercicio
físico durante largo tiempo. Se recomiendan tres
sesiones semanales de por lo menos media hora cada
una. El ejercicio regular mejora considerablemente
las funciones respiratorias y circulatorias de los
principiantes, quienes rápidamente sentirán el progreso.
ENTRENAMIENTO
máximo
Perfecto para una ejercitación de progreso y
mantenimiento. Un esfuerzo regular y razonable
desarrolla efectivamente el corazón y los pulmones
entrenando un mínimo de 30 minutos al menos tres
veces por semana. Para mejorar aún más su condición,
aumente o la frecuencia o el esfuerzo, pero no ambos al
mismo tiempo.
50-60 % del ritmo cardíaco máximo
•
60-70 % del ritmo cardíaco
•
47

ENTRENAMIENTO ACTIVO
70-80 % del ritmo
•
cardíaco máximo
El ejercicio de este nivel es adecuado sólo para quienes
están en óptimo estado, y presupone trabajos de alto
rendimiento.
CONTADOR
TECLAS DE FUNCION
1. SET
Selección de los valores objetivo
2. RESET
Puesta a cero de los valores objetivo, conclusión del
ejercicio y retorno al estado inicial
3. + / -
Selección de los valores objetivo, regulación de la
intensidad: incremento de la resistencia / ritmo cardiaco
tecla +, reducción de la resistencia / ritmo cardiaco tecla
-
4. RECOVERY
Medición del ritmo cardiaco de restablecimiento
10. INDICADOR DEL MODO DE FUNCIÓN
SELECCIONADO
El contador indica la modalidad de ejercicio
seleccionada (Program = programa predeterminado,
Manual = ejercicio manual, Recovery = medición
del ritmo cardiaco de restablecimiento, Target HR =
ejercicio de ritmo cardiaco, Min Max = establecimiento
de los límites inferior y superior del ritmo cardiaco)
11. MONITOR DE PERFIL DEL PROGRAMA DE
EJERCICIO
Perfil del programa predeterminado del ejercicio
seleccionado
12. MONITOR DEL RITMO CARDIACO ACUMULADO
En caso de que se realice la medición del ritmo cardiaco,
en el monitor aparece el perfil del ritmo cardiaco
configurado durante la realización del ejercicio
13. CAMBIO DE PILAS (BATTERY LOW)
La señal de aviso alerta de la necesidad del recambio de
las pilas del contador
USO DEL CONTADOR
C35
•
5. START / STOP
Inicio e interrupción del ejercicio
MONITOR GRAFICO
1. VELOCIDAD DE RENDIMIENTO (/MIN.)
Velocidad de rotación del pedal (RPM), además en la
parte inferior del campo de texto aparece una columna
que indica la velocidad del pedal
2. DURACIÓN DEL EJERCICIO
00:00 – 99:59: medición a intervalos de 1 segundo, h 1:
40 – h 9:59 medición a intervalos de 1 minuto
3. PULSACIONES DURANTE EL EJERCICIO
El símbolo corazón parpadea intermitentemente al
ritmo de las pulsaciones medidas. Los símbolos de flecha
en el monitor alertan en caso de que el ritmo cardiaco
supere el límite superior establecido o no alcance el
límite inferior fijado
4. RECORRIDO DEL EJERCICIO (KM. / MILLAS)
0.00 – 99.9 Km. / millas
5. VELOCIDAD DEL EJERCICIO (KMH / MPH )
00.0 – 99.9 Km/h / mph
6. CONSUMO DE ENERGÍA (KCAL.)
Estimación del consumo total de energía durante la
realización del ejercicio, 0 – 9999 Kcal.
7. RELOJ (CLOCK)
Reloj con tiempo real
8. TERMÓMETRO (GRADOS C / GRADOS F)
Termómetro de la temperatura ambiente, escala Celsius
o Fahrenheit
9. HIGRÓMETRO (HUMEDAD %)
Higrómetro de la humedad ambiente, 0 – 100%
El contador se pone en funcionamiento al presionar
cualquiera de las teclas del contador. En caso de que el
equipo permanezca sin uso 5 minutos, el contador se
desconecta automáticamente.
Seleccione las unidades de medición que desee mediante
el conector que se encuentra en la parte posterior del
contador. Puede seleccionar unidades métricas (Km.,
Km/h, Celsius) o unidades británicas (millas, mph,
Fahrenheit).
Para poner en hora el reloj (clock) proceda como sigue:
presione en el estado de inicio del ejercicio ambas
teclas de flecha al mismo tiempo durante 3 segundos.
En el monitor numérico principal aparecerá el reloj.
Introduzca los datos de la hora mediante las teclas de
flecha, para pasar de horas a minutos así como para
volver al estado de inicio del ejercicio presione la tecla
SET.
EJERCICIO MANUAL
En la modalidad de ejercicio manual puede regular el
nivel de resistencia durante el ejercicio mediante las
teclas + / -.
1. Puede iniciar el ejercicio inmediatamente presionando
las teclas START / STOP. Regule el nivel de resistencia
durante el ejercicio presionando las teclas + / -.
2. Puede iniciar el ejercicio estableciendo un valor
objetivo para el ejercicio. Presione la tecla + / - hasta
que aparezca el texto manual en en la parte inferior del
monitor numérico principal.
3. Presione la tecla SET para poder acceder al
establecimiento de los valores objetivo.
4. TIME = establezca la duración que desee para el
ejercicio presionando las teclas + / -. Al presionar la tecla
SET pasará a la siguiente configuración.
5. DISTANCE = establezca la distancia que desee para el
ejercicio presionando las teclas + / -. Al presionar la tecla
MANUAL DEL USARIO
48

MANUAL DEL USARIO • C35
E
SET pasará a la siguiente configuración.
6. KCAL. = establezca el valor objetivo de consumo
de energía para el ejercicio presionando las teclas +
/ -. Al presionar la tecla SET pasará a la siguiente
configuración.
7. PULSE = establezca el límite superior para el valor
del ritmo cardiaco durante el tiempo de duración del
ejercicio presionando las teclas + / -: en el monitor
aparecerán los símbolos del corazón y una flecha hacia
arriba. Presione la tecla SET para pasar a determinar
el límite inferior del valor del ritmo cardiaco: en el
monitor aparecerán los símbolos del corazón y una
flecha hacia abajo. Establezca el límite inferior para el
valor del ritmo cardiaco durante el tiempo de duración
del ejercicio presionando las teclas + / -. En caso de
que el valor de su ritmo cardiaco exceda los límites
establecidos, el contador le avisará haciendo parpadear
de forma intermitente la flecha del límite en cuestión
en el monitor. Después de esto podrá retornar al
establecimiento de la duración del ejercicio (TIME)
presionando la tecla SET.
8. Puede iniciar el ejercicio presionando la tecla START
/ STOP. Empiece a pedalear y regule en caso de que sea
necesario el nivel de resistencia durante el ejercicio.
9. Puede interrumpir el ejercicio presionando la tecla
START / STOP (en el monitor del contador figura
el texto Over). Los datos del programan permanecen
almacenados en la memoria del contador durante 5
minutos, de modo que podrá reanudar el ejercicio
interrumpido presionando nuevamente la tecla START
/ STOP.
10. Puede concluir el ejercicio presionando la
tecla RESET estando el contador en el estado de
interrupción.
11. En caso de que haya determinado un valor objetivo,
el contador emitirá una señal acústica y el valor del
monitor comenzará a parpadear intermitentemente
cuando se haya alcanzado el valor objetivo. Ponga el
monitor a cero presionando primero la tecla START /
STOP y después la tecla RESET.
EJERCICIO TARGET HR (RITMO CARDIACO
CONSTANTE)
En el ejercicio Target HR puede determinar el nivel
de ritmo cardiaco constante que desee; durante
la realización del ejercicio el aparato se ocupa
automáticamente de que el nivel del ritmo cardiaco
establecido por usted se mantenga independientemente
de la velocidad del pedal.
1. Presione las teclas de flecha hasta que en la parte
inferior del monitor numérico principal aparezca el
texto Target HR.
2. Determine el nivel de ritmo cardiaco constante que
desee para el ejercicio presionando la tecla SET. En el
monitor aparece el texto PULSE así como los símbolos
del corazón y las flechas hacia arriba y hacia abajo.
Puede establecer el nivel objetivo de ritmo cardiaco
presionando las teclas + / -. Al presionar la tecla SET
podrá pasar a la siguiente configuración.
3. TIME = establezca la duración que desee para el
ejercicio presionando las teclas + / -. A presionar la tecla
SET pasará a la siguiente configuración.
4. DISTANCE = establezca la distancia que desee para el
ejercicio presionando las teclas + / -. Al presionar la tecla
SET pasará a la siguiente configuración.
5. KCAL. = establezca el valor objetivo de consumo
de energía para el ejercicio presionando las teclas + / -.
Presionando la tecla SET retornará al establecimiento de
la duración del ejercicio (TIME).
6. Comience el ejercicio presionando la tecla START
/ STOP. Empiece a pedalear y en caso de que sea
necesario, regule el nivel del ritmo cardiaco continuo
durante el ejercicio presionando las teclas de flecha.
7. Puede interrumpir el ejercicio presionando la tecla
START / STOP (en el monitor del contador figura
el texto Over). Los datos del programan permanecen
almacenados en la memoria del contador durante 5
minutos, de modo que podrá reanudar el ejercicio
interrumpido presionando nuevamente la tecla START
/ STOP.
8. Puede concluir el ejercicio presionando la
tecla RESET estando el contador en el estado de
interrupción.
9. En caso de que haya determinado un valor objetivo,
el contador emitirá una señal acústica y el valor del
monitor comenzará a parpadear intermitentemente
cuando se haya alcanzado el valor objetivo. Ponga el
monitor a cero presionando primero la tecla START /
STOP y después la tecla RESET.
PERFILES DE EJERCICIO
1. Presione las teclas de flecha una vez que el contador
haya sido puesto en marcha (flecha hacia arriba y flecha
hacia abajo) hasta que en el monitor del contador
aparezca tanto el distintivo de perfil (P1 - P8) como el
modo de perfil. Todos los perfiles son los denominados
perfiles de momento constante de biela: cuanto más
rápidamente pedalee, más rápidamente avanza la
distancia medida por el contador. La duración prefijada
para todos los perfiles es de 20 minutos.
2. Seleccione el perfil que desee haciendo uso de las
teclas de flecha. Presionando la tecla SET pasará a la
determinación del tiempo del perfil de ejercicio: por
medio de las teclas de flecha podrá fijar el tiempo con
intervalos de 5 minutos entre 10:00 y 90:00 minutos.
3. Comience el ejercicio presionado la tecla START /
STOP. Empiece a pedalear. Durante la realización del
ejercicio puede cambiar el nivel de resistencia de aquella
parte del perfil que esté realizando en ese momento
presionando las teclas de flecha: flecha hacia arriba
aumenta la resistencia, flecha hacia abajo la reduce.
4. Puede interrumpir el ejercicio presionando la tecla
START / STOP (en el monitor del contador figura
el texto Over). Los datos del programan permanecen
almacenados en la memoria del contador durante 5
minutos, de modo que podrá reanudar el ejercicio
interrumpido presionando nuevamente la tecla START
/ STOP.
5. Puede concluir el ejercicio presionando la
tecla RESET estando el contador en el estado de
interrupción. En caso de que realice el perfil hasta el
final, el contador emitirá una señal acústica y el valor
del monitor empezará a parpadear intermitentemente
cuando se haya alcanzado el valor objetivo. Ponga el
monitor a cero presionando primero la tecla START /
STOP y después la tecla RESET.
49

RECOVERY – MEDICIÓN DEL RITMO CARDIACO
DE RECUPERACIÓN
Mide su ritmo cardiaco de recuperación una vez
concluido el ejercicio.
1. Podrá acceder a la medición del ritmo cardiaco de
recuperación presionando la tecla RECOVERY. En el
monitor aparecerá el texto Recovery.
2. La medición comienza automáticamente y dura dos
minutos.
por lo tanto que usted proteja todas las superficies de
métal fuera de las cubiertas plásticas con la cera de
Teflon.
Nunca quite la carcasa protectora del equipo.
•
Si la máquina no se usa por un largo período, la cinta
•
de transmisión puede deformarse temporariamente, lo
que puede producir una sensación de pedaleo levemente
desparejo. Después de unos minutos de uso, sin
embargo, el efecto desaparecerá al retornar la cinta a su
forma original.
C35
•
¡IMPORTANTE! En caso de que se produzca una
irregularidad durante la medición del ritmo cardiaco, el
texto Err. sustituirá al valor del ritmo cardiaco.
3. Al término del periodo de medición aparecerá en el
monitor la relación de recuperación del ritmo cardiaco
expresada en forma de porcentaje. Cuánto más pequeña
sea la cifra indicada, mejor es la condición física de
que goza. Observe que su resultado está en relación
con el ritmo cardiaco que tenía en el momento inicial
de la medición y que su resultado es personal y por
consiguiente no comparable directamente con los
resultados de otras personas. Para garantizar la veracidad
del resultado de la medición procure no cambiar
las circunstancias de la misma. Siempre empiece la
medición en el mismo nivel del pulso.
4. Para pasar de la medición del ritmo cardiaco de
recuperación a la visualización general del monitor,
presione la tecla RESET; el contador pasará al monitor
general automáticamente después de transcurrido un
minuto de la finalización de la medición.
TRANSPORTE Y
ALMACENAMIENTO
Siga estas instrucciones al trasladar y mover la máquina,
ya que levantarla incorrectamente puede forzarle la
espalda u otros accidentes:
NOTA: Siempre cierre el interruptor de alimentación
y desenchufe el cable de alimentación antes de mover el
equipo.
Incline la máquina hasta que quede apoyada únicamente
en las ruedas del soporte. Para dejarla de nuevo, bájela
manteniéndose siempre detrás del sillín. Al desplazar el
aparato se pueden producir daños en algunos suelos, por
ejemplo, en el parquet. Por esta razón el suelo deberá
protegerse.
Para evitar malfuncionamientos de la máquina, guárdela
en sitio seco con la menor variación de temperatura
posible y protegida del polvo.
MANTENIMIENTO
Los equipos Tunturi requieren muy poco
mantenimiento. Verifique sin embargo de tiempo en
tiempo que todos los tornillos y tuercas estén ajustados.
Después de ejercitar, seque siempre todas las piezas
•
del equipo con un paño suave, absorbente. No use
disolventes. El sudor causa la corrosión; recomendamos
DEFECTOS DE FUNCIONAMENTO
Pese al continuo control de calidad que realizamos, el
equipo puede presentar defectos o malfuncionamientos
debidos a fallos en componentes individuales. En la
mayoría de los casos no es necesario llevar todo el
equipo a reparar, y generalmente es suficiente con
reemplazar la parte defectuosa. En el reverso de esta
guía encontrará la lista de piezas. Utilice sólo piezas de
repuesto mencionadas en la lista de piezas de repuesto.
En el caso que se produzcan funciones anormales
en el equipo desenchufar la máquina y espere
aproximadamente un minuto. Vuelva a poner en marcha
la máquina para comprobar que el aparato ya funciona
adecuadamente. En este caso puede seguir utilizando el
equipo. Si el problema persiste, póngase en contacto con
el distribuidor del equipo.
DATOS TECNICOS
Largo ............................................135 cm
Ancho ..........................................66 cm
Alto ..............................................157 cm
Peso ..............................................63 kg
Todos los modelos Tunturi cumplen los requerimientos
de las directivas EMC de la UE sobre compatibilidad
electromagnética (89/336/EEC) y equipo eléctrico
diseñado para su uso dentro de ciertos límites de tensión
(73/23/EEC). Por lo tanto, este producto ostenta la
etiqueta CE.
Todos los modelos Tunturi en versión norteamericana
(115 V) cumplen con los requisitos de compatibilidad
electromagnética de la FCC y por consiguente llevan
la etiqueta de la FCC. Los modelos Tunturi en versión
norteamericana cumplen los requerimientos de las
directivas UL 1647 y CSA C 22.2 No. 68-92.
Todos los modelos Tunturi cumplen los standards EN
de precisión y seguridad (EN-957).
Debido a su política de continuo desarrollo de
productos, Tunturi se reserva el derecho de cambiar las
especificaciones sin previo aviso.
NOTA: La garantía no cubre daños debidos a
negligencias en los procedimientos de montaje, ajuste y
mantenimiento descritos en esta guía. Deben seguirse
estrictamente estas instrucciones en el montaje, uso y
mantenimiento de su equipo. Cambios o modificaciones
no expresamente aprobados por Tunturi Oy Ltd no
están autorizados a los usuarios.
MANUAL DEL USARIO
50
Le deseamos muchas agradables sesiones de
entrenamiento con su nuevo compañero de
entrenamiento Tunturi.

BRUKSANVISNING • C35
S
INNEHÅLL
BRUKSANVISNING .................................................48
MONTERING ............................................................52
ATT TRÄNA MED TUNTURI ...................................54
TRANSPORT OCH .................................................57
FÖRVARING ...........................................................57
UNDERHÅLL ........................................................... 57
TEKNISKA DATA .....................................................58
BRUKSANVISNING
Läs noga igenom denna handbok
innan du monterar upp, använder eller
reparerar ditt nya träningsredskap.
Spara denna handbok; den innehåller
information som du behöver nu
och i framtiden för att använda och
underhålla ditt redskap. Följ alltid dessa
instruktioner noggrannt. Observera att
garantin inte täcker skador uppkomna
genom försumlighet av inställningen och
justeringar eller underlåtenhet att följa
givna anvisningarna.
BEAKTANSVÄRT RÖRANDE HÄLSAN
Konsultera din läkare innan du inleder
•
ditt träningsprogram.
Om du känner dig illamående, får
•
svindel eller uppvisar andra onormala
symtom under träningen, skall du
omedelbart avbryta träningen och vända
dig till din läkare.
Redskapet tål vid träning en
•
omgivning från +10°C till +35°C.
Redskapet kan lagras vid temperaturer
mellan -15°C och +40°C. Luftfuktigheten
i tränings- eller upplagringsomgivningen
får aldrig överskrida 90 %.
BEAKTANSVÄRT RÖRANDE
REDSKAPETS ANVÄNDNING
Skydda mätaren mot solljus och torka
•
alltid ytan av ytan på mätaren om du ser
svettdroppar på den.
Föräldrar och andra personer som har
•
ansvar för barn skall beakta, att barnens
naturliga lekbehov och experimentlust
kan leda till situationer, för vilka
redskapet inte är avsett. Om barn får
använda redskapet, måste föräldrarna
eller andra ansvariga personer beakta
barnens psykiska och fysiska utveckling
och framför allt barnens natur. Barn
skall erhålla handledning i redskapets
användning.
Kontrollera att redskapet är i skick
•
innan du inleder träningen.Använd aldrig
ett redskap som är sönder.
Luta dig aldrig mot mätaren.
•
Tryck på tangenterna med
•
fingertopparna; naglar kan skada
tangentmembranet.
Använd aldrig redskapet, när
•
sidokåporna inte är på plats.
Värm upp före varje träningspass
•
(långsam trampning med lågt motstånd)
och avsluta med avslappningsövningar
och muskelsträckningar för att undvika
träningsvärk.
BEAKTANSVÄRT RÖRANDE
TRÄNINGSMILJÖN
Redskapet får inte användas utomhus.
•
Placera redskapet på ett så plant
•
underlag som möjligt.
Kontrollera att träningslokalen har en
•
god ventilation. Undvik dock träning i
dragiga lokaler, eftersom det kan leda till
förkylning.
För undvikande av skador
•
rekommenderas att redskapet placeras
på ett skyddat underlag.
Redskapet får endast användas av en
•
person åt gången.
Håll i styret vid på- och avstigning.
•
Använd lämpliga kläder och skor när
•
du tränar.
Utför endast de service-och
•
justeringsåtgärder som beskrivs i denna
bruksanvisning. Givna anvisningar bör
följas.
Redskapet får inte användas av
•
personer som väger över 135 kg.
51

Redskapet är avsett för träning i
•
hemmet! Tunturi Ltd:s garanti gäller
fel eller brister som uppkommer vid
användning i hemmet (24 månader).
VÄLKOMMEN TILL TUNTURIS
TRÄNINGSVÄRLD!
Ditt val visar att du verkligen vill investera i din
kondition och ditt välbefinnande; det visar också
att du verkligen värdesätter hög kvalitet och stil.
Med ett träningsredskap från Tunturi har du valt en
säker och motiverande produkt av hög kvalitet till
träningspartner. Oberoende av vilken målsättning du
har, är vi säkra på att det här är den rätta utrustningen
för att du skall nå ditt mål. Du kan hitta information
on hur du ska använda ditt träningsredskap och hur
man tränar effektivt pä Tunturis webplats på adressen
WWW.TUNTURI.COM.
MONTERING
För montering behövs två personer. Börja med att packa
upp och kolla att du har följande delar:
FRÄMRE STÖDET
Fäst det främre stödet med transporthjulen vid ramen
med två skruvar, brickor och låsbrickor.
BAKRE STÖDET
1. Ram
2. Främre stöd
3. Bakre stöd
4. Ramstolpe
5. Handtag (2 st.)
6. Fotplattor (2 st.)
7. Mätare
8. Handstöd
9. Metallstång
10. Nätsladd
11. Påse med installationstillbehör (innehållet har
märkts ut med * i reservdelsförteckningen): spara
tillbehören, för du kan behöva dem bl.a. till att göra
inställningar på redskapet
Det finns en reservdelsförteckning i slutet av denna
bruksanvisning. Om du märker ett problem, kontakta
din handlare och uppge alltid modell och serienummer.
I förpackningen finns det även en silikatpåse som
absorberar fukt under lagring och transport. Släng påsen
när du packat upp redskapet. Riktningarna vänster,
höger, fram och bak används så som man uppfattar dem
när man sitter i träningsställning. Placera redskapet så
att du har ett fritt utrymme på minst 100 cm framför,
bakom och på båda sidorna.
Tryck fast plastskydden i ändorna på det bakre stödet
och fäst stödet vid ramen med två skruvar, brickor och
låsbrickor.
RAMSTOLPEN
C35
•
BRUKSANVISNING
52

Ta bort gummibandsfästet på mätarledningen som
kommer ur ramröret. Koppla mätarledningen från
ramröret till kontakten i ramstolpen. För in ramstolpen
i ramröret: var noga med att inte skada mätarledningen!
Fäst stolpen med fyra brickor, låsningsbrickor och
fästskruvar. Dra åt hårt.
PEDALERNA
S
BRUKSANVISNING • C35
För den vänstra pedalarmen framåt, så att du kan föra in
fäströret i den främre ändan av pedalarmen i handtaget.
Välj önskad fästpunkt (se Justering av pedalarm) och
fäst handtaget vid fotpedalen med en justerskruv. Gör
samma sak med det högra handtaget.
Fäst pedalerna på önskat ställe på pedalarmen med två
skruvar, två brickor per skruv och en fästmutter.
HANDTAG
För metallstången genom lagerhuset för det vänstra
handtaget, placera handtaget bredvid fästhålet på
stolpen och för stången även genom axelhålet.
Tryck därefter fast det högra handtaget i ändan på
metallstången och lås stången genom att fästa en stor
bricka, en låsbricka och en fästskruv i ändan på lagerhus.
Dra åt handtagen med två sexkantshålskruvar.
MÄTAREN OCH HANDSTÖDET
Fästa handstödsröret på det främre stomröret.
Lossa på plastskydden på fästskruvarna och skjut
handpulskablarna genom hålet på främre stomröret.
Fästa skruvarna så tätt att handstödet inte kan röra sig
under träningen. Återställa plastskydden på plats ovanpå
fästskruvarna.
53

Lossa på de två fästskruvarna i botten av mätaren.
Förbinda kabeln från främre stomröret och pulskablarna
med mätarens anslutningar. Skjut mätaren in i ändan
av främre stomröret och fästa mätaren på sin plats med
fästskruvar. Akta för att inte skada kablarna!
ATT TRÄNA MED TUNTURI
JUSTERING AV PEDALARM
Justera höjden för pedalarmarna på följande sätt: vrid
vredet ett varv motsols och dra ut knoppen, så att
fäströret till pedalarmen kan röra sig fritt upp och ned.
Fäst pedalarmen genom att släppa greppet om knoppen
när höjden är lämplig. Vredet åker tillbaka med ett
klick. Dra därefter åt vredet medsols. OBS! Försäkra
dig alltid om att vredet är ordentligt åtdraget, innan du
börjar träna. Justera höjden på en pedalarm så, att den
elliptiska rörelsen känns behaglig i vristerna i varje fas av
rörelsen..
TRÄNINGSNIVÅ
Träning med motionscykel är en utmärkt aerobisk
motion. Grundidén är att motionen skall vara
förhållandevis lätt, men räcka länge. Aerobisk
motion bygger på en förbättring av den maximala
syreupptagningsförmågan, som i sin tur förbättrar
uthålligheten och konditionen. Kroppens förmåga att
använda fett som bränsle är direkt beroende av dess
förmåga att transportera syre.
C35
•
NÄTSLADD
Anslut nätsladden till uttaget ovanför det bakre
stödbenet. Anslut transformatorns nätsladd till
vägguttaget.
* Drag ur stickproppen efter varje träningspass.
* Kontrollera att nätsladden inte hamnar under
redskapet.
OBS! I modellen C35 finns det ett ytterligare batterifack
på mätarens bakdel. Det vill säga att redskapet kan
användas med nätström eller med 4 styck C-batterier.
Används endast batterier beakta att servobromsen
utnyttjar batterierna ganska snabbt. Vi rekommenderar
att du använder nätström som den primära strömkällan.
Beakta också att mätarens klocka använder ström från
batterier när redskapet inte är kopplad in i någon annan
strömkälla. Annars skulle klockan bli nollställd.
Aerobisk motion är framför allt angenäm. Du skall bli
svettig, men du får inte bli andfådd. När du trampar
skall du kunna prata, och inte bara flåsa. Du borde
motionera minst tre gånger i veckan à 30 minuter.
Detta ger dig en god baskondition. För att du skall
kunna upprätthålla baskonditionen bör du motionera
minst ett par gånger i veckan. När du har uppnått din
baskondition, kan den lätt förbättras genom att du ökar
antalet träningspass. Motion är alltid bra för den som
vill gå ner i vikt, eftersom det är det enda sättet att öka
kroppens energiförbrukning. Speciellt för personer som
bantar lönar det sig därför att kombinera kalorifattig
kost med regelbunden motion.
Den som bantar bör motionera dagligen. Först cirka
30 minuter eller ännu kortare perioder per gång
och sedan småningom längre perioder upp till en
timme per dag. Det lönar sig att börja långsamt med
låg tramphastighet och litet motstånd. En alltför
hög belastning kan hos överviktiga personer belasta
hjärtat och blodcirkulationen för mycket. I takt med
att konditionen förbättras, kan du småningom öka
motståndet och tramphastigheten. Effekten kan du
kontrollera med hjälp av pulsen. Tack vare C35:s
pulsmätare kan du lätt följa med pulsfrekvensen under
träningen och säkerställa att träningen är tillräckligt
effektiv och att belastningen inte är alltför stor.
PULS
Oberoende av vilken din målsättning är når du bästa
resultat genom att träna på rätt ansträngningsnivå och
det bästa måttet på det är din puls.
PULSMÄTNING MED SENSORER I
STYRSTÅNGEN
Blodcirkulationen är grunden för pulsmätning via
handtagens givare, och pulsen mäts när användaren rör
vid handtagens bägge sensorer samtidigt. Ett pålitligt
BRUKSANVISNING
54

BRUKSANVISNING • C35
S
mätresultat förutsätter att huden hela tiden berör
sensorerna och att huden är aningen fuktig.
TRÅDLÖS PULSMÄTNING
C35 har en inbyggd pulsmottagare kompatibel med
telemetrisk pulsöverföring. Sändaren kan köpas som
tillbehör. Trådlös pulsmätning, där elektroderna i en
sändare på bröstkorgen överför hjärtats slag med hjälp
av ett elektromagnetiskt fält till mätaren, har visat sig
vara det tillförlitligaste sättet att mäta pulsen.
VIKTIGT! I det fall du använder pacemaker – hör med
din läkare om du kan använda trådlös pulsmätning.
För trådlös mätning av pulsen under träningen, skall du
noggrant fukta de räfflade elektroderna i elektrodbältet
med vatten eller saliv. Om du använder pulssändaren
ovanpå skjortan, skall skjortan fuktas under
elektroderna. Spänn det elastiska bältet med sändaren
kring bröstet under bröstmusklerna, så att elektroderna
hela tiden har hudkontakt under träningen. Bältet
får dock inte vara så spänt att andningen försvåras.
Pulsvärdet från pulssändaren överförs automatiskt till
mottagaren upp till ett avstånd på 1 m.
Om elektrodytorna inte är fuktiga, visar mätaren inget
pulsvärde. Elektroderna skall då fuktas på nytt. Tänk
också på att elektroderna skall värmas upp på huden till
kroppstemperatur för att ge tillförlitliga resultat. Om
det finns flera apparater för trådlös pulsmätning bredvid
varandra, skall avståndet mellan dem vara minst 1,5
m. Om det bara finns en mottagare, men flera sändare,
får endast en person med sändare befinna sig inom
räckvidd för mottagaren under mätningen. När du tar
av dig elektrodbältet, kopplas sändaren bort. Fukt kan
dock hålla sändaren aktiverad, vilket förkortar batteriets
livslängd. Därför är det viktigt att sändaren omsorgsfullt
torkas av efter varje användning.
tränat på länge. Tre träningspass i veckan på minst en
halvtimme var rekommenderas. Regelbunden träning
förbättrar andnings- och cirkulationskapaciteten hos
nybörjare betydligt och du kommer snabbt att märka
förbättringen.
MOTIONÄR
60-70 % av maximipulsen
•
Denna nivå är perfekt för att förbättra och upprätthålla
konditionen. Även en måttlig ansträngning utvecklar
hjärtat och lungorna effektivt, om du tränar i minst
30 minuter åtminstone tre gånger i veckan. För
att ytterligare förbättra din konditon, höj antingen
träningsfrekvensen eller ansträngningen, men inte båda
på samma gång!
AKTIV IDROTTARE
70-80 % av maximipulsen
•
Träning på denna nivå lämpar sig bara för personer med
mycket bra kondition och bör föregås av träning för
lång uthållighet.
MÄTAREN
FUNKTIONSKNAPPARNA
1. SET
Välja målsättningsvärdena.
2. RESET
Nollställa träningsvärdena, sluta träning och återställ
allmänna displayen
3. + / -
Sätta målsättningsvärdena, intensitetsjustering: öka
motståndet / pulsen med plusknappen, minska
motståndet/pulsen med minusknappen
4. RECOVERY
Mätningen av återhämtningspulsen.
Observera när du väljer kläder att vissa fibrer i tyget
(t.ex. polyester, polyamid) genererar statisk elektricitet
och kan därför hindra en tillförlitlig pulsmätning.
Observera att mobiltelefoner, tv-apparater och andra
elektriska anordningar genererar ett elektromagnetiskt
fält omkring sig och kan därför ge upphov till problem i
pulsmätningen.
Ta först reda på din maximipuls, dvs. på vilken nivå
pulsen inte längre stiger trots att ansträngningen höjs.
Om du inte känner till din maximipuls, kan du använda
följande formler som riktgivare:
208 – 0,7 X ÅLDERN
Maximipulsen varierar från person till person.
Maximipulsen går i medeltal ner med en enhet per år.
Om du hör till någon riskgrupp, be en läkare mäta din
maximipuls åt dig.
Vi har definierat tre olika pulsområden för att hjälpa dig
när du sätter upp mål för träningen:
NYBÖRJARE
50-60 % av maximipulsen
•
Denna nivå lämpar sig också för viktväktare,
rehabiliteringspatienter och personer som inte har
5. START/STOP
Börja / avbryta träningen.
DISPLAYEN
1. PRESTATIONSHASTIGHET (/MIN)
Tramphastighet (RPM). Under avläsningen syns en
pelare som visar hastigheten.
2. TRÄNINGSTID
00:00 – 99:59; mätning i en sekunds intervaller, h1:40h9:59 mätning i en minuts intervaller
3. TRÄNINGSPULS
Hjärtsymbolen blinkar i takten med pulsmätningen.
Displayens pilsymboler visar om pulsen överskrider eller
underskrider det inställda gränsvärdet.
4. TRÄNINGSSTRÄCK (KM/MILES)
0.00-99.99 km/miles
5. TRÄNINGSHASTIGHET (KMH/MPH)
00.0-99.9 kmh/mph
6. ENERGIFÖRBRUKNING (KCAL)
Den estimerade totalenergiförbrukning under träningen,
0-9999 kcal
55

7. KLOCKA (CLOCK)
Realtidsklocka.
8. TERMOMETER (TEMP C / TEMP F)
Mäter rumstemperaturen antingen i Celsius eller
Fahrenheit
9. FUKTIGHETSMÄTARE (HUMIDITY %)
Mäter fuktigheten i rummet, 0 – 100%.
10. DISPLAYEN AV DET VALDA
FUNKTIONERINGSSÄTTET
Displayen visar det valda funktioneringssättet
(Program= ett fabrikinstallerat program, Manual= ett
manuellt inställt program, Recovery= mätningen av
återhämtningspulsen, Target HR= pulsträning, Min
Max = det utsatta under- och övergränsvärdet för
pulsen)
11. DISPLAYEN AV TRÄNINGSPROGRAMMETS PROFIL
Visar profilen av det valda fabrikinstallerade
programmet
12. DISPLAYEN AV KUMULATIV PULS
Mäts pulsen under träningssessionen ser man pulsens
profil formas under träningens lopp.
13. BATTERIBYTE (BATTERY LOW)
En varning påminner om batteribytet.
ANVÄNDNING AV MÄTAREN
knappen SET kommer du till nästa sättning.
6. KCAL = sätt en önskad energiförbrukningsnivå med
hjälp av plus- och minus- knappar. Genom att trycka på
knappen SET kommer du till nästa sättning.
7. PULSE = sätt ett övre gränsvärde för träningspulsen
med hjälp av plus- och minusknappar: på displayen
visas ett hjärta och en pil uppåt. Tryck på knappen SET
för att sätta ett nedre gränsvärde för träningspulsen:
Displayen visar ett hjärta och en pil nedåt. Sätt ett
nedervärde för träningspulsen genom att trycka på
plus- och minusknappar. Om du överskrider eller
underskrider de utsatta gränsvärdena visar displayen
detta genom att blinka den ifrågavarande pilen. Efter
detta återvänder du med knappen SET till att inställa
träningstiden (TIME).
8. Du kan börja träningen genom att trycka på knappen
START/STOP. Börja trampa och vid behov justera
moståndet under träningens lopp.
9. Du kan avbryta träningen genom att trycka på
knappen START/STOP (I displayen står ordet
”OVER”). Programinformationen lagras för fem
minuter i mätarens minne; återvänder du inom denna
tid gäller det bara att trycka på knappen START/STOP
för att fortsätta med träningen.
10. Du kan sluta träningen genom att trycka på -
knappen RESET när mätaren är i paustillståndet.
11. Har du utsatt ett målsättningsvärde ger mätaren
en ljudsignal när den är i paustillståndet efter att
målsättningsvärdet har uppnåtts. Nollställa siffrorna
genom att först trycka på knappen START/STOP och
därefter knappen RESET.
C35
•
Mätaren sätts igång genom att trycka någon av
mätarknapparna. Används redskapet inte i fem minuter
släcks mätaren automatiskt av.
Välj mätningsenheten med kopplingen på mätarens
bakdel. Du kan välja antingen metriska (km, km/h,
Celsius) eller engelska (mile, mph, Fahrenheit) enheter.
Ställ mätarens klocka (clock) på följande sätt: Vid
mätarens allmän display håll bägge pilknappar
nedtryckna tre sekunder. Då kommer klockan fram
i huvuddisplayen. Ställ tiden genom att trycka på
pilknapparna; från timmar till minuter och tillbaka till
allmänna displayenF kommer du genom att trycka på
knappen SET.
MANUELL TRÄNING (MANUAL)
I manuella träningen kan du justera motståndet under
träningens lopp genom att trycka på pilknapparna.
1. Du kan börja träningen genast genom att trycka
på knappen START/STOP. Justera motståndet under
träningens lopp med pilknapparna.
2. Du kan börja träningen genom att sätta gränsvärden
för träningssessionen. Tryck på pilknappen tills ordet
MANUAL står under huvuddisplayen.
3. Trycka på knappen SET för att sätta
målsättningsvärden.
4. TIME = sätt en önskad träningstid med hjälp av plus-
och minusknappar. Genom att trycka på knappen SET
kommer du till nästa sättning.
5. DISTANCE = sätt en önskad träningssträck med
hjälp av plus- och minusknappar. Genom att trycka på
TARGET HR –TRÄNING (KONSTANT PULS)
I Target HR-träningen sätter du en önskad konstant
puls. Under träningen sköter redskapet automatiskt
om att pulsen förblir på samma nivå oavsett
tramphastigheten.
1. Tryck på pilknappen tills ”Target HR” visas på
huvuddisplayen.
2. Sätt den önskade konstanta pulsnivån för träningen
genom att trycka på knappen SET-. På displayen
visas ”PULSE” samt ett hjärta och pilen uppåt och
nedåt. Målsättningspulsnivån sätts med plus- och
minusknappar. Med knappen SET kommer du till nästa
sättning.
3. TIME = sätt en önskad träningstid med hjälp av plus-
och minusknappar. Genom att trycka på knappen SET
kommer du till nästa sättning.
4. DISTANCE = sätt en önskad träningssträcka med
plus- och minusknappar. Genom att trycka på knappen
SET kommer du till nästa sättning.
5. KCAL = sätt en önskad energiförbrukningsnivå
med hjälp av plus- och minus- knappar. Genom att
trycka på knappen SET återvänder du till sättningen av
träningstiden (TIME).
6. Börja träningen med att trycka på knappen START/
STOP. Börja trampa och vid behov justera moståndet
under träningens lopp.
7. Du kan avbryta träningen genom att trycka på
knappen START/STOP ( På displayen står ”OVER”).
Programinformationen lagras för fem minuter i
mätarens minne; återvänder du inom denna tid gäller
det bara att trycka på knappen START/STOP igen för
BRUKSANVISNING
56

BRUKSANVISNING • C35
S
att fortsätta med träningen.
8. Du kan sluta träningen genom att trycka på knappen
RESET när mätaren är i paustillståndet.
9. Har du utsatt ett målsättningsvärde ger mätaren
en ljudsignal när den är i paustillståndet efter att
målsättningsvärdet har uppnåtts. Nollställa siffrorna
genom att först trycka på knappen START/STOP och
därefter knappen RESET.
TRÄNINGSPROFILER
1. Efter att mätaren startats tryck pilknappen (pil uppåt
eller nedåt) tills på displayen står en profilkod (P1-P8)
och profilform. Alla profiler är så kallade standardmo
tståndsprofiler; dvs ju mer du trampar desto snabbare
framskrider du på din träningssträcka. Alla profiler
har vid fabrikationen programmerats en längd av 20
minuter.
2. Välj en önskad profil med pilknappar. Genom att
trycka på knappen SET kan du sätta träningstiden: med
pilknappar kan du sätta tiden i fem minuters mellanrum
mellan 10 och 90 minuter.
3. Börja träningen genom att trycka på knappen
START/STOP. Börja trampa. Under träningens lopp
kan du med pilknapparna ändra motståndsnivån av
den profil, som du håller på att prestera; motsåndet
ökar genom att trycka på pilen uppåt, och motståndet
minskar genom att trycka på pilen nedåt.
4. Du kan avbryta träningen genom att trycka på
knappen START/STOP (på displayen står ordet
”OVER”). Programinformationen lagras för fem
minuter i mätarens minne; återvänder du inom denna
tid gäller det bara att trycka på knappen START/STOP
för att fortsätta med träningen.
5. Du kan sluta träningen genom att trycka på knappen
RESET när mätaren är i paustillståndet. Slutför du
profilen ger mätaren en ljudsignal och värdet på
displayen börjar blinka efter att målsättningsvärdet
uppnåtts. Nollställa displayen genom att först trycka på
knappen START/STOP och därefter knappen RESET.
RECOVERY – MÄTNINGEN AV
ÅTERHÄMTNINGSPULSEN
Mäta återhämtningspulsen efter träningen.
1. Mätningen kan du börja med att trycka på knappen
RECOVERY. På displayen står “Recovery”.
2. Mätningen börjar automatiskt och varar två minuter.
mätaren till den allmänna displayen en minut efter
återhämtningsmätningen slutförts.
TRANSPORT OCH
FÖRVARING
Vänligen följ nedanstående instruktioner när du vill
flytta på redskapet, eftersom du med fellyft kan sträcka
ryggen eller löpa risk för andra skador:
OBS! Koppla alltid av strömmen och dra ur elkabeln
innan du börjar flytta på redskapet!
Redskapet är lätt att förflytta tack vare de inbyggda
transporttrullarna. Ställ dig på framsidan av redskapet,
fatta tag i handtagen och luta det framåt. Redskapet kan
nu rullas bort. När man flyttar på redskapet kan vissa
golvmaterial ta skada, t.ex. parkettgolv. Underlaget bör i
sådana fall skyddas.
För att försäkra sig om att redskapet fungerar felfritt bör
man förvara det på ett torrt och dammfritt ställe med så
jämn temperatur som möjligt.
UNDERHÅLL
Modellen C35 kräver så gott som inget underhåll.
Kontrollera dock ibland att alla skruvar och muttrar är
åtdragna.
Vänligen rengör redskapet efter träningen med en
•
mjuk absorberande duk. Använd inga lösningsmedel.
Svett fräter metall; därför rekommenderar vi att du
skyddar alla synliga metall delarna med till exempel
skydsolja av teflon.
Ta aldrig bort skyddskåporna på redskapet!
•
Om redskapet inte används på en tid, kan det ge ett
•
temporärt fel på transmissionsremmen. Detta kan leda
till att motståndet känns ojämnt när du trampar. Efter
några minuters användning går detta dock över, när
remmen återtar sin ursprungliga form.
STÖRNINGAR VID ANVÄNDNING
OBS! Trots kontinuerlig kvalitetskontroll kan fel
eller funktionsstörningar som beror på någon enskild
komponent förekomma. Därför är det onödigt att hela
redskapet skickas på reparation, eftersom det för det
mesta räcker med att aktuell komponent byts.
OBS! Förekommer störningar under mätningen syns det
ingen avläsning på displayen; i stället står det “Err”.
3. Till slutet av mätningen visar displayen pulsens
återhämtningsrelation som procenttal. Ju mindre
avläsning, desto bättre kondition har du. Beakta
att dina resultater befinner sig i en relation till
inledningsmomentens pulsnivå och att dina resultater
är personliga prestationer som inte kan direkt jämföras
med andras resultater.För att förbättra tillförlitligheten
i mätningen av återhämtningspulsen bör du sträva efter
att alltid göra mätningen på samma sätt och så noggrant
som möjligt; börja mätningen så exakt som möjligt vid
samma pulsnivå.
4. Återvändningen från aterhämtningsmätningen sker
genom att trycka på knappen RESET; för övrigt återgår
Om ditt redskap fungerar på ett sätt som avviker
från det normala, koppla bort strömmen och vänta
i en minut. Koppla därefter på redskapet igen och
kontrollera om felet är avhjälpt. Om felet inte upprepas,
kan du använda redskapet normalt. Om felet inte
avhjälps av detta, kontakta din försäljare. Uppge alltid
redskapets modell och serienummer. Beskriv problemet,
hur redskapet använts, och uppge inköpsdagen.
Kontakta din försäljare om du behöver reservdelar.
Uppge alltid redskapets modell, serienummer och
numret på reservdelar; du hittar en lista på reservdelar i
slutet på den här handboken. Till apparaten får endast
delar från reservdelslistan användas.
57

TEKNISKA DATA
Längd ...........................................135 cm
Höjd ............................................157 cm
Bredd ...........................................66 cm
Vikt ..............................................63 kg
C35 uppfyller kraven i EU:s EMC-direktiv gällande
elektromagnetisk kompatibilitet (89/336/EEC) och
elutrustning som utformats för användning inom vissa
gränser för spänningen (73/23/EEC). Därför är denna
produkt CE-märkt.
C35 uppfyller EN-standarden för precision och säkerhet
(EN-957).
På grund av vår policy för kontinuerlig
produktutveckling förbehåller vi, Tunturi, oss rätten till
ändringar.
OBS! Garantin gäller inte skador som uppkommit
pga. underlåtande att iaktta de instruktioner för
montering, justering och underhåll som beskrivits här.
Instruktionerna måste följas noggrannt vid montering,
användning och underhåll av redskapet. Redskapet som
modifieras eller förändras på ett sätt som inte är godkänt
av Tunturi Oy Ltd får inte användas.
Vi önskar dig mycket nöje i träningen med
din nya träningspartner från Tunturi.
C35
•
BRUKSANVISNING
58

KÄYTTÖOHJE • C35
FIN
SISÄLTÖ
HUOMAUTUKSET JA VAROITUKSET ....................55
ASENNUS ................................................................ 60
KULJETUS JA SÄILYTYS .......................................65
HUOLTO ..................................................................65
TEKNISET TIEDOT .................................................65
HUOMAUTUKSET JA
VAROITUKSET
Tämä ohjekirja on tärkeä osa
kuntolaitettasi: perehdy tähän
oppaaseen huolellisesti ennen kuin
asennat, käytät tai huollat kuntolaitettasi.
Sinun on syytä myös säilyttää tämä
opas, sillä se on jatkossakin oppaasi niin
kuntolaitteesi tehokkaaseen käyttöön
kuin huoltoonkin. Muista aina noudattaa
tämän oppaan ohjeita. Huomaa, että
takuu ei korvaa mitään vahinkoja, jotka
ovat aiheutuneet tässä ohjekirjassa
mainittujen asennus-, säätö- ja huoltoohjeiden laiminlyönneistä.
HUOMIOITAVAA TERVEYDESTÄSI
Ennen harjoittelun aloittamista käy
•
varmistuttamassa terveydentilasi
lääkärillä.
Jos harjoittelun aikana tunnet
•
pahoinvointia, huimausta tai muita
epänormaaleja oireita, keskeytä
harjoittelu välittömästi ja ota yhteys
lääkäriin.
Estääksesi lihasten venähtämisen tai
•
kipeytymisen aloita ja päätä jokainen
harjoituskerta verryttelyllä (hidasta
poljentaa alhaisella vastuksella). Muista
myös venytellä harjoittelun päätteeksi.
HUOMIOITAVAA
HARJOITTELUYMPÄRISTÖSTÄ
Huolehdi, että harjoitteluympäristö on
•
riittävän hyvin ilmastoitu. Vilustumisen
estämiseksi vältä kuitenkin harjoittelua
vetoisissa tiloissa.
Harjoitteluolosuhteissa laite kestää
•
lämpötiloja +10 asteesta +35 asteeseen.
Varastoitaessa
laite kestää lämpötiloja -15 asteesta +40
asteeseen. Missään tapauksessa ilman
kosteus ei saa ylittää 90 %.
HUOMIOITAVAA LAITTEEN KÄYTÖSTÄ
Mikäli lasten annetaan käyttää laitetta,
•
vanhempien tai muiden vastuullisten
tulee ottaa huomioon lasten sekä
henkinen että fyysinen kehitys ja ennen
kaikkea luonne. Lapsia tulee valvoa ja
opastaa laitteen oikeassa käytössä.
Varmista ennen harjoittelun
•
aloittamista, että laite on kaikin puolin
kunnossa. Älä koskaan käytä viallista
laitetta.
Vain yksi henkilö kerrallaan saa
•
harjoitella laitteella.
Nouse laitteelle ja laitteelta ottaen
•
tukea käsikahvoista.
Käytä harjoittelun aikana
•
asianmukaisia vaatteita ja kenkiä.
Älä milloinkaan nojaa laitteen mittariin!
•
Paina näppäimiä sormenpäällä;
•
kynnet voivat vaurioittaa näppäinkalvoa.
Älä käytä laitetta mikäli laitteen
•
suojakotelot eivät ole paikallaan.
Suojaa mittari auringonvalolta ja
•
kuivaa mittarin pinta aina, mikäli sen
päälle on tippunut hikivettä.
Älä yritä tehdä laitteelle muita kuin
•
tässä ohjekirjassa kuvattuja säätöjä tai
huoltotoimenpiteitä.
Laitteen ehdoton
•
enimmäiskäyttäjäpaino on 135 kg.
Laitetta saa käyttää vain sisätiloissa.
•
Sijoita laite kovalle ja mahdollisimman
•
tasaiselle alustalle. Aseta laite myös
lattiaa suojaavalle alustalle.
Laite on tarkoitettu kotikäyttöön.
•
Tunturi Oy:n myöntämä takuu kattaa
vain kotikäytössä ilmenneet viat ja
puutteet; takuuaika on 24 kuukautta.
59

TERVETULOA TUNTURI-KUNTOILIJOIDEN
JOUKKOON!
Valintasi osoittaa, että tahdot todella huolehtia
kunnostasi; valintasi osoittaa myös sen, että arvostat
korkeaa laatua ja tyylikkyyttä. Tunturi-kuntolaitteen
myötä olet valinnut korkealuokkaisen, turvallisen ja
motivoivan kuntolaitteen harjoituskumppaniksesi.
Olkoon tavoitteesi kuntoilun saralla mikä tahansa,
olemme varmoja, että tällä Tunturin kuntolaitteella
tulet tavoitteesi saavuttamaan. Lisätietoa Tunturin
kuntolaitteista sekä harjoittelusta löydät internetistä
Tunturin kotisivuilta
WWW.TUNTURI.COM.
ASENNUS
Avaa pakkauslaatikko leikkaamalla kulmat auki ja levitä
sivut ja päädyt lattialle. Suosittelemme, että asennukseen
osallistuu kaksi henkilöä. Varmista, että pakkaus sisältää
seuraavat osat:
1. Runko
2. Etutukijalka
3. Takatukijalka
4. Eturunkoputki
5. Käsikahvat (2 kpl)
6. Jalkalaudat (2 kpl)
7. Mittari
8. Käsituki
9. Akselitanko
10. Muuntaja
11. Asennustarvikesarja (sisältö merkitty *:llä
varaosaluetteloon): säästä asennustarvikkeet, sillä voit
tarvita niitä mm. laitteen säätämiseen
Kiinnitä siirtopyörillä varustettu etutukijalka runkoon
kahdella pultilla, aluslaatalla ja lukituslaatalla.
TAKATUKIJALKA
Paina muovisuojat takatukijalan päihin ja kiinnitä
takatukijalka runkoon kahdella pultilla, aluslaatalla ja
lukituslaatalla.
ETUPUTKI
C35
•
Ota tarvittaessa yhteys laitteen myyjään ja ilmoita
laitteen malli, sarjanumero sekä puuttuvan osan
varaosanumero. Varaosaluettelon löydät käyttöohjeen
lopusta. Pakkauksessa on kuljetuksen ja varastoinnin
aikana kosteutta imevä silikaattipussi, jolle ei ole enää
käyttöä avattuasi pakkauksen. Ohjeessa esiintyvät
nimitykset oikea, vasen, etu ja taka on määritelty
harjoitusasennosta katsottuna. Aseta laite siten, että sen
ympärillä on joka suuntaan vähintään 100 cm vapaata
tilaa.
ETUTUKIJALKA
Poista runkoputkesta tulevan mittarijohdon
kuminauhapidike. Liitä runkoputkesta tuleva
mittarijohto etuputkessa olevaan liittimeen. Työnnä
etuputki runkoputken sisään: varo vahingoittamasta
mittarijohtoa! Kiinnitä etuputki neljällä aluslaatalla,
lukituslaatalla sekä kiinnitysruuvilla tiukkaan.
JALKALAUDAT
KÄYTTÖOHJE
60

KÄYTTÖOHJE • C35
FIN
Kiinnitä jalkalaudat haluamaasi kohtaan poljinvartta
kahdella ruuvilla , kahdella aluslaatalla / ruuvi sekä
kiristysmutterilla.
KÄSIKAHVAT
Työnnä käsitukien akselitanko vasemman kahvan
laakeripesän läpi, aseta kahva etuputken kiinnitysreiän
viereen ja työnnä tanko myös akselireiän läpi. Paina
tämän jälkeen oikeanpuoleinen kahva metallitangon
päähän ja lukitse tanko kiinnittämällä sen molempiin
päihin suuri aluslaatta, lukituslaatta sekä kiinnitysruuvi.
Kiristä kahvat kahdella kuusiokoloavaimella.
MITTARI JA KÄSITUKI
Kiinnitä käsituki etuputkeen. Poista kiinnitysruuvien
päissä olevat muovisuojat ja työnnä käsipulssijohdot
etuputken keskellä olevan reiän läpi. Kiristä ruuvit niin
tiukkaan, ettei käsituki liiku harjoittelun aikana. Paina
muovinen suoja paikalleen kiinnitysruuvien päälle.
Työnnä vasemmanpuoleista poljinvartta eteenpäin
siten, että voit työntää poljinvarren etupäässä olevan
kiinnitysputken kahvan sisään. Valitse haluamasi
kiinnityskohta (kts. Poljinvarren säätö) ja kiinnitä
kahva jalkalautaan säätöruuvilla. Toista toimenpide
oikeanpuoleiselle kahvalle.
Irrota mittarin pohjassa olevat kaksi kiinnitysruuvia.
Yhdistä etuputkesta tuleva johto sekä pulssijohdot
mittarin liittimiin. Työnnä mittari etuputken päähän
ja kiinnitä mittari paikalleen kiinnitysruuveilla: varo
vahingoittamasta johtoja.
MUUNTAJA
61

C35
•
Kytke muuntajan johto takajalan yläpuolella olevaan
pistokkeeseen. Kytke muuntaja pistorasiaan.
* Irroita muuntaja pistorasiasta aina harjoituksen
päätteeksi.
* Tarkista, ettei muuntajan johto ole laitteen alla!
TÄRKEÄÄ! Myös C35:n mittarin taustapuolella on
paristokotelo. Laitteen virtalähteenä voi siis toimia
joko verkkovirta tai paristot (4 kpl C-paristoja).
Mikäli virtalähteenä käytetään vain paristoja, on
huomattava, että servojarru kuluttaa niitä melko
nopeasti. Suosittelemme verkkovirran käyttöä laitteen
virtalähteenä. Huomaa kuitenkin, että mittarin kello
ottaa virran paristoista silloin, kun laite ei ole yhteydessä
virtalähteeseen, muutoin kello nollautuu.
KÄYTTÖ
POLJINVARREN SÄÄTÖ
Säädä poljinvarsien korkeutta seuraavalla tavalla:
käännä säätönuppia kierros vastapäivään ja vedä
nuppia ulospäin niin, että poljinvarren kiinnitysputki
pääsee vapaasti liikkumaan ylös- ja alaspäin. Kiinnitä
poljinvarsi irrottamalla ote nupista kun säätökorkeus on
sopiva. Säätönuppi loksahtaa paikalleen. Kiristä lopuksi
säätönuppi myötäpäivään.
TÄRKEÄÄ! Varmista aina ennen harjoittelun
aloittamista, että säätönuppi on kunnolla kiristetty.
Säädä poljinvarren korkeus siten, että laitteen elliptinen
liike tuntuu nilkoissasi miellyttävältä liikkeen jokaisessa
vaiheessa.
OIKEA HARJOITUSTASO
Harjoittelu kuntopyörällä on erinomaista aerobista
liikuntaa, jonka perusideana on, että liikunta on sopivan
kevyttä mutta pitkäkestoista. Aerobinen liikunta
perustuu elimistön maksimaalisen hapenottokyvyn
parantamiseen: se puolestaan lisää kestävyyttä ja kuntoa.
Elimistön kyky käyttää rasvaa polttoaineena on suoraan
riippuvainen sen kyvystä kuljettaa happea.
Aerobinen liikunta on ennen muuta miellyttävää.
Hien pitää nousta pintaan, mutta liikunnan aikana
ei saa hengästyä. Esimerkiksi poljettaessa on kyettävä
puhumaan eikä pelkästään huohottamaan. Liikkua
pitäisi vähintään kolme kertaa 30 minuuttia viikossa.
Näin saavutetaan peruskunto. Sen säilyminen
edellyttää paria liikuntakertaa viikossa. Kun peruskunto
on saavutettu sen nostaminen on helppoa vain
harjoituskertoja lisäämällä.
Liikunta palkitsee laihduttajan aina, sillä se on
ainoa keino lisätä elimistön energiankulutusta. Siksi
etenkin laihduttajan kannattaa liittää vähäkaloriseen
ruokavalioon aina myös säännöllinen liikunta.
Laihduttajan olisi syytä liikkua päivittäin; aluksi joko
30 minuuttia kerrallaan tai pienempinä jaksoina
ja vähitellen lisäten päivittäistä määrää tuntiin.
Liikkeelle kannattaa lähteä rauhallisesti alhaisella
poljentanopeudella ja pienellä vastuksella. Kova
rasitus ylipainoisella voi kuormittaa liikaa sydäntä ja
verenkiertoelimistöä. Kunnon kohotessa vastusta ja
poljentanopeutta voidaan vähitellen lisätä. Liikunnan
tehoa voidaan arvioida sydämen sykkeenavulla. Mittarin
syketoiminnon avulla voit helposti seurata sykettäsi
harjoittelun aikana ja varmistaa, että harjoittelu on
riittävän tehokasta, muttei liian kuormittavaa.
SYKE
Olipa tavoitteesi harjoittelussa mikä hyvänsä, parhaaseen
tulokseen pääset harjoittelemalla oikealla rasitustasolla.
PULSSINMITTAUS KÄSIANTUREIDEN AVULLA
Ääreisverenkierron tarkkailuun perustuva pulssinmittaus
hyödyntää käsituissa olevia antureita, jotka mittaavat
verenkierron sykepulsseja aina kun laitteen käyttäjä
koskettaa molempia käsituessa olevia sensoreita
yhtäaikaisesti. Luotettava pulssinmittaus edellyttää
että iho on jatkuvassa kosketuksessa antureihin ja että
sensoreita koskettava iho on hieman kostea. Liian kuiva
ja liian kostea iho heikentävät käsipulssimittauksen
toimivuutta.
TELEMETRINEN SYKEMITTAUS
Mittarissa on yhteensopiva sykevastaanotin, joten
voit käyttää sykemittaukseen myös koodaamattomia
sykevöitä. Luotettavimmaksi sykkeenmittausper
iaatteeksi on todettu langaton sykemittaus, jossa
rintakehälle kiinnitettävän lähettimen elektrodit siirtävät
sykeimpulssit sydämestä sähkömagneettisen kentän
avulla mittarille.
TÄRKEÄÄ! Mikäli käytät sydämentahdistinta, varmista
lääkäriltäsi, että voit käyttää langatonta sykemittausta.
Mikäli haluat mitata sykettä langattomasti harjoittelun
aikana, kostuta huolellisesti lähetinvyössä olevat, ihoa
vasten tulevat uralliset elektrodit vedellä tai syljellä.
Mikäli käytät lähetintä paidan päällä, kostuta paita
elektrodipintoja vastaavilta kohdilta. Kiinnitä lähetin
joustavan vyön avulla sopivan tiukasti rintalihasten
alapuolelle siten, että elektrodit pysyvät ihokontaktissa
koko harjoituksen ajan. Lähetin ei kuitenkaan saa
olla liian tiukalla, jottei esim. normaali hengitys
vaikeudu. Sykelähetin siirtää sydämen sykelukeman
automaattisesti sykevastaanottimelle n. 1 m:n
etäisyyteen saakka. Mikäli elektrodipinnat eivät ole
kosteat, sykelukema ei ilmesty mittarin näyttöön. Siksi
jos elektrodit kuivuvat iholla, kostuta ne uudelleen.
Muista myös, että elektrodien tulee antaa lämmetä
iholla kehon lämpöisiksi, jotta mittaus toimisi
luotettavasti. Jos langattomasti sykettä mittaavia laitteita
on useampia vierekkäin, niiden välisen etäisyyden tulee
olla vähintään 1,5 m. Vastaavasti jos käytössä on vain
yksi vastaanotin, mutta useampi lähetin, saa mittauksen
aikana lähetysetäisyydellä olla vain yksi henkilö, jolla on
lähetin. Lähettimen toiminta lakkaa, kun otat sen pois
yltäsi. Kosteus saattaa kuitenkin aktivoida lähettimen,
jolloin patterin käyttöikä lyhenee. Siksi on tärkeätä
kuivata lähetin huolellisesti käytön jälkeen.
Huomioi harjoitusvaatetuksessasi että tietyt vaatteisiin
käytetyt kuidut (esim. polyesteri, polyamidi) tuottavat
staattista sähköä, mikä saattaa estää luotettavan
KÄYTTÖOHJE
62

KÄYTTÖOHJE • C35
FIN
sykemittauksen. Huomioi myös että matkapuhelin,
tv ja muut sähkölaitteet muodostavat ympärilleen
sähkömagneettisen kentän, joka aiheuttaa ongelmia
sykemittauksessa.
Paras rasitustason mittari on oman sydämen syketaajuus.
Lähde liikkeelle selvittämällä ensin maksimisykearvosi
eli se lyöntimäärä, josta sykkeesi ei enää nouse,
vaikka rasitus lisääntyisikin. Jos et tiedä omaa
maksimisykearvoasi, voit käyttää seuraavaa kaavaa
suuntaa antavana:
208 - 0,7 X IKÄ
Maksimisyke voi vaihdella yksilöllisesti runsaastikin.
Maksimisyke putoaa keskimäärin yhden sykkeen
vuodessa. Mikäli kuulut johonkin riskiryhmään, sinun
kannattaa ehdottomasti varmistaa maksimisykkeesi
lääkärin avustuksella. Olemme määritelleet kolme eri
sykealuetta, joista löydät tavoitteitasi parhaiten vastaavat
harjoittelualueet.
ALOITTELIJAN TASO
50 - 60 % maksimisykkeestä
•
Tämä taso on sopiva laihduttajille, toipilaille ja niille,
jotka eivät ole harrastaneet liikuntaa aikaisemmin tai
pitkään aikaan. Suositeltava harjoitusmäärä on kolme
kertaa viikossa vähintään puoli tuntia kerrallaan.
KUNTOILIJAN TASO
60 - 70 % maksimisykkeestä
•
Tämä taso sopii erinomaisesti kunnon kohottamiseen
ja ylläpitämiseen. Harjoituksen tulisi kestääkerrallaan
vähintään puoli tuntia ja harjoituskertoja tulisi
olla vähintään kolme viikossa. Mikäli haluat
kohottaa kuntoasi edelleen, sinun on lisättävä joko
harjoituskertoja tai harjoitustehoa (ei kuitenkaan
molempia yhtäaikaa).
AKTIIVIKUNTOILIJAN TASO
70 - 80 % maksimi-
•
sykkeestä
Harjoittelu tällä tasolla soveltuu vain erittäin
hyväkuntoisille ja edellyttää jo pitkään jatkunutta
kuntoilua.
NÄYTÖT
1. SUORITUSNOPEUS (/MIN)
Poljinkierrosnopeus (RPM), lisäksi lukemanäytön alla
on pylväs, joka osoittaa poljinnopeutta
2. HARJOITUSAIKA
00:00- 99:59: mittaus 1 sekunnin välein, h1:40-h9:59
mittaus 1 minuutin välein
3. HARJOITUSPULSSI
Sydän-symboli vilkkuu mitatun pulssin tahdissa.
Näytön nuoli-symbolit osoittavat, mikäli pulssi ylittää
asetetun ylärajan tai alittaa asetetun alarajan
4. HARJOITUSMATKA (KM / MILE)
0.00-99.99 km / mailia
5. HARJOITUSNOPEUS (KMH / MPH)
00.0-99.9 km/h / mph
6. ENERGIANKULUTUS (KCAL)
Arvioitu kokonaisenergiankulutus harjoituksen aikana,
0-9999 kcal
7. KELLO (CLOCK)
Reaaliaikakello
8. LÄMPÖMITTARI (TEMP C / TEMP F)
Huonelämpötilan mittari, Celsius tai Fahrenheitasteikko
9. KOSTEUSMITTARI (HUMIDITY %)
Huonekosteuden mittari, 0-100 %
10. PARISTON VAIHTO (BATTERY LOW)
Varoitusnäyttö ilmoittaa mittarin paristojen
vaihtotarpeen
11. VALITUN TOIMINTOTAVAN OSOITIN
Mittari osoittaa valitun harjoitustavan (Program =
valmisohjelma, Manual = manuaaliharjoitus, Recovery
= palautussykkeen mittaus, Target HR = sykeharjoitus,
Min Max = sykkeen asetettu ala- ja yläraja)
MITTARI
PAINIKKEET
1. SET
Tavoitearvojen valinta
2. RESET
Harjoitusarvojen nollaus, harjoituksen päättäminen ja
paluu käynnistystilaan
3. + / -
Tavoitearvojen asetus. intensiteetin säätö:lisää vastusta
/ sykettä +-painikkeella, vähennä vastusta / sykettä -painikkeella
4. RECOVERY
Palautussykkeen mittaus
5. START / STOP
Harjoituksen aloitus ja keskeytys
12. PÄÄNUMERONÄYTTÖ
Valittu harjoitusarvo näkyy suurilla numeroilla mittarin
keskellä; muita harjoitusarvoja voi samalla seurata
ylärivin numeronäytöistä
13. HARJOITUSPROFIILINÄYTTÖ
Valittu harjoitusprofiili näkyy palkkeina mittarin
alaosassa
MITTARIN KÄYTTÖ
Mittari käynnistyy painamalla mitä tahansa
mittaripainiketta. Mikäli laite on käyttämättä 5
minuuttia, mittari kytkeytyy automaattisesti pois päältä.
Valitse haluamasi mittayksiköt mittarin taustapuolella
olevan kytkimen avulla. Voit valita metriset (km, km/h,
Celsius) tai englantilaiset (mailit, mph, Fahrenheit)
yksiköt.
63

C35
•
Aseta mittarin kellonaika (clock) seuraavasti:
paina käynnitystilassa molempia nuolipainikkeita
samanaikaisesti 3 sekunnin ajan. Päänumeronäyttöön
tulee kellonäkymä. Tee ajanasetus nuolipainikkeilla,
tunneista minuutteihin ja takaisin sekä käynnistystilaan
pääset siirtymään SET-painikkeella.
MANUAL-HARJOITUS
Manual-harjoituksessa voit säätää vastustasoa
harjoituksen aikana nuolipainikkeiden avulla.
1. Voit aloittaa harjoituksen heti painamalla START /
STOP-painiketta. Säädä vastustasoa harjoituksen aikana
nuolipainikkeilla.
2. Voit aloittaa harjoituksen asettamalla tavoitearvoja
harjoitukselle. Paina nuolipainiketta, kunnes
päänumeronäytön alla on teksti Manual.
3. Paina SET-painiketta, jolloin pääset tavoitearvojen
asetuksiin.
4. TIME = aseta harjoitukselle haluamasi kesto + /
- -painikkeilla. SET-painikkeella siirryt seuraavaan
asetukseen.
5. DISTANCE = aseta harjoitukselle haluamasi matka
+ / - -painikkeilla. SET-painikkeella siirryt seuraavaan
asetukseen.
6. KCAL = aseta harjoitukselle haluamasi
energiankulutuksen tavoitearvo + / - -painikkeilla SETpainikkeella siirryt seuraavaan asetukseen.
7. PULSE = aseta harjoituksen aikaiselle sykearvolle
yläraja + / - -painikkeilla: näytössä on sydän ja nuoli
ylös-symbolit. Paina SET-painiketta, jolloin siirryt
sykearvon alarajan asetukseen: näytössä on sydän
ja nuoli alas-symbolit. Aseta harjoituksen aikaiselle
sykearvolle alaraja + / - -painikkeilla. Mikäli sykearvosi
ylittää asetetut rajat, mittari osoittaa tämän vilkuttamalla
kyseisen rajan nuolta näytössä. Tämän jälkeen palaat
SET-painikkeella harjoitusajan (TIME) asetukseen.
8. Voit aloittaa harjoituksen painamalla START
/ STOP-painikketta. Aloita polkeminen ja säädä
tarvittaessa vastustasoa harjoituksen aikana.
9. Voit keskeyttää harjoituksen painamalla START
/ STOP-painiketta (mittarin näytössä teksti Over).
Ohjelman tiedot säilyvät 5 minuuttia mittarin muistissa,
joten voit jatkaa keskeyttämääsi harjoitustasi painamalla
uudestaan START / STOP-painiketta.
10. Voit lopettaa harjoituksen painamalla RESET-
painiketta mittarin ollessa keskeytystilassa.
11. Mikäli olet asettanut tavoitearvon, mittari antaa
äänimerkin ja näyttöarvo alkaa vilkkua tavoitearvon
täytyttyä. Nollaa näyttö painamalla ensin START/
STOP-painiketta ja sen jälkeen RESET-painiketta.
TARGET HR-HARJOITUS (VAKIOSYKE)
Target HR-harjoituksessa asetat haluamasi
vakiosyketason; harjoituksen aikana laite huolehtii
automaattisesti siitä, että asettamasi syketaso säilyy
poljinnopeudesta riippumatta.
1. Paina nuolipainiketta, kunnes päänumeronäytön alla
on teksti Target HR.
2. Aseta haluamasi vakiosyketaso harjoitukselle
painamalla SET-painiketta. Näyttöön tulee teksti
PULSE sekä sydän ja nuoli ylös / alas-symbolit. Voit
asettaa tavoitesyketason + / - -painikkeilla. SET-
painikkeella siirryt seuraavaan asetukseen.
3. TIME = aseta harjoitukselle haluamasi kesto + /
- -painikkeilla. SET-painikkeella siirryt seuraavaan
asetukseen.
4. DISTANCE = aseta harjoitukselle haluamasi matka
+ / - -painikkeilla. SET-painikkeella siirryt seuraavaan
asetukseen.
5. KCAL = aseta harjoitukselle haluamasi
energiankulutuksen tavoitearvo + / - -painikkeilla
SET-painikkeella palaat harjoituksen keston (TIME)
asetukseen.
6. Aloita harjoitus painamalla START / STOP-
painikketta. Aloita polkeminen ja säädä tarvittaessa
vakiosyketasoa harjoituksen aikana nuolipainikkeilla.
7. Voit keskeyttää harjoituksen painamalla START
/ STOP-painiketta (mittarin näytössä teksti Over).
Ohjelman tiedot säilyvät 5 minuuttia mittarin muistissa,
joten voit jatkaa keskeyttämääsi harjoitustasi painamalla
uudestaan START / STOP-painiketta.
8. Lopeta harjoitus painamalla RESET-painiketta
mittarin ollessa keskeytystilassa.
9. Mikäli olet asettanut tavoitearvon, mittari antaa
äänimerkin ja näyttöarvo alkaa vilkkua tavoitearvon
täytyttyä. Nollaa näyttö painamalla ensin START/
STOP-painiketta ja sen jälkeen RESET-painiketta.
HARJOITUSPROFIILIT
1. Paina mittarin käynnistyttyä nuolipainiketta (nuoli
ylös tai nuoli alas) kunnes mittarin näyttöön tulee
profiilitunnus (P1-P8) sekä profiiilimuoto. Kaikki
profiilit ovat ns. vakiokampimomenttiprofiileja: mitä
nopeammin poljet, sitä nopeammin etenet mittarin
mittaamassa matkassa. Kaikkien profiilien valmiiksi
asetettu kesto on 20 minuuttia.
2. Valitse haluamasi profiili nuolipainikkeilla. Painamalla
SET-painiketta pääset harjoitusprofiilin ajan asetukseen:
nuolipainikkeilla voit asettaa ajan 5 minuutin portain
välillä 10:00-90:00 minuuttia.
3. Aloita harjoitus painamalla START / STOP-
painiketta. Aloita polkeminen. Voit muuttaa
harjoituksen aikana sen profiiliosuuden vastustasoa, jota
parhaillaan suoritat painamalla nuolipainikkeita: nuoli
ylös lisää vastusta, nuoli alas vähentää sitä.
4. Voit keskeyttää harjoituksen painamalla START
/ STOP-painiketta (mittarin näytössä teksti Over).
Ohjelman tiedot säilyvät 5 minuuttia mittarin muistissa,
joten voit jatkaa keskeyttämääsi harjoitustasi painamalla
uudestaan START / STOP-painiketta.
5. Voit lopettaa harjoituksen painamalla RESET-
painiketta mittarin ollessa keskeytystilassa. Mikäli
suoritat profiilin loppuun, mittari antaa äänimerkin ja
näyttöarvo alkaa vilkkua tavoitearvon täytyttyä. Nollaa
näyttö painamalla ensin START/STOP-painiketta ja sen
jälkeen RESET-painiketta.
RECOVERY – PALAUTUSSYKKEEN MITTAUS
Mittaa palautussykkeesi harjoituksen päätteeksi.
1. Palautussykkeen mittaukseen siirryt painamalla
RECOVERY-näppäintä. Näyttöön tulee teksti Recovery.
2. Mittaus alkaa automaattisesti ja kestää kaksi
minuuttia.
3. Mittausjakson päätteeksi näyttöön ilmestyy sykkeen
palautumissuhde prosenttilukuna. Mitä pienempi
KÄYTTÖOHJE
64

KÄYTTÖOHJE • C35
FIN
lukema on, sitä paremmassa kunnossa olet. Huomaa,
että tuloksesi on suhteessa mittauksen alkuhetken
syketasoon, ja että tuloksesi on henkilökohtainen, eikä
suoraan verrattavissa muiden tuloksiin. Palautussykkeen
mittauksen luotettavuuden parantamiseksi pyri aina
vakioimaan mittaustapahtuma mahdollisimman
tarkasti; aloita mittaus mahdollisimman tarkasti samalta
syketasolta. Pysy mahdollisimman liikkumatta paikallasi
koko mittauksen ajan.
TÄRKEÄÄ! Mikäli sykemittauksessa ilmenee häiriö,
sykearvon korvaa näytössä Err; palautussykkeen mittaus
käynnistyy automaattisesti käyttöliittymän saadessa
jälleen sykesignaalin.
4. Palautussykemittauksesta siirryt takaisin yleisnäyttöön
painamalla RESET-painiketta; mittari siirtyy
yleisnäyttöön automaattisesti minuutin kuluttua
mittauksen päättymisestä.
KULJETUS JA SÄILYTYS
Laitetta on helppo kuljettaa pitkin lattiaa
kuljetuspyörien varassa työntäen. Siirrä aina laitetta
seuraavan ohjeen mukaisesti, sillä väärä nosto- ja
siirtotapa voi rasittaa selkää tai aiheuttaa vaaratilanteita.
Muista irrottaa verkkojohto ennen laitteen siirtoa!
Asetu laitteen etupuolelle, ota kiinni käsituesta ja kallista
laitetta itseesi päin. Siirrä laite etutukijalan päissä olevien
siirtopyörien varassa haluamaasi paikkaan ja laske laite
varovasti alas. Ota lattian suojaus huomioon myös
laitetta siirtäessäsi.
Toimintahäiriöiden välttämiseksi säilytä laitetta
mahdollisimman kuivassa ja tasalämpöisessä paikassa
pölyltä suojattuna.
HUOLTO
C35:n huoltotarve on vähäinen. Tarkista kuitenkin aika
ajoin kaikkien kiinnitysruuvien ja -muttereiden kireys.
Pyyhi laitteesi kaikki osat harjoituksen päätyttyä
•
hikivedestä pehmeällä, imukykyisellä liinalla. Älä
käytä liuottimia. Hikivesi voi syövyttää metallia; siksi
suosittelemme, että suojaat kaikki katteiden ulkopuoliset
metallipinnat esimerkiksi teflon- suojaöljyllä.
Älä poista laitteen suojakoteloita paikaltaan.
•
Mikäli laite on käyttämättä pidemmän aikaa,
•
voimansiirtohihna voi tilapäisesti muotoutua laitteen
voimansiirtopyörien mukaisesti. Tämä saattaa johtaa
hieman epätasaiseen poljintuntumaan, joka kuitenkin
katoaa jo muutaman minuutin käytön jälkeen, kun
hihna palautuu takaisin normaaliin muotoonsa.
aikana, irrota laitteen virtajohto, odota minuutti ja
kytke virtajohto takaisin. Mikäli laite toimii oikein, voit
jatkaa laitteen käyttöä. Mikäli virhe ei poistu tai toistuu,
ota välittömästi yhteys laitteen myyjään. Ilmoita laitteesi
malli ja sarjanumero (sarjanumerotarran sijainnin näet
tämän käyttöohjeen etukannen sisäpuolelta). Ilmoita
lisäksi häiriön luonne, laitteen käyttöympäristö sekä
ostopäivämäärä.
Mikäli tarvitset laitteeseesi varaosia, ota yhteys laitteen
myyjään. Ilmoita aina laitteen malli, sarjanumero sekä
tarvittavan osan varaosanumero. Varaosaluettelon
löydät tämän oppaan lopusta. Laitteessa saa käyttää vain
varaosalistassa mainittuja osia.
TEKNISET TIEDOT
Pituus ........................................... 135 cm
Leveys ......................................... 66 cm
Korkeus ........................................ 157 cm
Paino ............................................ 63 kg
C35 suunniteltu täyttämään sähkömagneettista
yhteensopivuutta koskevan EU:n EMC-direktiivin
(89/336/ETY) sekä pienjännitedirektiivin (73/23/ETY)
vaatimukset. Tuotteet on varustettu sen mukaisesti CEtarralla.
C35 täyttää CEN tarkkuus- ja turvanormien
vaatimukset (EN-957).
Oikeudet muutoksiin pidätetään.
TÄRKEÄÄ! Ohjekirjan tietoja kuntolaitteen
asennuksessa, käytössä tai huollossa on syytä noudattaa
erittäin huolellisesti. Takuu ei korvaa vahinkoja,
jotka ovat aiheutuneet tässä ohjekirjassa mainittujen
asennus-, säätö- tai huolto-ohjeiden laiminlyönneistä.
Mikäli laitteelle tehdään muita kuin Tunturi Oy Ltd:n
neuvomia ja nimenomaisesti hyväksymiä toimenpiteitä,
laitetta ei saa käyttää!
Toivotamme Sinulle miellyttäviä harjoitushetkiä
Tunturi-harjoituskumppanisi kanssa.
KÄYTTÖHÄIRIÖT
Jatkuvasta laaduntarkkailusta huolimatta laitteessa
saattaa esiintyäyksittäisistä komponenteista johtuvia
yksilövikoja tai toimintahäiriöitä. Koko laitteen
toimittaminen korjattavaksi on yleensä tarpeetonta, sillä
vika on useimmiten korjattavissa ko. osan vaihdolla.
Mikäli laitteen toiminnassa ilmenee häiriöitä käytön
65

1 103 7072 Base frame 1
2 103 7060 Front foot 1
3 103 7061 Rear foot 1
4 533 7077 Foot cover 4
*5 M10x25 DIN 912 Screw 4
*6 M10 DIN 127 Spring washer 4
*7 M10 DIN 125 Washer 4
8 173 7045 Chain cover, RH 1
- 173 7046 Chain cover, LH 1
9 533 7090 Turning plate cover 2
10 203 7050 Upright tube, (incl. 62) 1
11 403 7035 Cable set, 1
12 403 7066 Servo motor 1
*13 M8x15 ISO 7380 Allen head bolt 6
*14 M8 DIN 127 Spring washer 14
*15 M8 DIN 125 Washer 12
16 343 7019 Axle support 1
17 203 7045 Handle bar, RH (incl. 62,63,64) 1
18 203 7046 Handle bar, LH (incl. 62,63,64) 1
*19 M8 DIN 440 Washer 2
20 203 7024 Swivl tube EUR (incl. 47) 2
- 203 7038 Swivl tube, USA (incl. 47) 2
*21 373 1030 Spring knob, EUR 2
* - 653 7032 Screw, USA 2
22 103 7062 Pedal tube, left 1
23 363 7004 Pedal, pair (incl. 29) 1
*24 M6x45 DIN 603 Screw 4
*25 653 7022 Knob dawl 4
*26 M6 DIN 127 Spring washer 4
*27 M6 DIN 125 Washer 4
28 103 7063 Pedal tube, right 1
30 M5x10 DIN 7985 Screw 2
31 233 7028 Computer 1
32 203 7052 Fix handle bar (incl.36,37,42,43) 1
*33 M8x45 ISO 7380 Screw 2
*34 533 7094 End cap 1
*35 503 7025 Fix handlebar bracket 1
37 403 7067 Pulse grip unit (incl. 36) 2
38 403 7020 EU Transformer, EUR 1
- 403 1117 AUS Transformer, AUS 1
- 403 7020 GB Transformer, GB 1
- 403 7020 JPN Transformer, JPN 1
- 403 7020 USA Transformer, USA 1
39 3,9x25 DIN 7981 Screw 7
40 3,9x32 DIN 7981 Screw 1
41 653 7041 Screw 10-24 UNCx19 4
68 M6x10 DIN 7985 Screw 4
69 503 7017 Sensor bracket 1
70 403 7033 Sensor wire 1
71 3,5x13 DIN 7504-MScrew 1
72 403 7036 DC- cable 1
73 M8x16 DIN 7985 Screw 2
74 513 7016 Magnetic holder bracket 1
75 523 7014 Spacer sleeve 3
76 M6x14 DIN 933 Screw 3
77 M6 DIN 9021 Washer 3
78 513 7001 Bracket (incl. 66, 79) 1
79 17 DIN 417 Clip C17 3
80 643 7001 Carge spring 1
81 503 7018 Keep back bracket 1
82 503 7019 Spring bracket 1
83 M6x15 DIN 7985 Screw 1
84 303 7002 Flywheel (incl. 85 - 90) 1
85 523 504 84 Bearing 2
86 343 7021 Flywheel axle 1
87 12 DIN 471 Clip C12 2
88 653 7038 Washer 1
89 M10 DIN 125 Washer 2
90 653 7026 3/8” Wh nut 2
91 373 7006 Magnetic bow 1
92 M8x52 DIN 931 Screw 1
93 M8 DIN 985 Nylock nut 1
94 223 7005 Metal wire 1
95 643 7002 Spring 1
96 263 7007 Pulley (incl. 102) 1
97 343 7020 Axle for pulley 1
98 503 7011 Safe bracket 1
99 M6 DIN 985 Nylock nut 4
100 M6x18 DIN 933 Screw 4
101 443 7003 Belt 1
102 403 7017 Magnet 1
103 433 7028 Turning pedal 2
105 M8x25 DIN 933 Screw 2
106 653 7037 Screw 10-24 UNCx19 2
108 M8 DIN 125 Washer 2
109 503 7024 Bracket 1
110 653 7042 Screw 10-24 UNCx16 1
- 423 7070 Label set 1
- 553 7009 Assembly kit (incl. *) 1
- 583 7015 Owner’s manual 1
C35
42 213 7014 Fix handlebar grip, pair 1
43 533 7039 Fix handlebar end cap 2
44 72 0813 100 1 Sleeve 2
45 533 1048 Wheel 2
46 673 500 88 Caps 2
47 523 9006 Bearing 8
48 503 7026 Pedal fix bracket 2
49 8x14x03 DIN 988 Washer 2
50 M8 DIN 9021 Washer 2
51 M8x20 ISO 7380 Screw 2
52 533 7074 Bushing 4
53 503 7022 DC-wire bracket 1
54 M8x65 ISO 7380 Allen head bolt 2
55 M8 DIN 985 Nylock nut 2
56 533 7089 Pedal rear cover 2
57 M8x25 ISO 7380 Allen head bolt 2
58 343 7018 Pedal tube shaft 2
59 533 7043 End cap 2
60 653 7025 Washer 2
61 533 7088 Plastic insert 2
62 533 7091 Plug axle support 6
63 213 7015 Handle grip, pair 1
64 533 7076 Handlebar end cap 2
65 M5x10 DIN 7985 Screw 2
66 523 409 85 Bearing 4
66

C35
67

68

C35
69
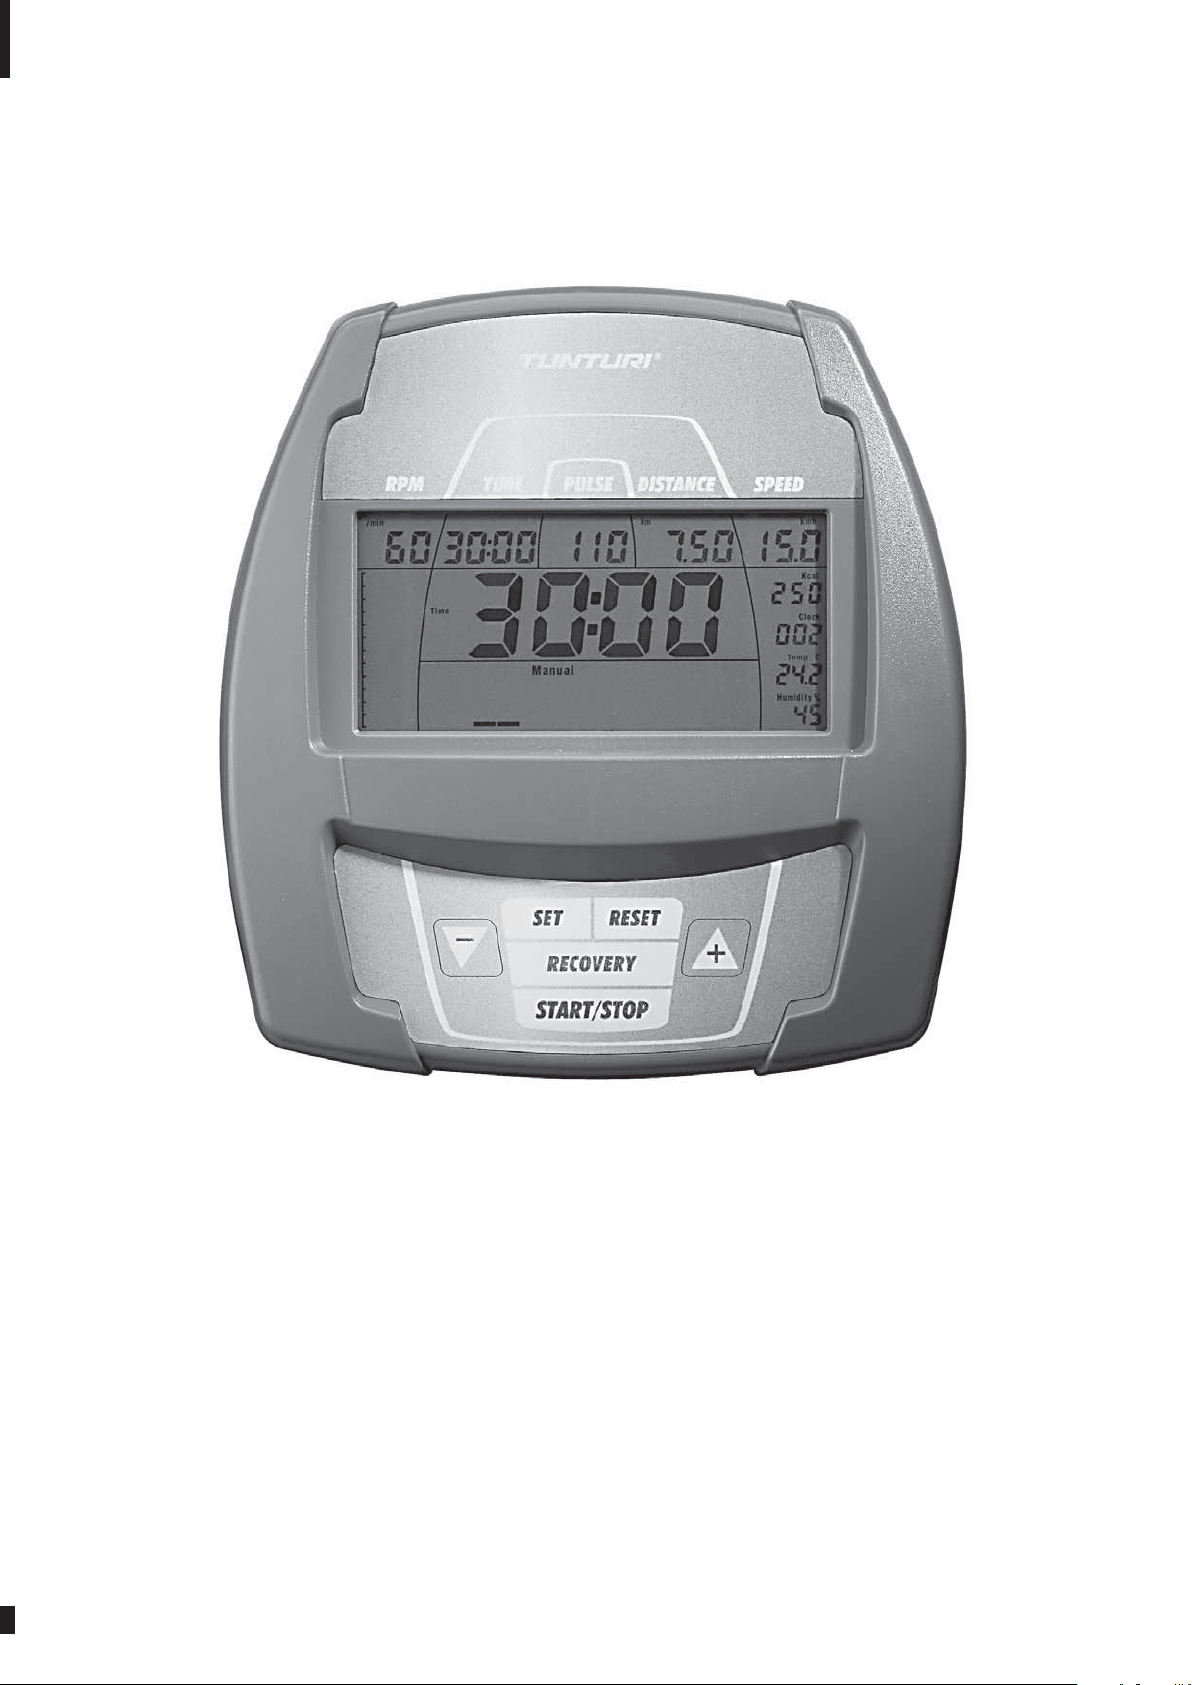


www.tunturi.com
TUNTURI OY LTD
P.O.BOX 750, FIN-20361
Turku, Finland
Tel. +358 (0)2 513 31
Fax +358 (0)2 513 3323
www.tunturi.com
583 7015 B
 Loading...