


F30 • F35
•SERIAL NUMBER
•SERIENNUMMER
•NUMERO DE SERIE
•SERIENUMMER
•NUMERO DI SERIE
•NÚMERO DE SERIE
•SERIENNUMMER
•SARJANUMERO
www.tunturi.com
OWNER’S MANUAL |
P. |
2 |
- 11 |
|
|
||
BETRIEBSANLEITUNG |
S. 12 - 21 |
||
|
|
||
MODE D’EMPLOI |
P. 22 - 32 |
||
|
|
|
|
HANDLEIDING |
P. |
33 |
- 42 |
|
|
||
MANUALE D’USO |
P. 43 - 52 |
||
|
|
||
MANUAL DEL USUARIO |
P. 53 - 62 |
||
|
|
|
|
BRUKSANVISNING |
S. 63 |
- 71 |
|
|
|
|
|
KÄYTTÖOHJE |
S. 72 |
- 80 |
|
|
|
|
|

O W N E R ’ S M A N U A L • F 3 0 • F 3 5
CONTENTS
IMPORTANT SAFETY INSTRUCTIONS |
2 |
ASSEMBLY |
3 |
USE |
6 |
EXERCISING |
6 |
CONSOLE |
8 |
USING THE CONSOLE |
8 |
MAINTENANCE |
10 |
MALFUNCTIONS |
10 |
TRANSPORT AND STORAGE |
10 |
TECHNICAL SPECIFICATIONS |
10 |
IMPORTANT SAFETY INSTRUCTIONS
Read this guide through carefully before assembling, using or servicing your fitness equipment. Please keep the guide somewhere safe; it will provide you now and in the future with the information you need to use and maintain your equipment. Always follow these instructions with care.
YOUR HEALTH
•Before you start any training, consult a physician to check your state of health.
•If you experience nausea, dizziness or other abnormal symptoms while exercising, stop your workout at once and consult a physician.
•To avoid muscular pain and strain, begin each workout by warming up and end it by cooling down (slow pedaling at low resistance). Don’t forget to stretch at the end of the workout.
THE EXERCISING
ENVIRONMENT
•The equipment is not to be used outdoors.
•Place the equipment on a firm, level surface. Place the equipment on a protective base to avoid any damages to the floor beneath the equipment.
•Make sure that the exercising environment has adequate ventilation. To avoid catching cold, do not exercise in a draughty place.
•In training, the equipment tolerates
an environment measuring +10°C to
+35°C. The equipment can be stored in temperatures ranging between -15°C and +40°C. Air humidity in the training or storage environment must never exceed 90 %.
THE EQUIPMENT
•Children are allowed to use the equipment, they should be supervised and taught to use the equipment properly, keeping in mind the child’s physical and mental development and their personality.
•Before you start using the equipment, make sure that it functions correctly
in every way. Do not use a faulty equipment.
•Press the keys with the tip of the finger; your nails may damage the key membrane.
•Never lean on the console.
•Never remove the side covers. Do not step on the frame casing.
•Only one person may use the equipment at a time.
•Hold the handlebar for support when getting on or off the equipment.
•Wear appropriate clothing and shoes when exercising.
•Protect the meter from sunlight and always dry the surface of the meter if there are any drops of sweat on it.
•The equipment has been designed for home use. The Tunturi warranty applies only to faults and malfunctions in home use (24 months). Further information on warranty terms can be found in the warranty booklet included with the product. Please note that the warranty does not cover damage due to shipping or negligence of adjustment or maintenance instructions described in this manual.
•The equipment must not be used by persons weighing over 135 kg.
•Make sure the equipment is unplugged before carrying out any assembly or maintenance procedures.
•Do not attempt any servicing or adjustments other than those described in this guide. Everything else must
2
be left to someone familiar with the maintenance of electromechanical equipments and authorised under the laws of the country in question to carry out maintenance and repair work.
• This product must be grounded. If it should malfunction or breakdown, grounding provides a path of least
resistance for electric current to reduce the risk of electric shock. This product is equipped with a cord having an equipment-grounding conductor and
a grounding plug. The plug must be plugged into an appropriate outlet that is properly installed and grounded in accordance with all local codes and ordinances.
DANGER:
Improper connection of the equipmentgrounding conductor can result in a risk of electric shock. Check with a qualified electrician or serviceman if you are
in doubt as to whether the product is properly grounded. Do not modify the plug provided with the product - if it will not fit the outlet, have a proper outlet installed by a qualified electrician.
SAVE THIS INSTRUCTION MANUAL
WELCOME TO THE WORLD OF
TUNTURI EXERCISING!
Your choice shows that you really want to invest in your well being and condition; it also shows you really value high quality and style. With Tunturi Fitness Equipment, you’ve chosen a high quality, safe and motivating product as your training partner. Whatever your goal in training, we are certain this is the training equipment
to get you there. You’ll find information about using your exercise equipment and what makes for efficient training at Tunturi’s website at
WWW.TUNTURI.COM.
ASSEMBLY
Start by unpacking the equipment and check that you have the following parts:
1.Frame
2.Rear support
3.Plastic covers for front support (2 pcs)
4.Handlebar support tube
O W N E R ’ S M A N U A L • F 3 0 • F 3 5 GB
5.Handlebar
6.Console
7.Pedals (2 pcs)
8.Seat
9.Transformer (F35)
10.Assembly kit (contents marked with in the spare part list): keep the assembly tools, as you may need them e.g. for adjusting the equipment.
If necessary, please contact your dealer with the model, equipment serial no. and spare part no. of the missing part. You’ll find a spare part list at the back of this guide. The packaging includes a silicate bag for absorbing moisture during storage and transportation. Please dispose of the bag once you have unpacked the equipment. The directions left, right, front and back are defined as seen from the exercising position.
PLASTIC COVERS OF THE FRONT SUPPORT
Push the grey plastic covers into place on the ends of the front support so that the retainers in the support fit into the oval holes in the covers.
3
O W N E R ’ S M A N U A L • F 3 0 • F 3 5
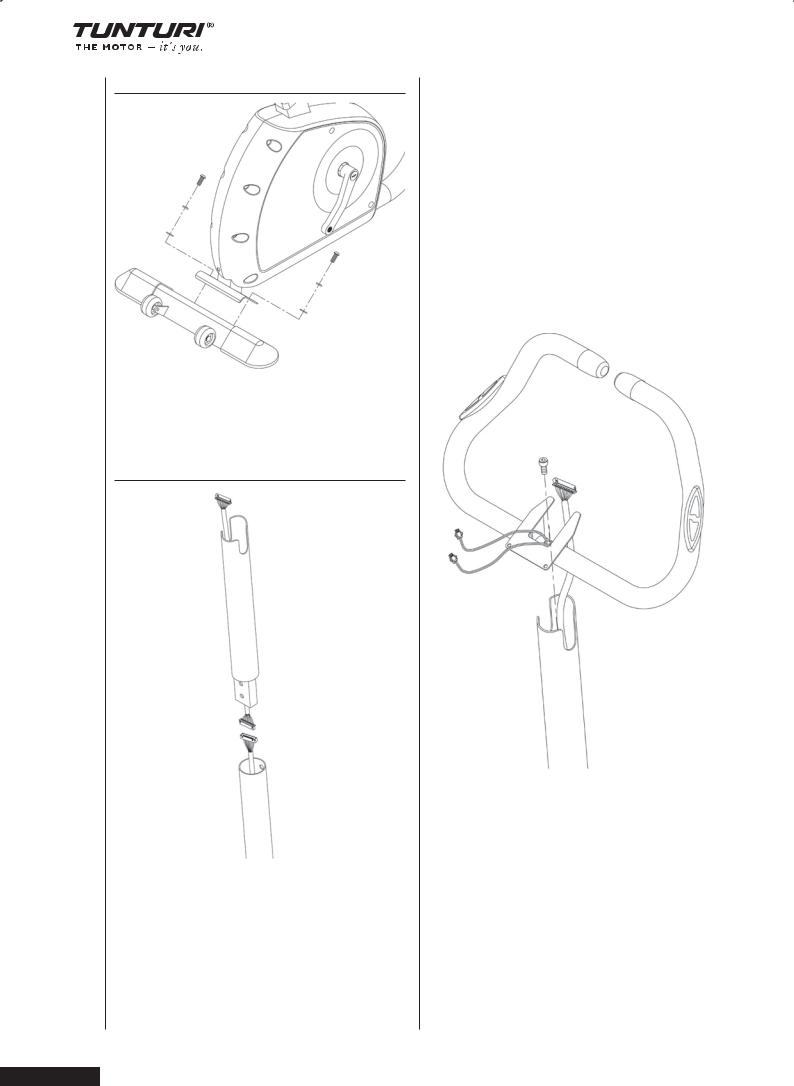
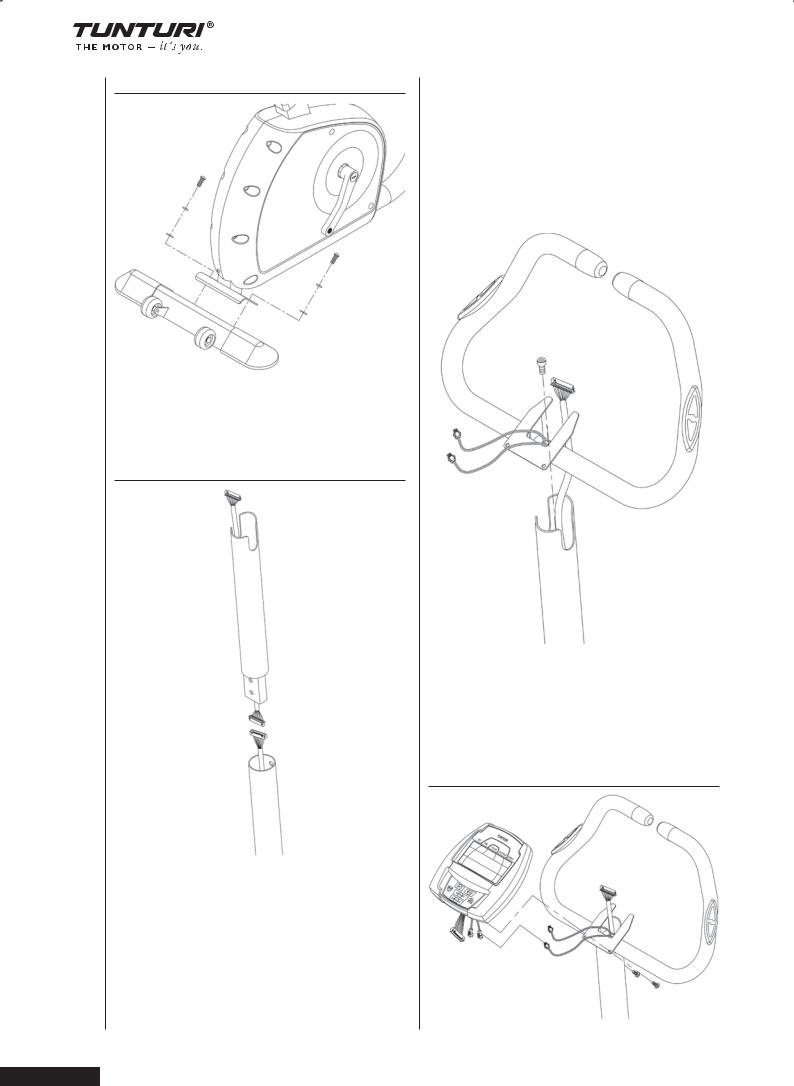
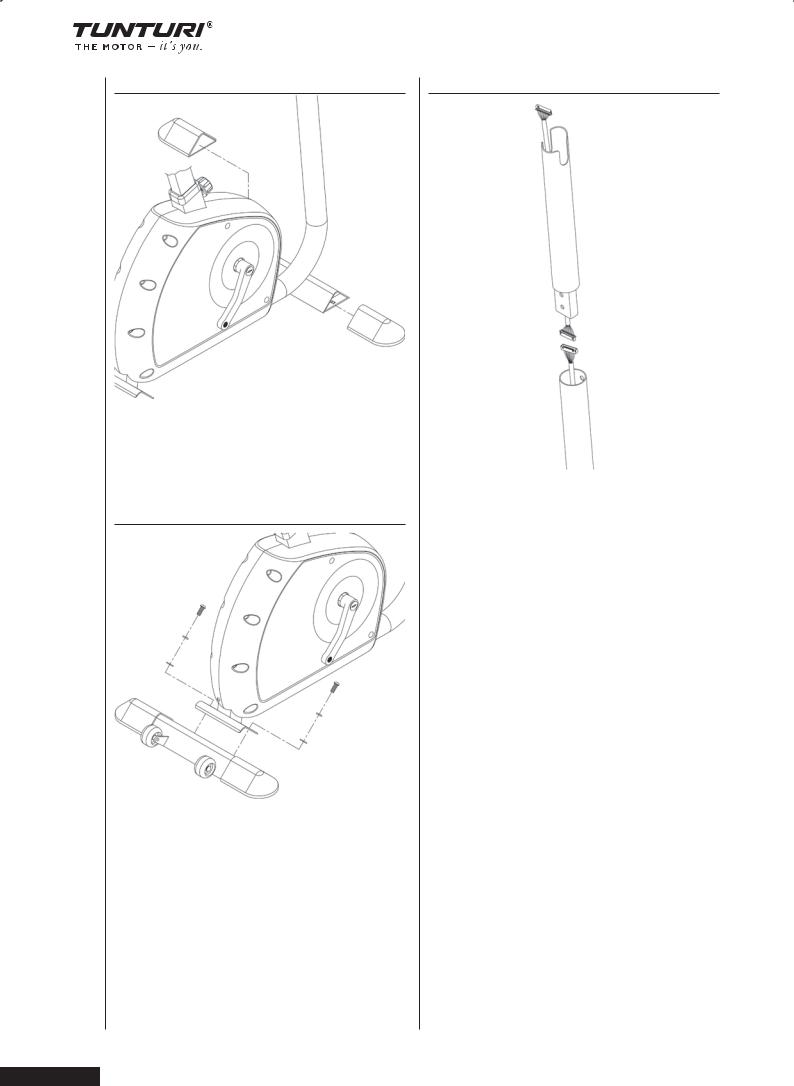
REAR SUPPORT
1.Place the support under the rear part of the frame.
2.Fasten it with two hex screws and washers.
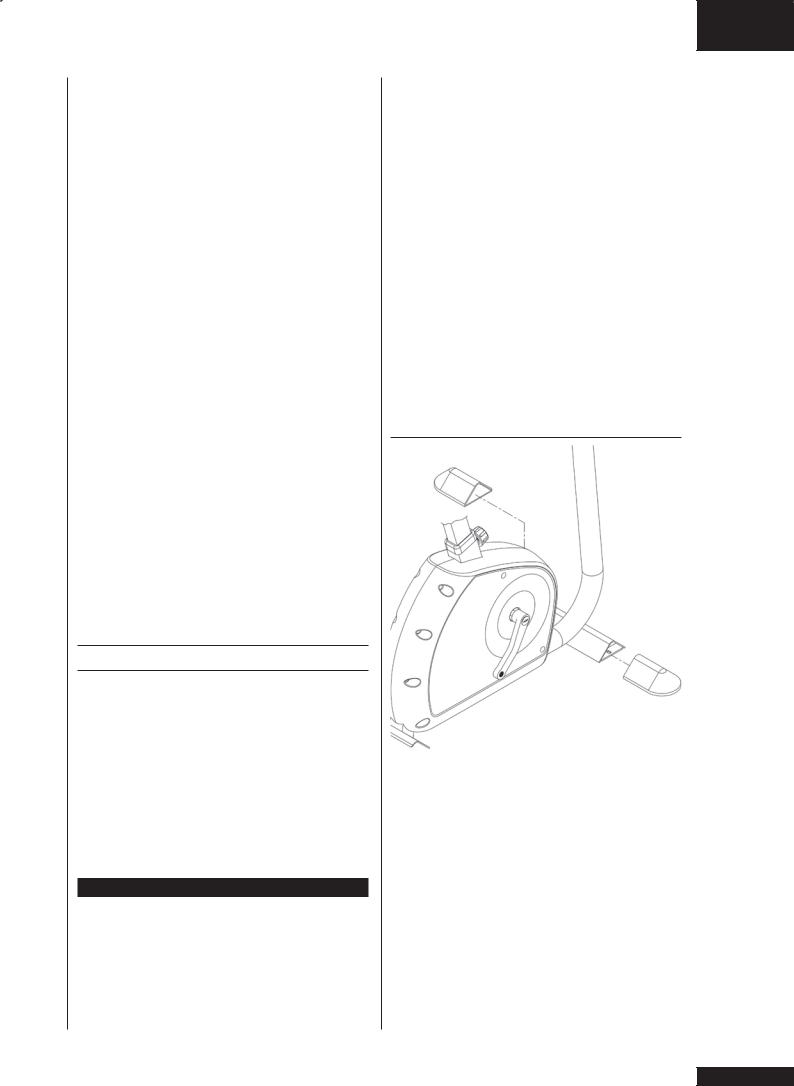
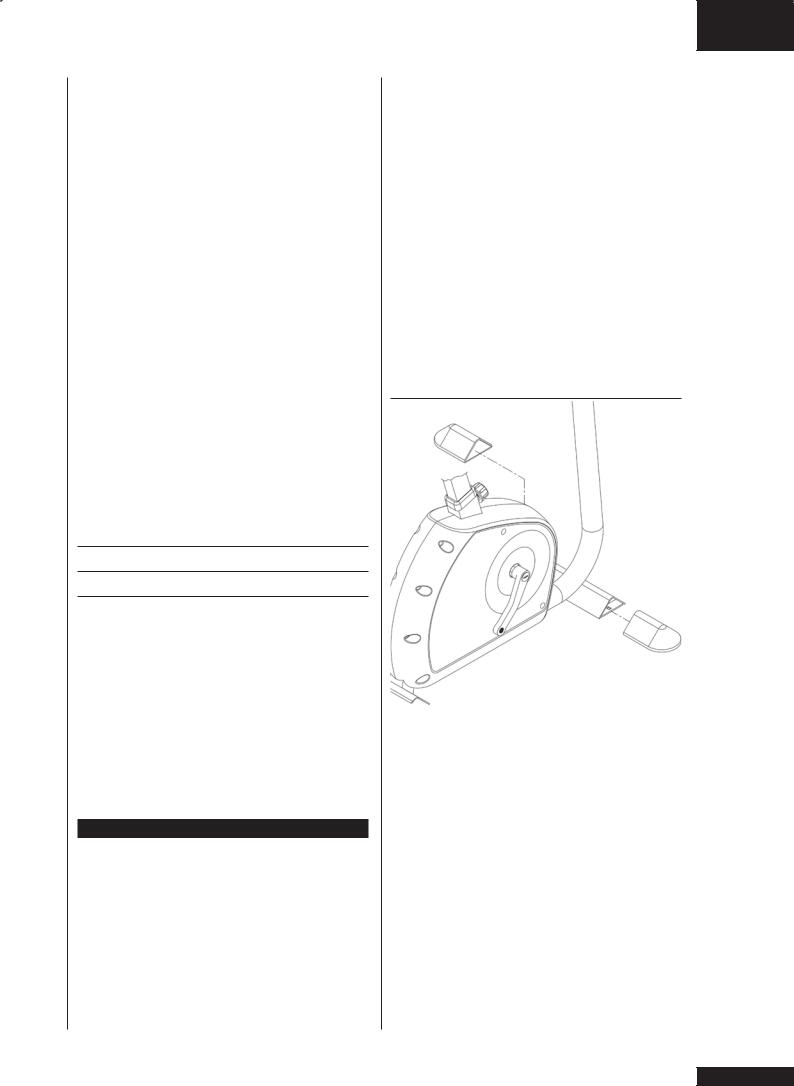
HANDLEBAR AND
HANDLEBAR SUPPORT TUBE
1. F30: Adjust the resistance knob to position 8. Steer the brake wire from the handlebar support
tube into the loop in the upper part of the brake wire outlet from the frame tube.
2. F30: Screw the wire ends into each other.
3. Attach the wires from the frame tube and the handlebar support tube. Push the handlebar support tube into place inside the frame tube.
NOTE! The fastening screws are ready-mounted, so please do not loosen them.
4. Use the enclosed Allen key to tighten both fastening screws through the holes in the tube.
NOTE ! Tighten the fastening screws by turning them counter-clockwise. And not too tight!
5. Pull the wire from the handlebar supprt tube slightly upwards and loosen the fastening screw at the end of the handlebar support tube. Insert the handlebar into the upper end of the handlebar support tube and fasten it by tightly screwing the fastening screw. Be careful not to damage the meter wire!
4

CONSOLE
1.Attach the wires from the handlebar and handlebar support tube to the corresponding console outlets. Thread the wires into the handlebar. Be careful not to damage the wires when attaching the console.
2.Slide the meter on the top of the handlebar support tube and attach it with three locking screws through the plastic sleeve.
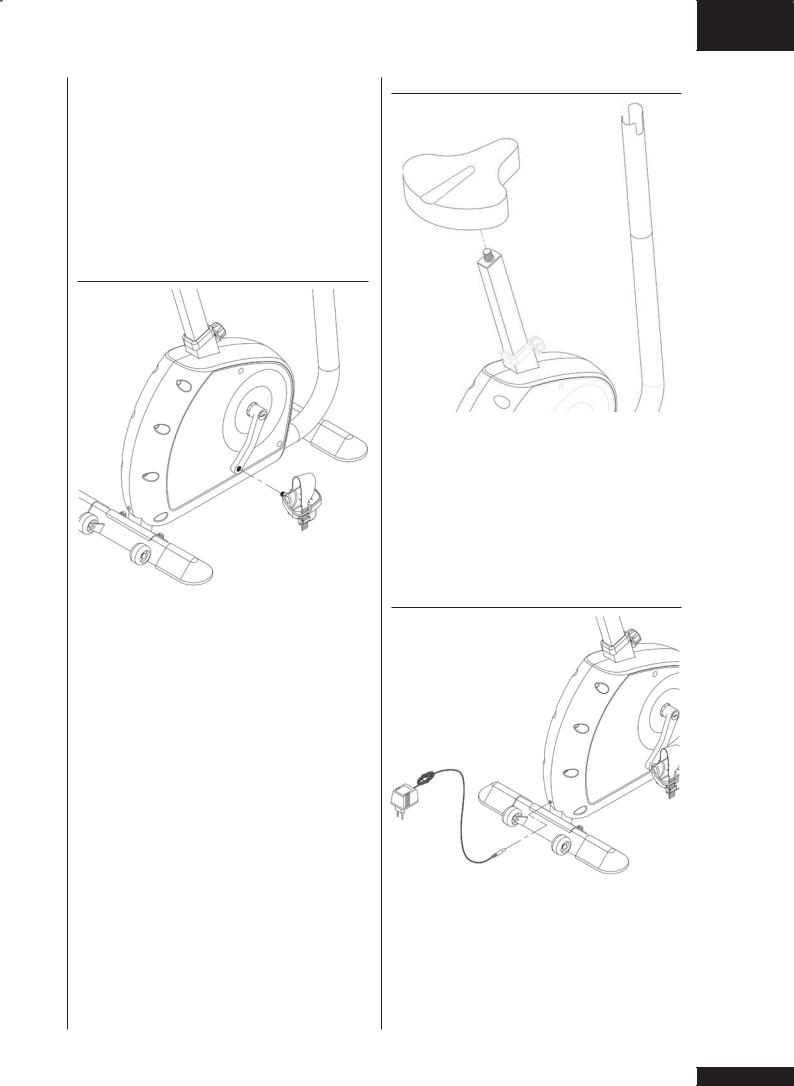
PEDALS
1.The pedals are distinguished by the markings R (= right) and L (= left) on their shafts. Fasten the right pedal to the right pedal crank turning clockwise and the left pedal to the left pedal crank turning counterclockwise.
2.Fasten the pedal bands first into the retainer at the device. Thread the band through the pedal loop and push the band opening into the projection in the pedal.
3.Fasten the pedal bands to the pedal outside. Push the band through the locking buckle and the
O W N E R ’ S M A N U A L • F 3 0 • F 3 5 GB
band locks automatically.
4. The length of the band can be adjusted with the locking buckle.
SEAT
Attach the seat to the seat support: tighten the locking nuts in opposite directions. Please note that you can adjust both seat inclination and the distance of the seat from the handlebar. Once the distance and inclination are set how you want, tighten the locking nuts carefully.
F35: POWER CORD
Plug the socket end of the transformer cord into the connector, just above the rear support in the centre of the frame, and the other end into the wall socket. Make sure the power cord does not run underneath the device. To prevent damage to the cord, we recommend you tie it to the protector next to the connector.
NOTE! The device must be connected to a
5

O W N E R ’ S M A N U A L • F 3 0 • F 3 5
grounded wall socket. Do not use extension wires when connecting the device to the power source.
DANGER: Always switch off the power and uplug this appliance from the electrical outlet immediately after using.
WARNING: To reduce the risk of burns, fire, electric shock, or injury to persons:
1)An appliance should never be left unattended when plugged in. Unplug from outlet when not in use, and before carrying out any maintenance or repair procedures.
2)Do not operate under blanket or other combustive material. Excessive heating can occur and cause fire, electric shock, or injury to persons.
IMPORTANT! Behind the console of F35 there is a battery case. The cycle can be used with
batteries or with electric current. If the device is used solely with batteries, please note that the servo brakes exhaust the batteries rather quickly. Hence, we recommend the use of electricity as the main power source.
NOTE: The clock in the console uses always batteries, even when the device is not connected to any power source. Otherwise the clock would reset to zero.
USE
CORRECT EXERCISING POSITION
The seat height should be set so that the middle part of the foot reaches the pedal with the leg almost straight and the pedal at its lowest point. To raise or lower the seat, turn the locking knob one counterclockwise. Pull the locking knob out so that the seat tube can be moved freely up and down.
When the height is right, let go of the knob. The seat locks into place. Tighten the locking knob clockwise. The scale on the seat tube helps you to find the seat height you have found suits you best.
NOTE! Always make sure that the locking knob is fastened properly before starting to exercise.
To adjust the horizontal seat position forward and back, loosen the locking screws under the seat. You can also adjust inclination from here.
Always make sure that the locking screws under the seat are properly fastened before starting to exercise. You can change the seat for another by unscrewing the locking screw.
The design of the handlebar allows you to exercise either in an upright position or with the upper body leaning forward. Remember, however, always to keep your back straight.
ADJUSTING PEDALLING RESISTANCE
F30: To increase or decrease resistance, turn the adjustment knob at the top of the handlebar support tube clockwise (+ direction) to increase resistance and counterclockwise (- direction) to
decrease resistance. The scale above the knob (1- 8) helps you find and reset a suitable resistance.
F35: Exercise intensity can be increased or decreased with ”+/- ” keys: ”+” increases the resistance and ”-” decreases the resistance.
EXERCISING
Working out using an exercise cycle is excellent aerobic exercise, the principle being that the exercise should be suitably light, but of long duration. Aerobic exercise is based on improving the body’s maximum oxygen uptake, which
in turn improves endurance and fitness. The ability of the body to burn fat as a fuel is directly dependent on its oxygen uptake capacity.
Aerobic exercise should above all be pleasant. You should perspire, but you should not get out of breath during the workout. You must, for example, be able to speak and not just pant while pedalling. You should exercise at least three times a week, 30 minutes at a time, to
reach a basic fitness level. Maintaining this level requires a few exercise sessions each week. Once the basic condition has been reached, it is easily improved, simply by increasing the number of exercise sessions. Exercise is always rewarding for weight loss, because it is the only way of increasing the energy spent by the body. This is why it is always worthwhile to combine regular exercise with a healthy diet. A dieter should exercise daily - at first 30 minutes or less at a time, gradually increasing the daily workout time to one hour.
You should start slowly at a low pedalling speed and low resistance, because for an overweight person strenuous exercise may subject the heart and circulatory system to excessive strain. As
6

fitness improves, resistance and pedalling speed can be increased gradually. Exercise efficiency can be measured by monitoring the pulse. The pulse meter helps you monitor your pulse easily during exercise, and thus to ensure that the exercise is sufficiently effective but not overstrenuous.
HEART RATE
No matter what your goal, you’ll get the best results by training at the right level of effort, and the best measure is your own heart rate.
PULSE MEASUREMENT WITH HAND GRIP PULSE
Pulse measurement is based on the monitoring of peripheral circulation. The handgrip sensors in the handlebars take a pulse measurement when the user is touching both sensors simultaneously. Pulse measurement requires that the skin is constantly touching the sensors and that the skin is slightly moist.
TELEMETRIC HEART RATE MEASUREMENT
The console has a heart rate receiver compatible with equipment, so you can also use uncoded heart rate belts for heart rate measurement. The most reliable heart rate measurement is achieved with a telemetric device, in which the electrodes of the transmitter fastened to the chest transmit the pulses rom the heart to the console by means of an electromagnetic field.
NOTE! If you are fitted with a pacemaker, please consult a physician before using a wireless heart rate monitor.
If you want to measure your heart rate this way during your workout, moisten the grooved electrodes on the transmitter belt with saliva or
water. Fasten the transmitter just below the chest with the elastic belt, firmly enough so that the electrodes remain in contact with the skin while exercising, but not so tight that normal breathing is prevented. If you wear the transmitter and belt over a light shirt, moisten the shirt slightly at the points where the electrodes touch the shirt. The transmitter automatically transmits the heart rate reading to the console up to a distance of about 1 m.
If the electrode surfaces are not moist, the heartrate reading will not appear on the display. If the electrodes are dry, they must be moistened again. Allow the electrodes warm up properly to
O W N E R ’ S M A N U A L • F 3 0 • F 3 5 GB
ensure accurate heart rate measurement. If there are several telemetric heart rate measurement devices next to each other, the distance between them should be at least 1.5 m. Similarly, if there is only one receiver and several transmitters in use, only one person with a transmitter should be within transmission range. The transmitter is switched to an active state only when it is being used for measurement. Sweat and other moisture can, however, keep the transmitter in an active state and waste battery energy. Therefore it is important to dry the electrodes carefully after use.
When selecting training attire, please note that some fibers used in clothes (e.g. polyester, polyamide) create static electricity, which may prevent reliable heart rate measurement. Please note that a mobile phone, television and other electrical appliances form an electromagnetic field around them, which will cause problems in heart rate measurement.
First find your maximum heart rate i.e. where the rate doesn’t increase with added effort. If you don’t know your maximum heart rate, please use the following formula as a guide:
208 - 0,7 X AGE
These are average values and the maximum varies from person to person. The maximum heart-rate diminishes on average by one point per year. If you belong to a risk group, ask a doctor to measure your maximum heart rate for you.
We have defined three different heart-rate zones to help you with targeted training.
BEGINNER • 50-60 % of maximum heart-rate. Also suitable for weight-watchers, convalescents and those who haven’t exercised for a long time. Three sessions a week of at least a half-hour each is recommended. Regular exercise considerably improves beginners’ respiratory and circulatory performance and you will quickly feel your improvement.
TRAINER • 60-70 % of maximum heart-rate. Perfect for improving and maintaining fitness. Even reasonable effort develops the heart and lungs effectively, training for a minimum of 30 minutes at least three times a week. To improve your condition still further, increase either frequency or effort, but not both at the same time!
7

O W N E R ’ S M A N U A L • F 3 0 • F 3 5
ACTIVE TRAINER • 70-80 % of maximum heartrate.
Exercise at this level suits only the fittest and presupposes long-endurance workouts.
CONSOLE
KEYS
1. SET
Selection of the goal values
2. RESET.
Zeroing the exercising values, ending the exercise and return into main display
3. ”+ / -”
Setting the goal values, F35: increasing the intensity (+), decreasing the intensity (-)
4. RECOVERY
Measuring the recovery heart rate
5. START/STOP
Starting and interrupting the exercise.
DISPLAY
1. PERFORMANCE SPEED (/MIN)
Pedalling speed (RPM). The column underneath also shows the pedalling speed.
2. EXERCISE DURATION
00:00-99:59; measuring at 1 second intervals, h1: 40-h9:59 measuring at 1 minute intervals.
3. HEART RATE DURING EXERCISE
The symbol of a heart blinks simultaneously with your own heart rate during the exercise. The arrow signs show if the heart rate exceeds or surpasses the set values.
4. EXERCISE TRIP LENGTH (KM/MILE)
O0.0 – 99.99 km / miles
5. EXERCISE SPEED (KMH/MPH)
00.0-99.9 kmh / mph
6. ENERGY CONSUMPTION (KCAL)
Estimated total energy consumption during the exercise, 0 –9999 kcal
7. CLOCK (CLOCK)
Real time clock
8. THERMOMETER (TEMP C / TEMP F)
Measures the room temperature either in Celsius or Fahrenheit
9. HYGROMETER (HUMIDITY %)
Measures the room humidity, 0-100%.
10. DISPLAY OF THE CHOSEN FUNCTION
The console displays the chosen exercise mode (Program = preprogrammed program; Manual = manually programmed exercise; Recovery = measuring of recovery heart rate, Target HR = heart rate exercise; Min Max = upper and lower heart rate limits)
11. F30: DISPLAY OF MAIN VALUES
The chosen exercise value shows in large numbers in the middle of the console; other values are shown in the upper row displays.
12. DISPLAY OF AN EXERCISE PROFILE
The profile of a preprogrammed exercise program.
13. DISPLAY OF THE CUMULATIVE HEART RATE
If the heart rate is measured during the exercise, the display shows the profile of the heart rate formed during the exercise.
14. CHANGE OF BATTERIES (BATTERY LOW)
A warning sign is displayed before the change of batteries.
USING THE CONSOLE
The console is turned on by pressing any key. It the device has not been used for five minuts, it automatically switches itself to main display.
Select the desired measuring unit with the switch behind the console. You can select either metric (km, km/h, Celsius) or English (miles, mph, Fahrenheit) units.
Set the clock in the console (Clock) as follows: In main display, press both of the arrow keys simultaneously for three seconds. The clock is shown in the main number display. Set the right time using the arrow keys; switch from hours to minutes and back to main display by pressing the SET key.
F30 AND F35: MANUAL EXERCISE
In a manual exercise you can adjust the resistance during the exercise.
1.You can start exercising immediately by pressing the START/STOP key. Adjust the resistance by pressing the “+/-” keys (F35) or with the adjustment ring (F30)..
2.You can start exercising by setting goal values.
8

Press an ”+/-” key until under the main number display is shown the text ”Manual”.
3.Press the SET key after which you can set the goal values.
4.TIME = select the desired exercise duration by pressing the ”+ / -” keys. Switch to the following step by pressing the SET key.
5.DISTANCE = select the desired distance by pressing the ”+ / -” keys. Switch to the following step by pressing the SET key.
6.KCAL= select the goal value of energy consumption by pressing the ”+ / -” keys. Switch to the following step by pressing the SET key.
7.PULSE = set the heart rate an upper limit with ”+ / -” keys: the display shows a heart symbol and an arrow upwards. Press the SET key to switch to setting the heart rate a lower limit. The display shows a heart and an arrow downwards. Set the lower limit with ”+ / -” keys. If your heart rate exceeds these limits, the limit value in question blinks in the display. To switch back to setting the exercise duration (TIME), press the SET key.
8.You can start exercising by pressing the START/STOP key. Start pedalling and adjust the resistance if necessary during the exercise.
9.You can interrupt the exercise by pressing START/STOP (”Over” is shown in the display). The program information stays in the console memory for five minutes. If you resume with training whithin this time, simply press the START/STOP key again to continue.
10.You can stop exercising by pressing RESET when the console is in the pause mode.
11.If you have set a goal value, the console gives a signal and the displayed value starts blinking after the goal has been reached. Reset the display by first pressing START/STOP and thereafter RESET.
F35: TARGET HR EXERCISE (CONSTANT HEART RATE)
In a Target HR –exercise you will set the desired heart rate; during the exercise the cycle sees to that this heart rate will be sustained independent of how fast you work.
1.Press a ”+/-” key, until the text Target HR is shown under the main number display.
2.Set the desired constant heart rate for the exercise by pressing SET. The display shows the word PULSE and the symbols of a heart and an arrow up / arrow down. You can set the desired heart rate by pressing the ”+ / -” keys. Switch to the following stepi by pressing SET.
O W N E R ’ S M A N U A L • F 3 0 • F 3 5 GB
3.TIME = select the desired exercise duration by pressing the ”+ / -” keys. Switch to the following step by pressing the SET key.
4.DISTANCE = select the desired distance by pressing the ”+ / -” keys. Switch to the following step by pressing the SET key.
5.KCAL= select the goal value of energy consumption by pressing the ”+ / -” keys. Switch back to setting the exercise durationt by pressing the SET key.
6.You can start exercising by pressing the START/STOP key. Start pedalling and adjust the heart rate level if necessary during the exercise.
7.You can interrupt the exercise by pressing START/STOP (”Over” is shown in the display). The program information stays in the console memory for five minutes. If you resume with training whithin this time, simply press the START/STOP key again to continue.
8.You can stop exercising by pressing RESET when the console is in the pause mode.
9.If you have set a goal value, the console gives a signal and the displayed value starts blinking after the goal has been reached. Reset the display by first pressing START/STOP and thereafter RESET.
F35: EXERCISE PROFILES
1.After the console is switched on, press ”+” or ”-” key until the display shows a profile code (P1-P8) and the profile form. All of the profiles are so called constant crank moment profiles, i.e the faster you cycle the faster you travel the exercise distance. All of the preprogrammed profiles are 20 minutes in duration.
2.Select the desired profile by the ”+/-” keys. Press SET to switch to setting the exercise profile duration; with the ”+/-” keys you can set the time in five minutes increments between 10 and 90 minutes.
3.Start exercising by pressing START/STOP. Start pedalling. With the ”+/-” keys, you can change the resistance level in the section of the profile you are performing at the moment. ”+” key increases the resistance; ”-” key decreases it.
4.You can interrupt the exercise by pressing START/STOP (”Over” is shown in the display).The program information stays in the console memory for five minutes. If you resume with training whithin this time, simply press the START/STOP key again to continue.
5.You can stop exercising by pressing RESET when the console is in the pause mode.
6.If you complete the whole profile, the console gives a signal tune and the displayed value starts
9

O W N E R ’ S M A N U A L • F 3 0 • F 3 5
blinking after the goal has been reached. Reset the display by first pressing START/STOP and thereafter RESET.
F30 AND F35: RECOVERY – MEASURING THE RECOVERY PULSE
Measure your recovery pulse rate at the end of the workout.
1.To start the measuring of the recovery pulse rate, press RECOVERY. The display also shows the word ”Recovery”.
2.The measuring starts automatically and takes two minutes.
IMPORTANT! If any disturbances during the measuring should occur, the display shows “Err” instead of the measurement value.
3.Upon completion of the measurement, the display shows the recovery rate as a percentage. The smaller the rate, the fitter you are. Please note that your results are in a relation to the pulse level in the beginning of the measurement, and that your results are personal and cannot directly be compared with any other person’s results.
In order to improve the reliability of recovery pulse measurement, always try to standardize the measurement situation as accurately as possible; start measuring at the same heart rate level as precisely as possible.
4.To switch back to the main display by pressing RESET. The console will also automatically switch to the main display one minute after the completion of the measurement.
MAINTENANCE
The F30 / F35 requires very little maintenance. Check, however, from time to time that all screws and nuts are tight. Clean the cycle with a damp cloth. Do not use solvents.
NOTE! Never remove the protective covers.
NOTE! The brake forms a magnetic field, which may damage the mechanism of a watch or the magnetic identification tape of a credit or cash card if they come into immediate contact with the magnets. Never attempt to detach or remove the magnet fork of the magnetic brake.
If the cycle is not used for a period of time the transmission belt may become temporarily distorted. This can lead to a slightly uneven pedalling sensation when used. However, after a few minutes of use the effect will disappear as
the belt returns to its original form.
CHANGING BATTERIES
The console gives a warning signal before the change of batteries is due. Detach the lid of the battery casing at the back of the meter and
remove the old batteries. Place the new batteries in the holder and push the battery casing lid back into place.
MALFUNCTIONS
Despite continuous quality control, defects and malfunctions caused by individual components may occur in the equipment. In most cases it’s unnecessary to take the whole device in for repair, as it’s usually sufficient to replace the defective part.
If the equipment does not function properly during use, contact your Tunturi dealer immediately. Always give the model and serial number of your equipment. Please state also the nature of the problem, conditions of use and purchase date.
If you require spare parts, always give the model, serial number of your equipment and the spare part number for the part you need. The spare part list is at the back of this manual. Use only spare parts mentioned in the spare part list.
TRANSPORT AND STORAGE
Move the cycle according to the following instruction, because lifting the cycle incorrectly may strain your back or cause other risk of accidents:
1.Stand behind the cycle.
2.Grip the seat with one hand and the handlebar with the other and set your foot on the rear support.
3.Tilt the cycle so that it rests on the transportation wheels and the cycle by wheeling it.
4.Lower the cycle while holding on to the handlebar and remaining all the time behind the
cycle.
NOTE! Transport the equipment with caution over uneven surfaces, for example over a step. The equipment should never be transported upstairs using the wheels over the steps, instead it must be carried. We recommend that you use a protective base when transporting the equipment.
10
O W N E R ’ S M A N U A L • F 3 0 • F 3 5 GB
To prevent malfunctioning of the cycle, store in a dry place with as little temperature variation as possible, protected from dust.
TECHNICAL SPECIFICATIONS
Length ........................ |
95 cm |
Width.......................... |
62 cm |
Height ........................ |
135 cm |
Weight ....................... |
38 kg |
The Tunturi models F30 and F35 meet the requirements of the EU’s EMC Directives on electromagnetic compatibility (89/336/EEC) and electrical equipment designed for use within certain voltage limits (73/23/EEC). This product therefore carries the CE label.
The Tunturi models F30 and F35 meet EN precision and safety standards (Class A, EN-957, parts 1 and 5).
Due to our continuous policy of product development, Tunturi reserves the right to change specifications without notice.
NOTE! The instructions must be followed carefully in the assembly, use and maintenance of your equipment. The warranty does not cover damage due to negligence of the assembly, adjustment and maintenance instructions described herein. Changes or modifications not expressly approved by Tunturi Oy Ltd will void the user’s authority to operate the equipment!
WE WISH YOU MANY ENJOYABLE TRAININGS WITH
YOUR NEW TUNTURI TRAINING PARTNER!
11

B E T R I E B S A N L E I T U N G • F 3 0 • F 3 5
INHALT
WICHTIGE SICHERHEITSHINWEISE |
12 |
MONTAGE |
13 |
BETRIEB |
16 |
TRAINIEREN |
16 |
COCKPIT |
18 |
BETRIEB DES COCKPITS |
18 |
WARTUNG |
20 |
BETRIEBSSTÖRUNGEN |
20 |
TRANSPORT UND AUFBEWAHRUNG |
21 |
TECHNISCHE DATEN |
21 |
WICHTIGE SICHERHEITSHINWEISE
Dieses Handbuch ist ein wesentlicher Bestandteil Ihrer Trainingsausrüstung. Lesen Sie dieses Handbuch bitte sorgfältig durch, bevor Sie Ihr Trainingsgerät montieren, mit ihm trainieren oder es warten. Bitte bewahren Sie dieses Handbuch; es wird Sie jetzt und zukünftig darüber informieren, wie Sie Ihr Gerät benutzen und warten. Befolgen Sie diese Anweisungen immer sorgfältig.
•Vor Beginn eines Trainingsprogrammes einen Arzt konsultieren.
•Bei Übelkeit, Schwindelgefühl oder anderen anomalen Symptomen sollte das Training sofort abgebrochen und unverzüglich ein Arzt aufgesucht werden.
•Dieses Gerät hat ein geschwindigk eitsabhängiges Bremssystem, d.h. je schneller Sie schreiten, desto höher ist die Belastung.
•Aufgrund des natürlichen Spieltriebes und der Experimentierfreudigkeit
der Kinder können Situationen und Verhaltensweisen entstehen, für die das Trainingsgerät weder gebaut noch abgesichert ist und die eine Verantwortung seitens des Herstellers ausschliessen.Wenn Sie dennoch Kinder an das Trainingsgerät lassen,
müssen Sie deshalb deren geistige und körperliche Entwicklung und vor allem deren Temperament berücksichtigen, sie gegebenenfalls beaufsichtigen und sie vor allem auf die richtige Benutzung des Gerätes hinweisen.
•Das Gerät sollte grundsätzlich nur von einer Person benutzt werden.
•Der Anwendungsbereich dieses Trainingsgerätes ist der Heimbereich.
•Das Gerät daft nur in Innenräumen benutzt werden.
•Das Gerät auf möglichst ebenen Untergrund stellen.
•Stützen Sie sich nie gegen das Benutzerinterface ab!
•Bedienen Sie die Tasten mit der Fingerkuppe. Ein Fingernagel kann die Membrane der Tasten
beschädigen.
•Das Gerät nie ohne die seitlichen Abdeckungen benutzen.
•Dieses Gerät ist nicht für den Einsatz in Feuch-
träumen (Sauna, Schwimmbad) vorgesehen.
•Beim Training muss die Umgebungstemperatur zwischen +10°C und +35°C liegen. Zur
Aufbewahrung kann das Gerät bei Temperaturen zwischen - 15°C und +40°C gelagert werden. Die Luftfeuchtigkeit darf nie 90 % überschreiten.
•Vor Beginn des Trainings sicherstellen, dass das Gerät völlig intakt ist. Auf keinen Fall mit einem fehlerhaften Gerät trainieren.
•Zum Auf-und Absteigen am Lenker abstützen. Nicht auf das Gehäuse treten.
•Zur Benutzung des Gerätes stets angemessene Kleidung und Schuhwerk tragen.
•Nie die Hände in die Nähe von beweglichen Teilen bringen.
•Zur Vermeidung von Muskelkater Aufund Abwärmtraining nicht vergessen.
•Keine anderen als die in dieser Betriebs-anleitung beschriebenen Wartungsmassnahmen und
12
Einstellungen vornehmen. Die angegebenen Wartungsanweisungen sind einzuhalten.
•Das Gerät darf nicht von Personen benutzt werden, deren Gewicht über 135 kg liegt.
•Ihr neuer Heimtrainer von Tunturi wurde für das Heimtraining entwickelt. Die Garantie dieses Gerätes beträgt 24 Monate für das Heimtraining. Nähere Informationen zur Garantie auf Ihr Fitnessgerät finden Sie im dem Gerät beiliegenden Garantieheft. Sowohl Tunturi, als auch seine nationalen Vertretungen übernehmen keine Haftung für Verletzungen oder Geräteschäden, die sich bei Dauereinsatz in gewerblichen Fitnesscentern, Sportvereinen und vergleichbaren Einrichtungen ergeben. Für Schäden, die durch Missachtung der beschriebenen Einstellungsund Wartungsanweisungen entstehen, besteht kein GarantieAnspruch!
HERZLICH WILLKOMMEN IN DER
WELT DES TRAINIERENS MIT
TUNTURI!
Durch Ihren Kauf haben Sie bewiesen, dass Ihnen Ihre Gesundheit und Ihre Kondition viel wert sind; auch haben Sie gezeigt, dass Sie Qualität zu schätzen wissen. Mit einem TunturiFitnessgerät haben Sie sich für ein hochwertiges, sicheres und motivierendes Produkt als Trainingspartner entschieden. Welches Ziel Sie auch immer mit Ihrem Training verfolgen, wir sind sicher, dass Sie es mit diesem Fitnessgerät erreichen. Hinweise zu Ihrem Trainingsgerät und zum effektiven Training damit finden Sie auf der Internetseite von Tunturi WWW.TUNTURI.COM.
MONTAGE
Prüfen Sie, dass folgende Teile enthalten sind:
1.Rahmen
2.Hinteres Fussrohr
3.Kunststoffabdeckungen (2 Stücke)
4.Lenkerrohr
5.Lenker
6.Cockpit
7.Pedale (2 Stücke)
8.Sattel
B E T R I E B S A N L E I T U N G • F 3 0 • F 3 5 D
9.Transformator (F35)
10.Montageset (der Inhalt steht mit * auf der Ersatzteilliste): bewahren Sie die Montageteile sorgfältig auf, denn Sie können sie später u.a. zur Justierung benötigen.
Die Ersatzteilliste finden Sie auf der Rückseite dieses Handbuches. In Problemfällen wenden Sie sich bitte mit der Typenbezeichnung und der Serienummer des Gerätes an Ihren Händler. Die Verpackung enthält eine Tüte mit Silikat, die die Feuchtigkeit während der Lagerung und des Transportes aufnimmt. Bitte entsorgen Sie diese Tüte, wenn Sie das Gerät ausgepackt haben. Die
Richtungsangaben links, rechts, vorne und hinten sind aus der Sicht in der Traininsgsposition abgeleitet.
KUNSTSTOFFABDECKUNGEN
1. Die grauen Kunststoffabdeckungen so anbringen, dass die Halter am Fussrohr in die runden Bohrungen der Kunststoffabdeckungen einrasten.
13
B E T R I E B S A N L E I T U N G • F 3 0 • F 3 5
HINTERES FUSSROHR
1.Das Fussrohr unter den hinteren Teil des Rahmens plazieren.
2.Das Fussrohr mit 2 Sechskantschrauben und Unterlegscheiben befestigen.
LENKERROHR UND LENKER
1. F30: Widerstandseinstellrad bis 8 drehen. Das Bremsseil aus dem Lenkerrohr in die Schake am Oberteil des Bremsseilanschlusses führen, der aus dem Rahmenrohr herkommt.
2.F30: Seilenden miteinander festschrauben.
3.Die Kabel aus dem Rahmenrohr und
Lenkerrohr miteinander verbinden. Schieben Sie das Lenkerrohr in den Rahmen.
BITTE BEACHTEN: Die Befestigungsschrauben sind fertig montiert, bitte nicht lösen!
4. Ziehen Sie mit dem beigefügten Imbusschlüssel beide Befestigungsschrauben durch die Öffnungen im Rohr an.
BITTE BEACHTEN: Ziehen Sie die Schrauben gegen den Uhrzeigersinn an, aber nicht zu fest!
5. Das Kabel aus dem Lenkerrohr ein bisschen nach oben ziehen und die Befestigungsschraube am Lenkerrohrende lösen. Den Lenker an seinen Platz anschieben und die Schraube wieder sehr fest befestigen. Achten Sie darauf, das DisplayKabel nicht zu beschädigen!
COCKPIT
14
1.Verbinden Sie die aus dem Lenkerrohr kommenden Leitungen mit den entsprechenden Anschlüssen des Cockpits. Schieben Sie die verbundenen Leitungen so in das Lenkerrohr, dass die Befestigungen des Cockpits nicht beschädigt werden. Achten Sie darauf, dass die Kabelleitungen nicht beschädigt werden!
2.Führen Sie das Cockpit auf das Lenkerrohr und befestigen Sie es mit zwei Schrauben. Die Schutzfolie auf dem Cockpit entfernen.
PEDALE
1.Die Pedale sind am Schaft durch die Beschriftungen L (links) und R (rechts) gekennzeichnet. Befestigen Sie das linke Pedal an der linken Kurbel, indem Sie es gegen
den Uhrzeigersinn drehen, und das rechte Pedal an der rechten Kurbel, indem Sie es im Uhrzeigersinn drehen.
2.Pedalbänder, erstens an den Halter am Gerät befestigen. Das Band in die Schake an dem Pedal schieben und die Bandöffnung in den Vorsrpung an dem Pedal drücken.
3.Bänder an die Aussenseite des Pedals befestigen. Das Band durch die Arretierschnalle schieben, dabei das Band automatisch sich schliesst.
4.Die Bandlänge kann mit Hilfe der Arretierschnalle justiert werden.
B E T R I E B S A N L E I T U N G • F 3 0 • F 3 5 D
SATTEL
Befestigen Sie den Sattel auf dem Sattelrohr. Ziehen Sie die Befestigungsmuttern fest in entgegengesetzter Richtung an. Beachten Sie, dass die Sattelbefestigung die Einstellung der Neigung des Sattels sowie die Einstellung der Entfernung des Sattels vom Lenker gestattet. Ziehen Sie die Befestigungsmuttern fest an, wenn Entfernung und Neigung die gewünschte Einstellung haben.
F35: NETZKABEL
Stecken Sie das Netzkabel des Trafos in die Steckdose und den Trafostecker in die Buchse im Rahmen des Geräts oberhalb des hinteren Standprofils. Vergewissern Sie sich, dass das Gerät nicht auf dem Netzkabel steht.
BITTE BEACHTEN: Auf der Hinterseite des Cockpits am F35 befindet sich ein Batterienfach. Somit kann das Gerät entweder mit Netzstrom
15

B E T R I E B S A N L E I T U N G • F 3 0 • F 3 5
oder mit vier Stücke C-Batterien betriebt werden. Falls das Gerät ausschliesslich mit Batterien betriebt wird, bitte beachten, dass die Servo-Bremse die Batterien ziemlich schnell ausnützt. Deshalb empfehlen wir, dass das Gerät hauptsächlich mit dem Netzstrom betriebt wird. Bitte beachten Sie auch, dass die Uhr am Cockpit zwar die Batterien benutzt, wenn das Gerät nicht an eine Stromquelle angekoppelt ist; übrigens würde die Uhr sich auf Null stellen.
BETRIEB
RICHTIGE TRAININGSHALTUNG
Die Sattelhöhe so einstellen, dass die Mitte der Fusssohle bei fast gestrecktem Bein das Pedal in unterster Position erreicht. Zum Einstellen der Sattelhöhe, zuerst das Handrad eine Umdrehung gegen den Uhrzeigersinn drehen. Das Handrad so nach aussen ziehen, dass sich das Sattelrohr frei auf und ab bewegen kann. Wenn die Sattelhöhe richtig ist, das Handrad loslassen. Das Sattelrohr rastet ein. Das Handrad im Uhrzeigersinn festdrehen. Wenn nötig, kann die richtige Sattelhöhe leicht mit Hilfe der Messskala am Sattelrohr neu eingestellt werden.
BITTE BEACHTEN: vor dem Trainieren immer sicherstellen, dass das Handrad ordnungsgemäss festgedreht ist.
Zum Einstellen der horizontalen Sattelposition nach vorn oder hinten lösen Sie die Befestigungsschrauben unter dem Sattel. Dabei können Sie auch die Neigung des Sattels einstellen. Durch Probieren finden Sie die
geeignete Trainingsposition. Ziehen Sie dann die Schrauben fest.
Zum Austauschen des Sattels lösen Sie die Feststellschraube unter dem Sattel.
Dank der ergonomischen Form des Lenkers kann das Training in aufrechter Stellung, bzw. Oberkörper nach vorne geneigt erfolgen. Den Rücken immer gerade halten!
EINSTELLUNG DES TRETWIDERSTANDES
F30: Der Tretwiderstand kann mit Hilfe des Einstellrades oben am Lenkerrohr eingestellt werden. Zum Erhöhen des Widerstandes das Einstellrad in Richtung ”+”, zum Reduzieren in Richtung ”-” drehen. Mit der Skala des Einstellrades (1-8) kann der richtige Widerstand leicht gefunden bzw. neu eingestellt werden.
F35: Die Trainingintensität kann durch Drücken der ”+/-” -Tasten erhöht oder verringert werden. Intensität durch Drücken der ”+” –Taste erhöhen oder sie durch Drücken der ”-” –Taste verringern.
TRAINIEREN
Treten ist eine ausgezeichnete aerobe Trainingsform, d. h. das Training ist zwar leicht, erfordert aber eine lange Trainingsdauer. Das aerobe Training basiert auf einer Verbesserung der max. Sauerstoffaufnahmefähigkeit, was
zu einer Verbesserung der Kondition und Ausdauer führt. Treten ist auch eine angenehme Trainingsform. Man soll war schwitzen, aber nicht ausser Atem kommen. So sollte man während des Trainings normal sprechen können. Das Training sollte aus mindestens drei 30minütigen Einheiten pro Woche bestehen.
So wird eine Grundkondition erreicht. Die Aufrechterhaltung der Kondition setzt zirka zwei Trainingssätze pro Woche voraus. Ist die Grundkondition erreicht, kann diese leicht durch Erhöhen der Trainingsfrequenz verbessert werden.
Körperliche Betätigung ist ein wichtiges Hilfsmittel zur Reduzierung des Körpergewichtes, denn Training ist das einzige Mittel, den Energieverbrauch des Körpers zu erhöhen. Dabei ist es neben einer kalorienarmen Diät wichtig, regelmässig zu trainieren. Die tägliche Trainingszeit sollte am Anfang 30 Minuten entweder auf einmal oder in kleineren Intervallen betragen und sollte langsam auf 60 Minuten erhöht werden. Lassen Sie das Training mit geringem Tretwiderstand beginnen. Eine grosse Anstrengung bei
einem hohen Körpergewicht kann zu einer gefährlichen Belastung des Herzens und des Kreislaufs führen. Die Trainingseffizienz kann mit Hilfe der Pulsfrequenz geschätzt und die Tretgeschwindigkeit der Kondition entsprechend langsam erhöht werden. Mit der Anzeige Ihres Gerätes können Sie ihre Pulsfrequenz während des Trainings beobachten und sicherstellen, dass das Training effektiv genug aber nicht zu anstrengend ist.
HERZFREQUENZ
Egal, welches Ziel Sie erreichen wollen, die besten Resultate erzielen Sie mit einem Training auf dem richtigen Leistungsniveau, und das beste Mass ist dabei Ihre eigene Herzfrequenz.
16

PULSMESSUNG MIT DEN SENSOREN IN DEN HANDSTÜTZEN
Die Pulsmessung beruht auf der Kontrolle Ihres Kreislaufs in den äusseren Blutgefässen. Hierzu werden die Sensoren in den Handstützen benutzt, die die Pulsschläge immer dann messen, wenn der Gerätebenutzer gleichzeitig die beiden
in den Handstützen angebrachten Sensoren berührt. Eine verlässliche Pulsmessung setzt voraus, dass die Haut etwas feucht und ständig in Kontakt mit den Sensoren ist. Tunturi empfielt jedoch, immer wenn eine höchst zuverlässige Herzfrequenzmessung wichtig ist, den Sendergurt zu verwenden.
TELEMETRISCHE HERZFREQUENZMESSUNG
Das Cockpit hat einen Herzfrequenzempfänger, so dass Sie zur Herzfrequenzmessung auch nicht kodierte Messgurte verwenden können. Als zuverlässigste Art der Herzfrequenzmessung hat sich die drahtlose Herzfrequenzabnahme erwiesen, bei der die Herzschläge mit einem Elektrodengurt von der Brust abgenommen werden. Vom Gurt werden die Impulse danach über ein elektromagnetisches Feld an den Empfänger in der Elektronikanzeige übertragen.
BITTE BEACHTEN! Falls Sie einen
Herzschrittmacher tragen, lassen Sie sich von Ihrem Arzt bestätigen, dass Sie die drahtlose Herzfrequenzmessung benutzen können.
Zur drahtlosen Herzfrequenzmessung während des Trainings die gegen die Haut kommenden Elektroden am Elektrodengurt sorgfältig mit Wasser oder Speichel anfeuchten. Wird der Elektrodengurt über einem dünnen Hemd getragen, sind die gegen die Elektroden gerichteten Flächen ebenfalls zu befeuchten. Den Sender mit Hilfe des Gurtes fest unterhalb der Brustmuskulatur befestigen und darauf achten, dass der Gurt beim Training nicht verrutscht. Den Elektrodengurt jedoch nicht so festziehen, dass z. B. die Atmung erschwert wird. Der Sender kann den Pulswert bis zu einer Entfernung von zirka 1 m an den Empfänger übertragen.
Bei trockenen Elektroden wird kein Herzfrequenzwert angezeigt. Ggf. Elektroden wieder anfeuchten. Für eine zuverlässige Herzfrequenzmessung müssen die Elektroden auf Körpertemperatur angewärmt sein. Sind mehrere drahtlose Herzfrequenzmessgeräte gleichzeitig eingesetzt, sollten sie mindestens 1,5 m voneinander entfernt sein. Werden nur
B E T R I E B S A N L E I T U N G • F 3 0 • F 3 5 D
ein Herzfrequenzempfänger, aber mehrere Sender eingesetzt, darf sich nur eine Person, die einen Herzfrequenzsender trägt, während der Herzfrequenz-messung innerhalb der Reichweite des Senders befinden. Der Sender schaltet sich aus, wenn der Elektrodengurt abgenommen wird. Er kann jedoch durch Feuchtigkeit neu aktiviert werden, was die Lebensdauer der Batterie verkürzt. Deswegen ist es wichtig, den Sender nach dem Training sorgfältig zu trocknen.
Achten Sie bei Ihrer Trainingskleidung darauf, dass bestimmte für Kleidungsstücke verwendete Fasern (z.B. Polyester, Polyamid) statische elektrische Ladungen verursachen, die ein Hindernis für eine zuverlässige Herzfrequenzmessung sein können. Beachten
Sie auch, dass durch Handys, Fernsehgeräte und andere elektrische Geräte elektromagnetische Felder entstehen, die Probleme bei der Herzfrequenzmessung verursachen können.
Ermitteln Sie zuerst Ihre maximale Herzfrequenz. Wenn Sie diese nicht kennen, orientieren Sie sich bitte an der nachfolgenden Formel:
208 - 0,7 X ALTER
Das Maximum unterscheidet sich von Mensch zu Mensch. Die maximale Herzfrequenz verringert sich pro Jahr durchschnittlich um einen Punkt. Wenn Sie zu einer Risikogruppe zählen, bitten Sie den Arzt, Ihre maximale Herzfrequenz festzustellen.
Wir haben drei Herzfrequenzbereiche definiert, die Sie bei Ihrem zielgerichteten Training unterstützen.
ANFÄNGER • 50-60 % der maximalen Herzfrequenz.
Sie ist ausserdem für Übergewichtige und Rekonvaleszenten geeignet sowie für
diejenigen, die seit langem nicht mehr trainiert haben. Drei Trainingseinheiten pro Woche von jeweils einer halben Stunde Dauer sind
angemessen. Regelmässiges Training verbessert die Leistungsfähigkeit der Atmungsund Kreislauforgane ganz entscheidend.
FORTGESCHRITTENE • 60-70 % der maximalen Herzfrequenz.
Perfekt geeignet zur Verbesserung und Erhaltung der Fitness. Damit stärken Sie Ihr Herz und Ihre Lungen mehr, als auf dem Anfängerniveau. Wir empfehlen mindestens 3 Trainingseinheiten
17

B E T R I E B S A N L E I T U N G • F 3 0 • F 3 5
pro Woche mit jeweils mindestens 30 Minuten. Wenn Sie Ihr Fitnessniveau noch weiter erhöhen möchten, trainieren Sie häufiger oder intensiver, aber nicht beides zugleich.
AKTIVE SPORTLER • 70-80 % der maximalen Herzfrequenz.
Das Training auf diesem Niveau ist nur für durchtrainierte Sportler geeignet und setzt ein Langzeit-Ausdauertraining voraus.
COCKPIT
BEDIENUNGSTASTEN
1. SET
Wahl der Zielwerte.
2. RESET
Nullen der Trainingswerte, Enden des Trainings und Rückkehr zur Hauptanzeige.
3. + / -
Einstellung der Zielwerte, F35: Erhöhung (+) oder Verringerung (-) der Trainingsintensität.
4. RECOVERY
Messung der Erholungsherzfrequenz
5. START / STOP
Das Training starten und unterbrechen
ANZEIGEN
1. LEISTUNGSGESCHWINDIGKEIT (/MIN)
Tretgeschwindigkeit (RPM). Unter der Ablesung wird ein Pfeiler mit Geschwindigkeitsinformatio n gezeigt.
2. TRAININGSDAUER
00:00 – 99:59, Messung nach jeder Sekunde, h1:40 – h9:59 Messung nach jeder Minute
3. HERZFREQUENZ WÄHREND DES TRAININGS
Herz-Symbol blinkt im Takt mit der gemessenen Herzfrequenz.
4. TRAININGSSTRECKE (KM/MILE)
0.00-99.99 km / miles
5. TRAININGSGESCHWINDIGKEIT (KMH / MPH)
00.0 – 99.9 kmh / mph
6. ENERGIEVERBRAUCH (KCAL)
Der berechnete Gesamtenergieverbrauch während des Trainings: 0-9999 kcal
7. UHR (CLOCK)
Realzeituhr
8. THERMOMETER (TEMP C / TEMP F)
Messung der Raumstemperatur (Celsius oder Fahrenheit)
9. FEUCHTIGKEIT (HUMIDITY %)
Messung der Raumsfeuchtigkeit, 0-100%
10. ZEIGER DES GEWÄHLTEN FUNKTIONSMODUSES.
Das Cockpit zeigt das gewählte Funktionsmodus (Program = Fertigprogramm; Manual = Manuelles Training; Recovery = Messung
der Erholungsherzfrequenz; Target HR = Herzfrequenztraining; Min Max = Oberund Untergrenzwerte für die Herzfrequenz)
11. F30: HAUPTNUMMERDISPLAY
Der gewählte Wert wird in grossen Nummern in der Mitte des Cockpits angezeigt. Andere Werte werden im oberen Rad gezeigt.
12. PROFILANZEIGE DES TRAININGPROGRAMMS
Das Profil eines gewählten fertigen Trainingsprogramms.
13. KUMULATIVE HERZFREQUENZANZEIGE
Falls Herzfrequenz während des Trainings gemessen wird, kann man das Profil der Herzfrequenz am Display zu formen sehen.
14. BATTERIENWECHSEL
Das Cockpit warnt im voraus wenn die Batterien gewechselt werden sollen.
BETRIEB DES COCKPITS
Das Cockpit wird durch Drücken irgendeiner Taste gestartet. Wird das Gerät mehr als fünf Minuten nicht betriebt schaltet sich das Cockpit automatisch aus.
Die gewünschte Messungseinheit mit der Taste auf der Rückseite des Cockpits wählen. Sie können zwischen metrische (km, km/h,
Celsius) oder englische (miles, mph, Fahrenheit) Messungseinheiten wählen.
Die Einstellung der Zeit (Clock) geschieht auf folgende Weise: Bei der Hauptanzeige die beiden Pfeiltasten gleichzeitig 3 Sekunden drücken. Die Uhr zeigt sich jetzt in dem Display an. Die Zeit mit Pfeiltasten einstellen. Durch drücken der SET-Taste können Sie von den Stunden zu den Minuten und zurück zu der Hauptanzeige kommen.
18

F30 UND F35: MANUAL TRAINING
In dem manuellen Training kann der Widerstand während des Trainings justiert werden.
1.Sie können gleich mit dem Training anfangen durch Drücken der START/STOP -Taste. Der Widerstand kann mit den “+/-”-Tasten (F35) oder mit dem Einstellrad (F30) geändert werden.
2.Sie können mit dem Training durch Wahl der Zielwerte anfangen. Die ”+/-” -Tasten drücken bis am Display das Wort “Manual” steht.
3.Die SET-Taste drücken um die Zielwerte einzustellen.
4.TIME = Trainingsdauer mit der Plusund Minustasten einstellen. Mit der SET-Taste kommen Sie weiter an die nächste Einstellung.
5.DISTANCE = Trainingsstrecke mit der Plusund Minustasten einstellen. Mit SET-Taste kommen Sie weiter an die nächste Einstellung.
6.KCAL = Zielwerte für Energieverbrauch
mit der Plusund Minustasten einstellen. Mit SET-Taste kommen Sie weiter an die nächste Einstellung.
7.PULSE = Obergrenze für Herzfrequenz mit den Plusund Minustasten einstellen: das Cockpit zeigt ein Herz und einen ”+” an.
Durch Drücken der SET –Taste können Sie die Untergrenze für Herzfrequenz mit der Plusund Minustasten einstellen: das Display zeigt jetzt ein Herz und einen “Pfeil unten” an. Wenn der Herzfrequenzwert die Obergrenze überschreitet, blinkt der betroffene Pfeil an dem Display. Rückkehr zur Einstellung der Trainingsdauer ( = TIME) geschieht durch Drücken der SET-Taste.
8.Sie können mit dem Training durch Drücken der START/STOP –Taste anfangen. Starten Sie zu treten und beim Bedarf den Widerstand während des Trainings justieren.
9.Sie können das Training durch Drücken der START/STOP –Taste unterbrechen (das Display zeigt “Over” an. Die Programminformation wird fünf Minuten lang gespeichert. Kehren Sie zurück zum Training während dieser Zeit brauchen Sie nur die START/STOP –Taste aufs neue zu drücken.
10.Während der Pause können Sie das Training durch Drücken der RESET-Taste enden.
11.Wenn Sie sich ein Zielwert eingestellt haben, gibt das Cockpit ein Signallaut und das gezeigte Wert beginnt zu blinken, welches bedeutet dass Sie das Ziel erreicht haben. Die Anzeige mit der START/STOP –Taste nullen und danach noch die RESET-Taste drücken.
B E T R I E B S A N L E I T U N G • F 3 0 • F 3 5 D
F35: TARGET HR – TRAINING (KONSTANTE HERZFREQUENZ)
In dem Target HR –Training stellen Sie das gewünschte Niveau der konstanten Herzfrequenz ein; während des Trainings versorgt das
Gerät dafür, dass Sie das Herzfrequenzniveau unabhängig von der Tretgeschwindigkeit erreichen.
1.Die Pfeiltaste drücken, bis das Display zeigt “Target HR” an.
2.Das gewünschte Herzfrequenzniveau für das Training durch Drücken der SET-Taste einstellen. Jetzt zeigt das Display “PULSE”, ein Herz und ein Pfeil oben/unten an. Das Zielniveau für die Herzfrequenz mit den Plusund Minustasten einstellen. Mit der SET-Taste kommen Sie weiter an die nächste Einstellung.
3.TIME = Trainingsdauer mit den Plusund Minustasten einstellen. Mit der SET-Taste kommen Sie weiter an die nächste Einstellung.
4.DISTANCE = Trainingsstrecke mit den Plusund Minustasten einstellen. Mit der SET-Taste kommen Sie weiter an die nächste Einstellung.
5.KCAL = Zielwerte für Energieverbrauch mit den Plusund Minustasten einstellen. Mit der SET-Taste kommen Sie weiter an die nächste Einstellung. Rückkehr zur Einstellung der Trainingsdauer ( = TIME) geschieht durch Drücken der SET-Taste.
6.Sie können mit dem Training durch Drücken der START/STOP –Taste anfangen. Starten Sie zu treten und beim Bedarf das Herzfrequenzniveau während des Trainings justieren.
7.Sie können das Training durch Drücken der START/STOP –Taste unterbrechen (das Display zeigt ”Over” an. Die Programminformation wird für fünf Minuten lang gespeichert. Kehren Sie zurück zum Training während dieser Zeit Minuten brauchen Sie nur die START/STOP –Taste aufs neue zu drücken.
8.Sie können das Training durch Drücken der RESET-Taste enden während das Cockpit in dem Pausezustand ist.
9.Wenn Sie sich ein Zielwert eingestellt haben, gibt das Cockpit ein Signallaut und das gezeigte Wert beginnt zu blinken, welches bedeutet, dass Sie das Ziel erreicht haben. Das Display mit der START/STOP –Taste nullen und danach noch die RESET-Taste drücken
F35: TRAININGSPROFILE
1. Nachdem das Cockpit eingeschaltet ist, irgendeine Pfeiltaste drücken bis auf dem Display ein Profilkod (P1-P8) und ein Profilform
19

B E T R I E B S A N L E I T U N G • F 3 0 • F 3 5
angezeigt werden. Alle Profile benutzen einen konstantem Widerstand; d.h. je schneller Sie treten, desto schneller kommen Sie weiter
in der Strecke, die das Cockpit messt. Die vorprogrammierte Dauer aller Profile beträgt 20 Minuten.
2.Das gewünschte Profil mit der Pfeiltasten wählen. Durch Drücken der SET-Taste kann die Dauer des Profils eingestellt werden: mit Pfeiltasten kann die Zeit jede fünf Minuten zwischen 10:00 und 90:00 Minuten eingestellt werden.
3.Das Training durch Drücken der START/ STOP –Taste beginnen. Beginnen Sie zu treten. Durch Drücken der Pfeiltasten kann jenes Widerstandsniveau des Profils geändert werden, das gerade im Gang ist. Mit Pfeil oben nimmt der Widerstand zu; mit Pfeil unten nimmt er ab.
4.Sie können das Training durch Drücken
der START/STOP –Taste unterbrechen (am Cockpit zeigt das Wort ”Over”. Die
Programminformation wird für fünf Minuten lang gespeichert. Kehren Sie zurück zum Training während dieser Zeit brauchen Sie nur die START/STOP –Taste aufs neue zu drücken. 5. Sie können das Training durch Drücken der RESET-Taste beenden, wenn das Cockpit im Pausezustand ist. Wenn Sie das ganze Profil durchgeführt haben, gibt das Gerät ein Signallaut und blinkt den Zielwert, welches bedeutet dass Sie die Zielwerte erreicht haben. Das Display durch Drücken der START/STOP –Taste nullen und danach die RESET-Taste drücken.
F30 UND F35: RECOVERY – MESSUNG DER ERHOLUNGSHERZFREQUENZ
Messen Sie Ihre Erholungsherzfrequenz nach dem Training.
1.Die Messung der Erholungsherzfrequenz wird durch Drücken die “RECOVERY”-Taste gestartet. Auch das Display zeigt “Recovery” an.
2.Die Messung startet automatisch und dauert zwei Minuten.
Wenn während der Messung Störungen vorkommen, zeigt das Display statt Herzfrequenz “Err”.
3. Nach dem Ende der Messung zeigt das Display die Erholungsbeziehung als ein Prozentzahl. Je kleiner dieser Zahl ist, desto besser ist Ihre Kondition! Beachten Sie, dass Ihre Ergebnisse in Beziehung mit dem Pulsniveau vom Messungsanfang steht, und dass Ihre
Ergebnisse immer persönliche Ergebnisse sind, die nicht mit Ergebnissen anderer Menschen direkt vergleichbar sind. Zur Verbesserung
der Zuverlässigkeit der Messung sollten Sie stets versuchen, den Messvorgang möglichst genau zu standardisieren; beginnen Sie die Messung möglichst genau auf dem gleichen Herzfrequenzniveau.
4. Der Rückkehr zum Hauptdisplay geschieht durch Drücken der RESET-Taste. Das Hauptdisplay stellt auch automatisch auf die Normalanzeige nach einem Minut um.
WARTUNG
Der F30 / F35 ist weitgehend wartungsfrei. Dennoch sind von Zeit zu Zeit Schrauben und Muttern auf festen Sitz zu überprüfen. Das Gerät mit einem feuchten Tuch von Staub und Schmutz befreien. Keine Lösungsmittel verwenden.
BITTE BEACHTEN: die Schutzabdeckungen des Gerätes nie abnehmen.
BITTE BEACHTEN: der Bügel der Magnetbremse entwickelt ein Magnetfeld, das z. B. die Armbanduhr oder die Magnetisierung von Kreditoder Geldautomatenkarten beschädigen kann, wenn diese in unmittelbare Nähe der Magneten gebracht werden. Auf keinen Fall versuchen, den Bügel der Magnetbremse zu lösen oder zu entfernen.
Wenn das Gerät für einige Zeit nicht benutzt wird, kann sich in gewissen Fällen der Antriebsriemen leicht verformen. Dies kann kurzzeitig zu einem leicht ungleichmässigen Bewegungsablauf führen. Der Effekt verschwindet jeweils nach einigen Minuten wieder von selbst.
BATTERIEWECHSEL
Das Cockpit zeigt ein Warnungssignal, bevor die Batterien gewechselt werden sollen. Den Deckel des Batteriefaches auf der Rückseite des Cockpits lösen. Die alten Batterien durch neue ersetzen und auf richtige Polarität achten. Den Deckel wieder anbringen.
BETRIEBSSTÖRUNGEN
BITTE BEACHTEN! Trotz kontinuierlicher Qualitätsüberwachung können vereinzelt an den Geräten durch einzelne Komponenten verursachte Funktionsstörungen auftreten. Dabei ist es nicht angebracht, das ganze Gerät zur
20
Reparatur zu bringen, da der Fehler meistens durch Austauschen der defekten Komponente behoben werden kann.
Wenn das Gerät während des Gebrauchs nicht einwandfrei funktioniert, wenden Sie sich bitte umgehend an die für Sie zuständige TunturiAlleinvertretung. Beschreiben Sie das Problem, die Einsatzbedingungen und teilen Sie das Kaufdatum und die Typenbezeichnung und die Seriennummer Ihres Gerätes mit.
Wenden Sie sich an Ihre nationale TunturiVertretung, wenn Sie Ersatzteile benötigen. Beschreiben Sie die Einsatzbedingungen und teilen Sie das Kaufdatum und die Seriennummer des Gerätes mit. Die Ersatzteilnummern finden Sie in der Liste am Ende dieser Anweisung. Nur Teile in der Ersatzteilliste dürfen verwendet werden.
TRANSPORT UND AUFBEWAHRUNG
Das Gerät wie folgt transportieren. Diese Transportanweisung beachten: wird das Gerät falsch angehoben bzw. transportiert, kann dies den Rücken belasten oder zu Gefahrensituationen führen.
1.Schalten Sie das F35 immer aus und ziehen Sie immer erst den Netzstecker aus der Wandsteckdose, bevor Sie das Gerät an einen anderen Platz stellen! Stellen Sie sich hinter das Gerät.
2.Mit der einen Hand am Sattel und mit der anderen am Lenker festhalten.
3.Das Gerät auf die Transportrollen am hinteren Ende anheben und das Gerät an den gewünschten Platz schieben.
4.Das Gerät am Lenker festhaltend und hinter dem Gerät stehend absetzen.
Ein Verschieben des Gerätes kann manche Fussbodenmaterialien beschädigen, z.B. Holzparkettböden. In diesem Fall müssen Sie den Boden vorher schützen.
Um Funktionsstörungen zu vermeiden, das Gerät in einem möglichst trockenen Raum mit gleichbleibender Temperatur vor Staub geschützt aufbewahren und benutzen.
|
B E T R I E B S A N L E I T U N G • F 3 0 • F 3 5 |
D |
|
|
|
||
|
|
||
|
|||
TECHNISCHE DATEN |
|
||
Länge.......................... |
95 cm |
||
Breite.......................... |
62 cm |
||
Höhe........................... |
135 cm |
||
Gewicht...................... |
38 kg |
||
Die Tunturi Heimtrainer F30 und F35 wurden nach den Richtlinien der EU für elektromagnetische Einheitlichkeit, EMC
(89/336/EWG) und europäische Niederspannung srichtlinie (72/23/EWG) gestaltet und tragen das CE Konformitäts-Zeichen.
Die Tunturi Heimtrainer F30 und F35 erfüllen die EN-Präzisions- und Sicherheitsstandards (Class A, EN-957, Teil 1 und 5).
Aufgrund unserer kontinuierlichen
Produktentwicklung behält sich Tunturi das
Recht vor, Spezifikationen ohne vorherige
Ankündigung zu verändern.
BITTE BEACHTEN: Die Hinweise bezüglich der Montage, der Benutzung und der Wartung Ihres Geräts müssen sorgfältig beachtet werden. Die Garantie schliesst keine Beschädigungen ein, die auf Fahrlässigkeit bei der Montage, Einstellung und Wartung, wie sie in diesem Handbuch beschrieben wurden, zurückzuführen sind. Werden Modifizierungen ohne das Einverständnis der
Tunturi Oy Ltd vorgenommen, erlischt jeglicher Garantieanspruch!
WIR WÜNSCHEN IHNEN VIELE ANGENEHME
TRAININGSSTUNDEN MIT IHREM NEUEN TUNTURI
TRAININGSPARTNER!
21

M O D E D ´ E M P L O I • F 3 0 • F 3 5
TABLE DES MATIERES
QUELQUES CONSEILS ET AVERTISSEMENTS |
22 |
ASSEMBLAGE |
23 |
UTILISATION |
26 |
EXERCICE |
27 |
UNITE DES COMPTEURS |
28 |
UTILISATION DU COMPTEUR |
29 |
MAINTENANCE |
31 |
DEFAUTS DE FONCTIONNEMENT |
31 |
TRANSPORT ET RANGEMENT |
32 |
CARACTERISTIQUES TECHNIQUES |
32 |
CONSEILS ET AVERTISSEMENTS
Lisez attentivement ce mode d’emploi avant d’assembler, d’utiliser ou d’effectuer l’entretien de votre appareil sportif. Veuillez conserver ce guide, il contient les renseignements dont vous aurez besoin, maintenant et plus tard, pour utiliser et entretenir votre appareil. Suivez toujours les instructions très rigoureusement.
VOTRE SANTE
•Consultez votre médecin avant de commencer vos exercices.
•Si vous êtes pris de nausées ou de vertiges ou sentez d’autres symptômes anormaux pendant l’entraînement, interrompez immédiatement la session et consultez votre médecin.
•Afin d’éviter toutes douleurs musculaires, commencez et terminez vos sessions par des mouvements d ’échauffement (pédalage lent avec une résistance faible). N’oubliez pas non plus d’effectuer des mouvements d’étirement pour terminer votre session.
MILIEU D’ENTRAINEMENT
•L’appareil ne doit pas être utilisé à l’exterieur.
•Placez l’appareil sur une surface aussi plane que possible. Placez une protection sous l’appareil.
•Assurez-vous d’une ventilation suffisante, mais evitez toutefois les courants d’air.
• En entraînement, l’appareil supporte des températures de 10°C à 35°C. L’appareil peut aussi être rangé à une température comprise entre - 15°C et +40°C. L’hygrométrie du local d’utilisation ou de rangement de
l’appareil ne doit jamais excéder 90 %. L’UTILISATION DE L’APPAREIL
•Si vous décidez de laisser un enfant utiliser l’appareil, prenez toujours en considération l’état de son
développement physique et mental ainsi que son caractère. Donnez à l’enfant les conseils nécessaires pour une bonne utilisation de l’appareil et ne le laissez jamais seul.
•Commencez par vérifier que l’appareil est en parfait état de marche. N’utilisez jamais un appareil défectueux.
•Ne vous accoudez jamais à l’unite des compteurs!
•Appuyez sur les touches du bout des doigts: vos ongles risquent d’abîmer la membrane des touches.
•N’utilisez jamais l’appareil avec les protections latérales démontées.
•Ne montez jamais à deux ou à plusieurs sur l’appareil.
•Prenez toujours appui avec vos mains sur le guidon en montant sur l’appareil ou en en descendant.
•Portez des vêtements et chaussures appropriés.
•Protégez l’unite des compteurs d’une exposition au soleil et séchez toujours la surface de l’unite des compteurs si des gouttes de sueur sont tombées dessus.
•N’effectuez jamais d ’autres opérations de réglage et d ’entretien que celles mentionnées dans ce guide et suivez bien les conseils d’entretien qui y sont donnés.
•L’appareil ne doit pas être utlisé par des personnes pesant plus de 135 kg.
•Cet appareil peut être utilisé à la maison. La garantie de la société
22

Tunturi Ltd ne couvre que les defauts ou imperfections s’étant manifestées pendant l’utilisation à la maison (24 mois). Pour information complémentaire sur la garantie de votre équipement de fitness, veuillez consulter la brochure de garantie livrée avec l’appareil. Veuillez noter que la garantie ne couvre pas les dommages causés par un manque de précaution quant aux instructions de montage et d’entretien decrites dans ce mode d’emploi.
•N’essayez pas d’effectuer d’autres entretiens ou réglages que ceux décrits dans ce mode d’emploi. Les autres opérations doivent être laissées aux soins des personnes compétentes dans l’entretien des dispositifs électromagnétiques et autorisées, aux regards des lois du pays concerné (ou équivalent) à accomplir les travaux
de maintenance et de réparations. Les instructions de maintenance de ce mode d’emploi doivent être suivies scrupuleusement.
•Ce produit doit être relié à la terre. S’il fonctionnait mal ou tombait en panne, le fait qu’il soit relié à la terre réduirait le risque de choc électrique. Ce produit est équipé d’un câble muni d’un équipement conducteur relié à la terre et d’une prise de terre. Le câble doit être branché dans une prise de courant appropriée, correctement installée et reliée à la terre selon les réglementations locales et les lois.
DANGER : une connexion incorrecte du câble peut avoir pour résultat le risque d’un choc électrique. Veuillez vérifier avec un électricien qualifié si vous avez un doute quant au bon branchement du produit. Ne modifiez pas le câble d’alimentation fourni avec l’appareil, s’il ne convient pas à la prise de courant, veuillez en faire installer une correcte par un électrician confirmée.
BIENVENUE DANS LE MONDE DE
L’ENTRAÎNEMENT TUNTURI !
Votre choix prouve que vous souhaitez réellement investir dans votre bien-être et votre condition; il révèle aussi que vous savez
M O D E D ´ E M P L O I • F 3 0 • F 3 5 F
apprécier la haute qualité et l’élégance. En choisissant un équipement sportif Tunturi, vous adoptez un produit de premier choix comme partenaire pour un entraînement motivant en toute sécurité. Quel que soit votre objectif, nous sommes persuadés que cet appareil est celui qui vous y conduira. Adressez-vous à WWW.TUNTURI. COM pour plus d’informations.
ASSEMBLAGE
Commencez par vérifier que les pièces suivantes se trouvent bien dans l’emballage :
1.Châssis
2.Support arrière
3.Protections plastique (2)
4.Tube de support du guidon
5.Guidon
6.Unité des compteurs
7.Pédales (2)
8.Transformateur
9.Selle
10.Accessoires de montage (le contenu avec * dans la liste des pièces détachées) : conservez les outils de montage, vous pourrez en avoir besoin pour régler l’appareil par exemple
S’il vous manque une pièce, contactez votre distributeur et indiquez-lui le modèle, le numéro de série de l’appareil et la référence de la pièce manquante. Vous trouverez la liste des pièces détachées à la fin de ce guide. L’emballage renferme un sachet de silicate pour l’absorption de l’humidité pendant le stockage et le transport. Veuillez le mettre au rebut après avoir déballé l’appareil. Les termes droit, gauche, avant et arrière sont définis par rapport à la position d’exercice. Assemblez votre appareil comme suit.
23
M O D E D ´ E M P L O I • F 3 0 • F 3 5
PROTECTIONS PLASTIQUES
1. Mettez en place les protections plastiques grises de la barre de soutien avant de façon à ce que les languettes se trouvant sur la barre s’engagent dans les trous se trouvant dans les protections.
SUPPORT ARRIERE
1.Mettez le support arrière à sa place sous le châssis.
2.Fixez le support avec deux vis à six pans et deux rondelles.
TUBE DE SUPPORT DU GUIDON ET GUIDON
1. F30 : Régler le bouton de résistance en position 8. Diriger le cable du frein sortant du tube
du guidon vers la bague située dans la partie supérieure du connecteur du câble de frein sortant du tube du guidon.
2.F30: Visser les extrémités des câbles entre elles.
3.Raccorder les fils sortant du tube du châssis et
du tube du guidon. Poussez le tube de support de guidon pour le mettre en place dans le châssis.
ATTENTION ! Les vis de fixation sont prémontées, ne les desserrez pas.
4. Prenez la clé à six pans, fournie, pour serrer les deux vis de fixation à travers les trous du tube.
ATTENTION ! Serrez les vis de fixation en tournant dans le sens inverse des aiguilles d’une montre. Ne serrez pas trop !
24

5. Tirer légèrement vers le haut le fil sortant du tube du guidon et retirer la vis de fixation à l’extrémité du tube du guidon. Mettre le guidon en place sur la partie supérieure du tube de support du guidon et le fixer en vissant fermement les vis de serrage. Faites bien attention de ne pas endommager le fil !
UNITE DES COMPTEURS
1. Raccorder les fils sortant du guidon et du tube de support du guidon aux raccords correspondants du compteur. Raccordez les
fils sortant de la barre du guidon aux bornes du compteur. Enfoncer les câbles raccordés à
l’intérieur du tube du repose-main de sorte qu’ils
M O D E D ´ E M P L O I • F 3 0 • F 3 5 F
ne soient pas endommagés pendant le montage du compteur. Attention à ne pas abîmer les câbles!
2. Positionnez le compteur à l’extrémité du guidon et fixez-le avec deux vis.
PEDALES
1.Les pédales sont repérées par un marquage L (gauche) et R (droite) sur leur axe. Fixez la pédale gauche sur la manivelle gauche en la
tournant dans le sens inverse des aiguilles d’une montre et la pédale droite sur la manivelle droite, en la tournant dans le sens des aiguilles d’une montre.
2.Fixer les courroies des pédales en commençant par les fixations situées sur l’équipement. Enfoncer la courroie à travers la bague située sur la pédale et appuyer l’ouverture de la courroie sur la protubérance de la pédale.
3.Fixer les courroies sur la partie externe de la pédale. Enfoncer la courroie à travers la boucle de verrouillage, ce qui va automatiquement la verrouiller.
4.La longueur de la courroie est réglabe. Régler la longueur à l’aide des boucles de verrouillage.
25

M O D E D ´ E M P L O I • F 3 0 • F 3 5
SELLE
Fixez la selle sur le tube de selle: serrez les écrous de fixation dans les directions opposées. Noter que la fixation du siège permet le réglage de l’inclinaison ainsi que le réglage de la distance du siège par rapport au repose-main. Lorsque la distance et l’inclinaison sont réglées selon vos préférences, serrer à fond les boulons de fixation.
F35: CORDON D’ALIMENTATION
Brancher le cordon de secteur du transformateur sur la prise et et la fiche du transformateur sur le châssis de l’équipement, sur le raccord situé dans la partie supérieure du support arrière. Pour protéger la fiche, il est conseillé de nouer le cordon autour de la boucle anti-arrachement qui protège la fiche.
ATTENTION ! L’appareil doit être branché sur une prise à la terre. N’utilisez pas de rallonge. Assurez-vous que le cordon ne passe pas pardessous l’appareil.
DANGER : il faut toujours couper l’alimentation et débracher l’appareil immédiatement aprés utilisation.
ATTENTION ! Pour réduire le risque de brûlure, de feu, de choc électrique ou de blessures sur les personnes:
1)Un appareil ne doit jamais être laissé sans surveillance quand il est branché.
2)Ne faîtes pas fonctionner l’appareil sous une couverture ou avec des matériaux combustibles. Une chaleur excessive peut avour pour conséqunce un feu, un choc électrique ou blesser quelqu’un.
IMPORTANT ! Il y a également un boîtier pour piles à l’arrière du compteur du F35. L’équipement peut donc fonctionner sous tension ou avec
des piles (4 piles C). Si l’on utilise uniquement des piles comme source d’alimentation, il faut noter que les servofreins les use relativement rapidement. Nous recommandons de brancher l’appareil sous tension lors de son utilisation. À noter cependant, l’horloge du compteur utilise l’alimentation des piles lorsque l’équipement n’est pas sous tension, faute de quoi l’horloge se mettrait à zéro.
UTILISATION
BONNE POSITION DE PEDALAGE
Réglez la hauteur de la selle de façon qu’en allongeant votre jambe, le milieu de votre pied atteigne juste la pédale, quand celle-ci est en basse position. Procédez comme suit: Tourner le bouton de blocage d’un tour dans le sens inverse des aiguilles d’une montre. Tirez le bouton de blocage vers l’extérieur de façon à ce que la barre de la selle puisse se déplacer librement en hauteur. Réglez la selle à la hauteur voulue et relâchez le bouton afin de bloquer la barre de
la selle. Resserrez le bouton de blocage en le tournant dans le sens des aiguilles d’une montre. L’échelle se trouvant sur la barre de la selle vous aide à retrouver la hauteur qui vous convient
le mieux. Avant de commencer l’entraînement, assurez-vous toujours que le bouton de blocage est bien serré.
Vous pouvez aussi régler l’inclinaison de la selle avec les mêmes vis. Resserrez les vis de fi xation.
ATTENTION ! Avant de commencer l’entraînement, assurez-vous toujours que les vis de fixation sous
26
 Loading...