


www.tunturi.com
J9 • J9F |
OWNER'S MANUAL |
|
BETRIEBSANLEITUNG |
||
|
||
|
|
|
|
MODE D'EMPLOI |
|
|
|
|
|
MANUALE D'USO |
|
|
|
|
|
MANUAL DEL USUARIO |
|
|
|
|
|
HANDLEIDING |
|
|
|
|
|
BRUKSANVISNING |
|
|
|
|
|
KÄYTTÖOHJE |
|
|
|
•SERIAL NUMBER • SERIENNUMMER
•NUMERO DE SERIE • NÚMERO DE SERIE
•NUMERO DI SERIE • SERIENUMMER
•SERIENNUMMER • SARJANUMERO

1 |
5 |
J9/J9F
|
J9 |
||
|
|
|
|
|
|
|
6 |
2 |
|
||
|
|
|
|
J9/J9F
J9
3 |
7 |
J9/J9F
J9F
4
J9F
2

O W N E R ' S M A N U A L J 9 • J 9 F
I M P O R TA N T S A F E T Y
I N S T R U C T I O N S
This Owner’s Manual is an essential part of your training equipment: reading all instructions in this manual before you start using this appliance. The following precautions must always be followed:
WARNING:
• Never use extension cords between the treadmill and your wall outlet. The device’s maximum power consumption is 10 A (EU) / 20 A (US). Outlets with fluctuating voltage of more than 5 %, may result in erratic performance or cause damage
to treadmill electronics. Using electrical power other than that which has been specified in this manual, will ultimately void any warranty, implied or otherwise.
WARNING: to reduce any risk to persons:
•Keep hands clear of any moving parts. Never place hands, feet or any other objects into any opening or under the treadmill.
•Never leave the treadmill unattended when plugged in. Unplug from outlet when not in use, before putting on or taking off parts. To disconnect, turn all controls to the off position, then remove plug from outlet.
•Close supervision is necessary when the treadmill used by, on, or near children, invalids, or disabled persons.
•Use the treadmill only for its intended use as described in this manual. Do not use attachments not recommended by Tunturi.
•Before you start using the treadmill, make sure that it functions correctly in every way. Do not use a faulty device.
•Keep the cord away from heated surfaces.
•J9 / J9F must not be used outdoors. J9 /
J9F tolerates an environment measuring +10°C to +35°C. Air humidity must never exceed 90 %.
•Do not attempt any servicing or adjustment other than those described in this manual. The given instructions must be followed carefully.
•Never operate this treadmill if it has a damaged cord or plug, if it has been dropped or damaged, or dropped into water. Return the treadmill to a service center for repair.
•Never operate the appliance with the air opening blocked. Keep the air openings free of lint, hair, and the like.
•Do not operate where aerosol (spray)
G B
O W N E R ' S M A N U A L • J 9 • J 9 F
products are being used or where oxygen is being administered.
•Strong electromagnetic fields may cause disturbances in the heart rate measurement.
•The device must not be used by persons weighing over 135 kg (300 lbs).
SAVE THESE INSTRUCTIONS!
WELCOME TO THE WORLD OF TUNTURI EXERCISING!
Your choice shows that you really want to invest in your well-being and condition; it also shows you really value high quality and style. With Tunturi Fitness Equipment, you’ve chosen a high-quality, safe and motivating product as your training partner. Whatever your goal in training, we are certain this is the training equipment to get you there.
A S S E M B LY
Before assembling the device, insure all parts are present:
1. Frame
2. Power cord
3. Assembly kit (contents are marked with an * in the spare part list)
In case of problems contact your Tunturi dealer. The packaging includes a disposable silicate bag for absorbing moisture during storage and transportation. The directions left, right, front and back are defined as seen from the exercising position.
J9: HAND RAIL AND INTERFACE
FIGURES 1, 2, 5 AND 6
Turn the user interface until the holes for the locking screws are in position and then attach by tightening the 4 screws on the rear side. Cut (M6x12) the green ribbon and attach the corner
pieces with the transportation wheels to the lower ends of the hand rail with 3 Allen screws (M6x16) on both sides. Lift the handrail to the upright position, place the cover tubes between corner pieces and the frame and thread the attachment bolts through the tubes. Tighten the bolts with nuts. Place the multi-purpose rack with the plastic end pieces on the top of the hand rail, pull the lower edge of the rack over the support bolts on the hand rail sides and attach the plastic end pieces with screws to the top of the hand rail. Attach the 2 (M6x12) screws on the front side of the interface and remove the protective film from the display.
3
O W N E R ' S M A N U A L • J 9 • J 9 F
J9F: HAND RAIL AND INTERFACE
(FIGURES 3, 4, 5 AND 6)
Turn the user interface until the holes for the locking screws are in position and then attach by tightening the 4 screws (M6x12) on the rear side. Cut the hand rail ribbon and place 2 pieces of styrox foam under the front end of the treadmill. Attach the folding frame to the treadmill with
3 Allen screws (M6x16) on both sides. Remove the styrox foam pieces. The running base must be held up during the gas spring installation, so you will need another person to support the running base. Thread the upper end of the gas spring (M8 thread) completely into the hexagonal bushing. NOTE! Attach the gas spring below the locking fork. Thread the gas spring by hand; do not use tools as these may damage the piston rod. Attach the lower end of the gas spring to the folding frame with an M8 screw and a nut. Lower the running base carefully and place the multi-purpose rack with the plastic end pieces on the top of
the hand rail, pull the lower edge of the rack over the support bolts on the hand rail sides and attach the plastic end pieces with screws to the top of the hand rail. Attach the 2 screws (M6x12) on the front side of the interface and remove the protective film from the display.
POWER CORD AND
GROUNDING INSTRUCTIONS
Plug the socket end of the power cord into the treadmill at the lower right front corner. Before connecting the device to a power source, make sure that local voltage matches that indicated on the type plate. The treadmill operates at either 230 V or 120 V (US-version). Turn on the power using the switch next to the socket on the treadmill.
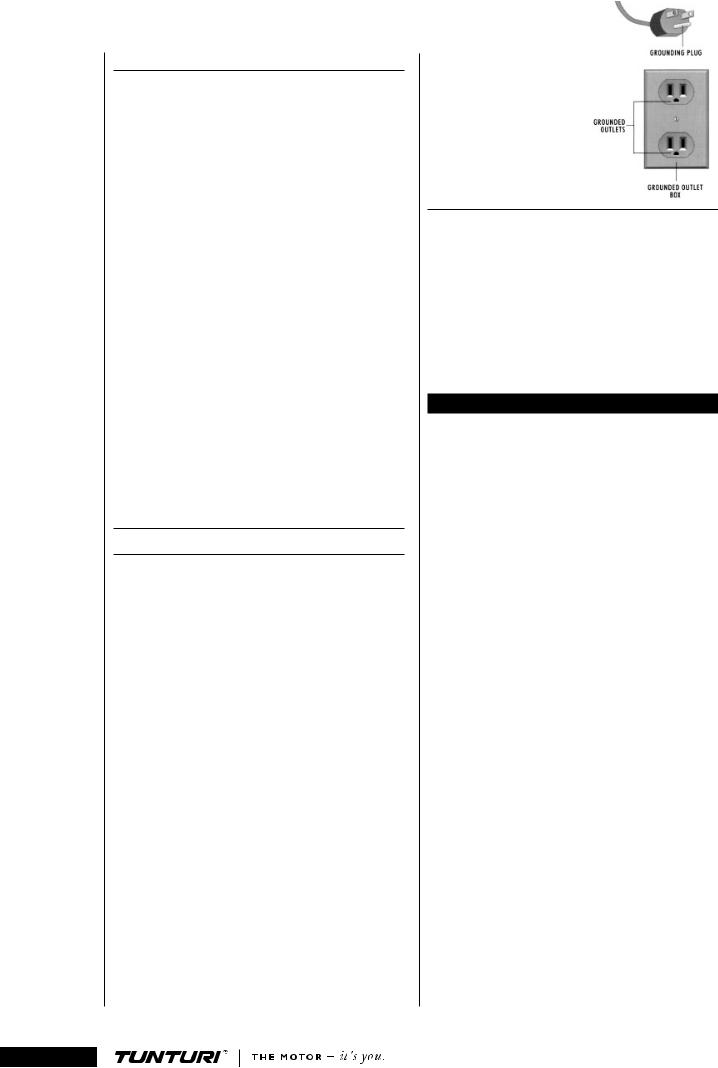
This treadmill must be grounded. If it should malfunction or breakdown, grounding provides a path of least resistance for electrical current to reduce the risk of electrical shock. This product is equipped with a cord having an equipmentgrounded conductor and a grounding plug.
The plug must be plugged into an appropriate outlet that is properly installed and grounded in accordance with all local codes and ordinances. Do not use extension cables when connecting the equipment to the power source.
DANGER! Improper connection of the equipment-grounding conductor can result in a risk of electric shock. Check with a qualified electrician or serviceman if you are in doubt as to whether the product is properly grounded. Do not modify the plug provided with the product - if it will not fit the outlet, have a proper outlet installed by a qualified electrician.
NOTE! The version for use on a nominal 120-volt circuit has a grounding plug that
looks like the plug illustrated. Make sure that the product is connected to an outlet having the same configuration as the plug. No adapter should be used with this product.
SAFETY TETHER KEY
The treadmill cannot be used if the tether key is not properly installed in the meter base; if the key is removed from its place near the electronic
display, the treadmill will immediately stop. Insert the safety tether key into the meter base. Ensure that the clip of the safety tether key is properly attached to your clothing; as the cord tightens, make sure the clip does not detach itself from your clothing before the safety tether key disconnects from the user interface.
E X E R C I S I N G
No matter what your goal, you’ll get the best results by training at the right level of effort,
and the best measure is your own heart-rate. First find your maximum heart-rate i.e. where the rate doesn’t increase with added effort. If you don’t know your maximum heart-rate, please use the following formula as a guide:
Women: 226 - age Men: 220 - age
These are average values and the maximum varies from person to person. The maximum heart-rate diminishes on average by one point per year. If you belong to one of the risk groups mentioned earlier, ask a doctor to measure your maximum heart-rate for you. We have defined three different heart-rate zones to help you with targeted training.
Beginner: 50-60 % of maximum heart-rate
Also suitable for weight-watchers, convalescents and those who haven’t exercised for a long time. Three sessions a week of at least a half-hour each is recommended. Regular exercise considerably improves beginners’ respiratory and circulatory performance and you will quickly feel your improvement.
Trainer: 60-70 % of maximum heart-rate
Perfect for improving and maintaining fitness. Even reasonable effort develops the heart and lungs effectively, training for a minimum of 30 minutes at least three times a week. To improve your condition still further, increase either frequency or effort, but not both at the same time!
Active trainer:
70-80 % of maximum heart-rate
Exercise at this level suits only the fittest and presupposes long-endurance workouts.
4

BEGINNING AN EXERCISE SESSION
•To avoid muscular pain and strain, begin and end each workout by stretching.
•Stand on the landing rails to the left and right of the running belt. Do not stand on the running belt.
•Always hold the handrail for support when getting on or off the treadmill and when changing the speed during exercise. Do not jump off the running belt while it is moving!
•If you experience nausea, dizziness or other abnormal symptoms while exercising, stop your workout at once and consult a physician.
FINISHING AN EXERCISE SESSION
•Never leave the safety tether key in the treadmill.
•Use the main power switch to turn the unit
off.
•Unplug the electrical cord from the wall outlet and from the treadmill.
•If necessary clean the treadmill from sweat with a damp cloth. Do not use solvents.
•Store the electrical cord where it is clear from all pathways and out of children’s reach.
HOW TO MOTIVATE YOURSELF
TO CONTINUE
In order to reach the goals you have set, you’ll need to keep finding the motivation to continue so you achieve your ultimate goal: life-long health and a new quality of living.
•Set yourself realistic targets.
•Progress step-by-step according to your schedule.
•Keep a fitness diary and write down your progress.
•Change your way of exercising from time to time.
•Use your imagination.
•Learn self-discipline.
One important aspect of your training is versatility. Varying your training exercises different muscle groups and helps maintain motivation.
I N T E R F A C E
FUNCTION KEYS
Manual is the default basic exercise mode when the device is switched on. In Manual mode you control the treadmill yourself.
Control offers three different standard heartrate exercises.
Prog provides 2 fitness tests and 7 preprogrammed exercise profiles. You can also create and save 5 profiles of your own.
PSC allows you to adjust treadmill speed by changing your position on the track.
G B
O W N E R ' S M A N U A L • J 9 • J 9 F
Set helps you define user weight, heart-rate alarm limits, audio signal use and units of measurement.
Reset is the key to reset time, distance and energy consumption displays for all exercises.
CUSTOM START
In Manual mode, use Custom Start to begin an exercise where speed and elevation are preset by the user. You can save the Custom Start values by setting the desired speed and elevation, and then pressing the Custom Start key for 2 seconds: an audio signal indicates that the setting is saved. For user safety, the speed range on the key is 0,5-10 km/h (0,3-6,2 mph).
SETTING KEYS, OK AND SCAN
Setting keys are used to set the values on-screen. The right arrow key is used for navigation, while the up/down keys are used to set values.
The OK key in the middle of the setting keys is used to confirm your selections.
Pressing SCAN key changes the profile display.
SPEED CONTROL KEYS
Speed control keys (Tortoise/Hare) are located below the display. Hare key increases the belt speed in 0,1 km/h (or 0,1 mph) increments, the tortoise key decreases it in 0,1 km/h (or 0,1 mph) increments. Pressing these keys longer makes the speed change faster. Track speed ranges from 0,5-18 km/h (0,3-11,2 mph). In some profiles you can replace these keys with the PSC feature.
ELEVATION CONTROL KEYS
Click the elevation up key to increase elevation in 1% increments, and the elevation down key to decrease it in 1% increments. Track elevation ranges from -2 % to 10 %.
STOP
Press STOP to end your exercise. Press STOP once in exercise profile training and the treadmill stops and moves into its waiting state for 5 minutes. You can restart the interrupted exercise by pressing the Hare key within 5 minutes. Press STOP twice to end your exercise.
SET AND RESET
With the Set key you can define the user weight (Weight), heart-rate alarm limits (Beat LO / HI ), audio signal use (Audio on / off) and units of measurement (Units EU / USA).
1. Press the Set key and a text indicating the value to be set will be displayed on the text line; the value will blink on and off.
• Use the up/down setting keys to set the value and press OK ; this will also move you forward to setting the next value.
5
 Loading...