


MMK-AP0073H
Toshiba MMK-AP0073H, MMK-AP0073H-C, MMK-AP0093H, MMK-AP0093H-C, MMK-AP0123H Owner Manual
...
SUPER MODULAR MULTI SYSTEM AIR CONDITIONER
Owner’s Manual
For wireless remote controller
Indoor Unit
Model name:
Для коммерческого использования
For commercial use
Pour usage commercial
Nur für gewerbliche Nutzung
Per uso commerciale
Para uso comercial
Para uso comercial
Voor commercieel gebruik
Για εμπορική χρήδη
Ticari amaçlý kullaným için
High-Wall Type
MMK-AP0073H, MMK-AP0073H-C
MMK-AP0093H, MMK-AP0093H-C
MMK-AP0123H, MMK-AP0123H-C
MMK-AP0153H, MMK-AP0153H-C
MMK-AP0183H, MMK-AP0183H-C
MMK-AP0243H, MMK-AP0243H-C
Owner’s Manual 1
Manuel du proprietaire 25
Betriebsanleitung 49
Manuale del proprietario 73
Manual del propietario 97
Manual do utilizador 121
Gebruiksaanwijzing 145
Εγχειρίδιο χρήσης 169
Руководство пользователя 193
English
Français
Deutsch
Italiano
Español
Português
Nederlands
Ελληνικά
Русский
Kullanım Kılavuzu 217
241
Türkçe
SMMS High-Wall Type
Thank you very much for purchasing TOSHIBA Air Conditioner.
Owner’s Manual
Please read this owner’s manual carefully before using your Air Conditioner.
• Be sure to obtain the “Owner’s manual” and “Installation manual” from constructor (or dealer).
Request to constructor or dealer
• Please clearly explain the contents of the Owner’s manual and hand over it.
NOTE
This manual describes operations of the indoor unit and the wireless remote controller.
For details of the wired remote controller and the outdoor unit, refer to the operation manual supplied with
the outdoor unit. (Keep these manuals carefully.)
ADOPTION OF NEW REFRIGERANT
This Air Conditioner is a new type which adopts a new refrigerant HFC (R410A) instead of the
conventional refrigerant R22 in order to prevent destruction of the ozone layer.
Contents
1 PRECAUTIONS FOR SAFETY . . . . . . . . . . . . . . . . . . . . . . . . . . . . . . . . . . . . . . . 2
2 ACCESSORIES . . . . . . . . . . . . . . . . . . . . . . . . . . . . . . . . . . . . . . . . . . . . . . . . . . . 4
3 PARTS NAME . . . . . . . . . . . . . . . . . . . . . . . . . . . . . . . . . . . . . . . . . . . . . . . . . . . . . 4
4 PARTS NAME OF REMOTE CONTROLLER . . . . . . . . . . . . . . . . . . . . . . . . . . . . 6
5 ADJUSTING CLOCK . . . . . . . . . . . . . . . . . . . . . . . . . . . . . . . . . . . . . . . . . . . . . . . 8
6 LIMITED OPERATION BY GROUP CONTROL . . . . . . . . . . . . . . . . . . . . . . . . . . . 9
7 HANDLING THE REMOTE CONTROLLER . . . . . . . . . . . . . . . . . . . . . . . . . . . . . 10
8 HOW TO USE REMOTE CONTROLLER . . . . . . . . . . . . . . . . . . . . . . . . . . . . . . . 11
9 HINTS FOR ECONOMICAL OPERATION . . . . . . . . . . . . . . . . . . . . . . . . . . . . . . 18
10 TEMPORARY OPERATION . . . . . . . . . . . . . . . . . . . . . . . . . . . . . . . . . . . . . . . . . 19
11 MAINTENANCE . . . . . . . . . . . . . . . . . . . . . . . . . . . . . . . . . . . . . . . . . . . . . . . . . . 20
12 TROUBLES AND CAUSES . . . . . . . . . . . . . . . . . . . . . . . . . . . . . . . . . . . . . . . . . 23
1-EN
–1–
SMMS High-Wall Type
1 PRECAUTIONS FOR SAFETY
DANGER
• Do not attempt to install this unit by yourself.
This unit requires qualified installer.
• Do not attempt to repair the unit by yourself.
This unit has no components which you can repair.
• Opening or removing the cover will expose you to dangerous voltage.
• Turning off the power supply will not prevent potential electric shock.
WARNING
WARNING ABOUT INSTALLATION
• Make sure to ask a dealer or a store specialized in electric work to install
the air conditioner.
If the air conditioner is imperfectly installed by yourself, it may cause
some problems such as water leak, electric shock, fire, and so on.
• Ground the air conditioner without fail.
Do not connect the ground wire to gas pipe, water pipe, lightning rod or
ground wire of telephone. If the air conditioner is imperfectly grounded, it
may cause electric shock.
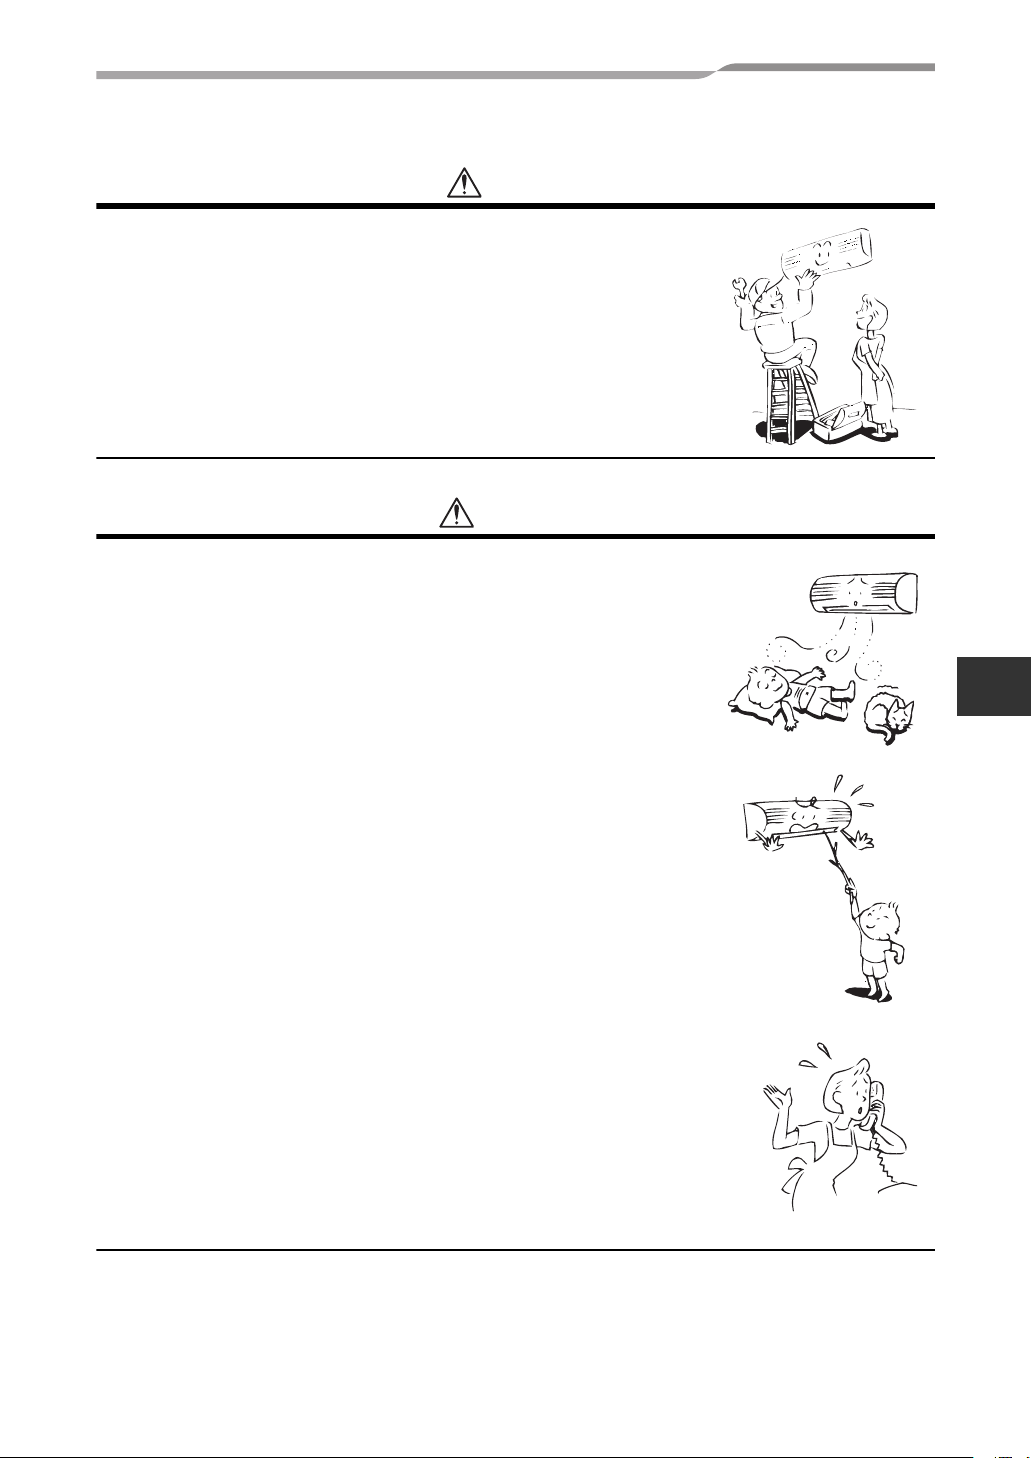
WARNING ABOUT OPERATION
• Avoid cooling the room too strong or exposing the human body to cool
wind for a long time, because it is bad for the health.
• Do not insert fingers and sticks into the air outlet and air inlet to avoid
getting injured and damaging the machine, because there are fans
running at a high speed inside both the air inlet and air outlet.
• When you are aware of something abnormal with the air conditioner
(smells something scorching, cools weak, etc.), immediately turn off the
main switch, the circuit breaker, from the main power supply to stop the
air conditioner, and make contact with the dealer.
If the air conditioner is continuously operated with something abnormal,
it may cause machine failure, electric shock, fire, and so on.
• Do not spill water or other liquid on the indoor unit. If the unit is wet, it may
cause an electric shock.
WARNING ABOUT MOVEMENT AND REPAIR
• Do not move nor repair any unit by yourself.
Since there is high voltage inside the unit, you may get an electric shock
when removing the cover and main unit.
• When moving the air conditioner for re-installing in another place, ask the
dealer to do it. If it is imperfectly installed, it may cause electric shock or
fire.
Owner’s Manual
EN
–2–
2-EN

SMMS High-Wall Type
CAUTION
CAUTIONS ABOUT INSTALLATION
• Certainly lay the drain hose for perfect draining.
Wrong drainage may cause flooding in the house and getting furniture
wet.
• Make sure to connect the air conditioner to an exclusive power supply
of the rated voltage; otherwise, the unit may break down or cause a fire.
• Do not install the unit in a place where inflammable gas may leak.
If inflammable gas accumulates around the unit, it may cause a fire.
CAUTIONS ABOUT OPERATION
• Carefully read this manual and the manual supplied with the outdoor
unit before starting the air conditioner. The manual includes many
important things for daily operation.
• Do not use this air conditioner for other purposes such as preserving
food, precision instruments, art objects, breeding animals, growing
potted plants, etc.
• Do not install this air conditioner in a special-purpose room such as a
ship or any kind of vehicle, otherwise it deteriorates the machine
performance.
• Avoid exposing potted plants and animals to wind of the air conditioner,
because it badly affects the health and growing of them.
• When the air conditioner is operated together with a combustion
appliance in the same place, be careful of ventilation to let fresh air into
the room.
Poor ventilation causes oxygen shortage.
• When the air conditioner is used in a closed room, be careful of
sufficient ventilation of the room. Poor ventilation causes oxygen
shortage.
• Do not touch operation button with wet finger; otherwise, you may get
an electric shock.
• Do not place any combustion appliance in a place where it is directly
exposed to wind of the air conditioner; otherwise, it may cause
imperfect combustion.
• When the air conditioner won’t be used for a considerably long time,
turn off the main switch or the circuit breaker, for safety. Disconnection
from the power supply prevents the unit from lightning and power
source surge.
• Do not put a vessel with water such as a vase on the unit, because
water may possibly sink into the unit and will bring about electric shock
because of deterioration in electric insulation.
• Do not wash the unit with water. It may cause an electric shock.
• Do not use alcohol, benzene, thinner, glass cleaner, polishing powder,
etc. for cleaning the unit, because they deteriorate or damage the air
conditioner.
• When cleaning the unit, make sure to turn off the main switch or circuit
breaker beforehand for preventing you from getting injured by the
electric fan running inside.
For details of cleaning method, refer to “Maintenance”.
• To make the air conditioner demonstrate its original performance,
operate it within the range of the operating temperature specified in the
instructions.
Otherwise it may malfunction, break down or water may leak from the
unit.
Owner’s Manual
3-EN
–3–

SMMS High-Wall Type
2 ACCESSORIES
Remote controller Remote controller holder Batteries (two)
3 PARTS NAME
Indoor unit
Owner’s Manual
11
TIMER SET
FAN
TIME
FILTER
SET
TEST
RESET
MODE
SAVE
VENT
CL
SWING/FIX
UNIT LOUVER
10
1 Room temperature sensor
2 Front panel
3 Air inlet grille
4 Air filter
5 Air outlet
3
4
5
6
7
6 Horizontal airflow louver
7 Vertical airflow louver
8 Display panel
9 Infrared signal receiver
10 Remote controller (wireless)
11 Remote controller (wired, sold separately)
8, 9
2
EN
1
–4–
4-EN
SMMS High-Wall Type
Owner’s Manual
Names and functions of
indicators and controls on
indoor unit
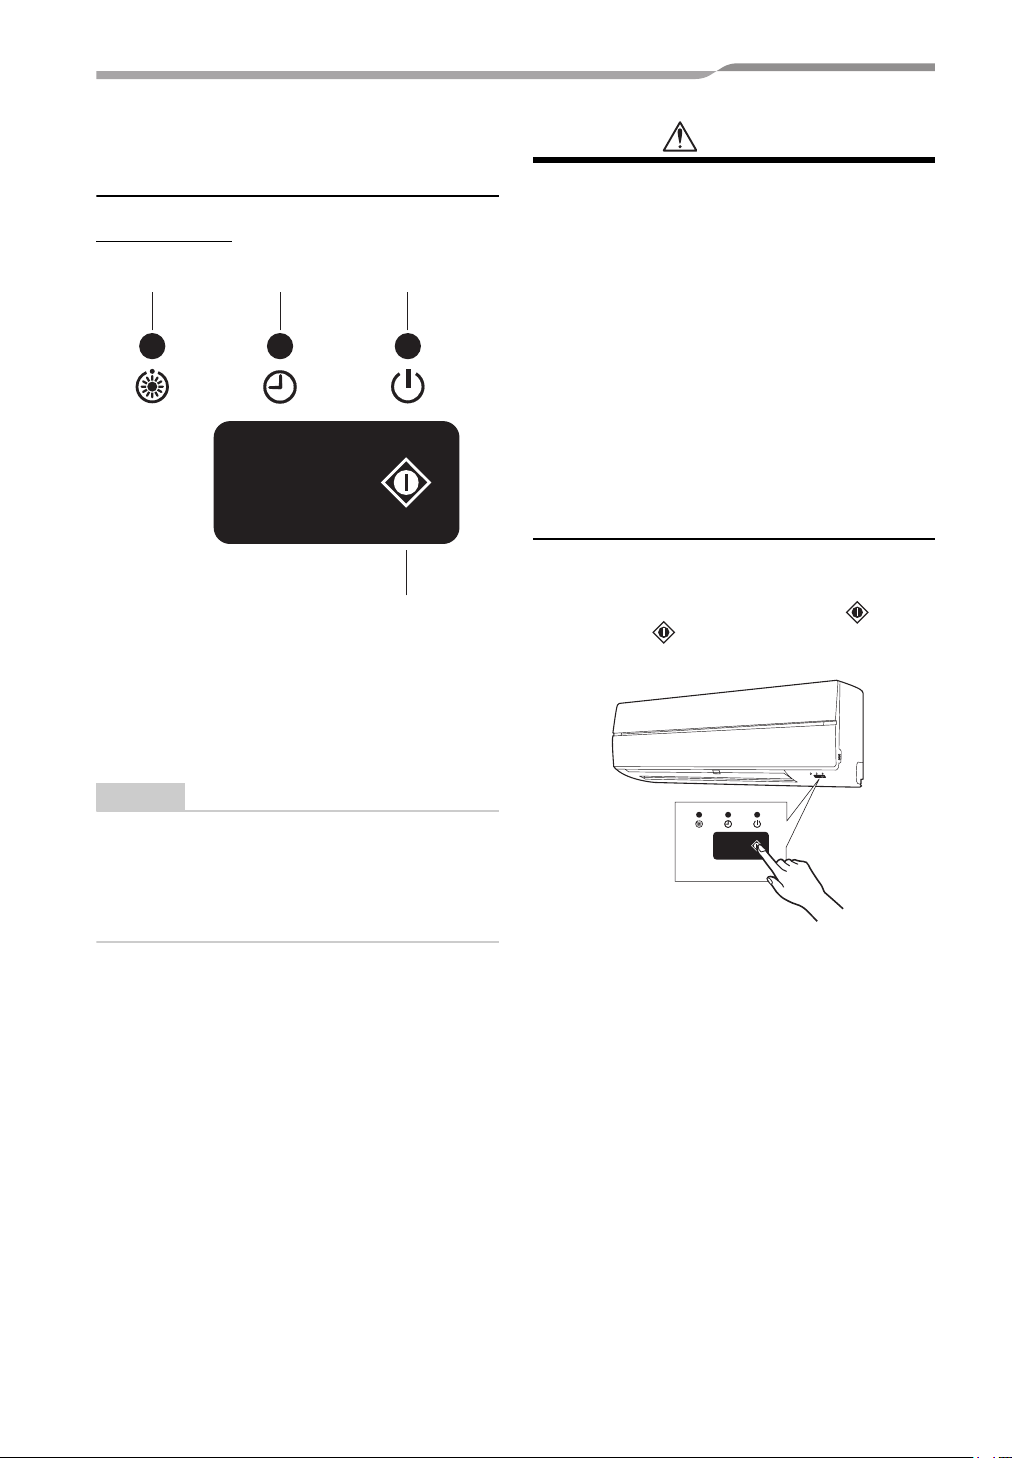
Display panel
123
4
The operating conditions are indicated below.
1 OPERATION (Green)
This lamp goes on during operation.
2 TIMER (Green)
This lamp goes on white the timer reserved.
CAUTION
• Disagreement in operation mode
If you select AUTOMATIC OPERATION in a
model with no auto-changeover (cooling/
heating) control setting or if you select HEAT in
a Cool Only model, an alarm sound (pi, pi) from
the air conditioner due to disagreement in
operation mode. Change the operation mode
with the MODE button on the wireless remote
controller. This disagreement indication cannot
be deleted by the wired remote controller.
• When local prohibition is set by the central
control from other equipment, no signal is
received even if the remote controller button is
pressed. However, a signal of START/STOP
button is accepted. (An alarm sound “pi ” arises
intermittently five times.)
4 TEMPORARY operation
If you misplace or lose the wireless remote controller
or its batteries are exhausted, push the button.
• Push the button to start the air conditioner.
Push this button once again to stop it.
NOTE
In case of timer setting by wired remote controller,
TIMER lamp does not light.
In case of group control, TIMER lamp goes on
header unit only. (see “6 LIMITED OPERATION
BY GROUP CONTROL”)
3 Preheat/Defrost (Orange)
This lamp lights up when the power is turned on or
right after heating operation starts or during defrost
operation.
5-EN
–5–
SMMS High-Wall Type
0
4 PARTS NAME OF REMOTE CONTROLLER
Owner’s Manual
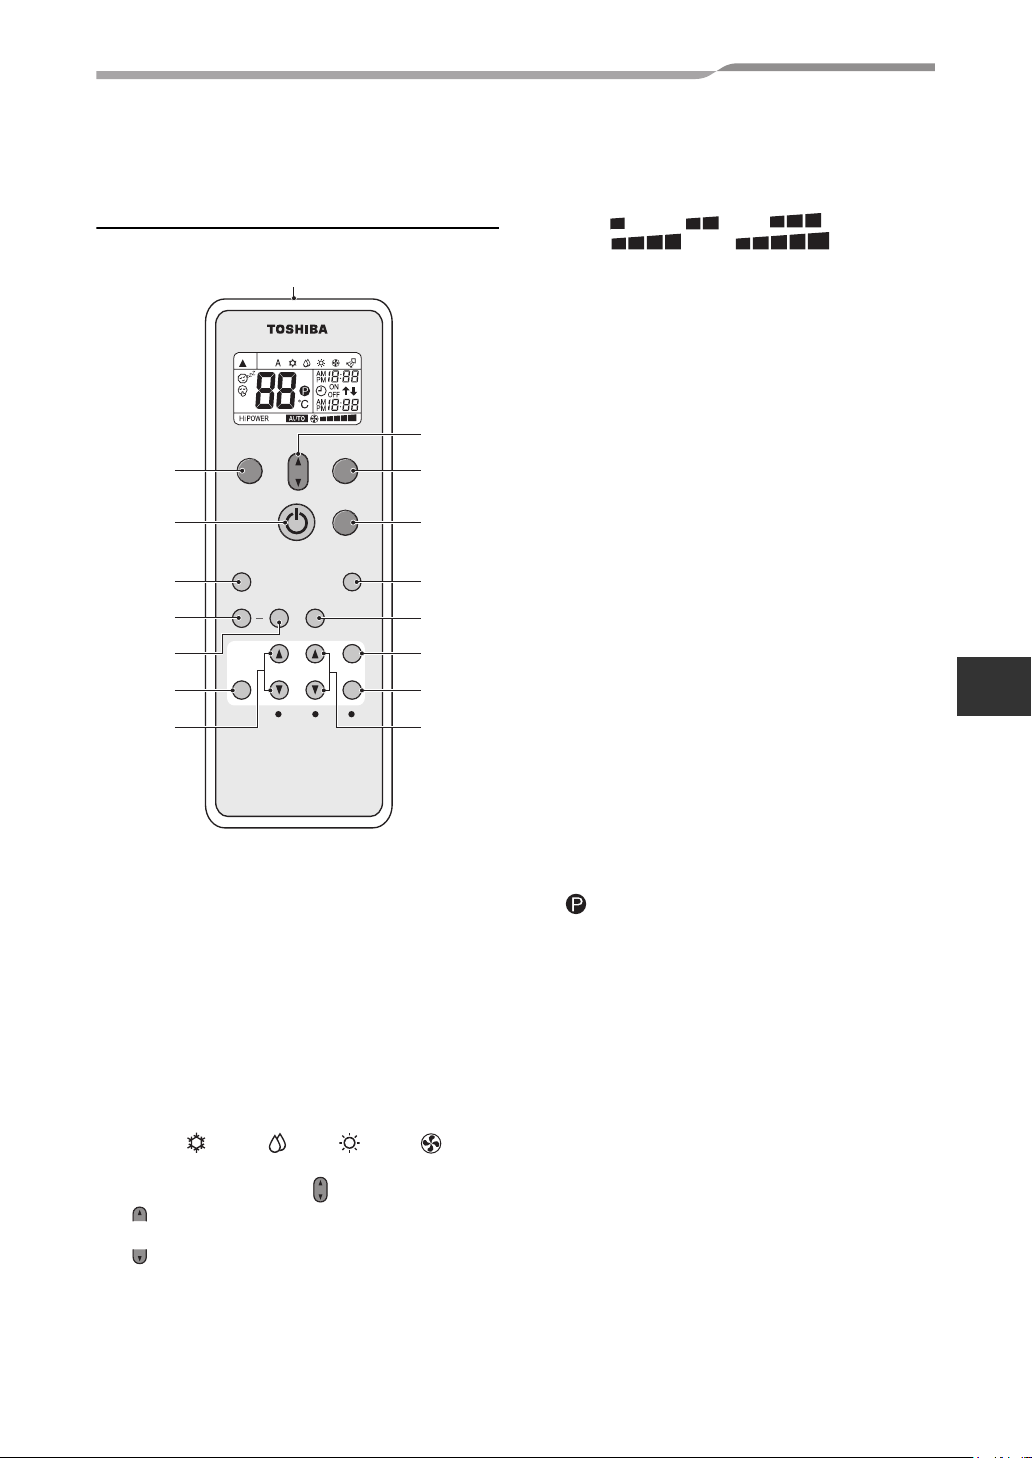
Wireless remote controller and
its functions
1
PRESET
13
TEMP
MOD
F
AN
E
2
OMFORT
C
SLEEP
Hi-
POWE
R
16
Q
U
IET
FIX
SWI
N
G
6
7
14
TIME
SLEEP
R
O
N
FILTE
CHK
CLR
OFF
SET
R
CLOCK
9
1 Infrared signal emitter
Transmits a signal to the indoor unit.
2 START/STOP button
Press the button to start operation.
(A receiving beep is heard.)
Press the button again to stop operation.
(A receiving beep is heard.)
If no receiving sound is heard from the indoor unit,
press the button twice.
3 Mode select button (MODE)
Press this button to select a mode.
Each time you press the button, a mode is selected in
a sequence that goes from A : Auto changeover
control, : Cool, : Dry, : Heat, : Fan
only, and back to A. (A receiving beep is heard.)
4 Temperature button ( )
............ The set temperature is increased up to
TEMP
TEMP
30°C.
............ The set temperature is dropped down to
17°C. (A receiving beep is heard.)
5 Fan speed button (FAN)
Press this button to select fan speed. When you
select AUTO, the fan speed is automatically adjusted
according to the room temperature.
TEMP
4
5
3
15
12
11
1
8
You can also manually select the desired fan speed
from among five settings.
(LOW , LOW
+
MED
(A receiving beep is heard.)
+
, MED ,
, HIGH )
6 Auto louver button (SWING)
Press this button to swing the louver.
(A receiving beep is heard.)
Press the SWING button to stop the louver swinging.
(A receiving beep is heard.)
7 Set louver button (FIX)
Press this button to adjust the airflow direction.
(A receiving beep is heard.) While this button is kept
depressed, the receiving tone continuously sounds.
8 Off timer button (OFF)
Press this button to set the OFF timer.
9 On timer button (ON)
Press this button to set the ON timer.
10 Reserve button (SET)
Press this button to reserve time settings.
(A receiving beep is heard.)
11 Cancel button (CLR)
Press this button to cancel ON timer and OFF timer.
(A receiving beep is heard.)
12 High power button (Hi POWER)
Press this button to start the high power operation.
This function is not operated group control.
13 PRESET button
Press this button to change the operation mode to the
preferred operation mode memorized previously. To
memorize the operation mode, press this button for at
least 3 seconds during the preferred operation mode.
is displayed and the operation mode is
memorized.
14 SLEEP button
Press this button to start the OFF timer operation that
automatically adjusts the room temperature and the
fan speed.
You can select the OFF timer time from four durations
(1, 3, 5 or 9 hours).
15 COMFORT SLEEP button
Press this button to start the OFF timer operation that
automatically adjusts the room temperature and the
fan speed.
You can select the OFF timer time from four durations
(1, 3, 5 or 9 hours).
During group control operation, the set temperature
and the fan speed are not automatically adjusted.
Only off timer function is activated.
16 QUIET button
Press this button to start quiet operation.
Pressing this button again will restore normal
operation.
EN
–6–
6-EN
SMMS High-Wall Type
0
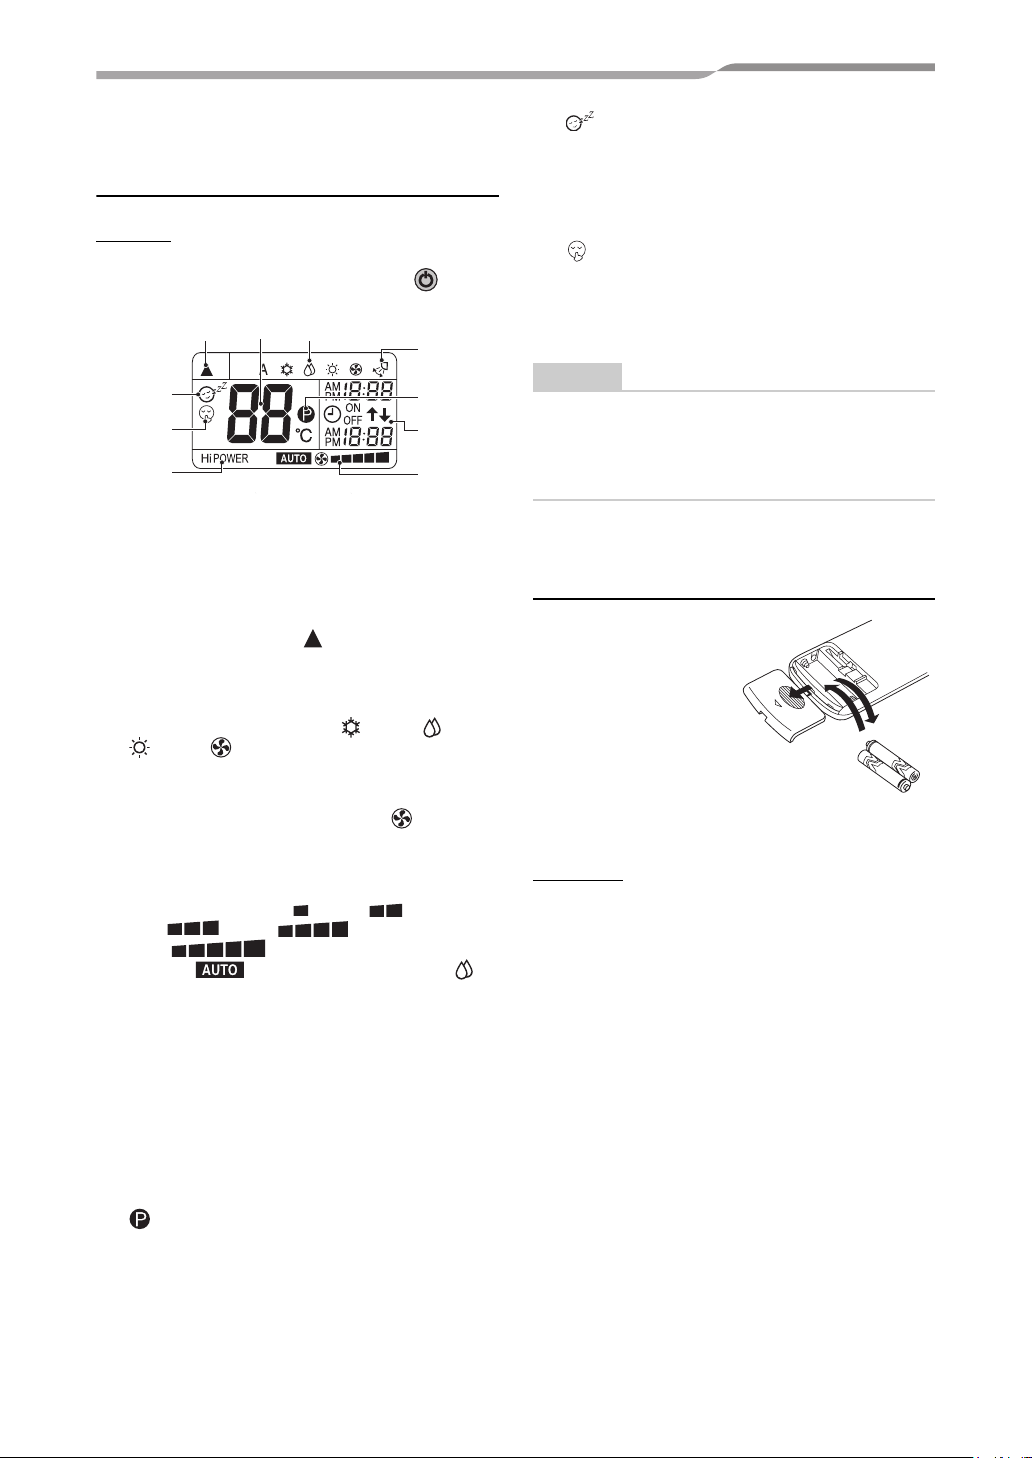
Owner’s Manual
Names and functions of
indications on wireless remote
controller
Display
All indications, except for clock time indication, are
indicated by pressing the START/STOP button.
3
12
1
8
9
6
• In the illustration, all indications are indicated for
explanation.
During operation, only the relevant indications
will be indicated on the remote controller.
1 Transmission mark
This transmission mark ( ) indicates when the
remote controller transmits signals to the indoor unit.
2 Mode display
Indicates the current operation mode.
(A : Auto changeover control, : Cool, : Dry,
: Heat, : Fan only)
3 Temperature display
Indicates the temperature setting (17°C to 30°C).
When you set the operating mode to : Fan only,
no temperature setting is indicated.
4 FAN speed display
Indicates the selected fan speed. AUTO or one of five
fan speed levels (LOW , LOW
MED , MED
HIGH ) can be indicated.
Indicates when the operating mode is :
Dry.
+
5 TIMER and clock time display
The time set for timer operation or clock time is
indicated.
The present time is always indicated except for
TIMER operation.
6 Hi POWER display
Indicates when the high power operation starts.
Press the Hi POWER button to start and press it
again to stop the operation.
7 (PRESET) display
Indicated when memorizing the preferred operation
mode or when it has been memorized.
Also, this icon is indicated when the memorized
preferred operation is displayed.
+
,
7
5
4
,
8 (COMFORT SLEEP) display
Indicated during the OFF timer operation that
automatically adjusts the room temperature and the
fan speed. Each time you press the COMFORT
SLEEP button, the display changes in the sequence
of 1h, 3h, 5h, and 9h.
9 (QUIET) display
Indicated during the quiet operation.
10 Swing display
Indicated during the swinging operation where the
horizontal louver automatically moves up and down.
NOTE
When both wired remote controller and wireless
remote controller are used, display on the screen of
wireless remote controller may differ from the
actual operation in some cases.
Preparation and check before
use
1. Loading Batteries
• Remove the battery
cover.
• Insert 2 new batteries
(R03 [AAA]) following
the (+) and (-)
positions.
2. Removing Batteries
• Remove the battery
cover.
• Remove the 2 used batteries.
Batteries
• To replace the batteries, use two new batteries
(R03 [AAA]) .
• In normal use, the batteries will last about one
year.
• Replace the batteries if there is no receiving
beep from the indoor unit or when the air
conditioner cannot be operated using the remote
controller.
• To avoid malfunctions by battery leakage,
remove the batteries when not using the remote
controller for more than one month.
• Please dispose of the used batteries according
to the local regulation.
A
C
L
2
1
7-EN
–7–
SMMS High-Wall Type
2
3
2
Owner’s Manual
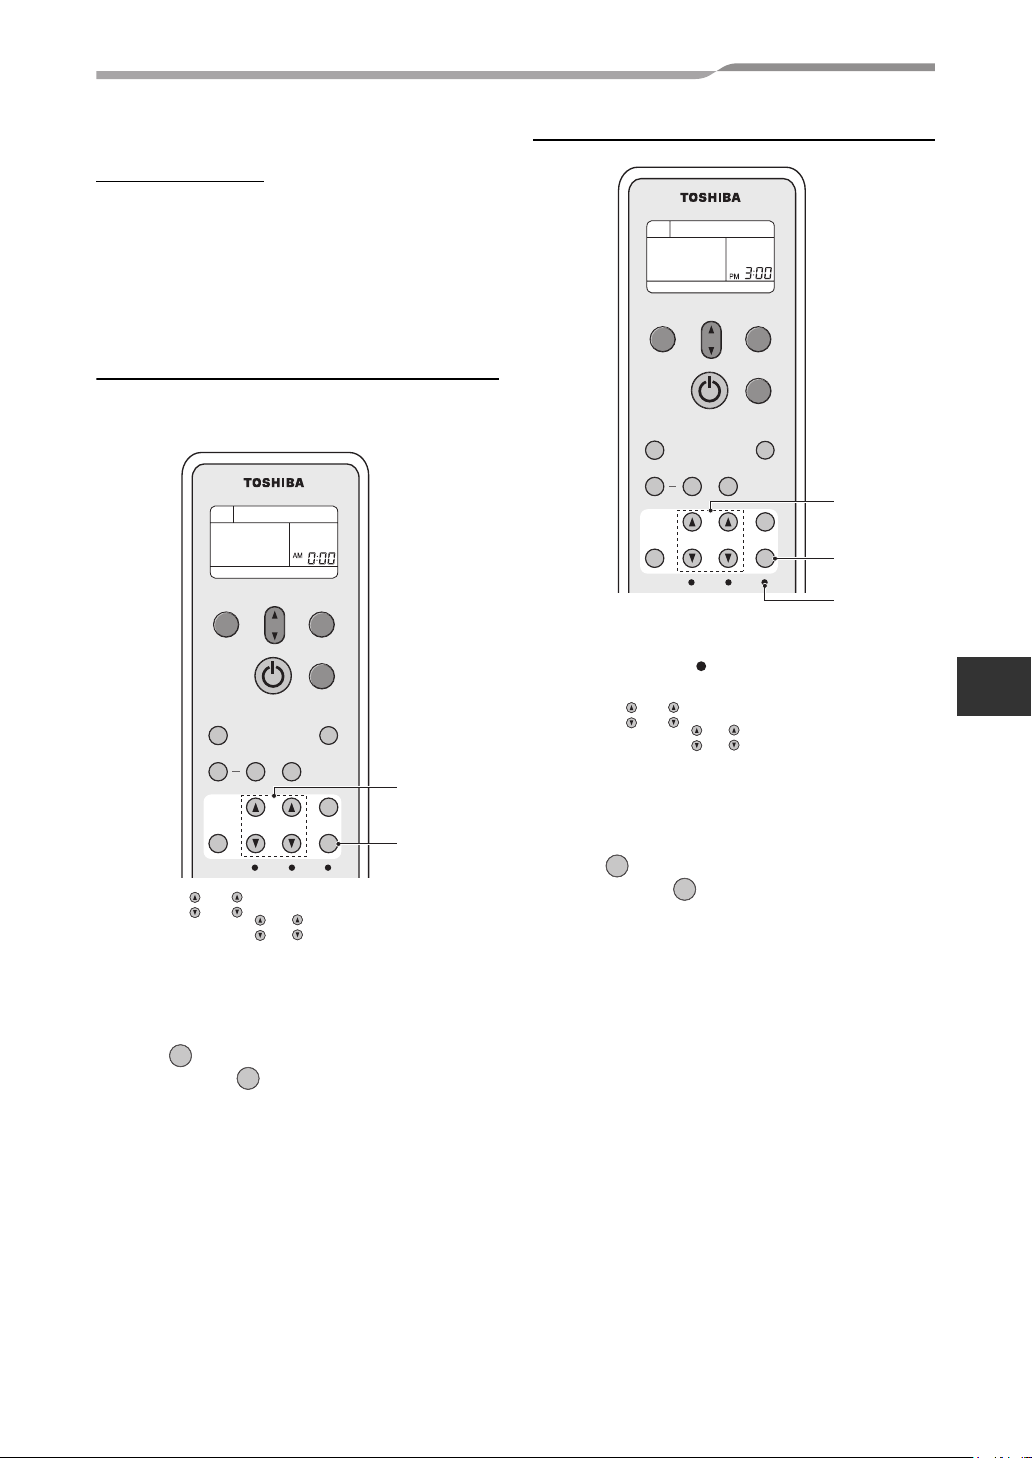
5 ADJUSTING CLOCK
Setting the clock
Before you start operating the air conditioner, set
the clock of the remote controller using the
procedures given in this section. The clock panel
on the remote controller will indicate the time
regardless of whether the air conditioner is in use or
not.
Initial setting
When batteries are inserted in the remote controller
the clock panel will indicate AM 0:00 and will flash.
PRESET
Q
U
IET
FIX
SWI
N
G
TIME
R
O
SLEEP
CHK
OFF
1 TIMER or button
ON
Press the TIMER or button to set the current
time.
Each press of the TIMER button changes the time in
one minute steps.
Pressing the TIMER button continually changes the
time in ten minute steps.
2 SET button
SET
Press the SET button.
SET
The current time is indicated and the clock starts.
N
ON
TEMP
FILTE
F
AN
MOD
E
OMFORT
C
SLEEP
Hi-
POWE
R
CLR
OFF
SET
R
CLOCK
OFF
1
Clock adjusting
PRESET
QUIET
SWING
TIMER
SLEEP
FIX Hi-POWER
ON
CHK
TEMP
FILTER
OFF
MODE
COMFORT
CLOCK
FAN
SLEEP
CLR
SET
1
1 CLOCK button
Press the CLOCK by tip of a pencil.
The CLOCK display flashes.
OFF
SET
ON
OFF
ON
SET
2 TIMER or button
Press the TIMER or button to set the current
time.
Each press of the TIMER button changes the time by
one minute.
Pressing the TIMER button continually changes the
time by ten minutes.
3 SET button
Press the SET button.
The current time is indicated and the clock starts.
EN
–8–
8-EN
SMMS High-Wall Type
Owner’s Manual
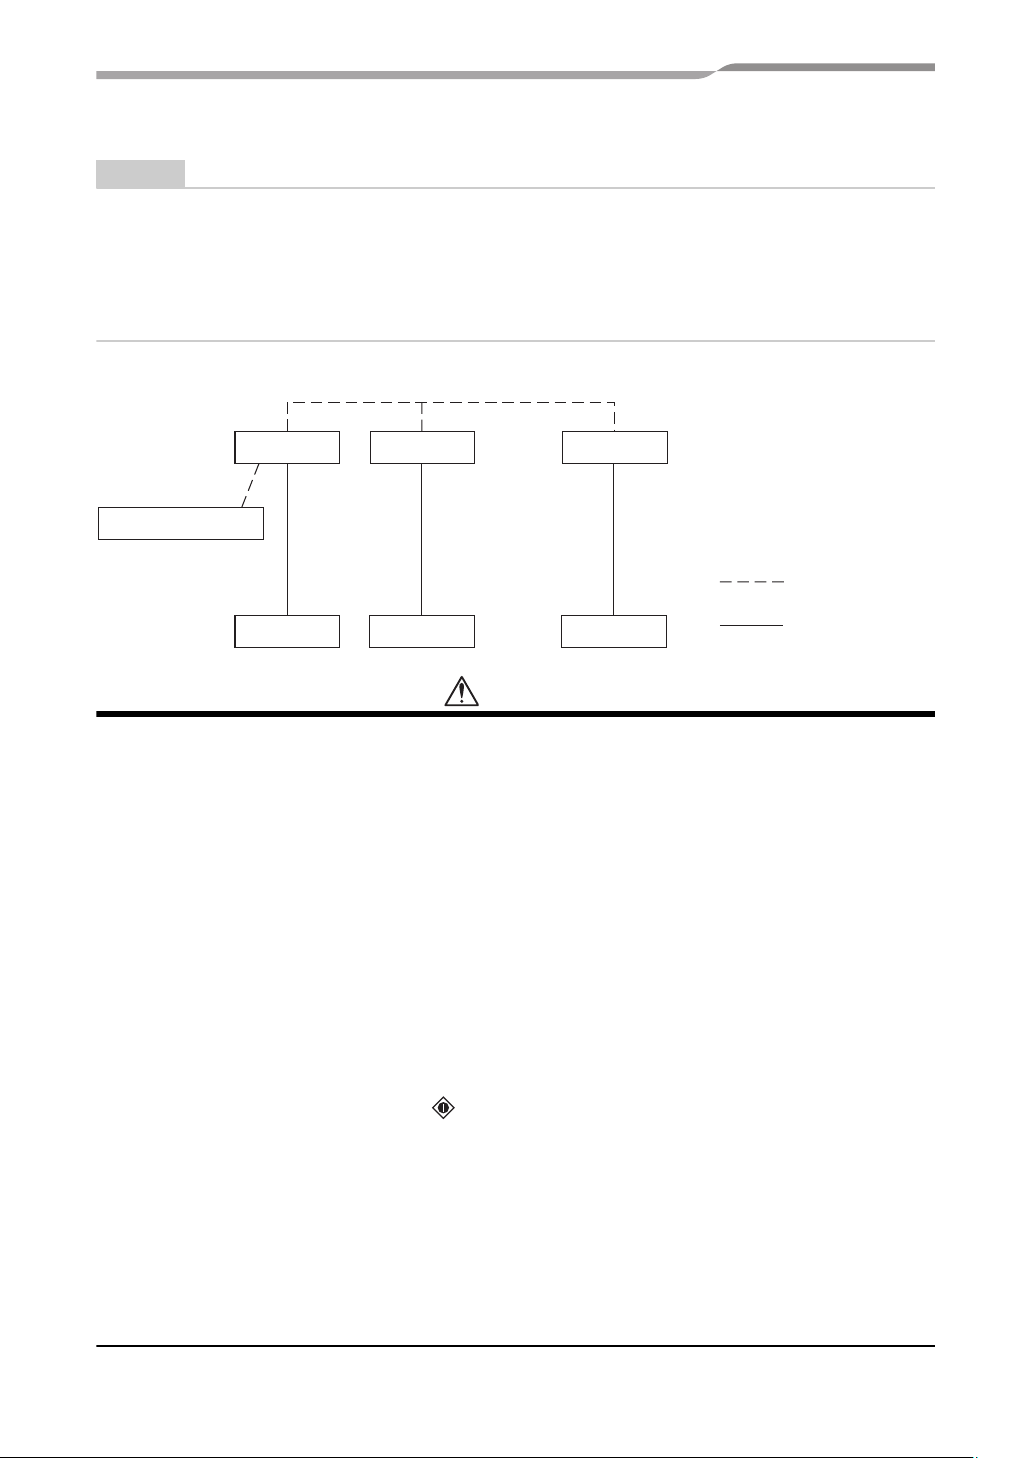
6 LIMITED OPERATION BY GROUP CONTROL
NOTE
Group control: Operate air conditioners in more than one system in same time.
Header indoor unit: The representative unit during group control. Receive commands from wired remote
controller and transmit the commands to follower units.
(Header indoor unit is indoor unit that receives START/STOP signal from the wireless remote control.)
Follower indoor unit: Indoor units other than the Header unit are called follower unit.
A wired remote controller (separately available) is required for the group control.
▼ Example of group combination
Indoor Indoor Indoor
Wired Remote controller
Control line
Outdoor
Outdoor
Outdoor
Other connecting line
CAUTION
When using indoor unit in group control,
1. Hi POWER operation will not function.
When Hi POWER is transmitted from wireless remote controller the receiving sound will be heard from the
indoor unit and display on the wireless remote controller will also change. However, the indoor unit does not
operate Hi POWER operation. Restore the display on the wireless remote controller pushing Hi POWER
button.
2. COMFORT SLEEP
When COMFORT SLEEP is transmitted from wireless remote controller, the receiving sound will be heard
from the indoor unit and the display on the wireless remote controller will also be changed as same as Hi
POWER operation. However, the set temperature and the fan speed will not be automatically adjusted. Only
off timer function is activated.
3. Units other than the Header unit cannot be operated with remote controller and the
TEMPORARY operation.
When operating air conditioner with wireless remote controller transmission should be sent to the Header
unit.
Header and follower indoor units are decided through address setting upon installation. Follower unit will not
receive any signals from wireless remote controller.
Air conditioner will not work even if the button on the follower unit is pressed.
(Some Follower units may receive SWING and FIX, but these operations are performed only on the unit that
received the signal.)
(When wireless remote controller is used, only the Header unit receives SWING signal. If the SWING signal
is transmitted to follower unit, the sound to refuse receiving signal (3 beeps) is heard and the follower unit
does not receive the signal.
For FIX operation, both Header and follower unit perform the operation by itself.
When wired remote controller is used, airflow direction can be changed on each unit by selecting the indoor
unit.)
4. TIMER lamp lights up only on the Header unit.
When the timer is set with wired remote controller, even the TIMER lamp on the Header unit will not light up.
9-EN
–9–
SMMS High-Wall Type
7 HANDLING THE REMOTE CONTROLLER
Owner’s Manual
CAUTION
• The air conditioner will not operate if curtains,
doors or other materials block the signals from
the remote controller to the indoor unit.
• Prevent any liquid from falling into the remote
controller.
Do not expose the remote controller to direct
sunlight or heat.
• If the infrared signal receiver on the indoor unit
is exposed to direct sunlight, the air conditioner
may not function properly.
Use curtains to prevent the sunlight from
reaching the receiver.
• If the room using the air conditioner has
fluorescent lighting with electronic starters,
signals may not be properly received. If you are
planning to use such fluorescent lamps, consult
your local dealer.
• If other electrical appliances react to the remote
controller move these appliances or consult
your local dealer.
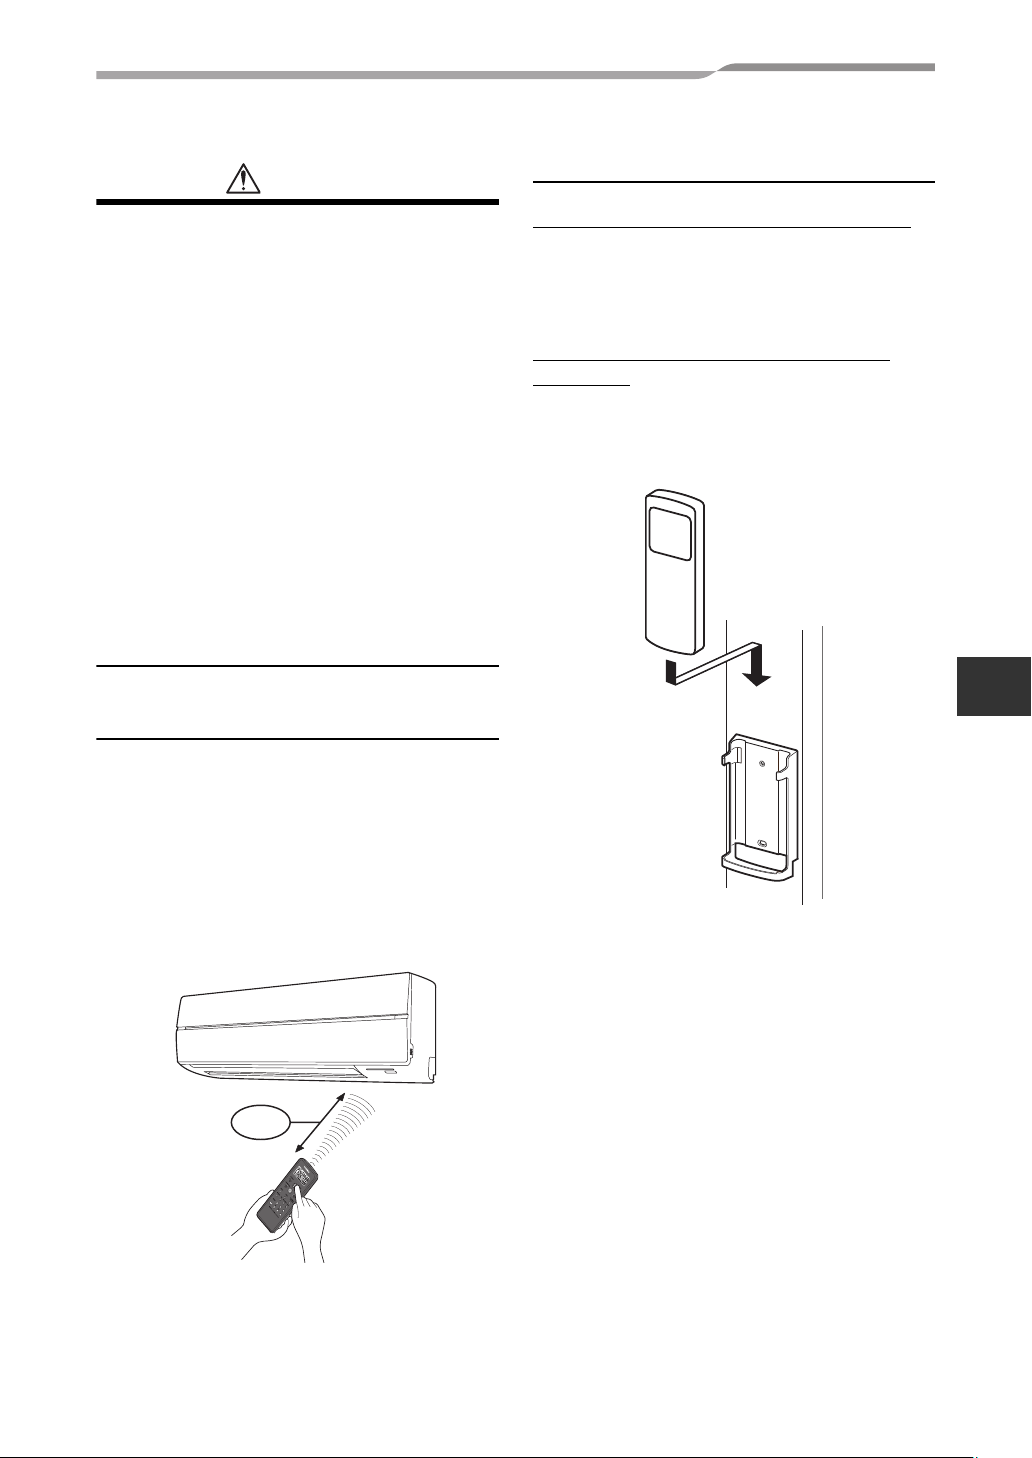
Location of the remote controller
Remote controller holder
Installing the remote controller holder
• Before you actually install the remote controller
holder on a wall or pillar, check whether the
remote controller signals can be received by the
indoor unit.
Mounting and removing the remote
controller
• To mount the remote controller hold it parallel to
the remote controller holder and push it in fully.
To remove the remote controller slide the remote
controller upwards and out from the holder.
EN
• Keep the remote controller where its signals can
reach the receiver of the indoor unit (a distance
of 7 m is allowed).
• When you select the timer operation, the remote
controller automatically transmits a signal to the
indoor unit at the specified time.
If you keep the remote controller in a position that
hinders proper signal transmission, a time lag of
up to 15 minutes may occur.
7 m
–10–
10-EN
SMMS High-Wall Type
2
4
3
2
3
8 HOW TO USE REMOTE CONTROLLER
Owner’s Manual
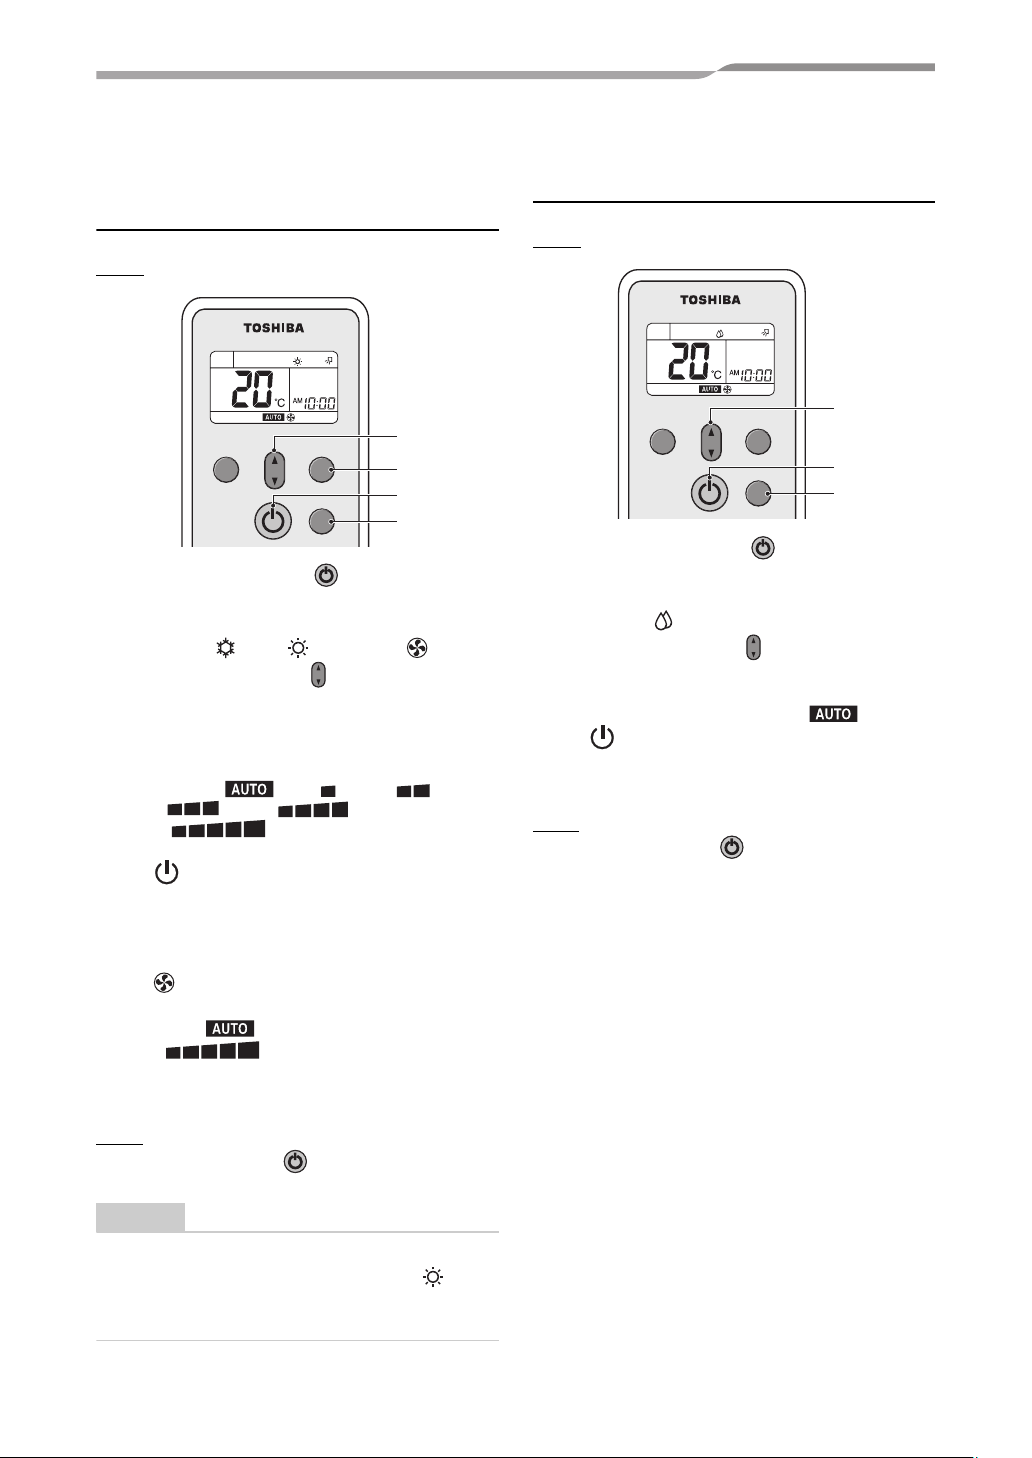
Cooling/heating/fan only
operation
Start
PRESET
TEMP
FAN
MODE
1
1 START/STOP button ( )
Press this button to start the air conditioner.
2 Mode select button (MODE)
Select Cool , Heat , or Fan only .
3 Temperature button ( )
Set the desired temperature.
When the air conditioner is in FAN ONLY operation,
the temperature display is not indicated.
TEMP
4 Fan speed button (FAN)
Select one of LOW , LOW
MED , MED
HIGH .
• The OPERATION lamp (green) on the
display panel of the indoor unit goes on. And
operation starts after approximately 3 minutes.
(If you select FAN ONLY mode, the unit will start
immediately.)
• The : Fan only mode does not control
temperature.
• Fan speed is the same as
HIGH .
Therefore, perform only steps
select this mode.
+
+
,
,
1, 2 and 4 to
Dry operation
Start
PRESET
TEMP
FAN
MODE
1
1 START/STOP button ( )
Press this button to start the air conditioner.
2 Mode select button (MODE)
Select DRY .
3 Temperature button ( )
Set the desired temperature.
• The fan speed display indicates
• The OPERATION lamp (green) on the
display panel of the indoor unit lights, and
operation starts after approximately 3 minutes.
Stop
START/STOP button ( )
Press this button again to stop the air conditioner.
TEMP
Stop
START/STOP button ( )
Press this button again to stop the air conditioner.
NOTE
When the indoor unit is operated together with a
cooling only outdoor model outdoor unit,
appears on the remote controller but the heating
operation is disabled.
11-EN
–11–
SMMS High-Wall Type
2
4
2
3
Owner’s Manual
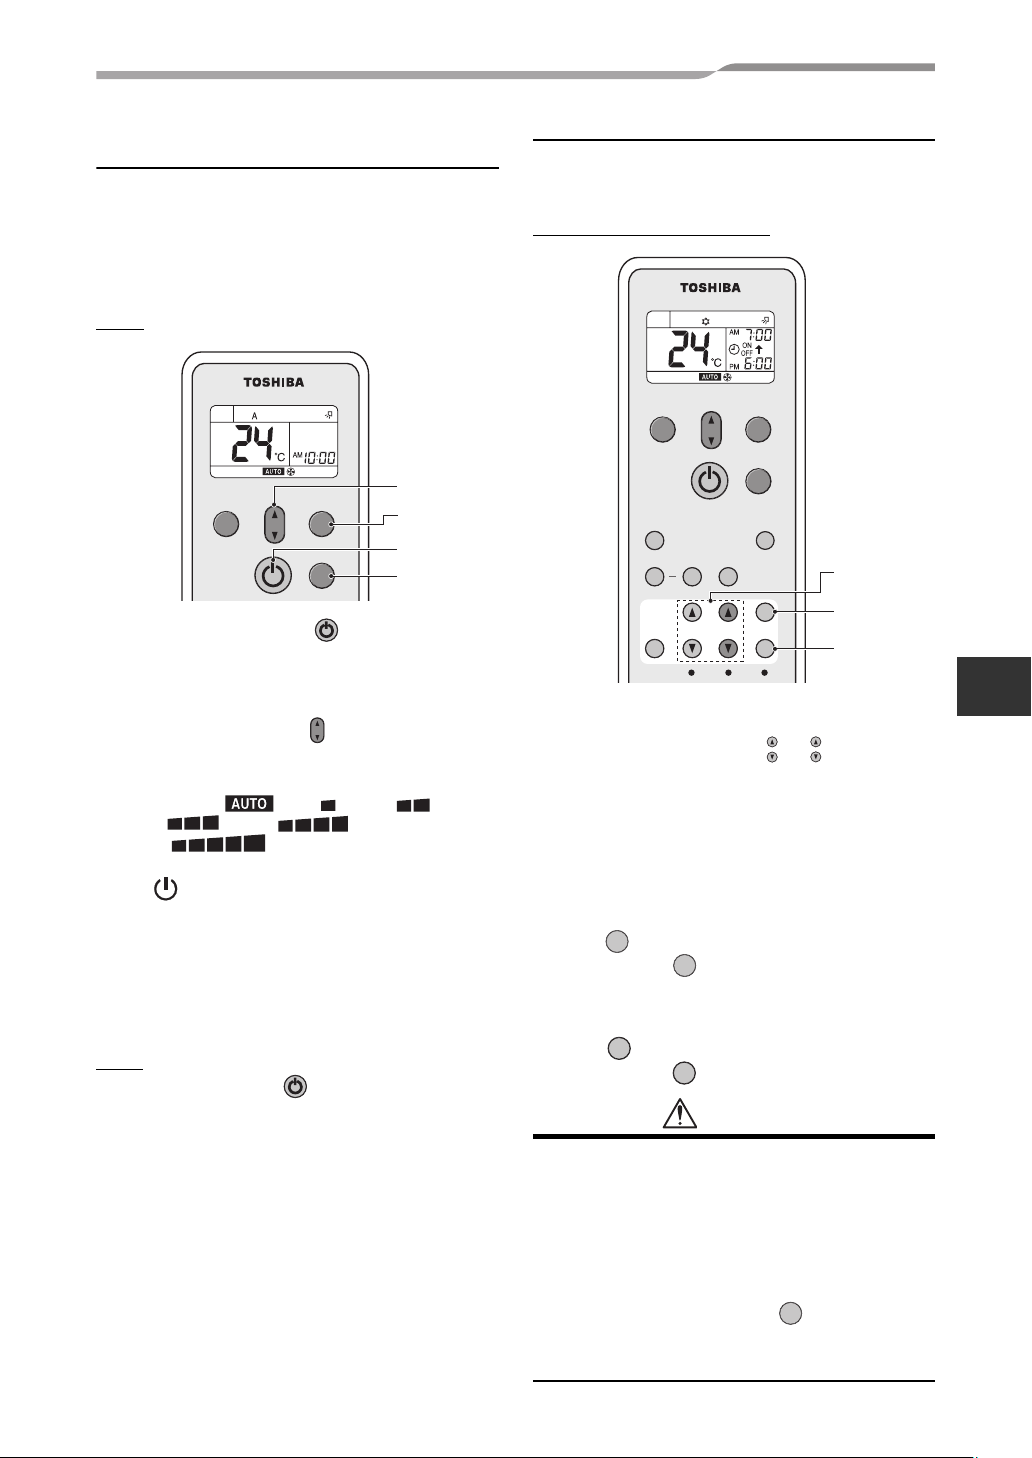
Automatic operation
(auto changeover)
This function is available only for use in
combination with a heat recovery model outdoor
unit. If this function is used with another model of
outdoor unit, “A” (Auto) appears on the remote
controller but the automatic operation is disabled.
Start
PRESET
FAN
TEMP
MODE
3
1
1 START/STOP button ( )
Press this button to start the air conditioner.
2 Mode select button (MODE)
Select A.
3 Temperature button ( )
Set the desired temperature.
TEMP
4 Fan speed button (FAN)
Select one of LOW , LOW
MED , MED
HIGH .
+
• The OPERATION lamp (green) on the
display panel of the indoor unit lights.
The operating mode is selected in accordance
with the room temperature and operation starts
after approximately 3 minutes.
• If the “A” mode is uncomfortable, you can select
the desired conditions manually.
Stop
START/STOP button ( )
Press this button again to stop the air conditioner.
+
,
,
Timer operation
Use the wired remote controller for timer setting if it
is also in use.
ON timer and OFF timer
PRESET
QUIET
SWING
FIX Hi-POWER
TEMP
FAN
MODE
COMFORT
SLEEP
1
TIMER
ON
SLEEP
FILTER
CHK
Setting TIMER
1 ON/OFF TIMER button ( or )
Press the ON or OFF TIMER buttons as required.
• The previous timer setting is displayed and flashes
along with ON/OFF timer display.
Set the timer to the desired time.
Each press of the TIMER button changes the time in
ten minute steps.
Pressing the TIMER button continually changes the
time in one hour step.
2 SET button
Cancelling TIMER
3 CLR button
SET
Press the SET button to set the timer.
The timer time is indicated and the timer starts.
CLR
Press the CLR button to cancel the timer setting.
SET
CLR
CLR
OFF
SET
CLOCK
ON
CAUTION
OFF
EN
• When you select the timer operation, the
remote controller automatically transmits the
timer signal to the indoor unit at the specified
time. Therefore, keep the remote controller in a
location where it can transmit the signal to the
indoor unit properly. Otherwise, the time lag of
up to 15minutes will occur.
• If you do not press the SET button within 30
SET
seconds after setting the time, the setting will
be cancelled.
–12–
12-EN
SMMS High-Wall Type
Owner’s Manual
Once you select the timer operation mode, the
settings are saved in the remote controller.
Thereafter, the air conditioner will start operating
under the same conditions when you simply press
the ON/OFF button of the remote controller.
If the clock display is flashing, you cannot set the
timer.
Follow the instructions in the section “SETTING
THE CLOCK” and then set the timer.
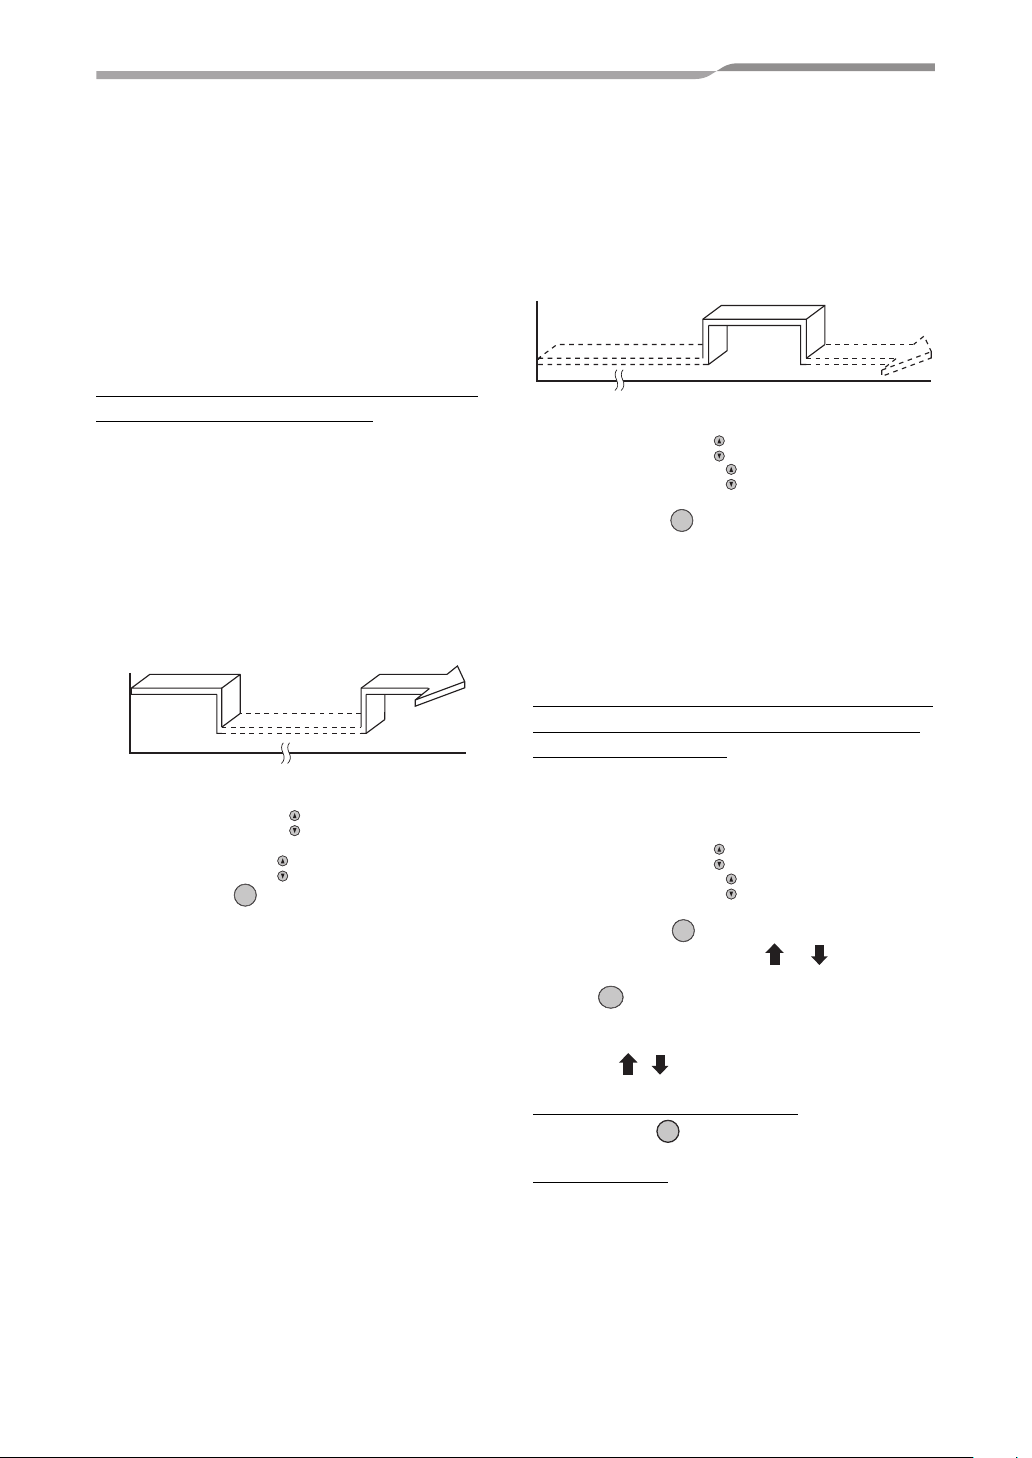
Combined timer (Setting both ON and
OFF timers simultaneously)
OFF timer —> ON timer
(Operation —> Stop —> Operation)
This feature is useful when you want to stop the air
conditioner after you go to sleep, and start it again
in the morning when you wake up or you return
home.
Example:
To stop the air conditioner and start it again next
morning.
Operation
▼ Setting combined TIMER
1. Press the OFF TIMER button to adjust the OFF
timer.
2. Press the ON TIMER button to adjust the ON timer.
3. Press the SET button.
SET
Operation again
Stop
OFF
ON
ON timer —> OFF timer
(Stop —> Operation —> Stop)
You can use this setting to start the air conditioner
when you wake up and stop it when you leave the
house.
Example:
To start the air conditioner next morning and stop it.
Operation
Stop Stop
▼ Setting combined TIMER
1. Press the ON TIMER button to adjust the ON timer.
2. Press the OFF TIMER button to adjust the OFF
timer.
3. Press the SET button.
ON
OFF
SET
• Either ON or OFF timer function which is closer
to the current time, is activated first.
• If the same time is set for both ON and OFF
timers, no timer operation is performed.
Also, the air conditioner may stop operating.
Every day combined timer (setting both
ON and OFF timer simultaneously and
activate every day.)
This feature is useful when you want to use
combined timer at the same time every day.
▼ Setting combined TIMER
1. Press the ON TIMER button to adjust the ON timer.
2. Press the OFF TIMER button to adjust the OFF
timer.
3. Press the SET button.
4. After step 3, an arrow mark ( or ) flashes for
about 3 seconds and during this flashing, press the
SET button.
SET
ON
OFF
SET
13-EN
• During the every day timer is activating, both
arrows ( , ) are indicated.
Cancel the timer operation
Press the CLR button.
CLR
Clock display
During the TIMER operation (ON-OFF, OFF-ON,
OFF timer) clock display is disappeared so as to
show the setting time. To see the present time,
press SET button briefly and the present time is
displayed about 3 seconds.
–13–
SMMS High-Wall Type
Owner’s Manual
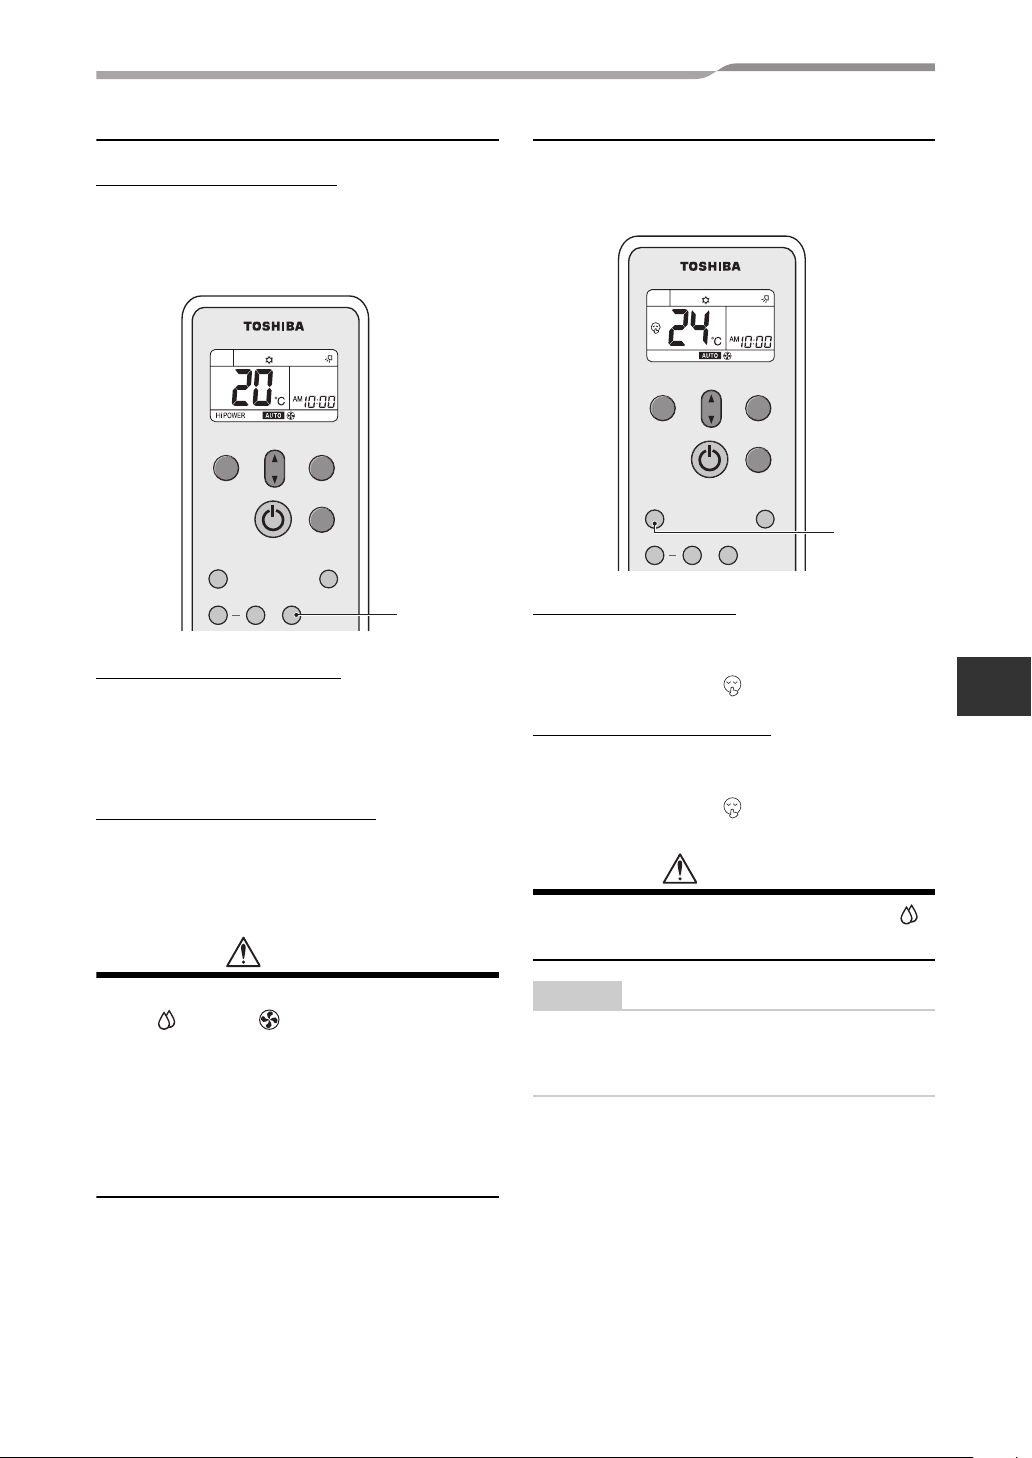
High power operation
High power (Hi POWER)
• The Hi POWER (high power operation) mode
automatically controls room temperature, airflow
and operation mode so that the room is quickly
cooled in summer and warmed in winter.
PRESET
QUIET
SWING
FIX Hi-POWER
TEMP
FAN
MODE
COMFORT
SLEEP
1
Setting Hi POWER mode
1 Hi POWER button
Press the Hi POWER button after starting any
operation. At the same time, the “Hi POWER” mark
on the remote controller is indicated.
Cancelling Hi POWER mode
1 Hi POWER button
Press the Hi POWER button once again.
At the same time, the “Hi POWER” mark on the
remote controller goes out.
CAUTION
Quiet operation
• The QUIET mode provides quiet operating
status by automatically setting the fan speed to
the lowest speed.
PRESET
QUIET
SWING
FIX Hi-POWER
TEMP
FAN
MODE
COMFORT
SLEEP
1
Setting QUIET mode
1 QUIET button
Press the QUIET button after starting any operation.
At the same time, the mark is indicated.
Cancelling QUIET mode
1 QUIET button
Press the QUIET button once again.
At the same time, the mark on the remote
controller disappears.
CAUTION
The QUIET mode cannot be activated in the
DRY operation.
EN
• The Hi POWER mode cannot be activated in
DRY and FAN ONLY operation and
the
when the ON TIMER operation is reserved.
• Hi POWER mode is not available for group
control.
When Hi POWER is transmitted to the Header
indoor unit, the receiving sound is heard but the
Hi POWER mode will not be performed. Please
cancel the Hi POWER mode.
NOTE
Under certain conditions, the quiet operation may
not provide adequate cooling or heating due to the
feature of quietness.
–14–
14-EN
 Loading...