


Blu-ray Disc™ Player
BDX4300KB
Owner’s Manual

English
Contents |
|
|
1 |
Important.................................................................................................................... |
3-6 |
|
Safety and important notice.............................................................................................. |
3 |
|
Disposal of your old product and batteries....................................................................... |
3-5 |
|
Notice for Trademark........................................................................................................ |
6 |
2 |
Your Product.............................................................................................................. |
7-9 |
|
Regions codes.................................................................................................................. |
7 |
|
Product overview.............................................................................................................. |
8 |
|
Remote Control................................................................................................................ |
9 |
3 |
Connections............................................................................................................ |
10-11 |
|
Connecting to a TV.......................................................................................................... |
10 |
|
Optional Connection....................................................................................................... |
10 |
|
Connect USB device........................................................................................................ |
11 |
|
Connect Power............................................................................................................... |
11 |
4 |
Preparation............................................................................................................. |
11-12 |
|
Prepare the remote control.............................................................................................. |
11 |
|
Setting up the player...................................................................................................... |
12 |
5 |
Playback................................................................................................................. |
12-15 |
|
Playback Functions..................................................................................................... |
12-15 |
6 |
Customizing............................................................................................................. |
16-25 |
|
General Setting.......................................................................................................... |
16-21 |
|
Display Setting........................................................................................................... |
22-23 |
|
Audio Setting............................................................................................................. |
23-24 |
|
System information......................................................................................................... |
24 |
|
Network Functional description........................................................................................ |
24 |
7 |
Specification................................................................................................................ |
25 |
8 |
Troubleshooting...................................................................................................... |
26-27 |
9 |
Glossary................................................................................................................... |
28-29 |
10 License Information................................................................................................ |
30-46 |
|
2
1 Important
Safety and important notice
Warning:
•Risk of overheating! Never install the product in a confined space. Always leave a space of at least
10cm around the product for ventilation. Ensure curtains or other objects never cover the ventilation slots on the product.
•Never place the product, remote control or batteries near naked flames or other heat sources, including direct sunlight.
•Only use this product indoors. Keep this product away from water, moisture and liquid-filled objects.
•Never place this product on other electrical equipment.
•Keep away from this product during lightning storms.
•Where the mains plug or an appliance coupler is used as the disconnect device, the disconnect device shall remain readily operable.
LASER CAUTION:
USE OF CONTROLS OR ADJUSTMENTS OR PERFORMANCE OF PROCEDURES OTHER THAN THOSE SPECIFIED HEREIN MAY RESULT IN HAZARDOUS RADIATION EXPOSURE.
CAUTION:
VISIBLE AND INVISIBLE LASER RADIATION
WHEN OPEN AND INTERLOCKS DEFEATED. DO
NOT STARE INTO BEAM.
LOCATION:
INSIDE, NEAR THE DECK MECHANISM.
EU Conformity Statement
This product is marked with "CE" and complies therefore with the applicable harmonized European standards listed under the Low Voltage Directive 2006/95/EC and the EMC Directive 2004/108/EC. ErP Directive 2009/125/ EC
Responsible for CE-marking is
TOSHIBA INFORMATION SYSTEMS (U.K.) LTD, Toshiba Court, Weybridge Business Park, Addlestone Road, Weybridge,Surrey,KT15 2UL, United Kingdom
Disposal of your old product and batteries
Following information is only valid for EUmember States:
Disposal of products
The crossed out wheeled dust bin symbol indicates that products must be collected and disposed of separately from household waste. Integrated batteries and accumulators can be disposed of with the product. They will be separated at the recycling centres.
The black bar indicates that the product was placed on the market after August 13, 2005. By participating in separate collection of products and batteries, you will help to assure the proper disposal of products and batteries and thus help to prevent potential negative consequences for the environment and human health.
For more detailed information about the collection and recycling programmes available in your country, please visit our website (http://www.recycle-more.co.uk/ ) or
alternatively please contact your retailer where the product was purchased.
Disposal of batteries and/or accumulators
The crossed out wheeled dust bin symbol indicates that batteries and/or accumulators
must be collected and disposed of separately Pb,Hg,Cd from household waste.
If the battery or accumulator contains more than the specified values of lead (Pb), mercury (Hg), and/or cadmium (Cd) defined in the Battery Directive (2006/66/EC), then the chemical symbols for lead (Pb), mercury (Hg) and/or cadmium (Cd) will appear below the crossed out wheeled dust bin symbol.
By participating in separate collection of batteries, you will help to assure the proper disposal of products and batteries and thus help to prevent potential negative consequences for the environment and human health.
For more detailed information about the collection and recycling programmes available in your country, please visit our website (http://www.recycle-more.co.uk/ ) or
alternatively please contact your retailer where the product was purchased.
General Information
This appliance may be fitted with a nonrewireable plug. If it is necessary to change the fuse in a non-rewireable plug the fuse cover must be refitted. If the fuse cover is lost or damaged, the plug must not be used until a replacement available from the appliance manufacturer is obtained. If the plug has to be changed because it is not suitable for your socket, or becomes damaged, it should be cut off and an appropriate
plug fitted following the wiring instructions below.
The plug removed must be disposed of safely as it is hazardous if inserted into a live socket.
English
3
English
IMPORTANT
The wires in this mains lead are coloured in accordance with the following code: BLUE: NEUTRAL
BROWN: LIVE
As the colours of the wires in the mains lead of this unit may not correspond with the coloured markings identifying the terminals in your plug, proceed as follows:
The wire that is coloured blue must be connected to the terminal in the plug which is marked with the letter N or coloured black.
The wire that is coloured brown must be connected to the terminal which is marked with the letter L or coloured red.
Do not connect either wire to the earth terminal which is marked by the letter E or by the safety earth symbol  or coloured green or green-and-yellow.
Use a 5A BS1362 fuse which is approved by ASTA or BSI. Always replace the fuse cover after changing the fuse.
Copyright notice
This product incorporates copyright protection technology that is protected by U.S. patents and other intellectual property rights. Use of this copyright protection technology must be authorized by Rovi Corporation, and is intended for home and other limited viewing uses only unless otherwise authorized by Rovi Corporation. Reverse engineering or disassembly is prohibited.
Disclaimers
I. HEALTH/SAFETY-RELATED IMPORTANT SAFETY INFORMATION
CONCERNING 3D VIEWING
• If you or any viewer experiences the following symptoms or any other discomfort from viewing 3D video images, stop viewing and contact your health care
provider: |
|
|
Convulsions |
Eye or muscle twitching |
|
Loss of awareness |
|
Altered vision |
Involuntary movements |
Disorientation |
|
Eye Strain |
|
Nausea/Vomiting |
Dizziness |
|
Headaches |
Fatigue |
|
|
•Some viewers may experience a seizure or blackout when exposed to certain flashing images or lights contained in certain 3D television pictures or video games. Anyone who has had a seizure, loss of awareness, or other symptom linked to an epileptic condition, or has a family history of epilepsy, should contact a health care provider before using the 3D function.
•If you feel eye fatigue or other discomfort from viewing 3D video images, stop viewing and take a rest until the condition is eliminated.
•Due to the possible impact on vision development, viewers of 3D video images should be age 6 or above. Children and teenagers may be more susceptible to health issues associated with viewing in 3D and should be closely supervised to avoid prolonged viewing without rest.
•Avoid use of the 3D function when under the influence of alcohol.
•Watching the screen while sitting too close for an extended period of time may cause eye strain. Consult your display manual to determine the ideal viewing distance.
•Viewing in 3D may cause dizziness and/ or disorientation for some viewers.
Therefore, to avoid injury do not place your player or display near open stairwells, balconies, or wires, and do not sit near objects that could be broken if accidentally hit.
•CAREFULLY READ INSTRUCTIONS PROVIDED WITH YOUR DISPLAY AND/OR 3D GLASSES BEFORE 3D VIEWING.
II. PERFORMANCE RELATED
•This product is designed to playback
Blu-rayTM discs that comply with the 3D specifications of Blu-ray Disc Association.
It is not compatible with other 3D specifications.
•3D capable display, 3D eyewear and
High Speed HDMI cable (all sold separately) required for playback and
4

viewing 3D content.
•If you route your signal through an AV receiver or other video distribution device they must be 3D capable to support 3D viewing. Viewing HD content and upconverting DVD content may require an
HDCP capable input on your display device.
•While up-converting DVD video content may result in a picture that appears to be near HD quality, results may vary depending on content, display and settings.
•1080p capable display required for viewing content in 1080p.
•1080p/24 fps encoded content and an
HD display capable of accepting a
1080p/24Hz signal required for viewing
1080p/24 fps content.
•Performance of interactive and/or network features may vary due to disc design or content, and may also require an always-on broadband internet connection. Firmware update may be required for some interactive and/or network features. Some features may require additional bandwidth.
•BD-LiveTM may require a USB flash drive with available storage capacity of at least
1GB (sold separately).
•For Dolby® TrueHD and DTS-HD Master Audio | Essential TM playback, content encoded in Dolby® TrueHD and DTS-HD Master Audio | Essential TM format required. Supported file types: JPEG, MP3, and AVCHD. Some recordable media, cards or files may not be supported. Deep Color feature as specified in HDMI specification requires compatible Deep
Color capable HD display and/or device.
Use of HDMI-CEC requires an HDMI-CEC compatible display device. Depending on the specifications of your display device, some or all HDMI-CEC functions may not work even if your display device is HDMICEC compatible.
•Products do not play HD DVD discs.
•Some features subject to delayed
availability.
•Because the Blu-rayTM format and 3D specifications use new technologies, certain disc, content, connection and other compatibility and/or performance issues are possible. If you experience such issues, please refer to www.home-entertainment.toshiba.co.uk
(for UK models) or http://eu.consumer.toshiba.eu/en
(for Europe continental models) to get information on the availability of firmware updates that may resolve your problem, or contact Toshiba Customer Solutions.
•While every effort has been made at the time of publication to ensure the accuracy of the information provided herein, product specifications, configurations, system/component/options availability are all subject to change without notice.
English
5
Notice for Trademark
English |
HDMI, the HDMI logo and High-Definition |
|
|
|
Multimedia Interface are trademarks or |
|
registered trademarks of HDMI Licensing |
|
LLC in the United States and other |
|
countries. |
BONUSVIEW ™
Blu-ray DiscTM, Blu-rayTM, Blu-ray 3DTM, BD-LiveTM, BONUSVIEWTM, and the logos aretrademarks of the Blu-ray Disc Association.
Manufactured under license from Dolby Laboratories. Dolby and the double-D symbol are trademarks of Dolby Laboratories.
Manufactured under license under U.S.
Patent Nos: 5,956,674; 5,974,380; 6,226,616; 6,487,535; 7,392,195; 7,272,567; 7,333,929; 7,212,872 & other U.S. and worldwide patents issued & pending. DTS-HD, the Symbol, & DTS-HD and the Symbol together are registered trademarks & DTS-HD Master Audio | Essential is a trademark of DTS, Inc. Product includes software. © DTS, Inc. All
Rights Reserved.
‘AVCHD’ and the ‘AVCHD’ logo are trademarks of Panasonic Corporation and Sony Corporation.
‘DVD Video’ is a trademark of DVD Format/ Logo Licensing Corporation.
6
Oracle and Java are registered trademarks of Oracle and/or its affiliates. Other names may be trademarks of their respective owners.
DLNA™, DLNA CERTIFIED™ are trademarks, service marks, or certification marks of the Digital Living Network Alliance.

2 Your Product
Regions Codes
Both the Blu-ray DiscTM Player and the discs are coded by region. These regional codes must match in order to play the disc.
If the codes do not match, the disc will not play.
The Region Number for this Blu-ray DiscTM Player is described on the rear panel of the Blu-ray DiscTM player.
Region |
DVD discs that |
||
|
can be played |
||
U.S.A.and |
ALL |
1 |
|
Canada regions |
|||
U.K., |
|
2 |
|
Europe regions and |
ALL |
||
Japan |
|||
|
|
||
Asia Pacific, |
|
|
|
Taiwan,Korea |
ALL |
3 |
|
|
|||
Australia, |
|
|
|
New Zealand, |
ALL |
4 |
|
LatinAmerica |
|||
Russia and |
ALL |
5 |
|
India regions |
|||
China,Calcos Islands, |
ALL |
6 |
|
Walls and Futuna |
|||
Islands |
|
|
|
Region |
Blu-ray™ discs that |
|
can be played |
||
|
||
North America, |
English |
|
|
||
Central America, |
|
|
South America, |
|
|
Korea, Japan, Taiwan, |
|
|
Hong Kong and |
|
|
South East Asia. |
|
|
Europe, Greenland, |
|
|
French territories, |
|
|
Middle East, Africa, |
|
|
Australia and |
|
|
New Zealand. |
|
India, China, Russia,
Central and
South Asia.
Feature highlights
High-Definition entertainment
Watch high-definition content disc with HDTV (High Definition Television). Connect it through a high speed HDMI cable. You can enjoy excellent picture quality up to
1080p resolution with the frame rate of 24 frames per second with progressive scan output.
BD-LiveTM
Connect this player to the movie studios website via the LAN jack to access a variety of up-to-date content (e.g. refreshed previews and exclusive special features).
Blu-ray DiscTM Java
Blu-ray DiscTM Java(BD-J) Application
The BD-ROM format supports Java for interactive functions. “BD-J” offers content providers almost unlimited functionality when creating interactive BD-ROM titles.
7
English
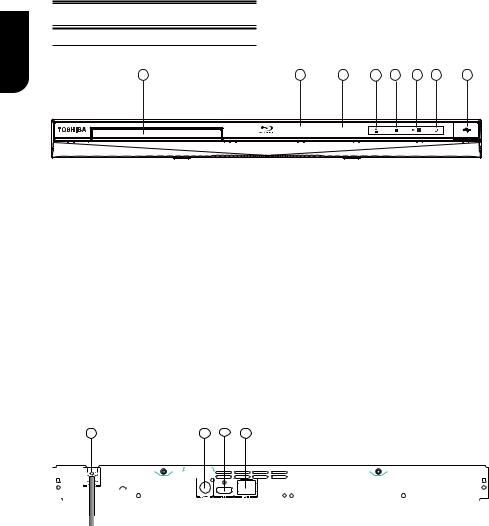
Product overview
Main Unit
8 |
7 |
6 |
5 * 4 * 3 * 2 * |
1 |
NO |
Control |
Function |
|
|
|
|
|
A |
USB jack |
Connect a USB flash drive by opening a cover. |
|
|
|
|
|
B |
1 |
Turn the power on (indicator light in blue) or restores the unit to the standby mode |
|
(indicator light in red). |
|||
|
|
||
|
|
|
|
C |
B/X |
Playback/Pause. |
|
|
|
|
|
D |
x |
Stop play. |
|
|
|
|
|
E |
Z |
Open or close the disc compartment. |
|
|
|
|
|
F |
Display panel |
Show information about the current status of this unit. |
|
|
|
|
|
G |
IR Sensor |
Point the remote control at the IR sensor. |
|
|
|
|
|
H |
Disc compartment |
Load a disc into the disc drive. |
|
|
|
|
(B*/C/*D/*E*) Notes:
1.Theseindicatorsarelocatedinthesensorfield.
2.Theindicatorswillgooffbrieflyafterpoweron(exceptPowericon).Toturnontheindicatorsagain, simplytouchthesensorfield,theindicatorswillbeevolvedandlightup.
3.Thesensorfieldiswithintherectangulararea.
1 |
2 |
3 |
4 |
|
|
|
|
|
|
|
|
|
|
|
|
|
|
|
|
|
|
|
|
|
|
|
|
|
|
|
|
|
|
|
|
|
|
|
|
|
|
|
|
|
|
|
|
|
|
|
|
|
|
|
|
|
|
|
|
|
|
|
|
|
|
|
|
|
|
|
|
|
|
|
|
NO |
|
Control |
Function |
||||||||
|
|
|
|
|
|
|
|
|
|
||
A |
|
AC power cord |
Connect to a standard AC outlet. |
||||||||
|
|
|
|
|
|
|
|
|
|
||
B |
|
COAXIAL jack |
Output digital audio signals when connecting the coaxial digital cable. |
||||||||
|
|
|
|
|
|
|
|
|
|
|
|
C |
|
HDMI OUTPUT jack |
Output video/audio signals to a connected TV, monitor or AV amplifier. |
||||||||
|
Connect to a TV, monitor or AV amplifier equipped with HDMI input. |
||||||||||
|
|
|
|
|
|
|
|
|
|||
D |
|
LAN jack |
When not using Wifi, use this to connect to a network with an always-on broadband |
||||||||
|
connection. It is reserved for future usage of BD-Live™, bonus content, Media |
||||||||||
|
|
|
|
|
|
|
|
|
|||
|
|
|
|
|
|
|
|
|
Server Search, and External Control. |
||
|
|
|
|
|
|
|
|
|
|
|
|
8
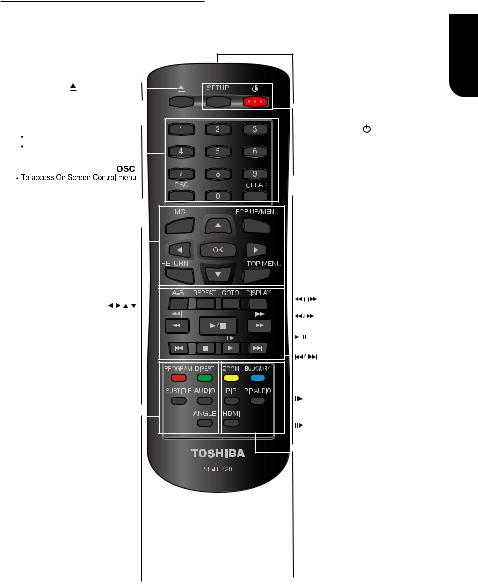
Remote Control
OPEN/CLOSE
• Open/ Close the disc tray
Number Buttons
Select numbered items in a menu Press to enter track/ chapter/ title numbers/password directly
CLEAR
• To clear an entry or the bookmark and program you set
MC(Media Center)
• To open/close Media Center
POP UP/MENU
• To display a menu included on many Blu-ray Disc™/DVD video discs
OK
• Acknowledge/ Confirm menu selection
• Navigation/ Cursor buttons for moving to the left / right / up / down
• Press
 during JPEG playback to rotate the current photo track, but the JPEG playback will be paused
RETURN
• Return to previous menu
TOP MENU
• To display the disc title during playback
PROGRAM
•To access program list.
DIGEST
•To access JPEG thumbnail view during playback
SUBTITLE
•To display subtitle; press repeatedly to select different subtitles available in your disc
AUDIO
• To select the sound stream; press repeatedly to select different audio streams available in your disc
ANGLE
• Switch the camera angle during playback
English
REMOTE SIGNAL EMITTER
• Point remote control to the sensor on the front panel
ON / STANDBY
•To switch the Blu-ray Disc™ Player to ON or standby mode
SETUP
 Enter or exit the system setup menu
REPEAT A-B
• To repeat from A to B
REPEAT
• Select various repeat mode.
GOTO
• To goto a title, chapter, track or playing time
DISPLAY
• To display a window to locate a title, chapter or track
/
 Instant replay/instant search
F.R & F.F
 Fast reverse/ fast forward
/PLAY/PAUSE
•Start/Pause playback
PREV & NEXT
• Skip to previous/next chapter/ title/track
 STOP
STOP
• Stop playback
• Do a slow forward during normal playback
• Advance the picture frame by frame during pause mode
ZOOM
• To zoom out/in
BOOKMARK
• To bookmark at any point during playback
PIP (Picture in Picture)
• Switch on or off the secondary video
PIP AUDIO
 Switch the secondary audio of secondary video(PIP) to on or off
HDMI
•To change resolution of HDMI video
output to fit TV. Such as 1080p, 1080i… etc.
9
3 Connections
|
Make the following connection to use this |
||||||||||||||
English |
product. |
||||||||||||||
|
|
|
|
|
|
|
|
|
|
|
|
|
|
||
|
|
|
|
|
|
|
|
|
|
|
|
|
|
||
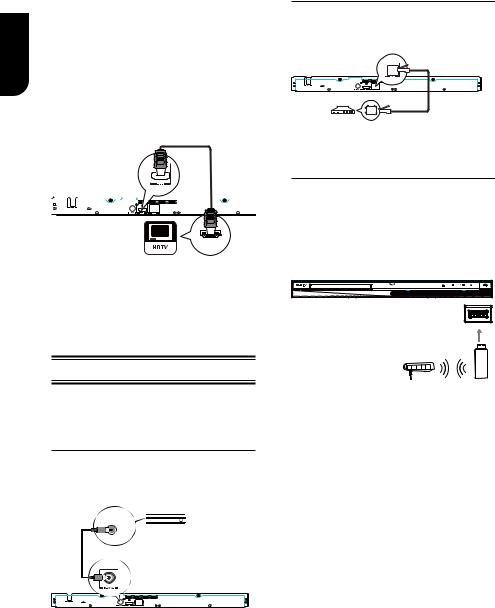
Connecting to a TV |
|||||||||||||||
|
|||||||||||||||
|
|
|
|
|
|
|
|
|
|
|
|
|
|
|
|
|
|
|
|
|
|
|
|
|
|
|
|
|
|
|
|
|
Connect the product to TV via HDMI jack to |
||||||||||||||
|
view the playback from the disc. |
||||||||||||||
|
|
|
|
|
|
|
|
|
|
|
|
|
|
|
|
|
Connect to the HDMI Jack |
||||||||||||||
|
|
|
|
|
|
|
|
|
|
|
|
|
|
|
|
|
|
|
|
|
|
|
|
|
|
|
|
|
|
|
|
|
|
|
|
|
|
|
|
|
|
|
|
|
|
|
|
|
|
|
|
|
|
|
|
|
|
|
|
|
|
|
|
HDMI IN
1. Connect a HDMI cable from the HDMI output jack on this product to the HDMI input jack on the TV.
Note:
– You can optimize the video output by pressing the HDMI button repeatedly to select the best resolution which the TV can support.
Optional Connection
Option 1: Connect to the digital amplifier/ receiver
Option 2: Connect to network
Option 3: Connect to Wifi
Option 1: Connect to the digital amplifier/receiver
Route the sound from this player to other device to enhance audio output.
1. Connect a coaxial cable from the
COAXIAL jack on this product to the COAXIAL jack on the device.
Option 2: Connect to network
Connect this product to the network to enjoy BD-LiveTM bonus content and software upgrade by network.
1. Connect the network cable from the LAN jack on the product to the LAN jack on the
network system.
Option 3: Connect to Wifi
Connect the TOSHIBA's USB Wi-Fi® adapter to the USB jack on the front panel of the Blu-ray Disc™ player, and set the wireless network options. No physical connection to the wireless router is
necessary.
wireless access point
Wireless LAN
Adapter
1.Configure your player to access the wireless access point or router.
2.The network configuration and connection method may vary depending on the equipment in use and the network environment. Your Blu-ray Disc™ player is equipped with an IEEE 802.11n wireless module, which also supports the 802.11 a/b/g/n standards. For the best wireless performance, we recommend using an IEEE 802.11n certified Wi-Fi® network (access point or wireless router).
Notes:
-USB Wi-Fi® adapter is required for a wireless connection (not supplied).
-This unit is compatible with TOSHIBA's USB Wi-Fi® adapter only (Model name: WLM-12EB1).
-For detailed information, please refer to the device’s User’s Guide for WLM-12EB1.
10
Connect USB device
The USB jack supports USB flash drive, TOSHIBA's USB Wi-Fi® adapter
(Model name: WLM-12EB1) and 4 ports
USB HUB.
A USB flash drive provides an additional memory to software upgrade and enjoy BD-LiveTM bonus content.
You can also enjoy playing back MP3/
JPEG/MPEG4 files stored in the USB flash drive.
1.Open the USB cover.
2.Connect the USB flash drive or TOSHIBA's USB Wi-Fi® adapter to the USB jack on this product.
Notes:
-ToenjoyBD-Live™bonuscontent,asyour localstorage,usea1 GB or larger USB flashdrive.
-ForsomeBlu-rayTM discswithBD-LiveTM feature, youmayneedtoplugintheUSBflashdrive beforeloadingthedisc.Otherwise,thediscmay notplayback.
-TOSHIBAdoesnotguarantee100% compatibilitywithallUSBflashdrives.
-USB-HUBisusedwhenusingUSBflashdrive andTOSHIBA'sUSBWi-Fi®adaptertogether.
Connect Power
1. Connect the AC power cable to: - the wall socket.
• The product is ready to be set up for use.
Notes:
–BeforeconnectingtheACpowercord,ensure youhavecompletedallotherconnections.
–Riskofproductdamage!Ensurethatthepower supplyvoltagecorrespondstothevoltageprinted onthebackoftheunit.
–Thetypeplateislocatedonthebackoftheunit.
4 Preparation
Always follow the instructions in this chapter |
English |
|
in sequence. |
||
Note: |
||
|
||
- Use of controls or adjustments or |
|
|
performance of procedures other than herein |
|
|
may result in hazardous radiation exposure or |
|
|
other unsafe operation. |
|
Prepare the remote control
1.Open the battery compartment.
2.Insert one R03 battery with correct polarity (+/-) as indicated.
3.Close the battery compartment.
Notes:
-If you are not going to use the remote control for a long time, remove the battery.
-Risk of explosion! Keep battery away from heat, sunshine or fire. Never discard battery in fire.
• The maximum operable ranges from the unit are as follows.
-Line of sight: approx. 10 m
-Either side of the centre: approx. 7 m within 30°
-Above: approx. 7 m within 30°
-Below: approx. 7 m within 30°
7 m |
10 m |
7 m |
11

English
Setting up the player
Find the correct viewing input
1.Press 1 to turn on this product.
2.Turn on the TV and switch to the correct video-in input (refer to the TV user manual on how to select the correct input).
Initial Setting
When you turn on this unit for the first time, you need to follow these steps.
1.A welcome page will be displayed when this product is powered on.
2.Press OK to enter language setting.
3.Select your desired language,
resolution and aspect ratio using /, then press OK.
4. Press SETUP to exit the Setup menu.
Use the SETUP menu
1. Press SETUP to display the Setup menu when the Blu-ray DiscTM Player is playing or no disc. And press SETUP to exit the Setup menu.
Tip:
-Whenplayinghigh-definitionsources, youmustpress STOP buttontoenterSETUP interface.
Select menu display language
1.Press SETUP, [General Setting] menu is displayed.
2.Select [Language], then press .
3.Select [OSD], then press .
- The language options may vary for different regions.
4. Press / to select a language, then press OK.
Note:
- If this disc player is connected to a HDMI CEC compliant TV, skip this setting. It switches automatically to the same OSD menu language as per your TV setting.
5 Playback
Playback Functions
Basic Playback
1.Press button on the front panel or the remote control, your Blu-ray Disc™ player will turn on.
The unit will take around 20 seconds to warm up. When the power supply is first switched on, the setup of the Power Down
Mode is in Normal mode.
2.Turn on the TV, and then select the input setting on the TV that matches the connection method you used to connect your player.
3.Press OPEN/CLOSE Z to slide out the disc tray.
4.Place a disc on the disc tray with the label facing up, and then press OPEN/CLOSE Z to slide back and close the disc tray.
The disc loading time depends on the types of disc you are loading, and loading a Blu-ray
DiscTM will take longer time.
5.If the disc does not start playing
automatically, please press B/X to start playback.
6.If a Blu-ray DiscTM or DVD menu displays, use cursor buttons to select PLAY. Then, press OK to confirm.
7.To eject the disc, press OPEN/CLOSE Z.
Pause playback
1.Press B/X to pause playback. The sound will be muted.
2.Press B/X to resume the playback.
Stop playback
1.Press STOP button once to go to resume mode, the TV screen will show the resume logo.
2.Press STOP twice to stop the playback completely.
3.Press B/X to resume playback from the point where playback is stopped or from the beginning of the disc after the playback is completely stopped.
Not all Blu-rayTM discs support the resume feature.
Fast Forward and Fast Reverse
1. Press F.F Mto fast forward through the disc. The fast forward speed changes based on how many times you pressed the button. The
12

speed will increase through the following sequence:
2X, 4X, 8X, 16X, 32X
2.Press B/X to resume playback.
3.Press F.R mto fast reverse through the disc. The fast reverse speed changes based on how many times you pressed the button. The speed will increase through the following sequence:
2X, 4X, 8X, 16X, 32X
4.Press B/X to resume playback.
Instant Search and Instant Replay
1.During playback, press and hold Mbutton, you can search 30 seconds forward.
2.During playback, press and hold m button, you can instant replay the content from 10 seconds before.
Previous and Next
During playback, press PREV . button, and you can skip back to the previous chapter or track. Each press of this button will allow you to skip a chapter or track till the beginning of the disc.
Press of NEXT > button during playback will allow you to skip the playback to next chapter or track.
Slow Forward
1.Press =B during normal playback. The slow forward speed is 1/16 in default.
2.To change slow forward speed, press =B repeatedly, and the slow forward speed will be changed in the following sequence: 1/16, 1/8, 1/4, 1/2, normal.
3.To exit slow forward mode and return to
normal playback, press B/X.
Step Forward
Use this feature to help you to enjoy the video frame by frame.
1.Press B/X during normal playback, then playback will change to pause state.
2.Press ==B repeatedly to advance the picture frame by frame.
3.Press B/X to resume normal playback.
HDMI
When there is file or disc being played, it is not allowed to switch resolution through the HDMI button of the Remote Control.
Advanced Playback
DISPLAY
Press this button and the screen will display some information about disc, such as: Title number, Chapter number, Track number, Elapsed Time, Mode, Audio, Angle, and
Subtitle languages. Press this button again to
turn off the information display.
During DVD/CD playback, you may edit the chapter and track.
REPEAT
Press REPEAT repeatedly to select different repeat modes.
Blu-ray DiscTM : Repeat Chapter and Title.
DVD: Repeat Chapter, Title and All.
VCD PBC Off/CD-DA/JPEG/MP3: Repeat Track
and All.
A-B
To play certain section within the video or song, press A-B button to set the start point. Then, press A-B button again to set the end point and complete the setting. The selected section will be played repeatedly.
Press A-B button the third time to cancel this function. The end point cannot be set until 5 seconds of playback has elapsed from the
start point.
Not all Blu-rayTM discs support the repeat A-B feature.
GOTO
During playback, press GOTO button to edit Title, Chapter, and Time.
Press / and OK button on the remote control to select Title, Chapter, or Time. Then press the numeric buttons or / and then press OK. The playback will skip to the desired location.
For Time Search, press / to select Title
or Chapter time search.
SUBTITLE
Press this button repeatedly and the screen will display “X/XX XXX” or “Off”. The “X” indicates the current number of this language; “XX” indicates the total number of language; “XXX” indicates the language.
The number of available languages depends
on the disc.
RETURN
Press this button to return to the previous on-screen menu in setup menu such as
External Memory Information, Parental Control, Country Code, etc.
During MP3/JPEG/VIDEO playback, press RETURN once, it will return back to Media
Center page.
English
13

English
During VCD disc playback and PBC On is selected, press the button to return to PBC
Menu.
ANGLE
During playback, press this button to change the angle of the picture. The screen will display “Angle X/X.” The first “X” indicates the current number of angle, and the second “X” indicates total number of angle.
Not all Blu-rayTM or DVD has the multi-angle feature. The screen will take around 5
seconds to change.
TOP MENU
You may press this button at any time, and the Blu-ray DiscTM or DVD video disc playback will pop up the disc menu.
POP UP/MENU
During Blu-ray DiscTM playback, press POP
UP/MENU to display the disc title, and the playback will not be stopped even the menu
is on the screen.
1.Press the /// buttons to select an option, then press OK to confirm.
2.Press POP UP/MENU to close the menu.
During DVD playback, press POP UP/MENU to open the disc menu.
During VCD playback, press POP UP/MENU to switch PBC On/Off.
During displaying USB and Data Disc file content in media center, press POP UP/MENU to add the Photo/Music/Video files to the playlist.
1.Press /// buttons to select an option under the Photo/Music/Video files.
2.In the file browser, press to select the file(s) to be added to the playlist. "√ " will appear beside the selected files.
3.Press POP UP/MENU button, a pop up menu will appear, then press / and OK button to select "Add to Playlist" to add the files to the Playlist. "Select all" and "Clear all" options are also available. Select "Cancel" to exit the pop up menu.
All the selected files will be added to the "Playlist" folder. You can play or delete the files in the playlist. Press POP UP/MENU to delete the selected files in "Playlist".
Note:
- This function is disabled for media server
browsing.
SETUP
Press the SETUP button, and the screen will display some information about the player, such as:
•General Setting
•Display Setting
•Audio Setting
•System Information
PROGRAM
During CD/DVD/VCD playback, you can press this button to edit the sequence of the
playlist.
BOOKMARK
During VCD/DVD disc playback, press the
BOOKMARK button to add the bookmark; press and hold for a few seconds to display the list of bookmark which you added before on the screen, then you can press the OK button to select the bookmark or CLEAR
button to delete the bookmark.
AUDIO
Press AUDIO button on the remote control to select the audio streams that set within the Blu-rayTM or DVD disc.
The screen will display: AUDIO: X / XX XXX XXXX
“X” - The Current Audio Stream Number “XX” - The total number of Audio Stream “XXX” - Audio Language
“XXXX” - Audio Technology
MC
Press this button to open Media Center. In
Media Center, you can choose to play the files in USB, Data Disc, Media Server Search or to
use other network features.
ZOOM
Press ZOOM button repeatedly to Zoom in/out playback in the video.
Zoom mode : Zoom 2x -> Zoom 3x -> Zoom
4x -> Zoom 1/2 -> Zoom 1/3 -> Zoom 1/4.
DIGEST
During playback of JPEG disc, press DIGEST to view a page of 12 thumbnail images.
-Use /// to select an image.
Press OK to view the selected image in full-screen and subsequent images will be displayed one after another automatically.
-Press PREV 
 /NEXT
/NEXT 
 to view the previous or next thumbnail screen.
PIP AUDIO
Press PIP AUDIO button to open the secondary audio of secondary video(PIP’s
sub-window video).
OSC
Press OSC to open On Screen Control menu during playback. In this menu, you can make some playback-related control.
The on screen control contains following items:
[Title]: The title in current playback/titles in total. Select your desired title to playback. [Chapter]: The chapter in current playback/
14
 Loading...