


Timex T49866, T49865, T2N944, T2N942, T2N700 User guide [ml]
...Perpetual Calendar • Fly-back Chronograph • Fly-back Chrono Compass
World Time • Compass • Tide Temp and Compass • Altimeter • Depth
Calendrier Perpétuel • Chronographe avec Fly-back
Boussole Chrono avec Fly-back • Heure Mondiale • Boussole
Marée Température et Boussole • Altimètre • Profondeur
Calendario Perpetuo • Cronógrafo Fly-back
Brújula y Cronógrafo Fly-back • Hora mundial • Brújula
Marea temperatura y brújula • Altímetro • Profundidad
™
TECHNOLOGY
W273 NA 355-095000

|
|
|
|
|
|
|
|
|
|
|
|
|
|
|
|
|
|
|
|
|
|
|
|
|
|
|
|
|
|
|
|
|
|
|
|
|
|
|
|
|
|
|
|
|
|
|
|
|
|
|
|
|
|
|
|
|
|
|
|
|
|
|
|
|
|
|
|
|
|
|
|
|
|
|
|
|
|
..............................English |
|
|
|
Page 1 |
|
|
|
|
|
|
|
|
|
|
|
|
|
|
|
||||||
Français............................ |
|
|
|
page 79 |
|
|
|
|
|
|
|
|
|
|
|
|
|
|
|
||||||
Español............................. |
|
|
|
página 163 |
|
|
|
|
|
|
|
|
|
|
|
|
|
|
|
||||||

TIMEX® WATCHES
Congratulations on purchasing your TIMEX® watch. Please read these instructions carefully to understand how to operate your Timex watch.
Your watch may not have all of the features described in this booklet.
For more information, and to register your product please visit: www.timex.com
1

Table of Contents |
|
How to Start Your Watch.................................................... |
5 |
Water and Shock Resistance.............................................. |
6 |
Indiglo® Night-Light............................................................. |
8 |
Date and Time Setting........................................................ |
9 |
Perpetual Calendar........................................................... |
11 |
Fly-back Chronograph...................................................... |
14 |
Fly-back Chronograph Compass...................................... |
20 |
Worldtime ........................................................................ |
32 |
Compass .......................................................................... |
39 |
Tide Temp and Compass .................................................. |
46 |
Altimeter .......................................................................... |
55 |
Depth ............................................................................... |
63 |
Tachymeter Function........................................................ |
67 |
How to Adjust Bracelet..................................................... |
69 |
Bracelet Link Removal...................................................... |
71 |
Battery.............................................................................. |
72 |
Warranty........................................................................... |
73 |
2 |
3 |

Welcome to the world of Timex® watches with Intelligent Quartz™ technology, the future of quartz analogue technology. Intelligent Quartz technology brings the power of a micro-processor to the reliability and accuracy of quartz analogue timekeeping. With Timex Intelligent Quartz watches, the technology is written into the design, delivering a new level of dial complication. Uses up to three additional independent hands to display an array of information, normally only available in digital watches, in a traditional analogue format.
How to Start Your Watch
(Does not apply to Perpetual Calendar models.) To start your watch remove the plastic guard from under the crown, then press the crown in against the case.
Some watches require the setting crown to be screwed in. If your watch case has a protrusion with screw threads, the crown must be screwed in after setting the watch.
To screw in, push the crown firmly against the threaded protrusion and hold in while turning the crown clockwise. Continue to screw in the crown until it is tight. You will need to unscrew the crown (counter-clockwise) before pulling it out the next time you want to set your watch.
4 |
5 |
Water and Shock Resistance
If your watch is water-resistant, meter marking (WR_M) is indicated.
Water-Resistance Depth |
p.s.i.a.* Water pressure |
|
Below Surface |
|
|
30m/98ft |
60 |
|
|
50m/164ft |
86 |
|
|
100m/328ft |
160 |
|
|
200m/656ft |
284 |
|
|
WARNING: TO MAINTAIN WATER-RESISTANCE, DO NOT PRESS ANY BUTTONS UNDER WATER UNLESS YOUR WATCH IS INDICATED AS 200 METER WATERRESISTANT. NEVER PULL OUT THE CROWN WHILE UNDER WATER.
1.Watch is water-resistant only as long as crystal, crown and case remain intact.
2.Watch is not a certified Diver’s watch.
3.Rinse watch with fresh water after exposure to salt water.
4.Shock-resistance will be indicated on the watch face or caseback. Watches are designed to pass ISO test for shock-resistance. However, care should be taken to avoid damaging the crystal.
6 |
7 |

Indiglo® Night-Light
Press button or crown to activate light. Electroluminescent technology used in the INDIGLO® night-light illuminates the watch face at night and in low light conditions.
or
date and time setting
NOTE: Your Intelligent Quartz™ watch crown has three positions: closed, middle and outer. To familiarize yourself to the difference between the various positions extend the crown to its outer position and then push the crown very lightly until you feel it click into the middle position.
To set the date and time:
Time
Pull the crown to its outer position and turn it until the correct time is shown. Ensure AM/PM setting is correct by verifying that the date changes at midnight, not noon.
Date (Does not apply to Perpetual Calendar)
Pull the crown to its middle position and turn it until the correct date appears in the date window. Note: The date changes between 10 pm and 2 am. Do not change the
8 |
9 |
date during this timeframe. Doing so could damage the watch movement.
Push crown to closed position after setting date/time. The second hand will begin moving.
NOTE: For months with fewer than 31 days, the date will need to be adjusted.
10
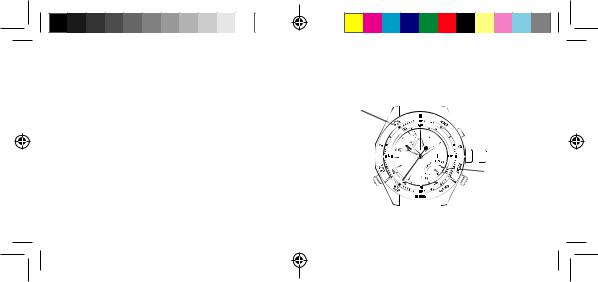
Perpetual Calendar
OVERVIEW
|
|
|
|
|
|
|
Date Hand |
Day Hand |
|
|
|
|
|
|
Button A |
|
|
|
|
|
|
|
(RECESSED) |
|
|
|
|
A |
Hour Hand |
||
|
|
|
|
|
|
|
|
Minute Hand |
|
|
|
|
1 2 3 CROWN |
||
|
|
|
|
|
|
|
Month Hand |
|
|
|
|
B |
|
Button B |
|
|
|
|
|
|
|
|
|
Second Hand |
|
|
|
|
|
|
(RECESSED) |
|
|
|
|
|
|
|
|
1 |
Closed |
2 |
Middle |
3 |
|
Outer |
|
|
Position |
|
Position |
|
|
Position |
|
11

Introduction
With your watch’s perpetual calendar feature, the date does not need adjustment until 2100. The watch
automatically accounts for short months and leap years, always showing the correct day and date. The day and date were preset at the Timex factory. You only need to adjust the time. The watch has two recessed push buttons for use by Timex Service Center to set the day and date after battery replacement. They have no use otherwise.
Leap Year Offset
To maintain the correct date, the watch includes a setting for the current leap year offset. This setting is made at the Timex factory or after battery replacement and cannot be changed, only viewed.
To view the offset, pull the crown to its middle position.
The date hand shows the offset: 1 = 1 year after leap year; 2 = 2 years after leap year; 3 = 3 years after leap year;
4 = leap year. Push the crown in when done and the hands resume their normal display of day, month, and date.
12 |
13 |
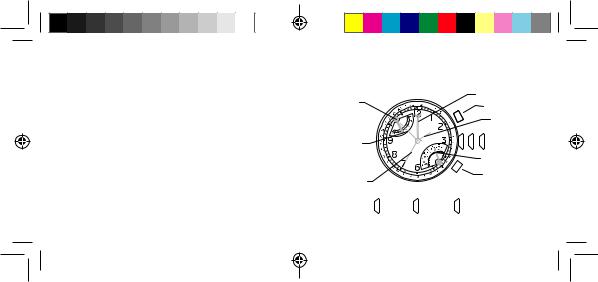
Fly-Back Chronograph
OVERVIEW
4th Center Hand |
|
|
|
Upper Hand |
|
|
|
Chrono Hours |
|
|
|
2nd Time Zone |
|
|
|
|
|
|
23 |
Minute Hand |
|
|
|
Second Hand |
|
|
|
1 |
Closed |
2 |
Middle |
|
Position |
|
Position |
Hour Hand
|
Button A |
A |
Date Window |
|


 1 2 3 CROWN
Chrono Minutes Scale
B
 Button B
Lower Hand
3 OuterPosition
14
4th center hand adjustment
To readjust a misaligned 4th center hand:
1.Pull the crown to its outer position. The upper and lower hands reset to the ends of their sweeps automatically.
2.4th center hand should point to 12 o’clock. If within 5 seconds of pulling the crown to its outer position the 4th center hand does not point to 12 o’clock, press Button A or B to move the hand counterclockwise or clockwise until it points to 12 o’clock.
3.Push crown to closed position when finished.
15
Second time zone
The upper hand shows the time for the second time zone.
Note that the scale is |
|
|
|
24-hours, with midnight |
|
|
|
at either end and noon in |
A |
|
|
the middle. Most often, |
|
|
|
time zones differ in hour |
23 |
|
|
increments. In such |
1 |
2 |
3 |
|
|
|
|
cases, the minute value |
|
|
|
of the second time zone |
B |
|
|
will be the same as that |
|
|
|
displayed by the watch’s |
|
|
|
minute hand. |
|
|
|
To set the second time zone:
1.Pull crown to its middle position. The upper hand shows the second time zone time and the 4th center
16 hand shows the minutes.
2.Assuming that the second time zone time has the same minutes value as the first time zone, the 4th center hand should be aligned with the minute hand. If the hands are not aligned, or if your second time zone is a different minute within the hour, press Button B to move the 4th center hand forward until it is in the desired position.
3.Press Button A to move the upper hand forward in one-hour increments until it reaches desired second time zone hour. To move the hand quickly, press and hold Button A.
4.Push the crown in when finished.
17

fly-back chronograph
The watch provides a 4-hour fly-back chronograph.
1.To start, press Button A (Start/Stop).
The 4th center hand shows the seconds with 1/5 second resolution. The lower hand shows the last digit of the minutes, counting up to ten and repeating. The upper hand shows the total time, including hours and minutes, with divisions every ten minutes. The chronograph counts up to four hours before stopping automatically.
2.To stop, press Button A (Start/Stop) again. All hands stop moving.
3.To resume, press Button A (Start/Stop) again.
4.To reset the fly-back chronograph to zero position, press Button B (Fly-back/Reset).
When the chronograph is reset, all hands move to zero position. After another eight seconds, the watch resumes normal display of the second time zone.
5.To reset and/or restart the fly-back chronograph while it is running, press and hold Button B (Fly-back/Reset). Release it when you wish to restart.
18 |
19 |
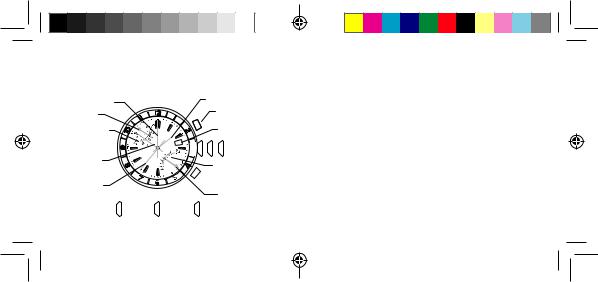
FlY-BACk CHronoGrAPH CoMPASS
oVErVIEW
4tH center Hand
uPPer Hand
cHrono HourS 2nd tiMe Zone
Hour Hand
Button C |
C |
|
Minute Hand |
|
Button A |
A |
date WindoW |
1 |
2 3 croWn |
|
cHrono MinuteS Scale |
B |
Button B |
|
Second Hand |
|
|
|
|
loWer Hand |
1 |
cloSed |
2 |
Middle |
3 |
outer |
|
PoSition |
|
PoSition |
|
PoSition |
20 |
|
|
|
|
|
InDICATor HAnD (4TH CEnTEr HAnD) ADjuSTMEnT
To readjust a misaligned indicator hand:
1.Pull the crown to its outer position. The upper and lower hands reset to the ends of their sweeps automatically.
2.The 4th center hand should point to 12 o’clock. If it does not within 5 seconds of pulling the crown to its outer position, press A or B to move the hand counterclockwise or clockwise, respectively, until it points to 12 o’clock.
3.Push the crown in when done.
21

SEConD TIME zonE
The upper hand normally shows the time for the second time zone. Note that the scale is 24 hours, with midnight at either end and noon in the middle.
To set the second time zone time:
1. Pull the crown to its |
|
|
middle position. The |
|
A |
upper hand shows |
|
|
|
|
|
the second time zone |
|
|
time in military hours |
|
1 2 3 |
and the 4th center |
|
|
hand shows the |
|
B |
minutes. |
C |
2.Press B to move the 4th center hand forward. Hold the button to move the hand quickly. The upper and 4th center hands move together; as the 4th center hand makes one revolution, the upper hand moves one hour. Assuming that the second time zone time has the same minutes value as your first time zone, the 4th center and minute hands should be aligned.
3.Press A to move the upper hand forward in one-hour increments. Hold the button to move the hand quickly.
4.Push the crown in when finished
The second time zone time can alternatively be used to display your home time on a 24-hour format, if you prefer. When setting the second time in this manner, ensure that the hour/minute display corresponds to the 24-hour display by verifying that the date changes at midnight, not noon.
22 |
23 |

FlY-BACk CHronoGrAPH
The watch provides a 4-hour fly-back chronograph.
1.To start, press A (START/STOP). The 4th center hand shows the seconds with 1/5-second resolution and the lower hand shows
the last digit of the |
|
|
minutes, counting up |
|
A |
to ten and repeating. |
|
|
|
|
|
The upper hand shows |
|
1 2 3 |
the total time, includ- |
|
|
ing hours and minutes, |
|
|
with divisions every |
C |
B |
ten minutes. The chro- |
|
|
nograph counts up to four hours before
stopping automatically.
2.To stop, press A again (START/STOP). All hands freeze.
3.To resume, press A (START/STOP) again, or to reset the chronograph to zero, press B (FLY-BACk/RESET).
When the chronograph is reset, all hands move to zero. After eight seconds, the watch resumes the normal display of the second time zone time.
4.You may also reset and/or restart the chronograph while it is running. To do so, press and hold B (FLYBACk/RESET) to zero the chronograph and release it when you wish to restart. You do not have to wait for all hands to reach zero before releasing the button; the timing will start internally from the button release. This “fly-back” feature allows you to measure lap time.
The compass may be used while the chronograph is running without interfering with its operation. See COMPASS OPERATION.
24 |
25 |

compass calibration
Before use, the compass must be calibrated.
Since a compass uses the earth’s magnetic field, you must be aware of large metallic objects, such as vehicles or bridges, or objects that give off electromagnetic radiation, such as televisions or computers, which
could affect the magnetic field around the watch. If the compass is calibrated near such objects, it will only work properly in that same location. If the compass
is calibrated away from such objects, it will not work properly near them. For best results, calibrate in the area of intended use.
In calibrating and taking headings, it is important, as with all compasses, to keep the compass level. Calibrating or taking a heading when the watch is not level can result in large errors. Also avoid areas that may exhibit higher
than normal concentrations of hard and soft iron, as they may cause inaccurate headings. Whenever a heading is suspect, recalibrate.
Do not store the watch near any source of magnetism, such as a computer, appliance, or television, as the watch can take on a magnetic charge, yielding inaccurate headings. Typical accuracy of wrist-worn instruments is within +/- 10 degrees.
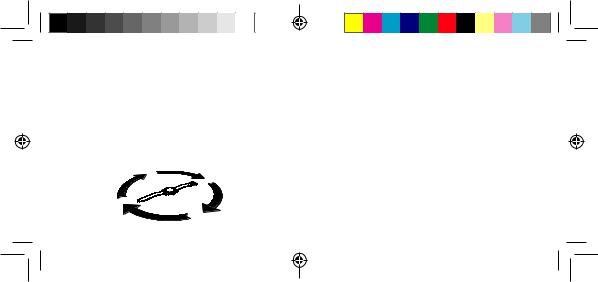
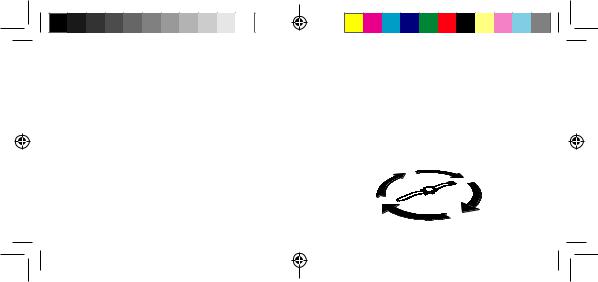
To calibrate the compass:
1.Pull the crown to its middle position and wait for the indicator hands to stop moving.
2.Keep the watch level or place it on a level surface (if the band interferes, place the watch on an inverted cup). The watch may be face down, but take care to protect the watch face.
26 |
27 |
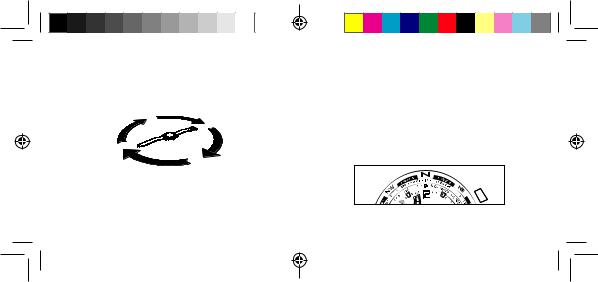
3.Press C (COMPASS) to begin. The 4th center hand rotates two revolutions to remind you to rotate the watch. While level, SLOWLY rotate the watch two revolutions, taking at least 15 seconds per revolution.
4. When done, press C (Compass), keeping the watch level. The 4th center hand moves back and forth to acknowledge the end of calibration and then moves to the current magnetic declination setting.
5.If you do not wish to set the magnetic declination, push the crown in. Otherwise, to have watch automatically compensate for the declination angle, turn the compass ring until north is at 12 o’clock.
6.Press A or B to move the 4th center hand west (-) or east (+), respectively, to point to your location’s declination angle using the declination scale. Hold a
button to move the hand quickly. See the figure below for an example.
7.Push the crown in when done.
A
Magnetic declination set to -14° (14°W)
28 |
29 |
compass operation
Normally, the compass is inactive, with the 4th center hand pointing to 12 o’clock or showing the chronograph seconds.
While holding the watch level, press C (COMPASS) to activate the compass. The compass hand moves to point north. If the watch is turned, the 4th center hand will continue to move, always pointing north. After 20 seconds, the compass will automatically turn off and the 4th center hand will return to its normal operation. This conserves battery life. Press C (COMPASS) at any time to keep the compass on for another 20 seconds.
The compass may be activated while the chronograph is in use. The 4th center hand merely switches operation temporarily. The upper and lower hands continue to show the chronograph time and all chronograph functions are
available through buttons A (START/STOP) and B (FLYBACK/RESET).
NOTE: During compass operation, the second hand moves in two-second increments. Also, when the compass is activated, the upper and lower hands may shift position slightly, returning to their proper positions when the compass is deactivated. This operation is normal and yields the most accurate compass reading.
30 |
31 |

Worldtime
OVERVIEW
24 cities
Upper Hand
World Time
Scale
Minute Hand 

Button C |
C |
Hour Hand
|
4th Center Hand |
|
A |
Button A |
|
Date Window |
||
|
||
|
CROWN |
|
B |
Button B |
Season Scale
Second Hand |
|
|
|
|
Lower Hand |
|
|
|
|
|
|
1 |
Closed |
2 |
Middle |
3 |
Outer |
Position |
Position |
Position |
|||
32 |
|
|
|
|
|
To set the world time:
1. Pull the crown to its middle position. The center hand shows the world time zone city and the upper hand shows the world time.


 A
A

 1 2 3
1 2 3
C |
B |
2. Press A or B to move the center hand to the city that represents your home time zone. Hold a button to
33

move the hand quickly. Any city may be used.
3.Pull the crown to its outer position. The city selector hand will revert back to the 12:00 position as indicated in INDICATOR HAND ADJUSTMENT. After a five second pause, the upper hand will show the world time (the time in the city selected in previous step), the center hand shows the minutes of the world time, and the lower hand shows the season (see SEASON SETTING). IMPORTANT: Do not manipulate any of the pushers
or the crown until the center hand has completed its adjustment. (Approximately 10 seconds after crown is pulled to its outer position).
4.If the displayed season is not correct for the home time zone, press C to change it. If the home time zone observes daylight savings time, the upper hand will move by one hour.
5.Press A or B to move the time backward or forward, respectively, to set the world time zone to be the same as the home time zone. Hold a button to change the time quickly. The hands move together; as the center hand makes one revolution, the upper hand moves one hour. After setting, the center and minute hands should be aligned.
6.Push the crown in when finished.
34 |
35 |
indicator hand (4th center hand) adjustment
To readjust a misaligned indicator hand:
1.Pull the crown to its outer position. The upper and lower hands reset to the ends of their sweeps, automatically.
2.The 4th center hand should point to 12 o’clock. If it does not within 5 seconds of pulling the crown to its outer position, press A or B to move the hand counterclockwise or clockwise, respectively, until it points to 12 o’clock.
3.Push the crown in when finished.
NOTE: If no button is pressed for five seconds after the hands stop, the watch proceeds to the world time setting operation (see WORLD TIME SETTING).
city time display
Press A or B to move the center hand backward or forward, respectively, and select a city. The upper hand moves to show the time in the selected city. Note that the scale is 24 hours, with midnight at either end and noon in the middle.
C
A |
|
|
1 |
2 |
3 |
B |
|
|
season setting
The season setting allows the watch to compensate for daylight savings time (also called “summer time”).
The watch provides one setting to represent the two periods all cities that observe daylight savings time have. For
36 |
37 |

the watch, the period of daylight savings time is SUMMER and the period of standard time is WINTER.
When the season in one city is set to SUMMER, all cities in the same hemisphere are automatically set to SUMMER, while all cities in the other hemisphere are automatically set to WINTER. The watch knows which cities are in each hemisphere.
Press C to change the season in the selected city.
38
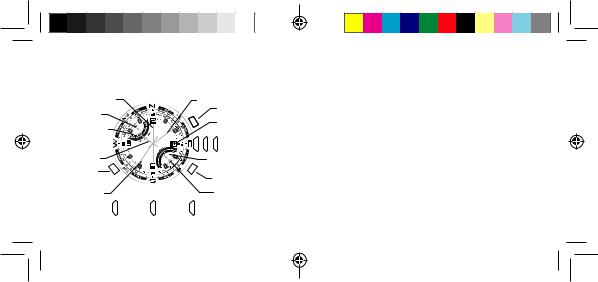
CoMPASS oVErVIEW
declination Scale |
coMPaSS Hand |
|
|
|
(nortH end iS red |
|
Pointed/longer) |
|
A (CoMPASS) |
|
croWn |
|
B (tuRnInG RInG) |
I 
 14
14 

I
I

 14
14 

I
Middle
center croWn
Set date
out
Set tiMe
39

COMPASS HAND ADJUSTMENT
Pull CROWN all the way out. Compass hand should point to 12 o’clock. If it does not, press either A or B to move compass hand until it points to 12 o’clock. Hold button to move hand fast. Push CENTER CROWN in when done and recalibrate compass.
compass calibration
Before use, the compass must be calibrated.
Since a compass uses the earth’s magnetic field, you must be aware of large metallic objects, such as vehicles or bridges, or objects that give off electromagnetic radiation, such as televisions or computers, which
could affect the magnetic field around the watch. If the compass is calibrated near such objects, it will only work properly in that same location. If the compass
is calibrated away from such objects, it will not work
properly near them. For best results, calibrate in the area of intended use.
In calibrating and taking headings, it is important, as with all compasses, to keep the compass level. Calibrating or taking a heading when the watch is not level can result in large errors. Also avoid areas that may exhibit higher than normal concentrations of hard and soft iron, as they may cause inaccurate headings. Whenever a heading is suspect, recalibrate.
Do not store the watch near any source of magnetism, such as a computer, appliance, or television, as the watch can take on a magnetic charge, yielding inaccurate headings. Typical accuracy of wrist-worn instruments is within +/- 10 degrees.
To calibrate the compass:
40 |
41 |
1.Pull the crown to its middle position and wait for the indicator hands to stop moving.
2.Keep the watch level or place it on a level surface (if the band interferes, place the watch on an inverted cup). The watch may be face down, but take care to protect the watch face.
3.Press A or B to begin. The 4th center hand rotates two revolutions to remind you to rotate the watch. While level, SLOWLY rotate the watch two revolutions, taking at least 15 seconds per revolution.
4.When done, press A or B, keeping the watch level. The 4th center hand moves back and forth to acknowledge the end of calibration and then moves to the current magnetic declination setting.
5.If you do not wish to set the magnetic declination, push the crown in. Otherwise, to have watch automatically compensate for the declination angle, turn the compass ring until north is at 12 o’clock.
6.Press A or B to move the 4th center hand west (-) or east (+), respectively, to point to your location’s declination angle using the declination scale. Hold a
button to move the hand quickly. See the figure below for an example.
7.Push the crown in when done.
42 |
43 |

A |
Magnetic declination set to -14° (14°W)
CoMPASS oPErATIon
Normally, the compass is inactive, with the 4th center hand pointing to 12 o’clock or showing the chronograph seconds.
While holding the watch level, press A or B to activate the compass. The compass hand moves to point north. If the watch is turned, the 4th center hand will continue to move, always pointing north. After 20 seconds, the compass will automatically turn off and the 4th center
hand will return to its normal operation. This conserves battery life. Press A or B at any time to keep the compass on for another 20 seconds.
noTE: During compass operation, the second hand moves in two-second increments.
44 |
45 |

TIDE TEMP AnD CoMPASS oVErVIEW
declination Scale


 indicator Hand


C (CoMPASS)
turning coMPaSS ring
date
teMPerature Scale
A(tEMP)
MiddleSet date  outerSet tiMe
croWn
B (tIDE)
tide Scale
InDICATor HAnD ADjuSTMEnT
Pull crown all the way out. Indicator hand should point to 12 o’clock. If it does not, press either TIDE or TEMP push button to move hand until it points to 12 o’clock. TIDE and TEMP push buttons move hand clockwise and
counterclockwise, respectively. Hold push button to move hand fast. Push crown in when done.
TIDE/TEMPErATurE SElECTIon
Indicator hand shows either tide or temperature constantly. When temperature is shown, press TIDE push button
to select tide clock. Hand moves to low tide and then to current tide. When tide is shown, press TEMP push button to select thermometer. Hand moves to beginning of thermometer scale and then to current temperature.
THErMoMETEr
When worn on wrist, thermometer reading is affected by
46 |
47 |

body heat. For more accurate readings, remove watch and put in shade for at least several minutes.
Watch can measure water temperature also, if submerged. Be sure to select temperature display before placing watch in water, as buttons should not be pressed when watch is underwater.
Thermometer readings are taken every minute, and more frequently, if temperature is changing.
TIDE CLOCK
For tide clock, indicator hand always rotates clockwise, so tide is rising when hand is pointing left and falling when pointing right. Number of hours to next high/low tide is shown on tide scale.
Tides are influenced by sun position and shape of shoreline, so tide clock cannot precisely give times of high and
low tides. Periodic adjustment may be necessary.
To set tide clock, pull crown to MIDDLE position. Press either TIDE or TEMP push button to move hand to current tide. TIDE and TEMP push buttons move hand clockwise and counterclockwise, respectively. Push crown in when done.
compass calibration
Before use, the compass must be calibrated.
Since a compass uses the earth’s magnetic field, you must be aware of large metallic objects, such as vehicles or bridges, or objects that give off electromagnetic radiation, such as televisions or computers, which
could affect the magnetic field around the watch. If the compass is calibrated near such objects, it will only work properly in that same location. If the compass
48 |
49 |
is calibrated away from such objects, it will not work properly near them. For best results, calibrate in the area of intended use.
In calibrating and taking headings, it is important, as with all compasses, to keep the compass level. Calibrating or taking a heading when the watch is not level can result in large errors. Also avoid areas that may exhibit higher than normal concentrations of hard and soft iron, as they may cause inaccurate headings. Whenever a heading is suspect, recalibrate.
Do not store the watch near any source of magnetism, such as a computer, appliance, or television, as the watch can take on a magnetic charge, yielding inaccurate headings. Typical accuracy of wrist-worn instruments is within +/- 10 degrees.
To calibrate the compass:
1.Pull the crown to its middle position and wait for the indicator hands to stop moving.
2.Keep the watch level or place it on a level surface (if the band interferes, place the watch on an inverted cup). The watch may be face down, but take care to protect the watch face.
3.Press C (COMPASS) to begin. The 4th center hand rotates two revolutions to remind you to rotate the watch. While level, SLOWLY rotate the watch two revolutions, taking at least 15 seconds per revolution.
50 |
51 |

4.When done, press C (Compass), keeping the watch level. The 4th center hand moves back and forth to acknowledge the end of calibration and then moves to the current magnetic declination setting.
5.If you do not wish to set the magnetic declination, push the crown in. Otherwise, to have watch automatically compensate for the declination angle, turn the compass ring until north is at 12 o’clock.
6.Press A or B to move the 4th center hand west (-) or east (+), respectively, to point to your location’s declination angle using the declination scale. Hold a
button to move the hand quickly. See the figure below for an example.
7.Push the crown in when done.
A |
Magnetic declination set to -14° (14°W)
CoMPASS oPErATIon
Normally, the compass is inactive, with the 4th center hand pointing to 12 o’clock or showing the chronograph seconds.
While holding the watch level, press C (COMPASS) to activate the compass. The compass hand moves to point north. If the watch is turned, the 4th center hand will continue to move, always pointing north. After 20 seconds, the compass will automatically turn off and the
52 |
53 |
4th center hand will return to its normal operation. This conserves battery life. Press C (COMPASS) at any time to keep the compass on for another 20 seconds.
noTE: During compass operation, the second hand moves in two-second increments.
AlTIMETEr oVErVIEW
aliMeter Scale (HundredS)
uPPer retrograde 


 (tHouSandS)


Button C
(unitS)
Button A
(MaxiMuM altitude)
 croWn
croWn
loWer retrograde (unitS)
Button B
(MiniMuM altitude)
54 |
55 |
 Loading...