


WB-100MA- /04.01.27 04.1.28 9:12 AM 1
GB
ELECTRONIC SCALE
WB-100MA/WB-110MA 
INSTRUCTION MANUAL
(REMOTE DISPLAY VERSION)
(COLUMN MOUNTED VERSION)
mPlease read this Instruction Manual carefully and keep it handy for future reference.
WB-100MA- /04.01.27 04.1.28 9:12 AM 2
GB
Table of Contents
GB
w Table of Contents••••••••••••••••••••••••••••••••••••••••••••••••••••••••••••••••••••••••••••••••••••••3
─────────────────────────────
w Applications••••••••••••••••••••••••••••••••••••••••••••••••••••••••••••••••••••••••••••••••••••••••••••••••4
─────────────────────────────
w Safety Notes ••••••••••••••••••••••••••••••••••••••••••••••••••••••••••••••••••••••••••••••••••••••••••••••••4
Caution Symbols ••••••••••••••••••••••••••••••••••••••••••••••••••••••••••••••••••••••••••••••••••••••••4
mWarning •••••••••••••••••••••••••••••••••••••••••••••••••••••••••••••••••••••••••••••••••••••••••••••••••4
mCaution••••••••••••••••••••••••••••••••••••••••••••••••••••••••••••••••••••••••••••••••••••••••••••••••••••4
m[Maintenance]•••••••••••••••••••••••••••••••••••••••••••••••••••••••••••••••••••••••••••••••••••••••5 m[Instructions for Measurement]•••••••••••••••••••••••••••••••••••••••••••••••••••••••5
<Usage Conditions> •••••••••••••••••••••••••••••••••••••••••••••••••••••••••••••••••••••••••••••••••5
<Storage Conditions> ••••••••••••••••••••••••••••••••••••••••••••••••••••••••••••••••••••••••••••••5
<Power Source>•••••••••••••••••••••••••••••••••••••••••••••••••••••••••••••••••••••••••••••••••••••••••5
─────────────────────────────
1. Product Assembly and Components •••••••••••••••••••••••••••••••••••••••••••••••••••6
WProduct Components••••••••••••••••••••••••••••••••••••••••••••••••••••••••••••••••••••••••••6
(Remote Display Version) (Column Mounted Version)
WControl Panel •••••••••••••••••••••••••••••••••••••••••••••••••••••••••••••••••••••••••••••••••••••••••7
WSymbols and their Meanings •••••••••••••••••••••••••••••••••••••••••••••••••••••••••••7
2.Preparation for Use ••••••••••••••••••••••••••••••••••••••••••••••••••••••••••••••••••••••••••••••••••8
WLevel Adjustment•••••••••••••••••••••••••••••••••••••••••••••••••••••••••••••••••••••••••••••••••8
(Remote Display Version) (Column Mounted Version)
WInstallation of the Equipment••••••••••••••••••••••••••••••••••••••••••••••••••••••••••8
(Remote Display Version)
WPrepare Power Source ••••••••••••••••••••••••••••••••••••••••••••••••••••••••••••••••••••••••9
3.Operating Instructions•••••••••••••••••••••••••••••••••••••••••••••••••••••••••••••••••••••••••••10
1.Standard Weighing Procedures••••••••••••••••••••••••••••••••••••••••••••••••••••10 2.Tare Weighing••••••••••••••••••••••••••••••••••••••••••••••••••••••••••••••••••••••••••••••••••••••10
3.Cancellation of Tare Weighing Function ••••••••••••••••••••••••••••••••••10
4.BMI Calculation: •••••••••••••••••••••••••••••••••••••••••••••••••••••••••••••••••••••••••••••••••11
4.RS-232C Communication Specifications••••••••••••••••••••••••••••••••••••••••••12
WSpecifications •••••••••••••••••••••••••••••••••••••••••••••••••••••••••••••••••••••••••••••••••••••••12
WNames and connection methods for signal lines ••••••••••••••••••12
WWeighing Mode ••••••••••••••••••••••••••••••••••••••••••••••••••••••••••••••••••••••••••••••••••12
WBMI Mode •••••••••••••••••••••••••••••••••••••••••••••••••••••••••••••••••••••••••••••••••••••••••••••12
5.Troubleshooting•••••••••••••••••••••••••••••••••••••••••••••••••••••••••••••••••••••••••••••••••••••••••13
W Possible Problems ••••••••••••••••••••••••••••••••••••••••••••••••••••••••••••••••••••••••••••••13
─────────────────────────────
w Specifications••••••••••••••••••••••••••••••••••••••••••••••••••••••••••••••••••••••••••Back cover
2 |
3 |
WB-100MA- /04.01.27 04.1.28 9:12 AM 4
Applications
•This equipment has been calibrated as a precision weighing instrument and can be used to certify weights and/or business transactions.
GB •It can be used to obtain reference data during medical examinations, such as periodic checkups, and can help the prevention of obesity.
Safety Notes
Caution Symbols
In this Instruction Manual and the descriptions on the equipment, there are various caution symbols that will enable you to use this equipment safely and correctly so that harm to you and other people and loss of your property will be prevented.
The symbols and their meanings are as follows. Please understand them well before proceeding with the Instruction Manual.
mWarning This symbol indicates the risk of death or serious injury if the safety instructions are ignored and the equipment is misused.
mCaution
mThis symbol indicates general precautions that should be taken when using this equipment.
mWarning
•To prevent electric shocks,
Do not insert or remove the power plug with wet hands.
•To prevent fire hazards,
Always use a correctly wired 230V AC not multiple extension cords.
mCaution
•To prevent the spread of infections,
Always clean the Weighing platform after use. Sterilize the platform with an appropriate alcohol-based cleaning fluid before each use.
•Installation of the Weighing Platform
Ensure the weighing platform is placed on a level and stable surface. If the equipment is used when the Platform is unstable, for example because not all the feet are on a level surface, there is a risk that it will topple over and it will be impossible to obtain an accurate measurement.
To avoid the risk of injury and damage to the equipment, never jump on the platform.
•How to handle the equipment when moving it
Since the Platform is heavy, please lift it by holding the Platform firmly with both hands so that you do not drop it.
•AC Adapter
Ensure that the adapter supplied (model A30930G) is always used with this equipment. Other adapters may cause malfunctions.
•Battery
When changing batteries, ensure that the new batteries are inserted with the correct polarity  /
/ . If the polarity is incorrect, then the batteries may leak and damage the equipment.
•The circuit board incorporates a fuse (100mA, 125V) for electronic equipment. If devices other than the original AC adapter are used or a large electrical current is applied, the fuse will be blown for safety purposes. If the fuse is blown, the unit must be inspected and repaired. As the fuse forms a fixed part of the unit and cannot be easily disassembled by the customer, please consult your nearest Tanita sales office or agent when the fuse needs to be replaced.
GB m[Maintenance]
This is a precision manufactured and accurately calibrated product. Please observe the following instructions.
•Never disassemble or adjust the equipment, as this may cause malfunctions. The equipment should only be inspected in accordance with the regulations in each country.
•When not in use for a long time, unplug the AC Adapter from the wall socket.
•When not in use for a long time, remove the batteries before storing the equipment.
•Do not wipe the equipment with corrosive chemicals (benzine, cleaner, etc.). Please use a neutral detergent to clean the equipment.
•Avoid subjecting the equipment to excessive shocks or vibrations.
•When disposing of this unit, please do so in accordance with the prevailing regulations in each country.
•If an unauthorised person attempts to disassemble or repair any of the part, the warranty will become invalid. When the unit malfunctions, please consult your nearest Tanita sales office or agent.
m[Instructions for Measurement]
Please observe the following instructions for accurate measurement.
•Measurement may not be possible on a surface that is strongly vibrating. In such cases transfer the equipment to a stable surface with little or no vibration.
•When the equipment has been transferred to another location with a temperature difference of more than 20˚C, leave at least two hours before using.
•While taking measurements, please keep any persons using transmitters, such as a mobile phone, away from the unit to avoid causing margin errors.
<Usage Conditions>
Temperature Range for Use : 0°C / +35°C
Relative Humidity : 30% / 80% (without condensation)
<Storage Conditions>
Temperature Range of Environment : -10°C / +50°C
Range of Relative Humidity : 10% / 90% (without condensation)
To avoid malfunctions, do not store the equipment in direct sunlight, significant temperature changes, the risk of dampness, a large amount of dust, in the vicinity of fires or where there is a risk of receiving vibrations or shocks.
<Power Source>
|
Value Range |
Voltage Range |
230VAC |
Frequency Range |
50Hz |
Electric Current Range |
65mA |
4 |
5 |

WB-100MA- /04.01.27 04.1.28 9:12 AM 6
1.Product Assembly and Components
W Product Components Please verify that the following components are in the package. |
W Control Panel |
GB
(Remote Display Version) |
Accessories |
|
AC Adapter |
|
MODEL:A30930G |
Display Box |
|
|
Battery Compartment |
Platform |
Fixing Screw for |
|
|
|
the Bracket (x 2) |
|
Instruction Manual |
Level Gauge |
|
Adjustable Feet |
|
GB
|
|
|
|
|
|
|
|
|
|
|
|
|
|
|
|
|
|
|
|
|
|
|
|
|
|
|
|
|
|
|
|
|
|
|
|
|
|
|
|
|
|
|
|
|
|
|
|
|
|
|
|
|
|
|
|
|
|
|
|
|
|
|
|
|
|
|
|
|
|
|
|
|
|
|
|
|
|
|
|
|
|
|
|
|
|
|
|
|
|
|
|
|
|
|
|
|
|
|
|
|
|
|
|
|
|
|
|
|
|
|
|
|
|
|
|
|
|
|
|
|
|
|
|
|
|
|
|
|
|
|
|
|
|
|
|
|
|
|
|
|
|
|
Power on and/or reset the display to |
NET mark: |
|||||||||||
zero. |
An arrow t appears next to this icon when the tare weighing function is on. |
|||||||||||
(Column Mounted Version) |
Power off. |
STABILIZED mark: |
|
Indicates that the displayed figure has stabilized. |
|||
|
|
|
Battery Compartment |
|
Tare weighing function. |
STEP ON mark (Ready mark): |
|
|
|
|
|
|
Indicates that the scale is ready to begin measurements. |
|
|
||||
|
|
|
|
|
||||
Display Box |
Accessories |
|
|
BMI mode, and/ or height setting. |
HEIGHT mark (Unit of height): |
|
|
|
AC Adapter |
Screws (x 5) |
|
Indicates the height is set |
|
|
|
||
|
|
|
|
|
|
|||
|
MODEL:A30930G |
|
Mode selection or increase numerical |
BMI mark: |
|
|
|
|
|
|
|
|
values. |
Indicates that BMI calculation. |
|
|
|
|
|
|
Spring Washer (x 4) |
Mode selection or decrease numerical |
BMI MODE mark: |
|
|
|
Level Gauge |
|
|
values. |
Indicates when BMI mode is on. |
|
|
|
|
|
|
|
|
|
|
|||
|
|
|
|
WEIGHT LOCK mark: |
|
|
|
|
|
|
|
|
Weight Lock Release |
|
|
|
|
|
Wrench |
Cap |
Cover |
Indicates when the measurement is stabilized. |
|
|
|
|
Platform |
|
* It appears only when the Weight Lock Switch is on. |
|
|
||||
|
|
|
|
|
|
|||
|
|
|
|
|
|
|
|
|
|
|
|
|
W Symbols and their Meanings |
|
|
|
|
|
|
|
|
: Display Unit On. |
: Display Unit Off. |
: Direct current |
|
|
|
Instruction Manual |
Assembly Instruction |
: Class II Equipment |
: Type B applied part |
: Zero reset |
|
|
|
|
|
|
|
|
|
|||
|
|
|
|
: Turn on the tare weighing |
: Caution. Refer to the |
: Conformity |
with |
Medical |
Adjustable Feet |
|
|
|
function. |
attached notes. |
Device Directive 93/42/EEC |
||
|
|
|
|
|
|
|
|
|
6 |
7 |
WB-100MA- /04.01.27 04.1.28 9:12 AM 8
2.Preparation for Use
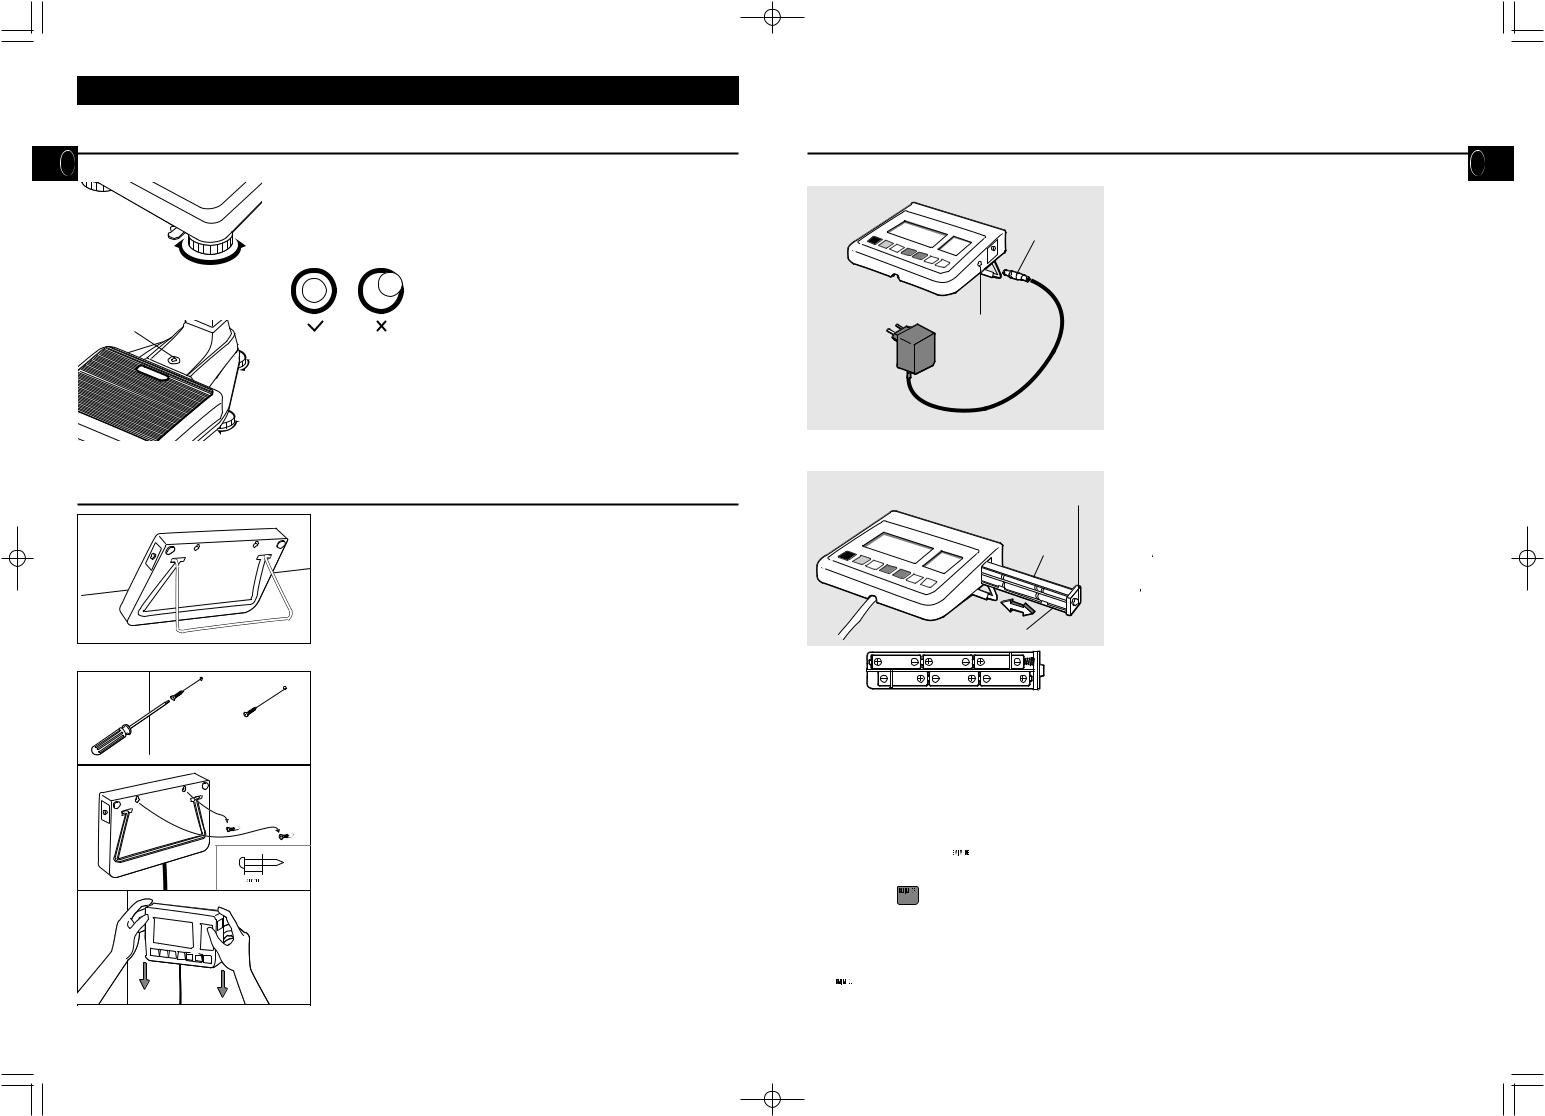
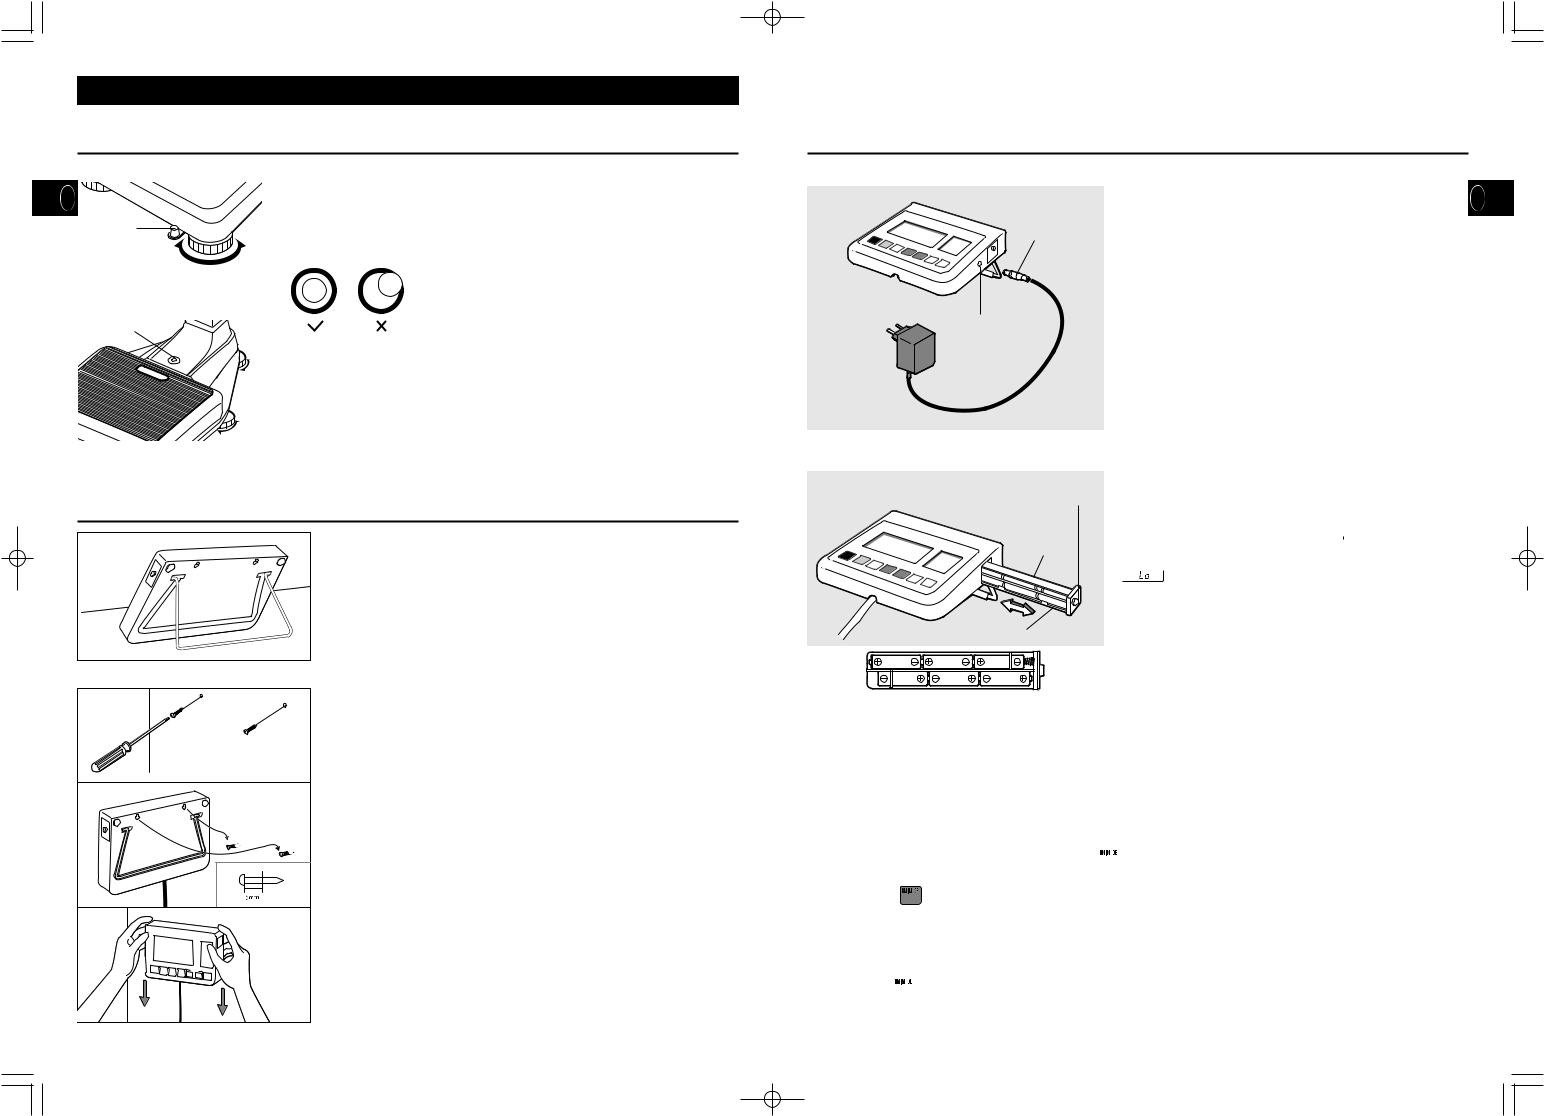
W Level Adjustment
GB
(Remote Display Version)
Level Gauge 
*Adjust the level by rotating |
feet. |
(Column Mounted Version)
Level Gauge
*Adjust the level by rotating the adjustable feet.
For accurate measurement, place the unit on as flat a surface as possible and adjust the level with the adjustable feet so the bubble in the level gauge is in the center of the frame.
mCaution
Place the equipment on a level surface. If the equipment is not stable, for example because not all the feet are on a level surface, there is a risk that it will topple over and it will be impossible to obtain an accurate measurement.
W Installation of the Equipment (Remote Display Version)
When using the stand
Please pull out the stand at the back of the display box.
When putting away the display box, please insert the stand in the slot on the back of the display box.
|
|
|
8 |
When installing the display box on the wall
a Screw the wall-hanging screws into the wall (leave the screws protruding from the wall by 5 mm).
b Insert the screw heads in the holes on the back of the display box.
cPull down the display box securely into place.
m If the Display Box is not fixed sufficiently, there is a danger that it may fall down.Avoid installing the Display Box in a place where users may step on or get caught
by the cable.
Do not swing the Display Box by the cable.
W Prepare Power Source
a When using the AC Adapter
plug
DC jack
 Pilot Lamp
b When using dry cell batteries
Fixing Screws for the
Battery Compartment
Dry Cell
Batteries
Battery Compartment
GB
Insert the cable plug for the AC Adapter into the DC jack on the side of the Display Box, and insert the AC Adapter plug into a 230V AC mains DC jack.
Then confirm the Pilot Lamp on the AC Adapter lights up.
mWarning
•To avoid electric shocks, do not insert and remove the plug with wet hands.
mCaution
•Use only the AC adapter (MODEL: A30930G) specified. Using an AC Adapter other than that specified may cause malfunctions.
Unscrew the Fixing Screws for the Battery Compartment on the right side of the Display Box and pull out the Battery Compartment. Place dry cell batteries LR6 (AA) in the correct positions as instructed inside the Battery Compartment and fix the Battery Compartment with the Fixing Screws.
If  is displayed on the Display, please replace all the six batteries LR6 (AA) with new ones.
 appares when the battery voltage is lower than 6.5 V w10%.
m•Please change the batteries LR6 (AA) carefully to avoid dropping them on your feet.
•Ensure that the batteries are inserted with the correct polarity  /
/ . If the polarity is incorrect, then the batteries may leak and damage the equipment.
•When not in use for a long time, remove the batteries before storing the equipment.
•When the equipment has been transferred to another location with a temperature difference of more than 20˚C, leave at least two hours before using.
c Auto Power off Interval Setting
When the Scale power off,Press  key and hold. Press
  key.
key.
Release the holding  key.
key.
The display turns to "Auto Power Off Interval Setting Mode" showing "20" as 20 minutes power off setting as default.
Press  (up arrow) or
  (down arrow) key and set 10 for 10 minutes and/or CONT for continuous setting if required. Press
  key to complete.
9

WB-100MA- /04.01.27 04.1.28 9:12 AM 10
3.Operating Instructions
1. Standard Weighing Procedures
GB |
1. Turn on the power by pressing the |
key. |
|
d
2. After all the segments flash, [0.0kg] is displayed.
d
3.Step onto the center of the scale platform.
The weight reading will be displayed.
d
4.Measurement is completed.
When the person being weighed steps off the scale, the display will return to [0.0kg].
Turn off the power by pressing the  key.
key.
2.Tare Weighing
1. Turn on the power by pressing the  key.
key.
d
2. After all the segments flash, [0.0kg] is displayed.
d
3.Carefully place the tare items (clothes, etc.) on the center of the platform.
The weight of the items will be displayed.
4. Press the  key.
key.
An arrow t[NET] will appear next to the mark and [0.0kg] will be displayed.
5.When weighing a person/object including tare items, the weight of the person/object minus that of the tare items, which is the net weight, will be displayed.
m• To change the tare weight, cancel the tare weighing function and repeat from step 3.
• When using the tare weighing function, the measurement range is reduced by the tare weight.
(Measurement Range) = (Maximum Measurable Weight) – (Tare Weight)
3.Cancellation of Tare Weighing Function
1.Remove the tare items (clothes, etc.) from the platform.
The weight will be displayed as a negative value.
d
2. Press the  key.
key.
The arrow tnext to the [NET] will disappear and [0.0kg] will be displayed.
4.BMI Calculation:
1. Turn on the power by pressing the |
key. |
GB |
|
|
d
2. After all the segments flash, [0.0kg] is displayed.
d
d
3. Push  for within two seconds.
d
[0.0kg] and the default height [170cm] will be displayed.
d
4. Set your height with the 
 key.
key.
(This can also be entered after you step on the scale).
d
Stand still on the scale platform.
The weight will be displayed.
d
5. Once your height and weight have been established, press  .
.
d
The weight and BMI figure will be displayed.
* By pressing the  key in BMI mode, the scale will switch alternately between BMI and height (and can be changed with the
 key) display.
* The display will return to [0.0 kg] and the default height [170cm], if it changes to a height display after stepping off the scale during measuring BMI.
Guidelines based on NIH/WHO BMI
Under Weight |
|
BMI 18.5 |
|
Normal Range |
|
18.5 BMI 25 |
|
Pre obese |
|
25 BMI 30 |
|
Obese |
|
CLASS l |
30 BMI 35 |
Obese |
|
CLASS ll |
35 BMI 40 |
Obese |
|
CLASS lll |
BMI 40 |
10 |
11 |
WB-100MA- /04.01.27 04.1.28 9:12 AM 12
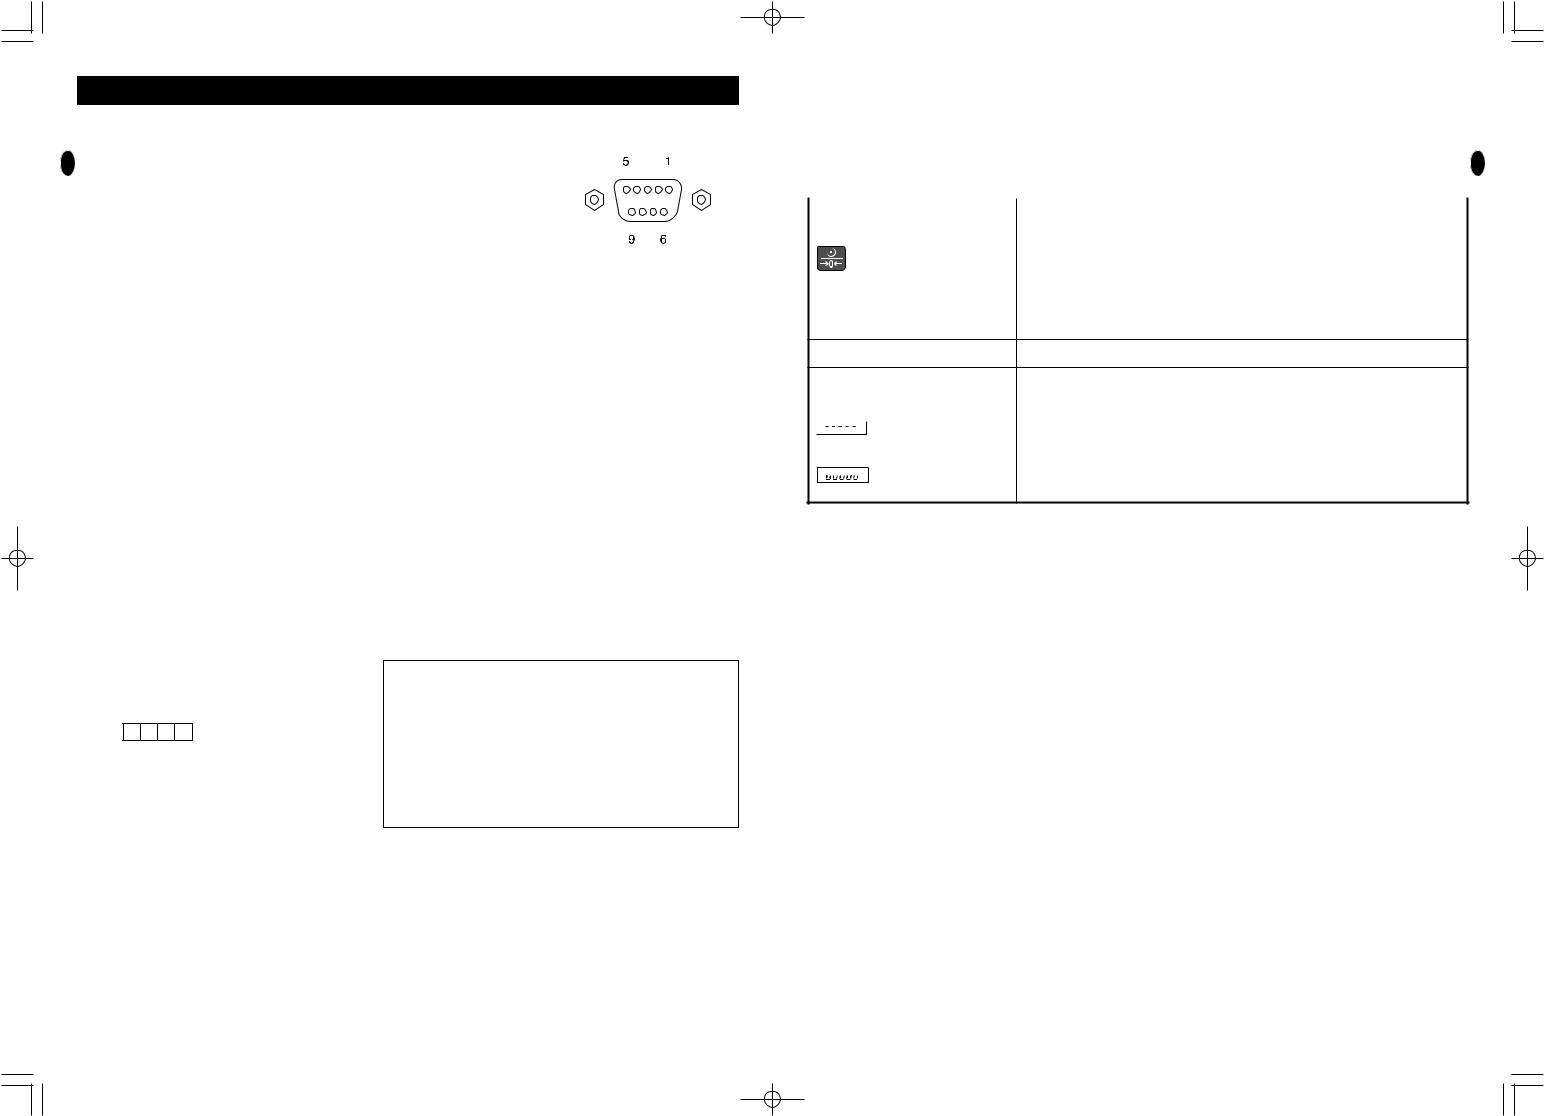
4. RS-232C Communication Specifications
|
■Specifications |
|
■Names and connection methods for signal lines |
|||||||||
GB |
|
|
|
|
|
|
|
|
|
|
|
|
|
Communication standard |
EIA RS-232C |
|
Terminal no. |
Signal name |
|
|
|
|
|
|
|
|
|
|
|
|
|
|
|
|
||||
|
|
Communication method |
Asynchronous method |
|
1 |
|
|
|
|
|
|
|
|
|
|
|
|
|
|
|
|
|
|
||
|
|
|
2 |
TXD |
|
|
|
|
|
|
||
|
|
|
|
|
|
|
|
|
|
|
||
|
|
Signal speed |
2,400 baud |
|||||||||
|
|
|
3 |
RXD |
|
|
|
|
|
|
||
|
|
|
|
|
|
|
|
|
|
|
||
|
|
Data bit length |
7 bit |
|
|
|
|
|
|
|
|
|
|
|
|
4 |
|
|
|
|
|
|
|
||
|
|
|
|
|
|
|
|
|
|
|||
|
|
Parity |
EVEN |
|
5 |
GND |
|
|
|
|
|
|
|
|
|
|
|
|
|
|
|
||||
|
|
|
|
|
6 |
|
|
|
|
|
|
|
|
|
Stop bit |
1 bit |
|
|
|
|
|
|
|
||
|
|
|
7 |
|
|
|
|
|
|
|
||
|
|
|
|
|
|
|
|
|
|
|
|
|
|
|
|
|
|
|
|
|
|
|
|
||
|
|
|
|
|
8 |
|
|
|
|
|
|
|
|
|
|
|
|
9 |
|
|
|
|
|
|
|
|
|
|
|
|
|
|
|
|
|
|
|
|
m• An RS-232C connector (D sub 9 pin female) is attached to the side of the display box.
•When connecting the display box with a personal computer, etc., please use an RS-232C straight cable.
•Use the RS232C cable ahorter than 3m long.
■Weighing Mode
When receiving 4 bytes of data as indicated in 1-1 while using the scale in weighing mode, weight data will be output in 14 bytes, as indicated in 1-2.
1-1 |
Reception data |
|
|
|
|
|
|
|
|
|
Details of Weighing Mode Transmission Data |
|||||||||||
|
1 |
2 |
3 |
4 |
|
|
|
|
|
|
|
|
|
|
|
|
||||||
|
|
|
|
|
|
|
|
|
|
|
|
|
|
|
|
|
|
|||||
|
|
|
|
|
|
|
|
|
|
Byte nos. 1-2 |
Header |
2 bytes fixed |
SD: Unstable S_: Stable |
|
||||||||
|
|
D |
R |
CR |
LF |
|
|
|
|
|
|
|
|
|
|
|
|
|
||||
|
|
|
|
|
|
|
|
|
|
|
|
|
|
|
|
|
|
|
|
|
SI: Overload, etc. |
|
|
|
|
|
|
|
|
|
|
|
|
|
|
|
|
|
|
|
|
|
|
|
|
1-2 |
Transmission data |
|
|
|
|
|
|
|
|
|
Byte nos. 3-4 |
Separator |
2 bytes fixed |
2 spaces |
|
|||||||
|
|
|
|
|
|
|
|
|
Byte nos. 5-10 |
Weight data |
6 bytes fixed |
Right-aligned |
|
|||||||||
|
|
|
|
|
|
|
|
|
|
|
|
|
|
|
|
|
|
|
||||
|
1 |
2 |
3 |
4 5 6 7 |
8 |
9 |
10 |
11 |
12 |
13 14 |
|
|
Byte nos. 11-12 |
Measurement units |
2 bytes fixed |
Kg:kg |
|
|||||
|
|
S |
D |
|
|
|
|
7 |
5 |
. |
0 |
k |
g |
CR |
LF |
|
|
Byte nos. 13-14 |
Terminator |
2 bytes fixed |
CR+LF |
|
|
|
|
|
|
|
|
|
|
|
|
|
|
|
|
|
|
|
|
|
|
|
|
■BMI Mode
While the scale is used in BMI mode, the output data will vary depending on the form of the received data.
a When receiving 4 bytes of data, as indicated in 1-1, the scale will calculate your BMI using the currently input height figure, and 26 bytes of data will be output, as indicated in 2-1 or 2-2, depending on the measurement unit.
bWhen receiving 11 bytes of data, including measurement units and height figures, in the form indicated in 1-2 or 1-3, the scale will calculate your BMI using these figures, and 26 bytes of data will be output, as indicated in 2-1 or 2-2, depending on the measurement unit.
1-1 Reception data
1 2 3 4
D R CR LF
1-2 Reception data (height data when using kg)
1 |
2 |
3 |
4 |
5 |
6 |
7 |
8 |
9 |
10 |
11 |
D |
H |
k |
g |
|
|
1 |
8 |
0 |
CR |
LF |
|
|
|
|
|
|
|
|
|
|
|
*Please input 90-99cm height data as 090-099.
2-1 Transmission data (kg/cm)
Details of BMI mode transmission data
Byte nos. 1-2 |
Header |
2 bytes fixed |
SD: Unstable S_: Stable |
|
|
|
SI: Overload, etc. |
Byte nos. 3-4 |
Separator |
2 bytes fixed |
2 spaces |
Byte nos. 5-10 |
Weight data |
6 bytes fixed |
Right-aligned |
Byte nos. 11-12 |
Measurement units |
2 bytes fixed |
Kg:kg |
Byte nos. 13 |
Separator |
1 byte fixed |
1 comma |
Byte nos. 14-18 |
Height data |
5 bytes fixed |
Right-aligned |
Byte nos. 19 |
Separator |
1 byte fixed |
1 comma |
Byte nos. 20-24 |
BMI data |
5 bytes fixed |
Right-aligned |
Byte nos. 25-26 |
Terminator |
2 bytes fixed |
CR+LF |
1 |
2 |
3 |
4 |
5 |
6 |
7 |
8 |
9 |
10 |
11 |
12 |
13 |
14 |
15 |
16 |
17 |
18 |
19 |
20 |
21 |
22 |
23 |
24 |
25 |
26 |
S |
D |
|
|
|
|
7 |
5 |
. |
0 |
k |
g |
, |
|
|
1 |
8 |
0 |
, |
|
2 |
3 |
. |
1 |
CR |
LF |
|
|
|
|
|
|
|
|
|
|
|
|
|
|
|
|
|
|
|
|
|
|
|
|
|
|
|
5.Troubleshooting |
|
|
W Possible Problems |
|
|
|
|
|
GB |
|
If problems occur, please refer to the following instructions. If the problem persists contact your nearest Tanita sales or |
|||
|
|||
repair center. |
|
|
|
|
|
||
|
|
|
|
Problem |
Solution |
|
|
|
|
|
|
The unit does not turn on when the |
•When Using with the AC Adapter |
|
|
key is pressed. |
Ensure that the AC Adapter cable is properly connected with the Display Unit. Ensure |
|
|
|
that the AC Adapter is correctly inserted in the mains DC jack. |
|
|
|
•Using dry cell batteries |
|
|
|
The batteries may have run out. Confirm that the equipment is working by using the |
|
|
|
AC Adapter or new batteries. |
|
|
Measurement is not correct. •Please confirm that all the adjustable feet are resting on a level surface.
Measurement does not become stable. |
•Measurement may be impossible in the case of excessive vibration. Use the equipment |
||
Display turns on and off. |
in another place. |
||
|
|
|
|
|
|
is displayed. |
•It is possible that the maximum weight capacity has been exceeded. Please stop |
|
|
||
|
|
measuring. |
|
|
|
|
|
|
|
|
|
|
|
is displayed. |
•Do not stand on or put objects on the Platform before starting measurement. Start |
|
|
||
|
|
measurement after confirming there is nothing on the Platform. |
|
|
|
|
|
12 |
13 |

WB-100MA- /04.01.27 04.1.28 9:12 AM 14
Specifications
|
|
|
TYPE |
|
WB-100MA |
|
WB-110MA |
|
|
|
|
|
|
|
AC adapterCentre minusMODEL A30930GCLASS 2 |
||
|
|
|
|
|
|
Input Voltage : 230VAC50Hz65mA |
||
GB |
|
|
Power Source |
|
Output Voltage : 9VDC±0.45VDC |
|||
|
|
|
Rated Current : 300mA |
|||||
|
|
|
|
|
||||
|
|
|
|
|
|
No Load Input Voltage : 12VDC±0.6VDC |
||
|
|
|
|
|
|
|||
|
|
|
|
|
|
LR6 (AA Alkaline battery) x 6, (Not included) |
||
|
|
|
|
|
|
|
|
|
|
|
|
Power Consumption |
|
|
0.3W max |
||
|
|
|
|
|
|
|
||
|
|
|
Measurement System |
Strain Gauge Load Cell |
||||
|
Weight Measurement |
|
|
|
|
|
|
|
|
|
Maxmum Capacity/Minmum Graduation |
200kg/0.1kg |
|
270kg/0.1kg |
|||
|
|
|
|
|
|
|
||
|
|
|
Accuracy at first calibration |
|
±0.1kg |
|||
|
Input Items |
|
Height |
|
90 – 249cm/1cm increments |
|||
|
|
|
|
|
Weight |
200kg/0.1kg increments |
|
270kg/0.1kg increments |
|
Output Items |
|
Display |
|
Height |
90 – 249cm/1cm increments |
||
|
|
|
|
|
BMI |
|
0.1 increments |
|
|
Size |
|
Display |
|
159u209u56mm |
|||
|
|
Platform |
|
301u336u80mm |
||||
|
(Remote Display Version) |
|
|
|||||
|
|
Cable Length |
|
|
2m |
|||
|
|
|
|
|
||||
|
|
|
|
|
|
|
||
|
Size (Column Mounted Version) |
|
336u600u1070mm |
|||||
|
|
|
Display |
|
Upper 5Digits and Lower 4Digits LCD |
|||
|
|
|
|
Height of numerals 25mm |
||||
|
|
|
|
|
|
|||
|
|
|
|
|
|
|
|
|
|
|
Output Data Interface |
|
RS-232C (D-sub 9pins Female Connector) |
||||
|
Temperature Range of usage |
|
|
0ºC/+35ºC |
||||
|
|
|
Relative Humidity |
|
30%/80% (without condensation) |
|||
|
Weight of Equipment (Remote Display Version) |
5.1kg (except battery) |
||||||
|
Weight of Equipment (Column Mounted Version) |
10.6kg (except battery) |
||||||
|
|
|
Rated Power |
|
DC9V 300mA (LR6 (AA Alkaline battery) u6 not included) |
|||
|
|
|
Battery Life |
|
approximately 100 hours of continuous use when using LR6 (AA Alkaline battery) |
|||
This product meets the follwing requirements ; 1. Medical Device Directive (93/42/EEC)
Safety Standard |
: EN60601-1:1990,AM No.1:1993,AM No.2:1995 |
|
IEC 60601-1:1988,AM No.1:1991,AM No.2:1995 |
EMC Standard |
: EN60601-1-2:2001 |
|
IEC60601-1-2:2001 |
2.Non-Automatic weighing Instruments (90/384/EEC)
D
ELEKTRONISCHE WAAGE WB-100MA/WB-110MA 
BEDIENUNGSANLEITUNG
(Modell Remote Display)
(Säulengestützte Version)
mBitte lesen Sie sich diese Bedienungsanleitung sorgfältig durch und bewahren Sie sie zum späteren Nachschlagen auf.
BW1007031(2)
WB-100MA- /04.01.27 04.1.28 9:12 AM 16
D
Inhaltsverzeichnis
w Inhaltsverzeichnis ••••••••••••••••••••••••••••••••••••••••••••••••••••••••••••••••••••••••••••••••••17
─────────────────────────────
D
w Anwendungen•••••••••••••••••••••••••••••••••••••••••••••••••••••••••••••••••••••••••••••••••••••••••18
─────────────────────────────
w Sicherheitshinweise ••••••••••••••••••••••••••••••••••••••••••••••••••••••••••••••••••••••••••••••••18
Warnsymbole•••••••••••••••••••••••••••••••••••••••••••••••••••••••••••••••••••••••••••••••••••••••••••18
mWarnung •••••••••••••••••••••••••••••••••••••••••••••••••••••••••••••••••••••••••••••••••••••••••••••18
mVorsicht ••••••••••••••••••••••••••••••••••••••••••••••••••••••••••••••••••••••••••••••••••••••••••••••••18
m[Wartung]••••••••••••••••••••••••••••••••••••••••••••••••••••••••••••••••••••••••••••••••••••••••••••19
m[Messanleitungen] ••••••••••••••••••••••••••••••••••••••••••••••••••••••••••••••••••••••••••••19
<Benutzungsbedingungen> ••••••••••••••••••••••••••••••••••••••••••••••••••••••••••••••••19
<Lagerbedingungen> ••••••••••••••••••••••••••••••••••••••••••••••••••••••••••••••••••••••••••••19
<Stromquelle>••••••••••••••••••••••••••••••••••••••••••••••••••••••••••••••••••••••••••••••••••••••••••19
─────────────────────────────
1. Produktaufbau und Komponenten •••••••••••••••••••••••••••••••••••••••••••••••••••20
WProduktkomponenten••••••••••••••••••••••••••••••••••••••••••••••••••••••••••••••••••••••20
(Modell Remote Display) (Säulengestützte Version)
WBedienungsfeld •••••••••••••••••••••••••••••••••••••••••••••••••••••••••••••••••••••••••••••••••••21
WSymbole und ihre Bedeutung •••••••••••••••••••••••••••••••••••••••••••••••••••••••21
2.Vorbereitung vor Gebrauch••••••••••••••••••••••••••••••••••••••••••••••••••••••••••••••••22
WHöheneinstellung•••••••••••••••••••••••••••••••••••••••••••••••••••••••••••••••••••••••••••••••22
(Modell Remote Display) (Säulengestützte Version)
WAufbau des Geräts•••••••••••••••••••••••••••••••••••••••••••••••••••••••••••••••••••••••••••••22
(Modell Remote Display)
WVorbereiten der Stromquelle ••••••••••••••••••••••••••••••••••••••••••••••••••••••••23
3.Betriebsanleitungen••••••••••••••••••••••••••••••••••••••••••••••••••••••••••••••••••••••••••••••••24
1.Normales Wiegen •••••••••••••••••••••••••••••••••••••••••••••••••••••••••••••••••••••••••••••••24 2.Bestimmen des Eigengewichts••••••••••••••••••••••••••••••••••••••••••••••••••••••24 3.Abstellen der Eigengewichtsfunktion••••••••••••••••••••••••••••••••••••••••24 4.BMI-Berechnung: ••••••••••••••••••••••••••••••••••••••••••••••••••••••••••••••••••••••••••••••••25
4.RS-232C Kommunikationsspezifikationen •••••••••••••••••••••••••••••••••••••26
WSpezifikationen •••••••••••••••••••••••••••••••••••••••••••••••••••••••••••••••••••••••••••••••••••26
WSignalleitungen und Verbindungsmethoden •••••••••••••••••••••••••26
WWiegemodus ••••••••••••••••••••••••••••••••••••••••••••••••••••••••••••••••••••••••••••••••••••••••26
WBMI-Modus ••••••••••••••••••••••••••••••••••••••••••••••••••••••••••••••••••••••••••••••••••••••••••26
5.Fehlersuche •••••••••••••••••••••••••••••••••••••••••••••••••••••••••••••••••••••••••••••••••••••••••••••••••27
W Mögliche Probleme •••••••••••••••••••••••••••••••••••••••••••••••••••••••••••••••••••••••••••27
─────────────────────────────
w Spezifikationen•••••••••••••••••••••••••••••••••••••••••••••••••••••••••••••••••••••••••Rückseite
16 |
17 |
WB-100MA- /04.01.27 04.1.28 9:12 AM 18
Anwendungen
•Diese Waage ist ein Präzisionsinstrument, das für den privaten und kommerziellen Gebrauch konzipiert wurde.
•Bei ärztlichen Untersuchungen, wie regelmäßigen Check-ups, liefert das Gerät Bezugsdaten und hilft beim Vorbeugen von Fettleibigkeit.
D
Sicherheitshinweise
Warnsymbole
In dieser Betriebsanleitung und der Gerätebeschreibung finden Sie verschiedene Warnsymbole, die Sie auf den sicheren und korrekten Gebrauch Ihres Geräts hinweisen sollen, um Verletzungen und Sachschäden zu vermeiden.
Die Symbole und ihre Bedeutung werden im Folgenden erläutert. Machen Sie sich bitte vor dem Weiterlesen dieser Betriebsanleitung mit ihnen vertraut.
mWarnung
mVorsicht
m
Dieses Symbol weist Sie darauf hin, dass eine Missachtung der Sicherheitsmaßnahmen bzw. ein Missbrauch des Gerätes zu tödlichen bzw. schweren Verletzungen führen kann.
Dieses Symbol weist Sie darauf hin, dass eine Missachtung der Sicherheitsmaßnahmen bzw. ein Missbrauch des Gerätes zu Körperverletzung und/oder Geräteschaden führen kann.
Dieses Symbol weist Sie auf allgemeine Vorsichtsmaßnahmen hin, die bei Gebrauch des Geräts getroffen werden sollten.
mWarnung
•Zur Verhinderung von elektrischen Schocks:
Stecker des Stromkabels nicht mit nassen Händen einstecken bzw. herausziehen.
•Zur Verhinderung von Brandgefahr:
Stets ein korrekt angeschlossenes Kabel von 230V AC ohne Verlängerungsschnur verwenden.
mVorsicht
•Zur Verhinderung von Infektionen:
Wiegeplattform stets nach Gebrauch reinigen. Desinfizieren Sie die Plattform vor dem Gebrauch mit einem geeigneten Reinigungsmittel auf Alkoholbasis.
•Aufstellen der Waage
Achten Sie darauf, dass die Waage auf einem ebenen, festen Untergrund steht. Bei Gebrauch auf unebenen Stellen kann das Gerät umkippen und kein genaues Wiegergebnis ermöglichen.
Um Verletzungen und Geräteschäden zu vermeiden, niemals auf die Plattform springen.
•Umgang mit dem Gerät bei Verlagerung
Die Wiegeplattform ist recht schwer. Halten Sie sie beim Anheben daher gut fest, um sie nicht fallen zu lassen.
•AC-Adapter
Stellen Sie sicher, dass das Gerät nur mit dem im Lieferumfang enthaltenen Adapter (Modell A30930G) benutzt wird. Andere Adapter können Funktionsstörungen verursachen.
•Batterie
Achten Sie beim Auswechseln der Batterien darauf, dass die Pole der neuen Batterien richtig herum eingelegt werden. Bei verkehrter Polarität können die Batterien auslaufen und das Gerät beschädigen.
•In der Platine ist eine Sicherung (100mA, 125V) für elektronische Geräte eingebaut. Werden statt dem im Lieferumfang enthaltenen AC-Adapter andere Adapter verwendet oder bei einer übermäßigen Stromzufuhr brennt die Sicherung aus Sicherheitsgründen durch. Das Gerät muss bei durchgebrannter Sicherung geprüft und repariert werden. Die Sicherung ist ein fester Bestandteil des Gerätes und lässt sich nur schwer herausnehmen. Wenden Sie sich zum Austausch der Sicherung daher bitte an Ihre nächste Tanita Verkaufsstelle bzw. Vertretung.
m[Wartung] |
D |
Dies ist ein exakt kalibriertes Präzisionsprodukt. Bitte befolgen Sie daher die nachstehenden Instruktionen genau.
•Versuchen Sie nicht, das Gerät selbst auseinander zu nehmen oder zu justieren, da dies zu Funktionsstörungen führen kann. Das Gerät sollte nur gemäß der in Ihrem Land geltenden Bestimmungen geprüft werden.
•Ziehen Sie den AC-Adapter bei längerem Nichtgebrauch des Geräts aus der Steckdose.
•Wenn Sie das Gerät längere Zeit nicht benutzen, sollten Sie vor dem Wegstellen die Batterien herausnehmen.
•Gerät nicht mit ätzenden Chemikalien (Benzin, Reiniger usw.) abwischen. Verwenden Sie zur Reinigung des Geräts einen Neutralreiniger.
•Gerät nicht übermässigen Stößen und Vibrationen aussetzen.
•Gerät bitte nur nach den vorherrschenden Bestimmungen Ihres Landes entsorgen.
•Sollte das Gerät von einer unbefugten Person auseinander genommen oder repariert werden, erlischt die Garantie. Wenden Sie sich bei Funktionsstörungen bitte an Ihre nächste Tanita Verkaufsstelle bzw. Vertretung.
m[Messanleitungen]
Bitte befolgen Sie die nachstehenden Instruktionen genau, um genaue Messwerte zu erhalten.
•Um zu gewährleisten, dass der Wiegevorgang nicht durch einen stark vibrierenden Untergrund behindert wird, stellen Sie das Gerät an einem möglichst bzw. völlig vibrationsfreien Ort auf.
•Wenn Sie das Gerät an einer anderen Stelle mit einem Temperaturunterschied von mehr als 20°C aufstellen, warten Sie mindestens zwei Stunden mit dem Gebrauch.
•Um beim Wiegen Anzeigefehler zu vermeiden, halten Sie Personen mit Funkgeräten, wie Handys, vom Gerät fern.
<Benutzungsbedingungen>
Temperaturbereich für Gebrauch : |
0°C / +35°C |
|
Relative Feuchtigkeit |
: 30% |
/ 80% (ohne Kondensation) |
<Lagerbedingungen>
Bereich der Umgebungstemperatur : -10°C / +50°C
Bereich der relativen Feuchtigkeit : 10% / 90% (ohne Kondensation)
Um Funktionsstörungen zu vermeiden, das Gerät nicht der prallen Sonne, extremen Temperaturschwankungen, Feuchtigkeit oder starkem Staub aussetzen und nicht in der Nähe von Heizgeräten oder in Bereichen, die Vibrationen und Stößen ausgesetzt sind, aufbewahren.
<Stromquelle>
|
Wertebereich |
Spannungsbereich |
230VAC |
Frequenzbereich |
50Hz |
Elektrischer Strombereich |
65mA |
18 |
19 |
WB-100MA- /04.01.27 04.1.28 9:12 AM 20
1.Produktaufbau und Komponenten
W Produktkomponenten In der Packung sind folgende Komponenten enthalten. |
W Bedienungsfeld |
(Modell Remote Display) |
Zubehör |
D |
AC-Adapter: |
|
|
|
MODELL: A30930G |
Anzeigegerät |
|
|
Batteriefach |
Wiegeplattform |
Bundschrauben für |
|
|
|
Schelle (x 2) |
|
Bedienungsanleitung |
Höhenregulierer |
|
Einstellbare Füße |
|
D
|
|
|
|
|
|
|
|
|
|
|
|
|
|
|
|
|
|
|
|
|
|
|
|
|
|
|
|
|
|
|
|
|
|
|
|
|
|
|
|
|
|
|
|
|
|
|
|
|
|
|
|
|
|
|
|
|
|
|
|
|
|
|
|
|
|
|
|
|
|
|
|
|
|
|
|
|
|
|
|
|
|
|
|
|
|
|
|
|
|
|
|
|
|
|
|
|
|
|
|
|
|
|
|
|
|
|
|
|
|
|
|
|
|
|
|
|
|
|
|
|
|
|
|
|
|
|
|
|
|
|
|
|
|
|
|
|
|
|
|
|
|
|
Schaltet das Anzeigegerät ein und stellt |
NET: |
|||||||||||
die Anzeige auf Null. |
Beim Messen des Eigengewichts erscheint neben diesem Symbol ein Pfeil t. |
|||||||||||
(Säulengestützte Version) |
Schaltet das Anzeigegerät ab |
STABILIZED: |
|
Sobald das Gewicht konstant ist, erscheint neben „STABILIZED“ ein Pfeil |
|||
|
|
|
Batteriefach |
|
|
Eigengewichtsfunktion |
STEP ON: (Betriebsbereit) |
|
|
|
|
Die Waage ist betriebsbereit. |
|
||
|
|
|
|
|
||
Anzeigegerät |
Zubehör |
|
|
BMI-Modus und/oder |
HEIGHT: (Größeneinheit) |
|
|
|
|
|
|||
AC-Adapter: |
|
Schrauben (x 5) |
Größeneinstellung |
Die Größe ist eingestellt. |
|
|
|
|
|
|
|
||
|
MODELL: A30930G |
|
Modus-Wahl bzw. Ändern der |
BMI: |
|
|
|
|
|
|
numerischen Werte nach oben |
BMI-Wert wird berechnet. |
|
|
|
|
Federscheibe (x 4) |
Modus-Wahl bzw. Ändern der |
BMI MODE: |
|
Höhenregulierer |
|
|
numerischen Werte nach unten |
Die Waage ist auf BMI-Modus geschaltet. |
|
|
|
|
|
|
|||
|
|
|
|
WEIGHT LOCK: |
|
|
|
|
|
|
Abstellen der Gewichtsfixierung |
|
|
|
Schraubenschlüssel |
Kappe |
Deckel |
Das Gewicht hat sich stabilisiert. |
|
|
Wiegeplattform |
|
* Erscheint nur, wenn die Gewichtsfixiertaste an ist. |
||||
|
|
|
|
|||
|
|
|
|
|
|
|
|
|
|
|
W Symbole und ihre Bedeutung |
|
|
|
|
|
|
: Anzeigegerät an |
: Anzeigegerät aus. |
: Gleichstrom |
|
Bedienungsanleitung |
Montageanleitung |
: Gerät der Klasse II |
: Verwendetes Teil Typ B |
: Nulleinstellung |
|
|
|
|
|
|||
|
|
|
|
: Anstellen der |
: Vorsicht: Entsprechende |
: Konformität mit Medical |
Einstellbare Füße |
|
|
|
Eigengewichtsfunktion |
Hinweise beachten. |
Device Directive 93/42/EWG |
|
|
|
|
|
|
|
20 |
21 |
WB-100MA- /04.01.27 04.1.28 9:12 AM 22
2.Vorbereitungen vor Gebrauch
W Höheneinstellung
(Modell Remote Display)
D
Höhenregulierer
* Höheneinstellung durch Drehen |
verstellbaren Füße |
(Säulengestützte Version)
Höhenregulierer
Um ein genaues Messergebnis zu ermöglichen, positionieren Sie das Gerät auf einem möglichst ebenen Untergrund und stellen Sie die Höhe mittels der verstellbaren Füße so ein, dass sich die Blase des Höhenregulierers in der Mitte des Rahmens
befindet.
mVorsicht
Achten Sie darauf, dass die Waage auf einem ebenen Untergrund steht. Bei Gebrauch des Gerät an unsicherer Stelle ohne festen Halt der Füße kann das Gerät umkippen und ein genaues Wiegen unmöglich machen.
* Höheneinstellung durch Drehen der verstellbaren Füße
W Aufbau des Geräts (Modell Remote Display)
Bei Verwendung des Ständers
Ziehen Sie den Ständer hinten am Anzeigegerät heraus.
Wenn Sie das Anzeigegerät wegstellen, verwahren Sie den Ständer im Schlitz hinten am
Anzeigegerät.
|
|
|
22 |
Bei Wandmontage
a Bringen Sie die Wandbefestigung mittels der Schrauben an und lassen Sie die Schrauben dabei 5 mm hervorstehen.
b Setzen Sie das Anzeigegerät auf die Schraubenköpfe auf.
cDrücken Sie das Anzeigegerät vorsichtig herunter, um zu gewährleisten, dass es sicher aufsitzt.
m Sollte das Display zu locker aufsitzen, kann es leicht herunterfallen.
Bringen Sie das Display so an, dass das Kabel nicht beschädigt werden kann oder eine Stolpergefahr besteht.
Das Display nicht am Kabel hin-und her schwingen.
W Vorbereiten der Stromquelle
a Verwendung eines AC-Adapters
Stecker
Buchse
 Kontrolllampe
b Verwendung von Trockenbatterien
Bundschrauben des
Batteriefachs
Trockenb atterien
Batteriefach
Stecken Sie den Kabelstöpsel für den AC-Adapter in die Buchse an der Seite des Anzeigegeräts und den Stecker des AC-Adapters in eine Netzsteckdose (230V AC).
Prüfen Sie, ob die Kontrolllampe am AC-Adapter aufleuchtet.
mWarnung
•Um elektrische Schocks zu vermeiden, den Stecker nicht mit nassen Händen einstecken oder herausziehen.
mVorsicht
•Nur den vorgegebenen AC-Adapter (MODELL: A30930G) verwenden. Andere Adapter können Funktionsstörungen verursachen.
Lösen Sie die Bundschrauben des Batteriefachs rechts am Anzeigegerät und ziehen Sie das Batteriefach heraus. Legen Sie die Batterien LR6 (AA) wie im Batteriefach angegeben ein, schließen Sie das Batteriefach und ziehen Sie die Bundschrauben wieder an.
Erscheint auf der Anzeige der Hinweis  , müssen alle sechs Batterien LR6 (AA) ausgewechselt werden.
erscheint, wenn die Batteriespannung unter 6,5 V w10%
liegt.
m•Achten Sie darauf, dass die Batteriepole  /
/  richtig herum eingelegt sind. Werden die Batterien falsch eingelegt, kann Flüssigkeit austreten und das Gerät beschädigen.
•Wenn Sie das Gerät längere Zeit nicht benutzen, sollten Sie vor dem Wegstellen die Batterien herausnehmen.
•Wenn Sie das Gerät an einer anderen Stelle mit einem Temperaturunterschied von mehr als 20°C aufstellen, warten Sie mindestens zwei Stunden mit dem Gebrauch.
D
c Intervall-Einstellung für automatisches Abschalten
Wenn die Wage abgeschaltet ist, drücken und halten Sie die Taste  . Drücken Sie dann die Taste
  .
.
Lassen Sie die Taste  wieder los.
Die Anzeige schaltet nun auf den Intervall-Einstellmodus für automatisches Abschalten (Auto Power Off Intervall Setting) um und es erscheint „20" als vorgegebene Einstellung. D.h. die Waage schaltet sich nach 20 Minuten automatisch ab.
Drücken Sie die Taste  (Pfeil hoch) bzw.
  (Pfeil runter) und stellen Sie 10 für 10 Minuten und/oder bei Bedarf CONT für Dauereinstellung ein. Drücken Sie auf die
  Taste um zu beenden.
23
 Loading...