


STA-RITE U-3 SKIMMER
INSTALLATION, OPERATION & PARTS
Save these instructions. Carefully read and follow all safety instructions in this manual.
Hazardous Suction. Risk of hair or body entrapment, drowning or
disembowelment.
Wall fitting on equalizer line must be non-entrapping of hair or body at flow rates upto 55 GPM.
NOTE: Skimmer is not equivalent to a main drain. All pools, spas, and hot tubs must have at least two main drains besides skimmer(s).


 Blocking pump suction can cause pressure surges and water hammer, which can damage pump or piping and may cause flooding.
OPERATION
All Models:
Pump suction pulls water through skimmer. Water flow into skimmer carries floating leaves, bugs, etc., into skimmer where they are trapped in skimmer basket. (Dust, body oils, etc., go on through to be removed by pool filter.) Floating weir in skimmer opening enhances surface flow and skimming action. Model Series 1403, 2403, 1404 and 2404 are NSF listed.
Water level: Keep pool, spa, or hot tub water level at least 1-1/2 to 2" above bottom of skimmer opening for proper operation. Float Valve: Float valve protects pump from loss of prime if skimmer clogs or flow through skimmer is restricted. Trimmer valve plate on bottom of float valve balances flow between skimmer and main drains.
Flow adjustment: Balance flow between skimmer and main drain.
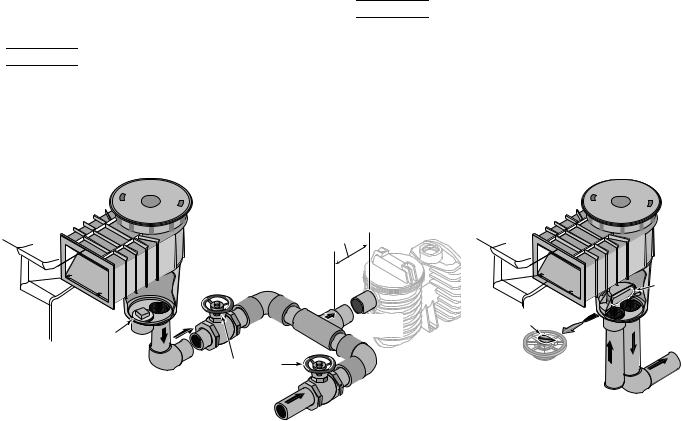
A.Skimmers without float: Adjust shut-off valves in pump suction line from skimmer and pool main drain line. (See Figure 1, below.)
B.Skimmers with float: If skimmer is equipped with float valve, adjust trimmer plate on bottom of float. To reach trimmer plate, remove cover, basket, and float valve (See Figure 2, below). Swing trimmer plate to one side to increase trimmer port size (more flow through skimmer, less flow through main drains); reduce port size for less flow through skimmer and more flow through main drains.
Sweeping pool: For installation without equalizer line, hold weir up to starve skimmer of water and close float valve. This directs all flow through main drains. To return to normal skimming operation, turn pump off 10-15 seconds, allowing skimmer to fill and float valve to return to open position. Skimmer will now operate normally as long as pool water level is high enough to allow normal flow over weir.
Typical Public Pool Skimmer Installation with Equalizer Line Installed
|
Float |
Float |
|
|
Valve |
||
Flow |
Open |
Valve |
|
No Flow |
Shut |
||
Through |
|
||
Over |
Check |
||
Skimmer |
|||
Weir |
Valve |
||
|
|||
|
|
Open |
|
|
Check |
To Pump |
|
|
To Pump |
|
|
Valve |
Suction |
|
From |
Suction |
|
|
Shut |
|
|
|
|
|
|
|
|
Equalizer |
|
|
|
|
|
|
|
|
|
Equalizer |
|
|
Outlet |
|
||
Line |
|
|
|
|
||
|
|
|
1023 0694 |
|
|
1022 0694 |
|
|
|
|
|
|
|
8010-0010 |
55GP |
|
8010-0010 |
55G |
|
|
|
|
M |
|
|
PM |
|
S |
|
|
|
S |
|
|
|
GNI |
C C |
|
|
GNGNTI TFINOITC |
|
|
TFINOIT |
|
|
|
||
Pool Vacuum
Hose
Vacuum |
Plate |
Remove Check |
|
Valve; Plug |
|
Equalizer (or |
To Pump |
Main Drain) |
Suction |
Port |
|
Equalizer
Line
1021 0694
010-0010 |
55G |
|
|
|
PM |
G |
NTI |
TC |
TFIFNOII |
||
Figure 1: Normal operation: float valve open, check valve shut.
Sta-Rite Pool/Spa Group
Figure 2: Equalizer operation; float valve shut, check valve open.
Figure 3: Vacuuming pool; float and check valves removed, equalizer (check valve) port plugged.
293 Wright Street, Delavan, WI 53115
International: 262-728-5551, FAX: 262-728-7550 www.starite.com
Union City, TN • Delavan, WI • Mississauga, ON
© 2005, Sta-Rite Industries |
39501-0028 (Rev. 3/25/05) |
Vacuuming pool (Figure 5): Remove cover, basket (and float valve and check valve if skimmer has them). Plug equalizer inlet. Replace basket and place vacuum plate on top of basket. Fill the vacuum hose with water, bring it in over coping or through skimmer throat, and attach the vacuum hose directly to the vacuum plate. Follow instructions in vacuum attachment or filter owner’s manual for vacuuming operation. After vacuuming, remove hose and vacuum plate, unplug equalizer port, and reinstall check valve, float, basket, and cover. Be sure cover is solidly in the frame to prevent accidentally dislodging it. Fasten cover with screws provided if children use pool.
No. 08655-0017 check valve is required when skimmer is installed with equalizer. Check valve is not used when skimmer is installed without equalizer.
NOTICE: The equalizer is an emergency bypass intended to prevent damage to the pump when pool water level is low or skimmer basket is blocked. Do not allow flow through equalizer for extended time periods.
MAINTENANCE
Weir: Periodically check weir for free operation. Replace if damaged or worn.
Public pool models:
Check Valve (Public Pool Models): Check valve is threaded into equalizer inlet port in skimmer. When closed, check valve prevents flow through equalizer line. If flow through skimmer decreases enough to let float valve drop, check valve opens to allow flow to pump from main drain/equalizer line (which prevents starving the pump).
Inspect equalizer regularly. During normal operation (with float valve open) the skimmer check valve prevents detectable flow through the equalizer wall fitting. There should be no flow through the wall fitting unless the skimmer float valve is closed. If you can feel suction into the equalizer wall fitting while the float valve is in normal (or up) position, the check valve is leaking; replace it.
NOTICE: The skimmer check valve is factory pre-set and not adjustable. If check valve appears worn or deteriorated, or if spring tension is loose, do not try to fix it; replace the check valve.
Equalizer: If flow over weir is restricted, Float valve closes, diverting pump suction to equalizer (or main drain) line and preventing loss of prime in pump. Seal normally remains until pump stops, when float valve will rise. If pump starts again before stoppage is cleared, float will close again and remain closed until pump stops, blockage is cleared, or pool water level returns to normal.


 Hazardous Suction. Risk of hair or body entrapment, drowning or disembowelment. Wall fitting on equalizer line must be non-entrapping of hair or body at flow rates up to 55 GPM and must conform to the requirements of ANSI/ASME A112.19.8M-1987 (Section 8.8.2). Install an 8011Series non-entrapping suction fitting on equalizer line.
Strainer Basket: Check strainer basket every few days for accumulated leaves, debris, etc. Empty basket as required. Reset float valve if it closed.
Float Valve: Periodically check that float valve is operating freely and is not waterlogged. If necessary, tighten trimmer plate pivot screw to maintain desired flow balance.
Check Valve (Public Pool Models): Inspect for wear or deterioration. Make sure that screw is tight in check valve body. If you can detect flow through equalizer with float valve open, replace check valve.
Equalizer (Wall) Fittings: Periodically check that wall fittings are correctly installed and that covers are tight to fittings.
Water Level: Maintain water level at least 1-1/2 to 2” above bottom of skimmer opening for proper operation. Adjust trimmer plate if necessary. Make sure set screw is tight.
Winterizing: Drain pool until level is below skimmer inlet. Remove cover, basket and float. Plug both bottom ports with standard 1-1/2 or 2" pipe plugs. Cover skimmer to prevent rainwater or snow accumulation.


 Falling and tripping hazard. Skimmer grate may deteriorate with prolonged use.
Cover must be flush with pool, spa, or hot tub deck level.
Skimmer is made of impact and weather resistant materials, but extended use (5-10 years) may lead to reduced strength. Regularly check condition of skimmer cover. Look for cracks, chips, deterioration of plastic, etc. If any sign of damage or deterioration is found in the cover, replace it.
|
At least 4 |
|
times Pipe |
|
Diameter |
From |
|
Skimmer |
|
|
To Pump |
Plug |
Suction |
Equalizer |
|
Port |
|
Adjust Shut-off |
973 0694 |
Valves to |
|
|
Balance Flow |
|
From |
Figure 4: Typical residential |
Pool |
Main |
|
installation without float valve. |
Drains |
|
|
Use with at least two main drains. |
|
Float
Valve
Adjust Trimmer Plate
to Balance Flow
From |
To Pump |
Pool |
Suction |
Main |
|
Drains |
|
|
991 0694 |
Figure 5: Typical residential installation with float valve. Use with at least two main drains.
2
 Loading...