


KDL-43WD75
Table of contents
 Loading...
KDL-49WD75x / 43WD75x / 32WD75x
Television
Operating Instructions
Parts and Controls
Connecting TV to the Internet
Watching TV
Navigating through Home Menu
Viewing Pictures from Connected
Equipment
Additional Information
2
GB
Table of Contents
IMPORTANT NOTICE . . . . . . . . . . . . . . . . . . . . 3
Safety information . . . . . . . . . . . . . . . . . . . . .3
Precautions . . . . . . . . . . . . . . . . . . . . . . . . . . . 5
Parts and Controls
TV. . . . . . . . . . . . . . . . . . . . . . . . . . . . . . . . . 7
Remote Control . . . . . . . . . . . . . . . . . . . . . 8
Connecting TV to the Internet
Setting up the Internet Connection . . . . 10
Type 1: Secured network with Wi-Fi
Protected Setup™ (WPS) . . . . . . . . . . . . . . . 10
Type 2: Secured network without Wi-Fi
Protected Setup™ (WPS) . . . . . . . . . . . . . . . 11
Type 3: Unsecured network with any type
of wireless LAN router . . . . . . . . . . . . . . . . . 11
Type 4: Wired network set-up. . . . . . . . . . . 11
Preparing a Wired Network . . . . . . . . . . . . . 12
Viewing the Network Status . . . . . . . . . . . . 12
If You Cannot Connect to the
Internet . . . . . . . . . . . . . . . . . . . . . . . . . . . 12
Privacy Policy . . . . . . . . . . . . . . . . . . . . . . 12
Watching TV
Changing the Viewing Style . . . . . . . . . . 13
Changing the Screen Format. . . . . . . . . . . . 13
Setting Scene Select. . . . . . . . . . . . . . . . . . . 13
Navigating through Home
Menu
All Apps . . . . . . . . . . . . . . . . . . . . . . . . . . . 14
Photo Sharing Plus . . . . . . . . . . . . . . . . . . . . 14
Using the TV as a Photo Frame Mode. . . . . 14
Listening to FM Radio (for Russia or
Ukraine only) . . . . . . . . . . . . . . . . . . . . . . . . . 15
Digital Programme List . . . . . . . . . . . . . . . 15
Digital EPG. . . . . . . . . . . . . . . . . . . . . . . . .16
Recordings. . . . . . . . . . . . . . . . . . . . . . . . .16
Media . . . . . . . . . . . . . . . . . . . . . . . . . . . . . 16
Playback Photo/Music/Video via USB . . . . 16
Home Network . . . . . . . . . . . . . . . . . . . . . 17
Connecting to a Home Network . . . . . . . . . 17
Renderer . . . . . . . . . . . . . . . . . . . . . . . . . . . . 17
Display Settings for Media Servers . . . . . . . 18
Settings . . . . . . . . . . . . . . . . . . . . . . . . . . .18
System Settings . . . . . . . . . . . . . . . . . . . . . . 18
Customer Support . . . . . . . . . . . . . . . . . . . .26
Viewing Pictures from
Connected Equipment
Connection Diagram. . . . . . . . . . . . . . . . 28
Using Audio and Video Equipment. . . . 30
Using Screen mirroring . . . . . . . . . . . . . . 30
Installing the TV to the Wall . . . . . . . . . . . 31
Additional Information
Troubleshooting . . . . . . . . . . . . . . . . . . . .32
Picture . . . . . . . . . . . . . . . . . . . . . . . . . . . . . .32
Sound. . . . . . . . . . . . . . . . . . . . . . . . . . . . . . . 33
Channels . . . . . . . . . . . . . . . . . . . . . . . . . . . . 33
Network . . . . . . . . . . . . . . . . . . . . . . . . . . . . . 33
General . . . . . . . . . . . . . . . . . . . . . . . . . . . . . 34
Specifications . . . . . . . . . . . . . . . . . . . . . .35

3
GB
GB
Introduction
Thank you for choosing t his Sony product.
Before operating the TV, please read this manual thoroughly and
retain i t for future reference.
Note
• The “x” that appears in the model name corresponds to a
numeric digit, related to design, colour or TV system.
• Before operating the TV, please read the “Safety information”
(page 3).
• Images and illustrations used in Setup Guide and this manual
are for reference only and may differ from the actual product.
Location of the Setup Guide
Setup Guide is placed on top of the cushion inside the TV carton.
Location of the identification label
Labels for the TV Model No., Production Date (year/month) and
Power Supply rating are located on the rear of the TV or package.
Labels for the mains adaptor Model No. and Serial No. are located
on the bottom of the mains adaptor.
WARNING
TO PREVENT THE
SPREAD OF FIRE, KEEP
CANDLES OR OTHER OPEN
FLAMES AWAY FROM THIS
PRODUCT AT ALL TIMES.
NOTICE FOR CUSTOMERS IN THE UNITED
KINGDOM
A moulded plug complying with BS1363 is fitted to this equipment
for your safety and convenience.
Should the fuse in th e plug suppli ed need to be rep laced with th e
same rating of fuse approved by ASTA or BSI to BS 1362 (i.e.,
marked with
or ) must be used.
If the plug supplied with this equipment has a detachable fuse
cover, be sure to attach the fuse cover after you change the fuse.
Never use the plug without the fuse cover. If you should lose the
fuse cover, please contact your nearest Sony service station.
How to replace the fuse
Open the fuse compartment with a blade screwdriver, and
replace the fuse.
Please refer to the illustration that actually equipped with the
product.
Notice for Wireless Signal
Hereby, Sony Corporation declares that this unit is in
compliance with the essential requirements and
other relevant provisions of Directive 1999/5/EC.
For details, please access the following URL:
http://www.compliance.sony.de/
WARN ING
Batteries must not be exposed to excessive heat such as
sunshine, fire or the like.
Never place a television set in an unstable location. A television
set may fall, causing serious personal injury or death. Many
injuries, particularly to children, can be avoided by taking simple
precautions such as:
Using cabinets or stands recommended by the manufacturer of
the television set.
Only using furniture that can safely support the television set.
Ensuring the television set is not overhanging the edge of the
supporting furniture.
Not placing the television set on tall furniture (for example,
cupboards or bookcases) without anchoring both the furniture
and the television set to a suitable support.
Not placing the television set on cloth or other materials that
may be located between the television set and supporting
furniture.
Educating children about the dangers of climbing on furniture
to reach the television set or its controls.
If your existing television set is being retained and relocated, the
same considerations as above should be applied.
Installation/Set-up
Install and use the TV set in accordance with the instructions
below in order to avoid any risk of fire, electric shock or damage
and/or injuries.
Installation
• The TV set should be installed near an easily accessible mains
socket.
• Place the TV on a stable, level surface to prevent it from falling
over and causing personal injury or property damage.
• Install the TV so that the TV's Table-Top Stand does not
protrudes out from the TV stand (not supplied).
If the Table-Top Stand protrudes out from the TV stand, it may
cause TV set to topple over, fa ll down, and cause personal injury
or damage to the TV.
FUSE
IMPORTANT NOTICE
This product has been manufactured by or on behalf of Sony
Corporation, 1-7-1 Konan Minato-ku To kyo, 108-0075 Japan.
Inquiries related to product compliance based on European
Union legislation shall be addressed to the authorized
representative, Sony Belgium, bijkantoor van Sony Europe
Limited, Da Vincilaan 7-D1, 1935 Zaventem, Belgium. For any
service or guarantee matters, please refer to the addresses
provided in the separate service or guarantee documents.
Safety information
4
GB
• Only qualified service personnel should carry out wall-mount
installations.
• For safety reasons, it is strongly recommended that you use
Sony accessories, including:
Wall-Mount Bracket – SU-WL450
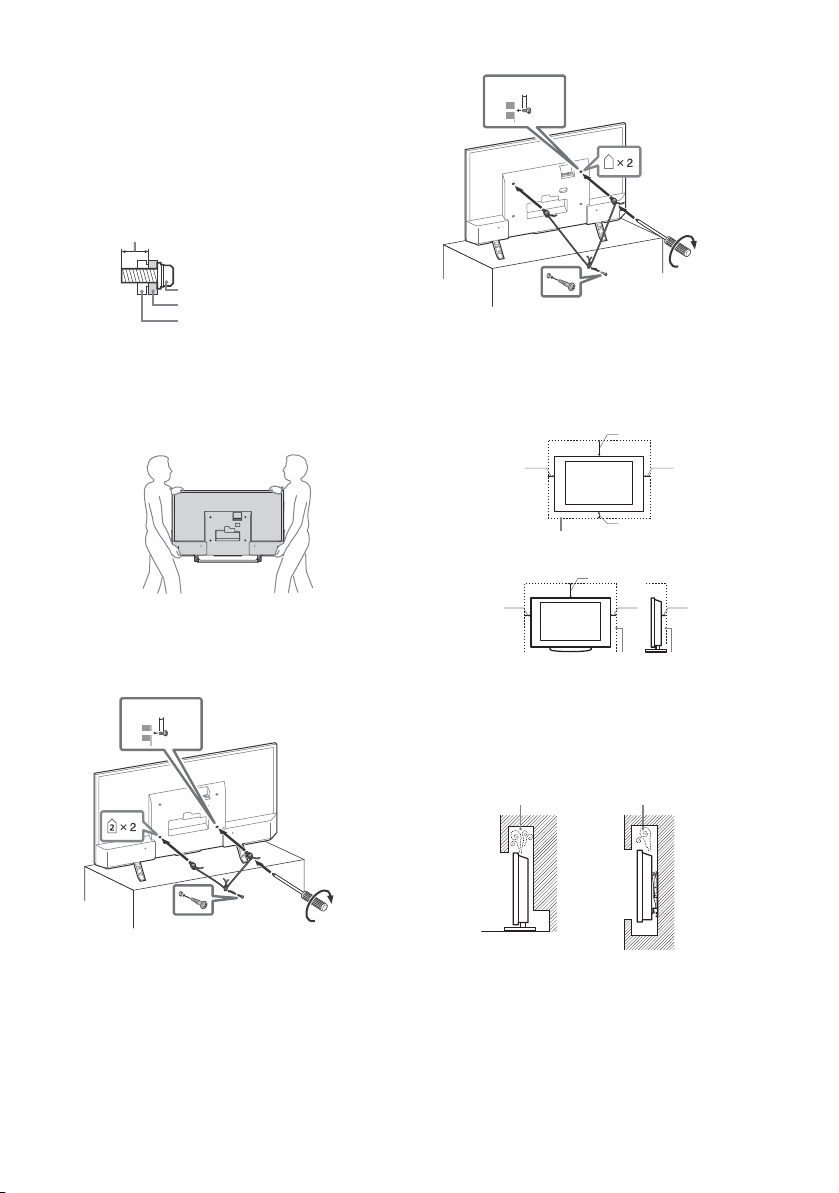
• Be sure to use the screws supplied with the Wall-Mount Bracket
when attaching the Wall-Mount Bracket to the TV set. The
supplied screws are designed as indicated by illustration when
measured from the attaching surface of the Wall-Mount Bracket.
The diameter and length of the screws differ depending on the
Wall-Mount Bracket model.
Use of screws other than those supplied may result in internal
damage to the TV set or cause it to fall, etc.
Tran spor ting
• Before transporting the TV set, disconnect all cables.
• Two or three people are needed to transport a large TV set.
• When transporting the TV set by hand, hold it as shown below.
Do not put stress on the LCD panel and the frame around the
screen.
• When lifting or moving the TV set, hold it firmly from the
bottom.
• When transporting the TV set, do not subject it to jolts or
excessive v ibration.
• When transporting the TV set for repairs or when moving, pack
it using the original carton and packing material.
Topple prevention
KDL-49WD75x / 43WD75x
KDL-32WD75x
Vent ilation
• Never cover the ventilation holes or insert anything in the
cabinet.
• Leave space around the TV set as shown below.
• It is strongly recommended that you use a Sony Wall-Mount
Bracket in order to provide adequate air circulation.
Installed on the wall
Installed with stand
• To ensure proper ventilation and prevent the collection of dirt or
dust:
Do not lay the TV set flat, install upside down, backwards, or
sideways.
Do not place the TV set on a shelf, rug, bed or in a closet.
Do no t cover th e TV set w ith a clot h, such a s curtai ns, or ite ms
such as newspapers, etc.
Do not install the TV set as shown below.
Screw (supplied with the
Wall-Mount Bracket)
Wall-Mount Bracket
8 mm - 12 mm
TV's rear cover
M6
8 mm - 12 mm
1.5 N·m/1,5 N·m
{15 kgf·cm}
2
M6
8 mm - 12 mm
1.5 N·m/1,5 N·m
{15 kgf·cm}
30 cm
10 cm
10 cm
10 cm
Leave at least this space around the set.
30 cm
10 cm
10 cm
Leave at least this space around the set.
6 cm
Air circulation is blocked.
Wall Wall
5
GB
GB
Mains lead
Handle the mains lead and socket as follows in order to avoid any
risk of fire, electric shock or damage and/or injuries:
Use only mains leads supplied by Sony, not other suppliers.
Insert the plug fully into the mains socket.
Operate the TV set on a 220 V - 240 V AC supply only.
When wiring cables, be sure to unplug the mains lead for your
safety and take care not to catch your feet on the cables.
Disconnect the mains lead from the mains socket before
working on or moving the TV set.
Keep the mains lead away from heat sources.
Unplug the mains plug and clean it regularly. If the plug is
covered with dust and it picks up moisture, its insulation may
deteriorate, which could result in a fire.
Note
• Do not use the supplied mains lead on any other equipment.
• Do not pinch, bend, or twist the mains lead excessively. The core
conductors may be exposed or broken.
• Do not modify the mains lead.
• Do not put anything heavy on the mains lead.
• Do not pull on the mains lead itself when disconnecting the
mains lead.
• Do not connect too many appliances to the same mains socket.
• Do not use a poor fitting mains socket.
NOTE ON MAINS ADAPTOR
Warn ing
To reduce the risk of fire or electric shock , do not expose this
apparatus to rain or moisture.
To prevent fire or shock hazard, do not place objects filled with
liquids, such as vases, on the apparatus. Do not install th is
equipment in a confined space, such as a bookshelf or similar
unit.
• Please ensure that the mains socket is installed near the
equipment and shall be easily accessible.
• Be sure to use the supplied mains adaptor and mains lead.
• Do not use any other mains adaptor. I t may cause a
malfunction.
• Connect the mains adaptor to an easily accessible mains socket.
• Do not coil the mains lead around the
mains adaptor. The core wire may be cut
and/or it may cause a malfunction of the
media receiver.
• Do not touch the mains adaptor with wet hands.
• If you notice an abnormality in the mains adaptor, disconnect it
from the mains socket immediately.
• The set is not disconnected from the mains source as long as it
is connected to the mains socket, even if the set itself has been
turned off.
• As the mains adaptor will become warm when it is used for a
long time, you may feel hot when touching it by hand.
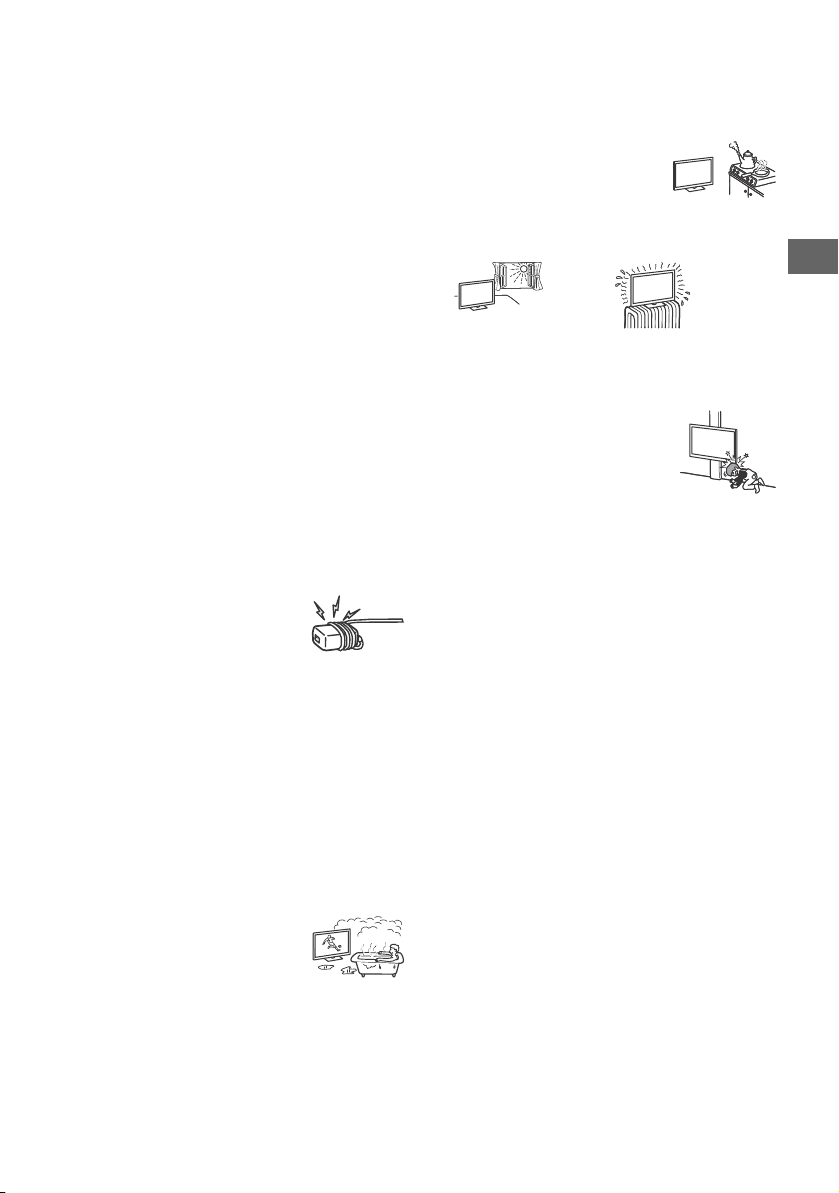
Prohibited Usage
Do not install/use the TV set in locations, environments or
situations such as those listed below, or the TV set may
malfunction and cause a fire, electric shock, damage and/or
injuries.
Location:
• Outdoors (in direct sunlight), at the seashore, on a ship or other
vessel, inside a vehicle, in medical institutions, unstable
locations, near water, rain, moisture or smoke.
• If the TV is placed in the changing room of
a public bath or hot spring, the TV may be
damaged by airborne sulphur, etc.
• For best picture quality, do not expose the screen to direct
illumination or sunlight.
• Avoid moving the TV from a cold area to a warm area. Sudden
room temperature changes may cause moisture condensation.
This may cause the TV to show poor picture and/or poor colour.
Should this occur, allow moisture to evaporate completely
before powering the TV on.
Environment:
• Places that are hot, humid, or excessively dusty; where insects
may enter; where it might be exposed to mechanical vibration,
near flammable objects (candles, etc). The TV set shall not be
exposed to dripping or splashing and no objects filled with
liquids, such as vases, shall be placed on the TV.
• Do not place the TV in a humid or dusty
space, or in a room with oily smoke or
steam (near cooking tables or
humidifiers). Fire, electric shock, or
warping may result.
• Do not install the TV in places subject to
extreme temperature such as in direct sunlight, near a radiator
or a heating vent. The TV may overheat in such condition which
can cause deformation of the enclosure and/or TV malfunction.
Situation:
• Do not use when your hands are wet, with the cabinet removed,
or with attachments not recommended by the manufacturer.
Disconnect the TV set from mains socket and aerial during
lightning storms.
• Do not install the TV so that it sticks out
into an open space. Injury or damage
from a person or object bumping into the
TV may result.
Broken pieces:
• Do not throw anything at the TV set. The screen glass may break
by the impact and cause serious injury.
• If the surface of the TV set cracks, do not touch it until you have
unplugged the mains lead. Otherwise this may cause an electric
shock.
When not in use
• If you will not be using the TV set for several days, the TV set
should be disconnected from the mains for environmental and
safety reasons.
• As the TV set is not disconnected from the mains when the TV
set is just turned off, pull the plug from the mains to disconnect
the TV set completely.
• Some TV sets may have features that require the TV set to be
left in standby to work correctly.
For children
• Do not allow children to climb on the TV set.
• Keep small accessories out of the reach of children, so that they
are not mistakenly swallowed.
If the following problems occur...
Turn off the TV set and unplug the mains lead immediately if any
of the following problems occur.
Ask your dealer or Sony service centre to have it checked by
qualified service personnel.
When:
Mains lead is damaged.
Poor fitting of mains socket.
TV set is damaged by being dropped, hit or having something
thrown at it.
Any liquid or solid object falls through openings in the cabinet.
About LCD TV Temperature
When the LCD TV is used for an extended period, the panel
surrounds become warm. You may feel hot when touching there
by the hand.
6
GB
Viewing the TV
• View the TV in moderate light, as viewing the TV in poor light or
during long period of time, strains your eyes.
• When using headphones, adjust the volume so as to avoid
excessive levels, as hearing damage may result.
LCD Screen
• Although the LCD screen is made with high-precision
technology and 99.99 % or more of the pixels are effective,
black dots may appear or bright points of light (red, blue, or
green) may appear constantly on the LCD screen. This is a
structural property of the LCD screen and is not a malfunction.
• Do not push or scratch the front filter, or place objects on top of
this TV set. The image may be uneven or the LCD screen may be
damaged.
• If this TV set is used in a cold place, a smear may occur in the
picture or the picture may become dark. This does not indicate a
failure. These phenomena disappear as the temperature rises.
• Ghosting may occur when still pictures are displayed
continuously. It may disappear after a few moments.
• The screen and cabinet get warm when this TV set is in use. This
is not a malfunction.
• The LCD screen contains a small amount of liquid crystal. Follow
your local ordinances and regulations for disposal.
Handling and cleaning the screen surface/
cabinet of the TV set
Be sure to unplug the mains lead connected to the TV set from
mains socket before cleaning.
To avoid material degradation or screen coating degradation,
observe the following precautions.
• To remove dust from the screen surface/cabinet, wipe gently
with a soft cloth. If dust is persistent, wipe with a soft cloth
slightly moistened with a diluted mild detergent solution.
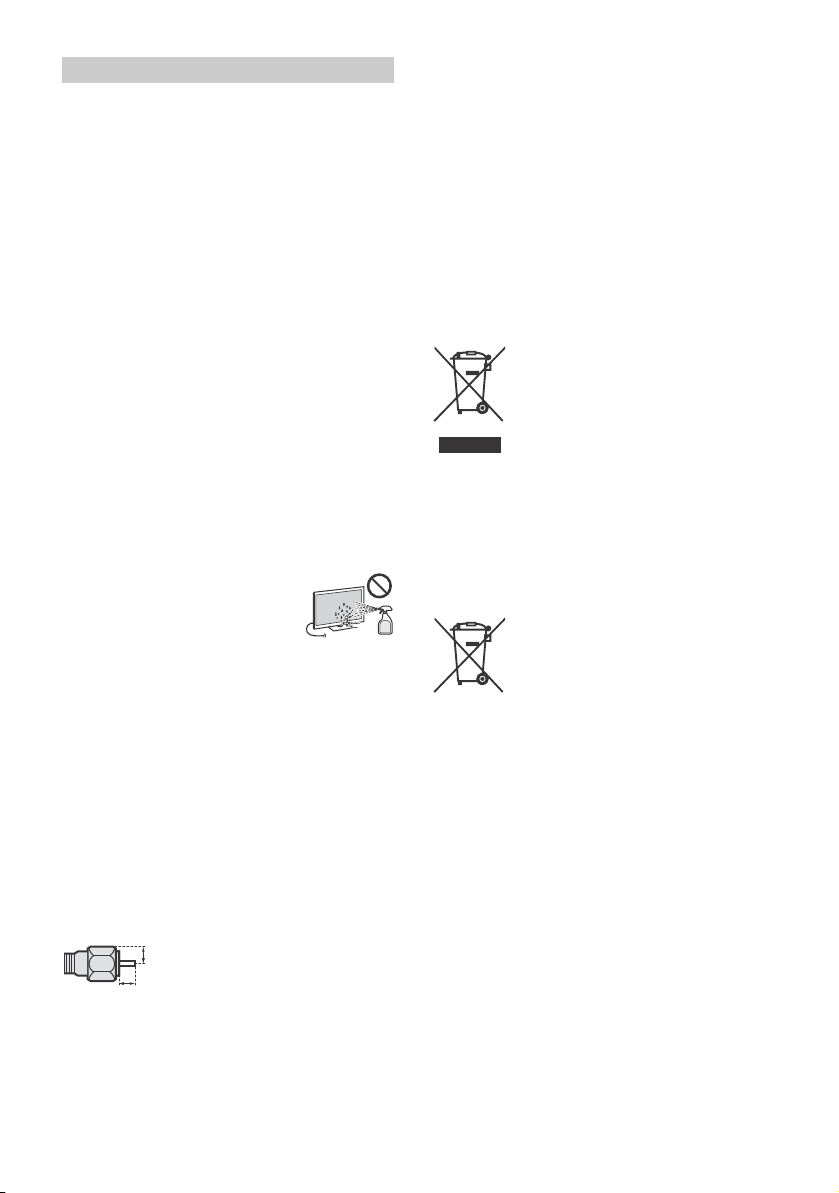
• Never spray water or detergent directly on
the TV set. It may drip to the bottom of the
screen or exterior parts and enter the TV
set, and may cause damage to the TV set.
• Never use any type of abrasive pad,
alkaline/acid cleaner, scouring powder, or
volatile solvent, such as alcohol, benzene,
thinner or insecticide. Using such materials or maintaining
prolonged contact with rubber or vinyl materials may result in
damage to the screen surface and cabinet material.
• Periodic vacuuming of the ventilation openings is
recommended to ensure to proper ventilation.
• When adjusting the angle of the TV set, move it slowly so as to
prevent the TV set from moving or slipping off from its table
stand.
Optional Equipment
• Keep optional components or any equipment emitting
electromagnetic radiation away from the TV set. Otherwise
picture distortion and/or noisy sound may occur.
• This equipment has been tested and found to comply with the
limits set out in the EMC Directive using a connection signal
cable shorter than 3 meters.
Recommendation of F-type plug
Projection of the inner wire from the connection part must be less
than 1.5 mm.
Caution about handling the remote control
• Observe the correct polarity when inserting batteries.
• Do not use different types of batteries together or mix old and
new batteries.
• Dispose of batteries in an environmentally friendly way. Certain
region may regulate the disposal of batteries. Please consult
your local authority.
• Handle the remote control with care. Do not drop or step on it,
or spill liquid of any kind onto it.
• Do not place the remote control in a location near a heat source,
a place subject to direct sunlight, or a damp room.
Wireless Function of the unit
• Do not operate this unit near medical equipment (pacemaker,
etc.), as malfunction of the medical equipment may result.
• Although this unit transmits/receives scrambled signals, be
careful of unauthorised interception. We cannot be responsible
for any trouble as a result.
Disposal of the TV set
Disposal of Old Electrical &
Electronic Equipment (Applicable in
the European Union and other
European countries with separate
collection systems)
This symbol on the product or on its packaging
indicates that this product shall not be treated
as household waste. Instead it shall be handed
over to the applicable collection point for the recycling of
electrical and electronic equipment. By ensuring this product is
disposed of correctly, you will help prevent potential negative
consequences for the environment and human health, which
could otherwise be caused by inappropriate waste handling of
this product. The recycling of materials will help to conserve
natural resources. For more detailed information about recycling
of this product, please contact your local Civic Office, your
household waste disposal service or the shop where you
purchased the product.
Disposal of waste batteries
(applicable in the European Union
and other European countries with
separate collection systems)
This symbol on the battery or on the packaging
indicates that the battery provided with this
product shall not be treated as household waste. On certain
batteries this symbol might be used in combination with a
chemical symbol. The chemical symbols for mercury (Hg) or lead
(Pb) are added if the battery contains more than 0.0005 %
mercury or 0.004 % lead. By ensuring these batteries are
disposed of correctly, you will help prevent potentially negative
consequences for the environment and human health which
could otherwise be caused by inappropriate waste handling of
the battery. The recycling of the materials will help to conserve
natural resources. In case of products that for safety, performance
or data integrity reasons require a permanent connection with an
incorporated battery, this battery should be replaced by qualified
service staff only. To ensure that the battery will be treated
properly, hand over the product at end-of-life to the applicable
collection point for the recycling of electrical and electronic
equipment. For all other batteries, please view the section on how
to remove the battery from the product safely. Hand the battery
over to the applicable collection point for the recycling of waste
batteries. For more detailed information about recycling of this
product or battery, please contact your local Civic Office, your
household waste disposal service or the shop where you
purchased the product.
Precautions
1.5 mm max.
(Reference drawing of the F type plug)
7 mm max.
7
GB
Parts and Controls
GB
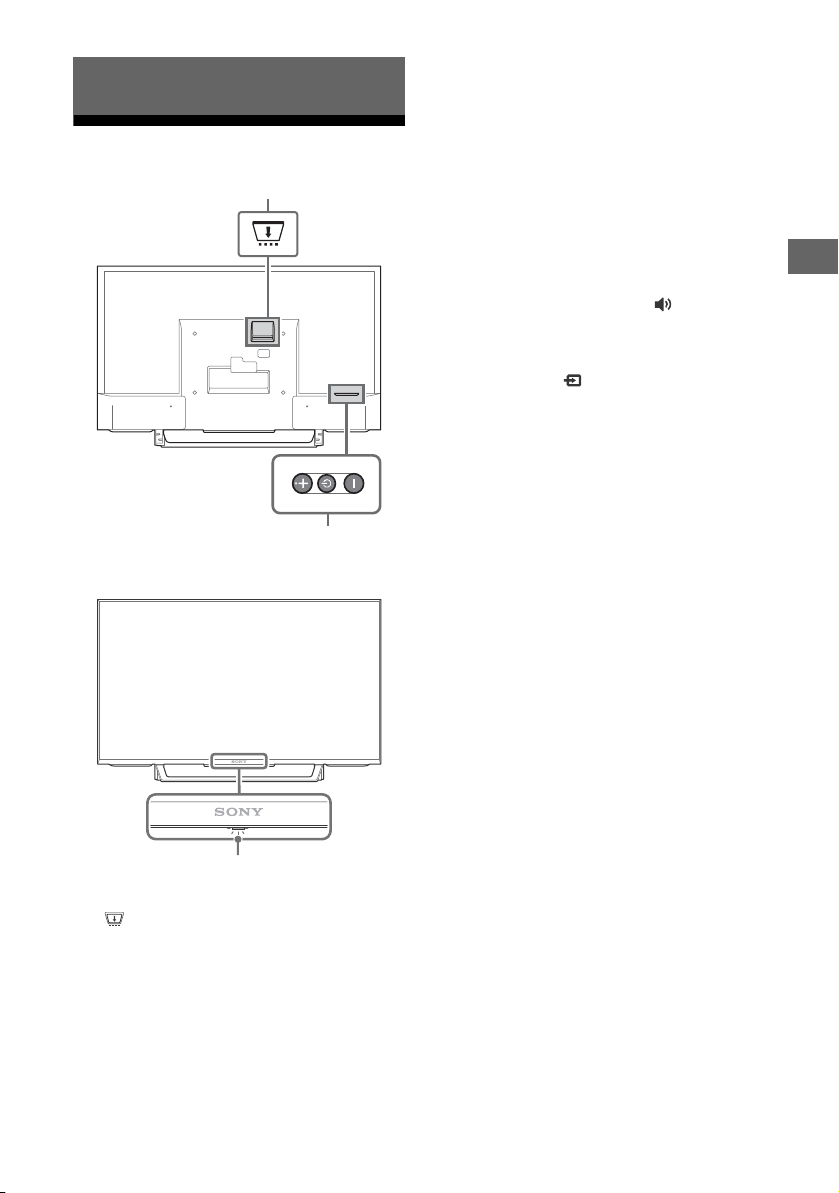
TV
CAM (Conditional Access Module)
• Provides access to pay TV services. For
details, refer to the instruction manual
supplied with your CAM.
• Do not insert the smart card directly into
the TV CAM slot. It must be fitted into the
Conditional Access Module provided by
your authorised dealer.
• CAM is not supported in some countries/
areas. Check with your authorised dealer.
• A CAM message may appear when you
switch to a digital programme after using
the Internet video.
(Power) / + / –
Short press to turn the TV on.
Long press until the TV turn off.
When the TV is on,
Volume
Press + or – button to increase/decrease the
volume.
You can also press until notification is
displayed. Increases/decreases the volume
by pressing the + or – button.
Input
Press until notification is displayed.
Moves the selected input source by pressing
+ (up) or – (down) button.
Programme
Press until PROG notification is displayed.
Select the programme by pressing + (next)
or – (previous) button.
(Sensors/LED indicator)
• Receives signals from the remote control.
Do not put anything over the sensor.
Doing so may affect its function.
• Lights up in amber when the [Sleep Timer]
or [On Timer] is set (page 24), or the TV is
in Photo Frame Mode (page 14).
• Lights up in white when [Power Saving] is
set to [Picture Off] (page 26).
• Lights up in white when the TV is turned
on.
• Does not light up when the TV is in
standby mode.
• Flashes while the remote control is being
operated.
Note
• Make sure that the TV is completely turned off before
unplugging the AC power cord (mains lead).
• To disconnect the TV from the AC power completely,
pull the plug from the mains socket.
• Please wait for a while when perform input selection
to change to other input.
Parts and Controls
3
2
1
8
GB
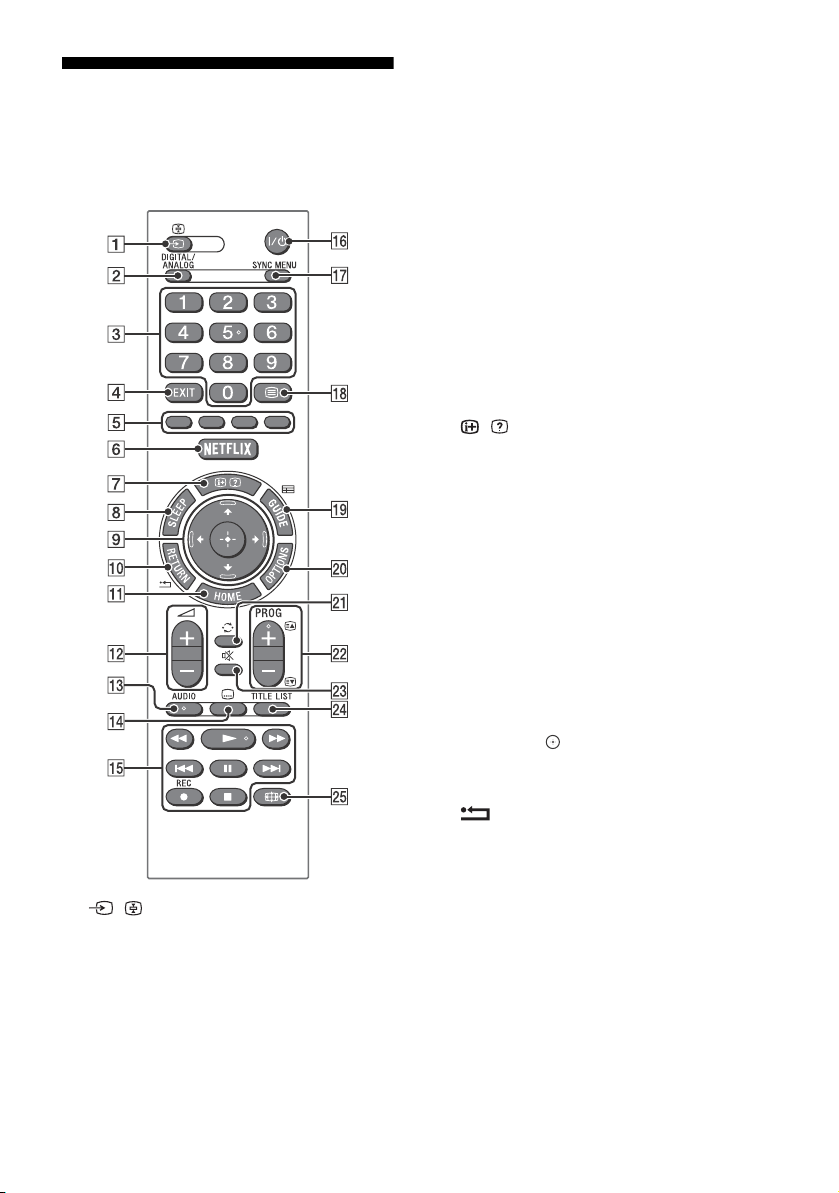
Remote Control
The remote control shape, location, availability
and function of remote control button may vary
depending on your region/country/TV model.
/ (Input select / Text hold)
• Displays and selects the input source.
• In text mode, holds the current page.
DIGITAL/ANALOG
Switches to digital or analogue input.
Number buttons
• Select channels. For channel numbers 10
and above, enter the next digit quickly.
• In text mode, enter the three digit page
number to select the page.
EXIT
Return to the previous screen or exit from
the menu. When an Interactive Application
service is available, press to exit from the
service.
Colour buttons
Displays operation guide (when colour
buttons are available).
NETFLIX (Only on limited region/
country/TV model)
Accesses the “NETFLIX” online service.
/ (Info / Text reveal)
• Displays information. Press once to
display information about the
programme/input you are viewing. Press
again to remove the display from the
screen.
• In text mode, reveals hidden information
(e.g. answers to a quiz).
SLEEP
Press repeatedly until the TV displays the
time in minutes ([Off]/[15 min]/[30 min]/
[45 min]/[60 min]/[90 min]/[120 min]) that
you want the TV to remain on before
shutting off. To cancel the sleep timer, press
SLEEP repeatedly until [Off] appears.
//// (Item select / Enter)
• Select or adjust items.
• Confirm selected items.
RETURN
• Returns to the previous screen of any
displayed menu.
• Stops playback when playing photo/
music/video file.
HOME
Displays or cancels the menu.
+/– (Volume)
Adjusts volume.
9
GB
Parts and Controls
GB
AUDIO
Select the sound of multilingual source or
dual sound for the programme current
being viewed (Depend on programme
source).
(Subtitle)
Changes the subtitle setting (page 20).
///////
• Operate media contents on TV and
connected BRAVIA Sync-compatible
device.
• This key also can be used to operate VOD
(Video on demand) service playback.
Availability is depend on VOD service.
/ (TV standby)
Turns the TV on or switches to standby
mode.
SYNC MENU
Press to display the BRAVIA Sync Menu and
then select connected HDMI equipment
from [Device Selection].
The following options can be selected from
BRAVIA Sync Menu.
Device Control:
Use the [Device Control] to operate
equipment that is compatible with BRAVIA
Sync Control. Select options from [Home
(Menu)], [Options], [Content List] and [Power
Off] to operate the equipment.
Speakers:
Select [TV Speakers] or [Audio System] to
output the TV’s sound from the TV speakers
or connected audio equipment.
TV Control:
Use the [TV Control] menu to operate the TV
from the [Home (Menu)] or [Options] menu.
Return to TV:
Select this option to return to TV
programme.
(Text)
In text mode, displays Text broadcast.
Each time you press , the display changes
cyclically as follows:
Tex t
Text over the TV picture (mix mode)
No Text (exit the Text service)
GUIDE (EPG)
Displays the Digital EPG (Electronic
Programme Guide) (page 16).
OPTIONS
Displays a list that contains shortcuts to
some setting menus.
The listed options vary depending on the
current input and content.
(Jump)
Returns to the previous channel or input
viewed more than 15 seconds.
PROG +/–/ /
• Selects the next (+) or previous (–)
channel.
• In text mode, selects the next ( ) or
previous ( ) page.
(Mute)
Mutes the sound. Press again to restore the
sound.
TITLE LIST
Display the Title list.
(Wide Mode)
Adjusts the screen display. Press repeatedly
to select the desired wide mode (page 13).
Hint
• The number 5, , PROG + and AUDIO buttons have
tactile dots. Use the tactile dots as references when
operating the TV.
Note
• If subtitles are selected and the user launches a
digital text application via ‘text’ key, subtitles may,
under certain circumstance stop being displayed.
When the user exits the digital text application,
subtitle decoding will resume automatically.

10
GB
Setting up the Internet
Connection
To use the network features of your TV it needs
to be connected to the Internet. The set-up
procedure differs depending on the type of
network and LAN router. Before setting up the
Internet connection, be sure to set up a LAN
router. Check your wireless LAN environment
using the following chart.
Wireless LAN
* Type 1 is easier to set up if your router has an
automatic setting button, e.g. Air Station One-Touch
Secure System (AOSS). Most of the latest routers have
this function. Check your router.
Type 1: Follow the configuration for Secured
network with Wi-Fi Protected Setup™
(WPS).
Type 2: Follow the configuration for Secured
network without Wi-Fi Protected
Setup™ (WPS).
Type 3: Follow the configuration for Unsecured
network with any type of wireless
LAN router.
Type 4: Follow the configuration for Wired
network set-up.
The WPS standard makes security of a wireless
home network as straightforward as pressing
the WPS button on the wireless LAN router.
Before setting up a wireless LAN, check the
location of the WPS button on the router and
verify how to use it.
For security purpose, [WPS (PIN)] provides a PIN
code for your router. PIN code is renewed every
time you select [WPS (PIN)].
1 Press HOME, then select [Settings]
[System Settings] [Set-up]
[Network] [Network Set-up].
2 IP Address setting/Proxy server:
– automatic setting:
[Set up network connection] [Easy]
– manual setting:
[Set up network connection] [Expert]
[Wired Set-up] or [Wireless Set-up]
3 Select [WPS (Push Button)] for Push
Button method or [WPS (PIN)] for PIN
method.
Note
Button name of the WPS may differ depending on
the router (e.g. AOSS button).
4 Follow the instructions on the set-up
screen.
Note
• If you use WPS for network set-up, the security
settings of the wireless LAN router activate, and any
equipment previously connected to the wireless LAN
in a non-secure status will be disconnected from the
network.
In this case, activate the security settings of the
disconnected equipment and then reconnect. Or, you
can deactivate the security settings of the wireless
LAN router, and then connect the equipment to a TV
in a non-secure status.
• To use the network with IPv6, select [Settings]
[System Settings] [Set-up] [Network] [IPv6/
IPv4 Priority] [IPv6], then select [Easy] in [Set up
network connection].
• When IPv6 is selected, HTTP Proxy cannot be set.
Connecting TV to the Internet
Secure Wireless LAN? NO
k Typ e 3
YES m
Do you use a wireless LAN
router compatible with Wi-Fi
Protected Setup™ (WPS)?
NO
k Typ e 2
YES m
Typ e 1*
Wired LAN , Type 4
Type 1: Secured network with Wi-Fi
Protected Setup™ (WPS)

11
GB
Connecting TV to the Internet
GB
To set up a wireless LAN, SSID (wireless network
name) and security key (WEP or WPA key) will be
required. If you do not know them, consult the
instruction manual of your router.
1 Press HOME, then select [Settings]
[System Settings] [Set-up]
[Network] [Network Set-up].
2 IP Address setting/Proxy server:
– automatic setting:
[Set up network connection] [Easy]
– manual setting:
[Set up network connection] [Expert]
[Wired Set-up] or [Wireless Set-up]
3 Select [Scan], then select a network from
the list of scanned wireless networks.
4 Follow the instructions on the set-up
screen.
Note
• To use the network with IPv6, select [Settings]
[System Settings] [Set-up] [Network] [IPv6/
IPv4 Priority] [IPv6], then select [Easy] in [Set up
network connection].
• When IPv6 is selected, HTTP Proxy cannot be set.
• Please make sure your surrounding is secure when
you key in your password.
To set up a wireless LAN, SSID (wireless network
name) will be required.
1 Press HOME, then select [Settings]
[System Settings] [Set-up]
[Network] [Network Set-up].
2 IP Address setting/Proxy server:
– automatic setting:
[Set up network connection] [Easy]
– manual setting:
[Set up network connection] [Expert]
[Wired Set-up] or [Wireless Set-up]
3 Select [Scan], then select a network from
the list of scanned wireless networks.
4 Follow the instructions on the set-up
screen.
Note
• Security key (WEP or WPA key) will not be required
because you do not need to select any security
method in this procedure.
• To use the network with IPv6, select [Settings]
[System Settings] [Set-up] [Network] [IPv6/
IPv4 Priority] [IPv6], then select [Easy] in [Set up
network connection].
• When IPv6 is selected, HTTP Proxy cannot be set.
Enter the respective alphanumeric values for
your router if necessary. The items that need to
be set (e.g. IP Address, Subnet Mask, DHCP)
may differ depending on the Internet service
provider or router. For details, refer to the
instruction manuals provided by your Internet
service provider, or those supplied with the
router.
1 Press HOME, then select [Settings]
[System Settings] [Set-up]
[Network] [Network Set-up].
2 IP Address setting/Proxy server:
– automatic setting:
[Set up network connection] [Easy]
– manual setting:
[Set up network connection] [Expert]
[Wired Set-up] or [Wireless Set-up]
3 Follow the instructions on the set-up
screen.
[Network Set-up] can also be set from [Auto
Start-up] menu.
Note
• Allows automatic configuration of your wired/
wireless network.
When connecting with LAN cable: Wired
When connecting with built-in Wireless LAN:
Wireless
When connecting with both of the cables: Wired
• Set to [Easy], sets the IP address automatically. For
proxy server is not use.
• To use the network with IPv6, select [Settings]
[System Settings] [Set-up] [Network] [IPv6/
IPv4 Priority] [IPv6], then select [Easy] in [Set up
network connection].
• When IPv6 is selected, HTTP Proxy cannot be set.
Type 2: Secured network without Wi-Fi
Protected Setup™ (WPS)
Type 3: Unsecured network with any
type of wireless LAN router
Type 4: Wired network set-up
12
GB
Note
• For LAN connections, use a Category 7 cable (not
supplied).
You can confirm your network status.
1 Press HOME, then select [Settings]
[System Settings] [Set-up]
[Network] [Network Set-up].
2 Select [View Network setting and
status].
If You Cannot Connect to the
Internet
Use the diagnosis to check possible causes for
network connection failures, and settings.
1 Press HOME, then select [Settings]
[System Settings] [Set-up]
[Network] [Network Set-up].
2 Select [View Network setting and
status].
3 Select [Check Connection].
This may take several minutes. You cannot
cancel the diagnosis after selecting [Check
Connection].
Privacy Policy
When you use the following functions to
connect to the Internet, certain information will
be sent to Sony Corporation’s global servers,
which is considered to be personal information,
and requires your agreement in order for service
providers to use it.
• System software updates by connecting to
Sony Corporation’s global servers via the
Internet.
• Internet contents or other Internet services
from service providers like Youtube.
This TV has the setting screens in Auto Start-up
or Setting Menu to confirm your agreement to
this after you read the detail of the Privacy
Policy. If you want to use these functions, please
check [Agree] in each setting screen. If
[Disagree] is checked, the above two functions
are not available.
However, even in this case, if [On] is selected at
[Automatic Software Download] in Auto Start-up
or Setting Menu, the system software updating
is available.
You can change this setting by pressing HOME,
then select [Settings] [System Settings]
[Set-up] [Privacy Policy].
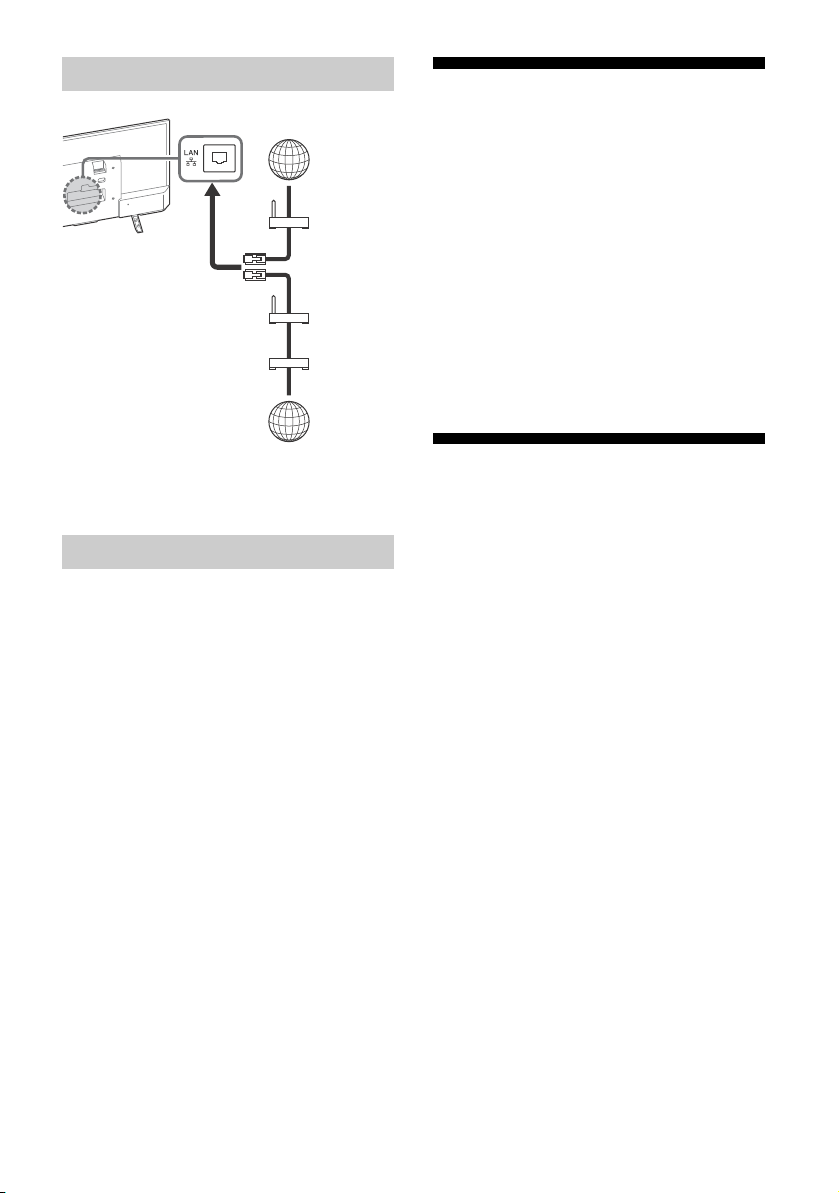
Preparing a Wired Network
Viewing the Network Status
Internet
Modem
with
router
functions
or
Router
Modem
Internet
TV
Loading...