


1500
Table of contents
 Loading...
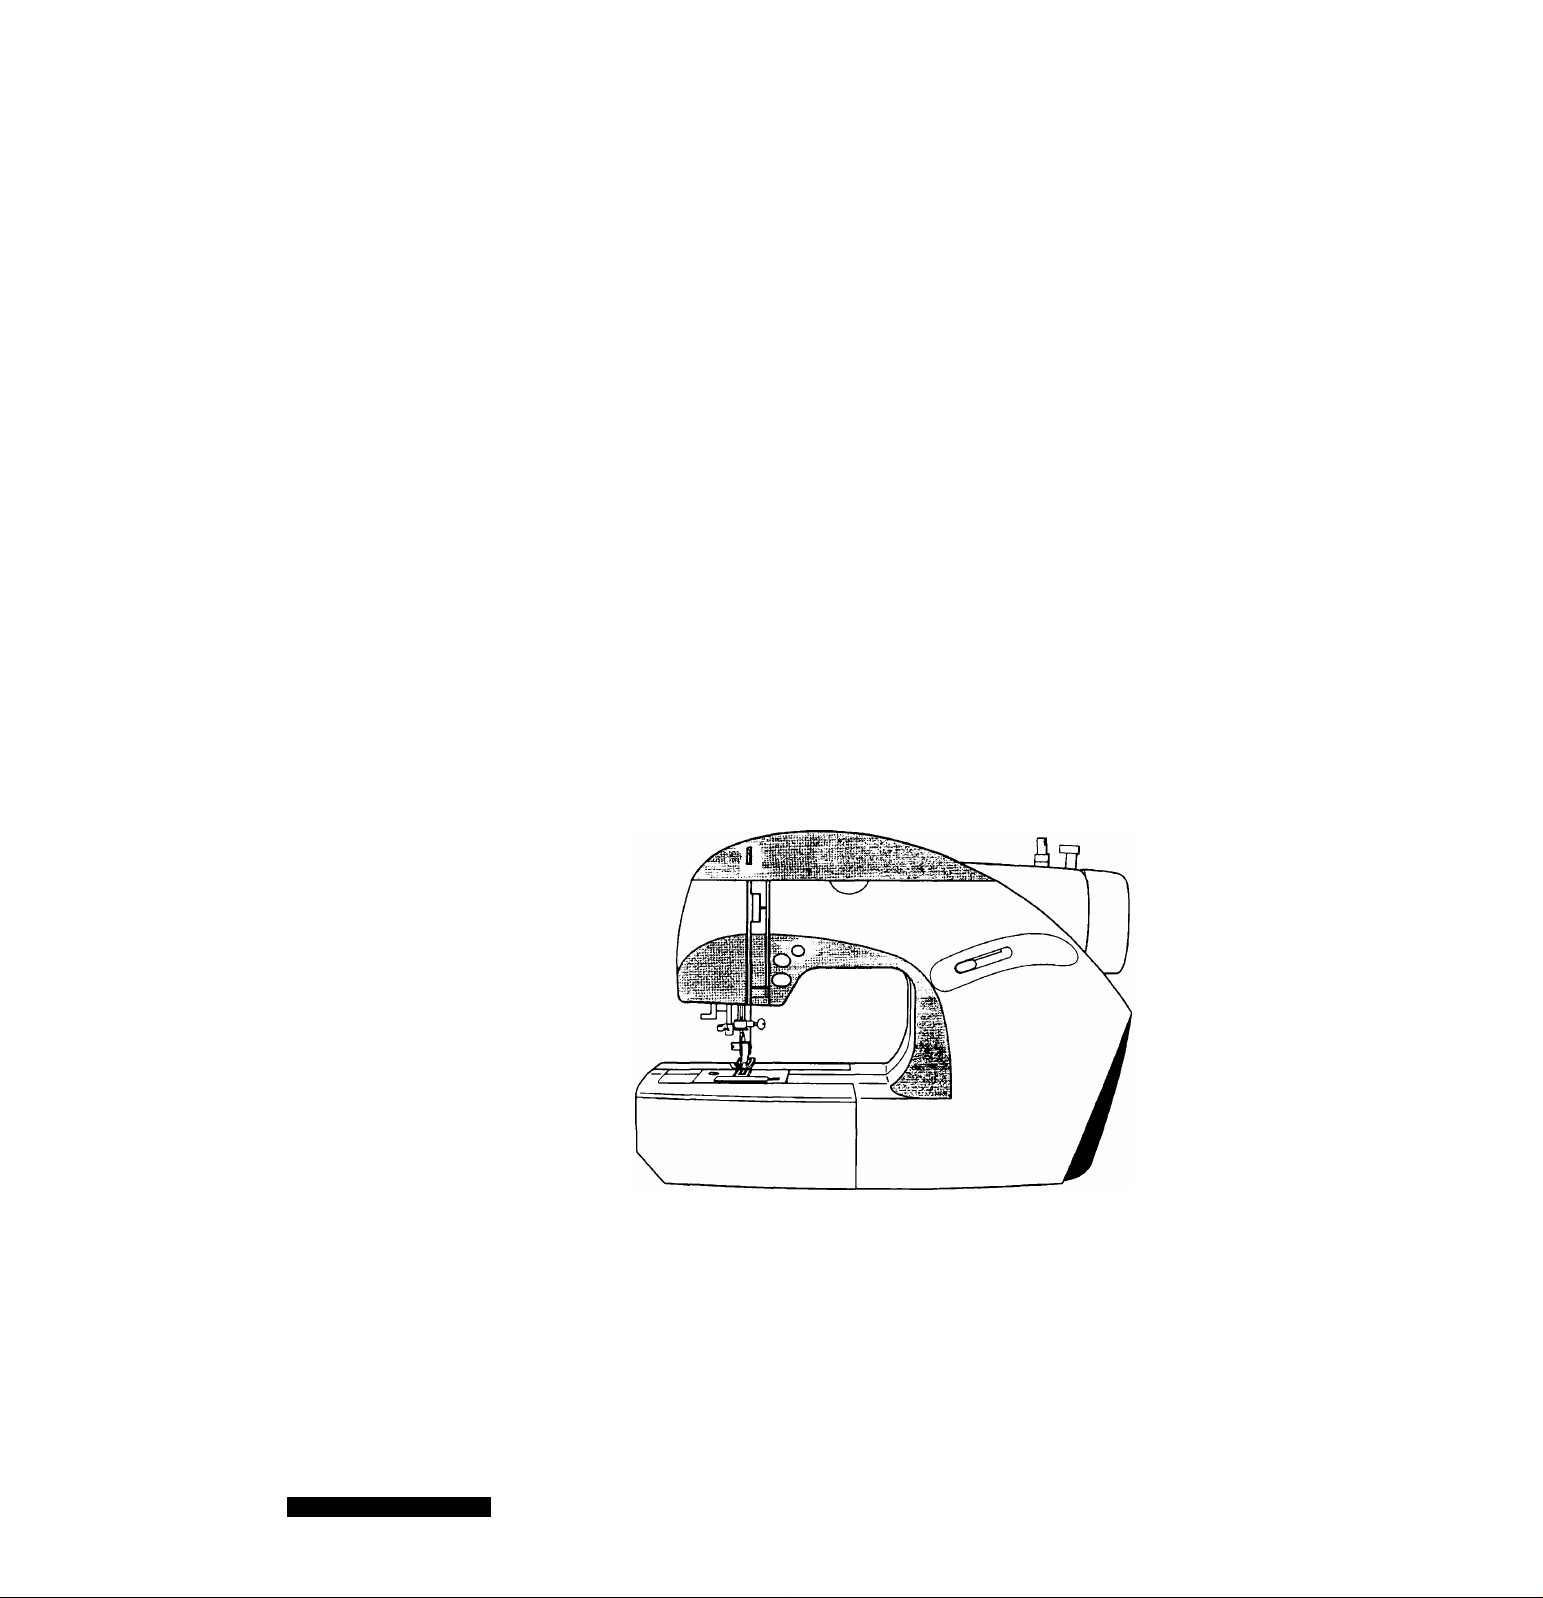
Ize K
INSTRUCTION MANUAL
Model 1500
Part No. 85681 9/00

u
IMPORTANT SAFETY INSTRUCTIONS”
"When using an electrical appliance, basic safety precautions should always be followed, including the following."
“Read all instructions before using this sewing machine."
“DANGER —■ To reduce the risk of electric shock:
1. “This sewing machine should never be left unattended when plugged in. Always unplug this sewing machine from the electric
outlet immediately after using and before cleaning."
2. “Always unplug before replacing light bulb. Replace bulb with same type rated DC 6.5V 2.8W."
“WARNING — To reduce the risk of burns, fire, electric shock, or injury to persons:"
1. “Do not allow to be used as a toy. Close attention is necessary when this sewing machine is used by or near children.”
2. “Use this sewing machine only for its intended use as described in this manual. Use only attachments recommended by the
manufacturer as contained in this manual."
3. “Never operate this sewing machine if it has a damaged cord or plug, if it is not working properly, if it has been dropped or
damaged, or dropped into water. Return the sewing machine to the nearest authorized dealer or service center for examination,
repair, electrical or mechanical adjustment."
4. “Never operate the sewing machine with any air openings blocked. Keep ventilation openings of the sewing machine and foot
control free from the accumulation of lint, dust, and loose cloth."
5. “Never drop or insert any object into any opening."
6. “Do not use outdoors."
7. "Do not operate where aerosol (spray) products are being used or where oxygen is being administered."
8. “To disconnect, turn switch to the off (“0") position, then remove plug from outlet."
9. “Do not unplug by pulling on cord. To unplug, grasp the plug, not the cord."
10. "Keep fingers away from all moving parts. Special care is required around the sewing machine needle.”
11. “Never sew with a damaged needle plate as this can cause needle to break.”
12. “Do not use bent needles."
13. "Do not pull or push fabric while stitching. It may deflect the needle causing it to break."
14. “Switch the sewing machine off (“0”) when making any adjustments in the needle area, such as threading needle, changing
needle, threading bobbin, or changing presser foot, etc."
15. “Always unplug sewing machine from the electrical outlet when removing covers, lubricating, or when making any other user
servicing adjustments mentioned in the instruction manual."
“CAUTION — Moving parts-To reduce risk of injury, switch off before servicing. Close cover before operating machine.’
“CAUTION — This product is not intended for children under 12 years of age and adult supervision is required."
“SAVE THESE INSTRUCTIONS”
“This product is for household use, or equivalent."
FOOT CONTROL (USA only)
Use Yamamoto Electric, Model YC-485 with this sewing machine.
CARRYING MACHINE
Grasp the handle at the right-hand side of the machine with your
right hand, hold the machine body firmly with your left hand as
illustrated. Be careful not to drop and break the machine or cause
injury.

.’V" TABLE OF CONTENTS
i»i
111
1. KNOWING YOUR SEWING MACHINE
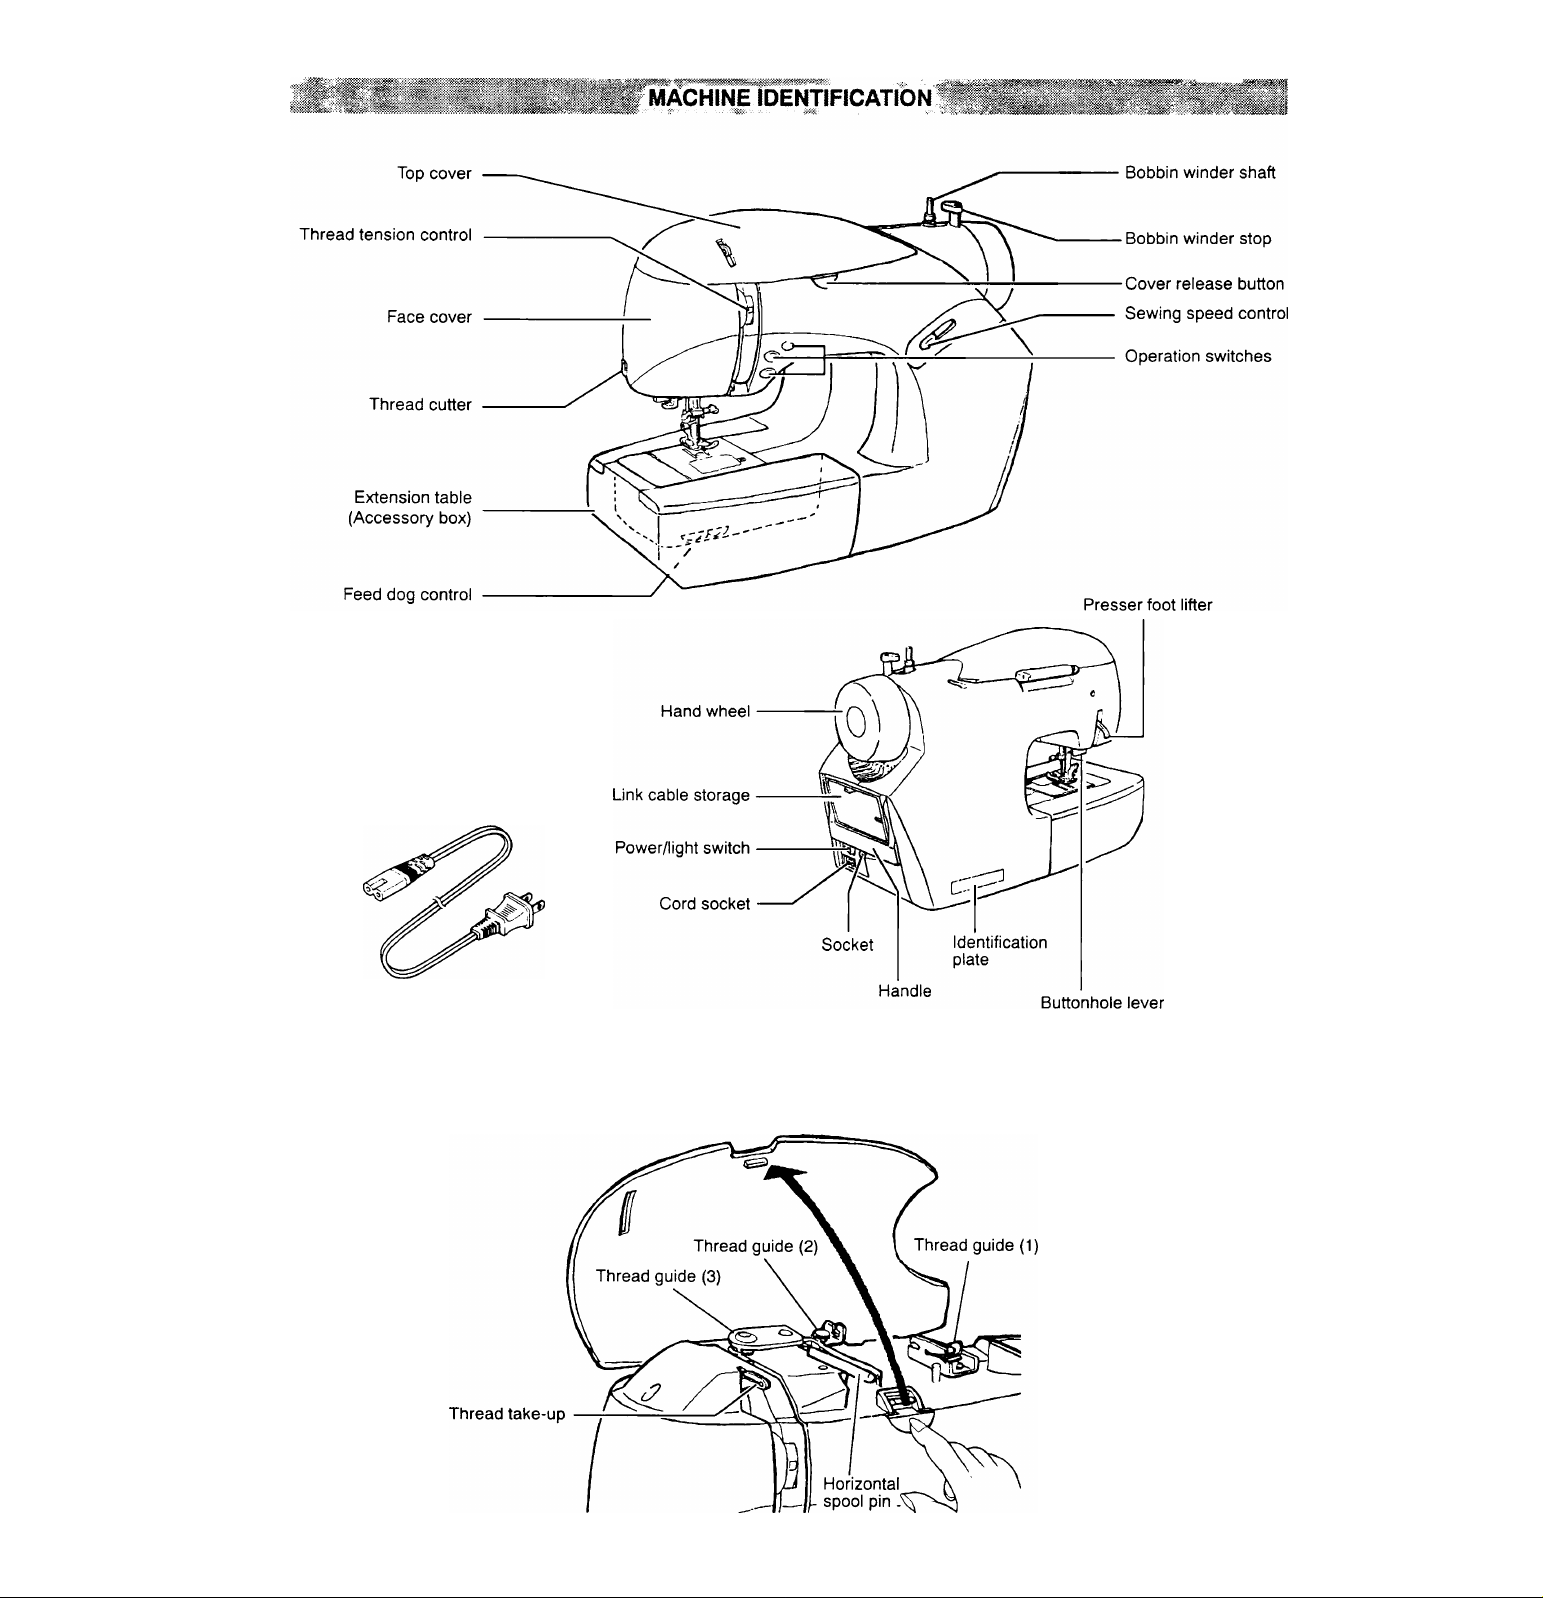
Machine identification
................................................................
2 - 3
Accessories.....................................................................................4
Setting up your machine.................................................................5
Operation switches
.........................................................................
6
Sewing speed Limiter control
........................................................
6
Spool pins.......................................................................................7
Presserfoot lifter..............................................................................8
Feed dog control................—.........................................................8
Converting to free-arm sewing........................................................9
Leveling Machine............................................................................9
Winding bobbin............................................................................-10
Threading the bobbin thread.....................................................11
Threading the top thread..............................................—
..............
12
Using automatic needle threader
..............................................
13
Picking up bobbin thread..............................................................14
2. TESTING TO SEW
Test sewing (1)
............................................................................
15
Test sewing (2) .......................................................................16-20
Connecting the GAME BOY, Operation of GAME BOY,
Connecting the sewing machine and the GAME BOY
Set-up guide screen
.........................
-
............................................
21
Safety device................................................................................21
Needle, thread and fabric chart
....................................................
22
Adjusting top thread tension
.........................................................
23
Changing presser foot
..................................................................
23
3. CHOOSING SETTINGS REFERRING TO THE SCREEN
Menu selections............................................................................24
Patterns........................................................................................25 - 31
Single pattern. Combinations
Buttonholes...................................................................................32 - 33
Letters
...........................................................
-
.......................
34 - 37
Favorites -—
................................................................................
38 - 41
Single pattern. Combinations, Letters, Custom
Custom.........................................................................................42 - 45
Colors............................................................................................46
4. STARTING TO SEW
Stitch length and stitch width quick reference table
..............
47 - 49
Placement of patterns....................................................................49
Straight stitching.....................................................................50 - 51
Turning a square corner. Reverse stitch switch.
Tacking (Basting)
Zigzag stitching.......................................................................52 - 53
Satin stitch
Faggoting......................................................................................53
Blind stitch.....................................................................................54
Shell stitch................................-.....................................................55
Double-action stitches
..................................................................
55
Multi-stitch zigzag
.........................................................................
56
Stretch stitches......................................................................57 - 59
Straight stretch stitch. Overlock stitch. Slant overedge stitch.
Stretch overlock stitch. Blanket stitch, Ric-rac stitch.
Feather stitch. Smocking stitch. Double overlook stitch (1),
Double overlock stitch (2), Stretch patching stitch.
Fishbone stitch. Elastic overlook stitch.
Herringbone stitch. Wish-bone stitch
Continuous patterns......................................................................59
Decorative embroidery designs....................................................60
Tips on design stitching
Novelty patterns....................................................................-
......
-61
Buttonhole making.................................................................62 - 64
Using buttonhole foot, Procedure
5. CARING FOR YOUR MACHINE
Cleaning the hook area and the feed dogs
..................................
65
Changing the light bulb.................................................................66
6. ERROR MESSAGES
Error messages............................................................................67
7. PERFORMANCE CHECKLIST..............................................68
1. KNOWING YOUR SEWING MACHINE
Power line cord
TOP COVER OPENED
(MACHINE IDENTIFiCATiON)
Needle bar
Thread cutter
Needle clamp screw
Foot release button
Presser foot
Feed dogs
Needle plate
Bobbin cover release button
SEWING MACHINE
OPERATION SOFTWARE
Foot control
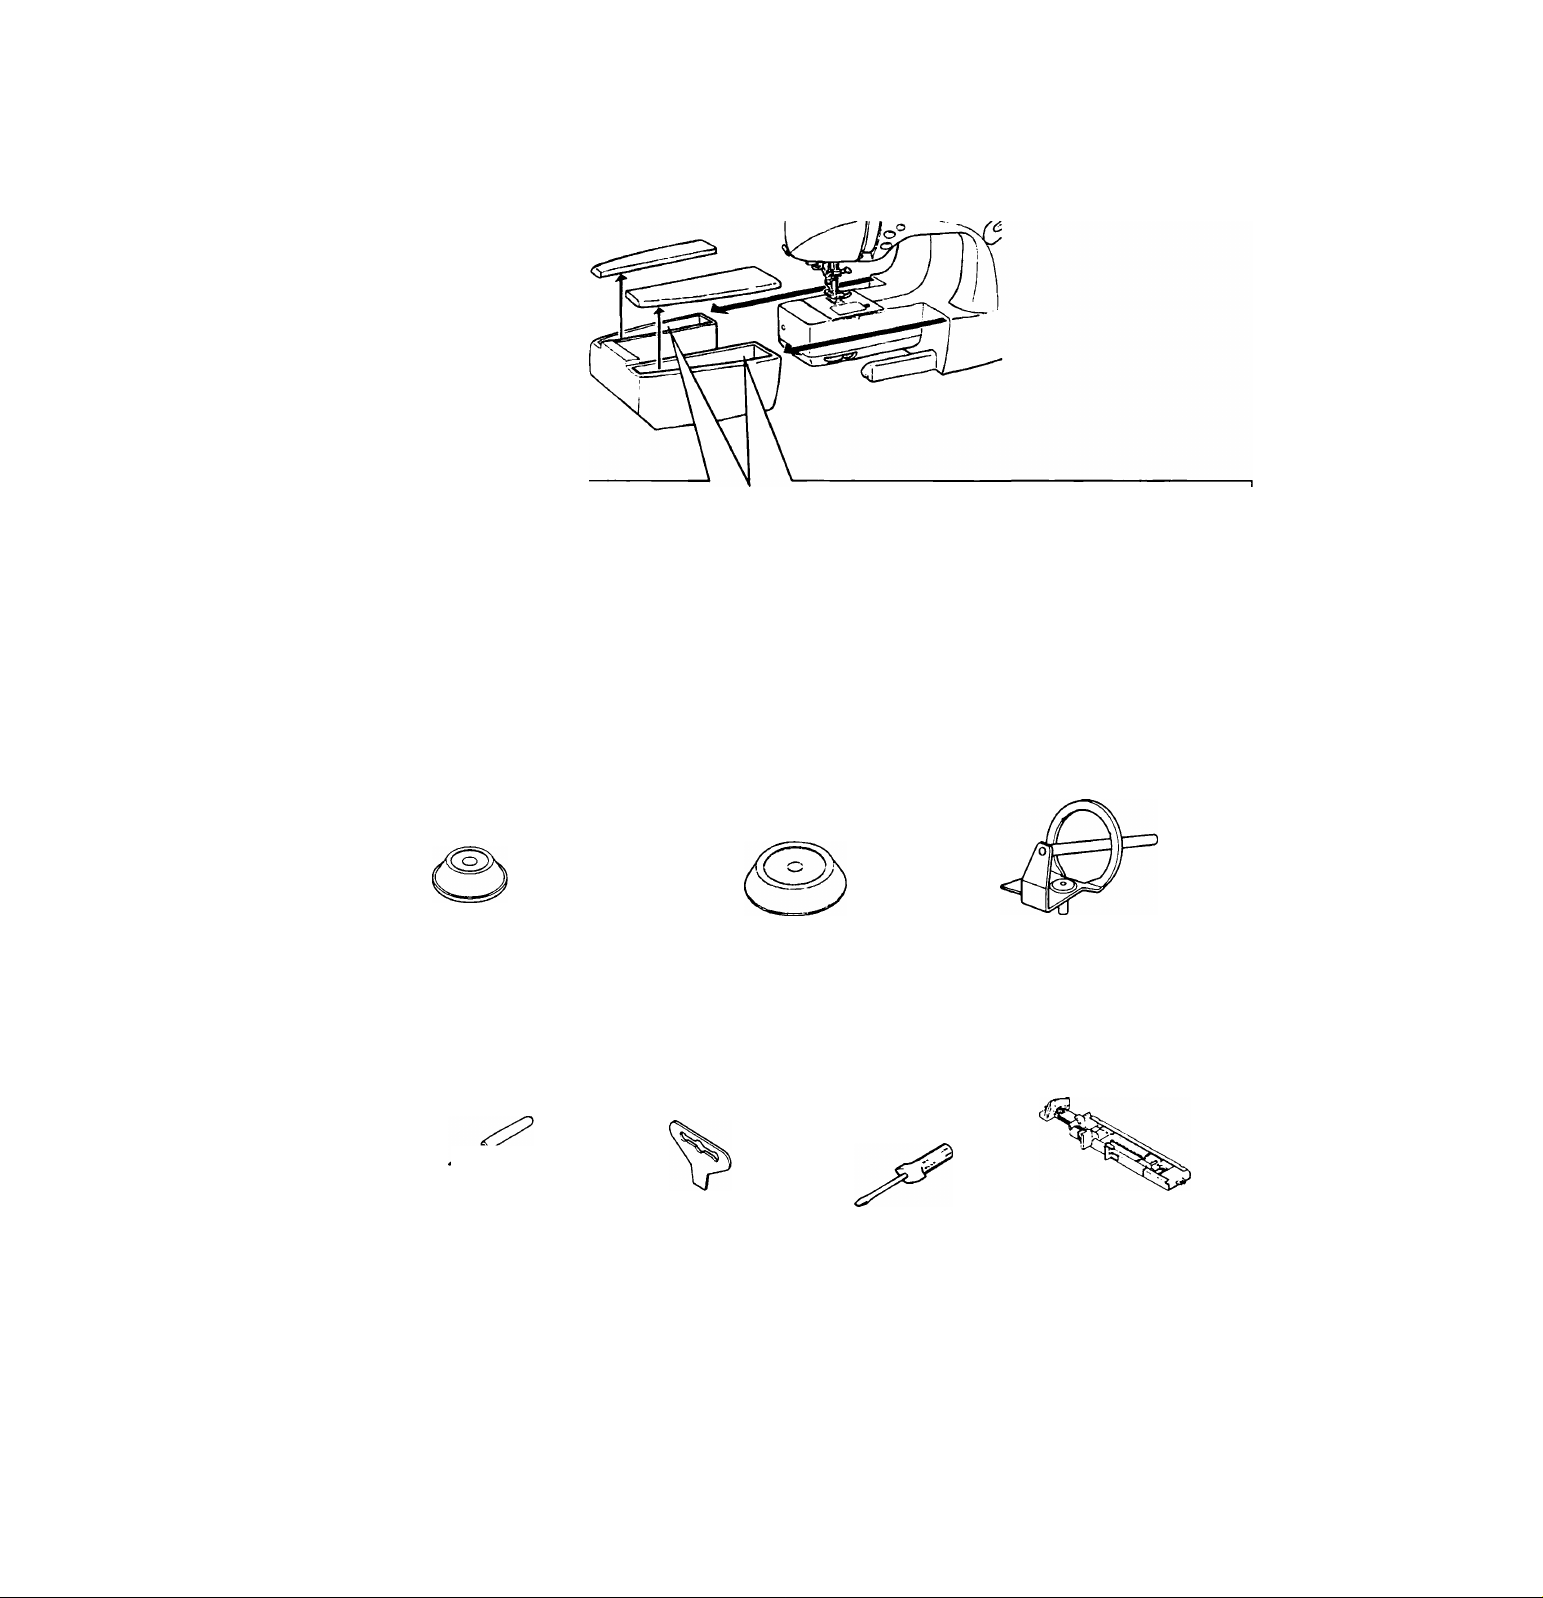
ACCESSORIES
<.-^ >
/' V ' .O',
o ^ f o
Needles
(R# 67233)
Bobbins
(P #85128)
Spool pin felt discs
(R# 77040x2)
Spool pin cap (mini)
(R# 85168)
Spool pin cap (small)
(P #79070)
Spool pin cap (large)
(P #85124)
Auxiliary spool pin (B)
(R# 85261)
Buttonhole opener/Brush
(R# 85365)
Screwdriver (large)
(R# 75748)
Screwdriver (small)
(R# 74793)
Buttonhole foot
(R# 85410)
ING UP YOUr
This machine can be used either with or without foot control.
Be sure to wipe off any surplus oil from needle plate area before using your machine the first time.
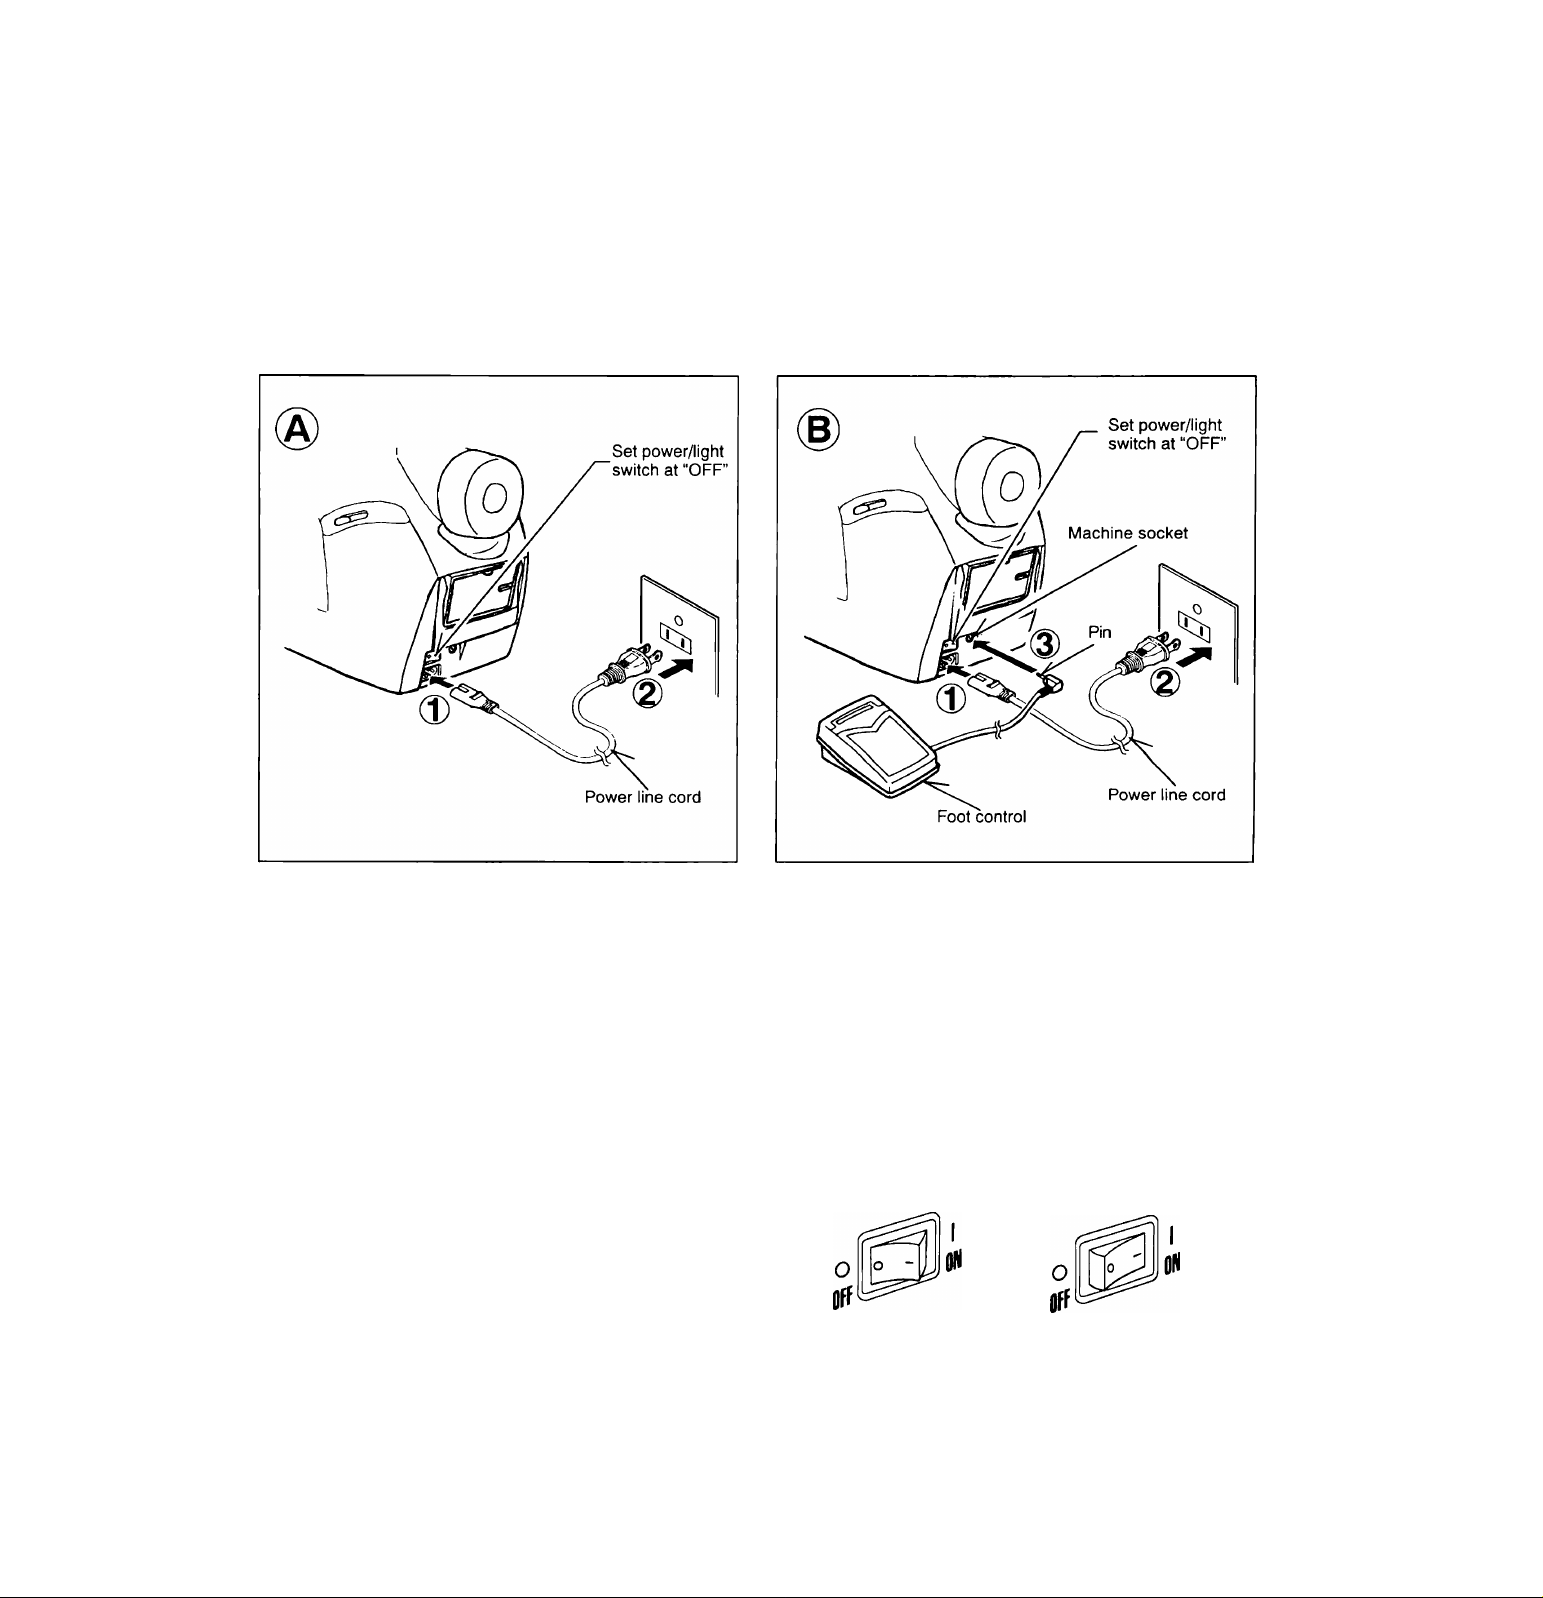
POWER LINE CORD
Connect the plug of the power line cord into the cord socket (1)
and your wall outlet (2) as illustrated (A).
FOOT CONTROL
Connect the plug of the power line cord into the cord socket (1)
and your wall outlet (2) as illustrated (B).
Connect the foot control plug into the machine socket (3).
A
Always disconnect the machine from power supply by removing the plug from the wall-outlet.
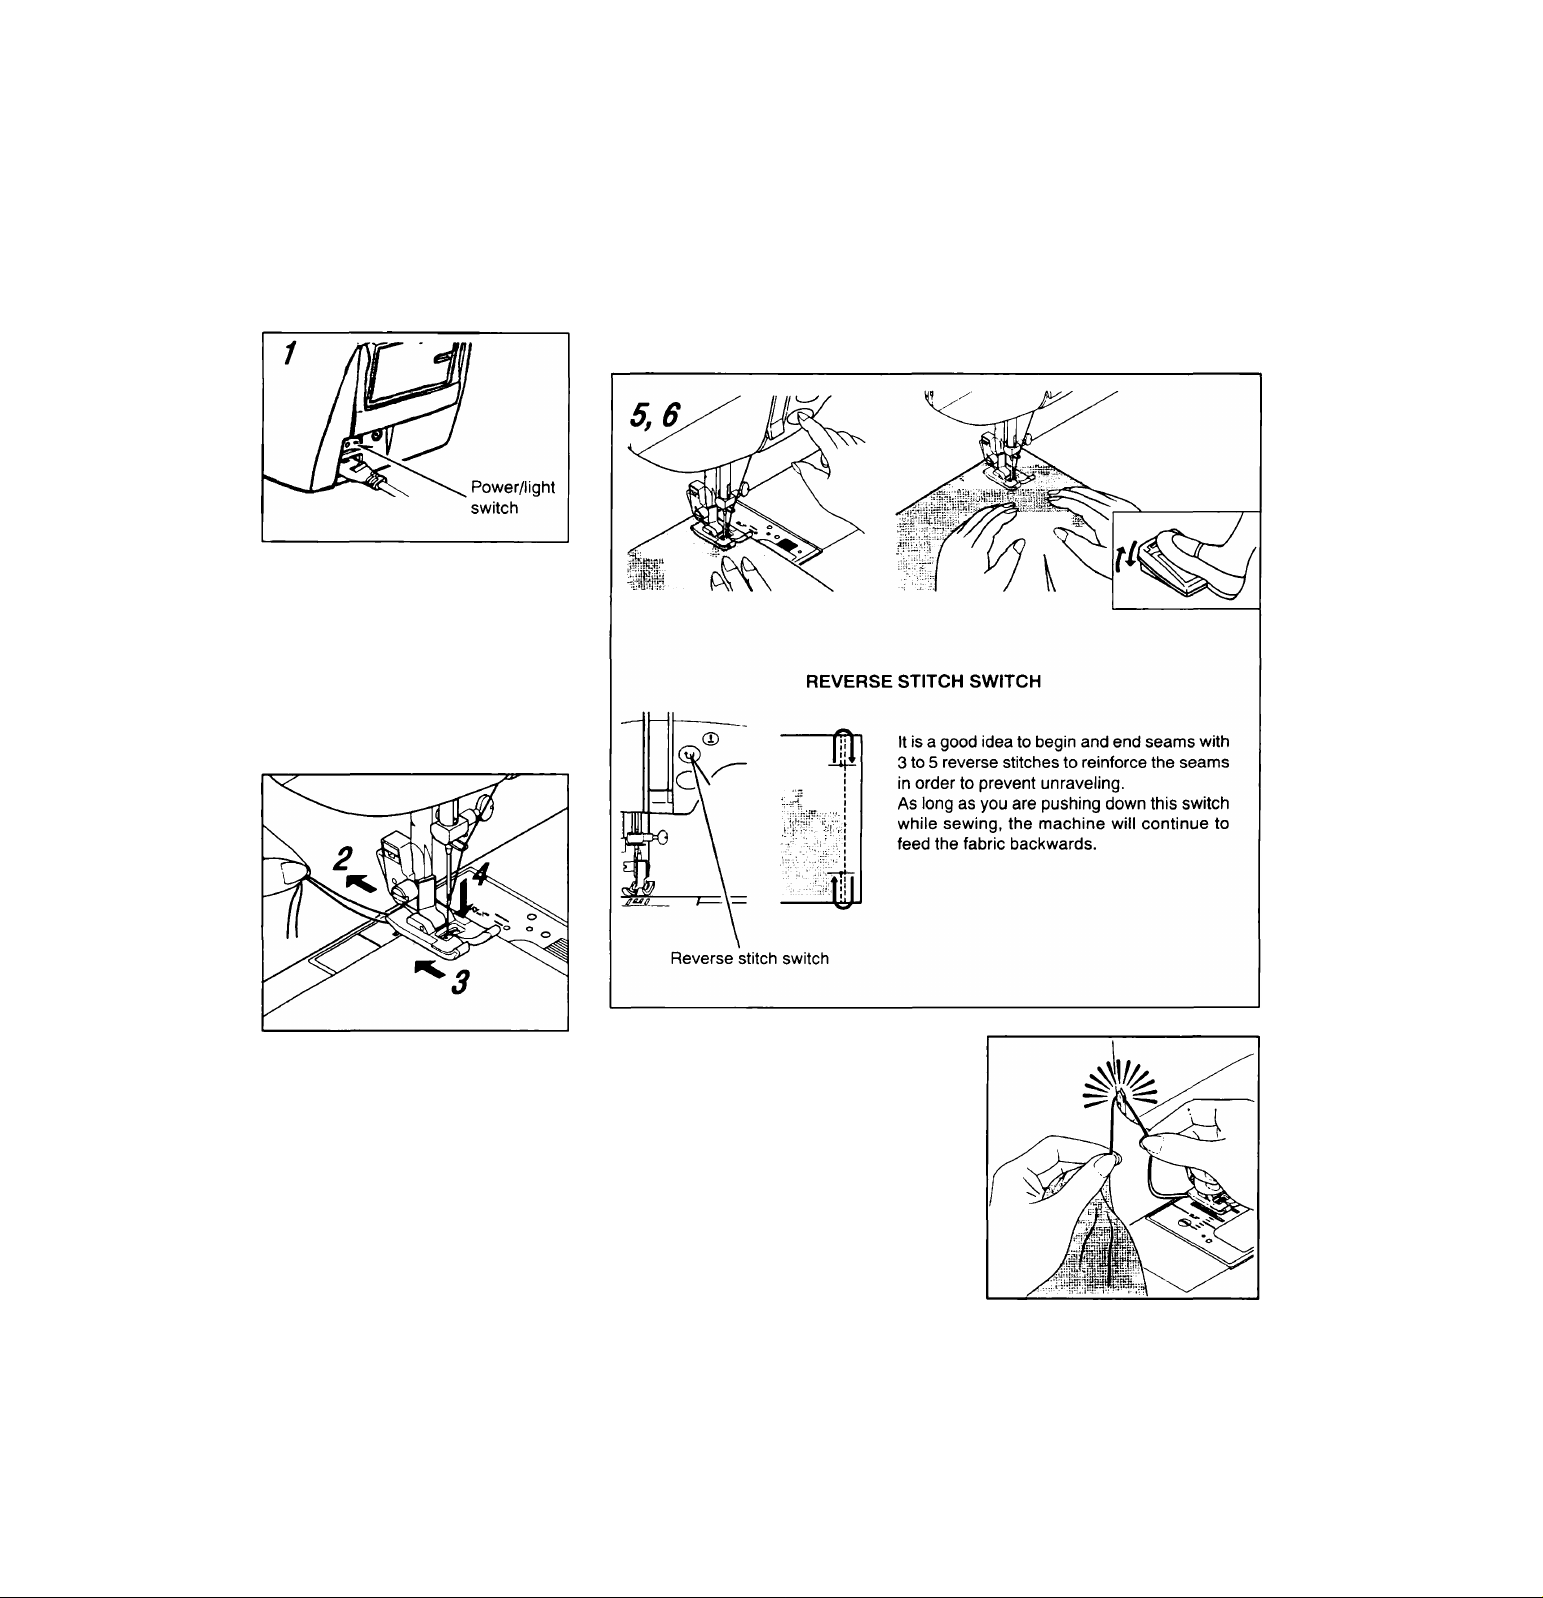
POWER/LIGHT SWITCH
Your machine will not operate until the power/light switch
is turned on. The same switch controls both the power
and the light.
When servicing the machine, or changing needles or
lamps, etc., machine must be disconnected from the
power supply.
Power/light switch “OFF"
Power/light switch “ON"

S OPERATION SWITCHES
i!|< ss> «•<>¥ 5
mu
SEWING SPEED UMITER CONTROL
STARTING/STOPPING the MACHINE
When using only the power line cord, when the start/stop switch is pushed,
the machine starts slowly, and when the switch is pushed once more, the
needle moves and stops at its highest position.
When using foot control, simply press your foot on pedal until you reach a
slow even speed. Never try to sew too fast. The harder you push, the faster
the machine will sew. Release pressure on foot pedal to stop the machine.
NOTE: When foot control is connected, start/stop switch cannot be used.
NEEDLE UP/DOWN SWITCH
When the needle up/down switch is pushed, the needle moves and stops at
its lowest position. If the switch is pushed once more, the needle moves and
stops at its highest position. These operations can be repeated in order to
sew basting stitches.
REVERSE STITCH SWITCH
Reverse sewing is carried out while the reverse stitch switch is pushed (only
for normal sewing). (The stitch length will be about 2 mm.)
NOTE: If the power cord is disconnected from the wall outlet during sewing,
or if the sewing machine stops due to a power outage, the sewing
machine will not operate immediately even when the power is restored,
To start the sewing machine again, turn the power switch to OFF and
then back to ON again, and then start the machine.
The top sewing speed is set by using the sewing
speed control in conjunction with the foot control.
The sewing speed control is moved horizontally to
determine the zone of speed required.
Regardless of the setting, the maximum speed may
be limited for selected patterns.
NOTE: When using the foot control, on the low
setting the machine will not sew faster than
a certain speed, even when the foot control
is fully depressed.
LED INDICATOR
Red light indicates that the machine is in operation.
Green light indicates that the machine is ready to start.
Flashing red light will be indicated if error should occur
or the machine becomes out of order. Flashing only for 2
- 3 seconds shows that an incorrect operation is
made.Continuous flashing indicates that the machine
malfunctions.
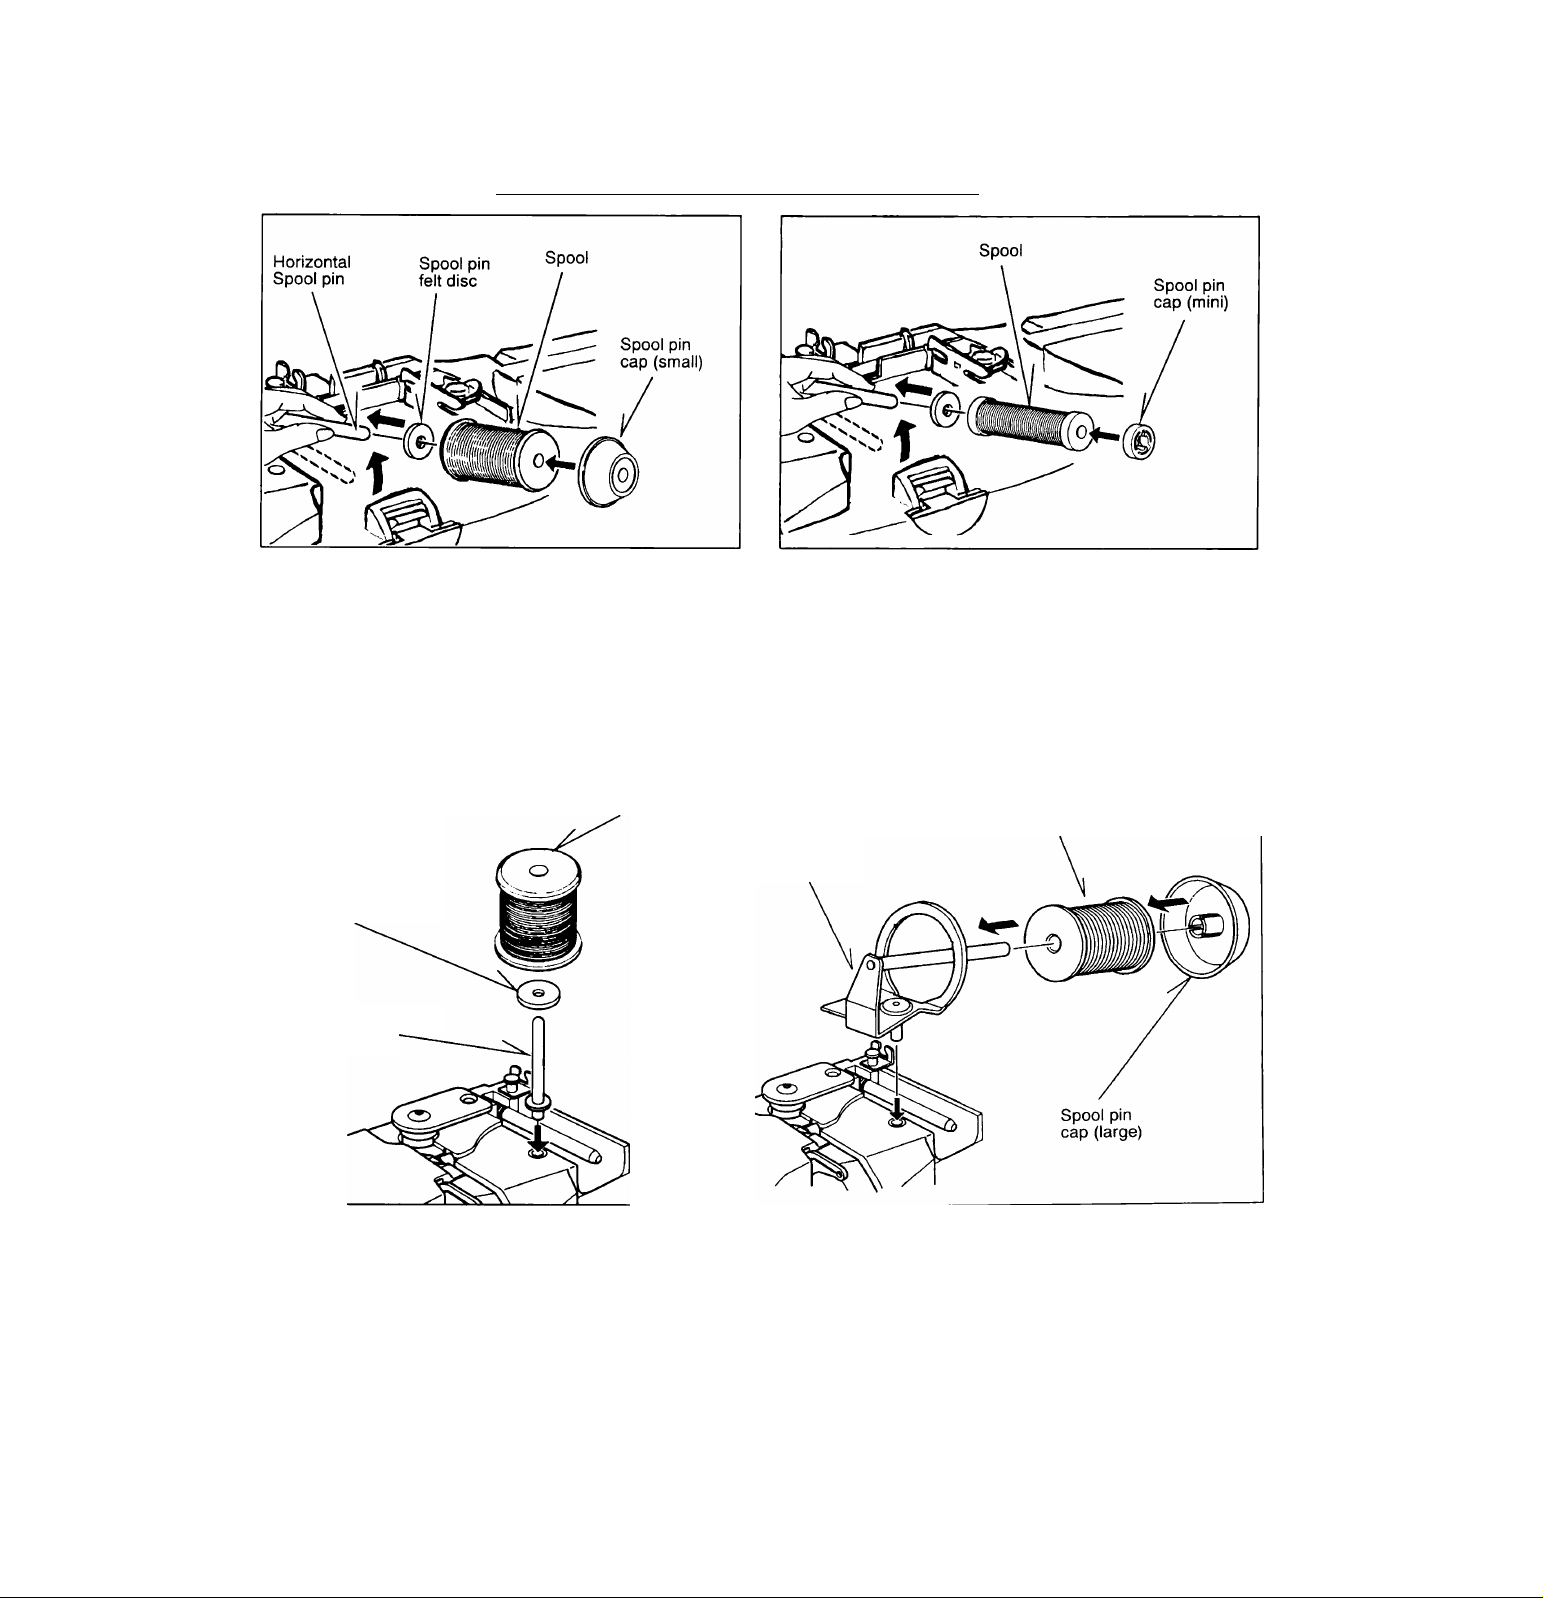
SPOOL
Place a felt disc on spool pin to control spool movement. Place a spool of thread on the pin, and secure with a suitable size spool cap,
to ensure smooth flow of thread. Be careful not to push the spool cap too tight as the spool must turn.
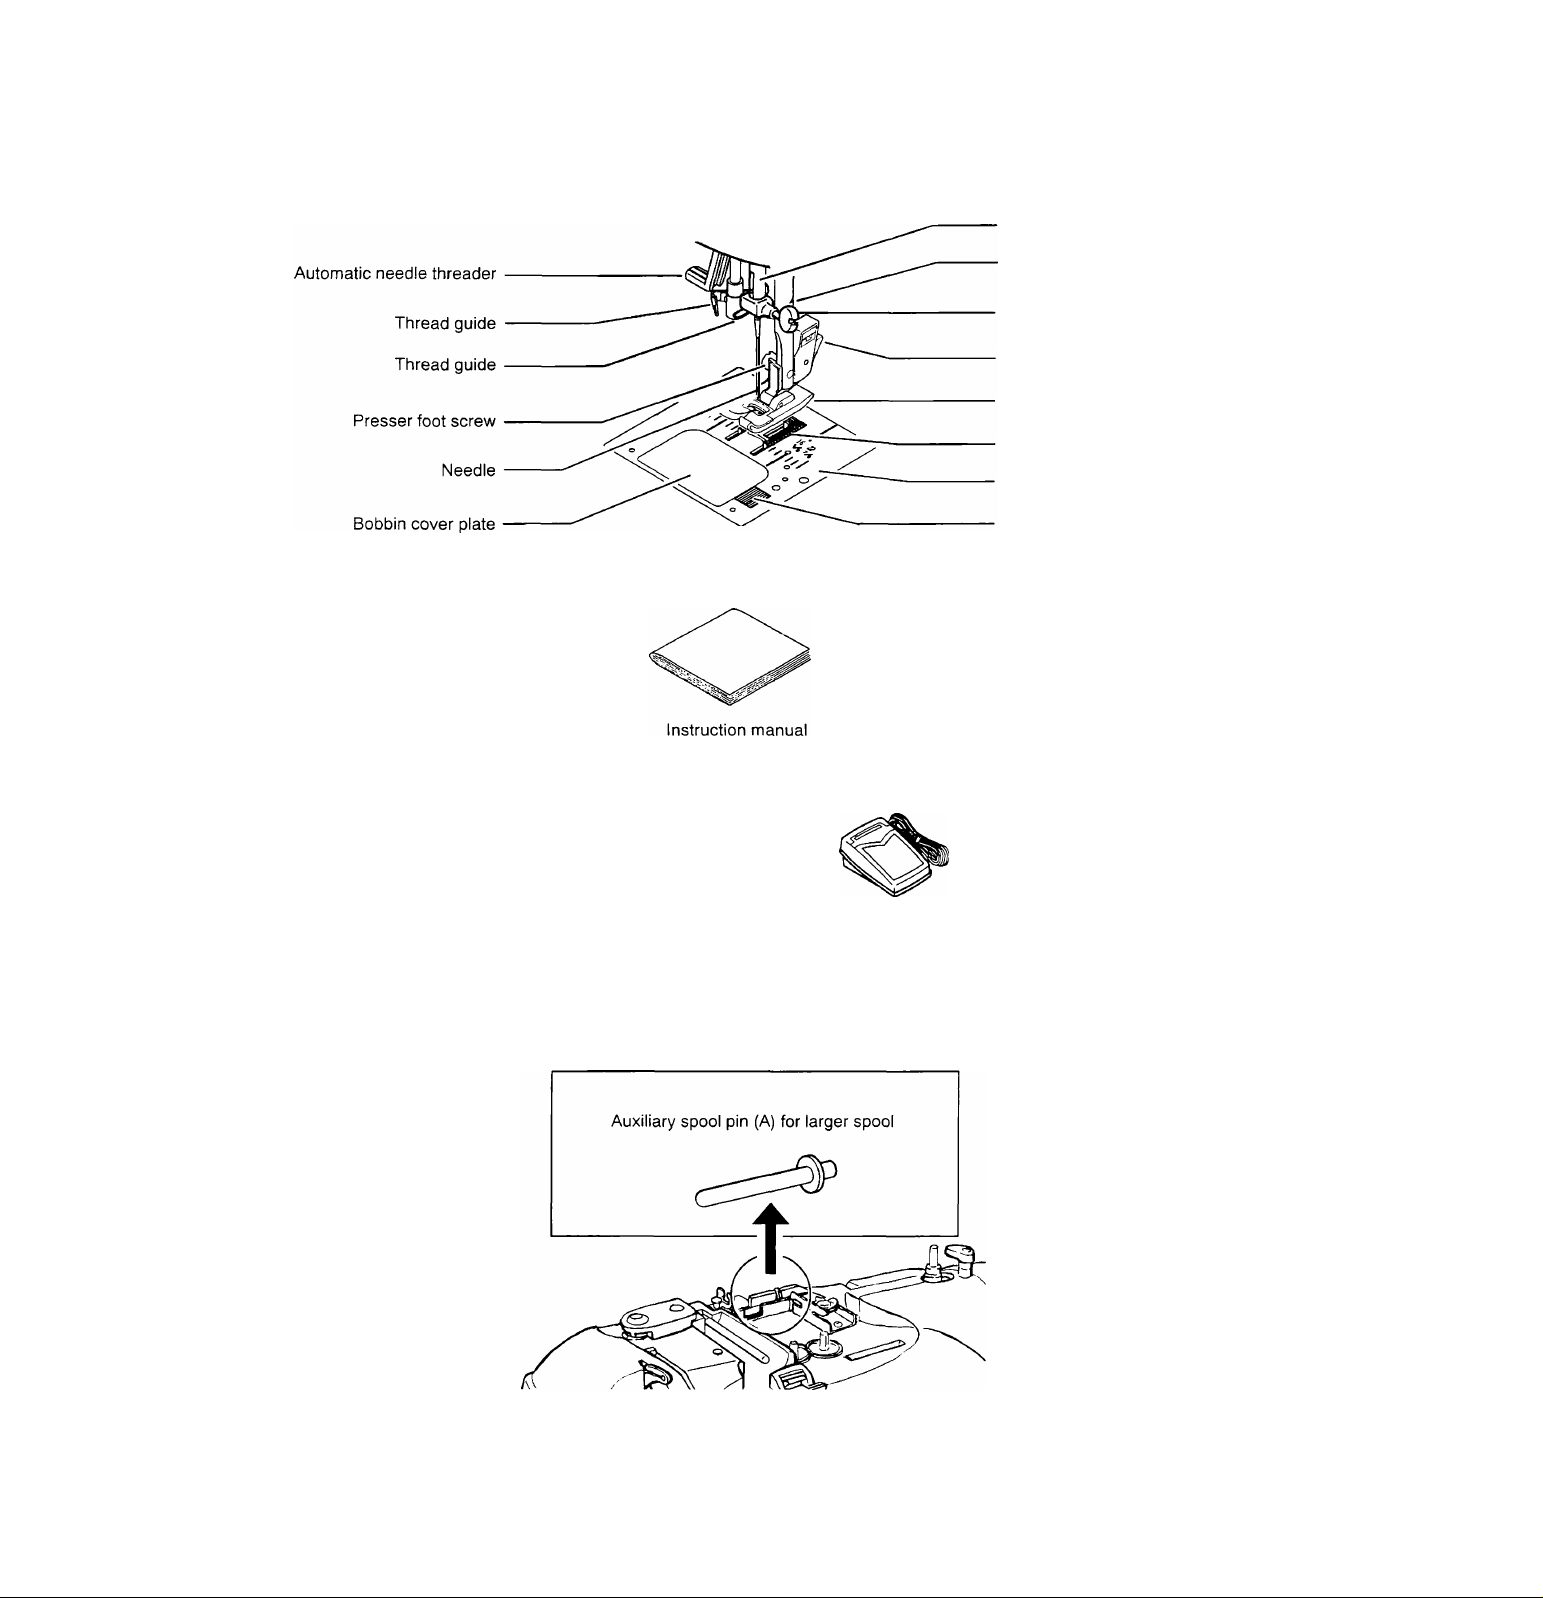
Auxiliary spool pins
Some size and style spools of thread do not deliver thread smoothly with horizontal spool pin and spool cap. In this case use vertical
auxiliary spool pin (A). It may not be possible to obtain good thread tension with some spools, so if problems with thread tension occur,
use spool pin (B).
Attach the spool pin (A) and place a felt disc over it. Place a
spool of thread on the spool pin as illustrated.
Spool
Spool pin felt disc
Auxiliary spool
pin (A)
Attach the spool pin (B) and place a spool of thread on the pin, and
secure with a suitable size spool cap as illustrated. With this spool pin
the cap should be installed tightly.
Spool
Auxiliary
spool pin (B)
NOTE:
1. Use the spool cap closest to the thread spool size to ensure smooth operation.
2. Auxiliary spool pins are not designed for twin needle sewing.
3. Depending on the size and conditions of spools of thread and spool pins, top cover cannot be
closed.
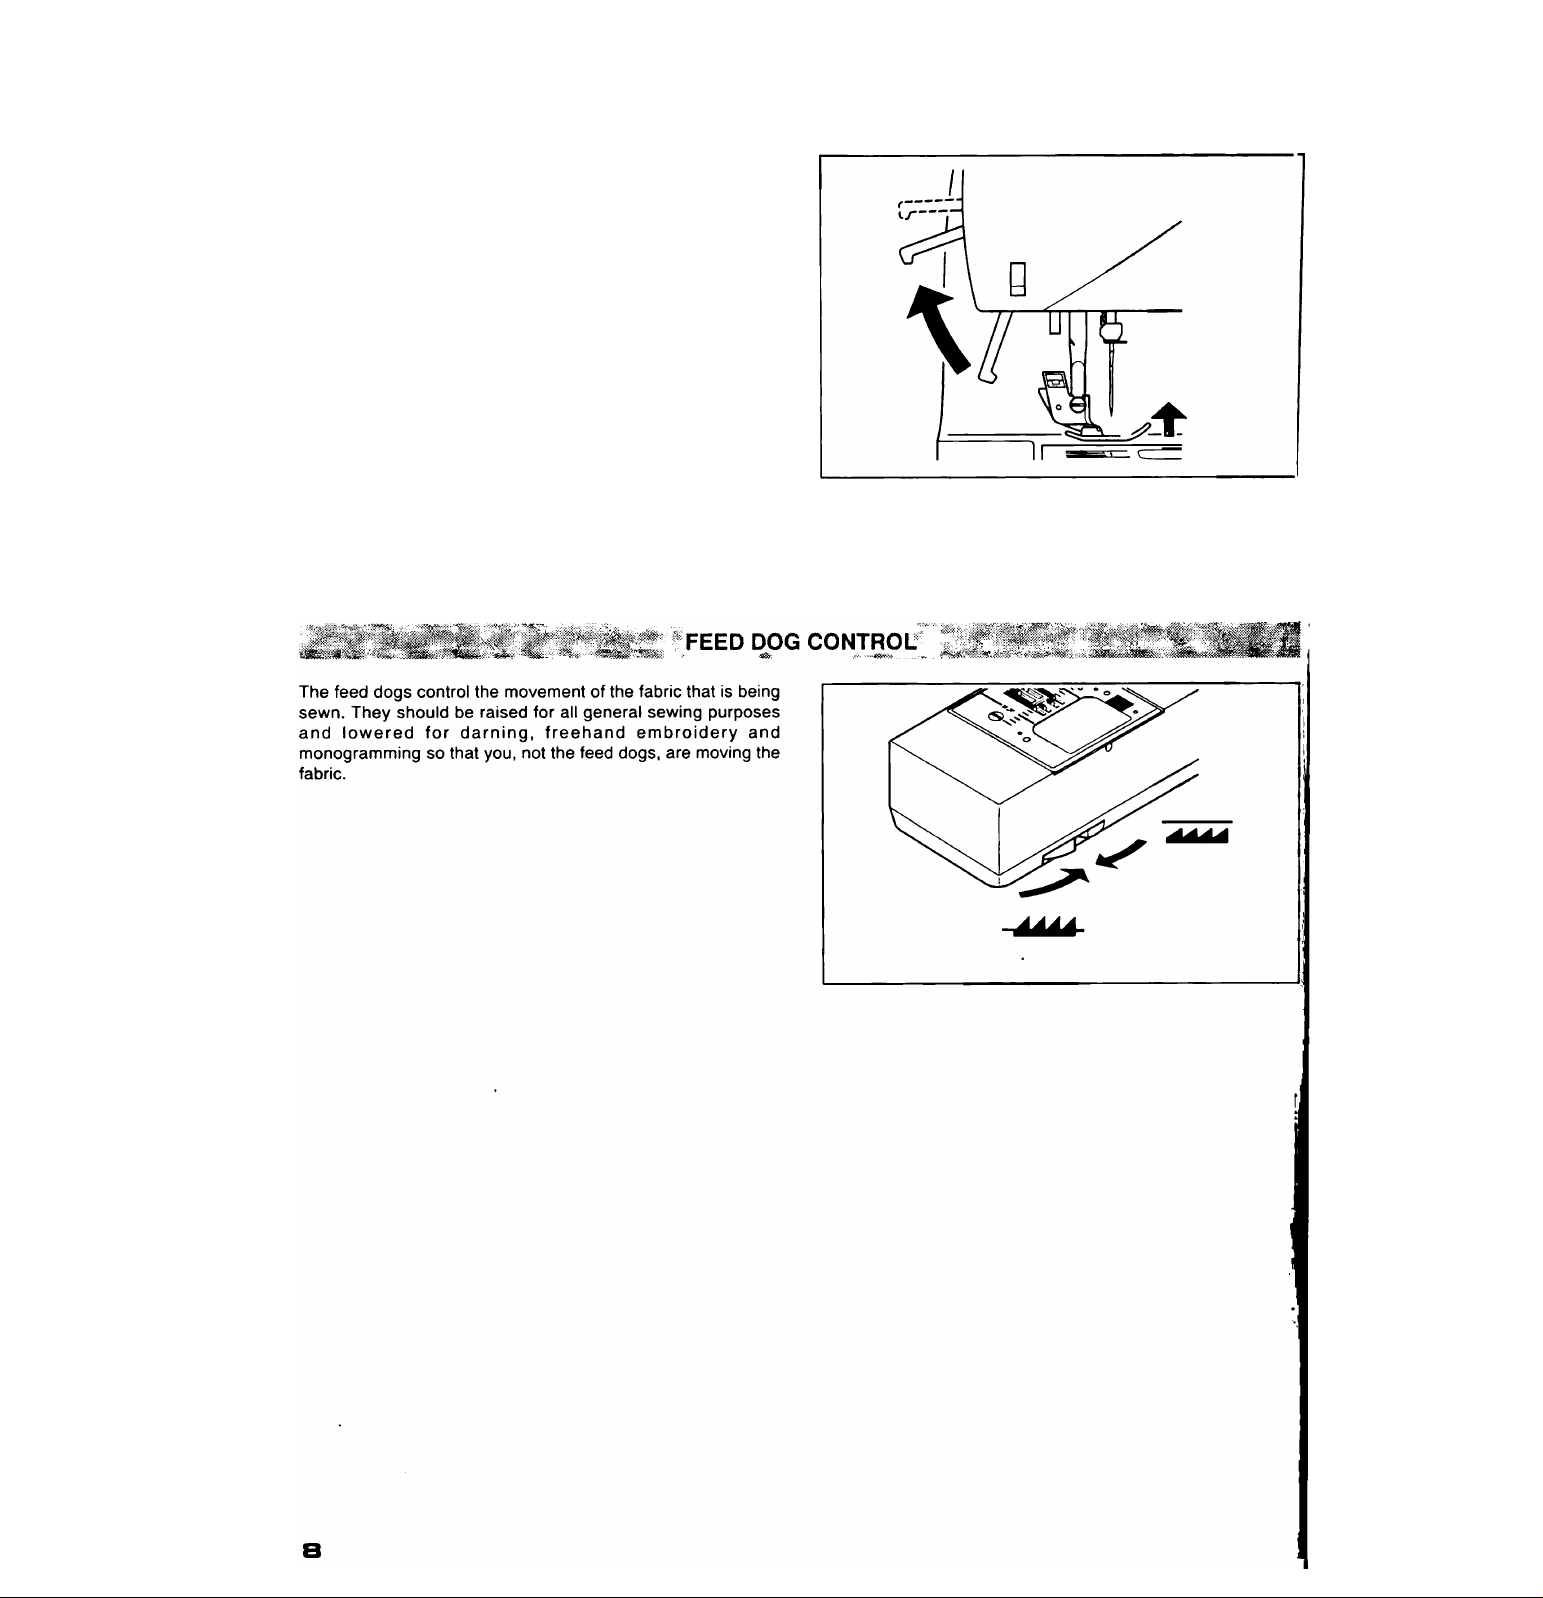
PRESSER FOOT LIFTER'^<' / '"-y’ , '*^ ^
There are three positions for your presser foot.
1. Lower the presser foot to sew.
2. Raise the lifter to the middle position to insert or remove fabric.
3. Lift it to its highest position to change the presser foot or to
remove thick fabric.
y
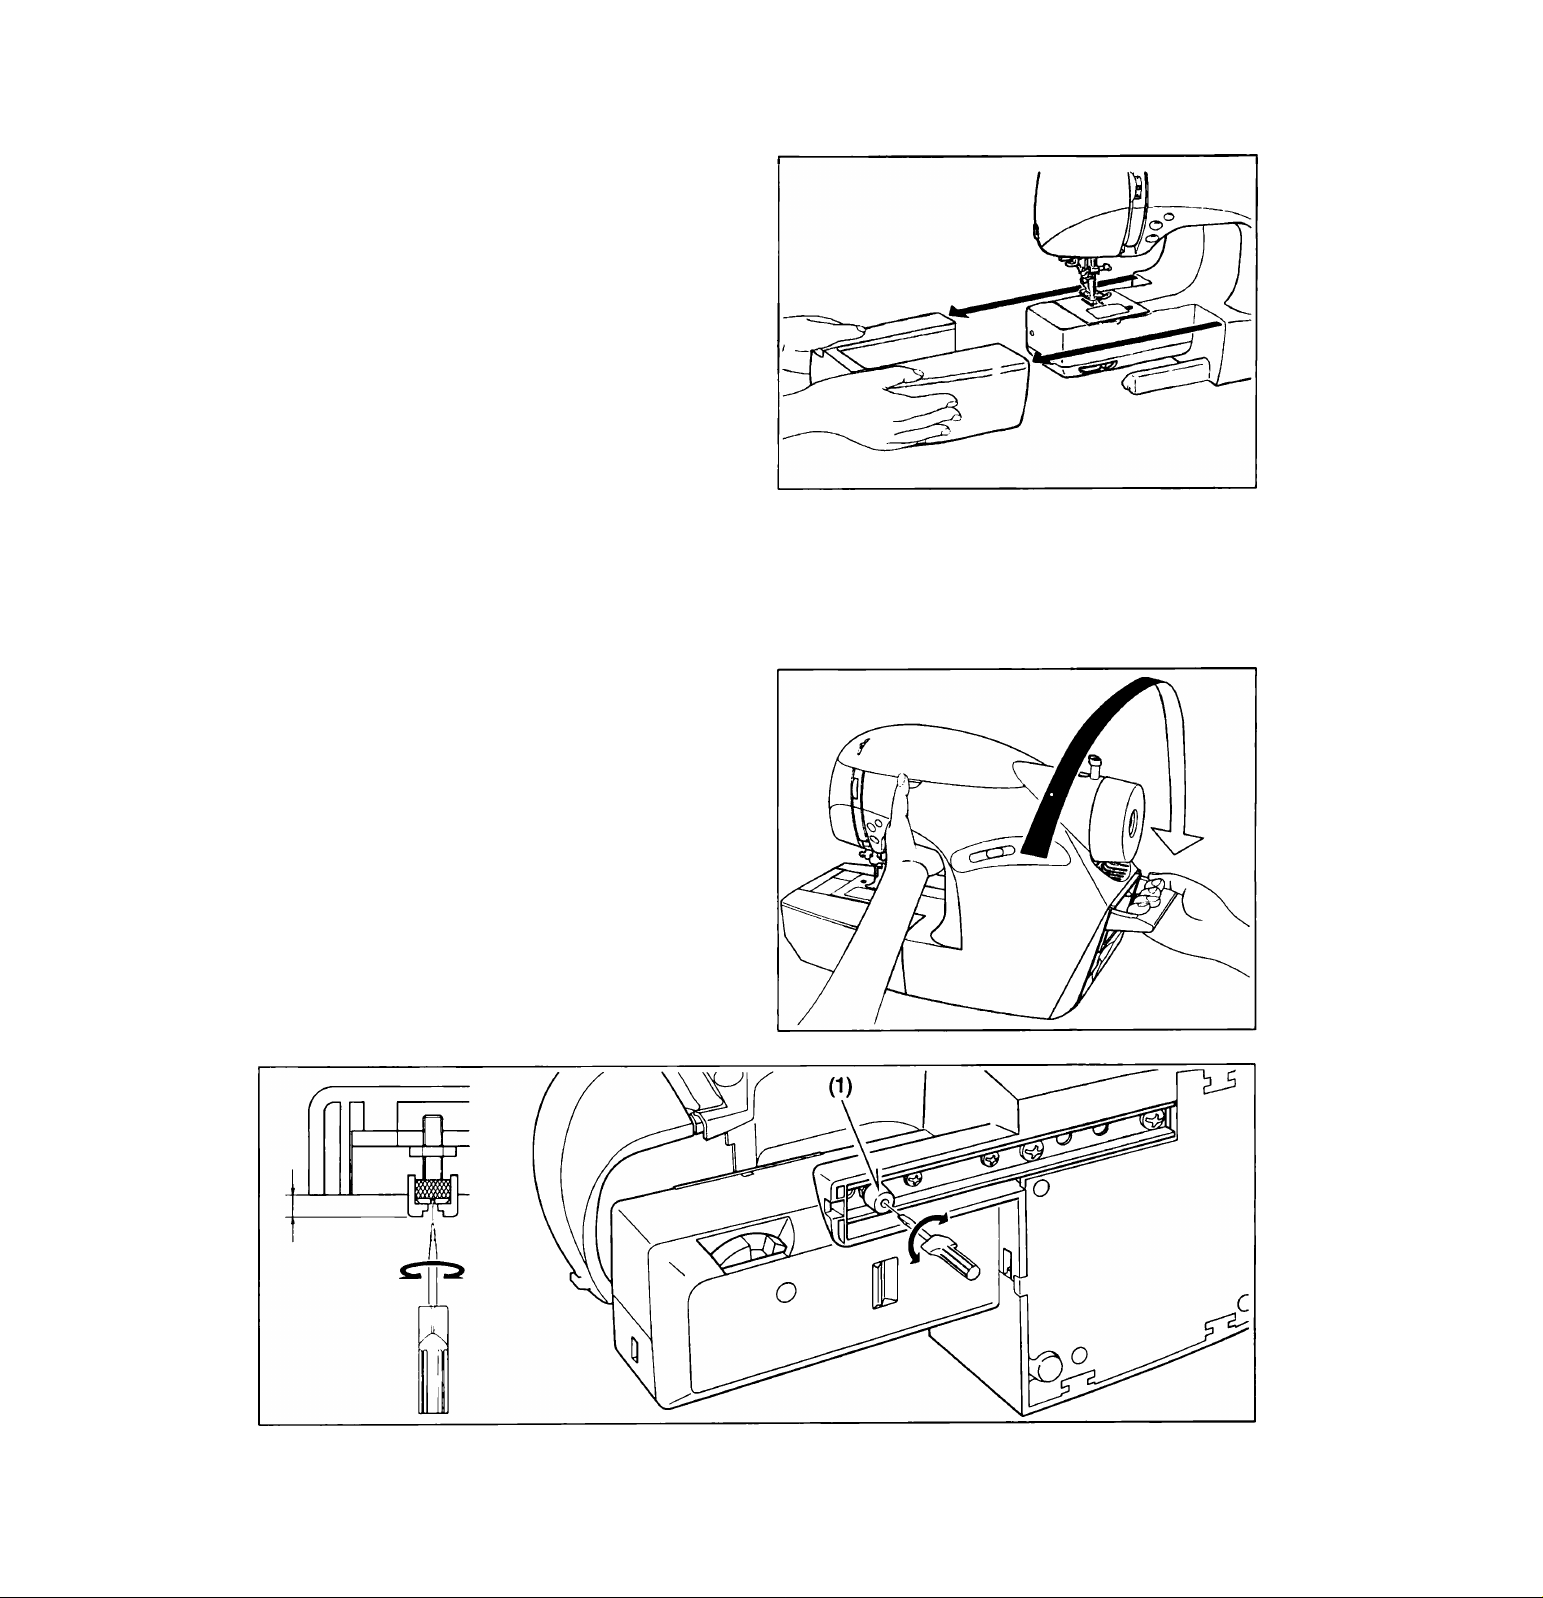
CONVERTING TO FREE-ARM SEWING ■ > > \
»«•■• 'ii'Syv. 'S»
Your machine can be used either as a flat- bed or as a free-arm
model.
With the extension table in position, it provides a large working
surface as a standard flat-bed model.
To remove the extension table, hold it firmly with both hands and
pull it off to the left as shown. To replace, slide the extension
table back into place until it clicks.
With the extension table removed the machine converts into a
slim free-arm model for children’s clothes, cuffs, trouser legs,
and other awkward places.
LEVELING MACHINE
CHECKING
Put the machine on a flat table.
Check the balance of the machine.
ADJUSTMENT
Lay machine on its back gently and carefully with both hands. Be
careful not to make scratches on both machine and table.
Be careful not to drop the machine and not to have your fingers
be caught between the machine and table.
Insert the driver into the hole (1) and adjust by turning it.
* Use screwdriver (small) included in the accessories.
Check the balance of the machine after adjustment.
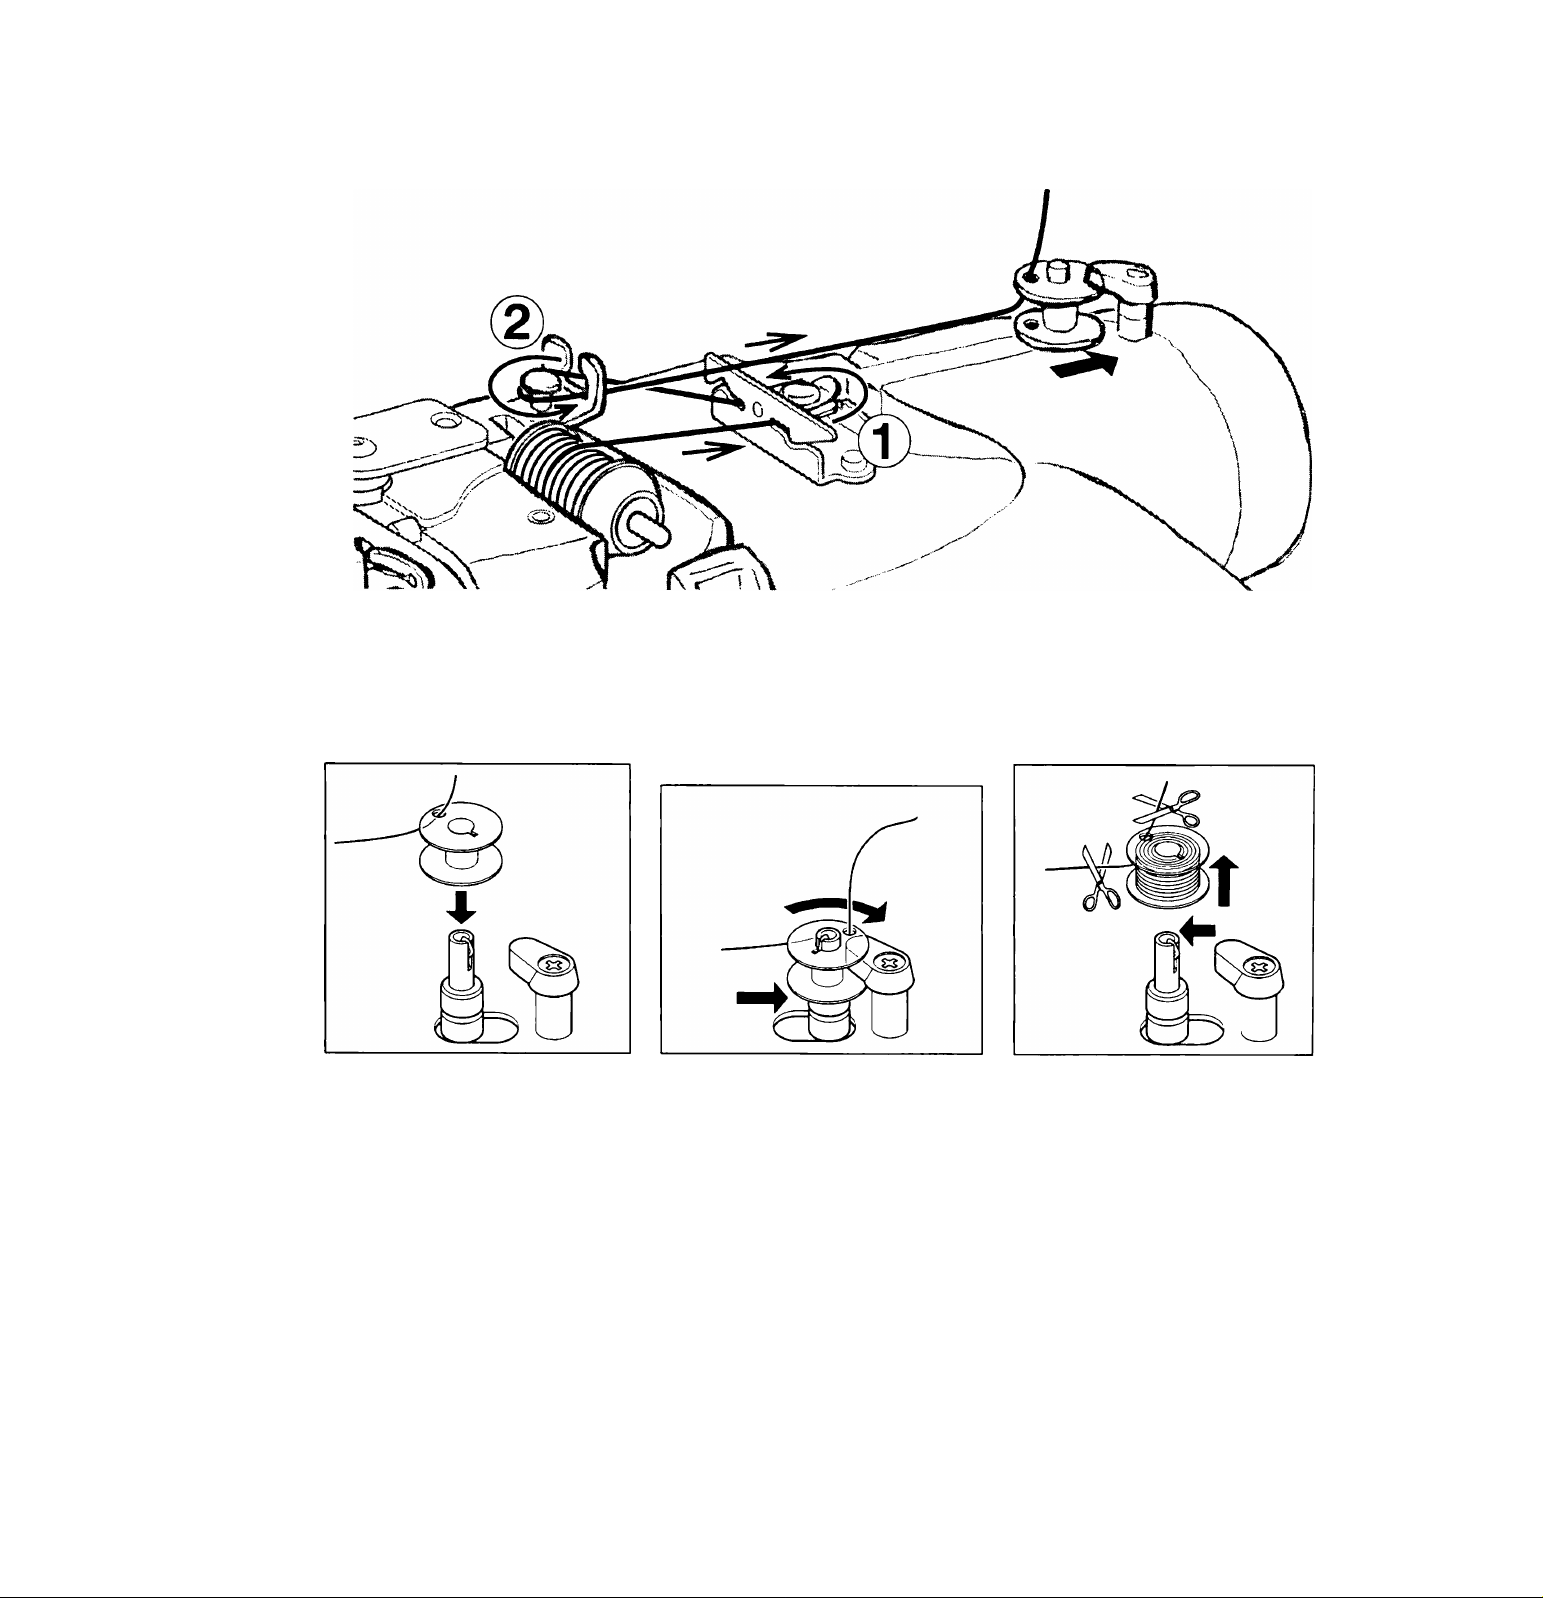
1. Place a spool of thread on the spool pin, and secure it with the spool pin cap (small). Pull the
thread out from the spool through thread guides (1) and (2).
. "’JWINDING bobbin;
2. Pull end of thread through hole in
bobbin as shown.
3. Push bobbin winder shaft to far left
position, if it is not already there. Place
bobbin onto shaft with end of thread
coming from top of bobbin. Push bobbin
winder shaft to the right until it clicks. Hold
onto end of thread.
4. Start machine. Bobbin will
automatically stop turning when
completely filled. Push shaft to the left
to remove bobbin and cut thread.
no
ji
4
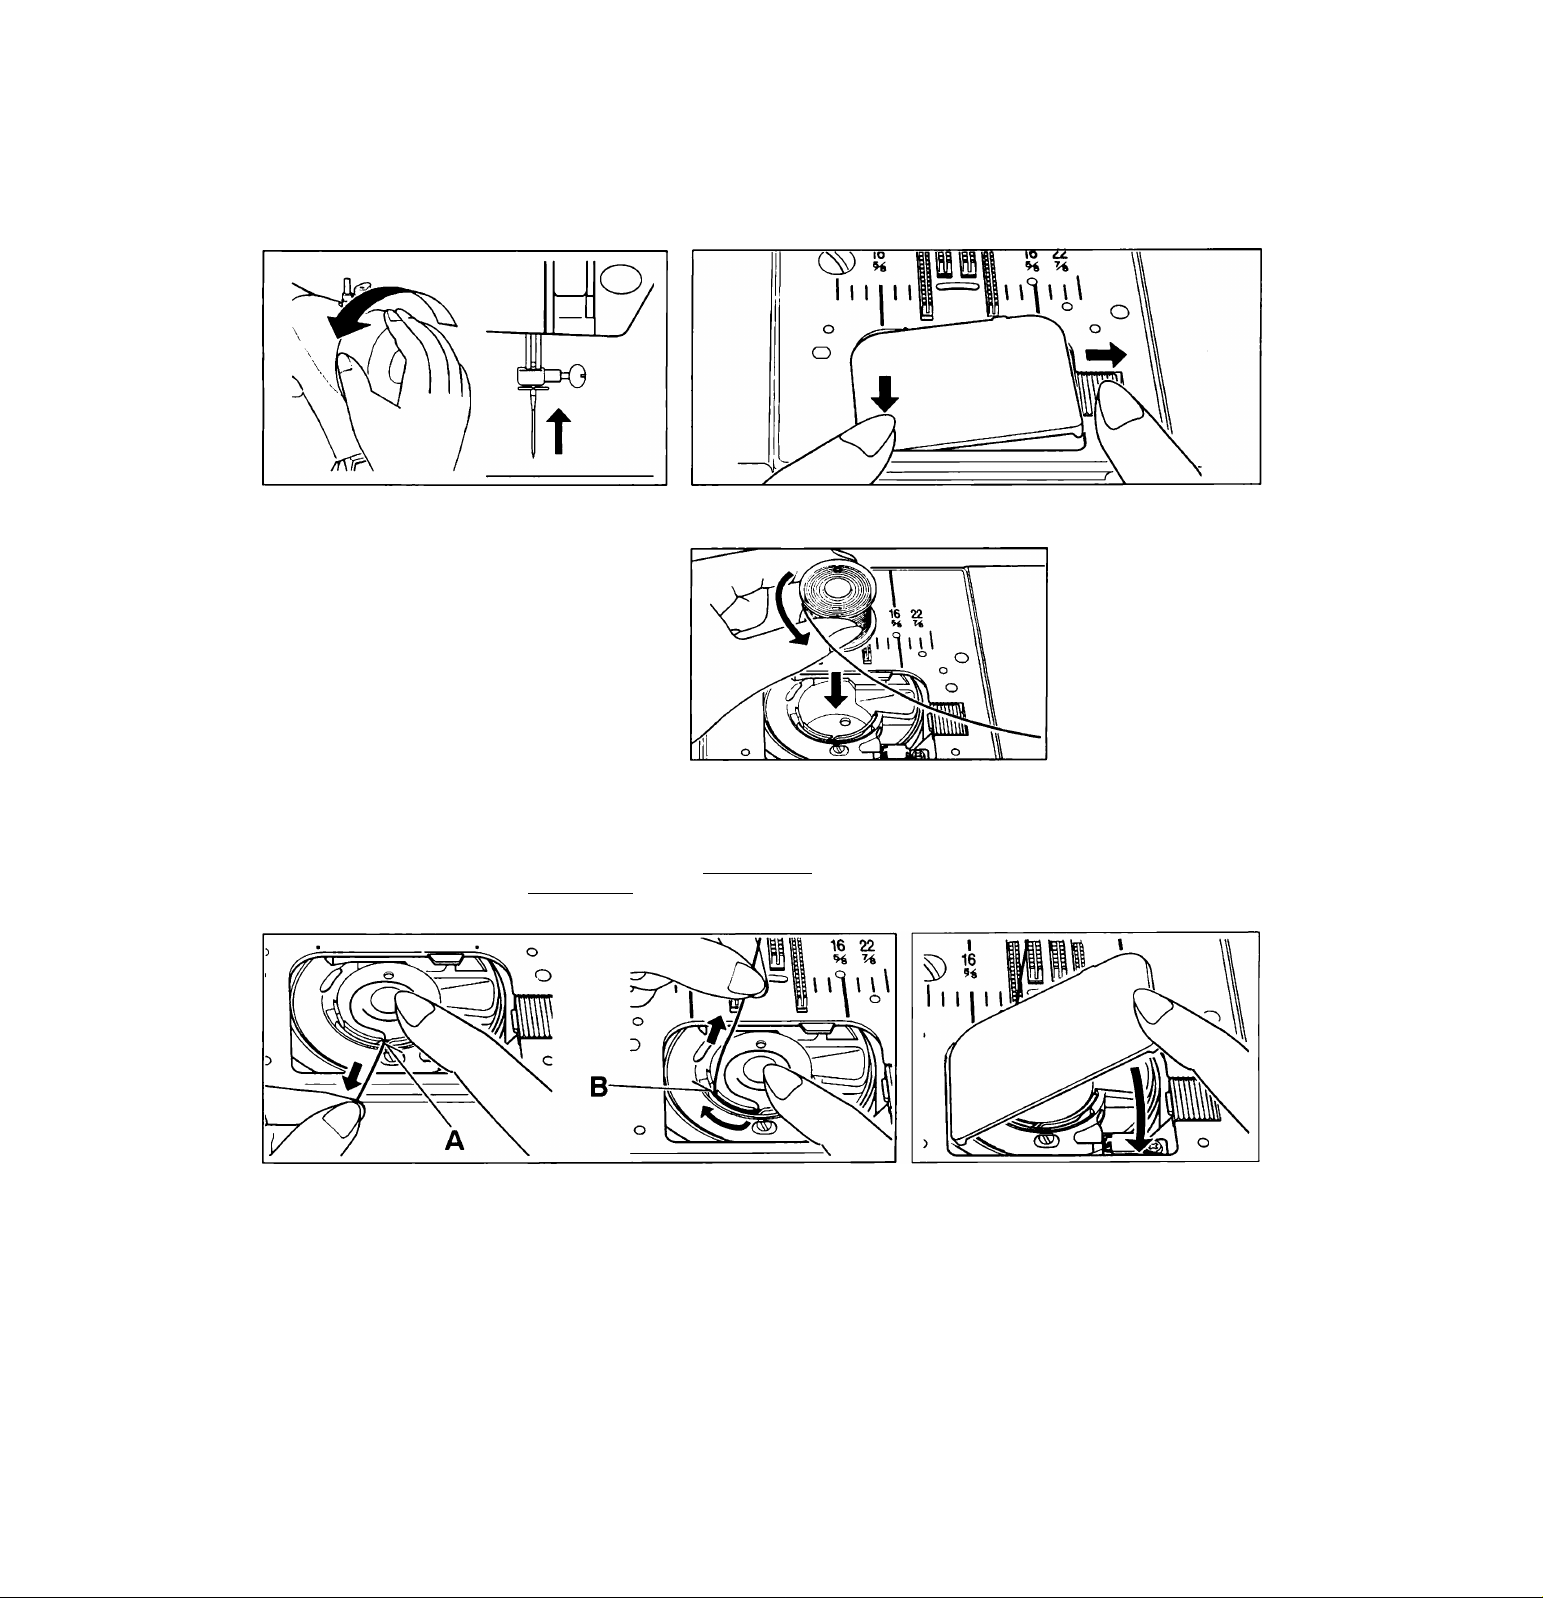
THREADING THE BOBBIN THREAD
1. Raise the needle to its highest position by rotating 2. Remove the bobbin cover plate by pushing the release button to the right
the hand wheel toward you.
while pushing the left corner of plate.
3. Insert the bobbin making sure the bobbin rotates
counter-clockwise.
4. Pull thread through the 5. With a finger held gently on top of the bobbin, 6. Replace the bobbin cover plate onto the
slot (A) and then to the left. pull thread through the slot (B) until you hear a needle plate.
clicking sound, and then leave about 6" (15 cm)
of thread.
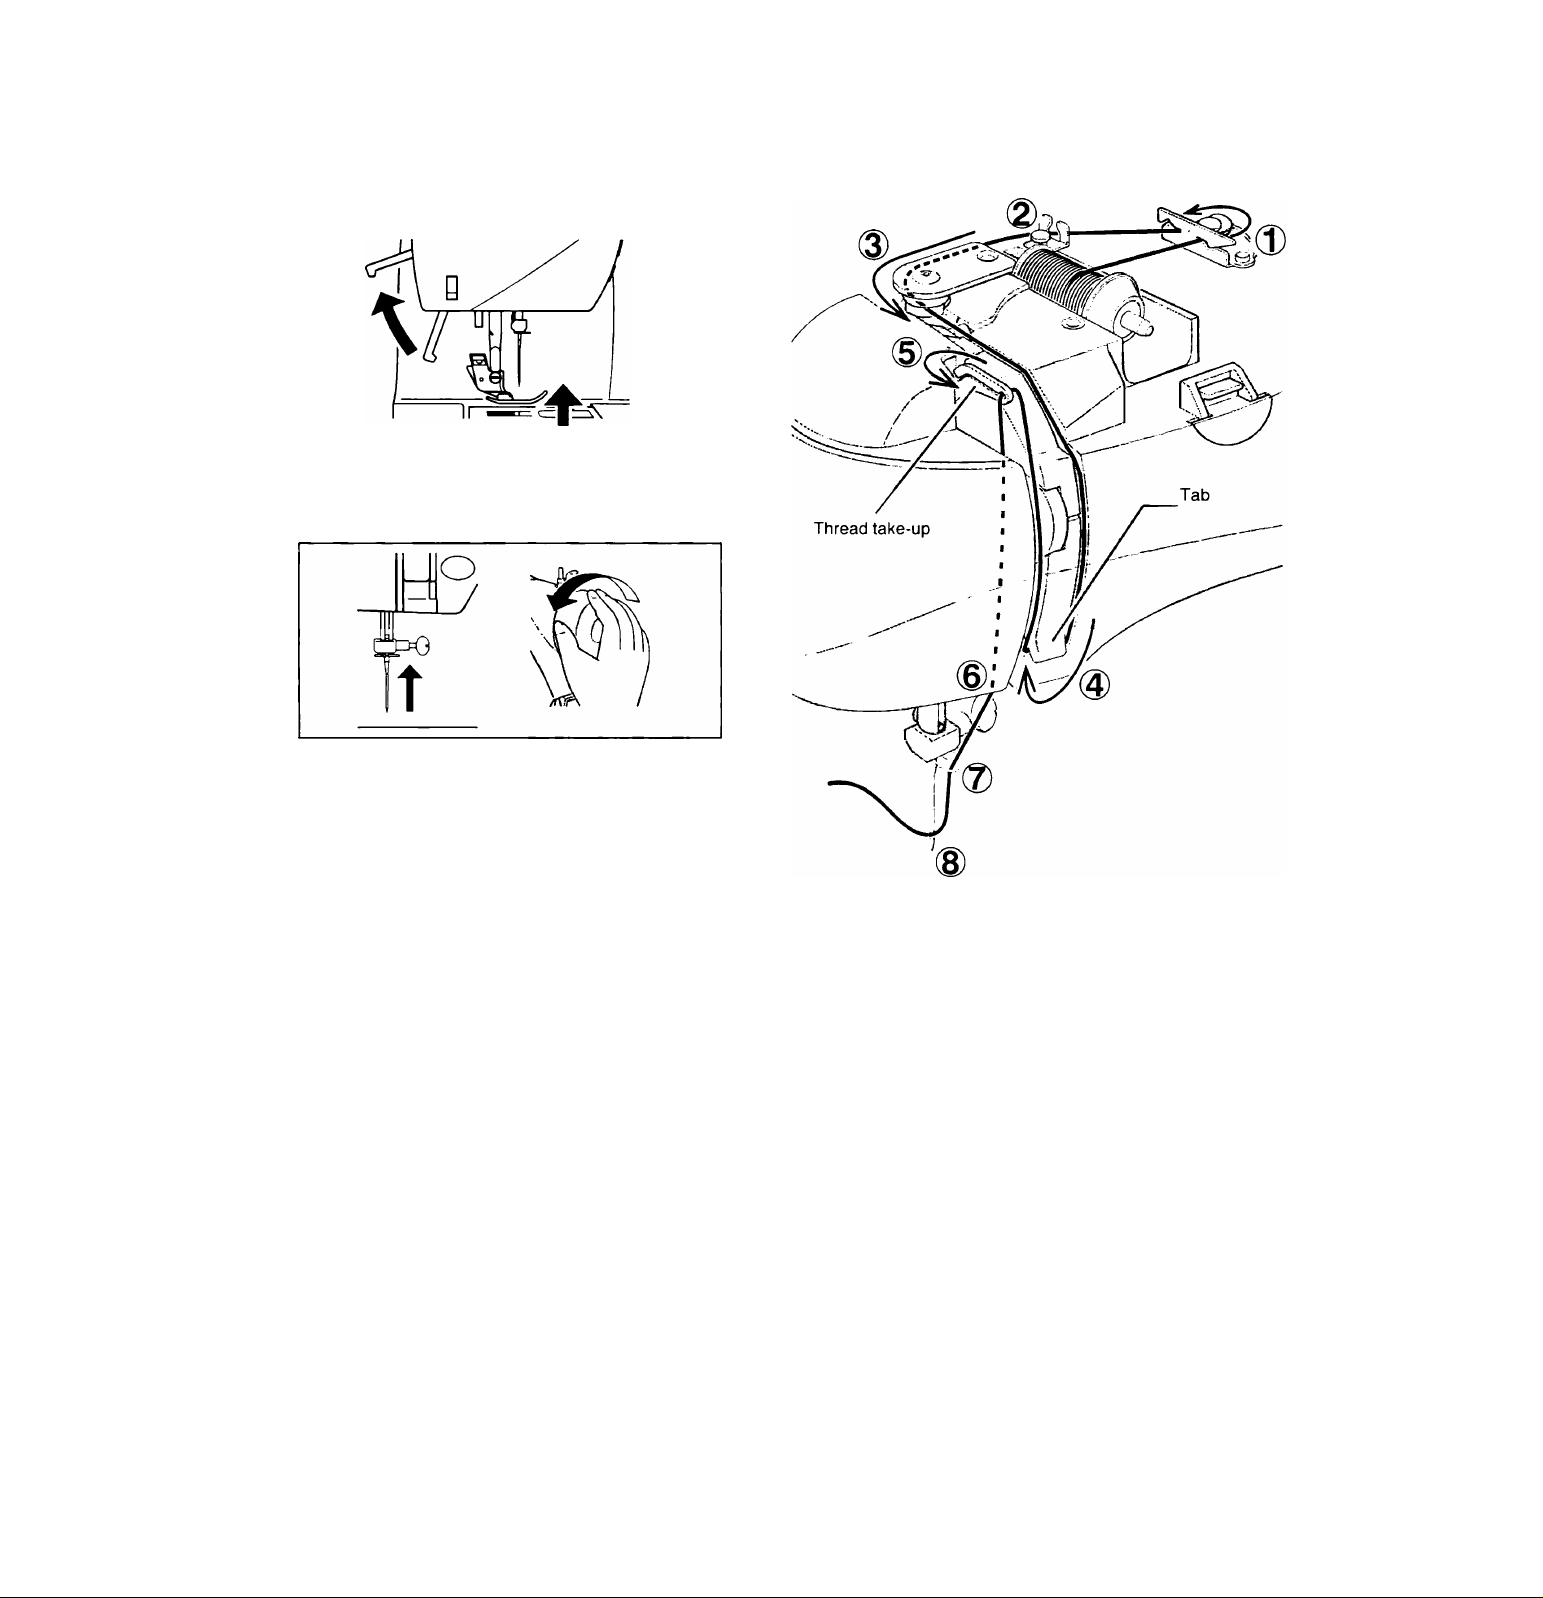
THREADING THE TOP THREAD
1. Raise the presser foot lifter. Always be sure to raise
the presser foot lifter before threading the top thread.
(If the presser foot lifter is not raised, correct thread
tension cannot be obtained.)
2. Turn the hand wheel toward you until the needle is in
its highest position and the thread take-up is visible.
3. Thread the machine in the following order as illustrated.
* Guide the thread through thread guides (1), (2) and (3), and then
pull it down along the groove.
* Do a U-turn around the inside of the tab (4).
* Pass the thread through the thread take-up (5) from right to left.
* Insert the thread into the inside of the groove (6).
* Guide the thread onto the thread guide (7).
* Pass the thread through the eye of the needle (8) from front to back.
.
■ii
USING AUTOMATIC NEEDLE THREADER
Raise the needle to its highest position by rotating the hand wheel towards you.
1. Pull down threader lever and hook
thread to thread guide as illustrated.
Continue to push the lever down until
the hooked end passes through the
needle eye.
2. Guide thread into hooked end and pull
it upward.
3. Release the threader lever and thread
simultaneously, and needle will be
threaded automatically.
NOTE: For smooth threading it is
recommended to set the machine
at straight stitching (middle
position) when using needle
threader.
^3

« ^ ''•'•A' f
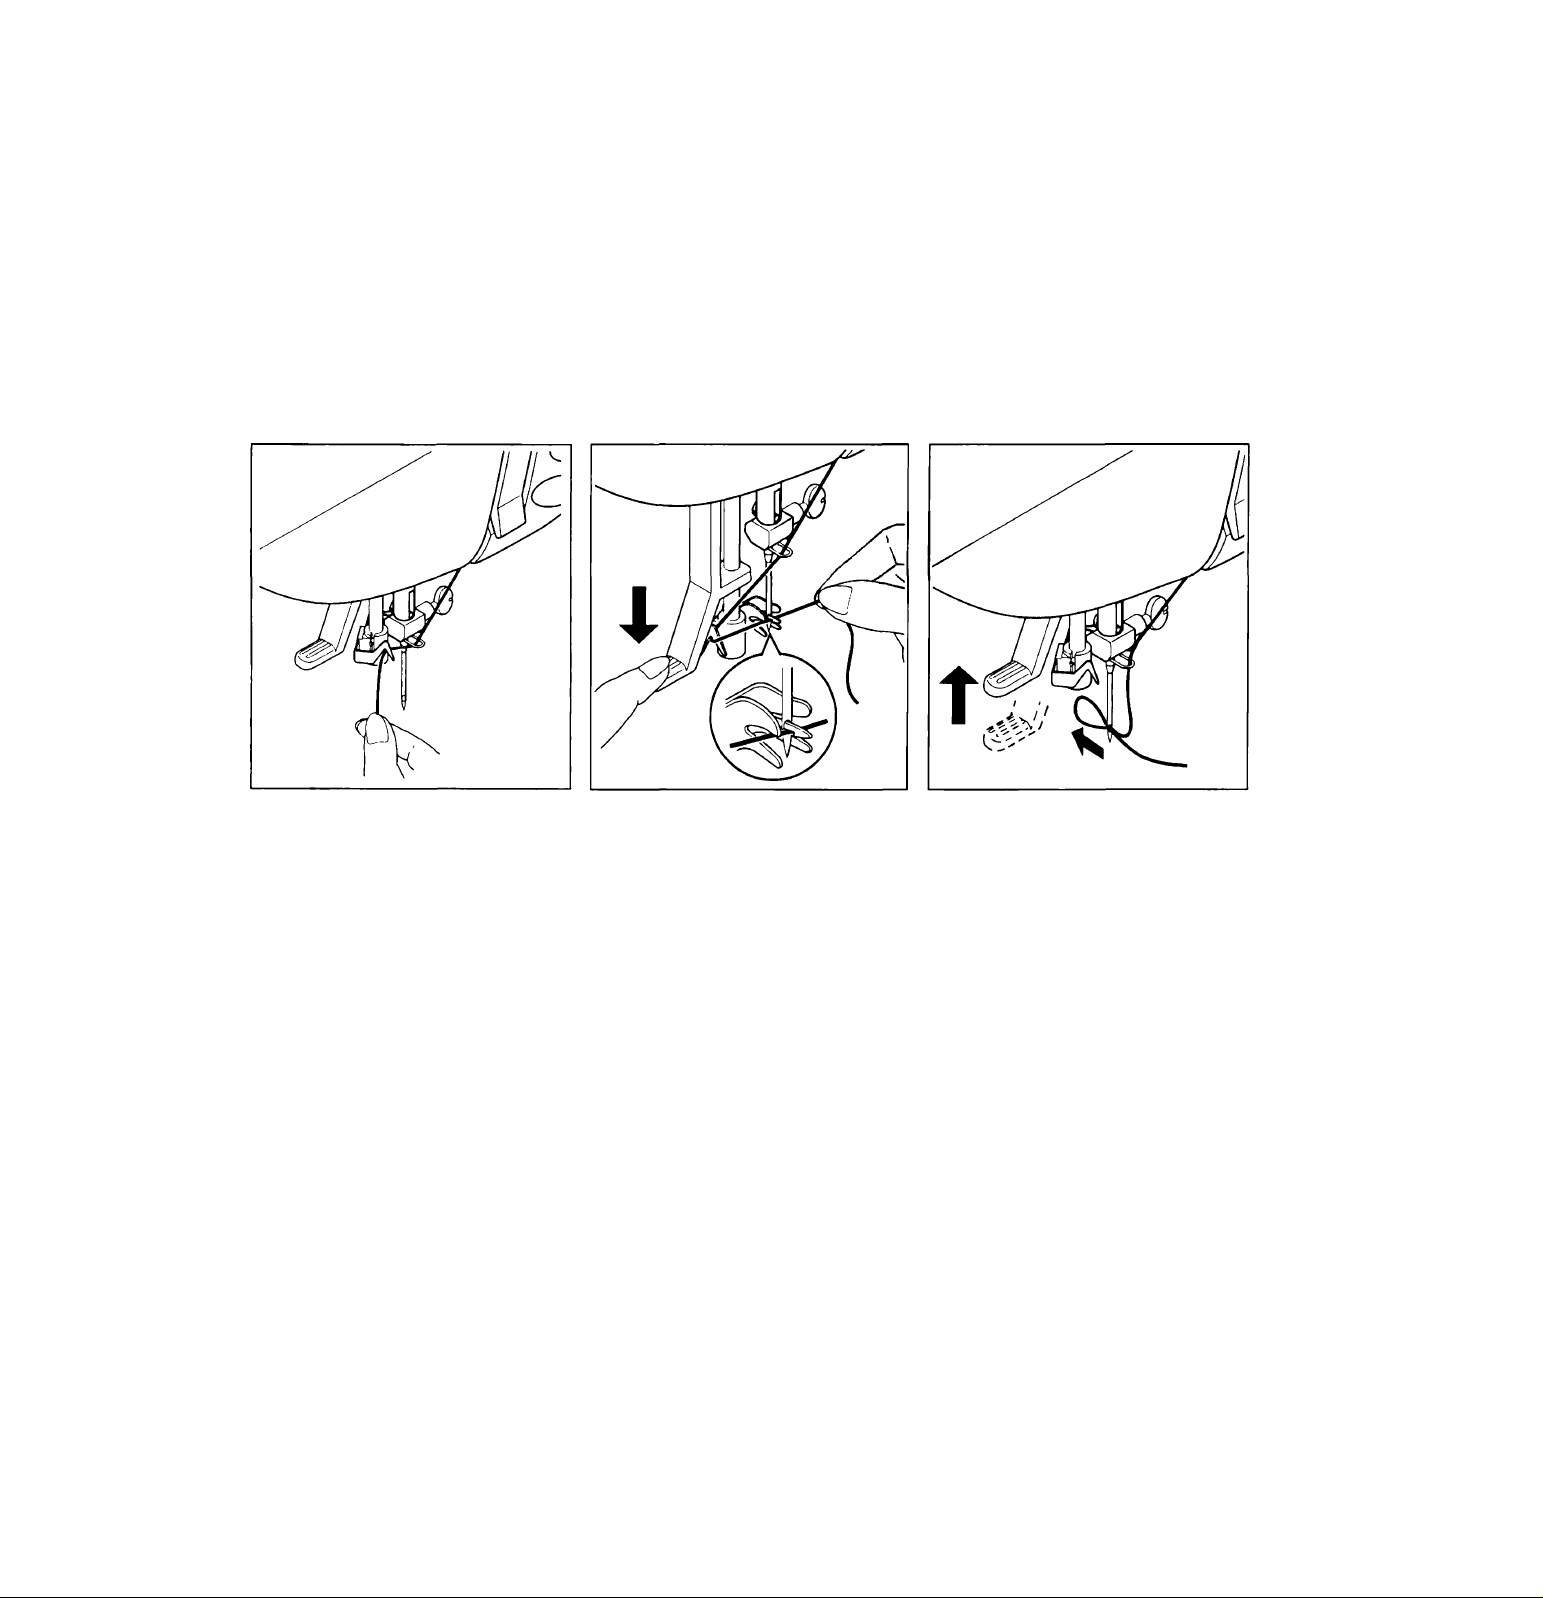
P|C^NG UP
1. Raise the presser foot lifter.
3. Lightly pull up the top thread, and pick up bobbin
thread, which will appear through the needle plate
slot.
2. Holding needle thread loosely with your left hand, turn hand wheel towarc
you with your right hand first lowering the needle and continuing until th€
needle comes to its highest position.
4. Pull both top and bobbin threads together toward the back of the machine
under the presser foot, leaving about 6" (15 cm) clear.
2. TESTING TO SEW
' , s
Test straight stitch function available without connecting the GAME BOY.
SETTINGS :Presser foot - Zigzag foot
:Thread tension control - 3 - 5
Needle position: Center needle position
Stitch length: 3 mm
1. Turn on the power for the sewing
machine.
2. Pull both threads under the presser
foot toward the back of the machine,
leaving about 6" (15cm) clear.
3. Place the fabric under the presser foot
and lower the presser foot lever.
4. Turn the hand wheel toward you until
the needle enters the fabric.
5. Start the machine.
Guide the fabric gently with your hand.
6. When reaching the edge of the material, stop the sewing machine.
7. First turn the handwheel toward you until the
needle is at its highest position, then raise
the presser foot, draw materials to the rear
and cut off excess thread with the thread
cutter located or\the bottom of face cover
as shown.
ITEST SEWING (2)
Connect the GAME BOY to use sewing machine for sewing.
CONNECTING THE GAME BOY
1. CHECK THE GAME BOY
Check that the batteries, the optional battery pack or the
optional AC adapter is installed correctly. (Refer to the
Operating Instructions for the GAME BOY for details.)
Compatible models:
GAME BOY Pocket, GAME BOY Color
* NOTE ON TRANSFERRING DATA FROM THE GAME BOY
Transferring data from the GAME BOY to the sewing machine
can be carried out with GAME BOY POCKET and GAME BOY
COLOR only.
Super Game Boy and the larger Game Boy which was first
released cannot be used.
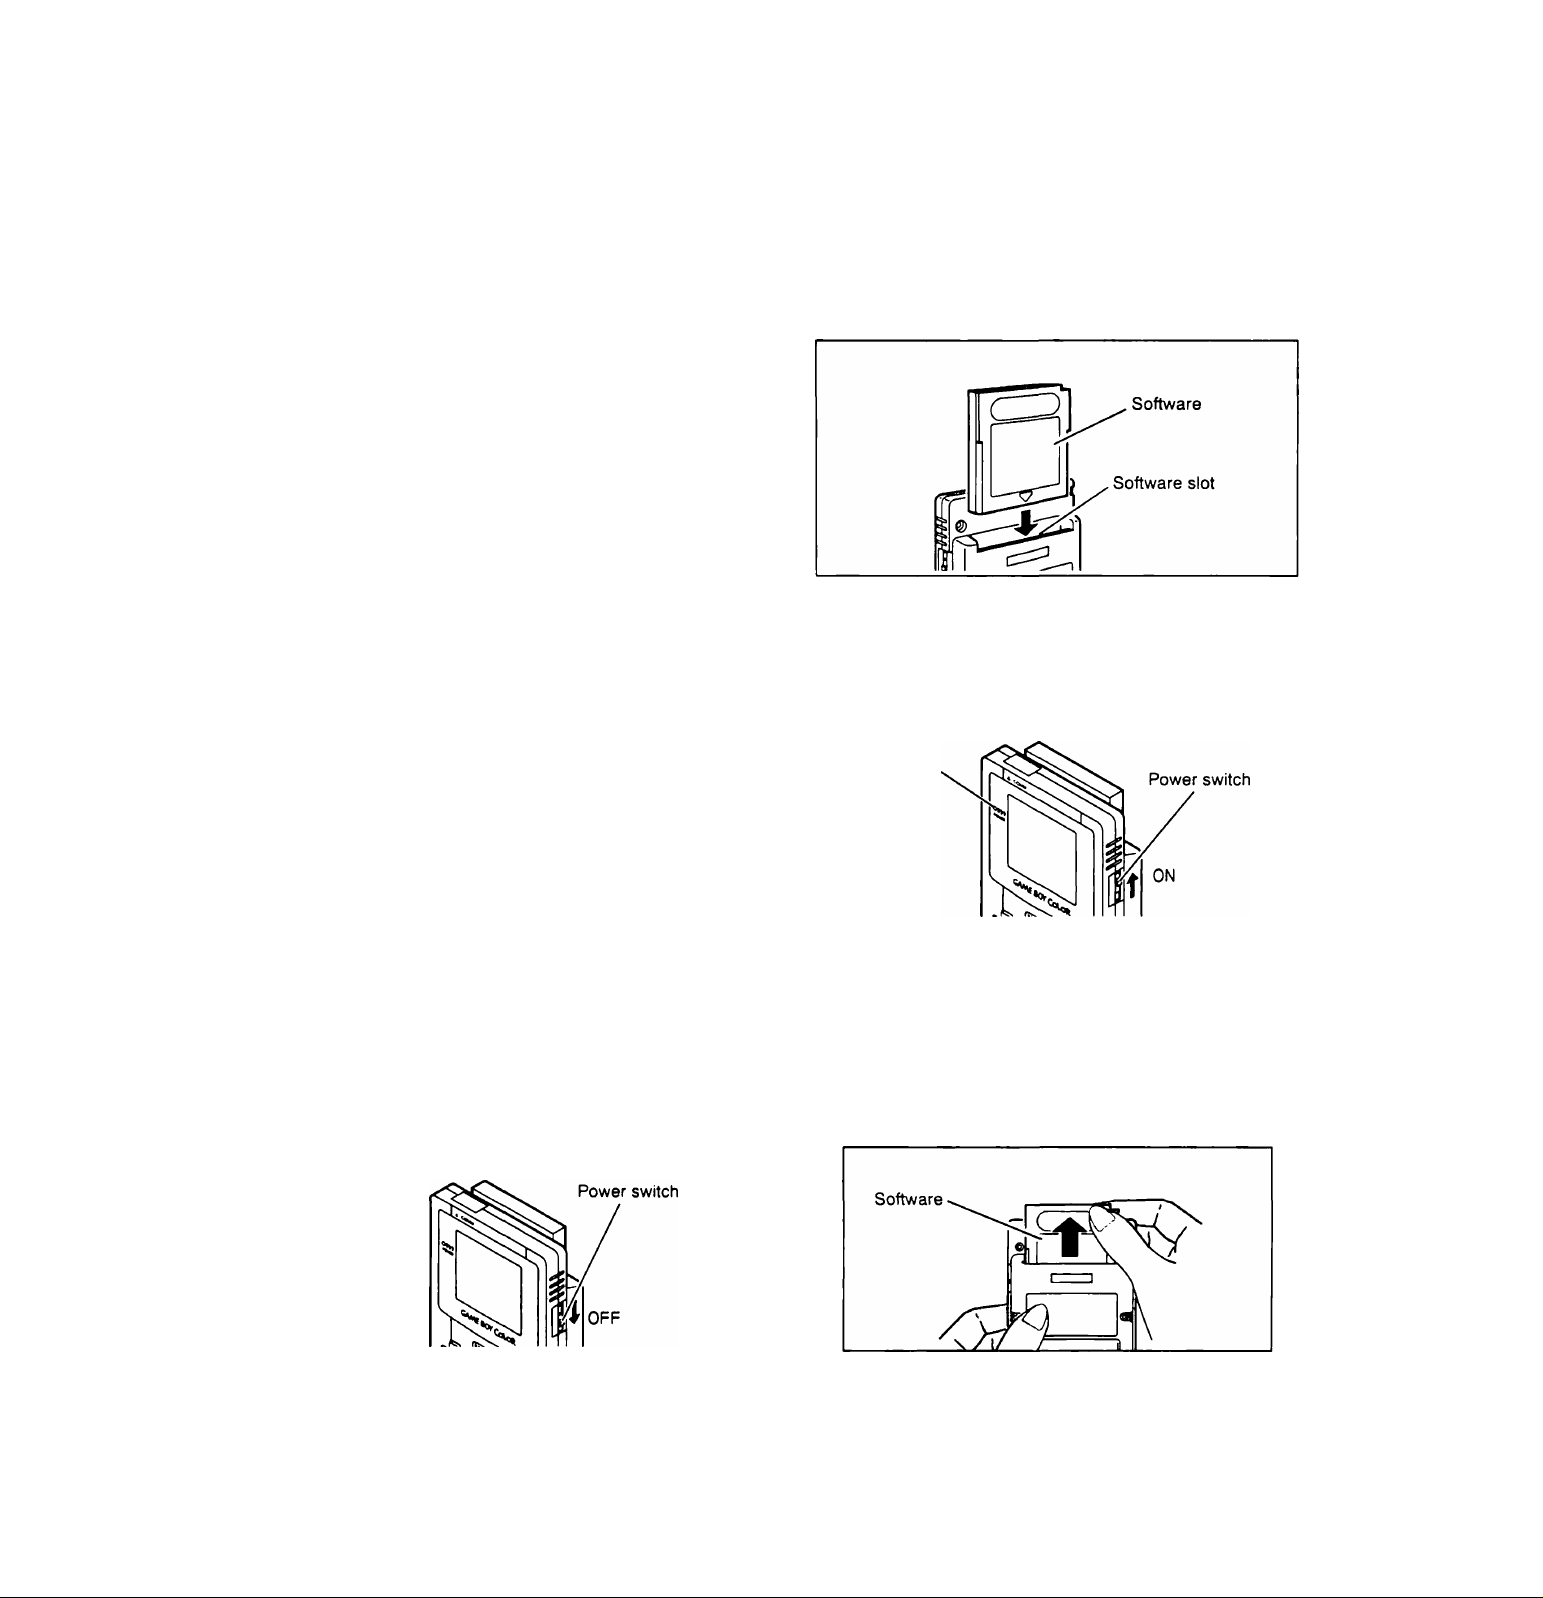
2. INSERT THE SOFTWARE
Insert the software into the slot at the rear of the GAME BOY
in the direction of the arrow until it clicks into place.
3. TURN ON THE POWER SWITCH
When the power switch is at the ON position, the power
indicator will illuminate.
NOTE: Remember to turn off the GAME BOY when you are
not using the machine.
Power
indicator
TURNING OFF THE GAME BOY
Turn the power switch to the OFF position.
REMOVING THE SOFTWARE
Push the Software up with your thumb as shown in the
illustration to remove the Software.
^6
I
f ^ ■ -;',v
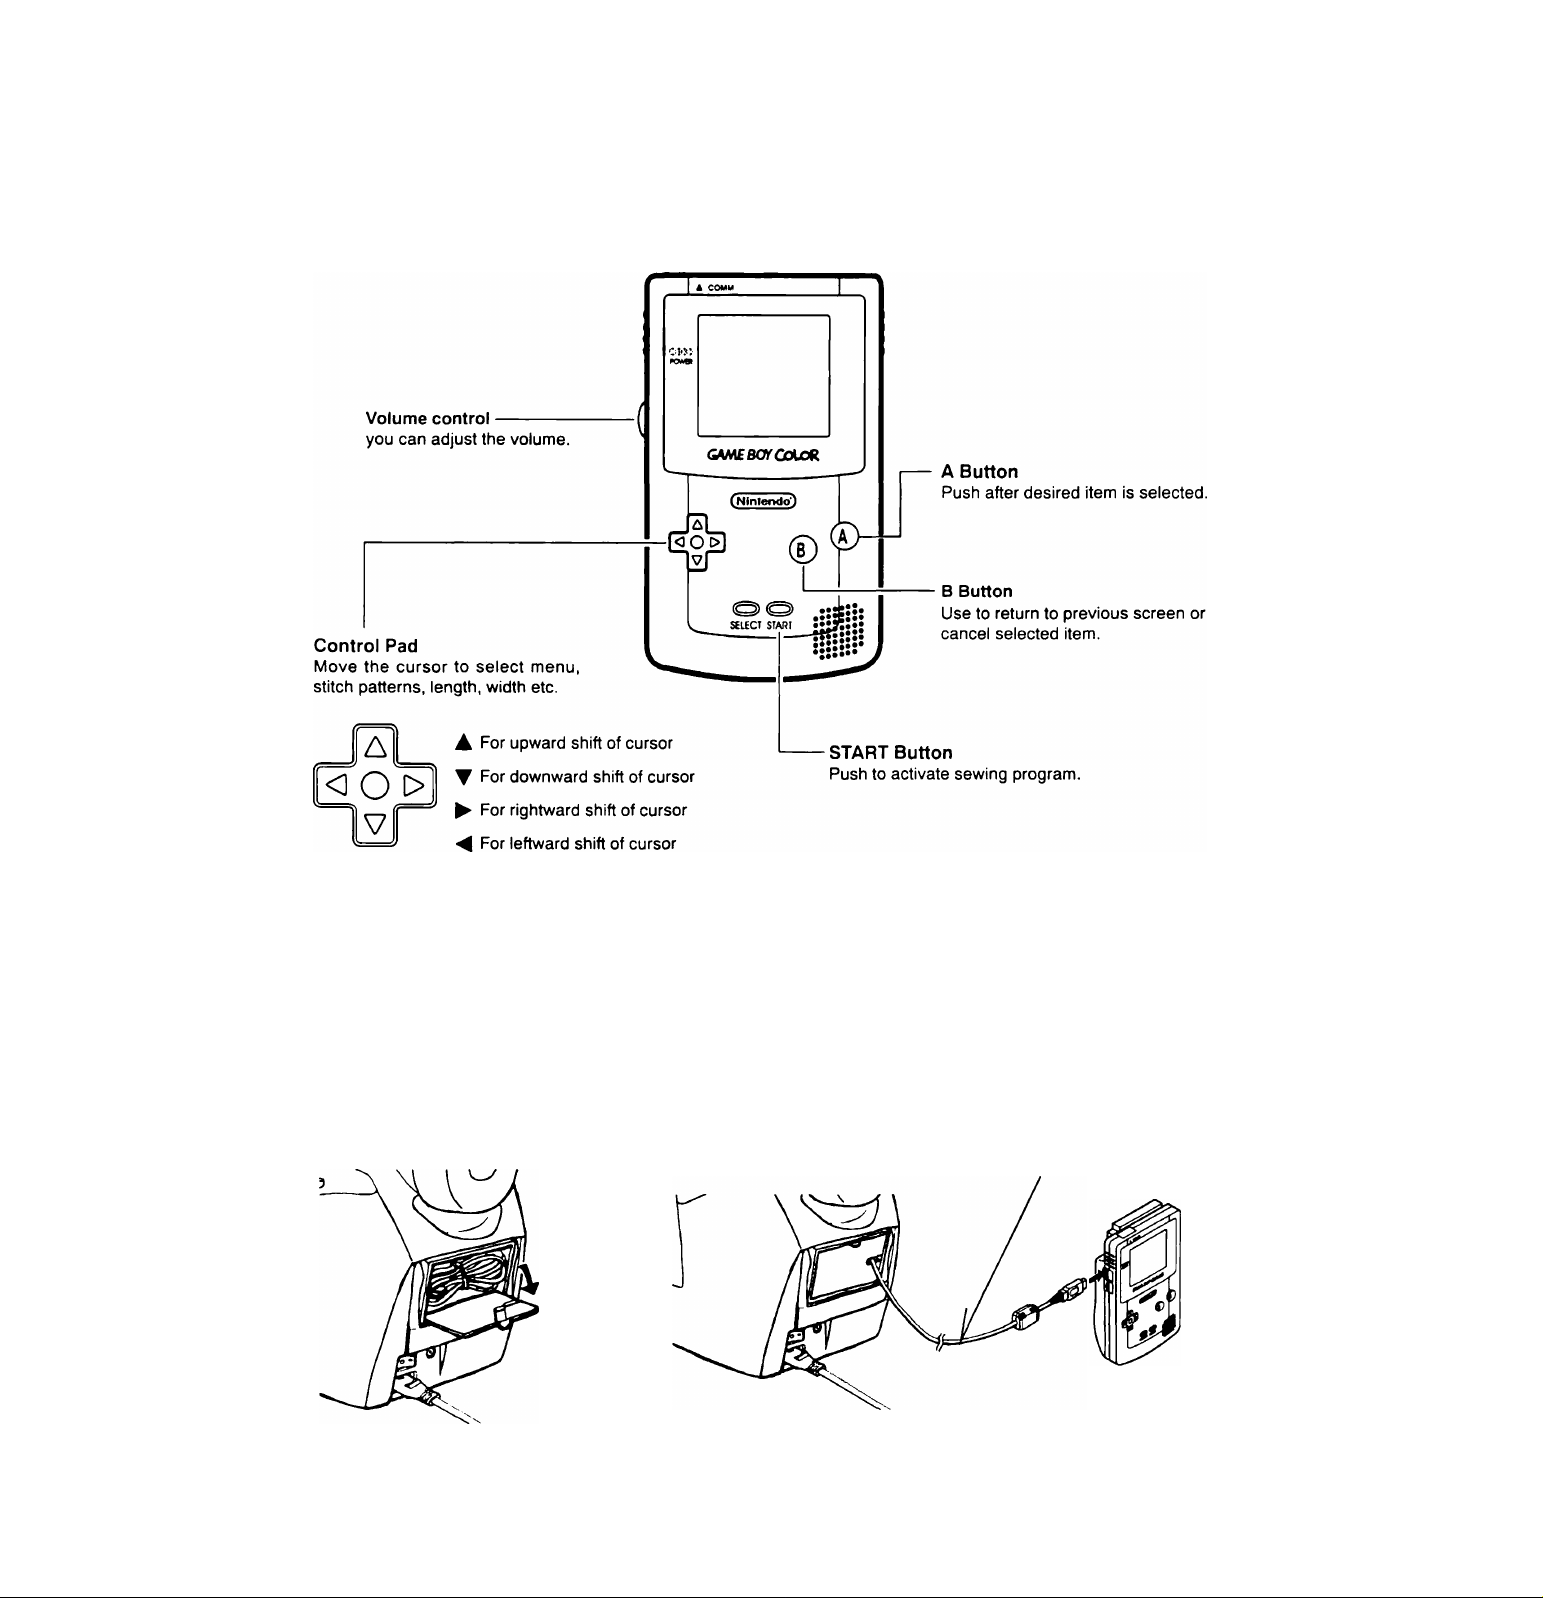
OPERATION OF GAME BOY
(TEST SEWING)
Basic operation is to select with Control Pad, decide with A Button and cancel with B Button.
CONNECTING THE SEWING MACHINE AND THE GAME BOY
Take the link cable out of the sewing machine’s storage compartment, and connect it to the GAME BOY.
Link cable (only for use with GAME BOY)
NOTE: Do not pull the link cable with excessive force, otherwise it may pull out or become damaged.
17
Test sewing with a zigzag stitch (stitch length <^1.5 mm,
sé ' stitch width-6.5 mm) as a sample.
SETTINGS Presser foot - Zigzag foot
Thread tension control - 3 - 5
(TEST SEWING)
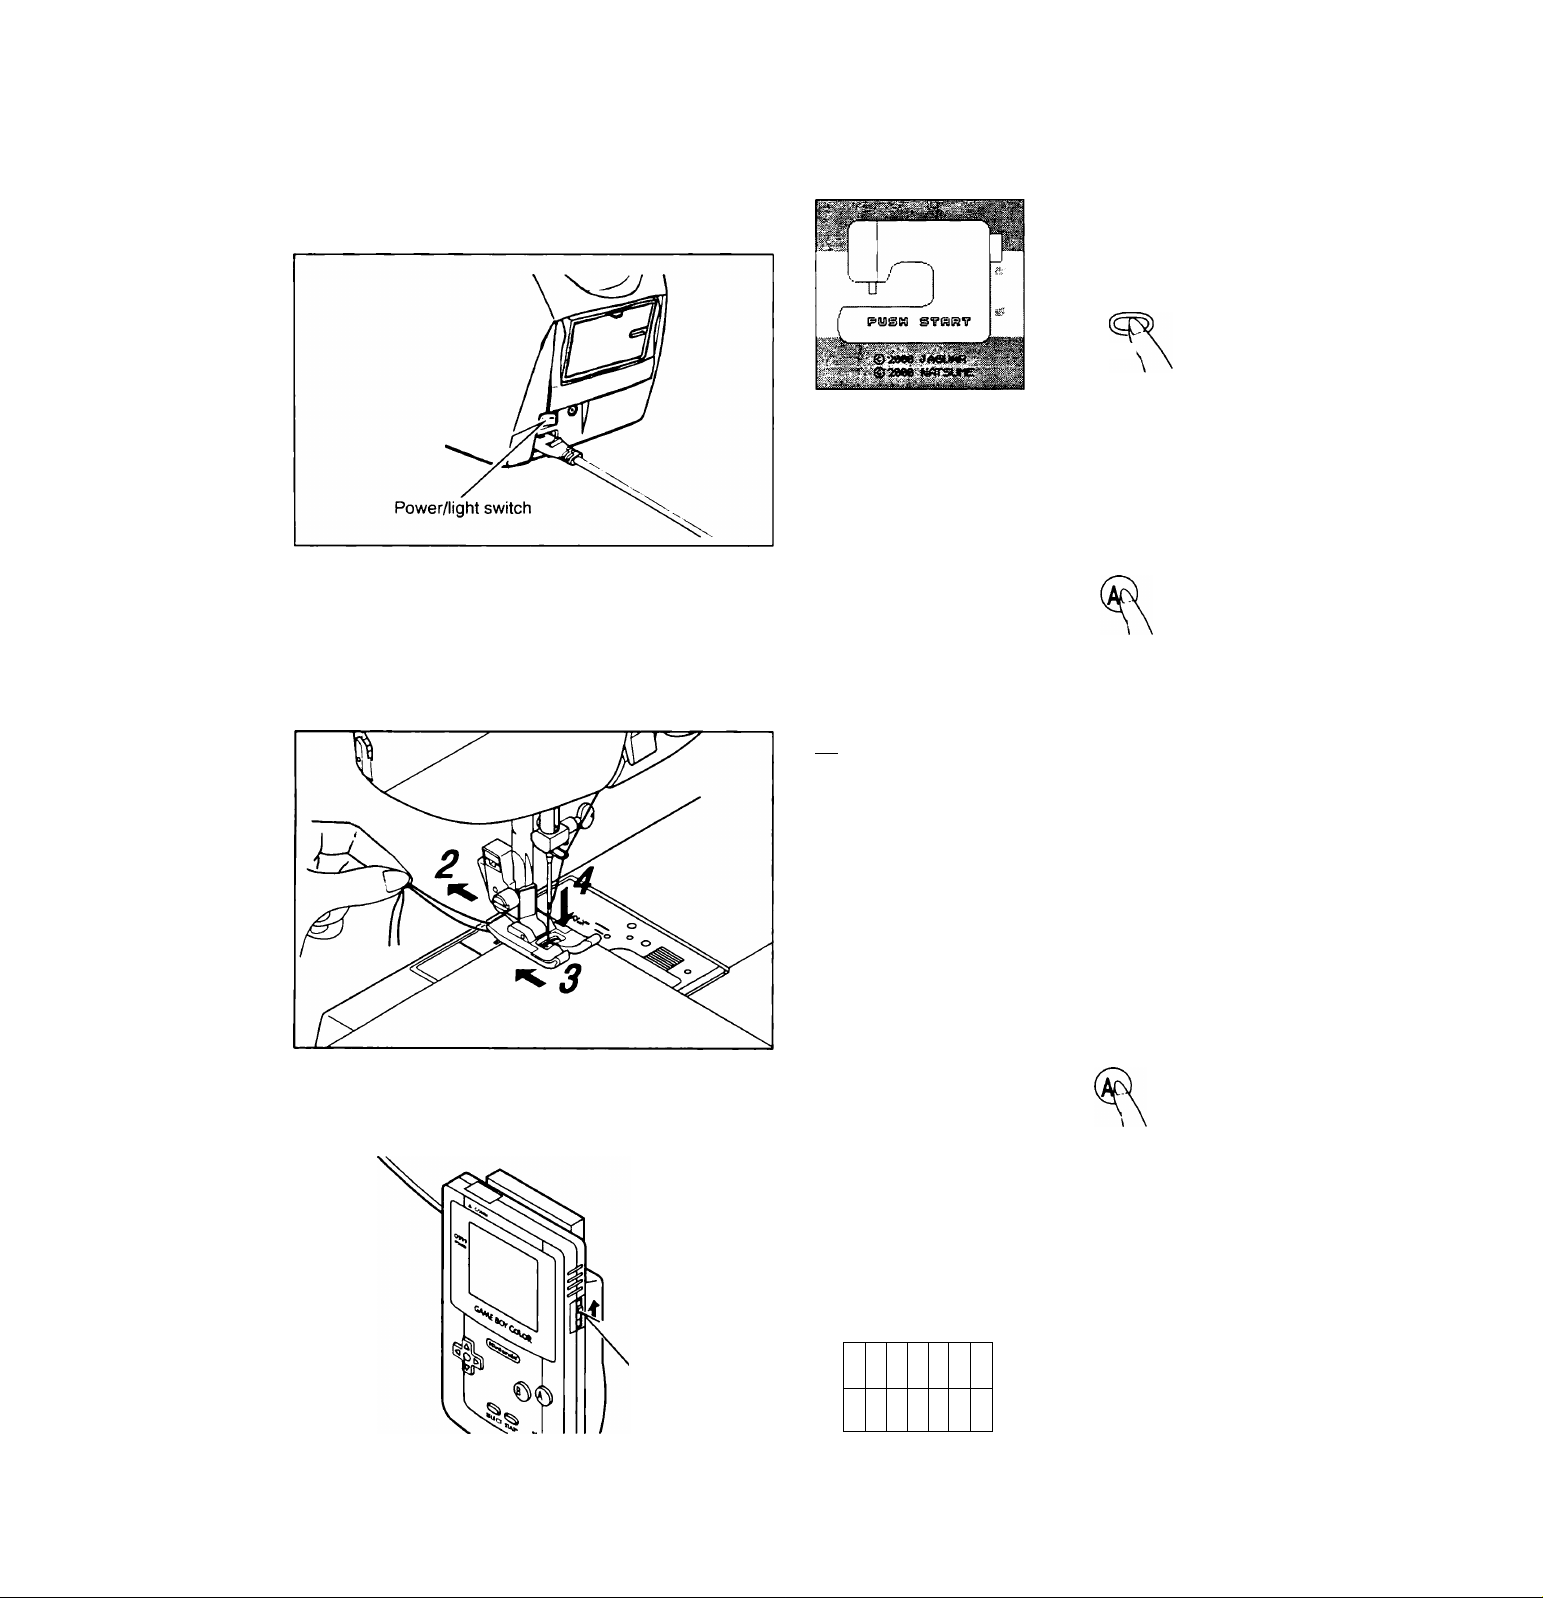
1. Turn on the power for the sewing machine.
2. Pull both threads under the presser foot toward the back of
the machine, leaving about 6” (15cm) clear.
3. Place the fabric under the presser foot and lower the presser
foot lifter.
4. Turn the hand wheel toward you until the needle enters the
fabric.
5. Turn on the Power switch after making sure the Software is
inserted firmly.
■ Power switch
6. Start the GAME BOY.
6 -1
The music will play, and then "PUSH
START" will flash on the screen.
Push the START Button or A
Button to activate sewing
program.
SELECT STA'
6-2
LANGUAGE xx^
► ENGLISH
FRfiNQfilS
ESPflNOL
Push the Control Pad until cursor is
shifted to desired language and
push the A Button to select it.
Push the A Button
(D
6-3
MENU xxxxx?>^
PATTERNS
BUnONHOLES
LETTERS
FfiUORITES
CUSTOM
COLORS
The menu screen will be displayed
automatically.
Push the A Button
6-4
PATTERNS
► SINGLE PfiTTERN j
COMBINATIONS
Push the A Button
6-5
SINGLE PATTERNS
1
1
1
1
1
1
1
I
j
-rt
r
ri
>
r ‘
>
y
1
]>
1...
f'
nCb]
N
! N
\
\
PATTERN
L^ A-005
Push the ( ►) Control Pad to move
the cursor to display pattern A-005.
Push the A Button
'IQ
(TESTSEWiNQ)
6-6
^ SINGLE PATTERNS
1
1
1
t
1
1
1
-rC
! r
1-
x"
yi
1
'>
i
kv
N
: \
\
• \
PATTERN NO.
A-005
Push the A Button
(You can then push the ( ►) Control
Pad to select a mirror image of
pattern.
Some symmetrical patterns do not
change when mirror image is
selected.)
6-7
SINGLE PATTERNS
PATTERN N0.
A-005
IIE
4 6.5
LENGTH WIDTH
Push the A Button
6-8
SINGLE PATTERNS -
1 PATTERN N0.
L£l A-005
► DATA THANSFER
ADD TO FAUORITES
RETURN
Push the A Button
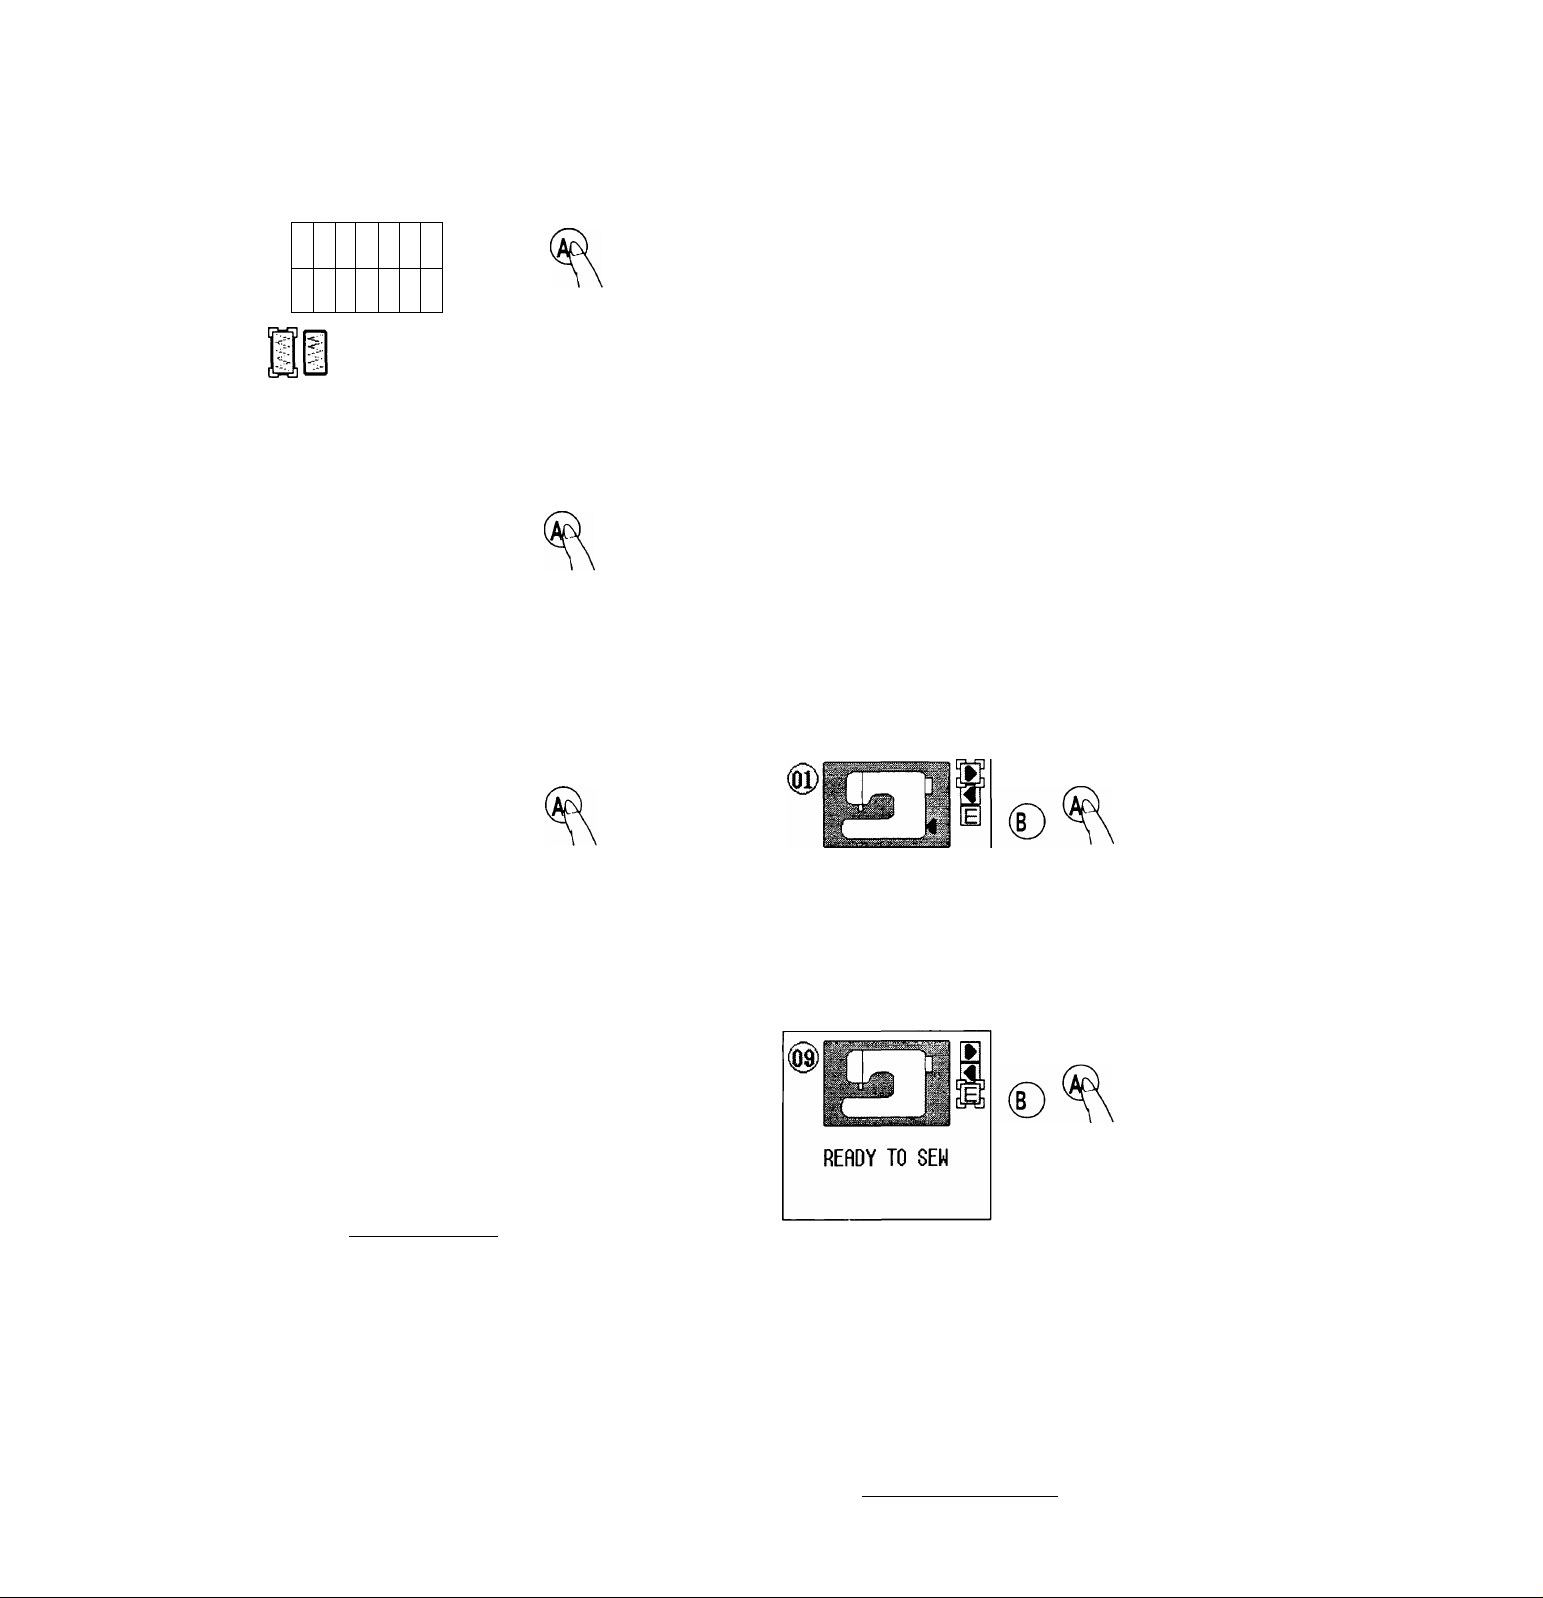
6-9
SINGLE PATTERNS
PATTERN N0.
m A-005
SEE S
ET-UP GUIDE?
YES
► NO
! W/XC»: : VNvX-Tv •
If you wish to view the set-
.up guide screen, push the
( A) Control Pad to select
“YES”.
Push the A Button
If you do not wish to
view the set-up guide
screen.
Push the A Button
DATA TRANSFERRED.
6-10
CONNECT POWER PLUG
SEE SETTING UP THE
MHCHINE IN MRNUnL
Push the A Button
"SET-UP GUIDE SCREEN", see
page 21.
6-11
Push the A Button
DATA TRANSFERRED.
6- 12
SINGLE PATTERNS ^
PATTERN N0.
A-005
TRANSFERRED
START
SEWING MACHINE
• V z ysy>i-y‘-1 ;: ysy>i!
This completes the preparations
required before starting the machine.
no
Loading...