


DETAILED THREADING GUIDE - Quantumlock® 14T967DC & 14T957DC |
|
2 / 3 / 4 / 5 – THREAD SERGERS |
|
TABLE OF CONTENTS |
|
THREADING INFORMATION FOR A 4-THREAD ULTRA STRETCH MOCK SAFETY STITCH ........... |
2 |
THREADIING INFORMATION FOR A NARROW 5-THREAD SAFETY STITCH.................................... |
11 |
THREADING INFORMATION FOR A TRIPLE COVER STITCH............................................................. |
25 |
HOW TO DISENGAGE THE MOVABLE UPPER KNIFE ......................................................................... |
46 |
HOW TO CONVERT THE UPPER (GREEN) LOOPER TO A SPREADER ............................................ |
47 |
HOW TO DISENGAGE THE UPPER (GREEN) LOOPER....................................................................... |
48 |
THREADING INFORMATION FOR A 4-THREAD ULTRA
STRETCH MOCK SAFETY STITCH
Threading the Green Upper Looper:
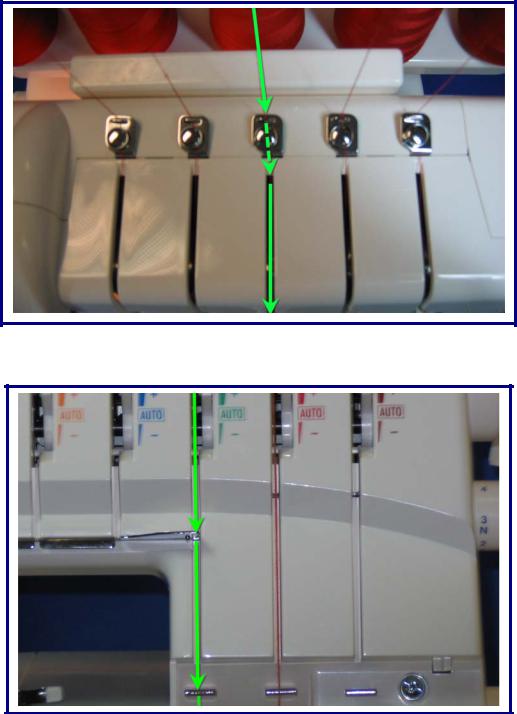
Top Cover Thread Guide.
Thread the top cover thread guide by slipping the thread under the guide from right to left, and then pull the thread under the small round disk from the right side.
Lay thread through Green tension disk, while holding the thread securely with both hands. Next slip into guide directly below the tension from right to left.
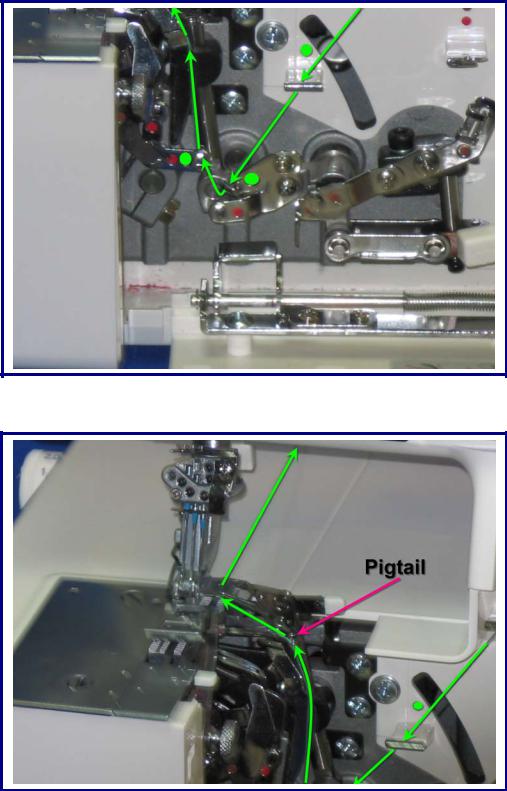
Using tweezers slip the thread into the next three guides marked with small green dots.
Thread the guide that looks like a little pigtail and then thread through the eye of the looper as shown. Pull the thread tail to the back of the serger approximately 4 to 6 inches.

Thread Red Lower Looper:
Top Cover Thread Guide
Thread the top cover thread guide by slipping the thread under the guide from right to left, and then pull the thread under the small round disk from the right side.
Lay thread through Red tension disk while holding the thread securely with both hands. Next slip into guide directly below the tension from right to left.

Tugging slightly on the thread tail at the back of the serger, push the threader lever all the way up to hook thread into the eye at the back of the looper.
Threading Blue Overedge Stitch Needle:
Top Cover Thread Guide
Thread the top cover thread guide by slipping the thread under the guide from right to left, and then pull the thread under the small round disk from the right side.

Using tweezers slip the thread into the slot at the back of the thread guide, and then into the next three guides marked with the small red dots.
Thread the eye of the looper as shown, making sure that the thread is positioned in the “V” cutout in front of the looper. Pull the thread tail to the back of the serger approximately 4 to 6 inches.

Lay thread through Blue tension disk while holding the thread securely with both hands. Next slip into guide directly below the tension from right to left.
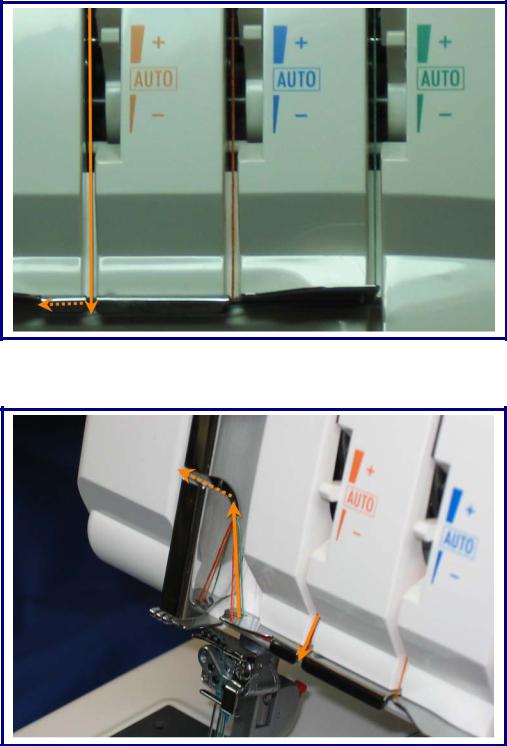
Slip the thread into the third slot closest to the back and then up and over the take up lever slot.

Slip the thread into the third slot on the right next to the take-up lever, then into the third slot on the right in the guides just above the needle clamp. Next slip the thread behind the metal guide and then into the eye of the needle in B position, and then under what looks like a bridge at the back of the foot. Pull the thread tail to the back of the serger.
Threading Orange Overedge Stitch Needle:
Top Cover Thread Guide
Thread the top cover thread guide by slipping the thread under the guide from right to left, and then pull the thread under the small round disk from the right side.
Lay thread through Orange tension disk, while holding the thread securely with both hands. Next slip into guide directly below the tension from right to left.
Slip the thread into the center slot and then up and over the take-up lever slot.

Slip the thread into the center slot next to the take-up lever, then into the center slot in the guides just above the needle clamp. Next slip the thread behind the metal guide and then into the eye of the needle in A position, and then under what looks like a bridge at the back of the foot. Pull the thread tail to the back of the serger.
THREAD TIPS FOR 4-THREAD ULTRA STRETCH SAFETY STITCH
•Be sure to follow the threading sequence outlined above.
•Make sure needles are set-up in positions A and B for the 4-thread Ultra Stretch Safety Stitch. This is very well illustrated in your manual on page 15.
•When inserting the needle in positions A & B, loosening both needle screws A and B will facilitate inserting and removing needles.
•The Brown Chain/Cover Stitch looper is not used for the 4-Thread Ultra Stretch Safety Stitch.
•Always reset the tension dials by re-selecting the stitch after threading the serger.
THREADING INFORMATION FOR A NARROW 5 THREAD
SAFETY STITCH
Threading the Green Upper Looper:
Thread the top cover thread guide by slipping the thread under the guide from right to left, and then pull the thread under the small round disk from the right side.

Lay thread through Green tension disk, while holding the thread securely with both hands. Next slip into guide directly below the tension from right to left.
Using tweezers slip the thread into the next three guides marked with the small green dots.

Thread the guide that looks like a little pigtail and then thread through the eye of the looper as shown. Pull the thread tail to the back of the serger approximately 4 to 6 inches.

Threading Red Lower Looper:
Thread the top thread guide by slipping the thread under the guide from right to left, and then pull the thread under the small round disk from the right side.
Lay the thread through Red tension disk while holding the thread securely with both hands. Next slip into guide directly below the tension from right to left.

Using tweezers slip the thread into the slot at the back of the thread guide, and then into the next three guides marked with the small red dots.
Thread the eye of the looper as shown, making sure that the thread is positioned in the “V” cut out in front of the looper. Pull the thread tail to the back of the serger approximately 4 to 6 inches.
 Loading...