


14T968DC
14T968DC
Instruction Book

14T968DC
This SINGER sewing machine, model 14T968DC,
SINGER is a registered trademark of The Singer Company Limited or its affiliates.
©2008 The Singer Company Limited or its affiliates. All rights reserved.

IMPORTANT SAFETY INSTRUCTIONS
When using this machine, basic safety precautions should always be followed including the following.
Read all instructions before using the machine.
DANGER -To reduce the risk of electric shock:
* The machine should never be left unattended when plugged in. Always unplug the machine from the
electric outlet immediately after using and before cleaning.
* Always unplug before re-lamping. Replace bulb with the same type rated 15 watts. Be sure to replace the
face plate which covers the light bulb before operating the machine.
WARNING -To reduce the risk of burns, fire, electric shock or injury to persons:
* Be sure that the electrical voltage of the electric outlet (wall receptacle) is the same as the rated voltage of
the motor.
* Use this machine only for its intended use as described in this Instruction Book. Use only attachments
recommended by the manufacturer as contained in the Instruction Book.
* To disconnect, turn all controls to the off ("0") position, then remove plug from outlet.
* Disconnect the power line plug from the socket outlet or switch the machine off when making any adjustments
in the needle area, such as threading needle and loopers, changing needle, changing throat plate or changing
presser foot, etc.
* Always unplug the machine from the electrical outlet when removing covers, lubricating, or when making
any other user servicing adjustments mentioned in the Instruction Book.
* Do not attempt to adjust the motor belt. Contact your nearest Service Center should any adjustment be
required.
* Handle the foot controller with care and avoid dropping it on the floor. Be sure not to place anything on top
of the controller.
* Always use the proper needle plate. The wrong plate can cause the needle to break.
* Do not use bent needles.
* When sewing, keep fingers away from all moving parts. Special care is required around the sewing machine
needle.
* Do not pull or push fabric while stitching. It may deflect the needles causing them to break.
* For double insulated machines, when servicing, use only identical replacement parts. See instructions for
Servicing of Double-Insulated Appliances.
* Never operate the machine if it has a damaged cord or plug, if it is not working properly, if it has been
dropped or damaged, or dropped into the water. Return the machine to the nearest authorized dealer or
Service Center for examination, repair, electrical, or mechanical adjustment.
* Never operate the machine with any air openings blocked. Keep ventilation openings of the machine and
foot controller free from the accumulation of lint, dust and loose cloth.
* Never drop or insert any object into any opening.
2

* Do not use outdoors.
* Do not operate where aerosol (spray) products are being used or where oxygen is being administered.
* Do not allow to be used as a toy. Close attention is necessary when the machine is used by or near
children.
* Do not expose the machine or machine plastic case to sunlight directly. Also, do not keep it in a very warm
or damp place.
* Do not touch the machine, foot controller and power line cord with wet hand, wet cloth or with anything wet.
* Do not connect power line cord to one of the many cords connected to one power outlet with adapters.
* Use machine on flat and stable table.
* Be sure to close the looper cover before operating the machine.
* Keep presser foot and needles away from children's reach.
* Be sure the light bulb has cooled off before changing with a new one.
* Do not dismantle or modify the machine yourself.
* Be sure to turn off the power switch and disconnect the power line plug before caring for your machine as
instructed in the Instruction Book.
* The appliance is not intended for use by young children or infirm persons without supervision.
* Young childen should be supervised to ensure that they do not play with the appliance.
* Do not unplug by pulling on cord. To unplug, grasp the plug, not the cord.
* SERVICING OF DOUBLE-INSULATED PRODUCTS. In a double-insulated product, two systems of
insulation is provided instead of grounding. No grounding means is provided on a double-insulated product,
nor should a means for grounding be added to the product. Servicing of a double-insulated product requires,
extreme care and knowledge of the system, and should be done only by qualified service personnel.
Replacement parts for a double-insulated product must be identical to those parts in the product. A double-
Insulated product is marked with the word "DOUBLE-INSULATION" or "DOUBLE-INSULATED".
3

TABLE OF CONTENTS
Page Page
1. Selection stitches & Auto tension..............................
2. Handy Reference Chart............................................
3. Accessories..............................................................
4. Needle Information...................................................
5. Principal Parts..........................................................
6. How to Open Looper Cover.....................................
7. Principal Parts Behind Looper Cover.......................
8. Preparation prior to sewing......................................
9. Removal and Replacement of Waste Tray..............
10. Preparation for Threading........................................
*Setting up the thread guide holder............................
*Anti-spill net..............................................................
*Spool cap..................................................................
11. How to Remove and Insert Needles........................
*Needle position.........................................................
*To remove needle(s).................................................
*To insert needle(s)....................................................
12. Threading the Machine...........................................
*Threading diagram...................................................
*Understanding the color code..................................
*To thread the machine correctly...............................
1) Threading the upper looper (Green)...................
2) Threading the lower looper (Red).......................
3) Threading the chain stitch looper (Brown)..........
4) Threading the overedge right needle (Blue).......
5) Threading the chain stitch needle (Orange)........
6) Threading the cover stitch needles.....................
1
Threading the cover stitch left needle (Orange)
2
Threading the cover stitch middle/chain stitch
needle(Blue).....................................................
3
Threading the cover stitch right needle(Green).
13. How to Change Threads / Tie on Method...............
14. How to Adjust the Stitch length...............................
15. How to Adjust the Seam width................................
*Width adjustment by changing needle position........
*Width adjustment with adjustment knob...................
16. How to Adjust the Presser Foot Pressure...............
17. Differential Feed......................................................
*Gathered overedge...................................................
*Stretch overedge......................................................
18. How to Disengage Movable Upper Knife................
19. To Convert upper Looper to Spreader....................
*To use the spreader..................................................
*To disengage to upper looper...................................
20. Standard overedge and Rolled Hem Stitching........
*To sew standard overedge.......................................
*To sew rolled hem....................................................
21. Chaining Off and Test Sewing............................
5
22. Settings and Sewing Instructions........................
8
1) Double chain stitch...........................................
9
2) 2-Thread Wrapped Edge Overlock...................
9
10
12
12
12
13
14
14
14
14
15
15
15
15
16
16
16
17
17
18
20
21
23
25
25
3) 2-Thread Overedge..........................................
4) 3-Thread Overlock............................................
5) 3-Thread Flatlock..............................................
6) 3-Thread Ultra Stretch Mock Safety Stitch.......
7) 4-thread Ultra Stretch Mock Safely Stitch.........
8) 4-Thread Safety Stitch......................................
9) 5-Thread Safety Stitch......................................
23. How to Sew a Cover Stitch.................................
24. How to Sew a Rolled hem..................................
1) 3-thread standard rolled hem stitching.............
2) 3-thread upper looper thread wrapped
rolled hem stitching...........................................
3) 2-thread standard rolled hem stitching.............
4) 2-thread lower looper thread wrapped
rolled hem stitching...........................................
25. Stitch Variations and Sewing Techniques...........
*Decorative Flatlocking..........................................
*How to sew an overlock blind hem.......................
*How to sew pin tucks...........................................
*Turning square corners........................................
*Pin placement.......................................................
*Securing the thread chain.....................................
*How to reinforce a seam.......................................
*Braiding by chaining off........................................
26. Machine Maintenance.........................................
26
28
30
31
31
31
31
32
33
33
34
35
36
36
36
37
*Cleaning the machine...........................................
*Oiling the machine................................................
*How to replace the moveable upper knife............
*How to exchange light bulb...................................
27.Optional Accessories...........................................
*Snap-on type presser foot....................................
*Optional presser feet............................................
1) Elastic foot.......................................................
2) Blind hem foot..................................................
3) Shirring foot......................................................
4) Pearl/Sequin foot.............................................
5) Piping/Cording foot..........................................
6) Taping foot.......................................................
28. Troubleshooting Chart.........................................
29. Relationship between Cloth, Thread and Need..
30. Specification........................................................
37
37
38
39
39
41
42
43
44
45
46
47
48
49
54
55
55
56
56
58
59
60
60
61
62
62
63
63
64
64
64
65
66
67
67
68
68
68
68
68
68
68
69
70
71
4

1. SELECTION OF STITCHES & AUTO TENSION
This machine is capable of producing various types of stitches according to the combination of Auto Tension
Selected, needle positions, threading methods, and the use of convertible right looper/spreader.
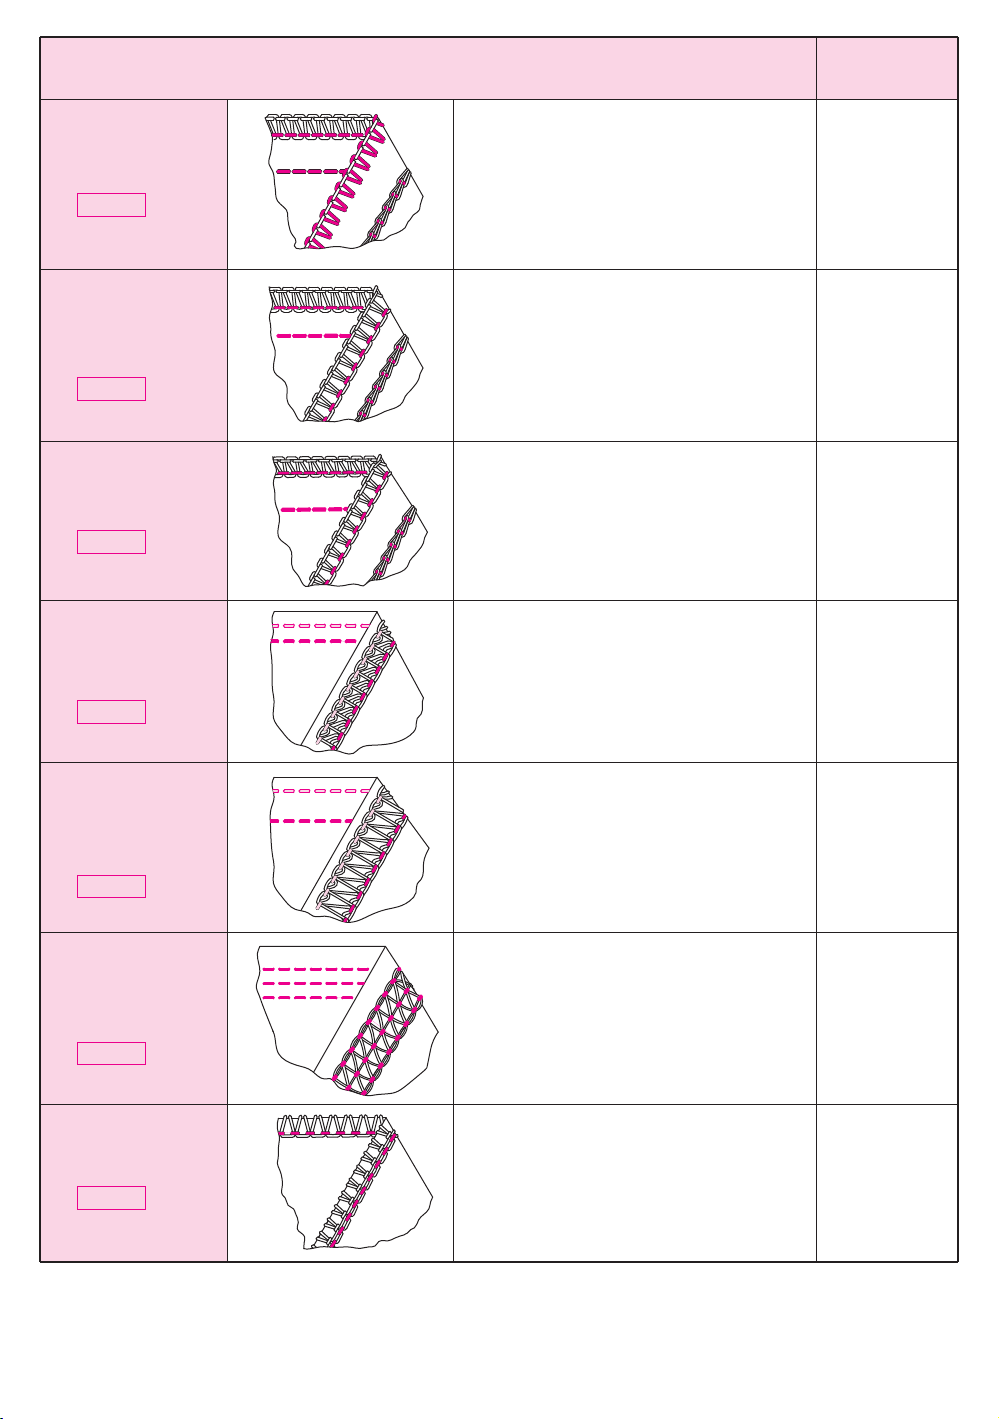
Stitch Type Reference
1. Double A 1-needle 2-thread straight stitch is used
Chain Stitch for construction or decorative stitching.
ATD: D
2. Two-thread 1-needle 2-thread stitch is used for
Wrapped Edge
Overlock
ATD: D
ATD: G
3. Two-thread 1-needle 2-thread stitch is used for
Overedge overedging common fabrics. It is also
ATD: E
4. Three-thread 1-needle 3-thread stitch is used for
Overlock
ATD: A
ATD: B
ATD : Auto Tension Dial Selected
Seams also can be sewn at desired
distance from edge of fabric by
disengaging the right looper and movable
knife.
seaming lightweight or stretch fabrics.
It is also ideal for rolled and blind hemming.
A 4 mm and 6 mm overlock seam width
can be obtained by changing the needle
position.
ideal for flatlock (butted or lapped) seams
and blind hemming. A 4 mm and
6 mm overedge seam width can be
obtained by changing the needle position.
overedging and seaming on common
fabrics. A 4mm and 6 mm overlock seam
width can be obtained by changing the
needle position.
Page
39
41
42
43
5. Three-thread 1-needle 3-thread stitch is used for
Flatlock butted or lapped seams and ornamental
stitching with decorative thread. Also,
a 4 mm and 6 mm flatlock width can
ATD: F
6. Three-thread 2-needle 3-thread stitch that is ideal for
Ultra-Stretch lightweight, extremely stretchy fabrics
Mock Safety such as tricot and spandex.
Stitch
ATD: G
7.Four-thread Ultra- 2-needle 4-thread stitch that is ideal
Stretch Mock for medium to heavyweight stretchy
Safety Stitch fabrics such as double knits and swim
ATD: A
be obtained by changing the needle
position.
Wear.
5
44
45
46
Stitch Type Reference
ATD : Auto Tension Dial Selected
Page
8. Four-thread
Safety Stitch made up of combined 2-thread
The 4-thread stitch is a safety stitch
overedge and double chainstitch.
ATD : I
9. Five-thread The 5-thread stitch is a safety stitch
Safety Stitch made up of combined 3-thread
Wide overlock and double chainstitch.
ATD : B
10. Five-thread The 5-thread stitch is a safety stitch
Safety Stitch made up of combined 3-thread
Narrow overlock and double chainstitch. 48
ATD : A
11. Cover Stitch 2-needle, 3-thread cover stitch is
Narrow suitable for stretchy fabrics such as
(2.8mm) knits, etc. 51
A wide seam is formed by using left needle.
Overedge and seaming can be done
in one operation on non-stretch fabrics.
A narrow seam is formed by using right
Needle. Overege and seaming can be done
in one operation on non-stretch fabrics.
47
48
ATD : K
12. Cover Stitch 2-needle 3-thread cover stitch is
Wide suitable for stretchy fabrics such as
(5.6mm) knits, etc.
ATD : H
13. Triple Cover 3-needle 4-thread cover stitch is
Stitch suitable for stretchy fabrics such as
(5.6mm) knits, etc.
ATD : J
14. Three-thread 1-needle 3-thread stitch is used for sewing
Rolled Hem narrow rolled hems.
A narrow seam is formed by using left
and middle needles.
A wide seam is formed by using left
and right needles.
A triple seam is formed by using left,
middle, and right needles
.
ATD : C
51
52
55
6
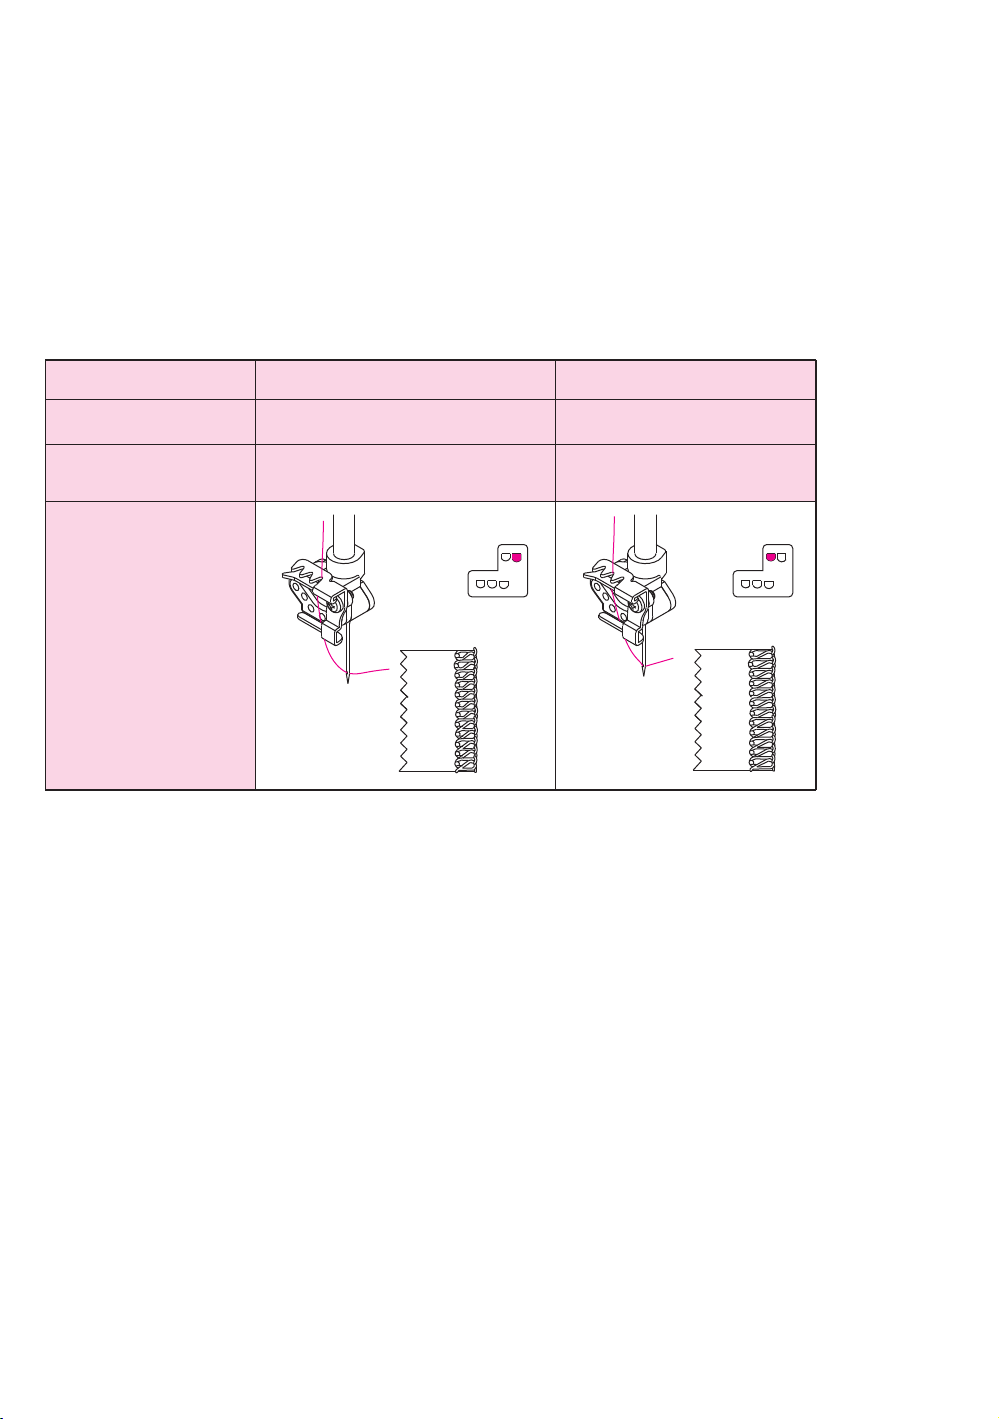
* Depending on the needle positions used, this machine can sew 2-thread and 3-thread standard width 4 mm
overedge anda6mmwide overedge seams.
Also, for overedging heavyweight fabrics, the seam width can be increased still more by turning the overedge
seam width adjustment knob. (See page )
Overedge width 4.0 mm 6.0 mm
Needle used Overedge right needle Overedge left needle
Needle thread Blue Orange
tension fine tuning
31
7
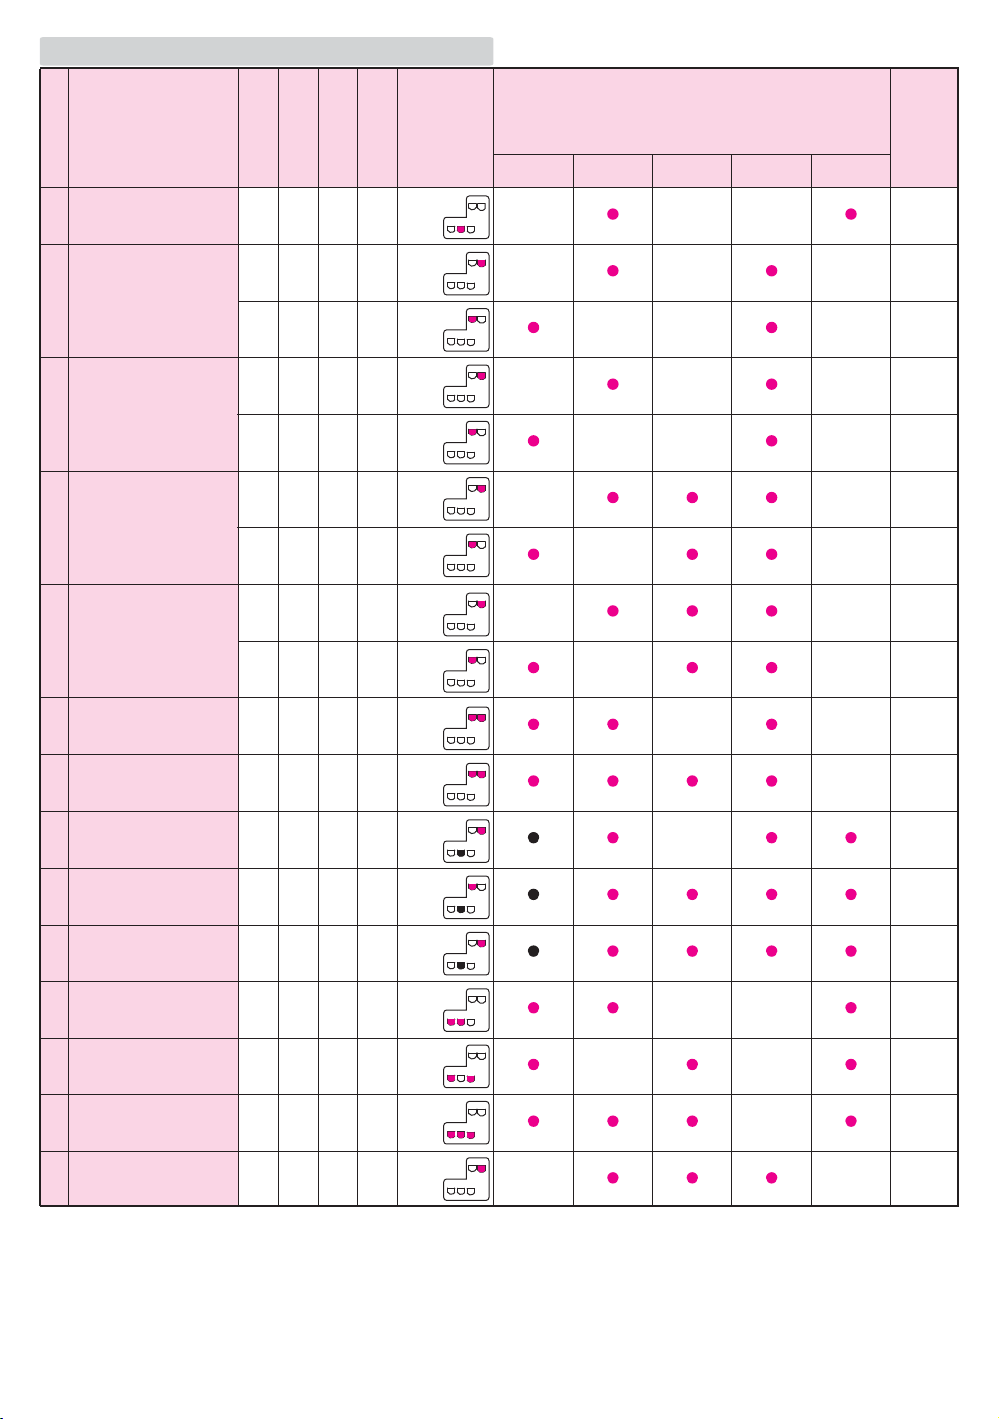
2. HANDY REFERENCE CHART
Stitch Type
Double Chain Stitch
1
Two - Thread
Wrapped Edge
2
Overlock
Two - Thread
3
Overedge
Three - Thread
4
Overlock
Three - Thread
5
Flatlock
A
T
D
D
D
G
E
E
A
B
F
F
SLDFL
N
N
2
N
2
N
2
N
2
N
N
N
N
N
2
N
2
N
/
C
C
L
L
L
L
L
L
L
L
Needle
Position
4.0mm
6.0mm
4.0mm
6.0mm
4.0mm
6.0mm
4.0mm
6.0mm
Correct Threading / Tension Path: When
using the Auto Tension Dial (ATD), the correct
tension is set automatically.
Orange Blue
Green Red Brown
Page
39
41
41
42
42
43
43
44
44
Three - Thread
Ultra - Stretch mock
6
Safety Stitch
four - Thread
7
Ultra - Stretch mock
Safety Stitch
Four - Thread
8
Safety Stitch
Five - Thread
Safety Stitch
9
Wide
Five - Thread
Safety Stitch
10
Narrow
Cover stitch
11
Narrow
Cover stitch
12
Wide
Triple Cover stitch
13
Three - Thread
14
Rolled Hem
G
2
N
L
A
N
N
L
I
N
N
L
B
N
N
L
A
N
N
L
K
N
N
H
N
N
J
N
N
C
1
N
2.8mm
C
5.6mm
C
5.6mm
C
4.0mm
L
45
46
47
48
48
51
51
52
55
ATD: Auto Tension Dial Selection SL: Stitch Length
DF: Differential Feed L / C: Upper Looper driving clutch position
*When option 2, 3, 6, 8 selected, use spreader.
*When option 1, 11, 12, 13 selected, turn upper knife down, move seam width finger knob to setting R, and change looper cover
attached cover (A) into (B).
*Auto tension settings are based on medium weight fabric and standard # 60 polyester spun thread. It can satisfy most requirements
for sewing. If using a different thread weight or fabric and the result is not as you expected, please adjust tension in small increments.
8
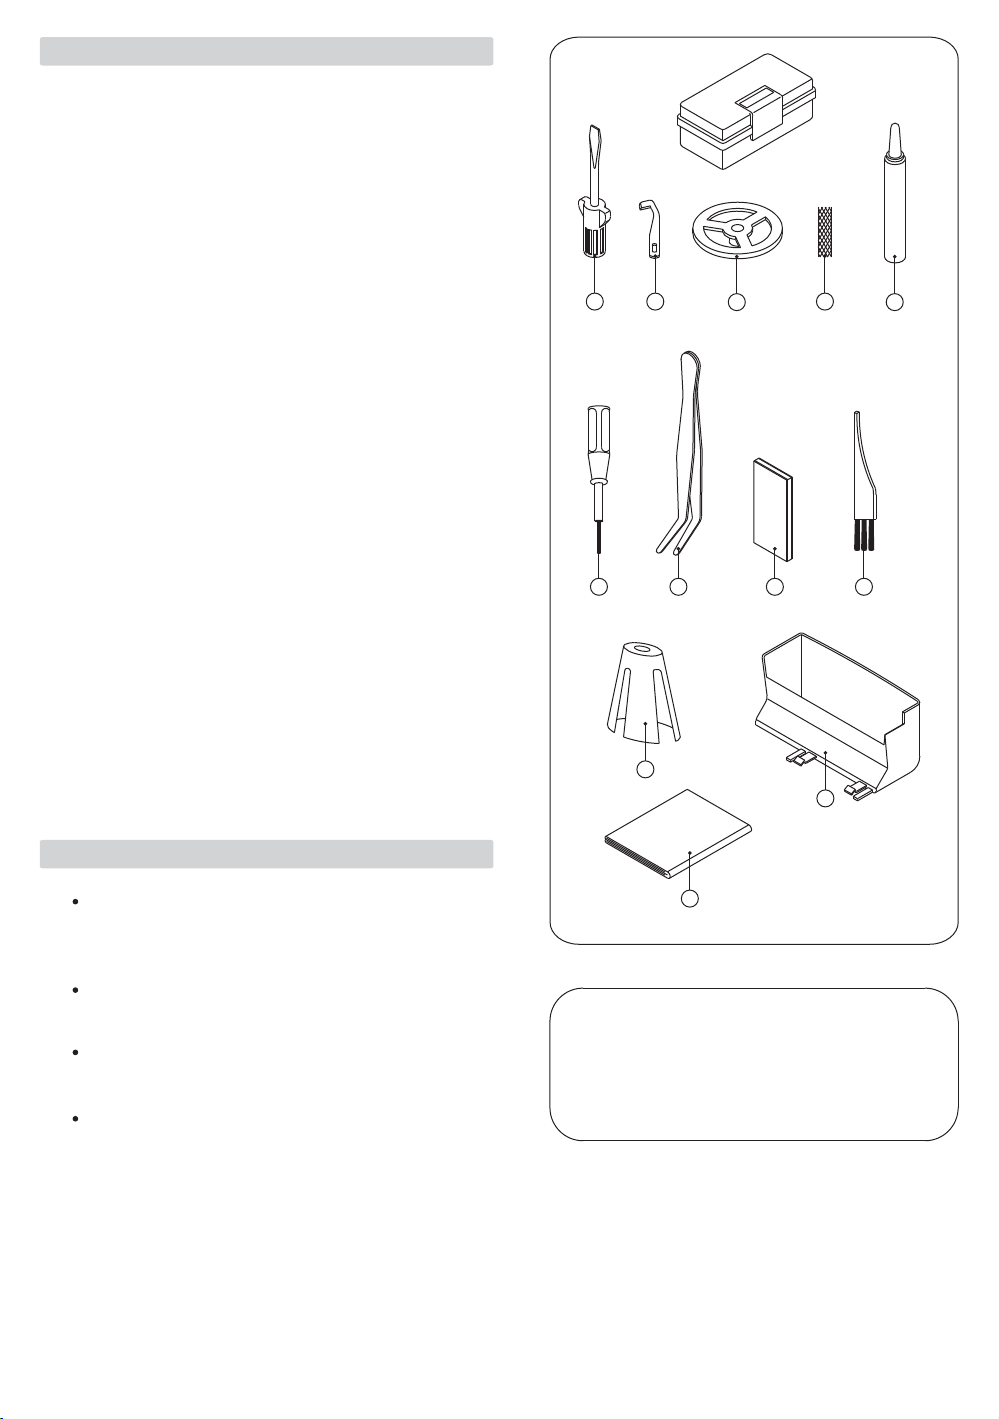
3. ACCESSORIES
Accessories are contained in the accessory case
1. Screw driver (large size)
2. Knife (stationary)
3. Thread Unwinder spool cap
4. Anti-spill net
5. Oiler
6. Allen Screw driver (small)
7. Tweezers
8. Needle set
9. Brush
10. Cone Adapters
11. Waste tray
12. Machine cover
1
1
5
5
1
1
1
1
1
5 (on machine)
1 in carton
1 in carton
1
2
6
3
789
4
5
4. NEEDLE INFORMATION
This overlock uses a flat shank industrial needle
that eliminates the possibility of inserting the needle
backwards.
Do not attempt to use a standard household sewing
machine needle of any size or type in this overlock.
Singer needle #2022 size 14/90 is furnished with the
machine.
Only use Needle #2022 size 14/90 and 11/80 as
supplied in the accessory case.
10
11
12
#2022
Overlock needle
9
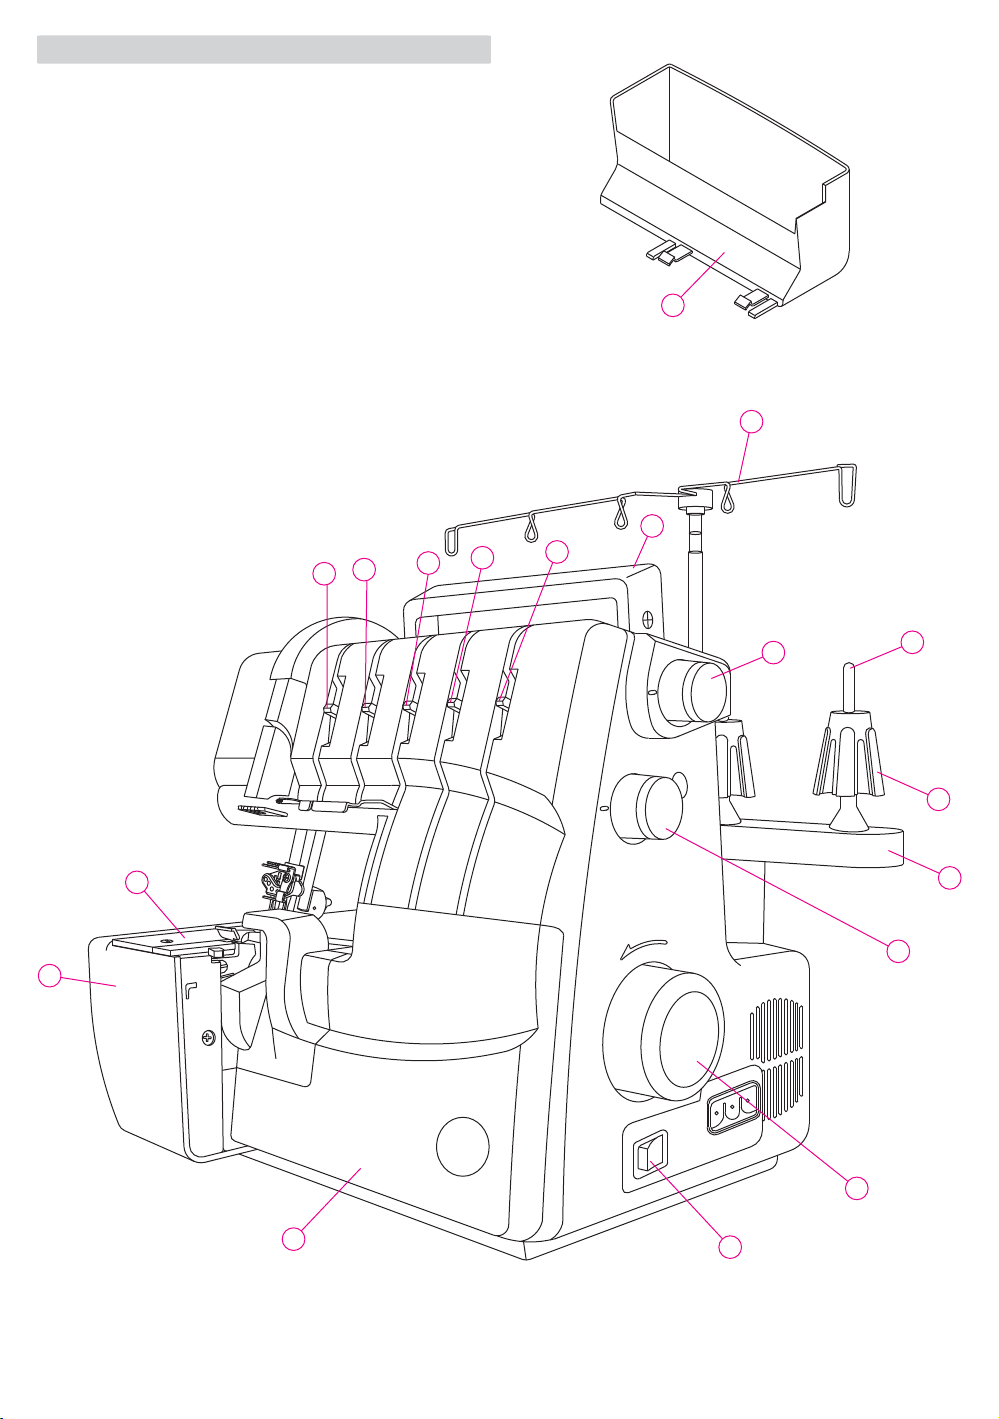
5. PRINCIPAL PARTS
1. Thread guides and holder
2. Handle
3. Left needle thread tension fine tuning lever (orange)
4. Right needle thread tension fine tuning lever (blue)
5. Upper looper thread tension fine tuning lever (green)
6. Lower looper thread tension fine tuning lever (red)
7. Chain stitch looper thread tension fine tuning lever (brown)
8. Needle plate
9. Cloth plate
10. Looper cover
11. Power & light switch
12. Stitch length dial
13. Hand wheel
14. Spool stand
15. Cone adaptor
16. Spool pin
17. Waste tray
1 . Auto tension dial8
6
4
3
5
17
1
2
7
18
8
9
16
15
14
12
13
10
11
10
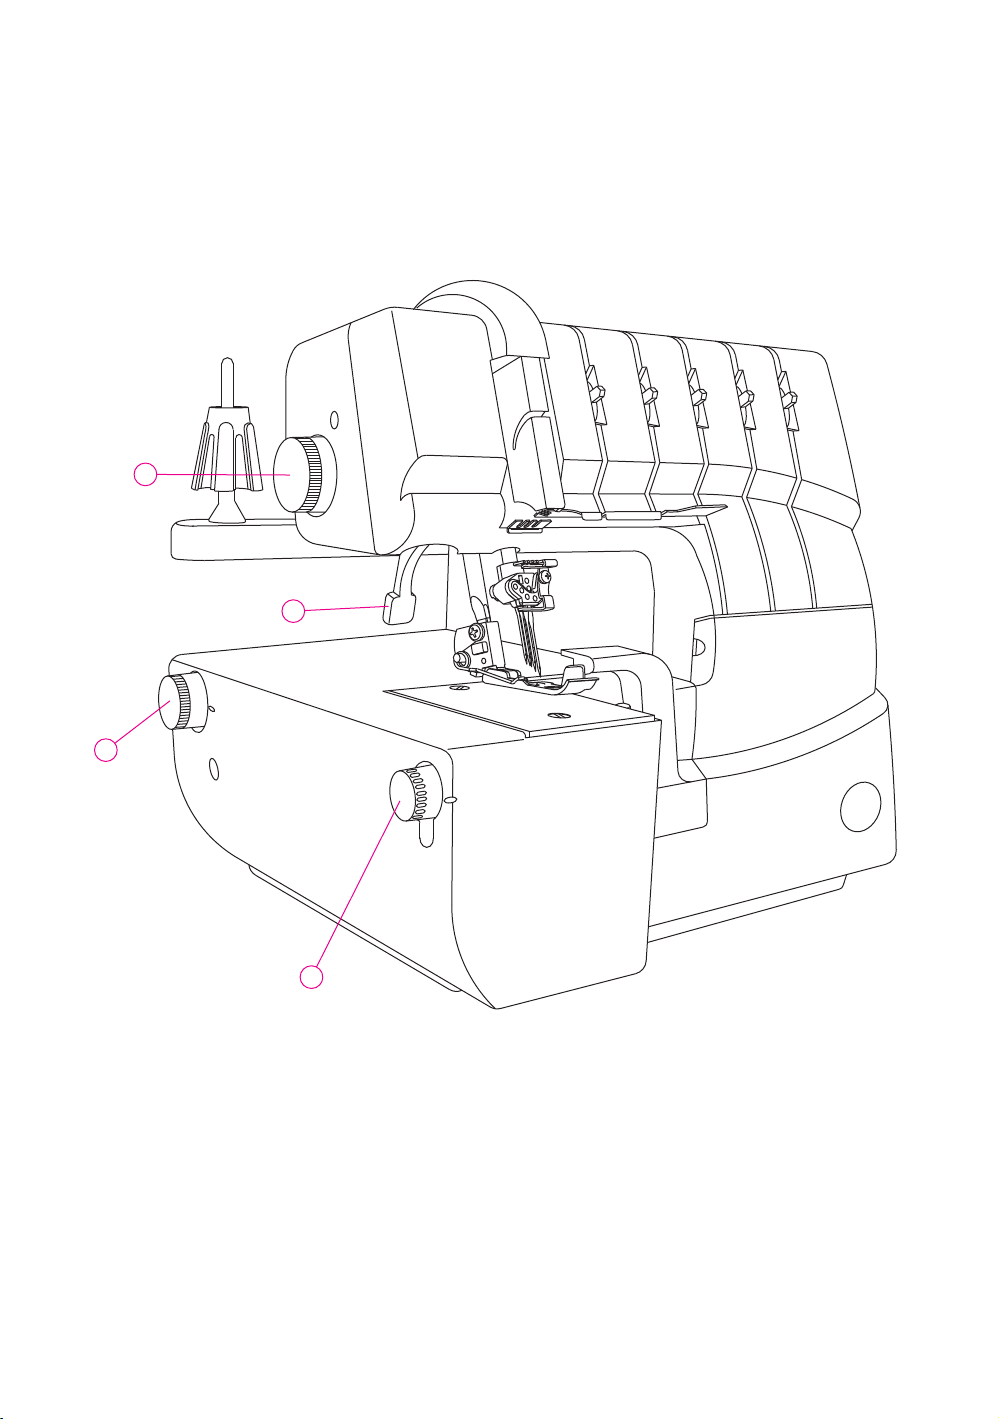
PRINCIPAL PARTS
19. Presser bar lifter and tension release
20. Differential feed adjusting dial
21. Cutting width dial
22. Presser foot pressure adjusting dial
22
19
20
21
11

6. HOW TO OPEN LOOPER COVER
Caution:
Be sure to turn off power switch.
Push the cover to the right as far as it will go.
Pull cover down toward you.
Caution:
Be sure looper cover is closed when
sewing.
Note: Machine will not operate when
Looper Cover is open.
1
2
7. PRINCIPAL PARTS BEHIND THE
LOOPER COVER
1. Upper looper
2. Moveable Upper knife
3. Presser foot
4. Fixed position lower knife
5. Lower looper
6. Chain/Cover looper
7. Rolled Hem lever
8. Spreader
9. Upper looper clutch
8. PREPARATION PRIOR TO SEWING
Connect the controller/electric plug to the machine
receptacle.
Plug power line into electric outlet.
Power Switch: Push"l"mark side to turn "ON"
Push "O" mark side to turn "OFF"
To run the machine and control the speed, press
the controller.
The harder you press, the faster the machine will sew.
1
2
3
7
4
8
5
6
9
To stop the machine from sewing, remove your foot
from the controller.
ON
OFF
WARNING:
Use only foot controller provided with this machine.
(Type 4C-316B for U.S.A. & CANADA only)
Be sure to make reference to "Warning" on following
Page.
12
POLARIZED PLUG INFORMATION (FOR U.S.A. & CANADA ONLY)
This appliance has a polarized plug (one blade wider than the other). To reduce the risk of
electric shock, this plug is intended to fit in a polarized outlet only way. If the plug does
not fit fully in the outlet, reverse the plug. If it still does not fit contact a qualified electrician
to install the proper outlet. Do not modify the plug in any way.
Warning:
* Be sure that the electrical voltage of the electric outlet (wall receptacle) is the same as the rated
voltage of the motor.
* Handle the foot controller with care and avoid dropping it on the floor. Be sure not to place anything
on top of it when not in use.
* Disconnect the power line plug from the electric outlet when changing needles, presser feet
or when leaving the machine unattended. This eliminates the possibility of starting the machine
by accidentally pressing the controller.
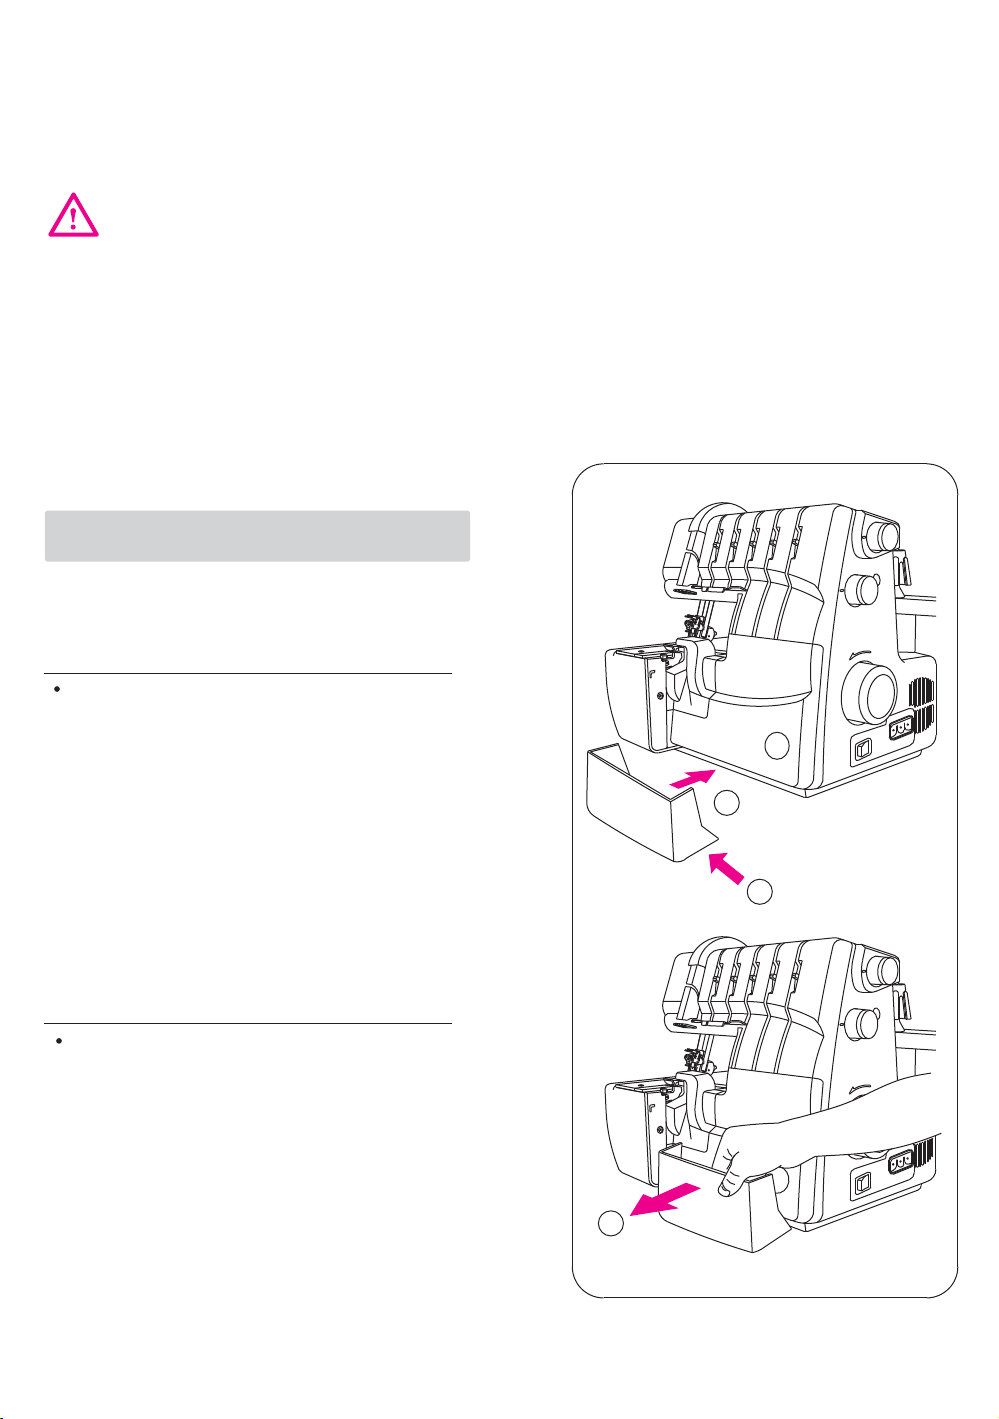
9. REMOVAL AND REPLACEMENT OF
WASTE TRAY
Replacement
Insert the waste tray under the looper cover.
Be sure the left side of waste tray is mounted near the
cutter where the scraps drop.
Removal
To remove, hold the waste tray as shown and
pull it outward.
1
2
3
13
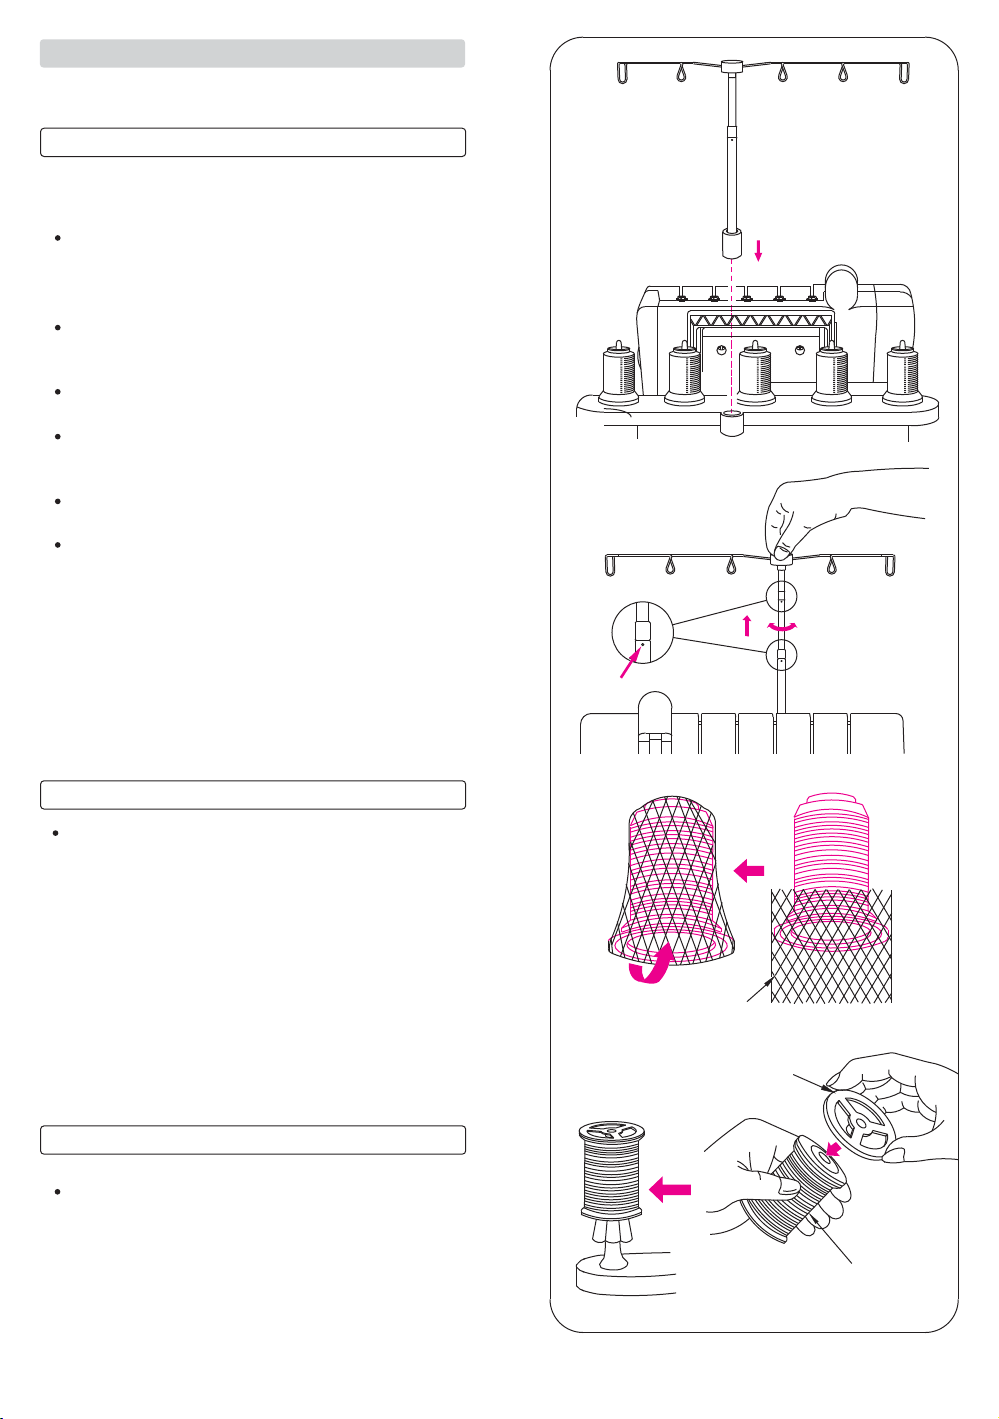
10. PREPARATION FOR THREADING
Setting Up the Thread Guide Holder
Take out the thread guide from the top of
Styrofoam, and insert it as shown on illustration.
This machine is shipped with the thread guide
holder in the lowered position.
Fully extend the thread guide holder.
The two joints on the telescope will click into place
when they are correctly positioned.
Center the thread guides above the spool pins.
Place thread over the cone adapters on the spool
pins.
Note: Your new machine is threaded to sew
Triple Cover Stitch. Refer to Page 30 for
instructions on tying on to the threads.
Anti-spill Net
When using synthetic threads that easily spill off
the cone, slip the anti-spill net furnished with the
machine over the thread from the bottom of the
cone leaving the thread end hanging free at the
top of the anti-spill net as shown on illustration.
Spool Cap
When using a regular thread spool, fit the spool cap
supplied with the machine onto the thread spool as
shown on illustration.
Anti-spill net
Spool cap
Press in
Thread spool
14

11. HOW TO REMOVE AND INSERT
NEEDLES
Needle Position
With this machine, five needles can be inserted into
the needle clamp as shown in the drawing but only
one or two or three needles are to be used for sewing.
Do not attempt to use four or five needles.
The Instruction Book refers to different needle
positions by illustrating the needle clamp at right.
Note: When both the left and right overedge needles
are inserted, the left needle will be slightly
higher than the right.
When all cover stitch needles are inserted,the
center needle will be slightly higher than the right
needle and the left needle slightly higher than the
center needle.
Overedge left needle
Overedge right needle
A
B
C
D
E
C
D
E
Cover stitch right needle
Cover stitch middle needle
/ Chain stitch needle
Cover stitch left needle
Right overedge
needle thread
D
Left and right
overedge needle
thread
To Remove Needle (s)
Caution:
Be sure to disconnect the machine from the
electric outlet before removing needle(s).
Turn the hand wheel toward you until the needles are
at their highest position.
Place a thick piece of fabric [such as felt] under the
presser foot. Lower the needles halfway into the
fabric.
Loosen, but do not remove the needle set screws with
the small allen screwdriver. Hold the needles with
your fingers and raise the needle bar. The needles
will remain in the fabric.
A. Overedge needleleft
B. Overedge needleright
C. Cover stitch left needle
D. Cover stitch middle needle
E. Cover stitch right needle
To Insert Needles (s)
Hold the needle with the flat surface to the back.
Insert the needle into the needle socket as far as it
will go.
Left, middle and right cover
stitch needle thread
Chain stitch
needle thread
B
C
D
Flat surface to the rear
B
A
A
B
E
When inserting a needle, if you first lower it down
into the hole in the needle plate it will line up with the
needle socket. Then direct it upwards
Note: When inserting needles into the A or B sockets
it is necessary to loosen both A & B Allen Screws.
After inserting the needles equally tighten both
screws.
This machine uses Singer #2022 needles. Do not
use Standard Household Needles.
To tighten
To loosen
15
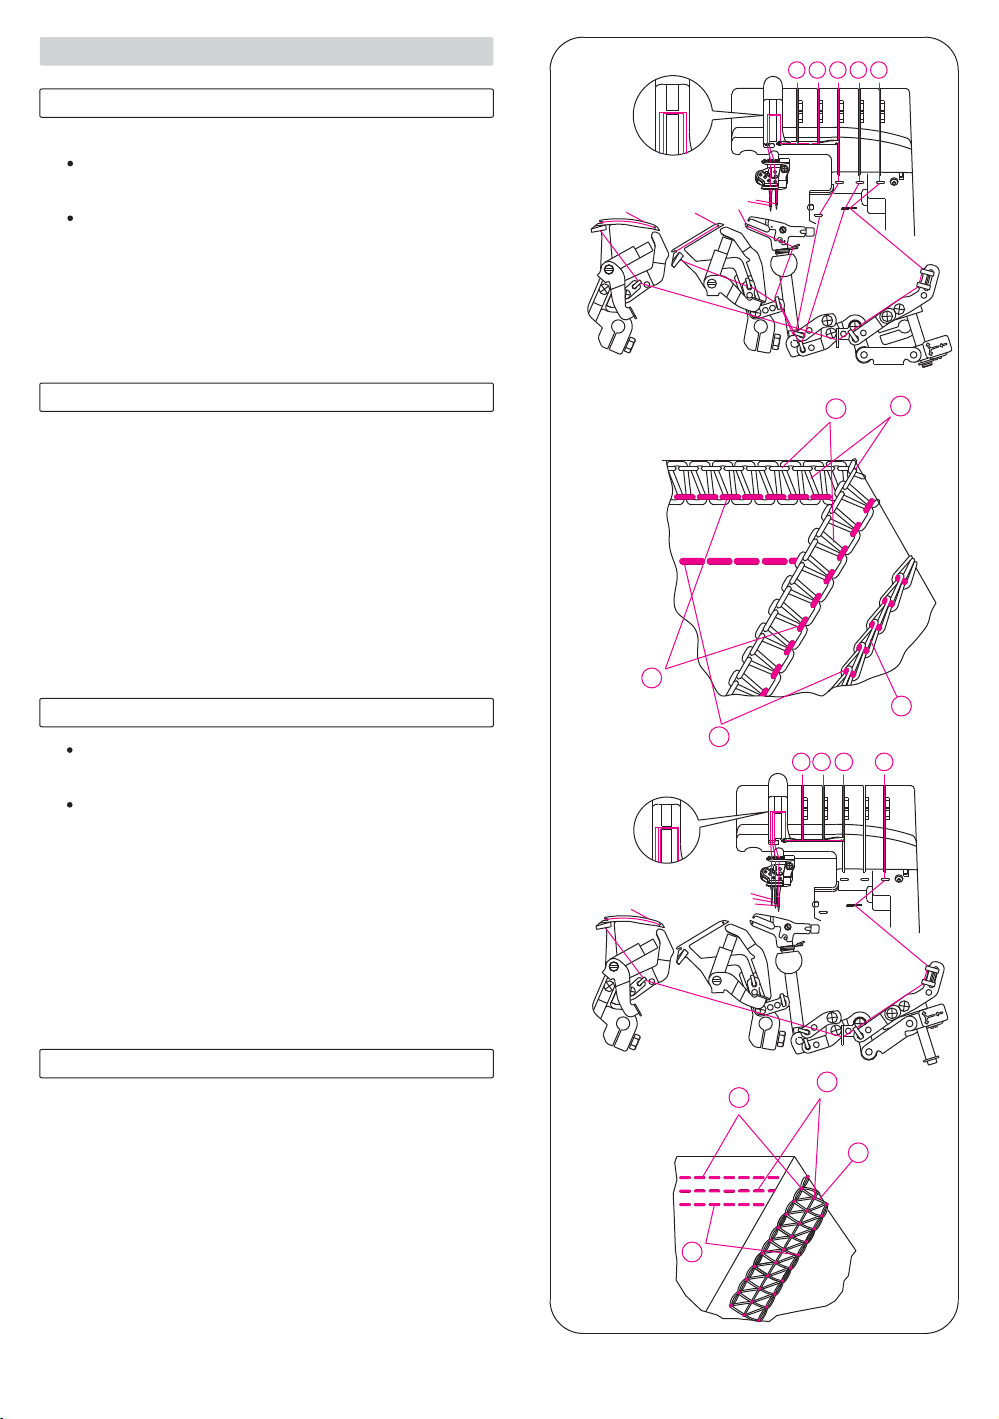
12. THREADING THE MACHINE
Threading Diagram: Overlock and Safety Stitches
A color coded threading diagram is located inside
the looper cover for quick reference.
Thread the machine in the order 1 to 5 as shown.
Note: Threads go through the take-up lever cover
for Overlock and Chain stitching as shown.
Chain stitch
Overlock
4
1
2
5
3
C
L
Tension Color Code: Overlock and Safety Stitch
1. Upper looper thread............................
2. Lower looper thread............................
3. Chain stitch looper thread...................
4. Right needle thread............................
5. Chain stitch needle thread..................
Green
Red
Brown
Blue
Orange
Threading Diagram: Cover Stitch
A color coded threading diagram is located inside
the looper cover for quick reference.
Thread the machine in the order 1 to 4 as shown.
Note: Threads go through take-up lever
cover for Cover stitch as shown.
2
4
5
3
4
1
3
2
1
Tension Color Code: Cover Stitch
1. Cover stitch looper thread.............
2. Right needle thread.......................
3. Middle needle thread.....................
4. Left needle thread..........................
Brown
Green
Blue
Orange
16
C
L
2
4
3
1
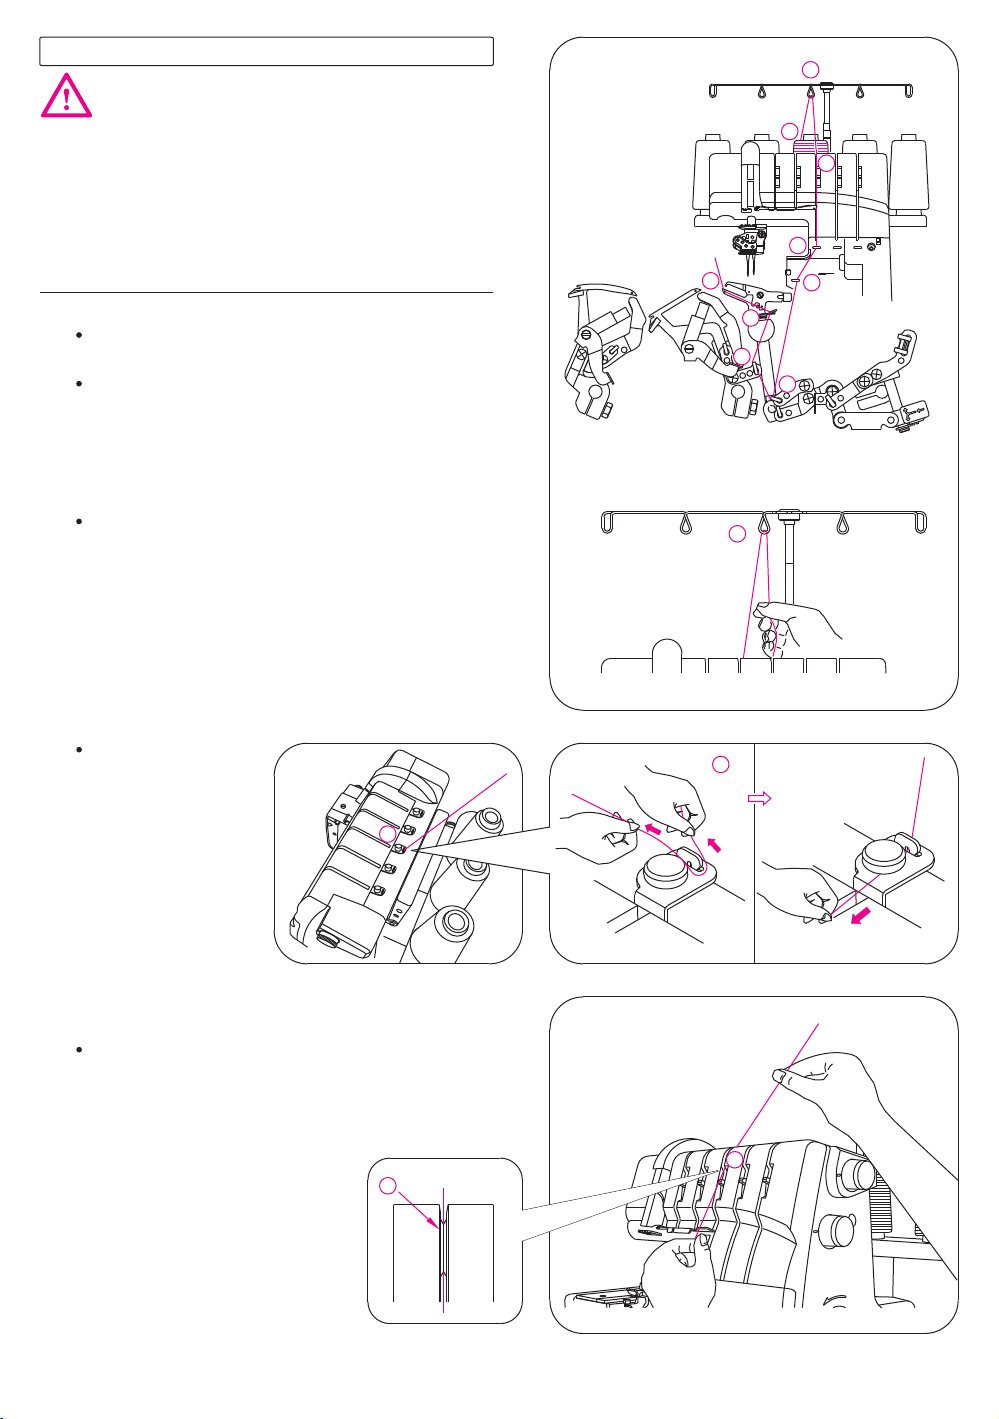
To Thread The Machine Correctly
Caution:
Be sure to turn off power switch.
Note: The instructions on this page and the following pages
will guide you through the proper threading for each
color coded threading path.
Before threading, refer to the Handy Reference Chart
for information on Stitch Types, Settings, Needle
Sockets and Color Coded Threading Paths.
1
2
3
4
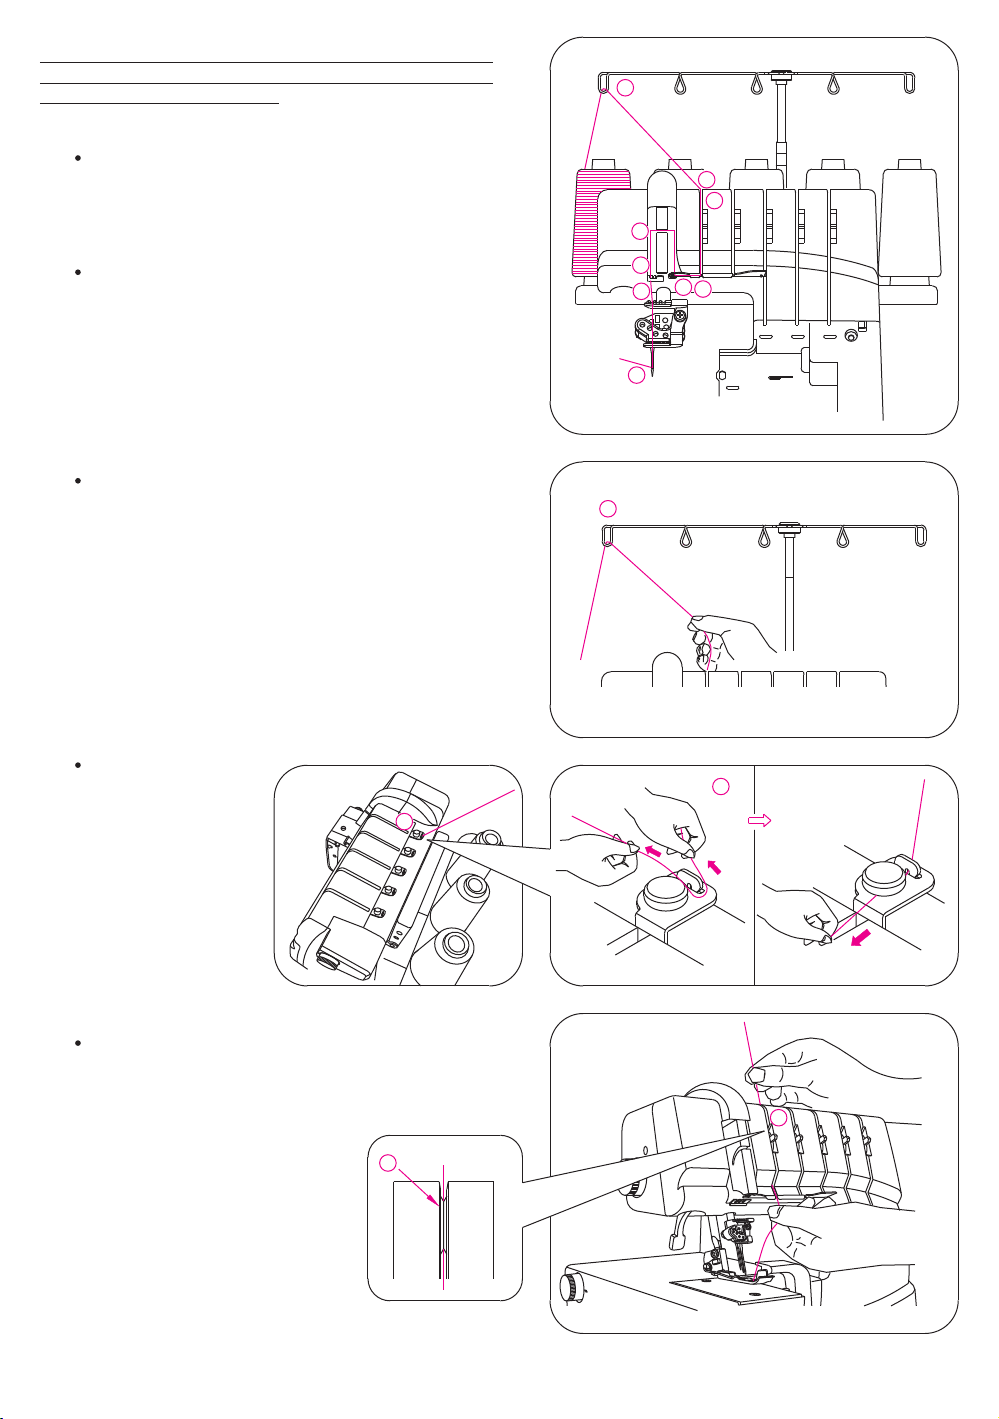
1) Threading the (Green)Upper Looper
Thread the upper looper as indicated 1~9.
Raise Presser foot to release tension discs.
Note: The presser foot is raised by lowering the
Presser bar lifter. The motion allows a clear
path for the fabric when sewing.
Pass thread from back to the front through the
thread guide 1.
Thread the top cover
thread guide by pulling
the thread towards the
left until it slips under
guide. Then pull
thread along the right
side of button as
illustrated.
9
8
7
1
2
2
5
6
C
L
While holding thread with fingers, pass it between
the tension discs and pull thread down to make
certain it is properly located in between the
tension discs 3.
3
3
17
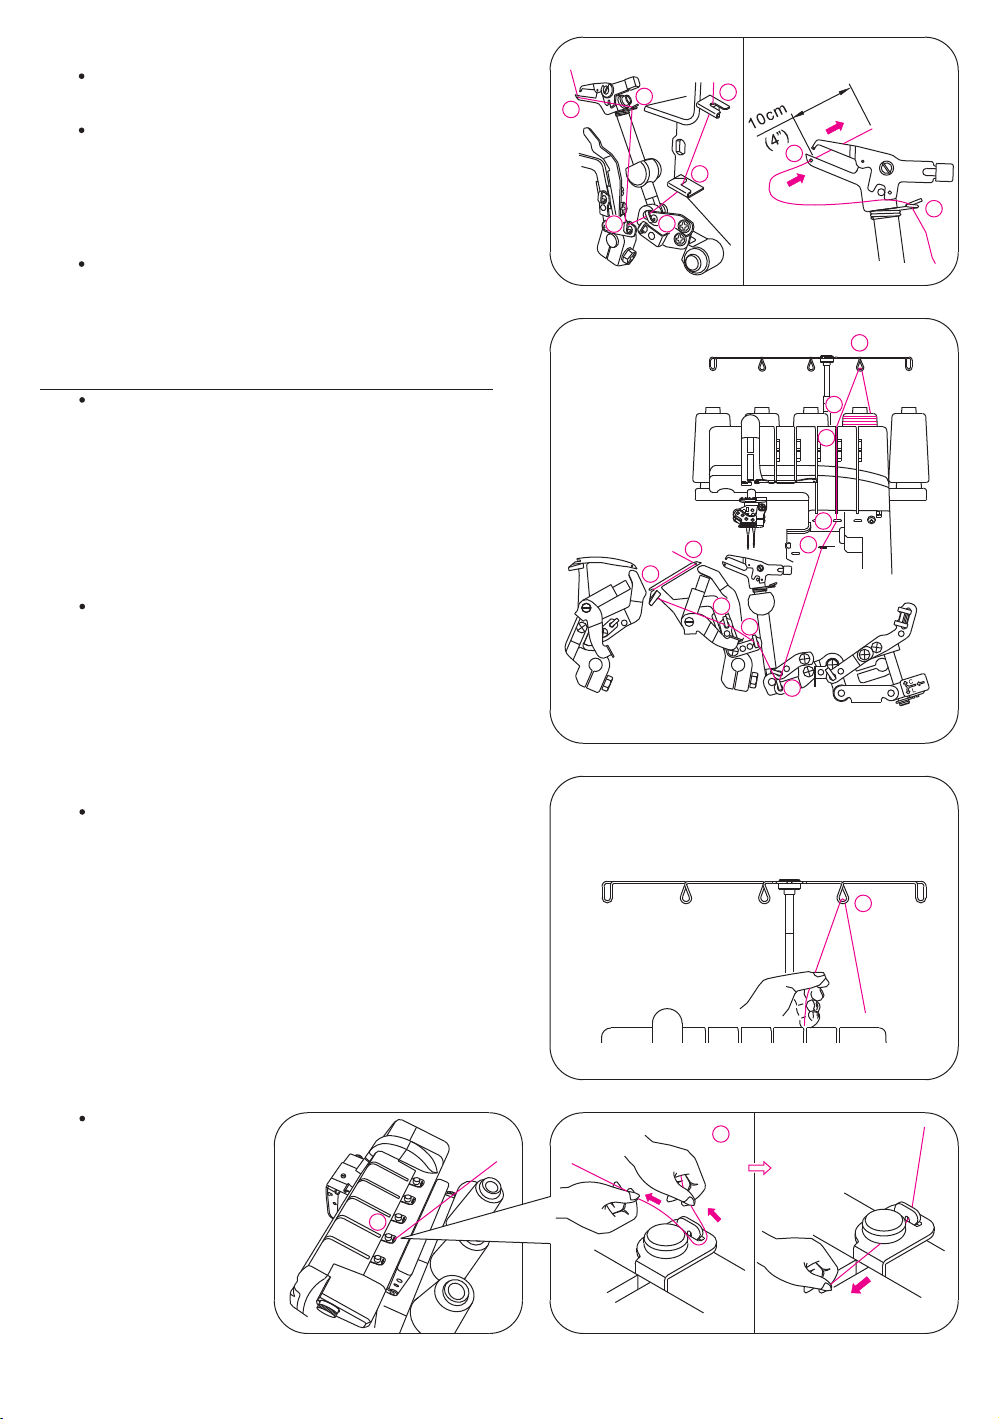
Thread the looper area of the machine following the
green color coded thread guides (4~9).
Thread the hole in the upper looper from front to
back 9. Note: Make sure thread passes behind lower
looper.
9
8
4
9
5
Note: Use tweezers provided in the accessory
case to aid in threading the looper.
Pull about 10cm(4 inches) of thread through the
looper and place to the back of the needle plate.
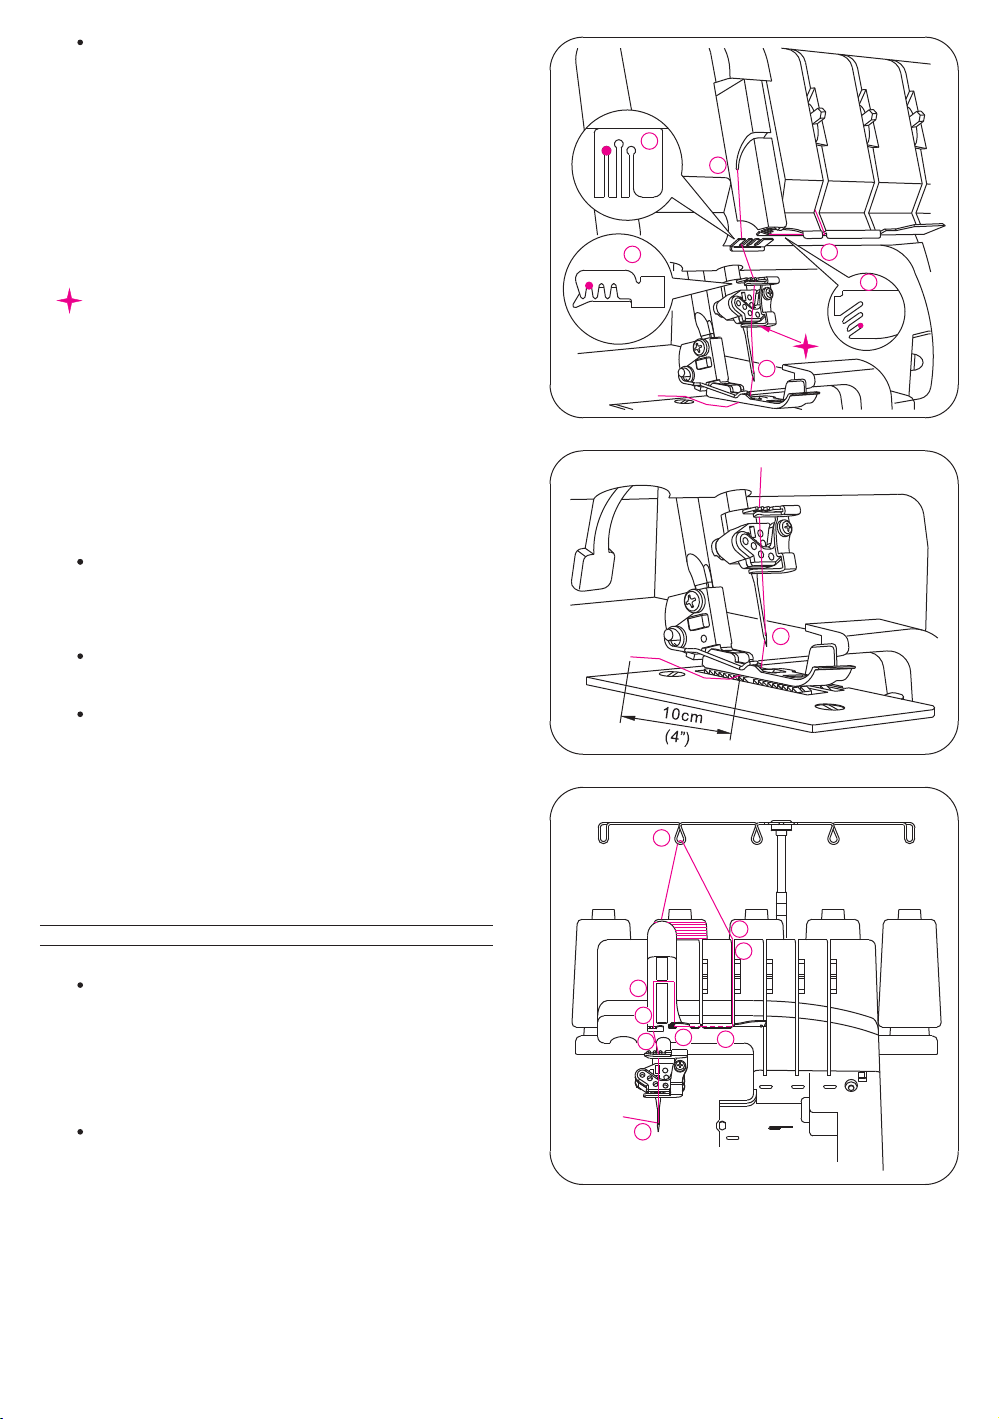
2) Threading the (Red)Lower Looper
Thread the lower looper as indicated 1~10.
Raise Presser foot by lowering presser bar lifter to
release Tension discs.
6
7
1
2
3
4
10
9
8
5
7
6
8
Pass thread from back to the front through the
thread guide 1.
Thread the top cover
thread guide by pulling
the thread towards the
left until it slips under
guide. Then pull thread
along the right side of
button as illustrated.
2
1
2
18
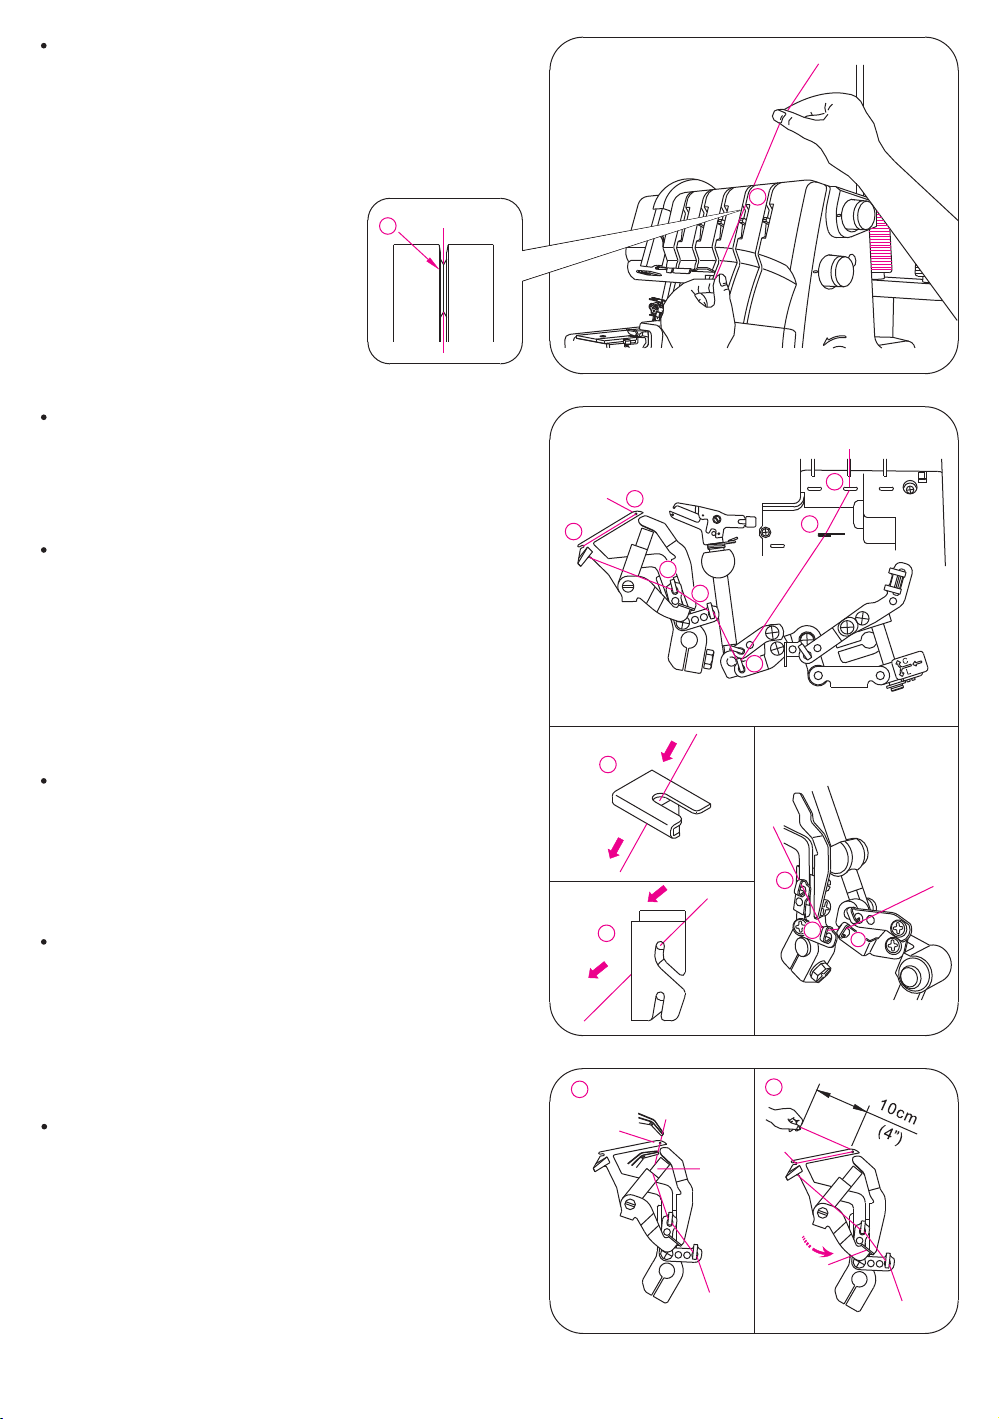
While holding thread with finger, pass it between
the tension discs and pull thread down to make
certain it is properly located in between the
tension discs 3.
Turn the hand wheel toward you until the lower
looper extends out 5~10mm from the needle
plate edge.
Thread the looper area of the machine following
the red color coded thread guides 4~10.
3
3
10
9
8
7
4
5
Note: Use tweezers provided in the accessory
case to aid in threading the looper.
Place the thread with the point of the tweezers
slightly from left and to the right of threading guide 4.
Place the thread with the point of the tweezers
slightly from front and to the back of threading guide 5.
Thread the looper eye (A) from front to back.
Pull about 10cm (4 inches) of thread.
Position thread into V cutout (B) on threader.
Firmly hold thread tail with left hand and pull
Threader lever (C) up into place (D).
6
4
8
5
9
7
6
10
A
D
B
19
C
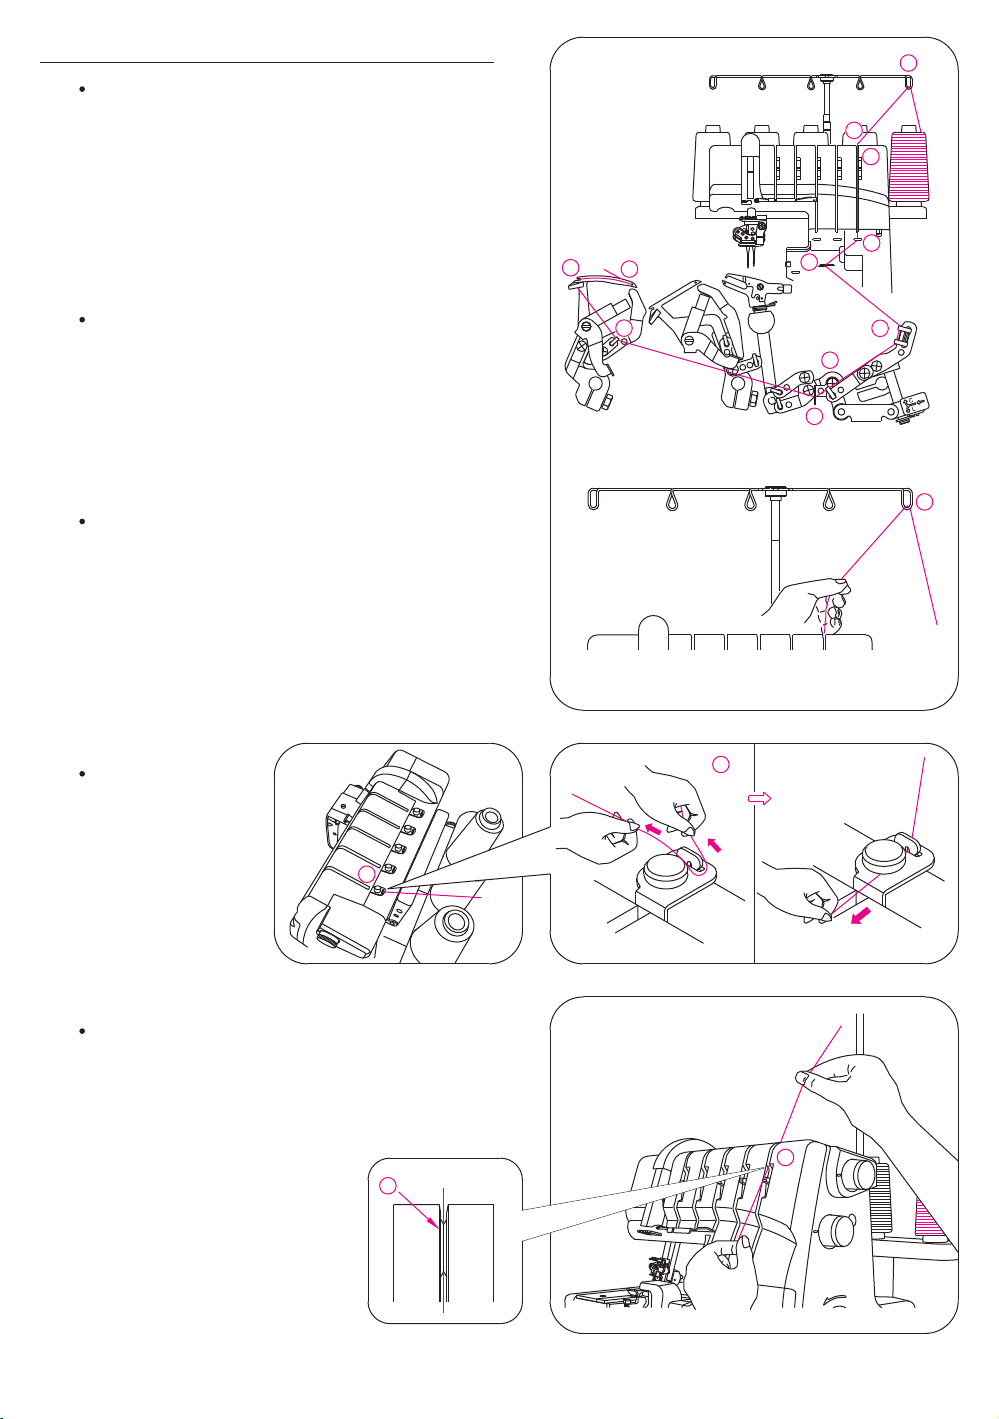
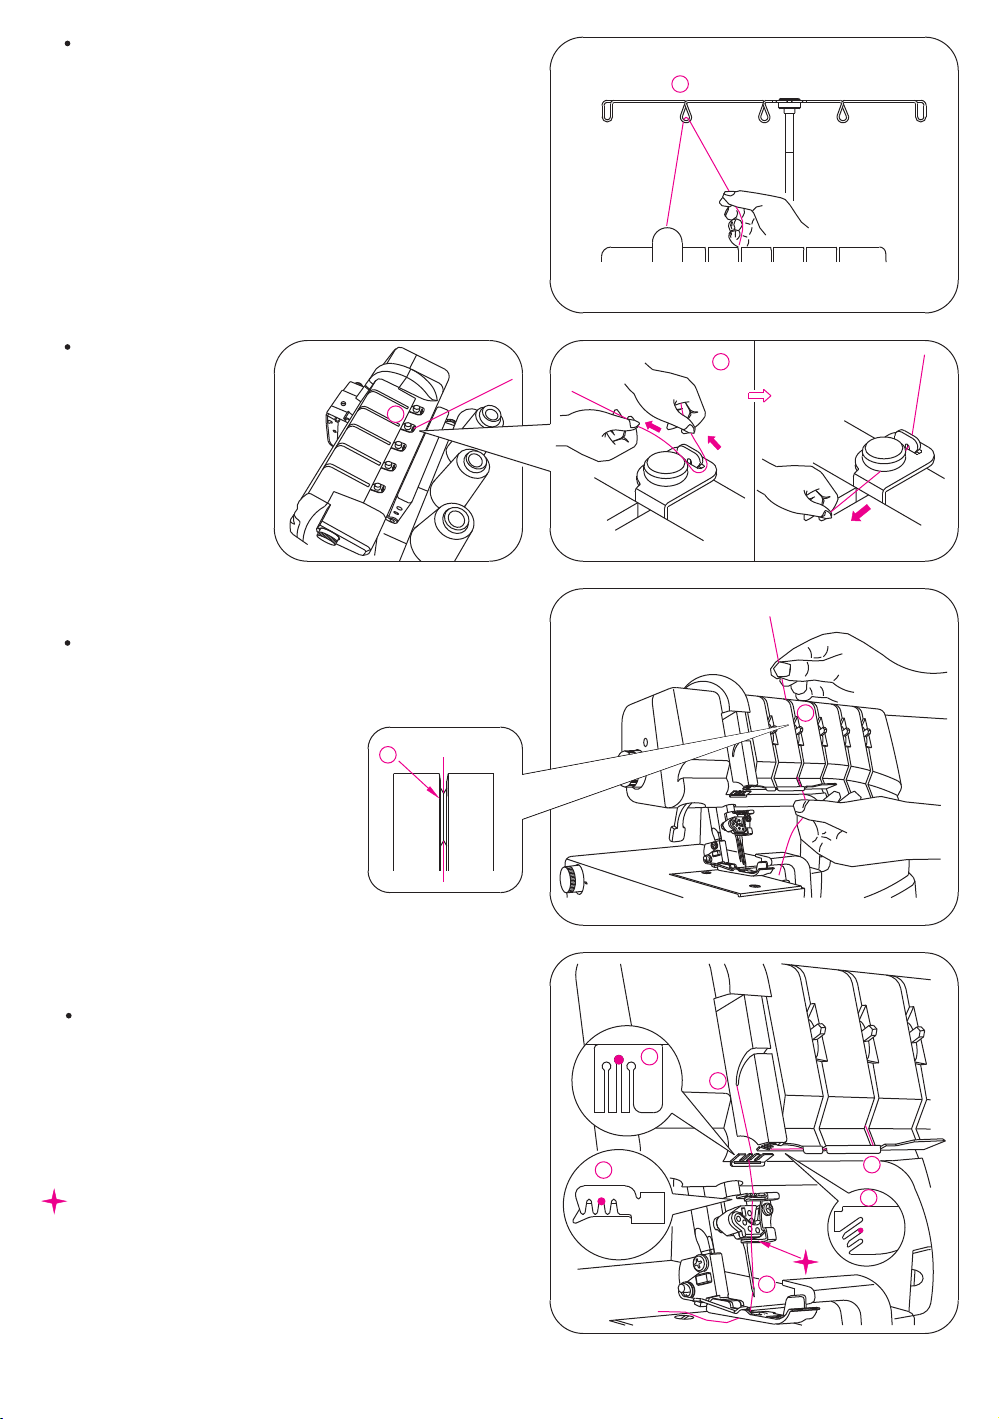
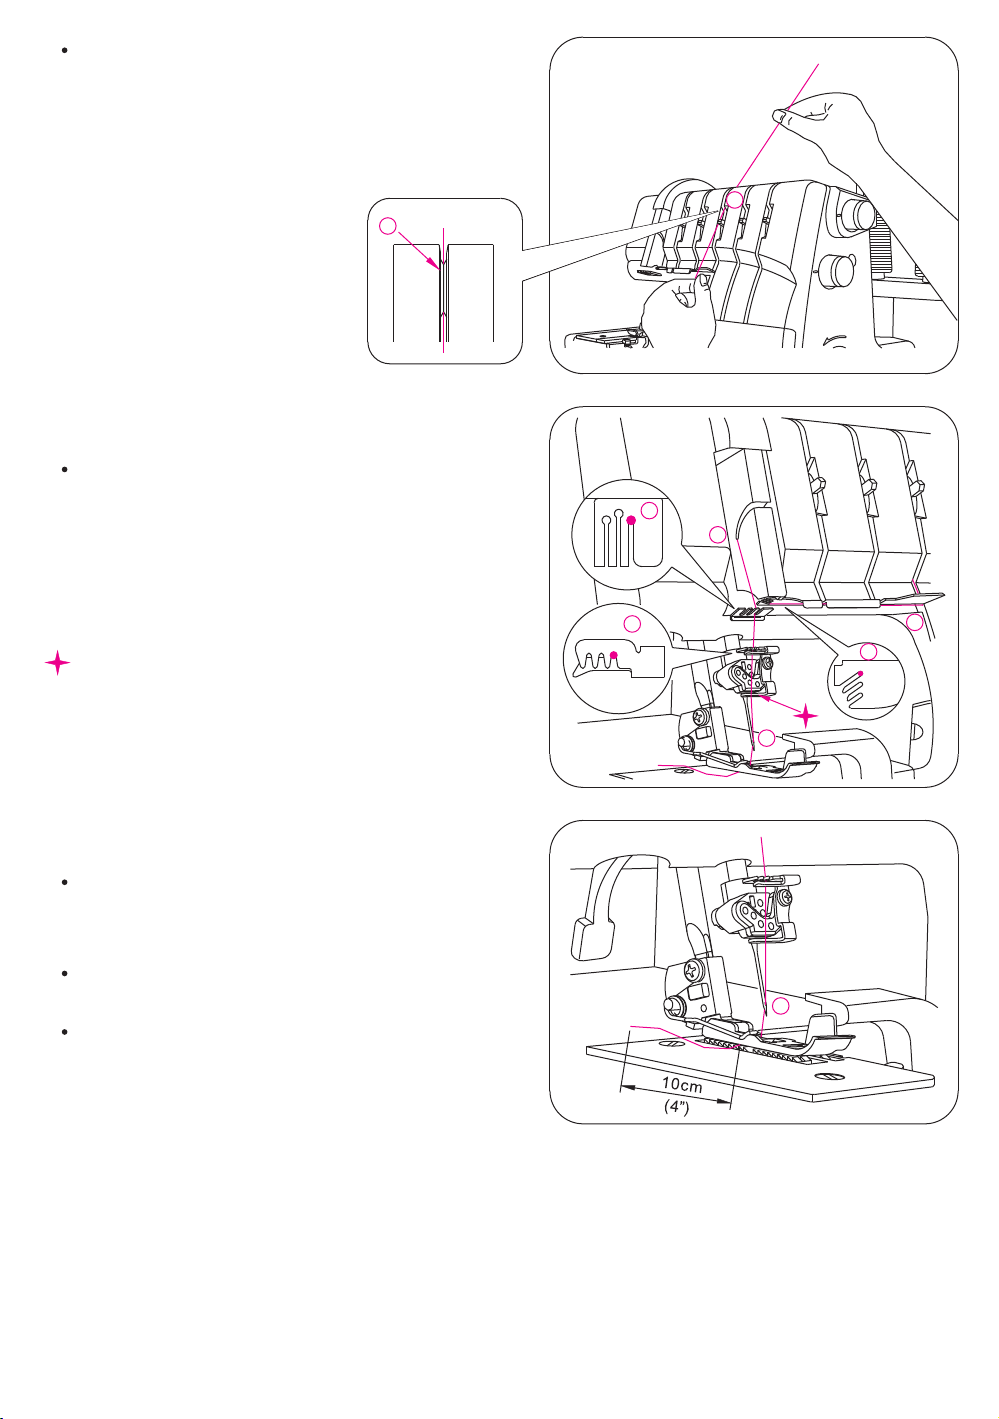
3) Threading the (Brown)Chain Stitch/Cover stitch Looper
Thread the chain stitch/cover stitch looper as indicated
1~11.
1
2
3
Raise Presser foot by lowering presser bar lifter to
release Tension discs.
Pass thread from back to the front through the
thread guide 1.
Thread the top cover
thread guide by pulling
the thread towards the
left until it slips under
guide. Then pull thread
along the right side of
2
button as illustrated.
10
11
9
2
5
4
6
7
8
1
While holding thread with fingers, pass it between
the tension discs and pull thread down to make
certain it is properly located in between the tension
discs 3.
3
3
20

Turn the hand wheel toward you until the chain stitch
looper extends out 10mm from the needle plate
edge.
Thread the looper area of the machine following
the brown color-coded thread guides 4~11.
Note: Use the tweezers provided in the accessory
case to aid in threading the looper.
Place the thread with the point of the tweezers
through threading guide 4.
Place the thread with the point of the tweezers
through the front slot of threading guide 5.
4
5
9
6
7
8
Thread the looper eye (A) from front to back.
Pull about 10cm (4 inches) of thread through the
looper. Position thread into V cutout (B) on
threader. Firmly hold thread tail with left hand
and pull threader lever (C) up into place (D).
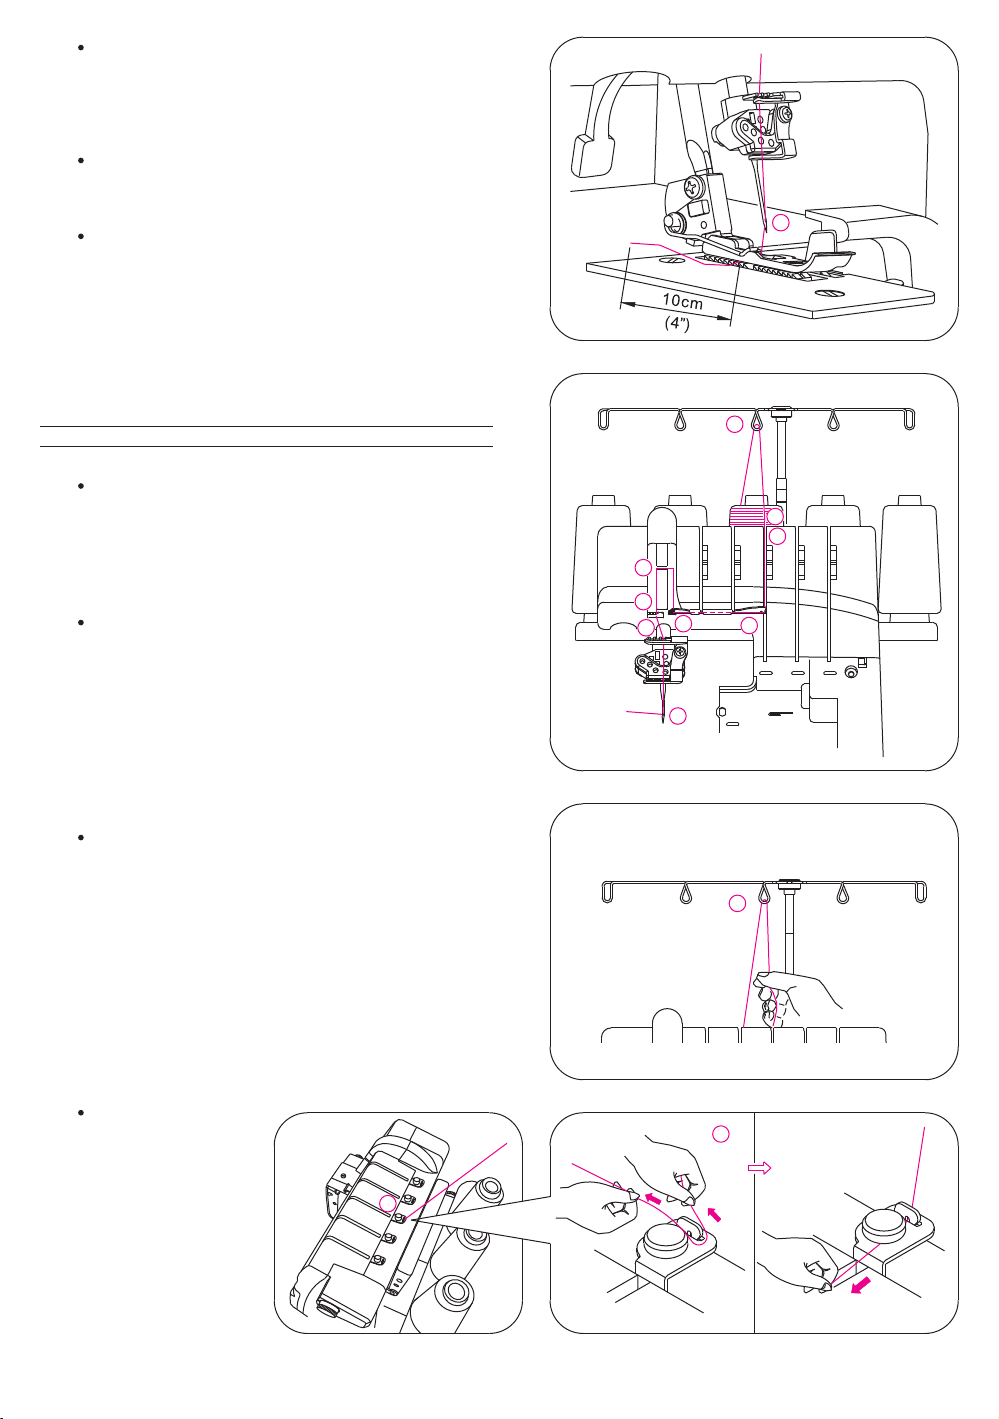
4) Threading the (Blue)Overedge Right Needle
(B on needle clamp)
Thread the right needle as indicated 1~9.
Raise Presser foot
to release Tension discs.
by lowering presser bar lifter
10 11
A
B
1
2
3
6
7
5
8
4
D
C
21
9
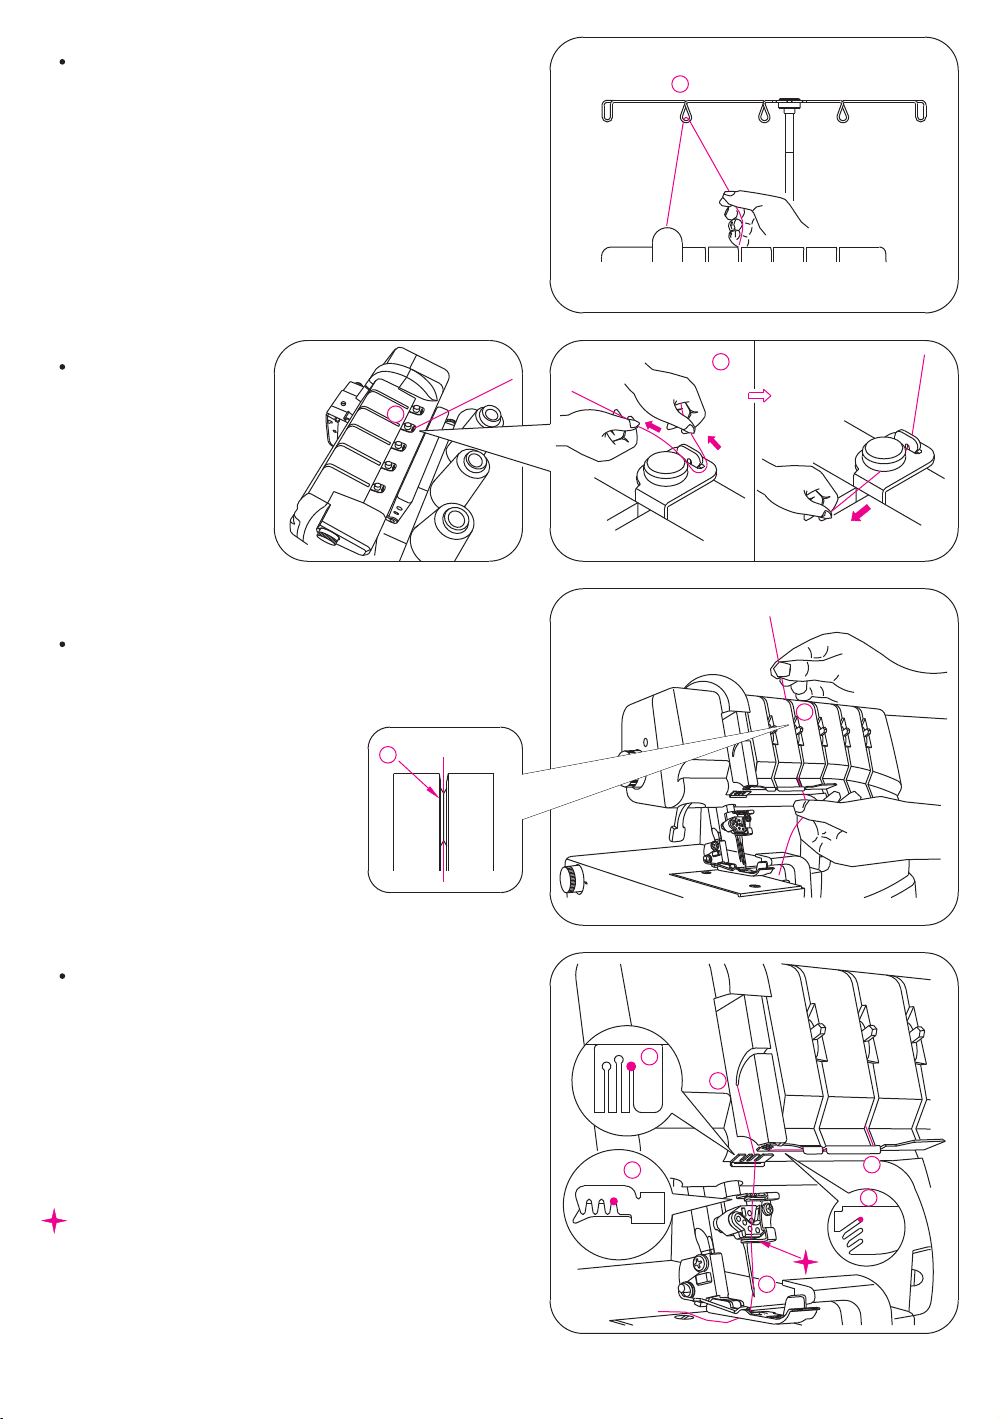
Pass thread from back to the front through the
thread guide 1.
1
Thread the top cover
thread guide by pulling
the thread towards the
left until it slips under
2
guide. Then pull thread
along the right side of
button as illustrated.
While holding thread with finger, pass it between
the tension discs and pull thread down to make
certain it is properly located in between the
tension discs 3.
3
2
3
Continue to thread points 4~8.
Note: Slip thread into the rear slot on the thread
guide 5 and the slot of take-up lever cover 6.
Then slip thread into the right slot on the thread
guide 7, and into the right slot on the thread
guide 8.
Before threading eye of needle, slip thread behind
thread guide located on the bottom of the needle
clamp.
22
7
6
8
9
4
5

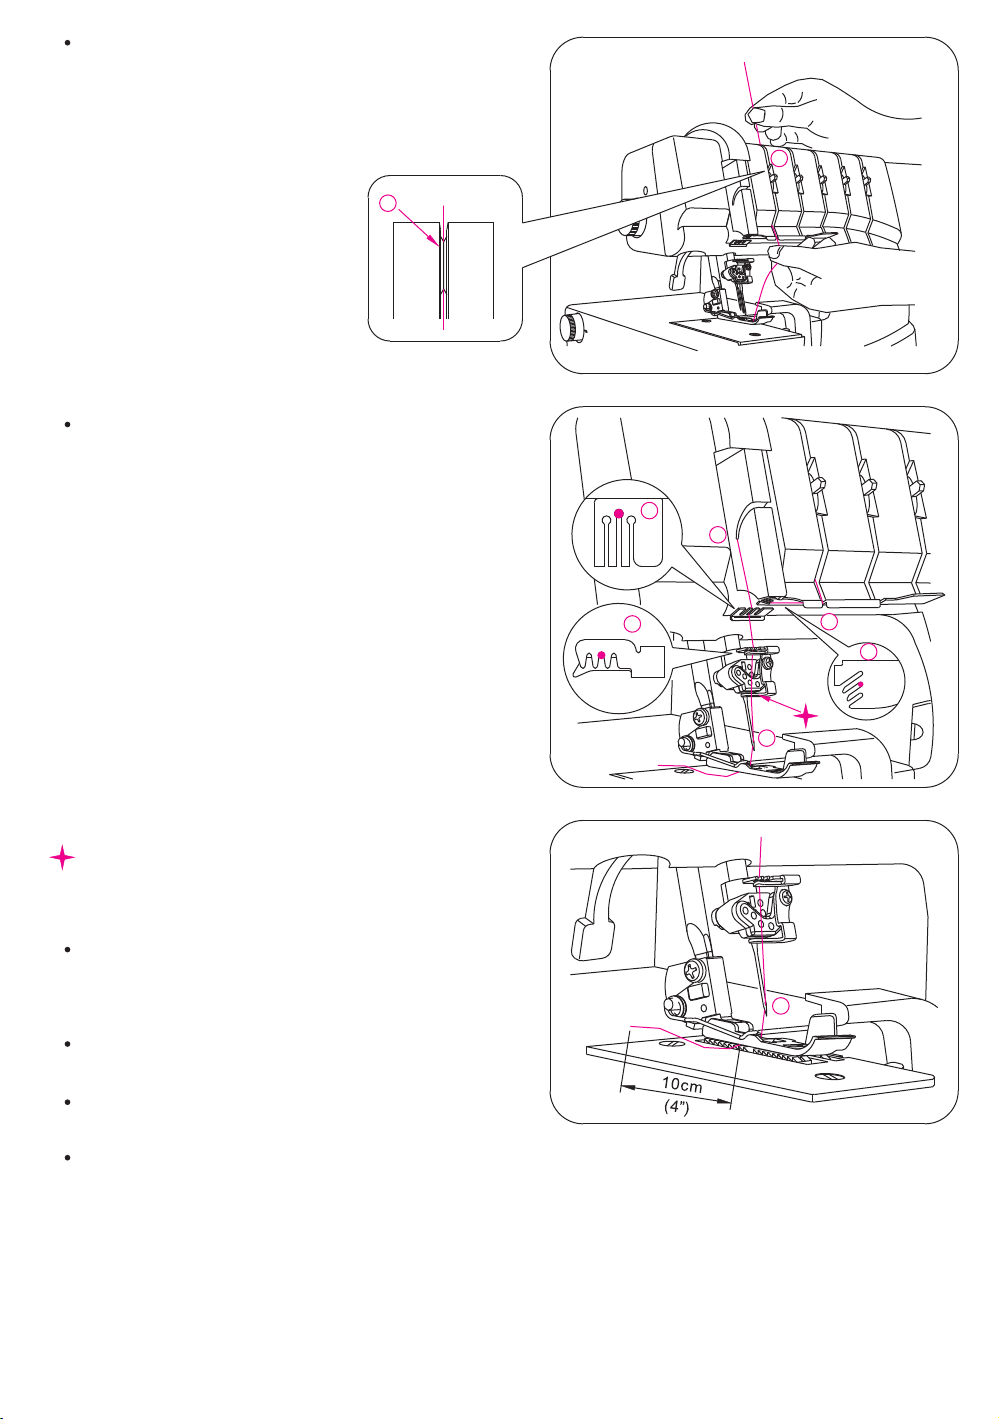
Thread the eye of the right needle 9.
Note: Use of tweezers in the accessory case will
make needle eye threading easy.
The position of the thread must be behind the thread
guide.
Draw about 10cm(4 inches) of thread through
needle eye towards the rear of machine.
Place the thread to the back, under the presser
foot.
5) Threading the (Orange)Chain Stitch Needle
(D on needle clamp)
Thread the left needle as indicated 1~9.
Raise Presser foot
to release Tension discs.
by lowering presser bar lifter
9
1
2
3
6
7
5
4
8
Pass thread from back to the front through the
thread guide 1.
Thread the top cover
Thread guide by pulling
the thread towards the
left until it slips under
guide. Then pull thread
along the right side of
button as illustrated.
9
1
2
2
23
While holding thread with fingers, pass it between
the tension discs and pull thread down to make
certain it is properly located in between the
tension discs 3.
3
Continue to thread points 4~8.
Note: Slip thread into the middle slot of the thread
guide 5 and into the slot of take-up
lever cover 6.
Then continue by slipping thread into the
middle slot of the thread guides 7 and 8.
Note: For 4 thread overlock left needle: Use needle
A.
Before threading eye of needle, slip thread behind
thread guide located on the bottom of the needle
clamp.
3
7
6
8
9
4
5
Note: For chain stitch :Use needle D.
Before threading eye of needle, make sure thread
is located on the bottom ofin front of thread guide
the needle clamp.
Thread the eye of the left needle 9.
Note: Use of tweezers in the accessory case will
make needle eye threading easy.
The position of the thread must be behind the
the thread guide.
Draw about 10cm (4 inches) of thread through
needle eye to hang free.
Place the thread to the back, under the presser
foot.
9
24
6) Threading the Cover Stitch Needles
(1) Threading the Cover Stitch Left Needle
(Orange) (C on needle clamp)
Thread the cover stitch left / chain stitch needle as
indicated 1~9.
Raise Presser foot
to release Tension discs.
Pass thread from back to the front through the
thread guide 1.
by lowering presser bar lifter
1
2
3
6
7
5
8
9
1
4
Thread the top cover
thread guide by pulling
the thread towards the
left until it slips under
2
guide. Then pull thread
along the right side of
button as illustrated.
While holding thread with finger, pass it between
the tension discs and pull thread down to make
certain it is properly located in between the
tension discs 3.
3
2
3
25
Continue to thread points 4~8.
Note: Slide thread into front slot on thread
guide 5 and slot of take-up lever
cover 6. Then slip thread into left slots
of thread guides 7 and 8.
7
6
Before threading eye of needle, make sure thread
is located on the bottomin front of thread guide
of the needle clamp.
Thread the eye of the left needle 9.
Note: Use of tweezers in the accessory case
will make needle eye threading easy.
Draw about 10cm (4 inches) of thread through
needle eye to hang free.
Place the thread to the back, under the presser
foot.
8
9
4
5
9
(2) Threading the Cover Stitch Middle / Chain Stitch
Needle(Blue) (D on needle clamp)
Thread the cover stitch middle / chain stitch
needle as indicated 1~9.
Raise the Presser foot by lowering presser bar lifter
to release Tension discs.
26
1
2
3
6
7
5
8
9
4
Pass thread from back to the front through the
thread guide 1.
1
Thread the top cover
thread guide by pulling
the thread towards the left
until it slips under guide.
Then pull thread along the
2
right side of button as
illustrated.
While holding thread with fingers, pass it between
the tension discs and pull thread down to make
certain it is properly located in between the
tension discs 3.
3
2
3
Continue to thread points 4~8.
Note: Slip thread into the middle slot of the thread
guide 5 and into the slot of take-up
lever cover 6.
Then continue by slipping thread into the
middle slot of the thread guides 7 and 8.
Before threading eye of needle, make sure thread is
in front of thread guide located on the bottom of the
needle clamp for Cover stitch and for Chain stitch.
27
7
6
8
9
4
5
Thread the eye of the middle needle 9.
Note: Use of tweezers in the accessory case will
make needle eye threading easy.
Draw about 10cm (4 inches) of thread through
needle eye towards the back of the machine.
Place the thread to the back, under the presser
foot.
(3) Threading the Cover Stitch Right Needle
(Green) (E on needle clamp)
Thread the cover stitch right needle as indicated
1-9.
Raise Presser foot by lowering presser bar lifter to
release Tension discs.
9
1
2
3
6
7
5
8
9
4
Pass thread from back to the front through the
thread guide 1.
Thread the top cover
thread guide by pulling
the thread towards the
left until it slips under
guide. Then pull thread
along the right side of
2
button as illustrated.
1
2
28
While holding thread with fingers, pass it between
the tension discs and pull thread down to make
certain it is properly located in between the
tension discs 3.
3
Continue to thread points 4~8.
3
Note: Slip thread into the rear slot on thread
guides 5. Slip the thread into the slot
of the Take-up Lever Cover 6. Slip the thread
into the right slots for thread guides 7 and 8.
Before threading eye of needle, make sure thread is
in front of thread guide located on the bottom of the
needle clamp for Cover stitch.
Thread the eye of the right needle 9.
Note: Use of tweezers in the accessory case will
make needle eye threading easy.
Draw about 10cm (4 inches) of thread through
needle eye towards the rear of the machine.
Place the thread to the back under the presser
foot.
7
6
8
9
9
4
5
29
 Loading...