

Page 1
WASSERKOCHER SWKS 2400 B1
WASSERKOCHER
Bedienungsanleitung
BOLLITORE
Istruzioni per l’uso
IAN 78281
BOUILLOIRE
Mode d’emploi
KETTLE
Operating instructions
Page 2

Klappen Sie vor dem Lesen die Seite mit den Abbildungen aus und machen Sie sich anschließend mit allen
Funktionen des Gerätes vertraut.
Avant de lire le mode d‘emploi, ouvrez la page contenant les illustrations et familiarisez-vous ensuite avec
toutes les fonctions de l‘appareil.
Prima di leggere aprire la pagina con le immagini e prendere confi denza con le diverse funzioni
dell’apparecchio.
Before reading, unfold the page containing the illustrations and familiarise yourself with all functions of
the device.
DE / AT / CH Bedienungsanleitung Seite 1
FR / CH Mode d’emploi Page 7
IT / CH Istruzioni per l’uso Pagina 13
GB Operating instructions Page 19
Page 3
Page 4

INHALTSVERZEICHNIS SEITE
Einleitung 2
Verwendungszweck 2
Lieferumfang 2
Bedienelemente 2
Technische Daten 2
Sicherheitshinweise 2
Inbetriebnahme 3
Wasser aufkochen 3
Reinigung und Pflege 4
Bevor Sie das Gerät reinigen ... . . . . . . . . . . . . . . . . . . . . . . . . . . . . . . . . . . . . . . . . . . . . . . . .4
Bei Kalk-Rückständen . . . . . . . . . . . . . . . . . . . . . . . . . . . . . . . . . . . . . . . . . . . . . . . . . . . . . . . . .4
Ausgießer-Sieb abnehmen / einsetzen . . . . . . . . . . . . . . . . . . . . . . . . . . . . . . . . . . . . . . . . . . .5
Aufbewahren 5
Entsorgen 5
Garantie und Service 5
Importeur 6
Lesen Sie die Bedienungsanleitung vor der ersten Verwendung aufmerksam durch und heben Sie diese für
den späteren Gebrauch auf. Händigen Sie bei Weitergabe des Gerätes an Dritte auch die Anleitung aus.
- 1 -
Page 5

WASSERKOCHER
Einleitung
Herzlichen Glückwunsch zum Kauf Ihres neuen
Gerätes.
Sie haben sich damit für ein hochwertiges Produkt
entschieden. Die Bedienungsanleitung ist Bestandteil dieses Produkts. Sie enthält wichtige Hinweise
für Sicherheit, Gebrauch und Entsorgung. Machen
Sie sich vor der Benutzung des Produkts mit allen
Bedien- und Sicherheitshinweisen vertraut. Benutzen
Sie das Produkt nur wie beschrieben und für die angegebenen Einsatzbereiche. Händigen Sie alle
Unterlagen bei Weitergabe des Produkts an Dritte
mit aus.
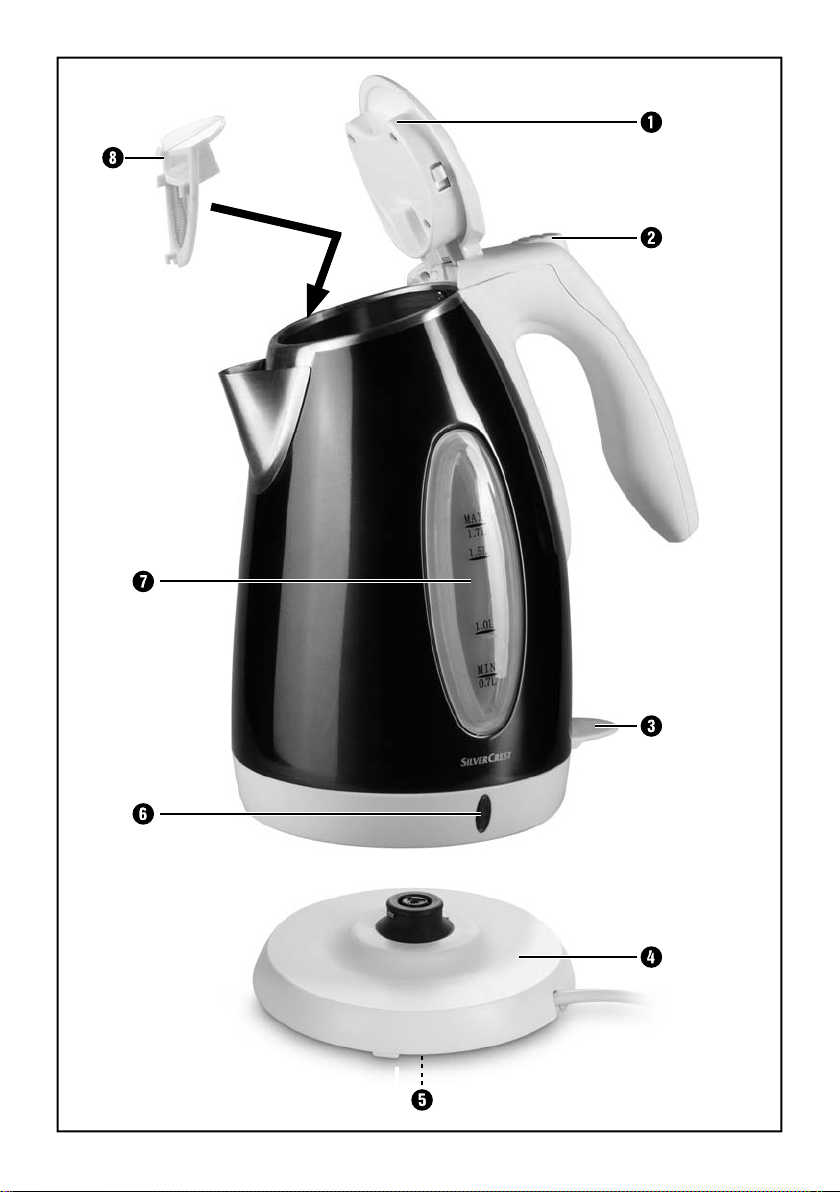
Bedienelemente
1 Deckel
2 Entriegelungstaste
3 EIN-/AUS-Schalter
4 Sockel
5 Kabelaufwicklung
6 Kontrollleuchte
7 Skala
8 Ausgießer-Sieb
Technische Daten
Spannung: 220 - 240 V ~/ 50 Hz
Leistungsaufnahme: 2000 - 2400 W
Füllmenge: max. 1,7 l
min. 0,7 l
Verwendungszweck
Dieses Gerät dient ausschließlich dem Erhitzen von
Wasser für den häuslichen Gebrauch. Es ist nicht
vorgesehen für die Verwendung mit anderen
Flüssigkeiten oder für gewerbliche Bereiche. Dieses
Gerät ist ausschließlich für die Benutzung in privaten Haushalten bestimmt. Benutzen Sie das Gerät
nicht gewerblich!
Lieferumfang
Wasserkocher
Sockel
Bedienungsanleitung
Bei älteren Hausinstallationen kann aufgrund
der hohen Leistungsaufnahme die Haussicherung (12 A) auslösen.
Sicherheitshinweise
Um Lebensgefahr durch elektrischen
Schlag zu vermeiden:
• Stellen Sie sicher, dass der Sockel mit den elektrischen Anschlüssen niemals mit Wasser in Berührung kommt! Lassen Sie den Sockel erst vollständig trocknen, wenn er versehentlich feucht
geworden ist.
• Verwenden Sie den Wasserkocher nur mit dem
mitgelieferten Sockel.
• Achten Sie darauf, dass im Betrieb das Netzkabel niemals nass oder feucht wird. Führen Sie es
so, dass es nicht eingeklemmt oder anderweitig
beschädigt werden kann.
- 2 -
Page 6
• Lassen Sie beschädigte Netzstecker oder Netzkabel sofort von autorisiertem Fachpersonal
oder dem Kundenservice austauschen, um
Gefährdungen zu vermeiden.
• Ziehen Sie nach Gebrauch immer den Stecker
aus der Steckdose. Ausschalten alleine genügt
nicht, weil noch immer Netzspannung im Gerät
anliegt, solange der Netzstecker in der
Steckdose steckt.
Um Brand- und Verletzungsgefahr zu
vermeiden:
• Erhitzen Sie Wasser immer nur bei geschlossenem Deckel, andernfalls funktioniert die Abschaltautomatik nicht. Kochendes Wasser kann
dann über den Rand herausspritzen.
• Es können heiße Dampfschwaden entweichen.
Die Kanne ist zudem im Betrieb sehr heiß. Tragen Sie daher Topf-Handschuhe.
• Stellen Sie sicher, dass das Gerät stabil und
senkrecht steht, bevor Sie dieses einschalten.
Kochendes Wasser kann ein unstabil stehendes
Gerät zum Umstürzen bringen.
• Dieses Gerät ist nicht dafür bestimmt, durch Personen (einschließlich Kinder) mit eingeschränkten physischen, sensorischen oder geistigen Fähigkeiten oder mangels Erfahrung und/oder
mangels Wissen benutzt zu werden, es sei denn,
sie werden durch eine für ihre Sicherheit zuständige Person beaufsichtigt oder erhielten von ihr
Anweisungen, wie das Gerät zu benutzen ist.
• Kinder sollten beaufsichtigt werden, um sicherzustellen, dass sie nicht mit dem Gerät spielen.
• Benutzen Sie keine externe Zeitschaltuhr oder
ein separates Fernwirksystem um das Gerät zu
betreiben.
Inbetriebnahme
• Bevor Sie das Gerät in Betrieb nehmen, überzeugen Sie sich davon, dass...
– das Gerät, Netzstecker und Netzkabel in
einwandfreiem Zustand sind und...
– alle Verpackungsmaterialien vom Gerät entfernt
sind.
• Befüllen Sie das Gerät mit Wasser bis zur MaxMarkierung auf der Skala 7 und lassen Sie es
einmal ganz aufkochen – wie im nächsten Abschnitt beschrieben.
• Gießen Sie dieses Wasser nach dem Aufkochen
weg.
• Spülen Sie die Kanne mit klarem Wasser aus.
• Befüllen Sie das Gerät noch einmal mit Wasser
bis zur MAX-Markierung auf der Skala 7 und
lassen Sie es aufkochen. Gießen Sie auch dieses
Wasser weg.
Das Gerät ist nun betriebsbereit.
Wasser aufkochen
Gefahr!
Bringen Sie niemals den elektrischen Sockel 4 in
die Nähe von Wasser – Lebensgefahr!
Hinweis:
Verwenden Sie immer frisches Trinkwasser. Verzehren Sie kein Wasser welches schon länger als eine
Stunde im Wasserkocher gestanden hat. Kochen
Sie kein erkaltetes Wasser erneut auf. Schütten Sie
altes Wasser immer weg. Es können sich Keime bilden!
• Nehmen Sie die Kanne ab zum Befüllen!
• Öffnen Sie den Deckel 1, indem Sie auf die
Entriegelungstaste 2 drücken.
- 3 -
Page 7

• Halten Sie beim Befüllen die Kanne senkrecht.
Nur dann können Sie die Markierungen der
Skala 7 richtig ablesen.
Befüllen Sie die Kanne...
– mindestens bis zur MIN-Markierung, damit das
Gerät nicht überhitzt,
– maximal bis zur MAX-Markierung, damit kein
kochendes Wasser heraus schwappt.
• Schließen Sie erst den Deckel 1...
• und setzen danach die Kanne auf den Sockel
4, bis diese ganz gerade auf dem Sockel 4
steht.
• Stecken Sie nun den Netzstecker in die
Steckdose.
• Drücken Sie den EIN-/AUS-Schalter 3 nach
unten, bis er unten einrastet.
• Die Kontrollleuchte 6 zeigt an, dass das Gerät
nun aufheizt.
• Das Gerät schaltet von selber ab und die Kontrollleuchte 6 erlischt, sobald das Wasser kocht.
Der EIN-/AUS-Schalter 3 springt nach oben.
Warnung!
Ziehen Sie erst den Netzstecker aus der Steckdose,
bevor Sie die Kanne vom Sockel 4 heben. Damit
verhindern Sie, dass heraus schwappendes Wasser
auf die elektrischen Anschlüsse im Sockel 4 kommt
und einen Kurzschluss verursachen kann.
Verletzungsgefahr!
Aus Sicherheitsgründen sollten Sie den Deckel 1
nicht öffnen, wenn das Wasser kocht oder sehr heiß
ist. Es besteht die Gefahr von Verbrühungen.
Reinigung und Pflege
Gefahr!
Öffnen Sie niemals irgendwelche Gehäuseteile. Es
befinden sich keinerlei Bedienelemente darin. Bei
geöffnetem Gehäuse kann Lebensgefahr bestehen
durch elektrischen Schlag.
Auf keinen Fall dürfen die Geräteteile in Wasser oder andere Flüssigkeiten getaucht werden! Hier kann Lebensgefahr durch elektrischen Schlag entstehen, wenn im Betrieb
Flüssigkeitsreste auf spannungsführende Teile
gelangen.
Bevor Sie das Gerät reinigen, ...
• ziehen Sie erst den Netzstecker aus der Steckdose und lassen Sie das Gerät erst abkühlen.
• Reinigen Sie alle Außenflächen und das Netzkabel mit einem leicht angefeuchteten Spültuch.
Trocknen Sie das Gerät auf jeden Fall gut ab,
bevor Sie es erneut verwenden.
• Für die Edelstahlkanne können Sie ein geeignetes Mittel aus dem Fachhandel verwenden.
• Verwenden Sie keine Reinigungs-, Scheuer- oder
Lösemittel. Diese können das Gerät
beschädigen.
Bei Kalk-Rückständen
• Nehmen Sie vor dem Entkalken das AusgießerSieb 8 heraus (siehe Kapitel „Ausgießer-Sieb
abnehmen/einsetzen”).
• Nehmen Sie einen für Lebensmittelbehälter geeigneten Kalklöser aus dem Haushaltswarengeschäft (z. B. Kaffeemaschinen-Entkalker). Gehen
Sie wie in der Bedienungsanleitung des Kalklösers beschrieben vor.
- 4 -
Page 8
Ausgießer-Sieb abnehmen /
einsetzen
• Öffnen Sie den Deckel 1.
• Drücken Sie von vorne gegen die mittig sitzende
obere Rastnase des Ausgießer-Siebes 8 und
halten Sie es gleichzeitig an der Lasche fest.
• Entnehmen Sie das Ausgießer-Sieb 8.
• Reinigen Sie das Ausgießer-Sieb 8 mit einem
leicht angefeuchteten Spültuch und unter fließendem Wasser.
• Setzen Sie nach dem Reinigen das AusgießerSieb 8 von innen gegen die Öffnung. Achten
Sie darauf, dass die untere und die seitlichen
Rastnasen in die Öffnung greifen. Drücken Sie
das Ausgießer-Sieb 8 an, bis die obere Rastnase an der Öffnung eingerastet ist.
• Sollten sich Kalkrückstände im Ausgießer-Sieb
8 festgesetzt haben, legen Sie es für einige
Stunden in eine Wasser-Essig-Lösung in einem
Verhältnis von 6:1. Die Kalkrückstände lösen
sich. Spülen Sie das Ausgießer-Sieb 8 mit viel
klarem Wasser ab.
Aufbewahren
Lassen Sie das Gerät erst vollständig auskühlen,
bevor Sie es wegstellen.
• Wickeln Sie das Netzkabel um die Kabelaufwicklung 5 unter dem Sockel 4.
• Lagern Sie das Gerät an einem trockenen Ort.
Entsorgen
Werfen Sie das Gerät keinesfalls in den
normalen Hausmüll. Dieses Produkt
unterliegt der europäischen Richtlinie
2002/96/EC.
Entsorgen Sie das Gerät über einen zugelassenen
Entsorgungsbetrieb oder über Ihre kommunale
Entsorgungseinrichtung.
Beachten Sie die aktuell geltenden Vorschriften.
Setzen Sie sich im Zweifelsfall mit Ihrer Entsorgungseinrichtung in Verbindung.
Führen Sie alle Verpackungsmaterialien
einer umweltgerechten Entsorgung zu.
Garantie und Service
Sie erhalten auf dieses Gerät 3 Jahre Garantie ab
Kaufdatum. Das Gerät wurde sorgfältig produziert
und vor Anlieferung gewissenhaft geprüft.
Bitte bewahren Sie den Kassenbon als Nachweis
für den Kauf auf. Bitte setzen Sie sich im Garantiefall mit Ihrer Servicestelle telefonisch in Verbindung.
Nur so kann eine kostenlose Einsendung Ihrer Ware
gewährleistet werden.
Die Garantieleistung gilt nur für Material- oder
Fabrikationsfehler, nicht aber für Transportschäden,
Verschleißteile oder für Beschädigungen an zerbrechlichen Teilen, z. B. Schalter oder Akkus. Das
Produkt ist lediglich für den privaten und nicht für
den gewerblichen Gebrauch bestimmt.
Bei missbräuchlicher und unsachgemäßer Behandlung, Gewaltanwendung und bei Eingriffen, die
nicht von unserer autorisierten Service-Niederlassung vorgenommen wurden, erlischt die Garantie.
Ihre gesetzlichen Rechte werden durch diese
Garantie nicht eingeschränkt.
- 5 -
Page 9
Die Garantiezeit wird durch die Gewährleistung
nicht verlängert. Dies gilt auch für ersetzte und reparierte Teile. Eventuell schon beim Kauf vorhandene
Schäden und Mängel müssen sofort nach dem
Auspacken gemeldet werden, spätestens aber zwei
Tage nach Kaufdatum. Nach Ablauf der Garantiezeit anfallende Reparaturen sind kostenpflichtig.
Service Deutschland
Tel.: 01805772033 (0,14 EUR/Min. aus dem dt.
Festnetz, Mobilfunk max. 0,42 EUR/Min.)
E-Mail: kompernass@lidl.de
IAN 78281
Service Österreich
Tel.: 0820 201 222 (0,15 EUR/Min.)
E-Mail: kompernass@lidl.at
IAN 78281
Service Schweiz
Tel.: 0842 665566 (0,08 CHF/Min.,
Mobilfunk max. 0,40 CHF/Min.)
E-Mail: kompernass@lidl.ch
IAN 78281
Importeur
KOMPERNASS GMBH
BURGSTRASSE 21
44867 BOCHUM, GERMANY
www.kompernass.com
- 6 -
Page 10

SOMMAIRE PAGE
Introduction 8
Finalité de la machine 8
Accessoires fournis 8
Eléments de réglage 8
Caractéristiques techniques 8
Consignes de sécurité 8
Mise en service 9
Faire bouillir de l'eau 9
Nettoyage et entretien 10
Avant de nettoyer l'appareil ... . . . . . . . . . . . . . . . . . . . . . . . . . . . . . . . . . . . . . . . . . . . . . . . .10
En cas de restes de calcaire . . . . . . . . . . . . . . . . . . . . . . . . . . . . . . . . . . . . . . . . . . . . . . . . . .10
Retirer/poser le filtre du bec verseur . . . . . . . . . . . . . . . . . . . . . . . . . . . . . . . . . . . . . . . . . . .10
Rangement 10
Mise au rebut 11
Garantie et service après-vente 11
Importateur 11
Lisez attentivement le mode d'emploi avant la première utilisation et conservez ce dernier pour une utilisation
ultérieure. Lors du transfert de l'appareil à une tierce personne, remettez-lui également le mode d'emploi.
- 7 -
Page 11

BOUILLOIRE
Introduction
Toutes nos félicitations pour l'achat de votre nouvel
appareil.
Vous avez choisi un produit de grande qualité. Le mode
d'emploi fait partie de ce produit. Il contient des remarques importantes concernant la sécurité, l'utilisation et la mise au rebut. Veuillez vous familiariser
avec l'ensemble des consignes d'opération et de sécurité avant l'usage du produit. N'utilisez le produit
que conformément aux consignes et pour les domaines d'utilisation prévus. En cas de transfert du produit
à un tiers, remettez-lui également tous les documents.
Finalité de la machine
Cet appareil sert à réchauffer de l'eau pour l'usage
domestique. Il n'est pas destiné à être utilisé avec
d'autres liquides ou pour des applications commerciales. Cet appareil est exclusivement destiné à l’utilisation dans le cadre de ménages privés. Ne pas
utiliser l’appareil dans un but commercial!
Accessoires fournis
Bouilloire
Socle
Manuel d'utilisation
Caractéristiques techniques
Tension : 220 - 240 V ~/ 50 Hz
Puissance consommée : 2000 - 2400 W
Contenance : max. 1,7 l
min. 0,7 l
Le fusible domestique (12 A) peut se déclen-
cher sur les anciennes installations domestiques
en raison de la puissance consommée élevée.
Consignes de sécurité
Pour éviter tout accident corporel
résultant d'un choc électrique :
• Assurez-vous que le socle comportant les raccordements électriques n'entre jamais en contact
avec de l'eau ! Laissez d'abord sécher entièrement le socle, s'il a accidentellement été mouillé.
• Utilisez la bouilloire exclusivement avec le socle
compris dans la livraison.
• Assurez-vous que le cordon d'alimentation ne
soit jamais mouillé ou même humide lorsque l'appareil est utilisé. Disposez le cordon de manière
à éviter qu'il ne soit endommagé ou coincé.
• Faites immédiatement remplacer la fiche secteur
ou le cordon d'alimentation endommagé par un
technicien spécialisé ou par le service clientèle
afin d'éviter tout danger.
• Après utilisation, veuillez retirer la fiche de la
prise secteur. Il ne suffit pas d'éteindre l'appareil,
en raison de la présence de courant dans l'appareil si celui-ci reste branché.
Eléments de réglage
1 Couvercle
2 Touche de déverrouillage
3 Commutateur MARCHE/ARRÊT
4 Socle
5 Enroulement de câble
6 Indicateur de contrôle
7 Graduation
8 Filtre du bec verseur
Pour éviter les risques d'incendie et
de blessures :
• Réchauffez l'eau uniquement lorsque le couvercle est fermé, sinon le dispositif automatique de
coupure ne fonctionnera pas. De l'eau bouillante
risque alors de déborder de la bouilloire.
• Des vapeurs chaudes peuvent se dégager.
La bouilloire est de plus très chaude pendant le
fonctionnement. Portez par conséquent des
gants de cuisine.
- 8 -
Page 12

• Assurez-vous que l'appareil repose sur un support stable et en position verticale avant de le
mettre en marche.
Lorsque de l'eau commence à bouillir, elle
peut entraîner la chute d'un appareil qui n'est
pas installé sur une surface plane.
• Cet appareil n'est pas prévu pour des personnes
(y compris des enfants) dont les capacités phy
siques, sensorielles ou mentales ou dont le manque d'expérience ou de connaissances les empêchent d'assurer un usage sûr des appareils,
s'ils n'ont pas été surveillés ou initiés au préalable.
• Les enfants doivent être surveillés afin d'éviter
qu'ils ne jouent avec l'appareil
• Ne pas utiliser de minuterie externe ou de dispositif de commande à distance pour faire fonctionner l'appareil.
Mise en service
• Avant de mettre l'appareil en service, assurezvous que ...
– l'appareil, la fiche secteur et le cordon d'alimen-
tation sont en parfait état et que ...
– tous les éléments de l'emballage ont été retirés
de l'appareil.
• Remplissez la bouilloire avec de l'eau jusqu'à la
marque Max et laissez-la une fois bouillir intégralement – comme décrit dans le paragraphe
suivant.
• Jetez cette eau que vous venez de faire bouillir.
• Rincez la bouilloire à l'eau claire.
• Remplissez encore une fois l'appareil avec de
l'eau jusqu'à la marque MAX sur la graduation
7 et portez à ébullition. Jetez également cette
eau.
Faire bouillir de l'eau
Danger!
Ne jamais approcher le socle électrique 4 de l'eau
– danger mortel !
Remarque:
Utilisez toujours de l'eau fraîche. Ne consommez
pas d'eau qui se trouve depuis plus d'une heure
dans la bouilloire. Ne faites pas bouillir à nouveau
de l'eau refroidie.
Jetez toujours de l'eau pas fraîche pour éviter
toute formation de germes !
• Retirez la bouilloire pour la remplir !
• Ouvrez le couvercle 1, en appuyant sur la
touche de déverrouillage 2.
• Tenez la bouilloire à la verticale pendant que
vous la remplissez. Ce n'est qu'à cette condition
que vous serez en mesure de lire correctement
les marques sur la graduation 7.
Remplissez la bouilloire...
– au moins jusqu'au marquage MIN, afin d'éviter
toute surchauffe de l'appareil,
– au maximum jusqu'au marquage MAX, afin
d'éviter tout débordement d'eau bouillante.
• Fermez d'abord le couvercle 1...
• puis placez ensuite la bouilloire sur le socle 4,
jusqu'à ce qu'elle soit toute droite sur le socle 4.
• Insérez ensuite la fiche secteur dans la prise.
• Appuyez le commutateur MARCHE/ARRET 3
vers le bas jusqu'à ce qu'il s'enclenche en bas.
• L'indicateur de contrôle 6 indique que l'appareil est en train de chauffer.
• L'appareil s'éteint automatiquement et l'indicateur de contrôle 6 s'éteint dès que l'eau bout.
Le commutateur MARCHE/ARRET 3 saute.
L'appareil est maintenant prêt à l'emploi.
- 9 -
Page 13

Avertissement!
Retirez toujours la fiche secteur de la prise secteur,
avant de lever la bouilloire du socle 4. Vous évitez
ainsi toute projection d'eau sur les raccords électriques du socle 4 et tout risque de court-circuit.
Risque de blessures!
Pour raisons de sécurité, vous ne devriez pas ouvrir
le couvercle 1, lorsque l'eau bout ou qu'elle est
très chaude. Il y a en effet un risque d'échaudage.
Nettoyage et entretien
Danger!
N'ouvrez jamais des pièces du boîtier. La machine
ne contient aucun élément de commande dans ces
pièces. Vous risquez votre vie par électrocution si
vous laissez le boîtier ouvert alors que l'appareil est
en marche.
Ne jamais plonger l'appareil dans de l'eau ou
tout autre liquide. Vous risquez votre vie par
électrocution en cas de contact de pièces conductrices d'électricité avec un reste de liquide
alors que l'appareil est en marche.
Avant de nettoyer l'appareil, ...
• Retirez tout d'abord la fiche secteur de la prise
et laissez l'appareil refroidir.
• Nettoyez toutes les surfaces extérieures ainsi
que le cordon d'alimentation à l'aide d'un chiffon légèrement humide. Séchez soigneusement
l'appareil avant de le réutiliser.
• Il est recommandé d'utiliser un produit adéquat
disponible dans le commerce spécialisé pour le
nettoyage de la bouilloire en acier inoxydable.
• N'utilisez aucun produit de nettoyage, détergeant ou récurant. Il peut en résulter des dommages sur l'appareil.
En cas de restes de calcaire
• Avant le détartrage, retirez le filtre du bec verseur 8 (voir le chapitre "Retirer/poser le filtre du
bec verseur").
• Utilisez un détartrant approprié pour les conteneurs de denrées alimentaires que vous pouvez
vous procurer dans un magasin d'équipements
ménagers (un détartrant pour machine à café
par exemple). Respectez les consignes d'utilisation du détartrant.
Retirer/poser le filtre du bec verseur
• Ouvrez le couvercle 1.
• Appuyez de l'avant contre l'ergot supérieur situé
au milieu du filtre du bec verseur 8 et maintenez-le en même temps au niveau de la languette.
• Retirez le filtre du bec verseur 8.
• Nettoyez le filtre du bec verseur 8 avec un chiffon légèrement humidifié et à l'eau courante.
• Après le nettoyage, insérez le filtre du bec verseur 8 de l'intérieur contre l'ouverture. Veillez à
ce que les ergots inférieurs et latéraux pénètrent
dans l'ouverture. Appuyez sur le filtre du bec verseur 8, jusqu'à ce que l'ergot supérieur se soit
enclenché dans l'ouverture.
• Si des restes de calcaire se sont accumulés dans
le filtre du bec verseur 8 laissez-le tremper pen-
dant quelques heures dans une solution d'eau et
de vinaigre dans un rapport de 6:1.
Les restes de calcaire se détachent. Rincez le filtre
du bec verseur 8 avec beaucoup d'eau claire.
Rangement
Attendez que l'appareil ait complètement refroidi
avant de le ranger.
• Enroulez le cordon d'alimentation dans l'enrouleur de câble 5 sous le socle 4.
• Entreposez l'appareil dans un endroit sec.
- 10 -
Page 14

Mise au rebut
L'appareil ne doit jamais être jeté dans
la poubelle domestique normale.
Cet appareil est soumis aux impératifs
de la directive européenne
2002/96/EC.
Remettez l'appareil destiné au recyclage à une entreprise spécialisée ou au centre de recyclage de votre commune.
Respectez la réglementation en vigueur.
En cas de doutes, contactez votre organisation de
recyclage.
La garantie est annulée en cas de manipulation incorrecte et inappropriée, d'utilisation brutale et en
cas d'intervention qui n'aurait pas été réalisée par
notre centre de service après-vente agréé. Cette garantie ne constitue pas une restriction de vos droits
légaux.
La durée de la garantie n'est pas prolongée par la
garantie du fabricant. Ceci vaut également pour les
pièces remplacées et réparées. Tous dommages et
défauts présents dès l'achat doivent être notifiés dès
que le produit est déballé, et au plus tard deux
jours après la date d'achat. Toutes réparations survenant après la période sous garantie ne seront pas
prises en charge.
Eliminez l'ensemble des matériaux d'emballage d'une manière respectueuse de
l'environnement.
Garantie et service après-vente
Cet appareil bénéficie de 3 ans de garantie à
compter de la date d'achat. L'appareil a été fabriqué avec soin et consciencieusement contrôlé avant
sa distribution. Veuillez conserver le ticket de caisse
en guise de preuve d'achat. Si la garantie devait s'appliquer, contactez par téléphone votre interlocuteur du service après-vente. Cette condition doit être
respectée pour assurer l'expédition gratuite de votre
marchandise.
La prestation de garantie s'applique uniquement
pour les erreurs de matériaux et de fabrication, pas
pour les dommages de transport, les pièces d'usure
ou les dommages subis par les pièces fragiles, comme par ex. les interrupteurs ou les batteries. Le produit est exclusivement destiné à un usage privé et
non commercial.
Service France
Tel.: 0800 919270
E-Mail: kompernass@lidl.fr
IAN 78281
Service Suisse
Tel.: 0842 665566 (0,08 CHF/Min.,
mobile max. 0,40 CHF/Min.)
E-Mail: kompernass@lidl.ch
IAN 78281
Importateur
KOMPERNASS GMBH
BURGSTRASSE 21
44867 BOCHUM, GERMANY
www.kompernass.com
- 11 -
Page 15

- 12 -
Page 16

INDICE PAGINA
Introduzione 14
Destinazione d'uso 14
Volume di fornitura 14
Elementi di comando 14
Dati tecnici 14
Avvertenze di sicurezza 14
Messa in funzione 15
Bollitura dell'acqua 15
Pulizia e cura 16
Prima di ripulire l'apparecchio ... . . . . . . . . . . . . . . . . . . . . . . . . . . . . . . . . . . . . . . . . . . . . . .16
In caso di residui di calcare . . . . . . . . . . . . . . . . . . . . . . . . . . . . . . . . . . . . . . . . . . . . . . . . . .16
Rimuovere / inserire il beccuccio-colino . . . . . . . . . . . . . . . . . . . . . . . . . . . . . . . . . . . . . . . . .16
Conservazione 16
Smaltimento 17
Garanzia & assistenza 17
Importatore 17
Leggere attentamente le istruzioni per l'uso prima del primo impiego e conservarle per l'impiego successivo.
In caso di cessione dell'apparecchio a terzi, consegnare anche il manuale di istruzioni.
- 13 -
Page 17

BOLLITORE
Introduzione
Congratulazioni per l'acquisto del nuovo apparecchio.
Lei ha scelto un prodotto di alta qualità. Il manuale
di istruzioni è parte integrante del presente prodotto. Esso contiene importanti indicazioni per la sicurezza, l'uso e lo smaltimento. Prima di utilizzare il
prodotto, si familiarizzi con tutte le indicazioni relative ai comandi e alla sicurezza.Utilizzi il prodotto
solo come descritto e per i campi di impiego indicati. In caso di cessione del prodotto a terzi, consegni
anche tutta la documentazione relativa.
Destinazione d'uso
Elementi di comando
1 Coperchio
2 Tasto di sbloccaggio
3 Interruttore ON/OFF
4 Base
5 Dispositivo di avvolgimento del cavo
6 Spia di controllo
7 Scala graduata
8 Beccuccio-colino
Dati tecnici
Tensione: 220 - 240 V ~/ 50 Hz
Potenza assorbita : 2000 - 2400 W
Capacità massima: max. 1,7 l
min. 0,7 l
Questo apparecchio è previsto per il riscaldamento
di acqua per il consumo domestico. Non è previsto
per l'impiego con altri liquidi o in ambito commerciale. Questo apparecchio è destinato esclusivamente per l'uso in ambienti privati domestici.
Non utilizzare l'apparecchio a fini commerciali!
Volume di fornitura
Bollitore elettrico
Base
Istruzioni per l'uso
In presenza di impianti elettrici non recenti, a
causa dell'elevato assorbimento di potenza, si
può verificare l'attivazione del salvavita (12 A).
Avvertenze di sicurezza
Per evitare il pericolo di morte a
causa di scossa elettrica:
• Impedire che la base con i collegamenti elettrici
venga a contatto con l'acqua! In caso di contatto accidentale con l'acqua, asciugare completamente la base prima di utilizzarla.
• Utilizzare il bollitore solo con la base acclusa.
• Accertarsi che durante il funzionamento il cavo
di alimentazione non si bagni o diventi umido.
Disporlo in modo tale che non si schiacci o possa essere danneggiato in altro modo.
• Fare sostituire immediatamente la spina o il cavo
di rete danneggiato da personale specializzato
autorizzato o dal centro di assistenza clienti, per
evitare possibili danni.
- 14 -
Page 18
• Dopo l'uso disinserire sempre la spina dalla presa. Lo spegnimento dell'apparecchio non è sufficiente a scollegarlo dalla tensione, se la spina è
inserita nella presa.
Per evitare il pericolo di incendio
e lesioni:
• Riscaldare l'acqua sempre e solo con il coperchio chiuso, altrimenti il meccanismo di spegnimento automatico non funzionerà. L'acqua in
fase di ebollizione potrebbe fuoriuscire dai bordi.
• Possono verificarsi perdite di vapore bollente.
Inoltre, il bricco si surriscalda durante l'uso.
Si consiglia quindi di utilizzare presine idonee.
• Assicurarsi che l'apparecchio sia posizionato
stabilmente e in verticale prima di accenderlo.
L'acqua in fase di ebollizione potrebbe far cadere l'apparecchio, se posizionato in modo instabile.
• Questo apparecchio non è indicato per l'uso da
parte di persone (inclusi bambini) con limitate
capacità fisiche, sensoriali o mentali o prive dell'esperienza e/o della conoscenza necessaria, a
meno che tali persone non vengano sorvegliate
da un responsabile per la sicurezza o abbiano
ricevuto indicazioni sull'impiego dell'apparecchio.
• Sorvegliare i bambini per assicurarsi che non
giochino con l'apparecchio.
• Non utilizzare un timer esterno né un sistema
di telecontrollo separato per azionare l'apparecchio.
Messa in funzione
• Prima di mettere in funzione l'apparecchio, accertarsi che...
– l'apparecchio, la spina e il cavo di rete siano in
perfetto stato e...
– tutti i materiali di imballaggio siano stati rimossi
dall'apparecchio.
• Riempire l'apparecchio con acqua fino al livello
Max e farla bollire come descritto di seguito.
• Gettare via l'acqua dopo la bollitura.
• Lavare il bricco con acqua corrente.
• Riempire l'apparecchio con acqua fino al livello
MAX sulla scala graduata 7 e portare a ebollizione. Versare via anche quest'acqua.
L'apparecchio è pronto per l'uso.
Bollitura dell'acqua
Pericolo!
Non collocare mai la base elettrica 4 in prossimità
dell'acqua: pericolo di morte!
Avvertenza!
Utilizzare sempre acqua corrente. Non utilizzare l'acqua che sia stata nel bollitore per più di un'ora.
Non bollire nuovamente l'acqua già bollita e raffreddata. Gettare sempre via l'acqua vecchia.
Potrebbero formarsi colonie di batteri!
• Rimuovere il bricco dalla base per riempirlo!
• Aprire il coperchio 1, premendo il tasto di
sbloccaggio 2.
• Durante il riempimento, mantenere il bricco in
posizione verticale. Solo in tal modo è possibile
leggere correttamente la scala graduata 7.
Riempire il bricco ...
– almeno fino all'indicazione MIN, per non surri-
scaldare l'apparecchio,
– non oltre il segno MAX affinché non fuoriesca
dell'acqua durante la bollitura.
• Chiudere prima il coperchio 1...
• e quindi poggiare il bricco sulla base 4, fino al
corretto posizionamento in verticale sulla base
4.
• Inserire quindi la spina nella presa di corrente.
• Premere l'interruttore ON/OFF 3 verso il basso,
fino al suo inserimento.
• La spia di controllo 6 indica che l'apparecchio
sta cominciando a riscaldarsi.
• L'apparecchio si spegne da solo e la spia di
controllo 6 si spegne non appena l'acqua bol-
le. L'interruttore ON/OFF 3 scatta verso l'alto.
- 15 -
Page 19

Avviso!
Disinserire la spina dalla presa, prima di sollevare il
bricco dalla base 4. In tal modo si evita che eventuali fuoriuscite di acqua possano ricadere sulla
base 4 e causare un cortocircuito.
Pericolo di ferimento!
Per motivi di sicurezza, non aprire il coperchio 1
quando l'acqua bolle o è molto calda. Sussiste il
pericolo di ustioni.
Pulizia e cura
Pericolo!
Non aprire mai nessuna parte dell'alloggiamento.
In essa non sono presenti elementi di comando.
Se l'alloggiamento è aperto, può sussistere il pericolo di morte a causa di scosse elettriche.
Non immergere in nessun caso le parti
dell'apparecchio in acqua o in altri liquidi!
Il contatto fortuito di elementi sotto tensione
con residui di liquido durante il funzionamento
può comportare il pericolo di morte per scossa elettrica.
Prima di ripulire l'apparecchio, ...
• Estrarre la spina dalla presa di corrente e far
raffreddare l'apparecchio.
• Pulire tutte le superfici esterne e il cavo di rete
con un panno leggermente inumidito. Asciugare
accuratamente l'apparecchio in ogni caso prima
di riutilizzarlo.
• Per pulire il bricco in acciaio inossidabile è possibile usare prodotti specifici disponibili presso i
rivenditori specializzati.
• Non usare detergenti, sostanze abrasive o solventi. Essi potrebbero danneggiare l'apparecchio.
In caso di residui di calcare
• Prima della decalcificazione, rimuovere il beccuccio-colino 8 (v. capitolo "Inserimento/rimo-
zione del beccuccio-colino").
• Acquistare in un negozio di articoli per la casa
un decalcificante adatto per contenitori per alimenti (per es. disincrostanti per macchine da caffè). Procedere come descritto nelle istruzioni del
decalcificante.
Rimuovere / inserire il beccuccio-colino
• Aprire il coperchio 1.
• Premere il perno superiore centrale del beccuccio colino 8 tenendolo contemporaneamente
fermo sulla linguetta.
• Rimuovere il beccuccio-colino 8.
• Pulire il beccuccio-colino 8 con un panno leggermente inumidito, tenendolo sotto l'acqua corrente.
• Dopo la pulizia inserire il beccuccio-colino 8
dall'interno contro l'apertura. Fare in modo che i
perni inferiore e laterale siano inseriti nell'apertura. Premere il beccuccio-colino 8 fino a ottenere l'inserimento del perno superiore nell'apertura.
• Se nel beccuccio-colino 8 fossero presenti incrostazioni di calcare, immergerlo per qualche
ora in una soluzione di acqua e aceto in un
rapporto di 6:1. Le incrostazioni di calcare si
dissolveranno. Risciacquare il beccucciocolino
8 con abbondante acqua corrente.
Conservazione
Prima di riporre l'apparecchio, è necessario farlo
raffreddare completamente.
• Avvolgere il cavo di rete intorno all'apposito dispositivo 5 situato sotto la base 4.
• Conservare l'apparecchio in luogo asciutto.
- 16 -
Page 20

Smaltimento
Non smaltire per alcun motivo l'apparecchio insieme ai normali rifiuti domestici. Questo prodotto è soggetto alla
direttiva europea 2002/96/EC.
Smaltire l'apparecchio presso un'azienda autorizzata o presso l'ente comunale di smaltimento.
Rispettare le norme attualmente in vigore.
In caso di dubbi, contattare l'azienda di smaltimento competente.
La garanzia decade in caso di impiego improprio o
manomissione, uso della forza e interventi non eseguiti dalla nostra filiale di assistenza autorizzata.
Questa garanzia non costituisce alcun limite ai
diritti legali del consumatore. Il periodo di garanzia
non viene prolungato in caso di un intervento in garanzia. Ciò vale anche per le componenti sostituite
e riparate. I danni e difetti presenti già all'acquisto
devono essere comunicati immediatamente dopo il
disimballaggio, e non oltre due giorni dalla data di
acquisto. Le riparazioni effettuate dopo la scadenza del periodo di garanzia sono a pagamento.
Smaltire tutti i materiali dell'imballaggio in
modo ecologicamente conforme.
Garanzia & assistenza
Questo apparecchio è garantito per 3 anni a
partire dalla data di acquisto. L'apparecchio
è stato prodotto con cura e debitamente collaudato
prima della consegna. Conservare lo scontrino
come prova d'acquisto. In caso di interventi in garanzia, contattare telefonicamente il proprio centro
di assistenza. Solo in questo modo è possibile
garantire una spedizione gratuita della merce.
La garanzia vale solo per i difetti di materiale o
fabbricazione, non per i danni da trasporto, parti
soggette a usura o danni a parti fragili come ad es.
interruttori o accumulatori. Il prodotto è destinato
esclusivamente all'uso domestico e non a quello
commerciale.
Assistenza Italia
Tel.: 02 36003201
E-Mail: kompernass@lidl.it
IAN 78281
Assistenza Svizzera
Tel.: 0842 665566 (0,08 CHF/Min.,
telefonia mobile max. 0,40 CHF/Min.)
E-Mail: kompernass@lidl.ch
IAN 78281
Importatore
KOMPERNASS GMBH
BURGSTRASSE 21
44867 BOCHUM, GERMANY
www.kompernass.com
- 17 -
Page 21

- 18 -
Page 22

CONTENT PAGE
Introduction 20
Intended Use 20
Items supplied 20
Operating Elements 20
Technical data 20
Safety instructions 20
Start-up 21
Boiling water 21
Cleaning and Care 22
Before cleaning the appliance ... . . . . . . . . . . . . . . . . . . . . . . . . . . . . . . . . . . . . . . . . . . . . . .22
In the event of scale deposits . . . . . . . . . . . . . . . . . . . . . . . . . . . . . . . . . . . . . . . . . . . . . . . . .22
Removing/replacing the pouring sieve . . . . . . . . . . . . . . . . . . . . . . . . . . . . . . . . . . . . . . . . .22
Storage 22
Disposal 23
Warranty & Service 23
Importer 23
Read the operating instructions carefully before using the device for the first time and preserve this booklet
for later reference. Pass this manual on to whoever might acquire the device at a future date.
- 19 -
Page 23

KETTLE
Introduction
Congratulations on the purchase of your new appliance.
You have clearly decided in favour of a quality
product. These operating instructions are a part of
this product. They contain important information in
regard to safety, use and disposal. Before using the
product, familiarise yourself with all of these operating and safety instructions. Use the product only
as described and only for the specified areas of application. In addition, pass these documents on,
together with the product, to any future owner.
Intended Use
This appliance is intended for the boiling-up of water in domestic households. It is not intended for use
with other liquids or for commercial use. This appliance is intended exclusively for use in domestic
households. Do not use the appliance for commercial purposes!
Items supplied
Kettle
Base
Operating instructions
Operating Elements
1 Lid
2 Unlocking button
3 ON/OFF switch
4 Base
5 Rolled-up cable
6 Control lamp
7 Scale
8 Pourer sieve
Technical data
Voltage : 220 - 240 V ~/ 50 Hz
Power consumption : 2000 - 2400 W
Volume: max. 1.7 l
min. 0.7 l
In older electrical installations, the building fuse
(12 A) may be triggered due to the high power
consumption.
Safety instructions
To avoid potentially fatal injury
through electric shock:
• Ensure that the base with the electrical connections does not come into contact with water! Ensure that the base is completely dry before use,
especially if it has accidentally become wet.
• Only use the water boiler with the supplied
base.
• Make sure that the power cord never becomes
wet or damp during operation. Lay the cord such
that it cannot be pinched or otherwise damaged.
• Arrange for defective power plugs and/or cables to be replaced at once by qualified technicians or our Customer Service Department.
• Always pull the plug out of the power socket
after use. Switching off the appliance is not sufficient because the appliance receives power as
long as the power plug is connected to the socket.
- 20 -
Page 24

To avoid burns and other injuries:
• Always heat water with the lid closed, otherwise
the automatic cut-out may not function.
Boiling water can then spray out over the edge.
• Hot steam clouds may be released.
The kettle also becomes very hot during use.
Wear oven mitts.
• Ensure that the appliance is standing securely
and vertically before switching it on.
Boiling water can cause an unstabile kettle to fall
over.
• This appliance is not intended for use by individuals (including children) with restricted physical,
physiological or intellectual abilities or deficiences in experience and/or knowledge unless they
are supervised by a person responsible for their
safety or receive from this person instruction in
how the applianice is to be used.
• Children should be supervised to ensure that
they do not play with the appliance.
• Do not use an external timing switch or a separate remote control system to operate the appliance.
Start-up
• Before taking the appliance into use, ensure that...
– the appliance, the plug and the power cable are
in good working order and...
– all packaging materials have been removed
from the appliance.
• Fill the appliance with water up to the MAX
mark and let it come to a full boil once – as described in the next section.
• Pour this water away when the procedure has
been completed.
• Rinse the kettle out with clear water.
• Fill the appliance with water up to the MAX marking on the scale 7 and then bring it to the boil.
Once again, pour this water away.
Boiling water
Danger!
Never place the electrical base 4 in close proxi-
mity to water – a potentially fatal risk!
Notice:
Always use freshly drawn water. Do not consume
any water that has already stood in the water boiler
for longer than one hour. Do not reboil water that
has cooled down. Always pour old water away.
Microbes could have formed in it!
• Lift the kettle off of the base when filling it!
• Press the unlocking button 2 and open the lid 1.
• Hold the kettle upright while filling it.
Only in this way can you correctly read the markings on the scale 7.
Fill the kettle...
– at least to the MIN mark, so that the appliance
does not overheat,
– no higher than the MAX mark, so that no boiling
water spills out.
• First close the lid 1...
• then place the kettle on the base 4 so that it
stands straight on the base 4.
• Now insert the plug into the power socket.
• Press the ON/OFF switch 3 down until it engages downwards.
• The control lamps 6 indicates that the appliance is now heating up.
• The appliance switches itself off and the control
lamps 6 go out as soon as the water is on the
boil. The ON/OFF switch 3 is released upwards.
The appliance is now ready for use.
- 21 -
Page 25

Warning!
First remove the plug from the wall power socket before you lift the kettle from the base 4. This avoids
the risk that any water splashing out could come
into contact with live electrical connections in the
base 4, which could cause a short circuit.
Injury hazard!
For safety reasons, the lid 1 should not be opened
while the water is boiling or is very hot. There is a
risk of receiving severe scalds.
Cleaning and Care
Danger!
Do not open any part of the housing. There are no
operating elements inside. An open housing can
create the risk of a life-threatening electrical shock.
Never submerse any parts of the appliance in
water or other liquids! This can create the risk
of a life-threatening electrical shock if residual
liquid comes into contact with powered components.
Before cleaning the appliance, ...
• first, remove the plug from the power socket and
allow the appliance to cool down completely.
• Clean the exterior surfaces and the power cable
with a slighly damp cloth. Be sure to dry the appliance well before taking it back into use.
• For stainless steel surfaces, you can use appropriate cleaning agents from a specialized dealer.
• Never use any cleansers, abbrasive substances
or solvents. These can damage the appliance.
In the event of scale deposits
• Before descaling, remove the pourer sieve 8
(see chapter "Removing/replacing the pourer
sieve").
• Take any decalcifying agent used for kitchen
utensils (e.g. decalcifiers for coffee machines)
from a grocery shop. Proceed as detailed in the
instructions provided for the use of the decalcfying agent.
Removing/replacing the pouring sieve
• Open the lid 1.
• Press from the front against the upper lug sitting
in the middle of the pouring sieve 8 and at the
same time hold it firmly by the flap.
• Remove the pourer sieve 8.
• Clean the pouring sieve 8 with a lightly moistened dishcloth and under running water.
• After cleaning it, place the pourer sieve 8 from
inside against the opening. Ensure that the lower
and the lateral lugs grip the opening. Press the
pourer sieve 8 until the upper lug engages in
the opening.
• Should the scale deposits in the pourer sieve 8
be firmly settled, lay it in a water-vinegar solution, with a ratio of 6:1, for a few hours. The scale deposits will dissolve themselves. Rinse the
pourer sieve 8 with lots of clear water.
Storage
Allow the appliance to cool off completely before
putting it into storage.
• Wind the power cable around the cable winder
5 under the base 4.
• Store the appliance in a dry place.
- 22 -
Page 26

Disposal
Do not dispose of this appliance in
your normal domestic waste. This product is subject to the provisions of European Directive 2002/96/EC.
Dispose of the appliance through an approved disposal centre or at your community waste facility.
Observe the currently applicable regulations.
In case of doubt, please contact your waste disposal centre.
Dispose of the packaging materials in an
environmentally responsible manner.
Warranty & Service
The warranty for this appliance is for 3 years from
the date of purchase. The appliance has been manufactured with care and meticulously examined before delivery. Please retain your receipt as proof of
purchase. In the event of a warranty claim, please
make contact by telephone with our Service Department. Only in this way can a post-free despatch for
your goods be assured.
The warranty covers only claims for material and
manufacturing defects, but not for transport damage, for wearing parts or for damage to fragile components, e.g. buttons or batteries. This product is for
private use only and is not intended for commercial
use. The warranty is void in the case of abusive and
improper handling, use of force and internal tampering not carried out by our authorized service
branch. Your statutory rights are not restricted in any
way by this warranty.
The warranty period will not be extended by repairs
made under warranty. This applies also to replaced
and repaired parts. Any damage and defects extant
on purchase must be reported immediately after unpacking the appliance, at the latest, two days after
the purchase date. Repairs made after the expiration of the warranty period are subject to payment.
Service Great Britain
Tel.: 0871 5000 720 (£ 0.10/Min.)
E-Mail: kompernass@lidl.co.uk
IAN 78281
Importer
KOMPERNASS GMBH
BURGSTRASSE 21
44867 BOCHUM, GERMANY
www.kompernass.com
- 23 -
Page 27

- 24 -
Page 28

KOMPERNASS GMBH
Burgstraße 21
D-44867 Bochum
www.kompernass.com
Stand der Informationen · Version des informations
Versione delle informazioni · Last Information Update:
08 / 2012 · Ident.-No.: SWKS2400B1072012-1
IAN 78281
 Loading...