


STANDMIXER / BLENDER / BLENDER SSM 600 B2
STANDMIXER
Bedienungsanleitung
BLENDER
Mode d’emploi
MIKSER STOJĄCY
Instrukcja obsługi
MIXÉR
Návod na obsluhu
IAN 339532_1910
BLENDER
Operating instructions
BLENDER
Gebruiksaanwijzing
TOLNÍ MIXÉR
Návod k obsluze
Klappen Sie vor dem Lesen die Seite mit den Abbildungen aus und machen Sie sich anschließend mit
allen Funktionen des Gerätes vertraut.
Before reading, unfold the page containing the illustrations and familiarise yourself with all functions of the
device.
Avant de lire le mode d‘emploi, ouvrez la page contenant les illustrations et familiarisez-vous ensuite avec
toutes les fonctions de l‘appareil.
Vouw vóór het lezen de pagina met de afbeeldingen open en maak u vertrouwd met alle functies van het
apparaat.
Przed przeczytaniem proszę rozłożyć stronę z ilustracjami, a następnie proszę zapoznać się z wszystkimi
funkcjami urządzenia.
Před čtením si otevřete stranu s obrázky a potom se seznamte se všemi funkcemi přístroje.
Pred čítaním si odklopte stranu s obrázkami a potom sa oboznámte so všetkými funkciami prístroja.
DE / AT / CH Bedienungsanleitung Seite 1
GB/IE Operating instructions Page 19
FR / BE Mode d’emploi Page 37
NL / BE Gebruiksaanwijzing Pagina 59
PL Instrukcja obsługi Strona 77
CZ Návod k obsluze Strana 95
SK Návod na obsluhu Strana 113


Inhaltsverzeichnis
Einleitung .....................................................2
Bestimmungsgemäßer Gebrauch .................................2
Lieferumfang ..................................................2
Gerätebeschreibung ............................................3
Technische Daten ...............................................3
Sicherheitshinweise ............................................4
Auspacken ....................................................6
Aufstellen .....................................................6
Bedienen .....................................................7
Mixaufsatz befüllen und montieren ..........................................7
Geschwindigkeitsstufe wählen ............................................... 8
Einfüllen im Betrieb ....................................................... 8
Mixaufsatz abnehmen ..................................................... 9
Nützliche Hinweise .............................................9
Rezepte .....................................................10
Bananen-Shake ......................................................... 10
Vanille-Shake ...........................................................10
Cappuccino-Shake ....................................................... 10
Tropical-Mix ............................................................10
Nuss-Nougat-Shake ......................................................11
Möhren-Shake .......................................................... 11
Johannisbeer-Mix ........................................................11
Hawaii-Shake ........................................................... 11
Fruchtiger Ananas-Erdbeer-Mix .............................................12
Andalusische kalte Suppe (Gazpacho) ....................................... 12
Reinigen ....................................................13
Mixaufsatz reinigen ...................................................... 13
Motorblock reinigen ..................................................... 15
Nach dem Reinigen ...................................................... 15
Aufbewahren ................................................15
Entsorgung. . . . . . . . . . . . . . . . . . . . . . . . . . . . . . . . . . . . . . . . . . . . . . . . . . . 16
Garantie der Kompernaß Handels GmbH .........................17
Service ................................................................18
Importeur ..............................................................18
SSM 600 B2
DE│AT│CH
│
1 ■

Einleitung
Herzlichen Glückwunsch zum Kauf Ihres neuen Gerätes. Sie haben sich damit
für ein hochwertiges Produkt entschieden. Die Bedienungsanleitung ist Bestandteil dieses Produkts. Sie enthält wichtige Hinweise für Sicherheit, Gebrauch und
Entsorgung. Machen Sie sich vor der Benutzung des Produkts mit allen Bedienund Sicherheitshinweisen vertraut. Benutzen Sie das Produkt nur wie beschrieben
und für die angegebenen Einsatzbereiche. Händigen Sie alle Unterlagen bei
Weitergabe des Produkts an Dritte mit aus.
Bestimmungsgemäßer Gebrauch
Dieses Gerät ist ausschließlich bestimmt für …
■ das Mischen, Pürieren und Rühren von Lebensmitteln sowie Zerkleinern
von Eiswürfeln (sog. “Crushen”),
■ haushaltsübliche Mengen und nur in privaten Haushalten in trockenen
Räumen.
Dieses Gerät ist nicht bestimmt für …
■ das Zerkleinern von harten Lebensmittelanteilen wie z. B. Nüsse, Kerne,
große Körner oder Stiele,
■ das Verarbeiten von Materialien, die nicht Lebensmittel sind,
■ den Einsatz für gewerbliche oder industrielle Zwecke,
■ die Verwendung in feuchter Umgebung oder im Freien,
■ das Verarbeiten von heißen/kochenden Flüssigkeiten.
Verwenden Sie nur Zubehör- und Ersatzteile, die für dieses Gerät bestimmt sind.
Andere Teile sind möglicherweise nicht ausreichend geeignet oder sicher!
Lieferumfang
Kontrollieren Sie nach dem Auspacken die Lieferung auf Vollständigkeit. Im
Lieferumfang enthalten ist:
▯ Motorblock, mit Netzkabel und Netzstecker
▯ Mixaufsatz
▯ Deckel
▯ Dosierkappe
▯ Bedienungsanleitung
■ 2 │ DE
│AT│
CH
SSM 600 B2

Gerätebeschreibung
1 Dosierkappe
2 Deckel
3 Mixaufsatz
4 Schneidmesser
5 Schalter
6 Motorblock
7 Kabelaufwicklung
8 Skala
9 Gummidichtung Deckel
Technische Daten
Nennspannung 220 – 240 V ∼ (Wechselstrom), 50 – 60 Hz
Nennleistung 600 W
Max. Einfüllmenge 1,75 Liter
Schutzklasse
KB-Zeit 3 Minuten
Die KB-Zeit (Kurzbetriebszeit) gibt an, wie lange man ein Gerät betreiben kann,
ohne dass der Motor überhitzt und Schaden nimmt. Nach der angegebenen
KB-Zeit muss das Gerät solange ausgeschaltet werden, bis sich der Motor auf
Raumtemperatur abgekühlt hat.
(Doppelisolierung)
II /
Alle Teile dieses Gerätes, die mit Lebensmitteln in Berührung kommen, sind lebensmittelecht.
SSM 600 B2
DE│AT│CH
│
3 ■

Sicherheitshinweise
GEFAHR! ELEKTRISCHER SCHLAG!
► Stellen Sie sicher, dass der Motorblock, das Netzkabel oder
der Netzstecker niemals in Wasser oder andere Flüssigkeiten
getaucht wird.
► Verwenden Sie das Gerät ausschließlich in trockenen Räumen,
niemals im Freien oder in feuchter Umgebung.
► Achten Sie darauf, dass im Betrieb das Netzkabel niemals
nass oder feucht wird. Führen Sie es so, dass es nicht eingeklemmt oder anderweitig beschädigt werden kann.
► Lassen Sie beschädigte Netzstecker oder Netzkabel sofort
von autorisiertem Fachpersonal oder dem Kundenservice
austauschen, um Gefährdungen zu vermeiden.
► Ziehen Sie nach Gebrauch immer den Stecker aus der Steck-
dose. Ausschalten alleine genügt nicht, weil noch immer
Netzspannung im Gerät anliegt, solange der Netzstecker in
der Steckdose steckt.
► Kontrollieren Sie vor jedem Gebrauch das Gerät auf seinen
einwandfreien Zustand. Das Gerät darf nicht verwendet
werden, wenn Schäden erkennbar sind, insbesondere am
Motorblock oder Mixaufsatz.
► Ziehen Sie sofort den Netzstecker aus der Steckdose, wenn
Sie eine ungewöhnliche Geräusch- oder Geruchsentwicklung
wahrnehmen oder bei erkennbarer Fehlfunktion.
WARNUNG! VERLETZUNGSGEFAHR!
► Greifen Sie niemals in den Mixaufsatz, insbesondere nicht
im Betrieb. Die Messer sind extrem scharf!
► Öffnen Sie nicht den Deckel, wenn das Gerät in Betrieb ist.
► Lassen Sie das Gerät nicht unbeaufsichtigt arbeiten, um bei
Gefahr sofort reagieren zu können.
■ 4 │ DE
│AT│
CH
SSM 600 B2

WARNUNG! VERLETZUNGSGEFAHR!
► Führen Sie niemals Besteckteile oder Rührgegenstände in
den Mixaufsatz, solange das Gerät in Betrieb ist. Es besteht
erhebliche Verletzungsgefahr, wenn diese das sich sehr
schnell drehende Messer berühren!
► Kinder sollten beaufsichtigt werden, um sicherzustellen, dass
sie nicht mit dem Gerät spielen.
► Missbrauchen Sie das Gerät nicht für andere Zwecke, als in
dieser Anleitung beschrieben.
► Bei Missbrauch des Gerätes besteht Verletzungsgefahr.
► Das Gerät ist bei nicht vorhandener Aufsicht und vor dem
Zusammenbau, dem Auseinandernehmen oder Reinigen
stets vom Netz zu trennen.
► Das Gerät darf nicht von Kindern benutzt werden.
► Das Gerät und seine Anschlussleitung sind von Kindern
fernzuhalten.
► Dieses Gerät kann von Personen mit reduzierten physischen,
sensorischen oder mentalen Fähigkeiten oder Mangel an
Erfahrung und/oder Wissen benutzt werden, wenn sie
beaufsichtigt oder bezüglich des sicheren Gebrauchs des
Gerätes unterwiesen wurden und die daraus resultierenden
Gefahren verstanden haben.
► Kinder dürfen nicht mit dem Gerät spielen.
► Seien Sie vorsichtig beim Umgang mit dem Gerät. Die Messer
sind sehr scharf!
► Gehen Sie vorsichtig beim Leeren des Mixaufsatzes vor!
Die Messer sind sehr scharf!
► Gehen Sie vorsichtig beim Reinigen des Gerätes vor! Die
Messer sind sehr scharf!
► Schalten Sie das Gerät aus und ziehen Sie den Netzstecker,
bevor Sie Zubehör wechseln oder Teile anfassen, die sich
während des Betriebs bewegen.
SSM 600 B2
DE│AT│CH
│
5 ■

WARNUNG! VERLETZUNGSGEFAHR!
► Stellen Sie sicher, dass der Mixer immer ausgeschaltet ist,
bevor Sie ihn vom Motorblock heben!
► Verwenden Sie den Mixaufsatz nur mit dem mitgelieferten
Motorblock!
ACHTUNG! SACHSCHADEN!
► Verwenden Sie das Gerät nicht im Bereich direkter Sonnenein-
strahlung oder Wärmeeinwirkung hitzeerzeugender Geräte.
► Füllen Sie niemals kochende Flüssigkeiten oder sehr heiße
Lebensmittel in den Mixaufsatz! Lassen Sie diese erst auf handwarme Temperatur abkühlen!
► Betreiben Sie das Gerät niemals im Leerzustand, d. h. ohne
Zutaten im Mixaufsatz.
Auspacken
■ Entfernen Sie alle Verpackungsteile oder Schutzfolien vom Gerät. Bewahren
Sie die Verpackung auf, um das Gerät geschützt lagern oder einsenden zu
können, z. B. im Reparaturfall.
■ Bevor Sie das Gerät verwenden, überzeugen Sie sich davon, dass das Gerät
unbeschädigt ist, ebenso das Netzkabel mit Netzstecker und alle Zubehörund Geräteteile.
■ Reinigen Sie sorgfältig alle Bestandteile vor dem ersten Gebrauch des Stand-
mixers (siehe „Reinigen”).
Aufstellen
Wenn Sie alle Teile gereinigt haben, wie unter „Reinigen” beschrieben:
■ Stellen Sie das Gerät so auf, …
■ 6 │ DE
│AT│
– dass das Netzkabel durch die Aussparung an der Rückseite geführt wird,
– dass der Netzstecker sofort erreichbar ist, um diesen bei Gefahr aus der
Steckdose ziehen zu können,
– dass es stabil und rutschfest steht, so dass die Saugnäpfe Halt finden,
damit bei Vibrationen das Gerät nicht umkippt,
– dass das Netzkabel nicht in den Arbeitsbereich ragt und durch verse-
hentliches Ziehen daran das Gerät umkippen kann.
CH
SSM 600 B2

Bedienen
WARNUNG
► Der Motor schaltet sich aus, sobald der Mixaufsatz 3 vom Motorblock6
entfernt oder der Deckel 2 geöffnet wird. Es wird dann vielleicht übersehen, dass die Maschine noch eingeschaltet ist. Der Motor startet dann
unvermutet, sobald der Mixaufsatz 3 montiert oder der Deckel 2 wieder
geschlossen wird:
Deshalb:
– Stecken Sie den Netzstecker erst dann in die Steckdose, sobald
der Mixaufsatz 3 fertig befüllt und verschlossen montiert ist.
– Vergewissern Sie sich vor dem Montieren stets, dass das Gerät
ausgeschaltet oder der Netzstecker gezogen ist.
– Schalten Sie erst aus, ziehen Sie den Netzstecker und warten Sie
den Stillstand des Motors ab, bevor Sie den Mixaufsatz 3 abnehmen oder den Deckel 2 öffnen.
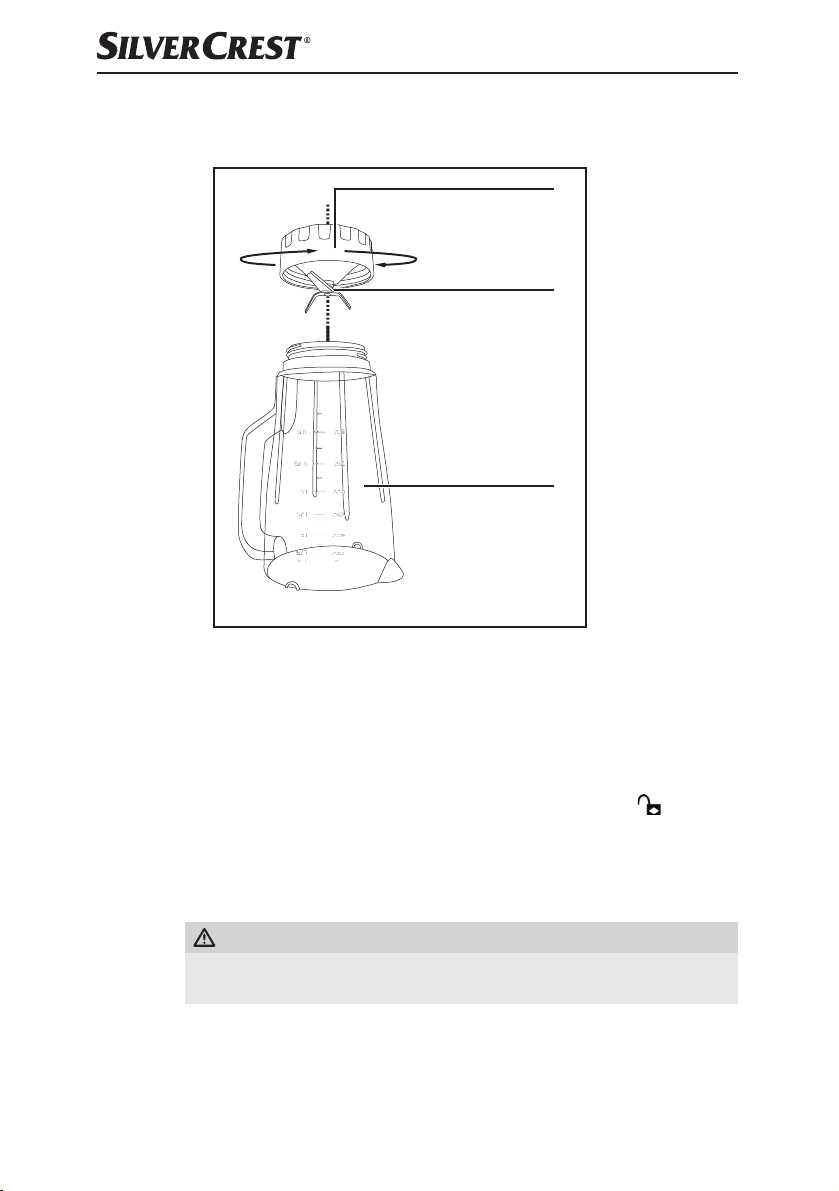
Mixaufsatz befüllen und montieren
1) Drehen Sie den Mixaufsatz 3 gegen den Uhrzeigersinn bis der Pfeil Tunter
dem Griff des Mixaufsatzes über der Position
Mixaufsatz 3 gerade nach oben vom Motorblock 6 ab.
2) Entfernen Sie den Deckel 2, indem Sie ihn so weit gegen den Uhrzeigersinn
Richtung Position
können.
3) Befüllen Sie den Mixaufsatz 3.
4) Drücken Sie den Deckel 2 versetzt wieder fest auf den Mixaufsatz 3 auf.
Schließen Sie den Deckel 2, indem Sie ihn im Uhrzeigersinn in die Position
drehen, bis er hörbar einrastet (siehe Abb. 2). Achten Sie darauf, dass die
Ausgießnase am Mixaufsatz 3 verschlossen ist. Nur wenn der Deckel 2
bündig aufgesetzt ist, kann der Motor starten.
drehen (siehe Abb. 1), bis Sie ihn nach oben abziehen
steht. Nehmen Sie den
Abb.1 Abb.2
5) Drücken Sie die Dosierkappe 1 bis zum Anschlag in die Deckelöffnung.
SSM 600 B2
DE│AT│CH
│
7 ■

6) Setzen Sie den fertig befüllten und verschlossenen Mixaufsatz 3 auf den
Motorblock 6. Nutzen Sie dazu die Aussparungen am Motorblock 6 und
achten Sie dabei darauf, dass der Pfeil Tam Mixaufsatz 3 auf das -Symbol
zeigt. Drehen Sie den Mixaufsatz 3 im Uhrzeigersinn in die Position
hörbar einrastet. Nur wenn der Mixaufsatz 3 bündig aufgesetzt ist, kann der
Motor starten.
Geschwindigkeitsstufe wählen
Wenn der Mixaufsatz 3 fertig befüllt und vollständig verschlossen auf dem
Motorblock 6 steht, können Sie das Gerät einschalten.
Stellen Sie den Schalter 5 auf …
■ Stufe 1 – 3
für flüssige oder mittelfeste Lebensmittel, zum Mischen, Pürieren und Rühren
■ Stufe 3 – 5
für festere Lebensmittel oder zum Zerkleinern
■ Stufe Ice crush /clean
für kurzen, kraftvollen Impulsbetrieb, z. B. zum Crushen von Eiswürfeln oder zur
Reinigung. Der Schalter 5 rastet in dieser Stellung nicht ein, um den Motor nicht
zu überlasten. Halten Sie den Schalter 5 deshalb nur kurz in dieser Stellung.
HINWEIS
► Befüllen Sie den Mixaufsatz 3 mit maximal 180 g Eiswürfeln. Ansonsten
zerkleinert das Gerät die Eiswürfel nicht optimal.
Einfüllen im Betrieb
, bis er
■ 8 │ DE
WARNUNG
► Wenn Sie bei laufendem Betrieb etwas einfüllen möchten, dürfen Sie aus-
schließlich die dafür eigens vorgesehene Dosierkappe 1 öffnen. Öffnen
Sie keinesfalls den Deckel 2.
► Führen Sie niemals Besteckteile oder Rührgegenstände in den Mixaufsatz 3,
solange das Gerät in Betrieb ist. Es besteht erhebliche Verletzungsgefahr,
wenn diese das sich sehr schnell drehende Schneidmesser 4 berühren!
Um bei laufendem Betrieb etwas einfüllen zu können, …
1) Ziehen Sie die Dosierkappe 1 aus dem Deckel 2 heraus.
2) Füllen Sie die Zutaten ein.
3) Drücken Sie die Dosierkappe 1 anschließend wieder in die Deckelöffnung.
│AT│
CH
SSM 600 B2

Mixaufsatz abnehmen
Wenn die Bearbeitung der eingefüllten Lebensmittel beendet ist:
1) Stellen Sie immer erst den Schalter 5 in Aus-Stellung („0“) und ziehen Sie
den Netzstecker.
2) Warten Sie erst den Stillstand des Motors ab, bevor Sie den Mixaufsatz 3
vom Motorblock 6 nehmen. Drehen Sie dazu den Mixaufsatz 3 gegen
den Uhrzeigersinn bis der Pfeil Tunter dem Griff des Mixaufsatzes über der
Position
Motorblock 6 ab.
steht. Nehmen Sie den Mixaufsatz 3 gerade nach oben vom
Nützliche Hinweise
■ Um beim Pürieren fester Zutaten beste Ergebnisse zu erzielen, geben Sie
nach und nach nur kleine Portionen in den Mixaufsatz 3, anstatt eine große
Menge auf einmal einzufüllen.
■ Wenn Sie feste Zutaten verarbeiten, schneiden Sie diese in kleine Stücke
(2 – 3 cm).
■ Beim Mixen flüssiger Zutaten beginnen Sie zunächst mit einer geringen
Menge Flüssigkeit. Geben Sie dann nach und nach mehr Flüssigkeit durch
die Deckelöffnung hinzu.
■ Wenn Sie bei laufendem Betrieb Ihre Hand oben auf den verschlossenen
Standmixer legen, können Sie das Gerät damit gut stabilisieren.
■ Für das Rühren von festen oder sehr dickflüssigen Lebensmitteln kann es
nützlich sein, die Stufe Ice crush /clean zu verwenden, um ein Festsetzen des
Schneidmessers 4 zu verhindern.
HINWEIS
SSM 600 B2
► Benutzen Sie das Gerät nicht, um die Körnung von Speisesalz, Raffinade-
zucker oder weißem Zucker zu verfeinern. Zum Beispiel, um Puderzucker
herzustellen.
DE│AT│CH
│
9 ■

Rezepte
Bananen-Shake
▯ 2 Bananen
▯ ca. 2 Esslöffel Zucker
(je nach Reifegrad der Bananen und persönlichem Geschmack)
▯ ½ Liter Milch
▯ 1 Spritzer Zitronensaft
Schälen Sie die Bananen und pürieren Sie sie auf Stufe 2. Geben Sie nach und
nach die Milch, dann den Zucker und den Zitronensaft hinzu. Mixen Sie alles
so lange, bis eine gleichmäßige Flüssigkeit entsteht. Servieren Sie den Shake
eisgekühlt.
Vanille-Shake
▯ ¼ Liter Milch
▯ 250 g Vanilleeis
▯ 125 g Eiswürfel
▯ 1 ½ Teelöffel Zucker
Crushen Sie die Eiswürfel mit der Stufe Ice crush /clean. Füllen Sie die restlichen
Zutaten in den Mixer. Mixen Sie alles so lange auf Stufe 2, bis eine gleichmäßige
Flüssigkeit entsteht.
Cappuccino-Shake
▯ 65 ml kalten Espresso (oder sehr starken Kaffee)
▯ 65 ml Milch
▯ 15 g Zucker
▯ 65 g Vanilleeis
▯ 100 g Eiswürfel
Crushen Sie die Eiswürfel mit der Stufe Ice crush /clean. Geben Sie den Espresso,
die Milch und den Zucker hinzu. Mixen Sie alles auf der Stufe 2, bis sich der
Zucker aufgelöst hat. Geben Sie zum Schluss das Vanilleeis hinzu und mixen Sie
alles kurz auf der Stufe 1 durch.
Tropical-Mix
▯ 125 ml Ananassaft
▯ 60 ml Papayasaft
▯ 50 ml Orangensaft
▯ ½ kleine Dose Pfirsiche mit Saft
▯ 125 g Eiswürfel
Crushen Sie die Eiswürfel mit der Stufe Ice crush /clean. Geben Sie alle Zutaten
in den Mixer und mischen Sie alles auf Stufe 3 durch.
■ 10 │ DE
│AT│
CH
SSM 600 B2

Nuss-Nougat-Shake
▯ ½ Liter Milch
▯ 200 g Nuss-Nougat-Creme
▯ 1 Kugel Vanilleeis
▯ 50 ml Sahne
Vermengen Sie alle Zutaten im Mixer auf Stufe 3, bis alles gleichmäßig vermengt ist
Möhren-Shake
▯ 300 ml Apfelsaft
▯ 500 ml Möhrensaft
▯ 4 Esslöffel Öl (Weizenkeim- oder Rapsöl)
▯ 4 Esslöffel Zitronensaft
▯ Ingwerpulver
▯ Pfeffer
Geben Sie den Apfelsaft, das Öl und den Zitronensaft in den Mixer und mischen
Sie alles auf Stufe 2. Geben Sie dann den Möhrensaft hinzu und mixen Sie alles
auf Stufe 2 durch. Schmecken Sie dann den Shake mit Ingwerpulver und Pfeffer ab.
Johannisbeer-Mix
▯ 2 Teelöffel Honig
▯ 2 Bananen
▯ ¼ Liter Buttermilch
▯ ¼ Liter Johannisbeersaft (schwarz)
Geben Sie alle Zutaten in den Mixer und mixen Sie alles auf Stufe 3 durch.
.
Hawaii-Shake
▯ 4 Bananen
▯ ¼ Liter Ananassaft
▯ ½ Liter Milch
▯ 2 EL Honig
▯ ¼ Liter Rum
Schälen Sie die Bananen und pürieren Sie sie auf Stufe 2. Geben Sie die weiteren
Zutaten hinzu und vermengen Sie alles auf Stufe 1.
SSM 600 B2
DE│AT│CH
│
11 ■

Fruchtiger Ananas-Erdbeer-Mix
▯ 250 ml Ananassaft
▯ 200 g Erdbeeren
▯ 300 ml Apfelsaft
▯ 4 Eiswürfel
Waschen Sie die Erdbeeren und entfernen Sie das Grün. Crushen Sie die Eiswürfel mit der Stufe Ice crush /clean. Pürieren Sie sie auf Stufe 2. Geben Sie
dann die restlichen Zutaten hinzu und mixen Sie alles auf Stufe 1.
Andalusische kalte Suppe (Gazpacho)
▯ ½ Gurke
▯ 1 Fleischtomate
▯ 1 grüne Paprika
▯ ½ Zwiebel
▯ 1 Knoblauchzehe
▯ ½ weißes Brötchen
▯ ½ Teelöffel Salz
▯ 1 Teelöffel Rotweinessig
▯ 1 Esslöffel Olivenöl
Schneiden Sie das Gemüse in ca. 2 cm große Stücke. Geben Sie zuerst die Tomatenstücke und danach die Gurke in den Mixer. Pürieren Sie diese auf Stufe 3. Fügen
Sie die restlichen Zutaten hinzu und pürieren/durchmengen Sie alles auf Stufe 3,
bis eine gleichmäßige Suppe entsteht. Servieren Sie das ganze mit Brot.
■ 12 │ DE
HINWEIS
► Rezepte ohne Gewähr. Alle Zutaten- und Zubereitungsangaben sind
Anhaltswerte. Ergänzen Sie diese Rezeptvorschläge um Ihre persönlichen
Erfahrungswerte.
HINWEIS
► Bei Laktose-Intoleranz empfehlen wir Ihnen, laktosefreie Milch zu verwenden.
Bedenken Sie dabei jedoch, dass laktosefreie Milch ein wenig süßer schmeckt.
│AT│
CH
SSM 600 B2

Reinigen
STROMSCHLAGGEFAHR!
Bevor Sie den Standmixer und seine Teile reinigen:
► Stellen Sie sicher, dass das Gerät ausgeschaltet und der Netzstecker
gezogen ist.
Auf keinen Fall darf der Motorblock 6 in Wasser oder andere Flüssigkeiten getaucht werden. Hierdurch kann Lebensgefahr durch elektrischen
Schlag entstehen und das Gerät kann beschädigt werden.
► Öffnen Sie niemals das Gehäuse des Gerätes. Andernfalls kann Lebens-
gefahr bestehen durch elektrischen Schlag.
WARNUNG! VERLETZUNGSGEFAHR!
► Demontieren Sie niemals das Schneidmesser 4 und greifen Sie auch
niemals in den Mixaufsatz 3. Das Schneidmesser 4 ist extrem scharf!
ACHTUNG! SACHSCHADEN!
► Verwenden Sie keine Lösungs- oder Scheuermittel für die Kunststoffflächen,
diese können andernfalls beschädigt werden.
Mixaufsatz reinigen
■ Reinigen Sie den Mixaufsatz 3 nur mit einer langstieligen Spülbürste, so
dass Sie sich nicht am Schneidmesser 4 verletzen können.
■ Reinigen Sie die Dosierkappe 1 und den Deckel 2 in milder Seifenlauge.
Achten Sie darauf, dass die Gummidichtung 9 richtig sitzt, bevor Sie den
Deckel 2 erneut verwenden.
HINWEIS
SSM 600 B2
Sie können den Deckel 2, die Dosierkappe 1 und den Mixaufsatz3
mit dem Schneidmesser 4 auch in der Spülmaschine reinigen.
■ Wenn Sie direkt nach der Benutzung den Standmixer reinigen, erzielen
Sie eine in den meisten Fällen ausreichende hygienische Reinigung durch
folgende Alternative:
Füllen Sie den Mixaufsatz 3 mit 750 ml Wasser und geben Sie einige Tropfen
eines milden Spülmittels dazu. Schließen Sie den Deckel 2 und setzen Sie
den Mixaufsatz 3 auf den Motorblock 6. Stecken Sie den Netzstecker in
die Steckdose und betätigen Sie ein paar Mal den Ice crush /clean-Betrieb,
so dass das Schneidmesser 4 mit maximaler Drehzahl durch das Wasser
pflügt. Spülen Sie danach den Mixaufsatz 3 mit viel klarem Wasser aus, so
dass alle Spülmittelreste beseitigt sind.
DE│AT│CH
│
13 ■

■ Um hartnäckige Verschmutzungen besser entfernen zu können, können Sie
den unteren Plastikteil des Mixaufsatzes 3 mit dem Schneidmesser 4 vom
oberen Plastikteil des Mixaufsatzes3 lösen:
C
B
A
Abb. 3
A oberer Plastikteil
B Messer
C unterer Plastikteil
1) Nehmen Sie den Mixaufsatz 3 vom Motorblock 6. Entfernen Sie für eine
bessere Standfestigkeit den Deckel 2, indem Sie ihn so weit gegen den Uhr-
zeigersinn Richtung Position
abziehen können.
drehen (siehe Abb. 1), bis Sie ihn nach oben
■ 14 │ DE
2) Stellen Sie das Gerät auf den Kopf und drehen Sie das untere Plastikteil C
des Mixaufsatzes 3 gegen den Uhrzeigersinn, so dass es sich vom oberen
PlastikteilA des Mixaufsatzes 3 lösen lässt (siehe Abb. 3).
WARNUNG! VERLETZUNGSGEFAHR!
► Gehen Sie vorsichtig mit den Messern B um. Sie sind sehr scharf.
Verletzungsgefahr!
3) Reinigen Sie beide Teile gründlich in milder Seifenlauge.
│AT│
CH
SSM 600 B2

HINWEIS
Sie können den oberen Plastikteil A des Mixaufsatzes 3 und das
Schneidmesser 4 mit dem unteren Plastikteil C auch in der Spülmaschine reinigen.
4) Trocknen Sie alle Teile gründlich ab, bevor Sie sie wieder zusammenbauen.
5) Setzen Sie das untere Plastikteil C des Mixaufsatzes 3 wieder auf den oberen
Plastikteil A des Mixaufsatzes 3 und drehen Sie es im Uhrzeigersinn fest.
Motorblock reinigen
1) Verwenden Sie ein trockenes oder höchstens leicht angefeuchtetes Tuch, um
die Oberflächen zu reinigen.
2) Kontrollieren Sie bei jeder Reinigung, dass der Kontaktschalter in der Aufnahme
für den Mixaufsatz 3 nicht durch Schmutzreste blockiert ist. Wenn Sie eventuelle Blockierungen nicht mit der Ecke von einem Blatt Papier lösen können,
wenden Sie sich an den Kundendienst. Verwenden Sie auf keinen Fall einen
harten Gegenstand, der Kontaktschalter könnte dadurch beschädigt werden.
3) Entfernen Sie eventuelle Verschmutzungen an der Unterseite des Motorblocks 6 ausschließlich mit einem trockenen Tuch oder einem Staubpinsel.
Achten Sie darauf, dass nichts durch die Lüftungsöffnungen in das Gerät
gelangt.
Nach dem Reinigen
Lassen Sie alle Teile gut trocknen, bevor Sie den Standmixer wieder zusammensetzen und verwenden.
Aufbewahren
1) Wenn Sie den Standmixer längere Zeit nicht verwenden, reinigen Sie ihn
gründlich (siehe Kapitel „Reinigen“).
2) Wickeln Sie das Netzkabel um die Kabelaufwicklung 7 am Boden des
Motorblocks 6.
3) Bewahren Sie den Standmixer an einem kühlen, trockenen Ort auf.
SSM 600 B2
DE│AT│CH
│
15 ■

Entsorgung
Werfen Sie das Gerät keinesfalls in den normalen Hausmüll.
Dieses Produkt unterliegt der europäischen Richtlinie 2012/19/EU.
Entsorgen Sie das Gerät über einen zugelassenen Entsorgungsbetrieb oder über
Ihre kommunale Entsorgungseinrichtung. Beachten Sie die aktuell geltenden
Vorschriften. Setzen Sie sich im Zweifelsfall mit Ihrer Entsorgungseinrichtung in
Verbindung.
Möglichkeiten zur Entsorgung des ausgedienten Produkts erfahren Sie bei Ihrer
Gemeinde- oder Stadtverwaltung.
Das Produkt ist recycelbar, unterliegt einer erweiterten Herstellerverantwortung
und wird getrennt gesammelt.
Beachten Sie die Kennzeichnung auf den verschiedenen Materialien und trennen
Sie diese gegebenenfalls gesondert. Die Materialien sind gekennzeichnet mit
Abkürzungen (a) und Ziffern (b) mit folgender Bedeutung:
1–7: Kunststoffe,
20–22: Papier und Pappe,
80–98: Verbundstoffe.
Die Verpackung besteht aus umweltfreundlichen Materialien, die Sie über die
örtlichen Recyclingstellen entsorgen können.
■ 16 │ DE
│AT│
CH
SSM 600 B2

Garantie der Kompernaß Handels GmbH
Sehr geehrte Kundin, sehr geehrter Kunde,
Sie erhalten auf dieses Gerät 3 Jahre Garantie ab Kaufdatum. Im Falle von
Mängeln dieses Produkts stehen Ihnen gegen den Verkäufer des Produkts gesetzliche Rechte zu. Diese gesetzlichen Rechte werden durch unsere im Folgenden
dargestellte Garantie nicht eingeschränkt.
Garantiebedingungen
Die Garantiefrist beginnt mit dem Kaufdatum. Bitte bewahren Sie den OriginalKassenbon gut auf. Diese Unterlage wird als Nachweis für den Kauf benötigt.
Tritt innerhalb von drei Jahren ab dem Kaufdatum dieses Produkts ein Materialoder Fabrikationsfehler auf, wird das Produkt von uns – nach unserer Wahl – für
Sie kostenlos repariert oder ersetzt. Diese Garantieleistung setzt voraus, dass
innerhalb der Drei-Jahres-Frist das defekte Gerät und der Kaufbeleg (Kassenbon)
vorgelegt und schriftlich kurz beschrieben wird, worin der Mangel besteht und
wann er aufgetreten ist.
Wenn der Defekt von unserer Garantie gedeckt ist, erhalten Sie das reparierte
oder ein neues Produkt zurück. Mit Reparatur oder Austausch des Produkts
beginnt kein neuer Garantiezeitraum.
Garantiezeit und gesetzliche Mängelansprüche
Die Garantiezeit wird durch die Gewährleistung nicht verlängert. Dies gilt auch
für ersetzte und reparierte Teile. Eventuell schon beim Kauf vorhandene Schäden
und Mängel müssen sofort nach dem Auspacken gemeldet werden. Nach Ablauf
der Garantiezeit anfallende Reparaturen sind kostenpflichtig.
Garantieumfang
Das Gerät wurde nach strengen Qualitätsrichtlinien sorgfältig produziert und vor
Auslieferung gewissenhaft geprüft.
Die Garantieleistung gilt für Material- oder Fabrikationsfehler. Diese Garantie
erstreckt sich nicht auf Produktteile, die normaler Abnutzung ausgesetzt sind und
daher als Verschleißteile angesehen werden können oder für Beschädigungen
an zerbrechlichen Teilen, z. B. Schalter, Akkus, Backformen oder Teile, die aus
Glas gefertigt sind.
Diese Garantie verfällt, wenn das Produkt beschädigt, nicht sachgemäß benutzt
oder gewartet wurde. Für eine sachgemäße Benutzung des Produkts sind alle
in der Bedienungsanleitung aufgeführten Anweisungen genau einzuhalten.
Verwendungszwecke und Handlungen, von denen in der Bedienungsanleitung
abgeraten oder vor denen gewarnt wird, sind unbedingt zu vermeiden.
Das Produkt ist nur für den privaten und nicht für den gewerblichen Gebrauch
bestimmt. Bei missbräuchlicher und unsachgemäßer Behandlung, Gewaltanwendung und bei Eingriffen, die nicht von unserer autorisierten Service-Niederlassung
vorgenommen wurden, erlischt die Garantie.
SSM 600 B2
DE│AT│CH
│
17 ■

Abwicklung im Garantiefall
Um eine schnelle Bearbeitung Ihres Anliegens zu gewährleisten, folgen Sie bitte
den folgenden Hinweisen:
■ Bitte halten Sie für alle Anfragen den Kassenbon und die Artikelnummer
(z. B. IAN 12345) als Nachweis für den Kauf bereit.
■ Die Artikelnummer entnehmen Sie bitte dem Typenschild, einer Gravur, auf
dem Titelblatt Ihrer Anleitung (unten links) oder als Aufkleber auf der Rückoder Unterseite.
■ Sollten Funktionsfehler oder sonstige Mängel auftreten, kontaktieren Sie zunächst
die nachfolgend benannte Serviceabteilung telefonisch oder per E-Mail.
■ Ein als defekt erfasstes Produkt können Sie dann unter Beifügung des Kauf-
belegs (Kassenbon) und der Angabe, worin der Mangel besteht und wann
er aufgetreten ist, für Sie portofrei an die Ihnen mitgeteilte Serviceanschrift
übersenden.
Auf www.lidl-service.com können Sie diese und viele weitere Handbücher,
Produktvideos und Software herunterladen.
Service
Service Deutschland
Tel.: 0800 5435 111 (Kostenfrei aus dem dt. Festnetz/Mobilfunknetz)
E-Mail: kompernass@lidl.de
Service Österreich
Tel.: 0820 201 222 (0,15 EUR/Min.)
E-Mail: kompernass@lidl.at
Service Schweiz
Tel.: 0842 665566 (0,08 CHF/Min., Mobilfunk max. 0,40 CHF/Min.)
E-Mail: kompernass@lidl.ch
IAN 339532_1910
Importeur
Bitte beachten Sie, dass die folgende Anschrift keine Serviceanschrift ist.
Kontaktieren Sie zunächst die benannte Servicestelle.
KOMPERNASS HANDELS GMBH
BURGSTRASSE 21
44867 BOCHUM
DEUTSCHLAND
www.kompernass.com
■ 18 │ DE
│AT│
CH
SSM 600 B2

Content
Introduction ..................................................20
Intended use .................................................20
Package contents .............................................20
Description of the appliance ....................................21
Technical data ................................................21
Safety instructions ............................................22
Unpacking ...................................................24
Setting up ....................................................24
Operation ...................................................25
Fitting and filling the blender ..............................................25
Selecting the speed setting ................................................ 26
Filling while in use ....................................................... 26
Removing the blender ....................................................27
Useful tips ...................................................27
Recipes ......................................................28
Banana shake .......................................................... 28
Vanilla shake ...........................................................28
Cappucino shake ........................................................ 28
Tropical mix ............................................................28
Nut nougat shake ....................................................... 29
Carrot shake ........................................................... 29
Blackcurrant mix ........................................................ 29
Hawaii shake ........................................................... 29
Fruity pineapple and strawberry mix .........................................30
Andalusian cold soup (gazpacho) .......................................... 30
Cleaning .....................................................31
Cleaning the blender ..................................................... 31
Cleaning the motor block .................................................33
After cleaning ..........................................................33
Storage .....................................................33
Disposal .....................................................34
Kompernass Handels GmbH warranty ............................35
Service ................................................................36
Importer ............................................................... 36
SSM 600 B2
GB│IE
│
19 ■

Introduction
Congratulations on the purchase of your new appliance.
You have selected a high-quality product. These operating instructions are a part
of this product. They contain important information on safety, usage and disposal.
Before using the product, familiarise yourself with all operating and safety
instructions. Use the product only as described and only for the specified areas
of application. In addition, pass these documents on, together with the product,
to any future owner.
Intended use
This appliance is intended exclusively for …
■ mixing, puréeing and stirring foods as well as crushing ice cubes,
■ use exclusively in normal domestic amounts and only for private use in a
domestic environment in dry rooms.
This appliance is not intended for …
■ the chopping of hard foodstuffs, such as nuts, seeds, large kernels or stalks,
■ the processing of materials that are not foodstuffs,
■ commercial or industrial use,
■ for use in damp environments or outdoors,
■ processing hot/boiling liquids.
Use only the accessories and spare parts that are specified for this appliance.
Other parts may not be adequately suitable or safe!
Package contents
After unpacking, check to ensure all items are available. The package contains:
▯ Motor block, with power cable and plug
▯ Blender
▯ Lid
▯ Measuring cap
▯ Operating instructions
■ 20 │ GB
│
IE
SSM 600 B2

Description of the appliance
1 Measuring cap
2 Lid
3 Blender
4 Cutting blades
5 Switch
6 Motor block
7 Cable retainer
8 Scale
9 Rubber lid seal
Technical data
Nominal voltage
Nominal power consumption 600 W
Max. capacity 1.75 litres
Protection Class
CO time 3 Minuten
The CO time (continuous operation time) is the amount of time an appliance can
be operated without the motor overheating and becoming damaged. When the
specified CO time has been reached, the appliance must be switched off until
the motor has cooled down to room temperature.
220 – 240 V ∼ (alternating current),
50 – 60 Hz
(double insulation)
II /
All of the parts of this appliance that come into
contact with food are food-safe.
SSM 600 B2
GB│IE
│
21 ■

Safety instructions
DANGER! ELECTRIC SHOCK!
► Ensure that the appliance, the power cable and the power
plug are never immersed in water or other liquids.
► Use the appliance only in dry rooms; never use it outdoors
or in damp environments.
► Ensure that the power cable never becomes wet or damp
during operation. Route the power cable in such a way that
it cannot become trapped or damaged in any way.
► Arrange for defective power plugs and/or cables to be
replaced as soon as possible by a qualified technician or by
our Customer Service Department to avoid the risk of injury.
► Always remove the plug from the power socket after use.
Switching off the appliance is not sufficient because the
appliance receives power as long as the power plug is connected to the socket.
► Check to ensure that the appliance is in a serviceable con-
dition before use. The appliance may not be used if it shows
signs of damage, especially to the motor block or the blender
attachment.
► Remove the plug from the socket immediately if you notice
unexpected smells or noises coming from the appliance
while it is in use or if there is an evident malfunction.
WARNING! RISK OF INJURY!
► NEVER insert your hand or fingers into the blender, especially
when it is in use. The cutting blades are extremely sharp!
► DO NOT remove the lid when the appliance is in operation.
► To ensure you can react immediately in the event of danger,
never leave the appliance running unattended.
■ 22 │ GB
│
IE
SSM 600 B2

WARNING! RISK OF INJURY!
► Do not insert cutlery items or mixing tools into the blender while
the appliance is in use. There is a considerable risk of injury if
these come into contact with the swiftly rotating cutting blades!
► Children should be supervised to ensure that they do not
play with the appliance.
► Never use the appliance for purposes other than those described
in these instructions.
► Risk of injury if appliance is misused.
► The appliance should always be disconnected from the mains
when not supervised and before assembly, disassembly or
cleaning.
► This appliance is not to be used by children.
► The appliance and its mains cable must be kept away from
children.
► This appliance can be used by persons with reduced physical,
sensory or mental capabilities or lack of experience and
knowledge if they have been given supervision or instruction
concerning safe use of the appliance, and if they are aware
of the potential risks.
► Do not allow children to play with the appliance.
► Be careful when handling the appliance. The cutting blades
are extremely sharp!
► Take care when emptying the blender! The cutting blades
are extremely sharp!
► Take care when cleaning the appliance! The cutting blades
are extremely sharp!
► Switch the appliance off and disconnect the plug from the
power supply before changing accessories or getting hold
of parts that move during operation.
SSM 600 B2
GB│IE
│
23 ■

WARNING! RISK OF INJURY!
► Always make sure that the blender is switched off before
removing the jug from the motor block!
► Use the blender only with the supplied motor block!
CAUTION! MATERIAL DAMAGE!
► Do not use the appliance in direct sunlight or near any
heatgenerating appliances.
► NEVER fill the blender with boiling liquids or other foods!
Allow these to cool to a lukewarm temperature.
► NEVER operate the appliance when it is empty, i.e. without
ingredients in the blender attachment.
Unpacking
■ Remove all packaging materials or protective films from the appliance. Retain
the packaging, so that you can store the appliance safely or send it by post,
e.g. if it needs to be repaired.
■ Before using the appliance, check that it is free of damage; check also that
the power cable and plug as well as all accessories and appliance parts are
undamaged.
■ Clean all components carefully before using the appliance for the first time
(see “Cleaning”).
Setting up
Once all components have been cleaned as described in the section “Cleaning”:
■ Position the appliance so that, …
■ 24 │ GB
│
– that the mains cable passes through the recess at the rear of the
appliance,
– the power plug is immediately accessible, so that it can be quickly
withdrawn in the event of danger,
– that it is stable and not liable to slip, and so that the sucker feet can
attach firmly and the appliance cannot tip over due to vibration,
– that the mains cable is not in the working area and thus does not present a
risk of being inadvertently snagged and tipping the appliance over.
IE
SSM 600 B2

Operation
WARNING!
► The motor switches off automatically as soon as the blender 3 is removed
from the motor block 6 or the lid 2 is opened. In such cases it may be
easy to forget that the machine is still switched on. The motor will then start
unexpectedly as soon as the blender attachment 3 is fitted or the lid 2 is
closed again:
Therefore:
– Do not insert the power plug into the wall socket until the blender 3 is
filled and mounted with its lid fitted and closed.
– Before fitting the blender, always check to see that the appliance is
switched off or that the power plug has been removed.
– Switch the appliance off first, pull the plug out and wait until the motor
has come to a standstill before removing the blender 3 or opening the
lid 2.
Fitting and filling the blender
1) Rotate the blender 3 anticlockwise until the arrow T under the blender
handle is located above the
motor block 6 in a vertical, upward motion.
2) Remove the lid 2 by rotating it anticlockwise towards position
until you can pull it upwards.
3) Fill the blender 3.
4) Press the lid 2 firmly down onto the blender 3. Close the lid 2 by turning
it clockwise to position
pouring spout on the blender 3 is closed. The motor cannot start until the
lid2 is fitted flush.
until it audibly engages (see Fig. 2). Ensure that the
position. Remove the blender 3 from the
(see Fig 1)
5) Press the measuring cap 1 into the lid as far as the stop.
SSM 600 B2
Fig. 1 Fig. 2
GB│IE
│
25 ■

6) Place the filled and closed blender 3 on the motor block 6. To do this, use
the recesses on the motor block 6 and ensure that the arrow T on the
blender is pointing to the
clockwise to position
the blender 3 is fitted flush.
until it audibly engages. The motor cannot start until
Selecting the speed setting
Once the blender 3 is filled and sitting completely closed on the motor block 6,
you can switch on the appliance.
Set the switch 5 to …
■ Level 1 – 3
for liquids or soft foodstuffs, for mixing, blending and stirring
■ Level 3 – 5
for more solid foods or for chopping
■ Level Ice Crush/Clean
for short, powerful impulse operation, e.g. for crushing ice cubes or when
cleaning. To prevent overloading the motor, the switch 5 does not lock in this
position. Therefore, hold the switch 5 in this position for short periods only.
NOTE
► Fill the blender 3 with a maximum of 180 g of ice cubes.
Otherwise, the ice cubes will not be crushed optimally.
Filling while in use
symbol while doing so. Turn the blender 3
■ 26 │ GB
WARNING!
► If you want to add additional foods during operation, use only the measuring
cap 1 provided for this purpose. Do NOT open the lid 2.
► Do not insert cutlery items or mixing tools into the blender 3 while the
appliance is in use. There is a considerable risk of injury if these come into
contact with the swiftly rotating cutting blades 4!
To add more food while the appliance is in use, …
1) Remove the measuring cap 1 from the lid 2.
2) Add the ingredients.
3) Press the measuring cap 1 back into the lid.
│
IE
SSM 600 B2

Removing the blender
Once you have finished processing the food in the attachment:
1) Always start by setting switch 5 to the off position (“0”) and pulling out the
mains plug.
2) Wait until the motor has come to a complete standstill before lifting the
blender 3 off the motor block 6. Rotate the blender 3 anticlockwise until
the arrow T under the blender handle is located above the
Remove the blender 3 from the motor block 6 in a vertical, upward motion.
Useful tips
■ To achieve the best results when puréeing firm ingredients, add small amounts
one after the other into the blender 3 rather than a single large portion.
■ When processing firm ingredients, cut them into small pieces (2 – 3 cm).
■ When mixing liquid ingredients, start off with a small amount of liquid.
Gradually add more liquids to the mixture through the measuring cap.
■ The appliance can be stabilised by placing your hand on top of the closed
blender during operation.
■ When stirring firm or very viscous foods, it can be helpful to use the level Ice
Crush/Clean to avoid a blocking of the cutting blades 4.
NOTE
► Do not use the appliance to grind crystals of cooking salt, refined sugar or
white sugar. For example, to make powdered sugar.
position.
SSM 600 B2
GB│IE
│
27 ■

Recipes
Banana shake
▯ 2 bananas
▯ approx. 2 tbsp. sugar
(depending on the ripeness of the bananas and personal taste)
▯ ½ l milk
▯ 1 dash of lemon juice
Peel the bananas and liquidise them at level 2. Gradually add the milk, then the
sugar and the lemon juice. Keep mixing everything until you have a smooth and
uniform liquid. Serve the shake chilled.
Vanilla shake
▯ ¼ l milk
▯ 250 g vanilla ice cream
▯ 125 g ice cubes
▯ 1½ tsp. sugar
Crush the ice cubes using the level Ice Crush/Clean. Place the remaining ingredients
into the mixer. Mix everything at Level 2 until the liquid has a smooth consistency.
Cappucino shake
▯ 65 ml cold espresso (or a very strong coffee)
▯ 65 ml milk
▯ 15 g sugar
▯ 65 g vanilla ice cream
▯ 100 g ice cubes
Crush the ice cubes using the level Ice Crush/Clean. Add the espresso, milk and
sugar. Mix everything together at level 2 until the sugar has dissolved. Finally,
add the vanilla ice cream and then briefly mix everything together at level 1.
Tropical mix
▯ 125 ml pineapple juice
▯ 60 ml papaya juice
▯ 50 ml orange juice
▯ ½ small tin of peaches with juice
▯ 125 g ice cubes
Crush the ice cubes using the level Ice Crush/Clean. Place all ingredients into the
mixer and blend them together at level 3.
■ 28 │ GB
│
IE
SSM 600 B2

Nut nougat shake
▯ ½ l milk
▯ 200 g nut nougat spread
▯ 1 scoop of vanilla ice cream
▯ 50 ml cream
Add all the ingredients to the blender and mix at level 3 until everything is evenly
blended together.
Carrot shake
▯ 300 ml apple juice
▯ 500 ml carrot juice
▯ 4 tbsp. cooking oil (wheatgerm oil or rapeseed oil)
▯ 4 tbsp. of lemon juice
▯ Powdered ginger
▯ Pepper
Add the apple juice, cooking oil and lemon juice into the blender and mix
everything together at level 2. Then add the carrot juice and mix everything
together at level 2. To finish, add the powdered ginger and pepper to taste.
Blackcurrant mix
▯ 2 tsp. honey
▯ 2 bananas
▯ ¼ l buttermilk
▯ ¼ l blackcurrant juice
Place all ingredients into the mixer and blend them together at level 3.
Hawaii shake
▯ 4 bananas
▯ ¼ l pineapple juice
▯ ½ l milk
▯ 2 tbsp. honey
▯ ¼ l rum
Peel the bananas and liquidise them at level 2. Then add the other ingredients
and mix everything together at level 1.
SSM 600 B2
GB│IE
│
29 ■

Fruity pineapple and strawberry mix
▯ 250 ml pineapple juice
▯ 200 g strawberries
▯ 300 ml apple juice
▯ 4 ice cubes
Wash the strawberries and remove the green parts. Crush the ice cubes using the
level Ice Crush/Clean. Liquidise them at level 2. Then add the other ingredients
and mix everything together at level 1.
Andalusian cold soup (gazpacho)
▯ ½ cucumber
▯ 1 large tomato
▯ 1 green pepper
▯ ½ onion
▯ 1 garlic clove
▯ ½ white bread roll
▯ ½ tsp. salt
▯ 1 tsp. red wine vinegar
▯ 1 tbsp. olive oil
Cut the vegetables into pieces approx. 2 cm in size. Start by adding the first the
tomatoes and then the cucumber to the blender. Liquidise them at level 3. Add
the remaining ingredients and then liquidise/blend them all together at level 3
until a smooth soup is created. Serve the soup with bread.
■ 30 │ GB
NOTE
► These recipes are provided subject to change. All ingredients and prepara-
tion information are guiding values. Adapt these recipe suggestions based
on your personal experience.
NOTE
► In cases of lactose intolerance, we recommend you use a lactose-free milk.
Keep in mind, however, that lactose-free milk is a little sweeter.
│
IE
SSM 600 B2
Cleaning
DANGER! ELECTRIC SHOCK!
Before starting to clean the blender and its components:
► Ensure that the motor is switched off and the power plug removed from the
socket.
Do not immerse the motor block 6 in water or other liquids. This could
result in you receiving a fatal electric shock and cause damage to the
appliance.
► Never open the housing of the appliance. Otherwise, there is a risk of a
fatal electric shock.
WARNING! RISK OF INJURY!
► Never disassemble the cutting blades 4 and never reach into the blender 3.
The cutting blades 4 are extremely sharp!
CAUTION! PROPERTY DAMAGE!
► Do not use solvents or abrasive cleaners on the plastic surfaces, they could
be damaged by them.
Cleaning the blender
■ To prevent injuring yourself on the cutting blades 4, clean the blender 3 only
with a long-handled washing-up brush.
■ Clean the measuring cap 1 and the lid 2 in mild soap solution. Ensure that
the rubber seal 9 is correctly fitted before using the lid 2 again.
NOTE
SSM 600 B2
You can also clean the lid 2, the measuring cap 1 and the
blender3 with the cutting blade 4 in your dishwasher.
■ If you clean the blender directly after use, you can often achieve a
satisfactory and hygienic level of cleaning by doing the following:
Fill the blender 3 with 750 ml of water and add a few drops of mild
detergent. Close the lid 2 and fit the blender 3 onto the motor block 6.
Insert the plug into a mains power socket and activate the Ice Crush/Clean
operation a few times, so that the cutting blades 4 churn through the water
at full speed.
Afterwards, rinse out the blender 3 with lots of clean water to ensure that
all detergent residues have been removed.
GB│IE
│
31 ■
■ To remove stubborn dirt, you can remove the lower plastic part of the
blender 3 with the cutting blade 4 from the upper plastic part of the
blender 3:
C
B
A
Fig. 3
■ 32 │ GB
Aupper plastic part
B blade
C lower plastic part
1) Remove the blender 3 from the motor block 6. To ensure improved stability,
remove the lid 2 by rotating it anticlockwise towards position
until you can pull it upwards.
2) Turn the appliance upside down and turn the lower plastic part C of the
blender 3 anticlockwise so that it can be removed from the upper plastic part
A of the blender 3 (see fig. 3).
WARNING! RISK OF INJURY!
► Always handle the blades B carefully. They are very sharp.
Risk of injury!
3) Clean both parts thoroughly in a mild soap solution.
│
IE
(see Fig 1)
SSM 600 B2

NOTE
You can also clean the upper plastic part A of the blender 3 and
the cutting blade 4 with the lower plastic part C in your dishwasher.
4) Dry all parts thoroughly before reassembling them.
5) Re-attach the lower plastic part C of the blender 3 to the upper plastic part
A of the blender 3 and turn it clockwise.
Cleaning the motor block
1) Use a dry or no more than slightly moistened cloth to clean the plastic
surfaces.
2) When cleaning, always check that the contact switch in the fitting for the
blender 3 is not blocked by soiling residues. If you cannot dislodge any
blockages with the corner of a piece of paper, make contact with Customer
Services. Do not use any hard objects, these could damage the contact
switch.
3) Remove any possible residues on the underside of the motor block 6 with a
dry cloth or a stiff-bristled brush only. Ensure that nothing can get in through
the ventilation openings of the appliance.
After cleaning
Allow all parts to dry well before reassembling and reusing the liquidiser.
Storage
1) If you do not intend to use the blender for an extended period, clean it
thoroughly (see chapter “Cleaning”).
2) Wrap the power cable around the cable retainer 7 on the base of the
motor block 6.
3) Store the blender in a cool and dry location.
SSM 600 B2
GB│IE
│
33 ■

Disposal
Do not dispose of the appliance in your normal domestic waste.
This product is subject to the provisions of European Directive
2012/19/EU.
Dispose of the appliance via an approved waste disposal company or your
municipal waste disposal facility. Please comply with all applicable regulations.
Please contact your waste disposal facility if you are in any doubt.
Your local community or municipal authorities can provide information on how to
dispose of the worn-out product.
The product is recyclable, subject to extended producer responsibility and is
collected separately.
Note the labelling on the packaging and separate the packaging material
components for disposal if necessary. The packaging material is labelled with
abbreviations (a) and numbers (b) with the following meanings:
1–7: Plastics,
20–22: Paper and cardboard,
80–98: Composites.
The packaging is made from environmentally friendly material and can be
disposed of at your local recycling plant.
■ 34 │ GB
│
IE
SSM 600 B2

Kompernass Handels GmbH warranty
Dear Customer,
This appliance has a 3-year warranty valid from the date of purchase. If this
product has any faults, you, the buyer, have certain statutory rights. Your
statutory rights are not restricted in any way by the warranty described below.
Warranty conditions
The warranty period starts on the date of purchase. Please keep your receipt in a
safe place. This will be required as proof of purchase.
If any material or manufacturing fault occurs within three years of the date of
purchase of the product, we will either repair or replace the product for you or
refund the purchase price (at our discretion). This warranty service requires that
you present the defective appliance and the proof of purchase (receipt) within
the three-year warranty period, along with a brief written description of the fault
and of when it occurred.
If the defect is covered by the warranty, your product will either be repaired or
replaced by us. The repair or replacement of a product does not signify the
beginning of a new warranty period.
Warranty period and statutory claims for defects
The warranty period is not prolonged by repairs effected under the warranty.
This also applies to replaced and repaired components. Any damage and
defects present at the time of purchase must be reported immediately after
unpacking. Repairs carried out after expiry of the warranty period shall be
subject to a fee.
Scope of the warranty
This appliance has been manufactured in accordance with strict quality
guidelines and inspected meticulously prior to delivery.
The warranty covers material faults or production faults. The warranty does not
extend to product parts subject to normal wear and tear or to fragile parts which
could be considered as consumable parts such as switches, batteries or parts
made of glass.
The warranty does not apply if the product has been damaged, improperly used
or improperly maintained. The directions in the operating instructions for the
product regarding proper use of the product are to be strictly followed. Uses and
actions that are discouraged in the operating instructions or which are warned
against must be avoided.
This product is intended solely for private use and not for commercial purposes.
The warranty shall be deemed void in cases of misuse or improper handling, use
of force and modifications / repairs which have not been carried out by one of
our authorised Service centres.
SSM 600 B2
GB│IE
│
35 ■

Warranty claim procedure
To ensure quick processing of your case, please observe the following instructions:
■ Please have the till receipt and the item number (e.g. IAN12345) available
as proof of purchase.
■ You will find the item number on the type plate on the product, an engraving
on the product, on the front page of the operating instructions (below left) or
on the sticker on the rear or bottom of the product.
■ If functional or other defects occur, please contact the service department
listed either by telephone or by e-mail.
■ You can return a defective product to us free of charge to the service address
that will be provided to you. Ensure that you enclose the proof of purchase
(till receipt) and information about what the defect is and when it occurred.
You can download these instructions along with many other manuals,
product videos and installation software at www.lidl-service.com.
This QR code will take you directly to the Lidl service page
(www.lidl-service.com) where you can open your operating instructions
by entering the item number (IAN) 123456.
Service
Service Great Britain
Tel.: 0800 404 7657
E-Mail: kompernass@lidl.co.uk
Service Ireland
Tel.: 1890 930 034
(0,08 EUR/Min., (peak))
(0,06 EUR/Min., (off peak))
E-Mail: kompernass@lidl.ie
IAN 339532_1910
Importer
■ 36 │ GB
Please note that the following address is not the service address. Please use the
service address provided in the operating instructions.
KOMPERNASS HANDELS GMBH
BURGSTRASSE 21
44867 BOCHUM
GERMANY
www.kompernass.com
│
IE
SSM 600 B2

Sommaire
Introduction ..................................................38
Usage en bonne et due forme ...................................38
Accessoires fournis ............................................38
Description de l’appareil .......................................39
Caractéristiques techniques .....................................39
Instructions relatives à la sécurité ................................40
Déballage ...................................................42
Installation ...................................................42
Utilisation ....................................................43
Remplir et monter le bol mixeur ............................................ 43
Sélectionner le niveau de vitesse ............................................44
Remplissage en marche ................................................... 44
Déposer le bol mixeur ....................................................45
Remarques utiles .............................................45
Recettes .....................................................46
Shake à la banane ...................................................... 46
Shake à la vanille ....................................................... 46
Shake au cappuccino ....................................................46
Mix tropical ............................................................46
Shake à la nougatine ..................................................... 47
Shake aux carottes ...................................................... 47
Mix de cassis ........................................................... 47
Shake Hawaii .......................................................... 47
Mix fruité ananas-fraise ...................................................48
Soupe froide andalouse (gazpacho) ........................................48
Nettoyage. . . . . . . . . . . . . . . . . . . . . . . . . . . . . . . . . . . . . . . . . . . . . . . . . . . 49
Nettoyage du bol mixeur .................................................. 49
Nettoyage du bloc moteur. . . . . . . . . . . . . . . . . . . . . . . . . . . . . . . . . . . . . . . . . . . . . . . . . 51
Après nettoyage ........................................................ 51
Rangement de l’appareil .......................................51
Mise au rebut ................................................52
Garantie pour Kompernass Handels GmbH pour la Belgique .........53
Garantie pour Kompernass Handels GmbH pour la France ...........55
Service après-vente ...........................................58
Importateur ..................................................58
SSM 600 B2
FR│BE
│
37 ■

Introduction
Toutes nos félicitations pour l’achat de votre nouvel appareil.
Vous avez choisi un produit de grande qualité. Le mode d’emploi fait partie de
ce produit. Il contient des remarques importantes concernant la sécurité, l’utilisation
et la mise au rebut. Veuillez vous familiariser avec l’ensemble des consignes
d’opération et de sécurité avant l’usage du produit. N’utilisez le produit que
conformément aux consignes et pour les domaines d’utilisation prévus. En cas
de transfert du produit à un tiers, remettez-lui également tous les documents.
Usage en bonne et due forme
Cet appareil sert exclusivement à …
■ mélanger, réduire en purée et remuer des aliments, ainsi qu’à broyer des
glaçons,
■ exclusivement pour des quantités habituelles pour un usage domestique et
uniquement pour un usage privé dans des locaux secs.
Cet appareil n’est pas prévu pour …
■ hacher des morceaux d’aliments durs tels que des noix, des noyaux, des
grandes graines ou des tiges,
■ travailler des matières autres que des denrées alimentaires,
■ une utilisation commerciale ou industrielle,
■ une utilisation en environnement humide ou à l’extérieur,
■ transformer des liquides chauds/bouillants.
Utilisez uniquement les accessoires et les pièces de rechange destinés à cet appareil.
D’autres pièces risquent de ne pas convenir ou de ne pas être suffisamment sûres !
Accessoires fournis
Vérifiez après déballage que toutes les pièces sont fournies. Les accessoires
livrés sont les suivants :
▯ bloc moteur avec cordon d’alimentation et fiche secteur
▯ bol mixeur
▯ couvercle
▯ bouchon doseur
▯ mode d’emploi
■ 38 │ FR
│
BE
SSM 600 B2

Description de l’appareil
1 Bouchon doseur
2 Couvercle
3 Bol mixeur
4 Lames
5 Sélecteur
6 Bloc moteur
7 Enroulement du cordon d’alimentation
8 Graduation
9 Joint caoutchouc couvercle
Caractéristiques techniques
Tension nominale 220 – 240 V ∼ (courant alternatif), 50 – 60 Hz
Puissance nominale 600 W
Niveau de remplissage maxi 1,75 litres
Classe de protection
Durée d'utilisation par
intermittence
La durée d’utilisation par intermittence indique pendant combien de temps
l’appareil peut être opéré, sans que le moteur ne surchauffe ou subisse de
dommages. Une fois la durée d’utilisation par intermittence écoulée, l’appareil
doit rester éteint jusqu’à ce que le moteur ait refroidi à température ambiante.
(double isolation)
II /
3 minutes
Tous les éléments de cet appareil, entrant en
contact avec les aliments sont approuvés pour
le contact alimentaire.
SSM 600 B2
FR│BE
│
39 ■

Instructions relatives à la sécurité
DANGER ! RISQUE D’ÉLECTROCUTION !
► Veillez à ne pas immerger le bloc moteur, le cordon d'alimen-
ou la fiche secteur dans l'eau ou tout autre liquide.
tation
► Utilisez l'appareil uniquement dans des pièces sèches, et
jamais à l'extérieur ou dans un environnement humide.
► Assurez-vous que le cordon d'alimentation ne soit jamais humide
ou mouillé lorsque l'appareil est en marche. Disposez le cordon
de manière à éviter qu'il ne soit coincé ou endommagé.
► Faites immédiatement remplacer la fiche secteur ou le cordon
d'alimentation endommagé par un technicien spécialisé ou
par le service après-vente afin d'éviter tout danger.
► Après utilisation, veuillez retirer la fiche de la prise secteur.
Il ne suffit pas d’éteindre l’appareil, en raison de la présence
de courant dans ce dernier s’il reste branché.
► Avant toute utilisation, vérifiez que l’appareil est en parfait
état. Ne pas utiliser l’appareil si vous constatez des dommages,
en particulier au niveau du bloc moteur ou du bol mixeur.
► Débranchez immédiatement la fiche secteur de la prise si
vous constatez une fumée ou une odeur inhabituelle ou un
dysfonctionnement identifiable.
AVERTISSEMENT ! RISQUE DE BLESSURES!
► Ne mettez jamais les doigts dans le bol mixeur. Les lames
sont extrêmement tranchantes !
► N'ouvrez pas le couvercle lorsque l'appareil est en marche.
► Ne mettez jamais de couvert ou d'ustensile pour remuer à
l'intérieur du bol mixeur lorsque l'appareil est en marche.
Vous risquez de graves blessures s'ils entrent en contact avec
la lame en rotation rapide !
■ 40 │ FR
│
BE
SSM 600 B2

AVERTISSEMENT ! RISQUE DE BLESSURES!
► Ne laissez pas l'appareil sans surveillance afin de pouvoir
réagir immédiatement en cas de danger.
► Les enfants doivent être surveillés afin d'éviter qu'ils ne jouent
avec l'appareil.
► N'utilisez pas l'appareil à d'autres fins que celles décrites
dans ce mode d'emploi.
► En cas d’usage abusif, il existe un risque de blessures.
► En cas d'absence de surveillance et avant l'assemblage, le
désassemblage ou le nettoyage, l'appareil doit toujours être
débranché du secteur.
► L’appareil ne doit pas être utilisé par des enfants.
► Tenir l’appareil et son cordon de raccordement à l’écart des
enfants.
► Cet appareil peut être utilisé par des personnes ayant des
capacités physiques, sensorielles ou mentales réduites ou
disposant de peu d’expérience et/ou de connaissances,
à condition qu’elles soient surveillées ou qu’elles aient été
initiées à l’utilisation sécurisée de l’appareil et qu’elles aient
compris les dangers en résultant.
► Ne pas laisser les enfants jouer avec l’appareil.
► Soyez prudent en manipulant l’appareil. Les lames sont très
tranchantes !
► Procédez avec la plus grande prudence lorsque vous videz
le bol mixeur. Les lames sont très tranchantes !
► Procédez avec la plus grande prudence lorsque vous net-
toyez l’appareil ! Les lames sont très tranchantes !
► Éteignez l’appareil et débranchez la fiche réseau avant de
remplacer des accessoires ou de saisir des pièces mobiles
lors du fonctionnement.
SSM 600 B2
FR│BE
│
41 ■

AVERTISSEMENT ! RISQUE DE BLESSURES!
► Utilisez le bol mixeur exclusivement avec le bloc moteur
compris dans la livraison !
► Assurez-vous que le mixer soit toujours éteint avant de retirer
le bol mixeur du bloc moteur !
ATTENTION ! DÉGÂTS MATÉRIELS !
► N'utilisez pas l'appareil sous l'exposition directe du soleil ou
de la chaleur émise par des appareils chauffants.
► Ne versez jamais de liquides brûlants dans le bol mixeur.
Laissez-les refroidir auparavant à température ambiante.
► N'opérez jamais l'appareil lorsqu'il est vide, c'est-à-dire sans
ingrédients dans le bol mixeur.
Déballage
■ Retirez tous les éléments d’emballage ou films de protection de l’appareil.
Conservez l’emballage, pour pouvoir entreposer ou expédier l’appareil en
toute sécurité, par ex. en cas de réparation.
■ Avant d’utiliser l’appareil, assurez-vous qu’il ne présente pas de dommages,
et que le cordon d’alimentation avec fiche secteur et tous les accessoires et
composants de l’appareil ne sont pas endommagés.
■ Nettoyez soigneusement tous les composants avant le premier usage du
mixeur (voir «Nettoyage»)
Installation
Lorsque vous avez nettoyé toutes les pièces comme indiqué sous «Nettoyage» :
■ Disposez l’appareil de telle manière …
■ 42 │ FR
│
BE
– que cordon d’alimentation soit acheminé à travers l’évidement au dos,
– que la fiche secteur soit immédiatement accessible pour pouvoir la
débrancher de la prise en cas de danger.
– qu’il soit stable et ne dérape pas, afin que les ventouses se maintiennent
et ne se renversent pas en cas de vibrations.
– que la fiche secteur ne dépasse pas sur la zone de travail et ne risque pas
de faire basculer l’appareil en tirant dessus involontairement.
SSM 600 B2

Utilisation
AVERTISSEMENT!
► Le moteur s‘éteint dès que le bol mixeur 3 est détaché du bloc moteur 6
ou que le couvercle 2 est ouvert. Dans ce cas, il y a risque d‘oublier que
l‘appareil est encore allumé. Dès que l‘on repose le bol mixeur 3 ou que
le couvercle 2 est à nouveau refermé, le moteur démarre d‘un coup :
– Attendez pour brancher la fiche secteur dans la prise que le bol mixeur
3 soit complètement rempli et soit monté fermé.
– Avant de procéder au montage, assurez-vous que l’appareil est éteint
ou que la fiche secteur est débranchée.
– Commencez par éteindre l’appareil, débranchez la fiche secteur de la
prise de courant et attendez que le moteur se soit immobilisé avant de
retirer le bol mixeur 3 ou d’ouvrir le couvercle 2.
Remplir et monter le bol mixeur
1) Tournez le bol mixeur 3 dans le sens anti-horaire jusqu’à ce que la flèche T
située sous la poignée du bol mixeur se trouve sur la position
le bol mixeur 3 tout droit vers le haut du bloc moteur 6.
2) Retirez le couvercle 2 en le tournant dans le sens anti-horaire en direction
de la position
3) Remplissez le bol mixeur 3.
4) Appuyez à nouveau fermement le couvercle 2 sur le bol mixeur 3 de
manière décalée. Refermez le couvercle 2 en le tournant dans le sens
horaire jusqu’à ce qu’il encrante audiblement en position
Veillez à ce que le bec verseur du bol mixeur 3 soit fermé. Le moteur ne
peut démarrer que si le couvercle 2 est posé de manière alignée.
(voir fig. 1), jusqu’à pouvoir le retirer par le haut.
. Détachez
(voir fig. 2).
5) Poussez le bouchon doseur 1 jusqu’en butée dans l’ouverture du couvercle.
SSM 600 B2
Fig. 1 Fig. 2
FR│BE
│
43 ■

6) Placez le bol mixeur 3 rempli et fermé sur le bloc moteur 6. Utilisez pour cela
les évidements du bloc moteur 6 et veillez ce faisant à ce que la flèche T
sur le bol mixeur pointe sur le symbole
sens horaire, jusque sur la position
Le moteur ne peut démarrer que si le bol mixeur 3 est posé de manière alignée.
Sélectionner le niveau de vitesse
Une fois que le bol mixeur 3 est rempli et qu’il repose complètement fermé sur le
bloc moteur 6, vous pouvez allumer l’appareil.
Amenez le sélecteur 5 sur …
■ Niveaux 1-3
pour les aliments liquides ou semi-solides pour mélanger, réduire en purée et
malaxer
■ Niveaux 3-5
pour les aliments solides ou pour mettre en morceaux
■ Niveau Ice Crush/Clean
pour un mode d’opération à impulsions court et puissant, par ex. pour broyer
les glaçons ou pour le nettoyage. L’interrupteur 5 ne s’enclenche pas dans
cette position, pour ne pas surcharger le moteur. Par conséquent, ne maintenez pas longtemps l’interrupteur 5 dans cette position.
REMARQUE
► Remplissez le bol mixeur 3 avec 180 g de glaçons au maximum.
Sinon, l'appareil ne parviendra pas au broyage optimal des glaçons.
. Tournez le bol mixeur 3 dans le
, jusqu’à ce qu’il encrante audiblement.
Remplissage en marche
AVERTISSEMENT!
► Pour ajouter quelque chose lorsque l'appareil est en marche, utilisez uni-
quement le bouchon doseur 1 prévu à cet effet. N'ouvrez pas le couvercle
2.
► N'introduisez pas de couvert ou d'ustensile pour remuer à l'intérieur du bol
mixeur 3 lorsque l'appareil est en marche. Vous risquez de graves blessures
s'ils entrent en contact avec les lames 4 en rotation rapide !
Pour pouvoir verser quelque chose alors que l’appareil est en marche, …
1) Retirez le bouchon doseur 1 du couvercle 2.
2) Remplissez les ingrédients.
3) Poussez ensuite à nouveau le bouchon doseur 1 jusqu’en butée dans
l’ouverture du couvercle.
■ 44 │ FR
│
BE
SSM 600 B2

Déposer le bol mixeur
Une fois la transformation des produits alimentaires terminée:
1) Ramenez toujours le sélecteu 5 sur la position Arrêt («0») et débranchez la
fiche secteur.
2) Attendez que le moteur se soit immobilisé avant de détacher le bol mixeur 3 du
bloc moteur 6. Pour cela, tournez le bol mixeur 3 dans le sens anti-horaire
jusqu’à ce que la flèche T située sous la poignée du bol mixeur se trouve
au-dessus de la position
haut du bloc moteur 6.
Remarques utiles
■ Afin d’atteindre de meilleurs résultats lors de la réduction en purée, ajoutez
petit à petit des petites portions dans le bol mixeur 3 au lieu de remplir une
grande quantité d’un seul coup.
■ Si vous travaillez avec des aliments solides, coupez ces derniers en petits
morceaux (2-3 cm).
■ Si vous mélangez des aliments liquides, commencez avec un petit volume
liquide. Rajoutez petit à petit de plus en plus de liquide à travers l’ouverture
du couvercle.
■ Pour stabiliser l’appareil lorsqu’il est en marche, posez la main sur le bat-
teur-mélangeur fermé.
■ Pour malaxer des aliments solides ou liquides épais, il est recommandé d’utiliser
le niveau Ice Crush/Clean pour éviter que les lames 4 ne bloquent.
. Détachez le bol mixeur 3 tout droit vers le
REMARQUE
SSM 600 B2
► N'utilisez pas l'appareil pour réduire la granularité du sel alimentaire, du
sucre cristallisé ou du sucre blanc, par exemple pour obtenir du sucre en
poudre.
FR│BE
│
45 ■

Recettes
Shake à la banane
▯ 2 bananes
▯ env. 2 c-à-s de sucre
(selon le degré de maturité des bananes et les préférences personnelles)
▯ ½ l de lait
▯ 1 goutte de jus de citron
Pelez les bananes et réduisez-les en purée à niveau 2. Ajoutez progressivement
le lait, puis le sucre et le jus de citron. Mixez le tout jusqu’à obtenir un liquide
homogène. Servez le shake glacé.
Shake à la vanille
▯ ¼ l de lait
▯ 250 g de glace à la vanille
▯ 125 g de glaçons
▯ 1 ½ c-à-c de sucre
Concassez les glaçons en mettant le mixeur sur le niveau Ice Crush/Clean.
Remplissez le reste d’ingrédients dans le mixeur. Mixez sur niveau 2 jusqu’à
obtention d’un liquide uniforme.
Shake au cappuccino
▯ 65 ml d’expresso froid (ou de café très serré)
▯ 65 ml de lait
▯ 15 g de sucre
▯ 65 g de glace à la vanille
▯ 100 g de glaçons
Concassez les glaçons en mettant le mixeur sur le niveau Ice Crush/Clean. Ajoutez
l’expresso, le lait et le sucre. Mixez le tout à niveau 2, jusqu’à ce que le sucre se
soit
dissous. Pour finir, ajoutez la glace à la vanille et mixez le tout brièvement à
niveau 1.
Mix tropical
▯ 125 ml de jus d’ananas
▯ 60 ml de jus de papaye
▯ 50 ml de jus d’orange
▯ ½ petite boîte de pêches dans leur jus
▯ 125 g de glaçons
Concassez les glaçons en mettant le mixeur sur le niveau Ice Crush/Clean.
Mettez tous les ingrédients dans le mixeur et mélangez le tout à niveau 3.
■ 46 │ FR
│
BE
SSM 600 B2

Shake à la nougatine
▯ ½ l de lait
▯ 200 g de crème de nougatine
▯ 1 boule de glace à la vanille
▯ 50 ml de crème fraîche
Mélangez tous les ingrédients dans le mixeur à niveau 3, jusqu’à obtenir un
mélange homogène.
Shake aux carottes
▯ 300 ml de jus de pomme
▯ 500 ml de jus de carotte
▯ 4 c-à-s d’huile (huile de germe de blé ou huile de colza)
▯ 4 c-à-s de jus de citron
▯ Gingembre en poudre
▯ Poivre
Mettez le jus de pomme, l’huile et le jus de citron dans le mixeur et mélangez
le tout à niveau 2. Ajoutez ensuite le jus de carottes et mélangez bien le tout à
niveau 2. Relevez ensuite le shake à la poudre de gingembre et au poivre.
Mix de cassis
▯ 2 c-à-c de miel
▯ 2 bananes
▯ ¼ l de petit-lait
▯ ¼ l de jus de cassis (noir)
Mettez tous les ingrédients dans le mixeur et mélangez le tout à niveau 3.
Shake Hawaii
▯ 4 bananes
▯ ¼ l de jus d’ananas
▯ ½ l de lait
▯ 2 c-à-s de miel
▯ ¼ l de rhum
Pelez les bananes et réduisez-les en purée à niveau 2. Ajoutez les autres ingrédients
et mélangez le tout à niveau 1.
SSM 600 B2
FR│BE
│
47 ■

Mix fruité ananas-fraise
▯ 250 ml de jus d’ananas
▯ 200 g de fraises
▯ 300 ml de jus de pomme
▯ 4 glaçons
Lavez les fraises et retirez les morceaux verts. Concassez les glaçons en mettant
le mixeur sur le niveau Ice Crush/Clean. Réduisez-les en purée à niveau2.
Ajoutez ensuite les autres ingrédients et mélangez le tout à niveau 1.
Soupe froide andalouse (gazpacho)
▯ ½ concombre
▯ 1 tomate charnue
▯ 1 poivron vert
▯ ½ oignon
▯ 1 gousse d’ail
▯ ½ petit pain blanc
▯ ½ c-à-c de sel
▯ 1 c-à-c de vinaigre de vin rouge
▯ 1 c-à-s d’huile d’olive
Coupez les légumes en morceaux d’env. 2 cm. Mettez tout d’abord les tomates,
puis les concombres dans le mixeur. Réduisez-les en purée à niveau 3.
Ajoutez les autres ingrédients et réduisez-les en purée/mélangez le tout à
niveau3, jusqu’à obtenir une soupe homogène. Servez le tout avec du pain.
■ 48 │ FR
REMARQUE
► Recettes sans garantie. Toutes les indications relatives aux ingrédients et aux
préparations sont des valeurs d'orientation. Complétez ces propositions de
recette avec vos expériences personnelles.
REMARQUE
► En cas d'intolérance au lactose, nous vous recommandons d'utiliser du lait
sans lactose. Toutefois, n'oubliez pas que le lait sans lactose est un peu
plus sucré.
│
BE
SSM 600 B2
Nettoyage
RISQUE D'ÉLECTROCUTION !
► Avant de nettoyer le batteur-mélangeur et ses pièces :
► Veillez à ce que l'appareil soit éteint et que la fiche secteur soit débranchée.
Veillez à ne pas immerger le bloc moteur 6, le cordon d’alimentation ou
la fiche secteur dans l’eau ou tout autre liquide. Vous risquez un choc
électrique susceptible de provoquer un accident mortel et d’endommager
l’appareil.
► N'ouvrez jamais le capot de l'appareil. Vous risquez autrement un choc
électrique potentiellement mortel.
AVERTISSEMENT! RISQUE DE BLESSURE !
► Ne démontez jamais les lames 4 et ne manipulez jamais l'intérieur du bol
mixeur 3. Les lames 4 sont extrêmement tranchantes !
ATTENTION ! DÉGÂTS MATÉRIELS !
► N'utilisez pas de produit solvant ou récurant pour les surfaces en plastique
afin de ne pas les endommager.
Nettoyage du bol mixeur
■ Nettoyez le bol mixeur 3 uniquement avec une brosse vaisselle manche
long afin de ne pas vous blesser sur les lames 4.
■ Nettoyez le bouchon doseur 1 et le couvercle 2 dans de l’eau additionnée
d’un produit à vaisselle doux. Veillez à ce que le joint caoutchouc 9 soit
correctement positionné avant de réutiliser le couvercle 2.
REMARQUE
SSM 600 B2
Vous pouvez aussi laver le couvercle 2, le bouchon doseur 1 et le
bol mixeur 3 avec les lames 4 au lave-vaisselle.
■ Si vous nettoyez le batteur-mélangeur juste après utilisation, vous obtenez un
nettoyage hygiénique généralement suffisant avec l’alternative suivante:
Remplissez le bol mixeur 3 avec 750 ml d’eau et ajoutez quelques gouttes
de détergent doux. Refermez le couvercle 2 et placez le bol mixeur 3 sur
le bloc moteur 6. Insérez la fiche secteur dans la prise secteur et actionnez
plusieurs fois le mode Ice Crush/Clean, afin que les lames 4 brassent l’eau
à régime maximal. Rincez ensuite le bol mixeur 3 avec beaucoup d’eau
claire, afin d’éliminer tous les restes de détergent.
FR│BE
│
49 ■
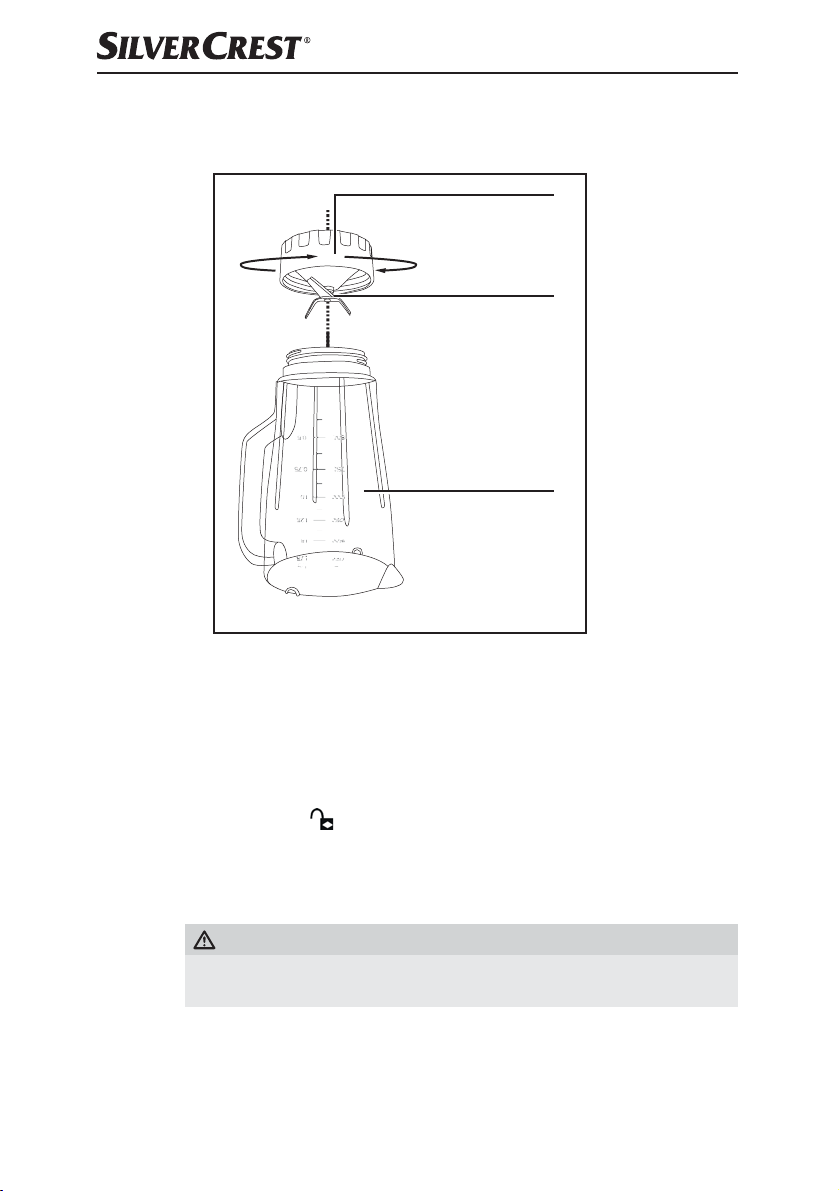
■ Si les salissures coriaces ne partent pas, vous pouvez détacher la partie en
plastique inférieure du bol mixeur 3, lames 4 comprises, de la partie en
plastique supérieure du bol mixeur 3 :
C
B
A
Fig. 3
■ 50 │ FR
A Pièce en plastique supérieure
B Lames
C Pièce en plastique inférieure
1) Détachez le bol mixeur 3 du bloc moteur 6. Pour une meilleure stabilité,
retirez le couvercle 2 en le tournant dans le sens anti-horaire en direction
de la position
2) Renversez l’appareil et tournez la pièce en plastique inférieure C du bol
mixeur 3 dans le sens antihoraire afin qu’elle se détache de la pièce en
plastique supérieure A du bol mixeur 3 (voir fig. 3).
AVERTISSEMENT! RISQUE DE BLESSURE !
► Manipulez les lames B avec précaution. Elles sont très tranchantes.
Risque de blessures!
3) Nettoyez les deux parties soigneusement dans de l’eau additionnée d’un
produit à vaisselle doux.
│
BE
(voir fig. 1), jusqu’à pouvoir le retirer par le haut.
SSM 600 B2

REMARQUE
Vous pouvez aussi laver la pièce en plastique supérieure A du bol
mixeur 3 et les lames 4 avec la pièce en plastique inférieure C au
lave-vaisselle.
4) Séchez bien toutes les pièces avant de les remonter.
5) Remettez la pièce en plastique inférieure C du bol mixeur 3 sur la pièce en
plastique supérieure A du bol mixeur 3 et serrez-la bien en tournant dans le
sens horaire.
Nettoyage du bloc moteur
1) Utilisez un chiffon sec ou légèrement humidifié pour nettoyer les surfaces en
plastique.
2) Vérifiez après chaque nettoyage que le contacteur du bol mixeur
pas bloqué par des résidus alimentaires. Si vous ne pouvez pas retirer les
morceaux bloqués à l’aide d’un coin de feuille de papier, adressez-vous au
service après-vente. N’utilisez pas d’objet dur qui risquerait d’endommager
le contacteur.
3) Éliminez les saletés éventuellement présentes sous le bloc moteur 6 en utilisant
exclusivement un chiffon sec ou un pinceau anti-poussières. Assurez-vous que
rien ne pénètre dans l’appareil à travers les ouvertures d’aération.
Après nettoyage
Faites bien sécher toutes les pièces avant de remonter le batteur-mélangeur et de
le réutiliser.
3
n’est
Rangement de l’appareil
1) Si vous laissez l’appareil inutilisé pendant une durée prolongée, nettoyez-le
soigneusement (voir chapitre «Nettoyage»).
2) Enroulez le cordon d’alimentation autour de l’enroulement du cordon d’alimentation 7 sur le bas du bloc-moteur 6.
3) Rangez le batteur-mélangeur dans un endroit sec et frais.
SSM 600 B2
FR│BE
│
51 ■

Mise au rebut
Ne jetez jamais l’appareil avec les ordures ménagères.
Ce produit est assujetti à la directive européenne 2012/19/EU
DEEE (déchets d’équipements électriques et électroniques).
Éliminez l’appareil par l’intermédiaire d’une entreprise de traitement des déchets
autorisée ou via le service de recyclage de votre commune. Respectez la
réglementation en vigueur. En cas de doute, veuillez contacter votre centre de
recyclage.
Renseignez-vous auprès de votre commune pour connaître les possibilités de
mise au rebut de votre appareil usagé.
Le produit récyclable doit être trié ou rapporté dans un point de collecte pour
être recycle.
Éliminez l‘emballage d‘une manière respectueuse de l‘environnement.
Observez le marquage sur les différents matériaux d‘emballage et triez-les
séparé ment si nécessaire. Les matériaux d‘emballage sont repérés par des
abréviations (a) et des numéros (b) qui ont la signification suivante:
1–7 : Plastiques,
20–22 : Papier et carton,
80–98 : Matériaux composites.
L’emballage se compose de matériaux respectueux de l’environnement qu’il est
possible d’éliminer via les centres de recyclage locaux.
■ 52 │ FR
│
BE
SSM 600 B2

Garantie pour Kompernass Handels GmbH pour
la Belgique
Chère cliente, cher client,
Cet appareil est garanti 3 ans à partir de la date d’achat. Si ce produit venait à
présenter des vices, vous disposez de droits légaux face au vendeur de ce produit.
Vos droits légaux ne sont pas restreints par notre garantie présentée ci-dessous.
Conditions de garantie
La période de garantie débute à la date d’achat. Veuillez bien conserver le ticket
de caisse. Celui-ci servira de preuve d’achat.
Si dans un délai de trois ans suivant la date d’achat de ce produit, un vice de
matériel ou de fabrication venait à apparaître, le produit sera réparé, remplacé
gratuitement par nos soins ou le prix d’achat remboursé, selon notre choix. Cette
prestation sous garantie nécessite, dans le délai de trois ans, la présentation
de l’appareil défectueux et du justificatif d’achat (ticket de caisse) ainsi que la
description brève du vice et du moment de son apparition.
Si le vice est couvert par notre garantie, vous recevrez le produit réparé ou un
nouveau produit en retour. Aucune nouvelle période de garantie ne débute avec
la réparation ou l’échange du produit.
Période de garantie et réclamation légale pour vices cachés
L’exercice de la garantie ne prolonge pas la période de garantie. Cette disposition s’applique également aux pièces remplacées ou réparées. Les dommages et
vices éventuellement déjà présents à l’achat doivent être signalés immédiatement
après le déballage. Toute réparation survenant après la période sous garantie
fera l’objet d’une facturation.
Étendue de la garantie
L’appareil a été fabriqué avec soin conformément à des directives de qualité
strictes et consciencieusement contrôlé avant sa livraison.
La prestation de la garantie s’applique aux vices de matériel et de fabrication.
Cette garantie ne s’étend pas aux pièces du produit qui sont exposées à une usure
normale et peuvent de ce fait être considérées comme pièces d’usure, ni aux détériorations de pièces fragiles, par ex. interrupteurs, batteries ou pièces en verre.
Cette garantie devient caduque si le produit est détérioré, utilisé ou entretenu de
manière non conforme. Toutes les instructions listées dans le manuel d’utilisation
doivent être exactement respectées pour une utilisation conforme du produit. Des
buts d’utilisation et actions qui sont déconseillés dans le manuel d’utilisation, ou
dont vous êtes avertis doivent également être évités.
Le produit est uniquement destiné à un usage privé et ne convient pas à un
usage professionnel. La garantie est annulée en cas d’entretien incorrect et
inapproprié, d’usage de la force et en cas d’intervention non réalisée par notre
centre de service après-vente agréé.
SSM 600 B2
FR│BE
│
53 ■
Procédure en cas de garantie
Afin de garantir un traitement rapide de votre demande, veuillez suivre les indications suivantes :
■ Veuillez avoir à portée de main pour toutes questions le ticket de caisse et la
référence article (par ex.IAN12345) en tant que justificatif de votre achat.
■ Vous trouverez la référence sur la plaque signalétique sur le produit, une
gravure sur le produit, sur la page de garde du mode d’emploi (en bas à
gauche) ou sur l’autocollant au dos ou sur le dessous du produit.
■ Si des erreurs de fonctionnement ou d’autres vices venaient à apparaître,
veuillez d’abord contacter le département service clientèle cité ci-dessous
par téléphone ou par e-mail.
■ Vous pouvez ensuite retourner un produit enregistré comme étant défectueux
en joignant le ticket de caisse et en indiquant en quoi consiste le vice et
quand il est survenu, sans devoir l’affranchir à l’adresse de service aprèsvente communiquée.
Sur www.lidl-service.com, vous pourrez télécharger ce mode d’emploi et de
nombreux autres manuels, vidéos produit et logiciels d’installation.
Grâce à ce code QR, vous arriverez directement sur le site Lidl service aprèsvente (www.lidl-service.com) et vous pourrez ouvrir votre mode d’emploi en
saisissant votre référence (IAN) 123456.
■ 54 │ FR
│
BE
SSM 600 B2

Garantie pour Kompernass Handels GmbH pour
la France
Chère cliente, cher client,
Cet appareil est garanti 3 ans à partir de la date d’achat. Si ce produit venait à
présenter des vices, vous disposez de droits légaux face au vendeur de ce produit.
Vos droits légaux ne sont pas restreints par notre garantie présentée ci-dessous.
Conditions de garantie
La période de garantie débute à la date d’achat. Veuillez bien conserver le ticket
de caisse. Celui-ci servira de preuve d’achat.
Si dans un délai de trois ans suivant la date d’achat de ce produit, un vice de
matériel ou de fabrication venait à apparaître, le produit sera réparé, remplacé
gratuitement par nos soins ou le prix d’achat remboursé, selon notre choix. Cette
prestation sous garantie nécessite, dans le délai de trois ans, la présentation
de l’appareil défectueux et du justificatif d’achat (ticket de caisse) ainsi que la
description brève du vice et du moment de son apparition.
Si le vice est couvert par notre garantie, vous recevrez le produit réparé ou un
nouveau produit en retour. Aucune nouvelle période de garantie ne débute avec
la réparation ou l’échange du produit.
Période de garantie et réclamation légale pour vices cachés
L’exercice de la garantie ne prolonge pas la période de garantie. Cette disposition s’applique également aux pièces remplacées ou réparées. Les dommages et
vices éventuellement déjà présents à l’achat doivent être signalés immédiatement
après le déballage. Toute réparation survenant après la période sous garantie
fera l’objet d’une facturation.
Étendue de la garantie
L’appareil a été fabriqué avec soin conformément à des directives de qualité
strictes et consciencieusement contrôlé avant sa livraison.
La prestation de la garantie s’applique aux vices de matériel et de fabrication.
Cette garantie ne s’étend pas aux pièces du produit qui sont exposées à une usure
normale et peuvent de ce fait être considérées comme pièces d’usure, ni aux détériorations de pièces fragiles, par ex. interrupteurs, batteries ou pièces en verre.
Cette garantie devient caduque si le produit est détérioré, utilisé ou entretenu de
manière non conforme. Toutes les instructions listées dans le manuel d’utilisation
doivent être exactement respectées pour une utilisation conforme du produit. Des
buts d’utilisation et actions qui sont déconseillés dans le manuel d’utilisation, ou
dont vous êtes avertis doivent également être évités.
Le produit est uniquement destiné à un usage privé et ne convient pas à un
usage professionnel. La garantie est annulée en cas d’entretien incorrect et
inapproprié, d’usage de la force et en cas d’intervention non réalisée par notre
centre de service après-vente agréé.
SSM 600 B2
FR│BE
│
55 ■

Article L217-16 du Code de la consommation
Lorsque l‘acheteur demande au vendeur, pendant le cours de la garantie
commerciale qui lui a été consentie lors de l‘acquisition ou de la réparation
d‘un bien meuble, une remise en état couverte par la garantie, toute période
d‘immobilisation d‘au moins sept jours vient s‘ajouter à la durée de la garantie
qui restait à courir. Cette période court à compter de la demande d‘intervention
de l‘acheteur ou de la mise à disposition pour réparation du bien en cause, si
cette mise à disposition est postérieure à la demande d‘intervention.
Indépendamment de la garantie commerciale souscrite, le vendeur reste tenu
des défauts de conformité du bien et des vices rédhibitoires dans les conditions
prévues aux articles L217-4 à L217-13 du Code de la consommation et aux
articles 1641 à 1648 et 2232 du Code Civil.
Article L217-4 du Code de la consommation
Le vendeur livre un bien conforme au contrat et répond des défauts de
conformité existant lors de la délivrance. Il répond également des défauts
de conformité résultant de l‘emballage, des instructions de montage ou de
l‘installation lorsque celle-ci a été mise à sa charge par le contrat ou a été réalisée sous sa responsabilité.
Article L217-5 du Code de la consommation
Le bien est conforme au contrat :
1° S´il est propre à l‘usage habituellement attendu d‘un bien semblable et, le
cas échéant :
– s‘il correspond à la description donnée par le vendeur et posséder les
qualités que celui-ci a présentées à l‘acheteur sous forme d‘échantillon
ou de modèle ;
– s‘il présente les qualités qu‘un acheteur peut légitimement attendre
eu égard aux déclarations publiques faites par le vendeur, par le
producteur ou par son représentant, notamment dans la publicité ou
l‘étiquetage ;
2° Ou s‘il présente les caractéristiques définies d‘un commun accord par les
parties ou être propre à tout usage spécial recherché par l‘acheteur, porté à
la connaissance du vendeur et que ce dernier a accepté.
■ 56 │ FR
Article L217-12 du Code de la consommation
L‘action résultant du défaut de conformité se prescrit par deux ans à compter de
la délivrance du bien.
│
BE
SSM 600 B2

Article 1641 du Code civil
Le vendeur est tenu de la garantie à raison des défauts cachés de la chose
vendue qui la rendent impropre à l‘usage auquel on la destine, ou qui diminuent
tellement cet usage que l‘acheteur ne l‘aurait pas acquise, ou n‘en aurait donné
qu‘un moindre prix, s‘il les avait connus.
Article 1648 1er alinéa du Code civil
L‘action résultant des vices rédhibitoires doit être intentée par l‘acquéreur dans
un délai de deux ans à compter de la découverte du vice.
Les pièces détachées indispensables à l’utilisation du produit sont disponibles
pendant la durée de la garantie du produit.
Procédure en cas de garantie
Afin de garantir un traitement rapide de votre demande, veuillez suivre les indications suivantes :
■ Veuillez avoir à portée de main pour toutes questions le ticket de caisse et la
référence article (par ex. IAN 12345) en tant que justificatif de votre achat.
■ Vous trouverez la référence sur la plaque signalétique sur le produit, une
gravure sur le produit, sur la page de garde du mode d’emploi (en bas à
gauche) ou sur l’autocollant au dos ou sur le dessous du produit.
■ Si des erreurs de fonctionnement ou d’autres vices venaient à apparaître,
veuillez d’abord contacter le département service clientèle cité ci-dessous
par téléphone ou par e-mail.
■ Vous pouvez ensuite retourner un produit enregistré comme étant défectueux
en joignant le ticket de caisse et en indiquant en quoi consiste le vice et
quand il est survenu, sans devoir l’affranchir à l’adresse de service aprèsvente communiquée.
Sur www.lidl-service.com, vous pourrez télécharger ce mode d’emploi et de
nombreux autres manuels, vidéos produit et logiciels d’installation.
Grâce à ce code QR, vous arriverez directement sur le site Lidl service aprèsvente (www.lidl-service.com) et vous pourrez ouvrir votre mode d’emploi en
saisissant votre référence (IAN) 123456.
SSM 600 B2
FR│BE
│
57 ■

Service après-vente
Service France
Tel.: 0800 919270
E-Mail: kompernass@lidl.fr
Service Belgique
Tel.: 070 270 171 (0,15 EUR/Min.)
E-Mail: kompernass@lidl.be
IAN 339532_1910
Importateur
Veuillez tenir compte du fait que l’adresse suivante n’est pas une adresse de
service après-vente. Veuillez d’abord contacter le service mentionné.
KOMPERNASS HANDELS GMBH
BURGSTRASSE 21
44867 BOCHUM
ALLEMAGNE
www.kompernass.com
■ 58 │ FR
│
BE
SSM 600 B2

Inhoudsopgave
Inleiding .....................................................60
Gebruik in overeenstemming met bestemming .....................60
Inhoud van de verpakking .....................................60
Apparaatbeschrijving ..........................................61
Technische gegevens. . . . . . . . . . . . . . . . . . . . . . . . . . . . . . . . . . . . . . . . . . .61
Veiligheidsvoorschriften .......................................62
Uitpakken ...................................................64
Plaatsen .....................................................64
Bediening ....................................................65
Mix-opzetstuk vullen en bevestigen ......................................... 65
Snelheidsstand kiezen ....................................................66
Vullen tijdens bedrijf ...................................................... 66
Mix-opzetstuk afnemen ................................................... 67
Nuttige tips ..................................................67
Recepten ....................................................68
Bananenshake ..........................................................68
Vanilleshake ............................................................ 68
Cappuccinoshake .......................................................68
Tropical-mix ............................................................68
Noten-nougat-shake ...................................................... 69
Wortelshake ............................................................69
Zwarte bessen-mix .......................................................69
Hawaii-shake ...........................................................69
Fruitige ananas-aardbei-mix ................................................ 70
Andalusische koude soep (Gazpacho) .......................................70
Reinigen .....................................................71
Mix-opzetstuk reinigen ....................................................71
Motorblok reinigen ......................................................73
Na het reinigen .........................................................73
Opbergen ...................................................73
Milieurichtlijnen ...............................................74
Garantie van Kompernaß Handels GmbH .........................75
Service ................................................................76
Importeur ..............................................................76
SSM 600 B2
NL│BE
│
59 ■

Inleiding
Gefeliciteerd met de aankoop van uw nieuwe apparaat. U hebt hiermee gekozen voor een hoogwaardig product. De bedieningshandleiding maakt deel uit
van dit product. Deze bevat belangrijke aanwijzingen voor veiligheid, gebruik en
afvoeren. Maak uzelf voorafgaand aan het gebruik van het product vertrouwd
met alle bedienings- en veiligheidsvoorschriften. Gebruik het product uitsluitend
op de voorgeschreven wijze en voor de aangegeven doeleinden. Geef alle
documenten mee als u het product doorgeeft aan een derde.
Gebruik in overeenstemming met bestemming
Dit apparaat is uitsluitend bestemd voor …
■ het mengen, pureren en roeren van levensmiddelen en voor het malen
(“crushen”) van ijsblokjes,
■ uitsluitend in hoeveelheden in het huishouden gebruikelijk en alleen voor
privé huishoudelijk gebruik in droge ruimtes.
Het apparaat is niet bestemd voor …
■ het fijnhakken van harde soorten levensmiddelen, zoals bijv. noten, pitten,
grote korrels of stelen,
■ het verwerken van materialen die geen levensmiddelen zijn,
■ het gebruik voor bedrijfsmatige en industriële doeleinden,
■ het gebruik in een vochtige omgeving of in de openlucht,
■ de verwerking van hete/kokende vloeistoffen.
Gebruikt u alleen de accessoires en reserveonder-delen die voor dit apparaat
bestemd zijn. Andere onderdelen zijn mogelijk niet voldoende geschikt of veilig!
Inhoud van de verpakking
Controleer de levering na het uitpakken op volledigheid. De inhoud van het
pakket bestaat uit:
▯ Motorblok, met netsnoer en netstekker
▯ Mix-opzetstuk
▯ Deksel
▯ Vuldop
▯ Gebruiksaanwijzing
■ 60 │ NL
│
BE
SSM 600 B2
Apparaatbeschrijving
1 Vuldop
2 Deksel
3 Mix-opzetstuk
4 Snijmes
5 Schakelaar
6 Motorblok
7 Kabelspoel
8 Schaalverdeling
9 Rubberen afdichting deksel
Technische gegevens
Nominale spanning 220 - 240 V ∼ (wisselstroom), 50 - 60 Hz
Nominaal vermogen 600 W
Max. vulhoeveelheid
Beveiligingsklasse
KB-tijd
De KB-tijd (kort bedrijf) geeft aan hoe lang een apparaat kan worden bediend,
zonder dat de motor oververhit raakt en schade hieraan ontstaat. Na de opgegeven KB-tijd moet het apparaat zo lang uitgeschakeld worden, totdat de motor
tot kamertemperatuur is afgekoeld.
1,75 liter
II / (dubbel geïsoleerd)
3 minuten
Alle delen van het apparaat die in aanraking komen
met levensmiddelen, zijn levensmiddelveilig.
SSM 600 B2
NL│BE
│
61 ■
Veiligheidsvoorschriften
GEVAAR VOOR ELEKTRISCHE SCHOK!
► Vergewis u ervan dat het motorblok, het netsnoer of de netstekker
nooit ondergedompeld worden in water of andere vloeistoffen.
► Gebruik het apparaat uitsluitend in droge ruimtes, nooit in
de openlucht of in een vochtige omgeving.
► Let erop dat het netsnoer nooit nat of vochtig wordt wanneer
het apparaat in bedrijf is. Leg het zo neer dat het niet beklemd
raakt of anderszins beschadigd kan worden.
► Laat beschadigde netsnoeren of netstekkers onmiddellijk
door deskundig personeel of de klantenservice vervangen,
om gevaar te voorkomen.
► Trek na gebruik altijd de stekker uit het stopcontact. Alleen uit-
schakelen is niet genoeg, omdat het apparaat onder spanning
blijft staan zolang de stekker in het stopcontact zit.
► Controleer het apparaat vóór ieder gebruik op perfecte
toestand. Het apparaat mag niet worden gebruikt als het
zichtbaar is beschadigd, met name bij schade aan het motorblok of het mix-opzetstuk.
► Haal meteen de stekker uit het stopcontact als u ongebruikelijke
geluiden of geuren waarneemt, of bij een evidente storing.
WAARSCHUWING! LETSELGEVAAR!
► Grijp nooit in het mix-opzetstuk, vooral niet tijdens het bedrijf.
De messen zijn extreem scherp!
► Het deksel niet openen terwijl het apparaat in bedrijf is.
► Laat het apparaat niet zonder toezicht in werking, om bij
gevaar meteen te kunnen reageren.
■ 62 │ NL
│
BE
SSM 600 B2

WAARSCHUWING! LETSELGEVAAR!
► Schakel het apparaat uit en haal de netstekker uit het stopcon-
tact voordat u accessoires verwisselt of onderdelen aanraakt
die tijdens het bedrijf bewegen.
► Bij kinderen is supervisie noodzakelijk om er voor te zorgen dat
ze niet met het apparaat spelen.
► Gebruik het apparaat nooit voor andere doeleinden dan in
deze gebruiksaanwijzing zijn beschreven.
► Bij verkeerd gebruik van het apparaat bestaat er kans op
letsel.
► Het apparaat moet altijd van de stroom worden losgekop-
peld indien er geen toezicht is, en voor montage, demontage
of reiniging.
► Het apparaat mag niet door kinderen worden gebruikt.
► Houd het apparaat en het bijbehorende snoer buiten bereik
van kinderen.
► Dit apparaat mag worden gebruikt door personen met beperkte
fysieke, zintuiglijke of geestelijke vermogens of gebrek aan
ervaring en/of kennis, mits ze onder toezicht staan of over
het veilige gebruik van het apparaat zijn geïnstrueerd en de
daaruit resulterende gevaren hebben begrepen.
► Kinderen mogen niet met het apparaat spelen.
► Ga voorzichtig om met het apparaat. De messen zijn zeer
scherp!
► Wees voorzichtig bij het legen van de kom. De messen zijn
zeer scherp!
► Wees voorzichtig bij het reinigen van het apparaat. De messen
zijn zeer scherp!
► Schakel het apparaat uit en haal de netstekker uit het stop-
contact voordat u accessoires verwisselt of onderdelen
aanraakt die tijdens het bedrijf bewegen.
SSM 600 B2
NL│BE
│
63 ■

WAARSCHUWING! LETSELGEVAAR!
► Gebruik het mix-opzetstuk uitsluitend met het meegeleverde
motorblok.
► Vergewis u ervan dat de mixer uitgeschakeld is voordat u
het mix-opzetstuk van het motorblok afhaalt.
LET OP! MATERIËLE SCHADE!
► Gebruik het apparaat niet daar waar rechtstreeks zonlicht is
of inwerking van warmte door andere apparaten.
► Nooit het mix-opzetstuk vullen met kokende vloeistoffen! Laat
deze eerst afkoelen tot handwarme temperatuur.
► Gebruik het apparaat nooit in lege toestand, d.w.z. zonder
ingrediënten in het mix-opzetstuk.
Uitpakken
■ Verwijder alle delen van de verpakking of de beschermfolie van het appa-
raat. Bewaar de verpakking, zodat u het apparaat kunt bewaren of kunt
opsturen, bijv. in geval van reparatie.
■ Voordat u het apparaat gebruikt, dient u zich ervan te vergewissen dat het
apparaat niet beschadigd is, evenmin als het netsnoer met netstekker en alle
accessoires en apparaatdelen.
■ Reinig alle onderdelen voor het eerste gebruik van de standmixer (zie
“Reinigen”).
Plaatsen
Als u alle delen hebt schoongemaakt, zoals onder “Reinigen” beschreven:
■ 64 │ NL
■ Plaats het apparaat zo, …
– dat het netsnoer door de uitsparing aan de achterzijde geleid wordt,
– dat de netstekker direct binnen bereik is, zodat deze in geval van gevaar
uit het stopcontact gehaald kan worden,
– dat het stabiel staat en niet kan wegglijden, zodat de zuignappen houvast
hebben en het apparaat in geval van trillingen niet omvalt,
– dat het netsnoer niet in de werkomgeving komt en doordat er per ongeluk
aan getrokken wordt het apparaat kan doen omvallen.
│
BE
SSM 600 B2

Bediening
WAARSCHUWING!
► De motor wordt uitgeschakeld zodra het mix-opzetstuk 3 van het motor-
blok 6 wordt gehaald of het deksel 2 wordt geopend. Mogelijk wordt
dan over het hoofd gezien dat de machine nog is ingeschakeld. De motor
start dan onverwacht zodra het mix-opzetstuk 3 wordt bevestigd of het
deksel 2 weer wordt gesloten:
Daarom:
– Doe de netstekker pas in het stopcontact als u klaar bent met het vullen
van het mix-opzetstuk 3 en dit gesloten is bevestigd.
– Vergewis u er vóór het bevestigen van dat het apparaat uitgeschakeld
is of dat de netstekker uit het stopcontact is gehaald.
– Schakel het apparaat eerst uit, trek de stekker uit het stopcontact en
wacht tot de motor stilstaat voordat u het mix-opzetstuk 3 van het
apparaat neemt of het deksel 2 opent.
Mix-opzetstuk vullen en bevestigen
1) Draai het mix-opzetstuk 3 tegen de wijzers van de klok in tot de pijl T
onder de greep van het mix-opzetstuk in de stand
mix-opzetstuk 3 recht omhoog van het motorblok 6.
2) U kunt het deksel 2 verwijderen, als u het zover tegen de wijzers van de
klok in naar de stand
kunt trekken.
3) Vul het mix-opzetstuk 3.
4) Druk vervolgens het deksel 2 weer vast op het mix-opzetstuk 3. Sluit
het deksel 2 door het met de wijzers van de klok mee naar de positie
te draaien tot het deksel hoorbaar vastklikt (zie afb. 2). Zorg dat ook de
schenktuit van het mix-opzetstuk 3 gesloten is. Alleen als het deksel 2
goed sluitend is geplaatst, kan de motor starten.
draait (zie afb. 1) dat u het deksel er omhoog af
staat. Neem het
Afb. 1 Afb. 2
SSM 600 B2
NL│BE
│
65 ■

5) Druk de vuldop 1 tot aan de aanslag in de dekselopening.
6) Plaats het gevulde en gesloten mix-opzetstuk 3 op het motorblok 6. Gebruik
daarvoor de uitsparingen in het motorblok 6 en let er daarbij op dat de pijl
T op het mix-opzetstuk in de stand
de wijzers van de klok mee naar de positie
als het mix-opzetstuk 3 goed op het motorblok staat, kan de motor starten.
Snelheidsstand kiezen
Als het mix-opzetstuk 3 is gevuld en volledig gesloten op het motorblok 6
staat, kunt u het apparaat inschakelen.
Zet de schakelaar 5 op …
■ Stand 1 – 3
voor vloeibare of matig vaste levensmiddelen, om te mengen, pureren of
roeren
■ Stand 3 – 5
voor vastere levensmiddelen of om klein te hakken
■ Stand Ice Crush/Clean
voor kort, krachtig impulsbedrijf, bijv. om ijsklontjes te crushen of om te
reinigen. De schakelaar 5 blijft in deze stand niet staan, om de motor niet te
overbelasten. Houd de schakelaar 5 daarom maar kort in deze stand.
OPMERKING
► Vul het mix-opzetstuk 3 met maximaal 180 g ijsklontjes. Anders maakt het
apparaat de ijsklontjes niet optimaal klein.
staat. Draai het mix-opzetstuk 3 met
tot het hoorbaar vastklikt. Alleen
Vullen tijdens bedrijf
WAARSCHUWING!
► Indien u tijdens het bedrijf iets wilt vullen, mag u hiervoor alleen de vuldop 1
die hiervoor bestemd is openen. Open in geen geval het deksel 2.
► Zet nooit bestek of dergelijke in het mix-opzetstuk 3 wanneer het appa-
raat in bedrijf is. Er is sprake van ernstig letselgevaar als deze het snel
draaiende snijmes 4 aanraken!
Om tijdens het bedrijf iets te kunnen vullen, …
1) Trek de vuldop 1 uit het deksel 2.
2) Vul met de ingrediënten.
3) Druk de vuldop 1 daarna weer in de dekselopening.
■ 66 │ NL
│
BE
SSM 600 B2

Mix-opzetstuk afnemen
Als de bereiding van de levensmiddelen in het mix-opzetstuk is voltooid:
1) Zet de schakelaar 5 altijd eerst op de stand “0” en trek vervolgens de
stekker uit het stopcontact.
2) Wacht tot de motor stilstaat voordat u het mix-opzetstuk 3 recht omhoog
van het motorblok 6 neemt. Draai daartoe het mix-opzetstuk 3 tegen de
wijzers van de klok in tot de pijl T onder de greep van het mix-opzetstuk
in de stand
motorblok 6.
staat. Neem het mix-opzetstuk 3 recht omhoog van het
Nuttige tips
■ Om bij het pureren van stevige ingrediënten tot het beste resultaat te komen,
doet u beetje bij beetje kleine porties in het mix-opzetstuk 3, in plaats van in
één keer een grotere hoeveelheid te vullen.
■ Als u stevige ingrediënten verwerkt, snijdt u deze in kleine stukken (2 – 3 cm).
■ Bij het mixen van vloeibare ingrediënten begint u eerst met een kleine
hoeveelheid vloeistof. Giet daarna stukje bij beetje meer vloeistof door de
dekselopening.
■ Als u tijdens het bedrijf uw hand op de gesloten blender legt, kunt u het
apparaat zo goed stabiliseren.
■ Om stevige of zeer stroperige levensmiddelen te roeren, kan het nuttig zijn
om de stand Ice Crush/Clean te gebruiken teneinde te voorkomen dat het
snijmes 4 vast komt te zitten.
OPMERKING
SSM 600 B2
► Het apparaat niet gebruiken om de korrels van keukenzout, geraffineerde
suiker of basterdsuiker fijner te maken. Bijvoorbeeld om poedersuiker te
maken.
NL│BE
│
67 ■

Recepten
Bananenshake
▯ 2 bananen
▯ ca. 2 eetlepels suiker
(naar gelang rijpheid van de bananen en persoonlijke smaak)
▯ ½ liter melk
▯ 1 scheutje citroensap
Pel de bananen en pureer deze op stand 2. Voeg de melk beetje bij beetje
toe, dan de suiker en het citroensap. Mix alles zo lang, totdat een gelijkmatige
vloeistof ontstaat. Serveer de shake ijskoud.
Vanilleshake
▯ ¼ liter melk
▯ 250 g vanille-ijs
▯ 125 g ijsklontjes
▯ 1 ½ theelepels suiker
Crush de ijsklontjes met de stand Ice Crush/Clean. Doe de overige ingrediënten
in de mixer. Meng alles zo lang op stand 2 tot er een gelijkmatige vloeistof
ontstaat.
Cappuccinoshake
▯ 65 ml koude espresso (of heel sterke koffie)
▯ 65 ml melk
▯ 15 g suiker
▯ 65 g vanille-ijs
▯ 100 g ijsklontjes
Crush de ijsklontjes met de stand Ice Crush/Clean. Doe de espresso, de melk en
de suiker erbij. Mix alles op stand 2, totdat de suiker is opgelost. Voeg tot slot
het vanille-ijs toe en mix alles kort door elkaar op stand 1.
Tropical-mix
▯ 125 ml ananassap
▯ 60 ml papayasap
▯ 50 ml sinaasappelsap
▯ ½ klein blikje perzikken op sap
▯ 125 g ijsklontjes
Crush de ijsklontjes met de stand Ice Crush/Clean. Doe alle ingrediënten in de
mixer en meng alles door elkaar op stand 3.
■ 68 │ NL
│
BE
SSM 600 B2

Noten-nougat-shake
▯ ½ liter melk
▯ 200 g noten-nougat-pasta
▯ 1 bolletje vanille-ijs
▯ 50 ml room
Meng alle ingrediënten in de mixer op stand 3, totdat alles gelijkmatig is gemengd.
Wortelshake
▯ 300 ml appelsap
▯ 500 ml wortelsap
▯ 4 eetlepels olie (tarwekiemolie of koolzaadolie)
▯ 4 eetlepels citroensap
▯ gemberpoeder
▯ peper
Doe het appelsap, de olie en het citroensap in de mixer en meng alles op stand 2.
Voeg dan het wortelsap toe en meng alles door elkaar op stand 2. Breng de
shake op smaak met gemberpoeder en peper.
Zwarte bessen-mix
▯ 2 theelepels honing
▯ 2 bananen
▯ ¼ liter karnemelk
▯ ¼ liter bessensap (zwart)
Doe alle ingrediënten in de mixer en meng alles door elkaar op stand 3.
Hawaii-shake
▯ 4 bananen
▯ ¼ liter ananassap
▯ ½ liter melk
▯ 2 EL honing
▯ ¼ liter rum
Pel de bananen en pureer deze op stand 2. Voeg de andere ingrediënten toe en
meng alles op stand 1.
SSM 600 B2
NL│BE
│
69 ■

Fruitige ananas-aardbei-mix
▯ 250 ml ananassap
▯ 200 g aardbeien
▯ 300 ml appelsap
▯ 4 ijsklontjes
Was de aardbeien en verwijder het groen. Crush de ijsklontjes met de stand Ice
Crush/Clean. Pureer ze op stand 2. Voeg dan de overige ingrediënten toe en
mix alles op stand 1.
Andalusische koude soep (Gazpacho)
▯ ½ komkommer
▯ 1 vleestomaat
▯ 1 groene paprika
▯ ½ ui
▯ 1 knoflookteen
▯ ½ wit broodje
▯ ½ theelepel zout
▯ 1 theelepel rode wijnazijn
▯ 1 eetlepel olijfolie
Snijd de groente in ca. 2 cm grote stukken. Doe eerst de tomaten en daarna de
komkommer in de mixer. Pureer deze op stand 3. Voeg de overige ingrediënten
toe en pureer/meng alles op stand 3, totdat een gelijkmatige soep ontstaat.
Serveer het geheel met brood.
■ 70 │ NL
OPMERKING
► Geen aansprakelijkheid voor recepten. Alle gegevens m.b.t. ingrediënten
en bereiding zijn richtwaarden. Vul deze receptsuggesties aan met uw
persoonlijke bevindingen.
OPMERKING
► In geval van lactose-intolerantie adviseren wij u lactosevrije melk te gebrui-
ken. Houd er echter rekening mee dat lactosevrije melk iets zoeter is.
│
BE
SSM 600 B2

Reinigen
GEVAAR VOOR EEN ELEKTRISCHE SCHOK!
Alvorens de blender en de accessoires te reinigen:
► Vergewis u ervan dat het apparaat uitgeschakeld is en dat de netstekker uit
het stopcontact is gehaald.
Het motorblok 6 mag in geen geval in water of andere vloeistoffen
worden ondergedompeld. Hierdoor kan levensgevaar ontstaat door
een elektrische schok en het apparaat kan beschadigd raken.
► Open nooit de behuizing van het apparaat. Anders kan er levensgevaar
ontstaan door een elektrische schok.
WAARSCHUWING! LETSELGEVAAR!
► Nooit de snijmessen 4 demonteren en ook nooit in het mix-opzetstuk 3
grijpen. De snijmessen 4 zijn extreem scherp!
LET OP! MATERIËLE SCHADE!
► Gebruik geen oplos- of schuurmiddelen voor de kunststofoppervlakken,
omdat deze anders beschadigd kunnen raken.
Mix-opzetstuk reinigen
■ Reinig het mix-opzetstuk 3 alleen met een afwasborstel met een lange steel,
zodat u zich niet aan de snijmessen 4 kunt verwonden.
■ Reinig de vuldop 1 en het deksel 2 in mild zeepsop. Let erop dat de rub-
beren afdichting 9 goed vastzit, voordat u het deksel 2 opnieuw gebruikt.
OPMERKING
SSM 600 B2
U kunt het deksel 2, de vuldop 1 en het mix-opzetstuk 3 met het
snijmes 4 ook in de vaatwasser reinigen.
■ Als u de blender direct na gebruik reinigt, verkrijgt u veelal voldoende hygië-
nische reiniging door de volgende alternatieven:
Vul het mix-opzetstuk 3 met 750 ml water en doe er een paar druppels
mild afwasmiddel bij. Sluit het deksel 2 en zet het mix-opzetstuk 3 op het
motorblok 6. Steek de stekker in het stopcontact en activeer een paar keer
de Ice Crush/Clean-stand, zodat het snijmes 4 op maximaal toerental door
het water draait. Spoel het mix-opzetstuk 3 daarna met veel helder water
om, zodat alle restanten van afwasmiddel worden verwijderd.
NL│BE
│
71 ■

■ Om hardnekkig vuil beter te kunnen verwijderen kunt u het onderste
kunststofdeel van het mix-opzetstuk 3 met het snijmes 4 scheiden van het
bovenste kunststofdeel van het mix-opzetstuk 3:
C
B
A
Afb. 3
■ 72 │ NL
ABovenste kunststofdeel
B Mes
C Onderste kunststofdeel
1) Haal het mix-opzetstuk 3 van het motorblok 6. U kunt het deksel 2 verwij-
deren zodat het mix-opzetstuk steviger staat, als u het deksel zover tegen de
wijzers van de klok in naar de stand
er omhoog af kunt trekken.
2) Zet het apparaat op de kop en draai het onderste kunststofdeel C van het
mix-opzetstuk 3 linksom, zodat het van het bovenste kunststofdeel A van het
mix-opzetstuk 3 kan worden gescheiden (zie afb. 3).
WAARSCHUWING! LETSELGEVAAR!
► Ga voorzichtig om met de messen B. Deze zijn heel scherp.
Letselgevaar!
3) Reinig beide delen grondig in mild zeepsop.
│
BE
draait (zie afb. 1) dat u het deksel
SSM 600 B2

OPMERKING
U kunt het bovenste kunststofdeel A van het mix-opzetstuk 3 en het
snijmes 4 met het onderste kunststofdeel C ook in de vaatwasser
reinigen.
4) Droog alles goed af voordat u het apparaat weer in elkaar zet.
5) Plaats het onderste kunststofdeel C van het mix-opzetstuk 3 weer op het
bovenste kunststofdeel A van het mix-opzetstuk 3 en draai het rechtsom
vast.
Motorblok reinigen
1) Gebruik een droge, hooguit licht bevochtigde doek om de oppervlakken van
kunststof schoon te maken.
2) Controleer bij iedere reiniging of de contactschakelaar in de opname van
het mix-opzetstuk 3 niet door resten van vervuiling geblokkeerd is. Indien u
mogelijke blokkeringen niet kunt oplossen met de punt van een blad papier,
neemt u contact op met de klantenservice. Gebruik in geen geval een hard
voorwerp, omdat de contactschakelaar daardoor beschadigd kan raken.
3) Verwijder mogelijke vervuilingen aan de onderzijde van het motorblok 6
alleen met een droge doek of met een stofkwastje. Let erop dat niets door de
ventilatieopeningen in het apparaat kan komen.
Na het reinigen
Laat alle delen weer goed drogen alvorens de blender weer in elkaar te zetten
en te gebruiken.
Opbergen
1) Mocht u de blender langere tijd niet meer gebruiken, reinig deze dan grondig (zie hoofdstuk “Reinigen”).
2) Wikkel het netsnoer om de kabelspoel 7 op de voet van het
motorblok 6.
3) Bewaar de blender op een koele, droge plaats.
SSM 600 B2
NL│BE
│
73 ■

Milieurichtlijnen
Gooi het apparaat in geen geval weg bij het gewone huisvuil.
Dit product voldoet aan de Europese richtlijn 2012/19/EU.
Voer het apparaat af via een erkend afvalverwerkingsbedrijf of via uw gemeentereiniging. Neem de momenteel geldende voorschriften in acht. Neem bij twijfel
contact op met de verantwoordelijke instantie.
Mogelijkheden voor het afvoeren van het afgedankte product vindt u bij uw
gemeente.
Het product is recycleerbaar; er is een uitgebreide producentenverantwoordelijkheid op van toepassing en het afval wordt gescheiden ingezameld.
Voer de verpakking af conform de milieuvoorschriften.
Let op de aanduiding op de verschillende verpakkingsmaterialen en voer ze zo
nodig gescheiden af. De verpakkingsmaterialen zijn voorzien van afkortingen (a)
en cijfers (b) met de volgende betekenis:
1–7: kunststoffen,
20–22: papier en karton,
80–98: composietmaterialen.
De verpakking bestaat uit milieuvriendelijke materialen, die u via de plaatselijke
recyclepunten kunt afvoeren.
■ 74 │ NL
│
BE
SSM 600 B2

Garantie van Kompernaß Handels GmbH
Geachte klant,
U hebt op dit apparaat 3 jaar garantie vanaf de aankoopdatum. In geval van
ge breken in dit product hebt u wettelijke rechten tegenover de verkoper van het
product. Deze wettelijke rechten worden door onze hierna beschreven garantie
niet beperkt.
Garantievoorwaarden
De garantieperiode geldt vanaf de datum van aankoop. Bewaar de kassabon
zorgvuldig. U hebt hem nodig als bewijs van aankoop.
Als er binnen drie jaar vanaf de aankoopdatum van dit product een materiaal- of
fabricagefout optreedt, wordt - naar onze keuze - het product door ons kosteloos
gerepareerd of vervangen of wordt de koopprijs terugbetaald. Voorwaarde voor
deze garantie is dat het defecte apparaat en het aankoopbewijs (kassabon)
binnen de termijn van drie jaar worden overlegd en dat kort wordt omschreven
waaruit het gebrek bestaat en wanneer het is opgetreden.
Wanneer het defect door onze garantie wordt gedekt, krijgt u het gerepareerde
product of een nieuw product retour. Met de reparatie of vervanging van het
product begint er geen nieuwe garantieperiode.
Garantieperiode en wettelijke aanspraken bij gebreken
De garantieperiode wordt door deze waarborg niet verlengd. Dat geldt ook
voor vervangen en gerepareerde onderdelen. Eventueel al bij aankoop aanwezige schade en gebreken moeten meteen na het uitpakken worden gemeld.
Voor reparaties na afloop van de garantieperiode worden kosten in rekening
gebracht.
Garantieomvang
Het apparaat is op basis van strenge kwaliteitsnormen met de grootst mogelijke
zorg vervaardigd en voorafgaand aan de levering nauwkeurig gecontroleerd.
De garantie geldt voor materiaal- of fabricagefouten. Deze garantie geldt niet
voor productonderdelen die onderhevig zijn aan normale slijtage en die daarom
als slijtonderdelen worden beschouwd, of voor schade aan breekbare onderdelen zoals schakelaars, accu‘s of onderdelen die van glas zijn gemaakt.
Deze garantie vervalt wanneer het product is beschadigd, ondeskundig is
gebruikt of is gerepareerd. Voor deskundig gebruik van het product moeten alle
in de gebruiksaanwijzing beschreven aanwijzingen precies worden opgevolgd.
Gebruiksdoeleinden en handelingen die in de gebruiksaanwijzing worden afgeraden of waarvoor wordt gewaarschuwd, moeten beslist worden vermeden.
Het product is uitsluitend bestemd voor privégebruik en niet voor bedrijfsmatige
doeleinden. Bij verkeerd gebruik en ondeskundige behandeling, bij gebruik van
geweld en bij reparaties die niet door ons erkend servicefiliaal zijn uitgevoerd,
vervalt de garantie.
SSM 600 B2
NL│BE
│
75 ■

Afhandeling bij een garantiekwestie
Voor een snelle afhandeling van uw aanvraag neemt u de volgende aanwijzingen
in acht:
■ Houd voor alle aanvragen de kassabon en het artikelnummer
(bijv.IAN12345) als aankoopbewijs bij de hand.
■ Het artikelnummer vindt u op het typeplaatje van het product, op het product
gegraveerd, op de titelpagina van de gebruiksaanwijzing (linksonder) of op
de sticker op de achter- of onderkant van het product.
■ Als er fouten in de werking of andere gebreken optreden, neemt u eerst
contract op met de hierna genoemde serviceafdeling, telefonisch of
viae-mail.
■ Een als defect geregistreerd product kunt u dan zonder portokosten naar het
aan u doorgegeven serviceadres sturen. Voeg het aankoopbewijs (kassabon)
bij en vermeld waaruit het gebrek bestaat en wanneer het is opgetreden.
Op www.lidl-service.com kunt u deze en vele andere handleidingen,
productvideo‘s en installatiesoftware downloaden.
Met deze QR-code gaat u direct naar de website van Lidl Service
(www.lidl-service.com) en kunt u met het invoeren van het artikelnummer
(IAN) 123456 de gebruiksaanwijzing openen.
Service
Service Nederland
Tel.: 0900 0400223 (0,10 EUR/Min.)
E-Mail: kompernass@lidl.nl
Service België
Tel.: 070 270 171 (0,15 EUR/Min.)
E-Mail: kompernass@lidl.be
IAN 339532_1910
Importeur
Let op: het volgende adres is geen serviceadres. Neem eerst contact op met het
opgegeven serviceadres.
KOMPERNASS HANDELS GMBH
BURGSTRASSE 21
44867 BOCHUM
DUITSLAND
www.kompernass.com
■ 76 │ NL
│
BE
SSM 600 B2

Spis tresci
Wprowadzenie ...............................................78
Użytkowanie zgodne z przeznaczeniem ..........................78
Zakres dostawy ..............................................78
Opis urządzenia ..............................................79
Dane techniczne ..............................................79
Wskazówki bezpieczeństwa ....................................80
Rozpakowanie ...............................................82
Ustawianie ..................................................82
Obsługa .....................................................83
Napełnianie i montowanie przystawki miksującej .............................. 83
Wybór stopnia prędkości. . . . . . . . . . . . . . . . . . . . . . . . . . . . . . . . . . . . . . . . . . . . . . . . . . 84
Napełnianie podczas pracy ............................................... 84
Zdejmowanie przystawki miksującej .........................................85
Przydatne wskazówki .........................................85
Przepisy .....................................................86
Shake bananowy ........................................................ 86
Shake waniliowy ........................................................86
Shake Cappucino .......................................................86
Koktajl tropikalny ....................................................... 86
Shake z kremem nugatowo-orzechowym ..................................... 87
Shake marchewkowy ..................................................... 87
Koktajl porzeczkowy .....................................................87
Shake po hawajsku ......................................................87
Owocowy koktajl ananasowo-truskowkowy ...................................88
Chłodnik andaluzyjski (Gazpacho) .......................................... 88
Czyszczenie ..................................................89
Czyszczenie przystawki miksującej ......................................... 89
Czyszczenie bloku silnika ................................................. 91
Po zakończeniu czyszczenia ...............................................91
Przechowywanie .............................................91
Utylizacja ....................................................92
Gwarancja Kompernaß Handels GmbH ...........................93
Serwis ................................................................94
Importer ............................................................... 94
SSM 600 B2
PL
│
77 ■

Wprowadzenie
Gratulujemy Ci zakupu naszego urządzenia.
Jest to produkt wysokiej jakości. Instrukcja obsługi stanowi część tego produktu.
Zawiera ona ważne wskazówki dotyczące bezpieczeństwa, użytkowania i utylizacji
urządzenia. Przed przystąpieniem do użytkowania produktu zapoznaj się z
wszystkimi wskazówkami obsługi i bezpieczeństwa. Używaj produkt zgodnie z
opisem i w podanych obszarach użytkowania. W razie przekazania produktu
następnej osobie, nie zapomnij dołączyć rów nież instrukcji obsługi.
Użytkowanie zgodne z przeznaczeniem
Niniejsze urządzenie jest przeznaczone wyłącznie do …
■ miksowania, przecierania i mieszania produktów spożywczych oraz kruszenia
kostek lodu,
■ przetwarzanie wyłącznie ilości na domowe potrzeby i do użytku prywatnego
w suchych pomieszczeniach.
Do czego nie jest przeznaczone to urządzenie …
■ rozdrabnianie twardych części produktów spożywczych, takich jak np.
orzechy, pestki, duże ziarna lub łodygi,
■ przetwarzanie materiałów innych niż produkty spożywcze,
■ zastosowanie do celów komercyjnych lub przemysłowych,
■ użytkowanie w wilgotnym otoczeniu lub na wolnym powietrzu,
■ przygotowywanie gorących/gotujących się płynów.
Używaj wyłącznie części zamiennych i akcesoriów przeznaczonych do tego urządzenia. Inne części mogą być niewystarczająco dopasowane lub niebezpieczne!
Zakres dostawy
Po rozpakowaniu urządzenia sprawdź, czy w zestawie znajdują się wszystkie
części. Zakres dostawy obejmuje:
▯ blok silnika, z kablem i wtyczką sieciową
▯ przystawka miksująca
▯ pokrywka
▯ przykrywka otworu wlotowego
▯ instrukcja obsługi
■ 78 │ PL
SSM 600 B2
Opis urządzenia
1 przykrywka otworu wlotowego
2 pokrywka
3 przystawka miksująca
4 nóż tnący
5 przełącznik
6 blok silnika
7 schowek na kabel zasilający
8 skala
9 Uszczelka gumowa pokrywki
Dane techniczne
Napięcie nominalne 220 – 240 V ∼ (prąd przemienny), 50 – 60 Hz
Moc znamionowa 600 W
Maksymalne napełnienie
Klasa ochronności
Czas pracy ciągłej
Czas pracy ciągłej określa, jak długo można używać urządzenie bez zagrożenia
sczasu pracy ciągłej urządzenie należy wyłączyć i odczekać aż do całkowitego
ostygnięcia silnika.
1,75 l
(podwójna izolacja)
II /
3 minuty
Wszystkie części tego urządzenia mające
kontakt z żywnością, są do tego odpowiednio
przystosowane.
SSM 600 B2
PL
│
79 ■

Wskazówki bezpieczeństwa
NIEBEZPIECZEŃSTWO PORAŻENIA PRĄDEM
ELEKTRYCZNYM!
► Upewnij się, że blok silnika, kabel sieciowy ani wtyczka nie
są zanurzone w wodzie ani innej cieczy.
► Korzystaj z urządzenia wyłącznie w suchych pomieszczeniach,
nigdy na wolnym powietrzu ani w wilgotnych pomieszczeniach.
► Zwróć uwagę, czy kabel w trakcie użytkowania urządzenia
nie był wilgotny ani mokry. Kabel układać w taki sposób, aby
nie został on zakleszczony lub uszkodzony w inny sposób.
► Naprawę uszkodzonej wtyczki lub kabla sieciowego zleć
niezwłocznie wykwalifikowanemu personelowi lub serwisowi
klienta.
► Po zakończeniu używania należy zawsze wyciągnąć wtyczkę
z gniazdka. Samo wyłączenie urządzenia nie wystarczy,
gdyż jest ono nadal pod-łączone do napięcia sieci, dopóki
wtyczka sieciowa znajduje się w gniazdku.
► Przed każdym użyciem sprawdź stan urządzenia. Nie wolno
używać urządzenia w przypadku widocznych uszkodzeń,
w szczególności jeśli uszkodzenia dotyczą bloku silnika lub
przystawki miksującej.
► W przypadku stwierdzenia nietypowych odgłosów pracy
urządzenia lub zauważenia usterek jak najszybciej wyciągnij
wtyczkę z gniazdka.
ZAGROŻENIE ODNIESIENIEM OBRAŻEŃ!
► Nigdy nie wkładaj rąk do przystawki miksującej, szczególnie
podczas pracy urządzenia. Noże są bardzo ostre!
► Nigdy nie otwieraj pokrywy, gdy urządzenie znajduje się w
trakcie pracy.
► Nie wolno pozostawiać żelazka parowego bez nadzoru,
gdy jestpodłączone do sieci.
■ 80 │ PL
SSM 600 B2

ZAGROŻENIE ODNIESIENIEM OBRAŻEŃ!
► W czasie pracy urządzenia nigdy nie wkładaj do przystawki
miksującej sztućców ani żadnych przyrządów do mieszania.
Występuje poważne niebezpieczeństwo odniesienia obrażeń
gdy włożone przedmioty dotkną obracających się z dużą
prędkością noży.
► Dzieci nie mogą bawić się urządzeniem.
► Nie używaj urządzenia do innych celów niż opisane w tej
instrukcji.
► Nieprawidłowe użycie urządzenia powoduje niebezpie-
czeństwo powstania obrażeń.
► Przy braku nadzoru oraz przed montażem, złożeniem, rozło-
żeniem lub czyszczeniem należy zawsze odłączać urządzenie
od zasilania sieciowego.
► Dzieci nie mogą posługiwać się urządzeniem.
► Urządzenie oraz jego kabel zasilający należy trzymać poza
zasięgiem dzieci.
► To urządzenie może być używane przez osoby o zmniejszonych
zdolnościach fizycznych, sensorycznych lub umysłowych lub
też osoby nieposiadające odpowiedniego doświadczenia i/
lub wiedzy, wyłącznie pod nadzorem lub po przeszkoleniu w
zakresie bezpiecznego używania urządzenia oraz wynikających
z niego zagrożeń.
► Nie można pozwolić dzieciom na zabawę urządzeniem.
► Zachowaj ostrożność podczas posługiwania się urządze-
niem. Ostrza są bardzo ostre!
► Podczas opróżniania pojemnika do miksowania zachowaj
ostrożność! Ostrza są bardzo ostre!
► Podczas czyszczenia urządzenia zachowaj ostrożność!
Ostrza są bardzo ostre!
► Zanim zaczniesz zmieniać akcesoria lub dotkniesz części,
które w trakcie pracy urządzenia się poruszają, wyłącz
urządzenie i wyjmij wtyczkę sieciową z gniazda.
SSM 600 B2
PL
│
81 ■

ZAGROŻENIE ODNIESIENIEM OBRAŻEŃ!
► Należy się upewnić, aby mikser był zawsze wyłączony, zanim
zacznie zdejmować się przystawkę miksującą z bloku silnika!
► Przystawkę miksującą należy używać wyłącznie z dołączonym
do niej blokiem silnika.
UWAGA! SZKODY MATERIALNE!
► Nigdy nie używaj urządzenia w obszarze bezpośredniego
działania promieni słonecznych ani oddziaływania cieplnego
przez urządzenia wytwarzające ciepło.
► Nigdy nie wlewaj do przystawki miksującej wrzących płynów!
Najpierw odczekaj, aż ostygną.
► Nigdy nie używaj urządzenia bez uprzedniego dodania
składników, np. bez składników w końcówce miksującej.
Rozpakowanie
■ Zdejmij z urządzenia wszystkie elementy opakowania lub folie ochronne.
Zachowaj opakowanie w celu bezpiecznego przechowywania urządzenia
lub umożliwienia jego odesłania, np. w razie naprawy.
■ Zanim przystąpisz do korzystania z urządzenia upewnij się, czy urządzenie,
w tym jego kabel sieciowy z wtyczką oraz wszystkie akcesoria i elementy
wyposażenia nie uległy uszkodzeniu.
■ Przed pierwszym użyciem miksera starannie wymyj wszystkie elementy
(zobacz „Czyszczenie”).
Ustawianie
Po wyczyszczeniu wszystkich części, jak opisano w rozdziale „Czyszczenie”:
■ Jak należy ustawić urządzenie, …
– by kabel sieciowy wychodził przez otwór z tyłu,
– wtyczka musi się znajdować w łatwo dostępnym miejscu, by móc ją
szybko wyciągnąć z gniazdka w razie wystąpienia niebezpieczeństwa.
– aby stało ono stabilnie na podstawie i możliwe było przyssanie się
przyssawek uniemożliwiając w ten sposób przewrócenie się urządzenia po wystąpieniu drgań.
– kabel sieciowy nie może sięgać do obszaru roboczego, ponieważ
przypadkowe pociągnięcie za kabel mogłoby spowodować przewrócenie
urządzenia.
■ 82 │ PL
SSM 600 B2
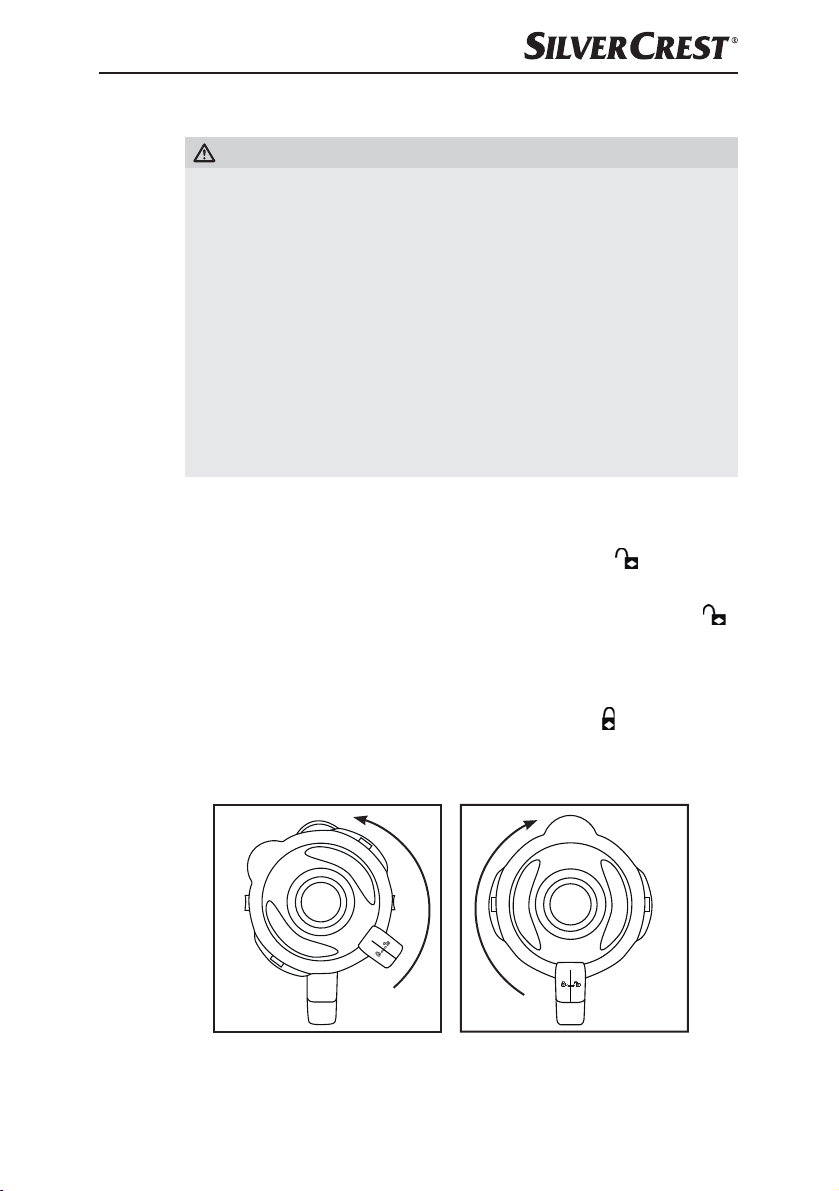
Obsługa
OSTRZEŻENIE!
► Silnik wyłącza się, gdy tylko przystawka miksująca 3 zostanie zdjęta z
bloku silnika 6 lub po otwarciu pokrywki 2. W związku z tym można
przeoczyć, że maszyna pozostaje w dalszym ciągu włączona. Silnik
uruchamia się wtedy nagle, gdy tylko przystawka miksująca 3 zostanie
zamontowana lub ponownie zamknie się pokrywkę 2.
Dlatego:
– Podłączaj wtyczkę do gniazdka dopiero wtedy, gdy przystawka
miksująca
– Zawsze przed przystąpieniem do zamontowania upewnij się, że urzą-
dzenie jest wyłączone lub wtyczka wyciągnięta z gniazdka.
– Najpierw wyłącz urządzenie, wyciągnij wtyk sieciowy i odczekaj do
pełnego zatrzymania silnika, zanim zdejmiesz przystawkę miksującą 3
lub otworzysz pokrywkę 2.
Napełnianie i montowanie przystawki miksującej
1) Nakręć przystawkę miksującą 3 obracając ją w lewo, aż strzałka T pod
uchwytem przystawki miksującej znajdzie się nad pozycją
przystawkę miksującą 3 prosto z bloku silnika 6.
2) Zdemontuj pokrywkę 2, obracając ją na tyle w lewo w kierunku pozycji
(patrz rys. 1), aż będzie można ją zdjąć do góry.
3) Napełnij przystawkę miksującą 3.
4) Wciśnij z przesunięciem pokrywkę 2 ponownie na przystawkę miksującą 3.
Zamknij pokrywkę 2, obracając ją w prawo w pozycję
w słyszalny sposób (patrz rys. 2). Upewnij się, że dziobek do wylewania
przystawki miksującej 3 jest zamknięty. Silnik uruchomi się tylko wtedy, gdy
pokrywka 2 jest dokładnie założona.
3
będzie do końca zapełniona i założona z zamknięciem.
. Zdejmij
, aż się zatrzaśnie
SSM 600 B2
Rys. 1 Rys. 2
PL
│
83 ■

5) Włóż przykrywkę otworu wlotowego 1 w otwór przykrywki i obróć ją
dokręcając w prawo.
6) Załóż napełnioną i zamkniętą przystawkę miksującą 3 na blok silnika 6.
W tym celu użyj otworów na bloku silnika 6 i upewnij się, że strzałka T
na przystawce miksującej wskazuje na symbol
jącą 3 w prawo, w pozycję
się tylko wtedy, gdy przystawka miksująca 3 zostanie dokładnie założona.
Wybór stopnia prędkości
Gdy przystawka miksująca 3 jest napełniona i całkowicie zamknięta i znajduje
się na bloku silnika 6, można włączyć urządzenie.
Ustaw przełącznik 5 na …
■ Stopień 1 – 3
do płynnych i średniostałych produktów spożywczych, do mieszania,
przecierania i ubijania
■ Stopień 3 – 5
do stałych produktów spożywczych lub do rozdrabniania
■ Stopień Ice Crush/Clean
do krótkotrwałej, intensywnej pracy impulsowej, np. do kruszenia kostek
lodu lub do czyszczenia. Przełącznik prędkości 5 nie blokuje się w tym
położeniu, żeby nie powodować nadmiernego przeciążania silnika. Z tego
powodu przełącznik prędkości 5 przytrzymaj chwilę w tym położeniu.
WSKAZÓWKA
► W przystawce miksującej 3 mieści się maksymalnie 180 g kostek lodu.
Urządzenie nie przerobi optymalnie większej ilości kostek lodu.
. Obróć przystawkę miksu-
, aż się słyszalnie zatrzaśnie. Silnik uruchomi
Napełnianie podczas pracy
OSTRZEŻENIE!
► By uzupełnić składniki podczas pracy, należy to wykonywać wyłącznie
przez przewidzianą do tego przykrywkę otworu wlotowego 1. Nigdy nie
otwieraj pokrywki 2.
► Nigdy nie wkładaj do przystawki miksującej 3 sztućców ani żadnych
przyrządów do mieszania podczas pracy urządzenia. Występuje poważne
niebezpieczeństwo odniesienia obrażeń gdy włożone przedmioty dotkną
obracających się z dużą prędkością noży tnących 4.
Uzupełnianie produktów podczas pracy urządzenia, …
1) Wyciągnij przykrywkę otworu wlotowego 1 z pokrywki 2.
2) Dodaj składniki.
3) Następnie wciśnij przykrywkę otworu wlotowego 1 ponownie w otwór w
pokrywce.
■ 84 │ PL
SSM 600 B2

Zdejmowanie przystawki miksującej
Po zakończeniu obróbki napełnionych produktów spożywczych:
1) Ustawiaj zawsze najpierw przełącznik 5 w położeniu wyłączonym („0”)
i następnie wyciągnij wtyk sieciowy z gniazda.
2) Odczekaj najpierw do pełnego zatrzymania silnika, zanim zdejmiesz
przystawkę miksującą 3 z bloku silnika 6. W tym celu obróć przystawkę
miksującą 3 obracając ją w lewo, aż strzałka T pod uchwytem przystawki
miksującej znajdzie się nad pozycją
prosto z bloku silnika 6.
. Zdejmij przystawkę miksującą 3
Przydatne wskazówki
■ Aby podczas przecierania stałych składników osiągnąć lepsze wyniki, należy
dodawać je do przystawki miksującej 3 po kolei w małych porcjach, zamiast
wkładania jednorazowo sporej ilości.
■ Podczas obróbki składników stałych, należy pokroić je na drobniejsze
kawałki (2 – 3 cm).
■ Podczas miksowania składników płynnych miksowanie należy rozpocząć
przede wszystkim z nieznaczną ilością płynu. Następnie należy dodawać
coraz więcej płynu przez otwór w pokrywie.
■ Przykładając rękę do górnej części zamkniętego miksera można skutecznie
usztywnić urządzenie.
■ Przy mieszaniu twardych lub gęstych produktów przydatne może być użycie
trybu Ice Crush/Clean, aby zapobiec zablokowaniu się noża tnącego 4.
WSKAZÓWKA
SSM 600 B2
► Nie używaj urządzenia do rozdrabniania soli ani do robienia cukru pudru
z cukru rafinowanego lub cukru białego.
│
PL
85 ■

Przepisy
Shake bananowy
▯ 2 banany
▯ około 2 łyżek cukru
(w zależności od stopnia dojrzałości bananów i własnych preferencji
smakowych)
▯ ½ litra mleka
▯ 1 pryśnięcie soku z cytryny
Banany obieramy ze skórki i miksujemy na 2 stopniu prędkości. Stopniowo
dodajemy mleko, następnie cukier i sok z cytryny. Całość miksujemy dotąd,
aż powstanie jednorodny napój. Shake podajemy mocno zmrożony.
Shake waniliowy
▯ ¼ litra mleka
▯ 250 g lodów waniliowych
▯ 125 g kostek lodu
▯ 1 ½ łyżeczki cukru
Kostki lodu kruszymy na stopniu Ice Crush/Clean. Dodajemy pozostałe produkty
do miksera. Miksujemy wszystko na stopniu 2, aż powstanie jednolity płyn.
Shake Cappucino
▯ 65 ml zimnej kawy Espresso (lub bardzo mocnej zwykłej kawy)
▯ 65 ml mleka
▯ 15 g cukru
▯ 65 g lodów waniliowych
▯ 100 g kostek lodu
Kostki lodu kruszymy na stopniu Ice Crush/Clean. Dodajemy kawę Espresso,
mleko i cukier. Całość miksujemy na 2 stopniu, aż cukier się rozpuści. Na
końcu dodajemy lody waniliowe i miksujemy przez chwilę na 1 stopniu.
Koktajl tropikalny
▯ 125 ml soku ananasowego
▯ 60 ml soku z papai
▯ 50 ml soku pomarańczowego
▯ ½ mała puszka brzoskwiń z sokiem
▯ 125 g kostek lodu
Kostki lodu kruszymy na stopniu Ice Crush/Clean. Wkładamy wszystkie składniki
do miksera i całość mieszamy na stopniu 3.
■ 86 │ PL
SSM 600 B2

Shake z kremem nugatowo-orzechowym
▯ ½ litra mleka
▯ 200 g kremu nugatowo-orzechowego
▯ 1 gałka lodów waniliowych
▯ 50 ml śmietany
Wszystkie składniki mieszamy w mikserze na stopniu 3, aż do powstania
jednorodnego napoju.
Shake marchewkowy
▯ 300 ml soku jabłkowego
▯ 500 ml soku marchwiowego
▯ 4 łyżki oleju (z kiełków pszenicznych lub rzepakowego)
▯ 4 łyżki soku z cytryny
▯ Imbir w proszku
▯ Pieprz
Sok jabłkowy, olej i sok z cytryny umieszczamy w mikserze i wszystko mieszamy
na 2 stopniu. Następnie dolewamy soku marchwiowego i mieszamy dalej na
2 stopniu. Shake doprawiamy imbirem w proszku i pieprzem.
Koktajl porzeczkowy
▯ 2 łyżeczki miodu
▯ 2 banany
▯ ¼ litra maślanki
▯ ¼ litra soku porzeczkowego (z czarnych porzeczek)
Wkładamy wszystkie składniki do miksera i całość mieszamy na 3 stopniu.
Shake po hawajsku
▯ 4 banany
▯ ¼ litra soku ananasowego
▯ ½ litra mleka
▯ 2 łyżki stołowe miodu
▯ ¼ litra rumu
Banany obieramy ze skórki i miksujemy na 2 stopniu prędkości. Dodajemy
pozostałe składniki i całość mieszamy na 1 stopniu.
SSM 600 B2
PL
│
87 ■

Owocowy koktajl ananasowo-truskowkowy
▯ 250 ml soku ananasowego
▯ 200 g truskawek
▯ 300 ml soku jabłkowego
▯ 4 kostki lodu
Truskawki myjemy i oddzielamy szypułki. Kostki lodu kruszymy na stopniu Ice
Crush/Clean. Miksujemy na 2 stopniu. Następnie dodajemy pozostałe składniki i
całość miksujemy na 1 stopniu.
Chłodnik andaluzyjski (Gazpacho)
▯ ½ ogórka
▯ 1 mięsisty pomidor
▯ 1 zielona papryka
▯ ½ cebula
▯ 1 ząbek czosnku
▯ ½ bułki pszennej
▯ ½ łyżeczki soli
▯ 1 łyżeczka czerwonego octu winnego
▯ 1 łyżka oliwy z oliwek
Warzywa kroimy na kawałki o wielkości 2 cm.
Do miksera wkładamy najpierw pomidory, a następnie ogórki. Warzywa
miksujemy na 3 stopniu. Dodajemy pozostałe składniki i miksujemy/mieszamy
całość na 3 stopniu, aż do uzyskania jednorodnej konsystencji zupy. Chłodnik
podajemy z chlebem.
■ 88 │ PL
WSKAZÓWKA
► Przepisy bez gwarancji. Wszystkie składniki i dane o przygotowaniu są
wartościami orientacyjnymi. Uzupełnij niniejsze przepisy własnymi dodatkami.
WSKAZÓWKA
► W przypadku nietolerancji laktozy zalecamy stosowanie mleka bezlak-
tozowego. Należy przy tym pamiętać, że mleko bezlaktozowe jest nieco
słodsze.
SSM 600 B2

Czyszczenie
NIEBEZPIECZEŃSTWO PORAŻENIA PRĄDEM ELEKTRYCZNYM!
Przed przystąpieniem do czyszczenia miksera i jego elementów:
► Upewnić się, czy urządzenie jest wyłączone, a wtyczka sieciowa jest
wyjęta z gniazdka.
Bloku silnika 6 nie wolno w żadnym wypadku zanurzać w wodzie ani
nie narażać w żaden innych sposób na działanie wilgoci. Może stwarzać to niebezpieczeństwo śmiertelnego porażenia prądem elektrycznym i uszkodzenia urządzenia.
► Nigdy nie otwieraj obudowy urządzenia. Inaczej zachodzi niebezpieczeń-
stwo wypadku lub śmiertelne niebezpieczeństwo porażenia prądem.
OSTRZEŻENIE! NIEBEZPIECZEŃSTWO OBRAŻEŃ!
► Nigdy nie zdejmuj noży tnących 4 ani nigdy nie wkładaj rąk do przystaw-
ki miksującej 3. Noże tnące 4 są bardzo ostre!
UWAGA! SZKODY MATERIALNE!
►
Nigdy nie używaj rozpuszczalników ani środków szorujących do powierzchni z tworzywa sztucznego. Groziłoby to ich uszkodzeniem.
Czyszczenie przystawki miksującej
■ Przystawkę miksującą 3 czyść wyłącznie szczotką na długim drążku, by
uniknąć dotykania noży tnących 4 rękoma.
■ Umyj przykrywkę otworu wlotowego 1 i pokrywkę 2 w łagodnym
roztworze wody z mydłem. Upewnij się, że gumowa uszczelka 9 jest prawidłowo osadzona, zanim ponownie użyjesz pokrywki 2.
WSKAZÓWKA
SSM 600 B2
Pokrywkę 2, przykrywkę otworu wlotowego 1 oraz przystawkę
miksującą 3 z nożem tnącym 4 można również myć w zmywarce
do naczyń.
■ Przy zachowaniu zasady mycia miksera bezpośrednio po użyciu, w więk-
szości wypadków uzyskuje się dostateczną czystość higieniczną poprzez
następującą alternatywę:
Do końcówki miksującej 3 wlej 750 ml wody i dodaj kilka kropel łagodnego
płynu do mycia naczyń. Załóż pokrywkę 2 i umieść końcówkę miksującą 3 na
bloku silnika 6. Podłącz wtyczkę do gniazdka sieciowego i kilka razy uruchom
urządzenie w trybie Ice Crush/Clean tak, by noże tnące 4 z maksymalną pręd-
kością przepłukały się w wodzie. Następnie końcówkę miksującą 3 przepłucz
obficie wodą, aż do usunięcia pozostałości płynu do mycia naczyń.
│
PL
89 ■

■ Aby łatwiej usuwać trudne do wyczyszczenia zabrudzenia, możesz zdemon-
tować dolną część plastikową przystawki miksującej 3 z nożem tnącym 4
z górnej części plastikowej przystawki miksującej 3:
C
B
A
Rys. 3
A górna część plastikowa
B nóż
C dolna część plastikowa
1) Zdejmij przystawkę miksującą 3 z bloku silnika 6. W celu zapewnienia
lepszej stabilności zdemontuj pokrywkę 2, obracając ją na tyle w lewo
w kierunku pozycji
2) bróć urządzenie do góry nogami i odkręć plastikową część C przystawki
miksującej 3 w lewo, aby odłączyć ją od górnej plastikowej części A
przystawki miksującej 3 (patrz rys. 3).
(patrz rys. 1), aż będzie można ją zdjąć do góry.
■ 90 │ PL
OSTRZEŻENIE! NIEBEZPIECZEŃSTWO OBRAŻEŃ!
► Zachować ostrożność podczas obchodzenia się z nożami B!
Są one bardzo ostre.
Niebezpieczeństwo obrażeń!
3) Umyj obie części dokładnie łagodnym roztworem wody z mydłem.
SSM 600 B2

WSKAZÓWKA
Górną część plastikową A przystawki miksującej 3 oraz nóż
tnący4 z dolną częścią plastikową C można również myć w
zmywarce do naczyń.
4) Przed montażem osusz wszystkie elementy dokładnie.
5) Załóż dolną plastikową część C przystawki miksującej 3 ponownie na
górną plastikową część A przystawki miksującej 3 i obróć ją w prawo,
aby dokręcić.
Czyszczenie bloku silnika
1) Do czyszczenia używaj suchej lub najwyżej delikatnie zwilżonej szmatki.
2) Przy każdym czyszczeniu sprawdź, czy resztki zanieczyszczeń nie blokują
przełącznika stykowego w mocowaniu przystawki miksującej 3. Gdy nie
można usunąć kartką papieru ewentualnych zanieczyszczeń w narożnikach,
zwrócić się do serwisu. Nigdy nie używaj twardych przedmiotów, ponieważ
mogłyby one zniszczyć przełącznik stykowy.
3) Ewentualne zabrudzenia pod blokiem silnika 6 usuwaj wyłącznie suchą
szmatką lub pędzelkiem. Uważaj, by przez otwory wentylacyjne do środka
urządzenia nie przedostały się żadne przedmioty.
Po zakończeniu czyszczenia
Przed złożeniem miksera do ponownego użytku dokładnie wysusz wszystkie
elementy.
Przechowywanie
1) Jeśli zamierzasz odstawić mikser na dłuższy okres czasu, dokładnie go
wyczyść (patrz rozdział „Czyszczenie”).
2) Nawiń kabel sieciowy w schowku na kabel zasilający 7 pod blokiem
silnika 6.
3) Mikser trzymaj w chłodnym, suchym miejscu.
SSM 600 B2
PL
│
91 ■

Utylizacja
W żadnym przypadku nie wyrzucaj urządzenia do zwykłych
śmieci domowych. Ten produkt podlega dyrektywie europejskiej
2012/19/EU.
Zużyte urządzenie należy oddać do certyfikowanego zakładu utylizacji odpadów lub do komunalnego zakładu oczyszczania. Należy przestrzegać aktualnie
obowiązujących przepisów. W razie pytań i wątpliwości odnośnie do zasad
utylizacji należy zwrócić się do miejscowego zakładu utylizacji odpadów.
Informacji na temat możliwości utylizacji wyeksploatowanego produktu udziela
urząd gminy lub miasta.
Produkt można poddać recyklingowi, podlega rozszerzonej odpowiedzialności
producenta i jest zbierany w ramach systemu segregacji odpadów.
Opakowania należy utylizować w sposób przyjazny dla środowiska.
Przestrzegać oznaczeń na różnych materiałach opakowaniowych i w razie
potrzeby utylizuj je zgodnie z zasadami segregacji odpadów. Materiały
opakowaniowe są oznaczone skrótami (a) i cyframi (b) w następujący sposób:
1–7: tworzywa sztuczne,
20–22: papier i tektura,
80–98: kompozyty.
Opakowanie urządzenia jest wykonane z materiałów przyjaznych dla środowiska naturalnego, które można zutylizować w lokalnych punktach recyklingu.
■ 92 │ PL
SSM 600 B2

Gwarancja Kompernaß Handels GmbH
Szanowny Kliencie,
To urządzenie objęte jest 3-letnią gwarancją, licząc od daty zakupu. W przypadku
wad tego produktu, masz gwarantowane ustawowo prawa w stosunku sprzedawcy.
Te ustawowe prawa nie są ograniczone przez nasze opisane poniżej warunki
gwarancji.
Warunki gwarancji
Okres gwarancji rozpoczyna się od daty zakupu. Należy zachować paragon.
Jest on wymagany jako dowód zakupu.
Jeżeli w ciągu trzech lat od daty zakupu produktu ujawni się w nim wada materiałowa lub produkcyjna, produkt zostanie wedle naszego uznania nieodpłatnie
naprawiony, wymieniony na nowy lub zostanie zwrócona jego cena. Warunkiem spełnienia tego świadczenia gwarancyjnego jest dostarczenie w trakcie
tego trzyletniego okresu uszkodzonego urządzenia wraz z dowodem zakupu
(paragonem) oraz krótkim opisem wady i daty jej wystąpienia.
Jeżeli wada jest objęta naszą gwarancją, otrzymasz z powrotem naprawiony lub
nowy produkt.
Okres gwarancji i ustawowe roszczenia gwarancyjne
Wykonanie usługi gwarancyjnej nie przedłuża okresu gwarancji. Dotyczy to
również wymienionych i naprawionych części. Wszelkie szkody i wady wykryte
w chwili zakupu należy zgłosić bezpośrednio po rozpakowaniu urządzenia. Po
upływie okresu gwarancji wszelkie naprawy są wykonywane odpłatnie.
Zakres gwarancji
Urządzenie zostało starannie wyprodukowane i poddane przed wysyłką skrupulatnej kontroli jakości.
Gwarancja obejmuje wady materiałowe lub produkcyjne. Niniejsza gwarancja nie obejmuje części produktu, podlegających normalnemu zużyciu, ani
uszkodzeń części łatwo łamliwych, np. przełączników, akumulatorów, lub części
wykonanych ze szkła.
Niniejsza gwarancja traci swoją ważność, jeśli produkt został uszkodzony, nie
używano go prawidłowo lub nie serwisowano należycie. W celu zapewnienia
prawidłowego stosowania produktu należy ściśle przestrzegać wszystkich instrukcji
wymienionych w instrukcjach obsługi. Należy bezwzględnie unikać zastosowania
oraz postępowania, których odradza się w instrukcji obsługi lub przed którymi
się w niej ostrzega.
Produkt przeznaczony jest wyłącznie do użytku domowego, a nie do zastosowań komercyjnych. Niewłaściwe użytkowanie urządzenia, używanie go w sposób niezgodny
z jego przeznaczeniem, użycie siły lub ingerencja w urządzenie, dokonywana
poza naszymi autoryzowanymi punktami serwisowymi, powodują utratę gwarancji.
SSM 600 B2
PL
│
93 ■

Realizacja zobowiązań gwarancyjnych
W celu zapewnienia szybkiego załatwienia sprawy, postępuj zgodnie z poniższymi wskazówkami:
■ W przypadku wszelkich pytań przygotuj paragon fiskalny oraz numer artykułu
(np. IAN12345) jako dowód zakupu.
■ Numer artykułu można znaleźć na tabliczce znamionowej na produkcie, wy-
grawerowany na urządzeniu, zapisany na stronie tytułowej instrukcji obsługi
(w dolnym lewym rogu) lub na naklejce ztyłu bądź na spodzie urządzenia.
■ W przypadku wystąpienia błędów działania lub innych wad, prosimy o
kontakt z odpowiednim działem serwisu telefonicznie lub przez e-mail.
■ Zarejestrowany jako wadliwy produkt możesz wtedy wraz z dołączonym do-
wodem zakupu (paragonem) oraz opisem i datą wystąpienia usterki wysłać
nieodpłatnie na przekazany wcześniej adres serwisu.
Na stronie www.lidl-service.com możesz pobrać te i wiele innych instrukcji,
filmów o produktach oraz oprogramowanie instalacyjne.
Za pomocą tego kodu QR możesz przejść bezpośrednio na stronę serwisu
Lidl (www.lidl-service.com), gdzie możesz otworzyć instrukcję obsługi, wpisując numer artykułu (IAN) 123456.
Serwis
Serwis Polska
Tel.: 22 397 4996
E-Mail: kompernass@lidl.pl
IAN 339532_1910
Importer
■ 94 │ PL
Pamiętaj, że poniższy adres nie jest adresem serwisu. Skontaktuj się najpierw
z odpowiednim punktem serwisowym.
KOMPERNASS HANDELS GMBH
BURGSTRASSE 21
44867 BOCHUM
NIEMCY
www.kompernass.com
SSM 600 B2

Obsah
Úvod ........................................................96
Účel použití ..................................................96
Obsah balení ................................................96
Popis přístroje ................................................97
Technické údaje ...............................................97
Bezpečnost ..................................................98
Vybalení ...................................................100
Umístění ....................................................100
Obsluha ....................................................101
Naplnění a montáž mixovacího nástavce ...................................101
Volba stupně rychlosti ...................................................102
Plnění za provozu ......................................................102
Sejmutí mixovacího nástavce ..............................................103
Užitečné pokyny .............................................103
Recepty ....................................................104
Banánový shake .......................................................104
Vanilkový shake ........................................................104
Cappucino shake .......................................................104
Tropical mix ...........................................................104
Nugátovo-ořechový shake ................................................105
Mrkvový shake .........................................................105
Rybízový mix ..........................................................105
Hawaii shake ..........................................................105
Ovocný ananasovo-jahodový mix ..........................................106
Andaluská studená polévka (gazpacho) .....................................106
Čištění .....................................................107
Čištění mixovacího nástavce ..............................................107
Čištění bloku motoru ....................................................109
Po čištění .............................................................109
Úschova ....................................................109
Likvidace ...................................................110
Záruka společnosti Kompernass Handels GmbH. . . . . . . . . . . . . . . . . . .111
Servis ................................................................112
Dovozce ..............................................................112
SSM 600 B2
CZ
│
95 ■

Úvod
Gratulujeme!
Vám k zakoupení nového přístroje.Vaším nákupem jste si vybrali kvalitní výrobek.
Návod k obsluze je součástí tohoto výrobku. Obsahuje důležité pokynya upozornění ohledně bezpečnosti, použití a likvidace. Před použitím výrobku si dobře
přečtěte provozní a bezpečnostní pokyny. Výrobek používejte pouze předepsaným způsobem a v uvedených oblastech použití. Při předávání výrobku třetím
osobám předávejte i tyto podklady.
Účel použití
Tento přístroj je určen výlučně pro …
■ míchání, mixování a míšení potravin a drcení kostek ledu (tzv. „Crushen“),
■ soukromému domácímu použití v suchých místnostech, pro potraviny v
běžném množství.
Tento přístroj není určen ke …
■ drcení tvrdých potravin, jako např. ořechů, jader, velkých zrnin nebo stonků
rostlin,
■ zpracování materiálů, které nejsou potravinami,
■ živnostenské nebo průmyslové použití,
■ použití ve vlhkém prostředí nebo venku,
■ zpracování horkých/vroucích tekutin.
Používejte pouze příslušenství a náhradní díly, které jsou určeny pro tento přístroj.
Jiné díly nemusí být dostatečně vhodné nebo bezpečné!
Obsah balení
Po vybalení zkontrolujte kompletnost dodávky. Balení obsahuje:
▯ blok motoru se síťovým kabelem a zástrčkou
▯ mixovací nástavec
▯ víko
▯ plnicí kryt
▯ návod k obsluze
■ 96 │ CZ
SSM 600 B2
Popis přístroje
1 Plnicí kryt
2 Víko
3 mixovací nástavec
4 řezací nůž
5 spínač
6 Blok motoru
7 Navíjení kabelu
8 Stupnice
9 Gumové těsnění víka
Technické údaje
Jmenovité napětí 220 – 240 V ∼ (střídavý proud), 50 – 60 Hz
Jmenovitý výkon 600 W
Max. možnost naplnění
Třída ochrany
Doba nepřetržitého mixování
Krátká provozní doba udává, jak dlouho je možné s přístrojem pracovat, aniž by
se přehřál, a tím poškodil motor. Po uplynutí udané krátké provozní doby musí
zůstat přístroj vypnutý do té doby, než motor zchladne.
1,75litrů
(dvojitá izolace)
II /
3 minuty
Všechny části tohoto přístroje, přicházející
do styku s potravinami, jsou bezpečné pro
potraviny.
SSM 600 B2
CZ
│
97 ■
 Loading...