

Page 1
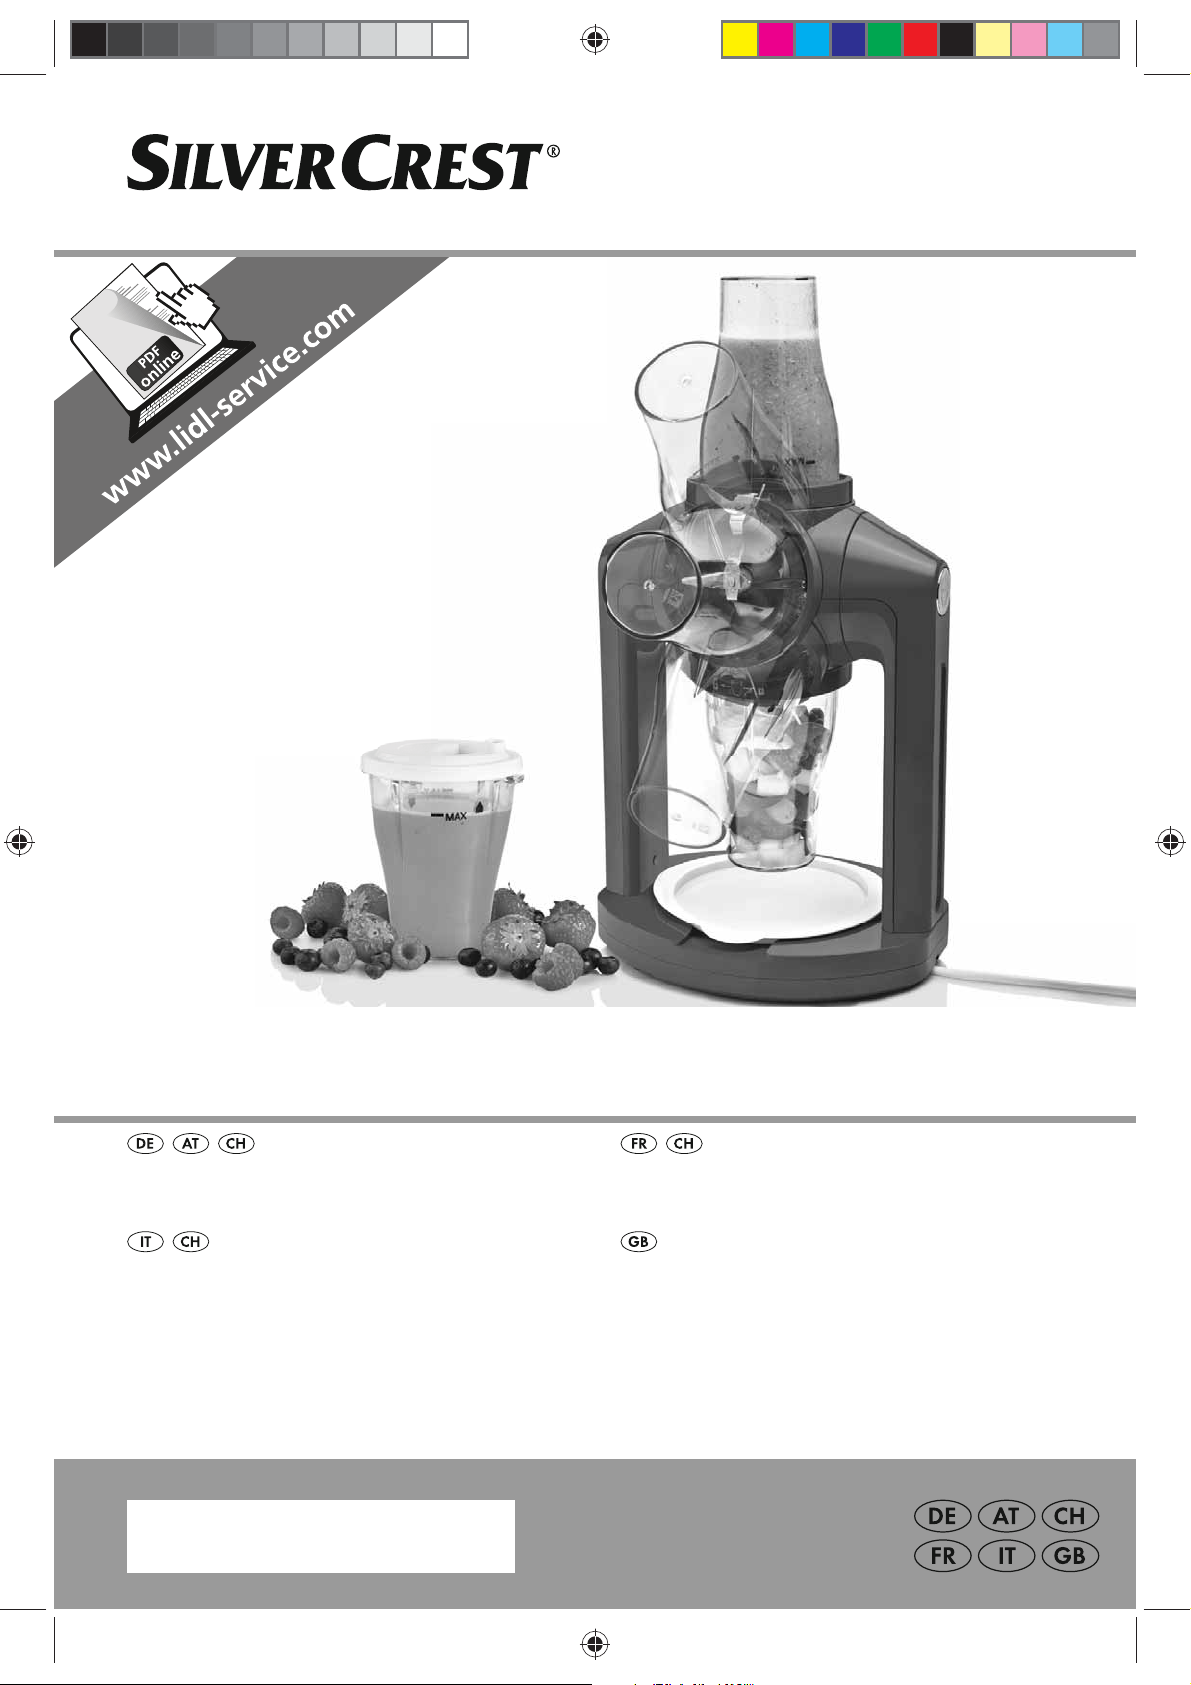
SMOOTHIE-MIXER SSM 175 B2
SMOOTHIE-MIXER
Bedienungsanleitung
MIXER PER FRULLATO
Istruzioni per l’uso
IAN 103371
RP103371_Smoothie Mixer_Cover_LB1.indd 2 28.10.14 13:08
BLENDER À SMOOTHIE
Mode d’emploi
SMOOTHIE MAKER
Operating instructions
Page 2
RP103371 Ausklapp.fm Seite 1 Dienstag, 25. November 2014 6:32 18
Deutsch.................................................................................... 2
Français ................................................................................. 12
Italiano .................................................................................. 22
English................................................................................... 32
ID: SSM 175 B2_15_V1.3
Page 3
__RP103371_B1.book Seite 2 Freitag, 21. November 2014 1:14 13
Übersicht / Aperçu de l'appareil / Panoramica / Overview
14
13
1
2
3
4
5
6
A
12
7
11
10
8
9
B
0
6
1
2
0
6
1
2
C
4
D
14
5
9
4
13
6
Page 4

__RP103371_B1.book Seite 2 Freitag, 21. November 2014 1:14 13
Inhalt
1. Übersicht ......................................................................................... 2
2. Bestimmungsgemäßer Gebrauch ...................................................... 3
3. Sicherheitshinweise ......................................................................... 3
4. Lieferumfang ................................................................................... 6
5. Inbetriebnahme ............................................................................... 6
6. Bedienung ....................................................................................... 6
7. Reinigen .......................................................................................... 7
8. Aufbewahrung ................................................................................ 8
9. Entsorgen ........................................................................................ 8
10. Problemlösung ................................................................................ 9
11. Rezepte ........................................................................................... 9
12. Technische Daten ........................................................................... 10
13. Garantie der HOYERHandel GmbH ................................................ 10
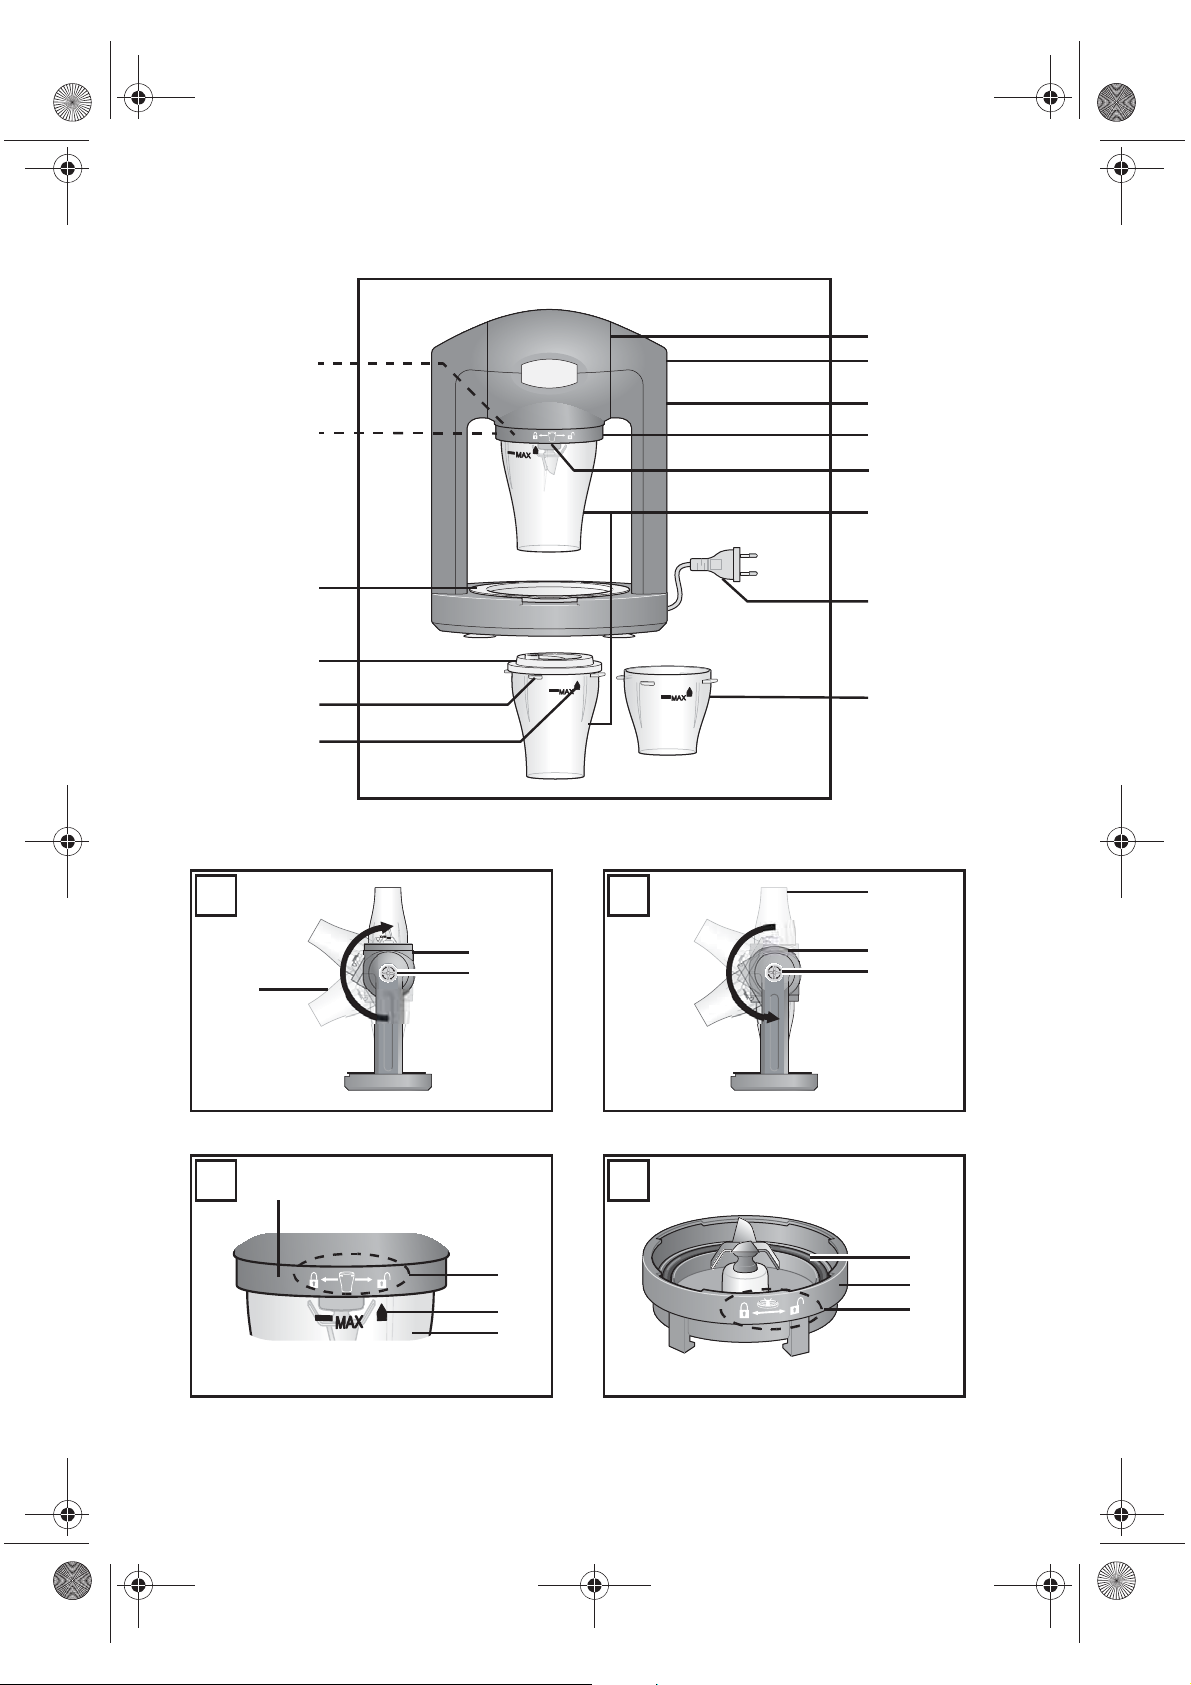
1. Übersicht
1 Motoreinheit (schwenkbar)
2 Mixtaste
3 Gehäuse
4 Messeraufsatz mit Klingen
5 Schlossmarkierungen für die Becherarretierung
6 Becher: maximale Füllmengen ca. 390 und 290ml
7 Anschlussleitung mit Netzstecker
8 Reinigungsbecher
9 Markierung am Becher
10 Verriegelungsflügel
11 Deckel mit Trinköffnung
12 Auffangschale
13 Schlossmarkierungen für die Messeraufsatzarretierung
14 Dichtungsring im Messeraufsatz
2
DE
Page 5
__RP103371_B1.book Seite 3 Freitag, 21. November 2014 1:14 13
Herzlichen Dank für Ihr
Vertrauen!
Wir gratulieren Ihnen zu Ihrem neuen
Smoothie-Mixer.
Für einen sicheren Umgang mit dem Gerät
und um den ganzen Leistungsumfang kennenzulernen:
• Lesen Sie vor der ersten Inbetriebnahme diese Bedienungsanleitung gründlich durch.
• Befolgen Sie vor allen Dingen die
Sicherheitshinweise!
• Das Gerät darf nur so bedient
werden, wie in dieser Bedienungsanleitung beschrieben.
• Bewahren Sie diese Bedienungsanleitung auf.
• Falls Sie das Gerät einmal weitergeben, legen Sie bitte diese
Bedienungsanleitung dazu.
2. Bestimmungsgemäßer
Gebrauch
Der Smoothie-Mixer ist ausschließlich zum
Mixen von Ganzfruchtgetränken (Smoothies)
vorgesehen.
Das Gerät ist für den privaten Haushalt konzipiert. Das Gerät darf nur in Innenräumen
benutzt werden.
Dieses Gerät darf nicht für gewerbliche
Zwecke eingesetzt werden.
Dieses Gerät ist ebenfalls dazu bestimmt, im
Haushalt und in haushaltsähnlichen Anwendungen verwendet zu werden, wie
beispielsweise ...
… in Küchen für Mitarbeiter in Läden,
Büros und anderen gewerblichen Bereichen;
… in landwirtschaftlichen Anwesen;
… von Kunden in Hotels, Motels und an-
deren Wohneinrichtungen;
… in Frühstückspensionen.
Vorhersehbarer Missbrauch
Wir wünschen Ihnen viel Freude mit Ihrem
neuen Smoothie-Mixer!
WARNUNG vor Sachschäden!
Dicke oder feste Schalen (z. B. von Zitrusfrüchten, Ananas), Stiele und Kerne von Steinfrüchten (z. B. Kirschen, Pfirsiche, Aprikosen)
müssen vor dem Mixen entfernt werden.
3. Sicherheitshinweise
Warnhinweise
Falls erforderlich, werden folgende Warnhinweise in dieser Bedienungsanleitung verwendet:
GEFAHR! Hohes Risiko: Missachtung der Warnung kann Schaden
für Leib und Leben verursachen.
WARNUNG! Mittleres Risiko: Missachtung
der Warnung kann Verletzungen oder
schwere Sachschäden verursachen.
DE
3
Page 6
__RP103371_B1.book Seite 4 Freitag, 21. November 2014 1:14 13
VORSICHT: Geringes Risiko: Missachtung
der Warnung kann leichte Verletzungen
oder Sachschäden verursachen.
HINWEIS: Sachverhalte und Besonderheiten, die im Umgang mit dem Gerät beachtet
werden sollten.
Anweisungen für den sicheren Betrieb
~
Dieses Gerät darf nicht durch Kinder benutzt werden.
~
Kinder dürfen nicht mit dem Gerät spielen.
~
Das Gerät und seine Anschlussleitung sind von Kindern fernzuhalten.
~
Dieses Gerät kann von Personen mit reduzierten physischen, sensorischen oder mentalen Fähigkeiten oder Mangel an Erfahrung und/
oder Wissen benutzt werden, wenn sie beaufsichtigt oder bezüglich des sicheren Gebrauchs des Gerätes unterwiesen wurden und
die daraus resultierenden Gefahren verstanden haben.
~
Wenn die Netzanschlussleitung dieses Gerätes beschädigt wird,
muss sie durch den Hersteller oder seinen Kundendienst oder eine
ähnlich qualifizierte Person ersetzt werden, um Gefährdungen zu
vermeiden.
~
Ziehen Sie den Netzstecker aus der Steckdose, …
… bei nicht vorhandener Aufsicht,
… bevor Sie das Gerät zusammenbauen oder auseinanderneh-
men und
… bevor Sie das Gerät reinigen.
~
Reinigen Sie den Messeraufsatz und die Becher mit warmem Wasser und etwas Spülmittel.
GEFAHR für Kinder
~ Verpackungsmaterial ist kein Kinder-
spielzeug. Kinder dürfen nicht mit den
Kunststoffbeuteln spielen. Es besteht Erstickungsgefahr.
~ Achten Sie darauf, dass Kinder das Ge-
rät nicht an der Anschlussleitung von
der Arbeitsfläche ziehen können.
~ Bewahren Sie das Gerät außerhalb der
Reichweite von Kindern auf.
4
DE
GEFAHR von Stromschlag
durch Feuchtigkeit
~ Das Gerät darf niemals in der Nähe ei-
ner Badewanne, einer Dusche, eines
gefüllten Waschbeckens o. Ä. betrieben
werden.
~ Die Motoreinheit, das Gehäuse, die An-
schlussleitung und der Netzstecker dürfen nicht in Wasser oder andere
Flüssigkeiten getaucht werden.
~ Schützen Sie die Motoreinheit und das
Gehäuse vor Feuchtigkeit, Tropf- und
Spritzwasser.
Page 7
__RP103371_B1.book Seite 5 Freitag, 21. November 2014 1:14 13
~ Sollte Flüssigkeit in die Motoreinheit oder
das Gehäuse gelangen, sofort den Netzstecker ziehen. Vor einer erneuten Inbetriebnahme das Gerät prüfen lassen.
~ Bedienen Sie das Gerät nicht mit feuch-
ten Händen.
~ Sollte das Gerät ins Wasser gefallen
sein, sofort den Netzstecker ziehen. Erst
danach das Gerät herausnehmen.
GEFAHR durch
Stromschlag
~ Stecken Sie den Netzstecker erst dann
in eine Steckdose, wenn das Gerät komplett zusammengebaut ist.
~ Schließen Sie den Netzstecker nur an
eine ordnungsgemäß installierte, leicht
zugängliche Steckdose an, deren Spannung der Angabe auf dem Typenschild
entspricht. Die Steckdose muss auch
nach dem Anschließen weiterhin leicht
zugänglich sein.
~ Achten Sie darauf, dass die Anschluss-
leitung nicht durch scharfe Kanten oder
heiße Stellen beschädigt werden kann.
Wickeln Sie die Anschlussleitung nicht
um das Gerät.
~ Das Gerät ist auch nach Ausschalten
nicht vollständig vom Netz getrennt. Um
dies zu tun, ziehen Sie den Netzstecker.
~ Achten Sie beim Gebrauch des Gerätes
darauf, dass die Anschlussleitung nicht
eingeklemmt oder gequetscht wird.
~ Um den Netzstecker aus der Steckdose
zu ziehen, immer am Stecker, nie am
Kabel ziehen.
~ Ziehen Sie den Netzstecker aus der
Steckdose, …
… wenn eine Störung auftritt,
… wenn Sie den Smoothie-Mixer nicht
benutzen,
… bei Gewitter.
~ Benutzen Sie das Gerät nicht, wenn es
sichtbare Beschädigungen am Gerät
oder der Anschlussleitung aufweist.
Um Gefährdungen zu vermeiden, nehmen
~
Sie keine Veränderungen am Gerät vor.
GEFAHR von Verletzungen
durch Schneiden
~ Die Klingen des Messeraufsatzes dre-
hen nach dem Ausschalten nach. Warten Sie den Stillstand ab, bevor Sie
einen Becher abnehmen.
~ Die Klingen des Messeraufsatzes sind
scharf. Gehen Sie vorsichtig mit ihm
um. Beim Spülen von Hand sollte das
Wasser so klar sein, dass Sie die Klingen gut sehen können.
~ Das Gerät darf unter keinen Umständen
ohne Becher betrieben werden.
WARNUNG vor Sachschäden
~ Dicke oder feste Schalen (z. B. von Zit-
rusfrüchten, Ananas), Stiele und Kerne
von Steinfrüchten (z. B. Kirschen, Pfirsiche, Aprikosen) müssen vor dem Mixen
entfernt werden.
~ Füllen Sie keine Zutaten in den Becher,
die heißer sind als 85°C.
~ Um einen Geräteschaden zu vermei-
den, unterbrechen Sie den Mixvorgang
sofort, wenn die Klingen des Messeraufsatzes nicht oder nur schwer drehen.
Ziehen Sie den Netzstecker und überprüfen Sie, ob sich ein Hindernis im Becher befindet oder ob die Speise zu zäh
ist. Überprüfen Sie auch, ob das Gerät
richtig zusammengesetzt ist.
~ Betreiben Sie das Gerät nicht leer, da
hierdurch der Motor heiß laufen und beschädigt werden kann.
~ Das Gerät ist für eine Betriebsdauer von
maximal 20 Sekunden ohne Unterbrechung ausgelegt. Danach muss das Gerät ausgeschaltet bleiben, bis es auf
Raumtemperatur abgekühlt ist.
~ Verwenden Sie nur das Originalzubehör.
~ Das Gerät (Gehäuse, Motoreinheit, An-
schlussleitung mit Netzstecker) ist nicht
spülmaschinengeeignet.
~ Verwenden Sie keine scharfen oder
scheuernden Reinigungsmittel.
DE
5
Page 8
__RP103371_B1.book Seite 6 Freitag, 21. November 2014 1:14 13
~
Das Gerät ist mit rutschfesten KunststoffSaugfüßen ausgestattet. Da Möbel mit einer Vielfalt von Lacken und Kunststoffen beschichtet sind und mit unterschiedlichen
Pflegemitteln behandelt werden, kann nicht
völlig ausgeschlossen werden, dass manche dieser Stoffe Bestandteile enthalten,
welche die Kunststoffsaugfüße angreifen
und aufweichen. Legen Sie ggf. eine
rutschfeste Unterlage unter das Gerät
.
6. Bedienung
~ Das Gerät darf unter keinen Umständen
~ Die Klingen des Messeraufsatzes4 sind
4. Lieferumfang
1 Smoothie-Mixer
1 Messeraufsatz4
1 Auffangschale12
3Becher6/8: maximale Füllmengen ca.
390, 290 und 180ml (Reinigungsbecher)
2 Deckel mit Trinköffnung11
1 Bedienungsanleitung
5. Inbetriebnahme
• Entfernen Sie sämtliches Verpackungsmaterial.
• Überprüfen Sie, ob alle Teile vorhanden
und unbeschädigt sind.
• Reinigen Sie das Gerät vor der
ersten Benutzung! (siehe “Reinigen”
auf Seite 7)
• Stellen Sie das Gerät auf eine trockene,
ebene, rutschfeste Unterlage.
~ Die Klingen des Messeraufsatzes dre-
WARNUNG! Um einen Geräteschaden zu
vermeiden, unterbrechen Sie den Mixvorgang sofort, wenn die Klingen des Messeraufsatzes4 nicht oder nur schwer drehen.
Ziehen Sie in diesem Fall den Netzstecker7
und überprüfen Sie, ob sich ein Hindernis im
Becher6 befindet.
Einsatzbereich
Der Smoothie-Mixer ist ausschließlich zum
Mixen von Ganzfruchtgetränken (Smoothies)
vorgesehen.
Lebensmittel vorbereiten
GEFAHR durch Stromschlag!
Stecken Sie den Netzstecker7 erst
dann in eine Steckdose, wenn der
Smoothie-Mixer komplett montiert ist.
GEFAHR von Verletzungen
durch Schneiden!
ohne Becher6 betrieben werden.
scharf. Gehen Sie vorsichtig mit ihm
um.
hen nach dem Ausschalten nach. Warten Sie den Stillstand ab, bevor Sie
einen Becher abnehmen.
6
WARNUNG vor Sachschäden!
Dicke oder feste Schalen (z. B. von Zitrusfrüchten, Ananas), Stiele und Kerne von Steinfrüchten (z. B. Kirschen, Pfirsiche, Aprikosen)
müssen vor dem Mixen entfernt werden.
• Waschen oder putzen Sie die Früchte.
• Zerteilen Sie die Früchte in grobe Stücke
(ca. 3-4cm Kantenlänge).
• Verwenden Sie ausreichend Flüssigkeit
(Mineralwasser, Fruchtsaft, Milch, Joghurt). Wir empfehlen ein Mischungsverhältnis von 1:1.
DE
Page 9
D_RP103371_Smoothie_Mixer.fm Seite 7 Dienstag, 25. November 2014 6:28 18
Mixen
VORSICHT: Füllen Sie je nach Härte und
Konsistenz der Zutaten den Becher6 nicht
bis an das Maximum, da ansonsten der
Messeraufsatz4 blockieren kann.
HINWEISE:
• Ist der Smoothie zu dickflüssig, füllen
Sie nach Bedarf etwas Mineralwasser,
Fruchtsaft, Milch oder Joghurt hinein.
Sie erreichen ggf. eine gleichmäßigere
•
Konsistenz des Smoothies (z.B. bei härteren Früchten), wenn Sie den Mixvorgang mehrmals kurz unterbrechen und
2
wieder starten (Pulsfunktion: Mixtaste
lösen und wieder drücken).
• Falls sich noch Speisereste (z.B. Fruchtkerne) auf dem Dichtungsring14 befin-
den sollten, wischen Sie diese mit
Küchenpapier ab, um ein korrektes Abdichten zu gewährleisten.
1. Füllen Sie die Fruchtstücke und Zutaten
in den Becher6 ihrer Wahl.
2. Bild C: Stecken Sie den Becher von un-
ten in den vormontierten Messeraufsatz4. Die Markierung9 zeigt dabei
auf das geöffnete Schloss5. Die Verriegelungsflügel10 am Becher greifen in
die Aussparung am Messereinsatz.
3. Drehen Sie den Becher bis zum Anschlag
im Uhrzeigersinn, bis die Markierung
5
auf das geschlossene Schloss
4. Stecken Sie den Netzstecker7 in die
Steckdose.
5. Bild A: Schwenken Sie den Becher mit
der Motoreinheit1 ganz nach oben.
6. Drücken und halten Sie die Mixtaste2.
Der Mixvorgang wird gestartet.
7. Lösen
8.
9. Warten Sie, bis sich das Getränk im
Sie nach ca. 10 - 20Sekunden
2
die Mixtaste
vorgang beendet.
Bild B:
der Motoreinheit ganz nach unten.
Becher6 gesammelt hat.
. Dadurch wird der Mix-
Schwenken Sie den Becher mit
zeigt.
9
10. Drehen Sie den Becher gegen den Uhr-
zeigersinn, bis die Markierung9 auf
das geöffnete Schloss5 zeigt.
11. Ziehen Sie den Becher nach unten vom
4
Messeraufsatz
cher zu entnehmen, schwenken Sie die
Motoreinheit vorher ein wenig nach oben.
12. Falls sich noch größere Fruchtstücke im
Smoothie befinden sollten, wiederholen
Sie für einige Sekunden den Mixvorgang.
13. Verschließen Sie den Becher ggf. mit
dem Deckel11.
14. Reinigen Sie das Gerät möglichst sofort
nach Gebrauch mit dem Reinigungsbecher8.
15. Ziehen Sie den Netzstecker7 aus der
Steckdose.
ab. Um den großen Be-
7. Reinigen
Reinigen Sie das Gerät vor der ersten Benutzung!
GEFAHR durch Stromschlag!
~ Ziehen Sie den Netzstecker7 aus der
Steckdose, bevor Sie den Smoothie-Mixer reinigen.
~ Die Motoreinheit1, das Gehäuse3,
die Anschlussleitung und der Netzstecker7 dürfen nicht in Wasser oder andere Flüssigkeiten getaucht werden.
GEFAHR von Verletzungen
durch Schneiden!
Beim Spülen von Hand sollte das Wasser so
klar sein, dass Sie den Messeraufsatz4 gut
sehen können.
WARNUNG vor Sachschäden!
Verwenden Sie keine scharfen oder scheuernden Reinigungsmittel.
HINWEIS:
Folgende Teile können auch in der Spülmaschine gereinigt werden:
- die Becher6/8 und deren Deckel11,
- die Auffangschale12.
DE
7
Page 10
__RP103371_B1.book Seite 8 Freitag, 21. November 2014 1:14 13
Nach jedem Gebrauch
Reinigen Sie das Gerät möglichst nach jedem Gebrauch und entfernen Sie dabei alle
Speisereste vom Messeraufsatz.
1. Füllen Sie den Reinigungsbecher8 mit
klarem Wasser und ggf. mit etwas
Spülmittel. Spülen Sie dann mit klarem
Wasser nach.
2. Bedienen Sie das Gerät, wie beschrieben
(Kapitel "Bedienung" auf Seite 6).
3. Ziehen Sie den Netzstecker7 aus der
Steckdose.
4. Schwenken Sie die Motoreinheit1
nach oben. Falls sich noch Speisereste
(z.B. Fruchtkerne) auf dem Dichtungsring14 befinden sollten, wischen Sie
diese mit Küchenpapier ab, um ein korrektes Abdichten zu gewährleisten.
Führen Sie ggf. eine Intensivreinigung
(siehe unten) durch.
5. Wischen Sie Gehäuse3, Motoreinheit1 und die Anschlussleitung7 bei
Bedarf mit einem leicht angefeuchteten
Tuch ab. Wischen Sie mit einem trockenen Tuch nach.
6. Die restlichen Zubehörteile können mit
warmem Wasser und etwas Spülmittel
gereinigt werden.
7. Lassen Sie alle Teile vollständig trocknen, bevor Sie sie wegräumen oder Sie
das Gerät erneut benutzen.
Intensivreinigung
Sollten sich Speisereste nicht mehr durch den
Einsatz des Reinigungsbechers entfernen lassen, können Sie den Messeraufsatz vom Gerät abnehmen und getrennt reinigen.
1. Ziehen Sie den Netzstecker7.
2. Drehen Sie ggf. den Becher6 gegen
den Uhrzeigersinn und ziehen ihn nach
unten vom Messeraufsatz4 ab.
3. Schwenken Sie die Motoreinheit1
ganz nach oben, bis sie in dieser Stellung einrastet.
4. Bild D: Drehen Sie den Rand des Messeraufsatzes4 im Uhrzeigersinn, bis
die Pfeilmarkierung auf das geöffnete
Schloss13 zeigt und ziehen ihn nach
oben von der Motoreinheit1 ab.
5. Reinigen Sie den Messeraufsatz mit
warmem Wasser und etwas Spülmittel.
6. Lassen Sie den Messeraufsatz vollständig trocknen.
7. Setzen Sie den Messeraufsatz4 auf die
Motoreinheit
zeigt auf das geöffnete Schloss
8. Drehen Sie den Messeraufsatz, bis die
Pfeilmarkierung auf das geschlossene
Schloss zeigt. Der Messeraufsatz ist
nun wieder korrekt montiert.
1
. Die Pfeilmarkierung
13
.
8. Aufbewahrung
GEFAHR für Kinder! Bewahren
Sie das Gerät außerhalb der Reichweite von Kindern auf.
GEFAHR!
Netzstecker7
der
nicht mit einer Steckdose verbunden sein.
• Wählen Sie einen Platz, wo weder star-
ke Hitze noch Feuchtigkeit auf das Gerät einwirken können.
Um Unfälle zu vermeiden, darf
während der Lagerung
9. Entsorgen
Das Symbol der durchgestrichenen Abfalltonne auf Rädern bedeutet, dass das
Produkt in der Europäischen
Union einer getrennten Müllsammlung zugeführt werden
muss. Dies gilt für das Produkt und alle mit
diesem Symbol gekennzeichneten Zubehörteile. Gekennzeichnete Produkte dürfen
nicht über den normalen Hausmüll entsorgt
werden, sondern müssen an einer Annahmestelle für das Recycling von elektrischen
und elektronischen Geräten abgegeben
werden. Recycling hilft, den Verbrauch von
Rohstoffen zu reduzieren und die Umwelt zu
entlasten. Informationen zur Entsorgung und
8
DE
Page 11
D_RP103371_Smoothie_Mixer.fm Seite 9 Montag, 24. November 2014 12:50 12
der Lage des nächsten Recyclinghofes erhalten Sie z.B. bei Ihrer Stadtreinigung oder in
den Gelben Seiten.
Verpackung
Wenn Sie die Verpackung entsorgen möchten, achten Sie auf die entsprechenden Umweltvorschriften in Ihrem Land.
10. Problemlösung
Sollte Ihr Gerät einmal nicht wie gewünscht
funktionieren, gehen Sie bitte erst diese
Checkliste durch. Vielleicht ist es nur ein kleines Problem, das Sie selbst beheben können.
GEFAHR durch Stromschlag!
Versuchen Sie auf keinen Fall, das
Gerät selbstständig zu reparieren.
Fehler
Keine Funktion
Messeraufsatz4 dreht
sich nicht oder
nur sehr schwer
Flüssigkeit läuft
aus
Mögliche Ursachen /
Maßnahmen
• Ist die Stromversorgung sichergestellt?
• Überprüfen Sie den
Anschluss.
• Ist der Messeraufsatz4
richtig montiert?
• Ist der Becher6 richtig
eingesetzt?
• Sofort ausschalten,
Netzstecker7 ziehen
und überprüfen:
Hindernis im Behälter?
• Ist die eingefüllte Menge an Zutaten zu groß?
11. Rezepte
VORSICHT: Füllen Sie je nach Härte und
Konsistenz der Zutaten den Becher6 nicht
bis an das Maximum, da ansonsten der
Messeraufsatz4 blockieren kann.
HINWEIS:
ten um einen kühlen Smoothie zu mixen, empfehlen wir Ihnen Crushed Ice zu verwenden.
Pfirsich-Bananen Smoothie
• 1/2 Banane (geschält)
• 2 halbe Pfirsiche (geschält und entkernt)
• 50ml Grapefruitsaft
• 1 Spritzer Zitronensaft
1. Waschen Sie die Früchte und entfernen
Sie Schalen und Kern.
2. Schneiden Sie die Früchte in Stücke.
3. Geben Sie die Zutaten in den Becher
und mixen Sie diese.
Himbeer-Birnen Smoothie
• 1/2 reife Birne (geschält und entkernt)
• 75g Himbeeren
• 100ml Wasser
• etwas Honig
1. Schneiden Sie die Birne in Stücke.
2. Geben Sie die Zutaten in den Becher
und mixen Sie diese.
3. Süßen Sie nach Geschmack mit Honig.
Himbeer Smoothie
• 100 ml Milch
• 100g Himbeeren
• 75g Joghurt, fettarm
• 1 Teelöffel Vanillezucker
Geben Sie die Zutaten in den Becher und
mixen Sie diese.
Wenn Sie Eis verwenden möch-
DE
9
Page 12
__RP103371_B1.book Seite 10 Freitag, 21. November 2014 1:14 13
Mango-Kiwi-Ingwer Smoothie
• 1/2 Mango (geschält)
• 1 Kiwi (geschält)
• 1 Stück Ingwer (ca. 1/2 Teelöffel)
• 1 Orange (geschält)
• 1/2 Limette (geschält)
1. Schneiden Sie die Früchte in Stücke.
2. Geben Sie die Zutaten in den Becher
und mixen Sie diese.
12. Technische Daten
Modell: SSM 175 B2
Netzspannung: 230V ~ 50 Hz
Schutzklasse: II
Leistung: Max. 175 W
Max. Dauerbetrieb (KB):
Technische Änderungen vorbehalten.
20 Sekunden
13. Garantie der
HOYERHandel GmbH
Sehr geehrte Kundin, sehr geehrter Kunde,
Sie erhalten auf dieses Gerät 3Jahre Garantie ab Kaufdatum. Im Falle von Mängeln
dieses Produkts stehen Ihnen gegen den Verkäufer des Produkts gesetzliche Rechte zu.
Diese gesetzlichen Rechte werden durch unsere im Folgenden dargestellte Garantie
nicht eingeschränkt.
Garantiebedingungen
Die Garantiefrist beginnt mit dem Kaufdatum. Bitte bewahren Sie den Original Kassenbon gut auf. Diese Unterlage wird als
Nachweis für den Kauf benötigt.
Tritt innerhalb von drei Jahren ab dem Kaufdatum dieses Produkts ein Material- oder Fabrikationsfehler auf, wird das Produkt von
uns – nach unserer Wahl – für Sie kostenlos
repariert oder ersetzt. Diese Garantieleis-
tung setzt voraus, dass innerhalb der Dreijahresfrist das defekte Gerät und der
Kaufbeleg (Kassenbon) vorgelegt und
schriftlich kurz beschrieben wird, worin der
Mangel besteht und wann er aufgetreten ist.
Wenn der Defekt von unserer Garantie gedeckt ist, erhalten Sie das reparierte oder
ein neues Produkt zurück. Mit Reparatur
oder Austausch des Produkts beginnt kein
neuer Garantiezeitraum.
Garantiezeit und gesetzliche
Mängelansprüche
Die Garantiezeit wird durch die Gewährleistung nicht verlängert. Dies gilt auch für ersetzte und reparierte Teile. Eventuell schon beim
Kauf vorhandene Schäden und Mängel müssen sofort nach dem Auspacken gemeldet
werden. Nach Ablauf der Garantiezeit anfallende Reparaturen sind kostenpichtig.
Garantieumfang
Das Gerät wurde nach strengen Qualitätsrichtlinien sorgfältig produziert und vor Anlieferung gewissenhaft geprüft.
Die Garantieleistung gilt für Material- oder
Fabrikationsfehler. Diese Garantie erstreckt
sich nicht auf Produktteile, die normaler Abnutzung ausgesetzt sind und daher als Verschleißteile angesehen werden können oder
für Beschädigungen an zerbrechlichen Teilen, z. B. Schalter, Akkus oder Teile, die aus
Glas gefertigt sind.
Diese Garantie verfällt, wenn das Produkt
beschädigt, nicht sachgemäß benutzt oder
gewartet wurde. Für eine sachgemäße Benutzung des Produkts sind alle in der Bedienungsanleitung aufgeführten Anweisungen
genau einzuhalten. Verwendungszwecke
und Handlungen, von denen in der Bedienungsanleitung abgeraten oder vor denen
gewarnt wird, sind unbedingt zu vermeiden.
Das Produkt ist lediglich für den privaten und
nicht für den gewerblichen Gebrauch bestimmt. Bei missbräuchlicher und unsachgemäßer Behandlung, Gewaltanwendung und
10
DE
Page 13
DE
AT
CH
__RP103371_B1.book Seite 11 Freitag, 21. November 2014 1:14 13
bei Eingriffen, die nicht von unserem autorisierten Service-Center vorgenommen wurden, erlischt die Garantie.
Abwicklung im Garantiefall
Um eine schnelle Bearbeitung Ihres Anliegens zu gewährleisten, folgen Sie bitte den
folgenden Hinweisen:
• Bitte halten Sie für alle Anfragen die Ar-
tikelnummer IAN:103371 und den
Kassenbon als Nachweis für den Kauf
bereit.
• Sollten Funktionsfehler oder sonstige Mängel auftreten, kontaktieren Sie zunächst
das nachfolgend benannte Service-Center
telefonisch oder per E-Mail.
• Ein als defekt erfasstes Produkt können
Sie dann unter Beifügung des Kaufbelegs
(Kassenbon) und der Angabe, worin der
Mangel besteht und wann er aufgetreten
ist, für Sie portofrei an die Ihnen mitgeteilte Service Anschrift übersenden.
Auf www.lidl-service.com können
Sie diese und viele weitere Handbücher, Produktvideos und Software
herunterladen.
Lieferant
Bitte beachten Sie, dass die folgende An-
keine Serviceanschrift
schrift
Kontaktieren Sie zunächst das oben benannte
Service-Center.
HOYER Handel GmbH
Kühnehöfe 5
22761 Hamburg
Deutschland
ist.
Service-Center
Service Deutschland
Tel.: 0800 5435 111
(kostenfrei)
E-Mail: hoyer@lidl.de
Service Österreich
Tel.: 0820 201 222
(0,15 EUR/Min.)
E-Mail: hoyer@lidl.at
Service Schweiz
Tel.: 0842 665566
(0,08 CHF/Min.,
Mobilfunk max. 0,40 CHF/Min.)
E-Mail: hoyer@lidl.ch
IAN: 103371
DE
11
Page 14
__RP103371_B1.book Seite 12 Freitag, 21. November 2014 1:14 13
Sommaire
1. Aperçu de l'appareil ...................................................................... 12
2. Utilisation conforme ....................................................................... 13
3. Consignes de sécurité ..................................................................... 13
4. Éléments livrés ............................................................................... 16
5. Mise en service .............................................................................. 16
6. Utilisation ...................................................................................... 16
7. Nettoyage ..................................................................................... 17
8. Rangement .................................................................................... 18
9. Mise au rebut ................................................................................ 18
10. Dépannage .................................................................................... 19
11. Recettes ......................................................................................... 19
12. Caractéristiques techniques ............................................................ 20
13. Garantie de HOYER Handel GmbH ................................................. 20
1. Aperçu de l'appareil
1 Unité moteur (basculante)
2 Bouton de mixage
3 Boîtier
4 Couteau avec lames
5 Repères en forme de cadenas pour le verrouillage du gobelet
6 Gobelets : niveaux de remplissage maximum env. 390 et 290 ml
7 Câble de raccordement avec fiche secteur
8 Gobelet de nettoyage
9 Repères sur le gobelet
10 Rebords de verrouillage
11 Couvercle avec ouverture pour boire
12 Coupelle de récupération
13 Repères en forme de cadenas pour le verrouillage du gobelet
14 Bague d'étanchéité du couteau
12
FR
Page 15

__RP103371_B1.book Seite 13 Freitag, 21. November 2014 1:14 13
Merci beaucoup pour
votre confiance !
Nous vous félicitons pour l’achat de votre
nouveau mixeur à smoothies.
Pour manipuler l'appareil en toute sécurité et
vous familiariser avec le volume de
livraison :
• Lisez attentivement ce mode
d’emploi avant la première utilisation.
• Respectez en priorité les
consignes de sécurité !
• L'appareil ne doit être utilisé
qu'aux fins décrites dans ce
mode d'emploi.
• Conservez ce mode d'emploi.
• Si vous transmettez l'appareil à
un tiers, n'oubliez pas d'y joindre
ce mode d'emploi.
2. Utilisation conforme
Le mixeur à smoothies est uniquement destiné
au mixage de boissons à base de fruits
(smoothies).
L'appareil est conçu pour un usage domestique. L'appareil doit être utilisé uniquement
à l'intérieur.
Cet appareil ne peut pas être utilisé dans un
cadre professionnel.
Cet appareil est également destiné à une utilisation domestique et quasi domestique,
par exemple...
… dans des cuisines du personnel aména-
gées dans des magasins, des bureaux
et d'autres locaux commerciaux ;
… dans des propriétés agricoles ;
… par des clients dans des hôtels, mo-
tels et d'autres logements ;
… dans des pensions offrant le petit dé-
jeuner.
Utilisation impropre prévisible
Nous vous souhaitons beaucoup de bonheur
avec votre nouveau mixeur à smoothies!
AVERTISSEMENT : risque de
dommages matériels !
Les peaux épaisses ou dures (par ex.
d'agrumes, d'ananas), les tiges et les noyaux
(par ex. de cerises, de pêches ou d'abricots)
doivent être retirés avant le mixage.
3. Consignes de
sécurité
Avertissements
Les avertissements suivants sont utilisés si nécessaire dans le présent mode d’emploi :
DANGER ! Risque élevé : le nonrespect de l’avertissement peut provoquer des blessures graves, voire
la mort.
AVERTISSEMENT ! Risque moyen : le nonrespect de l’avertissement peut provoquer
des blessures ou des dommages matériels
graves.
FR
13
Page 16

__RP103371_B1.book Seite 14 Freitag, 21. November 2014 1:14 13
ATTENTION : risque faible : le non-respect
de l’avertissement peut provoquer des blessures légères ou entraîner des dommages
matériels.
REMARQUE : remarques et particularités
dont il faut tenir compte en manipulant l’appareil.
Indications pour une utilisation en toute sécurité
~
Cet appareil ne doit pas être utilisé par des enfants.
~
Les enfants ne doivent pas jouer avec l'appareil.
~
L'appareil et son câble de raccordement doivent être tenus hors de
portée des enfants.
~
Cet appareil ne peut être utilisé par des personnes ayant des capacités physiques, sensorielles ou mentales réduites ou un manque
d'expérience et/ou de connaissance que lorsqu'ils sont surveillés
ou qu'ils ont été informés de l'utilisation sûre de l'appareil et ont
compris les risques qui en résultent.
~
Si le câble de raccordement de cet appareil est endommagé, il faut
le faire remplacer par le fabricant, son service après-vente ou une
personne ayant une qualification similaire pour éviter les mises en
danger.
~ Débranchez
… lorsque l'appareil est sans surveillance,
… avant d'assembler ou de démonter l'appareil et
… avant de nettoyer l'appareil.
~
Nettoyez le couteau et les gobelets à l'eau chaude avec un peu de
produit vaisselle.
la fiche secteur de la prise de courant …
DANGER pour les enfants
~ Le matériel d'emballage n'est pas un
jouet. Les enfants ne doivent pas jouer
avec les sachets en plastique. Ceux-ci
présentent un risque d'asphyxie.
~ Veillez à ce que les enfants ne puissent
pas faire tomber l'appareil du plan de
travail en tirant sur le câble de raccordement.
~ Conservez l’appareil hors de portée des
enfants.
14
FR
DANGER !
Risque d'électrocution en
raison de l’humidité
~ L'appareil ne doit jamais être mis en
marche à proximité, entre autres, d'une
baignoire, d'une douche ou d'un lavabo rempli.
~ L'unité moteur, le boîtier, le câble de
raccordement et la fiche secteur ne
doivent pas être plongés dans l'eau ni
dans tout autre liquide.
~ Protégez l'unité moteur et le boîtier de
l'humidité, des gouttes et des projections d'eau.
Page 17

__RP103371_B1.book Seite 15 Freitag, 21. November 2014 1:14 13
~ Si du liquide s'infiltre dans l'unité mo-
teur ou dans le boîtier, débranchez immédiatement la fiche secteur. Faites
contrôler l'appareil avant de le remettre
en service.
~ N'utilisez pas l'appareil avec les mains
mouillées.
~ Si l'appareil tombe dans l'eau, débran-
chez immédiatement la fiche secteur.
Ne retirer l'appareil qu'après cela.
DANGER ! Risque
d'électrocution
~ Ne branchez la fiche secteur sur une
prise de courant que si l'appareil est
complètement assemblé.
~ Raccordez la fiche secteur uniquement
à une prise de courant conforme et facilement accessible, dont la tension correspond aux indications figurant sur la
plaque signalétique. Après avoir branché l'appareil, la prise de courant doit
rester facilement accessible.
~ Évitez toute détérioration du câble de
raccordement par des arêtes vives ou
des surfaces brûlantes. N’enroulez pas
le câble de raccordement autour de
l’appareil.
~ L’appareil n’est pas complètement isolé
du secteur même après l’avoir éteint
avec l’interrupteur Marche/Arrêt. Pour
ce faire, débranchez la fiche secteur.
~ Lors de l'utilisation de l'appareil, le
câble de raccordement ne doit pas être
coincé ou écrasé.
~ Pour débrancher l'appareil, tirez tou-
jours sur la fiche, jamais sur le câble.
~ Débranchez la fiche secteur de la prise
de courant …
… lorsqu'une panne survient,
… quand vous n'utilisez pas le mixeur à
smoothies et
… en cas d'orage.
~ N'utilisez pas l'appareil si celui-ci ou le
câble de raccordement présente des dégâts apparents.
~ Si le câble d'alimentation est endomma-
gé, il doit être remplacé par le fabricant, son service après vente ou des
personnes de qualification similaire afin
d'éviter un danger.
~ Afin d'éviter tout risque d'accident, n'ef-
fectuez aucune modification au niveau
de l'appareil.
DANGER ! Risque de
blessures par coupure
~ Les lames du couteau continuent à tour-
ner après l'arrêt de l'appareil. Attendez
l'arrêt complet avant de retirer un gobelet.
~ Les lames du couteau sont coupantes.
Manipulez-le avec précaution. Si vous
le nettoyez à la main, l'eau doit être suffisamment claire de manière à ce que
les lames restent parfaitement visibles.
~ L'appareil ne doit en aucun cas être uti-
lisé sans le gobelet.
AVERTISSEMENT ! Risque de
dommages matériels
~ Les peaux épaisses ou dures (par ex.
d'agrumes, d'ananas), les tiges et les
noyaux (par ex. de cerises, de pêches
ou d'abricots) doivent être retirés avant
le mixage.
~ Ne versez dans le gobelet aucun ingré-
dient dont la température est supérieure
à 85 °C.
~ Pour éviter d'endommager l'appareil,
arrêtez immédiatement le processus de
mixage si les lames du couteau ne
tournent pas ou ne tournent plus que difficilement. Débranchez la fiche secteur
et vérifiez si un obstacle encombre le
gobelet ou si l'aliment est trop épais.
Vérifiez également si l'appareil est assemblé correctement.
~ Ne faites jamais fonctionner l'appareil
à vide, du fait que cela peut faire chauffer le moteur et l'endommager.
~ L’appareil est conçu pour une durée de
service de 20 secondes maximum sans
FR
15
Page 18

FR_RP103371_Smoothie_Mixer.fm Seite 16 Montag, 24. November 2014 10:27 10
interruption. L'appareil doit être ensuite
arrêté jusqu'à ce qu'il se soit refroidi à
la température ambiante.
~ Utilisez uniquement les accessoires
d’origine.
~ L'appareil (boîtier, unité moteur, câble
de raccordement avec fiche secteur) ne
doit pas être mis au lave-vaisselle.
~ N’utilisez aucun détergent acide ou dé-
capant.
~ L'appareil est équipé de pieds à ven-
touses antidérapants en plastique. Etant
donné que les meubles sont recouverts
d'une variété de laques et de matières
synthétiques et sont traités avec différents produits d'entretien, il ne peut pas
être totalement exclu que certaines de
ces substances contiennent des composants qui attaquent et ramollissent les
pieds à ventouses antidérapants en
plastique. Le cas échéant, placez un
support antidérapant sous l'appareil.
4. Éléments livrés
6. Utilisation
DANGER ! Risque
d'électrocution !
Ne branchez la fiche secteur7 sur
une prise de courant que si le mixeur
à smoothies est complètement monté.
DANGER ! Risque de
blessures par coupure !
~ L'appareil ne doit en aucun cas être uti-
lisé sans le gobelet6.
~ Les lames du couteau4 sont coupantes.
Manipulez-le avec précaution.
~ Les lames du couteau continuent à tour-
ner après l'arrêt de l'appareil. Attendez
l'arrêt complet avant de retirer un gobelet.
AVERTISSEMENT ! Pour éviter d'endommager l'appareil, arrêtez immédiatement le
processus de mixage si les lames du couteau4 ne tournent pas ou ne tournent plus
que difficilement. Dans ce cas, débranchez
la fiche secteur7 et vérifiez si un obstacle
encombre le gobelet6.
1 Mixeur à Smoothies
1Couteau4
1 Coupelle de récupération12
3Gobelets6/8 : niveaux de remplissage
maximum env. 390, 290 et 180 ml (gobelet de nettoyage)
2 Couvercles avec ouverture pour boire11
1 Mode d’emploi
5. Mise en service
• Otez tout le matériau d'emballage.
• Vérifiez si toutes les pièces sont présentes et en parfait état.
•
Nettoyez l'appareil avant la première utilisation !
à la page 17)
• Posez l'appareil sur une surface sèche,
plane et antidérapante.
(voir « Nettoyage»
Domaine d'utilisation
Le mixeur à smoothies est uniquement destiné
au mixage de boissons à base de fruits
(smoothies).
Préparation des aliments
AVERTISSEMENT ! Risque de
dommages matériels !
Les peaux épaisses ou dures (par ex.
d'agrumes, d'ananas), les tiges et les noyaux
(par ex. de cerises, de pêches ou d'abricots)
doivent être retirés avant le mixage.
• Lavez les fruits.
• Coupez les fruits en gros morceaux
(env. 3-4 cm de côté).
• Utilisez une quantité de liquide suffisante (eau minérale, jus de fruits, lait,
yaourt). Nous recommandons les proportions de mélange 1:1.
16
FR
Page 19

FR_RP103371_Smoothie_Mixer.fm Seite 17 Dienstag, 25. November 2014 6:29 18
8.
Mixer
ATTENTION : selon la dureté et la consistance des aliments, ne remplissez pas le gobelet6 jusqu'au maximum, sinon le
couteau4 risque d'être bloqué.
REMARQUES :
• Si le smoothie est trop épais, ajoutez selon
la consistance un peu d'eau minérale, du
jus de fruit, du lait ou du yaourt liquide.
•
Pour obtenir un smoothie de consistance
plus homogène (par ex. dans le cas de
fruits durs), interrompez brièvement et relancez le mixage plusieurs fois (fonction
par impulsions : relâchez puis enfoncez
2
de nouveau le bouton de mixage
• Si des résidus d'aliments (par ex. des
pépins de fruits) restent collés à la
bague d'étanchéité14, essuyez cette
dernière avec de l'essuie-tout afin d'assurer une bonne étanchéité.
).
Figure B :
le gobelet avec l'unité moteur vers le bas.
9. Attendez que la boisson se soit complè-
tement écoulée dans le gobelet6.
10. Faites tourner le gobelet dans le sens
antihoraire jusqu'à ce que le repère9
soit placé sur le cadenas ouvert5.
11. Retirez le gobelet du couteau4 en le ti-
rant vers le bas. Pour retirer le grand
gobelet, faites au préalable basculer légèrement l’unité moteur vers le haut.
12. Si le smoothie contient encore des morceaux de fruits trop gros, mixez de nouveau pendant quelques secondes.
13. Au besoin, fermez le gobelet à l'aide
du couvercle11.
14. Si possible, nettoyez l'appareil à l'aide
du gobelet de nettoyage8 directement
après utilisation.
15. Débranchez la fiche secteur7 de la
prise de courant.
faites complètement basculer
1. Mettez les morceaux de fruit et les ingrédients dans le gobelet
Figure C:
2.
teau
4 préalablement monté. Le repère9
est à ce moment placé sur le cadenas ou-
5
vert
tués sur le gobelet s'insèrent dans les
emplacements prévus sur le couteau.
3. Faites tourner le gobelet dans le sens
horaire jusqu'à la butée, jusqu'à ce
que le repère9 soit placé sur le cadenas fermé5.
4. Branchez la fiche secteur7 sur la prise
de courant.
5. Figure A : faites complètement bascu-
ler le gobelet avec l'unité moteur1 vers
le haut.
6. Appuyez sur le bouton de mixage2 et
maintenez-le enfoncé. Le processus de
mixage commence.
7. Au bout
lâchez le bouton de mixage
fin au processus de mixage.
fixez le gobelet sur le cou-
. Les rebords de verrouillage10 si-
d'environ 10 - 20 secondes, re-
6
de votre choix.
2
. Cela met
7. Nettoyage
Nettoyez l'appareil avant la première utilisation !
DANGER ! Risque
d'électrocution !
~ Débranchez la fiche secteur7 de la
prise de courant avant de nettoyer le
mixeur à smoothies.
~ L'unité moteur1, le boîtier3, le câble
de raccordement et la fiche secteur7 ne
doivent pas être plongés dans l'eau ni
dans tout autre liquide.
DANGER ! Risque de
blessures par coupure !
Si vous nettoyez l'appareil à la main, l'eau
doit être suffisamment claire de manière à ce
4
que le couteau
AVERTISSEMENT ! Risque de
dommages matériels !
N’utilisez aucun détergent acide ou décapant.
reste parfaitement visible.
FR
17
Page 20

FR_RP103371_Smoothie_Mixer.fm Seite 18 Mittwoch, 26. November 2014 9:49 09
REMARQUE :
les pièces suivantes peuvent aussi passer au
lave-vaisselle:
- les gobelets6/8 et leurs couvercles11,
- le récipient collecteur12.
Après chaque utilisation
Si possible, nettoyez l'appareil après
chaque utilisation et éliminez tous les restes
d'aliments du couteau.
1. Remplissez le gobelet de nettoyage8
d'eau claire et ajoutez-y éventuellement
un peu de produit vaisselle. Rincez ensuite à l'eau claire.
2. Utilisez l'appareil comme décrit au
Chapitre « Utilisation» à la page 16.
3. Débranchez la fiche secteur7 de la
prise de courant.
4. Faites basculer l'unité moteur1 vers le
haut. Si des résidus d'aliments (par ex.
des pépins de fruits) restent collés à la
bague d'étanchéité14, essuyez cette
dernière avec de l'essuie-tout afin d'assurer une bonne étanchéité. Si nécessaire, effectuez un nettoyage complet
de l'appareil (voir ci-dessous).
5. Au besoin, nettoyez le boîtier3, l'unité
1
moteur
avec un chiffon légèrement humide. Essuyez ensuite avec un chiffon sec.
6. Les autres accessoires peuvent être nettoyés à l'eau chaude avec un peu de
produit vaisselle.
7. Laissez toutes les pièces entièrement sécher, avant de les ranger ou d'utiliser
l'appareil à nouveau.
et le câble de raccordement7
Nettoyage intensif
Si l'utilisation du gobelet de nettoyage ne
suffit plus à éliminer les restes d'aliments,
vous pouvez démonter le couteau de l'appareil et le nettoyer séparément.
1. Retirez la fiche secteur7.
2. Au besoin, faites tourner le gobelet6
dans le sens antihoraire et retirez-le du
couteau4 en le tirant vers le bas.
3. Faites complètement basculer l'unité
moteur1 vers le haut jusqu'à ce qu'elle
s'encliquète dans cette position.
4. Figure D : faites tourner la bague du
couteau4 dans le sens horaire jusqu'à
ce que la flèche du repère soit placée
sur le cadenas ouvert13 puis retirez le
couteau de l'unité moteur1 en le tirant
vers le haut.
5. Nettoyez le couteau à l'eau chaude
avec un peu de produit vaisselle.
6. Laissez sécher complètement le couteau.
7. Fixez le couteau4 sur l'unité moteur1.
La flèche du repère est placée sur le ca-
13
denas ouvert
8. Faites tourner le couteau jusqu'à ce
que la flèche du repère soit placé sur le
cadenas fermé. Le couteau est alors
correctement monté.
.
8. Rangement
DANGER pour les enfants !
Conservez l’appareil hors de portée
des enfants.
DANGER !
fiche secteur7
une prise de courant lorsque vous le rangez
• Choisissez un endroit à l'abri d'une
forte chaleur ou de l'humidité.
Pour éviter tout accident, la
ne doit pas être branchée sur
9. Mise au rebut
Le symbole de la poubelle
sur roues barrée signifie
que, dans l’Union européenne, le produit doit faire
l’objet d’une collecte séparée des déchets. Cela s’applique au produit et à tous les accessoires
portant ce symbole. Les produits portant ce
symbole ne doivent pas être éliminés avec
les déchets ménagers normaux, mais
.
18
FR
Page 21

FR_RP103371_Smoothie_Mixer.fm Seite 19 Dienstag, 25. November 2014 6:29 18
doivent être déposés dans un point de collecte chargé du recyclage des appareils
électriques et électroniques. Le recyclage
contribue à réduire l’utilisation de matières
premières et à protéger l’environnement.
Emballage
Si vous souhaitez mettre l’emballage au rebut, respectez les prescriptions environnementales correspondantes de votre pays.
10. Dépannage
Si votre appareil ne fonctionne pas correctement, procédez dans un premier temps aux
tests de cette liste de contrôle. Il s’agit peutêtre seulement d’un problème mineur que
vous pouvez résoudre vous-même.
DANGER ! Risque
d'électrocution !
N’essayez en aucun cas de réparer
l'appareil vous-même.
11. Recettes
ATTENTION :
tance des aliments, ne remplissez pas le gobe-
6
jusqu'au maximum, sinon le couteau4
let
risque d'être bloqué.
REMARQUE : Si vous voulez ajouter de la
glace pour préparer un smoothie glacé,
nous vous recommandons d'utiliser de la
glace pilée.
Smoothie pêche-banane
• 1/2 banane (épluchée)
• 2 moitiés de pêche (épluchée et dénoyautée)
• 50 ml de jus de pamplemousse
• 1 filet de jus de citron
1. Lavez, épluchez et dénoyautez les fruits.
2. Coupez les fruits en morceaux.
3. Mettez les ingrédients dans le gobelet
et mixez-les.
selon la dureté et la consis-
Problème
Aucun fonctionnement
Le couteau4 ne
tourne pas
ou ne tourne
que difficilement
Il y a une
fuite de
liquide
Cause possible /
solution
• L’alimentation électrique
est-elle établie
correctement ?
• Vérifiez le branchement.
• Le couteau4 est-il correctement monté ?
• Le gobelet6 est-il correctement fixé ?
• Couper immédiatement,
débrancher la fiche sec-
7
et vérifier : un obs-
teur
tacle encombre-t-il le
récipient?
• La quantité d'ingrédients
est-elle trop importante ?
Smoothie poire-framboise
• 1/2 poire mûre (épluchée et épépinée)
• 75 g de framboises
• 100 ml d'eau
• un peu de miel
1. Coupez la poire en morceaux.
2. Mettez les ingrédients dans le gobelet
et mixez-les.
3. Sucrez à votre convenance avec le miel.
Smoothie à la framboise
• 100ml lait
• 100 g de framboises
• 75 g de yaourt liquide pauvre en ma-
tières grasses
• 1 cuillère à café de sucre vanillé
Mettez les ingrédients dans le gobelet et
mixez-les.
FR
19
Page 22

__RP103371_B1.book Seite 20 Freitag, 21. November 2014 1:14 13
Smoothie mangue-kiwigingembre
• 1/2 mangue (épluchée)
• 1 kiwi (épluché)
• 1 morceau de gingembre (env. 1/2 cuillère à café)
• 1 orange (épluchée)
• 1/2 citron vert (épluché)
1. Coupez les fruits en morceaux.
2. Mettez les ingrédients dans le gobelet
et mixez-les.
12. Caractéristiques
techniques
Modèle : SSM 175 B2
Tension secteur : 230 V ~ 50 Hz
Classe de protection : II
Puissance : max. 175 W
Durée de fonctionne-
ment max. (KB) : 20 secondes
Sous réserves de modifications techniques.
13. Garantie de
HOYER Handel GmbH
Chère cliente, cher client,
Vous obtenez pour cet appareil une garantie
de 3 ans à compter de la date d’achat. En
cas de défauts de ce produit, vous disposez
de droits légaux contre le vendeur de ce produit. Ces droits ne sont pas limités par notre
garantie présentée par la suite.
Indépendamment de la garantie commerciale souscrite, le vendeur reste tenu des défauts de conformité du bien et des vices
rédhibitoires dans les conditions prévues
aux articles L211-4 et suivants du Code de
la consommation et aux articles 1641 et suivants du Code Civil.
Conditions de garantie
Le délai de garantie commence à la date
d’achat. Conservez le ticket de caisse d’origine. Ce document sert de justificatif d’achat.
Si au cours des trois années suivant la date
d’achat, des défauts de matériel ou de fabrication apparaissent sur ce produit, celui-ci
vous est, à notre discrétion, réparé ou remplacé gratuitement. Les conditions pour faire
valoir la garantie sont que l’appareil et la
preuve d’achat (ticket de caisse) soient présentés dans un délai de trois ans et que le
défaut ainsi que le moment où il est survenu
soient brièvement décrits par écrit.
Si le défaut est couvert par notre garantie,
nous vous renvoyons le produit réparé ou
neuf. La réparation ou l’échange du produit
ne constitue pas un nouveau commencement
de période de la garantie.
20
Durée de garantie et requêtes
légales pour vices de construction
La durée de garantie n’est pas prolongée
par son application. Ceci est également valable sur les pièces réparées et remplacées.
Les dommages et les vices déjà présents au
moment de l’achat doivent être signalés im-
FR
Page 23

FR
CH
__RP103371_B1.book Seite 21 Freitag, 21. November 2014 1:14 13
médiatement après le déballage. Après l’expiration de la garantie, les réparations à
effectuer sont payantes.
Etendue de la garantie
L’appareil a été fabriqué selon des prescriptions de qualité rigoureuses et a été vérifié
minutieusement avant livraison.
La garantie s’applique aux défauts de matériel ou de fabrication. Cette garantie ne
s’applique pas aux pièces du produit subissant l’usure normale et pouvant donc être
considérées comme pièces d’usure ou aux
dommages sur les pièces fragiles comme le
bouton, la batterie ou les éléments en verre.
Cette garantie est perdue si l’appareil n’a
pas été utilisé ou entretenu de manière
conforme. Pour une utilisation conforme du
produit, respecter précisément toutes les
consignes présentées dans le mode d’emploi. Les fins d’utilisation et les actions
contre-indiquées ou déconseillées dans le
mode d’emploi doivent impérativement être
évitées.
Le produit est exclusivement conçu pour un
usage privé non commercial. La manipulation non autorisée et non conforme, l'utilisation de force et les interventions non
effectuées par notre centre de service autorisé entraînent la perte de garantie.
Déroulement en cas de garantie
Pour assurer un traitement rapide de votre
demande, respectez les éléments suivants :
• Pour toute demande, tenez à disposition
le numéro d’article IAN : 103371 et
le ticket de caisse comme preuve
d’achat.
• En cas d’erreur de fonctionnement ou
autres pannes, contactez d’abord par
téléphone ou par e-Mail le centre de
service cité ci-dessous.
• Envoyez ensuite gratuitement à l’adresse
de service qu’on vous a donnée le produit considéré comme défectueux en y
joignant la preuve d’achat (ticket de
caisse) et l’indication du défaut ainsi que
du moment où il est survenu.
Sur www.lidl-service.com, vous
pouvez télécharger ce mode d’emploi ainsi que ceux d’autres produits, des vidéos sur les produits et
des logiciels.
Centre de service
Service France
Tel.: 0800 919270
E-Mail: hoyer@lidl.fr
Service Suisse
Tel.: 0842 665566 (0,08 CHF/Min.,
mobile max. 0,40 CHF/Min.)
E-Mail: hoyer@lidl.ch
IAN : 103371
Fournisseur
Attention ! L’adresse suivante n’est pas
une adresse de service. Contactez
d’abord le centre de service cité plus haut.
HOYER Handel GmbH
Kühnehöfe 5
22761 Hamburg
Allemagne
FR
21
Page 24

__RP103371_B1.book Seite 22 Freitag, 21. November 2014 1:14 13
Indice
1. Panoramica ................................................................................... 22
2. Uso conforme ................................................................................ 23
3. Istruzioni per la sicurezza .............................................................. 23
4. Materiale in dotazione ................................................................... 26
5. Messa in funzione .......................................................................... 26
6. Funzionamento .............................................................................. 26
7. Pulizia ........................................................................................... 27
8. Conservazione ............................................................................... 28
9. Smaltimento .................................................................................. 28
10. Risoluzione dei problemi ................................................................ 29
11. Ricette ........................................................................................... 29
12. Dati tecnici ..................................................................................... 30
13. Garanzia della HOYER Handel GmbH ............................................ 30
1. Panoramica
1 Blocco motore (girevole)
2 Pulsante di miscelazione
3 Alloggiamento
4 Accessorio coltello con lame
5 Contrassegni lucchetto per bloccare il recipiente
6 Recipienti: capacità massime circa 390 e 290 ml
7 Cavo di collegamento con spina
8 Recipiente per pulizia
9 Contrassegno sul recipiente
10 Aletta di bloccaggio
11 Coperchio con apertura per bere
12 Piatto di raccolta
13 Contrassegni lucchetto per arresto accessorio coltello
14 Guarnizione anulare nell'accessorio coltello
22
IT
Page 25

__RP103371_B1.book Seite 23 Freitag, 21. November 2014 1:14 13
Vi ringraziamo per la
vostra fiducia.
Ci congratuliamo con voi per l'acquisto del
vostro nuovo mixer per frullato.
Per un impiego sicuro dell'apparecchio e
per conoscerne tutto il ventaglio di prestazioni:
• Leggere attentamente il presente manuale di istruzioni per l'uso
prima della prima messa in funzione.
• Attenersi soprattutto alle istruzioni per la sicurezza!
• È consentito usare l'apparecchio
solo come descritto nel manuale
di istruzioni per l'uso.
• Conservare il manuale di istruzioni per l'uso.
• Se si cede l'apparecchio a terzi,
consegnare anche il manuale di
istruzioni per l'uso.
Ci auguriamo che il mixer per frullato possa
darvi molte soddisfazioni!
2. Uso conforme
Il mixer per frullato è destinato esclusivamente alla preparazione di bevande di frutti interi
o smoothie (frappè).
L'apparecchio è stato ideato per l'uso domestico. Usare l'apparecchio solo al chiuso.
Questo apparecchio non va utilizzato a scopo commerciale.
Questo apparecchio è destinato all'impiego
sia in casa che per usi domestici, ad esempio …
… nelle cucine dei lavoratori in negozi,
uffici e altri locali commerciali;
… in tenute rurali;
… da parte dei clienti di alberghi, motel
e altre strutture residenziali;
… in pensioni con colazione.
Uso indebito prevedibile
AVVERTENZA: rischio di danni materiali!
Prima di miscelare occorre rimuovere le bucce
spesse o dure (ad es. di agrumi, ananas), i
piccioli e i noccioli della frutta con nocciolo
(ad es. ciliegie, pesche, albicocche).
3. Istruzioni per la
sicurezza
Avvertenze di sicurezza
Laddove necessario, nel presente manuale
di istruzioni per l'uso vengono utilizzate le
seguenti avvertenze di sicurezza:
PERICOLO! Rischio elevato: la
mancata osservanza di questa avvertenza può essere causa di danni
a persone.
AVVERTENZA! Rischio medio: la mancata
osservanza di questa avvertenza può essere
causa di lesioni o gravi danni materiali.
ATTENZIONE: Rischio minimo: la mancata osservanza di questa avvertenza può essere causa di lievi lesioni o danni materiali.
IT
23
Page 26

__RP103371_B1.book Seite 24 Freitag, 21. November 2014 1:14 13
NOTA: circostanze e particolarità di cui tener conto durante l'uso dell'apparecchio.
Istruzioni per un impiego sicuro
~
Questo apparecchio non deve essere utilizzato da bambini.
~
I bambini non devono giocare con l'apparecchio.
~
Tenere lontano dalla portata dei bambini l'apparecchio e il suo
cavo di collegamento.
~
Questo apparecchio può essere utilizzato da persone con facoltà
fisiche, sensoriali o mentali ridotte o prive di esperienza e/o conoscenze, a condizione che vengano sorvegliate o istruite circa l'utilizzo sicuro dell'apparecchio e che abbiano compreso i rischi
derivanti da tale utilizzo.
~
Se il cavo di collegamento di questo apparecchio è danneggiato,
per evitare rischi deve essere sostituito dal produttore, dal suo servizio clienti o da una persona con qualifica simile.
~
Staccare la spina dalla presa…
… se si prevede di lasciare l'apparecchio incustodito,
… prima di assemblare o di smontare l'apparecchio e
… prima di pulire l'apparecchio.
~
Pulire l'accessorio coltello e i recipienti con acqua calda e un poco
di detergente.
PERICOLO per i bambini
~ Il materiale di imballaggio non è un gio-
cattolo per bambini. I bambini non devono giocare con i sacchetti di plastica,
poiché ciò comporta un pericolo di soffocamento.
~ Assicurarsi che i bambini non possano
far cadere l'apparecchio dalla superficie di lavoro tirandolo dal cavo di collegamento.
~ Conservare l'apparecchio lontano dalla
portata dei bambini.
PERICOLO di scossa elettrica a causa dell'umidità
~ Non usare mai l'apparecchio in prossi-
mità di una vasca da bagno, una doccia, un lavandino pieno o simili.
24
IT
~ Non immergere il blocco motore, l'al-
loggiamento, il cavo di collegamento e
la spina in acqua o altri liquidi.
~ Proteggere il blocco motore e l'alloggia-
mento dall'umidità, dalle gocce e dagli
spruzzi.
~ Se dovesse penetrare umidità nel bloc-
co motore o nell'alloggiamento, staccare immediatamente la spina. Far
controllare l'apparecchio prima di rimetterlo in funzione.
~ Non usare l'apparecchio con le mani
bagnate.
~ Se l'apparecchio cade in acqua, stac-
care immediatamente la spina e solo in
seguito tirare fuori l'apparecchio.
Page 27

__RP103371_B1.book Seite 25 Freitag, 21. November 2014 1:14 13
PERICOLO di scossa
elettrica
~ Inserire la spina in una presa solo dopo
aver assemblato completamente l'apparecchio.
~ Collegare la spina solo ad una presa
correttamente installata e facilmente accessibile la cui tensione coincida con
quella indicata sulla targhetta. La presa
di corrente deve essere facilmente accessibile anche dopo il collegamento.
~ Assicurarsi che il cavo di collegamento
non possa essere danneggiato da bordi
taglienti o punti molto caldi. Non avvolgere il cavo di collegamento intorno
all'apparecchio.
~ Anche dopo lo spegnimento, l'apparec-
chio non è completamente staccato dalla rete. Per farlo, estrarre la spina.
~ Durante l'uso dell'apparecchio, assicu-
rarsi che il cavo di collegamento non
sia bloccato né schiacciato.
~ Per scollegare la spina dalla presa, tira-
re sempre la spina, mai il cavo.
~ Staccare la spina dalla presa…
… se si verifica un guasto,
… se non si utilizza il mixer per frullato e
… in caso di temporali.
~ Non utilizzare l'apparecchio se esso o
il cavo di collegamento presentano danni visibili.
~ Per evitare rischi non apportare alcuna
modifica all'apparecchio.
PERICOLO di lesioni da
taglio
~ Le lame dell'accessorio coltello conti-
nuano a girare dopo aver spento l'apparecchio. Attendere che si fermino del
tutto prima di togliere il recipiente.
~ Le lame dell'accessorio coltello sono af-
filate. Maneggiarlo con cautela. Quando si lava a mano, l'acqua dev'essere
abbastanza limpida da poter vedere
bene le lame.
~ L'apparecchio non va fatto funzionate
in nessun caso senza recipiente.
AVVERTENZA: rischio di danni
materiali
~ Prima di miscelare occorre rimuovere le
bucce spesse o dure (ad es. di agrumi,
ananas), i piccioli e i noccioli della frutta con nocciolo (ad es. ciliegie, pesche,
albicocche).
~ Non versare nel recipiente ingredienti a
temperatura maggiore di 85 °C.
~ Per evitare danni all'apparecchio, inter-
rompere subito la miscelazione se le
lame dell'accessorio coltello non girano
o girano con difficoltà. Staccare la spina e controllare se nel recipiente si trova un ostacolo o se l'alimento è troppo
duro. Controllare anche se l'apparecchio è assemblato correttamente.
~ Non far funzionare l'apparecchio a
vuoto, poiché il motore potrebbe surriscaldarsi e subire danni.
~ L'apparecchio è dimensionato per una
durata di funzionamento di massimo
20secondi senza interruzione. Poi l'apparecchio deve restare spento finché
non si raffredda alla temperatura ambiente.
~ Utilizzare solo gli accessori originali.
~ L'apparecchio (alloggiamento, blocco
motore, cavo di collegamento con spina) non è adatto al lavaggio in lavastoviglie.
~ Non utilizzare detergenti corrosivi o
abrasivi.
L'apparecchio è dotato di piedini antisci-
~
volo di plastica. Dato che i mobili sono rivestiti con un gran numero di vernici e
materie plastiche e vengono trattati con
prodotti diversi, non è possibile escludere
del tutto che alcune di queste sostanze contengano componenti in grado di aggredire
e indebolire i piedini di plastica. Eventualmente, collocare un piano di posa antiscivolo sotto l'apparecchio
.
IT
25
Page 28

__RP103371_B1.book Seite 26 Freitag, 21. November 2014 1:14 13
4. Materiale in
dotazione
1 Mixer per frullato
1 Accessorio coltello4
1 Piatto di raccolta12
3Recipienti6/8: capacità massime circa
390, 290 e 180 ml (recipiente per pulizia)
2 Coperchi con apertura per bere11
1 Manuale di istruzioni per l'uso
5. Messa in funzione
• Togliere tutto il materiale di imballaggio.
• Verificare che tutti i pezzi siano presenti
e integri.
• Pulire l'apparecchio prima di uti-
lizzarlo per la prima volta!
(vedere “Pulizia” a pagina 27)
• Collocare l'apparecchio su una superfi-
cie asciutta, piana e non scivolosa.
Campo di applicazione
Il mixer per frullato è destinato esclusivamente alla preparazione di bevande di frutti interi
o smoothie (frappè).
Preparazione degli alimenti
AVVERTENZA: rischio di danni
materiali!
Prima di miscelare occorre rimuovere le bucce
spesse o dure (ad es. di agrumi, ananas), i
piccioli e i noccioli della frutta con nocciolo
(ad es. ciliegie, pesche, albicocche).
• Lavare o pulire i frutti.
• Tagliare la frutta a pezzi grossi (bordi di
circa 3-4 cm di lunghezza).
• Utilizzare liquido a sufficienza (acqua
minerale, succo di frutta, latte, yogurt).
Si raccomanda un rapporto di miscelazione di 1:1.
Miscelazione
6. Funzionamento
PERICOLO di scossa elettrica!
Inserire la spina7 in una presa solo
dopo aver montato completamente il
mixer per frullato.
PERICOLO di lesioni da
taglio!
~ L'apparecchio non va fatto funzionate
in nessun caso senza recipiente6.
~ Le lame dell'accessorio coltello4 sono
affilate. Maneggiarlo con cautela.
~ Le lame dell'accessorio coltello conti-
nuano a girare dopo aver spento l'apparecchio. Attendere che si fermino del
tutto prima di togliere il recipiente.
AVVERTENZA!
recchio, interrompere subito la miscelazione
se le lame dell'accessorio coltello
no o girano con difficoltà. In tal caso staccare
7
la spina
trova un ostacolo.
e controllare se nel recipiente6 si
Per evitare danni all'appa-
4
non gira-
ATTENZIONE: a seconda della durezza e
della consistenza degli ingredienti, non riempire il recipiente6 al massimo, altrimenti
l'accessorio coltello4 potrebbe bloccarsi.
NOTE:
• Se il frappè è troppo denso, aggiungere
secondo necessità un poco d'acqua minerale, succo di frutta, latte o yogurt.
È possibile ottenere una consistenza
•
maggiormente omogenea del frappé
(per esempio in caso di frutta più dura)
interrompendo brevemente e riavviando
più volte la miscelazione (funzione a impulsi: rilasciare e premere di nuovo il pul-
2
sante di miscelazione
• Se si dovessero trovare ancora dei resti
di alimenti (ad es. semi di frutta) sulla
guarnizione anulare14, pulire con un
panno carta da cucina per garantire
una corretta tenuta ermetica.
).
26
IT
Page 29

IT_RP103371_Smoothie_Mixer.fm Seite 27 Mittwoch, 26. November 2014 9:53 09
1. Versare i pezzi di frutta e gli ingredien-
ti nel recipiente6 desiderato.
2. Figura C: inserire il recipiente dal
basso nell'accessorio coltello4. Il contrassegno9 indica il lucchetto aperto5. Le alette di bloccaggio10 del
recipiente si inseriscono nella rientranza dell'inserto lama.
3. Girare il recipiente in senso orario fino
all'arresto, finché il contrassegno9 indica il lucchetto chiuso5.
4. Inserire la spina7 nella presa di corrente.
5. Figura A: inclinare il recipiente con il
blocco motore1 completamente verso
l'alto.
6. Tenere premuto il pulsante di miscelazio-
2
. Inizia la miscelazione.
ne
7.
Dopo circa 10 – 20 secondi
pulsante di miscelazione
modo si conclude la miscelazione.
8. Figura B: inclinare il recipiente con il
blocco motore completamente verso il
basso.
9. Attendere che la bevanda si raccolga
nel recipiente6.
10. Girare il recipiente in senso antiorario
finché il contrassegno9 indica il lucchetto aperto5.
11. Staccare il recipiente dall'accessorio
coltello4 tirando verso il basso. Per ritirare il recipiente grande, inclinare leggermente il blocco motore verso l'alto.
12. Se rimangono ancora dei pezzi di frutta troppo grandi nel frappé, mescolare
di nuovo per alcuni secondi.
13. Eventualmente, chiudere il recipiente
con il coperchio11.
14. Se possibile pulire l'apparecchio subito
dopo l'uso con il recipiente per pulizia
15. Staccare la spina7 dalla presa.
rilasciare
2
. In questo
il
8
7. Pulizia
Pulire l'apparecchio prima di utilizzarlo per la prima volta!
PERICOLO di scossa elettrica!
~ Prima di pulire il mixer per frullato, stac-
care la spina7 dalla presa.
~ Non immergere il blocco motore1, l'al-
loggiamento3, il cavo di collegamento
e la spina7 in acqua o altri liquidi.
PERICOLO di lesioni da
taglio!
Quando si lava a mano, l'acqua dev'essere
abbastanza limpida da poter vedere bene
l'accessorio coltello4.
AVVERTENZA: rischio di danni
materiali!
Non utilizzare detergenti corrosivi o abrasivi.
NOTA:
I seguenti pezzi possono anche essere puliti
in lavastoviglie:
-i recipienti6/8 ed i loro coperchi11,
- il piatto di raccolta12.
Dopo ogni utilizzo
Se possibile, pulire l'apparecchio dopo
ogni uso eliminando i resti di cibo dall'accessorio coltello.
1. Riempire il recipiente per pulizia8 con
acqua pulita ed eventualmente con un
poco di detergente. Poi risciacquare
con acqua pulita.
2. Utilizzare l'apparecchio come descritto
(Capitolo "Funzionamento" a pagina 26).
3. Staccare la spina7 dalla presa.
4. Inclinare il blocco motore1 verso l'alto.
.
Se si dovessero trovare ancora dei resti
di alimenti (ad es. semi di frutta) sulla
14
guarnizione anulare
panno carta da cucina per garantire una
corretta tenuta ermetica. Eseguire eventualmente una pulizia intensiva (v. sotto).
, pulire con un
IT
27
Page 30

IT_RP103371_Smoothie_Mixer.fm Seite 28 Dienstag, 25. November 2014 6:30 18
5. Se necessario pulire l'alloggiamento3,
il blocco motore1 e il cavo di collegamento7 con uno straccio leggermente
inumidito. Asciugare poi con uno straccio asciutto.
6. Gli altri accessori si possono pulire con
acqua calda e un poco di detergente.
7. Far asciugare completamente le parti
prima di metterle da parte o di utilizzare di nuovo l'apparecchio.
Pulizia approfondita
Qualora non fosse più possibile eliminare i
resti di cibo utilizzando il recipiente per pulizia, è possibile staccare l'accessorio coltello dall'apparecchio e pulirlo a parte.
1. Staccare la spina7.
2. Se necessario, girare il recipiente6 in
senso antiorario e separarlo dall'accessorio coltello4 tirandolo verso il basso.
3. Girare il blocco motore1 completamente verso l'alto finché s'innesta in
questa posizione.
4. Figura D: girare il bordo dell'accessorio coltello4 in senso orario finché la
freccia indica il lucchetto aperto13 e
staccarlo dal blocco motore1 tirandolo verso l'alto.
5. Pulire l'accessorio coltello con acqua
calda e un poco di detergente.
6. Far asciugare completamente l'accessorio coltello.
7. Collocare l'accessorio coltello4 sul bloc-
1
co motore
to aperto
8. Girare l'accessorio coltello finché la
freccia indica il lucchetto chiuso. A
questo punto l'accessorio coltello è
montato di nuovo correttamente.
. La freccia indica il lucchet-
13
.
8. Conservazione
PERICOLO per i bambini! Conservare l'apparecchio lontano dalla
portata dei bambini.
PERICOLO!
conservazione la
collegata ad una presa.
• Scegliere un luogo nel quale non possano agire sull'apparecchio né un calore
forte né l'umidità.
Per evitare incidenti, durante la
spina7
non deve
restare
9. Smaltimento
Il simbolo del bidone della
spazzatura su ruote barrato
significa che all'interno
dell'Unione Europea il prodotto deve essere smaltito separatamente. Questo vale
per il prodotto e tutti i suoi accessori contrassegnati da questo simbolo. I prodotti così
contrassegnati non possono essere smaltiti
assieme ai normali rifiuti domestici, bensì
devono essere consegnati presso un centro
di raccolta per il riciclaggio degli apparecchi elettrici ed elettronici. Il riciclaggio contribuisce a ridurre il consumo di materie
prime e l'inquinamento ambientale.
Confezione
Smaltire la confezione nel rispetto delle normative ambientali vigenti nel proprio paese.
28
IT
Page 31

__RP103371_B1.book Seite 29 Freitag, 21. November 2014 1:14 13
10. Risoluzione dei
problemi
Qualora l'apparecchio non funzioni correttamente, scorrere la checklist seguente, poiché l’anomalia di funzionamento potrebbe
essere dovuta a un piccolo problema che
l'utente è in grado di risolvere autonomamente.
PERICOLO di scossa elettrica!
Non tentare mai di riparare autonomamente l'apparecchio.
Guasto
L’apparecchio
non funziona
L'accessorio
coltello4 non
gira o gira con
molta difficoltà
Il liquido
fuoriesce
Possibili cause /
Rimedi
• L'apparecchio è allacciato alla rete elettrica?
• Verificare l'allacciamento.
• L'accessorio coltello4
è montato correttamente?
• Il recipiente6 è inserito correttamente?
• Spegnere immediatamente, staccare la spina7 e controllare:
Ostacolo all'interno
del recipiente?
• La quantità di ingredienti versata è troppo
grande?
11. Ricette
ATTENZIONE: a seconda della durezza e
della consistenza degli ingredienti, non riempire il recipiente6 al massimo, altrimenti
l'accessorio coltello4 potrebbe bloccarsi.
NOTA: se si desidera utilizzare ghiaccio
per preparare un frappé freddo, si raccomanda di usare ghiaccio tritato.
Frappè di pesca e banana
• 1/2 banana (sbucciata)
• 2 mezze pesche (sbucciate e senza nocciolo)
• 50 ml di succo di pompelmo
• 1 spruzzo di succo di limone
1. Lavare la frutta ed eliminarne la buccia
e il nocciolo.
2. Tagliare la frutta a pezzi.
3. Versare gli ingrediente nel recipiente e
miscelarli.
Frappè di lampone e pera
• 1/2 pera matura (sbucciata e senza
nocciolo)
•75g di lamponi
• 100 ml di acqua
• un poco di miele
1. Tagliare la pera a pezzi.
2. Versare gli ingrediente nel recipiente e
miscelarli.
3. Addolcire con miele secondo i gusti.
Frappè di lampone
• 100ml latte
• 100 g di lamponi
• 75 g di yogurt magro
• 1 cucchiaino di zucchero vanigliato
Versare gli ingrediente nel recipiente e miscelarli.
IT
29
Page 32

__RP103371_B1.book Seite 30 Freitag, 21. November 2014 1:14 13
Frappè di mango, kiwi e zenzero
• 1/2 mango (sbucciato)
• 1 kiwi (sbucciato)
• 1 pezzo di zenzero (circa 1/2 cucchiaino)
• 1 arancia (sbucciata)
• 1/2 limetta (sbucciata)
1. Tagliare la frutta a pezzi.
2. Versare gli ingrediente nel recipiente e
miscelarli.
12. Dati tecnici
Modello: SSM 175 B2
Tensione di rete: 230 V ~ 50 Hz
Classe di protezione: II
Potenza: max. 175 W
Durata max. di
funzionamento (KB): 20 secondi
Con riserva di modifiche tecniche.
13. Garanzia della
HOYER Handel GmbH
Gentile cliente,
questo apparecchio è dotato di una garanzia di 3 anni a decorrere dalla data d'acquisto. In caso di difetti del prodotto dispone di
diritti legali contro il venditore. Questi diritti
legali non sono limitati dalla garanzia da noi
prestata, che viene descritta di seguito.
Condizioni della garanzia
Il termine della garanzia inizia dalla data
d'acquisto. Conservi con cura lo scontrino
originale. Questo documento è necessario
come prova dell'acquisto.
Se entro tre anni dalla data d'acquisto del
prodotto si presenta un difetto di materiale o
di produzione, ripareremo o sostituiremo gratuitamente il prodotto, a nostra scelta. Per avvalersi di questa garanzia occorre presentare
entro il termine di tre anni l'apparecchio difettoso e la prova d'acquisto (scontrino), descrivendo brevemente per iscritto in cosa consiste
il difetto e quando si è presentato.
Se il difetto è coperto dalla nostra garanzia,
vi verrà consegnato il prodotto riparato o un
prodotto nuovo. La riparazione o sostituzione del prodotto non comporta l'inizio di un
nuovo periodo di garanzia.
30
Periodo di garanzia e diritti per i
difetti
La prestazione della garanzia non prolunga
il periodo di garanzia. Ciò si applica anche
ai pezzi sostituiti o riparati. Danni e difetti
eventualmente presenti già al momento
dell'acquisto devono essere comunicati
dopo aver aperto la confezione. Le riparazioni effettuate dopo lo scadere del periodo
di garanzia sono a pagamento.
Entità della garanzia
L'apparecchio è stato prodotto con cura basandosi su severe direttive di qualità ed è
stato controllato scrupolosamente prima della consegna.
IT
Page 33

IT
CH
__RP103371_B1.book Seite 31 Freitag, 21. November 2014 1:14 13
La garanzia si applica agli errori di materiale o produzione. Questa garanzia non si
estende a parti del prodotto esposte a normale usura e dunque assimilabili a pezzi
soggetti a usura, né si estende ai danni a
parti fragili, ad es. interruttori, batterie o elementi di vetro.
La garanzia decade se il prodotto è stato
danneggiato o non è stato correttamente utilizzato o sottoposto a manutenzione. Per un
uso adeguato del prodotto occorre attenersi
strettamente a tutte le indicazioni riportate
nel manuale di istruzioni per l'uso. Occorre
evitare assolutamente usi o azioni sconsigliati o evidenziati negativamente nel manuale di istruzioni per l'uso.
Il prodotto è destinato esclusivamente
all'uso privato e non commerciale. La garanzia decade in caso di maneggio scorretto e
inadeguato, ricorso alla forza e interventi
non autorizzati dal nostro centro assistenza.
Disbrigo nei casi contemplati
dalla garanzia
Per garantire un rapido disbrigo della richiesta, la preghiamo di attenersi alle seguenti
indicazioni:
• Per tutte le richieste mantenga a portata
di mano il numero di articolo
IAN: 103371 e lo scontrino come
prova.
• Qualora si presentassero errori di funzionamento o altri difetti, si rivolga innanzitutto ai centri assistenza indicati di
seguito, telefonicamente o tramite
e-mail.
• Il prodotto registrato come difettoso potrà poi essere inviato a carico del destinatario all'indirizzo del centro assistenza
che Le verrà comunicato, allegando la
prova d'acquisto (scontrino) e indicando
in che cosa consiste il difetto e quando si
è presentato.
All'indirizzo www.lidl-service.com
è possibile scaricare questo manuale, molti altri manuali, filmati sui
prodotti e software.
Centri assistenza
Assistenza Italia
Tel.: 02 36003201
E-Mail: hoyer@lidl.it
Assistenza Svizzera
Tel.: 0842 665566 (0,08 CHF/Min.,
telefonia mobile max. 0,40 CHF/Min.)
E-Mail: hoyer@lidl.ch
IAN: 103371
Fornitore
Si tenga presente che il seguente indirizzo
non è un indirizzo di assistenza.
Rivolgersi innanzitutto ai centri assistenza riportati sopra.
HOYER Handel GmbH
Kühnehöfe 5
22761 Hamburg
Germania
IT
31
Page 34

__RP103371_B1.book Seite 32 Freitag, 21. November 2014 1:14 13
Contents
1. Overview ...................................................................................... 32
2. Intended purpose .......................................................................... 33
3. Safety information ......................................................................... 33
4. Items supplied ............................................................................... 35
5. How to use .................................................................................... 36
6. Operation ...................................................................................... 36
7. Cleaning ........................................................................................ 37
8. Storage ......................................................................................... 38
9. Disposal ........................................................................................ 38
10. Trouble-shooting ............................................................................ 38
11. Recipes .......................................................................................... 39
12. Technical specifications .................................................................. 39
13. Warranty of the HOYER Handel GmbH ........................................... 39
1. Overview
1 Motor unit (rotatable)
2 Mix button
3 Housing
4 Blade assembly with blades
5 Lock symbols for fastening of the blender jug
6 Blender jug: maximum volume approx. 390 and 290 ml
7 Power cable with mains plug
8 Cleaning jug
9 Marking on the blender jug
10 Locking blade
11 Lid with drink opening
12 Spill tray
13 Lock symbols for fastening of the blade assembly
14 Sealing ring in blade assembly
32
GB
Page 35

__RP103371_B1.book Seite 33 Freitag, 21. November 2014 1:14 13
Thank you for your trust!
Congratulations on your new Smoothie
Blender.
For a safe handling of the device and in order to get to know the entire scope of features:
• Thoroughly read these operating instructions prior to initial
commissioning.
• Above all, observe the safety instructions!
• The device should only be used
as described in these operating
instructions.
• Keep these operating instructions for reference.
• If you pass the device on to
someone else, please include
these instructions.
We hope you enjoy your new Smoothie
Blender!
2. Intended purpose
The Smoothie Blender is intended solely for
blending of whole fruit drinks (smoothies).
The device is designed for use in private
households. The device must only be used indoors.
This device must not be used for commercial
purposes.
This device is equally intended for use in the
home and in applications similar to the
home, such as for example...
… in kitchens for employees in shops,
offices and other commercial areas;
… on agricultural estates;
… by customers in hotels, motels and
other residential facilities;
… in bed-and-breakfast establishments.
Foreseeable misuse
WARNING! Risk of material
damage!
Thick or firm peels, (e.g. of citrus fruits, pineapple), stems and pips of stone fruits (e.g.
cherries, peaches, apricots) must be removed
before blending.
3. Safety information
Warnings
If necessary, the following warnings will be
used in these operating instructions:
DANGER! High risk: failure to observe this warning may result in injury to life and limb.
WARNING! Moderate risk: failure to observe this warning may result in injury or serious material damage.
CAUTION: low risk: failure to observe this
warning may result in minor injury or material damage.
NOTE:
be observed when handling the device.
circumstances and specifics that must
GB
33
Page 36

__RP103371_B1.book Seite 34 Freitag, 21. November 2014 1:14 13
Instructions for safe operation
~
This device must not be used by children.
~
Children should not be allowed to play with the device.
~
The device and the power cable must be kept away from children.
~
This device can be used by people with restricted physical, sensory
or intellectual abilities or people without adequate experience
and/or understanding if they are supervised or instructed on how
to use this device safely and if they are aware of the resulting risks.
~
If the power cable of this device should become damaged, it must
be replaced by the manufacturer, the manufacturer's customer service department or a similarly qualified specialist, in order to avoid
any hazards.
~
Disconnect the mains plug from the wall socket …
… when it is not supervised,
… before you assemble or disassemble the device, and
… before you clean the device.
~
Clean the blade assembly and the blender jugs with warm water
and a little detergent.
DANGER for children
~ Packing materials are not children's
toys. Children should not be allowed to
play with the plastic bags. There is a
risk of suffocation.
~ Please ensure that children are not able
to pull the device down from the work
surface with the power cable.
~ Keep the device out of the reach of chil-
dren.
DANGER! Risk of electric
shock due to moisture
~ The device must never be operated in
the vicinity of a bathtub, a shower, a
filled hand basin or similar.
~ The motor unit, the housing, the power
cable and the mains plug must not be
immersed in water or other liquids.
~ Protect the motor unit and housing from
dampness and dripping or splashing
water.
~ If liquid gets into the motor unit or hous-
ing, remove the mains plug immediately. Have the device checked before
reusing.
~ Never touch the device with wet hands.
~ If the device falls into water, disconnect
the mains plug immediately. Only then
is it safe to retrieve the device.
DANGER! Risk of electric
shock
~ Only plug the mains plug into the wall
socket after the device has been completely assembled.
~ Only connect the mains plug to a prop-
erly installed and easily accessible wall
socket whose voltage corresponds to
the specifications on the rating plate.
The wall socket must continue to be easily accessible after the device is
plugged in.
34
GB
Page 37

__RP103371_B1.book Seite 35 Freitag, 21. November 2014 1:14 13
~ Ensure that the power cable cannot be
damaged by sharp edges or hot points.
Do not wrap the power cable around
the device.
~ The device is not fully disconnected from
the power supply, even after it is
switched off. In order to fully disconnect
it, pull out the mains plug.
~ When using the device, ensure that the
power cable cannot be trapped or
crushed.
~ When removing the mains plug, always
pull the plug and never the cable.
~ Disconnect the mains plug from the wall
socket…
… if there is a fault,
… if you are not using the Smoothie
Blender and
… during thunderstorms.
~ Do not use the device if there is visible
damage to the device or the power cable.
~ To avoid any risk, do not make modifi-
cations to the device.
DANGER! Risk of injury
from cutting
~ The blades of the blade assembly carry
on rotating after the device has been
switched off. Wait until the blades have
come to a standstill before you remove
the blender jug.
~ The blades of the blade assembly are
sharp. Handle it with care. When washing manually, the water should be sufficiently clear that you can see the blades
easily.
~ Under no circumstances should the de-
vice be operated without the blender
jug.
WARNING! Risk of material
damage
~ Thick or firm peels, (e.g. of citrus fruits,
pineapple), stems and pips of stone
fruits (e.g. cherries, peaches, apricots)
must be removed before blending.
~ Do not put any ingredients with a tem-
perature in excess of 85 °C into the
blender jug.
~ In order to prevent damage to the de-
vice, interrupt the blending process immediately if the blades of the blade
assembly rotate with difficulty or not at
all. Pull out the mains plug and investigate whether there is an obstruction in
the blender jug or whether the contents
are too viscous. Also check whether the
device is assembled correctly.
~ Do not operate the device when it is
empty, as this causes the motor to overheat and may result in it being damaged.
~ The device is designed for a maximum
operating time of 20 seconds without interruption. After this, the device must remain switched off until it has cooled
down to room temperature.
~ Only use the original accessories.
~ The device (housing, motor unit, power
cable with mains plug) is not dishwasher safe.
~ Do not use any astringent or abrasive
cleaning agents.
~ The device is fitted with non-slip plastic
bases. As furniture is coated with a
wide array of varnishes and synthetics,
and is also treated with different care
products, it cannot be fully ruled out that
some of these materials contain ingredients that could attack and soften the
non-slip plastic bases. If necessary,
place a non-slip mat under the device.
4. Items supplied
1 Smoothie Blender
1 Blade assembly4
1 Spill tray12
3Blender jug6/8: maximum volume ap-
prox. 390, 290 and 180 ml (cleaning jug)
2 Lids with drink opening11
1 Set of operating instructions
GB
35
Page 38

__RP103371_B1.book Seite 36 Freitag, 21. November 2014 1:14 13
5. How to use
• Remove all packing material.
• Check to ensure that all parts are present and undamaged.
• Clean the device prior to its first
use! (see “Cleaning” on page 37)
• Place the device on a dry, level, non-slip
surface.
6. Operation
DANGER!
shock
into the wall socket when the Smooth-
Blender
ie
DANGER! Risk of injury from
cutting!
~ Under no circumstances should the de-
vice be operated without the blender
jug6.
~ The blades of the blade assembly4 are
sharp. Handle it with care.
~ The blades of the blade assembly carry
on rotating after the device has been
switched off. Wait until the blades have
come to a standstill before you remove
the blender jug.
WARNING! In order to prevent damage to
the device, interrupt the blending process
immediately if the blades of the blade assembly4 rotate with difficulty or not at all.
In this case, pull out the mains plug7 and
check whether there is an obstruction in the
blender jug6.
Risk of electric
!
Only plug the mains plug7
is completely assembled.
Preparing food
WARNING!
damage
Thick or firm peels, (e.g. of citrus fruits, pineapple), stems and pips of stone fruits (e.g.
cherries, peaches, apricots) must be removed
before blending.
• Rinse or wash the fruits.
• Cut the fruit into rough pieces (approx.
3-4 cm edge length).
• Please use a sufficient amount of liquid
(mineral water, fruit juice, milk, yoghurt).
We recommend a mixing ratio of 1:1.
Risk of material
!
Blending
CAUTION: depending on the hardness
and consistency of the ingredients in the
blender jug6, do not fill it to the maximum;
otherwise the blade assembly4 could become clogged.
NOTES:
• If the smoothie is too thick, add a little
mineral water, fruit juice, milk or yoghurt to suit your taste.
You may achieve a more even consisten-
•
cy for the smoothie (e. g. when using
harder fruits), if you repeatedly interrupt
and restart the blending process (pulse
function: release and then press the mix
2
button
• If there are still bit of food (e.g. fruit
cores) on the sealing ring14, wipe it
down with kitchen roll in order to ensure
its sealing function.
again).
Application area
The Smoothie Blender is intended solely for
blending of whole fruit drinks (smoothies).
36
GB
1. Place the fruit pieces and other ingredi-
ents into the blender jug6 as desired.
2. Figure C: stick the blender jug into the
preassembled blade assembly4 from
the bottom. The marking9 points towards the opened lock5. The locking
blades10 on the blender jug engage
into the recess at the blade insert.
Page 39

GB_RP103371_Smoothie_Mixer.fm Seite 37 Dienstag, 25. November 2014 6:30 18
3. Turn the blender jug as far as it will go in
a clockwise direction, until the marking
5
points to the closed lock
4. Connect the mains plug7 with the wall
socket.
5. Figure A: pivot the blender jug with
the motor unit1 into its maximum upward position.
6. Press and hold the mix button2. The
blending process is started.
7. Release
10 - 20 seconds. The blending process
is thereby completed.
8. Figure B: pivot the blender jug with
the motor unit into its fully downwards
position.
9. Wait until the drink has collected in the
blender jug6 .
10. Turn the blender jug anti-clockwise until
the marking9 points to the opened
lock5.
11. Pull the blender jug downwards to release it from the blade assembly4. To
remove the large blender jug, first pivot
the motor unit slightly upwards.
12. If there are still rather large pieces of
fruit in the smoothie, repeat the blending process for a few seconds.
13. If necessary, close the blender jug with
the lid11.
14. Clean the device with the cleaning
jug8 as soon as possible after use.
15. Disconnect the mains plug7 from the
wall socket.
the mix button2 after approx.
.
9
7. Cleaning
Clean the device prior to its first use!
DANGER! Risk of electric shock!
~ Pull out the mains plug7 from the wall
socket before cleaning the Smoothie
Blender.
The motor unit1, the housing3, the pow-
~
7
er cable and the mains plug
be immersed in water or other liquids.
must not
DANGER! Risk of injury from
When washing manually, the water should
be sufficiently clear for you to see the blade
assembly4 easily.
WARNING! Risk of material damage!
Do not use any astringent or abrasive cleaning agents.
NOTE:
The following parts can be cleaned in the
dish washer:
- the blender jug6/8 and its lid11,
- the spill tray12.
cutting!
After every use
Preferably clean the device after each use
and remove all food residues from the blade
assembly.
1. Fill the cleaning jug8 with clear water
and, if necessary, a little detergent.
Then rinse with clear water.
2. Operate the device as described
(Chapter "Operation" on page 36).
3. Disconnect the mains plug7 from the
wall socket.
4. Pivot the motor unit1 upwards. If there
are still bit of food (e.g. fruit cores) on
the sealing ring14, wipe it down with
kitchen roll in order to ensure its sealing function. If necessary, perform an
intensive cleaning (see below).
5. Wipe the housing3, motor unit1 and
the power cable7 with a damp cloth if
necessary. Dry with a dry cloth.
6. The rest of the parts can be cleaned
with warm water and some detergent.
7. Allow all parts to dry completely before
you put them away or use the device
again.
Intensive cleaning
If food residues can no longer be removed
by using the cleaning blender jug, the blade
assembly should be removed from the device and should be cleaned separately.
GB
37
Page 40

GB_RP103371_Smoothie_Mixer.fm Seite 38 Dienstag, 25. November 2014 6:30 18
1. Pull out the mains plug7.
2. If necessary, pull the blender jug6 anti-
clockwise and pull it down and off the
blade assembly4.
3. Rotate the motor unit1 right to the top
until it locks into place in this position.
4. Figure D: turn the rim of the blade assembly4 in a clockwise direction until
the arrow symbol shows to the opened
lock13 and pull it up and off the motor unit1.
5. Clean the blade assembly with warm
water and a little detergent.
6. Let the blade assembly dry completely.
7. Place the blade assembly4 on the motor
1
. The arrow symbol shows to the
unit
13
opened lock
8. Turn the blade assembly until the arrow
symbol shows to the closed lock. The
blade assembly is now correctly mounted again.
.
must be taken to a collection point for recycling electric and electronic appliances. Recycling helps to reduce the consumption of raw
materials and protect the environment.
Packaging
When disposing of the packaging, make
sure you comply with the environmental regulations applicable in your country.
10. Trouble-shooting
If your device fails to function as required,
please try this checklist first. Perhaps there is
only a minor problem, and you can solve it
yourself.
DANGER!
shock
device yourself under any circumstances.
Risk of electric
!
Do not attempt to repair the
8. Storage
DANGER for children! Keep the
device out of the reach of children.
DANGER!
mains plug7
wall socket while in storage.
• Select a location where neither high
temperatures nor moisture can affect the
device.
In order to avoid accidents, the
must never be connected to a
9. Disposal
The symbol showing a wheelie bin crossed through indicates that the product requires
separate refuse collection in
the European Union. This applies to the product and all accessories marked with this symbol. Products
identified with this symbol may not be discarded with normal household waste, but
Fault
No function
Blade assembly4 is turning
with difficulty or
not at all
Liquids are
running out
Possible causes /
Action
• Has the device been
connected to the power supply?
• Check the connection.
• Is the blade assembly4 mounted properly?
• Has the blender jug6
been engaged properly?
• Switch off immediately, pull out mains
7
plug
Blockage in the vessel?
• Is the quantity of ingredients filled into the
blender jug too large?
and check:
38
GB
Page 41

__RP103371_B1.book Seite 39 Freitag, 21. November 2014 1:14 13
11. Recipes
CAUTION: depending on the hardness
and consistency of the ingredients in the
blender jug6, do not fill it to the maximum;
otherwise the blade assembly4 could become clogged.
NOTE: If you want to use ice to blend a cool
smoothie we recommend using crushed ice.
Peach Banana Smoothie
• 1/2 banana (peeled)
• 2 peach halves (peeled and pitted)
• 50 ml grapefruit juice
• 1 squirt of lemon juice
1. Wash the fruit and remove the peels
and pips.
2. Cut the fruit into pieces.
3. Place the ingredients in the blender jug
and blend them.
Mango Kiwi Ginger Smoothie
• 1/2 mango (peeled)
• 1 kiwi (peeled)
• 1 piece of ginger (approx. 1/2 teaspoon)
• 1 orange (peeled)
• 1/2 lime (peeled)
1. Cut the fruit into pieces.
2. Place the ingredients in the blender jug
and blend them.
12. Technical
specifications
Model: SSM 175 B2
Mains voltage: 230 V ~ 50 Hz
Protection class: II
Power rating: Max. 175 W
Max. continuous
operation (KB): 20 seconds
Raspberry Pear Smoothie
• 1/2 ripe pear (peeled and cored)
• 75 g raspberries
• 100 ml water
• some honey
1. Cut the pear into pieces.
2. Place the ingredients in the blender jug
and blend them.
3. Sweeten with honey to suit your taste.
Raspberry Smoothie
• 100ml
• 100 g raspberries
• 75 g yoghurt, low-fat
• 1 teaspoon vanilla sugar
Place the ingredients in the blender jug and
blend them.
milk
Subject to technical modification.
13. Warranty of the
HOYER Handel GmbH
Dear Customer,
your device is provided with a 3 year warranty starting with the purchase date. In the
event of product defects, you are entitled to
statutory rights against the vendor. These
statutory rights are not restricted by our warranty presented in the following.
Warranty conditions
The warranty period starts with the purchase
date. Please keep the original purchase receipt in a safe place. This document is required to verify the purchase.
If within three years from the purchase date
of this product a material or factory defect
occurs, the product will be repaired or re-
GB
39
Page 42

GB
IE
__RP103371_B1.book Seite 40 Freitag, 21. November 2014 1:14 13
placed by us – at our discretion – free of
charge to you. This warranty implies that
within the period of three years the defective
device and the purchase receipt are presented, including a brief written description of
the defect and the time it occurred.
If the defect is covered by our warranty, the
repaired or a new product will be returned
to you. No new warranty period starts with
a repair or replacement of the product.
Warranty period and statutory
claims for defects
The warranty period is not extended when
the warranty has been claimed. This also applies to replaced and repaired parts. Any
damages and defects already existing at the
time of purchase must be reported immediately upon unpacking. Repairs arising after
the expiration of the warranty period are
subject to a charge.
Warranty coverage
The device was produced carefully according
to strict quality guidelines and tested diligently prior to delivery.
The warranty applies to material or factory
defects. This warranty does not include product parts that are subject to standard wear
and therefore can be considered wear parts;
the same applies to damages at fragile parts,
e.g. switches, rechargeable batteries or parts
made of glass.
This warranty expires if the product is damaged, not used as intended or not serviced.
For the proper operation of the product, all instructions listed in the operating instructions
must be observed carefully. Any form of use
and handling that is advised against in the
operating instructions or warned against
must always be avoided.
The product is only intended for private and
not for commercial use. In the case of incorrect and improper treatment, use of force and
interventions not performed by our authorised Service Centre, the warranty shall cease.
Handling in case of a warranty
claim
In order to ensure prompt processing of your
matter, please observe the following notes:
• Please keep the article number
IAN: 103371
as a purchase verification for all inquiries.
• If faulty operation or other defects occur,
first contact the Service Centre listed in
the following by telephone or email.
• Then, you are able to send a product reported as defective free of charge to the
service address specified to you, including the purchase receipt and the information on the defect and when it
occurred.
Please visit www.lidl-service.com to
download this and many other
manuals, product videos and software.
and the purchase receipt
Service Centre
Service Great Britain
Tel.: 0871 5000 720 (£ 0.10/Min.)
E-Mail: hoyer@lidl.co.uk
Service Ireland
Tel.: 1890 930 034
(0,08 EUR/Min., (peak))
(0,06 EUR/Min., (off peak))
E-Mail: hoyer@lidl.ie
IAN: 103371
Supplier
Please note that the following address is no
service address. First contact the afore-
mentioned Service Centre.
HOYER Handel GmbH
Kühnehöfe 5
22761 Hamburg
Germany
40
GB
Page 43

__RP103371_B1.book Seite 41 Freitag, 21. November 2014 1:14 13
GB
41
Page 44

__RP103371_B1.book Seite 42 Freitag, 21. November 2014 1:14 13
Page 45

__RP103371_B1.book Seite 43 Freitag, 21. November 2014 1:14 13
Page 46

HOYER HANDEL GMBH
Kühnehöfe 5
22761 Hamburg
Germany
Stand der Informationen · Version des informations ·
Stato attuale delle conoscenze · Status of information:
10/2014 · Ident.-Nr.: SSM 175 B2
IAN 103371
RP103371_Smoothie Mixer_Cover_LB1.indd 1 28.10.14 13:08
1
 Loading...