

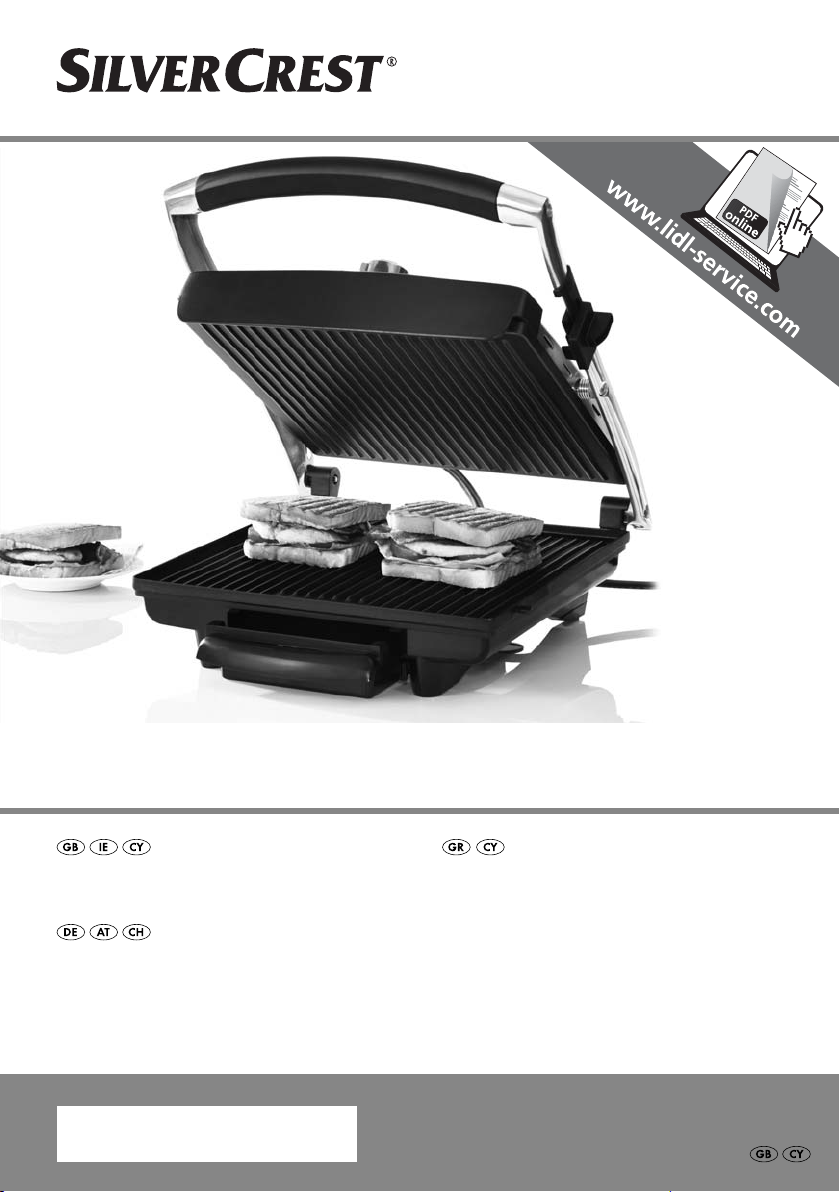
PANINI MAKER SPM 2000 A2
PANINI MAKER
Operating instructions
PANINI-GRILL
Bedienungsanleitung
ΨΗΣΤΙΕΡΑ
Οδηүίες χρήσης
IAN 87712

Before reading, unfold the page containing the illustrations and familiarise yourself with all functions of
the device.
Πριν ξεκινήσετε την ανάγνωση, ανοίξτε τις δυο σελίδες με τις εικόνες και εξοικειωθείτε με όλες τις
λειτουργίες της συσκευής.
Klappen Sie vor dem Lesen die Seite mit den Abbildungen aus und machen Sie sich anschließend mit allen
Funktionen des Gerätes vertraut.
GB / IE / CY Operating instructions Page 1
GR / CY Οδηүίες χρήσης Σελίδα 9
DE / AT / CH Bedienungsanleitung Seite 17
A
2
1
5 4
6
3
8
9
7
B
0

CONTENT PAGE
Introduction 2
Intended Use 2
Items supplied 2
Description of the appliance 2
Technical data 2
Safety instructions 2
Commissioning 4
Operation 4
Tips and Tricks 5
Cleaning and Care 5
Storage 5
Recipes 6
Spinach & Cheese Panini ................................................................................................................6
Chickenbreast Panini........................................................................................................................6
Mustard Baguette.............................................................................................................................7
Disposal 7
Warranty and Service 7
Importer 8
- 1 -

Panini Maker
Introduction
Congratulations on the purchase of your new
appliance.
You have clearly decided in favour of a quality
product. These operating instructions are a part of
this product. They contain important information in
regard to safety, use and disposal. Before using the
product, familiarise yourself with all of these operating
and safety instructions. Use the product only as described and only for the specified areas of application.
Retain these instructions for future reference. In addition, pass these documents on, together with the
product, to any future owner.
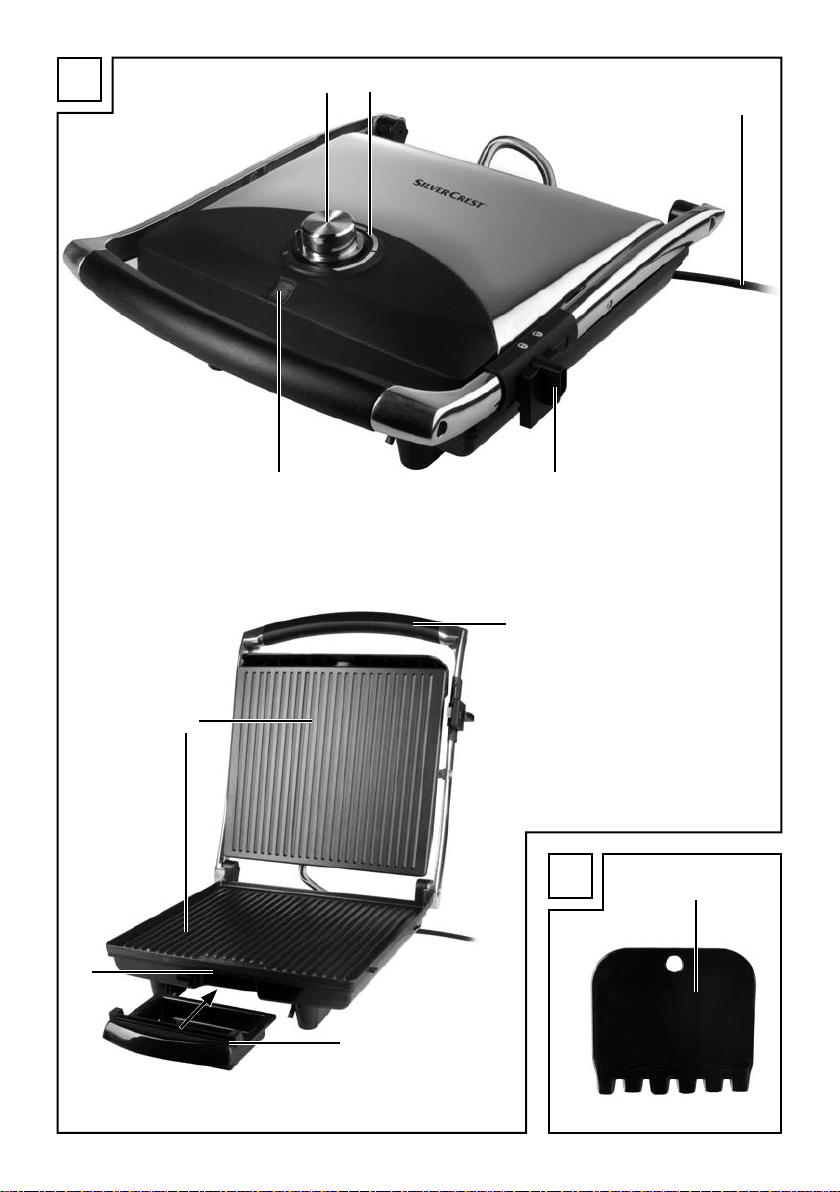
Description of the appliance
Figure A:
1 Heat level regulator
2 Red control lamp “Power”
3 Power cable
4 Safety closure
5 Green control lamp “Ready”
6 Handle
7 Grease catchment tray
8 Grease drainage outlet
9 Hotplates
Figure B:
0 Cleaning scraper
Technical data
Intended Use
This Panini Grill is intended for toasting small bread
rolls and sandwiches or for grilling other foodstuffs.
The appliance is intended for domestic use only.
Not for commercial use!
Items supplied
• Panini Maker
• Grease catchment tray
• Cleaning scraper
• Operating Instructions
Power rating: 220 - 240 V ~, 50 Hz
Power consumption : 2000 W
Safety instructions
How to avoid the risks of an
electrical shock
• The Panini Maker may only be used in dry rooms
indoors. Protect the appliance from spray water –
even when it is switched off.
• Use the appliance only if the local mains voltage
complies with the rated voltage of the appliance.
• Do not connect the appliance to a multiple connection power socket on which other electrical
devices are operating at the same time; this could
lead to an overload of the power circuit.
• Switch the appliance off after every use.
Additionally, disconnect the power plug.
• When cleaning, ensure that water cannot permeate
into the appliance. NEVER clean the appliance
under running water.
- 2 -

NEVER submerse the appliance in water or
other liquids.
• Protect the power cable from damage. Be careful
not to pinch/squeeze it, and keep it away from
hot objects. Do not allow the power cable to
hang freely from a table or workcounter.
• NEVER open the housing of the appliance.
• Arrange for defective power plugs and/or cables
to be replaced at once by qualified technicians
or our Customer Service Department.
• Repairs may only be carried out by experienced
specialists or workshops authorised to do so by
the manufacturer.
• This appliance is not intended for use by individuals (including children) with restricted physical,
physiological or intellectual abilities or deficiences
in experience and/or knowledge unless they are
supervised by a person responsible for their safety
or receive from this person instruction in how the
appliance is to be used.
• Children should be supervised to ensure that
they do not play with the appliance.
• Do not operate this appliance by means of an
external time switch or a separate remote control
system.
• After switching it off, allow the appliance to cool
completely before cleaning and storing it.
How to avoid the risk of fire
and injury
• Place your Panini Maker on a flat, non-slip and
heat-resistant surface and not on or close to other
appliances that could emit a significant level of
heat (e.g. toasters, kitchen ovens).
• Do not operate the appliance close to easily
flammable objects, such as curtains or next to
rolls of paper towels.
Even when used properly, some parts of the
appliance become very hot (such as the top
and bottom housing plates). After switching the
appliance off, take care not to touch these surfaces until they have cooled down completely.
• To avoid a dangerous overheating, ALWAYS
unwind the full length of the power cable.
• During use, the Panini Maker can be opened and
closed without risk by using the heat-insulated grip.
You can thus prevent the appliance
from being damaged
• To avoid damaging the non-stick coating of the
Sandwich Maker, remove your cooked foods
only with a plastic or wooden spatula or some
other suitable, non-metallic implement.
• For the same reason, do not use abrasive cleaners
and sharp objects to clean the appliance.
- 3 -

Commissioning
Operation
1. Take the appliance out of the packaging. Remove
all additional transport packing, e.g. plastic wrap
or cable holders.
2. Before the first usage, check that all items have
been delivered and there are no visible damages.
3. Read these operating instructions carefully.
4. Set up the appliance according to the safety
instructions.
5. Open the safety closure 4 .
6. Clean the appliance with a damp cloth as described in "Cleaning and Care".
7. Close the appliance.
8. Insert the plug into a power socket and allow the
appliance to heat up at its maximum temperature
setting for approx. 5 minutes.
Note:
Due to manufacturing residues, this initial heating up
could result in a light production of odour and smoke.
This is completely normal and is not dangerous.
Provide for sufficient ventilation, for example, open
a window.
9. After being heated up, remove the plug from
the wall socket and allow the appliance to
cool down.
10. Clean the appliance once more with a damp
cloth.
1. Close the appliance lid at the handle 6.
2. Push the grease catchment tray 7 into the app-
liance.
3. Insert the power plug into a wall power socket.
The red control lamp “Power” 2 glows.
4. Select the desired level with the heat level regulator 1. As soon as the selected heating level
has been reached, the green control lamp “Ready” 5 glows.
Note:
The green control lamp „Ready“ 5 also lights up
when the heat level regulator 1 is at position „0“.
As soon as you have set the heat level regulator 1
to the required position, the green control lamp
“Ready” 5 will go off until the desired temperature
has been attained.
Note:
The green control lamp “Ready” 5 can repeatedly
switch itself off. This means that the programmed
temperature has fallen, and the appliance is automatically heating itself up again!
5. Open the appliance lid and place the foodstuff
to be toasted/grilled on the lower hotplate 9.
6. Close the appliance lid using the handle 6.
Due to the positioning of the upper hotplate 9
being variable, even with thick items it is always
parallel to the lower hotplate 9. This ensures an
optimal cooking result.
7. After a short period check the browning of the
foodstuff. To do this, open the appliance lid
using the handle 6
Note:
Start with short cooking times and expand on them
until you have discovered the ideal duration.
- 4 -

8. When you are satisfied with the browning, open
the lid and remove the foodstuff.
Warning:
Do not use sharp or pointed objects to remove the
foodstuff. They could damage the surfaces of the
hotplates 9!
9. Turn the heat level regulator 1 to “0” and
remove the plug from the power socket.
Warning:
When the appliance is not in use, always remove
the plug from the power socket. It is not sufficient
to simply place the heat level regulator 1 in the
position “0”!
Tips and Tricks
• To make meat softer and to speed up grilling, it
can be marinaded beforehand. Suitable as the
basis for this are, for example, sour cream, red
wine, vinegar, buttermilk, or the fresh juice from
papayas or pineapples. Subject to taste, add
herbs and spices. Do not add salt, salt extracts
water from the meat and makes it hard. Place
the meat in the marinade so that it is completely
covered and then close the receptacle. It is best
to let it stand overnight.
• The hotplates 9 have a non-stick coating, extra
fat is therefore not needed. If you wish to use fat
anyway, please ensure that the fat/oil is suitable
for cooking, e.g. rapeseed oil.
• If you are not sure if the foodstuff is cooked in
the middle, use a standard commercial meat
thermometer.
Cleaning and Care
Important!
Before cleaning, remove the plug from the wall socket
and wait until the appliance has cooled down completely. Risk of injury!
Important!
Never clean the appliance under running water,
and never submerge it in water. The appliance
could be irreparably damaged!
• Draw the cleaning scraper 0, after the hotplates 9 have cooled, over the hotplates 9 so that
the fat and other residues are gathered together
so that you can better remove it.
• Wipe the hotplates 9 with a moist cloth. For
stubborn soiling use a mild detergent on the
cloth. To avoid destroying the non-stick coating,
do not use aggressive detergents, rough sponges or sharp objects.
• It is best to lay a wet dish cloth on encrusted residues in order to soften them.
A damp cloth is also sufficient for cleaning the outer
surfaces of the appliance.
Be sure to allow all parts to dry completely before
using the Panini Maker again.
Wipe the cleaning scraper 0 with a moist cloth.
For stubborn soiling, apply a mild detergent to the
cloth.
Storage
Store the cleaned appliance at a dry location.
Close the safety closure 4 .
Wrap the power cable 3 around the cable retainers
on the underside of the appliance.
- 5 -

Recipes
A Panini is a warm sandwich prepared with fresh
white bread. It is freshly toasted and then served.
Spinach & Cheese Panini
250 g Spinach leaves
1 Onion
1 Garlic clove
1 tbsp. oil
2 tbsp Lemon juice
1 Pinch of salt (and pepper)
4 Slices of white bread
40 g Herb butter
75 g Mozzarella
20 g Pine nuts
• Sort and wash the spinach leaves.
• Peel and finely hack the onion and garlic clove,
then steam them in hot oil until glassy. Add the
spinach. Flavour with lemon juice, salt and pepper.
• Spread herb butter on the bread.
• Cut the mozzarella into slices, spread them over
the two bread slices with the drained spinach.
Bestrew with pine nuts.
• Cover the Panini with a second slice of white
bread.
• Carefully place the Panini on the Panini Maker,
already pre-heated to a middle heat level, and
close the lid.
• Wait until the Panini is toasted to a golden-brown.
Then take it from the Panini Maker.
Chickenbreast Panini
400 g chicken breast fillet
20 g butter
Pepper, salt, paprika powder
120 g Bacon, in strips
6 Slices of white bread
3 Tbsp Salad dressing (Yoghurt)
30 g Lettuce
2 Tomatoes
1 Avocado
1 Tsp Lemon juice
50 g Cucumber
• Rinse the chicken breast fillets under running water
then pat them dry with kitchen paper. Heat some
butter in a non-stick pan and then roast the chicken
breast fillets well on both sides. Turn the cooker
down to a medium heat and then roast the chicken
breast fillets thoroughly for approx. 10 minutes.
After roasting, flavour with salt, pepper and paprika, take them from the pan and place them to
the side.
• Heat the fat up in the pan once again and then
fry the bacon strips until crispy.
• Spread the salad dressing onto 3 slices of white
bread, garnish with lettuce, cut the tomatoes into
slices, spice them and place them on the lettuce.
• Slice the chicken breast fillets along their length
and lay them on the tomatoes.
• Cut the avocado along its length all around and,
with a twist, detach it from its core. Peel it and slice
it into strips. Spread the lemon juice over the avocado so that it does not turn brown. Lay the
strips on the Panini.
• Cut the cucumber into slices and lay them on the
avocado.
• Cover the Panini with a second slice of white
bread.
• Carefully place the Panini on the Panini Maker,
already pre-heated to a middle heat level, and
close the lid.
• Wait until the Panini is toasted golden-brown and
then carefully remove it from the Panini-Maker.
- 6 -

Mustard Baguette
1 Baguette
1 Garlic clove
50 g Gherkin in piccalilli
40 g Pecorino Romano
1 Tbsp Mustard
2 Tbsp Sweet mustard
50 g Butter
2 Tbsp Chive rolls
Salt, pepper
• Cut, but do not separate into pieces, the baguette
laterally at distances of approx. 2-3 centimeters.
• Peel and crush the garlic, cube the gherkin very
finely and grate the Pecorino Romano.
• Blend the sharp and sweet mustards with the soft
butter, garlic, gherkin cubes, Pecorino Romano
and chives, flavour with salt and pepper.
• Fill the mustard butter into the baguette cuts and
wrap in aluminium foil.
• Pre-heat the Panini Maker to a medium level, place
the baguettes on it and close the lid. The baguette
should be golden-brown.
Disposal
Do not dispose of the appliance in your
normal domestic waste. This product is
subject to the European directive
2002/96/EC.
Warranty and Service
The warranty for this appliance is for 3 years from
the date of purchase. The appliance has been manufactured with care and meticulously examined
before delivery.
Please retain your receipt as proof of purchase. In
the event of a warranty claim, please make contact
by telephone with our Service Department. Only in
this way can a post-free despatch for your goods be
assured.
The warranty covers only claims for material and
maufacturing defects, but not for transport damage,
for wearing parts or for damage to fragile components, e.g. buttons or batteries. This product is for private use only and is not intended for commercial use.
The warranty is void in the case of abusive and improper handling, use of force and internal tampering
not carried out by our authorized service branch. Your
statutory rights are not restricted in any way by this
warranty.
The warranty period will not be extended by repairs
made under warranty. This applies also to replaced
and repaired parts. Any damage and defects extant
on purchase must be reported immediately after unpacking the appliance, at the latest, two days after
the purchase date. Repairs made after the expiration of the warranty period are subject to payment.
Dispose of the appliance through an approved disposal centre or at your community waste facility.
Observe the currently applicable regulations.
In case of doubt, please contact your waste disposal
centre.
Dispose of all packaging materials in an
environmentally friendly manner.
- 7 -

Service Great Britain
Tel.: 0871 5000 720 (£ 0.10/Min.)
E-Mail: kompernass@lidl.co.uk
IAN 87712
Service Ireland
Tel.: 1890 930 034
(0,08 EUR/Min., (peak))
(0,06 EUR/Min., (off peak))
E-Mail: kompernass@lidl.ie
IAN 87712
CY
Service Cyprus
Tel.: 8009 4409
E-Mail: kompernass@lidl.com.cy
IAN 87712
Importer
KOMPERNASS GMBH
BURGSTRASSE 21
44867 BOCHUM, GERMANY
www.kompernass.com
- 8 -

ΠΠεερριιεεχχόόμμεενναα ΣΣεελλίίδδαα
Εισαγωγή 10
Σκοπός χρήσης 10
Σύνολο αποστολής 10
Περιγραφή συσκευής 10
Τεχνικές πληροφορίες 10
Υποδείξεις ασφαλείας 10
Πρώτη θέση σε λειτουργία 12
Χειρισμός 12
Υποδείξεις και τεχνάσματα 13
Καθαρισμός και φροντίδα 13
Φύλαξη 14
Συνταγές 14
Πανίνι σπανάκι-τυρί........................................................................................................................14
Πανίνι με στήθος κοτόπουλο.........................................................................................................14
Μπαγκέτα με μουστάρδα...............................................................................................................15
Απομάκρυνση 15
Εγγύηση και σέρβις 15
Εισαγωγέας 16
- 9 -

ΨΨηησσττιιέέρραα
Εισαγωγή
Συγχαρητήρια για την αγορά της νέας σας συσκευής.
Αποφασίσατε έτσι την απόκτηση ενός προϊόντος
υψηλής ποιότητας. Οι οδηγίες χειρισμού είναι τμήμα
αυτού του προϊόντος. Περιέχουν σημαντικές
υποδείξεις για την ασφάλεια, τη χρήση και την
απόρριψη. Πριν από τη χρήση του προϊόντος εξοικειωθείτε με όλες τις υποδείξεις χειρισμού και
ασφάλειας. Χρησιμοποιείτε το προϊόν μόνο όπως
περιγράφεται και για τα αναφερόμενα πεδία χρήσης.
Σε περίπτωση παράδοσης του προϊόντος σε
τρίτους, παραδίδετε και όλα τα έγγραφα.
Σκοπός χρήσης
Η συσκευή παρασκευής πανίνι προορίζεται για το
ψήσιμο μικρών ψωμιών και σάντουιτς ή άλλων τροφίμων.
Προορίζεται αποκλειστικά για οικιακή χρήση.
Μη χρησιμοποιείτε τη συσκευή για επαγγελματικούς
σκοπούς!
Σύνολο αποστολής
• Ψηστιέρα
• Δοχείο συλλογής λίπους
• Ξέστρο καθαρισμού
• Οδηγίες χρήσης
Περιγραφή συσκευής
Εικόνα A:
1 Ρυθμιστής βαθμίδων θερμότητας
2 Κόκκινη λυχνία ελέγχου “Power (Ισχύς)”
3 Καλώδιο δικτύου
4 Κλείδωμα ασφαλείας
5 Πράσινη λυχνία ελέγχου “Ready( Έτοιμότητα)”
6 Χειρολαβή
7 Δοχείο συλλογής λίπους
8 Διάταξη εκροής λίπους
9 Θερμαντικές πλάκες
Εικόνα B:
0 Ξέστρο καθαρισμού
Τεχνικές πληροφορίες
Ονομαστική τάση: 220 - 240 V ~, 50 Hz
Μέγιστη απορρόφηση ισχύος : 2000 W
Υποδείξεις ασφαλείας
Έτσι αποφεύγετε κινδύνους μέσω
ηλεκτροπληξίας
• Η συσκευή επιτρέπεται να χρησιμοποιείται μόνο
σε στεγνούς εσωτερικούς χώρους. Κρατάτε τη
συσκευή – ακόμα και σε απενεργοποιημένη
κατάσταση – μακριά από ψεκαζόμενο νερό.
• Χρησιμοποιείτε τη συσκευή μόνο όταν η τοπική
τάση δικτύου συμφωνεί με την ονομαστική τάση
της συσκευής.
• Μη συνδέετε τη συσκευή μέσω ενός πολλαπλού,
μέσω του οποίου λειτουργούν ταυτόχρονα και άλλες
ηλεκτρικές συσκευές, διότι αυτό μπορεί να οδηγήσει
σε μια υπερφόρτωση του κυκλώματος ρεύματος.
• Απενεργοποιείτε τη συσκευή μετά από κάθε χρήση.
Για αυτό τραβάτε το βύσμα.
• Προσέχετε κατά τον καθαρισμό ώστε να μη φτάνει
καθόλου νερό στο εσωτερικό της συσκευής. Μην
καθαρίζετε ποτέ τη συσκευή κάτω από ρέον νερό.
- 10 -

Ποτέ μη βυθίζετε τη συσκευή μέσα σε νερό ή
άλλα υγρά.
• Προστατεύετε το καλώδιο δικτύου από ζημιά.
Προσέχετε ώστε να μην το συσφίγγετε και να
το κρατάτε μακριά από καυτά αντικείμενα. Μην
αφήνετε το καλώδιο δικτύου χαλαρά κρεμασμένο
σε τραπέζι ή σε πάγκο εργασίας.
• Ποτέ μην ανοίγετε την επικάλυψη της συσκευής.
• Τα βύσματα ή καλώδια δικτύου με βλάβη πρέπει
να αντικαθίστανται αμέσως από εξουσιοδοτημένο
ειδικό προσωπικό ή από το τμήμα εξυπηρέτησης
πελατών, ώστε να αποφεύγονται κίνδυνοι.
• Οι επισκευές επιτρέπεται να διεξάγονται μόνο στο
εξουσιοδοτημένο από τον κατασκευαστή κατάστημα
ή μέσω έμπειρου εξειδικευμένου προσωπικού.
Έτσι αποφεύγετε κινδύνους πυρκαγιάς
και τραυματισμών
• Τοποθετείτε τη συσκευή σε μια ίσια, αντιολισθητική
και θερμανθεκτική βάση και όχι επάνω ή δίπλα σε
άλλες συσκευές οι οποίες μπορεί να εκμπέμπουν
πολύ θερμότητα (π.χ. τοστιέρα, μάτι κουζίνας).
• Μη λειτουργείτε τη συσκευή κοντά σε εύφλεκτα
αντικείμενα, π.χ. κάτω από κουρτίνες ή δίπλα σε
ρολά κουζίνας.
• Αυτή η συσκευή δεν προορίζεται για χρήση
από άτομα (συμπεριλαμβανομένων παιδιών)
με περιορισμένες φυσικές, αισθητηριακές ή
πνευματικές δυνατότητες ή με έλλειψη εμπειρίας
και/ ή με έλλειψη γνώσεων, εκτός εάν επιτηρούνται
μέσω ενός υπεύθυνου ατόμου για την ασφάλειά
τους ή εάν έχουν λάβει υποδείξεις για το πως
χρησιμοποιείται η συσκευή.
• Τα παιδιά πρέπει να επιτηρούνται ώστε να
εξασφαλίζεται ότι δεν παίζουν με τη συσκευή.
• Μη λειτουργείτε αυτή τη συσκευή με έναν εξωτερικό
χρονοδιακόπτη ή με ένα ξεχωριστό σύστημα
τηλεχειρισμού.
• Αφήνετε τη συσκευή να κρυώνει πλήρως μετά την
απενεργοποίηση, πριν την καθαρίσετε ή φυλάξετε.
Έτσι αποφεύγετε βλάβες στη συσκευή
• Απομακρύνετε κάθε είδους τρόφιμα μόνο με
μια πλαστική ή ξύλινη σπάτουλα ή με ένα άλλο
κατάλληλο, μη μεταλλικό αντικείμενο, ώστε να μην
καταστρέψετε την αντικολλητική επίστρωση της
συσκευής.
• Μη χρησιμοποιείτε – για τον ίδιο λόγο – για
τον καθαρισμό αιχμηρά μέσα καθαρισμού και
αντικείμενα.
Ακόμα και σε σύμφωνη με τους κανονισμούς
χρήση, μεμονωμένα τμήματα της συσκευής
γίνονται πολύ καυτά (π.χ. η επάνω και κάτω
πλάκα περιβλήματος). Προσέξτε ώστε να μην
έρχεστε σε επαφή με αυτές τις επιφάνειες, έως
ότου κρυώσουν εντελώς μετά την απενεργοποίηση.
• Για να αποφύγετε μια επικίνδυνη υπερθέρμανση,
ξετυλίγετε πάντα ολόκληρο το μήκος του καλωδίου
δικτύου.
• Κατά τη διάρκεια της λειτουργίας μπορεί η συσκευή
να ανοίγει και κλείνει ακίνδυνα από τη θερμομονωμένη λαβή.
- 11 -

Πρώτη θέση σε λειτουργία
Χειρισμός
1. Απομακρύνετε τη συσκευή από τη συσκευασία.
Απομακρύνετε όλες τις συμπληρωματικές ασφάλειες
μεταφοράς, π.χ. μεμβράνες ή συγκρατήσεις
καλωδίων.
2. Πριν από τη θέση σε λειτουργία ελέγχετε το σύνολο
αποστολής για την πληρότητα και για ενδεχόμενες
ορατές ζημιές.
3. Διαβάστε αυτό το εγχειρίδιο προσεκτικά.
4. Τοποθετήστε τη συσκευή σύμφωνα με τις υποδείξεις
ασφαλείας.
5. Ανοίξτε το κλείδωμα ασφαλείας 4 .
6. Καθαρίζετε τη συσκευή με ένα νωπό πανί όπως
περιγράφεται στο Κεφάλαιο “Καθαρισμός και
φροντίδα”.
7. Κλείστε τη συσκευή.
8. Εισάγετε το βύσμα δικτύου σε μια πρίζα δικτύου
και αφήστε τη συσκευή να ζεσταθεί για περ. 5
λεπτά στη μέγιστη ρύθμιση θερμοκρασίας.
ΥΠΟΔΕΙΞΗ:
Κατά το πρώτο ζέσταμα της συσκευής, λόγω υπολειμμάτων από την κατασκευή, μπορεί να υπάρξει μια
ελαφριά δημιουργία καπνού και οσμής. Αυτό είναι
απόλυτα φυσιολογικό και ακίνδυνο. Φροντίζετε για
επαρκή αερισμό, για παράδειγμα ανοίξτε ένα
παράθυρο.
9. Μετά το ζέσταμα, τραβήξτε το βύσμα από την
πρίζα και αφήστε τη συσκευή να κρυώσει .
10. Καθαρίστε τη συσκευή άλλη μια φορά με ένα
νωπό πανί.
1. Κλείστε το καπάκι συσκευής από τη λαβή 6.
2. Ωθήστε το δοχείο συλλογής λίπους 7 στη συσκευή.
3. Εισάγετε το βύσμα σε μια πρίζα δικτύου.
Η κόκκινη λυχνία ελέγχου “Power” 2 ανάβει.
4. Ρυθμίστε την επιθυμητή βαθμίδα στο ρυθμιστή
βαθμίδων θερμότητας 1. Μόλις επιτευχθεί η
ρυθμισμένη βαθμίδα θερμότητας, ανάβει η
πράσινη λυχνία ελέγχου “Ready” 5.
ΥΠΟΔΕΙΞΗ:
Η πράσινη λυχνία ελέγχου "Ready" (Έτοιμο) 5
ανάβει ακόμα και όταν ο ρυθμιστής βαθμίδων
θερμότητας 1 βρίσκεται στο "0". Μόλις θέσετε τον
ρυθμιστή βαθμίδων θερμότητας 1 στην επιθυμητή
θέση, σβήνει η πράσινη λυχνία ελέγχου "Ready" 5
και ανάβει πάλι όταν επιτευχθεί η θερμοκρασία.
ΥΠΟΔΕΙΞΗ:
Η πράσινη λυχνία ελέγχου “Ready” 5 μπορεί
ενδιάμεσα να απενεργοποιηθεί πάλι. Αυτό σημαίνει
ότι η ρυθμισμένη θερμοκρασία κατέβηκε και η
συσκευή ζεσταίνεται πάλι!
5. Ανοίξτε το καπάκι συσκευής και τοποθετήστε τα προς
ψήσιμο τρόφιμα στην κάτω θερμαντική πλάκα 9.
6. Κλείστε το καπάκι της συσκευής από τη λαβή 6.
Επειδή η επάνω θερμαντική πλάκα στέκεται επάνω
σε περιστρεφόμενο έδρανο 9, ακόμα και σε πιο
χοντρό προϊόν ψησίματος, είναι παράλληλη
προς την κάτω θερμαντική πλάκα 9. Έτσι
επιτυγχάνεται ένα βέλτιστο αποτέλεσμα
ψησίματος.
7. Ελέγχετε μετά από κάποιο χρόνο το βαθμό
ροδίσματος του προϊόντος ψησίματος.
Ανοίξτε για αυτό το καπάκι της συσκευής από τη
λαβή 6.
ΥΠΟΔΕΙΞΗ:
Ξεκινήστε με σύντομους χρόνους ψησίματος και
αυξήστε τους έως ότου βρείτε τη σωστή διάρκεια.
- 12 -

8. Εάν είστε με το βαθμό ροδίσματος ικανοποιημένοι,
ανοίξτε το καπάκι και απομακρύνετε το προϊόν
ψησίματος.
Προσοχή:
Μη χρησιμοποιείτε αιχμηρά ή μυτερά αντικείμενα για
να απομακρύνετε το προϊόν ψησίματος. Αυτά θα
μπορούσαν να καταστρέψουν τις θερμαντικές
πλάκες 9!
9. Περιστρέψτε το ρυθμιστή βαθμίδας θερμότητας 1
στο “0” και τραβήξτε το βύσμα από την πρίζα
δικτύου.
Προσοχή:
Όταν δε χρησιμοποιείτε τη συσκευή, τραβάτε πάντα
το βύσμα από την πρίζα δικτύου. Δεν αρκεί να θέσετε το
ρυθμιστή βαθμίδας θερμότητας 1 στο “0”!
Υποδείξεις και τεχνάσματα
• Για να γίνει το κρέας πιο μαλακό και για να
επιταχύνετε το ψήσιμο, μπορείτε προηγουμένως
να μαρινάρετε το κρέας. Ως βάση για αυτό
ενδείκνυνται για παράδειγμα η ξινή κρέμα, το
κόκκινο κρασί, το ξίδι, το βουτυρόγαλα ή ο
φρέσκος χυμός από παπάγια ή ανανά. Ανάλογα
με τη γεύση προσθέστε μυρωδικά και καρυκεύματα.
Μη βάζετε αλάτι διότι αυτό αφαιρεί τα υγρά από
το κρέας και το κάνει σκληρό. Τοποθετήστε έτσι
το κρέας στη μαρινάδα ώστε να είναι εντελώς
καλυμμένο και κλείστε το δοχείο. Αφήστε το εκεί
μέσα καλύτερα όλη τη νύχτα να τραβήξει.
• Οι θερμαντικές πλάκες 9 έχουν αντικολλητική
επίστρωση, γι' αυτό το επιπλέον λίπος δεν είναι
απαραίτητο. Εάν ωστόσο εσείς θέλετε να
χρησιμοποιήσετε λίπος, προσέξτε ώστε το
λίπος/λάδι να ενδείκνυται για τηγάνισμα, όπως
για παράδειγμα το κραμβέλαιο.
• Εάν δεν είστε σίγουροι για το εάν το προϊόν
ψησίματος έχει ήδη ψηθεί και στο εσωτερικό,
χρησιμοποιήστε ένα θερμόμετρο κρέατος του
εμπορίου.
Καθαρισμός και φροντίδα
Προσοχή!
Τραβήξτε πριν από τον καθαρισμό το βύσμα και
περιμένετε έως ότου η συσκευή κρυώσει εντελώς.
Κίνδυνος τραυματισμού!
Προσοχή!
Ποτέ μην καθαρίζετε τη συσκευή σε ρέον νερό και
ποτέ μην την βυθίζετε σε αυτό. Η συσκευή μπορεί
να πάθει ανεπανόρθωτη βλάβη!
• Τραβήξτε το ξέστρο καθαρισμού 0, αφού
κρυώσουν οι θερμαντικές πλάκες 9, πάνω από
τις θερμαντικές πλάκες 9, έτσι ώστε να
μαζευτούν λίπη και υπολείμματα και για να
μπορείτε να τα απομακρύνετε καλύτερα.
• Σκουπίζετε τις θερμαντικές πλάκες 9 με ένα νωπό
πανί. Σε σκληρές ακαθαρσίες ρίξτε λίγο ήπιο
απορρυπαντικό επάνω στο πανί. Για τον καθαρισμό
μη χρησιμοποιείτε επιθετικά καθαριστικά μέσα,
σκληρά σφουγγάρια ή αιχμηρά αντικείμενα ώστε
να μην καταστρέφετε την αντικολλητική επίστρωση.
• Σε δημιουργία σκληρής κρούστας τοποθετήστε
ένα βρεγμένο πανί καθαρισμού στα κολλημένα,
ψημένα υπολείμματα ώστε να τα μαλακώσετε.
Για τον καθαρισμό των εξωτερικών επιφανειών της
συσκευής αρκεί ένα νωπό πανί.
Προσέχετε ώστε πριν από τη νέα χρήση της
συσκευής, όλα τα τμήματα να είναι εντελώς στεγνά.
Σκουπίστε το ξέστρο καθαρισμού 0 με ένα νωπό
πανί. Σε σκληρές ακαθαρσίες, βάλτε ένα ήπιο
καθαριστικό στο πανί.
- 13 -

Φύλαξη
Φυλάτε την καθαρή συσκευή σε ένα στεγνό σημείο.
Κλείστε το κλείδωμα ασφαλείας 4 .
Τυλίξτε το καλώδιο δικτύου 3 γύρω από τη διάταξη
τύλιξης καλωδίου στην κάτω πλευρά της συσκευής.
Συνταγές
Ένα πανίνι είναι ένα ζεστό σάντουιτς παρασκευασμένο
από λευκό ψωμί. Ψήνεται φρέσκο και στη συνέχεια
σερβίρεται.
Πανίνι σπανάκι-τυρί
250 γρ. φύλλα από σπανάκι
1 κρεμμύδι
1 σκελίδα σκόρδο
1 ΚΣ λάδι
2 κ.τσ. χυμό λεμονιού
1 πρέζα αλάτι (και πιπέρι)
4 φέτες τοστ/ λευκό ψωμί
40 γρ. βούτυρο με μυρωδικά
75 γρ. μοτσαρέλα
20 γρ. κουκουνάρι
• Ξεχωρίστε τα φύλλα σπανακιού και πλύνετέ τα.
• Καθαρίστε το κρεμμύδι και τη σκελίδα σκόρδου,
ψιλοκόψτε και αφήστε να ροδίσουν σε καυτό
λάδι. Προσθέστε το σπανάκι. Καρυκεύστε με το
χυμό λεμονιού, αλάτι και πιπέρι.
• Επιστρώστε το τοστ με βούτυρο με καρυκεύματα.
• Κόβετε τη μοτσαρέλα σε φέτες και την κατανέμετε
με το στραγγισμένο, μαγειρεμένο σπανάκι σε δύο
φέτες του τοστ. Πασπαλίζετε με το κουκουνάρι.
• Καλύπτετε το πανίνι με μια δεύτερη φέτα του τοστ.
• Τοποθετήστε το πανίνι προσεκτικά στην προθερμασμένη στη μεσαία βαθμίδα θερμότητας
συσκευή, και κλείστε το καπάκι.
• Περιμένετε έως ότου τα πανίνι ψηθούν και αποκτήσουν χρυσοκίτρινο χρώμα. Στη συνέχεια τα
απομακρύνετε από τη συσκευή παρασκευής για
πανίνι.
Πανίνι με στήθος κοτόπουλο
400 γρ. φιλέτο στήθους κοτόπουλου
20 γρ. βούτυρο
Πιπέρι, αλάτι, σκόνη πάπρικα
120 γρ. μπέϊκον σε λωρίδες
6 φέτες λευκό ψωμί/ τοστ
3 ΚΣ σάλτσα για σαλάτα (γιαούρτι)
30 γρ. σαλάτα άϊσμπεργκ
2 τομάτες
1 αβοκάντο
1 κ.τσ. χυμό λεμονιού
50 γρ. αγγούρι για σαλάτα
• Πλένετε το φιλέτο στήθους κοτόπουλου κάτω από
ρέον νερό και το στεγνώνετε με χαρτί κουζίνας.
Ζεσταίνετε ένα επιστρωμένο τηγάνι με βούτυρο και
ψήνετε εκεί μέσα και από τις δύο πλευρές τα φιλέτα
στήθους κοτόπουλου. Θέτετε το μάτι σε μεσαία
θερμοκρασία και τελειώνετε το ψήσιμο των φιλέτων
για άλλα περ. 10 λεπτά. Μετά το ψήσιμο καρυκεύετε
με αλάτι, πιπέρι και πάπρικα, τα απομακρύνετε από
το τηγάνι και τα τοποθετείτε αλλού.
• Ζεσταίνετε άλλη μια φορά το λίπος στο τηγάνι και
εκεί ψήνετε έως ότου γίνουν τραγανές οι λωρίδες
του μπέϊκον.
• Σε 3 φέτες του τοστ/ λευκού ψωμιού κατανέμετε τη
σάλτσα από γιαούρτι, βάζετε τη σαλάτα άϊσμπεργκ,
κόβετε τις τομάτες σε φέτες, τις καρυκεύετε και τις
τοποθετείτε και αυτές από πάνω.
• Κόβετε κατά μήκος τα φιλέτα στήθους κοτόπουλου
και τα τοποθετείτε επάνω στις τομάτες.
• Κόβετε το αβοκάντο γύρω - γύρω στο μήκος και
μέσω μιας περιστροφικής κίνησης τα απομακρύνετε
από το κουκούτσι. Βγάζετε τη φλούδα και κόβετε
σε φέτες. Περιχύνετε το χυμό λεμονιού στο αβοκάντο
ώστε να μην πάρει καφέ χρώμα.Τοποθετήστε τις
φέτες επάνω στα πανίνι.
• Κόψτε το αγγούρι σε φέτες και τοποθετήστε το
επάνω στο αβοκάντο.
• Καλύπτετε το πανίνι με μια δεύτερη φέτα του τοστ.
• Τοποθετήστε το πανίνι προσεκτικά στην προθερμασμένη στη μεσαία βαθμίδα θερμότητας
συσκευή και κλείστε το καπάκι.
• Περιμένετε έως ότου το πανίνι αποκτήσει
χρυσοκίτρινο χρώμα και το απομακρύνετε
προσεκτικά από τη συσκευή παρασκευής για πανίνι.
- 14 -

Μπαγκέτα με μουστάρδα
1 Μπαγκέτα
1 σκελίδα σκόρδο
50 γρ. αγγουράκια τουρσιά
40 γρ. πεκορίνο
1 ΚΣ μουστάρδα
2 ΚΣ γλυκιά μουστάρδα
50 γρ. βούτυρο
2 ΚΣ ρολά πρασουλίδες
αλάτι, πιπέρι
• Κόβετε τη μπαγκέτα σε διαστήματα περ. 2-3
εκατοστών εγκάρσια, ωστόσο δεν την κόβετε
εντελώς.
• Καθαρίζετε το σκόρδο και το συνθλίβετε, ψιλοκόβετε
το αγγουράκι τουρσί και τρίβετε το πεκορίνο.
• Ανακατεύετε την κανονική με τη γλυκιά μουστάρδα
και με το μαλακό βούτυρο, το σκόρδο, τους κύβους
τουρσί, το πεκορίνο και την πρασουλίδα και
καρυκεύετε με αλάτι και πιπέρι.
• Γεμίζετε στα κομμένα κενά της μπαγκέτας με αυτό
το μίγμα και τυλίγετε σε αλουμινόχαρτο.
• Τοποθετείτε τις μπαγκέτες στην προθερμασμένη
στη μεσαία βαθμίδα θερμότητας συσκευή, και
κλείνετε το καπάκι. Η μπαγκέτα πρέπει να αποκτήσει
χρυσοκίτρινο χρώμα.
Απομάκρυνση
ΣΣεε κκααμμίίαα ππεερρίίππττωωσσηη μμηηνν ππεεττάάξξεεττεε ττηη σσυυσσκκεευυήή
σστταα οοιικκιιαακκάά ααπποορρρρίίμμμμαατταα.. ΑΑυυττόό ττοο ππρροοϊϊόόνν
υυππόόκκεειιττααιι σσττηηνν ΕΕυ
22000022//9966//ΕΕCC..
υρρωωππααϊϊκκήή ΟΟδδηηγγίίαα
Εγγύηση και σέρβις
Έχετε για αυτή τη συσκευή 3 χρόνια εγγύηση από
την ημερομηνία αγοράς. Η συσκευή κατασκευάστηκε
και ελέγχθηκε προσεκτικά πριν από την αποστολή.
Παρακαλούμε φυλάξτε την απόδειξη ταμείου ως
απόδειξη για την αγορά. Παρακαλούμε
επικοινωνήστε τηλεφωνικά με την υπηρεσία σέρβις σε
περίπτωση εγγύησης. Μόνο έτσι μπορεί να
εξασφαλιστεί μια δωρεάν αποστολή του
εμπορεύματός σας.
Η απόδοση εγγύησης ισχύει μόνο για σφάλματα
υλικού ή κατασκευής, όχι όμως για ζημιές από τη
μεταφορά, για εξαρτήματα φθοράς ή για βλάβες σε
εύθραυστα εξαρτήματα, π.χ. διακόπτες ή
συσσωρευτές. Το προϊόν προορίζεται μόνο για την
ιδιωτική και όχι για την επαγγελματική χρήση.
Σε περίπτωση κακής μεταχείρισης και ακατάλληλης
χρήσης, σε χρήση βίας και σε παρεμβάσεις οι
οποίες δεν διεξήχθησαν από το εξουσιοδοτημένο
μας τμήμα σέρβις, η εγγύηση παύει να ισχύει. Τα νομικά σας δικαιώματα δεν περιορίζονται μέσω αυτής
της εγγύησης.
Ο χρόνος εγγύησης δεν επεκτείνεται μέσω της
απόδοσης εγγύησης. Αυτό ισχύει και για
εξαρτήματα τα οποία έχουν αντικατασταθεί ή
επισκευαστεί. Ενδεχόμενες ήδη υπάρχουσες κατά
την αγορά, ζημιές και ελλείψεις πρέπει να
αναφέρονται αμέσως μετά την αποσυσκευασία, το
αργότερο όμως δύο ημέρες μετά την ημερομηνία
αγοράς. Επισκευές που εμφανίζονται μετά τη λήξη
του χρόνου εγγύησης χρεώνονται.
Απομακρύνετε τη συσκευή μέσω μιας εγκεκριμένης
επιχείρησης απόρριψης ή μέσω της κοινοτικής
επιχείρησης απόρριψης.
Να τηρείτε τους ισχύοντες κανονισμούς.
Σε περίπτωση αμφιβολιών ελάτε σε επαφή με την
επιχείρηση απόρριψης.
Απομακρύνετε όλα τα υλικά συσκευασιών
φιλικά προς το περιβάλλον.
- 15 -

Σέρβις Ελλάδα
Tel.: 801 5000 019 (0,03 EUR/Min.)
E-Mail: kompernass@lidl.gr
IAN 87712
CY
Σέρβις Κύπρος
Tel.: 8009 4409
E-Mail: kompernass@lidl.com.cy
IAN 87712
Εισαγωγέας
KOMPERNASS GMBH
BURGSTRASSE 21
44867 BOCHUM, GERMANY
www.kompernass.com
- 16 -

INHALTSVERZEICHNIS SEITE
Einleitung 18
Bestimmungsgemäßer Gebrauch 18
Lieferumfang 18
Gerätebeschreibung 18
Technische Daten 18
Sicherheitshinweise 18
Erste Inbetriebnahme 20
Bedienen 20
Tipps und Tricks 21
Reinigen und Pflegen 21
Aufbewahren 22
Rezepte 22
Spinat-Käse-Panini..........................................................................................................................22
Hähnchenbrust-Panini ....................................................................................................................22
Senf-Baguette..................................................................................................................................23
Entsorgen 23
Garantie und Service 23
Importeur 24
- 17 -

Panini-Grill
Einleitung
Herzlichen Glückwunsch zum Kauf Ihres neuen
Gerätes.
Sie haben sich damit für ein hochwertiges Produkt
entschieden. Die Bedienungsanleitung ist Bestandteil dieses Produkts. Sie enthält wichtige Hinweise
für Sicherheit, Gebrauch und Entsorgung. Machen
Sie sich vor der Benutzung des Produkts mit allen
Bedien- und Sicherheitshinweisen vertraut. Benutzen
Sie das Produkt nur wie beschrieben und für die angegebenen Einsatzbereiche. Händigen Sie alle
Unterlagen bei Weitergabe des Produkts an Dritte
mit aus.
Gerätebeschreibung
Abbildung A:
1 Heizstufenregler
2 rote Kontrollleuchte “Power”
3 Netzkabel
4 Sicherheitsverschluss
5 grüne Kontrollleuchte “Ready”
6 Griff
7 Fett-Auffangschale
8 Fettauslauf
9 Heizplatten
Abbildung B:
0 Reinigungsschaber
Technische Daten
Bestimmungsgemäßer
Gebrauch
Der Panini-Grill ist dafür bestimmt, kleine Brötchen
und Sandwiches zu rösten oder andere Lebensmittel
zu grillen.
Er ist ausschließlich für den privaten Haushalt bestimmt. Benutzen Sie das Gerät nicht gewerblich!
Lieferumfang
• Panini-Grill
• Fett-Auffangschale
• Reinigungsschaber
• Bedienungsanleitung
Nennspannung: 220 - 240 V ~, 50 Hz
Leistungsaufnahme: 2000 W
Sicherheitshinweise
So vermeiden Sie Gefahren durch
elektrischen Schlag
• Das Gerät darf nur in trockenen Räumen im
Innenbereich eingesetzt werden. Halten Sie das
Gerät – auch im ausgeschalteten Zustand – von
Spritzwasser fern.
• Benutzen Sie das Gerät nur dann, wenn die örtliche Netzspannung mit der Nennspannung des
Gerätes übereinstimmt.
• Schließen Sie das Gerät nicht über eine Mehrfachsteckdose an, über die gleichzeitig andere
elektrische Geräte arbeiten, denn das kann zu
einer Überlastung des Stromkreises führen.
• Schalten Sie das Gerät nach jedem Gebrauch
aus. Ziehen Sie dazu den Netzstecker.
• Achten Sie beim Reinigen darauf, dass kein
Wasser in das Innere des Gerätes gelangt. Reinigen Sie das Gerät nie unter fließendem Wasser.
- 18 -

Tauchen Sie das Gerät nie in Wasser oder andere Flüssigkeiten ein.
• Schützen Sie das Netzkabel vor Beschädigung.
Achten Sie darauf, es nicht einzuklemmen und
von heißen Gegenständen fernzuhalten. Lassen
Sie das Netzkabel nicht lose von Tisch oder
Arbeitsplatte hängen.
• Öffnen Sie nie das Gehäuse des Gerätes.
• Lassen Sie beschädigte Netzstecker oder Netzkabel sofort von autorisiertem Fachpersonal
oder dem Kundenservice austauschen, um
Gefährdungen zu vermeiden.
• Reparaturen dürfen nur im vom Hersteller
autorisierten Fachhandel oder durch erfahrenes
Fachpersonal ausgeführt werden.
So vermeiden Sie Brand- und
Verletzungsgefahren
• Stellen Sie das Gerät auf eine ebene, rutschfeste
und hitzebeständige Unterlage und nicht auf
oder neben andere Geräte, die viel Wärme
ausstrahlen können (z.B. Toaster, Küchenherde).
• Betreiben Sie das Gerät nicht in der Nähe leicht
brennbarer Gegenstände, z.B. unter Gardinen
oder neben Küchenkrepp-Rollen.
Auch bei vorschriftsmäßiger Benutzung werden
einzelne Geräteteile sehr heiß (z.B. die obere
und untere Gehäuseplatte). Achten Sie darauf,
diese Oberflächen nicht zu berühren, bis sie
nach dem Ausschalten vollständig abgekühlt
sind.
• Dieses Gerät ist nicht dafür bestimmt, durch
Personen (einschließlich Kinder) mit eingeschränkten physischen, sensorischen oder
geistigen Fähigkeiten oder mangels Erfahrung
und/oder mangels Wissen benutzt zu werden,
es sei denn, sie werden durch eine für ihre
Sicherheit zuständige Person beaufsichtigt oder
erhielten von ihr Anweisungen, wie das Gerät
zu benutzen ist.
• Kinder sollten beaufsichtigt werden, um sicherzustellen, dass sie nicht mit dem Gerät spielen.
• Betreiben Sie dieses Gerät nicht mit einer externen Zeitschaltuhr oder einem separaten Fernwirksystem.
• Lassen Sie das Gerät nach dem Ausschalten vollständig abkühlen, bevor Sie es reinigen und verstauen.
So vermeiden Sie Schäden am
Gerät
• Entnehmen Sie jegliche Speisen nur mit einem
Kunststoff- oder Holzspachtel oder einem anderen geeigneten, nichtmetallischen Gegenstand,
um die Antihaftbeschichtung des Gerätes nicht
zu zerstören.
• Benutzen Sie – aus dem selben Grund – zur Reinigung keine scharfen Putzmittel und spitzen
Gegenstände.
• Um eine gefährliche Überhitzung zu vermeiden,
wickeln Sie stets die gesamte Länge des Netzkabels ab.
• Während des Betriebs kann das Gerät gefahrlos
am wärmeisolierten Griff geöffnet und geschlossen werden.
- 19 -

Erste Inbetriebnahme
Bedienen
1. Entnehmen Sie das Gerät aus der Verpackung.
Entfernen Sie alle zusätzlichen Transportsicherungen, z.B. Folien oder Kabelhalter.
2. Überprüfen Sie vor der Inbetriebnahme den Lieferumfang auf Vollständigkeit und eventuell sichtbare Beschädigungen.
3. Lesen Sie diese Gebrauchsanleitung aufmerksam
durch.
4. Stellen Sie das Gerät gemäß den Sicherheitshinweisen auf.
5. Öffnen Sie den Sicherheitsverschluss 4 .
6. Reinigen Sie das Gerät mit einem feuchten Tuch
wie unter “Reinigen und Pflegen” beschrieben.
7. Schließen Sie das Gerät.
8. Stecken Sie den Netzstecker in eine Netzsteckdose und lassen Sie das Gerät für ca.
5 Minuten auf maximaler Temperatureinstellung
aufheizen.
Hinweis:
Beim erstmaligen Aufheizen des Gerätes kann es
durch fertigungsbedingte Rückstände zu leichter
Rauch- und Geruchsentwicklung kommen. Das ist
normal und völlig ungefährlich. Sorgen Sie für ausreichende Belüftung, öffnen Sie zum Beispiel ein
Fenster.
9. Ziehen Sie den Netzstecker nach dem Aufheizen
aus der Netzsteckdose und lassen Sie das Gerät
abkühlen.
10. Reinigen Sie das Gerät noch einmal mit einem
feuchten Tuch.
1. Schließen Sie den Gerätedeckel am Griff 6.
2. Schieben Sie die Fett-Auffangschale 7 in das
Gerät.
3. Stecken Sie den Netzstecker in eine Netzsteckdose. Die rote Kontrollleuchte “Power” 2
leuchtet auf.
4. Stellen Sie die gewünschte Stufe am Heizstufenregler 1 ein. Sobald die eingestellte Heizstufe
erreicht ist, leuchtet die grüne Kontrollleuchte
“Ready” 5.
Hinweis:
Die grüne Kontrollleuchte “Ready” 5 leuchtet
auch, wenn der Heizstufenregler 1 auf „0“ steht.
Sobald Sie den Heizstufenregler 1 auf die ge-
wünschte Position stellen, erlischt die grüne Kontrollleuchte “Ready” 5 bis die Temperatur erreicht ist.
Hinweis:
Die grüne Kontrollleuchte “Ready” 5 kann sich
zwischendurch wieder abschalten. Das bedeutet,
dass die eingestellte Temperatur unterschritten wurde und das Gerät wieder aufheizt!
5. Öffnen Sie den Gerätedeckel und legen Sie die
zu röstenden/grillenden Lebenmittel auf die untere Heizplatte 9.
6. Schließen Sie den Gerätedeckel am Griff 6.
Durch die drehbar gelagerte obere Heizplatte
9, liegt er auch bei dickerem Grillgut immer
parallel zur unteren Heizplatte 9. So wird ein
optimales Grillergebnis erreicht.
7. Kontrollieren Sie nach einiger Zeit die Bräunung
des Grillgutes. Öffnen Sie hierzu den Gerätedeckel am Griff 6.
Hinweis:
Fangen Sie mit kurzen Grillzeiten an und steigern
Sie sie, bis Sie die richtige Dauer gefunden haben.
- 20 -

8. Wenn Sie mit der Bräunung zufrieden sind, entnehmen Sie das Grillgut.
Achtung:
Verwenden Sie keine spitzen oder scharfen Gegenstände, um das Grillgut zu entnehmen. Diese könnten
die Oberflächen der Heizplatten 9 beschädigen!
9. Drehen Sie den Heizstufenregler 1 auf „0“
und ziehen Sie den Netzstecker aus der
Netzsteckdose.
Reinigen und Pflegen
Achtung!
Ziehen Sie vor der Reinigung den Netzstecker und
warten Sie, bis das Gerät vollständig abgekühlt ist.
Verletzungsgefahr!
Achtung!
Reinigen Sie das Gerät nie unter fließendem Wasser und tauchen Sie es nie in Wasser ein. Das Gerät
kann irreparabel beschädigt werden!
Achtung:
Ziehen Sie immer den Netzstecker aus der Netzsteckdose, wenn Sie das Gerät nicht verwenden. Es
genügt nicht den Heizstufenregler 1 auf „0“ zu
stellen!
Tipps und Tricks
• Um Fleisch zarter zu machen und das Grillen zu
beschleunigen, können Sie es vorher marinieren.
Als Grundlage hierfür eignen sich zum Beispiel
saure Sahne, Rotwein, Essig, Buttermilch oder frischer Saft von Papaya oder Ananas. Fügen Sie,
je nach Geschmack, Kräuter und Gewürze hinzu. Geben Sie kein Salz hinzu, weil dieses dem
Fleisch das Wasser entzieht und es hart macht.
Legen Sie das Fleisch so in die Marinade, dass
es ganz bedeckt ist und schließen Sie das Gefäß. Lassen Sie es am besten über Nacht darin
ziehen.
• Die Heizplatten 9 sind antihaft-beschichtet,
daher ist extra Fett nicht nötig. Wenn Sie trotzdem Fett benutzen wollen, achten Sie darauf,
dass das Fett/Öl zum Braten geeignet ist, zum
Beispiel Rapsöl.
• Wenn Sie sich nicht sicher sind, ob das Grillgut
auch im Inneren schon gar ist, benutzen Sie ein
handelsübliches Fleischthermometer.
• Ziehen Sie den Reinigungsschaber 0, nachdem
sich die Heizplatten 9 abgekühlt haben, über
die Heizplatten 9, so dass Fett und Rückstände
zusammengeschoben werden und Sie diese besser entfernen können.
• Wischen Sie die Heizplatten 9 mit einem feuchten Tuch ab. Bei hartnäckigeren Verschmutzungen geben Sie ein mildes Spülmittel auf das
Tuch. Benutzen Sie zur Reinigung keine scharfen
Putzmittel, raue Schwämme oder spitze Gegenstände, um die Antihaftbeschichtung nicht zu
zerstören.
• Bei starken Verkrustungen legen Sie ein nasses
Spültuch auf die festgebackenen Rückstände, um
diese aufzuweichen.
Für die Reinigung der Außenflächen des Gerätes
genügt ein feuchtes Tuch.
Achten Sie darauf, dass vor der erneuten Verwendung des Gerätes alle Teile vollständig trocken sind.
Wischen Sie den Reinigungsschaber 0 mit einem
feuchten Tuch ab. Bei hartnäckigeren Verschmutzungen geben Sie ein mildes Spülmittel auf das Tuch.
- 21 -

Aufbewahren
Bewahren Sie das gereinigte Gerät an einem
trockenem Ort auf.
Schließen Sie den Sicherheitsverschluss 4 .
Wickeln Sie das Netzkabel 3 um die Kabelaufwicklung an der Unterseite das Gerätes.
Rezepte
Ein Panini ist ein warmes, aus frischem Weißbrot zubereitetes Sandwich. Es wird frisch geröstet und
dann serviert.
Spinat-Käse-Panini
250 g Blattspinat
1 Zwiebel
1 Knoblauchzehe
1 EL Öl
2 TL Zitronensaft
1 Prise Salz (und Pfeffer)
4 Scheiben Toast/Weißbrot
40 g Kräuterbutter
75 g Mozzarella
20 g Pinienkerne
• Blattspinat verlesen und waschen.
• Zwiebel und Knoblauchzehe schälen und fein
hacken, in heißem Öl glasig dünsten. Den Spinat
zufügen. Mit Zitronensaft, Salz und Pfeffer würzen.
• Toast mit Kräuterbutter bestreichen.
• Mozzarella in Scheiben schneiden, mit dem abgetropften Spinat auf zwei Toastscheiben verteilen. Mit Pinienkernen bestreuen.
• Die Panini mit einer zweiten Scheibe Toast bedecken.
• Die Panini vorsichtig auf den auf mittlere Heizstufe vorgeheizten Panini-Grill legen und den Dekkel schließen.
• Warten bis die Panini gold-braun geröstet sind.
Dann aus dem Panini-Grill entnehmen.
Hähnchenbrust-Panini
400 g Hähnchenbrustfilet
20 g Butter
Pfeffer, Salz, Paprikapulver
120 g Bacon, in Streifen
6 Scheiben Weißbrot/Toast
3 EL Salatdressing (Joghurt)
30 g Eisbergsalat
2 Tomaten
1 Avocado
1 TL Limonensaft
50 g Salatgurke
• Hähnchenbrustfilet unter fließendem Wasser
kurz abspülen und mit Küchenpapier trockentupfen. In einer beschichteten Pfanne Butter erhitzen
und die Hähnchenbrustfilets darin von beiden
Seiten kräftig anbraten. Den Herd auf mittlere
Temperatur zurückschalten und die Hähnchenbrustfilets ca. 10 Minuten fertig braten. Nach
dem Braten mit Salz, Pfeffer und Paprika würzen,
aus der Pfanne nehmen und beiseitelegen.
• Das Fett in der Pfanne noch einmal erhitzen und
die Bacon-Streifen darin knusprig braten.
• Auf 3 Toast-/Weißbrotscheiben Joghurt-Dressing
verteilen, Eisbergsalat darauflegen, Tomaten in
Scheiben schneiden, würzen und ebenfalls
drauflegen.
• Hähnchenbrustfilets der Länge nach aufschneiden und auf die Tomaten legen.
• Avocado der Länge nach rundum aufschneiden
und durch eine Drehbewegung vom Kern lösen.
Schale abziehen und Avocado in Scheiben
schneiden. Avocado mit dem Limonensaft beträufeln, damit sie nicht braun anläuft. Die Scheiben auf die Panini legen.
• Gurke in Scheiben schneiden und auf die Avocado legen.
• Die Panini mit einer zweiten Scheibe Toast bedecken.
• Die Panini vorsichtig auf den auf mittlere Heizstufe vorgeheizten Panini-Grill legen und den Dekkel schließen.
• Warten bis die Panini gold-braun geröstet sind
und vorsichtig aus dem Panini-Grill entnehmen.
- 22 -

Senf-Baguette
1 Baguette
1 Zehe Knoblauch
50 g Senfgurken
40 g Pecorino
1 EL scharfer Senf
2 EL süßer Senf
50 g Butter
2 EL Schnittlauchröllchen
Salz, Pfeffer
• Das Baguette in ca. 2-3 Zentimeter großen Abständen quer ein- aber nicht durchschneiden.
• Knoblauch abziehen und zerdrücken, Senfgurken sehr fein würfeln und Pecorino raspeln.
• Scharfen und süßen Senf mit der weichen Butter,
Knoblauch, Gurkenwürfeln, Pecorino und Schnittlauch verrühren und mit Salz und Pfeffer abschmecken.
• Senfbutter in die Baguetteeinschnitte füllen und
in Alufolie einwickeln.
• Die Baguettes auf den auf mittlere Heizstufe vorgeheizten Panini-Grill legen und den Deckel
schließen. Das Baguette sollte gold-braun sein.
Entsorgen
Werfen Sie das Gerät keinesfalls in den
normalen Hausmüll. Dieses Produkt
unterliegt der europäischen Richtlinie
2002/96/EC.
Garantie und Service
Sie erhalten auf dieses Gerät 3 Jahre Garantie ab
Kaufdatum. Das Gerät wurde sorgfältig produziert
und vor Anlieferung gewissenhaft geprüft.
Bitte bewahren Sie den Kassenbon als Nachweis
für den Kauf auf. Bitte setzen Sie sich im Garantiefall mit Ihrer Servicestelle telefonisch in Verbindung.
Nur so kann eine kostenlose Einsendung Ihrer Ware
gewährleistet werden.
Die Garantieleistung gilt nur für Material- oder
Fabrikationsfehler, nicht aber für Transportschäden,
Verschleißteile oder für Beschädigungen an zerbrechlichen Teilen, z. B. Schalter oder Akkus. Das
Produkt ist lediglich für den privaten und nicht für
den gewerblichen Gebrauch bestimmt.
Bei missbräuchlicher und unsachgemäßer Behandlung, Gewaltanwendung und bei Eingriffen, die
nicht von unserer autorisierten Service-Niederlassung vorgenommen wurden, erlischt die Garantie.
Ihre gesetzlichen Rechte werden durch diese
Garantie nicht eingeschränkt.
Die Garantiezeit wird durch die Gewährleistung
nicht verlängert. Dies gilt auch für ersetzte und reparierte Teile. Eventuell schon beim Kauf vorhandene
Schäden und Mängel müssen sofort nach dem
Auspacken gemeldet werden, spätestens aber zwei
Tage nach Kaufdatum. Nach Ablauf der Garantiezeit anfallende Reparaturen sind kostenpflichtig.
Entsorgen Sie das Gerät über einen zugelassenen
Entsorgungsbetrieb oder über Ihre kommunale
Entsorgungseinrichtung.
Beachten Sie die aktuell geltenden Vorschriften.
Setzen Sie sich im Zweifelsfall mit Ihrer Entsorgungseinrichtung in Verbindung.
Führen Sie alle Verpackungsmaterialien
einer umweltgerechten Entsorgung zu.
- 23 -

Service Deutschland
Tel.: 01805 772 033 (0,14 EUR/Min. aus dem dt.
Festnetz, Mobilfunk max. 0,42 EUR/Min.)
E-Mail: kompernass@lidl.de
IAN 87712
Service Österreich
Tel.: 0820 201 222 (0,15 EUR/Min.)
E-Mail: kompernass@lidl.at
IAN 87712
Service Schweiz
Tel.: 0842 665566 (0,08 CHF/Min.,
Mobilfunk max. 0,40 CHF/Min.)
E-Mail: kompernass@lidl.ch
IAN 87712
Importeur
KOMPERNASS GMBH
BURGSTRASSE 21
44867 BOCHUM, DEUTSCHLAND
www.kompernass.com
- 24 -

KOMPERNASS GMBH
BURGSTRASSE 21
44867 BOCHUM
DEUTSCHLAND / GERMANY
www.kompernass.com
Last Information Update · Έκδοση των πληροφοριών
Stand der Informationen:
02 / 2013 · Ident.-No.: SPM2000A2022013-2
IAN 87712
 Loading...