

Page 1
PIZZA-BÄCKER SPB 800 A1
PIZZA-BÄCKER
Bedienungsanleitung
FORNO PER PIZZA
Istruzioni per l’uso
FOUR À PIZZAS
Mode d’emploi
PIZZA-BAKKER
Gebruiksaanwijzing
PIZZA BAKERY
Operating instructions
IAN 75469
RP75469_Pizzadom_Cover_LB1.indd 2 19.07.12 09:49
Page 2

RP75469 Pizzabäcker LB1 Seite 1 Freitag, 27. Juli 2012 1:14 13
Deutsch . . . . . . . . . . . . . . . . . . . . . . . . . . . . . . . . . . . . . . . . . 3
Bitte beachten Sie die Ausklappseite
Français . . . . . . . . . . . . . . . . . . . . . . . . . . . . . . . . . . . . . . . 15
Veuillez tenir compte des informations fournies sur le rabat
Italiano . . . . . . . . . . . . . . . . . . . . . . . . . . . . . . . . . . . . . . . . 27
Osservare la pagina pieghevole
Nederlands . . . . . . . . . . . . . . . . . . . . . . . . . . . . . . . . . . . . 39
Neem a.u.b. ook de uitklappagina in acht.
English . . . . . . . . . . . . . . . . . . . . . . . . . . . . . . . . . . . . . . . . . 51
Be sure to note the fold-out page.
SPB800 A1_12_V1.5_DE_FR_IT_NL_GB
Page 3
RP75469 Pizzabäcker LB1 Seite 1 Freitag, 27. Juli 2012 1:14 13
2
13
4
5
6
9
87
Page 4

RP75469 Pizzabäcker LB1 Seite 2 Freitag, 27. Juli 2012 1:14 13
Page 5

RP75469 Pizzabäcker LB1 Seite 3 Freitag, 27. Juli 2012 1:14 13
Inhalt
1. Gerätebeschreibung . . . . . . . . . . . . . . . . . . . . . . . . . . . . . . . . . . . . . . . . . . . . . . . . . . . . . 3
2. Benennung der Teile (siehe Ausklappseite) . . . . . . . . . . . . . . . . . . . . . . . . . . . . . . . . . . . . . 4
3. Technische Daten. . . . . . . . . . . . . . . . . . . . . . . . . . . . . . . . . . . . . . . . . . . . . . . . . . . . . . . . 4
4. Sicherheitshinweise. . . . . . . . . . . . . . . . . . . . . . . . . . . . . . . . . . . . . . . . . . . . . . . . . . . . . . 4
5. Vor dem ersten Gebrauch. . . . . . . . . . . . . . . . . . . . . . . . . . . . . . . . . . . . . . . . . . . . . . . . . . 8
6. Bedienen . . . . . . . . . . . . . . . . . . . . . . . . . . . . . . . . . . . . . . . . . . . . . . . . . . . . . . . . . . . . . 8
7. Reinigen. . . . . . . . . . . . . . . . . . . . . . . . . . . . . . . . . . . . . . . . . . . . . . . . . . . . . . . . . . . . . 12
8. Entsorgung . . . . . . . . . . . . . . . . . . . . . . . . . . . . . . . . . . . . . . . . . . . . . . . . . . . . . . . . . . . 12
9. Garantie der HOYER Handel GmbH . . . . . . . . . . . . . . . . . . . . . . . . . . . . . . . . . . . . . . . . . 13
Herzlichen Glückwunsch zum Kauf
Ihres neuen Gerätes.
Sie haben sich damit für ein hochwertiges
Produkt entschieden. Die Bedienungsanleitung ist Bestandteil dieses Produkts. Sie enthält wichtige Hinweise für Sicherheit,
Gebrauch und Entsorgung.
1. Gerätebeschreibung
1.1 Verwendungszweck
Der Pizzabäcker SilverCrest SPB800 A1 ist
zum Zubereiten kleiner Pizzen direkt am
Tisch geeignet. Für die Zubereitung anderer
Speisen als Pizzen ist dieses Gerät nicht
geeignet.
Das Gerät darf nicht zum Auftauen, Erwärmen oder Trocknen von Gegenständen
benutzt werden.
Verwenden Sie das Gerät ausschließlich
innerhalb Ihres Haushaltes und niemals im
Freien.
Dieses Gerät ist für den Einsatz in Privathaushalten und nicht für den gewerblichen
Einsatz geeignet.
Machen Sie sich vor der Benutzung des Produkts mit allen Bedien- und Sicherheitshinweisen vertraut. Benutzen Sie das Produkt
nur wie beschrieben und für die angegebenen Einsatzbereiche.
Händigen Sie alle Unterlagen bei Weitergabe des Produkts an Dritte mit aus.
Das Gerät ist ebenfalls geeignet für:
• den Einsatz in Küchen für Mitarbeiter in
Läden, Büros und anderen gewerblichen
Bereichen,
• den Einsatz in landwirtschaftlichen
Anwesen,
• Kunden in Hotels, Motels und anderen
Wohneinrichtungen,
• Frühstückspensionen.
1.2 Lieferumfang
1 Pizzabäcker
1 Stechform
4 Pizzaheber
1 Bedienungsanleitung
SPB800 A1 3
Page 6
RP75469 Pizzabäcker LB1 Seite 4 Freitag, 27. Juli 2012 1:14 13
1.3 Funktionsbeschreibung
Am Tisch belegt sich jeder Teilnehmer eine
kleine Pizza nach eigenem Geschmack. Auf
einem Pizzaheber wird die Pizza in den
erhitzten Pizzabäcker geschoben und
gebacken.
1.4 Kennzeichnungen am Gerät
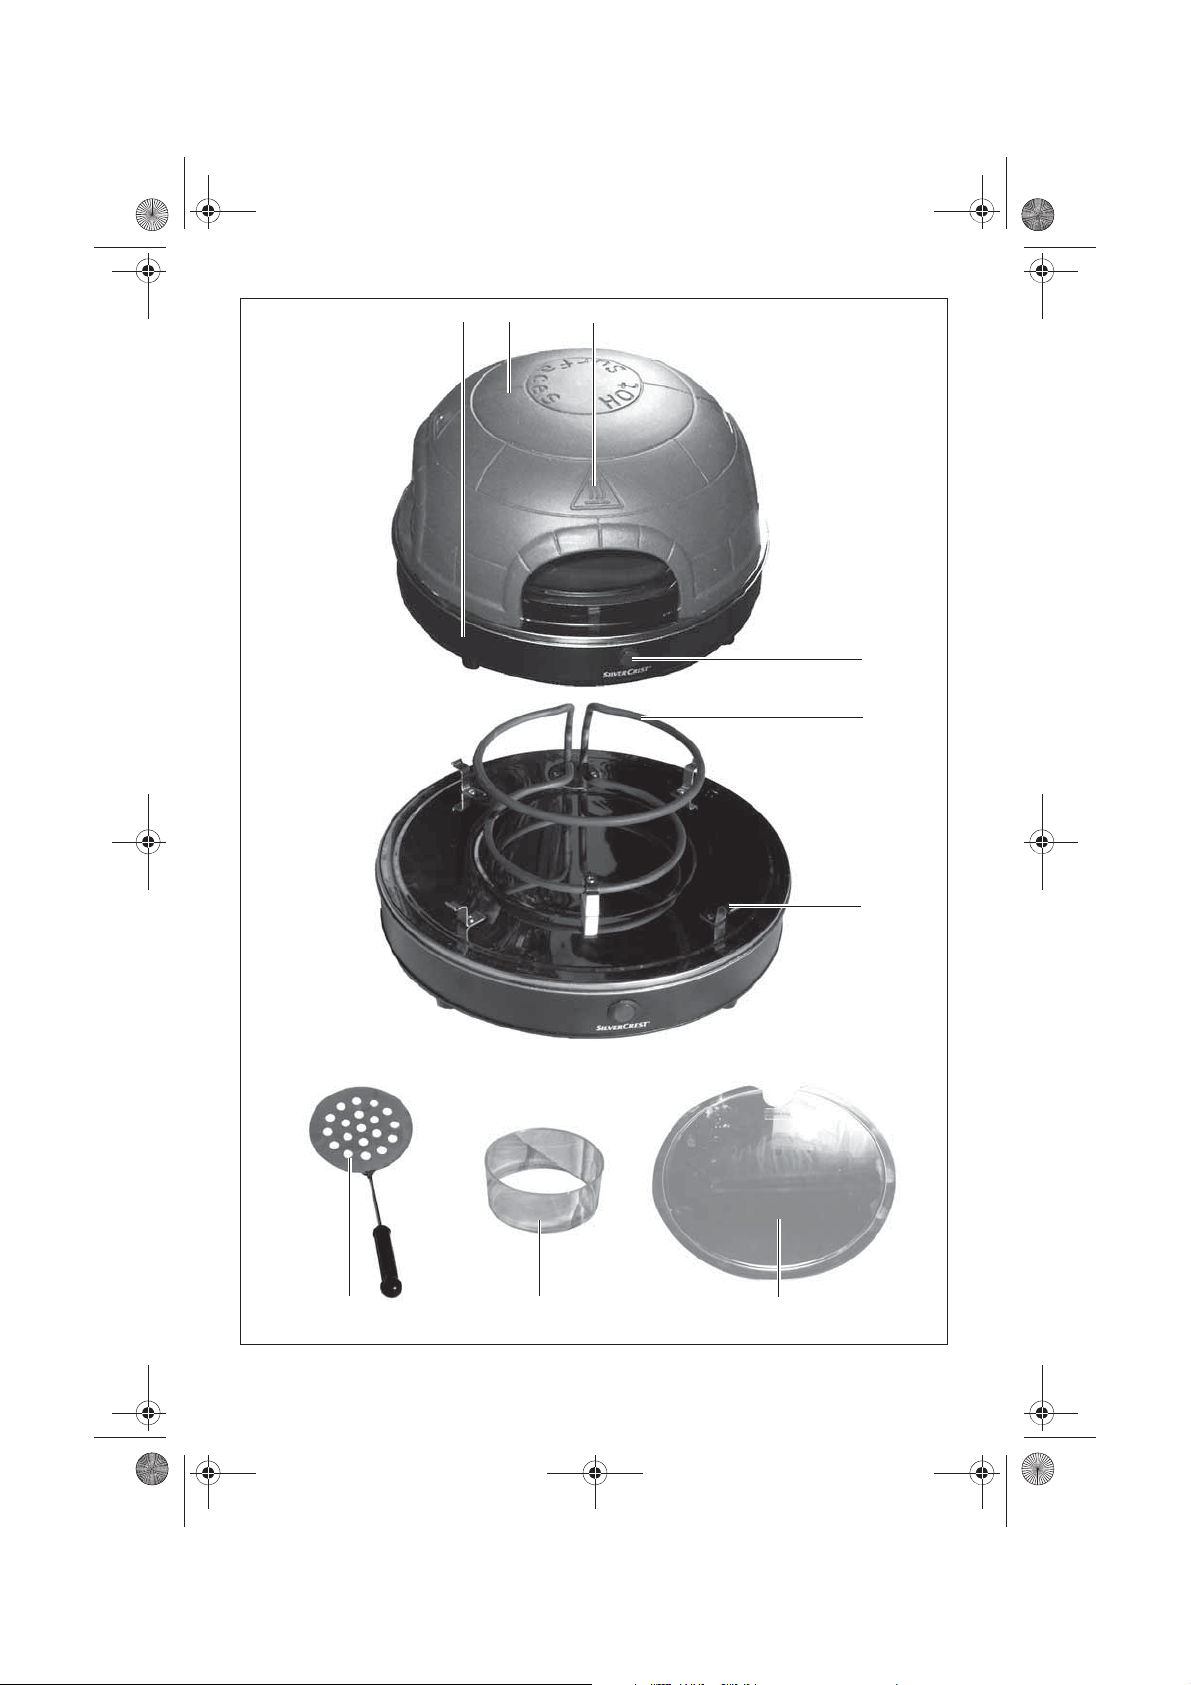
2. Benennung der Teile (siehe Ausklappseite)
1 Unterteil
2 Haube aus Terrakotta
3 Warnsymbol„Vorsicht - heiße
Oberflächen”
4 Betriebsanzeige
5 Heizspirale
6 Halter für Backplatte
7 Backplatte
8 Stechform
9 Pizzaheber
3. Technische Daten
Nennspannung: 220–240 V~ 50/60 Hz
Nennleistung: 800 - 900 W
Schutzklasse: I
4. Sicherheitshinweise
Nebenstehendes Symbol 3 warnt
vor dem Berühren von heißen
Oberflächen.
4.1 Begriffserklärung
Folgende Signalbegriffe finden Sie in dieser
Bedienungsanleitung:
Warnung!
Hohes Risiko: Missachtung der
Warnung kann Schaden für Leib
und Leben verursachen.
Vorsicht!
Mittleres Risiko: Missachtung der Warnung
kann einen Sachschaden verursachen.
Hinweis:
Geringes Risiko: Sachverhalte, die im
Umgang mit dem Gerät beachtet werden
sollten.
4
4.2 Besondere Anweisungen zum
sicheren Betrieb
•Dieses Gerät kann von Kindern ab
8 Jahren und von Personen mit reduzierten physischen, sensorischen oder
mentalen Fähigkeiten oder Mangel
an Erfahrung und/oder Wissen
benutzt werden, wenn sie beaufsichtigt oder bezüglich des sicheren
Gebrauches des Gerätes unterwie-
Page 7
RP75469 Pizzabäcker LB1 Seite 5 Freitag, 27. Juli 2012 1:14 13
sen wurden und die daraus resultierenden Gefahren verstanden haben.
Kinder dürfen nicht mit dem Gerät
spielen.
•Reinigung und Benutzer-Wartung
dürfen nicht durch Kinder durchgeführt werden, es sei denn, sie sind älter als 8 Jahre und beaufsichtigt.
•Kinder jünger als 8 Jahre sind vom
Gerät und der Netzanschlussleitung
fernzuhalten.
•Die Oberflächen des Gerätes können
heiß werden. Fassen Sie daher das
Gerät im Betrieb ausschließlich mit
Topflappen oder Küchenhandschuhe
an.
•Das Gerät darf nicht mit einer externen Zeitschaltuhr oder einem separaten Fernwirksystem, wie zum Beispiel
einer Funksteckdose, betrieben werden.
8
•Reinigen Sie die Stechform
Pizzaheber 9 sowie die Backplatte
, die
7
von Hand im Spülwasser.
4.3 Allgemeine Hinweise
• Lesen Sie vor dem Gebrauch bitte sorg-
fältig diese Bedienungsanleitung. Sie ist
Bestandteil des Gerätes und muss jederzeit verfügbar sein.
• Verwenden Sie das Gerät nur für den
beschriebenen Verwendungszweck (siehe
„1.1 Verwendungszweck“ auf Seite 3).
• Überprüfen Sie, ob die erforderliche
Netzspannung (siehe Typenschild am
Gerät) mit Ihrer Netzspannung übereinstimmt, um eine Beschädigung zu
verhindern.
• Beachten Sie, dass jeglicher Anspruch
auf Garantie und Haftung erlischt, wenn
Zubehörteile verwendet werden, die
nicht in dieser Bedienungsanleitung
empfohlen werden oder wenn bei Reparaturen nicht ausschließlich Originalersatzteile verwendet werden. Dies gilt
auch für Reparaturen, die durch nichtqualifizierte Personen durchgeführt werden. Die Kontaktdaten finden Sie in
„Service-Center” auf Seite 14.
• Bei eventuellen Funktionsstörungen
während der Garantiezeit darf die
Instandsetzung des Gerätes nur durch
unser Service-Center erfolgen. Ansonsten erlischt jeglicher Garantieanspruch.
Die Kontaktdaten finden Sie in „ServiceCenter” auf Seite 14.
• Lassen Sie das Gerät während des
Betriebes niemals unbeaufsichtigt, um
rechtzeitig einschreiten zu können, falls
Funktionsstörungen auftreten.
• Achten Sie darauf, dass die Netzanschlussleitung nie zur Stolperfalle wird
oder sich jemand darin verfangen oder
darauftreten kann und sich dabei
verletzt.
• Das Gerät darf ausschließlich auf einem
festen, ebenen, trockenen und nicht
brennbaren Untergrund aufgestellt werden, um zu verhindern, dass es umkippt,
verrutscht oder die Unterlage Feuer
fängt und dadurch Schaden entsteht.
• Halten Sie einen Abstand von mindestens 50 cm zu anderen Gegenständen
SPB800 A1 5
Page 8
RP75469 Pizzabäcker LB1 Seite 6 Freitag, 27. Juli 2012 1:14 13
ein, damit diese kein Feuer fangen
können.
• Das Gerät darf nicht auf heiße Herdplatten gestellt, in den heißen Backofen
geschoben oder in der Nähe von Gasund Durchlauferhitzern aufgestellt
werden, da dies zu Beschädigungen
führen könnte.
• Es kann nicht ausgeschlossen werden,
dass Pflegemittel für Ablageflächen
(Möbel) Bestandteile enthalten, die die
Gummifüße angreifen und aufweichen.
Wenden Sie sich in diesem Fall an das
Service-Center. Die Kontaktdaten finden
Sie in „Service-Center” auf Seite 14.
• Stellen Sie keine Gegenstände auf das
Gerät.
4.4 Schutz vor elektrischem Schlag
Warnung! Die folgenden Sicherheitshinweise sollen Sie vor einem
elektrischen Schlag schützen.
• Schließen Sie das Gerät ausschließlich
an einer Netzsteckdose mit Schutzkontakt an, da davon der Schutz vor
elektrischem Schlag abhängt.
• Wenn das Gerät beschädigt ist, darf das
Gerät keinesfalls benutzt werden. Lassen
Sie das Gerät in diesem Falle von qualifiziertem Fachpersonal reparieren. Die
Kontaktdaten finden Sie in „Service-Center” auf Seite 14.
• Überprüfen Sie regelmäßig, dass die
Netzanschlussleitung nicht beschädigt
ist.
• Wenn die Netzanschlussleitung dieses
Gerätes beschädigt wird, muss sie durch
den Hersteller oder eine ähnlich qualifizierte Person ersetzt werden, um
Gefährdungen zu vermeiden.
• In das Gerät dürfen keinesfalls Wasser
oder andere Flüssigkeiten eindringen.
Daher:
– niemals im Freien einsetzen
– niemals in Flüssigkeit tauchen
– keine mit Flüssigkeit gefüllten Gegen-
stände, z.B. Töpfe, darauf stellen
– niemals in sehr feuchter Umgebung
einsetzen.
Falls doch einmal Flüssigkeit in das
Gerät gelangt, ziehen Sie sofort den
Netzstecker und lassen das Gerät von
qualifiziertem Fachpersonal reparieren.
Die Kontaktdaten finden Sie in „ServiceCenter” auf Seite 14.
• Die Benutzung von Verlängerungskabeln
sollten Sie vermeiden. Sie ist nur unter
ganz bestimmten Voraussetzungen
gestattet:
– das Verlängerungskabel muss für die
Stromstärke des Gerätes geeignet sein
– das Verlängerungskabel darf nicht
„fliegend“ verlegt sein: es darf nicht
zur Stolperfalle werden oder von
Kindern erreichbar sein
– das Verlängerungskabel darf keines-
falls beschädigt sein
– es dürfen keine weiteren Geräte als
dieses Gerät an der Netzsteckdose
angeschlossen werden, da es sonst zu
einer Überlastung des Stromnetzes
kommen kann (Verbot von Mehrfachsteckdosen!).
• Fassen Sie das Gerät, die Netzanschlussleitung oder den Netzstecker niemals mit feuchten Händen an.
• Ziehen Sie die Netzanschlussleitung
stets am Stecker heraus. Ziehen Sie niemals am Kabel selber.
• Tragen Sie das Gerät nie an der Netzanschlussleitung.
• Achten Sie darauf, dass die Netzanschlussleitung nie geknickt oder
gequetscht wird.
• Halten Sie die Netzanschlussleitung von
heißen Flächen (z.B. Herdplatte) fern.
6
Page 9
RP75469 Pizzabäcker LB1 Seite 7 Freitag, 27. Juli 2012 1:14 13
• Tauchen Sie die Netzanschlussleitung
und das Unterteil 1 nie in Flüssigkeiten.
• Wenn Sie das Gerät nicht benutzen,
ziehen Sie den Stecker aus der Steckdose. Nur dann ist das Gerät völlig
stromfrei.
• Bei einem Gewitter kann das am Stromnetz angeschlossene Gerät durch Blitzschlag beschädigt werden.
4.5 Schutz vor Verbrühungen und
Verbrennungen
Warnung! Heiße Oberflächen
können zu Verletzungen führen.
Beachten Sie daher:
• Das Gerät darf nie ohne aufgesetzte
Haube 2 betrieben werden.
• Das Metall der Pizzaheber 9 wird im
Pizzabäcker sehr heiß. Fassen Sie daher
die Pizzaheber 9 ausschließlich an den
schwarzen Griffen an.
• Lassen Sie das Gerät stets abkühlen,
bevor Sie es reinigen oder erneut
benutzen.
• Verwenden Sie das Gerät nie in der
Nähe von Gardinen und anderen brennbaren Materialien. Sollte sich das
Gargut entzünden, könnten so die Flammen leicht auf andere Gegenstände
überspringen.
• Achten Sie darauf, dass Kinder niemals
das Gerät an der Netzanschlussleitung
herunterziehen können.
• Achten Sie darauf, dass die Verpackungsfolie nicht zur tödlichen Falle
für Kinder wird. Verpackungsfolien sind
kein Spielzeug.
4.7 Schutz vor Sachschäden
Vorsicht! Um Schäden am Gerät zu
vermeiden, beachten Sie:
•Die Haube 2 aus Terrakotta darf nicht
im heißen Zustand mit Wasser in
Berührung kommen oder auf einer kalten
Fläche abgestellt werden. Der Temperaturschock könnte zu Rissen führen.
•Die Haube 2 aus Terrakotta ist bruchund stoßempfindlich. Gehen Sie daher
sorgfältig mit ihr um und bewahren Sie
sie am besten immer im Originalkarton
auf.
• Wenn das Gerät nach der Reinigung für
längere Zeit gelagert werden soll, sollten
Sie die Backplatte 7 leicht einölen,
damit sich kein Flugrost bilden kann.
4.6 Zur Sicherheit Ihres Kindes
Warnung! Kinder können Gefahren oft nicht richtig einschätzen und
sich dadurch Verletzungen
zuziehen. Beachten Sie daher:
• Dieses Gerät darf nur unter Aufsicht von
Erwachsenen verwendet werden.
• Achten Sie sorgfältig darauf, dass sich
das Gerät immer außerhalb der Reichweite von Kindern befindet.
SPB800 A1 7
Page 10
RP75469 Pizzabäcker LB1 Seite 8 Freitag, 27. Juli 2012 1:14 13
5. Vor dem ersten Gebrauch
Bei der Produktion bekommen viele Teile
einen dünnen Ölfilm zu ihrem Schutz. Betreiben Sie das Gerät vor dem ersten Gebrauch
ohne Pizza, damit eventuell vorhandene
Rückstände verdampfen können.
Hinweis: Bei den ersten Aufheizvorgängen kann es zu einer leichten Geruchsentwicklung kommen. Sorgen Sie deshalb
für eine ausreichende Belüftung.
1. Nehmen Sie das Gerät und alle
Zubehörteile aus der Verpackung.
2. Überprüfen Sie, dass das Gerät keine
Beschädigungen aufweist.
3. Reinigen Sie das Gerät vor der ersten
Benutzung. Beachten Sie hierzu die Hinweise in dem Kapitel „6. Bedienen” auf
Seite 8.
4. Wählen Sie einen Standort, der fest,
eben und unbrennbar ist. Halten Sie
6. Bedienen
6.1 Pizzateig zubereiten
Hinweis: Der Pizzateig gelingt besonders
gut, wenn Sie ihn mindestens 24 Stunden
vor dem Backen zubereiten und ihn dann im
Kühlschrank ruhen lassen. Das folgende
Rezept sollte zu einem Ergebnis führen „wie
beim guten Italiener”.
Zutaten für 4 Personen:
• 500 g Mehl Typ 405
• 300 ml Leitungswasser
• maximal 1/5 Block Backhefe
• 20 g Salz
Zubereitung:
1. Geben Sie 300 g des Mehls in eine
Rührschüssel.
dabei einen Abstand von ca. 50 cm zu
anderen Gegenständen ein.
5. Setzen Sie die Haube 2 so auf das
Unterteil 1, dass die senkrechten Heizstäbe verdeckt sind.
6. Stecken Sie den Netzstecker in eine
geeignete Steckdose (siehe
„3. Technische Daten“ auf Seite 4).
Die Betriebsanzeige 4 leuchtet und das
Gerät heizt auf.
7. Schalten Sie das Gerät nach etwa
20 Minuten wieder aus, indem Sie den
Netzstecker ziehen und lassen Sie das
Gerät abkühlen.
8. Reinigen Sie das Gerät erneut. Beachten
Sie hierzu die Hinweise in dem Kapitel
„6. Bedienen” auf Seite 8.
Das Gerät ist nun betriebsbereit.
2. Fügen Sie 300 ml Leitungswasser hinzu.
3. Geben Sie die Backhefe hinzu.
4. Geben Sie das Salz hinzu.
5. Rühren Sie die Masse glatt.
6. Decken Sie die Schüssel ab und lassen
Sie den Teig bei Zimmertemperatur etwa
20 Minuten lang gehen.
7. Rühren Sie den Teig etwa 3 Minuten
lang durch.
8. Geben Sie nun nach und nach das restliche Mehl hinzu. Rühren bzw. kneten
Sie dabei den Teig immer wieder durch.
8
Page 11

RP75469 Pizzabäcker LB1 Seite 9 Freitag, 27. Juli 2012 1:14 13
Hinweis: Sobald sich der Pizzateig
beim Kneten vom Boden ablöst und sich
zu einer Kugel formt, ist die zugegebene
Mehlmenge genau richtig.
9. Kneten Sie zum Schluss den Teig noch
einmal ca. 3 Minuten lang durch. Dies
sollte inzwischen recht schwer gehen.
Hinweis: Der Pizzateig hat genau die
richtige Konsistenz, wenn er kurzfristig
die Kugelform hält, aber über längere
Zeit (ca. 30 Minuten) die Form verliert
und zerfließt.
10.Lassen Sie den Pizzateig erneut
20 Minuten in der Schüssel ruhen.
11.Drehen Sie die Schüssel um und lassen
Sie den Teig auf ein gut gemehltes Brett
fallen.
12.Bestäuben Sie die Oberfläche des
Teiges gut mit Mehl.
13.Kneten Sie den Teig kurz durch und
formen Sie ihn dabei zu einer Kugel.
14.Geben Sie den Teigball in einen
verschließbaren Behälter und stellen ihn
für 24 Stunden in den Kühlschrank.
15.Nehmen Sie den Teig aus dem Kühlschrank und legen ihn zurück auf ein mit
Mehl bestäubtes Backbrett.
16.Stäuben Sie den Teig gut mit Mehl ein
und kneten ihn kurz durch, damit ein
schöner Teigball geformt wird.
17. Drücken Sie nun den Teigball von Innen
nach Außen hin flach.
Hinweis: Sie können den Teig auch
durch Ziehen zwischen den Fäusten
oder mit einem Nudelholz auf die
gewünschte Dicke bringen.
18.Stechen Sie mit der Stechform 8 die
Teiglinge aus.
19.Bestäuben Sie die Teiglinge beidseitig
kräftig mit Mehl und legen Sie diese auf
einer Platte fürs Pizza backen bereit.
Hinweise:
• Die Hefe muss nicht unbedingt vorher in
Wasser aufgelöst werden.
• Es wird deutlich weniger Hefe zugegeben, als auf der Verpackung der Hefe
steht. Nehmen Sie nur soviel, wie laut
Packungsangabe für etwa 200 - 250 g
Mehl erforderlich ist.
• Schmeckt man bei Ihrem Pizzateig die
Hefe durch, sollten Sie die Hefemenge
weiter reduzieren. Die reduzierte Hefemenge wird durch die lange Gehzeit
wieder ausgeglichen.
• Meersalz macht den Teig aromatischer.
• Beim Abschmecken direkt nach der Salzzugabe muss der Teig zunächst etwas
nach Salz schmecken. Wenn Sie das
Mehl oder die Hefe deutlich herausschmecken, fehlt noch etwas Salz. Mit
der späteren Zugabe des restlichen
Mehls verliert sich der Salzgeschmack
wieder.
• Stellen Sie den Teig zum Gehen nicht
an eine zusätzliche Wärmequelle. Sie
können dann zwar Zeit sparen, aber der
Geschmack leidet darunter.
• Die Ruhezeit von 24 Stunden ist enorm
wichtig für einen gut schmeckenden
Pizzateig.
• Der so zubereitete Pizzateig kann
mehrere Tage im Kühlschrank gelagert
werden.
SPB800 A1 9
Page 12
RP75469 Pizzabäcker LB1 Seite 10 Freitag, 27. Juli 2012 1:14 13
6.2 Pizzasoße zubereiten
Zutaten:
• ca. 400 - 500 g passierte oder
gehackte Tomaten (noch besser: ca.
600 - 750 g frische vollaromatische
Tomaten, geschält und gehackt)
•frischer Basilikum
• frischer Oregano (ersatzweise getrockneter Oregano)
• 2-3 Knoblauchzehen
•1/2 Zwiebel
• 1 Lorbeerblatt
• 1 Esslöffel gutes Olivenöl (native oder
virgine)
Zubereitung:
1. Knoblauch in grobe Stücke hacken.
2. Kräuter von den Stielen lösen und klein
hacken.
3. In einem passenden Topf das Olivenöl
erhitzen.
4. Knoblauch hineingeben und glasig
anbraten.
Hinweis: Der Knoblauch darf nicht
braun werden, weil die Soße sonst bitter
schmeckt.
5. Mit den Tomaten ablöschen.
6. Restliche Zutaten untermischen.
7. Herd auf kleine Stufe stellen und die
Masse mindestens 30 Minuten lang
köcheln lassen.
Hinweis: Die Soße ist fertig, sobald
sich die Masse auf mindestens die
Hälfte reduziert hat.
8. Zwiebelhälfte und Lorbeerblatt aus der
Masse herausnehmen.
9. Mit einem Pürierstab die Masse pürieren.
Hinweis: Haben Sie keinen Pürierstab
zur Hand, geht es auch ohne pürieren.
Die Soße ist dann aber nicht so schön
sämig und sieht nicht so gut aus.
10.Mit Salz und Pfeffer abschmecken.
6.3 Belag vorbereiten
Bereiten Sie den Belag vor, indem Sie die
Zutaten auf die gewünschte Größe schneiden und auf dem Tisch bereitstellen.
Als Käse können Sie geraspelten Parmesan
oder geraspelten Gouda bereitstellen.
6.4 Gerät vorbereiten
1. Wählen Sie einen Standort, der fest,
eben und unbrennbar ist. Halten Sie
dabei einen Abstand von ca. 50 cm zu
anderen Gegenständen ein.
Hinweis: Der Pizzabäcker sollte keine
Zugluft bekommen, da sich sonst die
Wärme unter der Haube 2 nicht halten
kann.
2. Stellen Sie das Unterteil 1 auf eine hitzebeständige Unterlage.
3. Legen Sie die Backplatte 7 auf die entsprechenden Halter 6.
Hinweis: Die Oberseite der
Backplatte 7 ist markiert. Achten Sie auf
die korrekte Lage, da die Wölbung der
Backplatte 7 nach oben zeigen muss.
4. Setzen Sie die Haube 2 auf das Unterteil 1.
5. Stecken Sie den Netzstecker in eine
geeignete Steckdose (siehe
„3. Technische Daten“ auf Seite 4).
Die Betriebsanzeige 4 leuchtet und das
Gerät heizt auf.
6. Lassen Sie das Gerät etwa 10 Minuten
vorheizen, bevor Sie die erste Pizza
backen.
10
Page 13
RP75469 Pizzabäcker LB1 Seite 11 Freitag, 27. Juli 2012 1:14 13
Das Gerät ist nun betriebsbereit.
7. Fetten Sie die Pizzaheber 9 leicht mit Öl
ein, damit die Pizza nicht festbackt. Sie
können dafür auch Backspray benutzen.
6.5 Pizza backen
1. Stellen Sie die Teiglinge, die Pizzasoße
sowie die Zutaten für den Belag auf den
Tisch.
2. Legen Sie einen Teigling auf einen Pizzaheber 9.
3. Bestreichen Sie den Teigling mit Pizzasoße.
Hinweis: Damit keine Soße
herunterläuft und es einen schönen
knusprigen Rand gibt, sollten Sie am
Rand etwa einen halben Zentimeter frei
lassen, der nicht mit Pizzasauce
bestrichen wird.
4. Belegen Sie die Pizza mit Zutaten nach
Ihrer Wahl.
5. Schieben Sie den Pizzaheber 9 mit der
Pizza vollständig unter die Haube 2.
Hinweis: Lassen Sie beim Backen die
Pizza auf dem Pizzaheber 9. Legen Sie
die Pizza nicht auf die Backplatte 7, da
die Pizza dort festkleben würde.
Warnung!
Es besteht Verbrennungsgefahr
durch die heiße Pizza. Fassen Sie
die Pizza nicht mit den Händen an.
Hinweis: In der Mitte des Pizzabäckers
kann die Temperatur etwas höher sein, als
am Rand. Damit die Pizza gleichmäßig
gebacken wird, sollten Sie sie nach
ungefähr der Hälfte der Backzeit um eine
halbe Umdrehung drehen.
6. Sobald die Pizza fertig ist, entnehmen
Sie den Pizzaheber 9 und schieben Sie
die Pizza auf einen flachen Teller.
Hinweis: Die Backzeit ist
unterschiedlich und abhängig von:
–dem verwendeten Teig;
–dem Belag (Dicke und Art);
– der Anzahl der gleichzeitig gebacke-
nen Pizzen;
–der Umgebungstemperatur.
7. Legen Sie den heißen Pizzaheber 9 auf
einer hitzebeständigen Unterlage ab.
8. Guten Appetit!
6.6 Schnelles Rezept für Pizzateig
Zutaten für 4 Personen:
• 560 g Mehl
• 300 ml Leitungswasser
• 1 Packung Trockenhefe
• 2 Esslöffel Olivenöl
• 20 g Salz
Zubereitung:
1. Geben Sie alle Zutaten in eine Rührschüssel.
2. Kneten Sie die Masse glatt.
3. Decken Sie die Schüssel ab und lassen
Sie den Teig bei Zimmertemperatur etwa
60 Minuten lang gehen.
4. Drehen Sie die Schüssel um und lassen
Sie den Teig auf ein gut gemehltes Brett
fallen.
5. Stäuben Sie den Teig gut mit Mehl ein
und kneten ihn kurz durch, damit ein
schöner Teigball geformt wird.
6. Drücken Sie nun den Teigball von Innen
nach Außen hin flach.
7. Stechen Sie mit der Stechform 8 die
Teiglinge aus.
8. Bestäuben Sie die Teiglinge beidseitig
kräftig mit Mehl und legen Sie diese auf
einer Platte fürs Pizza backen bereit.
SPB800 A1 11
Page 14
RP75469 Pizzabäcker LB1 Seite 12 Freitag, 27. Juli 2012 1:14 13
7. Reinigen
Warnung!
– Ziehen Sie den Netzstecker,
bevor Sie das Gerät reinigen.
– Lassen Sie das Gerät abkühlen,
bevor Sie es reinigen. Da die
Haube 2 aus Terrakotta besteht
und daher sehr gut Wärme
speichern kann, kann es bis zu
45 Minuten dauern, bis sie
handwarm abgekühlt ist.
– Tauchen Sie die Netzanschluss-
leitung und das Unterteil 1 nie in
Flüssigkeiten.
Vorsicht! Verwenden Sie niemals scharfe
oder scheuernde Reinigungsmittel, da Ihr
Gerät dadurch beschädigt werden könnten.
Vorsicht! Die Einzelteile des Pizzabäckers
sind nicht spülmaschinengeeignet.
1. Reinigen Sie die Stechform 8, die Pizzaheber 9 sowie die Backplatte 7 von
Hand im Spülwasser.
8. Entsorgung
8.1 Gerät
Das Symbol der durchgestrichenen Abfalltonne auf Rädern
bedeutet, dass das Produkt in
der Europäischen Union einer
getrennten Müllsammlung
zugeführt werden muss. Dies
gilt für das Produkt und alle mit diesem Symbol gekennzeichneten Zubehörteile.
Gekennzeichnete Produkte dürfen nicht über
den normalen Hausmüll entsorgt werden,
sondern müssen an einer Annahmestelle für
das Recycling von elektrischen und elektronischen Geräten abgegeben werden.
2. Die Haube 2 braucht normalerweise
nicht gereinigt zu werden. Sollte sie
doch verschmutzt sein, benutzen Sie zur
Reinigung klares, warmes Wasser sowie
eine weiche Bürste.
3. Reinigen Sie das Unterteil 1 mit einem
feuchten Tuch oder einem weichen,
feuchten Schwamm. Sie können auch
etwas mildes Spülmittel nehmen, um die
fetthaltigen Überreste besser entfernen
zu können.
4. Verwenden Sie das Gerät erst wieder,
wenn alle Teile vollständig getrocknet
sind.
Vorsicht! Wenn das Gerät nach der
Reinigung für längere Zeit gelagert
werden soll, sollten Sie die Backplatte 7
leicht einölen, damit sich kein Flugrost
bilden kann.
Recycling hilft, den Verbrauch von Rohstoffen zu reduzieren und die Umwelt zu entlasten. Informationen zur Entsorgung und
zur Lage des nächsten Recyclinghofes erhalten Sie z.B. bei Ihrer Stadtreinigung oder in
den Gelben Seiten.
8.2 Verpackung
Wenn Sie die Verpackung entsorgen
möchten, achten Sie auf die entsprechenden
Umweltvorschriften in Ihrem Land.
12
Page 15
RP75469 Pizzabäcker LB1 Seite 13 Freitag, 27. Juli 2012 1:14 13
9. Garantie der HOYER Handel GmbH
Sehr geehrte Kundin, sehr geehrter Kunde,
Sie erhalten auf dieses Gerät 3 Jahre
Garantie ab Kaufdatum. Im Falle von
Mängeln dieses Produkts stehen Ihnen
gegen den Verkäufer des Produkts gesetzliche Rechte zu. Diese gesetzlichen Rechte
werden durch unsere im Folgenden dargestellte Garantie nicht eingeschränkt.
9.1 Garantiebedingungen
Die Garantiefrist beginnt mit dem Kaufdatum. Bitte bewahren Sie das Original des
Kassenbons gut auf. Diese Unterlage wird
als Nachweis für den Kauf benötigt.
Tritt innerhalb von drei Jahren ab dem Kaufdatum dieses Produkts ein Material- oder
Fabrikationsfehler auf, wird das Produkt von
uns – nach unserer Wahl – für Sie kostenlos
repariert oder ersetzt. Diese Garantieleistung setzt voraus, dass innerhalb der
Dreijahresfrist das defekte Gerät und der
Kaufbeleg (Kassenbon) vorgelegt und
schriftlich kurz beschrieben wird, worin der
Mangel besteht und wann er aufgetreten ist.
Wenn der Defekt von unserer Garantie
gedeckt ist, erhalten Sie das reparierte oder
ein neues Produkt zurück. Mit Reparatur
oder Austausch des Produkts beginnt kein
neuer Garantiezeitraum.
9.2 Garantiezeit und gesetzliche
Mängelansprüche
9.3 Garantieumfang
Das Gerät wurde nach strengen Qualitätsrichtlinien sorgfältig produziert und vor
Anlieferung gewissenhaft geprüft.
Die Garantieleistung gilt für Material- oder
Fabrikationsfehler. Diese Garantie erstreckt
sich nicht auf Produktteile, die normaler
Abnutzung ausgesetzt sind und daher als
Verschleißteile angesehen werden können
oder für Beschädigungen an zerbrechlichen
Teilen, z. B. Schaltern, Akkus oder Teilen, die
aus Glas gefertigt sind.
Diese Garantie verfällt, wenn das Produkt
beschädigt, nicht sachgemäß benutzt oder
gewartet wurde. Für eine sachgemäße
Benutzung des Produkts sind alle in der
Bedienungsanleitung aufgeführten Anweisungen genau einzuhalten.
Verwendungszwecke und Handlungen, von
denen in der Bedienungsanleitung abgeraten oder vor denen gewarnt wird, sind unbedingt zu vermeiden.
Das Produkt ist lediglich für den privaten und
nicht für den gewerblichen Gebrauch
bestimmt.
Bei missbräuchlicher und unsachgemäßer
Behandlung, Gewaltanwendung und bei
Eingriffen, die nicht von unserem autorisierten Service-Center vorgenommen wurden,
erlischt die Garantie.
9.4 Abwicklung im Garantiefall
Die Garantiezeit wird durch die Gewährleistung nicht verlängert. Dies gilt auch für
ersetzte und reparierte Teile. Eventuell schon
beim Kauf vorhandene Schäden und Mängel müssen sofort nach dem Auspacken
gemeldet werden. Nach Ablauf der Garantiezeit anfallende Reparaturen sind kostenpflichtig.
SPB800 A1 13
Um eine schnelle Bearbeitung Ihres Anliegens zu gewährleisten, folgen Sie bitte den
folgenden Hinweisen:
• Bitte halten Sie für alle Anfragen die Artikelnummer (für dieses Gerät:
IAN 75469) und den Kassenbon als
Nachweis für den Kauf bereit.
Page 16
RP75469 Pizzabäcker LB1 Seite 14 Freitag, 27. Juli 2012 1:14 13
• Die Artikelnummer entnehmen Sie bitte
dem Typenschild, einer Gravur, auf dem
Titelblatt ihrer Anleitung (unten links)
oder als Aufkleber auf der Rück- oder
Unterseite.
• Sollten Funktionsfehler oder sonstige
Mängel auftreten, kontaktieren Sie
zunächst das nachfolgend benannte
Service-Center telefonisch oder per
E-Mail.
• Ein als defekt erfasstes Produkt können
Sie dann unter Beifügung des Kaufbelegs (Kassenbon) und der Angabe,
worin der Mangel besteht und wann er
aufgetreten ist, für Sie portofrei an die
Ihnen mitgeteilte Service-Anschrift übersenden.
Auf www.lidl-service.com können Sie diese und viele weitere
Handbücher, Produktvideos
und Software herunterladen.
9.5 Service-Center
Service Deutschland
Tel.: 01805772033
(0,14 EUR/Min. aus dem dt. Festnetz,
Mobilfunk max. 0,42 EUR/Min.)
E-Mail: hoyer@lidl.de
Service Österreich
Tel.: 0820 201 222
(0,15 EUR/Min.)
E-Mail: hoyer@lidl.at
Service Schweiz
Tel.: 0842 665566
(0,08 CHF/Min.,
Mobilfunk max. 0,40 CHF/Min.)
E-Mail: hoyer@lidl.ch
IAN: 75469
9.6 Lieferant
Bitte beachten Sie, dass die folgende
Anschrift keine Serviceanschrift ist.
Kontaktieren Sie zunächst das oben
benannte Service-Center.
14
HOYER Handel GmbH
Kühnehöfe 5
22761 Hamburg
Deutschland
Page 17
RP75469 Pizzabäcker LB1 Seite 15 Freitag, 27. Juli 2012 1:14 13
Sommaire
1. Description de l’appareil . . . . . . . . . . . . . . . . . . . . . . . . . . . . . . . . . . . . . . . . . . . . . . . . . 15
2. Désignation des pièces (voir rabat) . . . . . . . . . . . . . . . . . . . . . . . . . . . . . . . . . . . . . . . . . 16
3. Caractéristiques techniques . . . . . . . . . . . . . . . . . . . . . . . . . . . . . . . . . . . . . . . . . . . . . . . 16
4. Consignes de sécurité . . . . . . . . . . . . . . . . . . . . . . . . . . . . . . . . . . . . . . . . . . . . . . . . . . . 16
5. Avant la première utilisation . . . . . . . . . . . . . . . . . . . . . . . . . . . . . . . . . . . . . . . . . . . . . . 20
6. Utilisation. . . . . . . . . . . . . . . . . . . . . . . . . . . . . . . . . . . . . . . . . . . . . . . . . . . . . . . . . . . . 20
7. Nettoyage. . . . . . . . . . . . . . . . . . . . . . . . . . . . . . . . . . . . . . . . . . . . . . . . . . . . . . . . . . . . 24
8. Mise au rebut . . . . . . . . . . . . . . . . . . . . . . . . . . . . . . . . . . . . . . . . . . . . . . . . . . . . . . . . . 24
9. Garantie de la société HOYER Handel GmbH . . . . . . . . . . . . . . . . . . . . . . . . . . . . . . . . . . . 25
Merci d'avoir acheté ce nouvel
produit.
Vous avez porté votre choix sur un produit
haut de gamme. La notice d’utilisation fait
partie intégrante de l’appareil. Elle contient
des remarques importantes relatives à la
sécurité, l'utilisation et la mise au rebut.
1. Description de l’appareil
1.1 Destination
Le four à mini pizzas SilverCrest SPB800
A1 convient pour la préparation de petites
pizzas directement à table. Cet appareil
n’est pas conçu pour préparer des aliments
autres que des pizzas.
L’appareil n’est pas destiné à la
décongélation, ni au chauffage ou au
séchage d’objets.
Utilisez l’appareil exclusivement en intérieur
et jamais à l’air libre.
Cet appareil est destiné aux ménages privés
et non à un usage professionnel.
L'appareil est également conçu pour être
utilisé :
Avant tout usage du produit, prenez
connaissance de toutes les consignes
d'utilisation et de sécurité. Utilisez le produit
uniquement comme décrit et pour les
domaines d'application indiqués.
En cas de transfert du produit à un tiers, tous
les documents qui accompagnent ce produit
doivent être remis simultanément.
• dans les cuisines par les employés des
magasins, bureaux et autres secteurs
commerciaux,
• dans les exploitations agricoles,
• par les clients dans des hôtels, motels ou
autres établissements,
• dans des pensions avec petit-déjeuner.
1.2 Contenu livré
1 four à mini pizzas
1 emporte-pièce
4 pelles à pizza
1 mode d’emploi
SPB800 A1 15
Page 18
RP75469 Pizzabäcker LB1 Seite 16 Freitag, 27. Juli 2012 1:14 13
1.3 Description du fonctionnement
À table, chaque participant garnit une petite
pizza en fonction de ses gouts. La pizza est
introduite dans le fous à mini pizzas chauffé
sur une pelle à pizza, puis cuite dans
l’appareil.
1.4 Marquages sur l’appareil
2. Désignation des pièces (voir rabat)
1 Base
2 Dôme en terre cuite
3 Symbole d’avertissement «Attention -
surfaces brulantes»
4 Voyant de fonctionnement
5 Spirale de chauffe
6 Support pour la plaque de cuisson
7 Plaque de cuisson
8 Emporte-pièce
9 Pelles à pizza
3. Caractéristiques techniques
Tension nominale : 220–240 V~ 50/60 Hz
Puissance nominale : 800 - 900 W
Classe de protection : I
4. Consignes de sécurité
Le symbole 3 ci-contre vous avertit
des surfaces brûlantes à ne pas
toucher.
4.1 Définition
Les termes suivants figurant dans la présente
notice d’utilisation sont destinés à attirer
votre attention :
Avertissement !
Risque majeur : le non-respect de
ces avertissements peut avoir des
conséquences fatales pour votre
santé et pour votre vie.
Attention !
Risque moyen : le non-respect de ces
avertissements peut entraîner des
dommages matériels
16
Remarque :
Risque mineur : il convient de tenir compte
de ces circonstances lors de l’utilisation de
l’appareil.
4.2 Instructions spéciales pour la
sécurité de fonctionnement
•Cet appareil peut être utilisé par des
enfants à partir de 8 ans et par des
personnes aux capacités physiques,
sensorielles ou mentales restreintes ou
manquant d’expérience et/ou de
Page 19
RP75469 Pizzabäcker LB1 Seite 17 Freitag, 27. Juli 2012 1:14 13
connaissances à condition d’être sous
surveillance ou d’avoir été initiés aux
4.3 Consignes générales
• Veuillez lire avec attention la présente
consignes de sécurité pour l’appareil
et d’avoir compris les risques qui en
résultent. Les enfants ne doivent pas
• N’utilisez le gril de table qu’aux fins
jouer avec l’appareil.
•Les enfants à partir de 8 ans ne
• Afin d’éviter tout endommagement,
doivent pas effectuer des travaux de
nettoyage et d’entretien s’ils ne sont
pas surveillés.
•Gardez le fer à repasser et son
• Veuillez prendre note que toute
cordon d’alimentation jusqu’à leur
complet refroidissement hors de la
portée des enfants qui n’ont pas
encore 8 ans.
•Les surfaces de l’appareil peuvent
devenir brûlantes. Pour cette raison,
touchez l’appareil pendant son
fonctionnement qu’avez des
maniques ou des gants de cuisine.
• Seul notre centre de service après-vente
•L'appareil ne doit pas être mis en
marche au moyen d'un interrupteur
horaire programmable ni d'un
système de déclenchement à distance
séparé, par ex. prise à
télécommande RF.
8
•Nettoyez l’emporte-pièce
9
pelles à pizza
ainsi que la plaque
, les
de cuisson 7 à la main dans de l’eau
• Ne laissez jamais l’appareil sans
• Veillez à ce que le câble secteur ne
de vaisselle.
notice d’utilisation avant utilisation. Elle
fait partie intégrante de l’appareil et doit
être à tout moment disponible.
décrites précédemment (voir
« 1.1 Destination » à la page 15).
assurez-vous que la tension secteur
nécessaire (voir plaque signalétique sur
l’appareil) concorde avec la tension
secteur de l’installation.
prétention à des droits de garantie et
reconnaissance de notre responsabilité
seront sans effet si des accessoires,
autres que ceux recommandés dans
cette présente notice d’utilisation, sont
utilisés ou si des pièces de rechange non
d’origine sont employées lors de
réparations. Il en sera de même pour
toute réparation effectuée par un
personnel non qualifié. Vous trouverez
les données de contact dans « Service
après-vente » à la page 26.
est habilité à remettre en état l'appareil
durant la période de garantie dans le
cas de dysfonctionnements éventuels.
Dans le cas contraire, il ne pourra être
prétendu à aucun droit de garantie.
Vous trouverez les données de contact
dans « Service après-vente » à la
page 26.
surveillance lorsque celui-ci est en
marche, afin de pouvoir intervenir à
temps si des dysfonctionnements
apparaissent.
puisse provoquer de chute et à ce que
SPB800 A1 17
Page 20
RP75469 Pizzabäcker LB1 Seite 18 Freitag, 27. Juli 2012 1:14 13
personne ne puisse marcher dessus et se
blesser.
• L’appareil est à installer exclusivement
sur un support solide, plan, sec et non
inflammable de sorte qu’il ne bascule ou
ne glisse ou que le support ne prenne
feu, occasionnant ainsi des dommages.
• Observez une distance de minimum
50 cm aux autres objets de sorte que
ceux-ci ne puissent prendre feu.
• L’appareil ne doit en aucun cas être
posé sur des plaques de cuisson
chaudes, dans des fours à haute
température ou à proximité d’un
réchauffeur gaz ou liquide, cela pouvant
induire des dommages.
• Il ne peut être exclu que certains agents
d’entretien des plans de travail
contiennent des constituants qui
attaquent et ramollissent les pieds en
caoutchouc. Veuillez dans ce cas vous
adresser au centre de service aprèsvente. Vous trouverez les données de
contact dans « Service après-vente » à
la page 26.
• Ne posez aucun objet sur l’appareil.
4.4 Protection contre le risque
d’électrocution
Avertissement ! Les consignes
de sécurité à suivre sont destinées
à vous protéger de toute
électrocution.
• Raccordez l'appareil exclusivement à
une prise de courant à contact de
protection en prévention des risques
d'une électrocution.
• Si l’appareil est endommagé, ne l’utiliser
en aucun cas. Faites dans ce cas réparer
l’appareil par une main d’oeuvre
qualifiée. Vous trouverez les données de
contact dans « Service après-vente » à
la page 26.
• Vérifiez régulièrement que le cordon
d’alimentation n’est pas endommagé.
• Si le câble d‘alimenation est
endommagé, il doit être remplacé par le
fabricant, son service après-ventes ou
des personne de qualification similaire
afin d‘éviter un danger.
• Ne faites jamais pénétrer de l’eau ou
tout autre liquide dans l’appareil. C’est
pourquoi :
– ne jamais utiliser l’appareil en
extérieur ;
– ne jamais le plonger dans un liquide ;
– ne jamais poser dessus de récipient,
par ex. une marmite, rempli de
liquide ;
– ne jamais utiliser l’appareil dans un
environnement très humide.
Si du liquide venait à pénétrer à
l’intérieur de l’appareil, débranchez
immédiatement la prise mâle secteur et
faites réparer l’appareil par un
personnel qualifié. Vous trouverez les
données de contact dans « Service
après-vente » à la page 26.
• Evitez l’utilisation de rallonges, autorisée
dans certaines conditions uniquement :
– la rallonge doit convenir à l’ampérage
de l'appareil ;
– la rallonge ne doit pas être posée
« volante » : elle ne doit ni pouvoir
provoquer de chute, ni pouvoir être
atteinte par des enfants ;
– la rallonge ne doit en aucun cas être
endommagée ;
– aucun autre appareil que le gril de
table ne doit être raccordé à la prise
femelle secteur, une surcharge du
secteur pouvant sinon survenir
(multiprises interdites !).
• Ne saisissez jamais l’appareil, le câble
secteur ou la prise mâle secteur, les
mains humides.
18
Page 21

RP75469 Pizzabäcker LB1 Seite 19 Freitag, 27. Juli 2012 1:14 13
• Débranchez toujours le câble secteur en
tirant sur la prise mâle. Ne tirez jamais
sur le câble lui-même.
• Ne portez jamais l’appareil par le câble
secteur.
• Veillez à ne jamais couder ou écraser le
câble secteur.
• Maintenez le câble secteur éloigné des
surfaces à haute température (comme
d’une table de cuisson par ex.).
• Ne plongez en aucun cas le cordon
d’alimentation et la base 1 dans du
liquide.
• Si vous n’utilisez pas votre gril de table,
retirez la prise mâle de la prise femelle.
Ce n’est qu’alors que l’appareil sera
totalement hors tension.
• En cas d’orage, l’appareil raccordé au
secteur peut être endommagé par la
foudre.
4.5 Protection contre les échaudures et
les brûlures
Avertissement! Les surfaces
brûlantes peuvent provoquer des
blessures. Prenez note par
conséquent:
• L’appareil ne doit en aucun cas être
utilisé sans que le dôme 2 soit en place.
• Dans le four à mini pizzas, le métal des
pelles à pizza 9 chauffe très fort. Pour
cette raison, touchez les pelles à pizza 9
uniquement aux poignées noires.
• Laissez toujours refroidir l’appareil avant
de le nettoyer ou de vous en resservir.
• N’utilisez jamais l’appareil à proximité
de rideaux et d’autres matières
inflammables. Si la pièce à cuire
s’enflamme, les flammes pourraient alors
aisément se propager à d’autres objets.
4.6 Pour la sécurité de votre enfant
Avertissement ! Les enfants ne
sont fréquemment pas à même
d’évaluer correctement les
dangers, risquant ainsi de se
blesser. Prenez note par
conséquent :
• Cet appareil ne doit être utilisé que sous
la surveillance d’adultes.
• Veillez attentivement à ce que l’appareil
se trouve toujours hors de la portée des
enfants.
• Veillez à ce que des enfants ne puissent
jamais faire basculer l’appareil en tirant
sur le câble.
• Veillez à ce que le film d’emballage ne
devienne pas un piège mortel pour des
enfants. Les films d’emballage ne sont
pas des jouets.
4.7 Protection contre les dommages
matériels
Attention! Pour éviter tout
endommagement de l’appareil, respectez
les points suivants:
•Le dôme 2 en terre cuite ne doit en
aucun cas entrer en contact avec de
l’eau ou être posé sur une surface froide
lorsqu’il est encore chaud. Le choc
thermique pourrait causer des fissures.
•Le dôme 2 en terre cuite craint les chocs
et se casse facilement. Prenez-en soin et,
de façon idéale, rangez-le toujours dans
son carton d’origine.
• Si vous souhaitez entreposer l’appareil
pendant une durée plus longue après
usage, il est recommandé d’huiler
légèrement la plaque de cuisson 7 pour
éviter la formation de points de rouille.
SPB800 A1 19
Page 22

RP75469 Pizzabäcker LB1 Seite 20 Freitag, 27. Juli 2012 1:14 13
5. Avant la première utilisation
Lors de la production, de nombreuses pièces
sont enduites d’une fine couche d’huile en
vue de leur protection. Avant la première
utilisation, laissez chauffer l’appareil sans
pizza à l’intérieur, de sorte que les résidus
éventuels puissent s’évaporer.
Remarque : Une légère odeur peut se
dégager lors des premières montées en
température. Veillez par conséquent à une
aération suffisante.
1. Retirez l’appareil et tous les accessoires
de leur emballage.
2. Vérifiez que l’appareil n’est pas
endommagé.
3. Nettoyez l’appareil avant première
utilisation. Observez pour ce faire les
instructions du chapitre « Utilisation » à
la page 20.
6. Utilisation
6.1 Préparer la pâte à pizza
Remarque: la pâte à pizza sera
particulièrement bien réussie, si vous la
préparez au moins 24 heures avant de la
cuire et la laissez reposer dans le
réfrigérateur. La recette suivante devrait
fournir un résultat «comme dans un bon
restaurant italien».
Ingrédients pour 4 personnes:
• 500g de farine à pâtisserie (type T45)
• 300ml d’eau plate
• au maximum 1/5 d’un cube de levure
de boulanger
• 20g de sel
4. Choisissez un support solide, plan et non
inflammable. Observez une distance de
50 cm environ aux autres objets.
5. Placez le dôme 2 sur la base 1 afin que
les éléments de chauffage vertical sont
cachés.
6. Enfichez la fiche de secteur dans une
prise appropriée (voir
« 3. Caractéristiques techniques » à la
page 16).
Le voyant de fonctionnement 4 s’allume
et l’appareil chauffe.
7. Arrêtez l’appareil après env. 20 minutes
en débranchant la fiche de secteur et
laissez refroidir l’appareil.
8. Nettoyez de nouveau l’appareil.
Respectez pour cela les remarques
portées au chapitre « 6. Utilisation » à la
page 20.
L’appareil est à présent opérationnel.
Préparation:
1. Versez 300g de farine dans un bol.
2. Ajoutez 300ml d’eau plate.
3. Ajoutez la levure de boulanger.
4. Ajoutez le sel.
5. Mélangez la préparation jusqu’à obtenir
une pâte lisse.
6. Recouvrez le bol et faites lever la pâte à
température ambiante pendant env.
20 minutes.
7. Ensuite, pétrissez la pâte pendant
environ 3 minutes.
20
Page 23

RP75469 Pizzabäcker LB1 Seite 21 Freitag, 27. Juli 2012 1:14 13
8. Ajoutez maintenant peu à peu le reste
de la farine. Pendant cela, continuez à
pétrir la pâte de temps à autre.
Remarque: dès que la pâte à pizza
se détache du fond du bol lorsque vous
la pétrissez et prend la forme d’une
boule, vous avez ajouté la quantité de
farine exacte.
9. Pour terminer, pétrissez encore une fois
la pâte pendant environ 3 minutes. Ceci
devrait maintenant être assez dur à faire.
Remarque: la pâte à pizza a
exactement la bonne consistance,
lorsqu’elle garde la forme d’une boule
pendant une courte durée, mais perd
cette forme et s’écrase après une durée
plus longue (env. 30 minutes).
10.Laissez de nouveau reposer la pâte à
pizza dans le bol pendant 20 minutes.
11.Renversez le bol et faites tomber la pâte
sur un plan de travail bien fariné.
12.Saupoudrez bien la surface de la pâte
avec de la farine.
13.Pétrissez brièvement la pâte en lui
donnant la forme d’une boule.
14.Mettez la boule de pâte dans un
récipient que vous pouvez fermer et
placez le tout dans le réfrigérateur
pendant 24 heures.
15.Après 24 heures, sortez la pâte du
réfrigérateur et posez-la de nouveau sur
une planche à pâtisserie farinée.
16.Saupoudrez bien la pâte avec de la
farine et pétrissez-la rapidement pour
former une belle boule de pâte.
17. Aplatissez maintenant la boule de pâte
du centre vers l’extérieur.
Remarque: vous pouvez également
aplatir la pâte en la tirant entre les
poings ou en utilisant un rouleau à
pâtisserie jusqu’à l’épaisseur souhaitée.
18.À l’aide de l’emporte-pièce 8, découpez
les ronds de pâte.
19.Farinez généreusement les ronds de
pâte des deux côtés et mettez-les à
disposition sur une plaque pour faire les
pizzas.
Remarques:
• Il n’est pas obligatoirement nécessaire
de diluer préalablement la levure dans
de l’eau.
• Utilisez bien moins de levure qu’indiqué
sur l’emballage de la levure. Utilisez
uniquement la quantité de levure
nécessaire pour environ 200 à 250 g
de farine selon les indications sur
lemballage.
• Si votre pâte a un goût de levure, vous
devez encore réduire la quantité de
levure. La faible quantité de levure est
compensée par le fait que vous laissez
lever la pâte pendant longtemps.
• Le sel marin donne plus d’arôme à la
pâte.
• Lorsque vous goutez la pâte juste après
avoir ajouté le sel, elle doit tout d’abord
avoir un peu le gout de sel. Si vous
sentez clairement un gout de farine ou
de levure, il manque un peu de sel. Une
fois que vous avez ajouté le reste de la
farine, le gout de sel disparait.
• Ne placez pas la pâte à proximité
d’une source de chaleur supplémentaire
pour la faire lever. Certes, cela vous
ferait gagner un peu de temps, mais le
gout en souffrirait.
• Le temps de repos de 24 heures est très
important pour une pâte à pizza
délicieuse.
• La pâte à pizza préparée ainsi se garde
plusieurs jours au réfrigérateur.
SPB800 A1 21
Page 24

RP75469 Pizzabäcker LB1 Seite 22 Freitag, 27. Juli 2012 1:14 13
6.2 Préparer la sauce à pizza
Ingrédients:
• env. 400 - 500g de coulis tomates ou
de tomates en petits morceaux (encore
mieux: env. 600 - 750g de tomates
fraiches de la meilleure qualité,
épluchées et coupées en petits
morceaux)
• du basilic frais
• de l’origan frais (ou sinon, de l’origan
séché)
• 2 à 3 gousses d’ail
• 1/2 oignon
• 1 feuille de laurier
• 1 cuillère à soupe d’huile d’olive de
bonne qualité (native ou vierge)
Préparation:
1. Hachez grossièrement l’ail.
2. Enlevez des tiges les feuilles des herbes
aromatiques et hachez-les finement.
3. Faites chauffer l’huile d’olive dans une
casserole adaptée.
4. Ajoutez l’ail et faites-le revenir
doucement.
Remarque: l’ail ne doit pas brunir,
car sinon, il donnerait un gout amer à la
sauce.
5. Ajoutez les tomates.
6. Incorporez le reste des ingrédients.
7. Baissez le feu et faites mijoter la
préparation pendant au moins 30
minutes.
Remarque: la sauce est prête lorsque
la préparation a réduit d’environ la
moitié.
8. Retirez la moitié d’oignon et la feuille de
laurier de la préparation.
9. Réduisez la préparation en purée avec
un mixeur.
Remarque: si vous n’avez pas de
mixeur, cette étape n’est pas
indispensable. La sauce n’est alors pas
aussi onctueuse et pas aussi belle.
10.Ajuster l’assaisonnement avec du sel et
du poivre.
6.3 Préparer la garniture
Préparez la garniture en coupant les
ingrédients à la taille souhaitée. Puis,
arrangez-les joliment sur la table.
Comme fromage, vous pouvez proposer du
parmesan râpé ou du gouda râpé.
6.4 Préparation de l’appareil
1. Choisissez un support solide, plan et non
inflammable. Observez une distance de
50cm environ avec les autres objets.
Remarque: Le four à mini pizzas ne
doit pas se trouver dans les courants
d’air, car sinon, la chaleur ne peut pas
s’accumuler sous le dôme 2 .
2. Posez la base 1 sur une surface
résistante à la chaleur.
3. Posez la plaque de cuisson 7 sur les
supports prévus à cet effet 6.
Remarque: la face supérieure de la
plaque de cuisson 7 est pourvue d’un
marquage. Respectez la pose correcte,
car le bombement de la plaque de
cuisson 7 doit montrer vers le haut.
4. Placez le dôme 2 sur la base 1.
5. Enfichez la fiche de secteur dans une
prise appropriée (voir
« 3. Caractéristiques techniques » à la
page 16).
Le voyant de fonctionnement 4 s’allume
et l’appareil chauffe.
22
Page 25

RP75469 Pizzabäcker LB1 Seite 23 Freitag, 27. Juli 2012 1:14 13
6. Faites préchauffer l’appareil pendant
environ 10 minutes avant de cuire la
première pizza.
L’appareil est à présent opérationnel.
7. Huilez légèrement les pelles à pizza 9
pour que les pizzas ne collent pas. Vous
pouvez également utiliser du spray de
cuisson.
6.5 Cuire des pizzas
1. Mettez les ronds de pâte, la sauce à
pizza ainsi que les ingrédients pour la
garniture sur la table.
2. Posez un rond de pâte sur une des pelles
à pizza 9.
3. Répartissez de la sauce à pizza sur le
rond de pâte.
Remarque: Pour que la sauce ne
goutte pas et pour obtenir un bord bien
croustillant, il est recommandé de
réserver sur le bord un demi-centimètre
non recouvert de sauce à pizza.
4. Garnissez la pizza avec les ingrédients
de votre choix.
5. Enfournez la pelle à pizza 9 avec la
pizza entièrement sous le dôme 2.
Remarque: la pizza doit rester sur la
pelle à pizza 9 lors de la cuisson. Ne
posez pas la pizza sur la plaque de
cuisson 7, car la pizza resterait coller
dessus.
Avertissement!
Il y a un risque de brûlure dû à la
pizza chaude. Ne touchez pas la
pizza avec les mains.
Remarque: au centre du four à mini
pizzas, la température peut être plus élevée
qu’au bord. Pour que la pizza cuise de
façon uniforme, nous vous recommandons
de faire tourner la pizza d’un demi-tour à la
mi-cuisson.
6. Dès que la pizza est prête, sortez la
pelle à pizza 9 et faites glisser la pizza
sur une assiette plate.
Remarque: le temps de cuisson est
différent et dépend des points suivants:
–la pâte utilisée
– la garniture (épaisseur et type)
– le nombre de pizzas qui cuisent en
même temps
– la température ambiante
7. Déposez la pelle à pizza 9 sur une
surface résistante à la chaleur.
8. Bon appétit!
6.6 Recette rapide de pâte à pizza
Ingrédients pour 4 personnes:
• 560g de farine à pâtisserie
• 300ml d’eau plate
• 1 levure sèche active paquet
• 2 cuillères à soupe d'huile d'olive
• 20g de sel
Préparation:
1. Versez tous les ingrédients dans un bol.
2. Sans heurt, pétrir la masse.
3. Recouvrez le bol et faites lever la pâte à
température ambiante pendant env.
60 minutes.
4. Renversez le bol et faites tomber la pâte
sur un plan de travail bien fariné.
5. Saupoudrez bien la pâte avec de la
farine et pétrissez-la rapidement pour
former une belle boule de pâte.
6. Aplatissez maintenant la boule de pâte
du centre vers l’extérieur.
7. À l’aide de l’emporte-pièce 8, découpez
les ronds de pâte.
8. Farinez généreusement les ronds de
pâte des deux côtés et mettez-les à disposition sur une plaque pour faire les
pizzas.
SPB800 A1 23
Page 26

RP75469 Pizzabäcker LB1 Seite 24 Freitag, 27. Juli 2012 1:14 13
7. Nettoyage
Avertissement!
– Retirez la fiche de secteur avant
de nettoyer l’appareil.
– Laissez refroidir l’appareil avant
de le nettoyer. Comme le
dôme 2 est en terre cuite et peut
ainsi très bien emmagasiner la
chaleur, cela peut prendre
jusqu’à 45 minutes avant que
l’appareil ait refroidi à
température du corps.
– Ne plongez en aucun cas le
cordon d’alimentation et la
base 1 dans du liquide.
Attention! N’utilisez jamais de produits
d’entretien agressifs ou abrasifs au risque
d’endommager votre appareil.
Attention! Les pièces détachées du four à
mini pizzas ne sont pas lavables au lavevaisselle.
1. Nettoyez l’emporte -pièce 8, les pelles à
pizza 9 ainsi que la plaque de cuisson
7 à la main dans de l’eau de vaisselle.
8. Mise au rebut
2. Le dôme 2 n’a normalement pas besoin
d’être nettoyé. S’il devait tout de même
être encrassé, utilisez de l’eau claire
chaude ainsi qu’une brosse souple pour
le nettoyage.
3. Nettoyez la base 1 avec un chiffon
humide ou une éponge souple et
humide. Vous pouvez également
employer un peu de liquide vaisselle
doux afin de mieux éliminer les restes de
matières grasses.
4. Ne réutilisez l’appareil qu’une fois que
toutes les pièces sont complètement
sèches.
Attention! Si vous souhaitez
entreposer l'appareil pendant une durée
plus longue après usage, il est
recommandé d'huiler légèrement la
plaque de cuisson 7 pour éviter la
formation de points de rouille.
8.1 Appareil
Le symbole représentant la
poubelle à roulettes barrée
signifie que ce produit doit être
éliminé, au sein de l’Union
européenne, dans un point de
collecte réservé. Cela
s’applique tant au produit lui-même qu’aux
accessoires qui portent ce symbole. Les
produits portant ce symbole ne doivent pas
être jetés avec les autres déchets ménagers,
mais doivent être portés dans un point de
24
collecte adapté au recyclage des
équipements électriques et électroniques. Le
recyclage sert à réduire la quantité de
matières premières utilisées et à protéger
l’environnement. Vous trouverez des
informations sur la mise au rebut et la
présence de points de collecte et de
recyclage près de chez vous auprès de
votre mairie ou dans les pages jaunes.
8.2 Emballage
Pour jeter l'emballage, respectez les
prescriptions en vigueur dans votre pays.
Page 27
RP75469 Pizzabäcker LB1 Seite 25 Freitag, 27. Juli 2012 1:14 13
9. Garantie de la société HOYER Handel GmbH
Chers clients,
Ce produit est garanti pendant 3 ans à
compter de la date d’achat. Si vous
constatez des défauts, vous disposez d'un
recours légal à l'encontre du vendeur. Ces
droits légaux ne sont pas limités par notre
garantie, exposée comme suit.
9.1 Conditions de la garantie
Le délai de garantie courre à partir de la
date d'achat. Conservez soigneusement le
ticket de caisse. Ce document sert de preuve
d'achat.
Si un défaut de matériel ou de fabrication
survient au cours des trois années suivant la
date d'achat du produit, celui-ci est réparé
gratuitement ou remplacé, à notre
discrétion. Cette garantie s'applique à
condition que le produit défectueux soit
retourné accompagné du justificatif d'achat
(ticket de caisse) durant cet intervalle de
trois ans, avec une explication écrite
succincte de l'origine et de la date du défaut
constaté.
Si le défaut est couvert par la garantie, nous
vous retournons l'appareil réparé ou un
produit neuf. La réparation ou le
remplacement n'entraîne pas le
renouvellement de la garantie pour une
nouvelle période.
9.2 Durée de la garantie et dommagesintérêts légaux
La durée de garantie n'est pas prolongée du
fait de son application. Il en va de même
pour les pièces réparées. Les défauts et
dommages existants précédemment à
l'achat doivent être signalés immédiatement
au déballage du produit. Les réparations
effectuées en dehors de la durée de
garantie sont payantes.
9.3 Etendue de la garantie
La production de ce produit a suivi des
normes de qualité strictes et le produit a été
soigneusement contrôlé avant livraison.
La garantie s'applique pour les défauts de
matériel ou de fabrication. Cette garantie ne
s'applique pas aux pièces soumises à une
usure normale et considérées comme telles
ou aux dommages causés à des pièces
fragiles comme les interrupteurs, les
accumulateurs ou les éléments en verre.
Cette garantie s'annule en cas de
détérioration du produit, d'utilisation ou
d'entretien inappropriés. Afin de s'assurer
d'un usage approprié du produit, il convient
de respecter toutes les consignes
mentionnées dans la notice d'utilisation.
Les modes d'utilisation et les traitements qui
sont déconseillés dans la notice d'utilisation
doivent être évités absolument.
Cet produit est destiné exclusivement à un
usage privé et non à un usage commercial.
En cas de traitement ou d'utilisation abusive
ou inappropriée et en cas d'intervention non
autorisée par notre SAV, la garantie ne
s'applique pas.
9.4 Procédure d'application de la
garantie
Pour traiter rapidement votre demande
d'application de la garantie, merci de suivre
les consignes suivantes :
• Préparez le justificatif d'achat et le
numéro de série (pour ce produit: IAN
75469) et le ticket de caisse faisant
office de preuve d'achat.
SPB800 A1 25
Page 28

RP75469 Pizzabäcker LB1 Seite 26 Freitag, 27. Juli 2012 1:14 13
• Le numéro de référence se trouve sur la
plaque signalétique, sur la page de
couverture de la notice d'utilisation
(gravure en bas à gauche) ou sur un
auto-collant situé sur la face avant ou
arrière de l'appareil.
• En cas de défaut de fonctionnement ou
autre défaillance, veuillez contacter en
premier lieu le service après-vente
mentionné ci-après, soit par téléphone,
soit pas courriel.
• Si le produit est considéré comme
défectueux, vous pouvez le retourner,
accompagné de la preuve d'achat
(ticket de caisse), franco de port à
l'adresse qui vous aura été indiquée, en
indiquant la cause et la date
d'apparition du défaut.
• Vous pouvez télécharger cette notice,
ainsi que d'autres manuels, des vidéos
du produit et des logiciels sous www.lidlservice.com.
Vous pouvez télécharger cette
notice, ainsi que d'autres
manuels, des vidéos du produit
et des logiciels sous
www.lidl-service.com.
9.5 Service après-vente
Service France
Tel.: 0800 919270
E-Mail: hoyer@lidl.fr
Service Belgique
Tel.: 070 270 171
(0,15 EUR/Min.)
E-Mail: hoyer@lidl.be
Service Suisse
Tel.: 0842 665566
(0,08 CHF/Min.,
mobile max. 0,40 CHF/Min.)
E-Mail: hoyer@lidl.ch
IAN: 75469
9.6 Fournisseur
Attention, il ne s'agit pas de l'adresse
du service après-vente. Contactez en
premier lieu le service après-vente indiqué
ci-dessus.
HOYER Handel GmbH
Kühnehöfe 5
D-22761 Hamburg
Allemagne
26
Page 29

RP75469 Pizzabäcker LB1 Seite 27 Freitag, 27. Juli 2012 1:14 13
Indice
1. Descrizione dell’apparecchio . . . . . . . . . . . . . . . . . . . . . . . . . . . . . . . . . . . . . . . . . . . . . . 27
2. Denominazione dei componenti (vedere pagina ripiegata) . . . . . . . . . . . . . . . . . . . . . . . . . 28
3. Dati tecnici . . . . . . . . . . . . . . . . . . . . . . . . . . . . . . . . . . . . . . . . . . . . . . . . . . . . . . . . . . . 28
4. Indicazioni di sicurezza . . . . . . . . . . . . . . . . . . . . . . . . . . . . . . . . . . . . . . . . . . . . . . . . . . 28
5. Istruzioni preliminari. . . . . . . . . . . . . . . . . . . . . . . . . . . . . . . . . . . . . . . . . . . . . . . . . . . . 32
6. Funzionamento . . . . . . . . . . . . . . . . . . . . . . . . . . . . . . . . . . . . . . . . . . . . . . . . . . . . . . . . 32
7. Pulizia . . . . . . . . . . . . . . . . . . . . . . . . . . . . . . . . . . . . . . . . . . . . . . . . . . . . . . . . . . . . . . 36
8. Smaltimento . . . . . . . . . . . . . . . . . . . . . . . . . . . . . . . . . . . . . . . . . . . . . . . . . . . . . . . . . . 36
9. Garanzia di HOYER Handel GmbH . . . . . . . . . . . . . . . . . . . . . . . . . . . . . . . . . . . . . . . . . . 37
Congratulazioni per l'acquisto del
vostro nuovo apparecchio.
Avete acquistato un prodotto di qualità. Le
istruzioni per l'uso sono parte integrante del
prodotto. Esse contengono avvertenze
importanti sulla sicurezza, l'utilizzo e lo
smaltimento.
1. Descrizione dell’apparecchio
1.1 Uso previsto
Il cuoci pizza SilverCrest SPB800 A1 è
adatto alla preparazione di pizzette
direttamente al tavolo. L'apparecchio non è
adatto alla preparazione di cibi diversi
dalla pizza.
L’apparecchio non deve essere utilizzato per
scongelare, riscaldare o asciugare oggetti.
L’apparecchio deve essere utilizzato
esclusivamente all'interno dell'ambiente
domestico e mai all'aperto.
Questo apparecchio è destinato all’uso in
abitazioni private e non può essere
utilizzato per applicazioni commerciali.
Prima di utilizzare il prodotto leggere con
attenzione tutte le avvertenze relative all'uso
e alla sicurezza. Utilizzare il prodotto solo
come descritto e per i campi di impiego
indicati.
In caso di cessione del prodotto a terzi
consegnare tutta la documentazione.
L'apparecchio è anche adatto per:
• l'utilizzo in cucine per dipendenti in
negozi, uffici e altri luoghi di lavoro,
• l'utilizzo in contesto agricolo,
• clienti di hotel, motel e altri tipi di
alloggi,
• bed & breakfast.
1.2 Dotazione
1 Cuoci pizza
1 Stampo
4 Palette per pizza
1 Istruzioni per l’uso
SPB800 A1 27
Page 30

RP75469 Pizzabäcker LB1 Seite 28 Freitag, 27. Juli 2012 1:14 13
1.3 Descrizione del funzionamento
Ognuno farcisce la propria pizzetta al
tavolo secondo il proprio gusto. Utilizzando
una paletta per pizza la pizza viene quindi
infornata nel cuoci pizza riscaldato per
essere cotta.
1.4 Contrassegni sull’apparecchio
2. Denominazione dei componenti (vedere pagina ripiegata)
1 Base
2 Coperchio in terracotta
3 Simbolo di avvertenza "Attenzione -
superfici roventi"
4 Spia di funzionamento
5 Resistenza
6 Supporto per piastra di cottura
7 Piastra di cottura
8 Stampo
9 Palette per pizza
3. Dati tecnici
Tensione nominale: 220–240 V~ 50/60 Hz
Potenza nominale: 800 - 900 W
Classe di protezione: I
4. Indicazioni di sicurezza
Il simbolo 3 a lato avverte di non
toccare le superfici calde.
4.1 Spiegazione dei termini
Nelle presenti istruzioni per l’uso vengono
utilizzati i seguenti termini di segnalazione:
Avvertenza!
Pericolo elevato: la mancata
osservanza dell’avvertenza può
determinare lesioni fisiche e
mortali.
Attenzione!
Pericolo medio: la mancata osservanza
dell’avvertenza può causare danni
materiali.
28
Indicazione:
Pericolo ridotto: circostanze che devono
essere osservate nell’utilizzo
dell’apparecchio.
4.2 Istruzioni speciali per il
funzionamento sicuro
•Il presente apparecchio può essere
utilizzato da bambini a partire
dall'età di 8 anni e da persone che
presentino limitazioni delle proprie
capacità fisiche, sensoriali o mentali
Page 31

RP75469 Pizzabäcker LB1 Seite 29 Freitag, 27. Juli 2012 1:14 13
o scarsa esperienza e/o scarsa
conoscenza, purché siano sorvegliati
o abbiano ricevuto istruzioni
sull'utilizzo sicuro dell'apparecchio e
abbiano compreso i pericoli che ne
derivano. I bambini non devono
giocare con l'apparecchio.
•La pulizia e la manutenzione
eseguibile dall'utente non devono
essere effettuate da bambini, tranne
nel caso in cui abbiano più di 8 anni
e siano sorvegliati.
•L'apparecchio e il cavo di
collegamento alla rete devono essere
tenuti fuori dalla portata dei bambini
di età inferiore a 8 anni.
•Le superfici dell’apparecchio
possono diventare roventi. Per questo
motivo, durante il funzionamento,
afferrare l’apparecchio soltanto con
presine o guanti da cucina.
•L’apparecchio non deve essere
azionato con un timer esterno o con
un sistema di telecontrollo separato,
come ad esempio una presa
telecomandata.
8
•Lavare a mano lo stampo
9
palette per pizza
e la piastra di
, le
cottura 7 utilizzando acqua di
risciacquo.
4.3 Indicazioni generali
• Prima dell’utilizzo leggere
accuratamente le presenti istruzioni per
l’uso. Sono parte integrante
dell’apparecchio e devono essere
disponibili in qualsiasi momento.
• Utilizzare l’apparecchio solo per
l’impiego previsto (vedi "1.1 Uso
previsto" a pagina 27).
• Per evitare di danneggiare
l’apparecchio, verificare che la tensione
di rete disponibile corrisponda alla
tensione di rete necessaria (vedere
targhetta sull’apparecchio).
• Si ricorda che qualsiasi diritto di
garanzia decade automaticamente
qualora si utilizzino accessori non
consigliati nelle presenti istruzioni per
l’uso oppure qualora vengano effettuate
riparazioni con pezzi di ricambio non
originali. Ciò vale anche in caso di
riparazione ad opera di personale non
qualificato. I contatti sono al paragrafo
"Centro d’assistenza" a pagina 38.
• In caso di eventuali anomalie di
funzionamento entro il periodo della
garanzia, la riparazione
dell’apparecchio può essere eseguita
soltanto dal nostro centro d’assistenza.
In caso contrario decade qualsiasi diritto
di garanzia. I contatti sono al paragrafo
"Centro d’assistenza" a pagina 38.
• Durante il funzionamento non lasciare
mai l’apparecchio incustodito, in modo
tale da poter intervenire
tempestivamente in caso di anomalie di
funzionamento.
• Assicurarsi che non sussista mai il
pericolo di ferirsi inciampando nel cavo
di rete oppure impigliandovisi o
calpestandolo.
SPB800 A1 29
Page 32

RP75469 Pizzabäcker LB1 Seite 30 Freitag, 27. Juli 2012 1:14 13
• L’apparecchio deve essere posizionato
esclusivamente su una base stabile,
piana, asciutta e non infiammabile per
evitarne il rovesciamento o lo
scivolamento ed impedire che la base
prenda fuoco provocando danni.
• Tenere una distanza di almeno 50 cm
da altri oggetti per evitare che questi
prendano fuoco.
• Non posizionare l’apparecchio su
piastre di cottura calde, nel forno caldo
o in prossimità di resistenze riscaldanti
che potrebbero causare danni.
• Non è escluso che i detergenti per piani
d’appoggio contengano componenti
che possono intaccare e danneggiare i
piedini in gomma. In tal caso rivolgersi
al centro d’assistenza. I contatti sono al
paragrafo "Centro d’assistenza" a
pagina 38.
• Non appoggiare oggetti
sull'apparecchio.
4.4 Protezione dalle folgorazioni
Avvertenza! Le seguenti
istruzioni di sicurezza servono per
proteggere l’utente da folgorazioni
elettriche.
• Collegare l’apparecchio esclusivamente
a una presa munita di contatto di
protezione, in quanto è da esso che
dipende la protezione da folgorazioni
elettriche.
• Mai utilizzare l’apparecchio se
danneggiato. In tal caso la riparazione
dell’apparecchio deve essere eseguita
da personale specializzato. I contatti
sono al paragrafo "Centro d’assistenza"
a pagina 38.
• Controllare regolarmente che il cavo di
collegamento alla rete non sia
danneggiato.
• Se il cavo di rete di questo apparecchio
è danneggiato, deve essere sostituito dal
produttore o da una persona
ugualmente qualificata, per evitare
pericoli.
• Evitare che acqua o altri liquidi
penetrino nell’apparecchio. Quindi:
– non utilizzare all’aperto
– non immergere in liquidi
– non appoggiare sull’apparecchio
oggetti contenenti liquidi, ad es.
pentole
– non utilizzare in ambiente molto
umido.
In caso di contatto dell’apparecchio con
liquidi, rimuovere immediatamente la
spina di rete e far riparare il dispositivo
da personale qualificato. I contatti sono
al paragrafo "Centro d’assistenza" a
pagina 38.
• L’utilizzo di cavi di prolunga dovrebbe
essere evitato. È consentito solo in
presenza di presupposti ben
determinati:
– il cavo di prolunga deve essere adatto
all’intensità di corrente
dell’apparecchio
– il cavo di prolunga non deve essere
posato “in aria”: non deve sussistere il
pericolo di inciamparvi e non deve
essere raggiungibile per i bambini
– il cavo di prolunga non deve
assolutamente essere danneggiato
– non deve essere collegato alla presa
di rete nessun altro apparecchio oltre
a questo, in quanto altrimenti può
verificarsi un sovraccarico della rete
elettrica (prese multiple vietate!).
• Non toccare mai l’apparecchio, il cavo
di rete o la spina di rete con mani umide.
• Estrarre sempre il cavo di rete in
corrispondenza della spina. Non
estrarlo mai afferrando il cavo stesso.
30
Page 33

RP75469 Pizzabäcker LB1 Seite 31 Freitag, 27. Juli 2012 1:14 13
• Non spostare l’apparecchio tirandolo
per il cavo di rete.
• Fare attenzione a non piegare o
schiacciare mai il cavo di rete.
• Tenere il cavo di rete lontano da
superfici calde (ad es. piastre di
cottura).
• Non immergere mai in liquidi il cavo di
collegamento alla rete e la base 1.
• Se l’unità non viene utilizzata per lungo
tempo, estrarre la spina dalla presa.
Soltanto in questo modo l’apparecchio è
completamente privo di alimentazione.
• In caso di temporali, gli apparecchi
collegati alla rete di alimentazione
possono venire danneggiati dai fulmini.
4.5 Protezione da scottature e ustioni
Avvertenza! Le superfici roventi
possono provocare lesioni. Per
questo motivo osservare quanto
segue:
• L’apparecchio non deve essere utilizzato
senza il coperchio 2.
• Il metallo delle palette per pizza 9
all'interno del cuoci pizza diventa
rovente. Afferrare pertanto le palette per
pizza 9 soltanto per i manici neri.
• Lasciare sempre raffreddare
l’apparecchio prima di pulirlo o
utilizzarlo nuovamente.
• Non utilizzare mai l’apparecchio in
prossimità di tende e altri materiali
infiammabili. Qualora il cibo da cuocere
prenda fuoco, le fiamme potrebbero
facilmente trasmettersi ad altri oggetti.
4.6 Per la sicurezza dei bambini
Avvertenza! Spesso i bambini
non sono in grado di valutare bene
i pericoli e possono così provocarsi
lesioni. Per questo motivo
osservare quanto segue:
• Questo apparecchio può essere
utilizzato solo con la sorveglianza di
adulti.
• Assicurarsi con attenzione che
l’apparecchio si trovi sempre al di fuori
della portata dei bambini.
• Assicurarsi che i bambini non possano
far cadere l’apparecchio tirando il cavo.
• Fare attenzione che la pellicola da
imballaggio non costituisca pericolo di
morte per i bambini. Le pellicole da
imballaggio non sono giocattoli.
4.7 Protezione da danni a cose
Attenzione! Per evitare danni
all’apparecchio, rispettare quanto segue:
•Il coperchio 2 in terracotta caldo non
deve mai entrare a contatto con l'acqua
o essere appoggiato su una superficie
fredda. Lo choc termico potrebbe
incrinarlo.
•Il coperchio 2 in terracotta è fragile e
sensibile agli urti. Utilizzarlo pertanto
con cautela e possibilmente conservarlo
sempre nella confezione originale.
• Se dopo la pulizia si ripone
l'apparecchio per lungo tempo senza
utilizzarlo, ungere leggermente la
piastra di cottura 7 in modo che non si
formi un velo di ruggine.
SPB800 A1 31
Page 34

RP75469 Pizzabäcker LB1 Seite 32 Freitag, 27. Juli 2012 1:14 13
5. Istruzioni preliminari
In fase di produzione, numerosi componenti
vengono protetti con una sottile pellicola
oleosa. Prima del primo utilizzo far
funzionare l’apparecchio senza pizza, in
modo tale da far evaporare eventuali residui
di tale pellicola.
Indicazione: Durante le prime fasi di
riscaldamento l’apparecchio può emettere
un leggero odore. Provvedere pertanto ad
una sufficiente aerazione.
1. Estrarre l’apparecchio e tutti gli
accessori dall’imballaggio.
2. Verificare che l’apparecchio non
presenti danni.
3. Prima del primo utilizzo pulire
l’apparecchio. A tale riguardo osservare
le indicazioni riportate nel capitolo
"6. Funzionamento" a pagina 32.
4. Scegliere un punto d’installazione
stabile, piano e ignifugo. Tenere una
distanza di ca. 50 cm da altri oggetti.
6. Funzionamento
5. Posizionare il coperchio 2 sopra alla
base 1 in modo che gli elementi di
riscaldamento verticale sono nascosti.
6. Inserire la spina di rete in una presa
idonea (vedi "3. Dati tecnici" a
pagina 28).
La spia di funzionamento 4 lampeggia
ed inizia il processo di riscaldamento
dell’apparecchio.
7. Dopo circa 20 minuti spegnere
nuovamente l'apparecchio estraendo la
spina di rete e lasciare raffreddare
l’apparecchio.
8. Pulire nuovamente l’apparecchio. A tale
riguardo osservare le indicazioni
riportate nel capitolo
"6. Funzionamento" a pagina 32.
L’apparecchio è ora pronto per l’uso.
6.1 Preparazione dell'impasto della
pizza
Indicazione: l'impasto della pizza riesce
particolarmente bene se viene preparato
almeno 24 ore prima della cottura e viene
lasciato riposare in frigorifero. Ecco una
ricetta per preparare la pizza "come quella
della pizzeria".
Ingredienti per 4 persone:
• 500 g di farina tipo 405
• 300 ml di acqua del rubinetto
• massimo 1/5 di cubetto di lievito
• 20 g di sale
32
Preparazione:
1. Versare 300 g di farina in una ciotola.
2. Aggiungere 300 ml di acqua di
rubinetto.
3. Aggiungere il lievito.
4. Aggiungere il sale.
5. Formare un impasto liscio.
6. Coprire la ciotola e lasciare lievitare
l'impasto a temperatura ambiente per
circa 20 minuti.
7. Lavorare l'impasto per circa 3 minuti.
Page 35

RP75469 Pizzabäcker LB1 Seite 33 Freitag, 27. Juli 2012 1:14 13
8. Aggiungere gradatamente la farina
restante. Continuare a impastare ovvero
a lavorare l'impasto.
Indicazione: quando, durante la
lavorazione, l'impasto della pizza si
stacca dal fondo e forma una palla,
significa che la quantità di farina
aggiunta è corretta.
9. Continuare a lavorare l'impasto per ca.
3 minuti. Nel frattempo deve essere
diventato ben compatto.
Indicazione: l'impasto della pizza ha
raggiunto la consistenza corretta
quando mantiene per breve tempo la
forma a palla, ma dopo un pò (ca. 30
minuti) perde di nuovo la forma e si
scioglie.
10.Fare riposare l'impasto della pizza per
altri 20 minuti all'interno della ciotola.
11.Capovolgere la ciotola e lasciare
cadere l'impasto su un tagliere ben
infarinato.
12.Cospargere sull'impasto un'abbondante
quantità di farina.
13.Lavorare brevemente l'impasto e formare
una palla.
14.Mettere la palla dell'impasto in un
contenitore richiudibile e collocarlo in
frigorifero per 24 ore.
15.Estrarre l'impasto dal frigorifero e porlo
su una teglia di cottura infarinata.
16.Cospargere altra farina sull'impasto e
lavorarlo brevemente fino a dargli la
forma di una palla.
17. Appiattire ora la palla procedendo
dall'esterno verso l'interno.
Indicazione: È possibile dare
all'impasto lo spessore desiderato anche
spianandolo con i pugni o con un
matterello.
18.Con lo stampo 8 formare ora le
pizzette.
19.Cospargere le pizzette su entrambi i lati
con abbondante farina e collocarle su
una piastra per la cottura.
Indicazioni:
• Non è necessario sciogliere prima il
lievito in acqua.
• Aggiungere molto meno lievito della
quantità indicata sulla confezione del
lievito. Utilizzare la quantità che sulla
confezione è indicata per circa 200 250 g di farina.
• Se nell'impasto della pizza si sente
troppo il lievito, ridurre ulteriormente la
quantità di lievito. La quantità di lievito
ridotta viene compensata dal lungo
tempo di lievitazione.
• Il sale marino conferisce più aroma
all'impasto.
• Assaggiando l'impasto subito dopo
l'aggiunta di sale, l'impasto deve
sembrare un pò salato. Se prevale il
sapore di farina o lievito, manca ancora
sale. Con l'aggiunta successiva della
farina restante, l'impasto perde ancora
di sapidità.
• Per la lievitazione non collocare
l'impasto vicino a un'ulteriore fonte di
calore. Questo farà sì risparmiare
tempo, ma a discapito del gusto.
• Il riposo di 24 ore è importantissimo per
la buona riuscita dell'impasto della
pizza.
• L'impasto della pizza preparato in
questo modo può essere conservato in
frigorifero per molti giorni.
SPB800 A1 33
Page 36

RP75469 Pizzabäcker LB1 Seite 34 Freitag, 27. Juli 2012 1:14 13
6.2 Preparazione del condimento al
pomodoro per la pizza
Ingredienti:
• ca. 400 - 500 g di passato di
pomodoro o pomodori tagliati (ancora
meglio: ca. 600 - 750 g di pomodori
freschi, sbucciati e tagliati)
•basilico fresco
• origano fresco (in sostituzione anche
essiccato)
•2-3 spicchi d'aglio
• 1/2 cipolla
• 1 foglia di alloro
• 1 cucchiaio di buon olio di oliva
(extravergine )
Preparazione:
1. Tritare grossolanamente l'aglio.
2. Togliere il gambo alle erbette e
sminuzzarle.
3. Riscaldare l'olio di oliva in una padella
adatta.
4. Aggiungere l'aglio e farlo rosolare.
Indicazione: l'aglio non deve
imbrunire, altrimenti la salsa avrà un
sapore amaro.
5. Aggiungere i pomodori.
6. Aggiungere gli ingredienti restanti.
7. Regolare a fuoco basso e lasciare
sobbollire la salsa per almeno 30 minuti.
Indicazione: la salsa è pronta
quando si sarà ridotta di almeno la
metà.
8. Togliere dalla salsa la mezza cipolla e
la foglia di alloro.
9. Passare la salsa in un mixer.
Indicazione: in mancanza di un mixer
la salsa può anche non essere passata.
Tuttavia non sarà altrettanto densa e
bella da vedere.
10.Aggiustare di sale e di pepe.
6.3 Preparazione della farcitura
Preparare la farcitura tagliando gli
ingredienti delle dimensioni desiderate e
disporli sul tavolo.
Come formaggio potete utilizzare del
parmigiano grattugiato o gouda
grattugiato.
6.4 Preparazione dell’apparecchio
1. Scegliere una superficie stabile, piana e
ignifuga. Tenere una distanza di ca. 50
cm da altri oggetti.
Indicazione: non esporre il cuoci
pizza a correnti d'aria, per non
disperdere il calore sotto il coperchio 2 .
2. Collocare la base 1 su una superficie
resistente al calore.
3. Collocare la piastra di cottura 7 sul
relativo supporto 6.
Indicazione: il lato superiore della
piastra di cottura 7 è contrassegnato.
Prestare attenzione al posizionamento
corretto, poiché la convessità della
piastra di cottura 7 deve essere rivolta
verso l'alto.
4. Posizionare il coperchio 2 sopra alla
base 1.
5. Inserire la spina di rete in una presa
idonea (vedi "3. Dati tecnici" a
pagina 28).
La spia di funzionamento 4 lampeggia
ed inizia il processo di riscaldamento
dell’apparecchio.
6. Lasciare preriscaldare l'apparecchio per
10 minuti prima di cuocere la prima
pizza.
L’apparecchio è ora pronto per l’uso.
34
Page 37

RP75469 Pizzabäcker LB1 Seite 35 Freitag, 27. Juli 2012 1:14 13
7. Ungere leggermente le palette per
pizza 9 con olio per non fare attaccare
la pizza. Si può utilizzare anche spray
per cottura.
6.5 Cottura della pizza
1. Collocare sul tavolo le pizzette, la salsa
per la pizza e gli ingredienti per la
farcitura.
2. Collocare una pizzetta su una paletta
per pizza 9.
3. Cospargere la pizzetta con la salsa.
Indicazione: per non far colare la
salsa e ottenere un bordo croccante,
lasciare libera una striscia di un mezzo
centimetro lungo il bordo, senza
cospargerla con la salsa.
4. Farcire la pizza con ingredienti a scelta.
5. Con la paletta per pizza 9 infornare
completamente la pizza sotto al
coperchio 2.
Indicazione: durante la cottura
lasciare la pizza sulla paletta per
pizza 9. Non collocare la pizza sulla
piastra di cottura 7, poiché la pizza
potrebbe attaccarsi.
Attenzione!
Pericolo di ustioni a causa della
pizza bollente. Non afferrare la
pizza con le mani.
Indicazione: al centro del cuoci pizza la
temperatura può essere più alta che sui
bordi. Per cuocere la pizza in modo
uniforme, trascorsa circa la metà del tempo
di cottura, farle compiere un mezzo giro.
6. Quando la pizza è pronta, estrarre la
paletta per pizza 9 e far scivolare la
pizza su un piatto piano.
Indicazione: il tempo di cottura varia
a seconda:
– dell'impasto utilizzato;
– della farcitura (spessore e tipo);
–del numero di pizze cotte
contemporaneamente;
– della temperatura ambiente.
7. Collocare la paletta per pizza 9 calda
su una superficie resistente al calore.
8. Buon appetito!
6.6 Ricetta veloce per la pasta della
pizza
Ingredienti per 4 persone:
• 560 g di farina
• 300 ml di acqua del rubinetto
• 1 pacchetto di lievito secco attivo
• 2 cucchiai di olio d'oliva
• 20 g di sale
Preparazione:
1. Versare tutti gli ingredienti in una ciotola.
2. Formare un impasto liscio.
3. Coprire la ciotola e lasciare lievitare
l'impasto a temperatura ambiente per
circa 60 minuti.
4. Capovolgere la ciotola e lasciare
cadere l'impasto su un tagliere ben
infarinato.
5. Cospargere altra farina sull'impasto e
lavorarlo brevemente fino a dargli la
forma di una palla.
6. Appiattire ora la palla procedendo
dall'esterno verso l'interno.
7. Co n l o st a mp o 8 formare ora le
pizzette.
8. Cospargere le pizzette su entrambi i lati
con abbondante farina e collocarle su
una piastra per la cottura.
SPB800 A1 35
Page 38

RP75469 Pizzabäcker LB1 Seite 36 Freitag, 27. Juli 2012 1:14 13
7. Pulizia
Attenzione!
– Prima di pulire l’apparecchio
estrarre la spina di rete.
– Lasciare sempre raffreddare
l’apparecchio prima di pulirlo.
Poiché il coperchio 2 è in
terracotta ed è pertanto idoneo
ad accumulare calore, potrebbe
impiegare anche 45 minuti
prima di diventare tiepido.
– Non immergere mai in liquidi il
cavo di collegamento alla rete e
la base 1.
Attenzione! Evitare l’uso di detergenti
aggressivi che possono danneggiare
l’apparecchio.
Attenzione! I singoli componenti del
cuoci pizza non possono essere lavati in
lavastoviglie.
8. Smaltimento
1. Lavare a mano lo stampo 8, le palette
per pizza 9 e la piastra di cottura 7
utilizzando acqua di risciacquo.
2. Normalmente non occorre lavare il
coperchio 2 . Se tuttavia dovesse essere
molto sporco, per la pulizia utilizzare
soltanto acqua tiepida pulita e una
spazzola morbida.
3. Pulire la base 1 con un panno umido o
con una spugna morbida inumidita. Per
eliminare più facilmente i residui di
grasso è possibile utilizzare anche un
detersivo delicato.
4. Riutilizzare l’apparecchio soltanto
quando tutti i componenti sono
completamente asciutti.
Attenzione! Se dopo la pulizia si
ripone l'apparecchio per lungo tempo
senza utilizzarlo, ungere leggermente la
piastra di cottura 7 in modo che non si
formi un velo di ruggine.
8.1 Apparecchio
Il simbolo del bidone della
spazzatura su ruote barrato
significa che il prodotto nel
territorio dell’Unione Europea
deve essere smaltito nella
raccolta differenziata. Ciò vale
per il prodotto e tutti gli accessori
contrassegnati con questo simbolo. I
prodotti contrassegnati non devono essere
smaltiti assieme ai normali rifiuti domestici
ma devono essere consegnati presso un
punto di raccolta per il riciclaggio di
apparecchi elettrici ed elettronici. Il
36
riciclaggio contribuisce a ridurre il consumo
di materie prime e a non gravare
sull’ambiente. Le informazioni relative allo
smaltimento e l’indirizzo del centro di
riciclaggio più vicino sono disponibili ad es.
presso la sede della nettezza urbana della
propria città o nelle Pagine Gialle.
8.2 Imballaggio
Se si desidera smaltire l’imballaggio,
rispettare le relative norme vigenti in materia
ambientale nel proprio paese.
Page 39

RP75469 Pizzabäcker LB1 Seite 37 Freitag, 27. Juli 2012 1:14 13
9. Garanzia di HOYER Handel GmbH
Gentile cliente,
questo apparecchio è accompagnato da
una garanzia di 3 anni a partire dalla data
di acquisto. In caso di difetti del prodotto
può far valere i Suoi diritti nei confronti del
venditore come previsto dalla legge. Tali
diritti di legge non sono limitati dalla nostra
garanzia, descritta di seguito in dettaglio.
9.1 Condizioni di garanzia
Il periodo di garanzia ha inizio dalla data
di acquisto. Conservare pertanto lo
scontrino di cassa originale, in quanto
documento comprovante l'acquisto.
Se entro tre anni dalla data di acquisto di
questo prodotto insorge un difetto di
materiale o di fabbricazione, ci impegniamo
a riparare o a sostituire a nostra scelta il
prodotto. La prestazioni di garanzia
presuppone, entro il termine di tre anni, la
presentazione dell'apparecchio difettoso e
della prova di acquisto (scontrino di cassa)
e una breve descrizione scritta del difetto e
del momento in cui è insorto.
Se il difetto è coperto dalla nostra garanzia,
ci impegniamo a rispedire il prodotto
riparato o un nuovo prodotto. Con la
riparazione o la sostituzione del prodotto
non decorre un nuovo periodo di garanzia.
9.2 Periodo di garanzia e rivendicazioni
per difetti
Il periodo di garanzia non viene prolungato
dalla prestazione di garanzia. Questo vale
anche per le parti sostituite e riparate.
Eventuali danni o difetti riscontrati già al
momento dell'acquisto devono essere
comunicati subito dopo l'apertura della
confezione. Dopo lo scadere del periodo di
garanzia le riparazioni vengono effettuate a
pagamento.
9.3 Ambito della garanzia
L’apparecchio è stato prodotto rispettando i
più severi standard di qualità ed è stato
scrupolosamente testato prima della
spedizione.
La garanzia copre i difetti di materiale o di
fabbricazione. Non si estende alle parti del
prodotto soggette a normale usura e
considerate pertanto parti usurabili, né ai
danni ai componenti più fragili, ad es.
interruttori, batterie o parti in vetro.
La garanzia decade se il prodotto viene
danneggiato, utilizzato o sottoposto a
manutenzione in modo non conforme. Per
un utilizzo conforme del prodotto è
necessario attenersi a tutte le avvertenze
contenute nelle istruzioni per l'uso.
Sono assolutamente da evitare gli utilizzi e
le azioni che le istruzioni per l'uso
sconsigliano.
Il prodotto è concepito esclusivamente per
l’uso privato, non per quello commerciale.
La garanzia decade in caso di utilizzo
indebito e non conforme, uso della forza e
interventi non effettuati dal nostro centro
d'assistenza autorizzato.
9.4 Svolgimento della garanzia
Per garantire una rapida evasione della
richiesta del cliente, si consiglia di attenersi
alla procedura seguente:
• Per tutte le richieste tenere a
disposizione il numero di articolo (per
questo apparecchio: IAN 75469) e lo
SPB800 A1 37
Page 40

RP75469 Pizzabäcker LB1 Seite 38 Freitag, 27. Juli 2012 1:14 13
scontrino di cassa comprovante
l'acquisto.
• Il numero di articolo si trova sulla
targhetta dati, inciso, sul frontespizio
delle istruzioni (in basso a sinistra)
oppure sull'adesivo sul retro o sulla
parte inferiore dell'apparecchio.
• In caso di errori di funzionamento o altri
difetti, contattare dapprima
telefonicamente o per e-mail il centro
d'assistenza riportato di seguito.
• Il prodotto difettoso può essere spedito
gratuitamente all'indirizzo di assistenza
fornito, allegando la prova di acquisto
(scontrino di cassa) e indicando in cosa
consiste il difetto e quando è stato
riscontrato.
Su www.lidl-service.com è
possibile scaricare questo e
tanti altri manuali, video dei
prodotti e software.
9.5 Centro d’assistenza
Assistenza Italia
Tel.: 02 36003201
E-Mail: hoyer@lidl.it
Assistenza Malta
MT
Tel.: 80062230
E-Mail: hoyer@lidl.com.mt
Assistenza Svizzera
Tel.: 0842 665566 (0,08 CHF/Min.,
telefonia mobile max. 0,40 CHF/Min.)
E-Mail: hoyer@lidl.ch
IAN: 75469
9.6 Fornitore
Nota bene: l'indirizzo seguente non è
l'indirizzo d'assistenza. Contattare
dapprima il centro d'assistenza indicato
sopra.
38
HOYER Handel GmbH
Kühnehöfe 5
D-22761 Hamburg
Deutschland
Page 41
RP75469 Pizzabäcker LB1 Seite 39 Freitag, 27. Juli 2012 1:14 13
Inhoud
1. Beschrijving van het apparaat . . . . . . . . . . . . . . . . . . . . . . . . . . . . . . . . . . . . . . . . . . . . . 39
2. Namen van de onderdelen (zie uitklappagina) . . . . . . . . . . . . . . . . . . . . . . . . . . . . . . . . . 40
3. Technische gegevens . . . . . . . . . . . . . . . . . . . . . . . . . . . . . . . . . . . . . . . . . . . . . . . . . . . . 40
4. Veiligheidsaanwijzingen . . . . . . . . . . . . . . . . . . . . . . . . . . . . . . . . . . . . . . . . . . . . . . . . . 40
5. Vóór het eerste gebruik . . . . . . . . . . . . . . . . . . . . . . . . . . . . . . . . . . . . . . . . . . . . . . . . . . 44
6. Bediening . . . . . . . . . . . . . . . . . . . . . . . . . . . . . . . . . . . . . . . . . . . . . . . . . . . . . . . . . . . . 44
7. Reinigen. . . . . . . . . . . . . . . . . . . . . . . . . . . . . . . . . . . . . . . . . . . . . . . . . . . . . . . . . . . . . 48
8. Weggooien. . . . . . . . . . . . . . . . . . . . . . . . . . . . . . . . . . . . . . . . . . . . . . . . . . . . . . . . . . . 48
9. Garantie van de HOYER Handel GmbH . . . . . . . . . . . . . . . . . . . . . . . . . . . . . . . . . . . . . . . 49
Hartelijk gefeliciteerd met de
aankoop van uw nieuwe apparaat.
U heeft voor een hoogwaardig product
gekozen. De gebruiksaanwijzing is
bestanddeel van dit product. Deze bevat
belangrijke aanwijzingen voor de veiligheid,
het gebruik en de verwijdering.
1. Beschrijving van het apparaat
1.1 Beoogd gebruik
De pizzabakker SilverCrest SPB800 A1 is
geschikt om kleine pizza's direct aan tafel te
maken. Voor de bereiding van andere
gerechten dan pizza's is dit apparaat niet
geschikt.
Het apparaat mag niet worden gebruikt
voor het ontdooien, opwarmen of drogen
van voorwerpen.
Gebruik het apparaat uitsluitend
binnenshuis en nooit buiten.
Dit apparaat is bestemd voor particulier
gebruik en niet voor commercieel gebruik
geschikt.
Het apparaat is bovendien geschikt voor:
Maak u, voor het eerste gebruik van het
product , vertrouwd met alle bedienings- en
veiligheidsaanwijzingen. Gebruik het
product alleen op de beschreven wijze en
voor de aangegeven toepassingsgebieden.
Overhandig ook alle documenten wanneer
u dit product aan derden doorgeeft.
• de toepassing in keukens voor
medewerkers in winkels, kantoren en
andere commerciële instellingen,
• de toepassing in boerderijen,
• klanten in hotels, motels en andere
wooninstellingen,
• pensions (logies en ontbijt).
1.2 Leveringsomvang
1 pizzabakker
1 steekvorm
4 pizzascheppen
1 gebruiksaanwijzing
SPB800 A1 39
Page 42

RP75469 Pizzabäcker LB1 Seite 40 Freitag, 27. Juli 2012 1:14 13
1.3 Beschrijving van de werking
Aan tafel belegt elke deelnemer een kleine
pizza naar eigen smaak. Op een
pizzaschep wordt de pizza in de verhitte
pizzabakker geschoven en gebakken.
1.4 Aanduidingen op het apparaat
oppervlakken.
2. Namen van de onderdelen (zie uitklappagina)
1 Ondergedeelte
2 Terracotta kap
3 Waarschuwingssymbool "voorzichtig -
hete oppervlakken"
4 Werkingsindicator
5 Verwarmingsspiraal
6 Houder voor bakplaat
7 Bakplaat
8 Steekvorm
9 Pizzaschep
3. Technische gegevens
Spanningsvoeding: 220–240 V~ 50/60 Hz
Nominaal vermogen: 800 - 900 W
Beschermklasse: I
4. Veiligheidsaanwijzingen
Met het hiernaast afgebeelde
symbool 3 wordt gewaarschuwd
voor het aanraken van hete
4.1 Verklaring van begrippen
U treft de volgende signaalbegrippen aan in
deze gebruiksaanwijzing:
Waarschuwing!
Hoog risico: het negeren van de
waarschuwing kan tot letsel of de
dood leiden.
Voorzichtig!
Gemiddeld risico: het negeren van de
waarschuwing kan schade veroorzaken.
Aanwijzing:
Gering risico: situaties waarop in de
omgang met het apparaat moet worden
gelet.
40
4.2 Speciale instructies voor de veilige
werking
•Dit apparaat kan door kinderen
vanaf 8 jaar en door personen met
beperkte fysieke, sensorische of
geestelijke vaardigheden of met
gebrekkige ervaring en/of
gebrekkige kennis worden gebruikt,
wanneer ze onder toezicht staan of
m.b.t. een veilig gebruik van het
apparaat werden onderwezen en de
Page 43

RP75469 Pizzabäcker LB1 Seite 41 Freitag, 27. Juli 2012 1:14 13
hieruit resulterende gevaren hebben
begrepen. Kinderen mogen niet met
het apparaat spelen.
•Reiniging en onderhoud door de
gebruiker mogen pas door kinderen
worden uitgevoerd als ze ouder dan
8 jaar zijn en onder toezicht staan.
•Kinderen die jonger dan 8 jaar zijn,
mogen niet bij het apparaat en de
netaansluiting komen.
•De oppervlakken van het apparaat
kunnen heet worden. Pak het
apparaat tijdens de werking daarom
alleen beet met pannenlappen of
ovenwanten.
•Het apparaat mag niet met een
externe tijdschakelklok of een aparte
afstandsbedieningssyteem zoals bij v.
een radiocontactdoos worden
gebruikt.
8
•Reinig de steekvorm
9
pizzascheppen
en de bakplaat
, de
7
met de hand in afwaswater.
4.3 Algemene aanwijzingen
• Lees voor gebruik deze
gebruiksaanwijzing zorgvuldig door.
Deze behoort bij het apparaat en moet
te allen tijde beschikbaar zijn.
• Gebruik het apparaat uitsluitend voor de
beschreven toepassing (zie „1.1 Beoogd
gebruik“ op pagina 39).
• Controleer of de vereiste netspanning
(zie typeplaatje op apparaat)
overeenstemt met uw netspanning om
beschadigingen te voorkomen.
• Let erop dat elke aanspraak op garantie
en elke aansprakelijkheid komt te
vervallen als er toebehoren worden
gebruikt die niet in deze
gebruiksaanwijzing worden aanbevolen
of als bij reparaties niet uitsluitend
originele reserveonderdelen worden
gebruikt. Dit geldt ook voor reparaties
die door niet-gekwalificeerde personen
worden uitgevoerd. De contactgegevens
vindt u in "Service-center" op pagina 50.
• Bij eventuele storingen binnen de
garantieperiode mag de reparatie van
het apparaat alleen door ons servicecenter plaatsvinden. Anders vervalt de
garantie. De contactgegevens vindt u in
"Service-center" op pagina 50.
• Laat het apparaat tijdens het gebruik
nooit zonder toezicht om tijdig te kunnen
ingrijpen als zich functiestoringen
voordoen.
• Let erop dat niemand over het netsnoer
kan struikelen of dat iemand daarin kan
blijven hangen of erop kan trappen en
zich daarbij kan verwonden.
• Het apparaat mag uitsluitend op een
vaste, egale, droge en niet brandbare
ondergrond worden geplaatst om te
voorkomen dat het kantelt, wegglijdt of
de steun in brand vliegt en daardoor
schade ontstaat.
• Houd een afstand van minstens 50 cm
tot andere voorwerpen aan zodat deze
niet in brand kunnen raken.
• Het apparaat mag niet op hete kachels
worden gezet, in de hete oven worden
geschoven of in de buurt van
(gas)geisers worden opgesteld, omdat
dit tot beschadigingen kan leiden.
SPB800 A1 41
Page 44

RP75469 Pizzabäcker LB1 Seite 42 Freitag, 27. Juli 2012 1:14 13
• Het kan niet worden uitgesloten dat
onderhoudsmiddelen voor
opbergoppervlakken bestanddelen
bevatten die de rubberen voetjes
aantasten en week maken. Wend u in
dat geval tot het service-center. De
contactgegevens vindt u in in "Servicecenter" op pagina 50.
• Zet geen voorwerpen op het apparaat.
4.4 Bescherming tegen elektrische
schokken
Waarschuwing! De volgende
veiligheidsinstructies zijn bestemd
om u tegen een elektrische schok
te beschermen.
• Sluit het apparaat uitsluitend aan een
geaard stopcontact aan, omdat
daarvan de bescherming tegen een
elektrische schok afhangt.
• Als het apparaat is beschadigd, mag het
in geen geval meer worden gebruikt.
Laat het apparaat in dat geval door
gekwalificeerd personeel repareren. De
contactgegevens vindt u in "Servicecenter" op pagina 50.
• Controleer regelmatig of het netsnoer
niet is beschadigd.
• Als het netsnoer van dit apparaat wordt
beschadigd, moet het door de fabrikant
of een ander gekwalificeerd persoon
worden vervangen om gevaar te
voorkomen.
• Er mag in geen geval water of andere
vloeistoffen in het apparaat
binnendringen. Let daarom op het
volgende:
– gebruik het apparaat nooit in de open
lucht
– nooit in vloeistof dompelen
– zet er geen met vloeistof gevulde
voorwerpen zoals potten op
– gebruik het apparaat nooit in een
zeer vochtige omgeving.
Als er niettemin vloeistof in het apparaat
komt, trek dan onmiddellijk de stekker uit
het stopcontact en laat het apparaat
door gekwalificeerd vakpersoneel
repareren. De contactgegevens vindt u
in "Service-center" op pagina 50.
• Het gebruik van verlengsnoeren dient u
te vermijden. Dat is alleen onder heel
speciale omstandigheden toegestaan:
– het verlengsnoer moet voor de
stroomsterkte van het apparaat
geschikt zijn
– het verlengsnoer mag niet
„verplaatsbaar“ aangebracht zijn: er
mag niet over worden gestruikeld of
voor kinderen bereikbaar zijn
– het verlengsnoer mag in geen geval
beschadigd zijn
– er mogen geen andere apparaten
dan dit apparaat aan het stopcontact
worden aangesloten, omdat anders
het elektriciteitsnet kan worden
overbelast (verbod op
aftakcontactdozen!).
• Pak het apparaat, het netsnoer of de
netstekker nooit met vochtige handen
aan.
• Trek de stekker altijd aan de stekker zelf
uit het stopcontact. Trek nooit aan het
snoer zelf.
• Draag het apparaat nooit aan het
netsnoer.
• Let erop dat het netsnoer niet geknikt of
geplet wordt.
• Houd het netsnoer weg van hete
oppervlakken (bijv. kookplaat).
• Dompel het netsnoer en het
ondergedeelte 1 nooit onder in
vloeistoffen.
• Wanneer u het apparaat niet gebruikt,
trek dan de stekker uit het stopcontact.
42
Page 45

RP75469 Pizzabäcker LB1 Seite 43 Freitag, 27. Juli 2012 1:14 13
Alleen dan is het apparaat volledig
stroomvrij.
• Bij onweer kan het aan het
elektriciteitsnet aangesloten apparaat
door blikseminslag worden beschadigd.
4.5 Bescherming tegen verbrandingen
Waarschuwing! Hete
oppervlakken kunnen letsel
veroorzaken. Let daarom op het
volgende:
• Het apparaat mag nooit zonder de
kap 2 erop worden gebruikt.
• Het metaal van de pizzascheppen 9
wordt in de pizzabakker heel heet. Pak
de pizzascheppen 9 daarom uitsluitend
beet aan de zwarte handgrepen.
• Laat het apparaat steeds afkoelen
voordat u het reinigt of opnieuw
gebruikt.
• Gebruik het apparaat nooit in de buurt
van gordijnen en andere brandbare
materialen. Als het te bakken voedsel in
brand vliegt, kunnen de vlammen
gemakkelijk op andere voorwerpen
overspringen.
4.6 Over de veiligheid van uw kind
Waarschuwing! Kinderen
kunnen gevaren vaak niet juist
inschatten en zich daardoor
verwonden. Let daarom op het
volgende:
• Dit apparaat mag alleen onder toezicht
van volwassenen worden gebruikt.
• Let er zorgvuldig op dat het apparaat
zich altijd buiten reikwijdte van kinderen
bevindt.
• Let erop dat kinderen nooit het apparaat
aan het snoer naar beneden kunnen
trekken.
• Let erop dat de verpakkingsfolie niet tot
een dodelijke val voor kinderen wordt.
Verpakkingsfolie is geen speelgoed.
4.7 Bescherming tegen materiële schade
Voorzichtig! Let op het volgende om
schade aan het apparaat te voorkomen:
•De terracotta kap 2 mag niet in hete
toestand met water in aanraking komen
of op een koud oppervlak worden
neergezet. De temperatuurschok zou
scheurtjes kunnen veroorzaken.
• De terracotta kap 2 is breuk- en
stootgevoelig. Ga er daarom zorgvuldig
mee om en bewaar hem liefst altijd in de
originele doos.
• Wanneer het apparaat na de reiniging
gedurende langere tijd moet worden
opgeborgen, moet u de bakplaat 7 licht
insmeren met olie, zodat er geen
roestlaagje kan ontstaan.
SPB800 A1 43
Page 46

RP75469 Pizzabäcker LB1 Seite 44 Freitag, 27. Juli 2012 1:14 13
5. Vóór het eerste gebruik
Bij de productie krijgen veel onderdelen een
dunne oliefilm als bescherming. Gebruik het
apparaat vóór het eerste gebruik zonder
pizza, zodat eventueel aanwezige resten
kunnen verdampen.
Aanwijzing: Bij de eerste paar keer
opwarmen kan er lichte geurontwikkeling
ontstaan. Zorg daarom voor voldoende
ventilatie.
1. Haal het apparaat en alle toebehoren
uit de verpakking.
2. Controleer of het apparaat geen
beschadigingen heeft.
3. Reinig het apparaat voor het eerste
gebruik. Lees hiertoe de aanwijzingen in
hoofdstuk „6. Bediening” op pagina 44.
4. Kies een standplaats die stevig, vlak en
onbrandbaar is. Houd een aftstand aan
van ca. 50 cm tot andere voorwerpen.
6. Bediening
6.1 Pizzadeeg maken
Aanwijzing: het pizzadeeg lukt vooral
goed wanneer u het minstens 24 uur vóór
het bakken maakt en het daarna in de
koelkast laat rusten. Het resultaat van het
volgende recept moet "als bij een goede
Italiaan" zijn.
Ingrediënten voor 4 personen:
• 500 g bloem type 405
• 300 ml leidingwater
• maximaal 1/5 blokje bakkersgist
• 20 g zout
5. Zet de kap 2 op het ondergedeelte 1
dat de verticale verwarmingselementen
zijn verborgen.
6. Steek de stekker in een geschikt
stopcontact (zie „3. Technische
gegevens“ op pagina 40).
De werkingsindicator 4 gaat branden
en het apparaat wordt opgewarmd.
7. Schakel het apparaat na ongeveer
20 minuten weer uit door de stekker uit
het stopcontact te trekken en laat het
apparaat afkoelen.
8. Reinig het apparaat opnieuw. Neem
hierbij de aanwijzingen in hoofdstuk
„6. Bediening” op pagina 44 in acht.
Het apparaat is nu gereed voor gebruik.
Bereiding:
1. Doe 300 g van de bloem in een
beslagkom.
2. Voeg 300 ml leidingwater toe.
3. Voeg het bakkersgist toe.
4. Voeg het zout toe.
5. Roer de massa glad.
6. Dek de kom af en laat het deeg bij
kamertemperatuur ongeveer 20 minuten
lang rijzen.
7. Roer het deeg ongeveer 3 minuten lang
door.
8. Voeg nu geleidelijk de resterende bloem
toe. Roer of kneed daarbij het deeg
steeds weer door.
44
Page 47

RP75469 Pizzabäcker LB1 Seite 45 Freitag, 27. Juli 2012 1:14 13
Aanwijzing: zodra het pizzadeeg bij
het kneden loslaat van de bodem en
een bal vormt, is de toegevoegde
hoeveelheid bloem precies goed.
9. Kneed tot slot het deeg nog eens ca. 3
minuten lang door. Dit moet inmiddels
behoorlijk zwaar gaan.
Aanwijzing: het pizzadeeg heeft
precies de juiste consistentie wanneer hij
tijdelijk een balvorm krijgt, maar na
langere tijd (ca. 30 minuten) deze vorm
verliest en stroperiger wordt.
10.Laat het pizzadeeg opnieuw 20 minuten
in de kom rusten.
11.Draai de kom om en laat het deeg op
een goed met bloem bestoven plank
vallen.
12.Bestuif het oppervlak van het deeg goed
met bloem.
13.Kneed het deeg kort door en maak er
een bal van.
14.Plaats de deegbal in een afsluitbare bak
en zet deze gedurende 24 uur in de
koelkast.
15.Haal het deeg uit de koelkast en leg het
terug op een met bloem bestoven plank.
16.Bestuif het deeg goed met bloem en
kneed het kort door, zodat er een mooie
deegbal ontstaat.
17. Druk de deegbal nu van binnen naar
buiten plat.
Aanwijzing: u kunt het deeg ook
door uit elkaar trekken tussen de vuisten
of met een deegroller op de gewenste
dikte brengen
18.Steek met de steekvorm 8 de
deegstukken uit.
19.Bestuif de deegstukken aan beide
kanten flink met bloem en leg ze op een
plaat klaar voor het pizzabakken.
Aanwijzingen:
• de gist hoeft niet per se eerst in water te
worden opgelost.
• Er wordt aanzienlijk minder gist in
gedaan dan op de verpakking van de
gist is aangegeven. Neem slechts zoveel
gist als volgens de informatie op
verpakking voor ongeveer 200 - 250 g
bloem nodig is.
• Als in uw pizzadeeg de gist te proeven
is, moet u de hoeveelheid gist nog
verder verminderen. De verminderde
hoeveelheid gist wordt door de lange
rijstijd weer gecompenseerd.
• Zeezout maakt het deeg aromatischer.
• Bij het proeven meteen na toevoeging
van zout moet het deeg eerst wat naar
zout smaken. Wanneer u de bloem of
gist er duidelijk bovenuit proeft,
ontbreekt nog wat zout. Met de latere
toevoeging van de resterende bloem
wordt de zoutsmaak weer minder.
• Plaats het deeg om te rijzen niet op een
extra warmtebron. U kunt daarmee wel
tijd besparen, maar de smaak gaat
ermee achteruit.
• De rusttijd van 24 uur is enorm
belangrijk voor een goed smakend
pizzadeeg.
• Het bereide pizzadeeg kan meerdere
dagen in de koelkast worden bewaard.
6.2 Pizzasaus maken
Ingrediënten:
• ca. 400 - 500 g gezeefde of gehakte
tomaten (nog beter: ca. 600 - 750 g
verse volaromatische tomaten, gepeld
en gehakt)
•verse basilicum
• verse oregano (of anders gedroogde
oregano)
• 2-3 teentjes knoflook
SPB800 A1 45
Page 48

RP75469 Pizzabäcker LB1 Seite 46 Freitag, 27. Juli 2012 1:14 13
•1/2 ui
• 1 laurierblad
• 1 eetlepel goede olijfolie (native of
vergine)
Bereiding:
1. Knoflook in grove stukjes hakken.
2. Kruiden van steeltjes ontdoen en fijn
hakken.
3. In een geschikte pan de olijfolie
verhitten.
4. Knoflook erin doen en glazig laten
worden.
Aanwijzing: de knoflook mag niet
bruin worden, omdat de saus anders
bitter smaakt.
5. Blussen met de tomaten.
6. Resterende ingrediënten erdoorheen
mengen.
7. Op een laag pitje zetten en de massa
minstens 30 minuten lang laten
pruttelen.
Aanwijzing: de saus is klaar zodra
de massa minstens de helft minder is
geworden.
8. Uienhelft en laurierblad uit de massa
halen.
9. Met een pureerstaaf de massa pureren.
Aanwijzing: als u geen pureerstaaf
bij de hand hebt, kan het ook zonder
pureren. De saus is dan echter niet zo
mooi smeuïg en ziet er niet zo goed uit.
10.Op smaak maken met zout en peper.
6.4 Apparaat voorbereiden
1. Kies een standplaats die stevig, vlak en
onbrandbaar is. Houd daarbij een
afstand van ca. 50 cm tot andere
voorwerpen aan.
Aanwijzing: de pizzabakker mag
niet worden blootgesteld aan tocht,
omdat anders de warmte onder de kap
2 niet constant blijft.
2. Zet het ondergedeelte 1 op een
hittebestendige ondergrond.
3. Leg de bakplaat 7 op de hiervoor
bedoelde houder 6.
Aanwijzing: de bovenzijde van de
bakplaat 7 is gemarkeerd. Let op de
juiste positie, omdat de welving van de
bakplaat 7 naar boven moet wijzen.
4. Zet de kap 2 op het ondergedeelte 1.
5. Steek de stekker in een geschikt
stopcontact (zie „3. Technische
gegevens“ op pagina 40).
De werkingsindicator 4 gaat branden
en het apparaat wordt opgewarmd.
6. Laat het apparaat ongeveer 10 minuten
voorverwarmen voordat u de eerste
pizza bakt.
Het apparaat is nu gereed voor gebruik.
7. V et d e p i zz as c he p 9 licht in met olie,
zodat de pizza niet vastplakt. U kunt
daarvoor ook bakspray gebruiken.
6.5 Pizza bakken
6.3 Pizzabeleg klaarmaken.
Bereid het pizzabeleg voor door de
ingrediënten op de gewenste grootte te
snijden en mooi opgemaakt op de tafel
klaar te zetten.
Als kaas kunt u geraspte Parmezaanse kaas
of geraspte Goudse kaas klaarzetten.
46
1. Zet de deegstukken, de pizzasaus en de
ingrediënten voor het pizzabeleg op de
tafel.
2. Leg een deegstuk op een pizzaschep 9.
3. Bestrijk het deegstuk met pizzasaus.
Page 49

RP75469 Pizzabäcker LB1 Seite 47 Freitag, 27. Juli 2012 1:14 13
Aanwijzing: om ervoor te zorgen dat
er geen saus afloopt en er een mooie
knapperige rand ontstaat, moet u langs
de rand ongeveer een halve centimeter
vrij laten waar geen pizzasaus op wordt
gedaan.
4. Beleg de pizza met ingrediënten naar
uw keuze.
5. Schuif de pizzaschep 9 met de pizza
volledig onder de kap 2.
Aanwijzing: laat de pizza bij het
bakken op de pizzaschep 9. Leg de
pizza niet op de bakplaat 7, omdat de
pizza daarop zou vastplakken.
Waarschuwing!
Er bestaat verbrandingsgevaar
door de hete pizza. Pak de pizza
niet met uw handen beet.
Aanwijzing: in het midden van de
pizzabakker kan de temperatuur iets hoger
zijn dan langs de rand. Om de pizza
gelijkmatig te bakken moet u deze na
ongeveer de helft van de baktijd een halve
slag draaien.
6. Zodra de pizza klaar is, haalt u de
pizzaschep 9 eruit en schuift u de pizza
op een plat bord.
Aanwijzing: de baktijd kan
verschillen afhankelijk van:
– het gebruikte deeg;
– het pizzabeleg (dikte en soort)
– het aantal pizza's die tegelijk worden
gebakken;
– de omgevingstemperatuur.
7. Leg de hete pizzaschep 9 op een
hittebestendige ondergrond.
8. Eet smakelijk!
6.6 Snel recept voor Pizzadeeg
Ingrediënten voor 4 personen:
• 560 g bloem
• 300 ml leidingwater
• 1 pakket actieve droge gist
• 2 eetlepels olijfolie
• 20 g zout
Bereiding:
1. Doe alle ingrediënten in een beslagkom.
2. Kneed de massa glad.
3. Dek de kom af en laat het deeg bij
kamertemperatuur ongeveer 60 minuten
lang rijzen.
4. Draai de kom om en laat het deeg op
een goed met bloem bestoven plank
vallen.
5. Bestuif het deeg goed met bloem en
kneed het kort door, zodat er een mooie
deegbal ontstaat.
6. Druk de deegbal nu van binnen naar
buiten plat.
7. Steek met de steekvorm 8 de
deegstukken uit.
8. Bestuif de deegstukken aan beide
kanten flink met bloem en leg ze op een
plaat klaar voor het pizzabakken.
SPB800 A1 47
Page 50

RP75469 Pizzabäcker LB1 Seite 48 Freitag, 27. Juli 2012 1:14 13
7. Reinigen
Waarschuwing!
–Trek de stekker uit het
stopcontact voordat u het
apparaat reinigt.
– Laat het apparaat afkoelen
voordat u het reinigt. Omdat de
kap 2 van terracotta is en
daarom heel goed warmte kan
opslaan, kan het tot wel
45 minuten duren tot hij
handwarm is afgekoeld.
– Dompel het netsnoer en het
ondergedeelte 1 nooit onder in
vloeistoffen.
Voorzichtig! Gebruik nooit scherpe of
schurende reinigingsmiddelen omdat uw
apparaat hierdoor beschadigd kan raken.
Voorzichtig! De onderdelen van de
pizzabakker zijn niet geschikt voor de
vaatwasser.
8. Weggooien
8.1 Apparaat
Het symbool van de afvalbak
op wielen met een kruis erdoor
geeft aan dat het product in de
Europese Unie niet met het
huisvuil mag worden
weggegooid. Dat geldt voor
het product en voor alle met dit symbool
aangegeven accessoires. Hiermee
gemarkeerde producten mogen niet met het
normale huisvuil worden weggegooid, maar
moeten worden afgegeven bij een
inzamelpunt voor recycling van elektrische
en elektronische apparaten. Recycling
draagt bij aan de vermindering van het
1. Reinig de steekvorm 8, de
pizzascheppen 9 en de bakplaat 7 met
de hand in afwaswater.
2. De kap 2 hoeft normaal gesproken niet
te worden gereinigd. Als hij toch vuil
mocht zijn geworden, gebruik dan voor
de reiniging helder, warm water en een
zachte borstel.
3. Reinig het ondergedeelte 1 met een
vochtige doek of een zachte, vochtige
spons. U kunt ook wat afwasmiddel
gebruiken om vetresten beter te kunnen
verwijderen.
4. Gebruik het apparaat pas weer als alle
onderdelen helemaal droog zijn.
Voorzichtig! Wanneer het apparaat
na de reiniging gedurende langere tijd
moet worden opgeborgen, moet u de
bakplaat 7 licht insmeren met olie, zodat
er geen roestlaagje kan ontstaan.
verbruik van grondstoffen en aan de
ontlasting van het milieu. Informatie over de
afvalverwijdering en de ligging van het
dichtstbijzijnde recyclingbedrijf vindt u
bijvoorbeeld bij uw gemeentelijke
afvalverwijderingsbedrijf of in de gouden
gids.
8.2 Verpakking
Als u de verpakking wilt wegwerpen, let dan
op de desbetreffende milieuvoorschriften in
uw land.
48
Page 51

RP75469 Pizzabäcker LB1 Seite 49 Freitag, 27. Juli 2012 1:14 13
9. Garantie van de HOYER Handel GmbH
Geachte klant,
Op dit apparaat verlenen wij 3 jaar
garantie vanaf de koopdatum. In geval van
defecten aan dit product heeft u wettelijke
rechten tegenover de verkoper van het
product. Deze wettelijke rechten worden
door onze hierna beschreven garantie niet
beperkt.
9.1 Garantievoorwaarden
De garantieperiode begint vanaf de
koopdatum. Bewaar de originele kassabon
op een veilige plaats. Deze bon heeft u
nodig om de koopdatum aan te tonen.
Indien binnen drie jaar vanaf de koopdatum
van het product een materiaal- of
fabricagefout optreedt, wordt het product
door ons (naar onze keuze) of kosteloos
voor u gerepareerd of vervangen. De
voorwaarde voor deze garantieprestatie is
dat binnen de periode van drie jaar het
defecte apparaat en de koopkwitantie
(kassabon) wordt ingeleverd en schriftelijk
kort wordt beschreven waaruit het gebrek
bestaat en wanneer dit is opgetreden.
Wanneer het defect door onze garantie
wordt gedekt, ontvangt u het gerepareerde
of een nieuw product terug. Door de
reparatie of vervanging van het product
begint geen nieuwe garantieperiode.
9.2 Garantieperiode en wettelijke
aanspraak op garantie
De garantieperiode wordt door de garantie
niet verlengd. Dit geldt ook voor vervangen
en gerepareerde onderdelen. Eventueel al
bij de koop aanwezige schade en gebreken
moeten direct na het uitpakken worden
gemeld. Aan reparaties die na afloop van
de garantieperiode noodzakelijk worden,
zijn kosten verbonden.
9.3 Omvang van de garantie
Het apparaat werd volgens strenge
kwaliteitsrichtlijnen geproduceerd en vóór
de levering zorgvuldig gecontroleerd.
De garantie geldt voor materiaal- of
fabricagefouten. Deze garantie wordt niet
verleend voor productonderdelen die
blootgesteld zijn aan normale slijtage en
daarom als slijtonderdelen worden
beschouwd of voor beschadigingen aan
breekbare onderdelen, bijvoorbeeld
schakelaars, accu’s en onderdelen die van
glas zijn gemaakt.
Deze garantie vervalt wanneer het product
werd beschadigd, niet vakkundig werd
gebruikt of onderhouden. Voor een
vakkundig gebruik van het product moeten
alle aanwijzingen in de gebruiksaanwijzing
nauwkeurig worden opgevolgd.
Toepassingsdoelen en handelingen
waarvan in de gebruiksaanwijzing wordt
afgeraden of waarvoor wordt
gewaarschuwd, moeten beslist worden
vermeden.
Het product is enkel voor particulier gebruik
en niet voor commercieel gebruik bedoeld.
Bij misbruik of onvakkundige behandeling,
gebruik van geweld en bij ingrepen die niet
door ons geautoriseerde servicecenter
worden uitgevoerd, vervalt de garantie.
SPB800 A1 49
Page 52

RP75469 Pizzabäcker LB1 Seite 50 Freitag, 27. Juli 2012 1:14 13
9.4 Afwikkeling in geval van garantie
Om een snelle bewerking van uw
aangelegenheid te garanderen, dient u de
volgende aanwijzingen op te volgen:
• Houd bij alle aanvragen het
artikelnummer (voor dit apparaat: IAN
75469) en de kassabon als bewijs van
aankoop bij de hand.
• Het artikelnummer vindt u op het
typeplaatje, een gravure, op de
titelbladzijde van uw
gebruiksaanwijzing (links onder) of als
sticker op de voor- of achterzijde.
• Indien er functiestoringen of andere
defecten optreden, neem dan eerst
telefonisch of per e-mail contact op met
het hierna genoemde service-center.
• Een als defect geregistreerd product kunt
u vervolgens onder toevoeging van de
kassabon en de beschrijving van het
defect en wanneer dit is opgetreden
franco aan het u meegedeelde
serviceadres opsturen.
Op www.lidl-service.com kunt
u dit handboek en vele andere
handboeken, productvideo’s
en software downloaden.
9.5 Service-center
Service Nederland
Tel.: 0900 0400223 (0,10 EUR/Min.)
E-Mail: hoyer@lidl.nl
Service België
Tel.: 070 270 171 (0,15 EUR/Min.)
E-Mail: hoyer@lidl.be
IAN: 75469
9.6 Leverancier
Let op dat het volgende adres geen
service-adres is. Neem eerst contact op
met het bovengenoemde service-center.
HOYER Handel GmbH
Kühnehöfe 5
D-22761 Hamburg
Deutschland
50
Page 53

RP75469 Pizzabäcker LB1 Seite 51 Freitag, 27. Juli 2012 1:14 13
Contents
1. Appliance description. . . . . . . . . . . . . . . . . . . . . . . . . . . . . . . . . . . . . . . . . . . . . . . . . . . . 51
2. Part names (see fold-out page) . . . . . . . . . . . . . . . . . . . . . . . . . . . . . . . . . . . . . . . . . . . . 52
3. Technical data . . . . . . . . . . . . . . . . . . . . . . . . . . . . . . . . . . . . . . . . . . . . . . . . . . . . . . . . . 52
4. Safety information . . . . . . . . . . . . . . . . . . . . . . . . . . . . . . . . . . . . . . . . . . . . . . . . . . . . . 52
5. Before using for the first time. . . . . . . . . . . . . . . . . . . . . . . . . . . . . . . . . . . . . . . . . . . . . . 55
6. Operation. . . . . . . . . . . . . . . . . . . . . . . . . . . . . . . . . . . . . . . . . . . . . . . . . . . . . . . . . . . . 56
7. Cleaning. . . . . . . . . . . . . . . . . . . . . . . . . . . . . . . . . . . . . . . . . . . . . . . . . . . . . . . . . . . . . 59
8. Disposal . . . . . . . . . . . . . . . . . . . . . . . . . . . . . . . . . . . . . . . . . . . . . . . . . . . . . . . . . . . . . 59
9. HOYER Handel GmbH Warranty . . . . . . . . . . . . . . . . . . . . . . . . . . . . . . . . . . . . . . . . . . . . 60
Congratulations on the purchase of
your new product.
You have selected a high-quality product.
The operating instructions are a constituent
part of this product. They contain important
information about safety, use and disposal.
1. Appliance description
1.1 Intended purpose
The SilverCrest pizza oven SPB800 A1 is
perfect for cooking small pizzas directly at
the table. This appliance is not suitable for
the preparation of dishes other than pizzas.
The appliance must not be used for thawing,
warming or drying objects.
Only use the appliance indoors, never
outside.
This appliance is intended for use in private
households and is not suitable for
commercial purposes.
The appliance is likewise suitable for:
• use in staff kitchens in shops, offices and
other commercial areas,
• use in agricultural settings,
Familiarize yourself with all the operating
and safety instructions before using the
product. Use the product only as described
and for the stated spheres of application.
If you pass the product on to a third party,
always pass on all the documentation as
well.
• customers in hotels, motels and other
accommodation,
• bed-and-breakfast establishments.
1.2 What’s in the box
1 pizza oven
1 cutting mould
4 peels
1 copy of the operating instructions
1.3 How it works
Each diner tops a small pizza with the
toppings of their choice at the table. The
pizza isplaced into the pre-heated pizza
oven on a peel and baked.
SPB800 A1 51
Page 54

RP75469 Pizzabäcker LB1 Seite 52 Freitag, 27. Juli 2012 1:14 13
1.4 Symbols on the appliance
An adjacent symbol 3 warns
against touching hot surfaces.
2. Part names (see fold-out page)
1 Bottom section
2 Terracotta lid
3 Warning symbol "Warning - hot
surfaces"
4 Indicator light
5 Heating coil
6 Baking plate holder
7 Baking plate
8 Cutting mould
9 Peel
3. Technical data
Power supply: 220–240 V~ 50/60 Hz
Rated power: 800 - 900 W
Protection class: I
4. Safety information
4.1 Explanation of terms
The following keywords are used in these
user instructions:
Warning!
High risk: ignoring this warning
could result in a risk to life and
limb.
Caution!
Medium risk: ignoring this warning may
result in damage.
Note:
Low risk: points to be noted when handling
the appliance.
4.2 Special instructions for safe
•This appliance can be used by
operation
children aged from 8 years and
above and persons with reduced
physical, sensory or mental
capabilities or lack of experience and
knowledge if they have been given
supervision or instruction concerning
use of the appliance in a safe way
and understand the hazards involved.
52
Page 55

RP75469 Pizzabäcker LB1 Seite 53 Freitag, 27. Juli 2012 1:14 13
Children shall not play with the
appliance.
•Cleaning and user maintenance shall
not be made by children unless they
• If the appliance should develop a fault
are older than 8 and supervised.
•Keep the appliance and its cord out
of reach of children less than 8 years.
•The surfaces of the appliance can get
hot. Therefore, only hold the
• To ensure you can intervene promptly if
appliance with pot cloths or oven
gloves when in use.
• Ensure that it is not possible for anyone
•The appliance must not be operated
with an external time switch or
separate remote control system, such
• The appliance may only be used on a
as a wireless remote control socket.
8
•Clean the cutting form
, the peels
and the baking plate 7 by hand in
9
• Maintain a distance of at least 50 cm
soapy water.
4.3 General information
• Please read these user instructions
carefully before use. They are a
constituent part of the appliance and
must be kept to hand at all times.
• Use the appliance only for the purpose
described (see “1.1 Intended purpose”
on page 51).
• To prevent damage, check that the
mains voltage required (see type plate
on the appliance) is compatible with
your mains voltage.
• Please note that any claim under the
warranty or for liability will be invalid if
accessories are used that are not
recommended in these user instructions,
• The appliance must not be placed on
• Surface cleaners may contain
• Do not put anything on the appliance.
or if original spare parts are not used for
repairs. This also applies to repairs
undertaken by unqualified persons. The
contact information can be found under
“Service Centre” on page 61.
during the warranty period, it may only
be repaired by our Service Centre.
Otherwise all claims under warranty are
null and void. The contact information
can be found under “Service Centre” on
page 61.
a fault occurs, never leave the appliance
unsupervised during operation.
to trip over or to get caught up in or step
on the mains cable and injure
themselves.
firm, level, dry and non-flammable
surface. This will prevent it from tipping
over, sliding or setting fire to the surface
and causing damage.
from other objects to prevent them from
catching fire.
hot stoves, put in a hot oven or set up in
the vicinity of gas heaters and ondemand water heaters, as this could
cause damage.
ingredients that could attack and soften
the rubber feet. In this case, please
contact the Service Centre. The contact
information can be found under “Service
Centre” on page 61.
SPB800 A1 53
Page 56

RP75469 Pizzabäcker LB1 Seite 54 Freitag, 27. Juli 2012 1:14 13
4.4 Protection against electric shock
Warning! The following safety
information is intended to protect
you against electric shock.
• Only connect the appliance to a mains
socket with an earthing contact as this
provides protection against electric
shock.
• The appliance must not under any
circumstances be used if it is damaged.
Have the device repaired in such cases
by a qualified specialist. The contact
information can be found under “Service
Centre” on page 61.
• Check the mains cable regularly for
damage.
• If the mains cable for this appliance is
damaged, it must be replaced by the
manufacturer or a person with similar
qualifications in order to avoid a
hazard.
• Water or other liquids must never be
allowed to enter the appliance. For this
reason:
– never use it outdoors
– never immerse it in liquids
– never place liquid-filled objects, e.g.
pans, on the appliance
– never use in very humid environments.
If liquid should enter the appliance,
unplug the mains plug immediately and
have the appliance repaired by a
qualified technician. The contact
information can be found under “Service
Centre” on page 61.
• Avoid using extension cables. These
may only be used under very specific
conditions:
– the extension cable must be able to
handle the amount of current drawn
by the appliance,
– the extension cable must not be
"suspended". Keep children away
from it and ensure that it is not
possible for anybody to trip over it
– under no circumstances use a
damaged extension cable
– do not connect any other appliances
to the mains socket, since it could
cause an overload (do not use
multiple sockets of any kind).
• Never touch the appliance, the mains
cable or the mains plug with wet hands.
• Always unplug the mains cable by
pulling out the plug. Never pull on the
cable itself.
• Never carry the appliance by the mains
cable.
• Ensure that the mains cable is not kinked,
twisted or crushed.
• Keep the mains cable away from hot
surfaces, such as the top of a stove.
• Never immerse the mains cable and the
bottom section 1 in liquids.
• If you are not going to use the appliance
for a while, remove the plug from the
wall socket. Only then is the appliance
completely free of current.
• If the appliance is connected to the
mains it may be damaged by lightning
during thunderstorms.
4.5 Protection against scalds and burns
Warning! Hot surfaces may
cause injury. Therefore, please
observe the following:
• The device must not be used without the
lid 2 in place.
• The metal on the peels 9 becomes very
hot in the oven. Therefore, only hold the
peels 9 by the black handles.
• Always let the appliance cool down
before cleaning it or using it again.
54
Page 57

RP75469 Pizzabäcker LB1 Seite 55 Freitag, 27. Juli 2012 1:14 13
• Never use the appliance near curtains
and other flammable materials. If the
food to be cooked catches fire, the
flames could easily spread to other
objects.
4.6 For the safety of your child
Warning! Children are often
unaware of danger and are injured
as a result. Please note therefore:
• Only allow children to use this appliance
under the supervision of an adult.
• Ensure the appliance is always kept out
of the reach of children.
• Ensure that children cannot pull the
appliance down onto themselves with
the cable.
5. Before using for the first time
During manufacture, many parts are given a
thin film of protective oil. Before using the
appliance for the first time, heat it up without
pizzas so that any residues can evaporate.
Note: When heating up for the first few
times a slight smell may be produced. Make
sure the room is adequately ventilated.
1. Take the appliance and all the
accessory parts out of the packaging.
2. Check that the appliance shows no signs
of damage.
3. Clean the appliance before using it for
the first time. Observe the information in
the chapter entitled “Operation” on
page 56.
4. Select a location that is firm, level and
not flammable. Maintain a distance of
approx. 50 cm from other objects.
• Ensure that the packing foil does not
become a deadly trap for a child.
Packing foils are not toys.
4.7 Preventing material damage
Caution! To avoid damaging the
appliance, please note:
• The terracotta lid 2 must not come into
contact with water or be placed on a
cold surface when it is hot. The
temperature shock could lead to cracks.
• The terracotta lid 2 is fragile and
sensitive to impact. Therefore, handle it
with care and store it in its original box if
possible.
• If the appliance is to stored for a long
period after cleaning, lightly oil the
baking plate 7 to prevent the build-up of
rust.
5. Place the lid 2 on the bottom section 1
so that the vertical heating elements are
hidden.
6. Insert the mains plug into a suitable
mains socket (see “3. Technical data”
on page 52).
The indicator light 4 lights up, and the
appliance starts to heat up.
7. After about 20 minutes, turn the
appliance off again by pulling out the
mains plug and let the appliance cool
down.
8. Clean the appliance again. Take note of
the relevant information in the section
entitled “6. Operation” on page 56.
The appliance is now ready to use.
SPB800 A1 55
Page 58
RP75469 Pizzabäcker LB1 Seite 56 Freitag, 27. Juli 2012 1:14 13
6. Operation
6.1 Making the pizza dough
Note: The pizza dough is particularly
good when prepared at least 24 hours in
advance and then allowed to rest in the
fridge. The following recipe should give you
pizza dough "just like Mamma used to
make".
Ingredients for 4 people:
• 500 g type 00 flour
• 300 ml water
• max. 1/5 of a block of yeast
• 20 g salt
Preparation:
1. Place 300 g of the flour in a mixing
bowl.
2. Add 300 ml of water.
3. Add the yeast.
4. Add the salt.
5. Mix the ingredients until smooth.
6. Cover the bowl and allow the dough to
rise at room temperature for about
20 minutes.
7. Mix the dough for about 3 minutes.
8. Now gradually add the remaining flour
to the mixture. While doing this, keep
mixing or kneading the dough.
Note: The the amount of flour is correct
when the dough can be lifted from the
surface and forms a ball when
kneading.
9. To finish, knead the dough one more
time for about 3 minutes. By now, this
should be much harder.
Note: The pizza dough has precisely
the right consistency when it holds in a
ball shape for a short period of time, but
over a longer period (roughly 30
minutes) looses its shape and flattens
out.
10.Allow the pizza dough to rest in the
bowl for a further 20 minutes.
11.Turn the bowl upside down and allow
the dough to fall onto a well floured
board.
12.Dust the surface of the dough well with
flour.
13.Quickly knead the dough together and
form it into a ball.
14.Put the dough ball into a lidded
container and place in the fridge for 24
hours.
15.Take the dough out of the fridge and
place it on a baking sheet.
16.Dust the dough well with flour and
quickly knead together to form a nice
dough ball.
17. Now flatten the dough ball by pressing
from the centre outwards.
Note: You can also form the dough to
the desired thickness by pulling it
between your fists or by using a rolling
pin.
18.Cut out the mini pizza bases with the
cutting mould 8.
19.Dust the mini pizza bases well with flour
on both sides and place these on a
sheet ready for baking.
Notes:
• The yeast does not need to be first
dissolved in water.
• Much less yeast is required as is
recommended on the yeast packaging.
Only use as much yeast as is required
56
Page 59

RP75469 Pizzabäcker LB1 Seite 57 Freitag, 27. Juli 2012 1:14 13
for about 200 - 250 g of flour according
to the packaging instructions.
• If your pizza dough tastes of yeast,
reduce the amount of yeast further. The
long rising time compensates for the
reduced amount of yeast.
• For more aromatic dough, add sea salt.
• When tasting just after adding the salt,
the dough should initially taste slightly
salty. If you can clearly taste the flour or
yeast, add another pinch of salt. The
salty taste becomes milder when the rest
of the flour is added.
•Do not place the dough near an
additional heat source to rise. You may
save time, but the flavour will suffer as a
result.
• The resting time of 24 hours is extremely
important for a good tasting pizza
dough.
• Pizza dough prepared in this way can
be stored in the fridge for several days.
6.2 Making the pizza sauce
Ingredients:
• roughly 400 - 500 g of tomato passata
or chopped tomatoes (or, even better:
roughly 600 - 750 g of fresh, aromatic
tomatoes, skinned and chopped)
• fresh basil
• fresh oregano (alternatively, use dried
oregano)
• 2-3 cloves of garlic
•1/2 an onion
• 1 bay leaf
• 1 tablespoon of good olive oil (virgin or
extra-virgin)
Preparation:
1. Roughly chop the garlic.
2. Strip the herbs from their stems and
finely chop.
3. Heat the olive oil in a suitable pan.
4. Add the garlic and fry until translucent.
Note: Do not allow the garlic to brown,
otherwise the sauce will taste bitter.
5. Add the tomatoes and stir.
6. Stir in the rest of the ingredients.
7. Turn the heat down to a low level and
allow the sauce to simmer for at least 30
minutes.
Note: The sauce is ready when it has
reduced by at least half.
8. Remove the onion halves and the bay
leaf from the sauce.
9. Purée the sauce with a blender.
Note: If you do not have a blender
available, the sauce tastes just as good
without. But it will not be as smooth and
does not look as good.
10.Season with salt and pepper.
6.3 Preparing the topping
Prepare the topping by chopping the
ingredients to the desired size and
arranging them on the table.
For cheese, you can use grated Parmesan or
grated Gouda.
6.4 Preparing the appliance
1. Select a location which is firm, level and
not flammable. Maintain a distance of
approx. 50 cm from other objects.
Note: The pizza oven should not be
placed in a draught, as the heat cannot
then be retained under the lid 2 .
SPB800 A1 57
Page 60

RP75469 Pizzabäcker LB1 Seite 58 Freitag, 27. Juli 2012 1:14 13
2. Place the bottom section 1 on a heatresistant base.
3. Position the baking plate 7 on the
corresponding holder 6.
Note: The upper side of the baking
plate 7 is marked. Make sure the
position is correct, as the dome on the
baking plate 7 must face upwards.
4. Place the lid 2 on the bottom section 1.
5. Insert the mains plug into a suitable
mains socket (see “3. Technical data”
on page 52).
The indicator light 4 lights up, and the
appliance starts to heat up.
6. Allow the appliance to pre-heat for
roughly 10 minutes before baking the
first pizza.
The appliance is now ready to use.
7. Lightly oil the peel 9 so that the pizza
does not stick to it when baking. You can
also use baking spray.
6.5 Baking the pizzas
1. Place the mini pizza bases, the pizza
sauce and the topping ingredients on
the table.
2. Place one mini pizza base on a peel 9.
3. Top the mini pizza base with pizza
sauce.
Note: To prevent the sauce from
running off and to create a crispy crust,
only spread the sauce up to about half a
centimetre from the edge of the base.
4. Top the pizza with the ingredients of
your choice.
5. Slide the peel 9 with the pizza fully
under the lid 2.
Note: Leave the pizza on the peel 9
during baking. Do not place the pizza
on the baking plate 7, or the pizza will
stick to it.
Warning!
The hot pizza poses a risk of burns.
Do not touch the pizza with your
hands.
Note: The temperature of the pizza oven
may be somewhat higher in the centre than
on the edge. After roughly half of the baking
time, rotate the pizza 180° so that the pizza
cooks evenly.
6. As soon as the pizza is ready, remove
the peel 9 and slide the pizza on to a
flat plate.
Note: The baking time varies and
depends on:
– the dough used;
– the topping (thickness and type);
– the number of pizzas baked together;
– the ambient temperature.
7. Place the hot peel 9 on a heat-resistant
surface.
8. Enjoy your pizzas!
6.6 Fast recipe for pizza dough
Ingredients for 4 people:
• 560 g flour
• 300 ml water
• 1 package active dry yeast
• 2 tablespoons olive oil
• 20 g salt
Preparation:
1. Place all the ingredients in a mixing
bowl.
2. Knead the ingredients until smooth.
3. Cover the bowl and allow the dough to
rise at room temperature for about
60 minutes.
58
Page 61

RP75469 Pizzabäcker LB1 Seite 59 Freitag, 27. Juli 2012 1:14 13
4. Turn the bowl upside down and allow
the dough to fall onto a well floured
board.
5. Dust the dough well with flour and
quickly knead together to form a nice
dough ball.
7. Cleaning
Warning!
– Pull out the mains plug before
cleaning the appliance.
– Always allow the appliance to
cool down before cleaning. The
lid 2 can take up to 45 minutes
to cool to a lukewarm
temperature, as the terracotta it is
made from retains heat very well.
– Never immerse the mains cable
and the bottom section 1 in
liquids.
Caution! Never use caustic or abrasive
cleaning agents, as they could damage your
appliance.
Caution! The individual components of the
pizza oven are not suitable for dishwashers.
6. Now flatten the dough ball by pressing
from the centre outwards.
7. Cut out the mini pizza bases with the
cutting mould 8.
8. Dust the mini pizza bases well with flour
on both sides and place these on a
sheet ready for baking.
1. Clean the cutting form 8, the peels 9
and the baking plate 7 by hand in
soapy water.
2. The lid 2 does not usually require
cleaning. If it becomes dirty, clean it in
clear, warm water with a soft brush.
3. Clean the bottom section 1 with a damp
cloth or a soft, damp sponge. You may
also use a little detergent in order to help
remove fatty deposits.
4. Do not use the appliance again until all
components have completely dried.
Caution! If the appliance is to stored
for a long period after cleaning, lightly
oil the baking plate 7 to prevent the
build-up of rust.
8. Disposal
8.1 Appliance
The symbol showing the
wheelie bin with a cross
through it means that that
product must be handed in for
the separated collection of
waste in the European Union.
This applies to the product and all
accessories that are marked with this
symbol. Products marked like this may not
SPB800 A1 59
be disposed of in normal domestic waste but
must be handed in at a collection point for
the recycling of electric and electronic
appliances. Recycling helps to reduce the
consumption of raw materials and hence is
better for the environment. You can obtain
information about disposal and the location
of your nearest recycling centre from your
local waste management service, for
example, or Yellow Pages.
Page 62

RP75469 Pizzabäcker LB1 Seite 60 Freitag, 27. Juli 2012 1:14 13
8.2 Packaging
If you wish to discard the packaging, please
observe the applicable environmental
regulations in your country.
9. HOYER Handel GmbH Warranty
Dear Customer,
You have a warranty on this product which
is valid for 3 years from the date of
purchase. In the event of this product being
defective, you have statutory rights against
the seller of the product. These statutory
rights are not limited by our warranty as set
out below.
9.1 Warranty conditions
The warranty period begins with the date of
purchase. Please keep the original till receipt
in a safe place. This is required as your
proof of purchase.
If a defect in materials or workmanship
occurs within three years of the date your
product was purchased, we will repair or
replace the product at our discretion at no
charge to you. This service under warranty
assumes that the defective product and the
proof of purchase (till receipt) are submitted
within the three-year period and that a brief
description in writing is provided of what the
defect is and when it occurred.
If the defect is covered by our warranty, the
repaired product or a new one will be sent
back to you. There is no new warranty
period following repair or replacement of
the product.
9.2 Warranty period and statutory
claims relating to defects
The warranty period is not extended when a
service is provided under warranty. This also
applies to replaced and repaired parts. Any
damage or defects present at purchase must
be reported immediately the product is
unpacked. Repairs incurred once the
warranty period has expired are
chargeable.
9.3 Scope of warranty
The product has been carefully
manufactured in accordance with strict
quality guidelines and was thoroughly
checked before being delivered.
The warranty applies to defective materials
or workmanship. This warranty does not
extend to product parts exposed to normal
wear and tear (and which can therefore be
considered wear parts) or to damage to
fragile parts such as switches, batteries or
parts made of glass.
This warranty is void if the product is
damaged or if it is not used or maintained
properly. All the information in the operating
instructions should be observed precisely to
ensure that the product is used properly.
It is essential to avoid intended uses and
actions which are discouraged or warned
against in the operating instructions.
The product is intended for only private use
and not for commercial purposes.
60
Page 63

RP75469 Pizzabäcker LB1 Seite 61 Freitag, 27. Juli 2012 1:14 13
The warranty is void in the event of misuse,
incorrect treatment, use of force or
interference by anyone other than our
authorized service centre.
9.4 Warranty process
Please follow the instructions below to
ensure that your claim is processed quickly.
• In case of any enquiry, please keep the
article number (for this product: IAN
75469) and the till receipt as proof of
purchase.
• The article number can be found on the
rating plate, as an engraving, on the
cover sheet of your instructions (bottom
left) or as a label on the back or
underside of your appliance.
• If malfunctions or any other defects
should occur, in the first instance contact
the Service Centre mentioned below by
telephone or e-mail.
• Once a product has been recorded as
defective, you can then send it Freepost
to the service address you are given,
enclosing the proof of purchase (till
receipt) and quoting what the defect is
and when it occurred.
You can download these
instructions and many other
manuals, product videos and
software from
www.lidl-service.com.
9.5 Service Centre
Service Great Britain
Tel.: 0871 5000 720 (£ 0.10/Min.)
E-Mail: hoyer@lidl.co.uk
Service Ireland
IR
Tel.: 1890 930 034
(0,08 EUR/Min., (peak))
(0,06 EUR/Min., (off peak))
E-Mail: hoyer@lidl.ie
Service Cyprus
CY
Tel.: 8009 4409
E-Mail: hoyer@lidl.com.cy
Service Malta
MT
Tel.: 80062230
E-Mail: hoyer@lidl.com.mt
IAN: 75469
9.6 Supplier
Please note that the address below is not a
service address. In the first instance,
contact the service centre mentioned above.
HOYER Handel GmbH
Kühnehöfe 5
D-22761 Hamburg
Germany
SPB800 A1 61
Page 64

RP75469 Pizzabäcker LB1 Seite 62 Freitag, 27. Juli 2012 1:14 13
Page 65

RP75469 Pizzabäcker LB1 Seite 63 Freitag, 27. Juli 2012 1:14 13
Page 66

HOYER HANDEL GMBH
Kühnehöfe 5
D-22761 Hamburg
Stand der Informationen · Version des informations ·
Stato attuale delle conoscenze · Stand van de informatie · Status of information:
07/2012 · Ident.-Nr.: SPB 800 A1
IAN 75469
RP75469_Pizzadom_Cover_LB1.indd 1 19.07.12 09:49
1
 Loading...