

KÜCHENMASCHINE / STAND MIXER /
ROBOT MULTIFONCTION SKM 600 A1
KÜCHENMASCHINE
Bedienungsanleitung
ROBOT MULTIFONCTION
Mode d’emploi
ROBOT KUCHENNY
Instrukcja obsługi
STAND MIXER
Operating instructions
KEUKENMACHINE
Gebruiksaanwijzing
KUCHYŇSKÝ ROBOT
Návod k obsluze
KUCHYNSKÝ ROBOT
Návod na obsluhu
IAN 314615/316618/317345/317346

Klappen Sie vor dem Lesen die Seite mit den Abbildungen aus und machen Sie sich anschließend mit
allen Funktionen des Gerätes vertraut.
Before reading, unfold the page containing the illustrations and familiarise yourself with all functions of the
device.
Avant de lire le mode d‘emploi, ouvrez la page contenant les illustrations et familiarisez-vous ensuite avec
toutes les fonctions de l‘appareil.
Vouw vóór het lezen de pagina met de afbeeldingen open en maak u vertrouwd met alle functies van het
apparaat.
Przed przeczytaniem proszę rozłożyć stronę z ilustracjami, a następnie proszę zapoznać się z wszystkimi
funkcjami urządzenia.
Před čtením si otevřete stranu s obrázky a potom se seznamte se všemi funkcemi přístroje.
Pred čítaním si odklopte stranu s obrázkami a potom sa oboznámte so všetkými funkciami prístroja.
DE / AT / CH Bedienungsanleitung Seite 1
GB/IE Operating instructions Page 13
FR / BE Mode d’emploi Page 25
NL / BE Gebruiksaanwijzing Pagina 37
PL Instrukcja obsługi Strona 49
CZ Návod k obsluze Strana 61
SK Návod na obsluhu Strana 73
A
B
Inhaltsverzeichnis
Einleitung .............................................................2
Bestimmungsgemäßer Gebrauch ..........................................2
Lieferumfang ..........................................................2
Gerätebeschreibung ....................................................2
Sicherheitshinweise .....................................................3
Vorbereitungen ........................................................5
Geschwindigkeitsstufen .................................................5
Arbeiten mit Knethaken, Schneebesen und Flachrührer .......................5
Nach der Arbeit ...................................................................6
Reinigen und Pflegen ....................................................7
Gehäuse reinigen ..................................................................7
Zubehör reinigen ...................................................................7
Aufbewahrung .........................................................7
Fehler beheben .........................................................8
Technische Daten .......................................................8
Entsorgung ............................................................8
Garantie der Kompernaß Handels GmbH ...................................9
Service ..........................................................................10
Importeur ........................................................................10
Rezepte .............................................................11
Grundrezept Hefeteig ..............................................................11
Grundrezept Mürbeteig .............................................................11
Grundrezept Rührkuchen ............................................................12
SKM 600 A1
DE│AT│CH
│
1 ■

Einleitung
Herzlichen Glückwunsch zum Kauf Ihres neuen
Gerätes.
Sie haben sich damit für ein hochwertiges Produkt
entschieden. Die Bedienungsanleitung ist Bestandteil dieses Produkts. Sie enthält wichtige Hinweise
für Sicherheit, Gebrauch und Entsorgung. Machen
Sie sich vor der Benutzung des Produkts mit allen
Bedien- und Sicherheitshinweisen vertraut. Benutzen
Sie das Produkt nur wie beschrieben und für die
angegebenen Einsatzbereiche. Händigen Sie alle
Unterlagen bei Weitergabe des Produkts an Dritte
mit aus.
Bestimmungsgemäßer
Gebrauch
Dieses Gerät dient ausschließlich dem Verarbeiten
von Lebensmitteln in haushaltsüblichen Mengen.
Dieses Gerät ist ausschließlich für die Benutzung in
privaten Haushalten bestimmt. Benutzen Sie es
nicht gewerblich!
Dieses Gerät ist nur für den privaten Gebrauch in
geschlossenen, regengeschützten Räumen vorgesehen. Benutzen Sie es nicht im Freien!
Das Gerät darf nur mit Originalzubehör benutzt
werden.
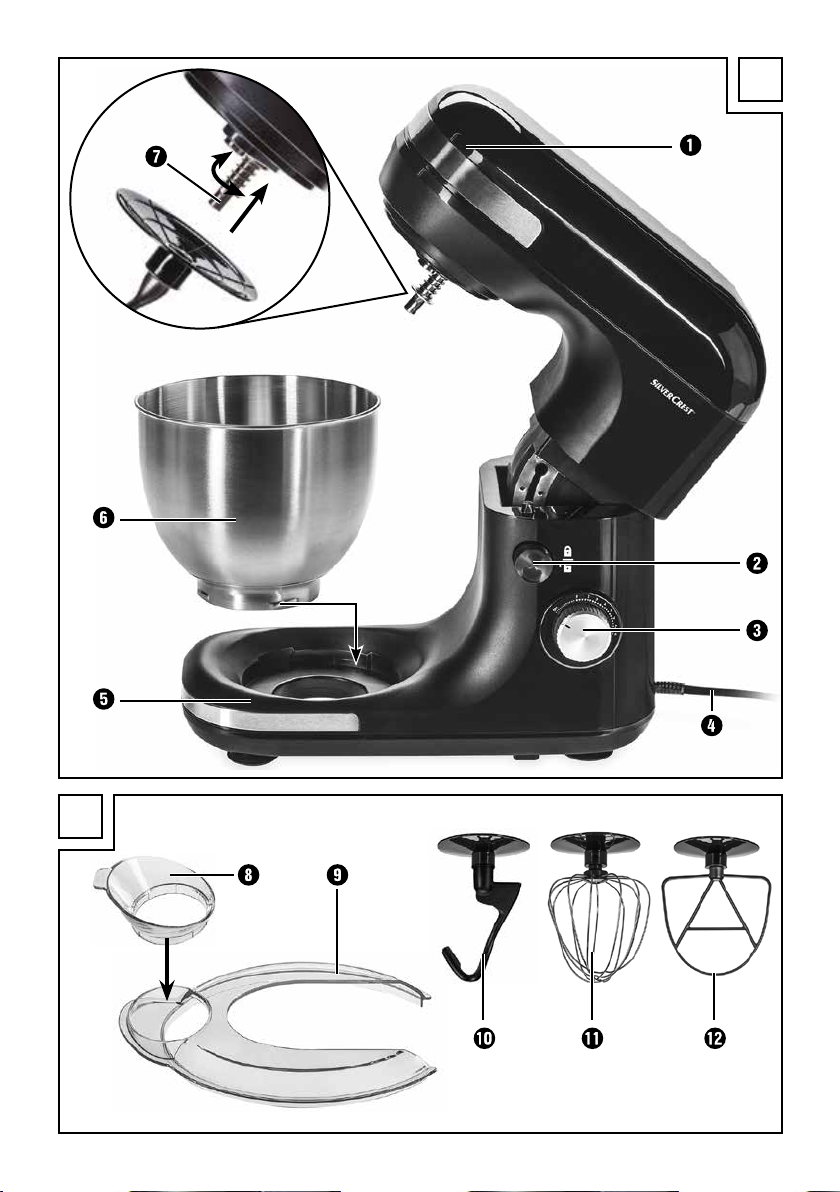
Gerätebeschreibung
Abbildung A:
1 Schwenkarm
2 Entriegelungstaste
3 Drehschalter
4 Netzkabel
5 Sockel
6 Rührschüssel
7 Antriebsachse
Abbildung B:
8 Einfüllhilfe
9 Deckel
0 Knethaken
q Schneebesen
w Flachrührer
Lieferumfang
Küchenmaschine
Rührschüssel mit Deckel und Einfüllhilfe
Knethaken
Schneebesen
Flachrührer
Bedienungsanleitung
HINWEIS
► Kontrollieren Sie den Lieferumfang direkt
nach dem Auspacken auf Vollständigkeit
und Beschädigungen. Wenden Sie sich,
wenn nötig, an den Service.
■ 2 │ DE
│AT│
CH SKM 600 A1
Sicherheitshinweise
GEFAHR! ELEKTRISCHER SCHLAG!
► Schließen Sie das Gerät nur an eine vorschriftsmäßig installierte
und geerdete Netzsteckdose an. Die Netzspannung muss mit den
Angaben auf dem Typenschild des Gerätes übereinstimmen.
► Achten Sie darauf, dass im Betrieb das Netzkabel nicht nass oder
feucht wird. Führen Sie es so, dass es nicht eingeklemmt oder beschädigt werden kann.
► Halten Sie das Netzkabel von heißen Oberflächen fern.
► Führen Sie keine Reparaturarbeiten am Gerät durch. Jegliche Re-
paraturen müssen durch den Kundendienst oder von qualifiziertem
Fachpersonal durchgeführt werden.
► Ziehen Sie den Netzstecker aus der Netzsteckdose, wenn das Gerät
gereinigt wird oder im Fehlerfall. Ausschalten alleine genügt nicht,
weil noch immer Netzspannung im Gerät anliegt, solange der Netzstecker in der Netzsteckdose steckt.
► Ziehen Sie den Netzstecker aus der Netzsteckdose, wenn das Gerät
nicht benutzt wird!
► Lassen Sie beschädigte Netzstecker oder Netzkabel sofort von auto-
risiertem Fachpersonal oder dem Kundenservice austauschen, um
Gefährdungen zu vermeiden.
► Das Gerät und seine Anschlussleitung sind von Kindern fernzuhalten.
Sie dürfen das Gerät keinesfalls in Wasser oder andere Flüssigkeiten tauchen.
WARNUNG! VERLETZUNGSGEFAHR!
► Trennen Sie das Gerät grundsätzlich vom Stromnetz, wenn Sie Zube-
hörteile abnehmen oder anbringen. Ein unbeabsichtigtes Einschalten
des Gerätes wird so vermieden.
Nach Stromunterbrechung läuft das Gerät wieder an!
► Das Gerät ist bei nicht vorhandener Aufsicht und vor dem Zus-
ammenbau, dem Auseinandernehmen oder Reinigen stets vom
Netz zu trennen.
SKM 600 A1
DE│AT│CH
│
3 ■

WARNUNG! VERLETZUNGSGEFAHR!
► Dieses Gerät darf nicht von Kindern benutzt werden.
► Verwenden Sie nur die Original-Zubehörteile zu diesem Gerät.
Zubehörteile anderer Hersteller sind dafür möglicherweise nicht
geeignet und führen zu Gefährdungen!
► Dieses Gerät kann von Personen mit reduzierten physischen, senso-
rischen oder mentalen Fähigkeiten oder Mangel an Erfahrung und/
oder Wissen benutzt werden, wenn sie beaufsichtigt oder bezüglich
des sicheren Gebrauchs des Gerätes unterwiesen wurden und die
daraus resultierenden Gefahren verstanden haben.
► Kinder dürfen nicht mit dem Gerät spielen.
► Missbrauchen Sie das Gerät nicht für andere Zwecke, als in dieser
Bedienungsanleitung beschrieben. Ansonsten besteht Verletzungsgefahr!
► Wechseln Sie das Zubehör nur bei Stillstand des Antriebs und bei
gezogenem Netzstecker! Das Gerät läuft nach dem Ausschalten
noch kurze Zeit nach!
► Lassen Sie das Gerät niemals unbeaufsichtigt.
► Vor dem Auswechseln von Zubehör oder Zusatzteilen, die im Betrieb
bewegt werden, muss das Gerät ausgeschaltet und vom Netz getrennt werden.
► Geben Sie während das Gerät läuft, ausschließlich die zu verar-
beitenden Zutaten in die Rührschüssel.
► Stecken Sie niemals Hände oder Fremdgegenstände in die Einfüll-
hilfe, um Verletzungen und Beschädigungen des Gerätes zu vermeiden.
ACHTUNG! SACHSCHÄDEN!
► Betreiben Sie das Gerät nie ohne Zutaten! Überhitzungsgefahr!
► Füllen Sie niemals heiße Zutaten in das Gerät!
■ 4 │ DE
│AT│
CH SKM 600 A1
Vorbereitungen
1) Entnehmen Sie alle Teile aus dem Karton und
entfernen Sie das Verpackungsmaterial und
eventuelle Schutzfolien und Aufkleber.
2) Reinigen Sie alle Teile, wie im Kapitel „Reinigen
und Pflegen“ beschrieben. Stellen Sie sicher,
dass alle Teile vollständig getrocknet sind.
3) Stellen Sie das Gerät auf einen glatten und
sauberen Untergrund und befestigen Sie es mit
den Saugnäpfen.
4) Stecken Sie den Netzstecker in die Steckdose.
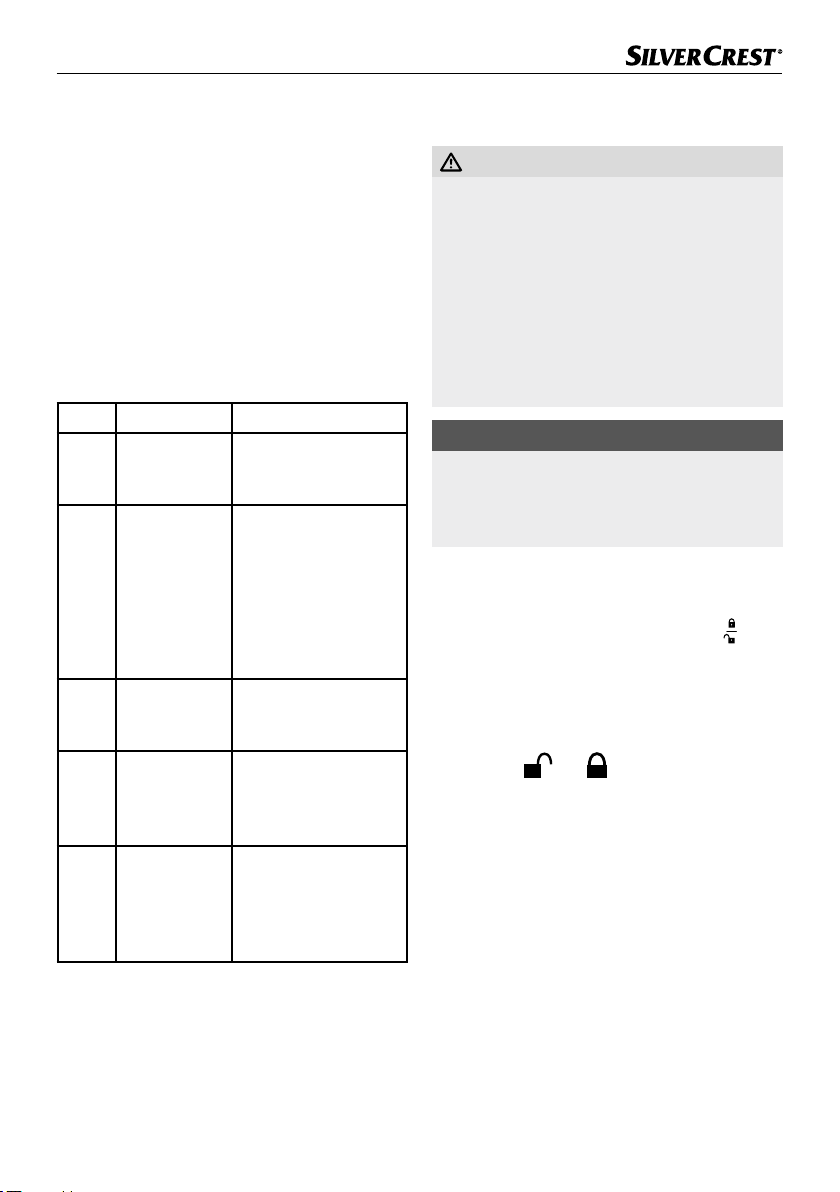
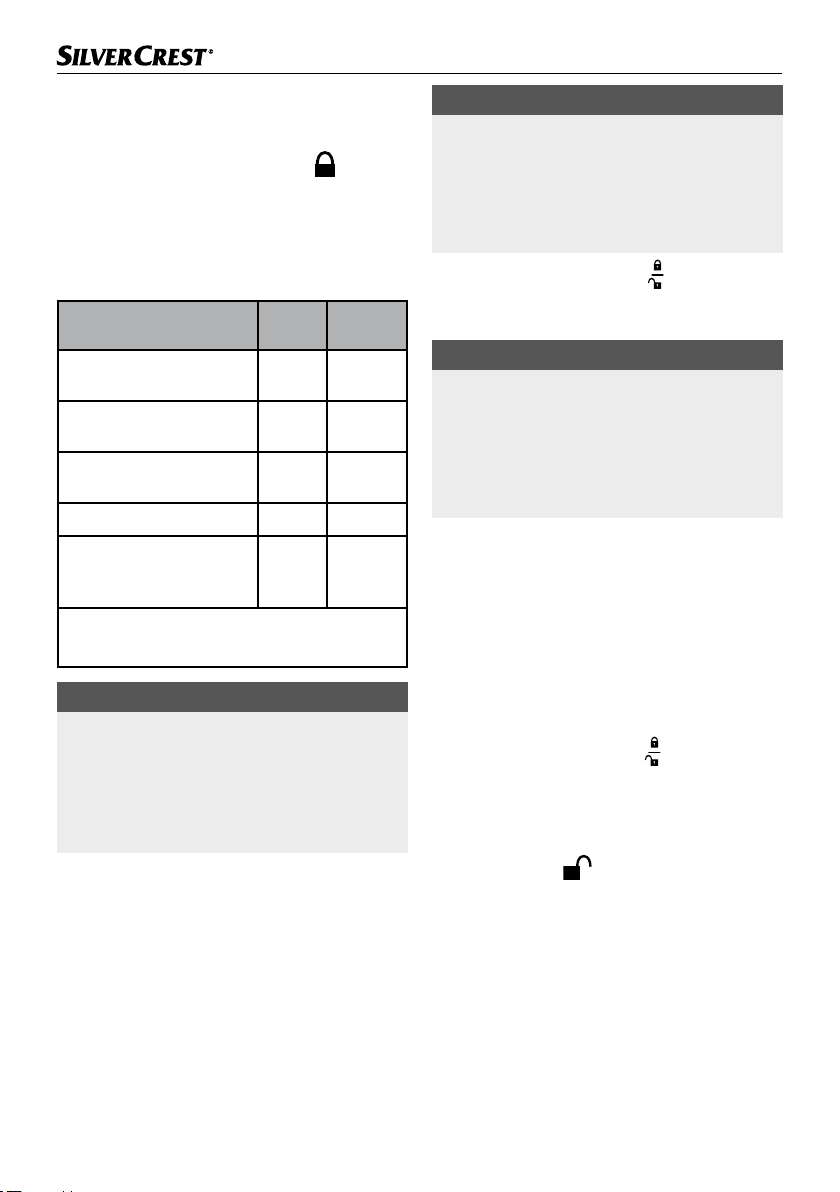
Geschwindigkeitsstufen
Stufe Einsatz geeignet für...
- Kneten und Mischen
von festem Teig oder
festeren Zutaten
- Mischen von dickem
Rührteig
- Mischen von Butter
und Mehl
- Mischen von Hefeteig
- Mischen von Mürbeteig
- Kneten von Hefeteig
- Kneten von dickem
Rührteig
- Kuchenteig
- Aufschlagen von
Butter mit Zucker
- Plätzchenteig
- Schlagsahne
- Eiweiß
- Majonnaise
- schaumig schlagen
von Butter
1 – 3
3 – 5
3 – 4
5 – 7
7 – 8
Knethaken 0
Flachrührer w
Flachrührer w
Knethaken 0
Flachrührer w
Schneebesen q
Arbeiten mit Knethaken,
Schneebesen und Flachrührer
WARNUNG! VERLETZUNGSGEFAHR!
► Greifen Sie während des Betriebes niemals in
die Rührschüssel 6! Verletzungsgefahr durch
rotierende Teile!
► Wechseln Sie Zubehör nur bei Stillstand des
Antriebs! Nach dem Ausschalten läuft der
Antrieb kurze Zeit nach.
► Schalten Sie im Fehlerfall das Gerät aus und
ziehen Sie den Netzstecker, um ein unbeabsichtigtes Einschalten des Gerätes zu vermeiden.
ACHTUNG! SACHSCHADEN!
► Bei Arbeiten mit Knethaken 0, Schnee-
besenq oder Flachrührer w empfehlen wir
nach 10 Minuten Betrieb das Gerät abkühlen
zu lassen.
Um das Gerät für den Betrieb mit Knethaken 0,
Schneebesen q und Flachrührer w vorzubereiten,
gehen Sie wie folgt vor:
1) Drücken Sie die Entriegelungstaste 2
Schwenkarm 1 bewegt sich nach oben.
2) Setzen Sie die Rührschüssel 6 so ein, dass die
Arretierungen an der Rührschüssel 6 in die
Aussparung am Sockel 5 greifen. Drehen Sie
die Rührschüssel 6 im Uhrzeigersinn (siehe
Symbole
diese verriegelt ist und fest sitzt.
3) Wählen Sie den passenden Einsatz 0 q w:
– Den Schneebesen q zum Schlagen von
Sahne.
– Den Flachrührer w zum Rühren von Rührteig.
– Den Knethaken 0 zum Kneten von schwerem
Teig, z. B. Hefeteig.
und am Sockel 5), so dass
. Der
SKM 600 A1
DE│AT│CH
│
5 ■
4) Montieren Sie je nach Aufgabe Knethaken 0,
Schneebesen q oder Flachrührer w auf der
Antriebsachse 7:
– Stecken Sie den Knethaken 0, Schnee-
besen q oder Flachrührer w (nachfolgend
„Einsatz“)so auf die Antriebsachse 7,dass
die beiden Metallstifte an der Antriebsachse7 in die Aussparungen am Einsatz
0 q w greifen.
– Drücken Sie den Einsatz 0 q w kräftig
auf die Antriebsachse 7, so dass sich die
Feder zusammendrückt und drehen Sie
dabei den Einsatz 0 q w ein wenig
gegen den Uhrzeigersinn (Richtung
– Lassen Sie den Einsatz 0 q w los. Dieser
sitzt nun fest auf der Antriebsachse 7.
5) Füllen Sie die Zutaten in die Rührschüssel 6,
beachten Sie dabei jedoch die folgende
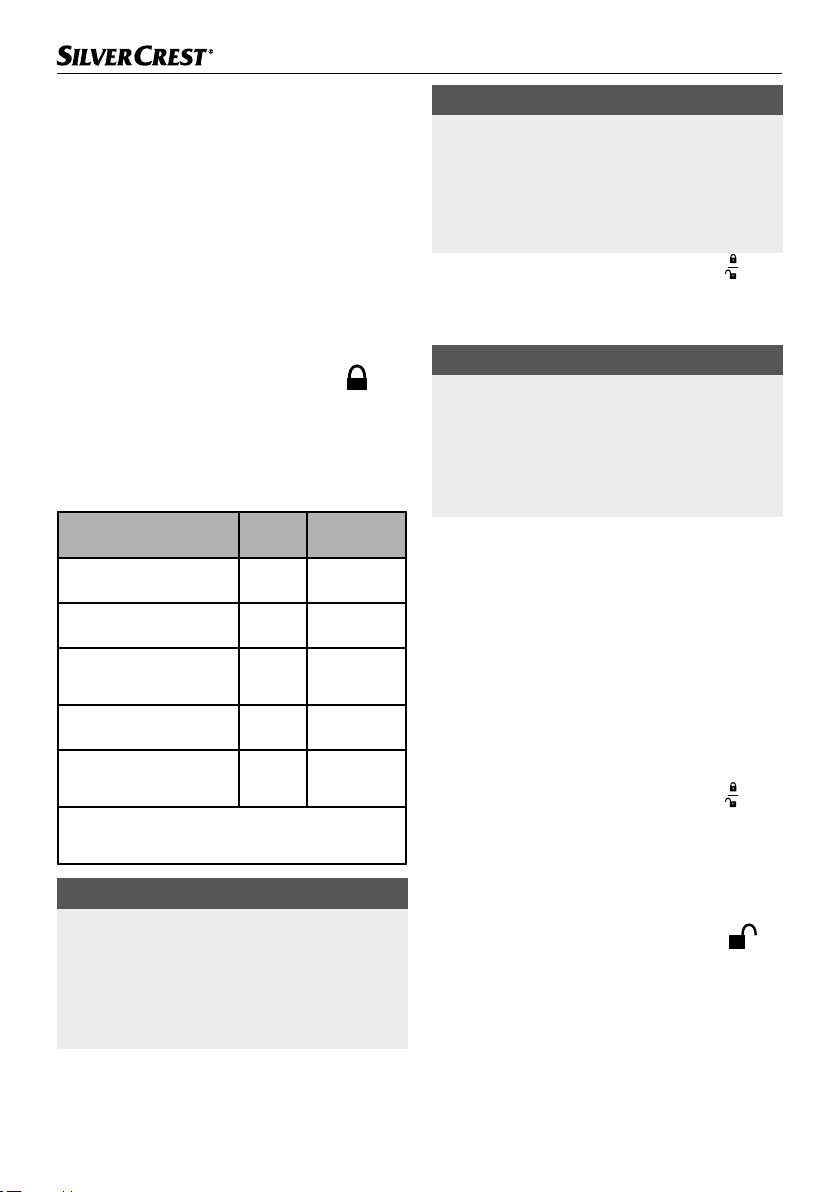
Tabelle mit den empfohlenen Einfüllmengen:
Einfüllmengen für… min. max.
Hefeteig N/A 500 g Mehl
Rührteig N/A 400 g Mehl
).
HINWEIS
► Beachten Sie, dass während des Knet-, bzw.
Rührvorgangs der Teig in der Rührschüssel 6
an Volumen zunimmt oder durch die Bewegung etwas nach oben gedrückt wird. Füllen
Sie daher niemals die Rührschüssel 6 bis
zum Rand voll!
6) Drücken Sie die Entriegelungstaste 2
schieben Sie den Schwenkarm 1 mit dem
montierten Einsatz 0 q w nach unten in die
Arbeitsposition.
HINWEIS
► Falls gewünscht, können Sie die Einfüllhilfe 8
am Deckel 9 montieren:
– Drücken Sie die Einfüllhilfe 8 in die
Aussparung am Deckel 9.
Sie können nun, auch während des Betriebs,
Zutaten einfüllen.
7) Schieben Sie den Deckel 9 auf die Rührschüssel 6.
8) Stellen Sie den Drehschalter 3 auf die
gewünschte Stufe (siehe Kapitel „Geschwindigkeitsstufen“).
und
schwerer Teig
(z. B. Mürbeteig)
Sahne 200 ml 1000 ml
Eiweiß
(Eier Gewichtsklasse M)
Passen Sie die restlichen Zutaten des Rezeptes
der jeweiligen Maximalmenge an.
ACHTUNG! SACHSCHADEN!
► Überschreiten Sie nicht die angegebenen
maximalen Einfüllmengen!
Ansonsten wird das Gerät überlastet.
► Falls das Gerät schwer läuft: Gerät abschalten,
die Hälfte des Teiges herausnehmen und jede
Hälfte gesondert kneten.
■ 6 │ DE
│AT│
N/A 400 g Mehl
2 12
CH SKM 600 A1
Nach der Arbeit
1) Schalten Sie das Gerät am Drehschalter 3
aus (Position „OFF“).
2) Nehmen Sie den Deckel 9 von der Rührschüssel 6 ab.
3) Drücken Sie die Entriegelungstaste 2
bringen Sie den Schwenkarm 1 in die höchste
Position.
4) Nehmen Sie den Einsatz 0 q w von der
Antriebsachse 7, indem Sie den Einsatz 0 q
w gegen die Antriebsachse 7 drücken und
gleichzeitig im Uhrzeigersinn (Richtung
drehen. Dann können Sie den Einsatz 0 q
w abnehmen.
5) Entnehmen Sie die Rührschüssel 6, indem Sie
diese gegen den Uhrzeigersinn dehen und
dann nach oben abnehmen.
6) Reinigen Sie alle Teile (siehe Kapitel „Reinigen
und Pflegen“).
und
)
Reinigen und Pflegen
GEFAHR! ELEKTRISCHER SCHLAG!
► Ziehen Sie vor jeder Reinigung den Netz-
stecker aus der Netzsteckdose! Es besteht
die Gefahr eines elektrischen Schlages!
Tauchen Sie das Gerät niemals in Wasser
oder andere Flüssigkeiten!
ACHTUNG! SACHSCHADEN!
► Verwenden Sie keine scheuernden oder ag-
gressiven Reinigungsmittel. Diese können die
Oberflächen beschädigen!
HINWEIS
► Reinigen Sie das Gerät am besten sofort nach
der Benutzung. Dann lassen sich Lebensmittelreste leichter entfernen.
Gehäuse reinigen
■ Wischen Sie das Gehäuse mit einem feuchten
Tuch ab. Bei hartnäckigeren Verschmutzungen,
geben Sie ein mildes Spülmittel auf das Tuch.
Wischen Sie Spülmittelreste mit einem mit klarem
Wasser befeuchteten Tuch ab. Trocknen Sie das
Gerät danach gut ab.
HINWEIS
Die Rührschüssel 6, der Deckel 9,
die Einfüllhilfe 8, der Knethaken 0,
der Schneebesen q und der Flachrührer w sind auch für die Reinigung in der Spülmaschine geeignet. Legen Sie möglichst alle
Teile, die (auch teilweise) aus Kunststoff bestehen,
in den oberen Korb der Spülmaschine und klemmen Sie die Teile nicht ein. Ansonsten kann es zu
Verformungen und Spannungsrissen kommen.
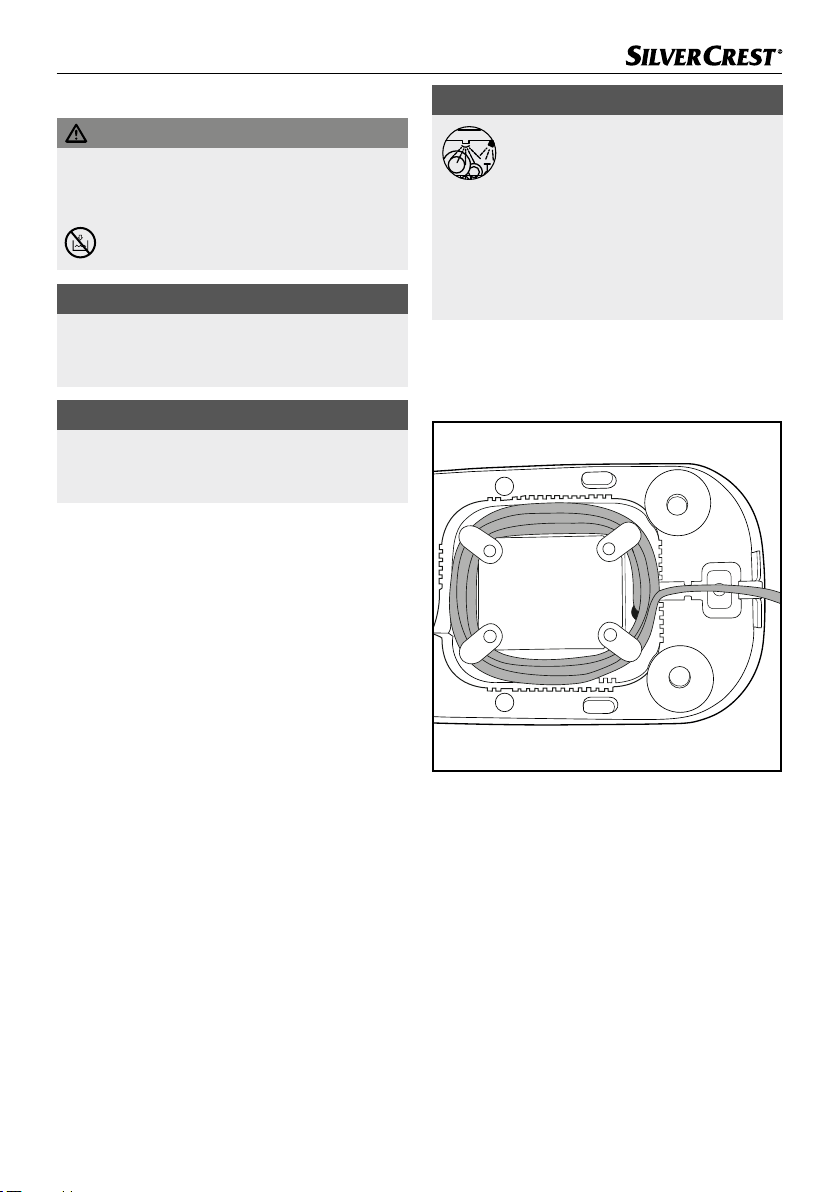
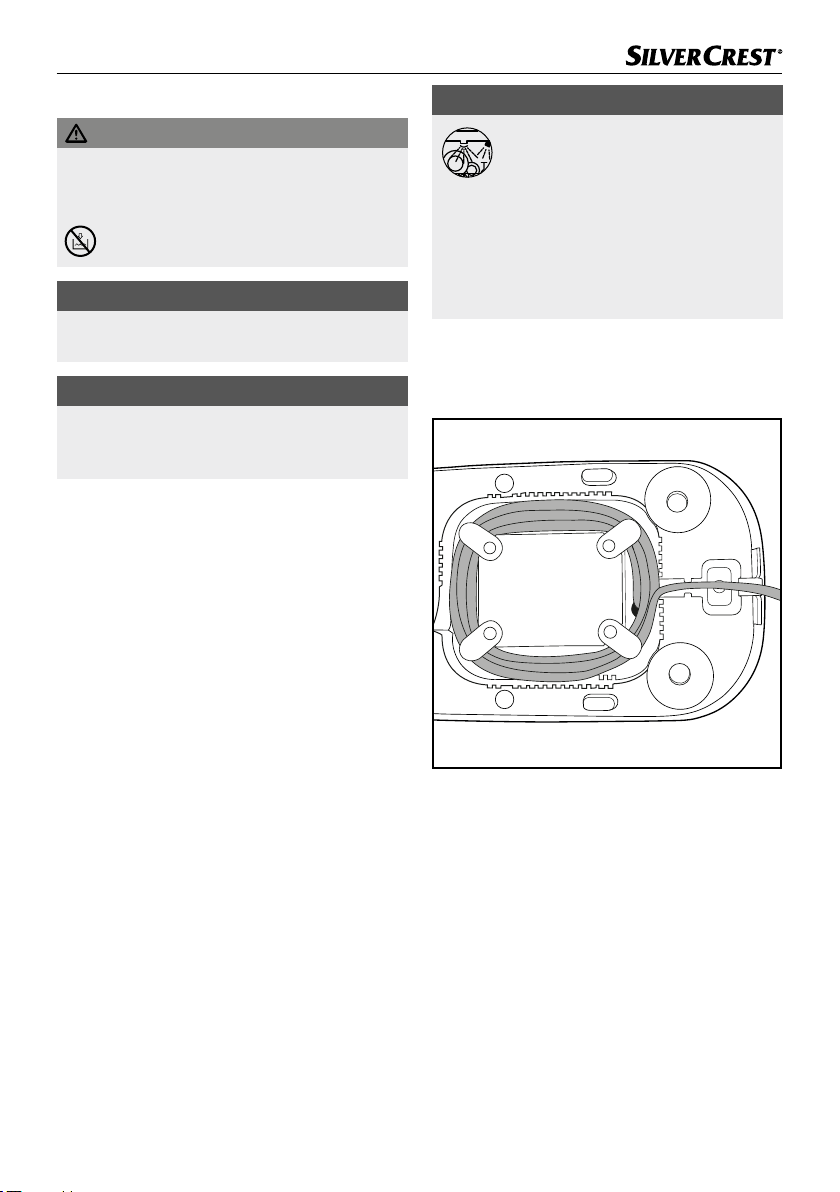
Aufbewahrung
■ Wickeln Sie das Netzkabel 4 um die Kabelauf-
wicklung an der Unterseite des Gerätes:
Zubehör reinigen
■ Reinigen Sie die Rührschüssel 6, den Deckel
9, die Einfüllhilfe 8 und den Knethaken 0,
den Schneebesen q und den Flachrührer w im
warmen Wasser mit etwas Spülmittel. Entfernen
Sie eventuelle Rückstände mit einer Spülbürste.
Spülen Sie alle Teile mit klarem, warmem
Wasser ab und stellen Sie sicher, dass alle Teile
vor einer erneuten Benutzung trocken sind.
SKM 600 A1
■ Bewahren Sie das gereinigte Gerät an einem
sauberen, staubfreien und trockenen Ort auf.
DE│AT│CH
│
7 ■

Fehler beheben
Wenn das Gerät plötzlich stehen bleibt:
■ Das Gerät ist überhitzt und die automatische
Sicherheitsabschaltung ist aktiviert.
– Drehschalter 3 auf „OFF“ stellen.
– Netzstecker aus der Steckdose ziehen.
– Das Gerät 15 Minuten abkühlen lassen.
– Ist das Gerät nach den 15 Minuten noch
nicht vollständig abgekühlt, wird es nicht
angehen.
– Weitere 15 Minuten warten und erneut
einschalten.
Entsorgung
Werfen Sie das Gerät keinesfalls in den normalen Hausmüll. Dieses Produkt unterliegt
der europäischen Richtlinie
2012/19/EU.
Entsorgen Sie das Gerät über einen zugelassenen
Entsorgungsbetrieb oder über Ihre kommunale Ent sorgungseinrichtung. Beachten Sie die aktuell
geltenden Vorschriften. Setzen Sie sich im Zweifelsfall mit Ihrer Entsorgungseinrichtung in Verbindung.
Möglichkeiten zur Entsorgung des aus gedienten Produkts erfahren Sie bei
Ihrer Gemeinde- oder Stadtverwaltung.
Wenn das Gerät sich nicht einschalten lässt:
– Überprüfen Sie, ob sich der Netzstecker in
der Steckdose befindet.
– Überprüfen Sie, ob sich der Schwenkarm 1
in der korrekten Position befindet.
Technische Daten
Netzspannung: 220 – 240 V ∼
(Wechselstrom),
50 – 60 Hz
Leistungsaufnahme: 600 W
Schutzklasse: II /
max. Fassungsvermögen
Rührschüssel 6: ca. 5 l
Alle Teile dieses Gerätes, die mit Lebensmitteln in Berührung kommen, sind lebensmittelecht.
Wir empfehlen folgende Betriebszeiten:
Lassen Sie das Gerät bei Arbeiten mit Knet-
haken0, Schneebesen q oder Flachrührer w
nach 10Minuten Betrieb abkühlen.
Wenn diese Betriebszeit überschritten wird, kann es
durch Überhitzung zu Schäden am Gerät führen.
(Doppelisolierung)
Die Verpackung besteht aus umweltfreundlichen Materialien, die Sie über
die örtlichen Recyclingstellen ent sorgen
können.
Entsorgen Sie die Verpackung umweltgerecht. Beachten Sie die Kennzeichnung auf den verschiedenen Verpack-
ungsmaterialien und trennen Sie diese
gegebenenfalls gesondert.
Die Verpackungsmate rialien sind gekennzeichnet
mit Abkürzungen (a) und Ziffern (b) mit folgender
Bedeutung: 1–7: Kunststoffe, 20–22: Papier und
Pappe, 80–98: Verbundstoffe.
■ 8 │ DE
│AT│
CH SKM 600 A1

Garantie der
Kompernaß Handels GmbH
Sehr geehrte Kundin, sehr geehrter Kunde,
Sie erhalten auf dieses Gerät 3 Jahre Garantie ab
Kaufdatum. Im Falle von Mängeln dieses Produkts
stehen Ihnen gegen den Verkäufer des Produkts
gesetzliche Rechte zu. Diese gesetzlichen Rechte
werden durch unsere im Folgenden dargestellte
Garantie nicht eingeschränkt.
Garantiebedingungen
Die Garantiefrist beginnt mit dem Kaufdatum. Bitte
bewahren Sie den Kassenbon gut auf. Dieser wird
als Nachweis für den Kauf benötigt.
Tritt innerhalb von drei Jahren ab dem Kaufdatum
dieses Produkts ein Material- oder Fabrikationsfehler auf, wird das Produkt von uns – nach unserer
Wahl – für Sie kostenlos repariert, ersetzt, oder der
Kaufpreis erstattet. Diese Garantieleistung setzt
voraus, dass innerhalb der Dreijahresfrist das defekte
Gerät und der Kaufbeleg (Kassenbon) vorgelegt
und schriftlich kurz beschrieben wird, worin der
Mangel besteht und wann er aufgetreten ist.
Wenn der Defekt von unserer Garantie gedeckt ist,
erhalten Sie das reparierte oder ein neues Produkt
zurück. Mit Reparatur oder Austausch des Produkts
beginnt kein neuer Garantiezeitraum.
Garantiezeit und gesetzliche
Mängelansprüche
Die Garantiezeit wird durch die Gewährleistung
nicht verlängert. Dies gilt auch für ersetzte und
reparierte Teile. Eventuell schon beim Kauf vorhandene Schäden und Mängel müssen sofort nach
dem Auspacken gemeldet werden. Nach Ablauf
der Garantiezeit anfallende Reparaturen sind kostenpflichtig.
Garantieumfang
Das Gerät wurde nach strengen Qualitätsrichtlinien
sorgfältig produziert und vor Auslieferung gewissenhaft geprüft.
Die Garantieleistung gilt für Material- oder Fabrikationsfehler. Diese Garantie erstreckt sich nicht auf
Produktteile, die normaler Abnutzung ausgesetzt
sind und daher als Verschleißteile angesehen werden
können oder für Beschädigungen an zerbrech lichen
Teilen, z. B. Schalter, Akkus oder Teile, die aus Glas
gefertigt sind.
Diese Garantie verfällt, wenn das Produkt beschädigt, nicht sachgemäß benutzt oder gewartet wurde.
Für eine sachgemäße Benutzung des Produkts sind
alle in der Bedienungsanleitung aufgeführten Anweisungen genau einzuhalten. Verwendungszwecke
und Handlungen, von denen in der Bedienungsanleitung abgeraten oder vor denen gewarnt wird,
sind unbedingt zu vermeiden.
Das Produkt ist nur für den privaten und nicht für
den gewerblichen Gebrauch bestimmt. Bei missbräuchlicher und unsachgemäßer Behandlung,
Gewaltanwendung und bei Eingriffen, die nicht von
unserer autorisierten Serviceniederlassung vorgenommen wurden, erlischt die Garantie.
SKM 600 A1
DE│AT│CH
│
9 ■
Abwicklung im Garantiefall
Um eine schnelle Bearbeitung Ihres Anliegens zu
gewährleisten, folgen Sie bitte den folgenden
Hinweisen:
■ Bitte halten Sie für alle Anfragen den Kassenbon
und die Artikelnummer (z.B.IAN123456) als
Nachweis für den Kauf bereit.
■ Die Artikelnummer entnehmen Sie bitte dem Typen-
schild am Produkt, einer Gravur am Produkt,
dem Titelblatt der Bedienungsanleitung (unten
links) oder dem Aufkleber auf der Rück- oder
Unterseite des Produktes.
■ Sollten Funktionsfehler oder sonstige Mängel
auftreten, kontaktieren Sie zunächst die nachfolgend benannte Serviceabteilung telefonisch
oder per E-Mail.
■ Ein als defekt erfasstes Produkt können Sie dann
unter Beifügung des Kaufbelegs (Kassenbon) und
der Angabe, worin der Mangel besteht und
wann er aufgetreten ist, für Sie portofrei an die
Ihnen mitgeteilte Serviceanschrift übersenden.
Auf www.lidl-service.com können Sie
diese und viele weitere Handbücher,
Produktvideos und Installationssoftware herunterladen.
Mit diesem QR-Code gelangen Sie
direkt auf die Lidl-Service-Seite (www.lidl-service.com)
und können mittels der Eingabe der Artikelnummer
(IAN) 123456 Ihre Bedienungsanleitung öffnen.
Service
Service Deutschland
Tel.: 0800 5435 111 (kostenfrei
aus dem dt. Festnetz/Mobilfunknetz)
E-Mail: kompernass@lidl.de
Service Österreich
Tel.: 0820 201 222 (0,15 EUR/Min.)
E-Mail: kompernass@lidl.at
Service Schweiz
Tel.: 0842 665566 (0,08 CHF/Min.,
Mobilfunk max. 0,40 CHF/Min.)
E-Mail: kompernass@lidl.ch
IAN 314615
316618
317345
317346
Importeur
Bitte beachten Sie, dass die folgende Anschrift
keine Serviceanschrift ist. Kontaktieren Sie zunächst
die benannte Servicestelle.
KOMPERNASS HANDELS GMBH
BURGSTRASSE 21
DE - 44867 BOCHUM
DEUTSCHLAND
www.kompernass.com
■ 10 │ DE
│AT│
CH SKM 600 A1

Rezepte
Grundrezept Hefeteig
Zutaten
500 g Weizenmehl Type 550
1 Würfel frische Hefe
60 g Butter
1 Prise Salz
200 – 250 ml lauwarme Milch
2 Eier
Zubereitung
♦ Alle Zutaten in die Rührschüssel 6 geben.
1 Minute auf Stufe 1 mit dem Knethaken 0
kneten und anschließend 5 Minuten auf Stufe 4.
In der Rührschüssel 6 40 Minuten gehen
lassen. Den Teig zu einer Kugel formen.
♦ Den Teig auf einem Backblech ausrollen und
nach Belieben belegen.
♦ Bei 200°C (Unter-/Oberhitze) für
25 – 30Minuten backen.
Grundrezept Mürbeteig
Zutaten
250 g Mehl
125 g kalte Butter
1 Prise Salz
1 Ei
150 g Zucker
Zubereitung
♦ Alle Zutaten für den Teig in die Rührschüssel 6
geben und mit dem Flachrührer w auf Stufe 3
ca. 2 – 3 Minuten zu einem mürben Teig kneten.
♦ Diesen 30 Minuten im Kühlschrank kaltstellen.
♦ Backofen auf 200°C vorheizen.
♦ Springform einfetten und leicht mit Mehl
bestreuen.
♦ Teig zwischen zwei Frischhaltefolien ausrollen
(auf ca. 30 cm Durchmesser) und in die Spring-
form geben.
♦ Bei 200°C (Unter-/Oberhitze) für 15 Minuten
backen.
SKM 600 A1
DE│AT│CH
│
11 ■

Grundrezept Rührkuchen
Zutaten
250 g Butter
250 g Zucker
1 Päckchen Vanillezucker
250 g Mehl
4 Eier
½ Päckchen Backpulver
Zubereitung
♦ Butter, Zucker und Vanillezucker in die Rühr-
schüssel 6 geben und mit dem Flachrührer w
auf Stufe 3 – 5 schaumig rühren.
♦ Eier nacheinander hinzugeben und weiterrühren
bis alles gut vermischt ist.
♦ Mehl und Backpulver hinzugeben und alles zu
einem glatten Teig verrühren.
♦ Eine Kastenform (ca. 30 cm) ausfetten und Teig
hineingeben.
♦ Bei 180°C (Unter/-Oberhitze) für ca.
50 – 60min backen.
■ 12 │ DE
│AT│
CH SKM 600 A1

Contents
Introduction ..........................................................14
Intended use ..........................................................14
Package contents ......................................................14
Appliance description ..................................................14
Safety information .....................................................15
Preparations ..........................................................17
Speed settings ........................................................17
Working with the kneading hook, beater and whisk ........................17
After you have finished using your appliance ............................................18
Cleaning and care .....................................................19
Cleaning the housing ...............................................................19
Cleaning the accessories ............................................................19
Storage ..............................................................19
Troubleshooting .......................................................20
Technical data .........................................................20
Disposal .............................................................20
Kompernass Handels GmbH warranty ....................................21
Service ..........................................................................22
Importer .........................................................................22
Recipes ..............................................................23
Basic recipe for yeast dough .........................................................23
Basic recipe for shortcrust pastry ......................................................23
Basic recipe for sponge cake. . . . . . . . . . . . . . . . . . . . . . . . . . . . . . . . . . . . . . . . . . . . . . . . . . . . . . . . .24
SKM 600 A1
GB│IE
│
13 ■

Introduction
Congratulations on the purchase of your new
appliance.
You have selected a high-quality product.
The operating instructions are part of this product.
They contain important information about safety,
usage and disposal. Before using the product,
please familiarise yourself with all operating and
safety instructions. Use the product only as described
and for the range of applications specified.
Please also pass these operating instructions on to
any future owner.
Intended use
This appliance is intended exclusively for processing
foodstuffs in normal household quantities.
This appliance is intended solely for use in private
households. It is not suitable for commercial use!
This appliance is intended only for private use in
enclosed, dry spaces. It must not be used outdoors.
Use the appliance only with the original accessories.
Package contents
Food processor
Mixing bowl with lid and filling accessory
Kneading hook
Whisk
Beater
Operating instructions
Appliance description
Figure A:
1 Swivel arm
2 Release button
3 Rotary switch
4 Power cable
5 Base
6 Mixing bowl
7 Drive shaft
Figure B:
8 Filling accessory
9 Lid
0 Kneading hook
q Whisk
w Beater
NOTE
► Check contents for completeness and damage
immediately after unpacking. Contact Customer Services if necessary.
■ 14 │ GB
│
IE SKM 600 A1
Safety information
DANGER! RISK OF ELECTRIC SHOCK!
► The appliance should only be connected to a correctly installed and
earthed mains power socket. Ensure that the rating for your local
power supply corresponds with the details on the rating plate of the
appliance.
► Ensure that the power cable does not become wet or moist during
use. Route the cable in such a way that it cannot be crushed or
damaged.
► Keep the power cable away from hot surfaces.
► Do not perform any repairs to the appliance. All repairs must be
performed by our Customer Service Unit or by a qualified specialist
technician.
► Remove the plug from the mains power socket when the appliance is
being cleaned or in the event of a fault. Just switching off the appliance
is not sufficient, as the appliance is subject to mains voltage as long
as the plug is connected to the mains power socket.
► Always remove the plug from the mains power socket when the
appliance is not in use.
► Arrange for defective power plugs and/or cables to be replaced
as soon as possible by a qualified technician or by our Customer
Service Department to avoid the risk of injury.
► The appliance and its connecting cable must be kept away from
children.
Never immerse the appliance in water or other liquids.
WARNING! RISK OF INJURY!
► Always disconnect the appliance from the mains power supply
when fitting or removing accessories. This will prevent unintentional
activation of the appliance.
The appliance will restart after any power outage!
SKM 600 A1
GB│IE
│
15 ■

WARNING! RISK OF INJURY!
► The appliance should always be disconnected from the mains when
unattended and before assembly, disassembly or cleaning.
► This appliance should not be used by children.
► Use only the original accessory parts for this appliance. Accessory
parts from other manufacturers may not be suitable, and this may
lead to risks!
► This appliance may be used by persons with limited physical, sensory
or mental capabilities or lack of experience and knowledge, provided
that they are under supervision or have been told how to use the
appliance safely and are aware of the potential risks.
► Children must not play with the appliance.
► Never use the appliance for purposes other than those described in
these instructions. Otherwise there is a risk of serious injury!
► Do not change accessories unless the drive unit is entirely at a standstill
and the blender is unplugged from the power supply! The appliance
will run on for a short time after being switched off!
► Never leave the appliance unattended!
► Before replacing any accessories or additional parts that move during
operation, the appliance must be switched off and disconnected from
the mains power.
► While the appliance is in operation, do not put anything other than
the ingredients to be processed into the mixing bowl.
► To avoid injuries or damage to the appliance, do not put your hands
or any foreign objects into the filling accessory.
ATTENTION! PROPERTY DAMAGE!
► Do not operate the appliance without ingredients. Risk of overheating!
► Never fill the appliance with hot ingredients!
■ 16 │ GB
│
IE SKM 600 A1

Preparations
1) Take all the parts out of the box and remove
the packaging material and any protective
wrapping or stickers.
2) Clean all components as described in the
section “Cleaning and care”. Ensure that all
parts are completely dry.
3) Place the appliance on a clean and level
surface and attach it firmly in place with the
suction cups.
4) Insert the power plug into the mains socket.
Speed settings
Level Use suitable for...
1 – 3
3 – 5
3 – 4
5 – 7
7 – 8
Kneading
hook 0
Beater w
Beater w
Kneading
hook 0
Beater w
Whisk q
- Kneading and mixing
of firm dough or
firmer ingredients
- Mixing thick cake
mixture
- Mixing butter and
flour
- Mixing yeast dough
- Mixing shortcrust
pastry
- Kneading yeast
dough
- Kneading thick cake
mixture
- Cake mix
- Whisking butter with
sugar
- Biscuit dough
- Whipped cream
- Egg white
- Mayonnaise
- Whisking butter until
fluffy
Working with the kneading
hook, beater and whisk
WARNING! RISK OF INJURY!
► Never place your hands or fingers in the
mixing bowl 6 during operation! Danger
of injury due to rotating parts!
► Do not change accessories unless the drive is at
a complete standstill! After being switched off,
the drive unit will continue to run for a short time.
► In cases of malfunction, switch the appliance
off and remove the plug from the wall socket
to prevent the appliance from being switched
back on unintentionally.
ATTENTION! PROPERTY DAMAGE!
► When working with the kneading hook 0,
whisk q or beater w we recommend allowing
the appliance to cool down after 10 minutes of
operation.
Please proceed as follows to prepare the appliance for operation with the kneading hook 0,
whisk q or beater w:
1) Press the release button 2
arm 1 moves upwards.
2) Insert the mixing bowl 6 in such a way that
the locking tabs on the mixing bowl 6 grip
into the recesses in the base 5. Turn the
mixing bowl 6 clockwise (see
symbols on the base 5) so that it is locked
and firmly held in place.
3) Select the appropriate attachment 0 q w:
– The whisk q for whipping cream.
– The beater w for stirring cake mixture.
– The kneading hook 0 for kneading heavy
dough such as yeast dough.
4) Depending on what you want to do, attach
the kneading hook 0, whisk q or beater w
to the drive shaft 7:
– Fit the kneading hook 0, whisk q or
beater w (referred to in the following as
“the attachment”) to the drive shaft 7 in
such a way that the two metal pins on the
drive shaft 7 engage in the recesses of the
attachment 0 q w.
. The swivel
and
SKM 600 A1
GB│IE
│
17 ■
– Push the attachment 0 q w firmly onto the
drive shaft 7 so that the spring compresses,
and rotate the attachment 0 q w anti-
clockwise a little way (towards
– Let go of the attachment 0 q w. It is
now sitting firmly on the drive shaft 7.
5) Put the ingredients into the mixing bowl 6,
observing the following table with the recommended filling quantities:
Filling quantities for... min. max.
Yeast dough N/A
Cake mixture N/A
Heavy dough
(e.g. shortcrust pastry)
Cream 200 ml 1000 ml
Egg white
(weight class M)
).
N/A
2 12
500 g
flour
400 g
flour
400 g
flour
NOTE
► Please note that during the kneading or stirring
process, the mixture in the mixing bowl 6
increases in volume or is pressed upward
slightly as a result of the movement. You
should therefore never fill the mixing bowl 6
right up to the top!
6) Press the release button 2
swivel arm 1 with the mounted attachment 0
q w downwards into the working position.
NOTE
► If you wish, you can fit the filling accessory 8
onto the lid 9:
– Press the filling accessory 8 into the
cut-out on the lid 9.
Now you can add ingredients even during
operation.
7) Push the lid 9 onto the mixing bowl 6.
8) Turn the rotary switch 3 to the required level
(see the section “Speed settings”).
and press the
Adapt the remaining ingredients in the recipe to
the respective maximum quantity.
CAUTION! PROPERTY DAMAGE!
► Do not exceed the specified maximum filling
quantities!
Otherwise the appliance will be overloaded.
► If the appliance is labouring: Switch off the
appliance, remove half of the dough and
knead each half separately.
■ 18 │ GB
│
IE SKM 600 A1
After you have finished using your
appliance
1) Turn the appliance off using the rotary switch 3
(Position “OFF”).
2) Remove the lid 9 from the mixing bowl 6.
3) Push the release button 2
swivel arm 1 to the highest position.
4) Remove the attachment 0 q w from the drive
shaft 7 by pushing the attachment 0 q w
against the drive shaft 7 and turning clockwise (direction
can remove the attachment 0 q w.
5) Remove the mixing bowl 6 by turning it anticlockwise and then pulling it upwards.
6) Clean the appliance (see section “Cleaning
and care”).
) at the same time. Then you
and move the
Cleaning and care
DANGER! RISK OF ELECTRIC SHOCK!
► Before cleaning the appliance, disconnect
the power plug from the mains power socket!
There is a risk of electric shock!
Never immerse the appliance in water or
any other liquid!
ATTENTION! PROPERTY DAMAGE!
► Do not use abrasive or aggressive cleaning
materials. These may damage the surfaces.
NOTE
► We recommend cleaning the appliance
directly after use. This makes food residues
easier to remove.
Cleaning the housing
■ Wipe the housing with a damp cloth. For stub-
born soiling use a mild detergent on the cloth.
Wipe off any detergent residue using a cloth
moistened with clean water. Then dry the
appliance carefully.
Cleaning the accessories
■ Clean the mixing bowl 6, the lid 9, the filling
accessory 8 and the kneading hook 0, the
whisk q and the beater w in warm water with
a little washing-up liquid. Any residues can be
removed with a washing-up brush. Rinse all
parts with warm clean water and make sure that
all parts are dry before re-using them.
NOTE
The mixing bowl 6, the lid 9, the
filling accessory 8, the kneading hook
0, the whisk q and the beater w are
also dishwasher-compatible. If possible,
place all parts that are completely (or
partially) made of plastic in the upper
basket of the dishwasher, and do not
wedge in the parts. Otherwise deformation or stress cracking may occur.
Storage
■ Wind the power cable 4 around the cable
retainer on the underside of the appliance.
■ Store the cleaned appliance in a clean, dust-free
and dry location.
SKM 600 A1
GB│IE
│
19 ■
Troubleshooting
If the appliance suddenly stops working:
■ The appliance has overheated and triggered the
automatic safety cut-out.
– Turn the rotary switch 3 to “OFF”.
– Remove the plug from the wall socket.
– Allow the appliance to cool for 15 minutes.
– If the appliance has not yet cooled off com-
pletely after 15 minutes, it will not start.
– Wait a further 15 minutes and try switching
on again.
If the appliance cannot be switched on.
– Check that the plug is correctly connected to
a wall socket.
– Check whether the swivel arm 1 is in the
correct position.
Disposal
Never dispose of the appliance
in your normal domestic
waste. This product is subject
to the provisions of European
Directive 2012/19/EU.
Dispose of the appliance through an approved
disposal facility or your municipal waste
facility. Please observe the currently applicable
regulations. Please contact your waste disposal
centre if you are in any doubt.
Your local community or municipal
authorities can provide information on
how to dispose of the worn-out
product.
The packaging is made from
environmentally friendly material and
can be disposed of at your local
recycling plant.
Technical data
Input voltage: 220 – 240 V ∼
(alternating current),
50 – 60 Hz
Power consumption: 600 W
Protection class: II /
Max. capacity
Mixing bowl 6: approx. 5 l
All parts of this appliance which come into
contact with food are food-safe.
We recommend the following operating times:
When working with the kneading hook 0, whisk q
or beater w, allow the appliance to cool down
after 10 minutes of operation.
If you exceed this operating time, the appliance
can overheat and be damaged!
(double insulation)
Dispose of the packaging in an
environmentally friendly manner.
Note the labelling on the packaging
and separate the packaging material
components for disposal if necessary. The
packaging material is labelled with abbreviations (a)
and numbers (b) with the following meanings:
1–7: Plastics, 20–22: Paper and cardboard,
80–98: Composites.
■ 20 │ GB
│
IE SKM 600 A1

Kompernass Handels GmbH
warranty
Dear Customer,
This appliance has a 3-year warranty valid from
the date of purchase. If this product has any faults,
you, the buyer, have certain statutory rights. Your
statutory rights are not restricted in any way by the
warranty described below.
Warranty conditions
The warranty period starts on the date of purchase.
Please keep your receipt in a safe place. This will
be required as proof of purchase.
If any material or manufacturing fault occurs within
three years of the date of purchase of the product,
we will either repair or replace the product for you
or refund the purchase price (at our discretion).
This warranty service requires that you present the
defective appliance and the proof of purchase (receipt) within the three-year warranty period, along
with a brief written description of the fault and of
when it occurred.
If the defect is covered by the warranty, your product will either be repaired or replaced by us. The
repair or replacement of a product does not signify
the beginning of a new warranty period.
Warranty period and statutory
claims for defects
The warranty period is not prolonged by repairs
effected under the warranty. This also applies to
replaced and repaired components. Any damage
and defects present at the time of purchase must
be reported immediately after unpacking. Repairs
carried out after expiry of the warranty period shall
be subject to a fee.
Scope of the warranty
This appliance has been manufactured in accordance with strict quality guidelines and inspected
meticulously prior to delivery.
The warranty covers material faults or production
faults. The warranty does not extend to product
parts subject to normal wear and tear or to fragile
parts which could be considered as consumable
parts such as switches, batteries or parts made of
glass.
The warranty does not apply if the product has
been damaged, improperly used or improperly maintained. The directions in the operating
instructions for the product regarding proper use
of the product are to be strictly followed. Uses
and actions that are discouraged in the operating
instructions or which are warned against must be
avoided.
This product is intended solely for private use and
not for commercial purposes. The warranty shall
be deemed void in cases of misuse or improper
handling, use of force and modifications / repairs
which have not been carried out by one of our
authorised Service centres.
SKM 600 A1
GB│IE
│
21 ■
Warranty claim procedure
To ensure quick processing of your case, please
observe the following instructions:
■ Please have the till receipt and the item number
(e.g.IAN12345) available as proof of purchase.
■ You will find the item number on the type plate
on the product, an engraving on the product,
on the front page of the operating instructions
(below left) or on the sticker on the rear or bottom of the product.
■ If functional or other defects occur, please
contact the service department listed either by
telephone or by e-mail.
■ You can return a defective product to us free of
charge to the service address that will be provided to you. Ensure that you enclose the proof
of purchase (till receipt) and information about
what the defect is and when it occurred.
You can download these instructions
along with many other manuals,
product videos and installation
software at www.lidl-service.com.
This QR code will take you directly to
the Lidl service page (www.lidl-service.com) where
you can open your operating instructions by entering the item number (IAN) 123456.
Service
Service Great Britain
Tel.: 0800 404 7657
E-Mail: kompernass@lidl.co.uk
Service Ireland
Tel.: 1890 930 034
(0,08 EUR/Min., (peak))
(0,06 EUR/Min., (off peak))
E-Mail: kompernass@lidl.ie
IAN 314615
316618
317345
317346
Importer
Please note that the following address is not the
service address. Please use the service address
provided in the operating instructions.
KOMPERNASS HANDELS GMBH
BURGSTRASSE 21
DE - 44867 BOCHUM
GERMANY
www.kompernass.com
■ 22 │ GB
│
IE SKM 600 A1

Recipes
Basic recipe for yeast dough
Ingredients
500 g wheat flour (type 550)
1 cube fresh yeast
60 g butter
Pinch of salt
200–250 ml lukewarm milk
2 eggs
Preparation
♦ Place all ingredients in the mixing bowl 6.
Knead for 1 minute at level 1 using the kneading
hook 0 and then for 5 minutes at level 4.
Leave to rise in the mixing bowl 6 for
40 minutes. Form the dough into a ball.
♦ Roll out the dough on a baking tray and add
toppings as required.
♦ Bake at 200°C (bottom/top heat) for 25–
30 minutes.
Basic recipe for shortcrust pastry
Ingredients
250g plain flour
125 g cold butter
Pinch of salt
1 egg
150 g sugar
Preparation
♦ Place all ingredients in the mixing bowl 6 and
knead with the beater w at level 3 for approx.
2–3 minutes until a crumbly dough is formed.
♦ Refrigerate this for 30 minutes.
♦ Preheat oven to 200°C.
♦ Grease a springform tin and sprinkle lightly with
flour.
♦ Roll out the dough between two pieces of cling
film (approx. 30 cm in diameter), remove cling
film and place dough into the springform tin.
♦ Bake at 200°C (bottom/top heat) for
15 minutes.
SKM 600 A1
GB│IE
│
23 ■

Basic recipe for sponge cake
Ingredients
250 g butter
250 g sugar
1 sachet of vanilla sugar
250g plain flour
4 eggs
½ sachet baking powder
Preparation
♦ Put butter, sugar and vanilla sugar in the mixing
bowl 6 and stir with the beater w at level
3–5 until fluffy.
♦ Add the eggs one after the other and continue
stirring until everything is well mixed.
♦ Add the flour and baking powder and mix
everything into a smooth dough.
♦ Grease a rectangular cake tin (approx. 30 cm)
and add the dough.
♦ Bake at 180°C (bottom/top heat) for approx.
50–60 min.
■ 24 │ GB
│
IE SKM 600 A1
 Loading...