

HOYER Handel GmbH
Tasköprüstraße 3
DE-22761 Hamburg
DEUTSCHLAND
Status of information · Stand der Informationen:
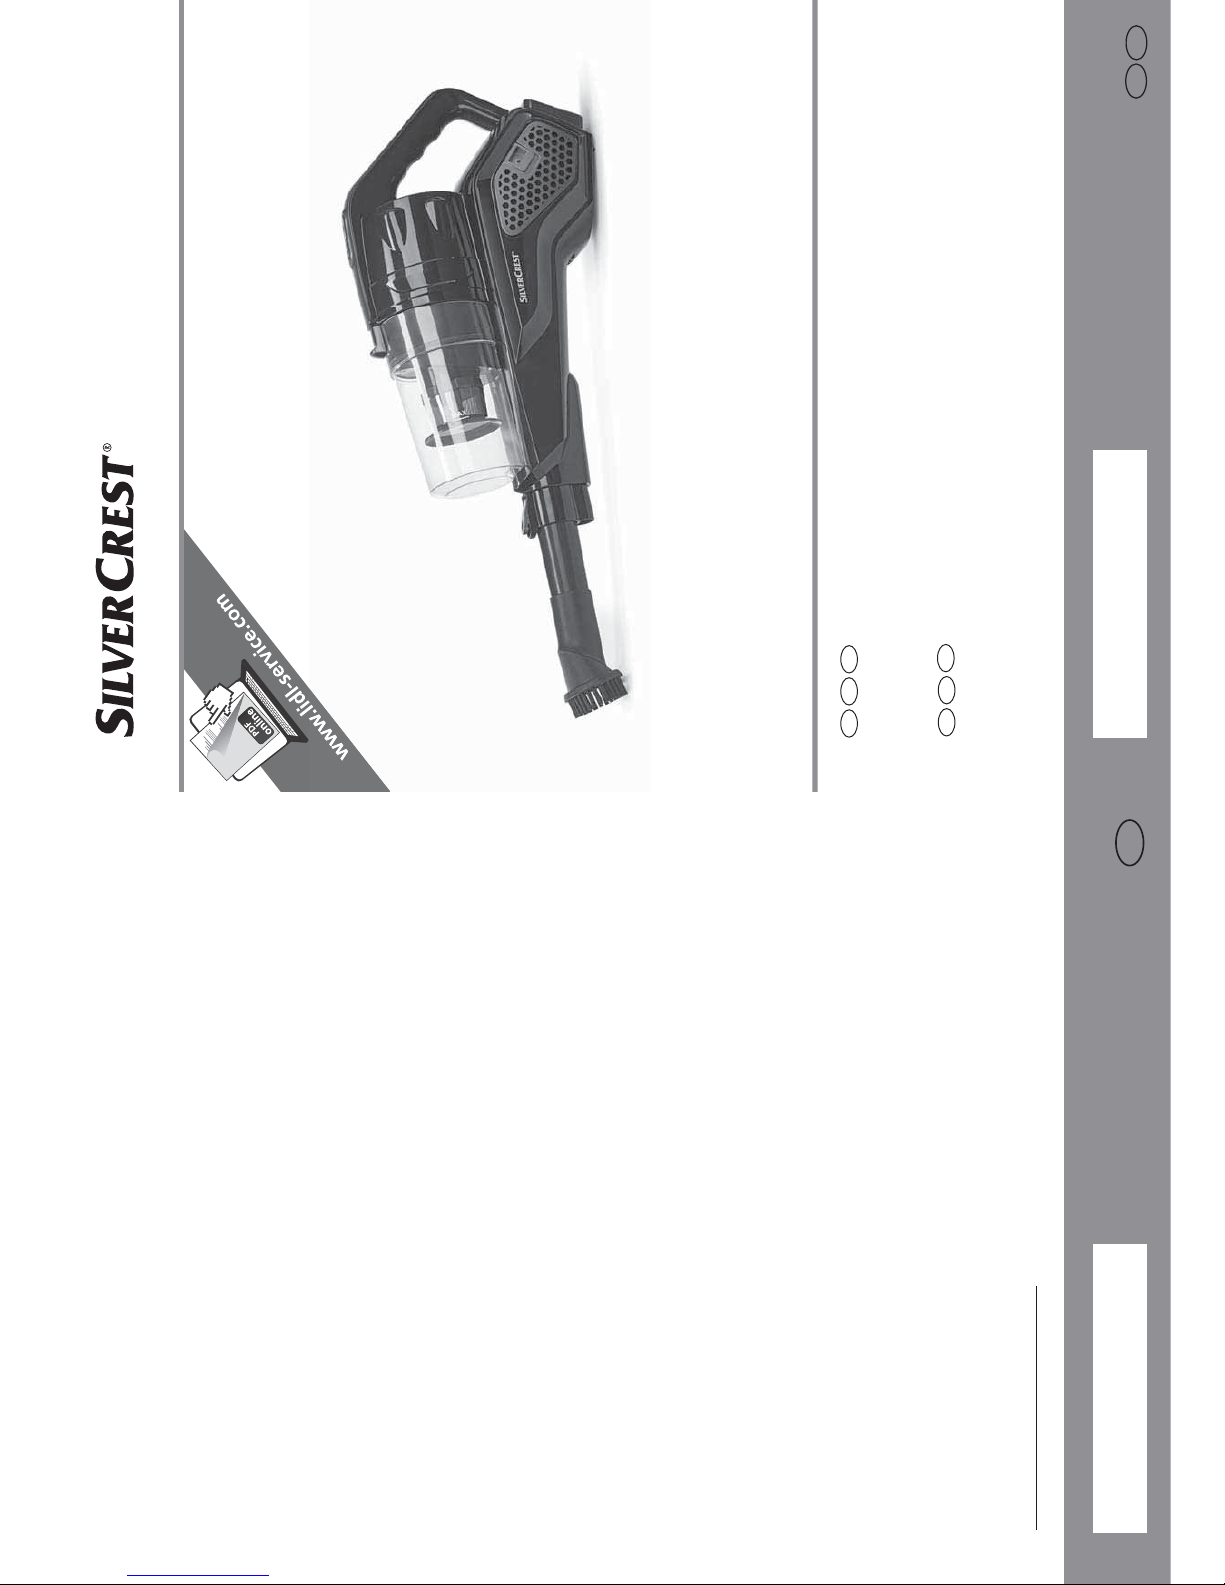
CORDLESS HAND-HELD AND UPRIGHT VACUUM CLEANER
SHAZ 21.6 B2
IAN 302302 IAN 302302
02/2018 ID: SHAZ 21.6 B2_18_V1.3
AKKU-HAND- UND -BODENSTAUBSAUGER
Bedienungsanleitung
DE
AT
CH
GB
DE
CORDLESS HAND-HELD AND UPRIGHT VACUUM CLEANER
Operating instructions
GB
IE
NI
GB

English..................................................................................... 2
Deutsch.................................................................................. 18
Overview / Übersicht
26
27 3128
33134
3
4
10
9
12
16
24
22
25
23
17
5
18
19
21
20
36 37 38 39 40
32
11
14
15
35
2
7
8
13
29 30
6

2
GB
Contents
1. Overview ........................................................................................ 3
2. Intended purpose ............................................................................ 4
3. Safety instructions ........................................................................... 5
4. Items supplied ................................................................................. 6
5. The base station ................................ ........................ ... ................... 7
5.1 Fastening the base station...................................................................... 7
5.2 Storing after use ................................................................................... 7
6. Charging the battery ....................................................................... 7
7. Assembly .................... .. ...... .. ...... .. ..... ... ..... ...... .. ...... .. ..... ... ..... ... ..... . 8
7.1 Engaging and disengaging connections .................................................. 8
7.2 Prior to every use........................................................................ ........ .. 8
7.3 The suction pipe.................................................................................... 9
7.4 The floorhead....................................................................................... 9
7.5 Large nozzle ........................................................................................ 9
7.6 Large brush nozzle................................................................................ 9
7.7 Small nozzles..................................................................................... 10
8. Vacuum cleaning ............................. .............................................. 10
8.1 Using the nozzles................................................................................ 10
9. Filter and dust container ................................................................ 10
9.1 Dust container .................................................................................... 11
9.2 Paper filter (HEPA) .............................................................................. 11
9.3 Metal filter ........................................................................................ 11
9.4 Motor protection filter.......................................................................... 11
9.5 Exhaust air filter.................................................................................. 11
10.Cleaning and care .......................................................................... 12
11.Storage ......................................................................................... 12
12.Disposal ........................................................................................ 13
13.Trouble-shooting ...... ................ ................ ............. ................ ......... 13
14.Technical specifications .................................................................. 14
15.Ordering accessories ..................................................................... 14
16.Warranty of the HOYER Handel GmbH ........................................... 15

3
GB
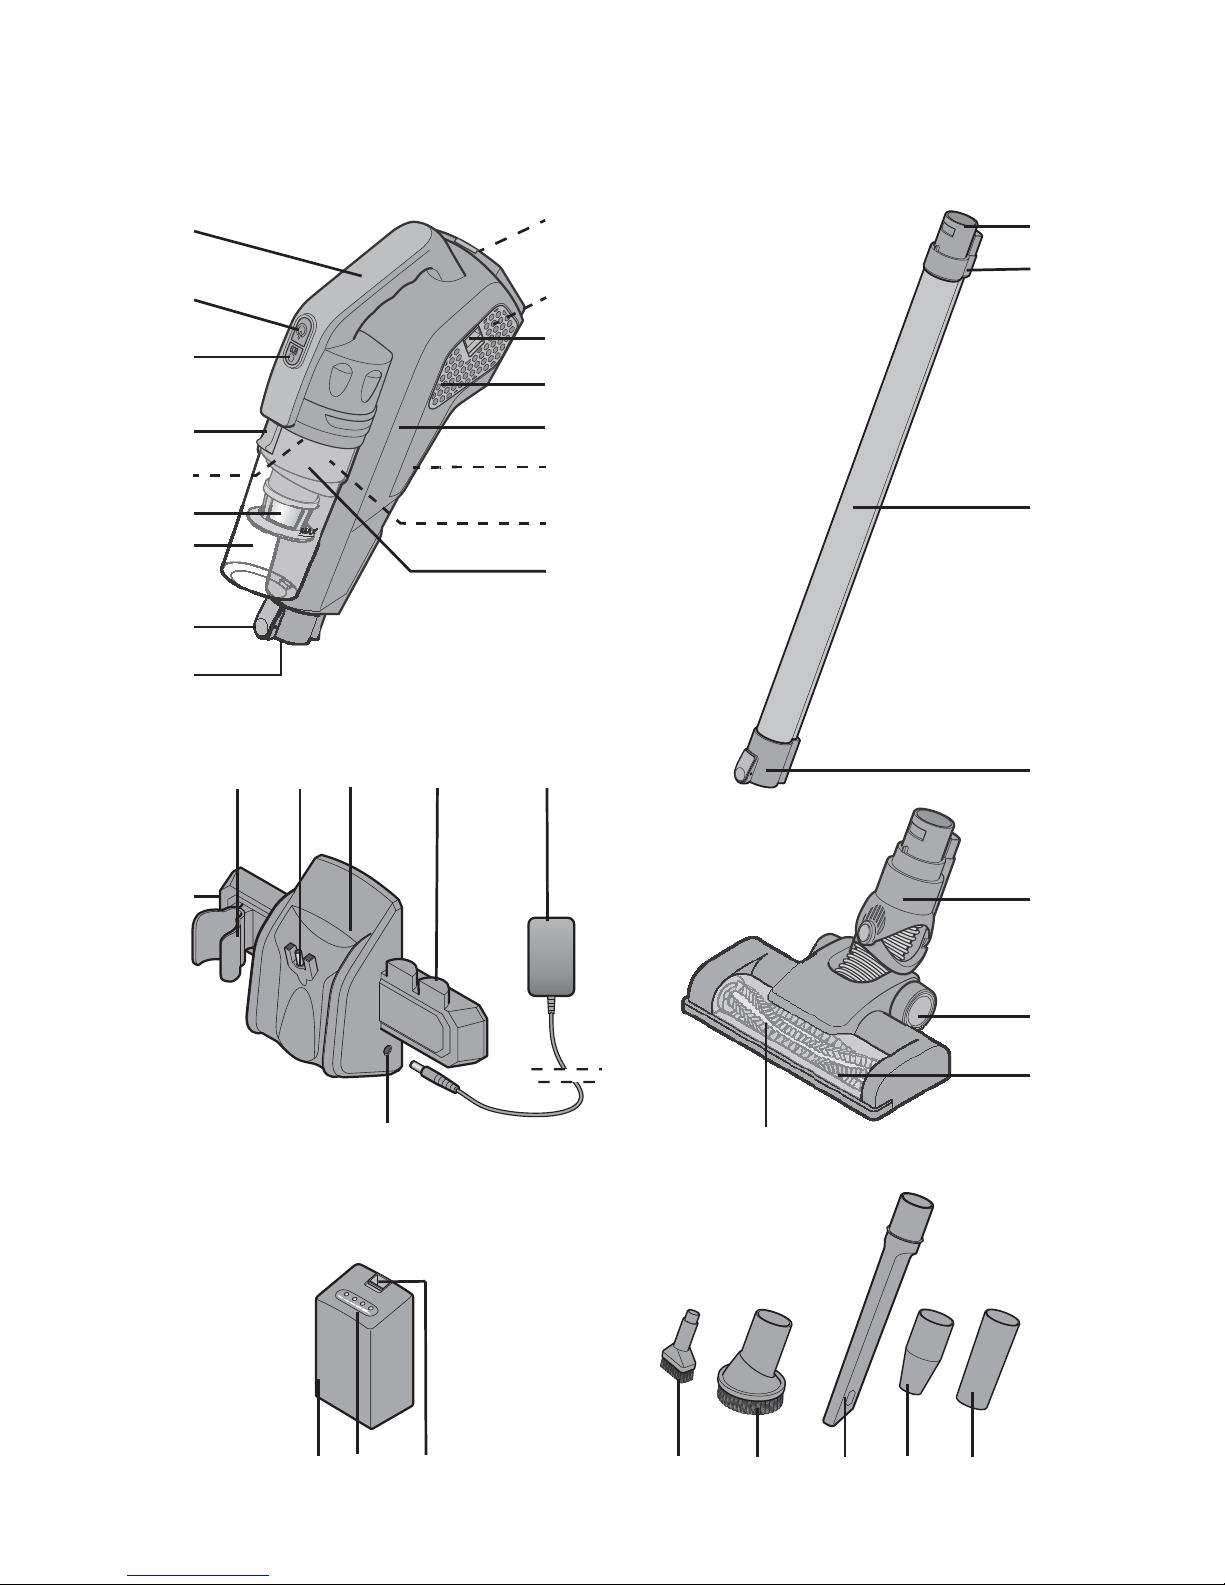
1. Overview
1 Battery compartment
2 Exhaust air filter (under the filter cover)
3 Unlocking mechanism for the filter cover
4 Filter cover
5 Suction device
6 Charging socket (connection of power adapter and/or plug of the base sta-
tion)
7 Paper filter (HEPA) (in the filter carrier)
8 Filter carrier (inside the dust container)
9 Opening at the suction device for the suction pipe, the floorhead, the large
nozzle and the adapter
10 Unlocking mechanism for the opening|9
11 Dust container
12 Metal filter
13 Motor protection filter (between dust container and suction device)
14 Unlocking mechanism for the dust container
15 ECO ECO button (reduces the suction power)
16 On/off switch
17 Handle
18 Connection of the suction device
19 Holder to hang up in the base station
20 Suction pipe
21 Opening at the suction pipe for the floorhead, the large nozzle and the
adapter
22 Floorhead (with joint)
23 Rollers of the floorhead
24 Inspection window of the floorhead
25 Rotating brush
26 Base station (for wall mounting)
27 Holder for the suction pipe
28 Plug for connecting the charging socket
29 Holder for the suction device
30 Holders for two nozzles
31 Power adapter with power cable
32 Connection for power adapter
33 Battery
34 Charging indicator of the battery
35 Unlocking mechanism of the battery
36 Small brush nozzle
37 Large brush nozzle (rotatable)
38 Large nozzle
39 Adapter for the small brush nozzle and small nozzles
40 Adapter for the large brush nozzle
not shown:
Fixing material
(2 rawlplugs, 2 screws)
Drilling template
4
GB
Thank you for your trust!
Congratulations on your new battery-powered hand-held vacuum cleaner.
For safe handling of the product and in order to get to know the entire scope of features:
• Thoroughly read these user instructions prior to initial use.
• Above all, observe the safety information!
• The device should only be used
as described in these user instructions.
• Keep this copy of the user instructions for reference.
• If you pass the device on to
someone else, please include this
copy of the user instructions. The
operating instructions are a part
of the product.
We hope you enjoy your new
battery-pow-
ered hand-held vacuum cleaner
!
2. Intended purpose
The
battery-powered hand-held vacuum
cleaner
is suited to vacuum normal, dry
house dust and a little coarser dirt.
The device is designed for private home use
and must not be used for commercial purposes.
The device must only be used indoors.
Foreseeable misuse
VARIOUS DANGERS!
~ The following materials must not be
sucked in:
- Liquids and moist dirt
- Explosive or flammable materials
such as flour or coal dust
- Harmful substances such as asbestos
dust
- Ember, burning matches or other hot
materials
- Particularly fine dusts such as toner
for copying machines. The filter inside
the device is not suited for such materials.
5
GB
3. Safety instructions
Warnings
If necessary, the following warnings will be
used in these user instructions:
DANGER! High risk: failure to observe this warning may result in injury to life and limb.
WARNING! Moderate risk: failure to observe this warning may result in injury or serious material damage.
CAUTION: low risk: failure to observe this
warning may result in minor injury or material damage.
NOTE: circumstance s and specifics that
must be observed when handling the device.
Instructions for safe operation
~ This device can be used by children from the age of 8 and peo-
ple with restricted physical, sensory or intellectual abilities or
people without adequate experience and/or understanding, if
they are supervised or instructed on how to use this device safely
and if they are aware of the r esulting dangers. Childr en must not
play with the device. Cleaning and maintenance by the user
must not be performed by children without supervision.
~
Children must not play with the device.
~ Prior to cleaning, the battery must be removed from the suction
device.
~ The device must not be used after falling or when showing visible
damage, or if it is leaking.
~ If the power cable of this device should become damaged, it
must be replaced by the manufactur er, the manufacturer's customer service department or a similarly qualified specialist in order
to avoid any hazards.
DANGER for children
~ Children must not play with packing ma-
terial. Do not allow children to play with
plastic bags. There is a risk of suffocation.
DANGER to and from pets
and livestock
~ Electrical devices can repr esent a hazar d
to pets and livestock. In addition, animals
can also cause damage to the device. For
this reason you should k eep animals
away from electrical devices at all times.
DANGER! Risk of electric
shock due to moisture
~ Protect the device from moisture, water
drops and water splashes.
~ The device, the cable and the mains
plug must not be immersed in water or
any other liquids.
~ If liquid gets into the device, remove the
mains plug immediately. Have the device checked before reusing.
~ If the device (base station) has neverthe-
less fallen into water, pull out the power
adapter immediately, and only then

6
GB
take the device out of the water. Do not
use the device again, and have it
checked by a specialist workshop.
~ Never touch the device with wet hands.
DANGER! Risk of electric shock
~ Lay the power cable such that no one
can step on it, get caught on it, or trip
over it.
~ Only connect the power adapter to a
properly installed and easily accessible
wall socket whose voltage corr esponds
to the specifications on the rating plate.
The wall socket must continue to be easily accessible after the device is
plugged in.
~
Ensure that the power cable cannot be
damaged by sharp edges or hot points.
Do not wrap the power cable around the
device (Danger! Risk of cable damage!).
~ Ensure that the power cable cannot be
trapped or crushed.
~ To pull the power adapter out of the
wall socket, always pull on the power
adapter, and never on the power cable.
~ Disconnect the power adapter from the
wall socket …
… if there is a fault,
… as long as you do not charge the bat-
tery,
… prior to cleaning the base station,
and
… during thunderstorms.
~ If the power cable or the device (base
station) is damaged, immediately pull
the power adapter out of the wall socket.
DANGER - Danger of
explosion
~ Never throw the battery into open fire.
W ARNING! Risk of ma teria l damage
~ F asten the base station firm ly to the wall.
Check whether the enclosed fixing material is suitable. If necessary, use other
screws and rawlplugs. If in doubt, have
the assembly performed by an expert.
~ Before drilling, check that there ar e no wa-
ter pipes or power cables in the wall at the
relevant point.
~ Only use the rechargeable vacuum cleaner
with all filters installed. V acuuming without
the filters installed destroys the motor.
~ Never come close to hair or loose clothing
with the rotating brush.
~ Use the original accessor ies only.
~ Do not use any sharp or abr asive cleaning
agents.
NOTES on the battery
• Only use the original battery charger (base
station) to load the batteries.
• The battery becomes warm during the
charging process. T his is normal.
4. Items supplied
1 suction device|5 with dust container|11
1 base station|26
1 power adapter|31
1 battery|33
1 suction pipe|20|
1 floorhead|22
1 small brush nozzle|36
1 large brush nozzle (rotatable)|37
1 large nozzle|38
1 adapter|39 for the small brush nozzle
and small nozzles|
1 adapter|40 for the large brush nozzle
1 drilling template
1 set of fixing material (2 rawlplugs, 2
screws)
1 copy of the user instructions
7
GB
5. The base station
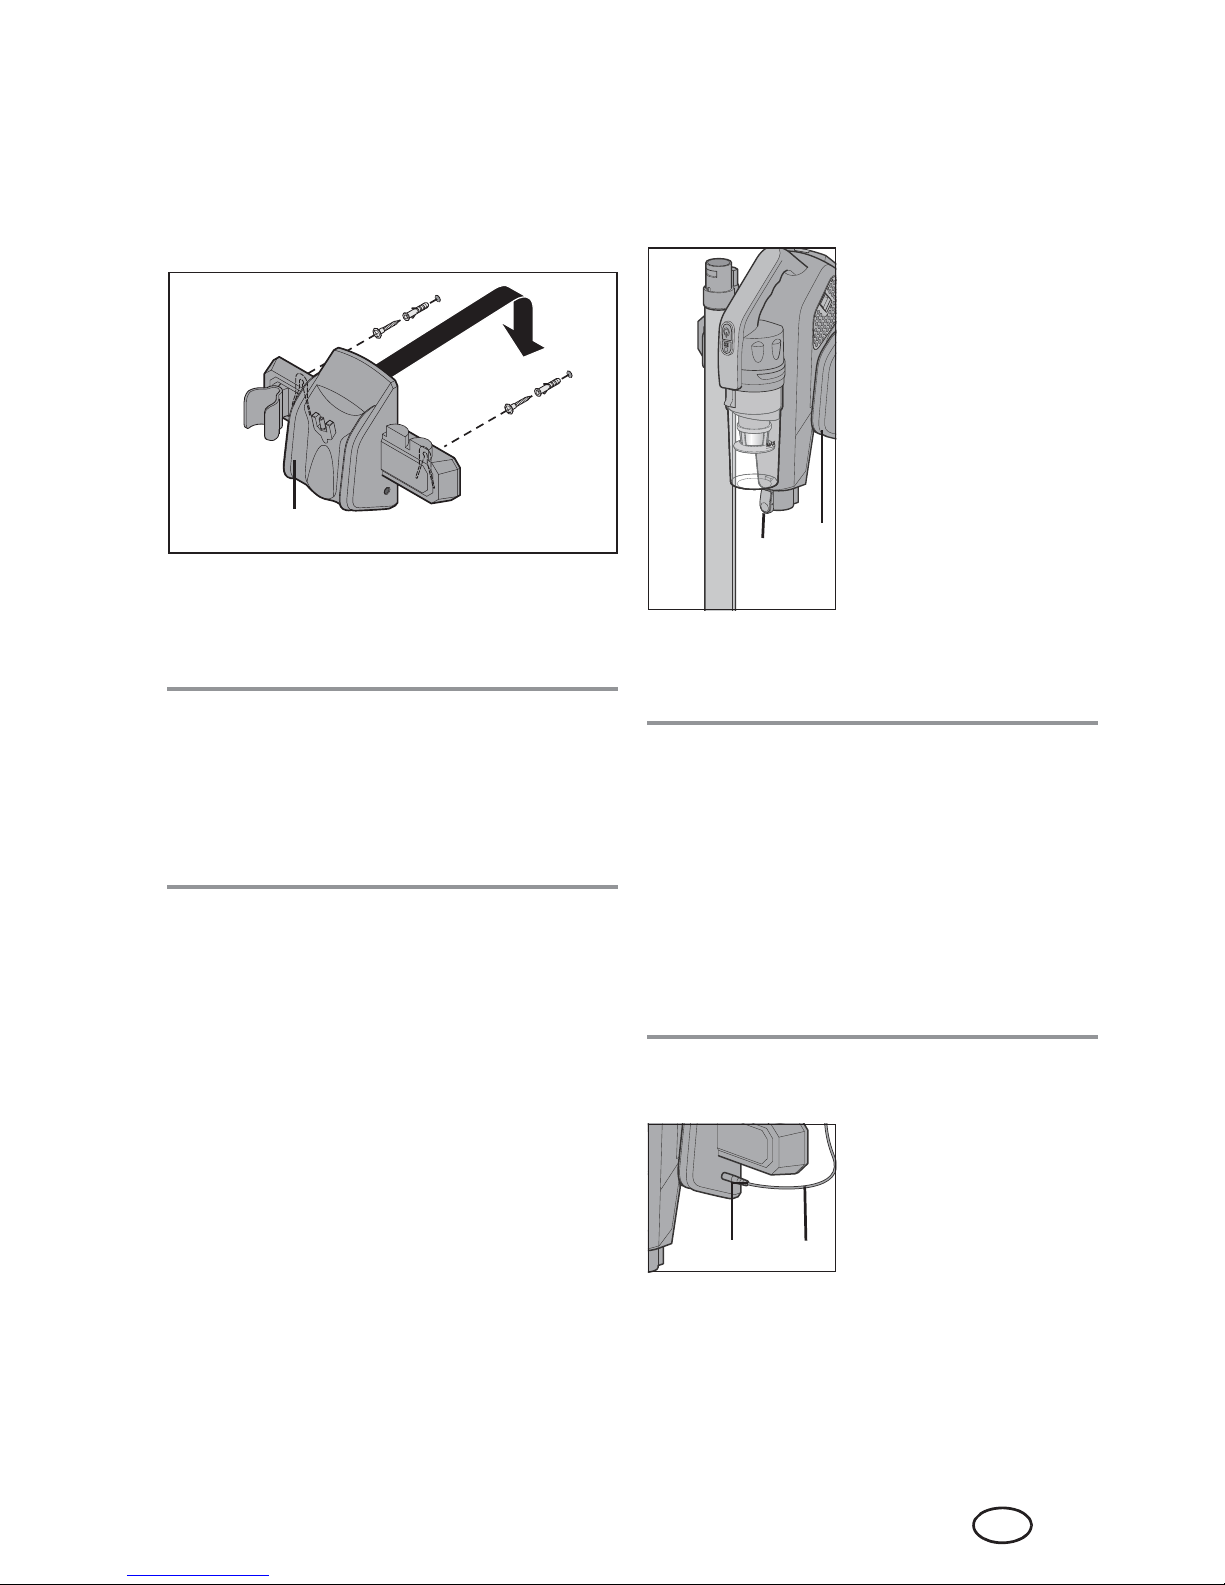
5.1 Fastening the base station
Fasten the base station|26 to the wall using
the drilling template and the fixing material
included in the delivery.
NOTE:
• Before fastening, check that the fixing
material included in the delivery meets
your requirements (e .g. wall structure).
If not, replace it with suitable fixing material.
1. Look for a plac e on the wall for the base
station|26. Make sure that there is a
wall socket nearby.
2. Using the drilling template, draw the
marking for the drill holes on the wall.
3. Drill holes with a diameter of 6 mm us-
ing a drill.
4. Insert the rawlplugs into the drill holes.
5. Tighten the screws in the rawlplugs.
6. Hang the base station|26 up on the
wall and check for a secure hold.
5.2 Storing after use
The base station|26 is used as a holder and
battery charger for the suction device|5 and
the suction pipe|20.
• After every use, hang
the suction device|5
and the suction
pipe|20 up in the
base station|26. The
battery is charged automatically.
• The large nozzle|38
and the large brush
nozzle|37 can be
plugged onto the
holders|30.
6. Charging the battery
NOTES:
• Fully charge the battery before using it
for the first time. This takes approx.
5hours.
• After every use, hang the suction device|5 up in the holder of the base station|26. This ensures that the suction
device will always work at full power.
The battery is not damaged by regular
charging.
Charging the suction device via the
base station
1. Plug the power
adapter|31 into a
suitable wall socket
and connect the
power cable with
the connection for
the power adapter|32.
The wall socket must co ntinue to be easily
accessible after the device is plugged in.
|26
|20
|5
|26
|31|32
8
GB
2. After every use,
hang the suction device|5 up in the
base station|26.
The LEDs of the
charging indicator|34 are lit or start
flashing. Once all
LEDs are lit, the battery is completely
charged. With a full
charge, you can use
the vacuum cleaner
for approx.
20 minutes.
Connecting the suction device
directly to the mains
The suction device does not have to be in the
battery charger for the battery to be
charged.
• Plug the power adapter|31 into a suitable wall socket and connect the power
cable directly with the charging socket|6 on the underside of the suction device|5.
LED signals on the base station
- Lit LEDs show the current charging state.
- Flashing LEDs show the consumed portion. When all LEDs are flashing, you
should charge the battery. With an insufficient charge, the device will stop
working.
LED signals during operation
- Lit LEDs show the current charging state.
- Unlit LEDs show the consumed portion.
- Only the LED above Empty is flashing:
battery weak; the device will turn off
soon.
7. Assembly
With its extensive accessories, there are numerous options enabling you to react perfectly to almost any conceivable requirement
on a vacuum cleaner. In this section, we describe the assembly for the most frequent applications.
CAUTION:
~ During all assembly steps, the vacuum
cleaner must be switched off.
7.1 Engaging and disengaging connections
There are two ways to mount and dismantle
parts.
The suction pipe|20, the floorhead|22, the
dust container|11, the filter covers|4 and
the battery|33 are inserted until they engage audibly. Press the respective release
button to disengage the connections.
All other parts are pushed on and pulled off.
If necessary, slightly rotate the parts in opposite directions.
7.2 Prior to every use
Prior to every use, the following parts must
be assembled:
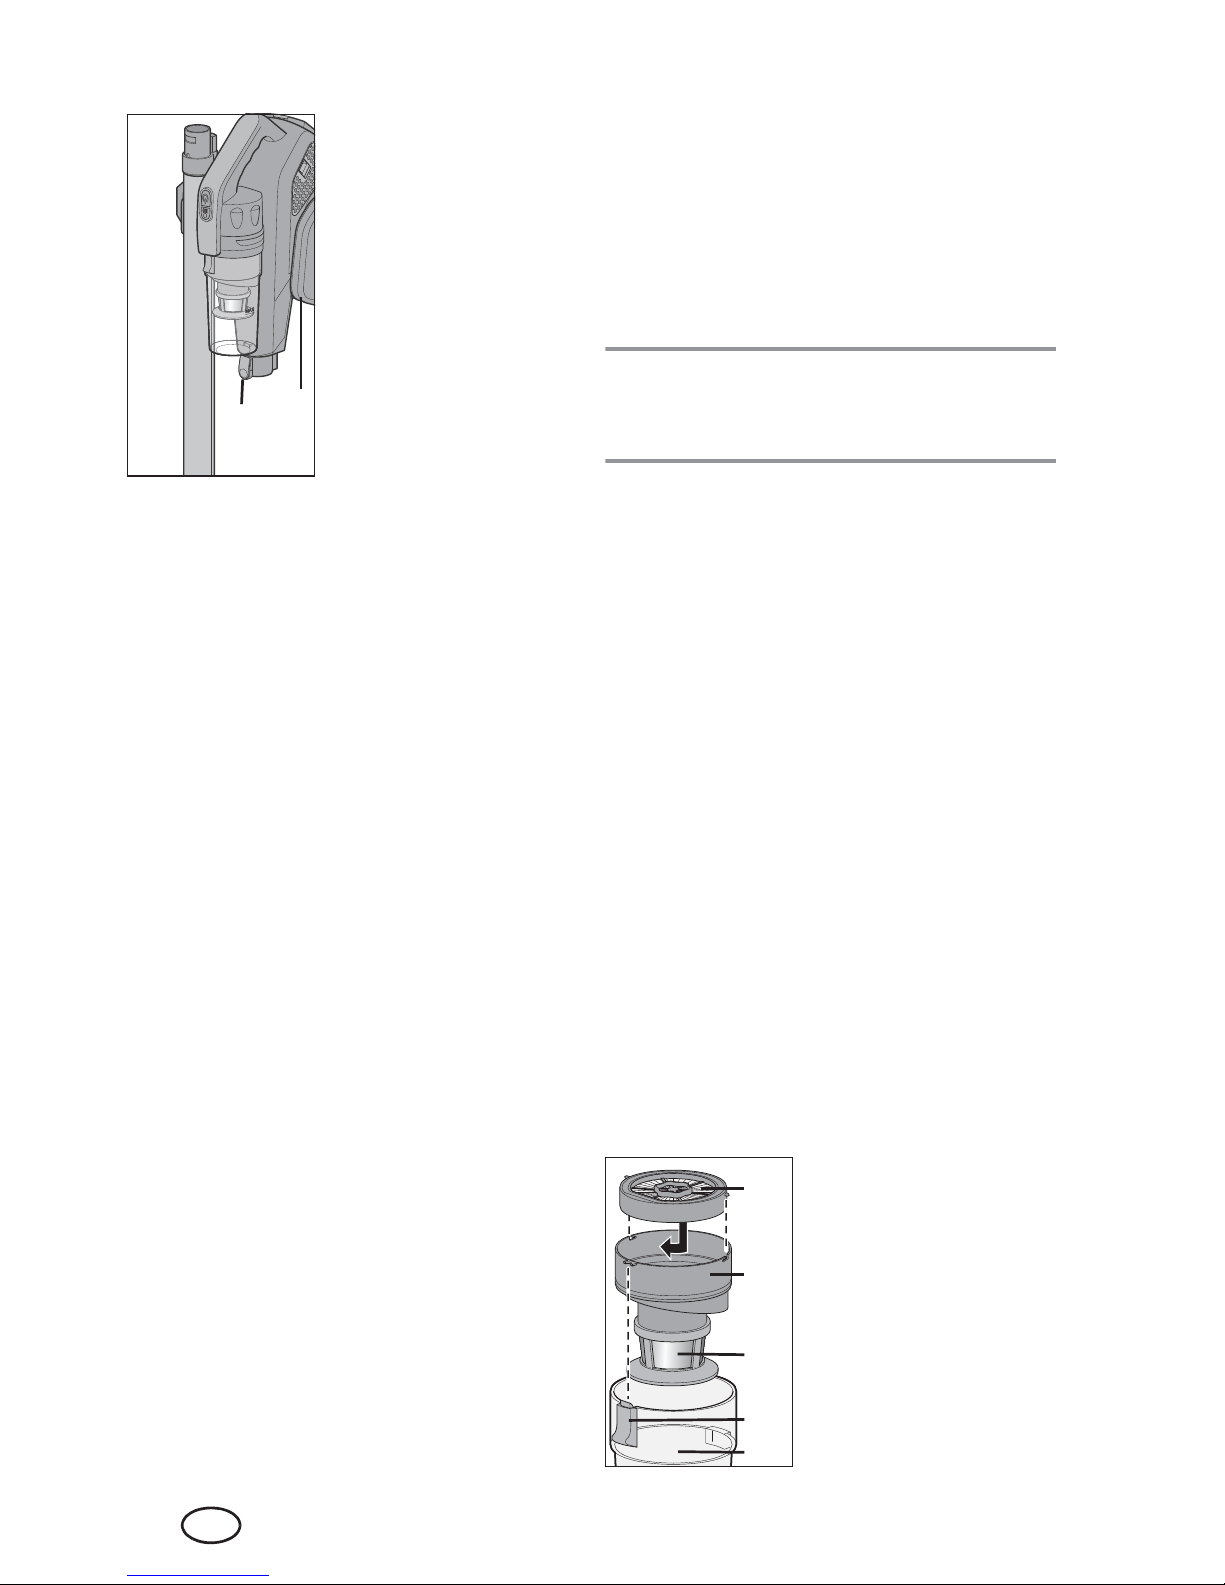
Filter unit
The filter unit consists of:
the filter carrier|8, the
metal filter|12 and the
paper filter|7.
• Always insert the
complete filter unit
into the dust container|11.
|20
|5
|26
|7
|12
|14
|11
|8
9
GB
• Both small guide pins of the filter carrier|must fit accurately into the small
openings underneath the unlocking
mechanism|14 of the dust container.
Dust container
Only use the dust container|11 with the complete filter unit.
• Place the dust container|11 on the suction device|5.
• Hook the bottom end
on and then push
down the upper end
until it engages audibly.
Battery
The vacuum cleaner
cannot be operated
without the charged battery mounted.
• Insert the battery|33
into the battery compartment|1 until it engages audibly.
7.3 The suction pipe
The suction pipe|20 is
used as an extension.
All parts to be connected to the clear end of
the suction pipe can
also be plugged directly
into the opening|9 at
the suction device|5.
• Insert the suction
pipe|20 into the
opening|9 until it engages.
7.4 The floorhead
In many cases, you will work with the floorhead.
You can attach the floorhead|22 directly to the
suction device|5 or the
suction pipe|20.
• Insert the floorhead|22 into the
opening|9 of the suction device|5 or into
the opening|21 of
the suction pipe|20.
7.5 Large nozzle
The large nozzle|38
can be inserted directly
into the suction device|5
or into the suction
pipe|20.
• Insert the large nozzle|38 into opening|9 or|21.
7.6 Large brush nozzle
The large brush nozzle|37 is always used
with the adapter|40.
• Insert the adapter|40 into opening|9 or|21.
• Plug the large brush
nozzle|37 onto the
adapter|40.
|11 |5
|1 |33
|5
|20
|9
|5
|20
|22
|21
|9
|5
|20
|38
|21
|9
|40
|21
9
|37
10
GB
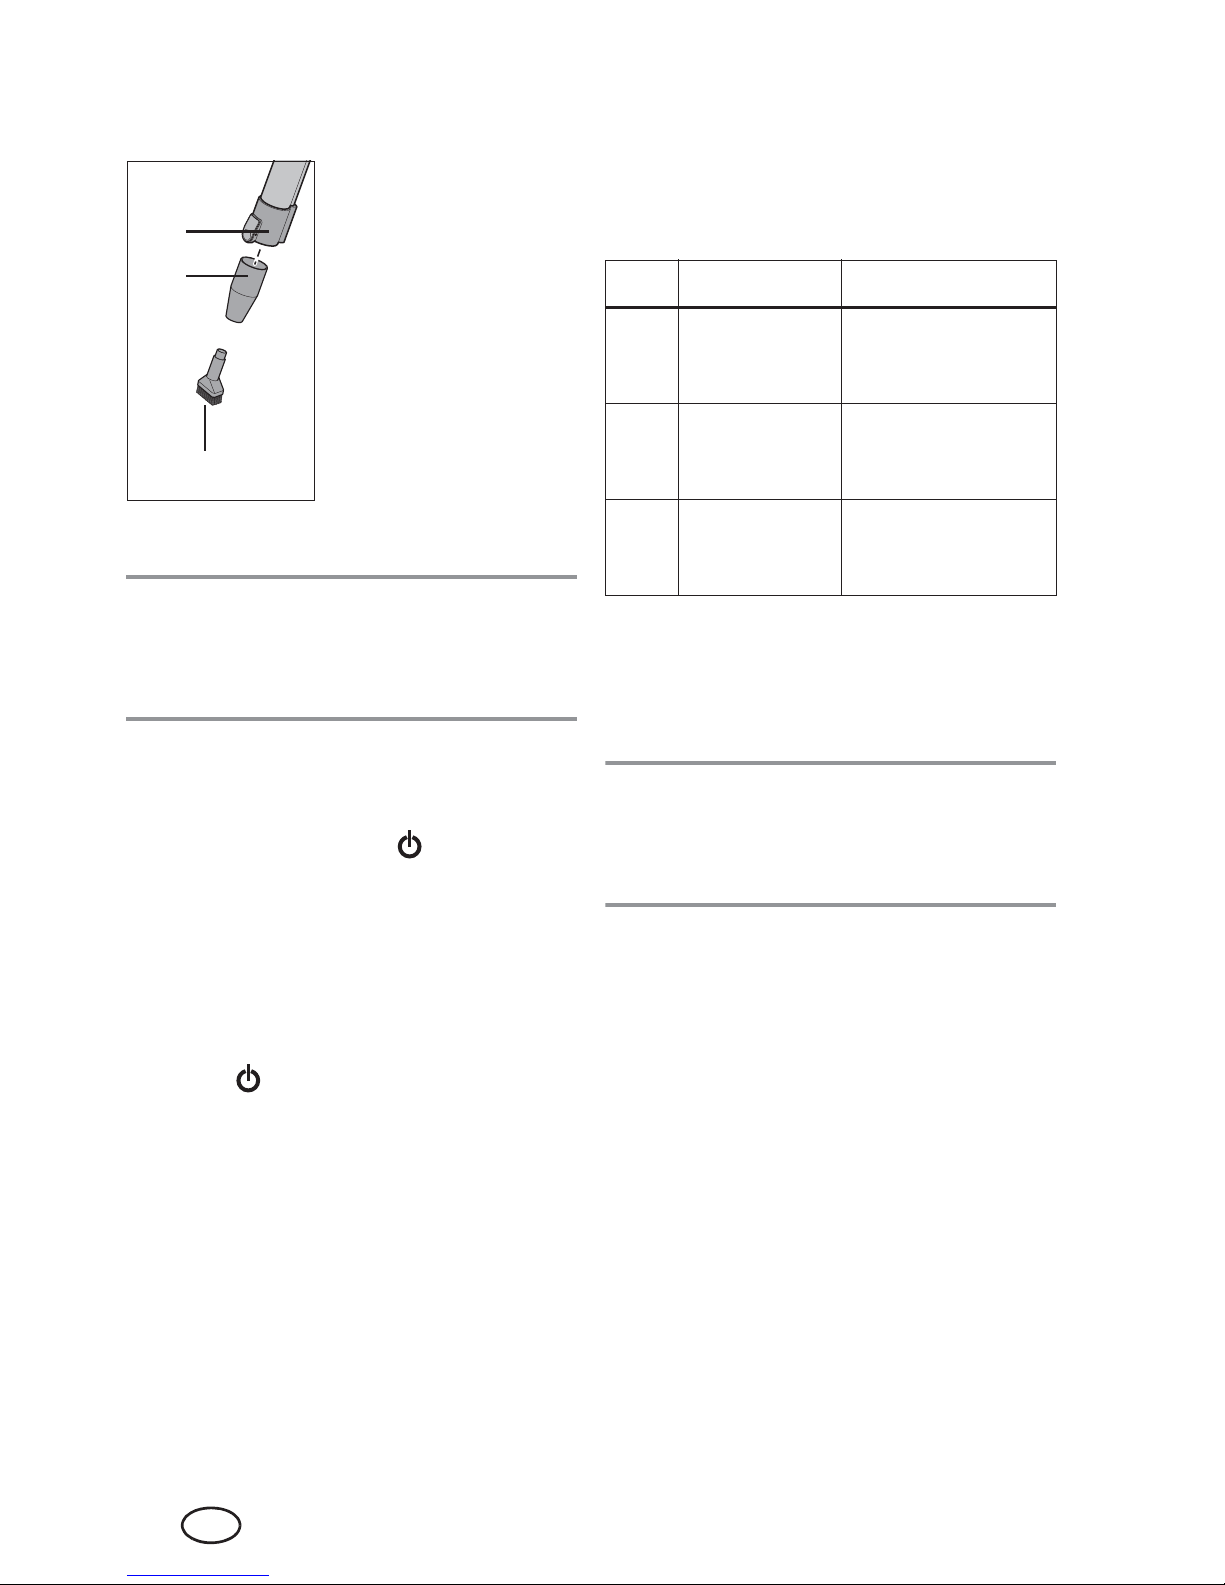
7.7 Small nozzles
The small brush nozzle|36 is always used
with the adapter|39.
• Insert the adapter|39 into opening|9 or|21.
• Plug the nozzle|36
onto the adapter|39.
8. Vacuum cleaning
CAUTION:
~ Vacuum cleaning always requires all fil-
ters and the dust container|11 to be
mounted.
1. Mount the accessories needed.
2. Insert the battery|33 into the battery
compartment|1.
3.
Press the on/off switch |
16 to switch
the device on.
- If you would like to reduce the suction
power, press the ECO button|15
once. The button is lit gr een. To switch
off the function, press the button
again.
4. To switch off the device, push the on/off
switch |16 again.
5. Empty the dust container|11 and hang
up the parts in the base station|26.
8.1 Using the nozzles
In the following table, you will find an overview of the cleaning tasks for which the various nozzles are particularly suitable.
9. Filter and dust
container
CAUTION:
~ Vacuum cleaning always requires all fil-
ters and the dust container|11 to be
mounted.
Every operation requires the dust container|11 and all filters to be inserted:
- the metal filter|12 inside the dust con-
tainer|11,
- the paper filter|7 inside the dust con-
tainer|11,
- the motor protection filter|13 between
dust container|11 and suction device|5
and
- both exhaust air filters|2 on the sides of
the suction device|5.
|36
|21
|39
No. Nozzle Use
|36
Small
brush nozzle
Sofas, armchairs,
mattresses, furniture, textiles
|37
Large
brush nozzle
Round brush:
bookshelves, hidden corners, floors
|38
Large nozzle Crevice nozzle:
cabinets, crevices,
corners, gaps
 Loading...