

Page 1

KITCHEN TOOLS
5
Rallador de verdura eléctrico SGR 150 A1
Grattugia elettrica per verdure
KOMPERNASS GMBH
BURGSTRASSE 21 · D-44867 BOCHUM
www.kompernass.com
ID-Nr.: SGR 150 A1-08/11-V3
IAN: 70022
Rallador de verdura
eléctrico
Instrucciones de uso
Ralador elétrico
de legumes
Manual de instruções
Elektrische Gemüseraspel
Bedienungsanleitung
Grattugia elettrica per
verdure
Istruzioni per l‘uso
Electric Grater
Operating instructions
Page 2

SGR 150 A1
e
w
2
1
3
4
q
0
5
9
6
7
8
Page 3

Índice
Información sobre estas instrucciones de uso . . . . . . . . . . . . . . . . . . . . . . . 2
Derechos de autor . . . . . . . . . . . . . . . . . . . . . . . . . . . . . . . . . . . . . . . . . . . . . . . . . . . . . . . . 2
Finalidad de uso . . . . . . . . . . . . . . . . . . . . . . . . . . . . . . . . . . . . . . . . . . . . . . . 2
Indicaciones de seguridad . . . . . . . . . . . . . . . . . . . . . . . . . . . . . . . . . . . . . . . 3
Contenido del suministro . . . . . . . . . . . . . . . . . . . . . . . . . . . . . . . . . . . . . . . . 4
Reciclaje del embalaje . . . . . . . . . . . . . . . . . . . . . . . . . . . . . . . . . . . . . . . . . . . . . . . . . . . . . 5
Características técnicas . . . . . . . . . . . . . . . . . . . . . . . . . . . . . . . . . . . . . . . . . . 5
Descripción del aparato/accesorios . . . . . . . . . . . . . . . . . . . . . . . . . . . . . . . 6
Antes del primer uso . . . . . . . . . . . . . . . . . . . . . . . . . . . . . . . . . . . . . . . . . . . . 6
Empleo . . . . . . . . . . . . . . . . . . . . . . . . . . . . . . . . . . . . . . . . . . . . . . . . . . . . . . . 6
Los tambores . . . . . . . . . . . . . . . . . . . . . . . . . . . . . . . . . . . . . . . . . . . . . . . . . . . . . . . . . . . . 6
Montaje . . . . . . . . . . . . . . . . . . . . . . . . . . . . . . . . . . . . . . . . . . . . . . . . . . . . . . . . . . . . . . . . 8
Manejo . . . . . . . . . . . . . . . . . . . . . . . . . . . . . . . . . . . . . . . . . . . . . . . . . . . . . . . . . . . . . . . . 8
Limpieza . . . . . . . . . . . . . . . . . . . . . . . . . . . . . . . . . . . . . . . . . . . . . . . . . . . . . 9
Conservación . . . . . . . . . . . . . . . . . . . . . . . . . . . . . . . . . . . . . . . . . . . . . . . . . 10
Solución de fallos . . . . . . . . . . . . . . . . . . . . . . . . . . . . . . . . . . . . . . . . . . . . . 10
ES
Reciclaje del aparato . . . . . . . . . . . . . . . . . . . . . . . . . . . . . . . . . . . . . . . . . . 11
Importador . . . . . . . . . . . . . . . . . . . . . . . . . . . . . . . . . . . . . . . . . . . . . . . . . . 11
Garantía . . . . . . . . . . . . . . . . . . . . . . . . . . . . . . . . . . . . . . . . . . . . . . . . . . . . 11
Asistencia técnica . . . . . . . . . . . . . . . . . . . . . . . . . . . . . . . . . . . . . . . . . . . . .12
Recetas . . . . . . . . . . . . . . . . . . . . . . . . . . . . . . . . . . . . . . . . . . . . . . . . . . . . . . 12
Ensalada de repollo . . . . . . . . . . . . . . . . . . . . . . . . . . . . . . . . . . . . . . . . . . . . . . . . . . . . . 12
Ensalada con queso Feta . . . . . . . . . . . . . . . . . . . . . . . . . . . . . . . . . . . . . . . . . . . . . . . . . 13
Calabacín gratinado . . . . . . . . . . . . . . . . . . . . . . . . . . . . . . . . . . . . . . . . . . . . . . . . . . . . . 13
Pesto de albahaca y almendras . . . . . . . . . . . . . . . . . . . . . . . . . . . . . . . . . . . . . . . . . . . . 14
SGR 150 A1
1
Page 4

ES
Información sobre estas instrucciones de uso
¡Enhorabuena por la compra de este nuevo aparato!
Ha elegido un producto moderno y de gran calidad. El manual de instrucciones
es un componente integral de este producto. Contiene indicaciones importantes
sobre seguridad, empleo y reciclaje. Antes de utilizar el producto, consulte todas
las indicaciones de uso y seguridad. Utilice este producto exclusivamente tal y
como se describe y para los fi nes indicados. Entregue también las instrucciones
en caso de traspasar el aparato a terceros.
Derechos de autor
Esta documentación está protegida por derechos de autor.
La reproducción o cualquier tipo de reimpresión, total o parcial, así como la
reproducción de imágenes, incluso modifi cadas, únicamente estarán permitidas
con el consentimiento escrito del fabricante.
Finalidad de uso
Este aparato está diseñado para el picar verduras, frutas y otros alimentos que
no sean excesivamente duros.
Este aparato no ha sido diseñado para su uso en entornos comerciales o industriales.
ADVERTENCIA
¡Peligro debido al uso contrario a lo dispuesto!
El aparato puede ser una fuente de peligros en caso de uso contrario a lo
dispuesto y/o para una fi nalidad diferente.
Usar el aparato exclusivamente según lo previsto. ►
Deben seguirse los procedimientos descritos en estas instrucciones de uso. ►
ADVERTENCIA
El aparato puede ser una fuente de peligros en caso de uso contrario a ►
lo dispuesto y/o para una fi nalidad diferente. Usar el aparato exclusivamente según lo pr
estas instrucciones de uso. No se asumirán responsabilidades de ningún
tipo por daños debidos al uso que no se corresponda a las indicaciones,
reparaciones no profesionales, modifi caciones no autorizadas o el uso de
piezas de repuesto no admitidas. El riesgo será responsabilidad exclusiva
del usuario.
2
evisto. Deben seguirse los procedimientos descritos en
SGR 150 A1
Page 5

Indicaciones de seguridad
PELIGRO DE ELECTROCUCIÓN
Conecte el aparato sólo a una base de enchufe de instalación normalizada ►
con una tensión de red de 220 - 240 V ~ / 50 Hz.
En caso de fallos de funcionamiento y antes de limpiar el apar
la clavija de la base de enchufe.
Extraiga siempre el cable de red de la base de enchufe tirando de la ►
clavija, y no del cable mismo.
No doble ni aplaste el cable de r
pisarlo ni tropezar con él.
No permita que el cable de conexión se moje o humedezca mientras el ►
aparato esté en funcionamiento.Tenga cuidado para que durante el manejo
o se dañe o quede aprisionado.
n
En caso de que el aparato, el cable de red o la clavija de red estén ►
dañados, deberán ser sustituidos por el servicio de asistencia técnica para
prevenir posibles situaciones de peligro.
Utilice el aparato sólo en habitaciones secas, no en el exterior. ►
¡No sumerja nunca el aparato en agua ni en otros líquidos! ►
¡ADVERTENCIA! ¡PELIGRO DE LESIONES!
Deje enfriar los accesorios antes de extraerlos. ►
Utilice sólo los accesorios originales de este aparato. Las piezas de otros ►
fabricantes no son, probablemente, sufi cientemente seguras.
No permita utilizar el apar
tades físicas, sensoriales o mentales, así como su falta de conocimientos o
xperiencia, les impida hacer un uso seguro del mismo si no están bajo
de e
vigilancia o han sido instruidos correctamente acerca del uso del aparato.
Vigile a los niños para asegurarse de que no jueguen con el aparato.
Nunca utilice el aparato sobre una placa caliente (fogón) o cerca de ►
llamas expuestas (cocina de gas).
Utilice el aparato exclusivamente sobre una superfi cie de trabajo estable. ►
No permita que cuelguen sobre el aparato cabellos, corbatas, bufandas ►
mientras lo esté utilizando. Podrían resultar atrapados en los componentes
otatorios.
r
ato a personas (incluidos los niños) cuyas facul- ►
ES
ato, extraiga ►
ed y tiéndalo de modo que nadie pueda ►
SGR 150 A1
3
Page 6

ES
¡ADVERTENCIA! ¡PELIGRO DE LESIONES!
¡Nunca alcance con las manos el tambor en movimiento! ►
¡No introduzca utensilios de cocina o cualquier otro objeto en el tambor ►
en movimiento!
¡Desenchufe la clavija de r
de tambor y espere a que el tambor se detenga por completo.
Nunca empuje los alimentos con las manos descubiertas en el tubo de ►
alimentación. Utilice siempre el compactador.
Nunca deje el apar
No utilice un cable prolongador. La clavija de red debe estar bien accesible ►
para los casos de emergencia.
No siga utilizando el aparato si se ha caído al suelo o se puedan observar ►
daños.
ATENCIÓN - ¡DAÑOS MATERIALES!
Nunca utilice el aparato sin tambor o con dos tambores al mismo tiempo. ►
Nunca utilice el aparato para triturar carne o alimentos duros. ►
ed de la base de enchufe antes de cada cambio ►
ato sin supervisión mientras esté enchufado. ►
Contenido del suministro
El aparato se suministra de serie con los siguientes componentes:
Picador eléctrico de verduras ▯
5 tambores ▯
Compactador ▯
Instrucciones de uso ▯
Extraiga de la caja todas las piezas del aparato y el manual de instruccio-1)
nes.
R
etire todo el material de embalaje. 2)
ADVERTENCIA
Compruebe la integridad de suministro y si hay daños visibles. ►
Si el suministro es incompleto o hay daños debido a un embalaje defi ciente ►
o al transporte, póngase en contacto con la línea directa de asistencia
éase capítulo Asistencia técnica).
(v
4
SGR 150 A1
Page 7
Reciclaje del embalaje
El embalaje protege el aparato durante el transporte. El material de embalaje se
ha seleccionado teniendo en cuenta criterios ecológicos y de técnica de eliminación y por ello es reciclable.
La reintroducción del embalaje en el ciclo de materiales ahorra materias primas
y reduce el volumen de residuos. Deseche los materiales de embalaje que no
sean necesarios según las normativas locales aplicables.
ADVERTENCIA
Si es posible, conserve el embalaje original durante el periodo de garantía ►
del aparato para poder empaquetarlo correctamente en caso de aplicación de la gar
antía.
Características técnicas
Tensión de red 220 - 240 V ~, 50 Hz
Potencia nominal 150 W
ES
Clase de protección
Intervalos de uso 2 minutos
Intervalos de uso
Los intervalos de uso (funcionamiento por un corto periodo de tiempo) indican
durante cuánto tiempo puede funcionar un aparato sin que el motor se sobrecaliente ni se dañe. Después del intervalo de uso indicado deberá apagarse el
aparato hasta que el motor se haya enfriado.
II
SGR 150 A1
5
Page 8
ES
Descripción del aparato/accesorios
1 Botón de inicio
2 Tapa de la bandeja de almacenamiento
3 Tambor de picado grueso (IV)
4 Tambor de picado fi no (III)
5 Tambor de rallado (V)
6 Tambor de corte fi no (I)
7 Bandeja de almacenamiento
8 Compartimento para guardar el cable
9 Eje motriz
0 Carcasa del tambor
q Tambor de corte grueso (II)
w Tubo de alimentación
e Compactador
Antes del primer uso
Limpie el aparato y todas las piezas (tambores ■ 3 4 5 6 q, compac-
tador e, carcasa de tambor 0) tal y como se describe en el capítulo
"Limpieza“.
Empleo
Los tambores
6
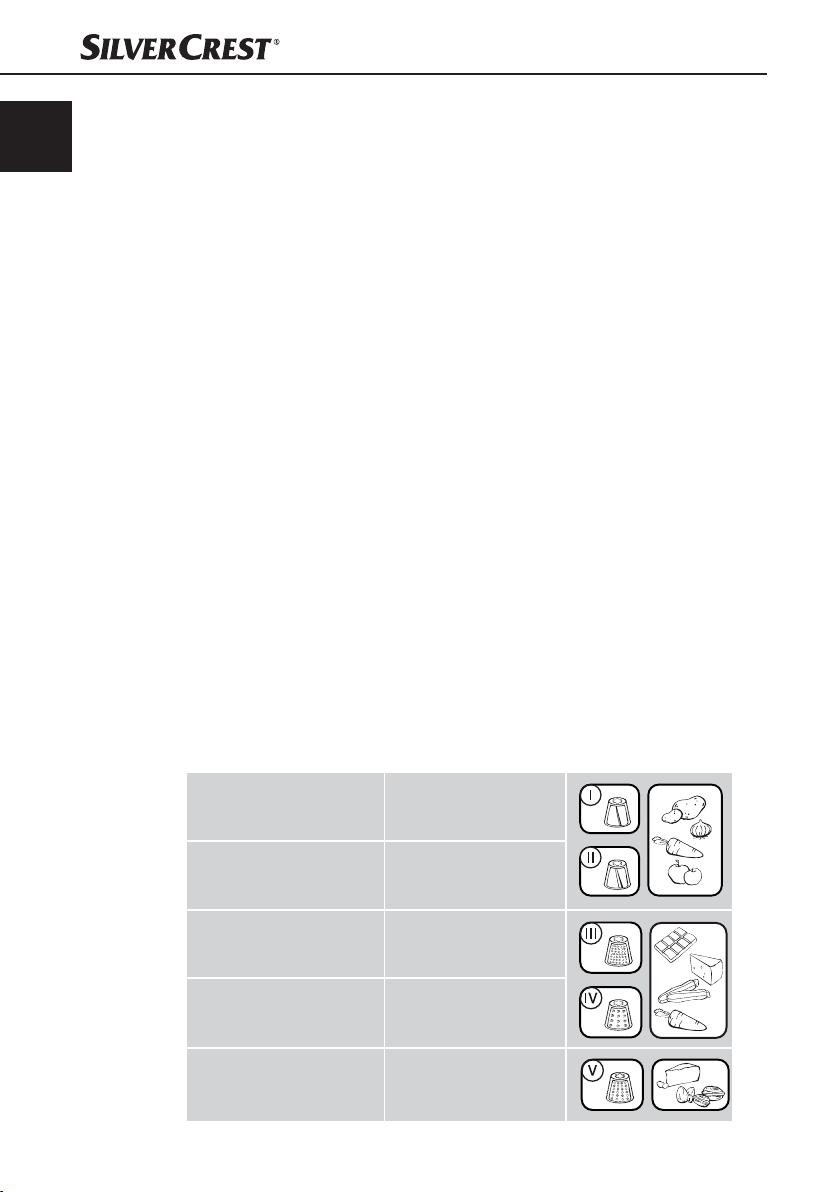
Dispone en total de 5 tambores diferentes para corte, picado y rallado:
Tambor de corte fi no 6
Tambor de corte
grueso q
Tambor de picado fi no 4
Tambor de picado
grueso 3
Tambor de rallado 5
Marca "I“ en la parte
metálica del tambor
Marca "II“ en la parte
metálica del tambor
Marca "III“ en la parte
metálica del tambor
Marca "IV“ en la parte
metálica del tambor
Marca "V“ en la parte
metálica del tambor
SGR 150 A1
Page 9

Utilice la siguiente tabla para seleccionar el tambor adecuado:
Tambor
Alimento
Calabacín • • • •
Pepino • •
Patata • • •
Pimiento • • •
Remolacha • •
Cebolla • •
Manzana • •
Col lombarda
y repollo
Chocolate • • •
Coco • •
Almendras/nueces/
avellanas
Pan duro •
Zanahorias • • • •
Parmesano •
Queso gruyere/suizo • • • •
de corte
fi no
- I 6
Tambor
de corte
grueso
- II q
••
Tambor
picado
fi no
- III 4
de
Tambor
de
picado
grueso
- IV 3
ES
Tambor
de
rallado
- V 5
•
SGR 150 A1
7
Page 10

ES
Montaje
Coloque la carcasa del tambor 1) 0 sobre el bloque de motor de forma que
la fl echa apunte al candado abierto
Gire la carcasa del tambor 2) 0 en el sentido contrario a las agujas del reloj
de forma que el tubo de alimentación w apunte hacia arriba y la fl echa
apunte hacia el candado cerrado
y quedará fi jada.
Abra la bandeja de almacenamiento 3) 7 y extraiga el tambor deseado 3
4 5 6 q.
Coloque el tambor deseado 4) 3 4 5 6 q sobre el eje motriz 9 en la
carcasa del tambor 0 y gírelo ligeramente en el sentido de las agujas del
reloj de forma que quede fi jado.
¡ADVERTENCIA! ¡PELIGRO DE LESIONES!
Tenga precaución al manipular el tambor 3 4 5 6 q.
!
¡Las cuchillas están muy afi ladas!
ADVERTENCIA
Cuando desee extraer el tambor nuevamente, gire la carcasa del tambor ► 0
de forma que se suelte del bloque de motor junto con el tambor aplicado.
Extraiga entonces el tambor de la carcasa 0. Monte la carcasa del tam-
bor 0 nuevamente tal y como se ha descrito anteriormente sobre el bloque
de motor y coloque el nuevo tambor que desee.
Conecte la clavija de red a la base de enchufe.5)
El aparato está ahora listo para funcionar.
.
. La carcasa del tambor 0 se encajará
Manejo
8
ADVERTENCIA
Puede almacenar el tambor que no necesita de forma cómoda, accesible ►
y ahorrando espacio en la bandeja de almacenamiento 7. Pr
la tapa de la bandeja de almacenamiento 2 sobre el símbolo
ligeramente hacia abajo y tire al mismo tiempo hacia atrás. Ahora puede
levantar la tapa 2. Cuando coloque la tapa 2, tenga en cuenta que las
fi jaciones encajen en los orifi cios previstos del aparato.
ATENCIÓN - ¡DAÑOS MATERIALES!
¡Nunca triture con el aparato alimentos duros como por ejemplo cubitos ►
de hielo! ¡Podría dañar el aparato de forma irreparable!
¡Nunca tritur
dañar el aparato de forma irreparable!
No permita nunca que el aparato funcione más de 2 minutos continuados. De- ►
berá esperar a que el motor se refrigere antes de volver a utilizar el aparato.
e con este aparato alimentos fi brosos como la carne! ¡Podría ►
esione
SGR 150 A1
Page 11

ATENCIÓN - ¡DAÑOS MATERIALES!
El alimento rallado/cortado/picado caerá hacia delante desde la carcasa del
tambor 0.
Limpieza
Prepare los alimentos: corte las piezas grandes en trozos más pequeños 1)
para que entren fácilmente en el tubo de alimentación w.
Coloque una bandeja u otro recipiente debajo de la carcasa del tambor 2) 0.
Pulse y mantenga presionado el botón de inicio 3) 1. El tambor utilizado 3
4 5 6 q comenzará a girar.
Pulse siempre primero el botón de inicio ► 1, antes de intr
mentos en el tubo de alimentación w. ¡Podría dañar el aparato de forma
irreparable!
Introduzca los alimentos en el tubo de alimentación 4) w y empújelos con el
compactador e, de forma que sean triturados por el tambor 3 4 5 6
q.
Cuando se hayan procesado todos los alimentos, suelte el botón de inicio 5) 1.
El tambor 3 4 5 6 q se detendrá.
Retire la clavija de red de la base del enchufe.6)
PELIGRO DE ELECTROCUCIÓN
Antes de limpiar el aparato, desconéctelo siempre de la red. ►
oducir los ali-
ES
SGR 150 A1
► Durante la limpieza no deberá en ningún caso sumergir el aparato
en agua o mantenerlo bajo un grifo de agua corriente.
¡ATENCIÓN - PELIGRO DE LESIONES!
¡Tenga cuidado con los tambores ► 3 4 5 6 q! ¡Los cuchillos están
lados!
muy afi
ATENCIÓN - ¡DAÑOS MATERIALES!
No use productos de limpieza abrasivos, agresivos o químicos. ¡Podrían ►
dañar la superfi cie de forma irreparable!
Retire la clavija de red.1)
Extraiga luego el tambor 2) 3 4 5 6 q de la carcasa 0.
Suelte la carcasa del tambor 3) 0 del bloque de motor.
9
Page 12

ES
Limpie el bloque de motor y la tapa del depósito de acumulación 4) 2 con
un paño húmedo. En caso de suciedad persistente, añada al paño un detergente suave. A continuación, elimine todos los restos de detergente solo con
agua y con un paño húmedo.
Los tambores ■ 3 4 5 6 q, la car
dor e se pueden lavar en el lavavajillas.
ADVERTENCIA
Los alimentos con colorantes fuertes, como por ejemplo las zanahorias, ►
puede suceder que los componentes plásticos del aparato mantengan la
ación. Limpie la coloración con un aceite alimenticio neutral.
color
Conservación
Lave el aparato tal y como se indica en el capítulo "Limpieza“.1)
Almacene los tambores 2) 3 4 5 6 q en la bandeja de almacena-
miento 7.
Introduzca el cable de alimentación en el compartimento del cable 3) 8, de
forma que solo sobresalga la clavija.
Guarde el aparato en un lugar limpio y seco.
Solución de fallos
casa del tambor 0, y el compacta-
10
PROBLEMA
El aparato no
funciona.
No se puede soltar
el tambor 3 4
5 6 q
POSIBLE
CAUSA
La clavija de red
no está conectada.
El aparato está
dañado.
La base de enchufe
tiene un defecto.
El tambor 3 4 5 6
q se engancha durante
el funcionamiento.
POSIBLES
SOLUCIONES
Conecte la clavija de red
a una base de enchufe.
Póngase en contacto con
el Servicio técnico.
Pruebe otra base de
enchufe.
Suelte la carcasa del
tambor 0 al completo.
El tambor 3 4 5 6
q también se soltará.
SGR 150 A1
Page 13

Reciclaje del aparato
En ningún caso deberá tirar el aparato con la basura doméstica.
Este producto está sujeto a la directiva europea 2002/96/EC.
Recicle el aparato en un centro de reciclaje autorizado a través de las instala-
ciones de reciclaje comunitarias. Preste atención a las normas en vigor. En caso
de dudas póngase en contacto con su centro de reciclaje.
Importador
KOMPERNASS GMBH
BURGSTRASSE 21
44867 BOCHUM, ALEMANIA
www.kompernass.com
Garantía
Con este aparato recibe usted 3 años de garantía desde la fecha de compra.
El aparato ha sido fabricado cuidadosamente y ha sido probado antes de su
entrega.
Guarde el comprobante de caja como justifi cante de compra. Si necesitara
hacer uso de la garantía, póngase en contacto por teléfono con su punto de
servicio habitual. Éste es el único modo de garantizar un envío gratuito.
ADVERTENCIA
La garantía cubre solo los defectos de fabricación o del material, pero ►
no los daños de transporte, las piezas sujetas a desgaste, ni los daños
sufridos por las piezas fr
ES
ágiles, p. ej. el interruptor.
SGR 150 A1
El producto ha sido diseñado únicamente para el uso privado y no para el uso
comercial. En caso de manipulación indebida e incorrecta, uso de la fuerza y
en caso de abrir el aparato personas ajenas a nuestros centros de asistencia
técnica autorizados, la garantía pierde su validez.
Sus derechos legales no se ven limitados por esta garantía.
El período de validez de la garantía no se prolonga al hacer uso de la misma.
Lo mismo se aplica a las piezas sustituidas y reparadas.
Los posibles daños y defectos ya presentes en el momento de la compra se
deberán notifi car inmediatamente después de desembalar el producto o, como
máximo, en un plazo de dos días desde de la fecha de compra.
Una vez fi nalizado el período de garantía las reparaciones no son gratuitas.
11
Page 14

ES
Asistencia técnica
Servicio España
Tel.: 902 59 99 22
(0,08 EUR/Min. + 0,11 EUR/llamada (tarifa normal))
(0,05 EUR/Min. + 0,11 EUR/llamada (tarifa reducida))
E-Mail: kompernass@lidl.es
IAN 70022
Recetas
Ensalada de repollo
Ingredientes
1,5 kg de repollo ■
1/2 pimiento ■
125 g de azúcar ■
125 ml de aceite ■
125 ml de vinagre ■
1 cucharada de sal ■
algo de pimienta ■
Corte el repollo en trozos pequeños y píquelo con el tambor de corte 1)
grueso q (II).
Cor
te el pimiento de forma que quepa en el tubo de alimentación 2) w y
píquelo con el tambor de rallado 3 (IV).
Caliente el aceite, el vinagre, el azúcar, la sal y un poco de pimienta.3)
Coloque la mezcla sobre el repollo y déjelo reposar durante unas 2 horas.4)
12
SGR 150 A1
Page 15

Ensalada con queso Feta
Ingredientes
2 tomates grandes ■
1 pepino ■
1 pimiento verde ■
1 pimiento rojo ■
1 cebolla ■
200 g de queso Feta ■
50 g de aceitunas ■
4 cucharadas de aceite ■
1 limón ■
30 g de su especia frescas preferida (por ejemplo albahaca) ■
Prepare los pepinos, pimientos y cebollas de forma que quepan en el tubo 1)
de alimentación w. R
Triture todo con el tambor de corte fi no 2) 6 (I).
Corte los tomates y el queso Feta en dados pequeños.3)
Mezcle todos los ingredientes y añada las aceitunas.4)
Mezcle el aceite con el zumo de limón y añádalo todo a la ensalada.5)
Espolvoree las hierbas sobre la ensalada.6)
ES
etire el corazón y la piel blanca del pimiento.
Calabacín gratinado
Ingredientes
6 pepinos ■
2 patatas ■
1 cebolla ■
1 taza de arroz cocido ■
1 huevo ■
Aprox. 30 ml de leche: ■
150 g de queso gruyere (queso suizo) ■
Sal y pimienta ■
SGR 150 A1
13
Page 16

ES
Prepare los calabacines, pimientos y cebollas de forma que quepan en el 1)
tubo de alimentación w.
Ralle los calabacines y las patatas con el tambor de rallado grueso 2) 3 (IV).
Corte las cebollas con el tambor de corte grueso 3) q (II).
Fría las verduras brevemente en una sartén.4)
Coloque una capa de arroz y otra de verduras en el envase para horno.5)
Mezcle el huevo con la leche, la sal y la pimienta y colóquelo todo sobre el 6)
envase para horno.
Ralle el queso gruyere con el tambor de rallado grueso 7) 3 (IV) y añádalo al
envase para horno.
Hornee el envase a unos 180° C durante unos 20 minutos.8)
Pesto de albahaca y almendras
Ingredientes
100 g de albahaca ■
45 g de piñones ■
25 g de almendras ■
50 g de queso parmesano ■
100 ml de aceite de oliva de calidad ■
Sal y pimienta ■
14
Ralle el queso parmesano con el tambor de rallado 1) 5 (V).
R
alle las almendras con el tambor de rallado 2) 5 (V).
Introduzca las hojas de albahaca, el aceite, los piñones, las almendras, la 3)
sal y la pimientas en la batidora y tritúrelo todo al máximo.
Finalmente, añada el queso parmesano y mézclelo todo nuevamente.4)
SGR 150 A1
Page 17

Indice
Informazioni sul presente manuale di istruzioni . . . . . . . . . . . . . . . . . . . . 16
Diritto d’autore . . . . . . . . . . . . . . . . . . . . . . . . . . . . . . . . . . . . . . . . . . . . . . . . . . . . . . . . . . 16
Uso conforme . . . . . . . . . . . . . . . . . . . . . . . . . . . . . . . . . . . . . . . . . . . . . . . . 16
Indicazioni di sicurezza . . . . . . . . . . . . . . . . . . . . . . . . . . . . . . . . . . . . . . . . 17
Volume della fornitura . . . . . . . . . . . . . . . . . . . . . . . . . . . . . . . . . . . . . . . . . 18
Smaltimento della confezione . . . . . . . . . . . . . . . . . . . . . . . . . . . . . . . . . . . . . . . . . . . . . . 19
Dati tecnici . . . . . . . . . . . . . . . . . . . . . . . . . . . . . . . . . . . . . . . . . . . . . . . . . . . 19
Descrizione dell’apparecchio / Accessori . . . . . . . . . . . . . . . . . . . . . . . . . . 20
Prima del primo impiego . . . . . . . . . . . . . . . . . . . . . . . . . . . . . . . . . . . . . . . 20
Uso . . . . . . . . . . . . . . . . . . . . . . . . . . . . . . . . . . . . . . . . . . . . . . . . . . . . . . . . .20
I tamburi . . . . . . . . . . . . . . . . . . . . . . . . . . . . . . . . . . . . . . . . . . . . . . . . . . . . . . . . . . . . . . . 20
Montaggio . . . . . . . . . . . . . . . . . . . . . . . . . . . . . . . . . . . . . . . . . . . . . . . . . . . . . . . . . . . . . 22
Uso . . . . . . . . . . . . . . . . . . . . . . . . . . . . . . . . . . . . . . . . . . . . . . . . . . . . . . . . . . . . . . . . . . 23
Pulizia . . . . . . . . . . . . . . . . . . . . . . . . . . . . . . . . . . . . . . . . . . . . . . . . . . . . . . 23
Conservazione . . . . . . . . . . . . . . . . . . . . . . . . . . . . . . . . . . . . . . . . . . . . . . . 24
Guasti e possibili rimedi . . . . . . . . . . . . . . . . . . . . . . . . . . . . . . . . . . . . . . . . 24
IT
MT
Smaltimento dell’apparecchio . . . . . . . . . . . . . . . . . . . . . . . . . . . . . . . . . . . 25
Importatore . . . . . . . . . . . . . . . . . . . . . . . . . . . . . . . . . . . . . . . . . . . . . . . . . . 25
Garanzia . . . . . . . . . . . . . . . . . . . . . . . . . . . . . . . . . . . . . . . . . . . . . . . . . . . . 25
Assistenza . . . . . . . . . . . . . . . . . . . . . . . . . . . . . . . . . . . . . . . . . . . . . . . . . . . 26
Ricette . . . . . . . . . . . . . . . . . . . . . . . . . . . . . . . . . . . . . . . . . . . . . . . . . . . . . . 26
Insalata di crauti . . . . . . . . . . . . . . . . . . . . . . . . . . . . . . . . . . . . . . . . . . . . . . . . . . . . . . . . 26
Insalata con formaggio feta . . . . . . . . . . . . . . . . . . . . . . . . . . . . . . . . . . . . . . . . . . . . . . . 27
Sformato di zucchine . . . . . . . . . . . . . . . . . . . . . . . . . . . . . . . . . . . . . . . . . . . . . . . . . . . . . 27
Pesto al basilico e mandorle . . . . . . . . . . . . . . . . . . . . . . . . . . . . . . . . . . . . . . . . . . . . . . . 28
SGR 150 A1
15
Page 18

IT
MT
Informazioni sul presente manuale di istruzioni
Congratulazioni per l’acquisto del nuovo apparecchio!
Ha scelto un prodotto moderno e di alta qualità. Il manuale di istruzioni è parte
integrante del presente prodotto. Esso contiene importanti informazioni per la
sicurezza, l’uso e lo smaltimento. Prima di utilizzare il prodotto familiarizzarsi
con tutte le indicazioni d’uso e di sicurezza. Utilizzare il presente prodotto solo
come descritto e per i campi di impiego indicati. In caso di cessione del prodotto
a terzi, consegnare anche tutta la documentazione relativa.
Diritto d’autore
La presente documentazione è tutelata dal diritto d’autore.
Qualsiasi riproduzione o ristampa, anche parziale, ovvero la riproduzione delle
immagini, anche se modifi cate, è consentita solo previo permesso scritto del
produttore.
Uso conforme
Il presente prodotto è previsto per grattugiare le verdure, la frutta e altri alimenti
non duri.
Questo apparecchio non è destinato all’uso nei settori commerciali e industriali.
AVVISO
Pericolo derivante da uso non conforme!
In caso di uso non conforme o diverso da quello previsto, possono verifi carsi
situazioni di pericolo.
Utilizzare l'apparecchio esclusivamente in conformità alla sua destinazione. ►
Attenersi alle procedure descritte nel presente manuale di istruzioni. ►
16
AVVERTENZA
In caso di uso non conforme o diverso da quello previsto, possono verifi carsi ►
situazioni di pericolo. Utilizzare l'apparecchio esclusivamente in conformità
alla destinazione. Attener
istruzioni. Si escludono rivendicazioni di qualsiasi genere per danni derivanti
da uso non conforme, riparazioni non professionali, modifi che non autorizzate
o impiego di parti di ricambio non omologate. Il rischio è esclusivamente a
carico dell'utente.
si alle procedure descritte nel presente manuale di
SGR 150 A1
Page 19

Indicazioni di sicurezza
PERICOLO DI FOLGORAZIONE
Collegare l'apparecchio a una presa installata a norma con tensione di ►
rete di 220 - 240 V ~ / 50 Hz.
In caso di guasti e prima della pulizia, staccar
presa di corrente.
Estrarre la spina dalla presa tirando sempre dalla spina, mai dal cavo. ►
Non piegare o schiacciare il cavo di alimentazione e posizionarlo in modo ►
che non sia di intralcio o di inciampo.
Assicurarsi che durante il funzionamento il cavo di rete non diventi umido o ►
bagnato. Collocarlo in modo tale da impedirne il bloccaggio o il danneggiamento.
In caso di danni all'appar
eseguire la sostituzione dal centro di assistenza ai clienti, al fi ne di evitare
pericoli.
Utilizzare l'apparecchio solo in ambienti asciutti, non all'aperto. ►
Non immergere mai l'apparecchio in acqua o altri liquidi! ►
ATTENZIONE! PERICOLO DI LESIONI!
Fare raff reddare gli accessori utilizzati prima di rimuoverli. ►
Utilizzare solo gli accessori originali di questo apparecchio. Componenti ►
diversi potrebbero non essere suffi cientemente
Questo apparecchio non è indicato per l'uso da parte di persone ►
(inclusi bambini) con limitate capacità fi siche, sensoriali o mentali o prive
dell'esperienza e/o della conoscenza necessaria, a meno che tali per
non vengano sorvegliate da un responsabile per la sicurezza o abbiano
ricevuto indicazioni sull'impiego dell'apparecchio. Sorvegliare i bambini
per assicurarsi che non giochino con l'apparecchio.
Non utilizzare mai l'apparecchio su piastre elettriche bollenti o nelle vicinanze ►
di fi amme libere (fornelli a gas).
Utilizzare l'apparecchio solo su una superfi cie di lavoro stabile. ►
Non fare pendere capelli lunghi, sciarpe, cravatte, ecc. sull'apparecchio ►
durante l'uso. Essi potrebbero altrimenti essere catturati dalle parti in
otazione.
r
IT
MT
e sempre la spina dalla ►
ecchio, al cavo di rete o alla spina di rete fare ►
sicuri.
sone
SGR 150 A1
17
Page 20

IT
MT
ATTENZIONE! PERICOLO DI LESIONI!
Non toccare mai i tamburi rotanti con le mani! ►
Non inserire utensili da cucina o altri oggetti nei tamburi rotanti! ►
Prima di qualsiasi sostituzione dei tamburi staccare la spina dalla presa di ►
rete e attendere fi no all'arresto completo del tamburo.
emere mai gli alimenti con le mani nude nel pozzetto di riempimento. ►
Non pr
Utilizzare sempre l'apposito pressino.
Non lasciar
elettrica.
Non utilizzare prolunghe. In caso di emergenza, la spina di rete dev'essere ►
raggiungibile rapidamente.
Non continuare a utilizzare l'apparecchio se è caduto o se presenta danni ►
visibili.
ATTENZIONE - DANNI MATERIALI!
Non utilizzare mai l'apparecchio senza tamburo o con due tamburi ►
contemporaneamente.
Non tagliar
e mai l'apparecchio incustodito quando è collegato alla rete ►
e mai la carne o alimenti duri con questo apparecchio. ►
Volume della fornitura
La fornitura standard dell’apparecchio comprende i seguenti componenti:
Grattugia elettrica per verdure ▯
5 tamburi ▯
Pressino ▯
Istruzioni per l’uso ▯
Rimuovere tutte le parti dell’apparecchio e il manuale di istruzioni dal 1)
car
tone.
Rimuovere completamente il materiale di imballaggio. 2)
18
AVVERTENZA
Controllare la completezza e integrità della fornitura in relazione ai danni ►
visibili.
In caso di fornitur
gio insuffi ciente o causati dal trasporto, rivolgersi alla Hotline di assistenza
(v. capitolo Assistenza).
a incompleta o in presenza di danni derivanti da imballag- ►
SGR 150 A1
Page 21
Smaltimento della confezione
L’imballaggio protegge l’apparecchio dai danni da trasporto. I materiali di
imballaggio sono stati selezionati in relazione alla loro ecocompatibilità e alle
caratteristiche di smaltimento, e pertanto sono riciclabili.
Il riciclo dell’imballaggio consente di risparmiare materie prime e riduce la generazione di rifi uti. Smaltire il materiale di imballaggio inutilizzato in conformità
alle norme vigenti localmente.
AVVERTENZA
Durante il periodo di validità della garanzia, se possibile, conservare ►
l'imballaggio originale, per poter imballare adeguatamente l'apparecchio
in caso di inter
vento in garanzia.
Dati tecnici
Tensione di rete 220 - 240 V ~, 50 Hz
Tensione nominale 150 W
IT
MT
Classe di protezione
Tempo di funzionamento abbreviato
Tempo di funzionamento abbreviato
Il tempo di funzionamento abbreviato indica il tempo di funzionamento dell’apparecchio senza pericolo di surriscaldamento e di guasti al motore. Dopo l’uso per
il tempo di funzionamento abbreviato indicato, l’apparecchio dev’essere spento
fi no al completo raff reddamento del motore.
II
2 minuti
SGR 150 A1
19
Page 22
IT
MT
Descrizione dell’apparecchio / Accessori
1 Pulsante di avvio
2 Coperchio del vano di custodia
3 Tamburo per grattugia grossolana (IV)
4 Tamburo per grattugia fi ne (III)
5 Tamburo per raspa (V)
6 Tamburo per taglio fi ne (I)
7 Vano di custodia
8 Vano portacavo
9 Albero motore
0 Alloggiamento dei tamburi
q Tamburo per taglio grossolano (II)
w Pozzetto di riempimento
e Pressino
Prima del primo impiego
Pulire l’apparecchio e tutti i componenti (tamburo ■ 3 4 5 6 q, pressino
e, alloggiamento tamburi 0) come descritto al capitolo “Pulizia“.
Uso
I tamburi
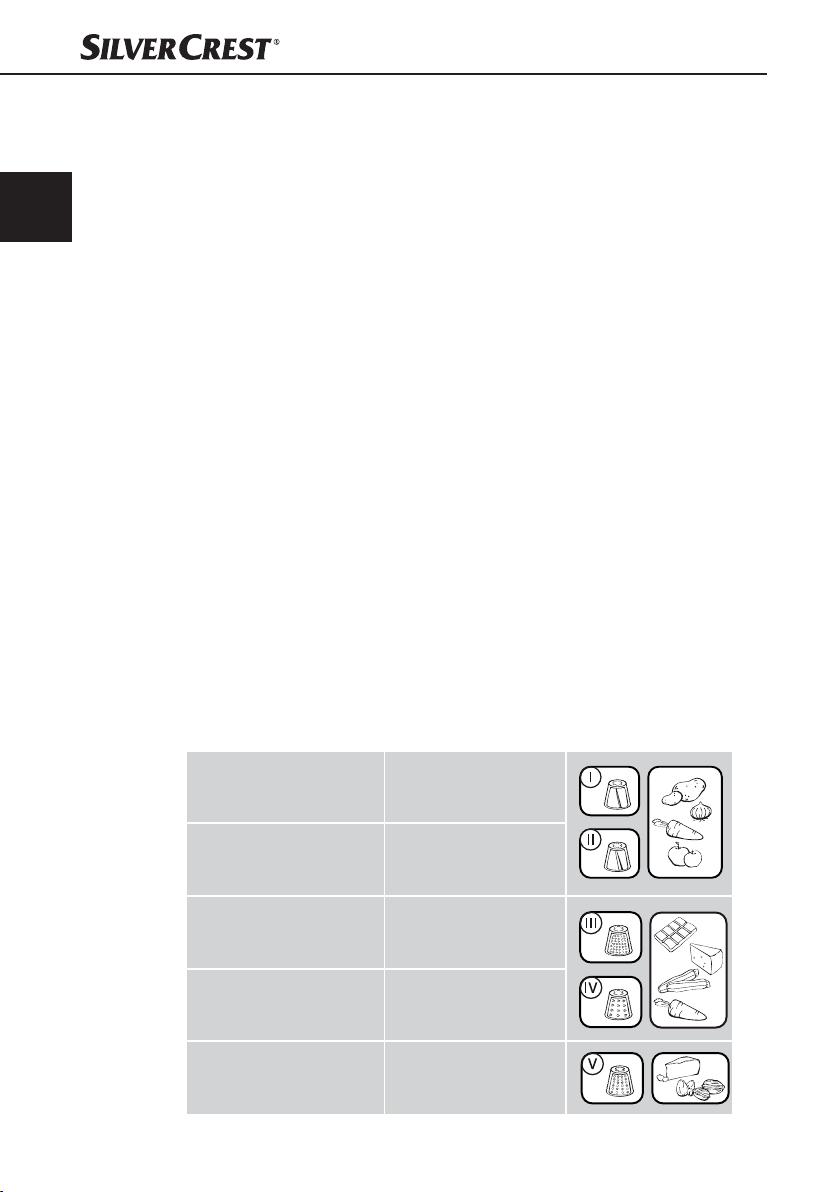
Sono a disposizione in totale 5 diversi tamburi di taglio, raspa e grattugia:
20
Tamburo per taglio fi ne
Tamburo per taglio
grossolano q
Tamburo per grattugia
fi ne 4
Tamburo per grattugia
grossolana 3
Tamburo per raspa 5
Marcatura "I" sulla
parte metallica del
tamburo
Marcatura "II" sulla
parte metallica del
tamburo
Marcatura "III" sulla
parte metallica del
tamburo
Marcatura "IV" sulla
parte metallica del
tamburo
Marcatura "V" sulla
parte metallica del
tamburo
SGR 150 A1
Page 23

Per la scelta del tamburo adatto orientarsi in base alla seguente tabella:
Tamburo
per
Alimento
Zucchine • • • •
Cetrioli • •
Patate • • •
Peperoni • • •
Bietole rosse • •
Cipolle • •
Mele • •
Cavolo bianco/rosso • •
Cioccolata • • •
Noce di cocco • •
Mandorle/noci/
nocciole
Pane secco •
Carote • • • •
Parmigiano •
Formaggio duro
Greyerzer (gruviera)/
svizzero
taglio
fi ne
- I 6
Tambu-
ro per
taglio
grosso-
lano
- II q
••••
Tambu-
ro per
grattu-
gia fi ne
- III 4
Tamburo
per
grattugia
grosso-
lana
- IV 3
Tamburo
raspa
- V 5
per
•
IT
MT
SGR 150 A1
21
Page 24

IT
MT
Montaggio
ATTENZIONE! PERICOLO DI LESIONI!
!
AVVERTENZA
L’apparecchio è pronto per l’uso.
Inserire l’alloggiamento dei tamburi 1) 0 sul blocco motore in modo tale che
la freccia punti sul lucchetto chiuso .
Ruotare l’alloggiamento dei tamburi 2) 0 in senso antiorario, in modo che il
pozzetto di riempimento w punti verso l’alto e la freccia punti verso il catenaccio chiuso
Aprire il vano di custodia 3) 7 e prelevare il tamburo desiderato 3 4 5 6
q.
Inserire il tamburo desiderato 4) 3 4 5 6 q sull’albero motore 9 nell’alloggiamento dei tamburi 0 e ruotarlo leggermente in senso orario, in modo
da ottenerne il saldo posizionamento.
Agire con cautela nell’uso dei rulli 3 4 5 6 q.
Le lame sono molto affi late!
Se si desidera estrarre nuovamente il tamburo, ruotare l'alloggiamento ►
dei tamburi 0 fi
inserito. Rimuovere quindi il tamburo dall'alloggiamento dei tamburi 0.
Rimontare l'alloggiamento dei tamburi 0 come descritto in precedenza sul
blocco motore e inserire il nuovo tamburo desiderato.
Inserire la spina nella presa di corrente.5)
. L’alloggiamento dei tamburi 0 si inserisce e si blocca.
no a distaccarlo dal blocco motore insieme al tamburo
22
AVVERTENZA
I tamburi non necessari possono essere riposti nuovamente in modo da rispar- ►
miare spazio ed essere sempre a portata di mano nel vano di custodia 7.
emere leggermente verso il basso il coperchio del vano di custodia 2 sul
Pr
segno
sollevare il coperchio 2. Nel riposizionare il coperchio 2 assicurarsi che i
blocchi rientrino negli appositi fori dell'apparecchio.
e tirarlo contemporaneamente all'indietro. In tal modo è possibile
SGR 150 A1
Page 25

Uso
ATTENZIONE - DANNI MATERIALI!
Non cercare mai di sminuzzare alimenti duri, come ad esempio il ghiaccio, ►
con questo apparecchio! L'apparecchio potrebbe danneggiarsi irreparabilmente!
care mai di sminuzzare alimenti fi brosi, come ad es. la carne, con ►
Non cer
questo apparecchio! L'apparecchio potrebbe danneggiarsi irreparabilmente!
Non utilizzar
il motore prima di riutilizzare l'apparecchio.
eparare l’alimento: tagliare i pezzi più grossi in modo che entrino nel 1)
Pr
pozzetto di riempimento w senza problemi.
Collocare una scodella o altro recipiente sotto l’alloggiamento dei tamburi 2) 0.
Premere e tenere premuto il pulsante Start 3) 1. Il tamburo inserito 3 4 5
6 q comincia a ruotare.
ATTENZIONE - DANNI MATERIALI!
Premere sempre il pulsante Start ► 1 prima di v
pozzetto di riempimento w. In caso contrario, l'apparecchio potrebbe
danneggiarsi irreparabilmente!
Versare gli alimenti nel pozzetto di riempimento 4) w e spingerli con il pressino e in modo da consentire al tamburo 3 4 5 6 q di sminuzzarli.
Gli alimenti grattugiati/tagliati/raspati cadono in avanti dall’alloggiamento dei
tamburi 0.
Al termine della lavorazione, rilasciare il pulsante Start 5) 1. Il tamburo 3 4
5 6 q si ferma.
Staccare la spina dalla presa di corrente.6)
e l'apparecchio per oltre 2 minuti alla volta. Fare raff reddare ►
ersare gli alimenti nel
IT
MT
Pulizia
SGR 150 A1
PERICOLO DI FOLGORAZIONE
Prima di pulire l'apparecchio, staccare sempre la spina dalla presa di ►
corrente.
► Non immergere assolutamente l'apparecchio in acqua per la pulizia
e non metterlo sotto l'acqua corrente.
AVVISO - PERICOLO DI LESIONI!
Utilizzare la massima cautela con i tamburi ► 3 4 5 6 q! I coltelli sono
molto affi lati!
23
Page 26

IT
MT
ATTENZIONE - DANNI MATERIALI!
Non utilizzare detergenti chimici, abrasivi o aggressivi! Essi possono attac- ►
care irrimediabilmente la superfi cie.
Staccare la spina.1)
Rimuovere il tamburo 2) 3 4 5 6 q dall’alloggiamento dei tamburi 0.
Staccare l’alloggiamento dei tamburi 3) 0 dal blocco motore.
Pulire il blocco motore e il coperchio del vano di custodia 4) 2 con un panno
umido. In caso di sporco resistente, versare un po’ di detergente delicato
sul panno. Rimuovere quindi tutti i resti di detergente solo con un panno
inumidito con acqua.
I tamburi ■ 3 4 5 6 q, l’alloggiamento dei tamburi 0 e il pr
sono idonei al lavaggio in lavastoviglie.
AVVERTENZA
Alcuni alimenti, come ad esempio le carote, potrebbero colorare le parti ►
in plastica dell'apparecchio. Trattare queste macchie strofi nando un po' di
olio alimentar
Conservazione
Pulire l’apparecchio come descritto al capitolo “Pulizia”.1)
Riporre i tamburi 2) 3 4 5 6 q nel vano di custodia 7.
Spingere il cavo di rete nel vano per il cavo 3) 8 in modo tale che sporga solo
la spina.
Riporre l’apparecchio in un luogo asciutto e pulito.
essino e
e neutro.
Guasti e possibili rimedi
PROBLEMA
L'apparecchio non
funziona.
Il tamburo 3 4
5 6 q non si
stacca
24
POSSIBILE
CAUSA
La spina di rete non
è collegata.
L'apparecchio è
danneggiato.
La presa di corrente è
guasta.
Il tamburo 3 4 5
6 q si è leggermente
agganciato durante
l'uso.
POSSIBILI
SOLUZIONI
Collegare l'apparecchio
a una presa di corrente.
Rivolgersi al servizio
clienti.
Provare a utilizzare un'altra
presa di corrente.
Staccare tutto l'alloggiamento dei tamburi 0 dal
blocco motore.
In tal modo anche il
tamburo 3 4 5 6 q
si staccherà.
SGR 150 A1
Page 27

Smaltimento dell’apparecchio
Non smaltire per alcun motivo l’apparecchio insieme ai normali
rifi uti domestici.
Questo prodotto è soggetto alla Direttiva Europea 2002/96/EC.
Smaltire l’apparecchio attraverso un’azienda di smaltimento autorizzata o attra-
verso l’ente di smaltimento comunale. Rispettare le prescrizioni attualmente in vigore. In caso di dubbi mettersi in contatto con l’ente di smaltimento competente.
Importatore
KOMPERNASS GMBH
BURGSTRASSE 21
44867 BOCHUM, GERMANY
www.kompernass.com
Garanzia
Questo apparecchio è garantito per tre anni a partire dalla data di acquisto.
L’apparecchio è stato prodotto con cura e debitamente collaudato prima della
consegna.
Conservare lo scontrino come prova d’acquisto. Nei casi contemplati dalla
garanzia, mettersi in comunicazione telefonicamente con il centro di assistenza
più vicino. Solo in tal modo è possibile garantire una spedizione gratuita della
merce.
IT
MT
SGR 150 A1
AVVERTENZA
La prestazione della garanzia vale solo per difetti del materiale o di fabbri- ►
cazione, ma non per i danni da trasporto, danni alle parti soggette a usura
o alle par
Il prodotto è destinato esclusivamente all’uso domestico e non a quello commerciale. La garanzia decade in caso di impiego improprio o manomissione, uso
della forza e interventi non eseguiti dalla nostra fi liale di assistenza autorizzata.
Questa garanzia non costituisce alcun limite ai diritti legali del consumatore.
Il periodo della garanzia non viene prolungato da interventi in garanzia.
Ciò vale anche per le parti sostituite e riparate.
I danni e difetti rilevati già all’atto dell’acquisto devono essere segnalati subito
dopo il disimballaggio, e comunque entro e non oltre due giorni dalla data di
acquisto.
Le riparazioni eseguite successivamente alla scadenza del periodo di garanzia
sono a pagamento.
ti fragili, come ad es. interruttori.
25
Page 28

IT
MT
Assistenza
Assistenza Italia
Tel.: 02 36003201
E-Mail: kompernass@lidl.it
IAN 70022
Assistenza Malta
Tel.: 80062230
E-Mail: kompernass@lidl.com.mt
IAN 70022
Ricette
Insalata di crauti
Ingredienti
1,5 kg di cavolo bianco a foglia ■
1/2 peperone ■
125 g di zucchero ■
125 ml di olio ■
125 ml di aceto ■
1 cucchiaio di sale ■
un po’ di pepe ■
26
Tagliare il cavolo a pezzetti e tagliarlo con il tamburo per taglio grossolano 1) q
(II).
T
agliare il peperone in modo tale che entri nel pozzetto di riempimento 2) w
e sminuzzarlo con il tamburo per grattugia grossolana 3 (IV).
Riscaldare l’olio, l’aceto, lo zucchero, il sale e un po’ di pepe.3)
Versare il liquido così ottenuto sul cavolo e far macerare per circa 2 ore.4)
SGR 150 A1
Page 29

Insalata con formaggio feta
Ingredienti
2 pomodori grandi ■
1 cetriolo ■
1 peperone verde ■
1 peperone rosso ■
1 cipolla ■
200 g di formaggio feta ■
50 g di olive ■
4 cucchiai di olio ■
1 limone ■
30 g di erbe fresche a piacere (ad es. basilico) ■
Preparare il cetriolo, il peperone e le cipolle in modo che entrino nel pozzetto 1)
d
i riempimento w. Rimuovere i noccioli e la parte bianca dal peperone.
Sminuzzare tutto con il tamburo per taglio fi ne 2) 6 (I).
Tagliare i pomodori e il formaggio feta a dadini.3)
Mescolare tutti gli ingredienti e aggiungere le olive.4)
Mescolare l’olio con il succo di limone e versare il tutto sull’insalata.5)
Cospargere l’insalata con le erbe.6)
IT
MT
Sformato di zucchine
Ingredienti
6 zucchine ■
2 patate ■
1 cipolla ■
1 tazza di riso già cotto ■
1 uovo ■
ca. 30 ml di latte ■
150 g di formaggio Greyerzer (o gruviera, formaggio duro svizzero) ■
Sale e pepe ■
SGR 150 A1
27
Page 30

IT
MT
Preparare le zucchine, le patate e le cipolle in modo che entrino nel pozzetto 1)
di riempimento w.
Grattugiare le zucchine e le patate con il tamburo per grattugia grossolana 2) 3
(IV).
Tagliare le cipolle con il tamburo per taglio grossolano 3) q (II).
Soff riggere brevemente le verdure in padella.4)
Alternare uno strato di riso e uno strato di verdure nella teglia.5)
Mescolare l’uovo con il latte, il sale e il pepe e versare il tutto sullo sformato.6)
Grattugiare il formaggio Greyerzer con il tamburo per grattugia grossolana 7) 3
(IV) e cospargerne lo sformato.
Far cuocere lo sformato in forno a 180° C per circa 20 minuti.8)
Pesto al basilico e mandorle
Ingredienti
100 g di basilico ■
45 g di pinoli ■
25 g di mandorle ■
50 g di parmigiano ■
100 ml di olio d’oliva di buona qualità ■
Sale e pepe ■
28
Grattare il parmigiano con il tamburo per raspa 1) 5 (V).
Gr
attare le mandorle con il tamburo per raspa 2) 5 (V).
Aggiungere le foglie di basilico, l’olio, i pinoli, le mandorle, il sale e il pepe 3)
nel mixer e ottenerne una purea.
Infi ne aggiungere il parmigiano e mescolare nuovamente tutto bene.4)
SGR 150 A1
Page 31

Índice
Informações acerca deste manual de instruções . . . . . . . . . . . . . . . . . . . . 30
Direitos de autor . . . . . . . . . . . . . . . . . . . . . . . . . . . . . . . . . . . . . . . . . . . . . . . . . . . . . . . . 30
Utilização correcta . . . . . . . . . . . . . . . . . . . . . . . . . . . . . . . . . . . . . . . . . . . . 30
Indicações de segurança . . . . . . . . . . . . . . . . . . . . . . . . . . . . . . . . . . . . . . . 31
Volume de fornecimento . . . . . . . . . . . . . . . . . . . . . . . . . . . . . . . . . . . . . . . 32
Eliminação da embalagem . . . . . . . . . . . . . . . . . . . . . . . . . . . . . . . . . . . . . . . . . . . . . . . . 33
Dados técnicos . . . . . . . . . . . . . . . . . . . . . . . . . . . . . . . . . . . . . . . . . . . . . . . . 33
Descrição do aparelho/ acessórios . . . . . . . . . . . . . . . . . . . . . . . . . . . . . . . 34
Antes da primeira utilização . . . . . . . . . . . . . . . . . . . . . . . . . . . . . . . . . . . . 34
Utilização . . . . . . . . . . . . . . . . . . . . . . . . . . . . . . . . . . . . . . . . . . . . . . . . . . . . 34
Os tambores . . . . . . . . . . . . . . . . . . . . . . . . . . . . . . . . . . . . . . . . . . . . . . . . . . . . . . . . . . . 34
Montagem . . . . . . . . . . . . . . . . . . . . . . . . . . . . . . . . . . . . . . . . . . . . . . . . . . . . . . . . . . . . . 36
Funcionamento. . . . . . . . . . . . . . . . . . . . . . . . . . . . . . . . . . . . . . . . . . . . . . . . . . . . . . . . . . 36
Limpeza . . . . . . . . . . . . . . . . . . . . . . . . . . . . . . . . . . . . . . . . . . . . . . . . . . . . . 37
Armazenamento . . . . . . . . . . . . . . . . . . . . . . . . . . . . . . . . . . . . . . . . . . . . . . 38
Resolução de problemas . . . . . . . . . . . . . . . . . . . . . . . . . . . . . . . . . . . . . . . 38
Eliminar o aparelho . . . . . . . . . . . . . . . . . . . . . . . . . . . . . . . . . . . . . . . . . . . 39
Importador . . . . . . . . . . . . . . . . . . . . . . . . . . . . . . . . . . . . . . . . . . . . . . . . . . 39
Garantia . . . . . . . . . . . . . . . . . . . . . . . . . . . . . . . . . . . . . . . . . . . . . . . . . . . . 39
Assistência técnica . . . . . . . . . . . . . . . . . . . . . . . . . . . . . . . . . . . . . . . . . . . . 40
PT
Receitas . . . . . . . . . . . . . . . . . . . . . . . . . . . . . . . . . . . . . . . . . . . . . . . . . . . . . 40
Salada de repolho . . . . . . . . . . . . . . . . . . . . . . . . . . . . . . . . . . . . . . . . . . . . . . . . . . . . . . . 40
Salada com queijo Feta . . . . . . . . . . . . . . . . . . . . . . . . . . . . . . . . . . . . . . . . . . . . . . . . . . . 41
Empadão de courgete . . . . . . . . . . . . . . . . . . . . . . . . . . . . . . . . . . . . . . . . . . . . . . . . . . . . 41
Pesto de manjericão e amêndoas . . . . . . . . . . . . . . . . . . . . . . . . . . . . . . . . . . . . . . . . . . . 42
SGR 150 A1
29
Page 32

PT
Informações acerca deste manual de instruções
Parabéns pela aquisição do seu novo aparelho!
Optou por um produto moderno e de alta qualidade. O manual de instruções
é parte integrante deste produto. Contém indicações importantes para a segurança, utilização e eliminação. Antes da utilização do produto, familiarize-se
com todas as indicações de operação e segurança. Utilize este produto apenas
como descrito e nas áreas de aplicação indicadas. Ao entregar o produto a
terceiros, entregue também todos os documentos.
Direitos de autor
Esta documentação está protegida por direitos de autor.
Qualquer reprodução ou reimpressão, mesmo de extractos, assim como a
reprodução de imagens, mesmo que editadas, apenas podem ser realizadas
mediante autorização por escrito do fabricante.
Utilização correcta
Este aparelho foi concebido para ralar legumes, fruta e outros alimentos não
rijos.
Este aparelho não se destina à utilização em áreas industriais ou comerciais.
AVISO
Perigo devido a uma utilização incorrecta!
Podem surgir riscos resultantes de uma utilização incorrecta e/ou não adequada do aparelho.
O aparelho deve ser utilizado apenas para a fi nalidade descrita. ►
Cumprir os procedimentos descritos neste manual de instruções. ►
30
NOTA
Podem surgir riscos resultantes de uma utilização incorrecta e/ou não ade- ►
quada do aparelho. Utilize o aparelho exclusivamente da forma correcta.
Cumprir os pr
ída a possibilidade de reclamações de qualquer tipo associadas a danos
resultantes de uma utilização incorrecta, reparações indevidas, alterações
realizadas sem autorização ou utilização de peças de substituição não
permitidas. O risco é da total responsabilidade do utilizador.
ocedimentos descritos neste manual de instruções. Está exclu-
SGR 150 A1
Page 33

Indicações de segurança
PERIGO DE CHOQUE ELÉCTRICO
Ligue o aparelho apenas a uma tomada correctamente instalada, com ►
uma tensão de rede de 220 - 240 V ~ / 50 Hz.
Em caso de av
a fi cha da tomada.
Retire o cabo de rede da tomada sempre pela fi cha de rede, não puxe ►
pelo cabo.
Não dobr
possa ser pisado e que pessoas não tropecem no mesmo.
Tenha atenção para que o cabo de rede não fi que molhado ou húmido ►
quando estiver em funcionamento. Manuseie-o de tal forma que não fi que
entalado ou seja danifi
Se o aparelho, o cabo ou a fi cha de rede apresentarem danos, devem ser ►
substituídos pela assistência técnica, de modo a evitar perigos.
Utilize o aparelho apenas em espaços secos, não ao ar livre. ►
Nunca mergulhe o aparelho em água ou outros líquidos! ►
AVISO! PERIGO DE FERIMENTOS!
Deixe arrefecer os acessórios antes de os retirar. ►
Utilize apenas acessórios originais para este aparelho. As outras peças ►
podem não ser sufi cientemente seguras.
Este apar
capacidades físicas, sensoriais ou mentais limitadas ou falta de experiência e/ou de conhecimento, a não ser que estas sejam super
por uma pessoa responsável pela sua segurança ou que desta recebam
instruções acerca do funcionamento do aparelho. As crianças devem ser
supervisionadas, de modo a garantir que não brincam com o aparelho.
Nunca opere o aparelho sobre placas quentes (fogão) ou na proximidade ►
de chamas (fogão a gás).
Utilize o aparelho apenas sobre uma superfície de trabalho estável. ►
Nunca deixe cabelos compridos, lenços ou gravatas etc. pendurados so- ►
bre o aparelho durante o funcionamento do mesmo. Caso contrário estes
podem ser r
arias de funcionamento e antes de limpar o aparelho, retire ►
e nem esmague o cabo de rede e coloque-o de forma que não ►
cado.
elho não deve ser utilizado por pessoas (incluindo crianças) com ►
ecolhidos pelas peças rotativas.
PT
visionadas
SGR 150 A1
31
Page 34

PT
AVISO! PERIGO DE FERIMENTOS!
Nunca toque com as mãos nos tambores em rotação! ►
Não introduza utensílios de cozinha ou outros objectos nos tambores em ►
rotação!
Antes de substituir os tambor
até o tambor estar totalmente parado.
Nunca pressione os alimentos na abertura para enchimento com as mãos ►
desprotegidas. Utilize sempre a barra de auxílio de enchimento.
Nunca deix
à rede eléctrica.
Não utilize extensões. A fi cha de rede deve encontrar-se num local de fácil ►
acesso, em caso de emergência.
Não continue a utilizar o aparelho se este tiver caído ao chão ou se ►
apresentar danos visíveis.
ATENÇÃO - DANOS MATERIAIS!
Nunca opere o aparelho sem tambor ou com dois tambores em simultâneo. ►
Nunca triture carne ou alimentos mais duros com este aparelho. ►
e o aparelho sem vigilância enquanto este se encontrar ligado ►
Volume de fornecimento
Por norma, o aparelho é fornecido com os seguintes componentes:
Raspador eléctrico de legumes ▯
5 tambores ▯
Barra de auxílio de enchimento ▯
Manual de instruções ▯
Retire da embalagem todas as peças do aparelho, assim como o manual de 1)
instruções.
R
etire todo o material de embalagem. 2)
es, retire a fi cha de rede da tomada e aguarde ►
32
NOTA
Verifi que o fornecimento quanto à sua integridade e danos visíveis. ►
No caso de um fornecimento incompleto ou de danos resultantes de uma ►
embalagem incompleta ou do transporte, contacte a linha directa de
assistência técnica (v
er capítulo Assistência técnica).
SGR 150 A1
Page 35

Eliminação da embalagem
A embalagem protege o aparelho de danos durante o transporte. Os materiais
da embalagem devem ser seleccionados numa perspectiva ecológica e de
poupança energética e, como tal, reciclados.
A reciclagem da embalagem permite a poupança de matérias-primas e reduz a
formação de lixo. Elimine os materiais de embalagem que já não são necessários
em conformidade com as normas locais em vigor.
NOTA
Se possível, conserve a embalagem original durante o período de garantia, ►
para que possa embalar o aparelho correctamente em caso de devolução
ou semelhante.
Dados técnicos
Tensão de rede 220 - 240 V ~, 50 Hz
Potência nominal 150 W
PT
Classe de protecção
Tempo de funcionamento contínuo 2 minutos
Tempo de funcionamento contínuo
O tempo de funcionamento contínuo indica durante quanto tempo é possível
trabalhar com um aparelho sem que o motor sobreaqueça e apresente danos.
Após o tempo de funcionamento contínuo indicado, o aparelho deverá ser
desligado até que o motor arrefeça.
II
SGR 150 A1
33
Page 36

PT
Descrição do aparelho/ acessórios
1 Botão de início
2 Tampa do compartimento de armazenamento
3 Tambor-raspador grande (IV)
4 Tambor-raspador pequeno (III)
5 Tambor-ralador (V)
6 Tambor de corte fi no (I)
7 Compartimento de armazenamento
8 Orifício de recolha do cabo
9 Eixo de accionamento
0 Caixa do tambor
q Tambor de corte grande (II)
w Abertura para enchimento
e Barra de auxílio de enchimento
Antes da primeira utilização
Limpe o aparelho e todas as peças (tambores ■ 3 4 5 6 q, barra de
auxílio de enchimento e, caixa do tambor 0) como descrito no capítulo
"Limpeza".
Utilização
Os tambores
34
Tem à sua disposição um total de 5 tambores diferentes para cortar, raspar e ralar:
Tambor de corte fi no 6
Tambor de corte
grande q
Tambor-raspador fi no 4
Tambor-raspador
grande 3
Tambor-ralador 5
Marcação "I" na parte
metálica do tambor
Marcação "II" na parte
metálica do tambor
Marcação "III" na parte
metálica do tambor
Marcação "IV" na parte
metálica do tambor
Marcação "V" na parte
metálica do tambor
SGR 150 A1
Page 37

Oriente-se pela seguinte tabela ao seleccionar o tambor mais adequado:
Tambor
Alimento
Courgete • • • •
Pepino • •
Batatas • • •
Pimento • • •
Beterraba • •
Cebolas • •
Maçãs • •
Couve vermelha/
branca
Chocolate • • •
Coco • •
Amêndoas/nozes/
avelãs
Pão seco •
Cenouras • • • •
Queijo parmesão •
Queijo duro suíço/
Gruyère
de corte
fi n o
- I 6
Tambor
de corte
grande
- II q
••
••••
Tambor-
raspa-
dor fi no
- III 4
Tambor-
raspador
grande
- IV 3
Tambor-
ralador
- V 5
PT
•
SGR 150 A1
35
Page 38

PT
Montagem
AVISO! PERIGO DE FERIMENTOS!
NOTA
O aparelho encontra-se agora operacional.
Introduza a caixa do tambor 1) 0 no bloco do motor de forma que a seta
indique no sentido do cadeado aberto
Rode a caixa do tambor 2) 0 no sentido oposto ao dos ponteiros do relógio,
de forma que a abertura para enchimento w fi que virada para cima e
a seta aponte no sentido do cadeado fechado
encaixa e prende.
Abra o compartimento para armazenamento 3) 7 e retire o tambor pretendido 3 4 5 6 q.
Encaixe o tambor pretendido 4) 3 4 5 6 q no eixo de accionamento 9
da caixa do tambor 0 e rode ligeiramente no sentido dos ponteiros do
relógio, de forma que prenda.
Utilize cuidadosamente os cones 3 4 5 6 q. As lâminas
!
são muito afi adas!
Quando pretender voltar a retirar o tambor, rode a caixa do tambor ► 0 até
que esta se solte do bloco do motor, juntamente com o tambor aplicado. De
seguida, retire o tambor da caixa 0. Volte a montar a caixa do tambor
0 no bloco do motor como acima descrito e coloque o novo tambor
pretendido.
• Encaixe a fi cha de rede na tomada.5)
.
. A caixa do tambor 0
NOTA
Funcionamento
ATENÇÃO - DANOS MATERIAIS!
36
Os tambores de que não precisar podem ser guardados, fi cando sempre ►
à mão no compartimento de armazenamento 7. Pr
compartimento de armazenamento 2 no símbolo
baixo e puxe em simultâneo para trás. A tampa 2 pode agora ser levantada.
Ao voltar a colocar a tampa 2, certifi que-se de que os bloqueios engatam
nos orifícios previstos no aparelho.
Nunca triture alimentos duros com este aparelho, como por exemplo ►
cubos de gelo. O aparelho pode sofrer danos irreparáveis!
Nunca tritur
O aparelho pode sofrer danos irreparáveis!
Nunca utilize o aparelho por mais de 2 minutos sem interrupção. De seguida ►
o motor deve primeiro arrefecer antes de se voltar a utilizar o mesmo.
e alimentos fi brosos, como por ex. carne, com este aparelho! ►
essione a tampa do
um pouco para
SGR 150 A1
Page 39

ATENÇÃO - DANOS MATERIAIS!
O alimento ralado/raspado/cortado cai pela parte da frente da caixa do
tambor 0.
Limpeza
Prepare o alimento: corte pedaços maiores em menores, de forma que estes 1)
entrem sem problemas na abertura para enchimento w.
Coloque uma taça ou outro recipiente sob a caixa do tambor 2) 0.
Prima e mantenha premido o botão Start 3) 1. O tambor aplicado 3 4 5
6 q começa a rodar.
Prima o botão Start ► 1 sempr
para enchimento w. Caso contrário, poderá provocar danos irreparáveis
no aparelho!
Introduza os alimentos na abertura para enchimento 4) w e empurre-os com
a barra de auxílio de enchimento e, de forma que sejam triturados pelo
tambor 3 4 5 6 q.
Quando tiver processado todos os alimentos, solte o botão Start 5) 1.
O tambor 3 4 5 6 q pára.
Retire a fi cha de rede da tomada.6)
PERIGO DE CHOQUE ELÉCTRICO
Antes de limpar o aparelho, retire a fi cha da tomada. ►
e antes de colocar os alimentos na abertura
PT
SGR 150 A1
► Durante a limpeza, nunca deve mergulhar o aparelho em água ou
colocá-lo debaixo de água corrente.
AVISO - PERIGO DE FERIMENTOS!
Proceda cuidadosamente com os tambores ► 3 4 5 6 q! As lâminas
estão muito afi
ATENÇÃO - DANOS MATERIAIS!
Não utilize produtos de limpeza abrasivos, agressivos ou químicos. Estes ►
podem danifi car a superfície irreparavelmente!
Retire a fi cha de rede.1)
Retire o tambor 2) 3 4 5 6 q da caixa 0.
Solte a caixa do tambor 3) 0 do bloco do motor.
adas!
37
Page 40

Limpe o bloco do motor e a tampa do compartimento de armazenamento 4)
2 com um pano húmido. Em caso de sujidade profunda, aplique um detergente suave no pano. De seguida, elimine todos os resíduos de detergente
com um pano humedecido apenas com água.
Os tambores ■ 3 4 5 6 q, a caix
de enchimento e podem ir à máquina de lavar louça.
a do tambor 0 e a barra de auxílio
PT
NOTA
No caso de alimentos de cor intensa, como por exemplo as cenouras, ►
pode acontecer que as peças plásticas do aparelho fi quem manchadas.
Limpe estas manchas com um pouco de óleo alimentar neutr
Armazenamento
Limpe o aparelho como descrito no capítulo "Limpeza".1)
Guarde os tambores 2) 3 4 5 6 q no compartimento de armazena-
mento 7.
Introduza o cabo de rede no compartimento do cabo 3) 8, de forma que
apenas a fi cha de rede fi que do lado de fora.
Guarde o aparelho num local limpo e seco.
Resolução de problemas
PROBLEMA
O aparelho não
funciona.
O tambor 3 4
5 6 q não se
solta.
CAUSA
POSSÍVEL
A fi cha de rede não
está ligada.
O aparelho encontra-se
danifi cado.
A tomada de rede está
avariada.
O tambor 3 4 5 6
q fi cou preso durante
o funcionamento.
o.
SOLUÇÕES
POSSÍVEIS
Ligue o aparelho a uma
tomada.
Dirija-se à assistência
técnica.
Experimente outra
tomada.
Solte toda a caixa do
tambor 0.
Assim também é possível
soltar o tambor 3 4 5
6 q.
38
SGR 150 A1
Page 41

Eliminar o aparelho
Nunca deposite o aparelho no lixo doméstico comum.
Este produto está em conformidade com a Directiva Europeia
2002/96/EC.
Elimine o aparelho através de uma instituição de recolha de resíduos autorizada
ou através da instituição de recolha do seu município. Tenha atenção aos
regulamentos actualmente em vigor. Em caso de dúvida, entre em contacto com
a entidade de eliminação de resíduos.
Importador
KOMPERNASS GMBH
BURGSTRASSE 21
44867 BOCHUM, GERMANY
www.kompernass.com
Garantia
Este aparelho tem 3 anos de garantia a partir da data de compra. Este aparelho foi fabricado com o máximo cuidado e escrupulosamente testado antes da
sua distribuição.
Guarde o talão como comprovativo da compra. Em caso de reivindicação da
garantia, entre em contacto com o seu serviço de assistência técnica por telefone. Apenas deste modo pode ser garantido um envio gratuito do seu produto.
PT
SGR 150 A1
NOTA
A garantia abrange apenas defeitos de material e de fabrico, mas não da- ►
nos devido ao transporte, peças de desgaste ou danos em peças frágeis,
x. interruptores.
por e
O produto destina-se apenas ao uso privado e não ao uso comercial. Em caso
de utilização incorrecta ou indevida, exercício de força excessiva e de intervenções não efectuadas pelo nosso representante autorizado de assistência técnica,
perderá o direito à garantia.
Os seus direitos legais não são limitados por esta garantia.
O período de garantia não é prolongado em caso de reivindicação. Isto também se aplica às peças substituídas e reparadas.
Danos e falhas eventualmente já existentes na altura da compra devem ser
comunicados imediatamente após o desempacotamento, o mais tardar, no
entanto, dois dias após a data de aquisição.
As reparações realizadas após o fi nal do período de garantia comportam
custos.
39
Page 42

Assistência técnica
Assistência Portugal
Tel.: 70778 0005 (0,12 EUR/Min.)
E-Mail: kompernass@lidl.pt
IAN 70022
PT
Receitas
Salada de repolho
Ingredientes
1,5 kg de repolho ■
1/2 pimento ■
125 g de açúcar ■
125 ml de óleo ■
125 ml de vinagre ■
1 c.s. de sal ■
uma pitada de pimenta ■
Separe a couve em pedaços pequenos e corte-a com o tambor de corte 1)
gr
ande q (II).
Corte o pimento de forma a caber na abertura para enchimento 2) w e triture-o
com o tambor-raspador grande 3 (IV).
Aqueça o óleo, o vinagre, o açúcar, o sal e um pouco de pimenta.3)
Coloque este líquido sobre a couve e deixe tudo repousar durante aprox. 4)
2 horas.
40
SGR 150 A1
Page 43

Salada com queijo Feta
Ingredientes
2 tomates grandes ■
1 pepino ■
1 pimento verde ■
1 pimento vermelho ■
1 cebola ■
200 g de queijo Feta ■
50 g de azeitonas ■
4 c.s. de óleo ■
1 limão ■
30 g de ervas frescas a gosto (p. ex. manjericão) ■
Prepare o pepino, os pimentos e a cebola, de forma a caberem na abertura 1)
par
a enchimento w. Remova as sementes e a pele branca dos pimentos.
Triture tudo com o tambor de corte fi no 2) 6 (I).
Corte os tomates e o queijo Feta em cubos pequenos.3)
Misture todos os ingredientes e adicione as azeitonas.4)
Misture o óleo com o sumo do limão e coloque sobre a salada.5)
Polvilhe as ervas sobre a salada.6)
PT
Empadão de courgete
Ingredientes
6 courgetes ■
2 batatas ■
1 cebola ■
1 cháv. de arroz cozido ■
1 ovo ■
aprox. 30 ml de leite ■
150 g de Gruyère (queijo duro suíço) ■
Sal e pimenta ■
SGR 150 A1
41
Page 44

PT
Prepare as courgetes, as batatas e a cebola de forma a caberem na abertura 1)
para enchimento w.
Raspe as courgetes e as batatas com o tambor-raspador grande 2) 3 (IV).
Corte as cebolas com o tambor de corte grande 3) q (II).
Salteie brevemente os legumes numa frigideira.4)
Coloque uma camada de arroz e uma camada de legumes alternadamente 5)
na forma de empadão.
Misture o ovo com o leite, sal e pimenta, e coloque sobre todo o empadão.6)
Raspe o Gruyère com o tambor-raspador grande 7) 3 (IV) e coloque sobre o
empadão.
Leve o empadão ao forno a 180°C por aprox. 20 minutos.8)
Pesto de manjericão e amêndoas
Ingredientes
100 g de manjericão ■
45 g de pinhões ■
25 g de amêndoas ■
50 g de queijo Parmesão ■
100 ml de azeite de boa qualidade ■
Sal e pimenta ■
42
Raspe o queijo Parmesão com o tambor-ralador 1) 5 (V).
R
aspe as amêndoas com o tambor-ralador 2) 5 (V).
Adicione as folhas de manjericão, o azeite, os pinhões, as amêndoas, o sal 3)
e a pimenta na batedeira e triture tudo bem.
Por último, adicione o queijo parmesão e misture tudo bem novamente.4)
SGR 150 A1
Page 45

Index
Information for these operating instructions . . . . . . . . . . . . . . . . . . . . . . . 44
Copyright . . . . . . . . . . . . . . . . . . . . . . . . . . . . . . . . . . . . . . . . . . . . . . . . . . . . . . . . . . . . . . 44
Intended use . . . . . . . . . . . . . . . . . . . . . . . . . . . . . . . . . . . . . . . . . . . . . . . . . 44
Safety instructions . . . . . . . . . . . . . . . . . . . . . . . . . . . . . . . . . . . . . . . . . . . . 45
Items supplied . . . . . . . . . . . . . . . . . . . . . . . . . . . . . . . . . . . . . . . . . . . . . . . . 46
Disposal of the packaging . . . . . . . . . . . . . . . . . . . . . . . . . . . . . . . . . . . . . . . . . . . . . . . . . 47
Technical data . . . . . . . . . . . . . . . . . . . . . . . . . . . . . . . . . . . . . . . . . . . . . . . . 47
Description of appliance / attachments . . . . . . . . . . . . . . . . . . . . . . . . . . . 48
Before the First Usage . . . . . . . . . . . . . . . . . . . . . . . . . . . . . . . . . . . . . . . . . 48
Utilisation . . . . . . . . . . . . . . . . . . . . . . . . . . . . . . . . . . . . . . . . . . . . . . . . . . . . 48
The Drums . . . . . . . . . . . . . . . . . . . . . . . . . . . . . . . . . . . . . . . . . . . . . . . . . . . . . . . . . . . . . 48
Assembly . . . . . . . . . . . . . . . . . . . . . . . . . . . . . . . . . . . . . . . . . . . . . . . . . . . . . . . . . . . . . . 50
Operation . . . . . . . . . . . . . . . . . . . . . . . . . . . . . . . . . . . . . . . . . . . . . . . . . . . . . . . . . . . . . 51
Cleaning . . . . . . . . . . . . . . . . . . . . . . . . . . . . . . . . . . . . . . . . . . . . . . . . . . . . . 51
Storage . . . . . . . . . . . . . . . . . . . . . . . . . . . . . . . . . . . . . . . . . . . . . . . . . . . . . 52
Troubleshooting . . . . . . . . . . . . . . . . . . . . . . . . . . . . . . . . . . . . . . . . . . . . . .52
GB
MT
Disposal of the appliance . . . . . . . . . . . . . . . . . . . . . . . . . . . . . . . . . . . . . . . 53
Importer . . . . . . . . . . . . . . . . . . . . . . . . . . . . . . . . . . . . . . . . . . . . . . . . . . . . . 53
Warranty . . . . . . . . . . . . . . . . . . . . . . . . . . . . . . . . . . . . . . . . . . . . . . . . . . . . 53
Service . . . . . . . . . . . . . . . . . . . . . . . . . . . . . . . . . . . . . . . . . . . . . . . . . . . . . . 54
Recipes . . . . . . . . . . . . . . . . . . . . . . . . . . . . . . . . . . . . . . . . . . . . . . . . . . . . . . 54
Coleslaw . . . . . . . . . . . . . . . . . . . . . . . . . . . . . . . . . . . . . . . . . . . . . . . . . . . . . . . . . . . . . . 54
Salad with feta cheese . . . . . . . . . . . . . . . . . . . . . . . . . . . . . . . . . . . . . . . . . . . . . . . . . . . 55
Zucchini souffl e . . . . . . . . . . . . . . . . . . . . . . . . . . . . . . . . . . . . . . . . . . . . . . . . . . . . . . . . . 55
Basil-Almond Pesto . . . . . . . . . . . . . . . . . . . . . . . . . . . . . . . . . . . . . . . . . . . . . . . . . . . . . . . 56
SGR 150 A1
43
Page 46

Information for these operating instructions
Congratulations on the purchase of your new appliance!
You have decided clearly in favour of a modern, high quality product. These
operating instructions are a component of this product. They contain important
information on its safety, use and disposal. Familiarise yourself with all of these
operating and safety instructions before using the product. Use this appliance
only as described and only for the purposes indicated. Additionally, pass these
instructions on to whoever might acquire the appliance at a future date.
GB
MT
Copyright
This documentation is copyright protected.
Any copying or reproduction of it, including as extracts, as well as the
reproduction of images, also in an altered state, is only permitted
with the written authorisation of the manufacturer.
Intended use
This appliance is intended for the shredding of vegetables, fruits and other not
too hard foods.
This appliance is not intended for use in commercial or industrial applications.
WARNING
Risks from unintended use!
Risks can be engendered if the appliance if used for unintended purposes
and/or other types of use.
Use the appliance exclusively for its intended purposes. ►
Pay heed to the procedures described in these operating instructions. ►
NOTICE
Risks can be engendered if the appliance if used for unintended purposes ►
and/or other types of use. Use the appliance exclusively for its intended
purposes. P
tions. Claims of all kinds resulting from damage caused by improper use,
incompetent repairs, unauthorised modifi cations or the use of unauthorised
spare parts are excluded. The operator alone bears the risk.
ay heed to the procedures described in these operating instruc-
44
SGR 150 A1
Page 47

Safety instructions
RISK OF ELECTRIC SHOCK
Connect the appliance only to correctly installed mains power sockets ►
supplying a mains voltage of 220 - 240 V ~ / 50 Hz.
vent of operating malfunctions and before cleaning the appliance, ►
In the e
remove the plug from the mains power socket.
To disconnect the power cable, always pull the plug from the mains power ►
socket, do not pull on the power cable itself.
Do not kink or crimp the po
prevent anyone from stepping on or tripping over it.
Ensure that the power cable cannot become wet or moist during use. ►
Place it such that it cannot be trapped or damaged.
Should the appliance, the po
to avoid personal risks arrange for it/them to be repaired by Customer
Services.
Use the appliance only in dry indoor areas, not outdoors. ►
NEVER submerse the appliance in water or other liquids! ►
WARNING! RISK OF INJURY!
Allow the accessories used to cool down before dismantling them. ►
Only use the original accessory parts for this appliance. Other accessories ►
may not meet the safety requirements.
This appliance is not intended for use b
with restricted physical, physiological or intellectual abilities or defi ciences
xperience and/or knowledge unless they are supervised by a person
in e
responsible for their safety or receive from this person instruction in how the
appliance is to be used. Children should be supervised to ensure that they
do not play with the appliance.
NEVER operate the appliance on hotplates (stoves) or in the vicinity of ►
open fl ames (gas cookers).
Operate the appliance only on a stable working surface. ►
Do not let long hair, scarves, ties, etc. hang over the appliance when it is in ►
operation. These could otherwise become entangled in the rotating parts.
wer cable and place it in such a way as to ►
GB
MT
wer cable or the plug become damaged, ►
y individuals (including children) ►
SGR 150 A1
45
Page 48

GB
MT
WARNING! RISK OF INJURY!
NEVER place your hands in the rotating drums! ►
Do not insert kitchen utensils or any other objects into the rotating drums! ►
Before changing a drum, always disconnect the plug from the mains power ►
socket and wait until the appliance comes to a complete stop.
ver press foodstuff s with your bare hands into the fi lling funnel. Always ►
Ne
use the stodger.
NEVER leav
power network.
Do not use an extension cable. In an emergency the plug must be quickly ►
and easily accessible.
Discontinue using the appliance if it has been dropped or is visibly damaged. ►
CAUTION - PROPERTY DAMAGE!
Never operate the appliance without a drum or with two drums simul- ►
taneously.
ver cut up meats or harder foodstuff s with this appliance. ►
Ne
Items supplied
The appliance is delivered with the following components as standard:
Electric vegetable grater ▯
5 Drums ▯
Stodger ▯
These operating instructions ▯
Remove all components of the appliance and these operating instructions 1)
fr
om the carton.
Remove all packaging material. 2)
e the appliance unattended when it is connected to the mains ►
46
NOTICE
Check the contents to ensure everything is available and for signs of visible ►
damage.
If the deliv
or transportation, contact the Service Hotline (see chapter Service).
ery is not complete, or is damaged due to defective packaging ►
SGR 150 A1
Page 49

Disposal of the packaging
The packaging protects the appliance from transport damage. The packaging
materials are selected from the point of view of their environmental friendliness
and disposal technology and are therefore recyclable.
The recirculation of packaging into the material circuit saves on raw material and
reduces the amount of waste generated. Dispose of packaging material that is
no longer needed according to the regionally established regulations.
NOTICE
If possible preserve the appliance's original packaging during the warranty ►
period so that in the case of a warranty claim you can package the appli-
operly for return.
ance pr
Technical data
Mains voltage 220 - 240 V ~, 50 Hz
Rated power 150 W
GB
MT
Protection class
C.O. Time 2 Minutes
C.O. Time
The C.O. Time (Continuous Operation) details how long an appliance may be
used without the motor overheating and being damaged. After the appliance
has run for this period it must be switched off until the motor has cooled itself
down.
II
SGR 150 A1
47
Page 50

GB
MT
Description of appliance / attachments
1 Start button
2 Storage compartment lid
3 Coarse shredding drum (IV)
4 Fine shredding drum (III)
5 Grating drum (V)
6 Fine cutting drum (I)
7 Storage compartment
8 Cable compartment
9 Drive shaft
0 Drum housing
q Coarse cutting drum (II)
w Filling shaft
e Stodger
Before the First Usage
Clean the appliance and all of its components (Drums ■ 3 4 5 6 q,
Stodger e, Drum housing 0) as described in the chapter “Cleaning”.
Utilisation
The Drums
You have a total of 5 diff erent cutting, shredding and grating drums available:
48
Fine cutting drum 6
Coarse cutting drum q
Fine shredding drum 4
Coarse shredding
drum 3
Grating drum 5
Marked "I" on the metal
part of the drum
Marked "II" on the
metal part of the drum
Marked "III" on the
metal part of the drum
Marked "IV" on the
metal part of the drum
Marked "V" on the
metal part of the drum
SGR 150 A1
Page 51

For the selection of the appropriate drum, orientate yourself with the following
table:
Fine
Foodstuff
Zucchini • • • •
Cucumber • •
Potatoes • • •
Paprika • • •
Beetroot • •
Onions • •
apple l • •
Red/white cabbage • •
Chocolate • • •
Coconut • •
Almonds/Walnuts/
Hazelnuts
Dry bread •
Carrots • • • •
Parmesan •
Greyerzer/Swiss
hard cheeses
cutting
drum -
I 6
Coarse
cutting
drum -
II q
••••
Fine
shred-
ding
drum -
III 4
Coarse
shred-
ding
drum -
IV 3
Grating
drum -
V 5
GB
MT
•
SGR 150 A1
49
Page 52

GB
MT
Assembly
WARNING! RISK OF INJURY!
NOTICE
The appliance is now ready for use.
NOTICE
Place the drum housing 1) 0 on the motor block such that the arrow points to
the opened lock .
Turn the drum housing 2) 0 anti-clockwise, so that the fi lling shaft w faces
upwards and the arrow points to the closed lock
engages and is fi rmly seated.
Open the storage compartment 3) 7 and extract the required drum 3 4 5
6 q.
Fit the required drum 4) 3 4 5 6 q onto the drive shaft 9 in the drum
housing 0 and rotate it slightly clockwise so that it is securely seated.
Exercise caution in your interaction with the drums 3 4 5 6
!
q. The blades are very sharp!
When you wish to remove the drum, rotate the drum housing ► 0 so far that
it, together with the fi
remove the drum from the drum housing 0. Fit the drum housing 0 as de-
scribed above back onto the motor block and insert the desired new drum.
Insert the plug into a mains power socket.5)
The drums which you do not need can, to save space and always have ►
handy, be stacked in the storage compartment 7. Pr
compartment 2 down a little at the markings
it backwards. The lid 2 can now be lifted off . When re-attaching the lid 2
ensure that the restraints grip in the holes provided on the appliance.
tted drum, loosens itself from the motor block. Then
. The drum housing 0
ess the lid of the storage
and simultaneously pull
50
SGR 150 A1
Page 53

Operation
CAUTION - PROPERTY DAMAGE!
CAUTION - PROPERTY DAMAGE!
The ready grinded/sliced/grated foodstuff s fall out from the front of the drum
housing 0.
NEVER shred hard foods such as ice cubes with this appliance! The appli- ►
ance could be irreparably damaged!
NEVER cut up fi
appliance could be irreparably damaged!
Do not oper
Afterwards, allow the motor to cool down before using the appliance again.
Prepare the foodstuff s: cut larger pieces so small that they fi t easily into the 1)
fi lling shaft w.
Place a bowl or other container under the drum housing 2) 0.
Press and hold the start button 3) 1. The fi tted drum 3 4 5 6 q begins
to rotate.
Always fi rst press the start button ► 1 befor
fi lling shaft w. Otherwise, the appliance could be irreparably damaged!
Insert the foodstuff s into the fi lling shaft 4) w and then push them in further with
the stodger e, so that they can be shredded by the drum 3 4 5 6 q.
When all of the food have been processed, release the start button 5) 1.
The drum 3 4 5 6 q stops.
Remove the plug from the mains power socket.6)
brous foodstuff s such as meats with this appliance! The ►
ate the appliance for longer than 2 minutes in one session. ►
e you place foodstuff s into the
GB
MT
Cleaning
SGR 150 A1
RISK OF ELECTRIC SHOCK
Always remove the plug from the mains power socket before you clean the ►
appliance.
► You must never immerse the appliance in water when cleaning it or
hold it under running water.
WARNING - RISK OF INJURY!
Be careful with the drums ► 3 4 5 6 q! The blades ar
e very sharp!
51
Page 54

GB
MT
Storage
Store the appliance at a clean and dry location.
CAUTION - PROPERTY DAMAGE!
Do not use aggressive, abrasive or chemical cleaning agents! They could ►
irreparably damage the upper surfaces!
Remove the plug from the mains power socket.1)
Remove the drum 2) 3 4 5 6 q from the drum housing 0.
Detach the drum housing 3) 0 from the motor block.
Clean the motor block and the lid of the storage compartment 4) 2 with a
moist cloth. For stubborn soiling use a mild detergent on the cloth. Then
remove all detergent residues with a cloth moistened only with water.
The drums ■ 3 4 5 6 q and the drum housing, 0, as w
e, are suitable for cleaning in the dishwasher.
NOTICE
Due to strongly staining foods, such as carrots, it can happen that plastic ►
parts on the appliance become discoloured. Rub these discolourations off
with a little neutr
Clean the appliance as described in “Cleaning”.1)
Store the drums 2) 3 4 5 6 q in the storage compartment 7.
Push the power cable into the cable compartment 3) 8 so that only the plug is
sticking out..
al cooking oil.
ell as the stodger
Troubleshooting
PROBLEM
The appliance does
not function.
The drum 3 4 5
6 q cannot be
loosened
52
POSSIBLE
CAUSE
The plug is not connected.
The appliance is
damaged.
The mains power socket
is defective.
The drum 3 4 5 6
q has become somewhat jammed during
operation.
POSSIBLE
SOLUTIONS
Connect the appliance to
a mains power socket.
In this case, contact
Customer Services.
Try another mains power
socket.
Loosen the complete drum
housing 0.
The drum 3 4 5 6 q
will then also be loosened.
SGR 150 A1
Page 55

Disposal of the appliance
Do not dispose of this appliance in your normal domestic waste.
This product is subject to the provisions of European Directive
2002/96/EC.
Dispose of this appliance through an approved disposal centre or at your com-
munity waste facility. Observe the currently applicable regulations. In case of
doubt, please contact your local waste disposal centre.
Importer
KOMPERNASS GMBH
BURGSTRASSE 21
44867 BOCHUM, GERMANY
www.kompernass.com
Warranty
You receive a 3-year warranty for this appliance as of the purchase date. This
appliance has been manufactured with care and meticulously examined before
delivery.
Please retain your receipt as proof of purchase. In the case of a warranty claim,
please make contact by telephone with our Customer Service department. Only
in this way can a post-free despatch for your goods be assured.
NOTICE
This pr
tions. In the event of misuse and improper handling, use of force and interference
not carried out by our authorised service branch, the warranty will become void..
Your statutory rights are not restricted in any way by this warranty.
The warranty period is not extended by repairs eff ected under warranty. This
applies also to replaced and repaired parts.
Damages or defects discovered after purchase are to be reported directly after
unpacking, at the latest two days after the purchase date.
Repairs carried out after lapse of the warranty period are subject to charge.
GB
MT
The warranty is valid only for material or manufacturing faults, not for ►
transport damage, normal wear and tear or damage to fragile parts, such
as switches.
oduct is for domestic use only and is not intended for commercial applica-
SGR 150 A1
53
Page 56

GB
MT
Service
Service Great Britain
Tel.: 0871 5000 720 (£ 0.10/Min.)
E-Mail: kompernass@lidl.co.uk
Service Malta
Tel.: 80062230
E-Mail: kompernass@lidl.com.mt
Recipes
Coleslaw
Ingredients
IAN 70022
IAN 70022
1.5 kg White cabbage ■
1/2 Paprika pod ■
125 g Sugar ■
125 ml Cooking oil ■
125 ml Vinegar ■
1 tbsp. Salt ■
a pinch of pepper ■
54
Cut the white cabbage up into small pieces and then slice it with the coarse 1)
cutting drum q (II).
Cut the paprik
with the coarse shredding drum 3 (IV).
Heat up the oil, vinegar, sugar, salt and the pepper.3)
Pour this liquid over the white cabbage and let it marinate for about 2 hours.4)
a pod up so that it fi ts into the fi lling shaft 2) w and then shred it
SGR 150 A1
Page 57

Salad with feta cheese
Ingredients
2 large Tomatoes ■
1 Cucumber ■
1 green Paprika ■
1 red Paprika ■
1 Onion ■
200 g Feta cheese ■
50 g Olives ■
4 tbsp. Cooking oil ■
1 Lemon ■
30 g fresh herbs as desired (for example, basil) ■
Prepare the cucumber, the pepper and the onion so that they fi t into the fi lling 1)
s
haft w. Remove the seeds and the white skin from the paprikas.
Slice everything with the fi ne cutting drum 2) 6 (I).
Cut the tomatoes and the feta cheese into small cubes.3)
Mix all of the ingredients and add the olives.4)
Blend the oil with the lemon juice and add all of it to the salad.5)
Sprinkle the herbs over the salad.6)
GB
MT
Zucchini souffl e
Ingredients
SGR 150 A1
6 Zucchinis ■
2 Potatoes ■
1 Onion ■
1 cup of cooked Rice ■
1 Egg ■
Approx. 30 ml Milk ■
150 g Greyerzer (Swiss hard cheese) ■
Salt and Pepper ■
55
Page 58

GB
MT
Prepare the zucchinis, the potatoes und and the onion so that they fi t into the 1)
fi lling shaft w.
Grate the zucchinis and potatoes with the coarse shredding drum 2) 3 (IV).
Slice the onion with the coarse cutting drum 3) q (II).
Briefl y fry the vegetables in a pan.4)
Place alternatively a layer of rice and a layer of vegetables in the souffl e 5)
dish.
Mix the egg with the milk, salt and pepper and pour it all over the souffl e.6)
Grate the Gruyere with the coarse shredding drum 7) 3 (IV) and sprinkle it over
the souffl e.
Bake the souffl e at 180°C for about 20 minutes.8)
Basil-Almond Pesto
Ingredients
100 g Basil ■
45 g Pine nuts ■
25 g Almonds ■
50 g Parmesan ■
100 ml good Olive oil ■
Salt and Pepper ■
56
Grate the Parmesan cheese with the grater drum 1) 5 (V).
Gr
ate the almonds with the grater drum 2) 5 (V).
Place the basil leaves, olive oil, pine nuts, almonds, salt and pepper in a 3)
blender and puree everything well.
Finally add the Parmesan and mix everything again thoroughly.4)
SGR 150 A1
Page 59

Inhaltsverzeichnis
Informationen zu dieser Bedienungsanleitung . . . . . . . . . . . . . . . . . . . . . 58
Urheberrecht . . . . . . . . . . . . . . . . . . . . . . . . . . . . . . . . . . . . . . . . . . . . . . . . . . . . . . . . . . . 58
Bestimmungsgemäße Verwendung . . . . . . . . . . . . . . . . . . . . . . . . . . . . . . 58
Sicherheitshinweise . . . . . . . . . . . . . . . . . . . . . . . . . . . . . . . . . . . . . . . . . . . 59
Lieferumfang . . . . . . . . . . . . . . . . . . . . . . . . . . . . . . . . . . . . . . . . . . . . . . . . . 60
Entsorgung der Verpackung . . . . . . . . . . . . . . . . . . . . . . . . . . . . . . . . . . . . . . . . . . . . . . . 61
Technische Daten . . . . . . . . . . . . . . . . . . . . . . . . . . . . . . . . . . . . . . . . . . . . . . 61
Gerätebeschreibung/Zubehör . . . . . . . . . . . . . . . . . . . . . . . . . . . . . . . . . . 62
Vor dem ersten Gebrauch . . . . . . . . . . . . . . . . . . . . . . . . . . . . . . . . . . . . . . 62
Gebrauch . . . . . . . . . . . . . . . . . . . . . . . . . . . . . . . . . . . . . . . . . . . . . . . . . . . . 62
Die Trommeln . . . . . . . . . . . . . . . . . . . . . . . . . . . . . . . . . . . . . . . . . . . . . . . . . . . . . . . . . . . 62
Zusammenbau . . . . . . . . . . . . . . . . . . . . . . . . . . . . . . . . . . . . . . . . . . . . . . . . . . . . . . . . . . 64
Bedienen . . . . . . . . . . . . . . . . . . . . . . . . . . . . . . . . . . . . . . . . . . . . . . . . . . . . . . . . . . . . . . 65
Reinigen . . . . . . . . . . . . . . . . . . . . . . . . . . . . . . . . . . . . . . . . . . . . . . . . . . . . . 65
Aufbewahrung . . . . . . . . . . . . . . . . . . . . . . . . . . . . . . . . . . . . . . . . . . . . . . . 66
Fehlerbehebung . . . . . . . . . . . . . . . . . . . . . . . . . . . . . . . . . . . . . . . . . . . . . . 67
DE
AT
CH
Gerät entsorgen . . . . . . . . . . . . . . . . . . . . . . . . . . . . . . . . . . . . . . . . . . . . . . 67
Importeur . . . . . . . . . . . . . . . . . . . . . . . . . . . . . . . . . . . . . . . . . . . . . . . . . . . 67
Garantie. . . . . . . . . . . . . . . . . . . . . . . . . . . . . . . . . . . . . . . . . . . . . . . . . . . . . 68
Service . . . . . . . . . . . . . . . . . . . . . . . . . . . . . . . . . . . . . . . . . . . . . . . . . . . . . . 68
Rezepte . . . . . . . . . . . . . . . . . . . . . . . . . . . . . . . . . . . . . . . . . . . . . . . . . . . . . 69
Krautsalat . . . . . . . . . . . . . . . . . . . . . . . . . . . . . . . . . . . . . . . . . . . . . . . . . . . . . . . . . . . . . . 69
Salat mit Fetakäse . . . . . . . . . . . . . . . . . . . . . . . . . . . . . . . . . . . . . . . . . . . . . . . . . . . . . . . 69
Zucchini-Aufl auf . . . . . . . . . . . . . . . . . . . . . . . . . . . . . . . . . . . . . . . . . . . . . . . . . . . . . . . . . 70
Basilikum-Mandel-Pesto . . . . . . . . . . . . . . . . . . . . . . . . . . . . . . . . . . . . . . . . . . . . . . . . . . . 71
SGR 150 A1
57
Page 60

DE
AT
CH
Informationen zu dieser Bedienungsanleitung
Herzlichen Glückwunsch zum Kauf Ihres neuen Gerätes!
Sie haben sich damit für ein modernes und hochwertiges Produkt entschieden.
Die Bedienungsanleitung ist Bestandteil dieses Produktes. Sie enthält wichtige
Hinweise für Sicherheit, Gebrauch und Entsorgung. Machen Sie sich vor der
Benutzung des Produkts mit allen Bedien- und Sicherheitshinweisen vertraut.
Benutzen Sie dieses Produkt nur wie beschrieben und für die angegebenen
Einsatzbereiche. Händigen Sie alle Unterlagen bei Weitergabe des Produkts an
Dritte mit aus.
Urheberrecht
Diese Dokumentation ist urheberrechtlich geschützt.
Jede Vervielfältigung, bzw. jeder Nachdruck, auch auszugsweise, sowie die
Wiedergabe der Abbildungen, auch im veränderten Zustand, ist nur mit schriftlicher Zustimmung des Herstellers gestattet.
Bestimmungsgemäße Verwendung
Dieses Gerät ist vorgesehen zum Raspeln von Gemüse, Obst und anderen, nicht
zu harten Lebensmitteln.
Dieses Gerät ist nicht für die Benutzung in industriellen oder gewerblichen Bereichen vorgesehen.
WARNUNG
Gefahr durch nicht bestimmungsgemäße Verwendung!
Von dem Gerät können bei nicht bestimmungsgemäßer Verwendung und/
oder andersartiger Nutzung Gefahren ausgehen.
Das Gerät ausschließlich bestimmungsgemäß verwenden. ►
Die in dieser Bedienungsanleitung beschriebenen Vorgehensweisen ►
einhalten.
58
HINWEIS
Von dem Gerät können bei nicht bestimmungsgemäßer Verwendung und/ ►
oder andersartiger Nutzung Gefahren ausgehen. Verwenden Sie das Ge-
ät ausschließlich bestimmungsgemäß. Die in dieser Bedienungsanleitung
r
beschriebenen Vorgehensweisen einhalten. Ansprüche jeglicher Art wegen
Schäden aus nicht bestimmungsgemäßer Verwendung, unsachgemäßen
Reparaturen, unerlaubt vorgenommenen Veränderungen oder Verwendung
nicht zugelassener Ersatzteile sind ausgeschlossen. Das Risiko trägt allein
der Benutzer.
SGR 150 A1
Page 61

Sicherheitshinweise
STROMSCHLAGGEFAHR
Schließen Sie das Gerät nur an eine vorschriftsmäßig installierte Netzsteck- ►
dose mit einer Netzspannung von 220 - 240 V ~ / 50 Hz an.
Ziehen Sie bei Betriebsstörungen, und be
Netzstecker aus der Netzsteckdose.
Ziehen Sie das Netzkabel stets am Netzstecker aus der Netzsteckdose, ►
ziehen Sie nicht am Kabel selbst.
en oder quetschen Sie das Netzkabel nicht und verlegen Sie das ►
Knick
Netzkabel so, dass niemand darauf treten oder darüber stolpern kann.
Achten Sie darauf, dass im Betrieb das Netzkabel nicht nass oder feucht ►
wird. Führen Sie es so, dass es nicht eingeklemmt oder beschädigt werden
ann.
k
Sollte das Gerät, das Netzkabel oder der Netzstecker beschädigt sein, ►
lassen Sie diese durch den Kundendienst ersetzen, um Gefährdungen zu
vermeiden.
Verwenden Sie das Gerät nur in trockenen Räumen, nicht im Freien. ►
Tauchen Sie das Gerät niemals in Wasser oder andere Flüssigkeiten ein! ►
WARNUNG! VERLETZUNGSGEFAHR!
Lassen Sie die verwendeten Zubehörteile erst abkühlen, bevor Sie diese ►
abnehmen.
erwenden Sie nur die Original-Zubehörteile zu diesem Gerät. Andere ►
V
Teile sind dafür möglicherweise nicht ausreichend sicher.
Dieses Gerät ist nicht dafür bestimmt, durch Personen (einschließlich ►
Kinder) mit eingeschränkten physischen, sensorischen oder geistigen
ähigkeiten oder mangels Erfahrung und/oder mangels Wissen benutzt zu
F
werden, es sei denn, sie werden durch eine für ihre Sicherheit zuständige
Person beaufsichtigt oder erhielten von ihr Anweisungen, wie das Gerät zu
benutzen ist. Kinder sollten beaufsichtigt werden, um sicherzustellen, dass
sie nicht mit dem Gerät spielen.
Betreiben Sie das Gerät niemals auf heißen Platten (Herd) oder in der ►
Nähe von off enen Flammen (Gasherd).
Betreiben Sie das Gerät nur auf einer stabilen Arbeitsfl äche. ►
Lassen Sie lange Haare, Schals, Krawatten usw. während des Betriebes ►
nicht über dem Gerät hängen. Diese könnten sich ansonsten in den rotie-
enden Teilen verfangen.
r
vor Sie das Gerät reinigen, den ►
DE
AT
CH
SGR 150 A1
59
Page 62

DE
AT
CH
WARNUNG! VERLETZUNGSGEFAHR!
Greifen Sie niemals mit den Händen in die rotierenden Trommeln! ►
Stecken Sie keine Küchenutensilien oder andere Dinge in die rotierenden ►
Trommeln!
Ziehen Sie v
Netzsteckdose und warten Sie, bis die Trommel völlig still steht.
Drücken Sie die Lebensmittel niemals mit bloßen Händen in den Einfüll- ►
schacht. Benutzen Sie immer den Stopfer.
Lassen Sie das Ger
netz verbunden ist.
Benutzen Sie keine Verlängerungskabel. Im Notfall muss der Netzstecker ►
schnell zu erreichen sein.
Benutzen Sie das Gerät nicht weiter, wenn es zu Boden gefallen ist oder ►
sichtbare Beschädigungen aufweist.
ACHTUNG - SACHSCHADEN!
Betreiben Sie das Gerät niemals ohne Trommel oder mit zwei Trommeln ►
gleichzeitig.
Zerkleinern Sie niemals Fleisch oder här
Lieferumfang
Das Gerät wird standardmäßig mit folgenden Komponenten geliefert:
elektrische Gemüseraspel ▯
5 Trommeln ▯
Stopfer ▯
Bedienungsanleitung ▯
Entnehmen Sie alle Teile des Gerätes und die Bedienungsanleitung aus dem 1)
K
arton.
Entfernen Sie sämtliches Verpackungsmaterial. 2)
or jedem Wechseln der Trommel den Netzstecker aus der ►
ät niemals unbeaufsichtigt, solange es mit dem Strom- ►
tere Lebensmittel mit diesem Gerät. ►
60
HINWEIS
Prüfen Sie die Lieferung auf Vollständigkeit und auf sichtbare Schäden. ►
Bei einer unvollständigen Lieferung oder Schäden infolge mangelhafter ►
Verpackung oder durch Transport wenden Sie sich an die Service-Hotline
apitel Service).
(siehe K
SGR 150 A1
Page 63

Entsorgung der Verpackung
Die Verpackung schützt das Gerät vor Transportschäden. Die Verpackungsmaterialien sind nach umweltverträglichen und entsorgungstechnischen Gesichtspunkten ausgewählt und deshalb recyclebar.
Die Rückführung der Verpackung in den Materialkreislauf spart Rohstoff e und
verringert das Abfallaufkommen. Entsorgen Sie nicht mehr benötigte Verpackungsmaterialien gemäß den örtlich geltenden Vorschriften.
HINWEIS
Heben Sie wenn möglich die Originalverpackung während der Garan- ►
tiezeit des Gerätes auf, um das Gerät im Garantiefall ordnungsgemäß
erpacken zu können.
v
Technische Daten
Netzspannung 220 - 240 V ~, 50 Hz
Nennleistung 150 W
DE
AT
CH
Schutzklasse
KB-Zeit 2 Minuten
KB-Zeit
Die KB-Zeit (Kurzzeitbetrieb) gibt an, wie lange man ein Gerät betreiben kann,
ohne dass der Motor überhitzt und Schaden nimmt. Nach der angegebenen
KB-Zeit muss das Gerät solange ausgeschaltet werden, bis sich der Motor
abgekühlt hat.
II
SGR 150 A1
61
Page 64

DE
AT
CH
Gerätebeschreibung/Zubehör
1 Start-Knopf
2 Deckel Aufbewahrungsfach
3 grobe Raspeltrommel (IV)
4 feine Raspeltrommel (III)
5 Reibetrommel (V)
6 feine Schneidtrommel (I)
7 Aufbewahrungsfach
8 Kabelschacht
9 Antriebswelle
0 Trommelgehäuse
q grobe Schneidtrommel (II)
w Einfüllschacht
e Stopfer
Vor dem ersten Gebrauch
Reinigen Sie das Gerät und alle Teile (Trommeln ■ 3 4 5 6 q, Stopfer
e, Trommelgehäuse 0) wie im Kapitel „Reinigen“ beschrieben.
Gebrauch
Die Trommeln
Sie haben insgesamt 5 verschiedene Schneid-, Raspel- und Reibetrommeln zur
Verfügung:
62
Feine Schneidtrommel 6
Grobe Schneidtrommel q
Feine Raspeltrommel 4
Grobe Raspeltrommel 3
Reibetrommel 5
Markierung „I“ am
Metallteil der Trommel
Markierung „II“ am
Metallteil der Trommel
Markierung „III“ am
Metallteil der Trommel
Markierung „IV“ am
Metallteil der Trommel
Markierung „V“ am
Metallteil der Trommel
SGR 150 A1
Page 65

Orientieren Sie sich bei der Auswahl der passenden Trommel an folgender
Tabelle:
feine
Lebensmittel
Zucchini • • • •
Gurken • •
Kartoff eln • • •
Paprika • • •
Rote Beete • •
Zwiebeln • •
Äpfel • •
Kohl rot/weiß • •
Schokolade • • •
Kokosnuss • •
Mandeln/Walnüsse/
Haselnüsse
trockenes Brot •
Karotten • • • •
Parmesan •
Greyerzer/Schweizer
Hartkäse
Schneid-
trommel
- I 6
••••
grobe
Schneid-
trommel
- II q
feine
Raspel-
trommel
- III 4
grobe
Raspel-
trommel
- IV 3
Reibe-
trommel
- V 5
DE
AT
CH
•
SGR 150 A1
63
Page 66

DE
AT
CH
Zusammenbau
Stecken Sie das Trommelgehäuse 1) 0 so auf den Motorblock, dass der Pfeil
auf das geöff nete Schloss weist.
Drehen Sie das Trommelgehäuse 2) 0 gegen den Uhrzeigersinn, so dass der
Einfüllschacht w nach oben weist und der Pfeil auf das geschlossene Schloss
weist. Das Trommelgehäuse 0 rastet ein und sitzt fest.
Öff nen Sie das Aufbewahrungsfach 3) 7 und entnehmen Sie die gewünschte
Trommel 3 4 5 6 q.
Stecken Sie die gewünschte Trommel 4) 3 4 5 6 q auf die Antriebswelle
9 im Trommelgehäuse 0 und drehen Sie sie ein wenig im Uhrzeigersinn, so
dass sie fest sitzt.
WARNUNG - VERLETZUNGSGEFAHR!
Seien Sie vorsichtig im Umgang mit den Trommeln 3 4 5 6
!
q! Die Messer sind sehr scharf!
HINWEIS
Wenn Sie die Trommel wieder herausnehmen wollen, drehen Sie das ►
Trommelgehäuse 0 so
Trommel, vom Motorblock löst. Nehmen Sie dann die Trommel aus dem
Trommelgehäuse 0. Montieren Sie das Trommelgehäuse 0 wieder wie
oben beschrieben am Motorblock und setzen Sie die gewünschte neue
Trommel ein.
Stecken Sie den Netzstecker in die Netzsteckdose.5)
Das Gerät ist nun betriebsbereit.
weit, dass es sich, zusamm en mit der eingesetzten
64
HINWEIS
Die Trommeln, die Sie nicht benötigen, können Sie platzsparend und immer ►
griff bereit im Aufbewahrungsfach 7 stapeln. Drück
des Aufbewahrungsfaches 2 an dem Zeichen
und ziehen Sie ihn gleichzeitig nach hinten. Der Deckel 2 lässt sich nun
abheben. Achten Sie beim wieder Aufsetzen des Deckels 2 darauf, dass
die Arretierungen in die dafür vorgesehenen Löcher am Gerät greifen.
en Sie den Deckel
ein wenig nach unten
SGR 150 A1
Page 67

Bedienen
Das fertig geriebene/geschnittene/geraspelte Lebensmittel fällt vorne aus dem
Trommelgehäuse 0.
ACHTUNG - SACHSCHADEN!
Zerkleinern Sie niemals harte Lebensmittel wie Eiswürfel mit diesem Gerät! ►
Das Gerät kann irreparabel beschädigt werden!
Zerkleinern Sie niemals faserige Lebensmittel wie z.B. Fleisch mit diesem ►
Gerät! Das Gerät kann irreparabel beschädigt werden!
eiben Sie das Gerät niemals länger als 2 Minuten am Stück. Danach ►
Betr
muss sich der Motor erst abkühlen, bevor Sie das Gerät wieder benutzen.
Bereiten Sie das Lebensmittel vor: schneiden Sie größere Stücke so klein, 1)
dass diese problemlos in den Einfüllschacht w passen.
Stellen Sie eine Schüssel oder ein anderes Gefäß unter das Trommelgehäuse 2)
0.
Drücken und halten Sie den Start-Knopf 3) 1. Die eingesetzte Trommel 3 4
5 6 q beginnt sich zu drehen.
ACHTUNG - SACHSCHADEN!
Drücken Sie immer erst den Start-Knopf ► 1, be
Einfüllschacht w geben. Ansonsten kann das Gerät irreparabel beschädigt
werden!
Geben Sie das Lebensmittel in den Einfüllschacht 4) w und schieben Sie es
mit dem Stopfer e weiter, so dass es von der Trommel 3 4 5 6 q
zerkleinert wird.
Wenn alle Lebensmittel verarbeitet sind, lassen Sie den Start-Knopf 5) 1 los.
Die Trommel 3 4 5 6 q stoppt.
Ziehen Sie den Netzstecker aus der Netzsteckdose.6)
vor Sie Lebensmittel in den
DE
AT
CH
Reinigen
SGR 150 A1
STROMSCHLAGGEFAHR
Bevor Sie das Gerät reinigen, ziehen Sie immer den Netzstecker aus der ►
Netzsteckdose.
► Sie dürfen das Gerät bei der Reinigung keinesfalls in Wasser tauchen
oder unter fl ießendes Wasser halten.
65
Page 68

DE
AT
CH
WARNUNG - VERLETZUNGSGEFAHR!
Sein Sie vorsichtig mit den Trommeln ► 3 4 5 6 q! Die Messer sind
sehr schar
ACHTUNG - SACHSCHADEN!
Benutzen Sie keine aggressiven, chemischen oder scheuernden Reinigungs- ►
mittel! Diese können die Oberfl äche irreparabel angreifen!
Ziehen Sie den Netzstecker.1)
Nehmen Sie die Trommel 2) 3 4 5 6 q aus dem Trommelgehäuse 0.
Lösen Sie das Trommelgehäuse 3) 0 vom Motorblock.
Reinigen Sie den Motorblock und den Deckel des Aufbewahrungsfaches 4) 2
mit einem feuchten Tuch. Bei hartnäckigen Verschmutzungen geben Sie ein
mildes Spülmittel auf das Tuch. Beseitigen Sie danach alle Spülmittelreste mit
einem nur mit Wasser befeuchteten Tuch.
Die Trommeln ■ 3 4 5 6 q, das T
e sind zur Reinigung in der Spülmaschine geeignet.
HINWEIS
Durch stark abfärbende Lebensmittel, wie zum Beispiel Karotten, kann es ►
passieren, dass sich Plastikteile des Gerätes verfärben. Reiben Sie diese
erfärbungen mit etwas neutralem Speiseöl ab.
V
Aufbewahrung
f!
rommelgehäuse 0, sowie der Stopfer
66
Reinigen Sie das Gerät wie im Kapitel „Reinigung“ beschrieben.1)
Verstauen Sie die Trommeln 2) 3 4 5 6 q im Aufbewahrungsfach 7.
Schieben Sie das Netzkabel in den Kabelschacht 3) 8, so dass nur noch der
Netzstecker heraus schaut.
Bewahren Sie das Gerät an einem trockenen und sauberen Ort auf.
SGR 150 A1
Page 69

Fehlerbehebung
PROBLEM
Das Gerät funktioniert nicht.
Die Trommel 3 4
5 6 q lässt sich
nicht lösen
Gerät entsorgen
Werfen Sie das Gerät keinesfalls in den normalen Hausmüll.
Dieses Produkt unterliegt der europäischen Richtlinie
2002/96/EC.
Entsorgen Sie das Gerät über einen zugelassenen Entsorgungsbetrieb oder über
Ihre kommunale Entsorgungseinrichtung. Beachten Sie die aktuell geltenden
Vorschriften. Setzen Sie sich im Zweifelsfall mit Ihrer Entsorgungseinrichtung in
Verbindung.
Importeur
KOMPERNASS GMBH
BURGSTRASSE 21
44867 BOCHUM, GERMANY
www.kompernass.com
MÖGLICHE
URSACHE
Der Netzstecker ist nicht
angeschlossen.
Das Gerät ist beschädigt.
Die Netzsteckdose ist
defekt.
Die Trommel 3 4 5
6 q hat sich während
des Betriebes etwas
verhakt.
MÖGLICHE
LÖSUNGEN
Schließen Sie das Gerät
an eine Netzsteckdose an.
Wenden Sie sich an den
Service.
Probieren Sie eine andere
Netzsteckdose aus.
Lösen Sie das komplette
Trommelgehäuse 0. Die
Trommel 3 4 5 6 q
löst sich dann auch.
DE
AT
CH
SGR 150 A1
67
Page 70

Garantie
Sie erhalten auf dieses Gerät 3 Jahre Garantie ab Kaufdatum. Das Gerät wurde
sorgfältig produziert und vor Anlieferung gewissenhaft geprüft.
Bitte bewahren Sie den Kassenbon als Nachweis für den Kauf auf. Bitte setzen
Sie sich im Garantiefall mit Ihrer Servicestelle telefonisch in Verbindung. Nur so
kann eine kostenlose Einsendung Ihrer Ware gewährleistet werden.
HINWEIS
Die Garantieleistung gilt nur für Material- oder Fabrikationsfehler, nicht ►
aber für Transportschäden, Verschleißteile oder für Beschädigungen an
erbrechlichen Teilen, z. B. Schaltern.
z
DE
AT
CH
Das Produkt ist lediglich für den privaten und nicht für den gewerblichen
Gebrauch bestimmt. Bei missbräuchlicher und unsachgemäßer Behandlung,
Gewaltanwendung und bei Eingriff en, die nicht von unserer autorisierten ServiceNiederlassung vorgenommen wurden, erlischt die Garantie.
Ihre gesetzlichen Rechte werden durch diese Garantie nicht eingeschränkt.
Die Garantiezeit wird durch die Gewährleistung nicht verlängert. Dies gilt auch
für ersetzte und reparierte Teile.
Eventuell schon beim Kauf vorhandene Schäden und Mängel müssen sofort nach
dem Auspacken gemeldet werden, spätestens aber zwei Tage nach Kaufdatum.
Nach Ablauf der Garantiezeit anfallende Reparaturen sind kostenpfl ichtig.
Service
Service Deutschland
Tel.: 01805 772 033 (0,14 EUR/Min. aus dem dt. Festnetz,
Mobilfunk max. 0,42 EUR/Min.)
E-Mail: kompernass@lidl.de
IAN 70022
Service Österreich
Tel.: 0820 201 222 (0,15 EUR/Min.)
E-Mail: kompernass@lidl.at
IAN 70022
Service Schweiz
Tel.: 0842 665566 (0,08 CHF/Min., Mobilfunk max. 0,40 CHF/Min.)
E-Mail: kompernass@lidl.ch
IAN 70022
68
SGR 150 A1
Page 71

Rezepte
Krautsalat
Zutaten
1,5 kg Weißkohl ■
1/2 Paprikaschote ■
125 g Zucker ■
125 ml Öl ■
125 ml Essig ■
1 EL Salz ■
etwas Pfeff er ■
Schneiden Sie den Kohl in kleine Stücke und schneiden Sie ihn mit der gro-1)
ben Schneidtr
Schneiden Sie die Paprika so, dass Sie in den Einfüllschacht 2) w passt und
zerkleinern Sie sie mit der groben Raspeltrommel 3 (IV).
Erhitzen Sie das Öl, den Essig, den Zucker, das Salz und ein wenig Pfeff er.3)
Geben Sie diese Flüssigkeit über den Kohl und lassen Sie alles etwa 2 4)
Stunden ziehen.
Salat mit Fetakäse
Zutaten
2 große Tomaten ■
1 Gurke ■
1 grüne Paprika ■
1 rote Paprika ■
1 Zwiebel ■
200 g Fetakäse ■
50 g Oliven ■
4 EL Öl ■
1 Zitrone ■
30 g frische Kräuter nach Belieben (z.B. Basilikum) ■
DE
AT
CH
ommel q (II).
SGR 150 A1
69
Page 72

Bereiten Sie die Gurke, die Paprika und die Zwiebel so vor, dass diese in 1)
den Einfüllschacht w passen. Entfernen Sie die Kerne sowie die weiße Haut
aus den Paprika.
Zerkleinern Sie alles mit der feinen Schneidtrommel 2) 6 (I).
Schneiden Sie die Tomaten und den Fetakäse in kleine Würfel.3)
Vermischen Sie alle Zutaten und geben Sie die Oliven hinzu.4)
Vermengen Sie das Öl mit dem Zitronensaft und geben Sie alles zu dem 5)
Salat.
Streuen Sie die Kräuter über den Salat.6)
DE
AT
CH
Zucchini-Aufl auf
Zutaten
6 Zucchinis ■
2 Kartoff eln ■
1 Zwiebel ■
1 Tasse gekochter Reis ■
1 Ei ■
ca. 30 ml Milch ■
150 g Greyerzer (Schweizer Hartkäse) ■
Salz und Pfeff er ■
Bereiten Sie die Zucchinis, die Kartoff eln und die Zwiebel so vor, dass sie in 1)
den Einfüllschacht w passen.
R
aspeln Sie die Zucchinis und die Kartoff eln mit der groben Raspeltrommel 2)
3 (IV).
Schneiden Sie die Zwiebeln mit der groben Schneidtrommel 3) q (II).
Braten Sie das Gemüse kurz in einer Pfanne an.4)
Geben Sie jeweils eine Schicht Reis und eine Schicht Gemüse in die Aufl auf-5)
form.
Mischen Sie das Ei mit der Milch, dem Salz und dem Pfeff er und geben Sie 6)
alles über den Aufl auf.
Reiben Sie den Greyerzer mit der groben Raspeltrommel 7) 3 (IV) und geben
Sie diesen über den Aufl auf.
Backen Sie den Aufl auf bei 180°C ca. 20 Minuten.8)
70
SGR 150 A1
Page 73

Basilikum-Mandel-Pesto
Zutaten
100 g Basilikum
■
45 g Pinienkerne ■
25 g Mandeln ■
50 g Parmesan ■
100 ml gutes Olivenöl ■
Salz und Pfeff er ■
Reiben Sie den Parmesan mit der Reibetrommel 1) 5 (V).
Reiben Sie die Mandeln mit der Reibetrommel 2) 5 (V).
Geben Sie die Basilikumblätter, das Öl, die Pinienkerne, die Mandeln, das 3)
Salz und den Pfeff er in den Mixer und pürieren Sie alles gut durch.
Als letztes geben Sie den Parmesan hinzu und mischen alles noch einmal gut 4)
durch.
DE
AT
CH
SGR 150 A1
71
 Loading...