


ELECTRIC COOKING POT SET 600 A1
ELECTRIC COOKING POT
Operating instructions
ELEKTRISCHER KOCHTOPF
Bedienungsanleitung
IAN 365498_2010
ΗΛΕΚΤΡΙΚΗ ΚΑΤΣΑΡΟΛΑ
Οδηүίες χρήσης
Before reading, unfold the page containing the illustrations and familiarise yourself with all functions of
the device.
Πριν ξεκινήσετε την ανάγνωση, ανοίξτε τη σελίδα με τις εικόνες και εξοικειωθείτε με όλες τις λειτουργίες
της συσκευής.
Klappen Sie vor dem Lesen die Seite mit den Abbildungen aus und machen Sie sich anschließend mit allen
Funktionen des Gerätes vertraut.
GB / IE / NI / CY Operating instructions Page 1
GR / CY Οδηүίες χρήσης Σελίδα 17
DE / AT / CH Bedienungsanleitung Seite 33

Contents
Introduction ...................................................2
Information about these operating instructions .................................. 2
Proper use .............................................................. 2
Safety information .............................................3
Package contents and transport inspection .........................5
Appliance description ...........................................6
Technical specifications ..........................................6
Requirements for the set-up location ..............................6
Use ..........................................................7
Handling and operation .........................................7
Typical applications ............................................8
Making porridge ......................................................... 8
Making pasta ........................................................... 9
Making hot pot .........................................................10
Cleaning and maintenance .....................................12
Descaling ..............................................................12
Storage .....................................................13
Disposal .....................................................13
Disposal of the appliance .................................................13
Disposal of the packaging .................................................13
Kompernass Handels GmbH warranty ............................14
Service ................................................................ 15
Importer ...............................................................15
SET 600 A1
GB│IE│NI│CY
│
1 ■

Introduction
Information about these operating instructions
Congratulations on the purchase of your new appliance.
You have selected a high-quality product. The operating instructions are part of
this product. They contain important information about safety, usage and disposal.
Before using the product, please familiarise yourself with all operating and safety
instructions. Use the product only as described and for the range of applications
specified. Please also pass these operating instructions on to any future owner.
Proper use
This appliance is intended exclusively for heating foods and water in private
households. It is not intended for use with other materials or liquids that are not
classified as foods. Using the appliance in the commercial sector is also not in
accordance with its intended use.
Claims of any kind for damage resulting from misuse, incompetent repairs,
unauthorised modification or the use of unauthorised spare parts will not be
accepted. The risk is borne solely by the user.
■ 2 │ GB
│IE│NI│
CY
SET 600 A1

Safety information
DANGER! RISK OF ELECTRIC SHOCK!
► Connect the appliance only to a properly installed and
easily accessible mains power socket supplying a mains
power voltage of 220–240V ∼, 50–60 Hz.
► Use the appliance only with the supplied mains cable.
► Ensure that the mains cable never gets wet or damp when
the appliance is in use. Route the cable so that it cannot
be trapped or damaged in any way.
► Make sure that the mains cable socket never comes into
contact with water! Allow the mains cable socket to dry
completely if it accidentally gets wet.
► Make sure that no liquid runs over the appliance's mains
plug connections.
► To avoid potential risks, if the appliance power cable is dam-
aged, it must be replaced by the manufacturer, its customer
service or by a qualified technician.
► Always disconnect the plug from the mains power socket
after use.
► Check the appliance for visible external damage before
use. Do not operate an appliance that has been damaged
or dropped.
► All repairs to the appliance must be carried out by autho-
rised specialist companies or Customer Service. Improper
repairs may put the user at risk. It will also invalidate any
warranty claims.
Never immerse the appliance in water or other liquids!
There is a risk of a fatal electric shock if liquid gets onto
live parts during operation.
SET 600 A1
GB│IE│NI│CY
│
3 ■

WARNING! RISK OF INJURY!
► Do not fill the pot any higher than the MAX marking.
Otherwise, the boiling contents of the pot can splash out.
► Hold the appliance by the handle only. The appliance gets
very hot during use and bursts of hot steam may be released.
Even after use, the surfaces of the appliance will still have
some residual heat.
► Make sure that the appliance is stable and level before
switching it on.
► The appliance and its connecting cable must be kept away
from children younger than 8 years old.
► This appliance may be used by children aged 8 years and
above and by persons with limited physical, sensory or mental
capabilities or lack of experience and knowledge, provided
that they are under supervision or have been told how to
use the appliance safely and are aware of the potential
risks. Children must not play with the appliance.
► Cleaning and user maintenance tasks must not be carried
out by children unless they are aged 8 years or more and
are supervised.
► There is a risk of injury if the appliance is misused.
Use the appliance only as described in the instructions.
■ 4 │ GB
│IE│NI│
CY
SET 600 A1

ATTENTION! PROPERTY DAMAGE!
► Do not use an external timer switch or a separate remote
control system to operate the appliance.
► Never leave the appliance unattended during operation.
► Make sure that the appliance, the mains cable and the plug
do not come into contact with heat sources such as hotplates or naked flames.
Package contents and transport inspection
Ƈ Remove all parts of the appliance and the operating instructions from the
packaging.
Ƈ Remove all packaging materials and any films and labels.
The package contents include the following components (see fold-out page for
illustrations):
▯ Electric cooking pot
▯ Lid
▯ Power cable
▯ Operating instructions (not shown)
NOTE
► Check the package for completeness and signs of visible damage.
► If the delivery is incomplete or damage has occurred as a result of defective
packaging or during transport, contact the customer service hotline (see
section Service).
SET 600 A1
GB│IE│NI│CY
│
5 ■

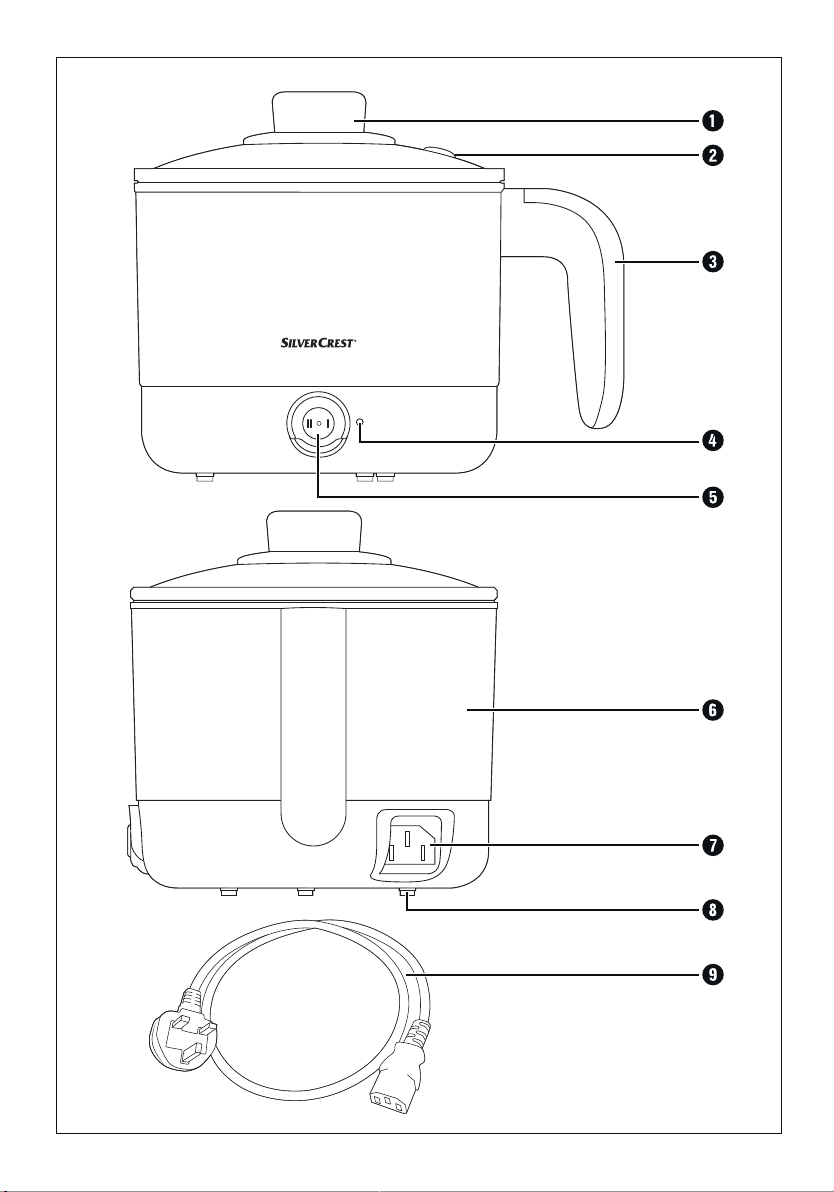
Appliance description
(See fold-out page for illustrations)
Lid
1
2 Steam outlet
3 Handle
4 Operating LED
5 Rocker switch O (Off)/I (Low: 300 W)/II (High: 600 W)
6 Pot
7 Mains cable socket
8 Non-slip feet
9 Mains cable (with mains plug)
Technical specifications
Power supply 220–240 V ∼ (AC), 50–60 Hz
Rated power 600–720 W
Max. fill capacity 1.7 litres
Capacity
Max. 1.2 l
Min. 0.5 l
All of the parts of this appliance that come into
contact with food are food-safe.
Requirements for the set-up location
ATTENTION! PROPERTY DAMAGE!
► Do not place the appliance on heat-sensitive or combustible materials, such
as fabric or carpet.
For safe and trouble-free operation of the appliance, the set-up location must fulfil
the following requirements:
► The set-up location must be a level, horizontal, stable surface. The non-slip
feet
8 on the underside of the pot 6 provide additional stability.
► The mains power socket must be easily accessible, so that the mains cable
can be easily disconnected in the event of an emergency.
■ 6 │ GB
│IE│NI│
CY
9
SET 600 A1
Use
Ƈ Before operating the appliance, make sure that
– the appliance, mains plug and mains cable
– all packaging materials have been removed from the appliance.
Ƈ Before first use, clean the appliance as described in the section Cleaning
and maintenance.
Handling and operation
DANGER! RISK OF ELECTRIC SHOCK!
► Keep water and other liquids away from the appliance's mains cable
connection
WARNING! RISK OF INJURY!
► When filling, pay attention to the markings on the inside of the pot
Do not fill the pot 6 any higher than the MAX marking (1.2 l). Otherwise,
the boiling contents of the pot can splash out.
► Only use fresh drinking water when cooking with the appliance. Do not
consume any water that is not certified as drinkable. Otherwise, there is a
risk of damage to health.
NOTE
► The appliance is fitted with an overheating protector and a boil-dry protec-
tion device. If the appliance is accidentally switched on without food or
water in the pot
appliance switches off automatically if the appliance boils dry, e.g. because
the lid 1 is left open. If this happens, allow the appliance to cool down
before using it again.
► Fill the pot
possibility that the appliance will boil dry and switch off automatically.
► Always make sure that the rocker switch
the appliance and if the mains cable 9 is still connected to the appliance.
Otherwise, the appliance could heat up unintentionally as soon as the
mains plug is plugged in again.
1) Remove the lid 1 from the pot 6.
2) Add food or water into the pot
(0.5 l) and MAX (1.2 l) markings on the inside of the pot
7. There is a risk of fatal electric shock!
6, the appliance switches off automatically. Likewise, the
6 at least to the MIN marking (0.5 l). Otherwise, there is a
9 are in perfect condition and
6.
5 is set to O when you unplug
6. When filling, pay attention to the MIN
6.
SET 600 A1
GB│IE│NI│CY
│
7 ■

3) Afterwards, close the lid
and level on the working surface.
4) Connect the mains cable
5) Plug the mains plug of the mains cable
6) Press the rocker switch
Ɣ to the right to position I (Low: 300 W) for slow heating at a low tempera-
ture or
Ɣ to the left to position II (High: 600 W) for rapid heating at a high
temperature.
The operating LED
WARNING! RISK OF INJURY!
► Note that hot steam may escape from the steam outlet
during operation. Stay at a safe distance.
► Hold the appliance
appliance when it is still in operation or if it has not yet cooled down.
7) As soon as the contents of the pot are cooked/heated through, switch off the
appliance by pushing the rocker switch 5 to the left or right (as required) to
the O (Off) position. The operating LED 4 goes out.
4 lights up orange.
Typical applications
NOTE
► The information provided in the recipes is a guideline and can vary consid-
erably depending on your personal taste and the nature of the food. Adjust
the recipes to your own preferences and experience as required.
1 and then position the pot 6 so that it is stable
9 to the mains cable socket 7.
9 into the socket.
5
2 in the lid 1
by the handle 3 only. Never touch the surface of the
Making porridge
WHAT IS PORRIDGE?
► Porridge, also called oatmeal, is a cereal made from oat flakes or oat flour
and milk and/or water.
To pep up the porridge, you can stir in various fruits, berries, nuts, seeds or
even chocolate chips after cooking. If you like it sweeter, you can sweeten
the porridge with sugar, honey, cinnamon or agave syrup. Use these to suit
your own preferences.
1) Pour water or milk and rolled oats into the pot
to the MIN (0.5 l) and MAX (1.2 l) markings on the inside of the pot 6.
Fill the pot 6 to no higher than the MAX marking but at least to the MIN
marking.
2) Close the lid
3) Press the rocker switch 5 to the right to position I.
■ 8 │ GB
│IE│NI│
CY
6. When filling, pay attention
1.
SET 600 A1

4) If you are making the porridge with milk, stir constantly while heating so that it
does not burn. If you are using water only, it is sufficient to stir the contents of
the pot occasionally.
5) Heat the contents of the pot for about 7 minutes and then switch off the appliance. Allow the porridge to swell for approx. 5 minutes before serving.
Example porridge recipe
▯ 500 ml milk
▯ 150 g porridge oats (rolled)
▯ 3 tbsp. honey
▯ Strawberries, raspberries, blueberries (or berries of your choice)
▯ Almonds (according to taste)
▯ 1 lemon
1) Prepare the milk and oat flakes as described above.
2) Stir in the honey and allow the oat flakes to swell.
3) Toast the almonds in a pan (without fat) until they are fragrant.
4) Carefully wash the berries, pat them dry and clean. Quarter the strawberries.
5) Wash the lemon in hot water, pat dry and finely grate the zest.
6) Divide the porridge between 3 bowls and garnish with berries, almonds and
lemon zest.
Making pasta
1) Fill the pot 6 with water. When filling, pay attention to the MIN (0.5 l) and
MAX (1.2 l) markings on the inside of the pot 6. Fill the pot 6 to no higher
than the MAX marking but at least to the MIN marking.
NOTE
► When filling the pot
other ingredients to the pot 6. Therefore, when cooking pasta or other
food that will be added later, do not fill the water all the way up to the
MAX mark (1.2 l)! The total contents of the pot 6 (water + food) may not
exceed the MAX marking (1.2 l).
When cooking pasta, we recommend adding 1 litre of water and 100 g
of pasta to the pot 6.
2) Close the lid 1.
3) Press the rocker switch 5 to the left to position II.
4) As soon as the water is boiling, add a tsp. of salt and the pasta to the pot
and press the rocker switch 5 to the right to position I.
5) Stir the contents of the pot occasionally.
6 with water, bear in mind that you will be adding
6
SET 600 A1
GB│IE│NI│CY
│
9 ■

6) After about 10 minutes, the pasta is cooked and ready to eat. However,
always pay attention to the information on the packaging of the pasta. If
necessary, follow the manufacturer's instructions if they differ from the 10
minutes given here.
Making hot pot
WHAT IS A "HOT POT"?
► In a "hot pot", also known as soup-food or steamboat, the food is prepared
in boiling broth. Small pieces of vegetables, thin slices of meat or seafood
can be cooked this way. It is traditionally served with various dips.
1) Fill the pot
jar, put the ready-made stock into the pot. When filling, pay attention to the
MIN (0.5 l) and MAX (1.2 l) markings on the inside of the pot 6. Fill the
pot 6 to no higher than the MAX marking but at least to the MIN marking.
NOTE
► When filling the pot
other ingredients to the pot 6. Therefore, when preparing a hot pot, do not
fill the water all the way up to the MAX mark (1.2 l)! The total contents of
the pot 6 (water + food) may not exceed the MAX marking (1.2 l).
6 with water. If you are using homemade stock or stock from a
6 with water, bear in mind that you will be adding
■ 10 │ GB
2) Close the lid
3) Press the rocker switch 5 to the left to position II.
4) As soon as the water boils, add the instant stock/stock cubes according to
the instructions on the packet and stir them in. Press the rocker switch
the right to position I. Simmer the broth at this level to prepare the hot pot.
│IE│NI│
CY
1.
5 to
SET 600 A1

Example hot pot recipe with peanut dip
▯ 800 ml water
▯ 15 g instant chicken stock
▯ 100 g chicken breast
▯ 1 red bell pepper
▯ 3–4 mushrooms
▯ 150 g peanut butter (crunchy)
▯ 10 tablespoons of water
▯ 1 tsp. honey
▯ 1 tsp. soya sauce
▯ A little sambal oelek (to taste)
1) Bring the stock to the boil as described above.
2) In the meantime, cut the chicken breast into small strips. The thicker the pieces
of meat, the longer the cooking time.
Slice the mushrooms.
Cut the pepper into strips.
3) Preparing the peanut dip:
To do this, mix the peanut butter well with the water, honey and soya sauce.
Add a little sambal oelek to taste.
4) Once the stock is boiling and the appliance is set to position I, carefully add
the chicken pieces, peppers and mushrooms to the pot.
5) After about 10 minutes (depending on the size of the food) the food is
cooked.
6) Remove from the pot with a spoon, slotted spoon or fork.
7) Serve with the peanut dip.
We also recommend fresh bread.
SET 600 A1
GB│IE│NI│CY
│
11 ■

Cleaning and maintenance
DANGER! RISK OF ELECTRIC SHOCK!
► Always pull out the plug before cleaning the appliance.
►
Never immerse the appliance in water or other liquids! There is a risk
of a fatal electric shock if liquid gets onto live parts during operation.
WARNING! RISK OF INJURY!
► Allow the appliance to cool sufficiently before cleaning it. There is a risk of
being burnt.
ATTENTION! PROPERTY DAMAGE!
► Do not use abrasive or caustic cleaning agents. These can corrode the
surface and damage the appliance beyond repair.
► Never clean the pot
NOTE
The lid 1 is dishwasher-proof.
6 in the dishwasher. Always clean it by hand.
Descaling
Scale deposits on the bottom of the appliance lead to increased energy consumption and reduce the service life of the appliance. Descale the appliance as
soon as scale deposits become apparent.
■ 12 │ GB
Ƈ Clean the exterior surfaces of the appliance and the mains cable
dampened cloth. For more stubborn dirt and for cleaning the insides of the
pot 6 and the lid 1 add some mild detergent to the cloth. Dry the pot 6
and lid 1 thoroughly before re-using the appliance. Ensure that there is no
detergent residue in the pot 6 before using the appliance again.
Ƈ If there are deposits in or on the pot
and warm water with washing-up liquid to loosen the deposits. Rinse out the
pot 6 thoroughly with fresh water afterwards.
Ƈ Use a descaler that is suitable for food containers in household appliances
(e.g. coffee machines). Proceed as described in the usage instructions for the
descaling agent.
Ƈ After descaling, rinse the appliance out with plenty of fresh water.
│IE│NI│
CY
6, use a washing-up brush or sponge
9 with a
SET 600 A1

Storage
Ƈ Allow the appliance to cool down completely before storing it.
Ƈ Store the appliance in a clean, dry location.
Disposal
Disposal of the appliance
The adjacent symbol of a crossed-out wheelie bin means that this appliance is
subject to Directive 2012/19/EU. This directive states that the product may not
be disposed of in normal household waste at the end of its useful life, but must
be taken to a specially set-up collection point, recycling depot or disposal
company.
This disposal is free of charge for the user. Protect the environment and dispose of this appliance properly.
Your local community or municipal authorities can provide information on how
to dispose of the worn-out product.
Disposal of the packaging
The packaging materials have been selected for their environmental compatibility
and ease of disposal and are therefore recyclable.
Dispose of packaging materials that are no longer needed in accordance with
applicable local regulations.
Dispose of the packaging in an environmentally friendly manner.
Note the labelling on the packaging and separate the packaging material
components for disposal, if necessary. The packaging material is labelled with
abbreviations (a) and numbers (b) with the following meanings:
1–7: plastics,
20–22: paper and cardboard,
80–98: composites.
SET 600 A1
GB│IE│NI│CY
│
13 ■

Kompernass Handels GmbH warranty
Dear Customer,
This appliance has a 3-year warranty valid from the date of purchase. If this product
has any faults, you, the buyer, have certain statutory rights. Your statutory rights
are not restricted in any way by the warranty described below.
Warranty conditions
The warranty period starts on the date of purchase. Please keep your receipt in a
safe place. This will be required as proof of purchase.
If any material or manufacturing fault occurs within three years of the date of
purchase of the product, we will either repair or replace the product for you or
refund the purchase price (at our discretion). This warranty service requires that
you present the defective appliance and the proof of purchase (receipt) within
the three-year warranty period, along with a brief written description of the fault
and of when it occurred.
If the defect is covered by the warranty, your product will either be repaired or
replaced by us. The repair or replacement of a product does not signify the beginning of a new warranty period.
Warranty period and statutory claims for defects
The warranty period is not prolonged by repairs effected under the warranty. This
also applies to replaced and repaired components. Any damage and defects
present at the time of purchase must be reported immediately after unpacking.
Repairs carried out after expiry of the warranty period shall be subject to a fee.
Scope of the warranty
This appliance has been manufactured in accordance with strict quality guidelines and inspected meticulously prior to delivery.
The warranty covers material faults or production faults. The warranty does not
extend to product parts subject to normal wear and tear or to fragile parts which
could be considered as consumable parts such as switches, batteries or parts
made of glass.
The warranty does not apply if the product has been damaged, improperly used
or improperly maintained. The directions in the operating instructions for the
product regarding proper use of the product are to be strictly followed. Uses and
actions that are discouraged in the operating instructions or which are warned
against must be avoided.
This product is intended solely for private use and not for commercial purposes.
The warranty shall be deemed void in cases of misuse or improper handling, use
of force and modifications / repairs which have not been carried out by one of
our authorised Service centres.
■ 14 │ GB
│IE│NI│
CY
SET 600 A1

Warranty claim procedure
To ensure quick processing of your case, please observe the following instructions:
► Please have the till receipt and the item number (e.g.IAN123456_7890)
available as proof of purchase.
► You will find the item number on the type plate on the product, an engraving
on the product, on the front page of the operating instructions (below left) or
on the sticker on the rear or bottom of the product.
► If functional or other defects occur, please contact the service department
listed either by telephone or by e-mail.
► You can return a defective product to us free of charge to the service address
that will be provided to you. Ensure that you enclose the proof of purchase
(till receipt) and information about what the defect is and when it occurred.
You can download these instructions along with many other manuals, product
videos and installation software at www.lidl-service.com.
This QR code will take you directly to the Lidl service page
(www.lidl-service.com) where you can open your operating instructions
by entering the item number (IAN) 365498_2010.
Service
Service Great Britain
Tel.: 0800 404 7657
E-Mail: kompernass@lidl.co.uk
Service Ireland
Tel.: 1890 930 034
(0,08EUR / Min.,(peak))
(0,06EUR / Min.,(off peak))
E-Mail: kompernass@lidl.ie
CY
Service Cyprus
Tel.: 8009 4409
E-Mail: kompernass@lidl.com.cy
IAN 365498_2010
Importer
Please note that the following address is not the service address. Please use the
service address provided in the operating instructions.
KOMPERNASS HANDELS GMBH
BURGSTRASSE 21
44867 BOCHUM
GERMANY
www.kompernass.com
SET 600 A1
GB│IE│NI│CY
│
15 ■

■ 16 │ GB
│IE│NI│
CY
SET 600 A1

Περιεχόμενα
Εισαγωγή ....................................................18
Πληροφορίες για τις παρούσες οδηγίες χρήσης ...............................18
Προβλεπόμενη χρήση ....................................................18
Υποδείξεις ασφαλείας ..........................................19
Παραδοτέος εξοπλισμός και έλεγχος μεταφοράς ....................21
Περιγραφή συσκευής ..........................................22
Τεχνικά χαρακτηριστικά ........................................22
Απαιτήσεις ως προς τη θέση τοποθέτησης ..........................22
Θέση σε λειτουργία ............................................23
Χειρισμός και λειτουργία .......................................23
Παραδείγματα χρήσης .........................................24
Παρασκευή πόριτζ ...................................................... 24
Μαγείρεμα ζυμαρικών .................................................... 25
Παρασκευή φαγητού κατσαρόλας Hot Pot .................................... 26
Καθαρισμός και φροντίδα ......................................28
Απομάκρυνση των αλάτων. . . . . . . . . . . . . . . . . . . . . . . . . . . . . . . . . . . . . . . . . . . . . . . . . 29
Αποθήκευση .................................................29
Απόρριψη ...................................................29
Απόρριψη της συσκευής .................................................. 29
Απόρριψη της συσκευασίας ............................................... 29
Εγγύηση της Kompernass Handels GmbH .........................30
Σέρβις ................................................................ 31
Εισαγωγέας ............................................................ 31
SET 600 A1
GR│CY
│
17 ■

Εισαγωγή
Πληροφορίες για τις παρούσες οδηγίες χρήσης
Συγχαρητήρια για την αγορά της νέας σας συσκευής.
Το προϊόν που αποκτήσατε είναι ένα προϊόν υψηλής ποιότητας. Οι οδηγίες
χρήσης αποτελούν τμήμα αυτού του προϊόντος. Περιλαμβάνουν σημαντικές
υποδείξεις για την ασφάλεια, τη χρήση και την απόρριψη. Πριν από τη χρήση
του προϊόντος, εξοικειωθείτε με όλες τις υποδείξεις χειρισμού και ασφάλειας.
Χρησιμοποιείτε το προϊόν αποκλειστικά όπως περιγράφεται και για τους αναφερόμενους τομείς χρήσης. Σε περίπτωση παράδοσης του προϊόντος σε τρίτους,
παραδώστε μαζί και όλα τα έγγραφα.
Προβλεπόμενη χρήση
Η συσκευή αυτή εξυπηρετεί αποκλειστικά στο ζέσταμα τροφίμων και νερού
για ιδιωτική χρήση. Δεν προβλέπεται για χρήση με άλλα υλικά ή υγρά που
δεν ανήκουν στον τομέα των τροφίμων. Επίσης, η χρήση της συσκευής για
επαγγελματικούς σκοπούς δεν είναι σύμφωνη με τους κανονισμούς.
Αποκλείονται αξιώσεις οποιουδήποτε είδους λόγω ζημιών από μη προβλεπόμενη
χρήση, ακατάλληλες επισκευές, μη επιτρεπόμενες τροποποιήσεις ή από χρήση μη
εγκεκριμένων ανταλλακτικών. Την ευθύνη φέρει αποκλειστικά ο χρήστης.
■ 18 │ GR
│
CY
SET 600 A1

Υποδείξεις ασφαλείας
ΚΙΝΔΥΝΟΣ ΗΛΕΚΤΡΟΠΛΗΞΙΑΣ!
► Συνδέετε τη συσκευή μόνο σε μια σύμφωνα με τις προδιαγρα-
φές εγκατεστημένη και εύκολα προσβάσιμη πρίζα με τάση
δικτύου 220–240V ∼, 50–60 Hz.
► Χρησιμοποιείτε τη συσκευή μόνο με το συνοδευτικό καλώδιο
δικτύου.
► Το καλώδιο δικτύου δεν πρέπει να βρέχεται ή να έρχεται σε
επαφή με υγρά κατά τη διάρκεια της λειτουργίας. Τοποθετείτε
το κατά τέτοιο τρόπο, ώστε να μην υπάρχει περίπτωση να
μαγκώσει ή να υποστεί άλλου είδους ζημιά.
► Βεβαιωθείτε ότι αποκλείεται οποιαδήποτε επαφή της σύνδεσης
καλωδίου δικτύου με νερό! Αφήνετε πρώτα τη σύνδεση καλωδίου δικτύου να στεγνώσει καλά, εάν έχει βραχεί ακούσια.
► Προσέχετε ώστε να μην διαπερνάνε υγρά τη σύνδεση βύ-
σματος καλωδίου δικτύου.
► Εάν το καλώδιο σύνδεσης δικτύου της συσκευής υποστεί
βλάβη, πρέπει να αντικατασταθεί από τον κατασκευαστή ή
το τμήμα εξυπηρέτησης πελατών ή ένα αντίστοιχα
εξειδικευμένο άτομο, ώστε να αποφευχθούν τυχόν κίνδυνοι.
► Μετά τη χρήση, αποσυνδέετε πάντοτε το βύσμα από την πρίζα.
► Πριν από τη χρήση, ελέγχετε τη συσκευή για εμφανείς εξωτε-
ρικές φθορές. Μη θέτετε τη συσκευή σε λειτουργία, εάν έχει
υποστεί βλάβη ή έχει πέσει κάτω.
► Αναθέτετε τις επισκευές της συσκευής αποκλειστικά σε εξου-
σιοδοτημένα εξειδικευμένα συνεργεία ή στο τμήμα εξυπηρέτησης πελατών. Σε περίπτωση ακατάλληλων επισκευών, ενδέχεται να προκύψουν κίνδυνοι για τον χρήστη. Επίσης,
ακυρώνεται η αξίωση εγγύησης.
Ποτέ μη βυθίζετε τη συσκευή σε νερό ή σε άλλα υγρά!
Υπάρχει κίνδυνος θανάτου από ηλεκτροπληξία, εάν
κατά τη λειτουργία καταλήξουν υγρά σε εξαρτήματα
υπό τάση.
SET 600 A1
GR│CY
│
19 ■

ΠΡΟΕΙΔΟΠΟΙΗΣΗ! ΚΙΝΔΥΝΟΣ ΤΡΑΥΜΑΤΙ-
ΣΜΟΥ!
► Γεμίστε το σκεύος το μέγιστο έως τη σήμανση MAX. Σε αντί-
θετη περίπτωση, το περιεχόμενο που βράζει μπορεί να χυθεί έξω.
► Πιάνετε πάντα τη συσκευή από τη χειρολαβή. Η συσκευή
είναι πολύ καυτή κατά τη λειτουργία και μπορεί να διαφεύγει καυτός ατμός. Ακόμα και μετά τη χρήση, στην επιφάνεια
της συσκευής παραμένει θερμότητα.
► Πριν από την ενεργοποίηση, να βεβαιώνεστε ότι η συσκευή
έχει τοποθετηθεί σταθερά και ίσια.
► Η συσκευή και το καλώδιο σύνδεσής της πρέπει να φυλάσ-
σονται μακριά από παιδιά κάτω των 8 ετών.
► Αυτή η συσκευή επιτρέπεται να χρησιμοποιείται από παιδιά
άνω των 8 ετών, καθώς και από άτομα με περιορισμένες φυσικές, αισθητηριακές ή νοητικές ικανότητες ή έλλειψη εμπειρίας και γνώσεων, εφόσον επιτηρούνται ή έχουν ενημερωθεί
αναφορικά με την ασφαλή χρήση της συσκευής και κατανοούν τους πιθανούς κινδύνους. Τα παιδιά δεν επιτρέπεται να
παίζουν με τη συσκευή.
► Ο καθαρισμός και η συντήρηση χρήστη δεν επιτρέπεται να
διεξάγονται από παιδιά, εκτός εάν είναι 8 ετών ή μεγαλύτερα
και επιτηρούνται.
► Σε περίπτωση εσφαλμένης χρήσης της συσκευής, υπάρχει
κίνδυνος τραυματισμού.
Χρησιμοποιείτε τη συσκευή πάντα όπως προβλέπεται.
■ 20 │ GR
│
CY
SET 600 A1

ΠΡΟΣΟΧΗ! ΥΛΙΚΕΣ ΖΗΜΙΕΣ!
► Μη χρησιμοποιείτε εξωτερικό χρονοδιακόπτη ή ξεχωριστό
τηλεχειριστήριο για τη χρήση της συσκευής.
► Επιτηρείτε τη συσκευή κατά τη διάρκεια της λειτουργίας.
► Βεβαιωθείτε ότι η συσκευή, το καλώδιο ή το βύσμα δεν
έρχονται σε επαφή με πηγές θερμότητας, όπως μάτια
κουζίνας ή φλόγες.
Παραδοτέος εξοπλισμός και έλεγχος μεταφοράς
Ƈ Αφαιρέστε όλα τα εξαρτήματα της συσκευής και τις οδηγίες χρήσης από
τη συσκευασία.
Ƈ Απομακρύνετε όλα τα υλικά συσκευασίας, ενδεχόμενες μεμβράνες και αυτο-
κόλλητα.
Ο παραδοτέος εξοπλισμός αποτελείται από τα ακόλουθα στοιχεία (για εικόνες
βλ. αναδιπλούμενη σελίδα):
▯ Ηλεκτρική κατσαρόλα
▯ Καπάκι
▯ Καλώδιο δικτύου
▯ Οδηγίες χρήσης (χωρίς εικόνα)
ΥΠΟΔΕΙΞΗ
► Ελέγξτε τον παραδοτέο εξοπλισμό ως προς την πληρότητα και για εμφανείς
φθορές.
► Σε περίπτωση ελλιπούς παραδοτέου εξοπλισμού ή ζημιών λόγω ελλιπούς
συσκευασίας ή λόγω μεταφοράς, απευθυνθείτε στην ανοικτή τηλεφωνική
γραμμή εξυπηρέτησης (βλ. κεφάλαιο Σέρβις).
SET 600 A1
GR│CY
│
21 ■

Περιγραφή συσκευής
(Για εικόνες βλ. αναδιπλούμενη σελίδα)
Καπάκι
1
2 Άνοιγμα διαφυγής αέρα
3 Χειρολαβή
4 LED λειτουργίας
5 Πλήκτρο-διακόπτης O (Off)/I (Χαμηλό: 300 W)/II (Υψηλό: 600 W)
6 Κατσαρόλα
7 Σύνδεση καλωδίου δικτύου
8 Αντιολισθητικά ποδαράκια
9 Καλώδιο δικτύου (με βύσμα δικτύου)
Τεχνικά χαρακτηριστικά
Τροφοδοσία τάσης
Ονομαστική ισχύς 600–720 W
Μέγ. ποσότητα πλήρωσης 1,7 λίτρα
Χωρητικότητα
220–240 V ∼ (εναλλασσόμενο ρεύμα),
50–60 Hz
Μέγ. 1,2 λ.
Ελάχ. 0,5 λ.
Όλα τα εξαρτήματα αυτής της συσκευής, τα
οποία έρχονται σε επαφή με τρόφιμα, μπορούν
να χρησιμοποιούνται με ασφάλεια σε τρόφιμα.
Απαιτήσεις ως προς τη θέση τοποθέτησης
ΠΡΟΣΟΧΗ! ΥΛΙΚΕΣ ΖΗΜΙΕΣ!
► Μην τοποθετείτε τη συσκευή επάνω σε ευαίσθητα σε υψηλές θερμοκρασίας
ή εύφλεκτα υλικά όπως π.χ. υφάσματα ή μοκέτες.
Για την ασφαλή και άψογη λειτουργία της συσκευής, η θέση τοποθέτησης πρέπει
να πληροί τις ακόλουθες προϋποθέσεις:
► Η θέση τοποθέτησης πρέπει να είναι μια οριζόντια, επίπεδη και σταθερή
επιφάνεια. Τα αντιολισθητικά ποδαράκια
λας 6 φροντίζουν επιπλέον για μια σταθερή θέση.
► Η πρίζα πρέπει να είναι εύκολα προσβάσιμη, έτσι ώστε το καλώδιο δικτύου
να μπορεί να αποσυνδεθεί εύκολα σε περίπτωση ανάγκης.
8 στην κάτω πλευρά της κατσαρό-
9
■ 22 │ GR
│
CY
SET 600 A1

Θέση σε λειτουργία
Ƈ Προτού θέσετε τη συσκευή σε λειτουργία, βεβαιωθείτε ότι
– η συσκευή, το βύσμα δικτύου και το καλώδιο δικτύου
κατάσταση και
– όλα τα υλικά συσκευασίας έχουν απομακρυνθεί από τη συσκευή.
Ƈ Καθαρίστε τη συσκευή πριν από την πρώτη θέση σε λειτουργία, όπως περι-
γράφεται στο κεφάλαιο
Καθαρισμός και φροντίδα
Χειρισμός και λειτουργία
ΚΙΝΔΥΝΟΣ ΗΛΕΚΤΡΟΠΛΗΞΙΑΣ!
► Η σύνδεση καλωδίου δικτύου
κοντά σε νερό ή άλλα υγρά. Υπάρχει κίνδυνος θανάτου από ηλεκτροπληξία!
ΠΡΟΕΙΔΟΠΟΙΗΣΗ! ΚΙΝΔΥΝΟΣ ΤΡΑΥΜΑΤΙΣΜΟΥ!
► Κατά την πλήρωση, λαμβάνετε υπόψη τις σημάνσεις στην εσωτερική πλευρά
της κατσαρόλας
σήμανση MAX (1,2 λ.). Σε αντίθετη περίπτωση, το περιεχόμενο που βράζει
μπορεί να χυθεί έξω.
► Όταν βράζετε νερό, χρησιμοποιείτε πάντα μόνο φρέσκο πόσιμο νερό. Μην
καταναλώνετε νερό, το οποίο δεν έχει αξιολογηθεί ως πόσιμο. Σε διαφορετική περίπτωση, υπάρχει κίνδυνος για την υγεία.
ΥΠΟΔΕΙΞΗ
► Η συσκευή είναι εξοπλισμένη με μια προστασία υπερθέρμανσης και μια
προστασία από στεγνή λειτουργία. Εάν η συσκευή ενεργοποιηθεί μη ηθελημένα, ενώ δεν υπάρχουν τρόφιμα ή νερό μέσα στην κατσαρόλα
συσκευή απενεργοποιείται αυτόματα. Επίσης, η συσκευή απενεργοποιείται
αυτόματα εάν εξατμιστούν όλα τα υγρά, π.χ. λόγω ενός καπακιού 1 που
δεν έχει κλείσει. Σε αυτές τις περιπτώσεις, αφήστε πρώτα τη συσκευή να
κρυώσει προτού τη χρησιμοποιήσετε εκ νέου.
► Γεμίστε την κατσαρόλα
Αλλιώς, υπάρχει η πιθανότητα να εξατμιστούν όλα τα υγρά από τη συσκευή
και να απενεργοποιηθεί αυτόματα.
► Εξασφαλίζετε πάντα ότι το πλήκτρο-διακόπτης
(Off), όταν το βύσμα δικτύου έχει αποσυνδεθεί και το καλώδιο δικτύου 9
συνεχίζει να είναι συνδεδεμένο με τη συσκευή. Αλλιώς, η συσκευή θα θερμανθεί μη ηθελημένα, μόλις συνδέσετε πάλι το βύσμα δικτύου στην πρίζα.
1) Αφαιρέστε το καπάκι 1 από την κατσαρόλα 6.
2) Γεμίστε την κατσαρόλα
τις σημάνσεις MIN (0,5 λ.) και MAX (1,2 λ.) στην εσωτερική πλευρά της
κατσαρόλας
6. Γεμίζετε την κατσαρόλα 6 το ανώτερο έως τη
6 το ελάχιστο έως τη σήμανση MIN (0,5 λ.).
6 με τρόφιμα ή νερό. Κατά την πλήρωση, προσέχετε
6.
9 είναι σε άψογη
.
7 της συσκευής δεν πρέπει να βρίσκεται ποτέ
6, η
5 βρίσκεται στη θέση
Ο
SET 600 A1
GR│CY
│
23 ■

3) Κλείστε πρώτα το καπάκι
έτσι, ώστε να εδράζεται σταθερά και ίσια επάνω στην επιφάνεια απόθεσης.
4) Συνδέστε το καλώδιο δικτύου
5) Συνδέστε το βύσμα δικτύου του καλωδίου δικτύου
6) Πιέστε το πλήκτρο-διακόπτη
Ɣ προς τα δεξιά στη θέση Ι (Χαμηλό: 300 W) για αργό ζέσταμα με ελάχιστη
θερμοκρασία ή
Ɣ προς τα αριστερά στη θέση
υψηλή θερμοκρασία.
Το LED λειτουργίας 4 ανάβει πορτοκαλί.
ΠΡΟΕΙΔΟΠΟΙΗΣΗ! ΚΙΝΔΥΝΟΣ ΤΡΑΥΜΑΤΙΣΜΟΥ!
► Κατά τη διάρκεια της λειτουργίας, μπορεί να διαφεύγει καυτός ατμός από το
άνοιγμα διαφυγής αέρα
► Πιάνετε πάντα τη συσκευή
επιφάνεια της συσκευής όταν βρίσκεται σε λειτουργία ή εάν δεν έχει κρυώσει
ακόμα.
7) Μόλις το περιεχόμενο της κατσαρόλας μαγειρευτεί/ζεσταθεί, απενεργοποιήστε
τη συσκευή γυρίζοντας το πλήκτρο-διακόπτη 5 προς τα αριστερά ή/και
δεξιά στη θέση Ο (Off). Το LED λειτουργίας 4 σβήνει.
Παραδείγματα χρήσης
ΥΠΟΔΕΙΞΗ
► Τα στοιχεία στις συνταγές ενδέχεται να διαφέρουν αναλόγως του προσωπι-
κού γούστου και της σύνθεσης των τροφίμων. Εάν χρειάζεται, προσαρμόζετε τις συνταγές στις δικές σας προτιμήσεις και εμπειρίες.
1 και στη συνέχεια τοποθετήστε την κατσαρόλα 6
9 με τη σύνδεση καλωδίου δικτύου 7.
9 στην πρίζα.
5
ΙΙ
(Υψηλό: 600 W) για γρήγορο ζέσταμα σε
2 στο καπάκι 1. Διατηρείτε κατάλληλη απόσταση.
από τη χειρολαβή 3. Ποτέ μην αγγίζετε την
Παρασκευή πόριτζ
ΤΙ ΕΙΝΑΙ ΤΟ ΠΟΡΙΤΖ;
► Το πόριτζ ή χυλός βρώμης είναι ένας χυλός σιτηρών που παρασκευάζεται
από νιφάδες βρώμης ή αλεύρι βρώμης και γάλα ή/και νερό.
Για να εμπλουτίσετε επιπλέον το πόριτζ, μπορείτε να ανακατέψετε διάφορα
φρούτα, μούρα, ξηρούς καρπούς, σπόρους ή για παράδειγμα ξύσμα
σοκολάτας μετά το μαγείρεμα. Εάν το θέλετε πιο γλυκό, μπορείτε να προσθέσετε ζάχαρη, μέλι, κανέλα ή σιρόπι αγαύης. Φτιάξτε το όπως προτιμάτε.
1) Γεμίστε με νερό ή γάλα και νιφάδες βρώμης την κατσαρόλα
πλήρωση, προσέχετε τις σημάνσεις MIN (0,5 λ.) και MAX (1,2 λ.) στην
εσωτερική πλευρά της κατσαρόλας 6. Γεμίστε την κατσαρόλα 6 το
ανώτερο μέχρι τη σήμανση MAX και το ελάχιστο μέχρι τη σήμανση MIN.
■ 24 │ GR
│
CY
6. Κατά την
SET 600 A1

2) Κλείστε το καπάκι 1.
3) Πιέστε το πλήκτρο-διακόπτη 5 προς τα δεξιά στη θέση I.
4) Εάν ετοιμάζετε το πόριτζ με γάλα, το ζεσταίνετε ανακατεύοντας συνεχώς,
ώστε να μην καεί. Κατά την προετοιμασία με νερό, αρκεί να ανακατεύετε ανά
διαστήματα το περιεχόμενο στην κατσαρόλα.
5) Θερμάνετε το περιεχόμενο της κατσαρόλας για περ. 7 λεπτά και κατόπιν
απενεργοποιήστε τη συσκευή. Αφήστε το πόριτζ να φουσκώσει για περ. 5
λεπτά πριν το καταναλώσετε. .
Παράδειγμα συνταγής για πόριτζ
▯ 500 ml γάλα
▯ 150 γρ. νιφάδες βρώμης (που λιώνουν εύκολα)
▯ 3 ΚΣ μέλι
▯ Φράουλες, κόκκινα βατόμουρα, μύρτιλλα (ή ότι μούρα επιλέξετε)
▯ Αμύγδαλα (σε ότι ποσότητα επιθυμείτε)
▯ 1 λεμόνι
1) Παρασκευάστε το γάλα και τις νιφάδες βρώμης σύμφωνα με την περιγραφή.
2) Ανακατέψτε το μέλι και σιγοβράστε τις νιφάδες βρώμης μέχρι να φουσκώσουν.
3) Καβουρδίστε τα αμύγδαλα σε ένα τηγάνι χωρίς λίπος μέχρι να μοσχομυρίσουν.
4) Πλύνετε προσεκτικά τα μούρα, στεγνώστε και σκουπίστε. Κόψτε τις φράουλες
στα τέσσερα.
5) Ξεπλύνετε το λεμόνι σε καυτό νερό, σκουπίστε το και ξύστε στον τρίφτη από
την λεπτή πλευρά.
6) Μοιράστε το πόριτζ σε 3 μπολ και γαρνίρετε με μούρα, αμύγδαλα και ξύσμα
λεμονιού.
Μαγείρεμα ζυμαρικών
1) Γεμίστε με νερό την κατσαρόλα 6. Κατά την πλήρωση, προσέχετε τις σημάνσεις
MIN (0,5 λ.) και MAX (1,2 λ.) στην εσωτερική πλευρά της κατσαρόλας6.
Γεμίστε την κατσαρόλα 6 το ανώτερο μέχρι τη σήμανση MAX και το
ελάχιστο μέχρι τη σήμανση MIN.
SET 600 A1
GR│CY
│
25 ■

ΥΠΟΔΕΙΞΗ
► Κατά την πλήρωση της κατσαρόλας
προσθέσετε και άλλα υλικά στην κατσαρόλα 6. Γι' αυτό, για το μαγείρεμα
ζυμαρικών ή άλλων τροφίμων που θα προστεθούν αργότερα, μη γεμίζετε με
νερό μέχρι τη σήμανση MAX (1,2 λ.)! Το συνολικό περιεχόμενο της κατσαρόλας
6 (νερό + τρόφιμα) δεν επιτρέπεται να υπερβαίνει τη σήμανση
MAX (1,2 λ.).
Για το μαγείρεμα ζυμαρικών, συστήνουμε να βάζετε στην κατσαρόλα 6
1λίτρο νερό και να προσθέτετε 100 γρ. ζυμαρικά.
2) Κλείστε το καπάκι
3) Πιέστε το πλήκτρο-διακόπτη 5 προς τα αριστερά στη θέση II.
4) Μόλις το νερό πάρει βράση, προσθέστε στην κατσαρόλα
και τα ζυμαρικά και θέστε το πλήκτρο-διακόπτη 5 προς τα δεξιά στη θέση Ι.
5) Ανακατεύετε ανά διαστήματα το περιεχόμενο στην κατσαρόλα.
6) Μετά από περ. 10 λεπτά, τα ζυμαρικά έχουν μαγειρευτεί και μπορείτε να τα
καταναλώσετε. Ωστόσο, λαμβάνετε πάντα υπόψη τις πληροφορίες επάνω στη
συσκευασία των ζυμαρικών. Εάν απαιτείται, ανατρέξτε στις πληροφορίες του
κατασκευαστή σε περίπτωση απόκλισης από τα εδώ αναφερόμενα 10 λεπτά.
1.
6 με νερό, να θυμάστε ότι πρέπει να
Παρασκευή φαγητού κατσαρόλας Hot Pot
ΤΙ ΕΙΝΑΙ ΤΟ «HOT POT»;
► Στο λεγόμενο «Hot Pot», που ονομάζεται και κινέζικο φοντύ, φοντύ με ζωμό
κρέατος, τα φαγητά παρασκευάζονται σε καυτό ζωμό. Με τον τρόπο αυτό
μπορείτε να μαγειρέψετε μικρά κομμάτια λαχανικών, λεπτές φέτες κρέατος
ή θαλασσινά. Παραδοσιακά, σερβίρονται μαζί διαφορετικά ντιπ.
1) Γεμίστε με νερό την κατσαρόλα
σε βαζάκι του εμπορίου, προσθέστε τον έτοιμο ζωμό στην κατσαρόλα.Κατά
την πλήρωση, προσέχετε τις σημάνσεις MIN (0,5 λ.) και MAX (1,2 λ.) στην
εσωτερική πλευρά της κατσαρόλας 6. Γεμίστε την κατσαρόλα 6 το
ανώτερο μέχρι τη σήμανση MAX και το ελάχιστο μέχρι τη σήμανση MIN.
ΥΠΟΔΕΙΞΗ
► Κατά την πλήρωση της κατσαρόλας
προσθέσετε και άλλα υλικά στην κατσαρόλα 6. Γι' αυτό, για την παρασκευή ενός Hot Pot το νερό δεν πρέπει να φτάνει μέχρι τη σήμανση MAX
(1,2 λ.)! Το συνολικό περιεχόμενο της κατσαρόλας 6 (νερό + τρόφιμα)
δεν επιτρέπεται να υπερβαίνει τη σήμανση MAX (1,2 λ.).
2) Κλείστε το καπάκι 1.
3) Πιέστε το πλήκτρο-διακόπτη 5 προς τα αριστερά στη θέση II.
6. Εάν χρησιμοποιείτε σπιτικό ζωμό ή ζωμό
6 με νερό, να θυμάστε ότι πρέπει να
6 μια ΚΓ αλάτι
■ 26 │ GR
│
CY
SET 600 A1

4) Μόλις το νερό βράσει, προσθέστε τον στιγμιαίο ζωμό/τον κύβο ζωμού σύμφωνα
με τις σχετικές οδηγίες και ανακατέψτε. Πιέστε το πλήκτρο-διακόπτη 5 προς τα
δεξιά στη θέση Ι. Για την παρασκευή του Hot Pot, αφήστε τον ζωμό να πάρει
βράση σε αυτή τη βαθμίδα.
Παράδειγμα συνταγής Hot Pot με ντιπ φιστικιού
▯ 800 ml νερό
▯ 15 γρ. στιμιαίος ζωμός πουλερικών
▯ 100 γρ. στήθος κοτόπουλου
▯ 1 κόκκινη πιπεριά
▯ 3 - 4 μανιτάρια
▯ 150 γρ. φιστικοβούτυρο (με κομματάκια)
▯ 10 ΚΣ νερό
▯ 1 ΚΓ μέλι
▯ 1 ΚΓ σάλτσα σόγιας
▯ Λίγη σάλτσα Σαμπάλ Ολέκ (προαιρετικά)
1) Βάλτε τον ζωμό να βράσει σύμφωνα με την περιγραφή.
2) Στο ενδιάμεσο, κόψτε το στήθος κοτόπουλου σε μικρές λωρίδες. Όσο πιο
χοντρά είναι τα κομμάτια, τόσο περισσότερο διαρκεί το μαγείρεμα.
Κόψτε τα μανιτάρια σε φέτες.
Κόψτε την πιπεριά σε φέτες.
3) Παρασκευή του ντιπ φιστικιού:
Ανακατέψτε καλά το φιστικοβούτυρο με το νερό, το μέλι και τη σάλτσα
σόγιας. Προαιρετικά, προσθέστε λίγο σάλτσα Σαμπάλ Ολέκ.
4) Ενώ βράζει ο ζωμός και η συσκευή έχει ρυθμιστεί στη θέση
κατσαρόλα προσεκτικά τα κομμάτια κοτόπουλου, την πιπεριά και τα μανιτάρια.
5) Μετά από περ. 10 λεπτά (αναλόγως του μεγέθους των τροφίμων), τα
τρόφιμα έχουν μαγειρευτεί.
6) Βγάλτε τα από την κατσαρόλα με ένα κουτάλι, μια τρυπητή κουτάλα ή ένα
πιρούνι.
7) Απολαύστε με το ντιπ φιστικιού.
Συστήνουμε να συνοδεύσετε με φρέσκο ψωμί.
Ι
, προσθέστε στην
SET 600 A1
GR│CY
│
27 ■

Καθαρισμός και φροντίδα
ΚΙΝΔΥΝΟΣ ΗΛΕΚΤΡΟΠΛΗΞΙΑΣ!
► Πριν από κάθε καθαρισμό, αποσυνδέετε το βύσμα από την πρίζα.
►
Ποτέ μη βυθίζετε τη συσκευή σε νερό ή σε άλλα υγρά! Υπάρχει κίνδυνος θανάτου από ηλεκτροπληξία, εάν κατά τη λειτουργία καταλήξουν υγρά σε εξαρτήματα υπό τάση.
ΠΡΟΕΙΔΟΠΟΙΗΣΗ! ΚΙΝΔΥΝΟΣ ΤΡΑΥΜΑΤΙΣΜΟΥ!
► Αφήνετε τη συσκευή να κρυώσει πριν από τον καθαρισμό. Υπάρχει κίνδυ-
νος εγκαύματος.
ΠΡΟΣΟΧΗ! ΥΛΙΚΕΣ ΖΗΜΙΕΣ!
► Μη χρησιμοποιείτε ισχυρά ή καυστικά απορρυπαντικά. Μπορεί να διαβρώ-
σουν την επιφάνεια και να προκαλέσουν ανεπανόρθωτες ζημιές στη
συσκευή.
► Ποτέ μην καθαρίζετε την κατσαρόλα
με το χέρι.
ΥΠΟΔΕΙΞΗ
Το καπάκι 1 ενδείκνυται για καθαρισμό στο πλυντήριο πιάτων.
6 στο πλυντήριο πιάτων, παρά μόνο
■ 28 │ GR
Ƈ Καθαρίζετε τις εξωτερικές πλευρές της συσκευής και το καλώδιο δικτύου
με ένα ελαφρώς νωπό πανί. Στην περίπτωση πιο επίμονων ρύπων και για τον
καθαρισμό των εσωτερικών πλευρών της κατσαρόλας 6 και του καπακιού 1,
προσθέτετε στο πανί ένα ήπιο απορρυπαντικό. Στεγνώστε καλά την κατσαρόλα
6 και το καπάκι 1 , προτού χρησιμοποιήσετε ξανά τη συσκευή. Προσέξτε
ώστε να μην υπάρχουν υπολείμματα απορρυπαντικού στην κατσαρόλα 6,
προτού θέσετε πάλι σε λειτουργία τη συσκευή.
Ƈ Σε περίπτωση εναποθέσεων μέσα ή γύρω από την κατσαρόλα
ποιείτε μια βούρτσα καθαρισμού ή ένα σφουγγάρι και ζεστό νερό με απορρυπαντικό για να διαλύσετε τις εναποθέσεις. Στη συνέχεια, ξεπλύνετε την
κατσαρόλα 6 με καθαρό νερό.
│
CY
6, χρησιμο-
SET 600 A1
9

Απομάκρυνση των αλάτων
Αποθέσεις αλάτων στη συσκευή οδηγούν σε απώλειες ισχύος και επηρεάζουν τη
διάρκεια ζωής της συσκευής. Αφαιρείτε τα άλατα από τη συσκευή, μόλις εμφανίζονται αποθέσεις αλάτων σε αυτήν.
Ƈ Χρησιμοποιείτε ένα κατάλληλο διαλυτικό αλάτων από κατάστημα οικιακών
ειδών, το οποίο ενδείκνυται για δοχεία τροφίμων (π.χ. διαλυτικό αλάτων
για καφετιέρες). Ακολουθείτε τη διαδικασία που αναγράφεται στις οδηγίες
χρήσης του διαλυτικού αλάτων.
Ƈ Μετά την απομάκρυνση των αλάτων, καθαρίζετε τη συσκευή με άφθονο καθα-
ρό νερό.
Αποθήκευση
Ƈ Αφήστε πρώτα τη συσκευή να κρυώσει πλήρως, πριν τη φυλάξετε.
Ƈ Αποθηκεύετε τη συσκευή σε έναν καθαρό, στεγνό χώρο.
Απόρριψη
Απόρριψη της συσκευής
Το παρακείμενο σύμβολο ενός διαγραμμένου κάδου απορριμμάτων με ρόδες
υποδηλώνει ότι αυτό το προϊόν υπόκειται στην οδηγία 2012/19/ΕU. Σύμφωνα
με αυτήν την οδηγία, δεν επιτρέπεται να απορρίψετε αυτό το προϊόν στα οικιακά
απορρίμματα μετά τη χρήση του, αλλά σε ειδικά διαμορφωμένα σημεία συλλογής, κέντρα ανακυκλώσιμων υλικών ή επιχειρήσεις απόρριψης.
Αυτή η δυνατότητα απόρριψης παρέχεται δωρεάν. Φροντίζετε το
περιβάλλον και απορρίπτετε σωστά τα διάφορα υλικά.
Για τις δυνατότητες απόρριψης του προϊόντος μετά το τέλος του κύκλου ζωής
του, απευθυνθείτε στην αρμόδια υπηρεσία της κοινότητας ή της πόλης σας.
Απόρριψη της συσκευασίας
Τα υλικά συσκευασίας έχουν επιλεγεί σύμφωνα με τους κανόνες προστασίας του
περιβάλλοντος και τις τεχνικές απόρριψης και, ως εκ τούτου, είναι ανακυκλώσιμα.
Απορρίπτετε τα υλικά συσκευασίας που δεν χρησιμοποιούνται πλέον σύμφωνα
με τις κατά τόπους ισχύουσες προδιαγραφές.
Απορρίπτετε τη συσκευασία με τρόπο φιλικό προς το περιβάλλον.
Λαμβάνετε υπόψη τη σήμανση στα διάφορα υλικά συσκευασίας και, εφόσον
απαιτείται, ξεχωρίζετέ τα. Τα υλικά συσκευασίας φέρουν σήμανση με συντομογραφίες (a) και ψηφία (b) με την εξής σημασία:
1–7: Πλαστικά,
20–22: Χαρτί και χαρτόνι,
80–98: Συνθετικά υλικά.
SET 600 A1
GR│CY
│
29 ■

Εγγύηση της Kompernass Handels GmbH
Αξιότιμη πελάτισσα, αξιότιμε πελάτη,
Η παρούσα συσκευή διαθέτει 3 χρόνια εγγύηση από την ημερομηνία αγοράς.
Στην περίπτωση ελλείψεων στο προϊόν έχετε νομικά δικαιώματα έναντι του πωλητή του προϊόντος. Αυτά τα νομικά δικαιώματα δεν περιορίζονται μέσω της κατωτέρω αναφερόμενης εγγύησης.
Προϋποθέσεις εγγύησης
Η περίοδος εγγύησης ξεκινά την ημερομηνία αγοράς. Φυλάσσετε την απόδειξη
αγοράς. Απαιτείται ως αποδεικτικό αγοράς.
Εάν, εντός τριών ετών από την ημερομηνία αγοράς, παρατηρηθεί κάποιο σφάλμα υλικού ή κατασκευής στο προϊόν, θα επισκευάσουμε ή θα αντικαταστήσουμε
(κατόπιν κρίσης μας) το προϊόν δωρεάν ή θα σας επιστραφεί το ποσό αγοράς.
Η παρούσα εγγύηση προϋποθέτει ότι η ελαττωματική συσκευή και η απόδειξη
αγοράς θα υποβληθούν μαζί με μια σύντομη περιγραφή αναφορικά με το πού
βρίσκεται η έλλειψη και πότε παρατηρήθηκε, εντός της περιόδου των τριών ετών.
Εάν το ελάττωμα καλύπτεται από την εγγύησή μας, θα λάβετε το επισκευασμένο ή
ένα νέο προϊόν.
Περίοδος εγγύησης και νομικές απαιτήσεις λόγω ελλείψεων
Ο χρόνος εγγύησης δεν παρατείνεται μέσω της παροχής εγγύησης. Αυτό ισχύει
και για εξαρτήματα, τα οποία έχουν αντικατασταθεί και επισκευαστεί. Ενδεχόμενες ήδη υπάρχουσες ζημιές και ελλείψεις κατά την αγορά πρέπει να γνωστοποιούνται αμέσως μετά την αποσυσκευασία. Μετά τη λήξη του χρόνου εγγύησης,
τυχόν εμφανιζόμενες επισκευές χρεώνονται.
Εύρος εγγύησης
Η συσκευή κατασκευάστηκε σύμφωνα με αυστηρές οδηγίες ποιότητας και ελέγχθηκε προσεκτικά πριν από την αποστολή.
Η εγγύηση ισχύει για σφάλματα υλικού ή κατασκευής. Η παρούσα εγγύηση δεν
καλύπτει εξαρτήματα του προϊόντος που υπόκεινται σε φυσιολογική φθορά και,
ως εκ τούτου, θεωρούνται αναλώσιμα εξαρτήματα ή ζημιές σε εύθραυστα εξαρτήματα, π.χ. διακόπτες, συσσωρευτές ή γυάλινα εξαρτήματα.
Η παρούσα εγγύηση ακυρώνεται εάν προκληθεί ζημιά στο προϊόν, εάν δεν γίνεται σωστή χρήση ή συντήρηση. Για μια σωστή χρήση του προϊόντος πρέπει να
τηρούνται επακριβώς οι αναφερόμενες υποδείξεις στις οδηγίες χειρισμού. Σκοποί χρήσης και χειρισμοί που δεν συνιστώνται ή για τους οποίους υπάρχει προειδοποίηση πρέπει απαραίτητα να αποφεύγονται.
Το προϊόν προορίζεται μόνο για ιδιωτική και όχι για επαγγελματική χρήση. Σε
περίπτωση κακής μεταχείρισης και ακατάλληλης χρήσης, χρήσης βίας και παρεμβάσεων, οι οποίες δεν διεξήχθησαν από το εξουσιοδοτημένο μας τμήμα
σέρβις, η εγγύηση παύει να ισχύει.
■ 30 │ GR
│
CY
SET 600 A1

Διαδικασία σε περίπτωση εγγύησης
Για την εξασφάλιση γρήγορης επεξεργασίας του ζητήματός σας, τηρείτε τις
ακόλουθες υποδείξεις:
► Για όλες τις ερωτήσεις έχετε έτοιμη την απόδειξη αγοράς και τον κωδικό
προϊόντος (π.χ.ΙΑΝ123456_7890) ως απόδειξη για την αγορά.
► Για τον κωδικό προϊόντος, ανατρέξτε στην πινακίδα τύπου στο προϊόν, σε
μια ετικέτα στο προϊόν, στο εξώφυλλο των οδηγιών χρήσης (κάτω αριστερά)
ή σε ένα αυτοκόλλητο στην πίσω ή κάτω πλευρά του προϊόντος.
► Εάν προκύψουν σφάλματα λειτουργίας ή άλλες ελλείψεις, επικοινωνήστε κατ'
αρχήν με το ακόλουθο αναφερόμενο τμήμα σέρβις τηλεφωνικά ή
μεE-Mail.
► Ένα προϊόν που θεωρείται ελαττωματικό μπορείτε να το αποστείλετε ατελώς
στην αναφερόμενη διεύθυνση του σέρβις επισυνάπτοντας την απόδειξη
αγοράς (απόδειξη ταμείου) και αναφέροντας που βρίσκεται η έλλειψη και
πότε εμφανίστηκε.
Στην ιστοσελίδα www.lidl-service.com μπορείτε να πραγματοποιήσετε λήψη
των παρόντων ή άλλων οδηγιών χρήσης, βίντεο προϊόντων και λογισμικού.
Με αυτόν τον κωδικό QR μεταβαίνετε απευθείας στη σελίδα εξυπηρέτησης
Lidl (www.lidl-service.com) και εισαγάγοντας τον κωδικό προϊόντος (IAN)
365498_2010 μπορείτε να ανοίξετε τις αντίστοιχες οδηγίες χρήσης.
Σέρβις
Σέρβις Ελλάδα
Tel.: 801 5000 019 (0,03EUR / Min.)
E-Mail: kompernass@lidl.gr
CY
Σέρβις Κύπρος
Tel.: 8009 4409
E-Mail: kompernass@lidl.com.cy
IAN 365498_2010
Εισαγωγέας
Η ακόλουθη διεύθυνση δεν είναι διεύθυνση σέρβις. Επικοινωνήστε, κατ' αρχήν,
με την αναφερόμενη υπηρεσία σέρβις.
KOMPERNASS HANDELS GMBH
BURGSTRASSE 21
44867 BOCHUM
ΓΕΡΜΑΝΙΑ
www.kompernass.com
SET 600 A1
GR│CY
│
31 ■

■ 32 │ GR
│
CY
SET 600 A1

Inhaltsverzeichnis
Einleitung ....................................................34
Informationen zu dieser Bedienungsanleitung .................................. 34
Bestimmungsgemäße Verwendung .......................................... 34
Sicherheitshinweise ...........................................35
Lieferumfang und Transportinspektion ...........................37
Gerätebeschreibung ...........................................38
Technische Daten ..............................................38
Anforderungen an den Aufstellort ...............................38
Inbetriebnahme ..............................................39
Bedienung und Betrieb .........................................39
Anwendungsbeispiele .........................................40
Porridge zubereiten ......................................................40
Nudeln kochen ......................................................... 41
Hot Pot zubereiten ....................................................... 42
Reinigung und Pflege ..........................................44
Entkalkung .............................................................44
Aufbewahrung ...............................................45
Entsorgung. . . . . . . . . . . . . . . . . . . . . . . . . . . . . . . . . . . . . . . . . . . . . . . . . . . 45
Entsorgung des Gerätes. . . . . . . . . . . . . . . . . . . . . . . . . . . . . . . . . . . . . . . . . . . . . . . . . . . 45
Entsorgung der Verpackung ............................................... 45
Garantie der Kompernaß Handels GmbH .........................46
Service ................................................................ 47
Importeur ..............................................................47
SET 600 A1
DE│AT│CH
│
33 ■

Einleitung
Informationen zu dieser Bedienungsanleitung
Herzlichen Glückwunsch zum Kauf Ihres neuen Gerätes.
Sie haben sich damit für ein hochwertiges Produkt entschieden. Die Bedienungs-
anleitung ist Bestandteil dieses Produkts. Sie enthält wichtige Hinweise für Sicherheit, Gebrauch und Entsorgung. Machen Sie sich vor der Benutzung des Produkts
mit allen Bedien- und Sicherheitshinweisen vertraut. Benutzen Sie das Produkt nur
wie beschrieben und für die angegebenen Einsatzbereiche. Händigen Sie alle
Unterlagen bei Weitergabe des Produkts an Dritte mit aus.
Bestimmungsgemäße Verwendung
Dieses Gerät dient ausschließlich dem Erhitzen von Nahrungsmitteln und von
Wasser für den privaten Gebrauch. Es ist nicht vorgesehen für die Verwendung
mit anderen Stoffen oder Flüssigkeiten, die nicht zum Bereich der Nahrungsmittel
gehören. Die Verwendung des Gerätes im gewerblichen Bereich ist ebenfalls nicht
bestimmungsgemäß.
Ansprüche jeglicher Art wegen Schäden aus nicht bestimmungsgemäßer Verwendung, unsachgemäßen Reparaturen, unerlaubt vorgenommenen Veränderungen oder Verwendung nicht zugelassener Ersatzteile sind ausgeschlossen.
Das Risiko trägt allein der Benutzer.
■ 34 │ DE
│AT│
CH
SET 600 A1

Sicherheitshinweise
GEFAHR! ELEKTRISCHER SCHLAG!
► Schließen Sie das Gerät nur an eine vorschrifts mäßig installierte
und gut erreichbare Steck dose mit einer Netzspannung von
220–240V ∼, 50–60 Hz an.
► Verwenden Sie das Gerät nur mit dem mitgelieferten Netzkabel.
► Achten Sie darauf, dass im Betrieb das Netzkabel niemals
nass oder feucht wird. Führen Sie es so, dass es nicht eingeklemmt oder anderweitig beschädigt werden kann.
► Stellen Sie sicher, dass der Netzkabelanschluss niemals mit
Wasser in Berührung kommt! Lassen Sie den Netzkabelanschluss erst vollständig trocknen, wenn er versehentlich
feucht geworden ist.
► Achten Sie darauf, dass keine Flüssigkeit auf die Netzkabel-
steckverbindung überläuft.
► Wenn die Netzanschlussleitung dieses Gerätes beschädigt
wird, muss sie durch den Hersteller oder seinen Kundendienst
oder eine ähnlich qualifizierte Person ersetzt werden, um
Gefährdungen zu vermeiden.
► Ziehen Sie nach Gebrauch immer den Netzstecker aus der
Steckdose.
► Kontrollieren Sie das Gerät vor der Verwendung auf äußere
sichtbare Schäden. Nehmen Sie ein beschädigtes oder
heruntergefallenes Gerät nicht in Betrieb.
► Lassen Sie Reparaturen am Gerät nur von autorisierten
Fachbetrieben oder dem Kundenservice durchführen. Durch
unsachgemäße Reparaturen können Gefahren für den Benutzer entstehen. Zudem erlischt der Garantieanspruch.
Tauchen Sie das Gerät niemals in Wasser oder andere
Flüssigkeiten! Es besteht Lebensgefahr durch elektrischen
Schlag, wenn im Betrieb Flüssigkeit auf spannungsführende Teile gelangt.
SET 600 A1
DE│AT│CH
│
35 ■

WARNUNG! VERLETZUNGSGEFAHR!
► Befüllen Sie den Topf höchstens bis zur Markierung MAX.
Ansonsten kann der kochende Topfinhalt herausschwappen.
► Fassen Sie das Gerät immer am Handgriff an. Das Gerät ist
im Betrieb sehr heiß und es können heiße Dampfschwaden
entweichen. Auch nach der Anwendung verfügt die Oberfläche des Gerätes noch über Restwärme.
► Stellen Sie sicher, dass das Gerät stabil und gerade steht,
bevor Sie es einschalten.
► Das Gerät und seine Anschlussleitung sind von Kindern jün-
ger als 8 Jahre fernzuhalten.
► Dieses Gerät kann von Kindern ab 8 Jahren und darüber
sowie von Personen mit verringerten physischen, sensorischen oder mentalen Fähigkeiten oder Mangel an Erfahrung und Wissen benutzt werden, wenn sie beaufsichtigt
oder bezüglich des sicheren Gebrauchs des Gerätes unterwiesen wurden und die daraus resultierenden Gefahren verstehen. Kinder dürfen nicht mit dem Gerät spielen.
► Reinigung und die Wartung durch den Benutzer dürfen
nicht durch Kinder vorgenommen werden, es sei denn, sie
sind 8 Jahre oder älter und werden beaufsichtigt.
► Bei Missbrauch des Gerätes besteht Verletzungsgefahr.
Verwenden Sie das Gerät immer bestimmungsgemäß.
■ 36 │ DE
│AT│
CH
SET 600 A1

ACHTUNG! SACHSCHADEN!
► Benutzen Sie keine externe Zeitschaltuhr oder ein separates
Fernwirksystem, um das Gerät zu betreiben.
► Lassen Sie das Gerät während des Betriebes niemals unbe-
aufsichtigt.
► Stellen Sie sicher, dass das Gerät, das Netzkabel oder der
Netzstecker nicht mit heißen Quellen, wie Kochplatten oder
offenen Flammen, in Berührung kommen.
Lieferumfang und Transportinspektion
Ƈ Entnehmen Sie alle Teile des Gerätes und die Bedienungsanleitung aus
der Verpackung.
Ƈ Entfernen Sie sämtliches Verpackungsmaterial und eventuelle Folien und
Aufkleber.
Der Lieferumfang besteht aus folgenden Komponenten (Abbildungen siehe
Ausklappseite):
▯ Elektrischer Topf
▯ Deckel
▯ Netzkabel
▯ Bedienungsanleitung (ohne Abbildung)
SET 600 A1
HINWEIS
► Prüfen Sie die Lieferung auf Vollständigkeit und auf sichtbare Schäden.
► Bei einer unvollständigen Lieferung oder Schäden infolge mangelhafter
Verpackung oder durch Transport wenden Sie sich an die Service-Hotline
(siehe Kapitel Service).
DE│AT│CH
│
37 ■

Gerätebeschreibung
(Abbildungen siehe Ausklappseite)
Deckel
1
2 Abzugsöffnung
3 Handgriff
4 Betriebs-LED
5 Kippschalter O (Aus)/I (Niedrig: 300 W)/II (Hoch: 600 W)
6 Topf
7 Netzkabelanschluss
8 Anti-Rutschfüße
9 Netzkabel (mit Netzstecker)
Technische Daten
Spannungsversorgung 220–240 V ∼ (Wechselstrom), 50–60 Hz
Nennleistung 600–720 W
Fassungsvermögen 1,7 l
Einfüllmengen
max. 1,2 l
min. 0,5 l
Alle Teile dieses Gerätes, die mit Lebensmitteln in
Berührung kommen, sind lebensmittelecht.
Anforderungen an den Aufstellort
ACHTUNG! SACHSCHADEN!
► Stellen Sie das Gerät nicht auf hitzeempflindliche oder brennbare Materialien
wie z. B. Stoff oder Teppichboden.
Für einen sicheren und fehlerfreien Betrieb des Gerätes muss der Aufstellort
folgende Voraussetzungen erfüllen:
► Der Aufstellort muss eine waagerechte, ebene und stabile Fläche sein. Die
■ 38 │ DE
Anti-Rutschfüße
einen stabilen Stand.
► Die Steckdose muss leicht zugänglich sein, so dass das Netzkabel
leicht abgezogen werden kann.
│AT│
CH
8 an der Unterseite des Topfes 6 sorgen zusätzlich für
9 notfalls
SET 600 A1

Inbetriebnahme
Ƈ Bevor Sie das Gerät in Betrieb nehmen, stellen Sie sicher, dass
– das Gerät, Netzstecker und Netzkabel
– alle Verpackungsmaterialien vom Gerät entfernt sind.
Ƈ Reinigen Sie vor der ersten Inbetriebnahme das Gerät wie im Kapitel
Reinigung und Pflege beschrieben.
Bedienung und Betrieb
GEFAHR! ELEKTRISCHER SCHLAG!
Bringen Sie niemals den Netzkabelanschluss
►
von Wasser oder anderen Flüssigkeiten. Es besteht Lebensgefahr durch
elektrischen Schlag!
WARNUNG! VERLETZUNGSGEFAHR!
► Achten Sie beim Befüllen auf die Markierungen an der Innenseite des
6. Befüllen Sie den Topf 6 höchstens bis zur Markierung MAX
Topfes
(1,2 l). Ansonsten kann der kochende Topfinhalt herausschwappen.
► Verwenden Sie immer nur frisches Trinkwasser, wenn Sie mit dem Gerät
Wasser kochen. Ver zehren Sie kein Wasser, welches nicht als Trinkwasser
ausgewiesen ist. Ansonsten besteht die Gefahr von Gesundheitsschäden.
HINWEIS
► Das Gerät ist mit einem Überhitzungsschutz und einem Trockengehschutz
ausgestattet. Wenn das Gerät versehentlich eingeschaltet wird, ohne dass
sich Nahrungsmittel oder Wasser im Topf
Gerät automatisch aus. Ebenso schaltet sich das Gerät automatisch aus,
wenn, z. B. aufgrund eines nicht geschlossenen Deckels 1, das Gerät
trockenläuft. Lassen Sie in diesen Fällen das Gerät erst abkühlen, bevor Sie
es erneut verwenden.
► Befüllen Sie den Topf
Ansonsten besteht die Möglichkeit, dass das Gerät trockenläuft und sich
automatisch abschaltet.
► Stellen Sie immer sicher, dass der Kippschalter
steht, wenn der Netzstecker gezogen ist und das Netzkabel 9 noch mit
dem Gerät verbunden ist. Ansonsten heizt das Gerät unbeabsichtigt auf,
sobald Sie den Netzstecker wieder mit der Steckdose verbinden.
1) Nehmen Sie den Deckel 1 vom Topf 6 ab.
2) Füllen Sie Nahrungsmittel oder Wasser in den Topf
Befüllen auf die Markierungen MIN (0,5 l) und MAX (1,2 l) an der Innen-
seite des Topfes
6 mindestens bis zur Markierung MIN (0,5 l).
6.
9 in einwandfreiem Zustand sind und
7 des Gerätes in die Nähe
6 befinden, schaltet sich das
5 auf der Position O (Aus)
6. Achten Sie beim
SET 600 A1
DE│AT│CH
│
39 ■

3) Schließen Sie erst den Deckel
dass dieser stabil und gerade auf der Abstellfläche steht.
4) Verbinden Sie das Netzkabel
5) Stecken Sie den Netzstecker des Netzkabels
6) Drücken Sie den Kippschalter
Ɣ nach rechts in Position I (Niedrig: 300 W) für langsames Erhitzen bei
geringer Temperatur oder
Ɣ nach links in Position II (Hoch: 600 W) für schnelles Erhitzen bei hoher
Temperatur.
Die Betriebs-LED
WARNUNG! VERLETZUNGSGEFAHR!
► Beachten Sie, dass während des Betriebs aus der Abzugsöffnung
Deckel 1 heißer Dampf entweichen kann. Halten Sie entsprechenden
Abstand.
► Fassen Sie das Gerät
Oberfläche des Gerätes, wenn es noch in Betrieb ist oder wenn es noch nicht
abgekühlt ist.
7) Sobald der Topfinhalt gekocht/erwärmt ist, schalten Sie das Gerät aus,
indem Sie den Kippschalter 5 nach links bzw. nach rechts in die Position O
(Aus) drücken. Die Betriebs-LED 4 erlischt.
4 leuchtet orange.
immer am Handgriff 3 an. Berühren Sie niemals die
Anwendungsbeispiele
1 und stellen Sie danach den Topf 6 so ab,
9 mit dem Netzkabelanschluss 7.
9 in die Steckdose.
5
2 im
HINWEIS
► Die Angaben in den Rezepten können je nach persönlichem Geschmack
und der Beschaffenheit der Lebensmittel variieren. Passen Sie die Rezepte
gegebenenfalls an Ihre eigenen Vorlieben und Erfahrungen an.
Porridge zubereiten
WAS IST PORRIDGE?
► Porridge, auch Haferbrei genannt, ist ein Getreidebrei, der aus Haferflocken
oder Hafermehl und Milch und/oder Wasser zubereitet wird.
Zum zusätzlichen verfeinern des Porridges kann man nach dem Kochen
verschiedene Früchte, Beeren, Nüsse, Samen oder zun Beispiel Schokoladensplitter unterrühren. Wer es süßer mag, kann das Porridge mit Zucker, Honig,
Zimt oder Agavendicksaft süßen. Verfahren Sie nach ihren eigenen Vorlieben.
1) Füllen Sie Wasser oder Milch und Haferflocken in den Topf
beim Befüllen auf die Markierungen MIN (0,5 l) und MAX (1,2 l) an der
Innenseite des Topfes 6. Befüllen Sie den Topf 6 höchstens bis zur Markierung MAX und mindestens bis zur Markierung MIN.
■ 40 │ DE
│AT│
CH
6. Achten Sie
SET 600 A1

2) Schließen Sie den Deckel 1.
3) Drücken Sie den Kippschalter 5 nach rechts in Position I.
4) Wenn Sie das Porridge mit Milch zubereiten, erwärmen Sie diese unter ständigem Rühren, damit diese nicht anbrennt. Bei der Zubereitung mit Wasser
reicht es, den Topfinhalt gelegentlich umzurühren.
5) Erwärmen Sie den Topfinhalt ca. 7 Minuten und schalten Sie das Gerät dann
aus. Lassen Sie das Porridge vor dem Verzehr ca. 5 Minuten quellen.
Beispielrezept Porridge
▯ 500 ml Milch
▯ 150 g Haferflocken (zartschmelzend)
▯ 3 EL Honig
▯ Erdbeeren, Himbeeren, Blaubeeren (oder Beeren nach Wahl)
▯ Mandeln (Anzahl nach Belieben)
▯ 1 Zitrone
1) Milch und Haferflocken wie beschrieben zubereiten.
2) Honig unterrühren und die Haferflocken ausquellen lassen.
3) Die Mandeln in einer Pfanne ohne Fett rösten, bis sie duften.
4) Die Beeren vorsichtig waschen, trocken tupfen und putzen. Erdbeeren vierteln.
5) Zitrone heiß abwaschen, trocken tupfen und Schale fein abreiben.
6) Porridge auf 3 Schälchen verteilen und mit Beeren, Mandeln und Zitronenabrieb garnieren.
Nudeln kochen
1) Füllen Sie Wasser in den Topf 6. Achten Sie beim Befüllen auf die Markierungen MIN (0,5 l) und MAX (1,2 l) an der Innenseite des Topfes 6.
Befüllen Sie den Topf 6 höchstens bis zur Markierung MAX und mindestens
bis zur Markierung MIN.
HINWEIS
► Bedenken Sie beim Befüllen des Topfes
tere Zutaten in den Topf 6 geben. Daher darf das Wasser zum Kochen
von Nudeln oder anderen Lebensmitteln, die später hinzugefügt werden,
nicht bis zur Markierung MAX (1,2 l) eingefüllt werden! Der Gesamtinhalt
des Topfes 6 (Wasser + Lebensmittel) darf die Markierung MAX (1,2 l)
nicht überschreiten.
Zum Kochen von Nudeln empfehlen wir 1 Liter Wasser in den Topf 6 zu
füllen und 100 g Nudeln hinzuzugeben.
2) Schließen Sie den Deckel
3) Drücken Sie den Kippschalter 5 nach links in Position II.
SET 600 A1
1.
6 mit Wasser, dass Sie noch wei-
DE│AT│CH
│
41 ■

4) Sobald das Wasser kocht, geben Sie einen TL Salz und die Nudeln in den
Topf 6 und schalten Sie den Kippschalter 5 nach rechts in Position I.
5) Rühren Sie den Topfinhalt gelegentlich um.
6) Nach ca. 10 Minuten sind die Nudeln gekocht und fertig zum Verzehr.
Beachten Sie jedoch immer auch die Angaben auf der Verpackung der
Nudeln. Richten Sie sich gegebenenfalls nach den Angaben des Herstellers,
sollten diese von den hier angegebenen 10 Minuten abweichen.
Hot Pot zubereiten
WAS IST EIN "HOT POT"?
► Im sogenannten "Hot Pot", auch chinesisches Fondue, Feuertopf oder Brüh-
fondue genannt, werden die Speisen in siedender Brühe zubereitet. Kleine
Gemüsestücke, dünne Fleischscheiben oder Meeresfrüchte können so
gekocht werden. Dazu reicht man traditionellerweise verschiedene Dips.
1) Füllen Sie Wasser in den Topf
Font aus dem Glas verwenden, geben Sie die fertige Brühe in den Topf.
Achten Sie beim Befüllen auf die Markierungen MIN (0,5 l) und MAX (1,2 l)
an der Innenseite des Topfes 6. Befüllen Sie den Topf 6 höchstens bis zur
Markierung MAX und mindestens bis zur Markierung MIN.
HINWEIS
► Bedenken Sie beim Befüllen des Topfes
tere Zutaten in den Topf 6 geben. Daher darf das Wasser zur Zubereitung
eines Hot Pots, nicht bis zur Markierung MAX (1,2 l) eingefüllt werden! Die
Gesamtinhalt des Topfes 6 (Wasser + Lebensmittel) darf die Markierung
MAX (1,2 l) nicht überschreiten.
6. Wenn Sie selbst hergestellte Brühe oder
6 mit Wasser, dass Sie noch wei-
■ 42 │ DE
2) Schließen Sie den Deckel
3) Drücken Sie den Kippschalter 5 nach links in Position II.
4) Sobald das Wasser kocht, geben Sie die Instantbrühe/Brühwürfel gemäß
deren Anweisungen hinzu und rühren Sie diese ein. Drücken Sie den Kippschalter
5 nach rechts in Position I. Lassen Sie die Brühe auf dieser Stufe für
die Hot Pot - Zubereitung köcheln.
│AT│
CH
1.
SET 600 A1

Beispielrezept Hot Pot mit Erdnussdip
▯ 800 ml Wasser
▯ 15 g Instantbrühe Geflügel
▯ 100 g Hähnchenbrust
▯ 1 rote Paprika
▯ 3 - 4 Champignons
▯ 150 g Erdnussbutter (mit Stückchen)
▯ 10 EL Wasser
▯ 1 TL Honig
▯ 1 TL Sojasauce
▯ etwas Sambal Oelek (nach Belieben)
1) Die Brühe wie beschrieben zum Kochen bringen.
2) In der Zwischenzeit die Hähnchenbrust in kleine Streifen schneiden. Je dicker
die Fleischstücke sind, umso länger dauert das Garen.
Die Pilze in Scheiben schneiden.
Die Paprika in Streifen schneiden.
3) Den Erdnussdip zubereiten:
Dazu die Erdnussbutter mit dem Wasser, dem Honig und der Sojasauce gut
vermengen. Nach Belieben etwas Sambal Oelek hinzugeben.
4) Wenn die Brühe kocht und das Gerät auf Position I gestellt ist, vorsichtig die
Hähnchenstücke, die Paprika und die Pilze in den Topf geben.
5) Nach ca. 10 Minuten (je nach Größe der Lebensmittel) sind die Lebensmittel
gar.
6) Mit einem Löffel, Schaumlöffel oder einer Gabel aus dem Topf entnehmen.
7) Mit dem Erdnussdip genießen.
Wir empfehlen frisches Brot dazu.
SET 600 A1
DE│AT│CH
│
43 ■

Reinigung und Pflege
GEFAHR! ELEKTRISCHER SCHLAG!
► Ziehen Sie vor jeder Reinigung den Netzstecker aus der Steckdose.
►
Tauchen Sie das Gerät niemals in Wasser oder andere Flüssigkeiten!
Es besteht Lebensgefahr durch elektrischen Schlag, wenn im Betrieb
Flüssigkeit auf spannungsführende Teile gelangt.
WARNUNG! VERLETZUNGSGEFAHR!
► Lassen Sie das Gerät vor der Reinigung abkühlen. Es besteht Verbrennungs-
gefahr.
ACHTUNG! SACHSCHADEN!
► Benutzen Sie keine scheuernden oder ätzenden Reinigungsmittel. Diese
können die Oberfläche angreifen und das Gerät irreparabel beschädigen.
► Reinigen Sie den Topf
HINWEIS
Der Deckel 1 ist für die Reinigung in der Spülmaschine geeignet.
6 niemals in der Spülmaschine sondern nur von Hand.
Ƈ Reinigen Sie alle Außenseiten des Gerätes und das Netzkabel
leicht angefeuchteten Tuch. Geben Sie bei hartnäckigeren Verschmutzungen
und für die Reinigung der Innenseiten von Topf 6 und Deckel 1 ein mildes
Spülmittel auf das Tuch. Trocknen Sie Topf 6 und Deckel 1 gut ab, bevor
Sie das Gerät erneut verwenden. Achten Sie darauf, dass sich keine Spülmittelreste mehr im Topf 6 befinden, bevor Sie das Gerät wieder in Betrieb nehmen.
Ƈ Bei Ablagerungen im oder am Topf
einen Spülschwamm und warmes Wasser mit Spülmittel, um die Ablagerungen
zu lösen. Spülen Sie den Topf 6 anschließend mit klarem Wasser aus bzw. ab.
Entkalkung
Kalkablagerungen im Gerät führen zu Energieverlusten und beeinträchtigen die
Lebensdauer des Gerätes. Entkalken Sie das Gerät, sobald sich Kalkablagerungen am Gerät zeigen.
Ƈ Nehmen Sie einen für Lebensmittelbehälter geeigneten Kalklöser aus dem
Haushaltswarengeschäft (z. B. Kaffeemaschinen-Entkalker). Gehen Sie wie in
der Bedienungsanleitung des Kalklösers beschrieben vor.
Ƈ Reinigen Sie nach dem Entkalken das Gerät mit viel klarem Wasser.
■ 44 │ DE
│AT│
CH
9 mit einem
6 benutzen Sie eine Spülbürste oder
SET 600 A1

Aufbewahrung
Ƈ Lassen Sie das Gerät erst vollständig abkühlen, bevor Sie es verstauen.
Ƈ Lagern Sie das Gerät an einem sauberen, trockenen Ort.
Entsorgung
Entsorgung des Gerätes
Das nebenstehende Symbol einer durchgestrichenen Mülltonne auf Rädern zeigt
an, dass dieses Produkt der Richtlinie 2012/19/EU unterliegt. Diese Richtlinie
besagt, dass Sie dieses Produkt am Ende seiner Nutzungszeit nicht mit dem
normalen Hausmüll entsorgen dürfen, sondern in speziell eingerichteten Sammelstellen, Wertstoffhöfen oder Entsorgungsbetrieben abgeben müssen.
Diese Entsorgung ist für Sie kostenfrei. Schonen Sie die Umwelt
und entsorgen Sie fachgerecht.
Möglichkeiten zur Entsorgung des ausgedienten Produkts erfahren Sie bei Ihrer
Gemeinde- oder Stadtverwaltung.
Entsorgung der Verpackung
Die Verpackungs materialien sind nach umweltverträglichen und entsorgungstechnischen Gesichtspunkten ausgewählt und deshalb recyclebar.
Entsorgen Sie nicht mehr benötigte Verpackungsmaterialien gemäß den örtlich
geltenden Vorschriften.
Entsorgen Sie die Verpackung umweltgerecht.
Beachten Sie die Kennzeichnung auf den verschiedenen Verpackungsmaterialien
und trennen Sie diese gegebenenfalls gesondert. Die Verpackungsmaterialien sind
gekennzeichnet mit Abkürzungen (a) und Ziffern (b) mit folgender Bedeutung:
1–7: Kunststoffe,
20–22: Papier und Pappe,
80–98: Verbundstoffe.
SET 600 A1
DE│AT│CH
│
45 ■

Garantie der Kompernaß Handels GmbH
Sehr geehrte Kundin, sehr geehrter Kunde,
Sie erhalten auf dieses Gerät 3 Jahre Garantie ab Kaufdatum. Im Falle von Män-
geln dieses Produkts stehen Ihnen gegen den Verkäufer des Produkts gesetzliche
Rechte zu. Diese gesetzlichen Rechte werden durch unsere im Folgenden dargestellte Garantie nicht eingeschränkt.
Garantiebedingungen
Die Garantiefrist beginnt mit dem Kaufdatum. Bitte bewahren Sie den Kassenbon
gut auf. Dieser wird als Nachweis für den Kauf benötigt.
Tritt innerhalb von drei Jahren ab dem Kaufdatum dieses Produkts ein Materialoder Fabrikationsfehler auf, wird das Produkt von uns – nach unserer Wahl – für
Sie kostenlos repariert, ersetzt oder der Kaufpreis erstattet. Diese Garantieleistung setzt voraus, dass innerhalb der Dreijahresfrist das defekte Gerät und der
Kaufbeleg (Kassenbon) vorgelegt und schriftlich kurz beschrieben wird, worin
der Mangel besteht und wann er aufgetreten ist.
Wenn der Defekt von unserer Garantie gedeckt ist, erhalten Sie das reparierte
oder ein neues Produkt zurück. Mit Reparatur oder Austausch des Produkts beginnt kein neuer Garantiezeitraum.
Garantiezeit und gesetzliche Mängelansprüche
Die Garantiezeit wird durch die Gewährleistung nicht verlängert. Dies gilt auch
für ersetzte und reparierte Teile. Eventuell schon beim Kauf vorhandene Schäden
und Mängel müssen sofort nach dem Auspacken gemeldet werden. Nach Ablauf
der Garantiezeit anfallende Reparaturen sind kostenpflichtig.
Garantieumfang
Das Gerät wurde nach strengen Qualitätsrichtlinien sorgfältig produziert und vor
Auslieferung gewissenhaft geprüft.
Die Garantieleistung gilt für Material- oder Fabrikationsfehler. Diese Garantie
erstreckt sich nicht auf Produktteile, die normaler Abnutzung ausgesetzt sind und
daher als Verschleißteile angesehen werden können oder für Beschädigungen an
zerbrechlichen Teilen, z. B. Schalter, Akkus oder Teile, die aus Glas gefertigt sind.
Diese Garantie verfällt, wenn das Produkt beschädigt, nicht sachgemäß benutzt
oder gewartet wurde. Für eine sachgemäße Benutzung des Produkts sind alle in
der Bedienungsanleitung aufgeführten Anweisungen genau einzuhalten. Verwendungszwecke und Handlungen, von denen in der Bedienungsanleitung abgeraten oder vor denen gewarnt wird, sind unbedingt zu vermeiden.
Das Produkt ist nur für den privaten und nicht für den gewerblichen Gebrauch bestimmt. Bei missbräuchlicher und unsachgemäßer Behandlung, Gewaltanwendung und bei Eingriffen, die nicht von unserer autorisierten Serviceniederlassung
vorgenommen wurden, erlischt die Garantie.
■ 46 │ DE
│AT│
CH
SET 600 A1

Abwicklung im Garantiefall
Um eine schnelle Bearbeitung Ihres Anliegens zu gewährleisten, folgen Sie bitte
den folgenden Hinweisen:
► Bitte halten Sie für alle Anfragen den Kassenbon und die Artikelnummer
(z.B.IAN123456_7890) als Nachweis für den Kauf bereit.
► Die Artikelnummer entnehmen Sie bitte dem Typenschild am Produkt, einer
Gravur am Produkt, dem Titelblatt der Bedienungsanleitung (unten links) oder
dem Aufkleber auf der Rück- oder Unterseite des Produktes.
► Sollten Funktionsfehler oder sonstige Mängel auftreten, kontaktieren Sie zu-
nächst die nachfolgend benannte Serviceabteilung telefonisch oder
perE-Mail.
► Ein als defekt erfasstes Produkt können Sie dann unter Beifügung des Kaufbelegs
(Kassenbon) und der Angabe, worin der Mangel besteht und wann er aufgetreten ist, für Sie portofrei an die Ihnen mitgeteilte Serviceanschrift übersenden.
Auf www.lidl-service.com können Sie diese und viele weitere Handbücher,
Produktvideos und Installationssoftware herunterladen.
Mit diesem QR-Code gelangen Sie direkt auf die Lidl-Service-Seite
(www.lidl-service.com) und können mittels der Eingabe der Artikelnummer
(IAN) 365498_2010 Ihre Bedienungsanleitung öffnen.
Service
Service Deutschland
Tel.: 0800 5435 111 (kostenfreiausdemdt.Festnetz / Mobilfunknetz)
E-Mail: kompernass@lidl.de
Service Österreich
Tel.: 0820 201 222 (0,15 EUR / Min.)
E-Mail: kompernass@lidl.at
Service Schweiz
Tel.: 0842 665566 (0,08CHF / Min.,Mobilfunkmax.0,40CHF / Min.)
E-Mail: kompernass@lidl.ch
IAN 365498_2010
Importeur
Bitte beachten Sie, dass die folgende Anschrift keine Serviceanschrift ist.
Kontaktieren Sie zunächst die benannte Servicestelle.
KOMPERNASS HANDELS GMBH
BURGSTRASSE 21
44867 BOCHUM
DEUTSCHLAND
www.kompernass.com
SET 600 A1
DE│AT│CH
│
47 ■

■ 48 │ DE
│AT│
CH
SET 600 A1

KOMPERNASS HANDELS GMBH
BURGSTRASSE 21
44867 BOCHUM
GERMANY
www.kompernass.com
Last Information Update · Έκδοση των πληροφοριών · Stand der Informationen:
01 / 2021 · Ident.-No.: SET600A1-112020-2
IAN 365498_2010
 Loading...