


STEAM IRON SDB 2200 D2
STEAM IRON
Operating instructions
DAMPSTRYGEJERN
Betjeningsvejledning
FER À REPASSER VAPEUR
Mode d’emploi
DAMPFBÜGELEISEN
Bedienungsanleitung
IAN 273029
STOOMSTRIJKIJZER
Gebruiksaanwijzing

Before reading, unfold the page containing the illustrations and familiarise yourself with all functions of
the device.
Før du læser, vend siden med billeder frem og bliv bekendt med alle apparatets funktioner.
Avant de lire le mode d'emploi, ouvrez la page contenant les illustrations et familiarisez-vous ensuite avec
toutes les fonctions de l'appareil.
Vouw vóór het lezen de pagina met de afbeeldingen open en maak u vertrouwd met alle functies van het
apparaat.
Klappen Sie vor dem Lesen die Seite mit den Abbildungen aus und machen Sie sich anschließend mit allen
Funktionen des Gerätes vertraut.
GB / IE Operating instructions Page 1
DK Betjeningsvejledning Side 11
FR / BE Mode d'emploi Page 21
NL / BE Gebruiksaanwijzing Pagina 31
DE / AT / CH Bedienungsanleitung Seite 41
A
B
CONTENT PAGE
Introduction 2
Intended use 2
Scope of delivery 2
Operating elements 2
Technical data 2
Safety instructions 3
Before initial use 5
Filling the water tank 5
Plugging in and ironing 6
Steam ironing 6
Ironing with steam blast 6
Temporarily setting the steam iron aside 6
Turning off the steam iron 7
Drip-stop function 7
Automatic switch-off 7
Cleaning 7
Self-cleaning function .......................................................................................................................7
Housing and sole of the iron...........................................................................................................8
Storage 8
Troubleshooting 8
Disposal 8
Warranty and service 9
Importer 9
- 1 -
STEAM IRON
Introduction
Congratulations on the purchase of your new appliance.
You have clearly decided in favour of a quality
product. These operating instructions are a constituent of this product. They contain important information with regard to safety, use and disposal.
Before using the product, familiarise yourself with all
of these operating and safety instructions. Use the
product only as described and only for the specified
areas of application. Please also pass these documents on to any future owner, together with the product.
Intended use
Operating elements
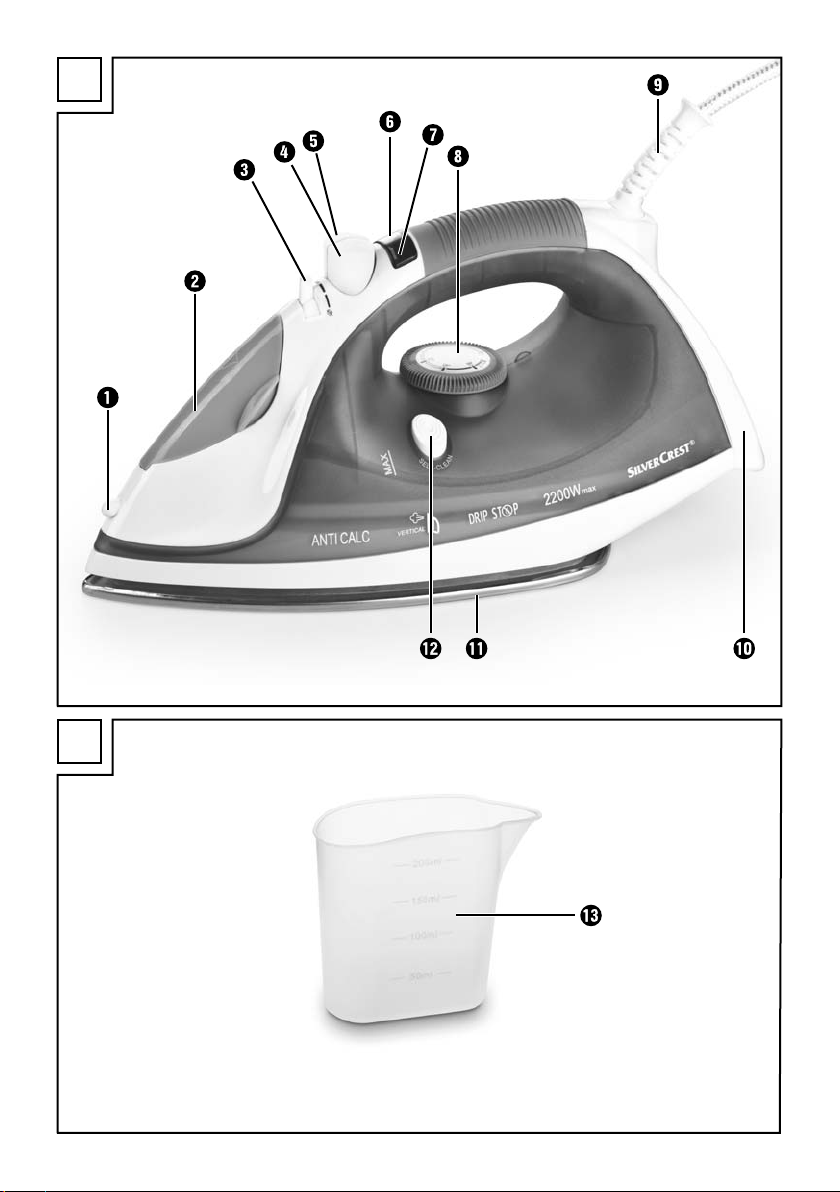
Figure A:
1 Water jet
2 Filler opening for the water tank
3 Steam regulator
4 Button for steam blast
5 Button for fine water spray
6 Automatic switch-off indicator lamp
7 Temperature control lamp
8 Thermostat
9 Power cable with anti-kink protection
0 Appliance base
q Ironing sole
w Self-clean button
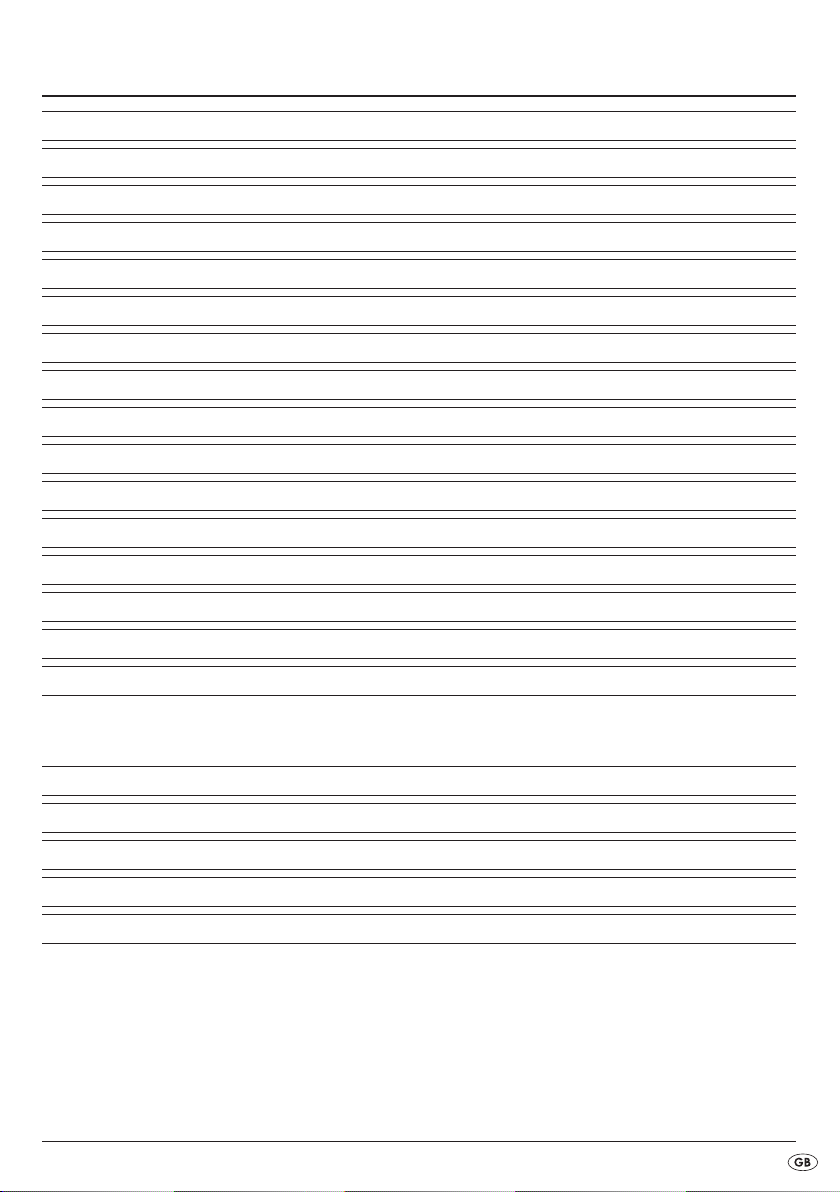
Figure B:
e Measuring beaker
The steam iron is exclusively intended for ironing
textiles. The iron may only be used indoors and in
private households. Any other use is deemed
improper. The apparatus is not intended for commercial use!
Scope of delivery
Steam Iron
Measuring beaker
Operating instructions
Technical data
Power supply voltage: 220 - 240 V
50/60 Hz
max. power consumption: 2200 W
- 2 -
~
Safety instructions
Risk of Burns!
•Always hold the steam iron by the handle when it is hot.
•Children should be supervised to ensure that they do not play with the
appliance.
•Never hold your hand over the steam spray or touch hot metal parts.
•The filler opening of the water reservoir must not be opened while the iron is in use.
First allow the steam iron to cool down and remove the plug from the power socket.
•The iron and its connecting cable must be kept out of the reach of children younger
than 8 years old when it is switched on or cooling down.
Risk of Injury! Risk of fire!
•Never leave a steam iron that is hot, switched on or connected to the mains power
supply unattended.
•Do not put the steam iron into storage until it has cooled down completely.
•This steam iron must be used and placed on a stable surface.
•When ironing, only use the temperatures detailed in the garment care instructions, or
those suitable for the material. Otherwise, you could damage the textiles. Should care
instructions not be given or known, start with the lowest temperature setting.
•Always put the iron on a level, heat-resistant surface.
The iron must be in a stable position.
•Should you wish to put the steam iron down, always put it on the appliance base.
Risk of electric shock!
• The rating of the local power supply must correspond with the details given on the ra-
ting plate of the appliance.
•To avoid potential risks, arrange for defective appliances to be checked and possibly
repaired by a qualified specialist workshop, or contact our Customer Service Department.
•Arrange for defective power plugs and/or cables to be replaced immediately by
qualified technicians or our Customer Service Department.
•To disconnect from the power source, only pull the plug itself, not the cable.
- 3 -

•Never bend (kink) or crush the power cable. Arrange it in such a way that it cannot
come into contact with hot surfaces and so that no-one can step on it or trip over it.
•Remove the plug from the power socket after every use, and before cleaning or filling
with tap water.
•Always unwind the power cable fully before switching on, and do not use an extension cable.
•Never touch the power cable or the plug with wet hands.
•Never use the steam iron near a bath, shower, wash basin or other vessel containing
water. The proximity of moisture presents a danger, even when the appliance is switched off.
•Under no circumstances should you submerge the steam iron in liquid or permit liquids to penetrate the casing of the steam iron. Do not expose the appliance to humidity and do not use outdoors. Should liquids enter the casing, unplug the appliance
from the socket immediately and arrange for it to be repaired by a qualified technician.
•You may not open the casing of the steam iron. Should repairs be necessary, only allow authorised technicians to repair a defective appliance.
•Under NO circumstance should you use the appliance if it shows visible signs of damage, has fallen, or is leaking.
Arrange for it to be repaired by qualified specialists.
•Do not use the appliance if the anti-kink protection on the power cable is
damaged!
•This appliance may be used by children aged 8 years or over and by individuals with
reduced physical, sensory or mental capabilities, or lack of experience and/or knowledge if they are supervised or have been instructed in the safe use of the appliance
and have understood the potential risks. Children may not play with the appliance.
Cleaning and user maintenance should not be carried out by children without supervision.
- 4 -

Attention! Property Damage!
• Should the clothing care instructions forbid ironing,
(symbol ), the clothing item may not be ironed. If
you do so, the clothing item could be permanently
damaged.
• The water tank is to be filled exclusively with tap wa-
ter or distilled water. Otherwise, you will damage
the steam iron.
• Do not clean the steam iron with solvents, alcohol or
abrasive cleaning agents, since these could cause
damage.
Before initial use
• Remove the steam iron from the packaging.
• Remove all stickers and protective film from the
steam iron and the ironing sole q.
Risk of asphyxiation!
Plastic bags can be dangerous. To avoid the risk of asphyxiation, keep plastic bags out of the reach of toddlers and small children.
Filling the water tank
• Hold the iron at an angle.
• Open the cover of the filler opening for the
water tank 2.
• Using the measuring beaker e, fill the water tank to
the "MAX" marking.
• Slide the cover of the filler opening for the water
tank 2 back to close it.
Note:
Should the tap water in your area be rated as hard, it is
recommended that you mix tap water with some distilled water. Otherwise, the jets for the steam blast function could calcify (become blocked) prematurely.
To extend the optimal steam blast function, mix tap water with distilled water as follows.
Ratios - distilled
Water hardness
very soft / soft 0
water to
tap water
• Pour water into the water tank (see chapter
"Filling the water tank").
• Insert the plug into a wall power socket supplying an
electrical current as detailed on the rating plate.
• Move the thermostat 8 to the "MAX" position.
• Heat the steam iron up for several minutes at the highest setting.
• Press the button for the steam blast 4 a few times until steam exits from the ironing sole q.
• Then iron a scrap piece of material to remove possible contamination from the ironing sole q.
medium 1 : 1
hard 2 : 1
very hard 3 : 1
The water hardness level can be queried at your
local water works.
- 5 -

Plugging in and ironing
Dry ironing is possible at all temperatures, steam ironing
is possible by adjusting to on the
thermostat 8.
• Insert the plug into a power socket.
Attention! Property Damage!
Should the clothing care instructions forbid ironing, (symbol ), the clothing item may not be ironed.
If you do so, the clothing item could be permanently damaged.
• Check the care instructions on the labels in the garment to see whether it is suitable for being ironed,
and at which temperature setting.
Symbol thermostat 8
Type of material
Acrylic, rayon
Silk, wool, polyester
blended fabrics
• Wait until the temperature control lamp 7
switches off.
• To moisten the laundry, press the button for fine water spray 5.
This function is suitable for extremely dry and extremely
crumpled garments.
Steam ironing
• Set the steam regulator 3 to the desired steam setting.
• The thermostat 8 must be moved to at least
adjustment range . Otherwise it cannot produce any steam.
Ironing with steam blast
The steam blast is especially suitable for smoothing
parts of a garment that are difficult to reach.
• Slightly raise the steam iron.
• For a steam blast, press the steam blast
button 4.
Cotton, linen, viscose
• Select the best suitable temperature setting with the
thermostat 8.
Note:
While it is heating up, always place the iron on the
base 0.
If you place the iron on the ironing sole q and do not
move it, the automatic switch-off will be activated after
30 seconds (see chapter “Automatic switch-off”) and
the appliance stops heating.
The temperature control lamp 7 glows. When the set
temperature has been reached, the temperature control
lamp 7 goes out.
Temporarily setting the steam iron
aside
Risk of fire!
NEVER leave the hot, mains-connected or switched-on
steam iron unattended.
• Set the thermostat 8 to the "MIN" position.
• Always put the steam iron on the appliance
base 0.
- 6 -

Turning off the steam iron
• Remove the plug from the wall socket.
• Empty the water tank and clean the ironing
sole q.
• Put the steam iron on the appliance base 0
after it has cooled down.
Note:
The automatic switch-off is not a substitute for unplugging the apparatus from the power supply! It is only intended for reducing the risk of fire if the iron is accidentally left on!
Cleaning
Drip-stop function
With conventional steam irons it can occur that water
drips from the ironing sole q at low temperatures. However, this iron possesses a new equipment characteristic, the DRIP-STOP function. At low temperatures the
iron automatically switches off the steam-blast function.
When this happens, a "CLICK" is heard. You must then
select a suitable temperature using the thermostat 8. As
soon as this is reached, steam production continues.
Automatic switch-off
The iron is equipped with an automatic switch-off. This
stops the iron from heating up.
If the iron is standing on its ironing sole q and has not
been moved for approx. 30 seconds, acoustic warning
signals are heard and the automatic switch-off indicator
lamp 6 flashes. The iron will no longer be heated. To
deactivate the automatic switch-off, pick up the iron and
move it around a little. The automatic switch-off indicator
lamp 6 will go off and the iron will heat up again.
Self-cleaning function
• Fill the water tank to the "MAX" marking.
• Insert the plug into a wall socket.
• Move the thermostat 8 to the "MAX" position.
• Adjust the steam regulator 3 to maximum steam power.
• Allow the steam iron to heat up until the temperature
control lamp 7 switches off and once again glows.
• Hold the steam iron horizontally over a catchment
receptacle.
• Press and hold down the self-clean button w. Move
the steam iron back and forth a little.
Steam and boiling water flows from the steam exit
holes in the ironing sole q.
Impurities that may be present are washed out.
• Release the self-clean button w as soon as all
of the water has exited.
• Thoroughly dry the ironing sole q. For this, slide the
ironing sole q back and forth over a hand towel or
an old piece of material several times.
• Allow the steam iron to cool down before placing it
in storage.
If the iron is standing on its base 0 and has not been
moved for approx. 8 minutes, acoustic warning signals
are heard and the automatic switch-off indicator lamp
6 flashes. The iron is no longer heated. To deactivate
the automatic switch-off, pick up the iron and move it
around a little. The automatic switch-off indicator lamp
6 will go off and the iron will heat up again.
- 7 -
Housing and sole of the iron
Disposal
Potentially fatal danger!
Remove the plug before cleaning the device.
There is a risk of electric shock!
Risk of physical injury!
Allow the appliance to cool down before cleaning it.
Otherwise, there is a risk of burns!
Attention! Property Damage!
Do not use abrasive, aggressive or chemical cleaning
agents.
They can damage the surface and also lead to irreparable damage to the appliance.
• Clean the housing with a soft, dry cloth only.
• Clean the ironing sole q using a damp cloth and a
mild, non-scouring detergent.
Storage
Store the appliance in a clean, dust-free, and dry
location after it has cooled down.
Do not dispose of the appliance in your
normal domestic waste. This appliance is
subject to the provisions of European Directive 2012/19/EU.
Dispose of the appliance through an approved dis-posal centre or at your community waste facility.
Observe the currently applicable regulations.
In case of doubt, please contact your waste disposal
centre.
Dispose of all packaging materials in an
environmentally friendly manner.
Troubleshooting
Steam iron producing little or no steam:
The reserves of water in the steam iron are depleted. Fill
the water tank with tap water (See "Filling the water
tank").
The steam iron does not get hot:
• The steam iron is not plugged in or is not switched
on. Insert the plug into a wall power socket and
adjust the thermostat 8 to the desired ironing temperature.
• The steam iron is defective. Arrange for the steam
iron to be repaired by qualified specialists.
- 8 -

Warranty and service
Importer
The warranty for this appliance is for 3 years from the
date of purchase. The appliance has been manufactured with care and meticulously examined
before delivery.
Please retain your receipt as proof of purchase. In the
event of a warranty claim, please telephone our Service
Department. This is the only way to ensure that your
goods are dispatched free of charge.
The warranty only covers claims for material and manufacturing defects, but not for transport damage, wearing
parts or damage to fragile components such as buttons
or batteries. This product is for private use only and is
not intended for commercial use.
The warranty is void in the case of incorrect and improper handling, use of force and internal manipulation
that is not carried out by our authorised service branch.
Your statutory rights are not restricted in any way by this
warranty.
The warranty period will not be extended by repairs
made under warranty. This also applies to replaced and
repaired parts. Any damage and defects that are discovered immediately after purchase must be reported immediately after unpacking the appliance, no more than
two days after the purchase date. Repairs made after
the expiration of the warranty period are subject to payment.
KOMPERNASS HANDELS GMBH
BURGSTRASSE 21
44867 BOCHUM
GERMANY
www.kompernass.com
Service Great Britain
Tel.: 0871 5000 720 (£ 0.10/Min.)
E-Mail: kompernass@lidl.co.uk
IAN 273029
Service Ireland
Tel.: 1890 930 034
(0,08 EUR/Min., (peak))
(0,06 EUR/Min., (off peak))
E-Mail: kompernass@lidl.ie
IAN 273029
Hotline availability:
Monday to Friday 08:00 - 20:00 (CET)
- 9 -

- 10 -

INDHOLDSFORTEGNELSE SIDE
Indledning 12
Anvendelsesområde 12
Medfølger ved køb 12
Betjeningselementer 12
Tekniske data 12
Sikkerhedsanvisninger 13
Før anvendelse første gang 15
Påfyldning af vandtanken 15
Tilslutning og strygning 16
Dampstrygning 16
Strygning med dampskud 16
Midlertidig frastilling af dampstrygejernet 16
Sådan slukkes dampstrygejernet 17
Dråbe-stop-funktion 17
Automatisk afbrydelse 17
Rengøring 17
Selvrensende funktion....................................................................................................................17
Hus og strygesål ...........................................................................................................................18
Opbevaring 18
Afhjælpning af funktionsfejl 18
Bortskaffelse 18
Garanti og service 19
Importør 19
- 11 -

DAMPSTRYGEJERN
Indledning
Til lykke med købet af din nye elartikel.
Dermed har du valgt et produkt af høj kvalitet. Betjeningsvejledningen er del af dette produkt. Den indeholder vigtige informationer om sikkerhed, anvendelse og
bortskaffelse. Du bedes sætte dig ind i alle produktets
betjenings- og sikkerhedsanvisninger før brug. Brug kun
produktet som beskrevet og kun til de angivne anvendelsesområder. Lad også vejledningen følge med produktet, hvis du giver det videre til andre.
Anvendelsesområde
Dampstrygejernet er udelukkende beregnet til strygning
af tøj. Det må kun anvendes i lukkede rum og i private
hjem. Al anden anvendelse betragtes som værende
uden for anvendelsesområdet. Det må ikke anvendes
i erhvervsmæssig sammenhæng.
Medfølger ved køb
Betjeningselementer
Kuva A:
1 Vanddyse
2 Påfyldningsåbning til vandbeholderen
3 Dampregulator
4 Knap til dampstød
5 Knap til vandtåge
6 Automatisk afbrydelse
7 Kontrollampe til temperaturen
8 Temperaturindstilling
9 Strømkabel
0 Kabelsokkel
q Strygesål
w Selfclean-knap
Kuva B:
e Målebæger
Tekniske data
Forsyningsspænding: 220 - 240 V
50/60 Hz
Maks. strømforbrug: 2200 W
~
Dampstrygejern
Målebæger
Betjeningsvejledning
- 12 -

Sikkerhedsanvisninger
Forbrændingsfare
•Hvis dampstrygejernet er varmt, må du kun holde på håndtaget.
•Børn skal være under opsyn, så det sikres, at de ikke leger med dampstrygejer-
net.
•Hold aldrig hænderne ind i dampskuddet eller på de varme metaldele.
•Påfyldningsåbningen til vandbeholderen må ikke åbnes under brug. Lad først
dampstrygejernet køle af, og træk stikket ud af stikkontakten.
•Mens dampstrygejernet er tændt eller køles af, skal det og dets tilslutningsled-
ning holdes uden for børns rækkevidde, hvis de er 8 år eller mindre.
Fare for personskade! Brandfare!
•Lad aldrig dampstrygejernet være uden opsyn, hvis det er varmt og sluttet til
strømnettet.
•Stil først dampstrygejernet på plads, når det er afkølet.
•Dampstrygejernet skal bruges og stilles på en stabil overflade.
•Stryg kun med temperaturindstillingerne, som er angivet i strygeanvisningerne, og
som egner sig til materialet. Ellers kan tøjet ødelægges. Begynd med den laveste
temperaturindstilling, hvis du ikke er sikker på, hvilken indstilling du skal bruge.
•Stil dampstrygejernet på et plant underlag, som kan tåle varme. Dampstrygejer-
net skal stå stabilt.
•Hvis du vil stille dampstrygejernet fra dig, skal du stille det på den medfølgende
sokkel.
Fare på grund af elektrisk stød!
•Strømforsyningens spænding skal stemme overens med dataene på dampstry-
gejernets typeskilt.
•Lad omgående dampstrygejernet reparere af et kvalificeret specialværksted,
hvis dampstrygejernet er defekt, eller henvend dig til kundeservice, så farlige situationer undgås.
•Lad omgående defekte stik eller kabler udskifte af en autoriseret reparatør, så
farlige situationer undgås.
•Træk altid i stikket og aldrig i ledningen.
•Knæk eller mas aldrig strømledningen, og læg den, så den ikke kan komme i
kontakt med varme overflader, og så man ikke kan snuble over den.
- 13 -

•Træk stikket ud før rengøring, ved påfyldning af vand og efter brug.
•Rul ledningen helt ud, før du tænder for dampstrygejernet, og brug ikke forlæn-
gerledning.
•Hold aldrig på ledningen eller stikket med våde hænder.
•Brug aldrig dampstrygejernet i nærheden af vand som f.eks. badekar, bruse-
bad, vaskekummer eller andre beholdere. Det kan også være farligt at stille
dampstrygejernet i nærheden af vand, selv om det er slukket.
•Dampstrygejernet må aldrig lægges ned i væske, og der må ikke komme væ-
ske ind i dampstrygejernets hus. Det må ikke udsættes for fugt og ikke bruges
udendørs. Hvis der
alligevel kommer væske ind i huset, skal du straks trække stikket ud af stikkontakten og få dampstrygejernet repareret af en professionel reparatør.
•Dampstrygejernets hus må ikke åbnes. Lad kun dampstrygejernet reparere af
en kvalificerede reparatør.
•Brug ikke dampstrygejernet, hvis det har synlige skader, falder ned, eller hvis
der løber vand ud. Lad det først reparere af en kvalificeret reparatør .
•Brug ikke dampstrygejernet længere, hvis knæksikringen på ledningen er be-
skadiget!
•Dette dampstrygejern kan bruges af børn på 8 år eller ældre og af personer
med nedsatte fysiske, sensoriske eller psykiske evner eller mangel på erfaring
og/eller viden, hvis de er under opsyn eller undervises i sikker brug af dampstrygejernet og har forstået de farer, der kan være forbundet med det. Børn må
ikke lege med dampstrygejernet. Rengøring og vedligeholdelse må ikke udføres af børn uden opsyn.
- 14 -

Obs! Materielle skader!
• Hvis vaskemærket i tøjet forbyder strygning
(symbol ), må tøjet ikke stryges. Ellers kan
tøjet ødelægges.
• Du må udelukkende fylde vand fra ledningsnettet/
destilleret vand i vandbeholderen. Ellers ødelægges
dampstrygejernet.
• Dampstrygejernet må ikke rengøres med opløsningsmidler, alkohol eller skurende rengøringsmidler. Ellers kan du beskadige det.
Før anvendelse første gang
• Tag dampstrygejernet ud af emballagen.
• Fjern alle mærkater og foliedele fra dampstrygejernet og strygesålen q.
Advarsel!
Plasticposer kan være farlige. Opbevar plasticposer
uden for babyers og småbørns rækkevidde, så der
ikke er fare for kvælning.
• Fyld vand i vandbeholderen (se kapitlet
"Påfyldning af vandtanken").
• Sæt strømstikket i en stikkontakt, som svarer til
spændingen, der er angivet på typeskiltet.
• Stil temperaturindstillingen 8 på stillingen
"MAKS".
• Varm dampstrygejernet op til det højeste trin i
nogle minutter.
• Aktivér knappen til dampskuddet 4 nogle
gange, så der kommer damp ud af strygesålen q.
• Stryg så et stykke tøj, der ikke skal bruge til noget,
så eventuelle urenheder fjernes fra strygesålen q.
Påfyldning af vandtanken
• Hold strygejernet skråt i hånden.
• Åbn dækslet til påfyldningsåbningen til vandbeholderen 2.
• Fyld vand på fra vandhanen med målebægeret
e indtil "Maks"-markeringen i vandbeholderen.
• Luk dækslet til påfyldningsåbningen til vandbeholderen 2.
Bemærk:
Hvis ledningsvandet, hvor du bor, er for hårdt, anbefales det at blande vandet med destilleret vand.
Ellers kan dyserne til dampstøds-funktionen kalke
for tidligt til.
For at forlænge den optimale dampskuds-funktion
blandes ledningsvandet med destilleret vand som
angivet i tabellen.
Andel af
Vandets hård-
hed
meget
blødt/blødt
middel 1 : 1
hårdt 2 : 1
meget hårdt 3 : 1
Spørg det lokale vandværk, hvilken hårdhed vandet
har.
destilleret vand i
forhold til
ledningsvand
0
- 15 -

Tilslutning og strygning
Tørstrygning uden damp er muligt ved alle temperaturer, men dampstrygning er først muligt fra indstillingsområdet på temperaturindstillingen 8.
• Sæt stikket i stikkontakten.
Obs! Materielle skader!
Hvis vaskemærket i tøjet forbyder strygning (symbol
), må tøjet ikke stryges. Ellers kan tøjet ødelægges.
• Følg anvisningerne på mærkerne i tøjet, så du ved,
hvilken temperaturindstilling tøjet skal stryges ved.
• Vent, til kontrollampen for temperaturen 7 slukkes.
• Tryk på knappen for vandtåge 5 for at fugte
tøjet.
Denne funktion er egnet til meget tørt, krøllet tøj.
Dampstrygning
• Indstil den ønskede dampstyrke med dampregulatoren 3.
• Temperaturindstillingen 8 skal mindst drejes til
indstillingsområdet . Ellers kan der ikke produceres damp.
Symbol
temperaturindstilling 8
• Indstil den rigtige temperatur med temperaturindstillingen 8.
Stoftype
Acryl, rayon
Silke, uld, blandede
polyesterstoffer
Bomuld, hør, viskose
Bemærk:
Stil altid strygejernet på soklen 0, når det varmes
op.
Hvis du under opvarmningen stiller strygejernet på
strygesålen q og ikke flytter strygejernet, vil den
automatiske afbrydelsesfunktion (se kapitlet “Automatisk afbrydelse”) slå opvarmningen fra.
Kontrollampen for temperaturen 7 lyser. Når kontrollampen 7 slukkes, er den indstillede temperatur
nået.
Strygning med dampskud
Dampskuddet er særligt egnet til at stryge steder
på tøjet, som er vanskelige at komme til.
• Løft dampstrygejernet en smule.
• Tryk på knappen for dampstød 4, hvis du
ønsker damp.
Midlertidig frastilling af
dampstrygejernet
Brandfare!
Lad aldrig dampstrygejernet være uden opsyn, hvis
det er sluttet til strømnettet eller er tændt.
• Stil temperaturindstillingen 8 på position
"MIN".
• Stil kun dampstrygejernet på soklen 0.
- 16 -

Sådan slukkes dampstrygejernet
• Træk stikket ud af stikkontakten.
• Tøm vandbeholderen, og rengør strygesålen q.
• Stil det afkølede dampstrygejern på soklen 0.
Bemærk:
Den automatiske afbrydelse erstatter ikke, at stikket
skal trækkes ud af stikkontakten! Den hjælper kun
med til at reducere brandfaren, hvis strygejernet
ikke slukkes ved en fejltagelse!
Dråbe-stop-funktion
Ved almindelige dampstrygejern kan det forekomme,
at der drypper vand ud af strygesålen q, hvis strygetemperaturen er for lav. Dette strygejern har dog en
ny funktion, nemlig DRÅBE-STOP-funktionen. Strygejernet slår automatisk dampskuddet fra ved lave
temperaturer. Hvis det sker, kan der høres et "klik".
Indstil den rigtige temperatur med temperaturindstillingen 8. Når den er nået, fortsættes dampproduktionen.
Automatisk afbrydelse
Strygejernet er udstyret med en automatisk afbrydelsesfunktion. Den stopper strygejernets opvarmning.
Hvis strygejernet står på strygesålen q og ikke flyttes
i ca. 30 sekunder, lyder der advarselssignaler, og
kontrollampen til den automatiske afbrydelse 6 blinker. Strygejernets opvarmning stoppes. For at deaktivere afbrydelsen skal strygejernet løftes og svinges
lidt frem og tilbage. Kontrollampen til den automatiske afbrydelse 6 slukkes, og strygejernet varmes op
igen.
Rengøring
Selvrensende funktion
• Fyld vandbeholderen indtil markeringen “MAKS”.
• Sæt stikket i stikkontakten.
• Stil temperaturindstillingen 8 på positionen
“MAKS”.
• Stil dampregulatoren 3 på maksimal dampstyrke.
• Lad dampstrygejernet varme op, indtil kontrollampen 7 slukkes og lyser igen.
• Hold dampstrygejernet vandret over en skål.
• Tryk på knappen Self-Clean w, og hold den nede.
Flyt samtidig dampstrygejernet lidt frem og tilbage.
Derved slipper der damp og kogende vand ud af
damphullerne i strygesålen q.
Eventuelle urenheder skylles med ud.
• Slip knappen Selfclean w, så snart vandet i
vandbeholderen er brugt op.
• Tør strygesålen q grundigt. Træk strygesålen q
nogle gange hen over et håndklæde eller et
gammelt stykke stof.
• Lad dampstrygejernet afkøle, før det stilles til side.
Hvis strygejernet står på stationen 0 og ikke flyttes i
ca. 8 minutter, lyder der advarselssignaler, og kontrollampen til den automatiske afbrydelse 6 blinker.
Strygejernets opvarmning stoppes. For at deaktivere
afbrydelsen skal strygejernet løftes og svinges lidt
frem og tilbage. Kontrollampen til den automatiske afbrydelse 6 slukkes, og strygejernet varmes op igen.
- 17 -

Hus og strygesål
Livsfare!
Træk altid strømstikket ud før rengøring.
Der er fare for elektrisk stød!
Afhjælpning af funktionsfejl
Der kommer ingen eller kun lidt damp ud af
dampstrygejernet:
Der er ikke mere vand i dampstrygejernets beholder.
Fyld vandbeholderen med ledningsvand (Se "Påfyldning af vandtanken").
Fare for personskader!
Lad dampstrygejernet afkøle før rengøring.
Ellers er der fare for skoldning!
Obs! Materielle skader!
Brug ikke stærke, skurende eller kemiske rengøringsmidler.
Disse kan angribe overfladen og medføre uoprettelige skader på strygejernet.
• Rengør huset med en blød, tør hud.
• Rengør strygesålen q med en klud, som er fug-
tet let med vand og et mildt, ikke skurende rengøringsmiddel.
Opbevaring
Opbevar det afkølede strygejern på et rent, støvfrit
og tørt sted.
Dampstrygejernet varmer ikke rigtigt:
• Strygejernet er ikke sluttet til eller tændt. Sæt
stikket i kontakten, og indstil den ønskede temperatur med temperaturindstillingen 8.
• Dampstrygejernet er defekt. Lad dampstrygejernet reparere af en kvalificeret reparatør.
Bortskaffelse
Smid aldrig dampstrygejernet ud
sammen med det normale husholdningsaffald. Dette produkt er underlagt
det europæiske direktiv 2012/19/EU.
Bortskaf dampstrygejernet hos et godkendt affaldsfirma eller på dit kommunale affaldsanlæg.
Følg de aktuelt gældende regler. Kontakt affaldsordningen, hvis du er i tvivl.
Aflever alle emballagematerialer på et
affaldsdepot, så miljøet skånes.
- 18 -

Garanti og service
Importør
På dette dampstrygejern får du 3 års garanti fra
købsdatoen. Apparatet er produceret omhyggeligt
og inden levering afprøvet samvittighedsfuldt.
Opbevar kassebonen som bevis for købet. I garantitilfælde bedes du kontakte service-afdelingen telefonisk. På denne måde kan gratis indsendelse af varen garanteres.
Garantiydelsen gælder kun for materiale- eller fabrikationsfejl, men ikke for transportskader, sliddele eller
skader på skrøbelige dele som f.eks. kontakter eller
batterier. Produktet er kun beregnet til privat og ikke
til erhvervsmæssigt brug.
Ved misbrug og uhensigtsmæssig behandling, anvendelse af vold og ved indgreb, som ikke er foretaget
af vores autoriserede service-afdeling, ophører garantien. Dine juridiske rettigheder indskrænkes ikke
ved denne garanti.
Garantiperioden forlænges ikke på grund af produktansvaret. Det gælder også for udskiftede og
reparerede dele. Eventuelle skader og mangler,
som allerede findes ved køb, skal straks anmeldes
efter udpakning og senest to dage efter købsdatoen.
Når garantiperioden er udløbet, skal udgifterne til
reparationer betales normalt.
KOMPERNASS HANDELS GMBH
BURGSTRASSE 21
44867 BOCHUM
GERMANY
www.kompernass.com
Service Danmark
Tel.: 32 710005
E-Mail: kompernass@lidl.dk
IAN 273029
Åbningstid for hotline:
Mandag til fredag fra kl. 8:00 – 20:00 (MET)
- 19 -

- 20 -

SOMMAIRE PAGE
Introduction 22
Usage conforme 22
Accessoires fournis 22
Eléments de réglage 22
Caractéristiques techniques 22
Instructions relatives à la sécurité 23
Avant la première utilisation 25
Remplir le réservoir d'eau 25
Branchement de l'appareil et repassage 26
Repassage à la vapeur 26
Repassage avec jet de vapeur 26
Poser momentanément le fer à repasser à vapeur 26
Eteindre le fer à repasser à vapeur 27
Fonction antigoutte 27
Arrêt automatique 27
Nettoyage 27
Fonction d'autonettoyage..............................................................................................................27
Boîtier et semelle de repassage ...................................................................................................28
Rangement 28
Réparer les dysfonctionnements 28
Mise au rebut 28
Garantie et service après-vente 29
Importateur 29
- 21 -

FER À REPASSER
VAPEUR
Introduction
Toutes nos félicitations pour l'achat de votre nouvel
appareil.
Vous avez choisi un produit de grande qualité. Le
mode d'emploi fait partie de ce produit. Il contient
des remarques importantes concernant la sécurité,
l'utilisation et la mise au rebut. Veuillez vous familiariser avec l'ensemble des consignes d'utilisation et
de sécurité avant l'usage du produit. N'utilisez le
produit que conformément aux consignes et pour
les domaines d'utilisation prévus. En cas de transfert
du produit à un tiers, remettez-lui également tous les
documents.
Usage conforme
Le fer à repasser à vapeur est exclusivement destiné
au repassage de vêtements. Vous devez l'utiliser uniquement dans des pièces fermées et dans le cadre
d'un usage privé. Toutes les autres applications ne
sont pas conformes à l'usage prévu de l'appareil.
Ne pas l'utiliser à des fins professionnelles !
Eléments de réglage
Figure A :
1 Buse eau
2 Orifice de remplissage du réservoir d'eau
3 Régulateur de vapeur
4 Touche pour le jet de vapeur
5 Touche
pour l'eau pulvérisée
6 Témoin lumineux de l'arrêt automatique
7 Témoin lumineux de la température
8 Régulateur de température (thermostat)
9 Cordon d'alimentation avec protection anti-pliure
0 Talon
q Semelle de repassage
w Touche Selfclean
Figure B :
e Verre mesureur
Caractéristiques techniques
Tension d'alimentation : 220 - 240 V
50/60 Hz
Puissance absorbée max. : 2 200 W
~
Accessoires fournis
Fer à repasser vapeur
Verre mesureur
Mode d'emploi
- 22 -

Instructions relatives à la sécurité
Risque de brûlure !
•Tenez le fer à repasser uniquement par sa poignée, lorsqu'il est chaud.
•Les enfants doivent être surveillés, afin d'éviter qu'ils ne jouent avec l'appareil.
•Ne placez jamais vos mains sur le jet de vapeur ou sur les pièces métalliques
chaudes de l'appareil.
•Vous ne devez jamais ouvrir l'orifice de remplissage du réservoir d'eau pendant
l'utilisation de l'appareil. Laissez d'abord refroidir le fer à repasser à vapeur et
retirez la fiche secteur de la prise de courant.
•Tenir le fer à repasser et son câble électrique à l'écart des enfants (de moins de
8 ans), lorsqu'il est en service ou encore chaud.
Risque de blessures ! Risque d'incendie !
•Ne jamais laisser le fer à repasser à vapeur sans surveillance, lorsqu'il est chaud
ou qu'il est branché sur la tension secteur.
•Laissez toujours refroidir le fer à repasser avant de le ranger.
•Le fer à repasser à vapeur doit être utilisé et déposé sur une surface stable.
•Repassez uniquement avec les réglages de température indiqués sur l'étiquette de
consignes d'entretien et adaptés à la matière. Dans le cas contraire, vous pourriez
abîmer les textiles. Si vous ne disposez pas de consignes d'entretien, commencez
par le réglage de température le plus bas.
•Installez le fer à repasser uniquement sur une surface plane et insensible à la
température. Le fer à repasser doit être en position stable.
•Si vous souhaitez poser le fer à repasser à vapeur, placez-le sur le talon.
Risque de choc électrique !
• La tension de la source de courant doit correspondre aux indications figurant
sur la plaque signalétique de l'appareil.
• Faites immédiatement réparer l'appareil défectueux par un technicien qualifié,
ou adressez-vous au service après-vente, pour éviter tous dangers.
• Faites immédiatement remplacer la fiche secteur ou le cordon d'alimentation end-
ommagé par un technicien spécialisé ou par le service après-vente, afin d'éviter tous dangers.
• Tirez toujours sur la fiche secteur, jamais sur le cordon.
• Ne pas plier ou tordre le cordon d'alimentation et placez-le de manière à ce
qu'il ne puisse pas entrer en contact avec des surfaces chaudes et que personne ne puisse marcher ou trébucher dessus.
- 23 -

• Retirez toujours la fiche secteur de la prise de courant avant le nettoyage, lors
du remplissage d'eau et après chaque utilisation.
• Déroulez toujours complètement le cordon d'alimentation avant de mettre en
marche le fer à repasser et n'utilisez aucune rallonge.
• Ne manipulez jamais le cordon ou la fiche secteur avec les mains mouillées.
• N'utilisez en aucun cas le fer à repasser à vapeur à proximité d'eau, par exemple
près de baignoires, douches, lavabos ou d'autres récipients. La proximité
d'eau représente un danger, même si l'appareil est éteint.
• Vous ne devez, en aucun cas, immerger le fer à repasser à vapeur dans un
liquide et aucun liquide ne doit pénétrer dans le boîtier de l'appareil. Vous ne
devez pas exposer l'appareil à l'humidité. L'utilisation de l'appareil à l'extérieur
est interdite. Si toutefois du liquide devait pénétrer dans le boîtier de l'appareil,
débranchez immédiatement la fiche secteur de la prise de courant et confiez
l'appareil à un technicien spécialisé pour le réparer.
• Vous ne devez jamais ouvrir le boîtier du fer à repasser à vapeur. Confiez la
réparation de l'appareil défectueux uniquement à un technicien spécialisé.
• N'utilisez en aucun cas le fer à repasser à vapeur s'il présente des dommages
visibles, s'il est tombé ou vous constatez des fuites d'eau. Faites réparer l'appareil par un technicien spécialisé.
• Ne plus utiliser l'appareil lorsque la protection anti-pliure sur le cordon d'ali-
mentation est endommagée !
• Cet appareil peut être utilisé par des enfants à partir de 8 ans et par des per-
sonnes aux capacités physiques, sensorielles ou mentales réduites ou disposant
d'expérience et/ou de connaissances insuffisantes uniquement sous la surveillance d'une personne responsable, ou bien s'ils ont reçu des instructions garantissant une utilisation en toute sécurité de l'appareil et s'ils ont compris les dangers
en résultant. Empêcher les enfants de jouer avec cet appareil. De même ne
pas laisser un enfant procéder seul à un nettoyage ou à un entretien.
- 24 -

Attention !
Risque de dégâts matériels !
• Si les consignes d'entretien du vêtement interdisent
le repassage (symbole ), vous ne devez pas
repasser le vêtement. Dans le cas contraire, vous
pourriez l'endommager.
• Vous devez remplir le réservoir d'eau seulement
avec de l'eau du robinet/eau distillée. Dans le cas
contraire, vous endommageriez l'appareil.
• Vous ne devez pas utiliser de solvants, d'alcool ou
de produits nettoyants abrasifs pour nettoyer le fer
à repasser. Dans le cas contraire, vous pourriez
l'endommager.
Avant la première utilisation
• Sortez le fer à repasser à vapeur de son
emballage.
• Retirez l'ensemble des étiquettes et éléments
d'emballage du fer à repasser à vapeur et de la
semelle de repassage q.
Risque d'étouffement !
Les sacs en plastique représentent un risque pour les
personnes. Pour éviter tout risque d'étouffement,
conservez les sacs en plastique hors de portée des
bébés et jeunes enfants.
• Remplissez d'eau le réservoir d'eau (voir le
chapitre "Remplir le réservoir d'eau").
• Branchez la fiche secteur dans une prise secteur
qui correspond à la tension indiquée sur la
plaque signalétique.
• Mettez le régulateur de température 8 en
position "MAX".
• Chauffez le fer à repasser à vapeur pendant
quelques minutes sur le niveau le plus élevé.
• Appuyez plusieurs fois sur la touche pour le jet
de vapeur 4 pour que la vapeur sorte de la
semelle de repassage q.
• Repassez alors une pièce de tissu dont vous
n'avez plus besoin pour éliminer d'éventuelles
impuretés de la semelle de repassage q.
Remplir le réservoir d'eau
• Tenez le fer à repasser de manière inclinée.
• Ouvrez le couvercle de l'orifice de remplissage du
réservoir d'eau 2.
• A l'aide du verre mesureur e, versez de l'eau
du robinet au plus jusqu'au marquage "MAX"
dans le réservoir d'eau.
• Fermez le couvercle de l'orifice de remplissage
du réservoir d’eau 2.
Remarque :
Si l'eau du robinet de votre domicile est trop dure,
il est recommandé de mélanger l'eau du robinet
avec de l'eau distillée. Sinon, vous risquez un entartrage prématuré des buses pour la fonction de jet
de vapeur.
Pour prolonger le fonctionnement optimal du jet de
vapeur, veuillez mélanger l'eau du robinet avec de
l'eau distillée selon les proportions indiquées dans
le tableau.
Proportion eau
Dureté de l'eau
très
douce/douce
moyennement
dure
dure 2 : 1
très dure 3 : 1
Vous pouvez vous renseigner sur la dureté de l'eau
en consultant votre service des eaux local.
distillée et eau
du robinet
0
1 : 1
- 25 -

Branchement de l'appareil et
repassage
Vous pouvez repasser à sec à toutes températures,
le repassage à vapeur est uniquement possible à
partir de la plage de réglage sur le régulateur de température 8.
• Branchez la fiche secteur dans une prise secteur.
Attention !
Risque de dégâts matériels !
Si les consignes d'entretien du vêtement interdisent
le repassage (symbole ), vous ne devez pas
repasser le vêtement. Dans le cas contraire, vous
pourriez l'endommager.
• Vérifier à l'aide des consignes d'entretien indiquées sur les étiquettes si le vêtement peut être
repassé et à quelle température.
Le témoin lumineux de la température 7 est allumé.
Lorsque le témoin lumineux 7 s'éteint, la température
réglée est atteinte.
• Attendez jusqu'à ce que le témoin lumineux de
la température 7 s'éteigne.
• Pour humidifier le linge, appuyez sur la touche
pour l'eau pulvérisée 5.
Cette fonction est appropriée pour du linge très sec
et fortement froissé.
Repassage à la vapeur
• Définissez la puissance de vapeur souhaitée à
l'aide du régulateur à vapeur 3.
• Le régulateur de température 8 doit au moins
être tourné sur la plage de réglage . Sinon,
aucune vapeur n'est produite.
Symbole du régulateur
de température 8
• Réglez la température appropriée avec le régulateur de température 8.
Type de tissu
Acrylique, rayon
Soie, laine, textiles
mélanges de polyester
Coton, lin, viscose
Remarque :
Pendant qu'il chauffe, posez toujours le fer à repasser sur le socle 0.
Si vous placez le fer à repasser sur la semelle de repassage q pendant qu'il chauffe et que vous ne le
déplacez pas, l'arrêt automatique s'active automatiquement au bout de 30 secondes (voir chapitre "Arrêt automatique") et l'appareil cesse de chauffer.
Repassage avec jet de vapeur
Le jet de vapeur est particulièrement approprié pour
lisser les zones difficilement accessibles des textiles.
• Lever légèrement le fer à repasser à vapeur.
• Pour obtenir un jet de vapeur, appuyez sur la
touche pour le jet de vapeur 4.
Poser momentanément le fer à
repasser à vapeur
Risque d'incendie !
Ne laissez jamais le fer à repasser à vapeur chaud,
raccordé au réseau électrique ou allumé sans surveillance.
• Réglez le régulateur de température 8 sur la
position "MIN".
• Poser le fer à repasser à vapeur uniquement sur
son talon 0.
- 26 -

Eteindre le fer à repasser
à vapeur
• Débranchez la fiche secteur de la prise de
courant.
• Videz le réservoir d'eau et nettoyez la semelle
de repassage q.
• Poser le fer à repasser refroidi sur son talon 0.
Fonction antigoutte
Chez les fers à repasser à vapeur traditionnels, il est
possible qu'en cas de température de repassage
faible, de l'eau goutte de la semelle de repassage q.
Ce fer à repasser à vapeur comporte toutefois une
nouvelle caractéristique, la fonction ANTIGOUTTE.
Le fer à repasser arrête automatiquement le jet de
vapeur à basse température. Lorsque ceci se produit,
un "Click" se fait entendre. Réglez ensuite la
température appropriée à l'aide du régulateur de
température 8. Dès que cette dernière est atteinte, la
production de vapeur recommence.
Arrêt automatique
Cet appareil est doté d'un arrêt automatique. Celui-ci
arrête le chauffage du fer à repasser.
Si le fer à repasser se trouve sur la semelle de
repassage q et n'est pas bougé pendant environ
30 secondes, un signal d'alarme retentit et le témoin
lumineux de l'arrêt automatique 6 clignote. Le
chauffage du fer à repasser s'arrête. Pour désactiver
l'arrêt automatique, prenez le fer à repasser en
main et bougez-le légèrement. Le témoin lumineux
de l'arrêt automatique 6 s'éteint et le fer à repasser
chauffe de nouveau.
Si le fer à repasser se trouve sur le talon 0 et n'est
pas bougé pendant environ 8 minutes, un signal
d'alarme retentit et le témoin lumineux de l'arrêt
automatique 6 clignote. Le chauffage du fer à
repasser s'arrête. Pour désactiver l'arrêt automatique,
prenez le fer à repasser en main et bougez-le légèrement. Le témoin lumineux de l'arrêt automatique 6
s'éteint et le fer à repasser chauffe de nouveau.
Remarque :
L'arrêt automatique ne remplace pas le débranchement de la fiche secteur ! Il sert uniquement à réduire
le risque d'incendie, si, par inadvertance, le fer à repasser n'a pas été débranché !
Nettoyage
Fonction d'autonettoyage
• Remplissez le réservoir d'eau jusqu'au marquage
"MAX".
• Branchez la fiche secteur dans la prise secteur.
• Mettez le régulateur de température 8 en posi-
tion "MAX".
• Réglez le régulateur de vapeur 3 à la puissan-
ce vapeur maximale.
• Laissez chauffer le fer à repasser à vapeur jusqu'à
ce que le témoin lumineux de la température 7
s'éteigne et s'allume à nouveau.
• Maintenez le fer à repasser à vapeur à l'horizontale au-dessus d'une bassine.
• Appuyez sur la touche Selfclean w et maintenez-la
enfoncée. Bougez un peu le fer à repasser à
vapeur. De la vapeur et de l'eau bouillante
s'échappent des orifices de sortie de vapeur
dans la semelle de repassage q. Les salissures
qui s'y trouvent éventuellement sont alors évacuées.
• Relâchez la touche Selfclean w, dès que l'eau
du réservoir d'eau est épuisée.
- 27 -

• Séchez soigneusement la semelle de repassage q.
Pour ce faire, faites glisser la semelle de
repassage q plusieurs fois sur une serviette ou
une vieille pièce de tissu en exécutant des mouvements de va-et-vient.
• Laissez refroidir le fer à repasser à vapeur, avant
de le mettre de côté.
Boîtier et semelle de repassage
Danger de mort !
Débranchez la fiche secteur avant le nettoyage.
Risque d'électrocution !
Risque de blessure !
Laissez l'appareil refroidir avant le nettoyage !
Sinon, il y a un risque de brûlure !
Risque de dégâts matériels !
N'utilisez pas de produits de nettoyage agressifs,
abrasifs ou chimiques.
Ils risqueraient d'attaquer la surface et d'entraîner
des dommages irréparables sur l'engin.
Réparer les dysfonctionnements
Le fer à repasser à vapeur ne diffuse pas de
vapeur ou très peu :
La réserve d'eau du robinet dans le fer à repasser
à vapeur est épuisée. Remplissez le réservoir d'eau
avec de l'eau du robinet (voir "Remplir le réservoir
d'eau").
Le fer à repasser à vapeur ne chauffe pas :
• Le fer à repasser n'est pas branché ou n’est pas
allumé. Branchez la fiche secteur dans la prise
secteur et réglez la température souhaitée à
l'aide du régulateur de température 8.
• Le fer à repasser à vapeur est défectueux. Faites
réparer le fer à repasser à vapeur par des
spécialistes qualifiés.
Mise au rebut
L'appareil ne doit jamais être jeté dans
les ordures ménagères normales.
Ce produit est soumis à la directive
européenne 2012/19/EU.
• Nettoyez le boîtier avec un chiffon doux et sec.
• Nettoyez la semelle de repassage q avec un
chiffon légèrement humidifié d'eau et un produit
de nettoyage doux, non abrasif.
Rangement
Conservez l'appareil refroidi dans un endroit propre,
sec et sans poussière.
Mettez l'appareil au rebut en le déposant auprès
d'une entreprise de traitement des déchets agréée ou
au service de recyclage de votre commune.
Respectez les réglementations en vigueur. En cas de
doutes, contactez votre organisation de recyclage.
Eliminer l'ensemble des matériaux d'emballage en respectant l'environnement.
- 28 -

Garantie et service après-vente
Cet appareil bénéficie de 3 ans de garantie à
compter de la date d'achat. L'appareil a été fabriqué avec soin et consciencieusement contrôlé avant
sa distribution. Veuillez conserver le ticket de caisse
en guise de preuve d'achat. Si la garantie devait s'appliquer, contactez par téléphone votre interlocuteur du service après-vente. Cette condition doit être
respectée pour assurer l'expédition gratuite de votre
marchandise.
La prestation de garantie s'applique uniquement
pour les erreurs de matériaux et de fabrication, pas
pour les dommages de transport, les pièces d'usure
ou les dommages subis par les pièces fragiles, comme par ex. les interrupteurs ou les batteries. Le produit est exclusivement destiné à un usage privé et
non commercial.
La garantie est annulée en cas de manipulation incorrecte et inappropriée, d'utilisation brutale et en
cas d'intervention qui n'aurait pas été réalisée par
notre centre de service après-vente agréé. Cette garantie ne constitue pas une restriction de vos droits
légaux.
La durée de la garantie n'est pas prolongée par la
garantie du fabricant. Ceci vaut également pour les
pièces remplacées et réparées. Tous dommages et
défauts présents dès l'achat doivent être notifiés dès
que le produit est déballé, et au plus tard deux
jours après la date d'achat. Toutes réparations survenant après la période sous garantie ne seront pas
prises en charge.
Service France
Tel.: 0800 919270
E-Mail: kompernass@lidl.fr
IAN 273029
Service Belgique
Tel.: 070 270 171 (0,15 EUR/Min.)
E-Mail: kompernass@lidl.be
IAN 273029
Heures de service de notre hotline :
du lundi au vendredi de 8 h à 20 h (HEC)
Importateur
KOMPERNASS HANDELS GMBH
BURGSTRASSE 21
44867 BOCHUM
GERMANY
www.kompernass.com
- 29 -

- 30 -

INHOUDSOPGAVE PAGINA
Inleiding 32
Gebruik in overeenstemming met bestemming 32
Inhoud van het pakket 32
Bedieningselementen 32
Technische gegevens 32
Veiligheidsvoorschriften 33
Vóór de eerste ingebruikname 35
Waterreservoir vullen 35
Aansluiten en strijken 36
Stoomstrijken 36
Strijken met stoomstoot 36
Stoomstrijkijzer tijdelijk uitzetten 36
Stoomstrijkijzer uitschakelen 37
Druppelstopfunctie 37
Automatische uitschakeling 37
Schoonmaken 37
Zelfreinigingsfunctie.......................................................................................................................37
Behuizing en strijkzool...................................................................................................................38
Opbergen 38
Storingen verhelpen 38
Milieurichtlijnen 38
Garantie en service 39
Importeur 39
- 31 -

STOOMSTRIJKIJZER
Inleiding
Gefeliciteerd met de aankoop van uw nieuwe
apparaat.
U hebt hiermee gekozen voor een hoogwaardig
product. De bedieningshandleiding maakt deel uit
van dit product. Deze bevat belangrijke aanwijzingen voor veiligheid, gebruik en afvoeren. Maak
uzelf voorafgaand aan het gebruik van het product
vertrouwd met alle bedienings- en veiligheidsvoorschriften. Gebruik het product uitsluitend op de
voorgeschreven wijze en voor de aangegeven
doeleinden. Geef alle documenten mee als u het
product doorgeeft aan een derde.
Gebruik in overeenstemming
met bestemming
Bedieningselementen
Afbeelding A:
1 Watersproeikop
2 Vulopening voor het waterreservoir
3 Stoomregelaar
4 Toets voor stoomstoot
5 Toets waternevel
6 Controlelampje voor automatische uitschakeling
7 Indicatielampje voor de temperatuur
8 Temperatuurregelaar
9 Netsnoer
0 Sokkel
q Strijkzool
w Selfclean-toets
Afbeelding B:
e Maatbeker
Technische gegevens
Het stoomstrijkijzer is uitsluitend bestemd voor het
strijken van kleding. Het is alleen bestemd voor gebruik binnen gesloten ruimtes en in privéhuishoudens.
Alle andere toepassingen gelden als niet in overeenstemming met de bestemming. Gebruik het
niet voor commerciële doeleinden!
Inhoud van het pakket
Stoomstrijkijzer
Maatbeker
Gebruiksaanwijzing
Stroomspanning: 220 - 240 V
50/60 Hz
max. vermogen: 2200 W
- 32 -
~

Veiligheidsvoorschriften
Verbrandingsgevaar!
•Als het stoomstrijkijzer heet is, pak het dan alleen vast bij de handgreep.
•Bij kinderen is supervisie noodzakelijk om ervoor te zorgen dat ze niet met het
apparaat spelen.
•Houd uw handen nooit in de stoomstoot of tegen hete metalen delen.
•De vulopening van het waterreservoir mag tijdens het gebruik niet worden geo-
pend. Laat het stoomstrijkijzer eerst afkoelen en haal de stekker uit het stopcontact.
•Houd het strijkijzer en het snoer buiten het bereik van kinderen jonger dan 8
jaar als het strijkijzer is ingeschakeld of afkoelt.
Letselgevaar! Brandgevaar!
•Laat het hete, ingeschakelde of aan de netstroom aangesloten stoomstrijkijzer
nooit onbeheerd.
•Berg het stoomstrijkijzer alleen op in de afgekoelde toestand.
•Het stoomstrijkijzer moet op een stabiel oppervlak gebruikt en neergezet wor-
den.
•Strijk alleen op de temperatuurinstellingen die zijn aangegeven op de wasla-
bels en geschikt zijn voor het materiaal. Anders kunt u het wasgoed beschadigen. Als er geen voorschriften bekend zijn, begint u op de laagste temperatuurinstelling.
•Plaats het strijkijzer altijd op een ondergrond die egaal is en hittebestendig. Het
strijkijzer moet stevig staan.
•Als u het stoomstrijkijzer wilt neerzetten, zet het dan alleen neer op de sokkel.
Gevaar voor een elektrische schok!
•De spanning van de stroombron moet overeenkomen met de gegevens op het
kenplaatje van het apparaat.
•Laat een defect apparaat onmiddellijk door een gekwalificeerde en vakkundi-
ge werkplaats repareren, of neem contact op met de klantenservice om gevaren te voorkomen.
•Laat beschadigde netstekkers of netsnoeren onmiddellijk door deskundig perso-
neel of door de klantenservice vervangen om gevaarlijke situaties te vermijden.
•Trek altijd alleen aan de netstekker, nooit aan het snoer.
•Knik of plet het netsnoer niet en leid het zodanig dat het niet in contact komt
met hete oppervlakken en dat niemand er op kan gaan staan of erover kan
struikelen.
- 33 -

•Haal vóór het reinigen en het bijvullen met leidingwater, en steeds na gebruik,
de stekker uit het stopcontact.
•Rol het netsnoer vóór inschakeling altijd volledig af en gebruik geen verlengs-
noer.
•Pak het snoer of de netstekker nooit met vochtige handen vast.
•Gebruik het stoomstrijkijzer in geen geval in de buurt van water dat zich in
badkuipen, douches, wastafels of andere reservoirs bevindt. De nabijheid van
water vormt een gevaar, ook wanneer het apparaat is uitgeschakeld.
•Dompel het stoomstrijkijzer nooit onder in een vloeistof en voorkom dat er vloei-
stoffen in de behuizing van het stoomstrijkijzer komen. Stel het apparaat niet
bloot aan vocht en gebruik het niet in de openlucht. Mocht er toch een keer
vloeistof in de behuizing van het apparaat terechtkomen, haal dan direct de
stekker van het apparaat uit het stopcontact en laat het apparaat door deskundig personeel repareren.
•U mag de apparaatbehuizing van het stoomstrijkijzer niet openen. Laat het de-
fecte stoomstrijkijzer uitsluitend door bevoegd, deskundig personeel repareren.
•Gebruik het stoomstrijkijzer in geen geval als het zichtbaar beschadigd blijkt,
gevallen is, of als er water uitloopt. Laat het eerst door deskundig personeel repareren.
•Gebruik het apparaat niet meer als de knikbescherming op het netsnoer be-
schadigd is!
•Dit apparaat kan worden gebruikt door kinderen vanaf 8 jaar en door perso-
nen met beperkte fysieke, zintuiglijke of mentale vaardigheden of gebrek aan
ervaring en/of kennis, mits zij onder toezicht staan of tevoren zijn geïnstrueerd
over het veilige gebruik van het apparaat en de gevaren die daarvan uitgaan
hebben begrepen. Kinderen mogen niet met het apparaat spelen. Kinderen
mogen geen reiniging en gebruikersonderhoud zonder toezicht uitvoeren.
- 34 -

Let op! Materiële schade!
• Als de waslabels in de kleding strijken verbieden
(symbool ), mag u het kledingstuk niet strijken.
Anders zou u het kledingstuk kunnen beschadigen.
• U mag het waterreservoir uitsluitend vullen met
leidingwater/gedestilleerd water. Anders kan
het stoomstrijkijzer beschadigd raken.
• Het stoomstrijkijzer mag niet worden schoongemaakt met oplosmiddel, alcohol of schurende
schoonmaakmiddelen. Anders zou het beschadigd
kunnen raken.
Vóór de eerste ingebruikname
• Haal het stoomstrijkijzer uit de verpakking.
• Verwijder alle stickers en stukken folie van het
stoomstrijkijzer en de strijkijzerzool q.
Waterreservoir vullen
• Houd het strijkijzer schuin in de hand.
• Open het deksel van de vulopening voor het
waterreservoir 2.
• Vul het waterreservoir met de maatbeker e hoo-
guit tot de „MAX“-markering.
• Schuif het deksel van de vulopening voor het
waterreservoir 2 dicht.
Opmerking:
Als het leidingwater in uw omgeving te hard is, kunt
u het leidingwater het beste mengen met gedestilleerd
water. Anders kunnen de sproeikoppen voor de
stoomstoot-functie voortijdig verkalkt raken.
Voor verlenging van de optimale stoomstoot-functie
mengt u het leidingwater met gedestilleerd water
volgens de tabel.
Risico van verstikking!
Plastic zakken kunnen gevaar opleveren. Om het risico van verstikking te voorkomen, bewaart u plastic
zakken buiten bereik van baby's en kleine kinderen.
• Doe water in het waterreservoir (zie hoofdstuk
„Waterreservoir vullen“).
• Steek de netstekker in een stopcontact dat overeenkomt met de spanning die is aangegeven
op het kenplaatje.
• Zet de temperatuurregelaar 8 in de stand „MAX“.
• Laat het stoomstrijkijzer enkele minuten op de
hoogste stand heet worden.
• Druk een paar keer op de toets voor de stoomstoot 4, zodat er stoom uit de strijkzool q
komt.
• Strijk dan een afgedankt stuk stof om mogelijke
onzuiverheden van de strijkijzerzool q te
verwijderen.
Aandeel
Waterhardheid
zeer
zacht/zacht
gemiddeld 1 : 1
hard 2 : 1
zeer hard 3 : 1
De waterhardheid kunt u bij uw plaatselijke
waterbedrijf opvragen.
gedestilleerd
water bij
leidingwater
0
- 35 -

Aansluiten en strijken
Droogstrijken zonder stoom kunt u op alle temperaturen en stoomstrijken is pas vanaf het instelbereik
op de temperatuurregelaar 8 mogelijk.
• Steek de netstekker in een stopcontact.
Let op! Materiële schade!
Als de waslabels in de kleding strijken verbieden
(symbool ), mag u het kledingstuk niet strijken.
Anders zou u het kledingstuk kunnen beschadigen.
Het indicatielampje voor de temperatuur 7 brandt.
Als de ingestelde temperatuur bereikt is, gaat het
indicatielampje 7 uit.
• Wacht totdat het indicatielampje voor de
temperatuur 7 uitgaat.
• Om het wasgoed vochtig te maken, drukt u op
de toets voor de waternevel 5.
Deze functie is geschikt voor erg droog en sterk
verkreukeld wasgoed.
• Controleer op de aanwijzingen over het verzorgen
op de waslabels in de kleding of en bij welke
temperatuurinstelling het kledingstuk gestreken
mag worden.
Symbool
temperatuurregelaar 8
• Stel de geschikte temperatuur in met de
temperatuurregelaar 8.
Soort stof
acryl, rayon
zijde, wol, gemengde
polyesterweefsels
Katoen, linnen, viscose
Opmerking:
Plaats het strijkijzer tijdens het afkoelen altijd op de
sokkel 0.
Wanneer u het strijkijzer tijdens het opwarmen op
de strijkzool q zet en het niet beweegt, wordt na
30 seconden de automatische uitschakeling geactiveerd (zie hoofdstuk “Automatische uitschakeling”)
en stopt het verwarmen van het apparaat.
Stoomstrijken
• Stel de gewenste stoomkracht in met de stoomregelaar 3.
• De temperatuurregelaar 8 moet minstens tot in
het instelbereik zijn gedraaid. Anders kan
er geen stoom worden geproduceerd.
Strijken met stoomstoot
De stoomstoot is vooral geschikt om moeilijk toegankelijke delen van het strijkgoed glad te strijken.
• Til het stoomstrijkijzer licht op.
• Voor een stoomstoot drukt u op de toets voor de
stoomstoot 4.
Stoomstrijkijzer tijdelijk uitzetten
Brandgevaar!
Laat het hete, op de netstroom aangesloten of
ingeschakelde stoomstrijkijzer nooit onbeheerd.
• Zet de temperatuurregelaar 8 in de stand „MIN“.
• Zet het stoomstrijkijzer alleen neer op de sokkel 0.
- 36 -

Stoomstrijkijzer uitschakelen
• Haal de stekker uit het stopcontact.
• Leeg het waterreservoir en reinig de strijkzool q.
• Zet het afgekoelde stoomstrijkijzer neer op de
sokkel 0.
Druppelstopfunctie
Bij gebruikelijke stoomstrijkijzers kan het gebeuren,
dat uit de strijkzool q bij een te lage strijktemperatuur
water druppelt. Dit strijkijzer onderscheidt zich echter
door een nieuwe voorziening, de DRUPPELSTOPfunctie. Het strijkijzer schakelt de stoomstoot bij lage
temperaturen automatisch uit. Als dit gebeurt is er
een „klik” te horen. Stelt u dan met de temperatuurregelaar 8 de geschikte temperatuur in. Zodra
deze is bereikt, wordt er weer stoom geproduceerd.
Automatische uitschakeling
Dit strijkijzer is voorzien van een automatische uitschakeling. Door die functie wordt het verhitten van
het strijkijzer uitgeschakeld.
Als het strijkijzer op de strijkzool q staat en gedurende ca. 30 seconden niet wordt bewogen, klinkt
een waarschuwingssignaal en begint het controlelampje voor automatische uitschakeling 6 te knipperen. Het verhitten van het strijkijzer wordt gestopt.
Til het strijkijzer op en beweeg het licht heen en weer
om de automatische uitschakeling weer te deactiveren. Het controlelampje voor automatische uitschakeling 6 dooft en het strijkijzer wordt weer verhit.
Als het strijkijzer op de sokkel 0 staat en gedurende ca. 8 minuten niet wordt bewogen, klinkt een
waarschuwingssignaal en begint het controlelampje
voor automatische uitschakeling 6 te knipperen.
Het verhitten van het strijkijzer wordt gestopt. Til het
strijkijzer op en beweeg het licht heen en weer om
de automatische uitschakeling weer te deactiveren.
Het controlelampje voor automatische uitschakeling 6 dooft en het strijkijzer wordt weer verhit.
Opmerking:
De automatische uitschakeling is geen vervanging
voor het uit het stopcontact trekken van de stekker!
De automatische uitschakeling dient uitsluitend om
de kans op brand kleiner te maken als het strijkijzer
per ongeluk niet wordt uitgezet!
Schoonmaken
Zelfreinigingsfunctie
• Vul het waterreservoir tot aan de markering
„MAX“.
• Steek de netstekker in het stopcontact.
• Zet de temperatuurregelaar 8 in de stand „MAX“.
• Zet de stoomregelaar 3 op maximale stoomkracht.
• Laat het stoomstrijkijzer opwarmen totdat het
indicatielampje voor de temperatuur 7 uitgaat
en opnieuw gaat branden.
• Houd het stoomstrijkijzer horizontaal boven een
opvangreservoir.
• Druk op de toets Selfclean w en houd deze in-
gedrukt. Beweeg het strijkijzer daarbij een beetje heen en weer.
Er komt stoom en kokend water uit de stoomgaten in de strijkzool q.
Eventueel aanwezige verontreinigingen worden
daarbij weggespoeld.
• Laat de toets Selfclean w los, zodra het water
in het waterreservoir is verbruikt.
• Droog de strijkzool q grondig af. Hiertoe gaat
u een paar keer met de strijkzool q heen en
weer over een handdoek of een oude lap stof .
• Laat het stoomstrijkijzer afkoelen voordat u het
opbergt.
- 37 -

Behuizing en strijkzool
Levensgevaar!
Haal vóór het reinigen de netstekker uit het stopcontact.
Er bestaat gevaar voor een elektrische schok!
Storingen verhelpen
Het stoomstrijkijzer stoot geen of erg weinig
stoom uit:
De watervoorraad in het stoomstrijkijzer is op. Vul
het waterreservoir met leidingwater (zie „Waterreservoir vullen“).
Letselgevaar!
Laat het apparaat afkoelen voor u het reinigt!
Anders bestaat er verbrandingsgevaar!
Let op! Materiële schade!
Gebruik geen agressieve, schurende of chemische
reinigingsmiddelen.
Deze kunnen het oppervlak van het apparaat aantasten en onherstelbare schade aan het apparaat
veroorzaken.
• Maak de behuizing uitsluitend schoon met een
zachte, droge doek.
• Reinig de strijkzool q met een doek die licht is
bevochtigd met water en met een mild, niet schurend schoonmaakmiddel.
Opbergen
Berg het apparaat, als het is afgekoeld, op een
schone, stofvrije en droge plaats op.
Het stoomstrijkijzer wordt niet heet:
• Het strijkijzer is niet aangesloten of niet ingeschakeld. Steek de stekker in het stopcontact en stel de
gewenste temperatuur in met de temperatuurregelaar 8.
• Het stoomstrijkijzer is defect. Laat het defecte
stoomstrijkijzer uitsluitend door een erkende
reparatiewerkplaats of door de klantenservice
repareren.
Milieurichtlijnen
Deponeer het toestel in geen geval bij
het normale huisvuil. Voor dit product
geldt de Europese richtlijn 2012/19/EU.
Voer het toestel af via een erkend afvalverwerkingsbedrijf of via uw gemeentereiniging.
Neem de bestaande voorschriften in acht. Neem in
geval van twijfel contact op met de gemeentelijke
reinigingsdienst.
Voer alle verpakkingsmateriaal op een
milieuvriendelijke manier af.
- 38 -

Garantie en service
Importeur
U hebt op dit apparaat 3 jaar garantie vanaf de
aankoopdatum. Het apparaat is met de grootst
mogelijke zorg vervaardigd en voorafgaand aan
de levering nauwkeurig gecontroleerd.
Bewaar a.u.b. de kassabon als aankoopbewijs. Als u
aanspraak wilt maken op garantie, neem dan a.u.b.
telefonisch contact op met uw servicefiliaal. Alleen
op die manier is een kosteloze verzending van uw
product gegarandeerd.
De garantie geldt alleen voor materiaal- of fabricagefouten, echter niet voor transportschade, of voor
onderdelen die aan slijtage onderhevig zijn, of voor
beschadigingen aan breekbare delen, bijv. schakelaars of accu's. Het product is uitsluitend bestemd voor
privé-gebruik en niet voor bedrijfsmatige doeleinden.
Bij verkeerd gebruik en ondeskundige behandeling,
bij gebruik van geweld en bij reparaties die niet
door ons geautoriseerd servicefiliaal zijn uitgevoerd,
vervalt de garantie. Uw wettelijke rechten worden
door deze garantie niet beperkt.
De garantieperiode wordt niet verlengd door de
aansprakelijkheid. Dit geldt eveneens voor vervangen
en gerepareerde onderdelen. Schade en gebreken
die mogelijk reeds bij de aankoop aanwezig zijn,
moeten direct na het uitpakken worden gemeld,
uiterlijk echter twee dagen na de dag van aankoop.
Na verstrijken van de garantieperiode moeten alle
voorkomende reparaties vergoed worden.
KOMPERNASS HANDELS GMBH
BURGSTRASSE 21
44867 BOCHUM
GERMANY
www.kompernass.com
Service Nederland
Tel.: 0900 0400223 (0,10 EUR/Min.)
E-Mail: kompernass@lidl.nl
IAN 273029
Service België
Tel.: 070 270 171 (0,15 EUR/Min.)
E-Mail: kompernass@lidl.be
IAN 273029
Bereikbaarheid hotline:
Maandag t/m vrijdag van 8:00 tot 20:00 uur (CET)
- 39 -

- 40 -

INHALTSVERZEICHNIS SEITE
Einleitung 42
Bestimmungsgemäßer Gebrauch 42
Lieferumfang 42
Bedienelemente 42
Technische Daten 42
Sicherheitshinweise 43
Vor dem ersten Gebrauch 45
Wassertank befüllen 45
Anschließen und Bügeln 46
Dampfbügeln 46
Bügeln mit Dampfstoß 46
Dampfbügeleisen vorübergehend abstellen 46
Dampfbügeleisen außer Betrieb nehmen 47
Tropf-Stop-Funktion 47
Automatische Abschaltung 47
Reinigen 47
Selbstreinigungs-Funktion...............................................................................................................47
Gehäuse und Bügelsohle..............................................................................................................48
Aufbewahren 48
Fehlfunktionen beseitigen 48
Entsorgen 48
Garantie und Service 49
Importeur 49
- 41 -

DAMPFBÜGELEISEN
Einleitung
Herzlichen Glückwunsch zum Kauf Ihres neuen
Gerätes.
Sie haben sich damit für ein hochwertiges Produkt
entschieden. Die Bedienungsanleitung ist Bestandteil dieses Produkts. Sie enthält wichtige Hinweise
für Sicherheit, Gebrauch und Entsorgung. Machen
Sie sich vor der Benutzung des Produkts mit allen
Bedien- und Sicherheitshinweisen vertraut. Benutzen
Sie das Produkt nur wie beschrieben und für die angegebenen Einsatzbereiche. Händigen Sie alle
Unterlagen bei Weitergabe des Produkts an Dritte
mit aus.
Bestimmungsgemäßer
Gebrauch
Bedienelemente
Abbildung A:
1 Wasserdüse
2 Einfüllöffnung für den Wassertank
3 Dampfregler
4 Taste für den Dampfstoß
5 Taste für Sprühfunktion
6 Kontrollleuchte für die
automatische Abschaltung
7 Kontrollleuchte für die Temperatur
8 Temperaturregler
9 Netzkabel mit Knickschutz
0 Sockel
q Bügelsohle
w Selfclean-Taste
Abbildung B:
e Messbecher
Technische Daten
Das Dampfbügeleisen ist ausschließlich zum Bügeln
von Kleidung bestimmt. Sie dürfen es nur innerhalb
geschlossener Räume und in privaten Haushalten
verwenden. Alle anderen Verwendungen gelten als
nicht bestimmungsgemäß. Benutzen Sie es nicht gewerblich!
Lieferumfang
Dampfbügeleisen
Messbecher
Bedienungsanleitung
Versorgungsspannung: 220 - 240 V
50/60 Hz
max. Leistungsaufnahme: 2200 W
- 42 -
~

Sicherheitshinweise
Verbrennungsgefahr!
•Fassen Sie das Dampfbügeleisen nur am Griff an, wenn es heiß ist.
•Kinder sollten beaufsichtigt werden, um sicherzustellen, dass sie nicht mit dem
Gerät spielen.
•Halten Sie niemals Ihre Hände in den Dampfstoß oder an heiße Metallteile.
•Sie dürfen die Einfüllöffnung für den Wassertank während des Gebrauchs nicht
öffnen. Lassen Sie das Dampfbügeleisen zunächst erkalten und ziehen Sie den
Netzstecker aus der Netzsteckdose.
•Das Bügeleisen und dessen Anschlussleitung müssen während des Einschaltens
oder Abkühlens außer Reichweite von Kindern sein, die jünger als 8 Jahre alt
sind.
Verletzungsgefahr! Brandgefahr!
•Lassen Sie das heiße, am Stromnetz angeschlossene oder eingeschaltete
Dampfbügeleisen niemals unbeaufsichtigt.
•Verstauen Sie das Dampfbügeleisen nur im abgekühlten Zustand.
•Das Dampfbügeleisen muss auf einer stabilen Oberfläche benutzt und abgestellt werden.
• Bügeln Sie nur mit den auf den Pflegehinweisen angegebenen und für das Ma-
terial geeigneten Temperatureinstellungen. Sie können die Wäsche andernfalls
beschädigen. Falls Sie keine Pflegehinweise kennen, beginnen Sie mit der niedrigsten Temperatureinstellung.
• Stellen Sie das Bügeleisen nur auf einen ebenen und hitzeunempfindlichen
Untergrund. Das Bügeleisen muss stabil stehen.
• Wenn Sie das Dampfbügeleisen aus der Hand legen wollen, stellen Sie es nur
auf dem Sockel ab.
Gefahr durch elektrischen Schlag!
• Die Spannung der Stromquelle muss mit den Angaben auf dem Typenschild
des Gerätes übereinstimmen.
• Lassen Sie ein defektes Gerät umgehend von einer qualifizierten Fachwerkstatt in-
standsetzen, oder wenden Sie sich an den Kundenservice, um Gefährdungen zu
vermeiden.
• Lassen Sie beschädigte Netzstecker oder Netzkabel sofort von autorisiertem
Fachpersonal oder dem Kundenservice austauschen, um Gefährdungen zu
vermeiden.
• Ziehen Sie immer nur am Netzstecker, niemals am Kabel.
- 43 -

• Knicken oder quetschen Sie das Netzkabel nicht und verlegen Sie es so, dass
es nicht in Kontakt mit heißen Oberflächen kommt und niemand darauf treten
oder darüber stolpern kann.
• Ziehen Sie vor dem Reinigen, beim Auffüllen mit Leitungswasser und nach je-
dem Gebrauch den Netzstecker.
• Rollen Sie das Netzkabel vor dem Einschalten immer vollständig ab und ver-
wenden Sie keine Verlängerungskabel.
• Fassen Sie das Kabel oder den Netzstecker niemals mit feuchten Händen an.
• Benutzen Sie das Dampfbügeleisen keinesfalls in der Nähe von Wasser, das in
Badewannen, Duschen, Waschbecken oder anderen Gefäßen enthalten ist.
Die Nähe von Wasser stellt eine Gefahr dar, auch wenn das Gerät
ausgeschaltet ist.
• Sie dürfen das Dampfbügeleisen keinesfalls in eine Flüssigkeit tauchen und kei-
ne Flüssigkeiten in das Gerätegehäuse des Dampfbügeleisens gelangen lassen. Sie dürfen das Gerät keiner Feuchtigkeit aussetzen und nicht im Freien
benutzen. Falls doch einmal Flüssigkeit in das Gerätegehäuse gelangt, ziehen
Sie sofort den Netzstecker des Geräts aus der Netzsteckdose und lassen Sie
es von qualifiziertem Fachpersonal reparieren.
• Sie dürfen das Gerätegehäuse des Dampfbügeleisens nicht öffnen. Lassen Sie
das defekte Dampfbügeleisen nur von qualifiziertem Fachpersonal reparieren.
• Benutzen Sie das Dampfbügeleisen auf keinen Fall, wenn es sichtbare Beschä-
digungen aufweist, heruntergefallen ist, oder Wasser ausläuft. Lassen Sie es
erst von qualifiziertem Fachpersonal reparieren.
• Benutzen Sie das Gerät nicht weiter, wenn der Knickschutz am Netzkabel be-
schädigt ist!
• Dieses Gerät kann von Kindern ab 8 Jahren und älter und von Personen mit re-
duzierten physischen, sensorischen oder mentalen Fähigkeiten oder Mangel
an Erfahrung und/oder Wissen benutzt werden, wenn sie beaufsichtigt oder
bezüglich des sicheren Gebrauchs des Gerätes unterwiesen wurden und die
daraus resultierenden Gefahren verstanden haben. Kinder dürfen nicht mit
dem Gerät spielen. Reinigung und Benutzer-Wartung dürfen nicht durch Kinder
ohne Beaufsichtigung durchgeführt werden.
- 44 -

Achtung! Sachschaden!
• Falls die Pflegehinweise in der Kleidung das
Bügeln untersagen (Symbol ), dürfen Sie das
Kleidungsstück nicht bügeln. Sie könnten das
Kleidungsstück andernfalls beschädigen.
• Sie dürfen ausschließlich Leitungswasser/destillier-
tes Wasser in den Wassertank einfüllen. Andernfalls beschädigen Sie das Dampfbügeleisen.
• Sie dürfen das Dampfbügeleisen nicht mit Lösungs-
mitteln, Alkohol oder scheuernden Reinigungsmitteln
säubern. Andernfalls könnten Sie es beschädigen.
Vor dem ersten Gebrauch
• Entnehmen Sie das Dampfbügeleisen aus der
Verpackung.
• Entfernen Sie alle Aufkleber und Folienteile vom
Dampfbügeleisen und der Bügelsohle q.
Erstickungsgefahr!
Plastiktüten können eine Gefahr darstellen. Um Erstickungsgefahr zu vermeiden, bewahren Sie die
Plastiktüten außerhalb der Reichweite von Babies
und Kleinkindern auf.
• Füllen Sie Wasser in den Wassertank (siehe Kapi-
tel „Wassertank befüllen“).
• Stecken Sie den Netzstecker in eine Netz-
steckdose, die der auf dem Typenschild
angegebenen Spannung entspricht.
• Stellen Sie den Temperaturregler 8 in die
Position „MAX“.
• Heizen Sie das Dampfbügeleisen einige
Minuten auf der höchsten Stufe auf.
• Betätigen Sie die Taste für den Dampfstoß 4
einige Male, so dass Dampf aus der Bügelsohle q austritt.
• Bügeln Sie dann ein nicht mehr benötigtes Stück
Stoff, um eventuelle Unreinheiten von der
Bügelsohle q zu beseitigen.
Wassertank befüllen
• Halten Sie das Bügeleisen schräg in der Hand.
• Öffnen Sie den Deckel der Einfüllöffnung für den
Wassertank 2.
• Füllen Sie mit dem Messbecher e Leitungswas-
ser bis höchstens zur „MAX“-Markierung in den
Wassertank.
• Schließen Sie den Deckel der Einfüllöffnung für
den Wassertank 2.
Hinweis:
Sollte das Leitungswasser Ihres Wohnortes zu hart
sein, empfiehlt es sich, das Leitungswasser mit destilliertem Wasser zu mischen. Ansonsten können die
Düsen für die Dampfstoß-Funktion vorzeitig verkalken.
Zur Verlängerung der optimalen Dampfstoß-Funktion mischen Sie das Leitungswasser mit destilliertem
Wasser entsprechend der Tabelle.
Anteil destillier-
Wasserhärte
sehr
weich/weich
mittel 1 : 1
hart 2 : 1
sehr hart 3 : 1
Die Wasserhärte können Sie beim örtlichem
Wasserwerk erfragen.
tes Wasser zu
Leitungswasser
0
- 45 -

Anschließen und Bügeln
Trockenbügeln ohne Dampf können Sie bei allen
Temperaturen, Dampfbügeln ist erst ab dem Einstellbereich am Temperaturregler 8 möglich.
• Stecken Sie den Netzstecker in eine
Netzsteckdose.
Die Kontrollleuchte für die Temperatur 7 leuchtet.
Wenn die Kontrollleuchte 7 erlischt, ist die
eingestellte Temperatur erreicht.
• Warten Sie, bis die Kontrollleuchte für die
Temperatur 7 erlischt.
• Zum Befeuchten der Wäsche drücken Sie auf
die Taste für die Sprühfunktion 5.
Achtung! Sachschaden!
Falls die Pflegehinweise in der Kleidung das Bügeln
untersagen (Symbol ), dürfen Sie das Kleidungsstück nicht bügeln. Sie könnten das Kleidungsstück
anderenfalls beschädigen.
• Prüfen Sie die Pflegehinweise auf den Schildern
in der Kleidung, ob und bei welcher Temperatureinstellung das Kleidungsstück zum Bügeln geeignet ist.
Symbol
Temperaturregler 8
• Stellen Sie die geeignete Temperatureinstellung
mit dem Temperaturregler 8 ein.
Stoffart
Acryl, Rayon
Seide, Wolle,
Polyestermischgewebe
Baumwolle, Leinen,
Viskose
Diese Funktion ist für sehr trockene, stark knittrige
Wäsche geeignet.
Dampfbügeln
• Stellen Sie mit dem Dampfregler 3 die
gewünschte Dampfstärke ein.
• Der Temperaturregler 8 muss mindestens bis in
den Einstellbereich gedreht sein. Ansonsten kann kein Dampf erzeugt werden.
Bügeln mit Dampfstoß
Der Dampfstoß eignet sich besonders, um schwer
zugängliche Bereiche der Wäsche zu glätten.
• Heben Sie das Dampfbügeleisen leicht an.
• Drücken Sie für einen Dampfstoß die Taste für
den Dampfstoß 4.
Dampfbügeleisen
vorübergehend abstellen
Hinweis:
Stellen Sie das Bügeleisen während des Aufheizens
immer auf den Sockel 0.
Wenn Sie das Bügeleisen während des Aufheizens
auf die Bügelsohle q stellen und nicht bewegen,
wird nach 30 Sekunden die automatische Abschaltung aktiviert (siehe Kapitel “Automatische Abschaltung”) und das Gerät stoppt das Heizen.
Brandgefahr!
Lassen Sie das heiße, am Stromnetz angeschlossene oder eingeschaltete Dampfbügeleisen niemals
unbeaufsichtigt.
• Stellen Sie den Temperaturregler 8 in die
Position „MIN“.
• Stellen Sie das Dampfbügeleisen nur auf dem
Sockel 0 ab.
- 46 -

Dampfbügeleisen außer Betrieb
nehmen
• Ziehen Sie den Netzstecker aus der
Netzsteckdose.
• Leeren Sie den Wassertank und reinigen Sie die
Bügelsohle q.
• Stellen Sie das abgekühlte Dampfbügeleisen auf
den Sockel 0.
Wenn das Bügeleisen auf dem Sockel 0 steht und
es für ca. 8 Minuten nicht bewegt wird, erklingen
Warnsignale und die Kontrollleuchte für die automatische Abschaltung 6 blinkt. Das Heizen des Bü-
geleisens wird gestoppt. Um die automatische Abschaltung zu deaktivieren, heben Sie das
Bügeleisen an und schwenken Sie es leicht hin und
her. Die Kontrollleuchte für die automatische Abschaltung 6 erlischt und das Bügeleisen heizt wieder auf.
Tropf-Stop-Funktion
Bei herkömmlichen Dampfbügeleisen kann es vorkommen, dass bei zu geringer Bügeltemperatur
Wasser aus der Bügelsohle q tropft. Dieses Bügeleisen weist jedoch ein neues Ausstattungsmerkmal,
die TROPF-STOP-Funktion auf. Das Bügeleisen
schaltet den Dampfstoß bei niedrigen Temperaturen
automatisch ab. Wenn dies geschieht, ist ein „Klick”
zu hören. Stellen Sie dann mit dem Temperaturregler 8 die geeignete Temperatur ein. Sobald
diese erreicht ist, wird die Dampferzeugung
fortgesetzt.
Automatische Abschaltung
Das Bügeleisen ist mit einer automatischen Abschaltung ausgestattet. Diese stoppt das Heizen des Bügeleisens.
Wenn das Bügeleisen auf der Bügelsohle q steht
und es für ca. 30 Sekunden nicht bewegt wird, erklingen Warnsignale und die Kontrollleuchte für die
automatische Abschaltung 6 blinkt. Das Heizen
des Bügeleisens wird gestoppt. Um die automatische Abschaltung zu deaktivieren, heben Sie das
Bügeleisen an und schwenken Sie es leicht hin und
her. Die Kontrollleuchte für die automatische Abschaltung 6 erlischt und das Bügeleisen heizt wieder auf.
Hinweis:
Die automatische Abschaltung ersetzt nicht das Ziehen des Netzsteckers! Sie dient lediglich der Reduzierung der Brandgefahr, wenn das Bügeleisen versehentlich nicht ausgeschaltet wird!
Reinigen
Selbstreinigungs-Funktion
• Füllen Sie den Wassertank bis zur Markierung
„MAX“.
• Stecken Sie den Netzstecker in die Netzsteckdose.
• Stellen Sie den Temperaturregler 8 auf Position
„MAX“.
• Stellen Sie den Dampfregler 3 auf maximale
Dampfstärke.
• Lassen Sie das Dampfbügeleisen aufheizen, bis
die Kontrollleuchte für die Temperatur 7 erlischt
und erneut aufleuchtet.
• Halten Sie das Dampfbügeleisen waagerecht
über eine Auffangschüssel.
• Drücken Sie die Taste Selfclean w und halten
Sie diese gedrückt. Bewegen Sie das Dampfbügeleisen dabei ein wenig hin und her.
Dampf und kochendes Wasser tritt aus den
Dampfaustrittslöchern in der Bügelsohle q aus.
Eventuell vorhandene Verunreinigungen werden
dabei herausgespült.
• Lassen Sie die Taste Selfclean w los, sobald das
Wasser im Wassertank aufgebraucht ist.
- 47 -

• Trocknen Sie die Bügelsohle q gründlich. Führen Sie dazu die Bügelsohle q einige Male
über ein Handtuch oder altes Stück Stoff hin und
her.
• Lassen Sie das Dampfbügeleisen abkühlen,
bevor Sie es zur Seite stellen.
Gehäuse und Bügelsohle
Lebensgefahr!
Ziehen Sie vor der Reinigung den Netzstecker. Es
besteht die Gefahr eines elektrischen Schlages!
Verletzungsgefahr!
Lassen Sie das Gerät vor dem Reinigen abkühlen.
Ansonsten besteht Verbrennungsgefahr!
Achtung! Sachschaden!
Benutzen Sie keine aggressiven, scheuernden oder
chemischen Reinigungsmittel. Diese können die
Oberfläche angreifen und zu irreparablen Schäden
am Gerät führen.
• Reinigen Sie das Gehäuse nur mit einem
weichen, trockenem Tuch.
• Reinigen Sie die Bügelsohle q mit einem leicht
mit Wasser befeuchtetem Tuch und einem milden, nicht scheuerndem Reinigungsmittel.
Aufbewahren
Fehlfunktionen beseitigen
Das Dampfbügeleisen stößt keinen oder sehr
wenig Dampf aus:
Der Vorrat an Leitungswasser im Dampfbügeleisen
ist erschöpft. Füllen Sie den Wassertank mit
Leitungswasser (Siehe „Wassertank befüllen“).
Das Dampfbügeleisen erhitzt sich nicht:
• Das Bügeleisen ist nicht angeschlossen oder
nicht eingeschaltet. Stecken Sie den Netzstecker
in die Netzsteckdose und stellen mit dem Temperaturregler 8 die gewünschte Temperatur ein.
• Das Dampfbügeleisen ist defekt. Lassen Sie das
Dampfbügeleisen von qualifiziertem Fachpersonal reparieren.
Entsorgen
Werfen Sie das Gerät keinesfalls in den
normalen Hausmüll. Dieses Produkt
unterliegt der europäischen Richtlinie
2012/19/EU.
Entsorgen Sie das Gerät über einen zugelassenen
Entsorgungsbetrieb oder über Ihre kommunale
Entsorgungseinrichtung.
Beachten Sie die aktuell geltenden Vorschriften.
Setzen Sie sich im Zweifelsfall mit Ihrer Entsorgungseinrichtung in Verbindung.
Bewahren Sie das abgekühlte Gerät an einem sauberen, staubfreien und trockenem Ort auf.
Führen Sie alle Verpackungsmaterialien
einer umweltgerechten Entsorgung zu.
- 48 -

Garantie und Service
Sie erhalten auf dieses Gerät 3 Jahre Garantie ab
Kaufdatum. Das Gerät wurde sorgfältig produziert
und vor Anlieferung gewissenhaft geprüft.
Bitte bewahren Sie den Kassenbon als Nachweis
für den Kauf auf. Bitte setzen Sie sich im Garantiefall mit Ihrer Servicestelle telefonisch in Verbindung.
Nur so kann eine kostenlose Einsendung Ihrer Ware
gewährleistet werden.
Die Garantieleistung gilt nur für Material- oder
Fabrikationsfehler, nicht aber für Transportschäden,
Verschleißteile oder für Beschädigungen an zerbrechlichen Teilen, z. B. Schalter oder Akkus. Das
Produkt ist lediglich für den privaten und nicht für
den gewerblichen Gebrauch bestimmt.
Bei missbräuchlicher und unsachgemäßer Behandlung, Gewaltanwendung und bei Eingriffen, die
nicht von unserer autorisierten Service-Niederlassung vorgenommen wurden, erlischt die Garantie.
Ihre gesetzlichen Rechte werden durch diese
Garantie nicht eingeschränkt.
Die Garantiezeit wird durch die Gewährleistung
nicht verlängert. Dies gilt auch für ersetzte und reparierte Teile. Eventuell schon beim Kauf vorhandene
Schäden und Mängel müssen sofort nach dem
Auspacken gemeldet werden, spätestens aber zwei
Tage nach Kaufdatum. Nach Ablauf der Garantiezeit anfallende Reparaturen sind kostenpflichtig.
Service Deutschland
Tel.: 0800 5435 111
(Kostenfrei aus dem dt. Festnetz/Mobilfunknetz)
E-Mail: kompernass@lidl.de
IAN 273029
Service Österreich
Tel.: 0820 201 222 (0,15 EUR/Min.)
E-Mail: kompernass@lidl.at
IAN 273029
Service Schweiz
Tel.: 0842 665566 (0,08 CHF/Min.,
Mobilfunk max. 0,40 CHF/Min.)
E-Mail: kompernass@lidl.ch
IAN 273029
Erreichbarkeit Hotline:
Montag bis Freitag von 8:00 Uhr - 20:00 Uhr (MEZ)
Importeur
KOMPERNASS HANDELS GMBH
BURGSTRASSE 21
44867 BOCHUM
GERMANY
www.kompernass.com
- 49 -

KOMPERNASS HANDELS GMBH
BURGSTRASSE 21
44867 BOCHUM
DEUTSCHLAND / GERMANY
www.kompernass.com
Last Information Update · Tilstand af information
Version des informations · Stand van de informatie
Stand der Informationen:
08 / 2015 · Ident.-No.: SDB2200D2-072015-1
IAN 273029
 Loading...