

Page 1
6WHDP,URQ6'%$
6WHDP,URQ
2SHUDWLQJLQVWUXFWLRQV
53B'DPSIEXHJHOHLVHQB&RYHUB/%LQGG
Page 2
__RP58929_B6.book Seite 1 Freitag, 29. Oktober 2010 1:38 13
English .............................................................................................. 2
ID: SDB 2200 A1_11_V1.0
Page 3
__RP58929_B6.book Seite 2 Freitag, 29. Oktober 2010 1:38 13
Overview
15
14
13
12
11
12
SELF
CLEAN
10
3
4
5
max
89
7
6
16
MAX
Page 4
GB_RP58929 Dampfbuegeleisen.fm Seite 2 Freitag, 29. Oktober 2010 3:32 15
Contents
1. Safety information ................................................................................................. 3
2. Items supplied ....................................................................................................... 4
3. Before using for the first time .............................................................................. 4
4. Operation ............................................................................................................... 4
4.1 Filling water tank ........................................................................................... 5
4.2 Selecting temperature setting for iron ........................................................... 5
4.3 Automatic shut-off ......................................................................................... 5
4.4 Spray function ............................................................................................... 5
4.5 Ironing without steam .................................................................................... 6
4.6 Ironing with steam......................................................................................... 6
4.7 Power steam function.................................................................................... 6
5. Cleaning ................................................................................................................. 6
6. Storage ................................................................................................................... 7
7. Disposal ................................................................................................................. 7
8. Troubleshooting .................................................................................................... 8
9. Technical specifications ....................................................................................... 8
10. Warranty ................................................................................................................. 8
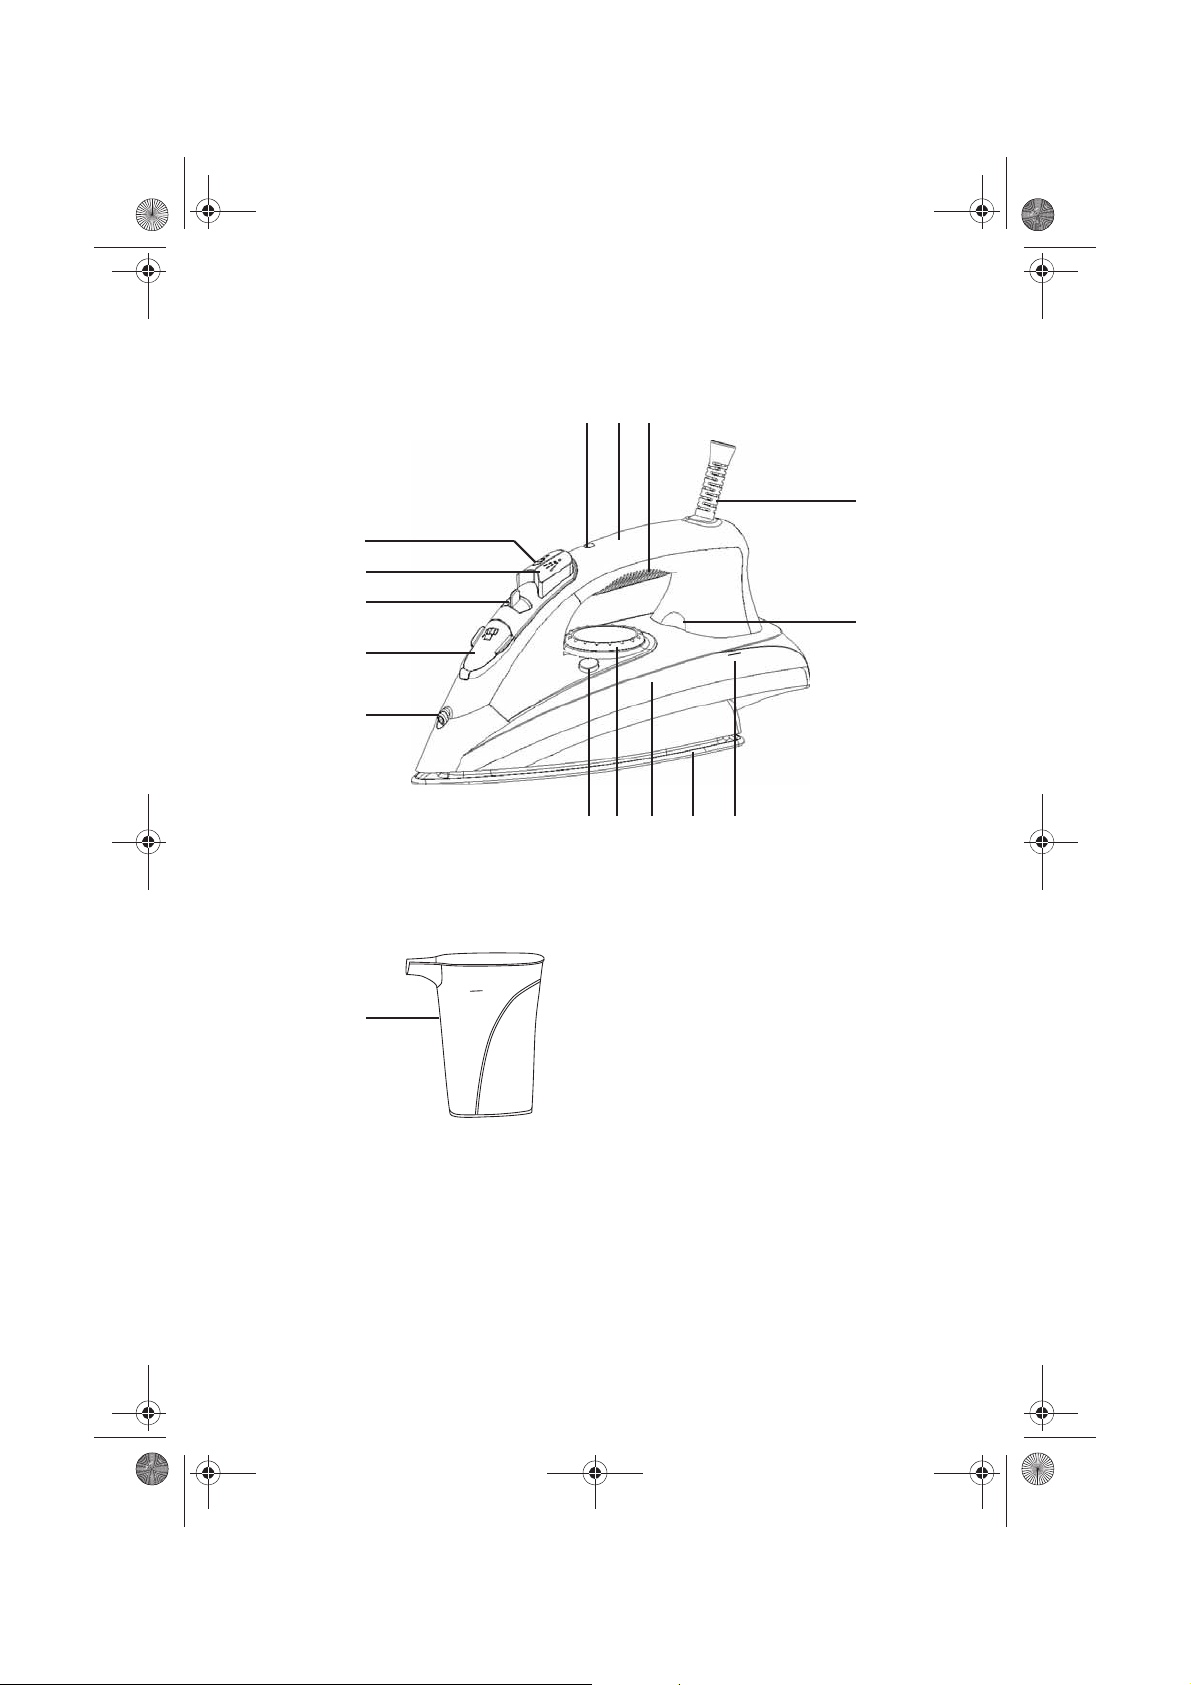
Overview
1
2
3
4
5
6 max
7
8
9 Temperature controller
SELF CLEAN
10
11
12
13
14
15
16
GB
2
Pilot light
Handle
Anti-slip rubber grip
Power cord
Temperature control lamp
Marking for maximum filling level of water tank
Soleplate with openings for steam
Water tank
Self-clean button
Spray nozzle
Lid of water tank
Steam level controller: high - low - no steam
Spray button
Power steam button
Measuring beaker
Page 5
__RP58929_B6.book Seite 3 Freitag, 29. Oktober 2010 1:38 13
1. Safety information
• Before using the appliance for the first
time, read through these operating instructions carefully and ensure you
comply with the operating instructions
in all respects!
• This appliance should only be used for
its intended purpose as described in
these instructions.
• Do not discard these instructions.
• If you pass the appliance on to someone else, please include the operating
instructions.
Intended purpose
The iron is designed for indoor use with
laundry in the home and is unsuitable for
commercial usage.
Possible misuse
Always set down the steam iron vertically
and not on the soleplate, even when only
stopping work briefly. There is a risk of fire!
Warnings
The following warning terms are used in
these operating instructions:
DANGER! High risk: Failure to
observe this warning may result in
injury to life and limb.
WARNING! Moderate risk: Failure to observe this warning may result in injury or
serious material damage.
CAUTION: Low risk: Failure to observe
this warning may result in minor injury or
material damage.
DANGER for children
• Packing materials are not children's
toys. Do not allow children to play with
plastic bags: There is a risk of suffocation.
• This appliance is not designed to be
used by people (including children)
with limited physical, sensory or mental capabilities or people without adequate experience and/or under-
standing unless they are supervised
by someone who is responsible for
their safety or who instructs them how
to use the iron.
• Children must be supervised to ensure
that they do not play with the appliance.
• The steam iron should be kept out of
the reach of children.
RISK of electric shock due to
moisture
• The appliance, the power cord and the
power plug must not be immersed in
water or other liquids.
• Protect the appliance from moisture,
dripping water and splashing: There is
the risk of an electric shock.
• When filling up the water tank, unplug
the appliance at the wall socket.
• The water tank should not be filled
with water above the max 6 mark to
prevent it overflowing.
• If liquids get into the appliance (apart
from the water tank), unplug from the
mains immediately. Have the appliance checked before re-using.
RISK of electrocution
• Only connect the power plug to a
properly installed wall socket that is
easily accessible and delivers voltage
matching the rating plate. The socket
must still be easily accessible after
connection.
• Ensure that the power cord cannot be
damaged by sharp edges or hot surfaces.
• Unplug the iron from the socket immediately if the power cord or the appliance is damaged.
• Do not use the appliance if there is visible damage to the iron or the power
cord, the appliance has been dropped
or if it is leaking. To avoid any risk, do
not make modifications to the product.
GB
3
Page 6

GB_RP58929 Dampfbuegeleisen.fm Seite 4 Freitag, 29. Oktober 2010 3:33 15
The power cord cannot be replaced at
home. Repairs should only be carried
out by a specialist workshop or the
Service Centre.
RISK of injury from burns
• Risk due to bursts of steam. Allow the
appliance to cool down before topping
up with fresh water.
• Warning about burns caused by steam
and splashes of hot water when using
Power steam button. Make sure the
soleplate is always directed at the item
of laundry or ironing board when using
the Power steam button.
• The soleplate becomes very hot in
use. When using the iron, only touch
the appliance by the handle and the
controls. Never iron garments while
wearing them.
RISK of fire
• Use the appliance on a stable, flat and
heat-resistant surface.
• Always set down the steam iron vertically and not on the soleplate, even
when only stopping work briefly.
Unplug the appliance when stopping
work for longer periods or when leaving the room.
WARNING about material damage
• Never iron over items such as zips,
metal studs or applications that will
damage the soleplate.
• Do not add vinegar, descaler or other
products to the water tank. They might
damage the appliance.
2. Items supplied
1 Steam iron
1 Measuring beaker
1 Instruction manual
3. Before using for the first
time
1. Check that the appliance is
unplugged.
2. Fill the water tank 8 up halfway.
3. Set the steam iron in a vertical posi-
tion.
4. Insert the power plug in a wall socket
that corresponds to the technical data.
The pilot light 1 on the handle 2 lights
up.
5. Set the temperature controller 9 to
MAX.
6. Once the appliance has reached the
required temperature (temperature
control lamp 5 extinguishes), iron an
old cotton cloth using steam until the
water tank 8 is empty.
When being used for the first time, the
appliance may give off an odour. This is
due to the design of the iron and is perfectly normal. Ensure sufficient ventilation
in the room.
4. Operation
DANGER: The soleplate 7
becomes very hot in use. When
using the iron, only touch the
appliance by the handle 2 and the
controls.
• Always set down the steam iron verti-
cally and not on the soleplate 7, even
when only stopping work briefly. There
is a risk of fire!
The soleplate 7 cools down slightly while
you are working. The appliance then heats
up the soleplate to reach the selected temperature again, and the temperature control lamp 5 lights up. The temperature
control lamp is extinguished when the
selected temperature is reached. This
process repeats itself while you work. You
4
GB
Page 7

MAX
MIN
W
O
O
L
C
O
T
T
O
N
L
I
N
E
N
N
Y
L
O
N
S
I
L
K
__RP58929_B6.book Seite 5 Freitag, 29. Oktober 2010 1:38 13
can simply continue ironing while the appliance heats up.
4.1 Filling water tank
DANGER: When filling up the
water tank 8, unplug the appliance at the wall socket.
• Only use clean tap water without adding anything to it (e.g. vinegar, descaler, starch, scent, fabric softener).
• The built-in Anti-scale system reduces
scale build-up with average water
hardness, so extending the life of your
iron. If the tap water in your area is
hard, use distilled water. If the water is
moderately hard, mix distilled water
and tap water in a ratio of 1:1.
1. Disconnect the power plug from the
wall socket.
2. Turn the steam level controller 13 to
.
3. Open the lid 12 of the water
tank and hold the appliance
at an angle to fill.
4. Use the measuring beaker 16 to fill up to
the
max 6
mark (however, so tank is at
least a quarter-full).
steam iron horizontally.
5. Close the lid 12 of the water tank.
6. Set the steam iron into a vertical position.
To check, hold the
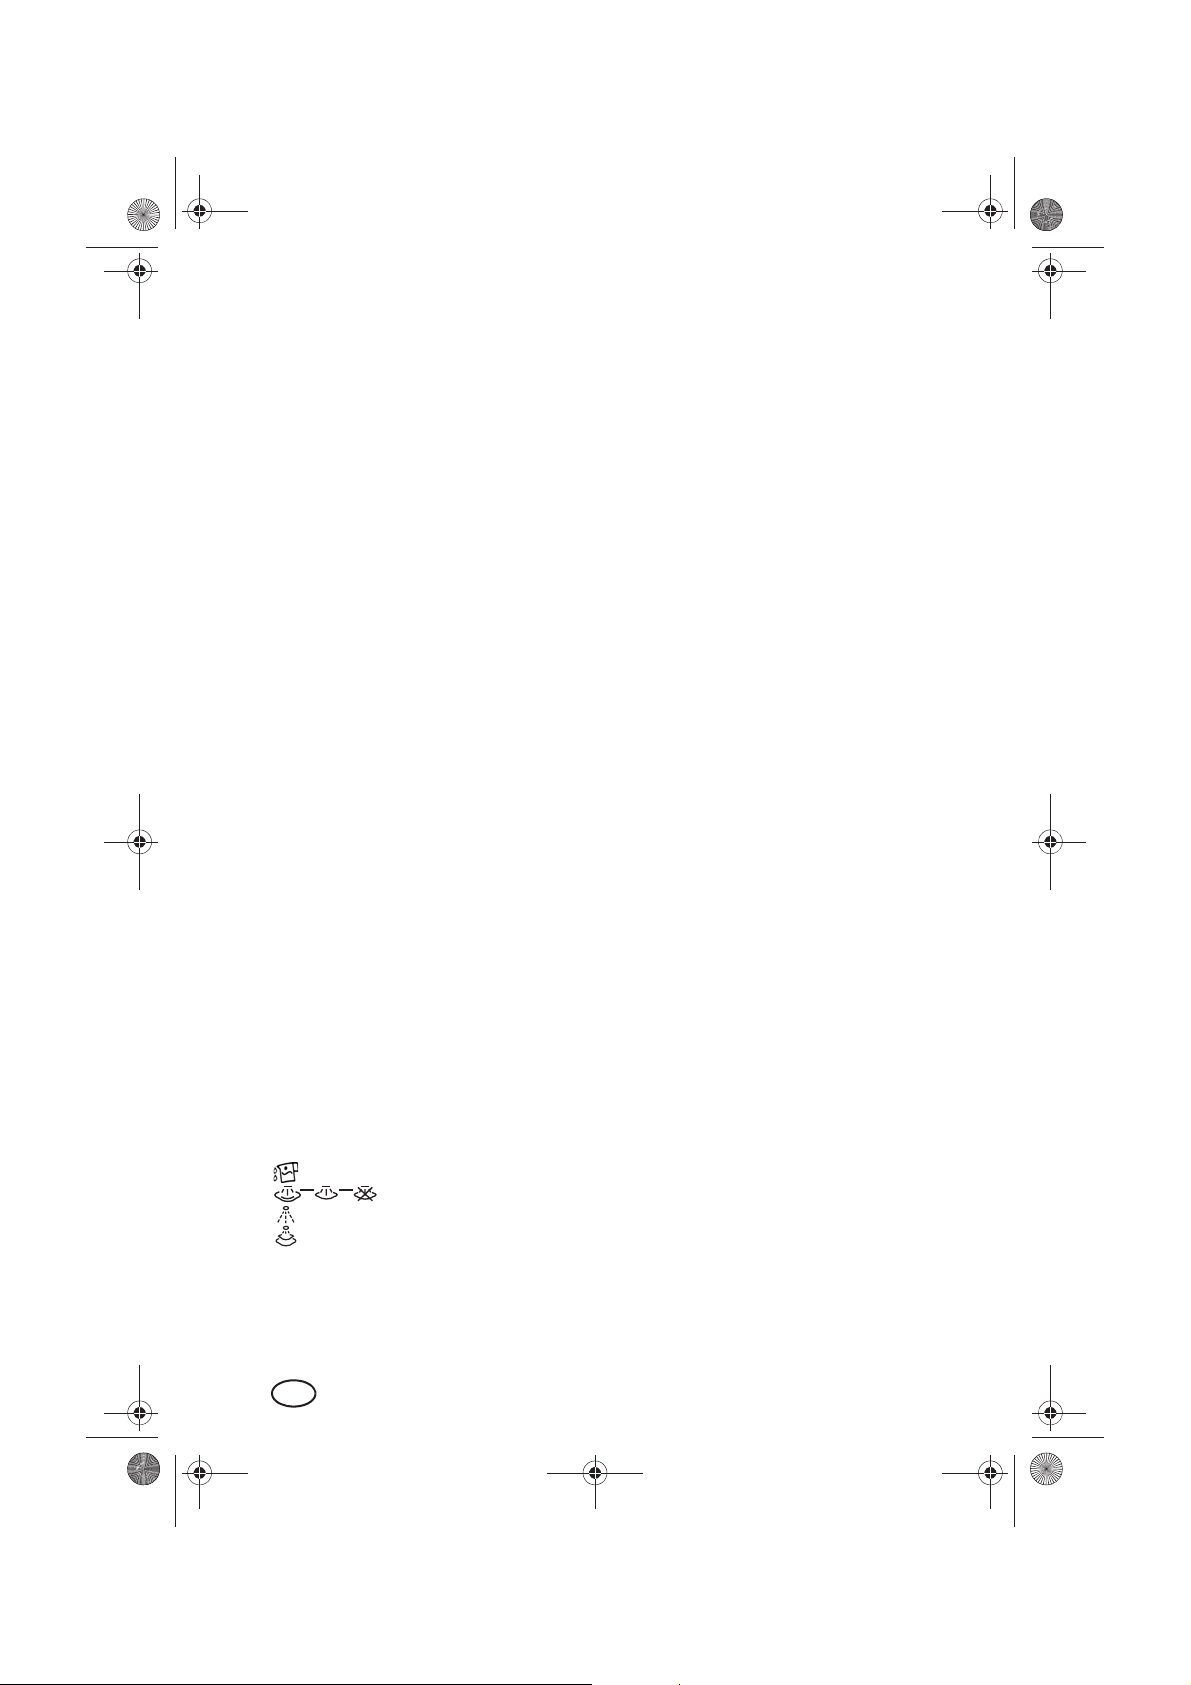
4.2 Selecting temperature setting for iron
1. Use the temperature controller 9 to
select the required temperature:
MIN
Appliance does not heat up
Temperature: up to approx. 110 °C
Temperature: up to approx. 150 °C
Temperature: up to approx. 210 °C
MAX
Maximum temperature
2. The temperature control lamp 5 lights
up as long as the steam iron is heating
up. It is extinguished when the selected
temperature is reached. You can then
start work.
4.3 Automatic shut-off
The automatic shut-off feature switches off
the heating when...
... you put the appliance down horizontally on the soleplate 7 and do not use
it for approx. 30 seconds.
... the appliance is not used for approx.
8 minutes when in a vertical position.
A short acoustic alarm signal is heard, and
the pilot light 1 on the handle 2 starts to
flash.
• Hold the appliance horizontally and
move it to continue ironing.
4.4 Spray function
The spray function is used to moisten dry
laundry. It is available whatever temperature setting you have selected. Here thewater tank 8 has to be at least a quarterfull.
• Press the Spray button 14 several
times while holding the iron horizontally over the item of laundry. Make
sure no water sprays on the ground.
GB
5
Page 8

__RP58929_B6.book Seite 6 Freitag, 29. Oktober 2010 1:38 13
4.5 Ironing without steam
Delicate fabrics are ironed at low temperatures without using steam. You can use
the spray function to moisten your laundry.
1. Set the steam level controller 13 to
and the temperature controller 9
to MIN.
2. Fill the water tank 8 if you wish to use
the spray function.
3. Set the steam iron into a vertical posi-
tion.
4. Insert the power plug into a wall socket.
The pilot light 1 on the handle 2 lights
up.
5. Select the required temperature on the
temperature controller 9. The temperature control lamp 5 lights up.
6. You can start ironing as soon as the
ironing temperature is reached and
the temperature control lamp 5 is
extinguished.
7. When you finish ironing, set the tem-
perature controller 9 to MIN and
unplug the appliance.
8. Let the steam iron cool down, pouring
out any water left in the water tank 8
through the filler opening of the tank.
4.6 Ironing with steam
Ironing with steam calls for a high temperature, at least temperature level . You
can use the spray function to moisten your
laundry.
1. Set the steam level controller 13 to
and the temperature controller 9
to MIN.
2. Fill the water tank 8.
3. Set the steam iron into a vertical posi-
tion.
4. Insert the power plug into a wall socket.
The pilot light 1 on the handle 2 lights
up.
5. Select the required temperature on the
temperature controller 9 (at least ).
The temperature control lamp 5 lights
up.
6. You can select the required steam level
or on the steam level
controller 13 and start ironing as soon
as the ironing temperature is reached
and the temperature control lamp 5 is
extinguished.
Steam will be ...
... produced as soon as you hold the
iron horizontally and
... stop as soon as you hold the iron vertically or set the steam level
13
controller
7. When you finish ironing, set the tem-
perature controller 9 to MIN, the steam
level controller 13 to and unplug
the appliance.
8. Let the steam iron cool down, pouring
out any water left in the water tank 8
through the filler opening of the tank.
to .
4.7 Power steam function
This function calls for a high temperature,
at least temperature level . Here the
water tank 8 has to be at least a quarter-full.
• Press the Power steam button 15
while moving the iron over the item of
laundry.
• Wait a few seconds before pressing
the Power steam button again.
5. Cleaning
DANGER: Unplug from the wall
socket before cleaning the steam
iron.
• Leave the appliance to cool down
before cleaning.
CAUTION: Do not use harsh or abrasive
cleaning agents.
6
GB
Page 9

__RP58929_B6.book Seite 7 Freitag, 29. Oktober 2010 1:38 13
Cleaning appliance
• Use only a slightly damp, soft cloth to
clean the iron.
• Use standard cleaning products for
chrome, silver or stainless steel to
remove soiling from the soleplate 7.
• Caked-on residues can be removed
by heating the steam iron up to MAX
and ironing over an old cotton cloth.
Self-cleaning
CAUTION: Do not add vinegar,
descaler or other products to the
water tank 8: They might damage
the appliance.
If you use tap water, you should carry out
the self-clean operation after every use.
Otherwise self-cleaning should be performed at least twice a month.
1. Fill the water tank 8.
2. Set the steam iron in a vertical position.
3. Insert the power plug into a wall socket.
The pilot light 1 on the handle 2 lights
up.
4. Set the steam level controller 13 to
and the temperature controller 9
to MAX.
5. Wait until the temperature control lamp 5
is extinguished.
6. Hold the appliance horizontally over a
heat-proof kitchen bowl.
7. Press SELF CLEAN 10 and hold
down. Limescale residue is now
ejected with steam and hot water from
the steam openings in the soleplate 7.
Hold the button down until steam or
hot water are no longer ejected.
8. Repeat steps 1. to 7. until there are no
more residues.
9. Unplug the appliance, allow it to cool
down and pour away any water left in
the tank.
6. Storage
DANGER: The steam iron should
be kept out of the reach of children.
1. Set the temperature controller 9 to
MIN.
2. Leave to cool down.
3. Set the steam level controller 13 to
and pour out any remaining water
through the filler opening of the water
tank 8.
4. Wind the power cord 4 up around the
back of the appliance, making sure it
is not too tight.
5. Store the steam iron in a vertical posi-
tion, not standing on the soleplate 7.
7. Disposal
The symbol showing a
wheelie bin crossed
through indicates that the
product requires separate
refuse collection in the European Union. This applies
to the product and all accessories marked with this symbol. Products identified with this symbol may not be
discarded with normal household waste,
but must be taken to a collection point for
recycling electric and electronic appliances. Recycling helps to reduce the consumption of raw materials and protect the
environment.
Packaging
When disposing of the packaging, make
sure you comply with the environmental
regulations applicable in your country.
GB
7
Page 10

GB_RP58929 Dampfbuegeleisen.fm Seite 8 Freitag, 29. Oktober 2010 3:18 15
8. Troubleshooting
If your appliance fails to function as
required, please try this checklist first. Perhaps there is only a minor problem which
you can solve yourself.
DANGER! Do not attempt to repair the appliance yourself under
any circumstances.
No function:
Connect the appliance to the electricity
supply.
Increase the temperature using the temperature controller 9.
Little or no steam:
Fill the water tank 8 at least a quarter-full.
Set the steam level controller 13 to .
Perform self-cleaning.
Power steam function does not work:
Fill the water tank 8 at least a quarter-full.
Select the right temperature.
Pause for a few seconds between each
burst of steam.
Spray function does not work:
Fill the water tank 8 at least a quarter-full.
You have to pump several times for the
first spray.
Acoustic warning signal (beep) / Pilot light 1
flashes:
The appliance has been standing in a vertical position for approx. 8 minutes without
being used and the heating is now
switched off, or the appliance has been
standing in a horizontal position for
approx. 30 seconds without being used
and the heating is now switched off.
9. Technical specifications
Electrical data
Model: SDB 2200 A1
Mains voltage: 220 - 240V ~ 50/60Hz
Protection class: I
Power: 2200 W
Subject to technical modifications.
10. Warranty
The warranty for your appliance is valid for
3 years from the date of purchase. The appliance has been manufactured in accordance with strict quality guidelines and
tested before delivery. Should operational
errors occur despite this, however, please
phone the service centre rst. Our customer consultants will gladly assist you, and
arrange with you how to proceed. The warranty will be invalidated if the appliance is
incorrectly connected, if parts from different manufacturers are used, in the case of
normal wear and tear, upon the use of
force, independent attempts at repairing
the appliance or improper use.
Contact details:
Service hotline:
00800/4212 4212
(Monday to Friday
between 9 a.m. and 5 p.m. CET)
E-mail: hoyer-gb@teknihall.com
8
GB
Page 11

__RP58929_B6.book Seite 9 Freitag, 29. Oktober 2010 1:38 13
GB
9
Page 12

__RP58929_B6.book Seite 10 Freitag, 29. Oktober 2010 1:38 13
Page 13

__RP58929_B6.book Seite 11 Freitag, 29. Oktober 2010 1:38 13
Page 14

+R\HU+DQGHO*PE+
.¾KQHK¸IH
6'%$BB9B Ɇ,$1B
53B'DPSIEXHJHOHLVHQB&RYHUB/%LQGG
'+DPEXUJ
 Loading...