

Page 1
6
Steam Iron SDB 2000 A1
Steam Iron
Operating instructions
KOMPERNASS GMBH
BURGSTRASSE 21 · D-44867 BOCHUM
www.kompernass.com
ID-Nr.: SDB2000A1-06/10-V2
Page 2
SDB 2000 A1
q
t
w
y
u
i
o
a
s
q
w
e
d
r
Page 3
CONTENT PAGE
Basic Safety Instructions 2
Items supplied 3
Proper use 3
Before the First Use 3
Operating Elements 3
Operation 3
Filling with Tap Water ......................................................................................................................3
Plugging In and Ironing 4
Steam Ironing 4
Ironing with Steam Spray 5
Setting the Steam Iron Temporarily Aside 5
Putting the Steam Iron Away After Use 5
Drip-Stop Function 5
Cleaning 5
Self-cleaning function .......................................................................................................................5
Casing................................................................................................................................................6
Metal Parts ........................................................................................................................................6
Troubleshooting 6
Technical Data 6
Disposal 6
Warranty & Service 7
Importer 7
Read these operating instructions carefully before using the appliance for the first time and preserve this
maual for later reference. Pass this manual on to whoever might acquire the appliance at a future date.
- 1 -
Page 4

STEAM IRON
Basic Safety Instructions
Risk of Burning!
• Grasp the steam iron only by the handle when
the iron is hot.
• This appliance is not intended for use by persons
(including children) with reduced physical, sensorial or mental cabilities, or lack of experience
and knowledge, unless they have been given
supervision or instruction concerning use of the
appliance by a person responsible for their
safety.
• Children should be supervised to ensure that
they do not play with the appliance.
• Never hold your hand over the steam spray or
on hot metal parts.
• You may not open the filler opening of the water
reservoir while the iron is in use. Allow the steam
iron to cool down first and remove the power
plug from the power socket.
Fire Hazard!
• Never leave the steam iron unattended when it is
hot or switched on.
• Only ever store the steam iron away once it has
cooled down.
• Only ever iron with the temperature settings instructed by the care instructions for the material. You
could otherwise cause damage to the material.
If you do not know the care instructions, start with
the lowest temperature setting.
• Grasp the steam iron only by the handle when
the iron is hot.
• Never let children use the steam iron.
• Place this iron only on a stable and heat resistant
surface.
• Use this iron only on a stable and heat resistant
surface, for example, on an ironing board.
Danger of Electrocution!
• The mains voltage at the mains socket must
match that shown on the rating plate on the
device.
• If the connection lead or device does not work
perfectly or is damaged, have it examined and
repaired immediately at the service centre.
• Arrange for defective power plugs and/or cables
to be replaced as soon as possible by a qualified
technician or by our Customer Service Department to avoid the risk of injury.
• Only pull on the power plug and never on the
cord.
• Never bend (kink) or crush the power cord. Arrange it in such a way that it can not come into
contact with hot surfaces and such that no-one
can step on it or trip over it.
• Always remove the power plug from the power
socket after every use and when cleaning or
filling.
• Always unroll the power cord fully before switching on and do not use an extension cord.
• Never touch the cord or the power plug with
wet hands.
• Under no circumstances should you submerge
the steam iron in any liquid or let any liquid into
the device casing of the steam iron. You should
never expose the appliance to moisture or use
the device outside. Should any liquid get into the
appliance casing, remove the power plug immediately from the power socket and have the appliance repaired by qualified technicians.
• Never use the steam iron near water in the
bathtub, shower, wash basin or other vessels.
Nearby water presents a danger, even when
the appliance is switched off.
• You may never open the steam iron casing.
Have the defect steam iron repaired by qualified
technicians.
• Discontinue using the iron if it has fallen down,
shows signs of visible damage or leaks water.
- 2 -
Page 5

Important!
• Should the care instructions for a clothing article
not mention ironing, (Symbol ), you should
not iron that clothing article. You could otherwise
cause damage to the clothing article.
• You may only fill the water reservoir with tap
water. You will otherwise damage the steam
iron.
• You may not clean the steam iron with solvents,
alcohol or abrasive cleaning agents. You could
otherwise cause damages.
Proper use
The steam iron is strictly intended for ironing clothes.
You may only use the iron in a closed room and in
the private household. All other use is deemed
improper use.
Items supplied
Steam iron
Measuring beaker
Operating instructions
• Heat the steam iron for several minutes on the
highest setting.
• Press the button a few times for the steam blast
• Iron on a piece of scrap material to remove any
possible unclean patches from the gliding
sole
.
r
i
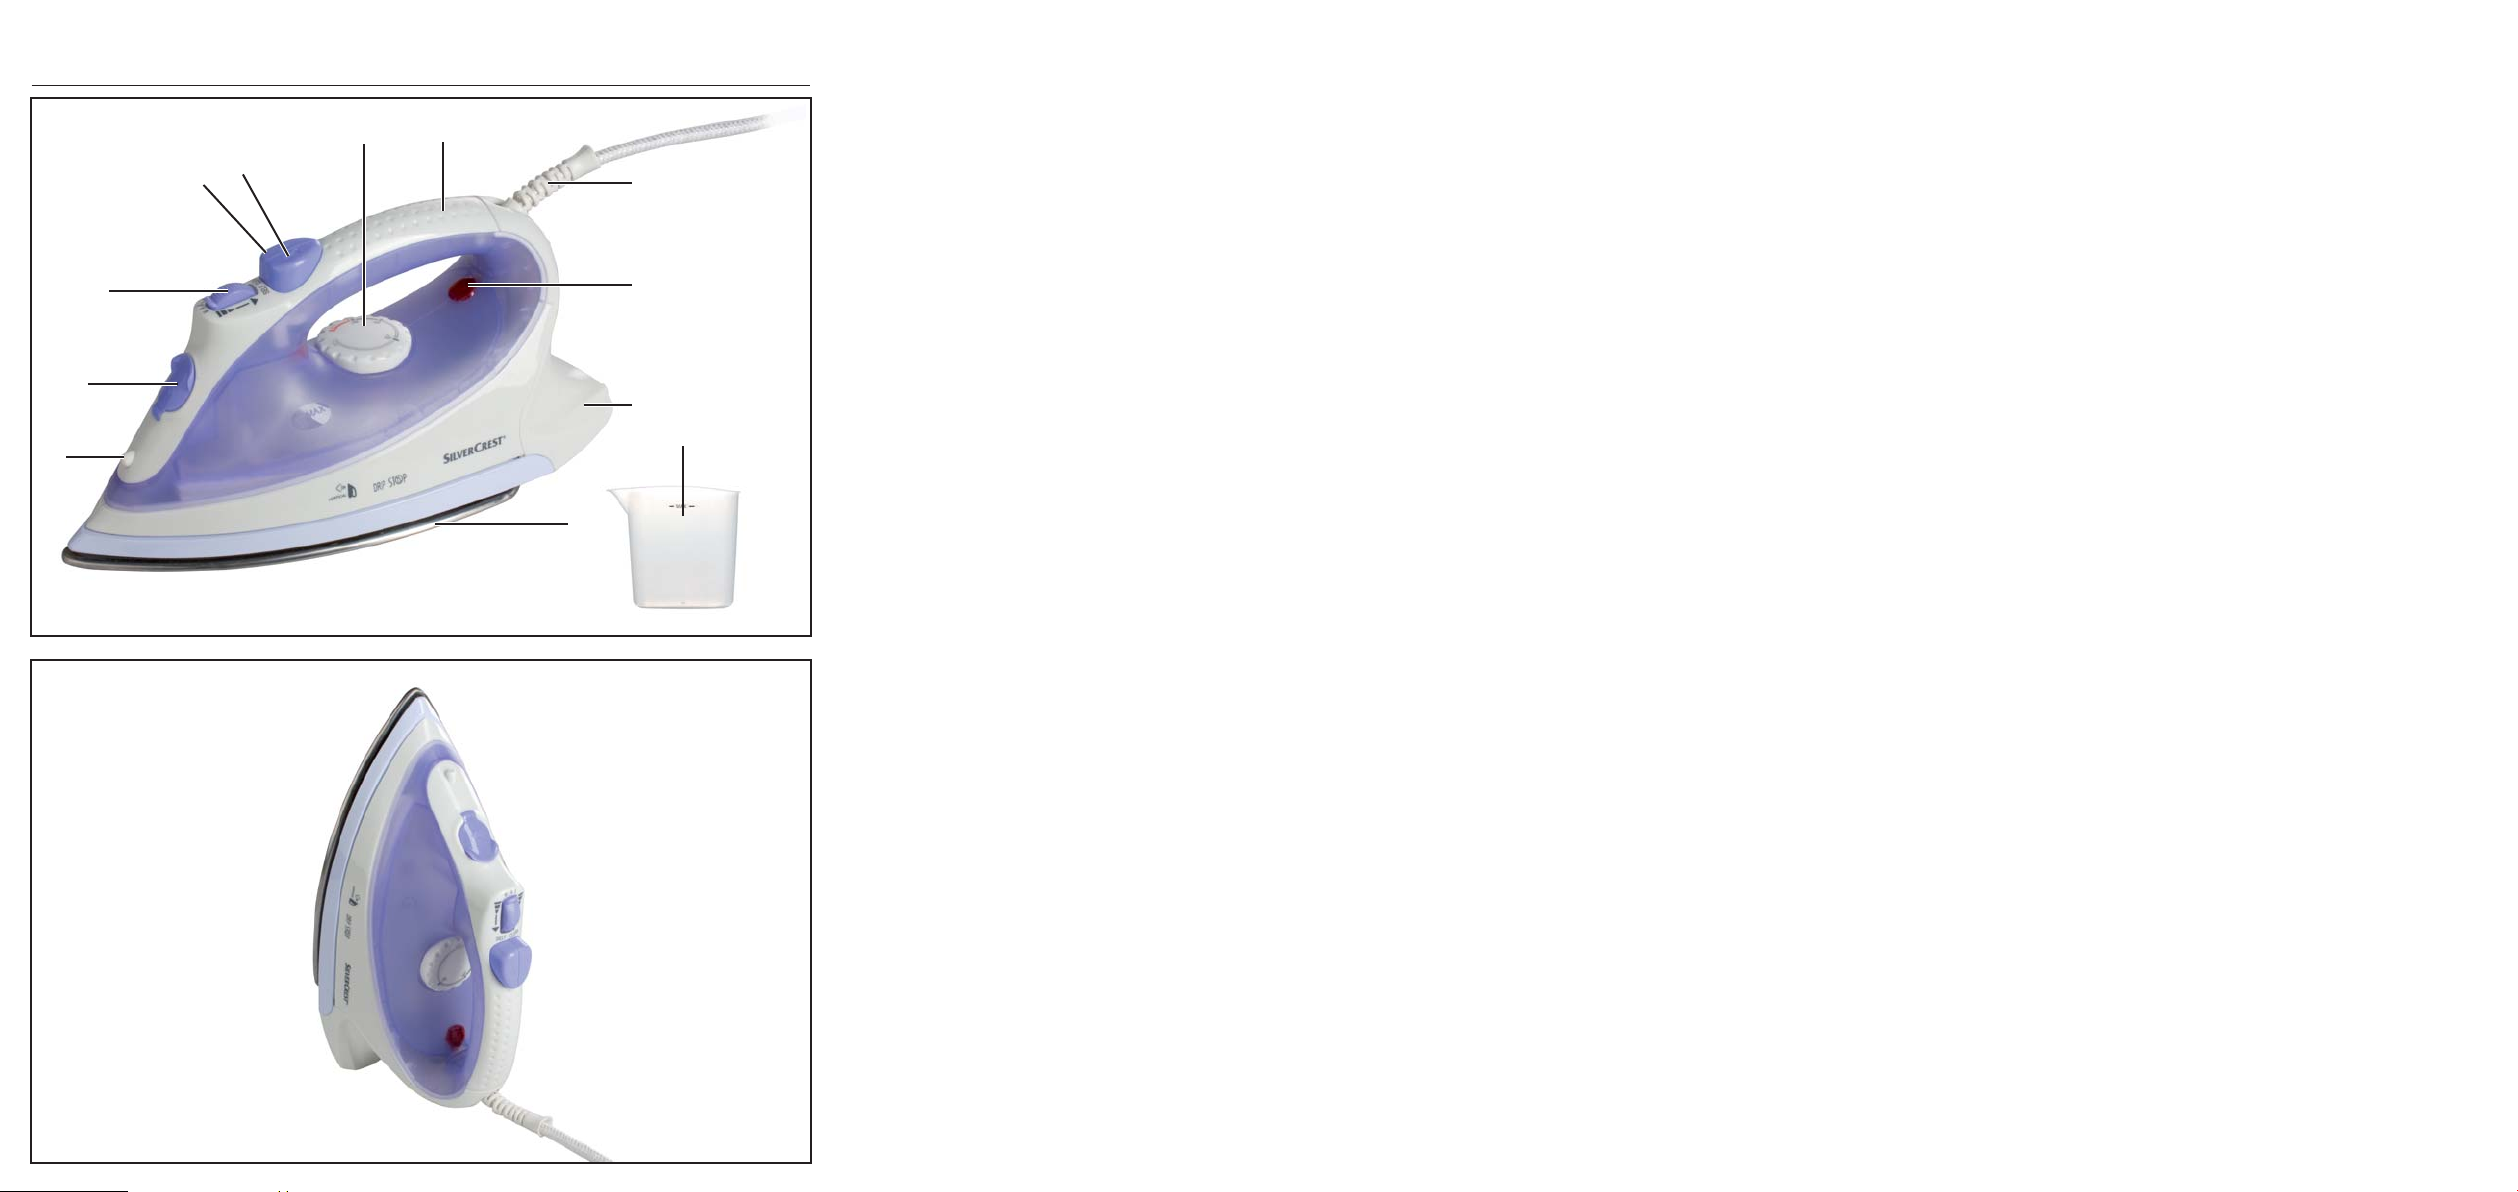
Operating Elements
Figure 1
Movable cable guide
q
Temperature control light
w
Standing foot
e
Gliding sole
r
Water nozzle
t
Filler opening for the water reservoir
y
Steam amount control
u
Button for the steam spray
i
Button for water fog
o
Temperature control
a
Handle
s
Measuring cup
d
Operation
.
Before the First Use
• Remove the steam iron from the packaging.
• Remove all stickers and films from the steam iron
and the gliding sole
Important!
Plastic bags can present a danger. To avoid any
danger of suffocation, keep this bag away from
babies and children.
• Plug the power plug into a power socket of
220 - 230 V~/50 Hz.
• Hold the steam iron horizontally.
• Set the temperature control
"MAX“.
r
.
to the position
a
Filling with Tap Water
• When it is cool, place the steam iron in a
horizontal position on its gliding sole
• Open the filler opening for the water
reservoir
• Fill the reservoir with tap water using the measuring cup
.
y
, at most to the "MAX" marking.
d
r
Notice
Should the mains water at your locality be rated as
hard, it is recommended that you mix mains water
with some distilled water. Otherwise, the jets for the
steam blast function could calcify (become blocked)
prematurely.
To extend the optimal steam blast function, mix mains
water with distilled water according to the table.
- 3 -
.
Page 6

Ratios - distilled
Water hardness
very soft / soft 0
medium 1: 1
water to mains
water
Important!
Should the care instructions for an article of clothing
not mention ironing, (Symbol ), you should not
iron that clothing article. You could otherwise cause
damage to the clothing article.
hard 2: 1
very hard 3: 1
The water hardness level can be queried at your
local water works.
• Close the water reservoir filler opening y,
making sure it "clicks" shut.
Plugging In and Ironing
You can dry iron without steam at all temperatures.
Steam ironing is first possible at level 2 (••), we
however recommend level 3 (•••) should be used for
steam ironing, because at this level the temperature
to generate steam is optimal.
• Plug the power plug into a power socket of
220 - 230 V~/50 Hz.
• Check the care instructions on the labels of the
clothing article whether and at which temperature the clothing article may be ironed.
Symbol
Temperature
regulator
• Set the appropriate temperature setting with the
temperature control
The control light for the temperature
When the control light goes out, the chosen
temperature
• Wait until the temperature control light
out.
• To moisten the material, press the button for the
water fog
a
has been reached.
w
.
o
Type of Material
Acrylic, rayon (viscose)
Silk, wool, polyester
blended fabrics
Cotton, linen, viscose
.
a
lights up.
w
w
goes
This function is suitable for very dry, crumpled or
creased materials.
Steam Ironing
• Set the steam control uto the desired steam
strength setting.
- 4 -
Page 7

Ironing with Steam Spray
The steam spray is especially suited to smoothing
places in the laundry that are difficult to access.
This prevents water dripping from the soleplate.
You must then re-set a suitable temperature with the
temperature controller
steam production is continued.
. As soon as this is reached,
a
• Raise the steam iron a little way.
• Press the steam spray button to release the steam
spray
i
.
Setting the Steam Iron
Temporarily Aside
Fire Hazard!
Never leave the steam iron unattended when it is
hot or switched on.
• Set the temperature control ato the position
"MIN“.
• Only put the steam iron down on its standing
foot
, fig. 2.
e
Putting the Steam Iron Away
After Use
• Remove the power plug from the power socket.
• Empty the water reservoir and clean the gliding
sole
.
r
• Place the cool steam iron horizontally on a soft,
clean base.
Drip-Stop Function
With conventional steam irons it can happen that
water drips from the iron sole
temperatures. This iron however possesses a new
equipment characteristic, the Drip-Stop function:
At low temperatures the iron automatically switches
off the supply of water for generating steam (for
steam blast and steam ironing). When this happens,
a “CLICK” is to be heard.
at too low ironing
r
Additionally, if you set the steam iron down or just
let it cool off, the drip-stop function prevents water
leakage from the soleplate
r
.
Cleaning
Self-cleaning function
• Fill the water container up to the marking MAX.
• Insert the plug into the power socket.
• Set the temperature regulator
MAX.
• Let the iron warm up till the control light
off and lights up again.
• Hold the iron horizontally over a trap vessel.
• Set the steam regulator
and hold it in this position. Now steam and boiling
water will start emerging from the steam escape
holes at the gilding sole
will get washed out.
• Release the steam regulator
water in the water container is used up.
• To ensure that no water remains in the steam
chamber, dry the gilding sole
this purpose, wipe the gilding sole
times on a towel or an old cloth.
• Allow the iron to cool down before storing it
away.
u
r
Note:
The effect of the self-cleaning function can diminish
after extended usage of the iron. We therefore recommend the addition of decalcification agent into
the water tank.
to the position
a
cuts
w
to Self-Clean position
. Any dirt, if present,
as soon as the
u
thoroughly. For
r
a few
r
- 5 -
Page 8

Casing
Disposal
Danger of injury!
Pull the mains power plug before cleaning. There is
a risk of electrical shock! Allow the device to cool
off. Danger of burning!
• Clean the casing only with a soft dry cloth.
• Do not use aggressive or chemical cleaning
agents.
Metal Parts
• Clean the metal parts with a cloth slightly
moistened with water and a mild, non-foaming
cleaning agent.
Troubleshooting
The steam iron puts out only little or no steam
The water reservoir in the steam iron is empty. Fill
the water reservoir with tap water (see "Filling with
Tap Water“).
The steam iron does not get hot
The steam iron is not plugged in or not switched on.
Plug the power plug into the power socket and set
the temperature control
temperature.
to the desired
a
Do not dispose of the appliance in your
normal domestic waste. This product is
subject to the European guideline
2002/96/EC.
Dispose of the appliance through an approved disposal centre or at your community waste facility.
Observe the currently applicable regulations.
In case of doubt, please contact your waste disposal
centre.
Dispose of all packaging materials in an
environmentally responsible manner.
The steam iron is defect. Have the defect steam iron
repaired by qualified technicians.
Technical Data
Power Supply Voltage: 220 - 240 V~/50 Hz
Output: 1600 - 2000 W
- 6 -
Page 9

Warranty & Service
Importer
The warranty for this appliance is for 3 years from
the date of purchase. The appliance has been manufactured with care and meticulously examined before delivery. Please retain your receipt as proof of
purchase. In the event of a warranty claim, please
make contact by telephone with our Service Department. Only in this way can a post-free despatch for
your goods be assured.
The warranty covers only claims for material and
maufacturing defects, but not for transport damage,
for wearing parts or for damage to fragile components, e.g. buttons or batteries. This product is for
private use only and is not intended for commercial
use. The warranty is void in the case of abusive and
improper handling, use of force and internal tampering not carried out by our authorized service
branch. Your statutory rights are not restricted in
any way by this warranty.
The warranty period will not be extended by repairs
made under warranty. This applies also to replaced
and repaired parts. Any damage and defects extant
on purchase must be reported immediately after unpacking the appliance, at the latest, two days after
the purchase date. Repairs made after the expiration of the warranty period are subject to payment.
KOMPERNASS GMBH
BURGSTRASSE 21
44867 BOCHUM, GERMANY
www.kompernass.com
DES Ltd
Units 14-15
Bilston Industrial Estate
Oxford Street
Bilston
WV14 7EG
Tel.: 0870/787-6177
Fax: 0870/787-6168
e-mail: support.uk@kompernass.com
Kompernass Service Ireland
Tel: 1850 930 412
Standard call rates apply. Mobile operators may vary.
e-mail: support.ie@kompernass.com
(0,082 EUR/Min.)
- 7 -
 Loading...