

Page 1
RD-6506
AUDIO/VIDEO RECEIVER
OPERATING INSTRUCTIONS
INSTRUCCIONES DE FUNCIONAMIENTO
RECEPTOR DE AUDIO/VIDEO
RECEPTEUR AUDIO/VIDEO
MODE D'EMPLOI
АУДИО/ВИДЕО ПРИЕМНИК
ИНСТРУКЦИЯ ПО ЭКСПЛУАТАЦИИ
AUDIO/VIDEO RECEIVER
BEDIENUNGSANLEITUNG
6505(G) cover_5lan_cover.qxp 2011-04-14 오전 9:43 페이지 1
Page 2
O
N / STANDBY
A
UTO / MANUAL
S
URROUND
S
TEREO
V
IDEO
A
UDIO
S
OUND
I
NPUT
AUDIO ASSIGNSPEAKER
O
N / OFF
TONE CH.LEVEL SETUP ENTER / MEMO BANDPRESETTUNE
P
HONES
A
UX 1 AUX 2
P
OWER
AUDIO / VIDEO RECEIVER R
D
6
505
O
N OFF
R
ETURN
M
AIN MENU
M
ASTER VOLUME
RD-6506(G)_ENG_110330_RD-6506(G)_ENG 2011-04-14 오전 9:29 페이지 2
Introduction
READ THIS BEFORE OPERATING YOUR UNIT
ENGLISH
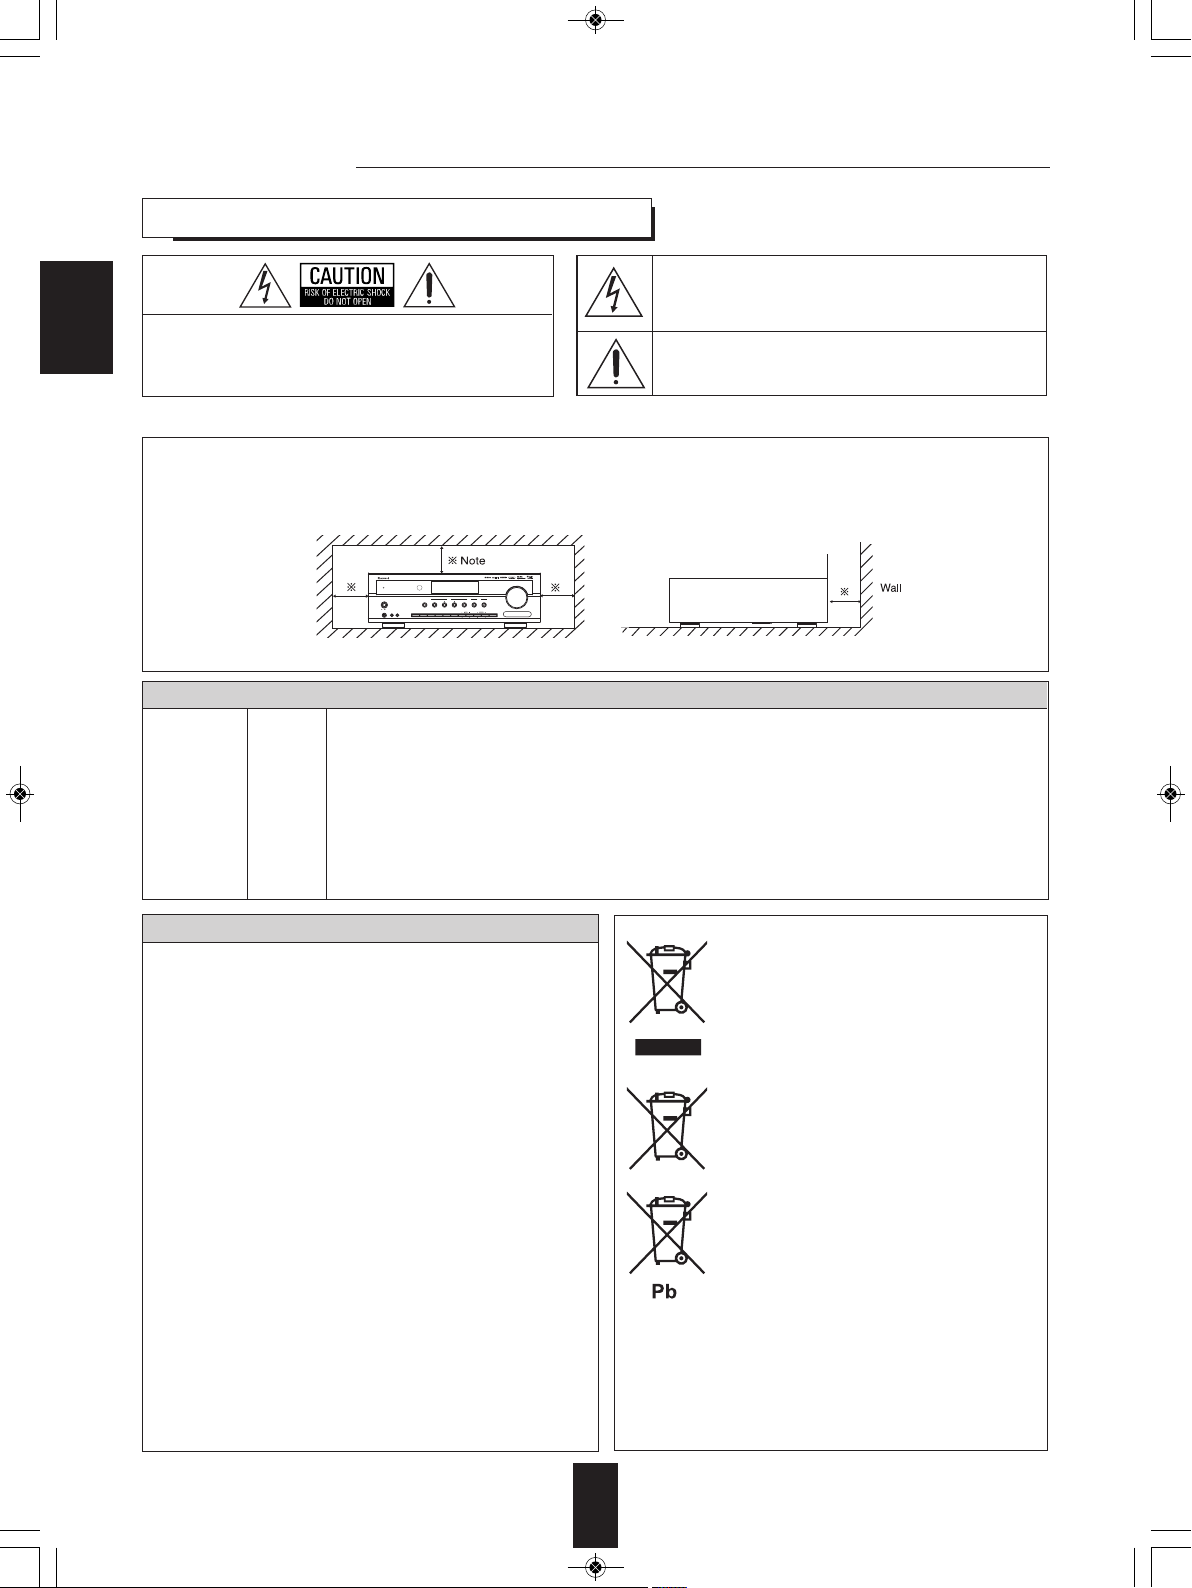
CAUTION
WARNING
Caution regarding installation
Note : For heat dispersal, do not install this unit in a confined space such as a bookcase or similar enclosure.
: TO REDUCE THE RISK OF ELECTRIC SHOCK,
O NOT REMOVE COVER (OR BACK).
D
NO USER-SERVICEABLE PARTS INSIDE.
REFER SERVICING TO QUALIFIED SERVICE
PERSONNEL.
: TO REDUCE THE RISK OF FIRE OR ELECTRIC SHOCK, DO NOT EXPOSE THIS APPLIANCE TO RAIN OR MOISTURE.
Be sure to leave a space around this unit equal to, or greater than, shown below.
Left, right and rear sides : 20 cm, top side : 40 cm
This symbol is intended to alert the user to the presence of
ninsulated "dangerous voltage" within the product's
u
enclosure that may be of sufficient magnitude to constitute
risk of electric shock to persons.
a
his symbol is intended to alert the user to the presence of
T
important operating and maintenance (servicing)
instructions in the literature accompanying the appliance.
Do not block ventilation openings or stack other equipment on the top.
FOR YOUR SAFETY
Units shipped to Australia are designed for operation on 230 V AC only.
To ensure safe operation, the three-pin plug supplied must be inserted only into a standard three-pin power point
which is effectively earthed through the normal household wiring. Extension cords used with the equipment must
be three-core and be correctly wired to provide connection to earth.
-
Improper extension cords are a major cause of fatalities. The fact that the equipment operates satisfactorily
does not imply that the power point is earthed and that the installation is completely safe. For your safety, if
EUROPE
AUSTRALIA
220 V
240 V
in any doubt about the effective earthing of the power point, consult a qualified electrician.
PAN-EUROPEAN UNIFIED VOLTAGE
All units are suitable for use on supplies 220-240 V AC.
CAUTION
Leave a space around the unit for sufficient ventilation.
•
Avoid installation in extremely hot or cold locations, or in an area
•
that is exposed to direct sunlight or heating equipment.
Keep the unit free from moisture, water, and dust.
•
Do not let foreign objects in the unit.
•
The ventilation should not be impeded by covering the ventilation
•
openings with items, such as newspapers, table-cloths, curtains,
etc.
No naked flame sources, such as lighted candles, should be
•
placed on the unit.
Please be care the environmental aspects of battery disposal.
•
The unit shall not be exposed to dripping or splashing for use.
•
No objects filled with liquids, such as vases, shall be placed on
•
the unit.
• Do not let insecticides, benzene, and thinner come in contact
with the set
Never disassemble or modify the unit in any way.
•
.
■Notes on the AC power cord and the wall outlet.
The unit is not disconnected from the AC power source(mains)
•
as long as it is connected to the wall outlet, even if the unit has
been turned off.
To completely disconnect this product from the mains,
•
disconnect the plug from the wall socket outlet.
When setting up this product, make sure that the AC outlet you
•
are using is easily accessible.
Disconnect the plug from the wall outlet when not using the unit
•
for long periods of time.
Information for Users on Collection and Disposal of
Old Equipment and used Batteries
These symbols on the products, packaging, and/or
accompanying documents mean that used electrical
and electronic products and batteries should not be
mixed with general household waste. For proper
treatment, recovery and recycling of old products and
used batteries, please take them to applicable
collection points, in accordance with your national
legislation.
By disposing of these products and batteries correctly,
you will help to save valuable resources and prevent
any potential negative effects on human health and the
environment which could otherwise arise from
inappropriate waste handling.
For more information about collection and recycling of
old products and batteries, please contact your local
municipality, your waste diposal service or the point of
sale where you purchased the items.
[Information on Disposal in other Countries outside the
European Union]
These symbols are only valid in the European Union. If
you wish to discard these items, please contact your
local authorities or dealer and ask for the correct
method of diposal.
Note for the battery symbol (bottom two symbol examples):
The sign Pb below the symbol for batteries indicates
that this batteries contains lead.
2
Page 3
RD-6506(G)_ENG_110330_RD-6506(G)_ENG 2011-04-14 오전 9:29 페이지 3
CONTENTS
Introduction
• READ THIS BEFORE OPERATING YOUR UNIT | 2
System Connections | 4
Front Panel Controls | 10
Remote Controls | 12
• REMOTE CONTROL OPERATION RANGE | 13
• LOADING BATTERIES | 13
Operations
• LISTENING TO A PROGRAM SOURCE | 14
• SURROUND SOUND | 16
• ENJOYING SURROUND SOUND | 17
• LISTENING TO RADIO BROADCASTS | 22
• LISTENING TO RDS BROADCASTS(FM ONLY) | 24
(RDS Tuner(Regional Option for some countries in Europe, etc.))
• RECORDING | 26
• OTHER FUNCTIONS | 27
• CONFIRMING THE HDMI FUNCTION | 28
ENGLISH
System Setup | 29
• SETTING THE SYSTEM | 31
• SETTING THE INPUT | 33
• SETTING THE SPEAKER SETUP | 34
• SETTING THE CH LEVEL | 38
• SETTING THE PARAMETER | 40
• SETTING THE HDMI | 42
Troubleshooting Guide | 44
Specifications | 45
3
Page 4
SN.
SPEAKERS
RLRL
SURROUND
(6 )
C
ENTER
(6 )
FRONT
(
6 )
POWER SOURCE
POWER CONSUMPTION
RD-6506
230V 50Hz
200W
D
ESIGNED IN USA
A
SSEMBLED IN CHINA
N
18041
HDMI
VIDEO 2
VIDEO 1
MONITOR
O
UT
CD
DIGITAL IN
R
L
I
N
VIDEO 2
I
N OUT
M
ONITOR
O
UT
V
IDEO 1VIDEO 1
V
IDEO
ANTENNAAUDIO
F
M 75
GND
A
M
LOOP
COAX 2
(CD)
O
PT
(VIDEO 1)
AVIS : RISQUE DE CHOC ELECTRIQUE-NE PAS OUVRIR.
WARNING : SHOCK HAZARD-DO NOT OPEN.
VIDEO 1
VIDEO 2 CD
VIDEO 1
TAPETAPE
R
L
I
N
O
UT
M
anufactured under license from Dolby Laboratories. Dolby, Pro Logic, and the double-D symbol are
t
rademarks of Dolby Laboratories.
S
UBWOOFER
O
UT
C
OAX 1
(V
IDEO 2
)
AUDIO/VIDEO RECEIVER
Manufactured under license under U.S. Patent #’s: 5,451,942 5,956,674 5,974,380 5,978,762 6,487,535 &
o
ther U.S. and worldwide patents issued & pending. DTS and the Symbol are registered trademarks &
D
TS Digital Surround and the DTS logos are trademarks of DTS, Inc. © DTS, Inc. All Rights Reserved.
842,3 3
23 6
5 1 27
ANTENNA
FM 75
GND
AM
L
OOP
ANTENNA
FM 75
G
ND
A
M
LOOP
ANTENNA
FM 75
GND
AM
LOOP
RD-6506(G)_ENG_110330_RD-6506(G)_ENG 2011-04-14 오전 9:29 페이지 4
System Connections
• Please be certain that this unit is unplugged from the AC outlet before making any connections.
• Since different components often have different terminal names, carefully read the operating instructions of the component
connected.
• Be sure to observe the color coding when connecting audio, video and speaker cords.
• Make connections firmly and correctly. If not, it can cause loss of sound, noise or damage to the receiver.
ENGLISH
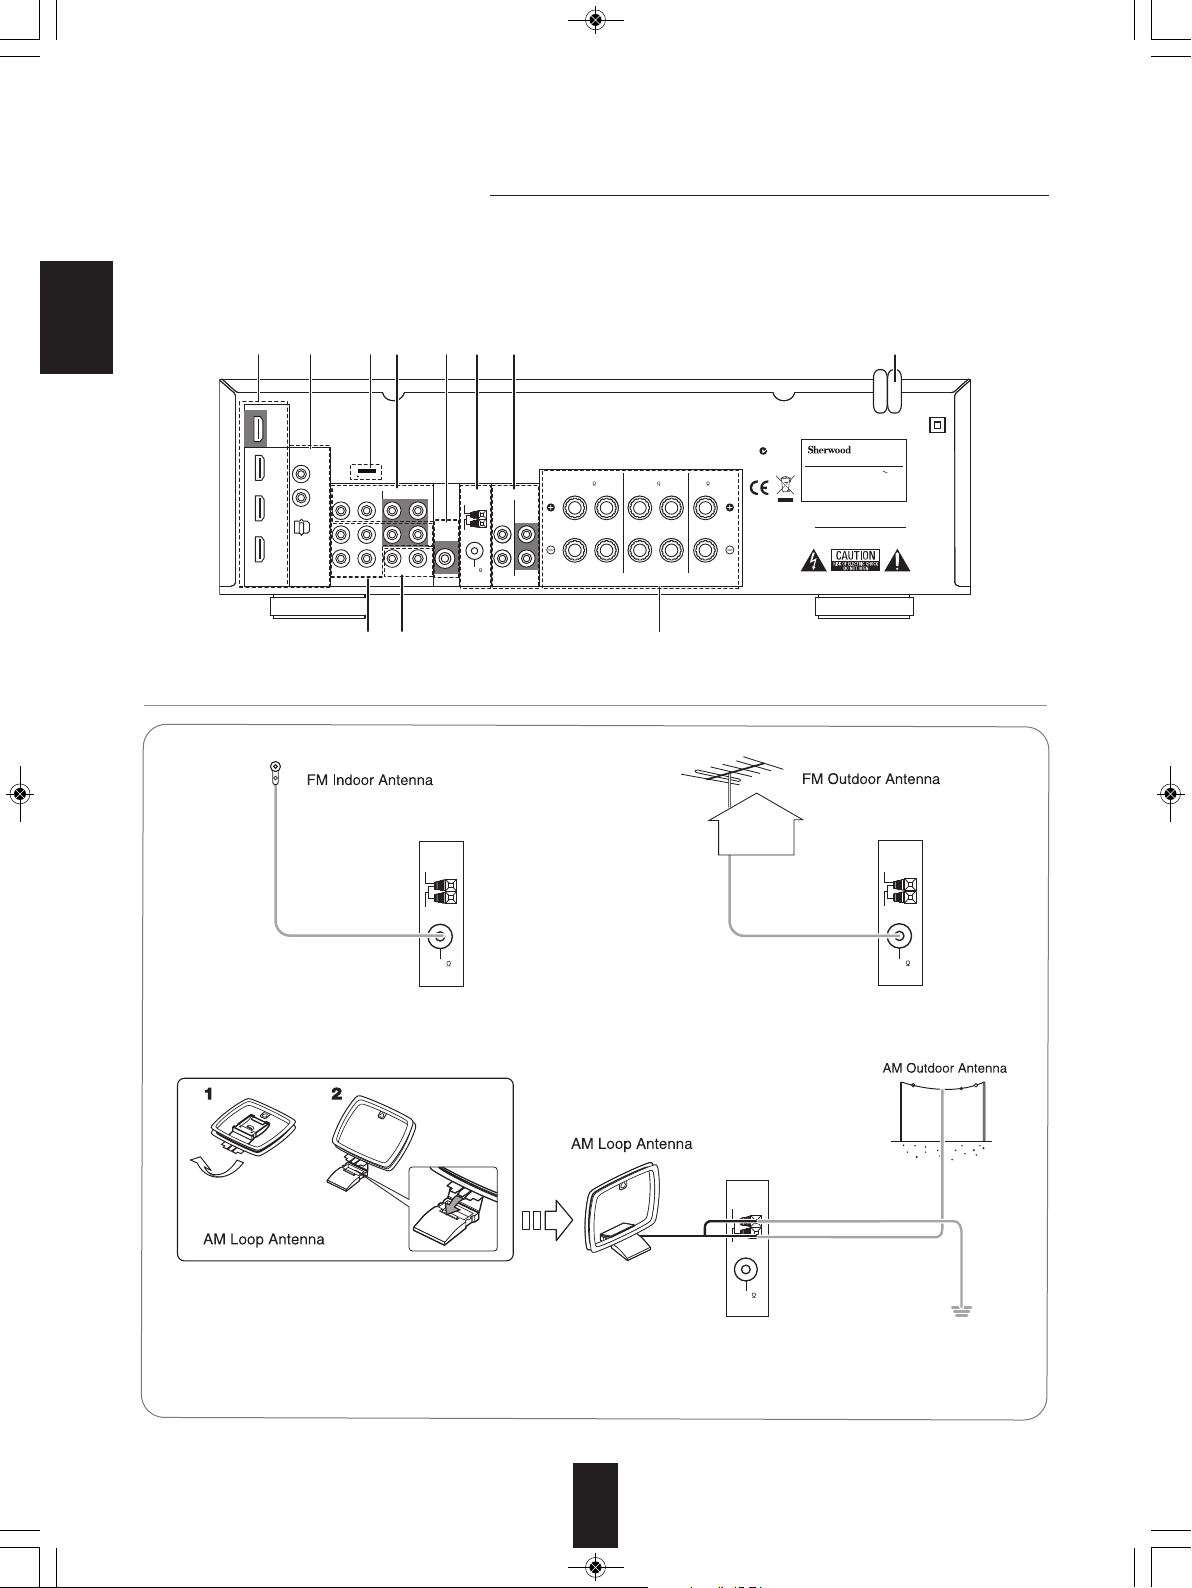
1. CONNECTING ANTENNAS
• Change the position of the FM indoor antenna until you get
the best reception of your favorite FM stations.
• A 75Ω outdoor FM antenna may be used to further
improve the reception. Disconnect the indoor
antenna before replacing it with the outdoor one.
• Place the AM loop antenna as far as possible from the receiver, TV set, speaker cords and the AC
input cord and set it to a direction for the best reception.
• If the reception is poor with the AM loop antenna, an AM outdoor antenna can be used in place of
the AM loop antenna.
4
Page 5

HDMI
VIDEO 2
VIDEO 1
MONITOR
OUT
VIDEO 2
IN OUT
MONITOR
OUT
VIDEO 1VIDEO 1
VIDEO
AUDIO
VIDEO 1
VIDEO 2
VIDEO 1
IN
RD-6506(G)_ENG_110330_RD-6506(G)_ENG 2011-04-14 오전 9:29 페이지 5
2. CONNECTING VIDEO COMPONENTS
• The jacks of VIDEO 1 may also be connected to a DVD recorder or other digital video recording component.
For details, refer to the operating instructions of the component to be connected.
• The jacks of VIDEO 2 can also be connected to an additional video component such as a cable TV tuner or satellite system.
• There are (composite) VIDEO jacks for analog video connections and the HDMI connectors for digital video and audio
connections.
• For your reference, the excellence in picture quality is as follows : "HDMI” > "(composite) VIDEO".
■Notes :
• When recording video program sources through the (composite) VIDEO 1 OUT jack or viewing video program sources
through the (composite) MONITOR OUT jack, you must connect the (composite) VIDEO IN jack to the video playback
components such as BD player, DVD player, etc.
ENGLISH
5
Page 6
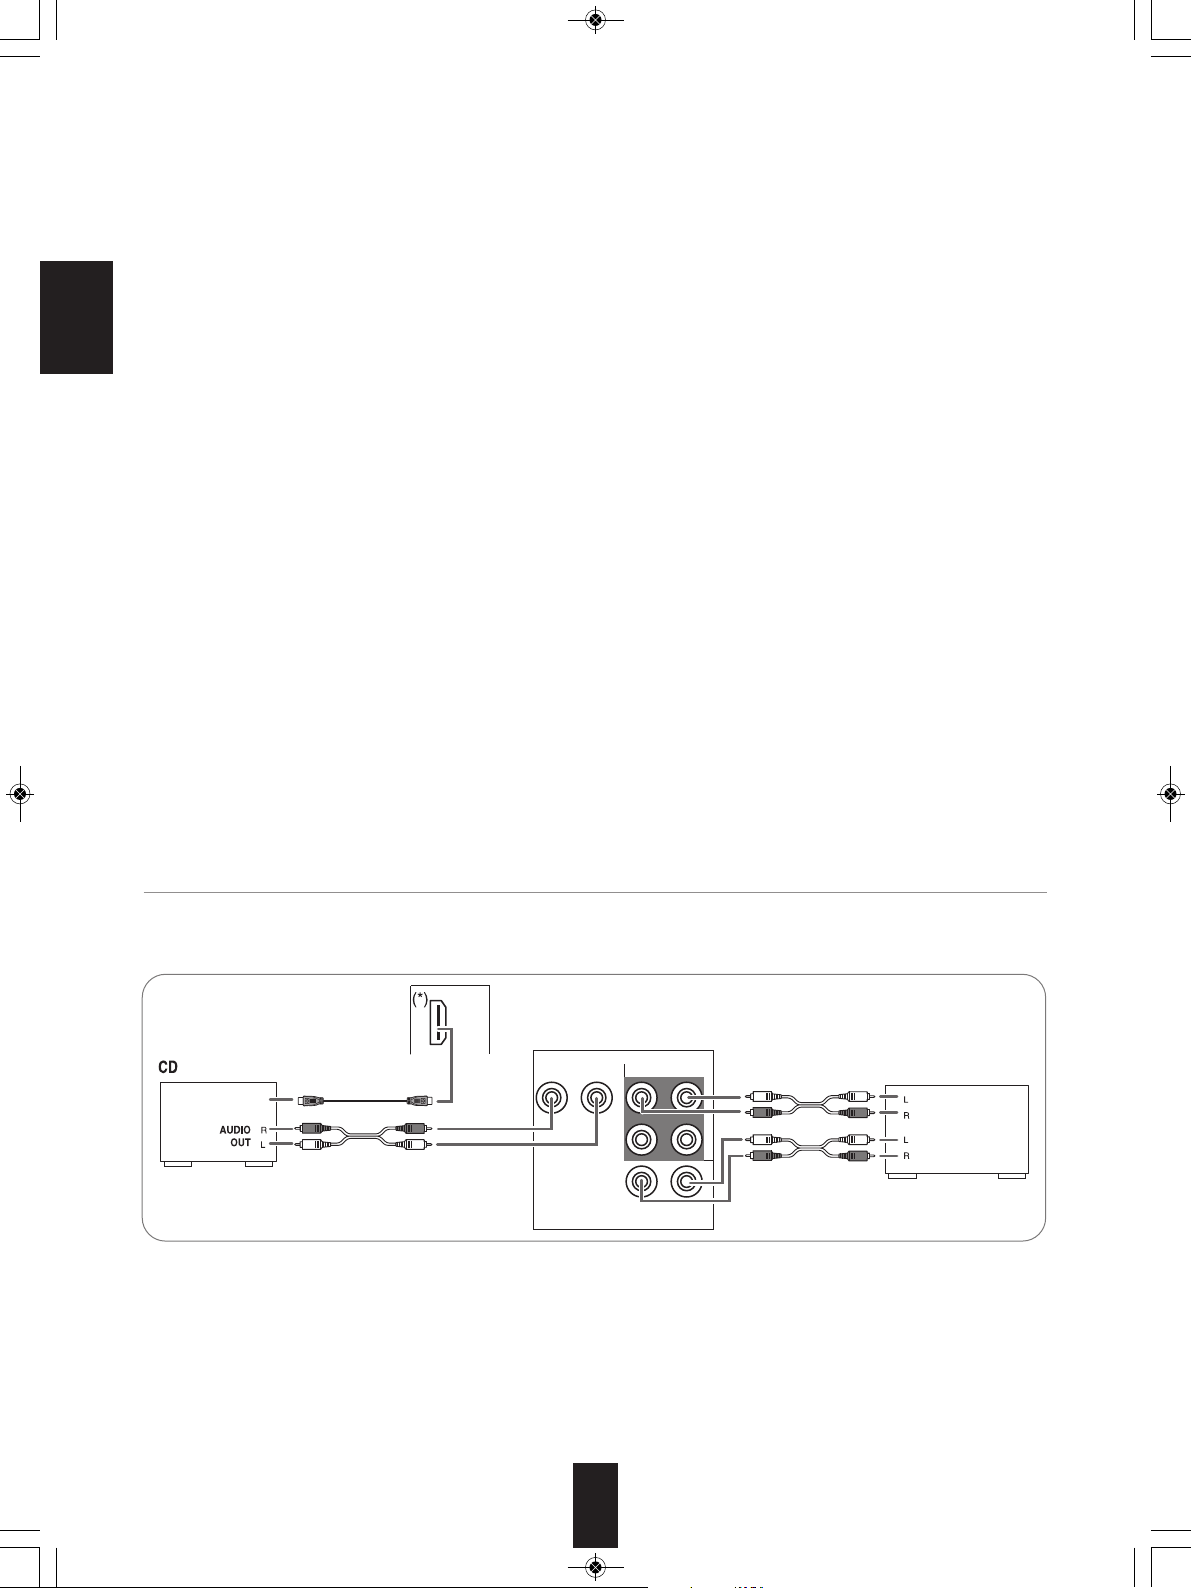
CD
RL
IN
AUDIO
CD
VIDEO 1
TAPETAPE
RL
IN
OUT
TAPE Tape deck, MD recorder, etc.
AUDIO
OUT
HDMI OUT
AUDIO
IN
CD player, BD player, Video game player, etc.
RD-6506(G)_ENG_110330_RD-6506(G)_ENG 2011-04-14 오전 9:29 페이지 6
Continued
■HDMI (High Definition Multimedia Interface) connection : (*)
• You can connect the source component (DVD player, etc.) to the display component (TV, projector, etc.) through this receiver
with using a commercially available HDMI cord.
• The HDMI connection can carry uncompressed digital video signals and digital audio signals.
• The HDMI video stream signals (video signals) are theoretically compatible with DVI-D. When connecting to a TV monitor,
etc., equipped with DVI-D connector, it is possible to connect using a commercially available HDMI-DVI converter cord.
Since the HDMI-to-DVI connection cannot carry any audio signals, set the HDMI AUDIO OUT to AMP to hear the HDMI digital
audio signals on this receiver.(For details, refer to "When selecting the HDMI AUDIO OUT" on page 42.)
ENGLISH
■Copyright protection system
• This unit supports HDCP (High-bandwidth Digital Contents Protection), technology to protect copyright of digital video signals
against illegal duplication. HDCP must also be supported on the components connected to this unit.
• HDMI, the HDMI logo and High-Definition Multimedia Interface are trademarks or registered trademarks of HDMI licensing
LLC.
■Notes :
• For stable signal transfer, we recommend using HDMI cables that are a maximum of 5 meters in length.
• Among the components that support HDMI, some components can control other components via the HDMI connector.
For details on the HDMI function, refer to “CONFIRMING THE HDMI FUNCTION” on page 28 and “SETTING THE HDMI” on
page 42.
• The audio signals from the HDMI connector (including the sampling frequency and bit length) may be limited by the
component that is connected.
• The video signals will not be output properly if a component incompatible with HDCP is connected.
• If the resolutions of the video signals which are output from the MONITOR OUTs and your monitor TV are not matched, the
picture is not clear, natural or displayed. In this case, change the setting of the resolution on the source component (BD
player, etc.) to one which the monitor TV can handle. (For details, refer to the operating instructions of the source component.)
• When you want to enjoy only the picture on your TV, not the sound, you should set the HDMI AUDIO OUT to AMP not to
output the digital audio signal from the HDMI MONITOR OUT of this receiver. (For details, refer to "When selecting the HDMI
AUDIO OUT" on page 42.)
3. CONNECTING AUDIO COMPONENTS
• The TAPE IN/OUT jacks can be connected to audio recording equipment such as a tape deck, an MD recorder, etc.
• The HDMI IN of CD can be connected to an additional video component without analog video jacks.
6
Page 7
SUBWOOFER
OUT
D
IGITAL IN
COAX 2
(CD)
OPT
(V
IDEO 1
)
C
OAX 1
(V
IDEO 2
)
RD-6506(G)_ENG_110330_RD-6506(G)_ENG 2011-04-14 오전 9:29 페이지 7
4. CONNECTING DIGITAL INS
• The OPTICAL and the COAXIAL DIGITAL OUTs of the
components that are connected to CD, VIDEO 1 and VIDEO 2 of
this unit can be connected to these DIGITAL INs.
• A digital input should be connected to the components such as a
CD player, DVD player, etc. capable of outputting DTS Digital
Surround, Dolby Digital or PCM format digital signals, etc.
• For details, refer to the operating instructions of the component
connected.
• When making the COAXIAL DIGITAL connection, be sure to use
a 75Ω COAXIAL cord, not a conventional AUDIO cord.
• Some of the commercially available optical fiber cords cannot be
used for the equipment. If there is an optical fiber cord which
cannot be connected to your equipment, consult your dealer or
nearest service organization.
■Note :
• Be sure to make either a OPTICAL or a COAXIAL DIGITAL
connection on each component. (You don’t need to do both.)
■Digital input default settings
• If you connect the DIGITAL INs to your components, it is easier to do so following the default settings.
• If your DIGITAL connections are different from default settings, you should assign the DIGITAL INs you used with the “When
selecting the AUDIO ASSIGN” procedure on page 33.
• The default settings are as follows :
OPTICAL IN : VIDEO 1, COAX 1 IN : VIDEO 2, COAX 2 IN : CD
ENGLISH
5. CONNECTING SUBWOOFER PREOUT
• To emphasize the deep bass sounds, connect a powered
subwoofer.
7
Page 8
SPEAKERS
RLRL
SURROUND
(6 )
CENTER
(6 )
FRONT
(6 )
RD-6506(G)_ENG_110330_RD-6506(G)_ENG 2011-04-14 오전 9:29 페이지 8
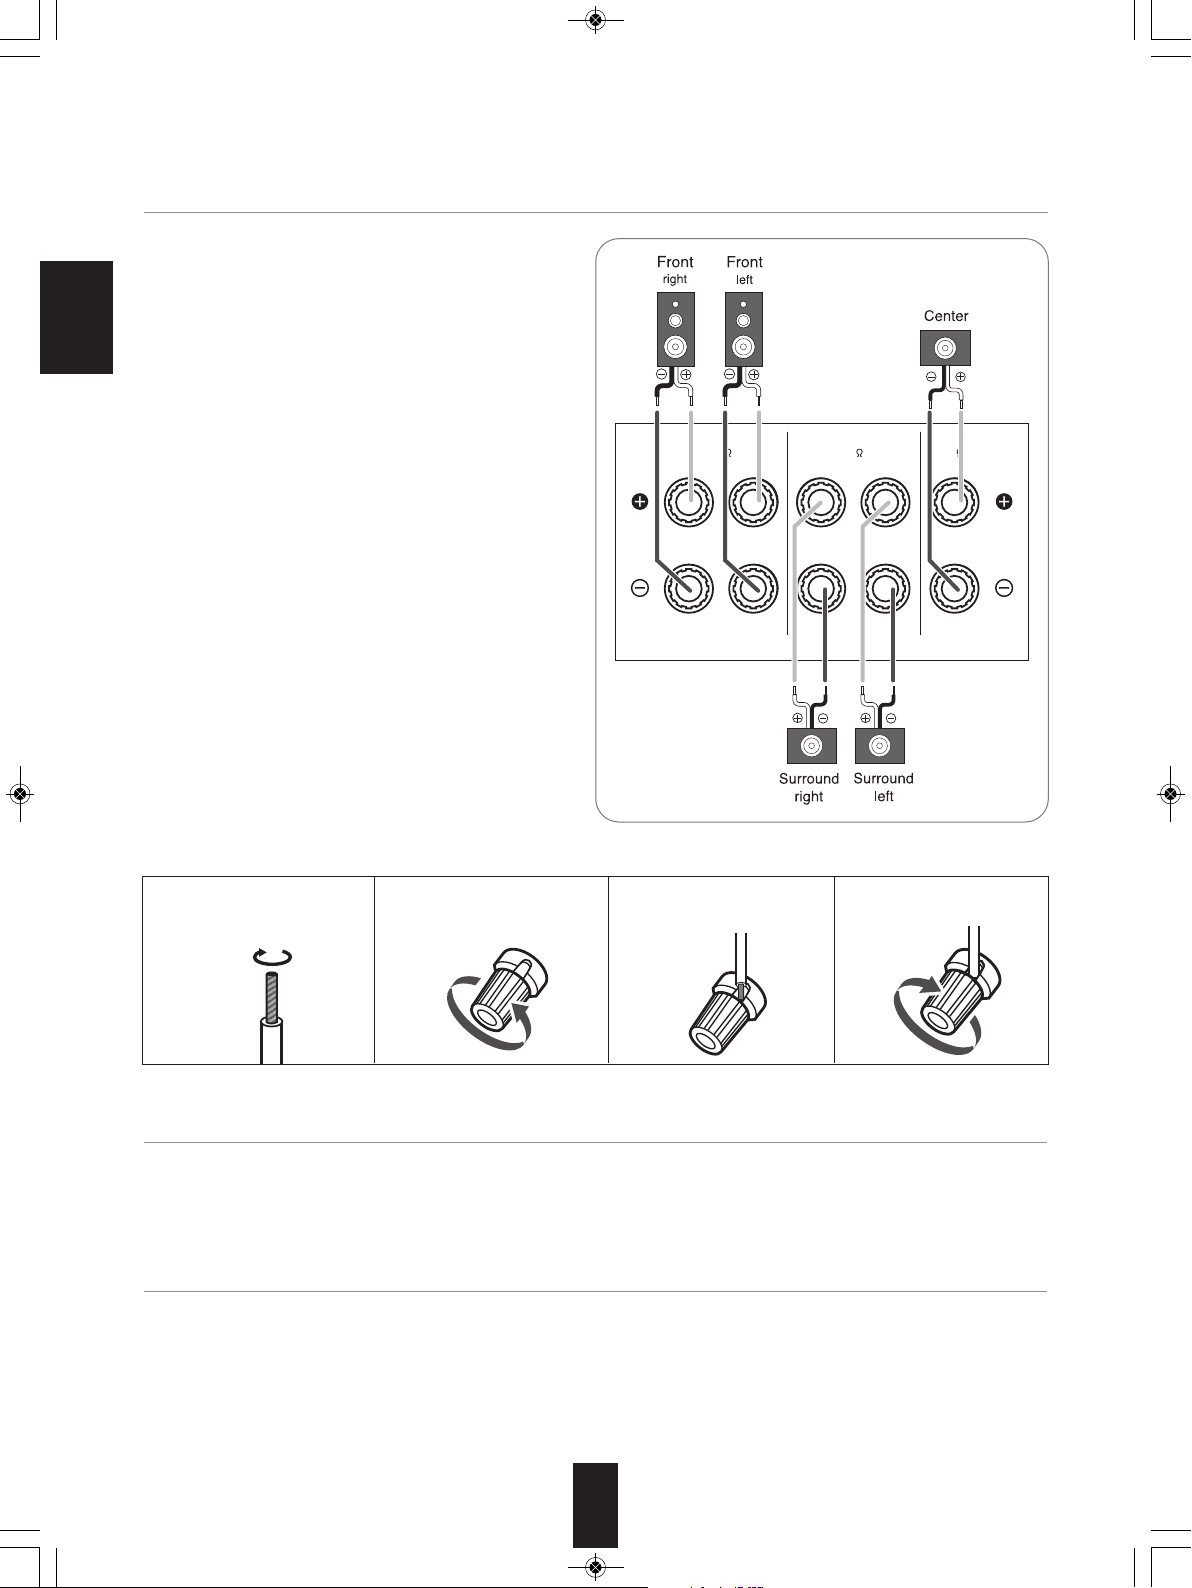
6. CONNECTING SPEAKERS
• Be sure to connect speakers firmly and correctly
according to the channel(left and right) and the polarity
(+ and -). If the connections are faulty, no sound will be
heard from the speakers, and if the polarity of the speaker
connection is incorrect, the sound will be unnatural and
lack bass.
ENGLISH
• For installing the speakers, refer to "Speaker placement"
on page 9.
• After installing the speakers, first adjust the speaker
settings according to your environment and speaker
layout.
(For details, refer to "SETTING THE SPEAKER SETUP"
on page 34.)
Caution :
• Be sure to use the speakers with the impedance of 6
ohms or above.
• Do not let the bare speaker wires touch each other or any
metal part of this unit. This could damage this unit and/or
the speakers.
• Never touch the speaker terminals while the AC input
cord is connected to the wall AC outlet. Doing so could
result in electric shocks.
■Connecting speaker wire
1. Strip away approx. 10 mm
(3/8 inch) of wire insulation,
then twist the wire ends
tight.
7. AC INPUT CORD
• Plug the cord into a wall AC outlet.
8. TERMINAL FOR UPGRADES
• This terminal may be used in the future to update the operating software so that it will be able to support new digital audio
formats, etc.
■Note :
• Programming for upgrades requires specialized programming knowledge and for that reason we recommend that it only be
done by qualified installers.
2. Loosen by turning the
speaker terminal counterclockwise.
3. Insert the bare part of the
wire.
4. Tighten by turning it
clockwise.
8
Page 9
RD-6506(G)_ENG_110330_RD-6506(G)_ENG 2011-04-14 오전 9:29 페이지 9
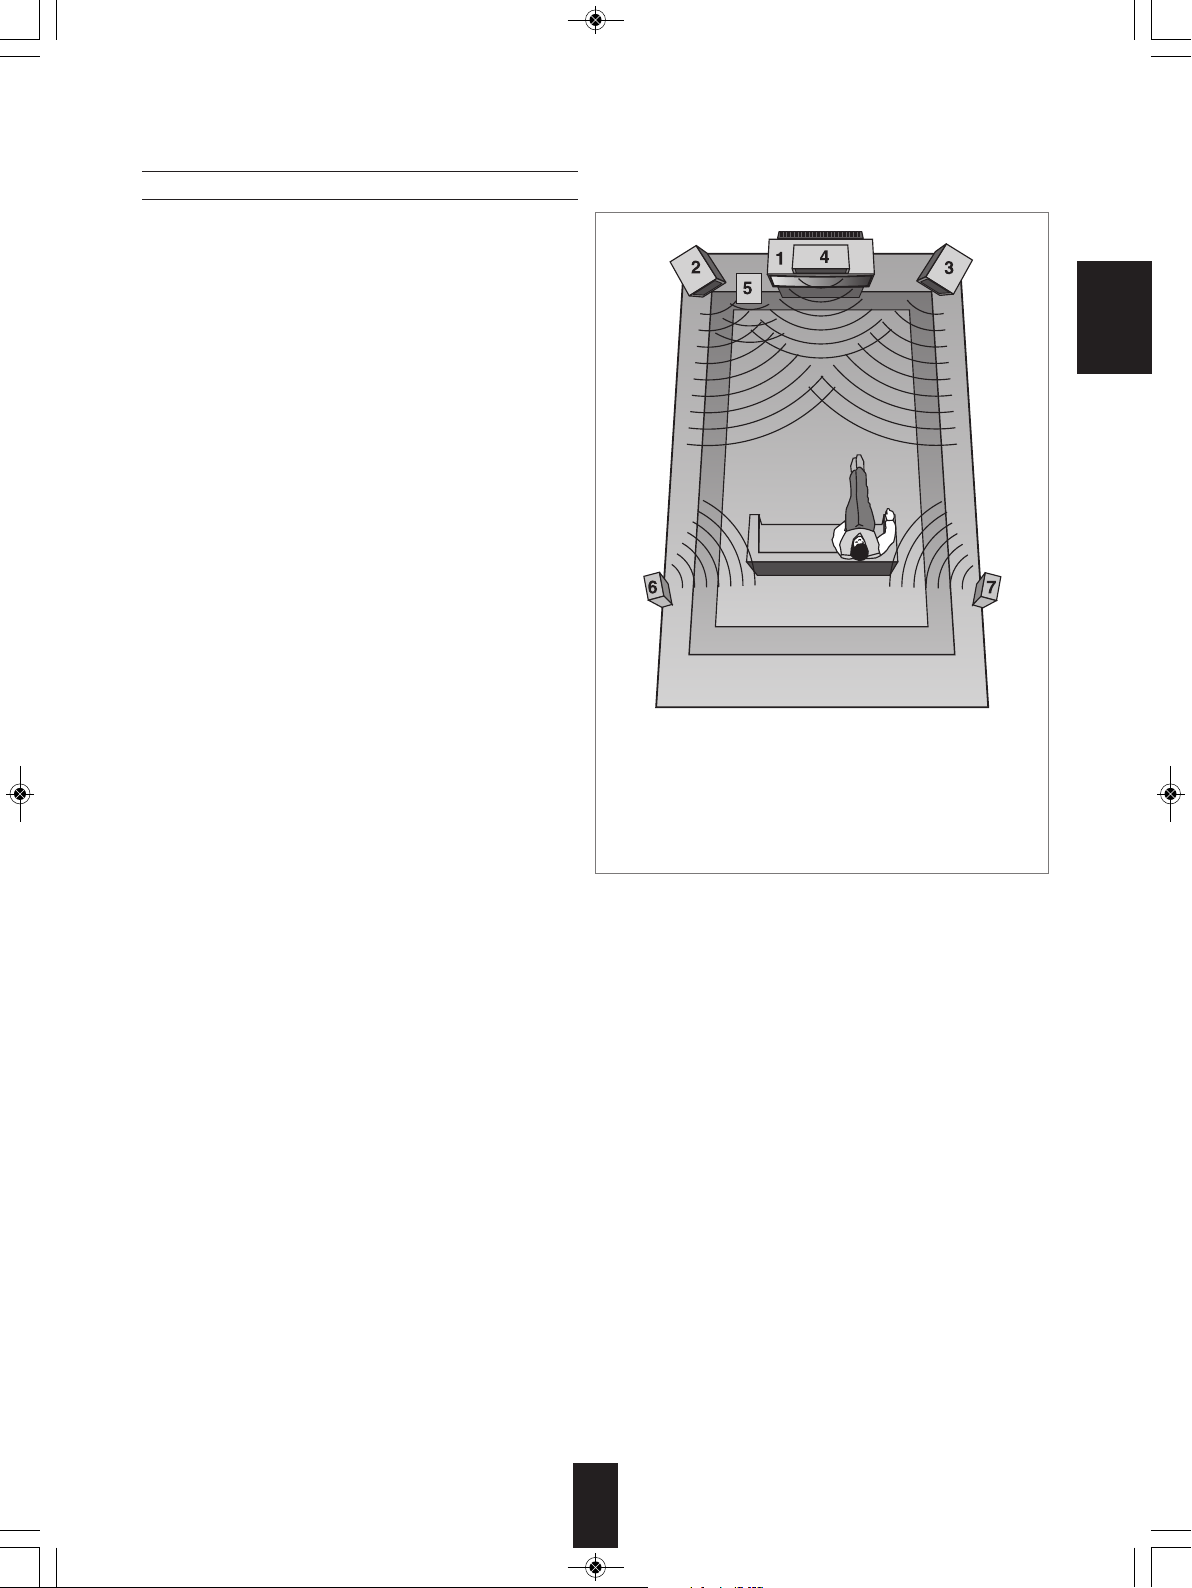
Speaker placement
Ideal speaker placement varies depending on the size of
your room and the wall coverings, etc. The typical example
of speaker placement and recommendations are as follows :
■Front left and right speakers and center speaker
• Place the front speakers with their front surfaces as flush
with TV or monitor screen as possible.
• Place the center speaker between the front left and right
speakers and no further from the listening position than the
front speakers.
• Place each speaker so that sound is aimed at the location
of the listener’s ears when at the main listening position.
■Surround left and right speakers
• Place the surround speakers approximately 1 meter (40
inches) above the ear level of a seated listener on the
direct left and right of them or slightly behind.
■Subwoofer
• The subwoofer reproduces powerful deep bass sounds.
Place a subwoofer anywhere in the front as desired.
ENGLISH
■Notes :
• When using a conventional TV, to avoid interference with
the TV picture, use only magnetically shielded front left
and right and center speakers.
• To obtain the best surround effects, the speakers except
the subwoofer should be full range speakers.
1. TV or Screen
2. Front left speaker
3. Front right speaker
4. Center speaker
5. Subwoofer
6. Surround left speaker
7. Surround right speaker
9
Page 10
O
N / STANDBY
AUTO / MANUAL
S
URROUND
STEREO
V
IDEO
A
UDIO
S
OUND
I
NPUT
A
UDIO ASSIGNSPEAKER
ON / OFF
T
ONE CH.LEVEL SETUP ENTER / MEMO BANDPRESETTUNE
P
HONES
AUX 1 AUX 2
P
OWER
AUDIO / VIDEO RECEIVER R
D-6
506
O
N OFF
RETURN
M
AIN MENU
MASTER VOLUME
681 2
9
10 12 1413 15 16 17 18 19 20 21 22
73 4 11 5
RD-6506(G)_ENG_110330_RD-6506(G)_ENG 2011-04-14 오전 9:29 페이지 10
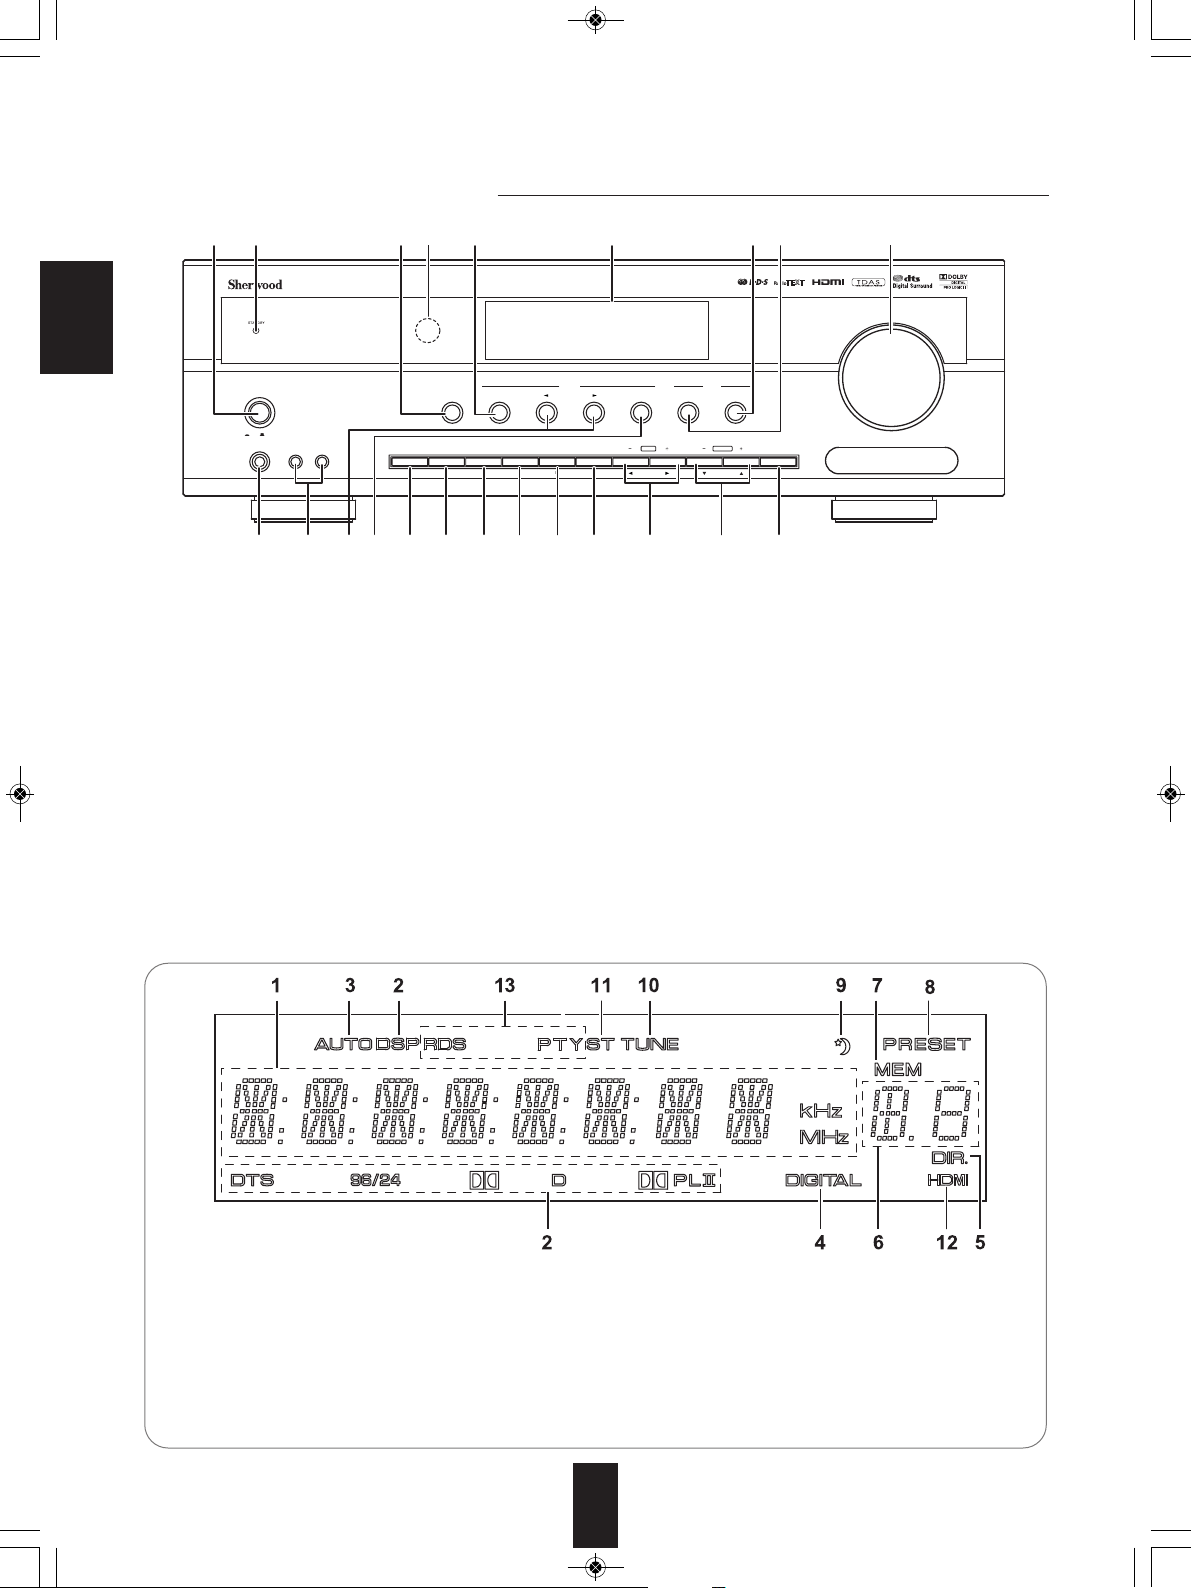
Front Panel Controls
ENGLISH
1. POWER switch
2. STANDBY indicator
3. POWER ON/STANDBY button
4. REMOTE SENSOR
5. FLUORESCENT DISPLAY
For details, see below.
6. VIDEO INPUT SELECTOR button
7. AUDIO INPUT SELECTOR button
8. MASTER VOLUME knob
9. HEADPHONE jack
10. AUX 1, 2 IN jacks
For details, see next page.
11. AUTO/MANUAL button
■FLUORESCENT DISPLAY
12. SURROUND MODE SELECT (▶/◀) buttons
13. STEREO button
14. SPEAKER button
15. AUDIO ASSIGN button
16. TONE MODE button
17. CHANNEL LEVEL button
18. SETUP button
19. ENTER/MEMORY button
20. TUNING UP/DOWN(+/-),
CURSOR LEFT/RIGHT(◀/▶) buttons
21. PRESET UP/DOWN(+/-),
CURSOR UP/DOWN(▲/▼) buttons
22. BAND button
1. Input, frequency, volume level, operating information, etc.
2. Surround mode indicators
3. AUTO indicator
4. DIGITAL INPUT indicator
5. DIRECT indicator
6. Preset number display
7. MEMORY indicator
8. PRESET indicator
9. SLEEP indicator
10. TUNED indicator
11. STEREO indicator
12. HDMI indicator
13. RDS indicators
(Regional option for Europe, etc.)
10
Page 11
A
UX 1 AUX 2
RD-6506(G)_ENG_110330_RD-6506(G)_ENG 2011-04-14 오전 9:29 페이지 11
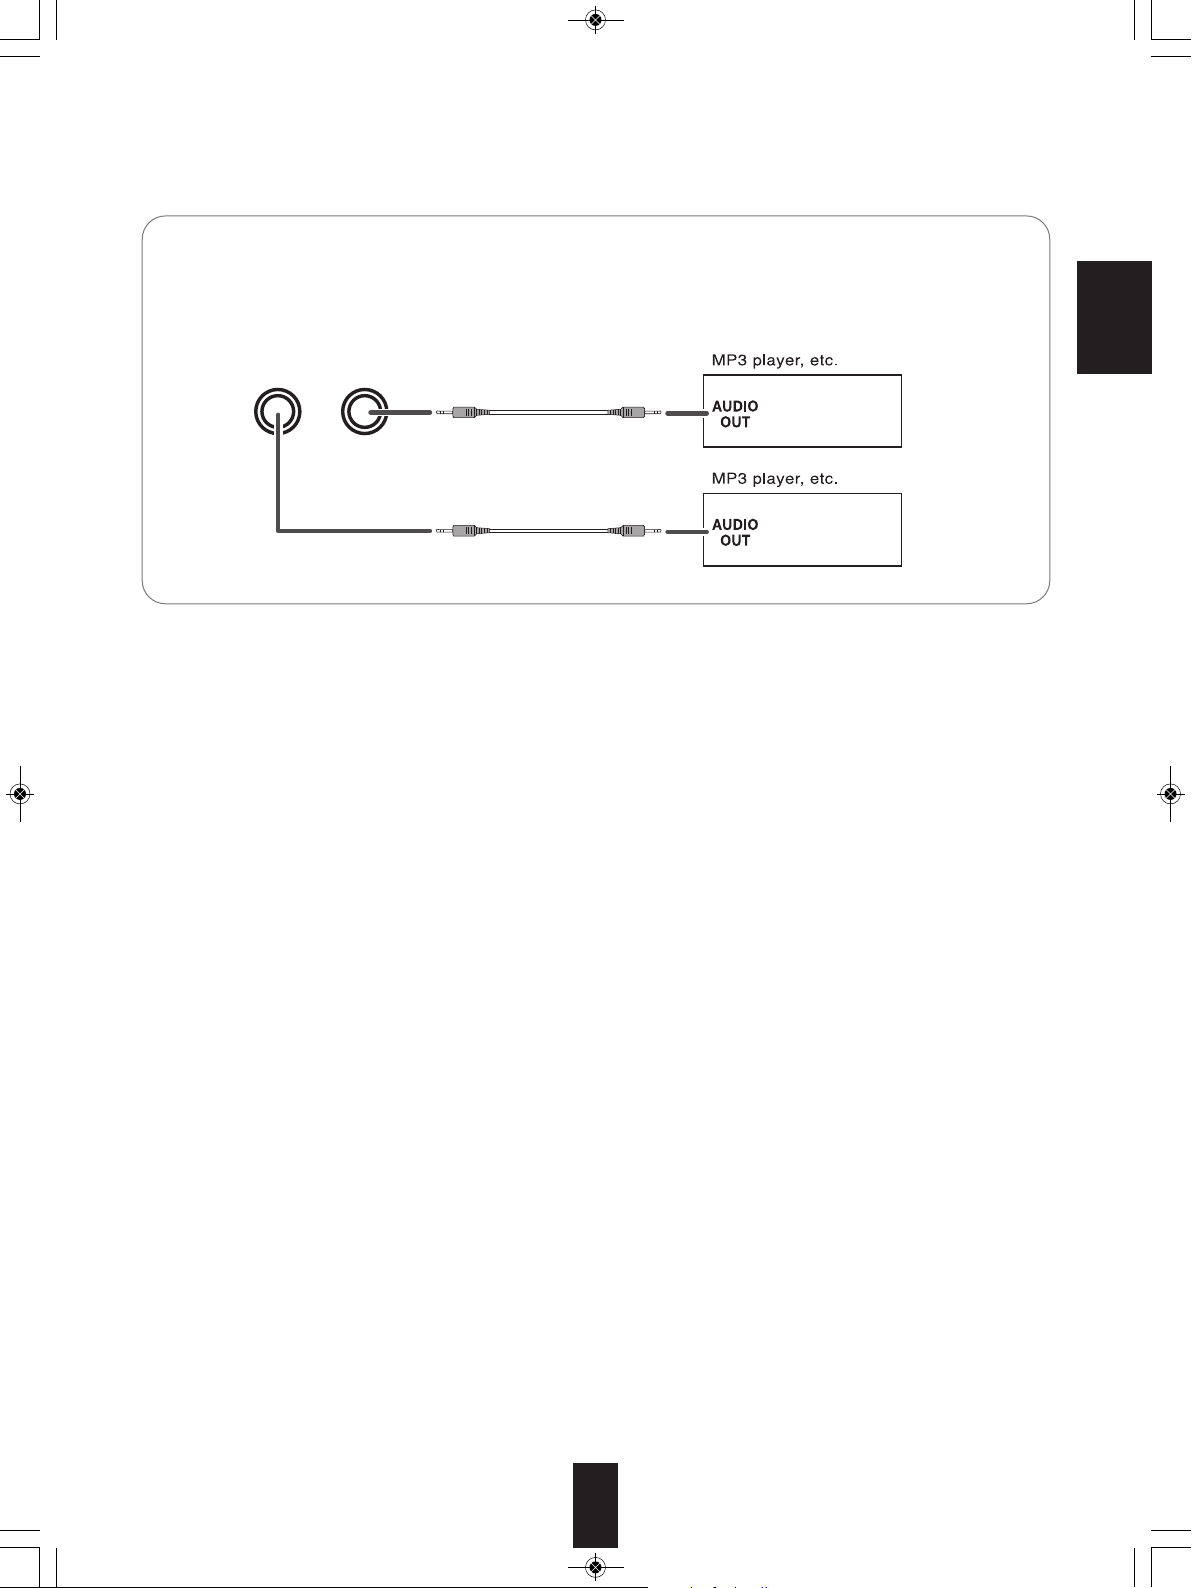
■AUX 1, 2 IN JACKS
• The AUX 1, 2 IN jacks can be connected to additional audio components such as an MP3 player, etc.
■ Note :
• When connecting these jacks to an MP3 player, etc., you should use the stereo mini cord, not a mono mini cord.
ENGLISH
11
Page 12

CURSOR CONTROL( , , , ), ENTER
</SEARCH MODE, SELECT / > buttons
The functions in “< >” are regional option
for Europe, etc.
NETWORK CONTROL buttons
RD-6506(G)_ENG_110330_RD-6506(G)_ENG 2011-04-14 오전 9:29 페이지 12
Remote Controls
ENGLISH
■ Note:
• The VIDEO 3 and NETWORK CONTROL buttons are not available for this receiver.
12
Page 13
O
N / STANDBY
A
UTO / MANUAL
S
URROUND
STEREO
V
IDEO
A
UDIO
S
OUND
I
NPUT
A
UDIO ASSIGNSPEAKER
ON / OFF
T
ONE CH.LEVEL SETUP ENTER / MEMO BANDPRESETTUNE
PHONES
A
UX 1 AUX 2
P
OWER
A
UDIO / VIDEO RECEIVER
R
D-6
506
O
N OFF
R
ETURN
M
AIN MENU
M
ASTER VOLUME
RD-6506(G)_ENG_110330_RD-6506(G)_ENG 2011-04-14 오전 9:29 페이지 13
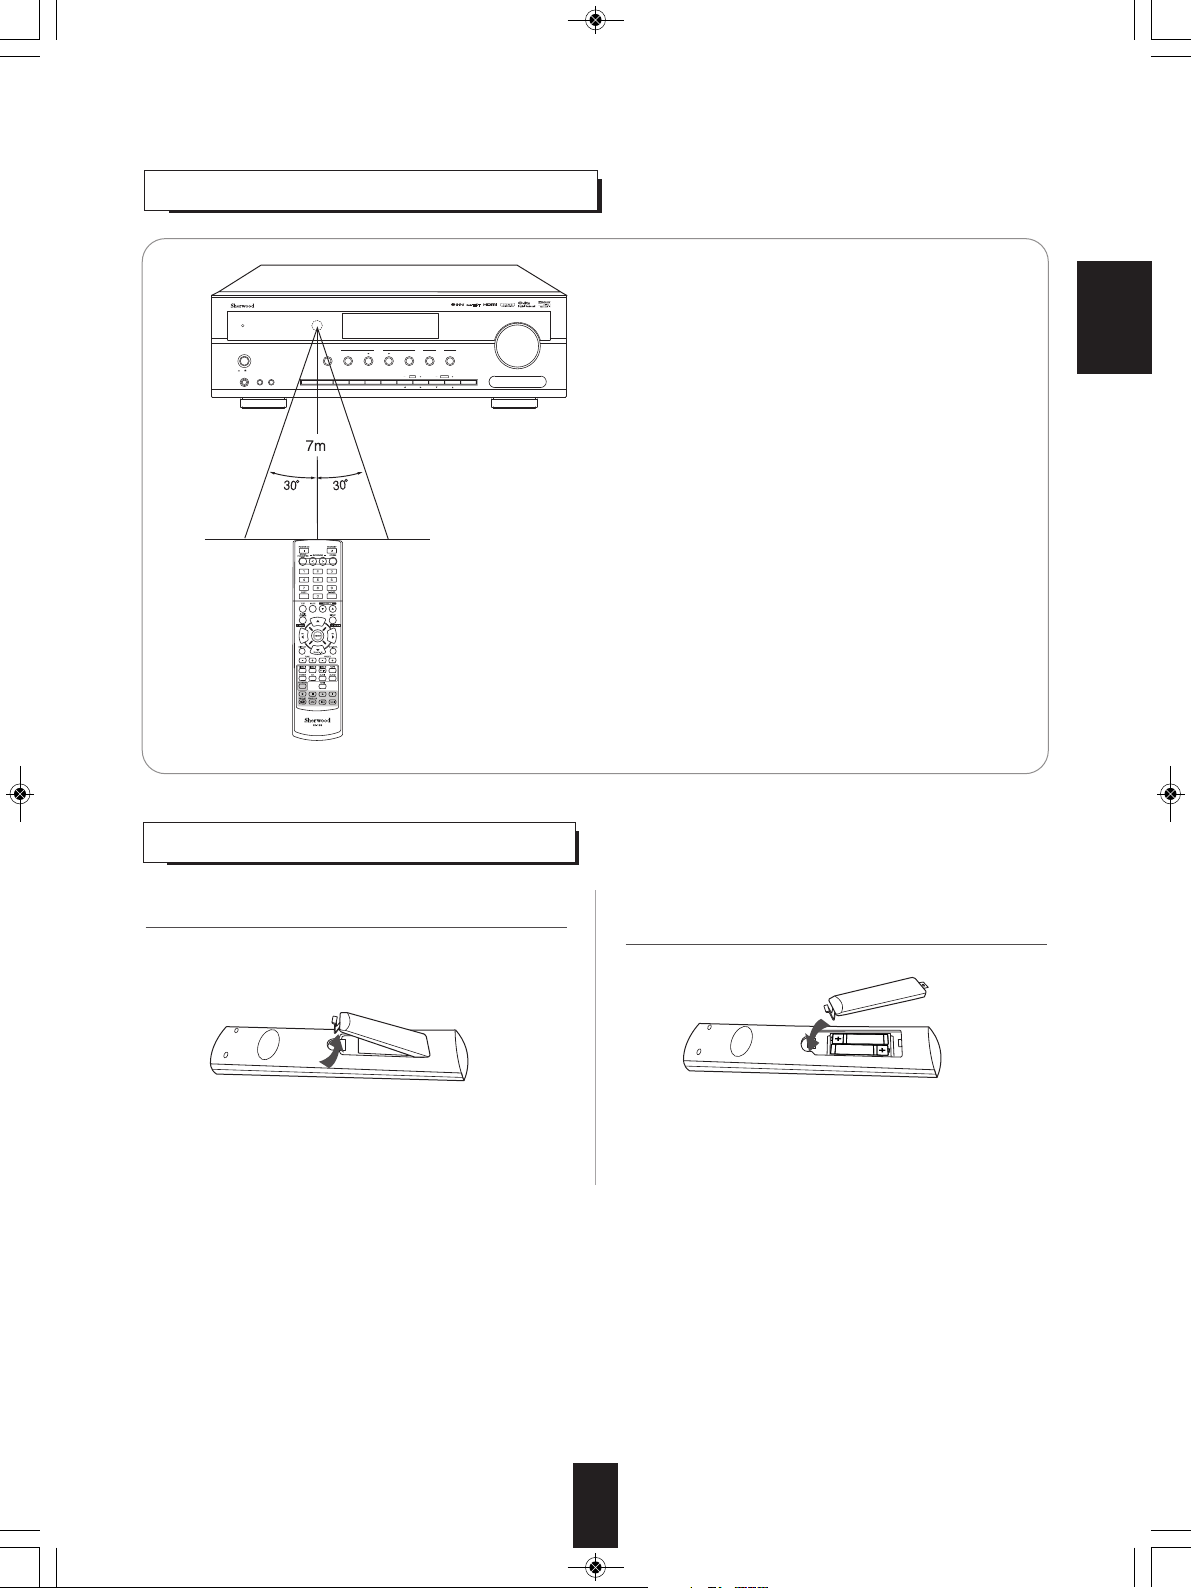
REMOTE CONTROL OPERATION RANGE
ENGLISH
• Use the remote control unit within a range of about 7 meters (23
feet) and angles of up to 30 degrees aiming at the remote sensor.
LOADING BATTERIES
1. Remove the cover. 2. Load two batteries ("AAA" size, 1.5 V) matching
the polarity.
• Remove the batteries when they are not used for a
long time.
• Do not use the rechargeable batteries (Ni-Cd type).
13
Page 14
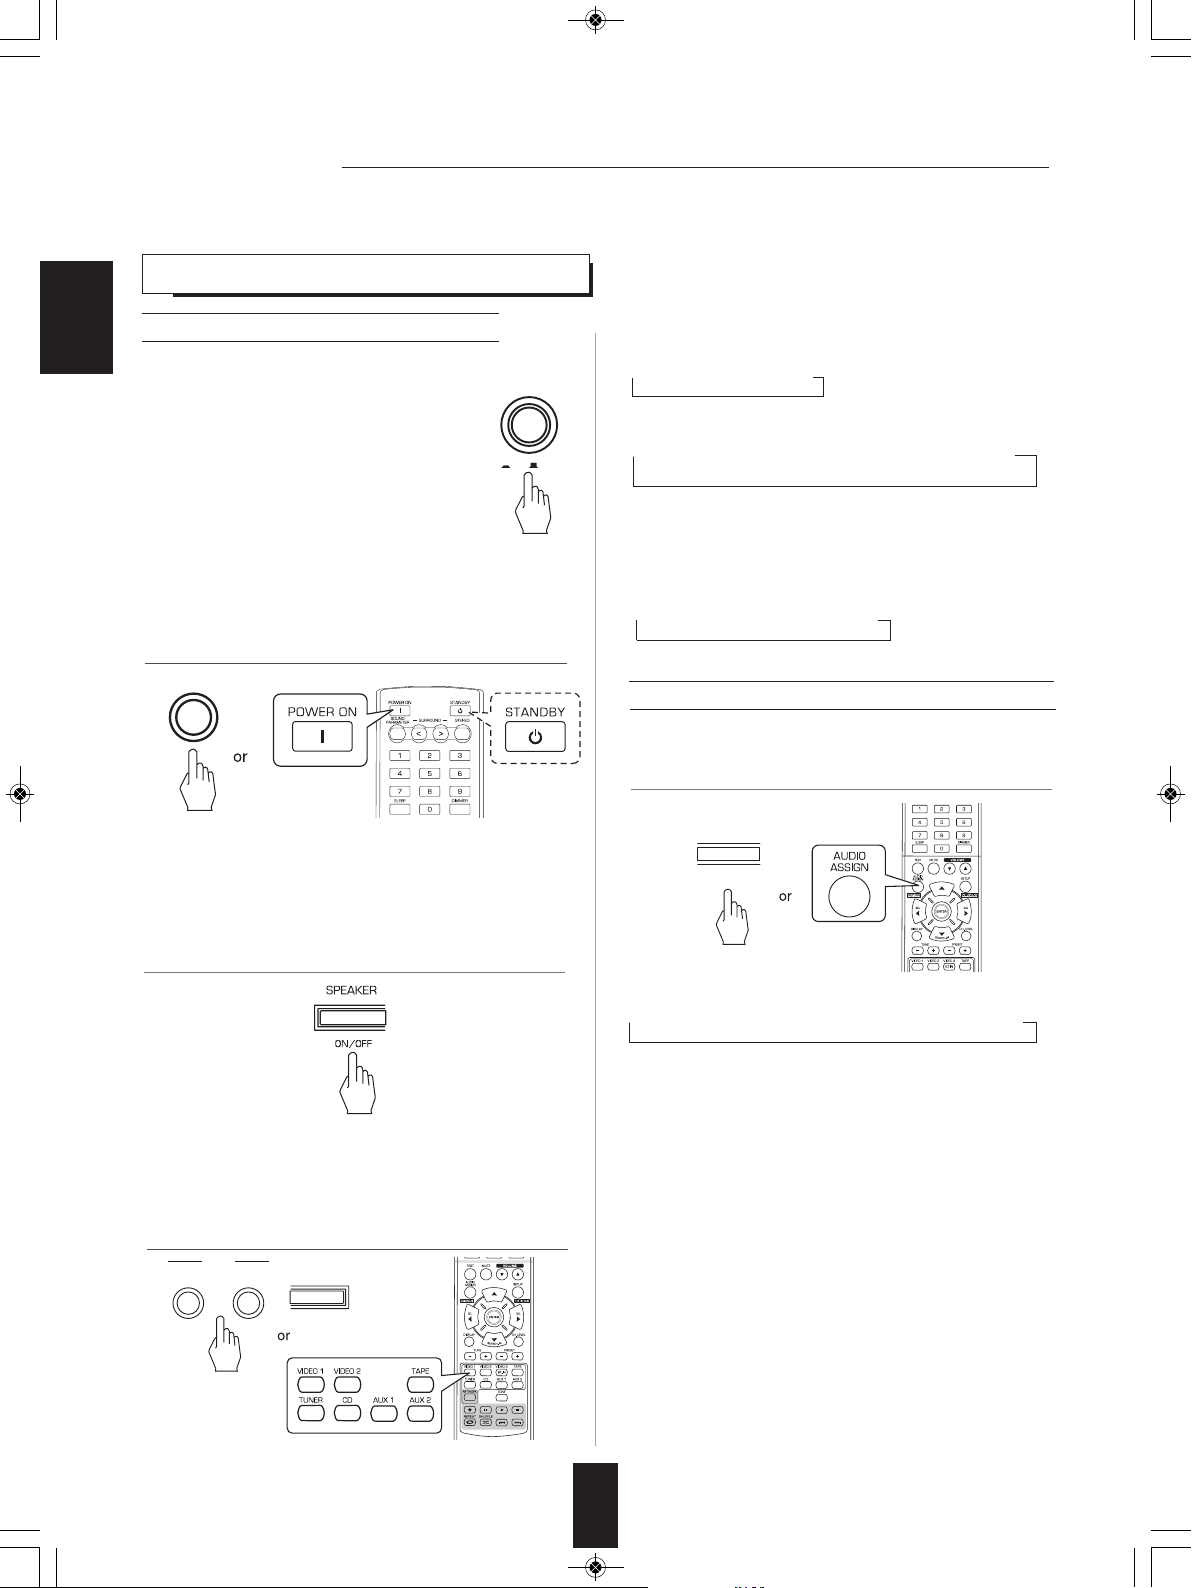
POWER
O
N OFF
ON / STANDBY
AUDIO ASSIGN
RETURN
INPUT
BAND
AUDIO
VIDEO
RD-6506(G)_ENG_110330_RD-6506(G)_ENG 2011-04-14 오전 9:29 페이지 14
Operations
■Note : Before operating this receiver, first set this unit as desired for optimum performance, doing the system setup
procedures. (For details, refer to "System Setup" on page 29.)
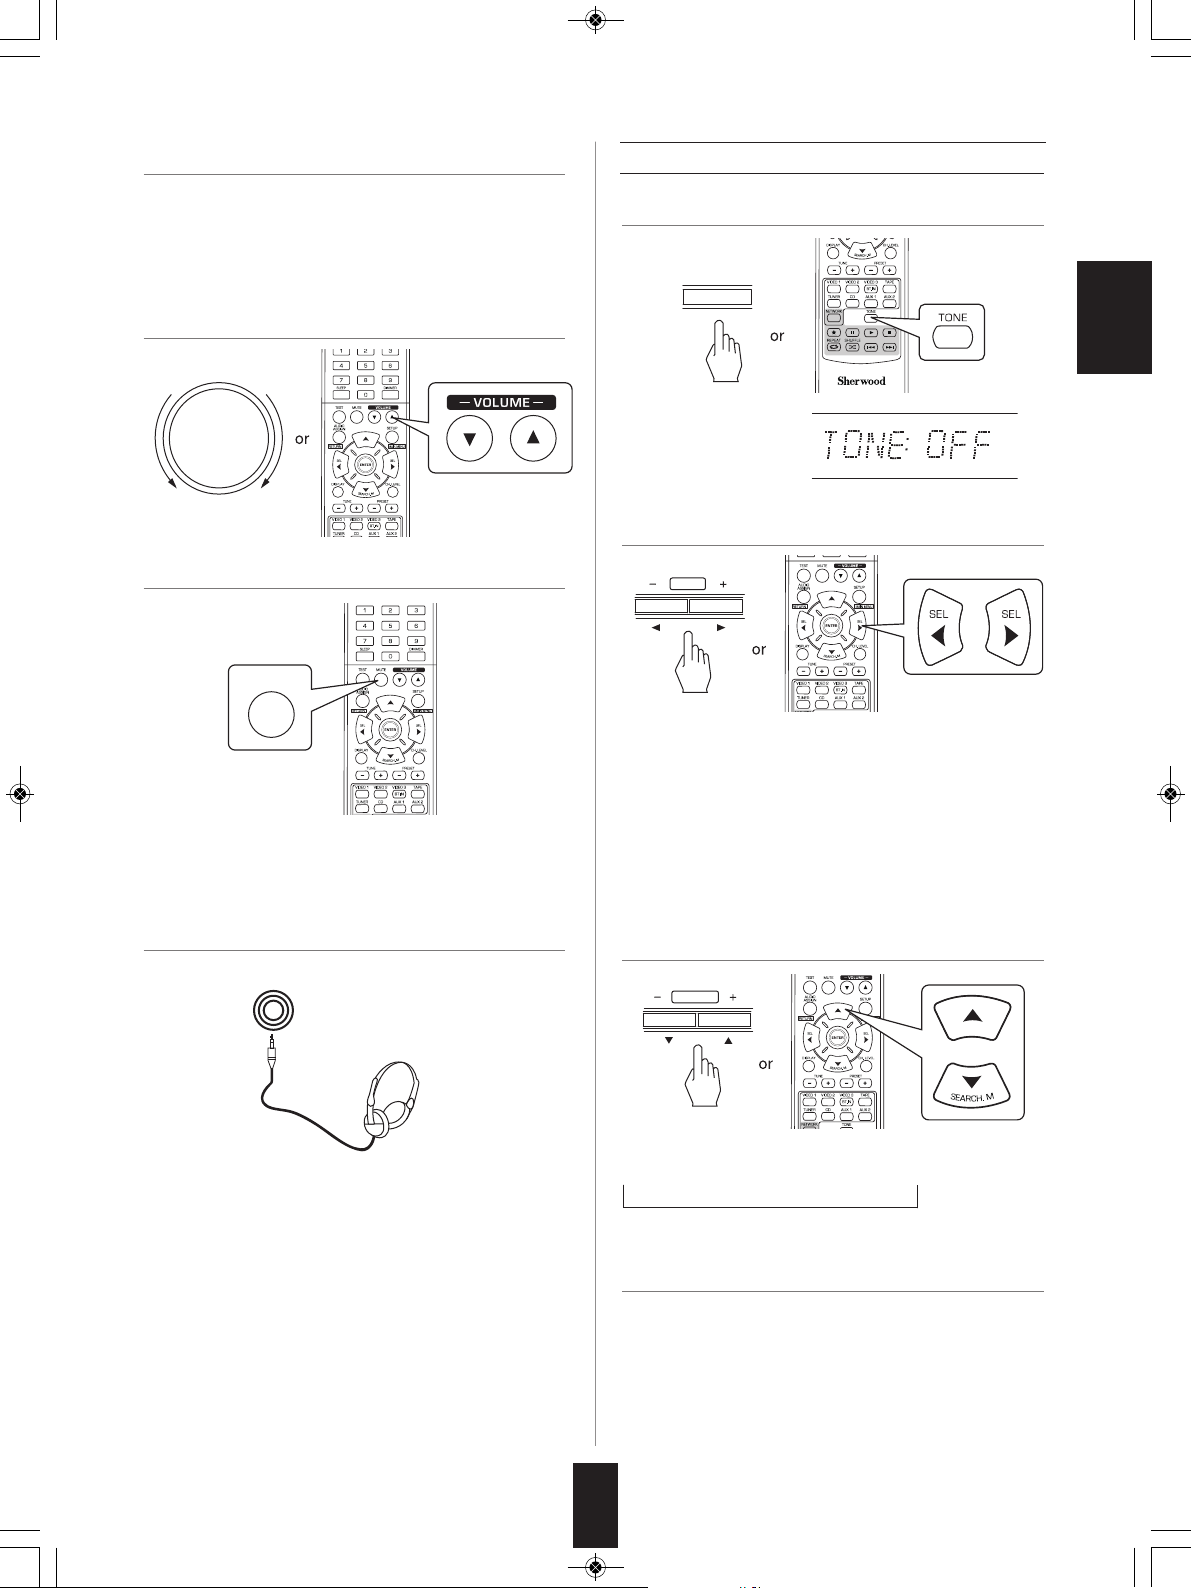
LISTENING TO A PROGRAM SOURCE
Before operation
ENGLISH
• Enter the standby mode.
• The STANDBY indicator lights up.
This means that the receiver is not disconnected from
the AC mains and a small amount of current is
etained to support the operation readiness.
r
• To switch the power off, push the POWER switch again.
• Then the power is cut off and the STANDBY indicator
oes off.
g
■ Auto Power Save
• The auto power save is a function that automatically
turns the power off to enter the standby mode. When any button is
ot pressed for more than the time you set, it will function. (For
n
details, refer to “When selecting the AUTO POWER SAVE” on
page 31.)
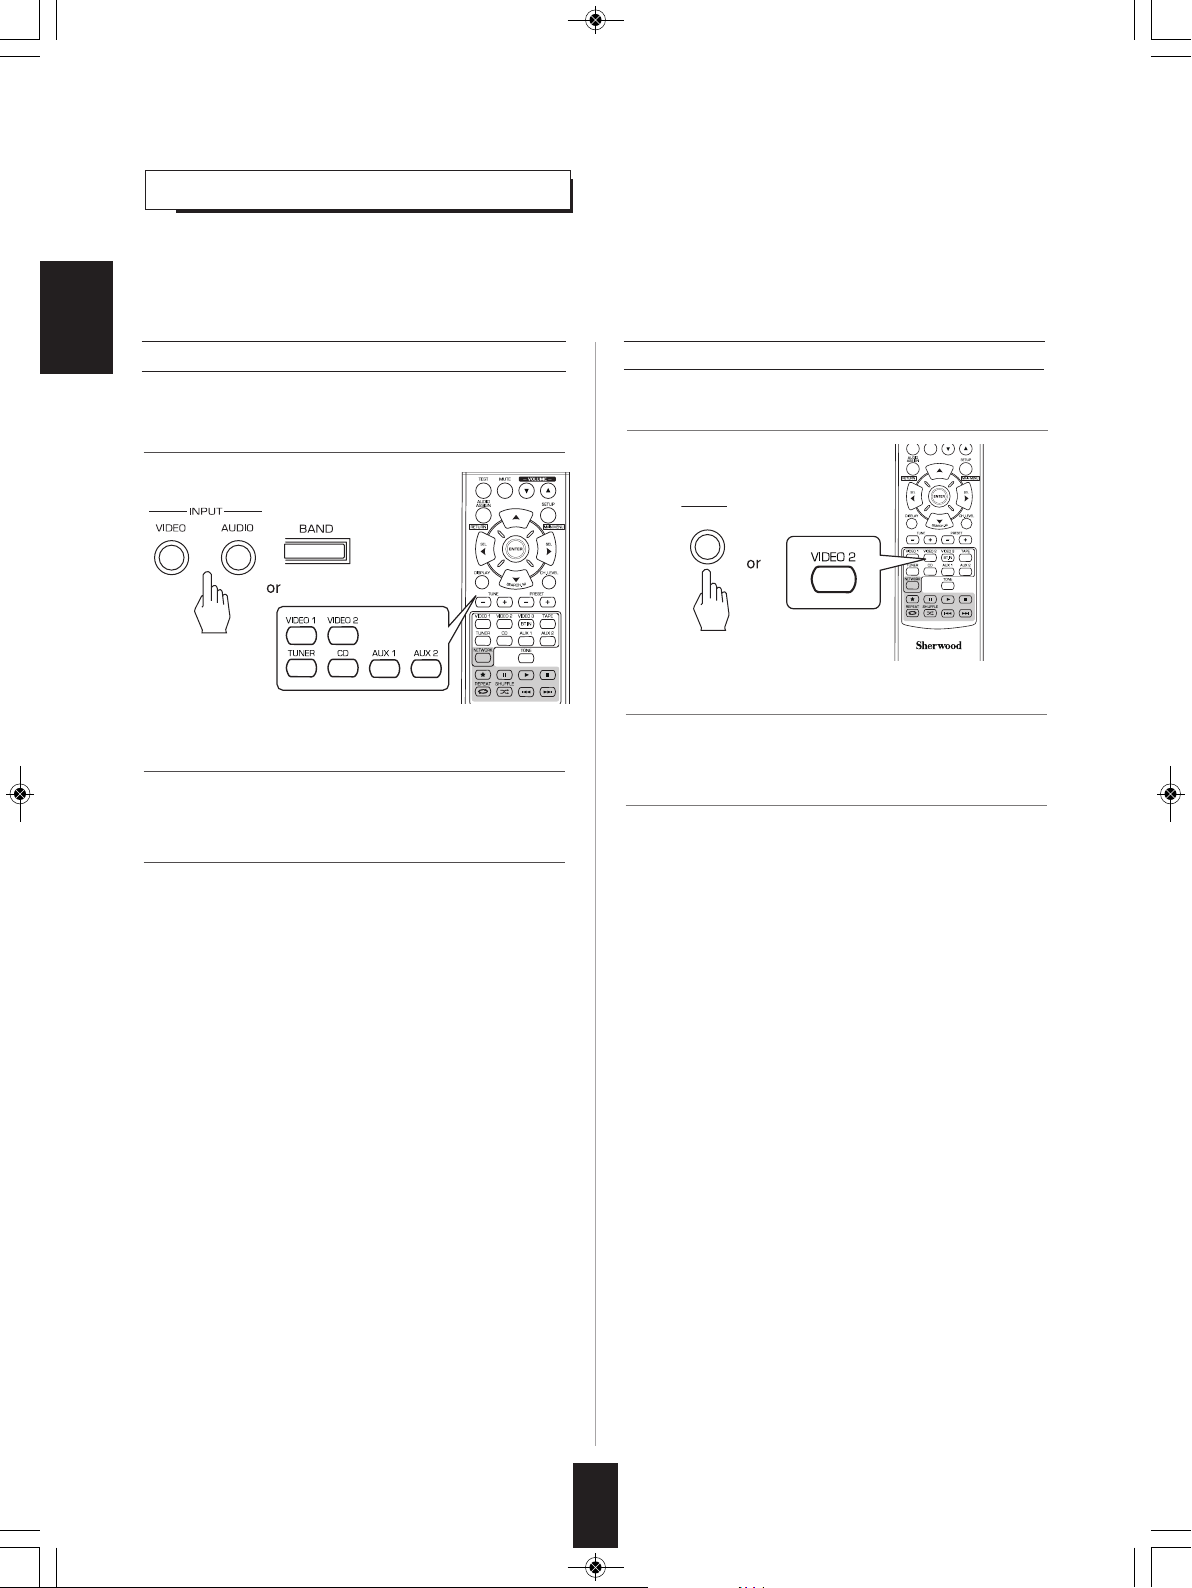
• Each time the “VIDEO” button on the front panel is
pressed, the input source changes as follows:
→ VIDEO 1 →VIDEO 2
• Each time the “AUDIO” button on the front panel is
pressed, the input source changes as follows:
→CD → AUX 1 →TV* → AUX 2 → TAPE→ TUNER
* : Only when the HDMI CONTROL is set to ON, you can
hear the digital audio signals from TV via a HDMI cable.
(For details, refer to “When selecting the HDMI
CONTROL” on page 42.)
• Each time the BAND button(or the TUNER button on the
remote control) is pressed, the band changes as follows:
→ FM ST → FM MONO → AM
1. In the standby mode, turn the power on.
When CD, VIDEO 1 ~ 2 is selected as an input source
4. Select the digital or the analog input connected as
desired.
Frequency display)
(
• Each time the POWER ON/STANDBY button on the front panel is
pressed, the receiver is turned on to enter the operating mode or off
to enter the standby mode.
• On the remote control, press the POWER ON button to enter the
operating mode or press the STANDBY button to enter the standby
mode.
2. Switch the speakers on.
• Then “SP ON” is displayed and the sound can be heard from the
speakers connected to the speaker terminals.
• When using the headphones for private listening, press the
SPEAKER button again to switch the speakers off(“SP OFF” is
displayed).
3. Select the desired input source.
• Each time this button is pressed, the corresponding input
is selected as follows:
→ O(ptical) → C(oaxial) 1 → C(oaxial) 2 → A(nalog)
■Notes :
• When the HDMI IN connector is connected to your video
component, you cannot assign the audio input as desired.
(It means that only the HDMI digital audio signals can be
heard.)
• When the HDMI IN connector is not connected (and the
“HDMI” indicator flickers), you can assign the audio input.
• When AUX 1, AUX 2, TAPE or tuner is selected as an input
source, the digital input cannot be selected.
• When the selected digital input is not connected, the
“DIGITAL” indicator flickers and the analog input is
automatically selected.
• The selected digital input or analog input is automatically
assigned to the corresponding input source on the INPUT
setup menu. (For details, refer to “SETTING THE INPUT” on
page 33.)
• The sound from the component connected to the selected
digital input can be heard regardless of the selected input
source.
14
Page 15
TONE
TUNE
PRESET
MASTER VOLUME
DOWN UP
MUTE
PHONES
RD-6506(G)_ENG_110330_RD-6506(G)_ENG 2011-04-14 오전 9:29 페이지 15
5. Operate the selected component for playback.
• When playing back the program sources with surround
sound, refer to “ENJOYING SURROUND SOUND” on
page 17.
6. Adjust the (overall) volume.
7. To mute the sound.
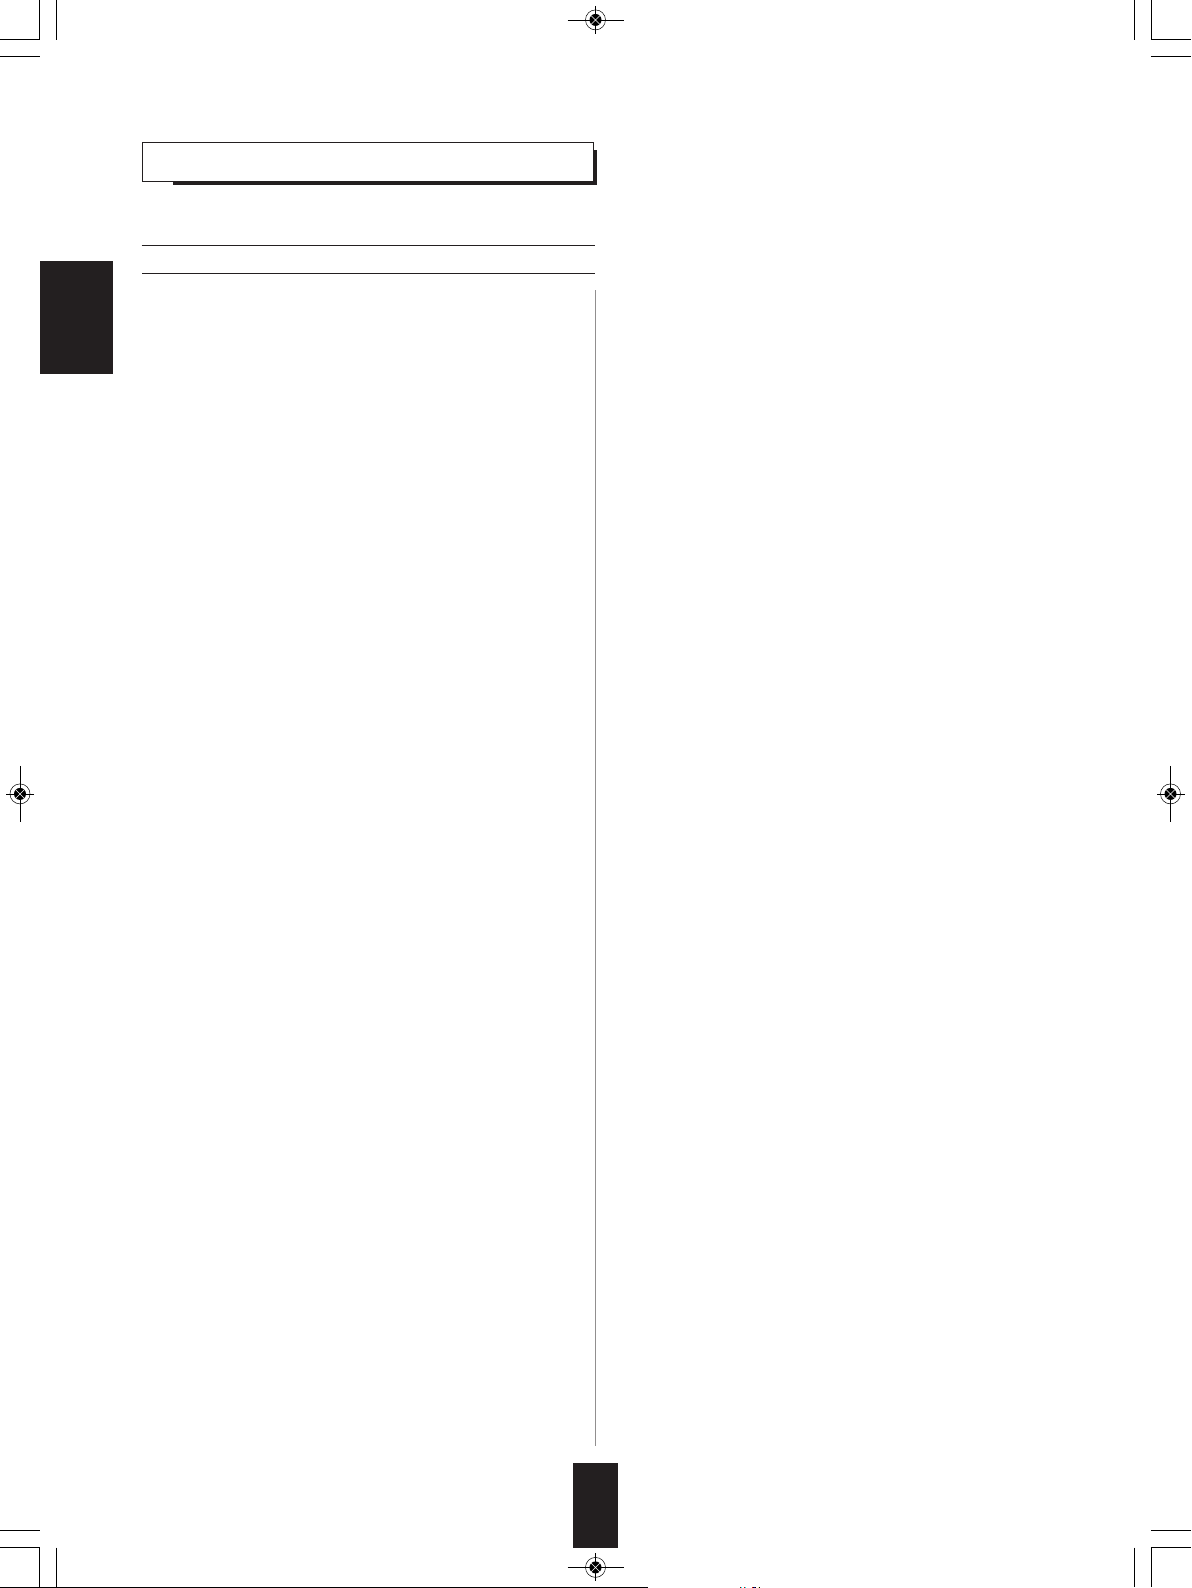
Adjusting the tone (bass and treble)
9. Enter the tone mode.
ENGLISH
• The tone mode is
displayed for several
seconds.
10. Press the CURSOR LEFT(◀)/RIGHT(▶)
buttons to select the desired tone mode.
• Each time these buttons are pressed, the tone mode is
selected as follows :
OFF : To listen to a program source without the
↕ tone effect.("DIR" lights up.)
ON : To adjust the tone for your taste.("DIR" goes off.)
• “MUTING” is displayed.
• To resume the previous sound level, press it again.
8. To listen with the headphones.
• Be sure to switch the speakers off.
• When listening to a DTS or Dolby Digital program source,
if the headphones are plugged in and the SPEAKER
button is set to off, it enters the 2CH downmix mode
automatically. (For details, refer to “2CH downmix
mode”on page 17.)
■Note:
• Be careful not to set the volume too high when using
headphones.
■When the TONE is set to ON to adjust the tone
(bass and treble).
11. Press the CURSOR UP(▲)/DOWN(▼) buttons
to select the desired tone.
• Each time these buttons are pressed, the tone is selected as
follows:
→ BASS ↔ TRE (treble) ↔ TONE: ON ←
12. Press the CURSOR LEFT(◀)/RIGHT(▶)
buttons to adjust the selected tone as desired.
• The tone level can be adjusted within the range of -10 ~
+10 dB.
• In general, we recommend the bass and treble to be
adjusted to 0 dB (flat level).
• Extreme settings at high volume may damage your
speakers.
• If the tone display disappears, start from the step 9 again.
15
Page 16
RD-6506(G)_ENG_110330_RD-6506(G)_ENG 2011-04-14 오전 9:29 페이지 16
URROUND SOUND
S
• This receiver incorporates a sophisticated Digital Signal Processor that allows you to create optimum sound quality and sound
atmosphere in your personal Home Theater.
Surround modes
■DTS Digital Surround
DTS Digital Surround(also called simply DTS) supports up to
5.1 discrete channels and uses less compression for high
ENGLISH
fidelity reproduction. Use it with DVDs and CDs bearing the
DTS logo.
■DTS 96/24
This is high resolution DTS with a 96 kHz sampling rate and
24 bit resolution, providing superior fidelity. Use it with DVDs
bearing the DTS 96/24 logo.
Manufactured under license under U.S. Patent Nos:
5,956,674; 5,974,380; 6,487,535 & other U.S. and worldwide
patents issued & pending. DTS, the Symbol, & DTS and the
Symbol together are registered trademarks & DTS Digital
Surround and the DTS logos are trademarks of DTS, Inc.
Product includes software. ⓒ DTS, Inc. All Rights Reserved.
■Dolby Digital
Dolby Digital is the multi-channel digital signal format
developed by Dolby Laboratories. Discs bearing the Dolby
Digital logo includes the recording of up to 5.1 channels of
digital signals, which can reproduce much better sound
quality, spatial expansion and dynamic range
characteristics than the previous Dolby Surround effect.
■Dolby Pro Logic II surround
This mode applies conventional 2- channel signals such as
digital PCM or analog stereo signals as well as Dolby
Surround signals, etc. to surround processing to offer
improvements over conventional Dolby Pro Logic circuits.
Dolby Pro Logic ll surround includes 2 modes as follows:
• The following modes apply conventional 2-channel
signals such as digital PCM or analog stereo signals to
high performance Digital Signal Processor to recreate
sound fields artificially. Select one of the 6 provided
surround modes according to the program source you
want to play.
■Theater
This mode provides the effect of being in a theater when
watching a play.
■Movie
This mode provides the effect of being in a movie theater
when watching a movie.
■Hall
This mode provides the ambience of a concert hall for
classical music sources such as orchestral, chamber music
or an instrumental solo.
■Game
This mode is suitable for video games.
■Stadium
This mode provides the expansive sound field to achieve
the true stadium effect when watching baseball or soccer
games.
■Multi CH Stereo
This mode is designed for playing background music. The
front and surround channels create a stereo image that
encompasses the entire area.
• Dolby Pro Logic ll Movie
When enjoying movies, this mode allows you to further
enhance the cinematic quality by adding processing that
emphasizes the sounds of the action special effects.
• Dolby Pro Logic ll Music
When listening to music, this mode allows you to further
enhance the sound quality by adding processing that
emphasizes the musical effects.
■Dolby Pro Logic
This mode expands any 2-channel source(including Dolby
Surround source) for 4 channel(front left, center, front right
and surround) playback.
The surround channel is monaural, but is played through
two surround speakers.
Manufactured under license from Dolby Laboratories.
Dolby, Pro Logic, and the double-D symbol are registered
trademarks of Dolby Laboratories.
16
Page 17
AUTO/MANUAL
SOUND
SURROUND
STEREO
RD-6506(G)_ENG_110330_RD-6506(G)_ENG 2011-04-14 오전 9:29 페이지 17
NJOYING SURROUND SOUND
E
■Note: Before surround playback, first perform the speaker setup procedure, etc. on the SETUP menu for optimum performance.
(For details, refer to "SETTING THE SPEAKER SETUP" on page 34.)
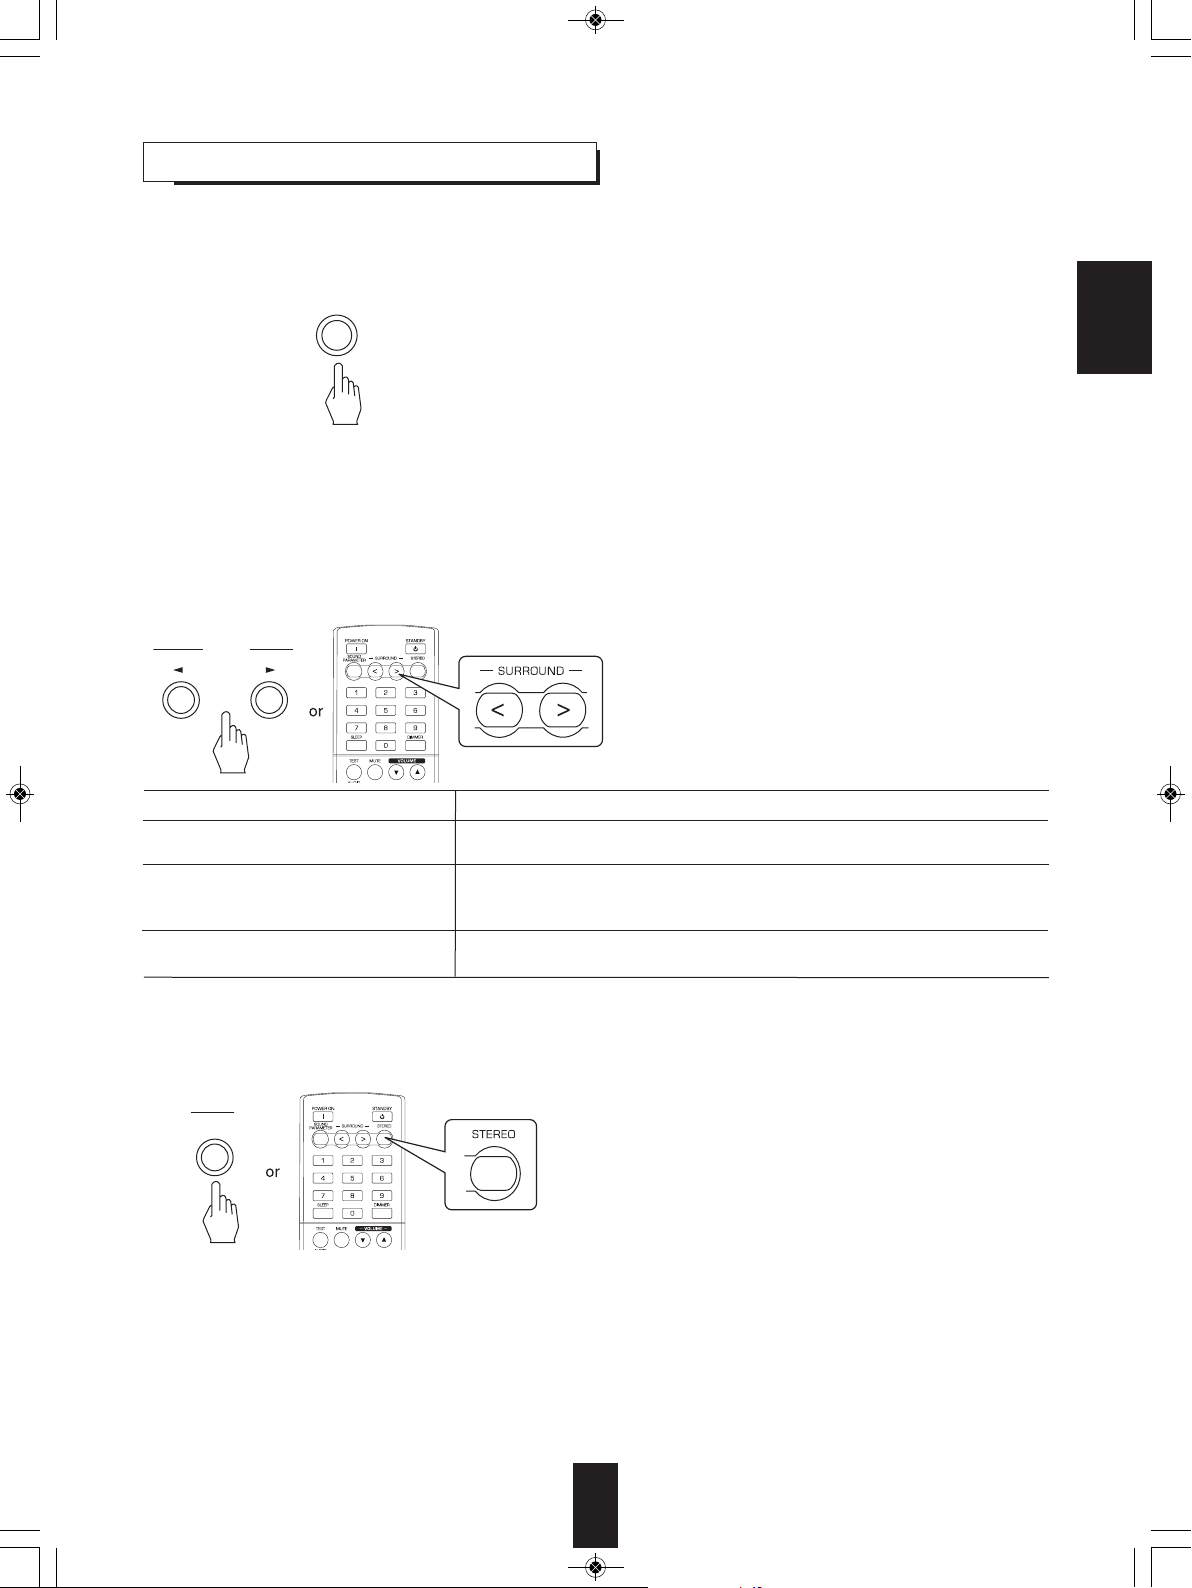
Depending on how to select a surround mode, select the auto surround mode or the manual surround mode.
• Each time this button is pressed, the mode changes as follows :
Auto surround mode : The optimum surround mode will be
"AUTO" indicator
(
lights up.)
Manual surround mode : You can select the desired of different
("AUTO" indicator
goes off.)
■Notes :
• When the SPEAKER button is set to off or “C(Center)” and “S(Surround)” are set to “NO”, the auto surround mode is invalid.
• Even when the auto surround mode is selected and the same type of digital signal format is being input, the optimum
surround mode may vary depending on whether the speaker type is set to "NO" or not.
• When the auto surround mode is selected, the surround modes other than the optimum surround mode cannot be selected.
■When selecting the manual surround mode with pressing the AUTO/MANUAL button on the front panel
Select the desired surround mode.
automatically selected depending on the signal
format being input.
surround modes selectable for the signal
being input with using the SURROUND
MODE SELECT (>/<) buttons.
ENGLISH
• Each time the SURROUND MODE SELECT (>/<)
buttons are pressed, the surround mode changes
depending on the input signal format as follows :
Signal format being input
Dolby Digital EX 6.1 channel sources,
DOLBY DIGITAL or <2 CH IN> *
Selectable surround mode
1
Dolby Digital 5.1 channel sources
Dolby Digital 2 channel sources,
PCM (2 channel) sources,
DOLBY PLII MOVIE, DOLBY PLII MUSIC, THEATER, MOVIE, HALL, GAME, STADIUM,
M.CH STEREO, DOLBY PRO LOGIC or <2 CH IN> *
1
Analog stereo sources
DTS sources,
Corresponding DTS mode or <2 CH IN>*
1
DTS 96/24 sources
*1: When “C(Center)” and “S(Surround)” are set to “NO”, any surround mode cannot be selected and the source can be
reproduced either in the stereo mode or in the 2CH downmix mode.
■To cancel the surround mode for stereo operation
• Depending on the signal format which is being input, either the
stereo mode or the 2CH downmix mode is selected.
• To cancel either the stereo mode or the 2CH downmix
mode, select the surround mode with using the SURROUND
MODE SELECT (>/<) buttons.
■2CH downmix mode
• This mode allows the multi-channel signals encoded in DTS or Dolby Digital format to be mixed down into 2 front channels and
to be reproduced through only two front speakers or through headphones.
• When the SPEAKER button is set to off to listen with headphones while playing the multi-channel digital signals from DTS or
Dolby Digital sources, it will enter the 2CH downmix mode automatically.
17
Page 18

PRESET
T
UNE
RD-6506(G)_ENG_110330_RD-6506(G)_ENG 2011-04-14 오전 9:29 페이지 18
When adjusting the sound parameters
• While playing digital signals form Dolby Digital program source or listening in Dolby Pro Logic II Music mode, you can
adjust their parameters for optimum surround effects.
1. Press the SOUND PARAMETER button.
3. Press the CURSOR LEFT(◀)/ RIGHT(▶)
buttons to adjust the selected parameter as
desired.
ENGLISH
• Then “DRC: ~” (or “PANO : ~ ”) is displayed for several
seconds.
• If the parameter mode disappears, press this button again.
2. Press the CURSOR UP(▲)/DOWN(▼) buttons
to select the desired parameter.
■When selecting the "DRC (Dynamic Range
Compression)"
• This function compresses the dynamic range of
previously specified parts of the Dolby Digital sound track
(with extremly high volume) to minimize the difference in
volume between the specified and non-specified parts.
This makes it easy to hear all of the sound track when
watching movies at night at low levels.
■Note :
• In some Dolby Digital softwares, DRC setting may not be
valid.
• Each time these buttons are pressed, the parameter mode
changes as follows:
→ "DRC" ↔ "PANO" ↔"C.WIDTH" ↔ "DIMEN" ←
(Dynamic Range (Panorama) (Center width (Dimension
Compression) control) control)
• "DRC" can be selected only while playing digital signals
from Dolby Digital source.
• "PANO", "C.WIDTH" and "DIMEN" can be selected only
while listening in Dolby Pro Logic II Music mode.
→ OFF : To turn off the DRC function. (Default value)
↕
MID
↕
→ MAX
■When selecting the "PANO (Panorama)"
This mode extends the front stereo image to include the
surround speakers for an exciting "wraparound" effect with
side wall imaging.
Select "OFF" or "ON"(default value: OFF).
■When selecting the "C. WIDTH (Center width)"
control
This adjusts the center image so it may be heard only from
the center speaker, only from the left/right speakers as a
phantom image, or from all three front speakers to varying
degrees.
The control can be set in 8 steps from 0 to 7(default value :
3).
■When selecting the "DIMEN (Dimension)" control
This gradually adjusts the soundfield either towards the
front or towards the rear. The control can be set in 7 steps
from -3 to +3 (default value : 0).
Higher compression
4. Repeat the above steps 2 and 3 to adjust other
parameters.
18
Page 19
TUNE
RD-6506(G)_ENG_110330_RD-6506(G)_ENG 2011-04-14 오전 9:29 페이지 19
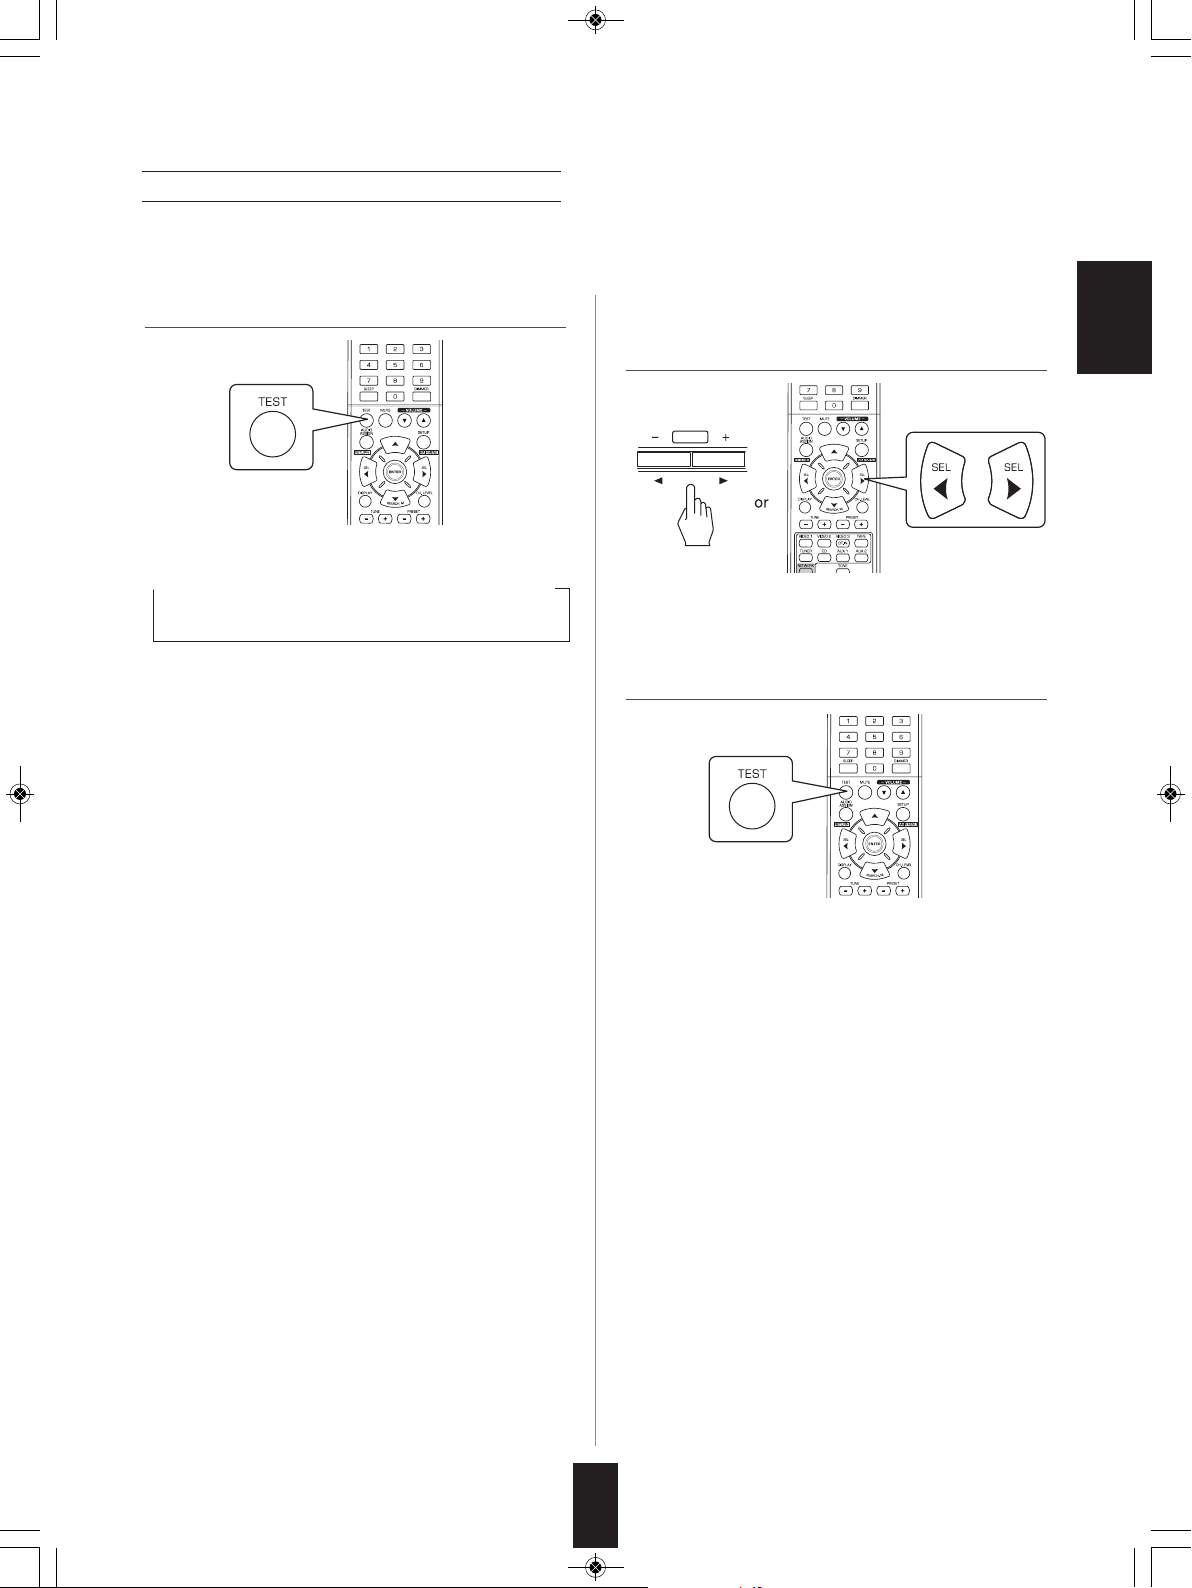
Adjusting each channel level with test tone
• The volume level of each channel can be adjusted easily with the test tone function.
■Note : When the SPEAKER button is set to off, the test tone function does not work.
1. Enter the test tone mode. 2. At each channel, adjust the level as desired until
the sound level of each speaker is heard to be
equally loud.
• The test tone mode is displayed and will be heard from
the speaker of each channel for 2 seconds as follows:
→ FL → C → FR → SR → SL → SW
Front Center Front Surround Surround Subwoofer
Left Right Right Left
• You can select the desired channel with pressing the
CURSOR UP(▲)/DOWN(▼) buttons.
ENGLISH
• When the speaker setting is "NO", the test tone of the
corresponding channel is not available.
3. Cancel the test tone function.
19
Page 20
CH.LEVEL
PRESET
TUNE
RD-6506(G)_ENG_110330_RD-6506(G)_ENG 2011-04-14 오전 9:29 페이지 20
Adjusting the current channel level
• After adjusting each channel level with test tone, adjust the channel levels either according to the program sources or to suit
your tastes.
• You can adjust the current channel levels as desired. These adjusted levels are just memorized into user’s memory ("CAL"),
not into preset memory("REF 1", "REF 2").
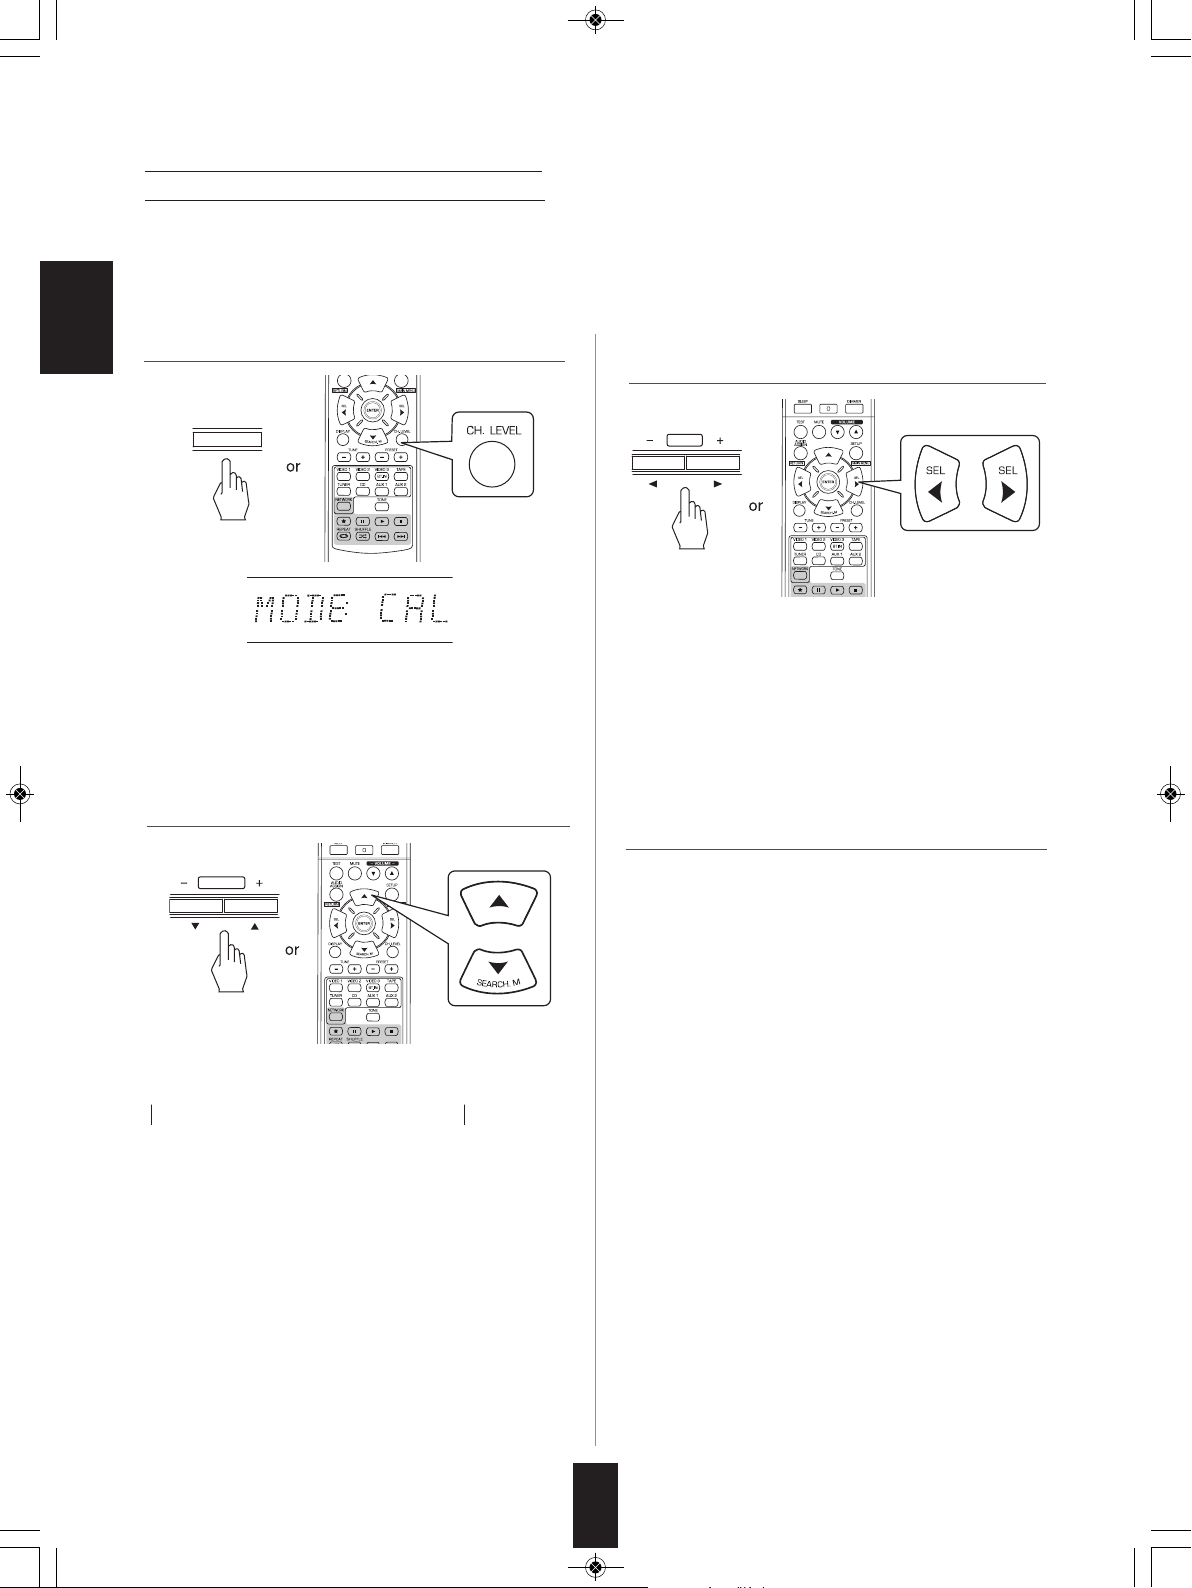
1. Press the CHANNEL LEVEL button.
ENGLISH
• Then the memory mode ("CAL", etc.) is displayed for
several seconds.
• When the memory mode or channel level disappears,
press this button again.
2. Select the desired channel.
3. Adjust the level of the selected channel as
desired.
• The LFE level can be adjusted within the range of -10 ~ 0
dB and other channel levels within the range of -15 ~ +15
dB.
• In general, we recommend the LFE level to be adjusted to
0 dB.(However, the recommended LFE level for some
early DTS software is -10 dB.) If the recommended levels
seem too high, lower the setting as necessary.
4. Repeat the above steps 2 and 3 to adjust each
channel level.
• Each time these buttons are pressed, the corresponding
channel is selected as follows:
→ REF 1, 2 (or CAL) ↔ L ↔ C ↔ R ←
→ <DTS or DD> ↔ SW ↔ SL ↔ SR ←
< >: Possible only when the digital signals from Dolby Digital or
DTS program sources that includes LFE signal are input.
• Depending on the speaker settings ("NO") and surround
mode, etc., some channels cannot be selected.
• When the SPEAKER button is set to off, only the Front
Left, Front Right (and LFE) channels can be selected.
20
Page 21
E
NTER/MEMO
ENTER/MEMO
TUNE
TUNE
CH.LEVEL
RD-6506(G)_ENG_110330_RD-6506(G)_ENG 2011-04-14 오전 9:29 페이지 21
Memorizing the adjusted channel levels
• You can memorize the adjusted channel levels into preset
memory("REF 1", "REF 2") and recall the memorized
whenever you want.
1. After performing the steps 1 ~ 4 in "Adjusting the
current channel level" procedure on page 20,
press the ENTER(/MEMORY) button.
• Then "1" of "REF 1" indication flickers for several seconds.
2. Select the desired one of REF 1 and REF 2.
Recalling the memorized channel levels
1. Press the CHANNEL LEVEL button.
ENGLISH
• "CAL " (or "REF 1", etc.) is displayed for several seconds.
• If the channel level mode display disappears, press this
button again.
2. Select the desired one of REF 1 and REF 2.
• Then the channel levels memorized into the selected
preset memory are recalled.
• If the preset memory disappears, perform the above step
1 again.
3. Confirm your selection.
• The adjusted channel levels have now been memorized
into the selected memory.
21
Page 22
TUNE
T
UNE
ENTER/MEMO
BAND
RD-6506(G)_ENG_110330_RD-6506(G)_ENG 2011-04-14 오전 9:29 페이지 22
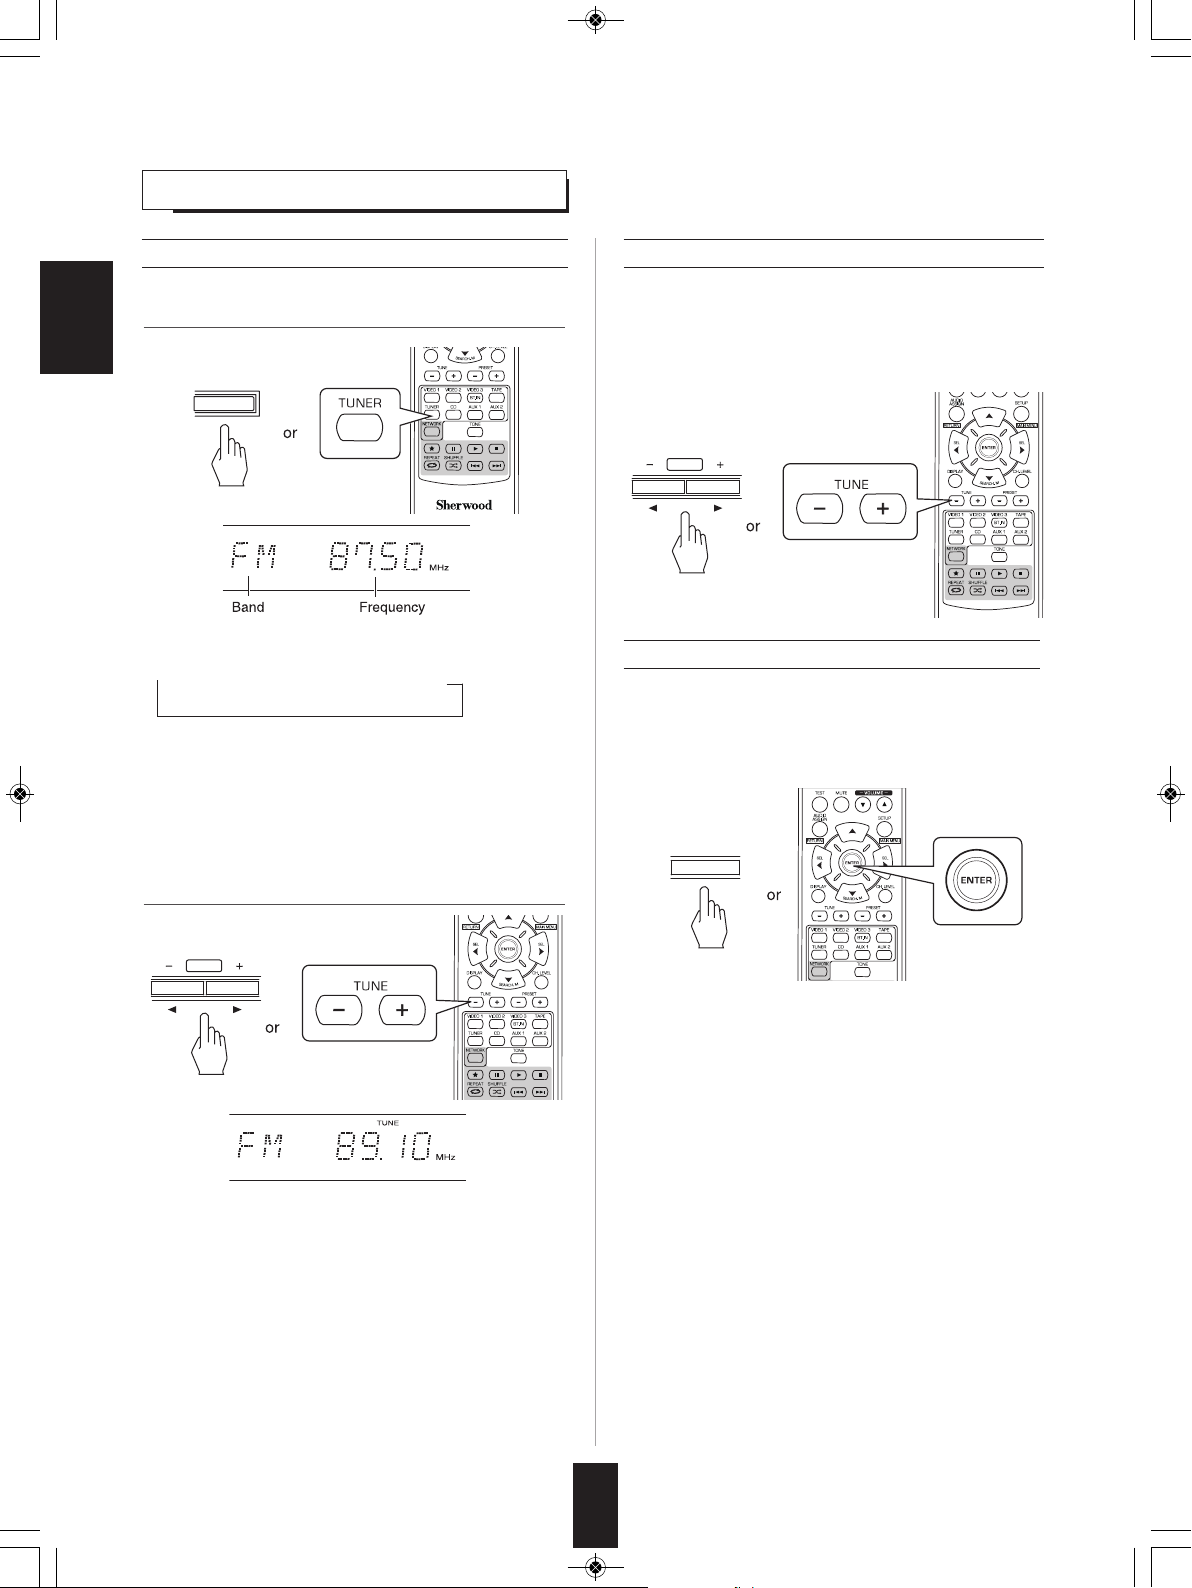
LISTENING TO RADIO BROADCASTS
Auto tuning
1. Select the desired band.
ENGLISH
• Each time this button is pressed, the band changes as
follows ;
→ FM ST → FM MONO → AM
("ST" lights up) ("ST" goes off)
• When FM stereo broadcasts are poor because of weak
broadcast signals, select the FM mono mode to reduce
the noise, then FM broadcasts are reproduced in
monaural sound.
Manual tuning
• Manual tuning is useful when you already know the
frequency of the desired station.
• After selecting the desired band, press the TUNING UP(+)
/ DOWN(-) buttons repeatedly until the right frequency has
been reached.
Auto presetting
• Auto presetting function automatically searches for FM
stations only and store them in the memory.
• While listening to FM radio broadcasts, press and hold
down the ENTER(/MEMORY) button for more than 2
seconds.
2. Press the TUNING UP(+)/DOWN(-) buttons for
more than 0.5 second.
• Then "AUTO MEM" flickers and this receiver starts auto
presetting.
• To stop auto presetting, press this button again.
• Up to 30 FM stations can be stored.
■Notes:
• FM stations of weak strength cannot be memorized.
• To memorize AM stations or weak stations, preform
"Manual presetting" procedure with using "Manual tuning"
operation.
• The tuner will now search until a station of sufficient
strength has been found. The display shows the tuned
frequency and "TUNE".
• If the station found is not the desired one, simply repeat
this operation.
• Weak stations are skipped during auto tuning.
22
Page 23
PRESET
ENTER/MEMO
TUNE
PRESET
ENTER/MEMO
RD-6506(G)_ENG_110330_RD-6506(G)_ENG 2011-04-14 오전 9:29 페이지 23
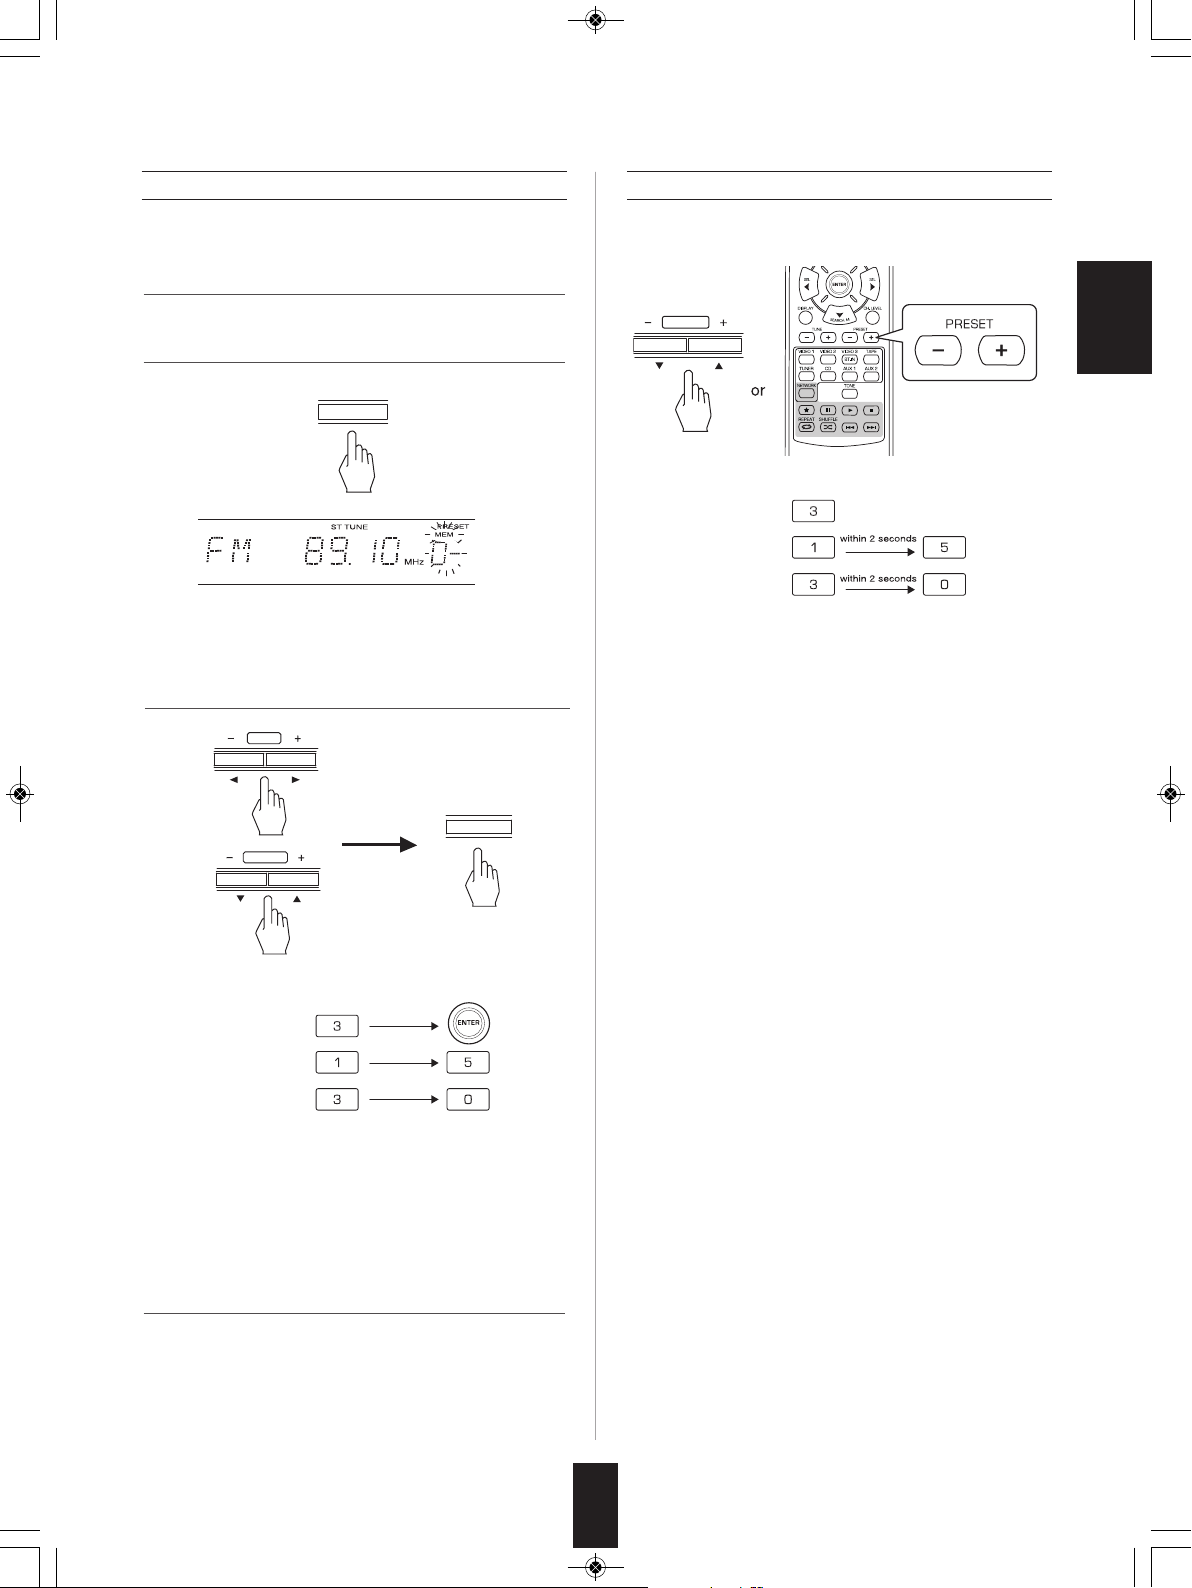
Manual presetting
• You can store up to 30 preferred stations in the memory.
1. Tune in the desired station with auto or manual tuning.
2. Press the ENTER(/MEMORY) button.
• "MEM", etc. flicker.
3. Select the desired preset number (1~30) and press the
ENTER(/MEMORY) button.
Tuning to preset stations
• After selecting the tuner as an input source, select the
desired preset number.
ENGLISH
• When using the NUMERIC buttons on the remote control.
Examples: For “3” :
For “15” :
For “30” :
• When using the NUMERIC buttons on the remote control.
Examples : For “3” :
For “15” :
For “30” :
• The station has now been stored in the memory.
• When specifying a two digit number with using the NUMERIC
buttons, the station is stored automatically without pressing the
ENTER(/MEMORY) button.
• A stored frequency is erased from the memory by storing
another frequency in its place.
4. Repeat the above steps1 to 3 to memorize other
stations.
■MEMORY BACKUP FUNCTION
The following items, set before the receiver is turned off,
are memorized.
• INPUT SELECTOR settings
• Surround mode settings
• Preset stations,etc.
23
Page 24
RD-6506(G)_ENG_110330_RD-6506(G)_ENG 2011-04-14 오전 9:29 페이지 24
RDS Tuner (Regional Option for some countries in Europe, etc.)
LISTENING TO RDS BROADCASTS(FM ONLY)
RDS(Radio Data System) is a method for sending information signals together with the transmitter signals. Your tuner is
capable of translating these signals and putting the information on the display. These codes contain the following information.
Program Service name (PS), A list of Program Types (PTY), Radio Text (RT).
■Notes :
• In the other countries, RDS tuner function cannot be available.
ENGLISH
• RDS is only possible in the FM band.
• RDS searches for the preset stations only. If no stations have been stored in the memory, or if the program type could not be
found among the preset stations, “NO PTY” is displayed.
Therefore, preset the radio stations before searching for RDS stations.
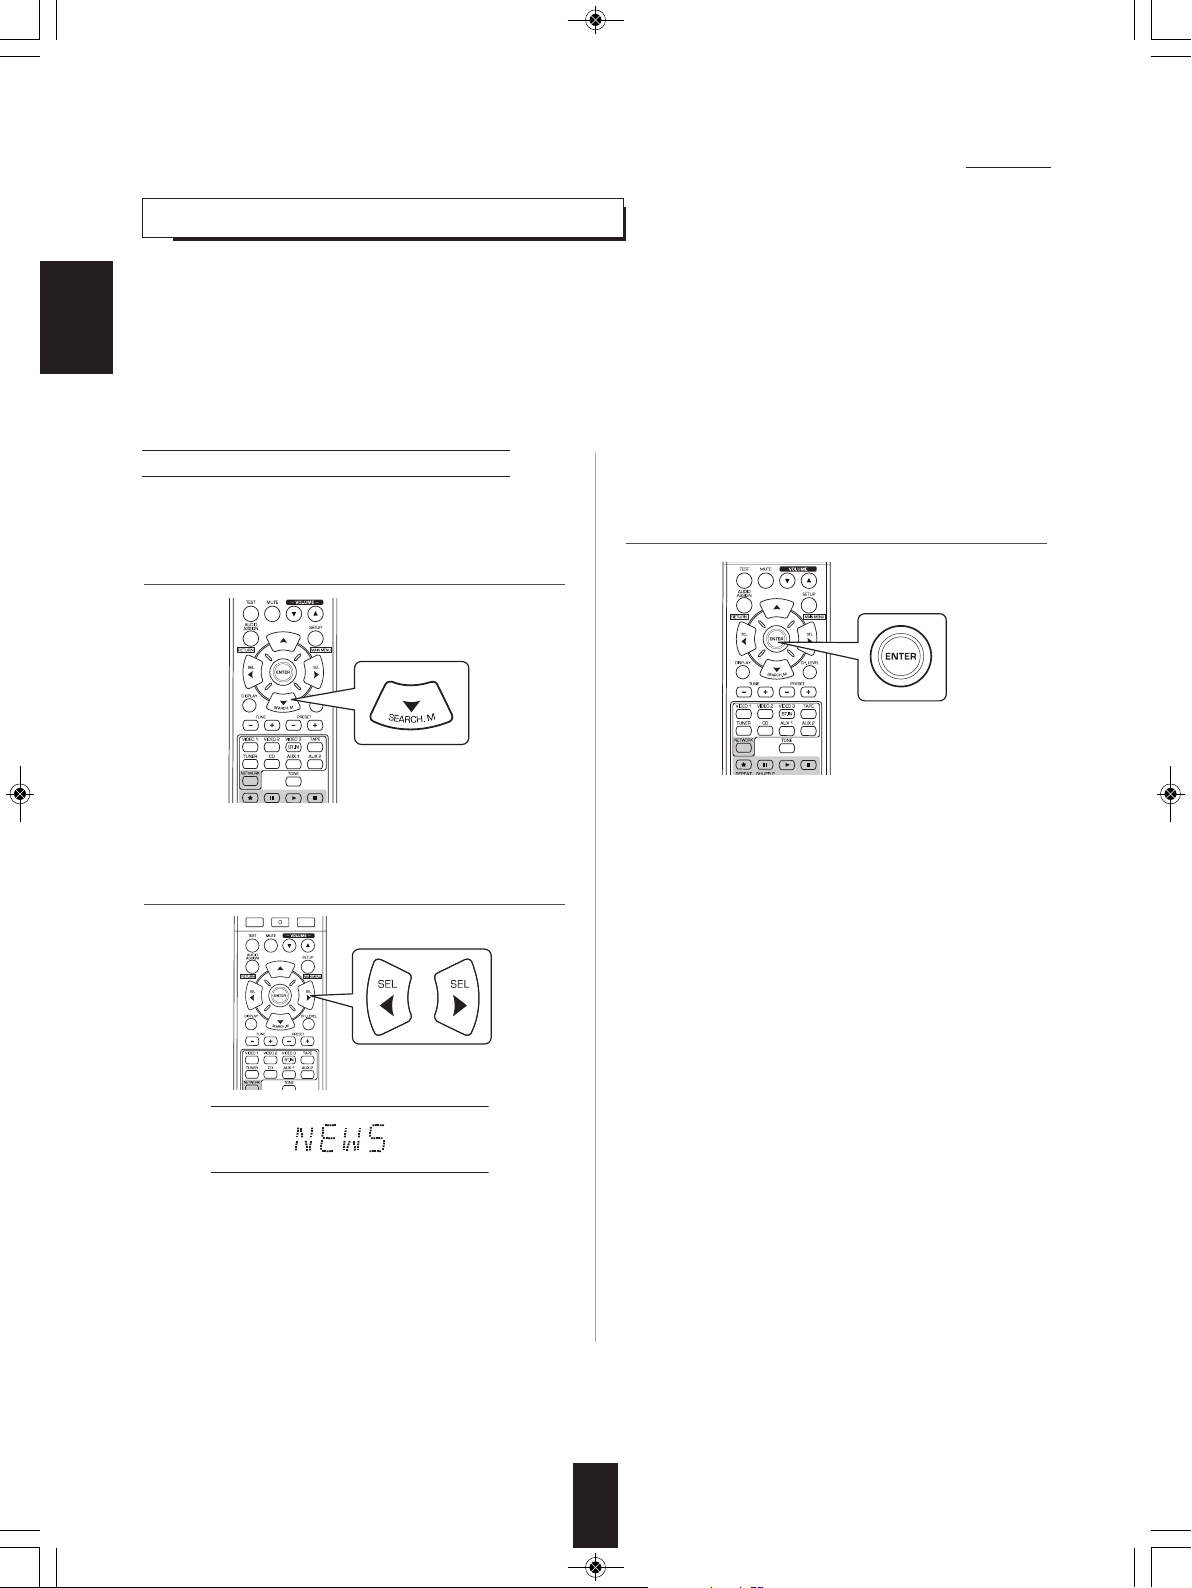
Searching for stations by program type
• You can search for stations by program type.
1. In the FM mode, press the SEARCH MODE
button.
• “SEARCH” is displayed for several seconds.
2. While displaying "SEARCH", select the desired
program type.
3. While displaying the selected program type, press
the ENTER button.
• The tuner starts searching through the preset station for
a match.
• When a station is found, the search stops and the
station plays.
• If no station is found, “NO PTY” is displayed.
• Each time these buttons are pressed, one of different
types of programs is selected.
(NEWS, AFFAIRS, INFO, SPORT, EDUCATE, DRAMA,
CULTURE, SCIENCE, VARIED, POP M, ROCK M,
EASY M, LIGHT M, CLASSICS, OTHER M, WEATHER,
FINANCE, CHILDREN, SOCIAL, RELIGION, PHONE
IN, TRAVEL, LEISURE, JAZZ, COUNTRY, NATION M,
OLDIES, FOLK M, DOCUMENT)
• If "SEARCH" disappears, press the SEARCH MODE
button again.
24
Page 25
RD-6506(G)_ENG_110330_RD-6506(G)_ENG 2011-04-14 오전 9:29 페이지 25
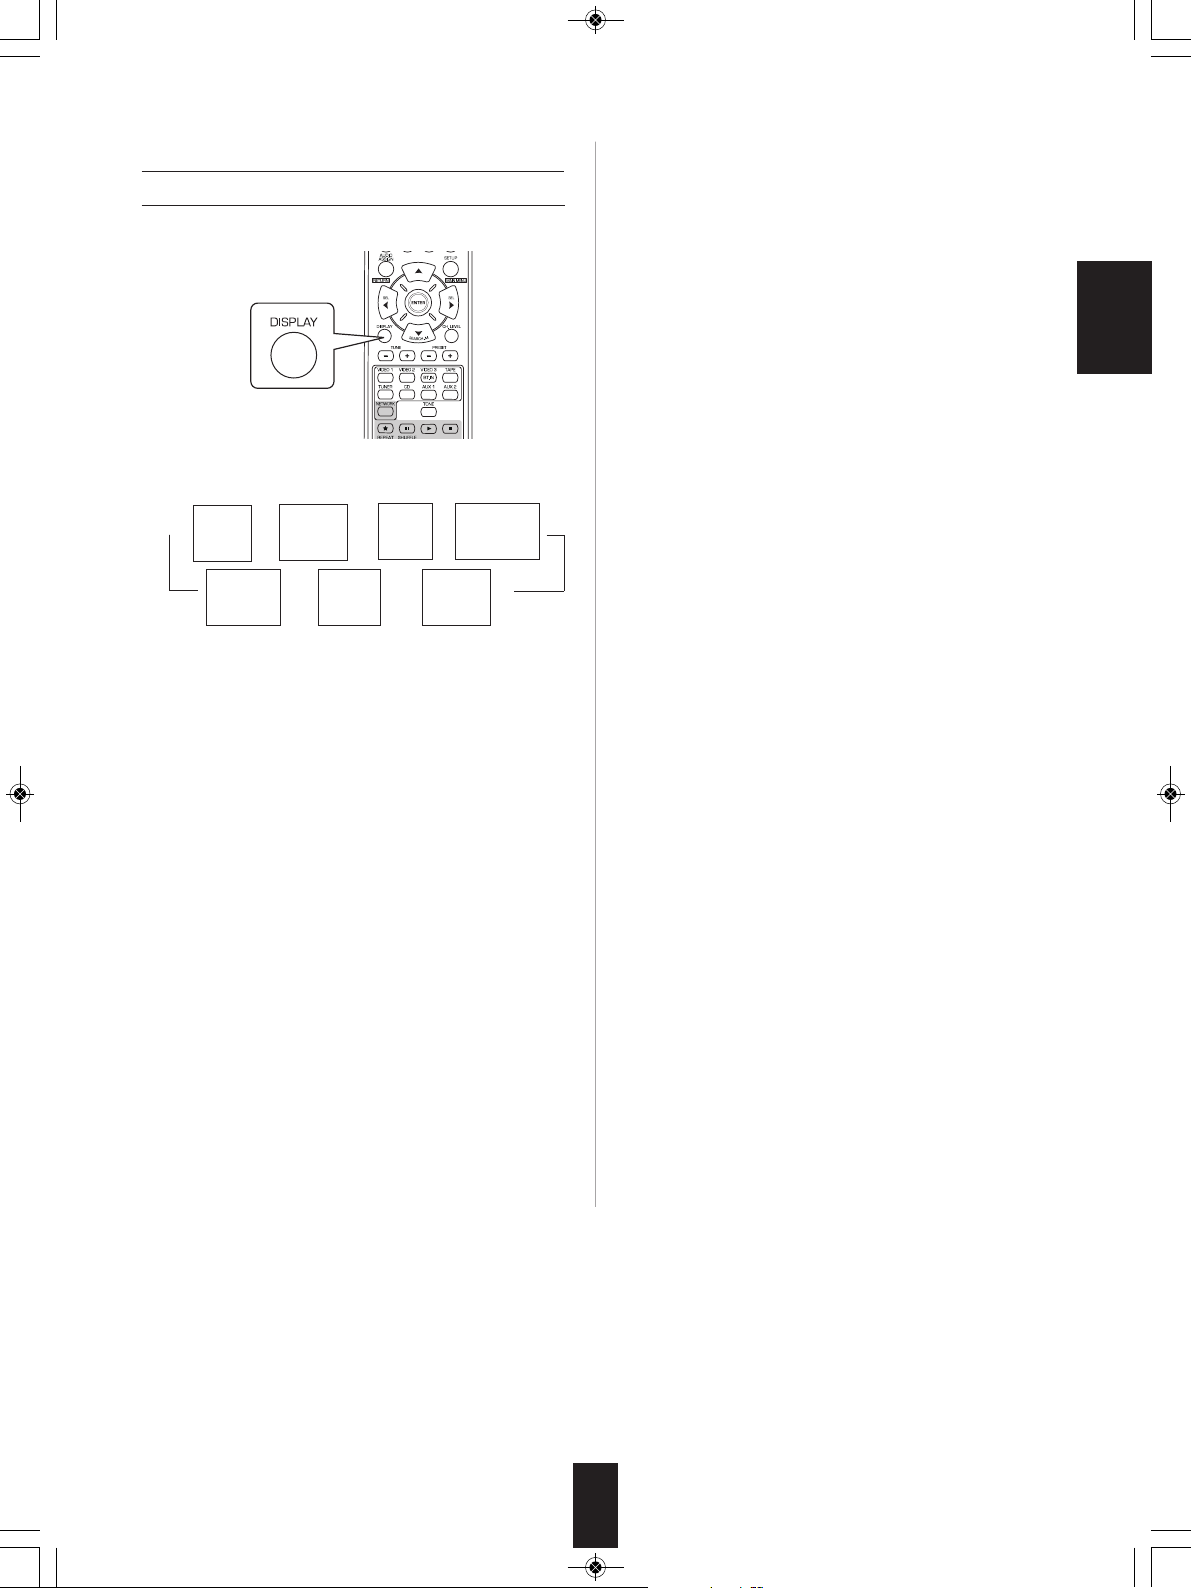
Displaying RDS information
In the FM mode,
• Each time this button is pressed, the display mode
changes as follows:
rogram
Service name
Program
Type
PTY)
(
P
(PS)
Input
Surround
mode
←← ←
Text (RT)
olume
V
→→ →→
source
Frequency)
(
R
Signal
input
adio
ENGLISH
* Program Service Name(PS)-The name of the radio
station.
* Program Type(PTY)-This indicates the kind of program
currently being broadcast.
* Radio Text(RT)-Messages sent by the radio station. For
example, a talk radio station may provide a phone
number as RT.
• If the signals are too weak or no RDS service is
available, "NO NAME", "NO PTY" or "NO TEXT" will be
displayed.
25
Page 26
VIDEO
RD-6506(G)_ENG_110330_RD-6506(G)_ENG 2011-04-14 오전 9:29 페이지 26
RECORDING
• The digital signals from the coaxial, optical digital input or HDMI IN can be heard but cannot be recorded.
• When recording the analog signals from CD, VIDEO 1~2, be sure to select the analog input.
(For details, refer to "When CD, VIDEO 1~2 is selected as an input source" on page 14.)
• The volume and tone (bass, treble) settings have no effect on the recording signals.
ENGLISH
Recording with TAPE
1. Select the desired input as a recording source
except for TAPE.
2. Start recording on the TAPE.
3. Start play on the desired input.
Dubbing from video components onto VIDEO 1
1.Select the VIDEO 2 as a recording source.
2. Start recording on the VIDEO 1.
3. Start play on the desired input.
• The audio and video signals from the desired input will be
dubbed onto the VIDEO 1 and you can enjoy them on the
TV set and from the speakers.
26
Page 27
RD-6506(G)_ENG_110330_RD-6506(G)_ENG 2011-04-14 오전 9:29 페이지 27
OTHER FUNCTIONS
Operating the sleep timer
• The sleep timer allows the system to continue to operate for a specified period of time before automatically shutting off.
• To set the receiver to automatically turn off after the specified period of time.
• Each time this button is pressed, the sleep time changes
as follows:
→ 10 → 20 → 30 → --- → 90 → OFF
• While operating the sleep timer, " " lights up.
• When the sleep time is selected, the fluorescent display
is dimly lit.
ENGLISH
Unit : minutes
Adjusting the brightness of the fluorescent display
Displaying the operation status
During playback,
• Each time this button is pressed, the brightness of
the fluorescent display changes as follows:
→ ON → dimmer → OFF
• In the display OFF mode, pressing some buttons
cancel the display OFF mode to display the operation
status.
• Each time this button is pressed, the display mode
changes as follows:
Volume
→→ → →
• When the RDS tuner function is available in your country,
for details on the FM mode information, see “Displaying
RDS information” on page 25.
Surround
mode
Signal
input
Input
source
27
Page 28
RD-6506(G)_ENG_110330_RD-6506(G)_ENG 2011-04-14 오전 9:29 페이지 28
CONFIRMING THE HDMI FUNCTION
To use the HDMI control functions properly, it is recommend to confirm the HDMI control functions usable with each
connected component by performing the following operations.
■Note :
• Some HDMI control functions may not work with certain components and TV that are not compatible with them.
ENGLISH
Before operation
• Check that this receiver, TV and player, etc are connected by HDMI cabels.
• Check that the HDMI control of TV and the HDMI-connectable player are enabled.
(For details on the setups of TV and player, refer to their operating instructions.)
• Set the HDMI CONTROL and the POWER CONROL to ON to enable the HDMI control of this receiver.
(For details, refer to “SETTING THE HDMI” on page 42.)
Confirming the basic HDMI operations
1.Turn the power on for all the components connected by HDMI cables.
2.Switch the TV input to the HDMI input connected to this receiver.
3.Switch this unit input to the HDMI input source.
• Confirm that its picture is displayed and the sound is heard from the speakers properly.
Confirming the HDMI control functions
1.Turn the power on for all the components connected by HDMI cables.
2.Turn the TV off to enter the standby mode.
• Confirm that all the components are turned off.
3.With all the components off, start playback on a player (connected by HDMI cable).
• Confirm that all the components are turned on and the inputs of this unit and TV are switched automatically.
28
Page 29
SETUP
ENTER / MEMO
PRESET
TUNE
MAIN MENU
RD-6506(G)_ENG_110330_RD-6506(G)_ENG 2011-04-14 오전 9:29 페이지 29
System Setup
o
t
u
yo
ws
o
l
l
a
d
n
a
y
a
l
sp
i
d
t
n
sce
e
r
o
u
l
f
e
h
t
n
o
d
ye
a
l
sp
i
d
s
i
u
n
e
m
p
u
t
se
e
Th
•
■
•
si
g
n
a
ch
se
e
Th
d
n
e
h
t
v
a
N
e
e
Th
we
Ho
u
b
e
Th
i
xp
ve
.
r
e
t
a
l
d
e
u
t
d
vi
i
a
g
l
r
o
t
t
co
u
n
e
m
p
e
t
a
,
n
o
t
n
i
p
u
d
u
o
r
h
t
g
n
i
h
s
n
o
i
t
a
n
n
ca
u
yo
e
h
t
n
o
s
f
o
s
st
si
n
s
u
o
i
r
va
e
h
t
h
g
ssu
a
e
r
e
b
e
h
t
se
u
n
a
p
t
n
o
r
f
m
n
i
a
m
6
n
e
m
-
b
su
m
p
u
t
e
s
u
yo
e
m
o
s
n
o
t
t
u
e
r
r
co
l
e
a
sp
syst
;
s
u
n
e
s.
u
u
n
e
g
n
si
u
e
r
n
o
r
f
e
h
t
n
o
t
d
n
o
n
i
,
m
e
o
t
t
u
b
e
h
t
a
l
e
n
a
p
t
n
o
se
o
h
t
a
e
sp
,
t
u
p
e
h
t
n
o
s
n
.
l
l
we
s
t
t
o
m
e
r
e
h
t
a
l
l
a
st
n
i
e
h
t
g
n
i
r
u
d
ce
n
o
s
i
h
t
t
se
o
t
d
e
e
n
y
l
n
o
l
l
wi
u
yo
s,
n
o
i
t
a
u
t
i
ke
a
l
d
n
a
n
o
p
u
t
se
r
co
e
t
o
m
e
r
l
o
r
t
n
co
e
,
yo
a
p
CH
n
s
e
o
t
u
l
l
o
r
t
sh
o
h
r
u
yo
f
a
r
a
p
,
l
ve
e
e
p
n
e
wh
w.
o
l
e
b
wn
o
t
a
e
h
t
e
m
n
a
r
e
t
e
m
g
n
i
m
r
o
f
r
e
d
h
t
a
,
r
HDM
e
se
t
i
d
n
.
I
p
u
t
e
n
y
l
e
r
a
r
m
se
e
Th
p
o
u
n
e
m
e
b
o
t
s
d
e
e
r
a
s
u
n
e
.
n
o
i
t
a
r
e
ENGLISH
st
o
m
n
I
y.
l
si
a
e
s
e
r
u
d
ce
o
r
p
p
u
t
se
e
h
t
m
r
o
f
r
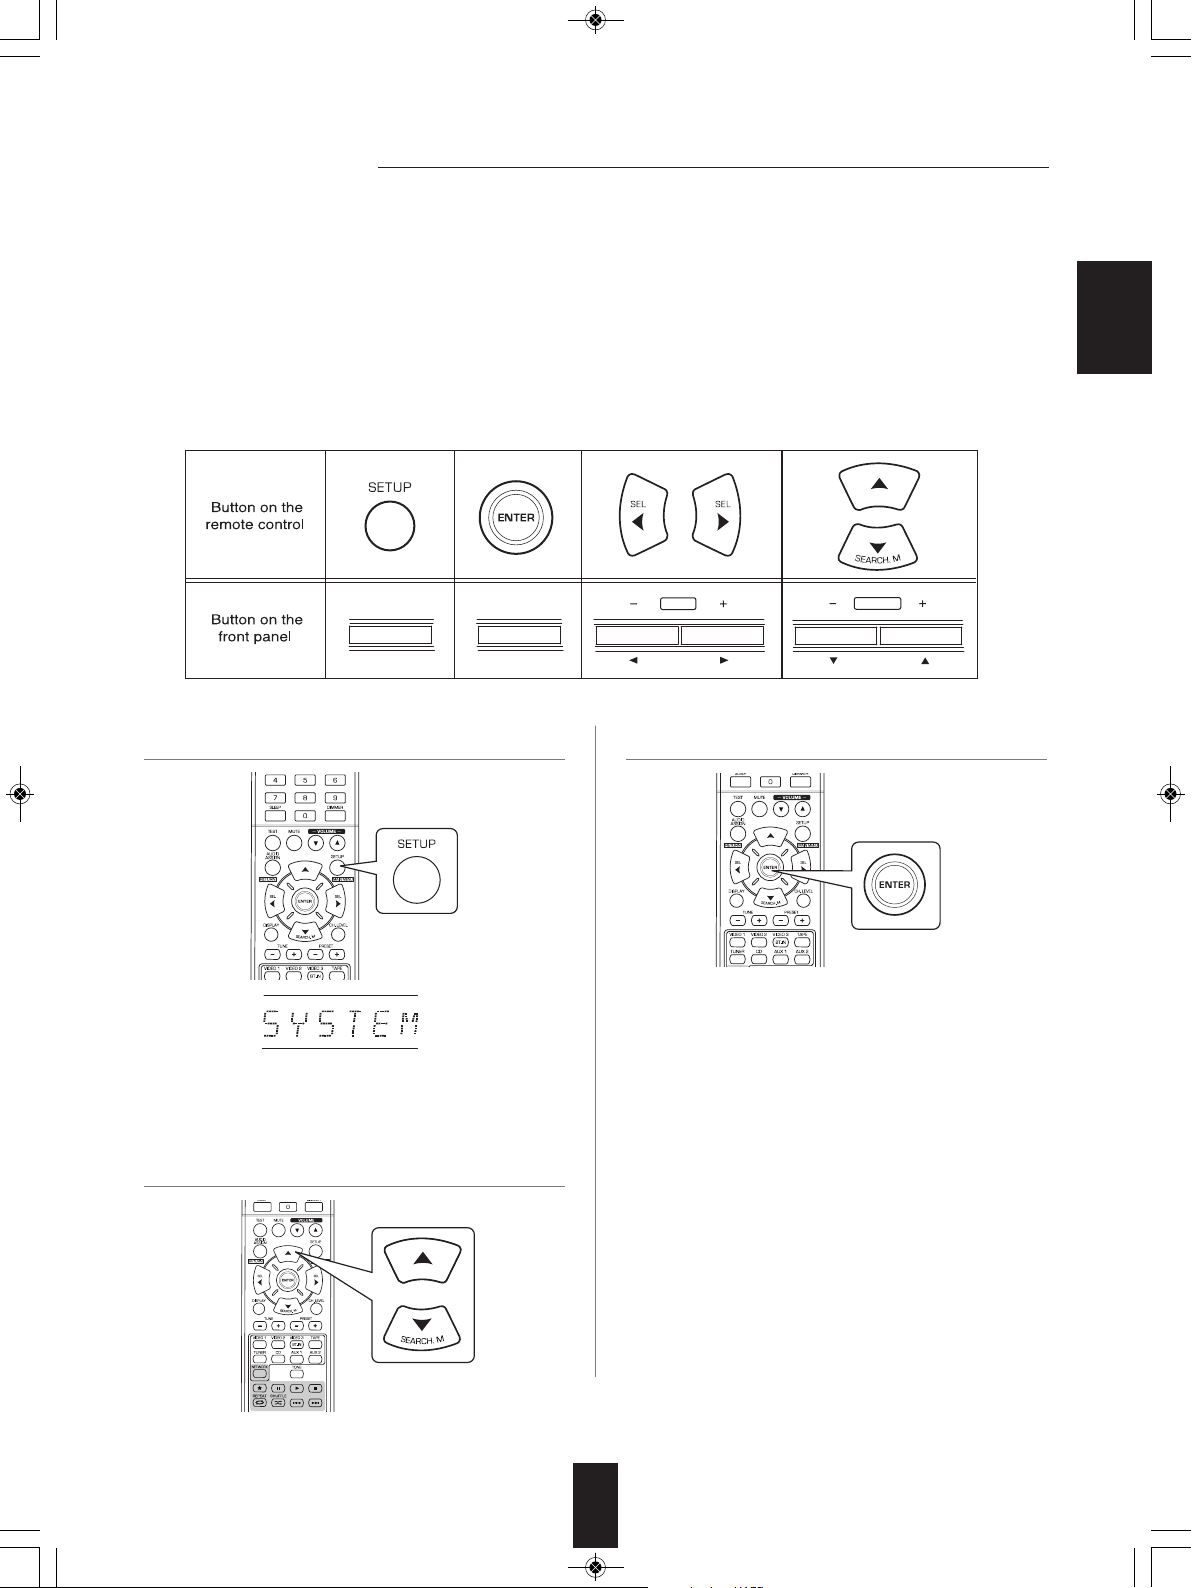
1. Turn the setup menu on.
• The setup menu will be shown.
• To turn the menu off, press this button again.
2. Select the desired menu using the CURSOR
UP(▲)/ DOWN(▼) buttons.
3. Confirm your selection.
• When selecting "SYSTEM", see "SETTING THE
SYSTEM" on page 31.
• When selecting "INPUT", see "SETTING THE INPUT" on
page 33.
• When selecting "SPK SET", see "SETTING THE
SPEAKER SETUP" on page 34.
• When selecting "CH LEVEL", see "SETTING THE CH
LEVEL" on page 38.
• When selecting "PARAMTR", see "SETTING THE
PARAMETER" on page 40.
• When selecting "HDMI", see "SETTING THE HDMI" on
page 42.
• When selecting "EXIT", the setup menu will be turned off.
29
Page 30

SW M : NORM / SW +
TONE : OFF
A.P.S : OFF / 2H / 4H / 6H
RETURN
BASS : 0 / - 10 ~ + 10
TRE : 0 / - 10 ~ + 10
SPK SET
VID 1 CFG
VID 2 CFG
CD CFG
RETURN
CONFIG
X-OVER
DISTANCE
RETURN
MODE : CAL / REF 1 / REF 2
L : 0 dB / -15 ~ + 15
C : 0 dB / -15 ~ + 15
R : 0 dB / -15 ~ + 15
SR : 0 dB / -15 ~ + 15
SL : 0 dB / -15 ~ + 15
SW : 0 dB / -15 ~ + 15
DD : 0 dB / -10 ~ 0
DTS : 0 dB / -10 ~ 0
RETURN
DRC : OFF / MID / MAX
RETURN
PANO : OFF / ON
C.WIDTH : 3 / 0 ~ 7
DIMEN : 0 / -3 ~ +3
DRC DD
RETURN
HDMI : AMP / THRU
CEC : OFF / ON
PWR : OFF / ON
RETURN
HDMI
EXIT
AUD : OPT / COX 1 / COX 2 / - - AUTO : ON / OFF
RETURN
AUD : OPT / COX 1 / COX 2 / - - AUTO : ON / OFF
RETURN
AUD : OPT / COX 1 / COX 2 / - - AUTO : ON / OFF
RETURN
FC : 40 / 50 / 80 / 100 / 150 / 200
RETURN
UNIT : M / FT
L : 3.0 M / 0.1 ~ 9.0
C : 3.0 M / 0.1 ~ 9.0
R : 3.0 M / 0.1 ~ 9.0
SR : 3.0 M / 0.1 ~ 9.0
SL : 3.0 M / 0.1 ~ 9.0
SW : 3.0 M / 0.1 ~ 9.0
RETURN
L : 10.0 FT / 0.5 ~ 30.0
C : 10.0 FT / 0.5 ~ 30.0
R : 10.0 FT / 0.5 ~ 30.0
SR : 10.0 FT / 0.5 ~ 30.0
SL : 10.0 FT / 0.5 ~ 30.0
SW : 10.0 FT / 0.5 ~ 30.0
RETURN
F : LARGE / SMALL
C : LARGE / SMALL / NO
S : LARGE / SMALL / NO
SW : YES / NO
RETURN
/ ON
RD-6506(G)_ENG_110330_RD-6506(G)_ENG 2011-04-14 오전 9:29 페이지 30
■Setup menu flow
• The setup menu flow is as follows :
ENGLISH
• When "RETURN" is selected on a sub-menu, it will return to the previous menu.
• When the AUDIO ASSIGN(/RETURN) button is pressed on a sub-menu, it will return to the previous menu, too.
■Note : During setup menu operation, only the (POWER ON/)STANDBY button and the buttons required for system setup
will function.
30
Page 31

SW M : NORM / SW +
TONE : OFF
A.P.S : OFF / 2H / 4H / 6H
RETURN
BASS : 0 / - 10 ~ + 10
TRE : 0 / - 10 ~ + 10
/ ON
RD-6506(G)_ENG_110330_RD-6506(G)_ENG 2011-04-14 오전 9:29 페이지 31
SETTING THE SYSTEM
• SW M(SUBWOOFER MODE) : To select the desired subwoofer mode.
• TONE : To adjust the tone (bass and treble) as desired.
• A.P.S(AUTO POWER SAVE) : To set the power-off time as desired.
• RETURN : To return to the previous menu.
ENGLISH
1. Press the CURSOR UP(▲)/DOWN(▼) buttons
to select the desired item.
2. Press the CURSOR LEFT(◀)/RIGHT(▶)
buttons to set the selected item as desired
When selecting the SUBWOOFER MODE
• "SW +" mode is effective only when “F”(Front) and "C"(Center) are set to "LARGE" and "SW"(Subwoofer) is set to "YES" on
the SPK SET menu. (For details, refer to "SETTING THE SPEAKER SETUP" on page 34.)
NORM : When the low frequency signals of channels set to "LARGE" are reproduced from those channels only.
SW +: When the low frequency signals of channels set to "LARGE" are reproduced simultaneously from those channels and
In this mode, the low frequency signals that are reproduced from the subwoofer channel is only the low frequency
signals of LFE (from the multi-channel sources that contains LFE (Low Frequency Effects) channel, also called the ".1"
↕
channel) and the channels set to "SMALL".
the subwoofer channel.
In this mode, the low frequency range expands more uniformly through the room, but depending on the size and shape
of the room, interference may result in a decrease of the actual volume of the low frequency range.
When selecting the AUTO POWER SAVE
• The auto power save is a function that automatically turns the power off to enter the standby mode. When any button is not
pressed for more than the time you set, it will function.
• You can set the power-off time as desired.
→ OFF ↔ 2H(Hour) ↔ 4H ↔ 6H ←
(To turn off the function)
31
Page 32

RD-6506(G)_ENG_110330_RD-6506(G)_ENG 2011-04-14 오전 9:29 페이지 32
When selecting the TONE
OFF : To listen to a program source without the tone effect. ("DIR" lights up.)
↕
ON : To adjust the tone for your taste. ("DIR" goes off.)
■When the TONE is set to ON to adjust the tone (bass and treble)
① Press the ENTER button to enter the tone setting mode.
ENGLISH
② Press the CURSOR UP(▲)/DOWN(▼) buttons to select the desired tone.
When selecting the BASS
③ Press the CURSOR LEFT(◀)/RIGHT(▶) buttons to adjust the selected tone as desired.
• The tone level can be adjusted within the range of -10 ~
+10 dB.
• In general, we recommend the bass and treble to be
adjusted to 0 dB (flat level).
• Extreme settings at high volume may damage your
speakers.
32
Page 33

VID 1 CFG
V
ID 2 CFG
CD CFG
RETURN
AUD : OPT / COX 1 / COX 2 / - - AUTO : ON / OFF
RETURN
AUD : OPT / COX 1 / COX 2 / - - AUTO : ON / OFF
RETURN
AUD : OPT / COX 1 / COX 2 / - - AUTO : ON / OFF
RETURN
RD-6506(G)_ENG_110330_RD-6506(G)_ENG 2011-04-14 오전 9:29 페이지 33
ETTING THE INPUT
S
• AUD (AUDIO ASSIGN) : To assign the connected DIGITAL INs to the desired input.
• AUTO (AUTO SURROUND) : To select the auto surround mode or the manual surround mode.
• RETURN : To return to the previous menu.
ENGLISH
1.Press the CURSOR UP(▲)/DOWN(▼) buttons to
select the desired input source, then press the
2. Press the CURSOR UP(▲)/DOWN(▼) buttons
to select the desired item.
ENTER button.
3. Press the CURSOR LEFT(◀)/RIGHT(▶)
buttons to set the selected item as desired.
Example: When selecting the VIDEO 2
When selecting the AUDIO ASSIGN
• You should assign the connected DIGITAL INs to the desired of CD and VIDEO 1~VIDEO 2.
(For details, refer to "CONNECTING DIGITAL INS" on page 7.)
• You can select the desired of OPT (optical), COX 1(coaxial 1), COX 2(coaxial 2) and - - - (analog).
■Notes :
• In such a case that a DIGITAL IN is assigned to two input sources or more, when these input sources are selected, the digital
audio signals can be heard from the same DIGITAL IN.
• When the HDMI IN connector is connected to your video component, the DIGITAL IN setting is invalid.
When selecting the AUTO SURROUND
• Depending on how to select a surround mode, you can select the auto surround mode or the manual surround mode.
OFF
ON(Auto surround mode) : The optimum surround mode will be automatically selected depending on the signal format being input.
■Notes :
• When the SPEAKER button is set to off or “C(Center)” and “S(Surround)” are set to “NO”, the auto surround mode is invalid.
• Even when the auto surround mode is selected and the same type of digital signal format is being input, the optimum surround
mode may vary depending on whether the speaker type is set to "NO" or not.
• When the auto surround mode is selected, the surround modes other than the optimum surround mode cannot be selected.
(Manual surround mode) : You can select the desired of different surround modes selectable for the signal being input with using
↕
the SURROUND MODE SELECT ( > / <) buttons. (For details, refer to "when selecting the manual
surround mode with pressing the AUTO/MANUAL button on the front panel" on page 17.)
33
Page 34

SPK SET
CONFIG
X-OVER
D
ISTANCE
RETURN
FC : 40 / 50 / 80 / 100 / 150 / 200
RETURN
UNIT : M / FT
L : 3.0 M / 0.1 ~ 9.0
C : 3.0 M / 0.1 ~ 9.0
R : 3.0 M / 0.1 ~ 9.0
SR : 3.0 M / 0.1 ~ 9.0
SL : 3.0 M / 0.1 ~ 9.0
SW : 3.0 M / 0.1 ~ 9.0
RETURN
L : 10.0 FT / 0.5 ~ 30.0
C : 10.0 FT / 0.5 ~ 30.0
R : 10.0 FT / 0.5 ~ 30.0
SR : 10.0 FT / 0.5 ~ 30.0
SL : 10.0 FT / 0.5 ~ 30.0
SW : 10.0 FT / 0.5 ~ 30.0
RETURN
F : LARGE / SMALL
C : LARGE / SMALL / NO
S : LARGE / SMALL / NO
SW : YES / NO
RETURN
RD-6506(G)_ENG_110330_RD-6506(G)_ENG 2011-04-14 오전 9:29 페이지 34
ETTING THE SPEAKER SETUP
S
• After you have installed this receiver and connected all the components, you should adjust the speaker settings for the
optimum sound acoustics according to your environment and speaker layout.
• Even when you change speakers, speaker positions, or the layout of your listening environment, you should adjust the
speaker settings, too.
ENGLISH
• CONFIG (CONFIGURATION) : To select the sizes of the speakers that are connected.
• X-OVER (CROSSOVER) : To select the desired crossover frequency.
• DISTANCE: To enter the distance between the listening position and each speaker to set the delay time automatically for
optimum surround playback.
• RETURN : To return to the previous menu.
When selecting the CONFIGURATION
1. Press the CURSOR UP(▲)/DOWN(▼) buttons to select the "CONFIG", then press the ENTER button.
2. Press the CURSOR UP(▲)/DOWN(▼) buttons to select the desired speaker.
34
Page 35

RD-6506(G)_ENG_110330_RD-6506(G)_ENG 2011-04-14 오전 9:29 페이지 35
3. Press the CURSOR LEFT(◀)/ RIGHT(▶) buttons to set the selected speaker as desired.
• Depending on your speaker type, you can select one of these following speaker types.
• Front, Center and Surround speakers :
LARGE : Select this when connecting speakers that can fully reproduce sounds below crossover frequency.
SMALL : Select this when connecting speakers that can not fully reproduce sounds below crossover frequency. When this is
selected, sounds below crossover frequency are sent to the subwoofer or speakers which are set to "LARGE" (when
not using a subwoofer).
NO : Select this when no speakers are connected. When this is selected, sounds are sent to the speakers which are not set to
"NO".
• Subwoofer :
YES : Select this to output LFE signals and bass frequencies of channels set to “SMALL” form the subwoofer.
NO : Select this when the subwoofer is not connected. The bass frequencies are output from other speakers.
ENGLISH
■Notes :
• When speakers are set to "SMALL", you should set their crossover frequency correctly according to their frequency
characteristics. (For details, refer to "When selecting the CROSSOVER" on page 36.)
• When the "F"(Front) is set to "SMALL", “C”(Center) and “S”(Surround) cannot be set to "LARGE" and the “SW”(Subwoofer)
cannot be set to “NO”.
4. Repeat the above steps 2 and 3 until the speakers are all set to the desired mode.
■About the speaker size
• Select "LARGE" or "SMALL" not according to the actual size of the speaker but according to the speaker's capacity for playing
low frequency (bass sound below frequency set on the "CROSSOVER" menu) signals.
• If you do not know, try comparing the sound at both settings (setting the volume to a level low enough so as not to damage
the speakers) to determine the proper setting.
35
Page 36

RD-6506(G)_ENG_110330_RD-6506(G)_ENG 2011-04-14 오전 9:29 페이지 36
When selecting the CROSSOVER
• When speakers are set to "SMALL", be sure to set their crossover frequency correctly according to their frequency
characteristics.
1. Press the CURSOR UP(▲)/DOWN(▼) buttons to select the "X-OVER", then press the ENTER button.
ENGLISH
2. Press the CURSOR LEFT(◀)/RIGHT(▶) buttons to set the crossover frequency as desired.
• You can select the crossover frequency among 40, 50, 80, 100, 150 and 200 Hz.
■About the crossover frequency
• When speakers are set to "SMALL", low frequencies in those channels that are below the crossover frequency are to output
from subwoofer or front speakers which are set to "LARGE" (when not using a subwoofer).
• Refer to the operating instructions of the speakers to be connected. If the frequency range of your speaker is 100 Hz~20 kHz,
the crossover frequency should be set to 100 Hz(or slightly higher).
36
Page 37

RD-6506(G)_ENG_110330_RD-6506(G)_ENG 2011-04-14 오전 9:29 페이지 37
When selecting the DISTANCE
1. Press the CURSOR UP(▲)/DOWN(▼) buttons to select the “DISTANCE”, then press the ENTER button.
2. Press the CURSOR UP(▲)/DOWN(▼) buttons to select the desired item.
ENGLISH
■Note :
• You cannot select the speakers set to "NO".
3. Press the CURSOR LEFT(◀)/RIGHT(▶) buttons to set the selected item as desired.
■When selecting the desired unit
• You can select either "M (Meter)" or "FT (Feet)".
• Once a unit is selected, the distances are automatically
changed in the selected unit.
■When setting the distance
• You can set the distance within the range of 0.1 ~ 9.0
meters in 0.1 meter intervals(or 0.5 ~ 30.0 feet in 0.5 feet
intervals).
4. Repeat the above steps 2 and 3 until the distances are all set as desired.
■About the speaker distance
When enjoying multi-channel surround playback with Dolby Digital and DTS sources, etc., it is ideal that the center and surround
speakers, etc. should be the same distance from the main listening position as the front speakers. By entering the distance
between the listening position and each speaker, the delay times of center and surround speakers, etc. are automatically
adjusted to create an ideal listening environment virtually as if the center and surround speakers, etc. were at their ideal locations
respectively.
37
Page 38

MODE : CAL / REF 1 / REF 2
L
: 0 dB / -15 ~ + 15
C : 0 dB / -15 ~ + 15
R : 0 dB / -15 ~ + 15
SR : 0 dB / -15 ~ + 15
SL : 0 dB / -15 ~ + 15
SW : 0 dB / -15 ~ + 15
DD : 0 dB / -10 ~ 0
DTS : 0 dB / -10 ~ 0
RETURN
RD-6506(G)_ENG_110330_RD-6506(G)_ENG 2011-04-14 오전 9:29 페이지 38
ETTING THE CH LEVEL
S
ENGLISH
■Note : Depending on the speaker settings ("NO", etc), some channels cannot be selected.
Adjusting the current channel level
• You can adjust the current channel levels as desired. These adjusted levels are just memorized into user’s memory("CAL"),
not into preset memory ("REF 1", "REF 2")
• After adjusting each channel level with test tone, adjust the channel levels either according to the program sources or to suit
your tastes. (For details, refer to "Adjusting each channel level with test tone" on page 19.)
1. Press the CURSOR UP(▲)/DOWN(▼) buttons
to select the desired channel.
2. Press the CURSOR LEFT(◀)/RIGHT(▶)
buttons to adjust the level of the selected
channel or program source's LFE as desired.
Example: When selecting Dolby Digital source's LFE
• The LFE level can be adjusted within the range of -10 ~ 0
dB and other channel levels within the range of -15 ~ +15 dB
• In general, we recommend the LFE level to be adjusted to
0 dB.(However, the recommended LFE level for some
early DTS software is -10 dB.) If the recommended levels
seem too high, lower setting as necessary.
3. Repeat the above steps 1 and 2 to adjust each
channel level.
38
Page 39

RD-6506(G)_ENG_110330_RD-6506(G)_ENG 2011-04-14 오전 9:29 페이지 39
Memorizing the adjusted channel levels
• You can memorize the adjusted channel levels into preset
memory("REF 1", "REF 2") and recall the memorized
whenever you want.
1. After performing the steps 1 ~ 3 in "Adjusting the
current channel level" procedure on page 38,
press the ENTER button.
• Then "1" of "REF 1" indication flickers.
2. Press the CURSOR LEFT(◀)/RIGHT(▶)
buttons to select the desired preset memory,
then press the ENTER button.
Recalling the memorized channel levels
1. Press the CURSOR UP(▲)/DOWN(▼) buttons
to select the "MODE ~ ".
ENGLISH
• "CAL" may be displayed instead of "REF 1" or "REF 2".
2. Press the CURSOR LEFT(◀)/RIGHT(▶)
buttons to select the desired one of REF 1 and
REF 2.
• Each time the CURSOR LEFT(◀) or RIGHT(▶) button is
pressed, "REF 1" or "REF 2" is selected.
• The adjusted channel levels have now been memorized
into the selected memory.
• Then the channel levels memorized into the selected
preset memory are recalled.
39
Page 40

DRC : OFF / MID / MAX
RETURN
PANO : OFF / ON
C.WIDTH : 3 / 0 ~ 7
D
IMEN : 0 / -3 ~ +3
DRC DD
RETURN
RD-6506(G)_ENG_110330_RD-6506(G)_ENG 2011-04-14 오전 9:29 페이지 40
ETTING THE PARAMETER
S
ENGLISH
• DOLBY PRO LOGIC II MUSIC PARAMETERS : To adjust the various Dolby Pro Logic II Music parameters for optimum
(PANO(PANORAMA), C.WIDTH(CENTER
WIDTH), DIMEN(DIMENSION))
• DRC DD(DYNAMIC RANGE COMPRESSION DOLBY DIGITAL) : To adjust the dynamic range compression that makes faint
• RETURN : To return to the previous menu.
When selecting “PANO”, “C.WIDTH”, “DIMEN”
• You can adjust the various Dolby Pro Logic II Music parameters for optimum surround effect.
surround effect.
sound easier to hear at low volume levels.
■Note:
• The parameter settings are valid only when listening in Dolby Pro Logic II Music mode.
1. Press the CURSOR UP(▲)/DOWN(▼) buttons to select the desired parameter.
2. Press the CURSOR LEFT(◀)/ RIGHT(▶) buttons to adjust the selected parameter as desired.
■When selecting the "PANO"(PANORAMA)
This mode extends the front stereo image to include the surround speakers for an exciting "wraparound" effect with side wall
imaging. Select "OFF" or "ON"(default value:OFF).
■When selecting the "C. WIDTH"(CENTER WIDTH) control
This adjusts the center image so it may be heard only from the center speaker, only from the left/right speakers as a phantom
image, or from all three front speakers to varying degrees. The control can be set in 8 steps from 0 to 7 (default value : 3).
■When selecting the "DIMEN"(DIMENSION)" control
This gradually adjusts the soundfield either towards the front or towards the rear. The control can be set in 7 steps from -3 to
+3 (default value : 0).
3. Repeat the above steps 1 and 2 to adjust other parameters.
40
Page 41

RD-6506(G)_ENG_110330_RD-6506(G)_ENG 2011-04-14 오전 9:29 페이지 41
When selecting “DRC DD”
• This function compresses the dynamic range of previously specified parts of the Dolby Digital sound track (with extremely high
volume) to minimize the difference in volume between the specified and non-specified parts.
This makes it easy to hear all of the sound track when watching movies at night at low levels.
■Notes:
• This setting is valid only when the digital signals from the Dolby Digital program source are being input.
• In some Dolby Digital softwares, this setting may not be valid.
1. Press the CURSOR UP(▲)/DOWN(▼) buttons to select “DRC DD”, then press the ENTER button.
ENGLISH
2. Press the CURSOR LEFT(◀)/ RIGHT(▶) buttons to adjust the dynamic range compression as desired.
→ OFF : To turn off the DRC function
↕
MID
↕
→ MAX
Higher compression
41
Page 42

HDMI : AMP / THRU
CEC : OFF / ON
PWR : OFF / ON
RETURN
HDMI
RD-6506(G)_ENG_110330_RD-6506(G)_ENG 2011-04-14 오전 9:29 페이지 42
ETTING THE HDMI
S
• HDMI(HDMI AUDIO OUT) : To output the digital audio signals from the HDMI MONITOR OUT connector.
• CEC(HDMI CONTROL) : To link operations with components connected to HDMI connectors and compatible with HDMI
ENGLISH
• PWR(POWER CONTROL) : To link the power ON/OFF status of this unit to components.
• RETURN : To return to the previous menu.
control.
1. Press the CURSOR UP(▲)/DOWN(▼) buttons
to select the desired item.
When selecting the HDMI AUDIO OUT
• The HDMI connection can carry uncompressed digital video signals and digital audio signals.
Depending on whether the digital audio signals input into the HDMI IN are output from the HDMI MONITOR OUT of this
receiver or not, you should set the HDMI AUDIO OUT correctly.
AMP : Not to output the HDMI digital audio signals from the HDMI MONITOR OUT of this receiver, meaning these signals are
heard from the speakers connected to this receiver.
↕
THRU : To output the HDMI digital audio signals from the HDMI MONITOR OUT, meaning these signals are heard from the
speakers of your TV.
■Note:
• When the HDMI AUDIO OUT is set to THRU, no sound will not be heard from the speakers connected to this unit.
When selecting the HDMI CONTROL
• The HDMI control function allows input selection of this unit to be interlocked with the operation of the connected components.
OFF : Not to use the HDMI CONTROL function.
↕
ON : To use the HDMI CONTROL function.
• When the HDMI CONTROL is set to ON, you can also use the ARC(Audio Return Channel) function, enabling the TV to send
the audio signals to this receiver via a HDMI cable.
2. Press the CURSOR LEFT(◀)/RIGHT(▶)
buttons to set the selected item as desired.
■Notes:
• The HDMI control function may not work depending on the connected component and its settings.
• To use the ARC function, the TV that supports the ARC function is required.
• For details on HDMI CONTROL and POWER CONTROL, refer to “CONFIRMING THE HDMI FUNCTION” on page 28.
42
Page 43

RD-6506(G)_ENG_110330_RD-6506(G)_ENG 2011-04-14 오전 9:29 페이지 43
When selecting the POWER CONTROL
• The Power control function allows the power status of this unit to be interlocked with the power ON/OFF and start of playback
of the connected components.
OFF : Not to use the POWER CONTROL function.
↕
ON : To use the POWER CONTROL function.
■Note:
• The POWER CONTROL can be set only when the HDMI CONTROL is set to ON.
ENGLISH
43
Page 44

RD-6506(G)_ENG_110330_RD-6506(G)_ENG 2011-04-14 오전 9:29 페이지 44
Troubleshooting Guide
If a fault occurs, run through the table below before taking your receiver for repair.
If the fault persists, attempt to solve it by switching the receiver off and on again. If this fails to resolve the situation, consult
your dealer. Under no circumstances should you attempt to repair the receiver yourself. This could void the warranty.
PROBLEM POSSIBLE CAUSE REMEDY
No power
ENGLISH
No sound
o sound from the surround
N
speakers
No sound from the center
speaker
No picture
No picture with an HDMI
connection
Noise or distorted picture
Stations cannot be received
Preset stations cannot be
received
Poor FM reception
Continuous or intermittent hissing
noise during AM reception,
especially at night.
Remote control unit does not
operate.
• The AC input cord is disconnected.
Poor connection at AC wall outlet or the outlet is
•
dead or off.
• The speaker wires are disconnected.
• The master volume is adjusted too low.
The MUTE button is pressed to ON.
•
• Incorrect selection of input source.
Incorrect connections between the components.
•
• The HDMI AUDIO OUT is set to THRU.
• The settings related to audio are set incorrectly.
Surround mode is switched off(stereo mode).
•
• Master volume and surround level are too low.
Monaural source is used.
•
• Surround speaker setting is "NO".
• Stereo mode, etc is selected.
• Center speaker setting is "NO".
Master volume and center level are too low.
•
• Video connections between this unit and the
monitor TV are not made correctly.
• Incorrect selection of input source on the monitor
TV.
• HDMI connection between this unit and the
monitor TV are not made correctly.
• The monitor TV or other equipments do not
support HDCP.
• Video format of your monitor TV, DVD player, etc.
is different from PAL.
• No antenna is connected.
• The desired station frequency is not tuned in.
• Antenna is in wrong position.
• An incorrect station frequency has been memorized.
• The memorized stations are cleared.
• No antenna is connected.
• The antenna is not positioned for the best reception.
• Weak signals.
• Noise is caused by motors, fluorescent lamps or
lightning, etc.
• Batteries are not loaded or exhausted.
• The remote sensor is obstructed.
Connect cord securely.
•
• Check the outlet using a lamp or another
appliance.
• Check the speaker connections.
Adjust the master volume.
•
• Press the MUTE button to cancel the muting effect.
• Select the desired input source correctly.
• Make connections correctly.
• Set it to AMP. (For details, refer to "When
selecting the HDMI AUDIO OUT" on page 42.)
• Set the settings correctly. (For details, refer to
SETTING THE INPUT" on page 33.)
"
• Select a surround mode.
• Adjust master volume and surround level.
• Select a stereo or surround source.
• Select the desired surround speaker setting.
• Select the desired surround mode.
Select the desired center speaker setting.
•
• Adjust master volume and center level.
• Make proper video connections.
• Select the input source correctly.
• Make proper HDMI connection.
• This unit will not output video signal unless the
connected equipments supports HDCP.
• Change the video format to PAL.
• Connect an antenna.
• Tune in the desired station frequency.
• Move antenna and retry tuning.
• Memorize the correct station frequency.
• Memorize the stations again.
• Connect an antenna.
• Change the position of the antenna.
• Install an outdoor FM antenna.
• Keep the receiver away from noise sources.
• Install an outdoor AM antenna.
• Replace the batteries.
• Remove the obstacle.
44
Page 45

RD-6506(G)_ENG_110330_RD-6506(G)_ENG 2011-04-14 오전 9:29 페이지 45
Specifications
■ AMPLIFIER SECTION
• Power output, stereo mode, 6 Ω, THD 0.7%, 40 Hz~20 kHz | 2x100 W
• Total harmonic distortion, 6 Ω, 100 W, 1 kHz | 0.05 %
• Intermodulation distortion
60 Hz : 7 kHz= 4 : 1 SMPTE, 6 Ω, 100 W | 0.1 %
• Input sensitivity, 47 kΩ
Line (CD, TAPE, VIDEO) | 250 mV
• Signal to noise ratio, IHF “A” weighted
Line (CD, TAPE, VIDEO) | 95 dB
• Frequency response
Line (CD, TAPE, VIDEO), 20 Hz~50 kHz | +0 dB, -3 dB
• Output level
TAPE REC, 2.2 kΩ | 250 mV
PRE OUT (Subwoofer), 1 kΩ | 1.5 V
• Bass/Treble control, 100 Hz/10 kHz | ±10 dB
• Surround mode, only channel driven
Front power output, 6 Ω, 1 kHz, THD 0.7 % | 100 W / 100 W
Center power output, 6 Ω, 1 kHz, THD 0.7 % | 100 W
Surround power output, 6 Ω, 1 kHz, THD 0.7 % | 100 W / 100 W
ENGLISH
■ DIGITAL AUDIO SECTION
• Sampling frequency | 32, 44.1, 48, 96 kHz
• Digital input level
Coaxial, 75 Ω | 0.5 Vp-p
Optical, 660 nm | -15~-21 dBm
■ VIDEO SECTION
• Video format | PAL
• Input sensitivity (=Output level), 75 Ω
Video (Composite (normal)) | 1 Vp-p
• HDMI connector | 19 pin
■ FM TUNER SECTION
• Tuning frequency range | 87.5~108 MHz
• Usable sensitivity, THD 3%, S/N 26 dB | 12.8 dBf
• 46 dB quieting sensitivity, mono/stereo | 20.2 / 45.3 dBf
• Signal to noise ratio, 65 dBf, mono/stereo | 55 / 50 dB
• Total harmonic distortion, 65 dBf,1 kHz, mono/stereo | 0.5 / 1.0 %
• Frequency response, 30 Hz~12 kHz | ±3.0 dB
• Stereo separation, 1 kHz | 30 dB
• Capture ratio | 4 dB
• IF rejection ratio | 80 dB
■ AM TUNER SECTION
• Tuning frequency range | 522~1611 kHz
• Usable sensitivity | 500 µV/m
• Signal to noise ratio | 40 dB
• Selectivity | 25 dB
■ GENERAL
• Power supply | 230 V ~ 50 Hz
• Power consumption | 200 W
• Dimensions (WxHxD, including protruding parts) | 435x143x359 mm (17-3/8x5-5/8x14-1/8 inches)
• Weight (Net) | 8.6 kg (19 lbs)
Note: Design and specifications are subject to change without notice for improvements.
45
Page 46

ON / STANDBY
A
UTO / MANUAL
SURROUND
S
TEREO
VIDEO
A
UDIO
SOUND
I
NPUT
A
UDIO ASSIGNSPEAKER
O
N / OFF
T
ONE CH.LEVEL SETUP ENTER / MEMO BANDPRESETTUNE
P
HONES
AUX 1 AUX 2
P
OWER
A
UDIO / VIDEO RECEIVER
R
D-6
505
O
N OFF
R
ETURN
M
AIN MENU
M
ASTER VOLUME
RD-6506(G)_DEU_110411_RD-6506(G)_DEU 2011-04-14 오전 9:30 페이지 2
Einleitung
BITTE LESEN SIE DIESE HINWEISE VOR INBETRIEBNAHME DES GERÄTS
UR VERMEIDUNG VON STROMSCHLAG GERÄTEGEHÄUSE
Z
NICHT ÖFFNEN.
S BEFINDEN SICH KEINE VOM VERBRAUCHER WARTBAREN
E
TEILE IM INNERN DES GERÄTS. REPARATUR UND WARTUNG
NUR DURCH FACHPERSONAL.
ZUR VERMEIDUNG VON FEUER UND STROMSCHLAG GERÄT WEDER REGEN NOCH FEUCHTIGKEIT AUSSETZEN.
ähnlichen Gehäuse.
Lassen Sie um das Gerät ausreichend Platz.
Links, rechts und an der Rückseite: 20 cm, oben: 40 cm
DEUTSCH
VORSICHT:
WARNHINWEIS:
Installationshinweise
Bitte beachten Sie: Bauen Sie dieses Gerät nicht umschlossen ein, beispielsweise in einem Bücherschrank oder in einem
Dieses Symbol weist auf gefährliche
ochspannung im Gerät hin, die zu
H
tromschlag führen kann.
S
Dieses Symbol weist auf wichtige
Bedienungs- und Wartungsanleitungen hin.
Blockieren Sie nicht die Lüftungsschlitze und stellen Sie keine anderen Geräte oben auf dem Gerät ab.
SICHERHEITSHINWEISE
Geräte für den australischen Markt sind für eine Netzspannung von 230V~ konzipiert.
Für einen sicheren Betrieb darf der dreistiftige Netzstecker nur an einer ordnungsgemäß geerdeten Standard
Haushaltssteckdose angeschlossen werden. Sollten Sie für das Gerät ein Verlängerungskabel benutzen, so
EUROPA
AUSTRALIEN
220 V
240 V
muss dieses dreiadrig verkabelt und geerdet sein. Nicht ordnungsgemäße Verlängerungskabel stellen eine große
Gefahrenquelle dar. Allein die Tatsache, dass dieses Gerät einwandfrei funktioniert, weist nicht darauf hin, dass
-
die Steckdose geerdet ist und dass die Elektroinstallation sicher ist. Zu Ihrer eigenen Sicherheit wenden Sie sich
im Zweifelsfall in Bezug auf die korrekte Erdung der Steckdose bitte an einen Elektrofachmann.
VEREINHEITLICHTE EUROPÄISCHE NETZSPANNUNG
Alle Geräte sind für eine Netzspannung von 220-240V~ geeignet.
VORSICHT
• Lassen Sie rings um das Gerät genügend Raum für
ausreichende Lüftung
Installieren Sie das Gerät nicht in besonders heißen oder kalten
•
.
Umgebungen, in direkter Sonneneinstrahlung oder in
unmittelbarer Nähe von Heizgeräten.
Schützen Sie das Gerät vor Feuchtigkeit, Wasser und Staub.
•
Führen Sie keine Fremdkörper in das Gerät ein.
•
Blockieren Sie keinesfalls die Lüftungsschlitze mit Zeitungen,
•
Tischtüchern, Gardinen oder ähnlichem.
Stellen Sie keine offenen Flammen (wie brennende Kerzen) auf
•
dem Gerät ab.
Bitte entsorgen Sie Batterien umweltgerecht.
•
Setzen Sie das Gerät weder Tropfwasser noch Spritzwasser aus.
•
Stellen Sie keine wassergefüllten Gegenstände (wie Vasen) auf
•
dem Gerät ab.
• Lassen Sie das Gerät nicht mit Insektenvernichtungsmitteln,
Waschbenzin oder Verdünner in Berührung kommen
Demontieren oder modifizieren Sie das Gerät nicht.
•
.
¢ Hinweise zum Netzkabel und zur Steckdose.
Dieses Gerät ist nicht vom Stromnetz getrennt, solange der
•
Netzstecker in der Steckdose steckt, selbst wenn das Gerät
ausgeschaltet ist.
Beim Ziehen des Netzsteckers fassen Sie bitte stets am Stecker
•
an, nicht am Kabel ziehen.
Bei längerer Nichtbenutzung ziehen Sie bitte den Netzstecker.
•
Die Steckdose sollte sich in unmittelbarer Nähe des Geräts
•
befinden und muss jederzeit frei zugänglich sein.
Verbraucherinformationen zur Sammlung und
Entsorgung von Altgeräten und erschöpften Batterien
Diese Symbole auf Produkt, Verpackung und/oder beigefügten
Dokumenten bedeuten, dass gebrauchte elektrische und
elektronische Geräte sowie Batterien nicht mit dem Hausmüll
entsorgt werden dürfen. Für ordnungsgemäße Behandlung,
Wiedergewinnung und Recycling von Altgeräten und erschöpften
Batterien geben Sie diese bitte bei einer entsprechenden
Sammelstelle gemäß örtlicher Richtlinien ab.
Durch die ordnungsgemäße Entsorgung dieser Geräte und
Batterien helfen Sie bei der Einsparung wertvoller Ressourcen mit
und vermeiden Sie mögliche negative Folgen für Umwelt und
Gesundheit, welche anderenfalls aufgrund unsachgemäßer
Abfallentsorgung entstehen könnten.
Für weitere Informationen zu Sammelstellen und zum
Recycling von Altgeräten und Batterien setzen Sie sich bitte
mit Ihrer Kommunalverwaltung, dem
Entsorgungsunternehmen oder mit der Verkaufsstelle, in
welcher Sie die Produkte gekauft haben, in Verbindung.
[Informationen zur Entsorgung in Ländern außerhalb der
Europäischen Union]
Diese Symbole gelten nur innerhalb der Europäischen Union.
Zur Entsorgung dieser Produkte setzen Sie sich bitte mit den
örtlichen Behörden oder Ihrem Fachhändler in Verbindung.
Hinweise für das Batteriesymbol (untere beide
Symbolbeispiele):
Die Bezeichnung Pb unterhalb des Batteriesymbols
bedeutet, dass diese Batterie Blei enthält.
2
Page 47

RD-6506(G)_DEU_110411_RD-6506(G)_DEU 2011-04-14 오전 9:30 페이지 3
INHALT
Einleitung
• BITTE LESEN SIE DIESE HINWEISE VOR INBETRIEBNAHME DES GERÄTS | 2
Systemanschlüsse | 4
Bedienelemente Frontblende | 10
Fernbedienung | 12
• REICHWEITE DER FERNBEDIENUNG | 13
• BATTERIEN EINSETZEN | 13
Bedienungshinweise
• WIEDERGABE EINER PROGRAMMQUELLE | 14
• SURROUND SOUND | 16
• SURROUND SOUND | 17
• RADIO HÖREN | 22
• WIEDERGABE VON RDS-SENDERN (NUR UKW) | 24
( RDS Tuner (Regionale Option für einige europäische Länder))
• AUFNAHME | 26
• SONSTIGE FUNKTIONEN I 27
• HDMI-FUNKTION BESTÄTIGEN | 28
DEUTSCH
Systemeinstellungen | 29
• SYSTEMEINSTELLUNGEN | 31
• EINGANGSEINSTELLUNGEN | 33
• LAUTSPRECHER EINSTELLUNGEN | 34
• KANALPEGELEINSTELLUNGEN | 38
• PARAMETEREINSTELLUNGEN | 40
• HDMI EINSTELLEN | 42
Störungserkennung | 44
Spezifikationen | 45
3
Page 48

S
N.
SPEAKERS
RLRL
SURROUND
(
6 )
CENTER
(
6 )
F
RONT
(6 )
POWER SOURCE
P
OWER CONSUMPTION
R
D
-
6
506
230V 50Hz
2
00W
D
ESIGNED IN USA
ASSEMBLED IN CHINA
N18041
HDMI
V
IDEO 2
VIDEO 1
M
ONITOR
O
UT
CD
DIGITAL IN
R
L
I
N
V
IDEO 2
IN OUT
M
ONITOR
O
UT
V
IDEO 1VIDEO 1
VIDEO
A
NTENNAAUDIO
FM 75
GND
AM
LOOP
COAX 2
(CD)
O
PT
(VIDEO 1)
A
VIS : RISQUE DE CHOC ELECTRIQUE-NE PAS OUVRIR.
WARNING : SHOCK HAZARD-DO NOT OPEN.
VIDEO 1
VIDEO 2 CD
VIDEO 1
TAPETAPE
R
L
I
N
O
UT
Manufactured under license from Dolby Laboratories. Dolby, Pro Logic, and the double-D symbol are
trademarks of Dolby Laboratories.
S
UBWOOFER
OUT
C
OAX 1
(V
IDEO 2
)
A
UDIO/VIDEO RECEIVER
M
anufactured under license under U.S. Patent #’s: 5,451,942 5,956,674 5,974,380 5,978,762 6,487,535 &
other U.S. and worldwide patents issued & pending. DTS and the Symbol are registered trademarks &
DTS Digital Surround and the DTS logos are trademarks of DTS, Inc. © DTS, Inc. All Rights Reserved.
842,3 3
23 6
5 1 27
ANTENNA
FM 75
GND
AM
LOOP
ANTENNA
F
M 75
G
ND
AM
L
OOP
ANTENNA
FM 75
GND
AM
LOOP
RD-6506(G)_DEU_110411_RD-6506(G)_DEU 2011-04-14 오전 9:30 페이지 4
Systemanschlüsse
• Nehmen Sie den Netzanschluss erst vor, nachdem alle Anschlüsse des Systems vorgenommen wurden.
• Unterschiedliche Komponenten haben häufig abweichende Bezeichnungen der Anschlüsse, daher lesen Sie die
Bedienungsanleitungen der anzuschließenden Komponenten bitte aufmerksam durch.
• Bitte beachten Sie beim Anschluss der Audio-, Video- und Lautsprecherkabel die Farbcodierung.
• Schließen Sie die Stecker fest und korrekt an, anderenfalls kann es zu Tonausfällen, Störungen oder Schäden am Receiver
kommen.
DEUTSCH
1. ANTENNENANSCHLUSS
• Richten Sie die UKW-Wurfantenne aus, um den besten
Empfang Ihrer Lieblingssender zu gewährleisten.
• Mit einer 75Ω UKW-Hausantenne verbessern Sie
den Empfang. Ziehen Sie die Wurfantenne vor
dem Anschluss der Hausantenne ab.
• Stellen Sie die MW-Zimmerantenne so weit wie möglich von Receiver, Fernseher, Lautsprecherund Netzkabeln entfernt auf und richten Sie die Antenne für besten Empfang aus.
• Ist das Empfangssignal mit der MW-Zimmerantenne nicht ausreichend, so können Sie alternativ
eine MW-Hausantenne benutzen.
4
Page 49

HDMI
VIDEO 2
VIDEO 1
MONITOR
OUT
VIDEO 2
IN OUT
MONITOR
OUT
V
IDEO 1VIDEO 1
VIDEO
AUDIO
VIDEO 1
VIDEO 2
VIDEO 1
IN
BD-Player, DVD-Player usw.
Videorekorder, DVD-Rekorder usw.
Fernseher, Projektor usw.
RD-6506(G)_DEU_110411_RD-6506(G)_DEU 2011-04-14 오전 9:30 페이지 5
2. ANSCHLUSS VIDEOGERÄTE
• An die VIDEO 1 Buchsen können Sie ebenfalls einen DVD-Rekorder oder ein anderes digitales Videoaufzeichnungsgerät
anschließen. Einzelheiten entnehmen Sie bitte der Bedienungsanleitung des anzuschließenden Geräts.
• An die VIDEO 2 Buchsen können Sie ebenfalls eine zusätzliche Videokomponente wie Kabelempfänger oder
Satellitensystem anschließen.
• Es stehen (Composite) VIDEO-Buchsen für Analog-Videoanschlüsse und die HDMI-Anschlüsse für digitales Video- und
Audio zur Verfügung.
• Die Reihenfolge der Bildqualität ist „HDMI“ > „(Composite) VIDEO“.
■Bitte beachten Sie :
• Bei der Aufnahme von Videoprogrammquellen über (Composite) VIDEO 1 OUT oder bei der Anzeige von
Videoprogrammquellen über (Composite) MONITOR OUT muss (Composite) VIDEO IN an der Videokomponente wie
BD-Player, DVD-Player angeschlossen sein.
DEUTSCH
5
Page 50

CD
RL
IN
AUDIO
CD
VIDEO 1
TAPETAPE
RL
IN
OUT
AUDIO
OUT
HDMI OUT
AUDIO
IN
CD-Player, BD-Player, Spielkonsole usw.
Kassettendeck, MD-Rekorder usw.
RD-6506(G)_DEU_110411_RD-6506(G)_DEU 2011-04-14 오전 9:30 페이지 6
Fortsetzung
■ HDMI (High Definition Multimedia Interface) Anschluss (*)
• Sie können die Signalquelle (DVD-Player usw.) am Anzeigegerät (Fernseher, Projektor usw.) über diesen Receiver mit einem
HDMI-Kabel anschließen, welches Sie im Fachhandel erwerben.
• Der HDMI-Anschluss kann nicht komprimierte digitale Videosignale und digitale Audiosignale übertragen.
• Die Signale des HDMI Video Stream (Videosignale) sind theoretisch mit DVI-D kompatibel. Beim Anschluss eines
Fernsehers, der über DVI-D Anschluss verfügt, ist die Benutzung eines HDMI-DVI/Adapterkabels möglich.
Da der HDMI-zu-DVI Anschluss keine Audiosignale überträgt, Da der HDMI-zu-DVI-Anschluss keine Audiosignale überträgt,
stellen Sie HDMI AUDIO OUT auf AMP ein, um die digitalen HDMI-Audiosignale auf diesem Receiver zu hören (Einzelheiten
siehe „Auswahl HDMI AUDIO OUT“ auf Seite 42).
■ Urheberrechtsschutzsystem
• Dieses Gerät unterstützt HDCP (High-bandwidth Digital Contents Protection), eine Technologie zum Urheberrechtsschutz
digitaler Videosignale gegen illegales Kopieren. HDCP muss ebenfalls von den angeschlossenen Komponenten unterstützt
werden.
• HDMI, das HDMI-Logo und High-Definition Multimedia Interface sind Marken oder eingetragene Marken von HDMI Licensing
DEUTSCH
LLC.
■ Bitte beachten Sie:
• Für eine stabile Signalübertragung empfehlen wir die Benutzung von HDMI Kabeln von nicht mehr als 5 m Länge.
• Von den Komponenten, welche HDMI unterstützen, können einige andere Komponenten über den HDMI-Anschluss steuern.
Einzelheiten zur HDMI-Funktion siehe „HDMI-FUNKTION BESTÄTIGEN“ auf Seite 28 und “HDMI EINSTELLEN” auf Seite 42.
• Die Audiosignale vom HDMI-Anschluss (einschließlich Abtastfrequenz und Bitlänge) können durch die angeschlossene
Komponente limitiert sein.
• Die Videosignale werden nicht ordnungsgemäß ausgegeben, wenn eine nicht HDCP-kompatible Komponente angeschlossen
ist.
• Sind die Auflösungen der Videosignale von MONITOR OUT und Ihrem Fernseher nicht aufeinander abgeglichen, so ist das
Bild verschwommen oder wird nicht angezeigt. In diesem Fall ändern Sie bitte die Einstellungen der Auflösung der
Quellenkomponente (BD-Player usw.) zu einer Auflösung, welche Ihr Fernseher verarbeiten kann (Einzelheiten entnehmen
Sie bitte der Bedienungsanleitung der Quellenkomponente).
• Wollen Sie nur das Bild auf Ihrem Fernseher anzeigen und nicht den Ton wiedergeben, so stellen Sie HDMI AUDIO OUT auf
AMP ein, womit das digitale Audiosignal über HDMI MONITOR OUT dieses Receivers nicht ausgegeben wird (Einzelheiten
entnehmen Sie bitte dem Abschnitt „Auswahl HDMI AUDIO OUT” auf Seite 42).
3. ANSCHLUSS AUDIOGERÄTE
• An die TAPE IN/OUT Buchsen können Audioaufzeichnungsgeräte, wie beispielsweise ein Kassettendeck, ein MD-Rekorder
usw. angeschlossen werden.
• HDMI IN des CD-Players kann an einer zusätzlichen Videokomponente ohne Analog-Videobuchsen angeschlossen werden.
6
Page 51

DIGITAL IN
C
OAX 2
(CD)
O
PT
(VIDEO 1)
COAX 1
(VIDEO 2)
Komponente mit
KOAXIAL-DIGITALAUSGANG
Komponente mit
K
OAXIAL-DIGITALAUSGANG
Komponente mit
OPTISCHEM DIGITALAUSGANG
SUBWOOFER
OUT
Aktiver Subwoofer
RD-6506(G)_DEU_110411_RD-6506(G)_DEU 2011-04-14 오전 9:30 페이지 7
4. ANSCHLUSS DIGITALER EINGÄNGE
• Die OPTISCHEN und KOAXIAL-DIGITALAUSGÄNGE der
Komponenten, welche an CD und VIDEO 1 ~ VIDEO 2 dieses
Geräts angeschlossen sind, können an diesen
DIGITALEINGÄNGEN angeschlossen werden.
• An einem Digitaleingang sollten Geräte wie beispielsweise ein
CD-Player, LD-Player, DVD-Player usw. mit DTS Digital
Surround, Dolby Digital oder mit PCM-formatigen Digitalsignalen
usw. angeschlossen werden.
• Einzelheiten entnehmen Sie bitte der Bedienungsanleitung
des anzuschließenden Geräts.
• Bei KOAXIAL-DIGITALANSCHLUSS benutzen Sie bitte ein
75 Ω KOAXIALKABEL, kein gewöhnliches AUDIOKABEL.
• Einige der optischen Glasfaserkabel können für dieses Gerät
nicht benutzt werden. Können optische Glasfaserkabel nicht an
Ihren Geräten angeschlossen werden, so setzen Sie sich bitte
mit Ihrem Fachhändler oder dem autorisierten Kundendienst in
Verbindung.
DEUTSCH
■Bitte beachten sie :
• Bitte nehmen Sie entweder einen OPTISCHEN oder einen KOAXIAL-DIGITALEN ANSCHLUSS der Komponenten vor (nicht
beide).
■ Standardeinstellungen der Digitaleingänge
• Beim Anschluss der DIGITALEINGÄNGE Ihrer Komponenten ist es einfacher, den Standardeinstellungen zu folgen.
• Weichen Ihre DIGITALANSCHLÜSSE von den Standardeinstellungen ab, so sollten Sie die DIGITALEINGÄNGE zuordnen,
wie unter „Auswahl AUDIO ASSIGN” auf Seite 33 beschrieben.
• Die Standardeinstellungen sind folgende:
OPTICAL IN: VIDEO 1, COAX IN : VIDEO 2, COAX2 IN : CD
5. ANSCHLUSS SUBWOOFER PRE OUT
• Zur Verstärkung der Bässe schließen Sie einen aktiven Subwoofer
an.
7
Page 52

SPEAKERS
R
LRL
SURROUND
(6 )
CENTER
(6 )
FRONT
(6 )
Mitte
Vorn
rechts
Vorn
links
Surround
rechts
Surround
links
RD-6506(G)_DEU_110411_RD-6506(G)_DEU 2011-04-14 오전 9:30 페이지 8
6. ANSCHLUSS LAUTSPRECHER
• Schließen Sie die Lautsprecher fest und korrekt am
entsprechenden Kanal (links und rechts) und mit der
korrekten Polarität (+ und -) an. Bei nicht
ordnungsgemäß ausgeführten Anschlüssen haben Sie
keinen Ton von den Lautsprechern und bei
vertauschter Polarität klingt der Sound unnatürlich und
die Bässe fehlen.
• Zur Installation der Lautsprecher siehe Abschnitt
„Aufstellen der Lautsprecher” auf Seite 9.
• Nach der Installation der Lautsprecher gleichen Sie
bitte zunächst die Lautsprechereinstellungen
entsprechend Ihrer häuslichen Umgebung und dem
DEUTSCH
Lautsprecherlayout ab.
(Einzelheiten finden Sie im Abschnitt
„LAUTSPRECHER EINSTELLUNGEN” auf Seite 34.)
Achtung :
• Bitte benutzen Sie ausschließlich Lautsprecher mit
einer Impedanz von 6 Ohm oder höher.
• Achten Sie darauf, dass die blanken Lautsprecherkabel
weder miteinander noch mit Metallteilen dieses Geräts
in Berührung kommen, das kann zu Schäden am Gerät
und/oder an den Lautsprechern führen.
• Berühren Sie keinesfalls die Lautsprecheranschlüsse,
während das Gerät am Netz angeschlossen ist, das
kann zu Stromschlag führen.
■Anschluss der Lautsprecherkabel
1. Isolieren Sie die Kabel etwa
10 mm ab und verzwirbeln
Sie die Kabelenden.
2. Mit Linksdrehung öffnen
Sie den
Lautsprecheranschluss.
3. Setzen Sie das abisolierte
Kabel ein.
4. Mit Rechtsdrehung
schließen Sie den
Lautsprecheranschluss.
7. NETZKABEL
• Stecken Sie den Netzstecker in die Steckdose.
8. ANSCHLÜSSE ZUR AKTUALISIERUNG
• Diese Anschlüsse können in Zukunft zur Aktualisierung der Software benutzt werden, um beispielsweise neue digitale
Audioformate zu unterstützen.
■Bitte beachten Sie:
• Die Programmierung für Aktualisierungen benötigt besondere Programmierkenntnisse, daher empfehlen wir, dies durch einen
qualifizierten Installateur durchführen zu lassen.
8
Page 53

RD-6506(G)_DEU_110411_RD-6506(G)_DEU 2011-04-14 오전 9:30 페이지 9
Aufstellen der Lautsprecher
Die Idealposition der Lautsprecher hängt unter anderem von Ihrer
Raumgröße sowie der Wandverkleidung ab. Ein typisches Beispiel
für die Aufstellung der Lautsprecher finden Sie nachstehend:
¢
Lautsprecher vorn links und rechts sowie mittlerer
Lautsprecher
• Stellen Sie die vorderen Lautsprecher mit deren Vorderseite
möglichst auf gleicher Höhe wie Fernseher oder Bildschirm auf.
• Stellen Sie den mittleren Lautsprecher zwischen dem linken und
rechten vorderen Lautsprecher und nicht weiter entfernt von der
Sitzposition auf, als die vorderen Lautsprecher.
• Richten Sie die Lautsprecher auf die Kopfhöhe der
hauptsächlichen Sitzposition aus.
¢
Linker und rechter Surround-Lautsprecher
• Stellen Sie die Surround-Lautsprecher etwa 1 Meter über
Kopfhöhe der Sitzposition direkt links und rechts oder etwas
nach hinten versetzt auf.
DEUTSCH
¢
Subwoofer
• Der Subwoofer erzeugt kräftige Bässe. Stellen Sie den
Subwoofer vorn an beliebiger Stelle auf.
¢
Bitte beachten Sie:
• Haben Sie einen herkömmlichen Fernseher, so benutzen Sie
bitte ausschließlich magnetisch abgeschirmte Lautsprecher vorn
links und rechts sowie in der Mitte, um Bildstörungen zu
vermeiden.
• Für beste Surround-Effekte sollten alle Lautsprecher, außer dem
Subwoofer, Full-Range-Lautsprecher sein.
. Fernseher oder Leinwand
1
2. Lautsprecher vorn links
3. Lautsprecher vorn rechts
4. Mittlerer Lautsprecher
5. Subwoofer
6. Surround-Lautsprecher links
7. Surround-Lautsprecher rechts
9
Page 54

ON / STANDBY
A
UTO / MANUAL
SURROUND
S
TEREO
VIDEO
AUDIO
S
OUND
I
NPUT
A
UDIO ASSIGNSPEAKER
O
N / OFF
T
ONE CH.LEVEL SETUP ENTER / MEMO BANDPRESETTUNE
P
HONES
A
UX 1 AUX 2
POWER
A
UDIO / VIDEO RECEIVER
RD-6506
O
N OFF
RETURN
MAIN MENU
M
ASTER VOLUME
681 2
9
10 12 1413 15 16 17 18 19 20 21 22
73 4 11 5
RD-6506(G)_DEU_110411_RD-6506(G)_DEU 2011-04-14 오전 9:30 페이지 10
Bedienelemente Frontblende
DEUTSCH
1. POWER: Hauptschalter
2. STANDBY Statusanzeige
3. ON/STANDBY: Ein/Aus-Schalter
4. SENSOR FERNBEDIENUNG
5. FLUORESZENZANZEIGE
Einzelheiten nachstehend.
6. UMSCHALTER VIDEOEINGÄNGE
7. UMSCHALTER AUDIOEINGÄNGE
8. MASTER-LAUTSTÄRKE
9. KOPFHÖRERBUCHSE
10. AUX 1, 2 EINGÄNGE
Einzelheiten nächste Seite.
11. AUTO/MANUAL Taste
■FLUORESZENZANZEIGE
12. Auswahltasten SURROUNDMODUS (▶/◀)
13. STEREO Umschalter
14. LAUTSPRECHER Taste
15. AUDIO ZUORDNUNG Taste
16. TONMODUS Taste
17. KANALPEGEL Taste
18. SETUP Taste
19. ENTER/MEMORY Taste
20. TUNING UP/DOWN (+/-), CURSOR
LEFT/RIGHT(◀/▶)
21. PRESET UP/DOWN (+/-), CURSOR
UP/DOWN (▲/▼)
22. BANDWAHL Umschalter
1. Eingang, Frequenz, Lautstärkepegel,
Betriebsinformationen usw.
2. Surroundmodus Statusanzeigen
3. AUTO Statusanzeige
4. DIGITALEINGANG Statusanzeige
5. DIREKT Statusanzeige
6. Anzeige Senderspeicher
7. MEMORY Statusanzeige
8. SENDERSPEICHER Statusanzeige
9. SLEEPTIMER Statusanzeige
10. SENDER Statusanzeige
11. STEREO Statusanzeige
12. HDMI Anzeige
13. RDS Statusanzeige
(Regionale Option für Europa usw.)
10
Page 55

A
UX 1 AUX 2
RD-6506(G)_DEU_110411_RD-6506(G)_DEU 2011-04-14 오전 9:30 페이지 11
■AUX 1, 2 EINGÄNGE
• Die AUX 1, 2 Eingänge können an eine zusätzliche Audiokomponente wie MP3-Player angeschlossen werden.
■Bitte beachten sie :
• Beim Anschluss beispielsweise eines MP3-Players benutzen Sie bitte ein Kabel mit Stereo-Klinke, kein Monokabel.
DEUTSCH
11
Page 56

Ein/Aus-Schalter
ZIFFERNTASTEN (0~9)
SLEEPTIMER Taste
STEREO Taste
AUDIO ZUORDNUNG Taste
KLANGPARAMETER Tasten
Auswahltasten
SURROUNDMODUS (>/<)
A
us
w
a
hl
t
as
t
en
f
ü
r
E
I
N
G
Ä
N
GE
N
E
TZW
E
R
K
STE
U
E
R
U
N
G
DIMMER Taste
DISPLAY Taste
SETUP Taste
TONMODUS Taste
TESTTON Taste
LAUTSTÄRKE ( / ) Tasten
KANALPEGEL Taste
STUMMSCHALTUNG
SENDERSPEICHER (+/-) TastenSENDERWAHL (+/-) Tasten
STANDBY Taste
NAVIGATIONSTASTEN( , , , ),ENTER
</SUCHMODUS, AUSWAHL / > Tasten
Funktionen in „<>” sind eine regionale
Option für Europa usw.
RD-6506(G)_DEU_110411_RD-6506(G)_DEU 2011-04-14 오전 9:30 페이지 12
Fernbedienung
DEUTSCH
■Bitte beachten sie :
• VIDEO 3 und NETZWERKSTEUERUNG sind für diesen Receiver nicht verfügbar.
12
Page 57

O
N / STANDBY
AUTO / MANUAL
S
URROUND
S
TEREO
V
IDEO
A
UDIO
S
OUND
I
NPUT
AUDIO ASSIGNSPEAKER
O
N / OFF
TONE CH.LEVEL SETUP ENTER / MEMO BANDPRESETTUNE
P
HONES
AUX 1 AUX 2
P
OWER
S
TANDBY
A
UDIO / VIDEO RECEIVER
R
D-6
506
O
N OFF
R
ETURN
M
AIN MENU
M
ASTER VOLUME
RD-6506(G)_DEU_110411_RD-6506(G)_DEU 2011-04-14 오전 9:30 페이지 13
REICHWEITE DER FERNBEDIENUNG
DEUTSCH
• Die Fernbedienung hat eine Reichweite von etwa 7 Metern bei
einem Winkel von jeweils 30 Grad. Richten Sie die Fernbedienung
auf den Sensor im Receiver aus.
BATTERIEN EINSETZEN
1. Öffnen Sie das Batteriefach. 2. Setzen Sie zwei Batterien (AAA, 1,5 V) mit der
korrekten Polarität ein.
• Bei längerer Nichtbenutzung nehmen Sie bitte die
Batterien aus der Fernbedienung.
• Benutzen Sie bitte keine Akkus (Ni-Cd).
13
Page 58

P
OWER
ON OFF
ON / STANDBY
AUDIO ASSIGN
RETURN
INPUT
BAND
AUDIO
VIDEO
RD-6506(G)_DEU_110411_RD-6506(G)_DEU 2011-04-14 오전 9:30 페이지 14
Bedienungshinweise
¢
Bitte beachten Sie : Vor der Benutzung des Receivers nehmen Sie bitte zunächst die Einstellungen für beste Leistung vor
WIEDERGABE EINER PROGRAMMQUELLE
(Einzelheiten finden Sie im Abschnitt „Systemeinstellungen” auf Seite 29).
Erste Schritte
• Schalten Sie den Receiver in Stand-by Modus.
• Die STANDBY Anzeige leuchtet auf.
er Receiver ist nicht vom Netz getrennt und hat eine
D
geringe Leistungsaufnahme zur Unterstützung der
Betriebsbereitschaft.
• Zum Ausschalten drücken Sie erneut den Hauptschalter
OWER.
P
DEUTSCH
• Die Spannungsversorgung wird unterbrochen und die
STANDBY Anzeige erlischt.
¢
utomatische Energieeinsparung
A
Die automatische Energieeinsparung schaltet die
•
Spannungsversorgung automatisch aus und ruft den Stand-byModus auf. Erfolgt für die voreingestellte Zeit kein Tastendruck, so
wird die Funktion aktiviert (Einzelheiten siehe „Auswahl
AUTOMATISCHE ENERGIEEINSPARUNG“ auf Seite 31.)
1. Schalten Sie den Receiver im Stand-by Modus ein.
oder
• Mit jedem Tastendruck auf ON/STANDBY auf der Frontblende wird
der Receiver entweder in den Betriebsmodus eingeschaltet oder in
Stand-by Modus ausgeschaltet.
• Drücken Sie POWER ON auf der Fernbedienung zum Aufrufen
des Betriebsmodus oder drücken Sie STANDBY zum Aufrufen
des Stand-by Modus.
• Mit jedem Tastendruck auf „VIDEO” auf der Frontblende
wird die Eingangsquelle wie folgt umgeschaltet:
" VIDEO 1 → VIDEO 2
• Mit jedem Tastendruck auf „AUDIO” auf der Frontblende
wird die Eingangsquelle wie folgt umgeschaltet:
→ CD → AUX 1 → TV
: Nur wenn HDMI CONTROL auf ON eingestellt ist, hören Sie die
*
digitalen Audiosignale vom Fernseher über HDMI-Kabel.
(Einzelheiten siehe „Auswahl HDMI CONTROL“ auf Seite 42).
* → AUX 2 → TAPE → TUNER
(Frequenzanzeige)
• Mit jedem Tastendruck auf BAND (oder TUNER auf der
Fernbedienung) ändert sich das Frequenzband wie folgt:
→ FM ST → FM MONO → AM
Auswahl von CD, VIDEO 1~2 als Eingangsquelle
4. Wählen Sie den gewünschten Digital- oder Analogeingang.
oder
2. Schalten Sie die Lautsprecher ein.
• „SP ON“ wird angezeigt und der Ton wird über die
angeschlossenen Lautsprecher gehört.
• Bei Anschluss von Kopfhörern für privaten Hörgenuss drücken Sie
erneut SPEAKER, um die Lautsprecher auszuschalten („SP OFF“
wird angezeigt).
3. Wählen Sie die gewünschte Eingangsquelle.
oder
• Mit jedem Tastendruck wird der entsprechende Eingang
wie folgt gewählt:
" O(ptical)" C(oaxial) 1 " C(oaxial) 2" A(nalog)
¢
Bitte beachten Sie:
• Ist HDMI IN an Ihrer Videokomponente angeschlossen,
dann können Sie den Audioeingang nicht wunschgemäß
zuordnen (nur die HDMI digitalen Audiosignale können
gehört werden).
• Ist HDMI IN nicht angeschlossen (und die Anzeige „HDMI“
blinkt), können Sie den Audioeingang zuordnen.
• Bei Auswahl von AUX 1, AUX 2, TAPE oder tuner als
Eingangsquelle kann der Digitaleingang nicht gewählt
werden.
• Ist der gewählte Digitaleingang nicht angeschlossen, so
blinkt die „DIGITAL” Statusanzeige und der
Analogeingang wird automatisch gewählt.
• Der gewählte Digital- oder Analogeingang wird der
entsprechenden Eingangsquelle im EINGANGSMENÜ
automatisch zugeordnet (Einzelheiten finden Sie im
Abschnitt „EINGANGSEINSTELLUNGEN” auf Seite 33.)
• Der Ton von dem am ausgewählten Digitaleingang
angeschlossenen Gerät kann unabhängig von der
gewählten Eingangsquelle gehört werden.
14
Page 59

TONE
TUNE
PRESET
M
ASTER VOLUME
D
OWN UP
MUTE
PHONES
RD-6506(G)_DEU_110411_RD-6506(G)_DEU 2011-04-14 오전 9:30 페이지 15
5. Wiedergabe von der gewählten Komponente.
• Bei Wiedergabe der Programmquellen mit Surround
Sound siehe „SURROUND SOUND” auf Seite 17.
6. Stellen Sie die (Master-) Lautstärke ein.
oder
7. Stummschaltung.
• „MUTING” blinkt.
• Mit erneutem Tastendruck heben Sie die Stummschaltung
wieder auf.
8. Benutzung der Kopfhörer.
Klangeinstellung (Bässe und Höhen)
9. Rufen Sie den Klangmodus auf.
oder
• Der Klangmodus wird
für einige Sekunden
angezeigt.
10. Mit den NAVIGATIONSTASTEN LINKS(t)/RECHTS
(u) wählen Sie den gewünschten Klangmodus.
oder
• Mit jedem Tastendruck schalten Sie den Klangmodus wie
folgt um:
OFF: Wiedergabe einer Programmquelle ohne den
Klangeffekt (die „DIR” Statusanzeige leuchtet auf)
2
ON: Einstellen der Klangeffekte nach persönlichem
Geschmack (die „DIR” Statusanzeige erlischt)
■Sind die Klangeinstellungen mit TONE aktiviert, dann
stellen Sie den Klang (Bässe und Höhen) ein.
11. Mit den NAVIGATIONSTASTEN AUFWÄRTS (p)/
ABWÄRTS (q) wählen Sie den gewünschten Klang.
DEUTSCH
• Schalten Sie die Lautsprecher aus.
• Bei Wiedergabe einer DTS oder Dolby Digital
Programmquelle wird beim Anschluss der Kopfhörer und
ausgeschalteten Lautsprechern automatisch der 2-KanalDownmixmodus aufgerufen (Einzelheiten finden Sie im
Abschnitt „2-Kanal-Downmixmodus” auf Seite 17.)
¢
Bitte beachten Sie:
• Stellen Sie die Lautstärke bei der Benutzung von
Kopfhörern nicht zu hoch ein.
oder
• Mit jedem Tastendruck schalten Sie den Klang wie folgt um :
" BASS 1 TRE (Höhen) 1 TONE: ON !
12. Mit den NAVIGATIONSTASTEN LINKS(t)/RECHTS
(u) stellen Sie den gewählten Klang wunschgemäß ein.
• Der Klangpegel kann im Bereich zwischen -10 ~ +10 dB
eingestellt werden.
• Allgemein empfehlen wir, Bässe und Höhen auf 0 dB
(Flat Level) einzustellen.
• Extreme Einstellungen können Ihre Lautsprecher bei
hohen Lautstärken beschädigen.
• Erlischt das Klangdisplay, so beginnen Sie erneut mit
Schritt 9.
15
Page 60

RD-6506(G)_DEU_110411_RD-6506(G)_DEU 2011-04-14 오전 9:30 페이지 16
SURROUND SOUND
• Dieser Receiver ist mit einem hoch entwickelten digitalen Signalprozessor ausgestattet, welcher Ihnen eine optimale
Soundqualität und Soundatmosphäre in Ihrem eigenen Heimkino liefert.
Surround-Modi
■ DTS Digital Surround
TS Digital Surround (oder einfach DTS) unterstützt bis zu 5.1
D
diskrete Kanäle, die allgemein aufgrund der geringeren
Audiokompression eine bessere Klangqualität liefern. Benutzung mit
DVDs und CDs mit dem DTS-Logo.
DEUTSCH
■ DTS 96/24
ierbei handelt es sich um hochauflösendes DTS mit 96 kHz
H
Abtastrate und 24 Bit Auflösung, es liefert überdurchschnittliche
Wiedergabetreue. Für DVDs mit dem DTS 96/24 Logo.
Hergestellt unter Lizenz nach US-Patenten Nr.: 5,956,674; 5,974,380;
6,487,535 sowie andere US-amerikanische und weltweite ausgestellte
und schwebende Patente. DTS, das Symbol sowie DTS und das
ymbol sind eingetragene Marken und DTS Digital Surround und die
S
DTS-Logos sind Marken von DTS, Inc. Produkt enthält Software. ©
DTS, Inc. Alle Rechte vorbehalten.
¢ Dolby Digital
Dolby Digital ist das Mehrkanal-Digitalsignalformat der Dolby
Laboratories. Discs mit dem Dolby Digital Logo enthalten
Aufzeichnungen von bis zu 5.1-Kanal Digitalsignalen zur
Reproduktion einer viel höheren Klangqualität, räumlichen
Ausdehnung und Dynamikbereichcharakteristik als der frühere Dolby
Surround Effekt.
¢ Dolby Pro Logic II Surround
Dieser Modus wendet auf konventionelle 2-Kanalsignale, wie
digitale PCM oder analoge Stereosignale wie auch Dolby
Surroundsignale und dergleichen, Surroundverarbeitung zur
Verbesserung gegenüber konventionellen Dolby Pro Logic
Schaltungen an. Dolby Pro Logic ll Surround umfasst die
nachstehenden 2 Modi:
• Dolby Pro Logic ll Movie
Beim Betrachten von Filmen erlaubt Ihnen dieser Modus
durch zusätzliches Processing eine weitere Verbesserung
der Filmqualität, wodurch der Sound der Action Special
Effects betont wird.
• Dolby Pro Logic ll Music
Beim Hören von Musik erlaubt Ihnen dieser Modus durch
zusätzliches Processing eine weitere Verbesserung der
Klangqualität, wodurch die musikalischen Effekte betont werden.
• Nachstehende Modi wenden auf konventionelle 2-Kanal-Signale,
wie digitale PCM oder analoge Stereosignale einen
ochleistungs-Digitalsignalprozessor zur künstlichen
H
Nachstellung von Klangfeldern an.
heater
■ T
Dieser Modus liefert Effekte, als würden Sie im Theater ein
Schauspiel sehen.
ovie
■M
In diesem Modus haben Sie Effekte wie im Kino.
■ Hall
Dieser Modus liefert die Atmosphäre eines Konzertsaals für
lassische Musik wie Orchester- oder Kammermusik oder ein
k
Instrumentalsolo.
■Game
Dieser Modus ist für Videospiele geeignet.
■ Stadium
Dieser Modus liefert das ausgedehnte Klangfeld zur Erreichung
eines wahrhaften Stadioneffekts, wenn Sie sich Baseball- oder
Fußballspiele ansehen.
■ Multi CH Stereo
Dieser Modus ist zur Wiedergabe von Hintergrundmusik konzipiert.
Vordere, Surround- und hintere Surroundkanäle kreieren ein
Stereoabbild, welches den gesamten Bereich umspannt.
¢
Dolby Pro Logic
Dieser Modus erweitert jegliche 2-Kanalquellen (einschließlich
Dolby Surround Signalquellen) auf 4 Kanäle (vorn links, Mitte, vorn
rechts und Surround) zur Wiedergabe.
Der Surroundkanal ist in Mono, wird jedoch über zwei SurroundLautsprecher wiedergegeben.
Hergestellt unter Lizenz von Dolby Laboratories.
Dolby, Pro Logic und das Doppel-D-Symbol sind eingetragene
Marken der Dolby Laboratories.
16
Page 61

AUTO/MANUAL
SOUND
SURROUND
STEREO
RD-6506(G)_DEU_110411_RD-6506(G)_DEU 2011-04-14 오전 9:30 페이지 17
SURROUND SOUND
¢
Bitte beachten Sie: Vor der Surround-Wiedergabe nehmen Sie bitte zunächst die Einstellung der Lautsprecher im SETUP-Menü für
Abhängig von der Auswahl des Surroundmodus wählen Sie den automatischen Surroundmodus oder den manuellen
Surroundmodus.
■Bitte beachten sies :
• Schalten Sie SPEAKER aus oder sind „C (Center)“ und „S (Surround)“ auf „NO“ eingestellt, dann ist der automatische
Surroundmodus ungültig.
• Selbst wenn der automatische Surroundmodus gewählt wird und ein gleichartiges digitales Signalformat anliegt, kann der
optimale Surroundmodus abhängig von der Lautsprechereinstellung auf „NO“ abweichen.
• Ist der automatische Surroundmodus gewählt, so kann kein anderer Surroundmodus als der optimale Surroundmodus
gewählt werden.
optimale Leistung vor (Einzelheiten finden Sie im Abschnitt „LAUTSPRECHER EINSTELLUNGEN” auf Seite 34).
• Mit jedem Tastendruck schalten Sie den Modus wie folgt um:
Automatischer Surroundmodus: Der optimale Surroundmodus wird
(„AUTO“ leuchtet auf)
Manueller Surroundmodus: Wählen Sie den gewünschten
„AUTO“ erlischt)
(
automatisch gewählt, abhängig vom
Eingangssignal.
Surroundmodus für den Signaleingang mit
auswahltasten SURROUNDMODUS (>/<).
DEUTSCH
■Auswahl des manuellen Surroundmodus mit AUTO/MANUAL auf der Frontblende
Wählen Sie den gewünschten Surroundmodus
• Mit jedem Tastendruck auf auswahltasten
SURROUNDMODUS (>/<) ändert sich der
oder
Surroundmodus entsprechend des
Eingangssignalformats wie folgt:
Eingangssignalformat Wählbarer Surroundmodus
Dolby Digital EX 6.1-Kanal-Quellen,
Dolby Digital 5.1-Kanal-Quellen
Dolby Digital 2-Kanal-Quellen
PCM (2-Kanal) Quellen
DOLBY DIGITAL oder <2 CH IN>
DOLBY PLII MOVIE, DOLBY PLII MUSIC, THEATER, MOVIE, HALL, GAME, STADIUM, M.CH
STEREO, DOLBY PRO LOGIC oder <2 CH IN>
1
*
1
*
Analog-Stereo-Quellen
DTS Quellen,
DTS 96/24 Quellen
1
*
: Sind „C (Center)“ und „S (Surround)“ auf „NO“ eingestellt, dann kann kein Surroundmodus gewählt werden und die Quelle
Entsprechen DTS modus oder <2 CH IN>
1
*
kann entweder in Stereo- oder 2CH-Downmixmodus wiedergegeben werden.
■Beenden des Surroundmodus zur Stereowiedergabe
• Abhängig vom Eingangssignalformat wird entweder der
Stereomodus oder der 2-Kanal-Downmixmodus gewählt.
oder
• Zur Deaktivierung entweder des Stereomodus oder des
2CH-Downmixmodus wählen Sie den Surroundmodus mit
auswahltasten SURROUNDMODUS(> /<).
■2-Kanal-Downmixmodus
• Dieser Modus erlaubt das Heruntermischen der Mehrkanalsignale im DTS oder Dolby Digital Format in 2 Frontkanäle und die
Wiedergabe über nur die beiden vorderen Lautsprecher oder über Kopfhörer.
• Bei Einstellung der Lautsprechertaste SPEAKER auf Deaktivierung zum Hören der Mehrkanal-Digitalsignale von DTS oder
Dolby Digital Quellen über Kopfhörer wird der 2-Kanal-Downmixmodus automatisch aufgerufen.
17
Page 62

PRESET
TUNE
RD-6506(G)_DEU_110411_RD-6506(G)_DEU 2011-04-14 오전 9:30 페이지 18
Einstellen der Soundparameter
• Bei der Wiedergabe von Digitalsignalen von Dolby Digital Programmquellen oder Hören von Dolby Pro Logic II Musikmodus
können Sie die Parameter für optimale Surroundeffekte einstellen.
1. Drücken Sie die SOUND PARAMETER Taste.
DEUTSCH
• Für einige Sekunden wird „DRC: ~” (oder „PANO: ~”)
angezeigt.
• Erlischt der Parametermodus, so drücken Sie diese Taste
bitte erneut.
2. Mit den NAVIGATIONSTASTEN AUFWÄRTS (p)
/ABWÄRTS (q) wählen Sie den gewünschten
Parameter.
oder
3. Mit den NAVIGATIONSTASTEN LINKS (t)
/RECHTS (u) stellen Sie den gewählten
Parameter wunschgemäß ein.
oder
¢ Auswahl „DRC (Dynamic Range Compression)“
Diese Funktion komprimiert den Dynamikbereich eines
zuvor spezifizierten Teils des Dolby Digital Soundtracks
(mit extrem hoher Lautstärke), um die Lautstärkespitzen
anzupassen.
Dies erleichtert das Hören des gesamten Soundtracks
beim Sehen von Filmen nachts mit niedriger Lautstärke.
¢ Bitte beachten Sie:
• Für einige Dolby Digital Software ist die DRC-Einstellung
nicht möglich.
→OFF : DRC-Funktion deaktivieren.
↕
MID
↕
→MAX
Höhere Kompression
• Mit jedem Tastendruck ändert sich der Parametermodus
wie folgt:
" "DRC" 1 "PANO" 1 "C.WIDTH" 1 "DIMEN" !
(Dynamic Range)(Panoramamodus) (Mittlere Breitenregelung) (Größenregelung)
Compression)
• „DRC“ kann nur gewählt werden, wenn Digitalsignale von
einer Dolby Digital Quelle wiedergegeben werden.
• „PANO”, „C.WIDTH” und „DIMEN” kann nur bei der
Wiedergabe in Dolby Pro Logic II Musikmodus gewählt
werden.
¢
Auswahl des „PANO (Panorama)” Modus
Dieser Modus erweitert das vordere Stereo-Klangbild zum
Einschluss der Surround-Lautsprecher für einen
aufregenden „Wraparound” Effekt mit
Seitenwandabbildung.
Wählen Sie „OFF” oder „ON” (Standardeinstellung: OFF).
¢
Auswahl der „C. WIDTH (Mittlere Breiten)” Regelung
Hier stellen Sie das mittlere Klangbild ein, sodass es nur
über den mittleren Lautsprecher, nur von den
linken/rechten Lautsprechern als Phantom-Klangbild oder
von allen drei vorderen Lautsprechern in unterschiedlichen
Maßen gehört wird.
Die Einstellung erfolgt in 8 Stufen zwischen 0 und 7
(Standardeinstellung: 3).
¢
Auswahl der „DIMEN (Größen)” Regelung
Hier wird das Klangfeld schrittweise mehr nach vorn oder
nach hinten eingestellt. Die Einstellung erfolgt in 7 Stufen
zwischen -3 und +3 (Standardeinstellung: 0).
4. Wiederholen Sie obige Schritte 2 und 3 zur
Einstellung der anderen Parameter.
18
Page 63

T
UNE
RD-6506(G)_DEU_110411_RD-6506(G)_DEU 2011-04-14 오전 9:30 페이지 19
Einstellen der einzelnen Kanäle mit dem Testton
• Der Lautstärkepegel jedes Kanals kann mit der Testtonfunktion leicht eingestellt werden.
■Bitte beachten sie : Sind die Lautsprecher mit der SPEAKER Taste deaktiviert, so haben Sie keine Testtonfunktion.
1. Rufen Sie den Testtonmodus auf. 2. Stellen Sie den Pegel für jeden Kanal ein, bis
der Klangpegel aller Lautsprecher gleich laut ist.
• Der Testtonmodus wird angezeigt und wird nacheinander
wie folgt vom Lautsprecher des entsprechenden Kanals
für 2 Sekunden übertragen:
→ FL → C → FR → SR → SL → SW
orn Mitte Vorn Surround Surround Subwoofer
V
links rechts rechts links
• Wählen Sie den gewünschten Kanal mit den
NAVIGATIONSTASTEN
DEUTSCH
oder
p/q.
• Ist die Lautsprechereinstellung „NO”, so ist der Testton
des entsprechenden Kanals nicht verfügbar.
3. Beenden Sie die Testtonfunktion.
19
Page 64

CH.LEVEL
PRESET
TUNE
RD-6506(G)_DEU_110411_RD-6506(G)_DEU 2011-04-14 오전 9:30 페이지 20
Einstellen des Kanalpegels
• Nach dem Einstellen der Kanalpegel mit dem Testton stellen Sie die Kanalpegel entweder entsprechend der Programmquelle
oder nach Ihrem persönlichen Geschmack ein.
• Der Kanalpegel kann beliebig eingestellt werden. Diese eingestellten Pegel werden nur im Nutzerspeicher („CAL”) abgelegt,
nicht im Speicher für die Voreinstellungen („REF 1”, „REF 2”).
1. Drücken Sie die KANALPEGEL Taste.
DEUTSCH
• Der Speichermodus („CAL” usw.) wird für einige
Sekunden angezeigt.
• Erlischt der Speichermodus oder der Kanalpegel, so
drücken Sie diese Taste erneut.
oder
2. Wählen Sie den gewünschten Kanal.
3. Stellen Sie den Pegel des gewählten Kanals
wunschgemäß ein.
oder
• Der LFE-Pegel kann im Bereich -10~0 dB eingestellt
werden, die anderen Kanalpegel im Bereich von
-15 ~ +15 dB.
• Allgemein empfehlen wir, den LFE-Pegel auf 0 dB
einzustellen (der empfohlene LFE-Pegel für einige frühe
DTS Software ist jedoch -10 dB). Erscheinen die
empfohlenen Pegel zu hoch, so stellen Sie diese
niedriger ein, falls nötig.
4. Wiederholen Sie obige Schritte 2 und 3 zur
Einstellung aller Kanalpegel.
oder
• Mit jedem Tastendruck wird der entsprechende Kanal wie
folgt gewählt:
→ REF 1, 2 (oder CAL) ↔ L ↔ C ↔ R ←
→ <DTS oder DD> ↔ SW ↔ SL ↔ SR ←
< >: Nur bei Digitalsignaleingang von Dolby Digital oder DTS
Programmquellen mit LFE-Signal kann der LFE-Pegel
angezeigt werden.
• Abhängig von Lautsprechereinstellungen („NO”) und
Surroundmodus usw., einige Kanäle können nicht gewählt
werden.
• Bei Einstellung der Lautsprechertaste SPEAKER auf
Deaktivierung können nur der vordere linke, vordere
rechte (und der LFE-) Kanal gewählt werden.
20
Page 65

ENTER/MEMO
ENTER/MEMO
TUNE
TUNE
CH.LEVEL
RD-6506(G)_DEU_110411_RD-6506(G)_DEU 2011-04-14 오전 9:30 페이지 21
Speichern der eingestellten Kanalpegel
• Sie können die eingestellten Kanalpegel in den
Voreinstellungen speichern („REF 1”, „REF 2”) und
jederzeit aufrufen.
1. Nach den Schritten 1 ~ 4 in „Einstellen des
Kanalpegels” auf Seite 20 drücken Sie die
ENTER(/MEMORY) Taste.
oder
• Die „1” in „REF 1” blinkt für einige Sekunden.
2. Wählen Sie zwischen REF 1 und REF 2.
Aufrufen der gespeicherten Kanalpegel
1. Drücken Sie die KANALPEGEL Taste.
oder
DEUTSCH
• „CAL” (oder „REF 1” usw.) wird für einige Sekunden
angezeigt.
• Erlischt die Anzeige des Kanalpegelmodus, so drücken
Sie diese Taste bitte erneut.
2. Wählen Sie zwischen REF 1 und REF 2.
oder
oder
• Erlischt die Voreinstellung, so wiederholen Sie bitte
Schritt 1.
3. Bestätigen Sie Ihre Auswahl.
oder
• Die eingestellten Kanalpegel sind nun im gewählten
Speicher abgelegt.
• Hiermit werden die in den Voreinstellungen
gespeicherten Kanalpegel aufgerufen.
21
Page 66

TUNE
TUNE
ENTER/MEMO
BAND
RD-6506(G)_DEU_110411_RD-6506(G)_DEU 2011-04-14 오전 9:30 페이지 22
RADIO HÖREN
Automatische Sendersuche
1. Wählen Sie das gewünschte Frequenzband.
oder
DEUTSCH
• Mit jedem Tastendruck wird das Frequenzband wie folgt
umgeschaltet:
" FM ST " FM MONO " AM
(„ST” leuchtet) („ST” erlischt)
• Bei schlechtem UKW Stereoempfang aufgrund
schwacher Signale wählen Sie bitte FM Mono zur
Störunterdrückung. Hiermit haben Sie den UKWEmpfang in Mono.
Manuelle Sendersuche
• Die manuelle Sendersuche ist hilfreich, wenn Sie
bereits die Frequenz des gewünschten Senders
kennen.
• Nach der Auswahl des gewünschten Frequenzbandes
drücken Sie mehrfach SENDERWAHL (+) / (-), bis die
gewünschte Frequenz angezeigt wird.
oder
Automatische Sendersuche und Speicherung
• Die automatische Sendersuche und Speicherung sucht
automatisch nur nach UKW-Sendern und speichert
diese im Senderspeicher.
• Beim Hören von UKW halten Sie die Taste
ENTER(/MEMORY) für mehr als 2 Sekunden gedrückt.
2. Halten Sie die SENDERWAHL (+)/(-) Tasten für
länger als 0,5 Sekunden gedrückt.
oder
• Der Tuner sucht nun, bis ein Sender mit ausreichender
Signalstärke aufgefunden wurde. Im Display werden die
Frequenz und „TUNE” angezeigt.
• Handelt es sich bei dem aufgefundenen Sender nicht
um den gesuchten Sender, so wiederholen Sie die
Suche einfach.
• Schwache Sender werden bei der automatischen
Sendersuche übersprungen.
oder
• „AUTO MEM” blinkt und der Receiver beginnt mit der
automatischen Sendersuche und Speicherung.
• Zur Beendigung der automatischen Sendersuche und
Speicherung drücken Sie die Taste erneut.
• Bis zu 30 UKW-Sender können gespeichert werden.
¢ Bitte beachten Sie:
• UKW-Sender mit schwachem Signal können nicht
gespeichert werden.
• Zur Speicherung von Mittelwelle-Sendern oder
schwachen Sendern führen Sie bitte die „manuelle
Speicherung” und die „manuelle Sendersuche” durch.
22
Page 67

PRESET
ENTER/MEMO
ENTER/MEMO
TUNE
PRESET
Innerhalb von
2 Sekunden
Innerhalb von
2 Sekunden
RD-6506(G)_DEU_110411_RD-6506(G)_DEU 2011-04-14 오전 9:30 페이지 23
Aufrufen der SenderspeicherManuelle Speicherung
• Sie können bis zu 30 Sender in den Senderspeicher
aufnehmen.
1. Stellen Sie den gewünschten Sender manuell
oder automatisch ein.
2. Drücken Sie ENTER(/MEMORY).
• „MEM“ blinkt.
3. Wählen Sie den gewünschten Senderspeicher
(1~30) und drücken Sie ENTER(/MEMORY).
• Nach Auswahl des Tuners als Eingangsquelle wählen
Sie den gewünschten Senderspeicher.
oder
DEUTSCH
• Benutzung der Zifferntasten auf der Fernbedienung.
Beispiele: Für „3“:
Für „15“:
Für „30“:
• Benutzung der Zifferntasten auf der Fernbedienung.
Beispiele: Für „3“:
Für „15“:
Für „30“:
• Der Sender ist nun gespeichert.
• Bei Eingabe einer zweistelligen Nummer mit den
Zifferntasten wird der Sender automatisch gespeichert,
ohne ENTER (/MEMORY) zu drücken.
• Eine gespeicherte Frequenz wird durch Überschreiben
mit einer neuen Frequenz gelöscht.
4. Wiederholen Sie obige Schritte 1 bis 3 zur
Speicherung weiterer Sender.
■ BACKUP-SPEICHERFUNKTION
Nachstehende Einstellungen werden gespeichert, bevor
der Receiver ausgeschaltet wird.
• Auswahleinstellung für EINGANG
• Surroundmodus
• Senderspeicher usw.
23
Page 68

RD-6506(G)_DEU_110411_RD-6506(G)_DEU 2011-04-14 오전 9:30 페이지 24
RDS Tuner (Regionale Option für einige europäische Länder)
WIEDERGABE VON RDS-SENDERN (NUR UKW)
RDS (Radio Data System) ist eine Methode zum Senden von Informationen zusammen mit den Sendersignalen. Ihr Tuner
kann diese Signale übersetzen und die Informationen auf dem Display wiedergeben. Diese Codes enthalten die folgenden
Informationen: Programmname (PS), eine Liste von Programmtypen (PTY), Radiotext (RT).
■Bitte beachten Sie:
• In einigen Ländern steht möglicherweise die RDS-Tunerfunktion nicht zur Verfügung.
• RDS ist nur im UKW-Frequenzband möglich.
• RDS sucht nur nach den Sendern im Senderspeicher. Wenn keine Sender im Speicher abgelegt wurden oder wenn die
Programmart nicht unter den voreingestellten Sendern zu finden ist, wird „NO PTY“ angezeigt.
Daher müssen vor der Suche nach RDS-Sendern die Sender gespeichert werden.
Suche nach Sendern mit Programmtyp
DEUTSCH
• Sie können Sender mit Programmtyp suchen.
1. Drücken Sie im UKW-Modus SEARCH MODE.
3. Drücken Sie während der Anzeige des gewählten
Typs ENTER.
• „SEARCH“ wird für einige Sekunden angezeigt.
2. Wählen Sie während der Anzeige von
„SEARCH“ den gewünschten Programmtyp.
• Mit jedem Tastendruck wird ein anderer Programmtyp
ausgewählt.
(NEWS, AFFAIRS, INFO, SPORT, EDUCATE, DRAMA,
CULTURE, SCIENCE, VARIED, POP M, ROCK M, EASY
M, LIGHT M, CLASSICS, OTHER M, WEATHER,
FINANCE, CHILDREN, SOCIAL, RELIGION, PHONE IN,
TRAVEL, LEISURE, JAZZ, COUNTRY, NATION M,
OLDIES, FOLK M, DOCUMENT)
• Wird „SEARCH“ ausgeblendet, so drücken Sie erneut
SEARCH MODE.
• Der Tuner durchsucht die gespeicherten Sender nach
einem Treffer.
• Die Suche wird beim Auffinden eines Senders
unterbrochen und der Sender wird gespielt.
• Wenn kein Sender gefunden wurde, wird „NO PTY“
angezeigt.
24
Page 69

RD-6506(G)_DEU_110411_RD-6506(G)_DEU 2011-04-14 오전 9:30 페이지 25
RDS-Information anzeigen
Im UKW-Modus:
• Mit jedem Tastendruck ändert sich der Anzeigemodus
wie folgt:
autstärke
L
→→ →→
ingangsquelle
E
(Frequenz)
Surround-
modus
←← ←
Radiotext (RT)
Signal-
ingang
e
rogrammtyp
P
(PTY)
Programmname
PS)
(
* Programmname (PS) - Name des Senders.
* Programmtyp (PTY) - Liefert Informationen über die Art
der aktuell ausgestrahlten Sendung.
* Radiotext (RT) - Vom Sender übermittelte Meldungen.
Zum Beispiel kann ein Talk-Sender eine
Telefonnummer als RT anbieten.
• Wenn die Signale zu schwach sind oder kein RDSDienst verfügbar ist, wird „NO NAME“, „NO PTY“ oder
„NO TEXT“ angezeigt.
DEUTSCH
25
Page 70

VIDEO
RD-6506(G)_DEU_110411_RD-6506(G)_DEU 2011-04-14 오전 9:30 페이지 26
AUFNAHME
• Die Digitalsignale vom koaxialen, optischen Digitaleingang oder vom HDMI EINGANG können gehört, jedoch nicht
aufgezeichnet werden.
• Bei der Aufnahme von Analogsignalen von CD, VIDEO 1 ~ 2 wählen Sie bitte den Analogeingang.
(Einzelheiten finden Sie im Abschnitt „Auswahl von CD, VIDEO 1~2 als Eingangsquelle” auf Seite 14.)
• Lautstärke- und Klangeinstellungen (Bässe, Höhen) haben keinen Einfluss auf die Aufnahmesignale.
Aufnahme mit TAPE
1. Wählen Sie den gewünschten Eingang als
DEUTSCH
Aufnahmequelle, außer TAPE.
oder
2. Starten Sie die Aufnahme mit TAPE.
3. Starten Sie die Wiedergabe der gewünschten
Eingangsquelle.
Überspielen von Videokomponenten auf VIDEO 1
1.Wählen Sie VIDEO 2 als Aufnahmequelle.
oder
2. Starten Sie die Aufnahme mit VIDEO 1.
3. Starten Sie die Wiedergabe des gewünschten Eingangs.
• Die Audio- und Videosignale vom Eingang werden auf
VIDEO 1 übertragen und Sie haben sie auf dem
Fernseher und den Lautsprechern.
26
Page 71

RD-6506(G)_DEU_110411_RD-6506(G)_DEU 2011-04-14 오전 9:30 페이지 27
SONSTIGE FUNKTIONEN
Sleeptimer
• Mit dem Sleeptimer können Sie das System sich automatisch nach einer gewissen Zeit ausschalten lassen.
• Einstellen des Receivers auf automatische Ausschaltung nach einem voreingestellten Zeitraum.
• Mit jedem Tastendruck durchlaufen Sie die
Voreinstellungen des Sleeptimers wie folgt:
" 10 " 20 " 30 " --- " 90 " OFF
inheit: Minuten
E
Einstellen der Helligkeit des Fluoreszenzdisplays
Anzeige des Betriebsstatus
Während der Wiedergabe:
• Bei aktiviertem Sleeptimer leuchtet „ ” im Display.
• Bei eingestellter Ausschaltzeit ist das Display nur
schwach beleuchtet.
• Mit jedem Tastendruck schalten Sie die Helligkeit
des Fluoreszenzdisplays wie folgt um:
" ON " Dimmer " OFF
• Bei ausgeschaltetem Display schalten Sie es mit
Tastendruck auf eine beliebige Taste zur Anzeige
des Betriebsstatus wieder ein.
• Mit jedem Tastendruck schalten Sie den Anzeigemodus
wie folgt um:
Lautstärke
→→ → →
Surround-
modus
Signal-
eingang
Eingang-
squelle
DEUTSCH
• Steht in Ihrem Land die RDS-Tunerfunktion zur
Verfügung, siehe Einzelheiten zum UKW-Modus unter
„RDS-Informationen anzeigen“ auf Seite 25.
27
Page 72

RD-6506(G)_DEU_110411_RD-6506(G)_DEU 2011-04-14 오전 9:30 페이지 28
HDMI-FUNKTION BESTÄTIGEN
Zur korrekten Benutzung der HDMI-Steuerfunktion empfehlen wir, die nutzbaren HDMI-Steuerfunktionen für jede angeschlossene
Komponente zu verifizieren, indem Sie folgende Schritte ausführen.
■Bitte beachten Sie:
• Einige HDMI-Steuerfunktionen arbeiten möglicherweise nicht mit allen Komponenten und Fernsehern, die nicht kompatibel sind.
Vor Inbetriebnahme
• Vergewissern Sie sich, dass dieser Receiver, Fernseher und Player usw. über HDMI-Kabel angeschlossen ist.
• Vergewissern Sie sich, dass die HDMI-Steuerung von Fernseher und HDMI-Player aktiviert ist (Einzelheiten zur Einstellung
DEUTSCH
von Fernseher und Player finden Sie in deren Bedienungsanleitungen).
• Stellen Sie HDMI CONTROL und POWER CONROL zur Aktivierung der HDMI-Steuerung dieses Receivers auf „ON“ ein
(Einzelheiten siehe „HDMI EINSTELLEN“ auf Seite 42).
Allgemeinen HDMI-Betrieb bestätigen
1.Schalten Sie alle über HDMI-Kabel angeschlossenen Komponenten ein.
2.Stellen Sie den TV-Eingang auf HDMI für diesen Receiver ein.
3.Stellen Sie den Eingang für dieses Gerät auf die HDMI-Eingangsquelle ein.
• Vergewissern Sie sich, dass das Bild angezeigt und der Ton korrekt über die Lautsprecher übertragen wird.
HDMI-Steuerfunktionen bestätigen
1.Schalten Sie alle über HDMI-Kabel angeschlossenen Komponenten ein.
2.Schalten Sie den Fernseher in Stand-by-Modus.
• Vergewissern Sie sich, dass all Komponenten ausgeschaltet sind.
3.Mit allen Komponenten ausgeschaltet starten Sie die Wiedergabe des Players (über HDMI-Kabel angeschlossen).
• Vergewissern Sie sich, dass all Komponenten eingeschaltet sind und dass die Eingänge dieses Geräts und des Fernsehers
automatisch eingestellt werden.
28
Page 73

SETUP
ENTER / MEMO
PRESET
TUNE
MAIN MENU
T
asten auf der
Fernbedienung
Tasten auf der
Frontblende
RD-6506(G)_DEU_110411_RD-6506(G)_DEU 2011-04-14 오전 9:30 페이지 29
Systemeinstellungen
• Das Einstellungsmenü wird im Fluoreszenzdisplay angezeigt und vereinfacht die Einstellungen. In den meisten Situationen
müssen Sie diese Einstellung während der Installation und des Layouts Ihres Heimkinos nur einmal durchführen und eine spätere
Umstellung ist nur in Ausnahmefällen nötig.
Das Einstellungsmenü besteht aus 6 Hauptmenüs: System, Eingang, Lautsprechereinstellungen, Kanalpegel, Parameter und
HDMI. Diese Menüs sind in eine Reihe von Untermenüs unterteilt.
¢ Navigation im Einstellungsmenü
• Die nachstehenden Erklärungen gehen davon aus, dass Sie für das Einstellungsmenü die Fernbedienung benutzen.
Sie können jedoch ebenfalls die Tasten auf der Frontblende benutzen.
Die Tasten auf der Frontblende entsprechen den Tasten auf der Fernbedienung wie folgt.
DEUTSCH
1. Rufen Sie das Einstellungsmenü auf.
• Das Einstellungsmenü wird angezeigt.
• Mit erneutem Tastendruck verlassen Sie das
Menü wieder.
2. Wählen Sie das gewünschte Menü mit den
NAVIGATIONSTASTEN AUFWÄRTS (p)/
ABWÄRTS (q) .
3. Bestätigen Sie Ihre Auswahl.
• Bei Auswahl von „SYSTEM” siehe
„SYSTEMEINSTELLUNGEN” auf Seite 31.
• Bei Auswahl von „INPUT” siehe
„EINGANGSEINSTELLUNGEN” auf Seite 33.
• Bei Auswahl von „SPK SET” siehe „LAUTSPRECHER
EINSTELLUNGEN” auf Seite 34.
• Bei Auswahl von „CH LEVEL” siehe
„KANALPEGELEINSTELLUNGEN” auf Seite 38.
• Bei Auswahl von „PARAMTR” siehe
„PARAMETEREINSTELLUNGEN” auf Seite 40.
• Bei Auswahl von „HDMI“ siehe „HDMI EINSTELLEN“ auf
Seite 42.
• Bei Auswahl von „EXIT” verlassen Sie das
Einstellungsmenü.
29
Page 74

SW M : NORM / SW +
TONE : OFF
A.P.S : OFF / 2H / 4H / 6H
RETURN
B
ASS : 0 / - 10 ~ + 10
T
RE : 0 / - 10 ~ + 10
SPK SET
VID 1 CFG
V
ID 2 CFG
CD CFG
RETURN
CONFIG
X-OVER
DISTANCE
RETURN
MODE : CAL / REF 1 / REF 2
L : 0 dB / -15 ~ + 15
C : 0 dB / -15 ~ + 15
R : 0 dB / -15 ~ + 15
SR : 0 dB / -15 ~ + 15
SL : 0 dB / -15 ~ + 15
SW : 0 dB / -15 ~ + 15
DD : 0 dB / -10 ~ 0
DTS : 0 dB / -10 ~ 0
RETURN
DRC : OFF / MID / MAX
RETURN
PANO : OFF / ON
C.WIDTH : 3 / 0 ~ 7
DIMEN : 0 / -3 ~ +3
DRC DD
RETURN
HDMI : AMP / THRU
CEC : OFF / ON
PWR : OFF / ON
RETURN
HDMI
EXIT
AUD : OPT / COX 1 / COX 2 / - - AUTO : ON / OFF
RETURN
AUD : OPT / COX 1 / COX 2 / - - AUTO : ON / OFF
RETURN
AUD : OPT / COX 1 / COX 2 / - - AUTO : ON / OFF
RETURN
FC : 40 / 50 / 80 / 100 / 150 / 200
RETURN
UNIT : M / FT
L : 3.0 M / 0.1 ~ 9.0
C : 3.0 M / 0.1 ~ 9.0
R : 3.0 M / 0.1 ~ 9.0
SR : 3.0 M / 0.1 ~ 9.0
SL : 3.0 M / 0.1 ~ 9.0
SW : 3.0 M / 0.1 ~ 9.0
RETURN
L : 10.0 FT / 0.5 ~ 30.0
C : 10.0 FT / 0.5 ~ 30.0
R : 10.0 FT / 0.5 ~ 30.0
SR : 10.0 FT / 0.5 ~ 30.0
SL : 10.0 FT / 0.5 ~ 30.0
SW : 10.0 FT / 0.5 ~ 30.0
RETURN
F : LARGE / SMALL
C : LARGE / SMALL / NO
S : LARGE / SMALL / NO
SW : YES / NO
RETURN
/
ON
RD-6506(G)_DEU_110411_RD-6506(G)_DEU 2011-04-14 오전 9:30 페이지 30
¢ Systemeinstellungen Ablaufdiagramm
• Der Ablauf der Systemeinstellungen ist wie folgt :
DEUTSCH
• Bei Auswahl von „RETURN” im Untermenü kehren Sie in das vorherige Menü zurück.
• Wird AUDIO ASSIGN(/RETURN) in einem Untermenü gedrückt, so kehren Sie ebenfalls in das vorherige Menü zurück.
¢ Bitte beachten Sie: Während der Systemeinstellungen sind nur die (POWER ON/) STANDBY Taste sowie die für die
Systemeinstellungen notwendigen Tasten belegt.
30
Page 75

SW M : NORM / SW +
TONE : OFF
A.P.S : OFF / 2H / 4H / 6H
RETURN
BASS : 0 / - 10 ~ + 10
TRE : 0 / - 10 ~ + 10
/ ON
RD-6506(G)_DEU_110411_RD-6506(G)_DEU 2011-04-14 오전 9:30 페이지 31
SYSTEMEINSTELLUNGEN
• SW M (SUBWOOFERMODUS): Gewünschten Subwoofermodus wählen.
• TONE: Klangeinstellungen (Bässe und Höhen).
• A.P.S (AUTOMATISCHE ENERGIEEINSPARUNG): Gewünschte Ausschaltzeit einstellen.
• RETURN: Rückkehr in das vorherige Menü.
DEUTSCH
1. Mit den NAVIGATIONSTASTEN AUFWÄRTS
(p)/ABWÄRTS (q) wählen Sie das gewünschte
Menüelement.
2. Mit den NAVIGATIONSTASTEN LINKS
(t)/RECHTS (u) stellen Sie das gewählte
Menüelement ein.
Auswahl des SUBWOOFER-Modus
• „SW +“ Modus ist nur wirksam, wenn „F“ (Front) und „C“ (Center) auf „LARGE“ und „SW“ (Subwoofer) auf „YES“ im SPK SET
Menü eingestellt ist (Einzelheiten siehe „LAUTSPRECHER EINSTELLEN“ auf Seite 34.)
NORM : Sind die Niederfrequenzsignale von Kanälen auf „LARGE” eingestellt, so werden sie nur von diesen Kanälen reproduziert.
SW +: Es werden die auf „LARGE” eingestellten Niederfrequenzsignale von Kanälen gleichzeitig von jenen Kanälen und dem
In diesem Modus sind die Niederfrequenzsignale, welche vom Subwoofer reproduziert werden, nur die
Niederfrequenzsignale von LFE (von den Mehrkanalquellen, welche LFE-Kanäle (Low Frequency Effects), auch „.1”
↕
Kanal genannt) enthalten und die Kanäle müssen auf „SMALL” eingestellt sein.
Subwooferkanal reproduziert.
In diesem Modus verläuft der Niederfrequenzbereich einheitlicher durch den Raum, jedoch kann es in Abhängigkeit
von Raumgröße und Grundriss zu Störungen mit verringerter tatsächlicher Lautstärke im Niederfrequenzbereich
kommen.
Auswahl AUTOMATISCHE ENERGIEEINSPARUNG
• Die automatische Energieeinsparung schaltet die Spannungsversorgung automatisch aus und ruft den Stand-by-Modus auf. Erfolgt
für die voreingestellte Zeit kein Tastendruck, so wird die Funktion aktiviert.
• Sie können die gewünschte Ausschaltzeit einstellen.
→AUS ↔ 2H(Stunden) ↔ 4H ↔6H ←
(Funktion deaktivieren)
31
Page 76

RD-6506(G)_DEU_110411_RD-6506(G)_DEU 2011-04-14 오전 9:30 페이지 32
Auswahl TONE
OFF : Wiedergabe einer Programmquelle ohne Klangeffekte („DIR” leuchtet).
↕
ON : Einstellung des Klanges („DIR” erlischt).
■ Einstellung von TONE CONTROL auf ON zur Klangeinstellung (Bässe und Höhen)
①. Mit ENTER rufen Sie den Klangeinstellmodus auf.
DEUTSCH
②. Mit den NAVIGATIONSTASTEN ▲/▼wählen Sie den gewünschten Klangmodus.
Auswahl BASS
③. Mit den NAVIGATIONSTASTEN ◀/▶stellen Sie den gewählten Klang ein.
• Der Klangpegel kann im Bereich -10 ~ +10 dB eingestellt
werden.
• Allgemein empfehlen wir, Bässe und Höhen auf 0 dB (Flat
Level) einzustellen.
• Extreme Einstellungen mit hoher Lautstärke können zur
Beschädigung Ihrer Lautsprecher führen.
• Wiederholen Sie die vorstehenden Schritte ②und ① zur
Beendigung der Einstellungen.
32
Page 77

SW M : NORM / SW +
T
ONE : OFF
A
.P.S : OFF / 2H / 4H / 6H
R
ETURN
BASS : 0 / - 10 ~ + 10
TRE : 0 / - 10 ~ + 10
VID 1 CFG
VID 2 CFG
CD CFG
RETURN
AUD : OPT / COX 1 / COX 2 / - - AUTO : ON / OFF
RETURN
A
UD : OPT / COX 1 / COX 2 / - - AUTO : ON / OFF
RETURN
AUD : OPT / COX 1 / COX 2 / - - AUTO : ON / OFF
RETURN
/ ON
RD-6506(G)_DEU_110411_RD-6506(G)_DEU 2011-04-14 오전 9:30 페이지 33
EINGANGSEINSTELLUNGEN
• AUD (AUDIO ASSIGN): Zuordnung der angeschlossenen Eingänge DIGITAL IN zum gewünschten Eingang.
• AUTO (AUTO SURROUND): Auswahl des automatischen Surroundmodus oder des manuellen Surroundmodus.
• RETURN: Rückkehr in das vorherige Menü.
1.Mit den NAVIGATIONSTASTEN AUFWÄRTS
(p)/ABWÄRTS (q) wählen Sie die gewünschte
Eingangsquelle, danach drücken Sie ENTER.
2. Mit den NAVIGATIONSTASTEN AUFWÄRTS (p)/
ABWÄRTS (q) wählen Sie das gewünschte
Menüelement.
3. Mit den NAVIGATIONSTASTEN LINKS (t)/RECHTS
(u) stellen Sie das gewählte Menüelement
wunschgemäß ein.
Beispiel) Bei Auswahl der VIDEO 2
Auswahl AUDIO ASSIGN
• Sie müssen die angeschlossenen DIGITALEINGÄNGE den gewünschten CD und VIDEO 1 ~ VIDEO 2 zuordnen (Einzelheiten
finden Sie im Abschnitt „ANSCHLUSS DIGITALER EINGÄNGE” auf Seite 7).
• Wählen Sie zwischen OPT (optisch), COX 1 (koaxial 1), COX 2 (koaxial 2) und - - - (analog).
¢ Bitte beachten Sie :
• Für den Fall, dass ein DIGITALEINGANG zwei oder mehr Eingangsquellen zugeordnet ist, können die digitalen Audiosignale
vom gleichen DIGITALEINGANG gehört werden, wenn diese Eingangsquellen gewählt sind.
• Ist HDMI IN an Ihrer Videokomponente angeschlossen, dann sind die DIGITAL IN Einstellungen ungültig.
DEUTSCH
Auswahl von AUTO SURROUND
• Sie können entweder den automatischen oder den manuellen Surroundmodus wählen.
(Manueller Surroundmodus) : Wählen Sie den gewünschten Surroundmodus für den Signaleingang mit auswahltasten
OFF
↕
ON(Automatischer Surroundmodus) : Der optimale Surroundmodus wird automatisch abhängig vom Eingangssignalformat gewählt.
■Bitte beachten sies :
• Schalten Sie SPEAKER aus oder sind „C (Center)“ und „S (Surround)“ auf „NO“ eingestellt, dann ist der automatische
Surroundmodus ungültig.
• Selbst wenn der automatische Surroundmodus gewählt wird und ein gleichartiges digitales Signalformat anliegt, kann der
optimale Surroundmodus abhängig von der Lautsprechereinstellung auf „NO“ abweichen.
• Ist der automatische Surroundmodus gewählt, so kann kein anderer Surroundmodus als der optimale Surroundmodus gewählt
werden.
SURROUNDMODUS (>/<). (Einzelheiten finden Sie im Abschnitt „Auswahl des manuellen
Surroundmodus mit AUTO/MANUAL auf der Frontblende” auf Seite 17.)
33
Page 78

SW M : NORM / SW +
TONE : OFF
A.P.S : OFF / 2H / 4H / 6H
RETURN
BASS : 0 / - 10 ~ + 10
TRE : 0 / - 10 ~ + 10
S
PK SET
VID 1 CFG
VID 2 CFG
CD CFG
RETURN
CONFIG
X-OVER
DISTANCE
RETURN
AUD : OPT / COX 1 / COX 2 / - - -
AUTO : ON / OFF
R
ETURN
AUD : OPT / COX 1 / COX 2 / - - -
AUTO : ON / OFF
RETURN
AUD : OPT / COX 1 / COX 2 / - - -
AUTO : ON / OFF
RETURN
FC : 40 / 50 / 80 / 100 / 150 / 200
RETURN
UNIT : M / FT
L
: 3.0 M / 0.1 ~ 9.0
C : 3.0 M / 0.1 ~ 9.0
R : 3.0 M / 0.1 ~ 9.0
SR : 3.0 M / 0.1 ~ 9.0
SL : 3.0 M / 0.1 ~ 9.0
SW : 3.0 M / 0.1 ~ 9.0
RETURN
L
: 10.0 FT / 0.5 ~ 30.0
C : 10.0 FT / 0.5 ~ 30.0
R : 10.0 FT / 0.5 ~ 30.0
SR : 10.0 FT / 0.5 ~ 30.0
SL : 10.0 FT / 0.5 ~ 30.0
SW : 10.0 FT / 0.5 ~ 30.0
RETURN
F : LARGE / SMALL
C : LARGE / SMALL / NO
S : LARGE / SMALL / NO
SW : YES / NO
RETURN
/ ON
RD-6506(G)_DEU_110411_RD-6506(G)_DEU 2011-04-14 오전 9:30 페이지 34
LAUTSPRECHER EINSTELLUNGEN
• Nach der Installation des Receivers und dem Anschluss aller Komponenten nehmen Sie die Lautsprechereinstellungen für
optimalen Klang entsprechend Ihrer Umgebung und des Lautsprecher-Layouts vor.
• Auch beim Austausch von Lautsprechern oder ihrer Umsetzung, der Veränderung der Sitzposition oder des Layouts Ihrer
Umgebung sollten Sie eine neue Einstellung der Lautsprecher vornehmen.
DEUTSCH
• CONFIG (KONFIGURATION): Auswahl der Größe der angeschlossenen Lautsprecher.
• X-OVER (CROSSOVER): Auswahl der gewünschten Überschneidungsfrequenz.
• DISTANCE: Eingabe des Abstands zwischen der Sitzposition und jedem Lautsprecher zur Einstellung der automatischen
• RETURN: Rückkehr in das vorherige Menü.
Verzögerungszeiten für optimale Surroundwiedergabe.
Auswahl der KONFIGURATION
1. Mit den NAVIGATIONSTASTEN AUFWÄRTS (p) /ABWÄRTS (q) wählen Sie „CONFIG”, danach drücken
Sie ENTER.
2. Mit den NAVIGATIONSTASTEN AUFWÄRTS (p)/ABWÄRTS (q) wählen Sie den gewünschten
Lautsprecher.
34
Page 79

RD-6506(G)_DEU_110411_RD-6506(G)_DEU 2011-04-14 오전 9:30 페이지 35
3. Mit den NAVIGATIONSTASTEN LINKS (t)/RECHTS (u) stellen Sie den gewählten Lautsprecher
wunschgemäß ein.
• Abhängig vom Lautsprechertyp können Sie einen der folgenden Lautsprechertypen wählen.
• Vordere, mittlerer und Surroundlautsprecher:
LARGE : Wählen Sie diese Einstellung beim Anschluss von Lautsprechern, welche Frequenzen unterhalb der
Crossoverfrequenz wiedergeben können.
SMALL : Wählen Sie diese Einstellung beim Anschluss von Lautsprechern, welche keine Frequenzen unterhalb der
Crossoverfrequenz wiedergeben können.
Bei dieser Auswahl werden Frequenzen unterhalb der Crossoverfrequenz an den Subwoofer oder an Lautsprecher
übertragen, die auf „LARGE“ eingestellt sind (wenn Sie keinen Subwoofer benutzen).
NO: Wählen Sie diese Einstellung, wenn keine Lautsprecher angeschlossen sind. Bei dieser Auswahl wird der Ton an jene
Lautsprecher übertragen, die nicht auf „NO“ eingestellt sind.
DEUTSCH
• Subwoofer :
YES : Wählen Sie dies zur Ausgabe der LFE-Signale und Bassfrequenzen von auf „SMALL“ eingestellten Kanälen vom
Subwoofer.
NO : Wählen Sie diese Einstellung, wenn kein Subwoofer angeschlossen ist. Die Bassfrequenzen werden von anderen
Lautsprechern ausgegeben.
■Bitte beachten Sie:
• Sind Lautsprecher auf „SMALL“ eingestellt, so sollten Sie deren Crossoverfrequenz korrekt entsprechend ihrer
Frequenzcharakteristiken einstellen (Einzelheiten siehe „Auswahl CROSSOVER“ auf Seite 36).
• Ist „F“ (Front) auf „SMALL“ eingestellt, dann können „C“ (Center) und „S“ (Surround) nicht auf „LARGE“ und „SW“(Subwoofer)
nicht auf „NO“ eingestellt werden.
4. Wiederholen Sie die vorstehenden Schritte 2 und 3, bis alle Lautsprecher auf den gewünschten Modus eingestellt sind.
■Hinweise zur Lautsprechergröße
• Wählen Sie „LARGE“ oder „SMALL“ nicht entsprechend der tatsächlichen Größe des Lautsprechers, sondern nach der seiner Fähigkeit, tiefe
Frequenzsignale (Bässe unterhalb der eingestellten Frequenz wiederzugeben, die im Menü „CROSSOVER“ eingestellt wurde).
• Wenn Sie diese nicht wissen, versuchen Sie, den Klang bei beiden Einstellungen zu vergleichen, um die richtige Einstellung zu bestimmen
(stellen Sie die Lautstärke niedrig genug ein, um die Lautsprecher nicht zu beschädigen).
35
Page 80

RD-6506(G)_DEU_110411_RD-6506(G)_DEU 2011-04-14 오전 9:30 페이지 36
Auswahl CROSSOVER
• Sind Lautsprecher auf „SMALL“ eingestellt, so vergewissern Sie sich davon, dass ihre Crossoverfrequenz korrekt
entsprechend ihrer Frequenzcharakteristiken eingestellt ist.
1. Mit CURSOR AUFWÄRTS (▲) / ABWÄRTS (▼) wählen Sie „X-OVER“, dann drücken Sie ENTER.
DEUTSCH
2. Mit CURSOR LINKS (◀) / RECHTS (▶) stellen Sie die Crossoverfrequenz ein.
• Die Crossoverfrequenz kann auf 40, 50, 80, 100, 150 und 200 Hz eingestellt werden.
■Hinweise zur Crossoverfrequenz
• Sind die Lautsprecher auf „SMALL“ eingestellt, dann werden tiefe Frequenzen auf diesen Kanälen, die unterhalb der
Crossoverfrequenz liegen, über den Subwoofer oder die vorderen Lautsprecher ausgegeben, die auf „LARGE“ eingestellt sind
(wenn kein Subwoofer verwendet wird).
• Schlagen Sie in der Bedienungsanleitung der Lautsprecher nach, die angeschlossen werden sollen. Wenn der
Frequenzbereich Ihrer Lautsprecher bei 100 Hz ~ 20 kHz liegt, muss die Crossoverfrequenz auf 100 Hz eingestellt werden
(oder etwas höher).
36
Page 81

RD-6506(G)_DEU_110411_RD-6506(G)_DEU 2011-04-14 오전 9:30 페이지 37
Auswahl DISTANCE
1. Mit den CURSOR AUFWÄRTS (▲) / ABWÄRTS (▼) wählen Sie „DISTANCE“, danach drücken Sie ENTER.
2. Mit den CURSOR AUFWÄRTS (▲) / ABWÄRTS (▼)wählen Sie das gewünschte Menüelement.
DEUTSCH
■ Bitte beachten Sie:
• Sie können nicht den Subwoofer und die auf „NO”
eingestellten Lautsprecher wählen.
3. Mit den CURSOR LINKS (◀) / RECHTS (▶) stellen Sie den gewählten Menüpunkt ein.
■ Auswahl der gewünschten Einheit
• Sie können METER oder FEET wählen.
• Nach der Auswahl der Einheit werden die Abstände
automatisch in die gewählte Einheit umgerechnet.
■ Einstellen der Entfernung
• Sie können die Entfernung zwischen 0,1 und 9,0 m in 0,1
Meter Intervallen einstellen (oder 0,5 ~ 30 Fuß in
0,5-Fuß-Schritten).
4. Wiederholen Sie die vorstehenden Schritte 2 und 3, bis alle Entfernungen eingestellt sind.
■ Informationen zur Entfernung der Lautsprecher
Bei der Wiedergabe von Mehrkanal-Surround Sound mit Dolby Digital und DTS Quellen sind der mittlere und die SurroundLautsprecher idealerweise in der gleichen Entfernung von der hauptsächlichen Sitzposition wie die vorderen Lautsprecher.
Durch Eingabe der Entfernung zwischen der Sitzposition und jedem Lautsprecher werden die Verzögerungszeiten für den
mittleren und die Surround-Lautsprecher automatisch zur Erzeugung einer idealen Hörumgebung eingestellt, gewissermaßen
als wären der mittlere bzw. die Surround-Lautsprecher in ihrer Idealposition.
37
Page 82

SW M : NORM / SW +
TONE : OFF
A.P.S : OFF / 2H / 4H / 6H
RETURN
B
ASS : 0 / - 10 ~ + 10
T
RE : 0 / - 10 ~ + 10
SPK SET
VID 1 CFG
VID 2 CFG
CD CFG
RETURN
CONFIG
X-OVER
DISTANCE
RETURN
MODE : CAL / REF 1 / REF 2
L : 0 dB / -15 ~ + 15
C : 0 dB / -15 ~ + 15
R : 0 dB / -15 ~ + 15
SR : 0 dB / -15 ~ + 15
SL : 0 dB / -15 ~ + 15
SW : 0 dB / -15 ~ + 15
DD : 0 dB / -10 ~ 0
DTS : 0 dB / -10 ~ 0
RETURN
AUD : OPT / COX 1 / COX 2 / - - -
AUTO : ON / OFF
RETURN
AUD : OPT / COX 1 / COX 2 / - - -
AUTO : ON / OFF
RETURN
AUD : OPT / COX 1 / COX 2 / - - -
AUTO : ON / OFF
RETURN
FC : 40 / 50 / 80 / 100 / 150 / 200
RETURN
UNIT : M / FT
L : 3.0 M / 0.1 ~ 9.0
C : 3.0 M / 0.1 ~ 9.0
R : 3.0 M / 0.1 ~ 9.0
SR : 3.0 M / 0.1 ~ 9.0
SL : 3.0 M / 0.1 ~ 9.0
SW : 3.0 M / 0.1 ~ 9.0
RETURN
L : 10.0 FT / 0.5 ~ 30.0
C : 10.0 FT / 0.5 ~ 30.0
R : 10.0 FT / 0.5 ~ 30.0
SR : 10.0 FT / 0.5 ~ 30.0
SL : 10.0 FT / 0.5 ~ 30.0
SW : 10.0 FT / 0.5 ~ 30.0
RETURN
F : LARGE / SMALL
C : LARGE / SMALL / NO
S : LARGE / SMALL / NO
SW : YES / NO
RETURN
/
ON
RD-6506(G)_DEU_110411_RD-6506(G)_DEU 2011-04-14 오전 9:31 페이지 38
KANALPEGELEINSTELLUNGEN
DEUTSCH
■ Bitte beachten Sie:
• Abhängig von den Lautsprechereinstellungen („NO” usw.) können einige Kanäle nicht gewählt werden.
Einstellen des Kanalpegels
• Der Kanalpegel kann beliebig eingestellt werden. Diese eingestellten Pegel werden nur im Benutzerspeicher („CAL”)
abgelegt, nicht im Voreinstellungsspeicher („REF 1”, „REF 2”).
• Nach der Einstellung der Kanalpegel mit dem Testton stellen Sie die Kanalpegel entweder entsprechend der
Programmquellen oder nach eigenem Geschmack ein (Einzelheiten finden Sie im Abschnitt „Einstellen der einzelnen
Kanäle mit dem Testton” auf Seite 19).
1. Mit den CURSOR AUFWÄRTS (▲) / ABWÄRTS
(▼) wählen Sie den gewünschten Kanal.
2. Mit den CURSOR LINKS (◀) / RECHTS (▶)
stellen Sie den Pegel des gewählten Kanals
oder den LFE-Pegel der Programmquelle ein.
Beispiel: Bei Auswahl von LFE der Dolby Digital Quelle
• Der LFE-Pegel kann im Bereich -10~0 dB eingestellt
werden, die anderen Kanalpegel im Bereich von -15 ~
+15 dB.
• Allgemein empfehlen wir, den LFE-Pegel auf 0 dB
einzustellen (der empfohlene LFE-Pegel für einige frühe
DTS Software ist jedoch -10 dB). Erscheinen die
empfohlenen Pegel zu hoch, so stellen Sie diese
niedriger ein, falls nötig.
3. Wiederholen Sie obige Schritte 1 und 2 zur
Einstellung aller Kanalpegel.
38
Page 83

RD-6506(G)_DEU_110411_RD-6506(G)_DEU 2011-04-14 오전 9:31 페이지 39
Speichern der eingestellten Kanalpegel
• Sie können die eingestellten Kanalpegel in den
Voreinstellungen („REF 1”, „REF 2”) speichern und
jederzeit aufrufen.
1. Nach den Schritten 1~3 im Abschnitt „Einstellen
des Kanalpegels” auf Seite 38, danach drücken
Sie ENTER.
Aufrufen der gespeicherten Kanalpegel
1. Mit den CURSOR AUFWÄRTS (▲) / ABWÄRTS
(▼) wählen Sie MODE (Speichermodus).
DEUTSCH
• „CAL” wird möglicherweise anstatt
„REF 1” oder „REF 2” angezeigt.
• Die „1“ in der Anzeige „REF 1“ blinkt.
2. Mit den CURSOR LINKS (◀) / RECHTS (▶)
wählen Sie die gewünschte Speicherstelle,
danach drücken Sie ENTER.
• Mit jedem Tastendruck auf die NAVIGATIONSTASTEN
oder u wird zwischen „REF 1” und „REF 2” umgeschaltet.
• Die eingestellten Kanalpegel sind nun entsprechend
gespeichert.
2. Mit den CURSOR LINKS (◀) / RECHTS (▶)
wählen Sie zwischen REF 1 und REF 2.
• Hiermit werden die in den Voreinstellungen
gespeicherten Kanalpegel aufgerufen.
t
39
Page 84

SW M : NORM / SW +
TONE : OFF
A
.P.S : OFF / 2H / 4H / 6H
R
ETURN
BASS : 0 / - 10 ~ + 10
T
RE : 0 / - 10 ~ + 10
SPK SET
VID 1 CFG
VID 2 CFG
CD CFG
R
ETURN
C
ONFIG
X-OVER
D
ISTANCE
RETURN
MODE : CAL / REF 1 / REF 2
L : 0 dB / -15 ~ + 15
C
: 0 dB / -15 ~ + 15
R : 0 dB / -15 ~ + 15
SR : 0 dB / -15 ~ + 15
SL : 0 dB / -15 ~ + 15
SW : 0 dB / -15 ~ + 15
D
D : 0 dB / -10 ~ 0
DTS : 0 dB / -10 ~ 0
RETURN
DRC : OFF / MID / MAX
RETURN
PANO : OFF / ON
C.WIDTH : 3 / 0 ~ 7
D
IMEN : 0 / -3 ~ +3
DRC DD
RETURN
AUD : OPT / COX 1 / COX 2 / - - -
A
UTO : ON / OFF
R
ETURN
AUD : OPT / COX 1 / COX 2 / - - -
AUTO : ON / OFF
R
ETURN
AUD : OPT / COX 1 / COX 2 / - - -
AUTO : ON / OFF
R
ETURN
FC : 40 / 50 / 80 / 100 / 150 / 200
RETURN
U
NIT : M / FT
L : 3.0 M / 0.1 ~ 9.0
C : 3.0 M / 0.1 ~ 9.0
R : 3.0 M / 0.1 ~ 9.0
SR : 3.0 M / 0.1 ~ 9.0
SL : 3.0 M / 0.1 ~ 9.0
SW : 3.0 M / 0.1 ~ 9.0
RETURN
L : 10.0 FT / 0.5 ~ 30.0
C : 10.0 FT / 0.5 ~ 30.0
R : 10.0 FT / 0.5 ~ 30.0
SR : 10.0 FT / 0.5 ~ 30.0
SL : 10.0 FT / 0.5 ~ 30.0
SW : 10.0 FT / 0.5 ~ 30.0
RETURN
F
: LARGE / SMALL
C
: LARGE / SMALL / NO
S : LARGE / SMALL / NO
SW : YES / NO
R
ETURN
/ ON
RD-6506(G)_DEU_110411_RD-6506(G)_DEU 2011-04-14 오전 9:31 페이지 40
PARAMETEREINSTELLUNGEN
• DOLBY PRO LOGIC II MUSIKPARAMETER: Einstellen der verschiedenen Dolby Pro Logic II Musikparameter für optimale
(PANO (PANORAMA), C.WIDTH (MITTLERE
BREITE), DIMEN (DIMENSION))
• DRC DD (DYNAMIC RANGE COMPRESSION DOLBY DIGITAL): Einstellen der Komprimierung des Dynamikbereichs, mit
DEUTSCH
• RETURN: Rückkehr in das vorherige Menü.
Bei Auswahl von „PANO“, „C.WIDTH“, „DIMEN“
• Sie können die verschiedenen Dolby Pro Logic II Musikparameter für optimale Surroundeffekte einstellen.
¢ Bitte beachten Sie :
• Die Parametereinstellungen sind nur im Dolby Pro Logic II Musikmodus gültig.
Surroundeffekte.
dem leisere Töne bei niedriger Lautstärke besser gehört
werden.
1. Mit CURSOR AUFWÄRTS (▲) / ABWÄRTS (▼) wählen Sie den gewünschten Parameter.
2. Mit CURSOR LINKS (◀) / RECHTS (▶) stellen Sie den gewählten Parameter ein.
■Auswahl „PANO“ (PANORAMA) Modus
Dieser Modus erweitert das vordere Stereoabbild zum Einschluss der Surroundlautsprecher für einen spannenden
„Wraparound“ Effekt mit Seitenwandabbild. Wählen Sie „OFF“ oder „ON“ (Standardwert: OFF).
■Auswahl Steuerung „C. WIDTH“ (MITTE BREITE)
Dies stellt das mittlere Abbild ein, um nur vom mittleren Lautsprecher, nur vom linken/rechten Lautsprecher als Phantomabbild
oder in unterschiedlichem Maß von allen drei vorderen Lautsprechern gehört zu werden. Die Steuerung kann in 8 Schritten
zwischen 0 und 7 (Standardwert: 3) erfolgen.
■Auswahl Steuerung „DIMEN“ (DIMENSION)
Dies stellt das Klangfeld schrittweise entweder in Richtung vordere oder hintere Lautsprecher ein. Die Steuerung kann in 7
Schritten zwischen -3 und +3 (Standardwert: 0) eingestellt werden.
3. Wiederholen Sie obige Schritte 1 und 2 zur Einstellung weiterer Parameter.
40
Page 85

RD-6506(G)_DEU_110411_RD-6506(G)_DEU 2011-04-14 오전 9:31 페이지 41
Auswahl „DRC DD“
• Diese Funktion komprimiert den Dynamikbereich eines zuvor spezifizierten Teils des Dolby Digital Soundtracks (mit
extrem hoher Lautstärke), um die Lautstärkespitzen anzupassen.
Dies erleichtert das Hören des gesamten Soundtracks beim Sehen von Filmen nachts mit niedriger Lautstärke.
¢Bitte beachten Sie:
• Diese Einstellung ist nur gültig, wenn die Digitalsignale von der Dolby Digital Programmquelle anliegen.
• Die Parametereinstellungen sind nur im Dolby Pro Logic II Musikmodus gültig.
1. Mit CURSOR AUFWÄRTS (▲)/ABWÄRTS (▼) wählen Sie „DRC DD“, dann drücken Sie ENTER.
DEUTSCH
2. Mit CURSOR LINKS (◀) / RECHTS (▶) stellen Sie die Kompression des Dynamikbereichs ein.
→ OFF : DRC-Funktion deaktivieren
↕
MID
↕
→ MAX
Höhere Kompression
41
Page 86

S
W M : NORM / SW +
T
ONE : OFF
A.P.S : OFF / 2H / 4H / 6H
RETURN
B
ASS : 0 / - 10 ~ + 10
TRE : 0 / - 10 ~ + 10
SPK SET
VID 1 CFG
VID 2 CFG
C
D CFG
RETURN
C
ONFIG
X
-OVER
DISTANCE
R
ETURN
MODE : CAL / REF 1 / REF 2
L : 0 dB / -15 ~ + 15
C : 0 dB / -15 ~ + 15
R
: 0 dB / -15 ~ + 15
SR : 0 dB / -15 ~ + 15
SL : 0 dB / -15 ~ + 15
SW : 0 dB / -15 ~ + 15
DD : 0 dB / -10 ~ 0
DTS : 0 dB / -10 ~ 0
RETURN
DRC : OFF / MID / MAX
R
ETURN
PANO : OFF / ON
C.WIDTH : 3 / 0 ~ 7
DIMEN : 0 / -3 ~ +3
DRC DD
RETURN
HDMI : AMP / THRU
CEC : OFF / ON
PWR : OFF / ON
R
ETURN
HDMI
AUD : OPT / COX 1 / COX 2 / - - -
A
UTO : ON / OFF
RETURN
AUD : OPT / COX 1 / COX 2 / - - -
A
UTO : ON / OFF
RETURN
AUD : OPT / COX 1 / COX 2 / - - -
A
UTO : ON / OFF
RETURN
F
C : 40 / 50 / 80 / 100 / 150 / 200
R
ETURN
UNIT : M / FT
L
: 3.0 M / 0.1 ~ 9.0
C : 3.0 M / 0.1 ~ 9.0
R : 3.0 M / 0.1 ~ 9.0
SR : 3.0 M / 0.1 ~ 9.0
S
L : 3.0 M / 0.1 ~ 9.0
SW : 3.0 M / 0.1 ~ 9.0
RETURN
L
: 10.0 FT / 0.5 ~ 30.0
C : 10.0 FT / 0.5 ~ 30.0
R : 10.0 FT / 0.5 ~ 30.0
SR : 10.0 FT / 0.5 ~ 30.0
S
L : 10.0 FT / 0.5 ~ 30.0
SW : 10.0 FT / 0.5 ~ 30.0
RETURN
F
: LARGE / SMALL
C : LARGE / SMALL / NO
S
: LARGE / SMALL / NO
SW : YES / NO
RETURN
/ ON
RD-6506(G)_DEU_110411_RD-6506(G)_DEU 2011-04-14 오전 9:31 페이지 42
HDMI EINSTELLEN
• HDMI (HDMI AUDIOAUSGANG): Ausgabe der digitalen Audiosignale über den Anschluss HDMI MONITOR OUT.
• CEC (HDMI-STEUERUNG): Gemeinsame Bedienung über HDMI angeschlossener und mit HDMI-Steuerung kompatibler
• PWR (EIN/AUS-STEUERUNG): Verbindung des EIN/AUS Status dieses Geräts mit den Komponenten.
• RETURN: Rückkehr in das vorherige Menü.
DEUTSCH
1. Mit CURSOR AUFWÄRTS (▲) / ABWÄRTS (▼)
wählen Sie den gewünschten Menüpunkt.
Komponenten.
2. Mit CURSOR LINKS (◀) / RECHTS (▶) stellen
Sie den gewählten Menüpunkt ein.
Auswahl HDMI AUDIO OUT
• Der HDMI-Anschluss kann nicht komprimierte digitale Videosignale und digitale Audiosignale übertragen.
Abhängig davon, ob die digitalen Audiosignaleingänge auf HDMI IN über HDMI MONITOR OUT dieses Receivers
ausgegeben werden, muss HDMI AUDIO OUT korrekt eingestellt sein.
AMP : Kein Ausgang der digitalen HDMI-Audiosignale über HDMI MONITOR OUT dieses Receivers, diese Signale werden
also über die an diesem Receiver angeschlossenen Lautsprecher gehört.
↕
THRU : Ausgang der digitalen HDMI-Audiosignale über HDMI MONITOR OUT dieses Receivers, diese Signale werden also
über die Lautsprecher Ihres Fernsehers gehört.
■Bitte beachten Sie:
• Ist HDMI AUDIO OUT auf THRU eingestellt, so haben Sie keinen Ton von den an diesem Gerät angeschlossenen
Lautsprecher.
Auswahl HDMI CONTROL
• Die HDMI-Steuerfunktion ermöglicht die Auswahl des Eingangs dieses Geräts in Verbindung mit den angeschlossenen Komponenten.
OFF: HDMI-Steuerfunktion ist deaktiviert.
↕
ON: HDMI-Steuerfunktion ist aktiviert.
• Ist HDMI CONTROL auf ON eingestellt, dann können Sie ebenfalls die Funktion ARC (Audio Return Channel) benutzen, womit der
Fernseher die Audiosignale über HDMI-Kabel an diesen Receiver übertragen kann.
■Bitte beachten Sie:
• Die HDMI-Steuerfunktion hängt von den angeschlossenen Komponenten und deren Einstellungen ab.
• Zur Nutzung der ARC-Funktion muss Ihr Fernseher die ARC-Funktion unterstützen.
• Einzelheiten zu HDMI CONTROL und POWER CONTROL siehe „HDMI-FUNKTION BESTÄTIGEN“ auf Seite 28.
42
Page 87

RD-6506(G)_DEU_110411_RD-6506(G)_DEU 2011-04-14 오전 9:31 페이지 43
Auswahl POWER CONTROL
• Die Ein/Aus-Steuerfunktion ermöglicht die Verbindung des EIN/AUS-Status dieses Geräts und den Start der Wiedergabe
angeschlossener Komponenten.
OFF : POWER CONTROL ist deaktiviert.
↕
ON : POWER CONTROL ist aktiviert.
■Bitte beachten Sie:
• POWER CONTROL kann nur eingestellt werden, wenn HDMI CONTROL auf ON eingestellt ist.
DEUTSCH
43
Page 88

RD-6506(G)_DEU_110411_RD-6506(G)_DEU 2011-04-14 오전 9:31 페이지 44
Störungserkennung
Kommt es zu einer Fehlfunktion, so sehen Sie sich bitte zunächst die nachstehende Tabelle an, bevor Sie sich an den
Kundendienst wenden.
Können Sie die Fehlfunktion nicht abstellen, so schalten Sie den Receiver aus und danach wieder ein. Kommen Sie auch hiermit
nicht weiter, so wenden Sie sich bitte an Ihren Fachhändler. Unter keinen Umständen versuchen Sie selbst, die Reparatur
durchzuführen, hiermit verlieren Sie Ihre Garantieansprüche.
PROBLEM MÖGLICHE URSACHE LÖSUNGSVORSCHLAG
eine Spannungsversorgung.
K
ein Ton.
K
DEUTSCH
Kein Ton von den
Surround-Lautsprechern.
Kein Ton vom mittleren
Lautsprecher.
Kein Bild.
Kein Bild über HDMI-Anschluss.
Bildstörungen oder verzerrtes Bild.
Kein Empfang von Radiosendern.
Senderspeicher können nicht
empfangen werden.
Schlechter UKW Empfang.
Ständige oder zeitweise
Zischgeräusche bei MW-Empfang,
insbesondere nachts.
Fernbedienung funktioniert nicht.
Das Netzkabel ist nicht angeschlossen.
•
• Schlechter Anschluss des Netzkabels oder
Steckdose defekt.
Die Lautsprecherkabel sind nicht angeschlossen.
•
• Die Master-Lautstärke ist zu niedrig eingestellt.
• MUTE wurde gedrückt.
Falsche Auswahl der Eingangsquelle.
•
• Falscher Anschluss der Komponenten.
HDMI AUDIO OUT ist auf THRU eingestellt.
•
• Die Audioeinstellungen sind nicht korrekt.
Surroundmodus ist deaktivi
•
Master-Lautstärke und Surroundpegel sind zu niedrig
•
eingestellt.
• Es wird eine Monoquelle benutzt.
• Surround-Lautsprecher sind auf „NO” eingestellt.
• Dolby Virtual Speaker, Stereomodus usw. ist
gewählt.
• Mittlerer Lautsprecher ist auf „NO” eingestellt.
• Master-Lautstärke und mittlerer Pegel sind zu
niedrig eingestellt.
• Die Videoanschlüsse zwischen diesem Gerät und
dem Fernseher sind fehlerhaft.
• Falsche Auswahl der Eingangsquelle auf dem
Fernseher.
• HDMI-Anschluss zwischen diesem Gerät und dem
Fernseher ist fehlerhaft.
• Fernseher oder andere Geräte unterstützen nicht
HDCP.
• Videoformat von Fernseher, DVD-Player usw. ist
nicht PAL.
• Es ist keine Antenne angeschlossen.
• Die gewünschte Senderfrequenz ist nicht
eingestellt.
• Die Antenne ist falsch ausgerichtet.
• Es wurde eine falsche Senderfrequenz gespeichert.
• Die Senderspeicher wurden gelöscht.
• Es ist keine Antenne angeschlossen.
• Die Antenne ist falsch ausgerichtet.
• Schwache Signale.
• Störungen werden durch Motoren, Neonlampen
oder Gewitter usw. verursacht.
• Die Batterien sind erschöpft.
• Der Sensor wird behindert.
ert (Stereomodus).
Schließen Sie das Netzkabel korrekt an.
•
• Überprüfen Sie die Steckdose.
Überprüfen Sie die Lautsprecheranschlüsse.
•
• Stellen Sie die Master-Lautstärke ein.
• Drücken Sie MUTE zur Aufhebung der
Stummschaltung.
Wählen Sie die gewünschte Eingangsquelle
•
korrekt.
• Nehmen Sie die Anschlüsse korrekt vor.
Stellen Sie auf AMP ein (Einzelheiten siehe
•
Abschnitt „Auswahl HDMI AUDIO OUT” auf Seite
42).
• Berichtigen Sie die Einstellungen (Einzelheiten
iehe Abschnitt „EINGANGSEINSTELLUNGEN”
s
auf Seite 33).
• Wählen Sie einen Surroundmodus.
Stellen Sie Master-Lautstärke und Surroundpegel
•
ein.
• Wählen Sie eine Stereo- oder Surroundquelle.
• Wählen Sie die gewünschte SurroundLautsprechereinstellung.
• Wählen Sie den gewünschten Surroundmodus.
• Wählen Sie die gewünschte Einstellung des
mittleren Lautsprechers.
• Stellen Sie Master-Lautstärke und mittleren Pegel
ein.
• Korrigieren Sie die Videoanschlüsse.
• Wählen Sie die korrekte Eingangsquelle.
• Korrigieren Sie den HDMI-Anschluss.
• Dieses Gerät gibt keine Videosignale aus, wenn es
nicht an Geräten angeschlossen ist, die HDCP
unterstützen.
• Stellen Sie das Videoformat auf PAL um.
• Schließen Sie eine Antenne an.
• Stellen Sie die gewünschte Senderfrequenz ein.
• Richten Sie die Antenne neu aus.
• Speichern Sie die korrekte Senderfrequenz.
• Speichern Sie die Sender erneut.
• Schließen Sie eine Antenne an.
• Richten Sie die Antenne neu aus.
• Montieren Sie eine UKW-Hausantenne.
• Halten Sie den Receiver von Störquellen fern.
• Montieren Sie eine MW-Hausantenne.
• Tauschen Sie die Batterien aus.
• Entfernen Sie Hindernisse.
44
Page 89

RD-6506(G)_DEU_110411_RD-6506(G)_DEU 2011-04-14 오전 9:31 페이지 45
Spezifikationen
¢VERSTÄRKER
• Ausgangsleistung, Stereomodus, 6 Ω, THD 0,7%, 40 Hz~20 kHz | 2×100 W
• Gesamtklirrfaktor, 6 Ω, 100 W, 1 kHz | 0,05 %
• Intermodulationsverzerrung
60 Hz: 7 kHz = 4 : 1 SMPTE, 6 Ω, 100 W | 0,1 %
• Eingangsempfindlichkeit, 47 kΩ
Line (CD, TAPE, VIDEO) | 250 mV
• Rauschabstand, IHF „A”-bewertet
Line (CD, TAPE, VIDEO) | 95 dB
• Frequenzgang
Line (CD, TAPE, VIDEO), 20 Hz~50 kHz | +0 dB, -3 dB
• Ausgangspegel
TAPE REC, 2,2 kΩ | 250 mV
PRE OUT (Subwoofer), 1 kΩ | 1,5 V
• Bässe-/Höhensteuerung, 100 Hz/10 kHz | ±10 dB
• Surroundmodus, nur kanalgetrieben
Front Ausgangsleistung, 6 Ω, 1 kHz, THD 0,7 % | 100 W / 100 W
Mitte Ausgangsleistung, 6 Ω, 1 kHz, THD 0,7 % | 100 W
Surround Ausgangsleistung, 6 Ω, 1 kHz, THD 0,7 % | 100 W / 100 W
DEUTSCH
¢DIGITALAUDIO
• Abtastfrequenz | 32, 44,1, 48, 96 kHz
• Digitaler Eingangspegel
Koaxial, 75 Ω | 0,5 Vp-p
Optisch, 660 nm | -15 ~ -21 dBm
¢VIDEO
• Videoformat | PAL
• Eingangsempfindlichkeit (= Ausgangspegel), 75 Ω
Video (Composite (normal)) | 1 Vp-p
• HDMI Anschluss | 19-pin
¢UKW TUNER
• Frequenzbereich | 87,5 ~ 108 MHz
• Nutzbare Empfindlichkeit, THD 3%, Rauschabstand 26 dB | 12,8 dBf
• 46 dB Dämmungsempfindlichkeit, Mono/Stereo | 20,2 / 45,3 dBf
• Rauschabstand, 65 dBf, Mono/Stereo | 55 / 50 dB
• Gesamtklirrfaktor, 65 dBf, 1 kHz, Mono/Stereo | 0,5 / 1,0 %
• Frequenzgang, 30 Hz~12 kHz | ±3,0 dB
• Stereotrennung, 1 kHz | 30 dB
• Erfassungsverhältnis | 4 dB
• ZF Gleichtaktunterdrückungsverhältnis | 80 dB
¢MW TUNER
• Frequenzbereich | 522 ~ 1611 kHz
• Nutzbare Empfindlichkeit | 500 µV/m
• Rauschabstand | 40 dB
• Trennschärfe | 25 dB
¢ALLGEMEIN
• Spannungsversorgung | 230 V ~ 50 Hz
• Leistungsaufnahme | 200 W
• Abmessungen (B×H×T, einschließlich überstehender Teile) | 435×143×359 mm
• Gewicht (netto) | 8,6 kg
Bitte beachten Sie: Änderung von Design und Spezifikationen, auch ohne Vorankündigung, vorbehalten .
45
Page 90

O
N / STANDBY
AUTO / MANUAL
S
URROUND
S
TEREO
V
IDEO
AUDIO
S
OUND
I
NPUT
A
UDIO ASSIGNSPEAKER
O
N / OFF
T
ONE CH.LEVEL SETUP ENTER / MEMO BANDPRESETTUNE
P
HONES
AUX 1 AUX 2
POWER
S
TANDBY
A
UDIO / VIDEO RECEIVER
RD-6505
O
N OFF
R
ETURN
M
AIN MENU
M
ASTER VOLUME
RD-6506(G)_ESP_110411_RD-6506(G)_ESP 2011-04-14 오전 9:32 페이지 2
Introducción
LEA ESTO ANTES DE UTILIZAR SU EQUIPO
PRECAUCIÓN:
ADVERTENCIA:
Precauciones sobre la instalación
Nota: Para una buena dispersión del calor, no instale este equipo en espacios reducidos como en un mueble librería o en
recintos similares.
Asegúrese de dejar un espacio alrededor de esta unidad, igual o mayor que el mostrado abajo.
Lados izquierdo, derecho y trasero: 20 cm, lado superior: 40 cm
ESPAÑOL
PARA REDUCIR EL RIESGO DE DESCARGA ELÉCTRICA,
O DESMONTE LA TAPA (NI EL PANEL TRASERO).
N
NO HAY PIEZAS REPARABLES POR EL USUARIO EN EL
INTERIOR. LLÉVELO A REPARAR A PERSONAL DE
ERVICIO CUALIFICADO.
S
PARA EVITAR EL RIESGO DE INCENDIO O DE DESCARGA ELÉCTRICA, NO EXPONGA EL APARATO A LA LLUVIA O LA HUMEDAD.
Este símbolo pretende alertar al usuario de la
presencia de "tensiones peligrosas" sin aislamiento
en el interior del equipo, que pueden ser de
magnitud suficiente para constituir un riesgo de
d
escarga eléctrica para las personas.
ste símbolo pretende alertar al usuario de la
E
resencia de instrucciones de mantenimiento
p
(servicio técnico) y funcionamiento importantes
en la literatura que acompaña al aparato.
No obstruya las ranuras de ventilación ni apile otro equipo encima.
PARA SU SEGURIDAD
Los equipos enviados a Australia están diseñados para funcionar sólo con 230 VCA.
Para asegurar un funcionamiento seguro, el enchufe de tres patillas suministrado debe ser utilizado en tomas de
corriente estándares de tres orificios que estén efectivamente conectadas a tierra a través del cableado normal del
hogar. Cables de extensión usados con el equipo deben ser de tres hilos y estar correctamente conectados para
proporcionar conexión a tierra.
-
Los cables de extensión inadecuados son la principal causa de las muertes. El hecho de que el equipo funcione bien no
implica que la toma de corriente tenga toma de tierra y que la instalación sea completamente segura. Para su seguridad,
EUROPA
AUSTRALIA
220 V
240 V
si tiene alguna duda sobre la correcta conexión a tierra de la toma de corriente, consulte con un electricista cualificado.
TENSIÓN UNIFICADA EN EUROPA
Todos los equipos son adecuados para una alimentación de 220-240 VCA.
PRECAUCIÓN
• Deje espacio alrededor del equipo para una ventilación adecuada.
• Evite su instalación en lugares extremadamente calientes o fríos, o en
áreas donde quede expuesto a la luz directa del sol o a equipos de
calefacción.
• Mantenga el equipo libre de humedad, agua y polvo.
• No permita que caigan objetos en el interior del equipo.
• Compruebe que no se impide la ventilación por tapar las ranuras de
ventilación con objetos como periódicos, manteles, cortinas, etc.
• No debería colocar sobre el equipo llamas desprotegidas, como velas
encendidas.
• Por favor tenga en cuentas los aspectos de protección ambiental al
deshacerse de las pilas.
• El equipo no debería quedar expuesto a goteos ni salpicaduras por
motivo de uso.
• No se colocarán objetos llenos de líquido, como jarrones, sobre el
aparato.
• No permita que insecticidas, bencina y aguarrás entren en contacto
con el aparato.
• Nunca desmonte ni modifique el equipo de ninguna manera.
¢ Notas sobre el cable de alimentación eléctrica y la toma de corriente.
• El equipo sigue recibiendo alimentación de Corriente Alterna mientras
continúe enchufado a la toma de corriente, incluso si está apagado.
• Para desconectar completamente el producto de la corriente eléctrica,
desconecte el enchufe de la toma de corriente.
• Cuando esté configurando la instalación del producto, compruebe que
la toma de corriente que está usando es de fácil acceso.
• Desconecte el enchufe de la toma de corriente cuando no use el
equipo durante largos periodos de tiempo.
Información para los usuarios sobre eliminación y
recogida de equipos viejos y pilas gastadas.
Estos símbolos sobre los equipos, embalajes y/o
documentos que los acompañan indican que los productos
eléctricos y electrónicos y las pilas no deberían eliminarse
mezclados con la basura general del hogar. Para un
tratamiento adecuado, haga una recogida selectiva y recicle
los productos viejos y las pilas, por favor llévelos a los puntos
de recogida en cuestión, según sus leyes nacionales.
Eliminando estos productos y pilas correctamente, ayudará a
salvar recursos valiosos y evitar efectos potencialmente
negativos para la salud humana y el medio ambiental que de
otro modo podrían surgir por un manejo inadecuado de la
basura.
Para más información sobre la recogida y el reciclaje de
equipos viejos y pilas, por favor póngase en contacto
con su ayuntamiento, su servicio de recogida selectiva
de basura o con el punto de venta donde compró los
objetos.
[Información sobre la eliminación en otros países fuera de
la Unión Europea]
Estos símbolos sólo son válidos en la Unión Europea. Si
desea deshacerse de estos objetos, por favor póngase
en contacto con las autoridades locales y pregunte por la
correcta forma de eliminación.
Nota sobre símbolos en la batería (los dos últimos símbolos
como ejemplo):
El signo Pb debajo del símbolo de las pilas indica que
esa pila contiene plomo.
2
Page 91

RD-6506(G)_ESP_110411_RD-6506(G)_ESP 2011-04-14 오전 9:32 페이지 3
ÍNDICE
Introducción
• LEA ESTO ANTES DE UTILIZAR SU EQUIPO I 2
Conexión del sistema I 4
Controles del Panel Frontal I 10
Control a distancia I 12
• ALCANCE DE FUNCIONAMIENTO DEL MANDO A DISTANCIA I 13
• COLOCACIÓN DE LAS PILAS I 13
Funcionamiento
• OÍR UNA FUENTE DE PROGRAMAS I 14
• SONIDO ENVOLVENTE I 16
• DISFRUTAR DEL SONIDO ENVOLVENTE I 17
• OÍR EMISIONES DE RADIO I 22
• OÍR EMISIONES RDS (SÓLO FM) I 24
(Sintonizadora RDS (Opción regional en algunos países de Europa, etc.))
• GRABAR I 26
• OTRAS FUNCIONES I 27
• CONFIRMAR LA FUNCIÓN HDMI I 28
ESPAÑOL
Configuración del Sistema I 29
• AJUSTANDO EL SISTEMA I 31
• AJUSTANDO LAS ENTRADAS I 33
• AJUSTANDO LAS CONFIGURACIÓN DE ALTAVOCES I 34
• AJUSTANDO LA NIVEL DE CANAL I 38
• AJUSTANDO LOS PARÁMETROS I 40
• AJUSTANDO EL HDMI I 42
Guía de resolución de problemas I 44
Especificaciones I 45
3
Page 92

SN.
SPEAKERS
RLRL
SURROUND
(
6 )
CENTER
(6 )
F
RONT
(6 )
POWER SOURCE
P
OWER CONSUMPTION
RD-6506
230V 50Hz
2
00W
DESIGNED IN USA
A
SSEMBLED IN CHINA
N
18041
HDMI
VIDEO 2
VIDEO 1
MONITOR
O
UT
CD
DIGITAL IN
R
L
I
N
VIDEO 2
I
N OUT
M
ONITOR
O
UT
VIDEO 1VIDEO 1
VIDEO
A
NTENNAAUDIO
FM 75
G
ND
AM
L
OOP
COAX 2
(CD)
O
PT
(V
IDEO 1
)
AVIS : RISQUE DE CHOC ELECTRIQUE-NE PAS OUVRIR.
WARNING : SHOCK HAZARD-DO NOT OPEN.
VIDEO 1
VIDEO 2 CD
VIDEO 1
TAPETAPE
R
L
IN
O
UT
Manufactured under license from Dolby Laboratories. Dolby, Pro Logic, and the double-D symbol are
trademarks of Dolby Laboratories.
SUBWOOFER
OUT
C
OAX 1
(V
IDEO 2
)
A
UDIO/VIDEO RECEIVER
M
anufactured under license under U.S. Patent #’s: 5,451,942 5,956,674 5,974,380 5,978,762 6,487,535 &
o
ther U.S. and worldwide patents issued & pending. DTS and the Symbol are registered trademarks &
D
TS Digital Surround and the DTS logos are trademarks of DTS, Inc. © DTS, Inc. All Rights Reserved.
842,3 3
5 1 27
ANTENNA
F
M 75
G
ND
AM
LOOP
ANTENNA
FM 75
GND
A
M
LOOP
ANTENNA
FM 75
GND
AM
LOOP
RD-6506(G)_ESP_110411_RD-6506(G)_ESP 2011-04-14 오전 9:32 페이지 4
Conexión del sistema
• Por favor, compruebe que esta unidad está desenchufada de la toma de corriente alterna antes de realizar cualquier conexión.
• Ya que equipos diferentes usan a menudo diferente nomenclatura en sus terminales, lea cuidadosamente las instrucciones de
funcionamiento del equipo que conecte.
• Asegúrese de cumplir con el código de colores cuando conecte los cables de audio, vídeo y altavoces.
• Realice las conexiones correctamente y con firmeza. De lo contrario pueden ocurrir pérdidas de sonido, ruidos o daños en el
receptor.
ESPAÑOL
1. CONEXIÓN DE LAS ANTENAS
• Cambie de posición la antena FM de interior hasta obtener
la mejor recepción de sus estaciones FM favoritas.
• Puede usar una antena exterior de 75Ω para
mejorar más la recepción. Desconecte la antena
interior antes de reemplazarla por una exterior.
• Coloque la antena AM de lazo lo más lejos posible del receptor, de la TV, de los cables de los
altavoces y del cable de alimentación, y oriéntela para una mejor recepción.
• Si la recepción es pobre con la antena AM de lazo. Puede usar una antena AM exterior en lugar de
la antena de lazo.
4
Page 93

HDMI
VIDEO 2
VIDEO 1
MONITOR
OUT
VIDEO 2
IN OUT
MONITOR
OUT
VIDEO 1VIDEO 1
VIDEO
AUDIO
VIDEO 1
VIDEO 2
VIDEO 1
IN
VÍDEO 2
Reproductor BD, Reproductor DVD, etc.
VÍDEO 1
VCR, Grabadora DVD, etc.
MONITOR
TV, Proyector, etc.
RD-6506(G)_ESP_110411_RD-6506(G)_ESP 2011-04-14 오전 9:32 페이지 5
2. CONEXIÓN DE LOS EQUIPOS DE VÍDEO
• Los conectores de VIDEO 1 también pueden conectarse a una grabadora DVD o a un equipo de grabación de vídeo digital.
Para los detalles, lea las instrucciones de funcionamiento de los equipos a conectar.
• Los conectores de VIDEO 2 también pueden conectarse a un equipo de video adicional como una sintonizadora de TV o un
sistema satélite.
• Hay conectores de vídeo (compuesto) para conexiones analógicas de vídeo y conectores HDMI para vídeo digital y
conexiones de audio.
• Para que lo tenga como referencia, la excelencia en calidad de imagen es la siguiente: “HDMI” > “VIDEO (compuesto)”.
■Nota :
• Cuando grabe fuentes de programa de vídeo a través del conector de salida VIDEO 1 (compuesto) o vea fuentes de
programa de vídeo a través de la salida MONITOR OUT (compuesto), debe conectar la entrada de VIDEO IN (compuesto) al
equipo de reproducción de vídeo, como un reproductor BD, reproductor DVD, etc.
ESPAÑOL
5
Page 94

CD
RL
IN
AUDIO
CD
VIDEO 1
TAPETAPE
RL
IN
OUT
AUDIO
OUT
HDMI OUT
AUDIO
IN
CD Reproductor CD, Reproductor BD,
Consola videojuegos, etc.
TAPE Pletina de cassette,
grabadora MD, etc.
RD-6506(G)_ESP_110411_RD-6506(G)_ESP 2011-04-14 오전 9:32 페이지 6
Continúa
¢ Conexión HDMI (Interfaz Multimedia de Alta Definición): (*)
• Usted puede conectar los equipos fuente (reproductor DVD, etc.) a un equipo de presentación (TV, proyector, etc.) a través
de este receptor usando un cable HDMI comercial.
• La conexión HDMI puede llevar señales de vídeo digital y señales de audio digital sin comprimir.
• Las señales de flujo de vídeo (señales de vídeo) son teóricamente compatibles con DVI-D. Cuando se conecte a una
pantalla TV, etc., equipada con un conector DVI-D, es posible hacer la conexión usando un cable convertidor HDMI-DVI
disponible en tiendas de electrónica.
Ya que la conexión HDMI-a-DVI no puede llevar señal de audio, Ya que la conexión HDMI-a-DVI no puede transportar
señales de audio, conecte las salidas HDMI AUDIO OUT a un Amplificador para oír las señales de audio HDMI de este
receptor. (vea la sección “Cuando seleccione la salida HDMI AUDIO OUT” en la página 42.)
¢ Sistema de protección de derechos de autor
• Esta unidad soporta el HDCP (Protección de contenido digital de alto ancho de banda), tecnología para proteger las señales
de vídeo digital contra su copia ilegal. HDCP debe ser soportado también por los equipos conectados a esta unidad.
• HDMI, el logo HDMI logo y High-Definition Multimedia Interface (Interfaz Multimedia de Alta-Definición) son marcas
comerciales o marcas comerciales registradas de la SRL de licencias HDMI.
¢ Notas:
• Para una transferencia de señal estable, le recomendamos que use cables HDMI de 5 metros de longitud como máximo.
• Entre los equipos que soportan HDMI, algunos pueden controlar otros equipos a través del conector HDMI. Para conocer los
ESPAÑOL
detalles de la función HDMI, vea la sección “CONFIRMAR LA FUNCIÓN HDMI” en la página 28 y “AJUSTANDO EL HDMI”
en la página 42.
• Las señales de audio procedentes del conector HDMI (incluidas la frecuencia de muestreo y la longitud de bits) pueden estar
limitadas por el equipo que se conecte.
• Las señales de video no saldrán correctamente si conecta un equipo no compatible con HDCP.
• Si la resolución de las señales de vídeo que salgan por las salidas MONITOR OUT no se corresponde con la de su pantalla
TV, la imagen no será clara, natural o no se mostrará. En este caso, cambie el valor de la resolución en el equipo fuente
(reproductor BD, etc.) a uno que pueda soportar su pantalla TV. (Para más detalles, lea las instrucciones de funcionamiento
del equipo fuente conectado.)
• Cuando quiera disfrutar sólo de la imagen en su TV, y no del sonido, debería ajustar la salida HDMI AUDIO a AMP para
inhabilitar la salida de audio digital de la salida HDMI MONITOR de este receptor. (Para más detalles, lea "Cuando
seleccione la salida HDMI AUDIO OUT" en la página 42.)
3. CONEXIÓN DE LOS EQUIPOS DE AUDIO
• Las conexiones TAPE IN/OUT pueden conectarse a quipos de grabación de audio como pletinas de cassette, grabadoras
MD, etc.
• El HDMI IN del CD puede conectarse a un componente de vídeo adicional sin clavijas de vídeo analógicas.
6
Page 95

SUBWOOFER
OUT
DIGITAL IN
COAX 2
(
CD)
OPT
(VIDEO 1)
C
OAX 1
(V
IDEO 2
)
Equipo con
Salida DIGITAL COAXIAL
Equipo con
Salida DIGITAL COAXIAL
Equipo con
Salida DIGITAL ÓPTICA
RD-6506(G)_ESP_110411_RD-6506(G)_ESP 2011-04-14 오전 9:32 페이지 7
4. CONEXIONES 'DIGITAL IN'
• Las salidas OPTICA y COAXIAL DIGITAL de los equipos que
están conectados al CD y VIDEO 1 ~ VIDEO 2 de este aparato
pueden conectarse a estas entradas 'DIGITAL IN'.
• Una entrada digital debería conectarse a equipos como
reproductores de CDs, reproductores LD, reproductores DVD,
etc. capaces de desarrollar señales de sonido envolvente DTS,
Dolby Digital o señales digitales en formato PCM, etc.
• Para conocer los detalles, lea las instrucciones de funcionamiento
de los equipos conectados.
• Cuando realice una conexión COAXIAL DIGITAL, asegúrese de
usar un cable COAXIAL de 75 Ω y no un cable de AUDIO
convencional.
• Algunos cables comerciales de fibra óptica no se pueden usar
con este equipo. Si tiene un cable de fibra óptica que no puede
conectar en su equipo, consulte con su vendedor o con el
servicio técnico más próximo.
■Nota :
• Asegúrese de realizar una conexión ÓPTICA o DIGITAL
COAXIAL en cada uno de los equipos. (No necesita hacer
ambas.)
ESPAÑOL
¢ Configuración por defecto de la Entrada digital
• Si conecta las entradas DIGITAL IN a sus equipos, es más fácil hacerlo siguiendo la configuración por defecto.
• Si su conexiones DIGTAL son diferentes de la configuración por defecto, deberá asignar las entradas DIGITAL IN usadas
utilizando el procedimiento "Cuando seleccione AUDIO ASSIGN" de la página 33.
• La configuración por defecto es la siguiente:
ÓPTICA IN : VIDEO 1, COAX 1 IN : VIDEO 2, COAX 2 IN : CD
5. CONEXIÓN 'SUBWOOFER PRE OUT'
• Para realzar los sonidos muy graves, conecte un Subwoofer con
etapa de potencia.
7
Page 96

SPEAKERS
RLRL
SURROUND
(6 )
CENTER
(6 )
FRONT
(6 )
Central
Frontal
derecho
Frontal
izquierdo
Envolvente
derecho
Envolvente
izquierdo
RD-6506(G)_ESP_110411_RD-6506(G)_ESP 2011-04-14 오전 9:32 페이지 8
6. CONEXIÓN DE LOS ALTAVOCES
• Asegúrese de conectar los altavoces con firmeza y
corrección de acuerdo con el canal (izquierdo y derecho) y
la polaridad (+ y -). Si realiza mal las conexiones, no se
oirá ningún sonido por los altavoces, y si la polaridad de la
conexión de los altavoces es incorrecta, el sonido será
poco natural y sin graves.
• Para la instalación de los altavoces, lea "Colocación de
los altavoces" en la página 9.
• Después de instalar los altavoces, primero ajuste la
configuración de los mismos según el ambiente y la
disposición de los altavoces.
(Para más detalles, lea "AJUSTANDO LAS
CONFIGURACIÓN DE ALTAVOCES" en la página 34.)
Precaución:
• Compruebe que los altavoces tienen una impedancia de 6
ohmios o más.
• No permita que los cables desnudos de los altavoces se
ESPAÑOL
toquen el uno al otro, ni a partes metálicas de este equipo.
Esto podría averiar el equipo o los altavoces.
• Nunca toque los terminales de los altavoces mientras
tenga el cable de alimentación conectado a la toma de
corriente. Si lo hace podría recibir una descarga eléctrica.
■Conectando los cables de los altavoces
1. Pele aprox. 10 mm (3/8
pulgadas) del aislamiento
del cable y luego una
firmemente los filamentos
del cable en espiral.
7. CABLE DE ALIMENTACIÓN DE CORRIENTE
• Enchufe el cable en la toma de corriente.
8. CONECTORES PARA ACTUALIZACIONES
• Estos terminales se podrán usar en el futuro para actualizar el software operativo de manera que pueda soportar nuevos
formatos de audio digital, etc.
■Nota :
• La programación de las actualizaciones requiere conocimientos especializados en programación y por esa razón le
recomendamos que sea realizadas únicamente por instaladores cualificados.
2. Afloje el terminal del
altavoz girando en sentido
contrario a las agujas del
reloj.
3. Introduzca la parte pelada
del cable.
4. Apriete el terminal
girándolo en sentido de
las agujas del reloj.
8
Page 97

RD-6506(G)_ESP_110411_RD-6506(G)_ESP 2011-04-14 오전 9:32 페이지 9
Colocación de los altavoces
La colocación ideal de los altavoces varía según el tamaño de
la habitación y el acabado de las paredes, etc. Un ejemplo
típico de colocación de los altavoces y recomendaciones es el
siguiente:
¢
Altavoces Frontal izquierdo, Frontal izquierdo y
Central
• Coloque los altavoces frontales con sus superficies
delanteras lo más alineadas posibles con la TV o la pantalla
del monitor.
• Coloque el altavoz central entre los altavoces derecho e
izquierdo y no más alejado de la posición de escucha que los
altavoces centrales.
• Coloque cada altavoz de modo que el sonido apunte a la
posición de los oídos del oyente cuando esté en la posición
principal de audición.
¢
Altavoces izquierdo y derecho del sonido
envolvente.
• Coloque los altavoces del sonido envolvente
aproximadamente 1 metro (40 pulgadas) sobre el nivel de los
oídos del oyente en posición de sentado a izquierda y
derecha, o ligeramente detrás.
¢
Subwoofer
• El subwoofer reproduce los sonidos muy graves de gran
potencia. Coloque el subwoofer en cualquier lugar de la
habitación que desee.
¢
Notas:
• Cuando utilice una TV convencional, para evitar
interferencias sobre la imagen de la TV, utilice solamente
altavoces frontales izquierdo y derecho que tengan
protección magnética.
• Para obtener los mejores resultados con el sonido
envolvente, todos los altavoces excepto el subwoofer
deberían ser de rango completo.
1. TV o pantalla
. Altavoz frontal izquierdo
2
3. Altavoz frontal derecho
4. Altavoz Central
5. Subwoofer
6. Sonido envolvente izquierdo
7. Sonido envolvente derecho
ESPAÑOL
9
Page 98

O
N / STANDBY
A
UTO / MANUAL
S
URROUND
S
TEREO
V
IDEO
AUDIO
S
OUND
INPUT
AUDIO ASSIGNSPEAKER
O
N / OFF
TONE CH.LEVEL SETUP ENTER / MEMO BANDPRESETTUNE
P
HONES
A
UX 1 AUX 2
POWER
A
UDIO / VIDEO RECEIVER
RD-6506
ON OFF
RETURN
MAIN MENU
M
ASTER VOLUME
681 2
9
10 12 1413 15 16 17 18 19 20 21 22
73 4 11 5
RD-6506(G)_ESP_110411_RD-6506(G)_ESP 2011-04-14 오전 9:32 페이지 10
Controles del Panel Frontal
ESPAÑOL
1. Interruptor de ALIMENTACIÓN
2. Indicador de modo STANDBY
3. Botón de ENCENDIDO/STANDBY
4. SENSOR A DISTANCIA
5. PANTALLA FLUORESCENTE
Para más detalle lea a continuación.
6. Botón SELECTOR ENTRADA VIDEO
7. Botón SELECTOR ENTRADA AUDIO
8. Rueda CONTROL MAESTRO VOLUMEN
9. Salida para AURICULARES
10. Conectores de entrada AUX 1, 2
Para detalles, vea la página siguiente.
11. Botón AUTO/MANUAL
■PANTALLA FLUORESCENTE
12. Botones de SELECCIÓN DE MODO ENVOLVENTE
(SURROUND MODE SELECT) (▶/◀)
13. Botón ESTÉREO
14. Botón de ALTAVOCES
15. Botón de ASIGNACIÓN de AUDIO
16. Botón MODO DE TONO
17. Botón NIVEL DE CANAL
18. Botón CONFIGURACIÓN
19. Botón ACEPTAR/MEMORIA
20. Botones SINTONÍA ARRIBA/ABAJO (+/-),
CURSOR IZQUIERDA/DERECHA (◀/▶)
21. Botones SUBIR/BAJAR (+/-) PRESINTONÍA,
CURSOR ARRIBA/ABAJO (▲/▼)
22. Botón de BANDA
1. Entrada, frecuencia, nivel de volumen,
información de funcionamiento, etc.
2. Indicadores de modo de Sonido envolvente
3. Indicador de AUTO
4. Indicador de ENTRADA
5. Indicador de DIRECTO
6. Preajuste de la pantalla numérica
7. Indicador de MEMORIA
8. Indicador de PRESINTONÍA
9. Indicador desconex. Auto (SLEEP)
10. Indicador de SINTONIZADO
11. Indicador de ESTÉREO
12. Indicador HDMI
13. Indicadores RDS
(Opción regional para Europa, etc.)
10
Page 99

AUX 1 AUX 2
RD-6506(G)_ESP_110411_RD-6506(G)_ESP 2011-04-14 오전 9:32 페이지 11
■ENCHUFES AUX 1, 2 IN
• Los conectores de entrada AUX 1 y 2 pueden conectarse a equipos de audio adicionales como un reproductor MP3,
etc.
¢
Nota:
• Cuado conecte un reproductor MP3, etc. a este conector, debería usar un cable mini estéreo y no un cable mini
mono.
ESPAÑOL
11
Page 100

Botón de ENCENDIDO
Botones NUMÉRICOS (0~9)
Botón Desconex. Auto
Botón ESTÉREO
Botón de ASIGNACIÓN de AUDIO
Botones de PARAMETROS DE SONIDO
Botones de SELECCIÓN DE MODO
ENVOLVENTE (>/<)
B
o
to
n
e
s
d
e
se
l
e
cc
i
ó
n
d
e
E
N
T
R
A
DA
B
o
to
n
e
s
d
e
C
O
N
T
R
OL
D
E
R
E
D
Botón ATENUADOR
Botón PRESENTACIÓN
Botón CONFIGURACIÓN
Botón MODO DE TONO
Botón PRUEBA DE TONO
Botones VOLUMEN ARRIBA/ABAJO ( / )
Botón NIVEL DE CANAL
Botón SILENCIO
Botones PRESINTONÍA ARRIBA/ABAJO (+/-)
Botones SINTONÍA ARRIBA/ABAJO (+/-)
Botón STANDBY (en espera)
CONTROL DEL CURSOR( , , , ),
botones ACEPTAR </MODO DE BÚSQUEDA,
SELECCIONAR / >
La function entre "<>" son opciones
regionales en Europa, etc.
RD-6506(G)_ESP_110411_RD-6506(G)_ESP 2011-04-14 오전 9:32 페이지 12
Control a distancia
ESPAÑOL
¢
Nota:
• Los botones VÍDEO 3 y CONTROL DE RED (NETWORK CONTROL) disponibles para este receptor.
12
 Loading...