


Dear Loyal Customer:
First, thank you for purchasing the Zaurus K-PDA and welcome to the Zaurus family. We are sure you will soon find that your new assistant will change your life and the way you do business. We would briefly like to share with you our vision.
Your Zaurus exists today thanks to an incredible amount of effort and determination from our entire Zaurus team (not to mention numerous pots of black coffee). Our team at Sharp has a dream to change the way we all do business. As a business person, you already know that access to information and people anytime, anywhere is the key to gaining a competitive edge in this fast-paced information age. We feel Zaurus is the tool that can deliver this to you. It is simple to use, has months of battery life, and fits in your pocket.
How did we come up with the idea for Zaurus? Many of us found that we were lugging around notebook computers to take notes, generate summaries, and report back to our office and clients. We also found that we had a lot of "down time" that could be put to better use; sitting on trains and planes, waiting for clients, and even in meetings. Now that we are using the Zaurus, we travel lighter, work smarter, and stay more in touch with our contacts and each other. Best of all, we have very little "down time" as our "Zauri" are always with us. Now you know why we say that "Zaurus means business anytime, anywhere".
We need your help to spread the word. Show a friend or someone at work how you use your Zaurus and what it can do for them. As more and more people start using the Zaurus, we can spend even more resources on developing new accessories, add-on software programs, and new versions of the Zaurus. Better yet, if you have a mobile staff or sales force that you would like to equip with Zauri, give us a call at 800-BE-SHARP. We'll show you how you can improve their efficiency and productivity as well as enable them to better keep in touch with their clients and each other.
Finally, let us know how you feel about your Zaurus. We look forward to getting letters from our users about how you use it and improvements you would like to see. We cannot promise to answer every letter, but you can be sure we read all of the suggestions you send us. We value feedback from our customers and try to incorporate as many requests as we can in our new products. Each of us takes an incredible amount of personal pride in our work and the Zaurus. We are all Zaurus users. We believe this makes a difference in the products we create. After using the Zaurus, we think you'll agree.
Thanks again for purchasing the Zaurus and sharing our dream. We look forward to shaping the future of the information age with you.
Sincerely,
The Z Team
1

Notices
•For any electronic memory device, data may be lost or altered under certain circumstances. Sharp strongly recommends that you keep separate written records of all important data.
•Sharp assumes no responsibility for data lost or altered as a result of improper use, repairs, defects, battery replacement/failures or any other cause.
•Sharp assumes no responsibility, directly or indirectly, for financial losses or claims from third parties resulting from the use of this product and any of its functions, such as stolen credit card numbers, loss or alteration of stored data, etc.
•Information provided in this manual is subject to change without notice.
•All company and/or product names are trademarks and/or registered trademarks of their respective holders.
•There are only two differences between the ZR5700 and ZR-5800 models:
Memory capacity: ZR-5700 ... 1 MB
ZR-5800 ... 2 MB Backlight: ZR-5700 ... Not supported
ZR-5800 ... Supported
•The display examples and keyboard illustrations used in this manual are taken from the ZR-5800, although they apply equally to both models.
•Unless otherwise specified, the information in this manual applies to both models.
The Zaurus will be referred to as the "unit" throughout this manual.
Check the contents
Please check the contents carefully. Your unit should come with the following:
•ZR-5700/ZR-5800 Main Unit
•Touch pen (installed)
•Operating batteries: LR6(AA) x 2
•Memory backup battery (installed): CR2032 x 1
•ZR-5700/ZR-5800 Operation Manual
•Spreadsheet and Communications Manual
•Registration Card
If there are problems with any of these contents, contact your Sharp dealer.
2

Contents |
|
Quick Start .................................................. |
9 |
Important things to do .................................... |
9 |
Installing the batteries ................................. |
10 |
Initializing ..................................................... |
11 |
Adjust LCD contrast ..................................... |
12 |
Adjusting the touch panel ............................ |
13 |
Setting the time and date............................. |
14 |
Setting the start-up display .......................... |
15 |
Making your first entry ................................. |
16 |
Entering an appointment ............................. |
17 |
Entering a To Do item .................................. |
18 |
Using the Calendar Views ........................... |
19 |
Taking notes ................................................ |
20 |
Making a letter ............................................. |
21 |
Searching for information ............................ |
22 |
Finding an entry from the Index view ........... |
23 |
Editing an entry ........................................... |
24 |
Deleting entries ........................................... |
25 |
Assigning an entry to Filer folders ............... |
26 |
Using Filer ................................................... |
27 |
Sending a fax ............................................... |
28 |
Copying and pasting text ............................. |
29 |
Tools ............................................................ |
30 |
Drawing pictures .......................................... |
32 |
Using the Calculator .................................... |
33 |
Commonly asked Questions & Answers .. |
35 |
What your unit can do ................................. |
41 |
About this Manual ....................................... |
42 |
Chapters ....................................................... |
42 |
Conventions used ....................................... |
44 |
Caring for your unit ..................................... |
45 |
CHAPTER 1 Getting Started ................. |
47 |
Before Use .................................................. |
47 |
Part Names and Functions ......................... |
48 |
Touch pen ..................................................... |
50 |
Display angle adjustment .............................. |
50 |
GUI operations ........................................... |
51 |
Display layout ............................................. |
52 |
Touch panel display .................................... |
52 |
Display symbols .......................................... |
53 |
Keyboard layout ............................................ |
53 |
3

Detail View and Index View......................... |
54 |
Tool bar ......................................................... |
54 |
Help Function ............................................. |
55 |
Key Sound .................................................. |
55 |
Save Battery Life ........................................ |
56 |
Sleep function ............................................... |
56 |
External power supply ................................... |
56 |
Backlight Function ...................................... |
56 |
CHAPTER 2 Desk Accessories ............ |
57 |
Calculator ................................................... |
57 |
Movable window display................................ |
58 |
Paperless printer ........................................... |
58 |
Date calculations ........................................... |
60 |
Data from other entries ................................. |
62 |
Error indicator E ............................................ |
62 |
Scrapbook .................................................. |
63 |
Drawing tools ................................................ |
64 |
Finding entries .............................................. |
64 |
Selecting an area .......................................... |
65 |
Moving or copying graphics .......................... |
65 |
Adding text strings to Scrapbook .................. |
66 |
The Stamps tool ............................................ |
67 |
Deleting Scrapbook entries ........................... |
69 |
Filer............................................................. |
69 |
Assigning entries to folders ........................... |
69 |
Collect related entries to one folder .............. |
70 |
Viewing entries via Filer ................................ |
72 |
Editing folder entries ..................................... |
73 |
New Assigned Entry...................................... |
73 |
Delete an entry from Filer ............................. |
74 |
Removing entries from folders ...................... |
74 |
Empty a folder ............................................... |
75 |
Merging (Moving) folders .............................. |
75 |
Sending folders ............................................. |
76 |
Generate a Report ........................................ |
77 |
Search ........................................................ |
78 |
Help ............................................................ |
79 |
Tools ........................................................... |
80 |
Utilities .......................................................... |
80 |
Preferences ................................................... |
80 |
Personal ........................................................ |
80 |
Memory ......................................................... |
81 |
Display .......................................................... |
82 |
Sound ............................................................ |
82 |
Start-up ......................................................... |
83 |
Sleep ............................................................. |
84 |
Secret ............................................................ |
85 |
Word List ....................................................... |
88 |
RAM Card ..................................................... |
90 |
Backlight set-up ............................................ |
90 |
4

Clock ........................................................... |
91 |
Daylight Saving Time .................................... |
91 |
World City ..................................................... |
91 |
User's City ..................................................... |
92 |
Setting daily alarms ...................................... |
93 |
Disabling alarm sound .................................. |
94 |
MORE ......................................................... |
95 |
Spreadsheets ............................................. |
95 |
CHAPTER 3 General Operations ......... |
97 |
Opening Applications and Accessories ...... |
97 |
Tool Bar Functions ...................................... |
98 |
Views/Index ................................................... |
98 |
To change Index/Detail View ......................... |
99 |
Filter .............................................................. |
100 |
Show ............................................................. |
102 |
Set Up ........................................................... |
102 |
Edit ................................................................ |
103 |
Link To ........................................................... |
104 |
Links .............................................................. |
104 |
File It ............................................................. |
105 |
Send .............................................................. |
105 |
General Editing Techniques ........................ |
105 |
Fields ............................................................ |
105 |
Resume ......................................................... |
106 |
Cursor ........................................................... |
106 |
Entering text .................................................. |
106 |
Moving around the display ............................ |
107 |
Moving between fields .................................. |
107 |
Inserting text ................................................. |
107 |
Deleting text .................................................. |
107 |
Blocks of text ................................................. |
108 |
Deleting blocks of text ................................... |
108 |
Cut, Copy and Paste ..................................... |
108 |
Scroll bars ..................................................... |
108 |
Finding Specific Entries .............................. |
109 |
Index View ..................................................... |
109 |
Keyword Search ............................................ |
110 |
Global Search ............................................... |
111 |
Using Filer ..................................................... |
112 |
By Date ......................................................... |
112 |
Deleting Entries .......................................... |
112 |
Deleting single entries from the keyboard ..... |
112 |
Deleting single entries .................................. |
113 |
Deleting group entries ................................... |
113 |
Cut, Copy and Paste ................................... |
114 |
Copying or moving blocks of text .................. |
114 |
Copying or moving entries ............................ |
115 |
Time Stamp and Date Stamp ..................... |
116 |
Symbols and Special Characters ............... |
116 |
5

CHAPTER 4 Time Management ............ |
119 |
Calendar views ........................................... |
119 |
Calendar view format .................................... |
119 |
Changing Activities Setup ............................. |
120 |
Calendar views ............................................. |
120 |
Accessing entries using calendar views ....... |
124 |
Selecting a date ............................................ |
124 |
Appointments.............................................. |
125 |
Making new Appointment entries .................. |
125 |
Making an Appointment entry ....................... |
125 |
Finding entries .............................................. |
126 |
Editing Appointment entries .......................... |
127 |
Deleting a single entry .................................. |
128 |
Deleting group entries ................................... |
128 |
Making entries for recurring or extended events ... |
129 |
Using the Appointment Repeat function ....... |
130 |
Appointment alarms ...................................... |
131 |
Clearing a set alarm ...................................... |
131 |
Birthday/Anniversary .................................. |
132 |
Reminder function ......................................... |
132 |
Making new entries in Birthday/Ann.............. |
132 |
Finding Birthday/Ann entries ......................... |
133 |
Editing an deleting entries ............................ |
133 |
Holiday ........................................................ |
134 |
Making new entries ....................................... |
134 |
Finding Holiday entries ................................. |
135 |
Editing and deleting entries .......................... |
135 |
To Do .......................................................... |
136 |
Making a new To Do entry............................. |
137 |
Entering a Monthly Goal ............................... |
138 |
Finding To Do entries .................................... |
138 |
Checking off completed entries ..................... |
139 |
Using Labels ................................................. |
140 |
Making To Do entries with labels................... |
140 |
Reviewing the To Do list by Labels ................ |
142 |
Editing labels ................................................. |
142 |
Copying a To Do entry ................................... |
142 |
Editing and deleting To Do entries ................ |
144 |
Changing Activity type .................................. |
144 |
CHAPTER 5 Databases ......................... |
145 |
Contacts and Data Files ............................. |
145 |
Selecting a file ............................................... |
146 |
Making a new Contacts entry........................ |
146 |
Finding entries .............................................. |
147 |
Using Index View .......................................... |
147 |
Keyword search ............................................ |
148 |
Direct search ................................................. |
149 |
Filter function ................................................ |
149 |
Link function ............................................... |
150 |
Linked Entries ............................................... |
150 |
New Linked Entry .......................................... |
150 |
Link by Searching ......................................... |
151 |
Viewing linked entries ................................... |
152 |
6

Link To function ............................................. |
153 |
Jump To function ........................................... |
154 |
Breaking Links .............................................. |
155 |
Editing Contacts and Data Files entries ..... |
155 |
Deleting Groups of entries ............................ |
156 |
Picture fields ............................................... |
156 |
Adding a picture to an entry .......................... |
157 |
Editing contents of picture fields ................... |
158 |
Setup for Contacts and Data Files .............. |
159 |
Configuring Contacts and Data Files ............ |
159 |
Fax number field ........................................... |
160 |
CHAPTER 6 Writing and Letters .......... |
161 |
Notes .......................................................... |
161 |
Taking Notes ................................................. |
161 |
Notes window ................................................ |
163 |
Changing Notes Setup .................................. |
163 |
Review Notes ................................................ |
164 |
Edit Notes ..................................................... |
165 |
Documents ................................................. |
165 |
Making a new entry based on an existing entry .... |
166 |
Finding entries .............................................. |
167 |
Editing a Documents entry ............................ |
167 |
Deleting Documents entries .......................... |
167 |
Changing display character size ................... |
168 |
Find Text ........................................................ |
168 |
Text styles ..................................................... |
169 |
Tabs and indents ........................................... |
170 |
Word wrap ..................................................... |
173 |
Document size .............................................. |
173 |
Display size ................................................... |
173 |
Page Setup ................................................... |
174 |
Inserting a page break .................................. |
175 |
Print Preview ................................................. |
176 |
Check Spelling .............................................. |
176 |
Make a Letter function .................................. |
177 |
Documents with pictures ............................... |
180 |
Headers and Footers .................................... |
180 |
Exchange Documents with PC Files ............. |
181 |
Outlines ...................................................... |
182 |
Example outline ............................................ |
183 |
Creating an Outlines entry ............................ |
183 |
Finding outlines ............................................. |
184 |
Full Topics or 1 Line Topics ........................... |
184 |
Revising outlines ........................................... |
185 |
Outline deletion ............................................. |
188 |
Using subtopics (children)............................. |
188 |
Expanding and Collapsing ............................ |
189 |
CHAPTER 7 Optional Accessories ....... |
191 |
Tools Utilities ................................................. |
191 |
Preferences ................................................... |
191 |
Printing ....................................................... |
192 |
Paper source ................................................. |
192 |
Printer connection ......................................... |
192 |
7

Printing restrictions ....................................... |
193 |
Printing the current display ........................... |
194 |
Faxes .......................................................... |
195 |
Fax Directory ................................................. |
196 |
Setting fax options ........................................ |
197 |
Cover sheets and headers ............................ |
198 |
Speed buttons ............................................... |
199 |
Sending a fax ................................................ |
200 |
Manual fax dialing ......................................... |
202 |
Fax Log ......................................................... |
202 |
About fax numbers ........................................ |
203 |
Conditions for sending faxes ......................... |
203 |
Optional Cards............................................ |
203 |
Using PC cards ............................................. |
205 |
SRAM and FLASH Memory Cards ............... |
206 |
SRAM cards .................................................. |
207 |
FLASH cards................................................. |
210 |
Fax/Modem cards ......................................... |
212 |
More ........................................................... |
213 |
Add-on software programs ............................ |
213 |
PC Files ........................................................ |
215 |
Data Exchange ........................................... |
217 |
Data Transfer with Other Sharp Devices..... |
219 |
Data transfer between ZR-5700/ZR-5800s or with ZR-5000 ... |
219 |
Wireless infrared transfer (Beaming) ............ |
219 |
Quick transfer ................................................ |
220 |
Unit to Unit transfer ....................................... |
220 |
Data Transfer with Other Computers .......... |
223 |
PC Link ......................................................... |
223 |
Organizer Link software for Other Sharp Products ... |
224 |
Special Communications Applications........ |
226 |
Remote Link .................................................. |
226 |
Terminal Mode .............................................. |
226 |
Message ....................................................... |
226 |
CompuServe Access .................................... |
227 |
AT&T Mail Access ......................................... |
227 |
ZR-Pager ...................................................... |
228 |
Appendices .............................................. |
229 |
A. Key Notations ......................................... |
229 |
B. Reset ...................................................... |
234 |
All Reset operation ........................................ |
234 |
C. Troubleshooting ...................................... |
235 |
D. Battery Replacement ............................. |
236 |
General guidelines ........................................ |
236 |
Replacing operating batteries ....................... |
236 |
Replacing the memory backup battery ......... |
238 |
E. Specifications ......................................... |
240 |
Index ......................................................... |
245 |
8

Quick Start
his section should be read and all neces- Tsary operations performed before you start
using your unit.
Important things to do
1.Complete and send in the registration card. This registers your purchase and allows us to notify you of new developments and products as they become available.
2.Read through this Quick Start section. It will quickly get you up and running. Refer to the rest of the manual for more details about particular operations.
3.If you have any particular questions about your unit, read through the list of commonly asked questions and answers. There is a good chance that any questions you have will be answered there.
4.When you need help with any operation,
touch  at the left of the display. On-
HELP
screen help is a topic-specific quick reference guide that explains features and their functions.
9

Installing the batteries
Before operation you will need to install the two operating batteries. The memory backup battery (CR2032) is installed at the factory and should last five years if operating batteries are replaced as required.
1.Set the battery replacement switch on the back to "REPLACE BATTERIES" (expose the red dot).
2.Slide the operating battery cover off.
3.Insert the two LR6(AA) operating batteries. Make sure the batteries are correctly aligned for polarity (+ and -).
Battery |
1 |
replacement
switch
2
4. Replace the operating battery cover.
+
 +
+
5.Set the battery replacement switch to "NORMAL OPERATION".
On average, you can expect to get about two months of battery life. Actual battery life will vary depending on individual use.
If this is the first time you have installed batteries, you must also initialize your unit.
2
 1
1
10
Initializing
Your unit must be initialized the first time it is used.
1.Press the lock button and open the display.
2.Remove the touch pen.
3. While holding down the ON key, push the RESET button on the back with the touch pen.
4. Touch  to initialize.
After initialization, the Start-up display appears.
Open
Press
11

Adjust LCD contrast
LCD contrast may sometimes need adjustment to suit certain lighting conditions.
1. Touch  at the left of the display.
TOOLS
2.Touch  (under Preferences) twice.
3.To adjust LCD contrast, touch  or
or  .
.
4.When you are satisfied with the setting, touch  .
.
If LCD contrast is too light or dark to see the display, you can adjust the contrast directly. Turn the unit off, hold down the
MENU key and then press ON . Press  and
and  to adjust the contrast.
12

Adjusting the touch panel
Each person holds a pen differently. The touch panel can be adjusted to respond correctly to your individual style of writing, drawing and selecting touch buttons.
1. Touch  .
.
TOOLS
2.Touch  (under Preferences) twice.
3.Touch  .
.
Press the  key.
key.
4.Touch the exact center of all four cross-points with the touch pen.
•As each cross-point is touched it will turn grey. When all four are touched, "Adjusted!" is displayed.
•If for some reason the adjustment fails, a "Sorry, please try again..." message is displayed. Touch the centers of all four cross-points again until "Adjusted!" is displayed.
13

Setting the time and date
For time-based functions to be effective, the built-in clock must be set to the correct Home City time and date.
1. Touch |
and then touch |
twice. |
TOOLS |
|
Clock |
2.To select a different Home city, touch the Home City name.
New York, USA is the default Home City.
3.Select your city (if available) or a city in your time zone and then touch  .
.
Use the scroll bars to see more cities.
By default, all cities are set to observe daylight saving time (DST). If your city does not use DST, touch the check box to disable it.
4.Touch  to set the time and date for your Home City.
Touch each time/date field box and then use  to change the value.
Alternately, you can enter the values from the keyboard. 
5.When you are finished touch  .
.
14

Setting the start-up display
Each time the unit is turned on, it can display your name, telephone number and address on one of two graphic backgrounds.
1. Touch  and then touch
  twice.
TOOLS
2. Select the required setting in each field.
Select User's Picture when you want to use your own  original start-up picture.
For details, see p. 83.
3. Touch  to save your settings.
15

Making your first entry
Your first entry will be a Contacts entry. The procedures described below can be used with other applications.
To make a new Contact 1 entry:
1. Touch |
at the right of the display. |
|
CONTACTS |
2.Touch  and select "New Business(1)".
“Business“ is the default file name of Contact 1.
3.Enter a name.
•Select the Company field and enter a company name.
•Select the Address field and enter an address. Touch a field name to select the field for data entry.
Dark outlines around a field indicate that it is selected.
4. When you complete the entry, press ENTER to save it.
16
Entering an appointment
1. Touch |
|
|
|
at the right of the display. |
|
||||
ACTIVITIES |
|
|||
Touch |
|
again if the Day view has not been |
||
|
||||
ACTIVITIES
displayed.
2.Touch and drag the pen across the start and end
times of the appointment on the time bar. 
When you lift the pen, a new appointment will appear.
3.Touch the text box and enter a description.
4. When you complete your entry, press ENTER .
17

Entering a To Do item
To Do lets you organize tasks and objectives.
1. Touch |
|
|
at the right of the display. |
|
|
||
|
ACTIVITIES |
||
2.Touch  and select "New To Do".
3.Touch the date box and then use  to select the
  due date (if the To Do item has one).
You can assign up to five labels to a task, then later use these to filter the item in a To Do list.
4.Enter a priority level (number or letter) as required.
5.Move to the text box and enter a description.
6. When you complete your entry, press ENTER to save it.
18

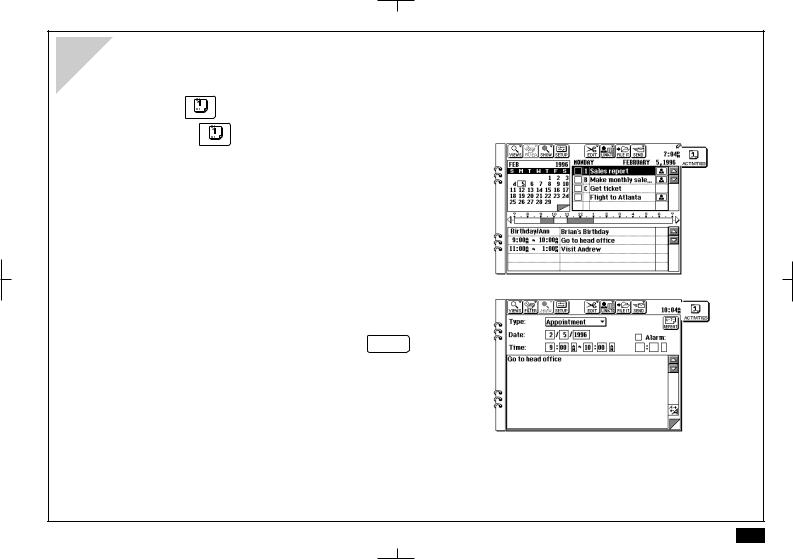
Using the Calendar Views
Activities has five different calendar views: Day (initial default view), Week, Weekly Graph, Month and Year. These calendar views can be used to show Appointment, Birthday/Ann, Holiday and To Do entries.
To use the calendar views:
1. Touch |
|
|
at the right of the display. |
|
|
||
|
ACTIVITIES |
||
2.Touch  and, if necessary, select "Day" view.
The time bar shows your appointments and free time.
3.Touch any entry twice to see details or make changes.
Touch any date to select that day. The flashing date indicates the currently selected date.
This box indicates today's date.
Touch here to view a week at a glance. Touch here to see a month at a glance.
Touch here to see a year at a glance.
To Do list
Displays Birthday/Ann, Holiday and Appointment entries for the Selected day.
19

Taking notes
Notes is an electronic writing pad that lets you make handwritten notes during meetings and appointments.
1. Touch |
at the right of the display. |
|
NOTES |
2.Touch  and select "New Note".
3.Use the touch pen to make your Notes entry.
The entire keyboard including OFF and others is disabled when entering Notes, so operations like DEL ,
CANCEL and MENU do not work.
Touch  to unlock the keyboard.
The keyboard is automatically unlocked when you select another application.
4.When you complete your Notes entry, touch  to unlock the keyboard (unless it is already unlocked)
then press ENTER .
To give your entry a text title, touch  and select "Topic Title".
20
Making a letter
The "Make a Letter" feature converts an unformatted Documents entry into a professional looking business letter.
1. Touch |
|
|
|
at the right of the display. |
|
|
|||
|
|
|
||
|
|
|
||
|
DOCUMENTS |
|||
For details on making a Documents entry, see Documents on p. 165.
2.Select the entry you want to make into a letter, or create a new entry.
3.Touch  and select "Make a Letter".
•Touch  to select a recipient.
•Adjust other settings or simply accept the defaults.
For details, see Make a Letter function on p. 177.
4.Touch  and the Documents entry will be converted into a letter.
5. When you complete your letter, press ENTER to save it.
21
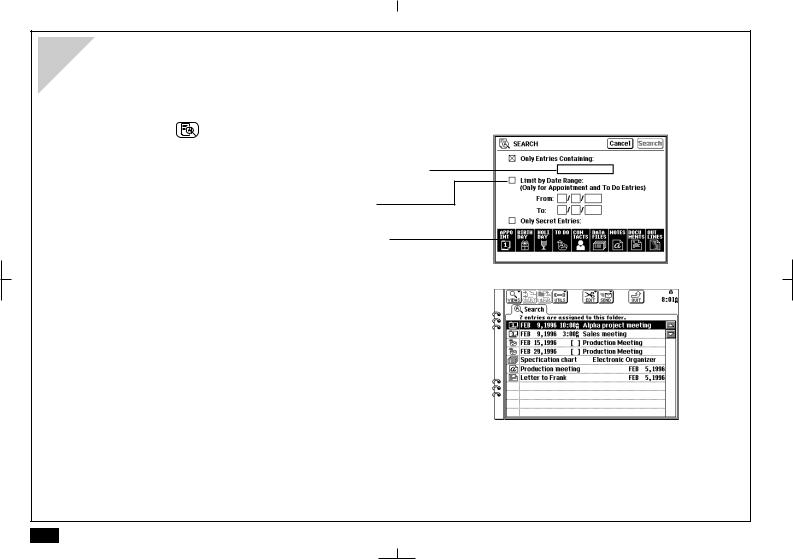
Searching for information
The search function lets you search for a keyword in the entries of selected applications.
1. Touch |
at the left of the display. |
|
SEARCH |
2.Enter a keyword in the "Only Entries Containing" field.
Select "Limit by Date Range" as required.
3.Select the applications you want to search.
All applications are selected for the search by default.
4. Touch  .
.
Matching entries are assigned temporarily to the Search folder in Filer.
5. Touch the entry you want to view twice.
22

Finding an entry from the Index view
Keyword search lets you search for entries containing any word in Activities, Contacts, Data Files, Notes, Outline and Documents.
1. Select the application and go to the Index View.
2. Press 2nd then F .
3.Enter the first few letters of the keyword (the word you are searching for).
4.Touch  to jump to the first entry that contains the keyword.
5.Touch  or
or  until you see the entry you are looking for.
Touch  to end the search.
23
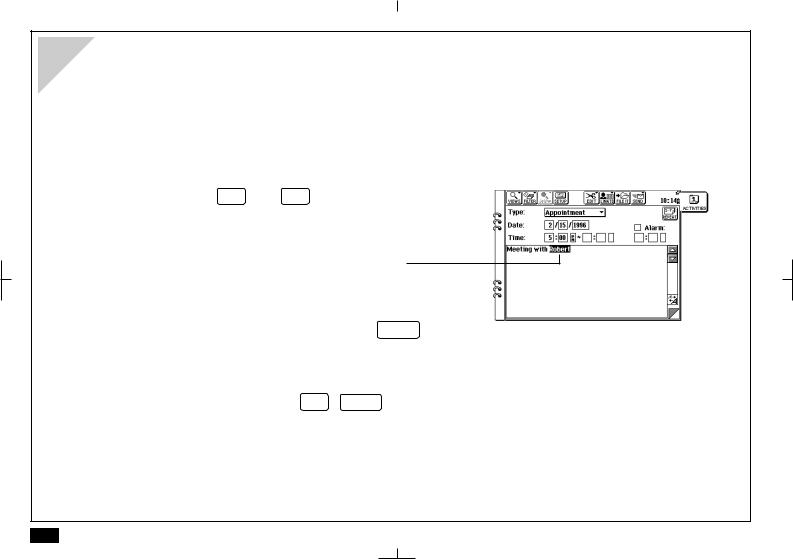
Editing an entry
Entries can be edited quickly and easily.
1.Display the entry you wish to edit in Detail View.
2.Make any necessary changes.
Use the scroll bars and cursor keys to move within the
display, use BS and DEL to delete text, and make
new entries from the keyboard.
You can also drag the pen over text to select it, then cut the text and paste it elsewhere, or just delete it.
3. When you complete your changes, press ENTER to save them.
If you want to save these changes as a new entry (and
preserve the original) press 2nd ENTER .
24

Deleting entries
You can delete single entries or specific groups of entries.
To delete a single entry:
1.Select the entry that you wish to delete in Index View or display it in Detail View.
2.Touch  and select "Delete Entry".
("Delete Note" in Notes; "Delete Document" in Documents; "Delete Outline" in Outline)
3. Touch  to confirm the deletion.
Single entries can also be deleted by selecting the entry
in Index View and pressing DEL .
To delete multiple entries:
1.Select the application that you want to delete entries from.
2.Touch  and select "Delete Group".
Use the pop-up menus to select the group entries for deletion.
3.Touch  .
.
4.Touch  to confirm the deletion.
25

Assigning an entry to Filer folders
Filer allows you to group entries into folders. Filer entries are not copied or moved to the folder, they are just assigned to the folder.
1.Display the entry you wish to assign to a folder in Index or Detail View.
2.Touch  .
.
3.Touch the folder(s) you want to assign the entry to.
•You can select multiple folders.
•Touch once to select a folder. Touch again to cancel the selection.
4.Touch  when you finish selecting the folder(s).
26

Using Filer
Filer allows you to manage information by subject instead of by entry type. Filer entries can be accessed and changed using the original application.
1. Touch  at the left of the display.
FILER
2.Touch a folder tab twice to view entries assigned to that folder.
You can also select a folder tab and press ENTER to view entries.
3. Touch an entry twice to examine it in Detail View.
You can also select the entry and press ENTER to see it in Detail View.
27

Sending a fax
With the optional CE-FM4 Fax/Modem connected to your unit, you can fax Filer, Documents, Notes or Scrapbook entries to a remote facsimile machine.
1. Connect your unit and the CE-FM4 Fax/Modem. Make sure the Fax/Modem is plugged into a wall jack.
For details about connecting the CE-FM4, see the CEFM4 manual.
2. Select a single entry or a Filer folder to be sent.
3.Touch  and select "Fax".
4.Touch  and select a recipient from your Contacts file.
5.Touch  .
.
For details, see Faxes on p. 195.
28

Copying and pasting text
You can copy text from one place to another.
1.Display the entry you want to copy text from in Detail View.
2.Drag the touch pen over a word or sentence.
The text will be displayed in reverse (white on black) to indicate it is selected.
To cancel the selection, touch any unhighlighted area.
3.Touch  and select "Copy".
4.Display the entry you want to add the text to in Detail View.
5.Touch the required place of insertion.
(In Scrapbook, use the area tool 


 to select an area to paste into.)
6. Touch  and select "Paste".
29
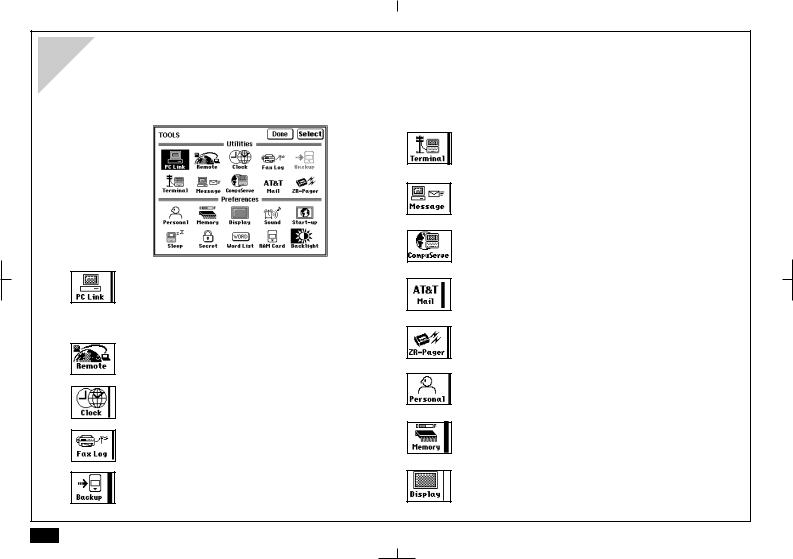
Tools
Tools provides a range of utilities that let you customize your unit to your personal taste. Tools is also used to set up communications and peripheral operations.
Exchange data with a personal computer or use PC Link for the Sharp Electronic Organizer (OZ-7000/OZ-8000/YO-600/ZQ-5000 series).
Access and exchange data with a remote PC via a modem and phone line.
Check the time at home and abroad.
Check the status of sent faxes.
Make a backup copy of main memory onto a memory card.
Transfer data with a remote computer via a modem and phone line.
Send/receive messages (email) to a remote computer.
Connect to CompuServe.
Send and receive AT&T Mail messages.
Send and (with Pager card) receive Pager messages.
Enter your name, etc. and set your password and signature.
Check the amount of storage memory available.
Adjust the screen contrast and calibrate the touch panel.
30
 Loading...